INSTRUCTION MANUAL
Model No.: AC-517E
Please read this Instruction Manual and the safety instructions before operating the appliance!
Espresso Coffee Maker
+ GRINDING
(The product in the package shall prevail.)

Chapter I: Precautions for Safe Use
Read this manual carefully before use, and please pay attention to the following content:
When unplugging the power cord, please make sure that the machine is turned off:
• Avoid the risk of electric shock! Don’t touch the power plug/socket/power supply or the machine with wet hands. Don’t cut
off the power by pulling the power cord or the plug.
• Avoid the risk of burns! Don’t move the machine while it is operating.
• Avoid the risk of burns! Don’t touch the hot parts of the machine (such as: water boiling parts or water outlet parts in
operation)
• Avoid the risk of burns! Don’t touch steam and water jets.
• Avoid the risk of burns! Don’t open the handle when the machine is operating.
• Avoid the risk of electric shock! Don’t immerse the machine, power cord and plug in water or other liquids.
• Before cleaning or repairing, please make sure to unplug the power cord and let the machine cool down.
• Before connecting the power supply, please check whether the local power supply voltage is consistent with the voltage
marked on the product.
• General electrical products are not intended for use by persons with physical, sensory or intellectual disabilities (including
children), or persons lacking experience and knowledge, unless they have been supervised or instructed by the person
responsible for safety. Adults should instruct children not to play with electrical appliances.
• Don’t let children use this product or play with it as a toy.
• Don’t use the product when the plug, wire or the product itself is damaged. Send it to the maintenance center as soon as
possible, and don’t refit, disassemble or repair it by yourself.
• This product is for household use only, and cannot be used for other purposes.
• Please place and use the product on a stable and heat-resistant surface, rather than in a humid and dusty environment. Don’t
use it in places with open flames, heat or splashes of water to avoid accidents.
2

• When the product is in abnormal condition, please stop using it immediately.
• When the product is in operation, please don’t cover the product.
• When the product is in operation, pay attention to water vapor and keep your face away from the water outlet to avoid burns.
• Don’t move the product when it is in operation to avoid accidents.
• When the product is in operation, it will produce slight vibration, causing the coffee cup to move slightly, which is a normal
phenomenon.
• Don’t open the handle when the product is in operation.
• Don’t put fingers or other objects into the brewing cup to avoid accidents.
• Keep this product, cords and coffee capsules out of the reach of children.
• It is forbidden to pour hot water into the water tank.
• Don’t unplug the power cord by pulling the power cord.
• Don’t touch the power cord with wet hands.
• Don’t disassemble the product.
• Turn off the product or unplug the power cord before cleaning the product.
• The product cannot be washed directly in water.
• Don’t use it outdoors, and protect the product from heat, direct sunlight, moisture (not immersed in liquid) and sharp edges.
Avoid touching the electrical appliance with wet hands, and immediately disconnect the main power supply if the appliance
gets wet.
• Regularly check whether the electrical appliance is damaged. If it is damaged, please do not use it.
• If the power cord, plug or other parts are damaged, or the function is invalid, it is strictly prohibited to use the product.
Please send it to the service shop for test, maintenance and replacement by professionals.
3

Notes on this operating manual
This operating manual cannot cover all possible circumstances. For further information or in case of problems
not adequately covered in this operating manual, please contact the service and sales centre.
Please keep this operating manual safe and pass it on to the next user.
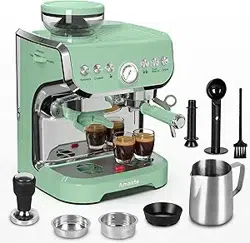
Unpacking
− Remove your espresso Capsule coffee machine from its packaging.
− After unpacking, please check that the following parts are included:
1. Water tank
2. Coffee machine
3. Manual
Note:
− Check that your home power supply voltage is the same as marked on the machine rating plate
− Destroy all the plastic bags to prevent danger to children!
Tip:
Keep the packaging for transporting the machine (e.g. for removals, servicing, etc.)
Note:
You may find a little water remaining in the machine.
4
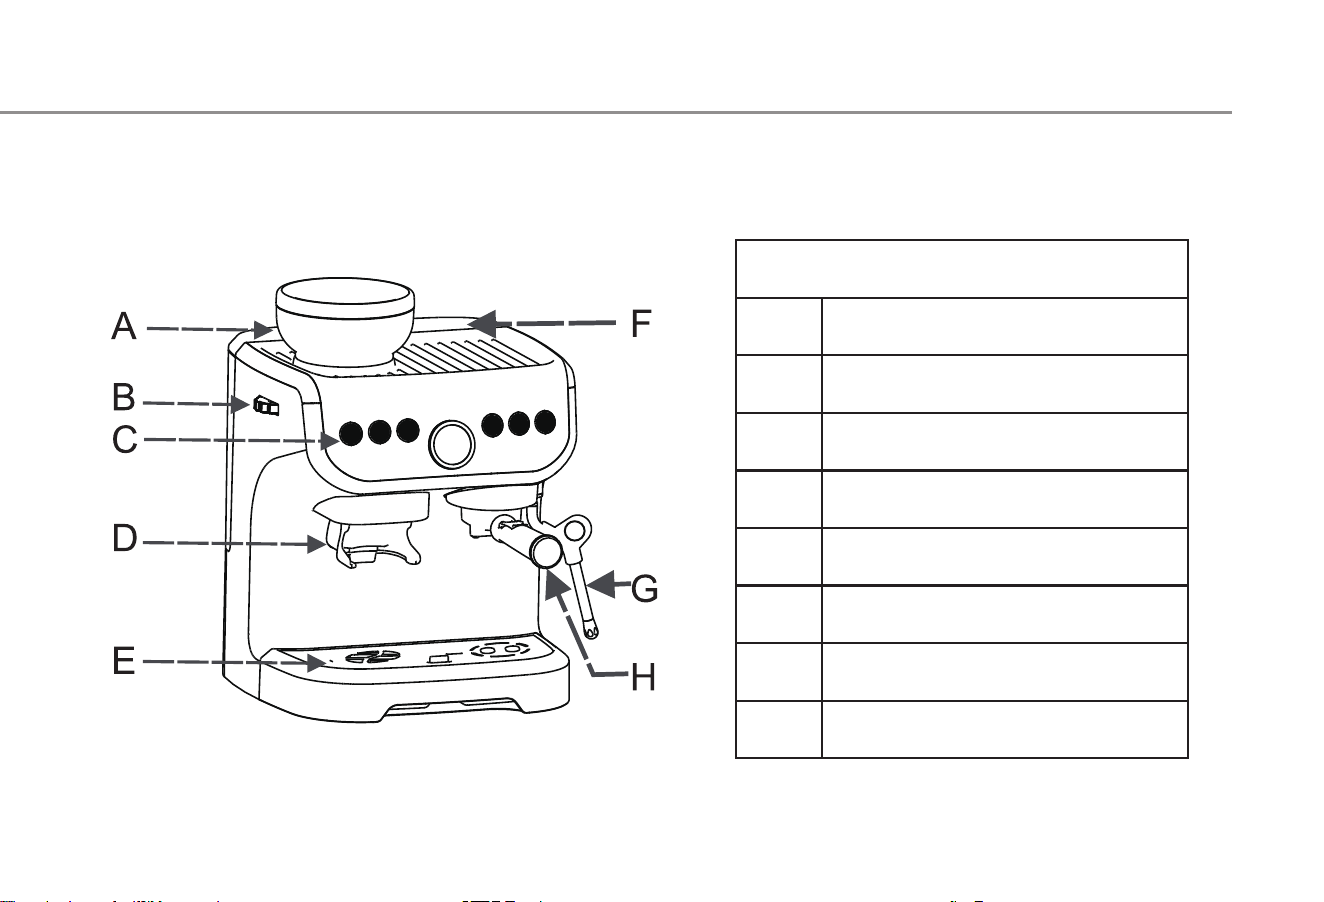
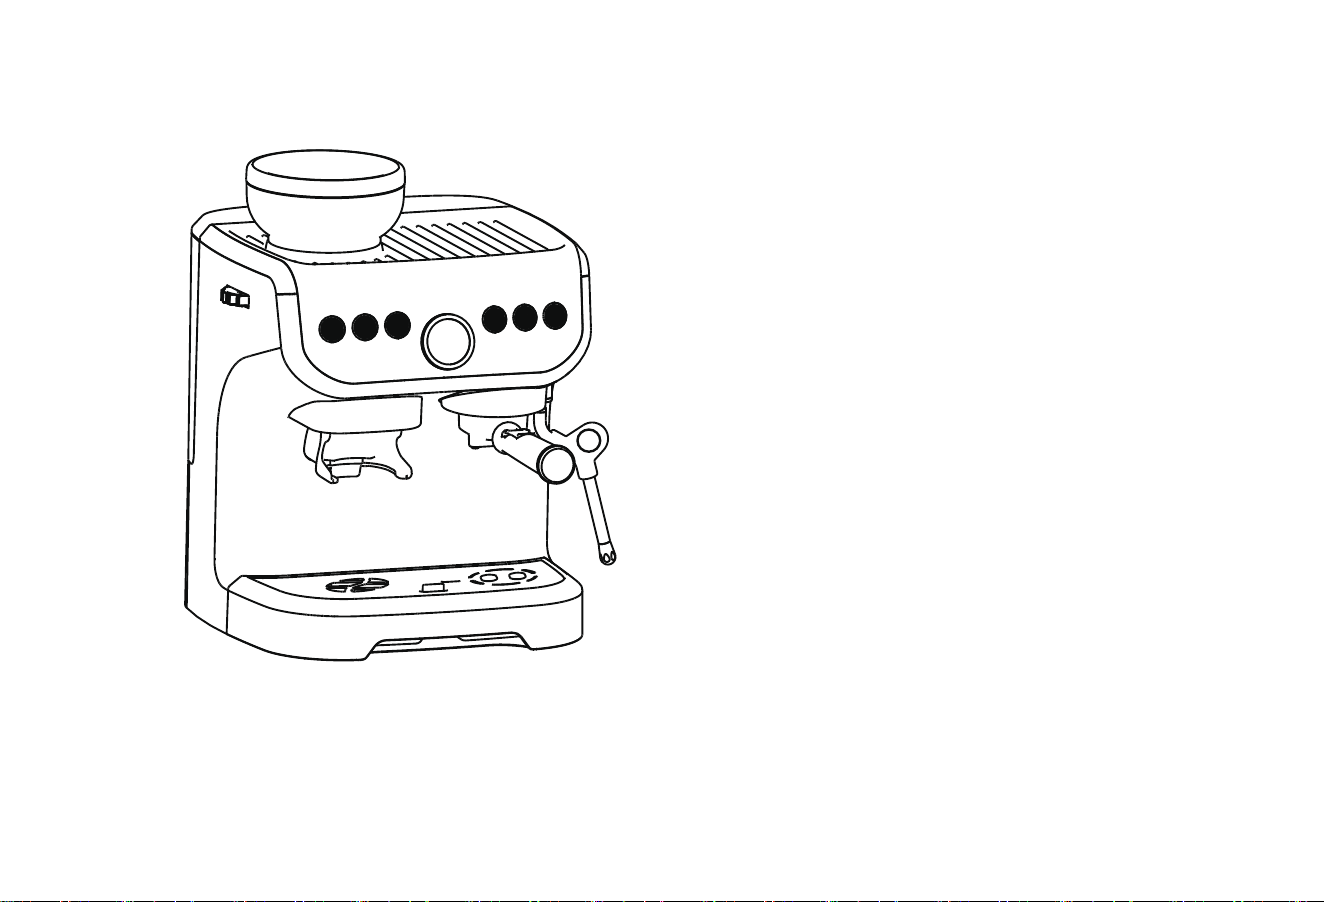
Component description
A
B
C
D
E
F
G
H
Coffee bean box
Coffee powder regulation
control panel
Coffee powder export
Waste water tray
water tank
Steam pipe
Brewing cup
Component description
5
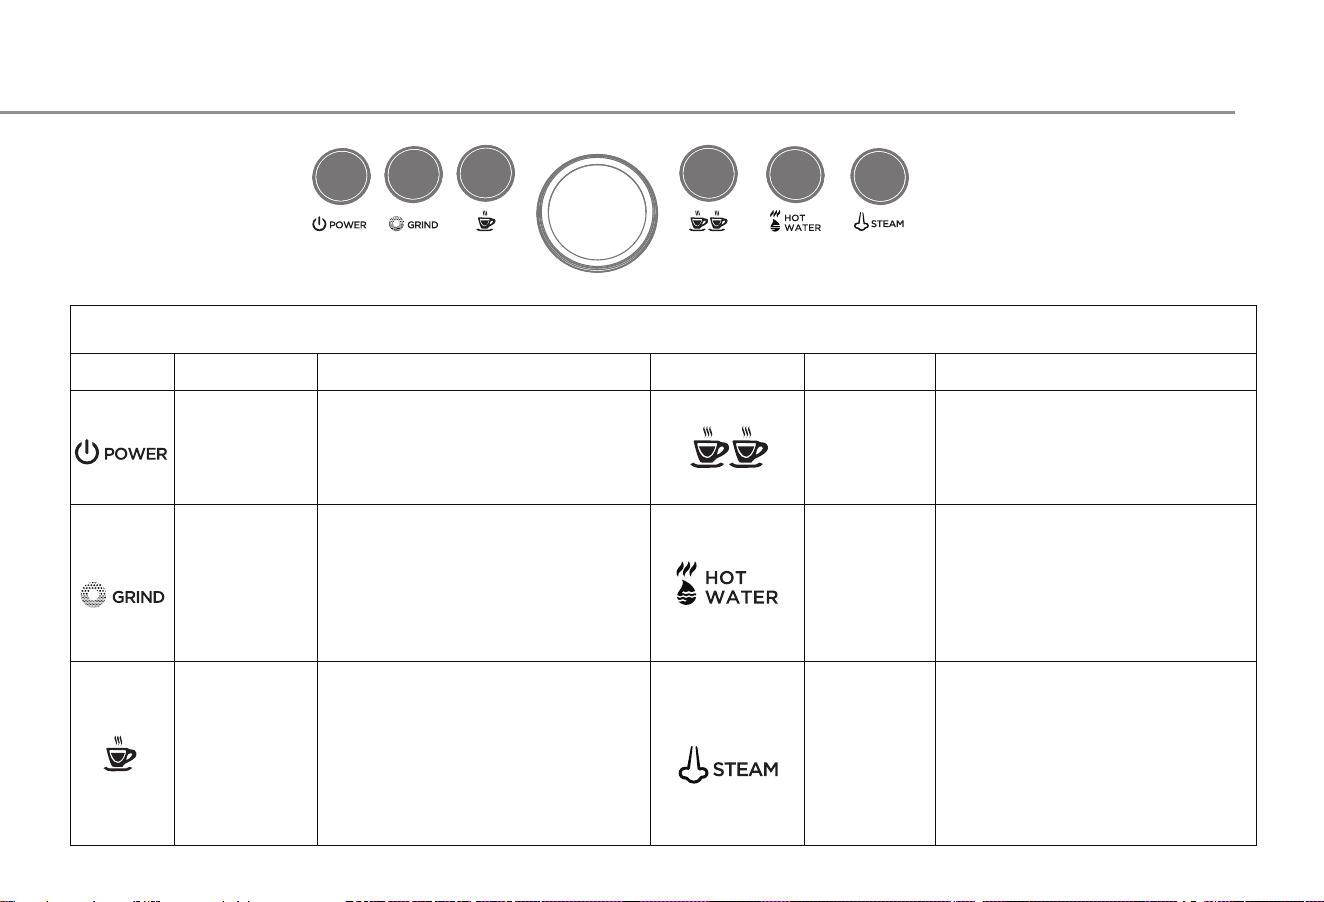
Control panel description
Control panel description
Name
Function description Function description Name
Press the double cup button,
the machine will start brewing
coffee, and then press the
machine to stop brewing coffee,
the amount of coffee is double
Put the cup (not less than
300ml) into the outlet of the
steam pipe, and then press the
hot water function key. When
the hot water reaches the
desired volume, press the hot
water function key to stop the
Put 1/3 milk in the flower cup
into the outlet of the steam
pipe, and then press the steam
function key. When the milk
bubble reaches Required milk
bubble, press the steam
function key to stop foaming
Power
Grinding
button
Single cup
button
Control machine switch
function
ress the button to grind
beans, and then press the
button to stop grinding
beans
Press the single cup button,
the machine will start
brewing coffee, and then
press the machine to stop
brewing coffee, the amount
Double cup
button
Hot water
function
key
Steam
function
key
6

The red light of single cup and double cup is
flashing, and the machine is short of water
Press the single or double cup to fill the waterway,
and the red light turns White.
Usage method
If it is used for the first time or not for a long time, the machine must be washed
Situation 1
Situation 2
1. Turn up the water
tank cover
2. Pour no more than 2
liters of purified
water into the water
tank (the water
temperature is no
more than 35 ℃)
Plug in the power Press the POWER key
Red light
White light White light
Red light
Flashing in white light, warm-up state
1. Place a cup (capacity more than 150
ml) above the waste water tray
2. Press the single cup or double cup
button and wait for the equipment to
finish flushing
7
Method 1
Press to start grinding, until
reaching the desired amount of coffee
powder, and press again to stop
grinding.
Method 2
Push forward the brewing cup to start
grinding, until reaching the desired
amount of coffee powder, and push the
brewing cup again to stop grinding.
Press to start the grinding function
Then use the adjusting wheel to adjust to
Required thick and thin coffee powder
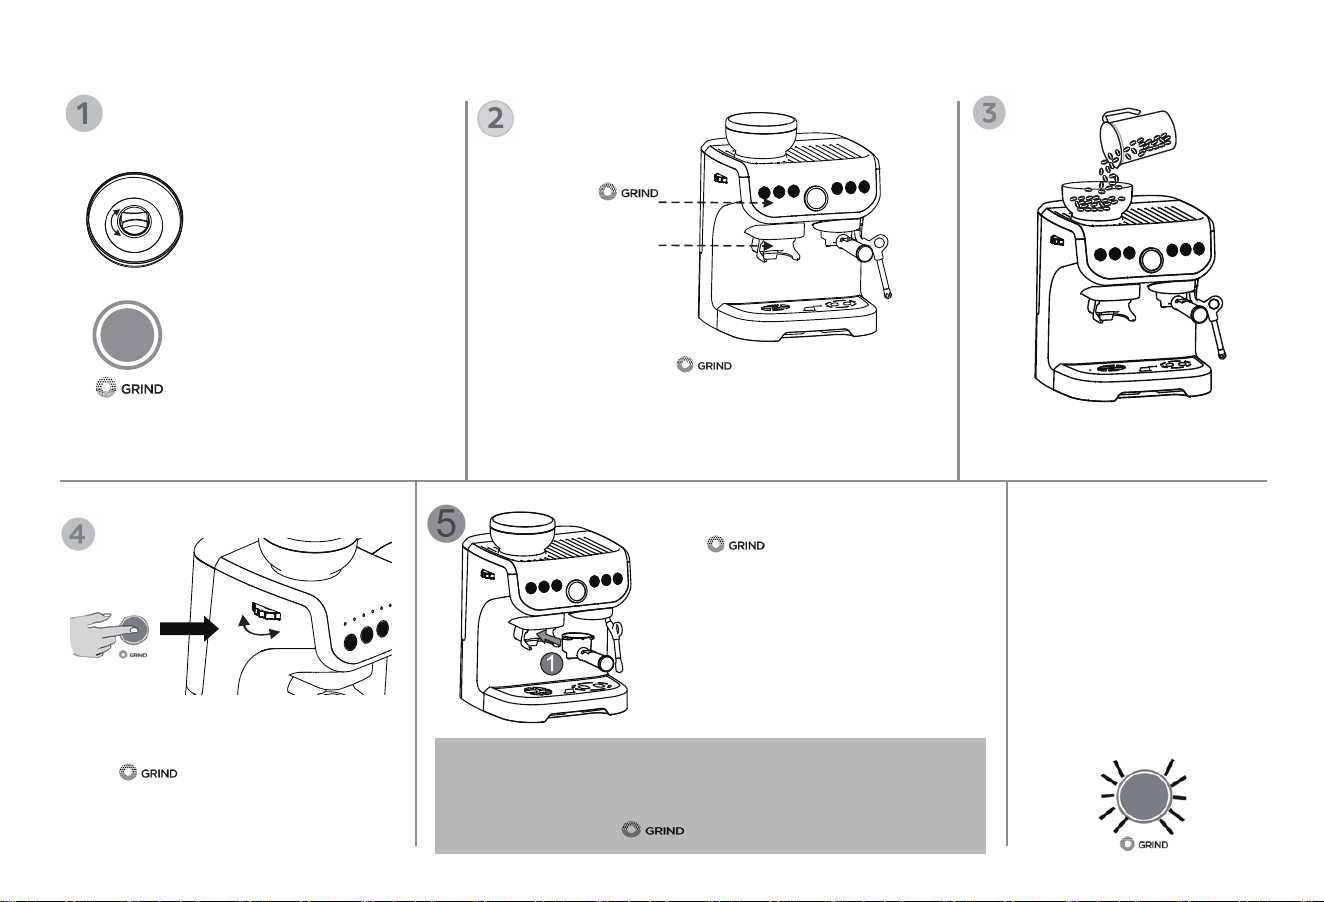
Coffee Bean Grinding
Control key 2
Control key 1
Preparation before putting coffee beans
Make sure the bean box
is locked before putting
coffee beans.
Control key 1: press to start grinding and
press again to stop the grinding.
Control key 2: use the brewing cup to push forward
to start the bean grinding function, and push the
control key 2 again to stop the bean grinding function
Pour no more than 150g of
coffee beans into the bean box
1. The red light flashes when
the bean box is in an
unlocked state, and the
grinding function does not
work.
2. The White light flashes when the bean box
is in a locked state, and the grinding
function can work.
! Attention: 1. After pressing the GRIND key, it will automatically
stop grinding after 13 seconds without any operation;
2. You can stop grinding by both pushing forward the brewing
cup again and press key again.
Lock
Unlock
Fin
e
Coarse
Reminder
When the grinding time
lasts for 4 minutes (about
6-7 times), the red light
of the grinding button
lights up, the machine
stops the grinding
function,and the grinding
function returns to normal
after the machine rests
for 8 minutes.
8

Method 1
Press to start grinding, until
reaching the desired amount of coffee
powder, and press again to
stop grinding.
Method 2
Push forward the brewing cup to start
grinding, until reaching the desired amount
of coffee powder, and push the brewing
cup again to stop grinding.
Making Coffee
Pour not more than 150g
coffee beans into the bean
! Attention: 1. After pressing the GRIND key, it will automatically stop grinding
after 13 seconds without any operation;
2. You can stop grinding by both pushing forward the brewing cup again and
press key again.
Press the coffee powder
with a coffee spoon
Transfer to brewing cup
Adjust to your desired particle
size of coffee powder
6
Fine
Coarse
Making coffee
1.Put the cup above the
waste water tray (make
sure there is more than 150 ml pure water
in the tank)
2. Press the desired amount of coffee
button (single or double) until the coffee is
finished( Make sure there is more than
150 ml of pure water in the tank
Tip: when the button is pressed, the button light will flash for
a few seconds and then start brewing.
9
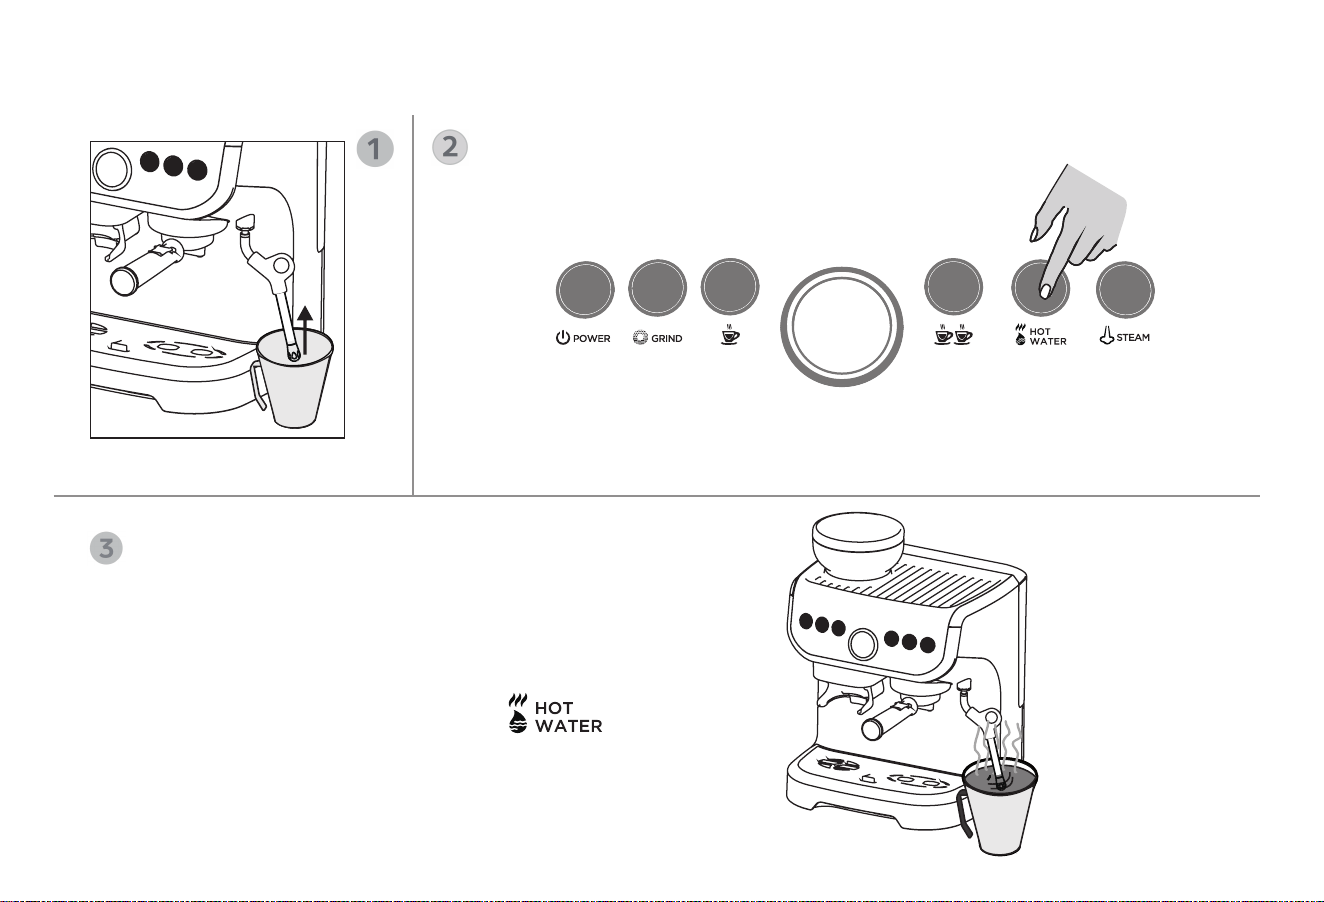
Hot water production
Put the cup in the steam pipe
Press the hot water function key
After finishing the Xinyi hot water, press , Complete
hot water production( Make sure there is more than 150 ml of
purified water in the tank)
10
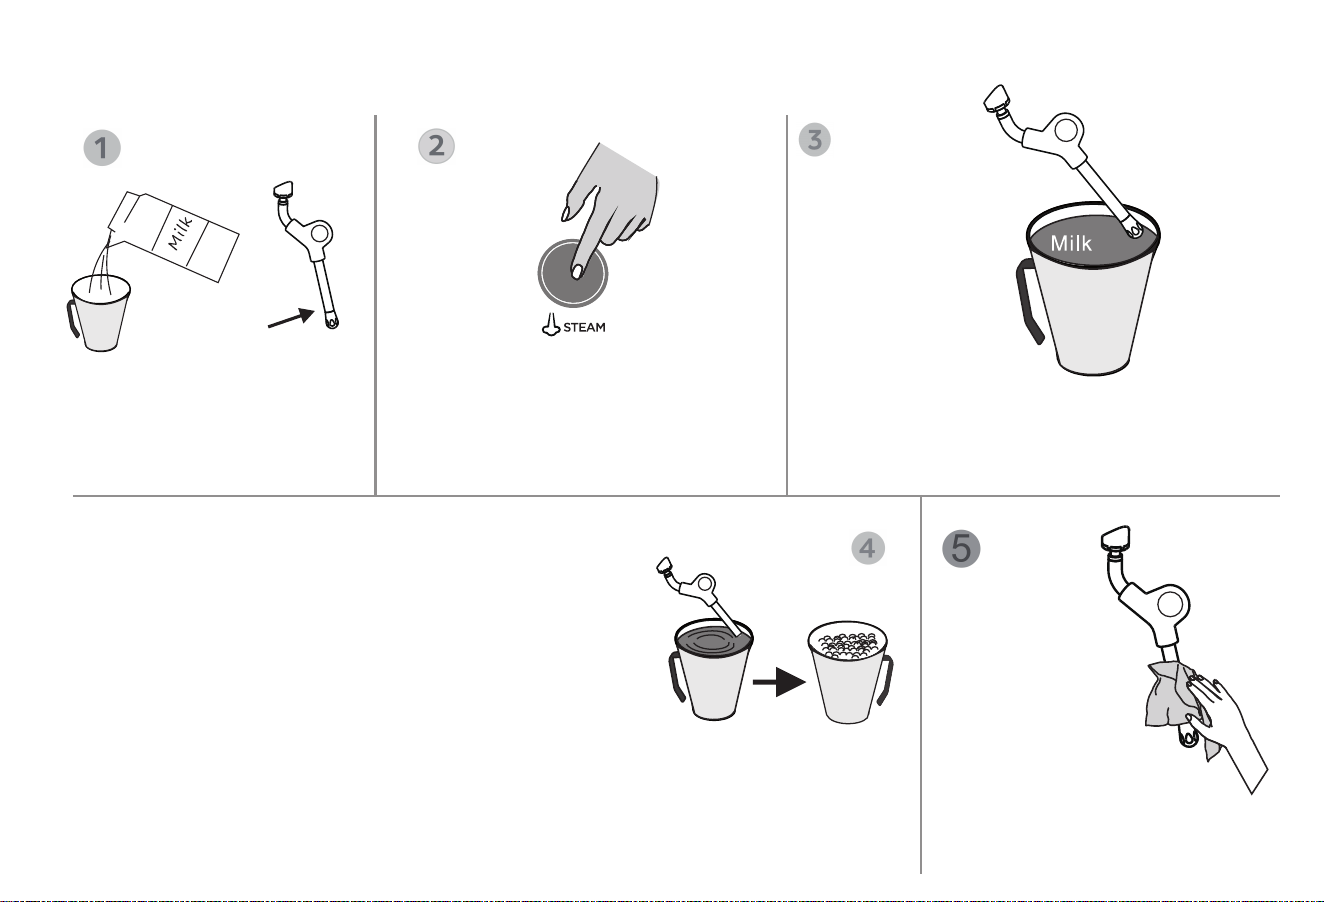
Pour not less than 50ml fresh
pure milk into the flower cup,
Make sure the milk sinks
through the steam nozzle
When the steam rod makes the milk rotate clockwise to form
a vortex, slowly lower the cup body. This will bring the steam
stick back to the milk noodle and start mixing air into the
milk. Use a steam stick to gently stir the top of the milk to
allow the milk to rotate at an appropriate speed
Place the steam stick at the same level or slightly lower
position on the milk surface, and let the milk rotate continu-
ously and generate vortices. Maintain the operation until the
milk reaches the required consistency and feel the cup body
hot. The milk reaches the required temperature (60-65 ℃) .
that is to complete the production of milk foam, press the steam key to stop the
production of milk foam
Note: before taking out the steam stick from the milk, press the steam key to stop the
production of milk foam
Press the steam key and the
machine needs to warm up for
about 30 seconds。
Extend the steam stick 1~2 cm from the milk
surface
Approach the 3 o'clock position on the right side
of the cup and wait for the steam to form.
Clean the steam
stick with a wet
towel
Note: do not touch the steam
rod directly with hands at
high temperature
Production of milk foam
11
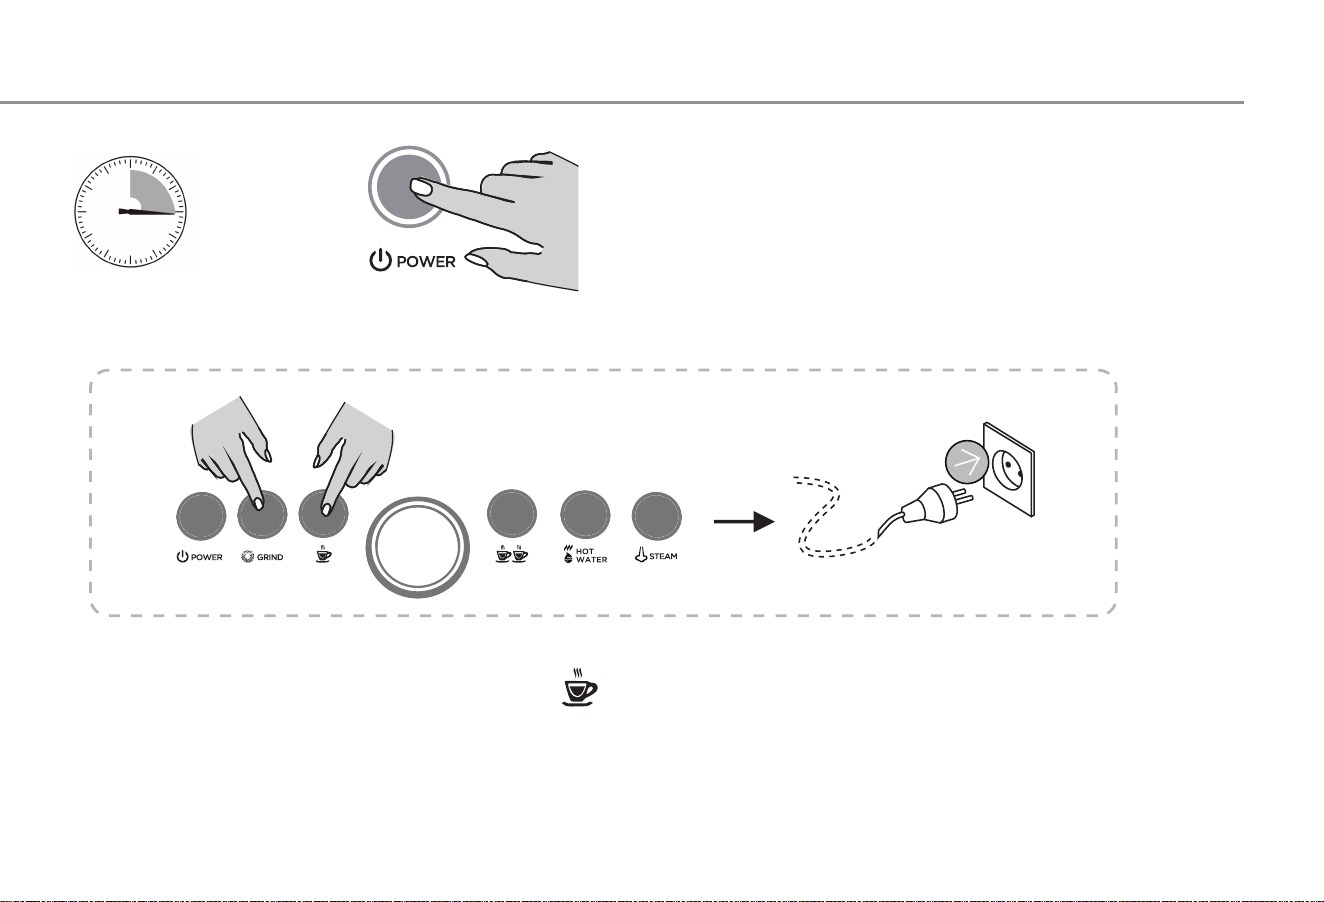
Energy-saving Mode
>15 minutes
Energy-saving mode
1. The machine is delivered with energy-saving mode.
The machine will automatically turn off all function indicators after
15 minutes.
2. When the machine is in an off state, press the POWER key
again and restart the machine.
Energy-saving mode setting
Press and hold at the same time GRIND key and key at the same time, and plug in the power.
Press GRIND Key light off. Energy saving mode cancelled, Press GRIND The key light is on . Energy saving
mode enabled
Press POWER Key to exit energy saving mode setting
12
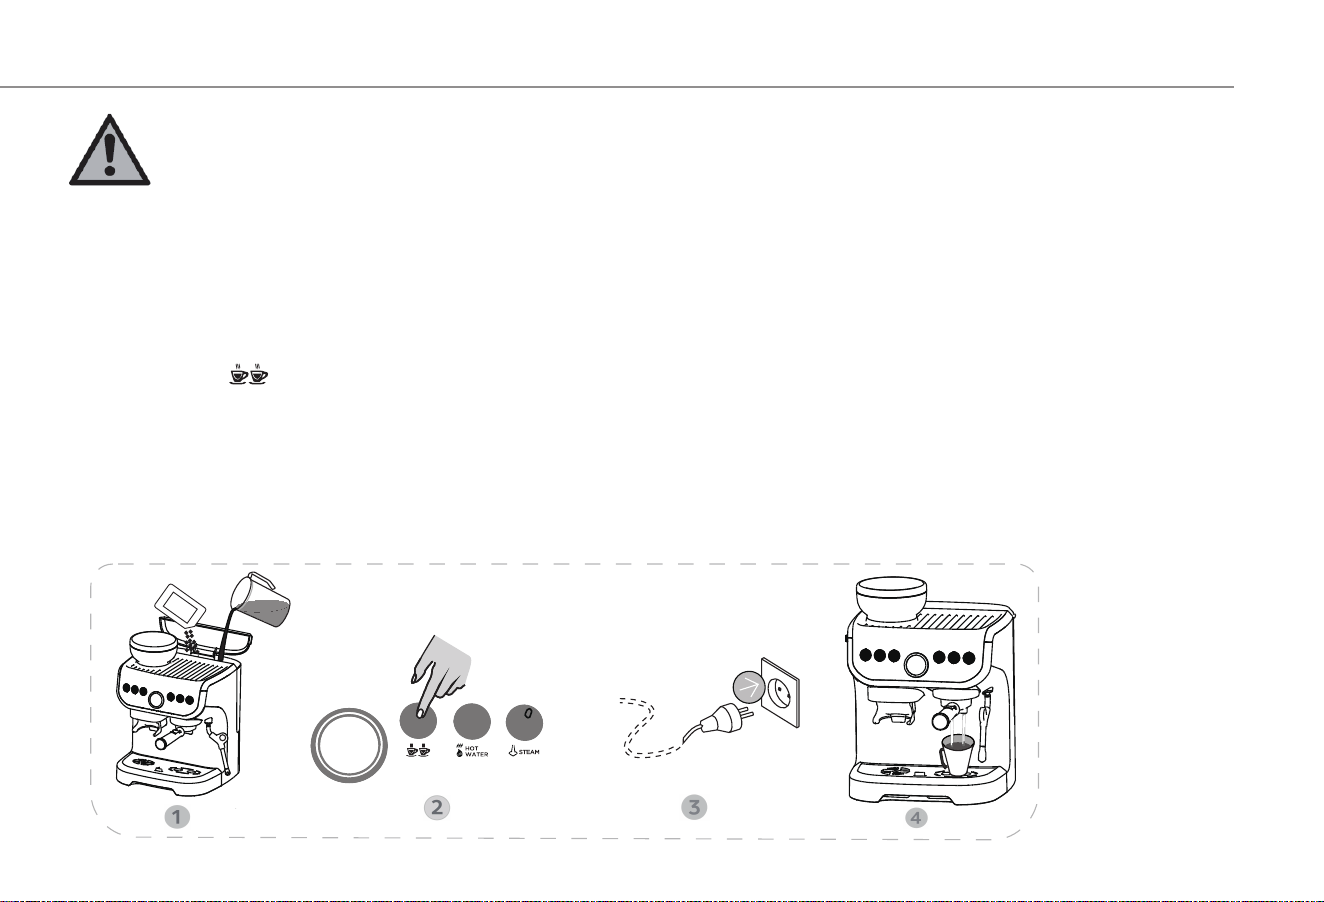
Descaling Mode
Cautions:
As the long-term use of the machine will lead to scale in the internal waterway system of the machine, the
machine will show bad conditions, such as a significant decrease in the amount of coffee or blockage. In this
case, it is necessary to use the descaling modefor descaling.
Descaling mode function
1. Place a cup at the water outlet in front of the machine
2. Add 1 liter of purified water into the water tank and put in an appropriate amount of detergent
3. Press and hold Key 2 seconds, Plug in the power
4. On key and double cup key light on,Press the double cup key, the descaling function starts, and the workload is 1 liter of
water. Then press the power key to exit the descaling function
! matters needing attention
When the machine makes no more than 400 cups of coffee, it needs to remove the scale regularly according to the above
function
Ci tr ic a ci d
13
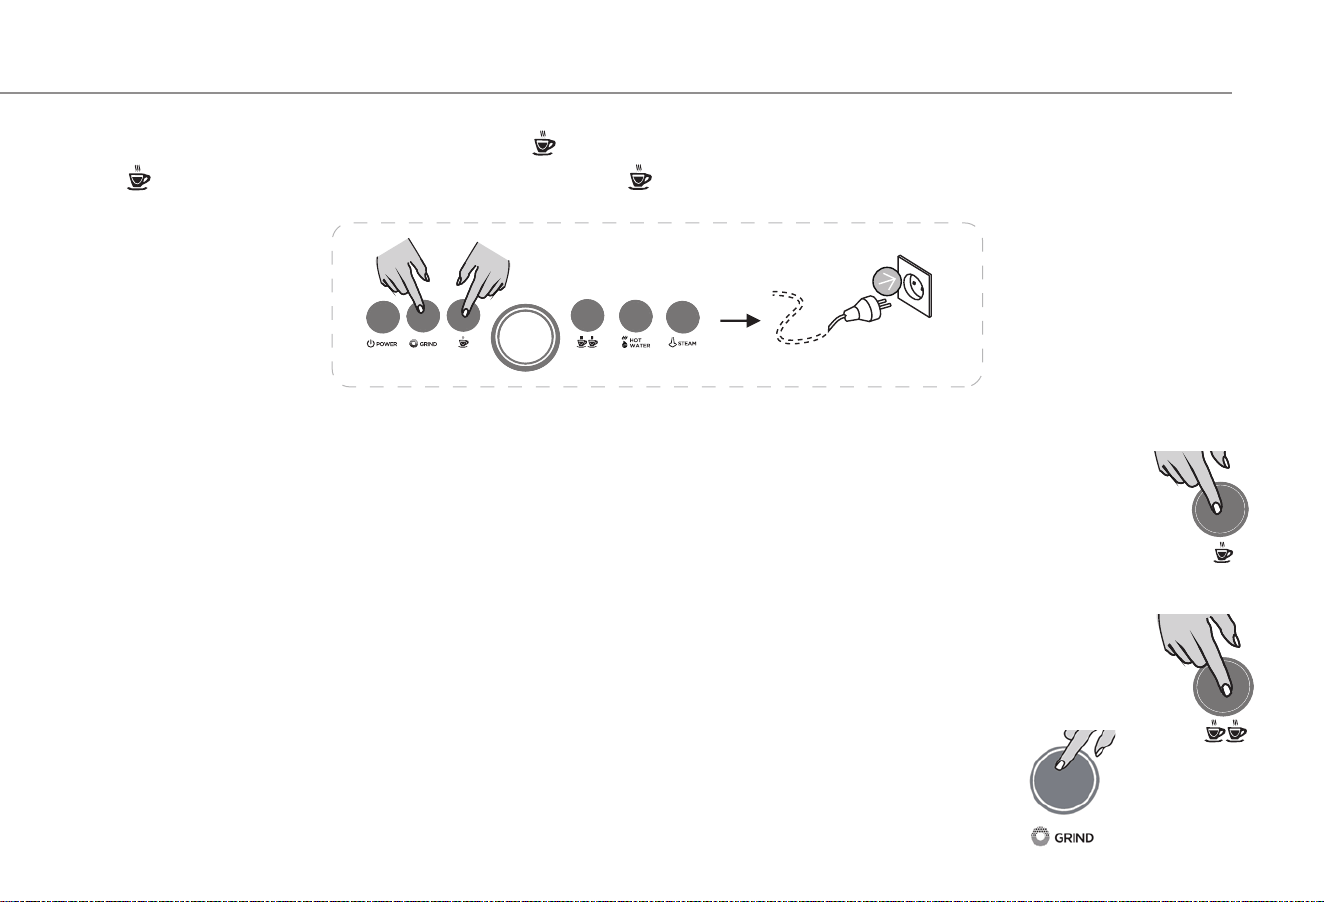
Pre brewing function
Pre brewing mode setting
Press and hold at the same time GRIND key and Key does not let go, Plug in the power and turn it on.
Press Key light off. Pre brewing mode cancelled, Press The key light is on and the pre brewing mode is started Press
the POWER key again to exit the energy saving mode setting.
Other setting
Single cup quantitative function setting
1. Place a cup at the water outlet in front of the machine
2. In the standby mode, press and hold the single cup key, the machine will start to work, the machine will start to
brew coffee, and release the key after reaching the quantity of required brewing cup. The single cup quantitative
setting is completed (at least 25ml).
Double cup quantitative function setting
1 Place a cup at the water outlet in front of the machine
2. In the standby mode, press and hold the double cup key, the machine will start to work, the machine will start
to brew coffee, and release the key after reaching the quantity of required brewing cup. The double cup
quantitative setting is completed (at least 25ml).
Quantitative setting of grinding time function
Press and hold GRIND in standby mode and wait for the required grinding time before letting go.
The grinding time function setting is completed. 9 seconds minimum and 20 seconds maximum.
14
Restore factory settings
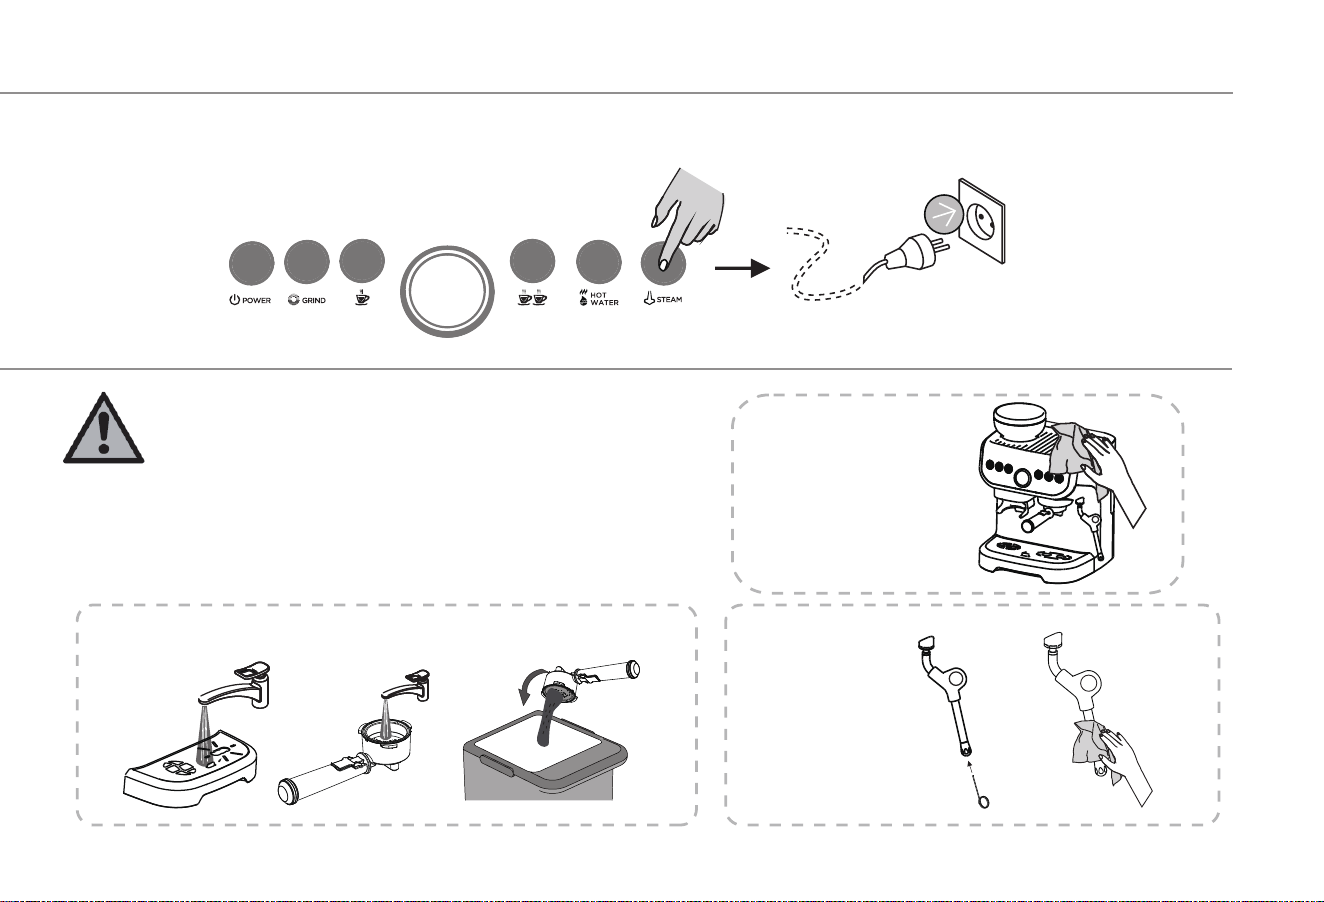
Cleaning
Cautions:
1. It is prohibited to immerse the coffee maker in
water.
2. Make sure to unplug the power cord before
cleaning the machine.
3. Do not use strong detergents, sharp objects,
brushes, etc. to clean the coffee maker.
Parts cleaning
Whole machine
cleaning
Steam rod
cleaning
1. Restore settings
2. Press and hold STEAM Don't let go of the button, Plug in the power and all the indicator lights flash twice to restore the
factory settings
15
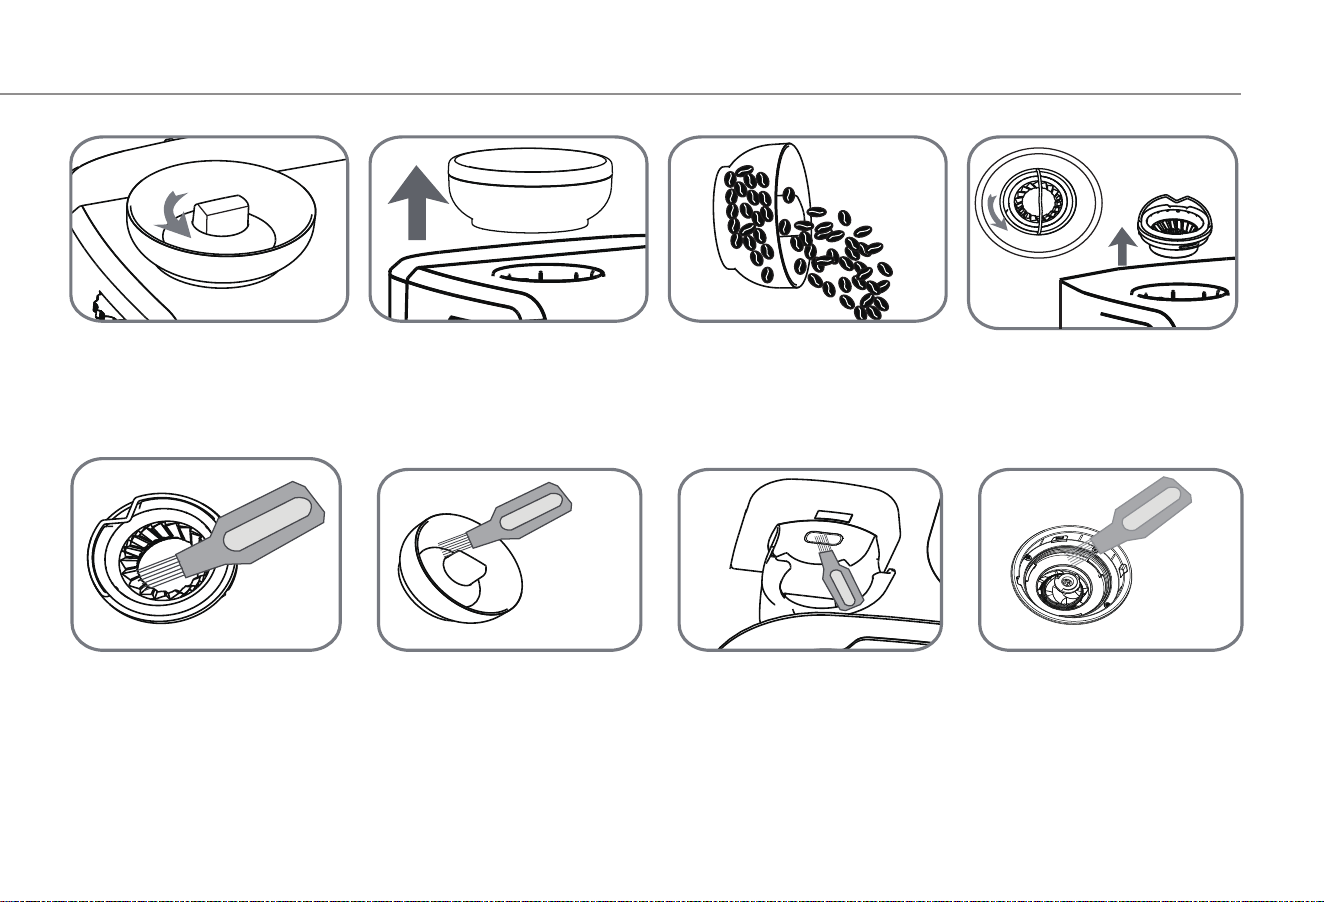
Bean box cleaning
1. Unlock the bean box.
2. Remove the bean box.
3. Pour out excess coffee
beans.
4. Unlock the grinder
counterclockwise, then lift
it away.
6. Use a brush to clean
the bean box.
5. Use a brush to clean
the grinder.
7. Use a brush to clean
the powder outlet.
8. Use a brush to clean
the grinding knife.
16
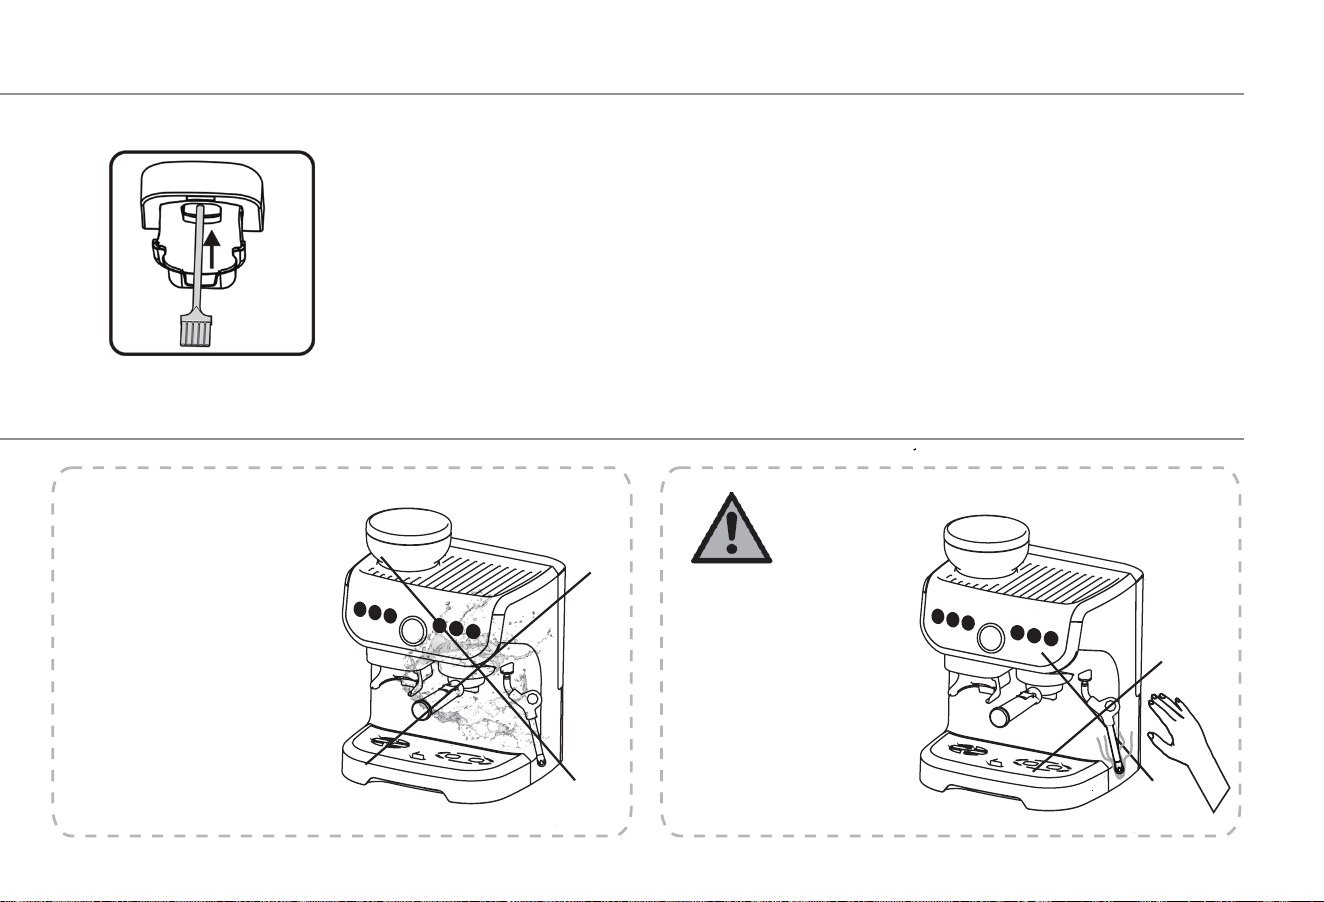
Don’t pour water
directly on the
machine.
Cautions
Pay attention to the
high temperature.
When making hot water
and making milk foam,
the steam bar will be
hot.
There is residual heat.
Powder plugging treatment
he powder outlet is blocked due to the difference of users' coffee beans, insufficient drying or improper operation.
Powder outlet channel with tools
17
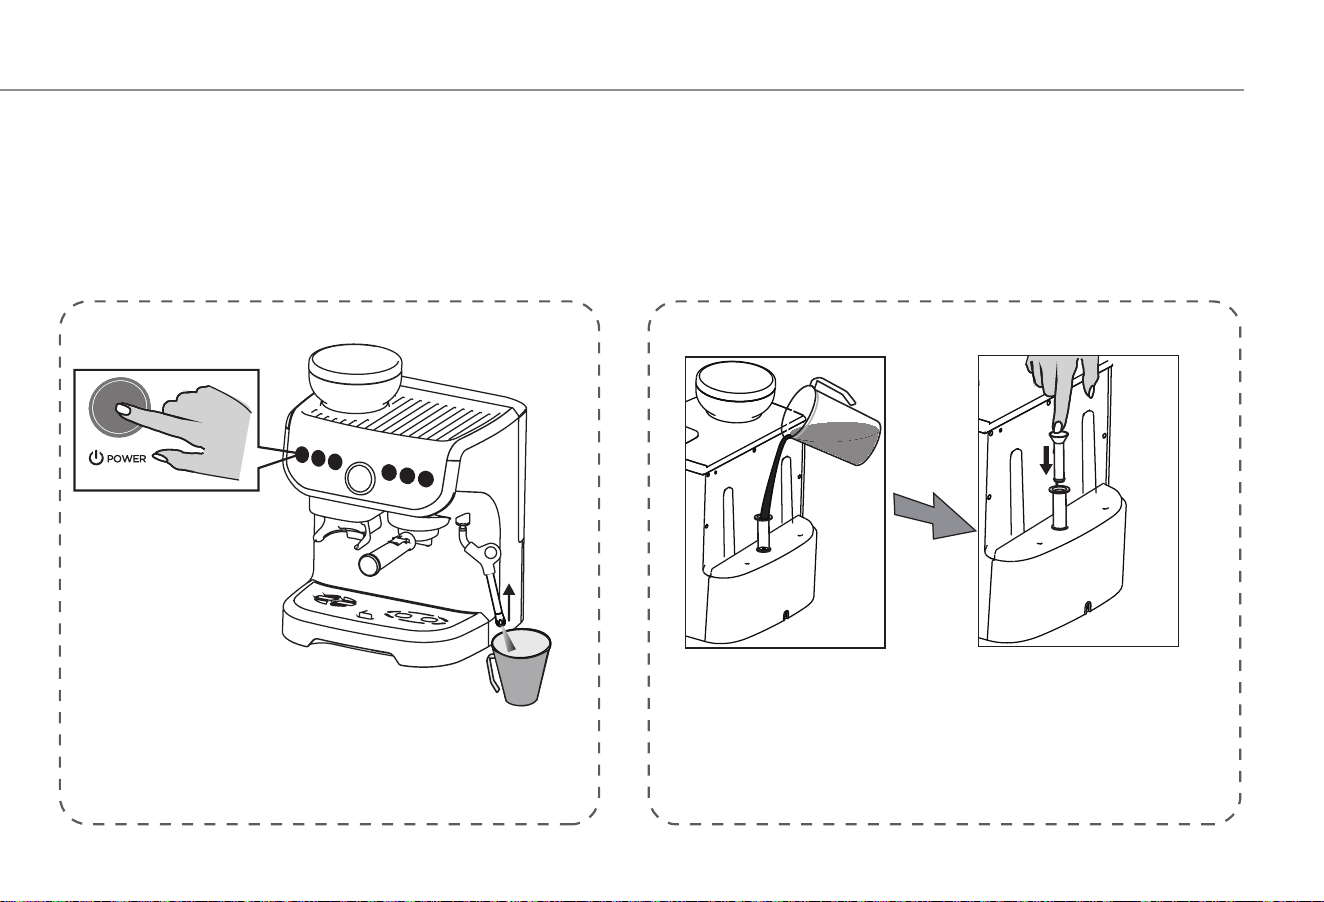
Solution for Water Pumping Failure
Cautions:
1. The new machine is used for the first time.
2. The machine is not used for a long time.
3. The water tank is lack of water during operating process.
4. There are two solutions to the phenomenon that the machine can't pump out water, as shown in the figure
(Solution 1/Solution 2).
Method 1
1. Put the cup under the steam pipe.
2. Press and hold the power key when the
machine is off.
The outlet of the steam pipe will automatically
spray clean water until the water is about 200ml.
Method 2
Use the "manual pump" in the accessories
of the machine to fill the machine with water.
18
Frequently Asked Questions
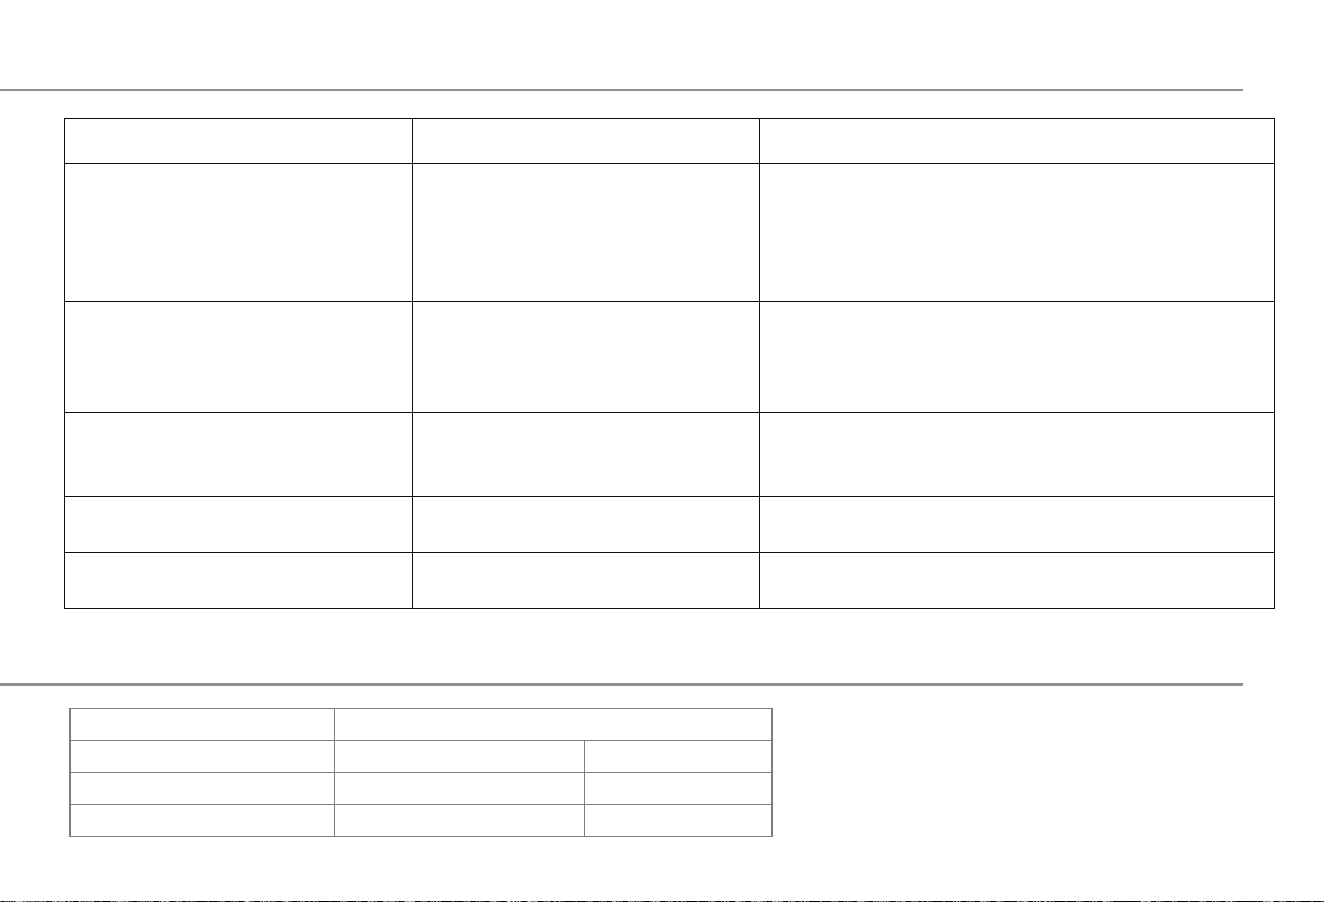
Product Safety Indexes
model No.
Rated voltage frequency
Coffee machine power
Grinding coffee power
AC-517E
AC220V-240V 50/60Hz
1450W
110W
AC110V 60Hz
1100W
110W
Fault phenomenon.
Potential causes
Troubleshooting methods
Water leakage or seepage.
No heating.
Water flows from the bottom of the
coffee machine.
Coffee drips too slowly or no coffee.
The indicator light is not on.
1. The power has not been
connected.
2. The key has not been pressed.
1. Check whether the power is plugged in.
2. Check whether the POWER key is pressed.
3. Make sure that the power supply is plugged in and the
power supply is matched correctly. If this phenomenon
still occurs, please find a professional to repair it.
1. Check whether the water tank is installed in place or
whether it is damaged.
2. Check whether the brewing cup matches the corre-
sponding coffee capsule.
Check whether the power socket is properly plugged in; if
it still does not work after plugging in, please find a
professional for repair.
Clean the water tray; if water still flows from the bottom
of the machine, please find a professional for repair.
1. Make sure the coffee capsule matches the brewing cup.
2. If the brewing cup is blocked, please clean it in time.
1. Leakage of water tank.
2. Leakage of brewing cup.
The power has not been connected.
Too much water has accumulated in
the water tray.
Coffee capsule does not match the
brewing cup.
19