
Technical Support and E-Warranty Certificate
www.vevor.com/support
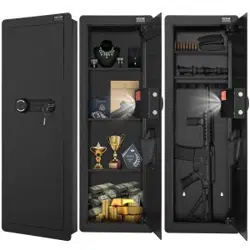
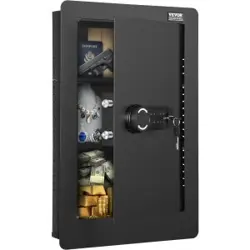
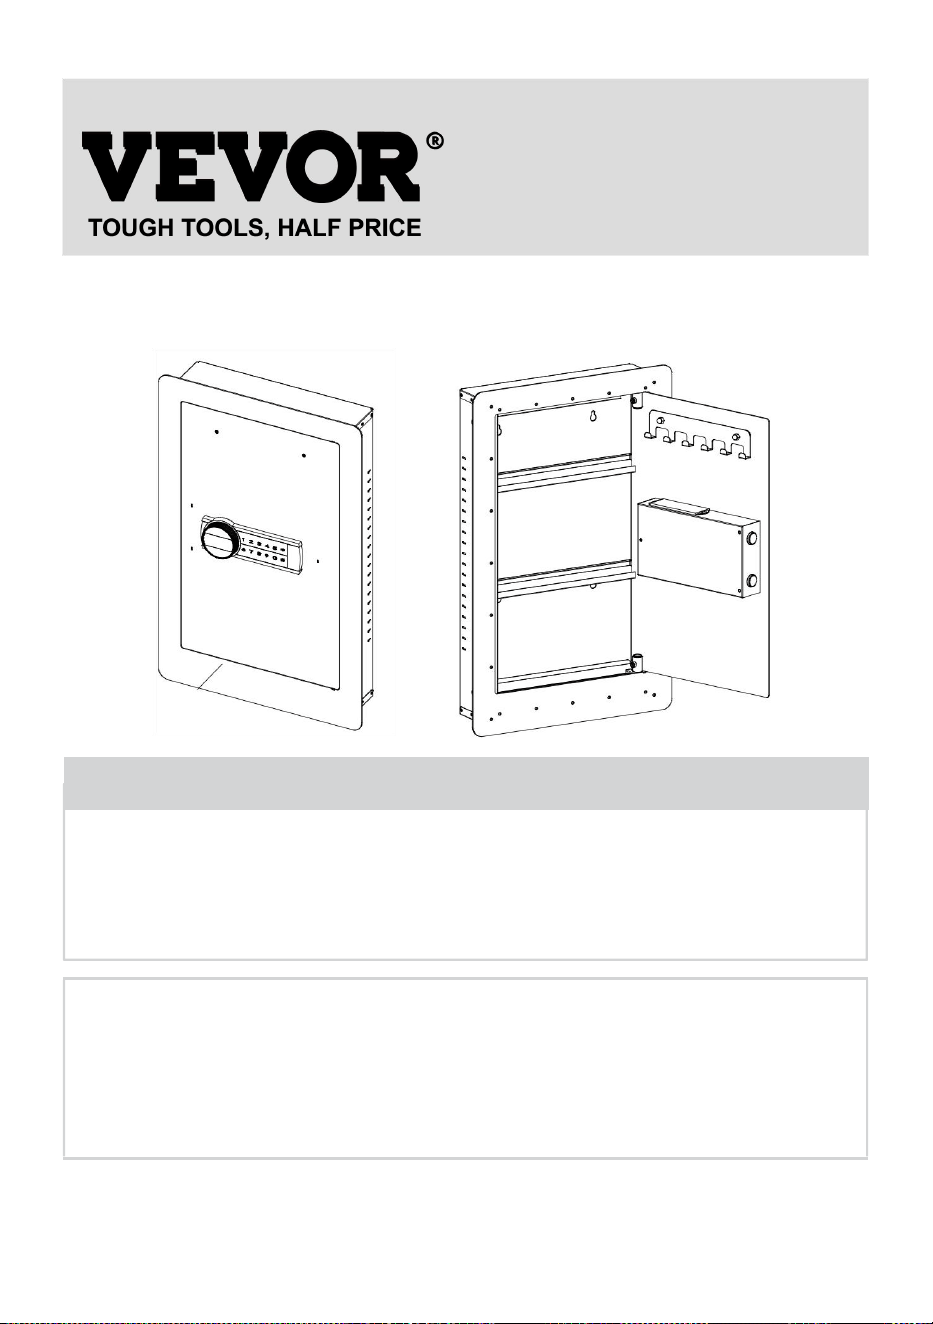
SAFE BOX
USER MANUAL
MODEL:SS-650QR
We continue to be committed to provide you tools with competitive price.
"Save Half", "Half Price" or any other similar expressions used by us only represents an
estimate of savings you might benefit from buying certain tools with us compared to the major
top brands and does not necessarily mean to cover all categories of tools offered by us. You
are kindly reminded to verify carefully when you are placing an order with us if you are
actually saving half in comparison with the top major brands.

1
MODEL:SS-650QR
Have product questions? Need technical support? Please feel free to
contact us:
Technical Support and E-Warranty Certificate
www.vevor.com/support
NEED HELP? CONTACT US!
This is the original instruction, please read all manual instructions
carefully before operating. VEVOR reserves a clear interpretation of our
user manual. The appearance of the product shall be subject to the
product you received. Please forgive us that we won't inform you again if
there are any technology or software updates on our product.
SAFE BOX

2
Warning-To reduce the risk of injury, user must read
instructions manual carefully.
This device complies with Part 15 of the FCC Rules. Operation is
subject to the following two conditions:(1)This device may not cause
harmful interference, and (2)this device must accept any interference
received, including interference that may cause undesired operation.
This product is subject to the provision of European Directive
2012/19/EC. The symbol showing a wheelie bin crossed through
indicates that the product requires separate refuse collection in the
European Union. This applies to the product and all accessories
marked with this symbol. Products marked as such may not be
discarded with normal domestic waste, but must be taken to a
collection point for recycling electrical and electronic devices
INSTRUCTIONS
Thank you very much for choosing this safe box. Please read all of the
instructions before using it.The information will help you achieve the best
possible results.

3
TECHNICAL PARAMETERS
PARTS LIST
Model
SS-650QR
Working Voltage Range
4.2-6.8Vdc
Product Size
650*420*100 mm
Working Power
4 x AA(1.5V) batteries
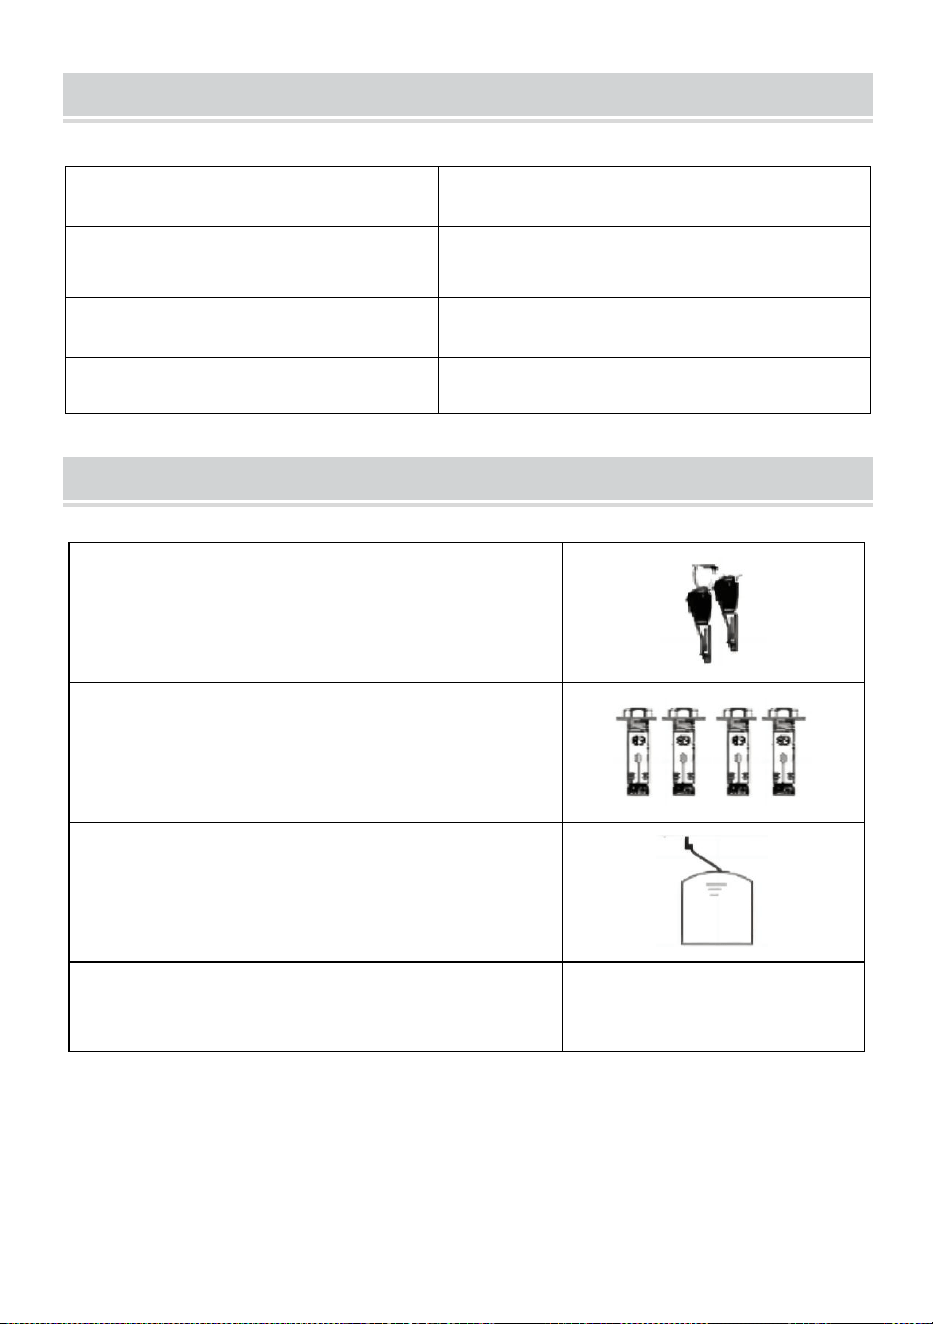
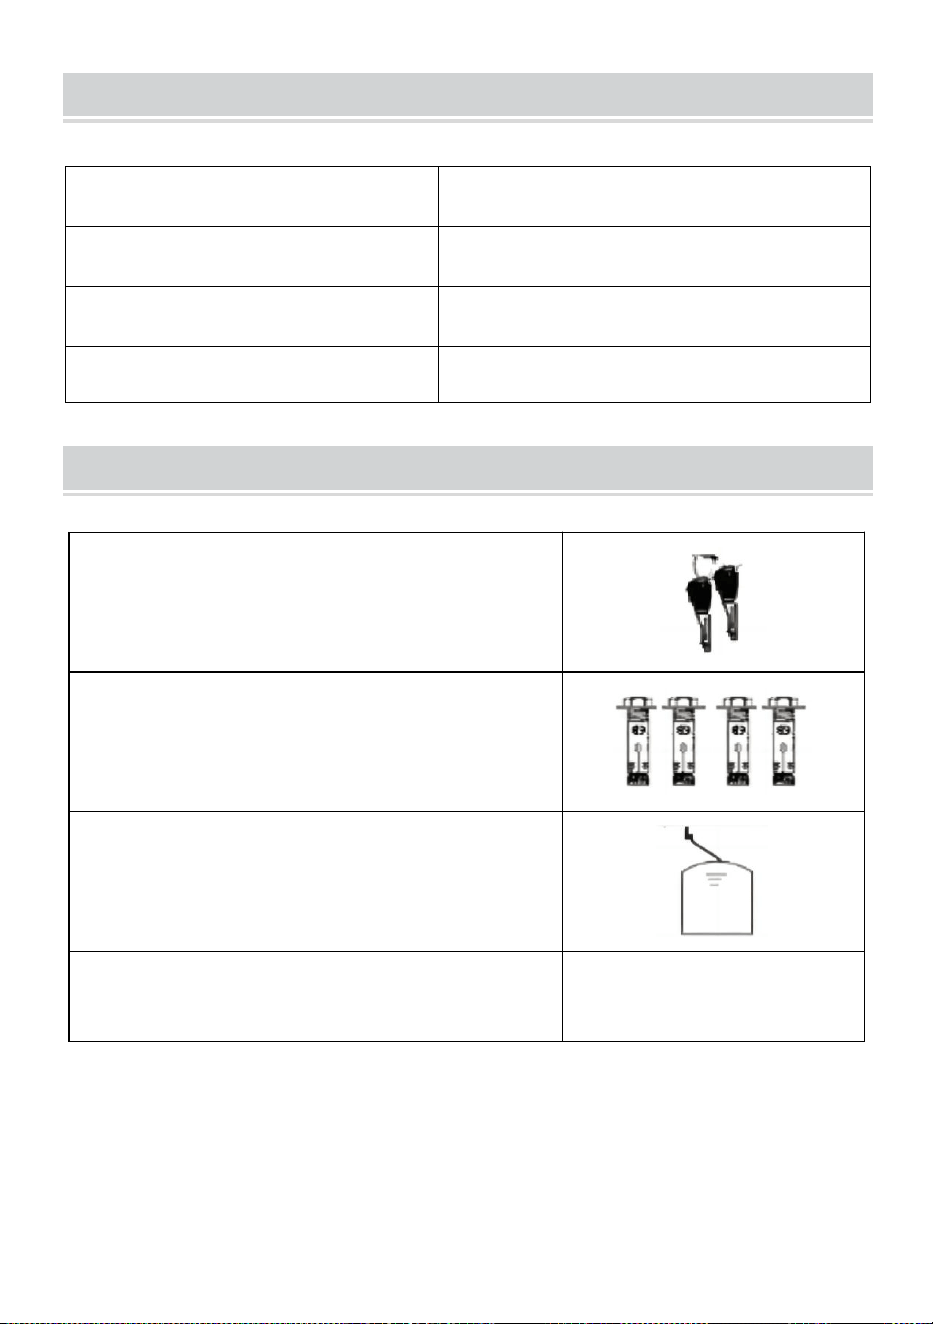
Built-in Storage Key*2
Expansion Bolt*4
External Power Box*1
Diaphragm Buckle*4
4
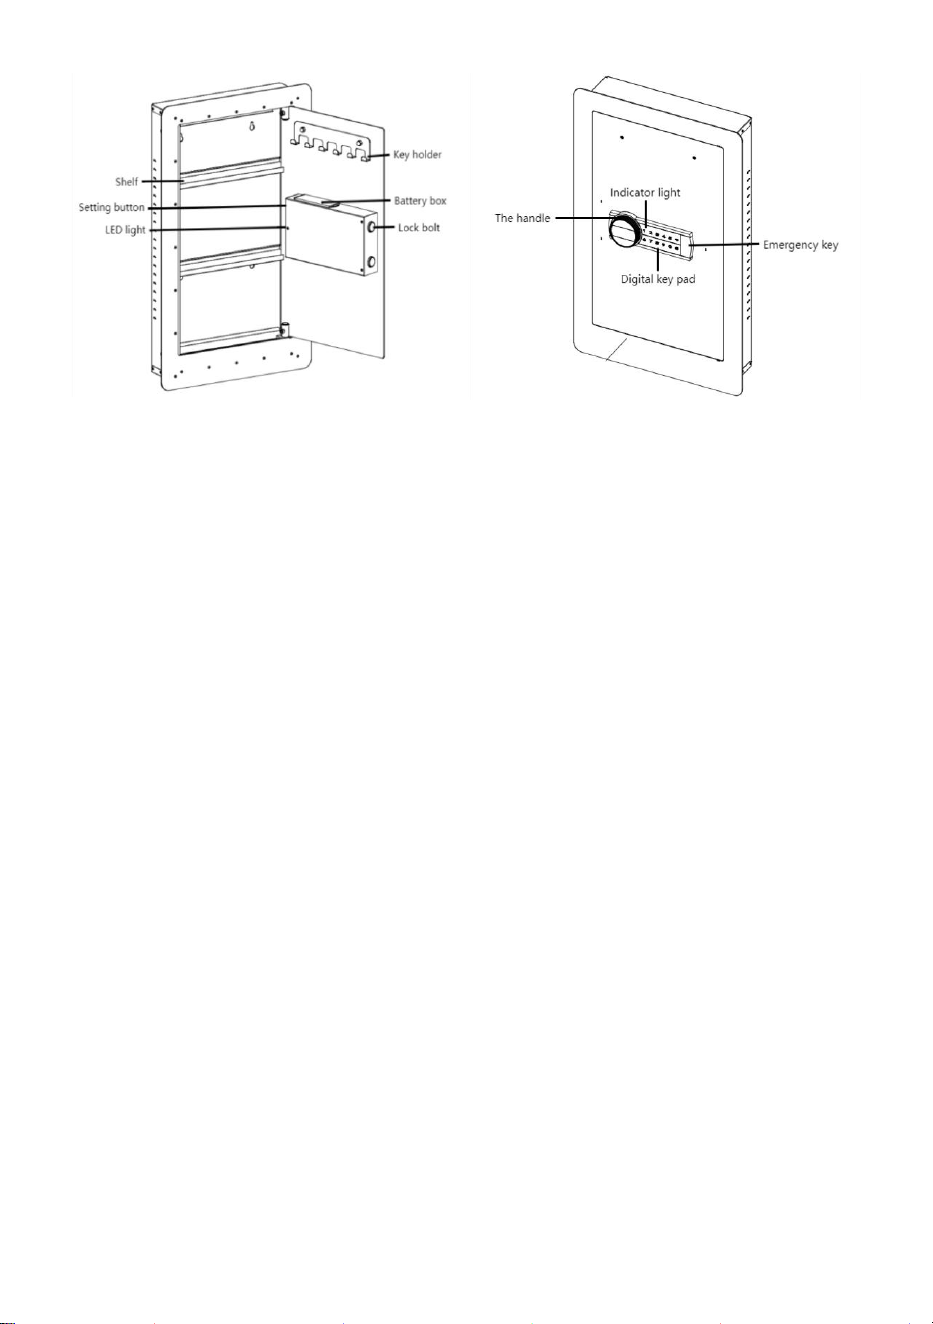
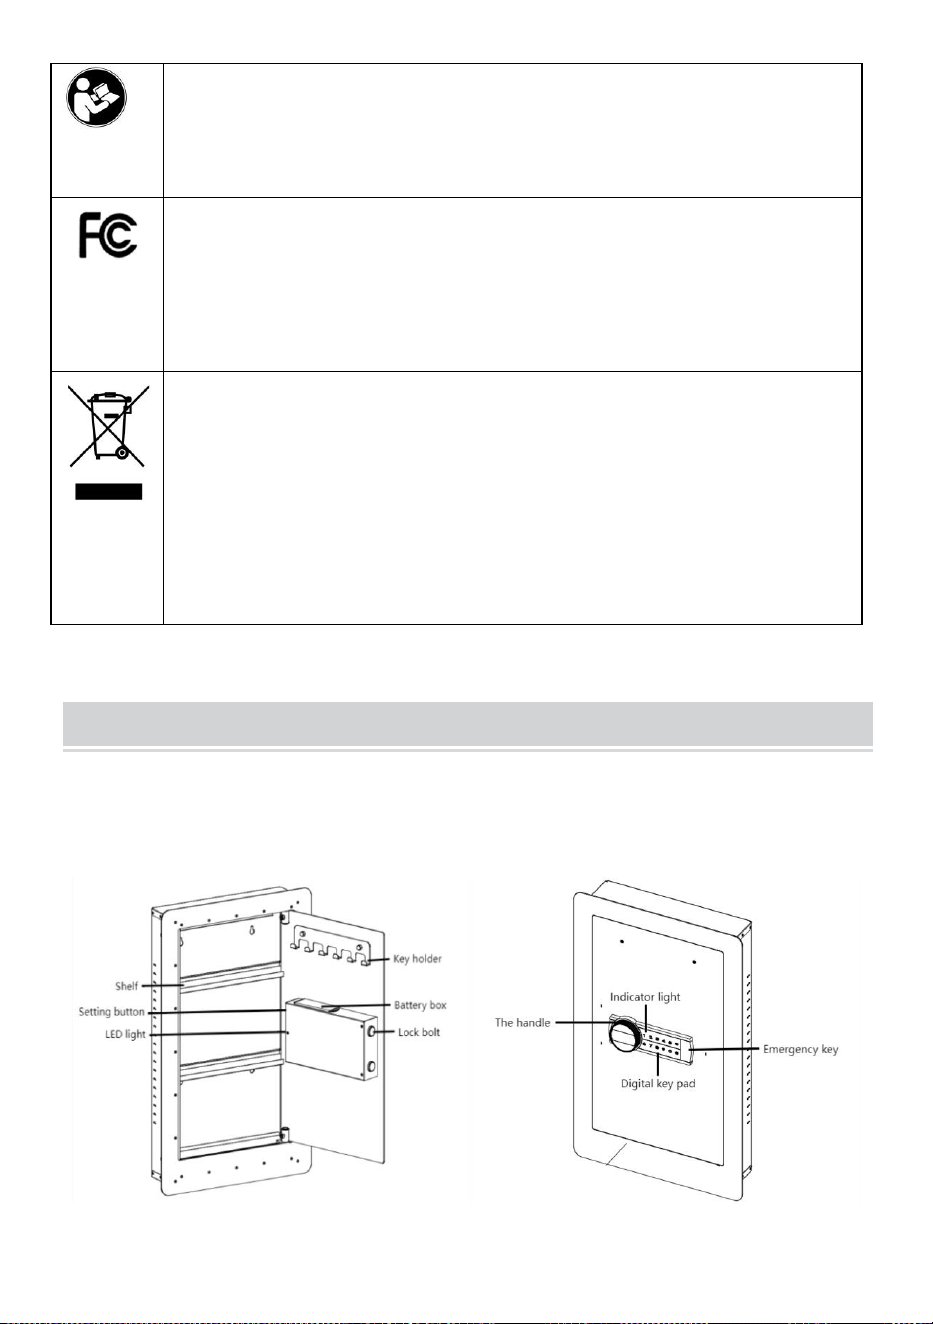
DESCRIPTION:
1. This product has 2 sets of passwords. Factory original password:
"123456", factory management you need set it up your self.
2. Yellow light: normal indicator, or wrong password indicator.
3. Green light: unlock and light up for 6-7 seconds.
4. Red light: low battery indicator.
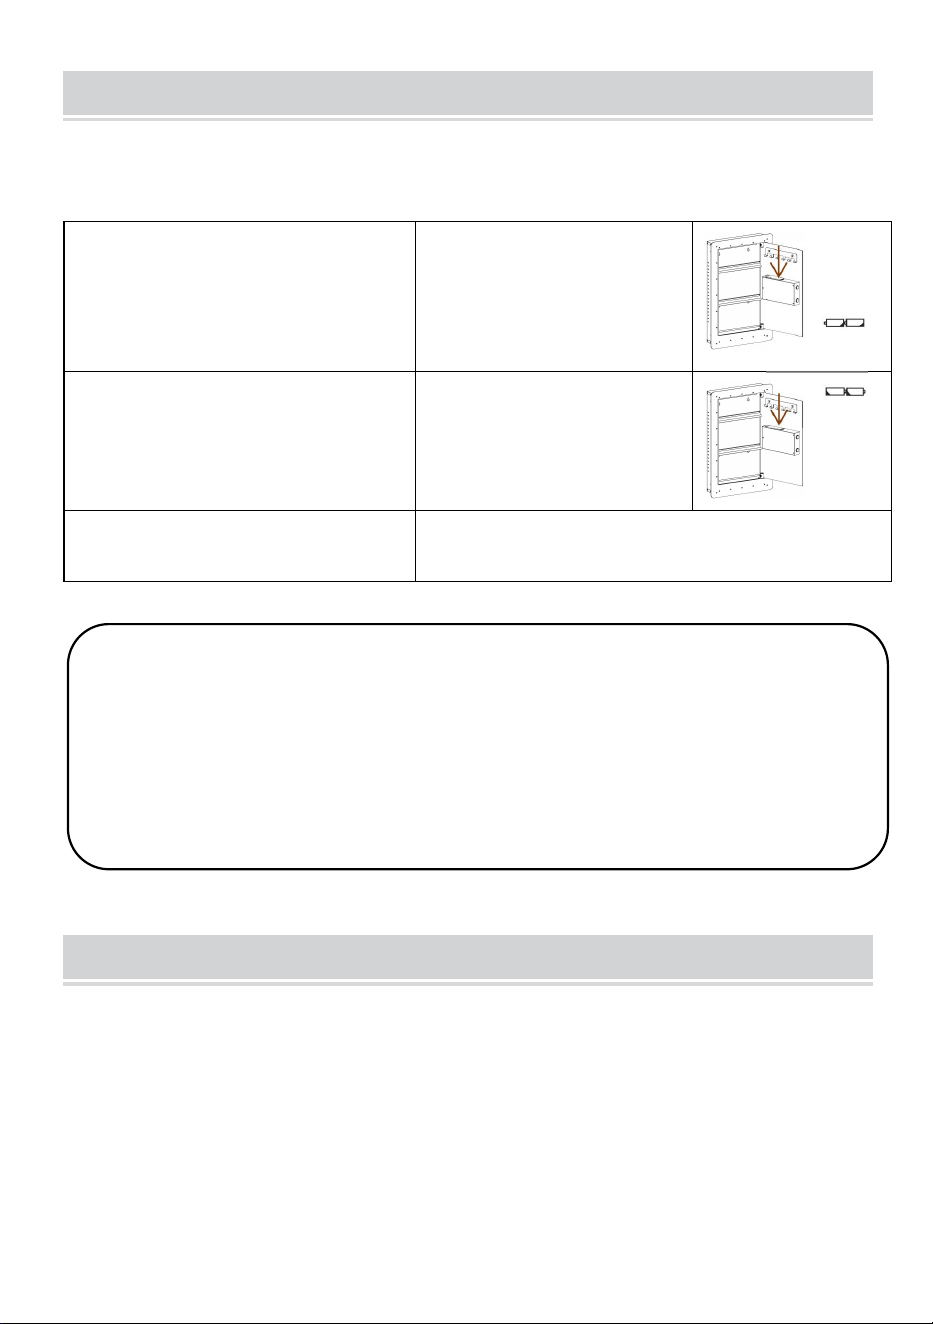
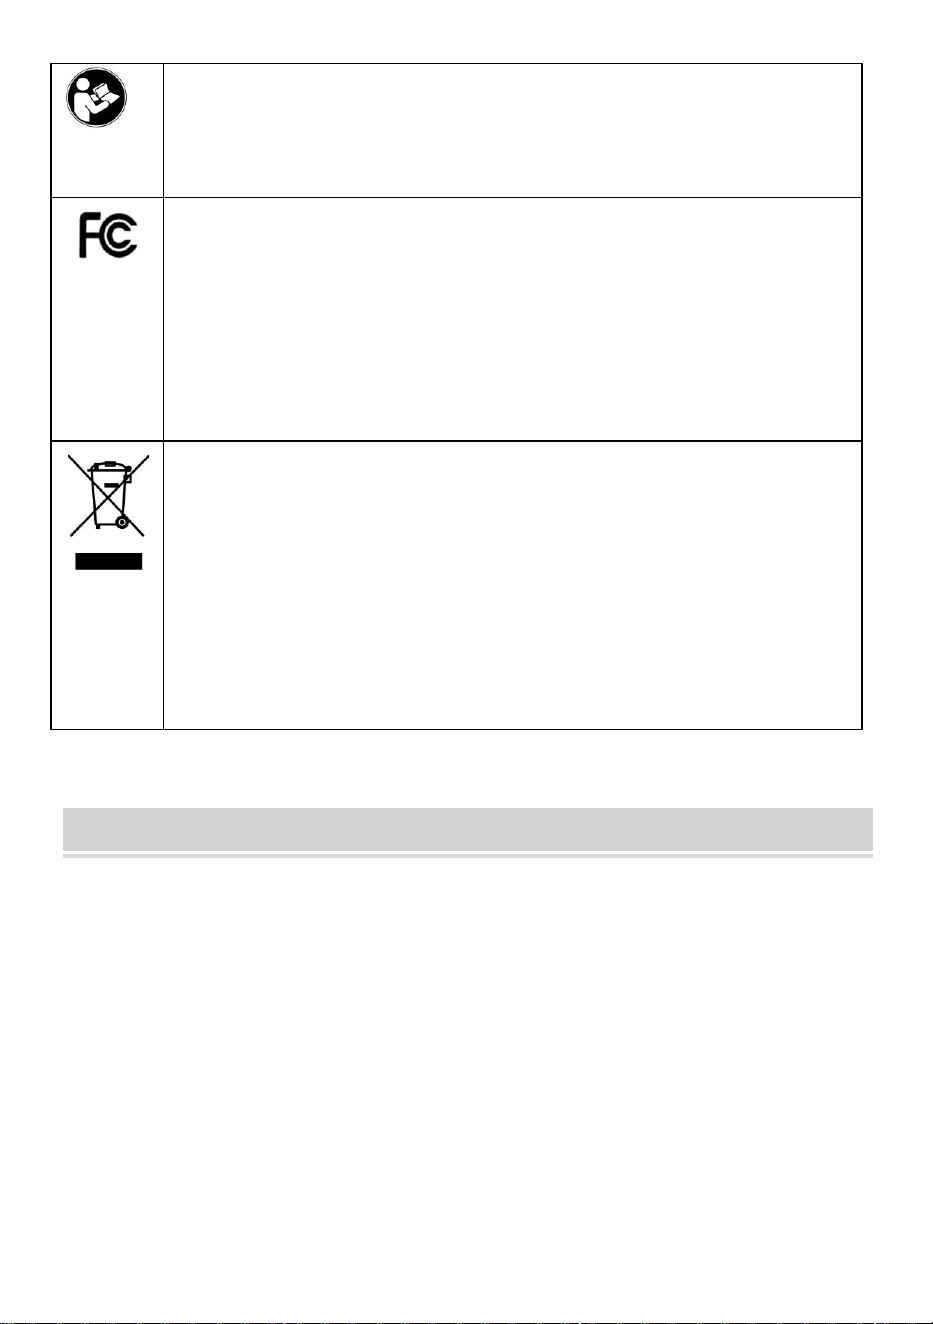
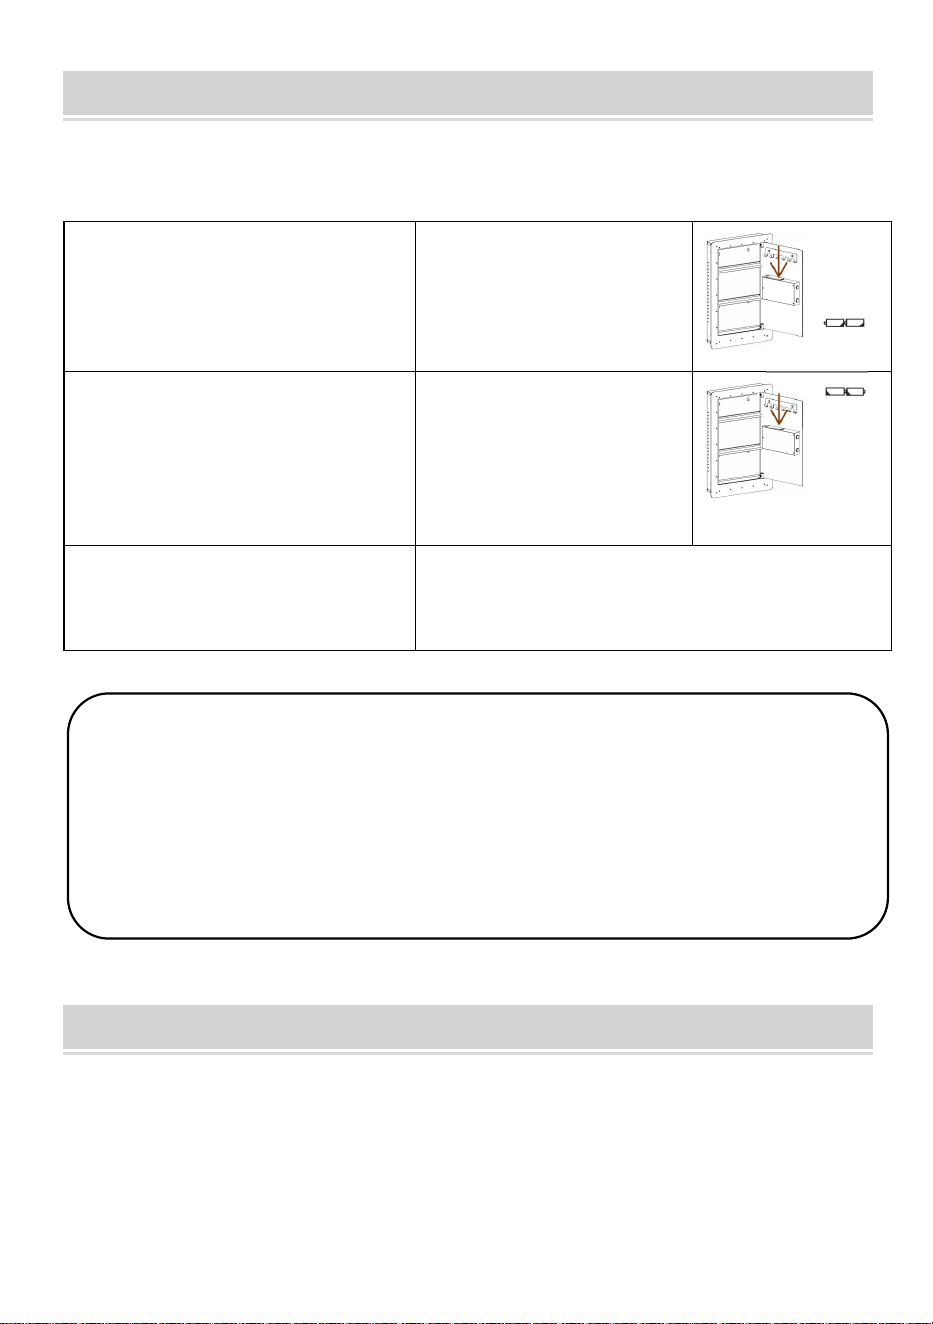
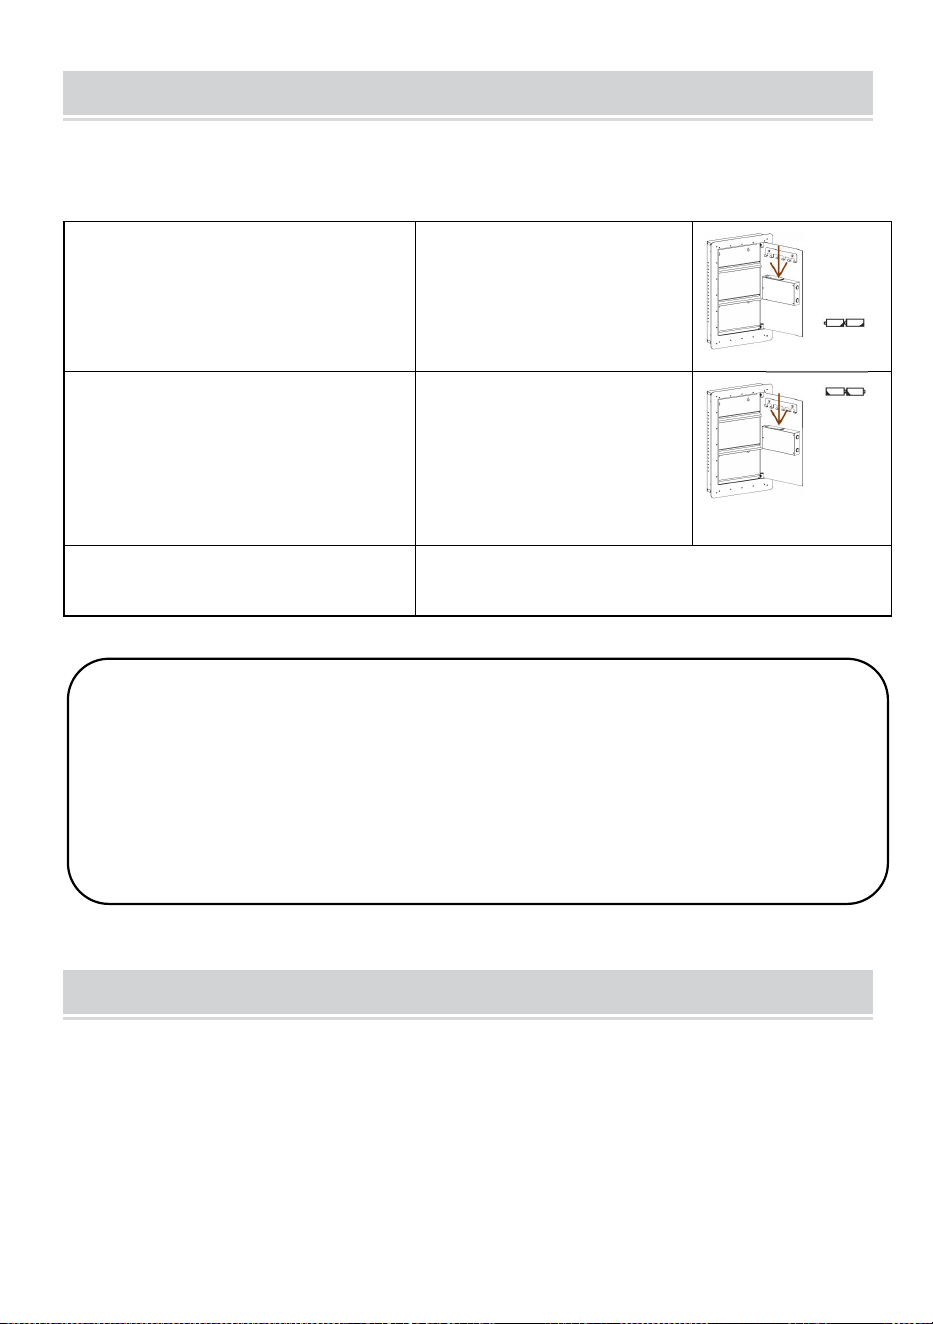
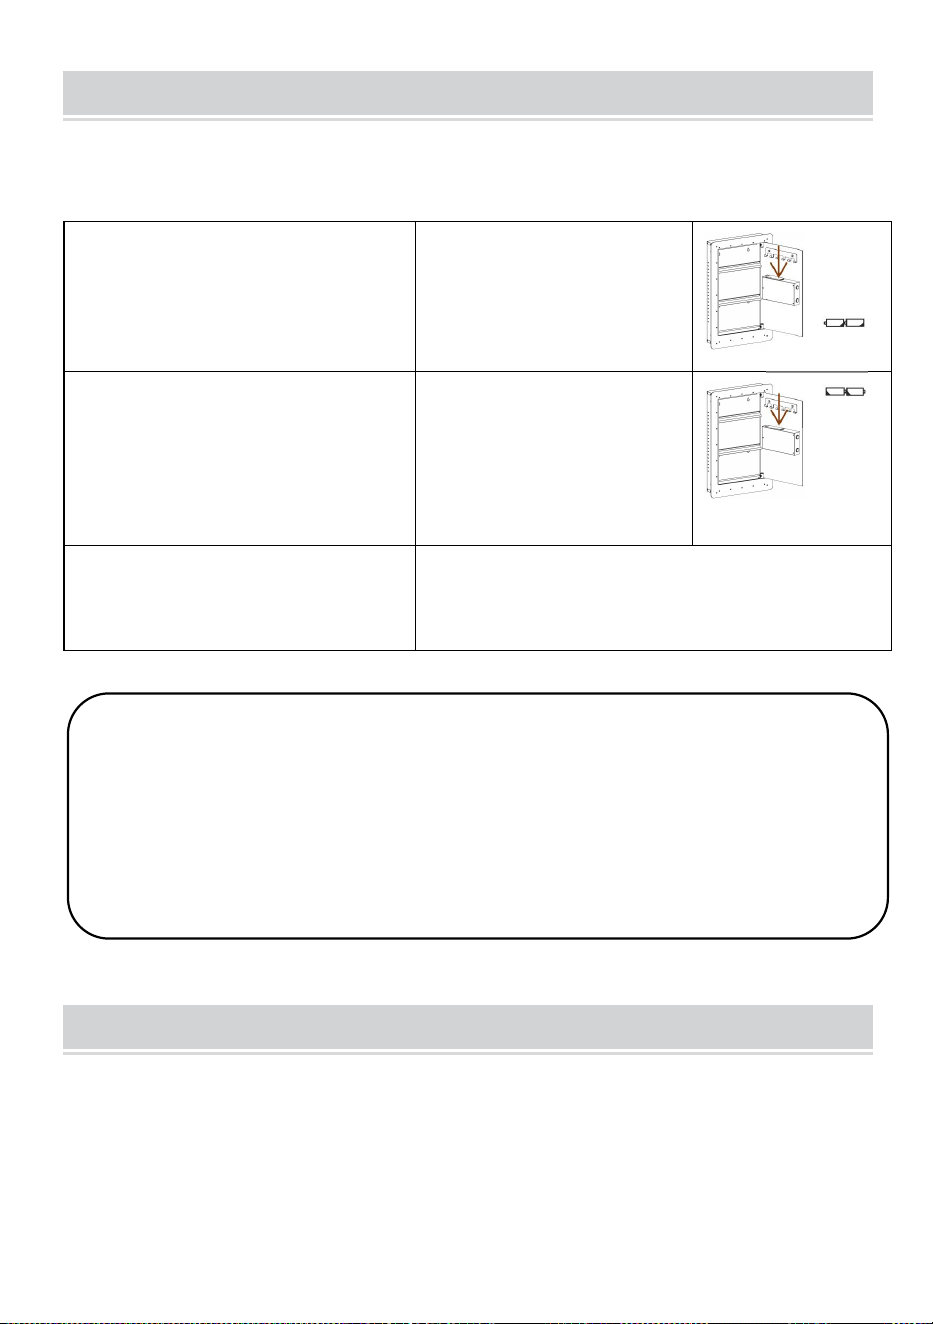
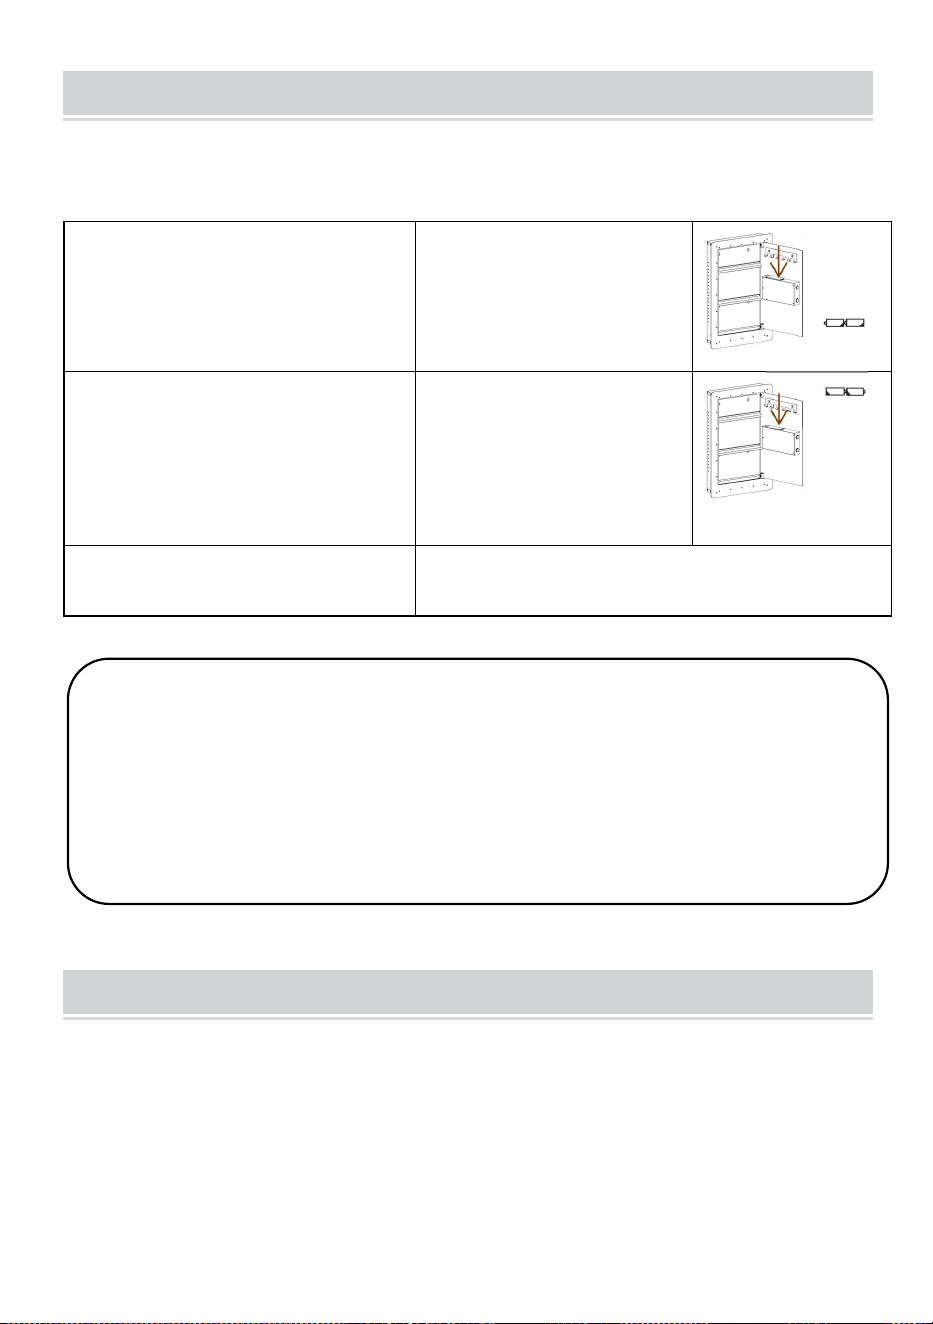
OPENING YOUR SAFE FOR THE FIRST TIME
Open the door for the first time, use the configured emergency key to open
the door. The operation steps are as follows:
PERSONAL PASSWORD SETTING
1. In the state of opening the door, press internal setting button of the door,
buzzer will sound once, and the yellow indicator light will be on.
2. Enter any new 3-12 digits password within 3 seconds. Press "#" to confirm.
If the buzzer sounds once and the yellow light goes off, the password has
been set successfully.
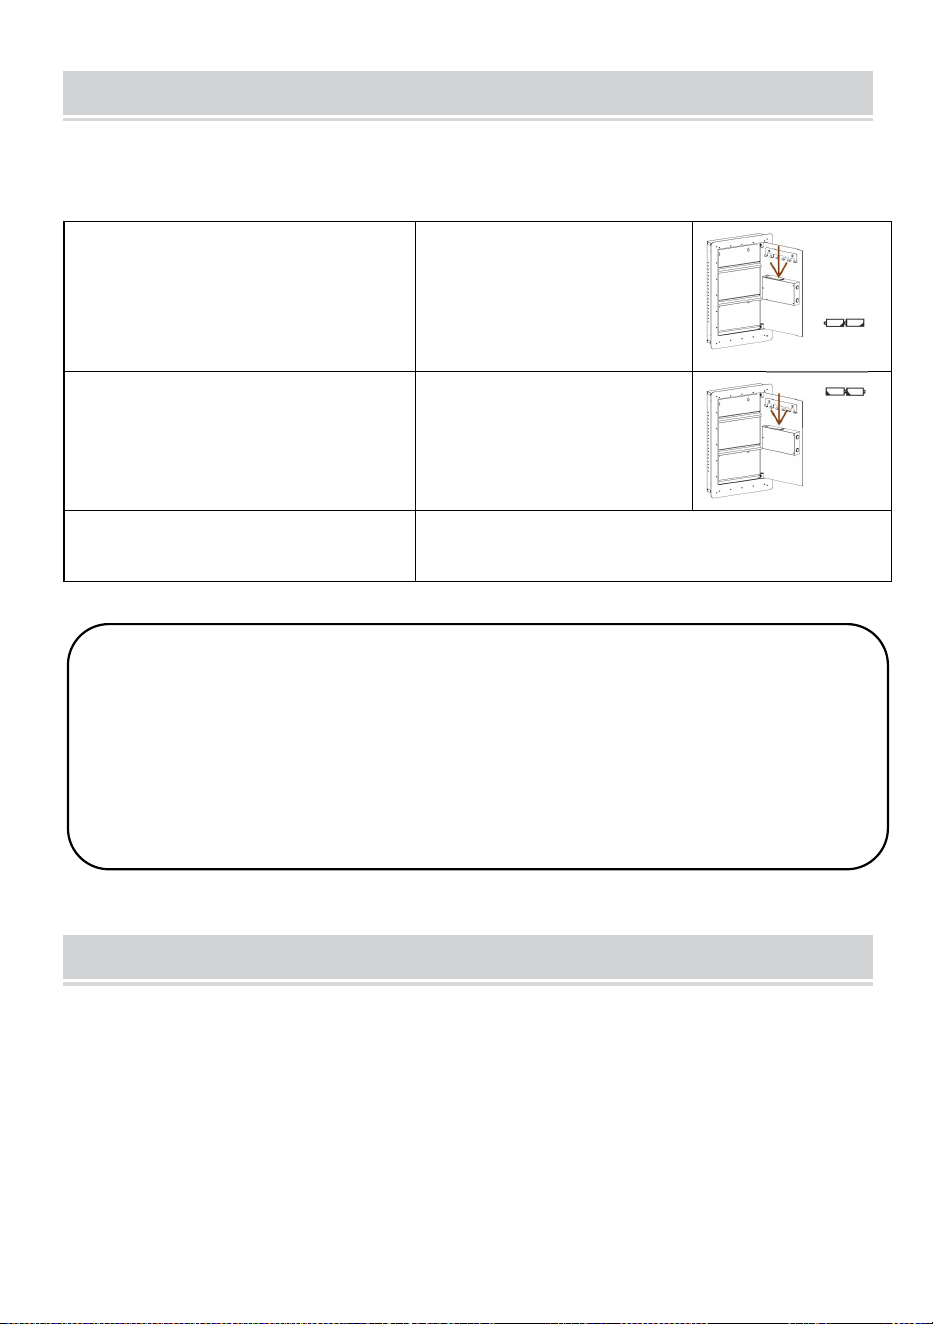
1. Slide down to open the
emergency lock cover.
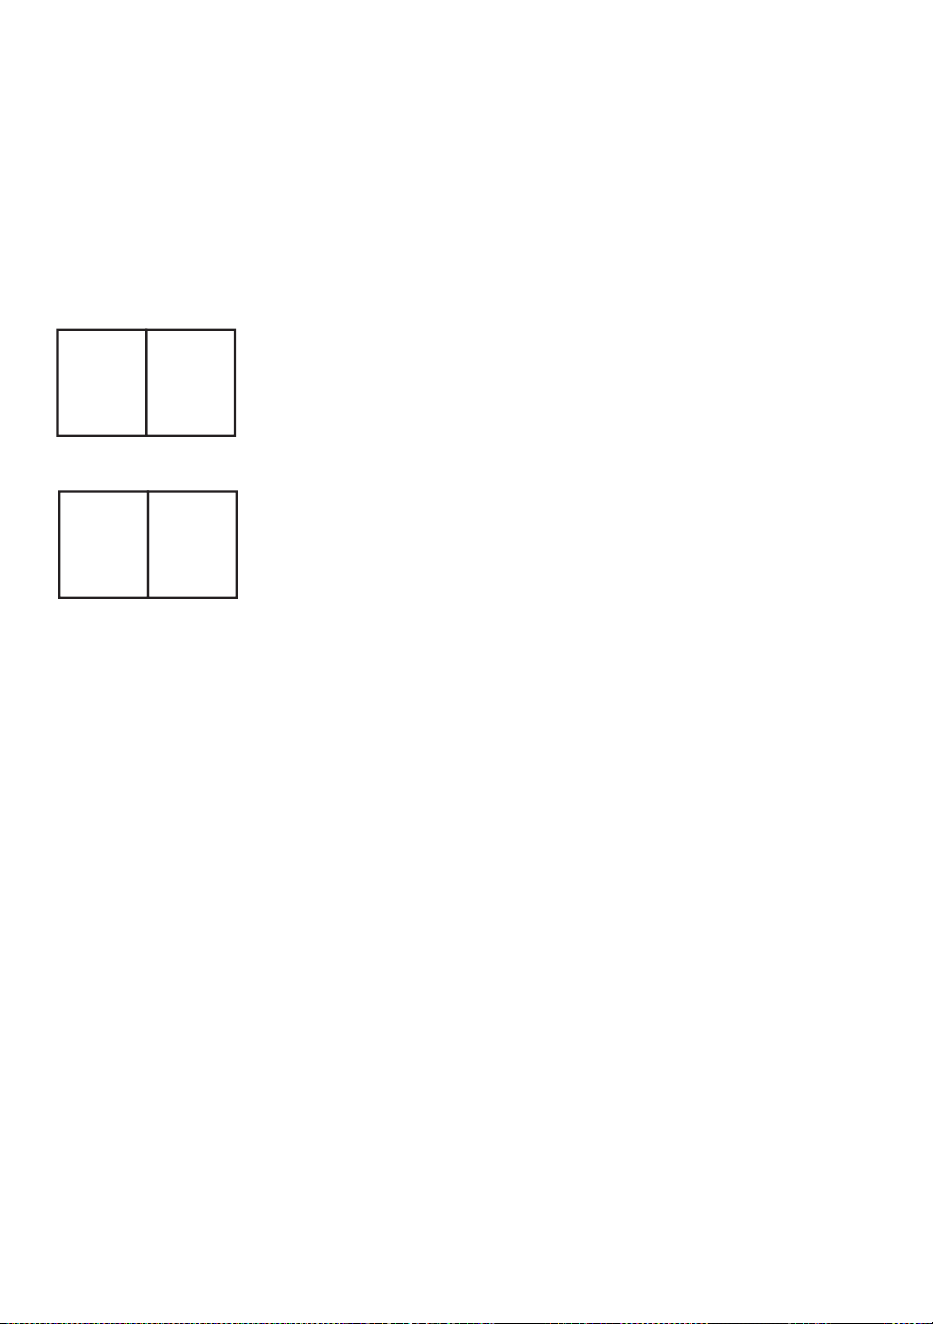
4. Install batteries into
battery box.
2. Insert the emergency key into
the keyhole and rotate it 65°
counterclockwise.
5.Make sure the battery
matches ‘+’ and ‘-’ .
(not including 4 alkaline
1.5V batteries)
3.Turn the handle clockwise to
open the door.
6.Weak power, emergency method:
Emergency key

5
Notice: After your password is set, please test the new password to make sure
it is valid. If you enter wrong password, the yellow light will on and ‘beep’ will
sound three times, just re-enter the correct password.
MANAGE PASSWORD SETTINGS
1. In the state of opening the door, press number key "0" twice, then press the
internal setting button. The buzzer sounds once and the yellow indicator light
on.
2. Enter any new 3-12 digits password within 3 seconds. Press "#" to confirm,
the buzzer will sound once and the yellow indicator light will off which shows
the management password has been set successfully.
Notice: Do not set personal password same with management code.
THREE WAYS TO OPEN THE SAFE
1. Emergency Key + Knob: Under the following situations like the first time
using, forget password or battery is out of power.
2. Password + Knob: Daily unlock. Enter your personal password or
management password, press "#" or "*", and then turn the knob clockwise.
3. Password + Knob + External Power Box: The internal battery is dead, the
key is damaged or lost. Insert the external power box, enter personal
password or management password, press "#" , then turn the knob
anticlockwise to open the door.

6
HOW TO REMOVE THE SHELF
Gently push 4 bendable iron strips under the shelf, when strips are showing a
vertical , you can easily take out the shelf.
LOW BATTERY ALERT
1. If battery voltage is below 4.8V, the red light will on and warning.
2. If the battery voltage is below 3.8V, user operation is prohibited. 6 beeps
will indicate that the battery is low and needs to be replaced.
VIGILANCE SETTING AND DEACTIVATION
1. Alarm on setting: In the standby state, press "*" key, buzzer will sound once,
and the yellow indicator light on. Then it active vibrating alarm state.
2. Conditions for the automatic alarm to sound: ①The safe will alarm when it is
hit by a certain external force or vibration; ②Enter wrong password three
consecutive times.
3. The duration of the alarm sound: automatically stop after 30 seconds.
4. Alarm cancellation setting: ①Enter correct password, the green indicator
light on. It immediately stop the alarm sound and turn off the vibration alarm;
②Open the door with the key and take out battery.
HOW TO WALL OR FLOOR MOUNTING
* Drill the appropriate size holes for the anchors you are using
* Mount the safe by running screws from inside of the safe and securing to
anchors
* Use proper drill tools depending on the type of floor you are mounting the
safe (wood, tile, or concrete)

7
SAFETY AND COMPLIANCE
1. Reduce the risk of theft, the safe must be fixed on the wall or floor to ensure
safety.
2. Please take good care of the emergency key and store it in a secret place
away from the safe. Do not put the emergency key into the safe, whether the
emergency key will not be used to open the safe when the battery runs out.
3. Do not place the product on an unsafe overhead, so as to avoid falling,
damaging the product or injuring people.
4. Do not spill liquid on the control panel, or it may cause electric shock to the
internal electronic components and prevent them from working properly.
WARMLY REMINDER
1. Because it is purely handmade, inside solder joint or rust stains are normal
phenomenon.
2. Please keep emergency keys, secret cabinet keys and external power
supply box safe.
3. The emergency key cannot open the safe of other brands or the same brand,
which is unique.
(Please do not try, to avoid damage to the safe and the unmatched key cannot
be taken out)
4. The protective film on the knob cover can be torn off.
5. Before closing the door, do not remove the emergency key or adjust its
direction, which can avoid the lock bolt from jamming, and knob operation will
be more smooth.
6. The door won’t shut: Make sure there are no obstructions. If the door bolts
are extended, re-enter the user code and turn the knob clockwise to retract
them.

8
AFTER-SALES SERVICE
1. If the product you received has other problems such as usage problems,
please feel free to contact us, and reply to online customer service within 24
hours to serve you.
2. Our products support 90 days for no reason to return or exchange.
3. I wish you a happy online shopping.

Manufacturer: Shanghaimuxinmuyeyouxiangongsi
Address: Shuangchenglu 803nong11hao1602A-1609shi, baoshanqu,
shanghai 200000 CN.
Imported to AUS: SIHAO PTY LTD. 1 ROKEVA STREETEASTWOOD
NSW 2122 Australia
Imported to USA: Sanven Technology Ltd. Suite 250, 9166 Anaheim
Place, Rancho Cucamonga, CA 91730
REP
EC
E-CrossStu GmbH
Mainzer Landstr.69, 60329 Frankfurt am Main.
REP
UK
YH CONSULTING LIMITED.
C/O YH Consulting Limited Office 147, Centurion
House, London Road, Staines-upon-Thames, Surrey,
TW18 4AX


Technique Assistance et certificat de garantie électronique
www.vevor.com/support
COFFRE-FORT
MANUEL DE L'UTILISATEUR
MODÈLE: SS-650QR
We continue to be committed to provide you tools with competitive price.
"Save Half", "Half Price" or any other similar expressions used by us only represents an
estimate of savings you might benefit from buying certain tools with us compared to the major
top brands and does not necessarily mean to cover all categories of tools offered by us. You
are kindly reminded to verify carefully when you are placing an order with us if you are
actually saving half in comparison with the top major brands.


1
MODÈLE: SS-650QR
Have product questions? Need technical support? Please feel free to
contact us:
Technical Support and E-Warranty Certificate
www.vevor.com/support
NEED HELP? CONTACT US!
This is the original instruction, please read all manual instructions
carefully before operating. VEVOR reserves a clear interpretation of our
user manual. The appearance of the product shall be subject to the
product you received. Please forgive us that we won't inform you again if
there are any technology or software updates on our product.
SAFE BOX
2
Avertissement : Pour réduire le risque de blessure, l'utilisateur
doit lire attentivement le manuel d'instructions.
Cet appareil est conforme à la partie 15 des règles FCC. Son
fonctionnement est soumis aux deux conditions suivantes : (1) Cet
appareil ne doit pas provoquer d'interférences nuisibles et (2) cet
appareil doit accepter toute interférence reçue, y compris les
interférences susceptibles de provoquer un fonctionnement
indésirable.
Ce produit est soumis aux dispositions de la directive européenne
2012/19/CE. Le symbole représentant une poubelle barrée indique
que le produit nécessite une collecte sélective des déchets dans
l'Union européenne. Ceci s'applique au produit et à tous les
accessoires marqués de ce symbole. Les produits marqués comme
tels ne peuvent pas être jetés avec les ordures ménagères normales,
mais doivent être déposés dans un point de collecte pour le
recyclage des appareils électriques et électroniques.
INSTRUCTIONS
Merci beaucoup d'avoir choisi ce coffre-fort. Veuillez lire toutes les
instructions avant de l'utiliser. Les informations vous aideront à obtenir les
meilleurs résultats possibles.
3

4
TECHNICAL PARAMETERS
PARTS LIST
Modèle
SS-650QR
Tension de travail Gamme
4,2-6,8 Vcc
Taille du produit
650 * 420 * 100mm
Puissance de travail
4 piles AA(1,5 V)
Clé de stockage intégrée*2
Boulon d'expansion * 4
Boîtier d'alimentation externe * 1
Boucle de diaphragme * 4
5
DESCRIPTION:
2. This product has 2 sets of passwords. Factory original password:
"123456", factory management you need set it up your self.
2. Yellow light: normal indicator, or wrong password indicator.
3. Green light: unlock and light up for 6-7 seconds.
4. Red light: low battery indicator.
OPENING YOUR SAFE FOR THE FIRST TIME
Ouvrez la porte pour la première fois, utilisez la clé d'urgence configurée
pour ouvrir la porte. Les étapes de l'opération sont les suivantes :
PERSONAL PASSWORD SETTING
3. En état d'ouverture de la porte, appuyez sur le bouton de réglage interne de
la porte, la sonnerie retentira une fois et le voyant jaune sera allumé.
4. Saisissez tout nouveau mot de passe de 3 à 12 chiffres dans les 3
secondes. Presse "#" confirmer. Si le buzzer retentit une fois et que le
1. Faites glisser vers le bas pour
ouvrir le couvercle du verrouillage
d'urgence.
5. Installer les piles dans
le boîtier de batterie.
2. Insérez la clé d'urgence dans
le trou de la serrure et faites-la
pivoter 6 5° dans le sens inverse
des aiguilles d'une montre .
5. Assurez-vous que la
batterie correspond à « +
» et « - » .
( non compris 4 piles
alcalines 1,5 V )
3. Tournez la poignée dans le
sens des aiguilles d'une montre
pour ouvrir la porte.
6. Faible puissance, méthode d'urgence :
Clé d'urgence

6
voyant jaune s'éteint, le mot de passe a été défini avec succès.
Remarque : Une fois votre mot de passe défini, veuillez tester le nouveau mot
de passe pour vous assurer qu'il est valide. Si vous entrez un mauvais mot de
passe, le voyant jaune s'allumera et un « bip » retentira trois fois. Il vous suffit
de saisir à nouveau le mot de passe correct.
MANAGE PASSWORD SETTINGS
3. En état d'ouverture de la porte, appuyez deux fois sur la touche numérique
« 0 », puis appuyez sur le bouton de réglage interne. Le buzzer retentit une
fois et le voyant jaune allumé .
4. Saisissez tout nouveau mot de passe de 3 à 12 chiffres dans les 3
secondes. Appuyez sur "#" pour confirmer, le buzzer retentira une fois et le
voyant jaune s'éteindra, indiquant que le mot de passe de gestion a été défini
avec succès.
Remarque : Ne définissez pas le mot de passe personnel de la même
manière que le code de gestion.
THREE WAYS TO OPEN THE SAFE
2. Clé d'urgence + bouton : Dans les situations suivantes, comme lors de la
première utilisation, vous avez oublié le mot de passe ou la batterie est
déchargée.
2. Mot de passe + bouton : déverrouillage quotidien. Entrez votre mot de
passe personnel ou votre mot de passe de gestion, appuyez sur "#" ou "*" ,
puis tournez le bouton dans le sens des aiguilles d'une montre .
3. Mot de passe + bouton + boîtier d'alimentation externe : la batterie
interne est morte, la clé est endommagée ou perdue. Insérez le boîtier
d'alimentation externe, entrez le mot de passe personnel ou le mot de passe

7
de gestion, appuyez sur "#" , puis tournez le bouton dans le sens inverse des
aiguilles d'une montre pour ouvrir la porte .

8
HOW TO REMOVE THE SHELF
Poussez doucement 4 bandes de fer pliables sous l' étagère , lorsque les
bandes montrent une verticale, vous pouvez facilement retirer l'étagère.
LOW BATTERY ALERT
3. Si la tension de la batterie est inférieure à 4,8 V, le voyant rouge s'allumera
et avertira.
4. Si la tension de la batterie est inférieure à 3,8 V, l'utilisation par l'utilisateur
est interdite. 6 bips indiqueront que la batterie est faible et doit être remplacée.
VIGILANCE SETTING AND DEACTIVATION
1. Réglage de l'alarme : en état de veille, appuyez sur la touche "*", le buzzer
retentira une fois et le voyant jaune s'allumera . Ensuite, il active l'état d'alarme
vibrante.
2. Conditions pour que l'alarme automatique retentisse : ①Le coffre-fort émet
une alarme lorsqu'il est frappé par une certaine force ou vibration externe ;
②Entrez un mot de passe erroné trois fois de suite.
3. La durée du son de l'alarme : s'arrête automatiquement après 30 secondes.
4. Paramètre d'annulation d'alarme : ①Entrez le mot de passe correct, le
voyant vert est allumé. Il arrête immédiatement le son de l'alarme et éteint
l'alarme vibrante ; ②Ouvrez la porte avec la clé et retirez la batterie.
HOW TO WALL OR FLOOR MOUNTING
* Percez des trous de taille appropriée pour les ancrages que vous utilisez
* Montez le coffre-fort en faisant passer les vis depuis l'intérieur du coffre-fort
et en le fixant aux ancrages.
* Utilisez des outils de forage appropriés en fonction du type de sol sur lequel

9
vous montez le coffre-fort (bois, carrelage ou béton).
SAFETY AND COMPLIANCE
5. R éduisez les risques de vol, le coffre-fort doit être fixé au mur ou au sol
pour assurer la sécurité.
6. Veuillez prendre soin de la clé de secours et conservez-la dans un endroit
secret, loin du coffre-fort. Ne placez pas la clé d'urgence dans le coffre-fort,
car elle ne sera pas utilisée pour ouvrir le coffre-fort lorsque la batterie est
épuisée.
7. Ne placez pas le produit sur un plafond dangereux, afin d'éviter de tomber,
d'endommager le produit ou de blesser des personnes.
8. Ne renversez pas de liquide sur le panneau de commande, car cela pourrait
provoquer un choc électrique sur les composants électroniques internes et
empêcher leur bon fonctionnement.
WARMLY REMINDER
1. Parce qu'il est purement fait à la main, les joints de soudure intérieurs ou les
taches de rouille sont un phénomène normal.
2. Veuillez conserver en sécurité les clés d'urgence, les clés secrètes de
l'armoire et le boîtier d'alimentation externe.
3. La clé d'urgence ne peut pas ouvrir le coffre-fort d'autres marques ou de la
même marque, ce qui est unique.
(Veuillez ne pas essayer, pour éviter d'endommager le coffre-fort et que la clé
inégalée ne puisse pas être retirée)
4. Le film protecteur sur le couvercle du bouton peut être arraché.
5. Avant de fermer la porte, ne retirez pas la clé d'urgence et n'ajustez pas sa
direction, ce qui peut éviter le blocage du pêne de verrouillage et le
fonctionnement du bouton sera plus fluide.
6. La porte ne ferme pas : assurez-vous qu'il n'y a pas obstructions. Si les
verrous de la porte sont sortis, saisissez à nouveau le code utilisateur et
tournez le bouton dans le sens des aiguilles d'une montre pour les rétracter .

10
AFTER-SALES SERVICE
1. Si le produit que vous avez reçu présente d'autres problèmes tels que des
problèmes d'utilisation, n'hésitez pas à nous contacter et à répondre au
service client en ligne dans les 24 heures pour vous servir.
2. Nos produits prennent en charge 90 jours sans raison de retour ou
d'échange.
3. Je vous souhaite un bon shopping en ligne.

11

Fabricant : Shanghaimuxinmuyeyouxiangongsi
Adresse : Shuangchenglu 803nong11hao1602A-1609shi, baoshanqu,
Shanghai 200000 CN.
Importé en Australie : SIHAO PTY LTD. 1 ROKEVA STREETASTWOOD
NSW 2122 Australie
Importé aux États-Unis : Sanven Technology Ltd. Suite 250, 9166
Anaheim Place, Rancho Cucamonga, CA 91730
REP
EC
E-CrossStu GmbH
Mainzer Landstr.69, 60329 Frankfurt am Main.
REP
UK
YH CONSULTING LIMITED.
C/O YH Consulting Limited Office 147, Centurion
House, London Road, Staines-upon-Thames, Surrey,
TW18 4AX


Technisch Support und E-Garantie-Zertifikat
www.vevor.com/support
TRESOR
BENUTZERHANDBUCH
MODELL: SS-650QR
We continue to be committed to provide you tools with competitive price.
"Save Half", "Half Price" or any other similar expressions used by us only represents an
estimate of savings you might benefit from buying certain tools with us compared to the major
top brands and does not necessarily mean to cover all categories of tools offered by us. You
are kindly reminded to verify carefully when you are placing an order with us if you are
actually saving half in comparison with the top major brands.

1
MODELL: SS-650QR
Have product questions? Need technical support? Please feel free to
contact us:
Technical Support and E-Warranty Certificate
www.vevor.com/support
NEED HELP? CONTACT US!
This is the original instruction, please read all manual instructions
carefully before operating. VEVOR reserves a clear interpretation of our
user manual. The appearance of the product shall be subject to the
product you received. Please forgive us that we won't inform you again if
there are any technology or software updates on our product.
SAFE BOX
2
Warnung: Um das Verletzungsrisiko zu verringern, muss der
Benutzer die Bedienungsanleitung sorgfältig lesen.
Dieses Gerät entspricht Teil 15 der FCC-Bestimmungen. Der Betrieb
unterliegt den folgenden beiden Bedingungen: (1) Dieses Gerät darf
keine schädlichen Störungen verursachen und (2) dieses Gerät
muss alle empfangenen Störungen akzeptieren, einschließlich
Störungen, die einen unerwünschten Betrieb verursachen können.
Dieses Produkt unterliegt den Bestimmungen der europäischen
Richtlinie 2012/19/EU. Das Symbol einer durchgestrichenen
Mülltonne weist darauf hin, dass das Produkt in der Europäischen
Union einer getrennten Müllentsorgung unterliegt. Dies gilt für das
Produkt und alle mit diesem Symbol gekennzeichneten Zubehörteile.
So gekennzeichnete Produkte dürfen nicht im normalen Hausmüll
entsorgt werden, sondern müssen an einer Sammelstelle für das
Recycling von elektrischen und elektronischen Geräten abgegeben
werden.
INSTRUCTIONS
Vielen Dank, dass Sie sich für diesen Safe entschieden haben. Bitte lesen
Sie vor der Verwendung alle Anweisungen sorgfältig durch. Die
Informationen helfen Ihnen, die bestmöglichen Ergebnisse zu erzielen.

3
4
TECHNICAL PARAMETERS
PARTS LIST
Modell
SS-650QR
Betriebsspannung
Reichweite
4,2-6,8 VDC
Produktgröße
650 * 420 * 100 mm
Arbeitsleistung
4 x AA(1,5 V) Batterien
Eingebauter Speicherschlüssel*2
Spreizbolzen * 4
Externes Netzteil*1
Membran Schnalle * 4

5
DESCRIPTION:
3. This product has 2 sets of passwords. Factory original password:
"123456", factory management you need set it up your self.
2. Yellow light: normal indicator, or wrong password indicator.
3. Green light: unlock and light up for 6-7 seconds.
4. Red light: low battery indicator.
OPENING YOUR SAFE FOR THE FIRST TIME
Öffnen Sie die Tür zum ersten Mal und verwenden Sie den konfigurierten
Notschlüssel, um die Tür zu öffnen. Die Bedienungsschritte sind wie folgt:
PERSONAL PASSWORD SETTING
5. Drücken Sie beim Öffnen der Tür die interne Einstelltaste der Tür. Der
Summer ertönt einmal und die gelbe Kontrollleuchte leuchtet auf.
6. Geben Sie innerhalb von 3 Sekunden ein neues 3- bis 12- stelliges
Passwort ein . Drücken Sie Mit „#“ bestätigen. Wenn der Summer einmal
1. Zum Öffnen der
Notverriegelungsabdeckung nach
unten schieben.
6. Batterien einlegen ins
Batteriefach.
2. Den Notschlüssel in das
Schlüsselloch stecken und
drehen 6 5° gegen den
Uhrzeigersinn .
5. Stellen Sie sicher, dass
die Batterie mit „ + “ und „
- “ übereinstimmt .
( ohne 4 alkalische
1,5-V-Batterien )
3. Drehen Sie den Griff im
Uhrzeigersinn , um die Tür zu
öffnen.
6. Schwache Leistung, Notfallmethode :
Notschlüssel

6
ertönt und das gelbe Licht erlischt, wurde das Passwort erfolgreich festgelegt.
Hinweis : Nachdem Sie Ihr Passwort festgelegt haben, testen Sie das neue
Passwort, um sicherzustellen, dass es gültig ist. Wenn Sie ein falsches
Passwort eingeben, leuchtet die gelbe Lampe auf und es ertönt dreimal ein
Piepton. Geben Sie das richtige Passwort einfach erneut ein.
MANAGE PASSWORD SETTINGS
5. Drücken Sie beim Öffnen der Tür zweimal die Zifferntaste „0“ und dann die
interne Einstelltaste. Der Summer ertönt einmal und die gelbe Kontrollleuchte
leuchtet .
6. innerhalb von 3 Sekunden ein neues 3- bis 12- stelliges Passwort ein.
Drücken Sie zur Bestätigung „#“. Der Summer ertönt einmal und die gelbe
Kontrollleuchte erlischt. Dies zeigt an, dass das Verwaltungskennwort
erfolgreich festgelegt wurde.
Hinweis : Legen Sie für Ihr persönliches Passwort nicht den gleichen
Verwaltungscode fest.
THREE WAYS TO OPEN THE SAFE
3. Notschlüssel + Knauf: In den folgenden Situationen, beispielsweise bei
der ersten Verwendung, beim Vergessen des Passworts oder wenn die
Batterie leer ist.
2. Passwort + Drehknopf: Tägliches Entsperren. Geben Sie Ihr persönliches
Passwort oder Verwaltungspasswort ein, drücken Sie „#“ oder „*“ und drehen
Sie den Drehknopf im Uhrzeigersinn .
3. Passwort + Knauf + externer Power-Box: Die interne Batterie ist leer, der
Schlüssel ist beschädigt oder verloren. Stecken Sie die externe Power-Box ein,
geben Sie Ihr persönliches Passwort oder Ihr Verwaltungspasswort ein,

7
drücken Sie „#“ und drehen Sie dann den Knauf gegen den Uhrzeigersinn, um
die Tür zu öffnen .

8
HOW TO REMOVE THE SHELF
die vier biegsamen Eisenstreifen vorsichtig unter das Regal . Wenn die
Streifen vertikal zeigen, können Sie das Regal leicht herausnehmen .
LOW BATTERY ALERT
5. Wenn die Batteriespannung unter 4,8 V liegt, leuchtet das rote Licht und
gibt eine Warnung aus.
6. Wenn die Batteriespannung unter 3,8 V liegt, ist eine Bedienung durch den
Benutzer nicht möglich. 6 Pieptöne zeigen an, dass die Batterie schwach ist
und ausgetauscht werden muss.
VIGILANCE SETTING AND DEACTIVATION
1. Alarm einschalten: Drücken Sie im Standby-Modus die Taste „*“, der
Summer ertönt einmal und die gelbe Kontrollleuchte leuchtet auf . Dann wird
der Vibrationsalarm aktiviert .
2. Bedingungen für den automatischen Alarm: ①Der Safe löst einen Alarm
aus, wenn er einer bestimmten äußeren Kraft oder Vibration ausgesetzt ist;
②Geben Sie dreimal hintereinander ein falsches Passwort ein.
3. Dauer des Alarmtons: Automatische Beendigung nach 30 Sekunden.
4. Alarmabbrucheinstellung: ①Geben Sie das korrekte Passwort ein, die
grüne Kontrollleuchte leuchtet auf. Der Alarmton wird sofort abgestellt und der
Vibrationsalarm wird ausgeschaltet. ②Öffnen Sie die Tür mit dem Schlüssel
und nehmen Sie die Batterie heraus.
HOW TO WALL OR FLOOR MOUNTING
* Bohren Sie Löcher in der passenden Größe für die von Ihnen verwendeten
Anker

9
* Montieren Sie den Safe, indem Sie Schrauben von der Innenseite des Safes
einführen und an Ankern befestigen.
* Verwenden Sie je nach Bodenart (Holz, Fliesen oder Beton), auf der Sie den
Safe montieren, geeignete Bohrwerkzeuge.
SAFETY AND COMPLIANCE
9. Um das Diebstahlrisiko zu verringern, muss der Safe aus
Sicherheitsgründen an der Wand oder am Boden befestigt werden.
10. Bitte bewahren Sie den Notschlüssel gut auf und bewahren Sie ihn an
einem geheimen Ort außerhalb des Safes auf. Legen Sie den Notschlüssel
nicht in den Safe, es sei denn, Sie verwenden ihn zum Öffnen des Safes,
wenn die Batterie leer ist.
11. Platzieren Sie das Produkt nicht an einer unsicheren Stelle über Ihnen, um
ein Herunterfallen, eine Beschädigung des Produkts oder Verletzungen von
Personen zu vermeiden.
12. Verschütten Sie keine Flüssigkeiten auf dem Bedienfeld. Dies kann zu
einem Stromschlag der internen elektronischen Komponenten führen und
deren ordnungsgemäße Funktion beeinträchtigen.
WARMLY REMINDER
1. Da es sich um reine Handarbeit handelt, sind Lötstellen im Inneren oder
Rostflecken normale Erscheinung.
2. Notschlüssel, Geheimschrankschlüssel und externe Netzteilbox bitte sicher
aufbewahren.
3. Der Notschlüssel kann den Safe anderer Marken oder der gleichen Marke
nicht öffnen, er ist einzigartig.
(Bitte nicht versuchen, da der Safe sonst beschädigt wird und der nicht
übereinstimmende Schlüssel nicht herausgenommen werden kann)
4. Die Schutzfolie auf der Knopfabdeckung ist abziehbar.
5. Vor dem Schließen der Tür den Notschlüssel nicht abziehen oder seine
Richtung ändern. Dadurch kann ein Verklemmen des Schlossriegels
vermieden werden und die Bedienung des Türknaufs läuft reibungsloser.
6. Die Tür schließt nicht: Stellen Sie sicher, dass keine Wenn die Türriegel

10
ausgefahren sind, geben Sie den Benutzercode erneut ein und drehen Sie
den Knopf im Uhrzeigersinn, um sie einzufahren .
AFTER-SALES SERVICE
1. Wenn das von Ihnen erhaltene Produkt andere Probleme, wie z. B.
Nutzungsprobleme, aufweist, können Sie sich gerne an uns wenden. Wir
werden Ihnen innerhalb von 24 Stunden beim Online-Kundendienst antworten.
2. Unsere Produkte können 90 Tage lang ohne Angabe von Gründen
zurückgegeben oder umgetauscht werden.
3. Ich wünsche Ihnen viel Spaß beim Online-Einkauf.

11

Hersteller: Shanghaimuxinmuyeyouxiangongsi
Adresse: Shuangchenglu 803nong11hao1602A-1609shi, Baoshanqu,
Shanghai 200000 CN.
Nach AUS importiert: SIHAO PTY LTD. 1 ROKEVA
STREETEASTWOOD NSW 2122 Australien
Importiert in die USA: Sanven Technology Ltd. Suite 250, 9166 Anaheim
Place, Rancho Cucamonga, CA 91730
REP
EC
E-CrossStu GmbH
Mainzer Landstr.69, 60329 Frankfurt am Main.
REP
UK
YH CONSULTING LIMITED.
C/O YH Consulting Limited Office 147, Centurion
House, London Road, Staines-upon-Thames, Surrey,
TW18 4AX


Tecnico Supporto e certificato di garanzia elettronica
www.vevor.com/support
CASSETTA DI SICUREZZA
MANUALE D'USO
MODELLO: SS-650QR
We continue to be committed to provide you tools with competitive price.
"Save Half", "Half Price" or any other similar expressions used by us only represents an
estimate of savings you might benefit from buying certain tools with us compared to the major
top brands and does not necessarily mean to cover all categories of tools offered by us. You
are kindly reminded to verify carefully when you are placing an order with us if you are
actually saving half in comparison with the top major brands.


1
MODELLO: SS-650QR
Have product questions? Need technical support? Please feel free to
contact us:
Technical Support and E-Warranty Certificate
www.vevor.com/support
NEED HELP? CONTACT US!
This is the original instruction, please read all manual instructions
carefully before operating. VEVOR reserves a clear interpretation of our
user manual. The appearance of the product shall be subject to the
product you received. Please forgive us that we won't inform you again if
there are any technology or software updates on our product.
SAFE BOX

2
Avvertenza: per ridurre il rischio di lesioni, l'utente deve
leggere attentamente il manuale di istruzioni.
Questo dispositivo è conforme alla Parte 15 delle norme FCC. Il
funzionamento è soggetto alle seguenti due condizioni: (1) Questo
dispositivo non può causare interferenze dannose e (2) questo
dispositivo deve accettare qualsiasi interferenza ricevuta, comprese
le interferenze che potrebbero causare un funzionamento
indesiderato.
Questo prodotto è soggetto alle disposizioni della Direttiva Europea
2012/19/CE. Il simbolo del bidone della spazzatura barrato indica
che nell'Unione Europea il prodotto richiede la raccolta differenziata
dei rifiuti. Ciò vale per il prodotto e tutti gli accessori contrassegnati
da questo simbolo. I prodotti contrassegnati come tali non possono
essere smaltiti con i normali rifiuti domestici, ma devono essere
portati in un punto di raccolta per il riciclaggio di dispositivi elettrici ed
elettronici
INSTRUCTIONS
Grazie mille per aver scelto questa cassetta di sicurezza. Si prega di
leggere tutte le istruzioni prima di utilizzarlo. Le informazioni ti aiuteranno a
ottenere i migliori risultati possibili.

3

4
TECHNICAL PARAMETERS
PARTS LIST
Modello
SS-650QR
Voltaggio di lavoro Allineare
4,2-6,8 Vcc
Taglia del prodotto
650 * 420 * 100 mm
Potenza di lavoro
4 batterie AA (1,5 V).
Chiave di archiviazione integrata*2
Bullone di espansione*4
Scatola di alimentazione esterna*1
Fibbia a membrana*4
5
DESCRIPTION:
4. This product has 2 sets of passwords. Factory original password:
"123456", factory management you need set it up your self.
2. Yellow light: normal indicator, or wrong password indicator.
3. Green light: unlock and light up for 6-7 seconds.
4. Red light: low battery indicator.
OPENING YOUR SAFE FOR THE FIRST TIME
Apri la porta per la prima volta, usa la chiave di emergenza configurata per
aprire la porta. Le fasi operative sono le seguenti:
PERSONAL PASSWORD SETTING
7. Nello stato di apertura della porta, premere il pulsante di impostazione
interna della porta, il cicalino suonerà una volta e la spia gialla sarà accesa.
8. Immettere una nuova password di 3-12 cifre entro 3 secondi. Premere "#"
per confermare. Se il cicalino suona una volta e la luce gialla si spegne, la
password è stata impostata correttamente.
1. Far scorrere verso il basso per
aprire il coperchio del blocco di
emergenza.
7. Installare le batterie
nella scatola della
batteria.
2. Inserire la chiave di
emergenza nella serratura e
ruotarla 6 5° in senso antiorario .
5. Assicurarsi che la
batteria corrisponda a ' + '
e ' - ' .
( escluse 4 batterie
alcaline da 1,5 V )
3. Ruotare la maniglia in senso
orario per aprire la porta.
6. Potenza debole, metodo di emergenza :
Chiave di emergenza

6
Avviso : dopo aver impostato la password, testare la nuova password per
assicurarsi che sia valida. Se inserisci una password errata, la luce gialla si
accenderà e verrà emesso un "bip" per tre volte, è sufficiente inserire
nuovamente la password corretta.
MANAGE PASSWORD SETTINGS
7. Nello stato di apertura della porta, premere due volte il tasto numerico "0",
quindi premere il pulsante di impostazione interna. Il cicalino suona una volta e
la spia gialla accesa .
8. Immettere una nuova password di 3-12 cifre entro 3 secondi. Premere "#"
per confermare, il cicalino suonerà una volta e la spia gialla si spegnerà,
indicando che la password di gestione è stata impostata correttamente.
Avviso : non impostare la password personale insieme al codice di gestione.
THREE WAYS TO OPEN THE SAFE
4. Chiave + Manopola Emergenza: Nelle seguenti situazioni, come al primo
utilizzo, si dimentica la password o la batteria è scarica.
2. Password + manopola: sblocco giornaliero. Immettere la password
personale o la password di gestione, premere "#" o "*" , quindi ruotare la
manopola in senso orario .
3. Password + Manopola + Alimentatore esterno: la batteria interna è
scarica, la chiave è danneggiata o persa. Inserire l'alimentatore esterno,
inserire la password personale o la password di gestione, premere "#" , quindi
ruotare la manopola in senso antiorario per aprire la porta .

7
HOW TO REMOVE THE SHELF
Spingi delicatamente 4 strisce di ferro pieghevoli sotto il ripiano , quando le
strisce mostrano una verticale, puoi facilmente estrarre il ripiano.
LOW BATTERY ALERT
7. Se la tensione della batteria è inferiore a 4,8 V, la luce rossa si accenderà e
avvertirà.
8. Se la tensione della batteria è inferiore a 3,8 V, l'utilizzo da parte dell'utente
è vietato. 6 segnali acustici indicheranno che la batteria è scarica e deve
essere sostituita.
VIGILANCE SETTING AND DEACTIVATION
1. Impostazione dell'allarme attivato: in stato di standby, premere il tasto "*", il
cicalino suonerà una volta e l'indicatore giallo si accenderà . Quindi attiva lo
stato di allarme a vibrazione.
2. Condizioni affinché l'allarme automatico suoni: ①La cassaforte emette un
allarme quando viene colpita da una determinata forza o vibrazione esterna;
②Inserisci la password errata per tre volte consecutive.
3. La durata del suono dell'allarme: si interrompe automaticamente dopo 30
secondi.
4. Impostazione cancellazione allarme: ①Inserire la password corretta,
l'indicatore verde si accende. Interrompe immediatamente il suono dell'allarme
e disattiva l'allarme a vibrazione; ②Aprire la porta con la chiave ed estrarre la
batteria.
HOW TO WALL OR FLOOR MOUNTING
* Praticare i fori di dimensioni adeguate per gli ancoraggi che si utilizzano

8
* Montare la cassaforte eseguendo le viti dall'interno della cassaforte e
fissandola agli ancoraggi
* Utilizzare strumenti di perforazione adeguati a seconda del tipo di pavimento
su cui si sta montando la cassaforte (legno, piastrelle o cemento)
SAFETY AND COMPLIANCE
13. R edurre il rischio di furto, la cassaforte deve essere fissata alla parete o al
pavimento per garantire la sicurezza.
14. Si prega di prendersi cura della chiave di emergenza e di conservarla in un
luogo segreto, lontano dalla cassaforte. Non inserire la chiave di emergenza
nella cassaforte, anche se la chiave di emergenza non verrà utilizzata per
aprire la cassaforte quando la batteria è scarica.
15. Non posizionare il prodotto su una superficie non sicura, per evitare di
cadere, danneggiare il prodotto o ferire le persone.
16. Non versare liquidi sul pannello di controllo, altrimenti si potrebbero
causare scosse elettriche ai componenti elettronici interni e impedirne il
corretto funzionamento.
WARMLY REMINDER
1. Poiché è realizzato esclusivamente a mano, i giunti di saldatura interni o le
macchie di ruggine sono fenomeni normali.
2. Conservare al sicuro le chiavi di emergenza, le chiavi segrete
dell'armadietto e la scatola di alimentazione esterna.
3. La chiave di emergenza non può aprire la cassaforte di altre marche o della
stessa marca, che è unica.
(Si prega di non tentare, per evitare danni alla cassaforte e la chiave non
abbinata non può essere estratta)
4. La pellicola protettiva sulla copertura della manopola potrebbe essere
strappata.
5. Prima di chiudere la porta, non rimuovere la chiave di emergenza né
regolarne la direzione, per evitare che il chiavistello della serratura si inceppi e
il funzionamento della manopola sarà più fluido.
6. La porta non si chiude: assicurati che non ci siano ostacoli. Se i chiavistelli

9
della porta sono estesi, reinserire il codice utente e ruotare la manopola in
senso orario per ritrarli .
AFTER-SALES SERVICE
1. Se il prodotto che hai ricevuto presenta altri problemi come problemi di
utilizzo, non esitare a contattarci e rispondere al servizio clienti online entro 24
ore per servirti.
2. I nostri prodotti supportano 90 giorni senza motivo di restituzione o cambio.
3. Ti auguro un felice shopping online.

10

Produttore: Shanghaimuxinmuyeyouxiangongsi
Indirizzo: Shuangchenglu 803nong11hao1602A-1609shi, baoshanqu,
shanghai 200000 CN.
Importato in AUS: SIHAO PTY LTD. 1 ROKEVA STREETEASTWOOD
NSW 2122 Australia
Importato negli Stati Uniti: Sanven Technology Ltd. Suite 250, 9166
Anaheim Place, Rancho Cucamonga, CA 91730
REP
EC
E-CrossStu GmbH
Mainzer Landstr.69, 60329 Frankfurt am Main.
REP
UK
YH CONSULTING LIMITED.
C/O YH Consulting Limited Office 147, Centurion
House, London Road, Staines-upon-Thames, Surrey,
TW18 4AX


Técnico Certificado de soporte y garantía electrónica
www.vevor.com/support
CAJA FUERTE
MANUAL DE USUARIO
MODELO:SS-650QR
We continue to be committed to provide you tools with competitive price.
"Save Half", "Half Price" or any other similar expressions used by us only represents an
estimate of savings you might benefit from buying certain tools with us compared to the major
top brands and does not necessarily mean to cover all categories of tools offered by us. You
are kindly reminded to verify carefully when you are placing an order with us if you are
actually saving half in comparison with the top major brands.


1
MODELO:SS-650QR
Have product questions? Need technical support? Please feel free to
contact us:
Technical Support and E-Warranty Certificate
www.vevor.com/support
NEED HELP? CONTACT US!
This is the original instruction, please read all manual instructions
carefully before operating. VEVOR reserves a clear interpretation of our
user manual. The appearance of the product shall be subject to the
product you received. Please forgive us that we won't inform you again if
there are any technology or software updates on our product.
SAFE BOX
2
Advertencia: para reducir el riesgo de lesiones, el usuario
debe leer atentamente el manual de instrucciones.
Este dispositivo cumple con la Parte 15 de las normas de la FCC. El
funcionamiento está sujeto a las dos condiciones siguientes: (1) Este
dispositivo no puede causar interferencias dañinas y (2) este
dispositivo debe aceptar cualquier interferencia recibida, incluidas
las interferencias que puedan causar un funcionamiento no
deseado.
Este producto está sujeto a las disposiciones de la Directiva Europea
2012/19/CE. El símbolo que muestra un contenedor con ruedas
tachado indica que el producto requiere recogida selectiva de basura
en la Unión Europea. Esto se aplica al producto y a todos los
accesorios marcados con este símbolo. Los productos marcados
como tales no podrán desecharse con la basura doméstica normal,
sino que deberán llevarse a un punto de recogida para el reciclaje de
aparatos eléctricos y electrónicos.
INSTRUCTIONS
Muchas gracias por elegir esta caja de seguridad. Lea todas las
instrucciones antes de usarlo. La información le ayudará a lograr los
mejores resultados posibles.

3

4
TECHNICAL PARAMETERS
PARTS LIST
Modelo
SS-650QR
Tensión de trabajo Rango
4,2-6,8 VCC
Tamaño del producto
650 * 420 * 100 milímetros
Potencia de trabajo
4 pilas AA (1,5 V)
Tecla de almacenamiento incorporada*2
Perno de expansión*4
Caja de alimentación externa*1
Hebilla de diafragma*4

5
DESCRIPTION:
5. This product has 2 sets of passwords. Factory original password:
"123456", factory management you need set it up your self.
2. Yellow light: normal indicator, or wrong password indicator.
3. Green light: unlock and light up for 6-7 seconds.
4. Red light: low battery indicator.
OPENING YOUR SAFE FOR THE FIRST TIME
Abra la puerta por primera vez, use la llave de emergencia configurada
para abrir la puerta. Los pasos de la operación son los siguientes:
PERSONAL PASSWORD SETTING
9. En el estado de apertura de la puerta, presione el botón de configuración
interna de la puerta, el timbre sonará una vez y la luz indicadora amarilla se
encenderá.
10. Ingrese cualquier contraseña nueva de 3 a 12 dígitos en 3 segundos.
1. Deslice hacia abajo para abrir la
cubierta del bloqueo de emergencia.
8. Instalar baterías en la
caja de la batería.
2. Inserte la llave de emergencia
en el ojo de la cerradura y gírela
6 5° en sentido antihorario .
5. Asegúrese de que la
batería coincida con ' + ' y
' - ' .
( sin incluir 4 pilas
alcalinas de 1,5 V )
3. Gire la manija en el sentido de
las agujas del reloj para abrir la
puerta.
6. Energía débil, método de emergencia :
llave de emergencia

6
Prensa "#" para confirmar. Si el timbre suena una vez y la luz amarilla se
apaga, la contraseña se ha establecido correctamente.
Aviso : una vez configurada su contraseña, pruebe la nueva contraseña para
asegurarse de que sea válida. Si ingresa una contraseña incorrecta, la luz
amarilla se encenderá y sonará un "bip" tres veces, simplemente vuelva a
ingresar la contraseña correcta.
MANAGE PASSWORD SETTINGS
9. En el estado de apertura de la puerta, presione la tecla numérica "0" dos
veces, luego presione el botón de configuración interna. El timbre suena una
vez y la luz indicadora amarilla encendida .
10. Ingrese cualquier contraseña nueva de 3 a 12 dígitos en 3 segundos.
Presione "#" para confirmar, el timbre sonará una vez y la luz indicadora
amarilla se apagará, lo que muestra que la contraseña de administración se
ha configurado correctamente.
Aviso : No establezca la misma contraseña personal que el código de
administración.
THREE WAYS TO OPEN THE SAFE
5. Llave de Emergencia + Perilla: En las siguientes situaciones, como la
primera vez que lo usa, olvidó la contraseña o la batería se quedó sin energía.
2. Contraseña + Perilla: Desbloqueo diario. Ingrese su contraseña personal o
contraseña de administración, presione "#" o "*" y luego gire la perilla en el
sentido de las agujas del reloj .
3. Contraseña + Perilla + Caja de alimentación externa: La batería interna
está agotada, la llave está dañada o perdida. Inserte la caja de alimentación
externa, ingrese la contraseña personal o la contraseña de administración,

7
presione "#" y luego gire la perilla en sentido antihorario para abrir la puerta .

8
HOW TO REMOVE THE SHELF
Empuje suavemente 4 tiras de hierro flexibles debajo del estante ; cuando las
tiras muestren una vertical, podrá sacar el estante fácilmente .
LOW BATTERY ALERT
9. Si el voltaje de la batería es inferior a 4,8 V, la luz roja se encenderá y
advertirá.
10. Si el voltaje de la batería es inferior a 3,8 V, se prohíbe la operación por
parte del usuario. 6 pitidos indicarán que la batería está baja y es necesario
reemplazarla.
VIGILANCE SETTING AND DEACTIVATION
1. Configuración de alarma: en el estado de espera, presione la tecla "*", el
timbre sonará una vez y la luz indicadora amarilla se encenderá . Luego activa
el estado de alarma vibratoria.
2. Condiciones para que suene la alarma automática: ①La caja fuerte emitirá
una alarma cuando sea golpeada por una determinada fuerza o vibración
externa; ②Ingrese la contraseña incorrecta tres veces consecutivas.
3. Duración del sonido de la alarma: se detiene automáticamente después de
30 segundos.
4. Configuración de cancelación de alarma: ①Ingrese la contraseña correcta,
la luz indicadora verde se encenderá. Detiene inmediatamente el sonido de la
alarma y apaga la alarma por vibración; ②Abra la puerta con la llave y saque
la batería.
HOW TO WALL OR FLOOR MOUNTING
* Taladre los orificios del tamaño adecuado para los anclajes que está

9
utilizando
* Monte la caja fuerte colocando tornillos desde el interior de la caja fuerte y
asegurándola a los anclajes.
* Utilice herramientas de perforación adecuadas según el tipo de piso en el
que vaya a montar la caja fuerte (madera, baldosas u hormigón).
SAFETY AND COMPLIANCE
17. R eduzca el riesgo de robo, la caja fuerte debe fijarse en la pared o en el
suelo para garantizar la seguridad.
18. Cuide bien la llave de emergencia y guárdela en un lugar secreto lejos de
la caja fuerte. No coloque la llave de emergencia en la caja fuerte, ya sea que
no se use para abrir la caja fuerte cuando se agote la batería.
19. No coloque el producto sobre un lugar elevado que no sea seguro para
evitar caídas, daños al producto o lesiones a las personas.
20. No derrame líquido sobre el panel de control, ya que podría provocar una
descarga eléctrica en los componentes electrónicos internos e impedir que
funcionen correctamente.
WARMLY REMINDER
1. Debido a que es puramente hecho a mano, las juntas de soldadura internas
o las manchas de óxido son un fenómeno normal.
2. Guarde en un lugar seguro las llaves de emergencia, las llaves del gabinete
secreto y la caja de fuente de alimentación externa.
3. La llave de emergencia no puede abrir cajas fuertes de otras marcas o de la
misma marca, que es única.
(Por favor, no lo intente, para evitar daños a la caja fuerte y no se pueda sacar
la llave no coincidente)
4. La película protectora de la tapa del pomo se puede arrancar.
5. Antes de cerrar la puerta, no retire la llave de emergencia ni ajuste su
dirección, lo que puede evitar que el perno de la cerradura se atasque y el
funcionamiento de la perilla será más suave.
6. La puerta no cierra: Asegúrate de que no haya obstrucciones. Si los pernos
de la puerta están extendidos, vuelva a ingresar el código de usuario y gire la

10
perilla en el sentido de las agujas del reloj para retraerlos .
AFTER-SALES SERVICE
1. Si el producto que recibió tiene otros problemas, como problemas de uso,
no dude en contactarnos y responder al servicio de atención al cliente en línea
dentro de las 24 horas para atenderlo.
2. Nuestros productos admiten 90 días sin motivo para devolución o cambio.
3. Te deseo unas felices compras online.

11

Fabricante: Shanghaimuxinmuyeyouxiangongsi
Dirección: Shuangchenglu 803nong11hao1602A-1609shi, baoshanqu,
shanghai 200000 CN.
Importado a AUS: SIHAO PTY LTD. 1 ROKEVA STREETASTWOOD
NSW 2122 Australia
Importado a EE. UU.: Sanven Technology Ltd. Suite 250, 9166 Anaheim
Place, Rancho Cucamonga, CA 91730
REP
EC
E-CrossStu GmbH
Mainzer Landstr.69, 60329 Frankfurt am Main.
REP
UK
YH CONSULTING LIMITED.
C/O YH Consulting Limited Office 147, Centurion
House, London Road, Staines-upon-Thames, Surrey,
TW18 4AX


Techniczny Certyfikat wsparcia i e-gwarancji
www.vevor.com/support
SEJF
INSTRUKCJA OBSŁUGI
MODEL:SS-650QR
We continue to be committed to provide you tools with competitive price.
"Save Half", "Half Price" or any other similar expressions used by us only represents an
estimate of savings you might benefit from buying certain tools with us compared to the major
top brands and does not necessarily mean to cover all categories of tools offered by us. You
are kindly reminded to verify carefully when you are placing an order with us if you are
actually saving half in comparison with the top major brands.


1
MODEL:SS-650QR
Have product questions? Need technical support? Please feel free to
contact us:
Technical Support and E-Warranty Certificate
www.vevor.com/support
NEED HELP? CONTACT US!
This is the original instruction, please read all manual instructions
carefully before operating. VEVOR reserves a clear interpretation of our
user manual. The appearance of the product shall be subject to the
product you received. Please forgive us that we won't inform you again if
there are any technology or software updates on our product.
SAFE BOX
2
Ostrzeżenie — aby zmniejszyć ryzyko obrażeń, użytkownik
musi uważnie przeczytać instrukcję obsługi.
To urządzenie jest zgodne z częścią 15 przepisów FCC. Działanie
podlega następującym dwóm warunkom: (1) to urządzenie nie może
powodować szkodliwych zakłóceń oraz (2) to urządzenie musi
akceptować wszelkie odbierane zakłócenia, w tym zakłócenia, które
mogą powodować niepożądane działanie.
Ten produkt podlega przepisom Dyrektywy Europejskiej 2012/19/EC.
Symbol przekreślonego kosza na śmieci oznacza, że produkt
wymaga selektywnej zbiórki śmieci na terenie Unii Europejskiej.
Dotyczy to produktu i wszystkich akcesoriów oznaczonych tym
symbolem. Produktów oznaczonych jako takie nie można wyrzucać
razem ze zwykłymi odpadami domowymi, lecz należy je oddać do
punktu zbiórki w celu recyklingu urządzeń elektrycznych i
elektronicznych
INSTRUCTIONS
Dziękujemy bardzo za wybór tego sejfu. Przed użyciem przeczytaj całą
instrukcję. Informacje te pomogą Ci osiągnąć najlepsze możliwe rezultaty.

3
TECHNICAL PARAMETERS
PARTS LIST
Model
SS-650QR
Napięcie robocze Zakres
4,2–6,8 V prądu stałego
Rozmiar produktu
650 * 420 * 100 mm
Moc robocza
4 baterieAA (1,5 V).
Klucz do wbudowanej pamięci*2
Śruba rozporowa*4
Zewnętrzna skrzynka zasilająca*1
Klamra membrany*4
4
DESCRIPTION:
6. This product has 2 sets of passwords. Factory original password:
"123456", factory management you need set it up your self.
2. Yellow light: normal indicator, or wrong password indicator.
3. Green light: unlock and light up for 6-7 seconds.
4. Red light: low battery indicator.
OPENING YOUR SAFE FOR THE FIRST TIME
Otwórz drzwi po raz pierwszy, użyj skonfigurowanego klucza awaryjnego,
aby otworzyć drzwi. Kroki operacji są następujące:
PERSONAL PASSWORD SETTING
11. W stanie otwarcia drzwi naciśnij przycisk ustawień wewnętrznych drzwi,
brzęczyk zabrzmi jeden raz i zaświeci się żółta lampka kontrolna.
12. Wprowadź nowe hasło składające się z 3–12 cyfr w ciągu 3 sekund.
Naciskać "#" potwierdzać. Jeśli brzęczyk zabrzmi raz i zgaśnie żółte światło,
1. Przesuń w dół, aby otworzyć
pokrywę zamka awaryjnego.
9. Zainstaluj ciasto , tj do
skrzynki na baterie.
2. Włóż klucz awaryjny do dziurki
od klucza i obróć go 6 5°
przeciwnie do ruchu wskazówek
zegara .
5. Upewnij się, że bateria
pasuje do znaków „ + ” i „
- ” .
( nie obejmuje 4 baterii
alkalicznych 1,5 V )
3. Obróć klamkę w kierunku
zgodnym z ruchem wskazówek
zegara , aby otworzyć drzwi.
6. Słaba moc, metoda awaryjna :
Klucz awaryjny

5
hasło zostało pomyślnie ustawione.
Uwaga : Po ustawieniu hasła przetestuj nowe hasło, aby upewnić się, że jest
prawidłowe. Jeśli wprowadzisz nieprawidłowe hasło, zaświeci się żółte światło
i trzykrotnie wyemitowany zostanie sygnał dźwiękowy. Wystarczy ponownie
wprowadzić prawidłowe hasło.
MANAGE PASSWORD SETTINGS
11. W stanie otwarcia drzwi należy dwukrotnie nacisnąć klawisz numeryczny
„0”, a następnie nacisnąć przycisk ustawień wewnętrznych. Brzęczyk zabrzmi
raz i zaświeci się żółta lampka kontrolna .
12. Wprowadź nowe hasło składające się z 3–12 cyfr w ciągu 3 sekund.
Naciśnij „#”, aby potwierdzić, brzęczyk zabrzmi jeden raz, a żółta lampka
kontrolna zgaśnie, co oznacza, że hasło zarządzania zostało pomyślnie
ustawione.
Uwaga : Nie ustawiaj hasła osobistego tak samo jak kodu zarządzającego.
THREE WAYS TO OPEN THE SAFE
6. Klucz awaryjny + pokrętło: W następujących sytuacjach, np. przy
pierwszym użyciu, zapomnisz hasła lub bateria się rozładuje.
2. Hasło + pokrętło: Codzienne odblokowanie. Wprowadź swoje hasło
osobiste lub hasło zarządzające, naciśnij „#” lub „*” , a następnie obróć
pokrętło w prawo .
3. Hasło + pokrętło + zewnętrzna skrzynka zasilająca: Bateria wewnętrzna
jest wyczerpana, klucz jest uszkodzony lub zagubiony. Włóż zewnętrzny
zasilacz, wprowadź hasło osobiste lub hasło zarządzania, naciśnij „#” , a
następnie obróć pokrętło w kierunku przeciwnym do ruchu wskazówek zegara,
aby otworzyć drzwi .

6

7
HOW TO REMOVE THE SHELF
Delikatnie wsuń 4 zginane żelazne paski pod półkę , gdy paski będą
ustawione pionowo, możesz łatwo wyjąć półkę.
LOW BATTERY ALERT
11. Jeśli napięcie akumulatora spadnie poniżej 4,8 V, zaświeci się czerwona
lampka i pojawi się ostrzeżenie.
12. Jeśli napięcie akumulatora jest niższe niż 3,8 V, obsługa użytkownika jest
zabroniona. 6 sygnałów dźwiękowych oznacza, że bateria jest słaba i należy ją
wymienić.
VIGILANCE SETTING AND DEACTIVATION
1. Ustawianie alarmu: W stanie gotowości naciśnij przycisk „*”, usłyszysz
jeden sygnał dźwiękowy i zaświeci się żółta lampka kontrolna . Następnie
aktywny jest stan alarmu wibracyjnego.
2. Warunki włączenia automatycznego alarmu: ①Sejf uruchomi się, gdy
zostanie uderzony określoną siłą zewnętrzną lub wibracją; ②Wprowadź
nieprawidłowe hasło trzy razy z rzędu.
3. Czas trwania dźwięku alarmu: automatyczne zatrzymanie po 30 sekundach.
4. Ustawienie anulowania alarmu: ①Wprowadź prawidłowe hasło, zaświeci
się zielona lampka kontrolna. Natychmiast zatrzymuje dźwięk alarmu i wyłącza
alarm wibracyjny; ②Otwórz drzwi kluczem i wyjmij baterię.
HOW TO WALL OR FLOOR MOUNTING
* Wywierć otwory o odpowiednich rozmiarach dla używanych kotew
* Zamontuj sejf wkręcając śruby od wewnątrz sejfu i mocując do kotew
* Użyj odpowiednich narzędzi do wiercenia w zależności od rodzaju podłogi,

8
na której montujesz sejf (drewno, płytki lub beton)
SAFETY AND COMPLIANCE
21. Aby zmniejszyć ryzyko kradzieży, sejf należy przymocować do ściany lub
podłogi, aby zapewnić bezpieczeństwo.
22. Proszę dobrze dbać o klucz awaryjny i przechowywać go w tajnym
miejscu, z dala od sejfu. Nie wkładaj klucza awaryjnego do sejfu, aby klucz
awaryjny nie został użyty do otwarcia sejfu, gdy wyczerpie się bateria.
23. Nie umieszczaj produktu na niebezpiecznej powierzchni nad głową, aby
uniknąć upadku, uszkodzenia produktu lub obrażeń osób.
24. Nie rozlewaj płynu na panel sterowania, gdyż może to spowodować
porażenie prądem wewnętrznych elementów elektronicznych i uniemożliwić
ich prawidłowe działanie.
WARMLY REMINDER
1. Ponieważ jest wykonany wyłącznie ręcznie, wewnątrz złącza lutowniczego
lub plamy rdzy są normalnym zjawiskiem.
2. Klucze awaryjne, tajne klucze do szafek i zewnętrzny zasilacz należy
przechowywać w bezpiecznym miejscu.
3. Kluczem awaryjnym nie można otworzyć sejfu innych marek lub tej samej
marki, co jest unikalne.
(Proszę nie próbować, aby uniknąć uszkodzenia sejfu i niemożności wyjęcia
niedopasowanego klucza)
4. Folię ochronną na osłonie pokrętła można oderwać.
5. Przed zamknięciem drzwi nie wyjmuj klucza awaryjnego ani nie zmieniaj
jego kierunku, co pozwoli uniknąć zakleszczenia się rygla zamka, a działanie
pokrętła będzie bardziej płynne.
6. Drzwi się nie zamykają: Upewnij się, że tak nie jest przeszkody. Jeśli rygle
drzwi są wysunięte, wprowadź ponownie kod użytkownika i obróć pokrętło w
kierunku zgodnym z ruchem wskazówek zegara, aby je cofnąć .

9
AFTER-SALES SERVICE
1. Jeśli otrzymany produkt ma inne problemy, takie jak problemy z
użytkowaniem, skontaktuj się z nami i odpowiedz w ciągu 24 godzin na
obsługę klienta online, aby Ci pomóc.
2. Nasze produkty obsługują 90 dni bez powodu do zwrotu lub wymiany.
3. Życzę udanych zakupów online.

10

Producent: Shanghaimuxinmuyeyouxiangongsi
Adres: Shuangchenglu 803nong11hao1602A-1609shi, baoshanqu,
szanghaj 200000 CN.
Import do AUS: SIHAO PTY LTD. 1 ROKEVA STREETEASTWOOD NSW
2122 Australia
Import do USA: Sanven Technology Ltd. Suite 250, 9166 Anaheim Place,
Rancho Cucamonga, CA 91730
REP
EC
E-CrossStu GmbH
Mainzer Landstr.69, 60329 Frankfurt am Main.
REP
UK
YH CONSULTING LIMITED.
C/O YH Consulting Limited Office 147, Centurion
House, London Road, Staines-upon-Thames, Surrey,
TW18 4AX


Technisch Ondersteuning en e-garantiecertificaat
www.vevor.com/support
KLUIS
HANDLEIDING
MODEL:SS-650QR
We continue to be committed to provide you tools with competitive price.
"Save Half", "Half Price" or any other similar expressions used by us only represents an
estimate of savings you might benefit from buying certain tools with us compared to the major
top brands and does not necessarily mean to cover all categories of tools offered by us. You
are kindly reminded to verify carefully when you are placing an order with us if you are
actually saving half in comparison with the top major brands.


1
MODEL:SS-650QR
Have product questions? Need technical support? Please feel free to
contact us:
Technical Support and E-Warranty Certificate
www.vevor.com/support
NEED HELP? CONTACT US!
This is the original instruction, please read all manual instructions
carefully before operating. VEVOR reserves a clear interpretation of our
user manual. The appearance of the product shall be subject to the
product you received. Please forgive us that we won't inform you again if
there are any technology or software updates on our product.
SAFE BOX

2
Waarschuwing-Om het risico op letsel te verminderen, moet
de gebruiker de handleiding zorgvuldig lezen.
Dit apparaat voldoet aan Deel 15 van de FCC-regels. Het gebruik is
onderworpen aan de volgende twee voorwaarden: (1) Dit apparaat
mag geen schadelijke interferentie veroorzaken, en (2) dit apparaat
moet alle ontvangen interferentie accepteren, inclusief interferentie
die een ongewenste werking kan veroorzaken.
Dit product valt onder de bepalingen van de Europese richtlijn
2012/19/EG. Het symbool met een doorgestreepte afvalcontainer
geeft aan dat het product in de Europese Unie een aparte
afvalinzameling vereist. Dit geldt voor het product en alle
accessoires die met dit symbool zijn gemarkeerd. Producten die als
zodanig gemarkeerd zijn, mogen niet met het normale huisvuil
worden weggegooid, maar moeten naar een inzamelpunt voor
recycling van elektrische en elektronische apparaten worden
gebracht
INSTRUCTIONS
Hartelijk dank dat u voor deze kluis heeft gekozen. Lees alle instructies
voordat u het gebruikt. De informatie zal u helpen de best mogelijke
resultaten te bereiken.
3

4
TECHNICAL PARAMETERS
PARTS LIST
Model
SS-650QR
Werkspanning Bereik
4,2-6,8Vdc
Product grootte
650 * 420 * 100 mm
Werkkracht
4 x AA-batterijen (1,5 V).
Ingebouwde opslagsleutel*2
Expansiebout*4
Externe voedingskast*1
Diafragmagesp*4
5
DESCRIPTION:
7. This product has 2 sets of passwords. Factory original password:
"123456", factory management you need set it up your self.
2. Yellow light: normal indicator, or wrong password indicator.
3. Green light: unlock and light up for 6-7 seconds.
4. Red light: low battery indicator.
OPENING YOUR SAFE FOR THE FIRST TIME
Open de deur voor de eerste keer, gebruik de geconfigureerde noodsleutel
om de deur te openen. De bedieningsstappen zijn als volgt:
PERSONAL PASSWORD SETTING
13. Terwijl u de deur opent, drukt u op de interne instelknop van de deur, de
zoemer klinkt één keer en het gele indicatielampje gaat branden.
14. binnen 3 seconden een nieuw wachtwoord van 3 tot 12 cijfers in. druk op
"#" bevestigen. Als de zoemer één keer klinkt en het gele lampje uitgaat, is het
wachtwoord succesvol ingesteld.
1. Schuif naar beneden om het
deksel van het noodslot te openen.
10. Installeer batterijen in
de accubak.
2. Steek de noodsleutel in het
sleutelgat en draai deze 6 5°
tegen de klok in .
5. Zorg ervoor dat de
batterij overeenkomt met
' + ' en ' - ' .
( exclusief 4 alkalische
1,5 V-batterijen )
3. Draai de hendel met de klok
mee om de deur te openen.
6. Zwakke stroom, noodmethode :
Noodsleutel

6
Opmerking : nadat uw wachtwoord is ingesteld, test u het nieuwe wachtwoord
om er zeker van te zijn dat het geldig is. Als u een verkeerd wachtwoord
invoert, gaat het gele lampje branden en klinkt er drie keer een pieptoon. Voer
gewoon het juiste wachtwoord opnieuw in.
MANAGE PASSWORD SETTINGS
13. Terwijl u de deur opent, drukt u tweemaal op de cijfertoets "0" en
vervolgens op de interne instelknop. De zoemer klinkt één keer en het gele
indicatielampje brandt .
14. binnen 3 seconden een nieuw wachtwoord van 3 tot 12 cijfers in. Druk op
"#" om te bevestigen, de zoemer klinkt één keer en het gele indicatielampje
gaat uit, wat aangeeft dat het beheerwachtwoord succesvol is ingesteld.
Let op : Stel het persoonlijke wachtwoord niet hetzelfde in als de beheercode.
THREE WAYS TO OPEN THE SAFE
7. Noodsleutel + knop: In de volgende situaties, zoals bij het eerste gebruik,
vergeet u het wachtwoord of is de batterij leeg.
2. Wachtwoord + knop: Dagelijks ontgrendelen. Voer uw persoonlijke
wachtwoord of beheerwachtwoord in , druk op "#" of "*" en draai vervolgens de
knop met de klok mee .
3. Wachtwoord + knop + externe voedingskast: de interne batterij is leeg,
de sleutel is beschadigd of verloren. Plaats de externe voedingskast, voer het
persoonlijke wachtwoord of het beheerwachtwoord in, druk op "#" en draai
vervolgens de knop tegen de klok in om de deur te openen .

7
HOW TO REMOVE THE SHELF
Duw voorzichtig 4 buigbare ijzeren strips onder de plank . Wanneer de strips
een verticale lijn vertonen, kun je de plank er eenvoudig uit halen .
LOW BATTERY ALERT
13. Als de accuspanning lager is dan 4,8 V, gaat het rode lampje branden en
wordt er een waarschuwing gegeven.
14. Als de accuspanning lager is dan 3,8 V, is bediening door de gebruiker
verboden. 6 pieptonen geven aan dat de batterij bijna leeg is en vervangen
moet worden.
VIGILANCE SETTING AND DEACTIVATION
1. Instelling alarm aan: Druk in de stand-bymodus op de toets "*", de zoemer
klinkt één keer en het gele indicatielampje gaat branden . Vervolgens wordt de
trilalarmstatus geactiveerd .
2. Voorwaarden voor het automatisch afgaan van het alarm: ①De kluis geeft
een alarm af als deze wordt geraakt door een bepaalde externe kracht of
trilling; ②Voer drie keer achter elkaar het verkeerde wachtwoord in.
3. De duur van het alarmgeluid: stopt automatisch na 30 seconden.
4. Instelling alarmannulering: ①Voer het juiste wachtwoord in, het groene
indicatielampje brandt. Het stopt onmiddellijk het alarmgeluid en schakelt het
trilalarm uit; ②Open de deur met de sleutel en verwijder de batterij.
HOW TO WALL OR FLOOR MOUNTING
* Boor gaten van de juiste maat voor de ankers die u gebruikt
* Monteer de kluis door schroeven aan de binnenkant van de kluis aan te
draaien en vast te zetten aan ankers

8
* Gebruik het juiste boorgereedschap, afhankelijk van het type vloer waarop u
de kluis monteert (hout, tegels of beton)
SAFETY AND COMPLIANCE
25. Verminder het risico op diefstal, de kluis moet aan de muur of vloer
worden bevestigd om de veiligheid te garanderen.
26. Zorg goed voor de noodsleutel en bewaar deze op een geheime plaats, uit
de buurt van de kluis. Steek de noodsleutel niet in de kluis, ongeacht of de
noodsleutel niet zal worden gebruikt om de kluis te openen wanneer de batterij
leeg is.
27. Plaats het product niet op een onveilige plek boven uw hoofd, om te
voorkomen dat u valt, het product beschadigt of mensen verwondt.
28. Mors geen vloeistof op het bedieningspaneel, omdat dit een elektrische
schok kan veroorzaken voor de interne elektronische componenten, waardoor
deze niet goed meer kunnen werken.
WARMLY REMINDER
1. Omdat het puur handgemaakt is, zijn soldeerverbindingen aan de
binnenkant of roestvlekken normaal.
2. Bewaar de noodsleutels, de geheime kastsleutels en de externe
voedingskast veilig.
3. De noodsleutel kan de kluis van andere merken of hetzelfde merk niet
openen, dit is uniek.
(Probeer het alstublieft niet, om schade aan de kluis te voorkomen en de
ongeëvenaarde sleutel kan niet worden verwijderd)
4. De beschermfolie op de knopafdekking kan worden afgescheurd.
5. Voordat u de deur sluit, mag u de noodsleutel niet verwijderen of de richting
ervan aanpassen, waardoor kan worden voorkomen dat de slotgrendel
vastloopt en de bediening van de knop soepeler zal verlopen.
6. De deur gaat niet dicht: Zorg ervoor dat er geen zijn obstakels. Als de
deurgrendels zijn uitgeschoven, voert u de gebruikerscode opnieuw in en
draait u de knop rechtsom om ze in te trekken .

9
AFTER-SALES SERVICE
1. Als het product dat u heeft ontvangen andere problemen heeft, zoals
gebruiksproblemen, neem dan gerust contact met ons op en antwoord binnen
24 uur op de online klantenservice om u van dienst te zijn.
2. Onze producten ondersteunen 90 dagen zonder reden om te retourneren of
te ruilen.
3. Ik wens je veel plezier bij het online winkelen.

10
Fabrikant: Shanghaimuxinmuyeyouxiangongsi
Adres: Shuangchenglu 803nong11hao1602A-1609shi, baoshanqu,
shanghai 200000 CN.
Geïmporteerd naar AUS: SIHAO PTY LTD. 1 ROKEVA
STREETEASTWOOD NSW 2122 Australië
Geïmporteerd naar de VS: Sanven Technology Ltd. Suite 250, 9166
Anaheim Place, Rancho Cucamonga, CA 91730
REP
EC
E-CrossStu GmbH
Mainzer Landstr.69, 60329 Frankfurt am Main.
REP
UK
YH CONSULTING LIMITED.
C/O YH Consulting Limited Office 147, Centurion
House, London Road, Staines-upon-Thames, Surrey,
TW18 4AX


Teknisk Support och e-garanticertifikat
www.vevor.com/support
KASSASKÅP
ANVÄNDARMANUAL
MODELL: SS-650QR
We continue to be committed to provide you tools with competitive price.
"Save Half", "Half Price" or any other similar expressions used by us only represents an
estimate of savings you might benefit from buying certain tools with us compared to the major
top brands and does not necessarily mean to cover all categories of tools offered by us. You
are kindly reminded to verify carefully when you are placing an order with us if you are
actually saving half in comparison with the top major brands.


1
MODELL: SS-650QR
Have product questions? Need technical support? Please feel free to
contact us:
Technical Support and E-Warranty Certificate
www.vevor.com/support
NEED HELP? CONTACT US!
This is the original instruction, please read all manual instructions
carefully before operating. VEVOR reserves a clear interpretation of our
user manual. The appearance of the product shall be subject to the
product you received. Please forgive us that we won't inform you again if
there are any technology or software updates on our product.
SAFE BOX
2
Varning - För att minska risken för skada måste användaren
läsa instruktionerna noggrant.
Denna enhet uppfyller del 15 av FCC-reglerna. Driften är föremål för
följande två villkor: (1) Den här enheten får inte orsaka skadliga
störningar och (2) den här enheten måste acceptera alla mottagna
störningar, inklusive störningar som kan orsaka oönskad funktion.
Denna produkt omfattas av bestämmelserna i det europeiska
direktivet 2012/19/EC. Symbolen som visar en soptunna korsad
anger att produkten kräver separat sophämtning i EU. Detta gäller för
produkten och alla tillbehör märkta med denna symbol. Produkter
märkta som sådana får inte slängas tillsammans med vanligt
hushållsavfall, utan måste lämnas till en insamlingsplats för
återvinning av elektriska och elektroniska apparater
INSTRUCTIONS
Tack så mycket för att du valde denna kassaskåp. Läs alla instruktioner
innan du använder den. Informationen hjälper dig att uppnå bästa möjliga
resultat.
3
TECHNICAL PARAMETERS
PARTS LIST
Modell
SS-650QR
Arbetsspänning R ange
4,2-6,8 VDC
Produktstorlek
650 * 420 * 100 mm
Arbetskraft
4 x AA(1,5V) batterier
Inbyggd lagringsnyckel*2
Expansionsbult*4
Extern strömbox*1
Membranspänne*4
4
DESCRIPTION:
8. This product has 2 sets of passwords. Factory original password:
"123456", factory management you need set it up your self.
2. Yellow light: normal indicator, or wrong password indicator.
3. Green light: unlock and light up for 6-7 seconds.
4. Red light: low battery indicator.
OPENING YOUR SAFE FOR THE FIRST TIME
Öppna dörren för första gången, använd den konfigurerade nödnyckeln för
att öppna dörren. Operationsstegen är som följer:
PERSONAL PASSWORD SETTING
15. När dörren öppnas trycker du på den interna inställningsknappen på
dörren, summern ljuder en gång och den gula indikatorlampan kommer att
lysa.
16. ett nytt 3-12 - siffrigt lösenord inom 3 sekunder. Tryck "#" att bekräfta.
Om summern ljuder en gång och den gula lampan slocknar, har lösenordet
ställts in.
1. Skjut nedåt för att öppna
nödlåskåpan.
11. Installera batterier i
batterilådan.
2. Sätt in nödnyckeln i
nyckelhålet och vrid den 6 5°
moturs .
5. Se till att batteriet
matchar ' + ' och ' - ' .
( exklusive 4 alkaliska
1,5V batterier )
3. Vrid handtaget medurs för att
öppna dörren.
6. Svag kraft, nödlägesmetod :
Nödnyckel

5
Observera : När ditt lösenord har ställts in, testa det nya lösenordet för att
säkerställa att det är giltigt. Om du anger fel lösenord tänds den gula lampan
och ett pip hörs tre gånger, skriv bara in rätt lösenord igen.
MANAGE PASSWORD SETTINGS
15. När dörren öppnas trycker du två gånger på siffertangenten "0" och
trycker sedan på den interna inställningsknappen. Summern ljuder en gång
och den gula indikatorlampan tänds .
16. ett nytt 3-12 - siffrigt lösenord inom 3 sekunder. Tryck på "#" för att
bekräfta, summern ljuder en gång och den gula indikatorlampan släcks vilket
visar att hanteringslösenordet har ställts in.
Observera : Ställ inte in personligt lösenord på samma sätt som
hanteringskoden.
THREE WAYS TO OPEN THE SAFE
8. Nödknapp + ratt: Under följande situationer som första gången du
använder, glöm lösenordet eller strömmen är strömlös.
2. Lösenord + ratt: Daglig upplåsning. Ange ditt personliga lösenord eller
hanteringslösenord, tryck på "#" eller "*" och vrid sedan ratten medurs .
3. Lösenord + Knopp + Extern Power Box: Det interna batteriet är urladdat,
nyckeln är skadad eller förlorad. Sätt i den externa strömboxen, ange
personligt lösenord eller hanteringslösenord, tryck på "#" och vrid sedan ratten
moturs för att öppna dörren .

6
HOW TO REMOVE THE SHELF
Tryck försiktigt in 4 böjbara järnlister under hyllan , när remsorna visar en
vertikal kan du enkelt ta ut hyllan.
LOW BATTERY ALERT
15. Om batterispänningen är under 4,8V tänds den röda lampan och varnar.
16. Om batterispänningen är under 3,8V är användarmanövrering förbjuden.
6 pip indikerar att batteriet är lågt och måste bytas ut.
VIGILANCE SETTING AND DEACTIVATION
1. Larm på inställning: I standby-läge, tryck på "*"-knappen, summern ljuder en
gång och den gula indikatorlampan tänds . Sedan är det aktivt vibrerande
larmläge.
2. Villkor för att det automatiska larmet ska ljuda: ① Skåpet larmar när det
träffas av en viss yttre kraft eller vibration; ②Ange fel lösenord tre gånger i
följd.
3. Larmljudets varaktighet: stoppas automatiskt efter 30 sekunder.
4. Inställning av larmavbrytning: ①Ange korrekt lösenord, den gröna
indikatorlampan lyser. Den stoppar omedelbart larmljudet och stänger av
vibrationslarmet; ②Öppna dörren med nyckeln och ta ut batteriet.
HOW TO WALL OR FLOOR MOUNTING
* Borra hål i lämplig storlek för de ankare du använder
* Montera kassaskåpet genom att skruva in skruvar från insidan av
kassaskåpet och fästa det vid ankare
* Använd lämpliga borrverktyg beroende på vilken typ av golv du ska montera
kassaskåpet (trä, kakel eller betong)

7
SAFETY AND COMPLIANCE
29. Minska risken för stöld, kassaskåpet måste fästas på väggen eller golvet
för att garantera säkerheten.
30. Ta väl hand om nödnyckeln och förvara den på en hemlig plats borta från
kassaskåpet. Lägg inte nödnyckeln i kassaskåpet, oavsett om nödnyckeln inte
kommer att användas för att öppna kassaskåpet när batteriet tar slut.
31. Placera inte produkten på en osäker ovanför, för att undvika att falla,
skada produkten eller skada människor.
32. Spill inte vätska på kontrollpanelen, eftersom det kan orsaka elektriska
stötar på de interna elektroniska komponenterna och hindra dem från att
fungera korrekt.
WARMLY REMINDER
1. Eftersom det är rent handgjorda är insidan av lödfog eller rostfläckar ett
normalt fenomen.
2. Förvara nödnycklar, hemliga skåpsnycklar och extern strömförsörjningsbox
säkert.
3. Nödnyckeln kan inte öppna kassaskåpet från andra märken eller samma
märke, vilket är unikt.
(Snälla försök inte, för att undvika skador på kassaskåpet och den omatchade
nyckeln kan inte tas ut)
4. Skyddsfilmen på knopplocket kan rivas av.
5. Innan du stänger dörren, ta inte bort nödnyckeln eller justera dess riktning,
vilket kan undvika att låskolven fastnar och rattens funktion blir smidigare.
6. Dörren stängs inte: Se till att det inte finns några hinder. Om dörrbultarna är
utdragna, skriv in användarkoden igen och vrid vredet medurs för att dra in
dem.

8
AFTER-SALES SERVICE
1. Om produkten du fick har andra problem såsom användningsproblem, var
god kontakta oss och svara på onlinekundtjänst inom 24 timmar för att hjälpa
dig.
2. Våra produkter stödjer 90 dagar utan anledning att returnera eller byta.
3. Jag önskar dig en trevlig onlineshopping.

Tillverkare: Shanghaimuxinmuyeyouxiangongsi
Adress: Shuangchenglu 803nong11hao1602A-1609shi, baoshanqu,
shanghai 200000 CN.
Importerad till AUS: SIHAO PTY LTD. 1 ROKEVA STREETEASTWOOD
NSW 2122 Australien
Importerad till USA: Sanven Technology Ltd. Suite 250, 9166 Anaheim
Place, Rancho Cucamonga, CA 91730
REP
EC
E-CrossStu GmbH
Mainzer Landstr.69, 60329 Frankfurt am Main.
REP
UK
YH CONSULTING LIMITED.
C/O YH Consulting Limited Office 147, Centurion
House, London Road, Staines-upon-Thames, Surrey,
TW18 4AX