
INSTRUCTION MANUAL
EN
2 SLICE AND 4 SLICE TOASTER
MANUEL D’UTILISATION
FR
GRILLE-PAIN 2 ET 4 TRANCHES
MANUAL DE USO
ES
TOSTADOR DE 2 Y 4 REBANADAS
INSTRUCTION MANUAL
EN
2 SLICE AND 4 SLICE TOASTER
MANUEL D’UTILISATION
FR
GRILLE-PAIN 2 ET 4 TRANCHES
MANUAL DE USO
ES
TOSTADOR DE 2 Y 4 REBANADAS
Important information for the user
Informations importantes pour l’utilisateur
Información importante para el usuario
Instructions / Instructions / Instrucciones
Description / Description / Descripción
Use / Usage / Uso
Cleaning and maintenance / Nettoyage et entretien / Limpieza y mantenimiento
Safety instructions / Directives de sécurité / Instrucciones de seguridad
Information / Informations / Información
Advice / Conseil / Recomendaciones
Scan the QR code for quick access to the My Smeg Assistant portal
Scannez le code QR pour un accès rapide au portail My SMEG Assistant
Escanee el código QR para acceder rápidamente al portal My Smeg Assistant

Dear Customer, Thank you for purchasing one of our appliances. Our products are unique because they combine
iconic style with innovative technical solutions. They match perfectly with other products in our range and work
equally well as a standalone design objects in your kitchen. We hope you enjoy using your new appliance! Best
regards.
Cher client, merci beaucoup pour votre achat. Nos produits sont uniques car ils combinent une forte recherche
esthétique avec une conception technique innovante. Ils sont coordonnés avec d’autres produits de la gamme et
peuvent constituer des éléments d’ameublement et de design. En espérant que vous pourrez apprécier pleinement
votre nouvel appareil électroménager, nous vous adressons nos meilleures salutations.
Estimado cliente, le damos las gracias por su compra. Nuestros productos son únicos porque combinan una notable
búsqueda estética con un diseño técnico innovador. Se combinan con otros productos de la gama y se pueden utilizar
como elementos de decoración y diseño. Le deseamos que pueda apreciar plenamente su nuevo electrodoméstico.
Le enviamos nuestros saludos más cordiales.
SMEG S.p.A.
Model: TSF01-02
6 7
21
2
1
3
5
8 9
4
A
14
15
10
11
12
13
B C
D
E
5
EN
IMPORTANT SAFEGUARDS
WARNING: If the instructions contained in this manual are not
followed precisely, a re or explosion may result causing property
damage, personal injury or death.
READ AND SAVE THESE INSTRUCTIONS
Your safety and the safety of others are very important.
We have provided many important safety messages throughout
this manual and on the appliance.
Read all the instructions before using the appliance and always
obey all safety messages.
RECOGNIZE SAFETY INFORMATION
This is the safety alert symbol. This symbol alerts you to potential
hazards that can result in severe personal injury or death.
UNDERSTAND SIGNAL WORDS
A signal word – DANGER, WARNING, or CAUTION – is used
with the safety alert symbol. DANGER denotes the most serious
hazards. It means you could be killed or seriously injured if you
do not immediately follow the instructions. WARNING means
you could be killed or seriously injured if the instructions are not
followed. CAUTION indicates a potentially hazardous situation,
which, if not avoided, could result in minor to moderate injury.
WARNING
• This appliance is intended for residential use only.
• Use this appliance only for its intended purpose. The
manufacturer cannot be held liable for damage caused
by improper use of this appliance.
• This appliance complies with current safety regulations.
Improper use can result in personal injury and material
damage.
• Read all the instructions before installing or using the
appliance for the rst time.
• Keep these operating instructions in a safe place and
pass them on to any future user.

6
IMPORTANT SAFEGUARDS
The safety messages will inform you of potential hazards, on how to avoid
the risk of injury and what can occur if the instructions are not followed.
IMPORTANT: Observe all codes and ordinances in force.
WARNING: For your safety, the instructions contained in this manual
must be followed to minimize the risk of re or explosion and to prevent
property damage, personal injury or death.
Do not store or use gasoline or other ammable vapors, liquids or materials
near this or any other appliance.
NOTE: This appliance is NOT designed for installation in
manufactured (mobile) homes or in recreational vehicles (RVs).
DO NOT install this appliance outdoors.

7
EN
IMPORTANT SAFEGUARDS
WARNING
To reduce the risk of re, electrical shock, personal injury,
or damage when using the appliance, follow basic safety
precautions, including the following:
Follow all safety instructions to use
the appliance safely.
• Read this user manual carefully
before using the appliance.
• To protect against electric shock,
do not immerse the appliance, the
power cord or the plug in water or
any other liquid.
• Do not use the appliance when
the power cord or the plug is
damaged or after the appliance
malfunctions, or when the
appliance has fallen or is damaged
in any manner. Return appliance
to the nearest authorized service
facility for examination, repair or
adjustment.
• Do not place the appliance on or
near a burning gas or an electrical
stove or in a heated oven.
• The cord is short to prevent
accidents.
• Do not let cord hang over edge
of table or counter or touch hot
surfaces.
• In case of a fault, repairs should
only be carried out by a qualied
technician.
• Never try to put out a re or ames
with water: turn off the appliance,
remove the plug from the socket
and smother the ames with a re
blanket or any other appropriate
means.
• Do not modify this appliance.
• Do not try to repair the appliance
yourself or without the intervention
of a qualied technician.
• If the power supply cable is
damaged, contact technical
support immediately.
• The use of accessory attachments
not recommended by the
appliance manufacturer may
cause injuries.
• Extreme caution must be used
when moving the appliance if
the crumb tray contains hot oil or
other hot liquids.
• Do not operate unattended.
For this appliance
• The toaster can get very hot
when it is operating. Do not touch
any hot surfaces. Use the control
knob and functions, the breadlift
and optional accessories.
• Unplug from the outlet when not
in use, before cleaning and in case
of fault. Let it cool before putting
on or taking off parts, and before
cleaning the appliance.
• Bread may burn. Therefore do not
use the appliance near or below
combustible materials, such as
curtains.
• Make sure the breadlift is elevated
before you plug in or unplug the
toaster.

8
IMPORTANT SAFEGUARDS
• Make sure that the air around the
toaster can circulate freely. Do
not place anything on top of the
toaster. A re may occur if the
toaster is covered with or touching
ammable material, including
curtains, draperies, walls or
similar, when in operation.
• Do not try to remove food from
the toaster when it is plugged in.
• When heating toaster pastries,
always use the lightest toast color
setting.
• Never insert in the toaster
oversized food, metal foil
packages, metallic objects such
as knives, forks, spoons as they
may involve a risk of re or electric
shock.
• Never use metallic objects such
as knives, forks or spoons to clean
the toaster.
• The appliance must never be
cleaned by unsupervised children.
• To disconnect, make sure all
controls are turned off, then
unplug the cord from the wall
outlet.
• Do not attempt to dislodge food
when toaster is plugged in.
• Close supervision is necessary
when any appliance is used by or
near children.
1 Instructions
This user manual is an integral
part of the appliance and must
therefore be kept in its entirety and
in an accessible place for the whole
working life of the appliance.
1.1 Intended use
• Use the appliance only indoors.
• This appliance has been designed
exclusively for domestic use. It can
only be used for toasting bread.
Do not use the appliance for
anything other than the intended
use.
• Carefully follow the notes and
suggestions provided in the user
manual.
• Only use the appliance for
toasting bread.
• The appliance can also be used
for preparing toasted sandwiches
but only if the specic sandwich
racks are used (sold separately).
• If food or other substances were
to come in to contact with the
heating elements they may cause
unpleasant odours, smoke and
damage the appliance.
• The appliance is not designed to
operate with external timers or
with remote-control systems.

9
EN
IMPORTANT SAFEGUARDS
• This appliance must not be used
by people (including children)
of reduced physical and mental
capacity, or lacking in experience
in the use of electrical appliances,
unless they are supervised or
instructed by adults who are
responsible for their safety.
• Children must never play with the
appliance.
1.2 General safety instructions
• Unplug from outlet when not in
use and before cleaning. Allow to
cool before putting on or taking
off parts, and before cleaning the
appliance.
• Do not immerse the appliance,
the power cord, the plug or the
base in water or any other liquid.
Do not unplug the appliance with
wet hands, or by pulling on the
power cord.
• Never wash the appliance in the
dishwasher.
• For cleaning instructions, please
refer to the chapter “Cleaning and
maintenance.”
• In the event of a fault, or if the
power cable is damaged, the
appliance must only be repaired
by a qualied technician or an
authorized technical support
center.
• Any modications to the appliance
will invalidate the warranty.
1.3 Manufacturer liability
The manufacturer declines all
liability for damage to persons or
property caused by:
• Use of the appliance other than
the one envisaged;
• Not having read the user manual;
• Tampering with any part of the
appliance;
• Use of non-original spare parts;
• Not following the safety
instructions.
1.4 Disposal
• Old appliances do not belong in
household waste! To comply with
current legislation, old appliances,
having reached the end of their
useful lives, should be taken to
a disposal facility where they
can be sorted. In this way, any
valuable material contained in the
old appliances can be recycled
and the environment protected.
Responsible local authorities or
their waste disposal operators
can provide further information.
• The appliance is packed in non-
polluting and recyclable materials.
• Dispose of the packing materials
at an appropriate disposal facility.
10
IMPORTANT SAFEGUARDS
Fire hazard:
• Do not position the
appliance above hot
surfaces, cooktop burners,
or inside a hot oven.
Suffocation hazard due to
plastic packaging:
• Do not leave the
packaging or any part of
it unattended.
• Do not let children play
with the plastic bags.
Risk of injury:
• Improper use of the
appliance can cause
personal injury.
Danger of electrocution:
• Plug into a grounded
3-prong outlet.
• Do not remove the
grounding prong.
• Do not use an adapter.
• Avoid spilling liquids onto
the power plug and base.
• Unplug the appliance
when it is not being used,
before cleaning and if you
notice any fault.
• Failure to follow these
instructions can result
in death, re, or electric
shock.
• Disconnect the main
power supply.
• Unplug the cord from the
wall outlet.
Caution
• To clean surfaces that
come into contact with
food, follow the special
cleaning procedures
provided in the
instructions.
Caution
• If the appliance is not
plugged in, the breadlift
will not lock.
Hot appliance
• The bun warmer and
sandwich rack will be hot
during the toasting cycle.
When removing it from
the toaster, take care
not to burn yourself by
touching the metal parts.
Hot appliance
• If the appliance is not
plugged in, the breadlift
will not lock.
SAVE THESE INSTRUCTIONS

11
EN
Description
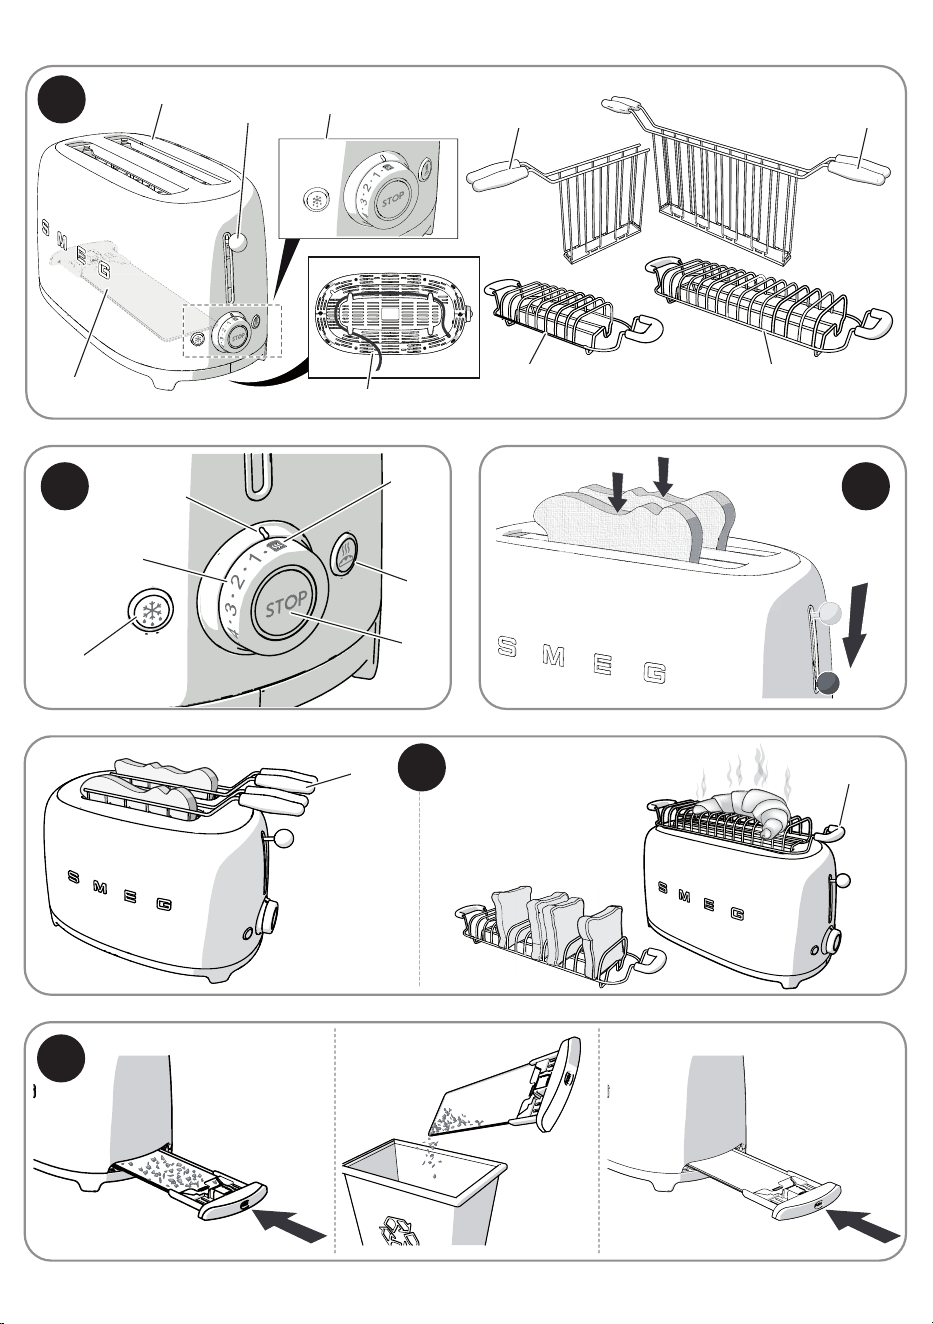
2 Product description
(Fig. A - B)
1) Extra-wide slots with self-centering
racks
2) Breadlift
3) Control panel
4) Crumb tray
5) Cable compartment (under base)
6) TSSR01 Sandwich racks (optional
accessory suitable for TSF01 Toaster)
7) TSSR02 Sandwich racks (optional
accessory suitable for TSF02 Toaster)
8) TSBW01 Bun Warmer (optional
accessory suitable for TSF01 Toaster)
9) TSBW02 Bun Warmer (optional
accessory suitable for TSF02 Toaster)
10) Defrost function button
11) Browning control knob
12) Browning indicator
13) Stop function button
14) Bagel function button
15) Reheat function
2.1 Control panel (Fig. B)
• Defrost function button (10 - Fig. B)
This function is useful when using frozen
bread. During toasting the defrost button
will light up to indicate that the cycle is
activated.
• Browning control knob (11 - Fig. B)
This control is used to select one of the 6
different browning levels or the Reheat
function. During toasting the central LED
lights up to indicate that the toasting cycle
is activated.
• Browning indicator (12 - Fig. B)
The Browning indicator shows the selected
browning level or the selected Reheat
function.
• Stop function button (13 - Fig. B)
The Stop button can be used to cancel or
stop the toasting cycle at any time.
• Bagel function button (14 - Fig. B)
This feature will toast one side of a bagel or
any other kind of bread, without toasting the
other side. During toasting the Bagel button
will light up to indicate that the function has
been activated.
• Reheat function (15 - Fig. B)
This function is used to reheat cold toast or
to continue a toasting cycle if the result is
not satisfactory. During toasting the central
LED lights up to indicate that the cycle is
activated.
12
Use
3 Use
Volts: 120 Volts AC only.
Hertz: 60 Hz
Tips and suggestions
Your toaster has a 3-prong
grounded plug. To reduce the risk
of electrical shock, this plug will
t in an outlet only one way. If
the plug does not t in the outlet,
contact a qualied electrician. Do
not modify the plug in any way.
• If the power supply cord is too short,
have a qualied electrician or serviceman
install an outlet near the appliance.
• A short power supply cord (or detachable
power supply cord) should be used to
reduce the risk resulting from becoming
entangled in or tripping over a longer
cord.
• Longer detachable power supply cords or
extension cords are available and may be
used if care is exercised in their use.
• If a longer detachable power supply cord
or extension cord is used:
‐ The marked electrical rating of the cord
set or extension cord should be at least
as great as the electrical rating of the
appliance.
‐ The cord should be arranged so that it
will not drape over the countertop or
tabletop where it can be pulled on by
children or tripped over unintentionally.
‐ If the appliance is of the grounded
type, the extension cord should be a
grounding-type 3-wire cord.
3.1 Before rst use
1) Remove all stickers and any packing or
printed material that might have fallen
inside during shipping or handling. Do
not probe inside the toaster with a
metal object.
2) Clean the outside of the toaster with a
damp cloth.
3) Use the toaster for the rst time without
any bread in it.
4) Turn the browning control to the
maximum position and press the
breadlift down. In this way you will burn
off any dust that has fallen into the
toaster during production or transport.
During rst use there may be
some smoke and odors.
Tips and suggestions
• Remember that the type of
bread you use will impact the
toasting times. The fresher the
bread you use, the longer it will
take to toast. Different kinds of
bread have different moisture
content and will require
different browning levels. For
example, fruit breads generally
toast much quicker, and freshly
baked breads will take longer
as they have a greater moisture
content.

13
EN
Use
4) Choose the desired browning level
(Browning levels 1 to 6, from light
to dark) or the “Reheat function”
(15 - Fig. B).
5) Push the lever down until it clicks to
activate the toasting cycle (Fig. C).
6) If needed, select the additional functions
Defrost (10 - Fig. B) or Bagel (14 - Fig. B)
or the two combined.
7) The heating element is now activated.
The bread will be centered in the
breadlift automatically for toasting.
8) The toasted bread will pop up
automatically when the toast is ready.
9) If the toast is not brown enough and
requires just a little extra time, use the
reheat button to extend the toasting
time.
3.3 Special functions
Canceling/stopping the toasting cycle
At any time, it is possible to cancel or stop
the toasting cycle by pushing the button
(13 - Fig. B).
Defrost (10 - Fig. B)
This function gently defrosts frozen bread
and toasts it to the selected browning level.
To activate it, insert the bread into the slot,
select the desired browning level, press the
breadlift down until it clicks, then push the
defrost button, which will light up. Toasting
time will be automatically increased to allow
the bread to defrost and brown correctly.
When the toast pops up automatically, the
light of the defrost button will switch off.
Tips and suggestions
• The rst batch of toast you
make enables the heating
elements to reach the correct
toasting temperature. Please
note that further batches of
toast could take less time.
For best results:
• Toast only one type of bread at
a time.
• Toast bread slices of the same
thickness.
• Use bread slices no thicker than
one inch.
• If you are using handcut bread,
try to cut slices as evenly as
possible. Uneven slices will
toast unevenly.
• Be aware that if you use very
thin or broken slices of bread,
they will burn.
3.2 Operation
If necessary, shorten the cord by wrapping
it under the base (5 - Fig. A).
1) Plug in the toaster.
2) Insert the bread in the slot (Fig. C).
3) Remember that as bread is not
normally square, you may need to turn
the bread on its side to get a better t
and optimize the toasting surface area.

14
Use
Bagel (14 - Fig. B)
This special function is ideal for toasting
one side only, for bagels, at bread, English
mufns, baguettes, etc. To use the function,
simply insert the bread into the slot with
the side that you want toasted facing the
outside. Select the desired browning level,
press the breadlift down until it clicks, then
push the Bagel function button, which will
light up. When the bread is toasted, it will
pop up automatically and the Bagel function
light will switch off.
Reheat (15 - Fig. B)
This function allows you to reheat cold
toasts or to continue a toasting cycle if the
result is not satisfactory. To activate it, insert
the bread into the slot, select the Reheat
function on the browning control knob and
press the breadlift down until it clicks. The
central light of the browning control knob
will light up. When the toast is ready, it will
pop up automatically and the light of the
control knob will switch off.
Defrost or Reheat can be selected
at the same time as the Bagel
function.
3.4 Using optional accessories
(6,7,8,9 - Fig. A)
Accessories may differ according
to the model.
Sandwich racks (1-Fig. D)
The sandwich racks are ideal for toasting
lled sandwiches, or for easier handling of
smaller items such as bagels.
• TSSR01 model suitable for TSF01 Toaster
(6 - Fig. A)
• TSSR02 model suitable for TSF02 Toaster
(7 - Fig. A).
Tips and suggestions
• Lightly butter the outside of the
bread, this prevents burning
and helps with the warming
of the lling. Do not butter the
inside of the sandwich.
• For best results use thinly sliced
ingredients and nely grated
cheese.
• For best results use cold meat
(ham, turkey, etc.) at room
temperature, not straight from
the refrigerator.
• Do not overll the sandwich.
• If using a low browning setting,
the lling might not heat through
correctly. In this case, at the end
of the toasting cycle, leave the
toast inside the toasting slot for
longer, or extend the time by
using the reheat button.

15
EN
Use / Cleaning and maintenance
How to use (1 - Fig. D):
1) Open the rack with the handles.
2) Place the sandwich inside the rack.
3) Close the sandwich rack handles
together to grip the sandwich in the
middle of the racks.
4) Insert the sandwich rack into the slot
and select a browning level. If a little
more browning is required, you can use
the reheat button to extend the toasting
time.
5) Push the breadlift down until it clicks to
activate the toasting cycle.
6) When the toasting cycle has ended
remove the sandwich rack from the
toaster.
Bun Warmer (2 - Fig. D)
The bun warmer is used to warm small
bread rolls, at bread or pastries.
• TSBW01 model suitable for TSF01
Toaster (8 - Fig. A)
• TSBW02 model suitable for TSF02
Toaster (9 - Fig. A).
How to use (2 - Fig. D):
1) Place the bun warmer on top of the
toaster, making sure the wire feet on
the bottom of the warmer t into the
toaster slots.
2) Place small bread rolls, at bread or
pastries on top of the warmer and set
the browning level to ‘1’ (no higher).
3) Lower the breadlift until it clicks to
activate the toasting cycle.
4 Cleaning and maintenance
4.1 Cleaning the surfaces
To keep the surfaces in good condition,
clean regularly after use. Let them cool rst.
Never use products that contain abrasives
or chlorine-based acids.
Pour the product onto a damp cloth and
wipe the surface, then wipe over thoroughly
and dry with a soft cloth or a microber cloth
Tips and suggestions
If grease or oil splatters on the
toaster, wipe it off immediately
using a clean, damp cotton cloth.
Any other servicing should be performed by
an authorized service representative.
4.2 Food stains or residues
Do not use metallic sponges or sharp
scrapers as they will damage the surfaces.
Use ordinary non-abrasive products with
the aid of wooden or plastic utensils if
necessary. Wipe over thoroughly and dry
with a soft cloth or a microber cloth.

16
Cleaning and maintenance/What to do if...
4.3 Cleaning the crumb tray (Fig. E)
1) Push the Crumb Tray (4 - Fig. A) to
unlock it, then pull to slide it out and
empty it. The Crumb Tray should be
emptied after each use.
Tips and suggestions
The Crumb Tray is hand-
washable. Always dry the tray
thoroughly before putting it back
in the toaster.
2) Put the Crumb Tray back in the toaster.
Press it in rmly until it clicks into
position. Do not use the toaster without
the Crumb Tray in the proper position.
3) Do not use any toaster cover.
4.4 Cleaning the optional sandwich
rack and bun warmer
Wash the sandwich rack and bun warmer by
hand in warm soapy water. After washing,
rinse them and dry them thoroughly with a
soft cloth.
What to do if...
If your toaster should fail to operate, check
the following:
• Check that the toaster is plugged into a
grounded 3-prong electrical outlet. If it is,
unplug the toaster.
• Plug in the toaster.
• If the toaster still does not work, check
the household fuse or circuit breaker.
If the problem cannot be solved:
• See the Smeg Warranty and Service
sections.

The manufacturer reserves the right to make any changes deemed necessary for the improvement of its products
without prior notice. The illustrations and descriptions contained in this manual are therefore not binding and are
merely indicative.
Le fabricant se réserve la faculté d’apporter, sans préavis, toutes les modications qu’il jugera utiles pour l’amélioration
de ses produits. Les illustrations et les descriptions gurant dans ce manuel ne sont pas contraignantes et n’ont
qu’une valeur indicative.
El fabricante se reserva el derecho a aportar sin aviso previo todas las modicaciones que considere útiles para la
mejora de sus propios productos. Las ilustraciones y las descripciones contenidas en este manual no son vinculantes
y tienen solo valor indicativo.