
INSTRUCTION MANUAL
EN
2 SLICE AND 4 SLICE TOASTER
AR
ةعطقلا ةيعابرو ةعطقلا ةيئانث ةصمحم
INSTRUCTION MANUAL
EN
2 SLICE AND 4 SLICE TOASTER
AR
ةعطقلا ةيعابرو ةعطقلا ةيئانث ةصمحم
Scan the QR code for quick access to the My Smeg Assistant portal
Important information for the user
Recommendations /
Description /
Use /
Cleaning and care /
Safety instructions /
Information /
Advice /

Dear Customer, Thank you for purchasing one of our appliances. Our products are unique because they combine
iconic style with innovative technical solutions. They match perfectly with other products in our range and work
equally well as a standalone design objects in your kitchen. We hope you enjoy using your new appliance! Best
regards.
SMEG S.p.A.
Model: TSF01-02
6 7
21
2
1
3
5
8 9
4
A
14
15
10
11
12
13
B C
D
E

5
EN
Instructions
1 Instructions
This user manual is an integral part of the
appliance and must therefore be kept in its
entirety and within the user’s reach for the
whole working life of the appliance.
1.1 Intended use
• Use the appliance only indoors.
• This appliance is intended for household
use and similar applications such as:
‐ staff kitchen areas in shops, ofces and
other working environments
‐ bed and breakfast facilities / farm
accommodation
‐ by guests in hotels, motels and other
residential accommodations
• Any other use, for example in restaurants,
coffee bars ans coffee shops is considered
improper.
• It can only be used for toasting bread. Do
not use the appliance for anything other
than the intended use.
• Carefully follow the notes and
suggestions provided in the user manual.
• Only use the appliance for toasting bread.
• The appliance can also be used for
preparing toasted sandwiches but only
if the specic sandwich racks are used
(sold separately).
• If food or other substances were to come
in to contact with the heating elements
they may cause unpleasant odours,
smoke and damage the appliance.
• The appliance is not designed to operate
with external timers or with remote-
control systems.
• This appliance may be used by children
aged at least 8 and by people of
reduced physical and mental capacity,
or lacking in experience in the use of
electrical appliances, as long as they are
supervised or instructed by adults who
are responsible for their safety.
• Children must never play with the
appliance. Keep the appliance out of
children’s reach.
1.2 General safety instructions
Follow all safety instructions in order to be
able to use the appliance safely.
• Do not immerse the appliance, the power
cord or the plug in water or any other
liquid.
• Do not use the appliance when the power
cord or the plug is damaged or when the
appliance has fallen or is damaged in any
manner.
• Do not place the appliance on or near a
burning gas or an electrical stove or in a
heated oven.
• The cord is short to prevent accidents. Do
not use an extension cord.
• In case of a fault repairs should only be
carried out by a qualied engineer.
• Switch off the appliance immediately
after use.
• Never try to put out a re or ames with
water: turn off the appliance, remove the
plug from the socket and smother the
ames with a re blanket or any other
appropriate cover.
• Read this user manual carefully before
using the appliance.
• Do not modify this appliance.
• Do not try to repair the appliance yourself
or without the intervention of a qualied
engineer.
• If the power supply cable is damaged,
contact technical support immediately.

6
Instructions
1.3 For this appliance
• The toaster can get very hot when it is
operating. Do not touch any hot surfaces.
Use the control knob and functions, the
breadlift and optional accessories.
• Remove the plug from the socket when
toaster is not in use, before cleaning and
in case of fault. Let it cool down before
cleaning.
• Bread may burn. Therefore do not use
the appliance near or below combustible
materials, such as curtains.
• Make sure the breadlift is elevated before
you plug in or remove the plug.
• Make sure that the air around the toaster
can circulate freely. Do not place anything
on top of the toaster.
• Do not try to remove food from the toaster
when it is still operating.
• Never rest metallic objects such as
knives, forks, spoons on the appliance
during use.
• Never use metallic objects such as knives,
forks, spoons to clean the toaster.
• The appliance must never be cleaned by
unsupervised children.
1.4 Manufacturer liability
The manufacturer declines all liability for
damage to persons or property caused by:
• Use of the appliance other than the one
envisaged;
• Not having read the user manual;
• Tampering with any part of the appliance;
• Use of non-original spare parts;
• Not following the safety instructions.
1.5 Disposal
This appliance must be disposed
of separately from other waste
(Directive 2012/19/EU).
• The appliance does not contain
substances in quantities sufcient to be
considered hazardous to health and the
environment, in accordance with current
European directives.
• Old electrical appliances must not be
disposed of together with household
waste! To comply with current legislation,
old appliances, on reaching the end
of their useful lives, should be taken to
a disposal facility where they can be
sorted. The relevant local authorities
or their waste disposal operators can
provide further information.
• Take these packing materials to the
appropriate recycling centre.

7
EN
Instructions
Power voltage
Danger of electrocution
• Disconnect the main power
supply.
• Disconnect the power cable
from the electrical system.
Suffocation hazard due to plastic
packaging:
• Do not leave the packaging or
any part of it unattended.
• Do not let children play with the
plastic bags.
Electrical Shock Hazard
• Plug into a grounded 3 prong
outlet.
• Do not remove earth prong.
• Do not use an adapter.
• Do not use an extension cord.
• Failure to follow these
instructions can result in death,
re, or electrical shock.
Improper use
Electrical shock hazard
• Always disconnect the plug
from the socket before cleaning
the toaster, crumb tray and
optional accessories.
Hot appliance
Burns Hazard
• Always leave the appliance
and optional accessories to cool
down before cleaning.
Improper use
Risk of damage to surfaces
• Do not use steam jets for
cleaning the appliance.
• Do not use cleaning products
containing chlorine, ammonia
or bleach on steel parts or
parts with metallic nishes
(e.g. anodizing, nickel- or
chromium-plating).
• Do not use abrasive or corrosive
detergents (e.g. powder
products, stain removers and
metallic sponges).
• Do not use rough or abrasive
materials or sharp metal
scrapers.
Hot appliance
• The bun warmer and sandwich
rack will be hot during the
toasting cycle. When removed
from the toaster, take care not
to burn yourself by touching the
metal parts.

8
Description
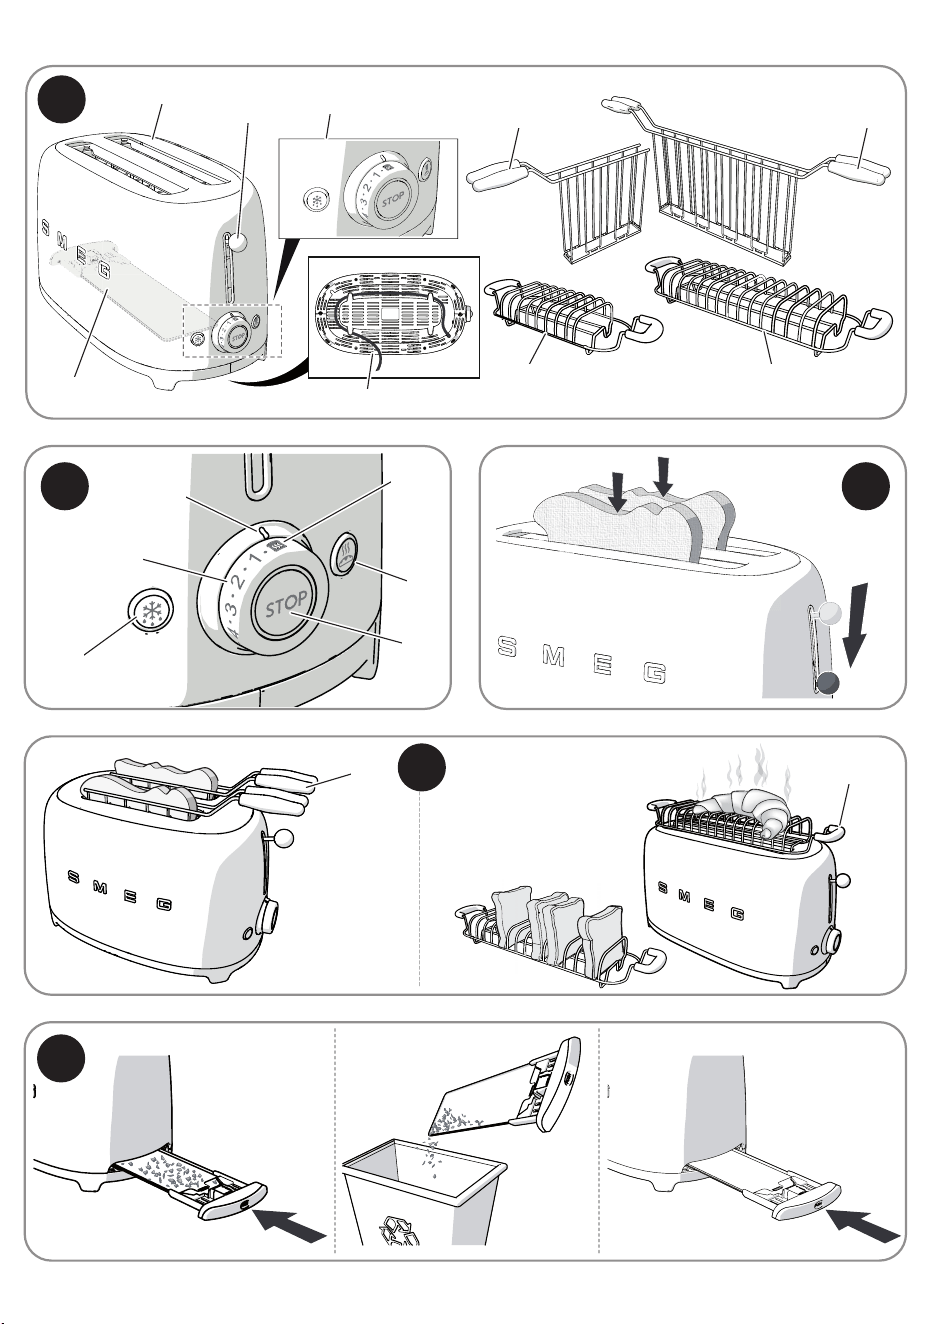
2 Product description
(Fig. A - B)
1) Extra-wide slots with self-centering
racks
2) Breadlift
3) Control panel
4) Crumb tray
5) Cable compartment (under base)
6) TSSR01 Sandwich racks (optional
accessory suitable for TSF01 Toaster)
7) TSSR02 Sandwich racks (optional
accessory suitable for TSF02 Toaster)
8) TSBW01 Bun Warmer (optional
accessory suitable for TSF01 Toaster)
9) TSBW02 Bun Warmer (optional
accessory suitable for TSF02 Toaster)
10) Defrost function button
11) Browning control knob
12) Browning indicator
13) Stop function button
14) Bagel function button
15) Reheat function
2.1 Control panel (Fig. B)
• Defrost function button (10 - Fig. B)
This function is useful when using frozen
bread. During toasting the defrost button
will light up to indicate that the cycle is
activated.
• Browning control knob (11 - Fig. B)
This control is used to select one of the 6
different browning levels or the Reheat
function. During toasting the central LED
lights up to indicate that the toasting cycle
is activated.
• Browning indicator (12 - Fig. B)
The Browning indicator shows the selected
browning level or the selected Reheat
function.
• Stop function button (13 - Fig. B)
The Stop button can be used to cancel or
stop the toasting cycle at any time.
• Bagel function button (14 - Fig. B)
This feature will toast one side of a bagel or
any other kind of bread, without toasting the
other side. During toasting the Bagel button
will light up to indicate that the function has
been activated.
• Reheat function (15 - Fig. B)
This function is used to reheat cold toast or
to continue a toasting cycle if the result is
not satisfactory. During toasting the central
LED lights up to indicate that the cycle is
activated.

9
EN
Use
3 Use
The appliance can be used safely
at both 50 Hz or 60 Hz without
making any setting change.
Tips and suggestions
Your toaster has a 3-prong
grounded plug. To reduce the risk
of electrical shock, this plug will
t in an outlet only one way. If
the plug does not t in the outlet,
contact a qualied electrician. Do
not modify the plug in any way.
3.1 Before rst use
1) Remove all stickers and any packing or
printed material that might have fallen
inside during shipping or handling. Do
not probe inside the toaster with a
metal object.
2) Clean the outside of the toaster with a
damp cloth.
3) Use the toaster for the rst time without
any bread in it.
4) Turn the browning control to the
maximum position and press the
breadlift down. In this way you will burn
off any dust that has fallen into the
toaster during production or transport.
During rst use there may be
some smoke and odors.
Tips and suggestions
• Remember that the type of
bread you use will impact the
toasting times. The fresher the
bread you use, the longer it will
take to toast. Different kinds of
bread have different moisture
content and will require
different browning levels. For
example, fruit breads generally
toast much quicker, and freshly
baked breads will take longer
as they have a greater moisture
content.
• The rst batch of toast you
make enables the heating
elements to reach the correct
toasting temperature. Please
note that further batches of
toast could take less time.
For best results:
• Toast only one type of bread at
a time.
• Toast bread slices of the same
thickness.
• Use bread slices no thicker than
one inch.
• If you are using handcut bread,
try to cut slices as evenly as
possible. Uneven slices will
toast unevenly.
• Be aware that if you use very
thin or broken slices of bread,
they will burn.
Warning
If the appliance is not connected
to the mains, the breadlift does
not lock.

10
Use
Defrost (10 - Fig. B)
This function gently defrosts frozen bread
and toasts it to the selected browning level.
To activate it, insert the bread into the slot,
select the desired browning level, press the
breadlift down until it clicks, then push the
defrost button, which will light up. Toasting
time will be automatically increased to allow
the bread to defrost and brown correctly.
When the toast pops up automatically, the
light of the defrost button will switch off.
Bagel (14 - Fig. B)
This special function is ideal for toasting
one side only, for bagels, at bread, English
mufns, baguettes, etc. To use the function,
simply insert the bread into the slot with
the side that you want toasted facing the
outside. Select the desired browning level,
press the breadlift down until it clicks, then
push the Bagel function button, which will
light up. When the bread is toasted, it will
pop up automatically and the Bagel function
light will switch off.
Reheat (15 - Fig. B)
This function allows you to reheat cold
toasts or to continue a toasting cycle if the
result is not satisfactory. To activate it, insert
the bread into the slot, select the Reheat
function on the browning control knob and
press the breadlift down until it clicks. The
central light of the browning control knob
will light up. When the toast is ready, it will
pop up automatically and the light of the
control knob will switch off.
Defrost or Reheat can be selected
at the same time as the Bagel
function.
3.2 Operation
If necessary, shorten the cord by wrapping
it under the base (5 - Fig. A).
1) Plug in the toaster.
2) Insert the bread in the slot (Fig. C).
3) Remember that as bread is not
normally square, you may need to turn
the bread on its side to get a better t
and optimize the toasting surface area.
4) Choose the desired browning level
(Browning levels 1 to 6, from light
to dark) or the “Reheat function”
(15 - Fig. B).
5) Push the lever down until it clicks to
activate the toasting cycle (Fig. C).
6) If needed, select the additional functions
Defrost (10 - Fig. B) or Bagel (14 - Fig. B)
or the two combined.
7) The heating element is now activated.
The bread will be centered in the
breadlift automatically for toasting.
8) The toasted bread will pop up
automatically when the toast is ready.
9) If the toast is not brown enough and
requires just a little extra time, use the
reheat button to extend the toasting
time.
3.3 Special functions
Canceling/stopping the toasting cycle
At any time, it is possible to cancel or stop
the toasting cycle by pushing the button
(13 - Fig. B).

11
EN
Use
3.4 Using optional accessories
(6,7,8,9 - Fig. A)
Accessories may differ according
to the model.
Sandwich racks (1-Fig. D)
The sandwich racks are ideal for toasting
lled sandwiches, or for easier handling of
smaller items such as bagels.
• TSSR01 model suitable for TSF01 Toaster
(6 - Fig. A)
• TSSR02 model suitable for TSF02 Toaster
(7 - Fig. A).
Tips and suggestions
• Lightly butter the outside of the
bread, this prevents burning
and helps with the warming
of the lling. Do not butter the
inside of the sandwich.
• For best results use thinly sliced
ingredients and nely grated
cheese.
• For best results use cold meat
(ham, turkey, etc.) at room
temperature, not straight from
the refrigerator.
• Do not overll the sandwich.
• If using a low browning setting,
the lling might not heat through
correctly. In this case, at the end
of the toasting cycle, leave the
toast inside the toasting slot for
longer, or extend the time by
using the reheat button.
How to use (1 - Fig. D):
1) Open the rack with the handles.
2) Place the sandwich inside the rack.
3) Close the sandwich rack handles
together to grip the sandwich in the
middle of the racks.
4) Insert the sandwich rack into the slot
and select a browning level. If a little
more browning is required, you can use
the reheat button to extend the toasting
time.
5) Push the breadlift down until it clicks to
activate the toasting cycle.
6) When the toasting cycle has ended
remove the sandwich rack from the
toaster.
Bun Warmer (2 - Fig. D)
The bun warmer is used to warm small
bread rolls, at bread or pastries.
• TSBW01 model suitable for TSF01
Toaster (8 - Fig. A)
• TSBW02 model suitable for TSF02
Toaster (9 - Fig. A).
How to use (2 - Fig. D):
1) Place the bun warmer on top of the
toaster, making sure the wire feet on
the bottom of the warmer t into the
toaster slots.
2) Place small bread rolls, at bread or
pastries on top of the warmer and set
the browning level to ‘1’ (no higher).
3) Lower the breadlift until it clicks to
activate the toasting cycle.

12
Cleaning and maintenance/What to do if...
4 Cleaning and maintenance
4.1 Cleaning the surfaces
To keep the surfaces in good condition,
clean regularly after use. Let them cool rst.
Never use products that contain abrasives
or chlorine-based acids.
Pour the product onto a damp cloth and
wipe the surface, then wipe over thoroughly
and dry with a soft cloth or a microber cloth
Tips and suggestions
If grease or oil splatters on the
toaster, wipe it off immediately
using a clean, damp cotton cloth.
Any other servicing should be performed by
an authorized service representative.
4.2 Food stains or residues
Do not use metallic sponges or sharp
scrapers as they will damage the surfaces.
Use ordinary non-abrasive products with
the aid of wooden or plastic utensils if
necessary. Wipe over thoroughly and dry
with a soft cloth or a microber cloth.
4.3 Cleaning the crumb tray (Fig. E)
1) Push the Crumb Tray (4 - Fig. A) to
unlock it, then pull to slide it out and
empty it. The Crumb Tray should be
emptied after each use.
Tips and suggestions
The Crumb Tray is hand-
washable. Always dry the tray
thoroughly before putting it back
in the toaster.
2) Put the Crumb Tray back in the toaster.
Press it in rmly until it clicks into
position. Do not use the toaster without
the Crumb Tray in the proper position.
3) Do not use any toaster cover.
4.4 Cleaning the optional sandwich
rack and bun warmer
Wash the sandwich rack and bun warmer by
hand in warm soapy water. After washing,
rinse them and dry them thoroughly with a
soft cloth.
What to do if...
If your toaster should fail to operate, check
the following:
• Check that the toaster is plugged into a
grounded 3-prong electrical outlet. If it is,
unplug the toaster.
• Plug in the toaster.
• If the toaster still does not work, check
the household fuse or circuit breaker.
If the problem cannot be solved:
• See the Smeg Warranty and Service
sections.

The manufacturer reserves the right to make any changes deemed necessary for the improvement of its products
without prior notice. The illustrations and descriptions contained in this manual are therefore not binding and are
merely indicative.