Guangdong Transtek Medical Electronics Co., Ltd.
Zone A, No.105, Dongli Road, Torch Development District,
528437 Zhongshan, Guangdong, China
Distributed by JOICOM CORPORATION
14129 The Merge Street, Building 3 Unit A, Eastvale, CA 92880
Thank you very much for selecting RENPHO Blood
Pressure Monitor TMB-1872-B.
Please read the user manual carefully and thoroughly
to ensure the safe usage of this product, Keep the
manual well for further reference in case you have
problems.
USER MANUAL
Blood Pressure Monitor
Model: TMB-1872-B
Version:1.3

FCC ID: OU9TMB1872BS
FCC Regulatory Compliance
This device complies with part 15 of the FCC Rules. Operation is subject to the
following two conditions: (1) This device may not cause harmful interference, and (2)
this device must accept any interference received, including interference that may
cause undesired operation.
Warning: changes or modifications not expressly approved by the party responsible for
compliance could void the user’s authority to operate the equipment.
Note: This equipment has been tested and found to comply with the limits for a Class B
digital device, pursuant to Part 15 of the FCC Rules. These limits are designed to
provide reasonable protection against harmful interference in a residential installation.
This equipment generates, uses and can radiate radio frequency energy and, if not
installed and used in accordance with the instructions, may cause harmful interference
to radio communications.
However, there is no guarantee that interference will not occur in a particular
installation.
If this equipment does cause harmful interference to radio or television reception, which
can be determined by turning the equipment off and on, the user is encouraged to try to
correct the interference by one or more of the following measures:
- Reorient or relocate the receiving antenna.
- Increase the separation between the equipment and receiver.
- Connect the equipment into an outlet on a circuit different from that to which the
receiver is connected.
- Consult the dealer or an experienced radio/TV technician for help.
RF Exposure Compliance
This equipment complies with FCC radiation exposure limits set forth for an uncontrolled
environment. This transmitter must not be co-located or operating in conjunction with
any other antenna or transmitter.
02
CATALOGUE CATALOGUE
Table of Contents
INTRODUCTION................................................................................3
APP OPERATION GUIDE ..............................................................27
BEFORE YOU START.....................................................................15
MEASUREMENT.............................................................................21
DATA MANAGEMENT.....................................................................24
Recall the Records
Delete the Records
INFORMATION FOR USERS.........................................................35
Tips for measurement
Maintenances
ABOUT BLOOD PRESSURE...........................................................37
What are systolic pressure and diastolic pressure?
What is the standard blood pressure classification?
Irregular heartbeat detector
Why does my blood pressure fluctuate throughout the day?
Why do I get a different blood pressure at home compared to the hospital?
Is the result the same if measuring on the right arm?
TROUBLESHOOTING.....................................................................42
SPECIFICATIONS............................................................................43
General Description
Indications for Use
Contraindications
Measurement Principle
Safety Information
LCD Display Signal
Monitor Components
List
Tie the Cuff
Start the Measurement
The Choice of Power Supply
Installing and Replacing the Batteries
Setting Date, Time
Select the User
EMC GUIDANCE............................................................................45
01
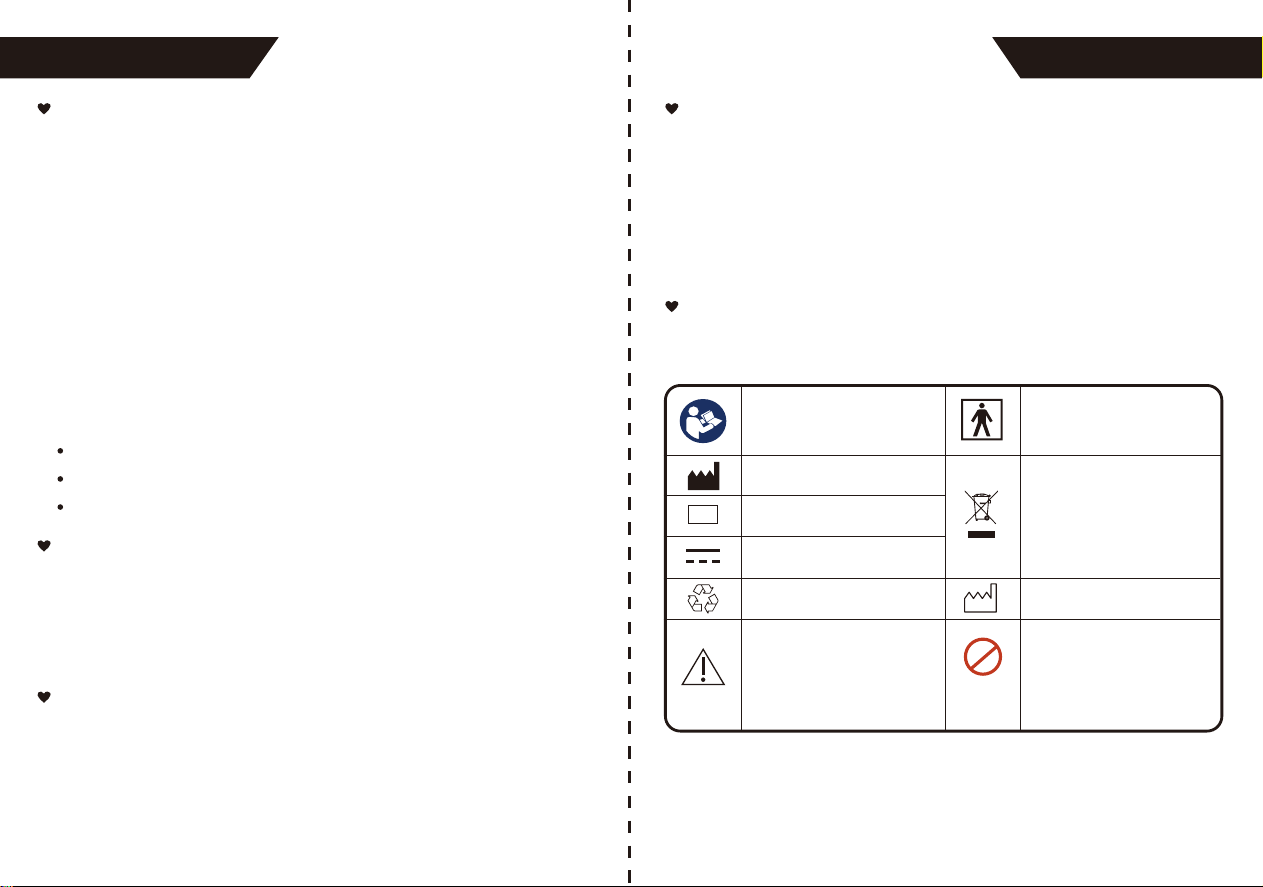
Symbol for “THE OPERATION
GUIDE MUST BE READ”
Symbol for “MANUFACTURER”
Symbol for “SERIAL NUMBER”
Symbol for “DIRECT CURRENT”
Symbol for “RECYCLE”
Symbol for “MANUFACTURE
DATE”
MR Unsafe
To identify an item which poses
unacceptable risks to the patient,
medical staff or other persons
with the MR environment.
Caution: These notes must be
observed to prevent any damage
to the device.
Symbol for “TYPE BF APPLIED
PARTS”
Symbol for “ENVIRONMENT
PROTECTION - Electrical waste
products should not be disposed
of with household waste. Please
recycle where facilities exist.
Check with your local authority
or retailer for recycling advice”
SN
MR
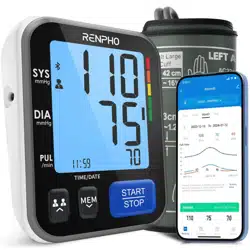
Thank you for selecting RENPHO arm type blood pressure
monitor (TMB-1872-B). The monitor features blood pressure
measurement, pulse rate measurement and the result storage.
The design provides you with two years of reliable service.
Readings taken by the TMB-1872-B are equivalent to those
obtained by a trained observer using the cuff and stethoscope
auscultation method.
This manual contains important safety and care information,
and provides step-by-step usage instructions for using the
product. Read the manual thoroughly before using the product.
The Blood Pressure Monitor is a digital monitor intended for use in
measuring blood pressure and heartbeat rate with arm circumference
ranging from 22cm to 42cm (about 8¾˝-16½˝).
It's intended for indoor use by adults only.
0403
INTRODUCTION
General Description
This product uses the Oscillometric Measuring method to detect
blood pressure. Before every measurement, the unit establishes a
“zero pressure” equivalent to the atmospheric pressure. Then it
starts inflating the arm cuff, meanwhile, the unit detects pressure
oscillations generated by beat-to-beat pulsatile, which is used to
determine the systolic and diastolic pressure, and also pulse rate.
Measurement Principle
The signs below might be in the user manual, labeling or other
components. They are the requirement of standard and use.
Safety Information
Indications for Use
1. The device should not be used by any person who may be
suspected of, or is pregnant.
2. The device is not suitable for patients with implanted, electrical
devices, such as cardiac pacemakers, defibrillators.
Contraindications
Features:
2.36*2.91inch Digital LCD display
Maximum 120 records per each user
Measuring during inflation technology
INTRODUCTION
* This device is intended for adult use in homes only.
* The device is not suitable for neonatal patients, pregnant women,
patients with implanted, electronic devices, patients with pre-ec-
lampsia, premature ventricular beats, atrial fibrillation, peripheral,
arterial disease and patients undergoing intravascular therapy or
arterio-venous shunt or people who received a mastectomy. Please
consult your doctor prior to using the unit if you suffer from
illnesses.
* The device is not suitable for measuring the blood pressure of
children. Ask your doctor before using it on older children.
*
The device is not intended for patient transport outside a health-
care
facility.
* The device is not intended for public use.
* This device is intended for non-invasive measuring and monitoring
of arterial blood pressure. It is not intended for use on extremities
other than the arm or for functions other than obtaining a blood
pressure measurement.
* Do not confuse self-monitoring with self-diagnosis. This unit
allows you to monitor your blood pressure. Do not begin or end
medical treatment without asking a physician for treatment advice.
* If you are taking medication, consult your physician to determine
the most appropriate time to measure your blood pressure. Never
change prescribed medication without consulting your physician.
* Do not take any therapeutic measures on the basis of a self
measurement. Never alter the dose of medicine prescribed by a
doctor. Consult your doctor if you have any questions about your
blood pressure.
0605
INTRODUCTION INTRODUCTION
CAUTION
* When the device is used to measure patients who have common
arrhythmias such as atrial or ventricular premature beats or atrial
fibrillation, the best result may occur with deviation. Please consult
your physician about the result.
* Don't kink the connection tube during use, otherwise, the cuff
pressure may continuously increase which can prevent blood flow
and result in injury to the PATIENT.
* When using this device, please pay attention to the following
situation which may interrupt blood flow and influence blood
circulation of the patient, thus causing injury to the patient: connec-
tion
tubing kinking too frequent and consecutive multiple measure-
ments; the application of the cuff and its pressurization on any arm
where intravascular access or therapy, or an arterio-venous (A-V)
shunt, is present; inflating the cuff on the side of a mastectomy.
* Warning: Do not apply the cuff over a wound; otherwise it can
cause further injury.
*Do not inflate the cuff on the same limb which other monitoring ME
equipment is applied around simultaneously, because this could
cause temporary loss of function of those simultaneously-used
monitoring ME equipment.
*On the rare occasion of a fault causing the cuff to remain fully
inflated during measurement, open the cuff immediately. Prolonged
high pressure (cuff pressure > 300mmHg or constant pressure >
15mmHg for more than 3 minutes) applied to the arm may lead to
danger.
*Please check that operation of the device does not result in
prolonged impairment of patient blood circulation.
CAUTION
0807
* When measurement, please avoid compression or restriction of
the connection tubing.
* The device cannot be used with HF surgical equipment at the
same time.
* The ACCOMPANYING DOCUMENT shall disclose that the
SPHYGMOMANOMETER was clinically investigated according to
the requirements of ISO 81060-2
* To verify the calibration of the AUTOMATED SPHYGMOMANOM-
ETER, please contact the manufacturer.
* This device is contraindicated for any female who may be susp-
ected of, or is pregnant. Besides providing inaccurate readings, the
effects of this device on the fetus are unknown.
* Too frequent and consecutive measurements could cause
disturbances in blood circulation and injuries.
* This unit is not suitable for continuous monitoring during medical
emergencies or operations.Otherwise, the patient’s arm and fingers
will become anaesthetic, swollen and even purple due to a lack of
blood.
* When not in use, store the device in a dry room and protect it
against extreme moisture, heat, lint, dust and direct sunlight. Never
place any heavy objects on the storage case.
* This device may be used only for the purpose described in this
booklet. The manufacturer cannot be held liable for damage caused
by incorrect application.
*This device comprises sensitive components and must be treated
with caution. Observe the storage and operating conditions
described in this booklet.
INTRODUCTION INTRODUCTION
CAUTION
* The equipment is not AP/APG equipment and not suitable for use
in the presence of a flammable anesthetic mixture with air of with
oxygen or nitrous oxide.
* Warning: No servicing/maintenance while the ME equipment is in
use.
* The patient is an intended operator.
* The patient can measure data and change batteries under normal
circumstances and maintain the device and its accessories
according to the user manual.
* To avoid measurement errors, please avoid the condition of strong
electromagnetic field radiated interference signal or electrical fast
transient/burst signal.
* The blood pressure monitor and the cuff are suitable for use within
the patient environment. If you are allergic to polyester, nylon or
plastic, please don't use this device.
* During use, the patient will be in contact with the cuff. The
materials of the cuff have been tested and found to comply with
requirements of ISO 10993-5 and ISO 10993-10. It will not cause
any potential sensation or irritation reaction.
* Adaptor is specified as a part of ME EQUIPMENT.
* If you experience discomfort during measurement, such as pain in
the arm or other complaints, press the START/STOP button to
release the air immediately from the cuff. Loosen the cuff and
remove it from your arm.
* If the cuff pressure reaches 40 kPa (300 mmHg), the unit will
automatically deflate. Should the cuff not deflate when the pressure
reaches 40 kPa (300 mmHg), detach the cuff from the arm and
press the START/STOP button to stop inflation.
CAUTION
1009
* Before use, make sure the device functions safely and is in proper
working condition. Check the device, do not use the device if it is
damaged in any way. The continuous use of a damaged unit may
cause injury, improper results, or danger.
* Do not wash the cuff in a washing machine or dishwasher!
* The service life of the cuff may vary by the frequency of washing,
skin condition, and storage state. The typical service life is 10000
times.
* It is recommended that the performance should be checked after
maintenance and repair, by retesting at least the requirements in
limits of the error of the cuff pressure indication and air leakage
(testing at least at 50mmHg and 200mmHg).
* Please dispose of ACCESSORIES, detachable parts, and the ME
EQUIPMENT according to the local guidelines.
* Manufacturer will make available on request circuit diagrams,
component part lists, descriptions, calibration instructions, etc., to
assist to service personnel in parts repair.
* The plug/adapter plug pins insulate the device from the main
supply. Do not position the device in a position where it is difficult to
disconnect from the supply mains to safely terminate operation of
ME equipment.
* The operator shall not touch the output of batteries/adapter and
the patient simultaneously.
* Cleaning: Dust environment may affect the performance of the
unit. Please use a soft cloth to clean the whole unit before and after
use. Don’t use any abrasive or volatile cleaners.
* The device doesn’t need to be calibrated within two years of
reliable service.
INTRODUCTION
CAUTION
INTRODUCTION
* If you have any problems with this device, such as setting up,
maintaining or using, please contact the SERVICE PERSONNEL of
RENPHO. Don’t open or repair the device by yourself in the event
of malfunctions. The device must only be serviced, repaired and
opened by individuals at authorized sales/service centers.
* Please report to RENPHO if any unexpected operation or events
occur.
* Keep the unit out of reach of infants, young children or pets to
avoid inhalation or swallowing of small parts. It is dangerous or
even fatal.
* Be careful against strangulation due to cables and hoses,
particularly due to excessive length.
* At least 30 min required for ME equipment to warm from the
minimum storage temperature between uses until it is ready for the
intended use. At least 30 min required for ME equipment to cool
from the maximum storage temperature between uses until it is
ready for the intended use.
* This equipment needs to be installed and put into service in
accordance with the information provided in the ACCOMPANYING
DOCUMENTS;
* Wireless communications equipment such as wireless home
network devices, mobile phones, cordless telephones and their
base stations, walkie-talkies can affect this equipment and should
be kept at least a distance d away from the equipment. The
distance is calculated by the MANUFACTURER from the 80MHz to
5.8 GHz column of Table 4 and Table 9 of IEC 60601-1-2 as
appropriate.
CAUTION
1211
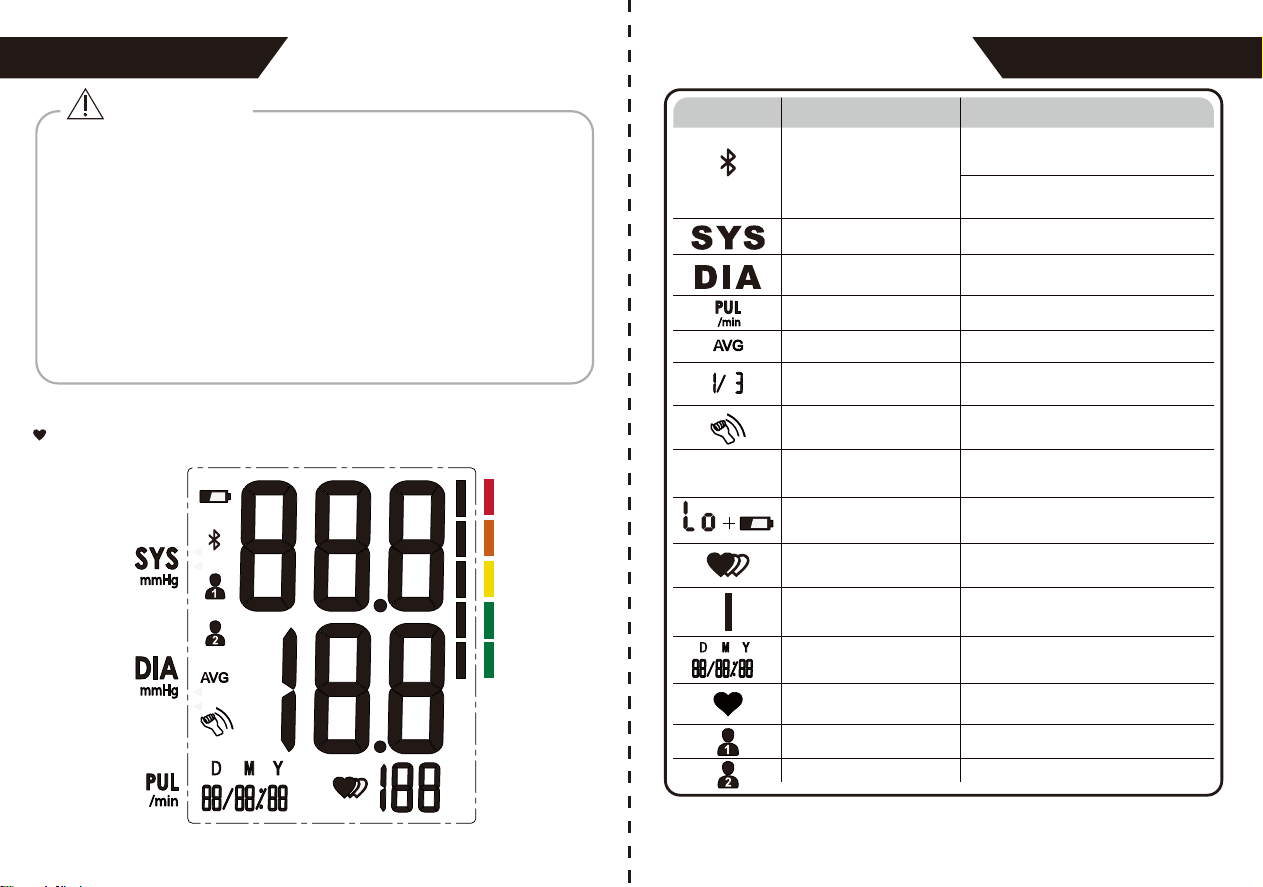
LCD Display Signal
* Please use ACCESSORIES and detachable parts specified/
authorised by MANUFACTURE. Otherwise, it may cause damage
to the unit or danger to the user/patients.
* There are no luer lock connectors in the construction of tubing.
There is a possibility that they might be inadvertently connected to
intravascular fluid systems, allowing air to be pumped into a blood
vessel.
* Please use the device under the environment which is indicated in
the user manual. Otherwise, the performance and lifetime of the
device will be impacted and reduced.
INTRODUCTION
CAUTION
INTRODUCTION
SYMBOL DESCRIPTION EXPLANATION
Systolic blood pressure
Bluetooth
Diastolic blood pressure
Pulse display
Average value
Memory
Motion indicator
mmHg
Low battery
Irregular heartbeat
Blood pressure
level indicator
Current Time
Heartbeat
User 1
User 2
High blood pressure
When flashing, it means Bluetooth
is pairing
When it is always on, it means that
Bluetooth is connected to Bluetooth
Low blood pressure
Pulse in beats per minute
The average value of blood pressure
Indicate it is in memory mode and
which group of memory it is.
Motion may result in an inaccurate
measurement
Measurement Unit of the blood pressure
(1mmHg=0.133kPa)
Batteries are low and need to be
replaced
Blood pressure monitor is detecting an
irregular heartbeat during measurement.
Indicate the blood pressure level
Day/Month/Year, Hour/Minute
Blood pressure monitor is detecting a
heartbeat during measurement.
Start measurement for User 1
Start measurement for User 2
mmHg
PM
PM
TIME/D ATE
MEM
1413
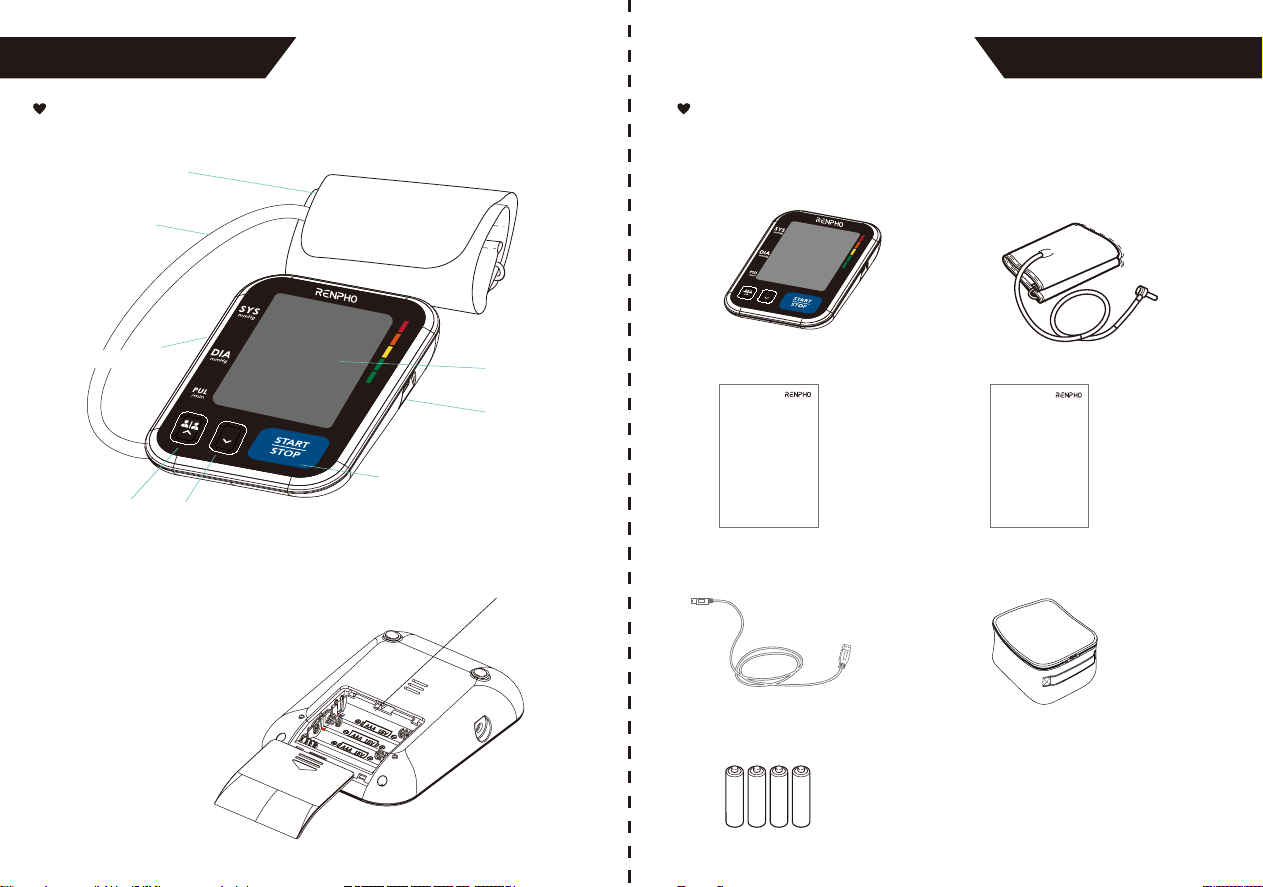
INTRODUCTION INTRODUCTION
Monitor Components List
USER BUTTON
MEM BUTTON
START/STOP BUTTON
CUFF
AIR HOSE
LCD DISPLAY
AIR CONNECTOR PLUG
BATTERY COMPARTMENT
Component list of pressure
measuring system
1. Cuff
2. Air pipe
3. PCBA
4. Pump
5. Valve
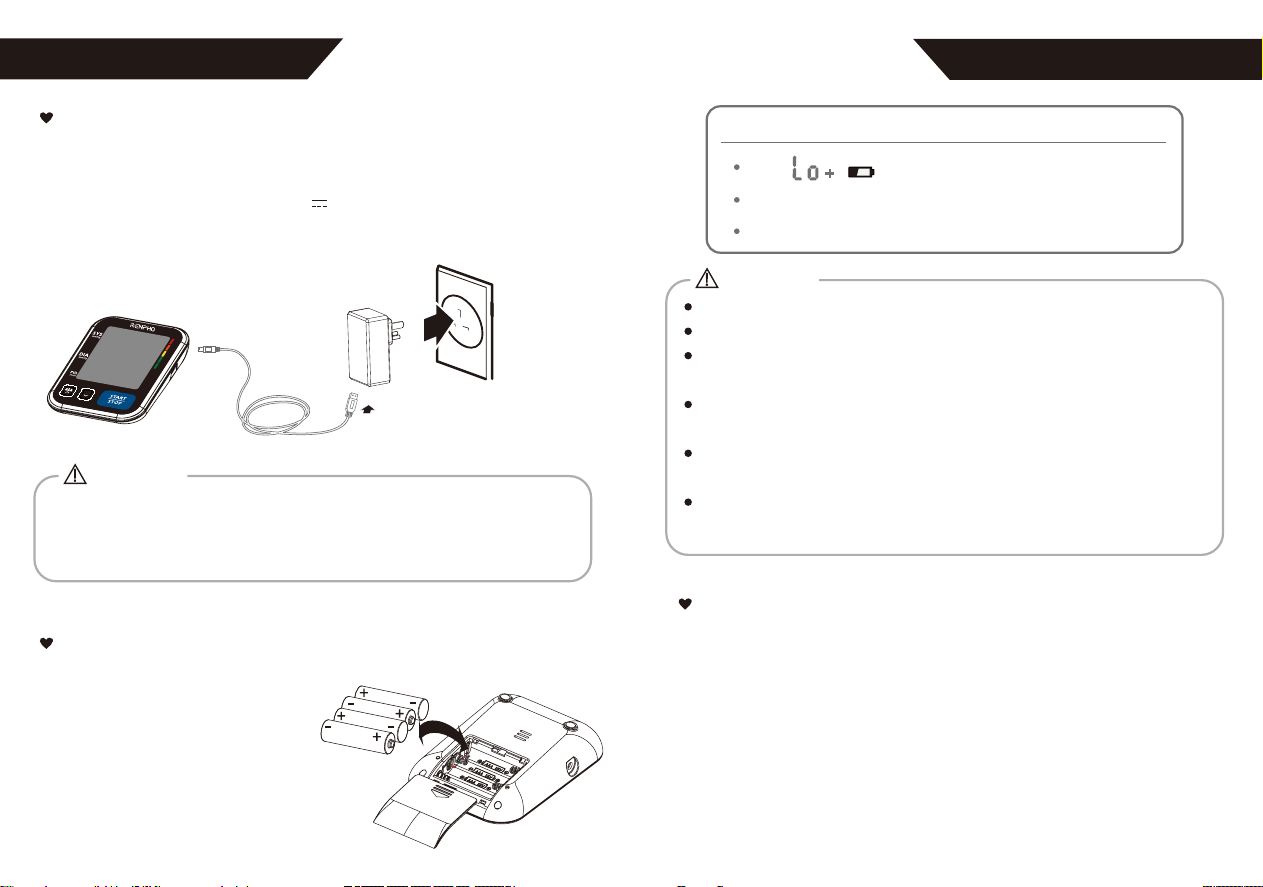
1. Blood Pressure Monitor
(TMB-1872-B)
2. Cuff (Type BF applied part)
(8.66~16.53in/22~42cm)
USB INTERFACE
TIME/
DATE
MEM
5. USB Cable
3. User Manual
6. Carrying Case
7. 4*AAA Batteries
Version:1.0
User Manual
Blood Pressure Monitor
Model: TMB-1872-B
4. Quick Guide
Quick Guide
Blood Pressure Monitor
Model: TMB-1872-B
Do not use new and used batteries together.
Do not use different types of batteries together.
Do not dispose of the batteries in fire. Batteries may explode or
leak.
Remove batteries if the device is not likely to be used for some
time.
Worn batteries are harmful to the environment. Do not dispose
with daily garbage.
Remove the old batteries from the device following your local
recycling guidelines.
CAUTION
BEFORE YOU START
BEFORE YOU START
Setting Date, Time
It is important to set the clock before using your blood pressure
monitor, so that a time stamp can be assigned to each record that is
stored in the memory. (The setting range of the year: 2020--2060)
Replace the batteries whenever the below happens
The shows
The display is dim
The display does not light up
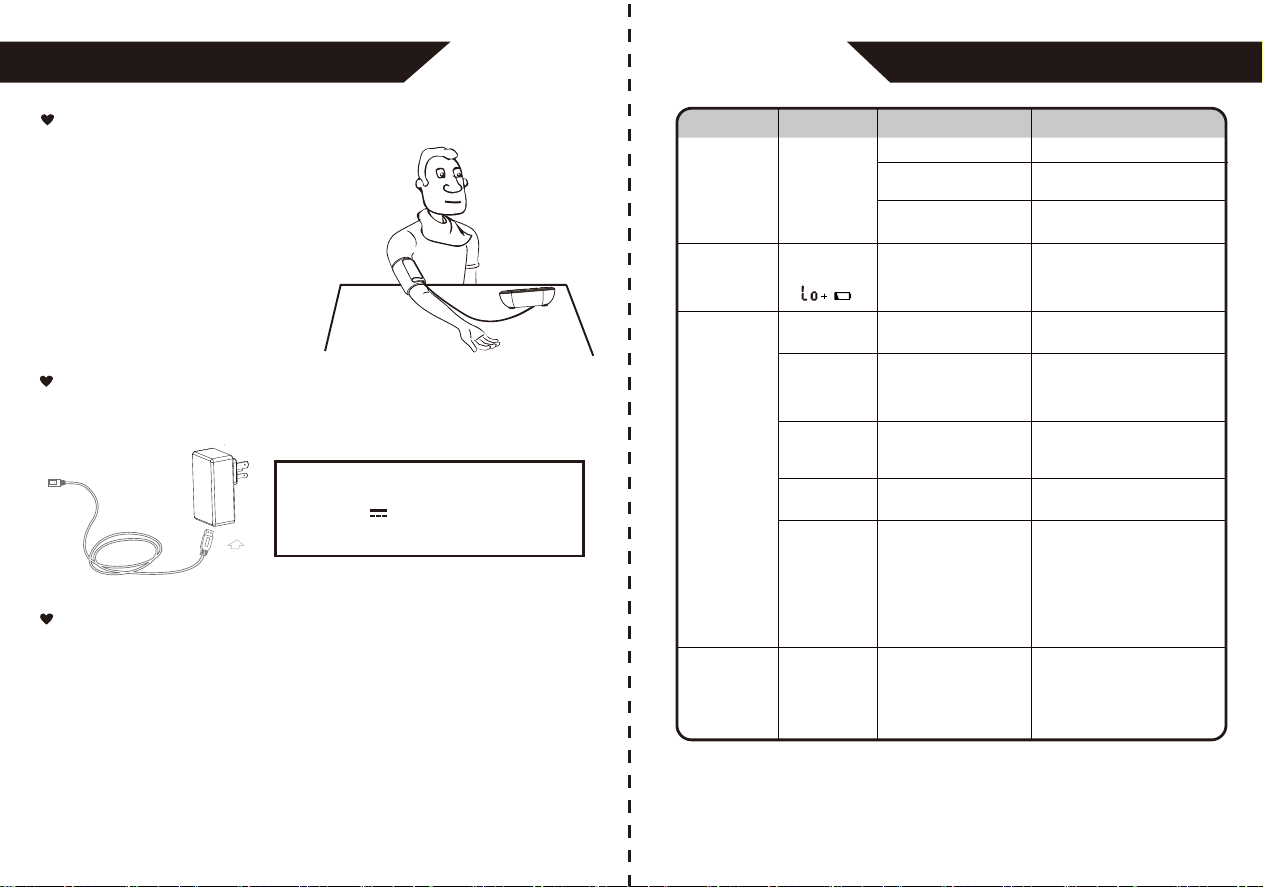
In order to get the best effect and protect your monitor, please use
the right battery and special power adaptor which complies with
local safety standard.
CAUTION
The Choice of Power Supply
Installing and Replacing the Batteries
1. Battery-powered mode:
6VDC 4*AAA batteries
2. AC adaptor powered mode: 5V 1A
Please use the AC adaptor (not included) and USB cable just
like the following picture:
• Slide off the battery cover.
• Install the batteries by matching
the correct polarity, as shown.
• Place the battery cover back.
AC adaptor
1615
TIME/
DATE
MEM
BEFORE YOU START
BEFORE YOU START
1817
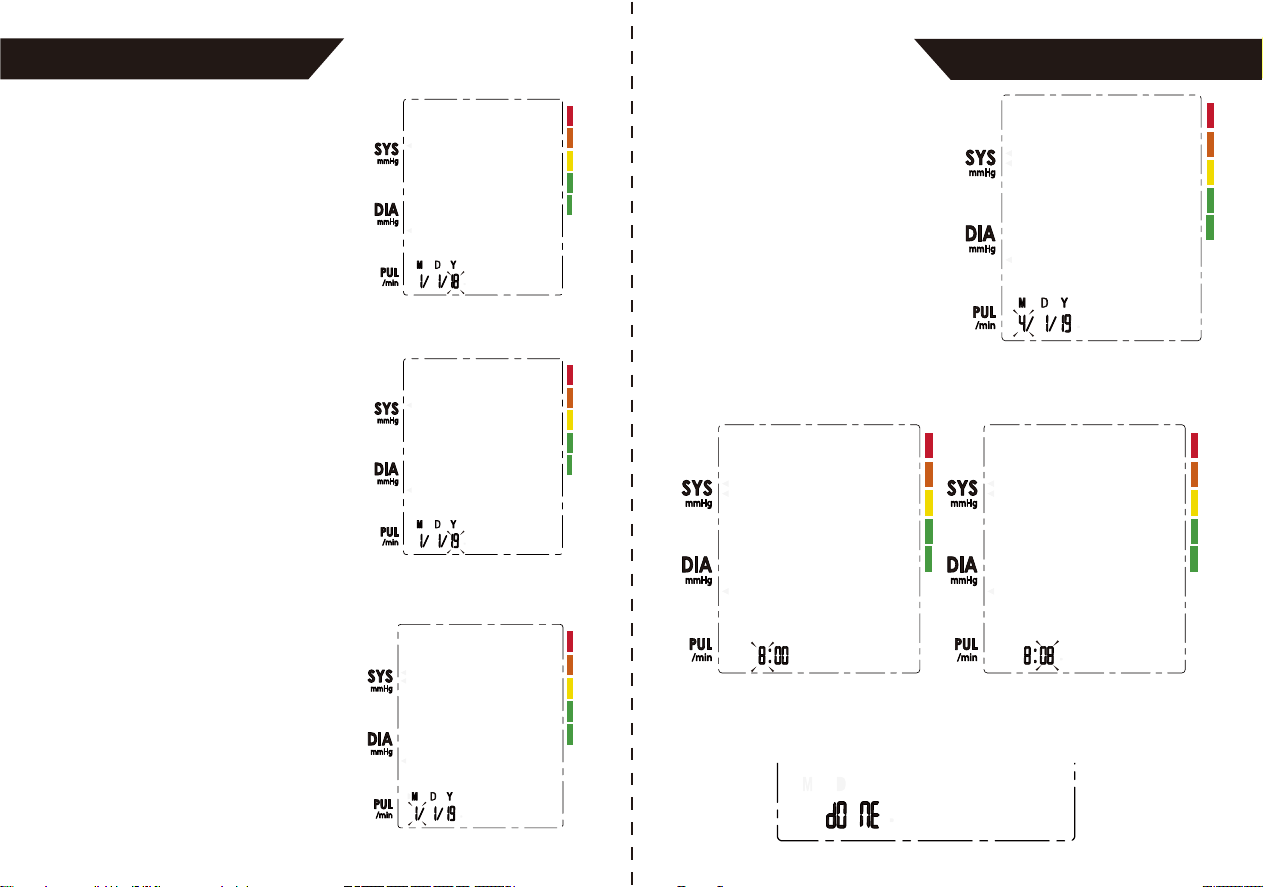
1. When the monitor is off,
press and hold the
“START/STOP” button for 3
seconds to enter the mode
for year setting.
3. When you get the right year,
press the “START/STOP”
button to set down and turn
to the next step.
2. Press the “USER” button or
“MEM” button to change the
[YEAR]. Each press will
increase or decrease the
numeral by one in a cycling
manner.
4. Repeat step 2 and 3 to set
the [MONTH] and [DAY].
5. Repeat step 2 and 3 to set the [HOUR] and [MINUTE].
6. After the [MINUTE] is set, the LCD will display “donE” first, then
display all the settings you have done and then it will shut off.
BEFORE YOU START BEFORE YOU START
Tie the Cuff
1. Remove all jewelry, such as
watches and bracelets from
your left arm. Note: If your doctor
has diagnosed you with poor
circulation in your left arm, use your
right arm.
2. Roll or push up your sleeve to
expose the skin. Make sure your
sleeve is not too tight.
3. Hold your arm with your palm facing up and
tie the cuff on your upper arm, then position the
tube off-center toward the inner side of arm in
line with the little finger. Or position the artery
mark over the main artery (on the inside of your arm).
Note: Locate the main artery by pressing with 2 fingers
approximately 2cm/0.79in above the
bend of your elbow on the
inside of your left arm. Identify
where the pulse can be felt
the strongest. This is your main
artery.
4. The cuff should be snug but not too tight. You should be able to
insert one finger between the cuff and your arm.
2~3cm/0.79~1.18in
2019
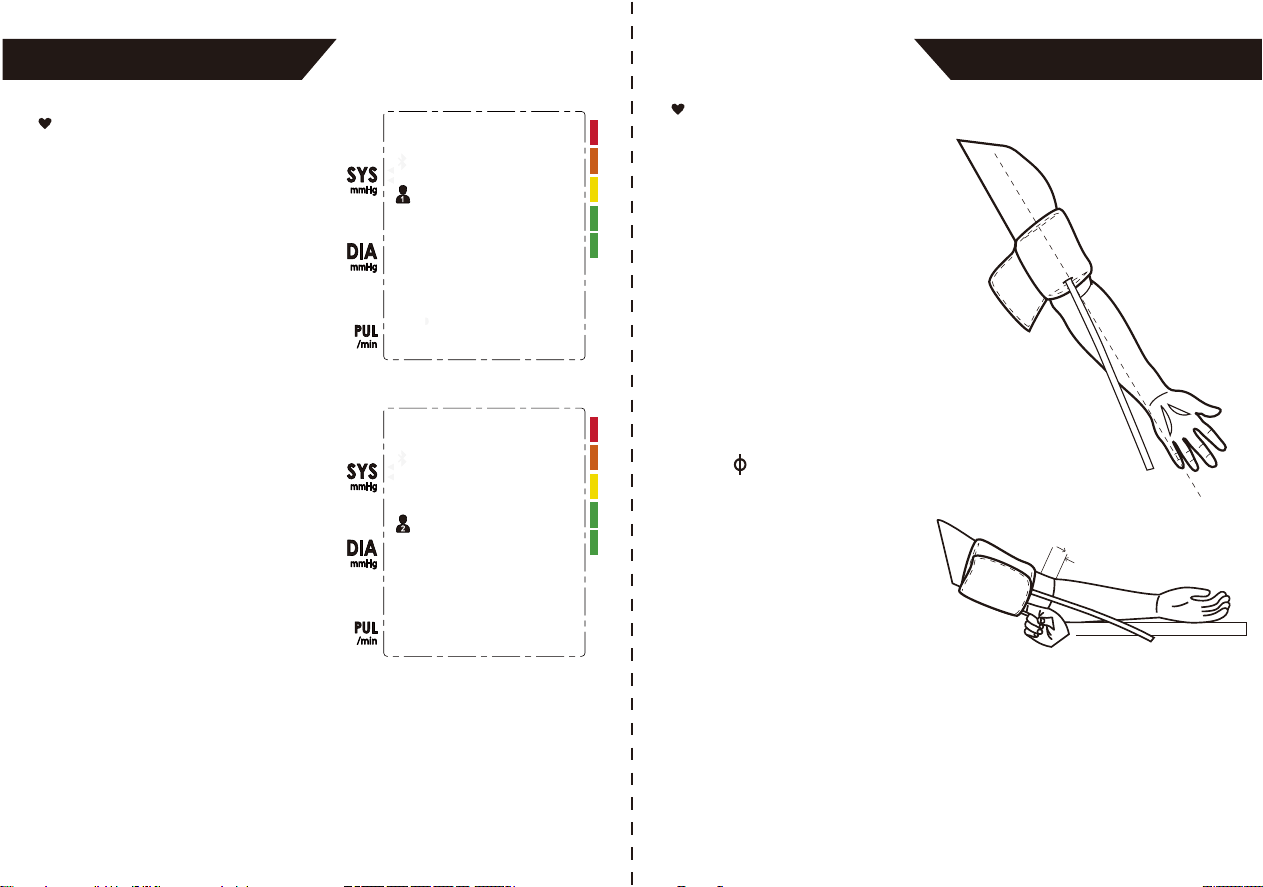
Select the User
1. When the monitor is off,
press the “USER ” button
shortly to enter the user
setting mode.
2. Then press the “ USER ”
button again to select the user
ID between user 1 and user 2.
3. After selecting the user ID, press the “START/STOP” button
to confirm and it will start to measure.
MEASUREMENT MEASUREMENT
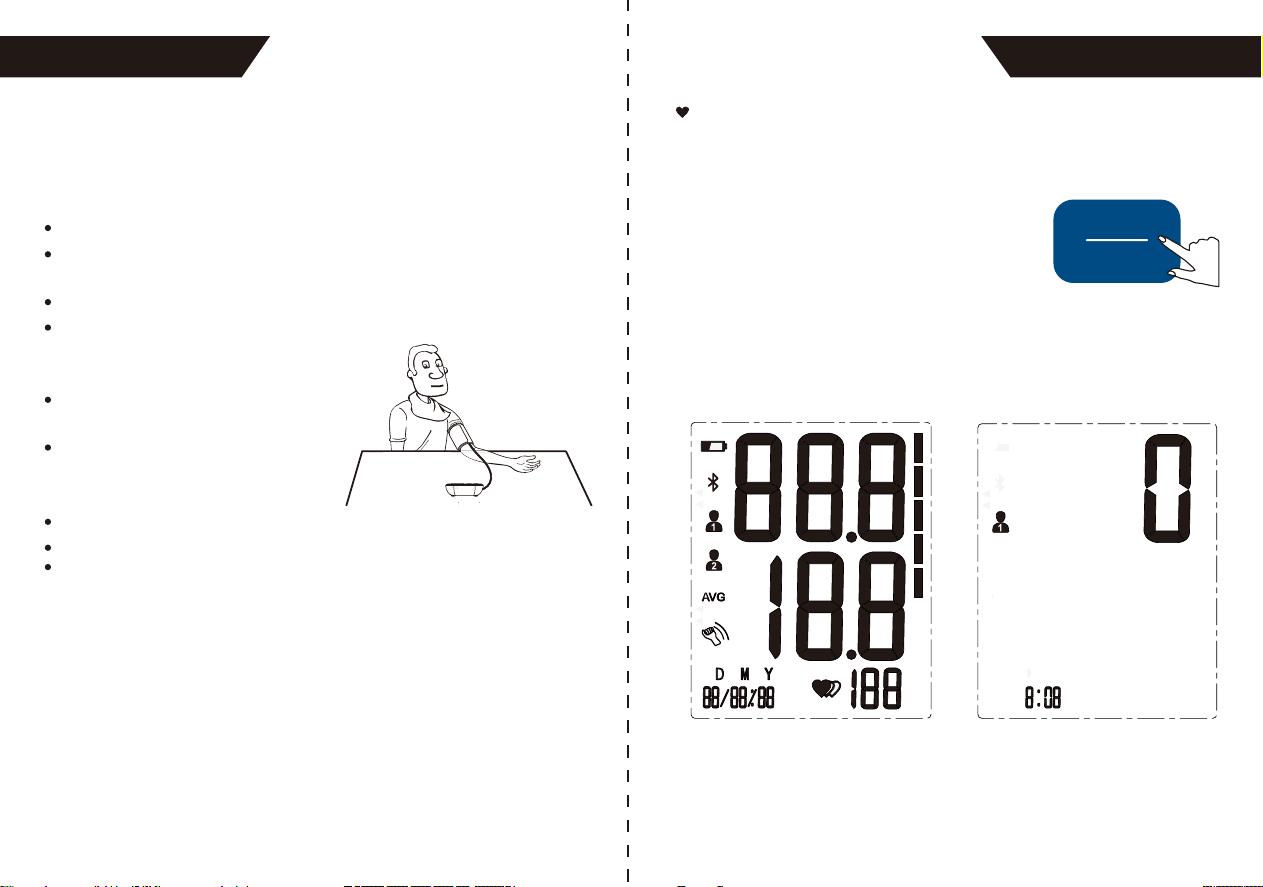
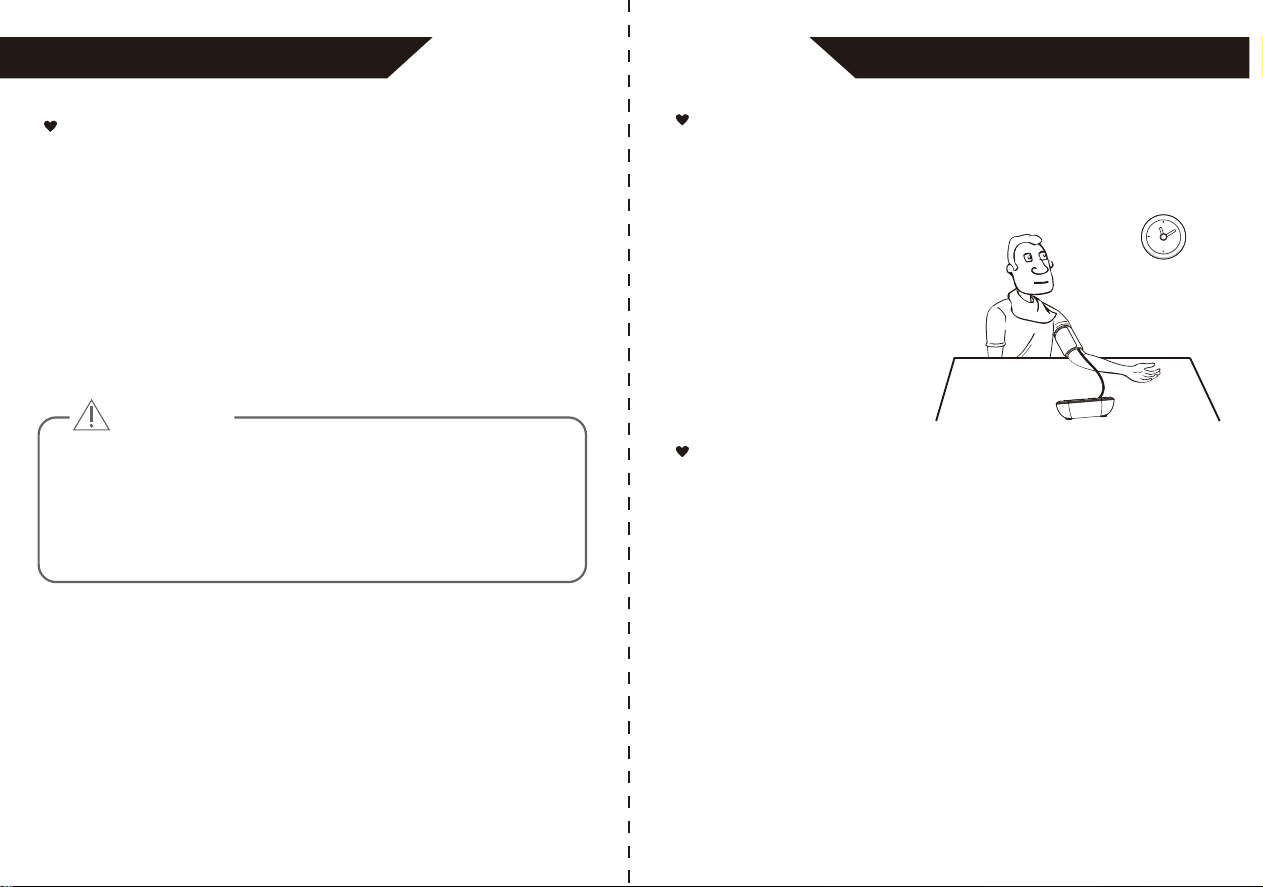
5. Sit comfortably with your tested arm resting on a flat surface. Place
your elbow on a table so that the cuff is at the same level as your
heart. Turn your palm upwards. Sit upright in a chair, and take 5-6
deep breaths.
6. Helpful tips for Patients, especially for Patients with Hypertension:
Rest for 5 minutes before the first measurement.
Wait at least 3 minutes between measurements.
This allows your blood circulation to recover.
Take the measurement in a silent room.
The patient must relax as much as possible
and do not move or talk during the
measurement procedure.
The cuff should maintain at the same
level as the right atrium of the heart.
Please sit comfortably. Do not cross
your legs and keep your feet flat on
the ground.
Keep your back against the backrest of the chair.
For a meaningful comparison, try to measure under similar conditions.
For example, take daily measurements at approximately the same time,
on the same arm, or as directed by a physician.
Start the Measurement
1. When the monitor is off, press the “START/
STOP” button to turn on the monitor, and it
will finish the whole measurement.
START
STOP
LCD display
PM
Adjust the zero.
2221

MEASUREMENT
2. Press the “Start/Stop” button to power
off, otherwise it will turn off within 1
minute.
Inflating and measuring. Display and save the results.
START
STOP
Recall the Records
1. When the monitor is off, please press
the “MEM” button to show the recent
record. If the records are less than 3
groups, it will display the latest record
instead. Take user 1 for example.
2. Press the “MEM” button to get the
record you want.
The date and time of the record will be
shown alternately.
The corresponding
time is 10:38.
The current No. is No. 1.
The corresponding
date is 2019 year
July 1st.
2423
DATA MANAGEMENT
DATA MANAGEMENT DATA MANAGEMENT
2625
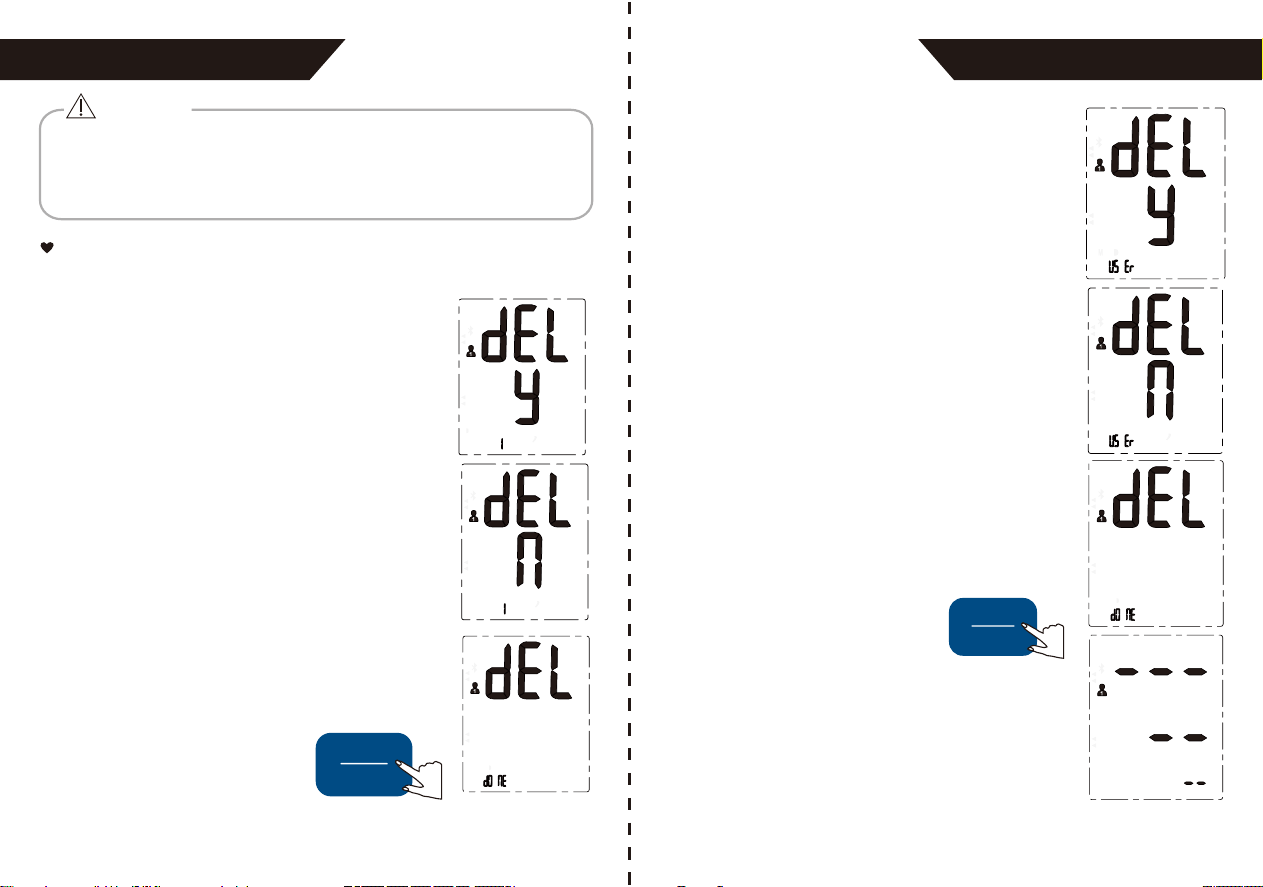
If you did not get the correct measurement, you can delete the
results by following the steps below.
A: Delete one record
Delete the Records
1. Hold pressing the “MEM” button for 3 seconds
when the monitor is in the memory recall mode,
the flash display “dELy 1 +USER ID” will show.
2. Press the “USER” button or “MEM” button and the
flash displays “dEL n” or “dEL y”.
The most recent record (1) is shown first. Each new measurement
is assigned to the first (1) record. All other records are pushed back
one digit (e.g., 2 becomes 3, and so on), and the last record (120)
is dropped from the list.
CAUTION
B: Delete all records
1. Press and hold the “MEM” button and
“USER” button for 3 seconds when the
monitor is in the memory recall mode, and
the flash display “USER ID+dELy U5Er”
will show.
3. Press the “START/STOP” button shortly to confirm
deleting this group result when it shows “dEL y”
and display “USER ID + dEL donE”, then the
device will show the latest record.
Tips: Press the “START/STOP”
when it shows “dEL n”, it will drop
out.
START
STOP
2. Press the “USER” button or “MEM” button
and the flash displays “dEL n” or “dEL y”.
4. If there is no record, it will display like
the right picture.
3. Press the “START/STOP” button shortly
to confirm deleting this group result
when it shows “dEL y” and displays
“USER ID + dEL donE”, then the device
will turn off.
Tips: Press the “START/STOP”
when it shows “dEL n”, it
will drop out.
START
STOP

2827
APP OPERATION GUIDE APP OPERATION GUIDE
Download
1. Search and download "Renpho Health" from Apple Store /
Google Play or scan the QR code below to download the app.
(The images shown are for illustration purposes only and may not be
an exact representation due to app update)
Add Device
2. Open the app. Register with your email
address and fill in your personal
information (this is required for
calculating accurate health measure-
ments). If you already have an account,
tap Log in.
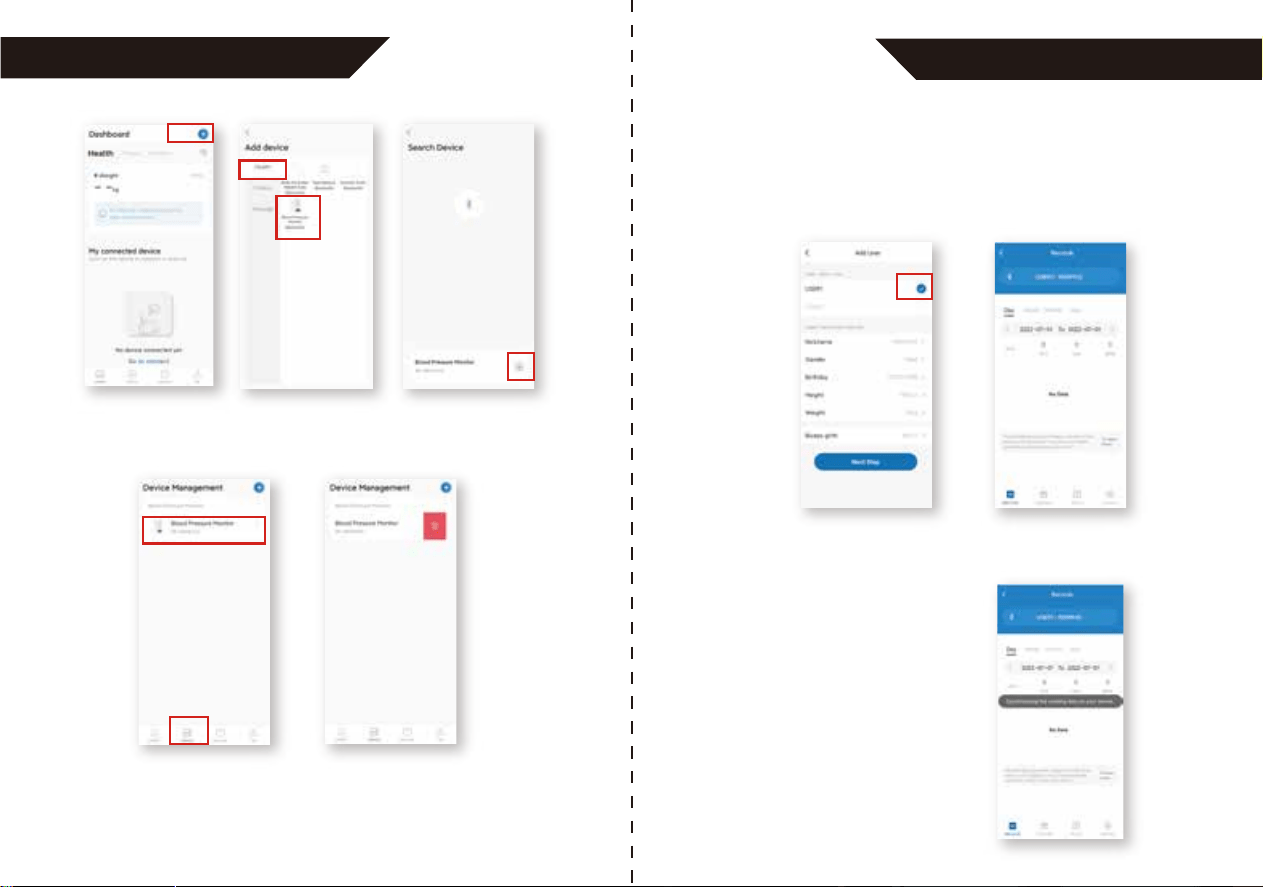
1. After logging in, you will be directed to the homepage as shown
below.
2. Activate Bluetooth on your phone, press the User button of the
blood pressure monitor (the Bluetooth icon will flash on the display).
3. A pop-up window will appear to allow you to pair your phone with
the device.
Alternatively, click “ ” on the right corner to connect manually.
1. Activate Bluetooth on your smartphone.
2. Click “ ” on the right corner.
3. Click “Blood Pressure Monitor (Bluetooth)” to search the device.
4. Press the User button on the blood pressure monitor
(the Bluetooth icon will flash on the display)
5. Click to connect.
3029
APP OPERATION GUIDE
APP OPERATION GUIDE
Add User 1
Synchronize the Existing Data
Select the “Blood Pressure Monitor” on the “Device” page to connect
for next use. Swipe left and click to delete to disconnect the device.
After pairing, you need to add a user profile if you connect the device
for the first time. After filling in the user information as shown below,
click “Next step” to save and you will be directed to the homepage
(“Records” interface). The “Bluetooth” icon will light up once the
device has been paired successfully.
After entering the homepage, you
need to synchronize the existing
measurement data of the device on
the app.
Note: The blood pressure monitor can be paired with one device only. If you
want to connect it with another device, please ensure it is fully disconnected
from any prior device.
3231
APP OPERATION GUIDE APP OPERATION GUIDE
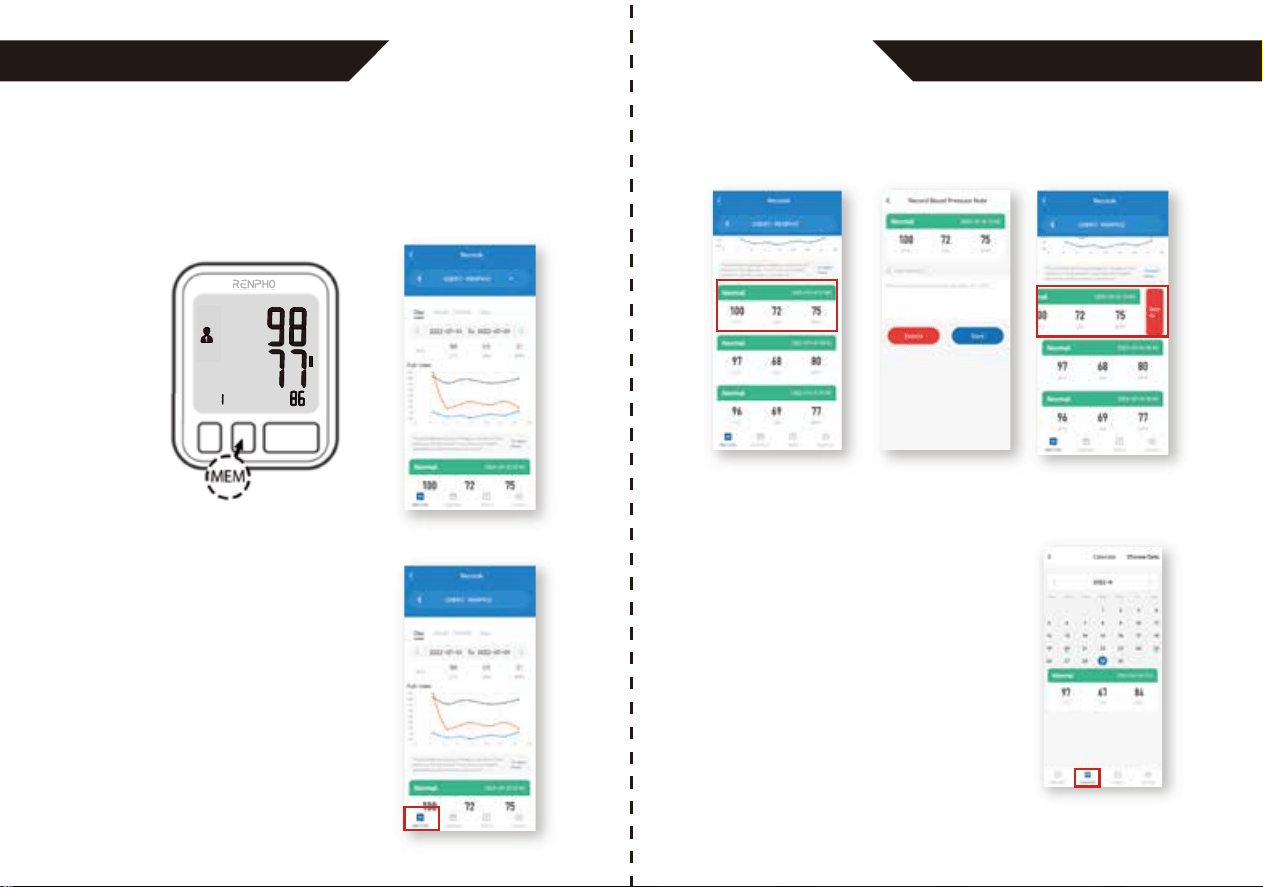
Check Measurement Record
Check Calendar
Check your measurement data on a
daily, weekly, monthly or yearly
basis on the “Records” page.
1. Press the "MEM" button on the blood pressure monitor.
2. Restart the app and enter the “Records” page.
3. The data will be synchronized once the “Bluetooth” icon lights up.
Note: The same measurement data can be synchronized for one
account only.
Click any measurement data to add remarks that will be displayed
along with it.
1. Enter the “Calendar” page to get a
holistic view of the dates of measure-
ment.
2. Click the day with blue dot to check
the measurement data of that day.
3. Click the data to add remarks or swipe
left to delete as mentioned in the part
of “Check Measurement Record”.
Swipe left and click to delete the data.
3433
APP OPERATION GUIDE APP OPERATION GUIDE
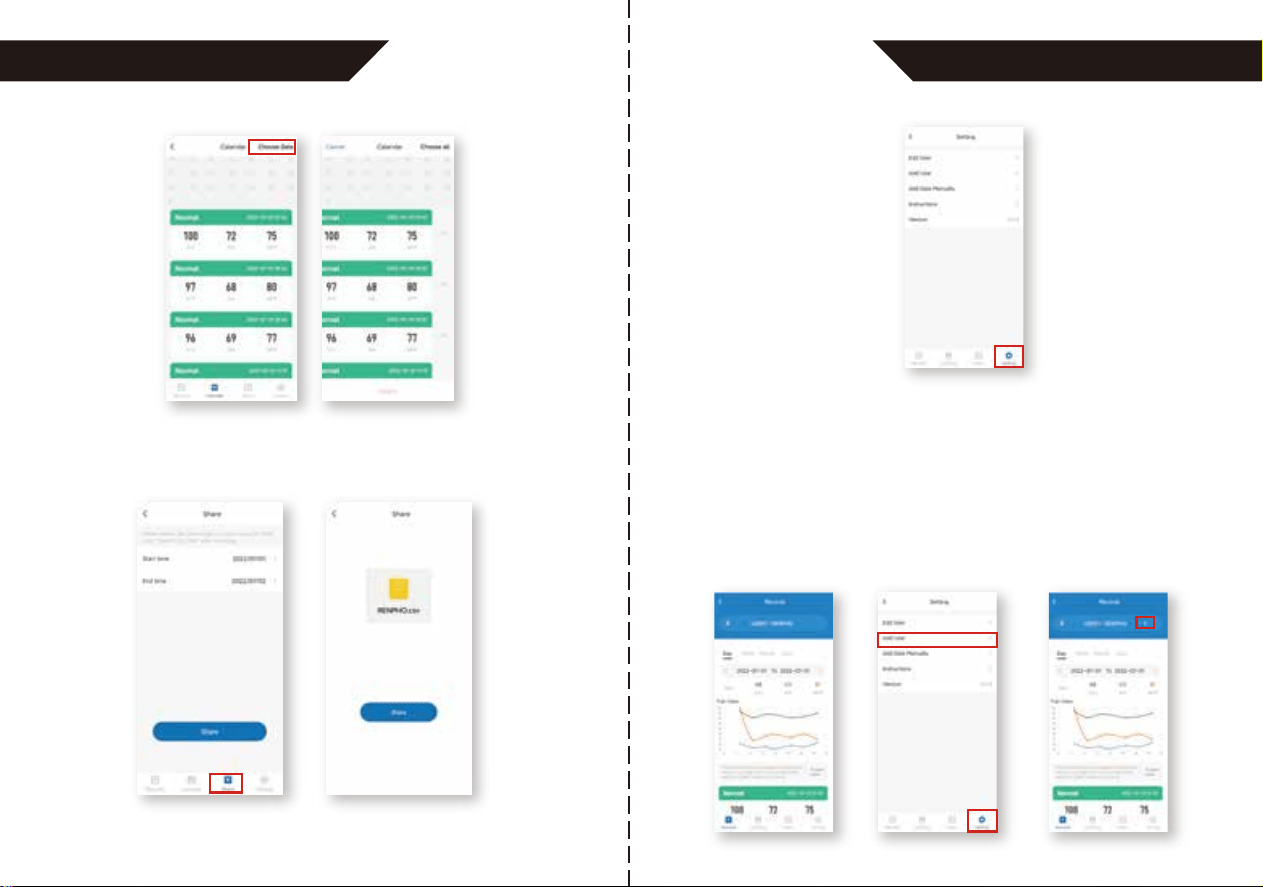
You can click “Choose Data” to delete multiple data at once.
Share
Enter the “Share” page and select the time period to share your
measurement results in CSV file.
Setting
Enter the “Setting” page
to adjust the following
functions.
Add User 2
1. Ensure the device is paired with the app (“Bluetooth” icon solid on
the “Records” interface).
2. Enter the “Setting” page and select “Add User”. Add the user profile
following the in-app instructions.
3.
After adding the user, you can switch between “User 1” and “User 2”
on the “Records” interface. Ensure the device has been disconnected
from the app (“Bluetooth” icon turned off) when you switch the
user.
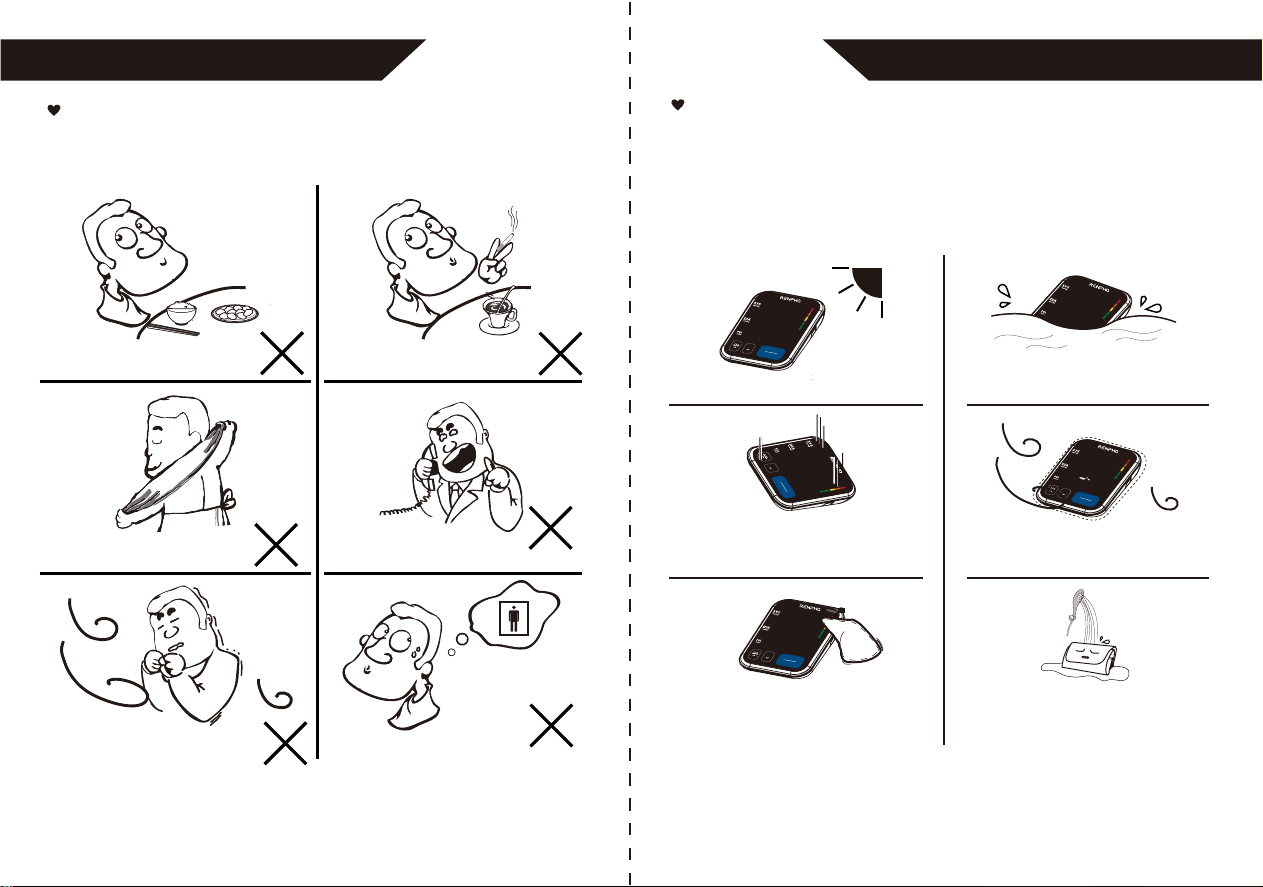
Tips for Measurement
Measurements may be inaccurate if taken under the following
circumstances.
Within 1 hour
after dinner or drinking
Within 20 minutes
after taking a bath
In a very cold environment
Immediate measurement
after tea, coffee, smoking
When talking or moving your fingers
When you want to discharge urine
INFORMATION FOR USERS INFORMATION FOR USERS
Maintenance
Please calibrate the blood pressure monitor in specific institute once
every two years to ensure precise measurements. In order to get the
best performance, please follow the instructions below for storage.
3635
Put in a dry place and avoid the sunshine
Avoid intense shaking
and collisions
Use wet cloths to remove dirt
Avoid touching water,
clean it with a dry cloth in case.
temperature environment
Do not attempt to clean the reusable cuff
with water and never immerse the cuff in
water
Avoid dusty and unstable
MEM
STAR T
STOP
TIME/DATE
MEM
STAR T
STOP
TIME/DATE
MEM
STAR T
STOP
TIME/DATE
MEM
START
STOP
TIME/DATE
MEM
STAR T
STOP
TIME/DATE
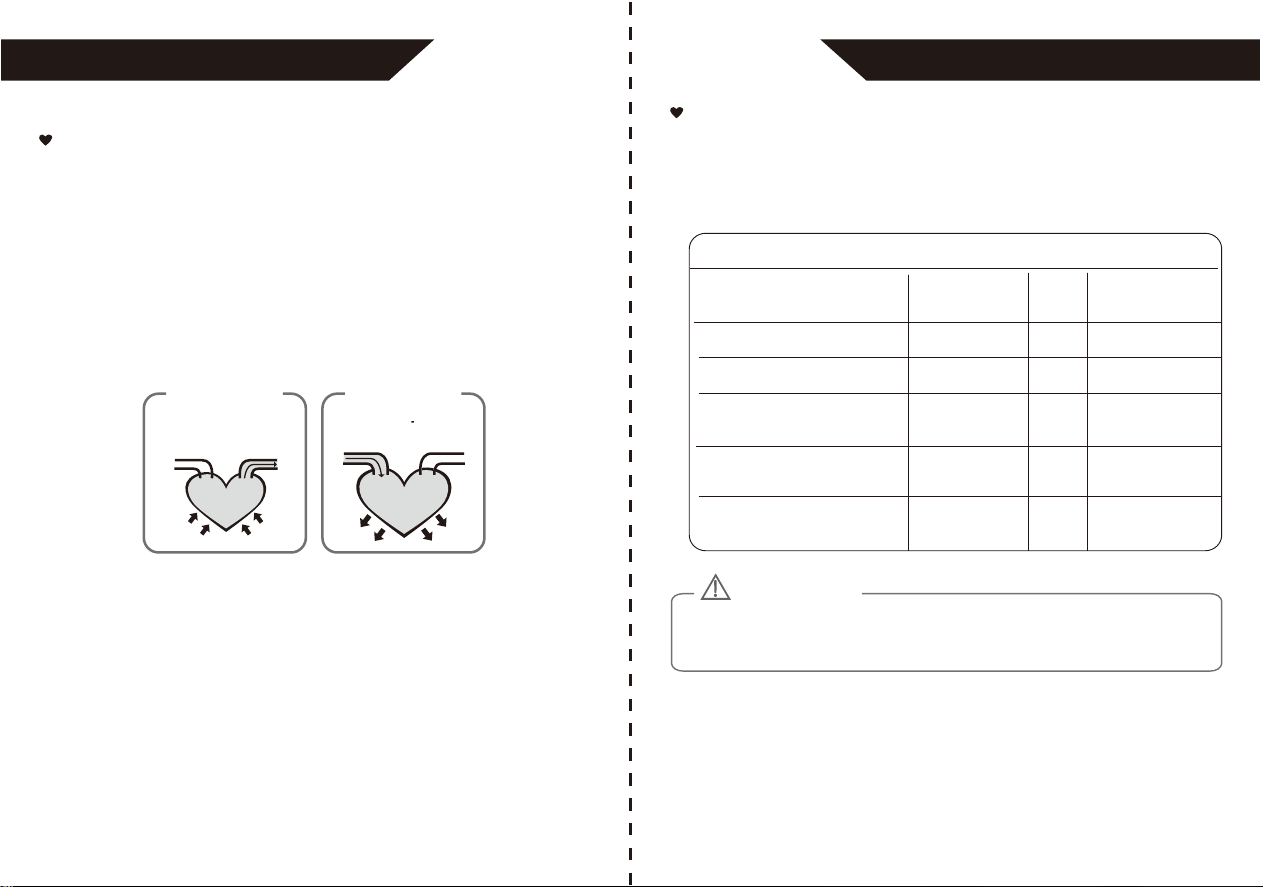
What are systolic pressure and
diastolic pressure?
When ventricles contract and pump blood out of the heart, the
blood pressure reaches its maximum value in the cycle, which is
called systolic pressure. When the ventricles relax, the blood
pressure reaches its minimum value in the cycle, which is called
diastolic pressure.
artery
press
vein
blood discharging
Systolic
relax
blood entering
Diastolic
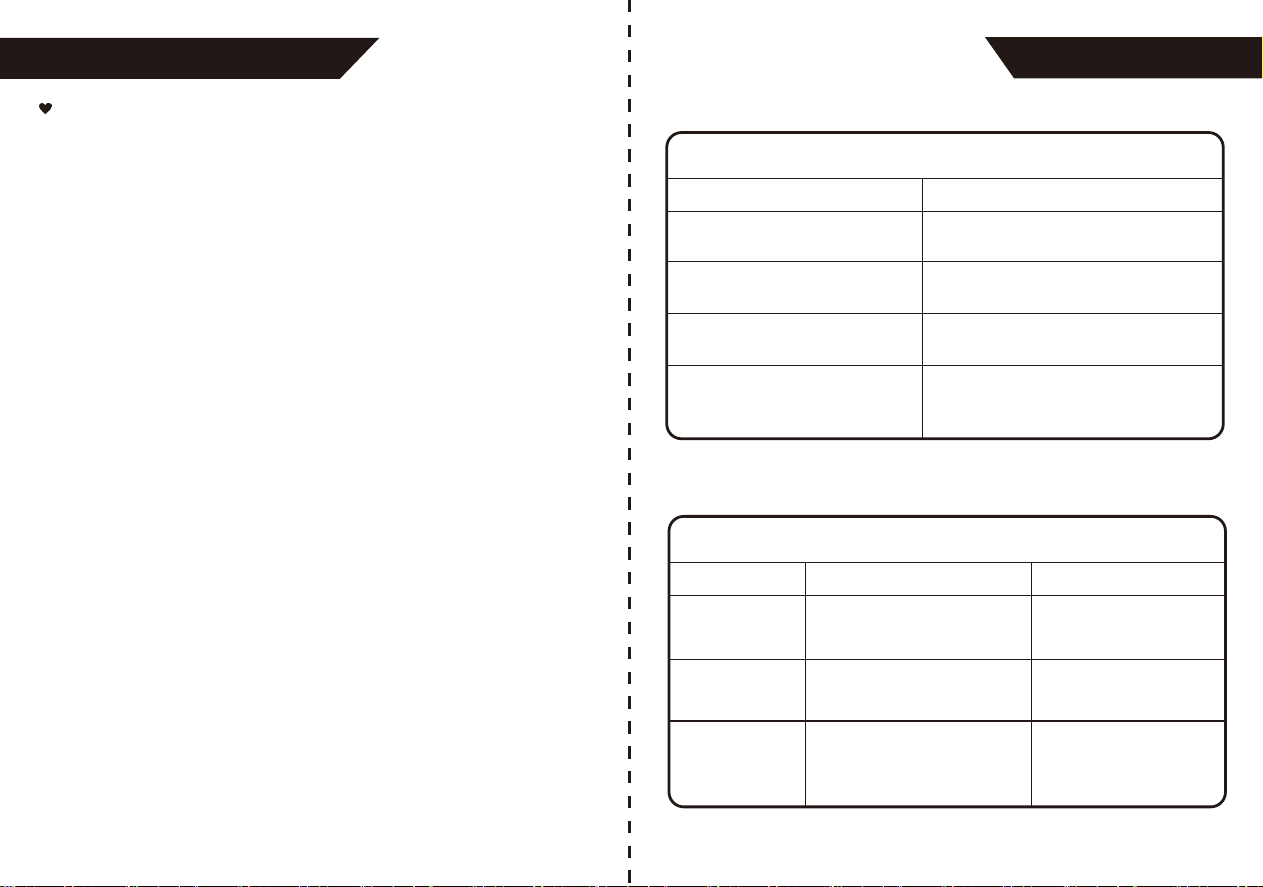
What is the standard blood pressure
classification?
ABOUT BLOOD PRESSURE
3837
The chart on the right is the standard blood pressure classification
published by American Heart Association (AHA).
Blood Pressure Category
Normal
Elevated
High Blood Pressure
(Hypertension) Stage 1
High Blood Pressure
(Hypertension) Stage 2
Hypertensive Crisis
(Consult your doctor immediately)
Systolic
mmHg (upper#)
Diastolic
mmHg (lower#)
less than 120
120-129
130-139
140 or higher
Higher than 180
and
or
or
and/or
less than 80
80-89
90 or higher
Higher than 120
This chart reflects blood pressure categories defined by American Heart Association.
Please consult a physician if your measuring result falls outside the range.
Please note that only a physician can tell whether your blood pressure value
has reached a dangerous point.
and
less than 80
ABOUT BLOOD PRESSURE
CAUTION
40
39
Why does my blood pressure
fluctuate throughout the day?
Why do I get a different blood
pressure at home compared to the
hospital?
1. Individual blood pressure varies multiple times every day. It is also
affected by the way you tie your cuff and your
measurement position, so please take
the measurement under the same
conditions.
2. If the person takes medicine, the
pressure will vary more.
3. Wait at least 3 minutes for
another measurement.
The blood pressure is different even throughout the day due to
weather, emotion, exercise, etc. Also, there is the “white coat”
effect, which means blood pressure usually increases in clinical
settings.
What you need to pay attention to when you measure your blood
pressure at home:
If the cuff is tied properly. If the cuff is too tight or too loose. If the
cuff is tied on the upper arm. If you feel anxious. Taking 2-3 deep
breaths before beginning will be better for measuring.
Advice: Relax yourself for 4-5 minutes until you calm down.
Irregular Heartbeat Detector
An irregular heartbeat is detected when a heartbeat rhythm varies
while the device is measuring systolic pressure and diastolic pressure.
During each measurement, blood pressure monitor will keep a record
of all the pulse intervals and calculate the average value of them. If
there are two or more pulse intervals, the difference between each
interval and the average is more than the average value of ±25%, or
there are four or more pulse intervals, the difference between each
interval and the average is more than the average value of ±15%, then
the irregular heartbeat symbol will appear on the display with the
measurement result.
CAUTION
The appearance of the IHB icon indicates that a pulse irregularity consistent
with an irregular heart-beat was detected during measurement. Usually this is
NOT a cause for concern. However, if the symbol appears often, we
recommend you seek medical advice. Please note that the device does not
replace a cardiac examination, but serves to detect pulse irregularities at an
early stage.
ABOUT BLOOD PRESSUREABOUT BLOOD PRESSURE
42
41
Is the result the same if measuring
on the right arm?
It is ok for both arms, but there
will be some different results for
different people. We suggest you
measure the same arm every
time.
ABOUT BLOOD PRESSURE TROUBLESHOOTING
1. Please use the manufacturer-authorized AC adaptor
(Not included)
Authorized Components
Please feel free to contact us if there is anything we can help with.
We’ll try our best to improve the product quality and service. All
products come with warranty and lifetime support.
Tel: +1(844) 417-0149
PST 9:00am-4:30pm Mon-Fri
Email: [email protected]
Contact Information
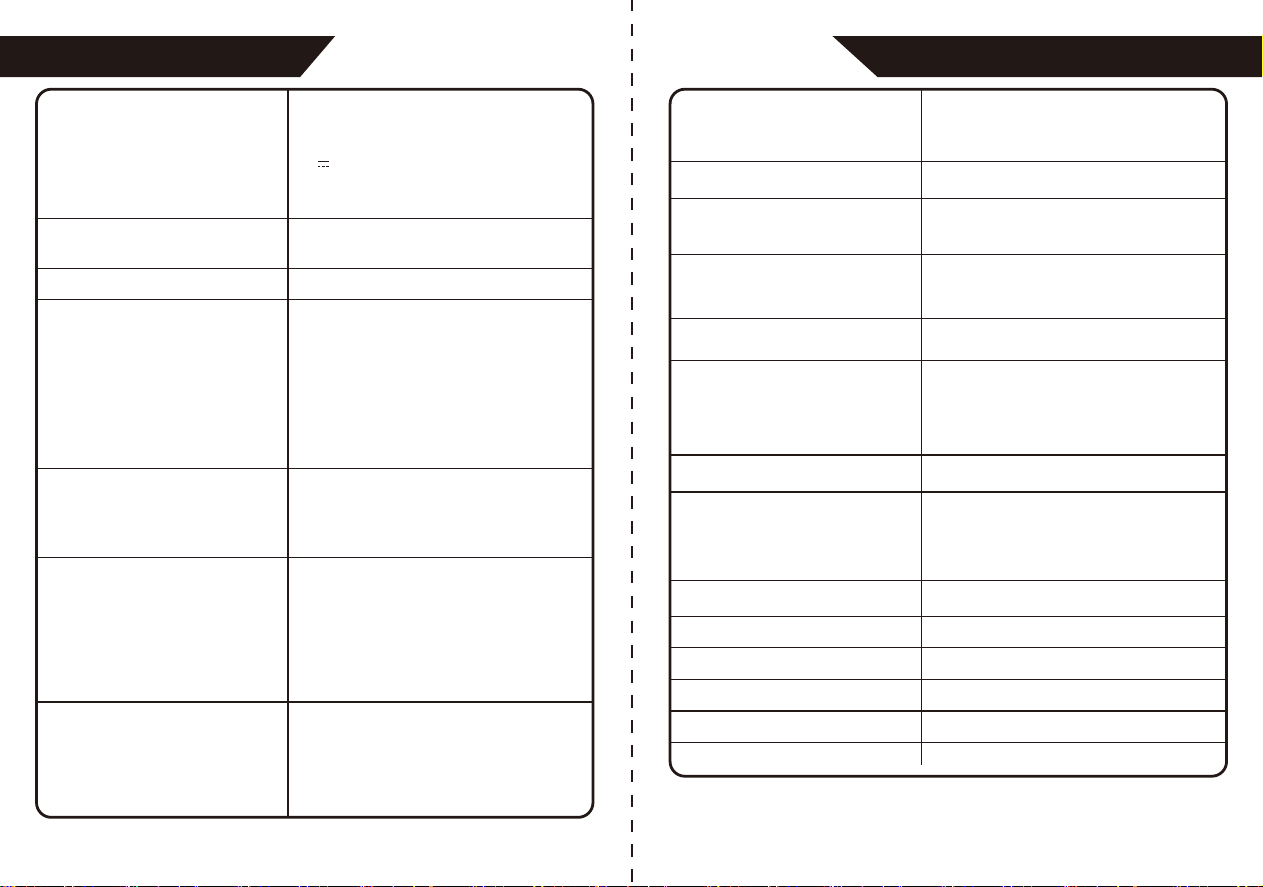
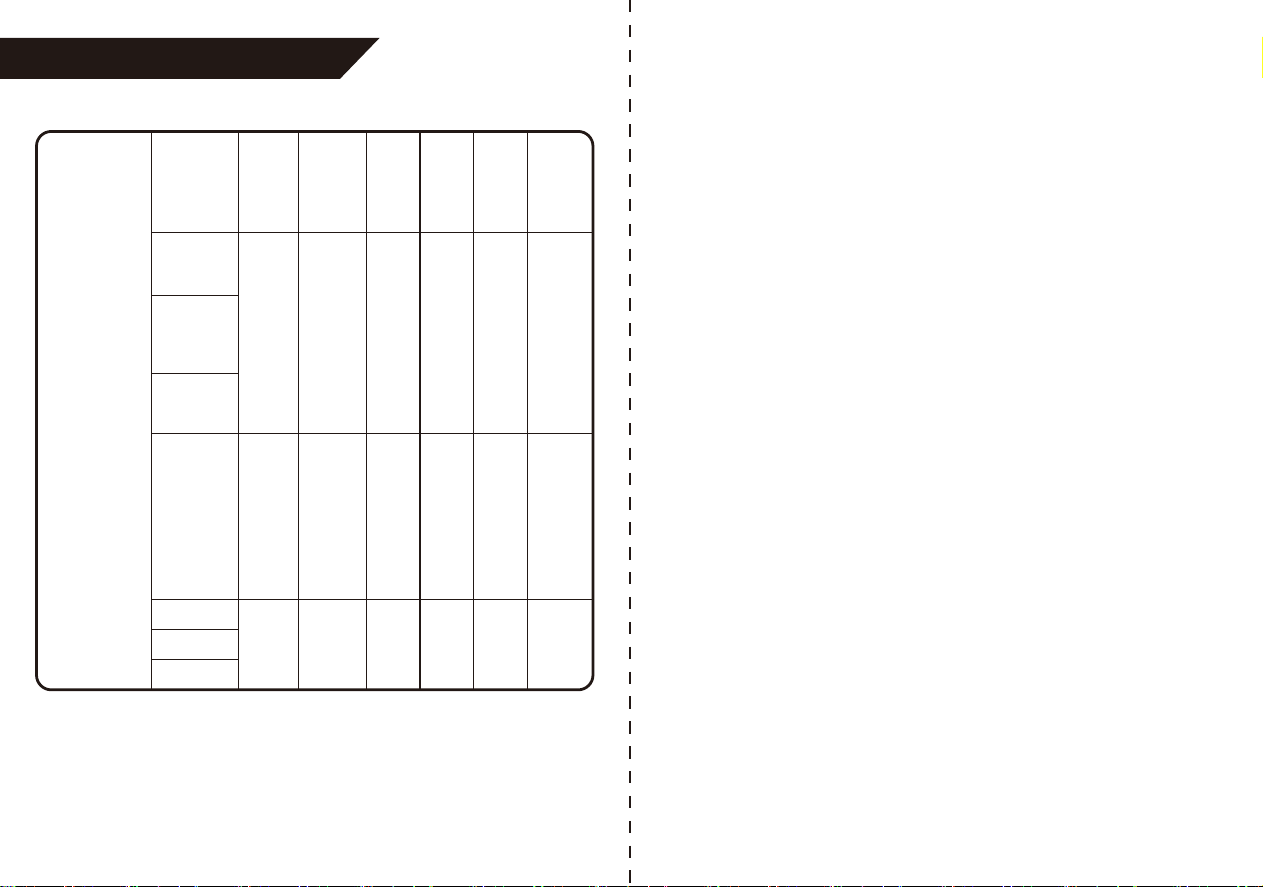
PROBLEM SYMPTOM CHECK THIS REMEDY
No power
Low batteries
Display will
not light up
Batteries are exhausted Replace with new batteries
Batteries are inserted
incorrectly
Insert the batteries correctly
Batteries are low Replace with new batteries
AC adaptor is inserted
incorrectly
Insert the AC adaptor tightly
Display is
dim or show
Error Display
will not
message
Warning
message
E 01 shows
The cuff is too tight or
too loose
Refasten the cuff and then
measure again
E 02 shows
The monitor detected
motion, talking, or the
pulse is too poor while
measuring
Relax for a moment and then
measure again
E 03 shows
The measurement
process does not detect
the pulse signal
Loosen the clothing on the arm
and then measure again
E 04 shows
The treatment of the
measurement failed
Relax for a moment and then
measure again
EExx shows
A calibration error
occurred
Retake the measurement. If the
problem persists, contact the
retailer or our customer service
department for further
assistance. Refer to the
warranty for contact information
and return instructions
Out of measurement
range
Relax for a moment. Refasten
the cuff and then measure
again. If the problem persists,
contact your physician
"out" shows
Adapter
Input:100~240V, 50~60Hz, 0.2Amax
Output: 5V 1000mA
BLJ06L050100U-U
4443
SPECIFICATIONS
Power supply
Battery powered mode:
6VDC 4*AAA batteries
AC adaptor powered mode:
5V 1A (Not included)
(Please only use the recommended AC
adaptor model).
Display mode
Digital LCD display V.A.2.36in*2.91in
(60mm*74mm)
Measurement mode
Oscillographic testing mode
Measurement range
Rated cuff pressure:
0mmHg~299mmHg(0kPa ~ 39.9kPa)
Measurement pressure:
SYS: 60mmHg~230mmHg
(8.0kPa~30.7kPa)
DIA: 40mmHg~130mmHg
(5.3kPa~17.3kPa)
Pulse value: (40-199)beat/minute
Accuracy
Pressure:
41°F-104°F (5°C-40°C) within±3mmHg
(0.4kPa)
Pulse value: ±5%
Normal working condition
A temperature range of :
41°F to +104°F(+5°C to +40°C)
A relative humidity range of 15% to 90%,
non-condensing, but not requiring a water
vapour partial pressure greater than
50 hPa An atmospheric pressure range of:
700 hPa to 1060 hPa
Storage & transportation
condition
Temperature: -4°F to +140°F
(-20°C to +60°C)
A relative humidity range of ≤ 93%,
non-condensing, at a water vapour
pressure up to 50hPa
SPECIFICATIONS
Measurement perimeter
of the upper arm
About 8.66in~16.53in (22cm~42cm)
Net Weight
Approx.187g (Excluding the batteries)
External dimensions
Approx.3.66in*5.12in*1.28in
(93mm*130mm*32.5mm)
Attachment
4*AAA batteries, cuff, user manual,
USB cable, carrying case, quick guide
Mode of operation
Continuous operation
Device Classification
Battery Powered Mode:
Internally Powered ME Equipment
AC Adaptor Powered Mode:
Class II ME Equipment
Degree of protection
Type BF applied part
Protection against
ingress of water
IP21 It means the device could protected
against solid foreign objects of 12.5mm
and greater, and protect against vertically
falling water drops.
WARNING: No modification of this equipment is allowed.
Software Version
A01
LS8261
Bluetooth Module NO.
2400 MHz to 2483.5 MHz
RF Frequency Range
≤8dBm
Output Power Range
1.9-3.6 V
Supply Voltage
Transmitting Distance
10 meters
46
45
The ME EQUIPMENT or ME SYSTEM is suitable for home healthcare
environments
Warning: Don’t near active HF surgical equipment and the RF shielded
room of an ME system for magnetic resonance imaging, where the
intensity of EM disturbances is high.
Warning: Use of this equipment adjacent to or stacked with other
equipment should be avoided because it could result in improper
operation. If such use is necessary, this equipment and the other
equipment should be observed to verify that they are operating
normally.
Warning: Use of accessories, transducers and cables other than those
specified or provided by the manufacturer of this equipment could
result in increased electromagnetic emissions or decreased electro-
magnetic immunity of this equipment and result in improper operation.
Warning: Portable RF communications equipment (including peripher-
als such as antenna cables and external antennas) should be used no
closer than 30 cm (12 inches) to any part of the equipment
TMB-1872-B, including cables specified by the manufacturer.
Otherwise, degradation of the performance of this equipment could
result.
Technical description:
1. All necessary instructions for maintaining BASIC SAFETY and
ESSENTIAL PERFORMANCE with regard to electromagnetic
disturbances for the excepted service life.
2. Guidance and manufacturer’s declaration -electromagnetic
emissions and Immunity
EMC Guidance
Table 1
Emissions test
Guidance and manufacturer’s declaration - electromagnetic emissions
Compliance
RF emissions
CISPR 11
Group 1
RF emissions
CISPR 11
Class [ B ]
Harmonic emissions
IEC 61000-3-2
Class A
Voltage fluctuations/
flicker emissions
IEC 61000-3-3
Comply
Table 2
Immunity Test IEC 60601-1-2 Test level
Guidance and manufacturer’s declaration – electromagnetic Immunity
Compliance level
Electrostatic
discharge (ESD)
IEC 61000-4-2
±8 kV contact
±2 kV, ±4kV, ±8 kV,
±15 kV air
±8 kV contact
±2 kV, ±4kV, ±8 kV, ±15 kV air
Electrical fast
transient/burst
IEC 61000-4-4
±2 kV for power supply lines
±1 kV signal input/output
100 kHz repetition frequency
±2 kV for power supply lines
±1 kV signal input/output
100 kHz repetition frequency
Surge
IEC61000-4-5
±0.5 kV, ±1 kV differential
mode
±0.5 kV, ±1 kV, ±2 kV
common mode
±0.5 kV, ±1 kV differential mode
±0.5 kV, ±1 kV, ±2 kV common
mode
EMC GUIDANCE
EMC GUIDANCE

4847
Table 3
Guidance and manufacturer’s declaration - electromagnetic Immunity
Radiated RF
IEC61000-4-3
(Test
specifications
for
ENCLOSURE
PORT
IMMUNITY to
RF wireless
communica-
tions
equipment)
Test
Frequency
(MHz)
Band
(MHz)
Service
Modu-
lation
(W)
Dista-
nce
(m)
IMMU-
NITY
TEST
LEVEL
(V/m)
Modu-
lation
385
380-
390
TETRA
400
1.8
0.3 27
Pulse
modu-
lation
b)
18Hz
450
710
745
780
430-
470
704-
787
800-
960
GMRS
460,
FRS
460
2 0.3 28
0.2 0.3 9
2 0.3 28
FM c)
± 5kHz
devia-
tion
1kHz
sine
LTE
Band 13,
17
GSM
800/900,
TETRA
800,
iDEN
820,
CDMA
850,
LTE
Band 5
Pulse
modu-
lation
b)
217Hz
Pulse
modu-
lation
b)
18Hz
810
870
930
Immunity Test IEC 60601-1-2 Test level
NOTE U T is the a.c. mains voltage prior to application of the
test level.
Compliance level
Voltage dips, short
interruptions and
voltage variations
on power supply
input lines
IEC 61000-4-11
0 % UT; 0,5 cycle. At 0°, 45°,
90°, 135°, 180°, 225°, 270°
and 315°. 0 % UT; 1 cycle
and 70 % UT; 25/30 cycles;
Single phase: at 0°. 0 % UT;
250/300 cycle
0 % UT; 0,5 cycle. At 0°, 45°, 90°,
135°, 180°, 225°, 270° and
315°.0 % UT; 1 cycle and 70 %
UT; 25/30 cycles; Single phase:
at 0°.0 % UT; 250/300 cycle
Power frequency
magnetic field
IEC 61000-4-8
30 A/m
50Hz/60Hz
30 A/m
50Hz/60Hz
Radiated RF
IEC61000-4-3
10 V/m
80 MHz – 2,7 GHz
80 % AM at 1 kHz
10 V/m
80 MHz – 2,7 GHz
80 % AM at 1 kHz
Conduced RF
IEC61000-4-6
3 V
0,15 MHz – 80 MHz
6 V in ISM and amateur
radio bands between
0,15 MHz and 80 MHz
80 % AM at 1 kHz
3 V
0,15 MHz – 80 MHz
6 V in ISM and amateur radio
bands between 0,15 MHz and
80 MHz 80 % AM at 1 kHz
EMC GUIDANCE
EMC GUIDANCE
49
Radiated RF
IEC61000-4-3
(Test
specifications
for
ENCLOSURE
PORT
IMMUNITY to
RF wireless
communica-
tions
equipment)
Test
Frequency
(MHz)
Band
(MHz)
Service
Modu-
lation
(W)
Dista-
nce
(m)
IMMU-
NITY
TEST
LEVEL
(V/m)
Modu-
lation
2 0.3 28
Pulse
modu-
lation
b)
217Hz
Pulse
modu-
lation
217 Hz
Pulse
mod-
ulation
217 Hz
GSM
1800;
CDMA
1900;
GSM
1900;
DECT;
LTE
Band 1,
3, 4,25;
UMTS
Blueto-
oth,
WLAN,
802.11
b/g/n,
RFID
2450,
LTE
Band 7
WLAN
802.11
a/n
1720
1700-
1990
2400-
2570
5100-
5800
2 0.3 28
0.2 0.3 9
1845
1970
2450
5240
5500
5785
EMC GUIDANCE