
06729
EN
Original Instructions
Version 2
May 2024
2kW PTC
ELECTRIC
SPACE HEATER
1.1 Product Reference
User Manual for: 2kW PTC Electric Space Heater
Stock No: 06729
Part No: ESH2000PTC/A
1.2 Revisions
Version 1: July 2021
First release
Version 2: May 2024
As our manuals are continually updated, always ensure
that the latest version is used.
Please visit drapertools.com/manuals for the latest
version of this manual and the associated parts list, if
applicable.
1.3 Understanding the Safety Content of
This Manual
WARNING!
– Situations or actions that may result
in personal injury or death.
CAUTION! – Situations or actions that may result
in damage to the product or surroundings.
Important: – Information or instructions of particular
importance.
1.4 Copyright © Notice
Copyright © Draper Tools Limited.
Permission is granted to reproduce this manual for
personal and educational use ONLY. Commercial
copying, redistribution, hiring or lending is strictly
prohibited.
No part of this manual may be stored in a retrieval system
or transmitted in any other form or means without written
permission from Draper Tools Limited.
In all cases, this copyright notice must remain intact.
1. Preface
– 2 –
These are the original product instructions. This
document is part of the product; retain it for the life
of the product, passing it on to subsequent holders.
Read this manual in full before attempting to
assemble, operate or maintain this product.
This Draper Tools manual describes the purpose
of the product and contains all the necessary
information to ensure its correct and safe use.
Following all the instructions and guidance in
this manual will ensure the safety of both the
product and the operator and increase the
lifespan of the product.
All photographs and drawings within this manual are
supplied by Draper Tools to help illustrate correct
operation of the product.
Every eort has been made to ensure the
information contained in this manual is accurate.
However, Draper Tools reserves the right to amend
this document without prior warning. Always use the
latest version of the product manual.
EN

2. Contents
– 3 –
EN
1. Preface 2
1.1 Product Reference 2
1.2 Revisions 2
1.3 Understanding the Safety Content of This
Manual 2
1.4 Copyright © Notice 2
2. Contents 3
3. Product Introduction 4
3.1 Intended Use 4
3.2 Specication 4
4. Health and Safety Information 5-6
4.1 General Health and Safety Precautions
for Heater 5
4.2 Connection to the Power Supply 6
5. Identication and Unpacking 7
5.1 Product Overview 7
5.2 Packaging 7
6. Operating Instructions 8-9
6.1 Positioning the Heater 8
6.2 The Operation Control Dial 8
6.3 The Thermostat Control Dial 9
6.4 Thermal Cut-Out 9
7. Maintenance and Troubleshooting 10
7.1 General Maintenance and Storage 10
7.2 Troubleshooting 10
8. Spares, Returns and Disposal 11
9. Warranty 11
10. Explanation of Symbols 11

3. Product Introduction
Stock No. 06729
Part No. ESH2000PTC/A
Rated voltage: 220~240V
Rated input: 2,000W
Rated frequency: 50Hz
Rated voltage: 9A
Fuse: 13A 13A
Position settings:
O: 0W
Half power: 1,100W
Full power: 2,030W
Dimensions: W 185 x D 170 X H 240mm
Weight 1.5kg
– 4 –
EN
3.2 Specication
3.1 Intended Use
This heater is intended to raise the ambient temperature
in garages and workshop environments and is suitable
for domestic and light commercial use only.
Any other application beyond the conditions established
for use will be considered misuse. Draper Tools accepts
no responsibility for improper use of this product.
Part of our core range, this product is suitable for
enthusiasts and tradespersons alike.
Read this manual in full before attempting to assemble,
operate or maintain the product and retain it for later use.

4. Health and Safety Information
Important: Read all the Health and Safety instructions
before attempting to operate, maintain or repair this
product. Failure to follow these instructions may result in
injury or damage to the user or the product.
4.1 General Health and Safety Precautions
for this Heater
• Observe all standard safety precautions and good
practices when working with electrical equipment.
• Take extra care when using this product around
children.
• This appliance is not suitable for use by children and
may not be used by persons with reduced physical,
sensory or mental capabilities, or lack of experience
or knowledge unless they are supervised or trained in
the correct use of the device and fully understand the
hazards involved.
− DO NOT allow children to play with the appliance.
− Cleaning and maintenance MUST be carried out
by or under the supervision of experienced and
knowledgeable persons.
• Keep your work environment clear and well-lit, with
bystanders at a safe distance.
• Before every use, inspect the heater for broken,
cracked, loose or corroded parts.
• Important: DO NOT use this product if it is damaged
in any way. Contact Draper Tools to discuss repair and
replacement options.
• Use the product only in the manner instructed in this
manual and DO NOT modify it in any way.
• This heater is for indoor use ONLY.
• DO NOT use this heater in small rooms that are
occupied by individuals that are not capable of
leaving the room on their own, unless constant
supervision is provided.
• DO NOT use the heater in dusty environments.
• Position the heater on a rm and level surface during
use and ensure that the adjustable screw is tightly
secured.
• The heater must ONLY be used in its upright position.
• Position this product ONLY on re-resistant ooring.
• DO NOT position the heater near curtains or other
combustible materials that may move and come into
contact with the heater.
• Allow a minimum of 2m clearance between the heater
outlet grille and any nearby objects.
• DO NOT position this heater in the vicinity of
combustible materials, in explosive environments or
in the presence of ammable or combustible gases
and vapours.
• DO NOT position this heater below or pointing
towards a power socket or outlet.
• Ensure that the power switch in the ‘OFF’ position
before connecting the heater to the power supply.
• ONLY use this product with a power supply that match
the rated voltage of the heater.
− NEVER use this heater with an extension lead,
multi-socket or plug adaptor; it must be plugged
directly into the power supply.
− NEVER plug more than one heater into the same
power outlet.
• NEVER abuse the power cord.
− Unwind the power cord fully before connecting it
to the power supply.
− NEVER remove the plug from the power supply by
pulling on the cord.
− DO NOT carry the product by the cord or plug.
− Keep the power cord away from sources of heat,
liquids, sharp edges and moving parts.
− The power cord attached to this product is not
suitable for use on building sites.
• NEVER leave the heater unattended while it is on.
• Avoid body contact with earthed or grounded
surfaces, such as pipes, radiators, ranges and
refrigerators.
• DO NOT use this heater with a programmer, timer,
separate remote-control system or any other device
that switches the heater on automatically, as it may be
covered or positioned incorrectly when activated and
pose a re risk.
• NEVER cover any part of the heater as this may cause
the heater to overheat or the covering item to ignite or
burn.
• NEVER insert foreign objects through the grilles.
• DO NOT operate the heater without both grilles
installed.
WARNING! Risk of shock!
− DO NOT allow the heater to come into contact
with water or any other liquid.
– 5 –
EN
4. Health and Safety Information
− DO NOT use this heater in the vicinity of a bath,
shower, swimming pool or other body of water.
− DO NOT touch the heater with wet hands.
WARNING! Some parts of the product become
very hot during use and may cause burns.
− DO NOT touch the metal grille on the front or rear
of the heater during or immediately after use.
− ALWAYS use the handle when adjusting the
position of the heater during and immediately
after use.
− ALWAYS switch o the heater, disconnect it from
the power supply and allow it to cool for at least
20 minutes before attempting to move or
reposition it.
− Particular attention MUST be given when children
and vulnerable people are present.
4.2 Connection to the Power Supply
This appliance is supplied with an approved plug and
cord for your safety. The value of the fuse tted is marked
on the pin face of the plug. Should the fuse need
replacing, ensure the substitute is of the correct rating,
approved to BS 1363/A and ASTA or BS Kite marked.
ASTA
BSI
The fuse can be replaced by removing the cover of the
plug using a cross-headed screwdriver and removing the
broken fuse from its holder. This should only be
performed by suitably qualied personnel.
If the power supply cord is damaged, it must be replaced
by Draper Tools, an authorised service agent or similarly
qualied personnel in order to avoid a hazard.
The damaged or incomplete plug, when cut from the
cord, shall be disabled to prevent connection to a live
electrical outlet.
This product is Class I† and is designed for connection to
a power supply matching that detailed on the rating label
and compatible with the plug tted.
CAUTION! DO NOT use this product with an
extension lead or multi-socket.
†Earthed: This product requires an earth connection to
protect against electric shock from accessible
conductive parts in the event of a failure of the basic
insulation.
– 6 –
EN
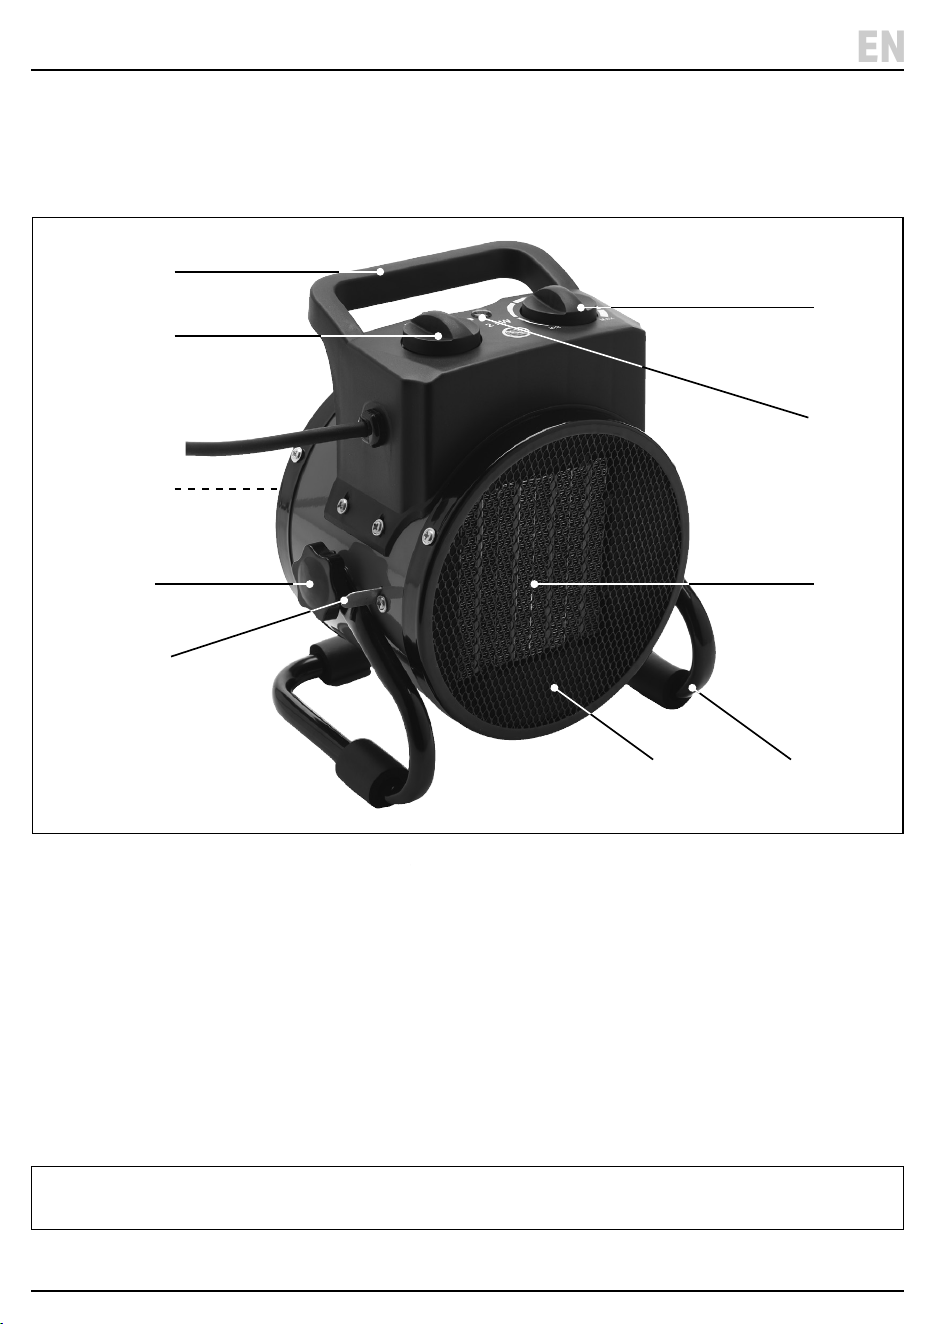
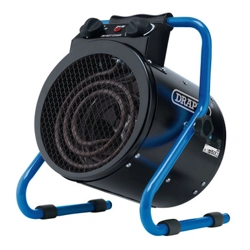
5. Identication and Unpacking
5.2 Packaging
Keep the product packaging for the duration of the
warranty period for reference should the product need to
be returned for repair.
WARNING! Keep packaging materials out of reach of
children. Dispose of packaging correctly and
responsibly and in accordance with local regulations.
1. Heater element
2. Operation control dial
3. Thermostat control dial
4. Transport handle
5. Stand
6. Inlet grille
7. Outlet grille
8. Power LED light
9. Position adjustment screw
10. Safety tab
Please visit drapertools.com for our full range of accessories and consumables.
– 7 –
EN
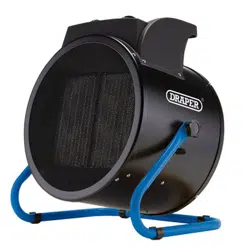
5.1 Product Overview
Carefully remove the product from the packaging and
examine it for any signs of damage that may have
occurred during shipment.
(7) (5)
(3)
(4)
(2)
(6)
(9)
(10)
(1)
(8)
6. Operating Instructions
Important: Before use, read and understand all the
safety instructions listed in this manual. Note: The heater
may emit an odour during rst use. This is normal and
will pass shortly after switching on.
WARNING! DO NOT leave the heater unattended
while it is connected to the power supply or switched
on.
6.1 Positioning the Heater
1. Position the fan so that it stands upright unaided on a
rm, level and re-resistant surface. Ensure the
heater is located a safe distance away from
ammable objects and wet environments.
1 Fig.
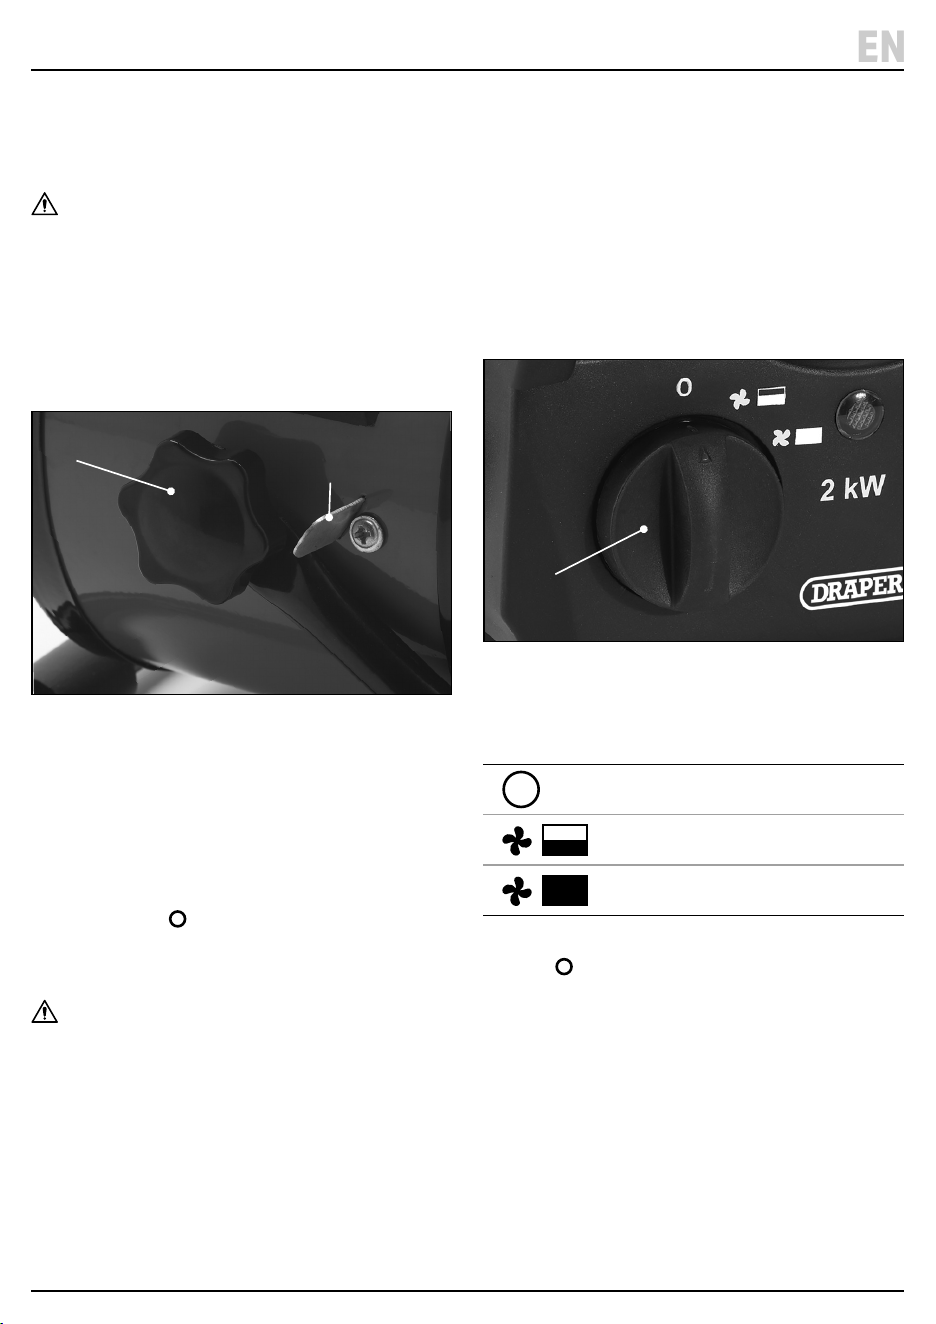
2. Set the angle of the heater by loosening the position
adjustment screws (9), tilting the heater as required
and then tightening the screws to secure it.
Important: ALWAYS ensure that the position adjustment
screw is tightly secured before switching on the heater.
3. Ensure that the operation control dial (2) is set to the
‘OFF’ position (
) and the thermostat control dial (9)
is set to the lowest position, then connect the plug
directly to a power outlet.
WARNING! DO NOT attempt to adjust the angle of
the heater during or immediately after use. ALWAYS
switch o the heater, disconnect the power supply and
allow it to cool before loosening the position
adjustment screw.
Safety Tab
• The heater is equipped with a safety tab (10) to
prevent the heater from being directed towards the
ground.
Important: DO NOT remove or bend the safety tab under
any circumstances. DO NOT use the heater if the safety
tab has been compromised in any way and contact
Draper Tools for support.
6.2 The Operation Control Dial
2 Fig.
(2)
The operation control dial (2) has three operating
positions:
Position Function
O (Unplug when not in use)
Half Power
Full Power
NOTE: When the operation control dial is set to the ‘OFF’
position (
), it will not operate, even if the power LED
(8) is lit.
– 8 –
EN
(9)
(10)
6. Operating Instructions
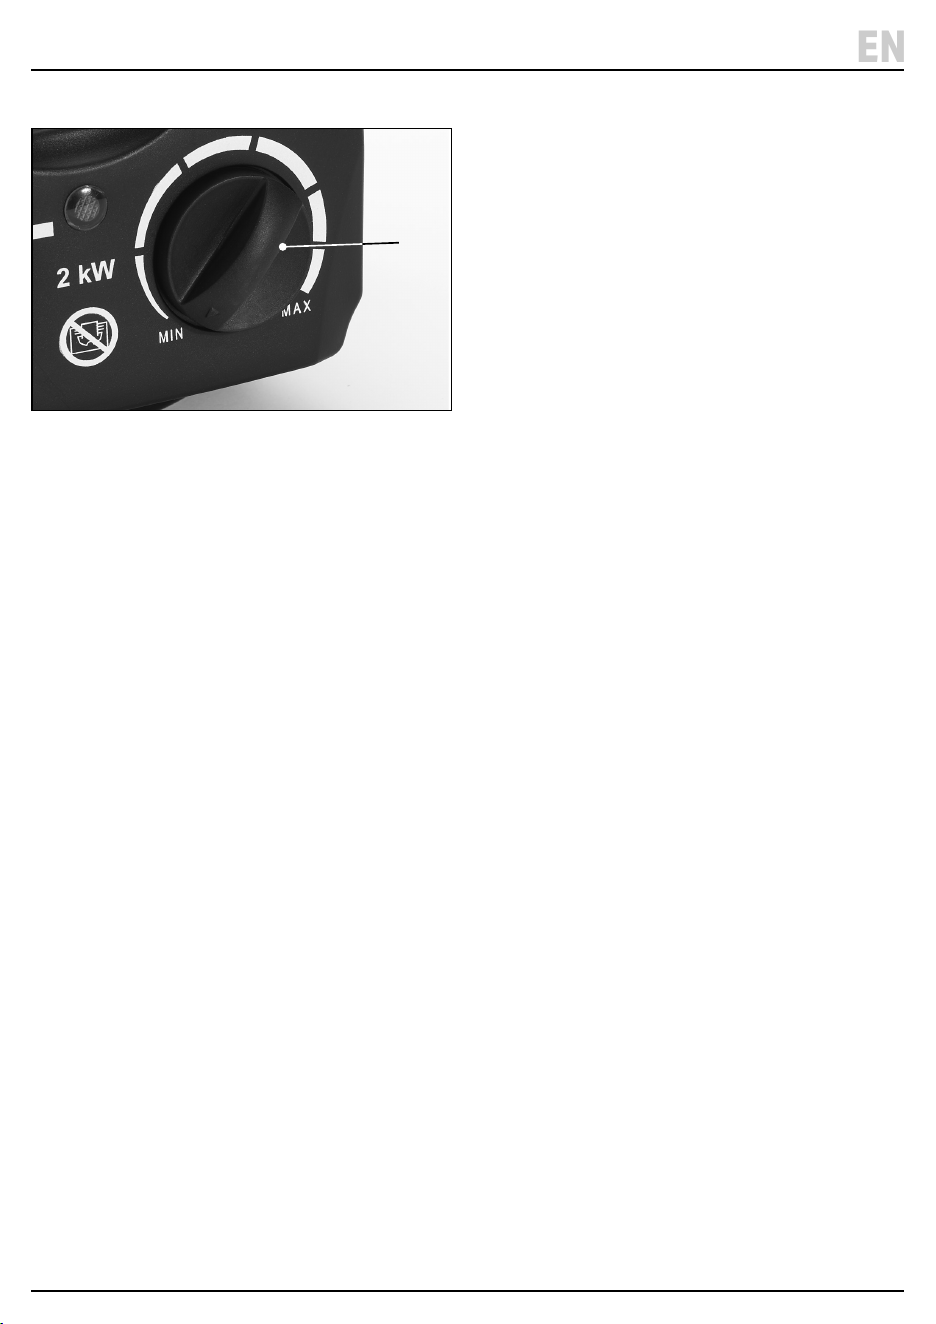
6.3 The Thermostat Control Dial
3 Fig.
The thermostat control dial (3) can be used to set the
desired room temperature. The heater will then maintain
the chosen temperature automatically.
1. Plug in the heater, turn the operation control dial (2)
to the desired position.
2. Turn the thermostat control dial to the maximum
position. The power LED (8) will come on when the
heater element begins to heat up.
3. Once the desired temperature is reached, turn the
thermostat control dial anticlockwise until it “clicks”
and the power LED goes out.
4. The heater will automatically switch on and begin
heating when the room temperature drops below the
current setting.
6.4 Thermal Cut-Out
The heater is equipped with a safety device that cuts the
power if the heater overheats. When this occurs, the
heater must be switched o, disconnected from the
power supply and left to cool for at least ten minutes.
Important: If overheating causes the heater to switch o
automatically, the cause of overheating MUST be
rectied before the heater is used again. Overheating
may be caused by the inlet (6) or outlet (7) grilles being
covered or the heater being positioned too close to a wall
or other object.
– 9 –
EN
(3)
7. Maintenance and Troubleshooting
Important: Read all the Health and Safety information in this manual before attempting to maintain this product. All
maintenance should be carried out ONLY by authorised and suitably qualied personnel.
WARNING!
ALWAYS ensure that the heater is switched o, disconnected from the power supply and has fully
cooled before attempting to maintain this product.
7.1 General Maintenance and Storage
• Keep the heater clean and dry.
− Clean the heater body using a dry cloth ONLY.
− Clean the heater grilles using a dry cloth or brush, ensuring that all dust and debris is collected and removed
from the heater.
• Any maintenance to the plug and cord MUST be carried out by suitably qualied personnel.
• Any repairs to the heater must be carried out by suitably qualied personnel.
• The heater should be inspected at least once a year by suitably qualied personnel.
• Store the heater in its original packaging, in a clean and dry location, out of reach of children.
7.2 Troubleshooting
Problem Possible cause Remedy
The heater does not
operate when
switched on.
The power supply is not
active.
Ensure that the power supply to which the heater is connected is
switched on.
The plug or cable
connection is loose or
damaged.
Remove the plug from the power supply and check it for damage
or loose parts.
The heating element
is glowing.
The input voltage is
incorrect.
Disconnect the heater IMMEDIATELY and allow it to cool before
reconnecting to a power supply matching the rating plate on the
product.
The input grille is
blocked.
Disconnect the heater and check that the input grille is not
obstructed by external objects. Allow the heater to cool, then
clean the grille with a brush or dry cloth.
The heater does not
emit any heat.
The ambient temperature
is too high.
Increase the thermostat control setting or move the heater to a
cooler environment.
The thermostat is
damaged.
Check that the power LED illuminates when the thermostat control
dial is turned to its maximum position. Contact Draper Tools to
discuss repair and replacement options.
The thermal cut-out has
been activated.
Switch o the heater, disconnect it from the power supply and
allow it to cool for at least ten minutes. Check for and clear any
blockages and obstructions. Reconnect the power and switch on
the heater.
The heater emits an
unusual noise.
The fan is obstructed. Switch o the heater, disconnect the power supply and allow it to
cool. Look through the inlet grille to check for any obstructions.
Clean both grilles thoroughly. Contact Draper Tools for support.
The heater is not level. Ensure that the heater is positioned on a at and level surface.
– 10 –
EN
For servicing, repair and replacement options, please
contact the Draper Tools Product Helpline for details of
your nearest authorised agent. Any servicing or repairs
carried out by unauthorised personnel will invalidate
your warranty.
At the end of its working life, dispose of the product
responsibly and in line with local regulations. Recycle
where possible.
DO NOT dispose of this product with
domestic waste; most local authorities
provide appropriate recycling facilities.
9. Warranty
Draper Tools products are carefully tested and inspected
before shipment and are guaranteed to be free from
defective materials and workmanship.
Should the tool develop a fault, return the complete tool
to your nearest distributor or contact Draper Tools
directly. Contact information can be found at the back of
this manual.
Proof of purchase must be provided.
If, upon inspection, it is found that the fault occurring is
due to defective materials or workmanship, repairs will
be carried out free of charge. This warranty period covers
parts and labour for 12 months from the date of
purchase. Where tools have been hired out, the warranty
period covers 90 days from the date of purchase.
This warranty does not apply to any consumable parts,
batteries or normal wear and tear, nor does it cover any
damage caused by misuse, careless or unsafe handling,
alterations, accidents, or repairs attempted or made by
any personnel other than the authorised Draper Tools
repair agent.
In all cases, to make a claim for faulty workmanship or
materials within the standard warranty period, please
contact or return the product to the place of purchase.
Proof of purchase may be required.
If the place of purchase is no longer trading or if you
experience any diculties with your warranty, please
contact Customer Services with the product details and
your proof of purchase. Contact details can be found at
the back of this manual.
If the tool is not covered by the terms of this warranty,
repairs and carriage charges will be quoted and charged
accordingly.
This warranty supersedes any other guarantees
expressed or implied and variations of its terms are not
authorised.
Your Draper Tools guarantee is not eective until you can
produce, upon request, a dated receipt or invoice to
verify your purchase within the guarantee period.
Please note that this warranty is an additional benet
and does not aect your statutory rights.
Draper Tools Limited
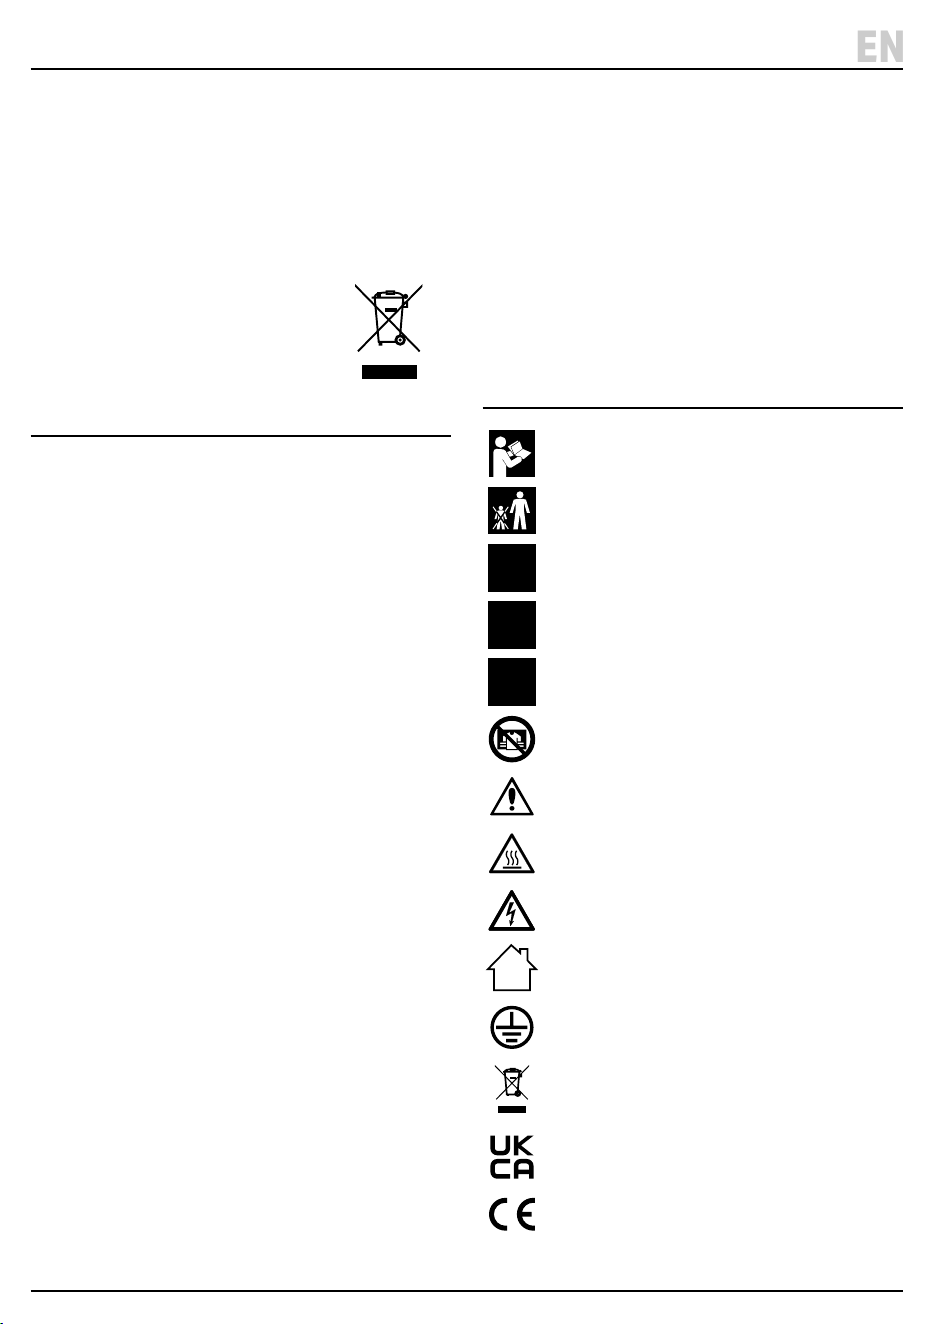
10. Explanation of Symbols
8. Spares, Returns and Disposal
– 11 –
EN
Read the instruction manual
Keep out of the reach of children
230
V
Rated voltage
2.8
kW
Rated input (example)
9554
BTU
Rated heat output (example)
DO NOT cover
WARNING!/CAUTION
WARNING! Heated surfaces
WARNING! Risk of shock
For indoor use only;
DO NOT expose to rain
Earthed
WEEE – Waste Electrical & Electronic Equipment
Do not dispose of Waste Electrical & Electronic Equipment in with
domestic rubbish
UK Conformity Assessed
European conformity

© Published by Draper Tools Limited© Published by Draper Tools Limited
Delta International
Delta International BV
Oude Graaf 8
6002 NL
Weert
Netherlands
Contact Details
Draper Tools
Draper Tools Limited
Hursley Road
Chandler’s Ford
Eastleigh
Hampshire
SO53 1YF
UK
Website: drapertools.com
Email: [email protected]
Product Helpline: +44 (0) 23 8049 4344
Telephone Sales Desk: +44 (0) 23 8049 4333
General Enquiries: +44 (0) 23 8026 6355
Please contact the Draper Tools Product Helpline for repair and servicing enquiries.