Pentos
Feuerschale
Fire Pit
Cuenco de fuego
Bol de feu
Coppa del fuoco
10033380


3
DE
Sehr geehrter Kunde,
wir gratulieren Ihnen zum Erwerb Ihres Gerätes.
Lesen Sie die folgenden Hinweise sorgfältig durch und
befolgen Sie diese, um möglichen Schäden vorzubeugen.
Für Schäden, die durch Missachtung der Hinweise und
unsachgemäßen Gebrauch entstehen, übernehmen wir
keine Haftung. Scannen Sie den folgenden QR-Code,
um Zugriff auf die aktuellste Bedienungsanleitung und
weitere Informationen rund um das Produkt zu erhalten:
INHALTVERZEICHNIS
Einzelteile 5
Zusammenbau 6
Benutzung 9
Reinigung und P ege 10
Hersteller 10
SICHERHEITSHINWEISE
WARNUNG
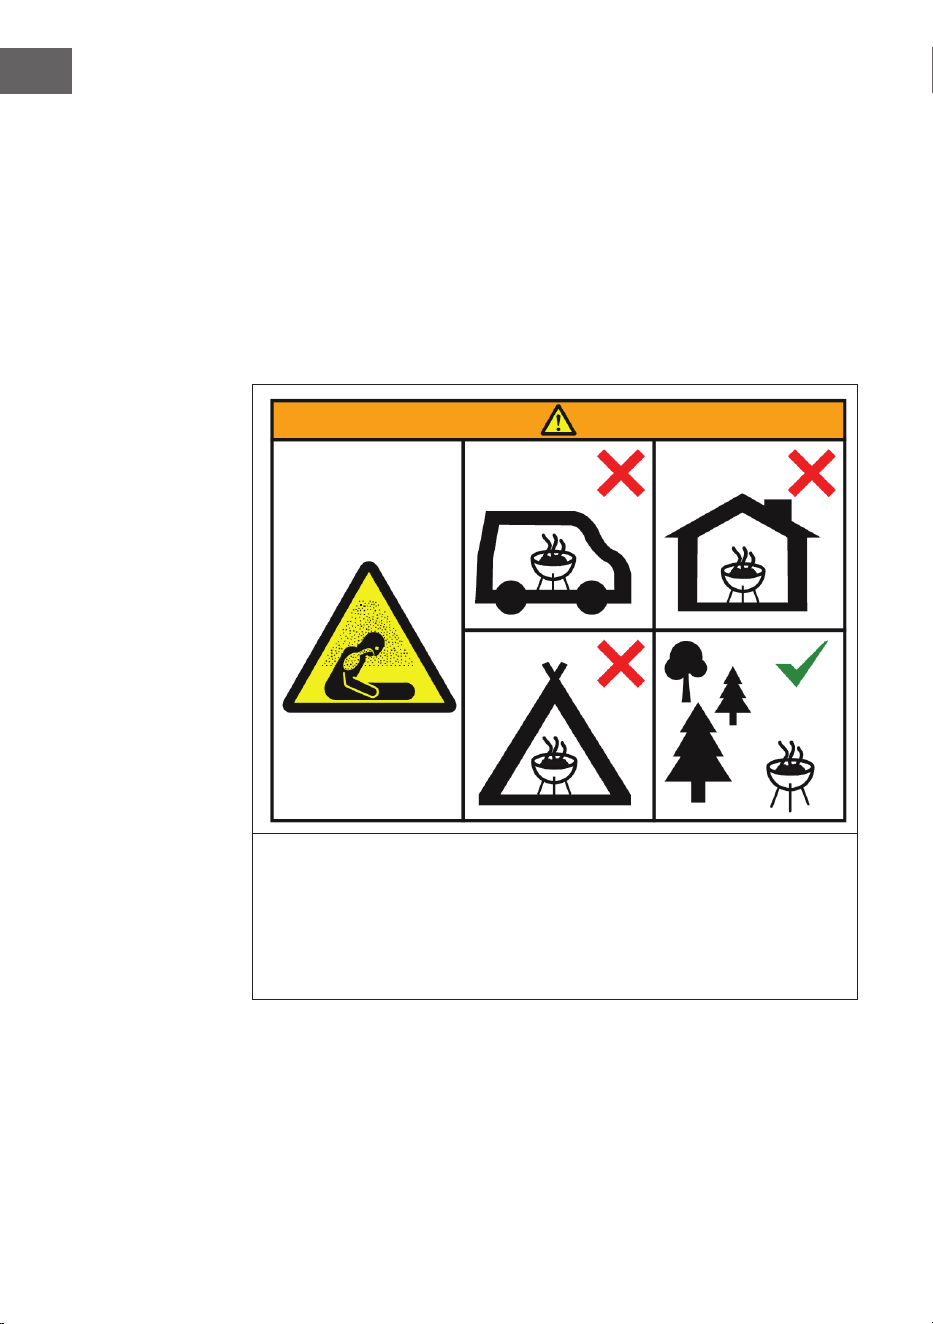
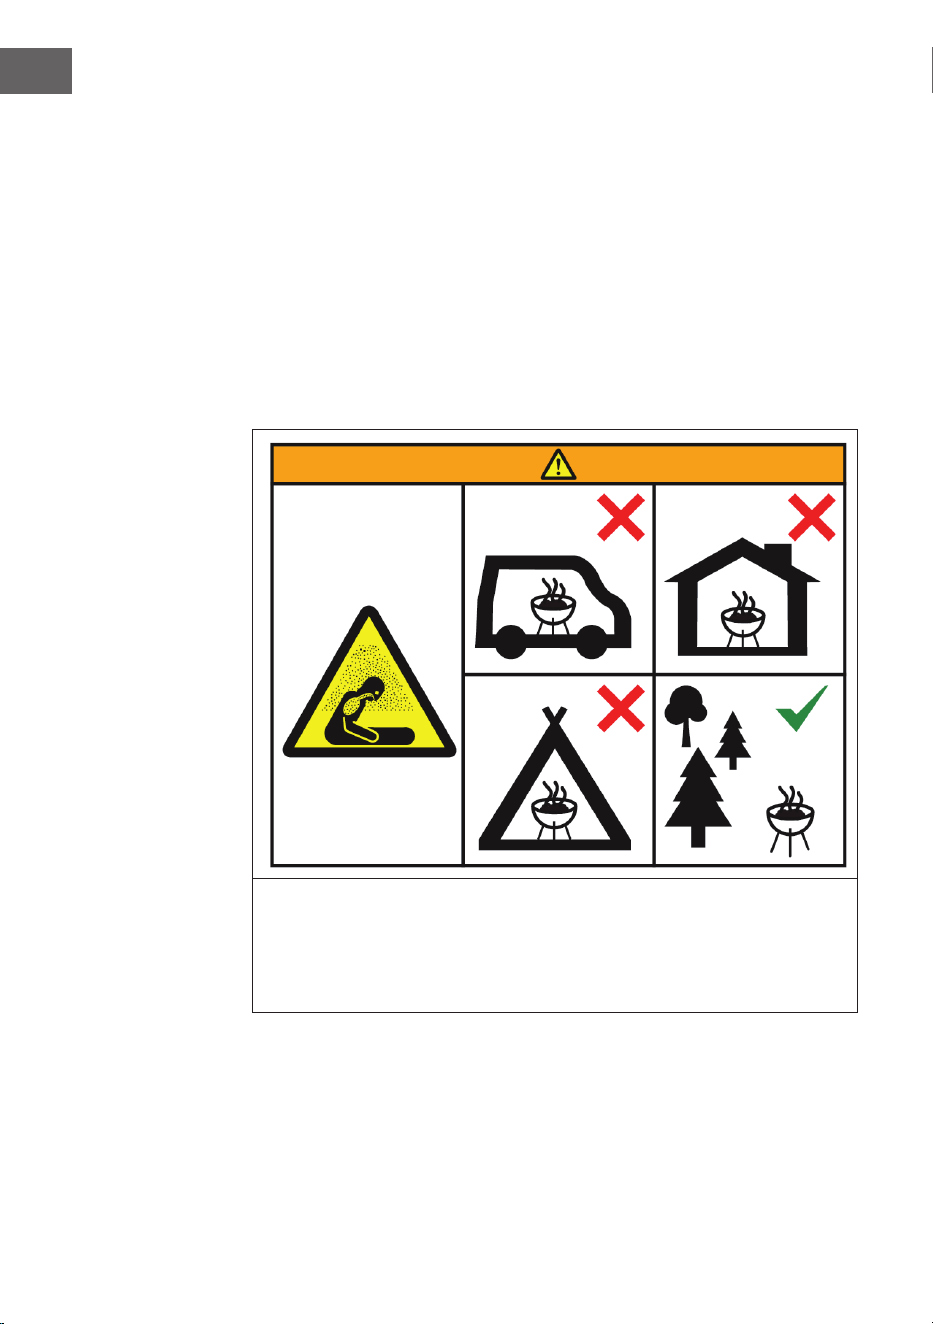
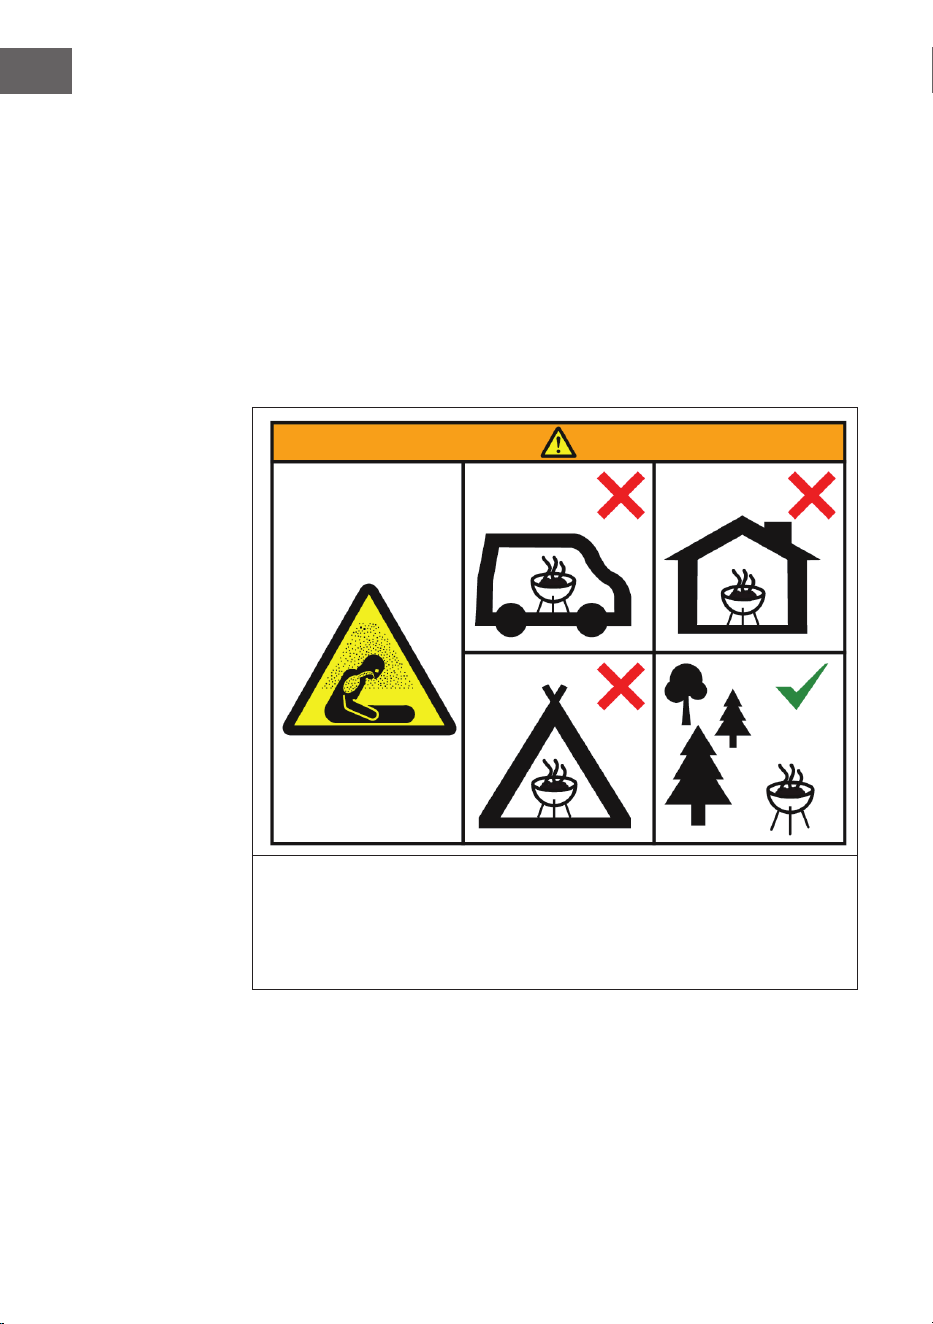
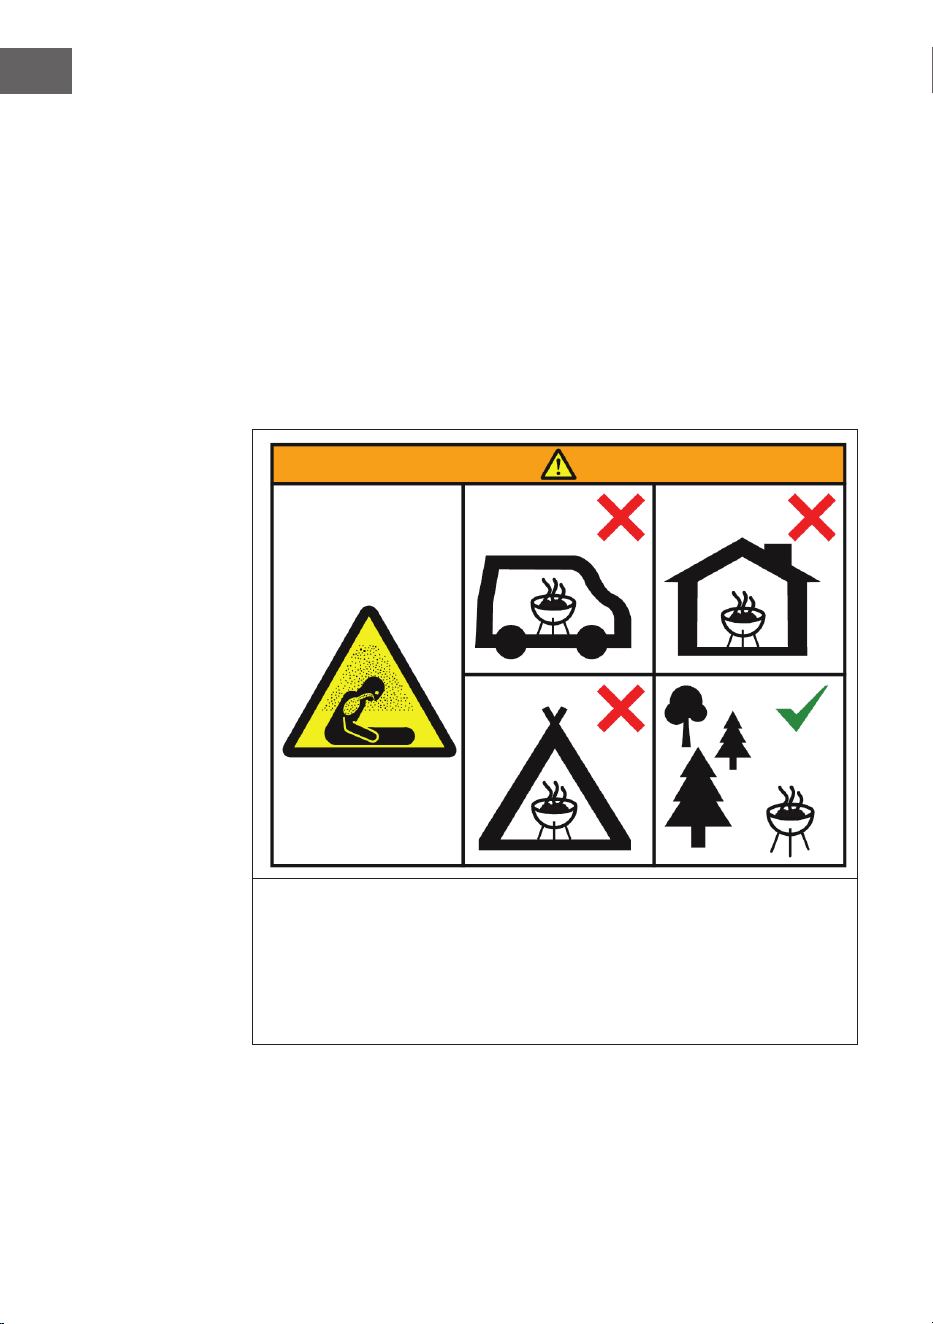
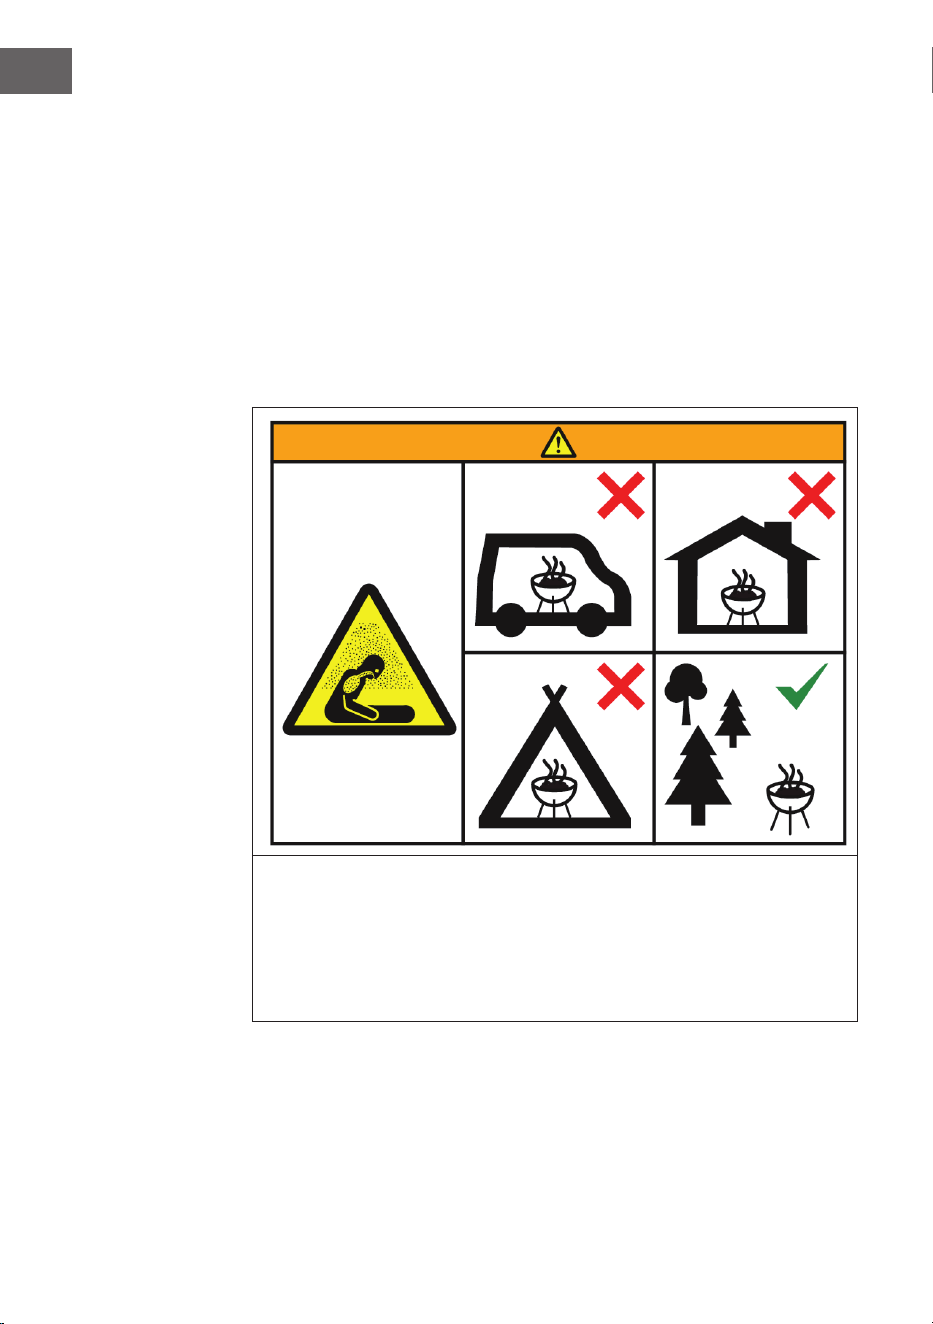
Erstickungsgefahr! Die Feuerstelle ist nur zur Nutzung im
Freien bestimmt. Sie darf nicht in Gebäuden, Garagen oder
anderen geschlossenen Bereichen verwendet werden. Es
können sich giftige Dämpfe bilden, die zum Ersticken führen.
• Die Feuerstelle ist nicht für gewerbliche Zwecke geeignet.
• Die Feuerstelle darf nur von Erwachsenen verwendet werden. Kinder und
Haustiere müssen einen sicheren Abstand einhalten.
• Verwenden Sie zum Anzünden kein Benzin, Brennspiritus,
Feuerzeugbenzin oder Alkohol.
• Benutzen Sie die Feuerstelle nicht, bevor sie nicht vollständig
zusammengebaut wurde und alle Teile fest sitzen.
• Verwenden Sie die Feuerstelle nicht auf Untergründen aus Holz oder
anderen brennbaren Materialien.
• Leeren Sie die Feuerstelle nach jeder Verwendung. Lassen Sie eine dünne
Ascheschicht darin, um den Boden zu schützen. Nehmen Sie die Asche erst
heraus, wenn die Kohle komplett abgebrannt und die Asche abgekühlt ist.
• Fassen Sie die Feuerstelle erst an, wenn sie komplett abgekühlt ist; Tragen
Sie während dem Betrieb hitzebeständige Handschuhe.
• Verstauen Sie die Feuerstelle erst wenn sie komplett abgekühlt ist und die
Asche entsorgt wurde.
English 11
Español 19
Français 27
Italiano 35
4
DE
• Verwenden Sie immer Werkzeuge und hitzebeständige Handschuhe,
wenn Sie Brennmaterial hinzufügen oder die Feuerstelle bewegen.
• Lassen Sie die Feuerstelle während der Benutzung nicht unbeaufsichtigt.
• Während der Benutzung kann heiße Glut aus der Feuerstelle fallen.
• Überladen Sie die Feuerstelle nicht mit Brennmaterial. Fügen Sie erst dann
neues Brennmaterial hinzu, wenn das Feuer heruntergebrannt ist. Wenn
ein Teil der Feuerstelle rot glüht, ist sie überladen.
• Halten Sie den Brennstoff von Wand der Feuerstelle fern, da die Wand von
hohen Temperaturen beschädigt werden kann.
• Atmen Sie den Rauch nicht ein und lassen Sie ihn nicht in die Ihre Augen kommen.
• Untersuchen Sie die Feuerstelle vor der Benutzung auf Beschädigungen.
• Durch die Benutzung kann sich die Metalloberäche leicht verfärben.
VORSICHT!
VERWENDEN SIE KEIN ALKOHOL
ODER BENZIN ZUM ENTZÜNDEN ODER
WIEDERENTZÜNDEN!

5
DE
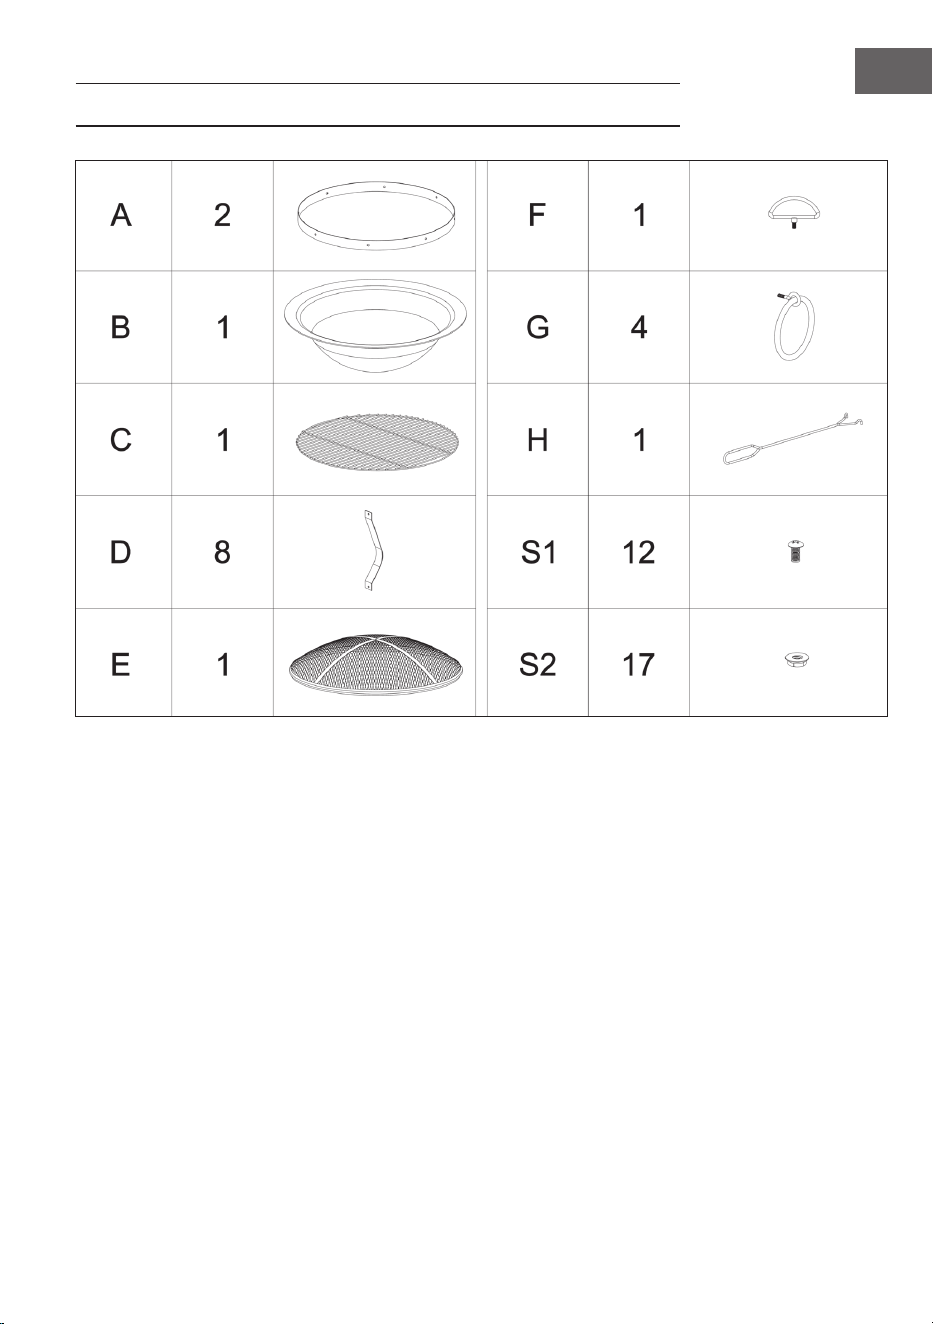
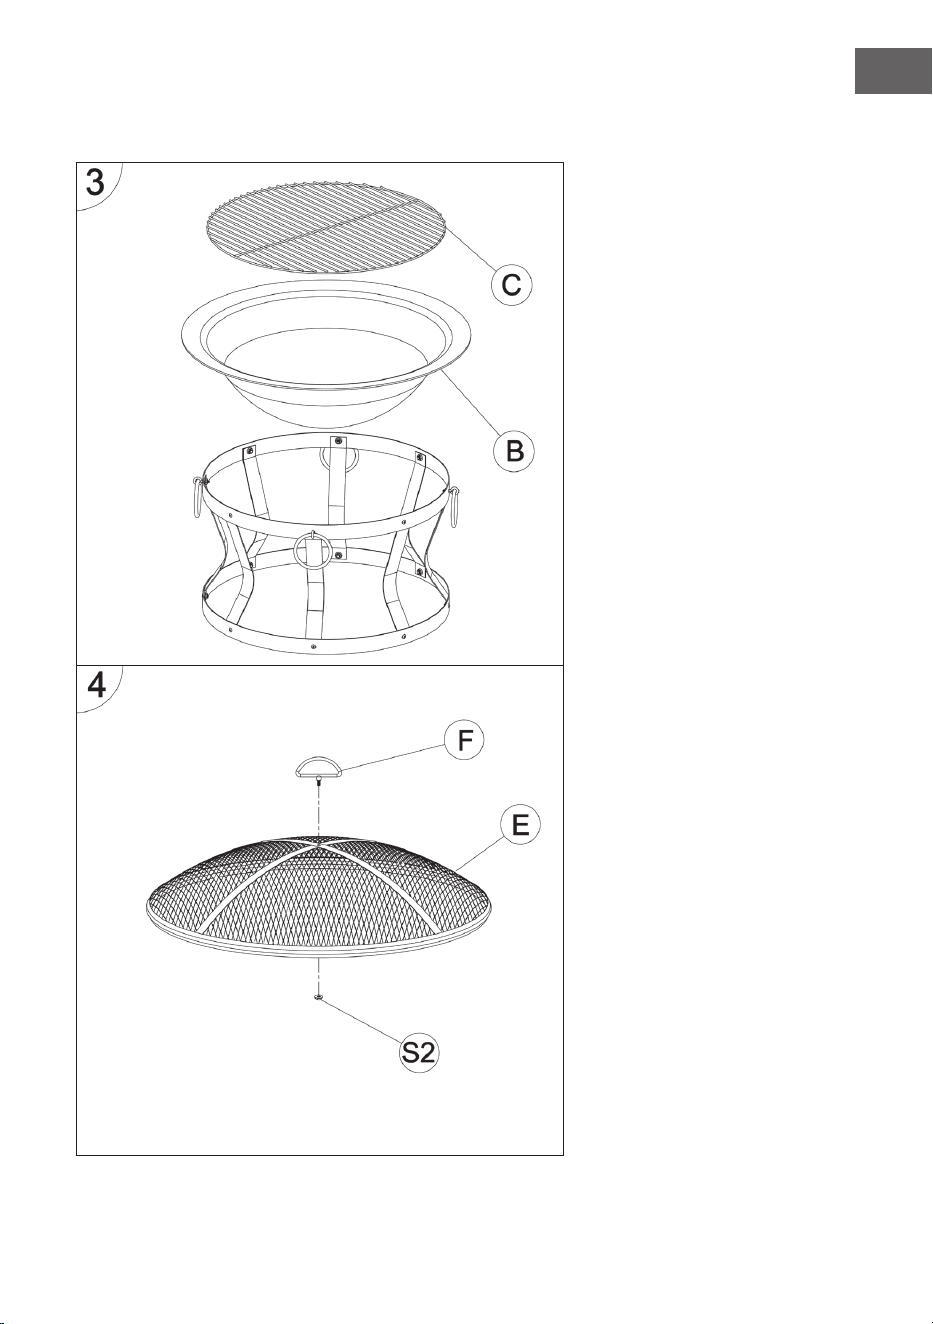
EINZELTEILE

6
DE
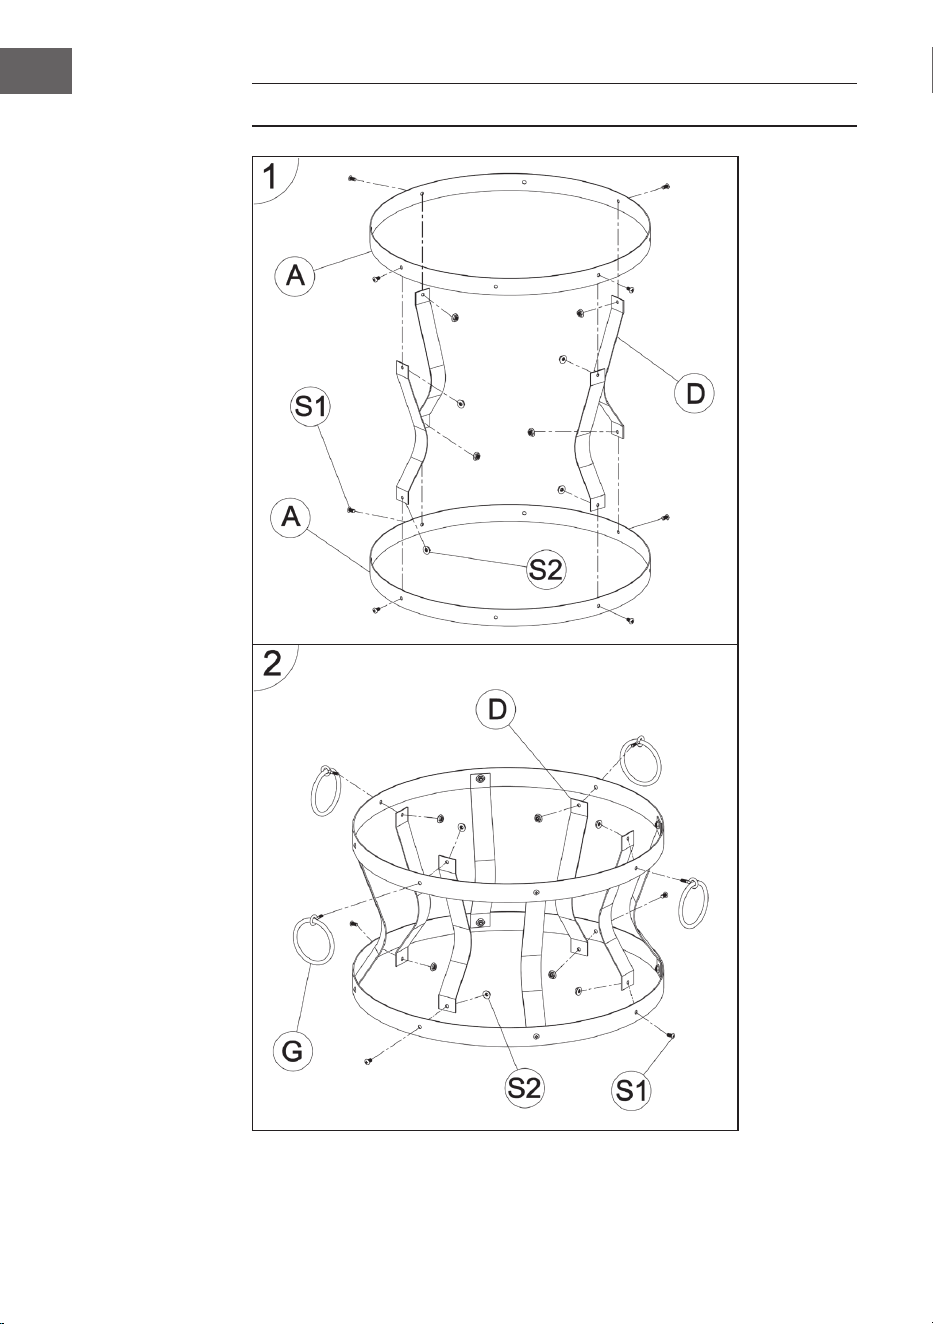
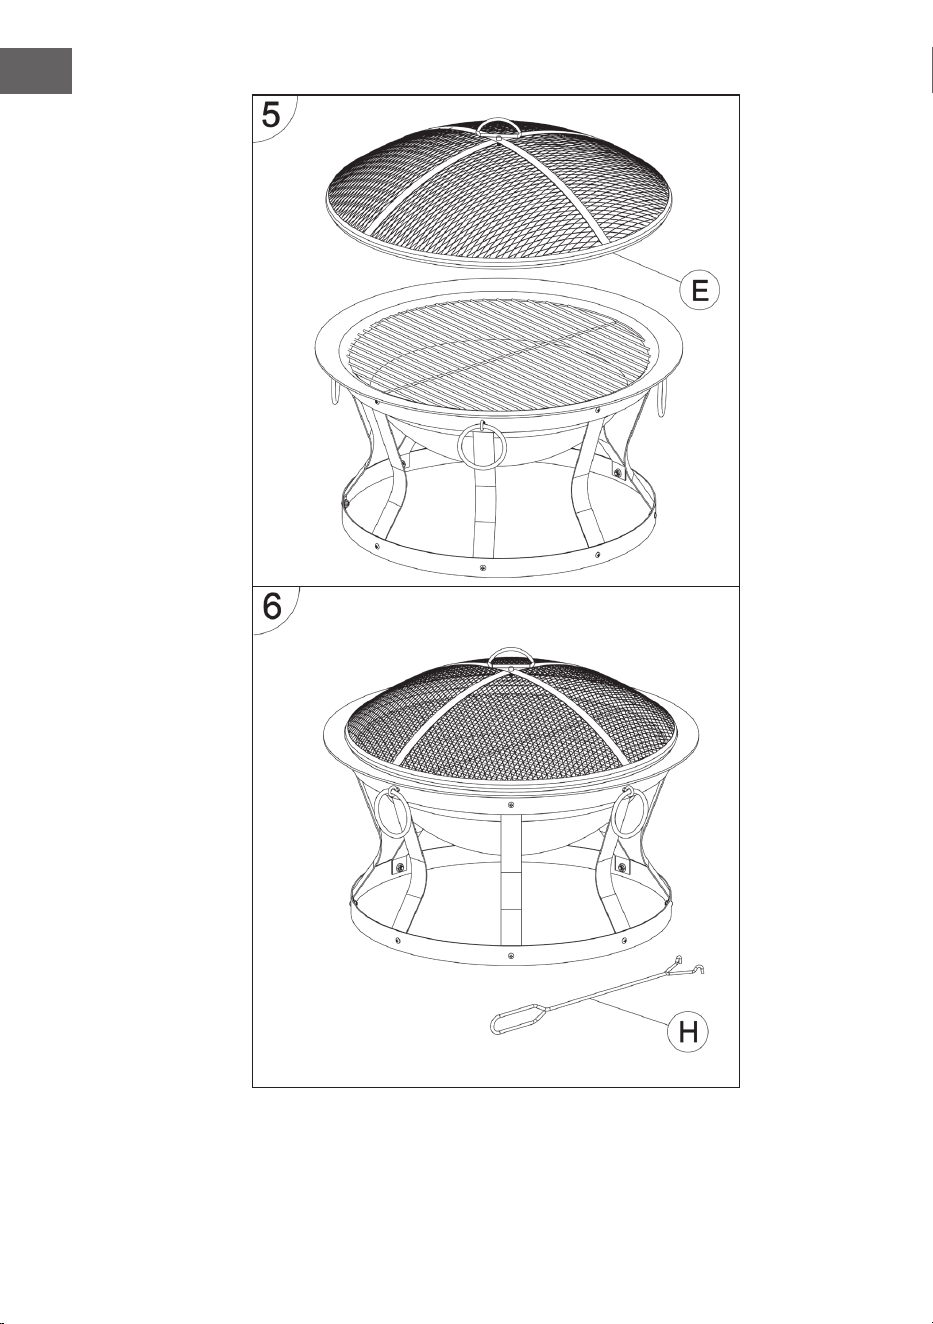
ZUSAMMENBAU

7
DE

8
DE

9
DE
BENUTZUNG
Feuer entzünden
• Stellen Sie sicher, dass die Feuerstelle auf einem festen, achen,
ebenen und hitzebeständigen Untergrund, entfernt von brennbaren
Gegenständen, aufgestellt ist.
• Legen Sie Papier oder trockenes Brennholz in die Mitte des
Feuerschalenbodens.
Hinweis: Legen Sie Brennmaterial nicht direkt in die Feuerschale sondern
immer auf das Papier bzw. das Brennholz.
• Zünden Sie das Papier oder Brennholz an.
Hinweis: Entfachen Sie erst ein kleines Feuer und lassen Sie es dann langsam
größer werden. Wenn sich die Hitze zu schnell und zu stark entwickelt, kann
es zu Rissen in der Konstruktion kommen.
Das Feuer schüren
• Geben Sie weiteres Brennmaterial hinzu, um die Hitze langsam zu
steigern. Überladen Sie die Feuerstelle nicht mit Brennmaterial. Drei
kleine Scheite sind ausreichend.
• Verwenden Sie beim Umschichten der Scheite das Schürwerkzeug.
Löschen
Um die Feuerstelle zu löschen, geben Sie kein Brennmaterial mehr hinzu oder
ersticken Sie das Feuer mit Sand. Löschen Sie das Feuer auf keinen Fall mit
Wasser!
10
DE
REINIGUNG UND PFLEGE
VORSICHT
Verbrennungsgefahr! Lassen Sie die Feuerstelle vollständig
abkühlen, bevor Sie sie auf Schäden untersuchen oder reinigen.
Die Feuerstelle auf Schäden untersuchen
Überprüfen Sie die Feuerstelle regelmäßig auf Schäden, um die
Produktsicherheit und eine längere Lebensdauer zu gewährleisten.
Reinigung
• Versichern Sie sich, dass das Feuer vollständig gelöscht ist, wenn Sie die
Feuerstelle nicht mehr verwenden.
• Stellen Sie sicher, dass das Feuer vollständig gelöscht ist und die
Feuerstelle abgekühlt ist, bevor Sie die Asche entfernen
• Verwenden Sie ein feuchtes Baumwolltuch, um Ruß zu entfernen.
Reinigen Sie die Feuerstelle regelmäßig, um eine lange Lebensdauer zu
gewährleisten.
Hinweis: Nach mehrmaligem Gebrauch kann sich die Ober äche verfärben.
• Verwenden Sie keinen Ofenreiniger oder Scheuermittel, da diese das
Produkt beschädigen können.
• Reinigen Sie die Außenseite mit Wasser und einem milden
Geschirrspülmittel.
• Verwenden Sie bei hartnäckigen Flecken Sie einen Reiniger auf Zitrusbasis
und eine Nylon-Bürste.
HERSTELLER & IMPORTEUR (UK)
Hersteller:
Chal-Tec GmbH, Wallstraße 16, 10179 Berlin, Deutschland.
Importeur für Großbritannien:
Berlin Brands Group UK Limited
PO Box 42
272 Kensington High Street
London, W8 6ND
United Kingdom
11
EN
Dear Customer,
Congratulations on purchasing this equipment. Please
read this manual carefully and take care of the following
hints to avoid damages. Any failure caused by ignoring
the items and cautions mentioned in the instruction
manual is not covered by our warranty and any liability.
Scan the QR code to get access to the latest user mannual
and other information about the product:
CONTENTS
Safety Instructions 11
Parts 13
Assembly 14
Operation 17
Cleaning and Care 18
Producer 18
SAFETY INSTRUCTIONS
WARNING
Risk of suffocation! This re pit is for outdoor use only and shall
not be used in a building, garage or any other enclosed area.
Toxic carbon monoxide fumes can accumulate and cause
asphyxiation.
• This re pit is not for commercial use.
• This re pit should only be used by adults and all children and pets should
be kept at a safe distance.
• Do not use petrol, white spirit, lighter uid, alcohol or other similar
chemicals to light a re as a rapid increase in temperature could damage
the re pit. This re pit is only suitable for use with charcoal, untreated
wood or dry logs. Do not use coal.
• Do not use this re pit until it is completely assembled and all parts are
securely fastened and tightened.
• Do not use the re pit on decking or any other ammable surfaces such as
dry grass, wood chips, leaves.
• Always empty this re pit after use. Leave a thin layer of ash to protect the
bottom. Do not remove ashes or charcoal until they are completely and
fully extinguished.
• Do not touch the re pit until it is completely cooled unless you are
wearing heat resistant gloves as it is hot when in use.
• Do not handle or move the re pit when in use as it is hot.
12
EN
• Do not attempt to store the re pit until all ashes and charcoals are
completely extinguished.
• Always use a safety tool and heat resistant gloves when adding or moving fuel.
• Do not leave a burning re unattended.
• Fire hazard-Hot embers may emit while in use.
• Do not overload the re pit with fuel. Do not add additional fuel until
the re burns down. If an portion of the re bowl is growing red, it is
overloaded.
• Do not burn fuel directly on the re bowl base.
• Do keep the fuel away from the wall of the re pit as the high temperature
may damage it.
• Avoid breathing smoke from the re and avoid getting it into your eyes.
• Always thoroughly inspect the re pit before use.
• A slight discolouration of nish may occur after use.
CAUTION!
DO NOT USE SPIRIT OR PETROL
FOR LIGHTING OR RE-LIGHTING!
13
EN
PARTS

14
EN
ASSEMBLY

15
EN

16
EN

17
EN
OPERATION
Ignite Fire
• Make sure that the replace is placed on a rm, at, level and heat-
resistant surface away from ammable objects.
• Place paper or dry rewood in the middle of the re tray base.
Note: Do not place fuel directly in the re bowl but always on the paper or
the rewood.
• Light the paper or rewood.
Note: Light a small re rst and then let it slowly grow. If the heat develops
too quickly and too strongly, cracks may occur in the construction.
Stoke the Fire
• Add more fuel to slowly increase the heat. Do not overload the replace
with fuel. Three small logs are sufcient.
• Use the scraping tool when rearranging the logs.
Extinguish Fire
To extinguish the replace, do not add fuel or suffocate the re with sand. Do
not extinguish the re with water!
18
EN
CLEANING AND CARE
CAUTION
Danger of burns! Allow the replace to cool completely before
inspecting or cleaning it for damage.
Inspect the fi replace for damage
Check the replace regularly for damage to ensure product safety and a longer
service life.
Cleaning
• Make sure that the re is completely extinguished when you no longer use
the replace.
• Make sure the re is completely extinguished and the replace has cooled
down before removing the ashes.
• Use a damp cotton cloth to remove soot. Clean the replace regularly to
ensure a long service life.
Note: The surface may discolour after repeated use.
• Do not use oven cleaner or scouring agents, as these can damage the
product.
• Clean the outside with water and a mild dishwashing liquid.
• For stubborn stains, use a citrus-based cleaner and a nylon brush.
MANUFACTURER & IMPORTER (UK)
Manufacturer:
Chal-Tec GmbH, Wallstrasse 16, 10179 Berlin, Germany.
Importer for Great Britain:
Berlin Brands Group UK Limited
PO Box 42
272 Kensington High Street
London, W8 6ND
United Kingdom
19
ES
Estimado cliente:
Le felicitamos por la adquisición de este producto. Lea
atentamente el siguiente manual y siga cuidadosamente
las instrucciones de uso con el n de evitar posibles
daños. La empresa no se responsabiliza de los daños
ocasionados por un uso indebido del producto o por
haber desatendido las indicaciones de seguridad.
Escanee el código QR para obtener acceso al manual
de usuario más reciente y otra información sobre el
producto.
ÍNDICE DE CONTENIDOS
Indicaciones de seguridad 19
Partes individuales 21
Ensamblaje 22
Uso 25
Limpieza y cuidado 26
Fabricante 26
INDICACIONES DE SEGURIDAD
ADVERTENCIA
¡Riesgo de as xia! La chimenea de jardín está concebida para
utilizarse únicamente en el exterior. No debe utilizarse en un
edi cio, garaje o área cerrada. Se pueden crear humos tóxicos y
provocar as xia.
• La chimenea no está diseñada para nes comerciales.
• Solamente un adulto debe operar la chimenea. Mantenga a niños y
mascotas a una distancia segura.
• No utilice gasolina, alcohol, gasolina para encendedores ni otros líquidos
explosivos para encender la chimenea.
• Utilice la chimenea únicamente después de haberla montado
completamente y comprobado que todas sus piezas están correctamente
atornilladas.
• No instale la chimenea sobre super cies hechas de madera u otros
materiales in amables.
• Vacíe la chimenea después de cada uso. Deje una capa na de cenizas para
proteger el fondo. Retire las cenizas cuando las brasas se hayan apagado y
la chimenea se haya enfriado.
• No toque la chimenea hasta que se haya enfriado; utilice guantes
resistentes al calor durante el manejo de la misma.
• Guarde la chimenea después de que se haya enfriado y haya retirado las
cenizas.
20
ES
• Utilice siempre utensilios y guantes resistentes al calor cuando añada el
material combustible o mueva la chimenea.
• No deje la chimenea sin supervisión cuando está encendida.
• Durante el uso, puede salir brasa muy caliente de la chimenea.
• No llene en exceso la chimenea con material de combustión. Añada más
material combustible cuando el fuego se esté apagando. Si una parte de la
chimenea se ilumina en rojo, signica que está llena en exceso.
• No coloque el material combustible cerca de las paredes de la chimenea,
ya que las altas temperaturas las podrían dañar.
• No inhale el humo y evite que entre en contacto con sus ojos.
• Inspeccione la chimenea antes de cada uso para detectar cualquier
deterioro.
• La supercie de metal puede decolorarse un poco por el uso.
ATENCIÓN!
¡NO UTILICE ALCOHOL O GASOLINA
PARA ENCEDER LA CHIMENEA!

21
ES
PARTES INDIVIDUALES

22
ES
ENSAMBLAJE

23
ES

24
ES

25
ES
USO
Encender el fuego
• Instale la chimenea en una supercie sólida, plana, nivelada y resistente al
calor, lejos de objetos inamables.
• Coloque en el centro del cuenco papel o madera seca.
Atención: no coloque el material de combustión directamente en el cuenco,
sino encima del papel o madera.
• Prenda el papel o la madera.
Atención: encienda primero un fuego pequeño y deje que gradualmente
se haga más grande. Si el calor se desarrolla de forma muy rápida y fuerte,
puede provocar grietas en la estructura.
Avivar el fuego
• Añada más material de combustión para aumentar lentamente el
fuego. No llene en exceso la chimenea con material de combustión. Tres
pequeños leños son sucientes.
• Utilice un atizador para apilar los leños.
Apagar el fuego
Para apagar el fuego, deje de añadir el material de combustión o cubra el fuego
con arena. ¡En ningún caso apague el fuego con agua!
26
ES
LIMPIEZA Y CUIDADO
ATENCIÓN
Riesgo de quemaduras. Deje que la chimenea se enfríe por
completo antes de limpiarla o examinarla para detectar
cualquier deterioro.
Examinar la chimenea
Inspeccione regularmente la chimenea para detectar posibles daños y, de este
modo, garantizar la seguridad del producto y una mayor vida útil.
Limpieza
• Compruebe que el fuego está completamente apagado si no utiliza más la
chimenea.
• Asegúrese de que el fuego está completamente apagado y la chimenea
enfriada antes de retirar las cenizas.
• Utilice un paño de algodón húmedo para retirar el hollín. Limpie
regularmente la chimenea para asegurar una mayor vida útil.
Atención: la super cie puede decolorarse después de varios usos.
• No utilice limpiadores de horno o productos de limpieza abrasivos, ya que
podría dañar la chimenea.
• Limpie el exterior con agua y un detergente para lavavajillas suave.
• Utilice un producto de limpieza a base de limón y un cepillo de nailon para
eliminar manchas difíciles.
FABRICANTE E IMPORTADOR (REINO UNIDO)
Fabricante:
Chal-Tec GmbH, Wallstraße 16, 10179 Berlín, Alemania.
Importador para Gran Bretaña:
Berlin Brands Group UK Limited
PO Box 42
272 Kensington High Street
London, W8 6ND
United Kingdom

27
FR
Cher client,
Toutes nos félicitations pour l’acquisition de ce nouvel
appareil. Veuillez lire attentivement les instructions
suivantes de branchement et d’utilisation a n d’éviter
d’éventuels dommages. Le fabricant ne saurait être tenu
pour responsable des dommages dus au non-respect
des consignes de sécurité et à la mauvaise utilisation de
l’appareil. Scannez le QR-Code pour accéder à la dernière
version du mode d‘emploi et à d‘autres informations
concernant le produit.
SOMMAIRE
Consignes de sécurité 27
Pièces détachées 29
Assemblée 30
Utilisation 33
Nettoyage et entretien 34
Fabricant 34
CONSIGNES DE SÉCURITÉ
MISE EN GARDE
Risque d‘étouffement ! Le braséro est destiné à un usage
extérieur seulement. Il ne doit pas être utilisé dans des
bâtiments, garages ou autres espaces clos. Il peut former des
fumées toxiques qui provoquent la suffocation.
• Le braséro ne convient pas à un usage commercial.
• Le braséro ne peut être utilisé que par des adultes. Les enfants et les
animaux de compagnie doivent garder une distance de sécurité.
• N‘utilisez pas d‘essence, d‘alcool à brûler, de liquide léger ou d‘alcool pour
l‘éclairage.
• N‘utilisez pas le braséro tant qu‘il n‘est pas complètement assemblé et que
toutes les pièces sont serrées.
• N‘utilisez pas le braséro sur du bois ou d‘autres matériaux combustibles.
• Videz le braséro après chaque utilisation. Laissez une ne couche de
cendre pour protéger le fond. Ne retirez les cendres que lorsque le
charbon a complètement brûlé et que les cendres se sont refroidies.
• Ne touchez pas le braséro avant qu‘il ne soit complètement refroidi ;
portez des gants résistant à la chaleur pendant le fonctionnement.
• Ne rangez le braséro que lorsqu‘il est complètement refroidi et que les
cendres ont été éliminées.
28
FR
• Utilisez toujours des outils et des gants résistant à la chaleur pour ajouter
du carburant ou déplacer le braséro.
• Ne laissez pas le braséro sans surveillance pendant l‘utilisation.
• Pendant l‘utilisation, des braises chaudes peuvent tomber du braséro.
• Ne surchargez pas le braséro avec du carburant. Ajoutez du nouveau
carburant seulement lorsque le feu a brûlé. Si une partie du foyer est
rouge, cela signie qu‘elle est surchargée.
• Gardez le carburant loin des parois du braséro car la paroi peut être
endommagée par les températures élevées.
• N‘inhalez pas la fumée et ne la laissez pas entrer dans vos yeux.
• Inspectez le braséro pour vous assurer qu‘il n‘est pas endommagé avant de
l‘utiliser.
• La surface métallique peut facilement décolorer au fur et à mesure des
utilisations.
ATTENTION !
NE PAS UTILISER D'ALCOOL OU
D'ESSENCE POUR ALLUMER OU
RALLUMER !

29
FR
PIÈCES DÉTACHÉES

30
FR
ASSEMBLÉE
31
FR

32
FR

33
FR
UTILISATION
Allumage du feu
• Assurez-vous que le foyer est installé sur une surface ferme, plane et
résistante à la chaleur, à l’écart des objets inammables.
• Placez le papier ou le bois de chauffage sec au centre du braséro.
Remarque : Ne mettez pas le combustible directement dans le braséro mais
toujours sur le papier ou le bois de chauffage.
• Allumez le papier ou le bois de chauffage.
Remarque : Allumez d‘abord un petit feu et laissez-le prendre lentement.
Si la chaleur se développe trop vite et trop fort, des ssures peuvent se
produire sur le braséro.
Pour entretenir le feu
• Ajouter plus de combustible pour augmenter lentement la chaleur. Ne
surchargez pas le foyer de combustible. Trois petites bûches sufsent.
• Pour répartir les bûches, utilisez le tisonnier.
Pour éteindre le feu
Pour éteindre le feu, n‘ajoutez plus de combustible ou bien étouffez le feu avec
du sable. N‘éteignez jamais le feu avec de l‘eau!
34
FR
NETTOYAGE ET ENTRETIEN
ATTENTION
Risque de brûlure ! laissez le foyer refroidir complètement avant
de l‘inspecter pour détecter d‘éventuels défauts, ou pour le
nettoyer.
Inspection du braséro
Véri ez régulièrement si le foyer n‘est pas endommagé pour assurer la sécurité
du produit et prolonger sa durée de vie.
Nettoyage
• Assurez-vous que le feu est complètement éteint lorsque vous arrêtez
d‘utiliser le foyer.
• Assurez-vous que le feu est complètement éteint et que le foyer est
refroidi avant de retirer les cendres
• Utilisez un chiffon de coton humide pour enlever la suie. Nettoyez le foyer
régulièrement pour lui assurer une longue vie.
Remarque : Il peut y avoir une décoloration de la surface au bout de
nombreuses utilisations.
• N‘utilisez pas de nettoyants pour four ou d‘abrasifs car ils pourraient
endommager le produit.
• Nettoyez l‘extérieur à l‘eau avec du liquide vaisselle doux.
• Pour les taches tenaces, utilisez un nettoyant à base d’agrumes et une
brosse en nylon.
FABRICANT ET IMPORTATEUR (UK)
Fabricant :
Chal-Tec GmbH, Wallstraße 16, 10179 Berlin, Allemagne.
Importateur pour la Grande Bretagne :
Berlin Brands Group UK Limited
PO Box 42
272 Kensington High Street
London, W8 6ND
United Kingdom
35
IT
Gentile cliente,
La ringraziamo per aver acquistato il dispositivo. La
preghiamo di leggere attentamente le seguenti istruzioni
per l’uso e di seguirle per evitare possibili danni tecnici.
Non ci assumiamo alcuna responsabilità per danni
scaturiti da una mancata osservazione delle avvertenze
di sicurezza e da un uso improprio del dispositivo.
Scansionare il codice QR seguente, per accedere al
manuale d’uso più attuale e per ricevere informazioni sul
prodotto.
INDICE
Avvertenze di sicurezza 35
Parti singole 37
Montaggio 38
Utilizzo 41
Pulizia e manutenzione 42
Produttore 42
AVVERTENZE DI SICUREZZA
ATTENZIONE
Pericolo di soffocamento! Il braciere da giardino è progettato
per il solo uso all’aperto. Non può essere utilizzato in edi ci,
garage o altri ambienti chiusi. Possono formarsi vapori tossici,
che provocano il soffocamento.
• Il braciere non è adatto a utilizzi commerciali.
• Il braciere può essere utilizzato solo da persone adulte. Tenere bambini e
animali domestici a distanza di sicurezza.
• Non utilizzare benzina, spirito, liquido per accendini o alcool per
accenderlo.
• Non utilizzare il braciere prima del completo montaggio e prima che tutti i
componenti siano saldamente assemblati.
• Non utilizzare il braciere su fondi in legno o in altri materiali in ammabili.
• Svuotare il braciere dopo ogni utilizzo. Lasciare un sottile strato di cenere
all’interno per proteggere il fondo. Togliere la cenere solo quando il
carbone è completamente bruciato e la cenere si è raffreddata.
• Toccare il braciere solo quando è completamente raffreddato. Durante
l’utilizzo, indossare guanti termoresistenti.
• Riporre il braciere solo quando è completamente raffreddato ed è stata
rimossa la cenere.
36
IT
• Quando si aggiunge materiale combustibile o si sposta il braciere,
utilizzare sempre utensili e guanti termoresistenti.
• Non lasciare il braciere privo di controllo durante il funzionamento.
• Durante il funzionamento, possono cadere braci fuori dal braciere.
• Non sovraccaricare il braciere con materiale combustibile. Aggiungere
combustibile solo quando il fuoco è debole. Se alcune parti del braciere
diventano rosse a causa dell’eccessivo calore, è stato inserito troppo
materiale combustibile.
• Tenere il combustibile lontano dalla parete del braciere, in quanto
temperature elevate potrebbero danneggiarla.
• Non inspirare il fumo e non farlo arrivare negli occhi.
• Controllare il braciere prima dell’utilizzo per eventuali danneggiamenti.
• L’utilizzo può causare un cambiamento di colore delle superci metalliche.
ATTENZIONE!
NON UTILIZZARE ALCOOL O BENZINA
PER ACCENDERE O RIACCENDERE IL
BRACIERE!

37
IT
PARTI SINGOLE
38
IT
MONTAGGIO

39
IT
40
IT

41
IT
UTILIZZO
Accendere il fuoco
• Assicurarsi che il braciere si trovi su un fondo stabile, piano e
termoresistente, lontano da oggetti inammabili.
• Mettere carta o legna secca da ardere al centro del fondo del braciere.
Avvertenza: non mettere il materiale da bruciare direttamente nel braciere,
ma sempre sulla carta o sulla legna da ardere.
• Accendere la carta o la legna da ardere.
Avvertenza: formare prima un fuoco piccolo e farlo crescere lentamente.
Se il calore si sviluppa in modo troppo rapido e intenso, possono comparire
crepe sulla struttura.
Attizzare il fuoco
• Aggiungere materiale da ardere per incrementare lentamente il fuoco.
No sovraccaricare il braciere con materiale da ardere. Sono sufcienti tre
piccoli ceppi.
• Utilizzare un attizzatoio per smuovere i ceppi.
Estinguere
Per estinguere il fuoco, smettere di aggiungere materiale combustibile o
soffocarlo con della sabia. Non estinguere in nessun caso il fuoco con acqua!
42
IT
PULIZIA E MANUTENZIONE
ATTENZIONE
Pericolo di ustione! Far raffreddare completamente il braciere,
prima di controllarlo per eventuali danni o di pulirlo.
Controllare il braciere per eventuali danni
Controllare regolarmente se il braciere è danneggiato, in modo da garantire
sicurezza e una lunga vita utile.
Pulizia
• Assicurarsi che il fuoco sia completamente spento, quando non si utilizza
più il braciere.
• Assicurarsi che il fuoco sia completamente spento e che il braciere si sia
raffreddato, prima di rimuovere la cenere.
• Utilizzare un panno in cotone umido per rimuovere la fuliggine. Pulire
regolarmente il braciere per garantire una lunga vita utile.
Avvertenza: dopo diversi utilizzi, la super cie può cambiare colore.
• Non utilizzare detergenti per forno o prodotti abrasivi, in quanto
potrebbero danneggiare il prodotto.
• Pulire la super cie esterna con acqua e un detergente per piatti delicato.
• In caso di macchie ostinate, utilizzare una spazzola di nylon e un
detergente a base di agrumi.
PRODUTTORE E IMPORTATORE (UK)
Produttore:
Chal-Tec GmbH, Wallstraße 16, 10179 Berlino, Germania.
Importatore per la Gran Bretagna:
Berlin Brands Group UK Limited
PO Box 42
272 Kensington High Street
London, W8 6ND
United Kingdom