Arielle
Duschsitz
Shower Seat
Silla para la ducha
Siège de douche
Sedile per doccia
10034209


3
DE
Sehr geehrter Kunde,
wir gratulieren Ihnen zum Erwerb Ihres Gerätes. Lesen Sie die
folgenden Hinweise sorgfältig durch und befolgen Sie diese,
um möglichen Schäden vorzubeugen. Für Schäden, die durch
Missachtung der Hinweise und unsachgemäßen Gebrauch
entstehen, übernehmen wir keine Haftung. Scannen Sie den
QR-Code, um Zugriff auf die aktuellste Bedienungsanleitung
und weitere Informationen rund um das Produkt zu erhalten.
SICHERHEITSHINWEISE
• Lesen Sie sich die Anleitung vor der Installation sorgfältig durch.
• Wenn die mitgelieferten Schrauben und Dübel nicht für die Montage
geeignet sind, verwenden Sie geeignete Schrauben und Dübel.
Hinweis: Das maximale Benutzergewicht beträgt 130 kg.
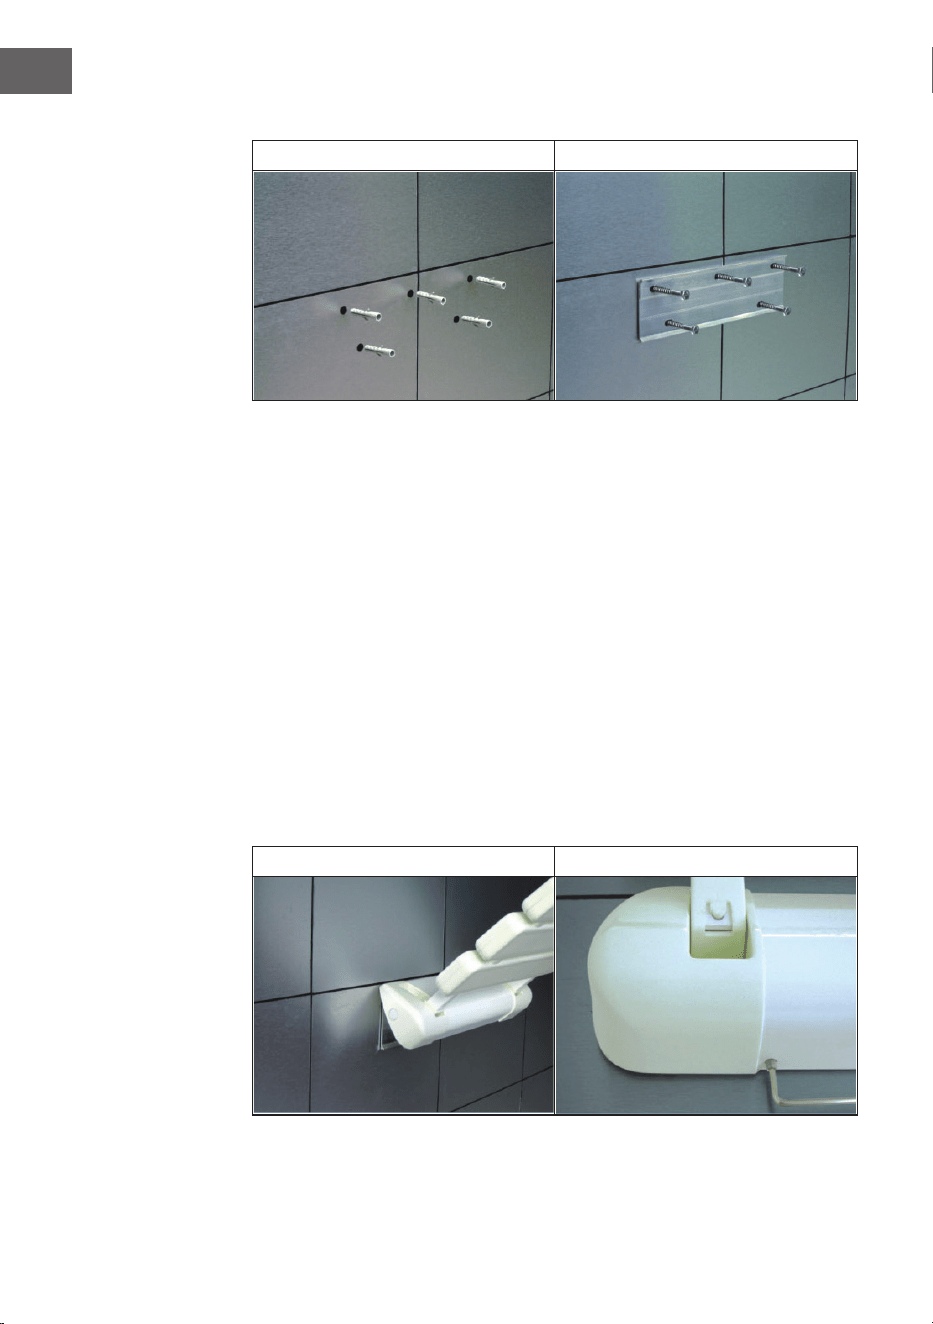
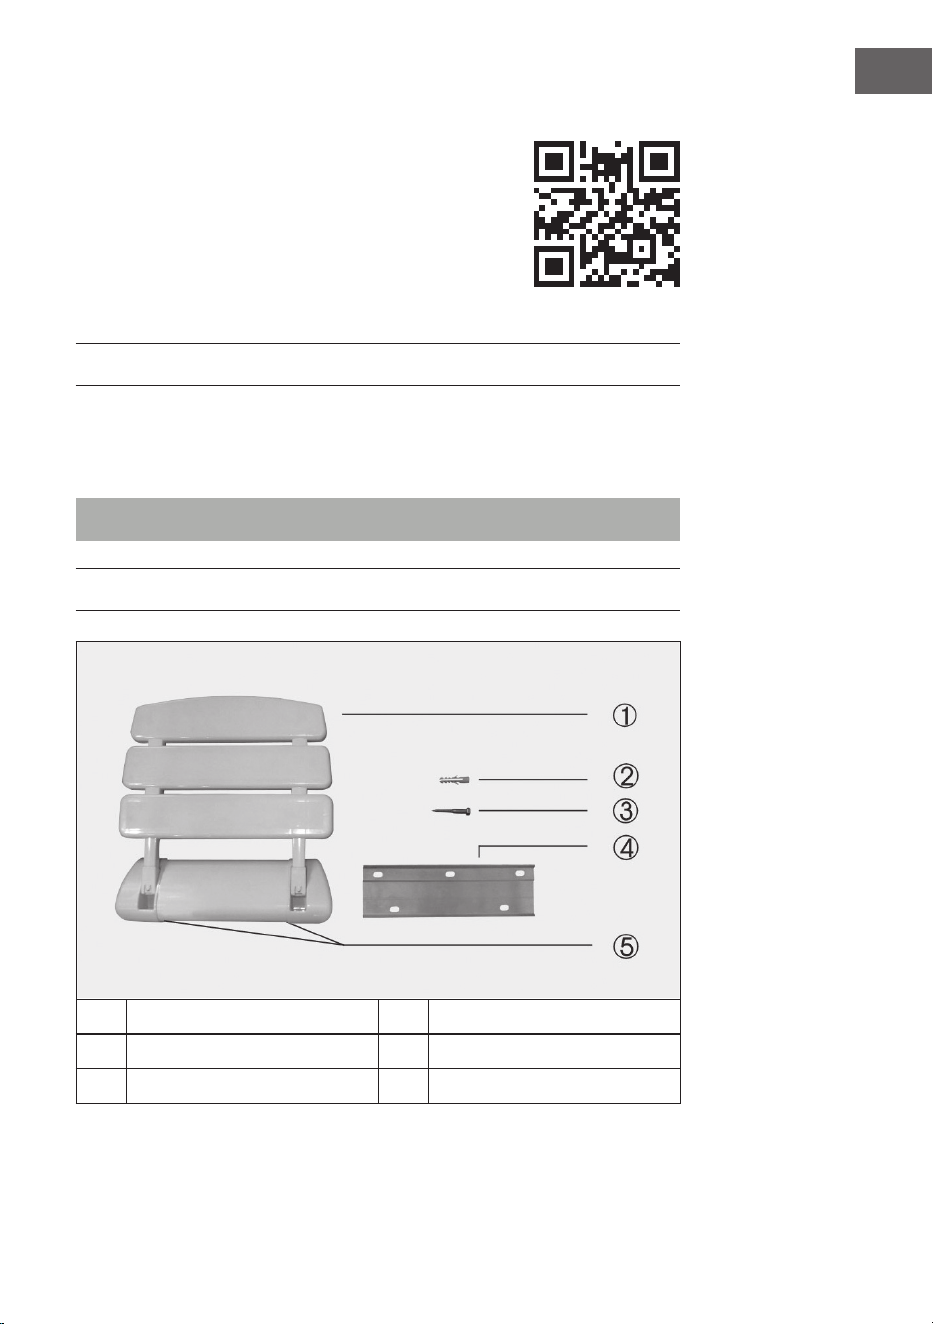
BEFESTIGUNG ARIELLE
1
Sitz
4
Wandhalterung
2
8*60 mm Dübel
5
5*8 mm Inbusschraube
3
5*60 mm Spreizschraube
4
DE
English 5
Español 7
Français 9
Italiano 11
Installation
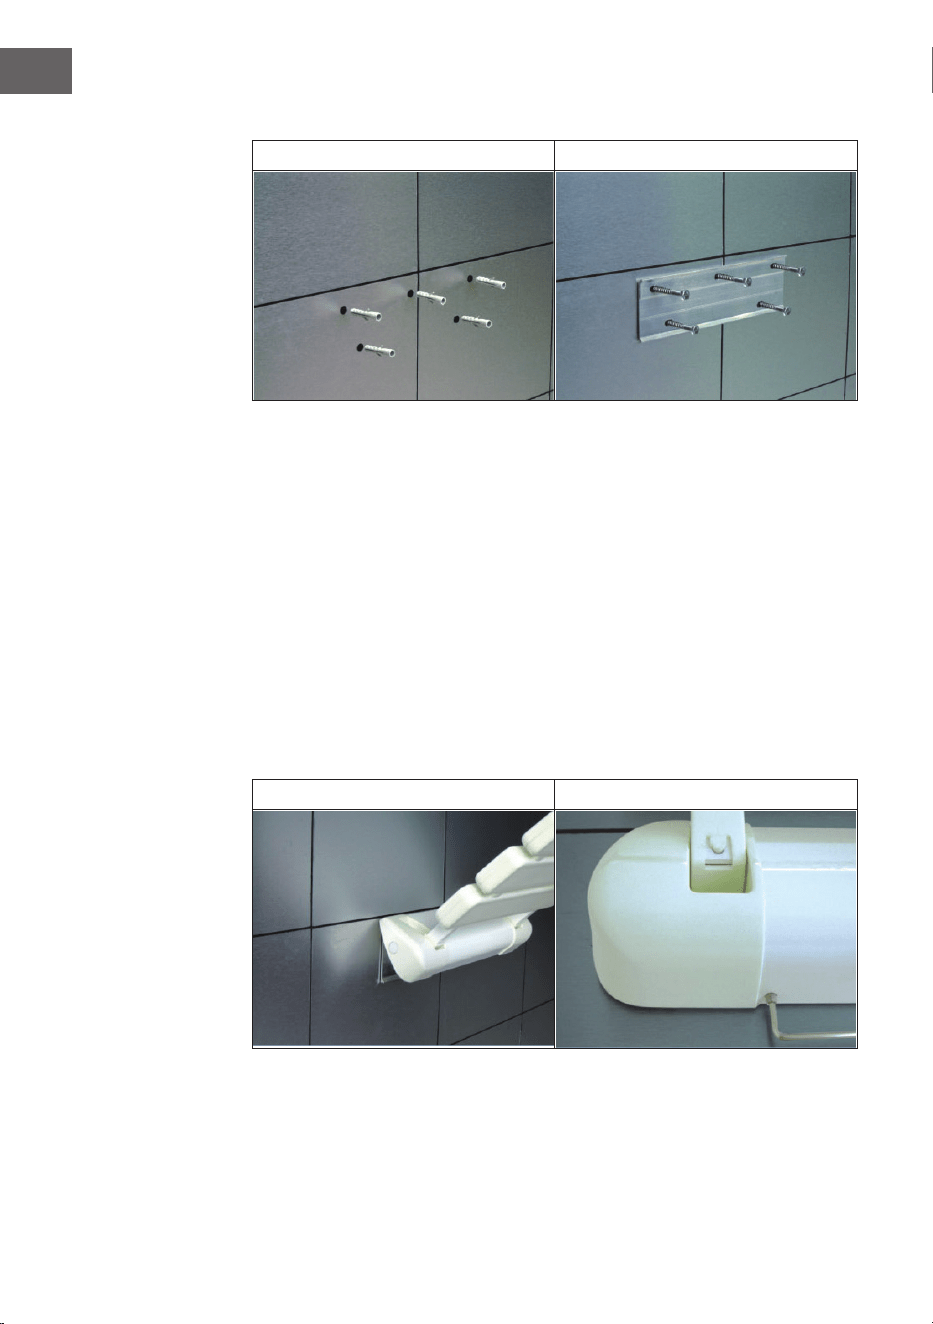
A B
(A) Halten Sie die Wandhalterung (04) an die Wand auf die gewünschte
Höhe. Die Kante mit den drei Löchern sollte dabei nach oben zeigen.
Die Unterseite der Wandhalterung sollte sich 40-50cm über dem
Boden benden. Markieren Sie die Schraubenlöcher und nehmen Sie die
Wandhalterung wieder ab. Bohren Sie fünf Löcher mit einer Tiefe von 60
mm und einem Durchmesser von 8 mm und stecken Sie die Dübel (2) in
die Löcher.
(B) Setzen Sie die Wandhalterung wieder auf die ursprüngliche Position und
schrauben Sie die Spreizschrauben (03) fest.
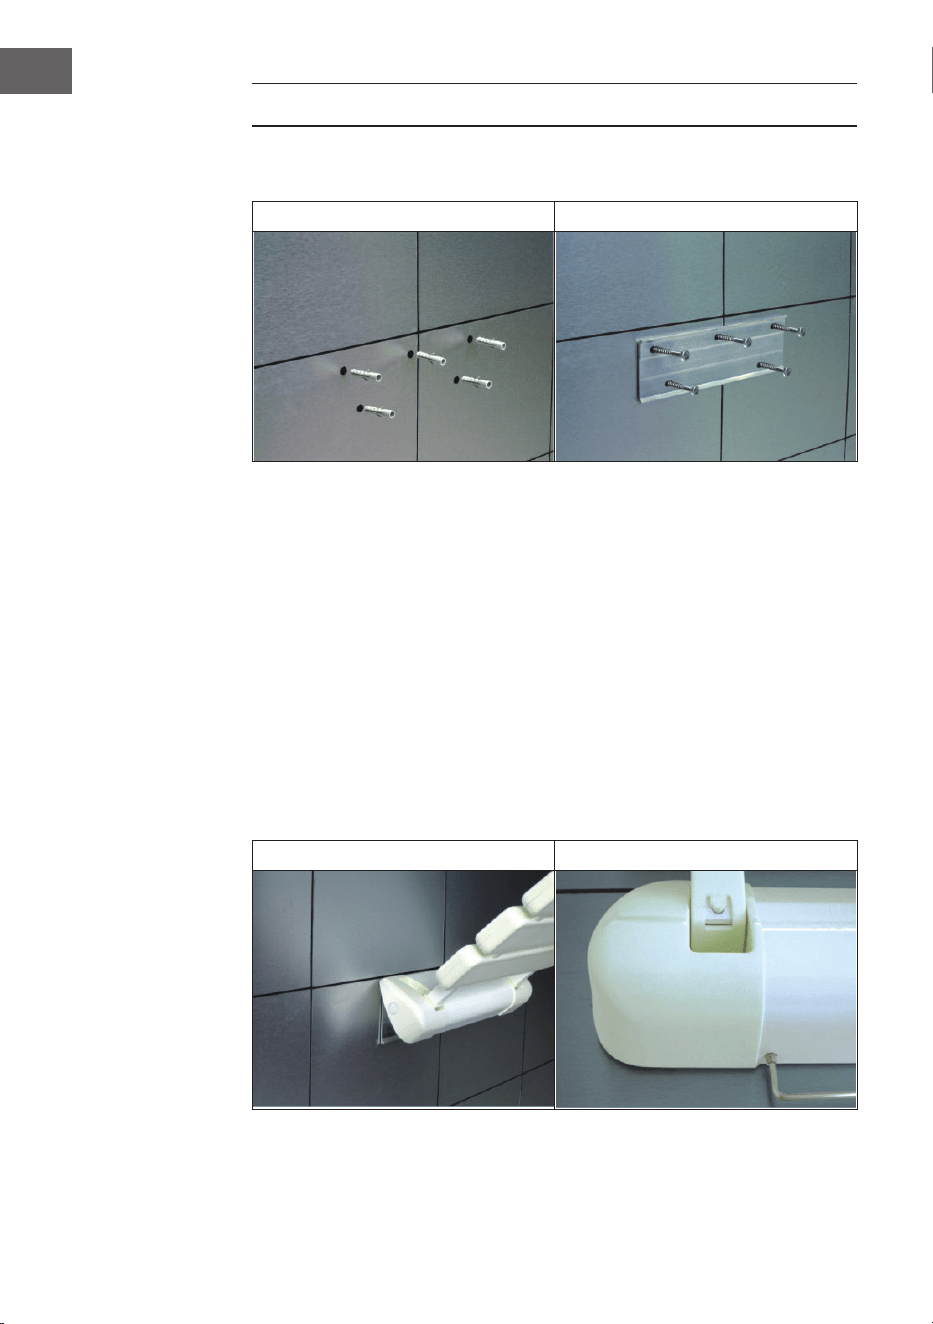
(C) Scheiben Sie die Halterung des Duschsitzes (1) von oben nach unten
auf die Wandhalterung bis er fest auf der Wandhalterung sitzt und sie
komplett abdeckt.
(D) Fixieren Sie die Halterung des Duschsitzes mit den zwei 5*8 mm
Inbusschrauben (05), indem Sie die Schrauben mit einem Inbusschlüssel in
die Unterseite der Halterung schrauben.
C D
5
EN
Dear Customer,
Congratulations on purchasing this device. Please read
the following instructions carefully and follow them to
prevent possible damages. We assume no liability for
damage caused by disregard of the instructions and
improper use. Scan the QR code to get access to the
latest user manual and more product information.
SAFETY INSTRUCTIONS
• Read the instructions carefully before installation.
• If the supplied screws and plugs are not suitable for installation, use
suitable screws and plugs.
Note: The maximum user weight is 130 kg.
ATTACHMENT ARIELLE
1
Seat
4
Wall bracket
2
8*60 mm Dowel
5
5*8 mm Allen screw
3
5*60 mm Expansion screw
6
EN
ATTACHMENT ARIELLE
Installation
A B
(A) Hold the wall bracket (04) against the wall at the desired height. The edge
with the three holes should point upwards. The bottom of the wall bracket
should be 40-50 cm above the oor. Mark the screw holes and remove the
wall bracket. Drill ve holes with a depth of 60 mm and a diameter of 8 mm
and insert the dowels (2) into the holes.
(B) Return the wall bracket to its original position and tighten the expansion
screws (03).
(C) Place the shower seat bracket (1) on the wall bracket from top to bottom
until it is rmly seated on the wall bracket and completely covers it.
(D) Secure the shower seat bracket with the two 5*8 mm Allen screws (05)
by screwing the screws into the underside of the bracket using an Allen
wrench.
C D

7
ES
Estimado cliente:
Le felicitamos por la adquisición de este producto.
Lea atentamente las siguientes instrucciones y sígalas
para evitar posibles daños. No asumimos ninguna
responsabilidad por los daños causados por el
incumplimiento de las instrucciones y el uso inadecuado.
Escanee el siguiente código QR para obtener acceso a
la última guía del usuario y más información sobre el
producto.
INSTRUCCIONES DE SEGURIDAD
• Lea atentamente las instrucciones antes de instalar el producto.
• Si los tacos y los tornillos incluidos en el paquete no son los adecuados,
utilice tacos y tornillos apropiados.
Nota: Peso máximo que soporta 160 kg
INSTALACIÓN DE ARIELL
1
Sillón
4
Soporte de pared
2
8*60 mm clavijas
5
5*8 mm tornillo Allen
3
5*60 mm tornillo de
expansión
8
ES
Instalación
A B
(A) Coloque la pieza de sujeción (04) en la pared a la altura deseada. La parte
con los tres agujeros debe mirar hacia arriba. La parte baja de la sujeción
debería estar a unos 40-50 cm del suelo. Marque el lugar donde deben ir
los agujeros y retire la pieza. Con el taladro perfore los cinco agujeros de
una profundidad de 60mm y un diámetro de 8mm introduzca los tacos (2)
en los agujeros.
(B) Vuelva a colocar la pieza en su lugar y atornille los tornillos de expansión
en los agujeros.
(C) Coloque la estructura del asiento (1) de arriba hacia abajo en la pieza de
sujeción hasta que esté bien asegurada en la pieza y la cubra entera.
(D) Fije la estructura con los tornillos Allen 5*8 mm (05) en la parte de abajo de
la estructura con una llave Allen
C D

9
FR
Chère cliente, cher client,
Toutes nos félicitations pour l’acquisition de ce nouvel
appareil. Veuillez lire attentivement et respecter
les instructions de ce mode d’emploi a n d’éviter
d’éventuels dommages. Nous ne saurions être tenus
pour responsables des dommages dus au non-respect
des consignes et à la mauvaise utilisation de l’appareil.
Scannez le QR-Code pour obtenir la dernière version
du mode d‘emploi et des informations supplémentaires
concernant le produit.
CONSIGNES DE SÉCURITÉ
• Lisez attentivement les instructions avant l‘installation.
• Si les vis et les chevilles fournies ne conviennent pas au montage, utilisez
des vis et des chevilles appropriées.
Remarque : le poids maximal de l‘utilisateur est de 160 kg.
FIXATION DE ARIELLE
1
Banquette
4
Support mural
2
8*60 mm goujons
5
5*8 mm vis Allen
3
5*60 mm vis expansible

10
FR
Installation
A B
(A) Tenez le support mural (04) contre le mur à la hauteur souhaitée. Le bord
avec les trois trous doit être dirigé vers le haut. Le bas de la xation murale
doit être à 40-50 cm au-dessus du sol. Marquez les trous de vis et retirez
à nouveau le support mural. Percez cinq trous d’une profondeur de 60 mm
et d’un diamètre de 8 mm et insérez les chevilles (2) dans les trous.
(B) Remettez le support mural dans sa position initiale et serrez les vis à
expansion (03).
(C) Faites glisser le support du siège de douche (1) de haut en bas sur le
support mural jusqu‘à ce qu‘il soit fermement inséré dans le support mural
et le recouvre complètement.
(D) Fixez le support du siège de douche avec les deux vis Allen de 5 * 8 mm
(05) et serrez les vis avec une clé Allen dans la partie inférieure du support.
C D
11
IT
Gentile cliente,
La ringraziamo per aver acquistato il dispositivo. La
preghiamo di leggere attentamente le seguenti istruzioni
per l’uso e di seguirle per evitare possibili danni. Non ci
assumiamo alcuna responsabilità per danni scaturiti da
una mancata osservazione delle avvertenze di sicurezza
e da un uso improprio del dispositivo. Scansionare il
codice QR seguente, per accedere al manuale d’uso più
attuale e per ricevere informazioni sul prodotto.
ISTRUZIONI DI SICUREZZA
• Leggere attentamente le istruzioni prima dell‘installazione.
• Se le viti e i tasselli forniti non sono adatti per il montaggio, utilizzare viti e
tasselli adeguati.
Nota: il peso massimo dell‘utente è di 160 kg.
INSTALLAZIONE ARIELLE
1
Poltrona
4
Staffa a parete
2
8*60 mm spine
5
5*8 mm vite a brugola
3
5*60 mm vite ad espansione

12
IT
Installazione
A B
(A) Tenere la staffa a parete (04) contro la parete all‘altezza desiderata. Il
bordo con i tre fori dovrebbe essere rivolto verso l‘alto. La parte inferiore
dell‘attacco a parete dovrebbe essere 40-50 cm dal suolo. Contrassegnare
i fori delle viti e rimuovere di nuovo la staffa a parete. Praticare cinque fori
con una profondità di 60 mm e un diametro di 8 mm e inserire i tasselli (2)
nei fori.
(B) Riportare la staffa a parete nella posizione originale e stringere le viti di
espansione (03).
(C) Far scivolare il supporto del sedile per doccia (1) dall‘alto verso il basso
sulla staffa a parete no a quando non è saldamente inserito nella staffa e
lo copre completamente.
(D) Fissare il supporto del sedile per doccia con le due viti a brugola da 5*8
mm (05) avvitando le viti con una chiave a brugola nella parte inferiore del
supporto.
C D

HERSTELLER
Manufacturer | Fabricante | Fabricant | Produttore
Chal-Tec GmbH, Wallstraße 16, 10179 Berlin, Deutschland (Germany).
IMPORTEUR FÜR GROSSBRITANNIEN
Importer for Great Britain | Importador para Gran Bretaña | Importateur
pour la Grande Bretagne | Importatore per la Gran Bretagna
Berlin Brands Group UK Ltd
PO Box 1145
Oxford, OX1 9UW
United Kingdom