Arielle Deluxe
Duschsitz
Shower Seat
Silla para la ducha
Siège de douche
Sedile per doccia
10034210


3
DE
Sehr geehrter Kunde,
wir gratulieren Ihnen zum Erwerb Ihres Gerätes. Lesen
Sie die folgenden Hinweise sorgfältig durch und befolgen
Sie diese, um möglichen Schäden vorzubeugen. Für
Schäden, die durch Missachtung der Hinweise und
unsachgemäßen Gebrauch entstehen, übernehmen wir
keine Haftung. Scannen Sie den QR-Code, um Zugriff
auf die aktuellste Bedienungsanleitung und weitere
Informationen rund um das Produkt zu erhalten.
INHALTSVERZEICHNIS
Sicherheitshinweise 4
Befestigung Arielle Deluxe 4
HERSTELLER & IMPORTEUR (UK)
Hersteller:
Chal-Tec GmbH, Wallstraße 16, 10179 Berlin, Deutschland.
Importeur für Großbritannien:
Berlin Brands Group UK Ltd
PO Box 1145
Oxford, OX1 9UW
United Kingdom
English 9
Español 15
Français 21
Italiano 27
4
DE
SICHERHEITSHINWEISE
• Lesen Sie sich die Anleitung vor der Installation sorgfältig durch.
• Wenn die mitgelieferten Schrauben und Dübel nicht für die Montage
geeignet sind, verwenden Sie geeignete Schrauben und Dübel.
Hinweis: Das maximal sichere Belastungsgewicht beträgt 130 kg.
BEFESTIGUNG ARIELLE DELUXE
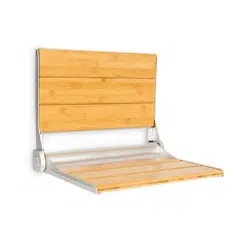
Abmessungen
Stopper an der
Oberseite
Kerbe zeigt
zum Boden

5
DE
Installation
Hinweis: Legen Sie eine Decke in den Bereich, in dem Sie den Sitz
installieren werden, um die Oberächen der Dusche oder Badewanne vor
Teilen zu schützen, die während der Montage herunterfallen können.
Hinweis: Bitte erkundigen Sie sich beim Fachhandwerker nach der
Bohranleitung. Der Prozess kann je nach Wandtyp unterschiedlich sein.
Bitte prüfen Sie mit einem Fachmann, ob Ihre Wand für die Befestigung
geeignet ist. Wir empfehlen Ihnen, das Gerät an einer Betonwand oder
einer massiven Ziegelwand zu befestigen.
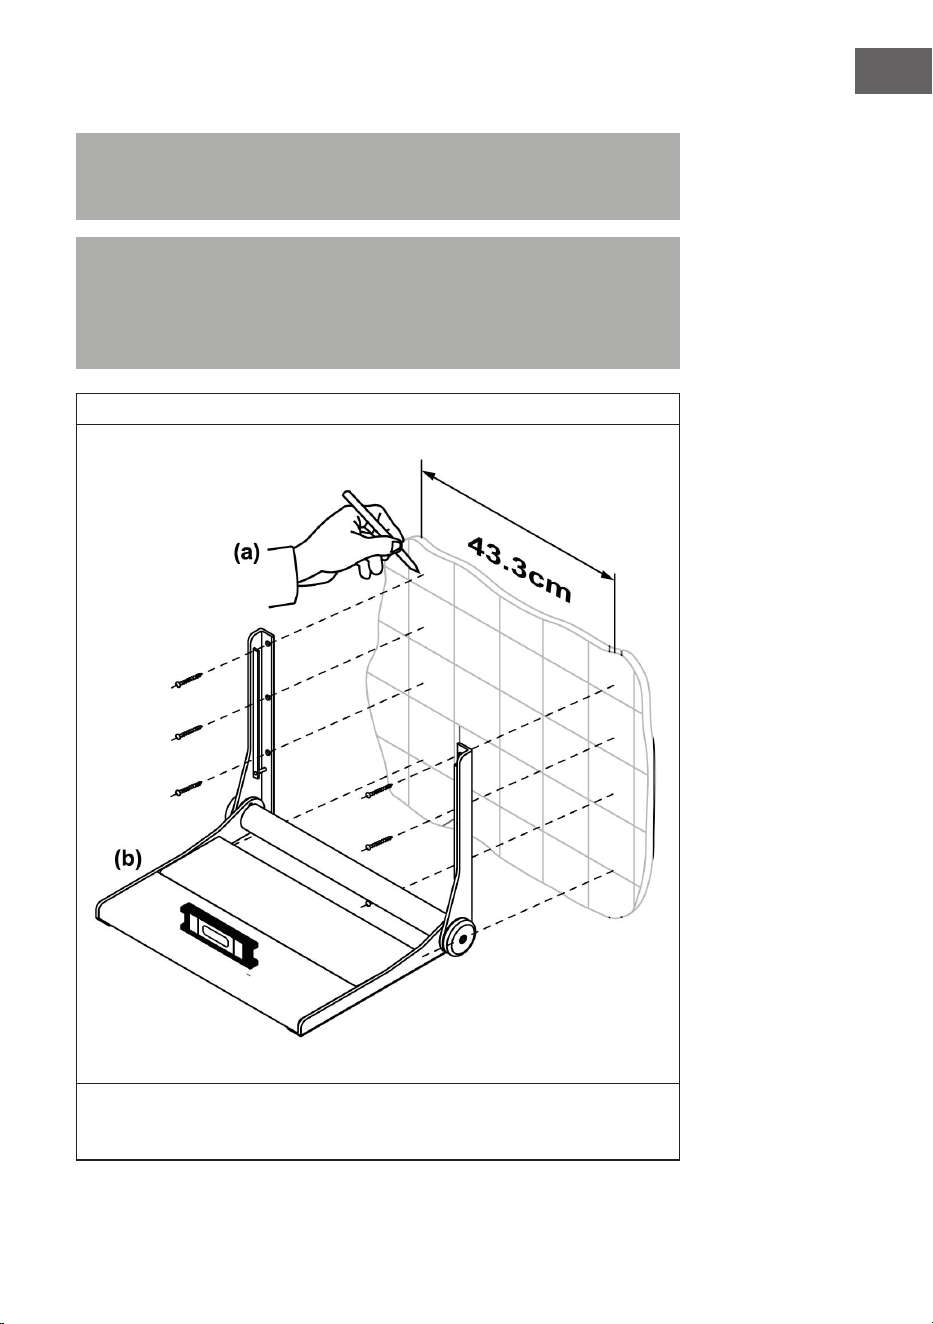
(1)
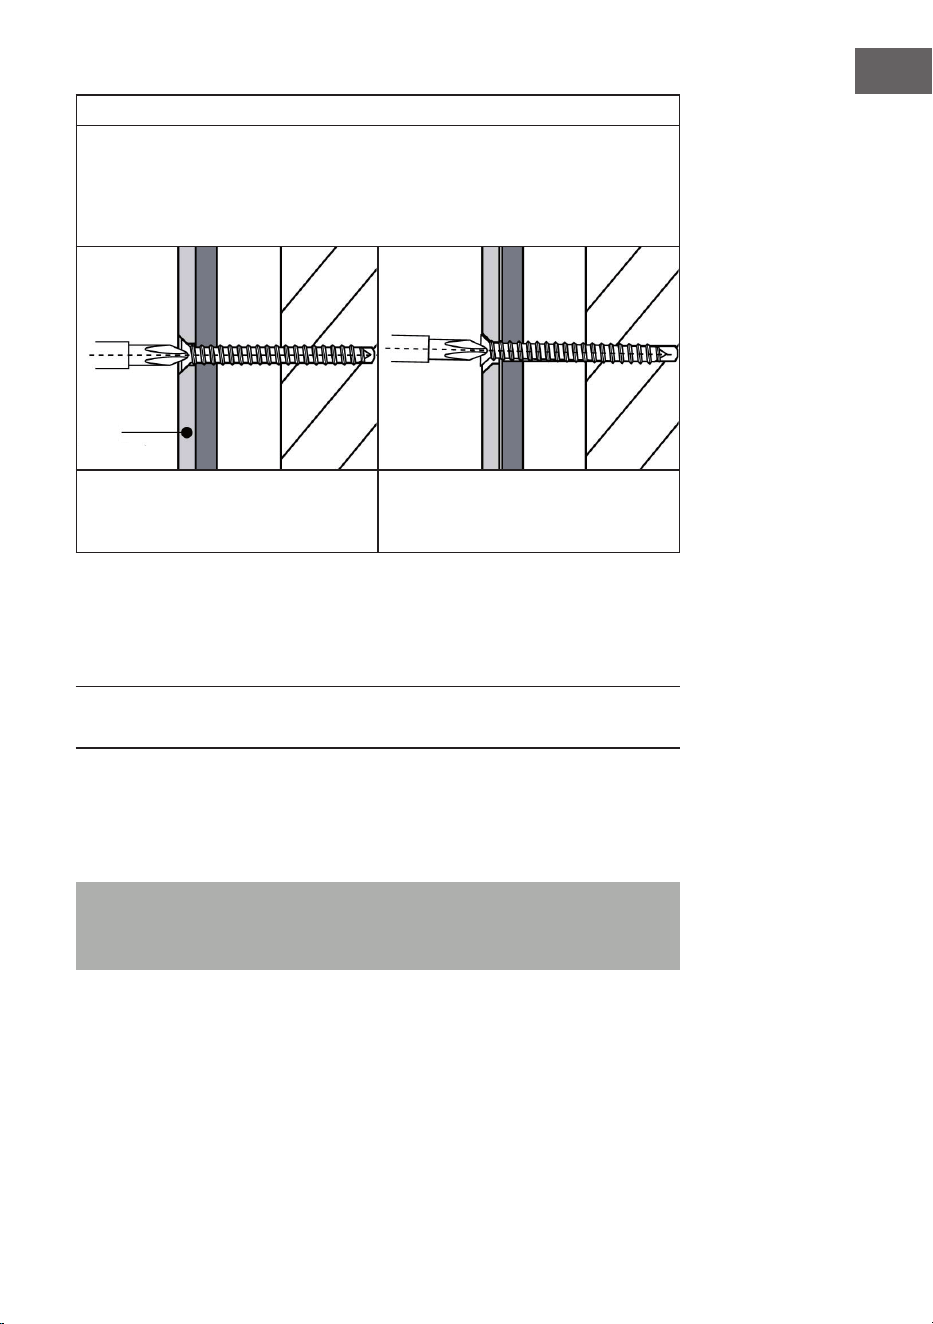
Bestimmen Sie die horizontale und vertikale Position des Sitzes. Bestimmen
und markieren Sie zuerst die Position des oberen Lochs auf der linken Seite
der Wandhalterung, wie in Abbildung 1 (a) dargestellt.

6
DE
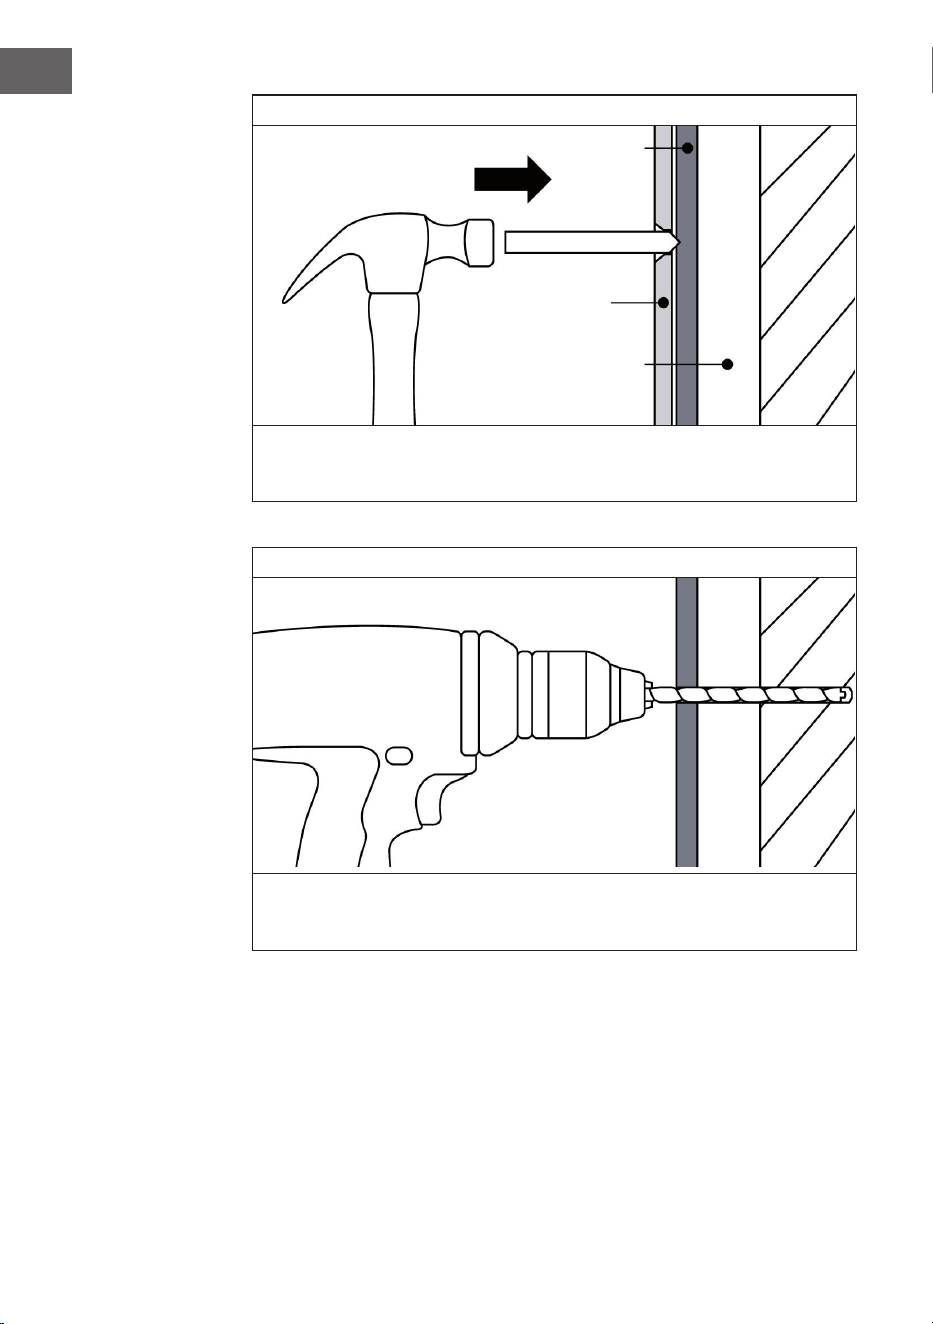
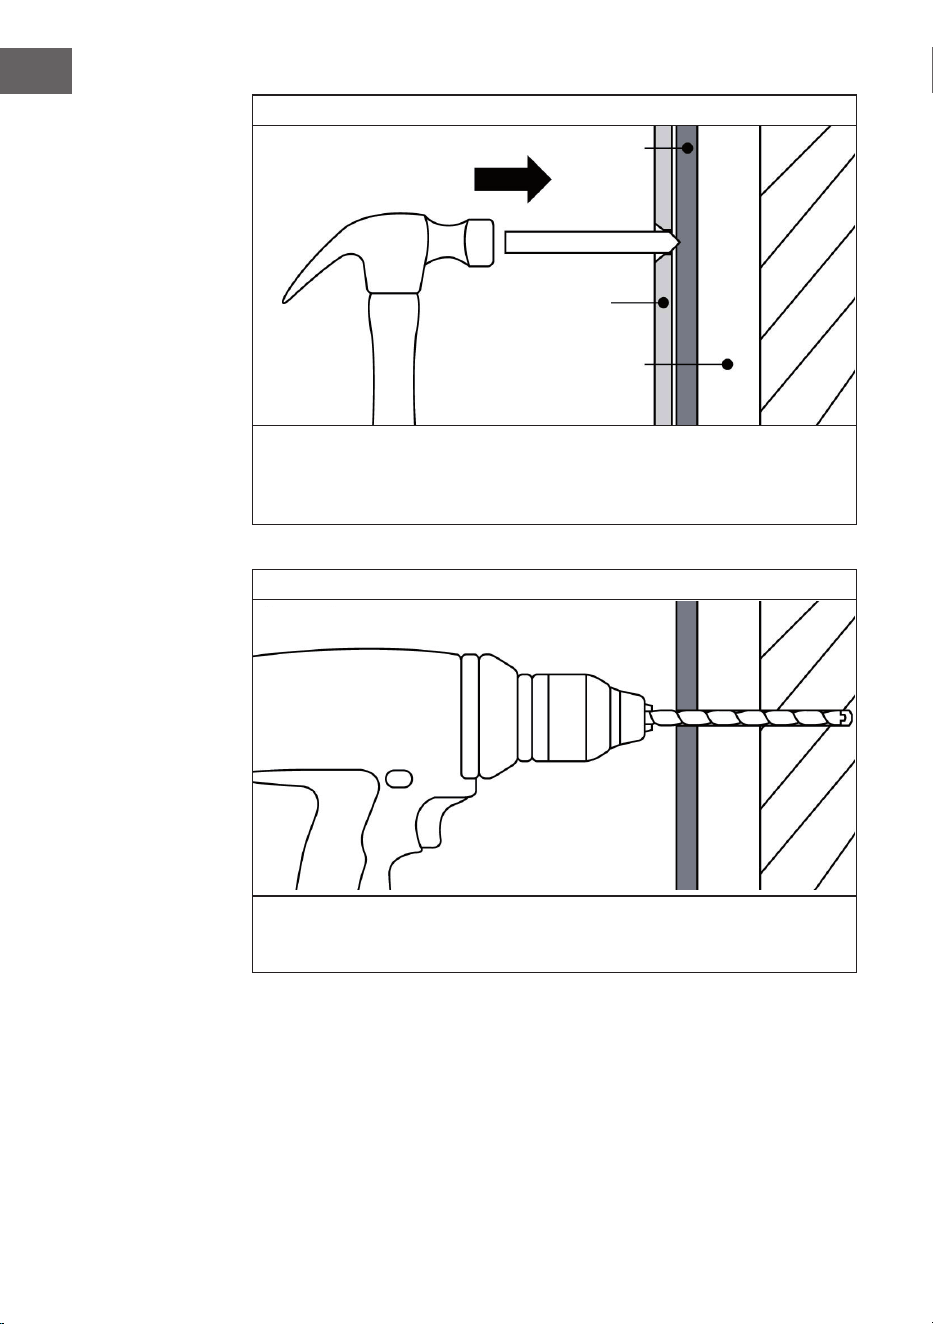
(2)
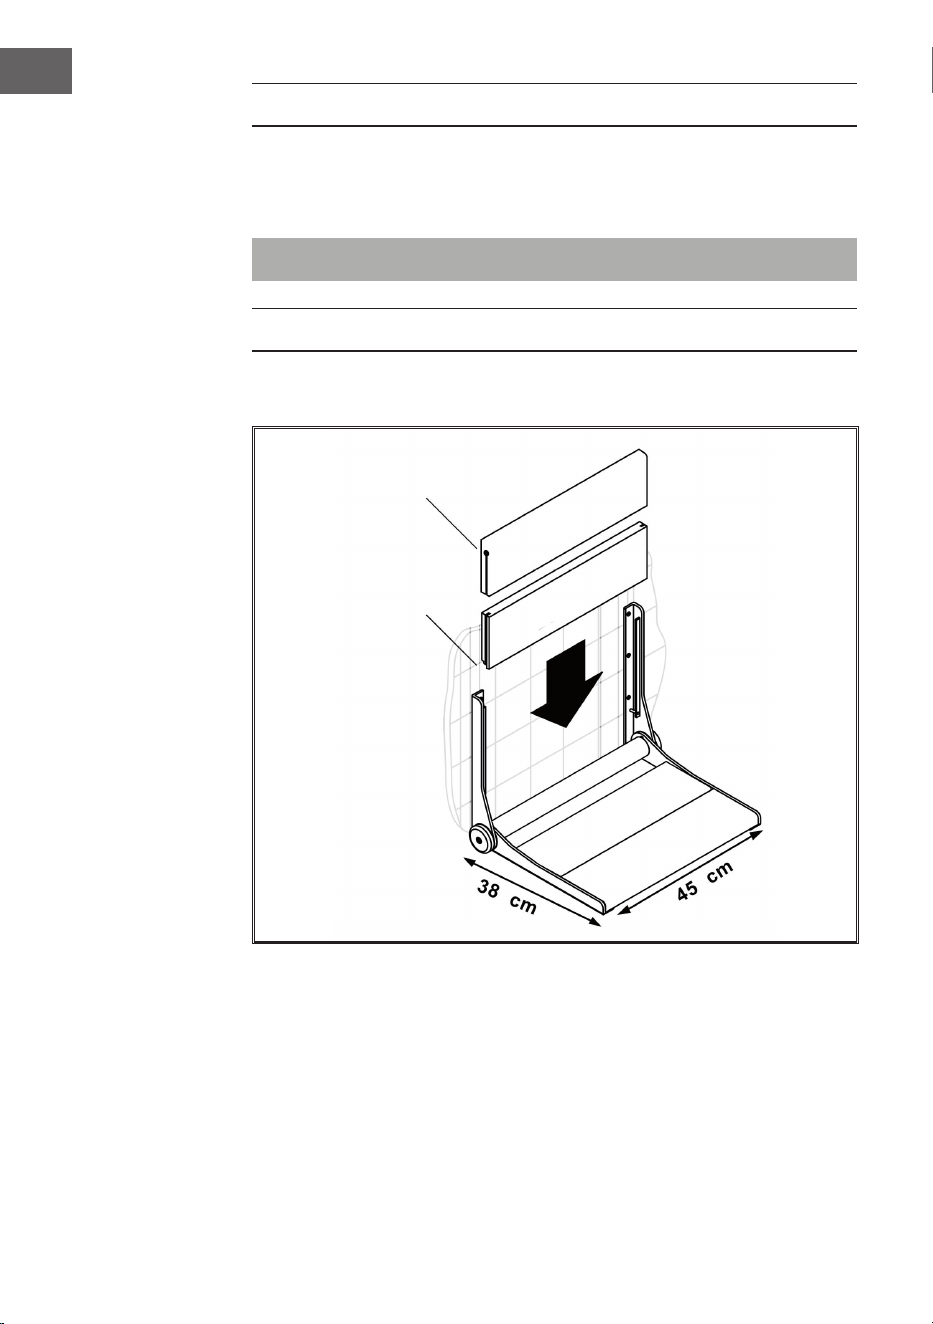
Stecken Sie eine Schraube durch das Loch in Wandhalterung und kerben
Sie die Fliese mit der Spitze der Schraube leicht ein, wie in Abbildung 2
dargestellt. Hinweis: Ein leichter Schlag mit dem Hammer genügt, um die
Fliese leicht einzukerben.
(3)
Bohren Sie das oberste Loche für die Wandhalterung, wie in Abbildung
3 dargestellt. Entfernen Sie Fremdkörper aus dem Loch, die bei der
Befestigung stören könnten, damit der Sitz bündig mit der Wand abschließt.
Nur leicht schlagen
Fliese
Wandhalterung
Betonplatte
7
DE
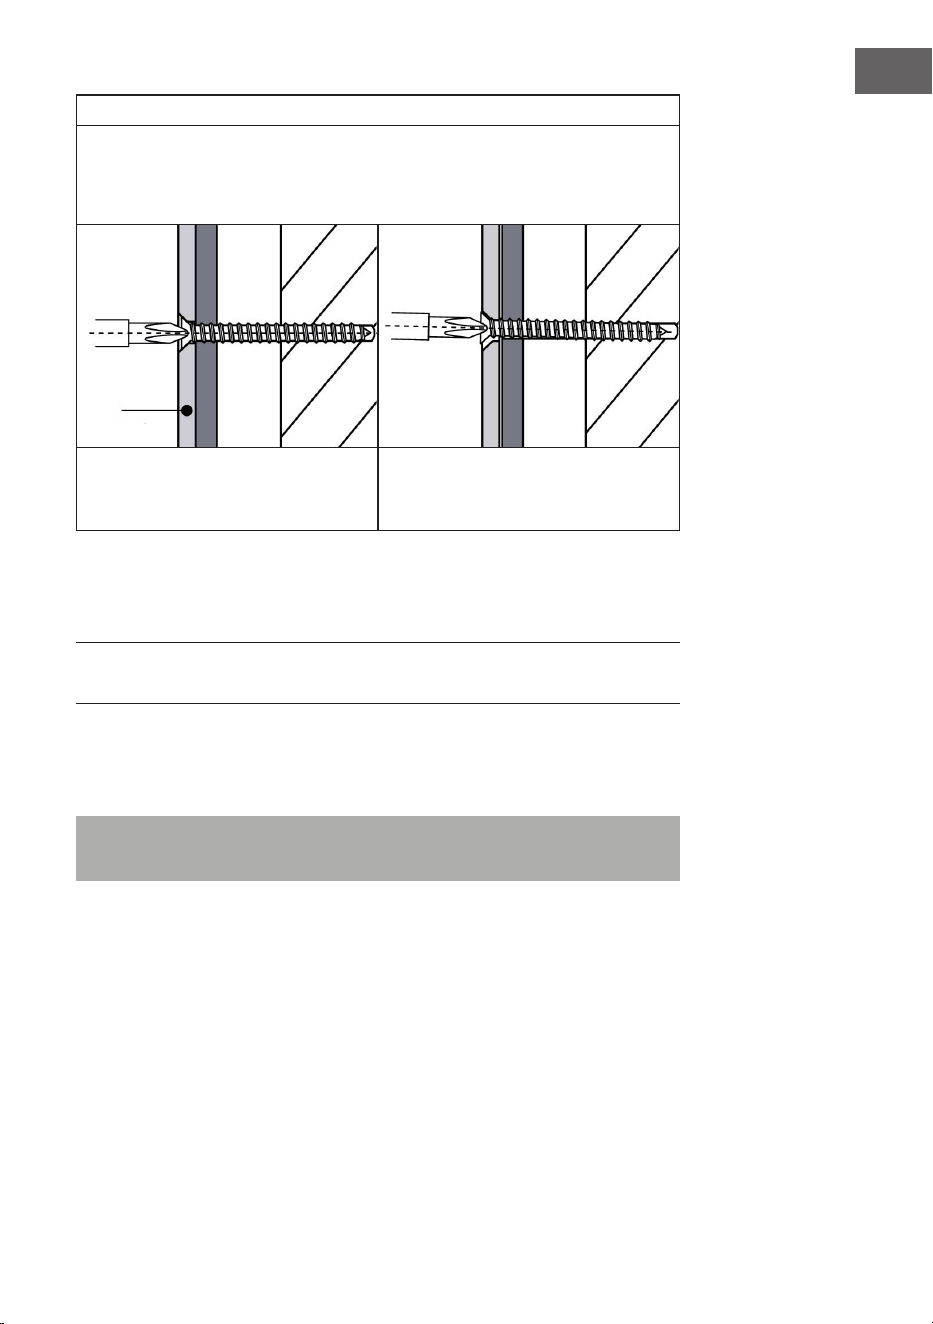
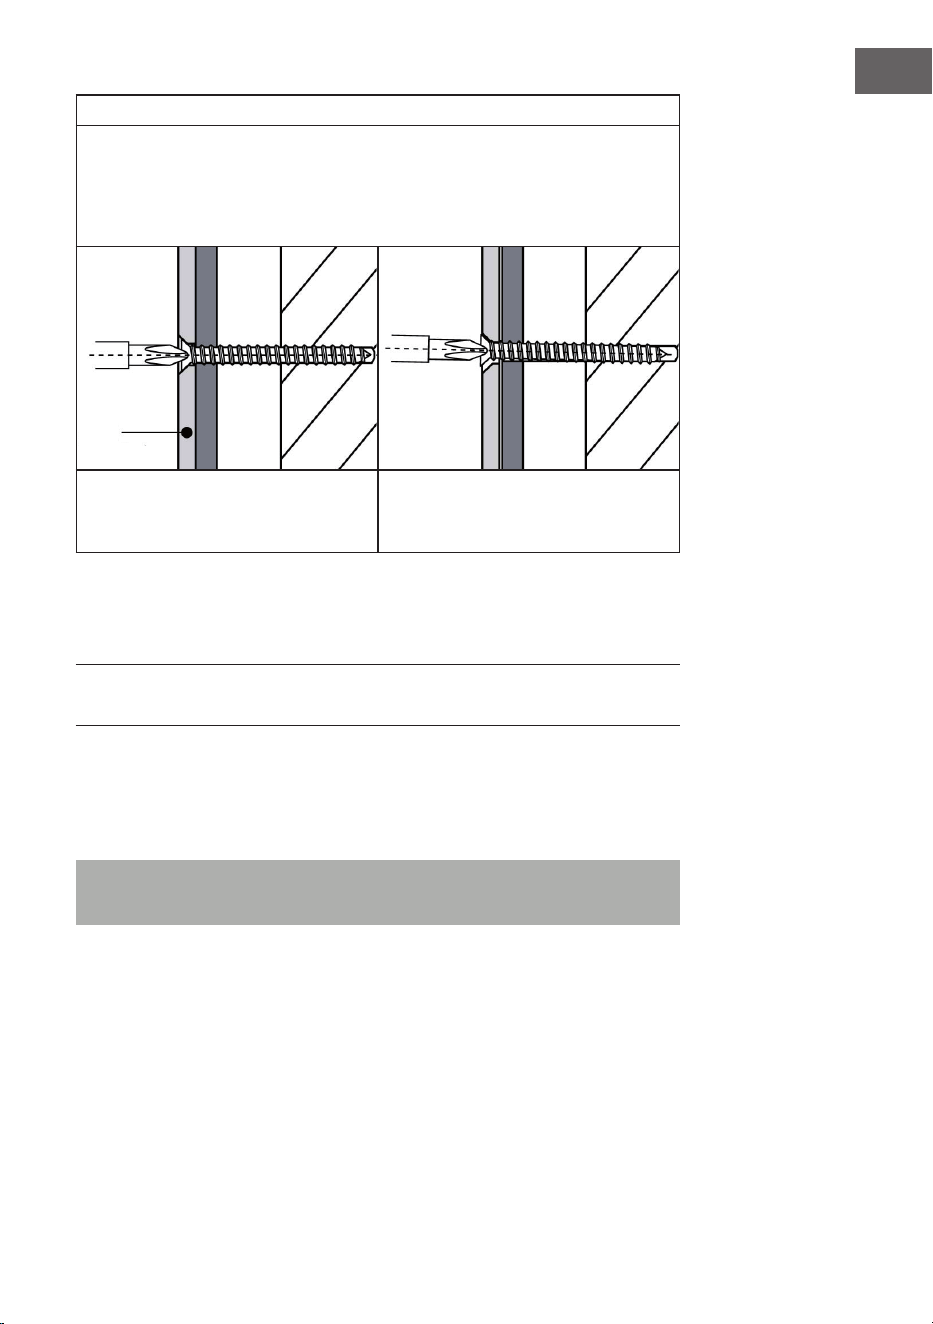
(4)
Befestigen Sie die Wandhalterung mit geeigneten Befestigungsmitteln.
Vergewissern Sie sich, dass die Schraube so gerade wie möglich eingeführt
wird, damit sich der Flachkopf der Schraube innerhalb des Senkbereichs
bendet, wie in Abbildung 4 dargestellt. Wenn er nach außen ragt, kann das
die Demontage der Rückenlehnenplatten beeinträchtigen.
Richtig
Flachkopf gerade in die
Bohrung montiert
Falsch
Flachkopf in einem Winkel in die
Bohrung montiert
(5) Verwenden Sie nach der Befestigung die in Abbildung 1 (b) dargestellte
Wasserwaage, um sicherzustellen, dass der Sitz gerade ist. Bestimmen
Sie dann die Position des oberen Lochs an der rechten Seite der
Wandhalterung.
Wichtig: Achten Sie darauf, dass der Abstand zwischen den Wandhalterungen
ein leichtes Verschieben der Rückenlehnenplatten ermöglicht.
(6) Wiederholen Sie zuerst die Schritte 2 bis 4 für das obere Loch an der
rechten Seite der Wandhalterung und vergewissern Sie sich, dass es eben
ist.
(7) Wiederholen Sie die Schritte 2 bis 4 und die restlichen Löcher.
Hinweis: Führen Sie einen abschließenden Anzug und eine Inspektion aller
Verbindungselemente durch. Testen Sie die Installation, indem Sie den Sitz
herunterdrücken oder sich darauf setzen.
(8) Sobald alle Schrauben montiert sind, können Sie die Rückenlehnenplatten
auf die Wandhalterung schieben. Stellen Sie sicher, dass sie korrekt sitzen.


9
EN
Dear Customer,
Congratulations on purchasing this device. Please read
the following instructions carefully and follow them to
prevent possible damages. We assume no liability for
damage caused by disregard of the instructions and
improper use. Scan the QR code to get access to the
latest user manual and more product information.
CONTENTS
Safety Instructions 10
Attachment Arielle Deluxe 10
MANUFACTURER & IMPORTER (UK)
Manufacturer:
Chal-Tec GmbH, Wallstrasse 16, 10179 Berlin, Germany.
Importer for Great Britain:
Berlin Brands Group UK Ltd
PO Box 1145
Oxford, OX1 9UW
United Kingdom

10
EN
SAFETY INSTRUCTIONS
• Read the instructions carefully before installation.
• If the supplied screws and plugs are not suitable for installation, use
suitable screws and plugs.
Note: The maximum safe load weight is 130 kg.
ATTACHMENT ARIELLE DELUXE
Dimensions
Stopper at the top
Notch faces
the oor
11
EN
Installation
Note: Place a blanket in the area where you will install the seat to protect
the surfaces of the shower or bath from parts that may fall during assembly.
Note: Please check with skilled workman on drilling instruction. The
process might be different depends on your wall type. Please check with
skilled workman if your wall is suitable for installation. We recommend you
to install on concrete wall or solid brick wall.
(1)
Determine the horizontal and vertical position of the seat. Determine and
mark the position of the top hole on the left side of the wall bracket as
shown in Figure 1 (a).
12
EN
(2)
Insert a screw through the hole in the wall bracket and slightly notch the
tile with the tip of the screw as shown in Figure 2. Note: A slight tap with a
hammer is enough to slightly notch the tile.
(3)
Drill the top hole for the wall bracket as shown in Figure 3. Remove any
foreign matter from the hole that may interfere with the mounting so that
the seat is ush with the wall.
Tap slightly
Tile
Wall bracket
Cement board
13
EN
(4)
Fasten the wall bracket with suitable fasteners. Make sure that the screw
is inserted as straight as possible so that the at head of the screw is within
the countersink area, as shown in Figure 4. If it protrudes outwards, it may
interfere with the disassembly of the backrest panels.
Right
Flat head mounted
straight into the hole
Wrong
Flat head mounted
at an angle in the hole
(5) After mounting, use the spirit level shown in Figure 1 (b) to ensure that the
seat is straight. Then determine the position of the top hole on the right
side of the wall bracket.
Important: Ensure that the distance between the wall brackets allows easy
movement of the backrest panels.
(6) First repeat steps 2 to 4 for the upper hole on the right side of the wall
bracket and make sure it is level.
(7) Repeat steps 2 to 4 and the remaining holes.
Note: Perform a nal suit and inspection of all fasteners. Test the
installation by pressing the seat down or sitting on it.
(8) Once all screws are in place, slide the backrest plates onto the wall
bracket. Make sure they are seated correctly.


15
ES
Estimado cliente:
Le felicitamos por la adquisición de este producto.
Lea atentamente las siguientes instrucciones y sígalas
para evitar posibles daños. No asumimos ninguna
responsabilidad por los daños causados por el
incumplimiento de las instrucciones y el uso inadecuado.
Escanee el siguiente código QR para obtener acceso a
la última guía del usuario y más información sobre el
producto.
ÍNDICE
Instrucciones de seguridad 16
Colocación de arielle deluxe 16
FABRICANTE E IMPORTADOR (REINO UNIDO)
Fabricante:
Chal-Tec GmbH, Wallstraße 16, 10179 Berlín, Alemania.
Importador para Gran Bretaña:
Berlin Brands Group UK Ltd
PO Box 1145
Oxford, OX1 9UW
United Kingdom

16
ES
INSTRUCCIONES DE SEGURIDAD
• Lea atentamente las instrucciones antes de instalar el producto.
• Si los tacos y los tornillos incluidos en el paquete no son los adecuados,
utilice tacos y tornillos apropiados.
Nota: El peso máximo de carga segura es de 130 kg.
COLOCACIÓN DE ARIELLE DELUXE
Medidas
Parte superior de
la jación
La ranura mira
hacia el suelo

17
ES
INSTALACIÓN
Nota: ponga una manta donde vaya a colocar la silla para proteger el suelo
de la ducha o de la bañera de posibles daños que pudieran provocarse por la
caída de piezas.
Nota: Solicite al comerciante especializado las instrucciones de
perforación. El proceso puede variar en función del tipo de muro.
Compruebe con un comerciante especializado si su pared es apta para la
jación. Le recomendamos que je la unidad a un muro de hormigón o a una
pared de ladrillos sólida.
(1)
Decida el lugar en el plano horizontal y vertical en el que va a colocar la silla.
Marque en primer lugar el agujero superior izquierdo en la pared, como se
indica en la gura (a)

18
ES
(2)
Coloque un tornillo en la pared y marque el azulejo con la punta del tornillo
suavemente, como en se muestra en la gura 2. Nota: un golpe suave con el
martillo basta para marchar ligeramente el azulejo.
(3)
Perfore con el taladro el agujero marcado, como se muestra en la gura 3.
Extraiga los restos que puedan quedar en el agujero para que pueda jar la
silla correctamente a la pared.
Golpear de manera suave
Azulejo
Elemento de
jación a la pared
Hormigón

19
ES
(4)
Fije la silla a la pared con los elementos de jación adecuados. Asegúrese de
que el tornillo está lo mas recto posible, para que encaje perfectamente en
el agujero, quedando la parte plana totalmente insertada, como en la gura
4. Si sobresale puede afectar al montaje del respaldo.
Correcto
cabeza del tornillo bien
insertada en el agujero
Incorrecto
cabeza del tornillo
que sobresale
(5) Utilice, como se muestra en la gura 1 (b) un nivel para asegurarse de que
el asiento está recto. Compruebe la posición del agujero superior en la
pared.
Importante: Tenga en cuenta la distancia entre la sujeción a la pared para que
deje bajar el respaldo.
(6) Repita los pasos del 2 al 4 para el agujero superior del lado derecho y
asegúrese de que está recto.
(7) Repita los pasos del 2 al 4 con el resto de los agujeros.
Nota: Haga una revisión nal de todas las sujeciones. Compruebe la
instalación presionando el asiento hacia abajo o sentándose en él.
(8) Una vez tenga todos los anclajes montados, puede insertar la silla en la
sujeción. Asegurese de que se asienta correctamente.

21
FR
Chère cliente, cher client,
Toutes nos félicitations pour l’acquisition de ce nouvel
appareil. Veuillez lire attentivement et respecter
les instructions de ce mode d’emploi an d’éviter
d’éventuels dommages. Nous ne saurions être tenus
pour responsables des dommages dus au non-respect
des consignes et à la mauvaise utilisation de l’appareil.
Scannez le QR-Code pour obtenir la dernière version
du mode d‘emploi et des informations supplémentaires
concernant le produit.
SOMMAIRE
Consignes de sécurité 22
Fixation de arielle deluxe 22
FABRICANT ET IMPORTATEUR (UK)
Fabricant :
Chal-Tec GmbH, Wallstraße 16, 10179 Berlin, Allemagne.
Importateur pour la Grande Bretagne :
Berlin Brands Group UK Ltd
PO Box 1145
Oxford, OX1 9UW
United Kingdom

22
FR
CONSIGNES DE SÉCURITÉ
• Lisez attentivement les instructions avant l‘installation.
• Si les vis et les chevilles fournies ne conviennent pas au montage, utilisez
des vis et des chevilles appropriées.
Remarque : le poids de charge maximal en toute sécurité est de 130 kg.
FIXATION DE ARIELLE DELUXE
Dimensions
Stoppeur vers le
haut
L‘encoche est
dirigée vers le bas

23
FR
Installation
Remarque : Placez une couverture dans la zone où vous installerez le siège
pour protéger les surfaces de la douche ou de la baignoire contre les pièces
susceptibles de tomber pendant l’installation.
Remarque: Veuillez vous renseigner auprès de l‘artisan spécialisé pour
connaître les instructions de perçage. Le processus peut varier en fonction
du type de mur. Veuillez vérier avec un professionnel si votre mur est
adapté à la xation. Nous vous recommandons de xer l‘appareil sur un mur
en béton ou un mur en briques massives.
(1)
Déterminez la position horizontale et verticale du siège. Commencez par
déterminer et marquer la position du trou supérieur du côté gauche du
support mural, comme indiqué à la gure 1 (a).

24
FR
(2)
Insérez une vis dans le trou du support mural et marquez légèrement le
carreau avec le bout de la vis, comme illustré à la gure 2. Remarque : un
léger coup de marteau suft à marquer légèrement le carreau.
(3)
Percez le trou supérieur du support mural, comme indiqué à la gure 3.
Retirez tous les objets étrangers du trou qui pourraient gêner le montage de
sorte que le siège soit au même niveau que le mur.
Frappez doucement
Carreau
Support mural
Plaque de béton

25
FR
(4)
Fixez le support mural avec des durcisseurs appropriés. Vériez que la vis
est insérée aussi droite que possible de sorte que la tête plate de la vis se
trouve dans la zone de fraisage, comme illustré à la gure 4. Si elle dépasse,
cela peut affecter le démontage des panneaux du dossier.
Correct
Tête plate montée directement
dans le trou
In correct
Tête plate de biais
dans le trou
(5) Après le montage, utilisez le niveau à bulle illustré à la gure 1 (b) pour
vous assurer que le siège est droit. Déterminez ensuite la position du trou
supérieur du côté droit du support mural.
Important : Assurez-vous que la distance entre les supports muraux permet le
déplacement facile des panneaux du dossier.
(6) Tout d’abord, répétez les étapes 2 à 4 pour le trou en haut à droite du
support mural et assurez-vous qu’il est de niveau.
(7) Répétez les étapes 2 à 4 pour les trous restants.
Remarque : Effectuer un assemblage nal et une inspection de toutes les
xations. Testez l‘installation en appuyant ou en vous asseyant sur le siège.
(8) Une fois que toutes les vis sont en place, vous pouvez faire glisser les
plaques du dossier sur le support mural. Assurez-vous qu‘elles sont xées
correctement.


27
IT
Gentile cliente,
La ringraziamo per aver acquistato il dispositivo. La
preghiamo di leggere attentamente le seguenti istruzioni
per l’uso e di seguirle per evitare possibili danni. Non ci
assumiamo alcuna responsabilità per danni scaturiti da
una mancata osservazione delle avvertenze di sicurezza
e da un uso improprio del dispositivo. Scansionare il
codice QR seguente, per accedere al manuale d’uso più
attuale e per ricevere informazioni sul prodotto.
INDICE
Istruzioni di sicurezza 28
Fissaggio arielle deluxe 28
PRODUTTORE E IMPORTATORE (UK)
Produttore:
Chal-Tec GmbH, Wallstraße 16, 10179 Berlino, Germania.
Importatore per la Gran Bretagna:
Berlin Brands Group UK Ltd
PO Box 1145
Oxford, OX1 9UW
United Kingdom

28
IT
ISTRUZIONI DI SICUREZZA
• Leggere attentamente le istruzioni prima dell‘installazione.
• Se le viti e i tasselli forniti non sono adatti per il montaggio, utilizzare viti e
tasselli adeguati.
Remarque : Il peso massimo di carico sicuro è di 130 kg.
FISSAGGIO ARIELLE DELUXE
Dimensioni
Stopper in alto
L´incisione punta
verso terra
29
IT
Installazione
Nota: posizionare una coperta nell‘area in cui verrà installato il sedile per
proteggere le superci della doccia o della vasca da parti che potrebbero
cadere durante l‘installazione.
Note: Si prega di chiedere le istruzioni di foratura all‘artigiano
specializzato. Il processo può variare a seconda del tipo di muro. Si prega di
vericare con un commerciante specializzato se il vostro muro è adatto al
ssaggio. Si consiglia di ssare l‘unità a un muro di cemento o a un muro di
mattoni solidi.
(1)
Determinare la posizione orizzontale e verticale del sedile. Determinare
innanzitutto e contrassegnare la posizione del foro superiore sul lato
sinistro della staffa a parete, come mostrato nella Figura 1 (a).
30
IT
(2)
Inserire una vite attraverso il foro nella staffa a parete e incidere
leggermente la piastrella con la punta della vite, come mostrato nella
Figura 2. Nota: un colpo leggero con il martello è sufciente per segnare
leggermente la piastrella.
(3)
Praticare il foro superiore per il supporto a parete come mostrato in Figura
3. Rimuovere dal foro eventuali corpi estranei che possono interferire con il
montaggio in modo che il sedile sia a lo con la parete.
Battere leggermente
Piastrella
Montaggio a
parete
Lastra di cemento
31
IT
(4)
Fissare la staffa a parete con dispositivi di ssaggio adeguati. Accertarsi che
la vite sia inserita il più dritta possibile in modo che la testa piatta della vite
si trovi all‘interno dell‘area della svasatura, come mostrato nella Figura 4. Se
sporgesse verso l‘esterno, potrebbe inuire sullo smontaggio dei pannelli
posteriori.
Giusto
Testa piatta montata
direttamente nel foro
Falso
Testa piatta montata ad
angolo nel foro
(5) Dopo il montaggio, utilizzare la livella a bolla d‘aria mostrata nella Figura 1
(b) per assicurarsi che il sedile sia diritto. Quindi determinare la posizione
del foro superiore sul lato destro della staffa a parete.
Importante: assicurarsi che la distanza tra le staffe a parete faciliti lo
spostamento dei pannelli posteriori.
(6) Innanzitutto, ripetere i passaggi da 2 a 4 per il foro superiore sul lato
destro della staffa a parete e assicurarsi che sia a livello.
(7) Ripetere i passaggi da 2 a 4 per i fori rimanenti.
Nota: eseguire una ispezione nale di tutti i dispositivi di ssaggio. Testare
l‘installazione premendo verso il basso o sedendosi sul sedile.
(8) Dopo aver installato tutte le viti, è possibile far scorrere i pannelli
posteriori sulla staffa a parete. Assicurati che stai sedendo correttamente.