

IMPORTANT
Please read this manual carefully before installing and operating the TV.
Keep this manual handy for further reference.
Content
1. Safety information 3
1.1. Markings on the product 4
1.2. Simplied EU declaration of conformity 4
1.3. Data protection 4
2. Introduction and feet installation 5
2.1. Unpacking and installation 5
2.2. Wall mounting warnings 6
3. TV buttons and connections 7
3.1. TV Button 7
3.2. Connections 8
3.3. Remote control 9
4. TV Installation 10
4.1. Set your TV 10
4.2. Initial Setup 10
4.3. Tuning Setup DTV 11
4.4. Auto Tuning (Analog TV + Digital TV) 12
5. Main Menu Operation 13
5.1. Channel Menu 13
5.2. ATV Manual Tuning 13
5.3. DTV Manual Tuning 14
5.4. Program Edit 15
5.5. Schedule List 16
5.6. Signal Information 17
5.7. Auto Tuning – satellite (DVB-S) 18
5.8. Satellite Dish Setup 19
6. Picture Menu 19
6.1. Picture Mode 20
6.2. Noise Reduction 21
7. Sound Menu 21
7.1. Sound Mode 22
8. Time Menu 23
8.1. Sleep Timer 24
8.2. Auto Standby 24
8.3. OSD Timer 25
9. Lock Menu 25
9.1. System Lock 25
9.2. Set Password 26
9.3. Channel Lock 26
9.4. Parental Guidance 27
10. Hotel Mode 28
11. Setup Menu 29
11.1. OSD (Manu) Language 30
11.2. TT (Teletext) Language 30
11.3. Audio Languages 31
11.4. Subtitle Language 31
11.5. Hearing Impaired 32
11.6. PVR Recording function 32
11.7. Aspect Ratio 33
11.8. Blue Screen 33
11.9. First Time Installation 33
11.10. Factory Reset 33
11.11. Software Update (USB) 34
11.12. Environment - Home mode/Shop Mode 34
11.13. HDMI CEC (Need to support the HDMI CEC/
ARC function) 34
12. Media operation 35
12.1. Photo Menu 35
12.2. Music Menu 36
12.3. Movie Menu 37
12.4. Text Menu 38
13. Troubleshooting 39
14. Technicalspecications 40
15. Country restrictions 40
16. Licences 40
mythomson.com https://tv.mythomson.com/en/Support/FAQs/ https://tv.mythomson.com/Support/Product-Registration/

3
1. Safety information
RISK OF ELECTRIC SHOCK!
High voltages are used in the operation of this product. To reduce the risk of electric shock, do not remove the
cover of the cabinet, refer servicing to qualied service personal.
In extreme weather (storms, lightning) and long inactivity periods (going on holiday) disconnect the TV
set from the mains.
The mains plug is used to disconnect the TV set from the mains and therefore it must remain readily
operable. If the TV set is not disconnected electrically from the mains, the device will still draw power
for all situations even if the TV is in standby mode or switched o.
Note: Follow the onscreen instructions for operating the related features.
Important: Please read these instructions fully before installing or operating.
WARNING
This device is intended to be used by persons (including children) who are capable / experienced of
operating such a device unsupervised unless they have been given supervision or instruction concerning
the use of the device by a person responsible for their safety.
• Use this TV set at an altitude of less than 2000 meters above the sea level, in dry locations and in regions with
moderate or tropical climates.
• The TV set is intended for household and similar general use but may also be used in public places.
• For ventilation purposes, leave at least 10 cm of free space around the TV.
• The ventilation should not be impeded by covering or blocking the ventilation openings with items, such as
newspapers, tablecloths, curtains, etc.
• The power cord plug should be easily accessible. Do not place the TV, furniture, etc. on the power cord. A
damaged power cord/plug can cause re or give you an electric shock. Handle the power cord by the plug, do
not unplug the TV by pulling the power cord. Never touch the power cord/plug with wet hands as this could
cause a short circuit or electric shock. Never make a knot in the power cord or tie it with other cords. When
damaged it must be replaced, this should only be done by qualied personnel.
• Do not expose the TV to dripping or splashing of liquids and do not place objects lled with liquids, such as
vases, cups, etc. on or over the TV (e.g., on shelves above the unit).
• Do not expose the TV to direct sunlight or do not place open ames such as lit candles on the top of or near
the TV.
• Do not place any heat sources such as electric heaters, radiators, etc. near the TV set.
• Do not place the TV on the oor and inclined surfaces.
• To avoid danger of suocation, keep plastic bags out of the reach of the babies, children and domestic animals.
• Carefully attach the feet / stand to the TV. If the feet / stand is provided with screws, tighten the screws rmly
to prevent the TV from tilting. Do not over-tighten the screws.
• Do not dispose of the batteries in re, or with hazardous or ammable materials.
• Do not install near any heat sources such as radiators, heat registers, stoves, or other apparatus (including
ampliers) that produce heat.
• Do not defeat the safety purpose of the polarized or grounding-type plug. A polarized plug has two blades
with one wider than the other. A grounding type of plug has two blades and a third grounding prong. The
wide blade or the third prong are provided for your safety, If the provided plug does not t into your outlet,
consult an electrician for replacement of the obsolete outlet.
• Protect the power cord from being walked on or pinched particularly at plugs, convenience receptacles, and
the point where they exit from the apparatus.
• Only use attachments /accessories specied by the manufacturer.
• Unplug this apparatus during lightning storms or when unused for long periods of time.
• To reduce the risk of re or electric shock, do not expose this apparatus to rain or moisture.
• The mains plug is used as disconnect device, the disconnect device shall remain readily operable.
• The socket-out shall be installed near the equipment and shall be easily accessible.
• This product should never be placed in a built-in installation such as a bookcase or rack unless proper
ventilation is provided, or the manufacturer’s instructions have been adhered to.
• The USB terminal should be loaded with 0.5 A under normal operation.
• Batteries must not be exposed to excessive heat such as sunshine, re or the like.
• Excessive sound pressure from earphones or headphones can cause hearing loss.
• Do not use this apparatus near water.
• Clean only with dry cloth.

4
ABOVE ALL - NEVER let anyone, especially children, push or hit the screen, push anything into
holes, slots, or any other openings in the case.
1.1. Markings on the product
The following symbols are used on the product as a marker for restrictions and precautions and safety instructions.
Each explanation shall be considered where the product bears related marking only. Note such information for
security reasons.
Class II Equipment: This appliance is designed in such a way that it does not require a safety connection
to electrical earth.
This marking indicates that this product should not be disposed with other household wastes throughout
the EU. Please recycle it responsibly to promote the sustainable reuse of material resources. To return
your used device, please use the return and collection systems or contact the retailer where the product
was purchased.
Warning
Do not ingest the battery, Chemical Burn Hazard. This product or the accessories supplied with the product may
contain a coin/button cell battery. If the coin/button cell battery is swallowed, it can cause severe internal burns
in just 2 hours and can lead to death.
Keep new and used batteries away from children. If the battery compartment does not close securely, stop using
the product and keep it away from children.
If you think batteries might have been swallowed or placed inside any part of the body, seek immediate medical
attention.
A television may fall, causing serious personal injury or death. Many injuries, particularly to children, can be
avoided by taking simple precautions such as:
• ALWAYS use cabinets or stands or mounting methods recommended by the manufacturer of the television set.
• ALWAYS use furniture that can safely support the television set.
• ALWAYS ensure the television set is not overhanging the edge of the supporting furniture.
• ALWAYS educate children about the dangers of climbing on furniture to reach the television set or its controls.
• ALWAYS route cords and cables connected to your television so they cannot be tripped over, pulled or grabbed.
• NEVER place a television set in an unstable location.
• NEVER place the television set on tall furniture (for example, cupboards or bookcases) without anchoring both
the furniture and the television set to a suitable support.
• NEVER place the television set on cloth or other materials that may be located between the television set and
supporting furniture.
• NEVER place items that might tempt children to climb, such as toys and remote controls, on the top of the
television or furniture on which the television is placed.
• The equipment is only suitable for mounting at heights ≤2 m.
If the existing television set is going to be retained and relocated, the same considerations as above should be
applied.
Apparatus connected to the protective earthing of the building installation through the MAINS connection or
through other apparatus with a connection to protective earthing – and to a television distribution system using
coaxial cable, may in some circumstances create a re hazard. Connection to a television distribution system
has therefore to be provided through a device providing electrical isolation below a certain frequency range
(galvanic isolator).
1.2. SimpliedEUdeclarationofconformity
Hereby, StreamView declares that the radio equipment type product device Smart TV is complying with Directive
2014/53/EU.
1.3. Data protection
The application providers and the providers of the services may collect and use technical data and related
information, including but not limited to technical information about this device, system and application software
and peripherals. They may use such information to improve products or to provide services or technologies,
5
which do not personally identify you. Additionally, some third-party services, already provided in the device or
installed by you after purchasing the product, may request a registration with your personal data. Some services
may collect personal data even without providing additional warnings. StreamView cannot be held liable for a
possible breach of data protection by third-party services.
2. Introduction and feet installation
Thank you for choosing our product. You’ll soon be enjoying your new TV. Please read these instructions carefully.
They contain important information which will help you get the best from your TV and ensure safe and correct
installation and operation.
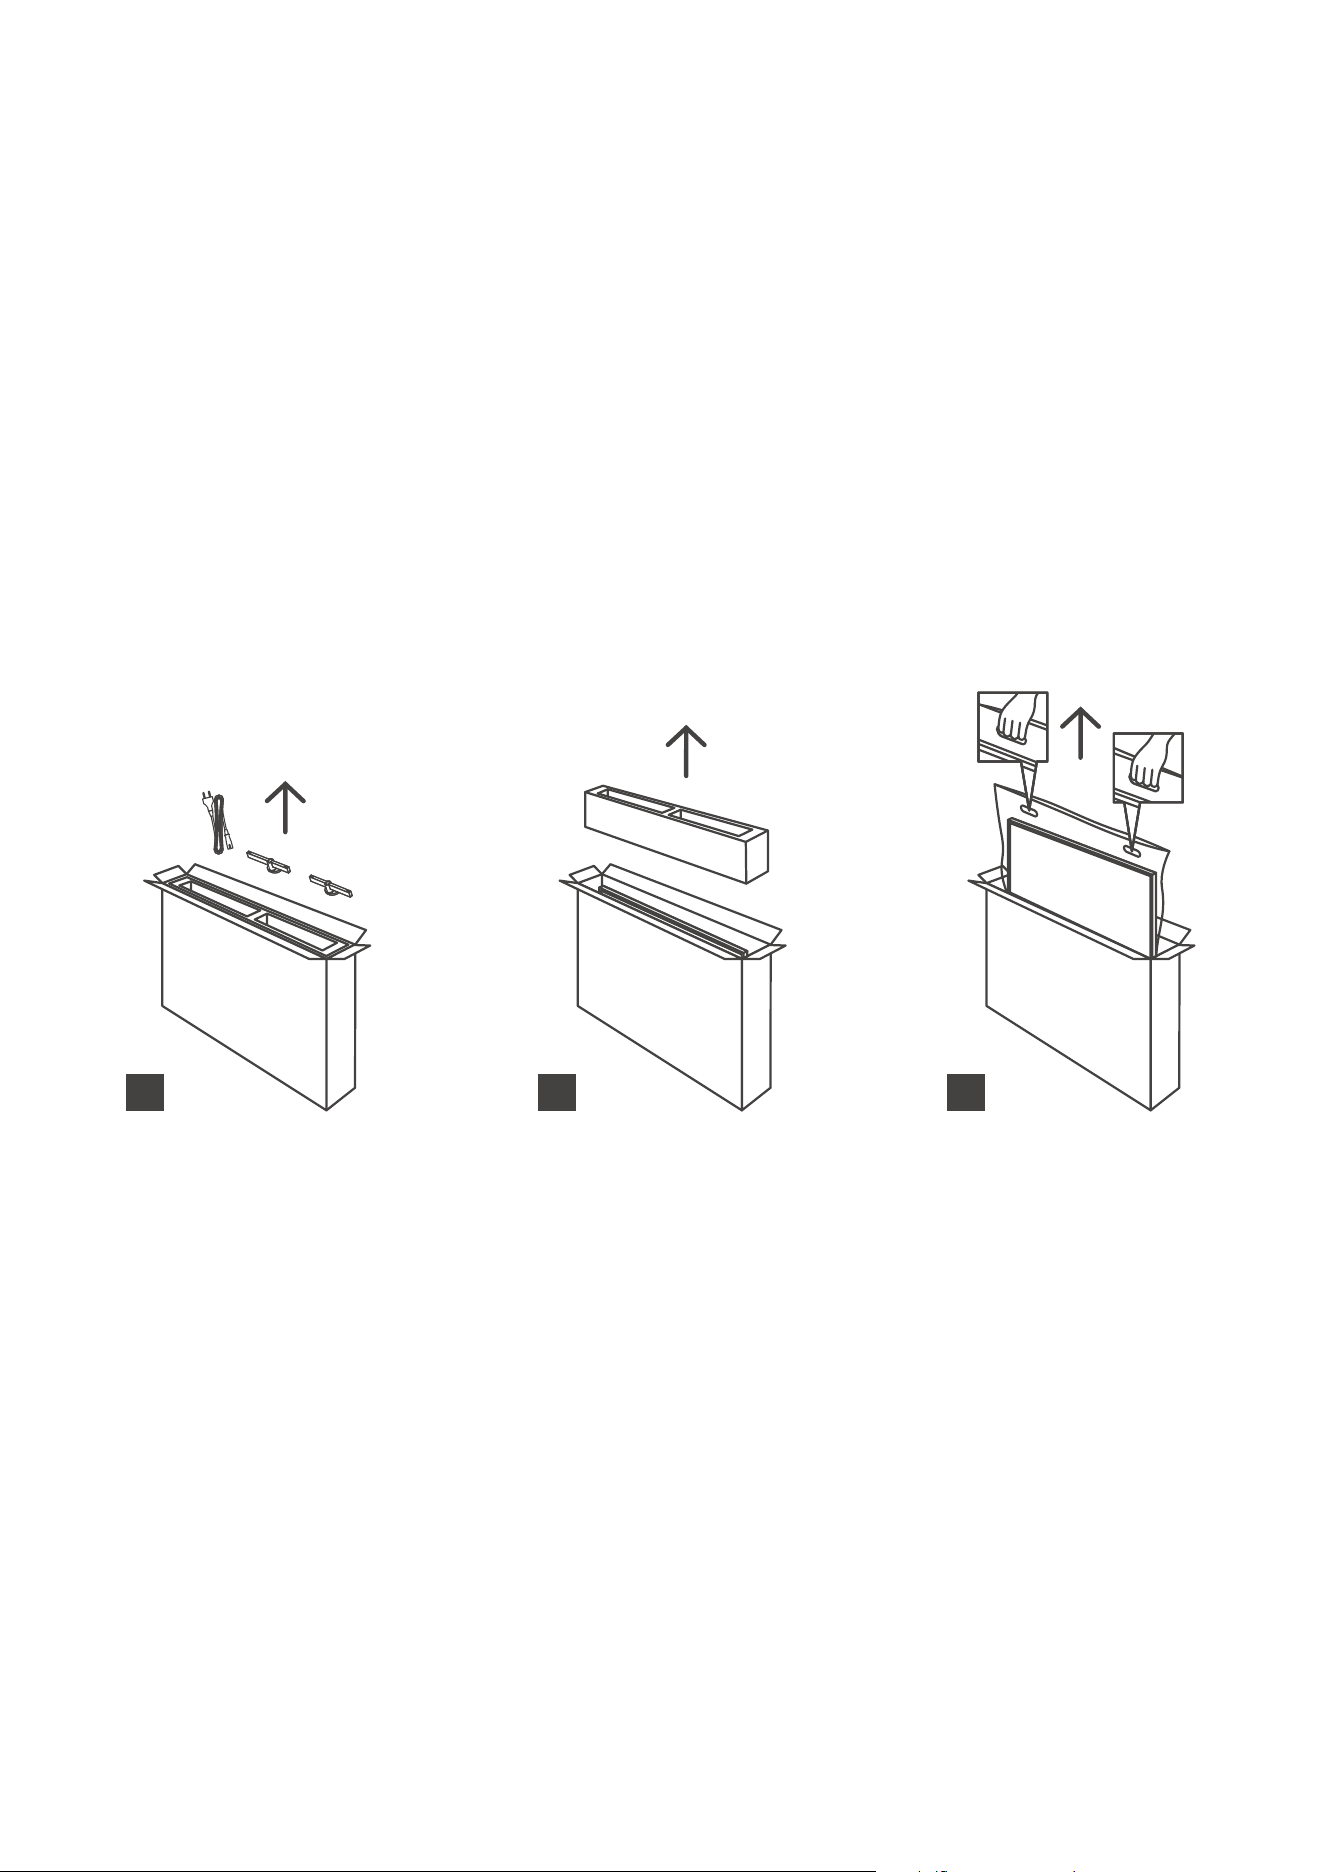
2.1. Unpackingandinstallation
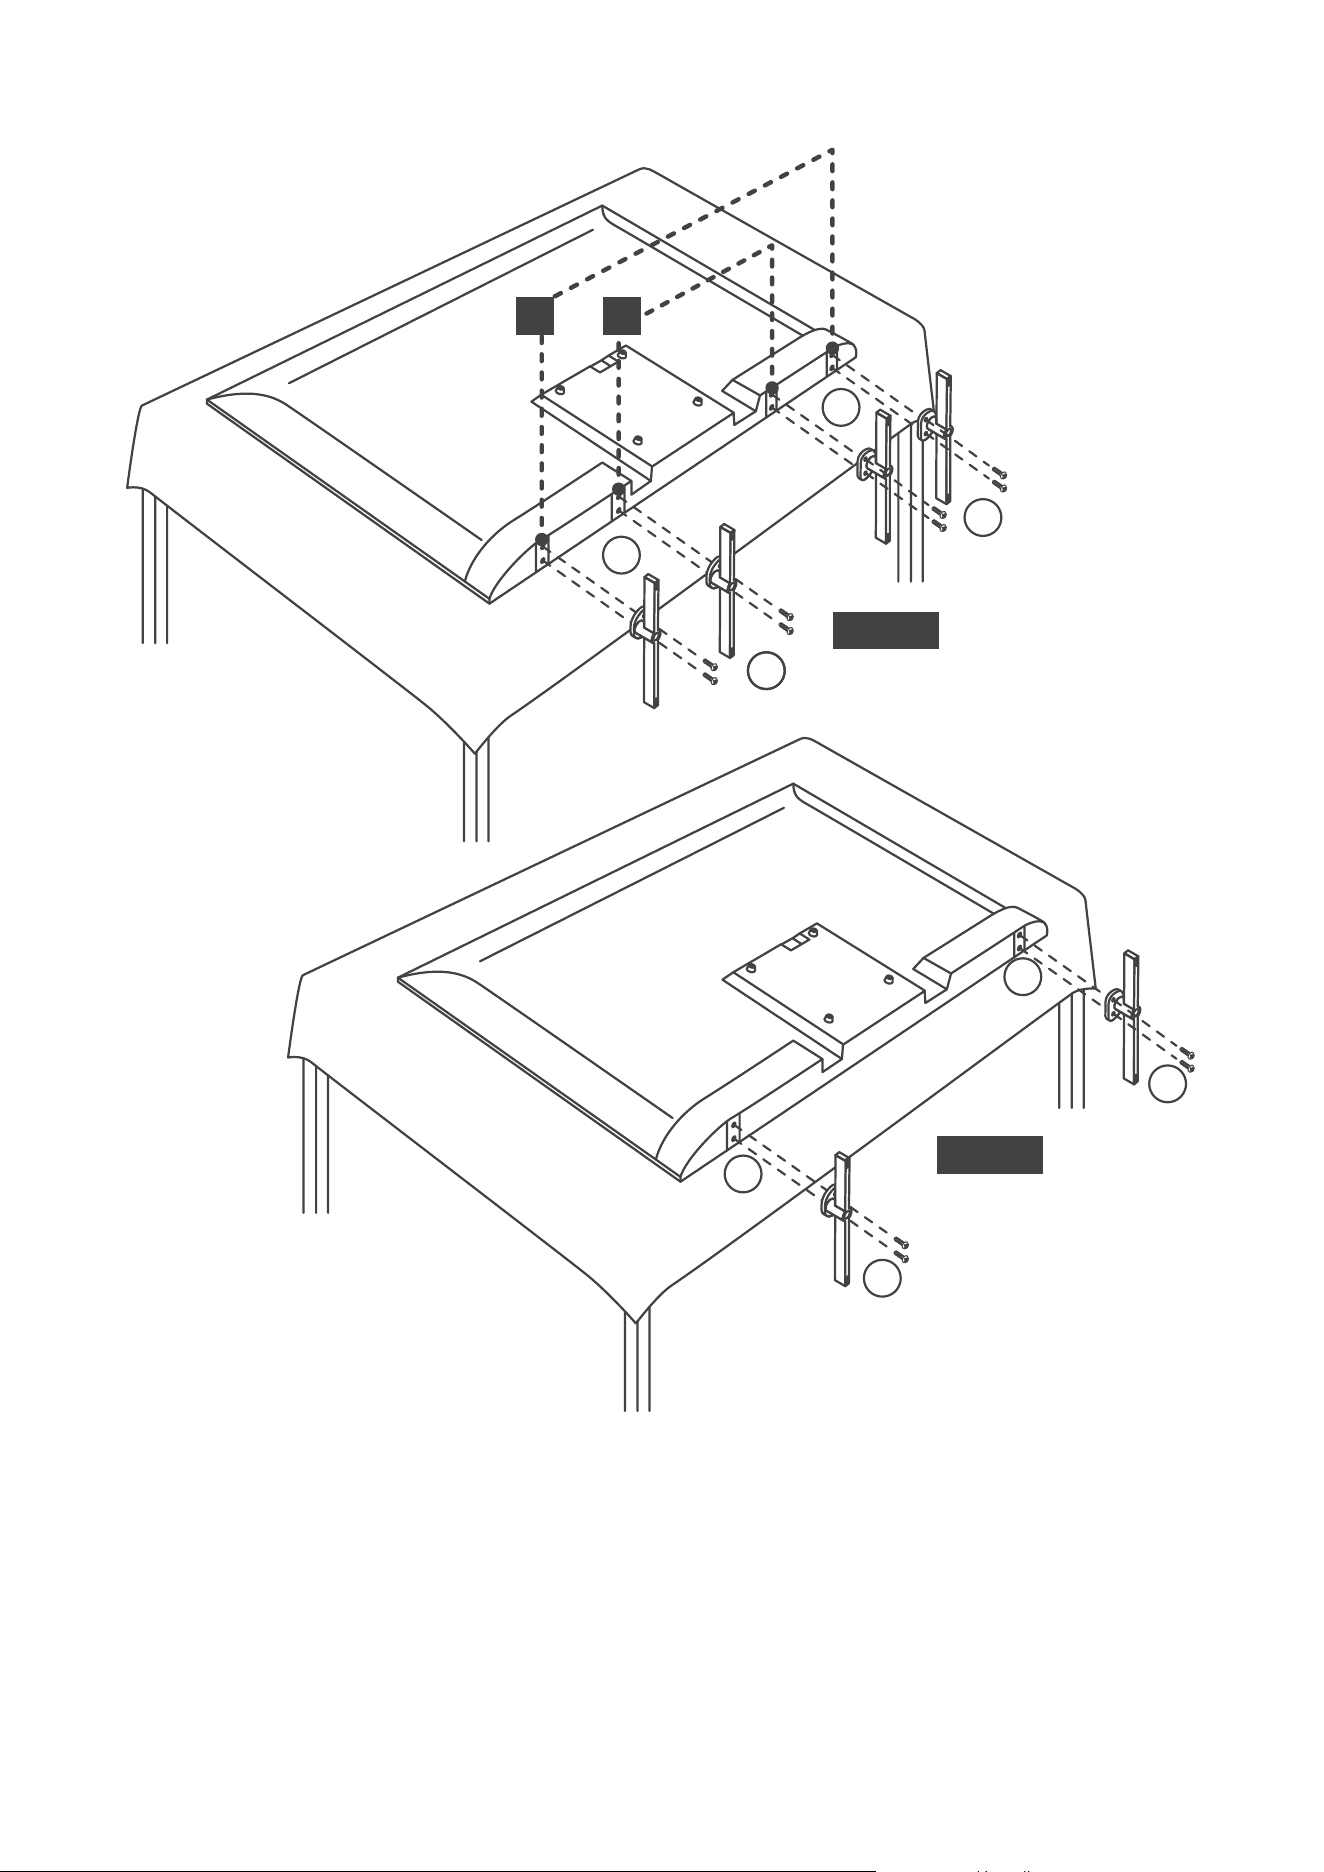
Take out the feet and the TV from the packing and put the feet onto a table or any other even surface.
• Use a at and rm table or similar even surface that can support the weight of the TV.
• Do not hold the screen panel part.
• Make sure not to scratch or break the TV.
• The feet are marked left and right.
24” - 43”
1 2
3
6
40”-43”
1 2
or
24”-32”
L
L
L
L
R
R
R
R
L
L
L
L
R
R
R
R
2.2. Wall mounting warnings
Read the instructions before mounting your TV on the wall.
The wall mount kit is optional. You can obtain it from your local dealer, if not supplied with your TV.
Do not install the TV on a ceiling or on an inclined wall.
Use the specied wall mounting screws and other accessories.
Tighten the wall mounting screws rmly to prevent the TV from falling. Do not over-tighten the screws.
Figures and illustrations in this user manual are provided for reference only and may dier from the actual
product appearance. Product design and specications may be changed without notice.
7
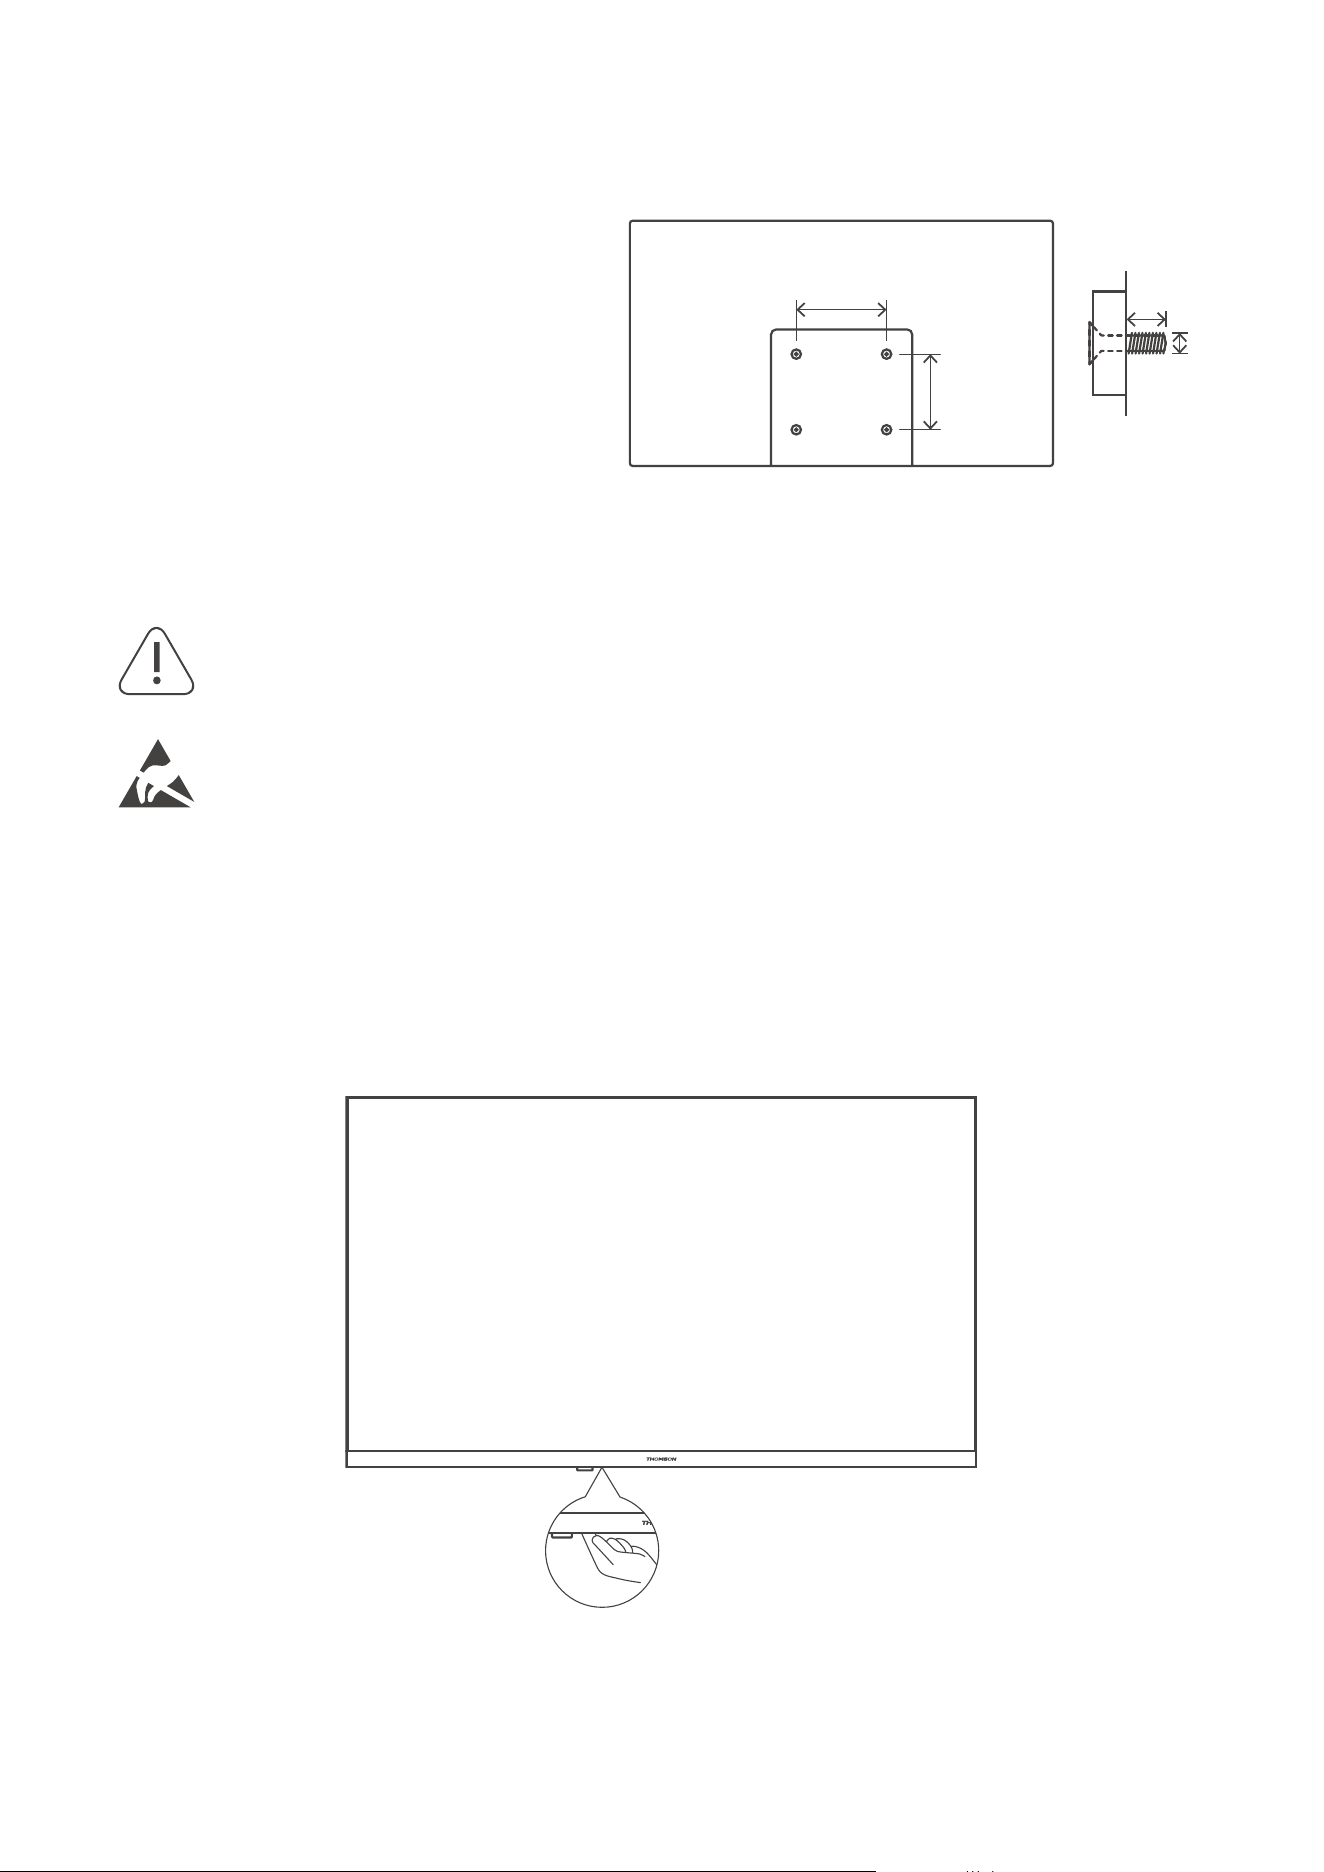
Your TV is also prepared for a VESA-compliant wall mount bracket. If it is not supplied with your TV, contact your
local dealer to purchase the recommended wall mount bracket.
Holes and measurements for wall mount bracket installation:
W (mm) H (mm) D (mm) L (mm)
24” 100 100 4 (M4) 6
32” 100 100 6 (M6) 8
40” 200 200 6 (M6) 8
43” 200 200 6 (M6) 8
3. TV buttons and connections
Caution:
If you want to connect a device to the TV, make sure that both the TV and the device are turned o
before making any connection. After the connection is done, you can turn on the units and use them.
Do not touch or be close to the HDMI, USB terminals, and prevent electrostatic discharge to
disturb these terminals while in USB operation mode, or it will cause the TV to stop working or
abnormal status.
Note:
The actual position and arrangement of ports may be dierent from model to model.
3.1. TV Button
Press this button in standby mode to turn on / o the TV.
Key panel - Key panel button can be activated or deactivated with a Key Lock function, see page 27.
W
H
L
D
8
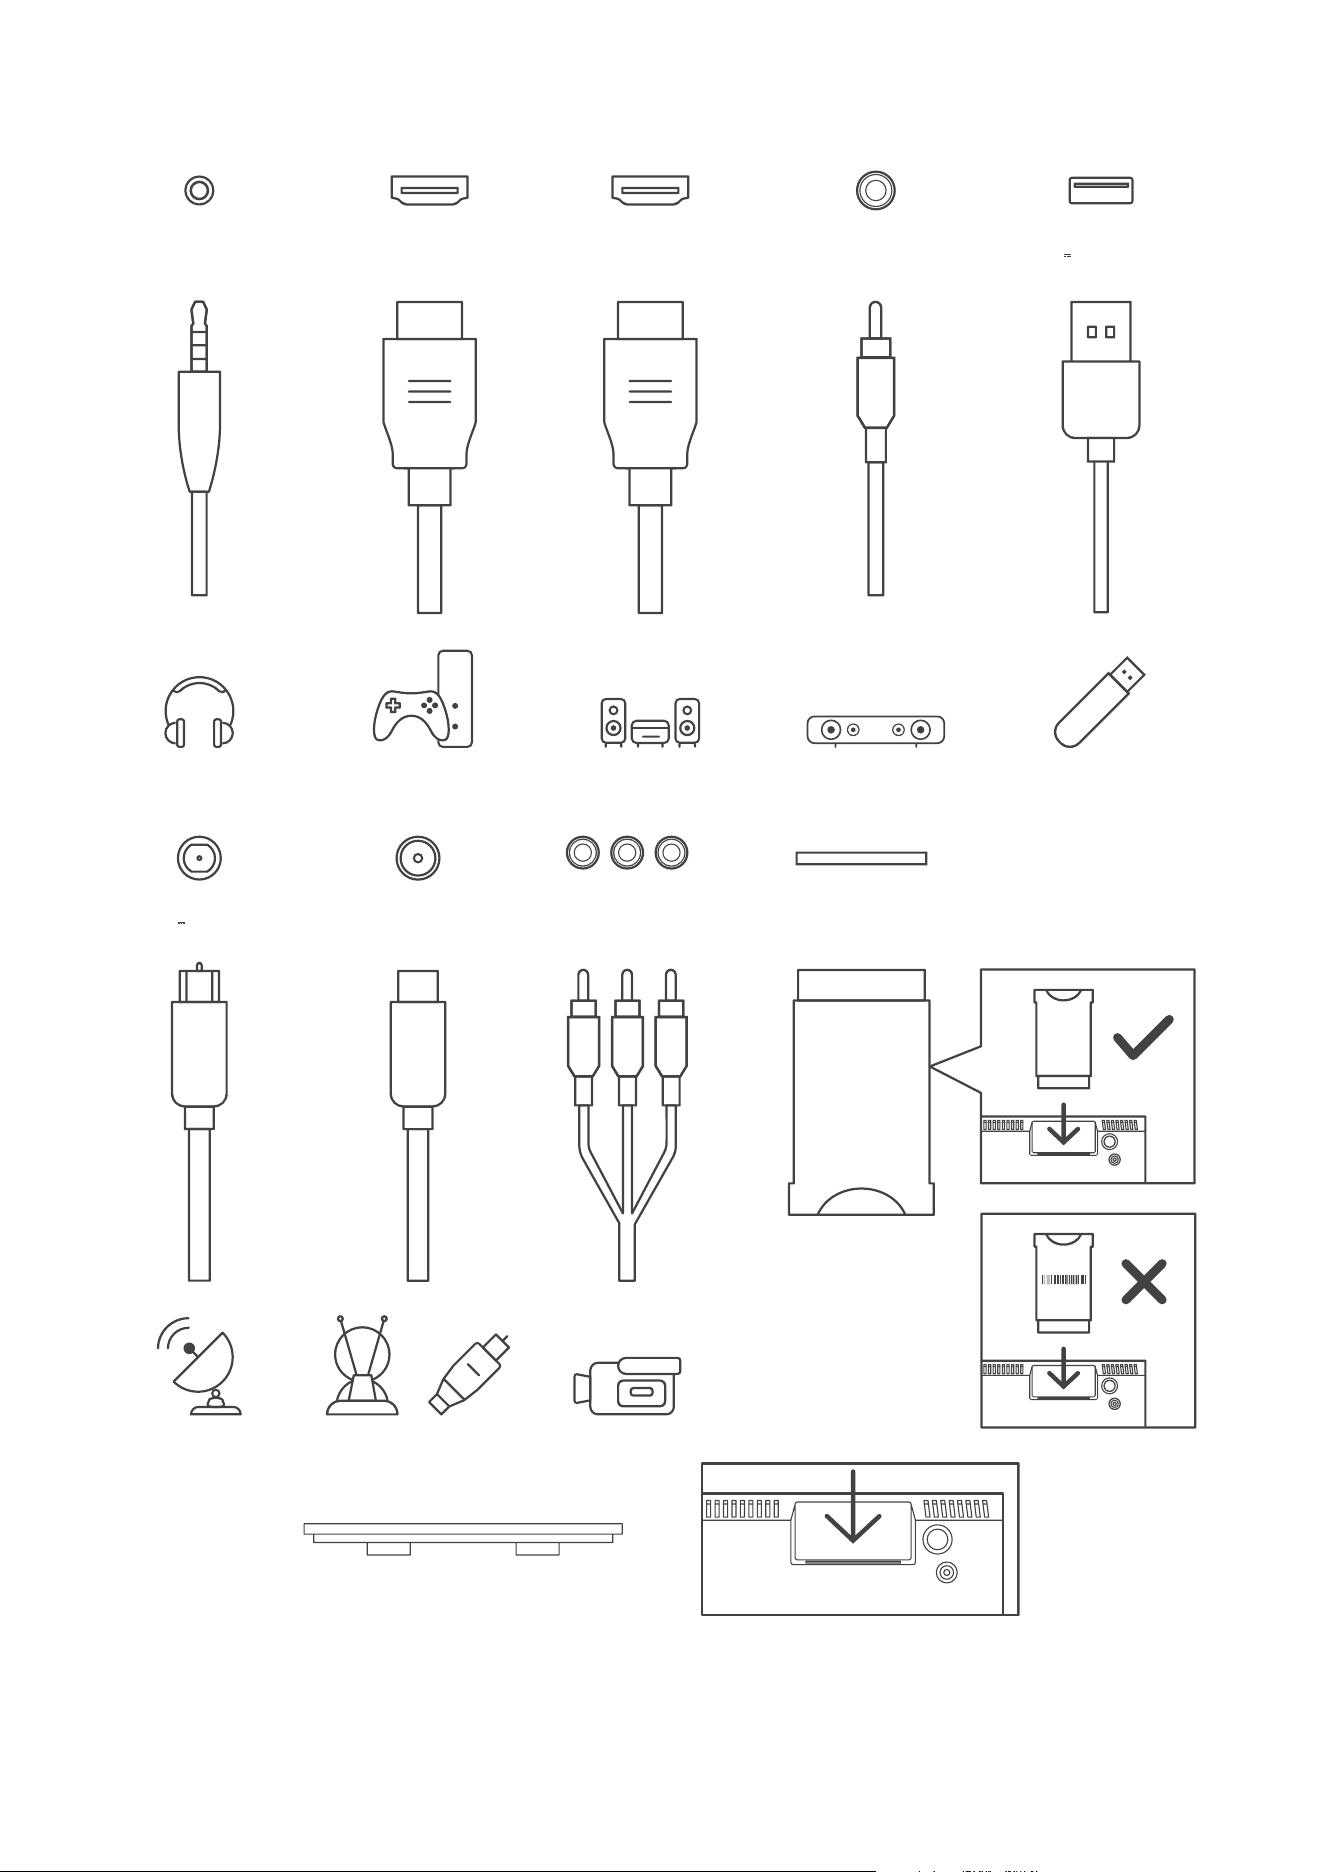
3.2. Connections
HEADPHONES
USB
5 V max. 500 mA
HDMI (ARC)
13/18 V 400 mA max
SATELLITE
HDMI
ANTENNA/DVB-T/C
VIDEOL R
AV IN
Logo
COMMON INTERFACE
Logo
CI+ Modul
AUDIO OUT
Digital coaxial
*silicone plug
Note: If the model has a CI card slot on top of its back cover, a silicone plug for the CI card slot can be found
in the accessory bag (for models without a CI card slot, there is no such silicone plug), please insert the silicone
plug into the slot when the CI card is not in use.
9
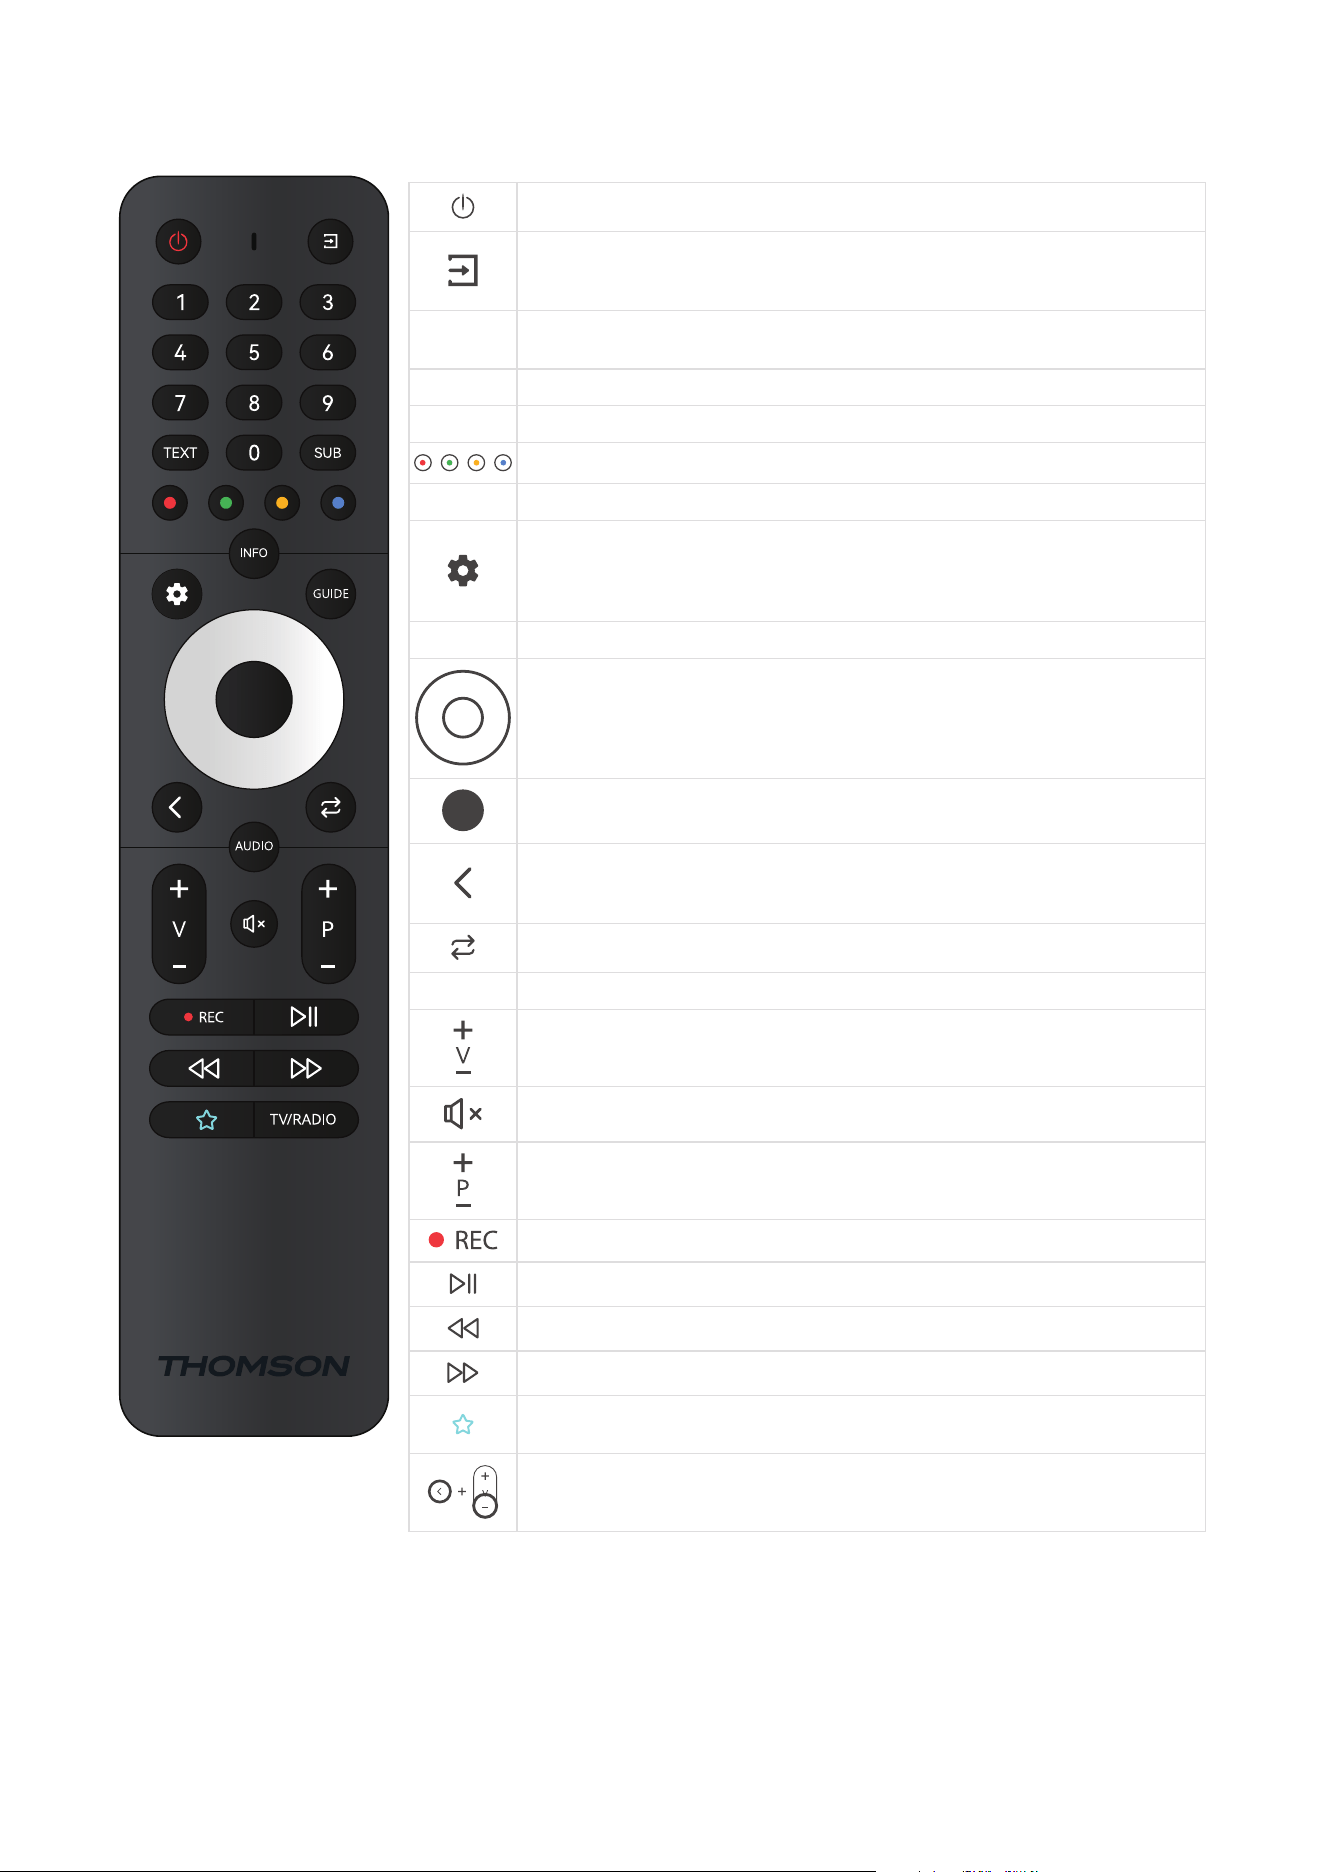
3.3. Remote control
Standby: Quick Standby / Standby / On
Source/Input: Closes and exits from Live TV Settings menus, exits from any running
application or menu or OSD banner, switches to last set source; Selecting the input of
the TV.
0-9
Numeric buttons: Switches the channel in Live TV mode, enters a number or a letter in
the text box on the screen
TEXT Text: Opens and closes teletext (where available in Live TV mode)
SUB Subtitles: Turns subtitles on and o (where available)
Colored Buttons: Follows the on-screen instructions for colored button functions
INFO Displays Broadcast information
SETTINGS/MENU: Displays Live TV Settings menu (in Live TV mode), displays available
setting options such as sound and picture; Those who have an SW with PVR function
bought, if settings button is pressed for 5 seconds an additional keypad will be
opened with additional functions
GUIDE Display EPG
Directional buttons: Navigates menus, setting options, moves the focus or cursor etc.,
sets record time and displays the subpages in Live TV-Teletext mode when pressed
Right or Left. Follow the on-screen instructions
OK/Enter: Conrms selections, enters sub-menus, views channel list (in Live TV mode).
Press 5 sec. to switch the backlight of the remote control on/o
Back/Return: Returns to previous menu screen, goes one step back, closes open
windows, closes teletext (in Live TV-Teletext mode). Exits the playback of multimedia
les and returns to the MMP (Multi Media Player) overview menu / Remote pairing
Sends back to previously watched channel
AUDIO Opens Audio track
Volume +/-: Controls the Sound Volume of the TV.
Mute: Completely turns o the volume of the TV
Program +/-: Zapping the single TV/radio channels. Scrolls the channel list page by
page when the channel list is displayed on the TV screen.
Records
Plays/Pauses Multimedia
Fast rewind
Fast forward
Favorite application: Determinates the Favorite application. Shows selection of the
Favorite applications.
Remote Control pairing: Simultaneously pressing the Back button and the V- button,
activates the pairing mode of the remote control.
10
4. TV Installation
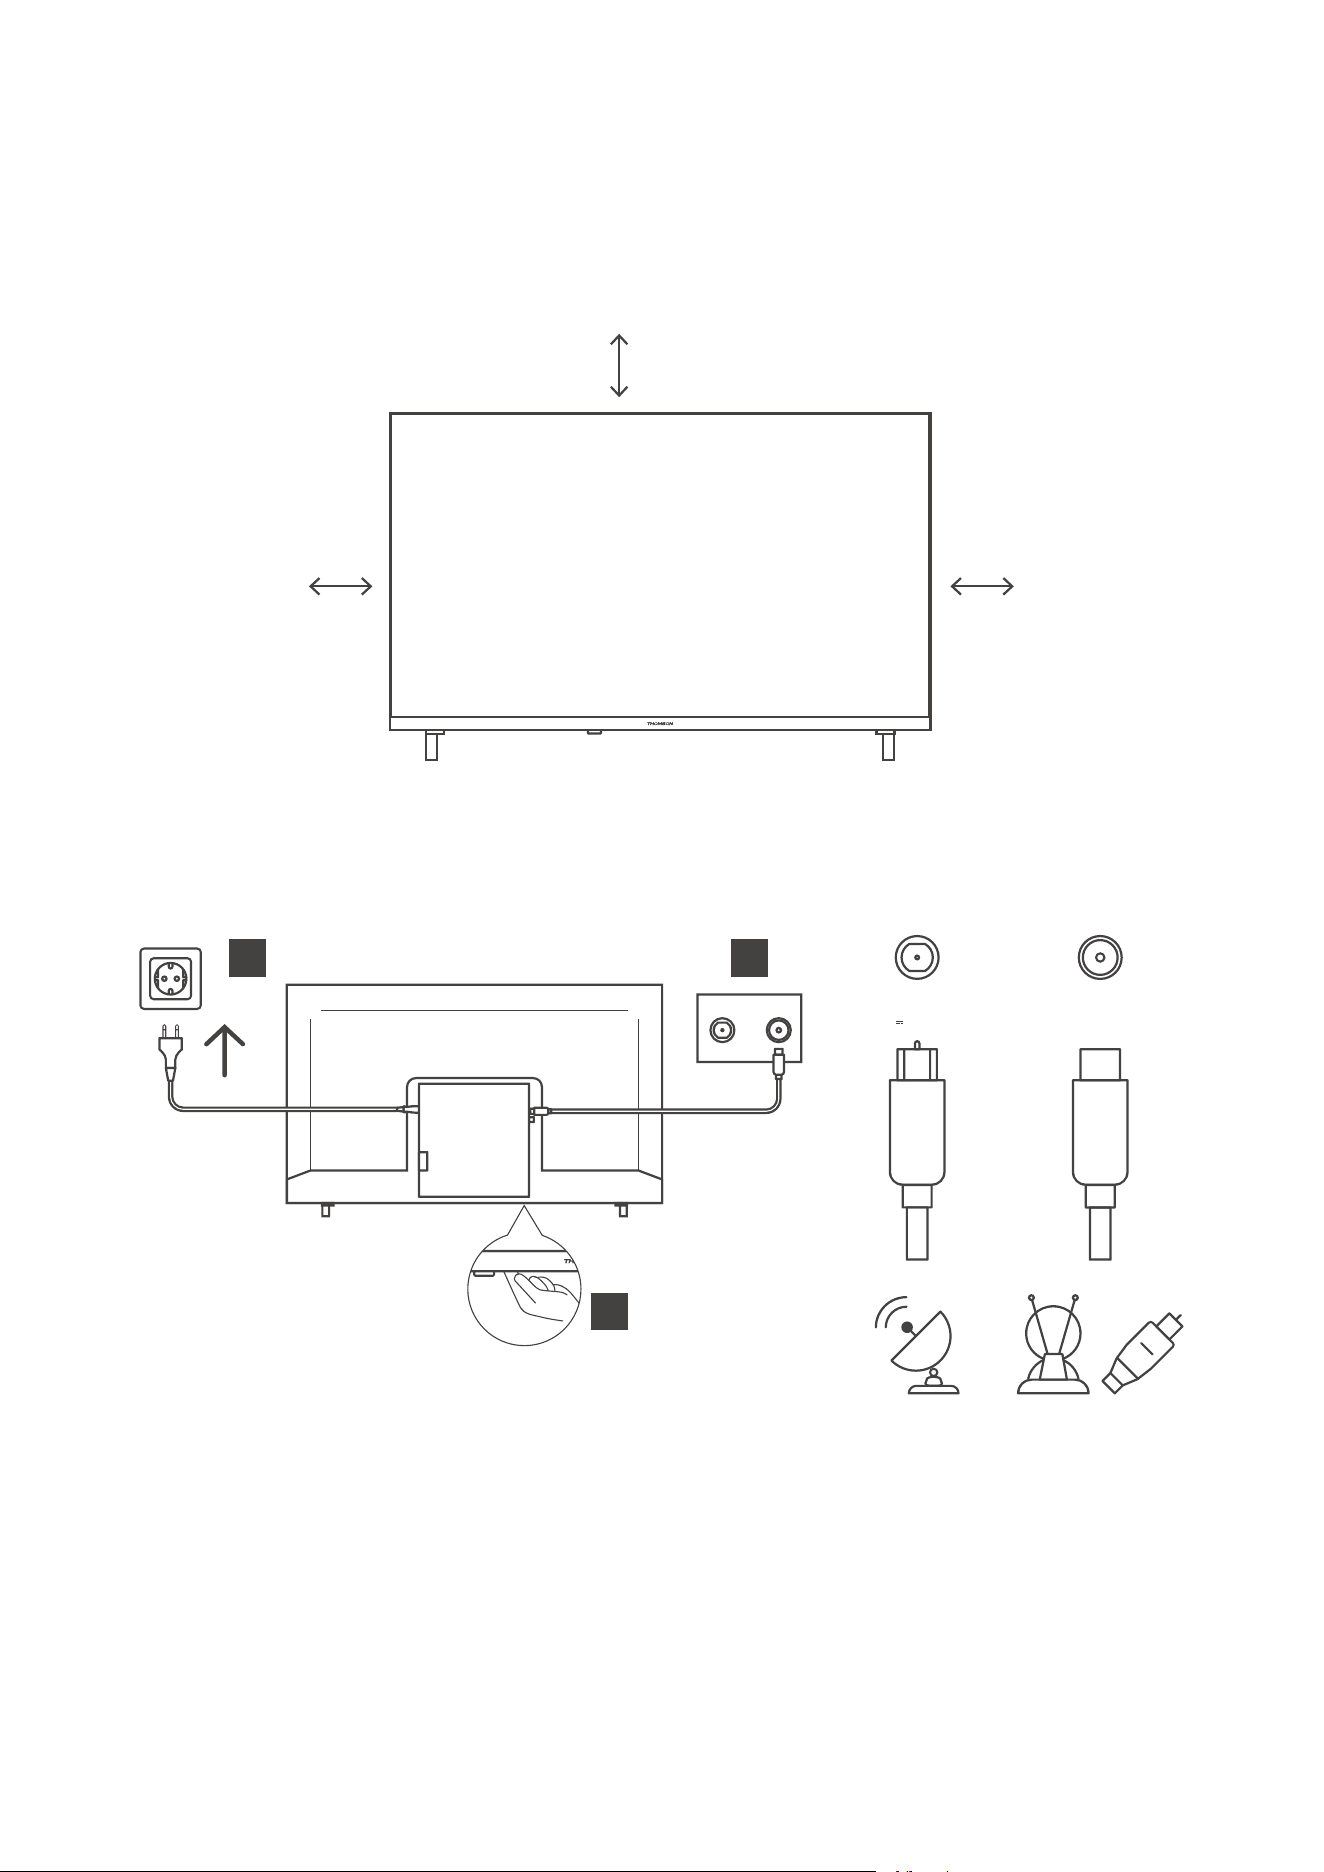
4.1. Set your TV
Put your TV on a rm place which can bear the weight of the TV. To avoid danger, please do not position the TV
near water or heating places (such as light, candle, heating machine), do not block the ventilation at the back of
the TV.
10 cm
10 cm
10 cm
Connect antenna and power.
1. Connect the antenna cable to the antenna socket on the back of the TV.
2. Plug in the power cord of your TV (AC 100-240 V~ 50/60 Hz). The TV enters standby mode (red light).
3. Turn on your TV by pressing the power button of the TV or the power button on the remote control.
13/18 V 400 mA max
SATELLITE
ANTENNA/
DVB-T/C
2
3
1
4.2. Initial Setup
For the rst initial setup, in-screen setup wizard will guide you through setting up your TV. Please follow the
guide to setup your TV correctly.
Connect an RF cable from the TV input called “RF-In” to your TV Aerial socket.
4.2.1 Select Language
Press the a / d button to select the language to be used for menus and message, then press OK to conrm.
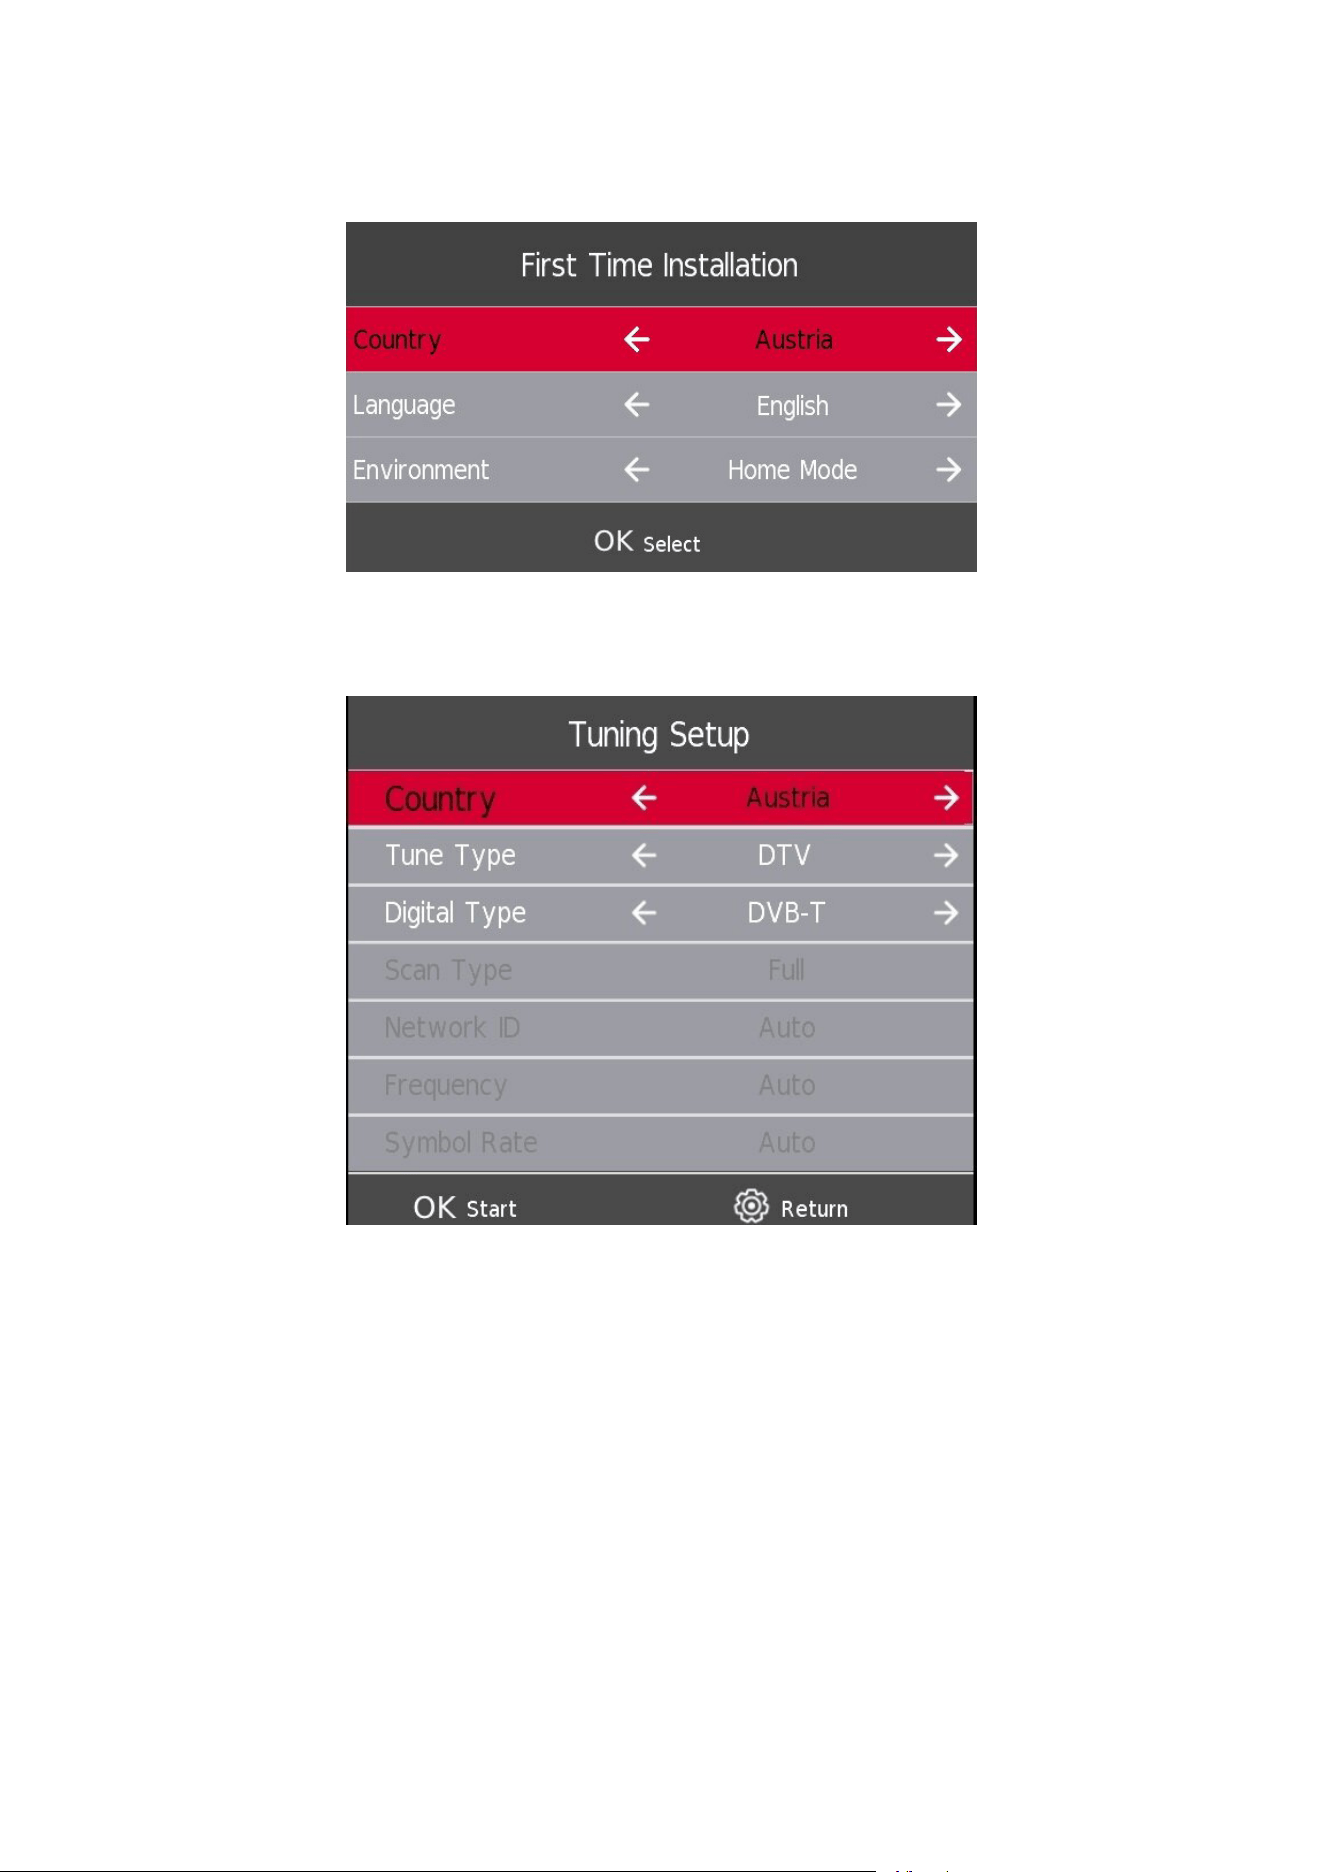
11
4.2.2 Select Country
Press the s / w button to highlight country menu. Press a / d button to select the country of your choice, then
press OK to conrm.
4.3. Tuning Setup DTV
Press the s / w button to select your reception art - DTV., then press OK to conrm.
12
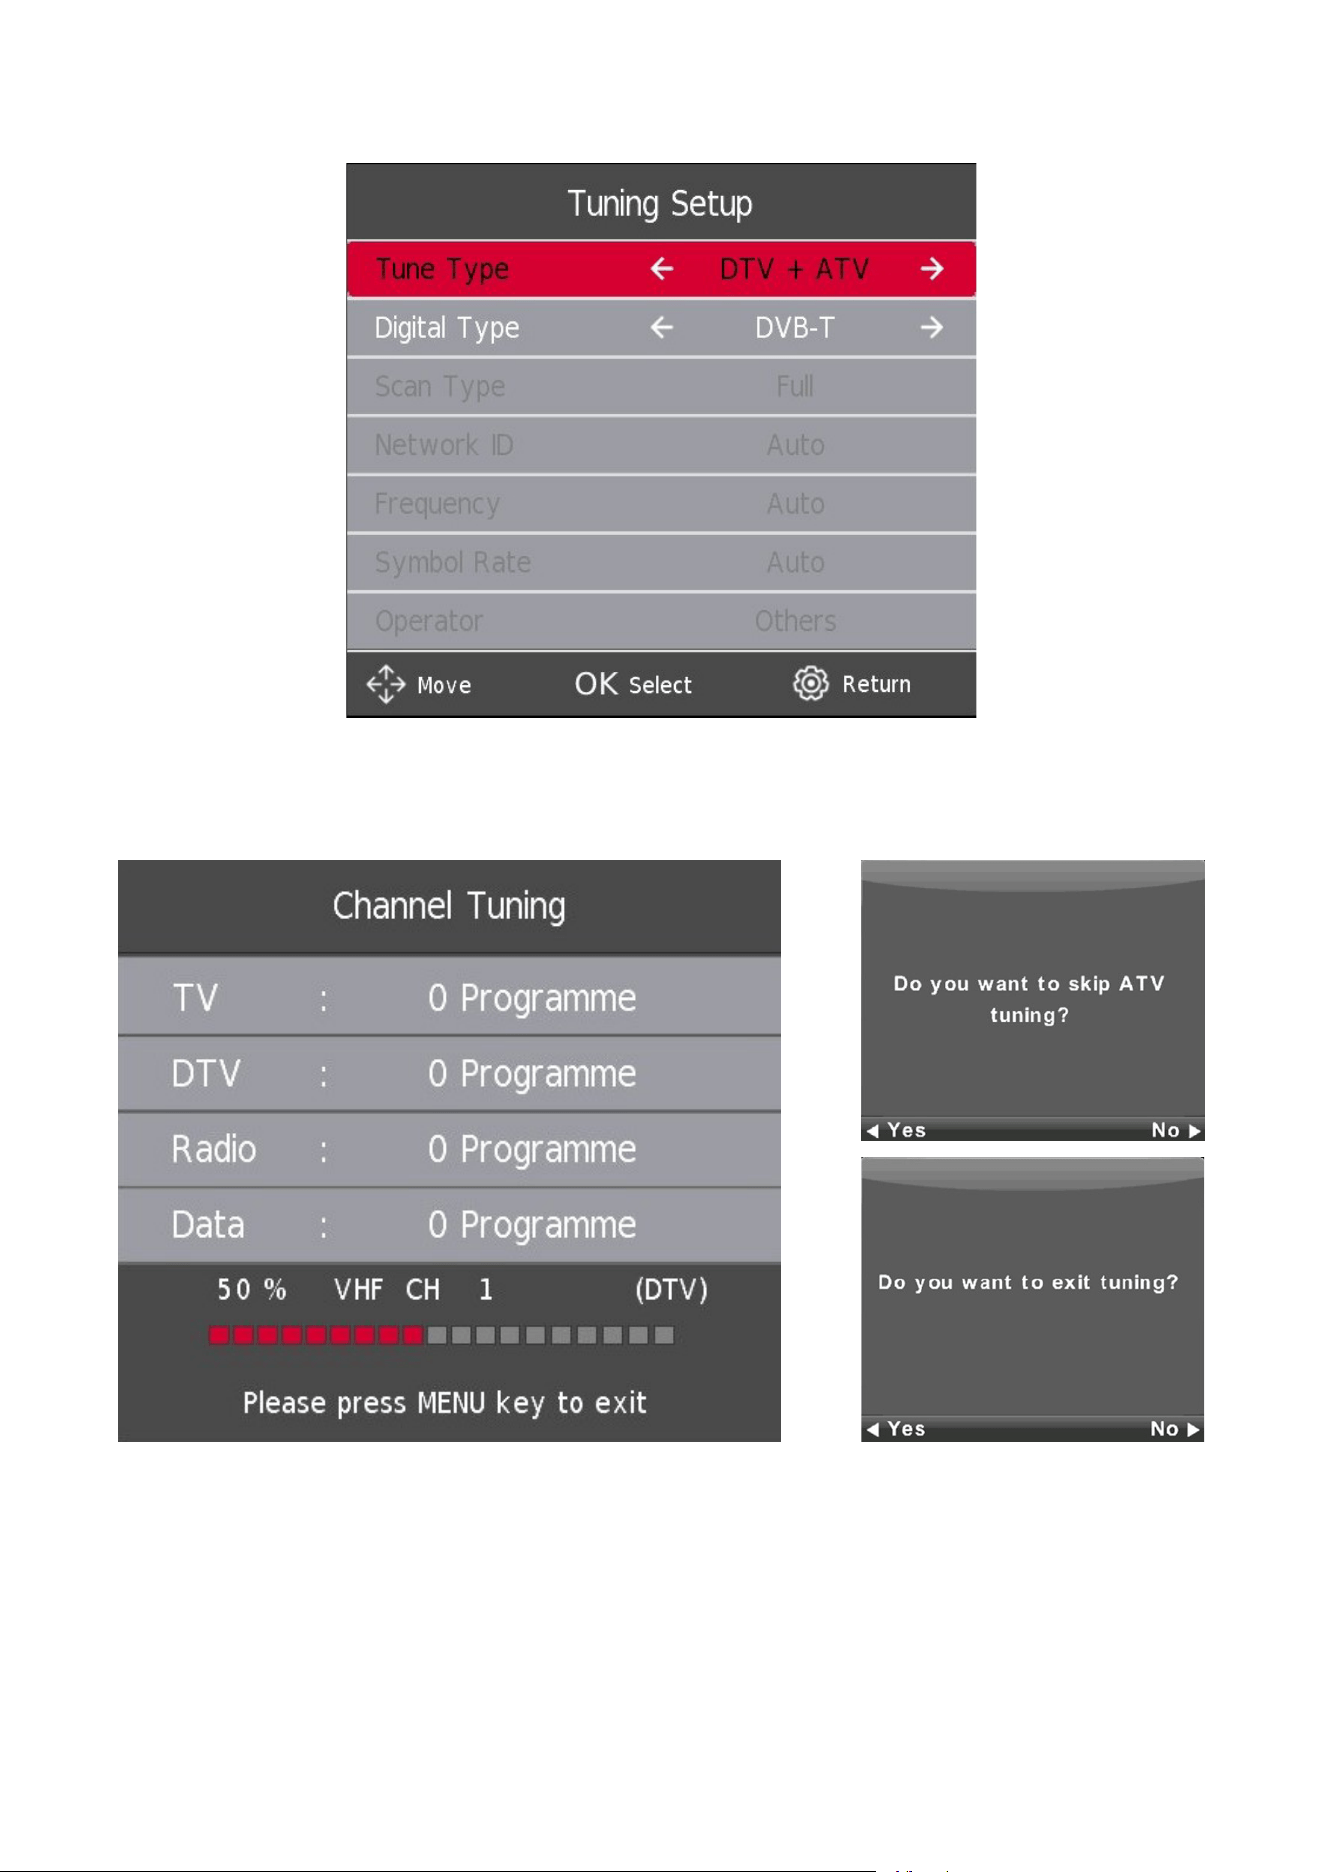
4.4. Auto Tuning (Analog TV + Digital TV)
By selecting ATV+DTV, two scans will be performed separately. To stop the rst scan, you must rst press the SETTINGS/
MENU button and then conrm your choice with the LEFT button. Then, the second scan will start automatically. In case
you want to interrupt the second scan, please press the
SETTINGS/MENU button again and press the LEFT button to
conrm.

13
5. Main Menu Operation
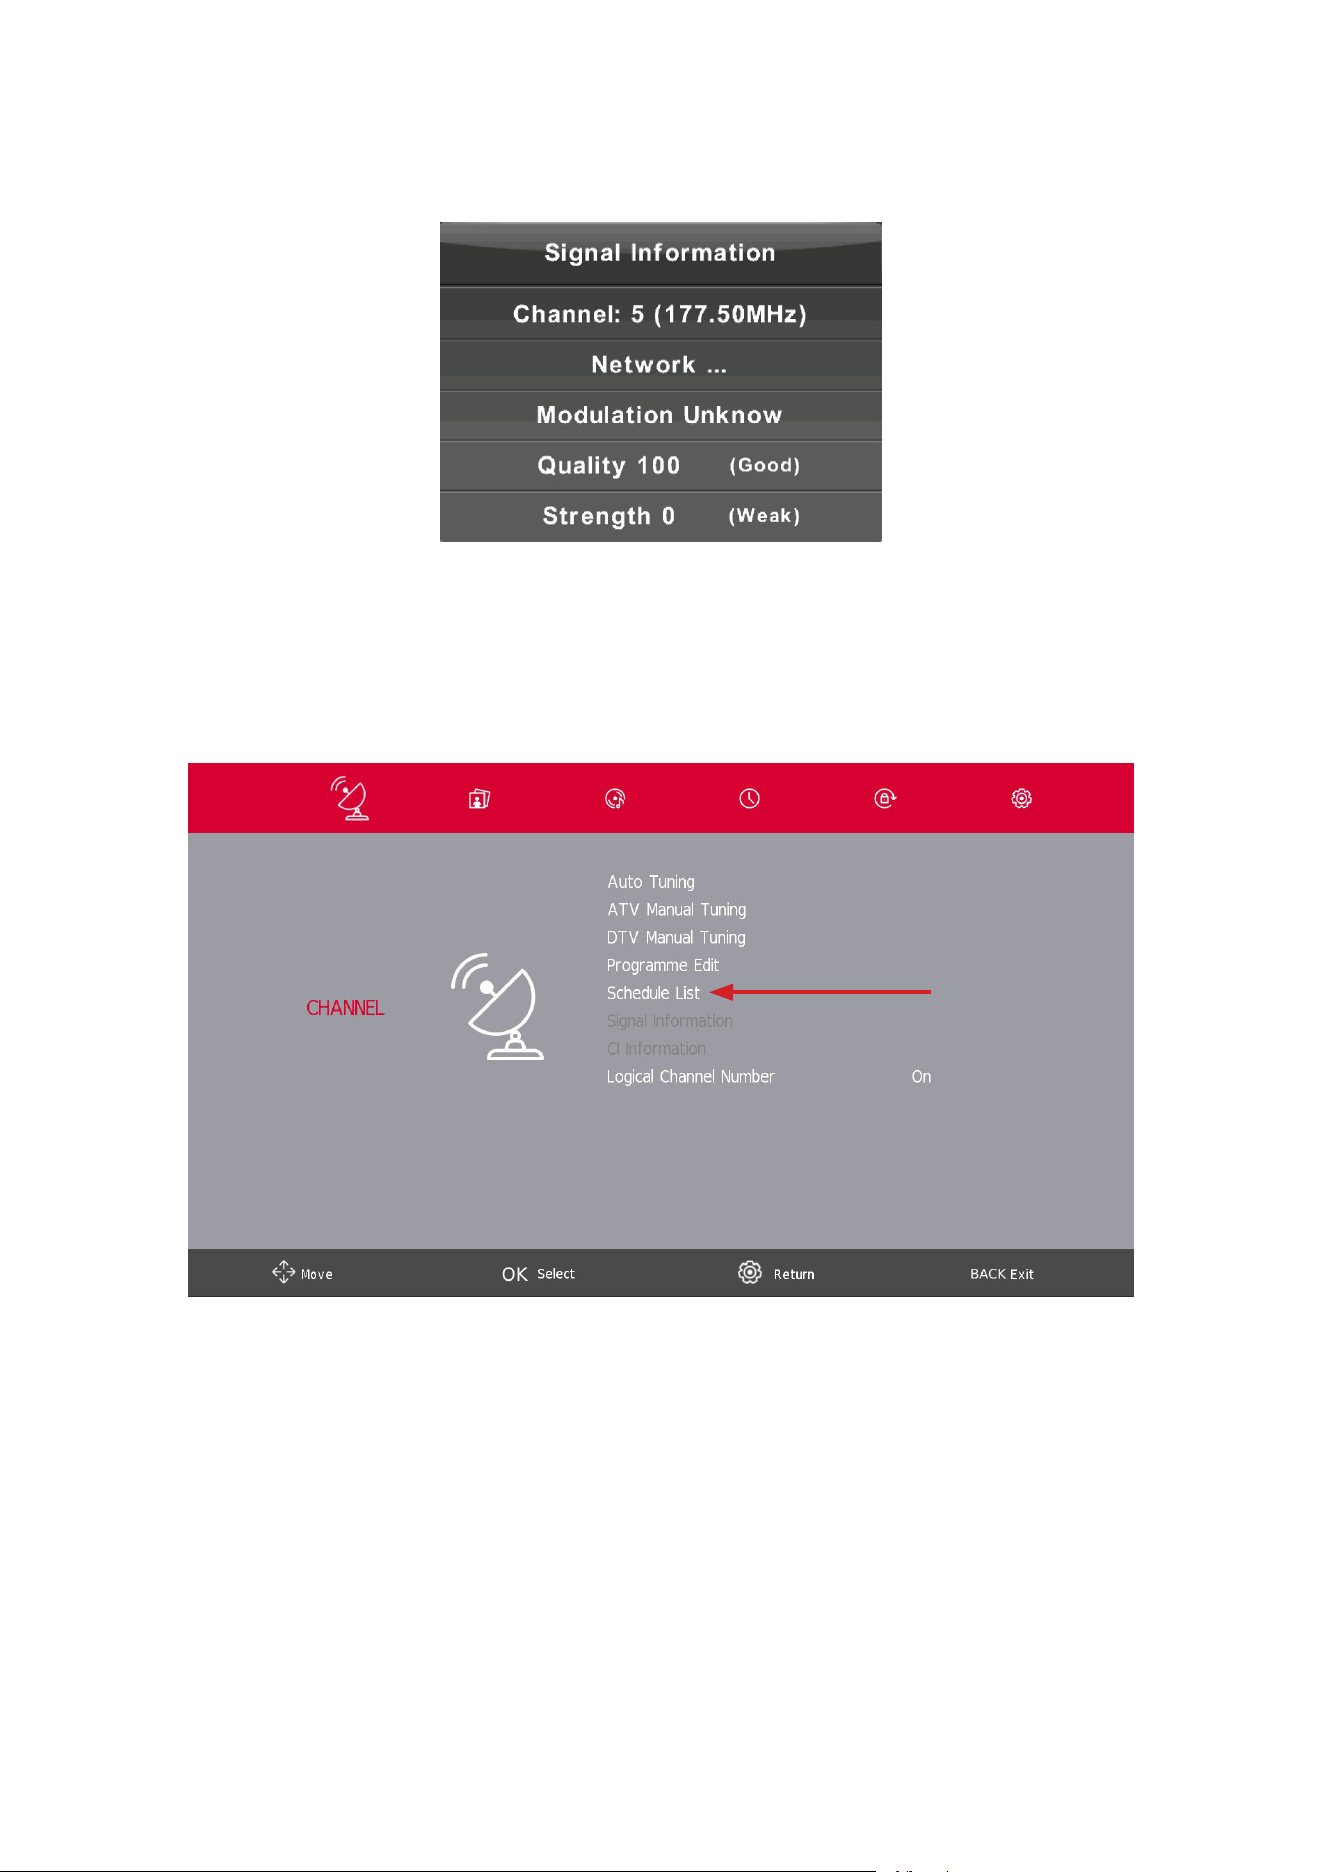
5.1. Channel Menu
Press the SETTINGS/MENU button to display the main menu.
Press the a / d button to select CHANNEL in the main menu.
1. Press the s / w button to select the option that you want to adjust in the CHANNEL menu.
2. Press the Enter button to adjust.
3. After nishing your adjustment, Press the Enter button to save and return to the previous menu.
5.2. ATV Manual Tuning
Current CH
Set the channel number.
Color System
Select the color system
(Available System: AUTO, PAL, SECAM)
14
Sound System
Select the Sound system
Fine-Tune
Adjust the frequency of the channel nely.
Search
Start channel searching
.
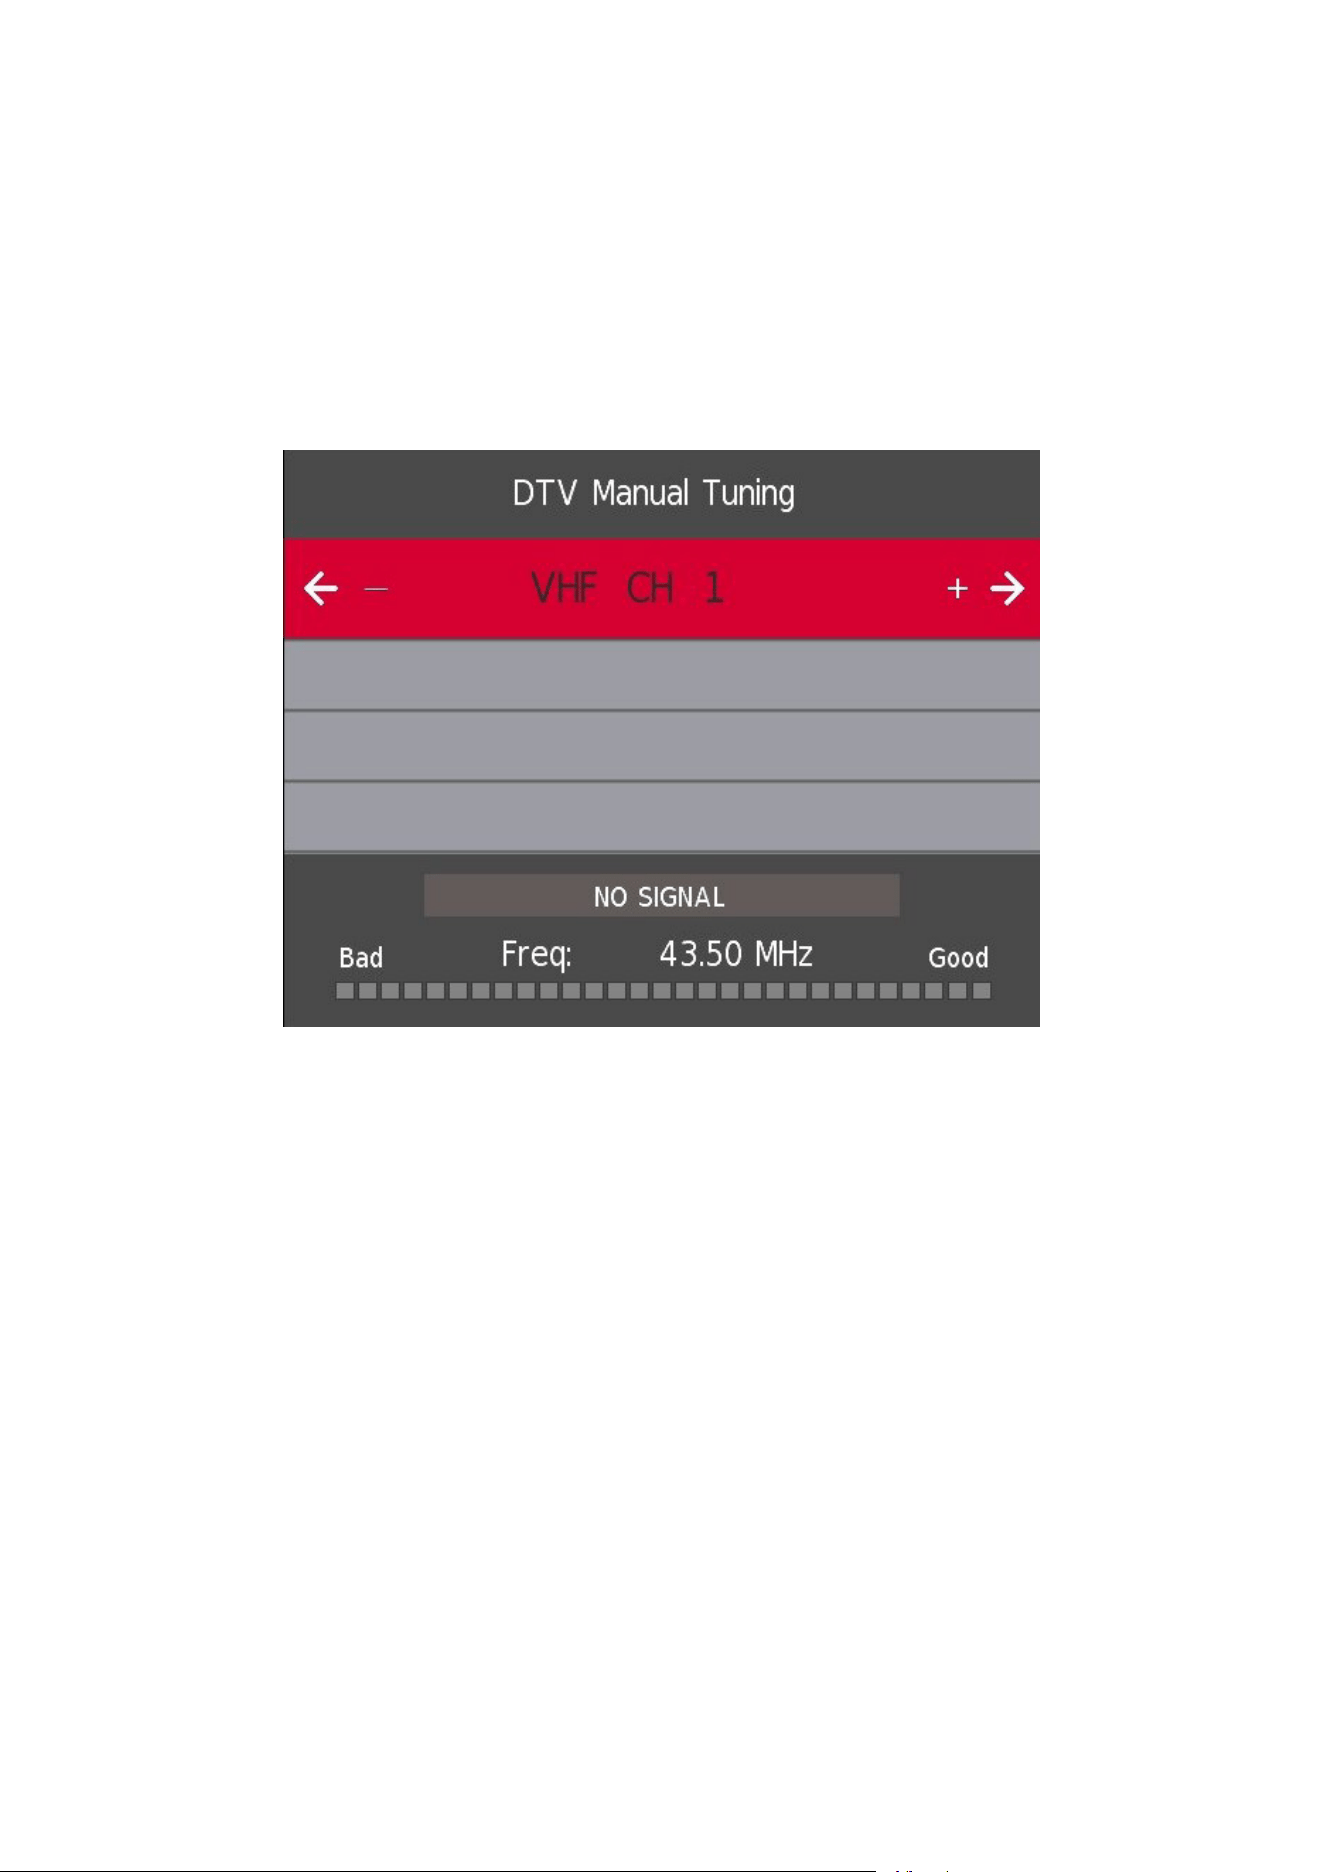
5.3. DTV Manual Tuning
Press the s / w button to select DTV Manual Tuning, then press Enter button to enter sub-menu.
Press the a / d button to select channel, then press Enter button to search program.
15
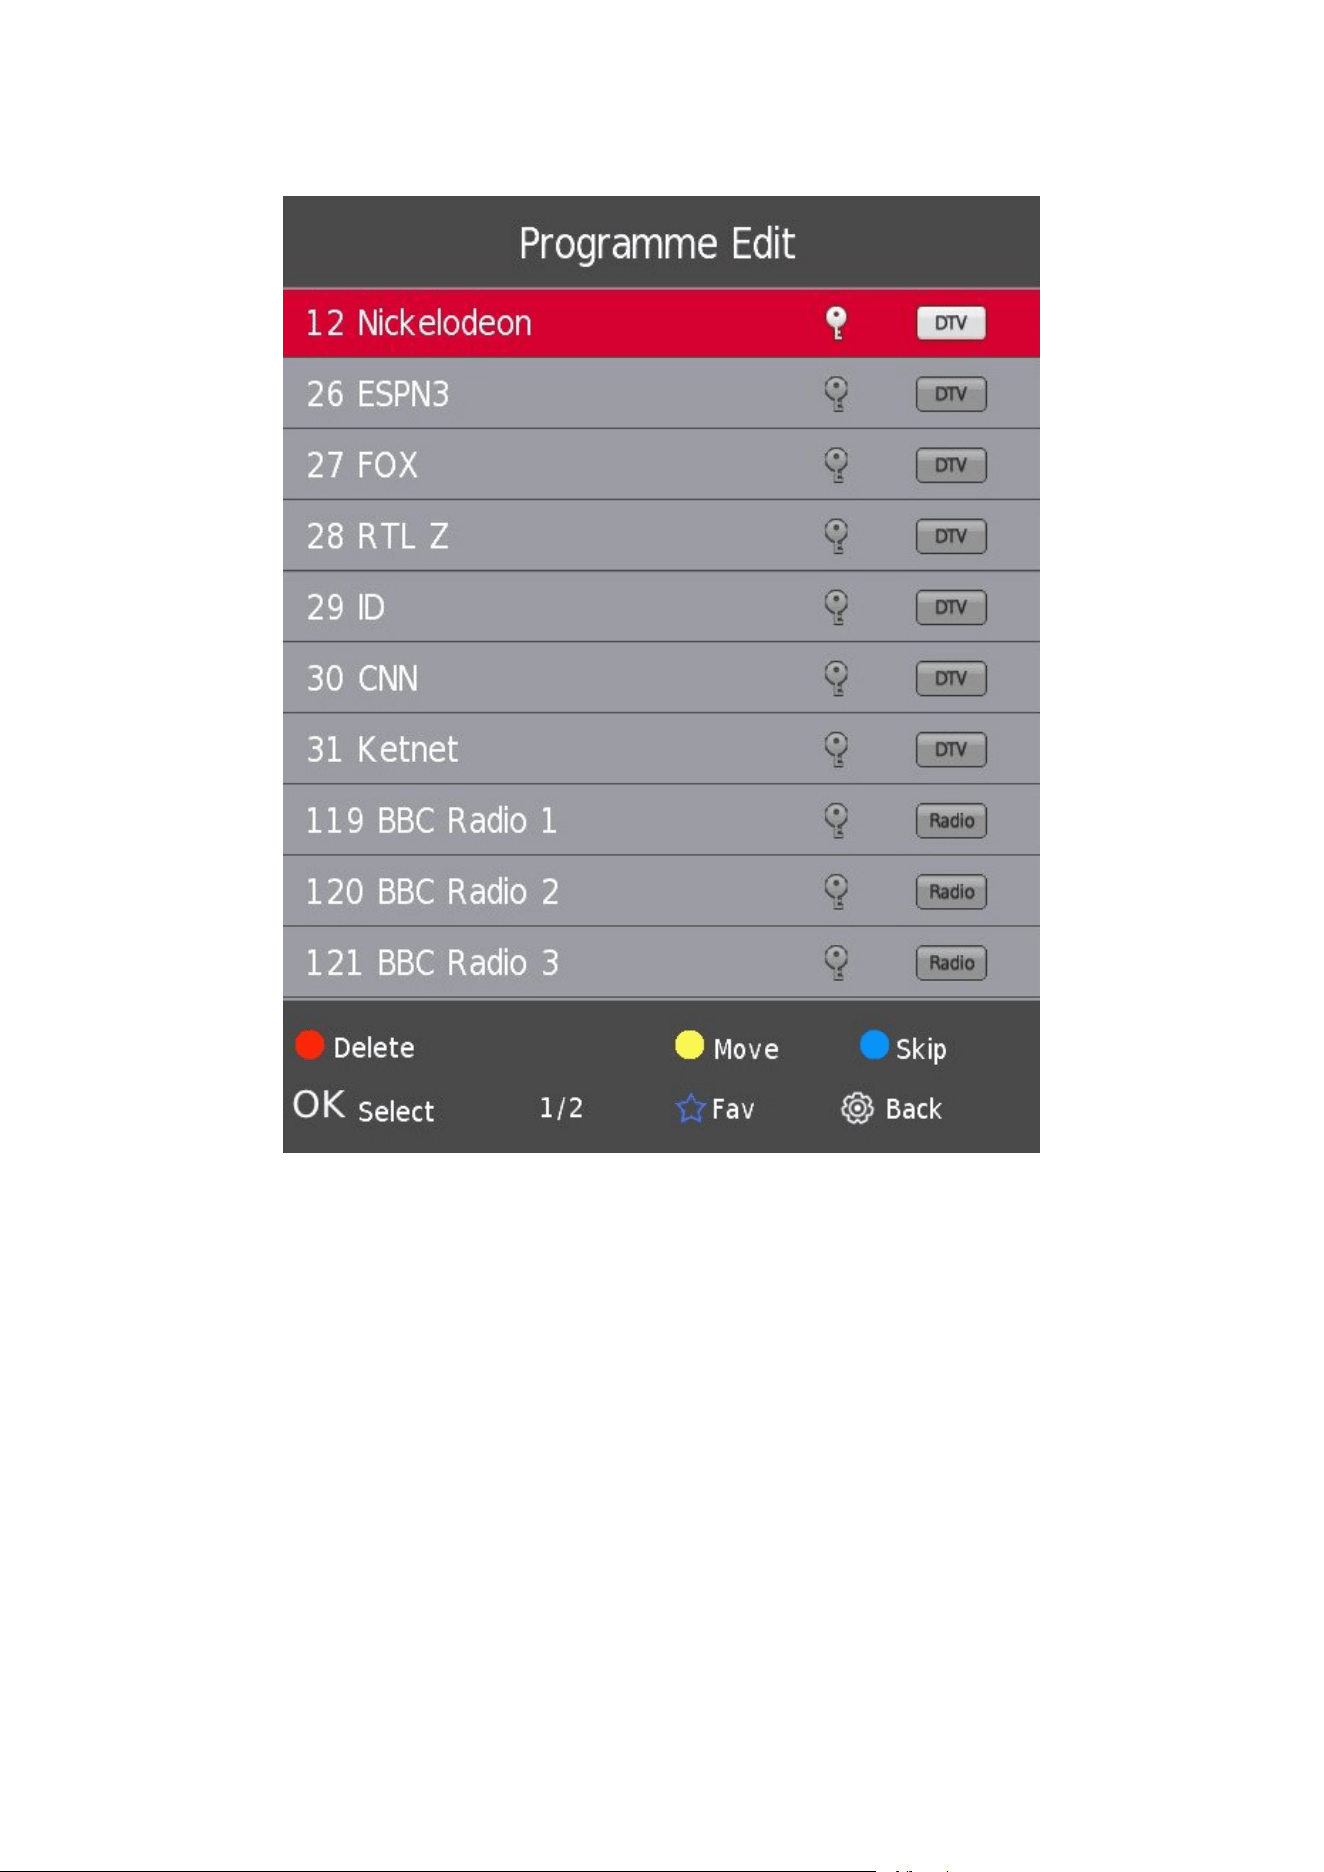
5.4. Program Edit
Press the s / w button to select Program Edit, then press the Enter button to enter sub-menu.
The three colored keys 4 4 4 are the shortcut keys for programming the channel.
First press s / w to highlight the channel you want to select, then:
Press the Red button to delete the program in the list.
Press the Yellow button to move the channel in the list.
Press the Blue button to skip the selected channel.
Press the Fav button to add the channel to or remove it from your favorite list. (Your TV set will skip the channel
automatically when using CH+/- to view the channels.)
16
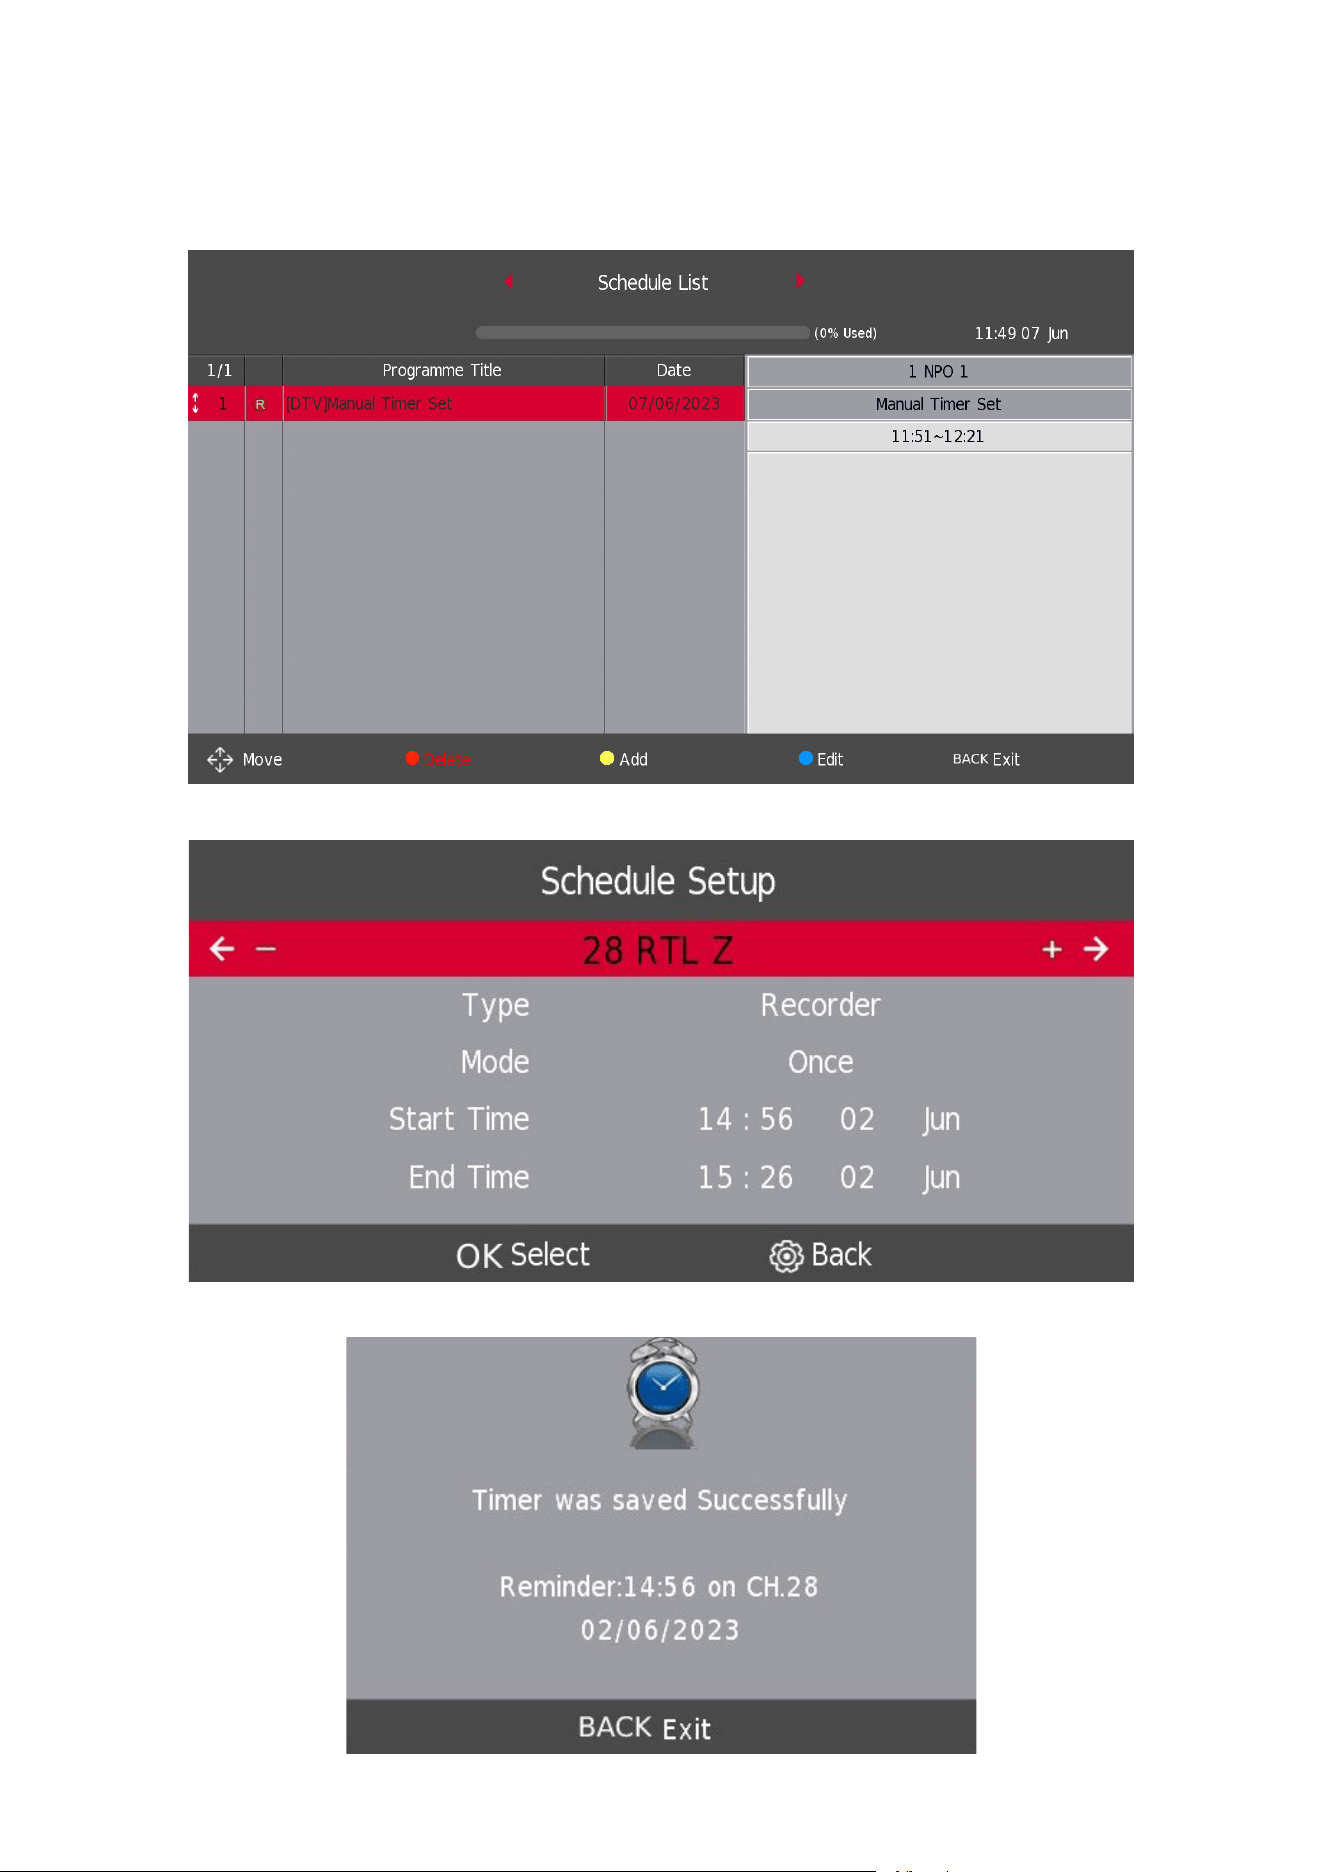
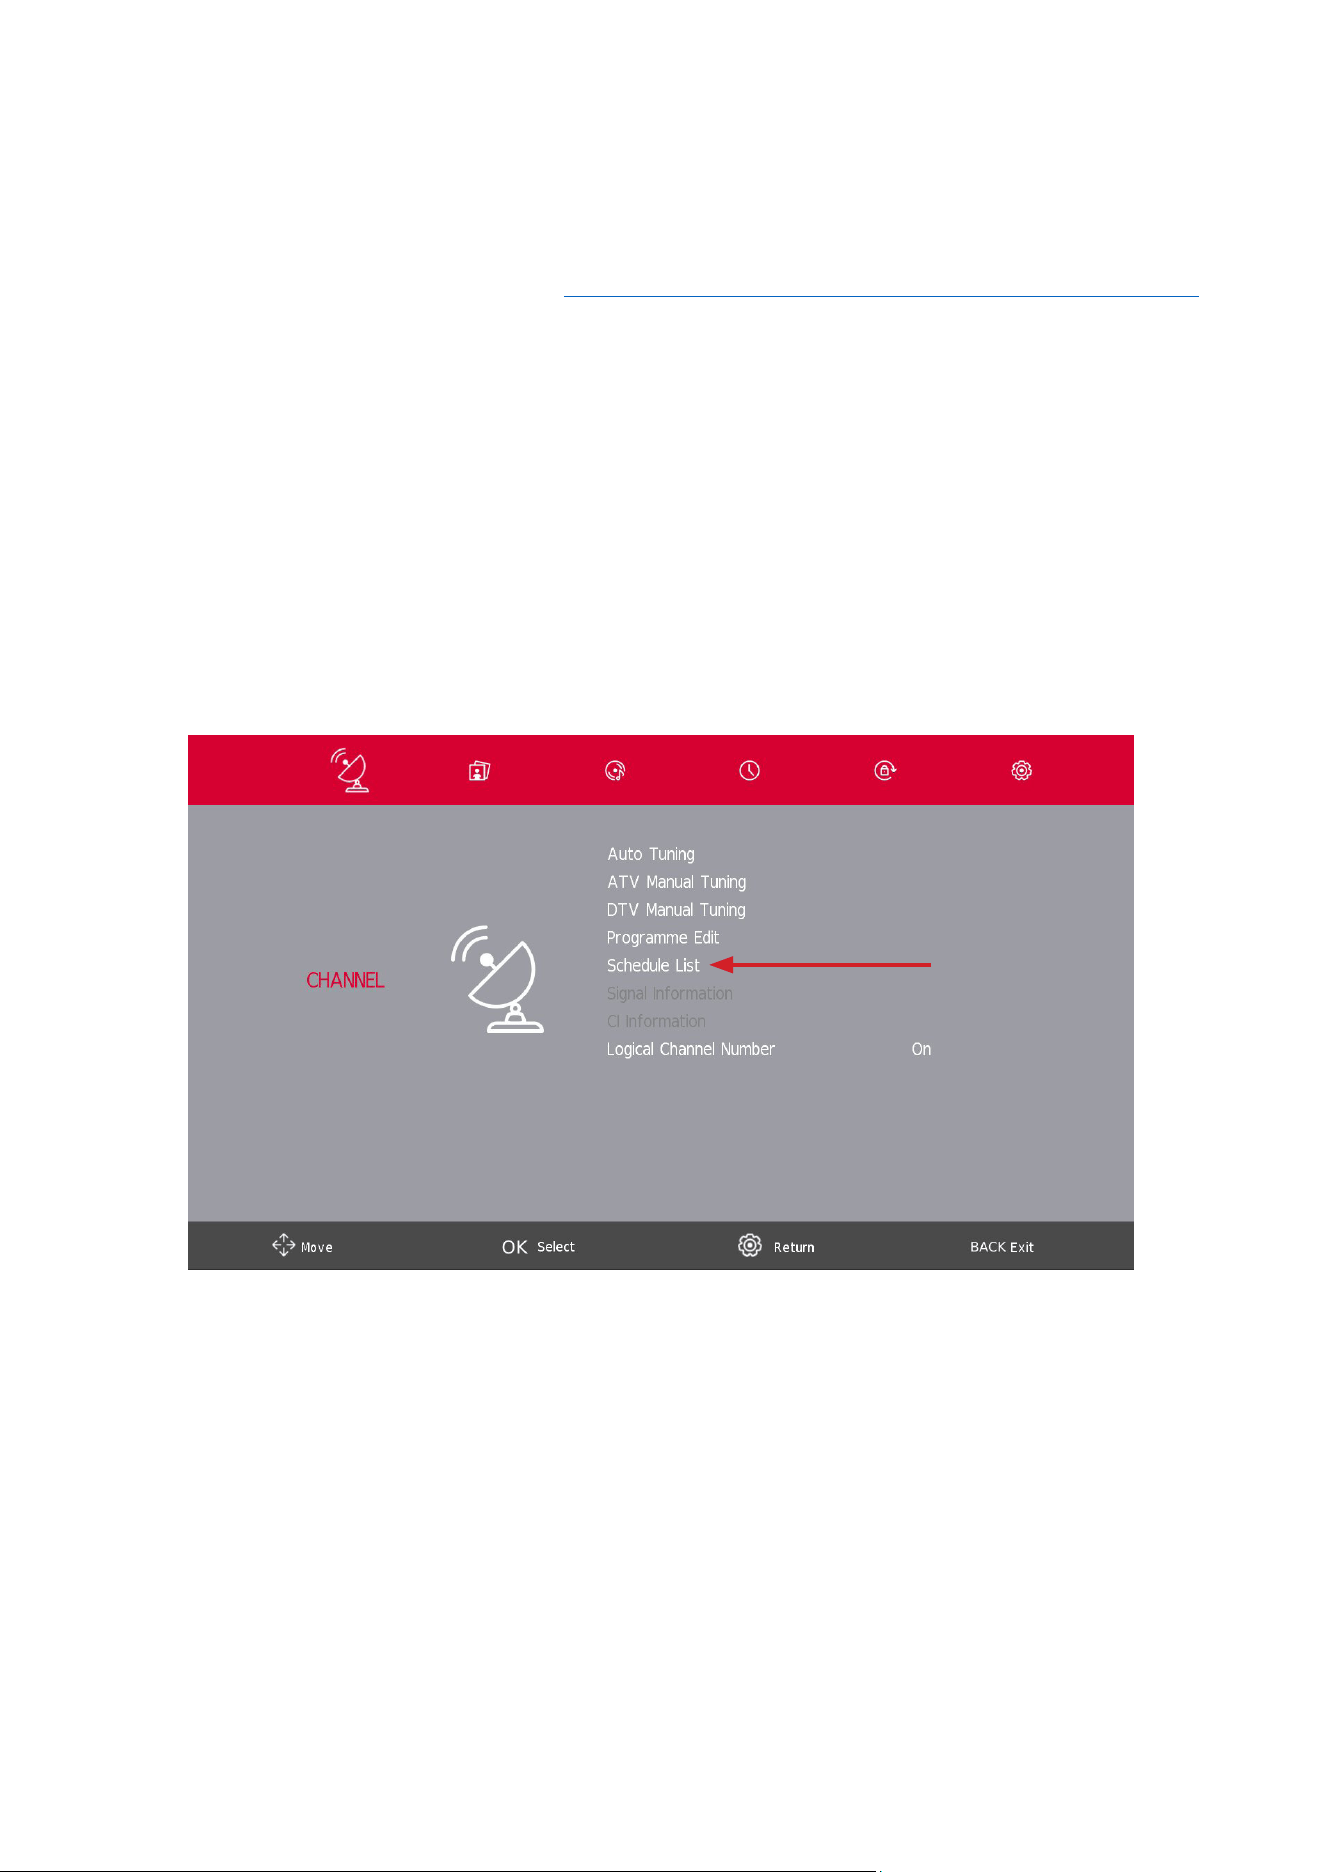
5.5. Schedule List
*only available with PVR
Press the s / w button to select Schedule List, then press the Enter button to enter sub-menu. It is available in
DTV and satellite source.
Press the YELLOW button to enter the interface below.
If there is a conict in the scheduled appointment, a warning message will be generated.
17
5.6. Signal Information
Press the s / w button to select Signal Information, press the Enter button to see the detail information about
the signal. Only available when there is signal in DTV.
CI Information (If CI function is supported)
Press the s/ wbutton to select CI Information, then press the Enter button to display details if you have inserted
the CI card.
The CHANNEL List in Satellite Source. (If DVB-S2 function is supported)
Schedule list is selectable with PVR software installed
18
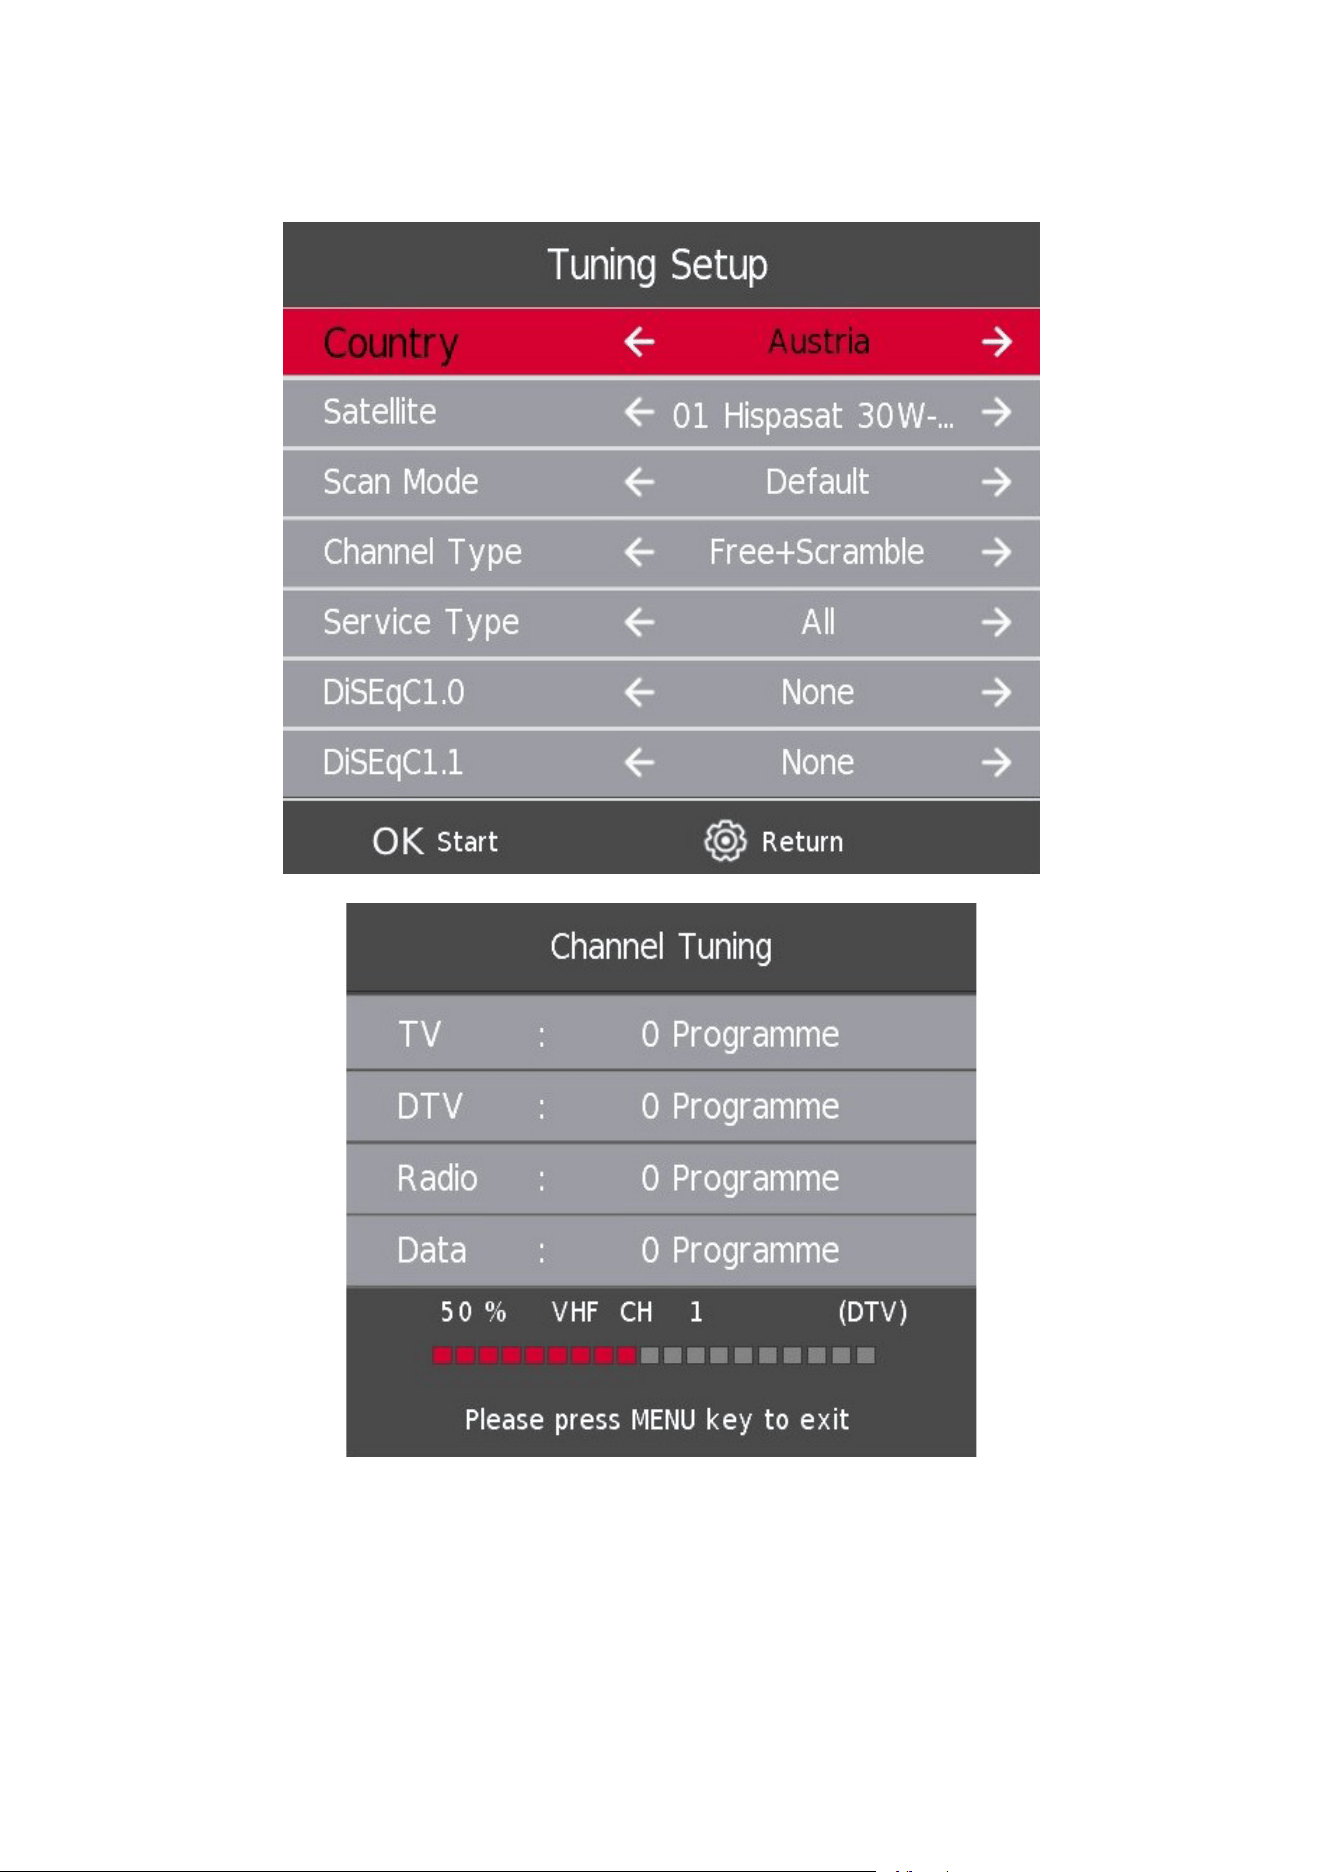
5.7. Auto Tuning – satellite (DVB-S)
Press the s / w button to select an option, then press the Enter button to enter. Please select and set all settings
required for your home installation.
19
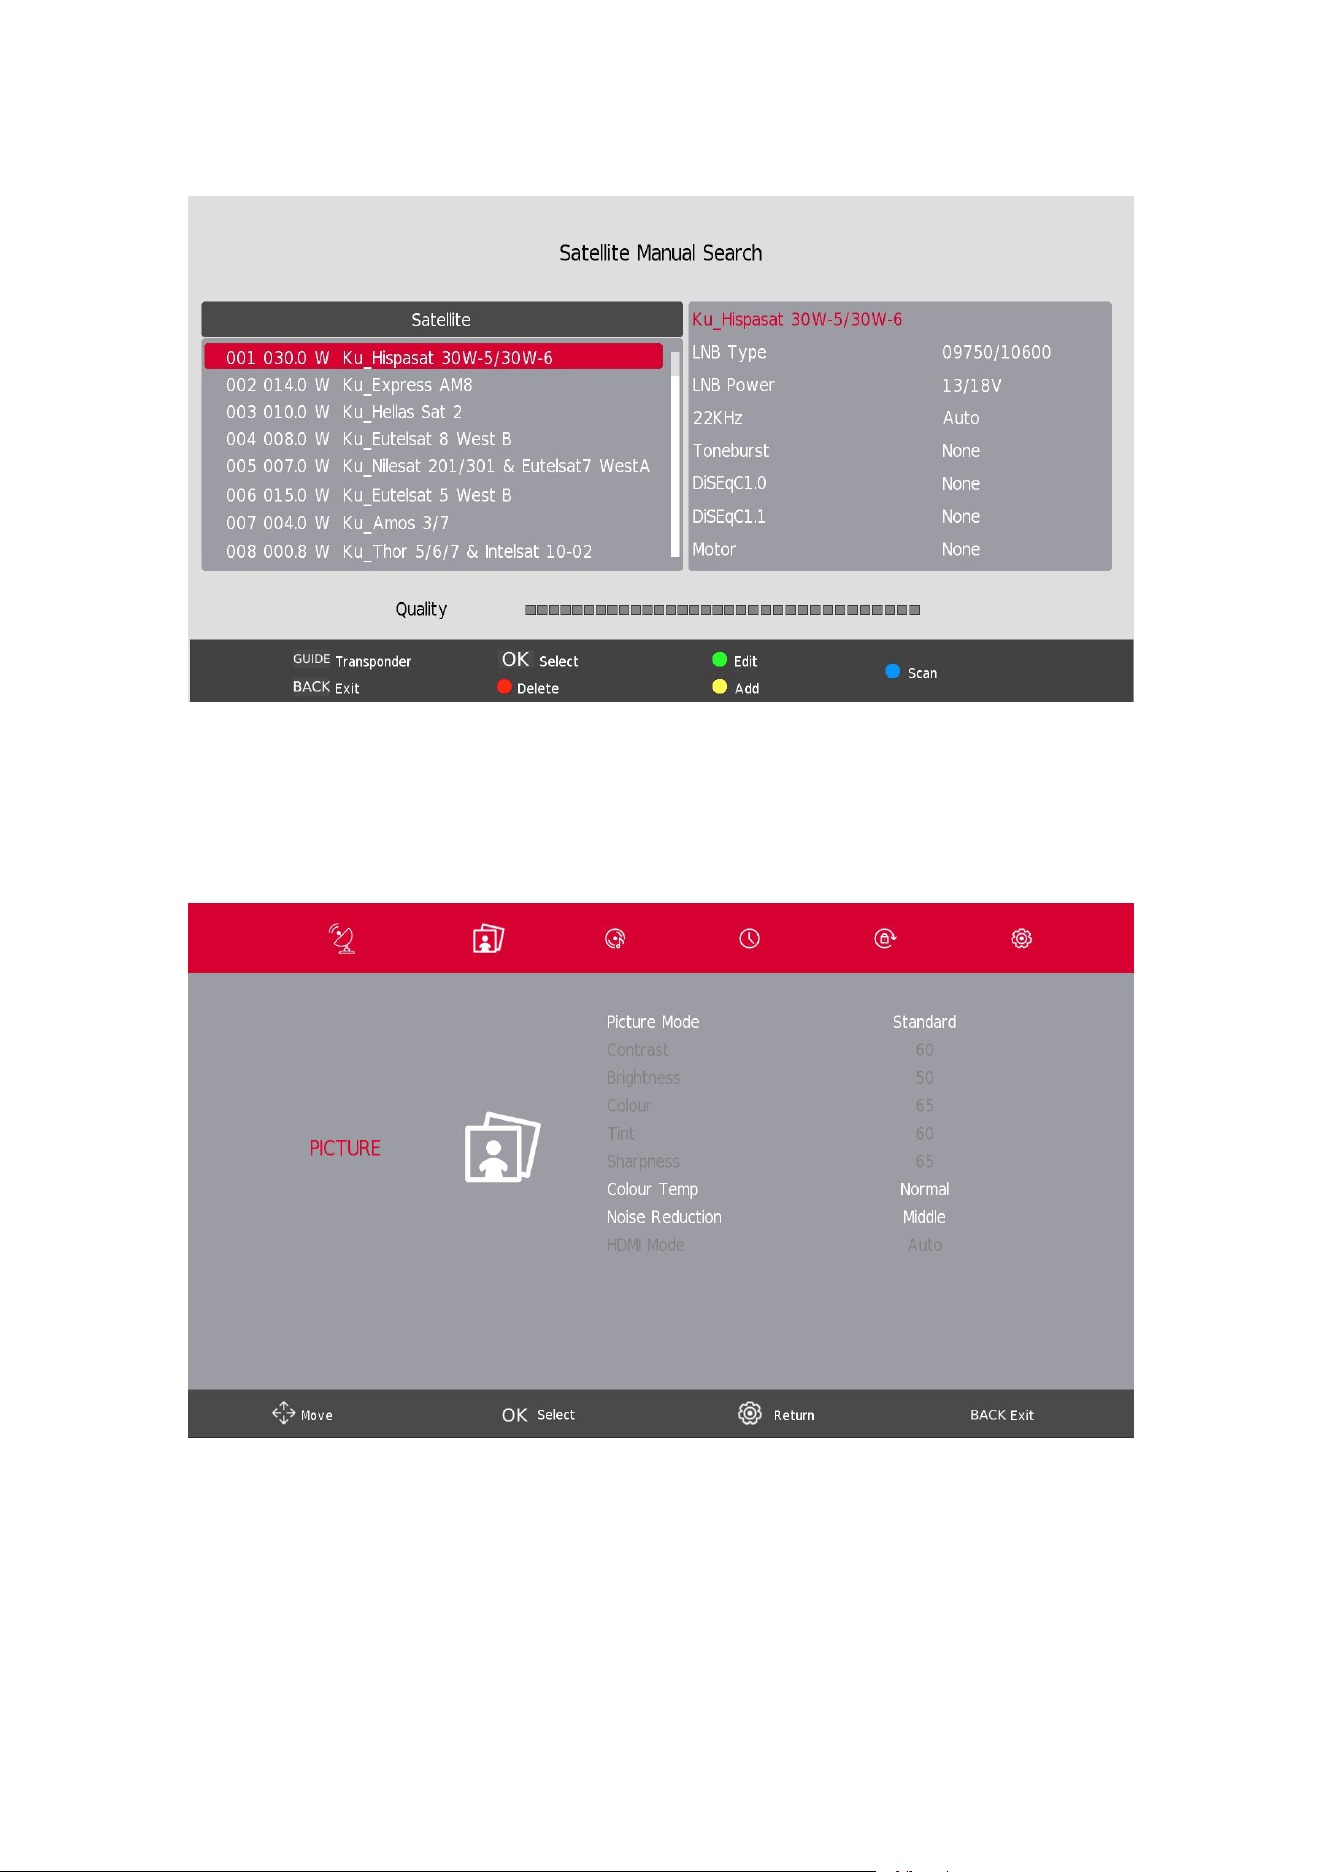
5.8. Satellite Dish Setup
Press the s / w button to select Satellite dish Setup then press the Enter button to conrm.
6. Picture Menu
Press the SETTINGS/MENU button to display the main menu.
Press the a / d button to select PICTURE in the main menu.
1. Press the s / w button to select the option that you want to adjust in the PICTURE menu.
2. Press the OK button to adjust.
3. After nishing your adjustment, Press theSETTINGS/MENU button to save and BACK to return to the
previous menu.
20
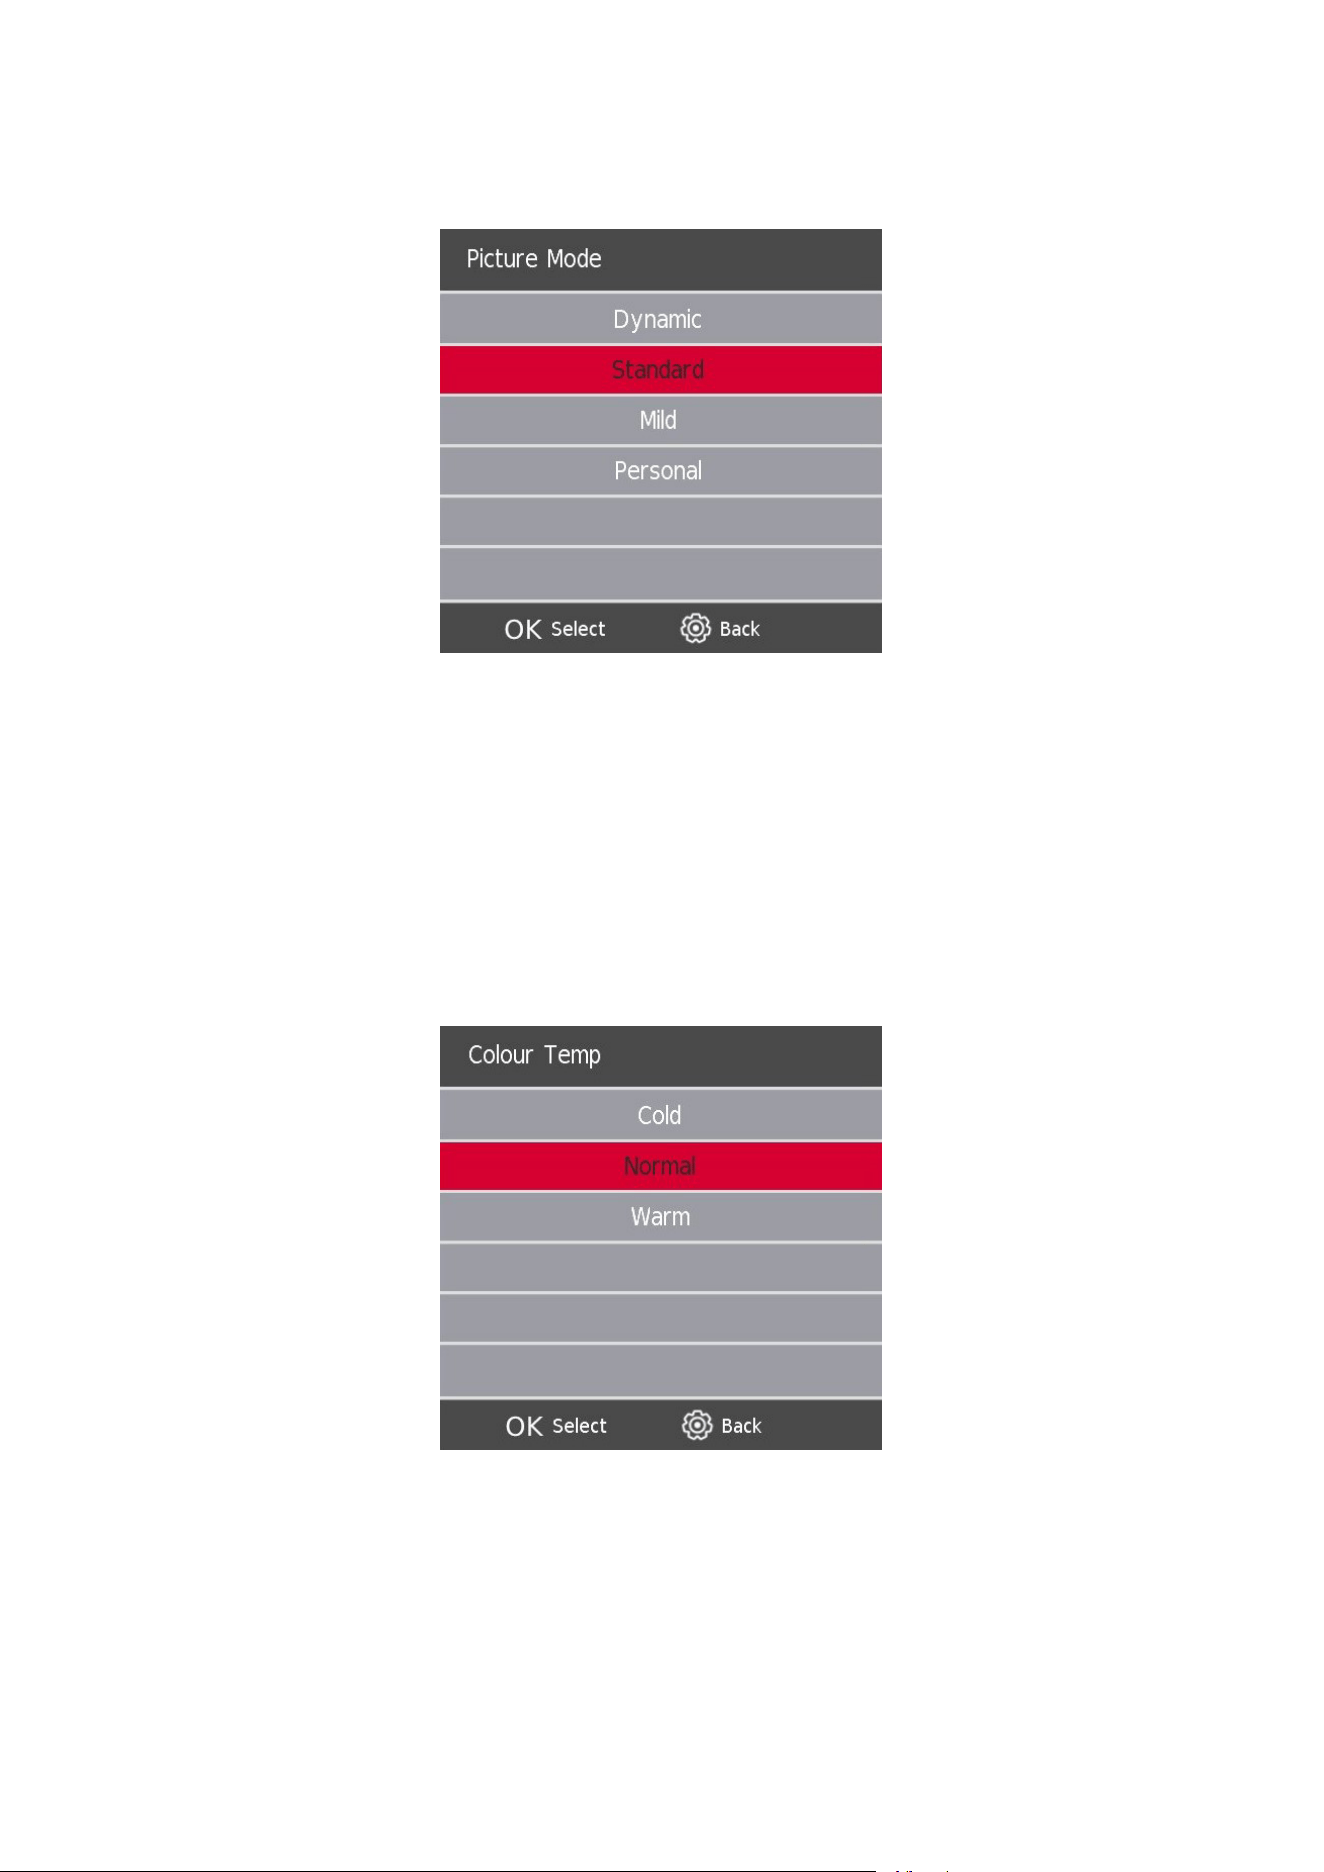
6.1. Picture Mode
Press the s / w button to select Picture Mode, then press the OK button to enter sub-menu.
You can change the value of contrast, brightness, color, sharpness and tint when the picture is in Personal mode.
Contrast / Brightness / Color / Tint / Sharpness
Press the s / w button to select option, then press the Enter button to adjust.
Contrast Adjust the highlight intensity of the picture, but the shadow of the picture is invariable.
Brightness Adjust the optical ber output of the entire picture Increasing brightness of an image will
light out all colors so the original light ones will become up to white. Reversely, decreasing
brightness will darken all colors so the original shaded ones will become up to black.
Color Adjust the saturation of the color based on your own
preference.
Tint Use in compensating color changed with the transmission in the NTSC code.
Sharpness Adjust the peaking in the detail of the picture.
Color Temp
Change the overall color cast of the picture.
Press the s / w button to select Color Temperature, then press the OK button to enter sub-menu.
Press the s / w button to select. (Available Picture mode: Cool, Normal, Warm).
21
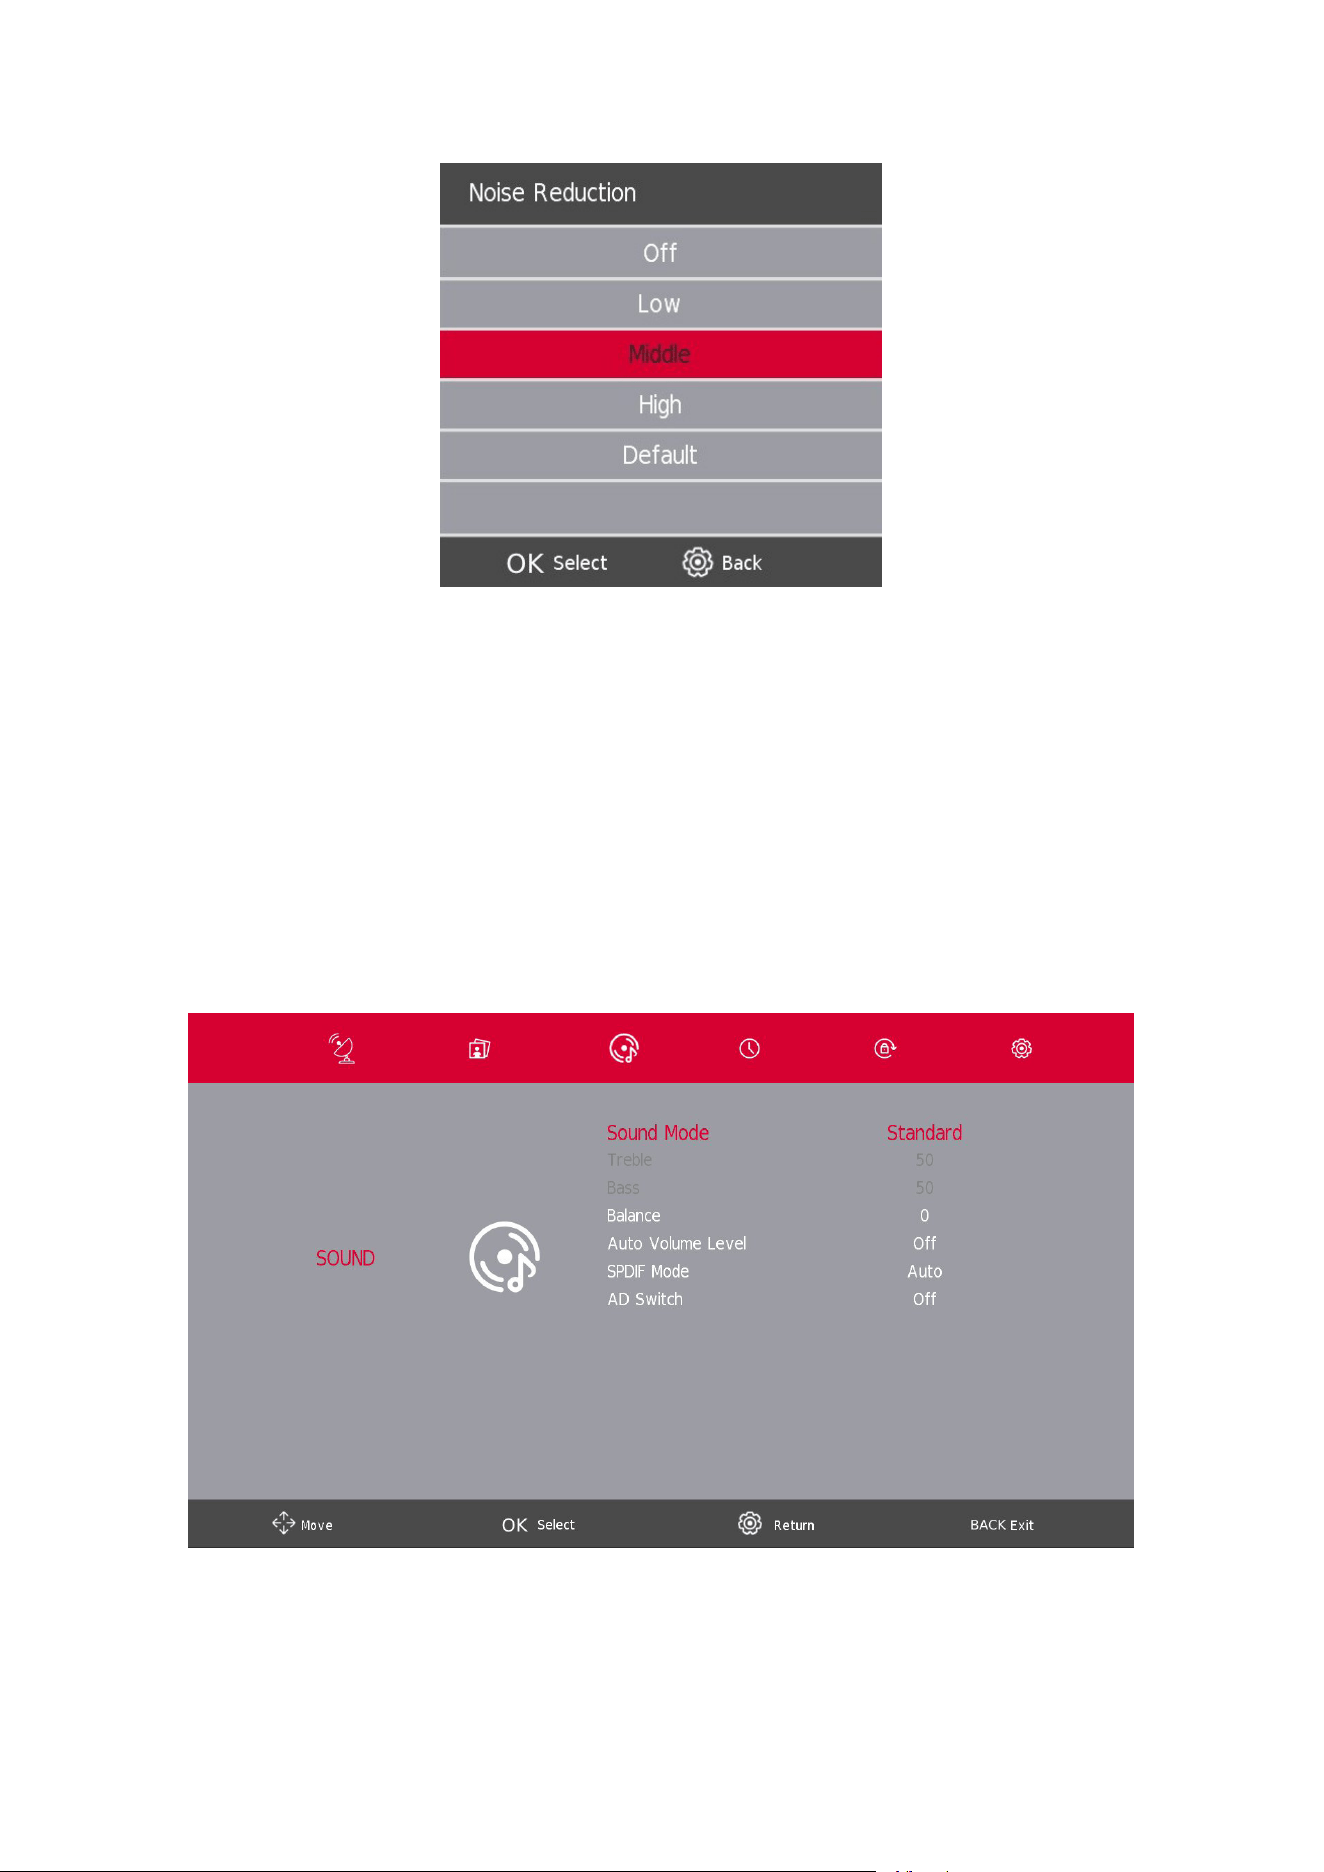
6.2. Noise Reduction
This setting helps to lter out and reduce image noise as well as improve picture quality. Press the s / w button to select
Noise Reduction, then press the OK button to enter sub-menu.
O Select to turn o video noise detection.
Low Detect and reduce low video noise.
Middle Detect and reduce moderate video noise.
High Detect and reduce enhanced video noise.
Default Set as Default.
7. Sound Menu
Press the SETTINGS/MENU button to display the main menu.
Press the button to select SOUND in the main menu.
1. Press the s / w button to select the option that you want to adjust in the SOUND menu.
2. Press the Enter button to adjust.
3. After nishing your adjustment, Press the SETTINGS/MENUbutton to save and BACK to return to the
previous menu.
22
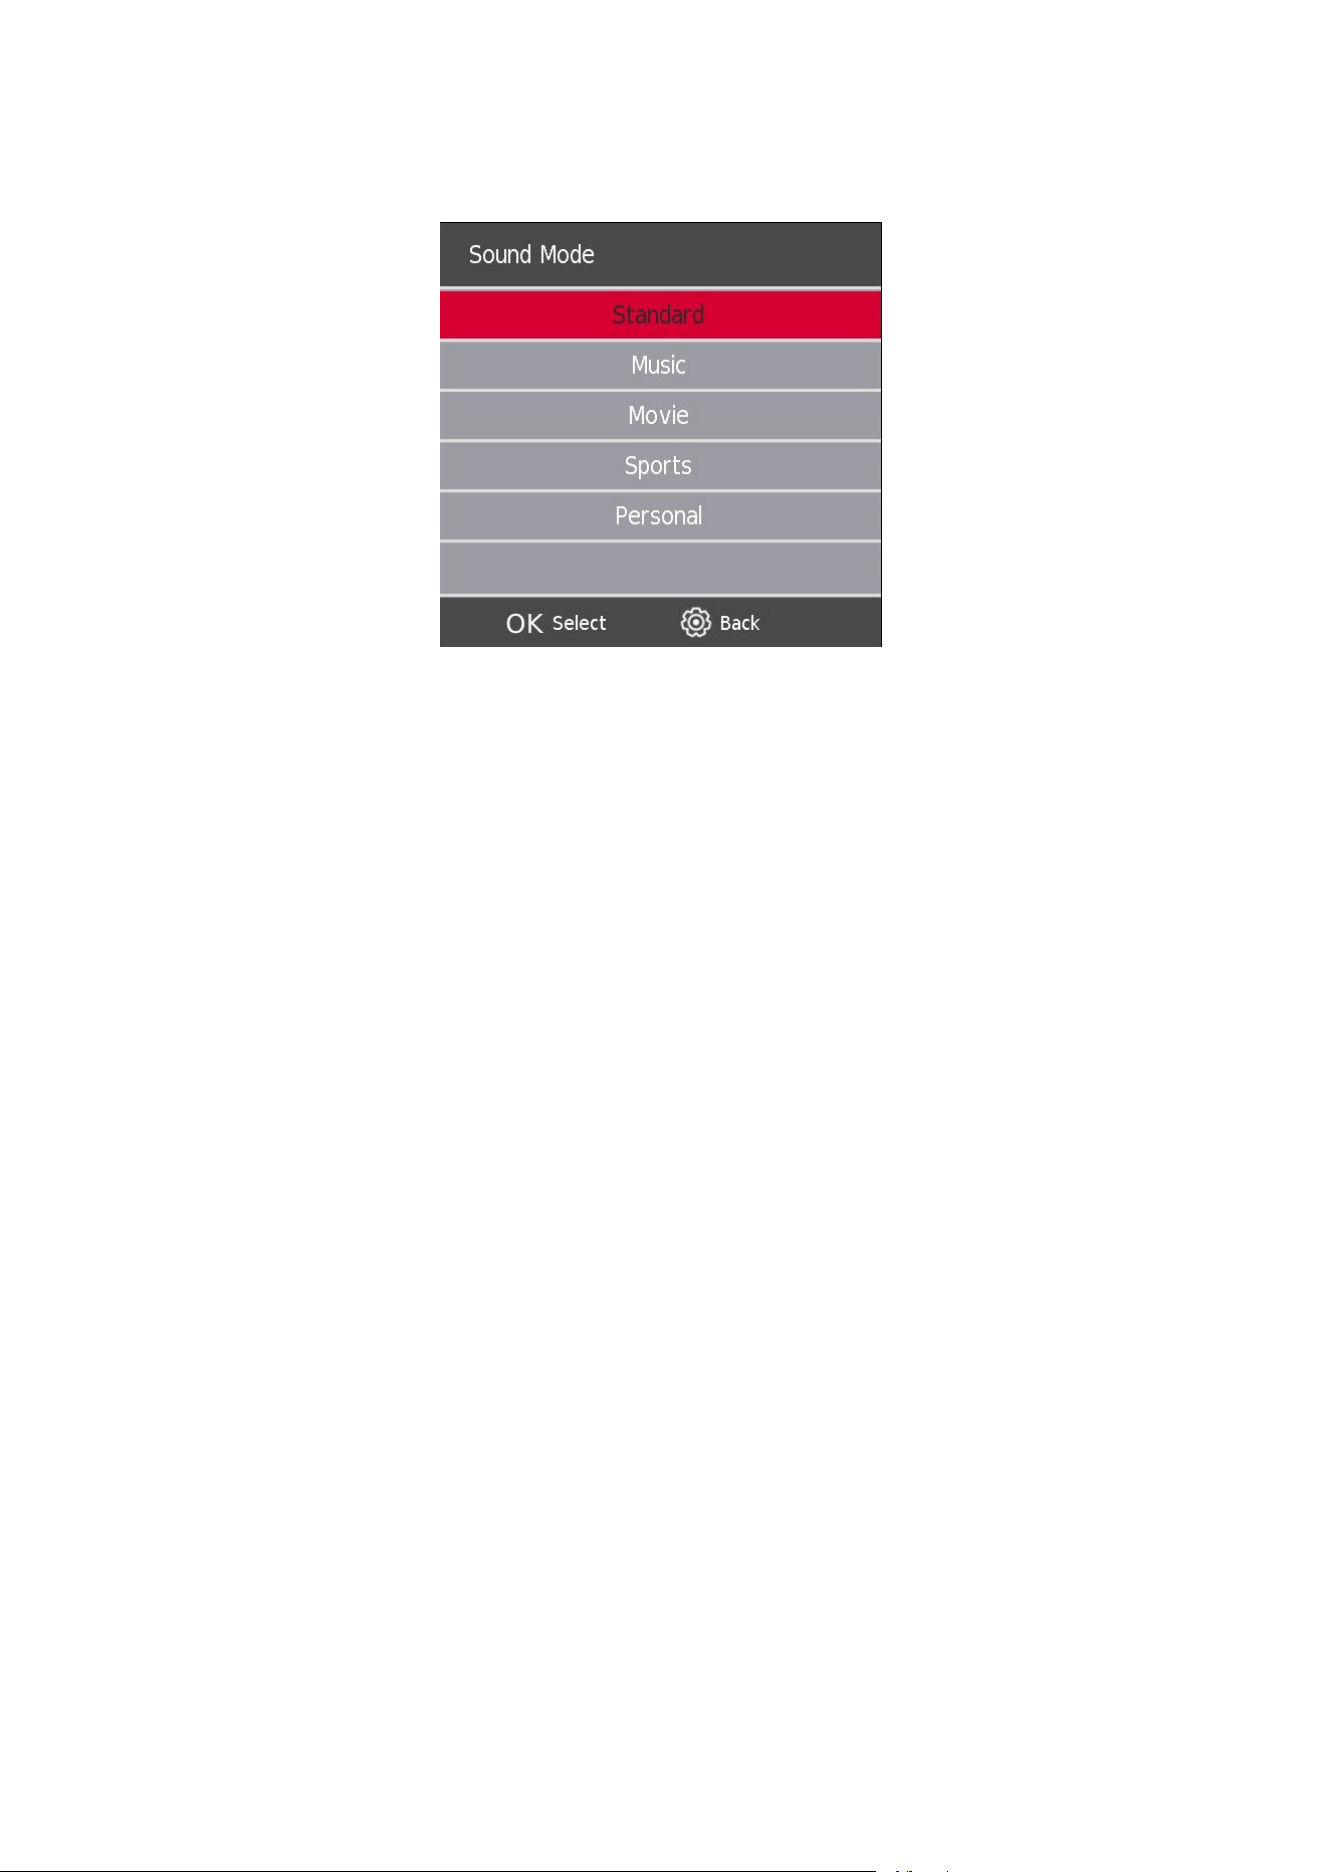
7.1. Sound Mode
Press the s / w button to select Sound Mode, then press the Enter button to enter sub-menu. Press the s/w
button to select.
You can change the value of Treble and Bass when the sound is in Personal mode.
Standard Produces a balanced sound in all environments.
Music Preserves the original sound. Suitable for musical programs.
Movie Enhances treble and bass for a rich sound experience.
Sports Enhances vocals for sports.
Personal Select to customize picture settings.
NOTE:
The treble and bass are only available in personal mode, you can adjust them as you like.
Balance
Press the s / w button to select the option, Press the a / d button to adjust.
Auto Volume level
Press thes / w button to select Auto Volume level, then press the a / d button to select On or O.
SPDIF Mode
Press the s / w button to select SPDIF Mode, then press the a / d button to select O / PCM / Auto.
AD Switch
Press the s / w button to select AD Switch, then press the a / d button to select On or O.
NOTE:
Balance: This function can adjust the speaker’s output.
Auto Volume: This function is used for reducing the dierence between channel and program’s volume
automatically.
23
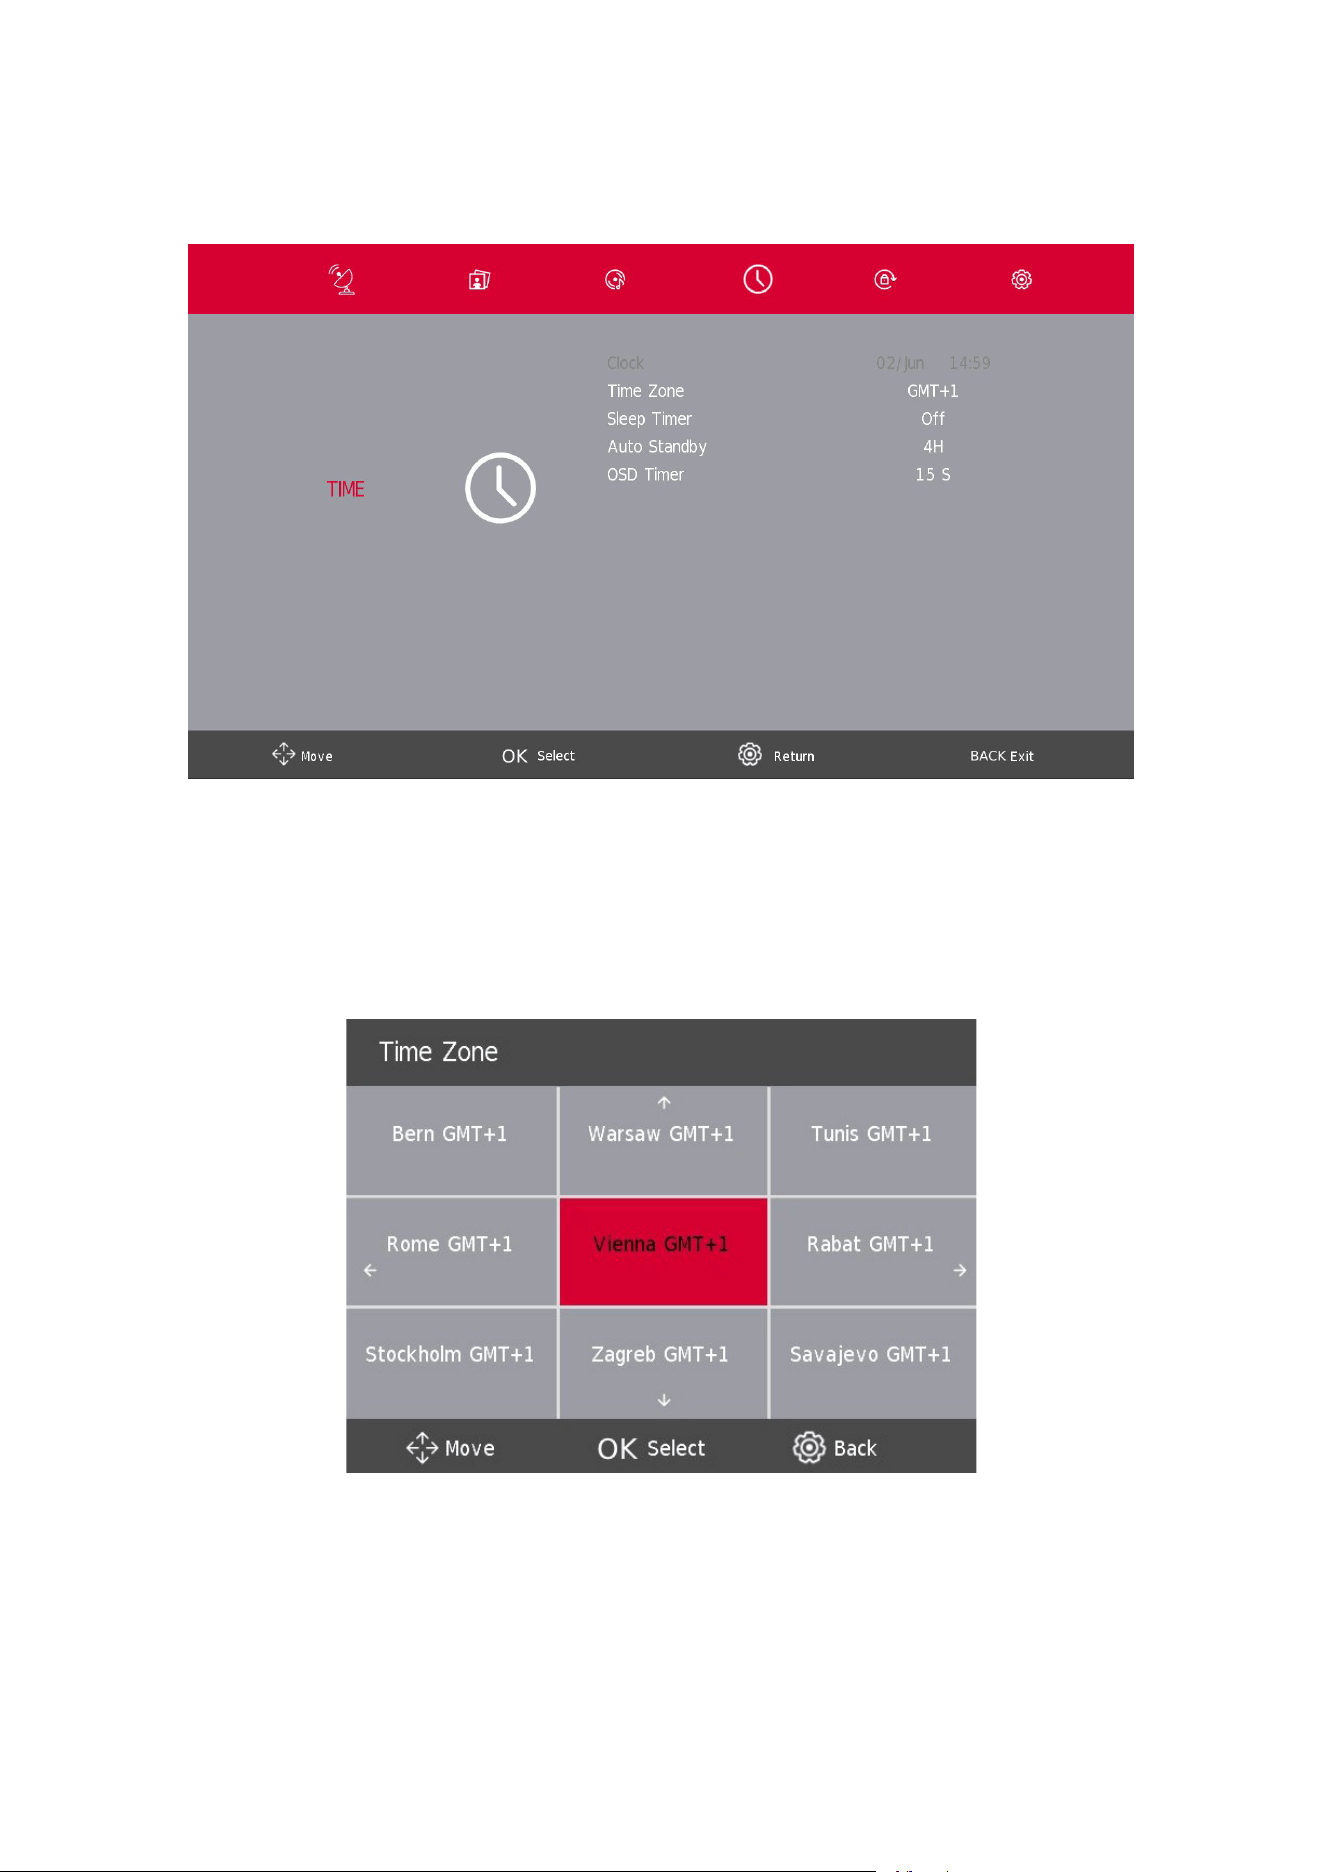
8. Time Menu
Press the SETTINGS/MENU button to display the main menu. Press the a / d button to select TIME in the main
menu.
1. Press thes / w button to select the option that you want to adjust in the TIME menu.
2. Press the Enter button to adjust.
3. After nishing your adjustment, Press the SETTINGS button to save and return to the previous menu.
Time Zone
Press the s / w button to select Time Zone, then press the OK/ENTER button to enter sub-menu.
Press the s / w / a / d button to select time zone.
24
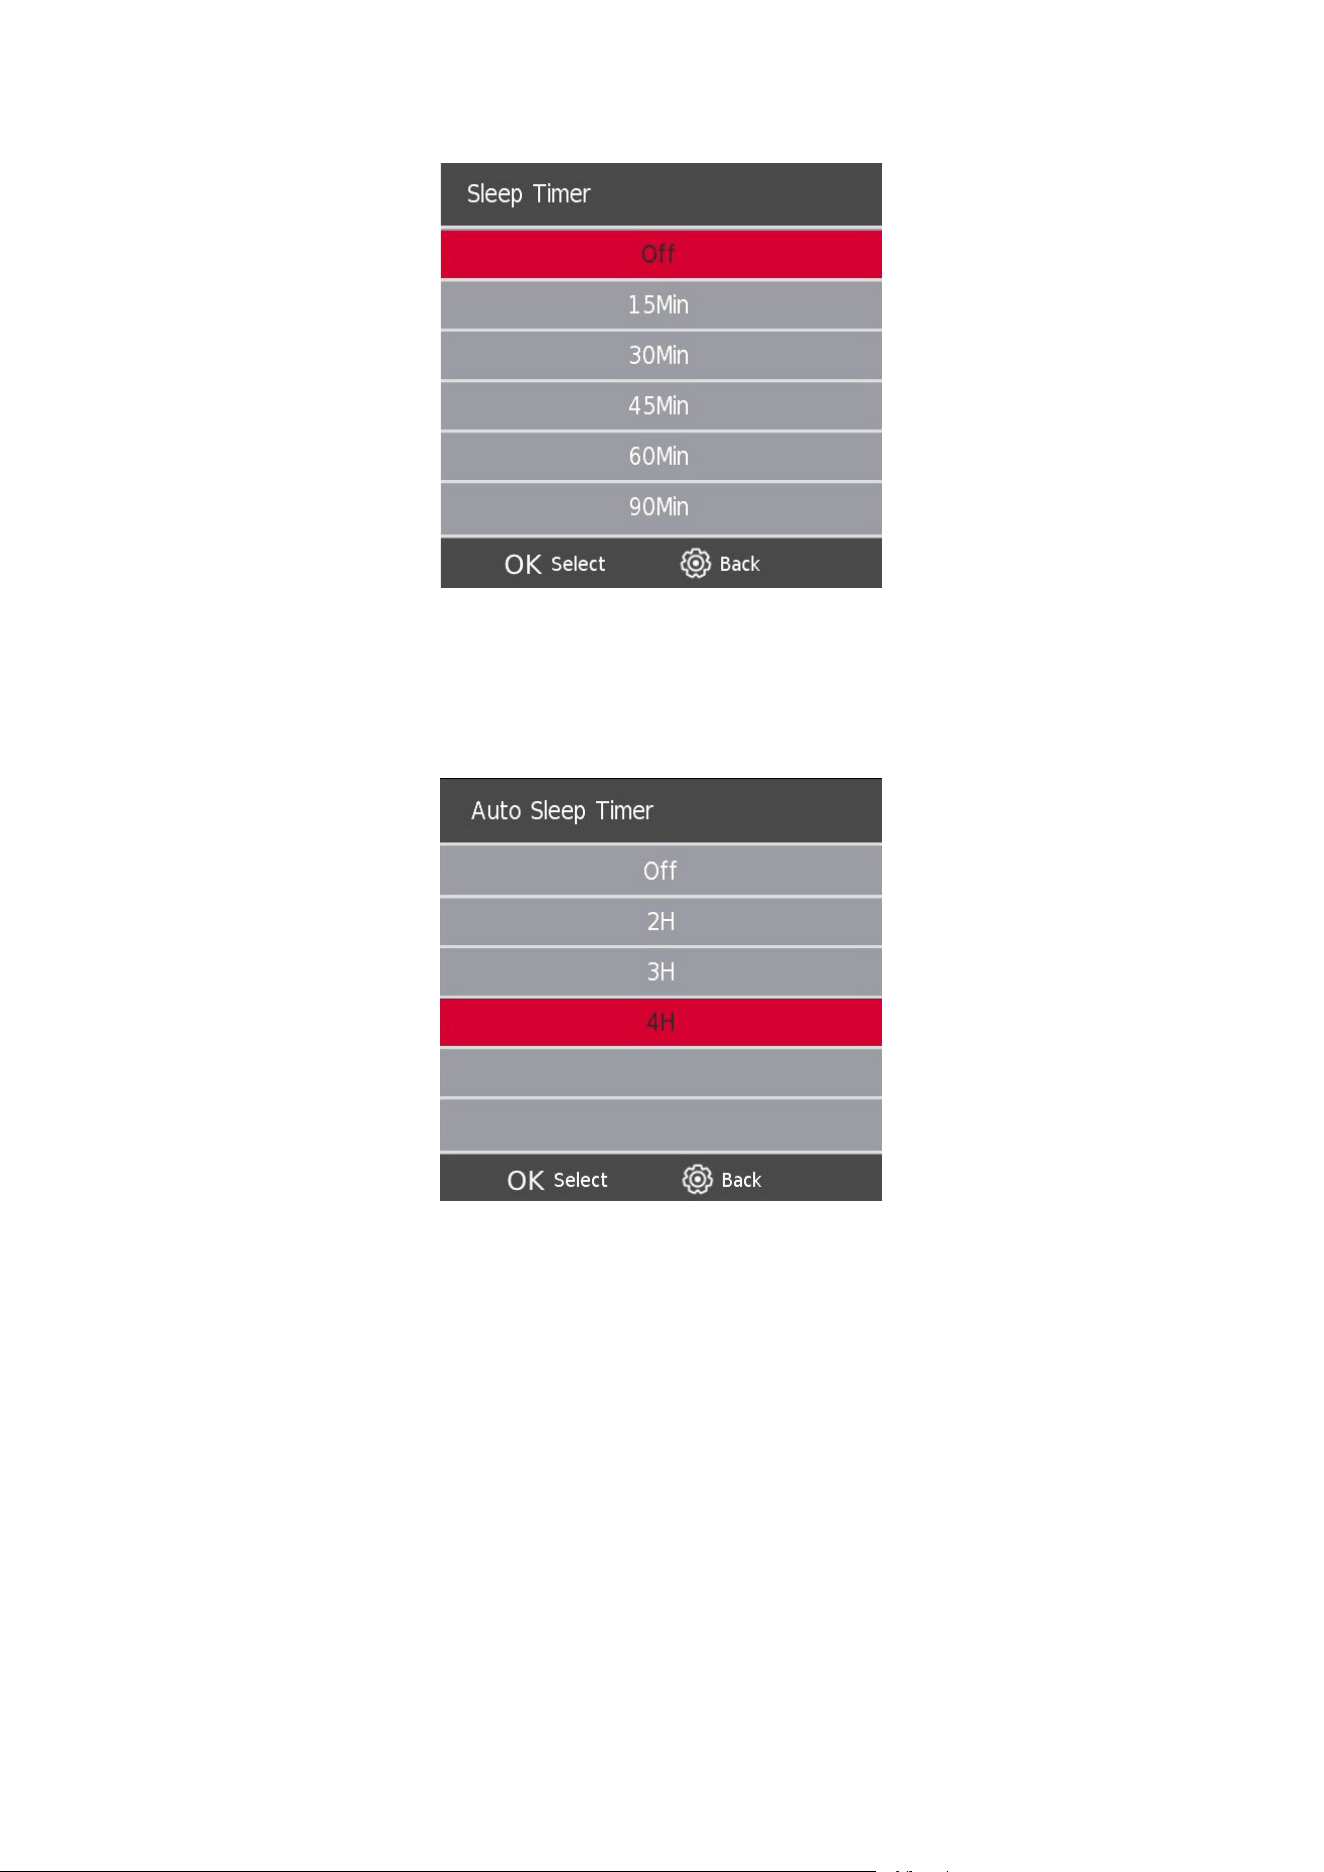
8.1. Sleep Timer
Press the s / w button to select Sleep Timer, then press the OK/ENTER button to enter sub-menu.
Press the s / w button to select.
(Available options are: O, 15min, 30min, 45min, 60min, 90min, 120min, 240min).
8.2. Auto Standby
Press the s / w button to select Auto Standby, then press the OK/ENTER button to enter sub-menu.
Press the s / w button to select.
Tips: The remote control does not make any operation in the standby time, the TV will switch o automatically.
In case you attempt any operation, the TV will reset the time.
25
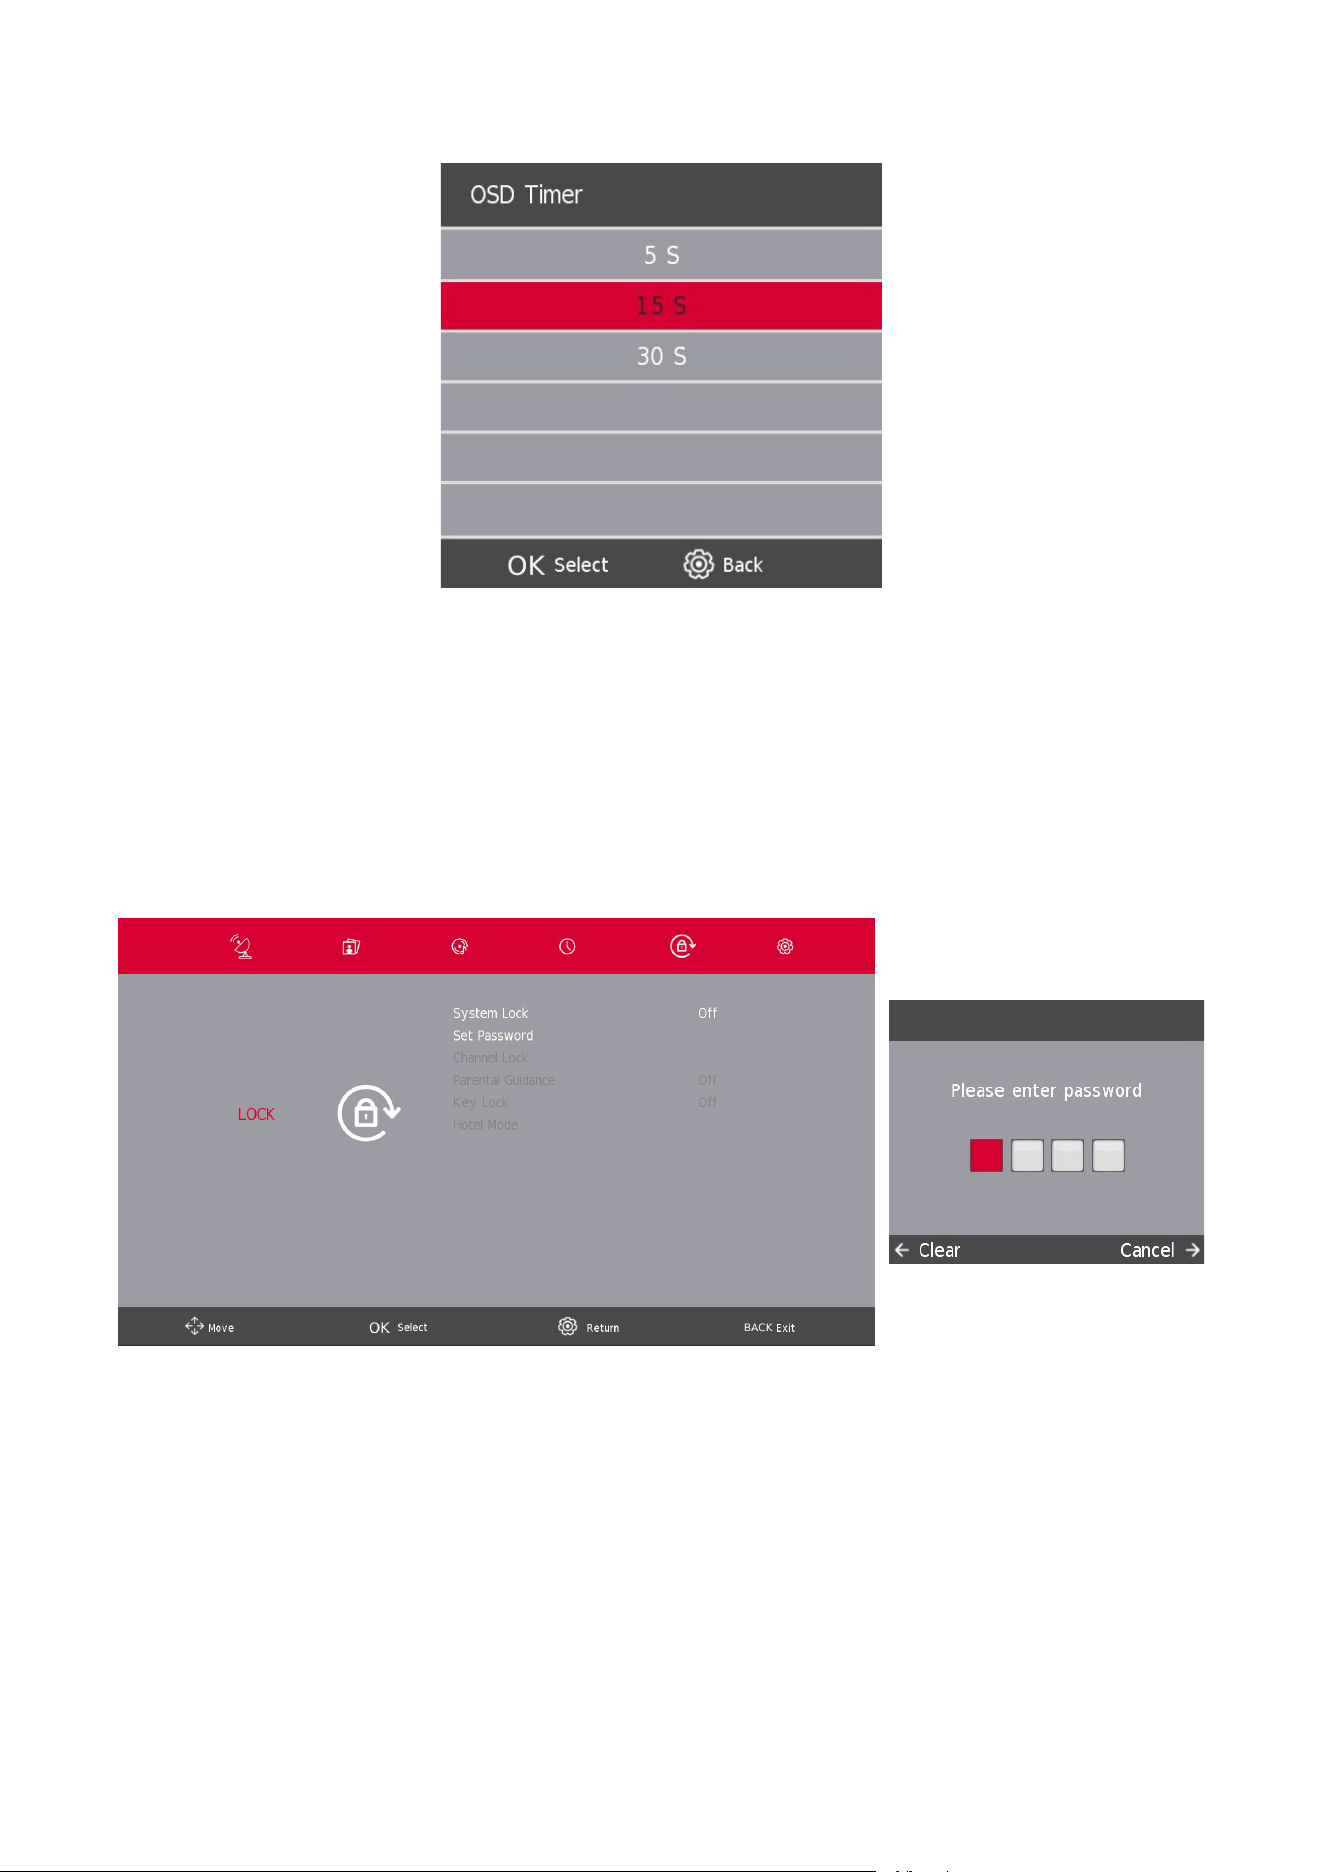
8.3. OSD Timer
Press thes / w button to select OSD Timer, then press the OK/ENTER button to enter sub-menu.
Press the s / w button to select.
9. Lock Menu
9.1. System Lock
Press the SETTINGS/MENU button to display the main menu.
Press the a / d button to select Lock in the main menu.
In order options to be selectable, the System Lock should be ON, to enable this please enter TV's Default
password 1111. The System Lock is now active.
1. Press the s / w button to select the option that you want to adjust in the SYSTEM LOCK menu.
2. Press the Enter and a / d button to adjust.
3. After nishing your adjustment, Press the SETTINGS/MENU button to go back to the previous menu.
26
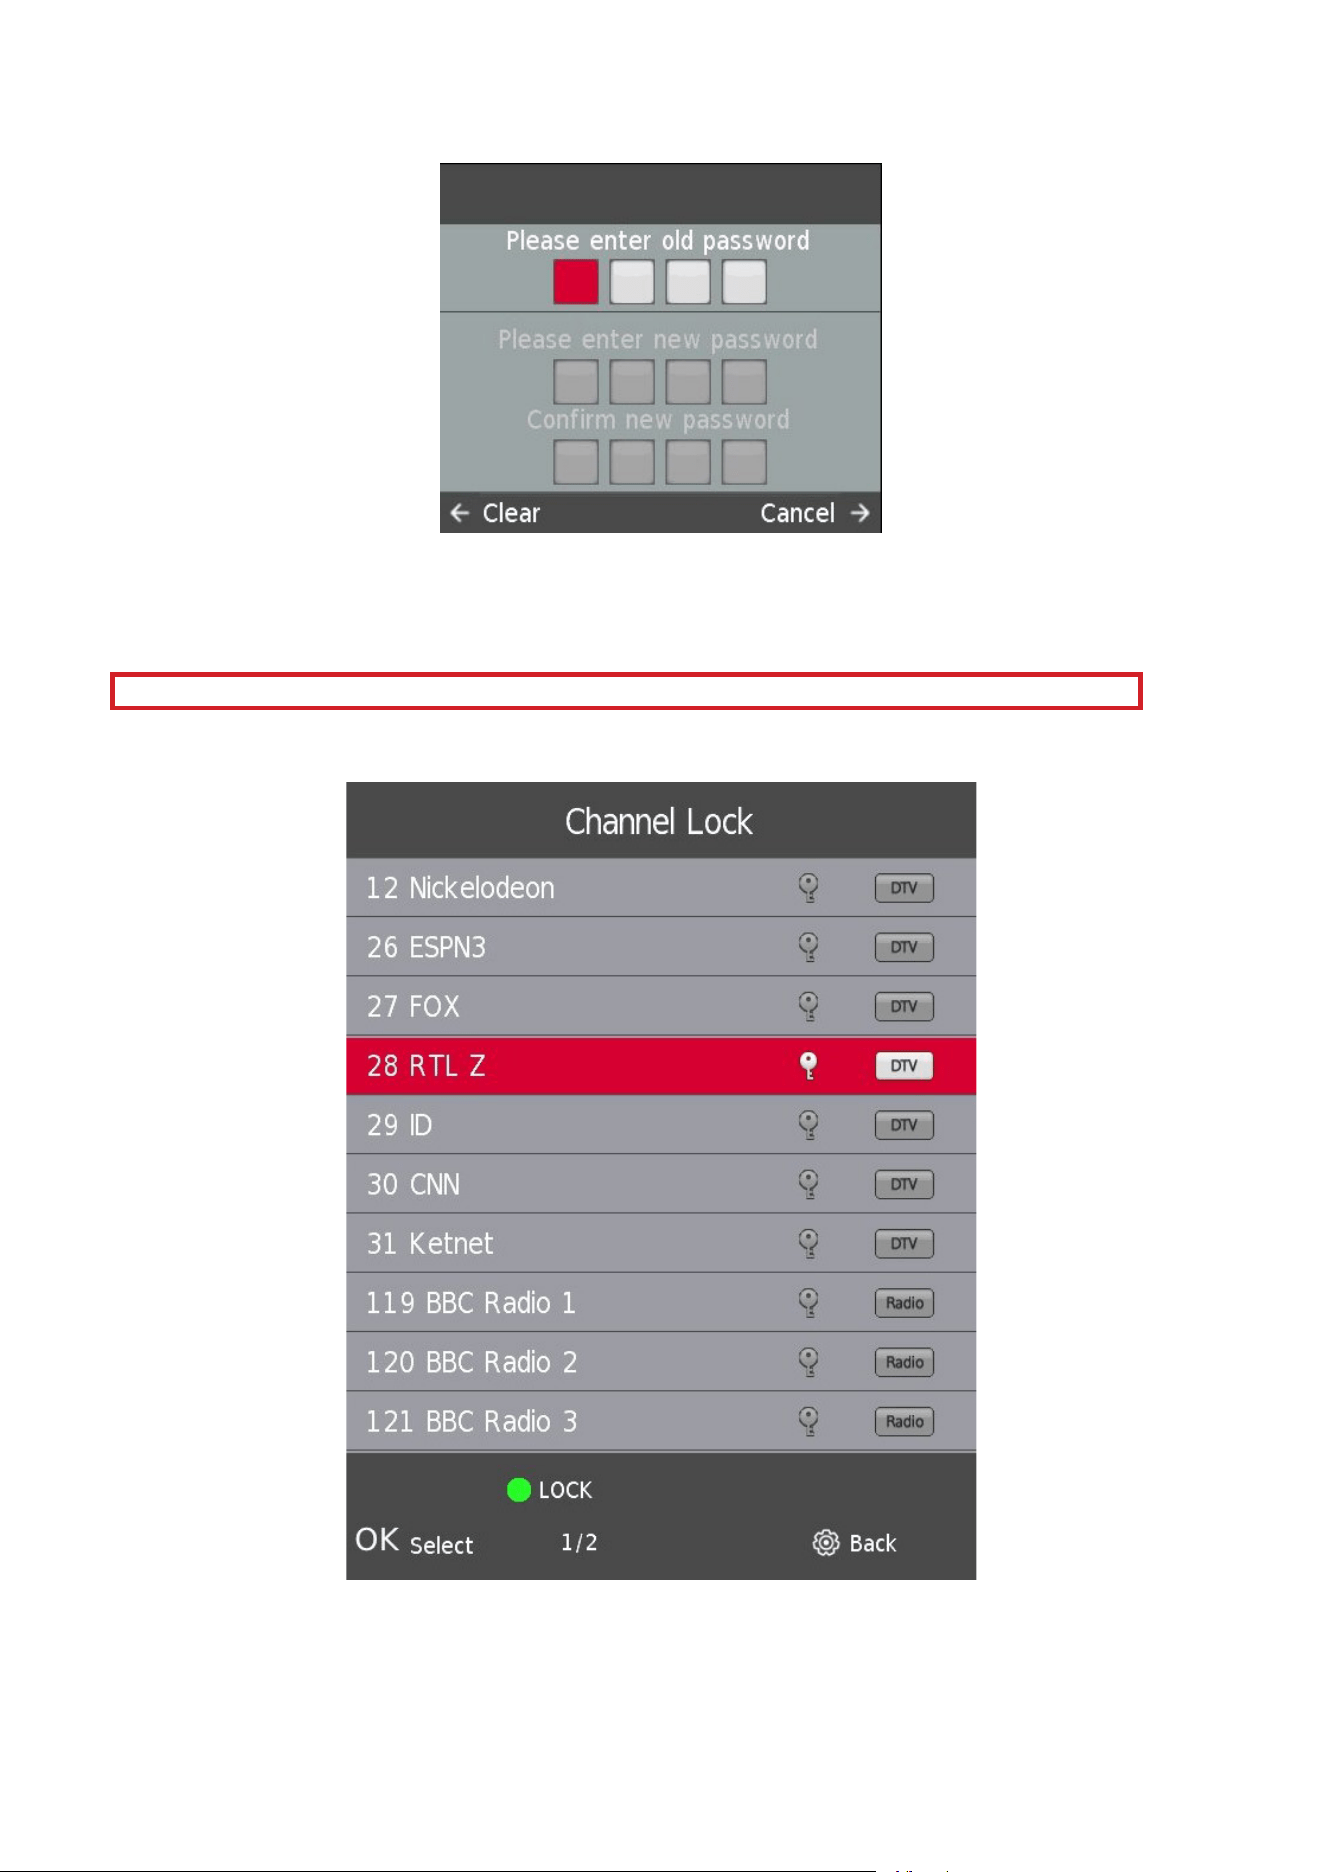
9.2. Set Password
Press the s / w button to select Set Password, then press the Enter/OK button to enter sub-menu to set new
password.
In order to set a new password, please enter the TV's Default password 1111.
Please continue with a set-up of your new password.
Please use Master pin 9876 to restore the settings of the TV and if you forgot your own password
9.3. Channel Lock
Press the s / w button to select Channel Lock then press the Enter/OK button to enter sub-menu to select.
Press the Green button to lock or unlock the channel.
27
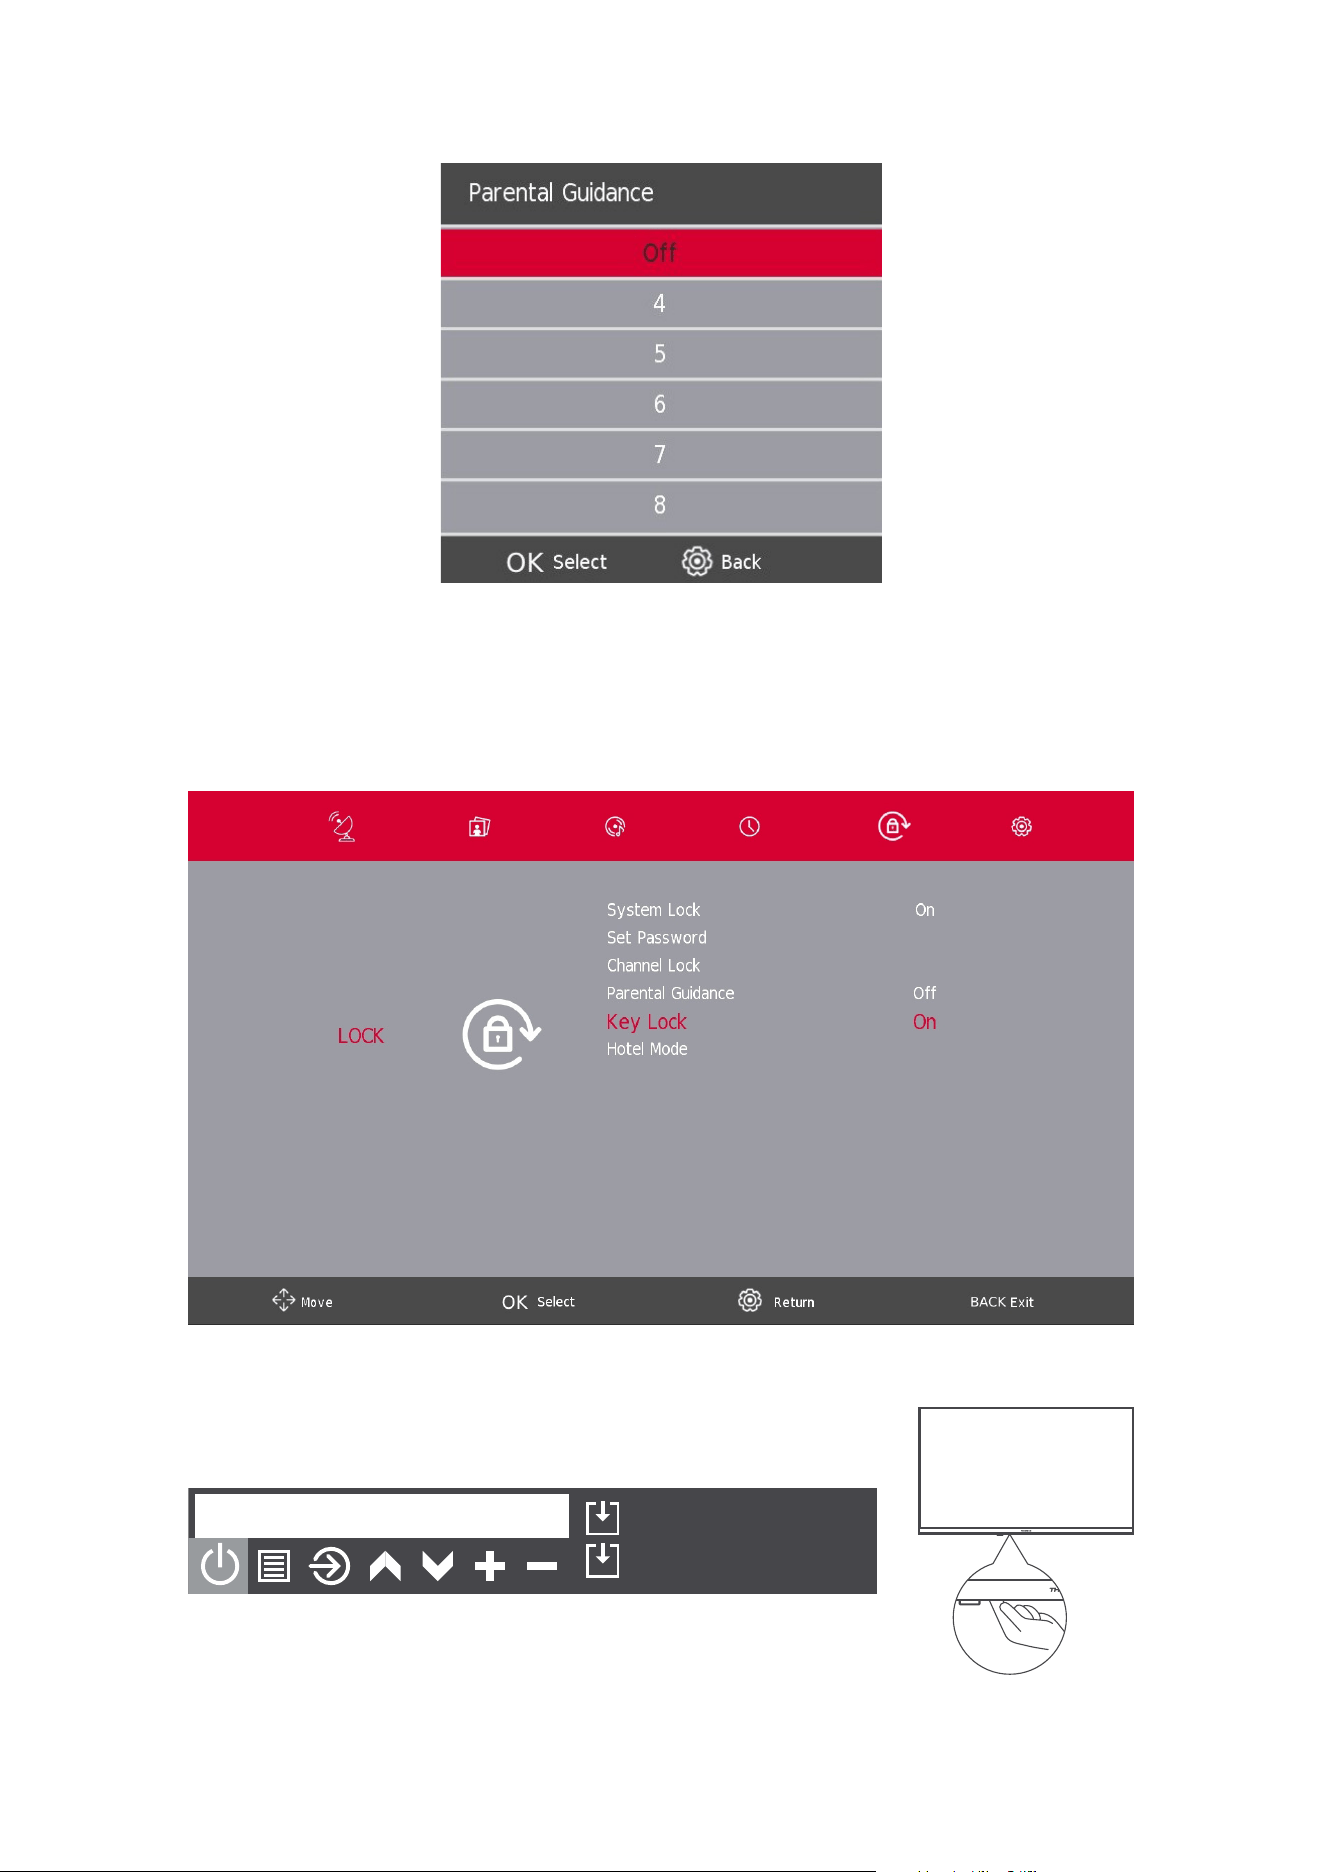
9.4. Parental Guidance
Press the s / w button to select Parental Guidance, then press the Enter/OK button to enter sub-menu to select
the age which is suitable for your children.
Key Lock
Press the s / w button to select Key Lock, then press the a / d button to select O or On. When Key Lock’s status
is ON, you can’t use the Key panel button.
Power Off
Press: Move
Press&Hold: Select
Key panel button / On/O button
28
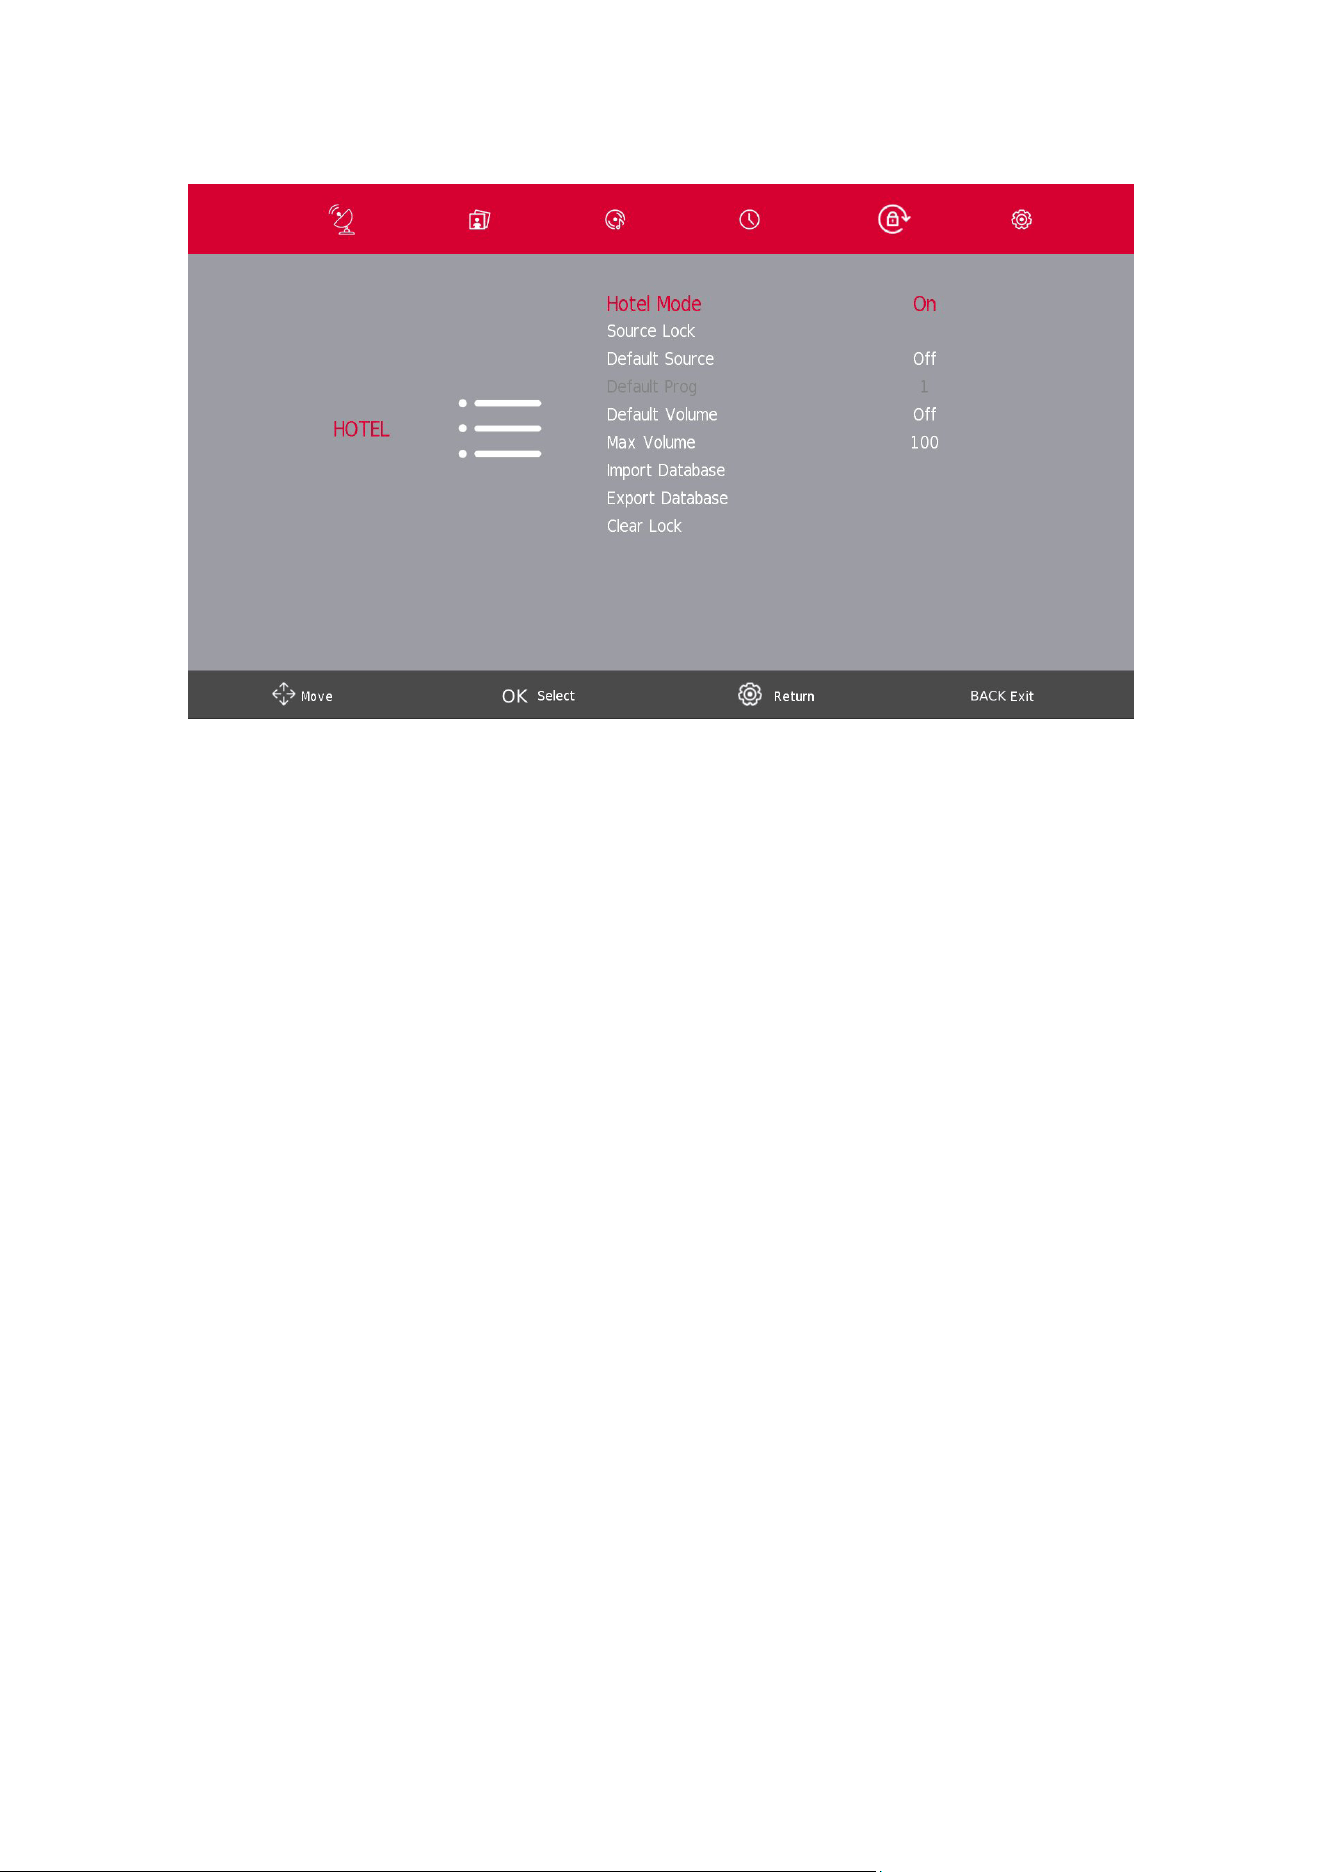
10. Hotel Mode
1. Press the s / w button on the remote control to select hotel mode in the Lock menu.
2. Press the Enter button on the remote control to enter the sub-menu.
3. After nishing your adjustment, Press theSETTINGS/MENU button to save and go back to the previous
menu.
Hotel Mode
Press the s / w button to select Hotel Mode, then press the a / d button to select on or o.
Source Lock
Press the s / w button to select Source lock, then press the Enter/OK button to enter sub-menu to select.
Default Source
Press the s / w button to select Default Source, then press the Enter/OK button to enter sub-menu to select.
Default Prog
Press the s / w button to select Default Prog, then press the a / d button to adjust. This function is available when
the default source is TV.
Max Volume
Press the s / w button to select Max Volume, then press the a / d button to adjust.
More information about Hotel mode you can nd here:
https://tv.mythomson.com/en/Support/Manuals-and-Downloads/
29
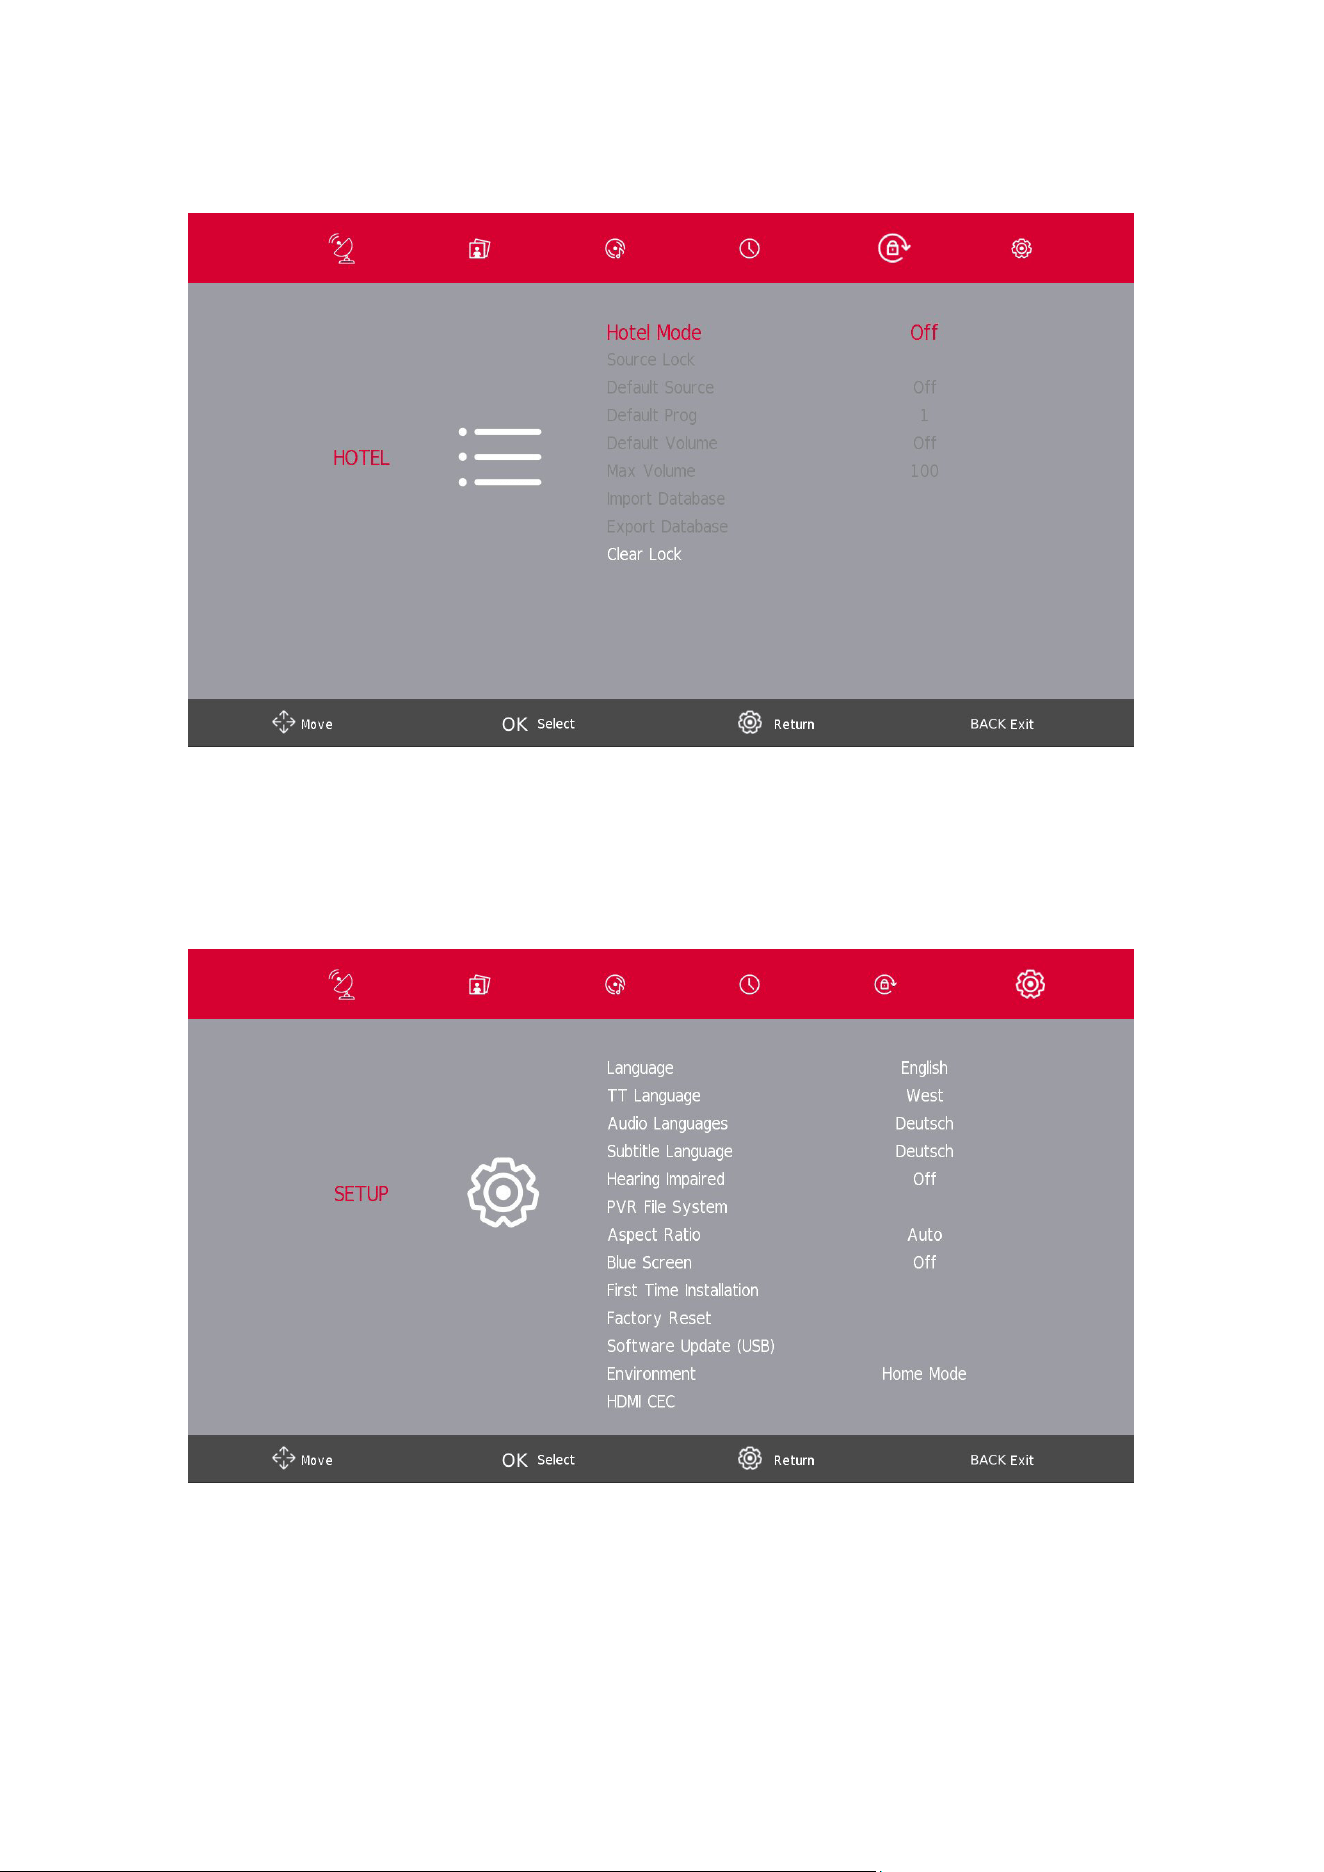
Clear Lock
Press the s / w button to select Clear Lock, then press the Enter/OK button to clear the setting you have done
before.
11. Setup Menu
Press the SETTINGS/MENUbutton to display the main menu.
Press the a / d button to select SETUP in the main menu.
1. Press the s / w button to select the option that you want to adjust in the SETUP menu.
2. Press the Enter/OK button to adjust.
3. After nishing your adjustment, Press the Enter/OK button to save and return to the previous menu.
30
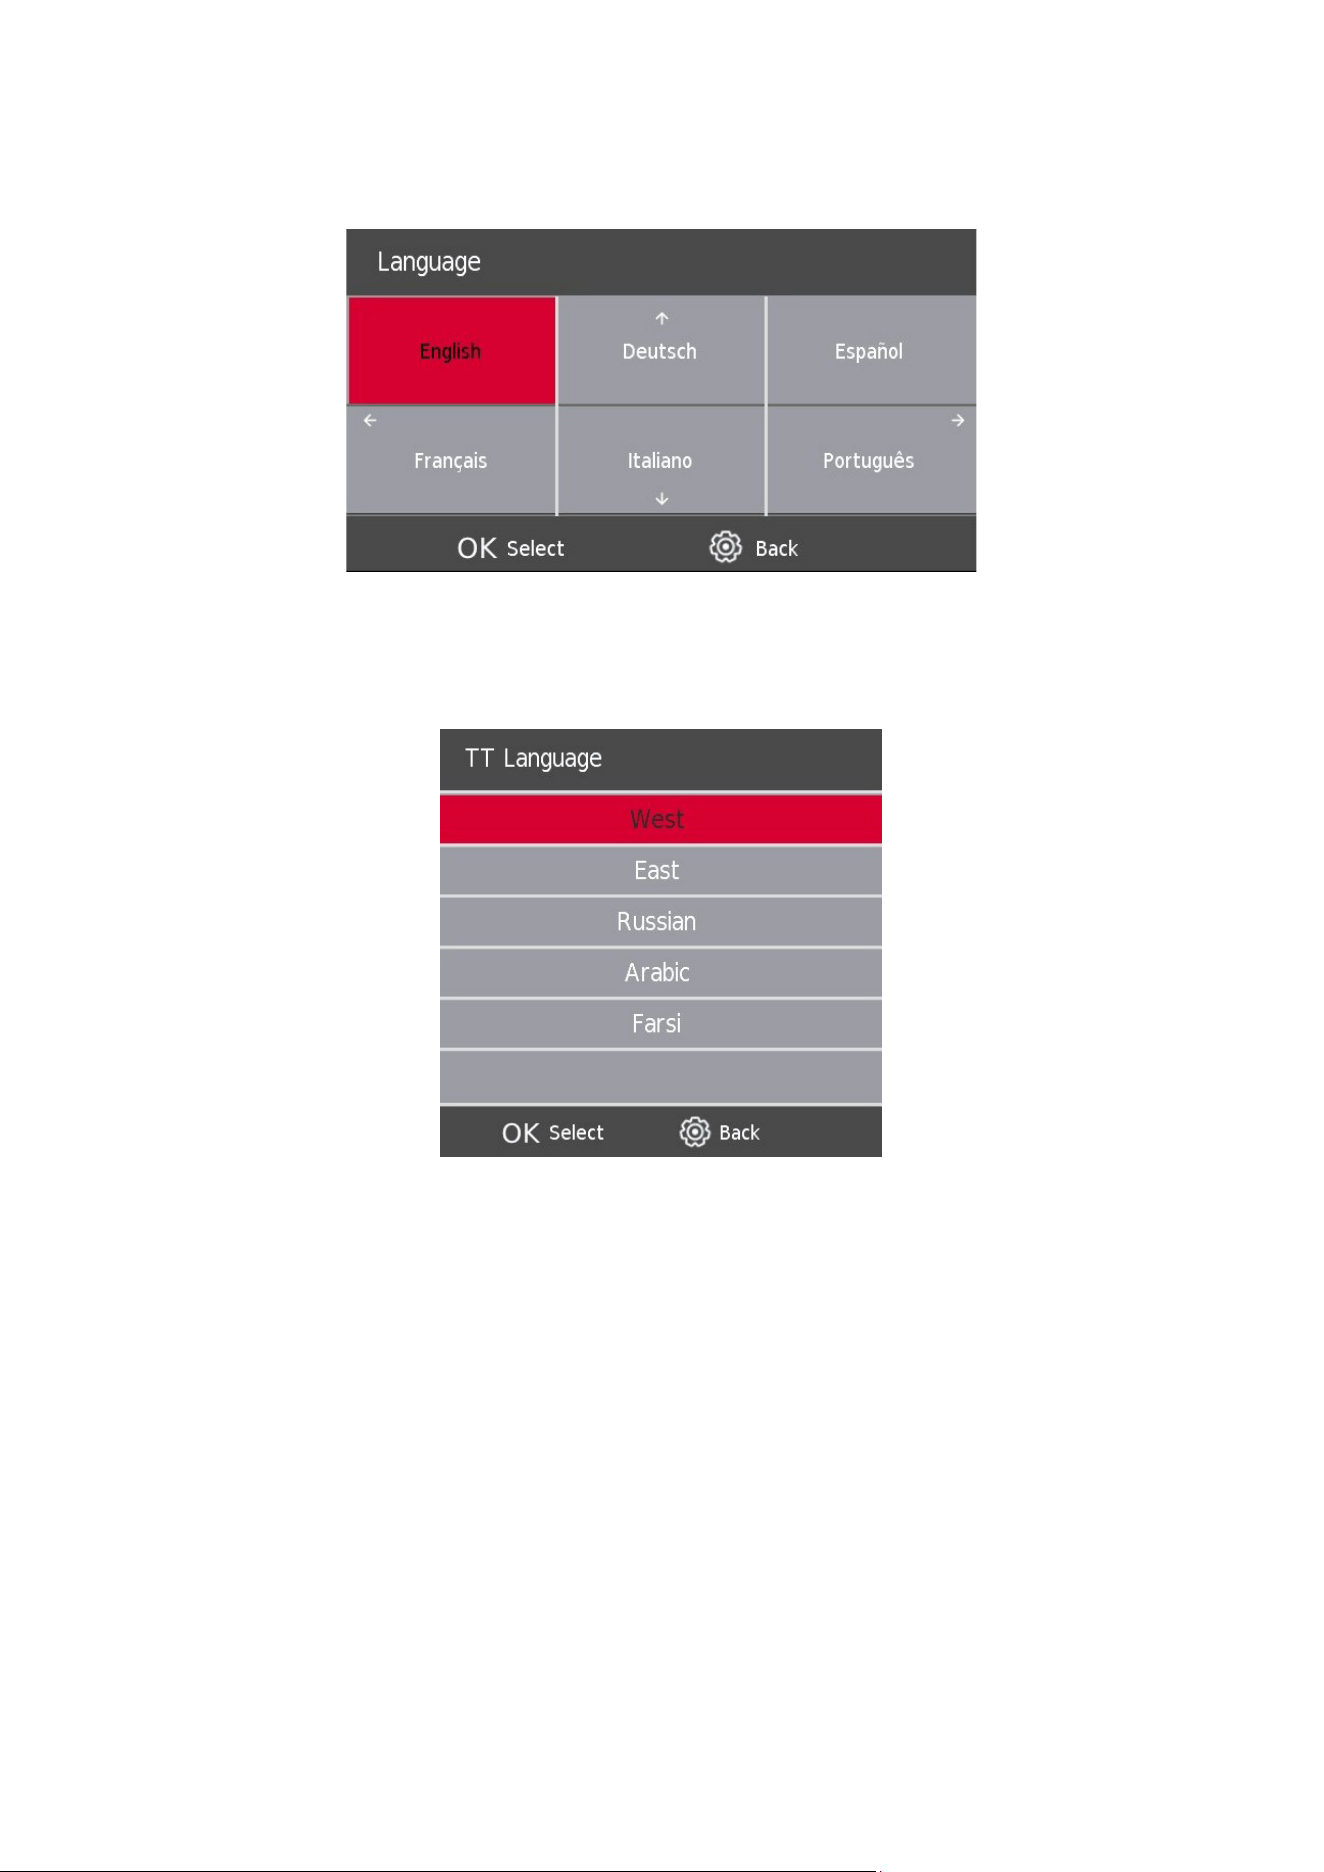
11.1. OSD (Manu) Language
Select an OSD menu language. By default, English is selected as menu language.
Press the s / w / a / d button to select Menu Language.
11.2. TT (Teletext) Language
Press the s / w button to select TT Language, then press the Enter button to enter sub-menu.
Press the s / w button to select TT language.
31
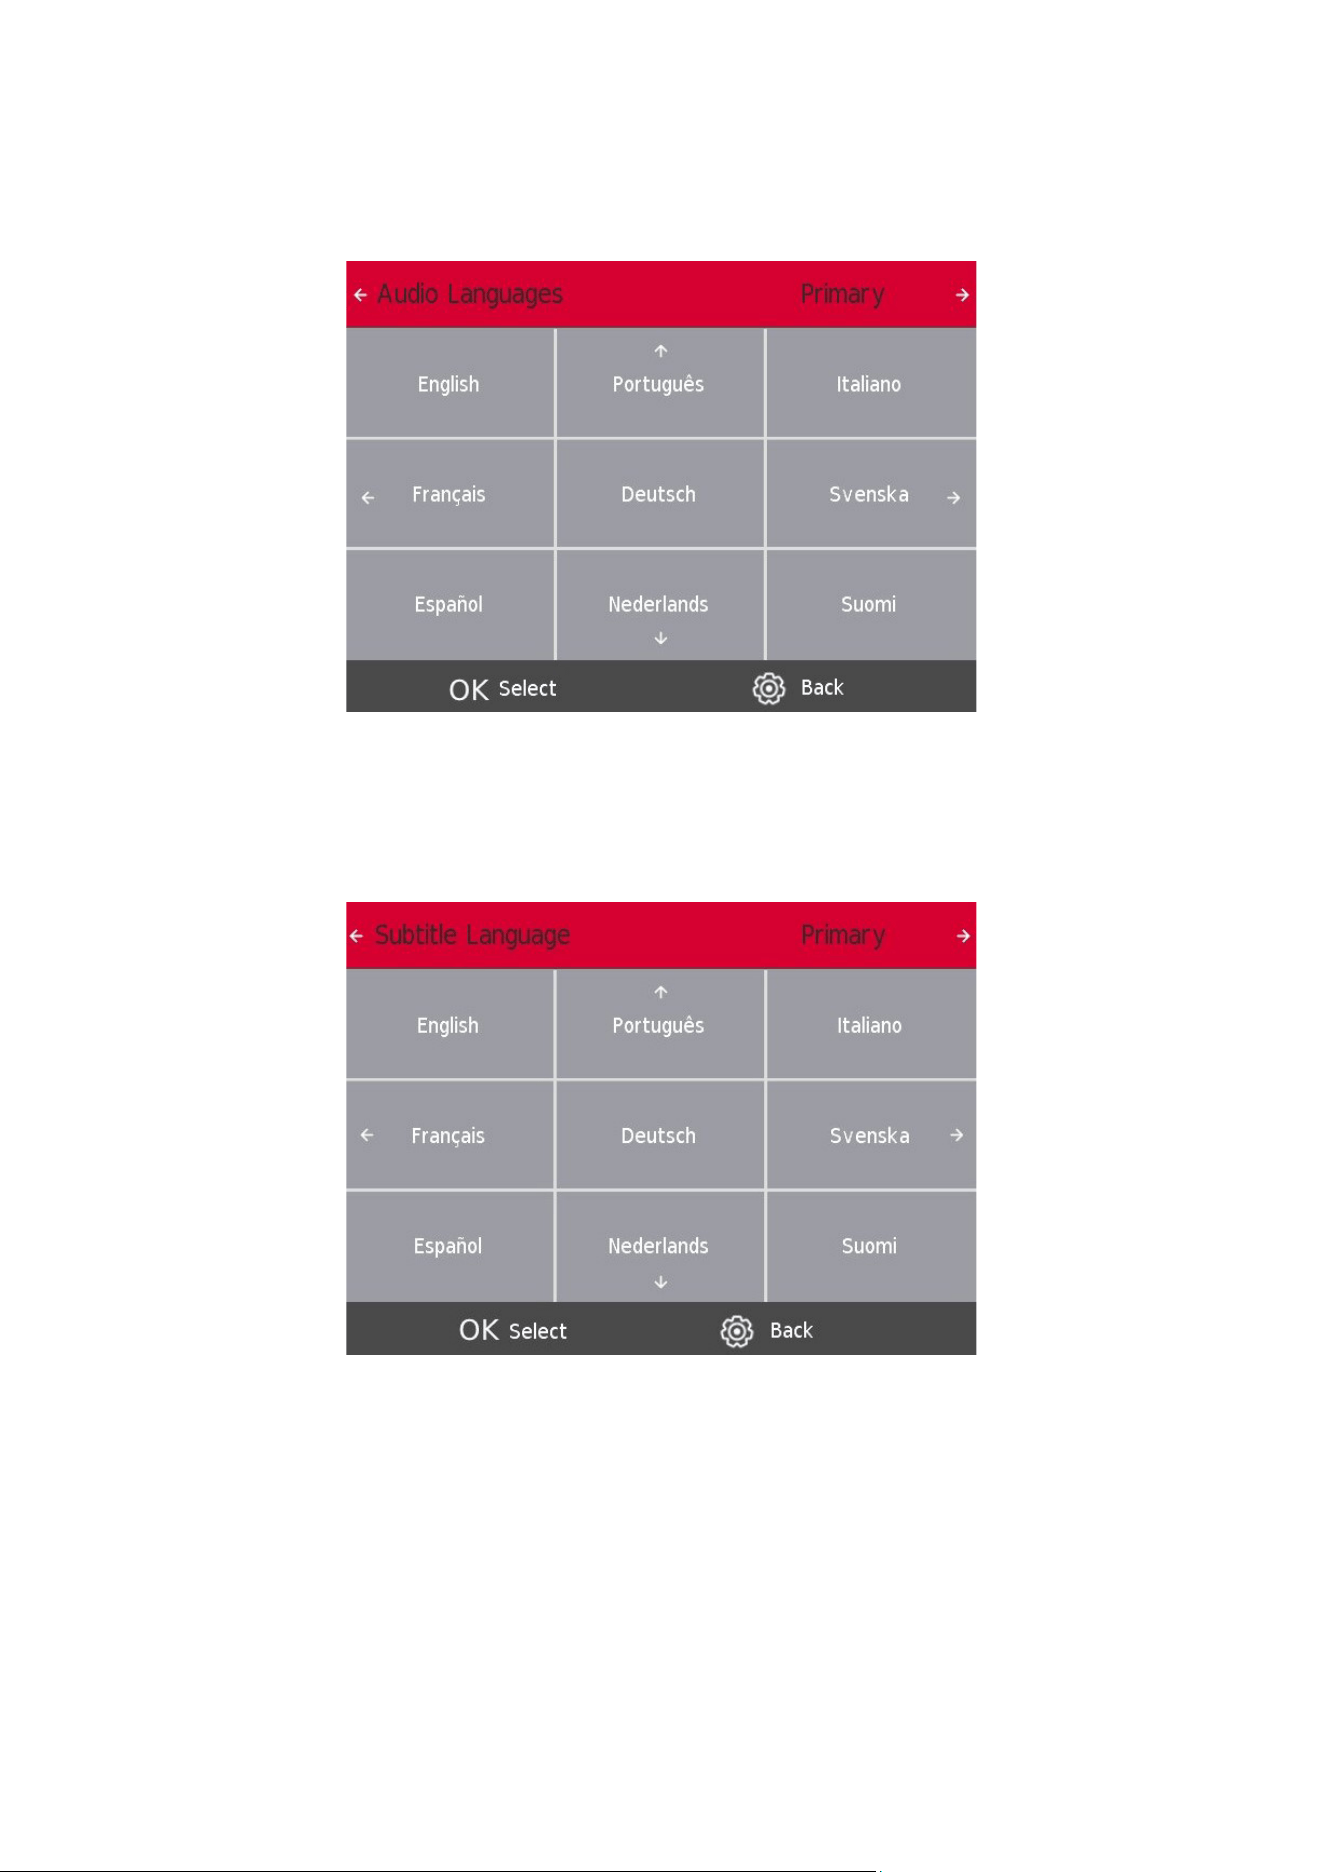
11.3. Audio Languages
Press the s / w button to select Audio Languages, then press the Enter/OK button to enter sub-menu.
Press the a / d button to select the primary Audio Languages.
Press the s / w / a / d button to select the Audio Languages
11.4. Subtitle Language
Press the s / w button to select the Subtitle Language, then press the Enter/OK button to enter sub-menu.
Press the a / d button to select the primary Subtitle Language.
Press the s / w / a / d button to select the Subtitle Language.
32
11.5. Hearing Impaired
Press the s / w button to select Hearing Impaired, then press the Enter/OK button to select turn On or O.
11.6. PVR Recording function
By default, the SW of the Thomson TVs is without PVR (recording) function. You can download and install the PVR
function of your choice on the following link https://tv.mythomson.com/en/Products/Accessories-Downloads/.
Additional fees may apply.
Instant recording
Do you want to record the content you are currently watching? Simply click on the REC button on your remote
control and the recording will start immediately. Note: The recording will only stop if you manually stop it or turn
OFF your TV. To manually stop the recording, click again on the REC button and click on Stop.
Timer recording
You have two options on how to schedule a recording ahead of time. You can either set the start and end time
manually or you select a specic movie or show you want to record.
Set start and end time:
After you have successfully installed the recording software, the feature “Schedule List” will be available in the
Channel menu.
By clicking on Schedule List, you can manually select the channel, the start and the end time of your recording.
Additionally, you can select how often this recording should happen (once, daily, or weekly).
• R = record once
• D = record daily
• W = record weekly
• A = record automatically
33
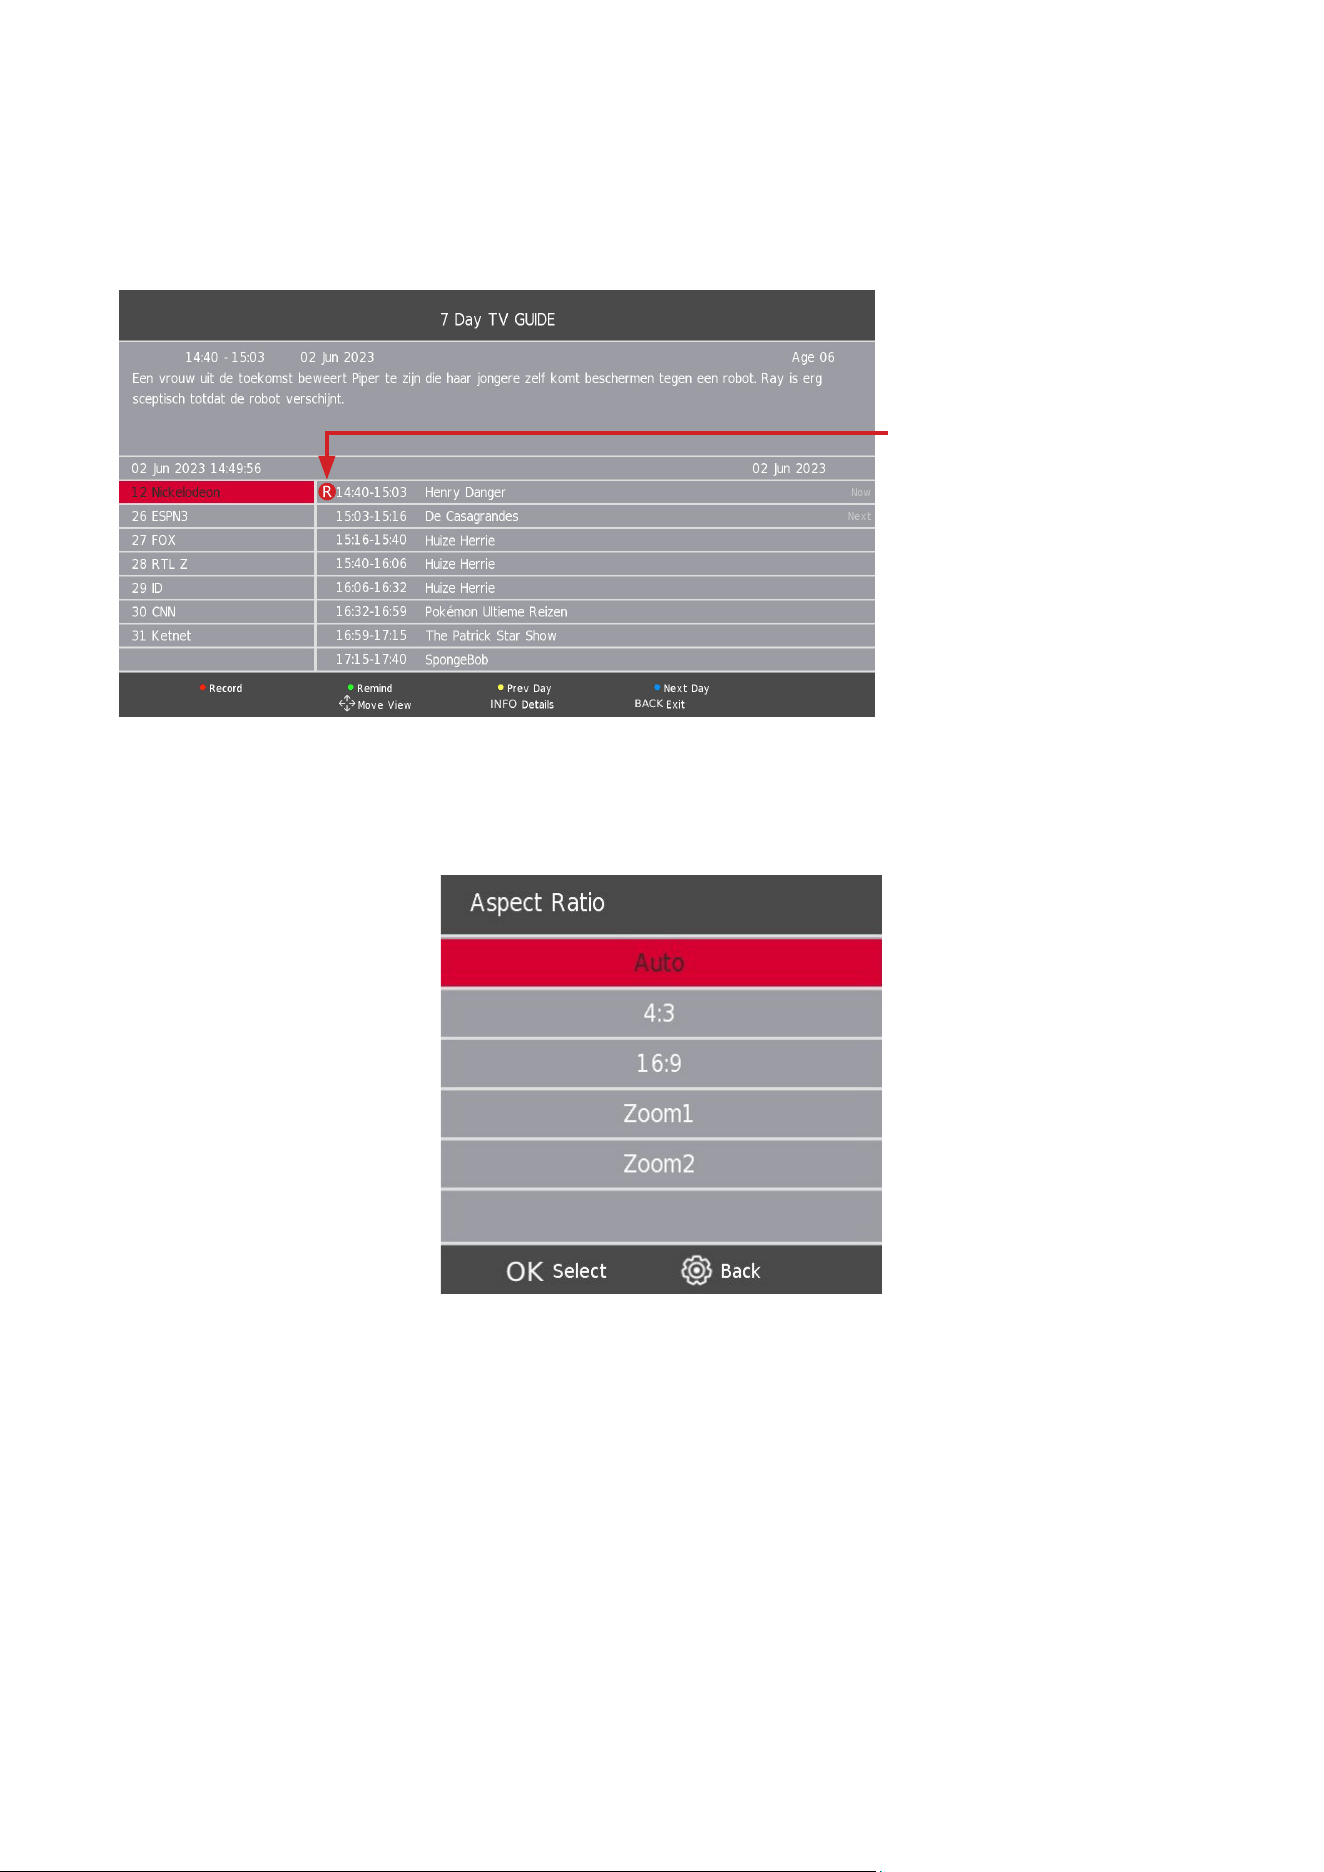
Selectaspecicmovie/show
1. Click on the GUIDE button of your remote control. This opens the electronic program guide, an extensive list
of available channels and movies.
2. Select the movie or show you want to record. Click on the red button of your remote control to schedule a
recording. Click on the green button of your remote control to get a reminder.
3. By repeatedly clicking on the red button, you can select the mode of the recording.
• R = record once
• D = record daily
• W = record weekly
• A = record automatically
11.7. Aspect Ratio
Press the s / w button to select Aspect Ratio, then press the Enter/OK button to enter sub-menu.
Press the s / w button to select aspect ratio. (Available options are: Auto, 4:3, 16:9, Zoom1, Zoom2).
11.8. Blue Screen
Press the s / w button to select Blue Screen, then press the Enter/OK button to select On or O.
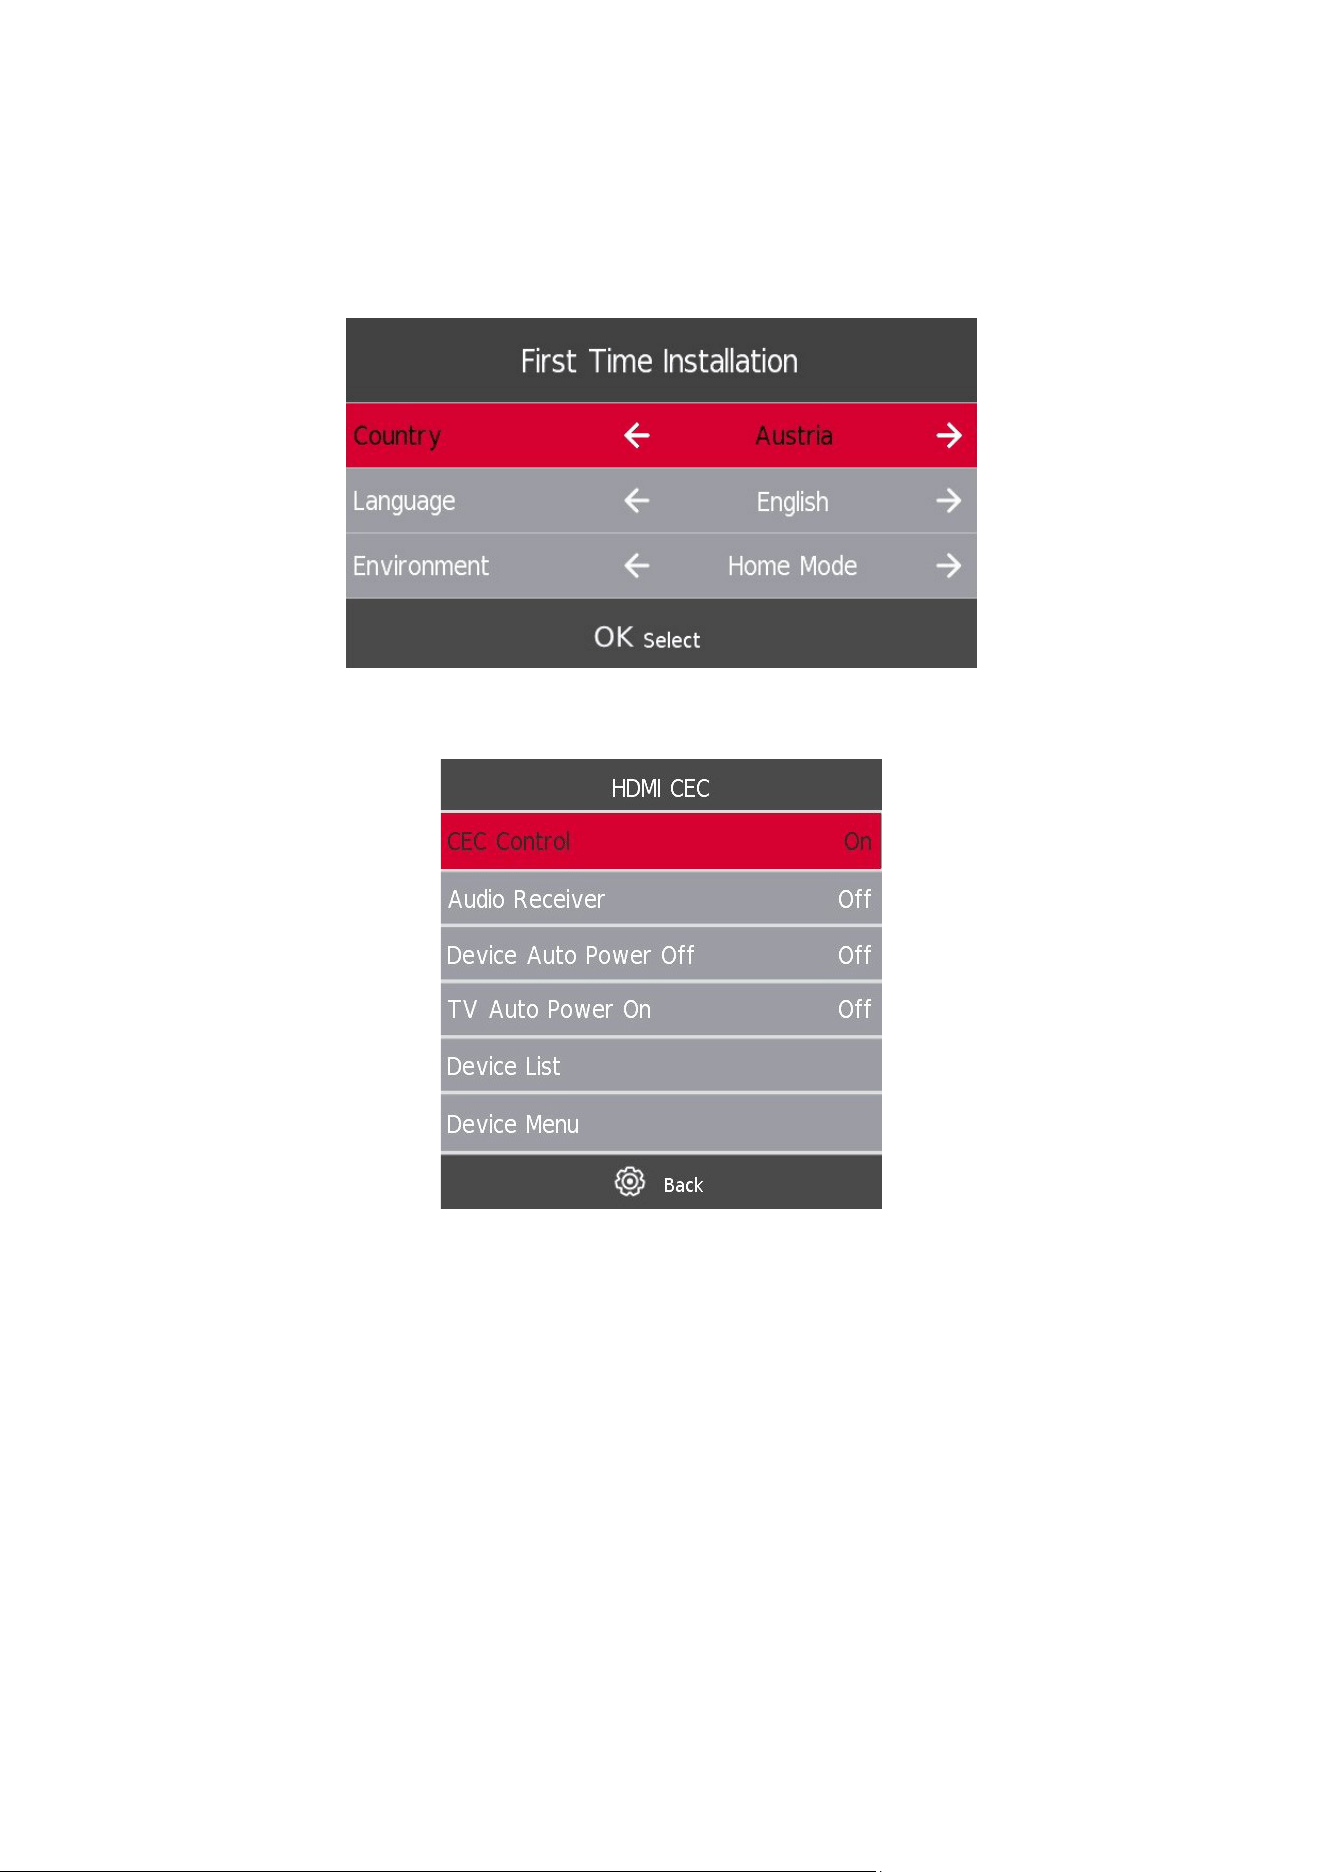
11.9. First Time Installation
Press the s / w button to select First time installation, then press the Enter/OK button to proceed.
11.10. Factory Reset
Press the s / w button to select Reset, then press the Enter/OK button to enter sub-menu.
34
11.11. SoftwareUpdate(USB)
Press the s / w button to select Software Update (USB), plug your USB device in the USB slot, then press the
Enter/OK button to update the right software.
11.12. Environment - Home mode/Shop Mode
Press the s / w button to select the desired environment, e.g. Home Mode or Shop Mode.
11.13. HDMI CEC (Need to support the HDMI CEC/ARC function)
Press the s / w button to select HDMI CEC, then press the Enter/OK button to enter the sub-menu.
HDMI CEC Press the a / d button to turn the HDMI CEC on or o.
HDMI ARC Press the a / d button to turn the HDMI ARC on or o.
Auto Standby Press the a / d button to turn the Auto Standby on or o.
Device List Press the Enter button to open the main menu of device.
35
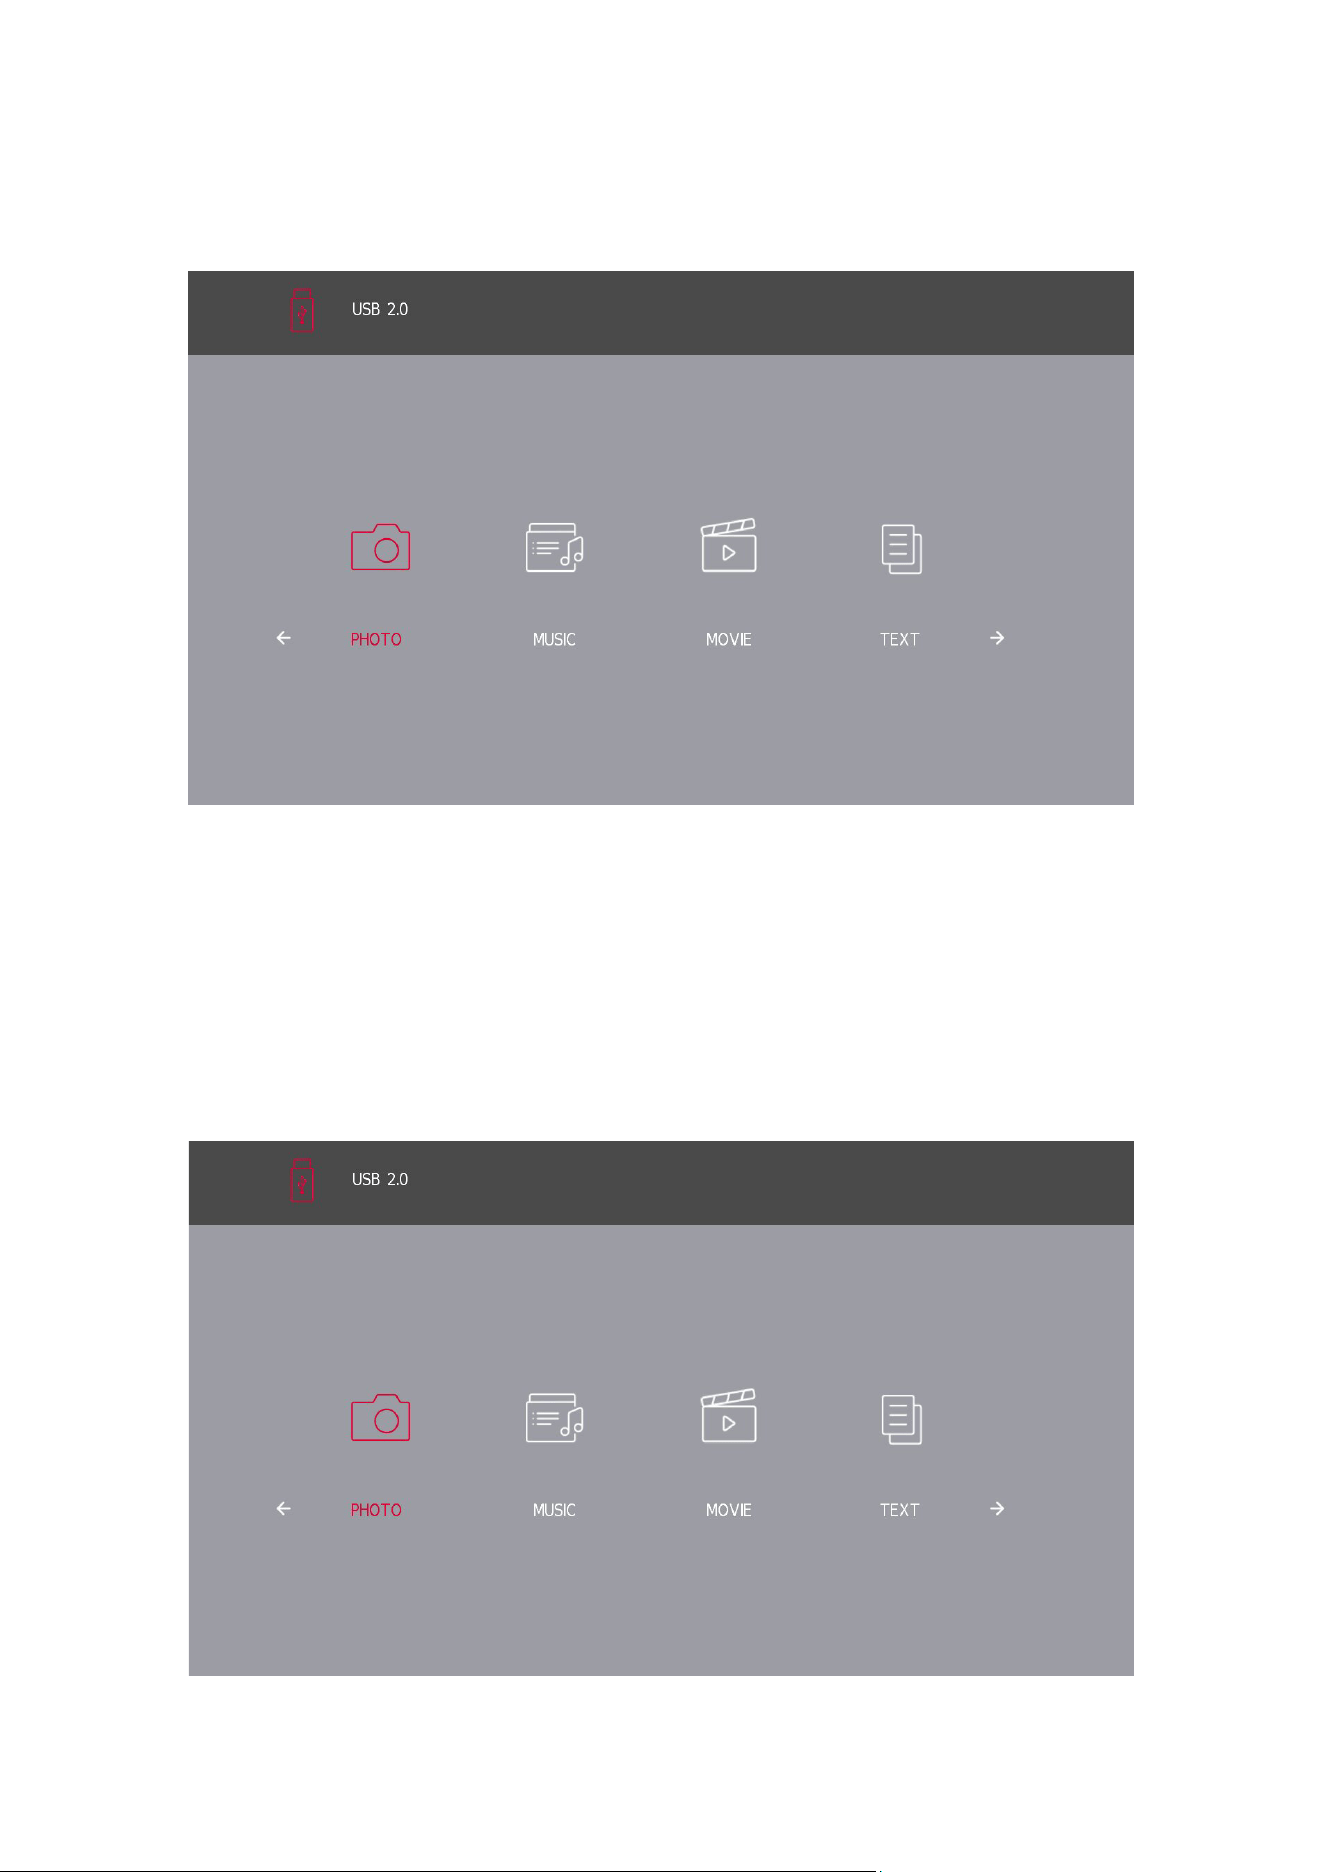
12. Media operation
Note: Before operating Media menu, plug in the USB device, then press the Source button to set the Input
Source to Media.
Press the s / w button to select Media in the Source menu, then press the Enter/OK button to proceed.
Press the a / d button to select the option you want to adjust in the main Media menu, then press the Enter/OK
button for selection.
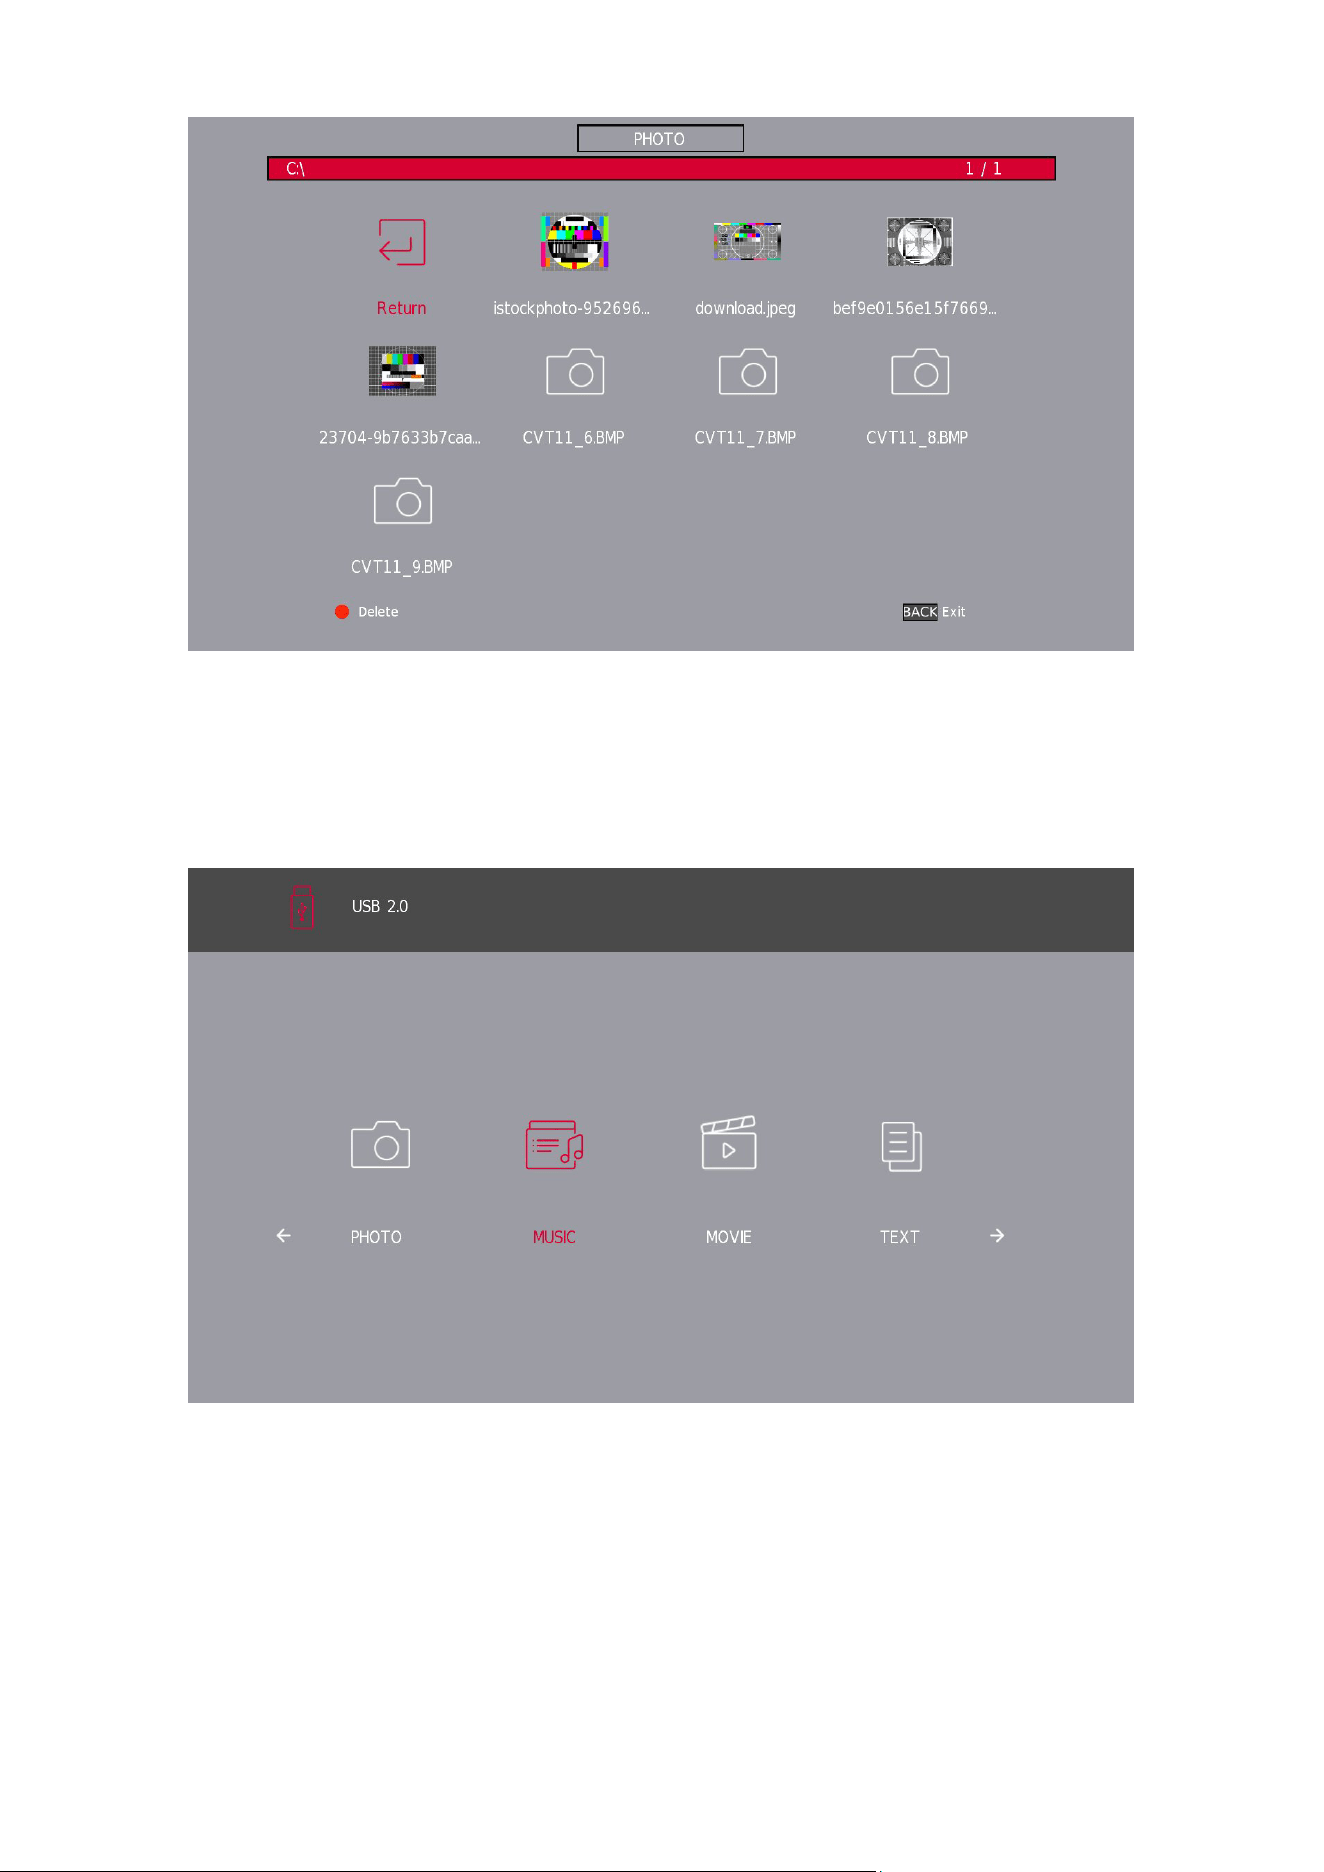
12.1. Photo Menu
Press the a / d button to select PHOTO in the main menu, then press the Enter/OK button to proceed.
Press the BACK button to return to the previous menu.
Press the a / d button to select the le you want to watch in the le selecting menu, then press the Enter/OK
button to display the picture.
When highlighting the option you select, the le information will appear on the right and the picture will be
previewed in the center.
36
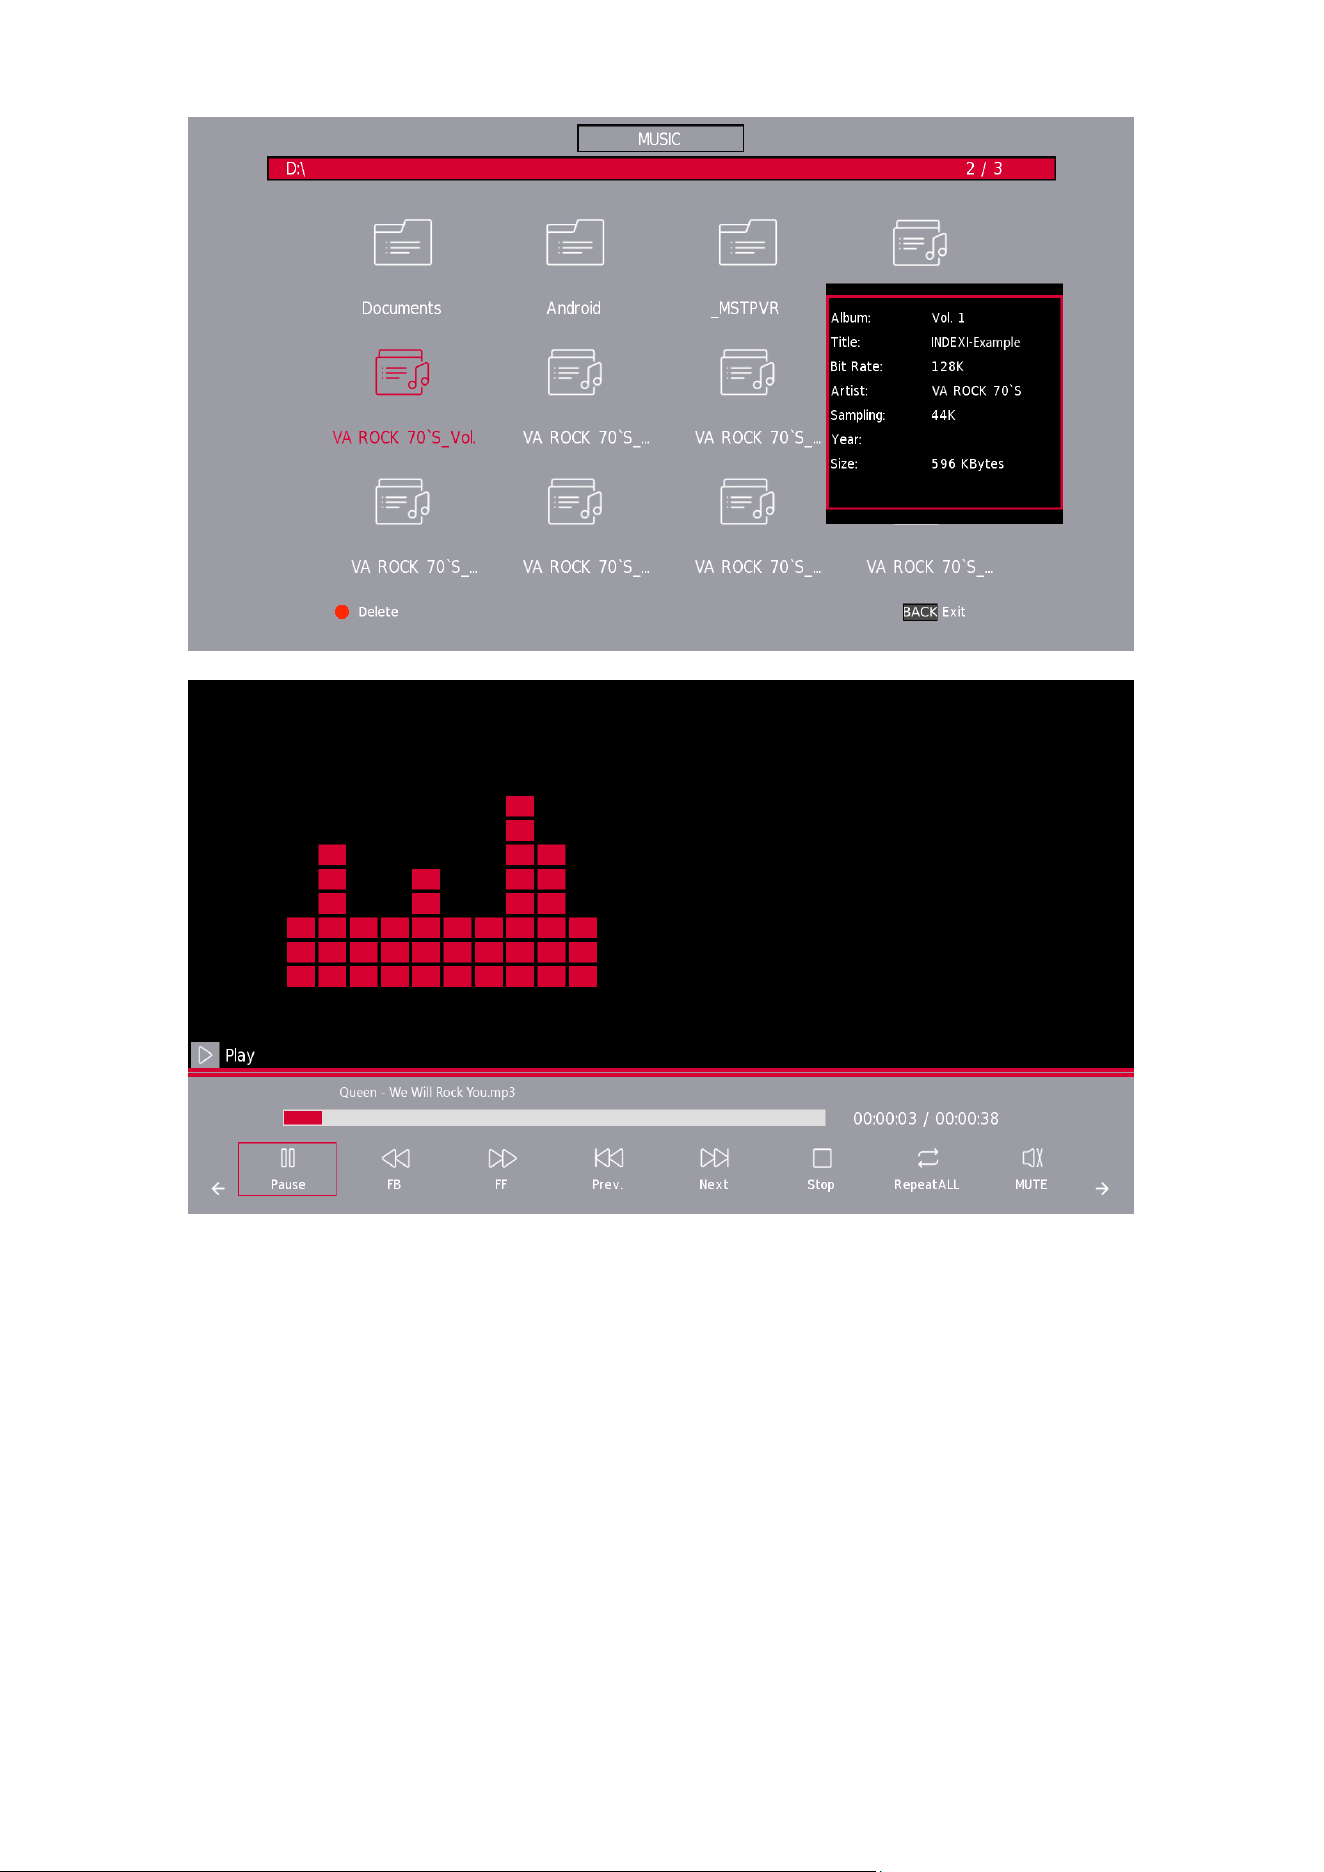
12.2. Music Menu
Press the a / d button to select MUSICin the main menu, then press the Enter/OK button to proceed. Press the
BACK button to return to the previous menu.
Press the a / d button to select drive disk you want to watch, then press the Enter/OK button to proceed.
Press the a / d button to select return option to the previous menu.
37
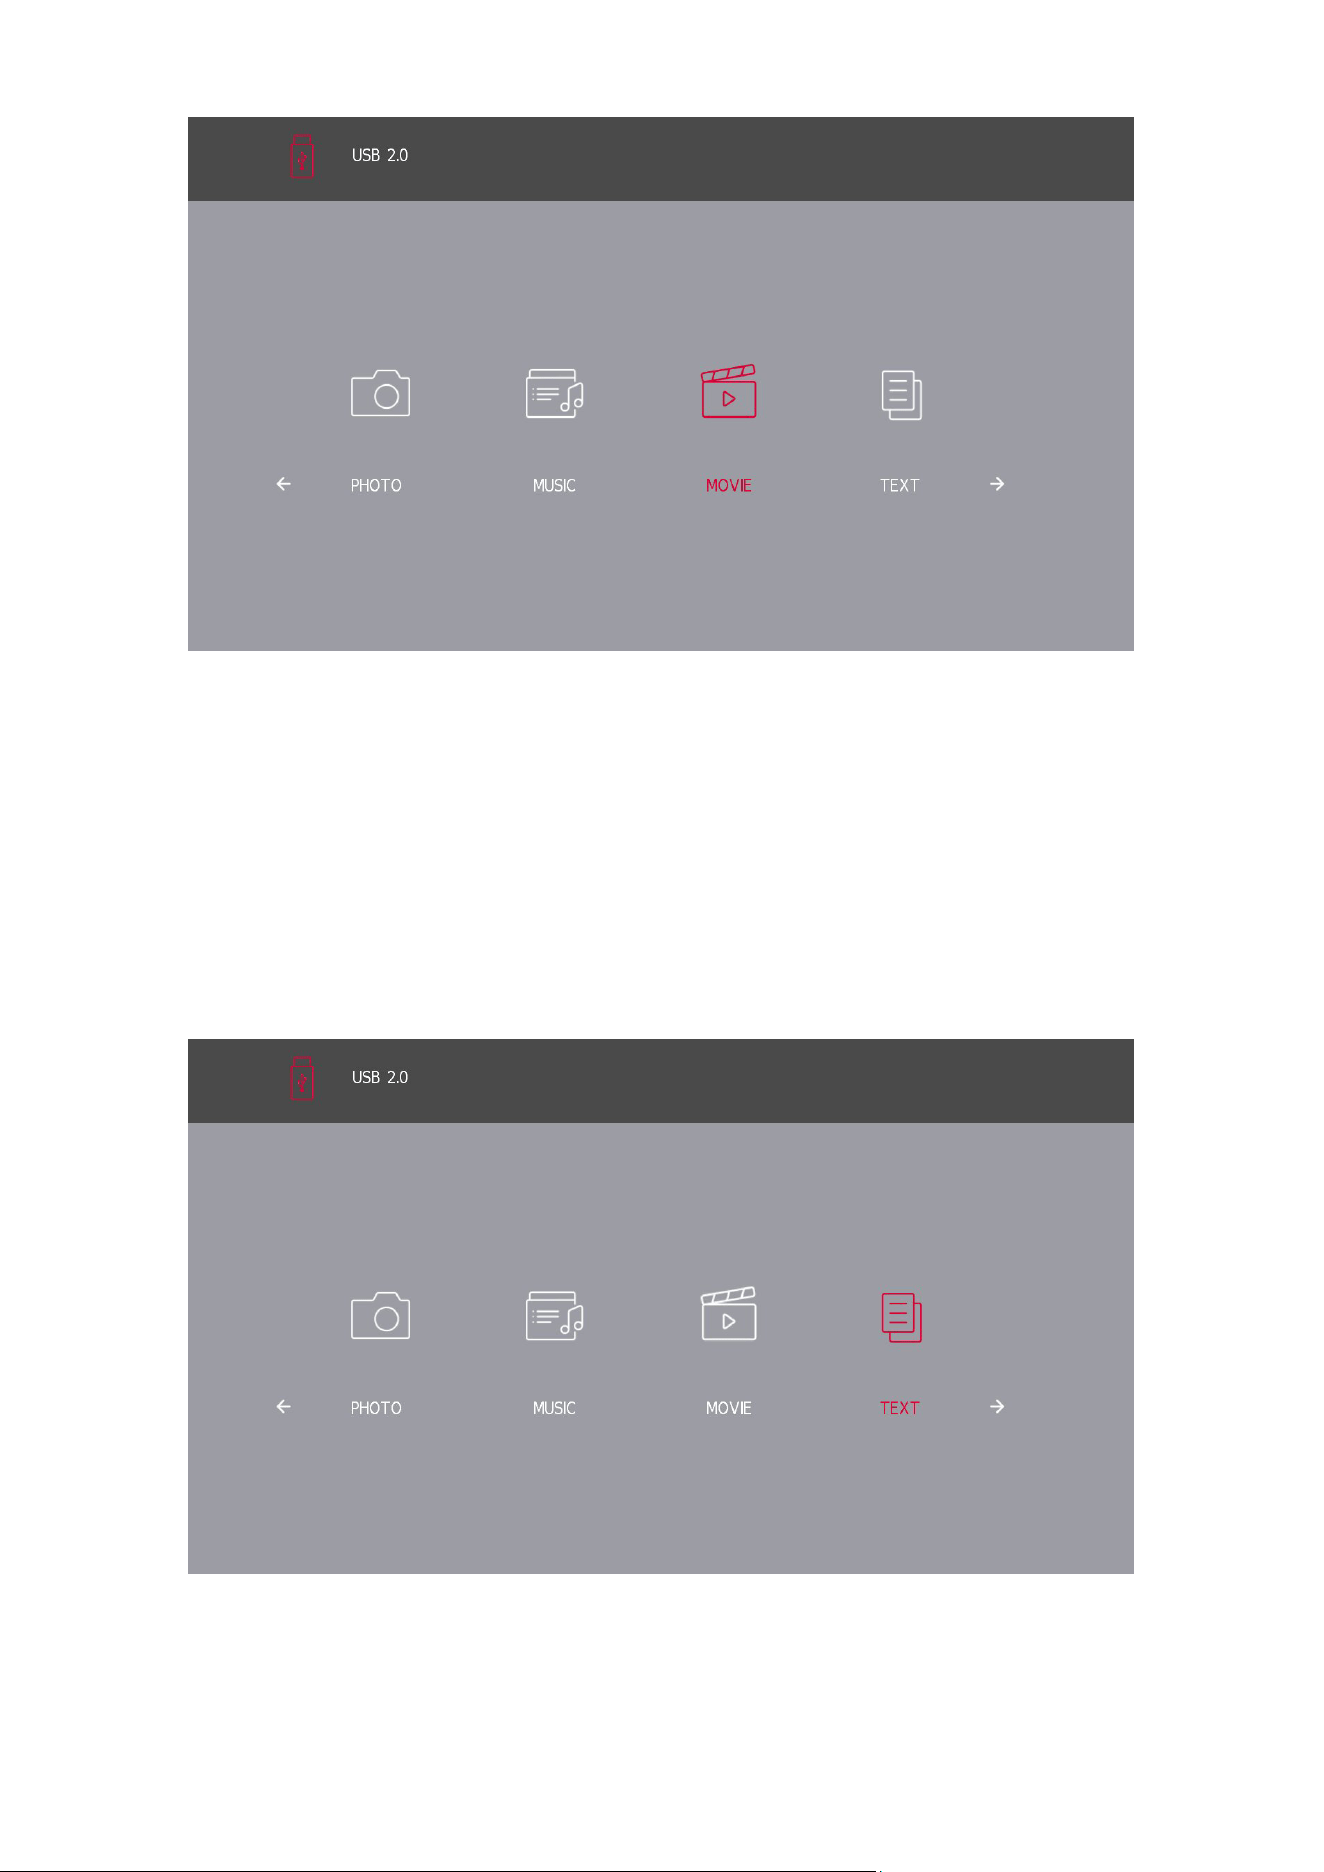
12.3. Movie Menu
Press the a / d button to select MOVIE in the main menu, then press the Enter/OK button to proceed.
Press the BACK button to return to the previous menu and to quit.
38
Press the a / d button to select the drive disk you want to watch, then press the Enter/OK button to proceed.
Press the Enter/OK button to play the selected movie.
Press the Enter/OK button to select the video le, then press the Enter/OK button to operate.
Press the BACK button to go back to the previous menu and Enter/OK button to quit the entire menu.
12.4. Text Menu
Press the a / d button to select the TEXT in the main menu, then press the Enter/OK button to enter.
Press the BACK button to return to the previous menu.
Press the a / d button to select the drive disk you want to watch, then press the Enter/OK button to enter.
Press the a / d button to select the return option to go back to the previous menu.
*Supported text formats: .txt les.

39
13. Troubleshooting
No power
• Check if the AC cord of the TV is plugged in or not. lf there is still no
power, please disconnect the plug, and reconnect to the socket after 60
seconds. Turn the power back on.
Signal not received properly
• Double or phantom images may appear on your TV if there are high
buildings or mountains close to where you are. You can adjust the image
thru manual operation: consult instruction of vernier regulation or adjust
the direction of the external antenna.
• lf you use an indoor antenna, under certain circumstances signal reception
may be more dicult. Adjust the direction of the antenna for optimum
reception. lf this does not improve reception; you may have to switch to
an external antenna.
No picture
• Check if the antenna at the back of the TV is connected properly.
• View other channels to see if the problem still occurs.
Video appears with no audio
• Try increasing the volume.
• Check if the TV’s sound is on mute or not.
Audio is present, but video does
not appear or is discolored
• Try adjusting the contrast and brightness.
Static noise aects video and
audio quality
• Check if the antenna at the back of the TV is connected properly.
Broken lines on screen
• Electrical appliances such as hair dryers or vacuums etc. may be interfering
with your TV set. Switch these appliances o.
Remote does not work
• Make sure the plastic bag which came with the remote control is removed.
Try using the remote in a shorter distance from the TV. Check if the
placement of the batteries is correct or try using new batteries with the
remote control.
• The TV will go into Standby mode if it receives no response in a few
minutes.
No video (PC mode)
• Please check if the cable is connected to the VGA port correctly, or if the
cable is bent in some places.
Vertical line blinking (PC Mode)
• Enter the main menu and adjust the vertical placement to eliminate the
vertical line.
Horizontal tearing (PC Mode) • Adjust the horizontal placement of the screen to clear any horizontal lines.
Screen is too bright or dark (PC
Mode)
• Adjust the brightness or contrast in the main menu.
No response from the PC
• Check if the PC’s display resolution is set to a compatible resolution for
the TV.
Lines appear when a device is
connected to the RCA port
• Make sure you are using a cable of good quality.
Problems are unresolved
• Unplug the power cable and wait for 30 seconds, then reconnect to the
socket. lf problems still persist, do not attempt to repair the TV by yourself.
Kindly contact
• the service center.
Do not leave your TV displaying a static image, whether it is from a paused video, menu screen, etc. for an
extended period of time, doing so will damage the display and may cause image burn-in.

40
14. Technicalspecications
24HD2S13
32HD2S13
32HD2S13W
40FD2S13
40FD2S13W
43FD2S13
Operating Voltage 100-240 V, 50-60 Hz 100-240 V, 50-60 Hz 100-240 V, 50-60 Hz 100-240 V, 50-60 Hz
Audio (DTS HD) no no no no
Audio Output Power 2 x 3 2 x 8 2 x 8 2 x 8
Power Consumption (W) 36 W 56 W 90 W 90 W
Networked Standby Power Consumption (W) < 0,5 < 0,5 < 0,5 < 0,5
Weight (Kg) 2.25 3.35 5.35 6
TV Dimensions DxLxH (with feet) (mm) 535x151x353 719x151x456 892x172x559 955x172x590
TV Dimensions DxLxH (without feet) (mm) 535x75x318 719x82x423 892x84x509 955x85x555
Display 24”/60 cm 32”/80 cm 40”/101 cm 43”/109 cm
15. Country restrictions
Intended for indoor use only in EU member states and EFTA states.
AT BE BG CH CY CZ DE DK EE ES FI FR GR HR HU IE IS
IT LI LT LU LV MT NL NO PL PT RO SI SK SE TR UK (NI)
16. Licences
Subject to alterations. In consequence of continuous research and development technical specications, design
and appearance of products may change.
The terms HDMI and HDMI High-Denition Multimedia Interface, and the HDMI logo are trademarks or registered
marks of HDMI Licensing Administrator, Inc. in the United States, and other countries.
Manufactured under license from Dolby Laboratories. Dolby, Dolby Audio, and the double-D symbol are
trademarks of Dolby Laboratories Licensing Corporation. All rights reserved. All product names are trademarks
or registered trademarks of their respective owners. © 2023
All other products, services, companies, trademarks, trade or product names and logos referenced herein are the
property of their respective owners.
©2024 StreamView GmbH, Franz-Josefs-Kai 1, 1010 Vienna, Austria. This product has been manufactured and
sold under the responsibility of StreamView GmbH. THOMSON, and the THOMSON logo are trademarks used
under license by StreamView GmbH – further information at www.thomson-brand.com.
08042024V01