

TABLE OF CONTENTS
WHAT’S INCLUDED ..................................................................................................4
WHAT YOU’LL NEED ................................................................................................5
REGULATORY INFORMATION ................................................................................. 5
PRODUCT DETAILS ................................................................................................... 6
LET’S GET STARTED .................................................................................................. 7
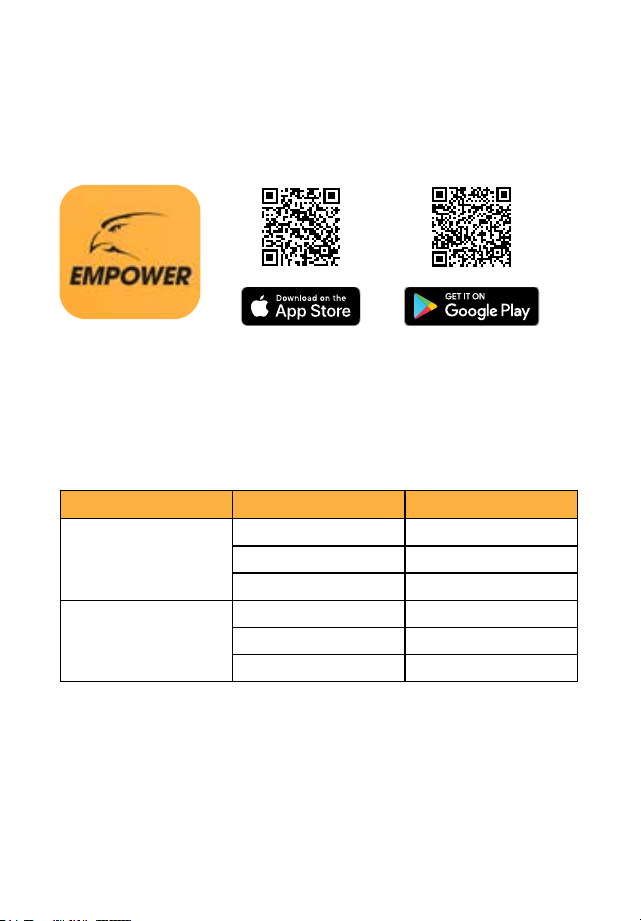
Download the App ....................................................................................................7
Plug-in your camera to power on ...........................................................................7
SETTING UP YOUR CAMERA .................................................................................... 8
Option 1: Discover your device ...............................................................................8
Option 2: Manually add your device ....................................................................10
Insert a Micro SD Card ...........................................................................................13
PROPER CAMERA INSTALLATION AND PLACEMENT .......................................... 14
RECORDING SETUP ................................................................................................ 15
SETTING UP MOTION DETECTION ........................................................................ 16
SURVEILLANCE AREA SETTING .............................................................................17
SETTING UP NOTIFICATIONS ................................................................................ 18
USING THE APP ...................................................................................................... 19
FREQUENTLY ASKED QUESTIONS ......................................................................... 19
3
ACTIVATE YOUR WARRANTY
EXTEND YOUR WARRANTY
PROTECT
Covered for the
unexpected
SUPPORT
Receive videos, tips &
updates for your product
VALUE
Exclusive access to
special oers
Don’t forget to protect your purchase and ease your mind by extending your
included 1 year manufacturer warranty to 2 or 3 years. If something goes wrong,
our team of Security Experts will get you back up and running fast!
Extended Warranties can be purchased up to 60 days after your product’s purchase.
2 YEAR WARRANTY
Extend your peace of mind to two years
◊ Product Defects
◊ Advanced Replacements
◊ Free Return Shipping
3 YEAR WARRANTY
Extend your peace of mind to three years
◊ Product Defects
◊ Advanced Replacements
◊ Free Return Shipping
Open your camera & scan this QR code, or
visit: DefenderCameras.com/Warranty
Open your camera & scan this QR code, or visit:
DefenderCameras.com/pages/extended-warranties
4
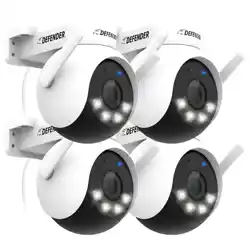
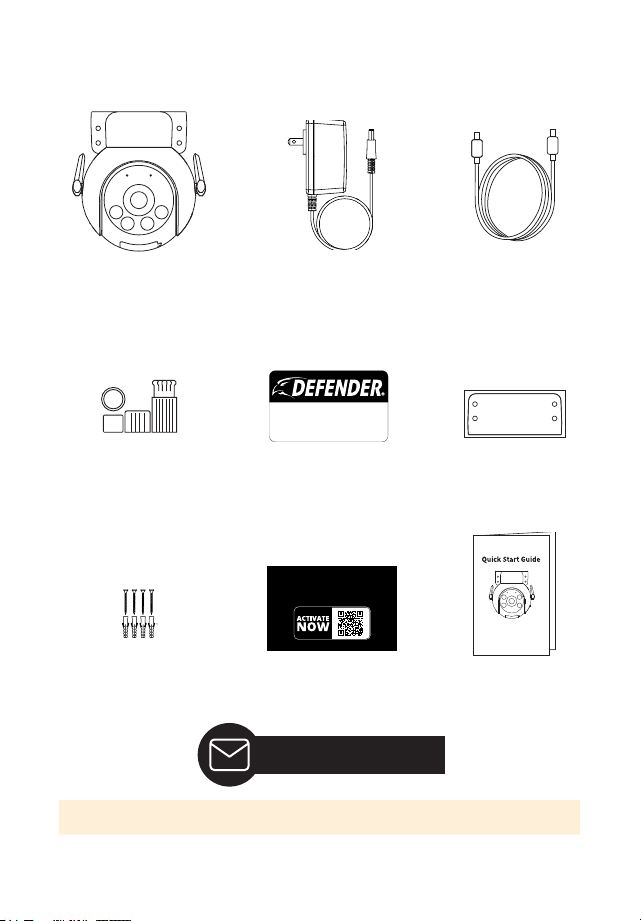
WHAT’S INCLUDED
Defender 4K Everwatch
PTZ Camera with Mounting
Bracket
Camera Power Extension
Cable (25ft)
Ethernet Waterproof Cable
Shield
Warranty Registration
Insert
Camera Mounting
Hardware
1 x Window Warning Sticker
Quick Start Guide
Drilling Template
Power supply (10ft)
ACTIVATE YOUR
WARRANTY
DefenderCameras.com/Warranty
24/7 VIDEO
SECURITY SYSTEM
DefenderCameras.com
Lifetime Support
IMPORTANT: The Camera Power Supply is NOT waterproof.

5
WHAT YOU’LL NEED
• Wi-Fi Internet Connection
• Drill and/or a Phillips #2 screwdriver
• 3/32” drill bit for pilot holes
• 7/32” drill bit for wall anchors
• 7/8” long drill bit (Choose the right drill bit based on the surface material)
• A compatible Android or iOS phone
REGULATORY INFORMATION
FCC STATEMENT: This device complies with part 15 of the FCC Rules. Operation
is subject to the following two conditions: (1) This device may not cause harmful
interference. (2) This device must accept any interference received, including inter-
ference that may cause undesired operation. This equipment complies with FCC
radiation exposure limits set forth for an uncontrolled environment. This equip-
ment should be installed and operated with a minimum distance of 20cm between
the radiator and any part of your body.
FCC WARNING: This equipment has been tested and found to comply with the lim-
its for a Class B digital device, pursuant to Part 15 of the FCC Rules. These limits are
designed to provide reasonable protection against harmful interference in a resi-
dential installation. This equipment generates, uses and can radiate radio frequency
energy and, if not installed and used in accordance with the instructions,may cause
harmful interference to radio communications. However, there is no guarantee that
interference will not occur in a particular installation. If this equipment does cause
harmful interference to radio or television reception, which can be determined
by turning the equipment o and on, the user is encouraged to try to correct the
interference by one or more of the following measures:
• Reorient or relocate the receiving antenna.
• Increase the separation between the equipment and the receiver.
• Connect the equipment into an outlet dierent from that to which the
receiver is connected.
• Consult the dealer or an experienced radio/TV technician for help.
IC STATEMENT: This device contains licence-exempt transmitter(s)/receiver(s) that
comply with Innovation, Science and Economic Development Canada’s licence-ex-
empt RSS(s). Operation is subject to the following two conditions: (1)This device may
not cause interference. (2)This device must accept any interference, including inter-
ference that may cause undesired operation of the device. This equipment complies
with IC RSS-102 radiation exposure limits set forth for an uncontrolled environment.
This equipment should be installed and operated with minimum distance 20cm
between the radiator and your body.
Changes or modications not expressly approved by the party responsible for
compliance could void the user’s authority to operate the equipment.
6
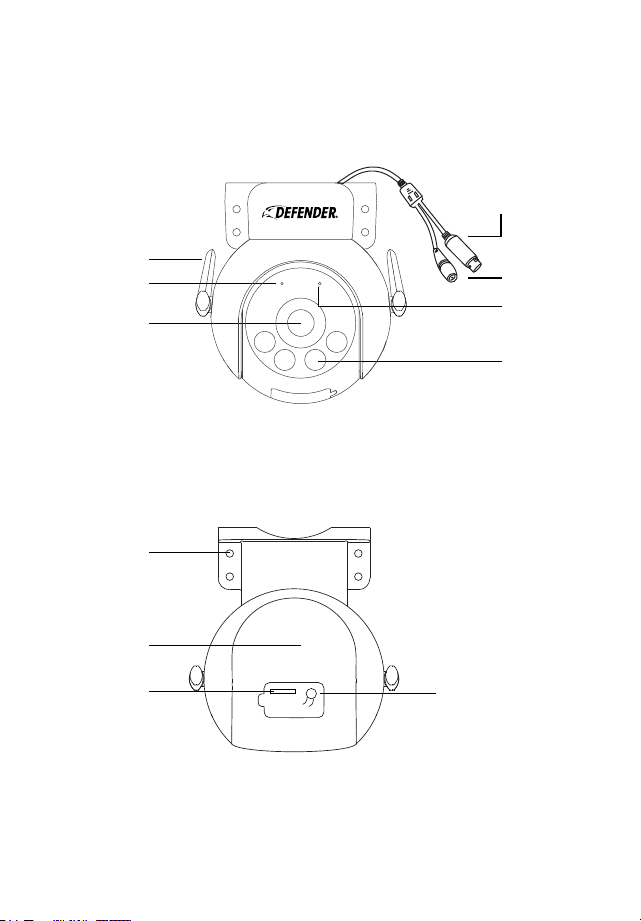
PRODUCT DETAILS
Microphone
Wi-Fi Antenna
Mounting Holes
Lens
Speaker
Micro SD Card
Power Adapter
Connector
Indicator Light
Spotlights
Reset Button
Ethernet Cable Connector
(Optional hard wire connection)
7
LET’S GET STARTED
STEP 1: DOWNLOAD THE APP
Download the Defender Empower app and follow the steps to create an account.
An email account is required for verication.
STEP 2: PLUG-IN YOUR CAMERA TO POWER ON
Your camera will perform a self-range check. Wait up to 60 seconds for the LED
indicator light to ash red and chime before connecting your camera to the App.
COLOR SOLID/FLASHING STATUS
RED Solid Booting
Flashing Slowly Updating Firmware
Flashing Quickly Ready for device setup
BLUE Solid Working properly
Flashing Slowly Camera connected to Wi-Fi
Flashing Quickly Camera connecting to Wi-Fi
8
SETTING UP YOUR CAMERA
There are two options for adding your camera to the Empower App.
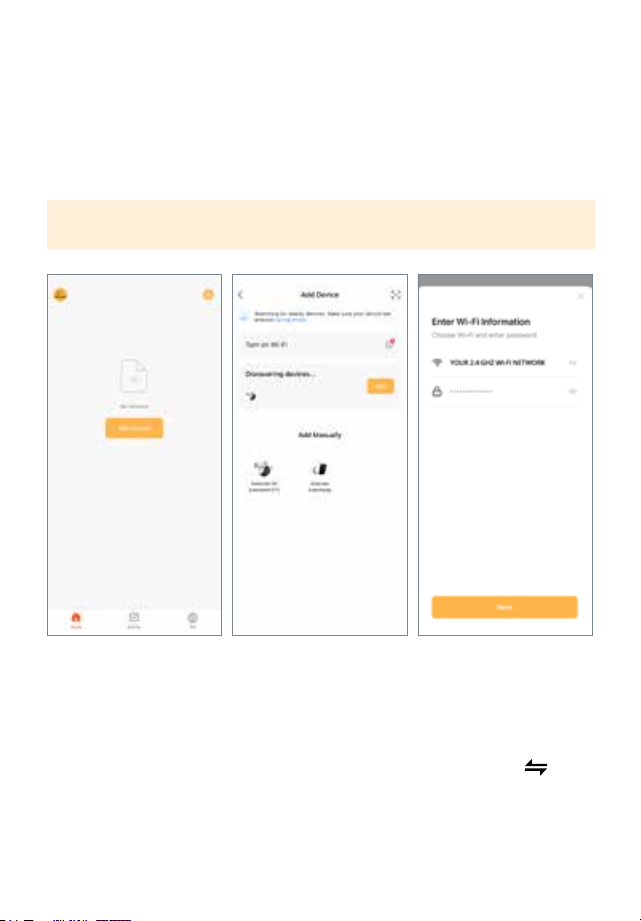
OPTION 1: DISCOVER YOUR DEVICE.
Step 1: Connect to your Wi-Fi and pair your camera.
IMPORTANT: Ensure you have your Bluetooth enabled on your phone when setting
up the camera.
Tap “Add Device” or tap
+ and select Add Device.
The App will scan for any
devices in the vicinity. Once
the image of the camera
appears select Add.
Select Add to add the
device.
Select your 2.4 GHz Wi-Fi
network and enter your
password. Your phone
may be connected to a 5
GHz network by default. To
switch to a dierent Wi-Fi
network, use the
button
to go to your phone settings
and switch to a 2.4 GHz
network. Once you are con-
nected, return to the app.
Click “Next” to continue.
9
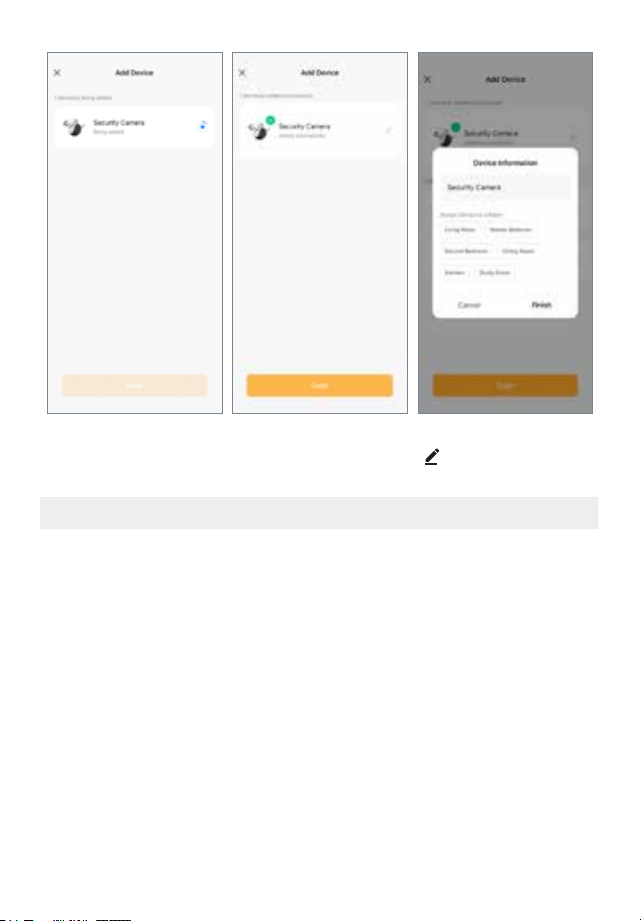
Please wait while the device
connects to the app.
We recommend naming your camera if you are adding
more than one device. Tap the
to name your camera.
Select Finish and Done.
NOTE: Repeat the steps for each additional camera you want to connect.

10
OPTION 2: MANUALLY ADD YOUR DEVICE.
IMPORTANT: Ensure you have your Bluetooth enabled on your phone when setting
up the camera.
Tap “Add Device” or tap +
and select Add Device.
Tap your product under
Add Manually to enter the
pairing process.
Select Next.
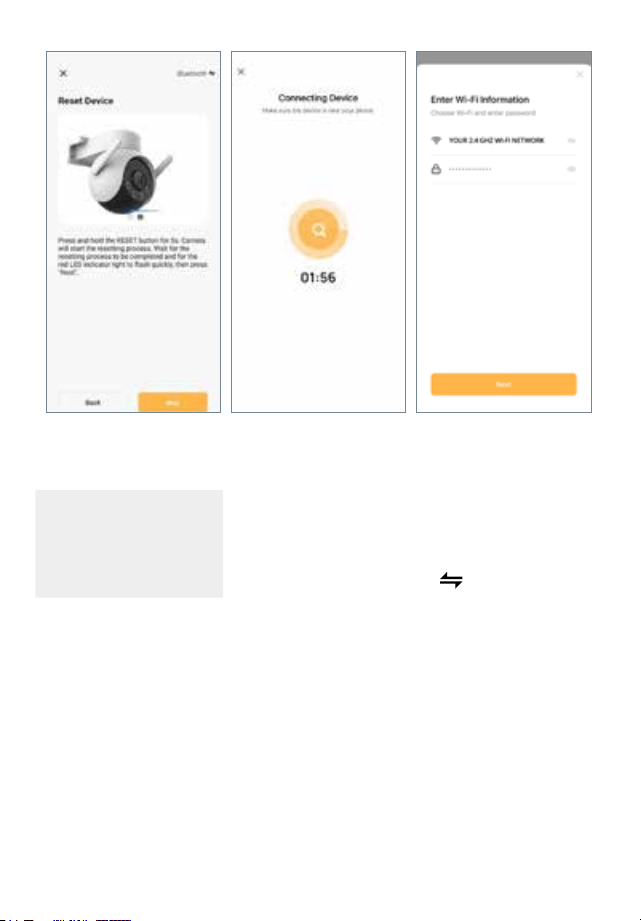
11
Ensure the camera indicator
light is ashing red, and
click “Next” to continue.
NOTE: If your indicator
light is no longer ashing
red, press the reset button
for 5 seconds to restart
the pairing process.
Wait for the device to
connect.
Select your 2.4 GHz Wi-Fi
network and enter your
password.
Your phone may be con-
nected to a 5 GHz network
by default. To switch to a
dierent Wi-Fi network, use
the
button to go to your
phone settings and switch
to a 2.4 GHz network. Once
you are connected, return
to the app. Click “Next” to
continue.

12
We recommend naming your camera if you are adding more than
one device. Tap the
to name your camera. Select Finish and
Done.
NOTE: Repeat the steps for each additional camera you want to
connect.
13
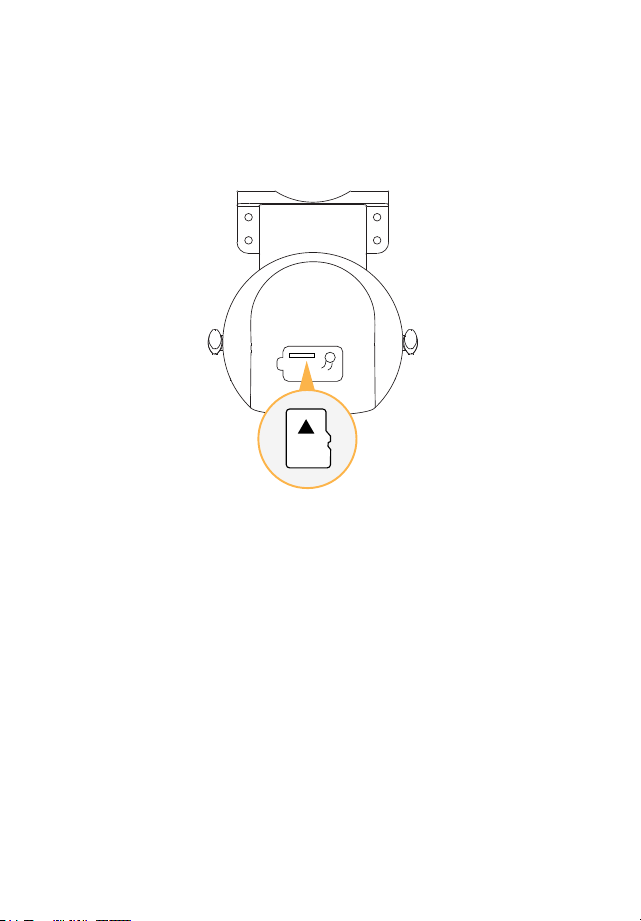
SETTING UP YOUR CAMERA
STEP 3: INSERT A MICRO SD CARD
Recordings can be locally stored on a Micro SD card, to insert or swap out your Micro
SD card please follow the steps below. The maximum size Micro SD card is 128GB.
1. Remove the lower cover by pulling up on the tab.
2. If swapping out a current Micro SD card, gently press on the card, it will pop out.
3. When inserting your Micro SD push it in until you hear a click sound.
14
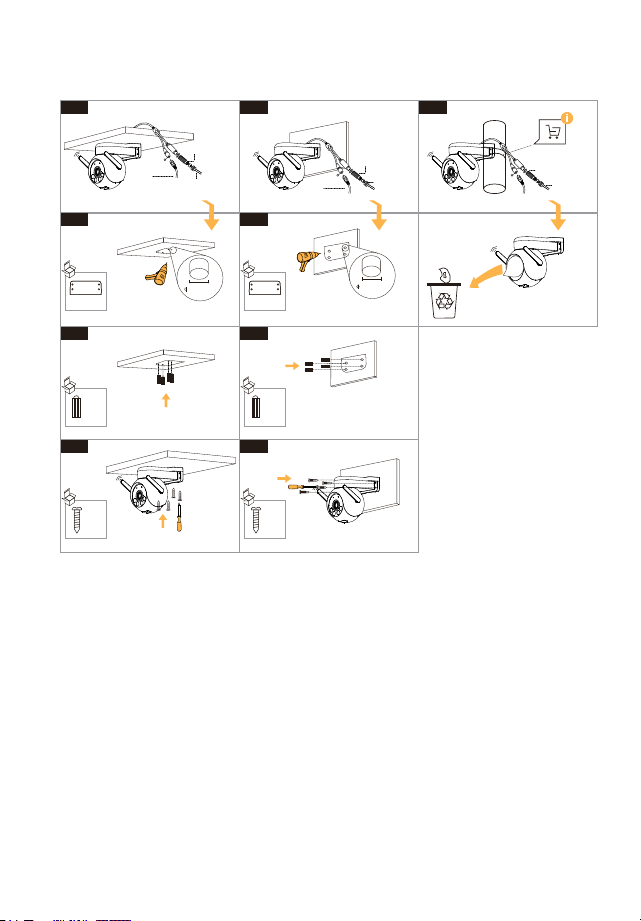
PROPER CAMERA INSTALLATION AND PLACEMENT
DC Power
Cable
Ethernet Cable
Drill Template
Drill Holes on the Wall
Wall Anchor
Install Wall Anchor
Screws
Install Screws
Wall Anchor
Install Wall Anchor
Screws
Install Screws
Drill Template
Drill Holes on the Wall
Install Waterproof Cap
(For wired connection)
A
X �
X �
�.�-�.�
mm
A-�
A-�
X �
DC Power
Cable
Ethernet Cable
Install Waterproof Cap
(For wired connection)
Ethernet Cable
Install Waterproof Cap
(For wired connection)
Zip-tie is not included
A-�
B
X �
X �
B-�
B-�
X �
B-�
�.�-�.�
mm
C

15
RECORDING SETUP
Your camera(s) default setting is to record when motion is detected. If this is your
preferred setting, skip this step.
To set up Continuous Recording, from the home screen select the camera you wish
you adjust the settings for. Next select ( · · · ) in the top right. Select Recording Settings,
select Recording Mode and select Continuous Recording.
NOTE: Once the SD card is full, the camera will continue to record by
overwriting older footage.
TIP: If you prefer to only record during certain times of the day, select Schedule to
create a schedule for when the camera will record.
16
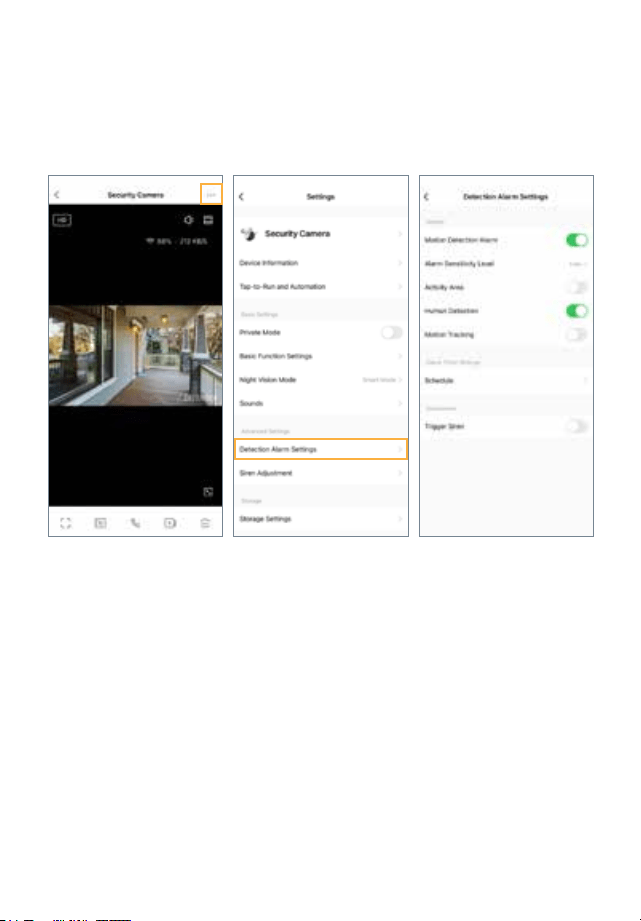
SETTING UP MOTION DETECTION
To access Detection Settings, navigate to the live view screen, tap ( · · · ), and select
Detection Alarm Settings. Toggle on/o your preferred notications.
*Repeat for each camera.
To receive notications for all types of motion, turn o Human Detection. If both
Motion and Human Detection are enabled, you will only receive alerts for human
detection.
Once the moving object is no longer detected, your camera will adjust back to your
default point of direction.
Human detection may not be 100% accurate. To minimize false notications, we
recommend enabling the Activity Area and selecting Surveillance Area Setting to
customize your detection region by masking areas to avoid any trees or larger
moving objects.
17
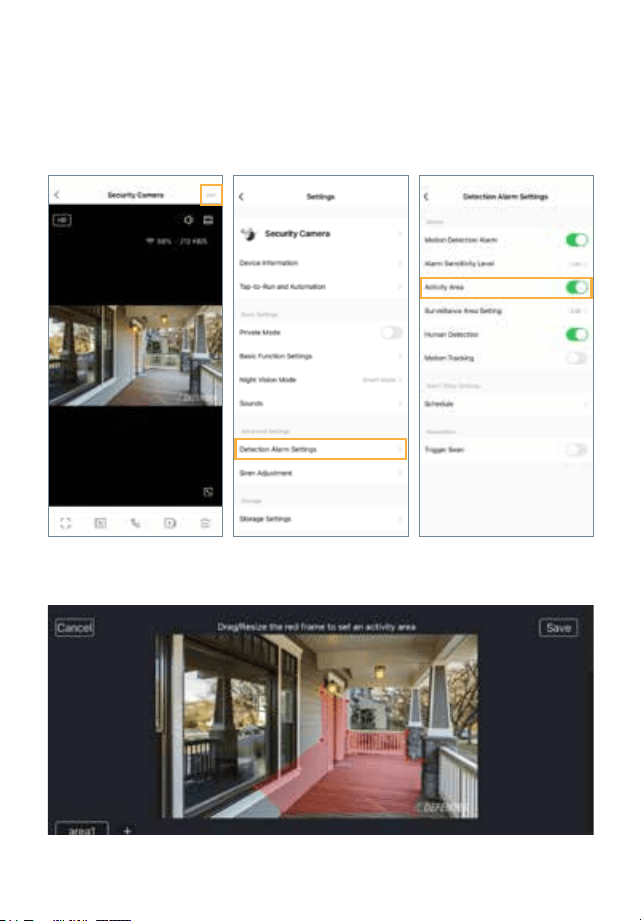
SURVEILLANCE AREA SETTING
To access the Surveillance Area Setting, navigate to the live view screen, tap ( · · · ),
and select Detection Alarm Settings.
Toggle on Activity Area. Select Edit.
Drag the circles to set your motion detection area. The areas highlighted will detect
motion. To add additional areas, tap the + icon. Select Save to conrm your changes.
18
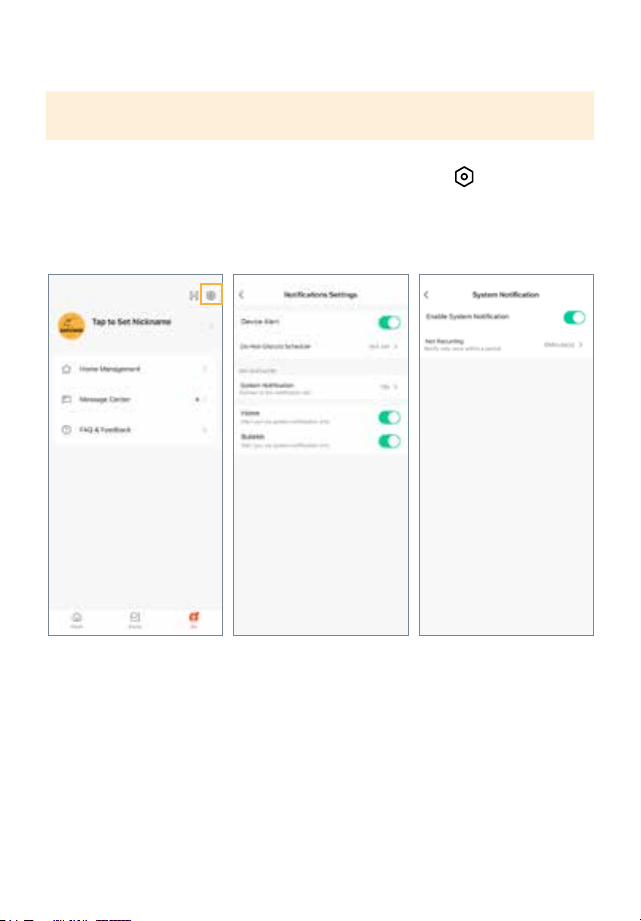
SETTING UP NOTIFICATIONS
To access Notications from the home screen, select Me. Select and select App
Notication.
Select your preferred notication settings. Please note this setting is for all devices
connected to the app.
IMPORTANT: Alarm and Message Push with image notications are on by default.
If this is your preferred setting, skip this step.

19
FREQUENTLY ASKED QUESTIONS
CAN I ALLOW OTHER PEOPLE TO VIEW MY CAMERA(S) REMOTELY?
Yes. You can share your Defender Empower App access with up to 20 additional
users. Each user must download the Defender Empower App and create their own
account before sharing access.
IS DEFENDER 4K EVERWATCH PTZ COMPATIBLE WITH ANY DEFENDER CAMERA
SYSTEM?
Defender 4K Everwatch PTZ cameras are only compatible with the Defender Em-
power App. It cannot be used with any other Defender security systems.
CAN I VIEW MY LIVE OR RECORDED FOOTAGE FROM A WEB BROWSER?
No, we do not oer web viewing. You can view the footage from the free Defender
Empower App with compatible iOS/Android smart phones/tablets.
USING THE APP
The Defender Empower App allows you to remotely view live video or playback
recorded footage, save and share recordings, and more. Scan the QR Code from
your mobile device to access the Defender Empower App Quick Start Guide.
• Navigating the App
• Sharing App Access
• Recording Schedules
• Customized Notications
• Night Vision Settings
• Motion Detection Settings
• How to use Deterrence

Need Help? Visit:
DefenderCameras.com/Support
Email [email protected]
Defender is continuously enhancing our products to bring customers the best user
experience. For the most up to date Quick Start Guide, please visit DefenderCameras.com.
DEFENDER® does not endorse any DEFENDER® products for illegal activities. DEFENDER®
is not responsible or liable in any way for any damage, vandalism, theft or any other action
that may occur while a DEFENDER® product is in use by the purchaser. We reserve the right
to change models, conguration, or specications without notice or liability. Product may
not be exactly as shown.
©2024 DEFENDER®. All rights reserved. DEFENDER®, the DEFENDER® logo and other
DEFENDER® marks may be registered. All other Trademarks are the property of their
respective owners.
REV01 05272024 v2
IP4KACBPTZ-QSG
8 42751 00756 9
