MICROW
AVE OVEN
Use & Care Guide
For questions about features, operation/performance, parts, accessories or service, call:
1-866-698-2538, or visit our website at www.whirlpool.com/owners
Model
DRAWER
WMBD5024
W11824118A
Horno microondas de cajón
Guía de uso y cuidado
Para consultas sobre características, funcionamiento/rendimiento, piezas, accesorios o servicio, llama al:
1-866-698-2538, o visita nuestro sitio web en www.whirlpool.com/owners

CONTENT
2
3
6
7
8
9
9
9
9
10
10
10
11
11
12
12
13
13
14
14
CONTROL PANEL
SETTINGS
SETTING THE CLOCK
SETTING THE TIMER
TABLE OF CONTENTS
PARTS AND FEATURES
MICROWAVE OVEN SAFETY
..........................................................................
............................................................
..........................................................................
...............
....................................................
....................................................
............................................................................
......................................................................
.........................................................................
.....................................................................
..............................................................
.................................................................
..........................................
.................................................
..................................................
8
..........................................................
....................................................
..................................................
........
MICROWAVE OVEN COOKING FUNCTIONS
13
MUTE FUNCTION
CONTROL LOCK
COOK TIME/POWER
EXPRESS COOKING
COOK
REHEAT
DEFROST
VEGGIES
POPCORN
SOFTEN/MELT
KEEP WARM
STEAM CLEAN
STANDBY MODE
6
....................................
COMBINATION INSTALLATION
..........................................................
..................................................................
.....................................................................
..............................................................
POTATOES
TABLA DE CONTENIDOS
LIMPIEZA CON VAPOR 26
CONTENIDO .................................................................................2
SEGURIDAD DEL HORNO MICROONDAS................................15
PIEZAS Y CARACTERÍSTICAS ..................................................18
INSTALACIÓN COMBINADA .......................................................18
PANEL DE CONTROL .................................................................19
AJUSTES .....................................................................................20
MODO DE ESPERA .................................................................................20
AJUSTE DEL RELOJ ...............................................................................21
AJUSTE DEL TEMPORIZADOR ..............................................................21
FUNCIÓN DE SILENCIO .........................................................................21
BLOQUEO DE CONTROL .......................................................................21
FUNCIONES DE COCCIÓN DEL HORNO MICROONDAS .......22
TIEMPO DE COCCIÓN/POTENCIA ........................................................22
COCCIÓN RÁPIDA ..................................................................................22
COCCIÓN .................................................................................................23
DESCONGELAR ......................................................................................23
RECALENTAR ..........................................................................................24
PALOMITAS DE MAÍZ ..............................................................................24
PATATAS ..................................................................................................25
VERDURAS ..............................................................................................25
ABLANDAR/FUNDIR ...............................................................................25
MANTENER CALIENTE............................................................................26
LIMPIEZA CON VAPOR ........................................................................... 26
2
MICROWAVE OVEN SAFETY
Your safety and the safety of others are very important.
We have provided many important safety messages in this manual and on your appliance. Always read and obey all safety
messages.
This is the safety alert symbol.
This symbol alerts you to potential hazards that can kill or hurt you and others.
All safety messages will follow the safety alert symbol and either the word “DANGER” or “WARNING.” These
words mean:
DANGER
WARNING
You can be killed or seriously injured if you do not
immedaitely follow instructions.
You can be killed or seriously injured if you do not follow
instructions.
All safety messages will tell you what the potential hazard is, tell you how to reduce the chance onjury, and tell you what can
happen if the instructions are not followed.
IMPORTANT SAFETY INSTRUCTIONS
When using electrical appliances basic safety precautions should be followed, including the following:
WARNING:
To reduce the risk of burns, electric shock, re, injury to persons, or exposure to excessive microwave energy:
Read all instructions before using the appliance.
Read and follow the specic “PRECAUTIONS TO AVOID
POSSIBLE EXPOSURE TO EXCESSIVE MICROWAVE
ENERGY” found in the PRECAUTIONS TO AVOID
POSSIBLE EXPOSURE TO EXCESSIVE MICROWAVE
ENERGY section.
This appliance must be grounded. Connect only to properly
grounded outlet. See “GROUNDING INSTRUCTIONS”
section.
Install or locate this appliance only in accordance with the
provided Installation Instructions.
Some products such as whole eggs and sealed containers -
for example, closed glass jars - are able to explode and
should not be heated in this oven.
Use this appliance only for its intended use as described in
the manual. Do not use corrosive chemicals or vapors in
this appliance. This type of oven is specically designed to
heat, cook, or dry food. It is not designed for industrial or
laboratory use.
HOT CONTENTS CAN CAUSE SEVERE BURNS. DO
NOT ALLOW CHILDREN TO USE THE MICROWAVE. Use
caution when removing hot items.
Do not operate this appliance it has a damaged cord or
plug, it is not working properly, or it has been damaged
or dropped.
This appliance should be serviced only by qualied service
personnel. Contact nearest authorized service facility for
examination, repair, or adjustment.
Do not cover or block any openings on the appliance.
Do not store this appliance outdoors. Do not use this
product near water – for example, near a kitchen sink, in a
wet basement, near a swimming pool, or similar locations.
Do not immerse cord or plug in water.
Keep cord away from heated surfaces.
Do not let cord hang over edge of table or counter.
Do not use replacement parts that have not been
recommended by the manufacturer (e.g. parts made at
home using a 3D printer).
See door surface cleaning instructions in the “Microwave
Oven Maintenance and Care” section.
Liquids, such as water, coee, or tea are able to be
overheated beyond the boiling point without appearing to
be boiling. Visible bubbling or boiling when the container is
removed from the microwave oven is not always present.
THIS COULD RESULT IN VERY HOT LIQUIDS
SUDDENLY BOILING OVER WHEN THE CONTAINER IS
DISTURBED OR A UTENSIL IS INSERTED INTO THE
LIQUID.
Do not operate any heating or cooking appliance beneath
this appliance.
Do not mount unit over or near any portion of a heating or
cooking appliance.
Do not mount over a sink.
Do not store anything directly on top of the appliance
surface when the appliance is in operation.
SAVE THESE INSTRUCTIONS
3
IMPORTANT SAFETY INSTRUCTIONS
When using electrical appliances basic safety precautions should be followed, including the following:
WARNING:
To reduce the risk of burns, electric shock, re, injury to persons, or exposure to excessive microwave energy:
To reduce the risk of re in the oven cavity:
• Do not overcook food. Carefully attend appliance when
paper, plastic, or other combustible materials are placed
inside the oven to facilitate cooking.
• Remove wire twist-ties from paper or plastic bags before
placing bag in oven.
• If materials inside the oven ignite, keep oven door
closed, turn oven o, and disconnect the power cord, or
shut o power at the fuse or circuit breaker panel.
• Do not use the cavity for storage purposes. Do not leave
paper products, cooking utensils, or food in the cavity
when not in use.
Oversized foods or oversized metal utensils should not be
inserted in a microwave/toaster oven as they may create a
re or risk of electric shock.
Do not clean with metal scouring pads. Pieces can burn o
the pad and touch electrical parts involving a risk of electric
shock.
Do not use paper products when appliance is operated in
the toaster mode.
Do not store any materials, other than manufacturer’s
recommended accessories, in this oven when not in use.
Do not
cover racks or any other part of the oven with metal
foil. This will cause overheating of the oven.
SAVE THESE INSTRUCTIONS
PRECAUTIONS TO AVOID POSSIBLE EXPOSURE TO
EXCESSIVE MICROWAVE ENERGY
(a) Do not attempt to operate this oven with the door open since
open-door operation can result in harmful exposure to
microwave energy. It is important not to defeat or tamper with
the safety interlocks.
(b) Do not place any object between the oven front face and the
door or allow soil or cleaner residue to accumulate on sealing
surfaces.
(c) Do not operate the oven it is damaged. It is particularly
important that the oven door close properly and that there is
no damage to the:
(1) Door (bent),
(2) Hinges and latches (broken or loosened),
(3) Door seals and sealing surfaces
(d) The oven should not be adjusted or repaired by anyone
except properly qualied service personnel.
4
This device complies with Part 18 of the FCC Rules.

MICROWAVE OVEN
MAINTENANCE AND CARE
General Cleaning
IMPORTANT: Before cleaning, make sure all controls are o and
the microwave oven is cool. Always follow label instructions on
cleaning products.
Soap, water, and a soft cloth or sponge are suggested rst, unless
otherwise noted.
STAINLESS STEEL AND BLACK STAINLESS
STEEL (on some models)
NOTE: To avoid damage to stainless steel surfaces, do not use
soap-lled scouring pads, abrasive cleaners, Cooktop Cleaner,
steel-wool pads, gritty washcloths, or abrasive paper towels.
Damage may occur to stainless steel surfaces, even with one-time
or limited use.
Rub in direction of grain to avoid damaging.
Cleaning Method:
Aresh
®
✝
Stainless Steel Cleaners Part Number W10355016
(not included) or aresh
®
Stainless Steel Cleaning Wipes Part
Number W1055049 (not included):
See the Quick Start Guide for ordering information.
Vinegar for hard water spots.
MICROWAVE OVEN DOOR EXTERIOR
Cleaning Method:
Glass cleaner and a soft cloth or sponge: Apply glass cleaner
to soft cloth or sponge, not directly on panel.
Aresh
®
Kitchen Appliance Cleaners Part Number
W10355010 (not included): See “Online Ordering Information”
section from Quick Start Guide to order.
NONSTICK CAVITY COATING (on some models)
To avoid damage to the microwave oven cavity, do not use metal
or sharp utensils or scrapers or any type of abrasive cleanser or
scrubbers.
MICROWAVE OVEN CAVITY
To avoid damage to the microwave oven cavity, do not use
soap-lled scouring pads, abrasive cleaners, steel-wool pads,
gritty washcloths, or some paper towels.
On stainless steel models, rub in direction of grain to avoid
damaging.
The area where the microwave oven door and frame touch when
closed should be kept clean.
Cleaning Method:
Average soil
Mild, nonabrasive soaps and detergents:
Rinse with clean water and dry with soft, lint-free cloth.
Heavy soil
Mild, nonabrasive soaps and detergents:
Heat 1 cup (250 mL) of water for 2 to 5 minutes in microwave
oven. Steam will soften soil. Rinse with clean water and dry
with soft, lint-free cloth.
Odors
Lemon juice or vinegar:
Heat 1 cup (250 mL) of water with 1 tbs (15 mL) of either
lemon juice or vinegar for 2 to 5 minutes in microwave oven.
✝affresh
®
is a registered trademark of Whirlpool, U.S.A.
Microwave Oven Use
Odors and smoke are normal when the microwave oven is used
the rst few times or when it is heavily soiled.
IMPORTANT: The health of some birds is extremely sensitive to
the fumes given o. Exposure to the fumes may result in death to
certain birds. Always move birds to another closed and well
ventilated room.
Safe Use of Aluminum Foil in a Microwave:
1. Small, Smooth Pieces: Use only small, at, new, and smooth
pieces ooil. Avoid wrinkled or crumpled foil.
2. Shielding: Use foil to shield small or thin areas oood to
prevent overcooking. Shape the foil smoothly around the food
without sharp edges.
3. Limited Coverage: Do not cover more than one-quarter of the
food with foil.
4. Keep Away from Walls: Ensure the foil is at least one inch
away from the microwave walls, top, and bottom.
5. No Metal Contact: Avoid contact between the foil and any
other metal parts inside the microwave.
6. Short Durations: Use foil for the shortest possible heating
time, ideally no more than 30 seconds.
7. Monitor Closely: Watch the microwave carefully. If you see
sparks, stop the microwave immediately and remove the foil.
Safe Use of Microwave-Safe Metal Containers:
1. Check for the “Microwave-Safe” Label: Only use metal
containers
that are explicitly labeled as microwave-safe by the
manufacturer.
2. Read the Manufacturer’s Instructions: Follow any specic
guidelines provided by the manufacturer.
3. Ensure Smooth, Rounded Edges: Avoid containers with sharp
or irregular edges, dents, or damage.
4. Avoid Contact with Microwave Walls: Keep the container away
from the sides, top, and bottom of the microwave cavity.
5. Do Not Use with Other Metals: Avoid placing metal utensils
inside the container and ensure no metal parts in the
microwave can touch the container.
6. Short Heating Intervals: Heat in shorter intervals and check
frequently.
7. Monitor Closely: Stay near the microwave, especially the rst
few times you use a new container. Stop immediately if you
see sparks.
8. Remove Lids (If Not Microwave-Safe): Remove any
non-microwave-safe lids before microwaving.
9. Be Aware of Longer Heating Times: Metal containers and their
contents may take longer to heat.
5
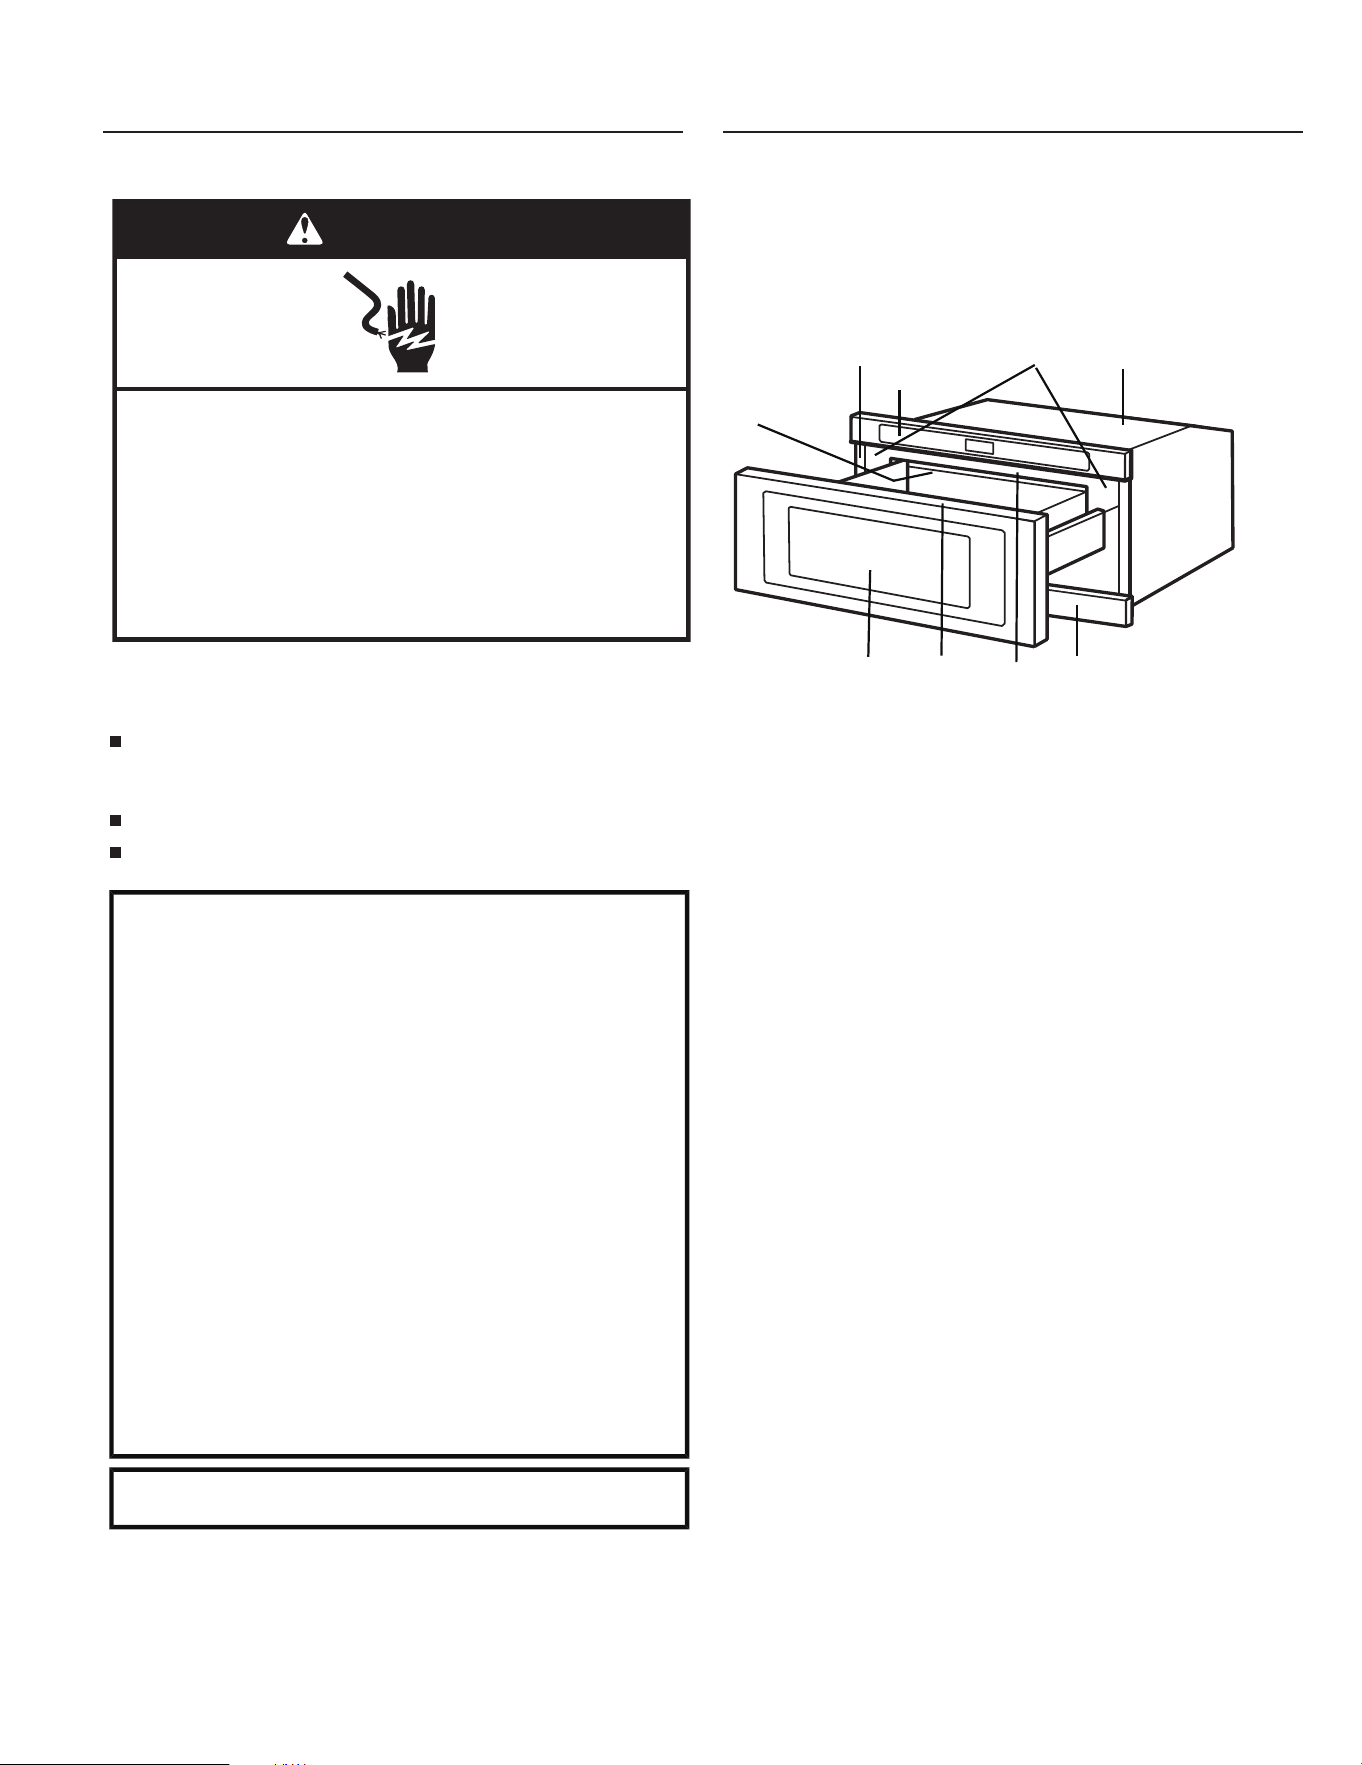
A. Trim
B. Control panel
C. Door lock system
D. Door and window panels
E.
F. Cavity back cover
H.
Cooking guide label
Frame
G. Microwave oven light
(inaccessible – in ceiling)
B
A
C
D
E
F
G
H
Rating label
I
.
I
Electrical Requirements
Observe all governing codes and ordinances.
Required:
A 120 V, 60 Hz, AC-only, 15- or 20-amp electrical supply
with a fuse or circuit breaker.
Recommended:
A time-delay fuse or time-delay circuit breaker.
A separate circuit serving only this microwave oven.
Electrical Shock Hazard
Plug into a grounded 3 prong outlet.
Do not remove ground prong.
Do not use an adapter.
Do not use an extension cord.
Failure to follow these instructions can result in death,
re, or electrical shock.
WARNING
GROUNDING INSTRUCTIONS
For a grounded, cord-connected appliance:
This appliance must be grounded. In the event of a
malfunction or breakdown, grounding will reduce the risk of
electric shock by providing a path oeast resistance for
electric current. This appliance is equipped with a cord having
an equipment-grounding conductor and a grounding plug.
The plug must be plugged into an appropriate outlet that is
properly installed and grounded in accordance with all local
codes and ordinances.
WARNING:
Improper connection of the equipment-
grounding conductor can result in a risk of electric shock.
Check with a qualied electrician or serviceman if you are in
doubt as to whether the appliance is properly grounded. Do
not modify the plug provided with the appliance: it will not t
the outlet, have a proper outlet installed by a qualied
electrician.
Do not use an extension cord. If the power supply cord is too
short, have a qualied electrician or serviceman install an
outlet near the microwave oven.
SAVE THESE INSTRUCTIONS
This device complies with Part 18 of the FCC Rules.
PARTS AND FEATURES
This manual may cover several dierent models. The model you
have purchased may have some or all of the features shown
here. The appearance of your particular model may dier slightly
from the illustrations in this manual.
6
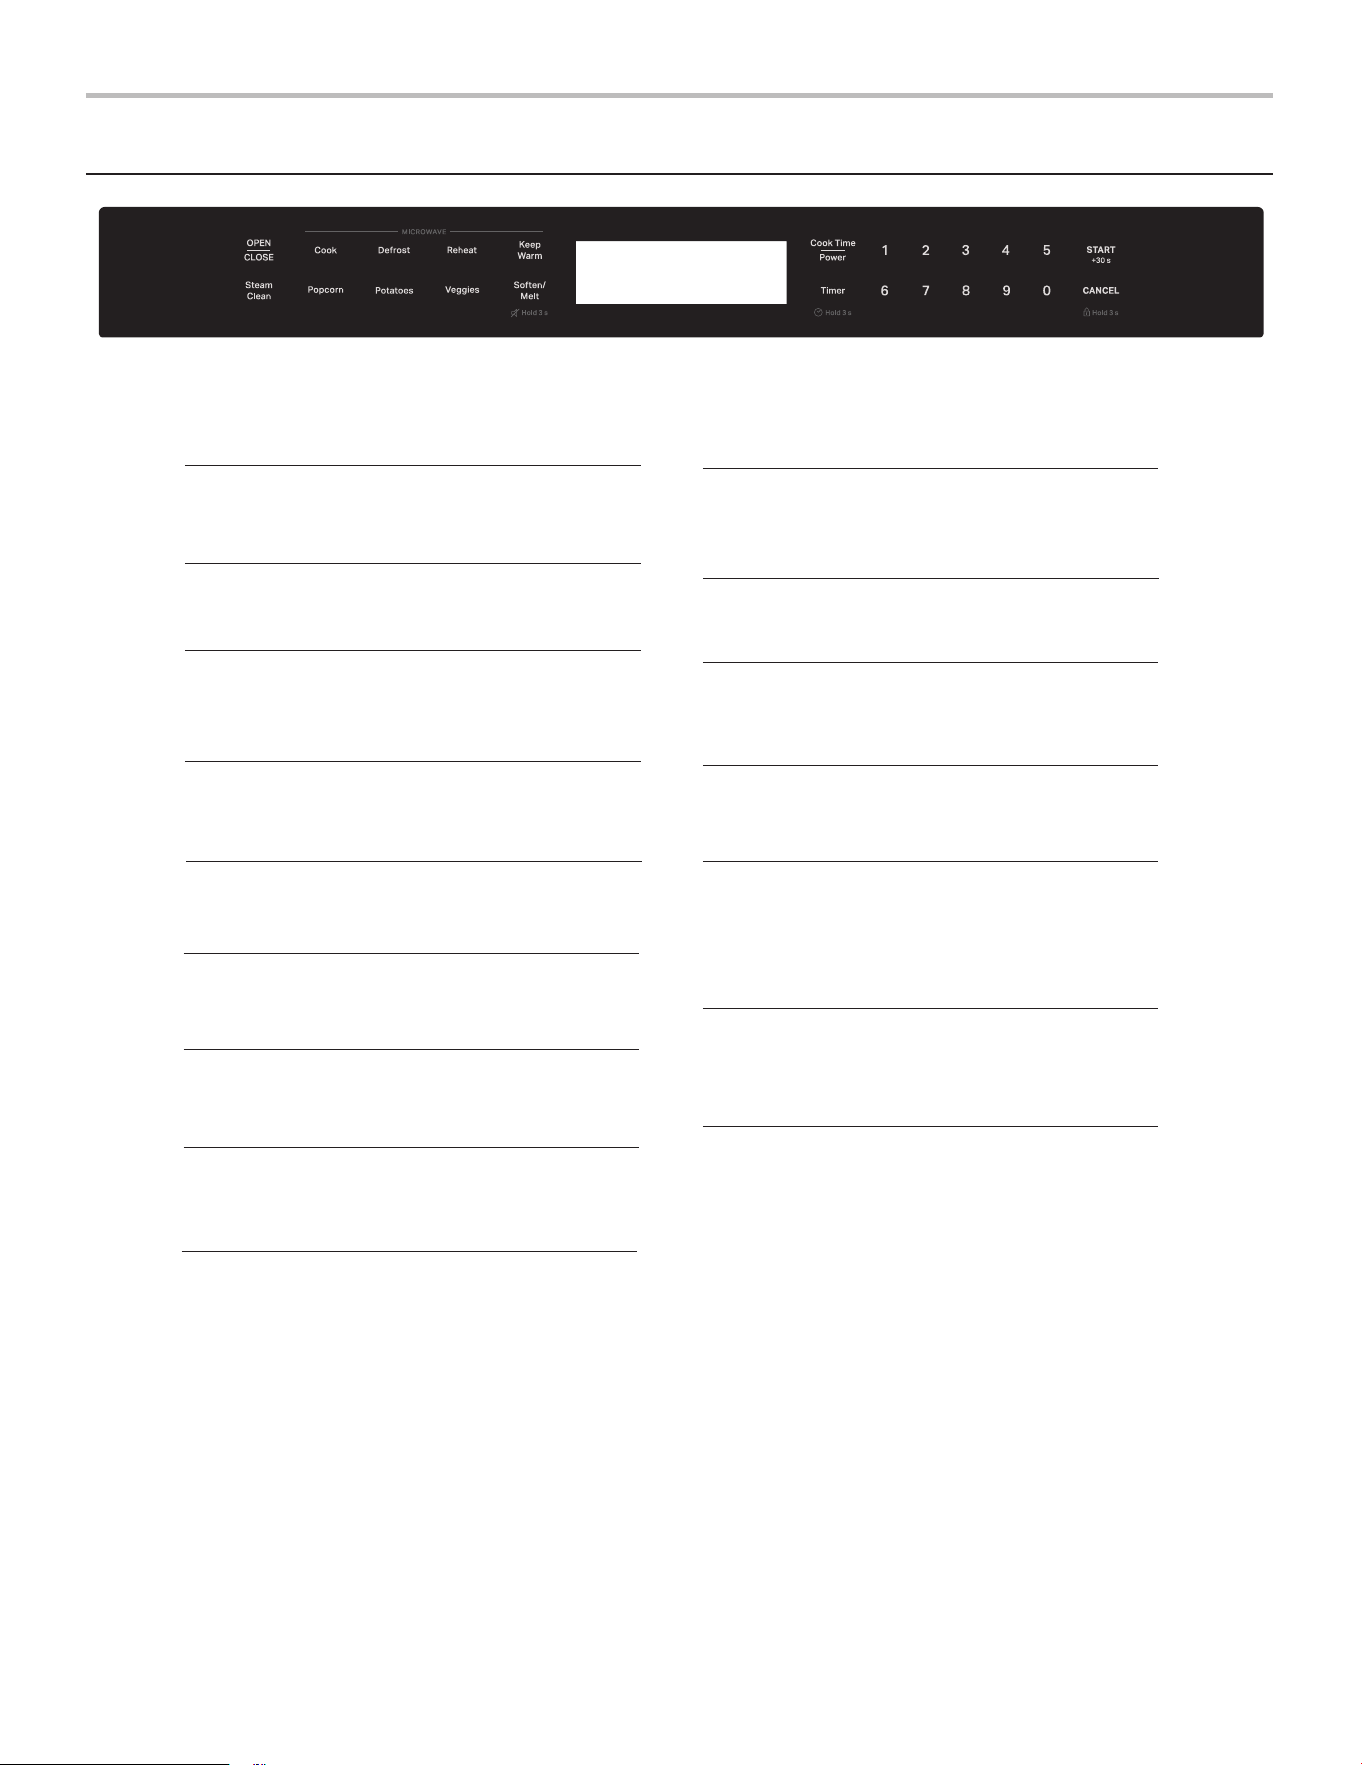
CONTROL PANEL
DISPLAY SCREEN
Time, power and indicators are displayed.
COOK
Press to select cooking menus.
DEFROST
Press to defrost food.
REHEAT
Press to select reheating menus.
/MELT
Press and hold for 3 seconds to mute all sounds.
SOFTEN
Press to soften/melt food.
POPCORN
Press to cook popcorn.
COOK TIME/POWER
Press to set microwave cooking program.
NUMBER BUTTONS
Press to set time, food weight or servings.
TIMER
Press once to set kitchen timer function.
Press and hold to set clock time function.
START/+30 s
Press to start a cooking program.
Press to quick start the microwave oven for 30
seconds at full power.
CANCEL
Press once to cancel cooking.
Press and hold for 3 seconds to set control lock.
STEAM CLEAN
Used to set steam clean function.
KEEP WARM
Used to set keeping warm function.
POTATOES
Press to cook potatoes.
VEGGIES
Press to cook veggies.
OPEN/CLOSE
When the Control Lock is deactivated, press the
OPEN/CLOSE button to automatically open or
close the drawer. The drawer can be manually
pushed or pulled to open or close at any time.
CAUTION: The maximum load capacity for the
automatic drawer is 7.7 lbs (3.5 kg). Exceeding this
limit may damage the motor or drive mechanism.
7
SETTINGS
When the oven is plugged in, a "beep" will
sound and all icons light up for 2 seconds.
After 2 seconds, the display screen will show
"12HR" (12 flashing),
(flashing), you can
press TIMER button to select 24- hour or
12-hour clock.
During cooking, if open the oven door, the
program will be paused, then close the door,
press START/+30 s button to resume.
During setting, a "beep" will sound and the
system will return to standby mode if there is
not any operation within 60 seconds.
If there is no operation for 60 seconds in
standby mode, a "beep" will sound, the backlight
will dim, and the system will enter power
saving mode. Pressing any button once and
opening the oven door will exit the power
saving mode.
After cooking ends, the display wi
ll show End
and 3 "beep" will sound. After 1 minute, a
second prompt sound will be emitted, and the
system will emit a prompt sound every 3
minutes. After the fifth prompt is completed,
it will automatically return to standby mode, or
press CANCEL button once or open the
oven door, and the system will return to
standby mode.
During cooking without opening the oven door,
if there is no operation for more than 10
minutes after pausing, the work will
automatically end and return to the standby
interface.
The electronically controlling system of the
microwave oven has the feature of cooling. As
for microwave
cooking mode which cooking
time above 2 minutes, after cooking ends, the
oven fan will work about 3 minutes
automatically to cool the oven for prolonging
the life of the oven.
When the door is opened or during cooking, the
oven light is turned
on by default.
When the microwave is in operation, if the
remaining cooking time is less than 6.8 seconds
when adjusting the time by pressing START/
+30 s, the time cannot be modified
After cooking is completed, press START/+30 s
button to immediately start a new cooking.
The parameters for the new cooking will
continue from the previous cooking parameters,
and the cooking time will
default to 30 seconds.
If the oven door is not closed, cooking cannot
be started, and the display screen shows
"DOOR" for 3 s
econds, prompting the user to
close the oven door
STANDBY MODE
When no functions are being used, the
microwave oven will switch to standby mode
and slightly dim the display brightness after
about 1 minutes. Press any button or open
the door, the display will return to normal
lightness.
When the unit is just powered on or returns to
the default mode, it will enter the protection mode.
At this time, the prompt "DOOR" will appear on the
startup screen for three seconds, and you need
to open and close the door once to start the cooking
Do not open the door or press the "CANCEL"button
during the the humidity menu is in operation;
otherwise, the cooking will malfunction and stop
working, returning to the standby screen.
8
SETTING THE CLOCK
The first method:
The second method:
1. When the oven is first plugged in, the display
screen will show "12 HR" (12 flashing), you
can press TIMER button repeatedly to select
24- hour or 12-hour clock.
2. Press START/+30 s button once.
3. Use number buttons to set correct time.
4. Press START/+30 s or TIMER button once to
confirm.
NOTE:
During the clock setting period after power
on, if the clock is not set or if there is not any
operation within 60 seconds, the system
returns to standby, the display screen will
show ":" (not flashing) indicating that the
clock has not been set. If there is not any
operation in 10 seconds on the clock
selection interface,
directly
enter the clock
setting interface.
After setting the clock value incorrectly,
press START/+30s button, and the
system will display "00:00" (flashing) and
emit an error prompt sound.
1. In idle state, press TIMER button once.
2. Use number buttons to enter desired time.
The longest time is 90 minutes.
3. Press START/+30 s button to confirm.
NOTE: When the countdown ends, the buzzer will
beep to remind you. During setting or cooking,
you can check the countdown time by pressing
TIMER button, and if CANCEL button is
pressed when the display shows the time, the
function can be cancelled.
To set: Press and hold SOFTEN/MELT button for
3 seconds, the display will show "
". The system
has entered mute mode.
To exit: In mute mode, press and hold SOFTEN/
MELT button for 3 seconds, the "
" will go off.
The system has exited mute mode.
The child proof lock prevents unsupervised
operation by children.
To set: In idle state, press and hold CANCEL
child lock mode and the lock indicator light
will turn on. In the lock state, all buttons are
disabled.
1. In idle state, press Timer button to activate oven.
2.
Press and hold TIMER button for 3 seconds.
3. Use number buttons to set the correct time.
4. Press START/+30 s or TIMER button once to
confirm
SETTING THE TIMER
MUTE FUNCTION
CONTROL CLOCK
To exit: In child lock mode, press and hold
CANCEL button for 3 seconds, the lock indicator
will go off. The system has exited child lock mode.
button for 3 seconds, the oven
will auto enter
9
MICROWAVE OVEN COOKING FUNCTIONS
EXPRESS COOKING
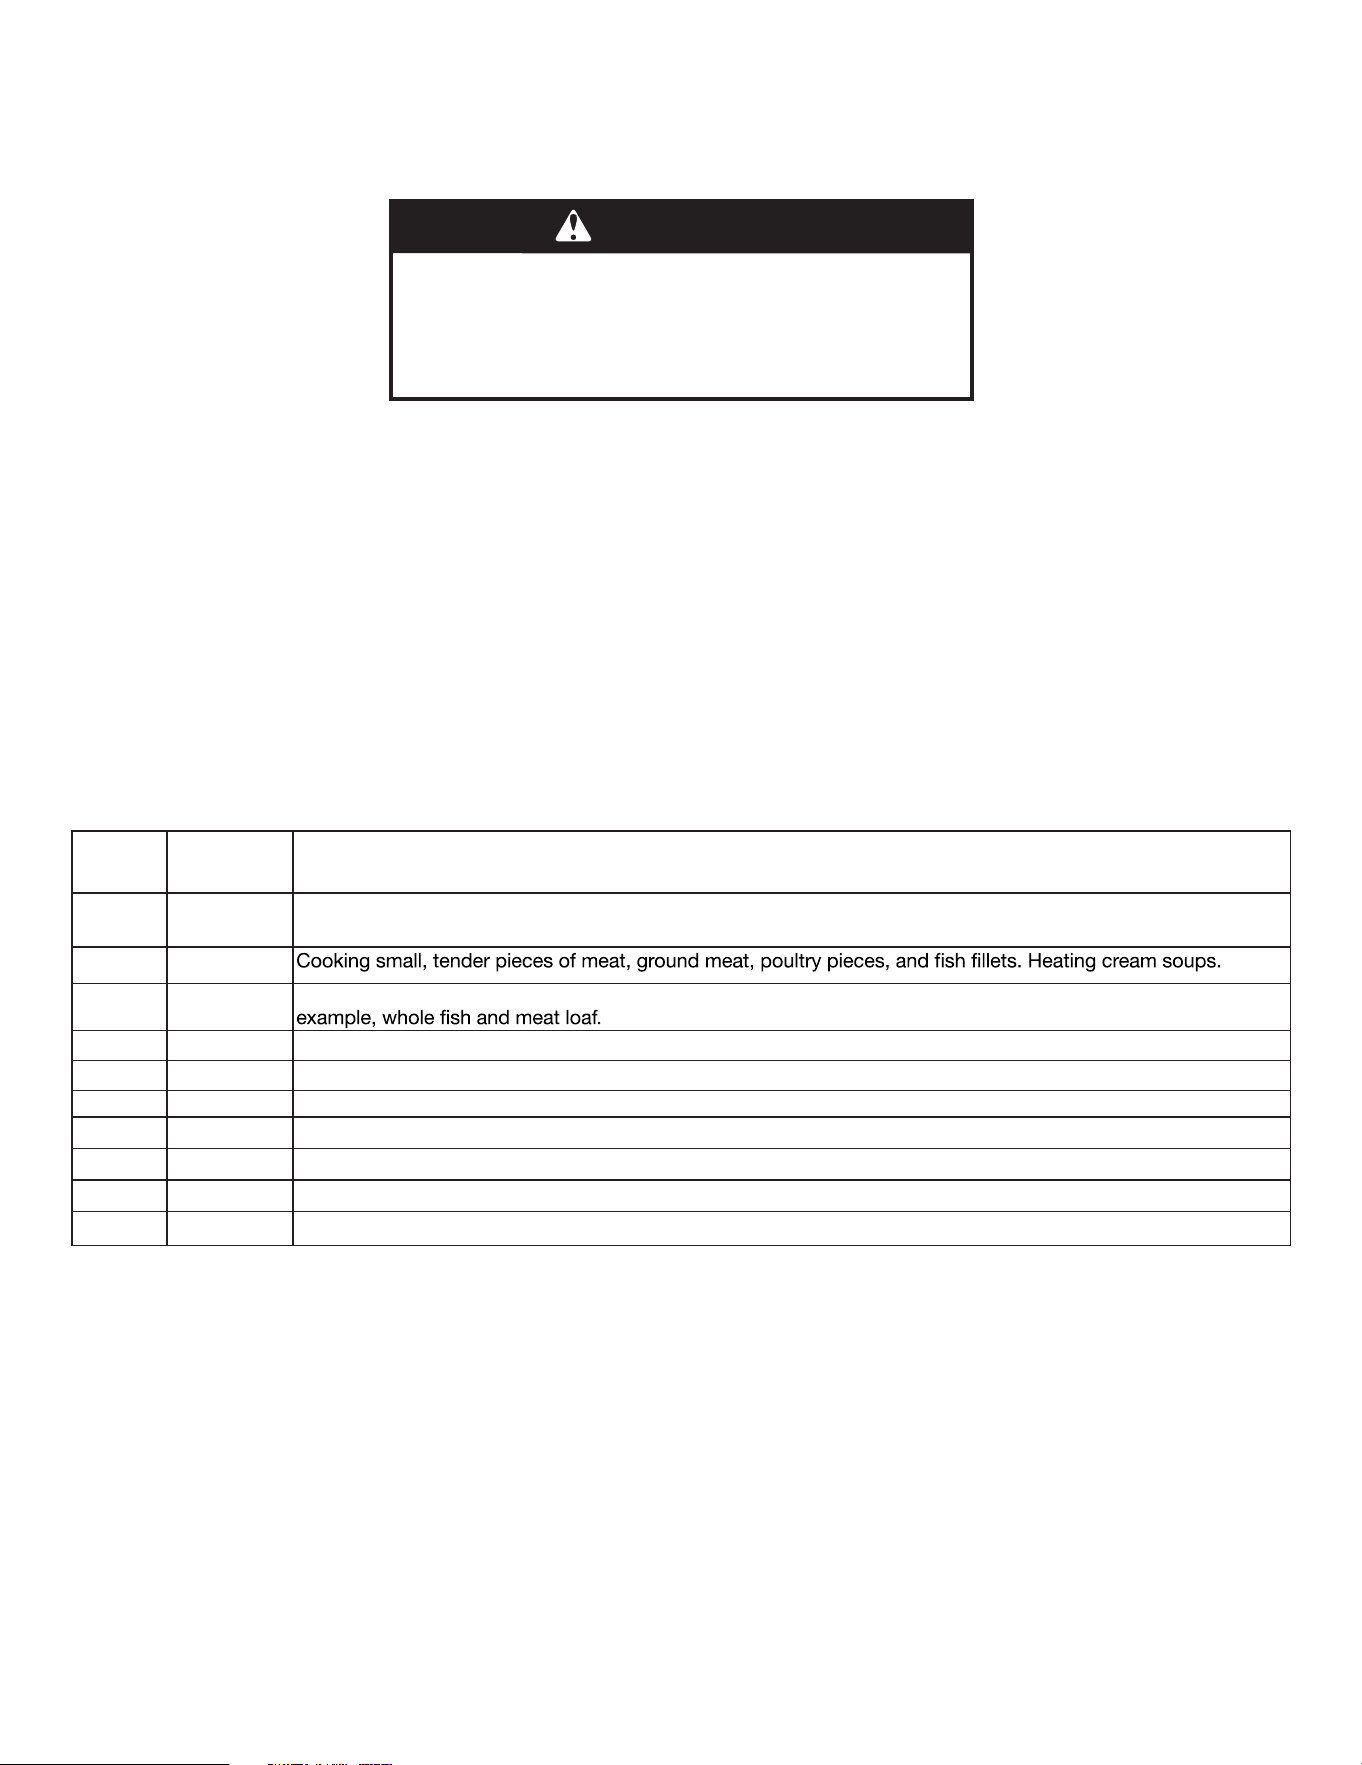
Use this feature to program the oven to microwave food at 100% power conveniently. In idle state, press START/+30 s. button once
(Default cooking time is 30 seconds), the oven will start automatically at 100% high power level.
NOTE: The longest cooking time is 90 minutes.
Number Percent/
Name
Use
10 100% Quick heating convenience foods and foods with high water content, such as cooking soups with raw
ingredients, heating beverages, and cooking most vegetables.
9 90%
8 80% Heating rice, pasta, or casseroles. Cooking and heating foods that need a cook power lower than high, for
7 70% Reheating ready-cooked food, single or multiple dishes.
6 60% Cooking sensitive foods such as cheese and egg dishes, pudding, and custards.
5 50% Cooking non-stirrable casseroles, such as lasagna.
4 40% Cooking ham, whole poultry, and pot roasts.
3 30% Simmering stews, melting butter.
2 20% Defrosting, melting chocolate. Heating bread, rolls, and pastries.
1 10% Taking chill out of fruit, Softening butter, cheese,and ice cream.
WARNING
Food Poisoning Hazard
Do not let food sit in oven more than one hour before
or after cooking.
Doing so can result in food poisoning or sickness.
Tips and suggestions:
For a better cooking performance, it is recommended to stir/turn and let the food stand 1 minutes after cooking and reheat.
When cooking foods with high water content (such as potatoes), moisture may form inside the door and oven cavity. After the oven cavity
and door cool down, wipe them o with a dry cloth.
During microwave cooking, press the "Cook Time/Power" button once. The current cooking time will pause (the countdown continues in
the background), and you will enter the time adjustment interface. At this time, press the number keys to set the desired time. The new time
setting will take eect automatically after 5 seconds, or you can press the "START/+30Sec" button to conrm and activate it immediately.
(Note: Time and power level cannot be adjusted if the remaining cooking time is less than 6 seconds.)
In the time setting interface, press the "Cook Time/Power" button once. The "%" indicator will ash, and you will enter the power level
adjustment interface. At this time, press the number keys to set the desired power level. The new power setting will take eect automatically
after 5 seconds, or you can press the "START/+30Sec" button to conrm and activate it immediately.
COOK TIME/POWER
1.While in the Idle State, press Cook Time/Power button once.
2.Use the number pad to enter the desired cooking time. (Maximum time: 90 minutes).
3.Press Cook Time/Power again to adjust the power level. (Default is 100%). Use the number pad to select a power level.
4.Press START / +30 Sec to begin cooking.
10
COOK
1. In idle state, press the Cook button repeatedly to select your food category.
2. Press the START/+30 s button, then use the number buttons to select the food quantity (this step can be skipped for sensor-based
food categories).
3. Press the START/+30 s button to begin.
DEFROST
1. In idle state, press the Defrost button repeatedly to select your food category.
2. Press the START/+30 s button, then use the number buttons to enter the defrost time or food quantity..
3. Press the START/+30 s button to begin.
•
• For optimal results, food should be 0°F (-18°C) or colder when defrosting.
• Unwrap foods and remove lids (from fruit juice) before defrosting.
• Shallow packages will defrost more quickly than deep blocks.
• Separate food pieces as soon as possible during or at the end of the cycle for more even defrosting.
• Foods left outside the freezer for more than 20 minutes or frozen ready-made food should not be defrosted using the Defrost feature
but should be defrosted manually.
•
• Times and cooking powers have been preset for defrosting a number of food types.
• Let stand 5-20 minutes after defrosting.
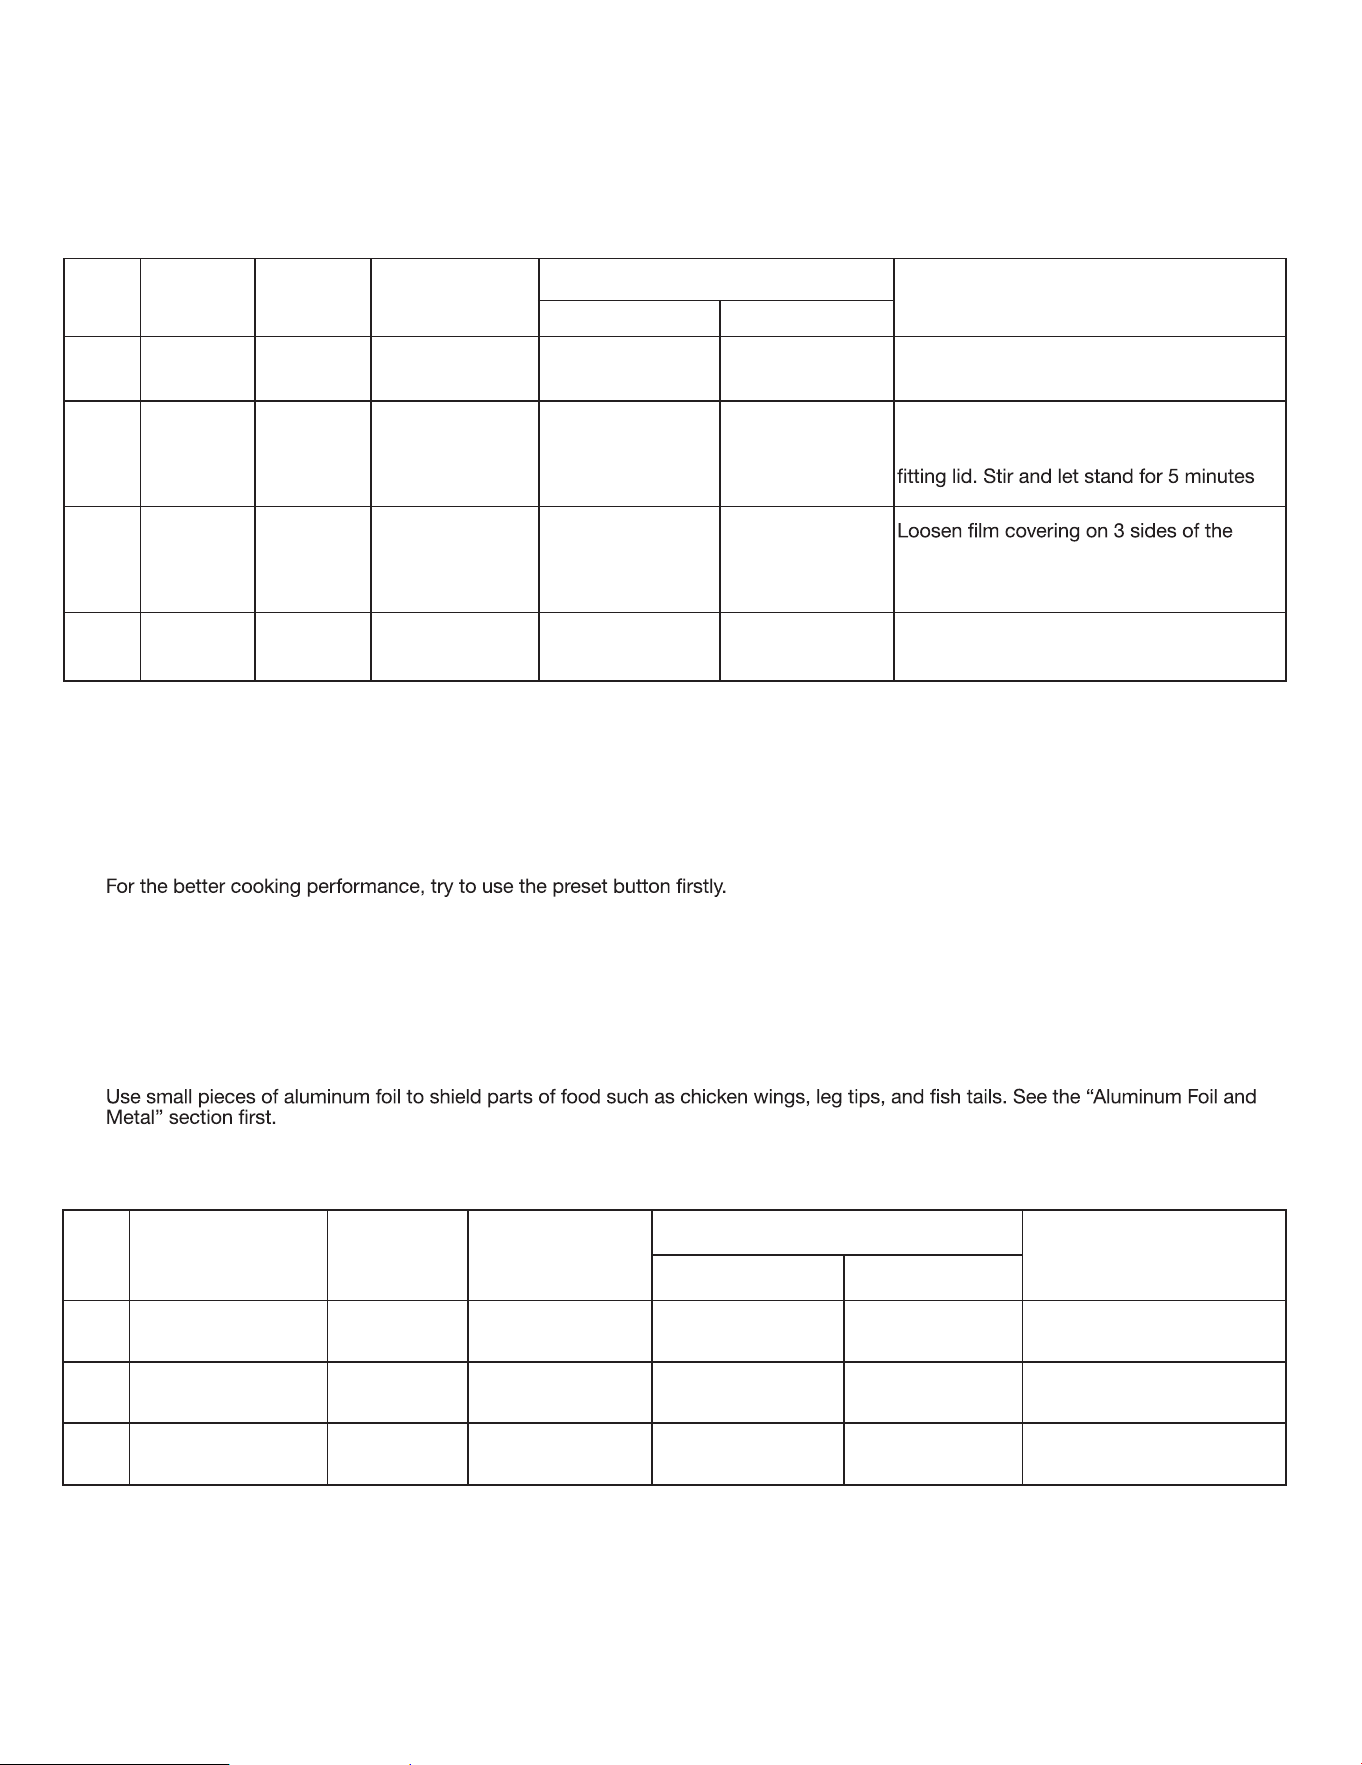
Item
Food
Category
Display Quantity
Food weight
Instruction
Ounce Gram
1 Bacon BACN 1-6 slices 0.7 oz / slice 20 g / slice
Average thickness: Follow directions on the
package. For best results, place bacon on
a microwave-safe bacon rack.
2 Rice RICE
Senses 0.5- 2.0
cups
3.4 oz - 13.6 oz
(6.8 oz rice / cup)
96 g - 384 g
(192 g rice /cup)
Follow measurements on the package for
ingredient amounts. Place rice and liquid in
a microwave-safe dish. Cover with a loose
after cooking, or until liquid is absorbed.
3
Frozen
Entree
FRZN MEAL Senses 10 - 40 oz 10 - 40 oz 283 - 1134 g
container leaving one of the short sides still
attached. Let stand for 3-5 minutes after
cooking.
4 Oatmeal OAT MEAL Senses 1-4 cups 1.2 oz / serving 35 g / serving
Cover with plastic wrap and vent.
Stir after cooking.
Item Food Category Display Quantity
Food weight
Instruction
Ounce Gram
1 Manual Defrost MDEF Enter time / / Use microwave safe plate
2 Chicken CHKN Enter 0.2-6.6 lb 3.2 - 106 oz 91 - 2994 g Use microwave safe plate
3 Ground Beef BEEF Enter 0.2-6.6 lb 3.2 - 106 oz 91 - 2994 g Use microwave safe plate
11
REHEAT
1. In idle state, press the REHEAT button repeatedly to select your food category.
2. Press the START/+30 s button, then use the number buttons to select the food quantity (this step can be skipped for sensor-based
food categories).
3. Press the START/+30 s button to begin.
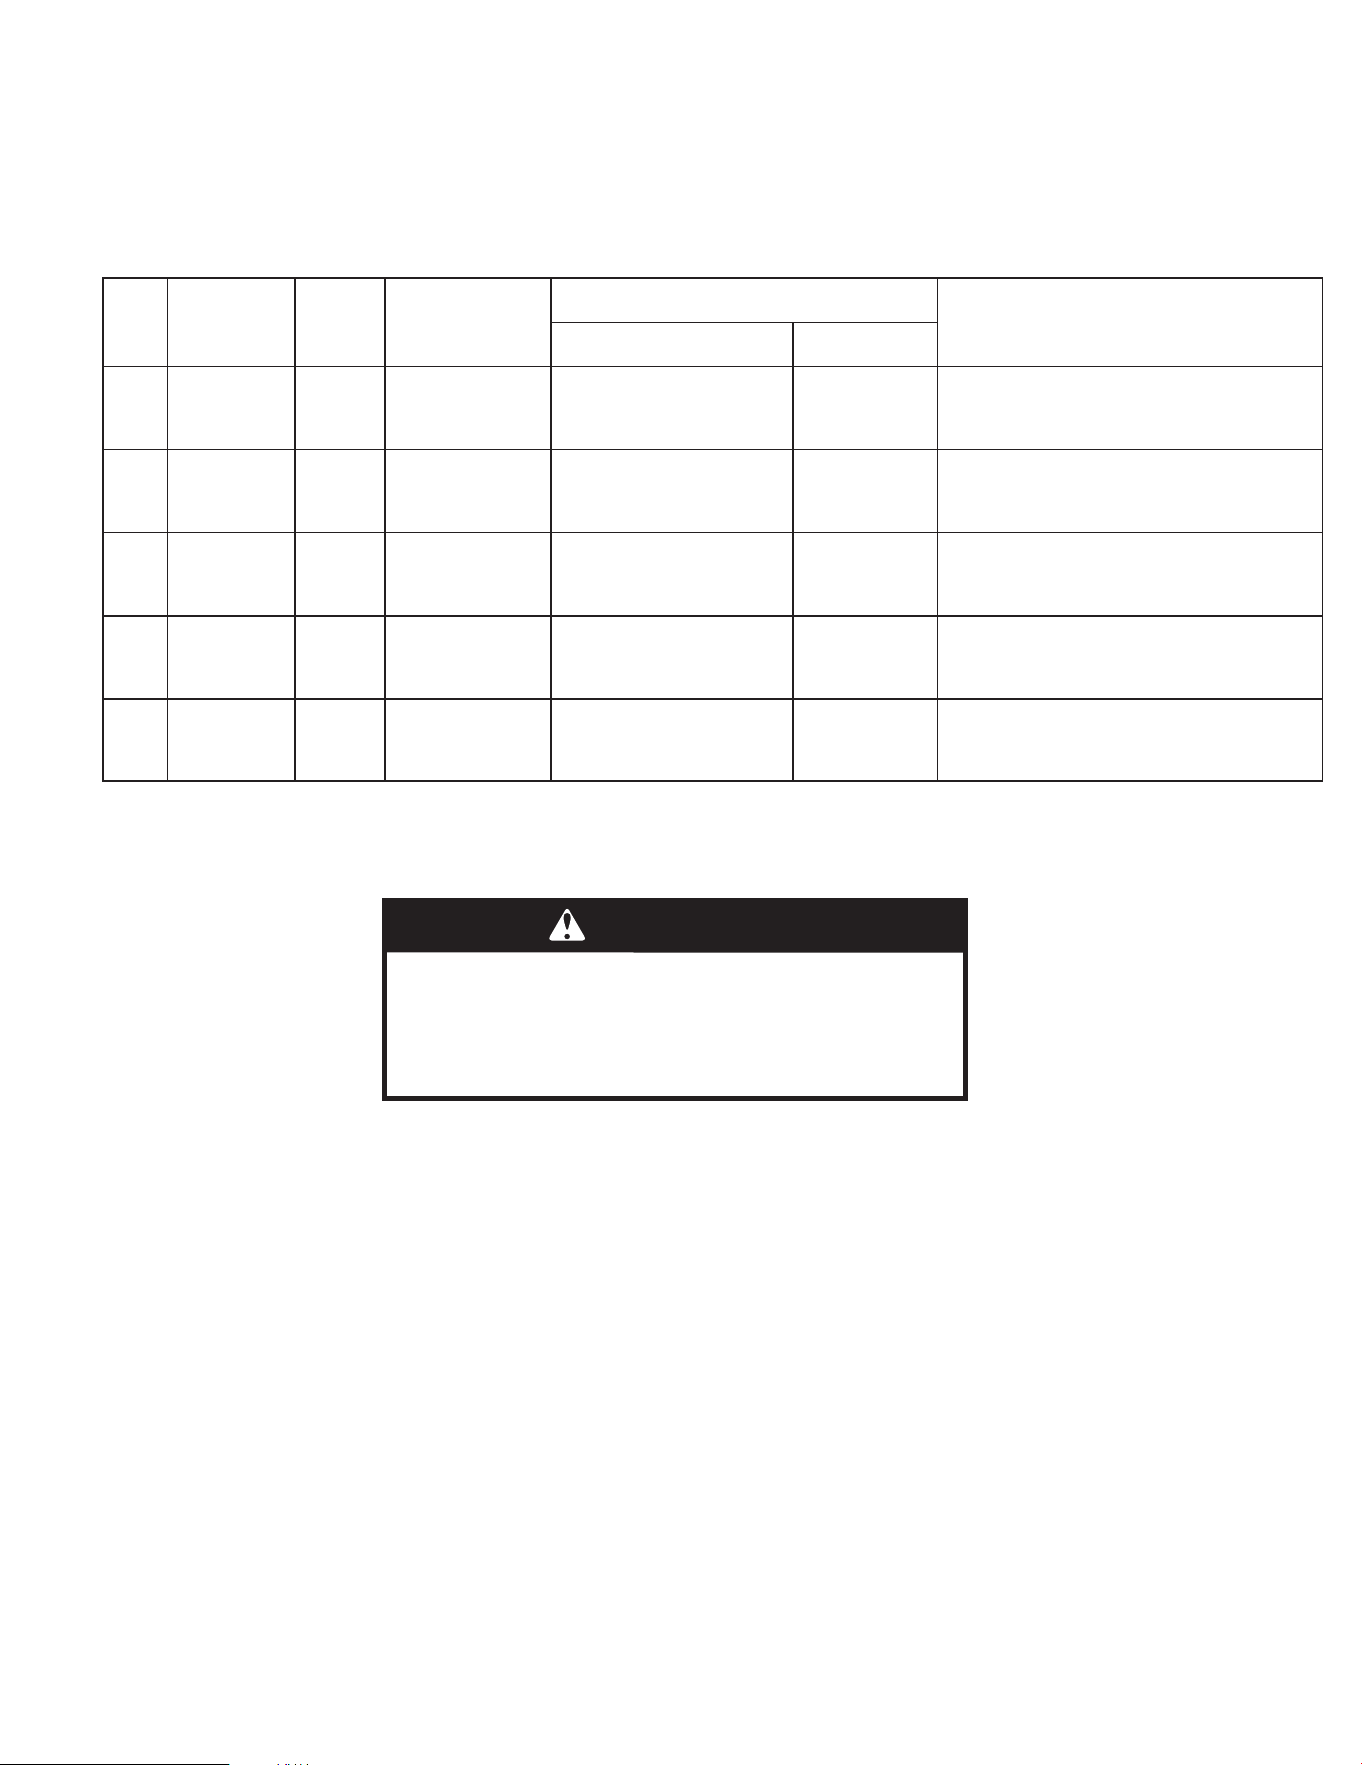
Item
Food
Category
Display Quantity
Food weight
Instruction
Ounce Gram
1 Dinner plate MEAL Sense 1 plate 10 - 15 oz 284 - 425 g
Place food on a plate.
Cover with plastic wrap and vent.
Let stand for 3 minutes after reheating.
2 Pizza PIZZ Sense 1-3 slices 3.5 oz / slice 100 g / slice
Place on a paper towel lined microwave-
safe plate.
3 Casserole CASS 1-4 cups 7.8 oz / cup 220 g / cup
Place in a microwave-safe container. Cover
with plastic wrap and vent. Stir and let
stand for 3 minutes after reheating.
4 Soup SOUP Sense 1-4 cups 8.8 oz- 35.2 oz 250 g - 1 kg
Place in a microwave-safe container. Cover
with plastic wrap and vent. Stir and let
stand for 3 minutes after reheating.
5 Beverage BEV 1-4 cups
8 oz - 32 oz
(8 oz / each)
236 g - 944 g
(236 g / cup)
Place in microwave-safe co
ntai
ner.
Do not cover.
Keep Warm
WARNING
Food Poisoning Hazard
Do not let food sit in oven more than one hour before
or after cooking.
Doing so can result in food poisoning or sickness.
1. In idle state, press KEEP WARM button repeatedly or use number buttons (1~4) to select time.
2. Press START/+30 s button to start.
12
POPCORN
1. Press the Popcorn button once, the display screen shows “POPC”.
2. Press START/+30 s button to start.
Steam Clean
Before starting the cycle:
1. Put 250 mL water into a container (see our recommendations in the below section “Tips and suggestions”).
2. Place the container directly on the middle of the oven bottom.
3. Close the door.
To Start The Cycle:
1. Press the Steam Clean button.
2. Press the START / + 30 s button to start the function.
When The Cycle Is Finished:
1. Press the CANCEL button.
2. Remove the container.
3. Use a soft cloth or a paper towel with mild detergent to clean the interior surfaces.
Tips and suggestions:
For a better cleaning result, it is recommended to use a container with a diameter of 17-20 cm, and a height that is lower than 6.5 cm.
It is recommended to use a container of light plastic material that is suitable for the microwave.
As the container will be hot after the cleaning cycle is completed, it is recommended to use a heat resistan
t glove when removing the
container from the microwave.
For a better cleaning effect and removal of unpleasant odors, add some lemon juice or vinegar to the water.
This automatic cleaning cycle will help you to clean the microwave oven cavity and to remove unpleasant odors.
Quantity
Food weight
Instruction
Ounce
Gram
Sense 3.0 ~
3.5 oz
3.0 ~ 3.5 oz
85 ~99 g
Do not use regular paper bags or glassware.
Follow manufacturer’s instructions when using a microwave popcorn popper.
Listen for popping to slow to one pop every 1 or 2 seconds, and then stop the cycle.
Do not
repop unpopped kernels.
For best results, use fresh bags of popcorn.
Cooking results may vary by brand and fat content. Follow the
instructions provided by the
microwave popcorn manufacturer.
1. Press the Potato button repeatedly to select potato size.
2. Press the START/+30 s button, then use number buttons to select potato quantity.
3. Press the START / + 30 s button to cook.
Potato
Item Food Category Display Quantity
Food Weight Instruction
Ounce Gram
1 Large potatoes LRG 1-4 potatoes 8 - 12 oz / each
227 - 340 g /
each
Pierce each potato several times with a fork.
Place on a paper towel, around ceramic plate
edges, at least 1” (2.5 cm) apart.
Place a single potato to the side of the glass tray.
Place 4 or more potatoes in a spoke pattern (long-
axis of potato pointing toward the center).
Let stand for 5 minutes after cooking.
2 Small potato SML 1-16 potatoes 3 - 5 oz / each
85 - 142 g /
each
Pierce each potato several times with a fork.
Place on a paper towel, around ceramic plate
edges, at least 1” (2.5 cm) apart.
Place 4 or more potatoes in a spoke pattern (long-
axis of potato pointing toward the center).
Let stand for 5 minutes after cooking.
Display
POPC
13
14
SOFTEN/MELT
1. In idle state, press SOFTEN/MELT button repeatedly to select food category.
2. Press START/+30 s button, then use number buttons to select the quantity.
3. Press START/+30 s button to start.
Veggies
1. In idle state, press the Veggies button repeatedly to select food category.
2. Press the START / + 30 s button to cook.
Item Food Category
Quantity
Food weight
Instruction
Ounce Gram
1 Fresh Vegetables Sense 1-4 cups 3.5 oz - 14 oz
(3.5 oz / each)
100 g - 400 g
(100 g / cup)
Place in a microwave-safe container
and add
2-4 tbs water.
Cover with plastic wrap and vent. Stir
and let
stand for 3 minutes after cooking.2 Frozen Vegetables Sense 1-4 cups
3.5 oz - 14 oz
(3.5 oz / each)
100 g - 400 g
(100 g / cup)
Item Food Category Display Quantity Food weight Instruction
Ounce Gram
1 Soften Butter SOF 1
0.5, 1.0, 1.5, 2.0
sticks
2, 4, 6, 8 oz
(4.0 oz / stick)
57, 113, 170, 227 g
(113 g / stick)
Unwrap and place in a
microwave-safe container. Stir
after melting.
2
Soften Cream
Cheese
SOF 2 3, 8 oz 3, 8 oz 85, 227 g
Place in a microwave-safe
container. Stir after melting.
3 Soften Ice Cream SOF 3 16, 32oz 16, 32 oz 454, 907 g
Cut squares into small pieces
or use chips. Place in a
microwave safe container. Stir
after melting.
4 Melt Butter MLT 4
0.5, 1.0, 1.5, 2.0
sticks
2, 4, 6, 8 oz
(4.0 oz / stick)
57, 113, 170, 227 g
(113 g / stick)
Unwrap and place in a
microwave-safe container. Stir
after melting.
5
Melt Chocolate
Chips
MLT 5 4, 8, 12 oz 4, 8, 12 oz 113, 227, 3
40 g
Cut squares into small piece
s
or use chips. Place in a
microwave safe container. Stir
after melting.
6 Melt Cheese MLT 6 8, 16 oz 8, 16 oz 227, 454 g
Cut into small pieces and
place in a microwave safe
container. Stir after melting.
Display
FRSH
FRZN
SEGURIDAD DEL HORNO MICROONDAS
Tu seguridad y la de los demás son muy importantes.
Hemos incluido muchos mensajes importantes de seguridad en este manual y en tu electrodoméstico. Lee y respeta
siempre todos los mensajes de seguridad.
Este es el símbolo de alerta de seguridad.
Este símbolo te advierte sobre posibles peligros que pueden causar la muerte o lesiones a ti y a otras
personas.
Todos los mensajes de seguridad irán acompañados del símbolo de alerta de seguridad y de la palabra
“DANGER” o “WARNING.” Estas palabras significan:
DANGER
WARNING
Puedes morir o sufrir lesiones graves si no
sigues las instrucciones de inmediato.
Puedes morir o sufrir lesiones graves si no sigues las
instrucciones.
Todos los mensajes de seguridad te indicarán cuál es el peligro potencial, cómo reducir la posibilidad de lesión y qué
puede ocurrir si no se siguen las instrucciones.
Al usar electrodomésticos eléctricos deben seguirse precauciones básicas de seguridad, incluidas las siguientes:
ADVERTENCIA:
Para reducir el riesgo de quemaduras, descarga eléctrica, incendio, lesiones a personas o
exposición excesiva a energía de microondas:
◼ Lee todas las instrucciones antes de usar el
electrodoméstico.
◼ Lee y sigue las “PRECAUTIONS TO AVOID
POSSIBLE EXPOSURE TO EXCESSIVE
MICROWAVE ENERGY” específicas que se
encuentran en la sección PRECAUTIONS TO
AVOID POSSIBLE EXPOSURE TO EXCESSIVE
MICROWAVE
sección ENERGY.
◼ Este electrodoméstico debe estar conectado a tierra.
Conéctalo únicamente a una toma de corriente
correctamente conectada a tierra. Consulta la sección
“GROUNDING INSTRUCTIONS”.
◼ Instala o ubica este electrodoméstico únicamente de
acuerdo con las instrucciones de instalación
proporcionadas.
◼ Algunos productos como huevos enteros y recipientes
sellados —por ejemplo, frascos de vidrio cerrados—
pueden explotar y no deben calentarse en este horno.
◼ Utiliza este electrodoméstico solo para el uso previsto
descrito en el manual. No utilices productos químicos o
vapores corrosivos en este electrodoméstico. Este tipo
de horno está diseñado específicamente para calentar,
cocinar o secar alimentos. No está diseñado para uso
industrial o de laboratorio.
◼ EL CONTENIDO CALIENTE PUEDE CAUSAR
QUEMADURAS GRAVES. HACER
NO PERMITIR QUE LOS NIÑOS USEN EL
MICROONDAS. Utiliza
precaución al retirar artículos calientes.
◼ No utilices este electrodoméstico si el cable o el
enchufe están dañados, si no funciona correctamente
o si ha sido dañado o se ha caído.
◼ Este electrodoméstico debe ser reparado únicamente
por personal de servicio cualificado. Contacta con el
centro de servicio autorizado más cercano para
inspección, reparación o ajuste.
◼ No cubras ni bloquees ninguna abertura del
electrodoméstico.
◼ No almacenes este electrodoméstico en exteriores. No
utilices este producto cerca del agua —por ejemplo,
cerca del fregadero, en un sótano húmedo, cerca de
una piscina o lugares similares.
◼ No sumerjas el cable ni el enchufe en agua.
◼ Mantén el cable alejado de superficies calientes.
◼ No dejes que el cable cuelgue del borde de la mesa o
encimera.
◼ No utilices piezas de repuesto que no hayan sido
recomendadas por el fabricante (por ejemplo,
piezas hechas en casa con una impresora 3D).
◼ Consulta las instrucciones de limpieza de la
superficie de la puerta en la sección “Microwave
Oven Maintenance and Care”.
◼ Los líquidos, como agua, café o té, pueden
sobrecalentarse más allá del punto de ebullición sin
parecer que están hirviendo. Las burbujas visibles o la
ebullición al retirar el recipiente del horno microondas no
siempre están presentes. ESTO PODRÍA
RESULTAR EN LÍQUIDOS MUY CALIENTES
QUE HIERVEN SÚBITAMENTE CUANDO EL
RECIPIENTE ES
PERTURBADO O SE INTRODUCE UN
UTENSILIO EN EL LÍQUIDO.
◼ No utilices ningún electrodoméstico de calefacción o
cocción debajo de este electrodoméstico.
◼ No instales la unidad sobre o cerca de ninguna parte
de un electrodoméstico de calefacción o cocción.
◼ No lo instales sobre un fregadero.
◼ No guardes nada directamente sobre la superficie
del electrodoméstico cuando esté en
funcionamiento.
CONSERVA ESTAS INSTRUCCIONES
15
INSTRUCCIONES IMPORTANTES DE SEGURIDAD
INSTRUCCIONES IMPORTANTES DE SEGURIDAD
Al usar electrodomésticos eléctricos deben seguirse precauciones básicas de seguridad, incluidas las siguientes:
ADVERTENCIA: Para reducir el riesgo de quemaduras, descarga eléctrica, incendio, lesiones a personas o exposición
excesiva a energía de microondas:
◼ Para reducir el riesgo de incendio en la cavidad del horno:
• No sobrecocines los alimentos. Supervisa
cuidadosamente el electrodoméstico cuando se
coloquen papel, plástico u otros materiales
combustibles dentro del horno para facilitar la
cocción.
• Retira las bridas metálicas de bolsas de papel o
plástico antes de colocarlas en el horno.
• Si los materiales dentro del horno se incendian,
mantén la puerta cerrada, apaga el horno y
desconecta el cable de alimentación o corta la
energía en el fusible o panel del interruptor.
• No utilices la cavidad como espacio de
almacenamiento. No dejes productos de papel,
utensilios de cocina o alimentos en la cavidad
cuando no esté en uso.
◼ No deben introducirse alimentos o utensilios metálicos
de gran tamaño en un horno microondas/tostador, ya
que pueden generar
incendio o riesgo de descarga eléctrica.
◼ No limpies con estropajos metálicos. Las partículas
pueden desprenderse del estropajo y tocar partes
eléctricas, lo que implica riesgo de descarga eléctrica.
◼ No utilices productos de papel cuando el
electrodoméstico funcione en modo tostador.
◼ No almacenes materiales, excepto los accesorios
recomendados por el fabricante, en este horno
cuando no esté en uso.
◼ No cubras las rejillas ni ninguna otra parte del horno
con papel de aluminio. Esto provocará el
sobrecalentamiento del horno.
CONSERVA ESTAS INSTRUCCIONES
PRECAUCIONES PARA EVITAR UNA POSIBLE
EXPOSICIÓN EXCESIVA A ENERGÍA DE
MICROONDAS
(a) No intentes operar este horno con la puerta abierta, ya que
su funcionamiento con la puerta abierta puede provocar
una exposición peligrosa a la energía de microondas. Es
importante no desactivar ni manipular los enclavamientos
de seguridad.
(b) No coloques ningún objeto entre la parte frontal del horno
y la puerta ni permitas que se acumule suciedad o
residuos de limpiador en las superficies de sellado.
(c) No utilices el horno si está dañado. Es especialmente
importante que la puerta del horno cierre correctamente y
que no haya daños en:
(1)Puerta (deformada),
(2)Bisagras y pestillos (rotos o sueltos),
(3)Juntas de la puerta y superficies de sellado
(d) El horno no debe ser ajustado ni reparado por nadie
excepto por personal de servicio debidamente
cualificado.
16
Este dispositivo cumple con la Parte 18 de las normas de la FCC.

Limpieza general
IMPORTANTE: Antes de limpiar, asegúrate de que todos los
controles estén apagados y de que el horno microondas esté frío.
Sigue siempre las instrucciones de la etiqueta de los productos de
limpieza.
Se recomienda usar primero jabón, agua y un paño suave o
esponja, salvo que se indique lo contrario.
ACERO INOXIDABLE Y ACERO INOXIDABLE
NEGRO
(en algunos modelos)
NOTA: Para evitar daños en las superficies de acero inoxidable,
no utilices estropajos con jabón, limpiadores abrasivos, limpiador
de superficies de cocción, estropajos de lana de acero, paños
ásperos ni toallas de papel abrasivas. Pueden producirse daños en
las superficies de acero inoxidable incluso con un uso único o
limitado.
Frota en la dirección de la veta para evitar daños.
Método de limpieza:
◼ Limpiadores de acero inoxidable affresh ® número de pieza
W10355016 (no incluidos) o toallitas de limpieza de acero
inoxidable affresh ® número de pieza W1055049 (no
incluidas):
Consulta la Guía de inicio rápido para información de pedido.
◼ Vinagre para manchas de agua dura.
EXTERIOR DE LA PUERTA DEL HORNO
MICROONDAS
Método de limpieza:
◼ Limpiacristales y un paño suave o esponja: Aplica el
limpiacristales en el paño suave o esponja, no directamente
en el panel.
◼ Limpiadores de electrodomésticos de cocina affresh ® número
de pieza W10355010 (no incluidos): Consulta la sección
“Información de pedidos en línea” de la Guía de inicio rápido
para realizar el pedido.
RECUBRIMIENTO ANTIADHERENTE DE LA CAVIDAD (en
algunos modelos)
Para evitar daños en la cavidad del horno microondas, no utilices
utensilios metálicos o afilados, raspadores ni ningún tipo de
limpiador o estropajo abrasivo.
CAVIDAD DEL HORNO MICROONDAS
Para evitar daños en la cavidad del horno microondas, no
utilices estropajos con jabón, limpiadores abrasivos,
estropajos de lana de acero, paños ásperos ni algunas toallas
de papel.
En modelos de acero inoxidable, frota en la dirección de la
veta para evitar daños.
El área donde la puerta del horno microondas y el marco entran
en contacto al cerrarse debe mantenerse limpia.
Método de limpieza:
Suciedad normal
◼ Jabones y detergentes suaves no abrasivos:
Enjuaga con agua limpia y seca con un paño suave sin pelusa.
Suciedad intensa
◼ Jabones y detergentes suaves no abrasivos:
Calienta 1 taza (250 mL) de agua durante 2 a 5 minutos en el
horno microondas. El vapor ablandará la suciedad. Enjuaga
con agua limpia y seca con un paño suave sin pelusa.
Olores
◼ Jugo de limón o vinagre:
Calienta 1 taza (250 mL) de agua con 1 cucharada (15 mL) de
jugo de limón o vinagre durante 2 a 5 minutos en el horno
microondas.
affresh® es una marca registrada de Whirlpool, U.S.A.
Uso del horno microondas
Los olores y el humo son normales cuando se utiliza el horno
microondas las primeras veces o cuando está muy sucio.
IMPORTANTE: La salud de algunas aves es extremadamente
sensible a los vapores emitidos. La exposición a estos vapores
puede causar la muerte de ciertas aves. Traslada siempre las aves
a otra habitación cerrada y bien ventilada.
Uso seguro del papel de aluminio en un microondas:
1. Piezas pequeñas y lisas: Utiliza solo piezas pequeñas,
planas, nuevas y lisas de papel de aluminio. Evita el papel
de aluminio arrugado o plegado.
2. Protección: Utiliza papel de aluminio para proteger zonas
pequeñas o finas de los alimentos y evitar que se sobrecocinen.
Da forma al papel de aluminio suavemente alrededor de los
alimentos sin bordes afilados.
3. Cobertura limitada: No cubras más de una cuarta parte del
alimento con papel de aluminio.
4. Mantener alejado de las paredes: Asegúrate de que el
papel de aluminio esté al menos a una pulgada de las
paredes, la parte superior y la inferior del microondas.
5. Sin contacto con metal: Evita el contacto entre el papel de
aluminio y cualquier otra pieza metálica dentro del
microondas.
6. Duraciones cortas: Utiliza el papel de aluminio durante el
menor tiempo de calentamiento posible, idealmente no
más de 30 segundos.
7. Supervisión constante: Observa el microondas
cuidadosamente. Si ves chispas, detén el microondas
inmediatamente y retira el papel de aluminio.
Uso seguro de recipientes metálicos aptos para microondas:
1. Verifica la etiqueta “Apto para microondas”: Utiliza únicamente
recipientes metálicos etiquetados explícitamente por el
fabricante como aptos para microondas.
2. Lee las instrucciones del fabricante: Sigue cualquier
indicación específica proporcionada por el fabricante.
3. Asegura bordes suaves y redondeados: Evita recipientes con
bordes afilados o irregulares, abolladuras o daños.
4. Evita el contacto con las paredes del microondas: Mantén el
recipiente alejado de los laterales, la parte superior y la inferior
de la cavidad del microondas.
5. No usar con otros metales: Evita colocar utensilios metálicos
dentro del recipiente y asegúrate de que ninguna pieza
metálica del microondas toque el recipiente.
6. Intervalos de calentamiento cortos: Calienta en intervalos
cortos y revisa con frecuencia.
7. Supervisión constante: Permanece cerca del microondas,
especialmente las primeras veces que uses un recipiente
nuevo. Detén el uso inmediatamente si ves chispas.
8. Retira las tapas (si no son aptas para microondas):
Retira cualquier tapa no apta para microondas
antes de calentar.
9. Ten en cuenta tiempos de calentamiento más largos: Los
recipientes metálicos y su contenido pueden tardar más en
calentarse.
17
MANTENIMIENTO Y CUIDADO DEL
HORNO MICROONDAS
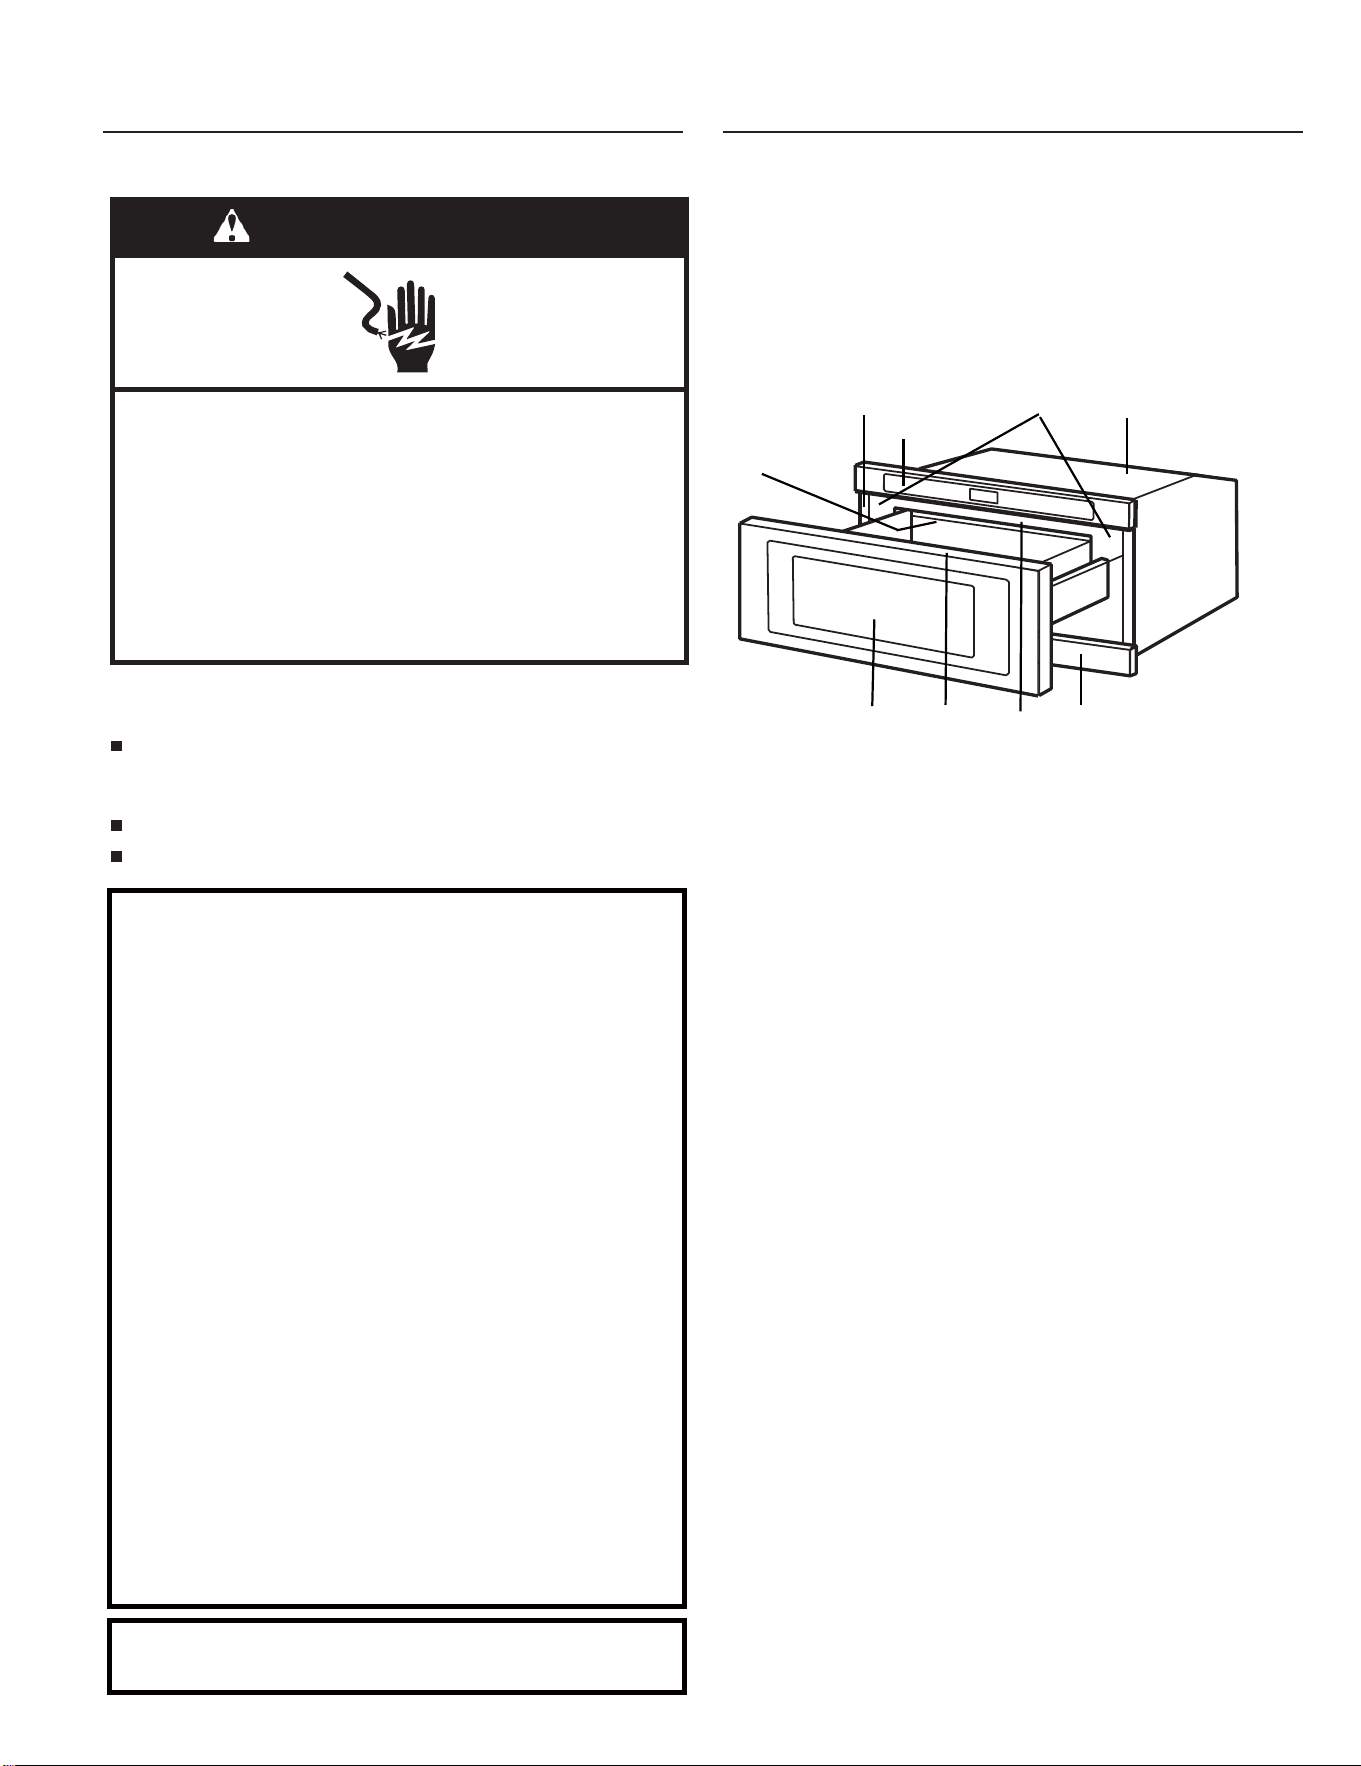
A. Moldura
B. Panel de control
C. Sistema de bloqueo de
la puerta
D. Paneles de la puerta y
ventana
E. Marco
F. Cubierta posterior de la
cavidad
G. Luz del horno
microondas (inaccesible
– en el techo)
H. Etiqueta de guía de
cocción
I.
Etiqueta de clasificación
A
C
D
E
F
B
G
H
I
Requisitos eléctricos
Cumple todos los códigos y normativas
vigentes. Requisitos:
Una alimentación eléctrica de 120 V, 60 Hz, solo
CA, de 15 o 20 amperios con fusible o disyuntor.
Recomendado:
Un fusible de retardo o disyuntor de retardo.
Un circuito independiente que alimente únicamente
este horno microondas.
ADVERTENCIA
Peligro de descarga eléctrica
Conéctalo a una toma de corriente
con conexión a tierra de 3 clavijas.
No retires la clavija de tierra.
No utilices un adaptador.
No utilices un cable de extensión.
El incumplimiento de estas instrucciones puede provocar la
muerte, incendio o descarga eléctrica.
INSTRUCCIONES DE CONEXIÓN A TIERRA
Para un electrodoméstico con conexión a tierra y cable de
alimentación:
Este electrodoméstico debe estar conectado a tierra. En
caso de fallo o avería, la conexión a tierra reducirá el
riesgo de descarga eléctrica al proporcionar un camino de
menor resistencia para la corriente eléctrica. Este
electrodoméstico está equipado con un cable que incluye
un conductor de puesta a tierra del equipo y un enchufe
con conexión a tierra.
El enchufe debe conectarse a una toma de corriente
adecuada que esté
correctamente instalada y conectada a tierra de acuerdo
con todos los códigos y normativas locales.
ADVERTENCIA: Una conexión incorrecta
del conductor de puesta a tierra del equipo puede provocar
riesgo de descarga eléctrica. Consulta con un electricista o
técnico cualificado si tienes dudas sobre si el
electrodoméstico está correctamente conectado a tierra. No
modifiques el enchufe suministrado con el
electrodoméstico: si no encaja en la toma de corriente, haz
que un electricista cualificado instale una toma adecuada.
No utilices un cable de extensión. Si el cable de
alimentación es demasiado corto, haz que un electricista
o técnico cualificado instale una toma de corriente cerca
del horno microondas.
CONSERVA ESTAS INSTRUCCIONES
Este dispositivo cumple con la Parte 18 de las normas de la
FCC.
PIEZAS Y
CARACTERÍSTICAS
Este manual puede cubrir varios modelos diferentes. El
modelo que has adquirido puede incluir algunas o todas las
características mostradas aquí. La apariencia de tu modelo
específico puede diferir ligeramente de las ilustraciones de
este manual.
18
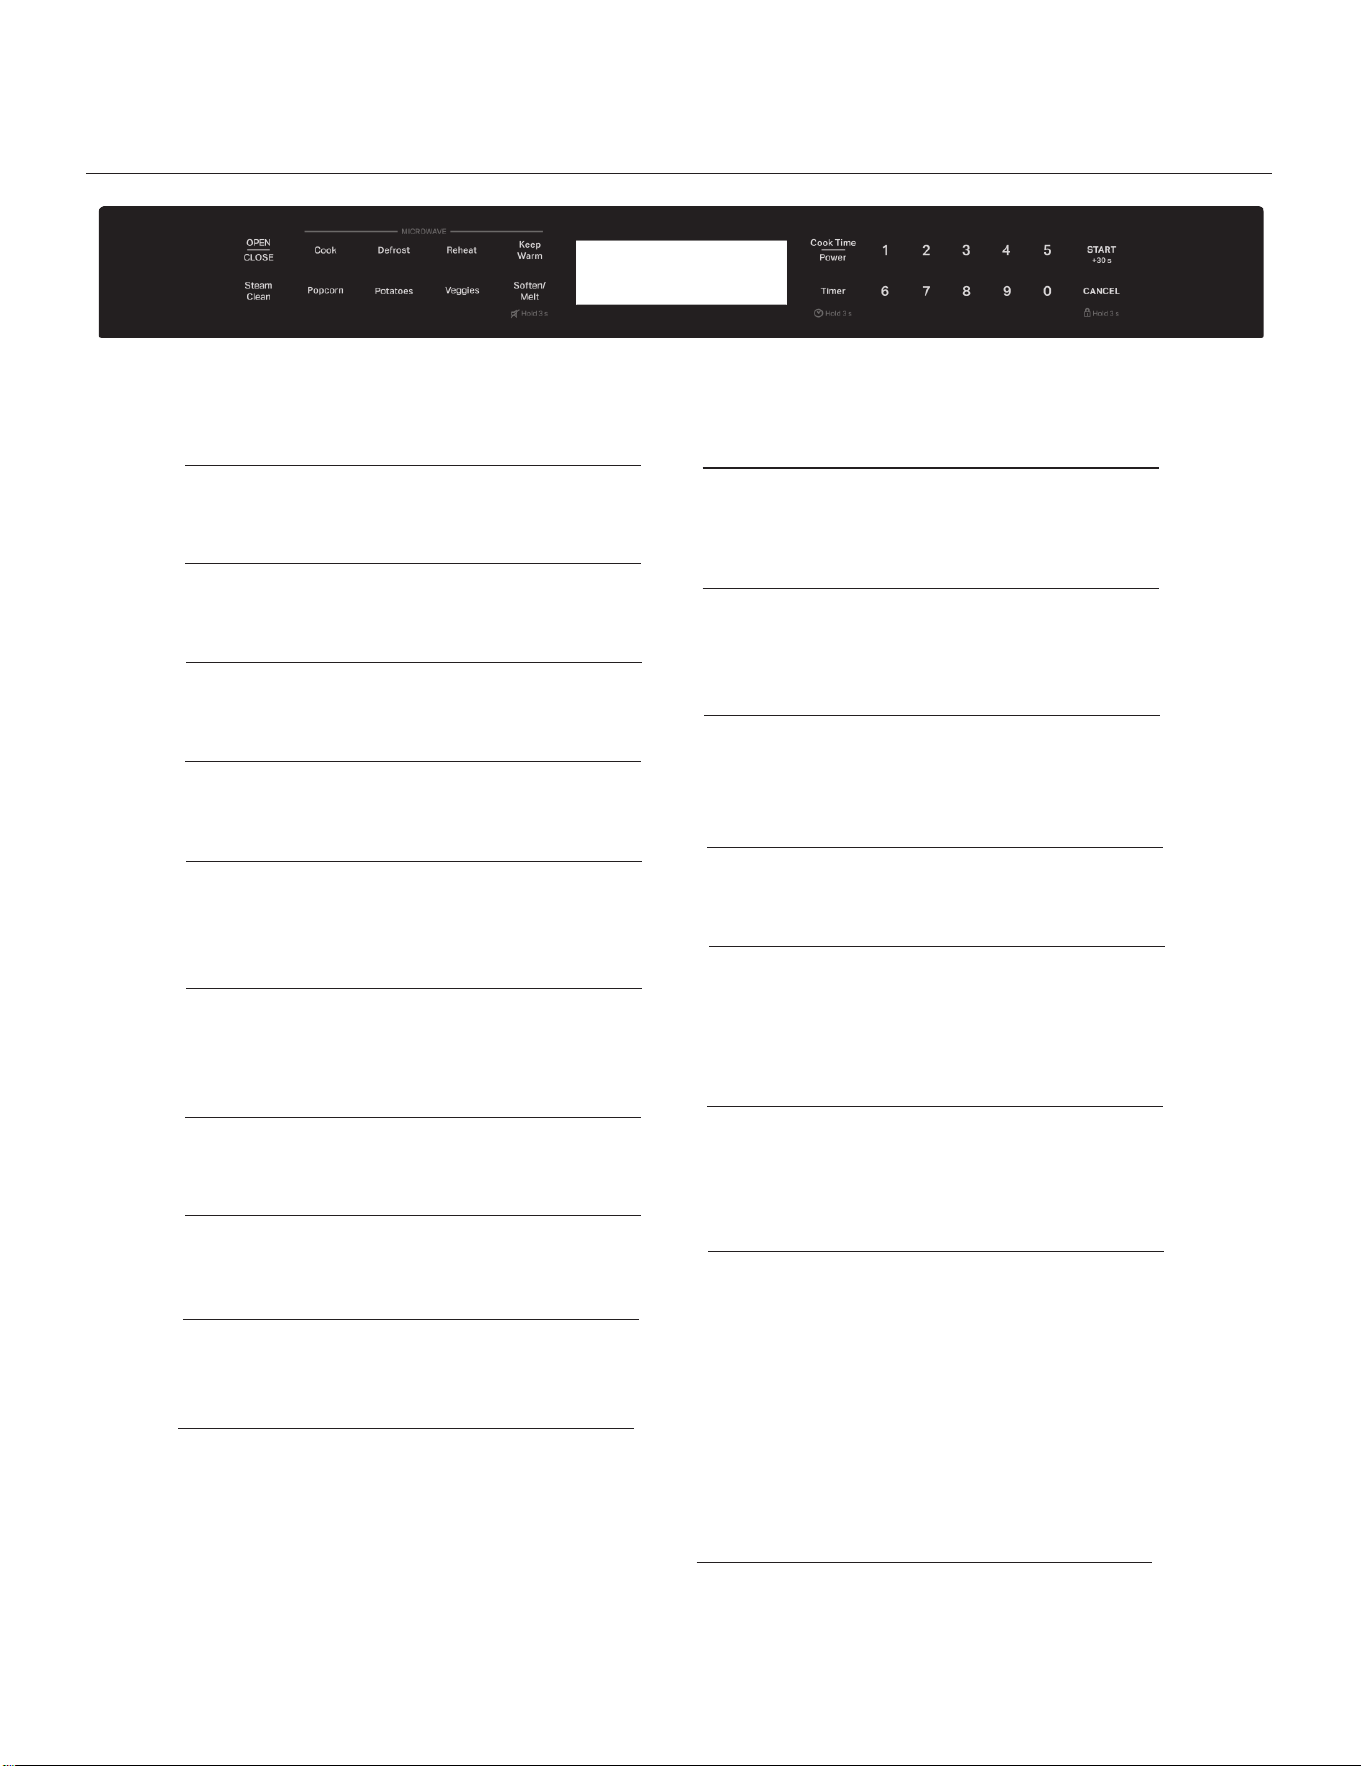
PANEL DE CONTROL
PANTALLA
Se muestran la hora, la potencia y los
indicadores.
COCINAR
Pulsa para seleccionar menús de cocción.
DESCONGELAR
Pulsa para descongelar alimentos.
RECALENTAR
Pulsa para seleccionar menús de recalentado.
MANTENER CALIENTE
Se utiliza para activar la función de mantener
caliente.
LIMPIEZA A VAPOR
Se utiliza para activar la función de limpieza a
vapor.
PALOMITAS DE MAÍZ
Pulsa para preparar palomitas de maíz.
PATATAS
Pulsa para cocinar patatas.
VERDURAS
Pulsa para cocinar verduras.
19
ABLANDAR / FUNDIR
Pulsa para ablandar/fundir alimentos.
Mantén pulsado durante 3 segundos para silenciar
todos los sonidos.
TIEMPO DE COCCIÓN/POTENCIA
Pulsa para configurar el programa de cocción del
microondas.
TEMPORIZADOR
Pulsa una vez para configurar la función
de temporizador de cocina. Mantén
pulsado para ajustar la hora del reloj.
BOTONES NUMÉRICOS
Pulsa para ajustar el tiempo, el peso de los
alimentos o las porciones.
INICIO/+30 s
Pulsa para iniciar un programa de cocción.
Pulsa para iniciar rápidamente el microondas
durante 30 segundos a máxima potencia.
CANCELAR
Pulsa una vez para cancelar la cocción.
Mantén pulsado durante 3 segundos para activar el
bloqueo de control.
ABRIR/CERRAR
Cuando el bloqueo de control está desactivado,
pulsa el botón ABRIR/CERRAR para abrir o
cerrar automáticamente el cajón. El cajón puede
empujarse o tirarse manualmente para abrirse o
cerrarse en cualquier momento.
PRECAUCIÓN: La capacidad máxima de carga del
cajón automático es de 7.7 lb (3.5 kg). Superar
este límite puede dañar el motor o el mecanismo
de accionamiento.
◼
◼ Cuando se abre la puerta o durante la
cocción, la luz del horno se enciende por
defecto.
Cuando el microondas está en
funcionamiento, si el tiempo restante de
cocción es inferior a 6.8 segundos
al ajustar el tiempo pulsando START/
◼ Después de finalizar la cocción, pulsa el botón
START/+30 s para iniciar inmediatamente una
nueva cocción.
Los parámetros de la nueva cocción
continuarán desde los parámetros de la
cocción anterior, y el tiempo de cocción por
defecto será de 30 segundos.
◼ Si la puerta del horno no está cerrada, no se
puede iniciar la cocción y la pantalla muestra
DOOR durante 3 segundos, indicando al
usuario que cierre la puerta del horno.
Cuando el equipo acaba de encenderse o vuelve
al modo predeterminado, entrará en modo de
protección. En este momento, el aviso "DOOR"
aparecerá en la pantalla de inicio durante tres
segundos, y seránecesario abrir y cerrar la puerta
una vez para iniciar la cocción. No abras la puerta
ni pulses el botón "CANCEL" mientras el menú de
humedad esté en funcionamiento; de lo contrario,
la cocción fallará y se detendrá, volviendo a la
pantalla de espera.
◼
◼ Durante la cocción, si se abre la puerta del
horno, el programa se pausará; luego, al
cerrar la puerta, pulsa el botón START/+30 s
para reanudar.
Durante la configuración, sonará un “beep” y el
sistema volverá al modo de espera si no hay
ninguna operación en 60 segundos.
◼ Si no hay ninguna operación durante 60
segundos en modo de espera, sonará un
“beep”, la retroiluminación
se atenuará y el sistema entrará en modo de
ahorro de energía. Al pulsar cualquier botón
una vez y
abrir la puerta del horno se saldrá del
modo de ahorro de energía.
◼ Después de finalizar la cocción, la pantalla
mostrará End
y sonarán 3 “beep”. Después de 1 minuto, se
emitirá un segundo aviso sonoro y el sistema
emitirá un aviso cada 3 minutos. Después de
completarse el quinto aviso,
volverá automáticamente al modo de espera,
o pulsa una vez el botón CANCEL o abre la
puerta del horno, y el sistema volverá al modo
de espera.
◼ Durante la cocción sin abrir la puerta del horno,
si no hay ninguna operación durante más
de 10 minutos después de la pausa, el
funcionamiento terminará automáticamente
y volverá a la interfaz de espera.
El sistema de control electrónico del horno
microondas cuenta con función de
refrigeración. En el modo de cocción por
microondas con un tiempo superior a 2
minutos, después de finalizar la cocción, el
ventilador del horno funcionará
automáticamente durante unos 3 minutos para
enfriar el horno y prolongar su vida útil.
AJUSTES
MODO DE ESPERA
Cuando no se estén utilizando funciones, el
horno microondas pasará al modo de espera
y atenuará ligeramente el brillo de la pantalla
después de aproximadamente 1 minuto.
Pulsa cualquier botón o abre
la puerta, la pantalla volverá a su brillo
normal.
20
◼ Cuando el horno se conecta a la corriente,
sonará un “beep” y todos los iconos se
iluminarán durante 2 segundos. Después de 2
segundos, la pantalla mostrará "12HR" (12
parpadeando), (parpadeando), puedes
pulsar el botón TIMER para seleccionar el
formato de 24 horas o de 12 horas.
AJUSTE DEL RELOJ
El primer método:
El segundo método:
1. Cuando el horno se conecta por primera
vez, la pantalla mostrará "12 HR" (12
parpadeando), puedes pulsar repetidamente
el botón TIMER para seleccionar reloj de 24
horas o de 12 horas.
2. Pulsa una vez el botón START/+30 s.
3. Utiliza los botones numéricos para ajustar la
hora correcta.
4. Pulsa una vez el botón START/+30 s o
TIMER para confirmar.
NOTA:
Durante el ajuste del reloj tras el encendido,
si no se configura el reloj o no hay ninguna
operación en 60 segundos, el sistema
vuelve al modo de espera y la pantalla
mostrará ":" (sin parpadear), indicando que
el reloj no ha sido configurado. Si no hay
ninguna operación durante 10 segundos en
la
interfaz de selección del reloj, se entra
directamente en la interfaz de ajuste del
reloj.
Si el valor del reloj se ajusta
incorrectamente, pulsa el botón
START/+30s, y el sistema mostrará "00:00"
(parpadeando) y emitirá un sonido de error.
1. En estado inactivo, pulsa una vez el botón
TIMER.
2. Utiliza los botones numéricos para
introducir el tiempo deseado. El tiempo
máximo es de 90 minutos.
3. Pulsa el botón START/+30 s para
confirmar.
NOTA: Cuando finaliza la cuenta atrás, el
zumbador emitirá un “beep” para avisarte.
Durante la configuración o la cocción, puedes
comprobar el tiempo de cuenta atrás pulsando el
botón TIMER, y si se pulsa el botón CANCEL
cuando la pantalla muestra el tiempo, la
función puede cancelarse.
BLOQUEO DE CONTROL
El bloqueo infantil evita el uso no
supervisado por parte de los niños.
Para activar: En estado inactivo, mantén
pulsado el botón CANCEL durante 3
segundos, el horno entrará automáticamente
en
modo bloqueo infantil y se encenderá el
indicador de bloqueo. En estado de
bloqueo, todos los botones quedan
deshabilitados.
Para desactivar: En modo bloqueo infantil,
mantén pulsado el botón CANCEL durante 3
segundos, el indicador de bloqueo se apagará. El
sistema ha salido del modo bloqueo infantil.
1. En estado inactivo, pulsa el botón Timer para
activar el horno.
2. Mantén pulsado el botón TIMER durante 3
segundos.
3. Utiliza los botones numéricos para ajustar la hora
correcta.
4. Pulsa una vez el botón START/+30 s o
TIMER para confirmar
AJUSTE DEL TEMPORIZADOR
21
FUNCIÓN DE SILENCIO
Para activar: Mantén pulsado el botón
SOFTEN/MELT durante 3 segundos, la pantalla
mostrará " ". El sistema
ha entrado en modo silencio.
Para salir: En modo silencio, mantén pulsado el
botón SOFTEN/MELT durante 3 segundos, el " "
se apagará. El sistema ha salido del modo silencio.
FUNCIONES DE COCCIÓN DEL HORNO MICROONDAS
Consejos y sugerencias:
Para un mejor rendimiento de cocción, se recomienda remover/girar los alimentos y dejarlos reposar 1 minutos después de la cocción
y el recalentado.
Al cocinar alimentos con alto contenido de agua (como patatas), puede formarse humedad dentro de la puerta y la cavidad del horno.
Una vez que la cavidad del horno y la puerta se enfríen, límpialas con un paño seco.
COCCIÓN RÁPIDA
Utiliza esta función para programar el horno y cocinar alimentos en el microondas a 100% de potencia de forma sencilla. En
estado inactivo, pulsa una vez el botón START/+30 s. (el tiempo de cocción predeterminado es de 30 segundos), el horno
comenzará automáticamente a 100% de potencia alta.
NOTA: El tiempo máximo de cocción es de 90 minutos.
Número
Porcentaje/
Nombre
Uso
10 100%
Calentamiento rápido de alimentos preparados y alimentos con alto contenido de agua, como
sopas con ingredientes crudos, bebidas y la mayoría de verduras.
9 90%
8 80%
Calentar arroz, pasta o guisos. Cocinar y calentar alimentos que requieren una potencia de cocción inferior a
alta, por ejemplo, pescado entero y pastel de carne.
7 70%
Recalentar alimentos ya cocinados, platos individuales o múltiples.
6 60%
Cocinar alimentos delicados como platos con queso y huevo, pudines y natillas.
5 50%
Cocinar guisos que no deben removerse, como lasaña.
4 40%
Cocinar jamón, aves enteras y asados de carne.
3 30%
Cocción a fuego lento de guisos, derretir mantequilla.
2 20%
Descongelar, derretir chocolate. Calentar pan, bollos y pasteles.
1 10%
Quitar el frío a la fruta, ablandar mantequilla, queso y helado.
ADVERTENCIA
Peligro de intoxicación alimentaria
No dejes alimentos en el horno más de una hora
antes o después de la cocción.
Hacerlo puede provocar intoxicación alimentaria o
enfermedades.
TIEMPO DE COCCIÓN/POTENCIA
1. En estado inactivo, pulsa una vez el botón Cook Time/Power.
2. Utiliza el teclado numérico para introducir el tiempo de cocción deseado. (Tiempo máximo: 90 minutos).
3. Pulsa de nuevo Cook Time/Power para ajustar el nivel de potencia. (El valor predeterminado es 100%). Utiliza el teclado
numérico para seleccionar un nivel de potencia.
4. Pulsa START / +30 Sec para iniciar la cocción.
Durante la cocción en el microondas, pulsa una vez el botón "Cook Time/Power". El tiempo de cocción actual se pausará (la
cuenta atrás continúa en segundo plano) y entrarás en la interfaz de ajuste del tiempo. En este momento, pulsa las teclas
numéricas para ajustar el tiempo deseado. El nuevo ajuste de tiempo se aplicará automáticamente después de 5 segundos, o
puedes pulsar el botón "START/+30Sec" para confirmar y activarlo inmediatamente. (Nota: El tiempo y el nivel de potencia no
pueden ajustarse si el tiempo restante de cocción es inferior a 6 segundos.)
En la interfaz de ajuste de tiempo, pulsa una vez el botón "Cook Time/Power". El indicador "%" parpadeará y entrarás en la
interfaz de ajuste del nivel de potencia. En este momento, pulsa las teclas numéricas para ajustar el nivel de potencia deseado. El
nuevo ajuste de potencia se aplicará automáticamente después de 5 segundos, o puedes pulsar el botón "START/+30Sec" para
confirmar y activarlo inmediatamente.
22
Cocción de trozos de carne pequeños y tiernos, carne molida, piezas de aves y filetes de pescado.
Calentamiento de cremas.
COCINAR
1. En estado inactivo, pulsa repetidamente el botón Cook para seleccionar la categoría de alimentos.
2. Pulsa el botón START/+30 s y luego utiliza los botones numéricos para seleccionar la cantidad de alimentos (este paso puede
omitirse en categorías basadas en sensor).
3. Pulsa el botón START/+30 s para comenzar.
DESCONGELAR
1. En estado inactivo, pulsa repetidamente el botón Defrost para seleccionar la categoría de alimentos.
2. Pulsa el botón START/+30 s y luego utiliza los botones numéricos para introducir el tiempo de descongelación o la cantidad de
alimentos.
3. Pulsa el botón START/+30 s para comenzar.
•
• Para obtener mejores resultados, los alimentos deben estar a 0°F (-18°C) o menos al descongelar.
• Desenvuelve los alimentos y retira las tapas (de los zumos de fruta) antes de descongelar.
• Los envases poco profundos se descongelan más rápido que los bloques gruesos.
• Separa las piezas de alimentos lo antes posible durante o al final del ciclo para una descongelación más uniforme.
• Los alimentos fuera del congelador durante más de 20 minutos o los alimentos preparados congelados no deben descongelarse
con la función Defrost, sino manualmente.
•
• Los tiempos y potencias de cocción han sido preestablecidos para descongelar varios tipos de alimentos.
• Deja reposar de 5 a 20 minutos después de descongelar.
Elem
ento
Categoría de
alimentos
Pantalla Cantidad
Peso del alimento
Instrucciones
Onza Gramo
1 Descongelación
manual
MDEF
Introduce el tiempo
/ /
Utiliza un plato apto para
microondas
2 Pollo CHKN
Introduce 0.2
-
6.6 lb
3.2 - 106 oz 91 - 2994 g
Utiliza un plato apto para
microondas
3
Carne de res molida
BEEF
Introduce 0.2
-
6.6 lb
3.2 - 106 oz 91 - 2994 g
Utiliza un plato apto para
microondas
23
Element
o
Categoría
de
alimentos
Pantalla Cantidad
Peso del alimento
Instrucciones
Onza Gramo
1 Bacon BACN 1-6 rebanadas 0.7 oz / rebanada 20 g / rebanada
Grosor medio: Sigue las instrucciones del
paquete. Para mejores resultados, coloca
el bacon en una rejilla apta para
microondas.
2 Arroz RICE
Detecta 0.5
- 2.0
tazas
3.4 oz - 13.6 oz
(6.8 oz arroz /
taza)
96 g - 384 g
(192 g arroz / taza)
Consulte las medidas en el empaque para
las cantidades de los ingredientes.
Coloque el arroz y el líquido en un
recipiente apto para microondas. Cubra
con una tapa que no cierre
herméticamente. Agite y deje reposar
durante 5 minutos después de la cocción,
o hasta que el líquido se haya absorbido.
3
Plato
congelado
FRZN
MEAL
Detecta 10
-
40 oz
10 - 40 oz 283 - 1134 g
Despegue la película protectora de 3 lados
del recipiente, dejando uno de los lados
cortos todavía sujeto. Deje reposar durante
3-
5 minutos después de la cocción.
4 Avena
OAT MEAL
Detecta 1
-
4 tazas
1.2 oz / porción 35 g / porción
Cubre con film plástico y haz
ventilación. Remueve después
de la cocción.
Para obtener los mejores resultados, use primero los botones de funciones preconfiguradas.
Use trozos pequeños de papel de aluminio para cubrir partes de los alimentos, como alitas de pollo, puntas de patas y colas de
pescado. Consulte primero la sección "Papel de aluminio y metal".
RECALENTAR
1. En estado inactivo, pulsa repetidamente el botón REHEAT para seleccionar la categoría de alimentos.
2. Pulsa el botón START/+30 s y luego utiliza los botones numéricos para seleccionar la cantidad de alimentos (este paso puede
omitirse en categorías basadas en sensor).
3. Pulsa el botón START/+30 s para comenzar.
Elemento
Categoría
de
alimentos
Pantalla
Cantidad
Peso del alimento
Instrucciones
Onza Gramo
1
Plato
principal
MEAL
Detecta 1 plato
10 - 15 oz
284 - 425 g
Coloca los alimentos en un plato.
Cubre con film plástico y haz ventilación.
Deja reposar durante 3 minutos después
de recalentar.
2
Pizza PIZZ Detecta 1-3
rebanadas
3.5 oz / rebanada
100 g /
rebanada
Coloca sobre un plato apto para
microondas forrado con papel
absorbente.
3
Cazuela CASS
1-4 tazas
7.8 oz / taza 220 g / taza
Coloca en un recipiente apto para
microondas. Cubre con film plástico y haz
ventilación. Remueve y deja reposar
durante 3 minutos después de recalentar.
4
Sopa
SOUP
Detecta 1
-
4 tazas
8.8 oz- 35.2 oz 250 g - 1 kg
Coloca en un recipiente apto para
microondas. Cubre con film plástico y haz
ventilación. Remueve y deja reposar
durante 3 minutos después de recalentar.
5
Bebida BEV 1-4 tazas
8 oz
- 32 oz (8 oz /
cada uno)
236 g - 944 g
(236 g / taza)
Coloca en un recipiente apto para
microondas. No cubrir.
Mantener caliente
ADVERTENCIA
Riesgo de intoxicación alimentaria
No dejes los alimentos en el horno más de una hora
antes o después de la cocción.
Hacerlo puede provocar intoxicación alimentaria o
enfermedad.
1. En estado inactivo, pulsa repetidamente el botón KEEP WARM o usa los botones numéricos
(1~4) para seleccionar el tiempo.
2. Pulsa el botón START/+30 s para iniciar.
24
Limpieza con vapor
Este ciclo de limpieza automática te ayudará a limpiar la cavidad del horno microondas y a eliminar los malos olores.
Antes de iniciar el ciclo:
1. Introduce 250 mL de agua en un recipiente (consulta nuestras recomendaciones en la sección inferior “Consejos y
sugerencias”).
2. Coloca el recipiente directamente en el centro del fondo del horno.
3.Cierra la puerta.
Para iniciar el ciclo:
1.Pulsa el botón Steam Clean.
2. Pulsa el botón START / + 30 s para iniciar la función.
Cuando finalice el ciclo:
1.Pulsa el botón CANCEL.
2.Retira el recipiente.
3.Utiliza un paño suave o papel absorbente con detergente suave para limpiar las superficies interiores. Consejos y sugerencias:
Para mejores resultados de limpieza, se recomienda usar un recipiente con un diámetro de 17-20 cm y una altura inferior a 6.5 cm.
Se recomienda usar un recipiente de plástico ligero apto para microondas.
Como el recipiente estará caliente al finalizar el ciclo de limpieza, se recomienda usar un guante resistente al calor al retirarlo del
microondas.
Para un mejor efecto de limpieza y eliminación de malos olores, añade un poco de zumo de limón o vinagre al agua.
PALOMITAS DE MAÍZ
1. Pulsa una vez el botón Popcorn; la pantalla mostrará “POPC”.
2. Pulsa el botón START/+30 s para iniciar.
Cantidad
Pantalla
Peso del alimento
Instrucciones
Onza
Gramo
Detecta 3.0 ~
3.5 oz
POPC
3.0 ~ 3.5 oz
85 ~99 g
No utilices bolsas de papel normales ni cristalería.
Sigue las instrucciones del fabricante al usar un recipiente para palomitas apto
para microondas.
Escucha hasta que los estallidos se reduzcan a uno cada 1 o 2 segundos y
entonces detén el ciclo. No vuelvas a cocinar los granos sin reventar.
Para mejores resultados, utiliza bolsas de palomitas frescas.
Los resultados de cocción pueden variar según la marca y el
contenido de grasa. Sigue las instrucciones proporcionadas
por el fabricante de palomitas para microondas.
Patata
1. Pulsa repetidamente el botón Potato para seleccionar el tamaño de la patata.
2. Pulsa el botón START/+30 s y luego utiliza los botones numéricos para seleccionar la cantidad de patatas.
3. Pulsa el botón START / + 30 s para cocinar.
25
Eleme
nto
Categoría de
alimentos
Pantalla Cantidad
Peso del alimento
Instrucciones
Onza Gramo
1
Patatas grandes
LRG
1
-4 patatas
8
-
12 oz / cada
una
227 - 340 g /
cada una
Pincha cada patata varias veces con un tenedor.
Coloca sobre papel absorbente, alrededor
de los bordes de un plato de cerámica,
separados al menos 1” (2.5 cm).
Coloca una sola patata a un lado de la bandeja
de vidrio. Coloca 4 o más patatas en forma de
radios (con el eje largo de la patata apuntando
hacia el centro).
Deja reposar durante 5 minutos después de la
cocción.
2
Patata pequeña
SML
1
-16 patatas
3
-
5 oz / cada
una
85 - 142 g /
cada una
Pincha cada patata varias veces con un tenedor.
Coloca sobre papel absorbente, alrededor
de los bordes de un plato de cerámica,
separados al menos 1” (2.5 cm).
Coloca 4 o más patatas en forma de radios (con
el eje largo de la patata apuntando hacia el
centro).
Deja reposar durante 5 minutos después de la
cocción.
26
ABLANDAR / DERRETIR
1. En estado inactivo, pulsa repetidamente el botón SOFTEN/MELT para
seleccionar la categoría de alimentos.
2. Pulsa el botón START/+30 s y luego utiliza los botones numéricos para
seleccionar la cantidad.
3. Pulsa el botón START/+30 s para iniciar.
Verduras
1. En estado inactivo, pulsa repetidamente el botón Veggies para
seleccionar la categoría de alimentos.
2. Pulsa el botón START / + 30 s para cocinar.
Elemen
to
Categoría de
alimentos
Pantalla Cantidad
Peso del alimento
Instrucciones
Onza Gramo
1
Ablandar
mantequilla
SOF 1
0.5, 1.0, 1.5, 2.0
barras
2, 4, 6, 8 oz
(4.0 oz / barra)
57, 113, 170, 227 g
(113 g / barra)
Desenvuelve y coloca en un
recipiente apto para
microondas. Remueve
después de derretir.
2
Ablandar
queso crema
SOF 2 3, 8 oz 3, 8 oz 85, 227 g
Coloca en un recipiente
apto para microondas.
Remueve después de
derretir.
3 Ablandar helado SOF 3 16, 32 oz 16, 32 oz 454, 907 g
Corta en cuadrados
pequeños o utiliza trozos.
Coloca en un recipiente apto
para microondas. Remueve
después de derretir.
4
Derretir mantequilla
MLT 4
0.5, 1.0, 1.5, 2.0
barras
2, 4, 6, 8 oz
(4.0 oz / barra)
57, 113, 170, 227 g
(113 g / barra)
Desenvuelve y coloca en un
recipiente apto para
microondas. Remueve
después de derretir.
5
Derretir chispas
de chocolate
MLT 5 4, 8, 12 oz 4, 8, 12 oz 113, 227, 340 g
Corta en cuadrados
pequeños o utiliza trozos.
Coloca en un recipiente apto
para microondas. Remueve
después de derretir.
6 Derretir queso MLT 6 8, 16 oz 8, 16 oz 227, 454 g
Corta en trozos pequeños
y coloca en un recipiente
apto para microondas.
Remueve después de
derretir.
Eleme
nto
Categoría de
alimentos
Pantalla
Cantidad
Peso del alimento
Instrucciones
Onza Gramo
1 Verduras frescas FRSH
Detecta 1
-4 tazas
3.5 oz
-
14 oz
(3.5 oz / cada
una)
100 g - 400 g
(100 g / taza)
Coloca en un recipiente apto para
microondas y añade 2
-4
cucharadas de agua.
Cubre con film plástico y haz
ventilación. Remueve
y deja reposar durante 3 minutos
después de la cocción.
2
Verduras congeladas
FRZN
Detecta 1
-4 tazas
3.5 oz
-
14 oz
(3.5 oz / cada
una)
100 g - 400 g
(100 g / taza)