For And By Computer Users
Laptop
User Guide
For detailed instrucons, drivers download, more support, or more
products, please get in touch with us or go to our website.
Email: support@firebatpc.com
Website: www.firebatpc.com
Facebook: Firebat

CONTENTS
English ..................................................................................... 1-8
Español .................................................................................. 9-16
Français ............................................................................... 15-25
Deutsch ............................................................................... 26-34
Italiano ................................................................................ 31-42
日本語 ................................................................................ 43-51

Any changes or modifications not expressly approved by the party
responsible for compliance could void the user’s authority to
operate the equipment.
This device complies with Part 15 of the FCC Rules. Operation is
subject to the following two conditions:
(1) this device may not cause harmful interference, and
(2) this device must accept any interference received, including
interference that may cause undesired operation.
Note: This equipment has been tested and found to comply with
the limits for a Class B digital device, pursuant to Part 15 of the
FCC Rules. These limits are designed to provide reasonable
protection against harmful interference in a residential
installation. This equipment generates, uses, and can radiate radio
frequency energy, and if not installed and used in accordance with
the instructions, may cause harmful interference to radio
communications. However, there is no guarantee that interference
will not occur in a particular installation. If this equipment does
cause harmful interference to radio or television reception, which
can be determined by turning the equipment off and on, the user
is encouraged to try to correct the interference by one or more of
the following measures:
– Reorient or relocate the receiving antenna.
– Increase the separation between the equipment and receiver.
– Connect the equipment into an outlet on a circuit different from
that to which the receiver is connected.
– Consult the dealer or an experienced radio/TV technician for
help.
SAR compliance is based on a separation distance of 0 mm
between the unit and the body of the user
La conformité du das est basée sur une distance de séparation de 0
mm entre l’unité et le corps de l’utilisateur

1
English
Disclaimer
1. Please be sure to use the original power supply. The company does not assume
any responsibility for any problems or failures caused by any third-party adapters.
2. Users can use music videos, pictures, and soware provided by third pares, but
we do not assume any responsibility for copyright issues or soware failures.
3. If the product fails, we will strictly abide by the warranty terms, but we will not
assume any responsibility for any property damage or economic loss that may be
caused during use.
4. The device comes with built-in soware when it leaves the factory, and it can be
used aer actual tesng. However, if it is deleted or not deleted when looking for
compability or other problems, it will not cause any impact on the machine. Please
note that this is not a problem related to product quality.
5. The company reserves the right to improve the product. Product specificaons and
design are subject to change without prior noce! Please refer to the actual product.
Notes
Before you use this product, please read the following guidelines in detail and abide
by these rules, which can increase the service life of this product and avoid danger or
violaon of the law.
1. Please be extra careful when performing operaons that may cause file damage
or loss.
2. Pay aenon to virus protecon during the use of the laptop, and try to use a
virus firewall.
3. Turn off the power and disconnect the power supply when the laptop is not used
for a long me.
4. Do not turn the laptop on and off frequently in a short me. It is recommended
that the interval between two starts is at least 10 seconds, preferably not less than
60 seconds.
5. To prevent the laptop from overheang, make sure that the vents are not blocked.
6. Do not press the display hard.
7. Do not force off the laptop screen or pinch the display to li the laptop.
8. Do not place or drop objects on the laptop.
9. Do not place the laptop on an uneven or unstable work plaorm.
10. If you are travelling with a laptop, please bring it in a special bag.
11. Do not use your laptop in harsh condions.
12. Do not expose the laptop to direct sunlight and keep away from magnec fields.
13. Do not place the computer on the edge of a fire or other heat source, and do not
use the notebook in an overheated or overcooled environment.
14. Do not expose the laptop to rain or dew.
15. Do not fiddle with the baery and keep it out of the reach of children.
2
English
16. Do not expose the laptop to dust or corrosive chemicals.
17. Do not spray water or other organic solvents directly onto the laptop display.
18. Do not drop liquids such as water and food on the laptop, and do not pull the
data cable, power cable, etc.
19. Pay aenon to moisture-proofing and keep the use environment clean and
sterile. If there is dust on the laptop, please wipe it with a dry so cloth.
20. It is strictly forbidden to use non-original baeries or other types of baeries,
otherwise, there will be a risk of explosion.
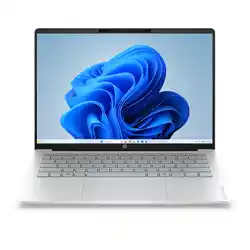
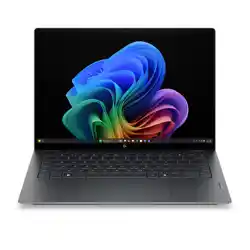
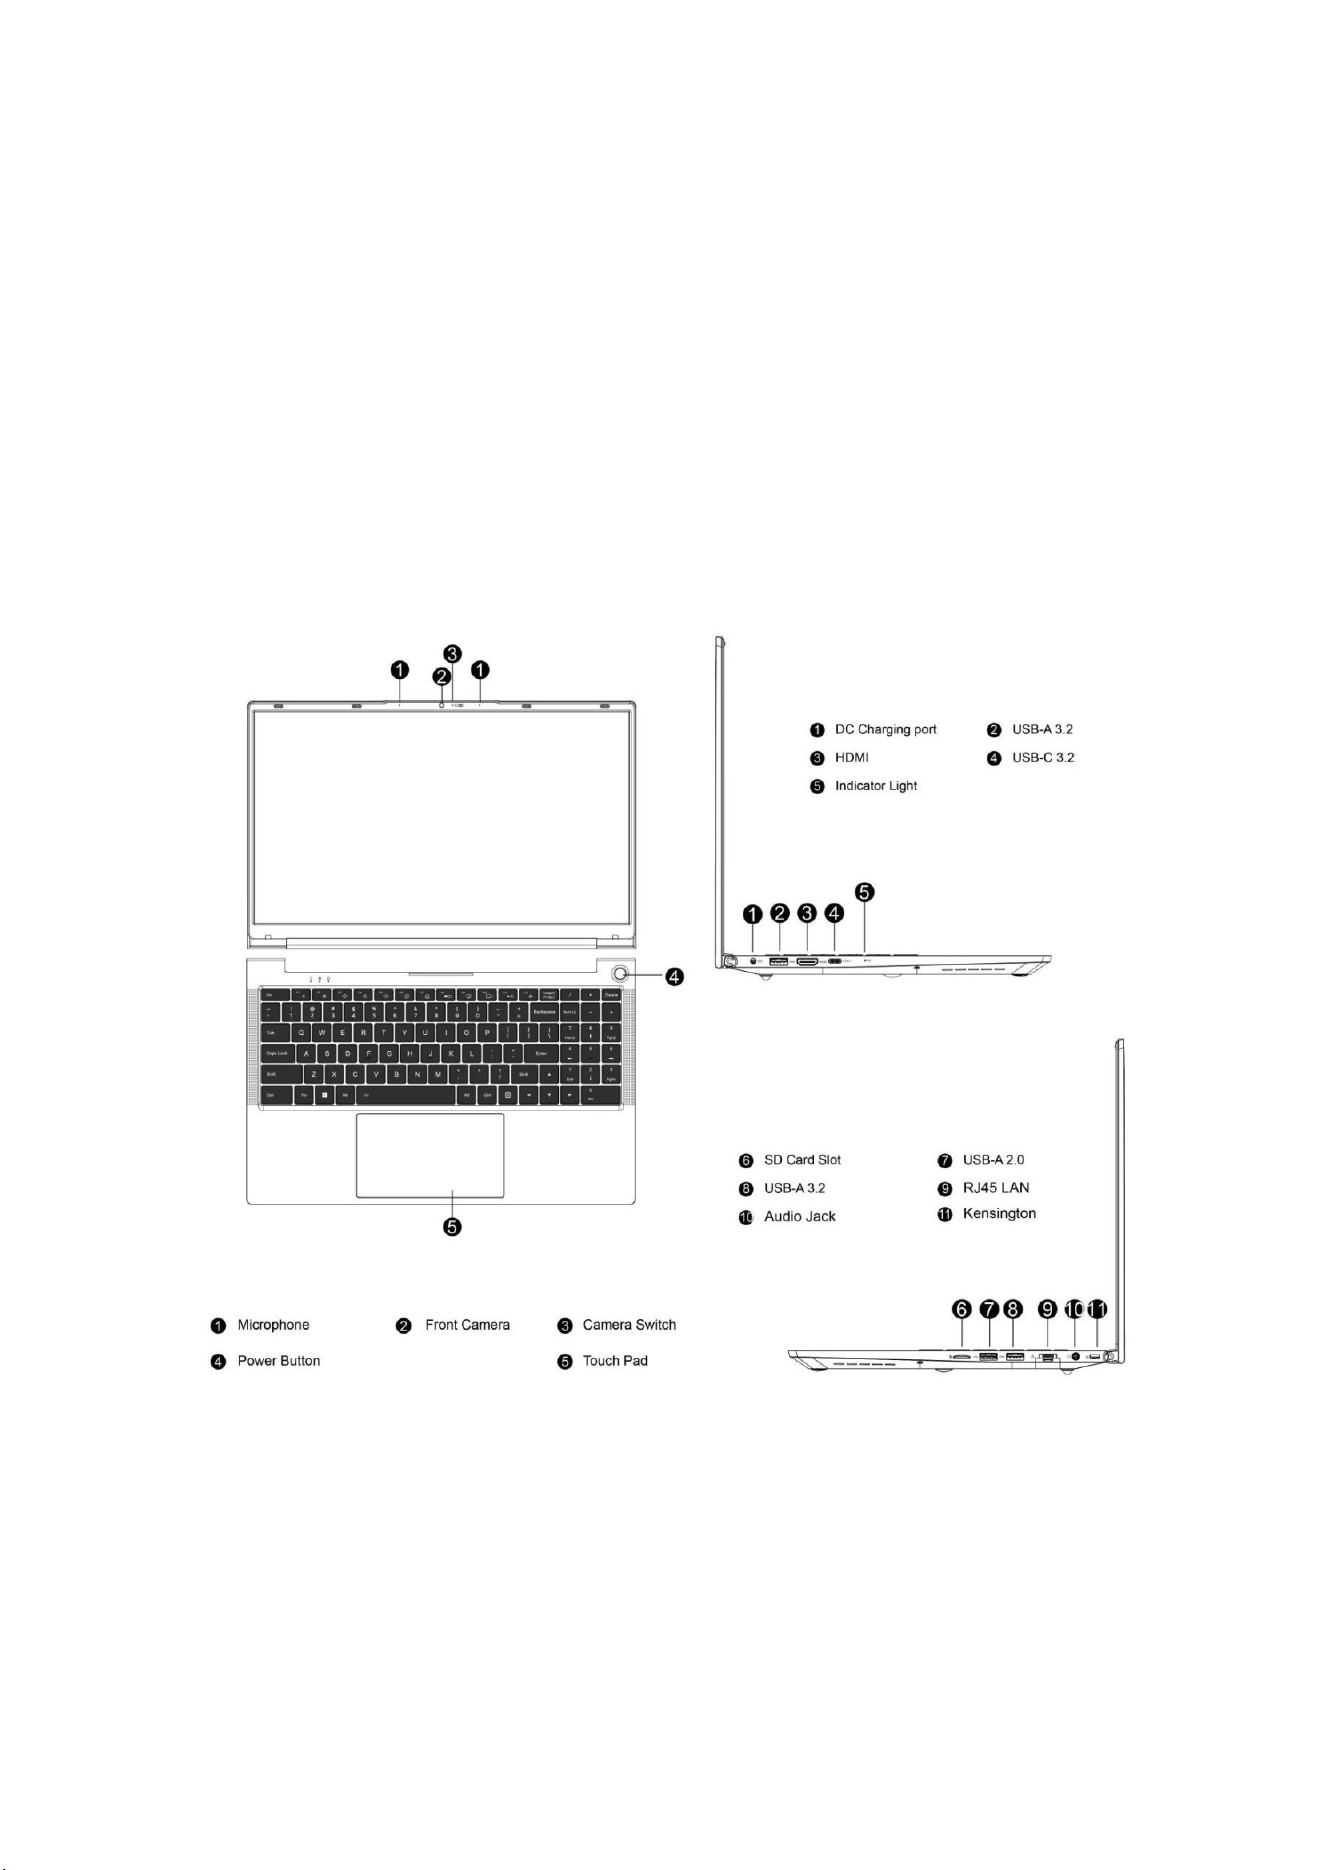
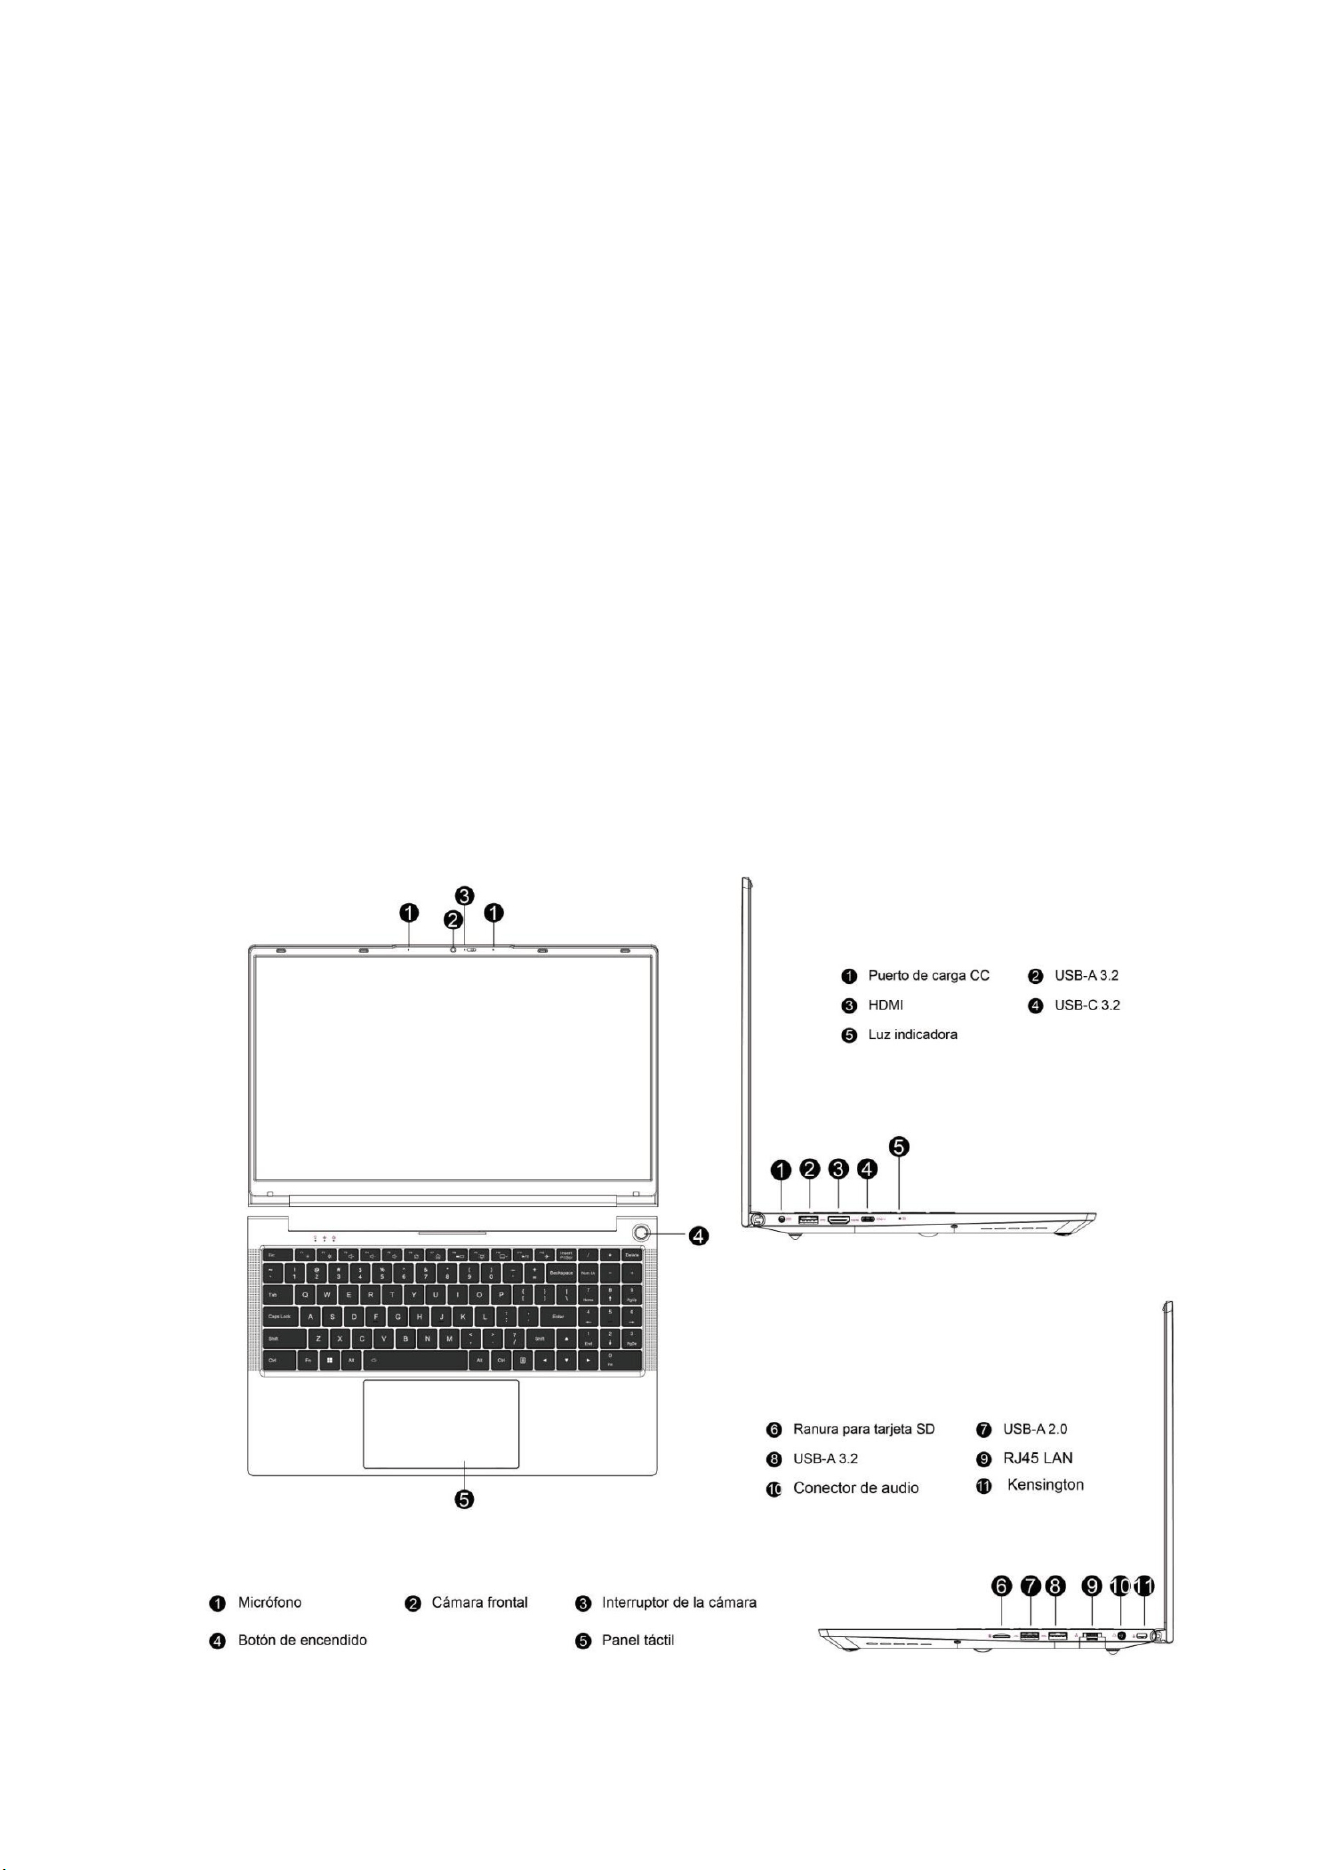
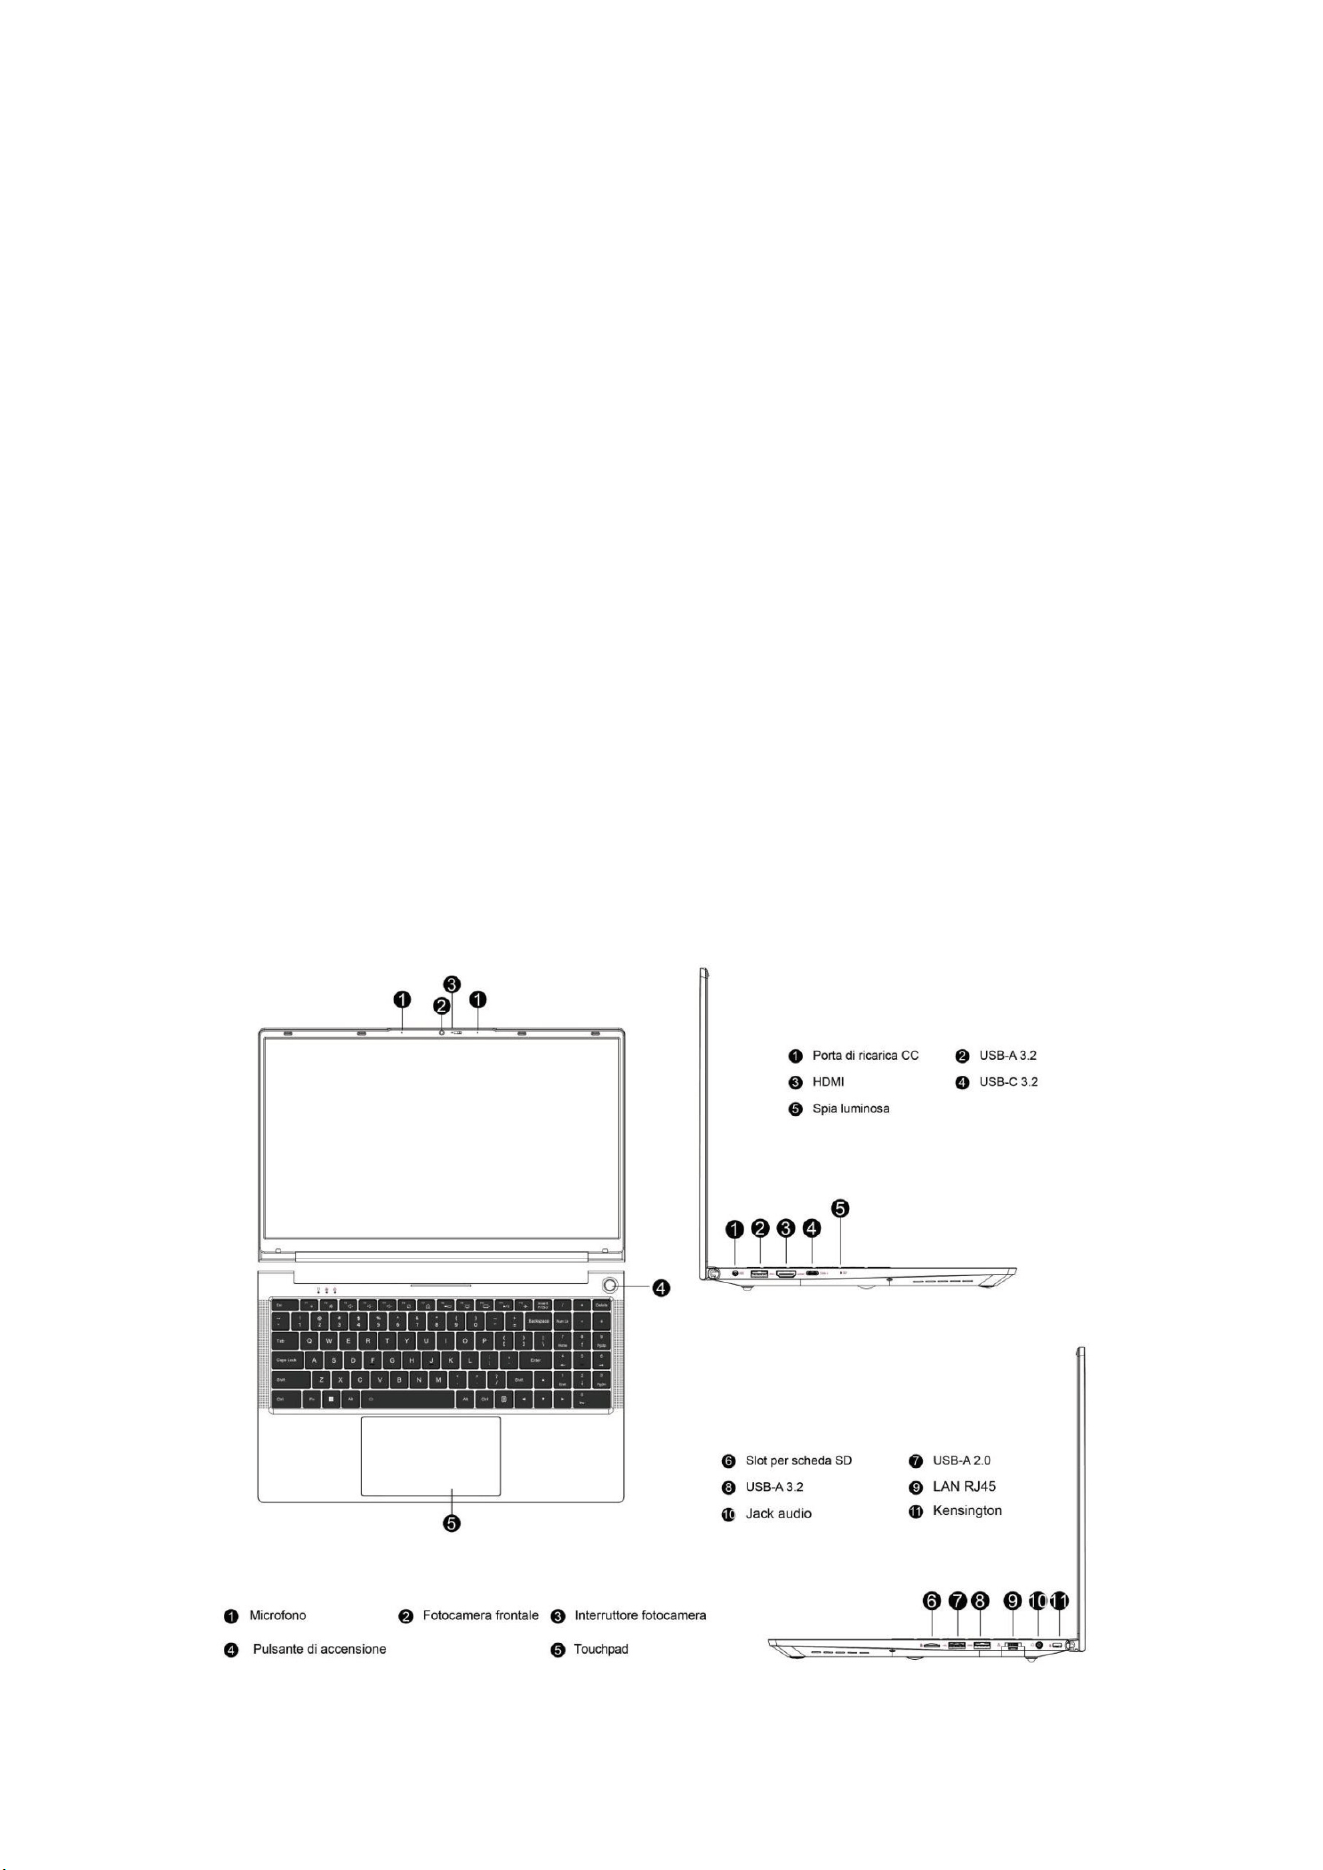
Product Diagram

3
English
Power and Charging
The laptop can be powered by a lithium baery or an AC power adapter. Aer
receiving the laptop, please connect the AC power adapter to charge the laptop.
Lithium baeries have no "memory effect", so there is no need to wait unl the
baery is completely exhausted before charging; while charging, if you are sll using
the laptop, the charging me will be longer.
If you want to charge quickly, please pause the use of the laptop or turn off the
laptop while charging.
To extend the life of the lithium baery, charge when the power is <95%, and do not
charge when the power is >95%.
When the baery power is low, the screen will display a prompt message, and the
baery will connue to work unl the power is too low and shut down. At this me,
the data may not be saved. Please charge in me and use the laptop normally aer
connecng the adapter.
Please use the original power adapter to avoid damaging the laptop. The baery is
toxic and hazardous. Please recycle the baery by environmental protecon
regulaons. Do not dispose of the baery at will to avoid causing environmental
polluon.
How to Start
When you start your laptop for the first me, the system will guide you in configuring
the Windows operang system.
a. Power On
Press the power buon to start your mini computer. You need to wait for several
minutes for the first startup unl the installaon interface appears.
Step 1: Select Language/Country (Region).
Step 2: Select "Input Method" and click "Confirm".
Step 3: Select the second input method, you can "skip".
Step 4: Network: Enter the password to connect aer selecng WiFi. Or choose to
plug in the network cable to connect. The network will automacally update, and the
update process will stay on an interface for a long me, which will extend the startup
me. (It is strongly recommended to skip the network connecon)
Step 5: Accept the License Agreement
Step 6: Set Username and Password aer the installaon process is completed, the
desktop will appear.
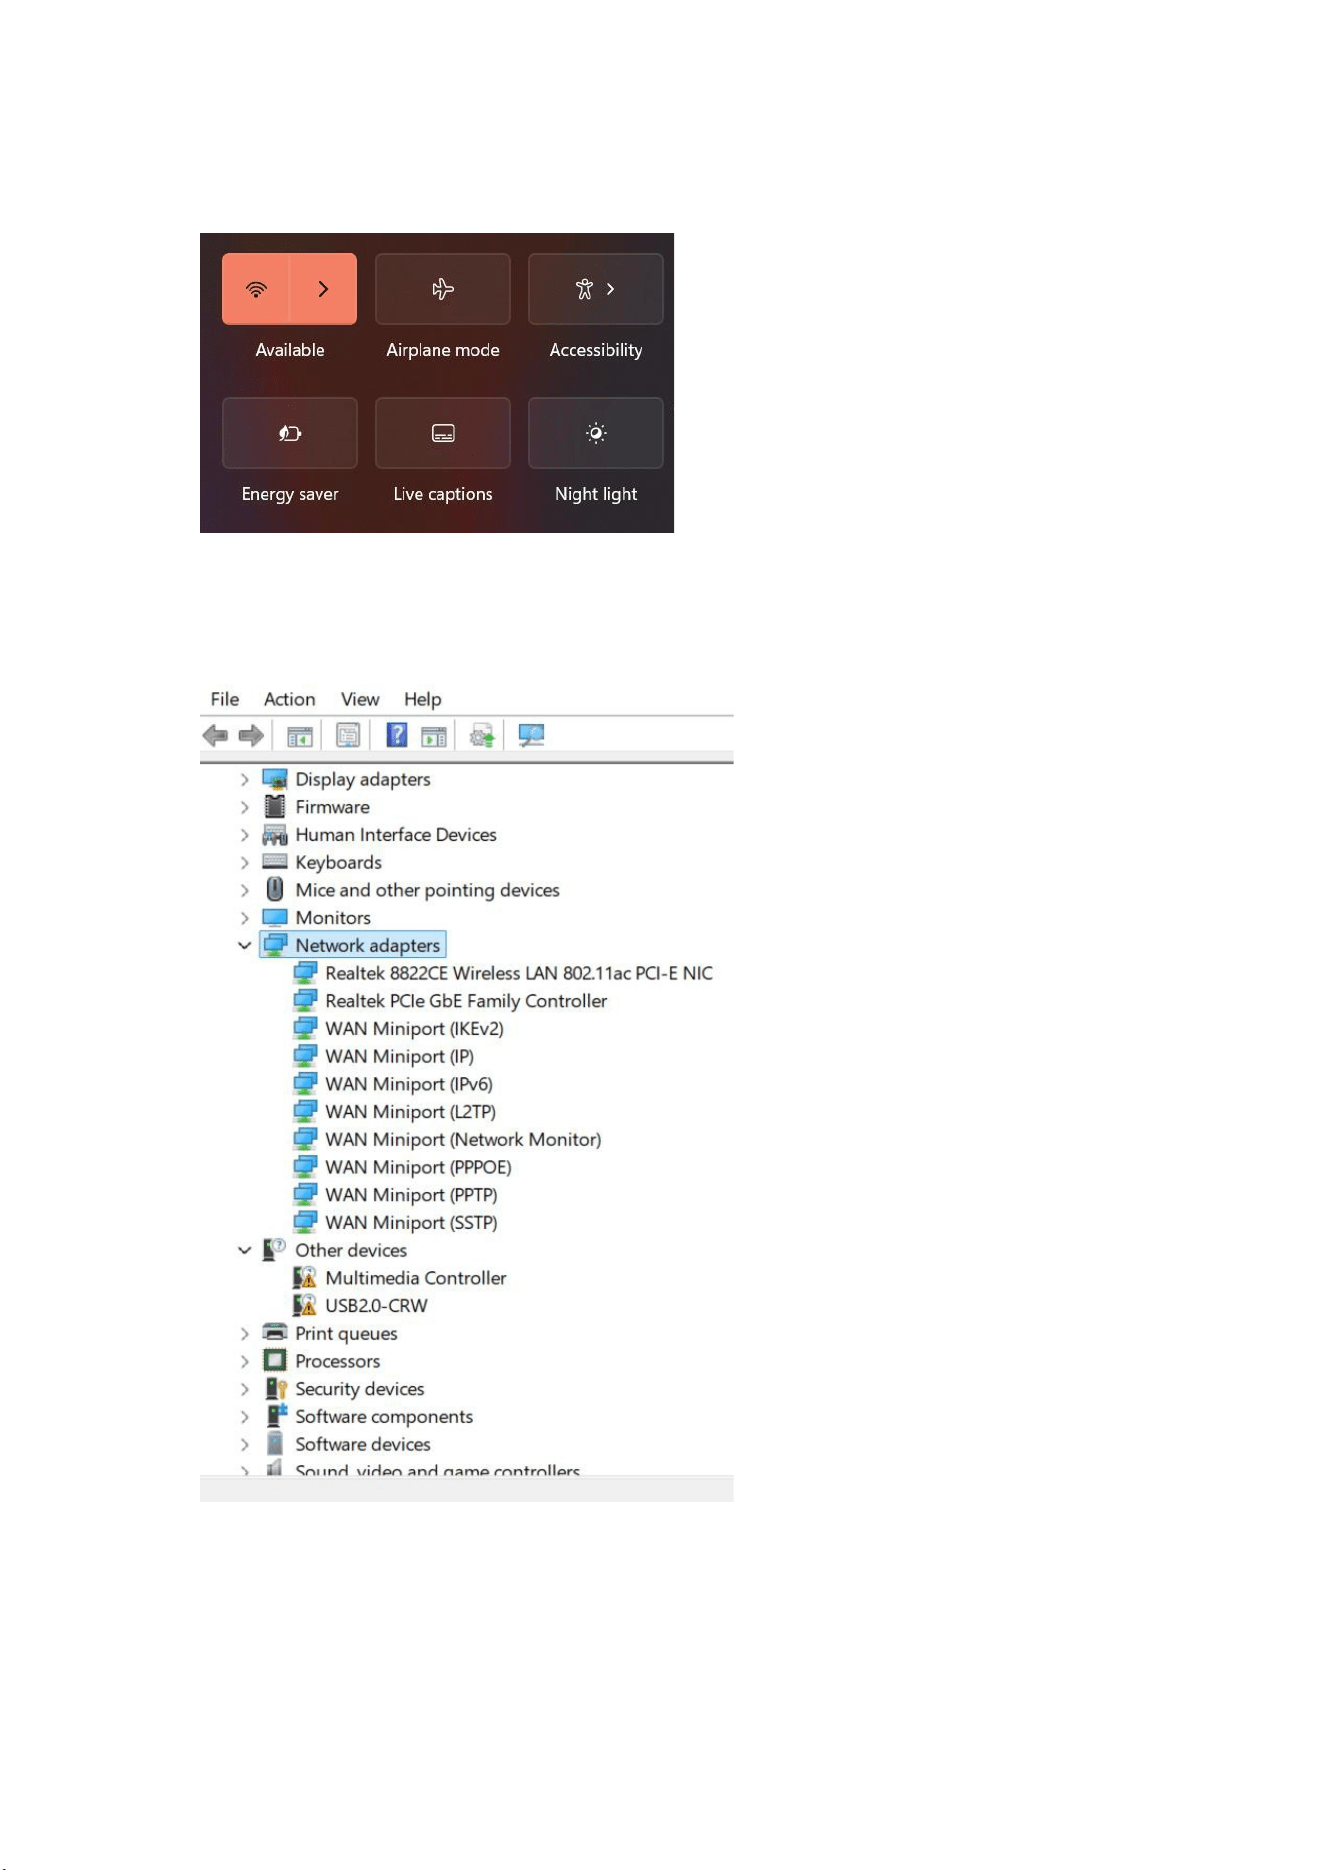
b. Connect to WiFi
Select the WiFi icon from the taskbar to turn on the WiFi.
Select an access point in the list of available WiFi connecons. Select one of the
connecons to start the network connecon.

4
English
Note: You may be prompted to enter a security key to acvate the WiFi connecon.
c. Enter BIOS Setup
BlOS (Basic Input/Output System) is the first soware loaded when the laptop starts.
Enter BIOS: Click the "Del" or "F2" key.
Under normal circumstances, the default BIOS sengs are applied in most cases to
ensure opmal performance. Do not change the default BIOS sengs unless you
have installed new system components that require further setup or a BIOS update.
Note: Inappropriate BlOS sengs may cause instability or failure to start. We strongly
recommend that you change BlOS sengs only with the help of technical service
personnel.
Troubleshoong
Q1: What should I do if my laptop won't turn on?
A1: Please make sure that the power cord is properly connected to the port and
charge for more than 30 minutes before restarng. The power buon has an
an-mistouch protecon funcon, so please press and hold it for 1-2 seconds when
turning on the computer.
Q2: Why is there no sound output?
A2: Please open the device manager to check whether the sound card driver is
installed. If not, please download and install it on the FIREBAT official website; check
whether the volume is set to "0", please increase the volume and confirm again. If
you are using headphones, please try another pair of headphones.
Q3: Why is the noise so loud?
A3: Replug the audio hardware to check if it is caused by poor contact. Check if there
is dust on the headphones or speakers. Check if the sound file is damaged.
Q4: Windows cannot be acvated immediately
A4: First, make sure that Wi-Fi is connected and the Wi-Fi network is a working
network. Second, make sure that the me zone and system me of your locaon are
correct. (Windows key acvaon delay somemes occurs due to network speed or
other reasons. If you ensure the above two points are correct and sll cannot
acvate, please contact the FIREBAT service team and we will provide you with
support immediately.
Q5: What should I do if I cannot connect to a wireless network?
A5: (1) Check the wireless network switch: Check whether the wireless network
switch of the laptop is turned on. The laptop has an independent wireless network
switch, which needs to be turned on manually.
5
English
(2) Check the wireless network card driver: Enter the device manager and check
whether the wireless network card driver is normal. If a yellow exclamaon mark
appears, please log in to the FIREBAT official website to download and update the
wireless network card driver.
(3) Check the wireless network signal: Make sure the laptop is within the effecve
coverage of the wireless router. If the signal is too weak, it may not be able to
connect to the wireless network normally. Please move the laptop closer to the
wireless router and confirm again.
6
English
Q6: How to turn on or off the Windows automac update funcon?
A6: Press the "Win+R" key combinaon on the keyboard to bring up the RUN bar,
enter "services.msc" in the input box, press the "Enter" key, find "Windows update"
on the "Services (Local)" page, double-click to open it, and there are four startup
types in "Startup type". Select the startup type you want.
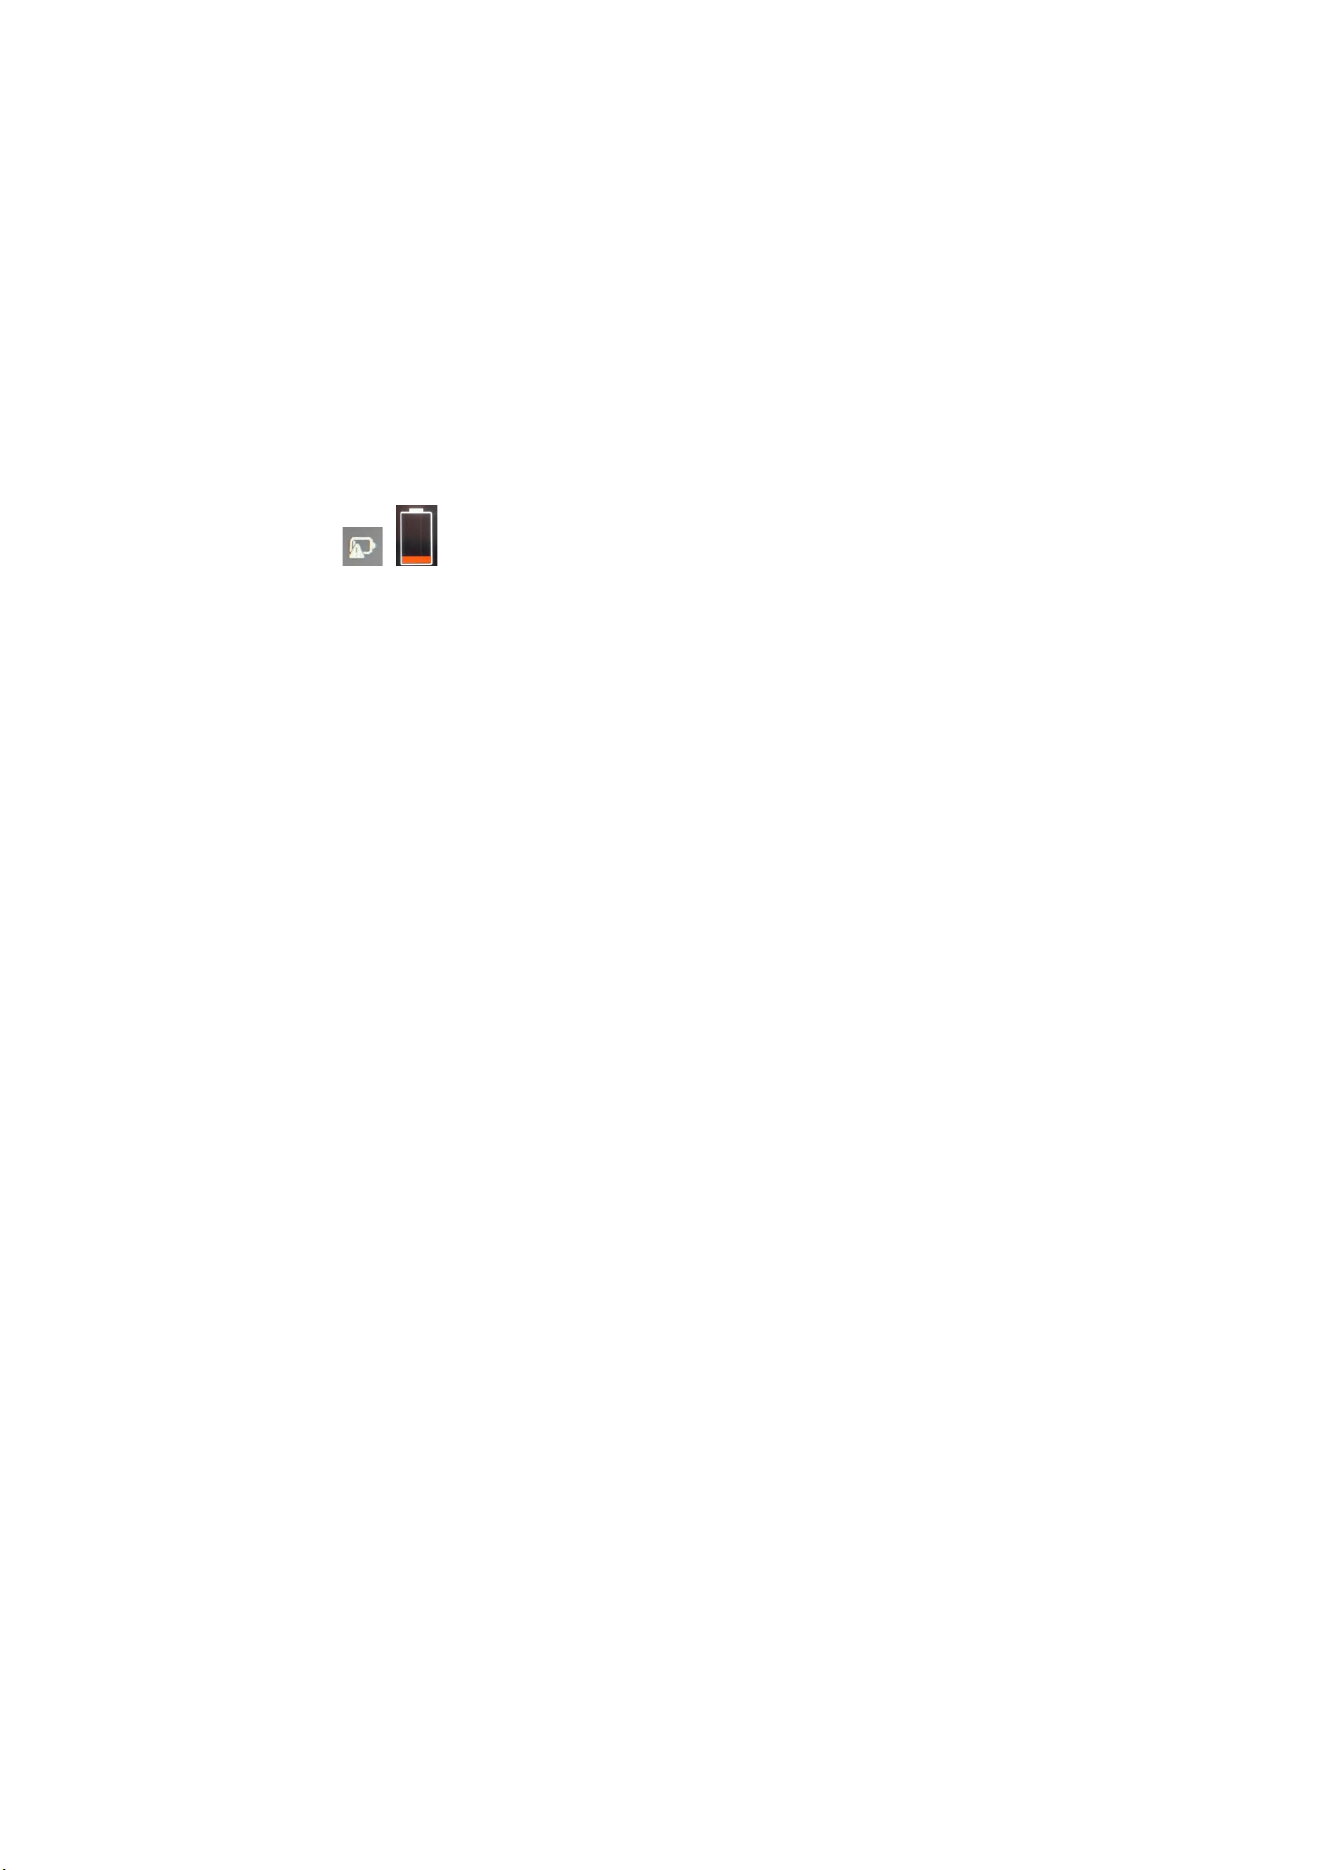
Q7: What does it mean when there is a red icon on the baery icon in the lower right
corner of the laptop screen or a red icon appears when the power buon is clicked
(as shown)?
A7: This means that the baery is low. Please plug in the original power adapter for
charging.
Q8: What should I do if the touchpad does not work?
A8: You can try the following methods:
(1) Press the following keyboard combinaon to enable/disable the touchpad
"Fn+F10";
(2) Go to the FIREBAT official website to re-download the new driver.
(3) Reinstall the system.
If reinstalling a new driver and reinstalling the system does not help, please contact
the FIREBAT team for the latest soluon.
Q9: What should I do if the taskbar disappears?
A9: Right-click on the desktop and select Personalizaon. Select the taskbar and
scroll down to "Taskbar Behavior". Expand the opons and uncheck "Automacally
hide the taskbar".
Q10: How should I solve the frequent restarts?
A10: You can first open the sengs to find privacy and security, click "Open Windows
Security Center", and select a heart-shaped icon which named “Device performance
& health” on the le. Aer opening, check whether there are any problems with the
performance and operaon status of the device. If there are no problems, try to
update the driver or reinstall the system. If the problem persists, please contact the
FIREBAT team.

7
English
Cleaning and Maintenance
1. Before cleaning, turn off the product and unplug the power adapter.
2. Wipe the product housing with a wet towel, avoiding interfaces and electronic
components, and then wipe it dry with a so cloth. Use computer-specific cleaners
to clean the screen and keyboard. Do not use corrosive cleaning fluids for cleaning.
3. Do not immerse the product in water or other liquids.
4. Aer cleaning, place the product in a dry and venlated environment and wait for
it to dry thoroughly before use or storage.
Warranty
We provide a one-year product quality warranty from the date of purchase and
provide free lifeme product technical support. For normal faults or quality problems
within the warranty period, we provide free replacement or repair services. For
damage caused by manual operaon, we will charge the cost of the product parts for
repair. Our technical support team is at your service 24 hours a day. If you encounter
any problems during use, please feel free to contact us.

8
Español
Para obtener instrucciones detalladas, descargar controladores, más soporte o más
productos, contáctenos o visite nuestro sio web.
Correo electrónico: support@firebatpc.com
Sio web: www.firebatpc.com
Aviso legal
1. Asegúrese de ulizar la fuente de alimentación original. La empresa no se
responsabiliza de los problemas o fallos causados por adaptadores de terceros.
2. Los usuarios pueden usar vídeos musicales, imágenes y soware de terceros, pero
no nos responsabilizamos de los derechos de autor ni de los fallos del soware.
3. Si el producto presenta alguna falla, cumpliremos estrictamente los términos de la
garantía, pero no nos responsabilizamos de los daños materiales ni de las pérdidas
económicas que puedan producirse durante su uso.
4. El disposivo viene con soware integrado de fábrica y puede ulizarse tras
realizar pruebas reales. Sin embargo, si se elimina o no se elimina al comprobar la
compabilidad o al buscar otros problemas, esto no afectará al disposivo. Tenga en
cuenta que esto no afecta a la calidad del producto.
5. La empresa se reserva el derecho a mejorar el producto. Las especificaciones y el
diseño del producto están sujetos a cambios sin previo aviso. Consulte el producto
real.
Notas
Antes de usar este producto, lea atentamente las siguientes instrucciones y sígalas.
Esto puede prolongar su vida úl y evitar peligros o infracciones legales.
1. Tenga mucho cuidado al realizar operaciones que puedan dañar o perder archivos.
2. Preste atención a la protección anvirus durante el uso del portál e intente
ulizar un firewall.
3. Apague el portál y desconéctelo de la fuente de alimentación cuando no lo ulice
durante un periodo prolongado.
4. No encienda y apague el portál con frecuencia. Se recomienda un intervalo de al
menos 10 segundos entre cada encendido y, preferiblemente, no menos de 60
segundos.
5. Para evitar el sobrecalentamiento del portál, asegúrese de que las rejillas de
venlación no estén bloqueadas.
6. No presione la pantalla con fuerza.
7. No fuerce la pantalla del portál ni la presione para levantarlo.
8. No coloque ni deje caer objetos sobre el portál. 9. No coloque el portál sobre
una superficie de trabajo irregular o inestable.
10. Si viaja con un portál, llévelo en una bolsa especial.
9
Español
11. No ulice el portál en condiciones adversas.
12. No exponga el portál a la luz solar directa y manténgalo alejado de campos
magnécos.
13. No coloque el portál cerca del fuego ni de ninguna otra fuente de calor, ni lo
ulice en un entorno demasiado caliente o frío.
14. No exponga el portál a la lluvia ni al rocío.
15. No manipule la batería y manténgala fuera del alcance de los niños.
16. No exponga el portál al polvo ni a productos químicos corrosivos.
17. No rocíe agua ni otros disolventes orgánicos directamente sobre la pantalla del
portál. 18. No deje caer líquidos como agua o alimentos sobre la laptop, ni re del
cable de datos, el cable de alimentación, etc.
19. Preste atención a la humedad y mantenga el entorno de uso limpio y esterilizado.
Si hay polvo en la laptop, límpiela con un paño suave y seco.
20. Está estrictamente prohibido ulizar baterías no originales u otros pos de
baterías, ya que existe riesgo de explosión.
Diagrama del producto

10
Español
Alimentación y carga
La laptop puede funcionar con una batería de lio o un adaptador de CA. Tras recibir
la laptop, conecte el adaptador de CA para cargarla.
Las baterías de lio no enen efecto memoria, por lo que no es necesario esperar a
que se descargue por completo antes de cargarla. Si sigue usando la laptop, el
empo de carga será mayor.
Si desea una carga rápida, detenga el uso de la laptop o apáguela mientras se carga.
Para prolongar la vida úl de la batería de lio, cárguela cuando la carga sea inferior
al 95 % y no la cargue cuando sea superior al 95 %.
Cuando la batería esté baja, la pantalla mostrará un mensaje y la batería connuará
funcionando hasta que la carga sea demasiado baja y se apague. En ese caso, es
posible que no se guarden los datos. Cargue la laptop a empo y ulice la laptop con
normalidad después de conectar el adaptador.
Ulice el adaptador de corriente original para evitar dañar la laptop. La batería es
tóxica y peligrosa. Recicle la batería de acuerdo con las normas de protección
ambiental. No deseche la batería a su antojo para evitar causar contaminación
ambiental.
Cómo iniciar
Al iniciar su portál por primera vez, el sistema le guiará en la configuración del
sistema operavo Windows.
a. Encender
Presione el botón de encendido para iniciar su minicomputadora. Espere varios
minutos desde el primer inicio hasta que aparezca la interfaz de instalación.
Paso 1: Seleccione el idioma/país (región).
Paso 2: Seleccione "Método de entrada" y haga clic en "Confirmar".
Paso 3: Seleccione el segundo método de entrada; puede omirlo.
Paso 4: Red: Ingrese la contraseña para conectarse después de seleccionar Wi-Fi.
También puede conectar el cable de red. La red se actualizará automácamente y el
proceso de actualización permanecerá en una interfaz durante un empo prolongado,
lo que prolongará el empo de inicio. (Se recomienda omir la conexión de red).
Paso 5: Acepte el Acuerdo de licencia
Paso 6: Establezca su nombre de usuario y contraseña; una vez finalizada la
instalación, aparecerá el escritorio.
b. Conectarse a Wi-Fi
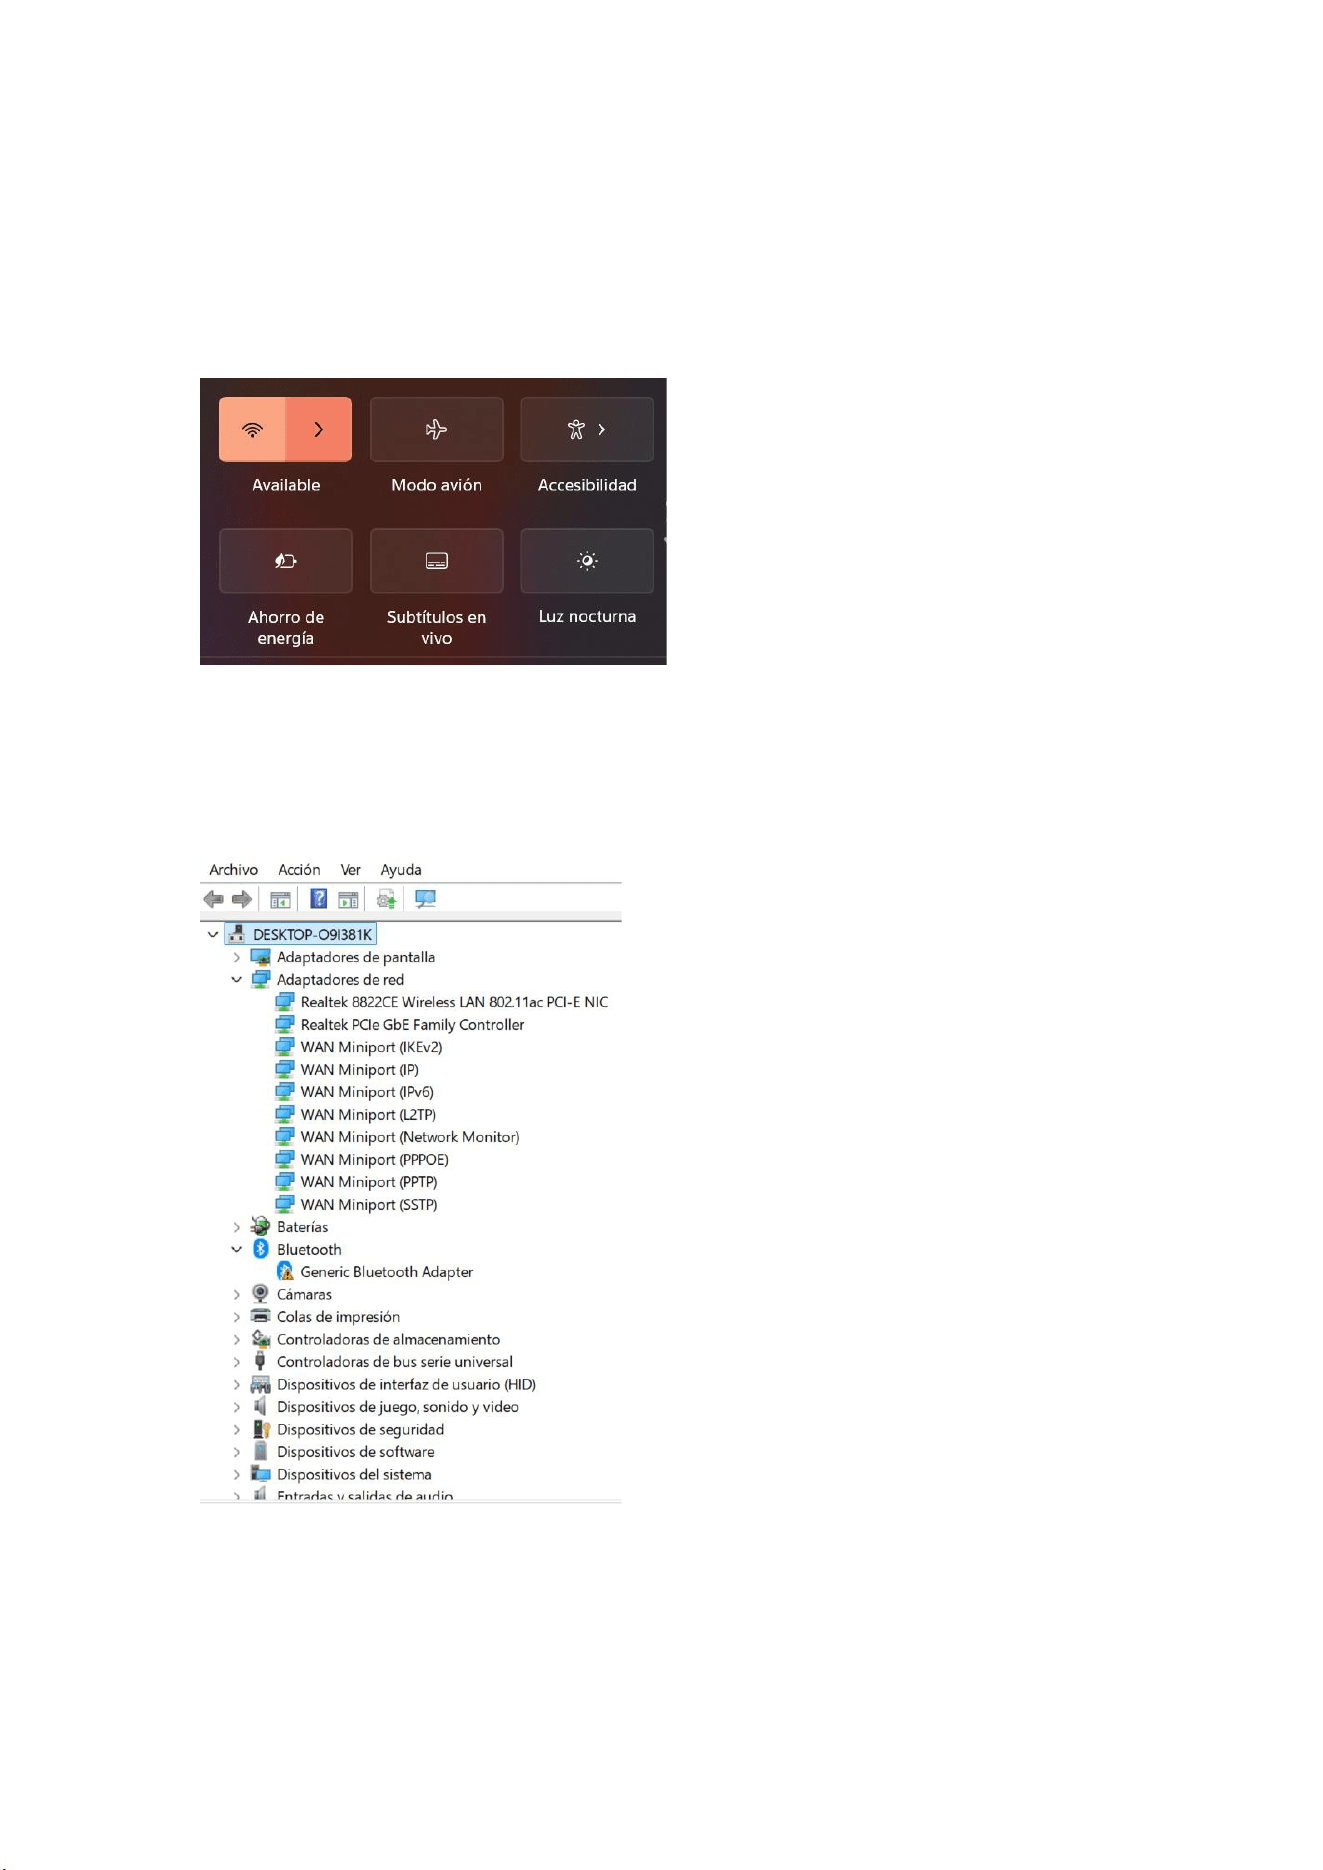
Seleccione el icono de Wi-Fi en la barra de tareas para acvar la conexión. Seleccione
un punto de acceso en la lista de conexiones WiFi disponibles. Seleccione una de las
conexiones para iniciar la conexión de red.

11
Español
Nota: Es posible que se le solicite una clave de seguridad para acvar la conexión
WiFi.
c. Acceda a la configuración del BIOS
BIOS (Sistema básico de entrada/salida) es el primer soware que se carga al iniciar
el portál.
Acceda al BIOS: Pulse la tecla "Supr" o "F2".
Normalmente, se aplica la configuración predeterminada del BIOS para garanzar un
rendimiento ópmo. No modifique la configuración predeterminada del BIOS a
menos que haya instalado nuevos componentes del sistema que requieran una
configuración adicional o una actualización del BIOS.
Nota: Una configuración incorrecta de BIOS puede causar inestabilidad o fallos de
arranque. Recomendamos encarecidamente que solo cambie la configuración de
BIOS con la ayuda del personal de servicio técnico.
Solución de problemas
P1: ¿Qué debo hacer si mi laptop no enciende?
R1: Asegúrese de que el cable de alimentación esté correctamente conectado al
puerto y de que cargue la computadora durante más de 30 minutos antes de
reiniciarla. El botón de encendido ene una función de protección an-contacto
accidental, así que manténgalo presionado durante 1 o 2 segundos al encender la
computadora.
P2: ¿Por qué no hay sonido?
R2: Abra el administrador de disposivos para comprobar si el controlador de la
tarjeta de sonido está instalado. De lo contrario, descárguelo e instálelo desde el sio
web oficial de FIREBAT; compruebe si el volumen está a "0", súbalo y vuelva a
confirmar. Si usa auriculares, pruebe con otros.
P3: ¿Por qué el ruido es tan fuerte?
R3: Vuelva a conectar el disposivo de audio para comprobar si se debe a un mal
contacto. Compruebe si hay polvo en los auriculares o altavoces. Compruebe si el
archivo de sonido está dañado.
P4: Windows no se puede acvar inmediatamente
R4: Primero, asegúrese de que la red Wi-Fi esté conectada y que funcione. Segundo,
asegúrese de que la zona horaria y la hora del sistema de su ubicación sean correctas.
(La acvación de la clave de Windows a veces se retrasa debido a la velocidad de la
red u otros movos. Si se asegura de que los dos puntos anteriores son correctos y
aún no puede acvarse, póngase en contacto con el equipo de servicio técnico de
FIREBAT y le brindaremos soporte de inmediato.
12
Español
P5: ¿Qué debo hacer si no puedo conectarme a una red inalámbrica?
R5: (1) Compruebe el interruptor de red inalámbrica: Compruebe si el interruptor de
red inalámbrica del portál está acvado. El portál ene un interruptor de red
inalámbrica independiente que debe acvarse manualmente.
(2) Compruebe el controlador de la tarjeta de red inalámbrica: Acceda al
administrador de disposivos y compruebe si el controlador de la tarjeta de red
inalámbrica funciona correctamente. Si aparece un signo de exclamación amarillo,
inicie sesión en el sio web oficial de FIREBAT para descargar y actualizar el
controlador de la tarjeta de red inalámbrica.
(3) Compruebe la señal de la red inalámbrica: Asegúrese de que el portál esté
dentro de la cobertura efecva del enrutador inalámbrico. Si la señal es demasiado
débil, es posible que no pueda conectarse a la red inalámbrica con normalidad.
Acerque el portál al enrutador inalámbrico y vuelva a confirmar.
13
Español
P6: ¿Cómo acvar o desacvar las actualizaciones automácas de Windows?
¿Función?
R6: Presione la combinación de teclas "Win+R" para abrir la barra de EJECUTAR,
escriba "services.msc" en el cuadro de entrada, presione la tecla "Intro", busque
"Windows Update" en la página "Servicios (Local)", haga doble clic para abrirlo y
encontrará cuatro pos de inicio en "Tipo de inicio". Seleccione el po de inicio que
desee.
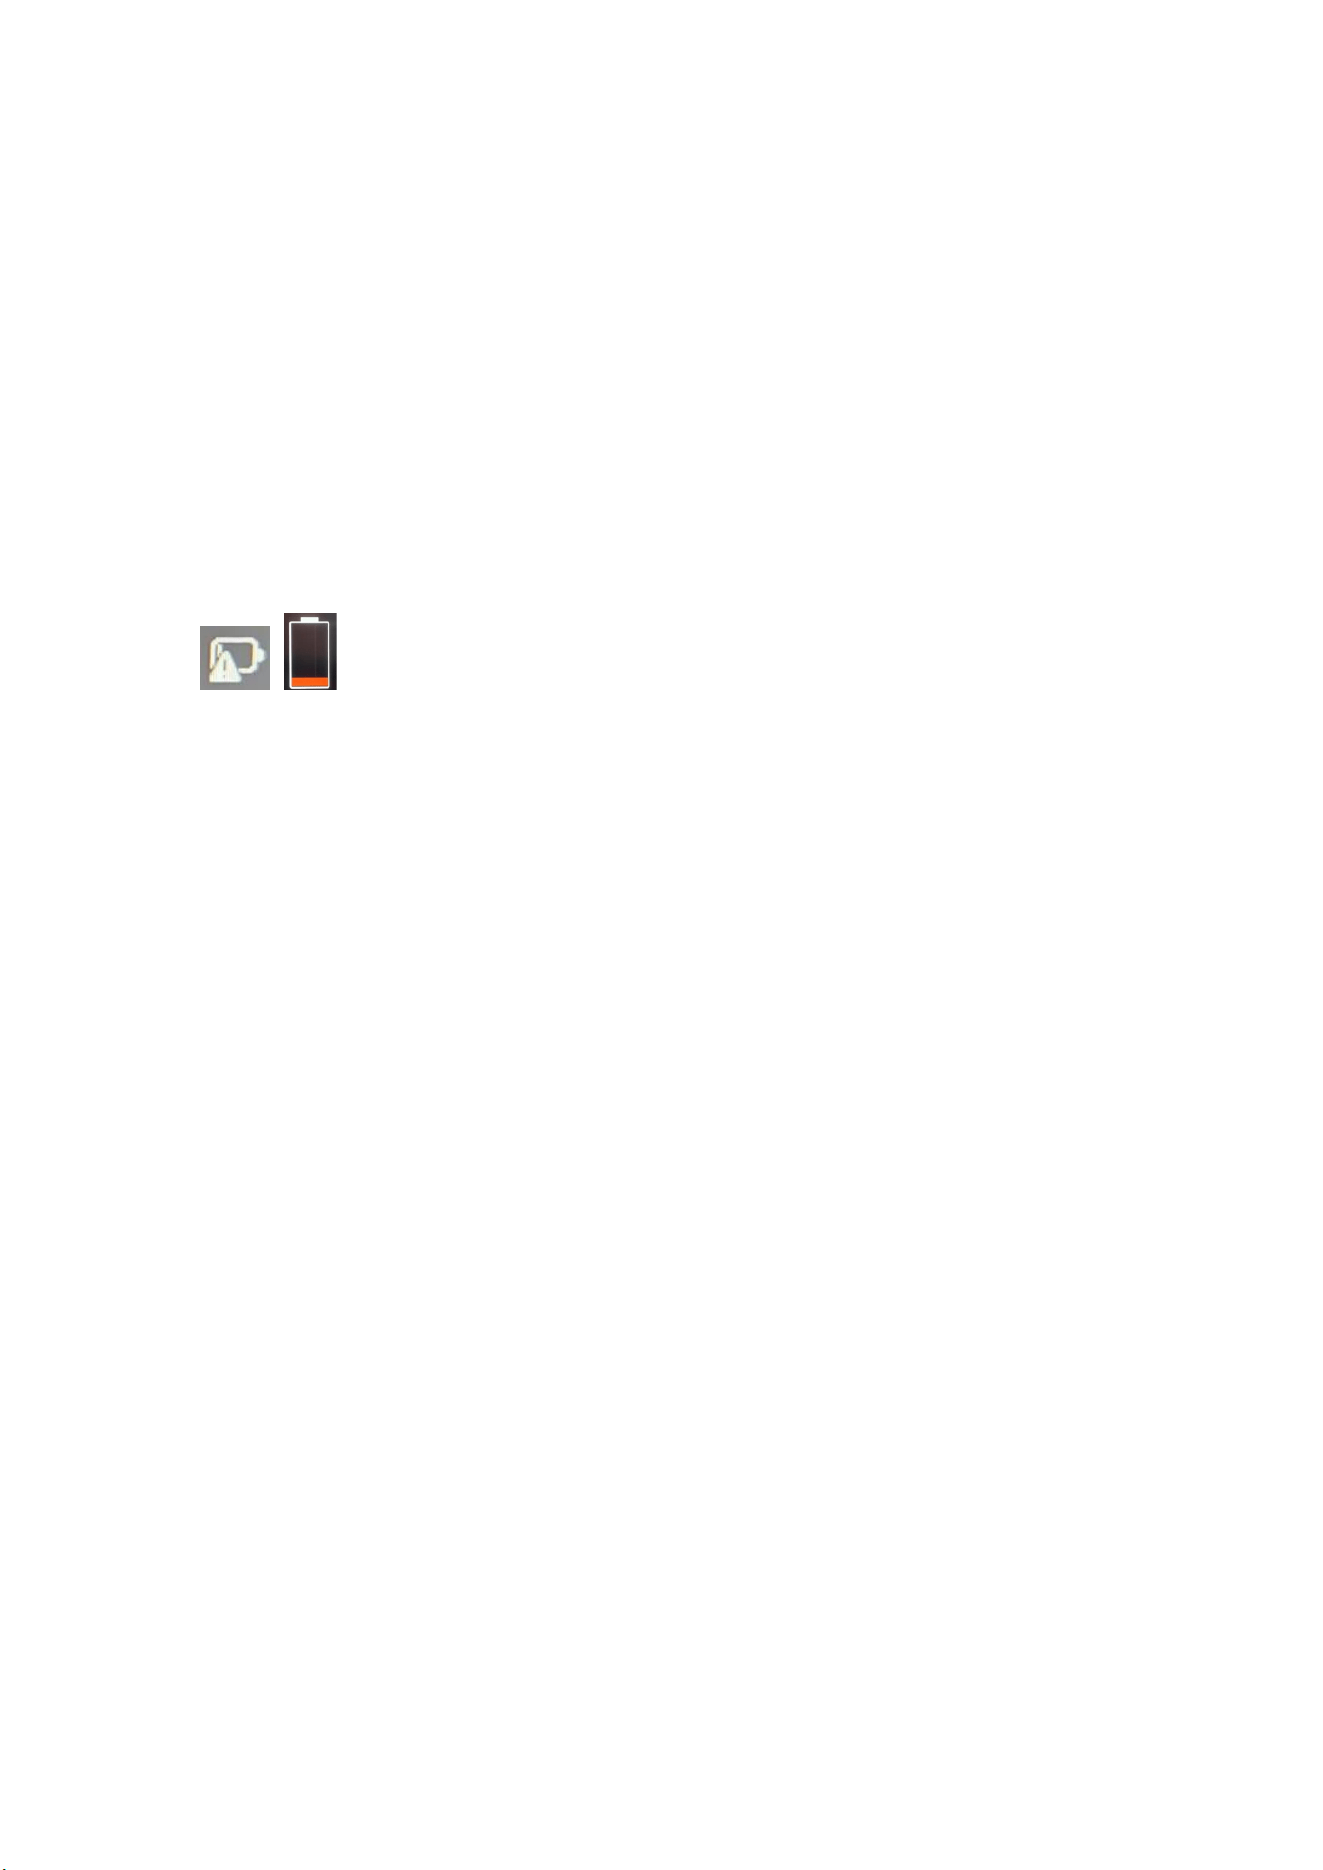
P7: ¿Qué significa que aparezca un icono rojo en el icono de la batería en la esquina
inferior derecha de la pantalla del portál o al pulsar el botón de encendido (como
se muestra a connuación)?
R7: Esto significa que la batería está baja. Conecte el adaptador de corriente original
para cargarla.
P8: ¿Qué debo hacer si el panel tácl no funciona?
R8: Puede probar los siguientes métodos:
(1) Presione la siguiente combinación de teclas para acvar o desacvar el panel
tácl: "Fn+F10";
(2) Vaya al sio web oficial de FIREBAT para volver a descargar el nuevo controlador.
(3) Reinstale el Sistema.
Si reinstalar un nuevo controlador y el sistema no soluciona el problema, contacte
con el equipo de FIREBAT para obtener la solución más reciente.
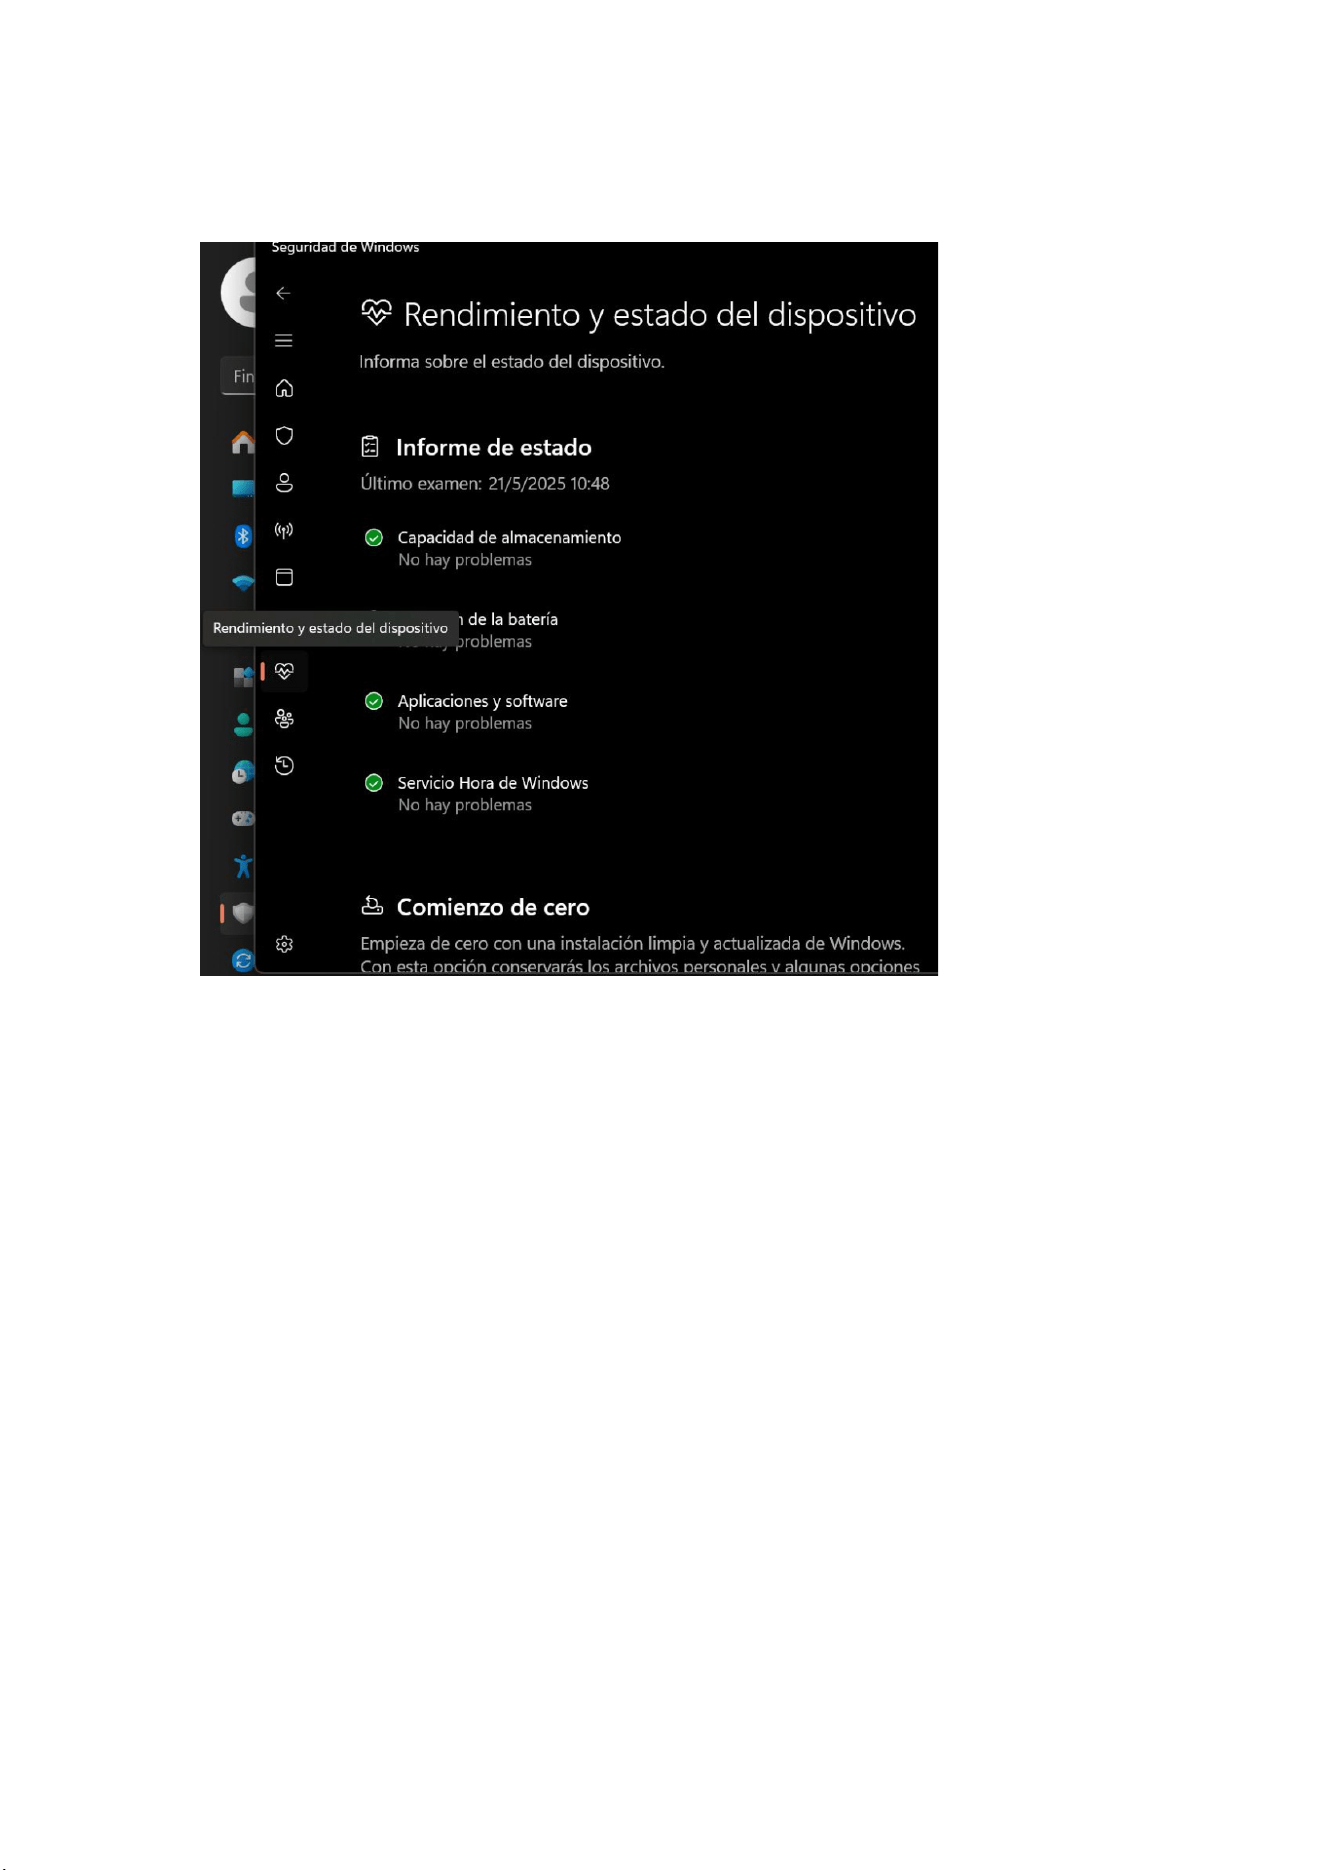
P9: ¿Cómo puedo solucionar los reinicios frecuentes?
R9: Primero puede abrir la configuración para buscar privacidad y seguridad, hacer
clic en "Abrir el Centro de Seguridad de Windows" y seleccionar el icono con forma
de corazón "Rendimiento y estado del disposivo" a la izquierda. Después de abrirlo,
compruebe si hay algún problema con el rendimiento y el estado operavo del
disposivo. Si no hay problemas, intente actualizar el controlador o reinstalar el
sistema. Si el problema persiste, contacte con el equipo de FIREBAT.
P10: ¿Qué debo hacer si la barra de tareas desaparece?
R10: Haga clic derecho en el escritorio y seleccione Personalización. Seleccione la
barra de tareas y desplácese hacia abajo hasta "Comportamiento de la barra de
tareas". Expanda las opciones y desmarque "Ocultar la barra de tareas
automácamente".
14
Español
Limpieza y mantenimiento
1. Antes de limpiar, apague el producto y desconecte el adaptador de corriente.
2. Limpie la carcasa del producto con una toalla húmeda, evitando las interfaces y los
componentes electrónicos, y luego séquela con un paño suave. Ulice limpiadores
específicos para computadoras para limpiar la pantalla y el teclado. No ulice
líquidos de limpieza corrosivos.
3. No sumerja el producto en agua ni en otros líquidos.
4. Después de limpiarlo, coloque el producto en un lugar seco y venlado y espere a
que se seque completamente antes de usarlo o guardarlo.
Garantía
Ofrecemos una garantía de calidad de un año a parr de la fecha de compra y
soporte técnico gratuito de por vida. Para fallas normales o problemas de calidad
dentro del período de garantía, ofrecemos servicios gratuitos de reemplazo o
reparación. En caso de daños causados por el uso manual, se cobrará el costo de
las piezas del producto para su reparación. Nuestro equipo de soporte técnico está a
su disposición las 24 horas del día. Si ene algún problema durante el uso, no dude
en contactarnos.

15
Français
Pour obtenir des instrucons détaillées, télécharger des pilotes, obtenir une
assistance supplémentaire ou découvrir d'autres produits, veuillez nous contacter ou
consulter notre site web.
E-mail : support@firebatpc.com
Site web : www.firebatpc.com
Avis de non-responsabilité
1. Veuillez uliser le bloc d'alimentaon d'origine. L'entreprise décline toute
responsabilité en cas de problème ou de panne causé par des adaptateurs ers.
2. Les ulisateurs peuvent uliser des vidéos musicales, des images et des logiciels
fournis par des ers, mais nous déclinons toute responsabilité en cas de problème de
droits d'auteur ou de panne logicielle.
3. En cas de panne du produit, nous respecterons scrupuleusement les condions de
garane, mais déclinons toute responsabilité en cas de dommage matériel ou de
perte économique pouvant survenir pendant l'ulisaon.
4. L'appareil est livré avec un logiciel intégré à sa sore d'usine et peut être ulisé
après des tests réels. Cependant, sa suppression ou son absence pour des raisons de
compabilité ou autres n'aura aucun impact sur l'appareil. Veuillez noter qu'il ne
s'agit pas d'un problème de qualité du produit.
5. L'entreprise se réserve le droit d'améliorer le produit. Les spécificaons et la
concepon du produit sont suscepbles d'être modifiées sans préavis ! Veuillez vous
référer au produit réel.
Remarques
Avant d'uliser ce produit, veuillez lire aenvement les instrucons suivantes et les
respecter afin d'en prolonger la durée de vie et d'éviter tout danger ou infracon à la
loi.
1. Soyez extrêmement prudent lorsque vous effectuez des opéraons suscepbles
d'endommager ou de perdre des fichiers.
2. Veillez à la protecon anvirus lors de l'ulisaon de l'ordinateur portable et
ulisez un pare-feu.
3. Éteignez l'ordinateur portable et débranchez-le du secteur lorsque vous ne
l'ulisez pas pendant une longue période.
4. Évitez d'allumer et d'éteindre l'ordinateur portable fréquemment. Il est
recommandé de respecter un intervalle d'au moins 10 secondes entre deux
démarrages, et de préférence d'au moins 60 secondes.
5. Pour éviter toute surchauffe de l'ordinateur portable, assurez-vous que les
aéraons ne sont pas obstruées.
6. N'appuyez pas trop fort sur l'écran.

16
Français
7. Ne forcez pas sur l'écran de l'ordinateur portable et ne le pincez pas pour le
soulever.
8. Ne posez et ne laissez pas tomber d'objets sur l'ordinateur portable.
9. Ne placez pas l'ordinateur portable sur une surface de travail inégale ou instable.
10. Si vous voyagez avec un ordinateur portable, veuillez le transporter dans un sac
spécial.
11. N'ulisez pas votre ordinateur portable dans des condions difficiles.
12. N'exposez pas l'ordinateur portable à la lumière directe du soleil et tenez-le à
l'écart des champs magnéques.
13. Ne placez pas l'ordinateur au bord d'un feu ou d'une autre source de chaleur, et
ne l'ulisez pas dans un environnement surchauffé ou trop refroidi.
14. N'exposez pas l'ordinateur portable à la pluie ou à la rosée.
15. Ne touchez pas à la baerie et gardez-la hors de portée des enfants.
16. N'exposez pas l'ordinateur portable à la poussière ou à des produits chimiques
corrosifs.
17. Ne vaporisez pas d'eau ou d'autres solvants organiques directement sur l'écran
de l'ordinateur portable.
18. Ne versez pas de liquides tels que de l'eau ou de la nourriture sur l'ordinateur
portable et ne rez pas sur le câble de données, le câble d'alimentaon, etc.
19. Veillez à la protecon contre l'humidité et maintenez l'environnement
d'ulisaon propre et stérile. En cas de poussière sur l'ordinateur portable,
essuyez-le avec un chiffon doux et sec.
20. Il est strictement interdit d'uliser des baeries non originales ou d'autres types
de baeries, sous peine de risque d'explosion.
17
Français
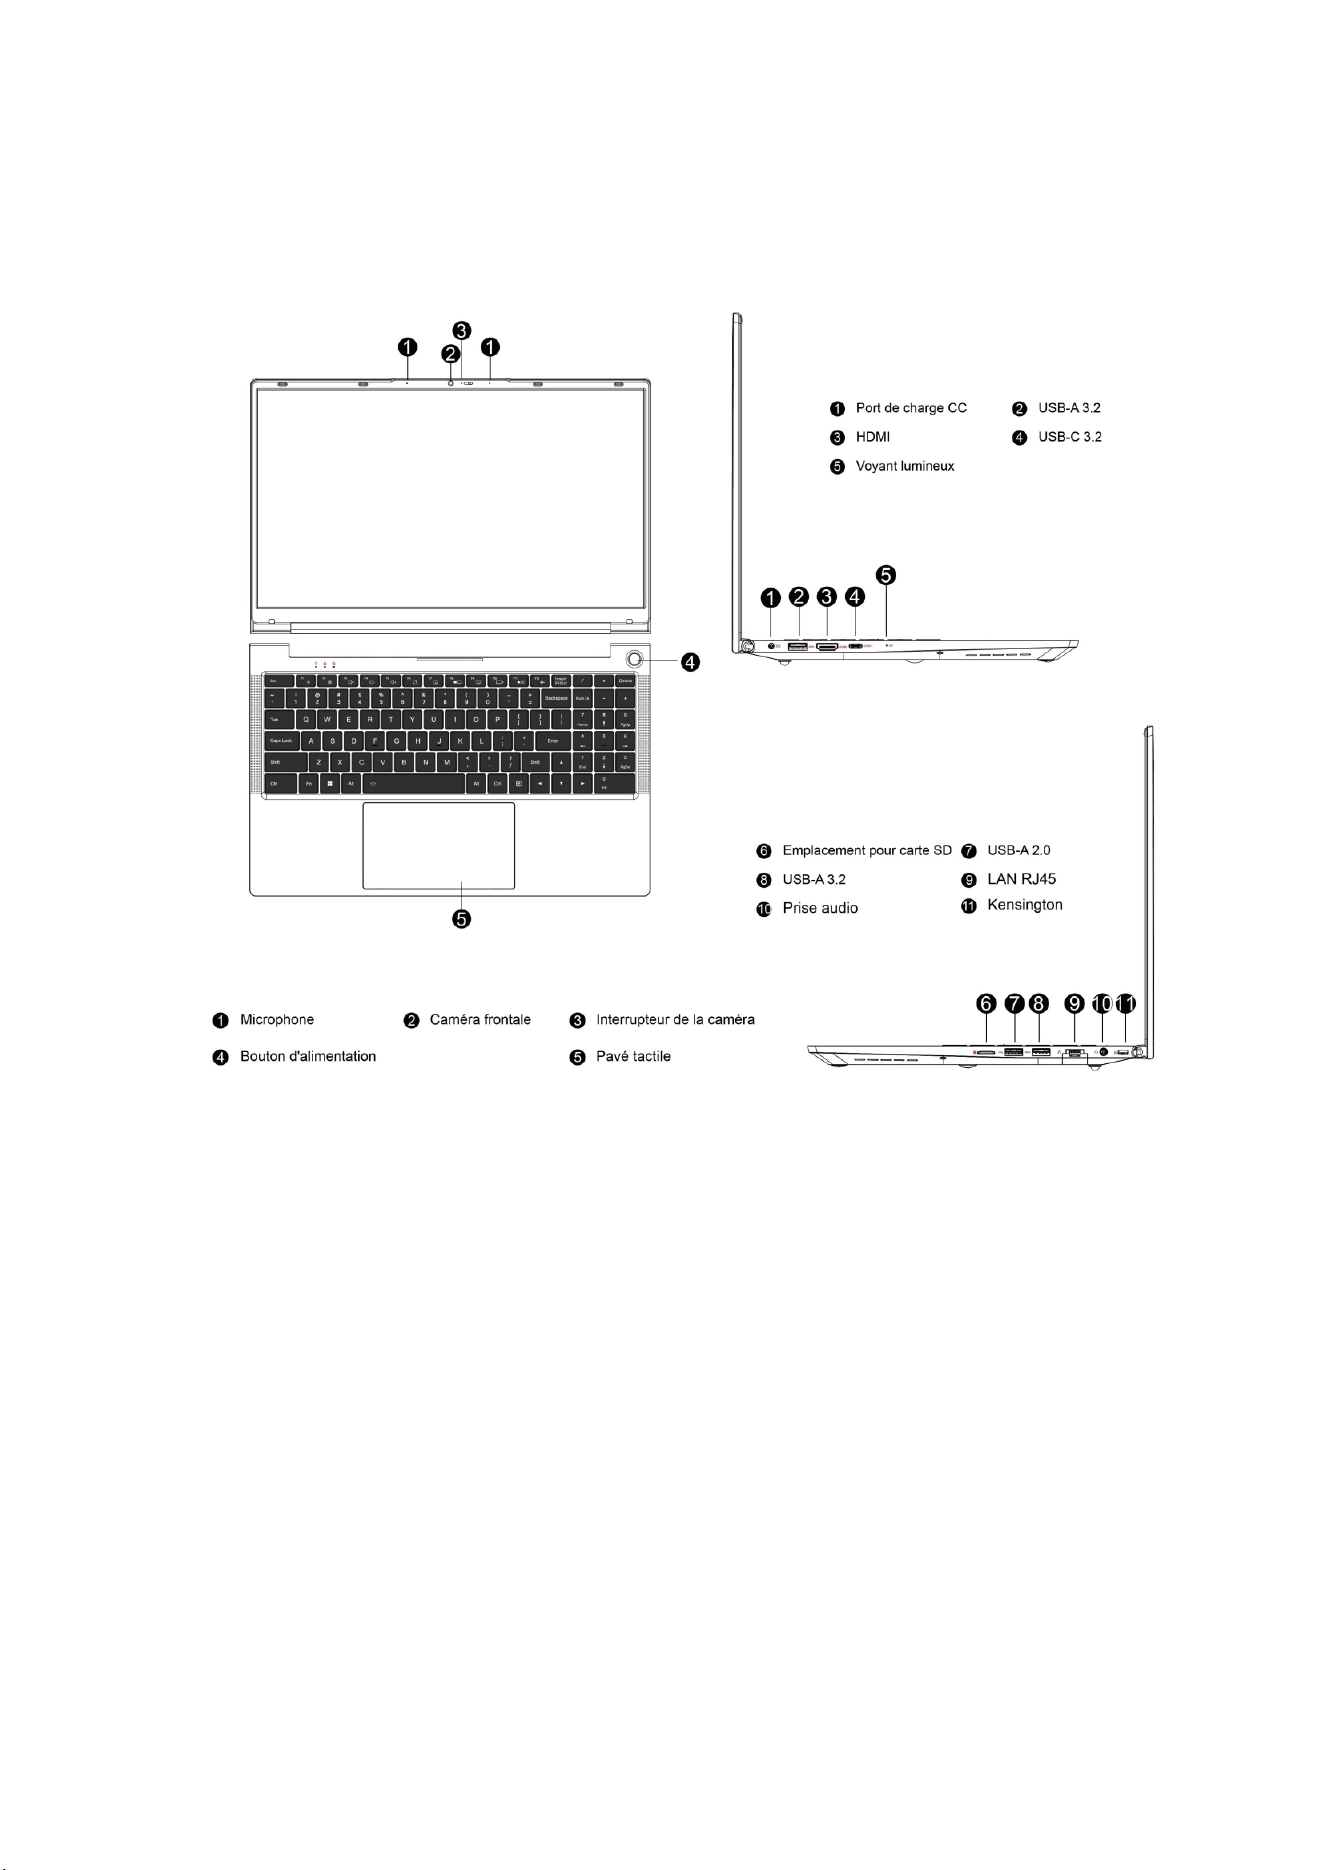
Schéma du produit
Alimentaon et charge
L'ordinateur portable peut être alimenté par une baerie au lithium ou un
adaptateur secteur. Après récepon de l'ordinateur portable, veuillez brancher
l'adaptateur secteur pour le charger.
Les baeries au lithium n'ont pas d'effet mémoire ; il n'est donc pas nécessaire
d'aendre que la baerie soit complètement déchargée avant de la charger. Si vous
connuez à uliser l'ordinateur portable pendant la charge, le temps de charge sera
plus long.
Pour une charge rapide, veuillez mere l'ordinateur portable en pause ou l'éteindre
pendant la charge.
Pour prolonger la durée de vie de la baerie au lithium, chargez-la lorsque le niveau
de charge est inférieur à 95 % et ne la chargez pas lorsque le niveau de charge est
supérieur à 95 %.
Lorsque la baerie est faible, un message d'averssement s'affiche à l'écran et la
baerie connue de fonconner jusqu'à ce que le niveau de charge soit trop faible et
s'éteigne. À ce moment-là, les données risquent de ne pas être enregistrées. Veuillez

18
Français
charger l'ordinateur portable à temps et uliser normalement après avoir branché
l'adaptateur.
Veuillez uliser l'adaptateur secteur d'origine pour éviter d'endommager l'ordinateur
portable. La baerie est toxique et dangereuse. Veuillez la recycler conformément
aux réglementaons environnementales. Ne jetez pas la baerie à volonté pour
éviter de provoquer une polluon de l'environnement.
Comment démarrer
Lorsque vous démarrez votre ordinateur portable pour la première fois, le système
vous guidera dans la configuraon du système d'exploitaon Windows.
a. Mise sous tension
Appuyez sur le bouton d'alimentaon pour démarrer votre mini-ordinateur. Aendez
quelques minutes au premier démarrage, jusqu'à ce que l'interface d'installaon
apparaisse.
Étape 1 : Séleconnez la langue/le pays (région).
Étape 2 : Séleconnez « Méthode de saisie » et cliquez sur « Confirmer ».
Étape 3 : Séleconnez la deuxième méthode de saisie ; vous pouvez ignorer cee
étape.
Étape 4 : Réseau : Saisissez le mot de passe pour vous connecter après avoir
séleconné le Wi-Fi. Vous pouvez également brancher le câble réseau. Le réseau se
mera à jour automaquement et le processus de mise à jour restera sur une
interface pendant un certain temps, ce qui prolongera le démarrage. (Il est fortement
recommandé d'ignorer la connexion réseau.)
Étape 5 : Acceptez le contrat de licence
Étape 6 : Définissez le nom d'ulisateur et le mot de passe. Une fois l'installaon
terminée, le bureau apparaîtra.
b. Connexion au Wi-Fi
Séleconnez l'icône Wi-Fi dans la barre des tâches pour acver le Wi-Fi. Séleconnez
un point d'accès dans la liste des connexions Wi-Fi disponibles. Séleconnez l'une
des connexions pour établir la connexion réseau.
Remarque : Vous serez peut-être invité à saisir une clé de sécurité pour acver la
connexion Wi-Fi.
c. Accédez au BIOS
BlOS (Basic Input/Output System) est le premier logiciel chargé au démarrage de
l'ordinateur portable.
Accédez au BIOS : Appuyez sur la touche « Suppr » ou « F2 ».
En temps normal, les paramètres par défaut du BIOS sont appliqués dans la plupart
des cas pour garanr des performances opmales. Ne modifiez pas les paramètres

19
Français
par défaut du BIOS, sauf si vous avez installé de nouveaux composants système
nécessitant une configuraon supplémentaire ou une mise à jour du BIOS.
Remarque : Des paramètres BlOS inappropriés peuvent entraîner une instabilité ou
un échec de démarrage. Nous vous recommandons vivement de ne modifier les
paramètres BlOS qu'avec l'aide du service technique.
Dépannage
Q1 : Que faire si mon ordinateur portable ne s’allume pas ?
A1 : Veuillez vous assurer que le cordon d’alimentaon est correctement branché et
qu’il est en charge pendant plus de 30 minutes avant de le redémarrer. Le bouton
d’alimentaon est doté d’une protecon an-erreur ; veuillez donc le maintenir
enfoncé pendant 1 à 2 secondes lors de la mise sous tension de l’ordinateur.
Q2 : Pourquoi n’y a-t-il pas de son ?
A2 : Veuillez ouvrir le gesonnaire de périphériques pour vérifier si le pilote de la
carte son est installé. Si ce n’est pas le cas, téléchargez-le et installez-le sur le site
officiel de FIREBAT ; vérifiez que le volume est réglé sur « 0 », augmentez-le et
confirmez à nouveau. Si vous ulisez un casque, essayez avec un autre casque.
Q3 : Pourquoi le bruit est-il si fort ?
A3 : Rebranchez le matériel audio pour vérifier s’il s’agit d’un mauvais contact.
Vérifiez s’il y a de la poussière sur le casque ou les haut-parleurs. Vérifiez si le fichier
audio est endommagé.
Q4 : Windows ne peut pas être acvé immédiatement
A4 : Tout d’abord, assurez-vous que le Wi-Fi est connecté et que le réseau Wi-Fi est
fonconnel. Ensuite, assurez-vous que le fuseau horaire et l’heure système de votre
emplacement sont corrects. (Un délai d'acvaon de la clé Windows peut survenir
en raison de la vitesse du réseau ou d'autres raisons. Si vous êtes sûr que les deux
points ci-dessus sont corrects et que l'acvaon ne fonconne toujours pas, veuillez
contacter l'équipe du service client FIREBAT. Nous vous fournirons une assistance
immédiate.)
Q5 : Que faire si je ne parviens pas à me connecter à un réseau sans fil ?
A5 : (1) Vérifiez le commutateur réseau sans fil : Vérifiez que le commutateur réseau
sans fil de l'ordinateur portable est acvé. L'ordinateur portable possède un
commutateur réseau sans fil indépendant, qui doit être acvé manuellement.
20
Français
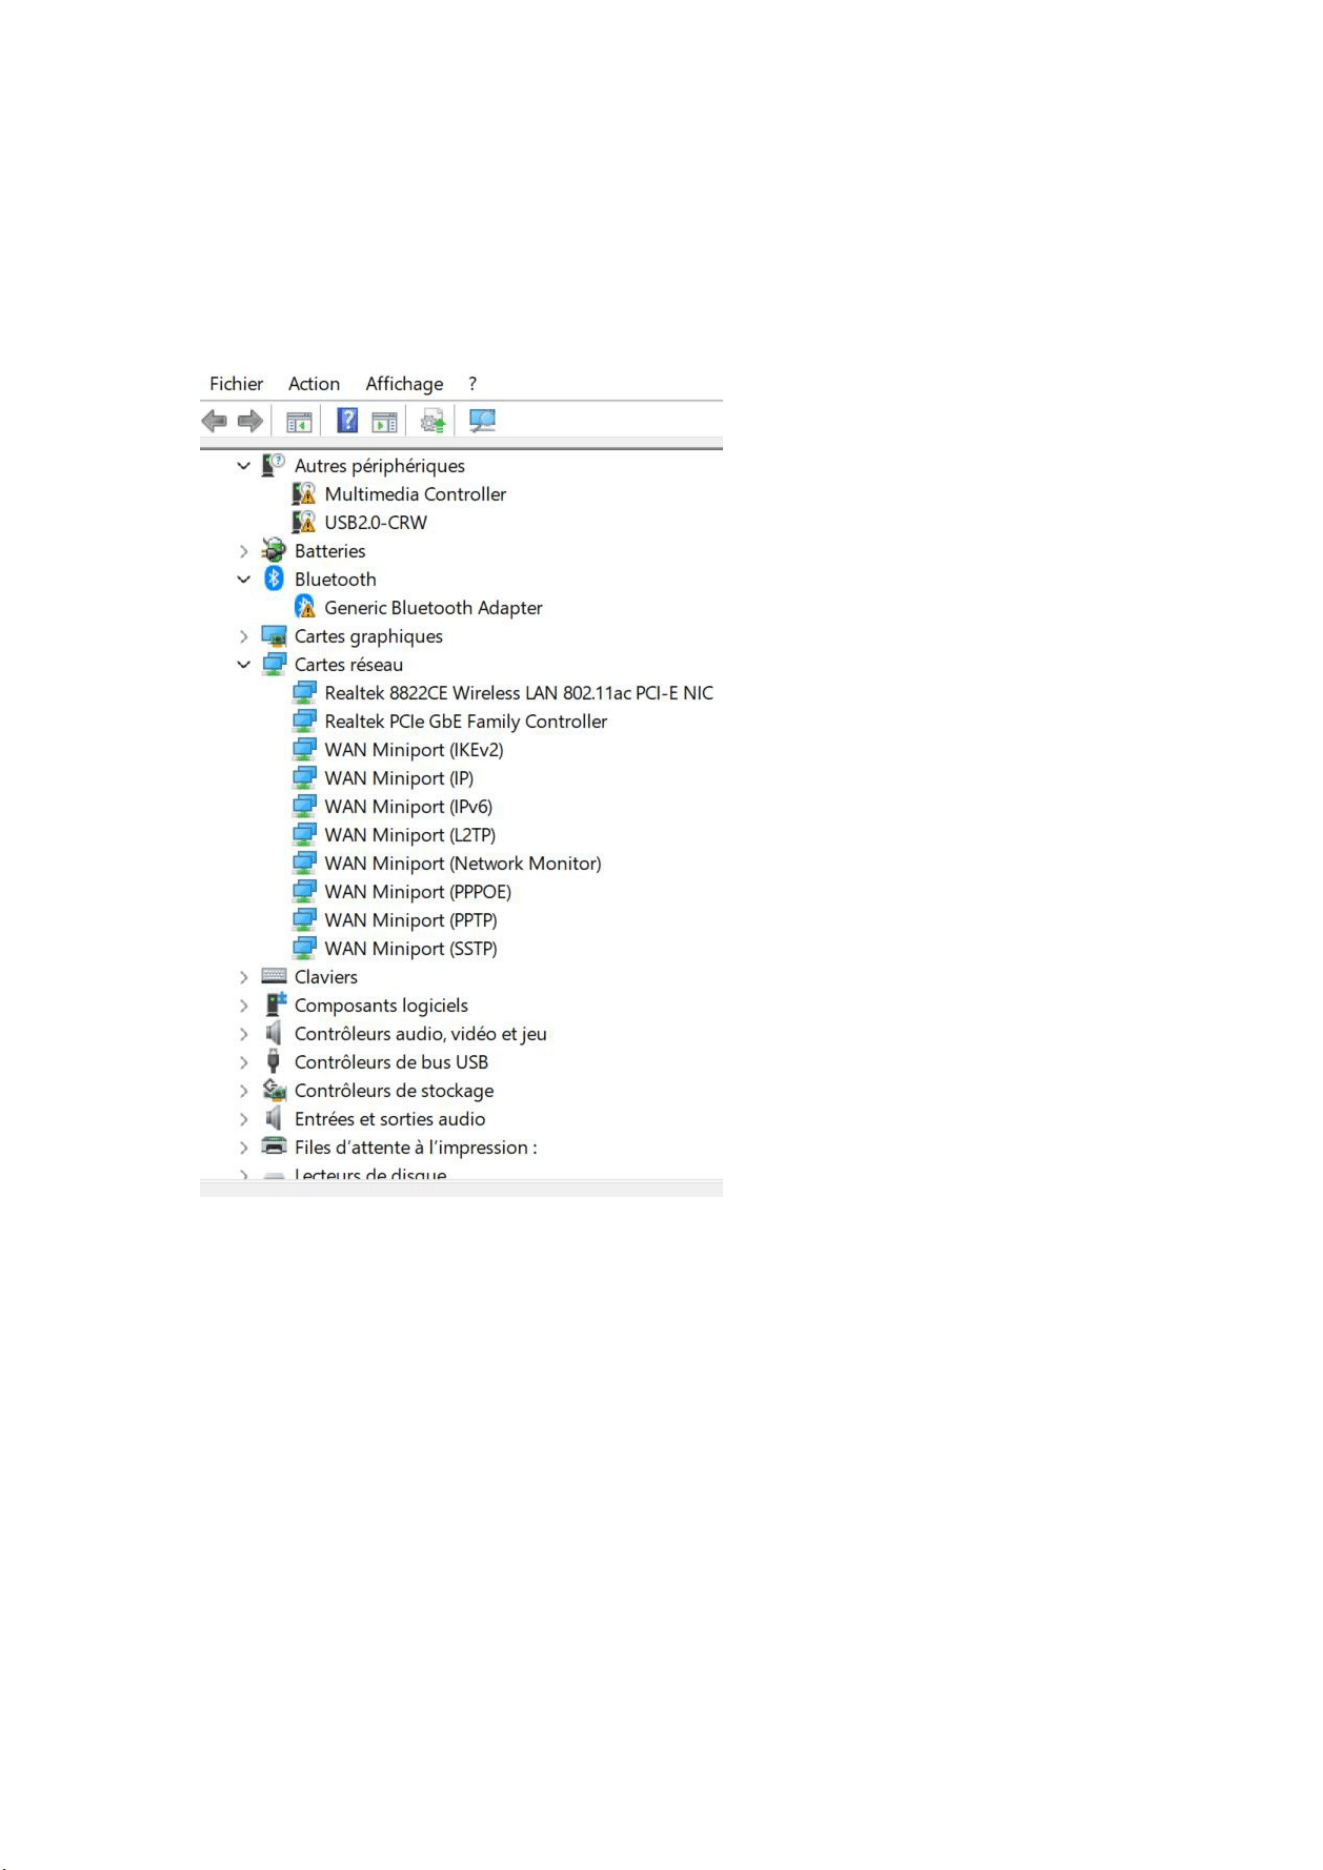
(2) Vérifiez le pilote de la carte réseau sans fil : Accédez au gesonnaire de
périphériques et vérifiez que le pilote de la carte réseau sans fil est normal. Si un
point d'exclamaon jaune apparaît, connectez-vous au site web officiel de FIREBAT
pour télécharger et mere à jour le pilote de la carte réseau sans fil.
(3) Vérifiez le signal du réseau sans fil : Assurez-vous que l'ordinateur portable se
trouve dans la zone de couverture du routeur sans fil. Si le signal est trop faible, il se
peut qu'il ne puisse pas se connecter normalement au réseau sans fil. Rapprochez
l'ordinateur portable du routeur sans fil et confirmez à nouveau.
Q6 : Comment acver ou désacver la foncon de mise à jour automaque de
Windows ?
A6 : Appuyez sur le bouton Appuyez sur la combinaison de touches « Win+R » pour
afficher la barre d'exécuon. Saisissez « services.msc » dans le champ de saisie, puis
appuyez sur la touche « Entrée ». Recherchez « Windows Update » sur la page
« Services (locaux) », double-cliquez dessus pour l'ouvrir. Quatre types de démarrage
sont disponibles dans « Type de démarrage ». Séleconnez le type de démarrage
souhaité.

21
Français
Q7 : Que signifie l'icône rouge de la baerie en bas à droite de l'écran de l'ordinateur
portable ou l'icône rouge qui apparaît lorsque vous appuyez sur le bouton
d'alimentaon (comme illustré ci-dessous) ?
A7 : Cela signifie que la baerie est faible. Veuillez brancher l'adaptateur secteur
d'origine pour la recharger.
Q8 : Que faire si le pavé tacle ne fonconne pas ?
A8 : Vous pouvez essayer les méthodes suivantes :
(1) Appuyez sur la combinaison de touches suivante pour acver/désacver le pavé
tacle : « Fn+F10 »;
(2) Accédez au site web officiel de FIREBAT pour retélécharger le nouveau pilote.
(3) Réinstallez le système.
Si vous réinstallez un nouveau pilote, Si la réinstallaon du système ne résout pas le
problème, veuillez contacter l'équipe FIREBAT pour obtenir la soluon la plus
récente.
Q9 : Que faire si la barre des tâches disparaît ?
A9 : Faites un clic droit sur le bureau et séleconnez « Personnalisaon ».
Séleconnez la barre des tâches et faites défiler jusqu'à « Comportement de la barre
des tâches ». Développez les opons et décochez « Masquer automaquement la
barre des tâches ».
Q10 : Comment résoudre les redémarrages fréquents ?
A10 : Ouvrez d'abord les paramètres de confidenalité et de sécurité, cliquez sur
« Ouvrir le Centre de sécurité Windows », puis séleconnez l'icône en forme de cœur
« Performances et santé de l'appareil » à gauche. Après ouverture, vérifiez si
l'appareil présente des problèmes de performances et de fonconnement. Si tout va
bien, essayez de mere à jour le pilote ou de réinstaller le système. Si le problème
persiste, veuillez contacter l'équipe FIREBAT.

22
Français
Neoyage et entreen
1. Avant de neoyer l'appareil, éteignez-le et débranchez l'adaptateur secteur.
2. Essuyez le boîer de l'appareil avec un chiffon humide, en évitant les interfaces et
les composants électroniques, puis séchez-le avec un chiffon doux. Ulisez des
neoyants spécifiques pour ordinateur pour neoyer l'écran et le clavier. N'ulisez
pas de produits de neoyage corrosifs.
3. Ne plongez pas l'appareil dans l'eau ou tout autre liquide.
4. Après le neoyage, placez l'appareil dans un endroit sec et aéré et aendez qu'il
soit complètement sec avant de l'uliser ou de le ranger.
Garane
Nous offrons une garane qualité d'un an à compter de la date d'achat et une
assistance technique gratuite à vie. En cas de défaut normal ou de problème de
qualité pendant la période de garane, nous offrons un remplacement ou une
réparaon gratuits. En cas de dommage causé par une ulisaon manuelle, le coût
des pièces détachées sera facturé. Notre équipe d'assistance technique est à votre
disposion 24h/24. En cas de problème d'ulisaon, n'hésitez pas à nous contacter.

23
Deutsch
Für detaillierte Anleitungen, Treiber-Downloads, weiteren Support oder weitere
Produkte kontakeren Sie uns bie oder besuchen Sie unsere Website.
Email: support@firebatpc.com
Website: www.firebatpc.com
Haungsausschluss
1. Bie verwenden Sie unbedingt das Originalnetzteil. Das Unternehmen übernimmt
keine Verantwortung für Probleme oder Ausfälle, die durch Netzteile von
Drianbietern verursacht werden.
2. Nutzer können Musikvideos, Bilder und Soware von Drianbietern verwenden,
wir übernehmen jedoch keine Verantwortung für Urheberrechtsverletzungen oder
Sowarefehler.
3. Bei Produkehlern halten wir uns strikt an die Garanebedingungen, übernehmen
jedoch keine Verantwortung für Sachschäden oder wirtschaliche Verluste, die
während der Nutzung entstehen.
4. Das Gerät wird mit vorinstallierter Soware ausgeliefert und kann nach einem Test
verwendet werden. Das Löschen der Soware bei der Überprüfung der
Kompabilität oder anderer Probleme hat jedoch keine Auswirkungen auf das Gerät.
Bie beachten Sie, dass dies kein Qualitätsproblem darstellt.
5. Das Unternehmen behält sich das Recht vor, das Produkt zu verbessern.
Produktspezifikaonen und Design können ohne vorherige Ankündigung geändert
werden! Bie beachten Sie das tatsächliche Produkt.
Hinweise
Bie lesen Sie vor der Verwendung dieses Produkts die folgenden Richtlinien
sorgfälg durch und halten Sie sich daran. Dies erhöht die Lebensdauer des Produkts
und vermeidet Gefahren und Gesetzesverstöße.
1. Seien Sie besonders vorsichg bei Vorgängen, die zu Dateischäden oder -verlust
führen können.
2. Achten Sie beim Gebrauch des Laptops auf Virenschutz und verwenden Sie nach
Möglichkeit eine Viren-Firewall.
3. Schalten Sie den Laptop aus und trennen Sie ihn von der Stromversorgung, wenn
Sie ihn längere Zeit nicht benutzen.
4. Schalten Sie den Laptop nicht häufig in kurzer Zeit ein und aus. Es wird empfohlen,
zwischen zwei Startvorgängen mindestens 10 Sekunden, vorzugsweise mindestens 60
Sekunden, einzuhalten.
5. Um eine Überhitzung des Laptops zu vermeiden, achten Sie darauf, dass die
Lüungsschlitze nicht blockiert sind.
6. Üben Sie keinen starken Druck auf das Display aus.

24
Deutsch
7. Heben Sie den Laptop-Bildschirm nicht mit Gewalt ab und drücken Sie ihn nicht
zusammen, um ihn anzuheben.
8. Stellen Sie keine Gegenstände auf den Laptop und lassen Sie sie nicht fallen.
9. Stellen Sie den Laptop nicht auf eine unebene oder instabile Arbeitsfläche.
10. Wenn Sie mit einem Laptop reisen, transporeren Sie ihn bie in einer speziellen
Tasche.
11. Verwenden Sie Ihren Laptop nicht unter rauen Bedingungen.
12. Setzen Sie den Laptop keiner direkten Sonneneinstrahlung aus und halten Sie ihn
von Magneeldern fern.
13. Stellen Sie den Computer nicht auf den Rand von Feuer oder anderen
Wärmequellen und verwenden Sie das Notebook nicht in einer überhitzten oder
unterkühlten Umgebung.
14. Setzen Sie den Laptop weder Regen noch Tau aus.
15. Haneren Sie nicht mit dem Akku und bewahren Sie ihn außerhalb der
Reichweite von Kindern auf.
16. Setzen Sie den Laptop keinem Staub oder ätzenden Chemikalien aus.
17. Sprühen Sie kein Wasser oder andere organische Lösungsmiel direkt auf das
Laptop-Display.
18. Lassen Sie keine Flüssigkeiten wie Wasser oder Lebensmiel auf den Laptop
fallen und ziehen Sie nicht am Datenkabel, Netzkabel usw.
19. Achten Sie auf Feuchgkeitsschutz und halten Sie die Umgebung sauber und
steril. Wischen Sie Staub mit einem trockenen, weichen Tuch ab.
20. Die Verwendung von nicht originalen Akkus oder anderen Akkutypen ist
strengstens verboten, da sonst Explosionsgefahr besteht.
25
Deutsch
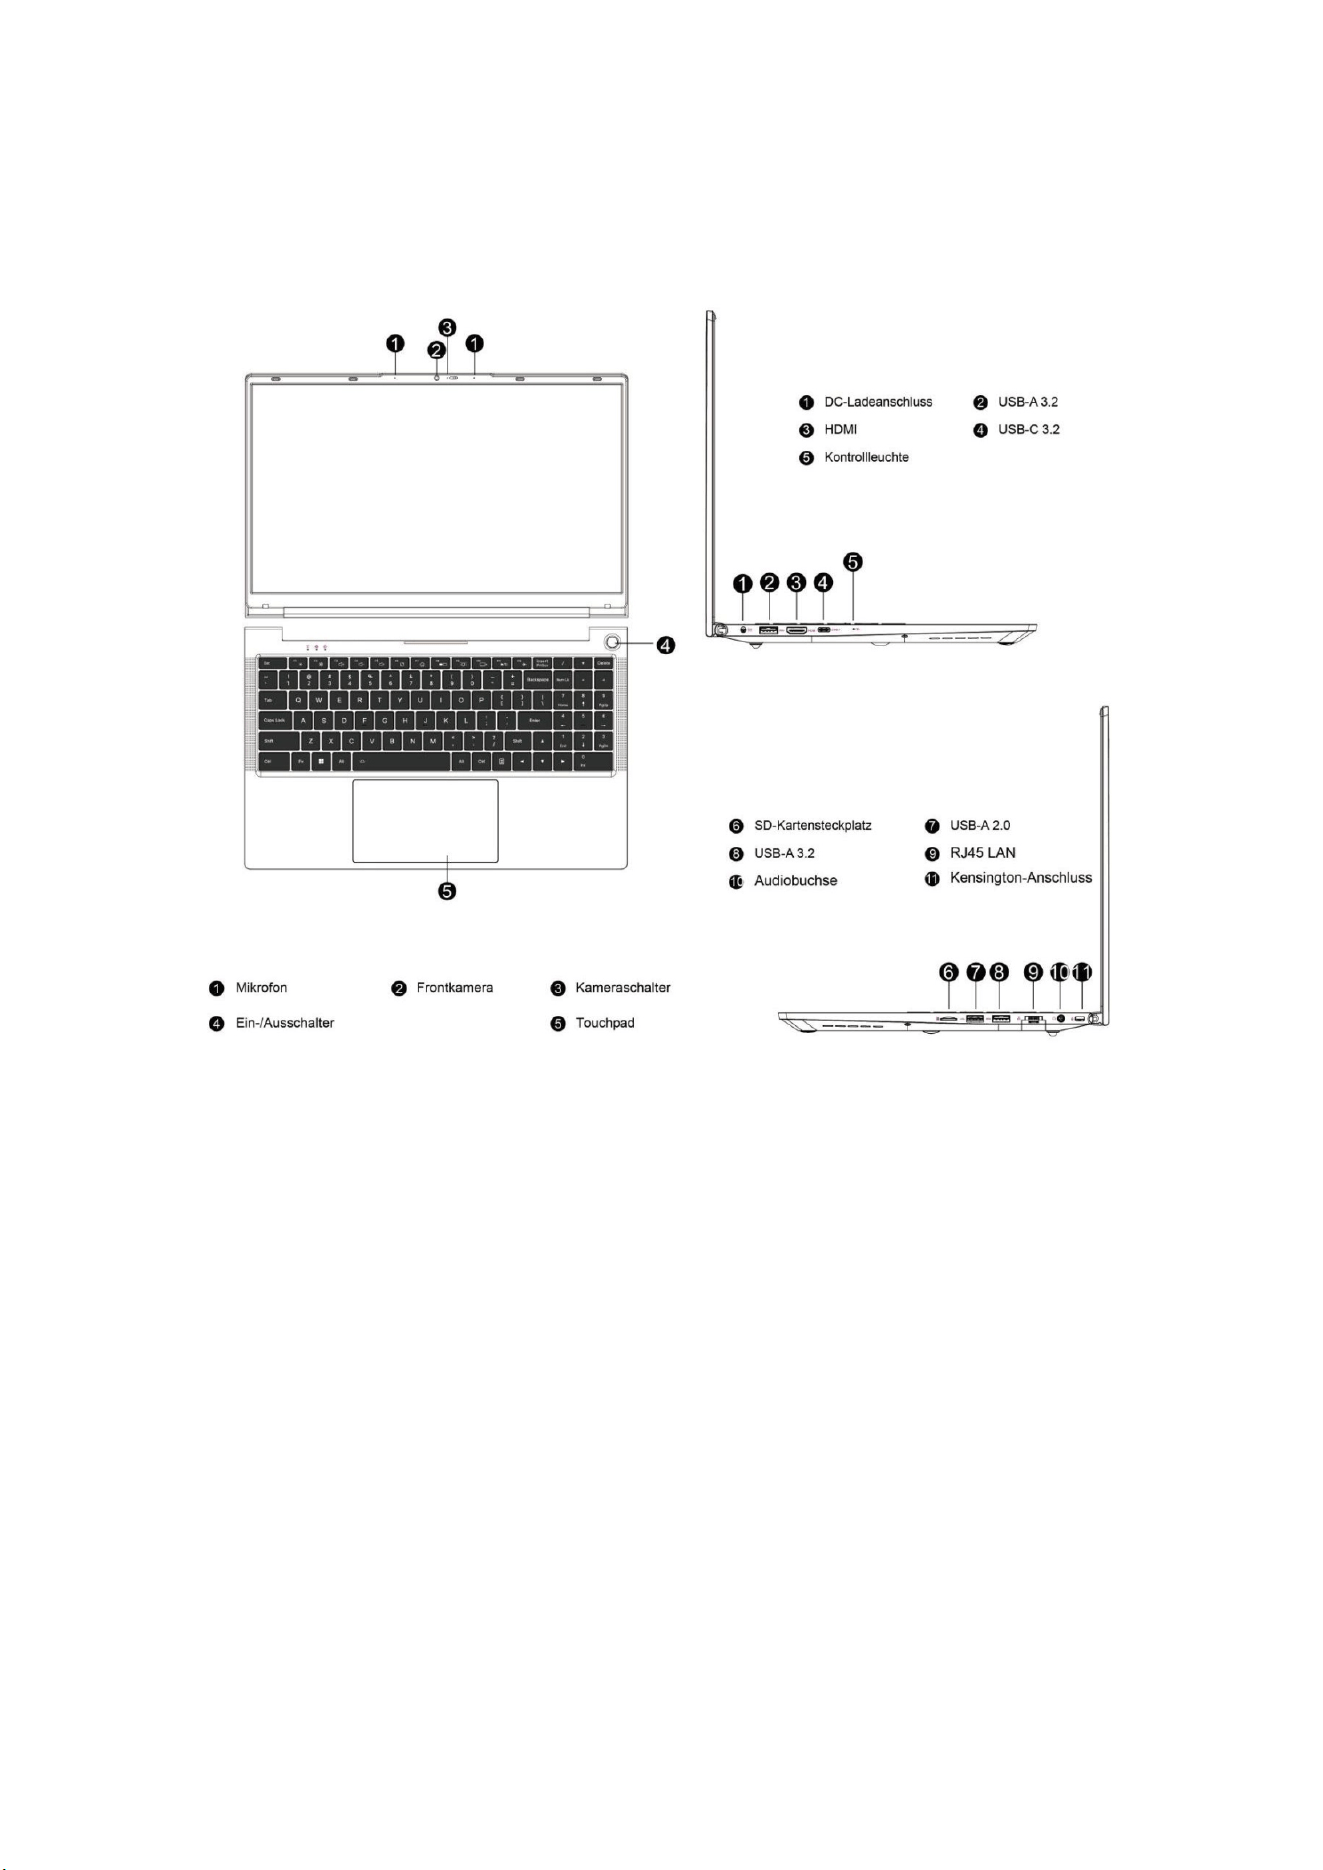
Produktdiagramm
Stromversorgung und Laden
Der Laptop kann über einen Lithium-Ionen-Akku oder ein Netzteil mit Strom versorgt
werden. Schließen Sie nach Erhalt des Laptops bie das Netzteil an, um ihn
aufzuladen.
Lithium-Ionen-Akkus haben keinen Memory-Effekt. Warten Sie daher nicht, bis der
Akku vollständig entladen ist. Wenn Sie den Laptop während des Ladevorgangs
weiterhin verwenden, verlängert sich die Ladezeit.
Zum Schnellladen pausieren Sie bie die Nutzung des Laptops oder schalten Sie ihn
aus.
Um die Lebensdauer des Lithium-Ionen-Akkus zu verlängern, laden Sie ihn bei einem
Ladestand von <95 % und nicht bei einem Ladestand von >95 %.
Bei niedrigem Akkustand wird eine Meldung angezeigt. Der Akku funkoniert weiter,
bis er zu schwach wird und sich abschaltet. In diesem Fall werden die Daten
möglicherweise nicht gespeichert. Laden Sie den Laptop rechtzeig auf und
verwenden Sie ihn nach dem Anschließen des Netzteils wie gewohnt.

26
Deutsch
Bie verwenden Sie das Original-Netzteil, um Schäden am Laptop zu vermeiden. Der
Akku ist giig und gefährlich. Bie recyceln Sie den Akku gemäß den
Umweltschutzbesmmungen. Um eine Umweltverschmutzung zu vermeiden,
entsorgen Sie die Baerie nicht willkürlich.
So starten Sie
Wenn Sie Ihren Laptop zum ersten Mal starten, führt Sie das System durch die
Konfiguraon des Windows-Betriebssystems.
a. Einschalten
Drücken Sie den Netzschalter, um Ihren Mini-Computer zu starten. Warten Sie einige
Minuten, bis die Installaonsoberfläche erscheint.
Schri 1: Wählen Sie Sprache/Land (Region).
Schri 2: Wählen Sie „Eingabemethode“ und klicken Sie auf „Bestägen“.
Schri 3: Wählen Sie die zweite Eingabemethode. Sie können diese überspringen.
Schri 4: Netzwerk: Geben Sie nach Auswahl von WLAN das Passwort ein, um sich zu
verbinden. Alternav können Sie das Netzwerkkabel anschließen. Das Netzwerk wird
automasch aktualisiert. Der Aktualisierungsvorgang dauert lange, was die Startzeit
verlängert. (Es wird dringend empfohlen, die Netzwerkverbindung zu überspringen.)
Schri 5: Akzeperen Sie die Lizenzvereinbarung.
Schri 6: Legen Sie Benutzernamen und Passwort fest. Nach Abschluss der
Installaon wird der Desktop angezeigt.
b. Mit WLAN verbinden
Wählen Sie das WLAN-Symbol in der Taskleiste, um WLAN zu akvieren.
Wählen Sie einen Zugangspunkt aus der Liste der verfügbaren WLAN-Verbindungen.
Wählen Sie eine der Verbindungen aus, um die Netzwerkverbindung herzustellen.
Hinweis: Sie werden möglicherweise aufgefordert, einen Sicherheitsschlüssel
einzugeben, um die WLAN-Verbindung zu akvieren.
c. BIOS-Setup aufrufen
BlOS (Basic Input/Output System) ist die erste Soware, die beim Start des Laptops
geladen wird.
BIOS aufrufen: Drücken Sie die En- oder F2-Taste.
Normalerweise werden die BIOS-Standardeinstellungen verwendet, um eine
opmale Leistung zu gewährleisten. Ändern Sie die BIOS-Standardeinstellungen nicht,
es sei denn, Sie haben neue Systemkomponenten installiert, die eine weitere
Einrichtung oder ein BIOS-Update erfordern.
Hinweis: Ungeeignete BlOS-Einstellungen können zu Instabilität oder Starehlern
führen. Wir empfehlen dringend, BlOS-Einstellungen nur mit Hilfe eines technischen
Kundendienstes zu ändern.

27
Deutsch
Fehlerbehebung
F1: Was kann ich tun, wenn sich mein Laptop nicht einschalten lässt?
A1: Bie stellen Sie sicher, dass das Netzkabel richg angeschlossen ist, und laden Sie
den Computer mindestens 30 Minuten lang auf, bevor Sie ihn neu starten. Der
Netzschalter verfügt über einen Berührungsschutz. Halten Sie ihn daher beim
Einschalten des Computers 1–2 Sekunden lang gedrückt.
F2: Warum wird kein Ton ausgegeben?
A2: Bie öffnen Sie den Gerätemanager, um zu prüfen, ob der Soundkartentreiber
installiert ist. Falls nicht, laden Sie ihn bie von der offiziellen FIREBAT-Website
herunter und installieren Sie ihn. Prüfen Sie, ob die Lautstärke auf „0“ eingestellt ist.
Erhöhen Sie die Lautstärke und bestägen Sie die Eingabe erneut. Falls Sie Kopörer
verwenden, versuchen Sie es mit einem anderen Kopörer.
F3: Warum ist das Geräusch so laut?
A3: Schließen Sie die Audiohardware erneut an, um zu prüfen, ob die Ursache ein
schlechter Kontakt ist. Prüfen Sie, ob sich Staub auf den Kopörern oder
Lautsprechern befindet. Prüfen Sie, ob die Audiodatei beschädigt ist.
F4: Windows lässt sich nicht sofort akvieren.
A4: Stellen Sie zunächst sicher, dass eine WLAN-Verbindung besteht und das
WLAN-Netzwerk funkoniert. Stellen Sie außerdem sicher, dass die Zeitzone und die
Systemzeit Ihres Standorts korrekt sind. (Die Akvierung der Windows-Taste kann
aufgrund der Netzwerkgeschwindigkeit oder anderer Gründe verzögert sein. Wenn
Sie die oben genannten Punkte überprü haben und die Akvierung dennoch nicht
funkoniert, wenden Sie sich bie an das FIREBAT-Serviceteam. Wir unterstützen Sie
umgehend.
F5: Was kann ich tun, wenn ich keine Verbindung zu einem WLAN herstellen kann?
A5: (1) WLAN-Schalter prüfen: Prüfen Sie, ob der WLAN-Schalter des Laptops
eingeschaltet ist. Der Laptop verfügt über einen separaten WLAN-Schalter, der
manuell eingeschaltet werden muss.
28
Deutsch
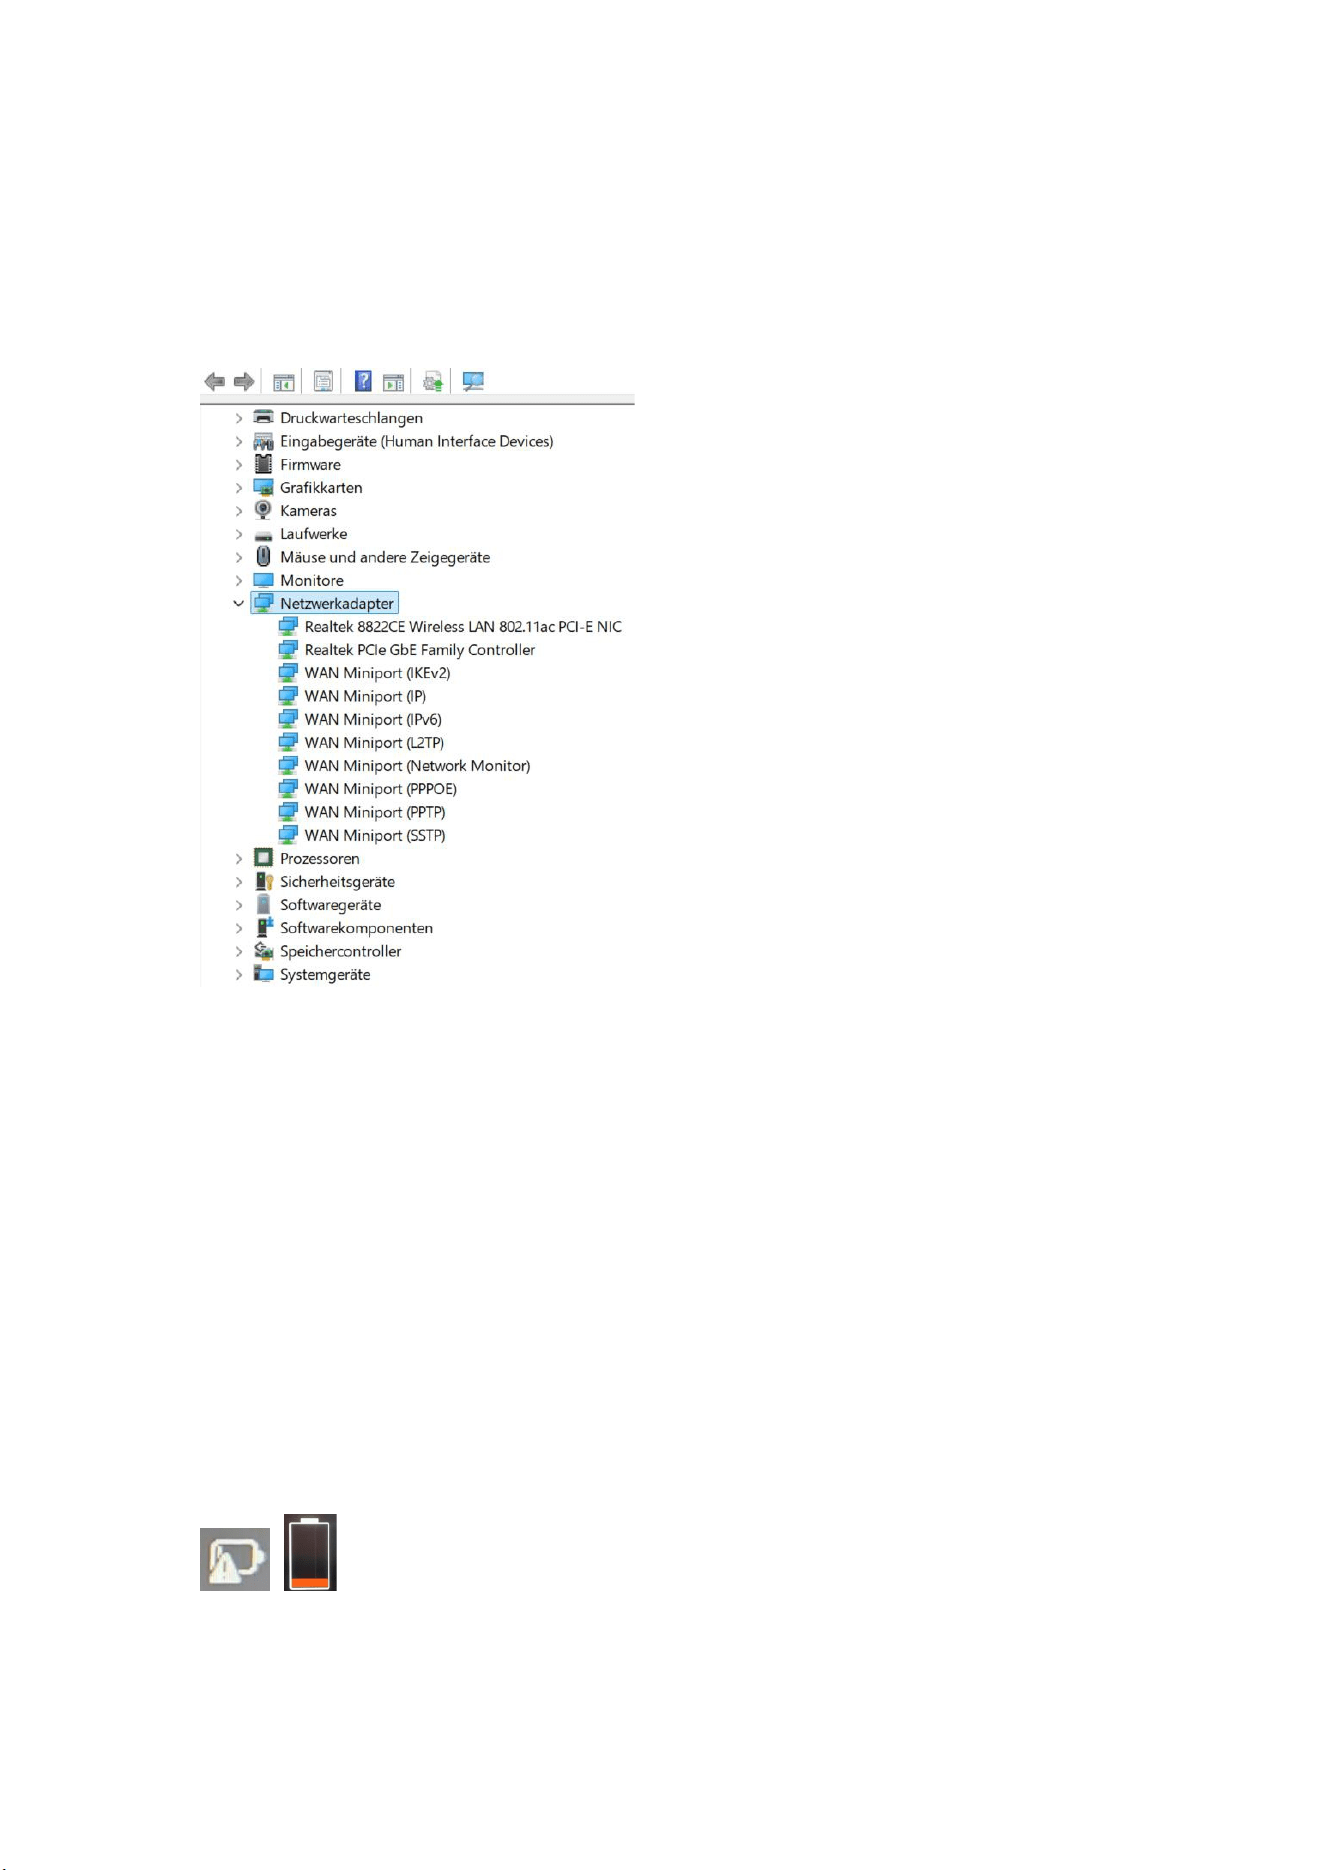
(2) Treiber der WLAN-Karte prüfen: Öffnen Sie den Gerätemanager und prüfen Sie,
ob der Treiber der WLAN-Karte korrekt ist. Wenn ein gelbes Ausrufezeichen angezeigt
wird, melden Sie sich bie auf der offiziellen FIREBAT-Website an, um den Treiber der
WLAN-Karte herunterzuladen und zu aktualisieren.
(3) WLAN-Signal prüfen: Stellen Sie sicher, dass sich der Laptop im Empfangsbereich
des WLAN-Routers befindet. Ist das Signal zu schwach, kann möglicherweise keine
normale Verbindung zum WLAN hergestellt werden. Gehen Sie näher an den
WLAN-Router heran und bestägen Sie die Eingabe erneut.
F6: Wie akviere oder deakviere ich die automasche Windows-Update-Funkon?
A6: Drücken Sie Öffnen Sie die Ausführungsleiste mit der Tastenkombinaon „Win+R“.
Geben Sie „services.msc“ in das Eingabefeld ein und drücken Sie die Eingabetaste.
Suchen Sie auf der Seite „Dienste (Lokal)“ nach „Windows Update“. Doppelklicken Sie,
um die Seite zu öffnen. Unter „Staryp“ stehen Ihnen vier Starypen zur Verfügung.
Wählen Sie den gewünschten Staryp aus.
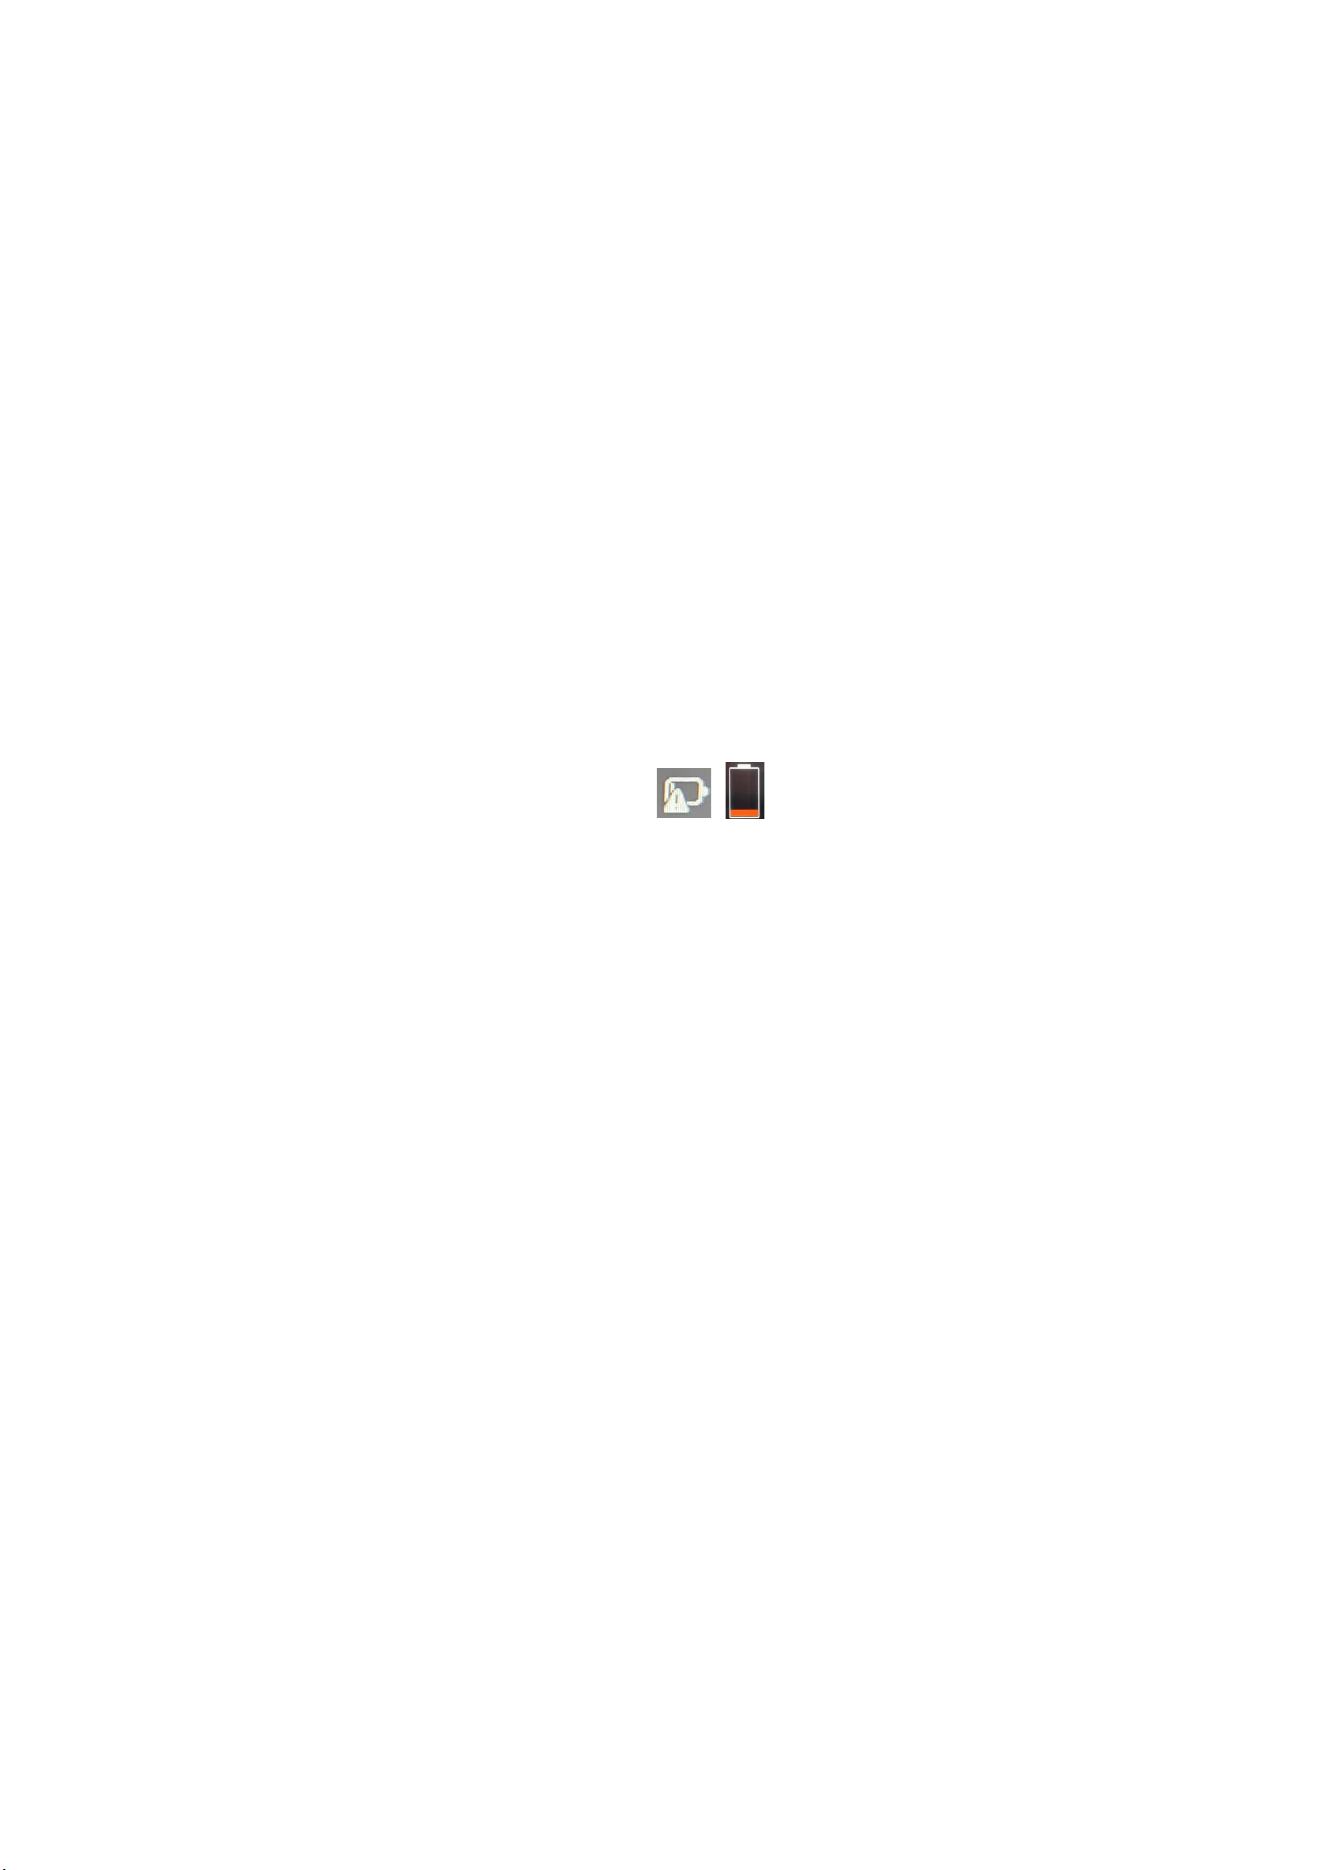
F7: Was bedeutet ein rotes Symbol auf dem Akkusymbol in der unteren rechten Ecke
des Laptop-Bildschirms oder ein rotes Symbol beim Drücken des Netzschalters (siehe
Abbildung unten)?
A7: Dies bedeutet, dass der Akku fast leer ist. Schließen Sie zum Laden bie das
Original-Netzteil an.
29
Deutsch
F8: Was kann ich tun, wenn das Touchpad nicht funkoniert?
A8: Sie können Folgendes versuchen:
(1) Drücken Sie die Tastenkombinaon „Fn+F10“, um das Touchpad zu
akvieren/deakvieren.
(2) Laden Sie den neuen Treiber von der offiziellen FIREBAT-Website herunter.
(3) Installieren Sie das System neu.
Wenn Sie einen neuen Treiber neu installieren und Eine Neuinstallaon des Systems
hil nicht. Bie wenden Sie sich für eine aktuelle Lösung an das FIREBAT-Team.
F9: Was kann ich tun, wenn die Taskleiste verschwindet?
A9: Klicken Sie mit der rechten Maustaste auf den Desktop und wählen Sie
„Personalisierung“. Wählen Sie die Taskleiste aus und scrollen Sie nach unten zu
„Taskleistenverhalten“. Erweitern Sie die Oponen und deakvieren Sie „Taskleiste
automasch ausblenden“.
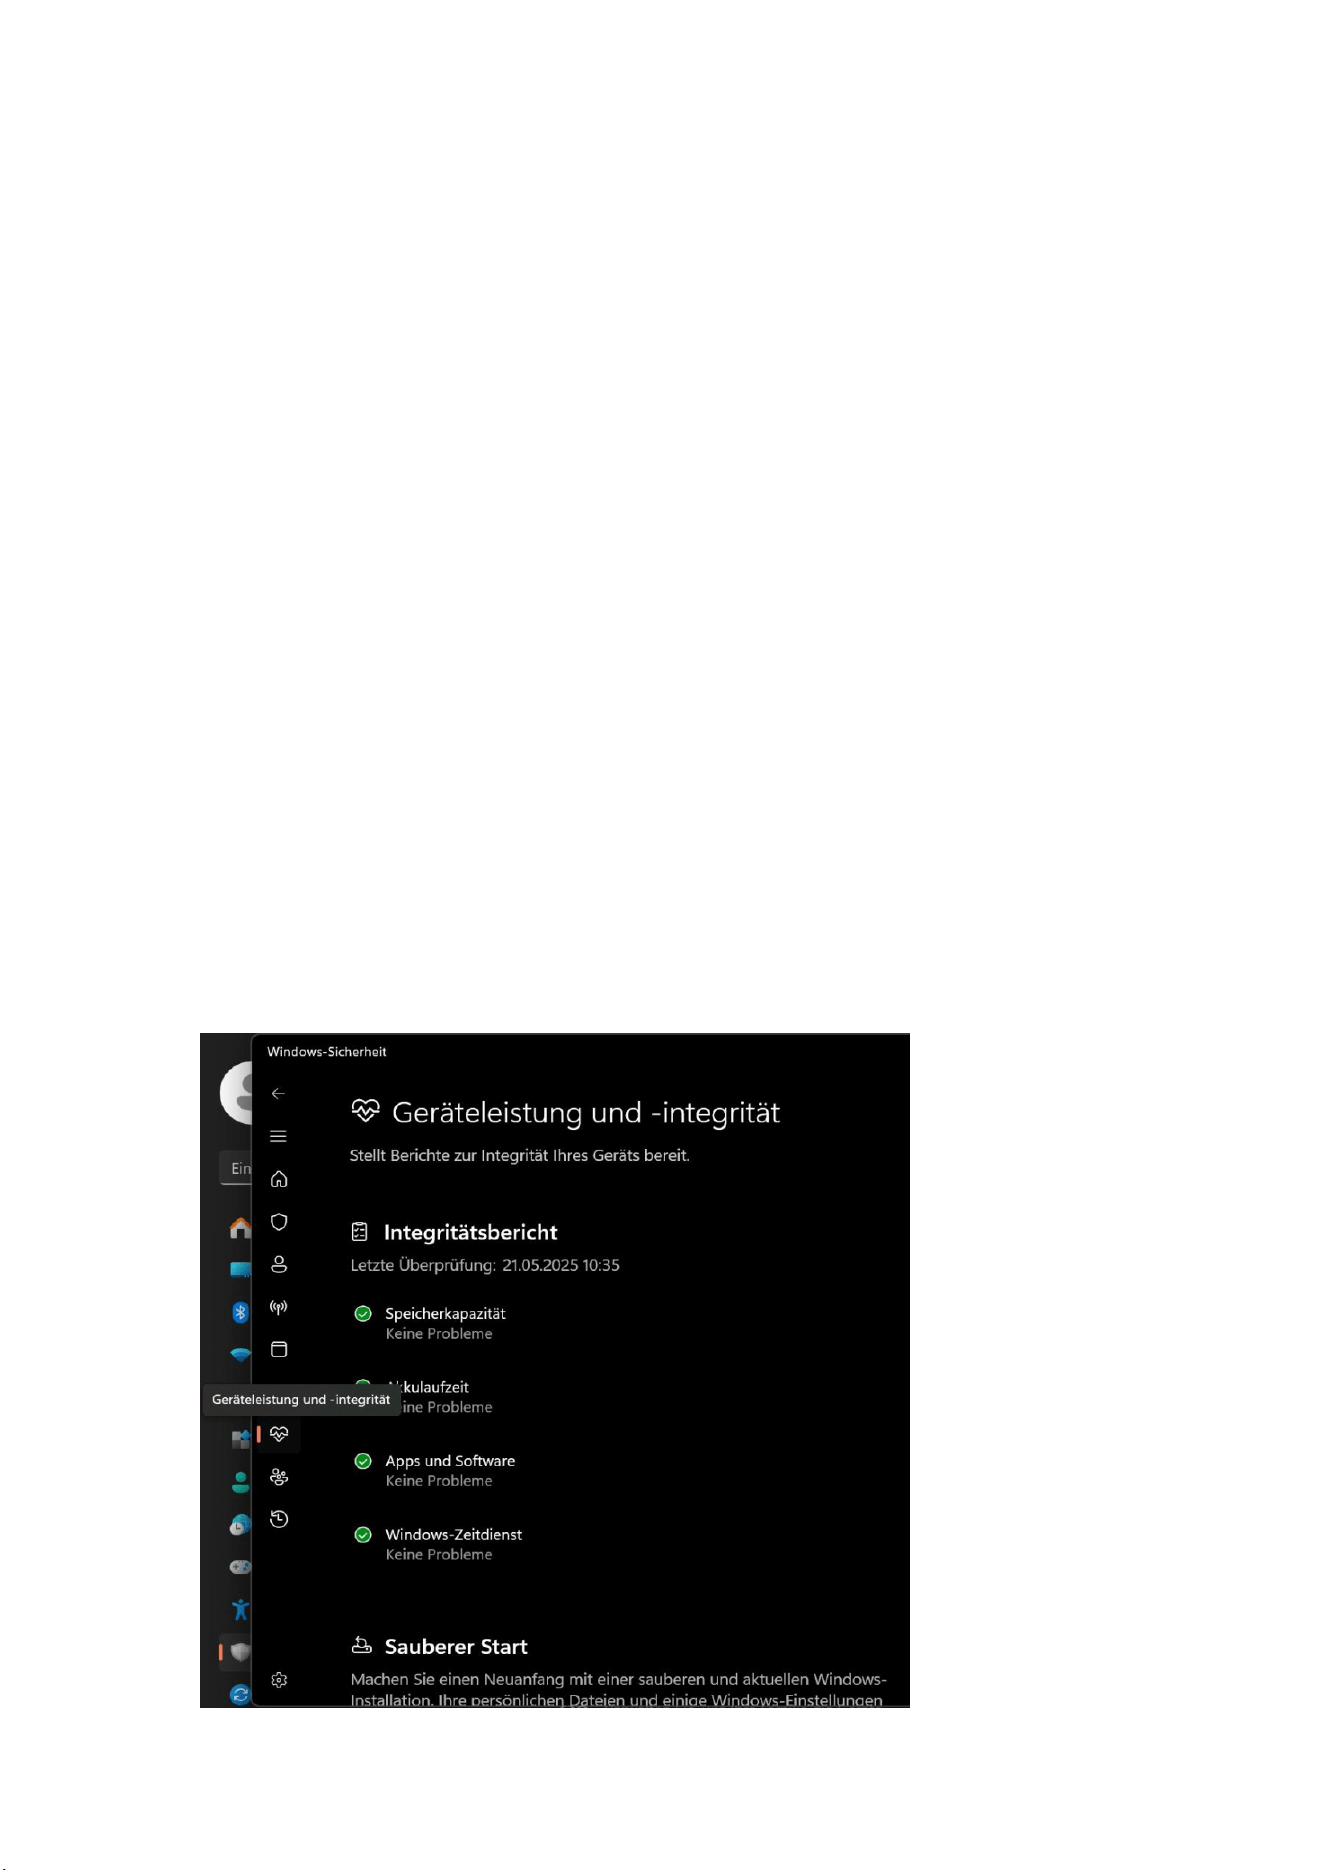
F10: Wie behebe ich die häufigen Neustarts?
A10: Öffnen Sie zunächst die Einstellungen unter „Datenschutz und Sicherheit“.
Klicken Sie auf „Windows-Sicherheitscenter öffnen“ und wählen Sie links das
herzförmige Symbol „Geräteleistung und -zustand“. Überprüfen Sie anschließend, ob
Probleme mit der Leistung und dem Betriebsstatus des Geräts vorliegen. Wenn keine
Probleme vorliegen, aktualisieren Sie den Treiber oder installieren Sie das System
neu. Sollte das Problem weiterhin bestehen, wenden Sie sich bie an das
FIREBAT-Team.

30
Deutsch
Reinigung und Wartung
1. Schalten Sie das Produkt vor der Reinigung aus und ziehen Sie den Netzstecker.
2. Wischen Sie das Gehäuse mit einem feuchten Tuch ab. Vermeiden Sie dabei
Schnistellen und elektronische Komponenten. Trocknen Sie es anschließend mit
einem weichen Tuch ab. Verwenden Sie für Bildschirm und Tastatur spezielle
Computerreiniger. Verwenden Sie keine ätzenden Reinigungsmiel.
3. Tauchen Sie das Produkt nicht in Wasser oder andere Flüssigkeiten.
4. Lagern Sie das Produkt nach der Reinigung an einem trockenen und belüeten Ort
und lassen Sie es vor der Verwendung oder Lagerung vollständig trocknen.
Garane
Wir gewähren ein Jahr Qualitätsgarane ab Kaufdatum und lebenslangen
kostenlosen technischen Support. Bei normalen Mängeln oder Qualitätsproblemen
innerhalb der Garanezeit bieten wir kostenlosen Ersatz oder Reparatur an. Bei
Schäden, die durch manuelle Bedienung verursacht wurden, berechnen wir die
Kosten für die Reparatur der Produkeile. Unser technischer Support ist rund um die
Uhr für Sie da. Bei Problemen während der Nutzung kontakeren Sie uns bie.

31
Italiano
Per istruzioni deagliate, download di driver, ulteriore supporto o altri prodo,
contaaci o visita il nostro sito web.
Email: support@firebatpc.com
Sito web: www.firebatpc.com
Disclaimer
1. Assicurarsi di ulizzare l'alimentatore originale. L'azienda non si assume alcuna
responsabilità per eventuali problemi o guas causa da adaatori di terze par.
2. Gli uten possono ulizzare video musicali, immagini e soware forni da terze
par, ma non ci assumiamo alcuna responsabilità per problemi di copyright o guas
del soware.
3. In caso di guasto del prodoo, rispeeremo rigorosamente i termini di garanzia,
ma non ci assumiamo alcuna responsabilità per eventuali danni materiali o perdite
economiche che potrebbero verificarsi durante l'ulizzo.
4. Il disposivo viene fornito con soware integrato al momento dell'uscita dalla
fabbrica e può essere ulizzato dopo un test effevo. Tuavia, se il soware viene
eliminato o non eliminato durante la ricerca di compabilità o altri problemi, non
avrà alcun impao sul disposivo. Si prega di notare che questo non è un problema
relavo alla qualità del prodoo.
5. L'azienda si riserva il dirio di migliorare il prodoo. Le specifiche e il design del
prodoo sono sogge a modifiche senza preavviso! Fare riferimento al prodoo
reale.
Note
Prima di ulizzare questo prodoo, leggere aentamente le seguen linee guida e
aenersi a queste regole, in modo da aumentarne la durata e prevenire pericoli o
violazioni della legge.
1. Prestare parcolare aenzione quando si eseguono operazioni che potrebbero
causare danni o perdite di file.
2. Prestare aenzione alla protezione anvirus durante l'ulizzo del laptop e provare
a ulizzare un firewall anvirus.
3. Spegnere il laptop e scollegare l'alimentatore quando non si ulizza il laptop per
un lungo periodo.
4. Non accendere e spegnere il laptop frequentemente in tempi brevi. Si consiglia di
aendere almeno 10 secondi tra un avvio e l'altro, preferibilmente non meno di 60
secondi.
5. Per evitare il surriscaldamento del laptop, assicurarsi che le prese d'aria non siano
ostruite.
6. Non esercitare una pressione eccessiva sul display.
32
Italiano
7. Non forzare lo schermo del laptop per staccarlo o pizzicarlo per sollevarlo.
8. Non appoggiare o far cadere ogge sul laptop. 9. Non posizionare il laptop su una
superficie di lavoro irregolare o instabile.
10. Se si viaggia con un laptop, trasportarlo in un'apposita borsa.
11. Non ulizzare il laptop in condizioni difficili.
12. Non esporre il laptop alla luce direa del sole e tenerlo lontano da campi
magneci.
13. Non posizionare il computer sul bordo di un fuoco o di altre fon di calore e non
ulizzare il notebook in un ambiente surriscaldato o eccessivamente raffreddato.
14. Non esporre il laptop a pioggia o rugiada.
15. Non maneggiare la baeria e tenerla fuori dalla portata dei bambini.
16. Non esporre il laptop a polvere o sostanze chimiche corrosive.
17. Non spruzzare acqua o altri solven organici direamente sul display del laptop.
18. Non far cadere liquidi come acqua e cibo sul laptop e non rare il cavo da, il
cavo di alimentazione, ecc.
19. Prestare aenzione all'umidità e mantenere l'ambiente di ulizzo pulito e sterile.
In caso di polvere sul laptop, pulirlo con un panno morbido e asciuo.
20. È severamente vietato ulizzare baerie non originali o altri pi di baerie,
altrimen sussiste il rischio di esplosione.
Diagramma del prodoo

33
Italiano
Alimentazione e ricarica
Il laptop può essere alimentato da una baeria al lio o da un adaatore CA. Dopo
aver ricevuto il laptop, collegare l'adaatore CA per caricarlo.
Le baerie al lio non hanno "effeo memoria", quindi non è necessario aendere
che la baeria sia completamente scarica prima di caricarla; durante la carica, se si
sta ancora ulizzando il laptop, il tempo di ricarica sarà più lungo.
Se si desidera una ricarica rapida, meere in pausa l'uso del laptop o spegnerlo
durante la ricarica.
Per prolungare la durata della baeria al lio, caricarla quando la carica è <95% e non
caricarla quando è >95%.
Quando la carica della baeria è bassa, lo schermo visualizzerà un messaggio di
avviso e la baeria connuerà a funzionare finché la carica non sarà troppo bassa e si
spegnerà. In questo caso, i da potrebbero non essere salva. Ricaricare per tempo e
ulizzare il laptop normalmente dopo aver collegato l'adaatore.
Ulizzare l'adaatore di alimentazione originale per evitare di danneggiare il laptop.
La baeria è tossica e pericolosa. Riciclare la baeria secondo le normave sulla
tutela ambientale. Non smalre la baeria liberamente per evitare di inquinare
l'ambiente.
Come iniziare
Quando avvii il laptop per la prima volta, il sistema guiderà nella configurazione del
sistema operavo Windows.
a. Accensione
Premi il pulsante di accensione per avviare il mini computer. È necessario aendere
alcuni minu per il primo avvio, fino a quando non viene visualizzata l'interfaccia di
installazione.
Passaggio 1: Seleziona Lingua/Paese (Regione).
Passaggio 2: Seleziona "Metodo di input" e fai clic su "Conferma".
Passaggio 3: Seleziona il secondo metodo di input, puoi "saltarlo".
Passaggio 4: Rete: Inserisci la password per conneer dopo aver selezionato il Wi-Fi.
In alternava, scegli di collegare il cavo di rete per conneer. La rete si aggiornerà
automacamente e il processo di aggiornamento rimarrà su un'interfaccia per un
lungo periodo, prolungando i tempi di avvio. (Si consiglia vivamente di saltare la
connessione di rete)
Passaggio 5: Accea il contrao di licenza
Passaggio 6: Imposta nome utente e password. Al termine dell'installazione, verrà
visualizzato il desktop.

34
Italiano
b. Conne al Wi-Fi
Seleziona l'icona del Wi-Fi dalla barra delle applicazioni per avare il Wi-Fi.
Selezionare un punto di accesso nell'elenco delle connessioni Wi-Fi disponibili.
Selezionare una delle connessioni per avviare la connessione di rete.
Nota: potrebbe essere richiesto di inserire una chiave di sicurezza per avare la
connessione Wi-Fi.
c. Accedere alle impostazioni del BIOS
BLOS (Basic Input/Output System) è il primo soware caricato all'avvio del laptop.
Accedere al BIOS: premere il tasto "Canc" o "F2".
In circostanze normali, nella maggior parte dei casi vengono applicate le impostazioni
predefinite del BIOS per garanre prestazioni omali. Non modificare le
impostazioni predefinite del BIOS a meno che non siano sta installa nuovi
componen di sistema che richiedono un'ulteriore configurazione o un
aggiornamento del BIOS.
Nota: impostazioni BLOS inappropriate possono causare instabilità o problemi di
avvio. Si consiglia vivamente di modificare le impostazioni BLOS solo con l'aiuto del
personale di assistenza tecnica.
Risoluzione dei problemi
D1: Cosa devo fare se il mio laptop non si accende?
R1: Assicurarsi che il cavo di alimentazione sia correamente collegato alla porta e
lasciare in carica per più di 30 minu prima di riavviarlo. Il pulsante di accensione è
dotato di una funzione di protezione an-tocco errato, quindi tenerlo premuto per
1-2 secondi quando si accende il computer.
D2: Perché non viene emesso alcun suono?
R2: Aprire Gesone disposivi per verificare che il driver della scheda audio sia
installato. In caso contrario, scaricarlo e installarlo dal sito web ufficiale di FIREBAT;
verificare che il volume sia impostato su "0", aumentare il volume e confermare
nuovamente. Se si ulizzano le cuffie, provare con un altro paio di cuffie.
D3: Perché il rumore è così forte?
R3: Ricollegare l'hardware audio per verificare se il problema è causato da un
contao inadeguato. Verificare che non vi sia polvere sulle cuffie o sugli altoparlan.
Verificare che il file audio non sia danneggiato. D4: Windows non può essere avato
immediatamente.

35
Italiano
R4: Innanzituo, assicura che il Wi-Fi sia connesso e che la rete Wi-Fi sia
funzionante. In secondo luogo, assicura che il fuso orario e l'ora di sistema della tua
posizione siano corre. (A volte si verifica un ritardo nell'avazione della chiave
Windows a causa della velocità della rete o di altri movi. Se i due pun preceden
sono corre e non è ancora possibile avarla, contaare il team di assistenza
FIREBAT che fornirà supporto immediato.
D5: Cosa devo fare se non riesco a conneermi a una rete wireless?
R5: (1) Controllare lo switch di rete wireless: verificare che lo switch di rete wireless
del laptop sia acceso. Il laptop dispone di uno switch di rete wireless indipendente,
che deve essere avato manualmente.
(2) Controllare il driver della scheda di rete wireless: accedere a Gesone disposivi e
verificare che il driver della scheda di rete wireless funzioni correamente. Se viene
visualizzato un punto esclamavo giallo, accedere al sito Web ufficiale di FIREBAT per
scaricare e aggiornare il driver della scheda di rete wireless.
36
Italiano
(3) Controllare il segnale di rete wireless: assicurarsi che il laptop si trovi all'interno
della copertura effeva del router wireless. Se il segnale è troppo debole, potrebbe
non essere in grado di conneersi normalmente alla rete wireless. Avvicinare il
laptop al router wireless e confermare nuovamente.
D6: Come avare o disavare la funzione di aggiornamento automaco di
Windows?
R6: Premere la combinazione di tas "Win+R" sulla tasera per visualizzare la barra
ESEGUI, digitare "services.msc" nella casella di testo, premere il tasto "Invio", trovare
"Windows Update" nella pagina "Servizi (Locali)", fare doppio clic per aprirlo e
visualizzare quaro pi di avvio in "Tipo di avvio". Selezionare il po di avvio
desiderato.
D7: Cosa significa quando è presente un'icona rossa sull'icona della baeria
nell'angolo in basso a destra dello schermo del laptop o quando si preme il pulsante
di accensione (come mostrato di seguito)?
R7: Ciò significa che la baeria è scarica. Collegare l'alimentatore originale per la
ricarica.
D8: Cosa devo fare se il touchpad non funziona?
R8: È possibile provare i seguen metodi: (1) Premere la seguente combinazione di
tas per abilitare/disabilitare il touchpad: "Fn+F10";
(2) Visitare il sito Web ufficiale di FIREBAT per scaricare nuovamente il nuovo driver.
(3) Reinstallare il sistema.
Se si reinstalla un nuovo driver e La reinstallazione del sistema non risolve il
problema. Contaa il team FIREBAT per la soluzione più aggiornata.
D9: Cosa devo fare se la barra delle applicazioni scompare?
R9: Fai clic con il pulsante destro del mouse sul desktop e seleziona
"Personalizzazione". Seleziona la barra delle applicazioni e scorri verso il basso fino a
"Comportamento barra delle applicazioni". Espandi le opzioni e deseleziona
"Nascondi automacamente la barra delle applicazioni".
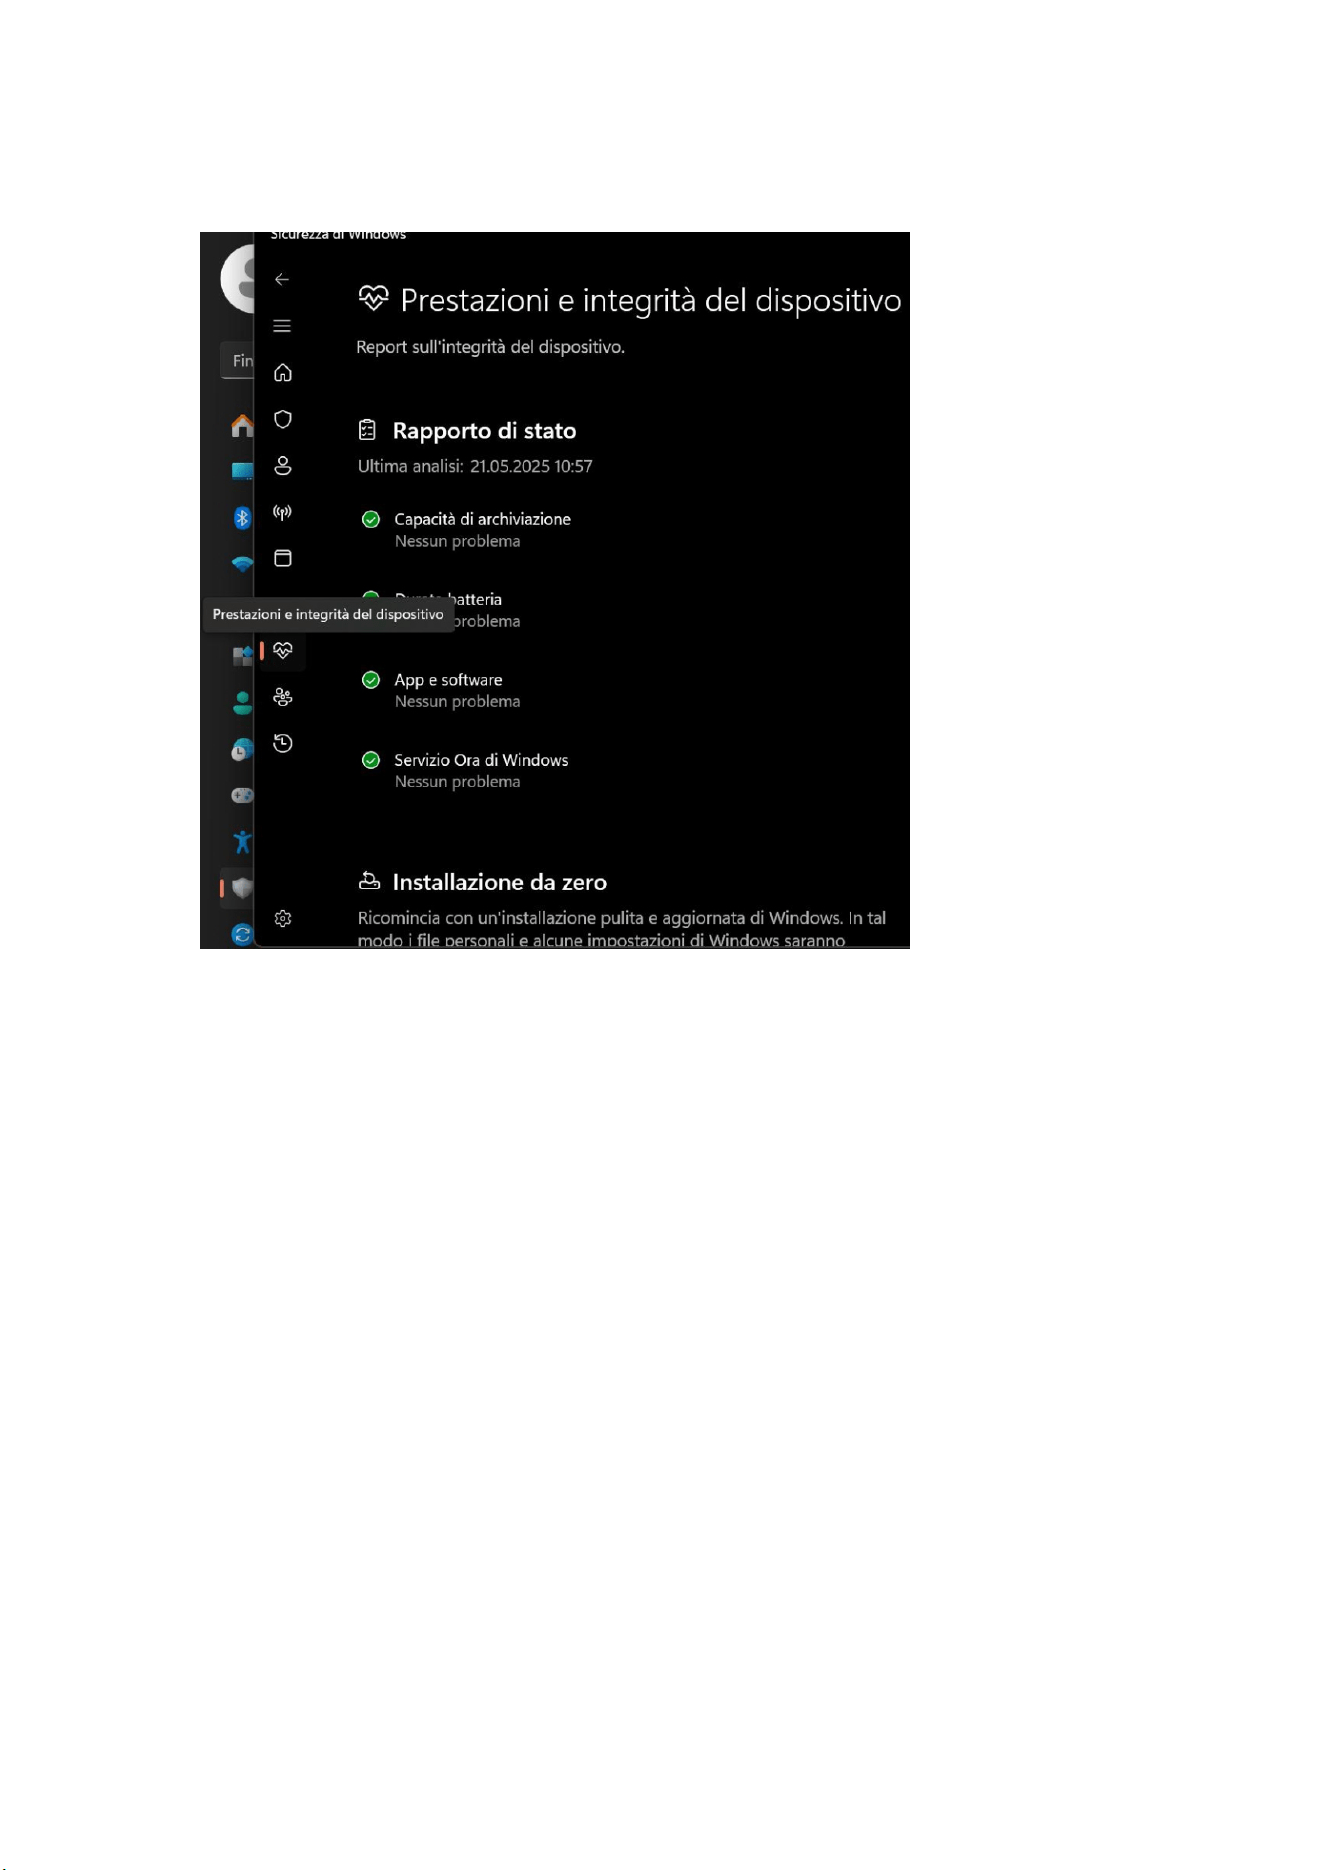
D10: Come posso risolvere i frequen riavvii?
R10: Puoi prima aprire le impostazioni per trovare la sezione "Privacy e sicurezza",
fare clic su "Apri Centro sicurezza PC Windows" e selezionare l'icona a forma di cuore
denominata "Prestazioni e integrità disposivo" sulla sinistra. Dopo l'apertura,
verifica se ci sono problemi con le prestazioni e lo stato operavo del disposivo. Se
non ci sono problemi, prova ad aggiornare il driver o a reinstallare il sistema. Se il
problema persiste, contaa il team FIREBAT.
37
Italiano
Pulizia e manutenzione
1. Prima della pulizia, spegnere il prodoo e scollegare l'alimentatore.
2. Pulire l'involucro del prodoo con un panno umido, evitando le interfacce e i
componen eleronici, quindi asciugarlo con un panno morbido. Ulizzare
detergen specifici per computer per pulire lo schermo e la tasera. Non ulizzare
liquidi corrosivi per la pulizia.
3. Non immergere il prodoo in acqua o altri liquidi.
4. Dopo la pulizia, riporre il prodoo in un ambiente asciuo e venlato e aendere
che si asciughi completamente prima dell'uso o della conservazione.
Garanzia
Offriamo una garanzia di qualità del prodoo di un anno dalla data di acquisto e
un'assistenza tecnica gratuita a vita. Per guas normali o problemi di qualità durante
il periodo di garanzia, offriamo servizi di sostuzione o riparazione gratui. Per danni
causa da operazioni manuali, addebiteremo il costo dei componen del prodoo
per la riparazione. Il nostro team di assistenza tecnica è a vostra disposizione 24 ore
su 24. In caso di problemi durante l'ulizzo, non esitate a contaarci.

38
日本語
免責事項
1. 必ず純正の電源をご使用ください。サードパーティ製のアダプターに起因
する問題や故障については、当社は一切の責任を負いません。
2. ユーザーは、第三者が提供する音楽ビデオ、画像、ソフトウェアを使用す
ることができますが、著作権の問題やソフトウェアの不具合については、一切
責任を負いません。
3. 製品が故障した場合、当社は保証条件を厳守しますが、使用中に発生した
物的損害や経済的損失については一切の責任を負いません。
4. 工場出荷時に内蔵されているソフトウエアは、実際にテストしてから使う
ことができる。ただし、互換性などを調べる際に削除したり、削除しなかった
りしても本体に影響はありません。製品の品質に関する問題ではございません
ので、予めご了承ください。
5. 当社は製品を改良する権利を有します。製品の仕様およびデザインは予告
なく変更する場合があります!実際の製品をご参照ください。
注意事項
本製品を使用する前に、以下のガイドラインをよくお読みになり、本製品の
寿命を延ばし、危険や法律違反を避けるために、これらのルールを遵守して
ください。
1. ファイルの損傷や紛失を引き起こす可能性のある操作を行う場合は、十分
にご注意ください。
2. ノートパソコンの使用中はウイルス対策に注意し、ウイルスファイアウォ
ールを使うようにする。
3. ノートパソコンを長期間使用しない場合は、電源を切り、電源装置を外し
てください。
4. ノートパソコンの電源を短時間に頻繁に入れたり切ったりしないでくださ
い。2 回の起動の間隔は少なくとも 10 秒、できれば 60 秒以上あけることをお
勧めします。
5. ノートパソコンの過熱を防ぐため、通気口が塞がれていないことを確認し
てください。
6. ディスプレイを強く押さないでください。
7. ノートパソコンの画面を無理に外したり、ディスプレイをつまんで持ち上
げたりしないでください。
8. ノートパソコンの上に物を置いたり落としたりしないでください。
9. 凹凸のある不安定な作業台の上にノートパソコンを置かないでください。
10. ノートパソコンをお持ちの方は、専用のバッグに入れてご持参ください。
11. 過酷な環境でノートパソコンを使用しないでください。
12. ノートパソコンを直射日光に当てたり、磁場に近づけたりしないでくださ
い。また、ノートブックを過熱または過冷却の環境で使用しないでください。
13. ノートパソコンを雨や露にさらさないでください。
39
日本語
14. バッテリーはいじらず、子供の手の届かないところに保管してください。
15. ノートパソコンをほこりや腐食性の化学薬品にさらさないでください。
16. 水やその他の有機溶剤をノートパソコンのディスプレイに直接スプレー
しないでください。
17. ノートパソコンの上に水や食べ物などの液体を落としたり、データケーブ
ルや電源ケーブルなどを引っ張ったりしないでください。
18. 防湿に注意し、使用環境を清潔に保ってください。ノートパソコンにホコ
リが付着している場合は、乾いた柔らかい布で拭いてください。
19. 純正品以外のバッテリーや他の種類のバッテリーを使用することは固く
禁じられています。
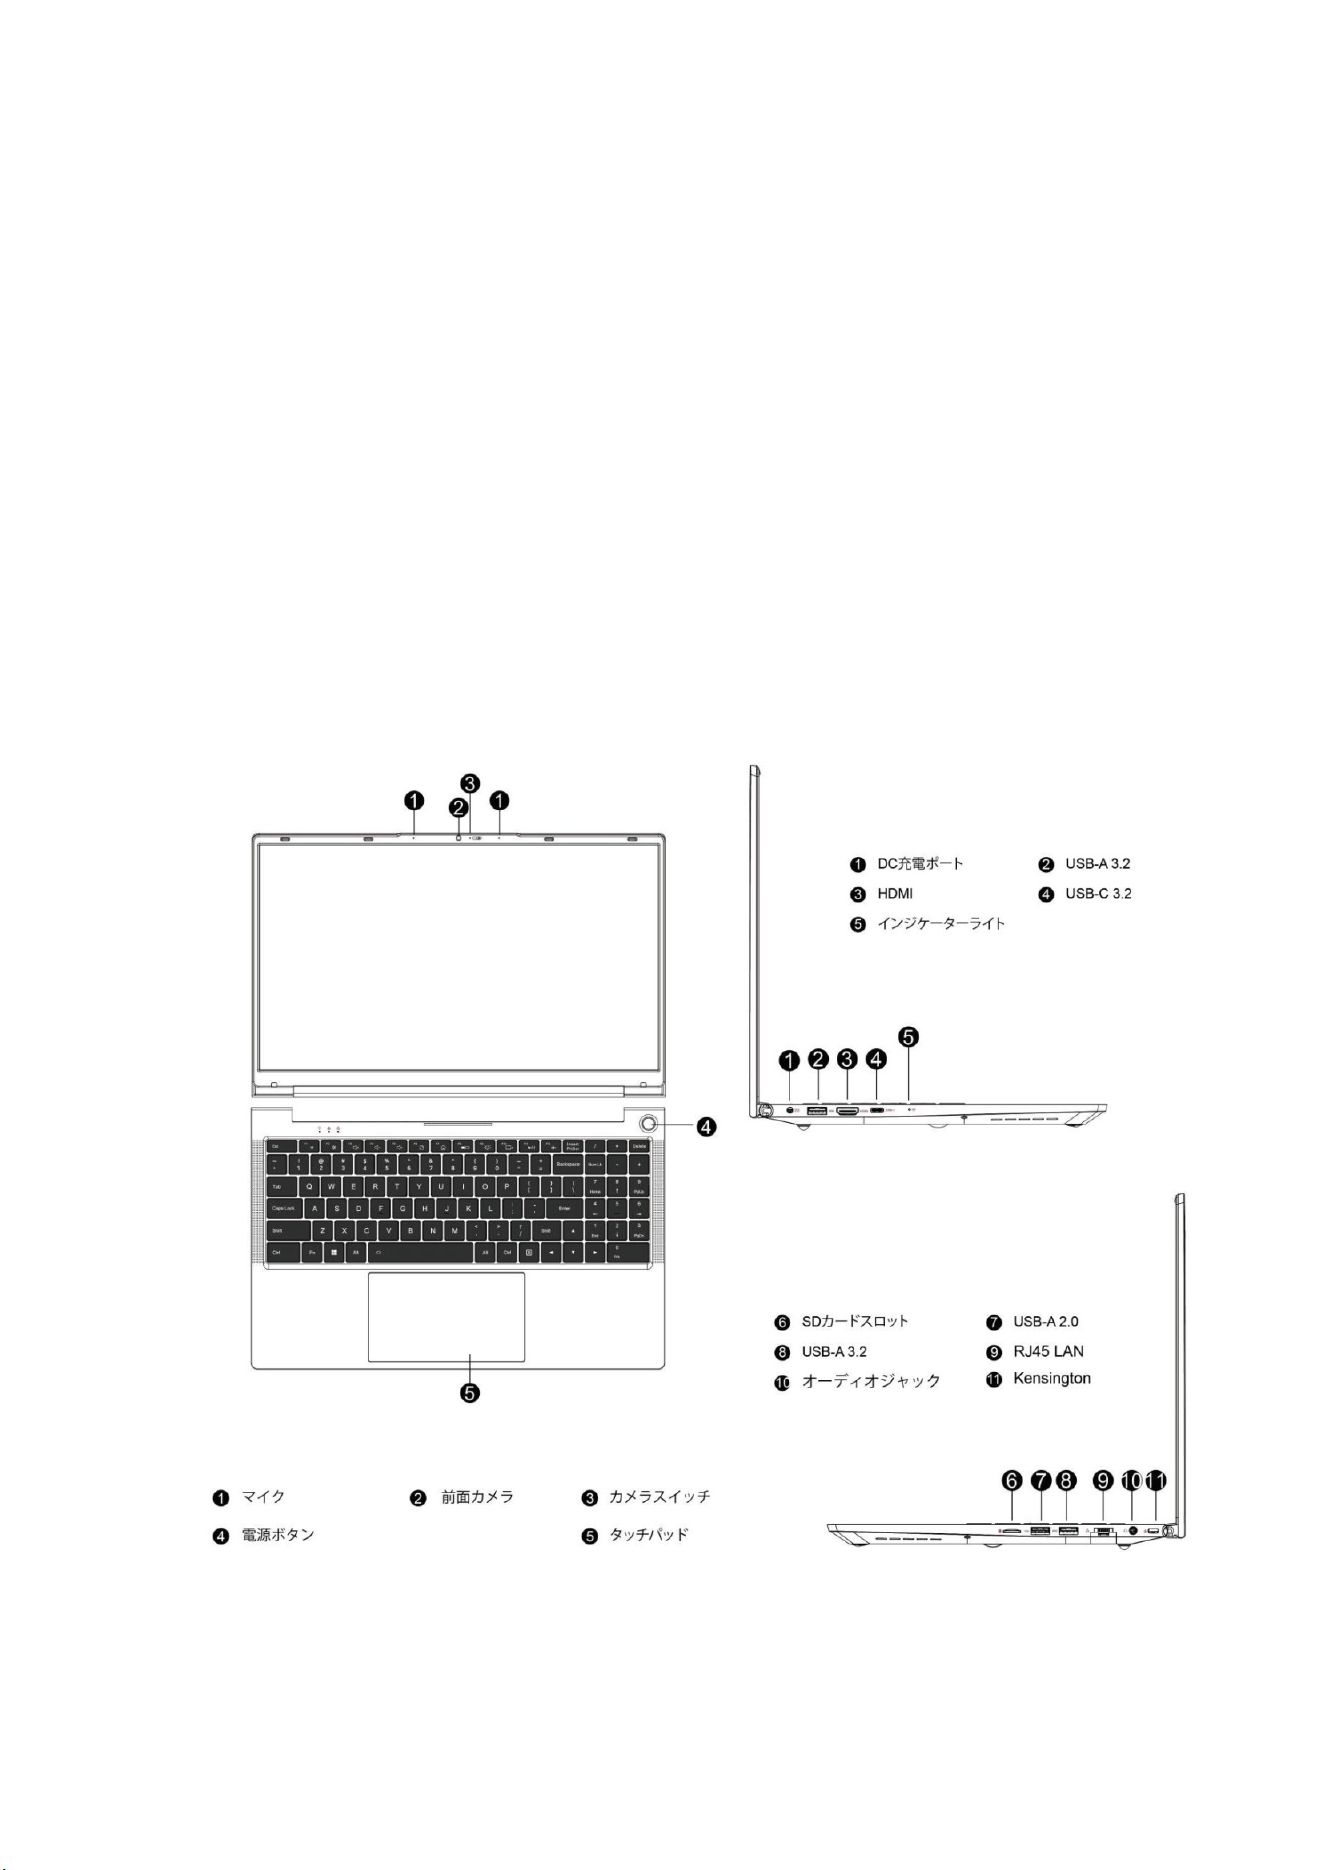
製品構成図

40
日本語
電源と充電
ノートパソコンは、リチウムバッテリーまたは AC 電源アダプターで駆動する。
ノートパソコンを受け取った後、AC 電源アダプタを接続してノートパソコン
を充電してください。
リチウム電池には「メモリー効果」がないため、充電前に電池が完全になくな
るまで待つ必要はありません。充電中もノートパソコンを使用している場合は、
充電時間が長くなります。
早く充電したい場合は、ノートパソコンの使用を一時停止するか、充電中にノ
ートパソコンの電源を切ってください。
リチウム電池の寿命を延ばすには、電源が 95%未満のときに充電し、95%以
上のときは充電しないでください。
バッテリーの残量が少なくなると、画面にプロンプトメッセージが表示され、
残量が少なくなりすぎてシャットダウンするまで動作し続けます。このとき、
データが保存されないことがあります。時間内に充電し、アダプタを接続した
後、ノートパソコンを通常通り使用してください。
ノートパソコンの破損を避けるため、純正の電源アダプターをご使用ください。
バッテリーは有害で危険です。環境保護規則に従ってバッテリーをリサイクル
してください。環境汚染を避けるため、バッテリーを勝手に廃棄しないでくだ
さい。
はじめに
ノートパソコンを初めて起動すると、Windows オペレーティングシステムの設
定を案内します。
a. 電源オン
電源ボタンを押してミニコンピュータを起動します。最初の起動は、インスト
ールインターフェイスが表示されるまで数分間待つ必要があります。
Step 1: 言語/国(地域)を選択します。
Step 2: 「入力方法」を選択し、「確認」をクリックします。
Step 3: 2 番目の入力方法を選択すると、「スキップ 」することができます。
Step 4: ネットワーク WiFi を選択後、接続するためのパスワードを入力します。

41
日本語
または、ネットワークケーブルを接続して接続することもできます。ネットワ
ークは自動的に更新され、更新プロセスはインターフェイスに長時間留まるた
め、起動時間が長くなる。(ネットワーク接続をスキップすることを強くお勧
めします。)
Step 5: ライセンス契約に同意する
Step 6: ユーザー名とパスワードを設定する インストールが完了すると、デス
クトップが表示されます。
b. WiFi への接続
タスクバーから WiFi アイコン を選択し、WiFi をオンにします。利用可能な
WiFi 接続のリストからアクセスポイントを選択します。いずれかの接続を選択
し、ネットワーク接続を開始します。
注:WiFi 接続を有効にするために、セキュリティキーの入力を求められる場合
があります。
c. BIOS セットアップに入る
BlOS(Basic Input/Output System)は、ノートパソコンの起動時に最初にロード
されるソフトウェアです。
BIOS に入る:「 Del 」または 「F2 」キーをクリックする。
通常、ほとんどの場合、デフォルト BIOS 設定が適用され、最適なパフォーマ
ンスが保証されます。さらなるセットアップや BIOS アップデートが必要な新
しいシステムコンポーネントをインストールしない限り、デフォルト BIOS 設
定を変更しないでください。
注:BlOS の設定が不適切な場合、不安定になったり、起動しなくなったりす
ることがあります。 BlOS 設定の変更は、技術サービス担当者の助けを借りて
のみ行うことを強くお勧めします。

42
日本語
問題解決
Q1: ノートパソコンの電源が入らない場合はどうすればよいですか?
A1: 電源コードがポートに正しく接続されていることを確認し、 30 分以上充
電してから再起動してください。電源ボタンにはミスタッチ防止機能が付いて
いますので、コンピュータの電源を入れる際は 1~2 秒間押し続けてください。
Q2: なぜ音が出ないのですか?
A2: デバイスマネージャーを開き、サウンドカードドライバーがインストール
されているか確認してください。 音量が 「0 」になっていないか確認し、音
量を上げて再度ご確認ください。 ヘッドホンをお使いの場合は、別のヘッド
ホンをお試しください。
Q3: なぜ騒音がうるさいのか?
A3: オーディオハードウェアを再接続し、接触不良が原因かどうかを確認する。
ヘッドホンやスピーカーにホコリが付着していないか確認してください。サウ
ンドファイルが壊れていないか確認してください。
Q4: ウィンドウズをすぐに起動できない
A4: まず、Wi-Fi が接続され、Wi-Fi ネットワークが機能していることを確認す
る。次に、タイムゾーンとシステム時刻が正しいことを確認してください。
(Windows キーのアクティベーションの遅延は、ネットワークの速度やその他
の理由で発生することがあります) 上記 2 点が正しいことをご確認の上、そ
れでもアクティベーションができない場合は、FIREBAT サービスチームまでご
連絡ください。
Q5: ワイヤレスネットワークに接続できない場合はどうすればよいですか?
A5: (1) ワイヤレスネットワークスイッチを確認してください: ノートパソコ
ンのワイヤレスネットワークスイッチがオンになっているか確認してくださ
い。ノートパソコンには独立したワイヤレスネットワークスイッチがあり、手
動でオンにする必要がある。
43
日本語
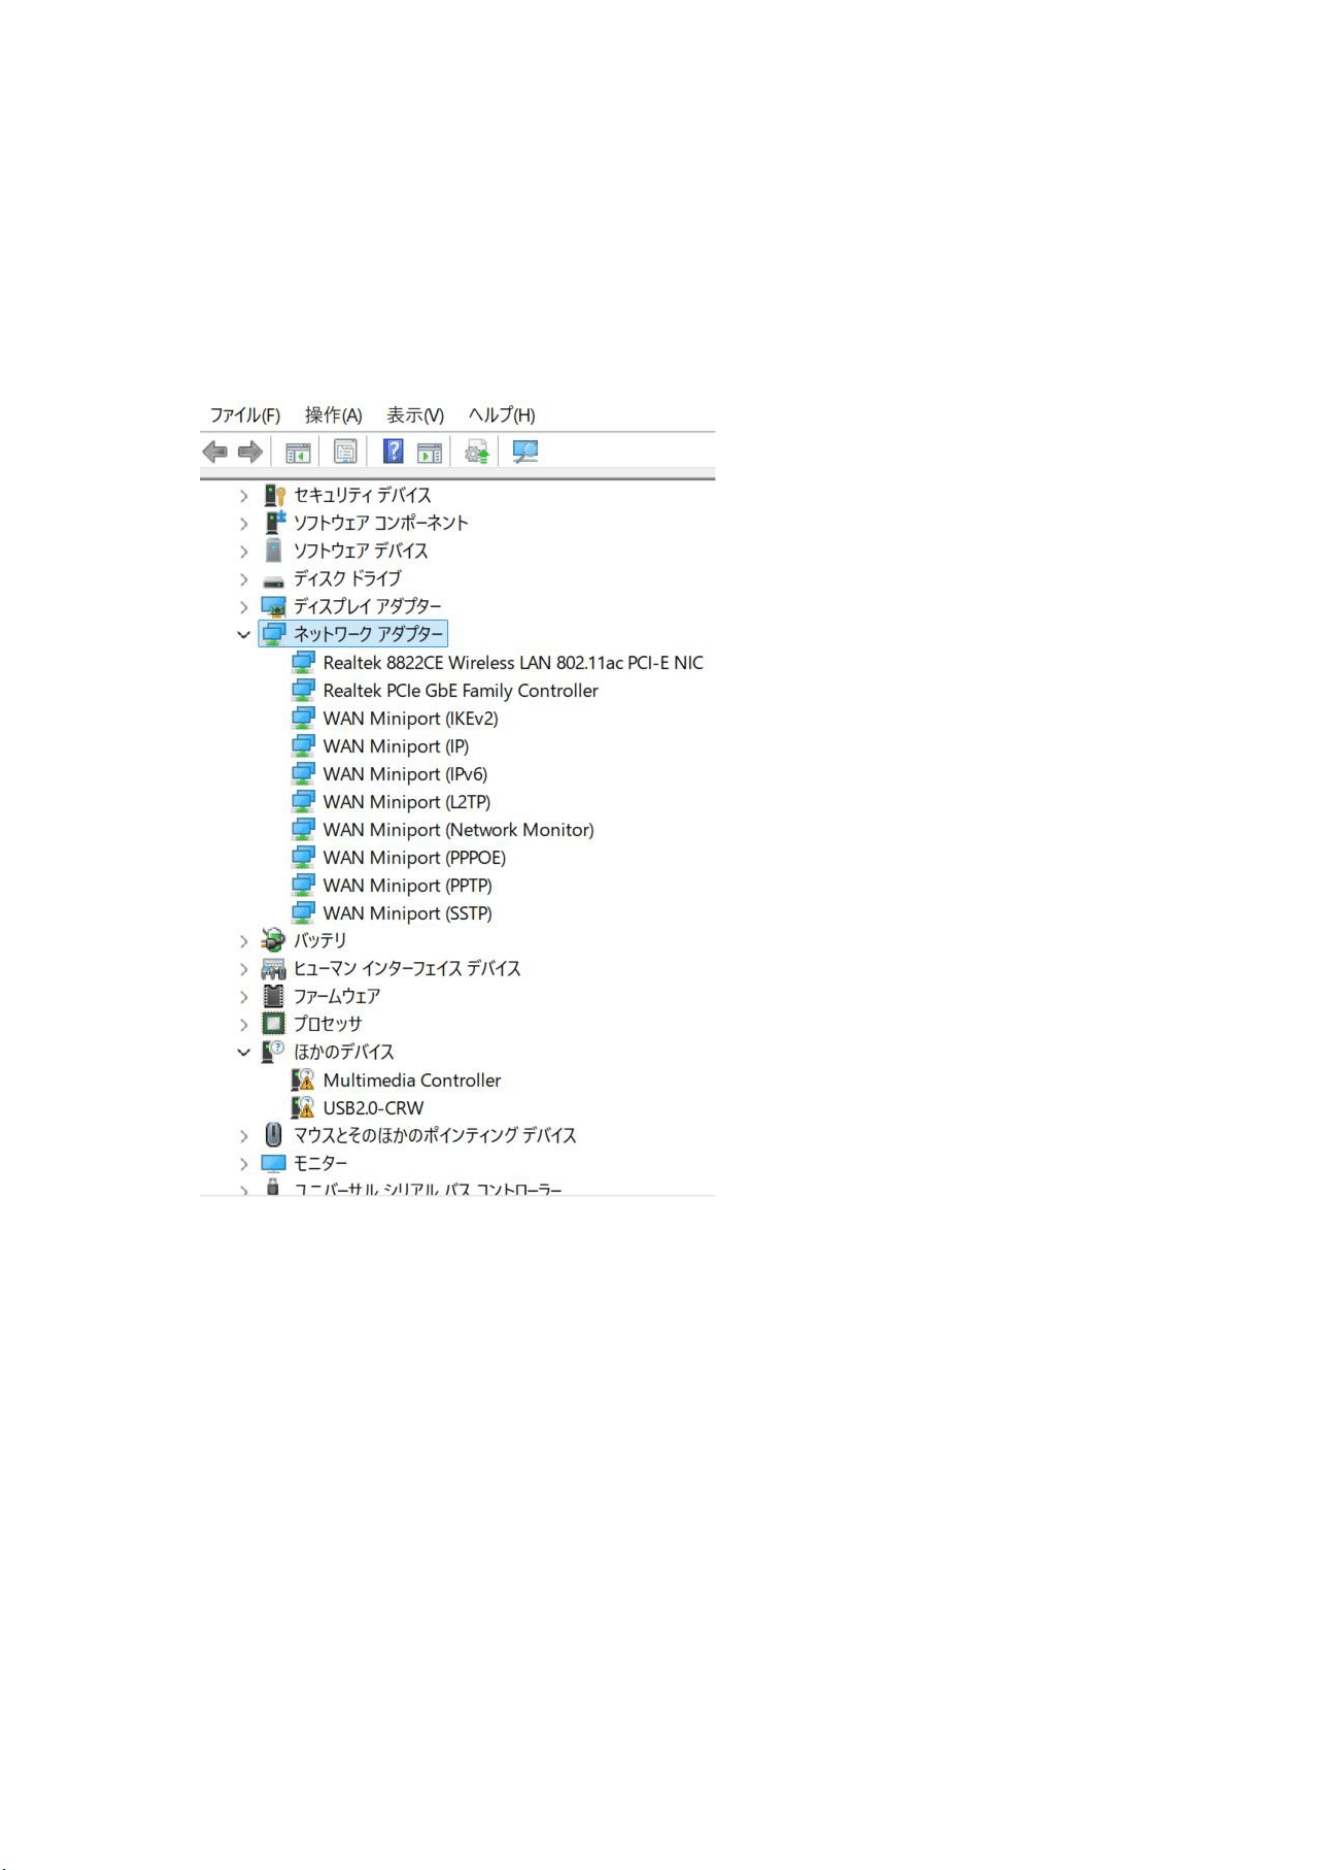
(2) ワイヤレスネットワークカードのドライバを確認する : デバイスマネージ
ャに入り、ワイヤレスネットワークカードドライバが正常かどうかを確認しま
す。 黄色いエクスクラメーションマークが表示された場合は、FIREBAT 公式ウ
ェブサイトにログインし、ワイヤレスネットワークカードドライバをダウンロ
ードして更新してください。
(3) ワイヤレスネットワークの信号を確認する : ノートパソコンがワイヤレス
ルーターの有効範囲内にあることを確認してください。 信号が弱すぎると、
ワイヤレスネットワークに正常に接続できない場合があります。ノートパソコ
ンを無線 LAN ルーターに近づけて、もう一度確認してください。
Q6: Windows の自動更新機能をオンまたはオフにする方法は?
A6: キーボードの 「Win+R 」キーの組み合わせを押して、RUN バーを表示す
る, 入力ボックスに 「services.msc 」と入力する,「Enter」キーを押す, 「Services
(Local)」ページで「Windows update」を探す, ダブルクリックして開くと、「Startup
type 」に 4 つのスタートアップタイプがある。スタートアップの種類を選択し
てください。

44
日本語
Q7: ノートパソコンの画面右下にあるバッテリーアイコンに赤いアイコンが
表示されていたり、電源ボタンをクリックすると赤いアイコンが表示されたり
するのは、どういう意味ですか(下図参照)?
A7: これはバッテリーの残量が少ないことを意味する。充電には純正電源アダ
プターを接続してください。
Q8: タッチパッドが動作しない場合はどうすればよいですか?
A8: 以下の方法をお試しください。
(1) タッチパッドを有効/無効にするには、「Fn+F10」キーを押します。
(2) FIREBAT 公式サイトにアクセスして、新しいドライバーを再度ダウンロード
します。
(3) システムを再インストールします。
新しいドライバーとシステムを再インストールしても問題が解決しない場合
は、FIREBAT チームに最新の解決策についてお問い合わせください。
Q9: タスクバーが消えてしまったらどうすればいいでしょうか?
A9: デスクトップを右クリックして、「個人設定」を選択します。 タスクバ
ーを選択し、「タスクバーの動作」まで下にスクロールします。 オプション
を展開し、「タスクバーを自動的に非表示にする」のチェックを外します。
Q10: 頻繁な再起動を解決するにはどうすればよいですか?
A10: まず設定を開いてプライバシーとセキュリティを見つけます, 「Windows
セキュリティ センターを開く」をクリックします , 左側の「デバイスのパフ
ォーマンスと健全性」というハート型のアイコンを選択します。 開封後は機
器の性能や動作状態に問題がないかご確認ください。 問題がない場合は、ド
ライバーを更新するか、システムを再インストールしてみてください。問題が
解決しない場合は、FIREBAT チームにお問い合わせください。

45
日本語
クリーニング&メンテナンス
1. クリーニングの前に、製品の電源を切り、電源アダプターを抜いてくださ
い。
2. 製品の筐体を濡れたタオルで、インターフェースや電子部品を避けて拭き、
柔らかい布で乾拭きしてください。コンピュータ専用のクリーナーを使って、
スクリーンとキーボードを掃除する。洗浄には腐食性の洗浄液を使用しないで
ください。
3. 製品を水やその他の液体に浸さないでください。
4. 洗浄後は、乾燥した換気の良い場所に置き、十分に乾燥してから使用また
は保管してください。
保証について
購入日から 1 年間の品質保証と、生涯無料の製品テクニカル・サポートを提供
します。保証期間内の通常の故障または品質上の問題については、無料で交換
または修理サービスを提供します。手作業による破損の場合、修理のための部
品代を請求させていただきます。テクニカルサポートチームは 24 時間体制で
お客様をサポートいたします。使用中に何か問題が発生した場合は、お気軽に
お問い合わせください。