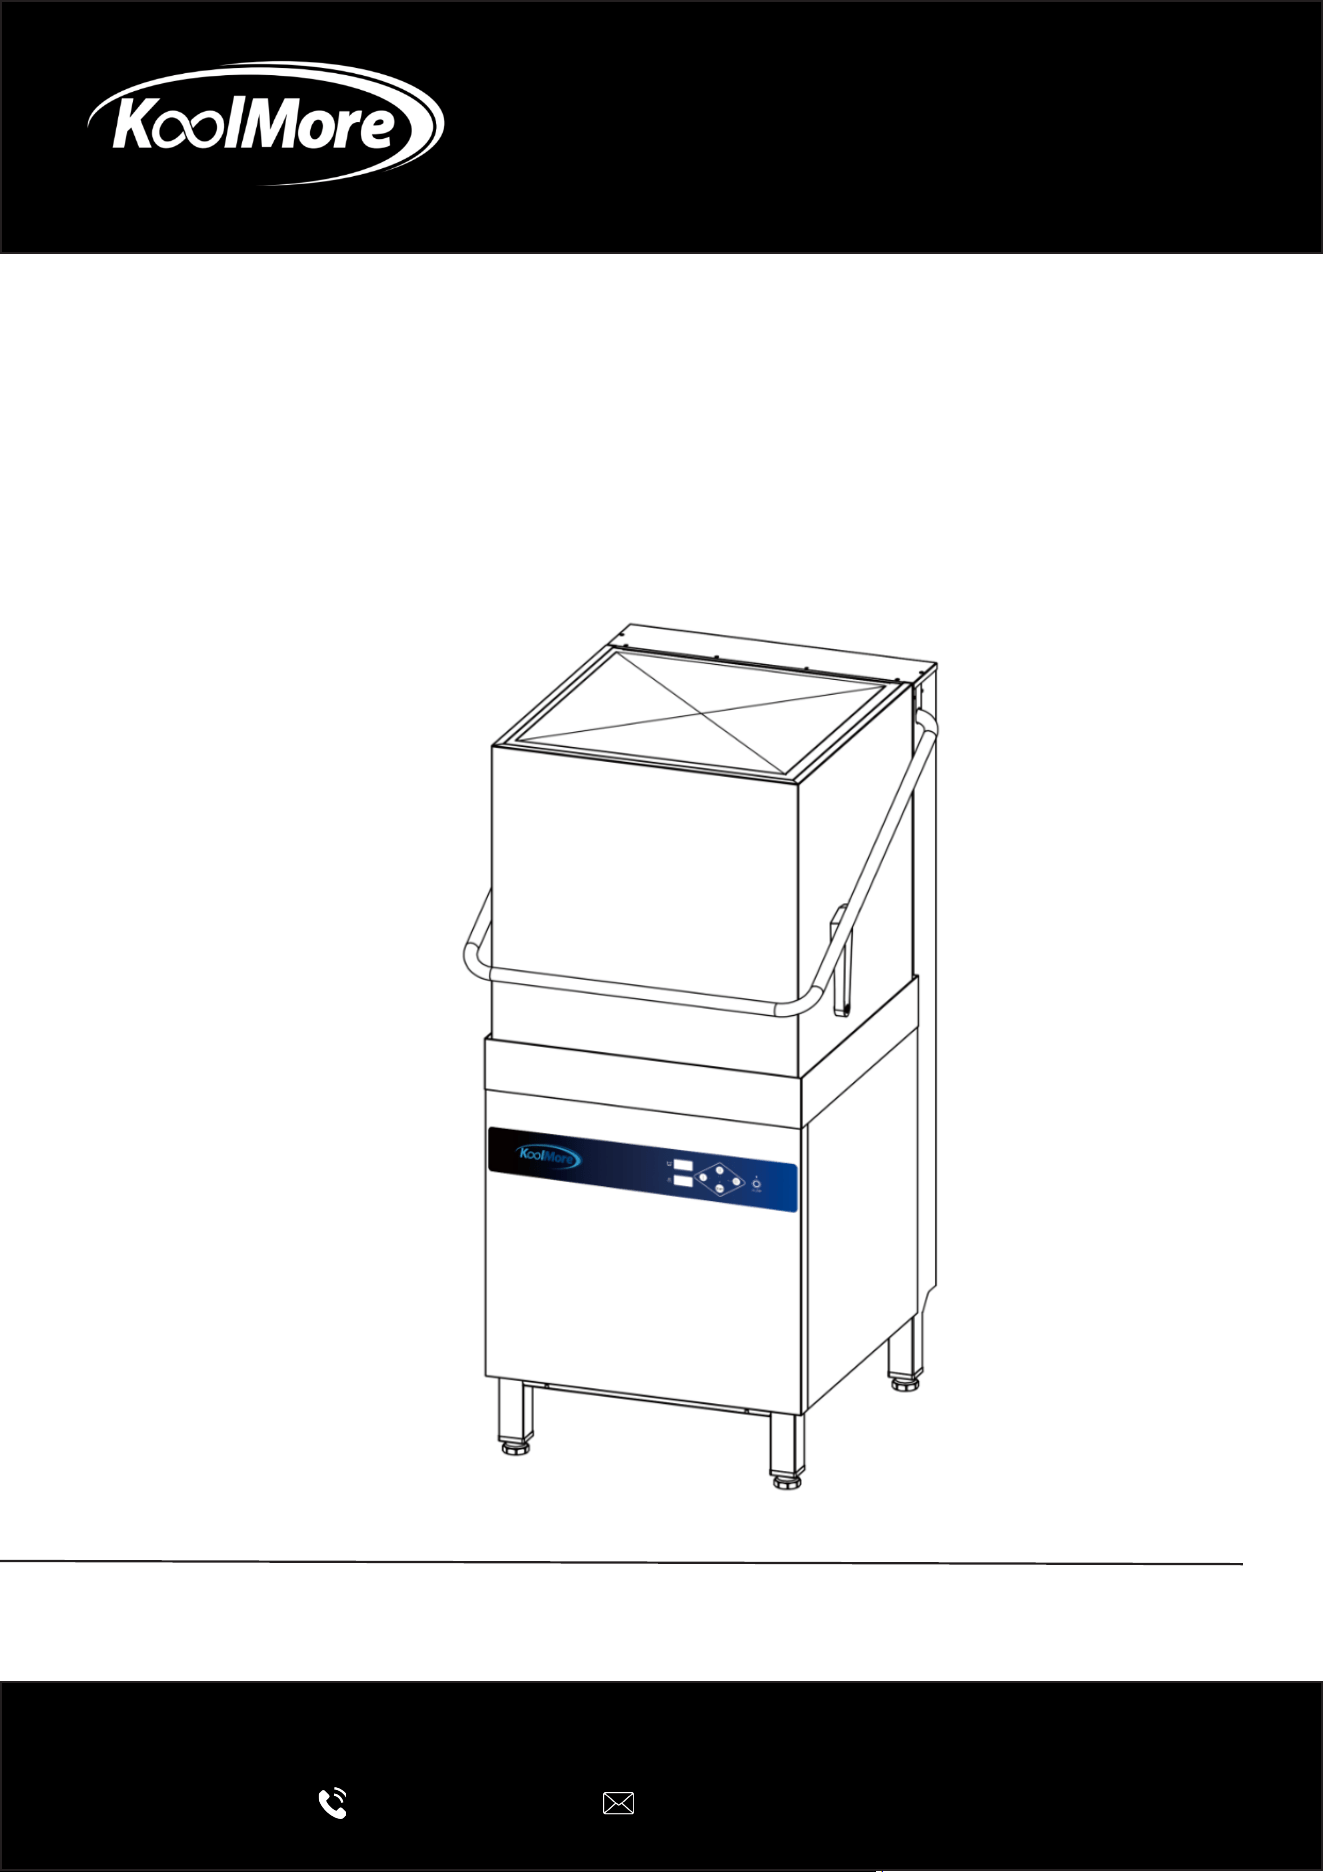
COMMERCIAL DISHWASHER
Commercial High-Temperature Hood/Door
Type 4-Cycle Dishwasher, 240V in Stain-
less-Steel
User Manual
Before use, please read these instructions carefully to ensure proper
operation and optimal performance.
For any service related issues, please contact us:
718-576-6342
suppor[email protected]
Model: KM-HTD-HT
Stay informed with the latest information for your
KoolMore appliance.
Scan the QR code below to access the most up-to-date user manual.
If you need any assistance or have questions, our customer support
team is here to help.
Phone: 718-576-6342 Email: suppor[email protected]
Please write down the model number and serial number below for future reference. Both numbers are located on the
rating label on the back of your unit or inside the unit and are needed to obtain warranty service. You may also want
to staple your receipt to this manual as it is your proof of purchase and may also be needed for service
under warranty.
Model Number:
Serial Number:
Date of Purchase:
To better serve you, please do the following before contacting customer service:
If you received a damaged product, immediately contact the retailer or dealer that sold you the product.
Read and follow this User Manual carefully to help you install, use, and maintain your unit.
Refer to the Troubleshooting section of this manual as it will help you diagnose and solve many common issues.

3
Contents
Safety ............................................................................................ 4
Overview ........................................................................................ 5
Technical Data ............................................................................... 6
Installation .................................................................................... 8
Operation ....................................................................................... 12
Maintenance .................................................................................. 16
Troubleshooting ............................................................................ 18
Warranty ........................................................................................ 19

4
Safety
• Use only potable water with a hardness of 1.5–4.3 gpg (25–75 mg/L).
• Thoroughly pre-rinse tableware before placing it in the dishwasher.
• Use only commercial detergents, rinse aids, sanitizers, and descaling chemicals intended for
commercial dishwashers. Always follow the chemical manufacturer’s instructions and recom-
mended concentrations.
• At the end of each working day, remove food debris from the wash tank and thoroughly clean,
rinse, and dry the dishwasher. Leave the door open to allow the interior to air dry.
• Descale the dishwasher regularly according to the recommendations of your chemical supplier
and local water conditions.
• Use only cleaning products approved for stainless steel surfaces.
• Do not use household dishwashing detergents or cleaning products intended for residential
dishwashers.
• Do not use steel wool, wire brushes, abrasive pads, or other abrasive cleaning materials on the
dishwasher or tableware.
• Do not allow foreign objects, especially metal objects not intended for washing, to enter the
dishwasher.
• Do not spray or rinse the exterior of the dishwasher with a hose, pressure washer, or other
direct water source.
NOTICE
Installation, servicing, or repairs performed by unauthorized personnel, the use of non-genuine
replacement parts, or unauthorized modications may void the product warranty.
WARNING
Do not connect the dishwasher to a hot water supply exceeding 140°F (60°C).
5
Overview
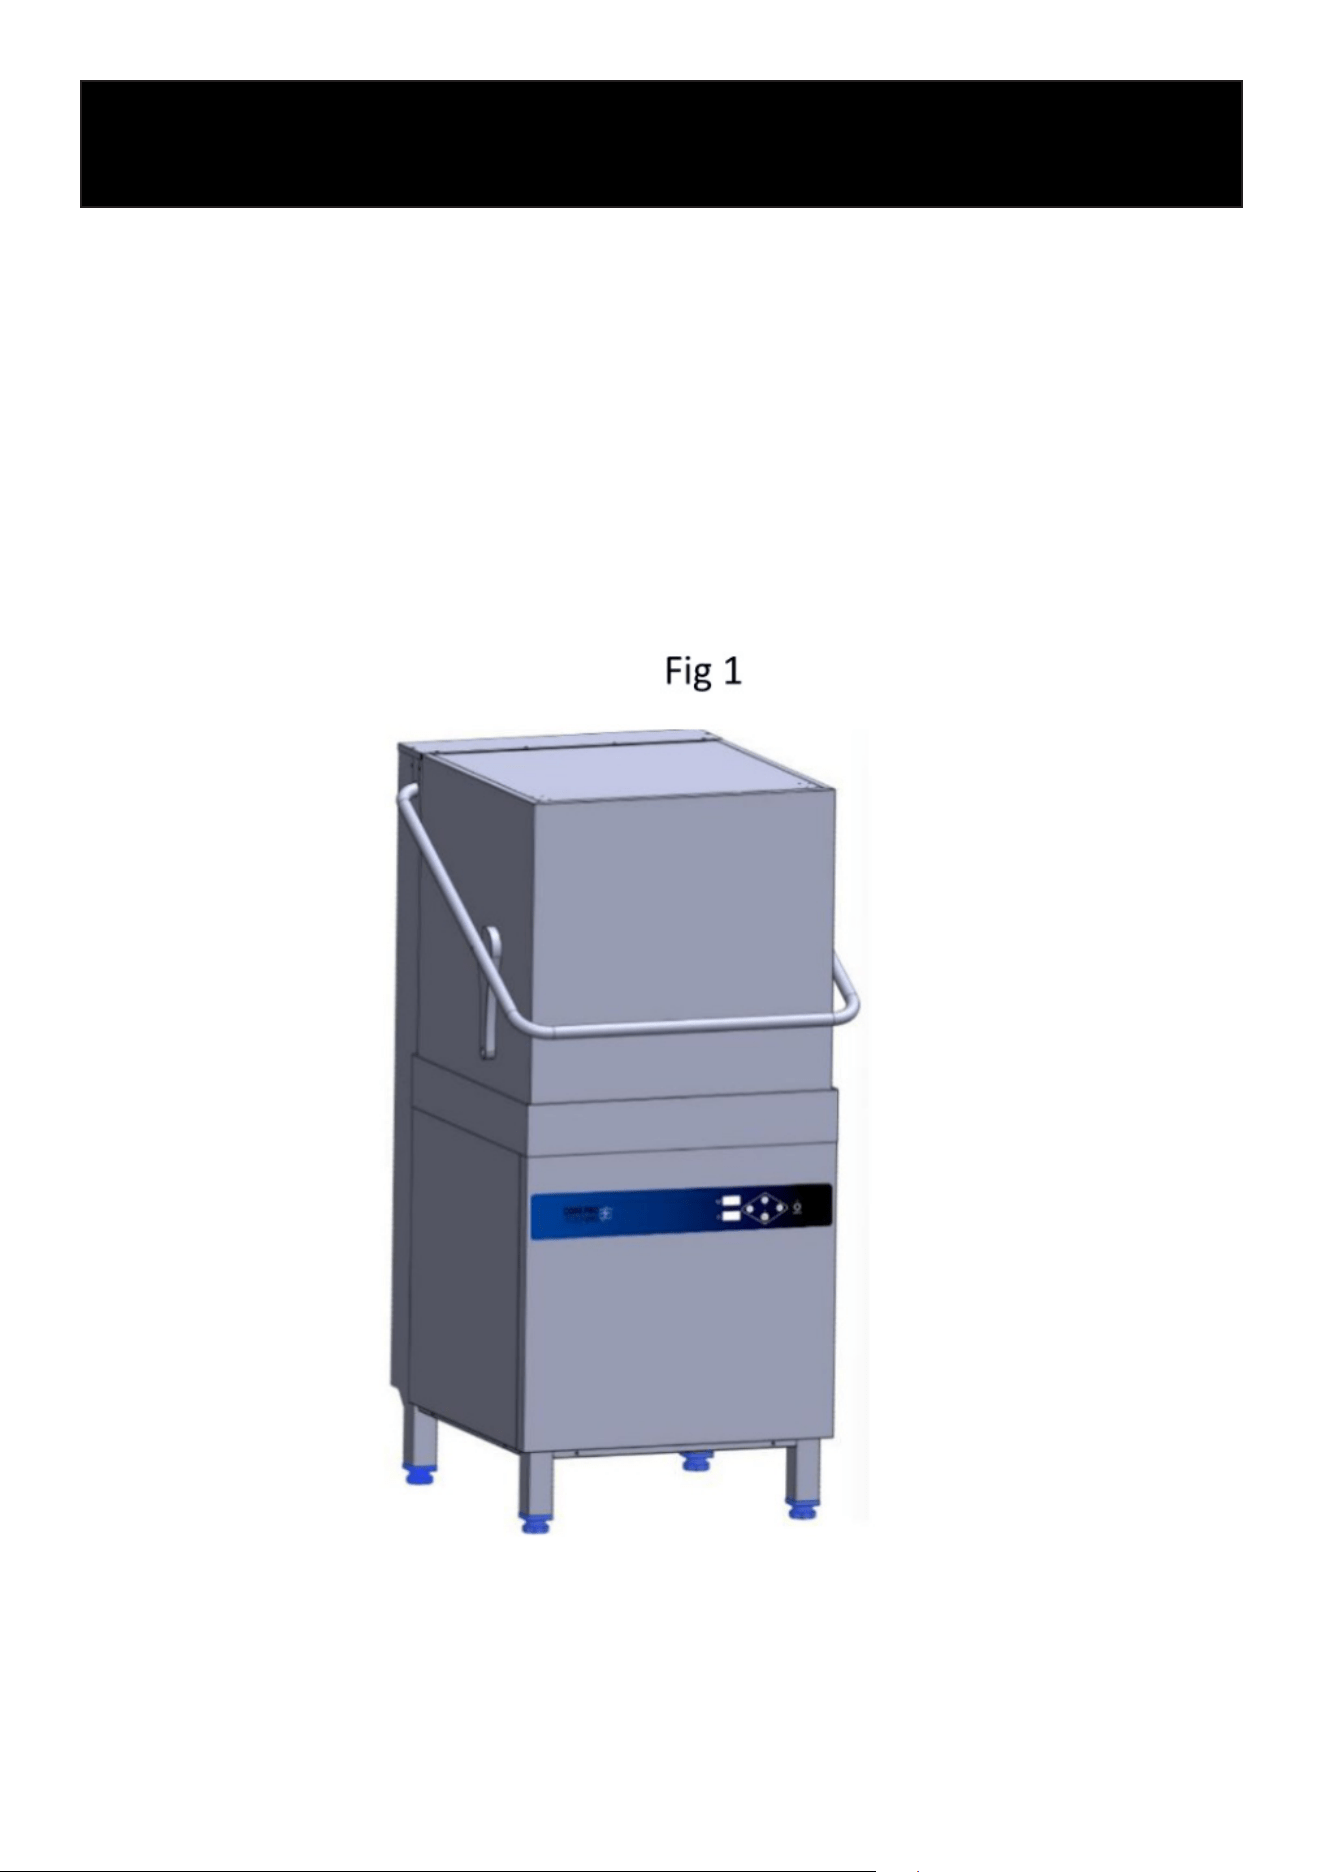
This equipment is a semi-automatic rack dishwasher. Raise the hood to load or remove the dish
rack. When the wash tank water level is low, the dishwasher automatically lls the tank with water.
Once the proper water level and operating temperature are reached, select the desired wash pro-
gram and press the START button to begin the wash cycle.
The dishwasher features a built-in 9 kW rinse-water heating system and a 3 kW wash-tank heating
system. The wash and rinse heating systems are interlocked for proper operation. The unit also
includes a rinse pump, built-in chemical dispensers, water inlet lter, and solenoid valve.
6
Technical Data
7
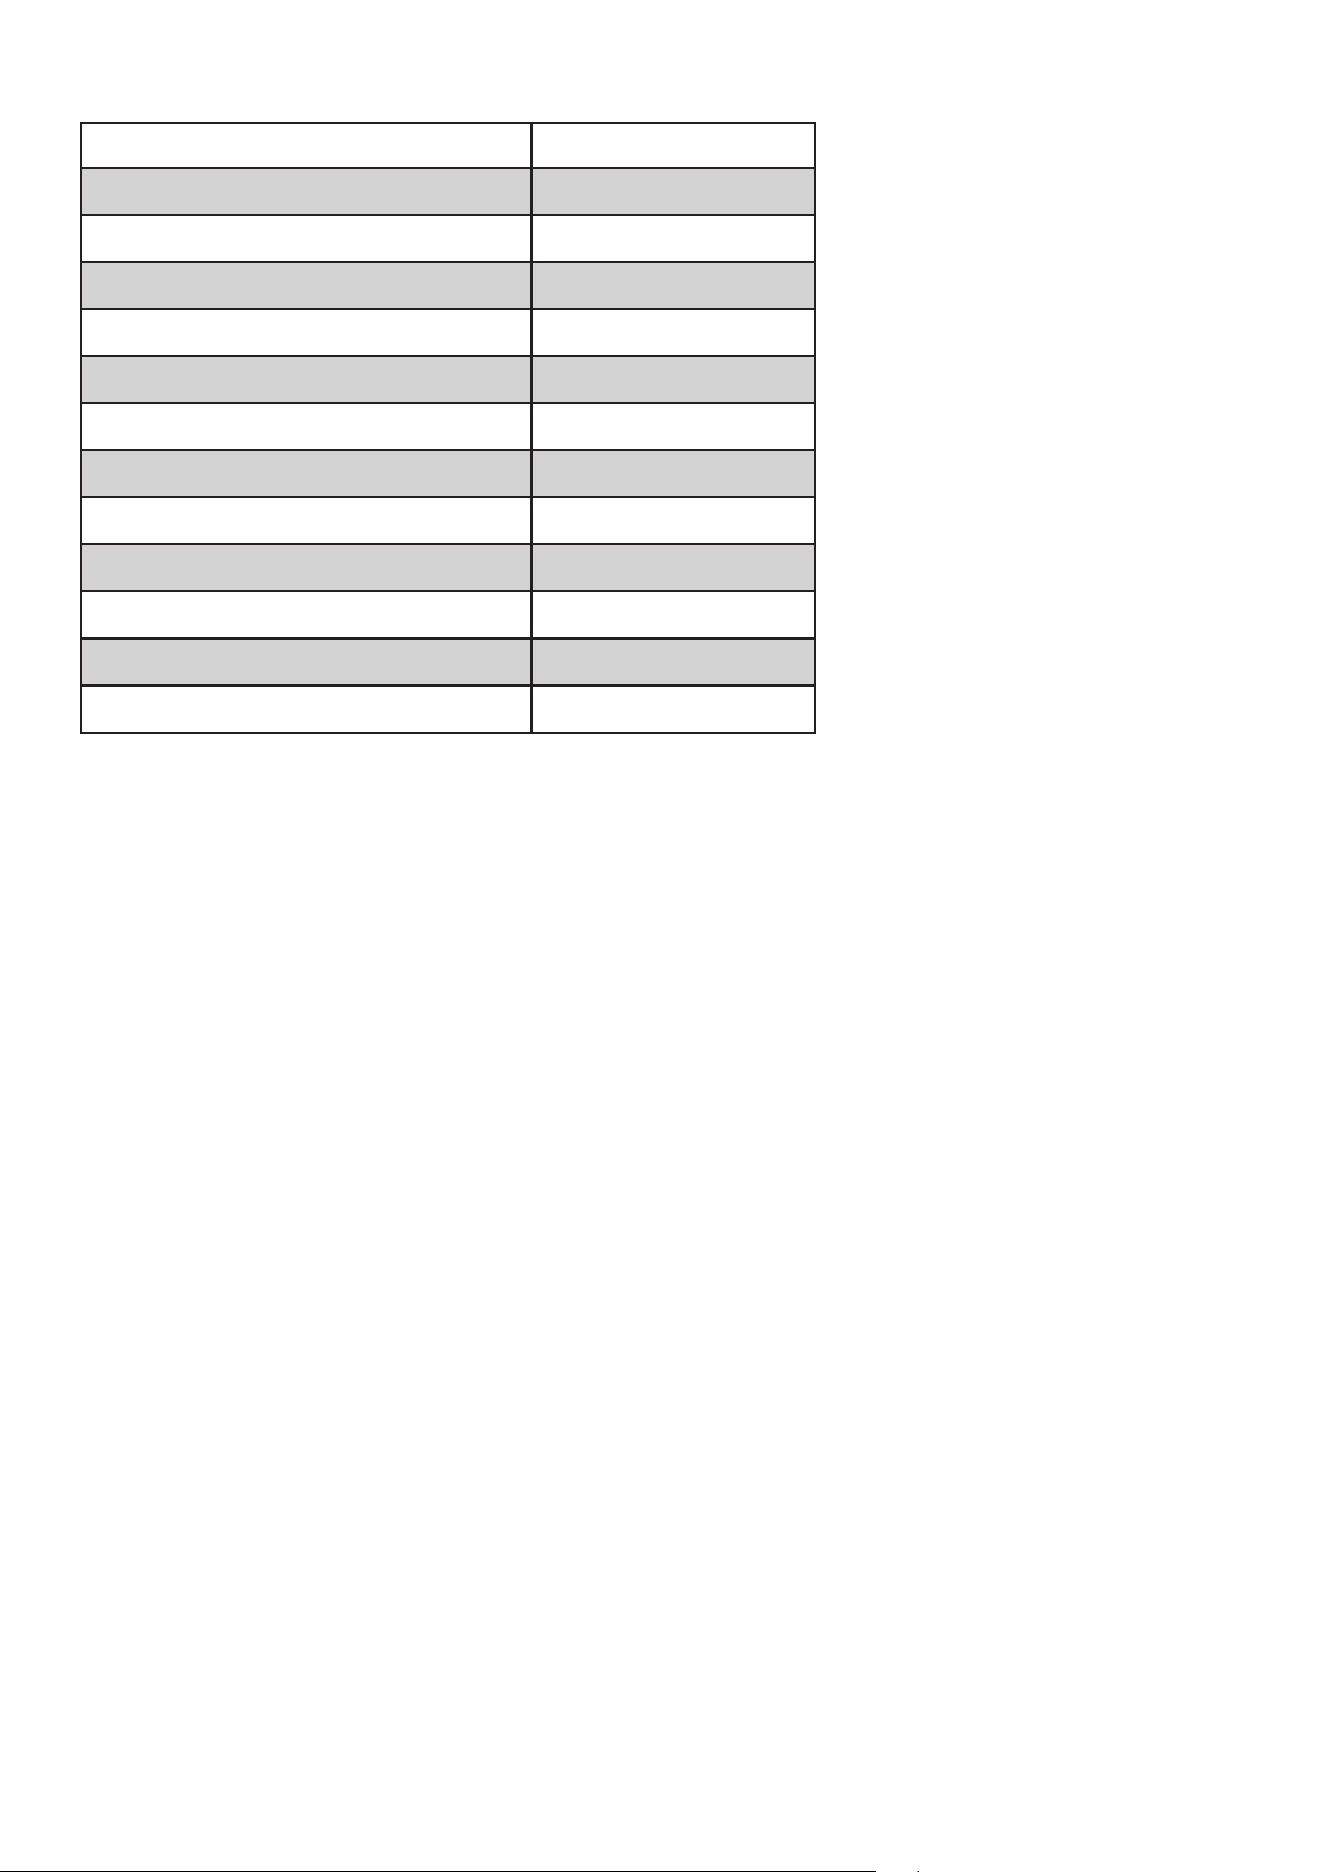
Overall Dimension 28.1” x 31.5” x 56.1”/73.9”
Racks Per Hour 40
Water Inlet Temp 122°F-140°F (50°C-60°C)
Power Supply 208-240V / 60Hz/3 Phase
Total Power 9.86 kW
Max Wash Height 16.6” (422 mm)
Wash Heater Power 3 kW
Wash Pump Motor Power 0.71 kW
Water Consumption 0.66 gal/rack (2.5 L)
Water Tank Capacity 6.9 gallons (26 L)
Wash Temperature 140°F-149°F (60°C-65°C)
Rinse Water Temperature 181°F-194°F (83°C-90°C)
Rack Size 20” × 20” (500 × 500 mm)
Technical Parameters
8
`
Installation
Before installing the dishwasher, verify that the electrical supply matches the voltage and frequen-
cy shown on the product rating label. Inspect the dishwasher immediately after unpacking. If ship-
ping damage is found, retain all packaging materials and contact your dealer or carrier promptly.
Select the Appropriate Location
Place the dishwasher in the proper operating position. Install the dishwasher on a level, stable sur-
face with adequate space for operation, maintenance, plumbing, electrical connections, and door
opening. If equipped, allow sucient space for the gas heater and automatic detergent dispenser.
To ensure the optimal use of the equipment, the equipment must be leveled. Level the dishwasher
by turning the adjustable feet until the unit is stable and level.
Connecting Dish Tables
The standard dish table height is 33.5 in. (850 mm). Specify the required height when ordering.
Before connecting the dish tables, water supply, drain, or electrical connections, make sure the
dishwasher is positioned on a stable, level surface. Adjust the leveling feet as necessary.
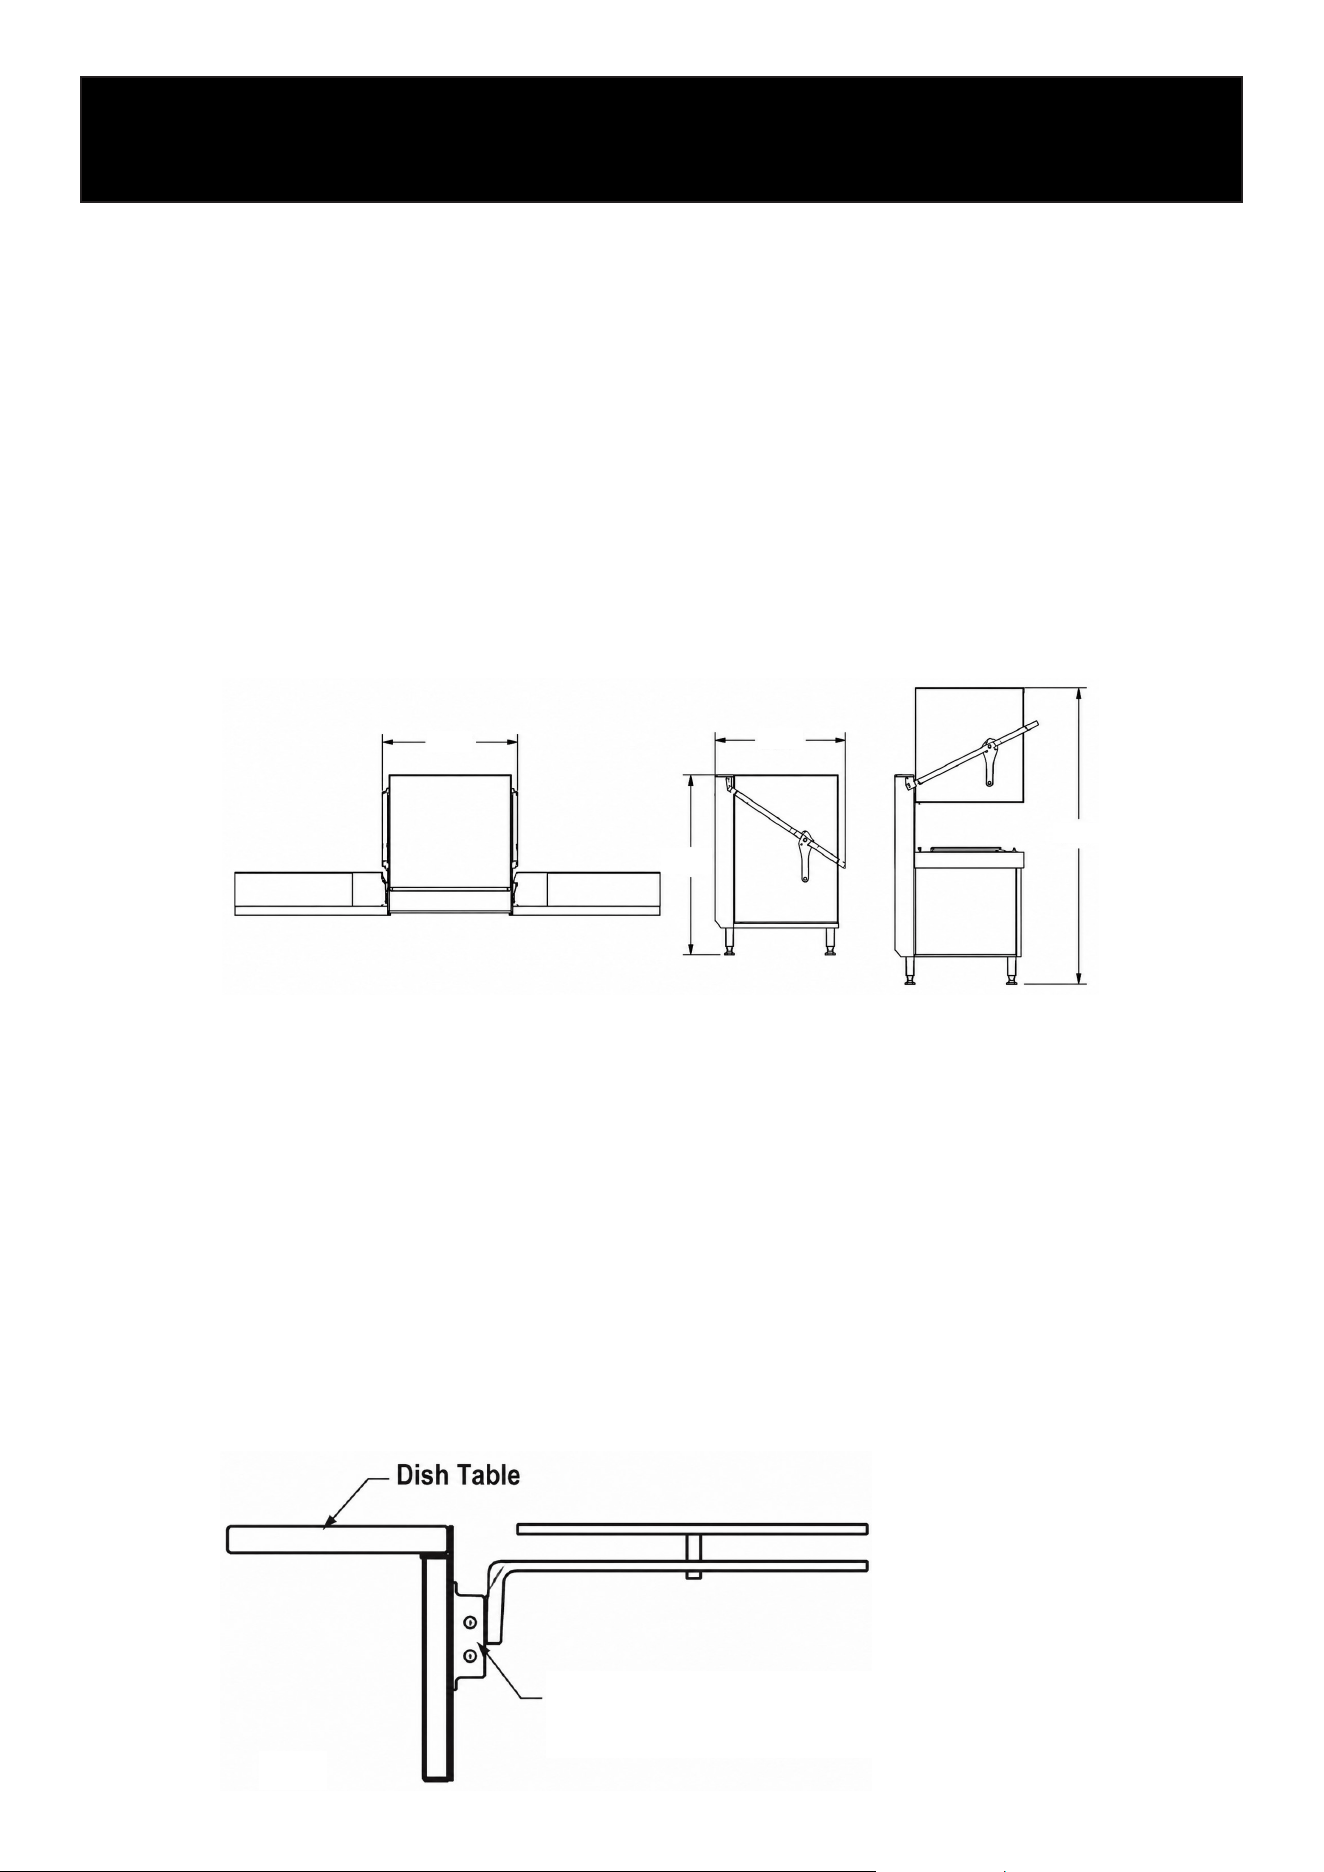
Position the dish table against the dishwasher as shown in the gure below, ensuring that the
table is properly aligned with the dishwasher opening. Secure the dish table in place according to
the installation conguration.
Local codes may require the installation of an exhaust hood or ventilation system. If required, pro-
vide a minimum exhaust airow of 206 CFM (350 m³/h).
This area should be sealed
to prevent leakage.
31.5”
73.9”
55.5”
28.1”
Model Connection Type
Voltage
(V)
Total
Load (A)
Total
Power
(kW)
Pump
Load (A)
Pump
Power
(kW)
Water
Tank
Power
(kW)
Boiler
Power
(kW)
KM-HTD-HT
208–240 V, 60 Hz, 3
Ph~
208V 25.3 7.74 3.1 0.64 2.43 6.85
220V 26.5 8.58 3 0.66 2.72 7.67
240V 28.4 10 2.8 0.67 3.24 9.15
Check Motor Rotation Direction (Required for Three-Phase Machines Only)
The three-phase motor must rotate in the same direction as the arrow on the pump housing. If the
rotation direction is incorrect, please cut off the power supply and interchange any two phase con-
ductors to each other. Briey operate the machine and verify that the motor rotates in the direction
indicated by the arrow on the pump housing.
WARNING: When testing the machine for the rst time after installation, you must rst check
whether the rotation direction of the washing pump motor is consistent with the indicated direc-
tion. Operating the wash pump with incorrect rotation may reduce washing performance and may
damage the pump.
9
Electric Connection
Electrical installation must be performed by qualied personnel in accordance with all applicable
electrical codes.
Connect the dishwasher to a dedicated branch circuit using 6 mm² (approximately AWG 10) cop-
per conductors or conductors of an equivalent ampacity as required by local electrical codes.
Install an appropriately rated disconnecting means and ground-fault protection where required by
local regulations.
WARNING: Electrical circuits and grounding connections must comply with the applicable provi-
sions of the National Electrical Code and other local electrical codes.
WARNING: An independent all-pole disconnecting device, such as a disconnect switch, must be
installed in the power supply circuit of this machine. See the circuit data sheet for electrical pa-
rameters.
WARNING: Disconnect the power supply and apply lockout/tagout procedures before servicing the
dishwasher.
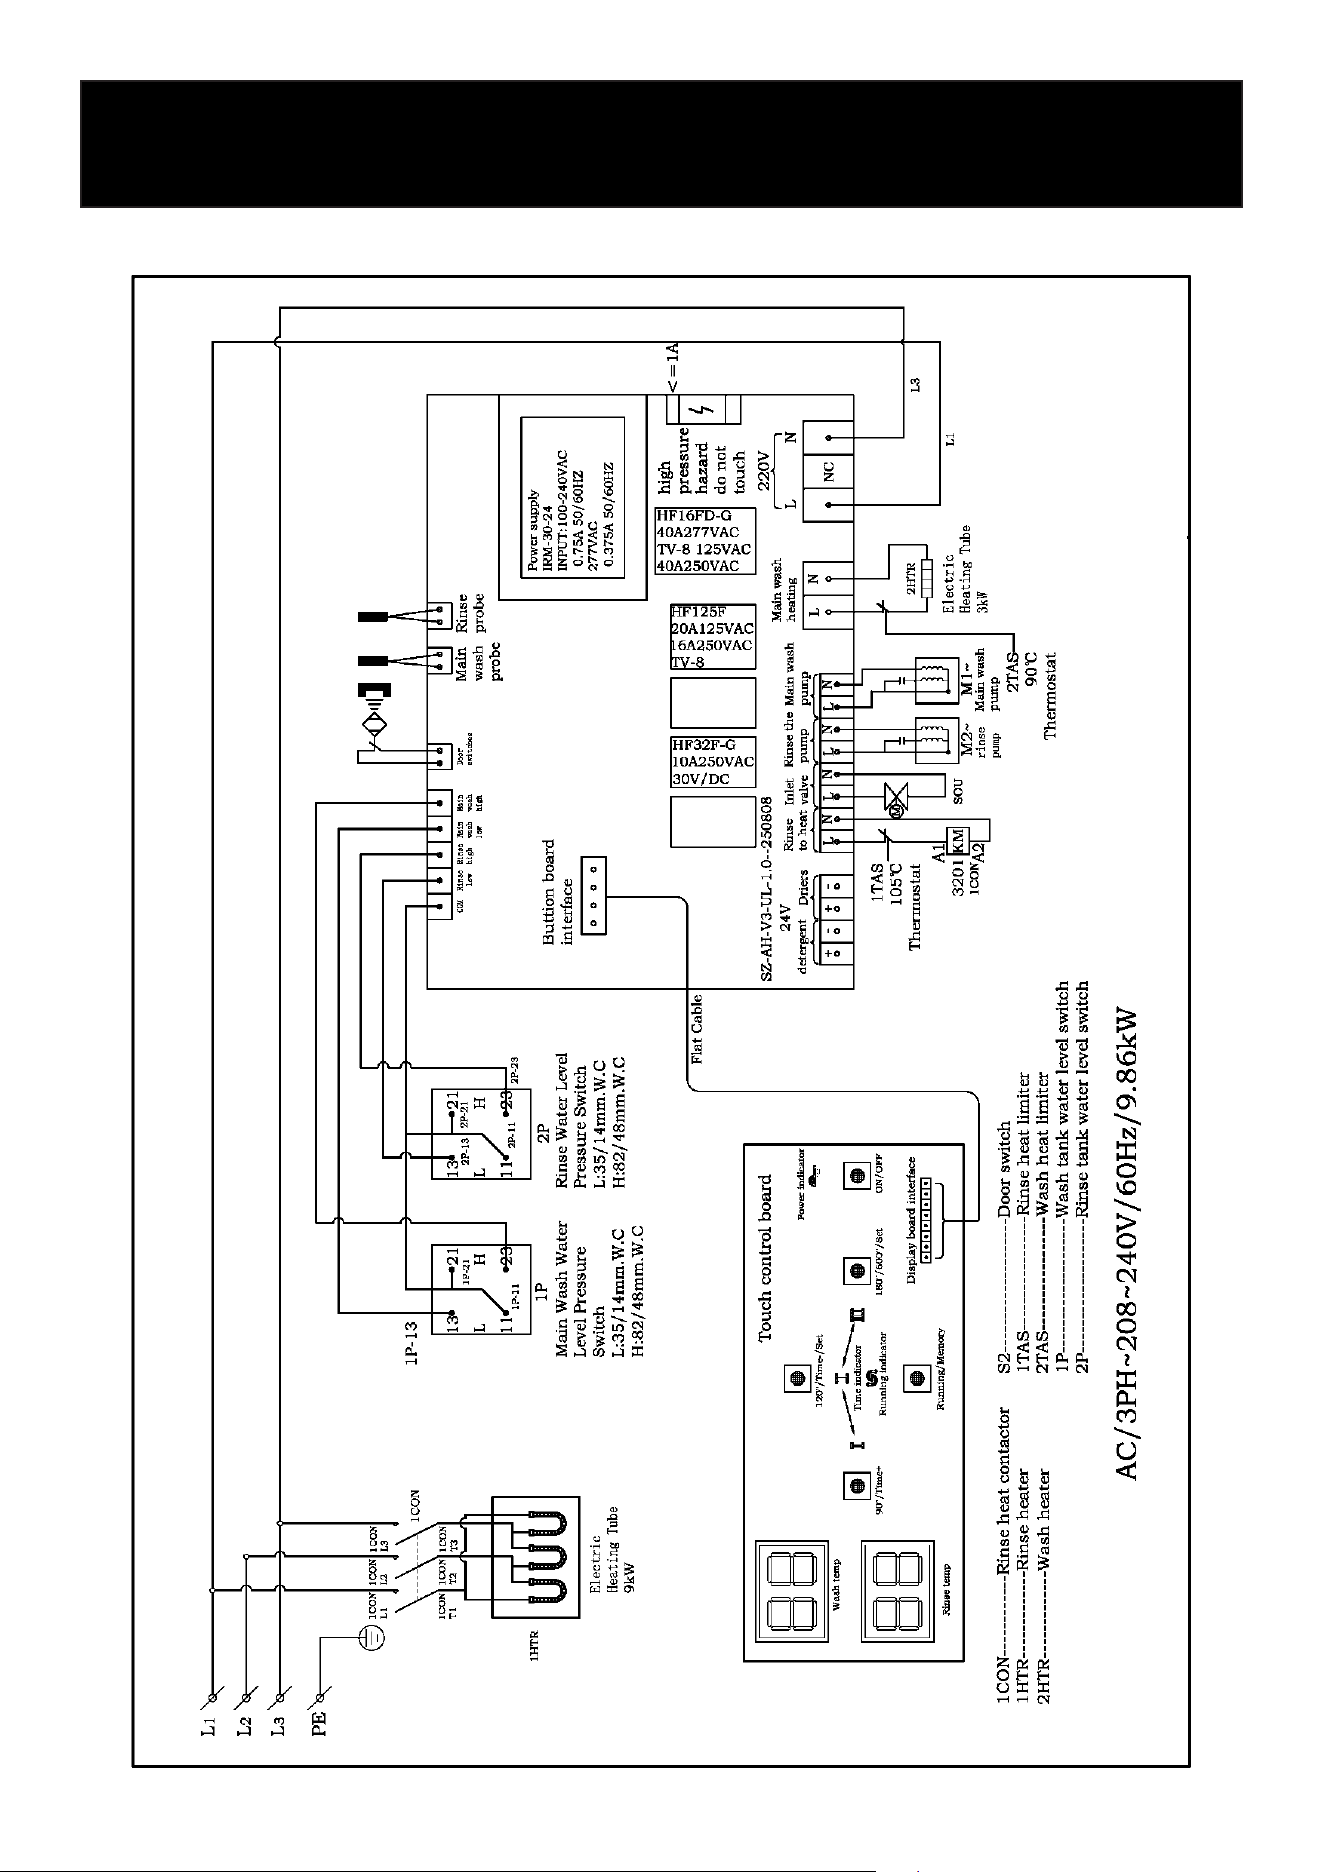
Please refer to the instructions on the power cord and the electrical schematic inside the bezel of
the machine to correctly connect the different colored power cords to the power supply.
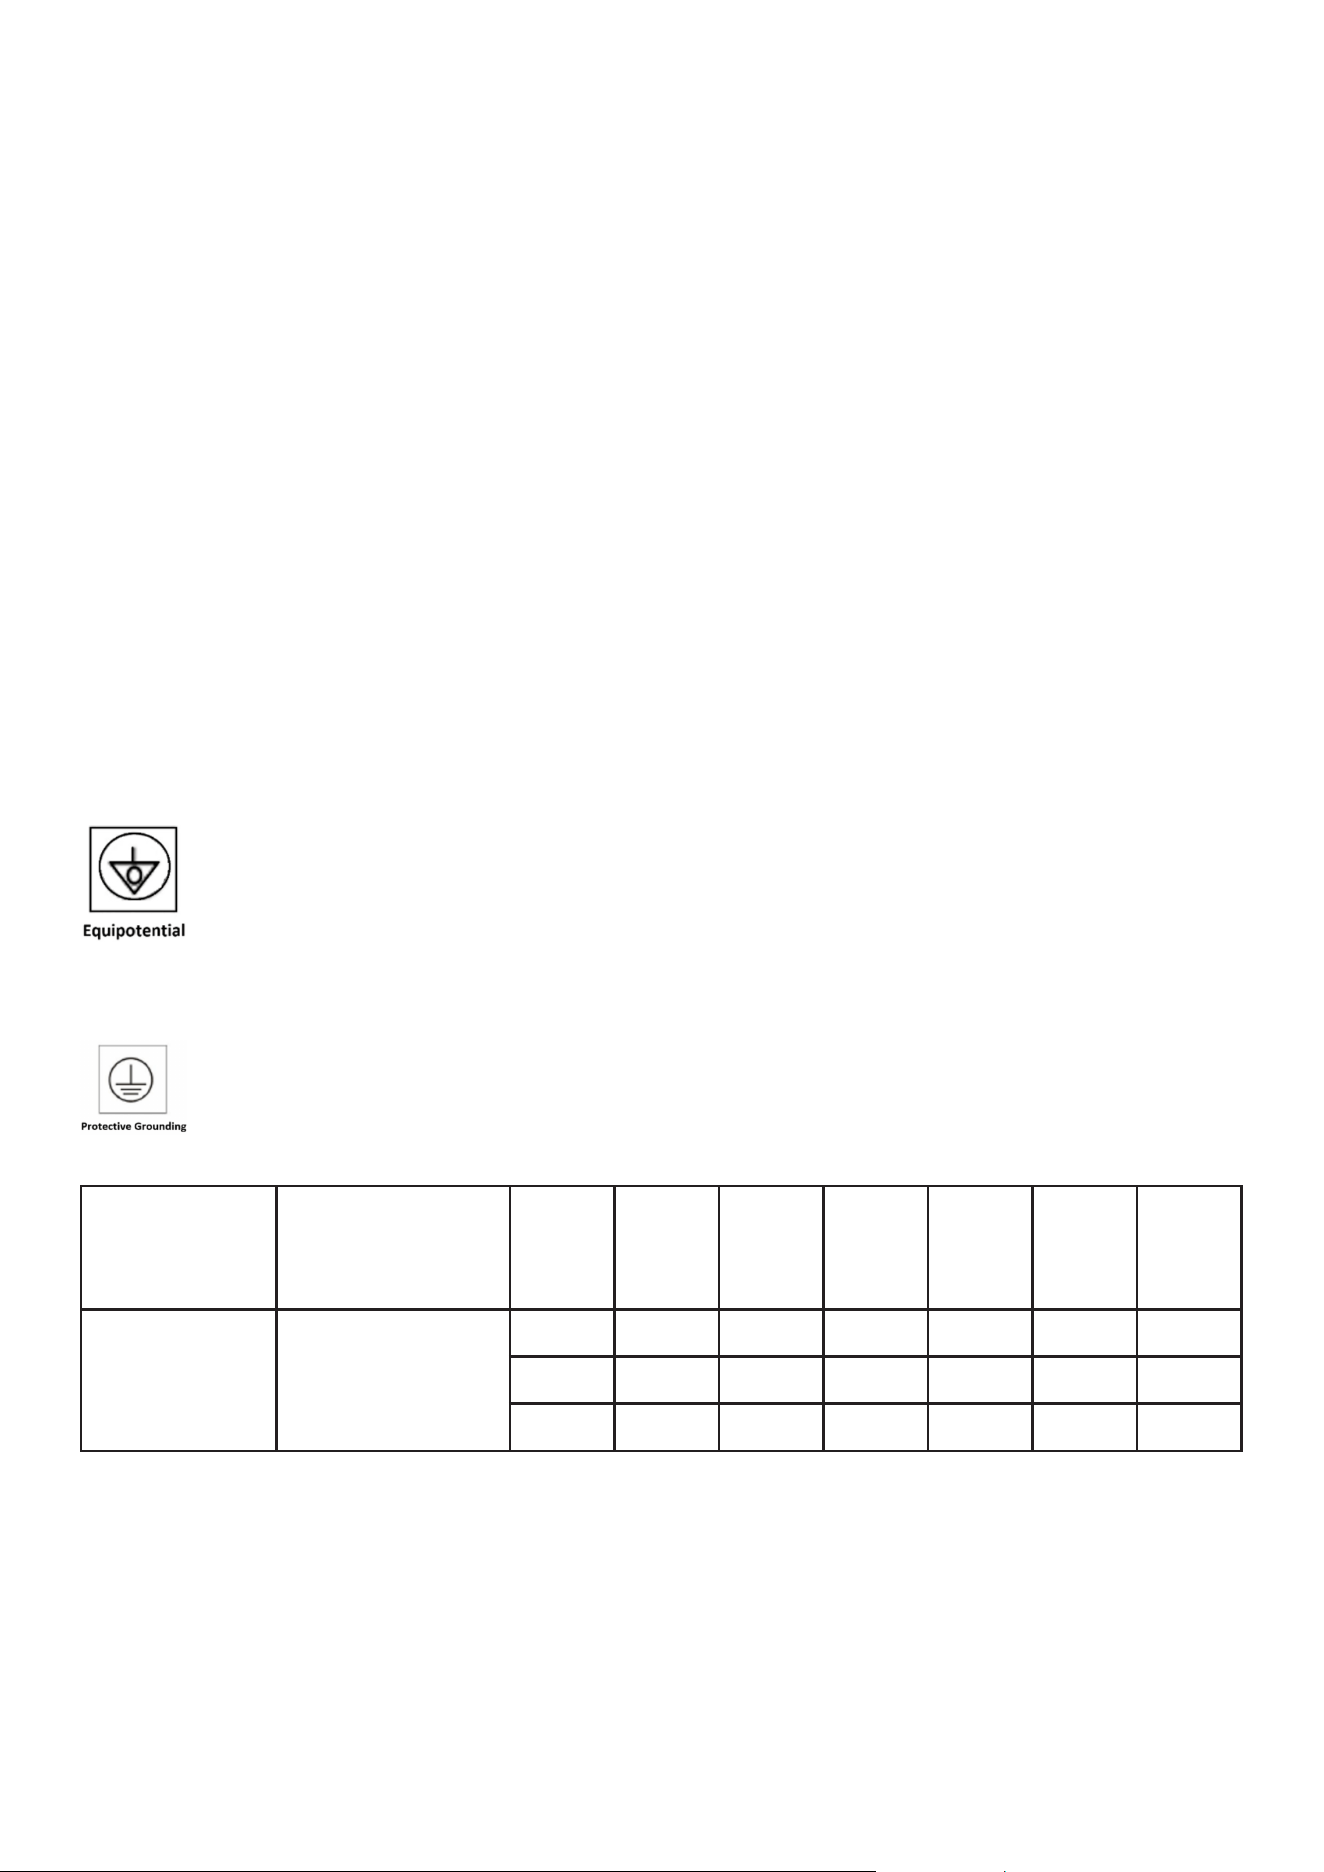
Equipotential
Equipotential means the terminal marked by the equipotential identication is the termi-
nal that reaches the same potential for each part of the equipment or system used after
being connected to each other, which is not necessarily the ground potential, such as a
local connection (the equipotential connection part is below the equipment).
Protective Grounding
Grounding protection means the terminal marked by the grounding protection symbol
refers to the terminal connected with the external protective conductor to prevent elec-
tric shock in case of fault, or the terminal connected with the protective earth electrode.
10
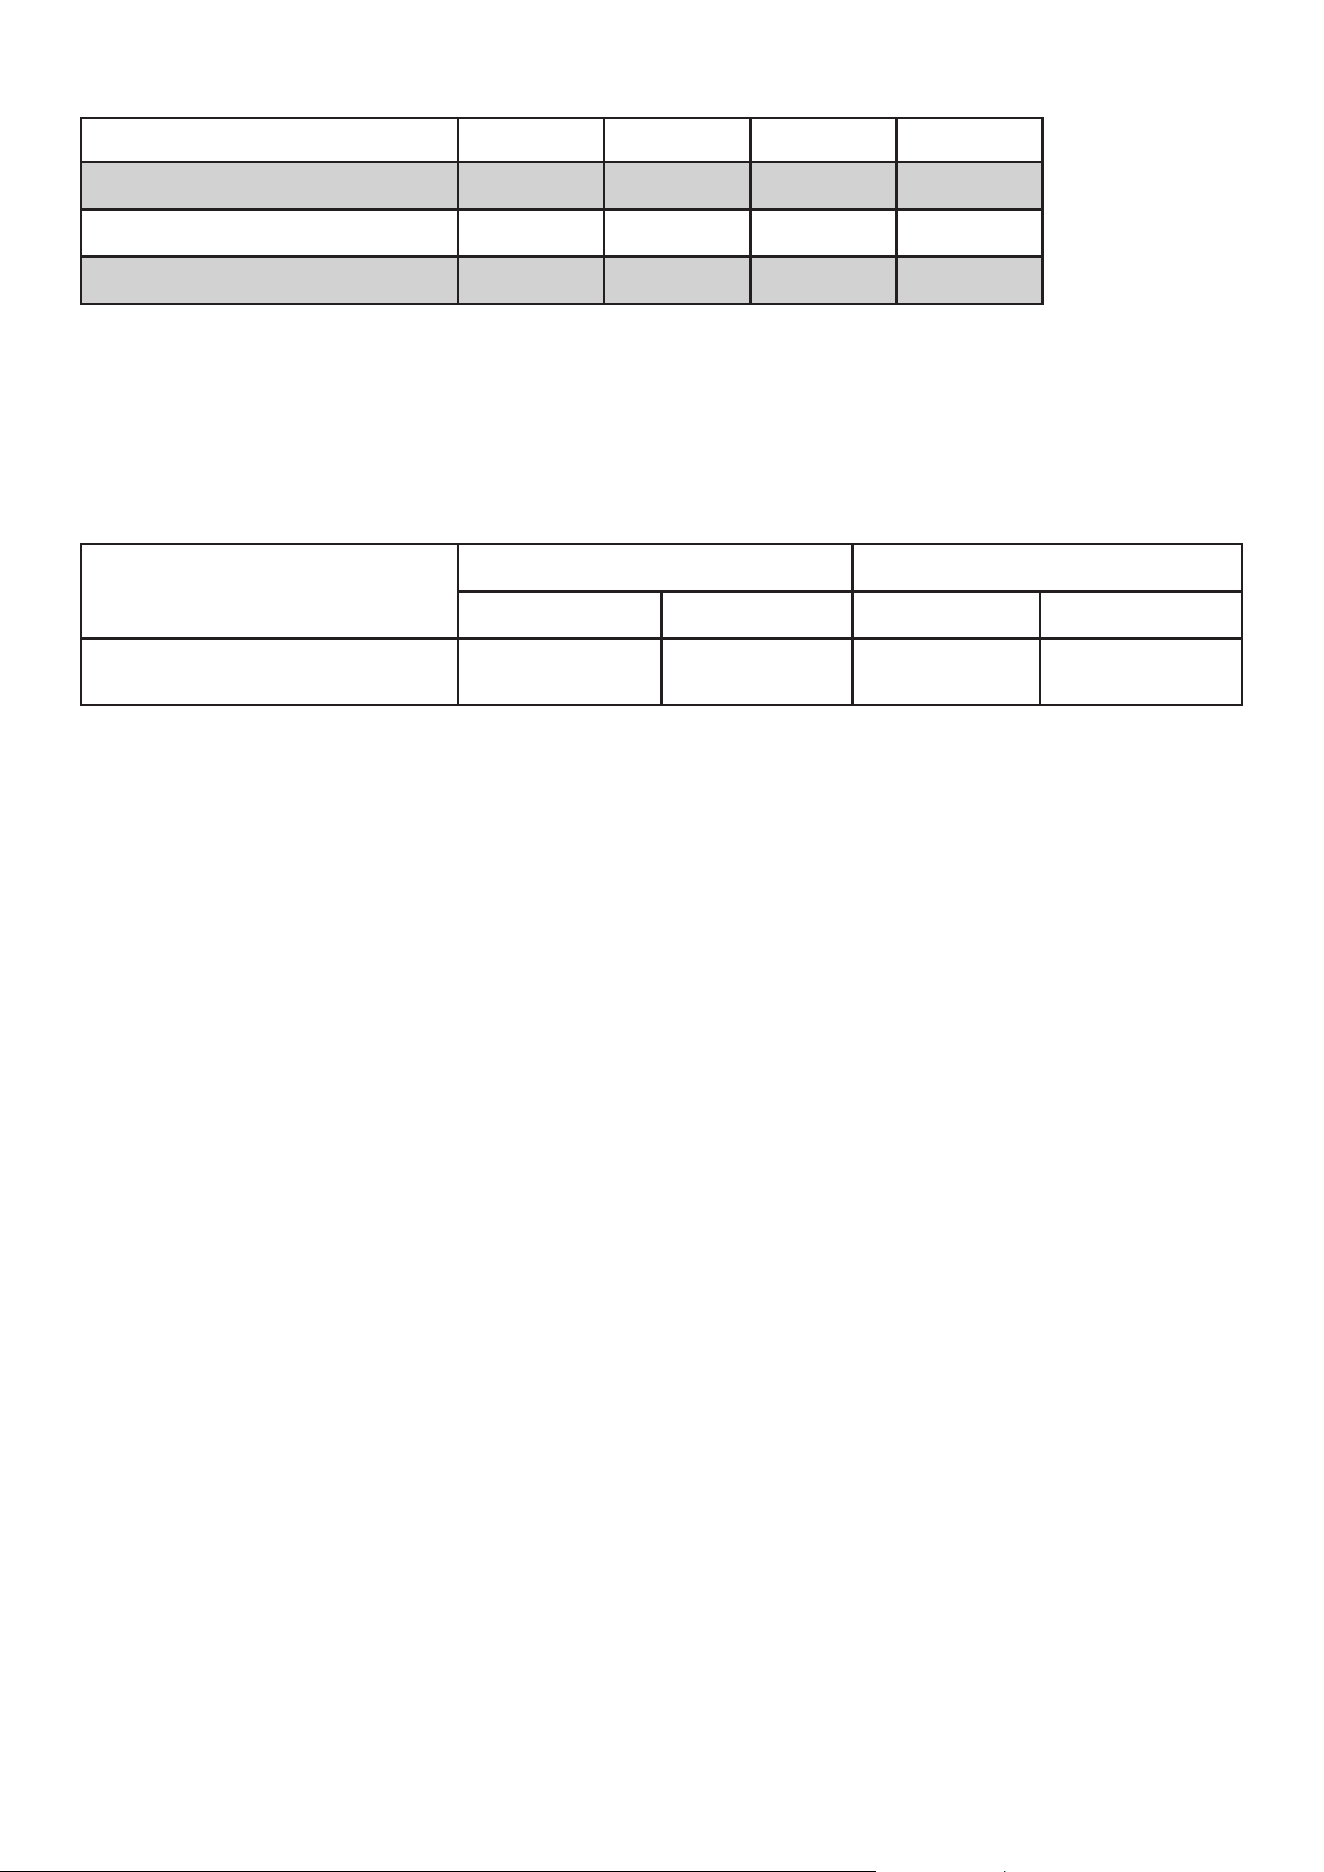
Duty Cycle (seconds) I II III IV
Cleaning Time (sec) 74 104 164 584
Pause Time (seconds) 4 4 4 4
Spray Time (sec) 12 12 12 12
WARNING: Plumbing connections must comply with relevant hygiene and safety standards and
plumbing regulations.
Water Supply Connection
Connect the machine inlet hose to the water source (DN 20 female). The water supply specica-
tions are shown in the table below:
Electric Heater Power
Water Inlet Temperature Inlet Water Pressure
Celsius Fahrenheit PSI (kPa) kg / cm
9kW 50~60 122~140
29–58 psi
(200–400 kPa)
0.2~0.4
Drain Connection
Connect the 1¼ in. (32 mm) drain hose under the tank to the appropriate drain. If regulations re-
quire the installation of an oil trap, the ow rate should be at least 40 GPM (150 L/min).
After completing the water supply connection, check the inlet water pressure. If the owing water
pressure is below 29 psi (200 kPa), install a suitable booster pump. If the static water pressure
exceeds 58 psi (400 kPa), install a suitable pressure-reducing valve.
Note: Use only insulated, sheathed wiring rated for 600 V or higher. Do not use bell wire, lamp cord,
or other wiring not rated for this application.
Supply pressure of the rinse aid distributor: 0.05–0.10 MPa.
Supply pressure of the detergent distributor is 0.05–0.10 MPa.
Chemical Dispenser Connections
The detergent and rinse aid supply hoses are secured to the back of the dishwasher for shipping.
• Remove the shipping ties and separate the detergent and rinse aid hoses.
• Place each hose into the appropriate chemical container. Make sure the hose reaches the
chemical and is not kinked or obstructed.
• Turn on the dishwasher.
Duty Cycle Time Data

11
• Prime the detergent line: Press and hold Program I until detergent has been drawn through the
hose and reaches the dishwasher.
• Prime the rinse aid line: Press and hold Program III until rinse aid has been drawn through the
hose and reaches the dishwasher.
• Release the corresponding button once the line is fully primed.
• NOTICE: Use only commercial dishwasher detergent and rinse aid. Follow the chemical manu-
facturer’s instructions for proper concentration and use.
12
Operation
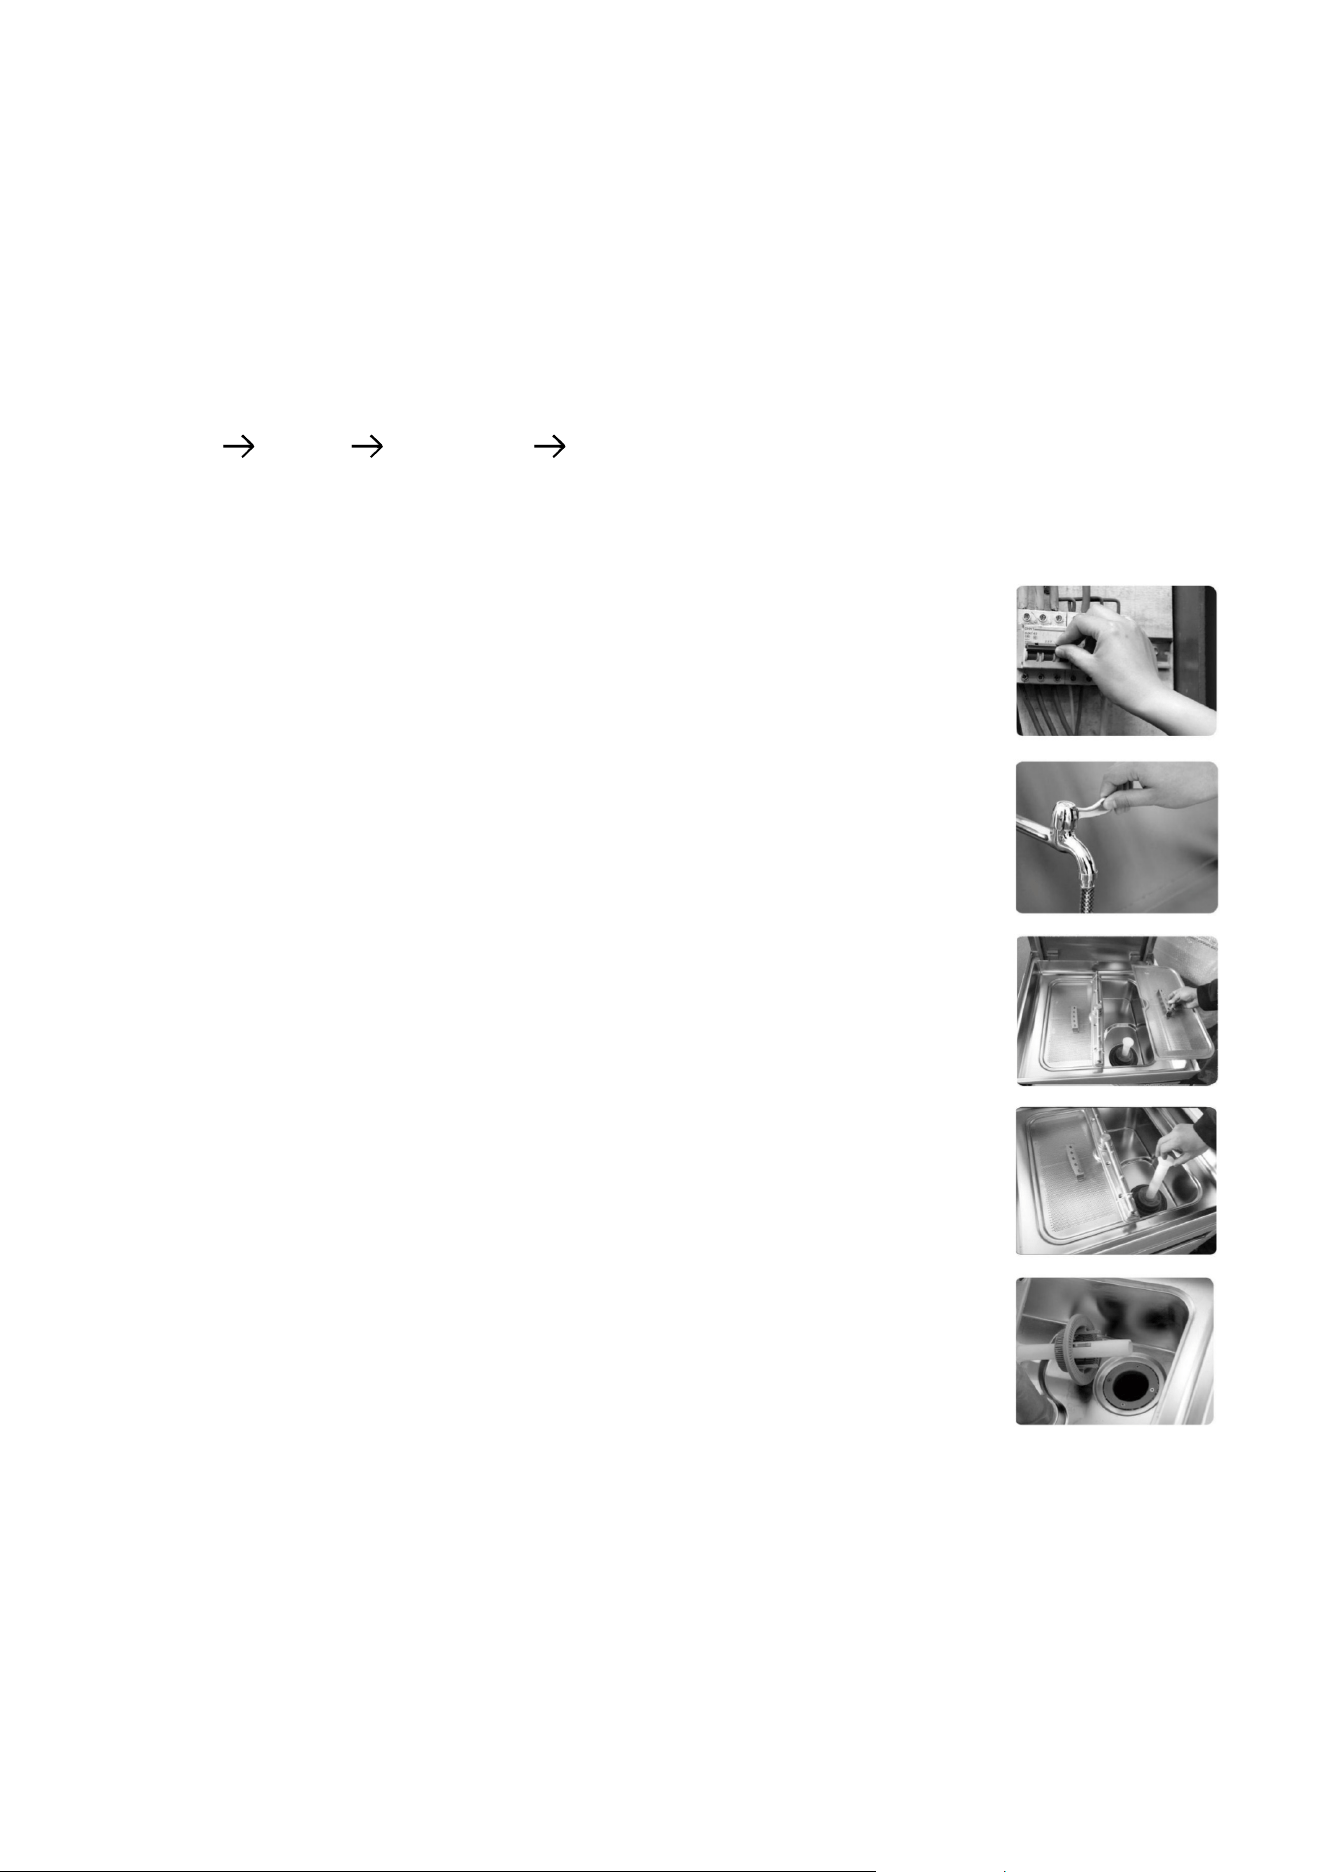
1. Open the water supply valve and turn on the main power switch. Verify that the detergent and
rinse aid supplies are adequate. Ensure the lter and drain pipe are correctly installed.
2. Close the hood and press the power button. The power indicator light indicates that the ma-
chine is on. The dishwasher automatically lls the wash tank with water. Once the water reaches
the correct level, the heater begins heating the water. When the set temperature is reached, the
dishwasher is ready for operation.
3. Select and Start a Wash Program
1. Load the dish rack and close the hood.
2. Select Program I, II, or III for normal washing.
3. For the Program IV Low-Temperature Disinfection Cycle, press and hold the Program III button
for approximately 3 seconds to select the low-temperature mode.
4. Press the START button to begin the selected program.
5. The work indicator illuminates while the cycle is operating. When the cycle is complete, the
indicator turns off.
Low -Temperature Mode: Once Program IV is selected, the dishwasher remains in low-tempera-
ture mode for subsequent cycles until another program is selected.
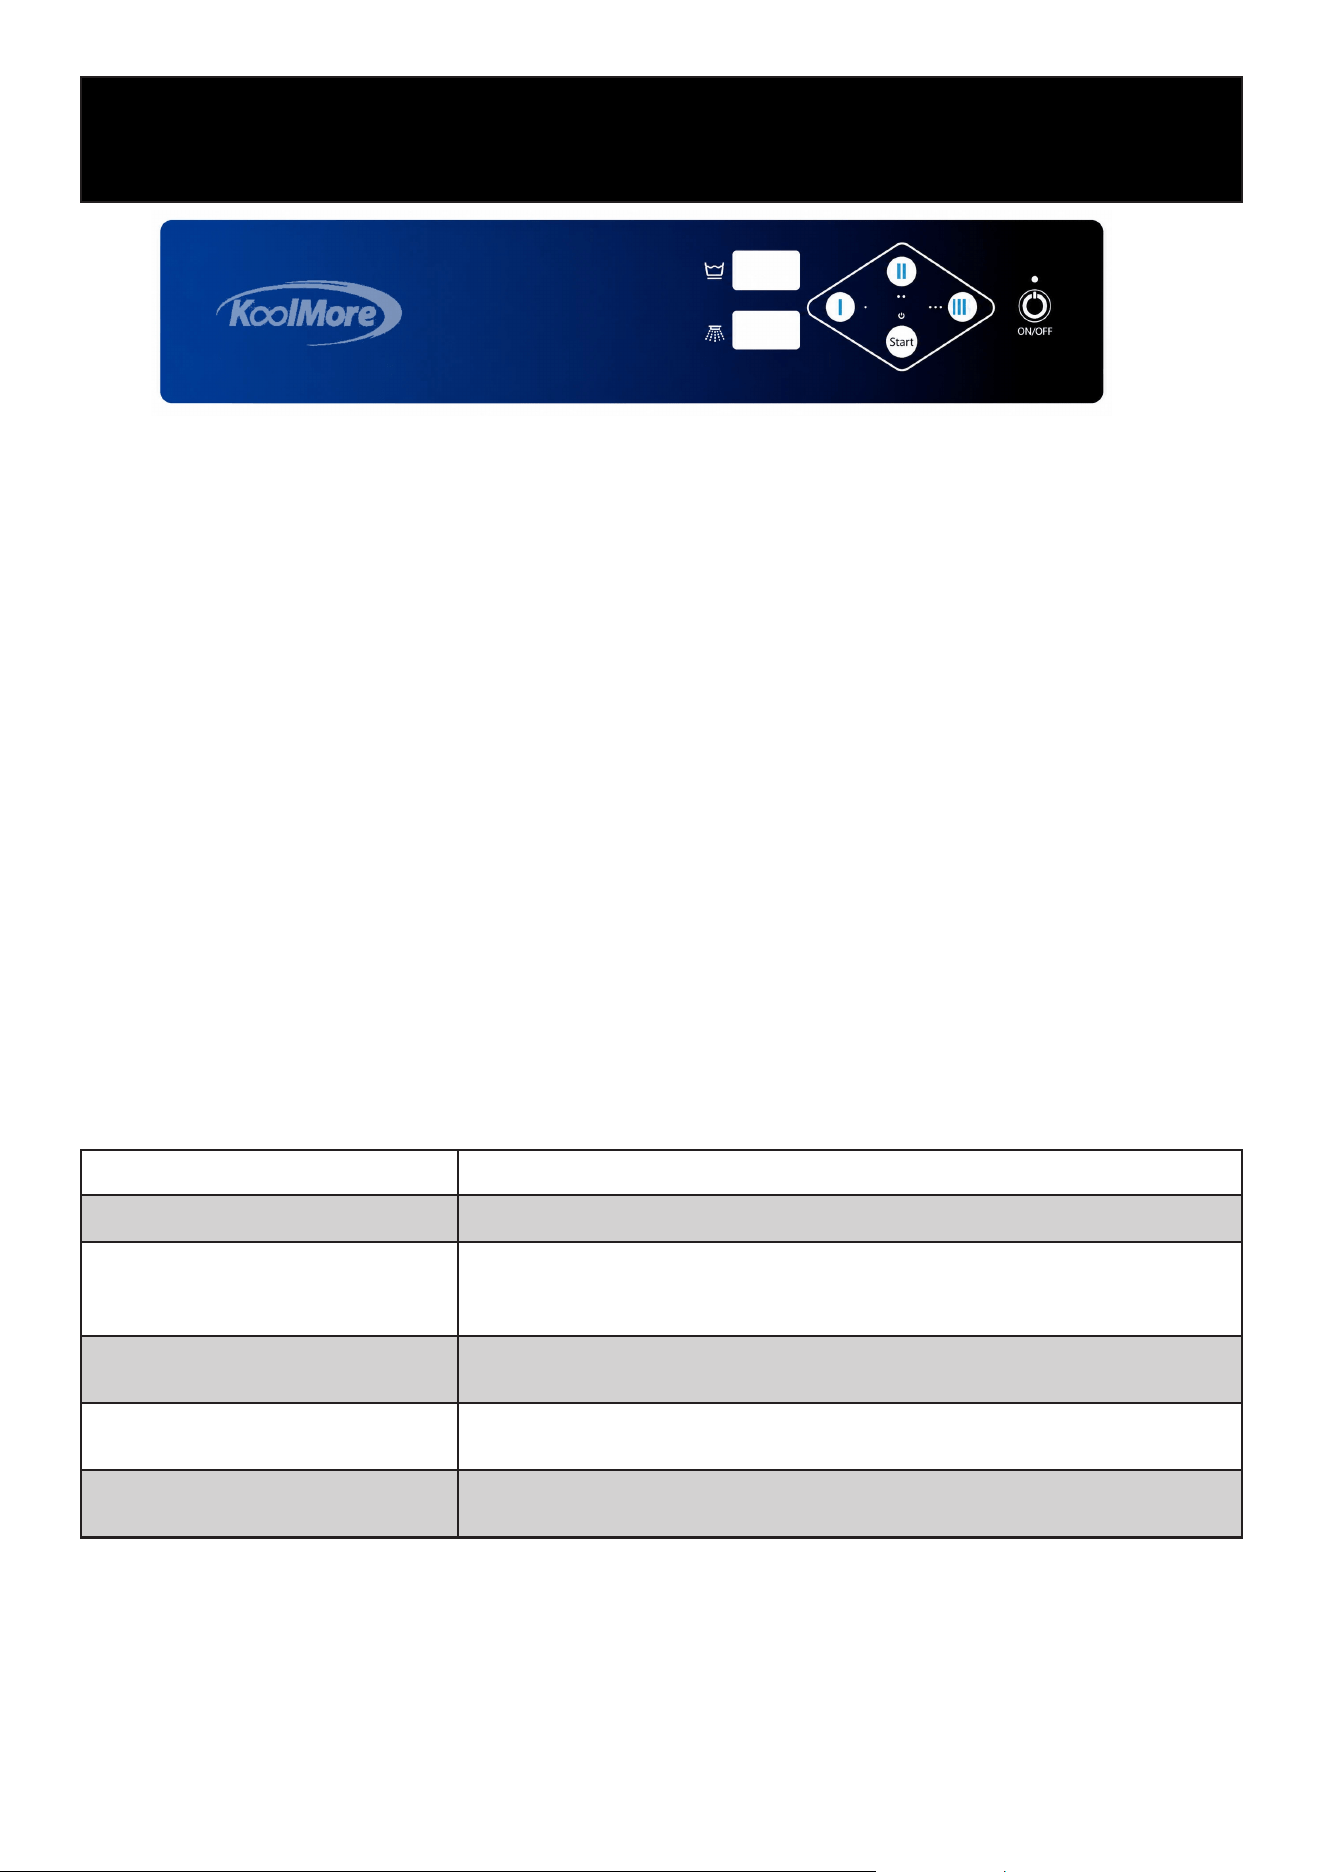
Function Description
Power Indicator When the indicator lights up, it means the machine is turned on.
Work Instructions
When the indicator light is on, it means that the machine is in the process of
cleaning. When the indicator light is off, it means that the cleaning process
has ended.
Thermometer
Displays the wash tank temperature (upper display) and rinse tank tempera-
ture (lower display).
Start Button
After selecting Program I, II, or III, press the START button to begin the select-
ed wash cycle.
Drain Pipe
When washing is nished, pull out the drain pipe in the tank and drain the
water from the tank.
Fig 7
13
Recommended Operating Temperature
Parameter Recommended Setting
Temperature of Washing Water Set at 140–149°F (60–65°C).
Final Rinse Water Temperature Set at 181–194°F (83–90°C).
Preparation Procedure
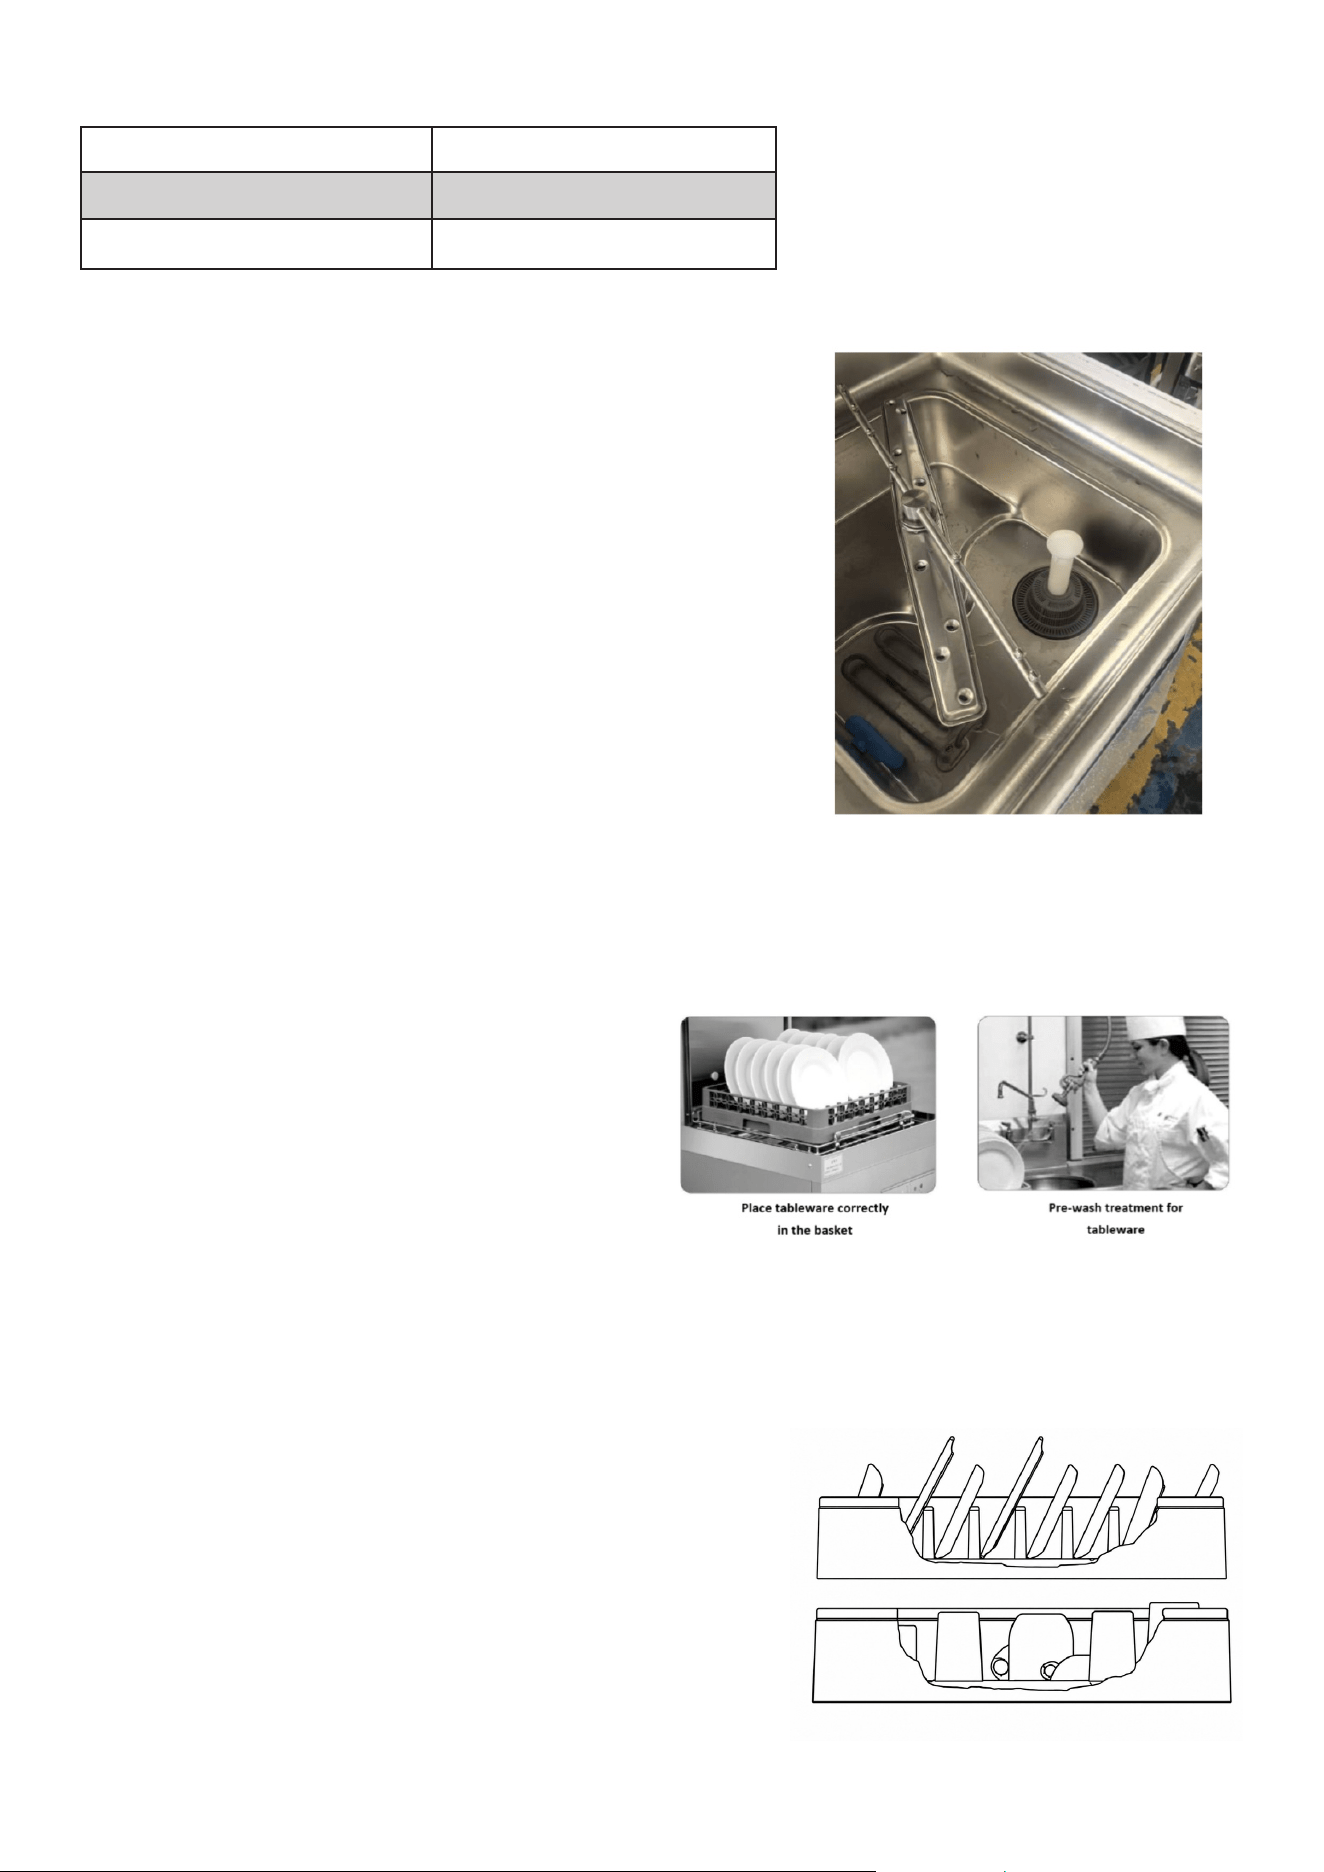
1. Put the sieve plate and sieve basket in the appropri-
ate position on the cleaning tank, insert the drain pipe
(please refer to Figure 8), and close the hood.
2. Press the power switch. The machine will automati-
cally ll with water.
3. Once lling is complete, raise the hood and verify that
the wash tank has lled to the proper water level. If
an automatic detergent dispenser is installed, follow
the dispenser manufacturer’s instructions.
4. Allow the wash and rinse water to reach the recom-
mended operating temperatures. Load the dish rack,
close the hood, select the desired wash program, and
press the START button to begin the wash cycle.
Fig. 8
Fig. 9
Wash
1. Remove large food scraps from dishes
before loading.
2. Pre-rinse or soak heavily soiled tableware
in clean water as needed.
3. Load the tableware properly into the ap-
propriate dish rack.
4. If necessary, pre-wash heavily soiled
items before placing them in the dish-
washer.
5. Select Program I, II, or III based on the
type of tableware and the level of soil.
Loading the Dish Rack
Place plates upright in the rack to allow water to reach
both sides during the wash cycle.
Do not overload or stack dishes, as this may reduce wash-
ing performance.
Place cups, glasses, and bowls in the appropriate open
rack with the openings facing downward to allow proper
drainage.
Place atware and small utensils loosely in the designated
cutlery basket to ensure thorough cleaning.
14
Dishwashing Process
• Load the dish rack into the dishwasher and close the hood.
• Select Program I, II, or III according to the type of tableware and level of soil.
• Press the START button. The dishwasher will run the selected wash cycle.
• When the cycle is complete, raise the hood and remove the clean dish rack.
• If additional dishes are ready, load the next rack, close the hood, select the desired program,
and press START to begin the next cycle.
• Allow cleaned tableware to air dry for approximately 1 minute before unloading or storing.
Wash Cycle Sequence
Main Wash Pause Final Rinse Cycle Complete
When the cycle is complete, the program/work indicator turns off.
When the unit is in standby, the digital display shows the current temperatures for the wash and
rinse cycles.
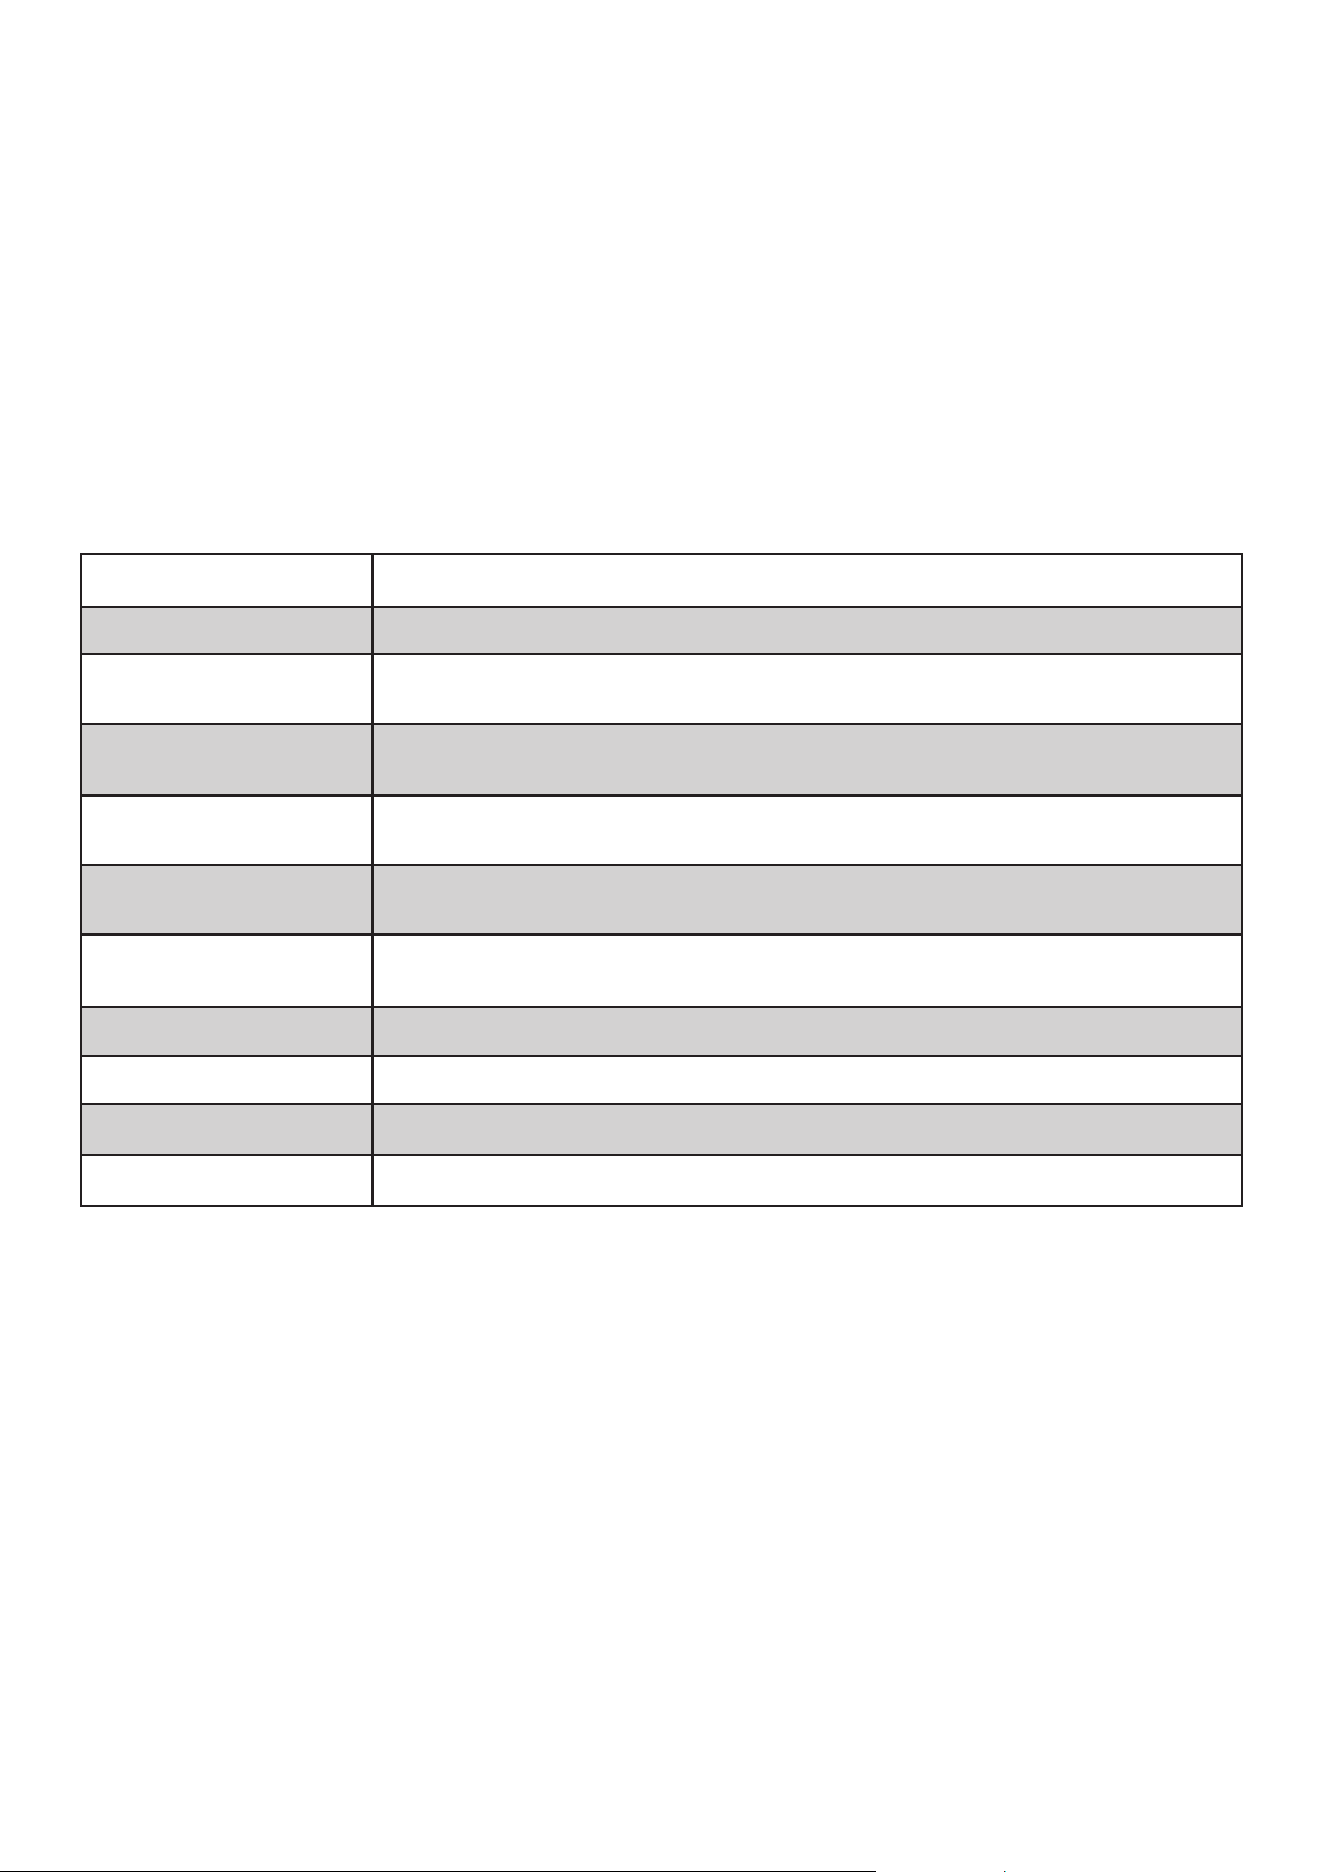
Cleaning the Dishwasher
Warning: Hot water and internal components may cause burns. Allow the
dishwasher and wash water to cool before cleaning. Disconnect the dish-
washer from the power supply before performing cleaning or maintenance.
1. Turn the dishwasher off, then disconnect the main power supply.
2. Close the water supply valve.
3. Raise the hood and remove the dish rack.
4. Remove the wash tank screens and drain pipe. Allow the wash tank to
drain completely.
5. Remove food debris from the screens and wash tank. Thoroughly clean
and rinse the interior of the dishwasher.
6. Remove and clean the pump suction screen.
7. Inspect the wash and rinse arms and remove any debris or buildup from
the spray openings.
8. Inspect the heating elements for scale buildup and descale as necessary.
9. Reinstall the pump suction screen, drain pipe, and wash tank screens.
10. Leave the hood open and allow the interior to air dry.
Parameter Settings
The dishwasher controller includes adjustable parameters for temperature control, cycle timing,
and chemical dispensing.
NOTICE: Parameter settings are factory congured for normal operation. Incorrect adjustments
may affect washing performance, temperature control, chemical dispensing, or equipment opera-
tion. Parameter settings should only be adjusted when necessary.
15
Entering and Navigating Parameter Setting Mode
1. Turn the dishwasher on.
2. Press and hold Program II and Program III simultaneously for approximately 5 seconds to
enter Parameter Setting Mode.
3. The display will show the rst parameter.
4. Press Program III to advance to the next parameter.
5. Press Program I to decrease the displayed value or Program II to increase the displayed value.
6. Continue pressing Program III to cycle through the available parameters and make adjust-
ments as needed.
7. Press the Power button to save the settings and exit Parameter Setting Mode.
Parameter Descriptions
Parameter Description
P00 Temperature Unit: Selects the temperature display unit. 0 = °C; 1 = °F.
P01
Rinse Heater Upper Temperature: Sets the upper temperature threshold for the rinse
heater. The heater turns off when this temperature is reached.
P03
Wash Heater Upper Temperature: Sets the upper temperature threshold for the wash-
tank heater. The heater turns off when this temperature is reached.
P04
Wash Heater Restart Temperature: Sets the temperature at which the wash-tank heat-
er turns back on as the water temperature drops.
E02
Program II Wash Time: Sets the wash duration for Program II. Factory setting: 104
seconds.
E03
Program III Wash Time: Sets the wash duration for Program III. Factory setting: 164
seconds.
E04 Short-Cycle Rinse Time: Sets the nal rinse duration for the short wash cycle.
E06 Long-Cycle Rinse Time: Sets the nal rinse duration for the long wash cycle.
D01 Detergent Dispensing Time: Sets the detergent pump operating time, in seconds.
C01 Rinse-Aid Pump Flow: Controls the rinse-aid pump ow setting. Factory setting: 30.

16
Maintenance
WARNING:
Before starting any repair work, disconnect the power supply and hang a visible sign at the power
switch to let others know that you are repairing the circuit.
Cleaning Arm Maintenance
The upper and lower cleaning arms and spray arms should be able to rotate freely. After rotating
by hand, they should continue rotating on their own for a few seconds before stopping. Please
switch off the power supply before turning the washing arm and remove all obstacles.
If the sieve basket or pump suction screen is not installed, foreign matter (such as food debris or
bones) may cause the washing arm outlet nozzle to plug. The cleaning arm can be easily removed
for cleaning.
To remove the wash arm and spray arm, loosen the knurled nut between the wash arm and spray
arm to remove the wash arm and spray arm.
Spray Arm Removal (Refer to Figure 12)
Note: The pad sleeve on the lower cleaning arm shaft does not have to be removed.
When removing the upper washing arm and spray arm, please hold the washing arm rmly while
loosening the knurled nut so that the washing arm does not fall off. The cleaning arm and spray
arm are interchangeable between the upper and lower positions.
Daily Maintenance Items
1. Check the detergent and rinse aid levels daily and rell the containers as needed. Use only
commercial dishwasher detergent and rinse aid recommended for this equipment.
2. Always keep the equipment clean. At the end of each day, clean the residue in the washing tub
with a rag or brush, and remove the washing arm for cleaning. Check whether the rinsing noz-
zle is blocked every week. If a nozzle is blocked, remove the obstruction and rinse the nozzle
thoroughly with clean water.
3. Clean stainless steel surfaces regularly with a rag or brush.
4. If the equipment is not equipped with a demineralized water device, it must be regularly des-
caled. After descaling, thoroughly remove any residual descaler and scale with clean water.
5. During machine operation, check the equipment parts, washing operation, and rinsing effect.
If any abnormality is found, stop operation immediately, inspect the machine, troubleshoot the
issue, and then continue working.
6. When not in use for a long time, clean the dirt inside the machine, dry it, pack it well, and store
it in a ventilated and dry place.
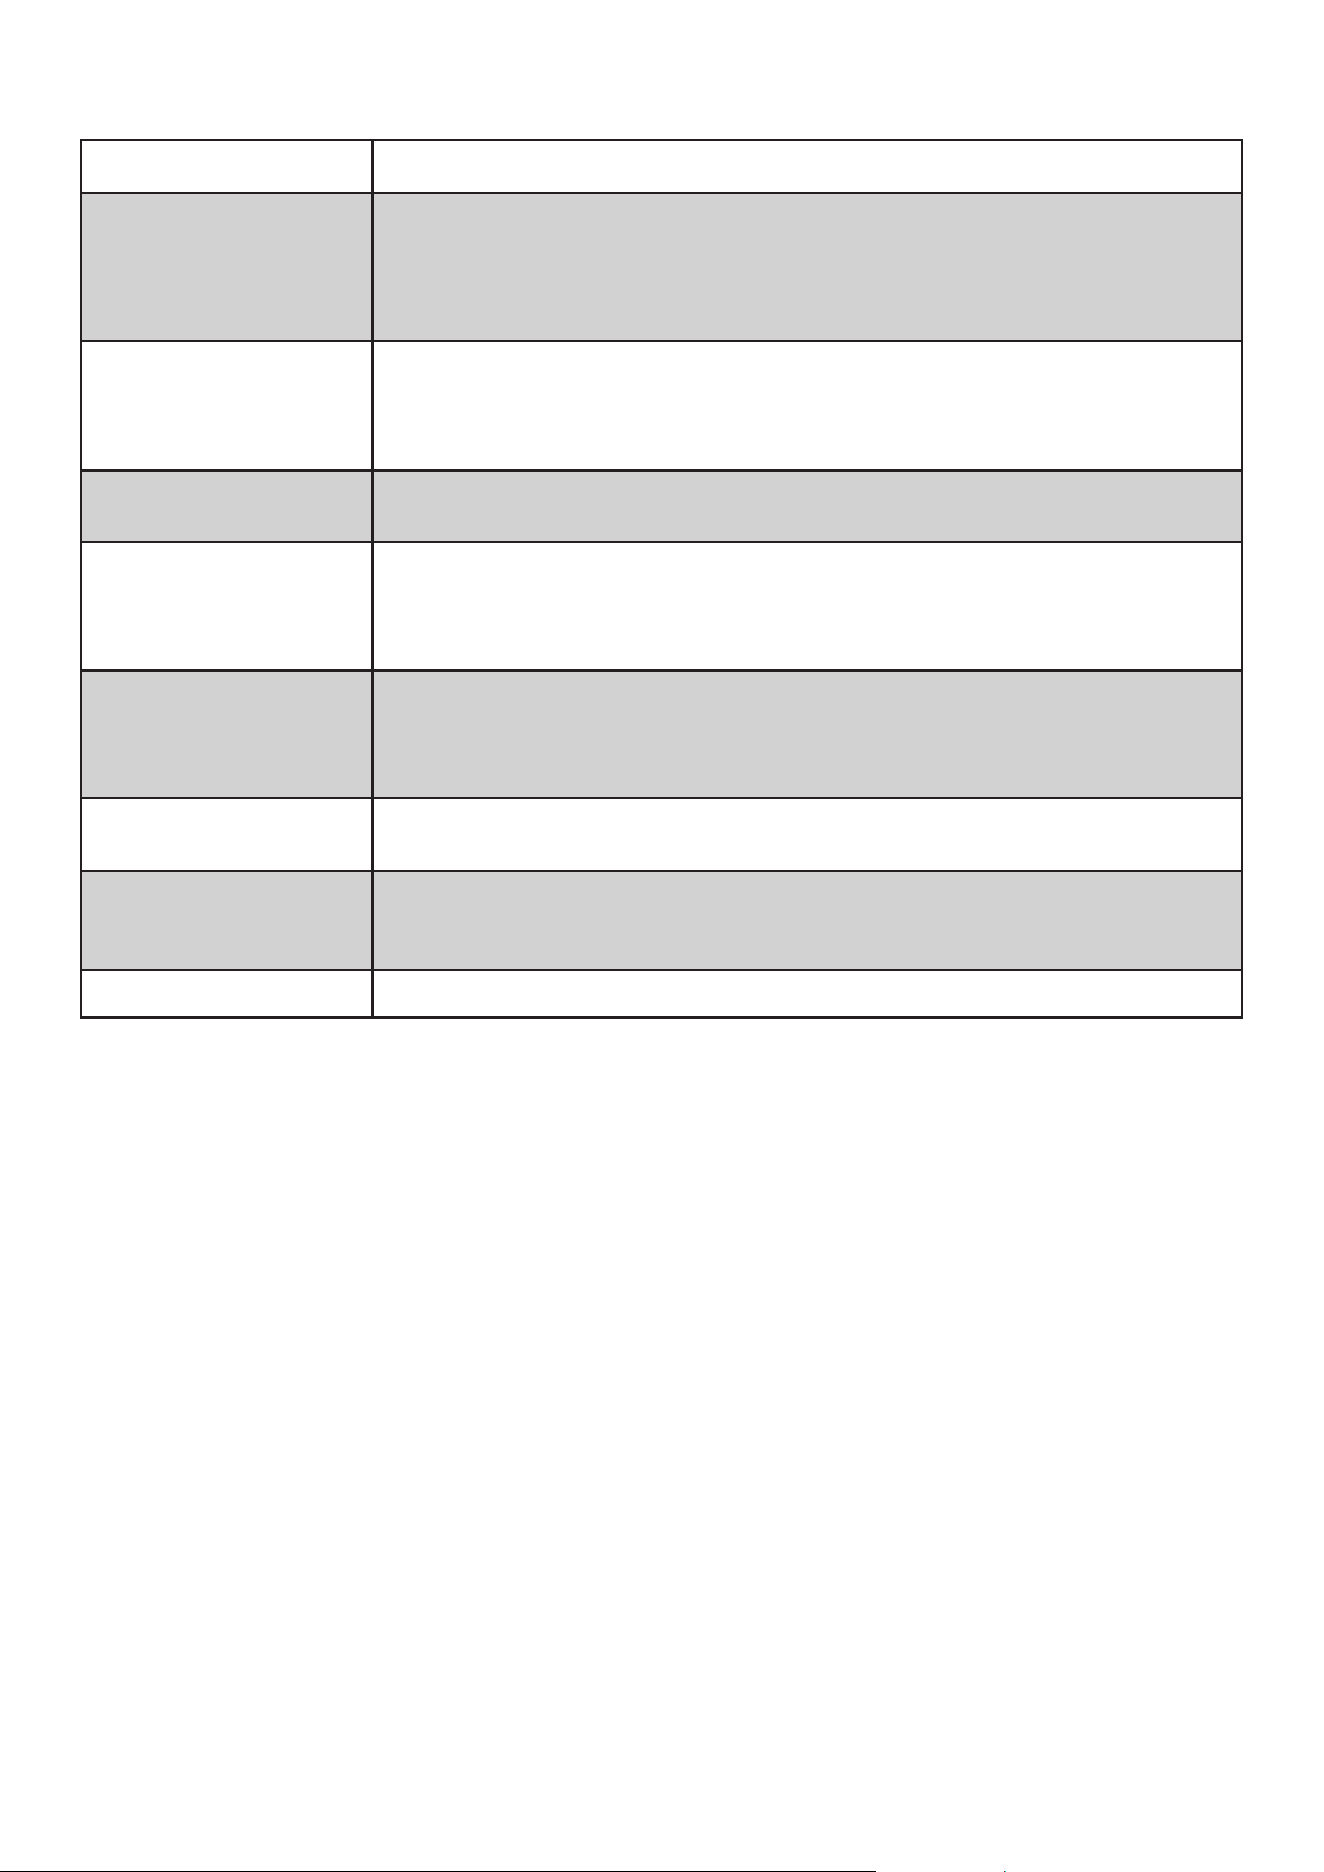
17
Maintenance Item Maintenance Content
Water Pump
• Check water pump tightness, seal ring, water pump rotation noise, direction of
rotation, etc.
• Check the suction of the pump.
• Check whether the installation position and operation of the equipment lter
screen are correct.
Washing System
• Check water level of the main washing tank.
• Check the tightness of the washing line.
• Check if the washing system is complete, sprays correctly, and if the main wash-
ing arm is in the center position.
Rinse System
• Check water pressure and tightness.
• Check that the rinsing system is complete and sprays correctly.
Racks and Components
• Inspect the water tank, door, and equipment surfaces, and inspect the main wash
tank screens.
• Check rinse tanks, hoses, clamps, plastics, and seals.
• Inspect the hood mechanism and other moving components for proper operation.
Water Inlet Device
• Check water level switch, solenoid valve, and clean the lter screen.
• Check tightness of all connections.
• Check water hardness, water softener, and softener for total or partial failure (if
any).
Drain System
• Check tightness.
• Check water pipe pressure and operation of the drain pump.
Electrical Equipment
• Check all fuses and tighten all relevant screws.
• Check main wash and rinse heater wires, thermostat, and overheat protection
switch.
Detergent Dispenser • Check concentration and adjust if necessary.
Monthly Maintenance
18
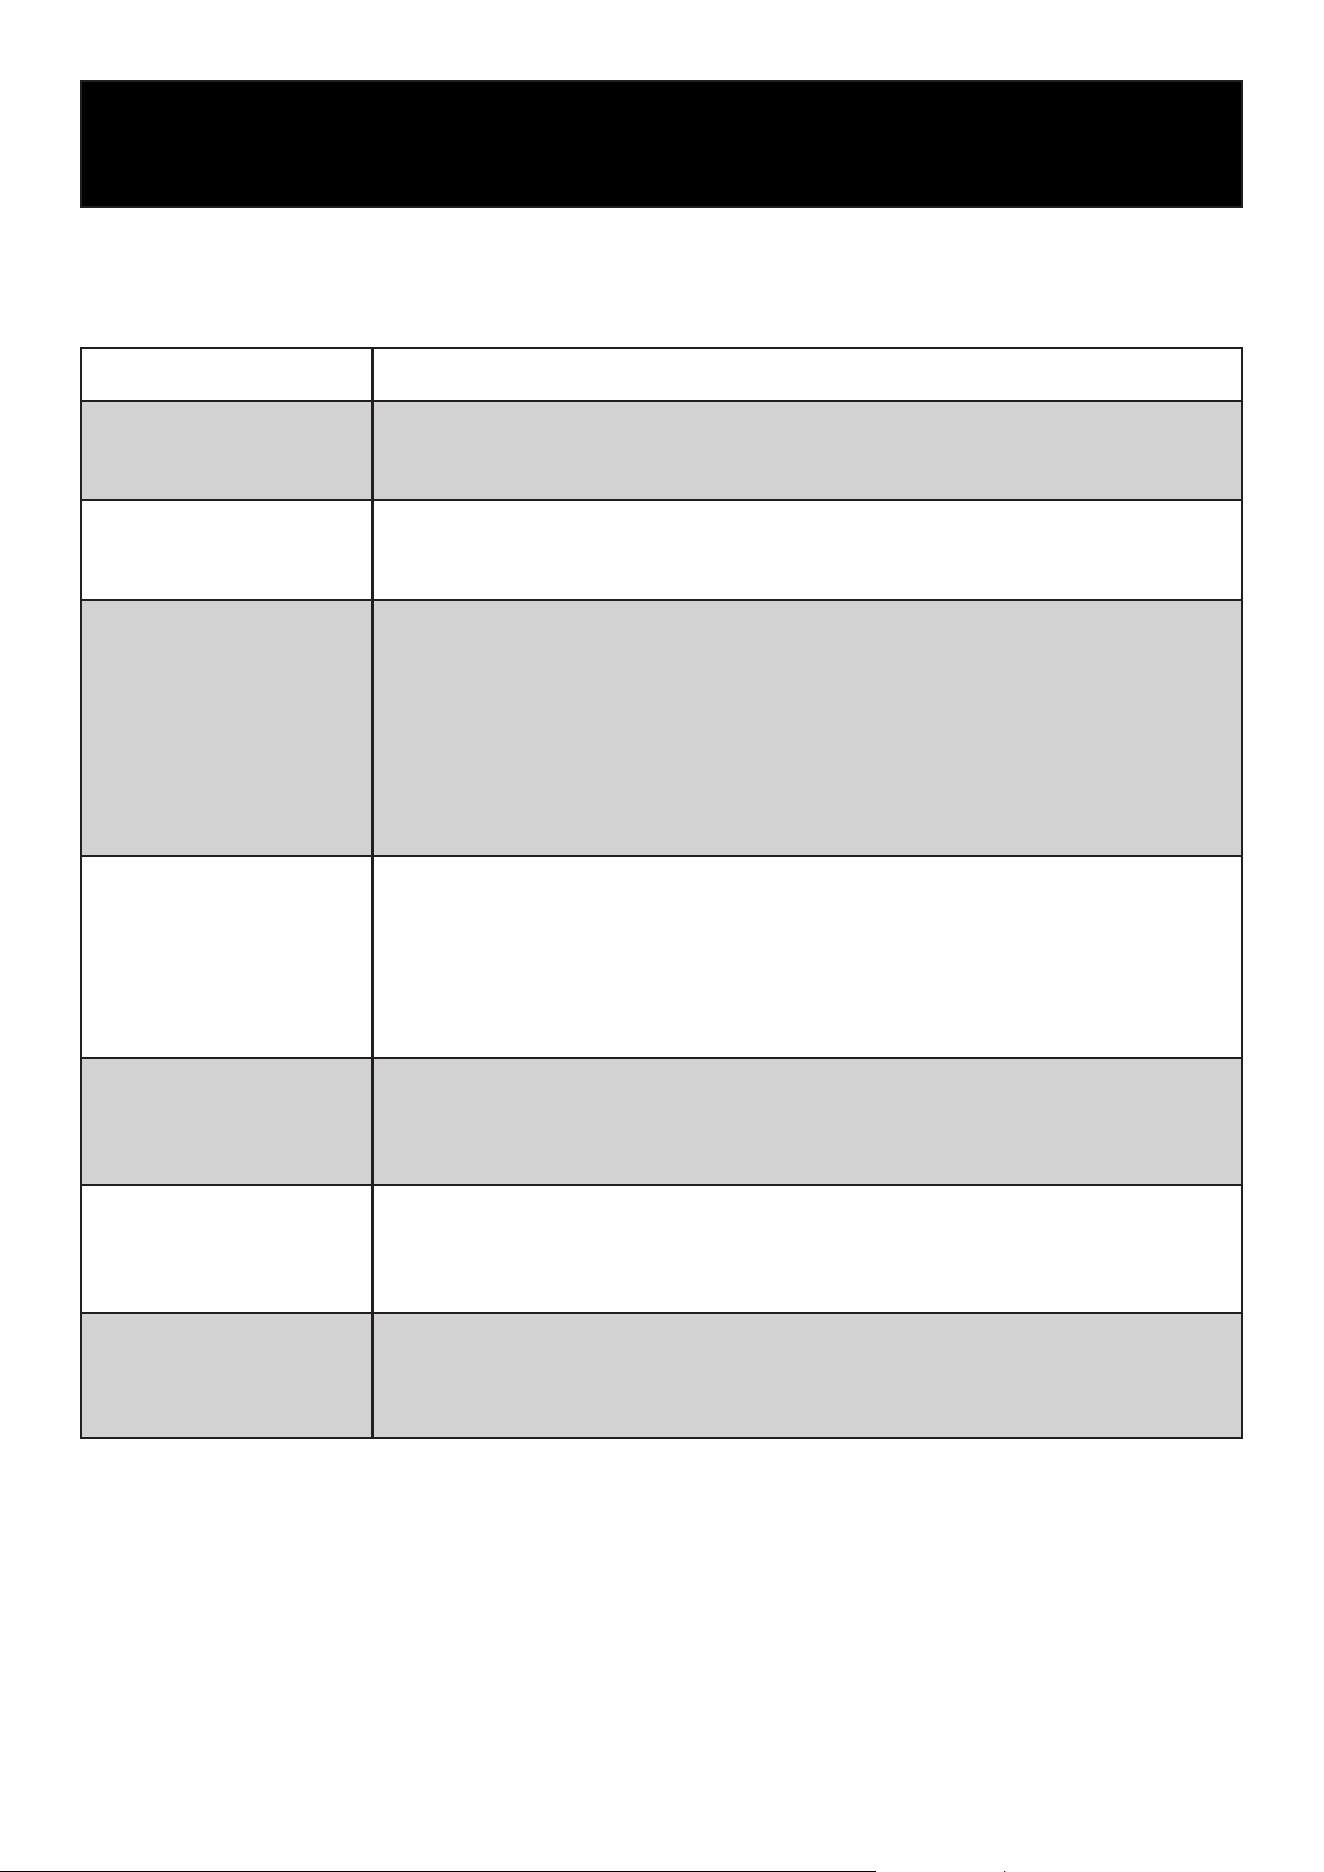
Troubleshooting
Problem Possible Cause
The machine doesn’t work
• Open the door for 2 seconds, then close it.
• Power fuse burned out or circuit breaker tripped.
• Check whether the control circuit fuse FU3 is damaged.
Wash Cycle Takes Too
Long
• The temperature of the heating box does not reach the set temperature.
• Check whether the preheating time is too short and whether the thermostat and
heater are damaged.
Poor Washing Performance
• Cleaning pump suction plug caused by insucient water pressure. Cut off the
power supply and drain the water tank. Check whether there is foreign matter
blocking the pump suction.
• The water temperature is too low or the preheating time is too short. Check the
thermostat and heater.
• The amount of detergent is not correct. Please contact your detergent manufac-
turer representative.
• Cleaning arm and spray arm have excessive scale deposits. Descaling may be
required.
Spots on Cutlery, Glasses,
and Dishes
• The tableware is incorrectly installed in the basket.
• Spray water temperature is not high enough.
• The water pump suction port is blocked and the water pressure is insucient.
• Water hardness is too high.
• The detergent is not suitable for the water used.
• The quick-drying agent is not suitable for the water used.
• Cleaning agent or quick-drying agent concentration is not correct.
Poor Rinsing
• The water leakage lter is too dirty, causing the ow to slow down. Turn off the
water source, open the inlet hose connector and solenoid valve inlet connector,
remove the lter, clean it, and reinstall it.
• Water supply pipeline pressure is too low.
Valve Leakage
• Foreign matter obstructs the normal operation of the valve. Note: Inspection after
installing the machine is critical, as pipe compound or debris may fall into the
valve during installation. Shut off the water supply, loosen the screws, remove the
valve cap, clean the valve thoroughly, and reassemble it.
No Water Injection or Slow
Water Injection
• The water leakage lter is too dirty, causing the ow to slow down. Turn off the
water source, open the inlet hose connector and solenoid valve inlet connector,
remove the lter, clean it, and reinstall it.
• The water pressure in the water supply pipeline is too low.
This section allows you to try to solve the problem yourself, but if the problem persists after you
check for possible causes, contact your local maintenance department and an authorized service
unit immediately.

19
LIMITED WARRANTY
KoolMore Supply Inc. extends a limited warranty to the original purchaser, guaranteeing that this KoolMore product is
free from manufacturing defects in material or workmanship for one year from the date of purchase.
Should you discover any such defect within the warranty period, KoolMore Supply Inc. reserves the right to repair or re-
place the product without charge, or to cover the cost of replacement parts and repair labor needed to correct defects
present at the time of purchase or resulting from regular usage, when the appliance has been installed, operated, and
maintained as per the instructions provided.
At its sole discretion, KoolMore Supply Inc. may decide to replace the product. In such an event, your replacement
appliance will carry the warranty for the remaining term of the original unit’s warranty period.
This warranty is valid exclusively to the original purchaser of the product and only applicable within the United States.
The warranty commences from the date of original consumer purchase. Proof of the original purchase date will be
required to obtain service under this warranty.
Under this limited warranty, your sole and exclusive remedy will be product repair, as outlined above. All services must
be provided by a KoolMore designated service company.
KoolMore shall not be responsible or liable for any loss, spoilage, or damage to food, beverages, pharmaceuticals,
medical supplies, or any other contents stored in the unit resulting from failure, malfunction, defects, improper instal-
lation, improper use, power interruption, or any other cause. Any such losses are expressly excluded from coverage
under this warranty.
To claim warranty or request repair service:
Email [email protected]. Please include your name, address, phone number, warranty repair request, and a copy
of your proof of purchase receipt. Alternatively, visit koolmore.com and use the Contact Us page. A KoolMore custom-
er service representative will promptly arrange service for your appliance.
We thank you for choosing KoolMore.
WARRANTY EXCLUSIONS
This limited warranty will not cover:
1. Failure of the product to perform during power failures or interruptions, or due to inadequate electrical service.
2. Damage incurred during transportation or handling.
3. Damage caused by accidents, vermin, lightning, winds, re, oods, or acts of God.
4. Damage resulting from accidents, alterations, misuse, abuse, improper installation, repair, or maintenance. This
includes using any external device that alters or converts the voltage or frequency of electricity.
5. Unauthorized product modications, repairs by unauthorized centers, or use of non-approved replacement parts.
6. Abnormal cleaning and maintenance not aligned with the user’s manual.
7. Use of incompatible accessories or components.
8. Any costs associated with repairs or replacements under these excluded circumstances shall be the responsibility
of the consumer.
WARRANTY