User Manual
kawa-in.com
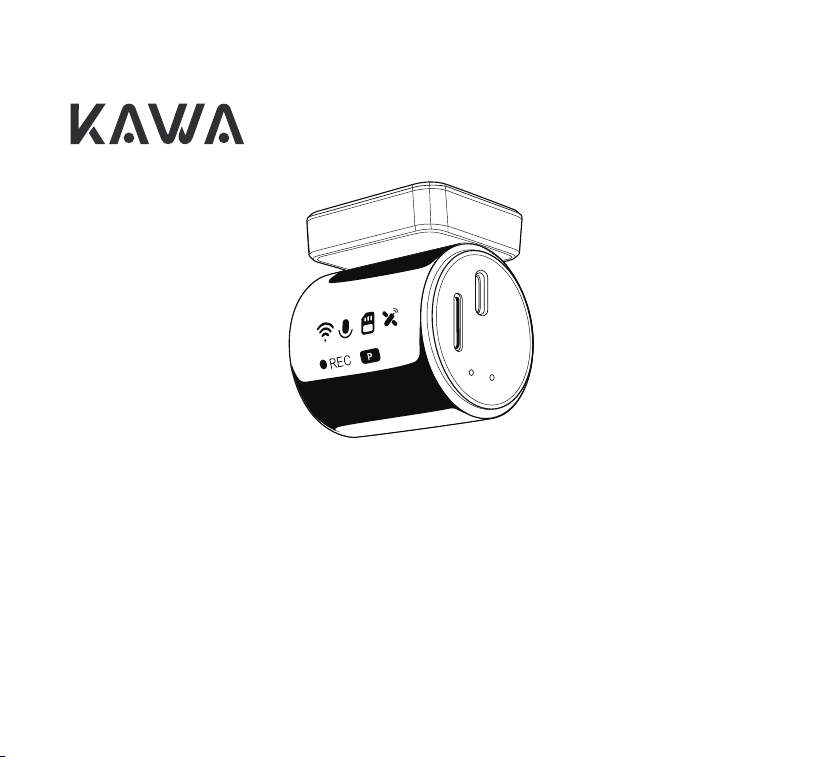
KAWA Dash Cam MINI 7 Pro
Follow and Contact Us
@Kawa.easylife
Facebook
YouTube Tik Tok
Instagram
@kawa.easylife
@kawa.Official @kawasecurity

4.9 GPS Feature
1. Quick Start Guide 1
1
1
Contents
2. Installation and usage instructions
2
4
4
5
7
7
7
9
13
16
16
16
17
17
17
17
18
19
20
22
23
23
23
26
27
4.2 Emergency Recording
4.1 Loop Recording
4.4 No Movement Detected
4.5 Video Flip and Mirror
4.6 HDR Mode
5.1 Android System OTA Upgrade
5.2 iOS System OTA Upgrade
4.7 Parking Monitoring
4.8 Time-Lapse Recording
4.3 Voice Commands
4. Key Features
5. Dashcam OTA Update
6. Basic Specifications
7. Important Precautions
1.1 Package List
1.2 Product Overview
1.4 Screen Icon Description
1.3 Buttons and LED indicator lights
2.1 Installing Memory Card
2.2 Installation of the recorder
3. APP User Guide
3.1 APP Download
3. 4 APP Settings
3.2 APP Connection
3.3 APP Preview Page
3
4.11 Playback and Delete Files in the APP
22
28
8. FAQ
30
9. After-Sales Service
4.10 Playback and Delete Files

Please re vad the instruction manual carefully before use;
The dash cam must be powered on to function;
Do not debug the product or use a mobile phone to watch driving videos while driving, and pay attention
to driving safety;
This product requires a Micro SD card for use, Suggest to use KAWA Micro SD card or new U3 Micro sd card;
Do not disassemble the dash cam housing or repair it yourself. If the product malfunctions, please contact
KAWA: [email protected];
Please do not install the dash cam in a position that may obstruct your driving view;
Please use this product away from high-temperature and humid environments;
To enhance the product experience, the product firmware will be updated periodically. If necessary, you
can update the firmware for a better experience. You can find the upgrade package on
KAWA Web: www.kawa-in.com ;
Please do not install the dash cam directly in front of the passenger to prevent accidental detachment and
potential safety hazards;
Please note that KAWA dash cams don't support to connect to CarPlay or Android Auto yet;
Please use this product within the scope permitted by law.
Notes
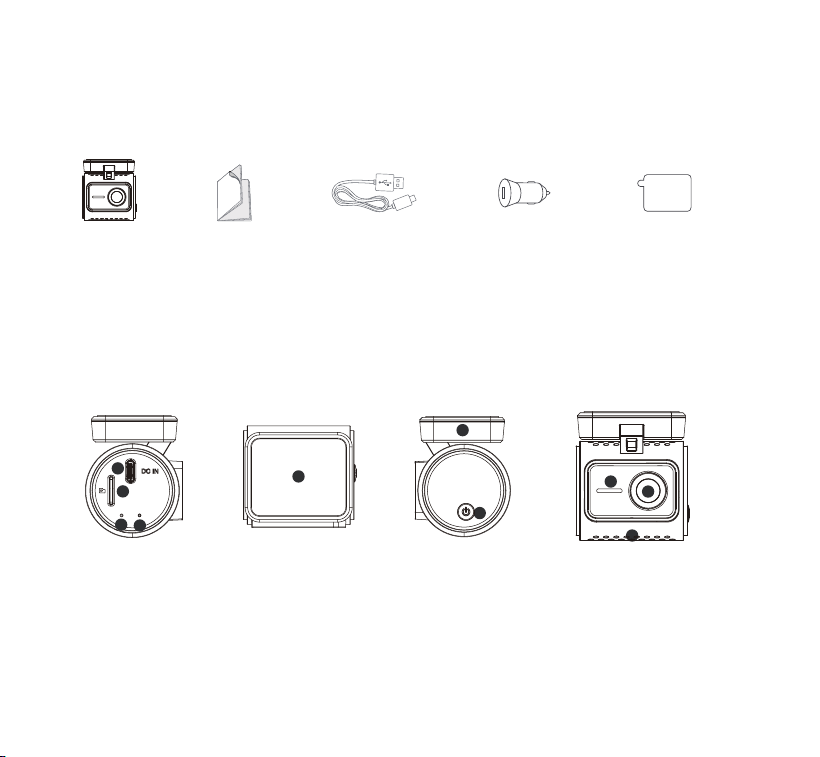
1. Quick Start Guide
1.1 Package List
MINI 7 Pro
Dash cam
Type-C Power
cord(3.5m)
Operation
Guidance
Detachable
Car Charger
1.2 Product Overview
Electrostatic
Sticker
1
9
8
2
1
3
4
6
7
5
10
1. LED
2. MIC
3. Function Button
4. Holder
5. Cooling Hole
6. Camera
8. Power Port
9. TF card slot
7. Speaker
10. Heat-resistant
Adhesiv e Paper

1.3 Button and LED indicator lights
Button Operations and Functions
Press once--Turn on dash cam
Press and hold for 3 seconds--Turn off dash cam
Press and hold for 10 seconds above--Restart the dash cam
Press once--Turn on/off WiFi
Press twice--Turn on/off audio recording
Press 3 times--Format TF card
Press 5 times--Reset dash cam
Press once --To authorize
Functions
Recording
Stop recording
TF card error
Status
OFF
ON
Authorization
request received
Led Status
Remain green
Breathing in green
Fast flash in green
Voice Commands
Take photo
Lock the video
Turn on audio
Turn off audio
Turn on WiFi/hotspot
Turn off WiFi/hotspot
2
Voice Control: While the dashcam is running, simply say a voice command to trigger the
corresponding function.
Voice commands support English, Japanese, French, Russian, Thai, and Vietnamese. For other
languages, please use English commands.
The screen will automatically turn off after 60 seconds of inactivity.
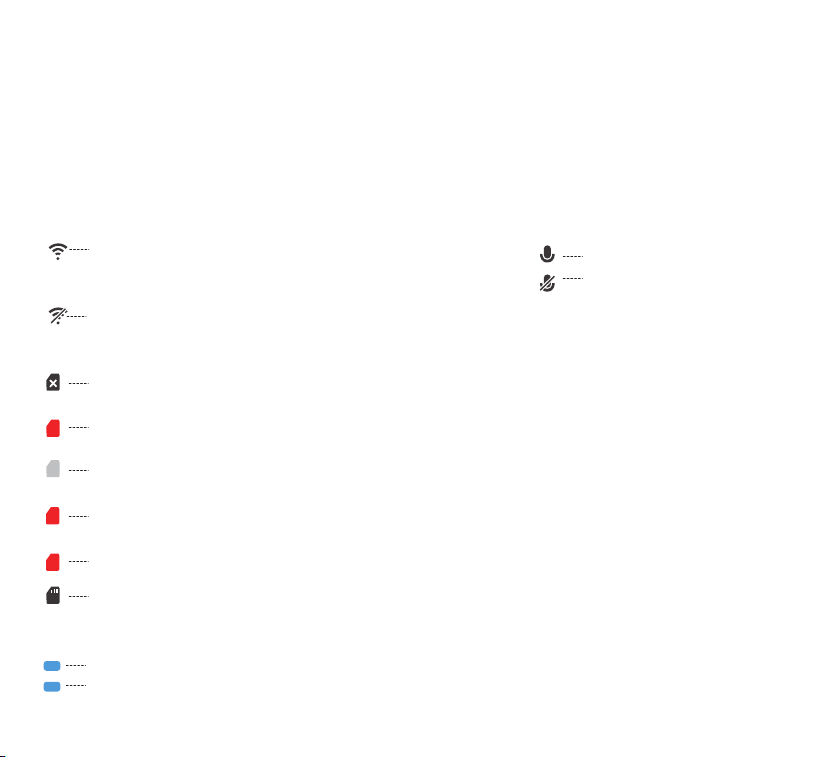
1.4 Screen Icon Description
3
①WiFi Icon:
When the APP accesses the recorder, the icon turns blue.
When you access the recorder album on the mobile app,
the WIFI icon turns blue and stops recording.
WiFi is off.
②MIC Recording Icon:
④ Parking-related settings icon:
AO
Time-lapse recording is turned on.
Auto shutdown without displacement is turned on.
T
Mic is on.
Mic is off.
③ Memory Card Icon:
Memory Card Not Available. The red "X" storage card icon indicates that the memory card is not
available, and the recording is paused with the screen will stay on.
The storage card needs to be formatted, its icon is red. During the formatting process, the icon is
white.
The storage card is being formatted, indicated by the white "F" deposit card icon, And when
recording, the screen stays on constantly.
F
F
If the storage card is less than 16GB, it is indicated by a red "<16GB" icon and the recording is
paused, and the screen stays on constantly.
The storage card is below Class 10.
The memory card is normal.
16
<
<
C10
2. Installation and usage instructions
Please insert a TF card (supporting 32GB-256GB capacity, Class
or higher speed level), We recommend using KAWA TF card or
mainstream brand cards with class 10 or higher>16GB, as the
of the dash cam requires a certain speed of the memory card,
and low-quality cards may cause abnormal video recording or
card failure.
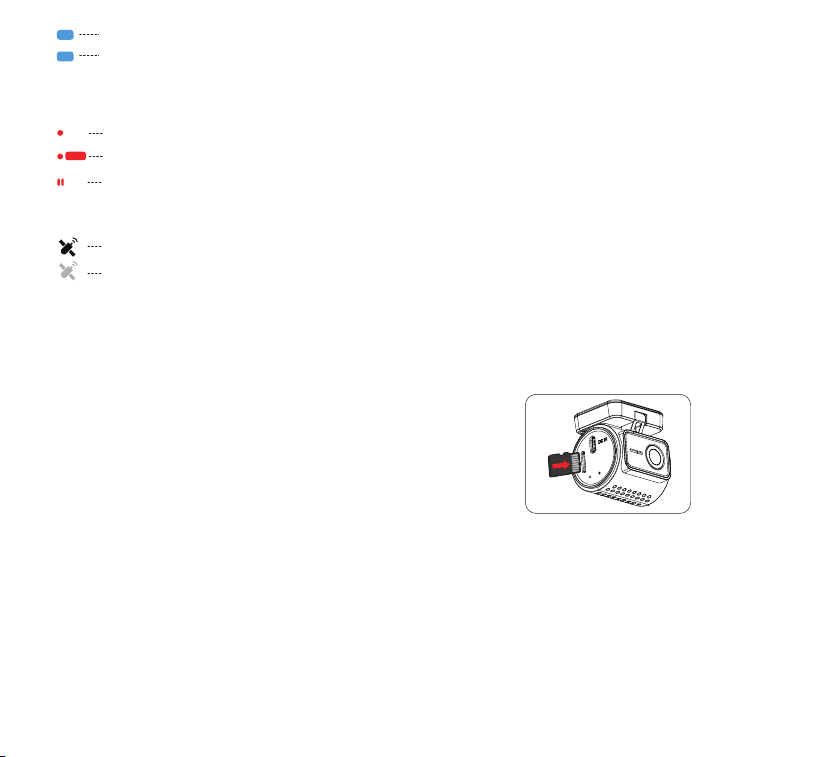
TF card installation: There is a memory card insertion direction icon at the card slot position. Please
push the memory card into the slot according to the direction indicated by the icon until a "click" sound
is heard in the slot, indicating that the memory card has been inserted.
After inserting the TF card, in order to ensure the normal use of the recorder, please format the TF card.
The method of formatting the memory card is as follows:
After booting up, press the power button three times in a row to format the memory card. When you
hear a successful SD card formatting prompt sound, the formatting is complete.
2.1 Installing Memory Card
4
Parking monitor is on. The icon will be blue.
P
Parking monitor and time-lapse recording are turned on simultaneously.
PT
(When all three settings above are turned off, the icon is gray.)
⑥ Satellite Status Icon:
Satellite Positioning Information (GPS) Acquired.
Satellite Positioning Information (GPS) Not Acquired Yet.
⑤Recording Status Icon:
REC
REC
Recording Normal Video , The red dot on the REC status indicates that recording is in progress.
Recording Emergency Video, "REC" background color is red.
Stop Recording.
REC
1. When using the memory card, it is recommended to format it once a month to ensure the normal
use of the recorder.
2. During recording, please do not directly plug or unplug the memory card to avoid losing important
recorded videos.
3. Do not use defective or low-speed cards on the recorder, as it may cause issues such as video
stoppage or missing recordings due to memory card failure.
4. Before formatting the card, please check the folder on the micro SD card for any videos that need
to be saved separately to avoid accidentally deleting important videos.
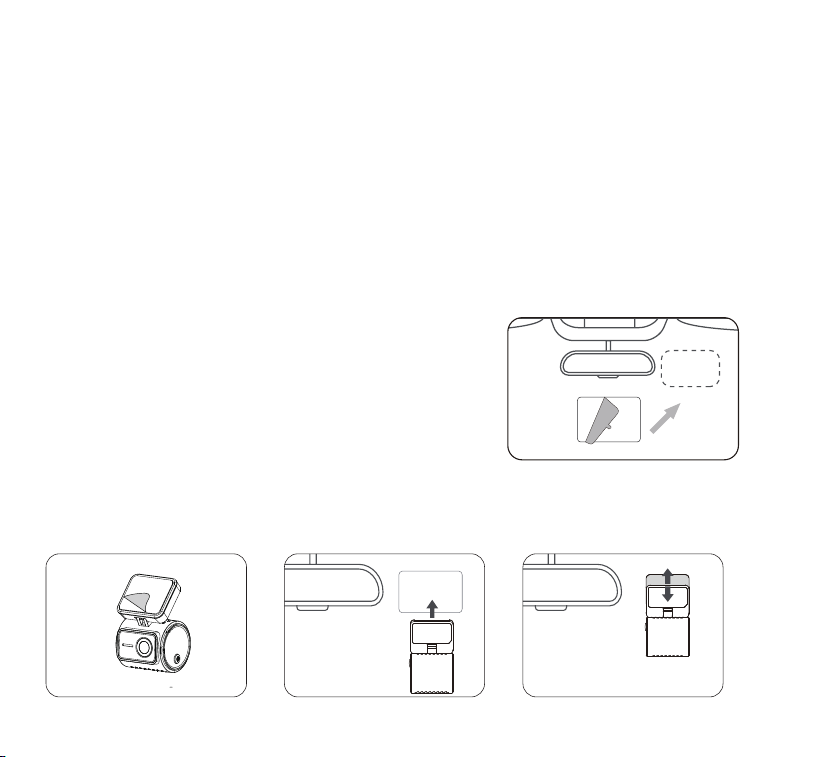
Please select the right position on the windshield, clean it and
install the electrostatic first. It is recommended that you turn
on the power first and choose the best installation location by
observing the lens screen.
Installation of electrostatic sticker: please first tear off the
protective film, stick it to the windshield, and then install the
recorder.
After tearing the protective film on the 3M backpack, install it on the electrostatic adhesive.
The cover adopts a removable design to push the bracket alignment recorder into the bracket
interface until the bracket is installed.
Precautions
2.2 Installation of the recorder
5
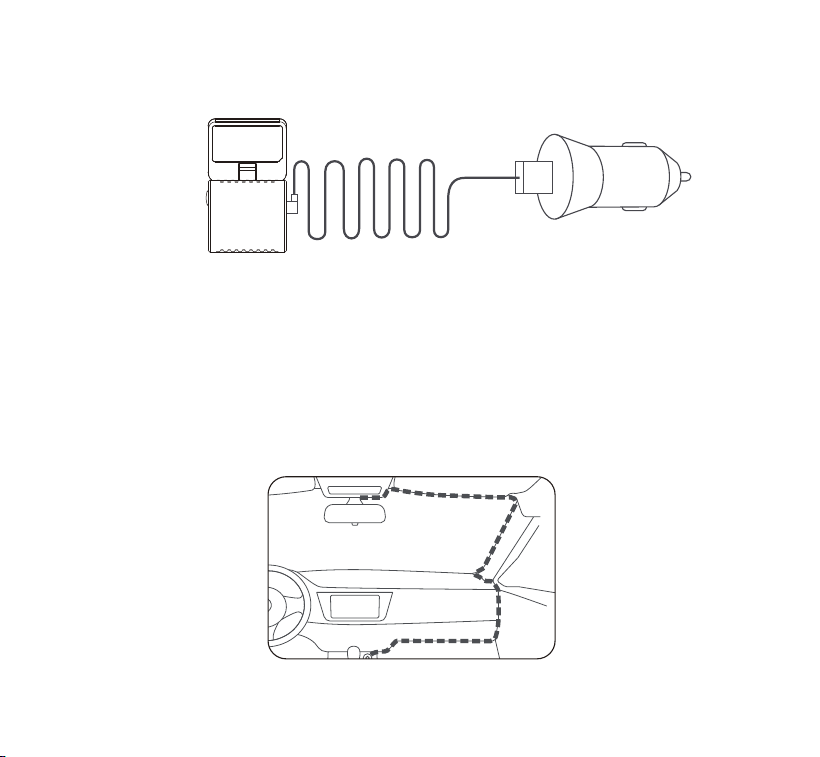
Important Warning:
Please use the original car charger, USB cable, or parking monitoring cable that comes with this
device (the parking monitoring cable needs to be purchased separately).
If using non original accessories, make sure the voltage is not higher than 5V, otherwise it may
damage the equipment.
The wires can be hidden according to the wiring method in the picture.
Remove the car charge, the car charge one end to connect the cigarette lighter, the other end is
connected to the rack power interface, after the car starts, the recorder can be started.
6
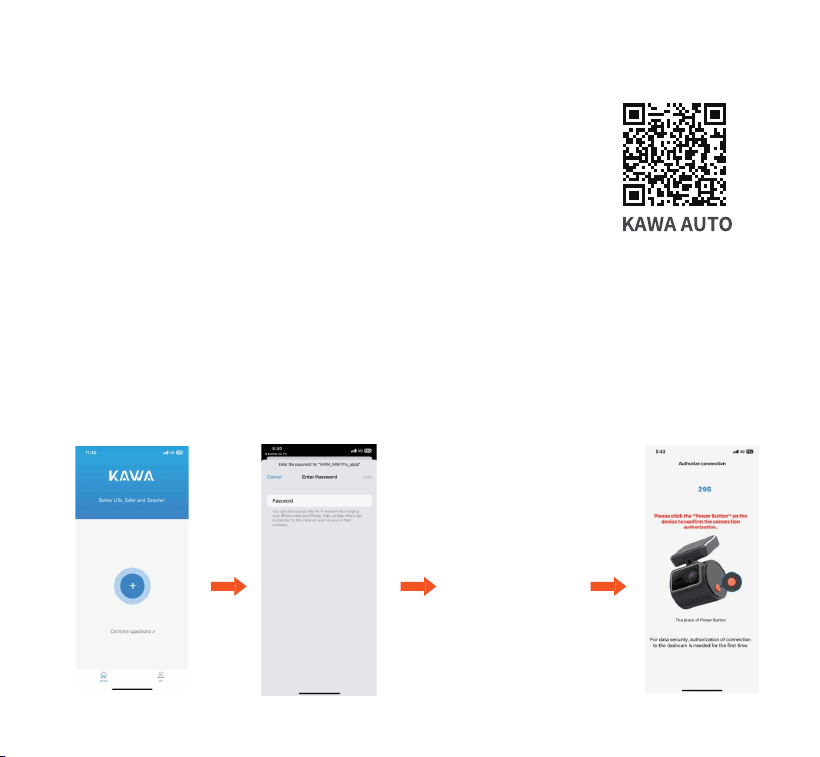
3. APP User Guide
3.1 APP Download
Scan the QR code below to download and install the KAWA APP, then follow the
prompts to complete installation.
Note: Once connected via WiFi, the following functions are available: real-time
video preview, changing dashcam settings, zero-data file download, and video
playback on your phone.
1. Download and open KAWA AUTO APP, click "+" to add the dash cam and follow the steps to finish the
connection.
2. Turn on the dashcam WiFi (One press the power to turn on and the LED is blue ).
3. Go to your phone's WiFi settings and find the WiFi name: KAWA_MINI 7 Pro_XXXX.
5. After connecting, return to the APP and press the dashcam's power button within 30 seconds to complete.
6. And we made some guidance videos on KAWA YouTube channel, please check if you need.
3.2 APP Connection
7

Note:
1. If you open the APP without connecting to WiFi first, the APP will prompt "Please connect to WiFi first" and
automatically redirect you to WiFi settings. Please complete the WiFi connection steps first.
2. If WiFi is already connected but the APP requests app permissions after selecting the model, please check
that wireless network permissions are enabled for the APP.
Note:
(1) First connection is necessary for dash cam to work, then disconnecting won't affect recording anymore.
(2) Please turn off VPN before connecting to the dashcam.
(3) If you forget the password, press the power button 5 times to reset the dash cam, then connect using the
default password:12345678.
3. The device's default password is for initial login only. To ensure security, please change it immediately
after first login under "Settings → WiFi Information" to prevent unauthorized access or other issues.
If you forget your WiFi password, you can restore the dashcam to factory settings by pressing the
power button 5 times consecutively. The WiFi password will then reset to the default: 12345678.
8
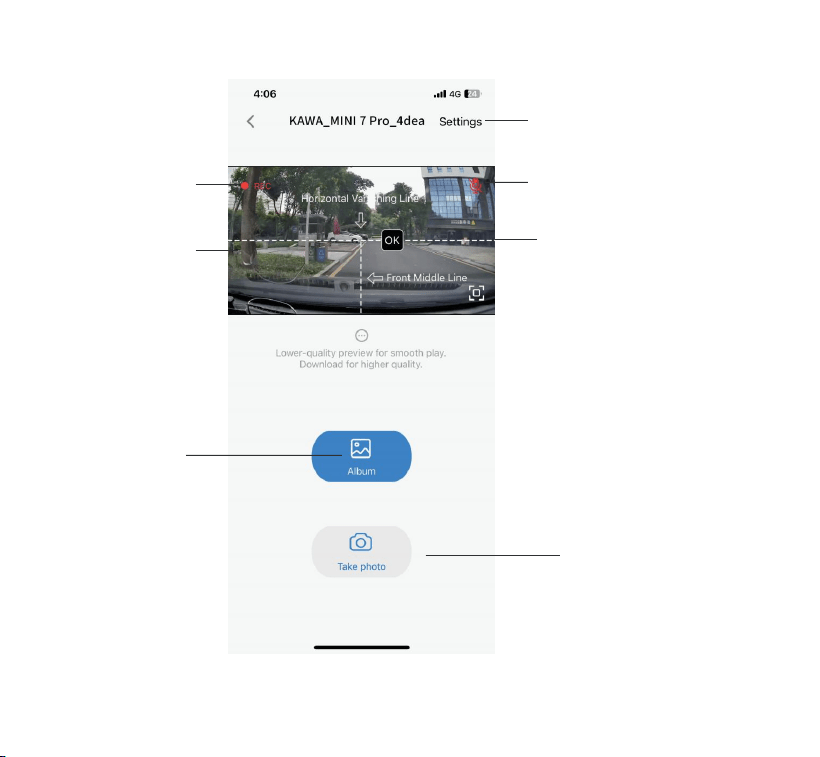
Lens Calibration Line
Microphone Switch
Settings
Live Recording
Video Preview
3.3 APP Preview Page
Take Photo
Album
9
After entering the APP live preview, the following operations are available:
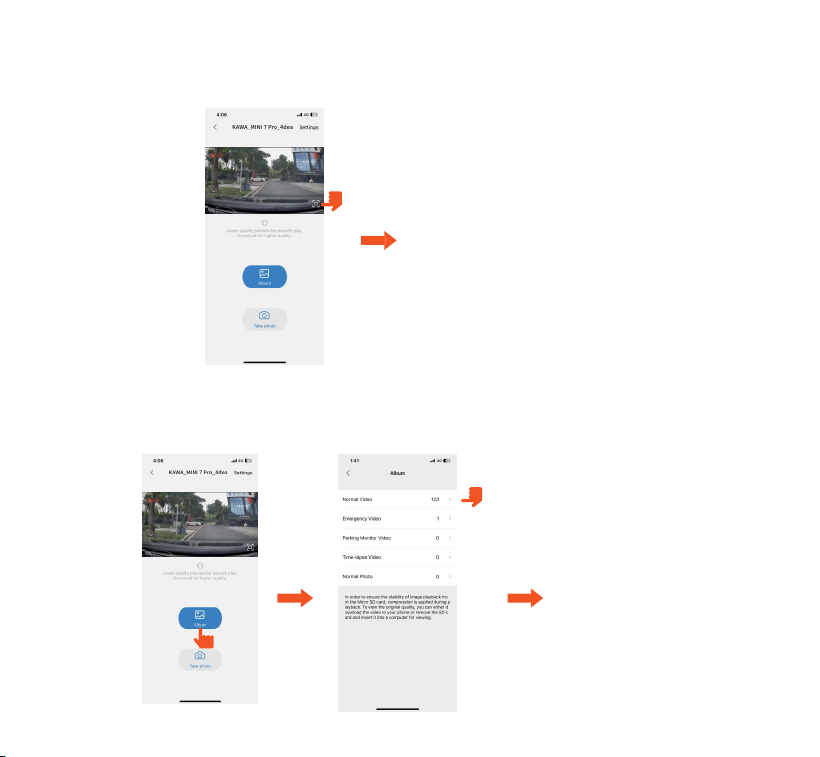
1. Video Preview: Once the APP is connected to the dashcam, it enters the live preview page. Tap the
full-screen button or turn your phone horizontally to automatically switch to full-screen preview mode.
2. Playback Video: Tap Album to view recorded videos or photos saved on the microSD card. Tap a file to
check. (Note: When you enter the album, recording will stop. Recording will resume only after you exit
the album and back to the preview page.)
10
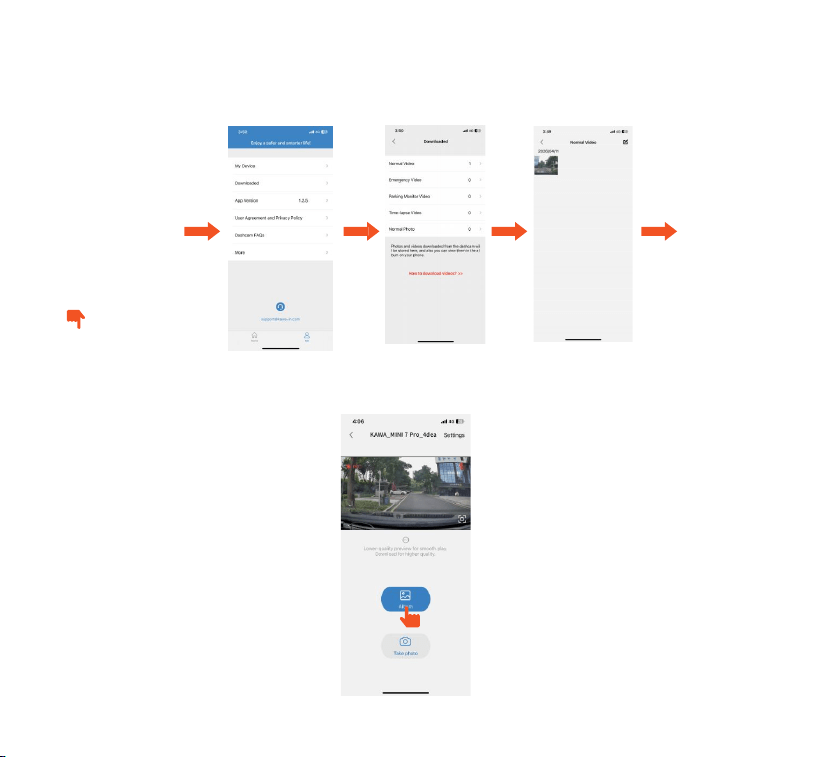
3. Video Download: Enter Album(below the live video), in the file browsing interface or video playback
page, you can select to download videos or photos. After downloading, files can be played in the APP's
local files:Me page--Downloaded. GPS track information can be viewed for videos (Android phones
require an internet connection to view).
4. Take Photo: In the live preview page, click "take photo" button to take a photo of the current screen.
11
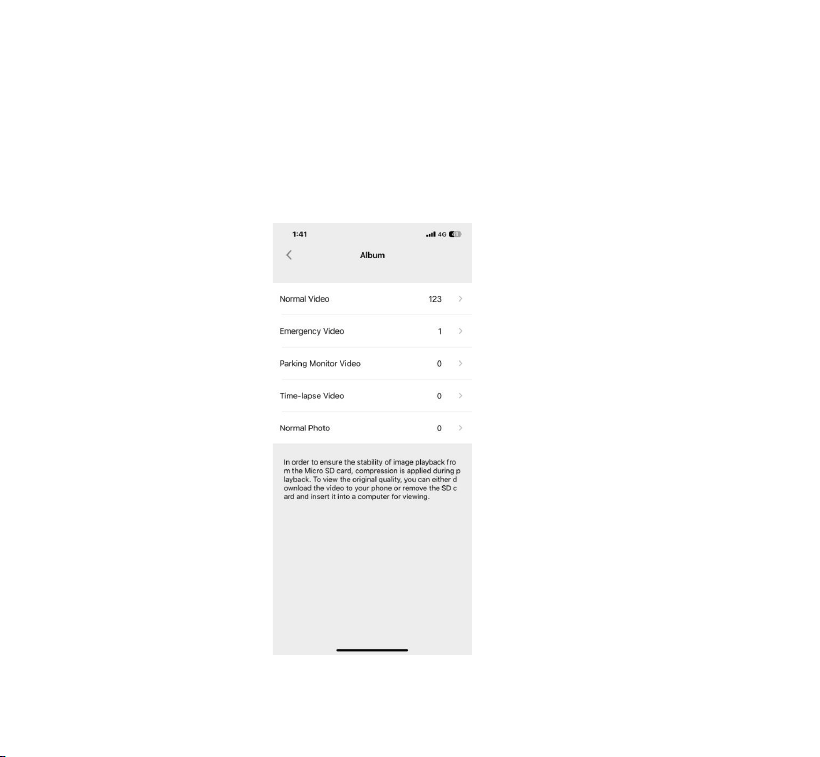
File Browsing:
In this section, you can view video and photo files recorded by the dashcam.
a. Normal Video: This folder stores loop recording videos.
b. Emergency Video: This folder stores emergency recording files.
c. Parking Monitoring Video: This folder stores parking monitoring recording files.
d. Time-Lapse Video: This folder stores time-lapse recording files.
e. Normal Photo: Photo files are stored in this folder.
12
13
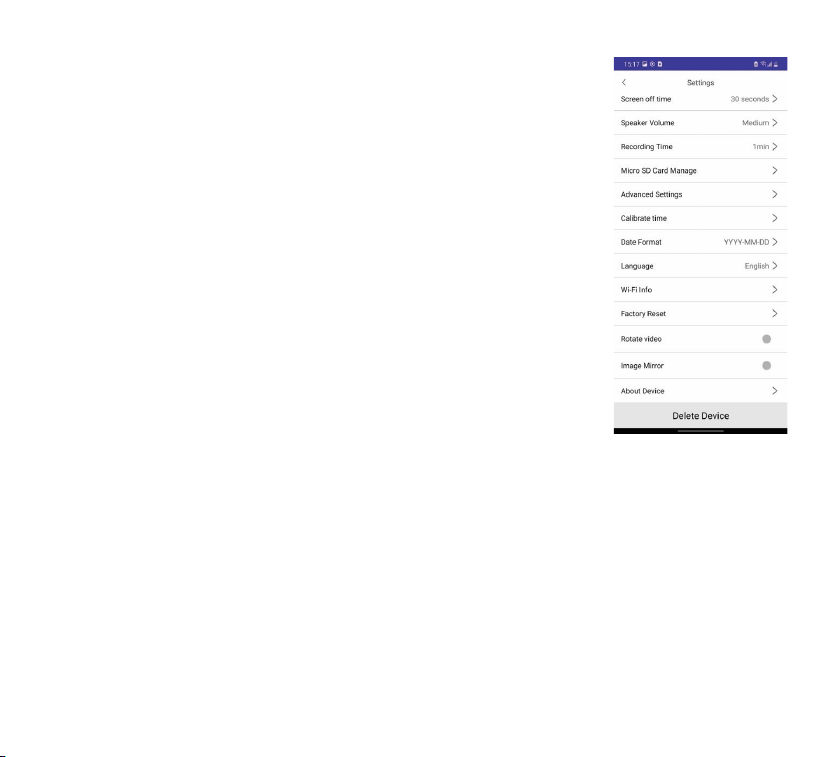
3. 4 APP Settings
Installation Guide for Dashcam : Enable/disable video guidelines.
MIC Recording: Enable/disable video audio recording.
Voice Control: Enable/disable voice control. When enabled, the device can be
controlled by voice commands; when disabled, control is via buttons or the APP.
Screen off time: Screen illumination time can be set to 30 seconds/1 minute
/always on.
Speaker Volume: Set high/medium/low voice broadcast volume or turn off
machine sound.
Recording Time: The recording time for loop recording can be set to 1min/
2min/3min(note: using a 256GB card, the recording time is fixed at 3 minutes)
Micro SD Card Manage: Here you can see the capacity usage of the micro SD
card, and you can also press the blue button to format it.
Advanced Settings: Settings for emergency recording, video resolution, etc
Calibrate time: Machine can be updated to the latest time.
Date Format: You can choose the time format of year month day/month day
year/day year month .
Language: Set the machine system display language.
Wi-Fi Info: View the name, password, and address of the currently connected Wi-Fi.
Rotate video: Rotate the recording direction by 180° in the app settings. Recorded videos will be saved to
the album. (Note: Set the 180° flip before recording; videos already recorded cannot be flipped.)
Image Mirror: Enable mirror image in the app settings. Recorded videos will be saved to the album.
(Note: Set the mirror before recording; videos already recorded cannot be mirrored.)
Factory Reset: Restore to factory settings, information and files will be cleared. Please save the necessary
files in advance.
About Device: View device model, version, and machine production time.
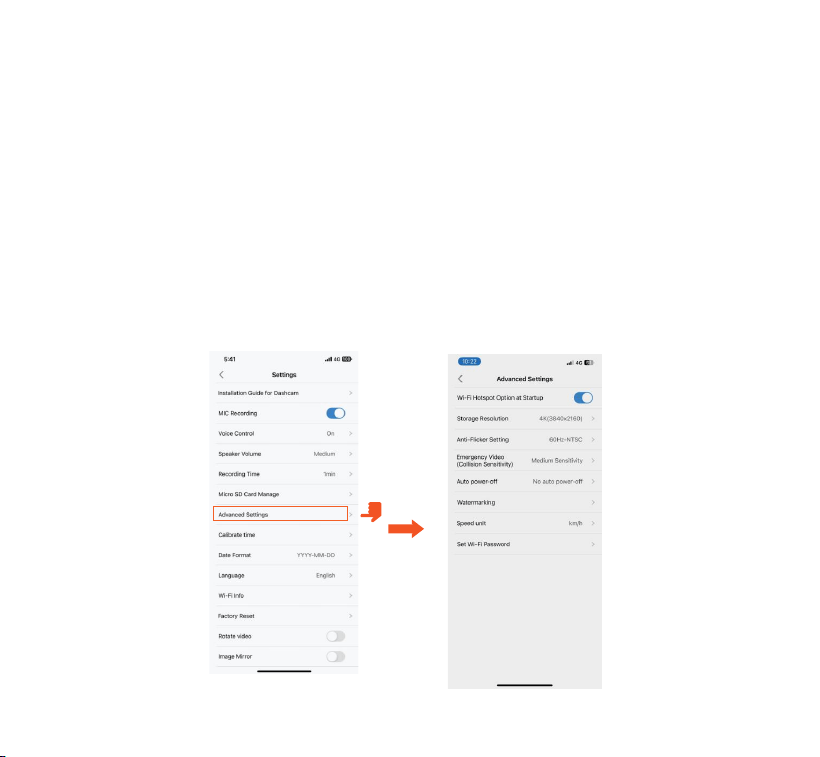
Advanced Settings
Wi-Fi Hotspot Option at Startup: Wi-Fi hotspot option on/off during startup.
Storage Resolution: The higher the resolution, the clearer the saved image quality. And the larger the
memory usage. On the contrary, the lower the resolution, the less clear the saved image and the
smaller the memory usage.
Anti-Flicker Setting: Different countries have different light source frequencies. To avoid affecting video
recording, choose a light source frequency of 50Hz or 60Hz according to different regions.
Emergency Video(Collision Sensitivity): Select the collision sensitivity level you need, which has three
options: low/medium/high/off.
Auto power-off: The automatic shutdown time of the machine after parking can be selected as 5 minutes
/10 minutes/20 minutes/no shutdown (note: this function is only applicable to vehicles that do not turn off
the engine after parking).
Watermarking: Set video watermark on/off.
Speed unit: Set the speed unit for video display.
Set Wi-Fi Password: Reset Wi-Fi password.
14
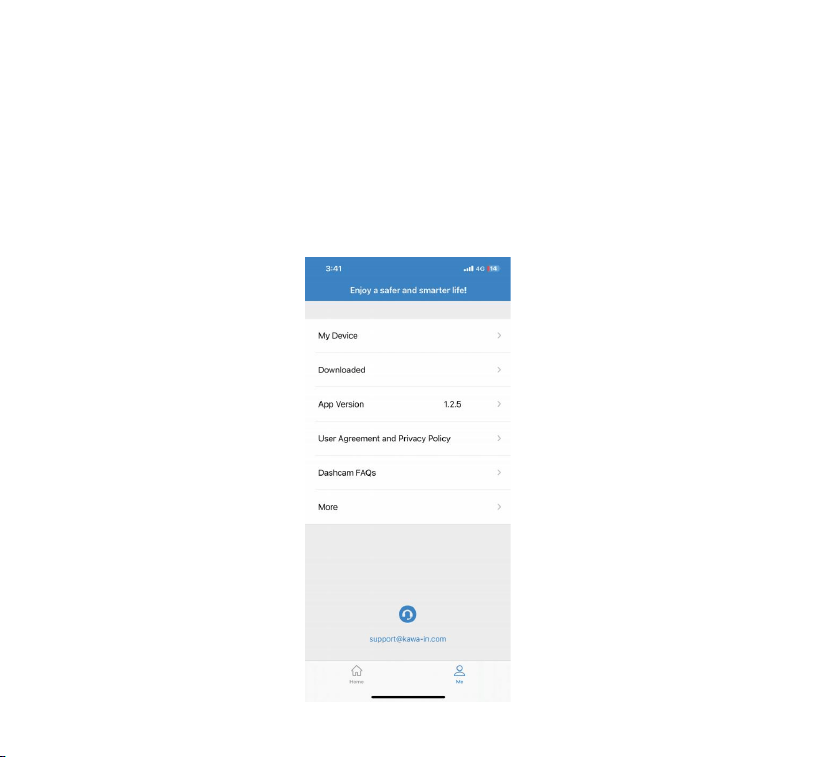
My Devices: View connected device history.
Downloaded: View downloaded videos.
App Version: Check the app version and upgrade here. The app will automatically detect whether it is the
latest version. If a new version is available, follow the prompts to upgrade.
User Agreement & Privacy Policy: View relevant agreements and policies.
Dashcam FAQs: Select the corresponding model to view frequently asked questions with detailed answers.
More: Clear device cache.
Official Customer Service Email: [email protected]. Contact us via this email address.
15

The dashcam automatically enters loop recording mode after powering on. Videos are saved in the Normal
Video folder at the preset loop recording duration, which can be adjusted in the app (Settings > Recording
Time> 1/2/3 minutes). The Normal Video folder uses up to 50% of total storage capacity. Once this folder
reaches 50% capacity, new loop recording files will automatically overwrite the oldest ones. This feature
ensures continuous recording without the card filling up while driving. Storage is shared across folders—
when other folders have available space, Normal Video can use up to 92% of total storage.
Note: Proper loop recording function depends heavily on the memory card's speed. Please format
the memory card regularly to prevent issues such as excessive files or card aging that may affect
loop recording. For optimal user experience, when using a 256GB memory card, video segments are
limited to 3 minutes. Regularly check loop recording videos to prevent important footage from being
overwritten.
Emergency recording is triggered automatically when the vehicle experiences a collision or impact. The
dashcam detects vibrations via the high-precision G-sensor and locks the current video. When
triggered, it saves a 30-second emergency video consisting of the 5 seconds before the trigger and
the 25 seconds after. Emergency recording can also be triggered manually by voice command: say
"Lock the video" to record an emergency video, or say "Take a photo" to capture a photo.
After emergency recording ends, videos are saved in the Emergency Video folder, and photos are saved in
the Normal Photo folder.
Note: The sensitivity of automatic triggering is determined by the collision sensitivity setting. Higher
sensitivity increases the likelihood of triggering. (Sensitivity settings: APP > Settings > Advanced
Settings > Emergency Video Collision Sensitivity) Emergency video files occupy up to 16% of the total
memory card capacity. When this limit is reached, new emergency videos will automatically overwrite the
oldest ones. It is recommended to periodically review and save important emergency videos elsewhere
to prevent loss.
4.2 Emergency Recording
4.1 Loop Recording
4. Key Features
16

If no vibration is detected within 5 minutes (adjustable) after the vehicle is parked, the dashcam will
automatically shut down. If vibration is detected after shutdown, the device will automatically power on.
This feature needs to be enabled in the app (APP > Advanced Settings > Auto Shutdown After Parking >
5 min / 10 min / 20 min / Never Shut Down). This feature applies only to vehicles that remain powered
after parking and must be powered via the cigarette lighter (using the included power cable).
Voice commands support English, Japanese, French, Russian, Thai, and Vietnamese. For other
languages, please use English commands.
In addition to controlling the dashcam with buttons, you can also use voice commands to capture photos,
record videos, lock footage, and more. While the dashcam is running, simply say a supported voice
command to trigger the corresponding function.
4.4 Auto Shutdown When No Movement Detected
The recording direction can be rotated 180 ° in the application settings, and the recorded video will be
saved to the album (please note to set it before shooting, as already shot videos cannot be changed).
The recording direction can be mirrored and flipped in the application settings, and the recorded video will
be saved to the album (please note to set it before shooting, as already shot videos cannot be changed).
4.5 Video Flip and Mirror
When driving in backlit conditions or with high contrast between light and shadow, enabling HDR mode
ensures that bright areas are not overexposed and dark areas retain detail, resulting in clearer footage. This
feature supports 2K (2560×1440P) resolution. To enable HDR mode, go to APP > Settings > Advanced
Settings > Resolution > select 2K (2560×1440P).
4.6 HDR Mode
4.3 Voice Commands
Voice Commands
Take photo
Lock the video
Turn on audio
Turn off audio
Turn on WiFi/hotspot
Turn off WiFi/hotspot
17

Parking mode is one of the dashcam's key features, responsible for security monitoring while the vehicle is
parked. It continues to operate after the engine is turned off, providing 24-hour parking surveillance. This
function requires a hardwire kit or OBD-II hardwire kit (sold separately).
Parking monitoring needs to be manually turned on on the APP. When the parking monitoring is turned on,
the parking monitoring icon will be displayed on the screen, indicating that the recorder is currently using
parking monitoring mode. The parking monitoring sensitivity can be adjusted in 1 to 3 levels (Settings -
Advanced Settings - Emergency Video Sensitivity - High/Medium/Low/Off), and you can adjust
according to your own habits and the condition of the car.
Note: To ensure proper operation of parking mode, use a stable and continuous power supply for the
dashcam. In high-temperature conditions with prolonged sun exposure, it is recommended to use parking
monitoring mode without enabling time-lapse recording. When the interior temperature reaches
60°C (140°F), it is advised to turn off the dashcam to prevent abnormal operation due to excessive heat.
When the vehicle is turned off (ACC OFF) and parking monitoring is enabled, the P icon will appear on the
screen, indicating that the dashcam is in parking monitoring mode. Parking monitoring will not take effect
immediately; it requires a 5-minute wait. During this 5-minute period, the indicator light will remain off.
Parking monitoring triggered
When the G-sensor detects that the vehicle is stationary for 5 minutes (entering parking monitoring mode),
the recorder screen will display the corresponding icon and automatically shut down. After
shutdown, if the vehicle vibrates or moves, the recorder will automatically turn on and record a 1-minute
video (the duration depends on the setting), and then turn off again to ensure that key images are recorded.
The file is stored in the "Parking Monitor Video" folder.
Recording triggers and device performance
When recording is triggered, the device indicator light goes through a sequence of changes: it turns from
off to red, then stays solid green. The device screen flashes briefly and turns off after one second. After
recording finishes, the device resumes parking monitoring mode, and the screen remains off throughout
Parking Monitoring Activation
4.7 Parking Monitoring (Requires Separate Hardwire kit)
18

When the vehicle ignition is turned off (ACC OFF) and the time-lapse recording function is enabled, the
dashcam screen will display the corresponding icon "T". If both parking monitoring and time-lapse
recording are activated, the screen will show "PT". Time-lapse recording takes effect immediately, and the
indicator light will stay solid green to indicate the function is active. The screen remains off during recording.
This function requires a dedicated parking monitoring hardwire kit or an OBD cable (sold separately).
When time-lapse recording is enabled, it captures at a rate of one frame per second, significantly reducing
storage usage. Once 30 frames are accumulated, the dashcam compresses them into a 1-second video clip.
As a result, 30 minutes of time-lapse footage is stored as a 1-minute video file (saved in the
"Time-Lapse Video" folder).
Note: If the time-lapse recording lasts less than 30 minutes (e.g., 15 minutes), the video file will be
compressed proportionally (e.g., saved as a 30-second video file).
Parking Monitoring and Time-Lapse Recording Enabled Together
When the vehicle is turned off (ACC OFF), time-lapse recording begins immediately. Within the first minute,
parking monitoring will not be triggered. After 1 minute, if a collision occurs, the device will immediately
record a parking monitoring video. Once the parking monitoring video is complete, the device will
automatically switch back to time-lapse recording mode. If no collision occurs, the device will continue
recording in time-lapse mode.
the recording process. Once recording is complete, the device powers off automatically. If recording is
triggered again before the device shuts down, the indicator light repeats the above cycle (off → red →
solid green → power off), while the screen stays dark the entire time.
Attention
Within 5 minutes before activating the parking monitoring mode, if recording is triggered (such as collision),
the device will record regular videos and save them in the "Normal Video" folder. After 5 minutes, if
recording is triggered again, the device will record parking monitoring videos and save them in the "Parking
Monitor Video" folder.
4.8 Time-Lapse Recording (Requires Separate Parking Monitoring Cable)
19
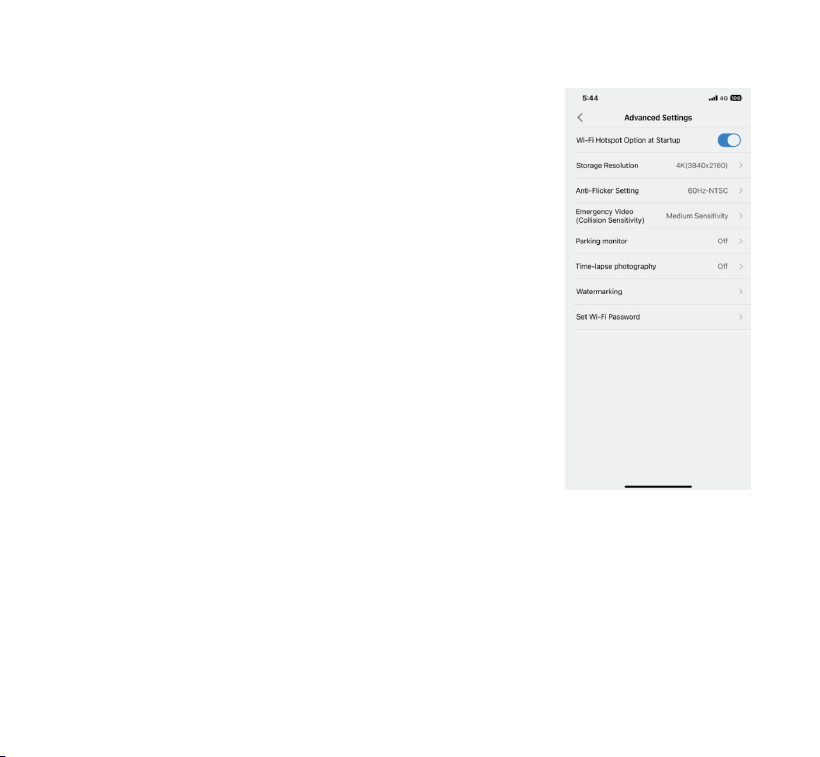
Advanced settings after connecting the parking monitoring line
·Wi-Fi Hotspot Option on Startup: Enable or disable Wi-Fi.
·Storage Resolution: Set the resolution for parking monitoring
videos. Higher resolution provides clearer video quality.
·Anti-Flicker Setting:Different countries have different light source
frequencies. To avoid affecting video recording, choose a light source
frequency of 50Hz or 60Hz according to different regions.
·Watermarking: Different countries use different power frequencies.
To avoid interference with recording, select 50Hz / 55Hz / 60Hz
based on your region.
·Emergency Video (Collision Sensitivity): Select the desired collision
sensitivity level ‒ options: Low / Medium / High / Off.
·Parking monitor: Adjust parking monitoring sensitivity ‒ options:
Low / Medium / High / Off.
·Time-Lapse photography: Enable or disable time-lapse recording.
·Watermarking: Enable or disable the brand and model watermark
in videos.
·Set Wi-Fi Password: Change the Wi-Fi password here.
Note:
Parking monitoring and time-lapse recording functions will
only appear in Advanced Settings after the parking monitoring
cable is correctly connected.
GPS is another important feature of the dashcam and is enabled by default. It automatically corrects
local time and date based on your region, and records the location and vehicle speed information for videos.
4.9 GPS Feature
20
Important Notes:
1. GPS Track Playback: GPS track information is only available for videos recorded after GPS has successfully
acquired a signal.
2. GPS Signal Acquisition: GPS signals are only available in open outdoor environments. GPS will not work in
tunnels, underground garages, or indoors. The following factors may also affect GPS signal strength: cloudy
weather (thick cloud cover), shaded areas (under trees), surroundings with tall buildings, the dashcam's
mounting position inside the vehicle, and signal interference from other in-car devices.
3. GPS Track Playback: An internet connection is required to play back GPS track information.
4. Android Users: When connected to the dashcam's Wi-Fi, Android phones cannot simultaneously use
data. An internet connection is required for track playback.
5. PC Support: The KAWA Player is available for PC.
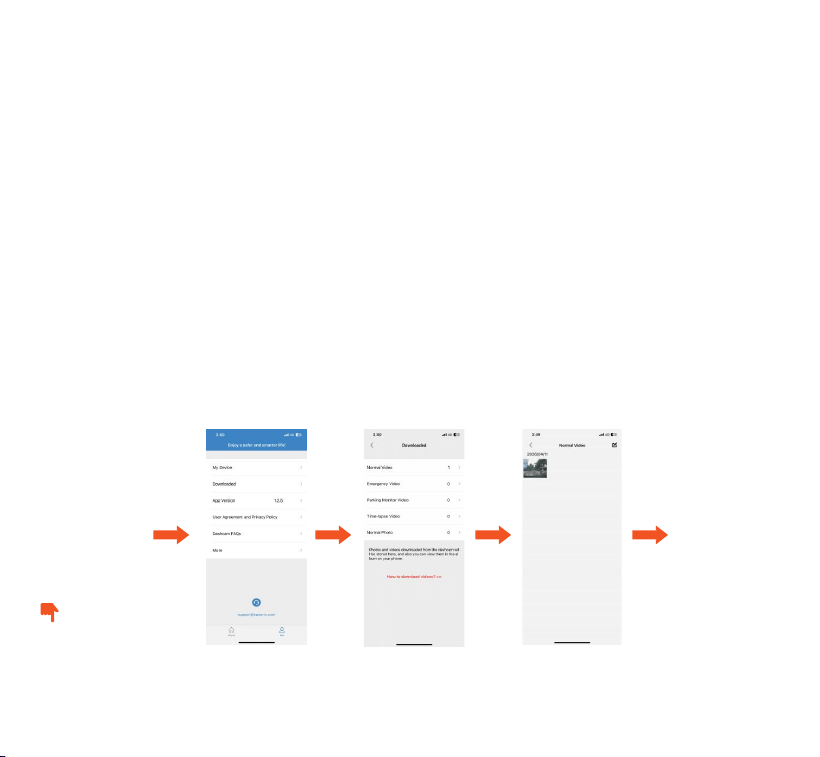
GPS Information Viewing Guide
Online video playback album
The dashcam records driving tracks via GPS information. In the APP album, download the relevant video.
The download is complete, the video file will be saved in the APP's local album. After connecting to the
internet, you can view the driving track within the APP.
Select file to
download video
Back to the APP
homepage - Me
Enter local video Choose to download
video files
Play the video
21
22
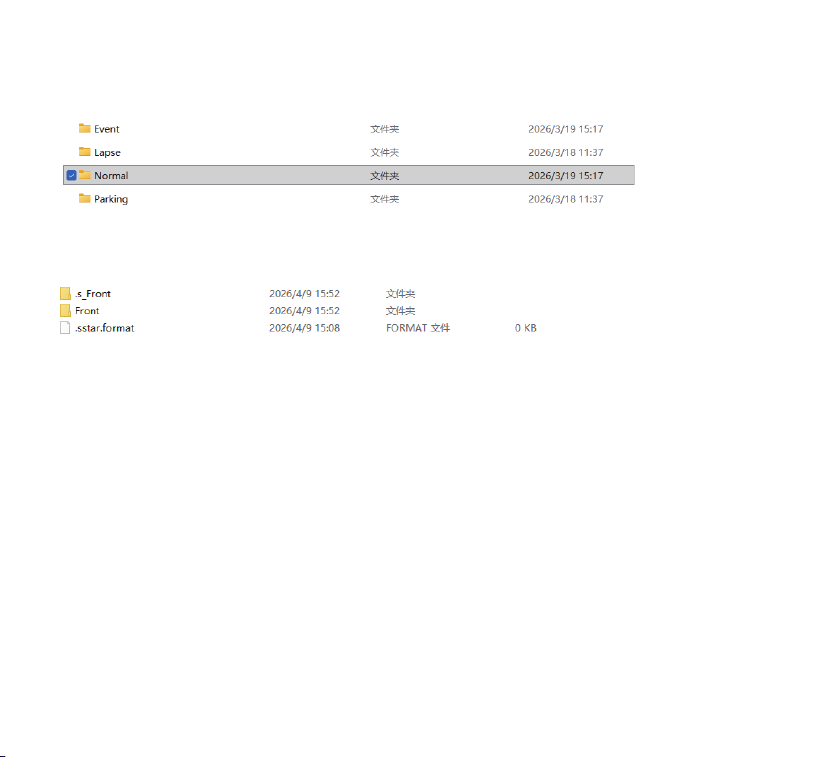
Users can use a USB card reader to view or delete files on the memory card via a computer.
Files can be viewed and downloaded here.
4.10 Playback and Delete Files
S_F: Low bitrate video — used for playback in the phone album. View and download here.
F: High bitrate video — saved at the resolution you set. View and download here.
When the dash cam is connected to your phone via Wi Fi, you can play back,
download, and delete files from the camera folder in the app.
Note:
1. Playing back or downloading microSD card files in the APP does not consume
mobile data.
2. After downloading a video file to your device, you can view GPS track information
during playback. On Android, you need to disconnect from the dashcam's Wi-Fi
and connect to the internet to view the track; otherwise, the map will appear blank.
iOS supports simultaneous Wi-Fi and mobile data usage.
4.11 Playback and Delete Files in the APP

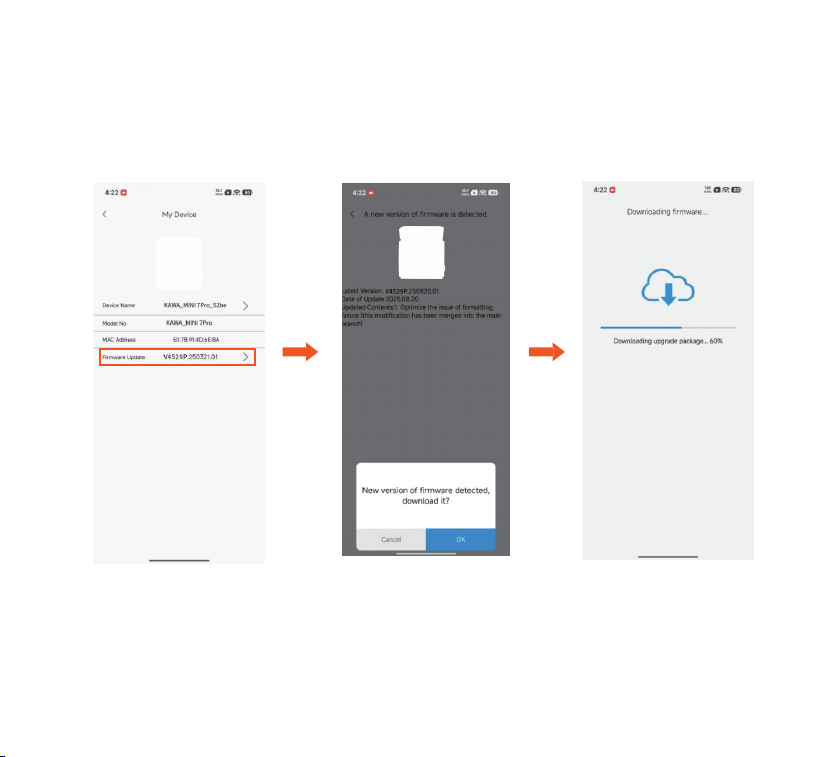
When users open the APP, they will receive a dashcam firmware update notification. After confirming the
update, the interface will redirect to the OTA update screen. Follow the APP instructions to complete the
update.
1. Open Wi-Fi settings on your phone and connect to the corresponding device hotspot, e.g.
KAWA_MINI 7Pro_XXXX.
2. Open the KAWA AUTO app and enter the device preview interface. If the device has already been added,
"Connected successfully!" will appear. If not, follow the device addition process.
3. Tap the "My" icon in the bottom navigation bar to enter the menu list. Tap "My Device" to access the
connected device list, then select the device model to upgrade.
4. On the current screen, switch networks to perform the upgrade. There are two options:
Cellular Data: Pull down the status bar, turn off Wi-Fi, and enable cellular data. Alternatively, press the
Home button to return to the main screen, go to Settings, disable Wi-Fi, enable cellular data, then return
to the app and tap the version number to check for firmware updates.
Wi-Fi: Pull down the status bar, long-press the Wi-Fi icon to select an external network to connect to.
Alternatively, press the Home button to return to the main screen, go to Settings, select Wi-Fi to connect,
then return to the KAWA app and tap the version number to check for firmware updates.
5. When a new firmware version is detected, you will be prompted to download it.
6. After tapping OK, the download screen will appear with a progress bar.
7. Once the download is complete, a pop-up will appear indicating that the phone must remain connected
to the dashcam hotspot. Pull down the status bar or go to Settings to switch the Wi-Fi connection back to
the dashcam hotspot (e.g. KAWA_MINI 7 Pro). After successfully reconnecting, return to the
KAWA AUTO app.
5.1 Android System OTA Upgrade
OTA Update Notes: Whether updating via file or OTA, ensure the dashcam remains powered on throughout
the update process. Downloading the OTA update file requires mobile data.
Notes: Network switching must be performed under "My Device" in the interface described in step
4 to detect the upgrade.
5. Dashcam OTA Update
23
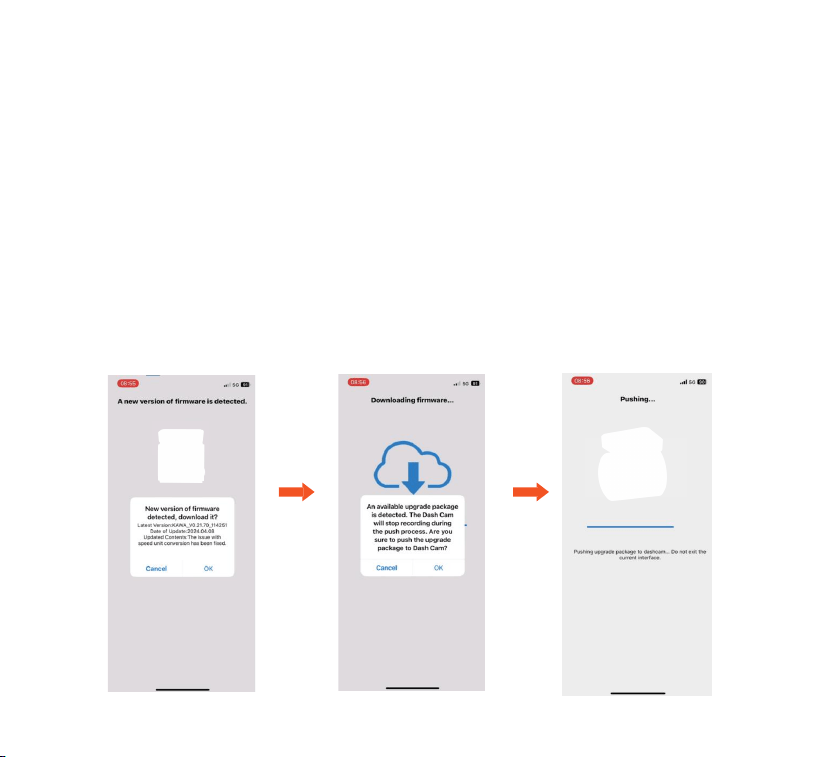
8. Tap "Push the upgrade package" to send the firmware to the dashcam. A progress bar will appear, and
you will be prompted not to exit the current screen. After the push is complete, you will automatically
return to the KAWA main interface, and the dashcam will begin upgrading automatically.
9. If the push fails, tap "Re-push" to try again.
24
5.2 iOS System OTA Upgrade
1. Open Wi-Fi settings on your phone and connect to the corresponding device hotspot, e.g.
KAWA_MINI 7Pro_XXXX .
2. Open the KAWA AUTO app and enter the device preview interface. If the device has already been added,
"Connected successfully!" will appear. If not, follow the device addition process.
3. Tap the device to enter the monitoring preview interface. A pop-up will automatically appear prompting
that a new firmware is available for download. Tap OK to begin downloading.
4. The firmware download interface will appear with a progress bar.
5. Once the download is complete, a prompt will appear: "A new upgrade package has been detected. Do
you want to push it? Recording will stop during the push. Are you sure you want to push the upgrade
package to the dashcam?" Tap OK to push it to the dashcam.
6. A progress bar will appear indicating that the push is in progress. Do not exit the current interface.
7. After a successful push, a pop-up will appear indicating that the dashcam is upgrading. Do not
disconnect the power.
8. If the push fails, tap Re-push to try again.
25

Important Warning
Please use the original car charger, USB cable, Hardwire Kit that come with the device
(Hardwire Kit must be purchased separately).
If aftermarket accessories are used, ensure that the voltage does not exceed 5V; failure
to do so may damage the device.
6. Basic Specifications
Product
Model
Resolution
Special Features
Wide-Angle Lens
Operating Temperature
Storage Temperature
Storage Capacity
Power Supply
Power Interface
DASH CAMERA
MINI 7 Pro
4K(3840×2160)(30FPS)
3K(2880×1620)(30FPS)
1440P(2560×1440)(30FPS HDR)
Voice Control, Transparent Display
150°
-20°C-65°C(-4°F-149°F)
-30°C-80°C(-22°F-176°F)
32GB-256GB
5V 2A
Type-C
26

•Do not install in high-temperature, humid, or damp areas (e.g., near heaters, vents, or vehicle doors).
•Do not install in locations that obstruct the driver’s view, interfere with vehicle safety systems (such
as airbags or hazard lights), or affect safe operation.
•This device is designed to record the surrounding environment and does not enhance driving safety.
The manufacturer assumes no responsibility for accidents, data loss, or improper use.
•Performance may vary due to vehicle conditions, driving environment, or external factors. Power loss,
extreme temperatures, collisions, or TF card issues may result in recording failure.
•Use only the accessories provided or specified in the instructions. Use of incompatible accessories may
cause damage, detachment, or malfunction of the device.
•Extended periods of non-use may cause the time to reset. Connect to the app to correct the time.
•Do not connect or disconnect the rear camera while the device is powered on during installation or use,
as this may cause damage to the product.
•Format the SD card regularly to maintain optimal performance.
Operation and Environment
· Operating temperature range: -20°C to 65°C (-4°F to 149°F).
·The dash cam should be kept away from water, chemical cleaners, strong magnetic fields, and severe
vibrations to prevent malfunction.
·Clean the dash cam with a soft, dry cloth.
7. Important Precautions
27

Device Fails to Power On
Verify that the power connection is secure, and that original accessories and an SD card are being used.
Check whether the power cable or car charger is damaged.
Memory Card Error
Ensure that a compatible Micro SD card is in use and format it regularly (see section 2.1). Replace the TF
card if the issue persists.
TF Card Incompatibility (Format Reminder)
The TF card must be compatible with the dash cam. Follow the voice prompts to format it. Replace the
TF card if necessary.
Device Does Not Record
Reset the device or replace the TF card.
Recorded Videos Not Found
Go to the app, navigate to Live Preview Interface > Album, and view all videos.
Wi-Fi Unavailable Prompt
This message can be ignored. Return to the app and connect to the dash cam.
Frequent Emergency Recording Triggers
Adjust the sensitivity or disable the feature as needed. Go to App Settings > Advanced Settings >
Emergency Video Collision Sensitivity to (see section 3.4).
Forgotten Hotspot Password
Briefly press the power button five times to restore factory settings. The default password will be reset to
12345678.
App Crashes or Freezes
Avoid using the dash cam’s Wi-Fi in environments with multiple devices or signal interference.
8. FAQ
28

Unable to Connect to Dash Cam
Verify that the KAWA AUTO app has the necessary permissions on your phone. Restart the app and reset
the device if required, then attempt to reconnect.
GPS Not Displaying
Drive to an open area. Positioning may take 1‒5 minutes. If the GPS signal is not restored, perform a
factory reset on the dash cam and power it on again.
Rear Camera Image Is Mirrored
Due to the viewing angle being opposite to the recording angle, the live preview appears mirrored. Videos
will display correctly in the album. For special requirements, contact KAWA support.
Device Not Operational
Power the device with a 5V⎓2A supply. Inspect both the car charger and the device’s power interface.
Wi-Fi Connection Failure
Restart the device and ensure the dash cam’s Wi-Fi is ready for connection.
Unresponsive Buttons
Check the device firmware version and reset the dash cam to restore functionality.
If the issue persists, contact official customer support for further assistance.
29
30
KAWA offers a 12-month warranty period. For any product-related inquiries, please contact the
customer service team at your point of purchase or email us at [email protected]. A support
representative will respond within 12‒24 hours.
KAWA is committed to continuously improving our products, services, and user experience. If you have
any suggestions, please share them with us at [email protected].
Thank you for choosing KAWA.
9. After-Sales Service
E-mail: [email protected]
Website: www.kawa-in.com
Manufacturer: KAWA ELECTRONICS COMPANY LIMITED
Address: FLAT A 21/F CHEUNG LEE IND BLDG 9 CHEUNG LEE ST CHAI WAN HONG KONG
ÉLÉMENTS D’EMBALLAGE
À SÉPARER ET À DÉPOSER
DANS LE BAC DE TRI
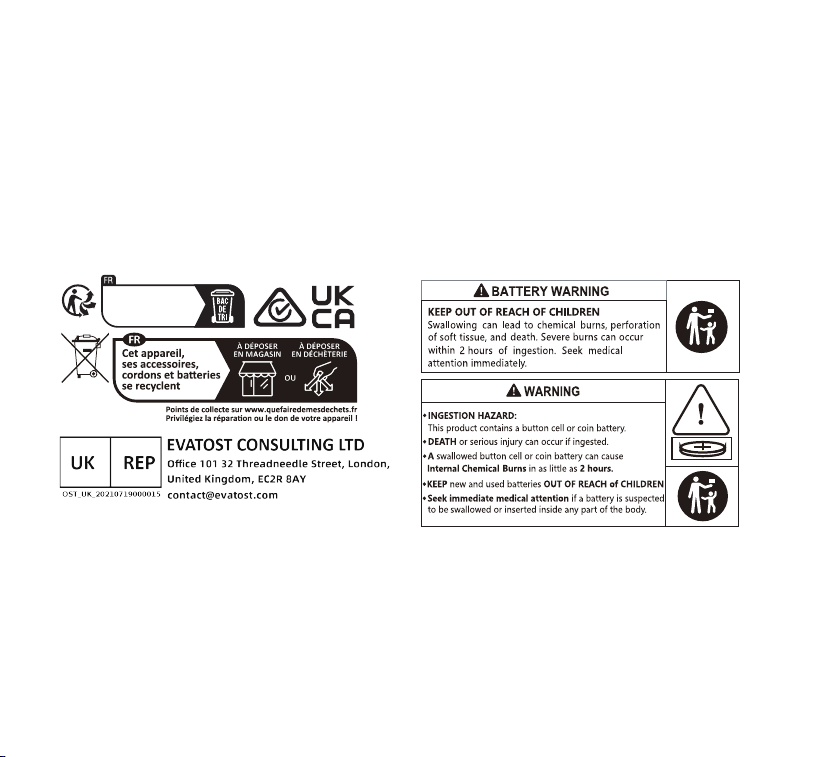
a)This product contains a non-replaceable button/coin cell battery.
b) Battery type: MS621FE
c) Nominal voltage: 3.0V