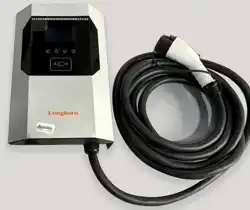
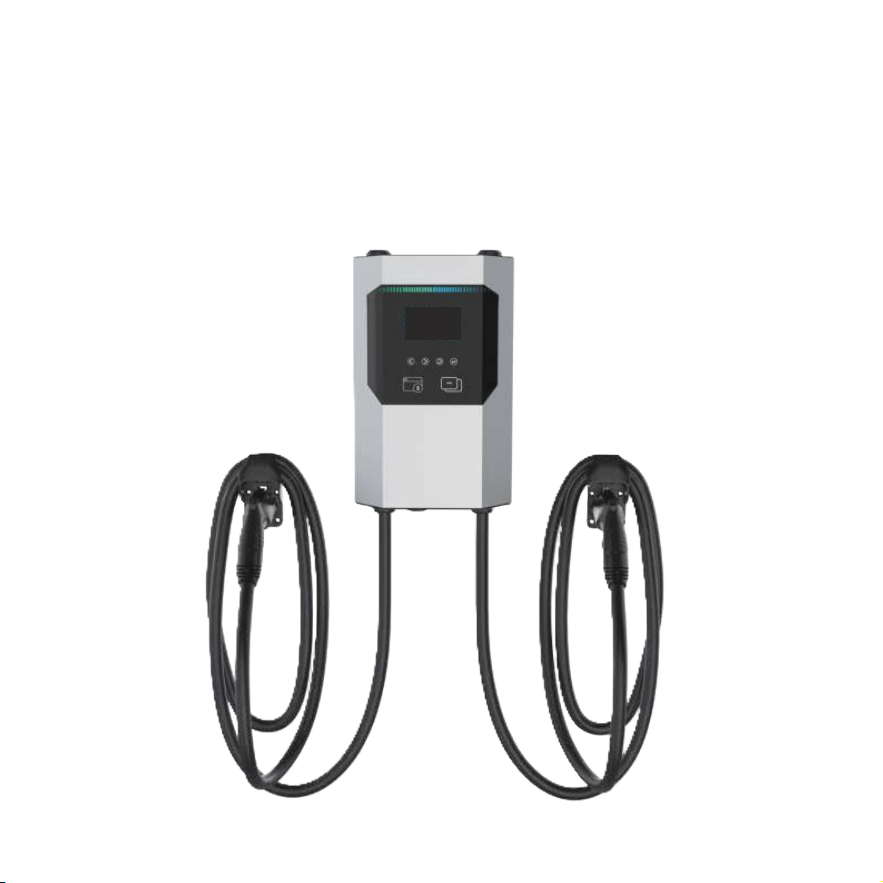
EV Charger
User Manual

Instrucciones de seguri-
dad importantes relacio-
nadas con el riesgo de
incendio o descarga
eléctrica
ADVERTENCIA: Al trabajar con productos eléctricos,
deben seguirse siempre las precauciones básicas. Este
manual contiene instrucciones importantes para los
modelos ECA-NC8002S-SG80
ECA-NC8002S-DG40, ECA-NC8002S-DG80, que
deben observarse durante la instalación, el funcionamien-
to y el mantenimiento.
1.Lea todas las instrucciones antes de utilizar este
producto.
2.El uso de este aparato cerca de niños debe hacerse
bajo supervisión.
3.No introduzca los dedos en el conector EV.
4.No utilice este producto si el cable de alimentación
flexible o el cable del scooter están deshilachados, tienen
el aislamiento roto o presentan cualquier otro daño.
5.No utilice este producto si la carcasa o el conector EV
están rotos, agrietados, abiertos o presentan cualquier
otro daño.
6.Indique el grado de temperatura ambiente: -30°C a
50°C.
7.Anote lo siguiente o algo similar: "Para reducir el riesgo
de incendio, conecte a un circuito que cumpla la siguiente
función". La protección máxima contra sobreintensidades
del circuito derivado de @ampere deberá ser conforme al
Código Eléctrico Nacional ANSI/NFPA 70, y al Código
Eléctrico Canadiense Parte 1 C22.1.
8.Medios de desconexión. Para equipos de más de 60
amperios o más de 150 voltios a tierra, los medios de
desconexión se proporcionarán e instalarán en un lugar de
fácil acceso. Los medios de desconexión
-Los medios de desconexión deberán poder abrirse con
llave de acuerdo con 110.25.
GUARDE ESTAS INSTRUCCIONES
Important Safety
Instructions Related
To Risk of Fire or
Electric Shock
WARNING: When working with electrical products, basic
precautions should always be followed. This manual
contains important instructions for
ECA-NC8002S-SG80 ECA-NC8002S-DG40,
ECA-NC8002S-DG80 models, needs to be observed
during installing, operating and maintaining.
1.Please read all instructions before using this product.
2.Use of this device around children should be done under
supervision.
3.Do not stick your fingers into the EV connector.
4.Do not use this product if the flexible power cord or
scooter cable is frayed, has torn insulation, or has any
other damage.
5.Do not use this product if the housing or EV connector is
broken, cracked, open, or otherwise damaged.
6.Indicate the ambient temperature grade: -30°C to 50°C.
7.Note the following or something similar: “To reduce the
risk of fire, connect to a circuit providing the following
function”. @ampere's maximum branch circuit overcurrent
protection shall be in accordance with the National
Electrical Code ANSI/NFPA 70, and Canadian Electrical
Code Part 1 C22.1.
8.Disconnecting Means. For equipment rated more than
60 amperes or more than 150 volts to ground, the
disconnecting means shall be provided and installed in a
readily accessible location. The disconnect
-ing means shall be lockable open in accordance with
110.25.
SAVE THESE INSTRUCTIONS

Instructions de sécu-
rité importantes rela-
tives au risque d'in-
cendie ou de choc
électrique
AVERTISSEMENT : Lors de l'utilisation de produits
électriques, des précautions de base doivent toujours
être prises. Ce manuel contient des instructions
importantes pour les modèles ECA-NC8002S-SG80
ECA-NC8002S-DG40, ECA-NC8002S-DG80 ,
qui doivent être respectées lors de l'installation, de
l'utilisation et de l'entretien.
1) Veuillez lire toutes les instructions avant d'utiliser ce
produit.
2. l'utilisation de cet appareil en présence d'enfants doit
se faire sous surveillance.
3 Ne mettez pas vos doigts dans le connecteur EV.
4. n'utilisez pas ce produit si le cordon d'alimentation
flexible ou le câble du scooter est effiloché, si l'isolation
est déchirée ou s'il est endommagé de quelque manière
que ce soit.
5. n'utilisez pas ce produit si le boîtier ou le connecteur
EV est cassé, fissuré, ouvert ou autrement endommagé.
6 Indiquer la température ambiante : -30°C à 50°C.
7. notez la mention suivante ou une mention similaire :
"Pour réduire le risque d'incendie, branchez l'appareil sur
un circuit assurant la fonction suivante". La protection
maximale contre les surintensités du circuit de dérivation
de @ampere doit être conforme au Code national de
l'électricité ANSI/NFPA 70 et au Code canadien de
l'électricité, partie 1 C22.1.NFPA 70, and Canadian
Electrical Code Part 1 C22.1.
8.moyens de déconnexion. Pour les appareils de plus de
60 ampères ou de plus de 150 volts à la terre, le
dispositif de déconnexion doit être fourni et installé dans
un endroit facilement accessible. Le dispositif de
déconnexion
-Le dispositif de déconnexion doit être verrouillable et
ouvert conformément à l'article 110.25.
CONSERVER CES INSTRUCTIONS

CONTENTS
Abbreviations
Satety Instructions
Standard
Safety Standard
Radio Frequency Standard
Energy Star Standard
Charging Connections
1 Product Information
1.1 Type
1.1.1 Shape and Size
1.1.2 Block Diagram
1.2 Cable Holder and Hook
1.3 Model definition
1.3 Specifications
2 Operations
2.1 Power Switch
2.2 About the Interface
3 Function Introduction
3.1 User Interface & Control
3.2 Configure the Network
3.3 Operation Guide
3.4 Troubleshooting
4 Product Installation
4.1 Labels
4.2 Packing List
4.3 Check and Confirm
4.4 Preparation
4.5 Installation Steps
4.5.1 Wall Mount
4.5.2 Pedestal Mount
4.6 Grounding Instructions
4.7 Maintenance
Warranty Agreement
1
2
3
3
3
3
3
4
4
4
5
6
8
11
14
14
14
16
16
22
22
26
28
28
29
30
31
31
36
39
40
30

S/N Abbreviations Description
1 EV/PHEV Electric vehicles, either BEV (battery electric vehicles)
or PHEV (plug-in hybrid electric vehicles)
2 EVSE Electric vehicle supply equipment
3 KW Kilowatt
4 A Ampere (unit of current)
5 V Volts (unit of voltage)
6 Hz Hertz (unit of frequency)
7 RFID Radio frequency identification
Abbreviations
1
2
Safety Instructions
In this manual, the following warning labels and
precautions are used on AC EV Chargers:
CAUTION
WARNING
Pour les véhicules électriques
véhicules électriques.
Ventilation non requise.
Pour éviter tout risque d'incendie ou de choc électrique,
n'utilisez pas cet appareil avec une rallonge.
Cet appareil est destiné uniquement à la charge de
véhicules ne nécessitant pas de ventilation pendant la
charge.
LA PERTINENCE DE L'UTILISATION DE CORDONS
FLEXIBLES CONFORMÉMENT AU CODE CE, PARTIE
Pour réduire le risque de choc électrique, ne branchez
l'appareil que sur des prises correctement mises à la
terre.
N'utilisez pas ce produit si l'appareil est endommagé.
Risque d'électrocution, ne pas retirer le couvercle ou
tenter d'ouvrir le boîtier. Aucune pièce réparable par
l'utilisateur ne se trouve à l'intérieur. Confier l'entretien à
un personnel qualifié.
ATTENTION
AVERTISSEMENT
For use with Electric Vehicles.
Ventilation Not Required.
To avoid a risk of fire or electric shock, do not use this
device with an extension cord.
This device is intended only for charging vehicles not
requiring ventilation during charging.
THE SUITABILITY OF THE USE OF FLEXIBLE CORD IN
ACCORDANCE WITH CE CODE, PARTI
To reduce the risk of electric shock, connectonly to
properly grounded outlets.
Do not use this product if there is any damage to the
unit.
Risk of electric shock, Do not remove cover or attempt
toopen the enclosure. No user serviceable parts inside.
Refer servicing toqualified service personnel.
Para evitar el riesgo de incendio o descarga eléctrica,
no use este dispositivo con un cable de extensión.
Para uso con vehículos eléctricos.
No se requiere ventilación.
Este dispositivo está destinado únicamente para cargar
vehículos que no requieran ventilación durante la carga.
IDONEIDAD DEL USO DE CORDÓN FLEXIBLE DE
ACUERDO CON EL CÓDIGO CE, PARTE I.
ADVERTENCIA
Para reducir el riesgo de descarga eléctrica, conéctelo
sólo a enchufes con toma de tierra.
PRECAUCIÓN
Riesgo de descarga eléctrica, No retire la tapa ni
intente abrir la carcasa. El interior no contiene piezas
que el usuario pueda reparar. Encargue el
mantenimiento a personal cualificado.
No utilice este producto si la unidad presenta daños.
Standard
Safety Standard
Complies with UL 2594 UL 2231 UL 1998 UL991
Radio Frequency Standard
47CFR Part 15 (2020)
ANSI C63.4 (2014)
ICES-003 Issue 7: October 2020+
Energy Star Standard
ENERGY STAR® Program Requirements for Electric Vehicle Supply Equipment (EVSE) Version 1.0, 1.1 and 1.2
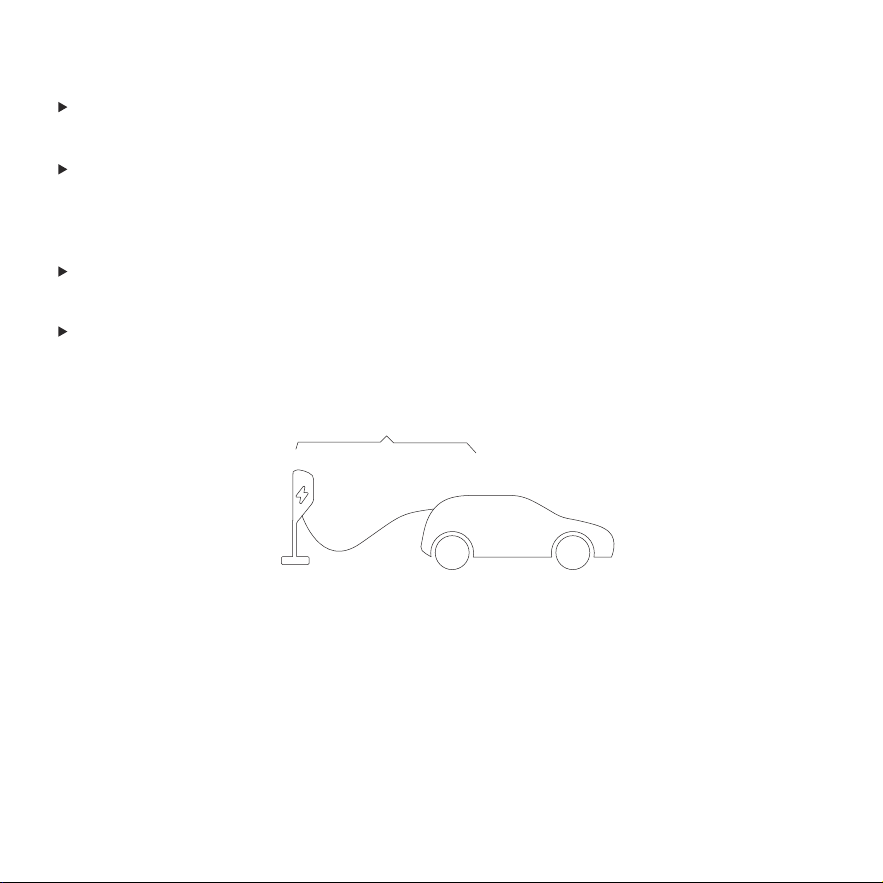
Charging Connection
The Connections for Charging are Shown Below
Cable
Charging Station
3
1 Product Information
Welcome to our AC EVSE
1.1 Type
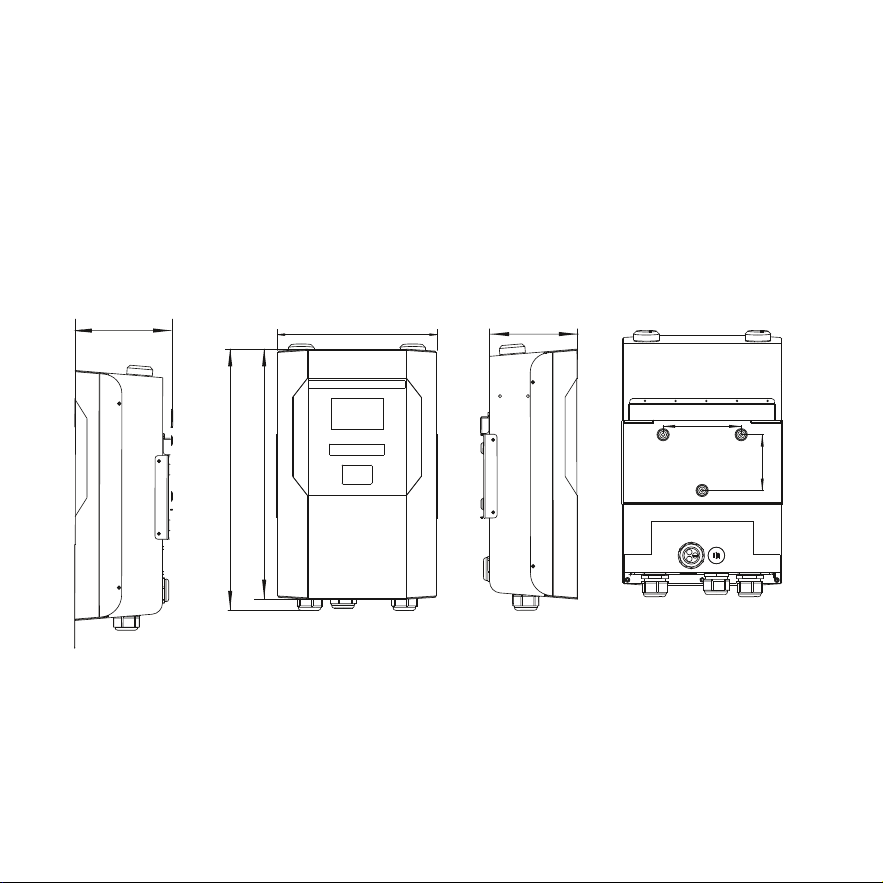
1.1.1 Shape and Size
The shape and size of the AC EVSE is shown in the figure below:
4
100mm(3.937")
140mm(5.512")
285.5mm(11.24")
173.5mm(6.831")
448.2mm(325.403")
468.4mm(18.44")
157.5mm(6.201")
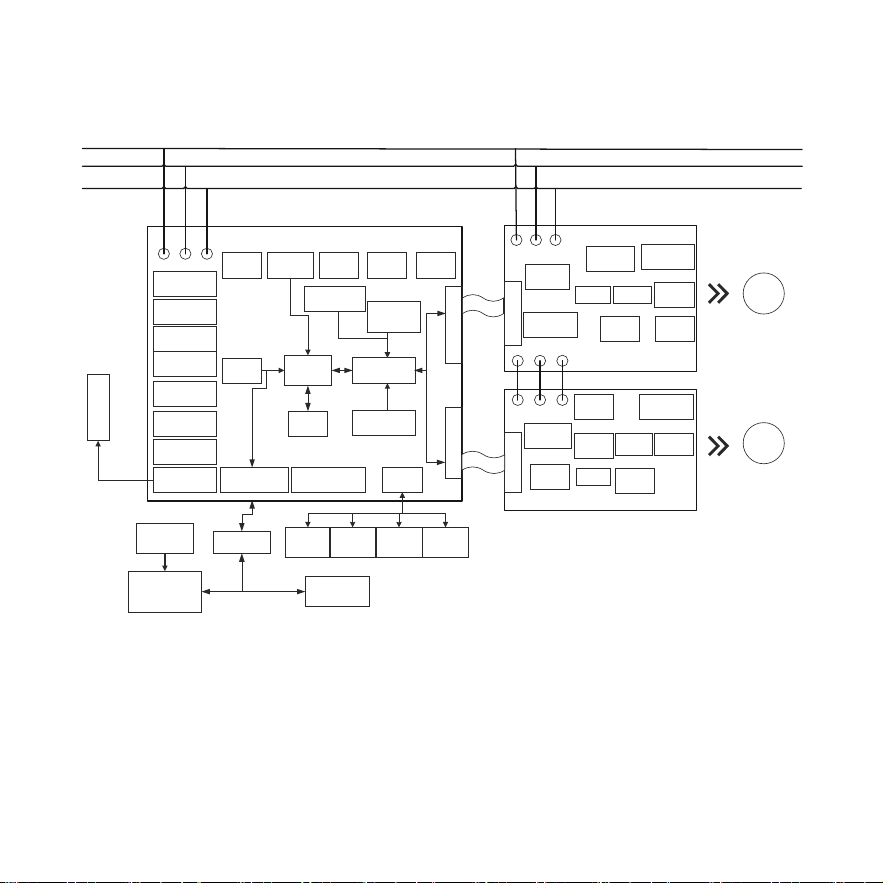
1.1.2 Block Diagram
The block diagram of EVSE is as follows:.
Flash
DC-DC
12V-5V
AC-DC
12V
DC-DC
12V~-12V
CAN/232
DC-DC
12V~3.3V
Surge protec�on
Power mode
DIP switch
Ground protec�on
circuit
A circuit relay
control
Overload
protec�on
Short circuit
protec�on
Overcurrent
protec�on
Leakage
detec�on
Metering
module
B circuit
relay control
B relaystatus
Metering
module
Short circuit
protec�on
Overcurrent
protec�on
Overload
protec�on
Over and under
voltage
protec�on
Temperature
protec�on
circuit
Leakage
detec�on
Temperature
protec�on circuit
Over and
under voltage
protec�on
A circuit relay
status monitoring
B-way interoperable
communica�on
Charge control
MCU
Main control
MCU
RTC circuit
A-way
interoperable
communica�on
TF ard interface
Isolate 485interface
USB interface
Ethernet module
Wifi module
Bluetooth module
4G module
Capaci�ve touch
bu�ons
4.3-inch LCD display RFID/NFC module
RGB indicator strip V2G module V2G module
ISO15118
module
ISO15118
module
Isolated CAN interface
Human-computer
interac�on interface
Aantenna
L1 L2
PE
L1 L2 PE
L1
L2
PE
L1 L2 PE
L1 L2
PE
Cable
Cable
Main control-power
board interface
Main control-Apower
boardinterface
Main control-Apower
boardinterface
Charge
coupler A
Charge
coupler B
ain control-power
board interface
5
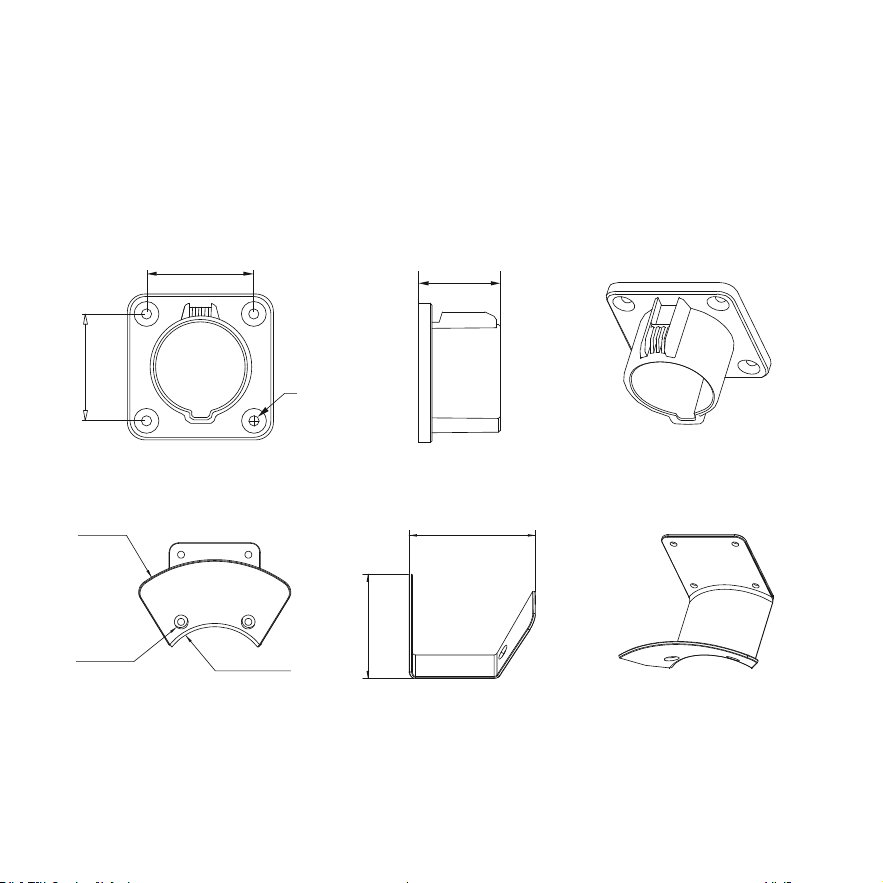
1.2 Cable Holder and Hook
AC EVSE is equipped with an American standard car-side charging connector.
When the EVSE is in standby mode, insert the car end charging connector into an empty seat to protect
the car end charging connector.
Use the mounting screws to fix this empty socket in place next to the EVSE.
53mm(2.087")
38mm(1.496")
R96.56mm (3.802")
99.75mm (3.927")
82.31mm (3.241")
R43.6 mm(1.716")
2mm (0.078")-11mm(0.433")
Φ5.5mm(0.217")
53mm(2.087")
6

1.3 Model definition
7
EC A N C 80 02 S DG40
Presents power input way
Number of charging ports and the
current specification of the charge coupler
Present product series number
Present power output specification code
Presents product application place type
Presents target market/region
Presents power output type
Present new energy products
category identifier
①②③④⑤⑥⑦⑧

Description of Model Number
1. Two capital letters XX stands for: New energy product line category identification..
Products category
Code EC ES EP
New energy
electrical vehicle
charger equipment
New energy storage
equipment
New energy photovoltaic
equipment
2.One capital X for the type of power output that can be supported.
Power output type
Code A D M
AC Power
DC power
Multi-mode: AC &
DC compatible
3. One capital X represents the market area code where the product can be placed.
Market/
Region
Europe
Code
E
N U C J K R
Americas UK China Japan Korea Russia
4. One X capital letter represents the product product application place type.
Application type
Code
H C M
Household/Home-use
Commerical- use
Multi-use: household
&commercial
8

5. Two-digit XX/three-digit XXX digital representation: product power output specification.
6. two-digit XX stands for: product series number, following the following principles.
7. One uppercase X for supported power input methods.
Upgrade from 01-99 according to product development plan.
Power output
40A 80A
40
80
AC mode are marked by maximum output current
Power input
method
Code
Code
S T M
Single Phase
Three phases
Multi- input: Single-phase &
three-phase co-existence
SG80 Single charge coupler 80A 1*80A
Charge coupler 40A 2*40A
Both charge coupler 80A 1*80A/2*40A
DG40
DG80
8. Two capital letter XX + Two number XX, means the number of charging ports and the current
specification of the charge coupler, which are defined as follows.
9

1.4 Specification
RD03 American Standard AC EV Charger Series
Specifications & Parameters
Category
Model
ECA-
NC8002S-
SG80
Level 2,
208/240VAC
60Hz
Level 2,
208/240VAC.
60Hz
Level 2,
208/240VAC
60Hz
80A
80A
80A
80A 19.2kW
SAE J1772
TYPE1 /80A
SAE J1772
TYPE1 /40A
SAE J1772
TYPE1 /80A
2*40A 2*9.6kW
19.2kW
1*80A/2*40A
Load Balancing
LAN (RJ-45)
WiFi 2.4G
4G cat. 4
BLE 5.0
RFID
USB (type A)
RS-485
CAN
OCPP 1.6J(Upgradeable to 2.0)
ECA-
NC8002S-
DG40
ECA-
NC8002S-
DG80
Rated input/
output voltage
Rated input
current
Charge
Coupler
Rated output
current
Max
power
Option
Optional
Optional
Optional
Power
Specification
Power Wiring
Communication
OCPP Version
LCD screen size:4.3-inch;/pixels resolution:800*480/262K colors/No touch function.
RGB LED light bar
Capacitive touch buttons
Power option switch
User Interface
& Control
11

Swipe card
QR Code /APP
User Authentication
Optional
Optional
Optional
ISO 15118 (Plug & Play )
On-board power meter Measurement error accuracy less than 1%
V2G
Load balancing:single device
Load balancing:operating stations
Flash rom (128M bit)
TF card memory expansion (No TF card)
Over-current protection
Over voltage protection
CCID20
Under voltage protection
Meter
Power Management
Memory
Real Time Clock
Protection Function
Over-current protection
Over load protection
Over load protection
Short circuit protection
Ground protection
Over-temp protection
12

Surge protection 6 kV @ 3,000A
Fault self-test
Enclosure Protection: Type 4, IK10
Operating Temperature: -30 ~ 50℃
Storage Temperature: -40 ~ 75℃
Protection Function
Regulation
Warranty
Safety Regulations:ETL(UL2231 UL2594 UL1998 UL991)
Metering & Billing:CTEP
Energy Efficiency:Energy Star
Wireless Certificate:FCC/IC
2 Years
Environmental
Mechanical
Humidity: Up to 95%, non-condensing
Altitude: <2000m
Cooling Method: Natural Cooling
Cable Length:18ft or Customization
Product Outline Size:TBD
Net Weight:
ECA-NC8002S-SG80(14.7kg)
ECA-NC8002S-DG40(16kg)
ECA-NC8002S-DG80(21kg)
13
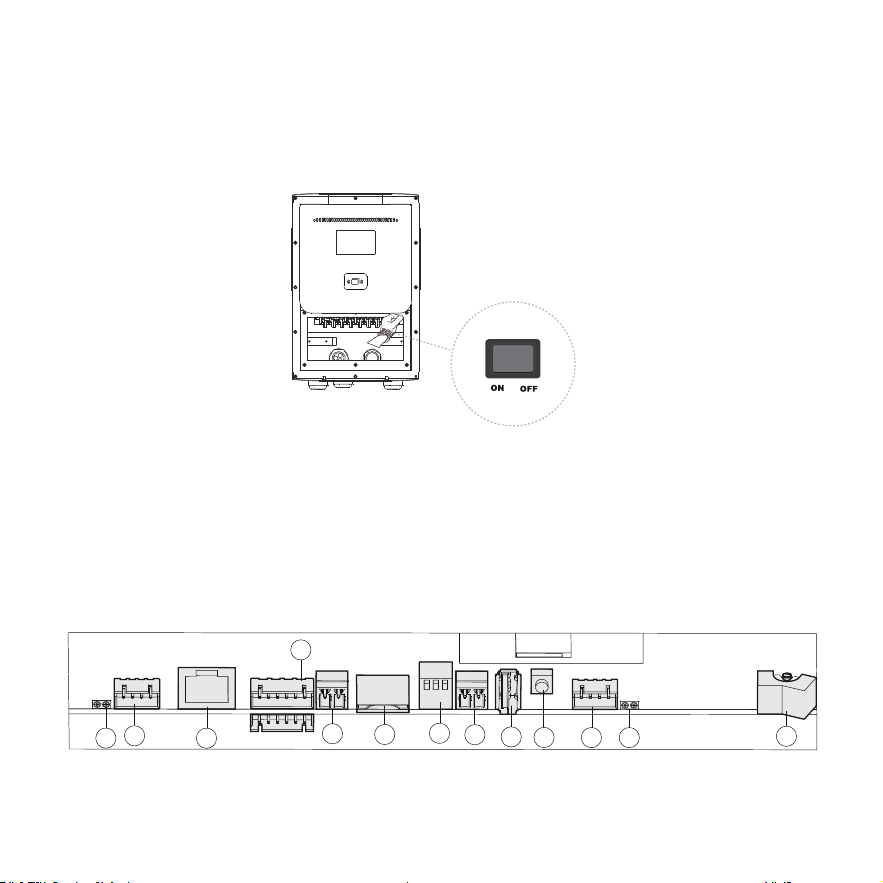
2 Operations
2.1 Power Switch
2.2 About the Interface
1. Check and make sure the mainboard power switch is off and that the fuse is there and installed. As shown below.
2. Turn off the power of this product, turn on the power switch of the mainboard; observe whether the boot interface of
the product is normal.
12
1
2
3
4
5
6
7
8
9
10
11
13
14
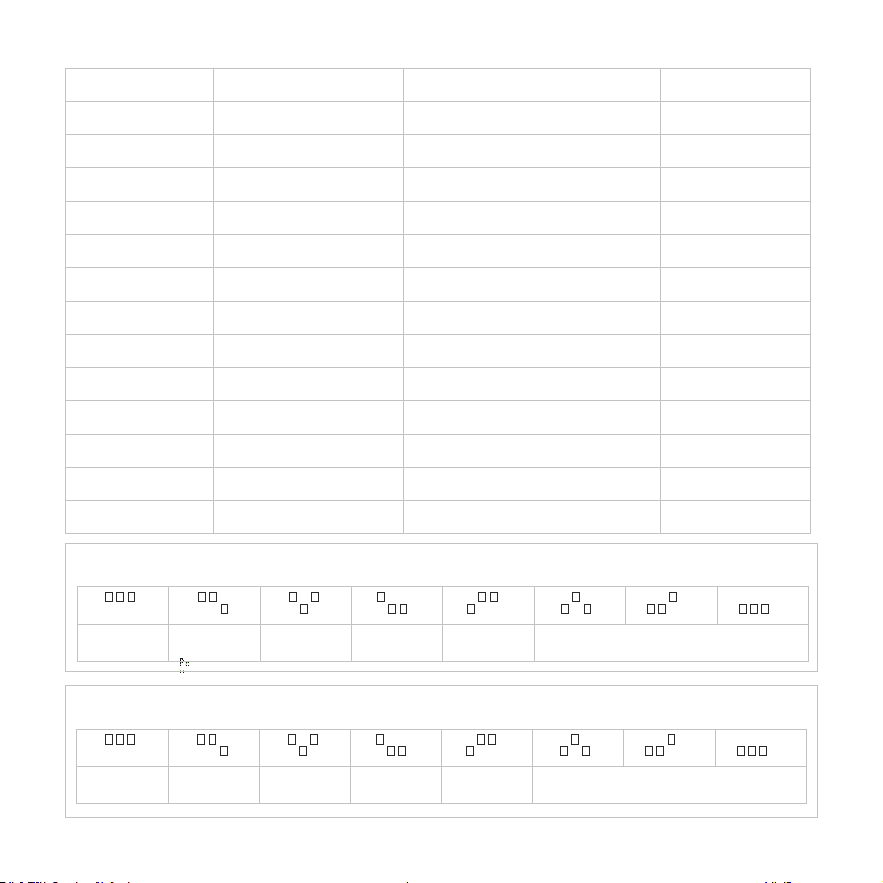
NO. Name Function Specification
1
Power pulse signal output interface
Debug port
M-bus protocol
Micro SD
Firmware burn-in port
Refer power mode setup instructions
USB 2.0
Download Interface
485 Interface
TF Interface
Power mode selection
CAN Interface
TF card interface
USB Interface
WIFI reset button
Charge coupler B
line Interface
Charge coupler A meter
PF pulse output port
Power switch Charging pile control power switch
Power pulse signal output interface
2
3
4
5
6
7
8
9
10
11
12
13
Charge coupler A meter PF
pulse output port.
Charge coupler A
line Interface
Ethernet Interface
CP signal, temperature signal, CC
signal and power supply
10/100M ethernet network
CP signal, temperature signal,
CC signal and power supply
Charging with single pot version ECA-NC8002S-DG80 updates the rated current according to the DIP switch
status, no reboot required
Charging with dual pot version ECA-NC8002S-SG80 updates the rated current according to the DIP switch
status, no reboot required
16A+16A 24A+24A 32A+32A 40A+40A 48A+48A 1*80A/2*40A
16A 24A 32A 40A 48A 80A
15
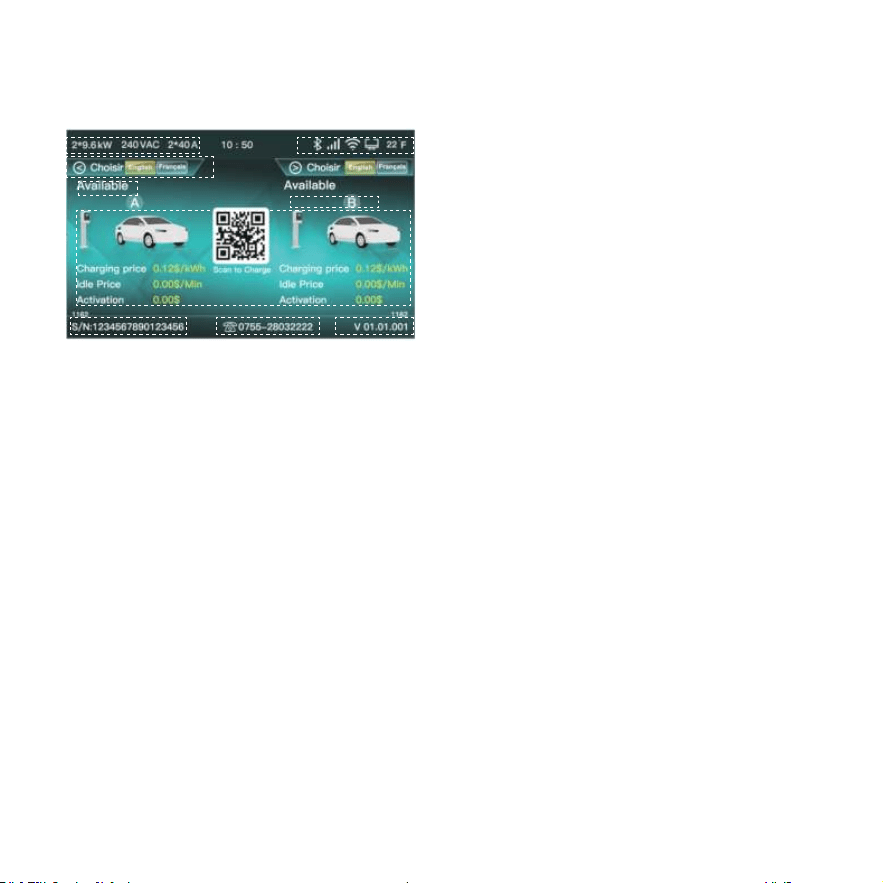
3 Function Introduction
3.1 User Interface & Control
1. The electrical parameters are displayed in the upper left
corner of the status bar. The order from left to right is:
charging power, voltage level, and rated current.
Charging power is calculated by multiplying the grid voltage
and the rated current. The voltage level is automatically
detected as "208VAC " or "240VAC" when turned on. The
rated current can be set by dial switch. For details on dial
settings, please refer to the interface introduction and
instructions.
2. The upper right corner of the status bar displays network
communication parameters. From left to right, there are
Bluetooth, 4G, WIFI, Ethernet, and Fahrenheit icons in the
charger. The Bluetooth icon only appears when the
Bluetooth module is installed. If the 4G module is not
installed, it will be a gray low-light icon. If the 4G module is
installed normally, it will be a white high-light icon. If there is
no connection, WIFI is a gray low-light icon. When WIFI is
correctly set up and successfully connected, WIFI is a white
high-light icon. If communication with the router is not
established, Ethernet is a gray low-light icon, and when
successfully established, a white high-light icon appears.
The temperature inside the pile has a white highlight icon, it
is dynamic, and it is displayed in degrees Fahrenheit.
3. This language switching prompt is unique to the "Ready"
interface. When you touch the button below, you can switch
between English and French. Currently, these are the only
two languages available.
4. Status prompts vary as per different language and
different status.
5. The operation status of charge coupler A is displayed
on the left, and the operation status of charge coupler B
is displayed on the right. After swiping the card, the user
can choose which charge coupler to activate for
operation through the touch button at the bottom of the
screen.
6. The main interface displays different content under
each status.
7. Charging pile CID code - a unique code assigned at
the time of shipment. The client can modify it through the
server, and the uniqueness after modification is not
guaranteed.
8. After-sales service phone number.
9. Software Version No.
16
1 2
3
4
5
6
7 8 9
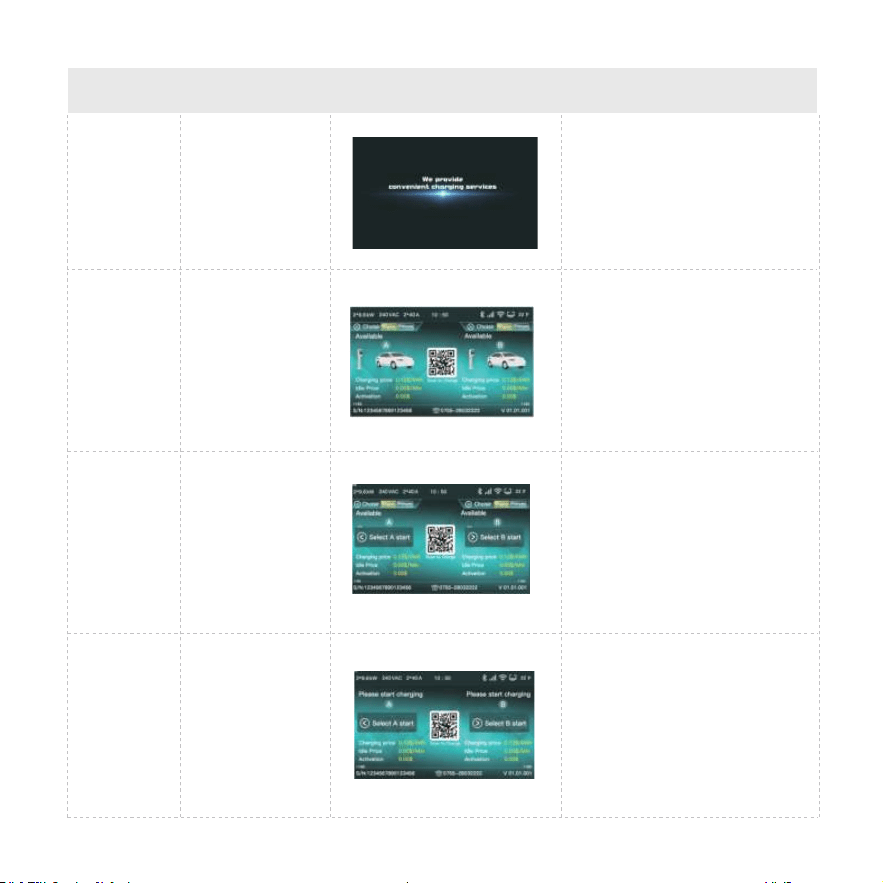
Status LED Description Current Status Interactive Functions
Power On No operation is recommended.
Available
After the red, green
and blue colors flash
once, yellow slow
flash twice
1. Enter to the available page after the
bootup finished;
2. Touch the left and right keys to switch
A and B cable languages respectively;
3. If there is no operation, the screen
brightness will drop to 50% after 3
minutes;
4. There is cable insertion, card tapping
platform interactive action screen and
press any key brightness is 100%.
1. If you tap the card in standby mode
without plugging the cable, you will
enter the cable selection (unplugged)
interface;
2. Touch the left and right buttons to
select A and B cables respectively,
and enter the cable insertion interface
after selection.
Green always on
Charge Coupler
Selection
(Unplugged)
Green flash
1. If you tap the card in standby mode
with plugging the cable, you will enter
the cable selection (plugged) interface;
2. Touch the left and right buttons to select
A and B cables respectively, and enter
the vehicle not ready interface after
selection.
Charge Coupler
Selection
(Plugged)
Green flash
17
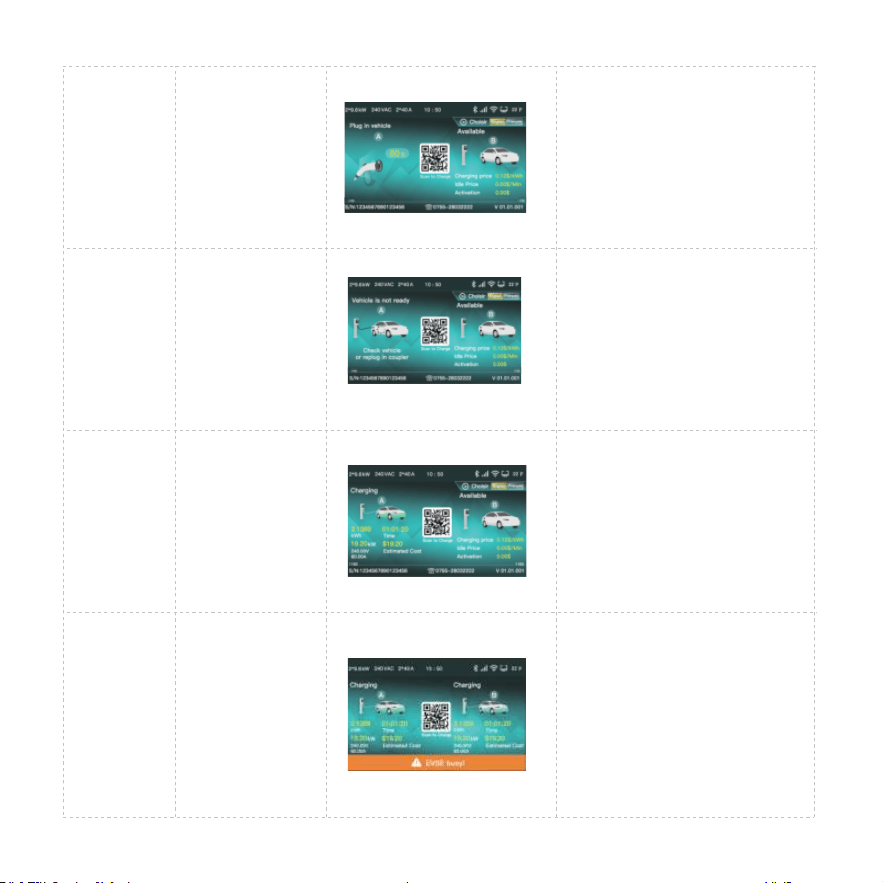
Connect the
Charge Coupler
to the Vehicle
Blue slow flash
1. When a cable is not plugged in the
standby state, and the user selects the
cable for charging by tapping the card,
APP activation, platform activation, etc.
it jumps to the page that prompts the
cable to be plugged;
2. The interface will stay for 1 minute, if the
user does not insert the plug within 1
minute, it will return to the standby mode.
Vehicle not
Ready
Green flash
1. After inserting the coupler and charging,
the S2 switch inside the car is not closed,
and it is not ready for
charging, will jumps to the car not ready
page;
2. Enter the charging page when the car is
ready;
3. If you unplug the charging cable at this
time, the screen will return to the
standby page.
Charging Blue is always on
1. Enter the charging settlement page after
successfully starting charging;
2.You'll be prompted to select a cable after
the card is tapped;
3. Enter the charging completion interface
after APP or platform stops charging;
4. Return to standby page with plugging
out the cable.
Charging
(Busy Electric
Piles)
Blue is always on
1. After the charging is completed normally,
enter the charging completion settlement
page;
2. Unplug the charging cable or wait 1
minute to return to the standby page.
18
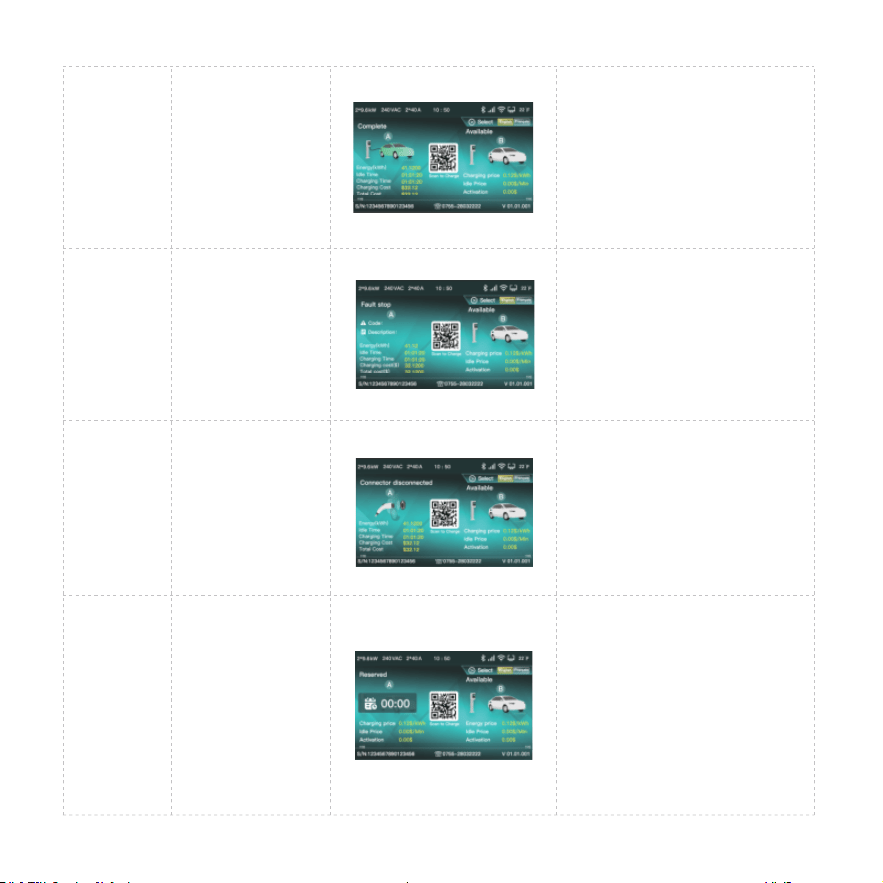
Complete
Purple is always on
1. After the charging is completed
normally, enter the charging completion
settlement page;
2. Unplug the charging cable to return to
the standby page.
Fault Causes
Charging to Stop
Unrecoverable fault:
red is always on
Recoverable fault:
slow flashing red
1. If an abnormality occurs in the charging
state, jump to the fault prompt page;
2. Return to standby page after unplugging
charging cable.
Charge Coupler
Disconnected
Purple slow flash
1. The plug is abnormally loose in the
charging state, jumping to abnormal
settlement page;
2. Hold for 1 minute and return to the
standby page.
Reserved Green slow flash
1. The user selects the electric pile in
the APP, and enters the reserved
page after operating the scheduled
charging;
2. Only reserved users can start charging;
3. When non-reserved users start
charging, it will prompt that the electric
pile has been reserved;
4. After the scheduled time is exceeded,
if the customer is not present for use, it
will automatically return to the standby
page.
19
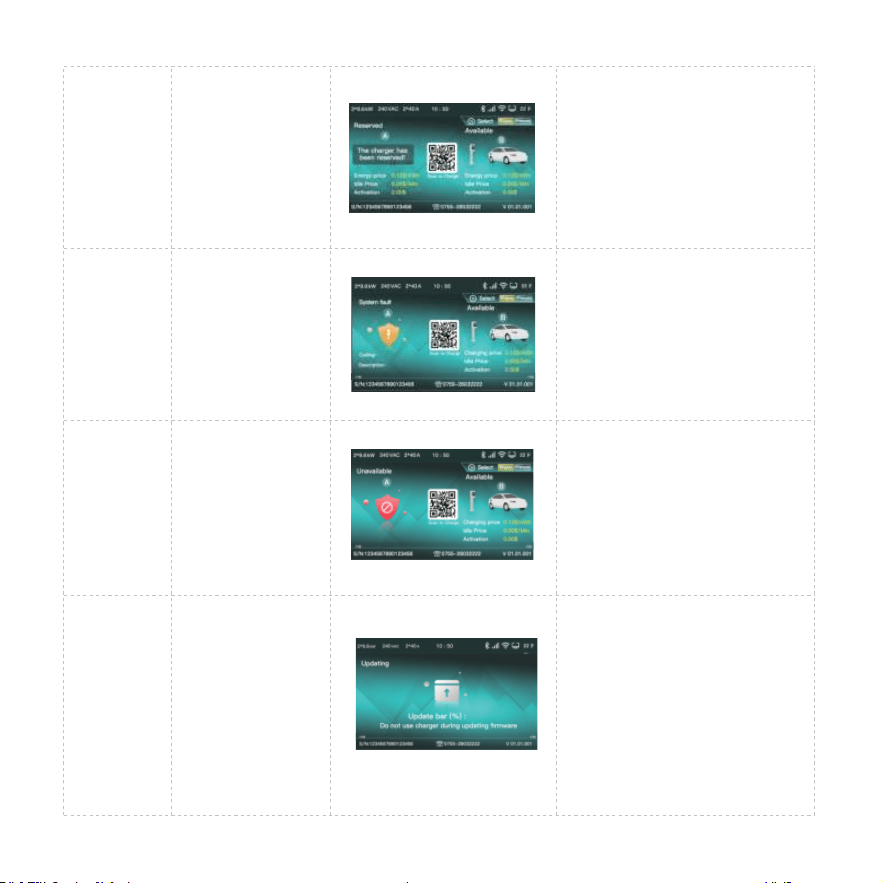
Reminder to
be Reserved
Green slow flash
1. Plugging in the cable in the booked
state will prompt the device number
have been booked;
2. The prompt disappears after
unplugging the cable.
Charge Coupler
Failure
Unrecoverable fault:
red is always on
Recoverable fault:
slow flashing red
1. Pile body abnormality occurs in charging
pile in non-charging state, jumping to the
system fault interface;
2. Return to the standby page after the
fault is resolved.
Out of Service Yellow always on
1. In the standby state, will enter to out of
service state when receive "stop use"
command from the server;
2. Return to the standby state when
receive "recover to use"command from
server.
System Update
Yellow slow flash
1. Perform remote OTA in standby state, it
will enter the upgrade page;
2. When the download is complete and
the verification is successful, it will enter
the upgrade success state;
3. During the download process, if the
network is disconnected or the
verification fails after the download is
complete, it will enter to upgrade failure
state;
4. After the upgrade is complete, the
firmware version number in the bottom
right corner will be updated.
20
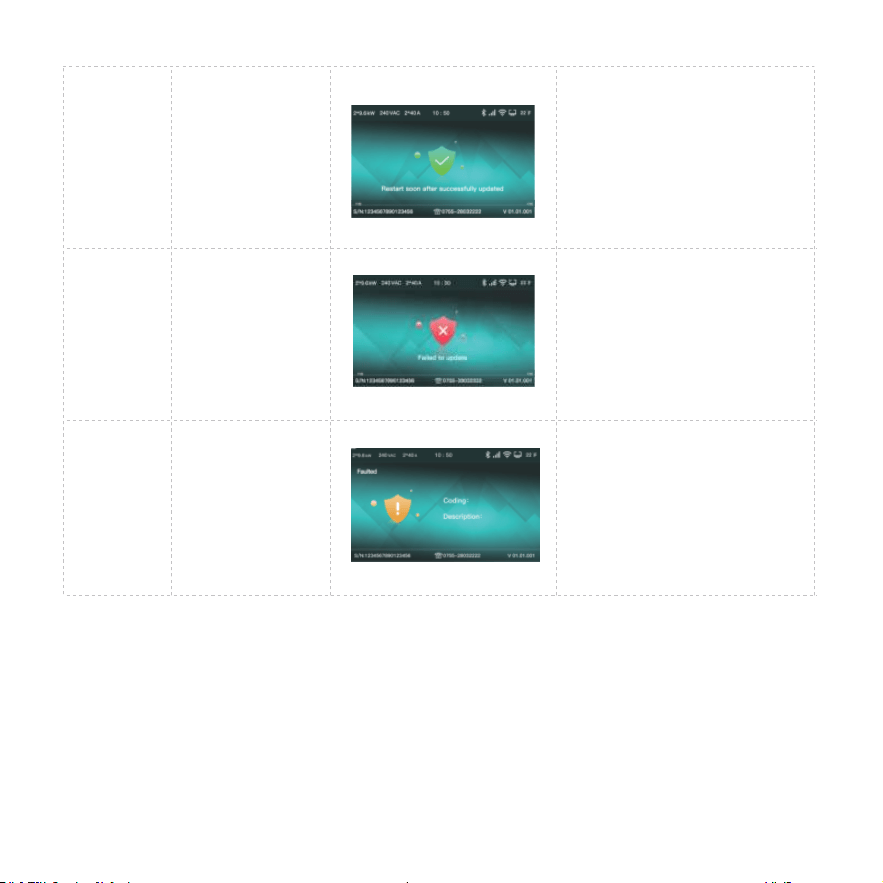
System Update
Succeeded
Yellow slow flash
1. After the update is successful, jump to
the upgrade success page;
2. Wait for the device to reboot
automatically, do not reboot manually.
System Update
Failed
Red slow flash
1. If the upgrade fails, enter the upgrade
failure prompt page;
2. Wait for 10 seconds and return to the
state before the firmware upgrade.
System Fault
Unrecoverable fault:
steady red
Recoverable fault:
slow flashing red
1. Pile body abnormality occurs in charging
pile in non-charging state, jumping to the
system fault interface;
2. Return to the standby page after the
fault is resolved.
21
3.2 Configure WIFI Network
3.3 Operation Guide
Internet configuration via WIFI and OCPP Authpass.
Take the laptop configuration charger parameters as an example, the introduction is as follows. (The method of setting
parameters with a mobile phone is similar and will not be repeated)
Step 1: Connect to WIFI Hotspot
Keep your laptop in a state where it can connect to a WIFI hotspot. Turn on the charger, find the hotspot- named "ECA-NH",
and connect to it without a password. (If you do not find a hotspot named "ECA-NH", please restart the power of the charging
station).
Step 2: Log in to Settings
Open a web browser, preferably Google Chrome or Microsoft Edge, and fill in the - IP address "192.168.4.1" in the browser's
address bar. Press the Enter key to enter the page of EVSE CONFIGURA- TION LOGIN. (Note: Microsoft IE browser cannot
visit)
Step 3: Configure Your EV Charger
Fill in the default password "1000" to enter this page. When you log in to this page for the first time, please change to a new
login password,The new password can only be a 4-digit number.
Fill in the name of the hotspot and the password of your WIFI router on the web page, click the "SAVE" button to save the
settings, and click the "RESTART" button to restart the charging pile to make the settings take effect. Once it takes effect, the
charging pile can be accessed through your WIFI router the Internet.
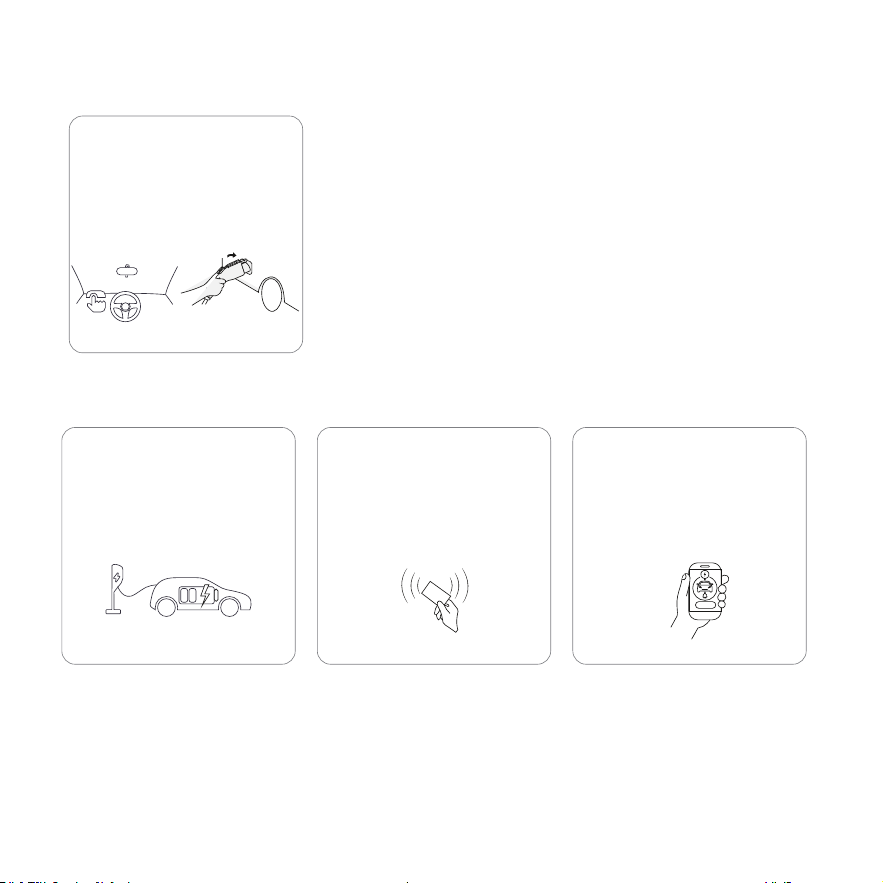
1. Charging Preparation:
A. Find the available charging pile:
Product, park the car, turn off the
vehicle, and make the electric car in
a chargeable state.
B. If choose to use APP:
You can download the APP according
to the prompts, and register an
account according to the prompts.
C. If choose to use an RFID card:
Contact the operator to obtain an
RFID card; the private pile is
equipped with an RFID card in the
box.
Download App
FRID
22
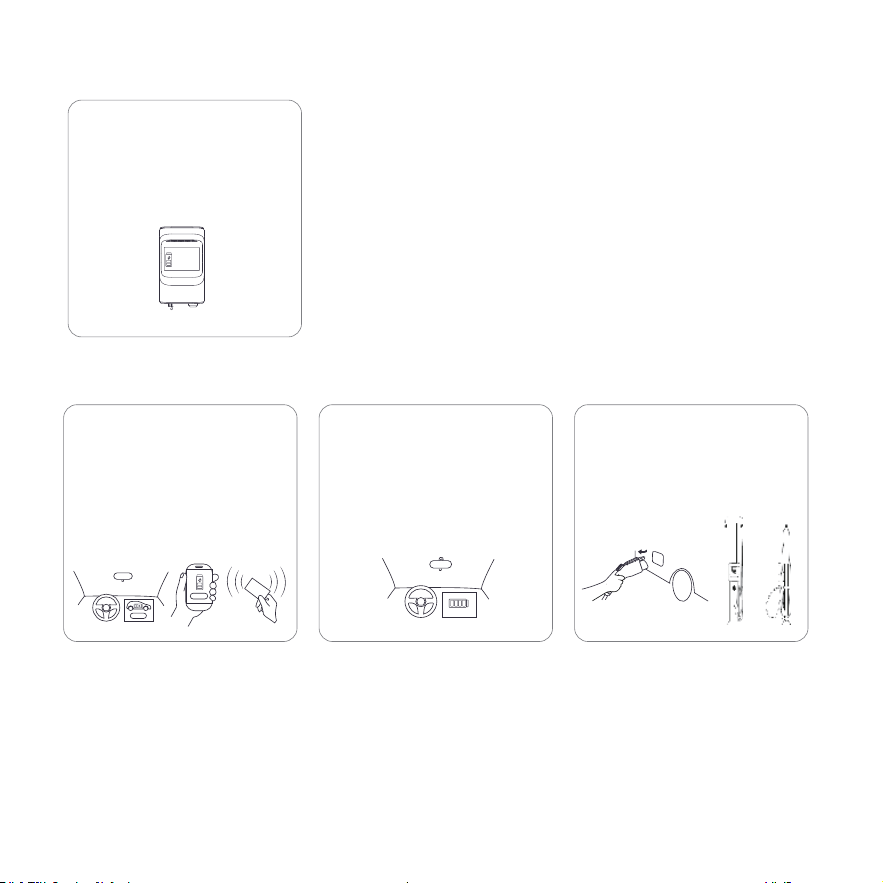
2. To Connect The Charging Connector
Open the cover of the car charging
socket, and connect the charging
cable to the car socket stably. Make
sure the connection is successful.
3. Start Charging
A. Plug and charge
The charging mode is configured as
plug and charge, when step 2 is
completed, the car is ready to start
charging.
B. Tap card to start
Put the RFID card close to the
card-tapping. Select the charging
cable to be activated according to
the prompts to start charging, after
the charging process taps the card
again, selecting the corresponding
charging cable will end the charging.
C. APP start and stop
Use the APP to scan the QR code,
select the charging cable number
according to APP prompts, start
charging, and after charging, click
to stop charging according to the
APP prompts.
启动充电
FRID
23
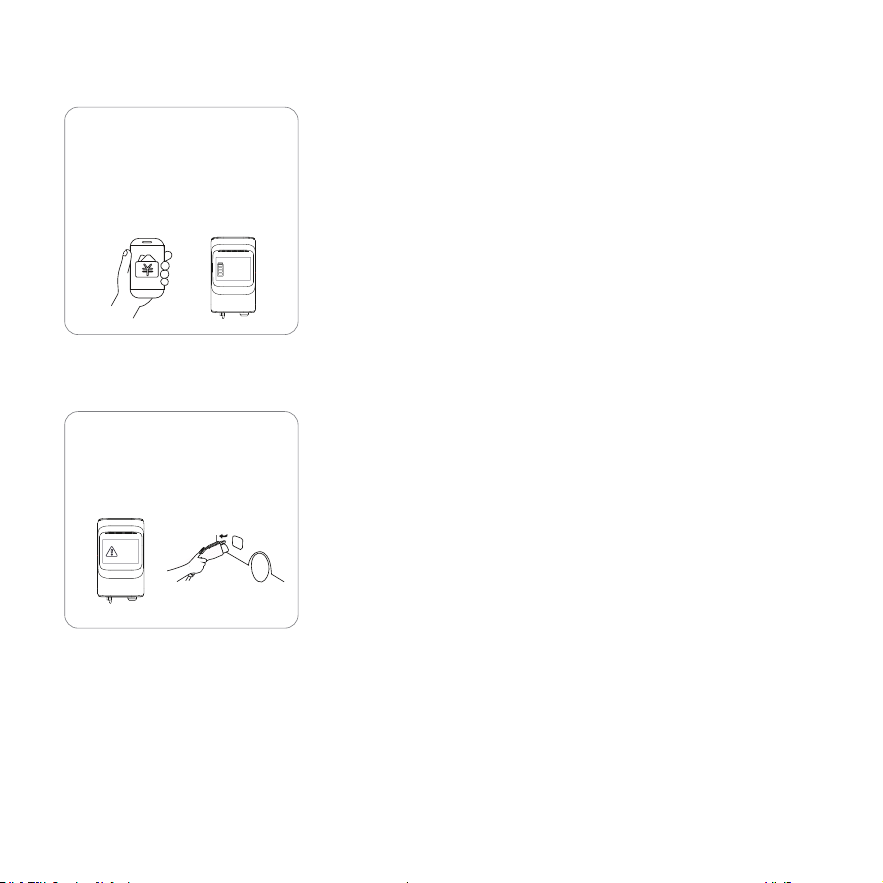
4. Charging:
During the charging process, the
charging pile screen will display the
charging voltage, charging current,
charging time.
230.41v
Voltage
2.1369kWh
Electricity
$0.12/kWh
80.12A
Current
01:01:20
Time
5. End Charging:
A. Through charging, the car owner
can take initiative to end the
charging, plug-and-play charging
situation can be stopped through the
car terminal; To start by tapping the
card, you can stop by selecting the
corresponding charging charge
coupler after tapping the card; APP
startup can be controlled and stopped
in APP.
B. After the car is fully charged
and the charging current is less
than 1A for 15 minutes, the pile
will automatically stop charging.
C. After the charging is completed,
please pull out the charging
coupler and put it back to the
empty coupler-holder and hang the
cables back on the hook.
停止充电
FRID
停止充电
100%
24
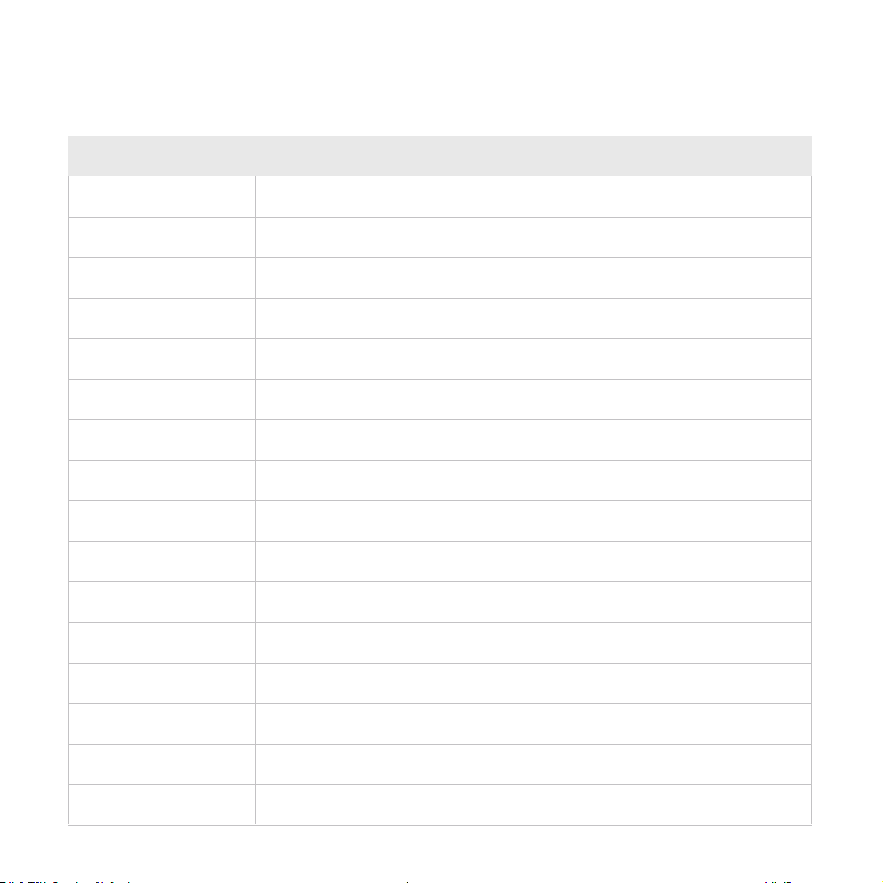
6. Order Settlement:
7. Abnormal Situation:
After the charging is completed, the
display screen will display the
charging power and charging cost.
The order settlement will be
completed on the APP or plat form.
In any state, if there is abnormal
prompt on the screen and the light
bar, please stop charging and
disconnect the charging cable from
the socket on the car.
Coding: 21
Description:
2.1369kwh
Electricity
$41.12
Total cost
$0.12/kWh
Unit price
01:01:20
Time
25
3.4 Troubleshooting
When a fault occurs, the charger will automatically protect. The fault information and processing methods are as follows.
20 Flash Fault The memory chip is damaged, you need to contact the after-sales service.
The memory chip is damaged, you need to contact the after-sales service.
Check that the emergency stop button is not pressed.
Resolve the fault after restoring the emergency stop button.
Check whether there is any problem with the input power supply.
Resolve the fault after restoring the power supply.
The charging pile is not grounded, so the circuit needs to be tested.
The equipment temperature is too high. Resolve the fault after the temperature drops.
Internal communication line failure, need to contact the after-sales service.
Check whether the input cable is connected correctly; whether the grid voltage is abnormal.
Check that the charging adapter is properly connected to the car and that the car charger
is working properly.
Check whether the input cable is connected correctly; whether the grid voltage is abnormal.
Damaged relay, need to contact after-sales service.
Damaged relay, need to contact after-sales service.
Damaged relay, need to contact after-sales service.
Damaged relay, need to contact after-sales service.
The temperature measuring element is damaged, need to contact the after-sales service.
Temperature measuring element is damaged, need to contact the after-sales service.
21 EEPROM Fault
22 Emergency Stop Failure
23 Power Failure
24 Ground Fault
25 Motherboard Over
Temperature Alarm
30/40 A/B Cable Meter
Communication Fault
31/41 A/B A/B Cable Input
Undervoltage Alarm
32/42 A/B Cable Input
Overcurrent Alarm
33/43 A/B Cable Input
Overvoltage Alarm
34/44 A/B Cable L1 On
RLY Closure Fault
35/45 A/B Cable L2 On
RLY Closure Fault
36/46 A/B Cable L1 On RLY
Normal Opening Fault
37/47 A/B Cable L2 On RLY
Normal Opening Fault
38/48 A/B Cable Relay NTC
Alarm
39/49 A/B Cable L1L2 NTC
Alarm
Fault Code Handling Method
26
ЗA/4AA/B Cable Relay
Over-Temperature Alarm
3B/4B A/B Cable L1L2
Over-Temperature Alarm
3C/4C A/B Cable
Leakage Current Fault
3D/4D A/B Cable Leakage
Current Device Self-test Fault
3E/4EA/B Cable Input
Overload Alarm
The relay temperature is too high. The fault will be resolved after the temperature drops.
L1L2 line temperature is too high. The fault will be resolved after the temperature drops.
Check the charging adapter and its cable for damaged or wet. Recovery after fault.
removal.
Leakage detection equipment is damaged, need to contact the after-sales service.
Check whether the charging adapter is correctly connected to the car and check whether
the car charger is normal.
27
4 Installation
4.1 Labels
28
Model: ECA-NC8002S-DG80
Input/Output: 208/240VAC
60Hz
Max 1*80A/2*40A
Max 19.2kW
Enclosure Type: TYPE 4
Operating Temp: -30 50°C
Storage Temp: -40 75°C
MMQ: 0.5kWh
СТЕР CОА:
~
~
~
~
EV Charger
To avoid a risk of fire or
electric shock, do not use this
device with an extension
cord.
For use with Electric Vehicles.
Ventilation Not Required.
This device is intended only
for charging vehicles not
requiring ventilation during
charging.
THE SUITABILITY OF THE
USE OF FLEXIBLE CORD IN
ACCORDANCE WITH CE
CODE, PARTI.
WARNING
Pour réduire le risque de
choc électrique, ne
branchez l'appareil que sur
des prises correctement
mises à la terre.
ATTENTION
Pour éviter tout risque
d'incendie ou de choc
électrique, n'utilisez pas cet
appareil avec une rallonge.
Pour les véhicules électriques
véhicules électriques.
Ventilation non requise.
Cet appareil est destiné
uniquement à la charge de
véhicules ne nécessitant pas
de ventilation pendant la
charge.
AVERTISSEMENT
N'utilisez pas ce produit si
l'appareil est endommagé.
Risque d'électrocution, ne
pas retirer le couvercle ou
tenter d'ouvrir le boîtier.
Aucune pièce réparable par
l'utilisateur ne se trouve à
l'intérieur. Confier l'entretien à
un personnel qualifié.
CAN ICES(A)/NMB(A)
FCC ID: 2APP2-ECA03
IC: 27568 -ECA03
Contains FCC ID: 2AFOS-WT32C3-SX
Contains IC:27481-WT32C3S1S2
Contains FCC ID: XMR202008EC25AFXD
Contains IC:10224A-022EC25AFXD
To reduce the risk of electric
shock, connectonly to
properly grounded outlets.
CAUTION
Risk of electric shock, Do
not remove cover or attempt
toopen the enclosure. No
user serviceable parts
inside. Refer servicing
toqualified service
personnel.
Do not use this product if
there is any damage to the
unit.
-40 167°F
-22 122°F
4912888535269720090
Date Code
ECA2315RD030001
Conforms to UL Std.2594
Certified to CSA Std.C22.2#280
5014466
FOR USE WITH ELECTRIC VEHICLES.
FOR INDOOR OR OUTDOOR USE.
LA PERTINENCE DE
L'UTILISATION DE
CORDONS FLEXIBLES
CONFORMÉMENT AU CODE
CE, PARTIE..
Longhorn Intelligent Tech Co.,Ltd
Para evitar el riesgo de
incendio o descarga
eléctrica, no use este
dispositivo con un cable
de extensión.
Para uso con vehículos
eléctricos.
No se requiere ventilación.
Este dispositivo está
destinado únicamente
para cargar vehículos que
no requieran ventilación
durante la carga.
IDONEIDAD DEL USO DE
CORDÓN FLEXIBLE DE
ACUERDO CON EL CÓDIGO
CE, PARTE I.
ADVERTENCIA
Para reducir el riesgo de
descarga eléctrica,
conéctelo sólo a enchufes
con toma de tierra.
PRECAUCIÓN
Riesgo de descarga
eléctrica, No retire la tapa ni
intente abrir la carcasa. El
interior no contiene piezas
que el usuario pueda
reparar. Encargue el
mantenimiento a personal
cualificado.
No utilice este producto si la
unidad presenta daños.
4.2 Packing List
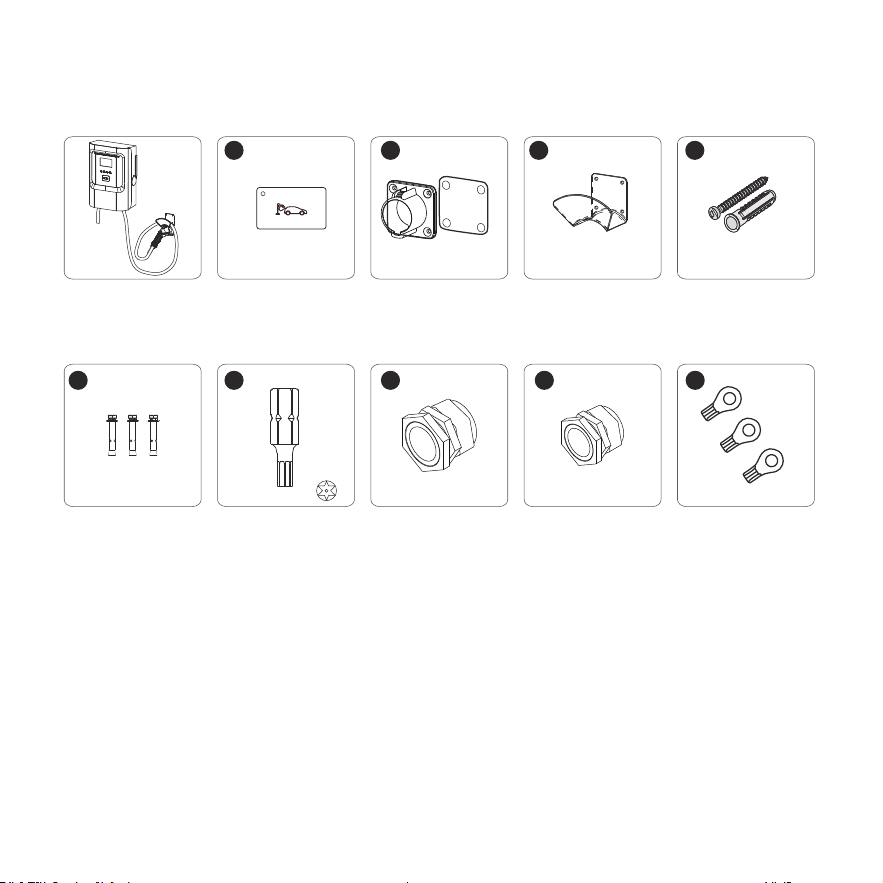
AC charger
Expansion screw
(3pcs)
Electric drill bit
(1pcs)
3-hole waterproof
connector
BN-M32-25 (1pcs)
3-hole waterproof
connector
BN-M25-18 (1pcs)
VE tube terminal
(3pcs)
RFID card
(2pcs)
1
2
3
4
5 6 7 8 9
Coupler holder
(1pcs)
Cord holder
(1pcs)
Torx self-tapping
screws (8pcs)
Rubber Plug Expansion
Tube (8pcs)
29
4.3 Check and Confirm
4.4 Preparation
When unpacking, please carefully confirm the
following points:
In order to ensure long-term stable operation of the
product, it is recommended to avoid the following
installation problems:
According to the packaging list, whether the
accessories are missing.
Whether there is any damage during transportation.
Whether the model and specification on the name
plate of the machine are consistent with the order
requirements.
If any damaged or missing parts are found, do not
start the machine and contact the supplier as soon as
possible.
Please keep the box and packaging materials for 1
month for future disposal. Paper packaging is
recyclable.
This product is an electrical device. Handle with care
and avoid severe vibration and shock.
EVSE cannot be transported by dragging the charging
connector and charging cable.
EVSE cannot be used in extreme weather, especially
when the ambient temperature is too low or too high,
which will affect the use of EVSE.
It is recommended to install EVSE in a ventilated and
cool place away from direct sunlight and rain. To ensure
good ventilation, you should install the EVSE vertically
with enough space. Installation tools before installing AC
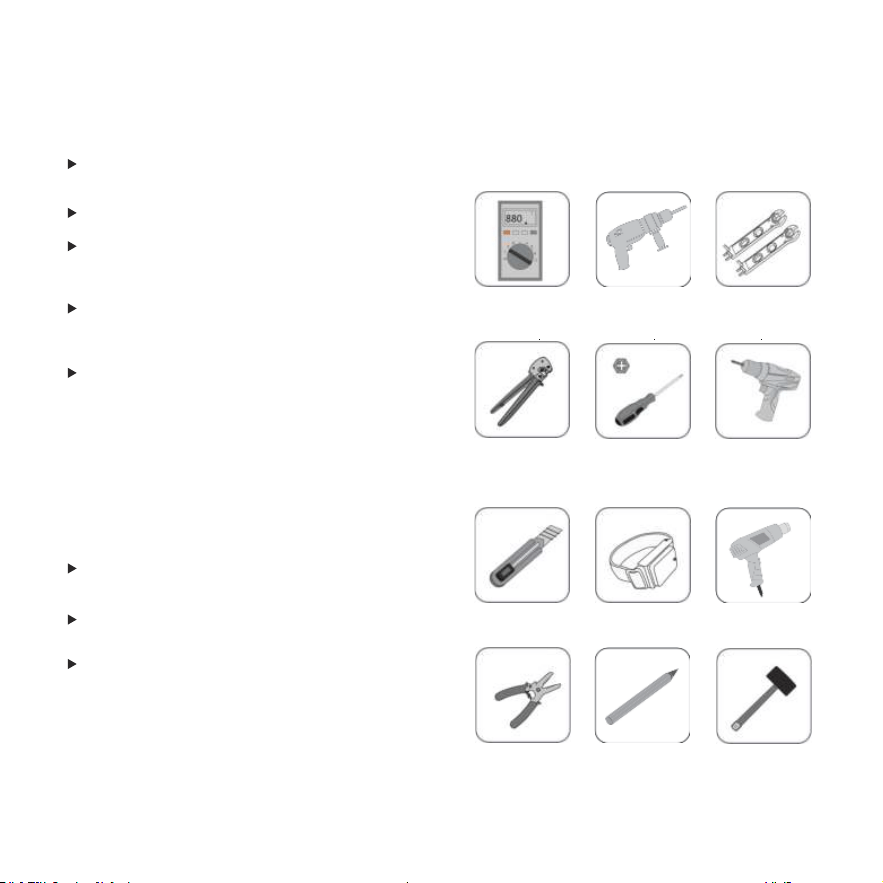
EVSE, you should prepare at least the following tools:
Wrench(10mm)
Wire Strippers
AWG23-7
Tube Terminal
Crimping Pliers
Phillips Screwdriver
(D5mm)
Electric Batch
(With plum blossom
hole T20.T25 bit)
Multimeter
Electric Impact
Drill(D8mm+D6mm)
Utility Knife Anti-static bracelet Heat Coupler
Rubber Hammer
Marker Pen
30
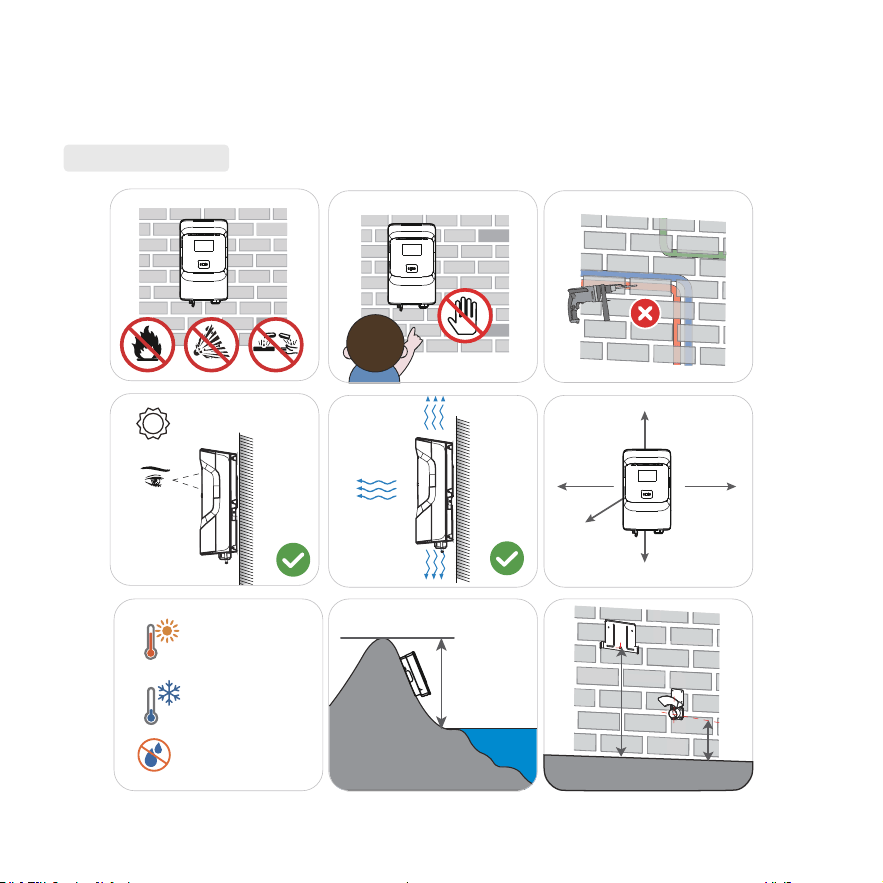
4.5 Installation Step
4.5.1 Wall Mount Installation
From the ground
From the ground
1150mm(45.28 )
"
850mm( . )33 46"
≥200mm(7.87)"
Aaltitude
2000mm(78. )
74"
≥200mm(7.87
)
"
≥300mm(11.8 )1"
≥300mm(11.8 )1"
≥500mm(19.69")
+50℃ (+122° F)
-30℃ (-22° F)
0-95%Rh
Location Requirements
Children are not
allowed to touch
31
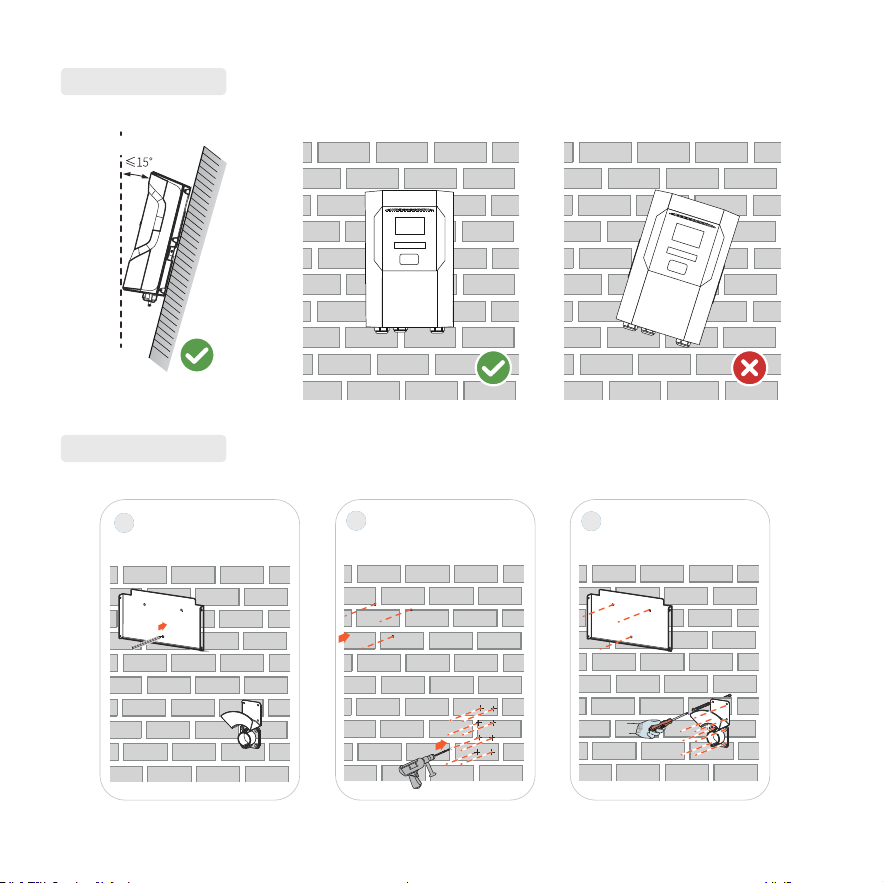
Angle Requirements
Angle Requirements
1
2
3
Install the wall-mounted
version and trace holes
on the wall
Punch holes in the wall
Install wall mounts,
hanging plates and
empty blocks
32
4
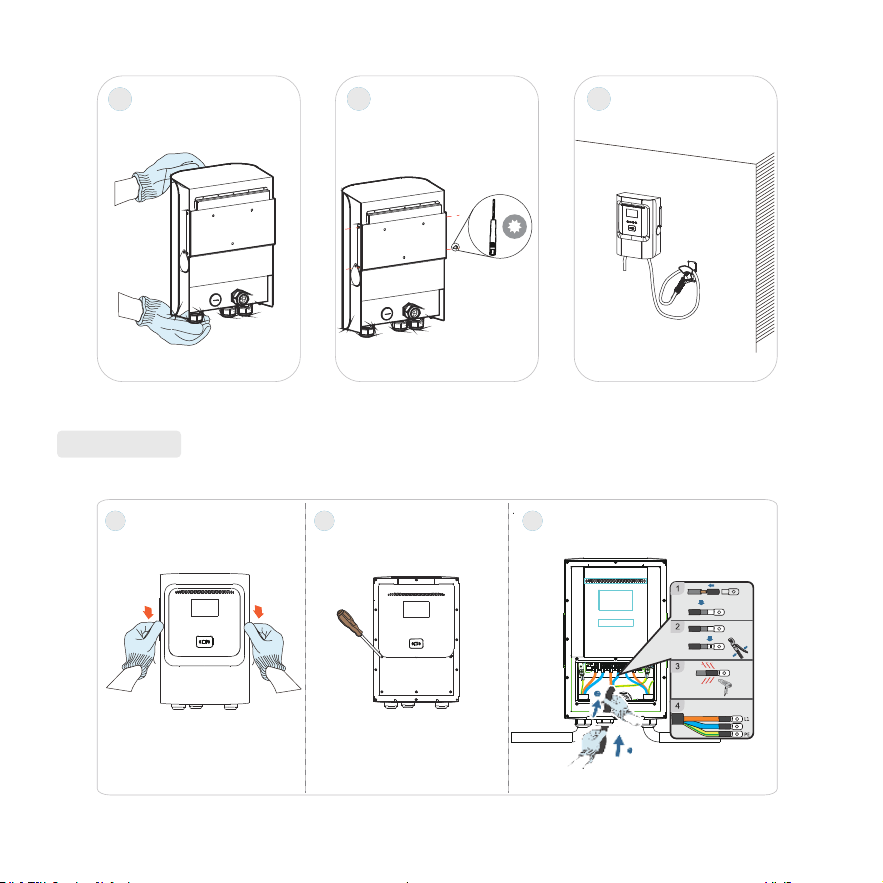
5 6
T20
Install the pile body on
the mounting plate
Set screw Installation pile
completion diagram
1
Remove the decorative shell
2
Remove the wiring cove
.
3
Wiring
Product Wiring
33
L2
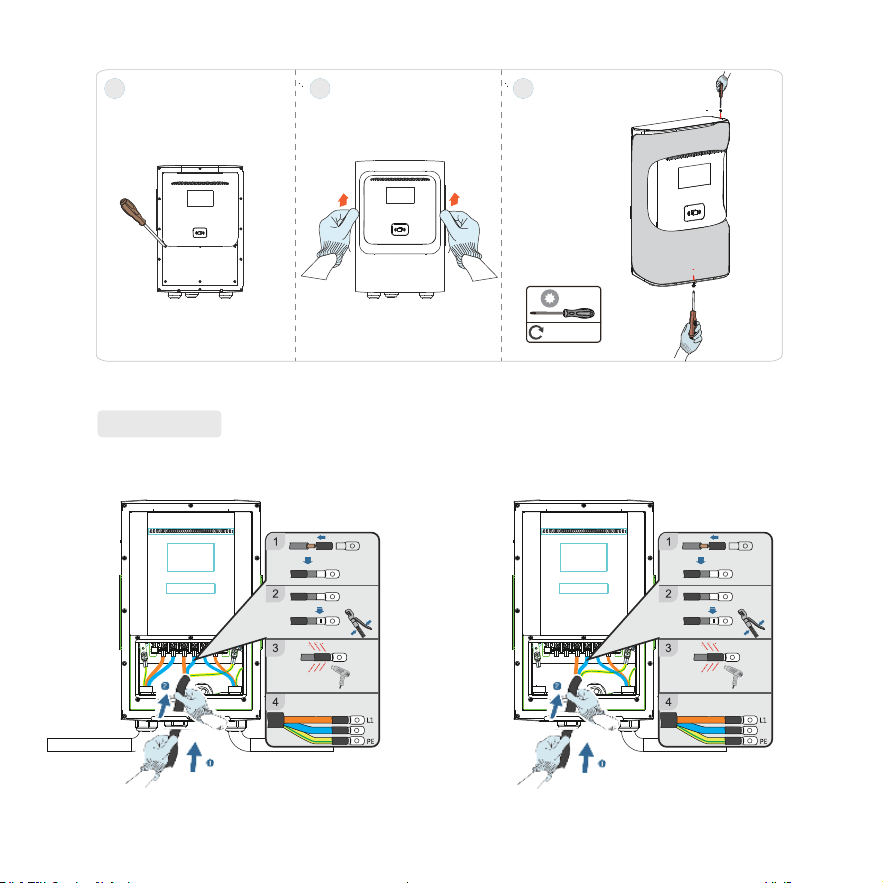
4 5 6
Lock wire cover
Reinstall the trim case Tighten the screws of
the decorative cover
.
T20
1.2~2N·m
Product Wiring
Copper cable cross-section: 3*6 AWG
Step 1 push up the back cover plate with hand.
L2L2
Dual Charge Coupler Input Wiring Single Charge Coupler Input Wiring
34
Color Terminal
Brown L1
L2
Blue
Yellow-green PE
DANGER
DANGER
If L1,L2, PE are connected incorrectly, it will not only damage the machine, but also create a potential shock hazard.
In the TT, TN-C and TN-S system, make sure that the ground cable is connected reliably.
Otherwise, it may cause electric shock.
35
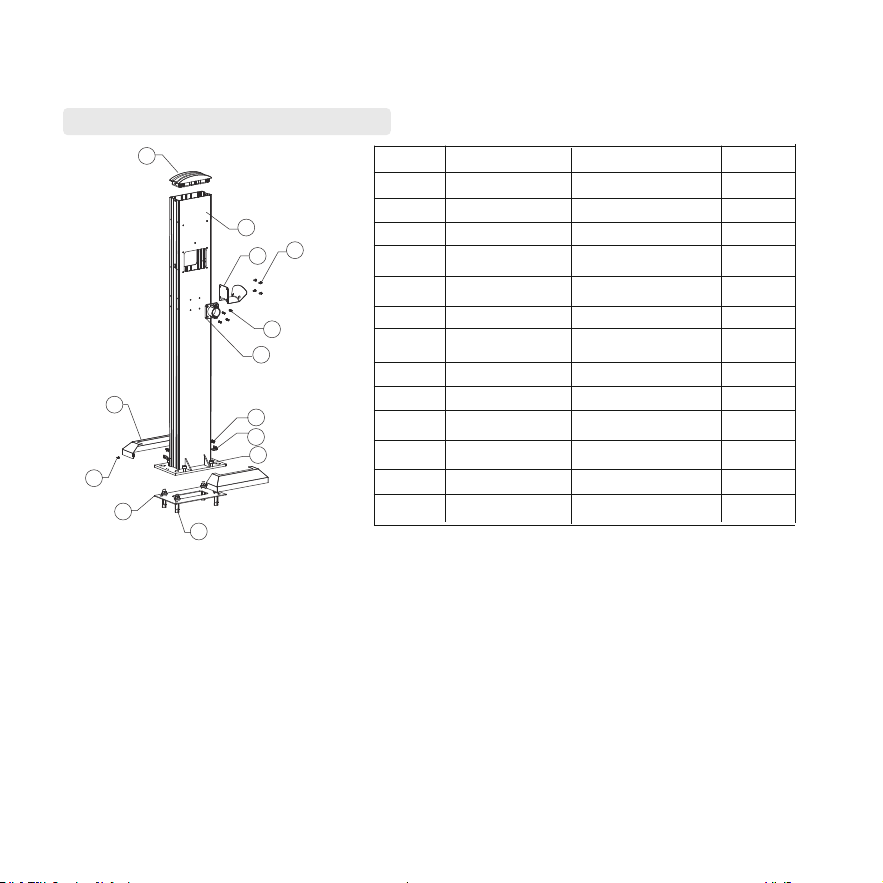
4.5.2 Pedestal Mount
1
2
3
4
5
6
7
8
9
1
1
1
4
4
1
4
2
2
2
4
1
4
10
11
12
13
AL6063-T6+Oxidation 1
SGCC+baking paint
SGCC+baking paint
SGCC+baking paint
Stainless steel
Stainless steel
Nylon
Stainless steel
Stainless steel
Stainless steel
Stainless steel
Stainless steel
Silica gel
Column cap
Column boom
Hook up
M5*12 combination
screw
M5*20 countersunk
head screw
M4*10 countersunk
head screw
M12*30 hexagon
socket screw
Coupler mount
M4*10 combination
screw
Floor bracket
Base cover
Leveling pad
M12*120
expansion screw
Number Name Material Quantity
Schematic Diagram of Column Decomposition
1
2
3
4
5
6
7
9
10
12
13
8
11
36
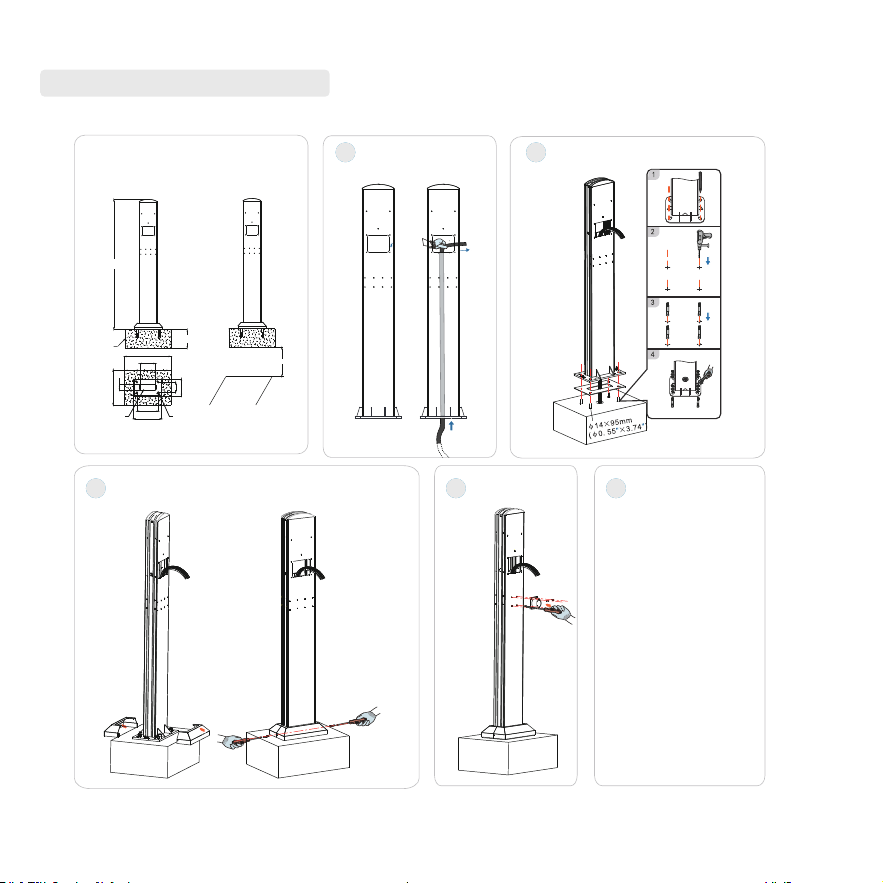
Schematic Diagram of Column Installation
200.0
380
500
230.64
303.4
110.64
183.4
1406.5
M12膨胀螺丝安装孔位
水泥基座
170
进线孔
车位
500
380
500
230.64
303.4
110.64
183.4
M12膨胀螺丝安装孔位
170
60
进线孔
Cement foundation size chart
1
Pull wire
2
Fixed column
5
Install the hanging
board
4
Install empty seat
3
Fixed base cover
37
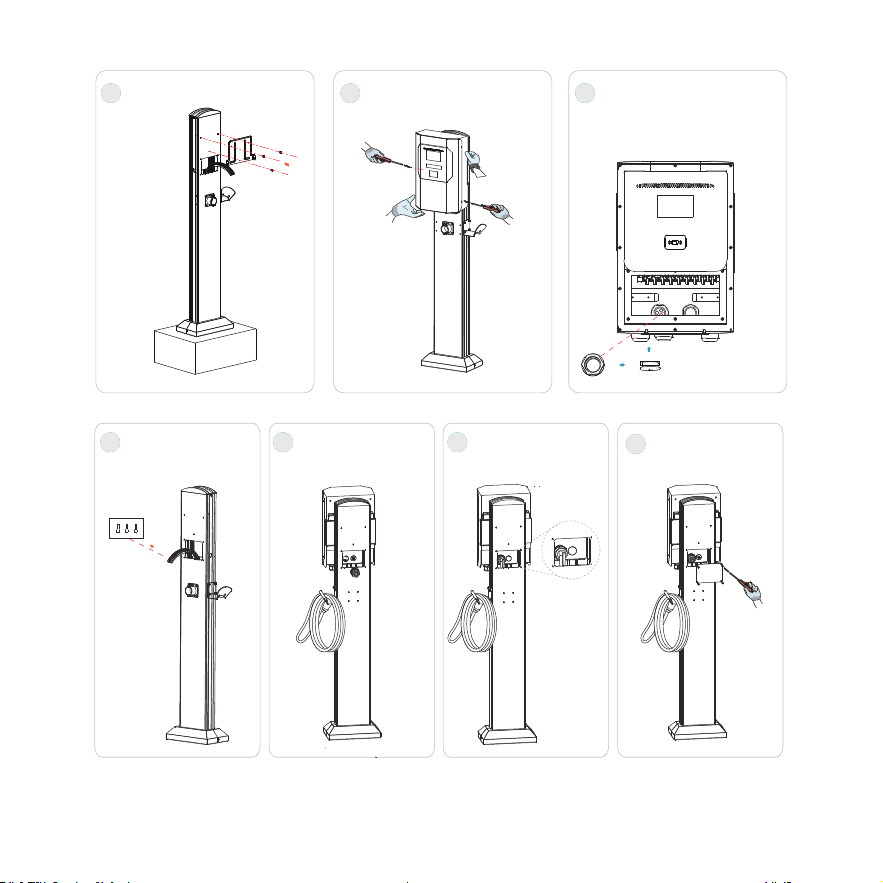
6
Install wall panel
7
Install the pile
8
The input surface mounting
holes are changed to
surface mounting holes, and
the wiring on the back
9
Input line terminal
crimping tube type
terminal
10
Concealed hole
installation three-hole
waterproof connector
11
The input line passes
through the three-hole
waterproof connector
12
Lock the seat
38
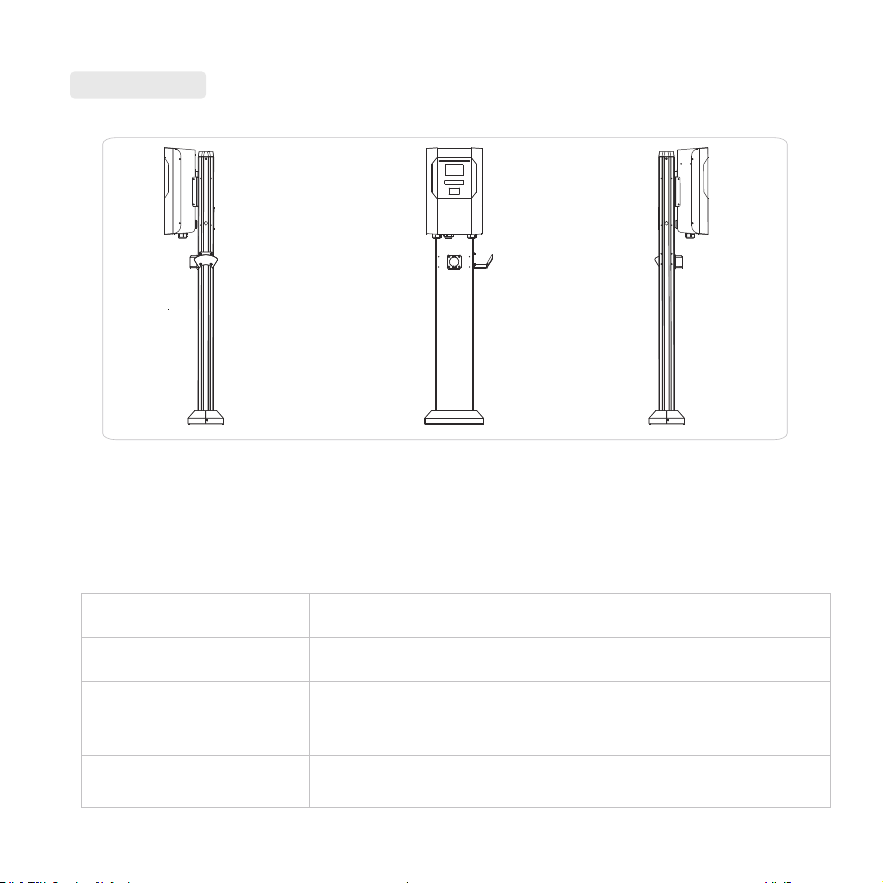
4.6 Grounding Instructions
After Installation
This product must be connected to a grounded, metallic, permanent wiring system, or an equipment ground wire must be run
with the circuit conductor and connected to the equipment ground terminal or conductor on the product.
The ground conductor must run with the circuit conductors and be connected to the equipment ground terminal or conductor
on the product.
Wiring Port
L1I PEPE L2I
SC16-6
2 ~ 5 N m
L2L1 L1
Crimp Terminal Specifications
Installation Tool Specifications
Installation Tool Specifications
.
Diameter 3mm (0.1181”) flat-blade screwdriver
Diameter 5mm (0.1968”) flat-blade screwdriver
Diameter 5mm-6mm Phillips screwdriver
39

4.7 Maintenance
Warranty Agreement
To ensure the long-term stable operation of the equipment, please perform regular (usually monthly) maintenance on the device
according to the operating environment.
a) Equipment is maintained by professionals.
b) Check whether the equipment is well grounded and safe.
c) Check whether there are safety hazards around the charging pile, such as whether there are high temperatures, corrosion or
flammable and explosive items near the charger.
d) Check whether the connection points of the input terminals are in good contact and whether there is any abnormality.
Check other wiring points for looseness.
1.The scope of the warranty refers to the product itself.
2.The warranty period is 24 months. During the warranty period, if the product fails or is damaged under normal use (determined
by the company's technicians ), the company will repair it free of charge.
3.The starting time of the warranty period is the production date of the product.
4.Even within the warranty period, if the following conditions occur, a certain maintenance fee will be charged.
Equipment failure caused by failure to operate according to the user manual.
Equipment damage caused by fire, flood, abnormal voltage, etc.
Equipment damage caused by the entry of foreign objects.
Equipment damage caused by other human-made external factors.
5.Service fees shall be calculated based on actual costs. If there is any other contract, this contract shall prevail.
6.During the warranty period, be sure to keep this card and show it to the maintenance personnel.
7.If you have any questions, please contact the agent or our after-sales service center directly.
40

For Both FCC & IC application:
This device complies with Part 15 of the FCC Rules / Industry Canada licence-exempt
R
SS standard(s). Operation is subject to the following two conditions: (1) this device may not cause harmful
i
nterference, and (2) this device must accept any interference received, including interference that may cause
u
ndesired operation.
Le présent appareil est conforme aux CNR d'Industrie Canada applicables aux appareils radio exempts de
licence. L'exploitation est autorisée aux deux conditions suivantes :(1) l'appareil ne doit pas produire de
brouillage, et (2) l'utilisateur de l'appareil doit accepter tout brouillage radioélectrique subi, même si le
brouillage est susceptible d'en compromettre le fonctionnement.
Changes or modifications not expressly approved by the party responsible for compliance could void the
user's authority to operate the equipment.
This equipment has been tested and found to comply with the limits for a Class A digital device, pursuant to
part 15 of the FCC Rules. These limits are designed to provide reasonable protection against harmful
interference in a residential installation. This equipment generates uses and can radiate radio frequency
energy and, if not installed and used in accordance with the instructions, may cause
harmful interference to
radio communications. However, there is no guarantee that interference will not occur in a part
installation. If this equipment does cause harmful interference to radio or television reception, which can be
determined by turning the equipment off and on, the user is encouraged to try to correct the interference by
one or more of the following measures:
—
Reorient or relocate the receiving antenna.
—
Increase the separation between the equipment and receiver.
—
Connect the equipment into an outlet on a circuit different from that to which the receiver is connected.
—
Consult the dealer or an experienced radio/TV technician for help.
MPE Requirements
To satisfy FCC / IC RF exposure requirements, a separation distance of 20 cm or more should be maintained
between the ante
nna of this device and persons during device operation.
To ensure compliance, operations at closer than this distance is not recommended.
Les antennes installées doivent être situées de facon à ce que la population ne puisse y être exposée à une
distance de moin de 20 cm. Installer les antennes de facon à ce que le personnel ne puiss
cm ou moins de la position centrale de l’ antenne.
La FCC des éltats-unis stipule que cet appareil doit être en tout temps éloigné d’au moins 20 cm des
personnes pendant son functionnement.
41



