TK3-M350产品使用说明书
2024.4
用户说明书
V1.0


目录
一、免责声明与警告 ·································· 01
二、TK3供电系统介绍································· 01
三、TK3供电系统安装和使用教程 ························ 06
四、固件升级 ······································· 29
五、产品保养与维修 ·································· 42
Contents
I. Disclaimers and Warnings ··························· 45
II. Introduction to TK3 Power Supply System ············· 45
III. Installation and Use Course of TK3 Power Supply System··· 50
IV. Firmware Upgrade································ 74
V. Product Maintenance and Repair····················· 85

01
一、免责声明与警告
二、TK3供电系统介绍
警告事项
感谢您购买成至智能产品。本文所提及的内容关系到您的安全以及合法权益与责
任。使用本产品之前,请仔细阅读本文以确保已对产品进行正确的设置。不遵循
和不按照本文的说明与警告来操作可能会给您和周围的人带来伤害,损坏本产品
或者其他周围的物品。本文档及所有相关的文档最终解释权归成至智能所有。如
有更新,恕不另行通知。请访问www.czi.com.cn官方网站以获取最新的产品信息。
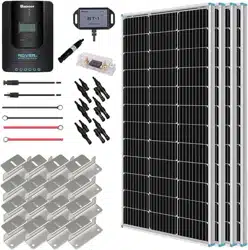
成至 TK3 成至新一代地面供电系统,进一步优化尺寸和重量,将 220V 交流电转
换成 400V 高压直流电,通过高性能镍合金供电线缆传输给无人机,使无人机实
现 24 小时不间断飞行。配合无人机矩阵灯、大功率云台灯、云台相机等任务载荷
使用,可在复杂的应急场景中满足长时间大面积的应急照明和监控需求。
①使用前需要详细阅读说明书,确保 TK3 线缆被正确连接到无人机上。为防止
旋转的桨叶打到 TK3 线缆,需要使用轧带将 TK3 线缆固定在无人机上。
②使用 TK3 时,无人机电池电量不要低于 60%,否则 TK3 会给飞机电池充电,
影响电池寿命。
③无人机起飞之前,不要开启“电源开关”,否则无人机将无法起飞。
④不可在雨天飞行(雨水会顺着供电线缆进入电源箱)。
⑤为防止意外发生,任何时候都不可徒手触摸 TK3 线缆( 高压 400V)。如必须
带电接触 TK3 电缆,请务必带好绝缘手套(绝缘要求大于 500V)。
02
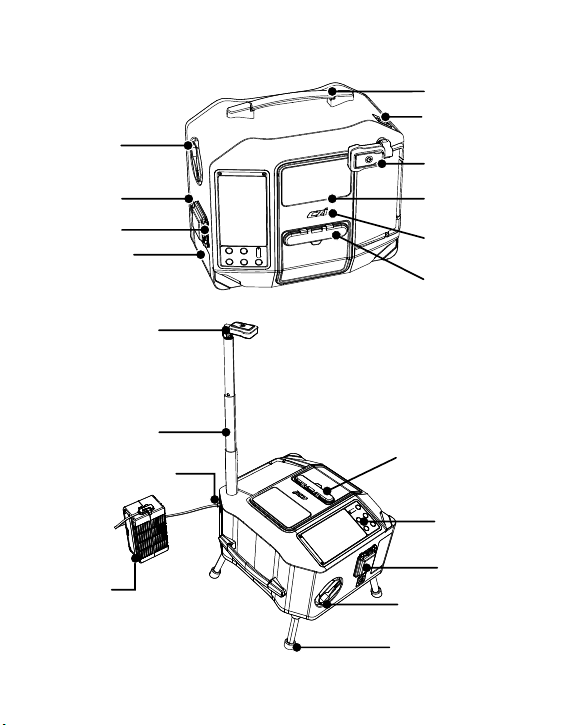
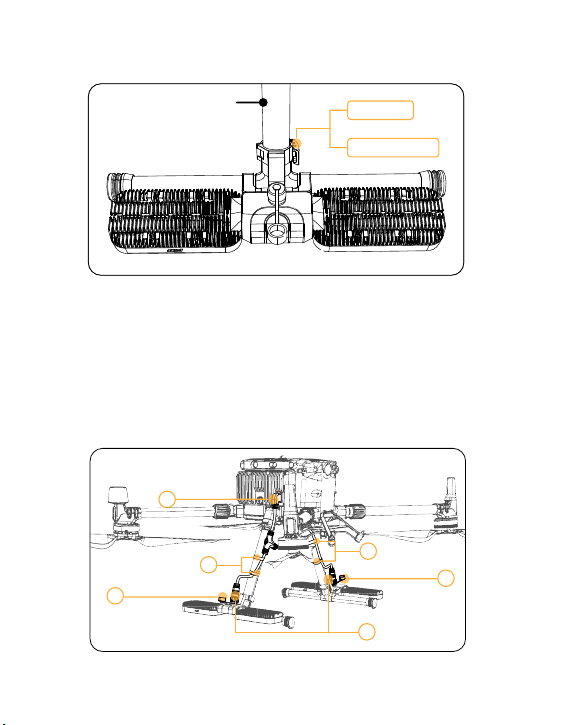
2.1 机载电源
对频按键
升级TPYE-C口 高压输入接口
灯光输出接口
03
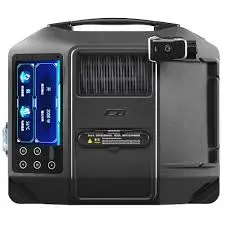
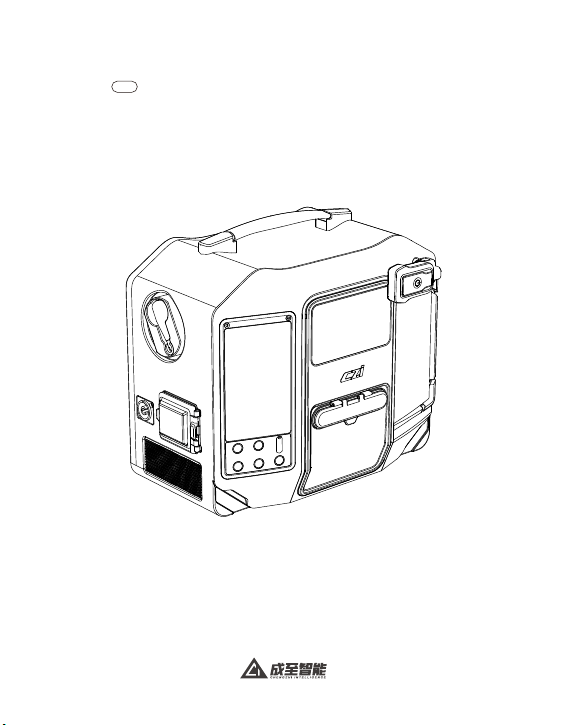
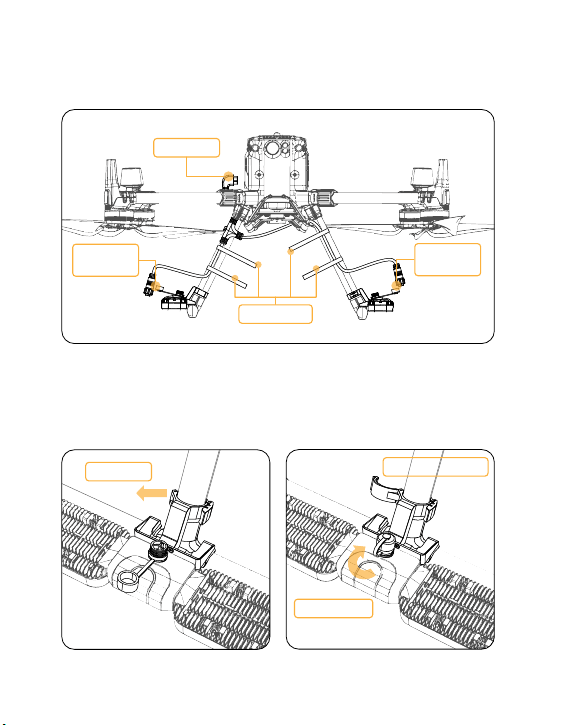
2.2 地面供电系统
运输模式
工作模式
提手
单手可提
电池连接 TYPE-C
插口
近场灯光系统
近场灯光系统
可伸缩支撑杆
飞机电池
电池连接 TYPE-C 插口
线缆观察口
czi 标志
操作面板
总电源开关
手动回线手柄
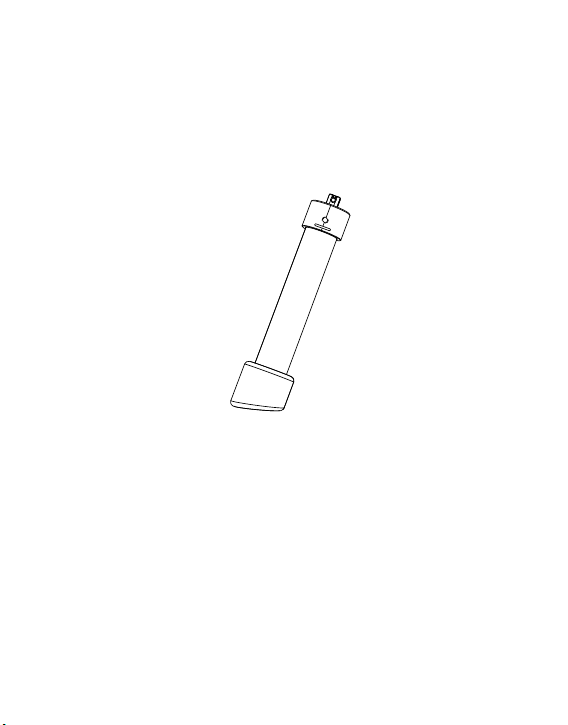
快拆式脚架
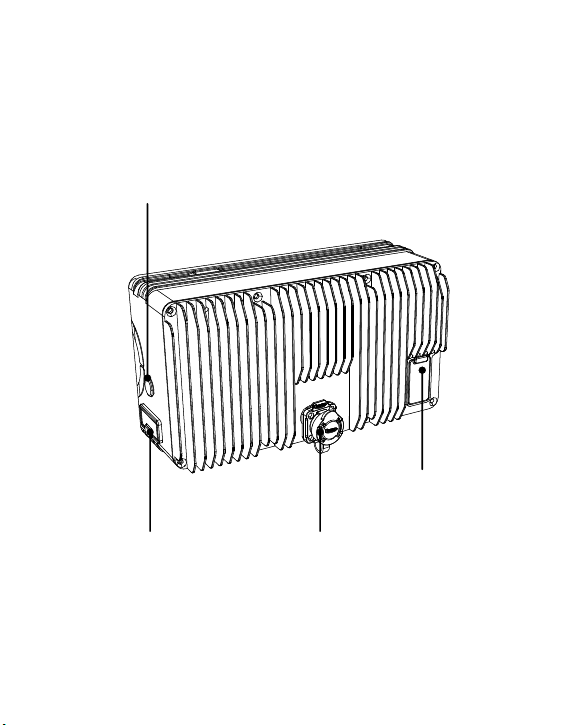
高压线缆出线口
输出口三防设计
高压线缆出口输出口
总电源开关
三防设计
手动回线手柄
打开金属手柄
可以手动收线
电源插座
电源散热进风口
双层设计
04
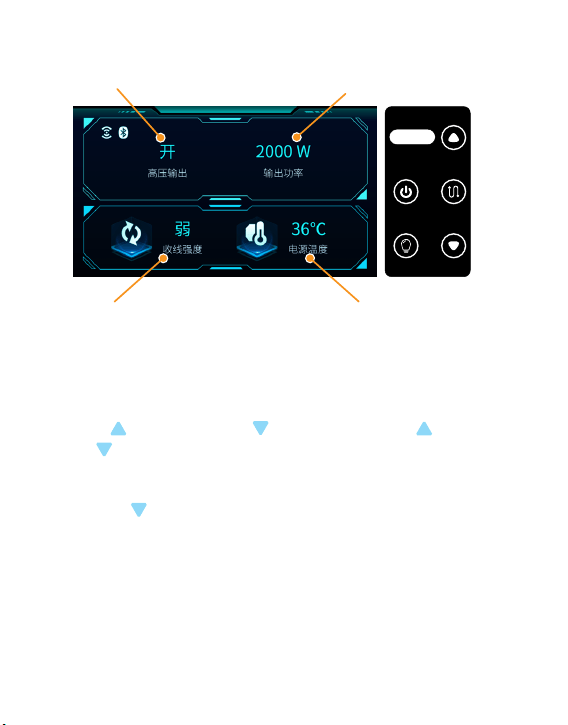
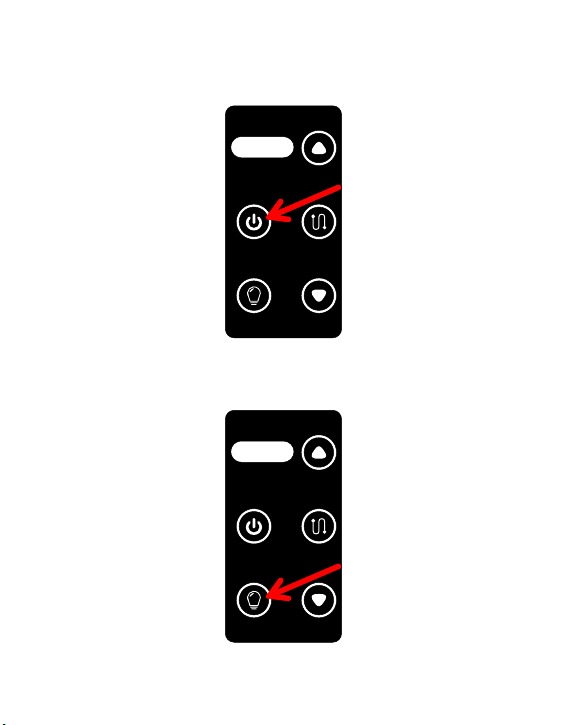
2.3 地面供电系统控制面板
电源开或关
收线力度,共分“弱”、“中”、“强”三挡
地面端输出功率
电源温度
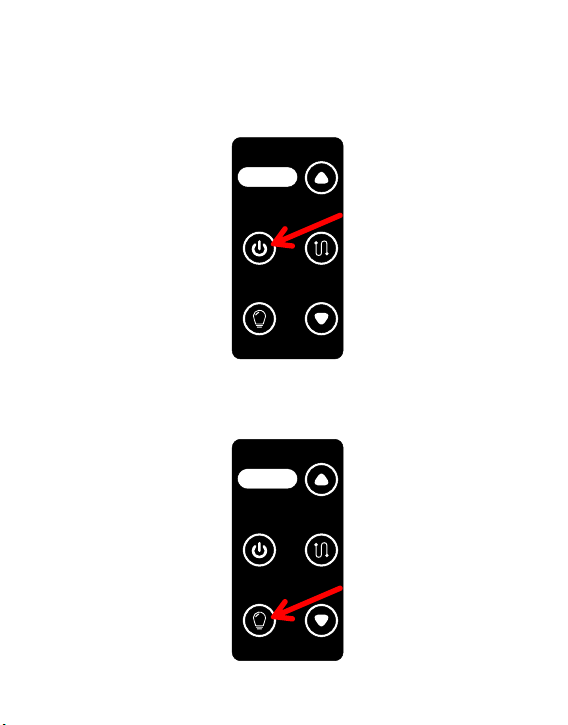
2.3.1 长按“电源开关”3 秒控制电源输出开启和关闭(开启和关闭时有发出蜂鸣声)
2.3.2 短按“灯光开关” 控制天空端的灯光开启和关闭(开启和关闭时有发出蜂鸣
声 );
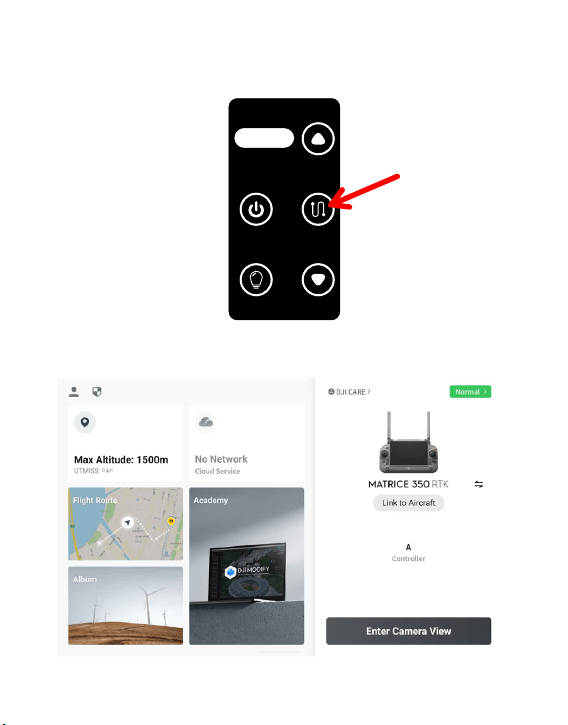
2.3.3 短按“收线开关” 控制自动收线开启和关闭(开启和关闭时有发出蜂鸣声);
2.3.4 短按 增加收线力度,短按 减小收线力度;长按 3 秒 切换语言模式,
长按 5S 进入对频模式,如果在对频模式长按,取消对频;
2.3.5 断电报警:当高压输出为“开”时,电源断开时,“电源开关”蜂鸣器发出
60s 的警报声,通上电源即可恢复;
2.3.6 长按 3S 进入对频模式 , 同时天空端长按 3S“对频按键”,天空端指示灯
对频前,绿灯常亮 ; 对频中,绿灯熄灭,红灯闪烁 ; 对频成功,红灯熄灭,绿灯常亮;
对频失败,红灯亮 3 秒后熄灭,绿灯变为常亮。
电源开 关
Power s witch
收线开 关
Line s witch
灯光开 关
Ligh t switc h
此键长 按
3秒
Press a nd hold t his
Bottom f or 3 secon ds

05
TK3地面端
TK3-M350 天空端
外形尺寸
外形尺寸
重量
功率
额定输入电压
额定输出电压
主额定输出电流
356mm*310mm*229mm
165.6mm*90.9mm*68.9mm
566g±5%
额定3.0KW
260-410 VDC
36.5-52.5 VDC
60A
重量 7.5kg±5%
功率
≥3000W(176Vac-264Vac输入);≥1500W(90Vac-175Vac
输入)
线缆
80 米电缆
线缆直径小于 2.8mm,过电流能力大于 10A, 重量小于 1.2kg/ 百
米 , 抗拉强度大于 20kg,耐压 600V,内阻小于 3.6Ω/100m@20℃
额定输入电压 90-264 VAC+10%
额定工作频率 50/60 Hz
输出电压 400 VDC
2.4 设备参数
06
三、TK3供电系统安装和使用教程
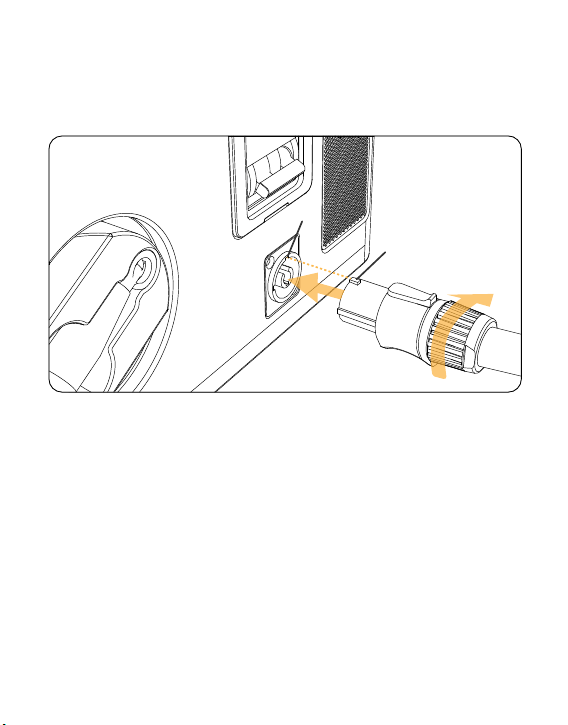
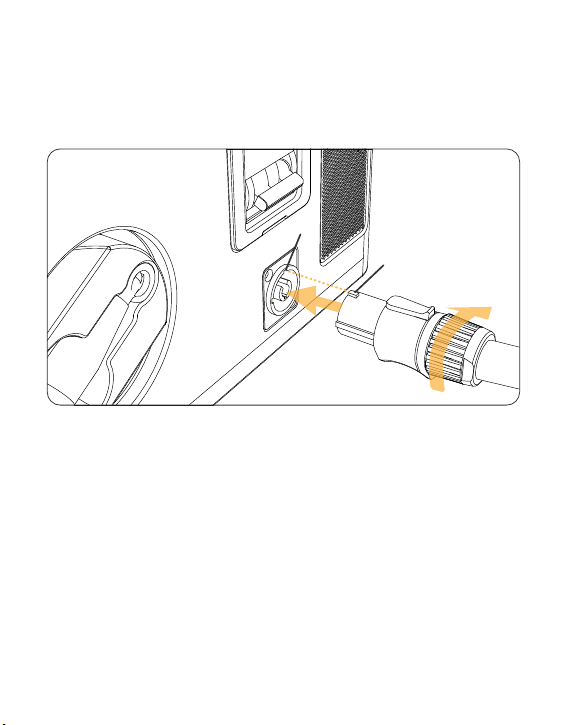
3.1 激活步骤(首次使用设备)
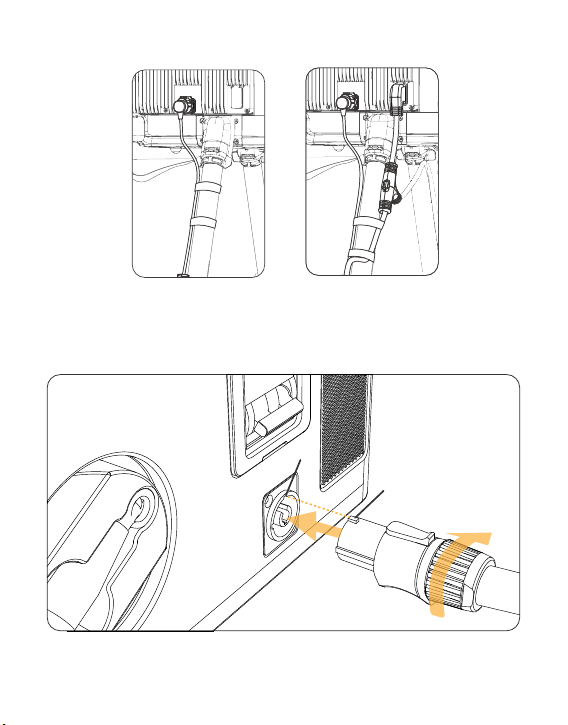
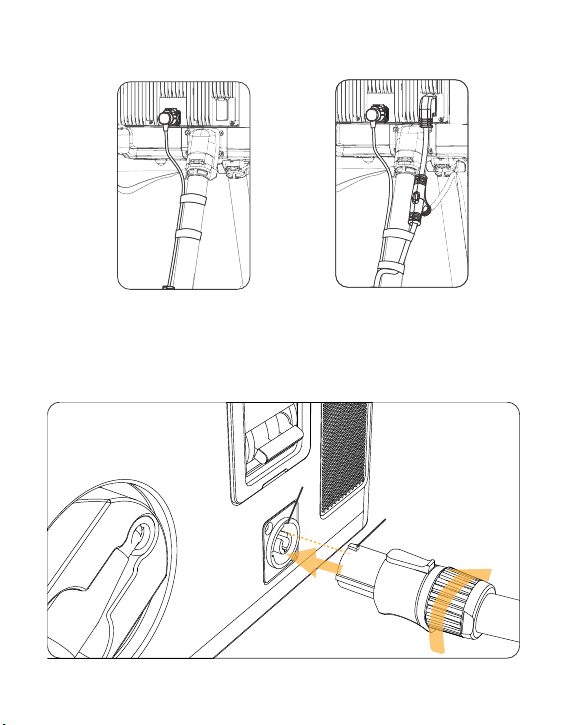
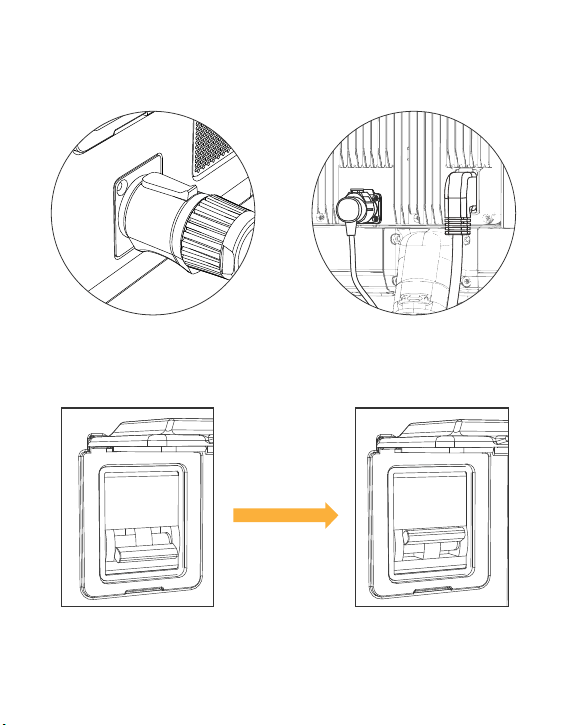
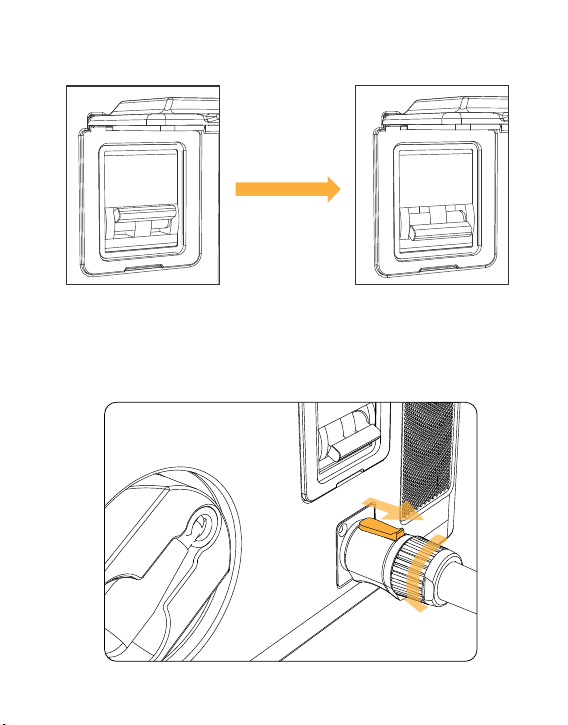
1)图示 1 处的凸块与图示 2 的槽对准后,将电源线插入,顺时针旋转,直到听到
“咔”,表示已完成。
2)电源插头与市电或者发电机插座连接完成,打开空气开关。
3)APP下载:www.czi.com.cn
1
2
07
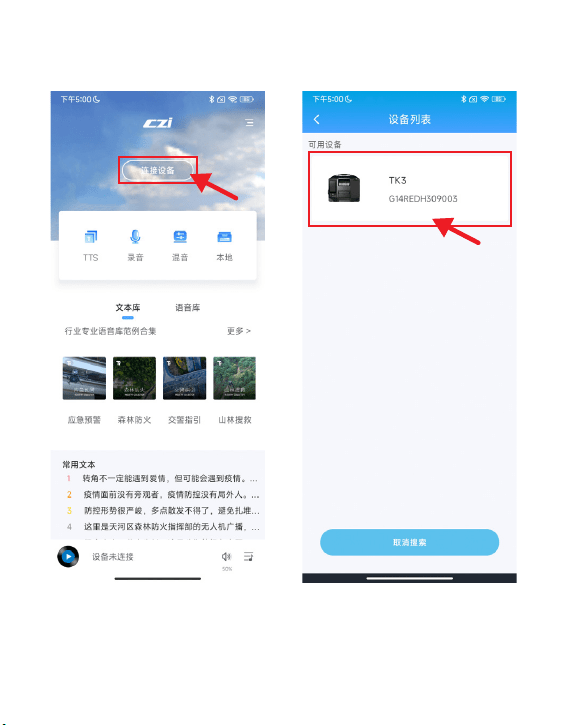
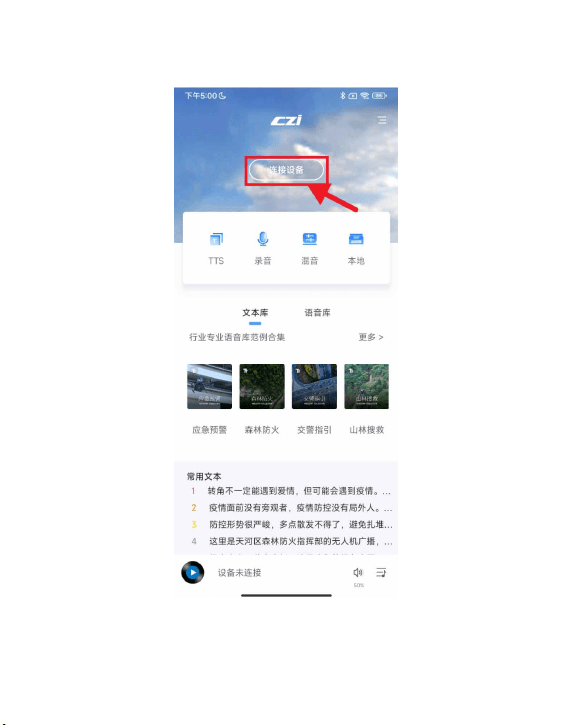
4)打开“智声”APP,进入“智声”主界面,
点击“连接设备”,如下图所示:
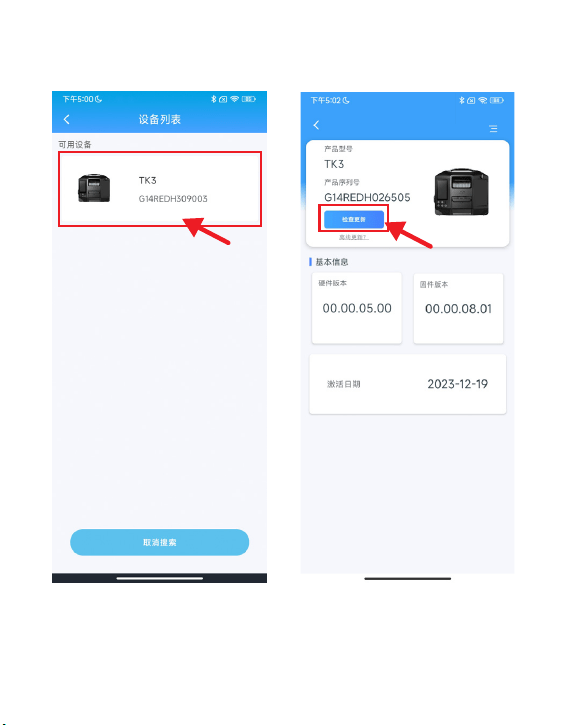
5)点击可用设备“TK3”, 如下图所示:
08
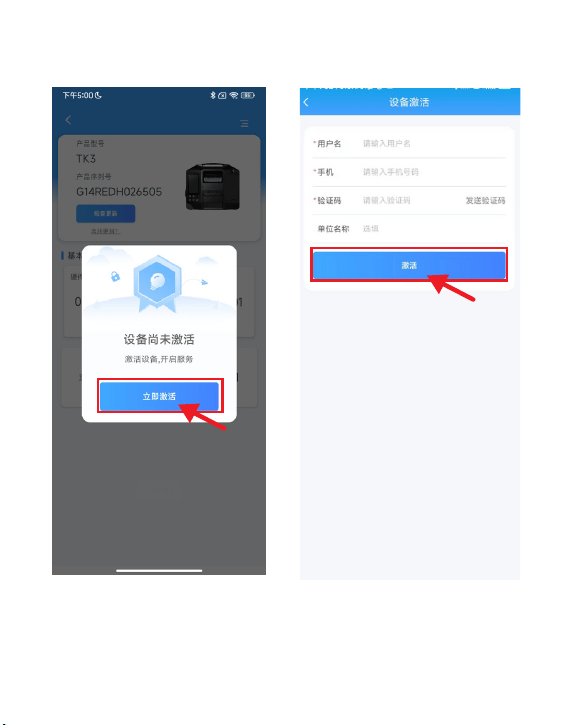
6)点击“立即激活”,如下图所示: 7)填写信息后,点击“激活”进入下
一步。
09
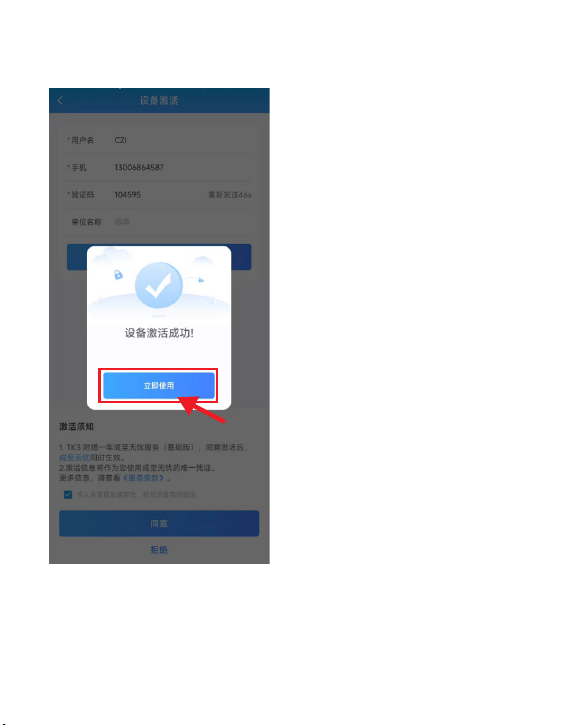
8)显示“设 备 激活成 功”,点击“立
即使用”。
9)等待地面端显示屏熄屏并重新启动,
激活完成。
10
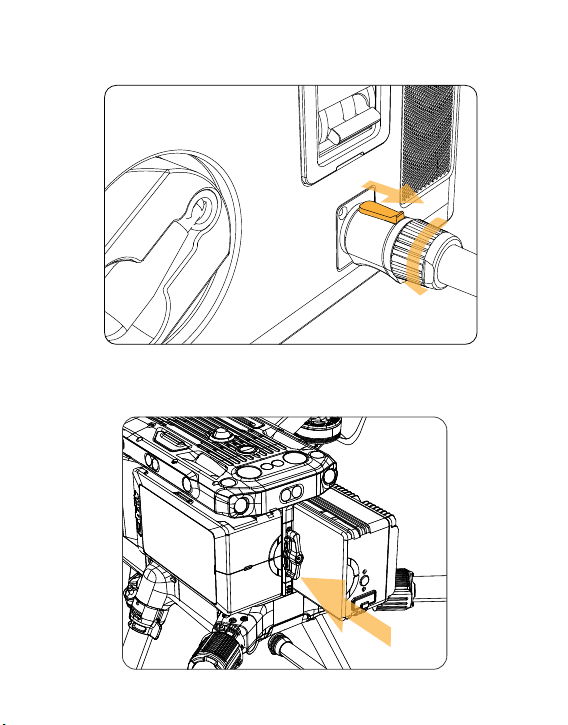
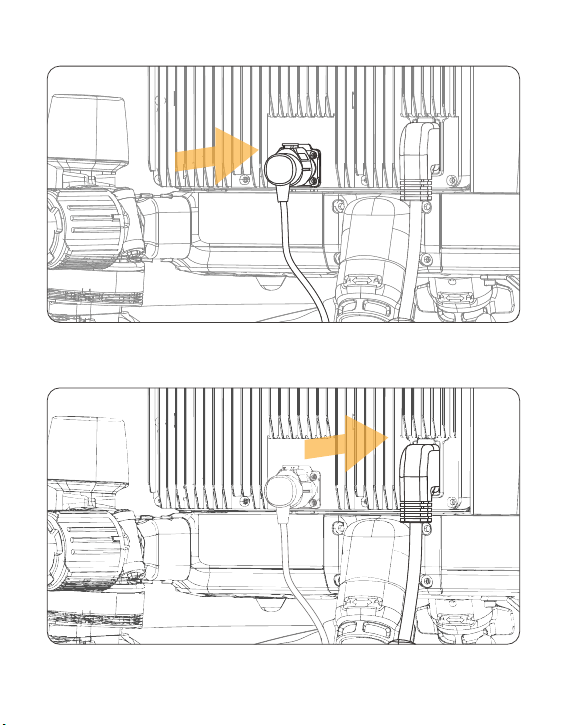
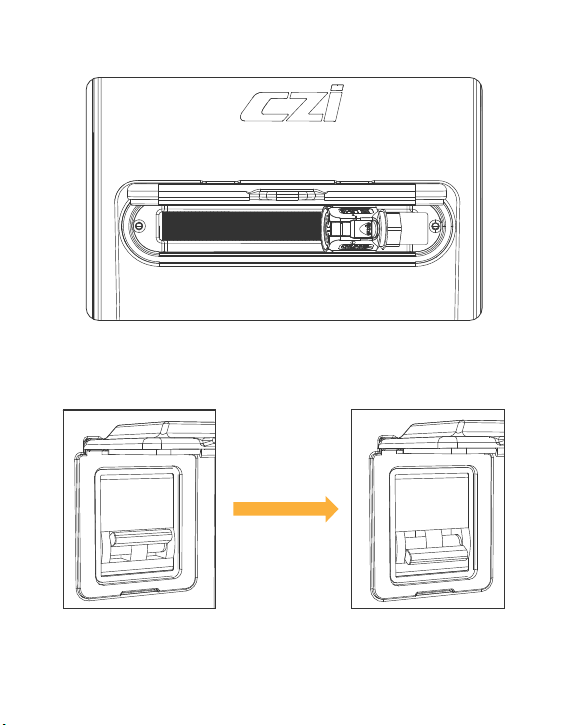
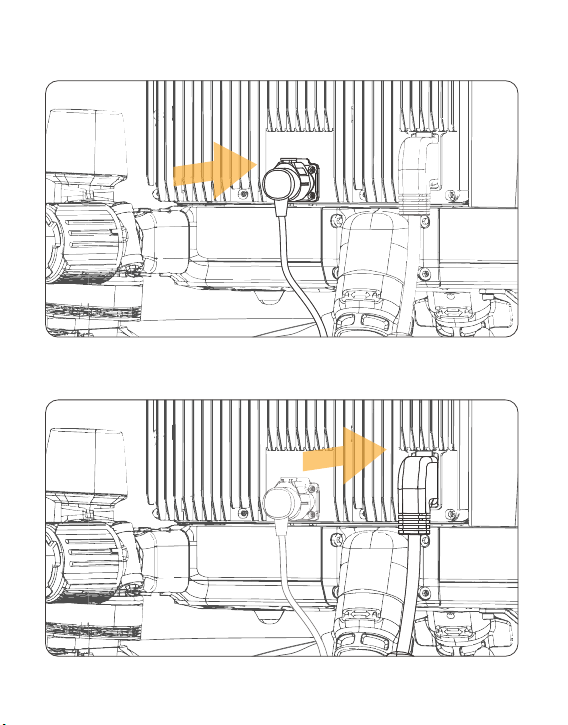
10)将按钮往箭头 1 所示方向移动,逆时针方向旋转,将供电线插头从插座上拔下,
把供电线收回,并盖上电源盖。
3.2 机载电源的安装教程
3.2.1 将天空端安装到无人机右电池的舱位上,替代原来的右电池(天空端只能
替代右边的电池)。
1
11
3.3 ML200-M350 矩阵灯的安装教程(若不使用 ML200-M35 矩阵灯省略此步骤)
3.3.1 使用说明
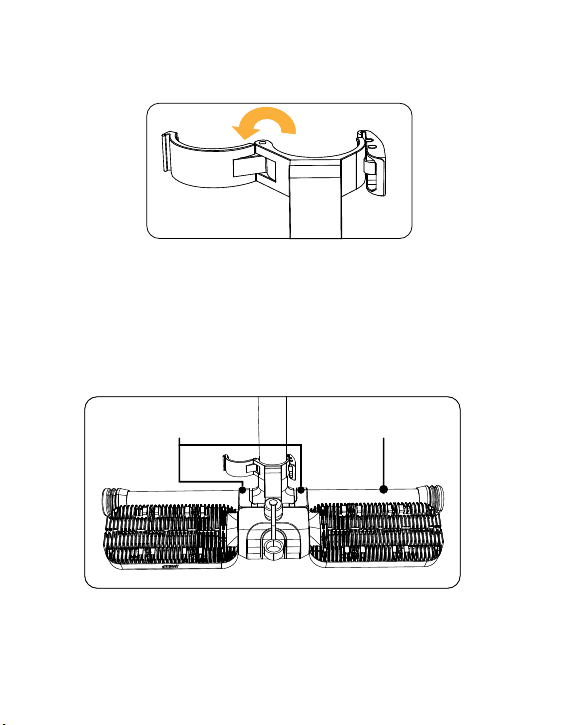
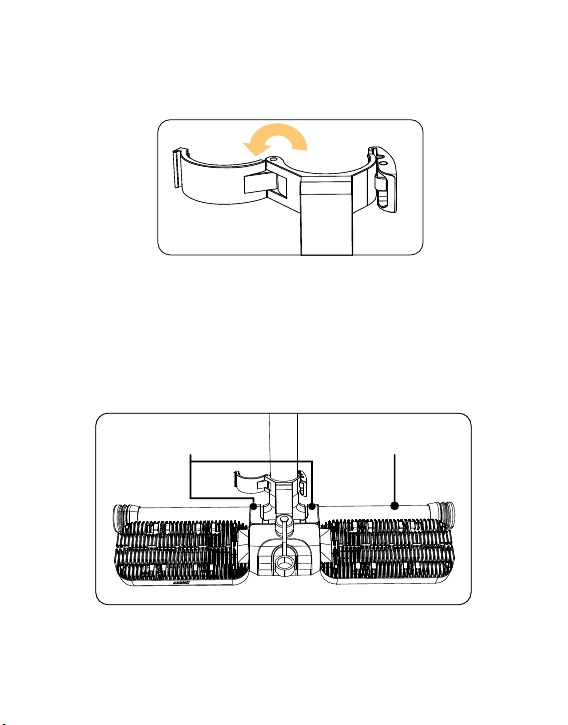
1)将管夹打开到如下图状态。
2)将灯体上的两个 U 型座架在无人机的脚架上,如下图状态。
U 型座 M350 脚架
12
3)将已经打开的灯管夹向前推至贴紧M350的脚架竖管,然后合起灯管夹的夹盖,
用搭扣钩住灯管夹夹盖,最后按压搭扣尾部将其扣紧,安装完成,如下图。
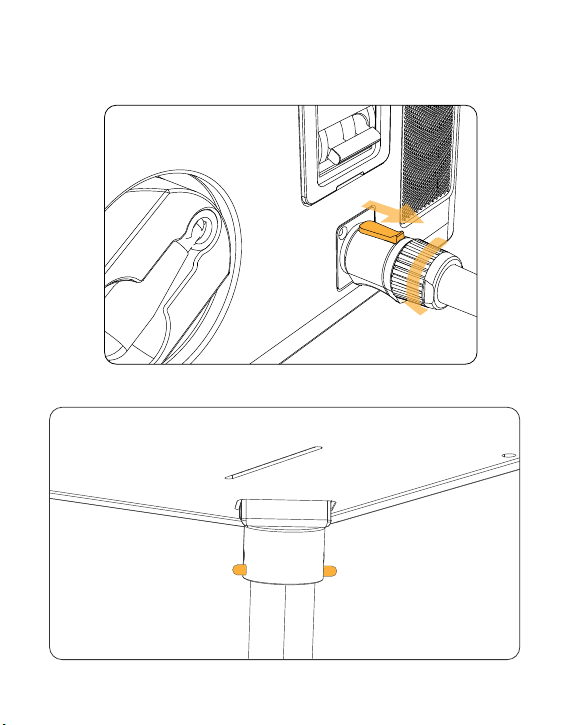
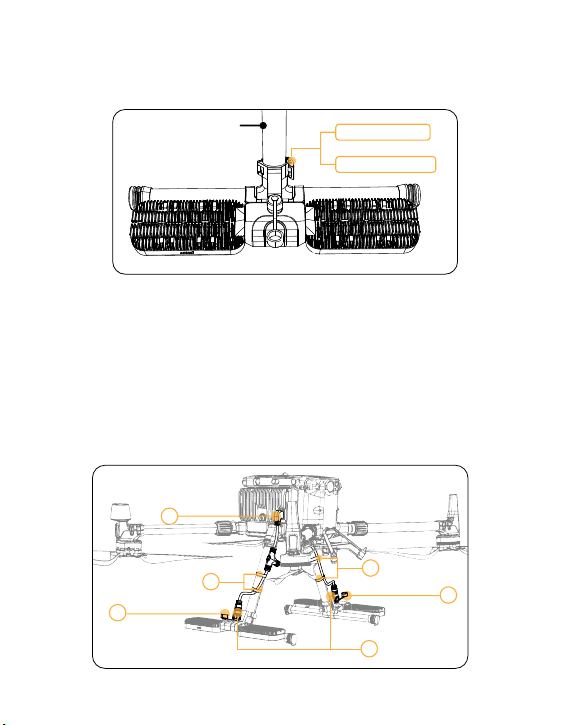
4) 拿出产品配置的电缆,逐一把端部的插头插入对应的插座内。
①插上天空端插头;
②松开灯体上的插头防水盖;
③插上灯体上的插头,其中灯具上的插头插好后还需要将插头上的螺母顺时针
拧紧在插座上;
④将电缆按下图方式排布在两个支撑竖管上,用电缆自带的魔术贴将线缆固定,
完成安装,如下图。
M350 支撑架竖管
搭扣扣住
按压搭扣尾部
1
2
3
4
2
4
13
3.3.2 拆卸
1) 依次拆下三个魔术贴,然后逆时针拧开插在灯具上的插头螺母,将所有插头
依次拔出,即可取下电缆,如下图。
2) 将搭扣尾部向外掰开,然后打开灯管夹盖,再将整灯向上拉起取出,最后盖
上插座上的防水盖,即可完成拆卸,如下图。
向外掰开
打开灯管固定夹
盖上防水盖
拔出插头
拧开螺母
拔出插头
拆开魔术贴
拧开螺母
拔出插头
14
3.4 TK3 地面端的安装教程
3.4.1 把 TK3 地面端快拆脚架分别装在地面端上,如图所示。(地面有水或者泥
泞的场所选择使用快拆脚架;地面没有水,无需装上脚架,可以省略此步骤)
3.3.3 控制
上电后,系留地面端面板可控制开关灯。
15
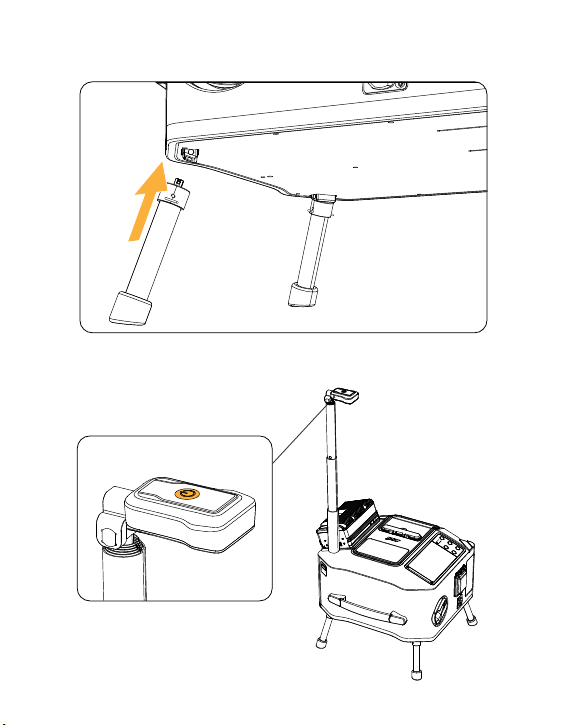
3.4.2 用手握住手把,用力装到支座上,直到听到“咔”的一声,表示快拆脚架
已经安装成功了。
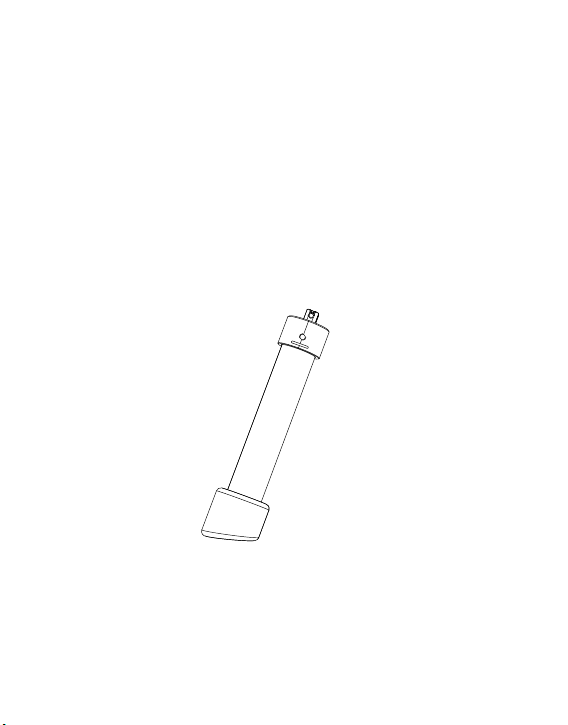
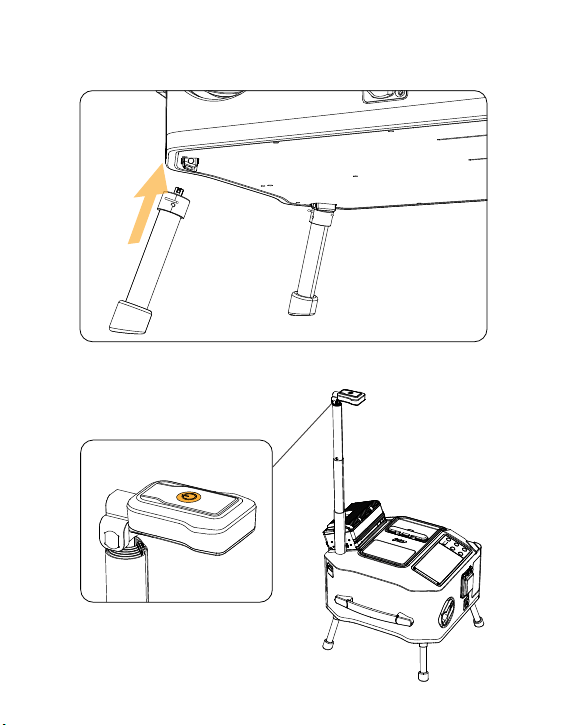
3.4.3 拉出 TK3 地面端上的伸缩杆,按压照明灯电源键,打开照明灯光。(夜间
操作使用)
16
3.4.4 将地面端 LP12 航空插头拉出约 3 米,与机载电源的 LP12 航空插座连接。
3.4.5 将 ML200-M350 矩阵灯的插头,与机载电源的灯插口插座连接。
17
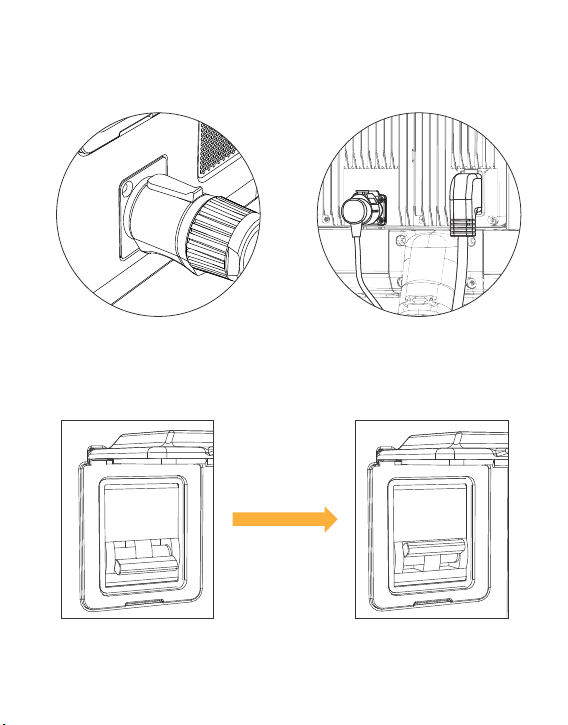
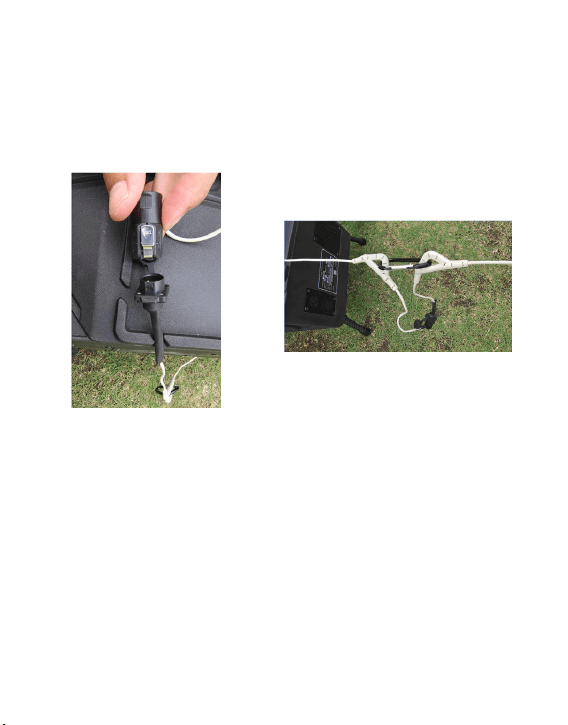
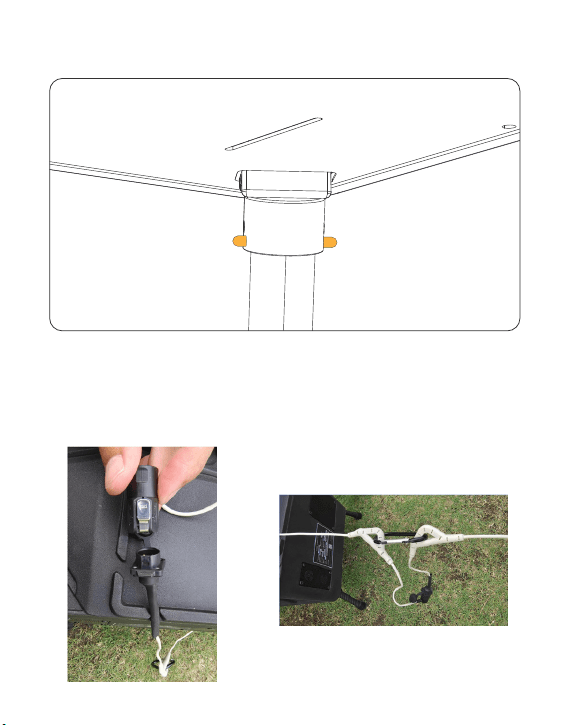
3.4.6 用魔术轧带把 TK350 供电线绑在无人机脚架上,也可以与矩阵灯供电线一
起绑。
单独 TK3 线缆的绑法 与矩阵灯供电线一起的绑法
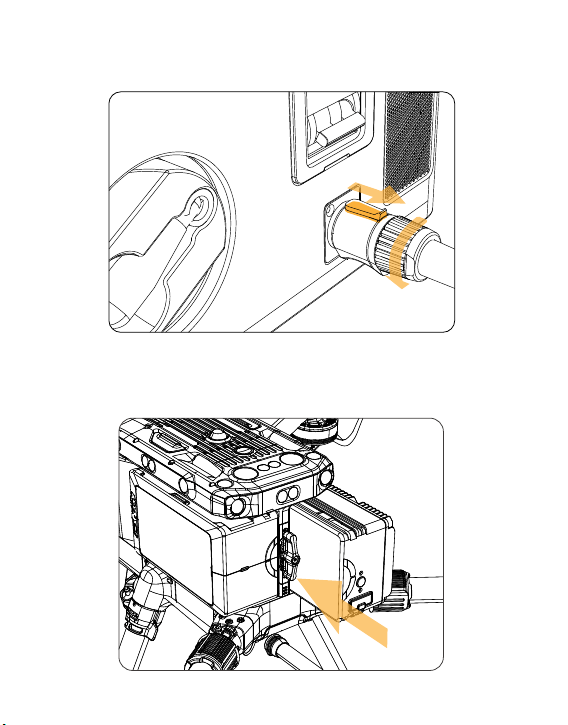
3.4.7 图示 1 处的凸块与图示 2 的槽对准后,将电源线插入,顺时针旋转,直到
听到“咔”,表示已完成。
1
2
18
3.4.8 电源插头与市电或者发电机插座连接。
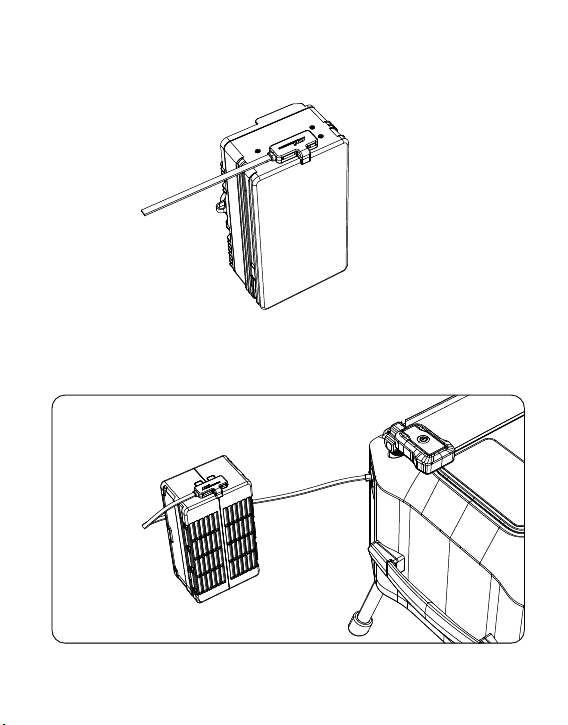
3.4.9 将电池信号线插入 M350 电池插座,如图所示:
3.4.10 再将电池信号线插入 TYPE-C 插座,如图所示:
19
3.5 TK3 供电系统使用教程
3.5.1 按照上述步骤安装好 TK3 天空端、灯光和 TK3 地面端后。
3.5.2 打开 TK3 地面端的空气开关,开启地面端。
20
电源开关
Powe r switc h
收线开关
Lin e switch
灯光开关
Lig ht swit ch
此键长按
3秒
Pres s and hol d this
Botto m for 3 seco nds
3.5.3 开启无人机,飞机解锁,飞到离地 3 米高度悬停。
3.5.4 长按“电源开关”3 秒启动电源输出。(请注意,飞机没起飞时不要启动电
源输出,否则无人机无法起飞)
3.5.5 短按“灯光开关”开启灯光。(无人机未起飞,灯光亮起 3 秒后自动关闭)
电源开关
Powe r switc h
收线开关
Lin e switch
灯光开关
Lig ht swit ch
此键长按
3秒
Pres s and hol d this
Botto m for 3 seco nds
21
3.5.6 飞机以 1 米 / 秒的速度上升飞到预定高度悬停,短按“收线开关”开启收线,
收线力度根据需要调整,能把线缆拉直即可。
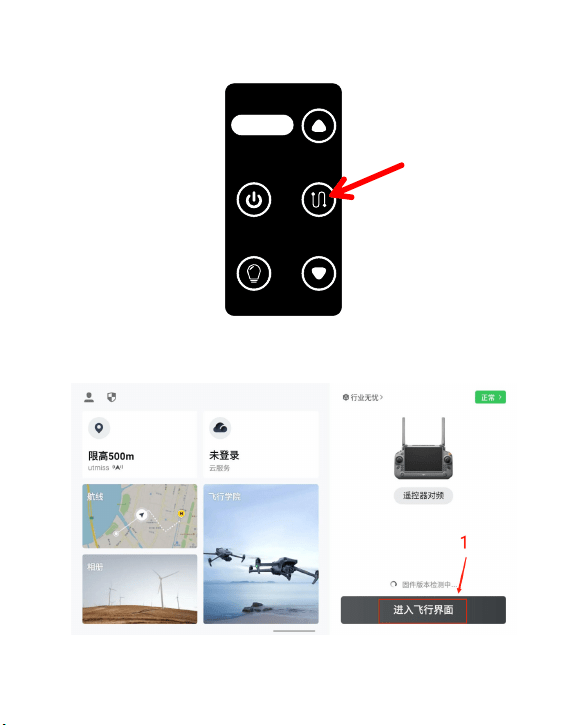
3.5.7 遥控设置教程
1)打开遥控,进入飞行界面。
电源开关
Powe r switc h
收线开关
Lin e switch
灯光开关
Lig ht swit ch
此键长按
3秒
Pres s and hol d this
Botto m for 3 seco nds
22
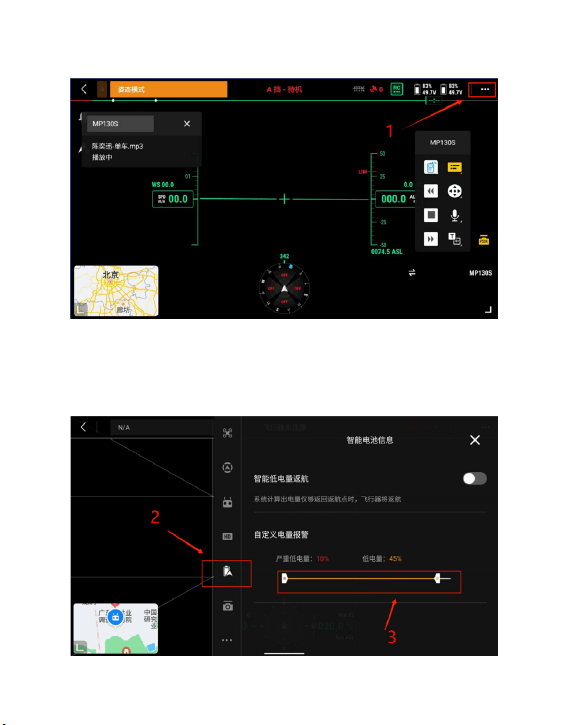
2)进入“飞控参数设置”,如下图所示。
3)点击图标处,自定义电量报警,推荐设置低电量值范围 45%。(当电量低于
45% 警报,系留为非正常工作状,请尽快下降无人机)
23
3.6 TK3 供电系统回收教程
3.6.1 收线强度调整为“中”,操纵无人机以 1 米 / 秒的速度下降。
3.6.2 无人机降落至离地面 3 米高度时悬停,关闭灯光,关闭收线,关闭电源输出。
3.6.3 飞机继续降落地面停桨,关闭飞机。
3.6.4 拔下 LP12 航空插头。(千万注意,拔 LP12 航空插头前,必须确认“电源开关”
处于“关”的状态)
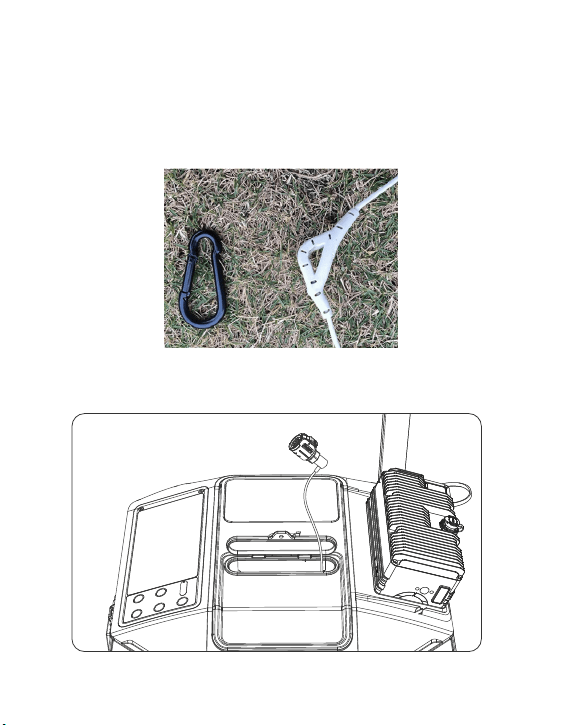
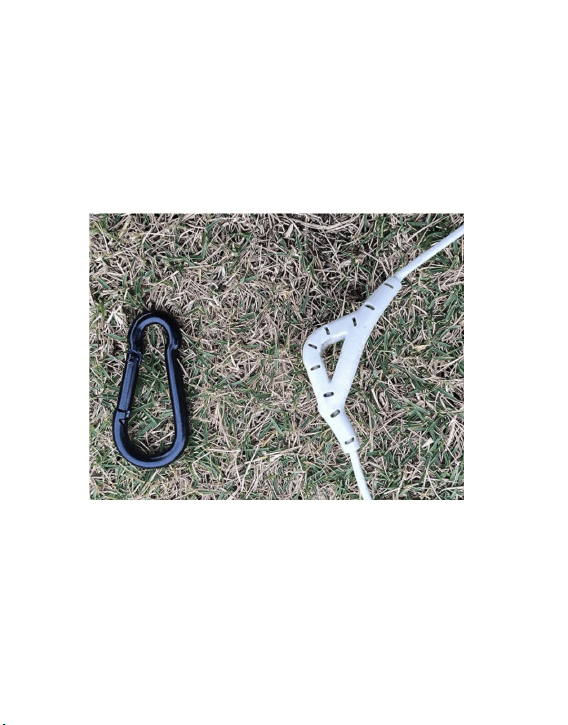
3.6.5 将挂线勾拆卸下来,如图所示:
3.6.6 关闭应急照明灯,把伸缩杆收回。(夜间操作使用)
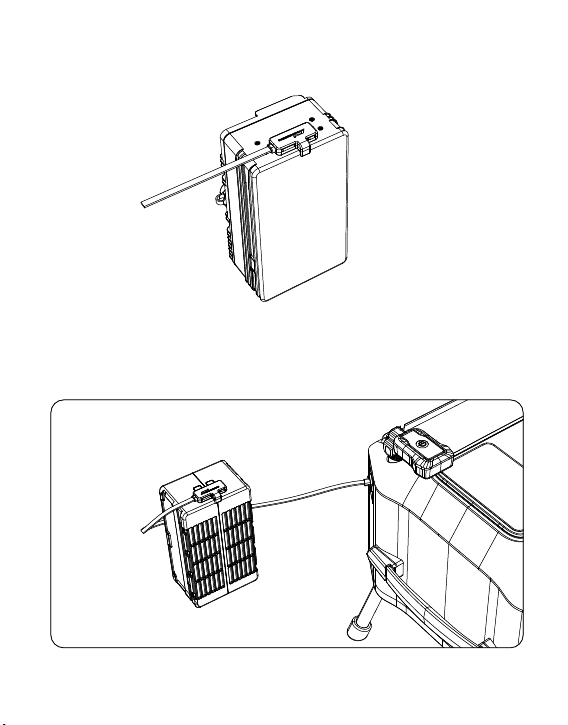
3.6.7 手动把剩余供电线缆收回设备内部,如图所示。(图中收不回去是正常的,
需要手动将线放进地面端里面)
24
3.6.8 手动将线折叠放进地面端里面,收纳完成后如图所示:
3.6.9 关闭 TK3 地面端的空气开关。
25
3.6.10 将按钮往箭头 1 所示方向移动,逆时针方向旋转,把将供电线接头从插座
上拔下,把供电线收回,并盖上电源盖。
3.6.11 把 TK3 地面端竖直立起,手握住图示位置,直接把折叠脚架拔出来。
1
26
3.7 使用 TK3 常见问题及解答
问题 1:使用 TK3 时能否先供电后启动无人机?
答:不能,这样无人机无法起飞,正确步骤是先启动无人机,后供电。
问题 2:导线破损能自行处理吗?
答:导线出现破损不能自行处理,必须发回厂家处理。
问题 3:TK3 那些接口支持热插拔?
答:TK3 是高压供电设备,所有接口都不支持热插拔,切记!
问题 4:开启电源怎么判断系留是否正常工作?
答:打开“电源开关”,地面端显示屏输出功率正常,代表系留正常工作。
3.6.12 30 米延长线安装教程
将地面端线缆上的吊环与 30 米延长线的
吊环通过快拆卡扣连接,如图所示。
将地面端 LP12 航空插头拉出约
3 米,与 30 米延长线的 LP12
航空插座连接。
27
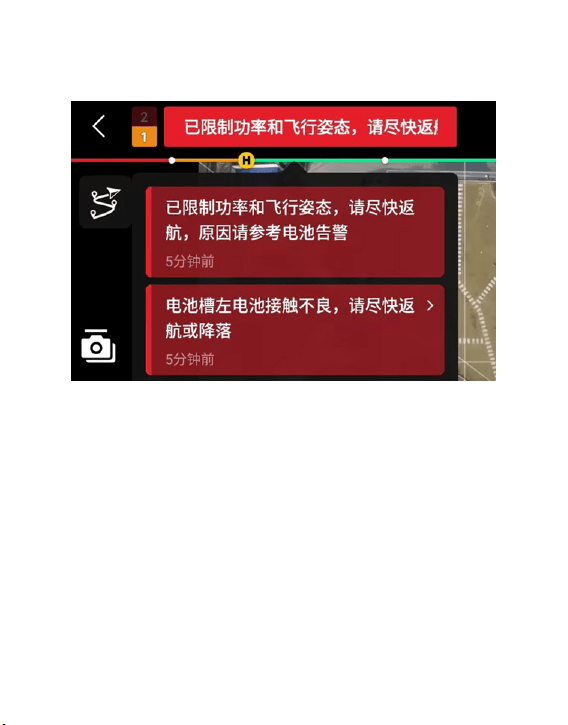
问题 5:使用 TK3 系留的过程中遥控器提示“电池槽左电池接触不良,请尽快
返航或降落”和“电池槽右电池接触不良,请尽快返航或降落”,“电池输出功
率不足,请尽快返航或降落”怎么办?
答 : 以上均为正常情况,可以继续飞行,使用 TK3 给飞机供电都会出现这个警报。
出现这种警报是因为无人机处于 TK3 工作状态下,优先 TK3 供电,当 TK3 供
电能满足无人机功耗时,电池没有功率输出,电池没有功率输出,就会激发飞
机报警,对飞行安全没有影响。
问题 6: 使用 TK3 系留的过程中遥控器提示“电池温度过低无法起飞,请等待电
池自加热至 10 度以上或提前预热电池”,怎么办?
答:将两个电池放到无人机,打开无人机电源,等待电池加热完成,无人机电
池再与地面端的 TPYE-C 连接。
28
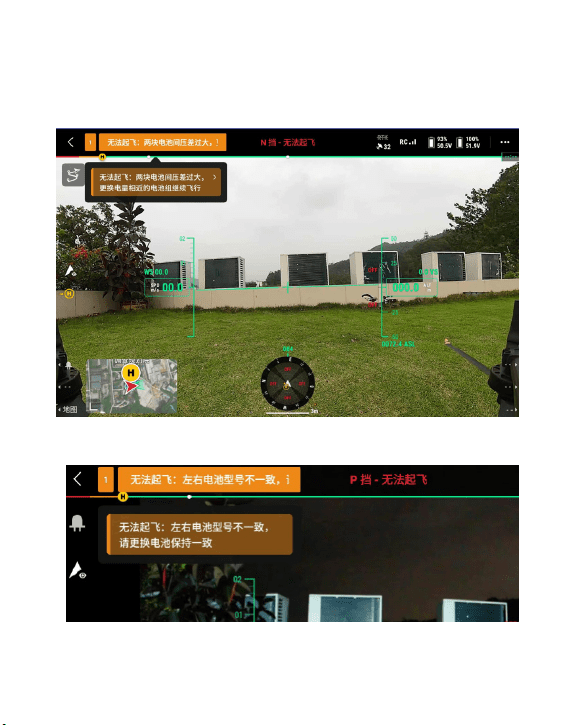
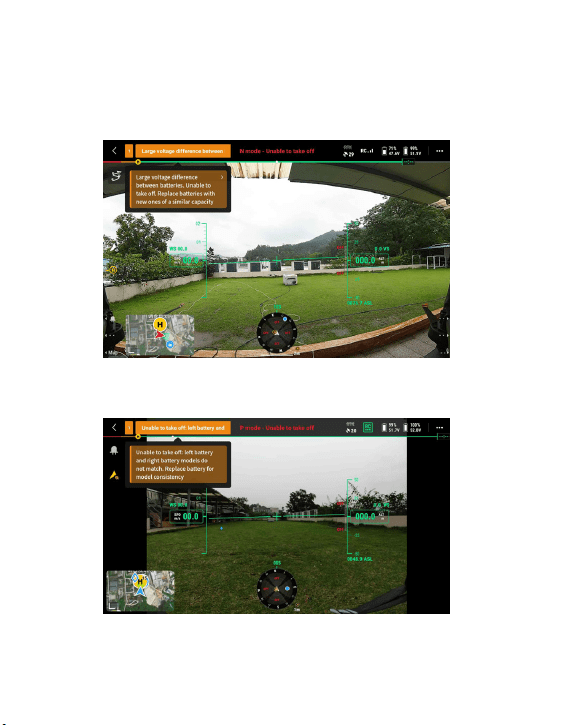
问题 7: 使用系留时,无人机下降后,遥控器报“无法起飞 : 两块电池间压差过大”
怎么办?
答;当电池电量过高时,出现两块电池间压差过大是正常的,或者可以调换两
块电池继续飞行。
问题 8: 使用系留时,无人机下降后,遥控器报“左右电池版本不一致”怎么办?
答:出现此报错是正常,重启无人机后即可再次起飞。
29
四、固件升级
4.1“智声”APP固件升级
4.1.1 App下载网址:
www.czi.com.cn
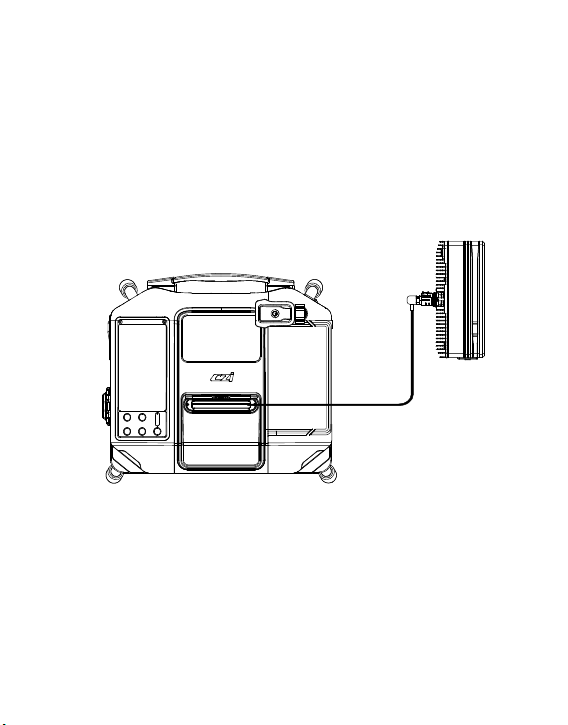
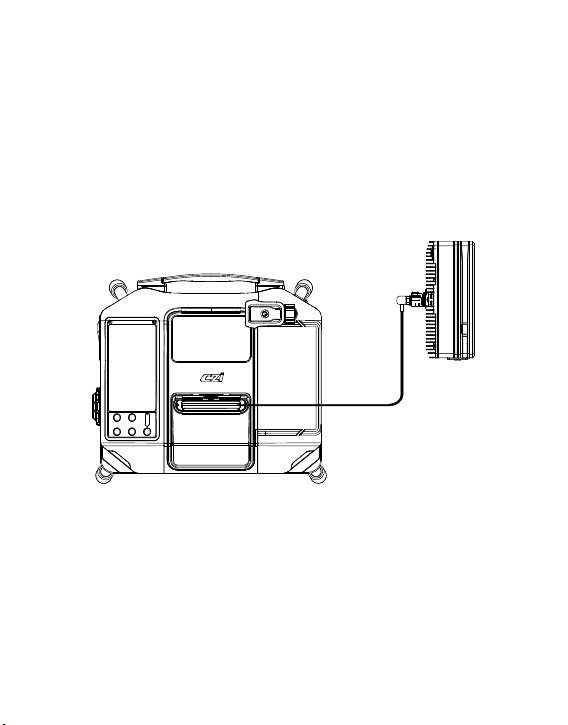
4.1.2 TK3地面端接上电源,打开空气开关;
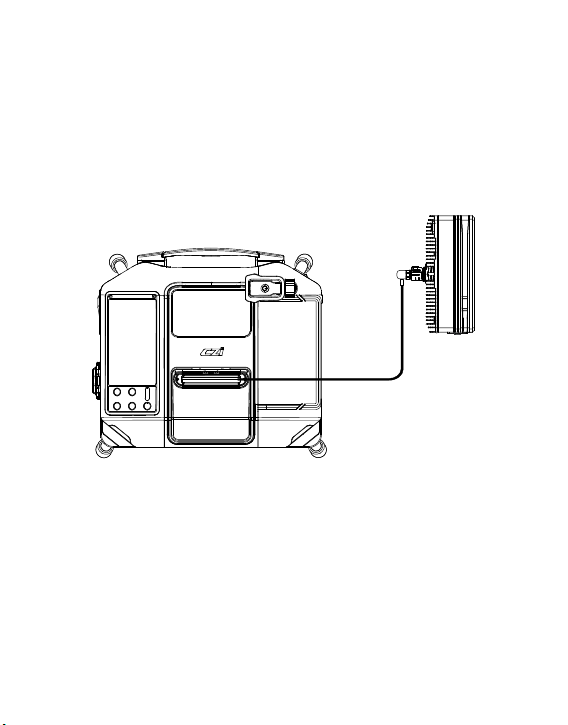
4.1.3 TK3地面端的高压线缆插入天空端上,长按“电源开关”3秒控制电源输出
开启。(天空端不能装到无人机上),如图所示:
30
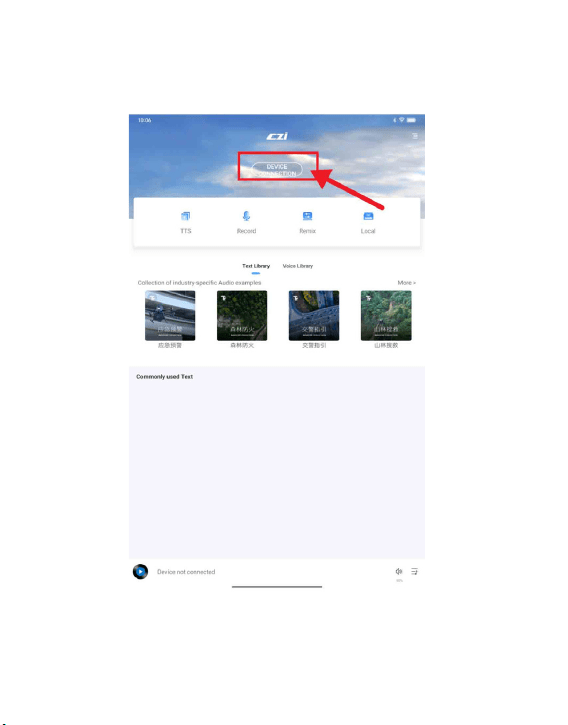
4.1.4 进入“智声”APP主界面,点击“连接设备”,如下图所示:
31
4.1.5 点击可用设备“TK3”, 如下图所
示:
4.1.6 点击“检查更新”, 如下图所示 :
32
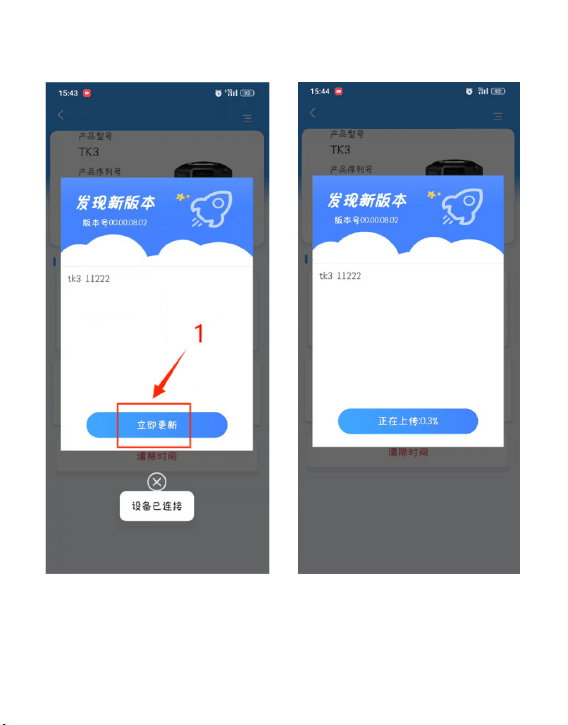
4.1.7 点击“立即更新”, 如下图所示 : 4.1.8 等待上传进度完成,如下图所示 :

33
4.1.9 上传成功,点击“确认”。 4.1.10 固件上传完成后等待地面端显
示屏熄屏并重新启动,升级完成。
34
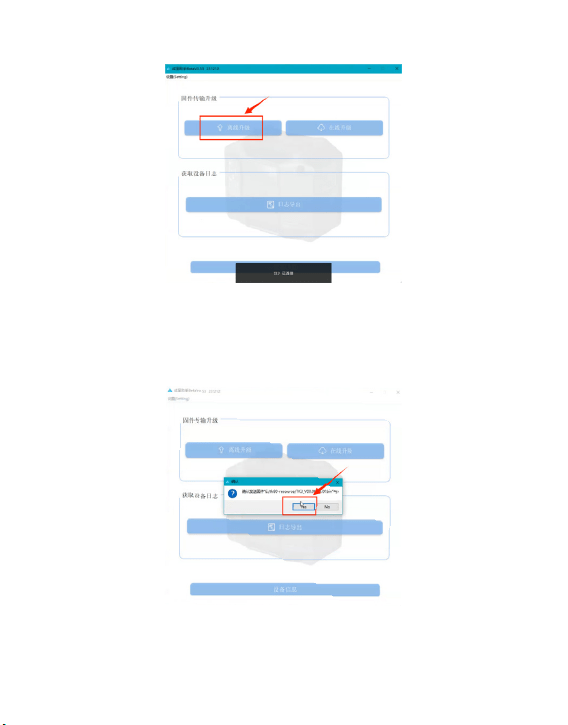
4.2 有线固件升级
4.2.1 在线升级方式。
4.2.2 官方网站 www.czi.com.cn 下载“CziAssistant.exe”PC 软件安装包。
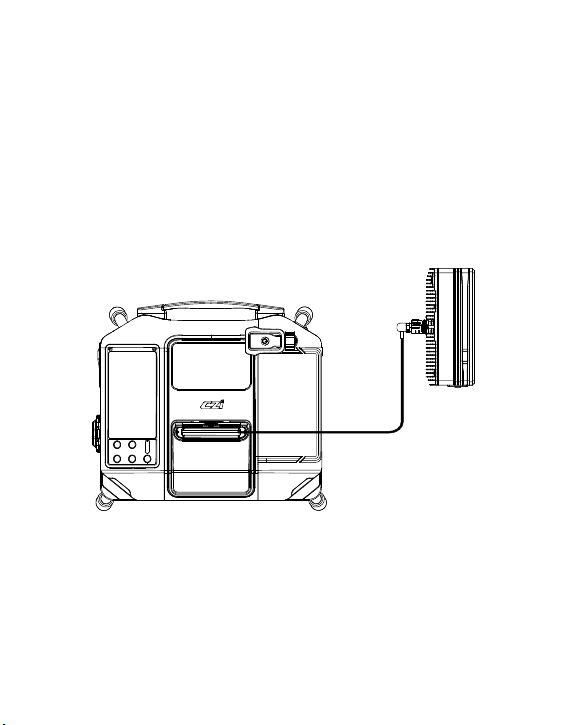
4.2.3 TK3 地面端接上电源,打开空气开关;用数据线连接面板的 TYPE-C 处,另
外一端连接电脑。
4.2.4 TK3 地面端的高压线缆插入天空端上,长按“电源开关”3 秒控制电源输出
开启。(天空端不能装到无人机上),如图所示。
35
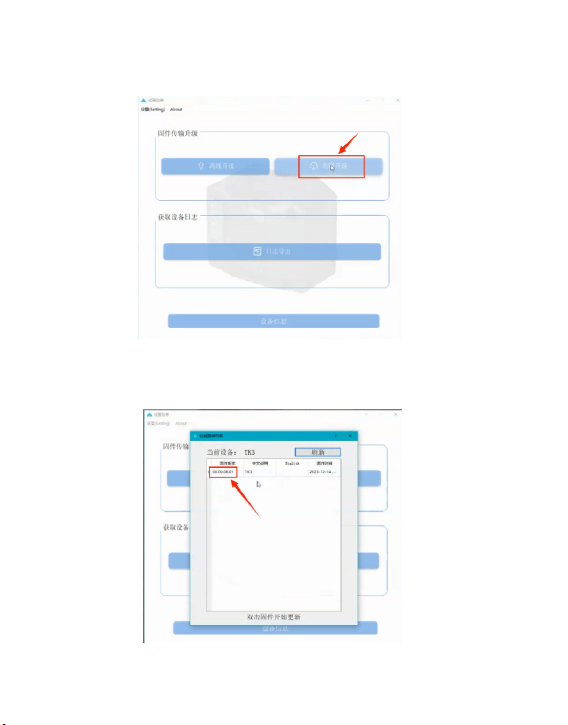
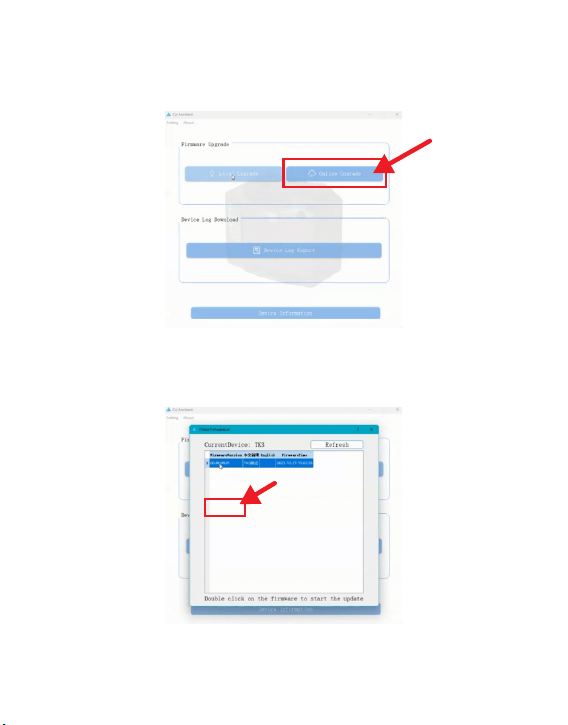
4.2.5 进入“CziAssistant.exe”PC 主界面,点击“在线升级”,如下图所示:
4.2.6 双击“固件版本”,如下图所示:
36
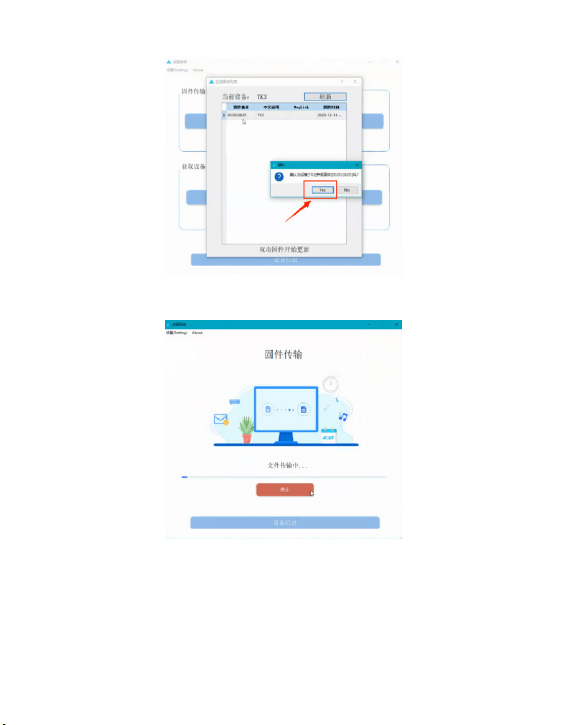
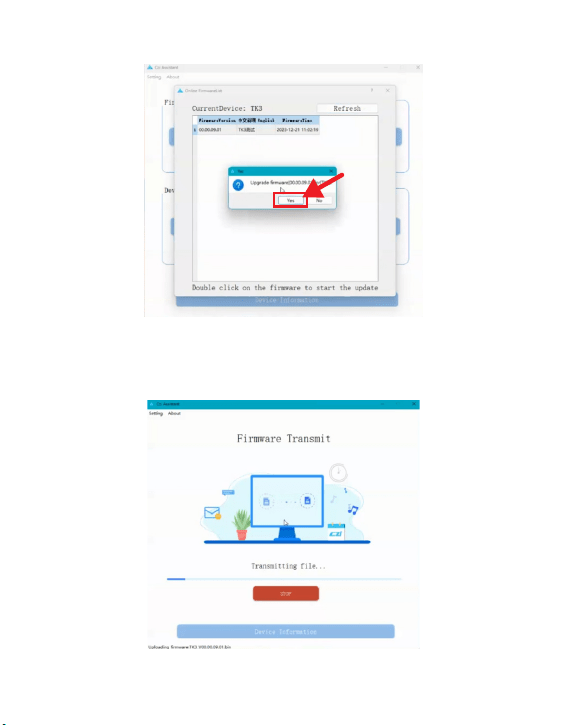
4.2.7 弹出窗口点击“Yes”, 如下图所示:
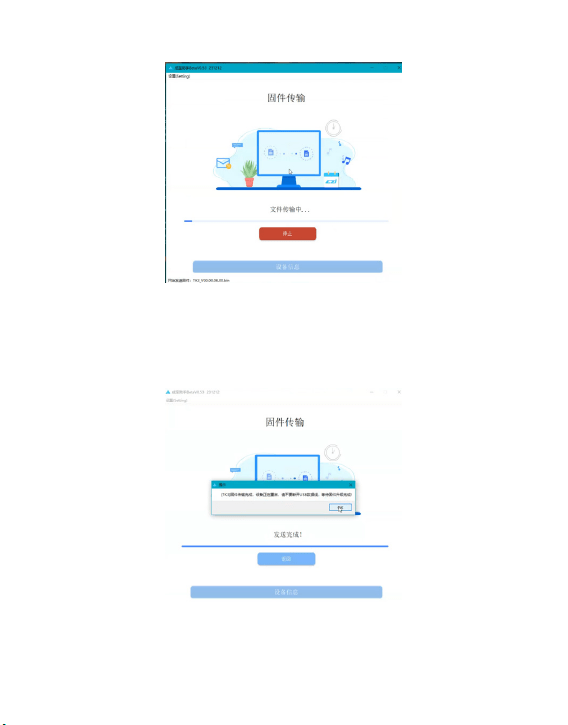
4.2.8 文件传输中,等待进度条完成,如下图所示:
37
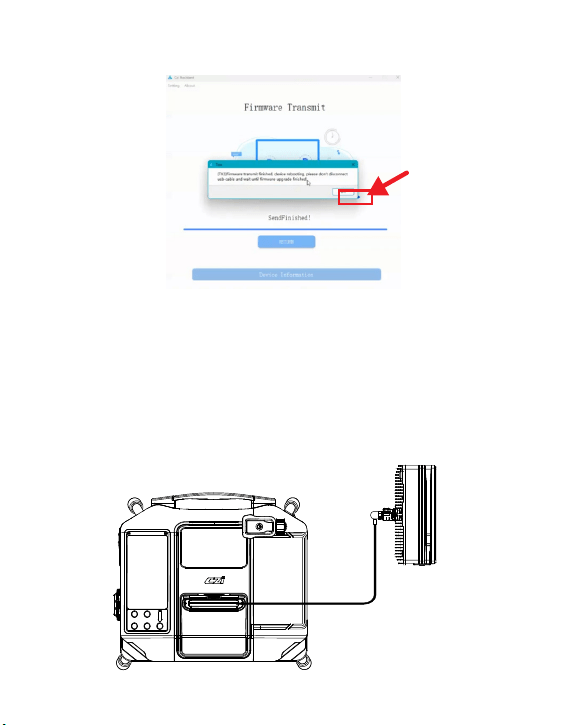
4.2.9 固件传输完成后,等待地面端显示屏熄屏并重新启动,升级完成。
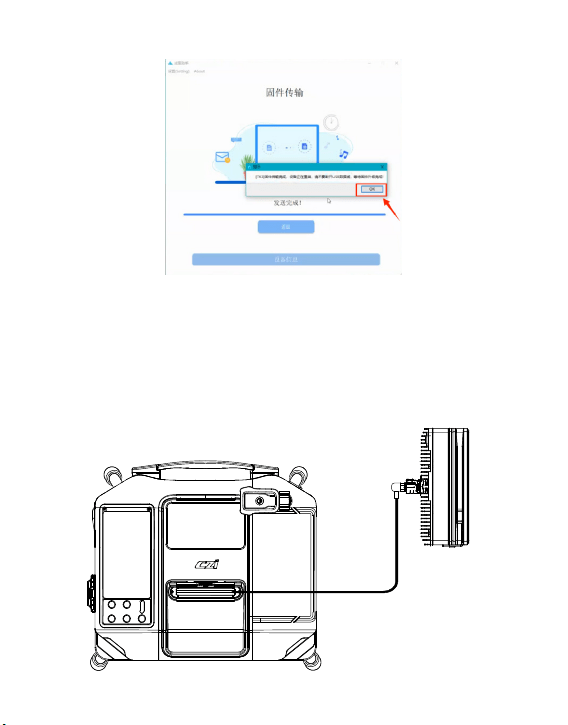
4.3 离线升级方式
4.3.1 官方网站 www.czi.com.cn 下载“CziAssistant.exe”PC 软件安装包。
4.3.2 TK3 地面端接上电源,打开空气开关;用数据线连接面板的 TYPE-C 处,另
外一端连接电脑。
4.3.3 TK3 地面端的高压线缆插入天空端上,长按“电源开关”3 秒控制电源输出
开启。(天空端不能装到无人机上),如图所示:
38
4.3.5 点击“固件版本文件”,例 TK3_XXX.bin 文件。
4.3.6 弹出窗口点击“Yes”, 如下图所示:
4.3.4 进入“CziAssistant”APP 主界面,点击“离线升级”,如下图所示:
39
4.3.8 固件传输完成后,等待地面端显示屏熄屏并重新启动,升级完成。
4.3.7 文件传输中,等待进度条完成,如下图所示:

40
地面端
1、目视及触摸检查快拆脚架、提手、整体外壳是否完好,有
裂纹或有破损。
1、前后两部分是否连接紧密,各个螺丝是否锁紧。
2、电池锁紧旋钮是否牢靠,确保飞行时不会松脱。
3、各个接口是否有异物。
4、天空端外表是否有明显损伤,若有明显损伤禁止用于飞行。
2、各个连接部件螺丝是否锁紧,尤其关注快拆脚架连接件、
提手连接件、电源线连接件的螺丝。
4、各个风扇进风口和出风口有无异物堵塞。
5、TK3供电线是否能正常拉出。
3、把全部TK3线缆拉出,观察线缆表皮是否有破损、粘连,
若有破损禁止使用,联系成至智能售后,严禁私自处理。
天空端
五、产品保养与维修
5.1 检查保养
在作业前后开展例行检查或定期保养,可大幅提升产品可靠性,降低安全隐患,
延长使用寿命。
5.1.1 日常检查
每次外出使用前和使用后,建议执行以下例行检查。
不带电检查表

41
外出应急物资检查
TK3 地面供电系统装箱清单(M350 版)
5.1.2 上电检查
①地面端是否能正常开机。
②地面端显示屏是否能正常显示参数。
③飞行供电测试,设备是否能给飞机供电,ML200 矩阵灯能否正常点亮。
④地面端是否能正常收线。
⑤观察各个风扇是否能正常转动。
⑥飞机能否正常起飞。
TK3 地面端
地面电源连接线
可拆卸脚架
TK3-M350 天空端
TK3-M350 电池插头
绝缘手套
挂线扣
产品合格证
产品使用说明书
1台
1根
4个
1个
1根
1双
2个
1张
1本
42
5.2 产品维修
5.2.1 如何维修
如有退换货需求请致电 400-008-8306 客服热线,联系售后客服进行处理
成至智能保证,在正常使用情况下,您购买的成至智能产品在保修期内没有材
料和工艺上的缺陷。本产品的保修期从您收到货物后的当日算起,或由成至智
能另有规定。

43
5.2.2 维修规则
在产品有效保修期内产品出现性能故障,您可以申请产品保修服务 , 实行免费保
修服务必须符合以下条件:
√ 自购买产品在规定的产品保修期限内正常使用,出现非人为的性能故障的产
品;
√ 无擅自拆除、无非官方说明书指引的改装或加装、其它非人为引起的故障;
√ 提供有效的购买证明、单据及单号。
以下情况不属于免费产品保修服务的情形:
× 发生人为的非产品本身质量问题导致的碰撞、烧毁事故;
× 发生非官方说明书指导的私自改装、拆解、开壳等行为而造成的损坏;
× 未按说明书指导的不正确安装、使用及操作所造成的损坏;
× 在无官方说明指导的情况下,客户自行维修装配件导致的损坏;
× 因非官方说明书指导的电路改造、或电池组、充电器的匹配使用不当导致的
损坏;
× 未按产品说明书操作导致的损坏;
× 在恶劣的环境下操控导致的损坏,如大风、雨天、沙尘等;
× 在电磁环境复杂或强干扰源环境下操控导致的损坏,如矿区、发射塔、高压线、
变电站等,
× 与其他无线设备相互干扰的情况下操控导致的损坏,如发射机、图传信号、
WiFi 信号干扰等;
× 在零部件发生老化或损坏的情况下强制使用造成的损坏;
× 与非成至智能认证的第三方部件同时使用时发生可靠性及兼容性问题导致的
损坏;
× 在电量不足时、或使用存在质量问题的电池导致放电不足而产生的损坏;
× 机器序列号、出厂标签及其他标示撕毁、涂改迹象;
× 联系成至智能确认保修服务后,没有在 7 个自然日内寄出相应物件。
× 政策所述其他情况。

44
5.2.3 其他须知:
√ 不同国家购买产品,鉴于产品差异,保修期间退换货和保修服务将有所不同。
详情请咨询 400-008-8306。
√ 将产品寄往成至智能时您需先行承担邮寄费用。
√ 用户需将问题产品寄回,成至智能授权代理商或成至智能售后服务中心收到
问题机后,将对产品进行故障检测以确定问题责任。若属于产品本身质量缺陷,
成 至智能负责承担检测费、材料费、人工费及快递费。
√ 若经过检测产品不符合免费维修条件,客户可选择付费维修或寄回。
√ 若机器的问题不在保修范围内(如人为导致机器损坏),我们会根据具体问题
收取相 应的检测费、更换零件费、测试费、人工费及快递费。
√ 请注意,产品维修可能会导致数据丢失,请您先行备份您的数据。
√ 已过保产品可付费使用数据分析服务,分析结果将不影响成至智能的最终处
理方案。
√ 请勿寄回电芯破损、鼓包、漏液等严重损坏的电池;若已经寄回,则我司将
会对此类电池进行报废处理,不作退还。
√ 鉴于产品版本差异,产品不支持全球联保,只能在成至智能指定的区域维修
中心进行保修服务。如果需要在非购买区域指定维修中心维修,成至智能会根
据当 地的库存情况酌情处理,且只提供付费服务。
√若客户提供的收件地址错误,或存在收件人拒绝接收的情况,由此产生的损
失须由客户承担。
√ 快递无法投递或被拒收后退还成至智能的,成至智能将代为保管,并从退还
之日起计算仓储费。由于仓储环境有相应的要求,仓储费计费标准详询
400-008-8306,当仓储费等价于产品剩余价值时,成至智能将有权对该产品进
行处置。( 产品剩余价值计算方法:剩余价值 = 原售价 - 本次维修费用 )
√ 未经成至智能同意跨国寄回产品,由此产生的关税及清关等费用须由客户承
担。
√ 如产品发生进水情况,会严重影响产品性能,且不具备维修价值,故成至智
能无法提供维修服务,将提供更换产品服务,请知悉并酌情寄回。
√ 产品寄修前,请您妥善处理原有产品上附着的个性化物品和装饰(包含但不
仅限于产品装饰性贴纸、UAS 贴纸、涂料喷漆等),成至智能对个性化物品和装
饰 的破损与遗失概不负责。
√ 为确保您的正常权益,在签收商品时,请您检查产品是否完好(是否存在因
物流等原因造成的损坏)。如产品存在异常,请于签收日起的 7 日内反馈我们;
否则 将视您默认产品无损坏且性能正常。

Made in China
ChengZhi Support
www.czi.com.cn
Service Hotline: 400-008-8306
www.czi.com.cn
If you have any questions or suggestions
regarding the manual, please contact us at:
如您对说明书有任何疑问或者建议
请通过以下电子邮箱联系我们:
成至技术支持
服务热线:400-008-8306

I. Disclaimers and Warnings
II. Introduction to TK3 Power Supply System
Warnings
Thank you for purchasing czi products. The contents mentioned herein are
related to your safety, legal rights and responsibilities. Before using this
product, please read this document carefully to ensure that you have set up
the product properly. Failure to follow and comply with the instructions and
warnings in this document may result in injury to you and others, damage to
the product or other surrounding items. This document and all related docu-
ments are subject to the final interpretation of czi. Updates are subject to
change without notice. Please visit the official website at www.czi.com.cn
for the latest product information.
czi TK3 new generation ground power supply system, which further optimiz-
es the size and weight, converts 220V AC into 400V DC high voltage and
transmits it to the UAV through the high-performance nickel alloy power
supply cable to enable the UAV to achieve 24-hour uninterrupted flight.
Combined with the use of UAV matrix lamp, high-power gimbal lamp, gimbal
camera and other mission payloads, it can meet the needs of long-time and
large-area emergency lighting and monitoring in complex emergency
scenarios.
① Please read the Specification carefully before use to make sure that the
TK3 cable is properly connected to the UAV. It’s necessary to fix TK3 cable
on the UAV with rolling strip to prevent the rotating blade from hitting the
TK3 cable.
② The battery power of the UAV shall not be less than 60% when in use,
otherwise the TK3 will charge it, which will short the battery life.
③ Do not turn on the “Power switch” before the UAV takes off, otherwise
the UAV will not be able to take off.
④ Do not fly in rainy days (because the rain will enter the power box along
the cable).
⑤ It’s forbidden to touch TK3 cable (high voltage 400V) with bare hands
at any time so as to prevent accidents. If it’s necessary, please wear
insulating gloves (with high voltage greater than 500V).
45
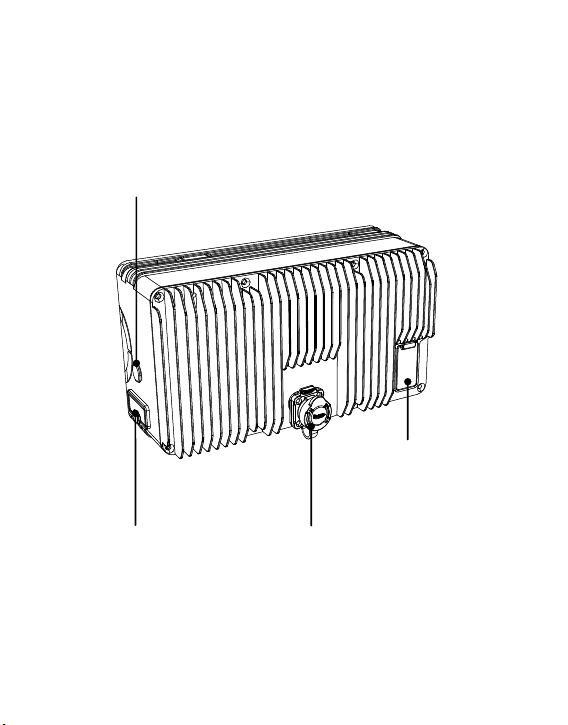
2.1 Airborne Power Supply
Light output interface
High-voltage input interface
Frequency matching button
Upgraded TYPE-C interface
46
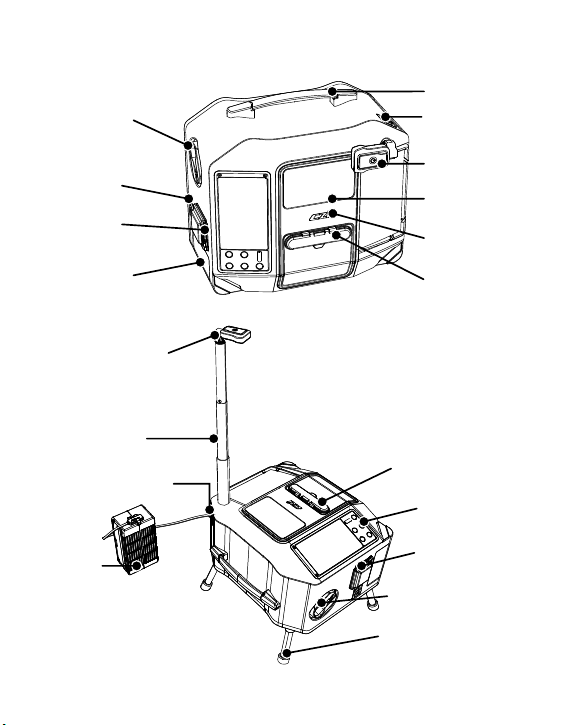
2.2 Ground End Power Supply System
Transportation mode
Operating mode
Manual handle of
retracting the cable
Open the metal handle to
manually retract the cable
Handle
Carry with one hand
TYPE-C socket for
battery connection
Near field lighting
system
Cable viewing port
czi logo
High voltage cable outlet
Triple-proof design of
output ports
Main power On / Off
Three-proof design
Power supply heat dissipation air inlet
Double-layer design
Power supply socket
Near field lighting system
High voltage cable outlet
Operating panel
Main power switch
Manual handle of
retracting the cable
Quick release stand
Extendable support rod
TYPE-C socket for
battery connection
Drone battery
47
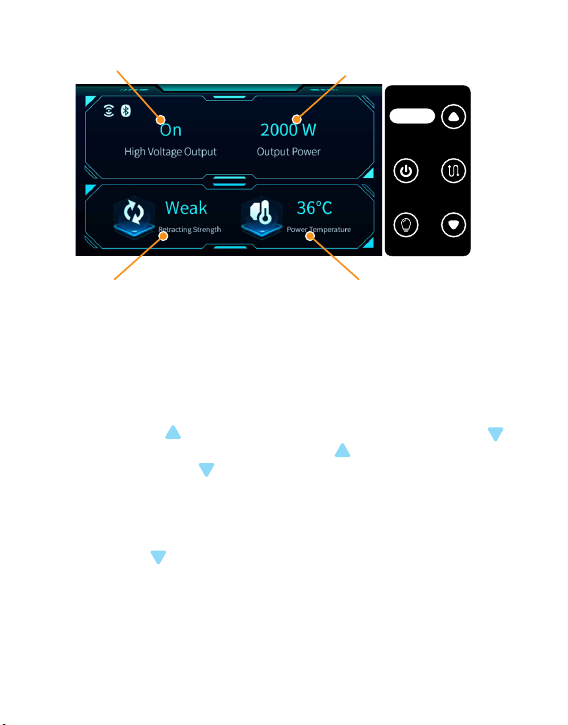
2.3 Ground power supply system control panel
Power On or Off Ground-end output power
Power supply temperature
2.3.1 Press the “Power On / Off” for 3 seconds to control the power output on
and off (Buzzing sound when turning on and off);
2.3.2 Short press the “Light On / Off” to control the turning on and off of the
light connected to the drone end (Buzzing sound when turning on and off);
2.3.3 Short press the “Cable retrieve On / Off” to control the automatic cable
retrieve on and off (Buzzing sound when turning on and off);
2.3.4 Short press to increase line retrieve strength; short press to
decrease line retrieve force; press and hold for 3S to switch language
mode, press and hold for 5S to enter frequency matching mode, in
frequency matching mode, press and hold to cancel frequency matching.
2.3.5 Power failure alarm: when the high-voltage output is “on” and the
power supply is disconnected, the “Power On / Off” buzzer will sound an
alarm for 60s. It can be restored by turning on the power.
2.3.6 Long press for 3S to enter into frequency matching mode, and at the
same time, long press 3S “Frequency matching button” on the drone end.
Before frequency matching of the drone end indicator light, the green light is
always on; in frequency matching, the green light is off and the red light is
flashing; if the frequency matching is successful, the red light is off and the
green light is always on; if the frequency matching fails, the red light is on for
3 seconds and then off, and the green light becomes always on.
Take-up strength in three gears:
“weak”, “medium” and “strong”
电源开 关
Power s witch
收线开 关
Line s witch
灯光开 关
Ligh t switc h
此键长 按
3秒
Press a nd hold t his
Bottom f or 3 secon ds
48

TK3 ground end
TK3-M350 drone end
Overall
dimensions
Overall
dimensions
Weight
Power
Rated Input
Voltage
Rated output
voltage
Main rated
output current
356mm*310mm*229mm
165.6mm*90.9mm*68.9mm
566 g ± 5%
Rated 3.0 kw
260-410 VDC
36.5-52.5 VDC
60 A
Weight 7.5 kg ± 5%
Power
≥ 3000 W (176Vac-264Vac input); ≥ 1500 W(90Vac-175Vac
input)
Cable
80m cable
Cable diameter less than 2.8mm, over-current capacity greater
than 10 A, weight less than 1.2 kg / hundred meter, tensile
strength greater than 20 kg, withstand voltage 600 V, internal
resistance less than 3.6Ω/100m@20℃
Rated Input
Voltage
90-264 VAC+10%
Rated operating
frequency
50/60 Hz
Output voltage 400 VDC
2.4 Equipment Parameters
49
III. Installation and Use Course of TK3 Power Supply System
3.1 Activation Steps (Using the device for the first time)
1) After aligning the tab at the 1 position with the slot at the 2 position in the
figure, insert the power cables and rotate them clockwise until you hear a
“click”, indicating that it is done.
2) The power plug is connected to the electric supply or generator socket to
complete the connection, and open the air switch.
3) Download APP :www.czi.com.cn
1
2
50
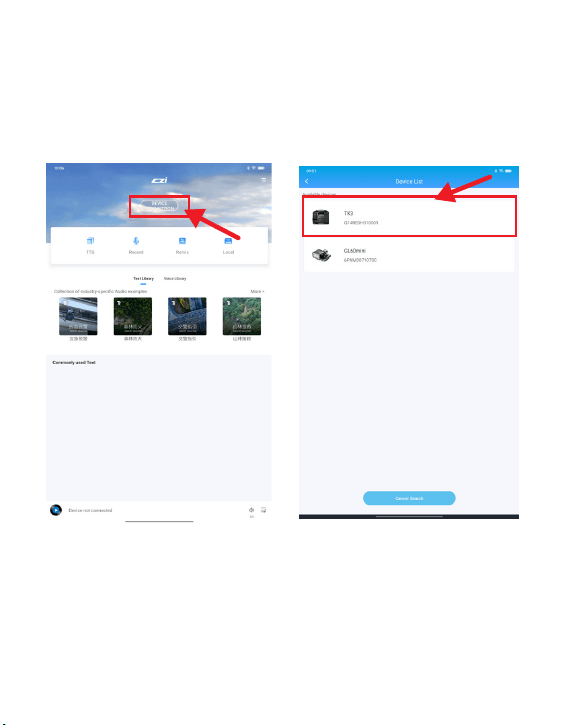
4) Open “czi Sound” APP, enter the
main interface of “czi Sound”, and
click “Connect Device”, as shown in
the following figure.
5) Click the available device “TK3”,
as shown in the following figure.
51
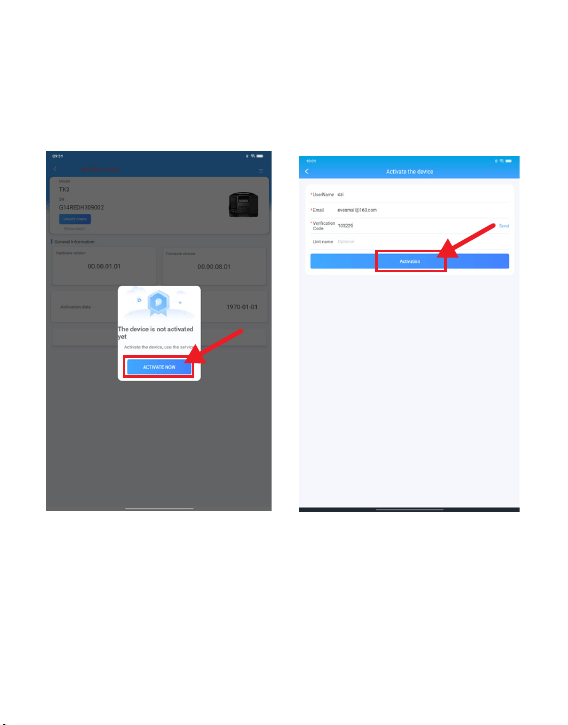
6) Click “Activate Now”, as shown
in the following figure.
7) After filling in the information,
click “Activate” to enter the next
step.
52
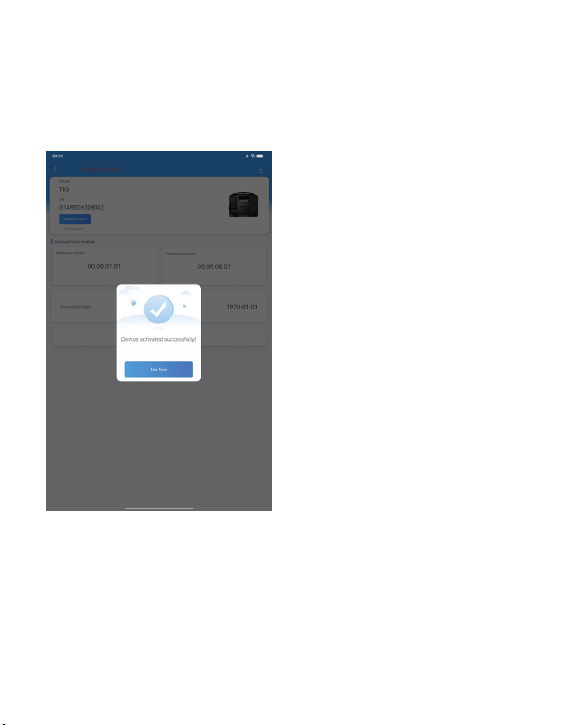
8) Display “Device Activation
Successful”, and click “Use Now”.
9) Wait for the ground end display
screen to be black and restart,
when activation is complete.
53
10) Move the button in the direction shown by arrow 1, turn it counterclock-
wise, unplug the power supply cable from the socket, retract the power
supply cable and close the power supply cover.
3.2 Installation Tutorial of Drone Power Supply
3.2.1 Replace the original right battery by installing the drone end into the
storage space for the UAV's right battery (the drone end can only replace
the right battery).
1
54
3.3 Installation Tutorial of ML200 matrix lamp (Please omitted if ML200
matrix lamp is not used)
3.3.1 Instructions for Use
1)Open the pipe clamp as shown in the following figure.
2) Put the two U-shaped seats on the light body on the tripod of the UAV, as
shown in the following figure.
55
UU-shaped seats M350 tripod
3) Push the opened light clamp forward to the tripod standpipe that is close
to the M350, then close the cover of the lamp clamp, hook the light clamp
cover with the buckle, and finally press the buckle at the end to fasten it, and
complete the installation, as shown in the following figure.
4) Take out the cables configured with the product and insert the end plugs
into the corresponding sockets one by one.
①Plug in the drone end.
② Loosen the plug waterproof cover on the light body.
③ Plug in the light body, tighten the nut clockwise on the socket after it is
plugged in.
④ Arrange the cables on the two support standpipes as shown in the follow-
ing figure, fix the cables with the Velcro that comes with the cable, and
complete the installation, as shown in the following figure.
56
M350 Support
Buckle fastened
Press the buckle
1
2
3
4
2
4

3.3.2 Disassembly
1) Remove the three Velcro strips in turn, then unscrew the plug nuts plugged
into the light counterclockwise, pull out all the plugs in turn, and then
remove the cable, as shown in the following figure.
2) Break the tail of the buckle outward, open the light clamp cover, then
pull the whole light up and take it out, and finally cover with a waterproof
cover on the socket to complete the disassembly, as shown in the following
figure.
57
Break it outward
Open the light clamp
Cover with a waterproof cover
Unplug
Unscrew
the nut
and
unplug
Disassemble the velcro
Unscrew
the nut
and
unplug
3.3.3 Control
When powered on, the tethered ground end panel controls the lamps on
and off.
3.4 Installation Tutorial for TK3 Ground End
3.4.1 Install the quick-release stand on the ground end of the TK3 on the
ground end respectively, as shown in the figure (choose to use the quick-re-
lease stand if there is water or mud on the ground; if there is no water on
the ground and there is no need to install the stand, skip this step).
58
3.4.2 Hold the handle with your hand and install it on the support until
you hear a “click”, indicating that the quick release stand has been
successfully installed.
3.4.3 Pull out the extendable rod on the ground end of the TK3 and press
the lighting power button to turn on the lighting. (for night operation)
59
3.4.4 Pull the LP12 aviation plug ground end out for about 3m and
connect it to the LP12 aviation socket of the onboard power supply .
3.4.5 Connect the plug of the ML200-M350 matrix lamp to the lamp socket
of the drone power supply.
60
How to tie a separate TK3 cable
How to tie together with the
matrix light power supply cable
3.4.6 Tie the TK350 power supply cable to the UAV tripod with Velcro
strips, or it can be tied together with the matrix light power supply cable.
3.4.7 After aligning the tab at the 1 position with the slot at the 2 position in
the figure, insert the power cables and rotate them clockwise until you hear
a “click”, indicating that it is done.
1
2
61
3.4.8 Connect the power plug to the electric supply or generator socket.
3.4.9 Insert the battery signal cable into the M350 battery socket, as
shown in the figure.
3.4.10 Then insert the battery signal cable into the TYPE-C socket, as
shown in the figure.
62
3.5 Tutorial for TK3 Power Supply System
3.5.1 Install the TK3 drone end, lighting and TK3 ground end following the
above steps.
3.5.2 Turn on the air switch of TK3 ground end and start the ground end.
63
3.5.3 Turn on the UAV, unlock the drone, and drone hover at a height of 3m
above the ground.
3.5.4 Press and hold the “Power switch” for 3S to start the power output.
(Please note, do not start the power output before the drone takes off,
otherwise the UAV will not be able to take off)
3.5.5 Press “Light switch” briefly to turn on the light. (If the UAV does not
take off, the lights will come on for 3S and then turn off automatically)
电源开 关
Powe r switc h
收线开 关
Lin e switc h
灯光开 关
Lig ht swit ch
此键长 按
3秒
Pres s and hol d this
Botto m for 3 seco nds
电源开 关
Powe r switc h
收线开 关
Lin e switc h
灯光开 关
Lig ht swit ch
此键长 按
3秒
Pres s and hol d this
Botto m for 3 seco nds
64
3.5.6 The drone ascends at the speed of 1 m/s till the predetermined
altitude, then hover. Press the “Line switch” to start the line retrieve. Adjust
the line retrieve force as required to straighten the cable.
3.5.7 Remote Control Setup Tutorial
1)Turn on the remote control and enter the flight interface.
电源开 关
Powe r switc h
收线开 关
Lin e switc h
灯光开 关
Lig ht swit ch
此键长 按
3秒
Pres s and hol d this
Botto m for 3 seco nds
65
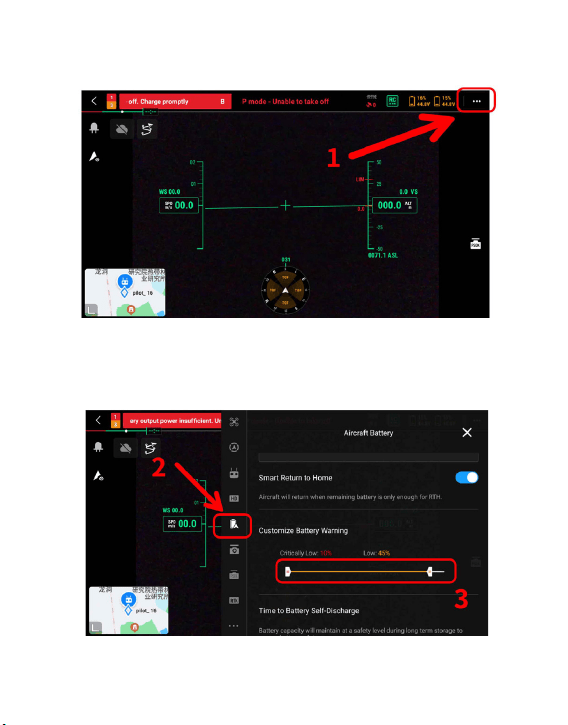
2)Enter “Flight Control Parameter Setting”, as shown in the following
figure.
3)Click on the icon to customize the battery alarm, and it is recommended
to set the low battery value range to 45%. (When the battery level is lower
than 45%, there will be an alarm; the tethering is not in normal working
condition, please descend the UAV as soon as possible)
66
3.6 TK3 Power Supply System Recycling Tutorial
3.6.1 Adjust the strength of Cable retrieve to “Medium” and control UAV to
make it descend at a speed of 1 m/s .
3.6.2 The UAV descend and hover at a height of 3m above the ground, turn
off the lights, close the Cable retrieve and turn off the power output.
3.6.3 The drone land on the ground, stop the oars and shut down.
3.6.4 Unplug the LP12 aviation plug. (please note that the “power On / Off”
on “Off” state is confirmed before pulling out the LP12 aviation plug)
3.6.5 Disassemble the hanging wire hook as shown in the figure.
67

3.6.6 Turn off the emergency lights and retrieve the extendable rod (for
night operation).
3.6.7 Manually take back the remaining power supply cable inside the
device as shown in the figure. (It is normal that the cable cannot be
retrieved in the figure, and it is necessary to manually put the cable inside
the ground end).
3.6.8 Manually fold the cable and put it inside the ground end, and the
stowage is completed as shown in the figure.
68
3.6.9 Turn off the air switch at the ground end of TK3.
3.6.10 Move the button in the direction shown by arrow 1 and turn it coun-
terclockwise to unplug the power supply cable connector from the socket,
retrieve the power supply cable and close the power supply cover.
1
69
3.6.11 Stand the ground end of the TK3 upright, hold it by hand in the
position shown in the figure, and pull out the folding stand directly.
3.6.12 Installation tutorial of 30m extension cable
Pull out about 3m LP12 aviation
plug of the ground end and
connect it to the LP12 aviation
socket with a 30m extension
cable.
Connect the lifting ring on the
ground end cable to the lifting ring
with a 30m extension cable through
a quick-release buckle, as shown in
the figure.
70

3.7 Frequently Asked Questions and Answers When applying TK3
Question 1: Can the TK3 power on before starting the power supply for
UAV?
Answer: No, the UAV will not be able to take off. The correct procedure is to
start the UAV first and then power it on.
Question 2: Can a broken wire be handled by myself?
Answer: The damaged wire cannot be handled by yourself. It must be sent
back to the manufacturer for treatment.
Question 3: Which interfaces of the TK3 system support hot swap?
Answer: TK3 is a power supply equipment for high voltage. All interfaces do
not support hot plug. Remember!
Question 4: How to judge whether the tether is working normally by turning
on the power?
Answer: Turn on the “Power switch”, the normal output power of the
ground end display means that the tether is working normally.
71

Question 5: What should I do if the remote control prompts “The left
battery in the battery compartment is in poor contact, please return or land
as soon as possible”, “The battery in the battery compartment is in poor
contact, please return or land as soon as possible”, or “The battery output
power is insufficient, please return or land as soon as possible”?
Answer: The above are normal conditions. You can continue to fly, and this
alarm will appear when you use TK3 to power the drone. Such an alarm
occurs because the UAV is first powered by TK3 when TK3 is working. When
the TK3 power supply can meet the power consumption of the UAV, the
battery will have neither power output nor power output, which triggers
the drone alarm, but there will be no impact on flight safety.
Question 6: What should I do if the remote control prompts “The battery
temperature is too low to take off, please wait for the battery to heat up to
more than 10℃ or preheat the battery in advance” during the TK3 tether-
ing?
Answer: Put the two batteries into the UAV, turn on the UAV power, wait for
the battery heating to complete, and then connect the UAV battery with the
TPYE-C on the ground end.
72
Question 7: When using the tether, after the UAV descends, the remote
control prompts “unable to take off: the pressure difference between the
two batteries is too large”, what should I do?
Answer: When the battery is too high, it is normal for the pressure differ-
ence between the two batteries to be too large, or you can replace the two
batteries to continue flying.
Question 8: When using the tether, after the UAV descends, what should I
do if the remote control reports “the left and right battery versions are
inconsistent”?
Answer: This error is normal, and the UAV can take off again after restart-
ing.
73
IV. Firmware Upgrade
4.1“CZI Sound” APPFirmware Upgrade
4.1.1 App download website: www.czi.com.cn;
4.1.2 Connect the power supply to the ground end of TK3, turn on the air
switch;
4.1.3 Insert the high voltage cable of TK3 ground end into the drone end,
press and hold the “Power switch” for 3S to turn on the power output. (The
drone end can not be installed on the UAV), as shown in the figure.
74
4.1.4 Enter the main interface of “CZI Sound” APP, click “Connect Device”,
as shown in the following figure.
75
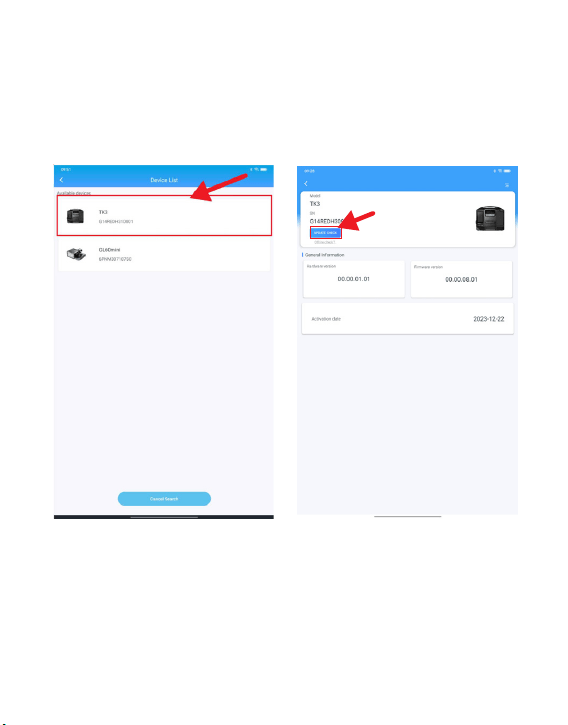
4.1.5 Click the available device
“TK3”, as shown in the following
figure.
4.1.6 Click the “Check for Updates”,
as shown in the following figure.
76
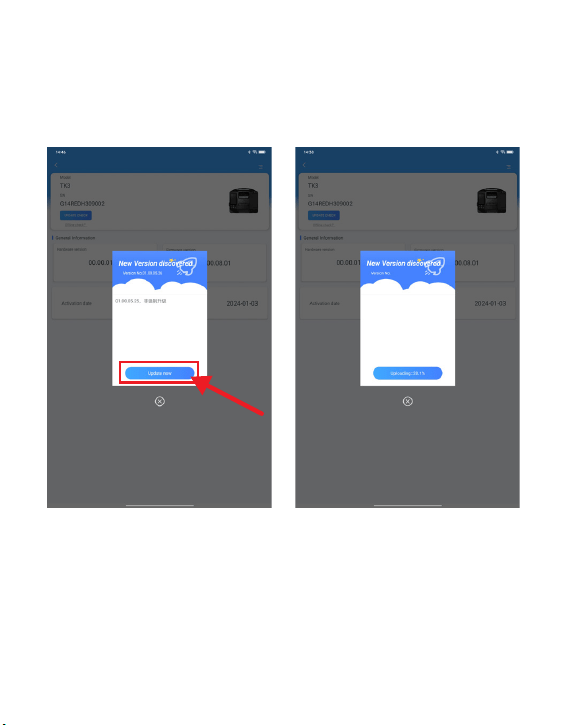
4.1.7 Click the “Update Now”, as
shown in the following figure.
4.1.8 Wait for the completion of
uploading progress, as shown in the
following figure.
77
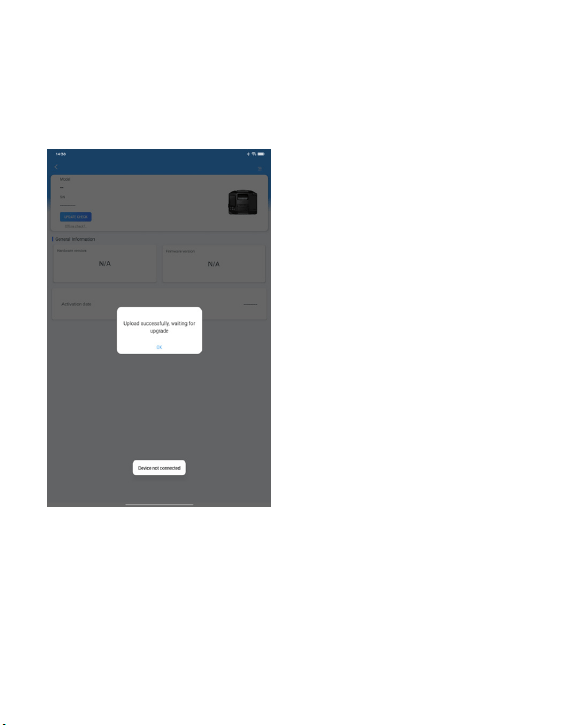
4.1.9 Upload successfully, click
“Confirm”.
4.1.10 After the firmware finishing
uploading, wait for the ground end
display screen to turn off and restart,
and the upgrade is completed.
78
4.2 Wired firmware upgrade
4.2.1 Online upgrade method.
4.2.2 Download “CziAssistant.exe” PC software installation package from
the official website: www.czi.com.cn.
4.2.3 Connect the ground end of TK3 to the power supply and turn on the
air switch; connect the data cable to the TYPE-C of the panel and the other
end to the computer.
4.2.4 Insert the high voltage cable of TK3 ground end into the drone end,
press and hold the “Power switch” for 3S to turn on the power output. (The
drone end can not be installed on the UAV), as shown in the following
figure.
79
4.2.5 Enter the main interface of “CziAssistant.exe” PC, click “Online
Upgrade”, as shown in the following figure.
4.2.6 Double click on “Firmware Version”, as shown in the following figure.
80
4.2.7 Click “Yes” in the pop-up window, as shown in the following figure.
4.2.8 While the file transfer is in progress, wait for the progress bar to
complete, as shown in the following figure.
81
4.2.9 Once the firmware transfer is complete, wait for the ground side display
screen to turn off and restart, and the upgrade is completed.
4.3 Offline upgrade mode
4.3.1 Download “CziAssistant.exe” PC software installation package from the
official website: www.czi.com.cn.
4.3.2 Connect the TK3 ground end to the power supply and turn on the air
switch; connect the data cable to the TYPE-C of the panel, and connect the
other end to the computer.
4.3.3 Insert the high voltage cable of TK3 ground end into the drone end,
press and hold the “Power switch” for 3S to turn on the power output. (The
drone end can not be installed on the UAV), as shown in the figure.
82

4.3.5 Click “Firmware Version File”, for example TK3_XXX.bin file.
4.3.6 Click “Yes” in the pop-up window, as shown in the following figure.
4.3.4 Enter the main interface of “CziAssistant” APP, click “Offline Upgrade”,
as shown in the following figure.
83

4.3.8 Once the firmware transfer is complete, wait for the ground side display
screen to turn off and restart, and the upgrade is completed.
4.3.7 While the file transfer is in progress, wait for the progress bar to
complete, as shown in the following figure.
84

V. Product Maintenance and Repair
5.1 Inspection and maintenance
Carrying out routine inspection or regular maintenance before and after
operation, can greatly improve product reliability, reduce potential safety
hazard and extend service life.
5.1.1 Routine inspection
The following routine inspections are recommended before and after each trip.
Power-off check list
Ground end
1. visual and touch to inspect the folding stand, handle,
harness and overall housing to see if they are in good
condition, cracked or damaged.
1. Check whether the front and rear parts are connected
tightly and whether the screws are locked.
2. Check whether the battery locking knob is firm, to
ensure that it will not get loose during flight.
3. Whether there are foreign matters at each interface.
4. Whether there is obvious damage on the surface of
drone end. If there is obvious damage, it is prohibited to
use for flight.
2. Check whether the screws of each connecting part are
locked tightly, especially the screws of folding foot rest
connecting parts, handle connecting parts and harness
connecting parts.
4. There is no foreign matter blockage behind the air inlet
and air outlet of each fan.
5. Whether TK3 power cord can be pulled out normally.
3. Pull out all TK3 cables and observe whether the surface
of the cables is damaged or adhered. If any damage, they
are prohibited to use. Contact the intelligent after-sales. It
is strictly prohibited to handle it without permission.
Drone end
85

Inspection of outgoing emergency materials
Packing list of TK3 ground power supply system (M30 version)
5.1.2 Power-on inspection
① Whether the ground end start up normally.
② Whether the ground end display screen can display parameters normally.
③ Flight power supply test: whether the equipment can supply power to the
drone, and whether ML150 matrix light can be lit normally.
④ Whether the ground end can take up normally.
⑤ Observe whether each fan can rotate normally.
⑥ Whether the drone can take off normally.
TK3 ground end
Ground power connection cable
Detachable stand
TK3-M350 drone end
TK3-M350 Battery Plug
Insulating gloves
Hanging wire buckle
Product qualification certificate
Product instruction
1 unit
1 cable
4pcs
1pc
1pc
1 Pair
2 pcs
1pc
1pc
86
5.2 Product Maintenance
5.2.1 How to Repair
Please call the customer service hotline 400-008-8306 and contact the
after-sales for handling if you need to return or replace the goods.
CZI guarantee, under normal use, the smart products you purchased are free
from defects in materials and processes within the warranty period. The
warranty period of this product starts from the day of receipt, or CZI speci-
fied otherwise.
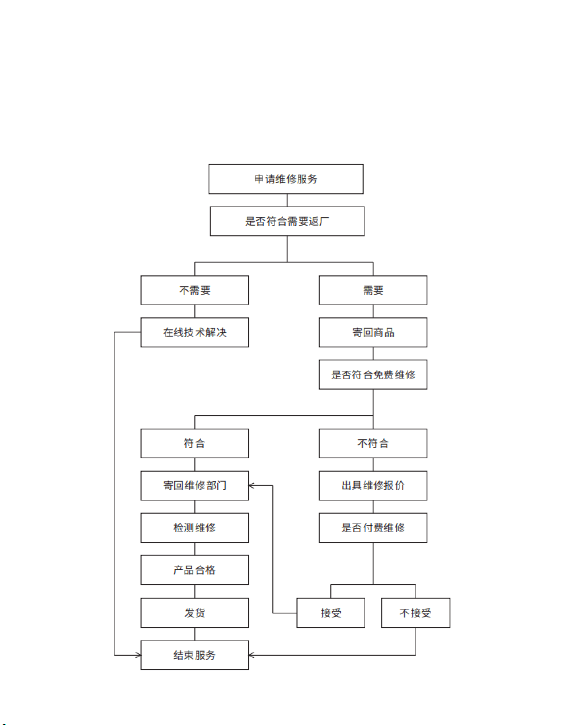
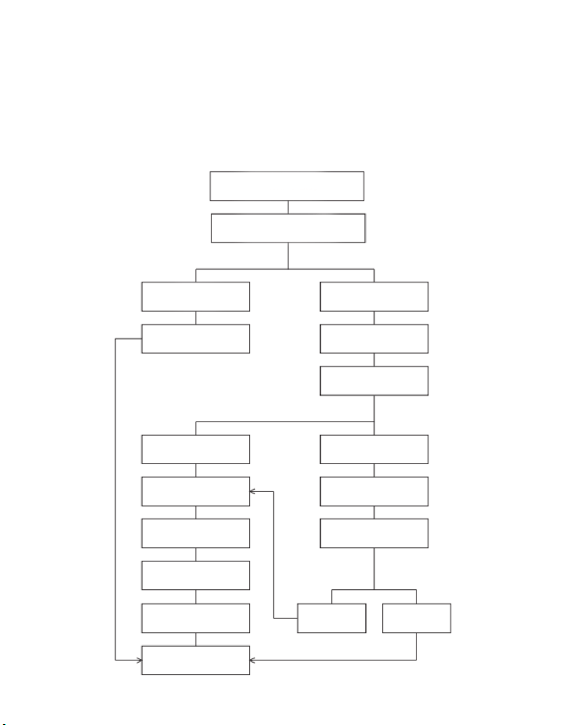
Maintenance service
Whether it meets the requirements
to return to the factory
No Yes
Online technical solution Send back the product
Whether or not it meets
the requirements for free
maintenance
Yes No
Send it back to the
maintenance department
Issue the maintenance
quote
Inspection and
maintenance
Whether to pay for
maintenance
Qualified products
Shipment
Yes No
End of Service
87

5.2.2 Maintenance rules
In case of any performance failure during the valid warranty period of the
product, you may apply for product warranty service. The following condi-
tions must be met for free warranty service:
√ The purchased products are normally used within the specified product
warranty period, and non-artificial performance failure occurs;
√ No unauthorized removal, no modification or addition not guided by the
official instructions, or other faults not caused by human beings;
√ Provide valid proof of purchase, receipt and order number.
The following conditions are not covered by a free product warranty:
× Collision and burning accidents caused by man-made and non-product
quality problems;
× Damage caused by unauthorized refitting, disassembly, shell opening,
etc. not guided by the official instruction manual;
× Damage caused by improper installation, use and operation not in accor-
dance with the instruction manual;
× Damage caused by the customer’s self-repair of the assembly without
official instructions;
× Damage caused by circuit modification not guided by official manual or
improper matching and use of battery pack and charger;
× Damage caused by failure to operate not in accordance with the product
instructions;
× Damage caused by operation in severe environment, such as strong wind,
rainy day, sand dust, etc.;
× Damage caused by operation in complex electromagnetic environment or
strong interference source environment, such as mining area, launching
tower, high-voltage line, substation, etc.;
× Damage caused by manipulation in case of mutual interference with
other wireless devices, such as transmitter, image transmission signal, WiFi
signal interference, etc.;
× Damage caused by forced use in case of aging or damage of parts;
× Damage caused by reliability and compatibility when used together with
the third-party parts without smart certification;
× Damage caused by insufficient discharge due to insufficient power or use
of batteries with quality problems;
× The serial number of the machine, the factory label and other signs are
torn or altered;
× After contacting Smart to confirm the warranty service, the corresponding
items are not mailed within 7 natural days;
× Other situations as stated in the policy.
88

5.2.3 Other notes
√ Due to the differences in products purchased in different countries,
returns and warranty services will vary during the warranty period. For more
information, please consult 400-008-8306.
√ When sending the product to czi, you shall bear the postage in advance.
√ The user shall send the problem product back. After receiving the prob-
lem machine, czi Authorized Agent or czi After-sales Service Center shall
carry out fault detection on the product to determine the responsibility for
the problem. In case of quality defect of the product, czi shall be responsible
for the detection cost, material cost, labor cost and express cost.
√ If the tested product does not meet the conditions for free repair, the
customer may choose to pay for repair or mail it back.
√ If the problem of the machine is not covered by the warranty (such as
man-made damage to the machine), we will charge the corresponding
inspection fee, replacement part fee, test fee, labor fee and express fee
according to the specific problem.
√ Please note that product maintenance may result in data loss. Please
back up your data first.
√ Please do not send back the seriously damaged batteries such as broken
battery core, bump, leakage, etc. If they have been sent back, our company
will discard these batteries and do not return them.
√In view of the product version difference, the product does not support
global warranty. Warranty service can only be provided in the regional repair
center designated by Smart. If the repair is required in the designated repair
center in the non-purchased area, czi will handle it as appropriate according
to the local inventory situation, and only provide compensable service.
√ In case of incorrect address provided by the customer or refusal of the
addressee, the customer shall be responsible for the losses arising there-
from.
√ If the express delivery cannot be delivered or rejected and returned to czi,
czi will take care of it and the storage fee shall be calculated from the date of
return. As the storage environment has corresponding requirements, inquiry
400-008-8306 for detail storage fee charge. When the storage fee is equiva-
lent to the residual value of the product, czi will have the right to dispose of
the product; (calculation method of product residual value: residual value=-
original selling price-current maintenance cost)
√ If the products are sent back from abroad without the consent of czi, the
customs duties and customs clearance expenses arising therefrom shall be
borne by the customer.
89

√ In case of water inflow to the product, the performance of the product
will be seriously affected, and there is no maintenance value. Therefore, czi
cannot provide maintenance service. Instead, the replacement service will
be provided. Please know and send it back as appropriate.
√ Before the products are sent for repair, please properly dispose of the
personalized articles and decorations attached to the original products
(including but not limited to decorative stickers, UAS stickers, paints and
lacquers, etc.). czi will not be responsible for the damage or loss of the
personalized articles and decorations.
√ In order to ensure your normal rights and interests, please check wheth-
er the product is in good condition (whether there is any damage caused by
logistics) when signing the goods. If the product is abnormal, please feed
back to us within 7 days from the date of receipt; otherwise, it’s regarded
as you agree that the product has no damage and the performance is
normal.
90


Made in China
ChengZhi Support
www.czi.com.cn
Service Hotline: 400-008-8306
www.czi.com.cn
If you have any questions or suggestions
regarding the manual, please contact us at:
如您对说明书有任何疑问或者建议
请通过以下电子邮箱联系我们:
成至技术支持
服务热线:400-008-8306