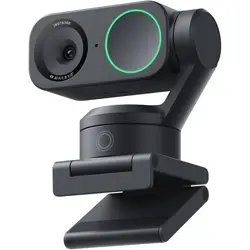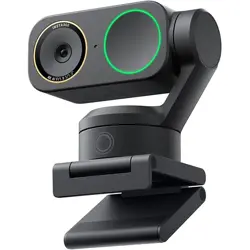
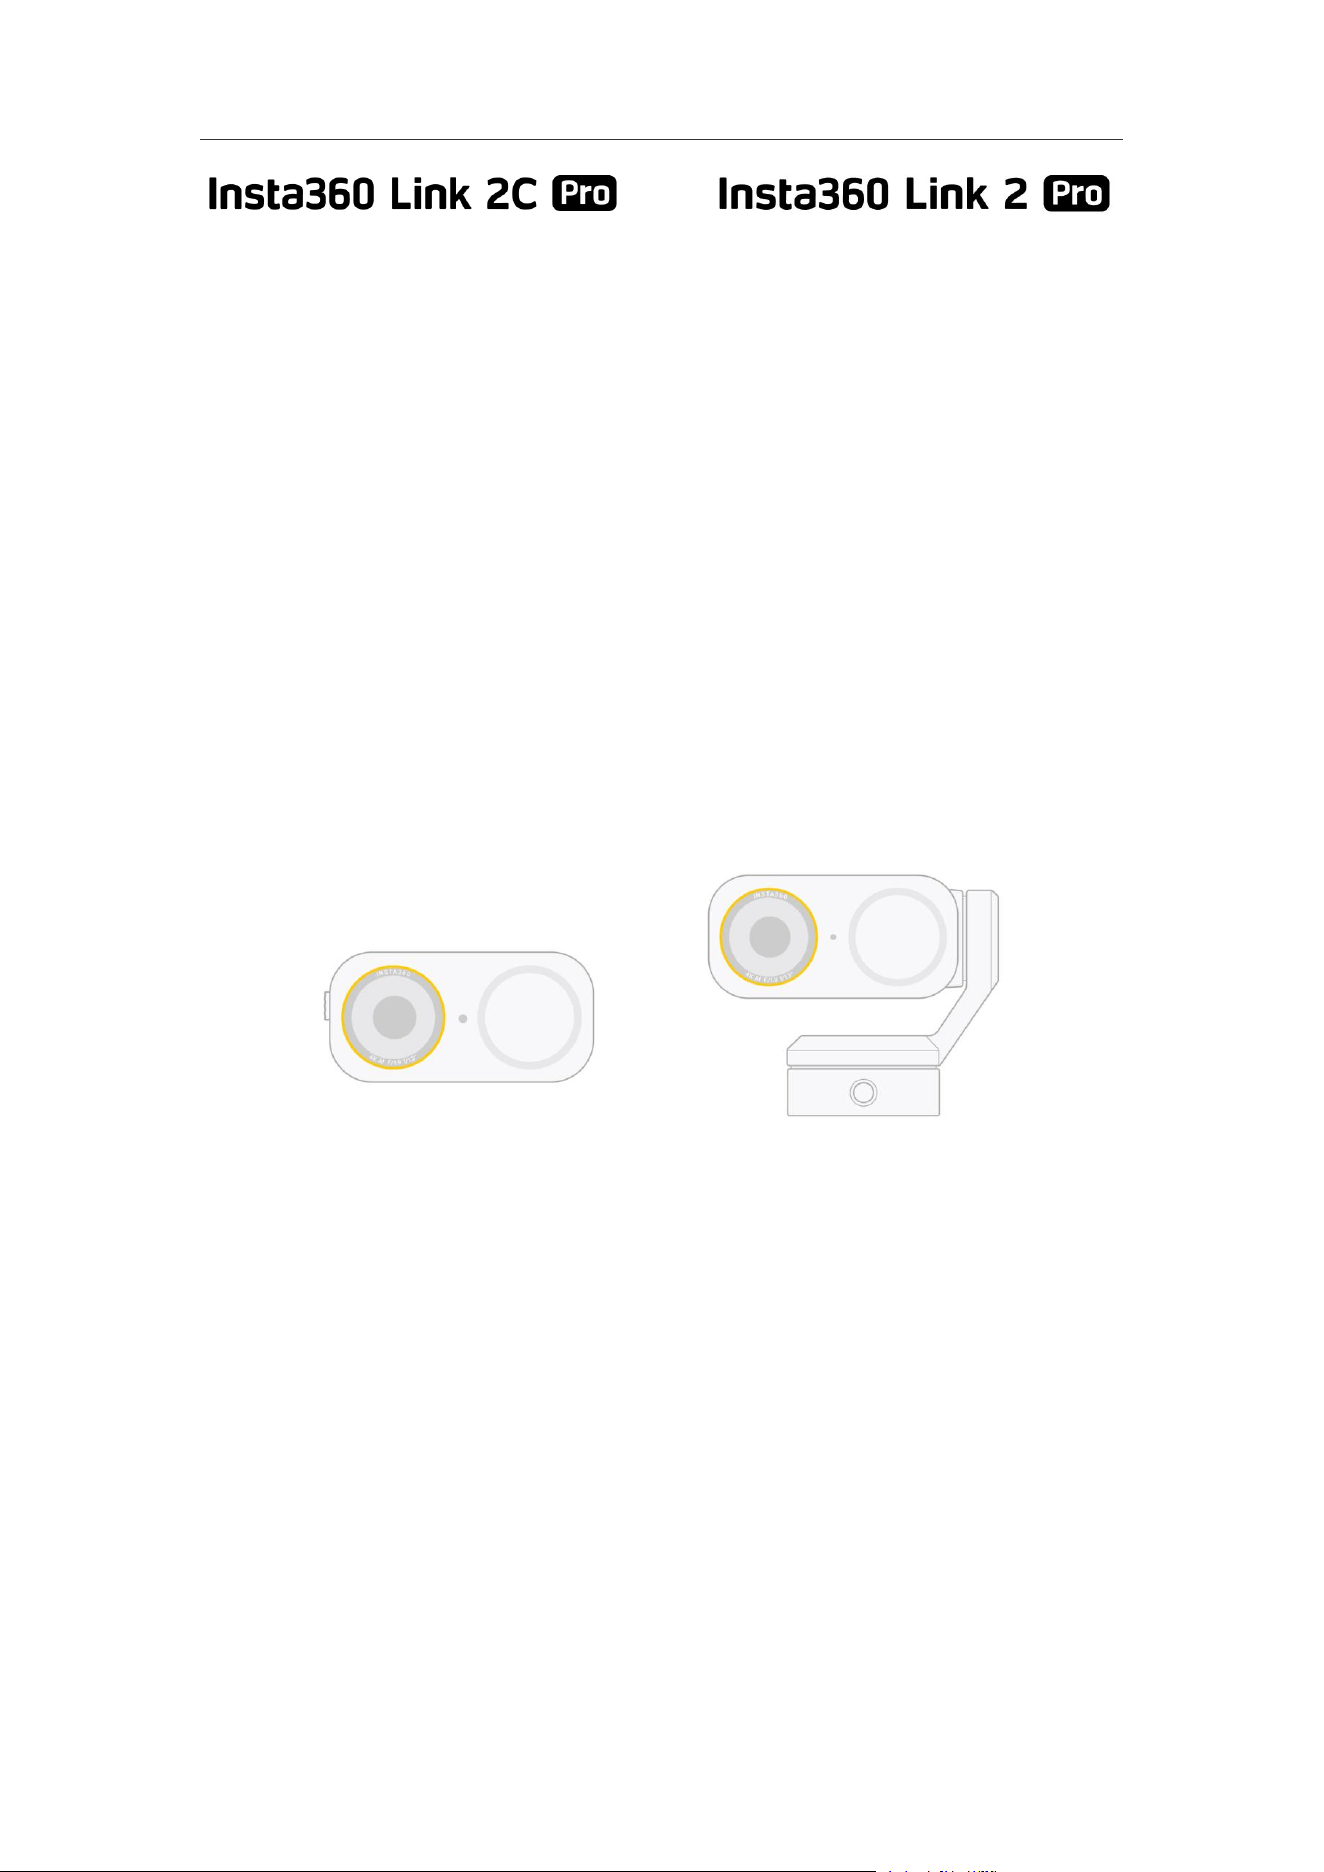
Link 2C Pro & Link 2 Pro User Manual
User Manual

Link 2C Pro & Link 2 Pro User Manual
Contents
ABOUT THIS MANUAL ......................................................................................... 1
OVERVIEW ............................................................................................................ 1
Appearance ..................................................................................................... 1
What's in the Box ............................................................................................ 2
Indicator Light ................................................................................................. 3
FIRST USE ............................................................................................................. 5
Setting Up the Device ......................................................................................5
Connecting to Computer ................................................................................ 6
Basic Use (No Client Required) ...................................................................... 7
INSTA360 LINK CONTROLLER .......................................................................... 11
Download and Installation ............................................................................11
Software Interface Overview ........................................................................ 12
Audio Mode Selection .................................................................................. 13
Insta360 InSight and AI Recording Summary ..............................................14
Other Useful Features ...................................................................................16
ADVANCED USE ................................................................................................. 17
AI Tracking and Auto Framing..................................................................... 17
Whiteboard Mode ......................................................................................... 21
DeskView Mode ............................................................................................ 23
LIVE STREAMING ............................................................................................... 24
Preparations: Installation and Basic Settings ............................................. 24
Two Camera Signal Sources........................................................................ 26
Configuring the Camera in Streaming Software ......................................... 27

Link 2C Pro & Link 2 Pro User Manual
Using the Camera via OBS Studio................................................................ 28
Advanced Application — Green Screen Keying Live Stream .......................30
ECOSYSTEM INTEGRATION .............................................................................. 33
Using Elgato Stream Deck to Control Link 2 Series Cameras .................... 33
Advanced Application — Multi-Camera Live Streaming ..............................40
Integration with Wave ...................................................................................44
MAINTENANCE AND CARE ................................................................................45
Checking the Serial Number (SN)................................................................ 45
Log Upload .................................................................................................... 47
Firmware Update .......................................................................................... 49
Storage and Maintenance ............................................................................ 49
SPECIFICATIONS ................................................................................................50
Link 2C Pro & Link 2 Pro User Manual
1
About This Manual
1. This manual applies to both the Insta360 Link 2 Pro and Link 2C Pro cameras.
Where functions and operations are identical, they will be referred to collectively
as "this device" or "the camera". Any differences will be noted separately.
2. The images in this manual are for reference only. Actual interface may vary
slightly.
Overview
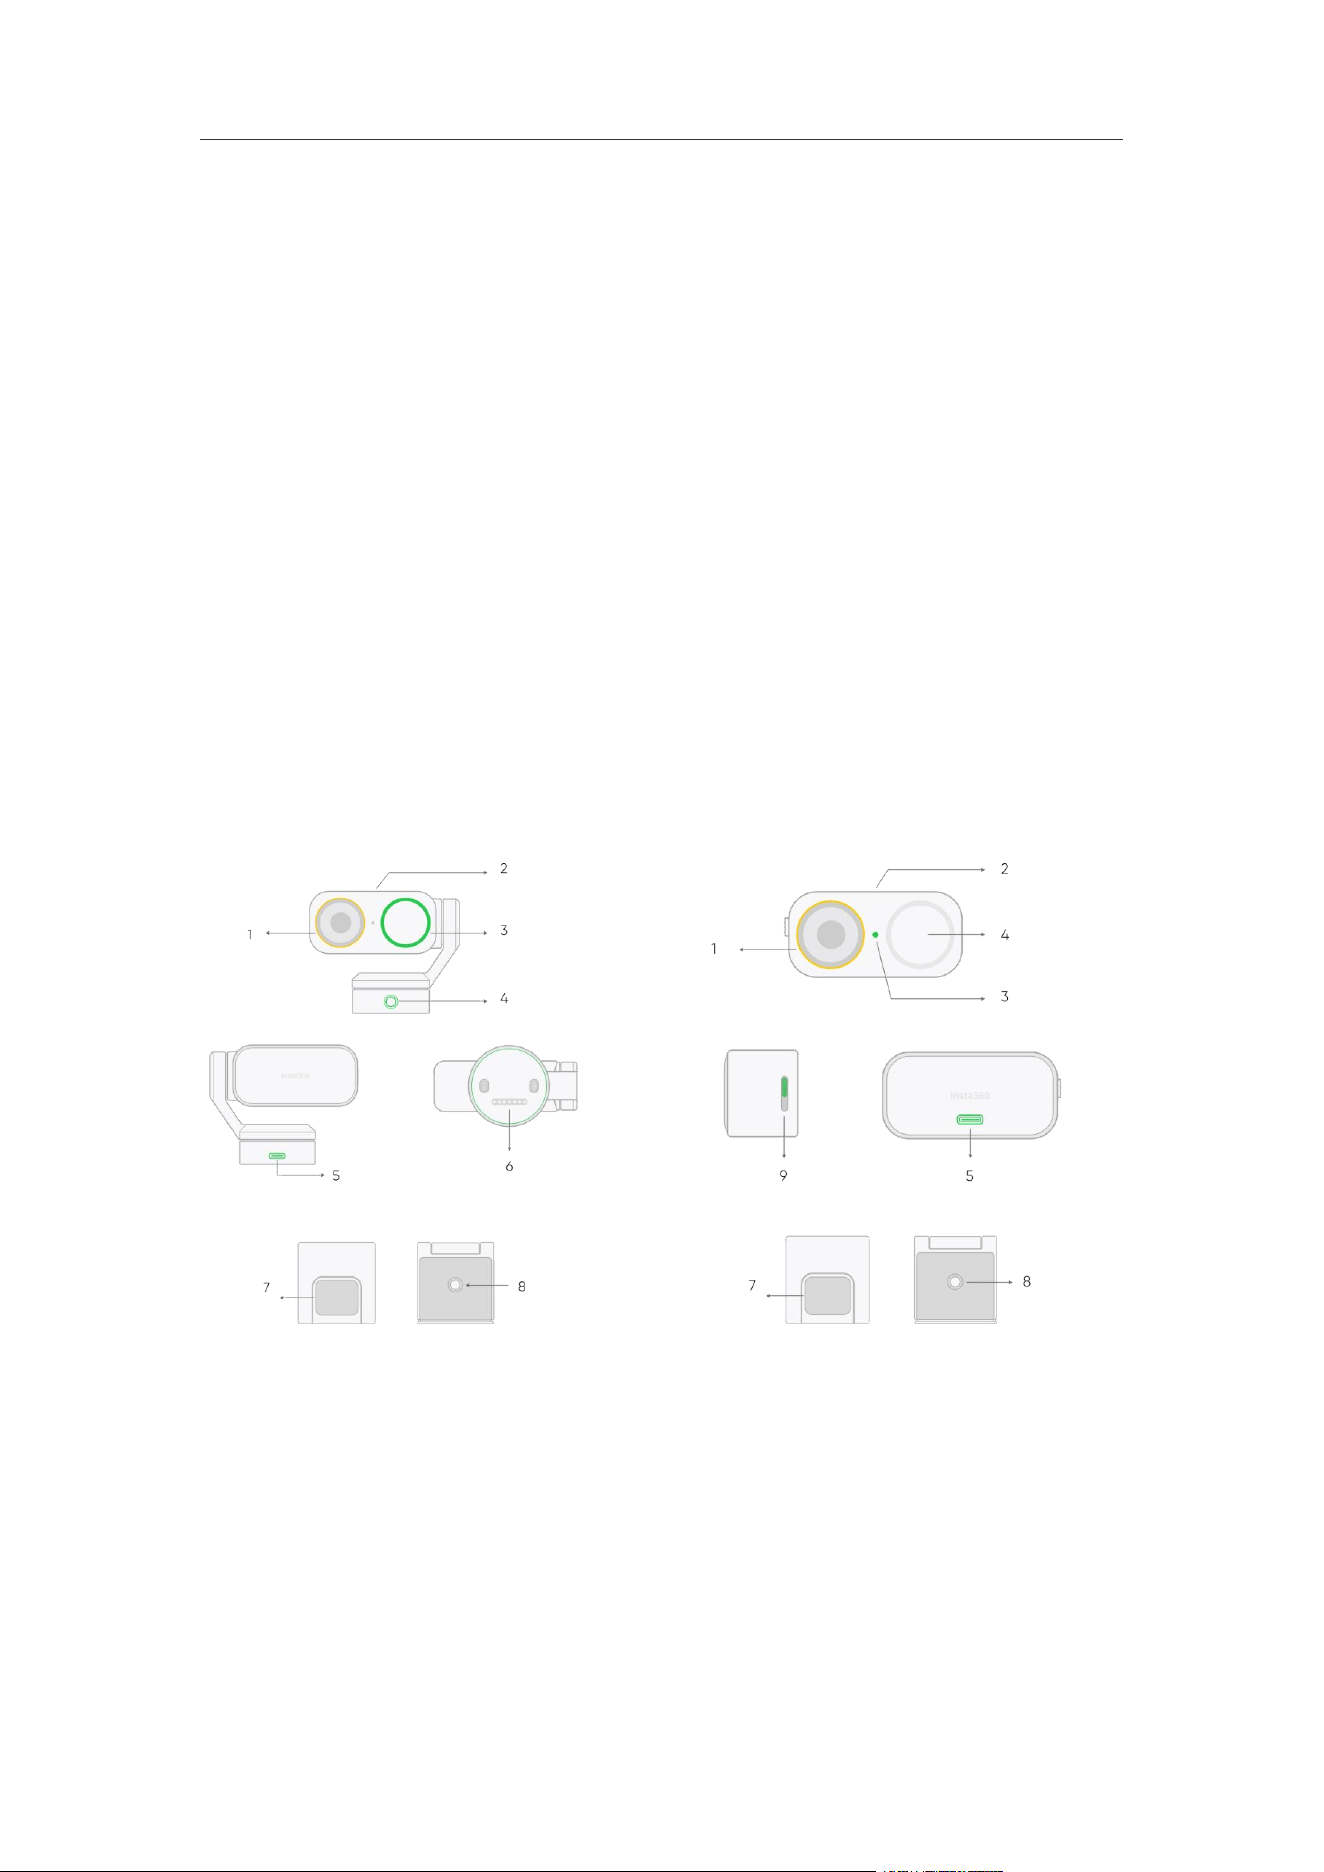
Appearance
Link 2 Pro Link 2C Pro
1. Lens
2. Microphone
3. Indicator Light
4. Touch Key
5. USB-C Port
6. Magnetic Base (Link 2 Pro Only)
7. Magnetic Surface
8. 1/4" Screw Hole
9. Privacy Switch (Link 2C Pro Only)
Link 2C Pro & Link 2 Pro User Manual
2
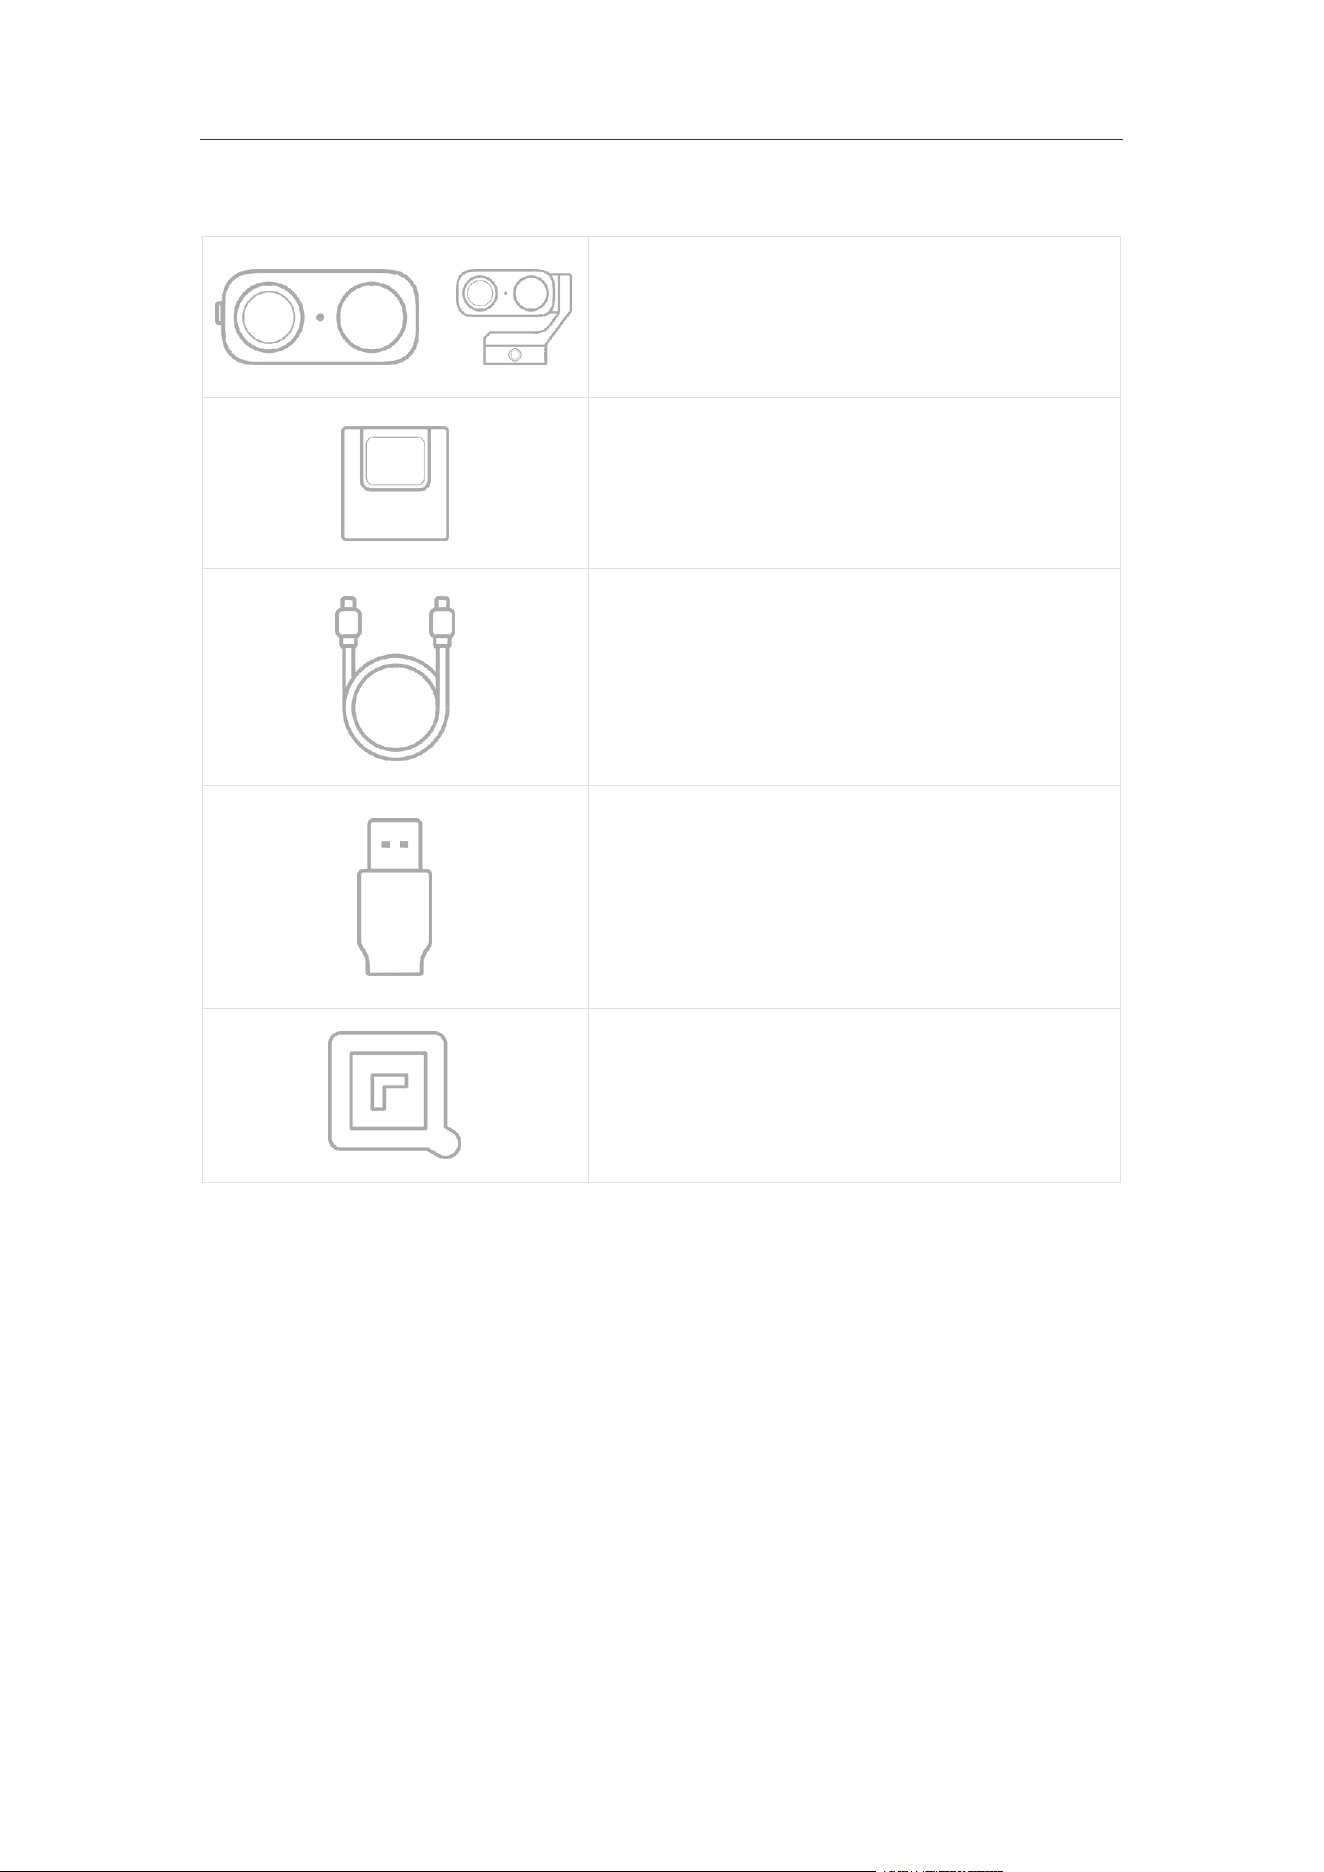
What's in the Box
Insta360 Link 2C Pro / Insta360 Link 2 Pro
Magnetic Mount
USB-C Cable
USB-C to USB-A Adapter
Whiteboard Recognition Markers

Link 2C Pro & Link 2 Pro User Manual
3
Indicator Light
1. System & Basic Status
Status
Indicator Light
Powering On
Solid Green
Startup Self-check
Breathing Green
Standby (Idle)
Solid Green
Sleep
Light Off
U-Disk Mode
Solid Blue
Firmware Update in Progress
Breathing Blue
Firmware Update Successful
Solid Green
Factory Reset in Progress
Flashing Blue
Factory Reset Complete
Solid Green
2. Main Working Modes
Status
Indicator Light
Single-Person Tracking Active
Solid Cyan
Multi-Person Tracking Active
Solid Cyan
Whiteboard Mode - Scanning
Breathing Green
Whiteboard Mode - Active
Solid Green
Smart Whiteboard - Scanning
Breathing Green
Smart Whiteboard - Active
Solid Green
DeskView Mode - Active
Solid Green
Auto-Framing - Active (Link 2C Pro)
Solid Cyan

Link 2C Pro & Link 2 Pro User Manual
4
3. Prompts & Abnormalities
Status
Indicator Light
Gesture Control Successful
Fast Flashing Green (3 times)
Hardware Failure
Solid Red
Update Failed
Fast Flashing Red (3 times, then stops)
Abnormal Operation
Fast Flashing Red (3 times, then stops)
Single Person Tracking - Interrupted
Fast Flashing Red (3 times, then stops)
Whiteboard Mode - Not Scanned
Fast Flashing Red (3 times, then stops)
Gesture Recognized - Failed to Activate
Fast Flashing Red (3 times, then stops)
4. Privacy Mode
Status
Indicator Light
Privacy Mode
(Link 2 Pro only, camera and
microphone are disabled by default)
Solid Yellow
Link 2C Pro & Link 2 Pro User Manual
5
First Use
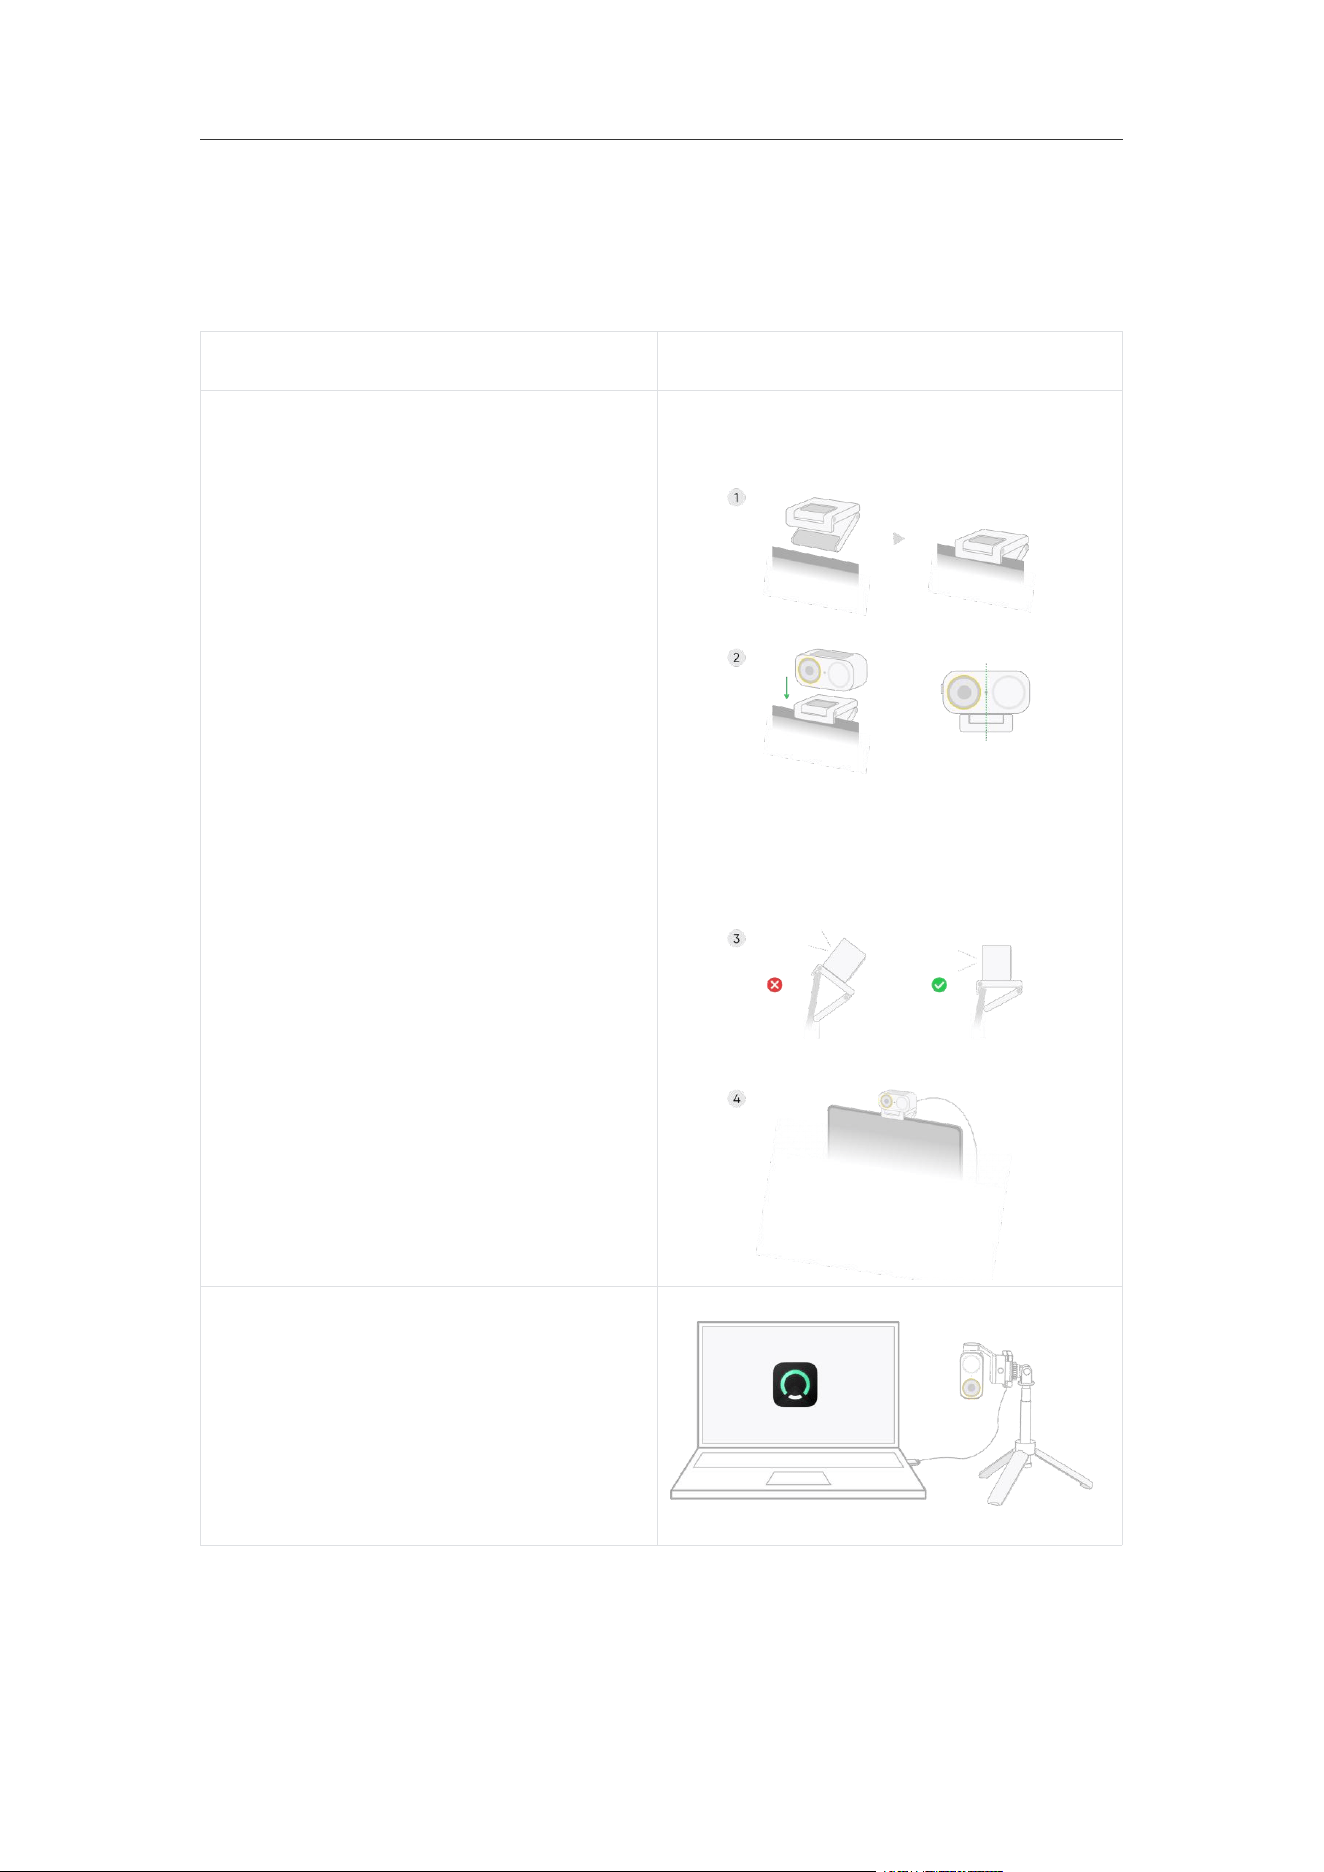
Setting Up the Device
Status
Graphics
1. Secure the Magnetic Mount to your
screen's edge as shown.
2. Place the camera, ensuring the
status LED on top is centered with
the screen.
3. Adjust the angle of the mount to
keep the camera roughly at body
level.
4. Connect the camera to your
computer using the included cable.
Once successfully connected, the
indicator light will turn solid green.
For vertical shooting, a tripod is
required. The camera can be mounted
on a tripod via the 1/4" screw hole at
the bottom of the Magnetic Mount.
Link 2C Pro & Link 2 Pro User Manual
6
Connecting to Computer
1. Connect the device to your computer using the included cable. The webcam will
perform a self-check, then the indicator light will then turn solid green, indicating
the camera is ready to use.
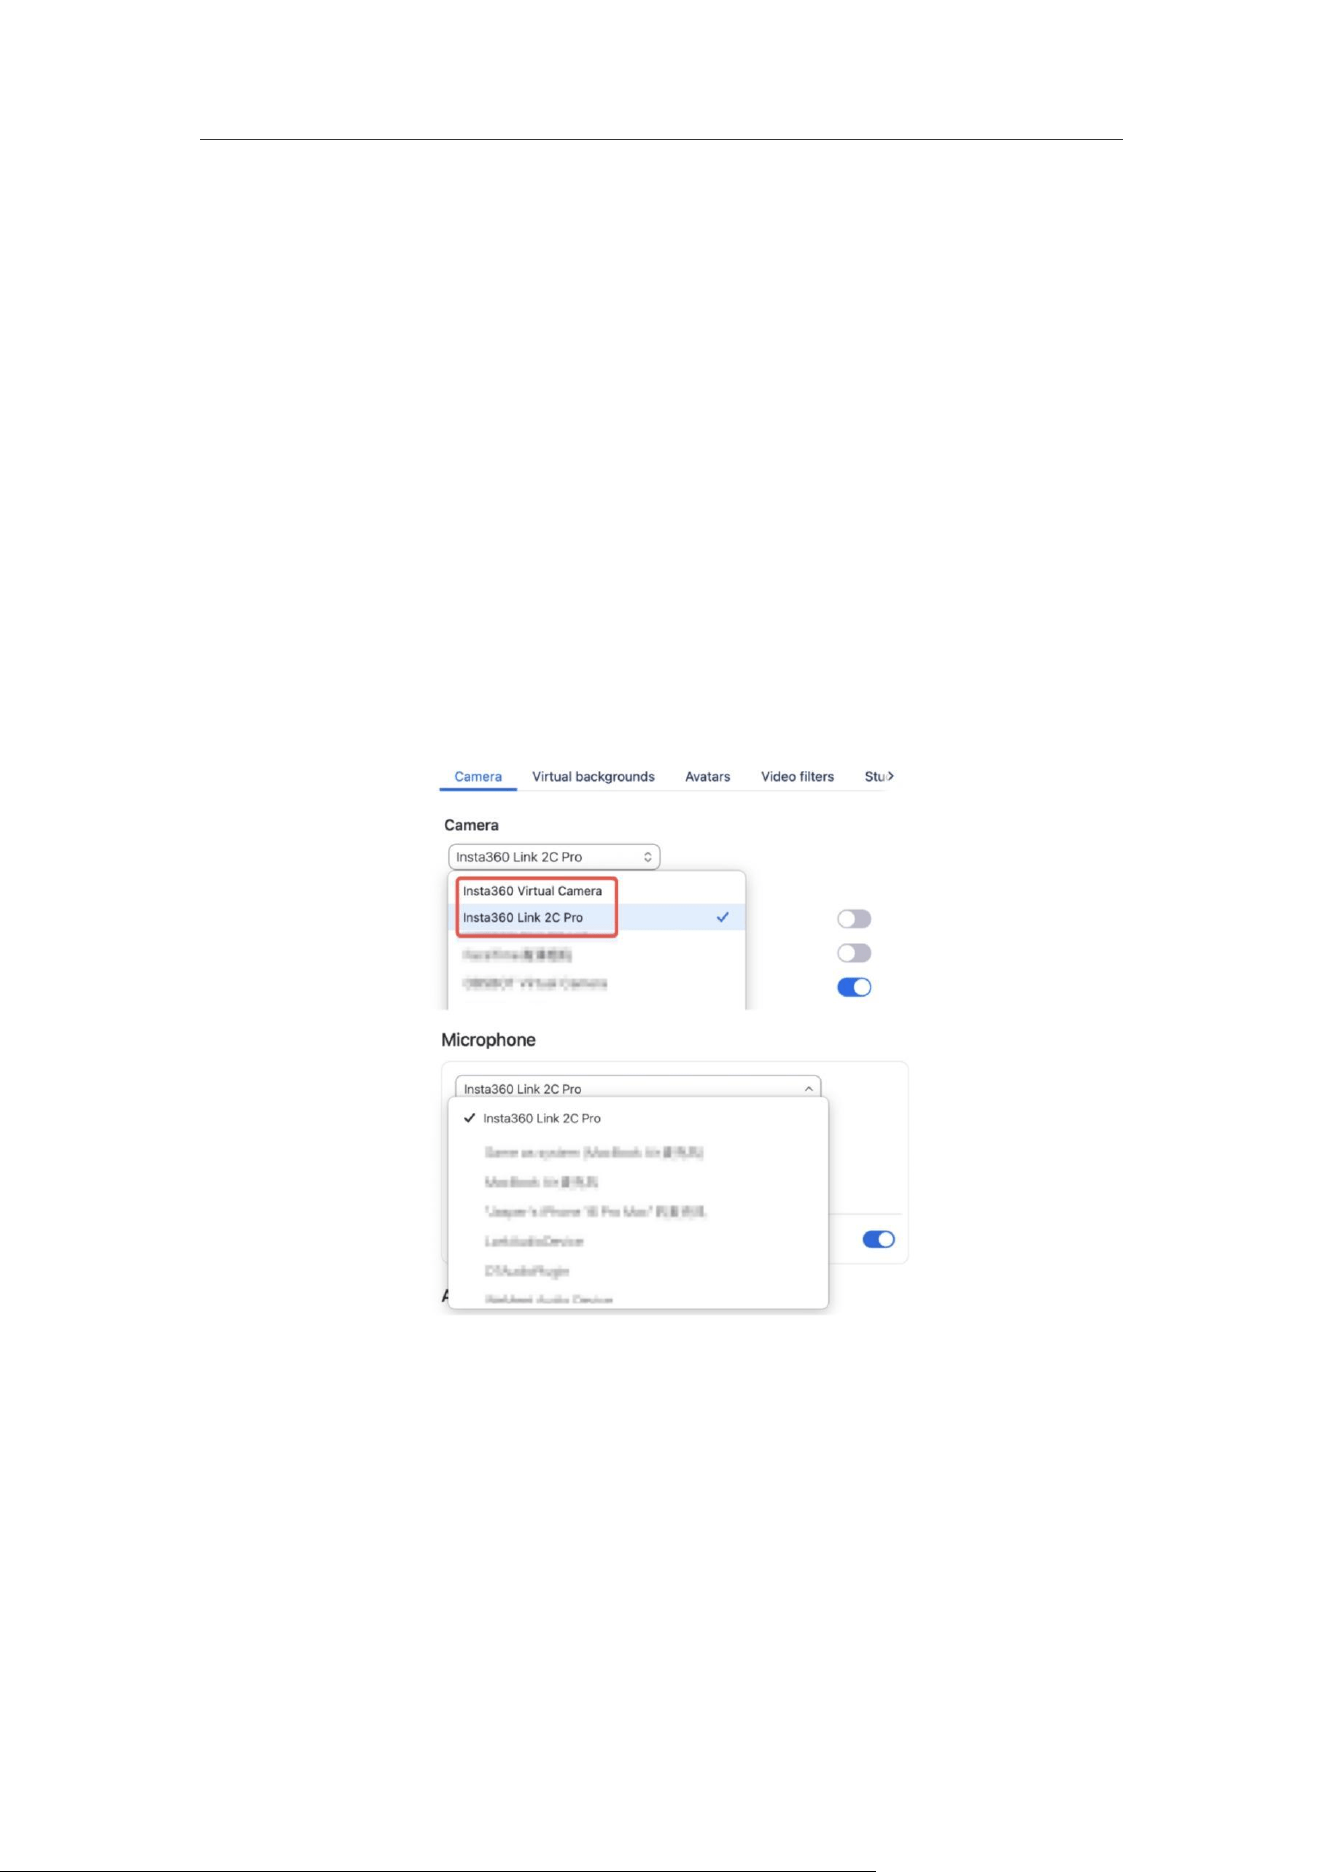
2. Once connected, you can select this device as the video and audio source in
third-party video conferencing software. You will see two options in the
camera/microphone settings list:
○ Insta360 Link 2C/2 Pro (Physical Camera Stream): Provides basic video and
audio, and supports AI tracking control via the camera's buttons or gestures.
○ Insta360 Virtual Camera (Virtual Camera Stream): Enable this option to use
all advanced features provided by the Insta360 Link Controller, such as
Makeup, Beautify, Virtual Background, Smart Whiteboard, etc.
3. To experience the full performance of the device, it is recommended to
download the Insta360 Link Controller software (hereinafter referred to as the
"client") from the official website. This allows you to use features such as Smart
Whiteboard, Background Replacement, Background Blur, Bokeh, Green Screen
Keying, Makeup, Beautify, as well as utilize Insta360 InSight and customize AI
Tracking settings (e.g., setting pause-track areas/tracking areas and adjusting
tracking speed).

Link 2C Pro & Link 2 Pro User Manual
7
Notes:
• To prevent malfunctions due to power supply, please connect the device directly
to your computer or to a dock with an independent power supply. (Power
requirements: 5V/1A)
• This device is compatible with Windows and macOS computers. To avoid
compatibility issues, please ensure you use the included cable to connect to
your computer.
Basic Use (No Client Required)
Touch Key
• Single Tap: Turn AI Tracking on or off.
• Double Tap: Link 2 Pro: Double-tap the touch key on the gimbal base to recenter
the gimbal. Link 2C Pro: Double-tap the touch key to switch between 1x and 1.5x
zoom.
• Triple Tap: Triple-tap and then long press for 5 seconds to enter U-Disk Mode for
firmware updates and other operations. Unplug the cable to exit U-Disk Mode
(On Windows, please safely remove hardware first).
Gesture Control
Gesture control allows you to perform operations such as zooming, Whiteboard
Mode, and tracking for a more efficient and smooth experience. Below are the
gestures that can be used without the client software. Gesture Control is enabled by
default on Link 2 Pro and disabled by default on Link 2C Pro.

Link 2C Pro & Link 2 Pro User Manual
8
Zoom via Gestures
1. Ensure your face is within the camera's frame.
2. Show an "L" gesture to the lens. The indicator light will flash green, indicating
successful detection. (Ensure the gesture does not block your face).
3. Keep the gesture visible; move your hand upward to zoom in and downward to
zoom out. (You only need to perform the upward or downward motion;
continuous movement is not required).
Tips:
• The "L" gesture must remain within the frame during the zooming process.
• When multiple people are in the frame, the camera will only track one person at a
time. For the "L" gesture, it will only respond to the first detected gesture.
• If multiple people move in different directions, it will not affect the recognition
rules; the camera still responds based on the first detected gesture.
Control Whiteboard Mode via Gestures
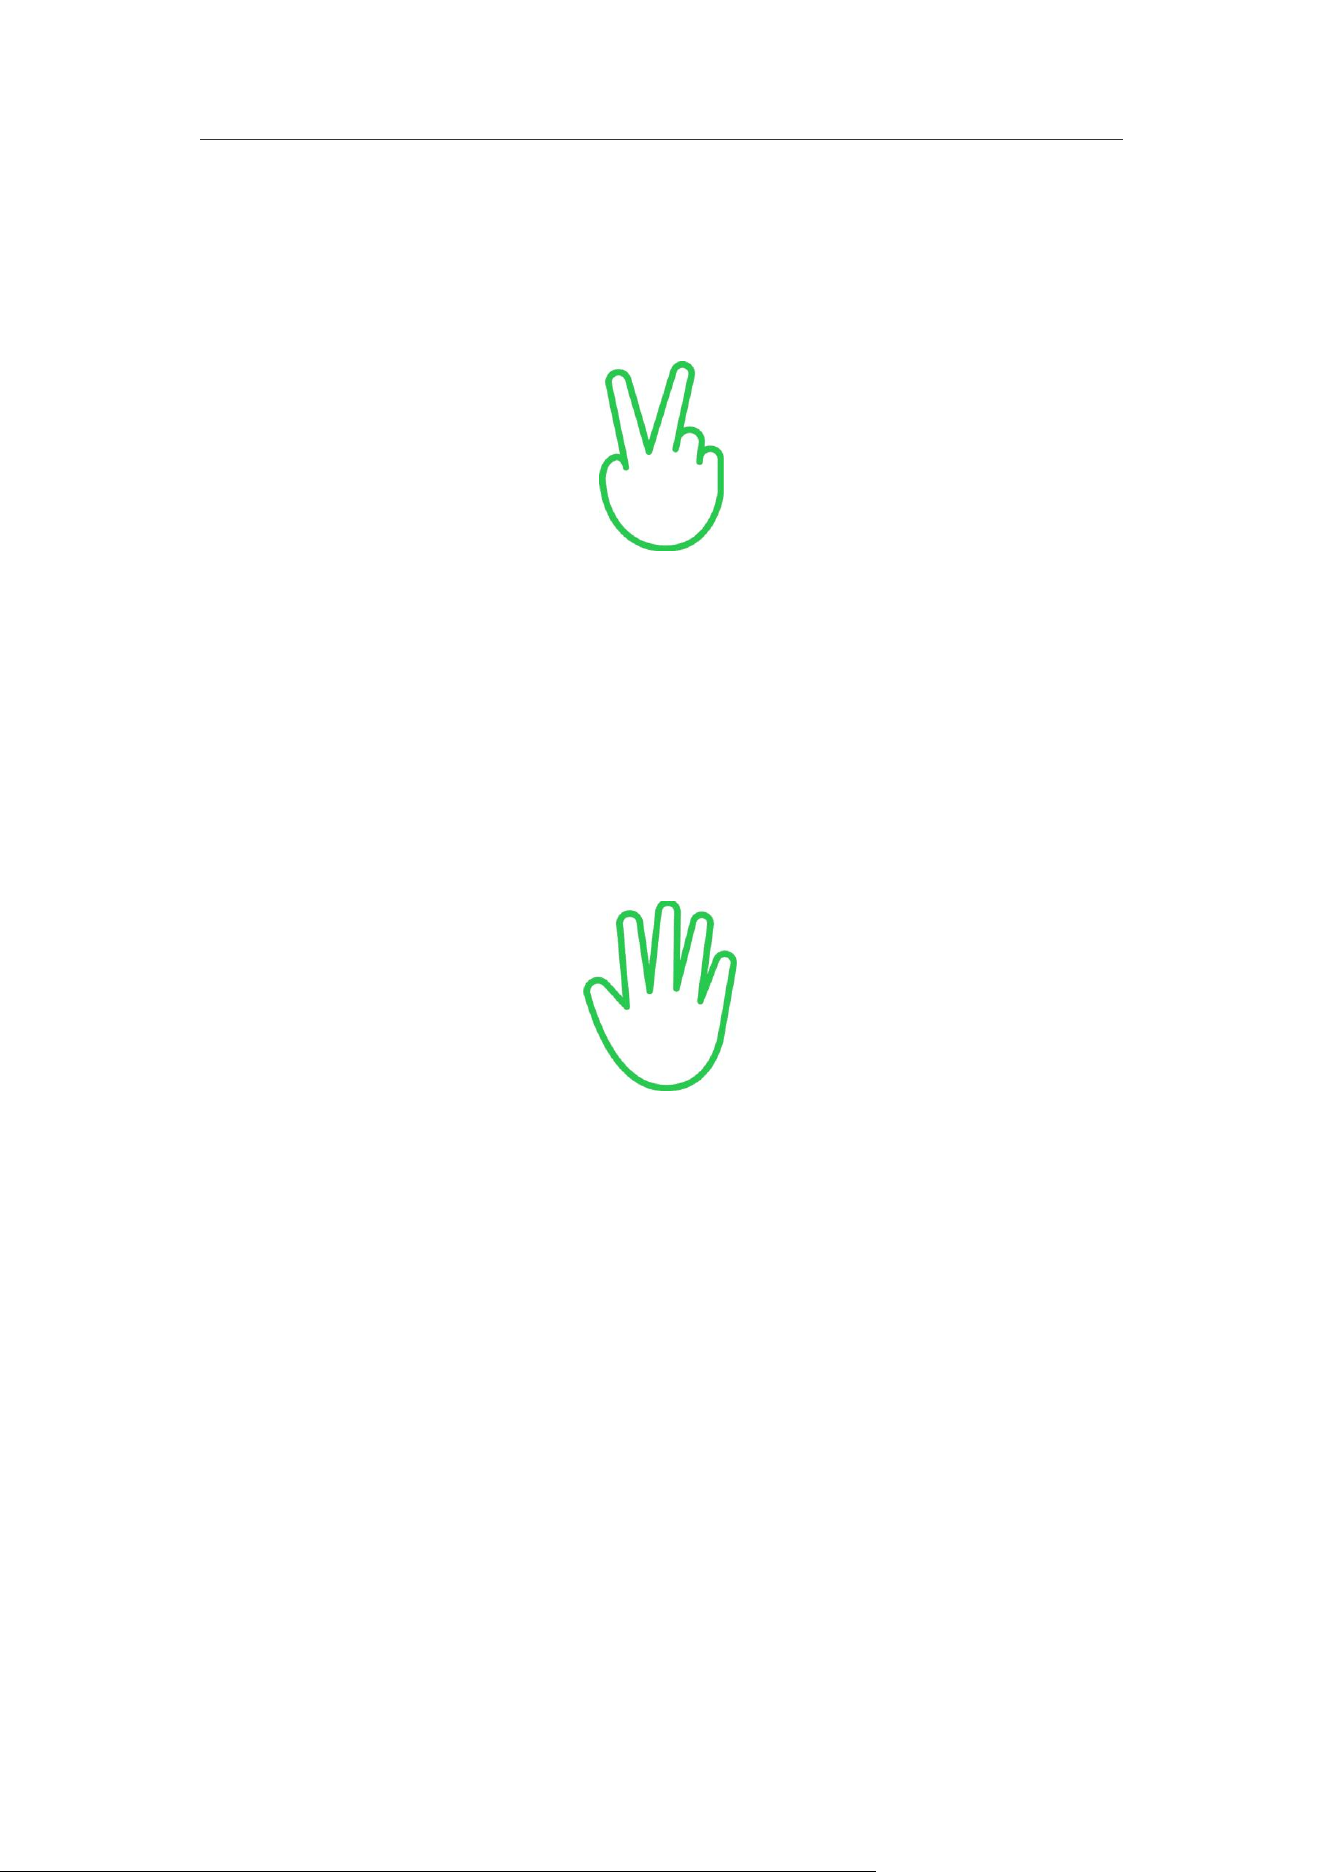
1. When the whiteboard you are using meets the following conditions, you can
directly activate Whiteboard Mode via a "V" gesture, without relying on
recognition markers or opening the Link Controller client:
• Whiteboard Characteristics:
○ White background with distinct borders. The maximum recognition distance
is 5m when facing the device directly. When tilted, the angle should not
exceed 30 degrees, and the recognition distance should not exceed 3m.
2. Show a "V" gesture (scissors sign) within the camera's frame. The indicator light
will flash green, indicating successful detection.
3. The device will then detect the whiteboard in the frame and highlight it.
Link 2C Pro & Link 2 Pro User Manual
9
4. If using a non-white surface (such as a blackboard) or an irregularly shaped
surface, please use Whiteboard Recognition Markers or enable Smart
Whiteboard Mode in the Link Controller client for recognition.
Control AI Tracking or Auto Framing via Gestures
With your face in frame, show your palm to the camera and hold it for a moment.
Once the green light flashes, recognition is successful and AI Tracking is enabled. At
this point, Link 2 Pro will adjust the gimbal angle to follow the subject's movement;
Link 2C Pro will use digital zoom and cropping to keep the subject centered in the
frame as much as possible.
Privacy Mode
Link 2 Pro
Manually tilt the camera downward 90° to enter Privacy Mode. The camera and
microphone functions will be disabled. Manually tilt the camera back up to exit
Privacy Mode.
Note: Entering Privacy Mode disables both audio and video. When the device is not
being used by any platform, the camera will automatically tilt down after 10 seconds
to enter Sleep Mode.

Link 2C Pro & Link 2 Pro User Manual
10
When the camera is in Privacy Mode, you can wake it up using any of the following
methods:
• Software wake-up: Open a software that requires the camera (e.g., a video
conferencing app). The camera will wake up automatically when the software
starts receiving the video or audio stream.
• Manual wake-up: Manually rotate the camera gimbal up to a normal usage angle
to exit Privacy Mode.
• Reconnection: Unplug and replug the camera's cable to re-establish the
connection for use.
Link 2C Pro
Toggle the privacy switch on the camera to physically block the lens view and protect
your privacy. To turn off the microphone, please manually disable the audio input in
the Insta360 Link Controller or third-party software.
Link 2C Pro & Link 2 Pro User Manual
11
Insta360 Link Controller
Download and Installation
• Download: Please visit the Download Center on the official Insta360 website.
• Installation: After downloading the "Insta360 Link Controller" software, follow
the prompts to complete the installation.
• Virtual Camera Settings (Important): To use advanced features such as Smart
Whiteboard, Virtual Background, and Beautify, you must select "Insta360 Virtual
Camera" as the video source in your live streaming or conferencing software.
The setup methods are as follows:
○ Windows: Click the virtual camera icon within the Link Controller software
and follow the prompts to complete the installation.
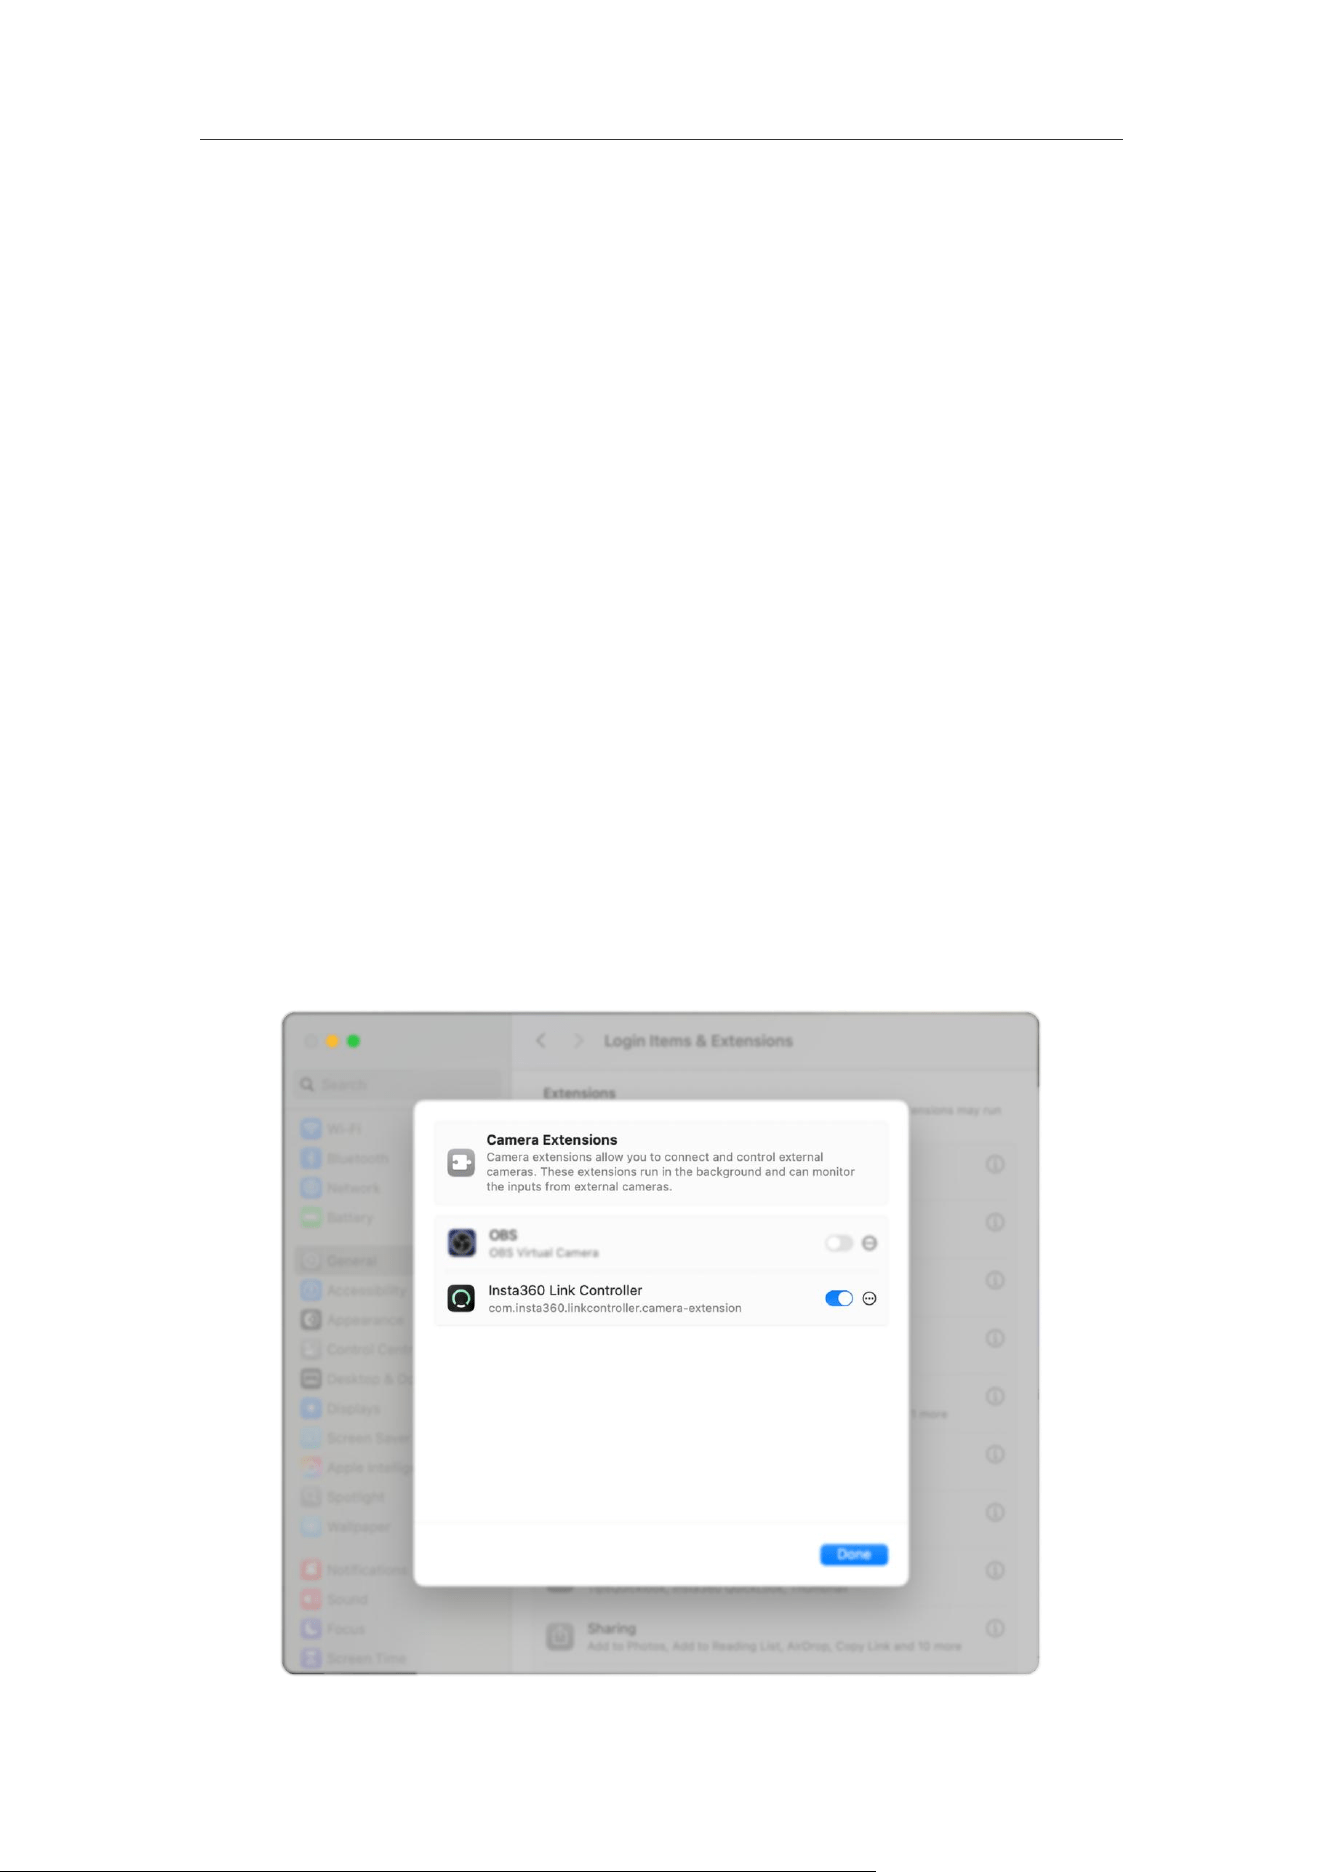
○ macOS: For first-time use, follow the system prompts to go to "System
Settings" > "Privacy & Security" to allow the relevant camera extension
permissions, then restart the client. If your macOS version is 15.0.1 or later,
go to "System Settings" > "General" > "Login Items & Extensions" > "Camera
Extensions", enable the client permission, and restart the client for the
feature to take effect.
Link 2C Pro & Link 2 Pro User Manual
12
Software Interface Overview
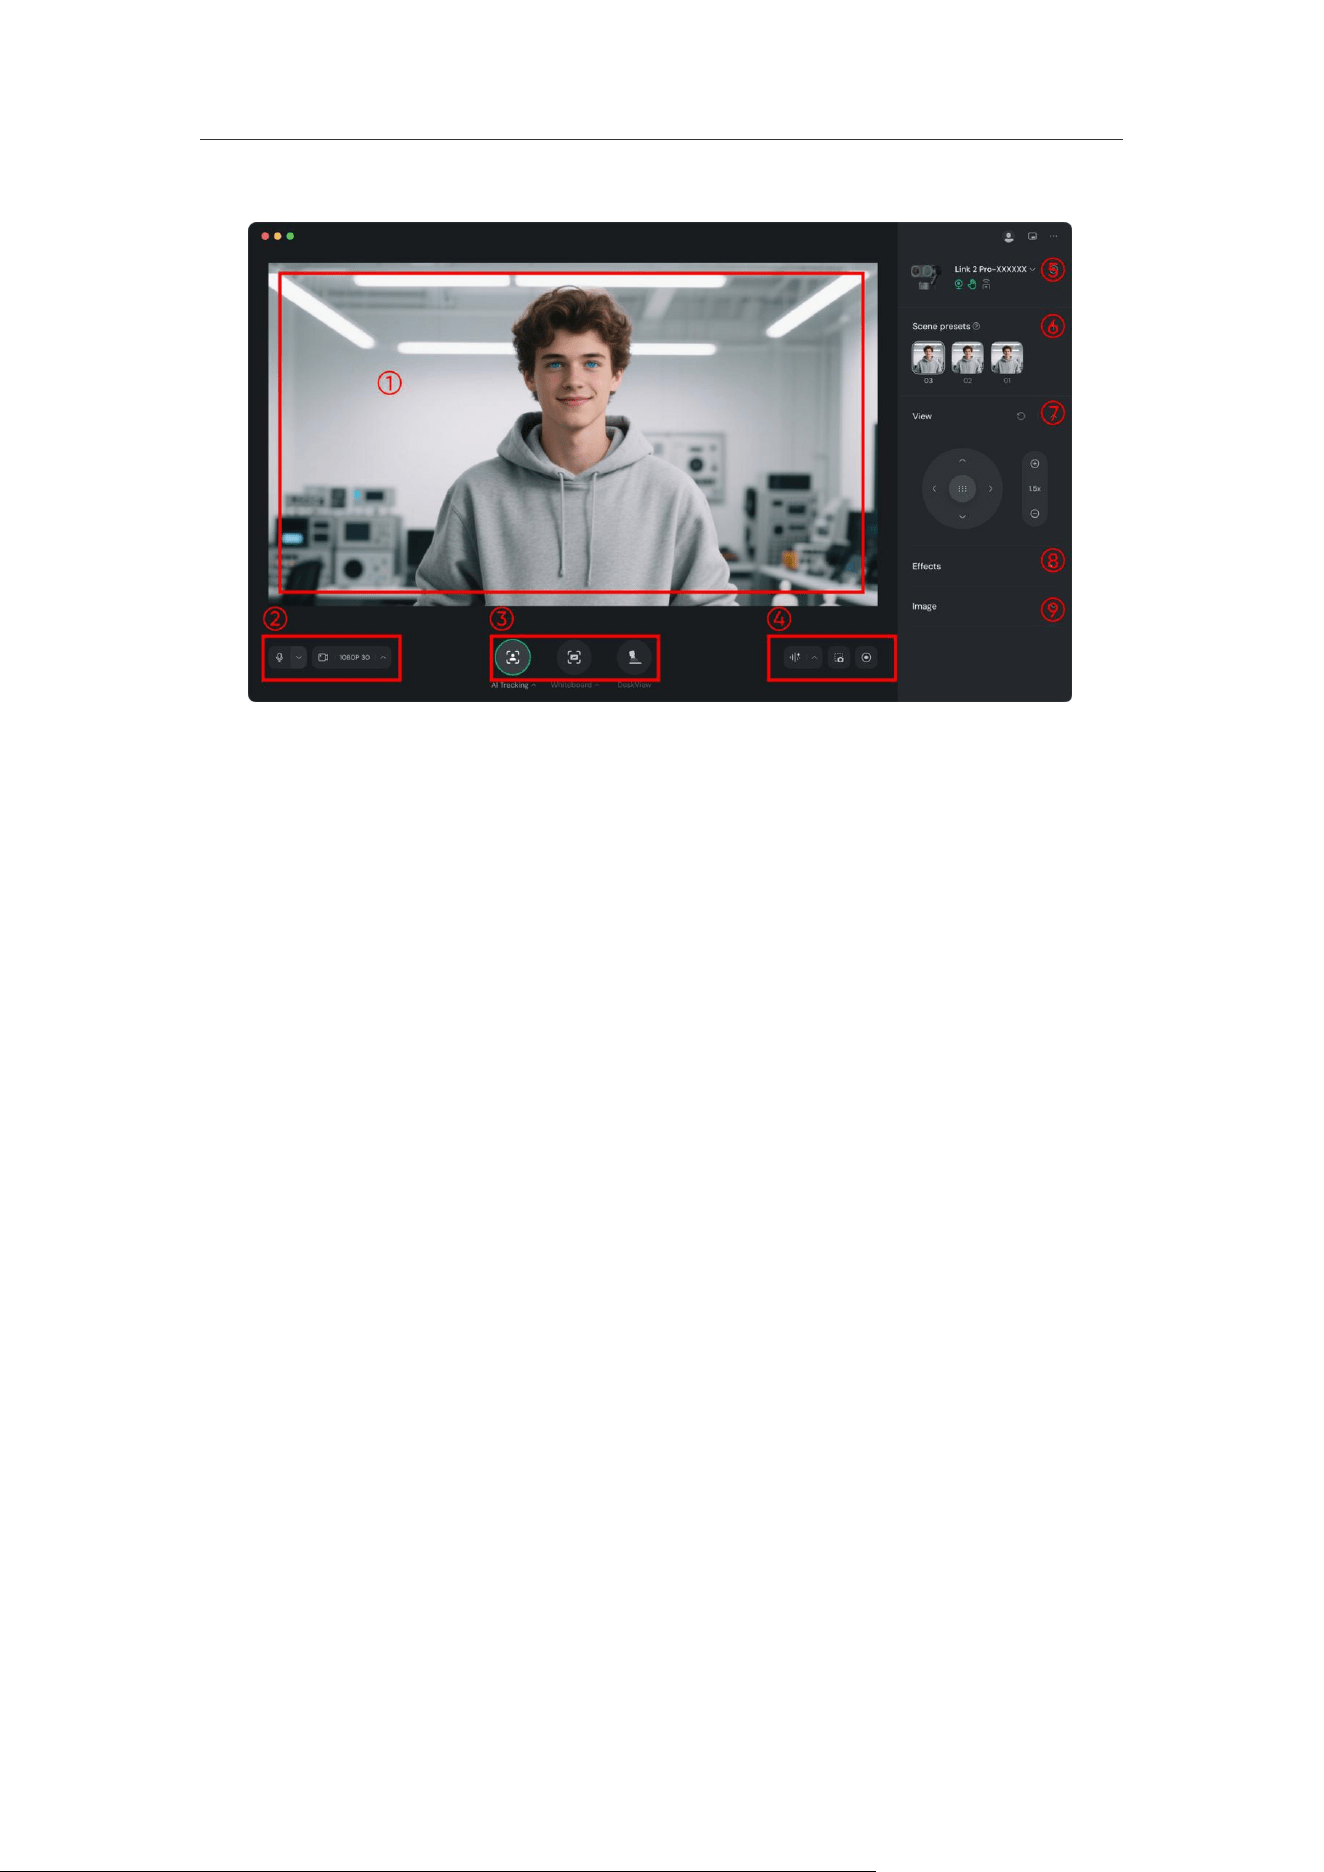
1. Preview Area: Real-time preview of the captured footage.
2. Video and Audio Settings Area: Connect or disconnect video/audio signals and
adjust settings (select microphone source, pickup mode, aspect ratio, resolution,
frame rate, vertical and horizontal mirroring, etc.).
3. Smart Features Entry: Turn "AI Tracking" / "Auto Framing," "Whiteboard," and
"DeskView" on or off, and access specific settings for adjustments. See below
for detailed operation methods.
4. Recording Area: Start or stop standard video recording, use AI Recording
(transcribes audio into text summaries; requires account login), or take
screenshots.
5. Status Bar: Display and adjust gesture settings, virtual camera status, and
access more settings.
6. Scene Presets: Save current parameters as a preset (AI mode, view, effects,
image settings) for quick switching.
7. View: Adjust the camera direction (Link 2 Pro only) and zoom.
8. Effects: Select real-time filters, use or upload virtual backgrounds (choose
"Bokeh" to focus on the subject, or "Background Blur/Replacement" to protect
privacy), perform Green Screen Keying (see "Advanced Applications — Green
Screen Keying Live Streaming" for detailed steps), and apply real-time Beautify &
Makeup effects.
9. Image: Manually adjust exposure, color temperature, saturation, etc., and save
these parameters as a color template for one-click application in future sessions.
Link 2C Pro & Link 2 Pro User Manual
13
Audio Mode Selection
Based on your usage, click the microphone icon at the bottom of the client to select
the pickup mode and access more audio settings.
Modes
Description
Graphics
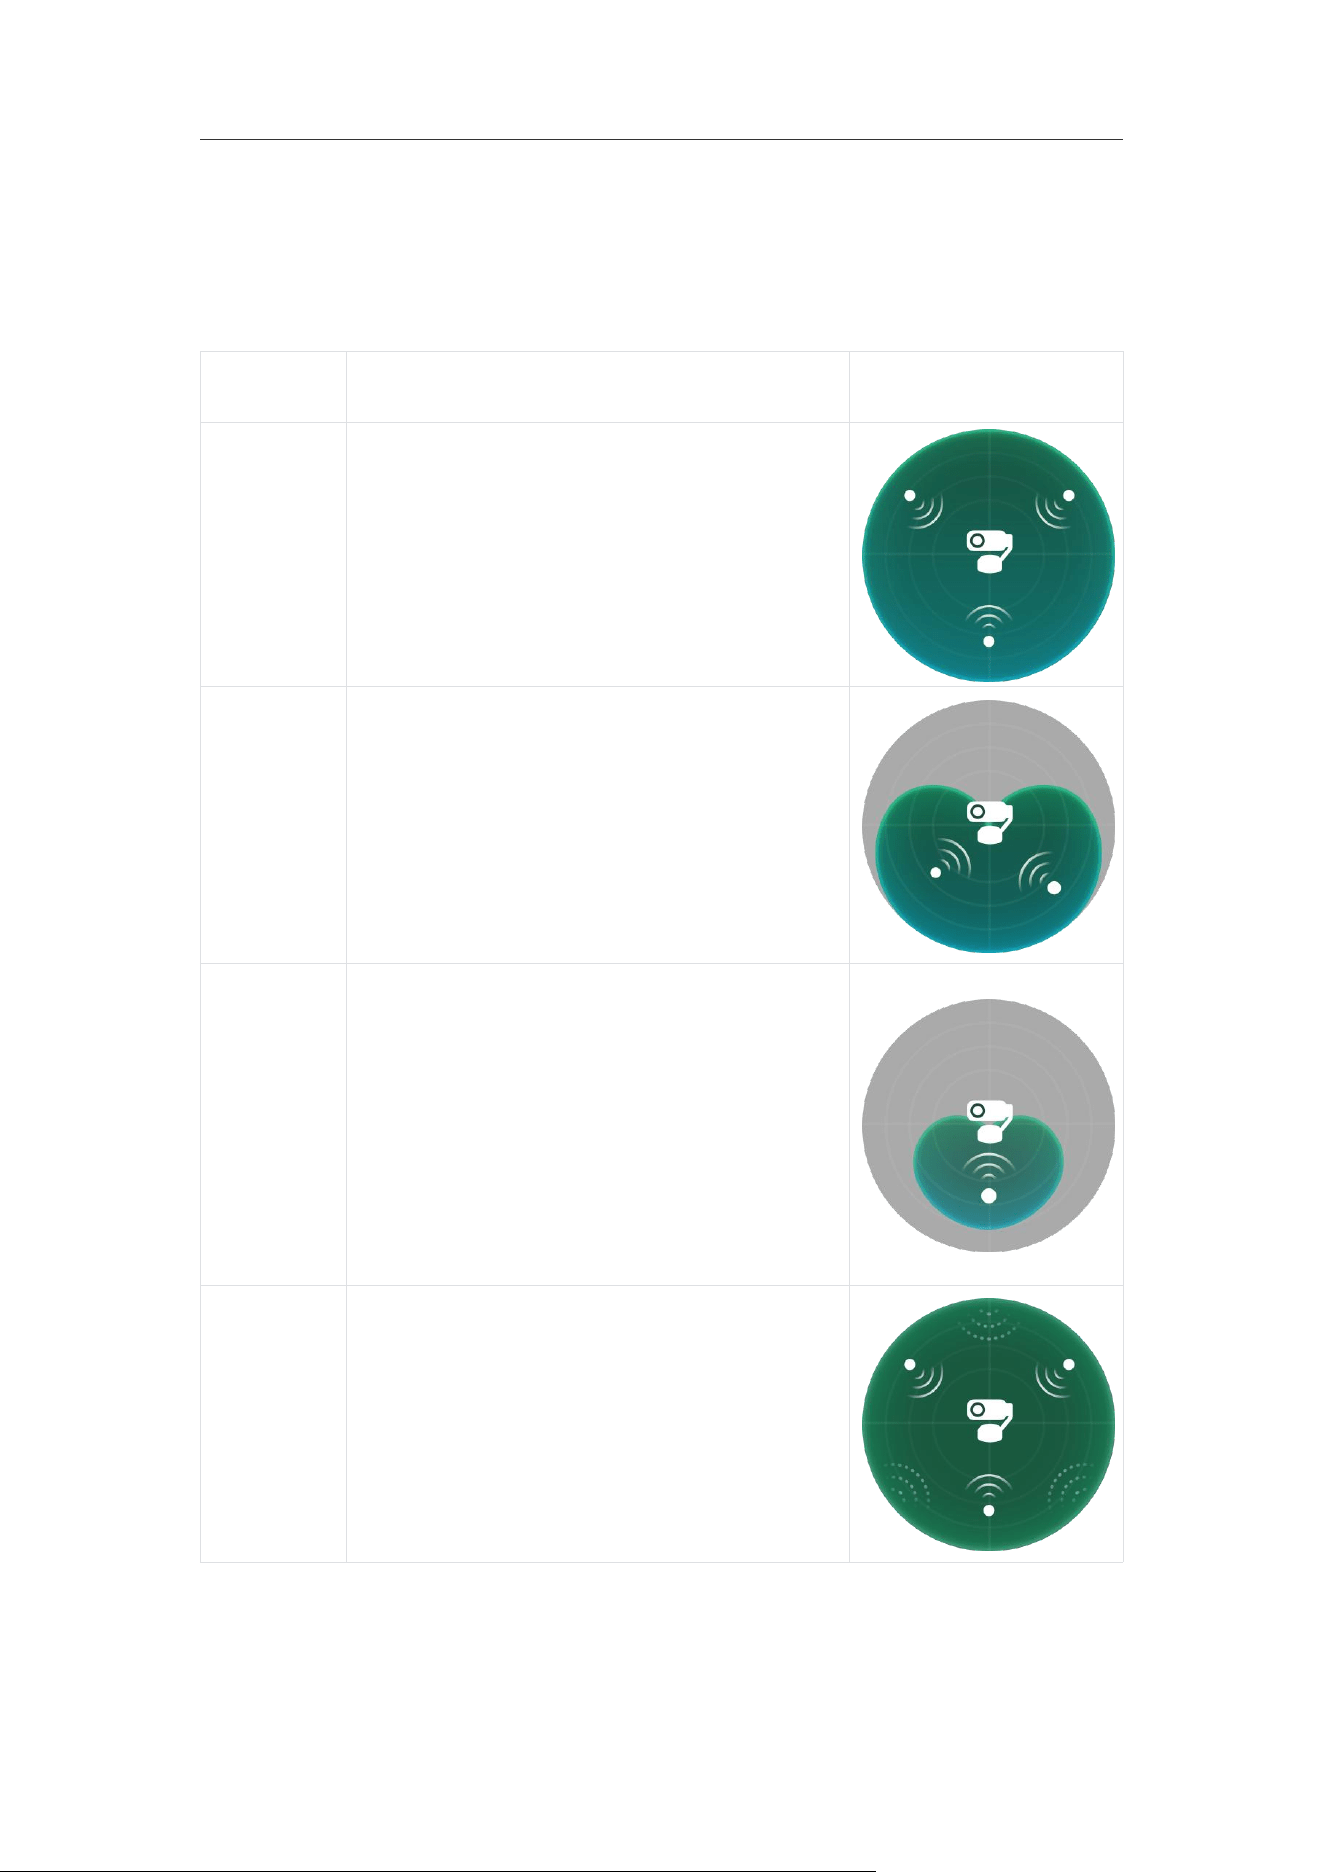
Standard
Suitable for daily use. It picks up ambient
sound around the device, enhances and
highlights human voices, and slightly
reduces environmental noise.
Wide
Suitable for single or multi-person
meetings, live streaming, and other
scenarios. It picks up and enhances all
human voices in front of the device while
automatically suppressing environmental
noise and voices from behind the device.
Focus
Suitable for noisy environments such as
workstations or cafes. The pickup range is
more concentrated, prioritizing the
enhancement of human voices within
approximately 1 meter in front of the device
while automatically suppressing voices and
environmental noise outside this area.
Original
Suitable for scenarios with high audio
quality requirements, such as content
creation and live streaming. It picks up
ambient sound around the device with
noise reduction turned off to preserve the
original sound as much as possible.
Link 2C Pro & Link 2 Pro User Manual
14
Insta360 InSight and AI Recording Summary
InSight is our premiere, value-added AI: An intelligent meeting assistant. After logging
in to your account, you can record meetings directly in the client and automatically
obtain complete text transcripts and AI-generated summaries, helping you and your
team efficiently capture and retain meeting content.
Operation Process
1. Preparation Before Starting
• Log in to your account: Make sure you are logged in to your Insta360 official
website account in the Link Controller client. The AI recording summary feature
is not available without logging in.
• Check audio: Click the microphone icon at the bottom to confirm that the correct
audio input device is selected.
• Recording settings: Click the “^” next to the “AI Recording” button in the client
to access settings.
○ Summary: When enabled, after ending the recording while connected to the
internet, the AI will generate a summary using the default template.
○ Recording Language: Set the language used during recording. The AI will
transcribe and summarize based on this language to improve accuracy.
○ Local Cache Location: Used to temporarily store recordings that have not
yet been uploaded. The file will be automatically deleted after upload.
○ Meeting Recording Reminder: When a meeting is detected to start and the
audio input device is selected as Link 2 Pro or Link 2C Pro, the system will
automatically prompt you to start recording.
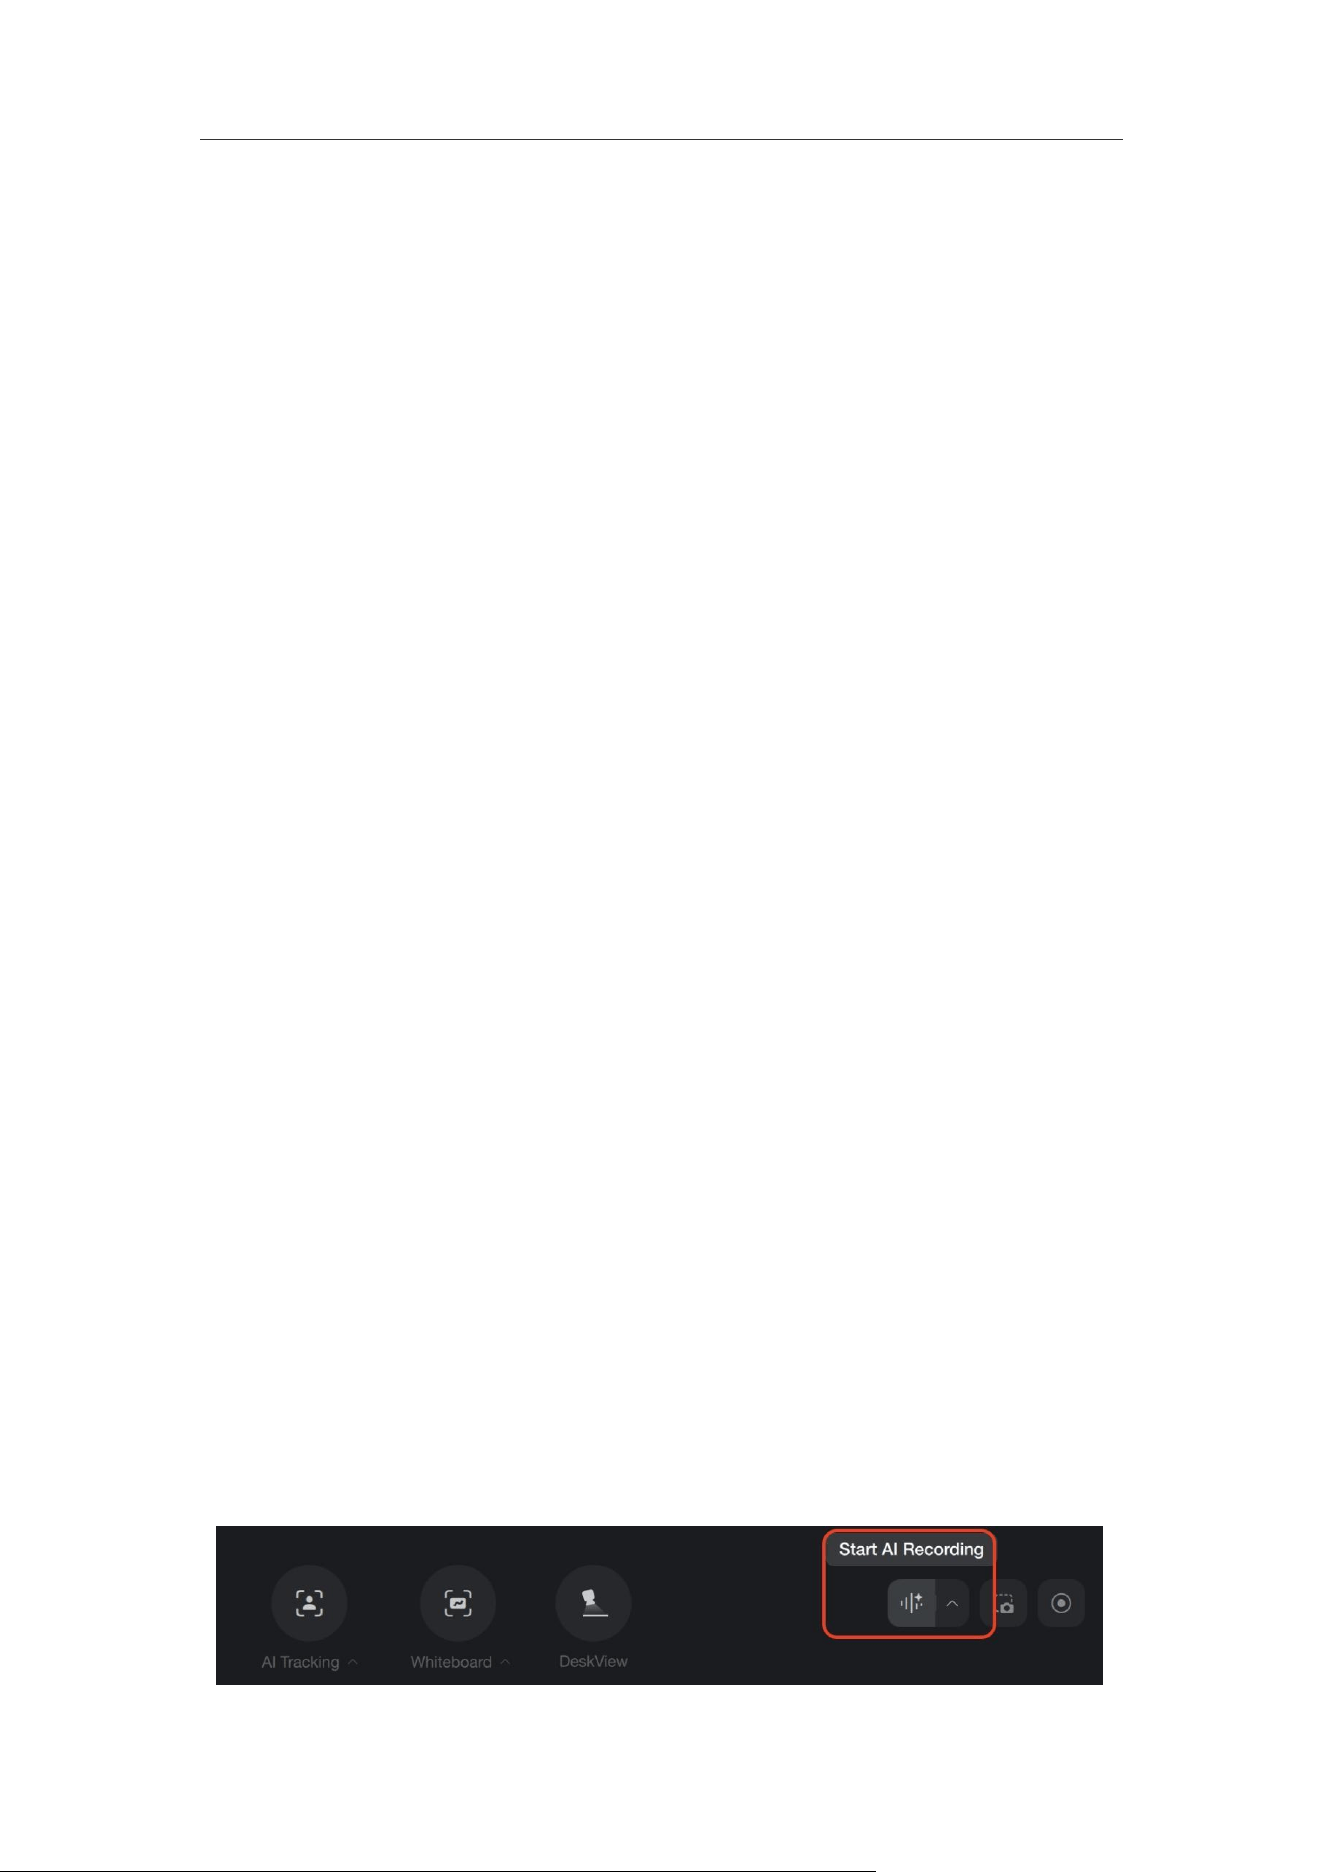
2. Start AI Recording
• Recording: On the main interface of the client, click the “Start AI Recording”
button to begin capturing meeting audio. (You must review and agree to the
privacy policy before first use.)
Link 2C Pro & Link 2 Pro User Manual
15
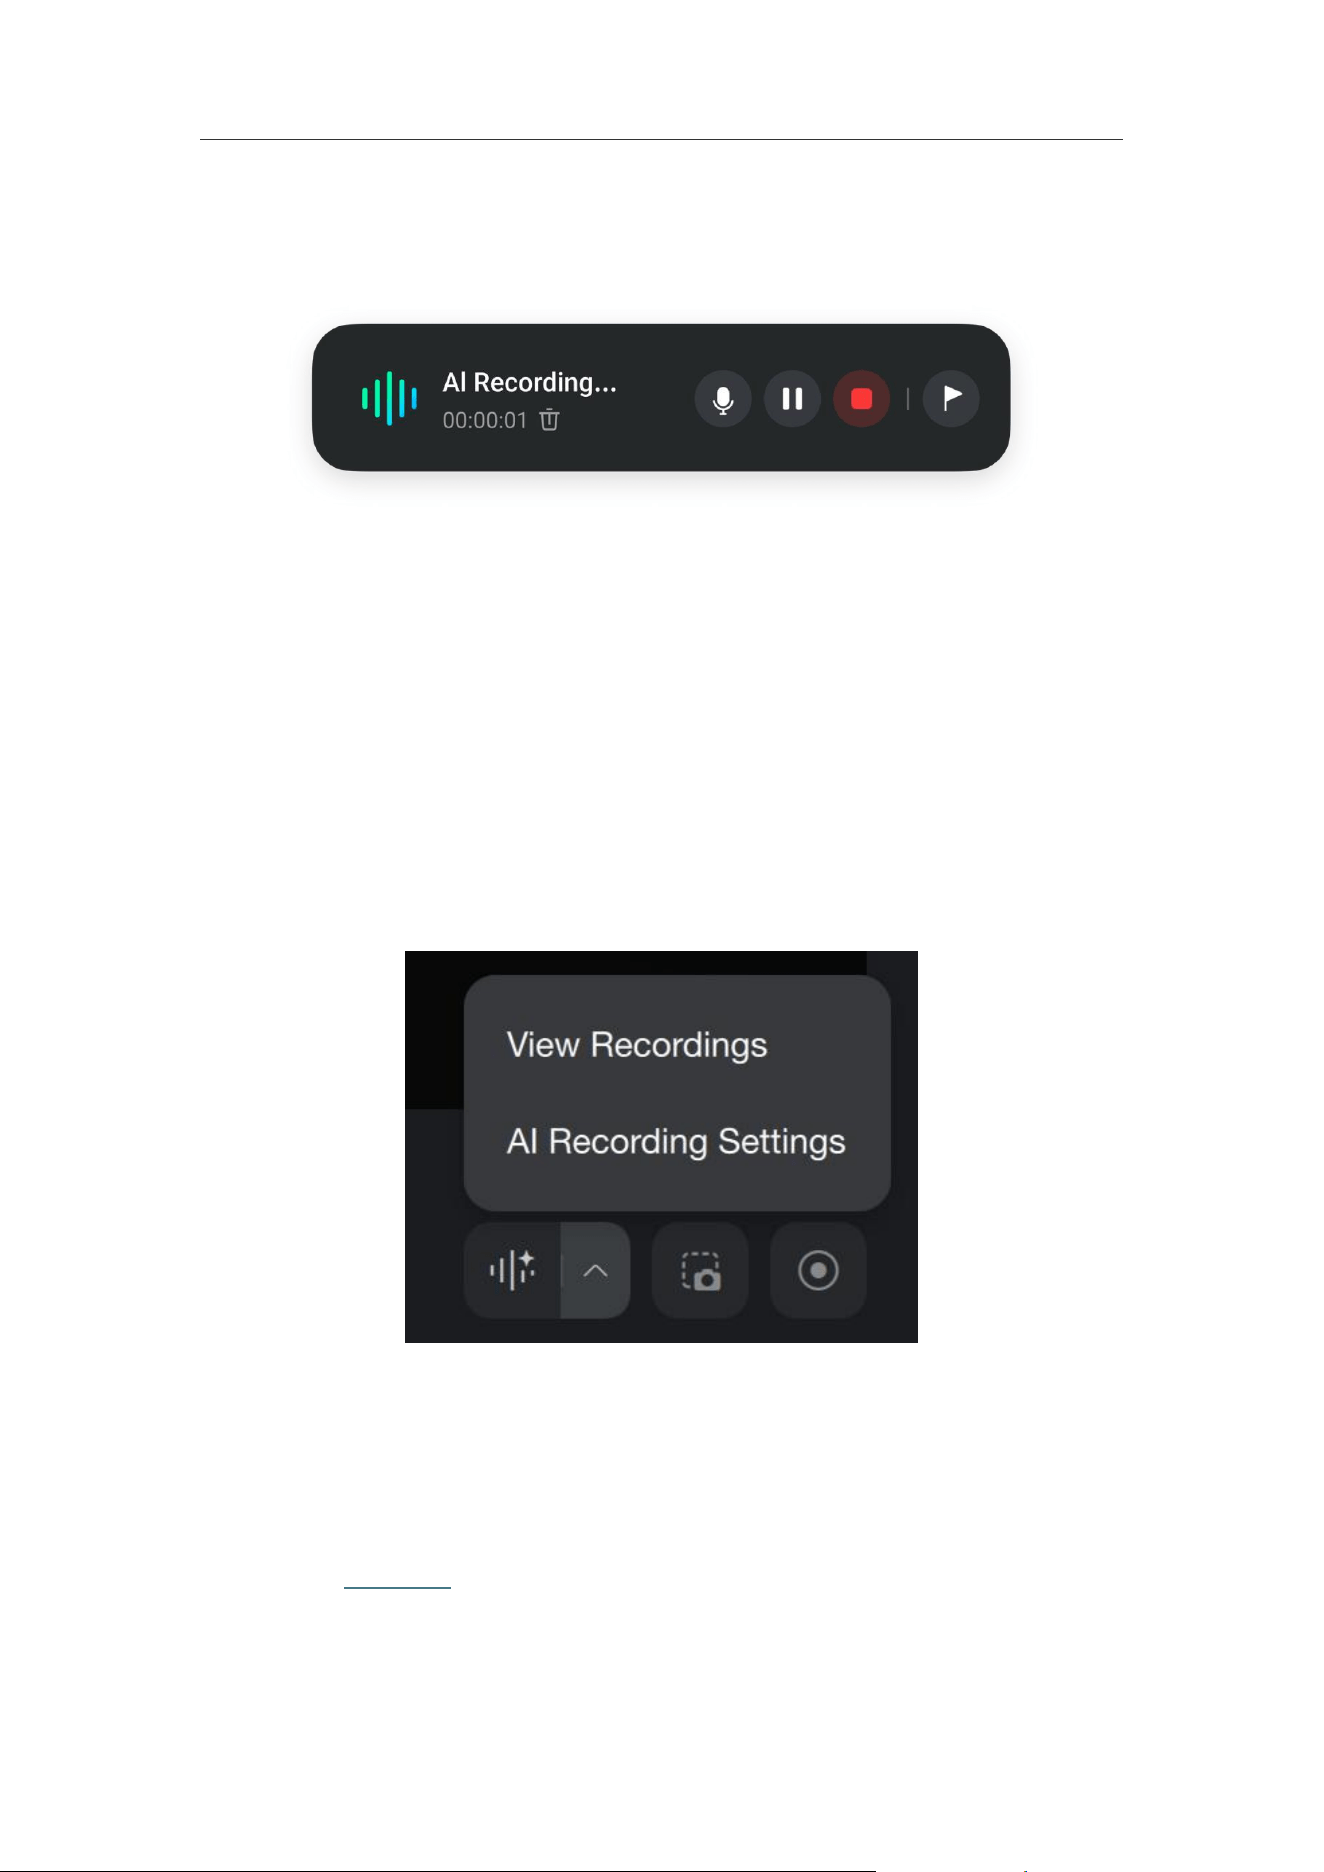
• Controls: During recording, you can pause or resume at any time, or click the
microphone icon to temporarily mute. You can also quickly locate and mark
important moments in the recording.
• Stop: After the meeting ends, click the red
“
Stop Recording
”
button to end the
recording. The system will automatically upload the audio (closing the window
will not affect file upload). You can then choose to manually generate an AI text
summary or set it to be generated automatically in advance.
3. View and Use the Recordings
• View in the client: After recording ends, click the “^” next to the “AI Recording”
button in the client and select “View Recordings” to enter the InSight web page
to view files.
• In-depth analysis on the InSight website: Visit the InSight website to view the
complete interactive transcript, AI-generated meeting summaries, extracted to-
do items, and other in-depth insights. It also supports locating and exporting key
content. Click here to learn more about the features of the InSight website.

Link 2C Pro & Link 2 Pro User Manual
16
Tips:
• This is an optional feature and does not affect the core hardware performance
or daily use of the device.
• As a Link 2 Pro or Link 2C Pro user, you will receive 300 minutes of free
transcription time to try the feature. For longer recording time, more
transcription minutes, or access to advanced features, you can choose a paid
subscription.
• Click here to learn more about InSight.
Other Useful Features
• Insta360 Insight (Meeting Assistant): After logging into your account, the
software can automatically transcribe recorded audio into text transcripts,
meeting summaries, and AI insights to improve meeting efficiency. Your history
can be viewed within the client.
• Remote Control: Ensure your phone and the camera are on the same Wi-Fi
network. Scan the QR code in the client to remotely control the field of view,
switch modes, and more through your phone's browser.
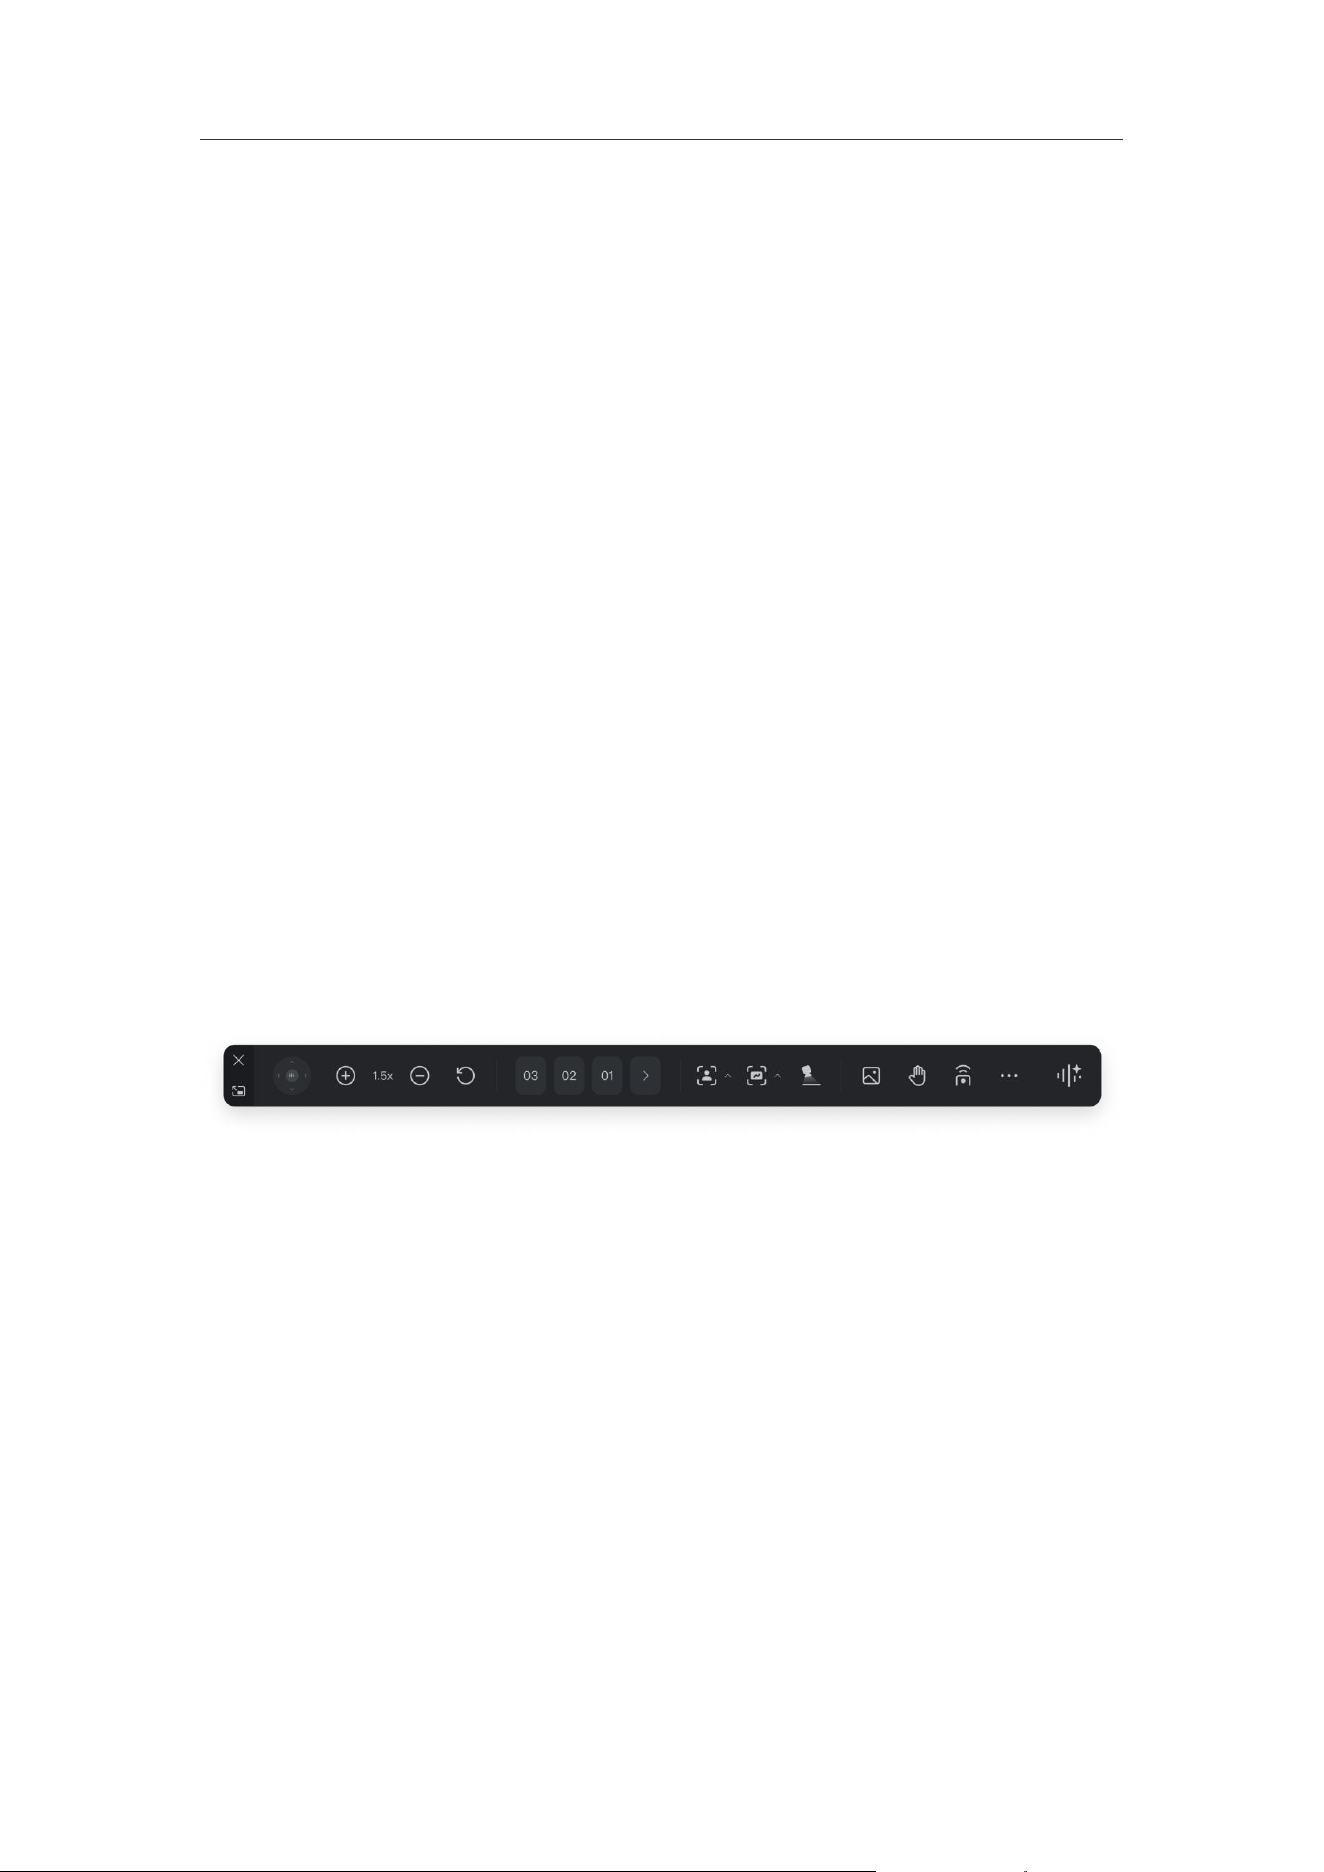
• Toolbar Mode: Click to minimize the client into a floating toolbar, allowing you to
quickly access core functions while using third-party software (such as video
conferencing apps).
• Virtual Camera Usage: This allows you to use all software enhancement
features (such as Beautify & Makeup, Background Blur, Background
Replacement, Bokeh, and Green Screen Keying). Please select "Insta360 Virtual
Camera" from the camera device list in your streaming software (e.g., OBS,
StreamLabs). See below for detailed operation methods.
Link 2C Pro & Link 2 Pro User Manual
17
Advanced Use
AI Tracking and Auto Framing
AI Tracking and Auto Framing automatically identify and lock onto subjects in the
frame. As you move, the camera uses gimbal rotation and smart zoom to track you
continuously, ensuring you remain centered and providing an optimal perspective for
video conferences, online classes, and live streaming. You can customize tracking
zones, no-tracking zones, tracking speed, and composition within the client.
• Link 2 Pro: Long-press the directional axis in the client to control gimbal
movement; click the buttons for digital zoom.
• Link 2C Pro: Use the buttons for digital zoom; after zooming in, you can drag the
frame to adjust the composition.
Operation Guide
• Gesture Recognition: Quickly activate this feature using the gestures described
in the "First Use" chapter.
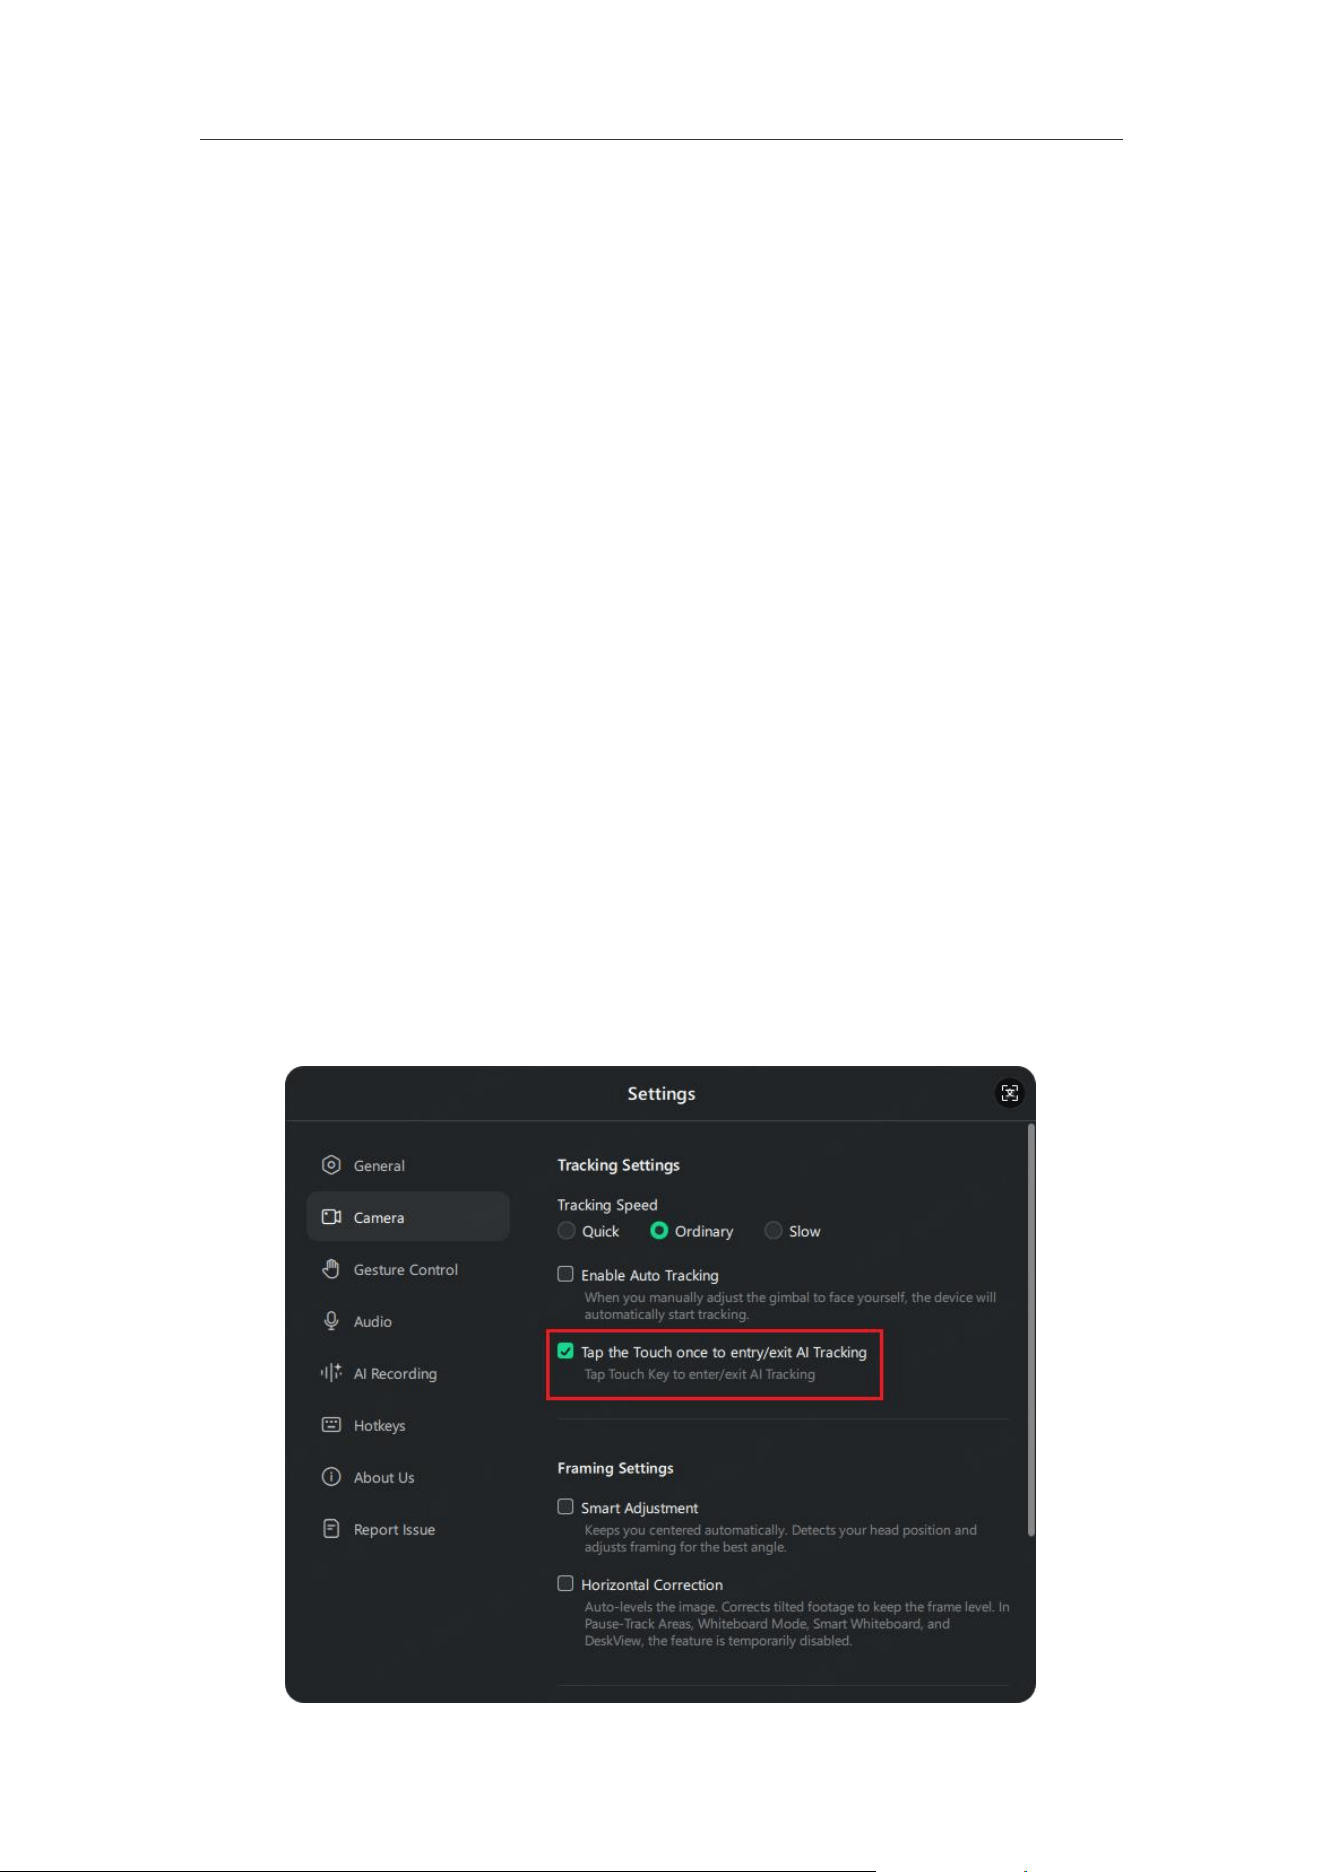
• Touch Key (Link 2 Pro Only): Single-tap the Touch Button on the camera to
quickly enable or disable AI Tracking. Ensure that "Tap /Touch once to activate
Al Tracking" feature is turned on under "Settings" > "Camera".
Link 2C Pro & Link 2 Pro User Manual
18
• Client Control
1. Open the client and click the "AI Tracking" or "Auto Framing" icon in the
bottom control bar to toggle the feature.
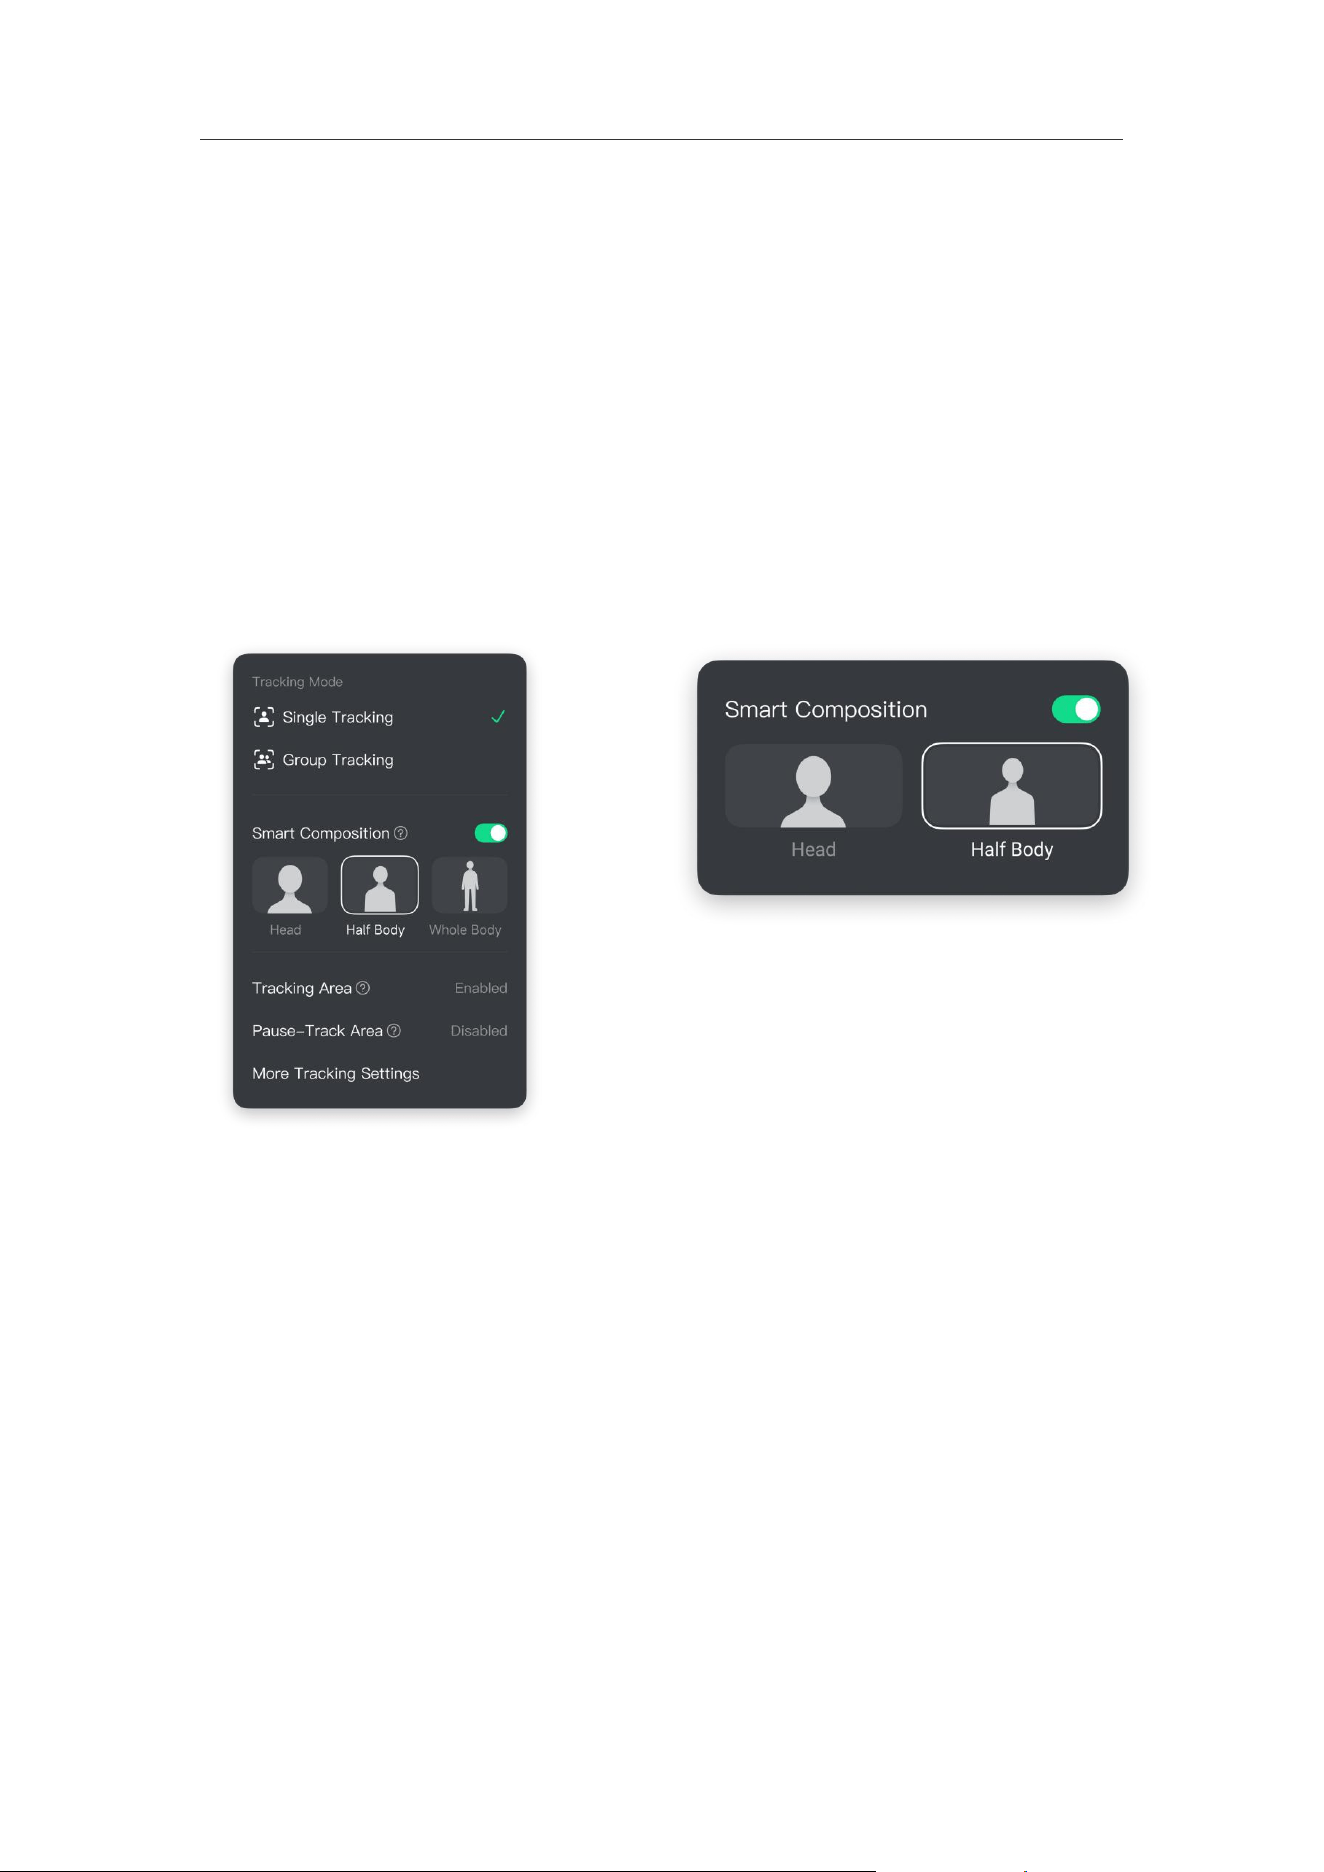
2. Click the "^" icon to the right of the button to access more settings. Link 2C
Pro allows for Head or Half-body framing adjustments; Link 2 Pro offers
options for single or multi-person tracking, smart composition, tracking
areas, pause-track areas and more.
Link 2 Pro Link 2C Pro
Tips:
• By default, AI Tracking uses Single-Person Tracking and Gesture Control.
• Do not block your face when using gestures to avoid recognition failure.
Advanced Operations via Insta360 Link Controller
1. Open the client.
2. Click to enable the [AI Tracking] feature. Once the camera identifies a person,
the indicator light will turn cyan, and tracking will begin.
3. Once enabled, the camera will automatically identify and track the main subject
(single person), keeping them centered in the frame.
Link 2C Pro & Link 2 Pro User Manual
19
Multi-Person Tracking
• Intelligently adjusts the composition to ensure everyone in the frame is included.
• When there are two or more people in the frame, if you wish to track a specific
individual, select Single Tracking Mode, then manually click the detection box
over the target person's face in the preview area. The camera will switch to
tracking the selected person.
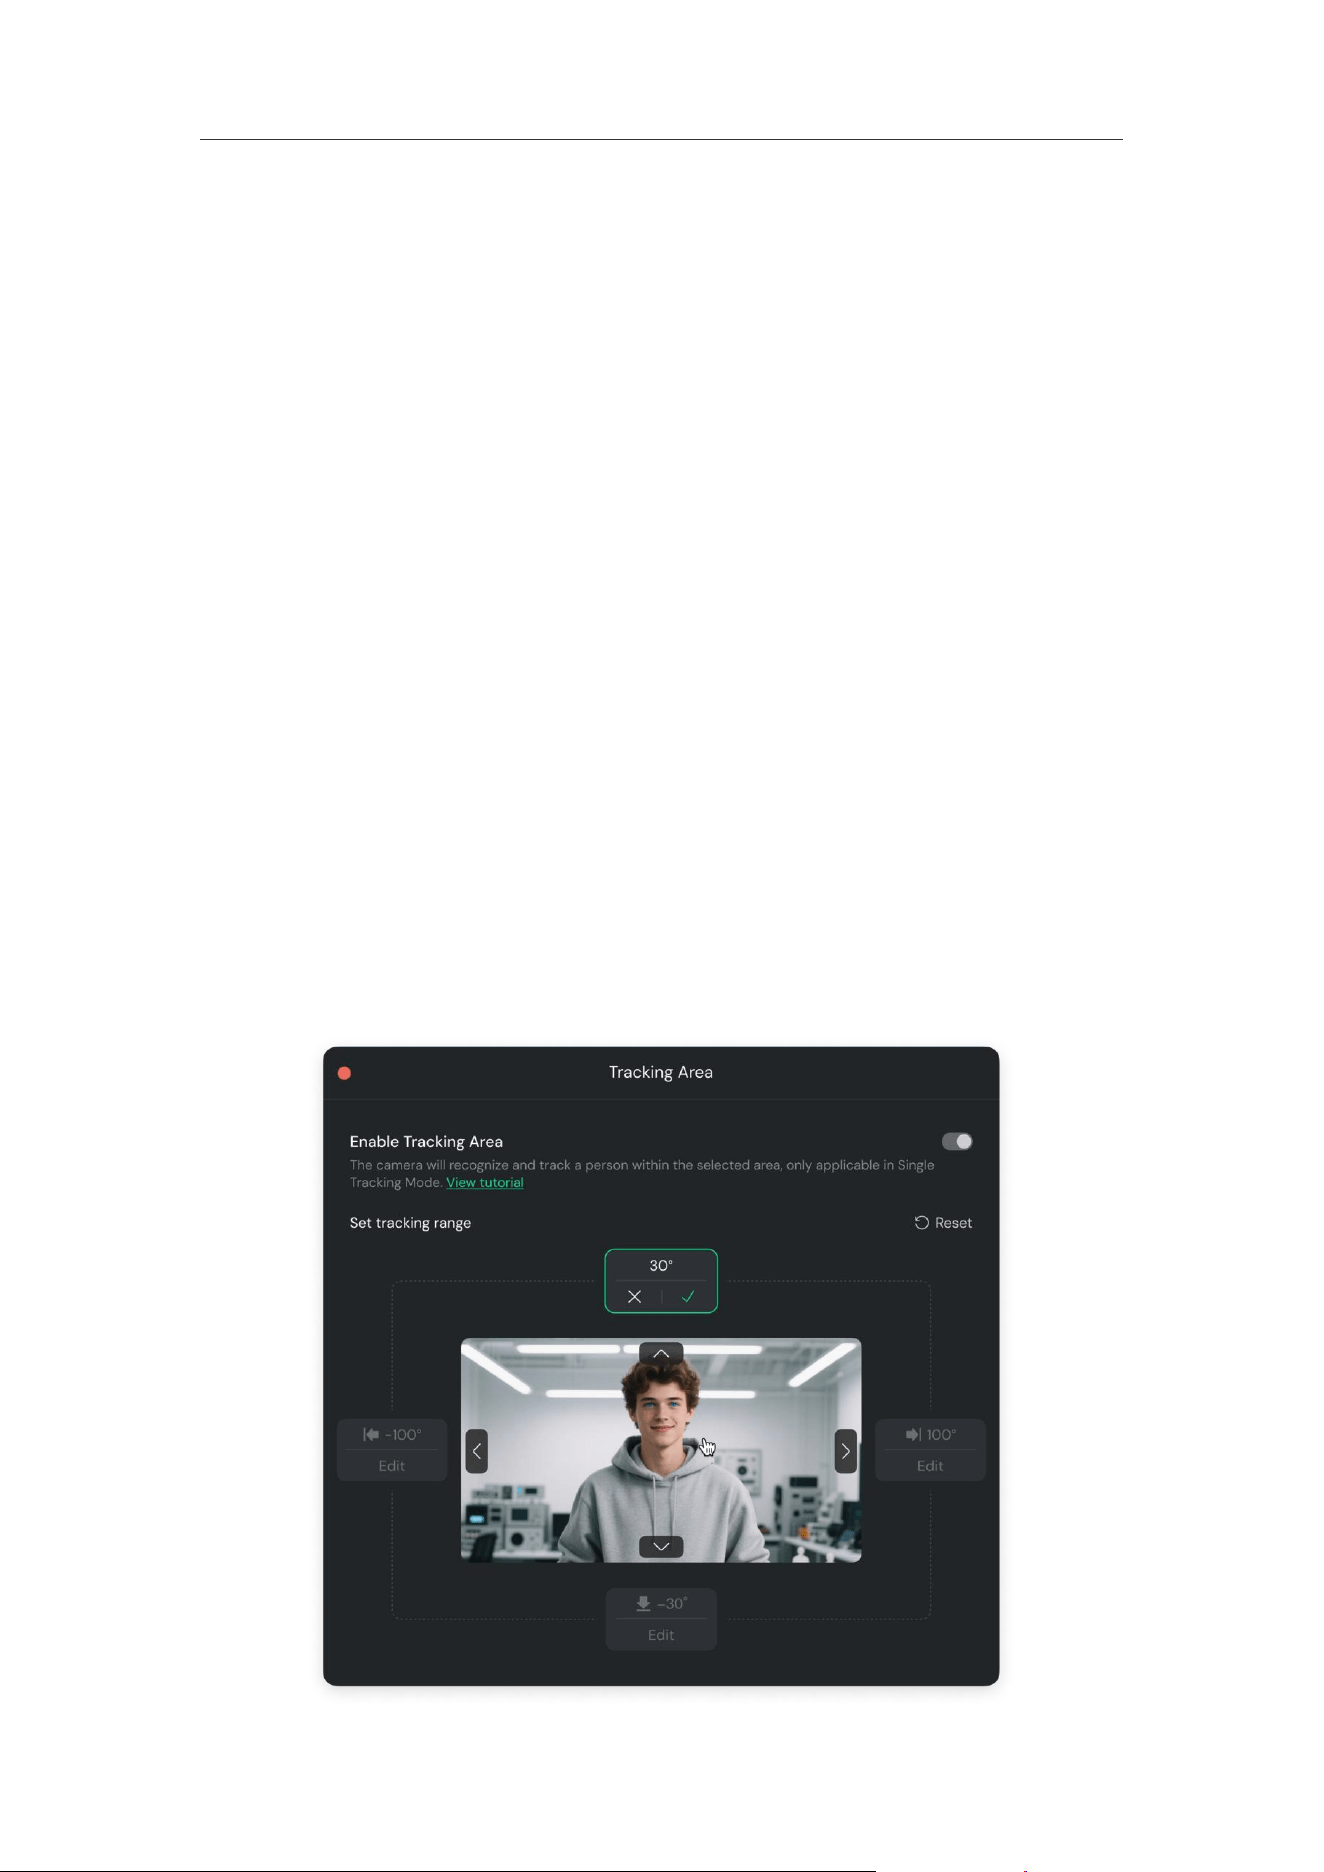
Smart Composition
Once enabled, you can choose between Head, Half Body, or Whole Body. This feature
only takes effect when tracking is active.
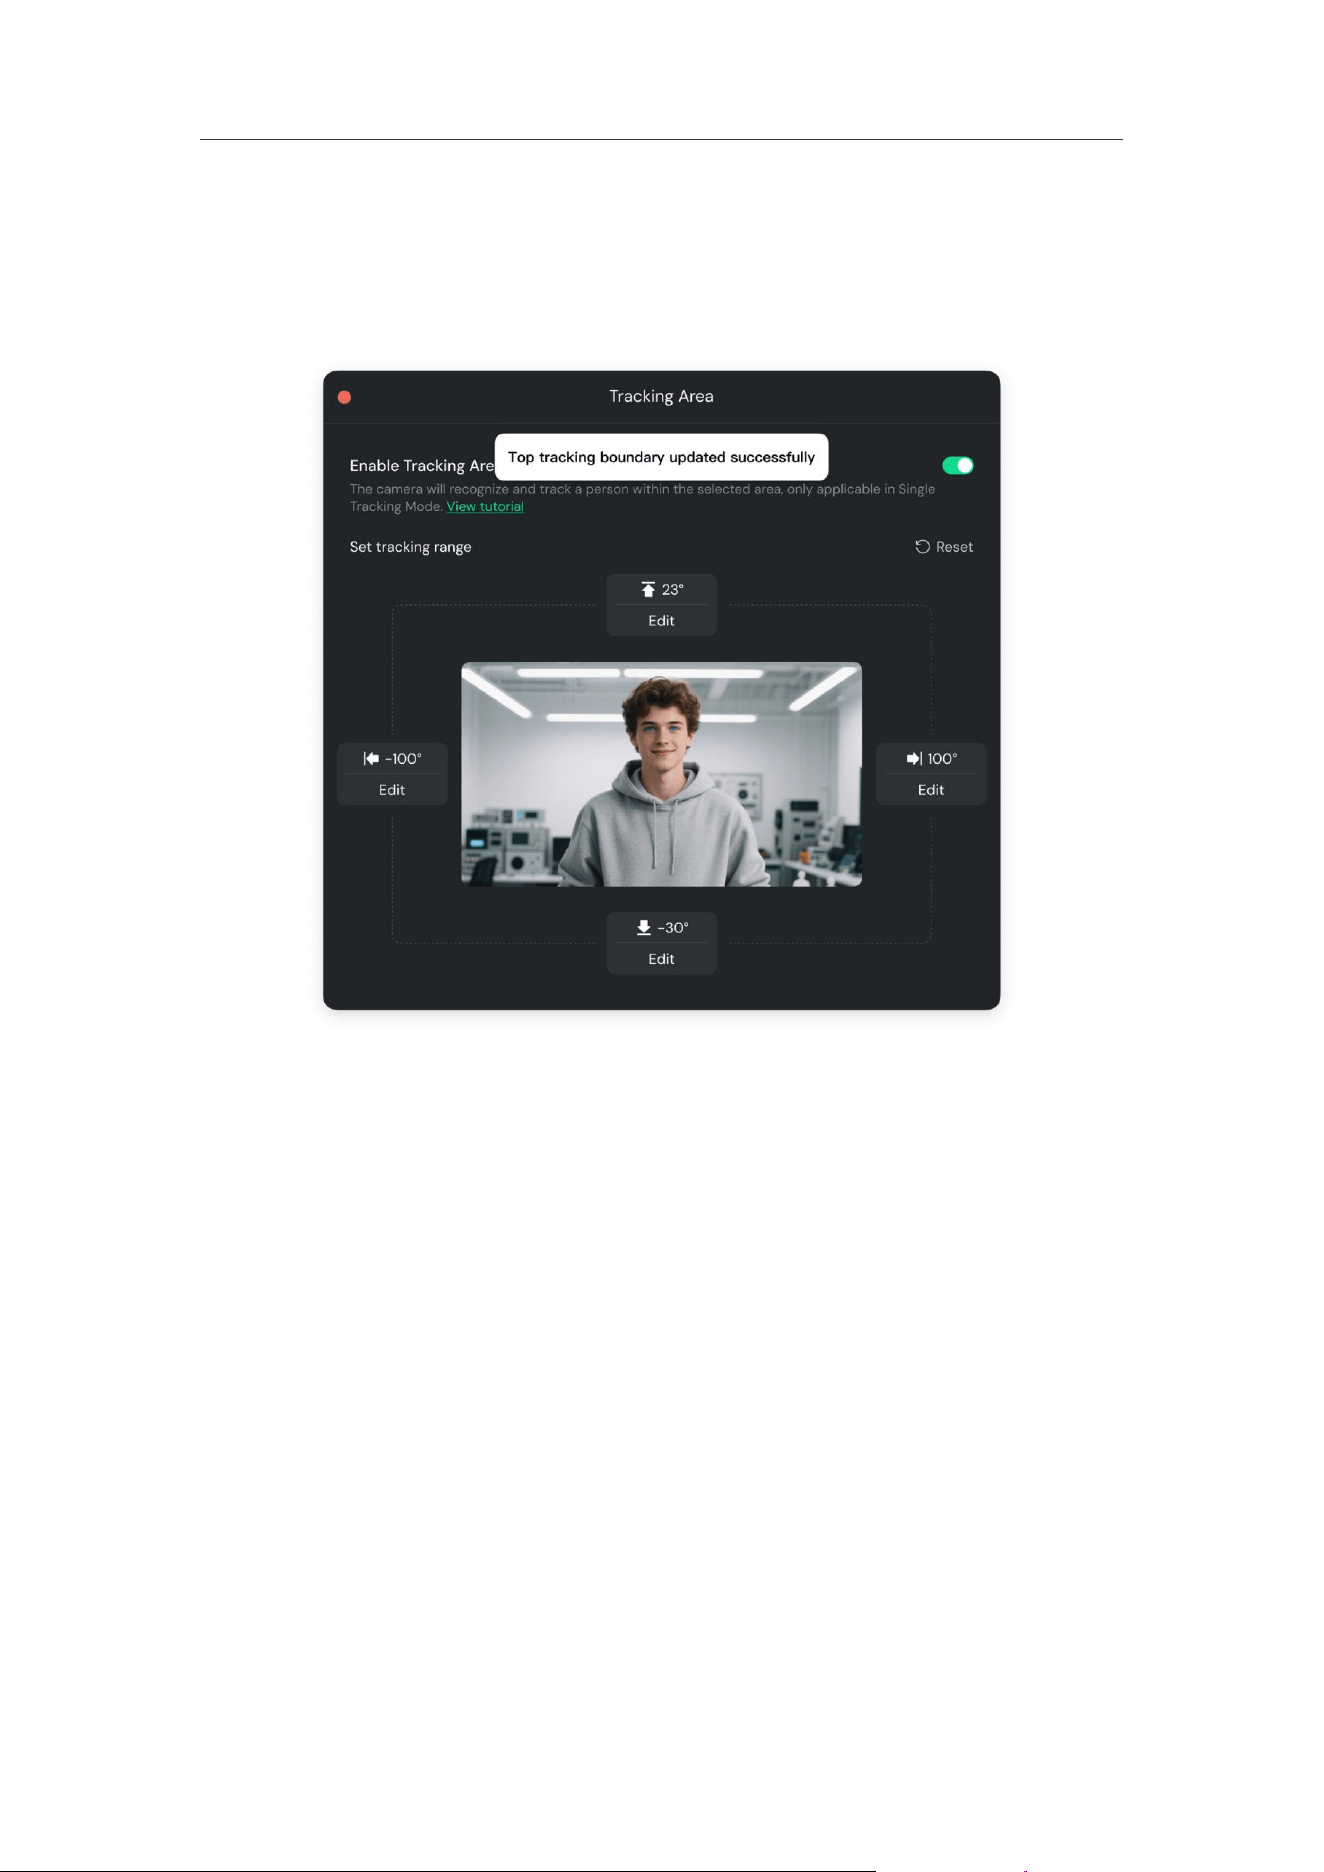
Tracking Zone
Once enabled, the camera will only track within the specified area, making it easy to
protect your privacy.
• Requirement: Only applicable to Single-Person Tracking mode.
• Setup Method:
○ In the AI Tracking settings, click to enable [Tracking Area].
○ Enter the angle adjustment page. You can click the directional arrows or
drag the frame to adjust the angle and set the boundaries.
Link 2C Pro & Link 2 Pro User Manual
20
Only one boundary angle can be edited at a time. After clicking "✓" to save, you can
adjust the next boundary angle value. You can adjust the boundary angles for the
"Top, Bottom, Left, and Right" directions as needed. Once the boundary angle
adjustments are complete, the tracking range will be restricted to this area.
Pause-Track Area
This feature allows you to set specific areas within the frame. When the tracked
subject enters these areas, the camera will stop tracking and keep the lens steady.
This is suitable for scenarios requiring a fixed frame, such as product
demonstrations or presenting in front of a whiteboard.
• Requirement: Only applicable to Single-Person Tracking Mode.
• Setup Method:
○ Find the "Pause-Track Area" option in the AI Tracking settings.
○ You can directly drag the mouse on the preview screen to draw rectangular
areas. Up to 6 no-tracking zones can be set.
○ (Optional) You can draw or import a panoramic view of the room to visually
preview the corresponding positions of each no-tracking zone in physical
space.

Link 2C Pro & Link 2 Pro User Manual
21
More Settings
You can adjust tracking speed, enable/disable Auto Tracking (the device starts
tracking automatically when the camera is facing you), framing settings (Smart
Adjustment, Horizontal Correction), compatibility settings (Portrait Resolution, Enable
Low Resolution), etc.
Tips:
• AI Tracking only supports tracking human faces; it does not support tracking
hands, objects, or animals.
• If no human face is detected for 60 consecutive seconds, AI Tracking will
automatically turn off.
• When both "Tracking Area" and "Pause-Track Area" are enabled, all no-tracking
zones must be entirely within the boundaries of the tracking zone to function
properly.
• If a no-tracking zone is partially or fully outside the tracking zone's boundary, it
will be retained but cannot be activated, and the camera will ignore the no-
tracking command for that area.
Whiteboard Mode
Whiteboard Mode (Regular)
Whiteboard Mode offers two convenient ways to use whiteboards: Gesture
Recognition for standard white rectangular whiteboards without recognition stickers,
and the Whiteboard Mode button in the client for whiteboards or any flat surface with
recognition stickers, allowing for efficient presentations.
Operation Guide
• Gesture Recognition: Quickly activate Whiteboard Mode using the gestures
described in the First Use chapter. This method is particularly suitable for
temporary, quick explanations when the whiteboard is in a fixed position.
• Client Control: Open the client and click "Whiteboard Mode" at the bottom of the
software interface to toggle the feature.

Link 2C Pro & Link 2 Pro User Manual
22
Smart Whiteboard
In Smart Whiteboard Mode, recognition stickers are not required. The client
automatically recognizes or allows you to manually set the whiteboard area, which is
then automatically corrected and displayed in full screen. This mode is ideal for
complex scenarios, such as working off-site or using multiple whiteboards.
Note: Before using Smart Whiteboard or background recognition features, please
enable Insta360 Virtual Camera. When using this mode in third-party software, you
must select Insta360 Virtual Camera as the video stream.
Operation Guide:
1. Open the client.
2. Click "Smart Whiteboard" at the bottom of the software interface to toggle the
feature.
Whiteboard Mode supports the recognition of regular standard whiteboards without
corner markers. When paired with recognition stickers, it can customize specific
whiteboard areas, such as blackboards, green boards, walls, or monitors. Smart
Whiteboard Mode supports both regular whiteboards without stickers and any
whiteboard or area with stickers.
FAQ
Can the device switch to vertical mode while in Whiteboard Mode?
Yes. You must set the device to Portrait Mode first, and then enable Whiteboard
Mode.
Are the whiteboard recognition stickers reusable? Do they need glue to
enhance stickiness when reused?
• The whiteboard recognition stickers are reusable approximately 100 times.
• Simply stick them directly onto the surface when reusing; you can also use
double-sided tape to help secure them if needed.
• If stickers are lost or the stickiness is significantly reduced, you can purchase
replacement stickers at the official Insta360 Store.

Link 2C Pro & Link 2 Pro User Manual
23
DeskView Mode
1. Click DeskView Mode in the client, and the gimbal will automatically tilt the
camera downward.
2. Manually adjust the Magnetic Mount until an ideal overhead angle is achieved.
*You can further adjust the mount manually to get the best angle.
Link 2 Pro achieves DeskView Mode by adjusting the gimbal angle.
Link 2C Pro achieves DeskView Mode by manually adjusting the mount and fine-
tuning the angle via the Link Controller.
Tips:
• In DeskView Mode, virtual background features (including Background Blur,
Bokeh, Background Replacement, and Green Screen Keying) will be temporarily
disabled.
• If the device fails to enter DeskView Mode, try tilting the device forward and try
again.
Link 2C Pro & Link 2 Pro User Manual
24
Live Streaming
Preparations: Installation and Basic Settings
Install Client Software
Please ensure that the client software installation and setup have been completed.
Basic Client Settings
After installation, please configure the following settings for a better live streaming
experience:
1. Connect the Camera: Connect the camera to your computer via a USB cable.
Open the client, and the software should automatically recognize the device.
2. Turn Off Preview (Optional): Click the camera icon in the lower-left corner of the
software to disable the live preview and save system resources.
3. Enable Toolbar Mode: Click the icon in the top-right corner of the software to
enable "Toolbar Mode." This mode provides a compact floating control bar,
allowing you to quickly adjust camera settings during a live stream without
switching windows.
Vertical Live Streaming Settings
For vertical live streaming, it is recommended to follow these steps for the best
compatibility:
1. Preferred Option: Rotate the Canvas in Streaming/Broadcasting
Software
• Physical Preparation: Use a tripod to position the device vertically.
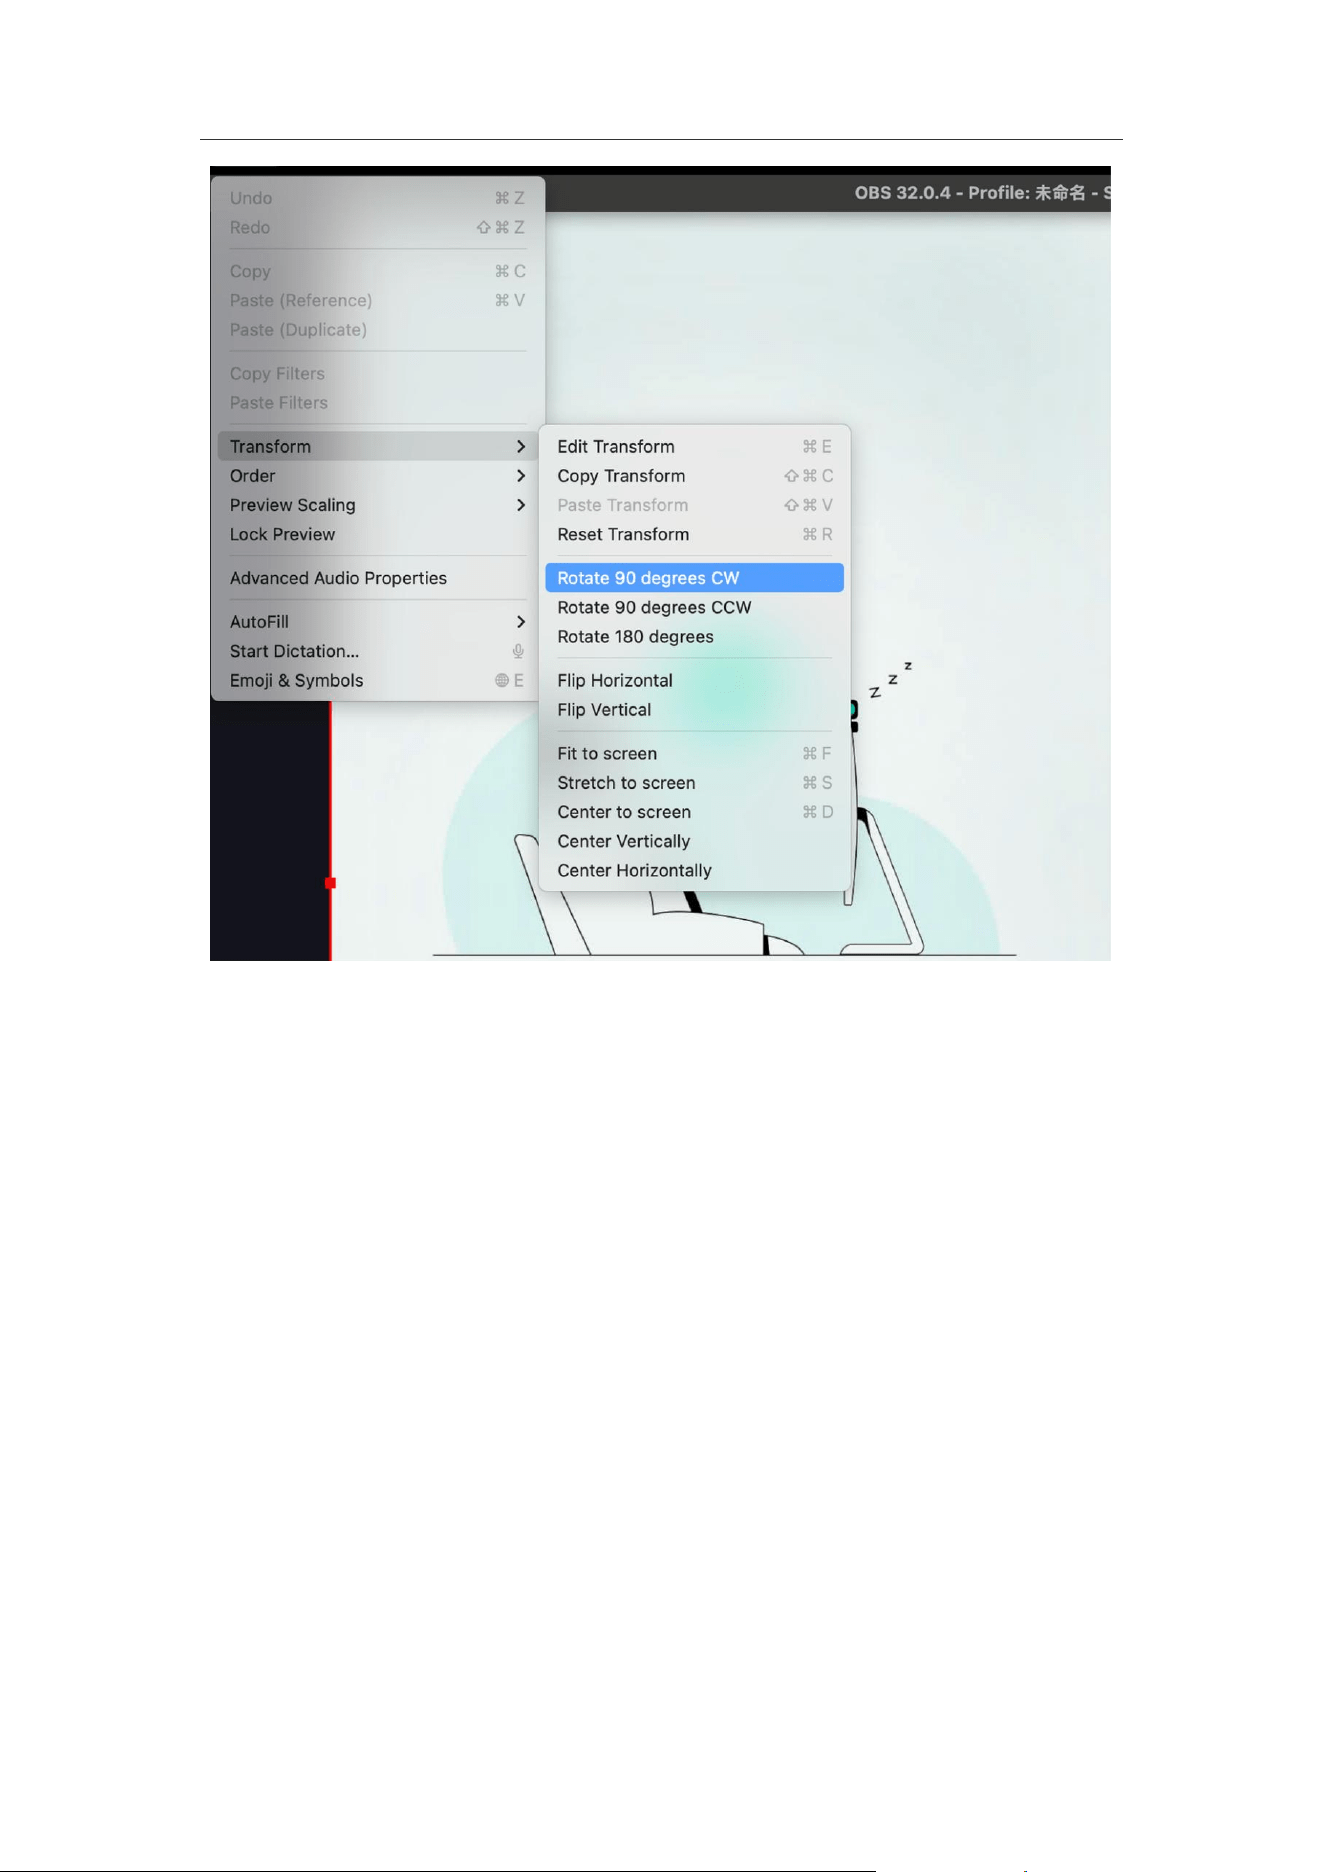
• Software Settings: In your streaming software (e.g., OBS, StreamLabs), rotate the
entire live canvas or the camera source to vertical (typically a 9:16 aspect ratio).
Link 2C Pro & Link 2 Pro User Manual
25
• Client Settings: On a Mac computer, you can keep the client preview enabled at
the same time. On a Windows computer, please turn off the client preview;
otherwise, OBS may fail to properly obtain the camera video stream due to
resource usage.
2. Alternative Option: Switch Resolution in the Client
This method is primarily used for scenarios where third-party software (such as
video conferencing apps) needs to directly recognize and preview a vertical frame.
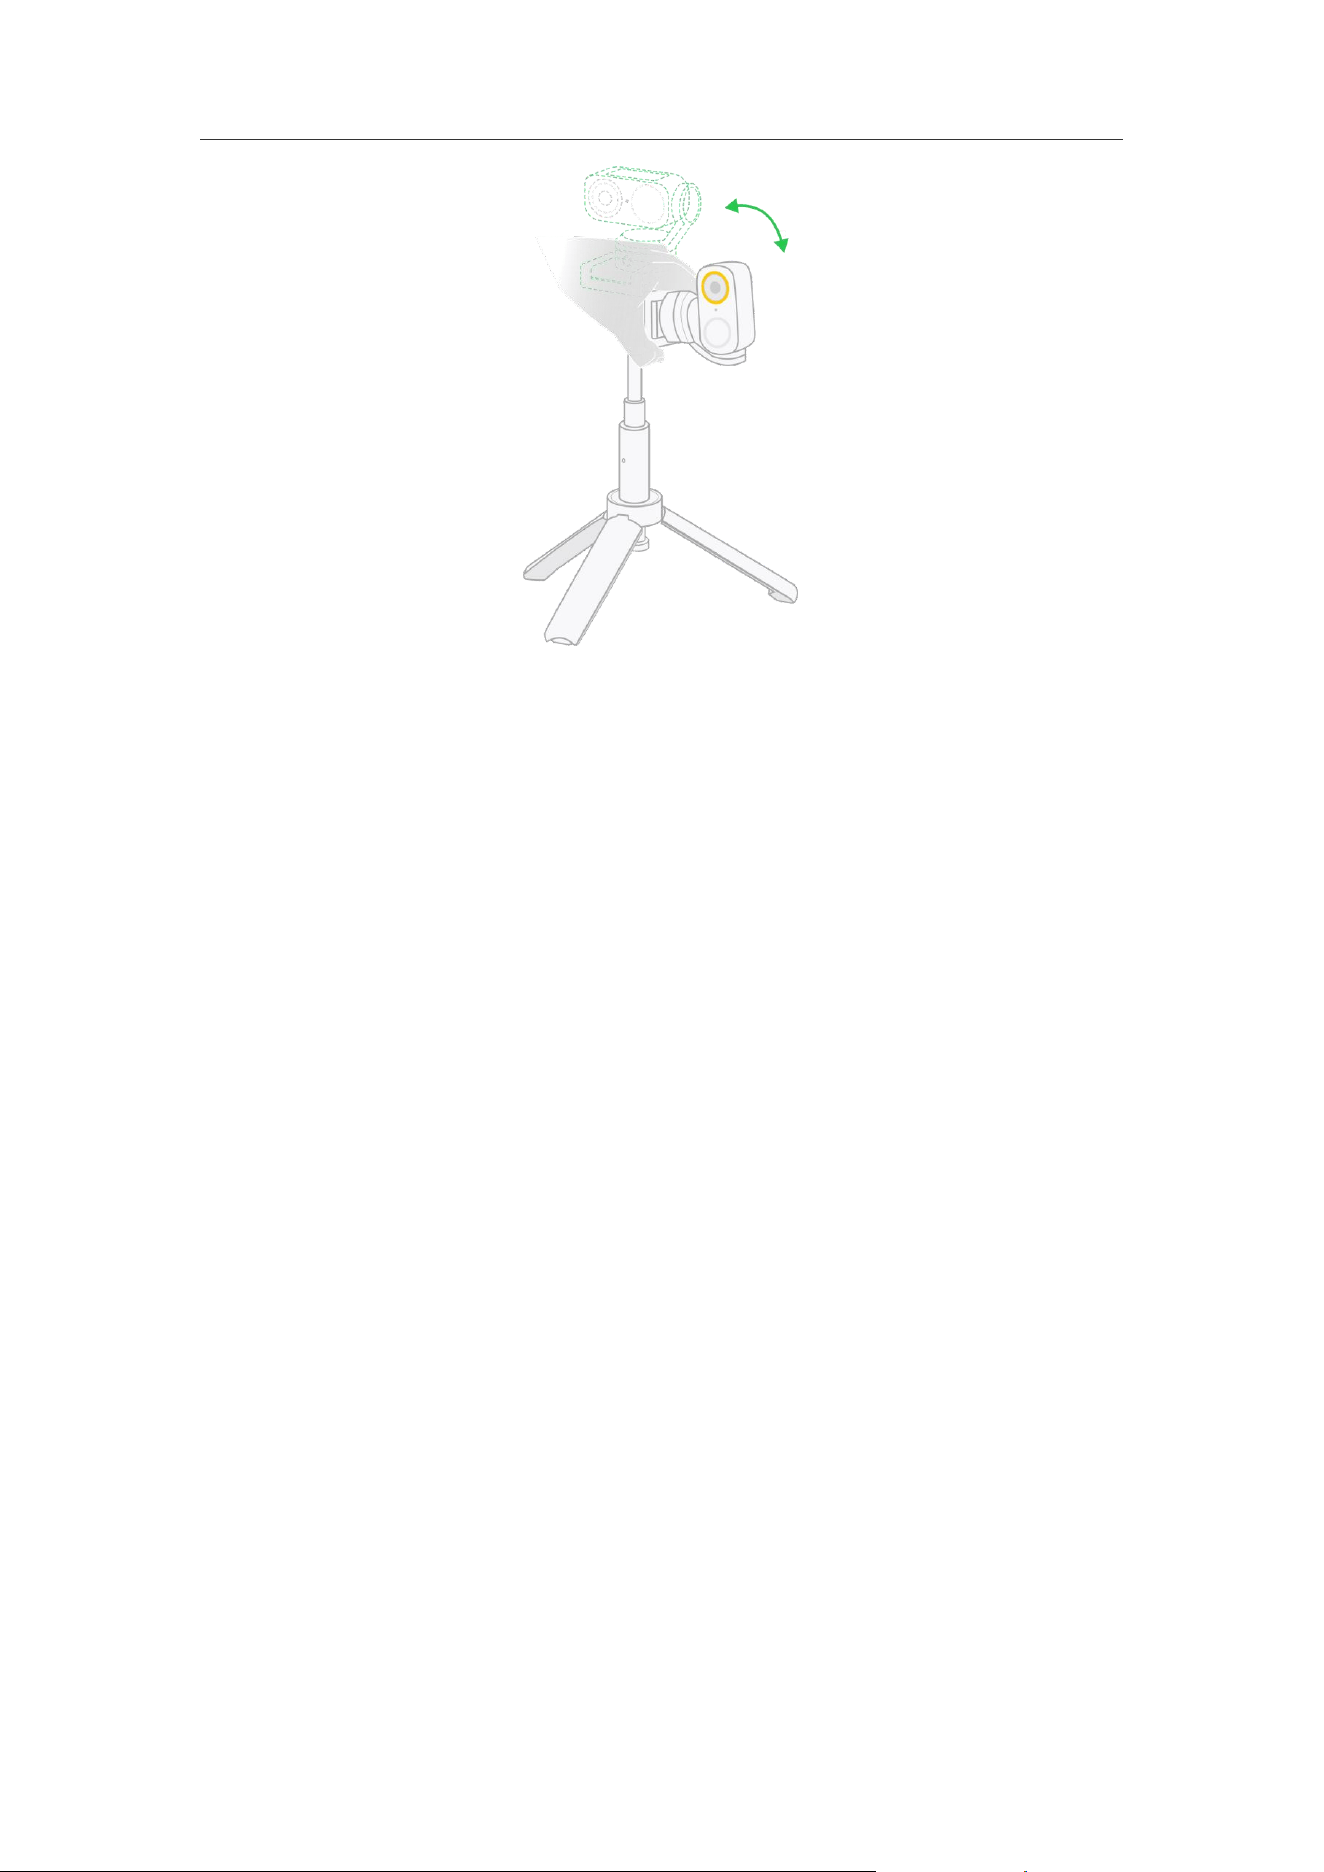
• Physical Preparation: Use a tripod to position the device vertically.
Link 2C Pro & Link 2 Pro User Manual
26
• Client Settings: Click the Settings button in the top-right corner of the client, go
to "Camera" > "Compatibility Settings," and enable "Portrait Resolution."
• Once enabled, the camera's output stream will be in a native vertical format. You
can see the correct vertical preview in other software without needing to rotate
the canvas manually.
Two Camera Signal Sources
• Physical Camera (Insta360 Link 2C/2 Pro): Directly accesses the camera
hardware to provide basic video, AI tracking, and microphone functions.
• Virtual Camera (Insta360 Virtual Camera): An advanced video stream generated
by the Insta360 Link Controller software. You must select this option to use all
advanced features, including Beautify & Makeup, Virtual Backgrounds (including
Green Screen Keying), Filters, and Smart Whiteboard. Select [Insta360 Virtual
Camera] as the video source in your meeting or live streaming platform to output
these effects.
Tips: If your macOS version is 15.0.1 or later, go to "System Settings" > "General" >
"Login Items & Extensions" > "Camera Extensions", enable the client permission, and
restart the client for the feature to take effect.

Link 2C Pro & Link 2 Pro User Manual
27
Configuring the Camera in Streaming Software
General Setup Steps:
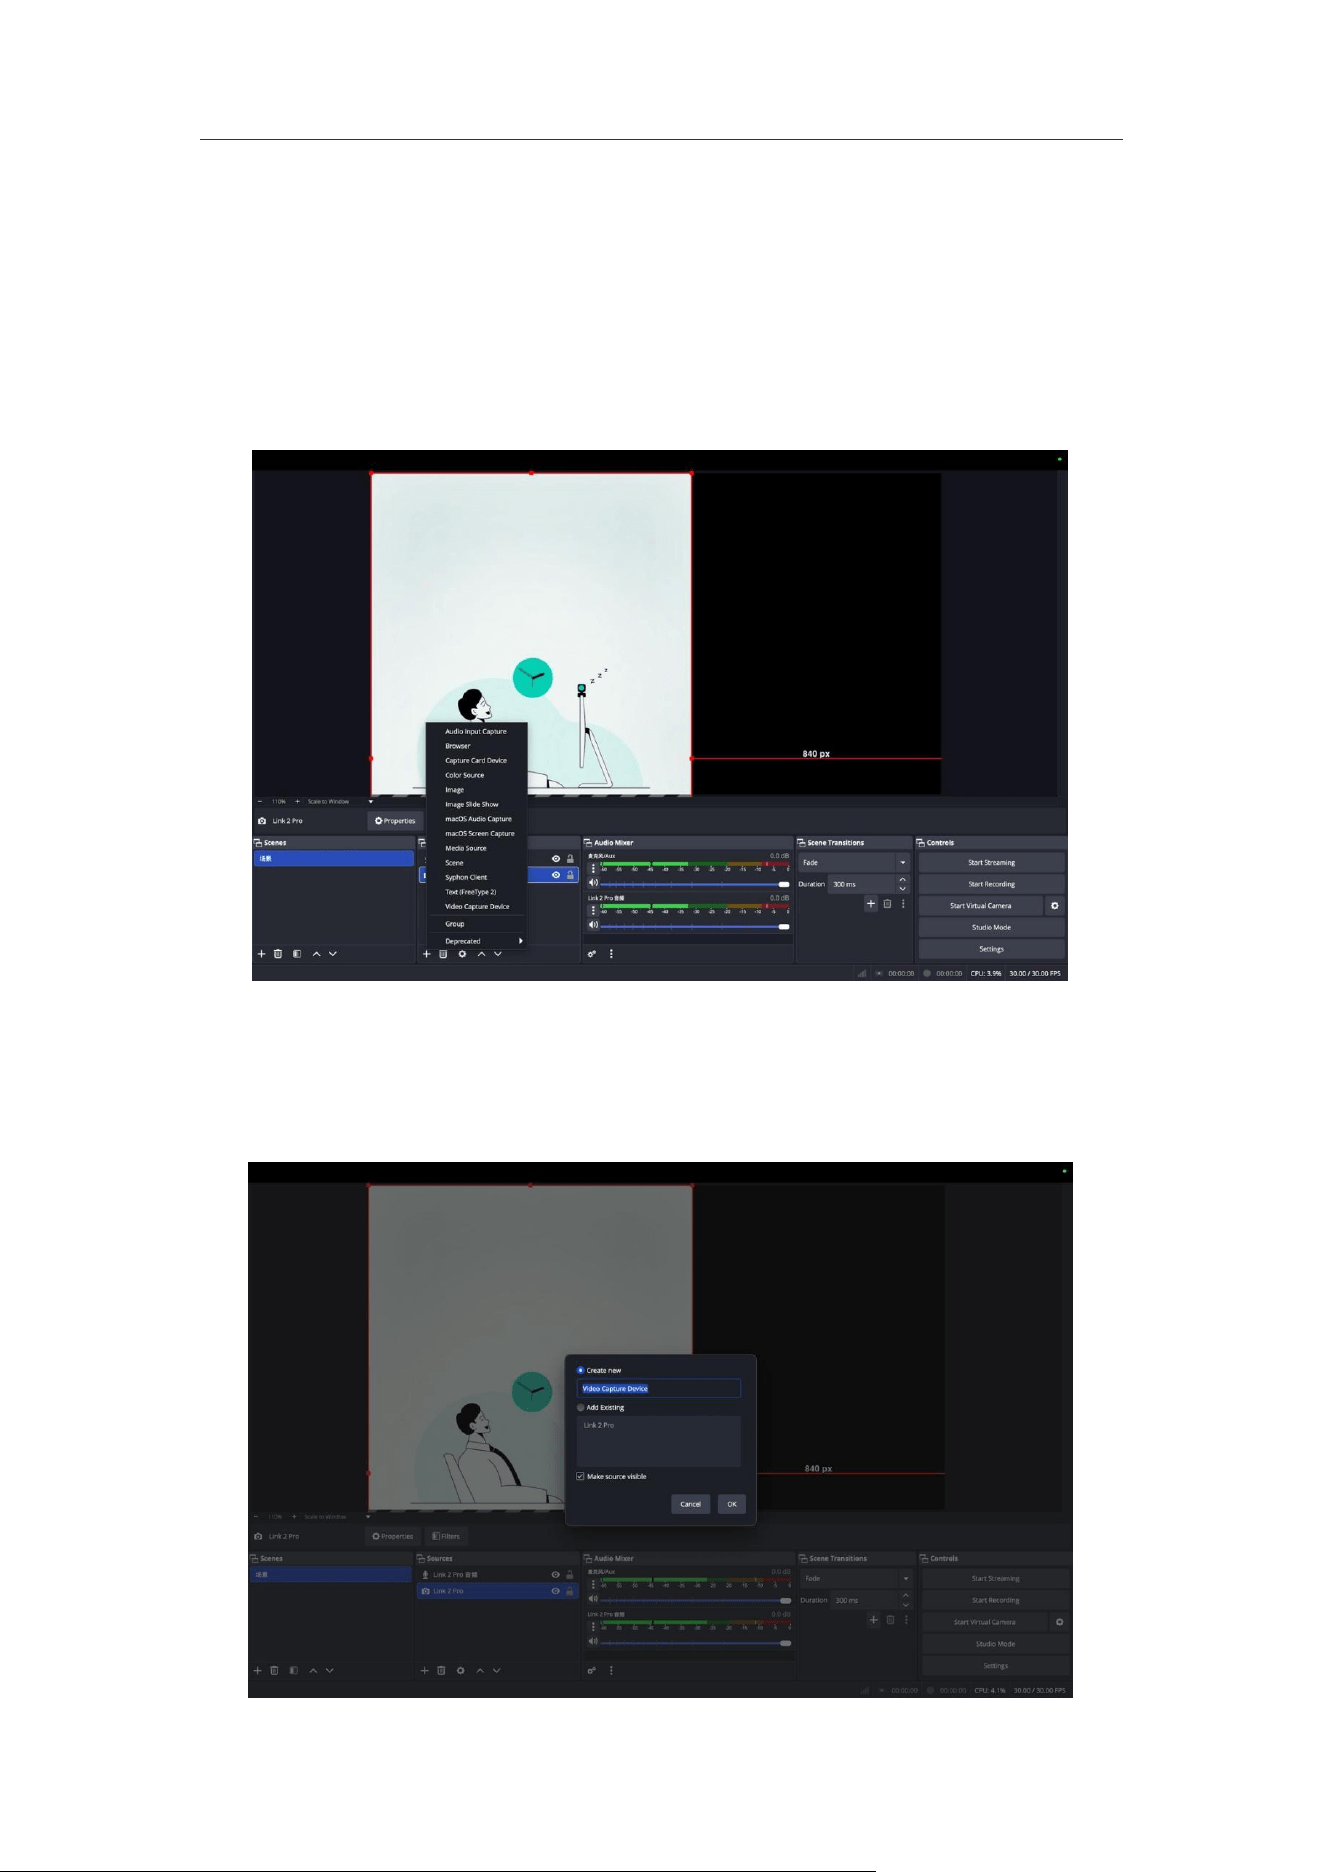
1. Open your live streaming software (e.g., OBS, StreamLabs, etc.).
2. Add a video source and select [Camera] or [Video Capture Device].
3. Key Selections:
○ If you only need basic tracking and video, select "Insta360 Link 2C/2 Pro" (or
the corresponding model). Then choose the appropriate resolution based on
your streaming canvas (Landscape/Portrait).
For platforms like TikTok and Zoom, it is recommended to set the resolution as
follows (Landscape / Portrait): 1920x1080 or 3840x2160 / 1080x1920 or 2160x3840.
○ To use advanced features like Beautify or Virtual Backgrounds, select
"Insta360 Virtual Camera." Additionally, when using Beautify features,
please ensure you are connected to the internet and set the resolution
to 1080p.
Important Notes:
• Stream Occupancy Rule (Windows): The video stream from a single physical
camera cannot be accessed by multiple software applications simultaneously.
Before opening your streaming software, please close any other applications
that might be using the camera (such as video conferencing apps).
• Ensure the Client is Running: When using the "Insta360 Virtual Camera," the
Insta360 Link Controller client must remain running in the background at all
times.
Link 2C Pro & Link 2 Pro User Manual
28
Using the Camera via OBS Studio
OBS is a professional live streaming and recording software that supports high levels
of customization.
Adding a Physical or Virtual Camera
1. In the OBS "Sources" panel, click "+" → select "Video Capture Device."
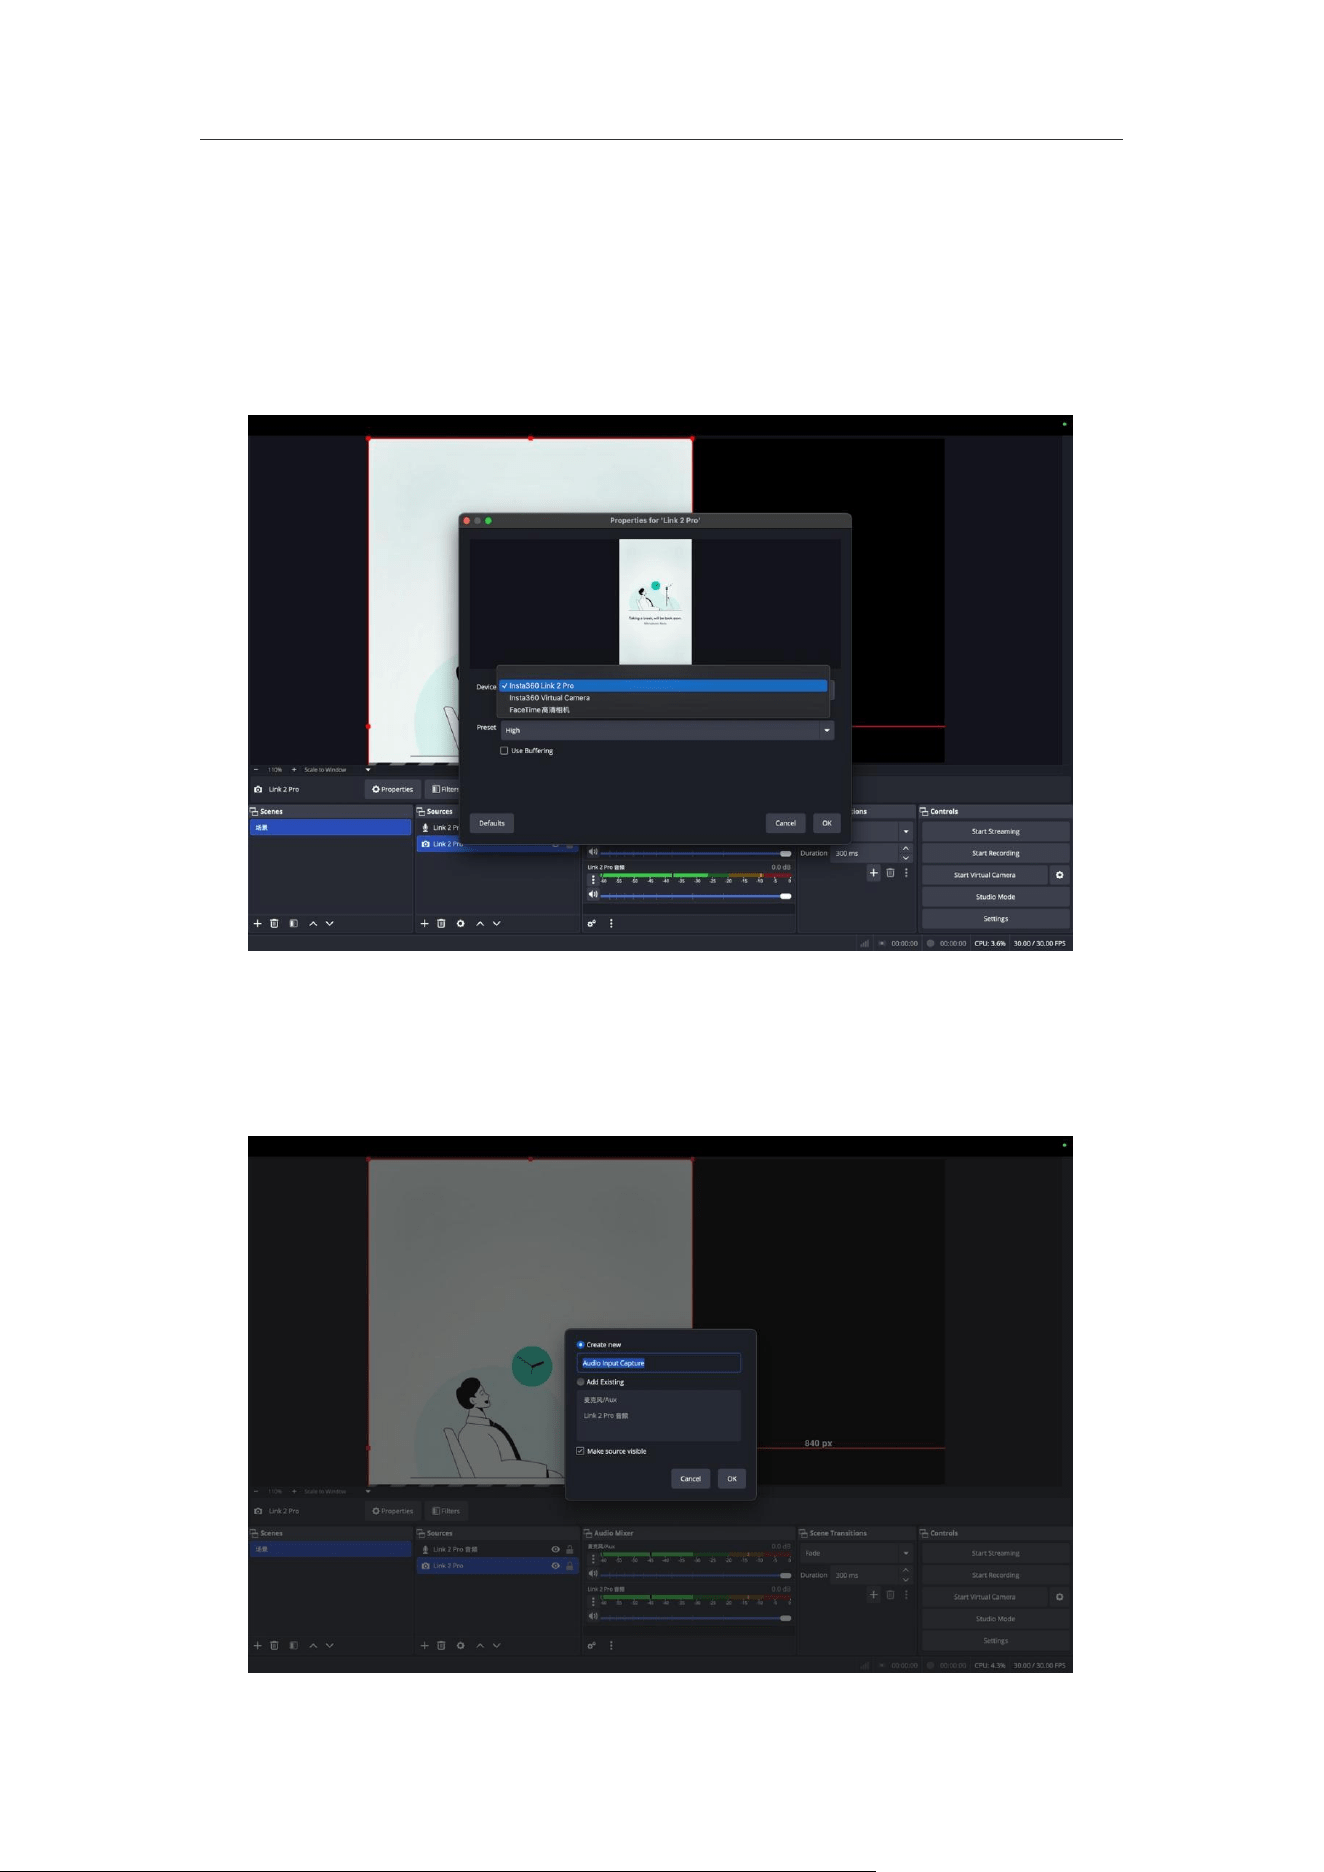
2. In the settings pop-up, check "Create new," enter a camera name, and click "OK."
In the "Device" dropdown menu of the next pop-up, scroll down and select your
target Link series camera.
Link 2C Pro & Link 2 Pro User Manual
29
3. When creating a new source or selecting an existing one, in the "Device"
dropdown menu:
○ Select the camera labeled with the device model for basic features.
○ Select "Insta360 Virtual Camera" for advanced features (the virtual camera
feature must be enabled in the Link Controller first).
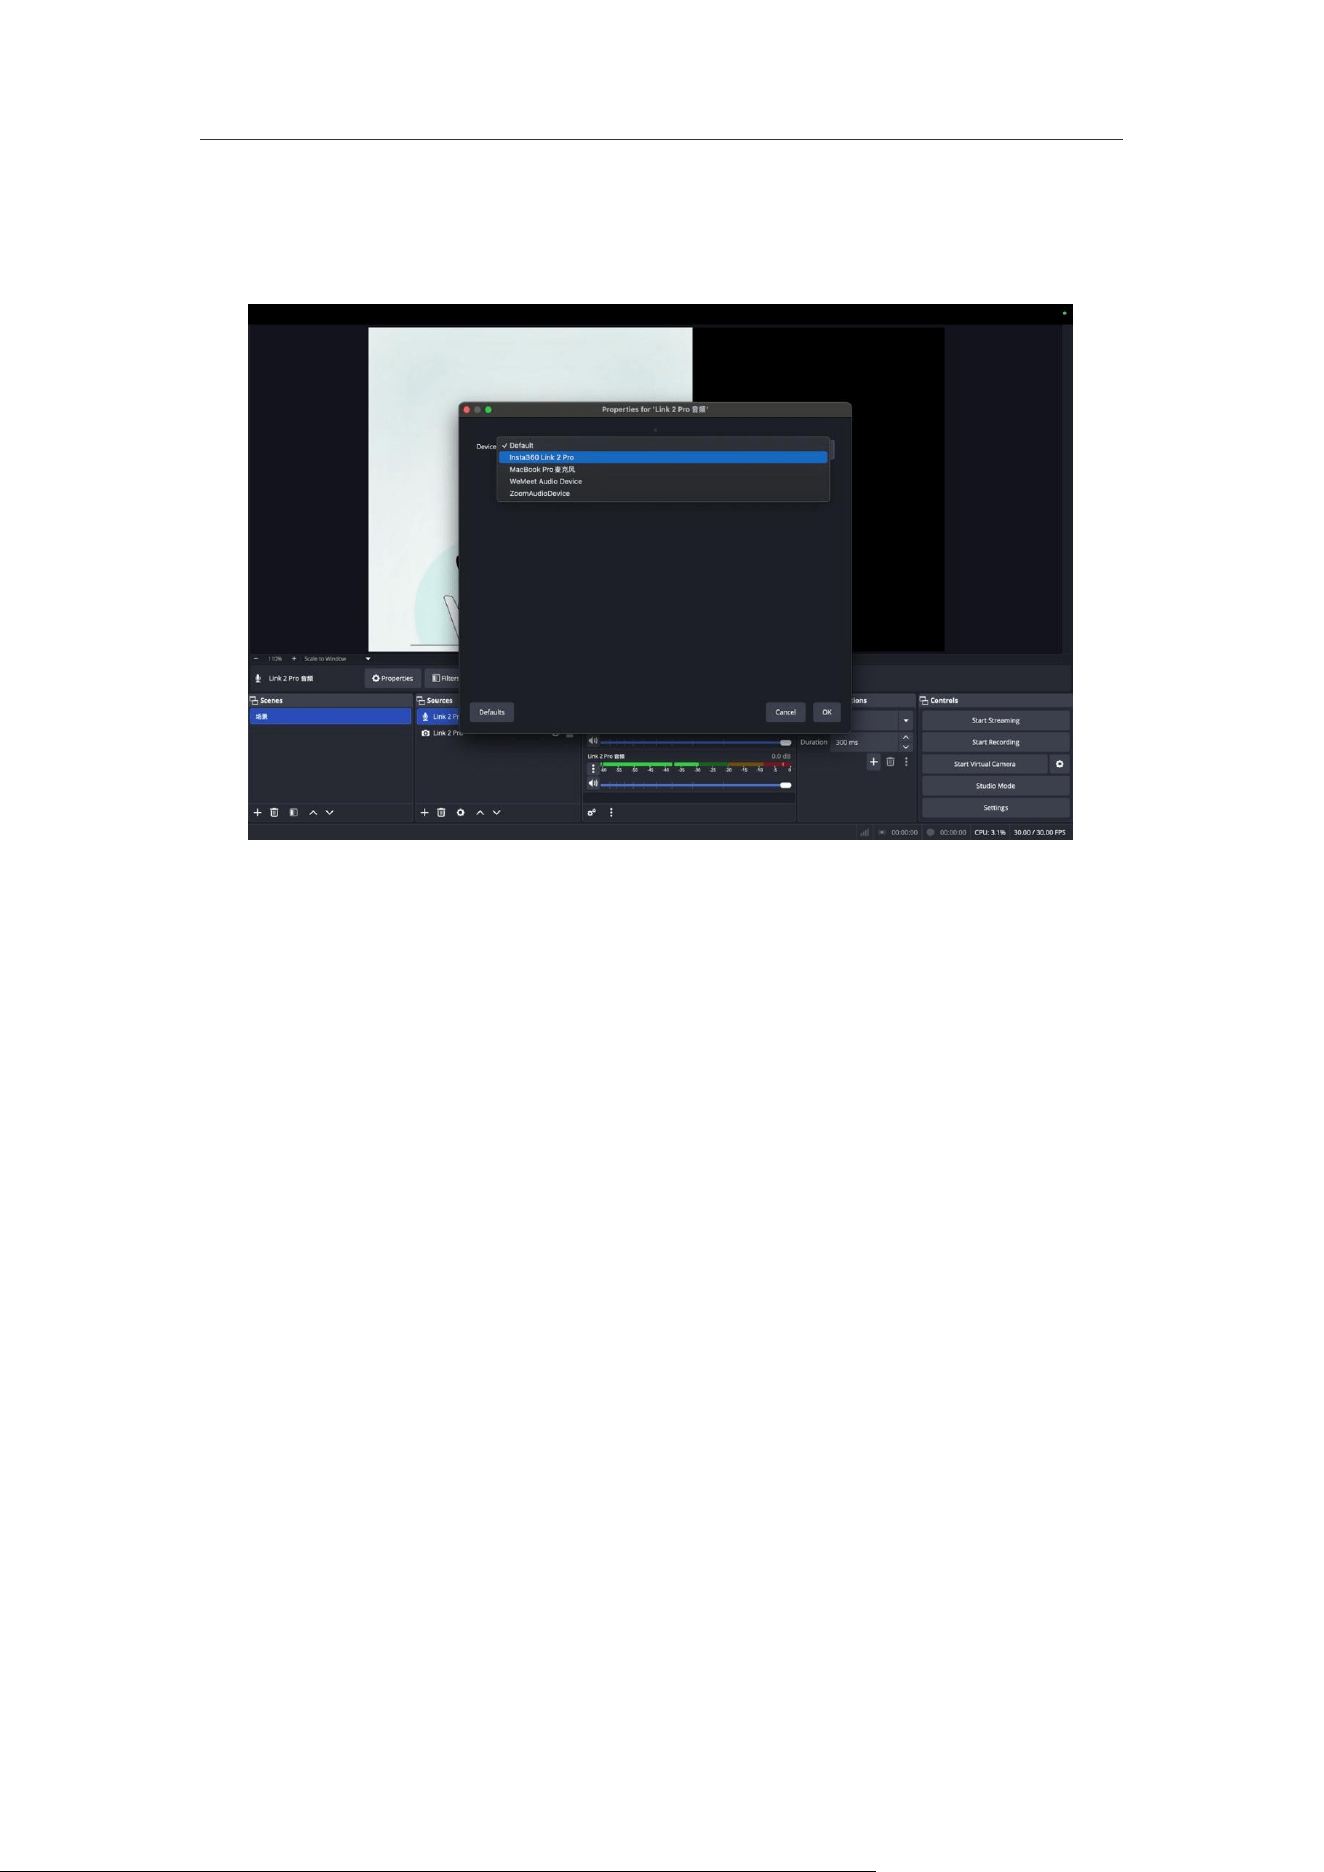
Adding the Camera Microphone as an Audio Source
1. In the OBS "Sources" panel, click "+" → select "Audio Input Capture."
Link 2C Pro & Link 2 Pro User Manual
30
2. Check "Create new," enter a microphone name (e.g., "Link 2 Pro Audio"), and
click "OK." In the "Device" list, select the microphone of your target Link series
camera and click "OK."
Notes
• You can add multiple camera sources by repeating the steps above.
• The physical and virtual cameras of the same device cannot output active video
simultaneously. If one is in use, the other may display a black screen.
Advanced Application — Green Screen Keying Live
Stream
1. Setting up Keying in the Client:
• Open the client and go to the "Effects" tab.
• In "Background"settings, select a virtual background or upload an image/video.
• Check "Green screen available", the system will automatically recognize the
backdrop color in the environment and optimize the keying parameters to
quickly achieve an initial chroma key effect.
Link 2C Pro & Link 2 Pro User Manual
31
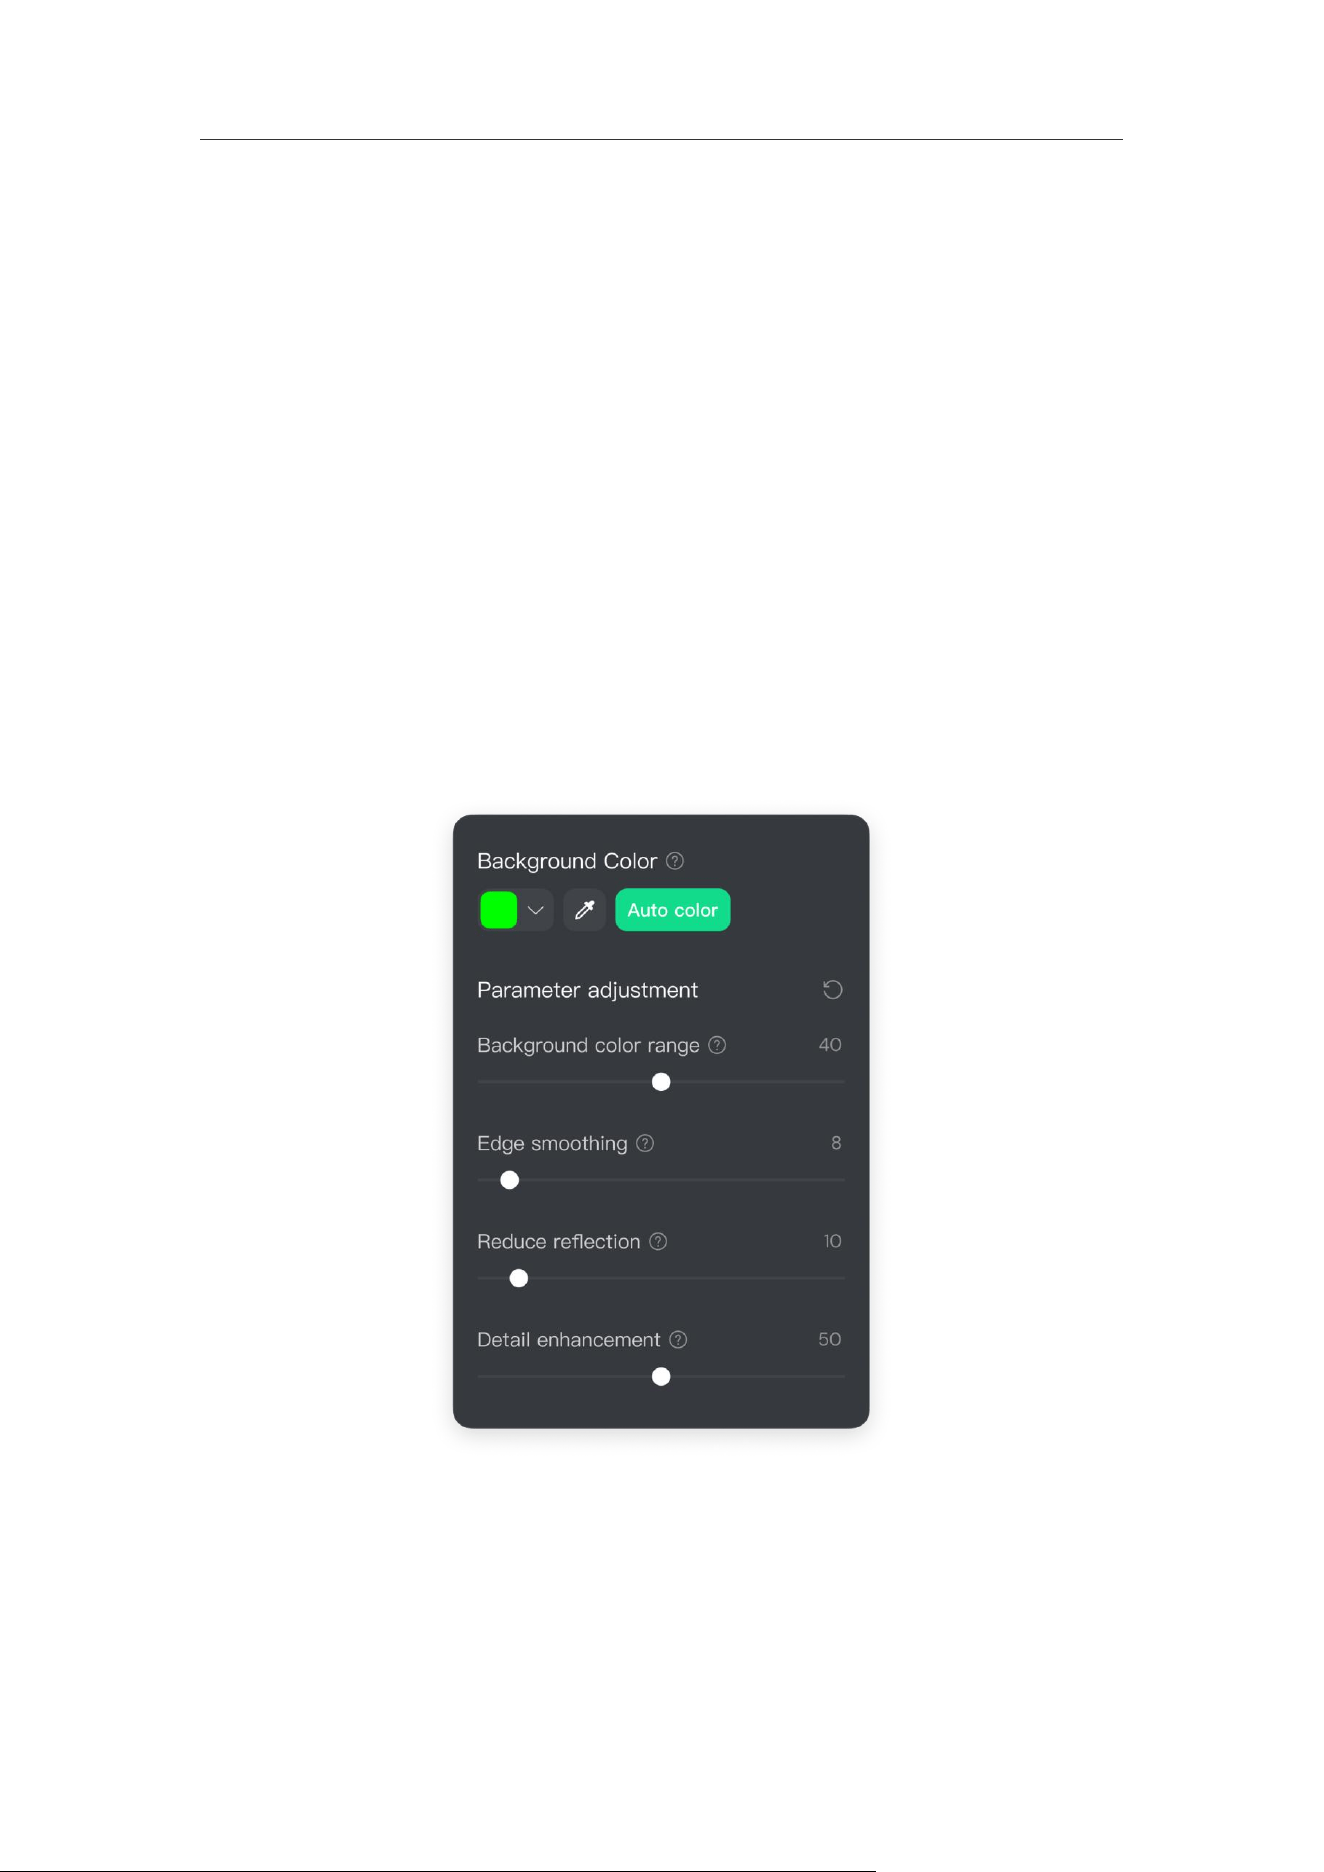
If you are not satisfied with the result or if the environment changes, you can choose
to:
• Click "Auto Color" for one-click keying, or use the eyedropper tool to manually
sample a color within the video frame for keying;
• Use the sliders to fine-tune the details until the keyed edges are clean and the
subject appears natural:
○ Background Color: Adjust the range of background removal during keying to
display the subject more completely.
○ Edge Smoothing: Optimize the transition between the subject and the
background, making the edges appear more natural.
○ Reduce Reflection: Minimize the impact of background lighting on the
subject, making the subject’s colors more pure.
○ Detail Enhancement: Enhance details such as hair and clothing to make the
subject appear more realistic and natural.
2. Selecting the Signal Source in Streaming Software:
• When adding a camera to your streaming software, select "Insta360 Virtual
Camera."

Link 2C Pro & Link 2 Pro User Manual
32
3. Real-time Synchronization:
• Any adjustments made in the client—such as toggling AI Tracking, changing
Beautify & Makeup intensity, adjusting image parameters (brightness, contrast,
etc.), or switching virtual backgrounds and filters—will be synced to the
streaming software's preview in real time.
Tips:
• Use the "Auto color" function to quickly achieve ideal keying results and reduce
manual adjustments.
• It is recommended to use green or blue screens for the best keying results.
• Ensure the screen is flat and wrinkle-free, and that the lighting is as even as
possible.
• Maintaining a distance (recommended ≥1 meter) between the person and the
green screen can effectively reduce color spill.
FAQ
If I restart my computer and use streaming software without opening the
client, will the camera maintain the previously set audio control mode by
default?
In non-vertical 4K high-resolution modes, the camera will maintain the last set audio
mode by default even if the computer is restarted and the client is not open.
Can I use the microphone separately without using the camera?
Yes, the microphone can be used independently. For example, in a Teams meeting,
you can turn off the camera and use the Link series microphone alone.
Link 2C Pro & Link 2 Pro User Manual
33
Ecosystem Integration
Using Elgato Stream Deck to Control Link 2 Series
Cameras
By integrating with Stream Deck, you can map frequently used functions of Link 2
series cameras to Stream Deck keys, enabling quick settings and control without
needing to use the client interface.
Software Installation and Setup
1. Ensure both the camera and Stream Deck are connected to your computer.
2. Download and open the Elgato Stream Deck software. Search for and install the
"Insta360 Webcam" plugin in the plugin store. If the search fails, you can also
download the plugin and install it manually.
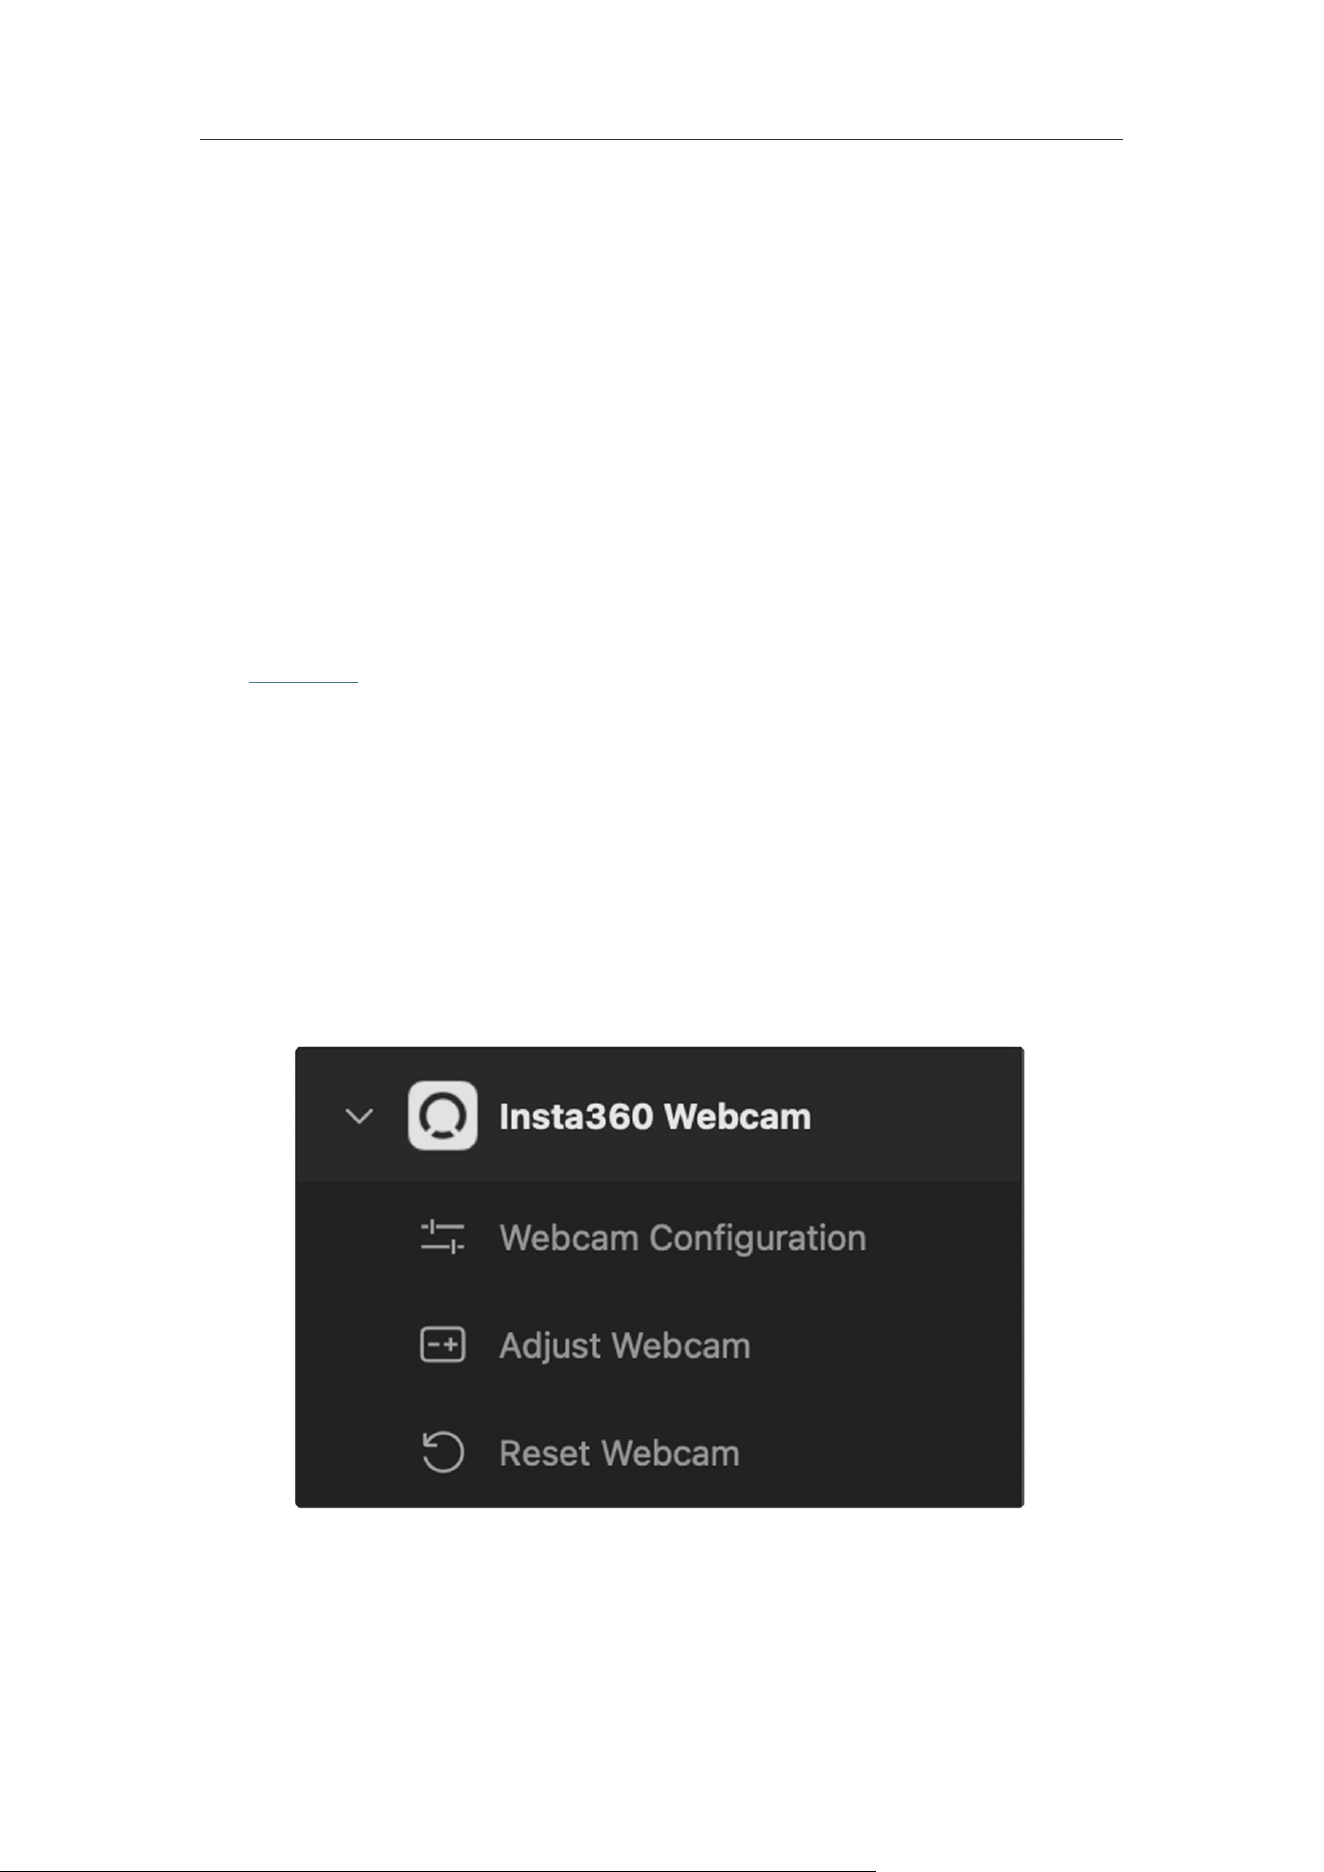
3. Once installation is complete, the "Insta360 Webcam" option will appear in the
software sidebar, featuring the following three categories of control functions:
○ Webcam Configuration
○ Adjust Webcam
○ Reset Webcam
Link 2C Pro & Link 2 Pro User Manual
34
Operation Guide
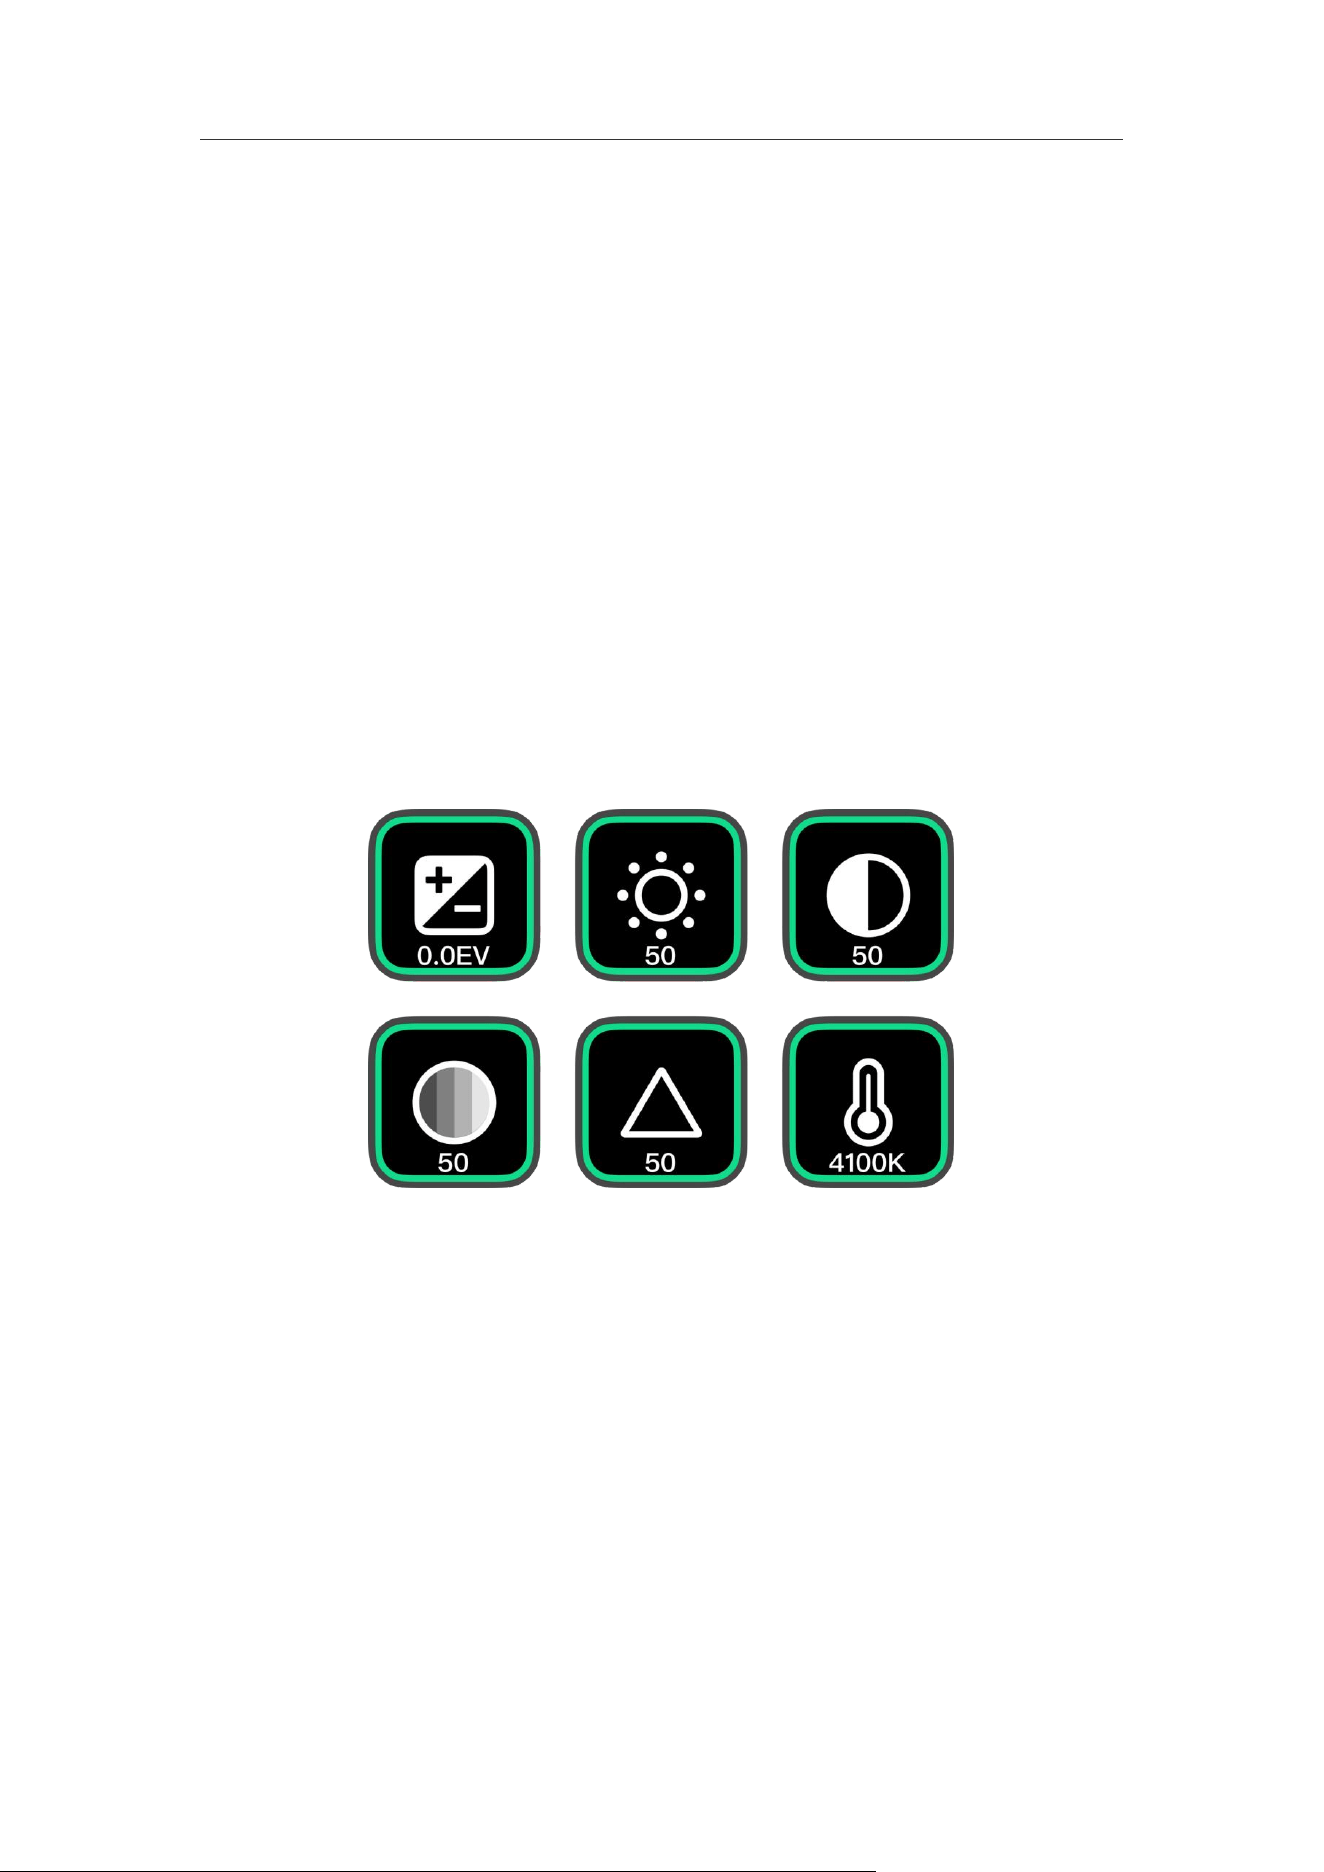
1. Webcam Configuration
This function is used to set camera parameters to a predefined fixed value with a
single click or to act as a toggle for specific features.
• Parameter Preset Example: Drag and drop "Webcam Configurationa" onto a key,
enter a button title, select the camera, and choose the "Color Temperature"
function with a value set to "10000." Once pressed, the color temperature will
immediately adjust to 10000K, regardless of the current setting. This applies
similarly to other adjustable parameters like brightness and saturation.
• Feature Toggle Example: Set the key function to "AI Tracking On/Off." Pressing
this key will enable or disable the AI tracking feature. Pressing it again will toggle
the state.
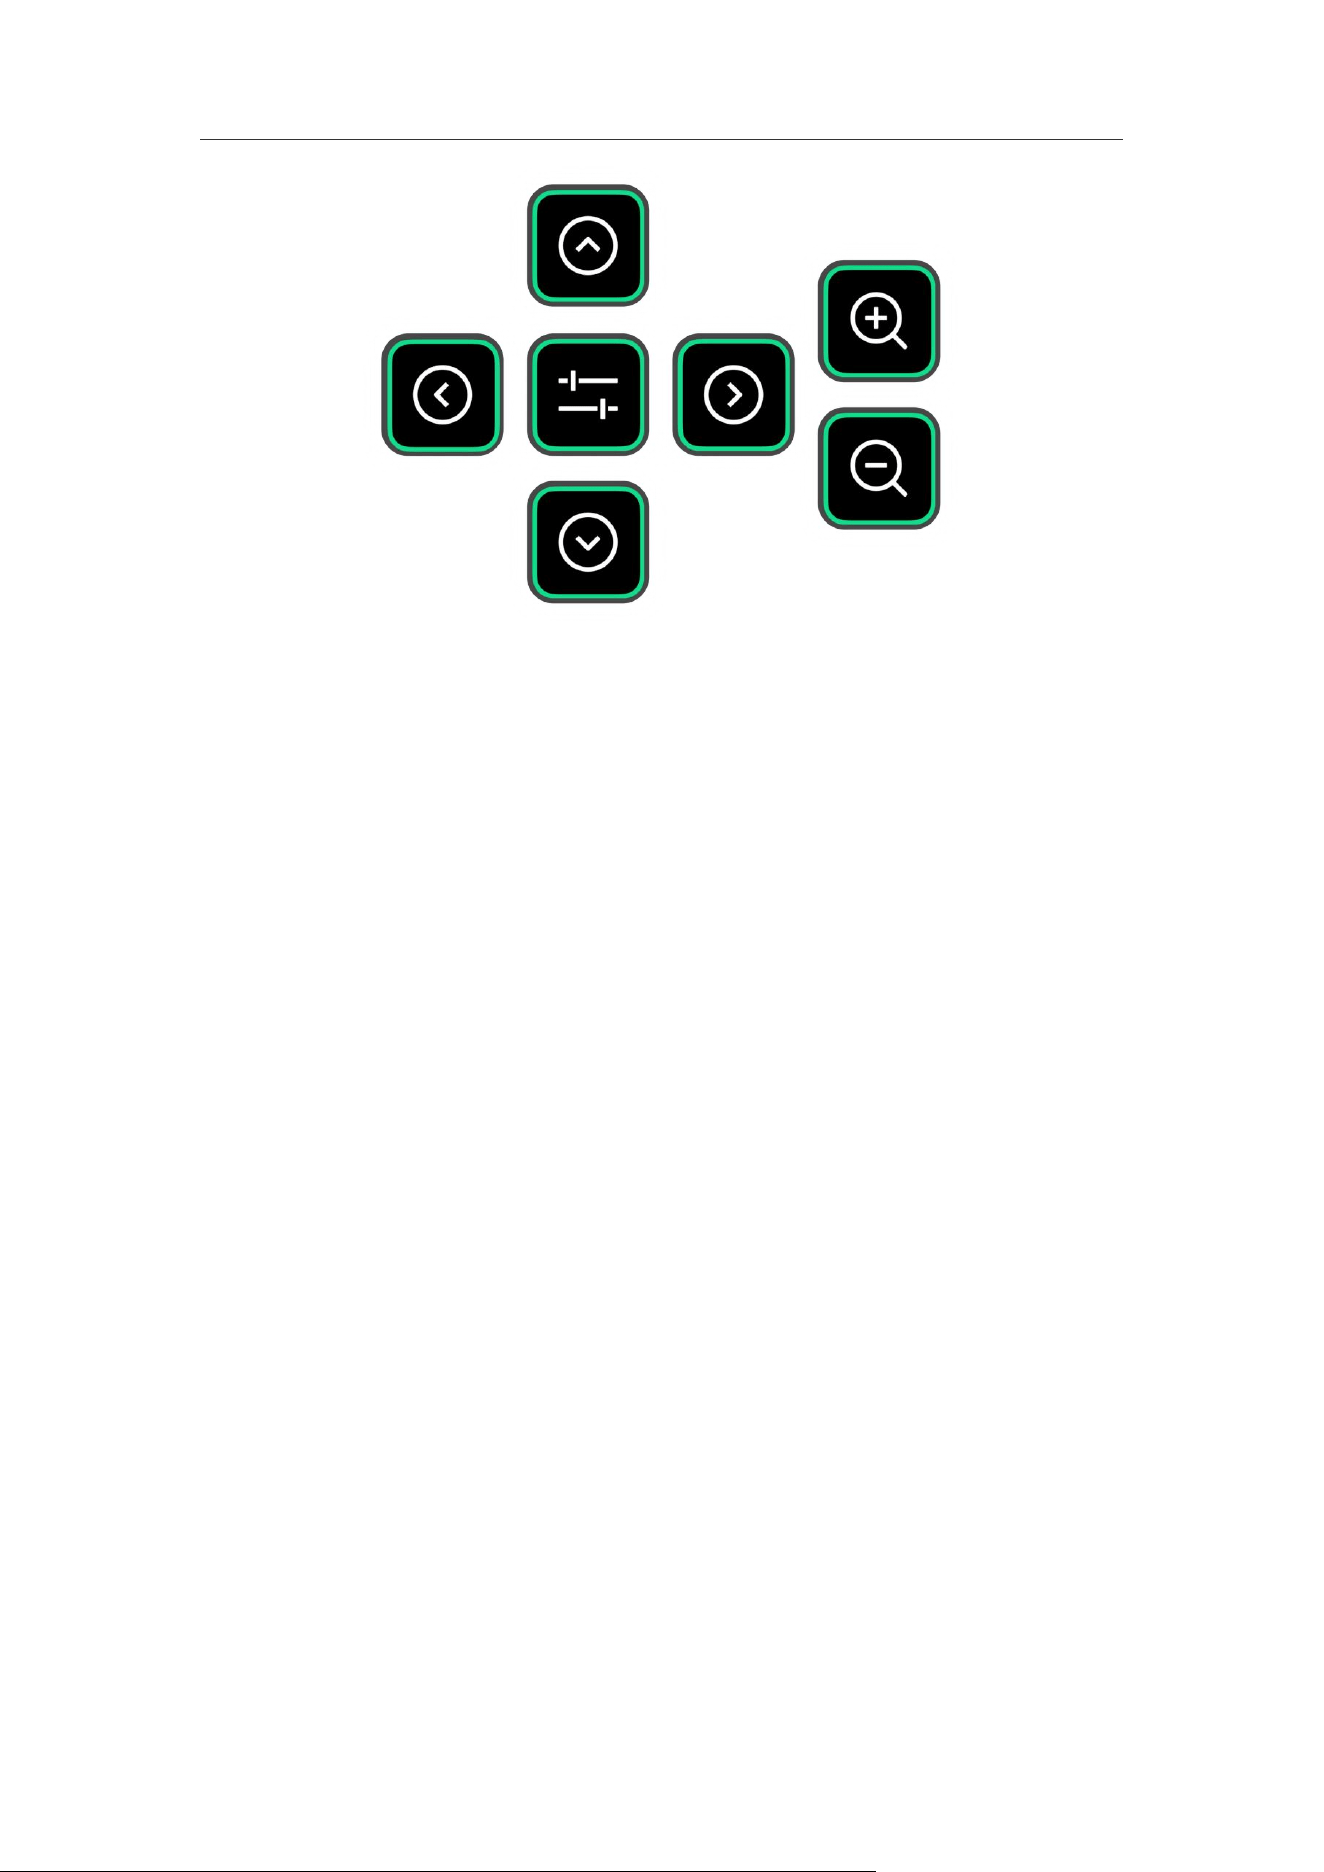
2. Adjust Webcam
This function is used to adjust the camera incrementally by a set amount.
• Operation Example: Drag and drop two "Adjust Webcam" functions onto two
separate keys.
• Key 1: Select "Zoom" for the function and set the increment to "+0.1" (Zoom In).
• Key 2: Select "Zoom" for the function and set the increment to "-0.1" (Zoom Out).
• By repeatedly pressing these two keys, you can gradually zoom the field of view
in or out.
Link 2C Pro & Link 2 Pro User Manual
35
3. Reset Webcam
This function is used to restore one or all of the camera's settings to their initial state.
• Single Reset Example: Set the key function to "Brightness." If you are unsatisfied
with the brightness adjustment, press this key to restore the brightness value to
its standard initial value.
• Reset All: Set the key function to "All Parameters." Pressing the key will restore
all image and function settings of the camera to factory default states.
Tips: If using macOS, you need to open System Preferences and grant permissions
to Stream Deck to trigger the keys.
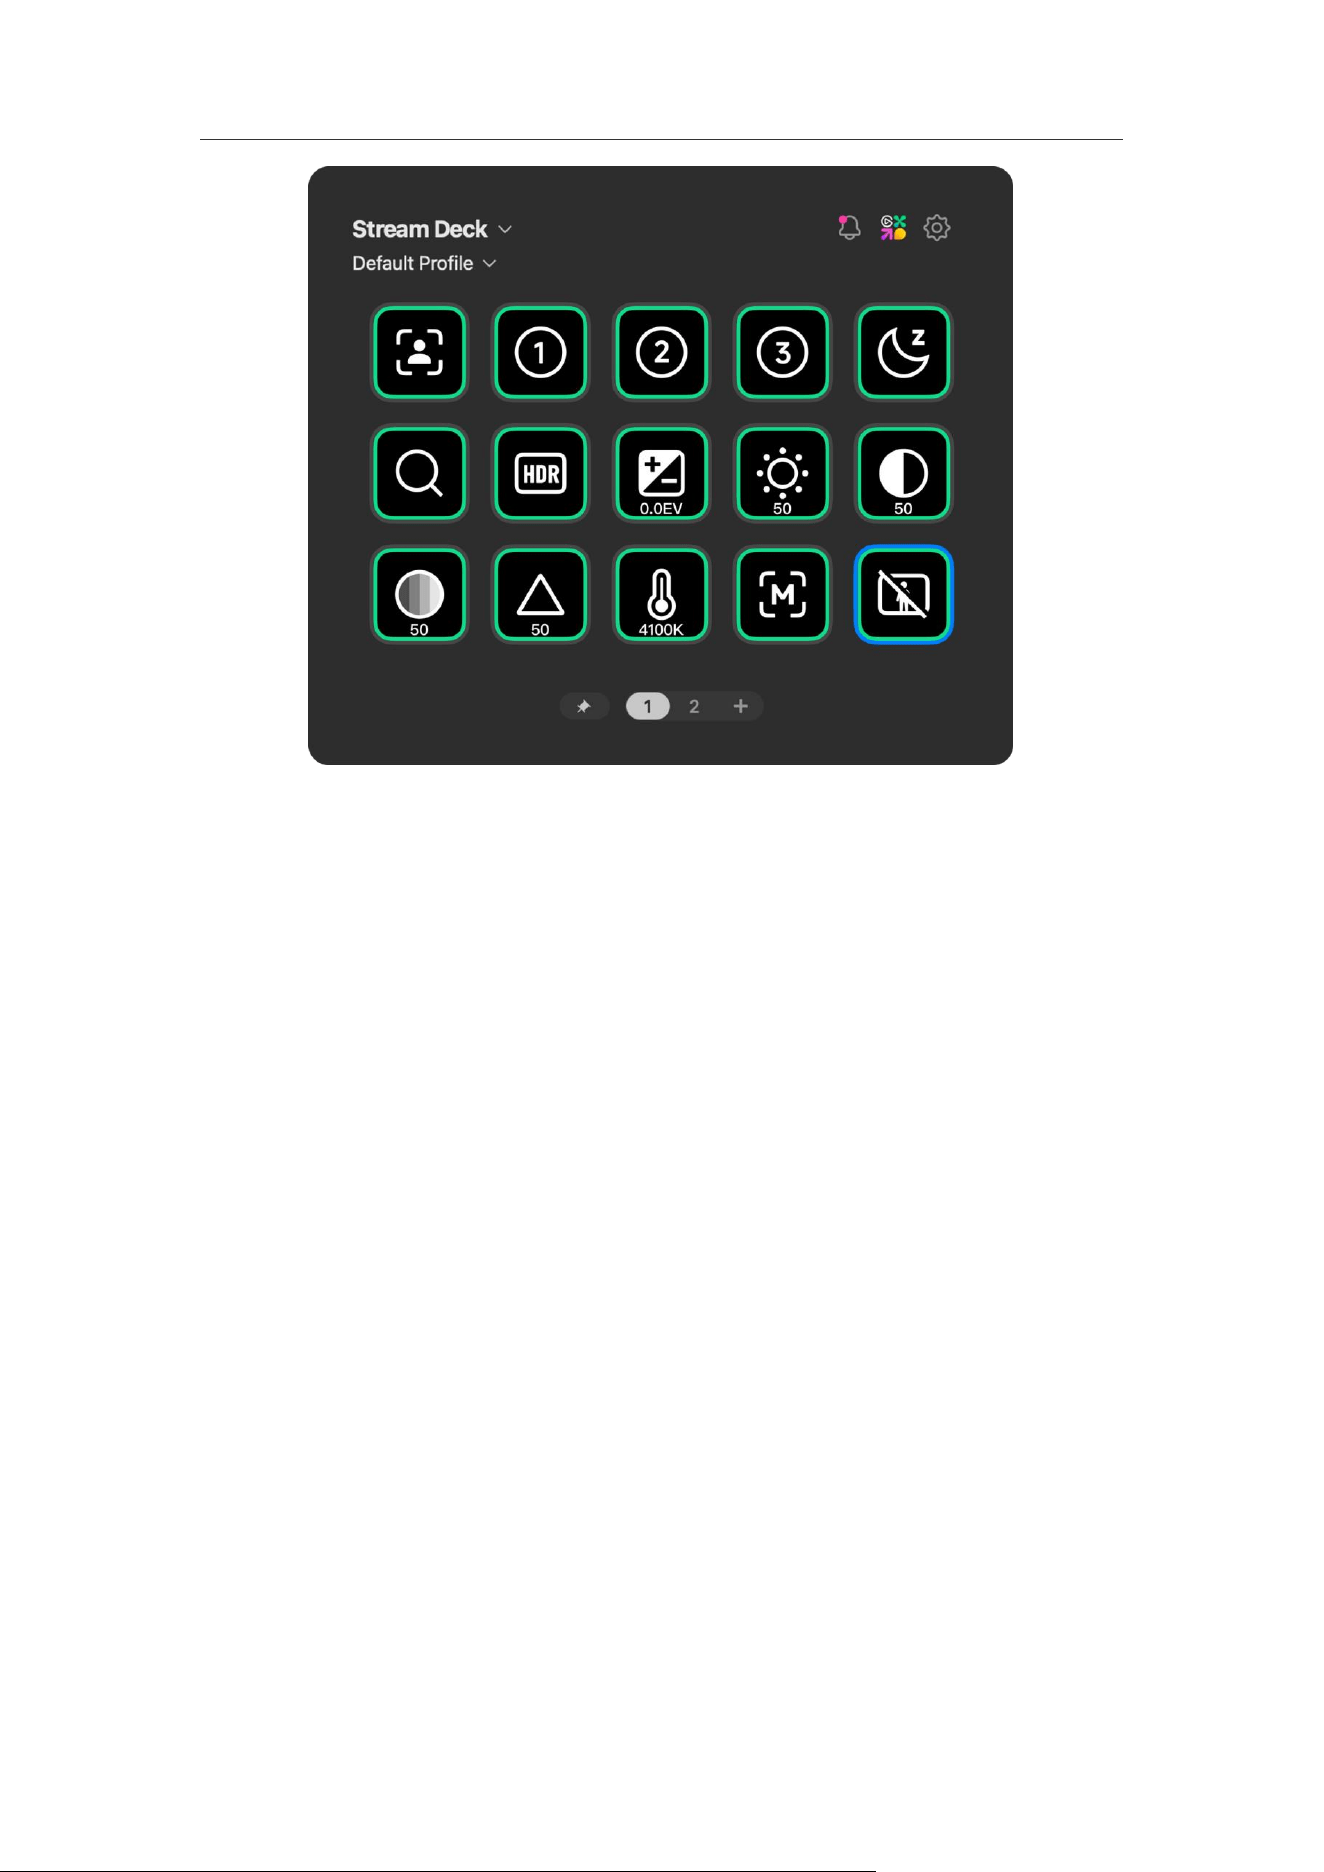
Customizing Control Panel Layout
Users can customize the panel layout. You can partially modify preset buttons or
click the page numbers below to set up a new page. Here is a suggested layout for
the Stream Deck control panel, which you can customize based on your personal
habits:
Link 2C Pro & Link 2 Pro User Manual
36
• Central Area (Directional Control): Place five "Adjust Webcam" keys with
functions set to: Gimbal Up, Down, Left, Right, and "Gimbal Reset."
• Left and Right Sides (Zoom Control): Place two "Adjust Webcam" keys with the
"Zoom" function, setting the increments to "+0.1" and "-0.1."
• Other Keys: You can place "Webcam Configuration" keys to quickly toggle
frequently used functions, such as:
○ AI Tracking On/Off
○ DeskView Mode On/Off
○ Adjusting exposure (brightness) to a specific value
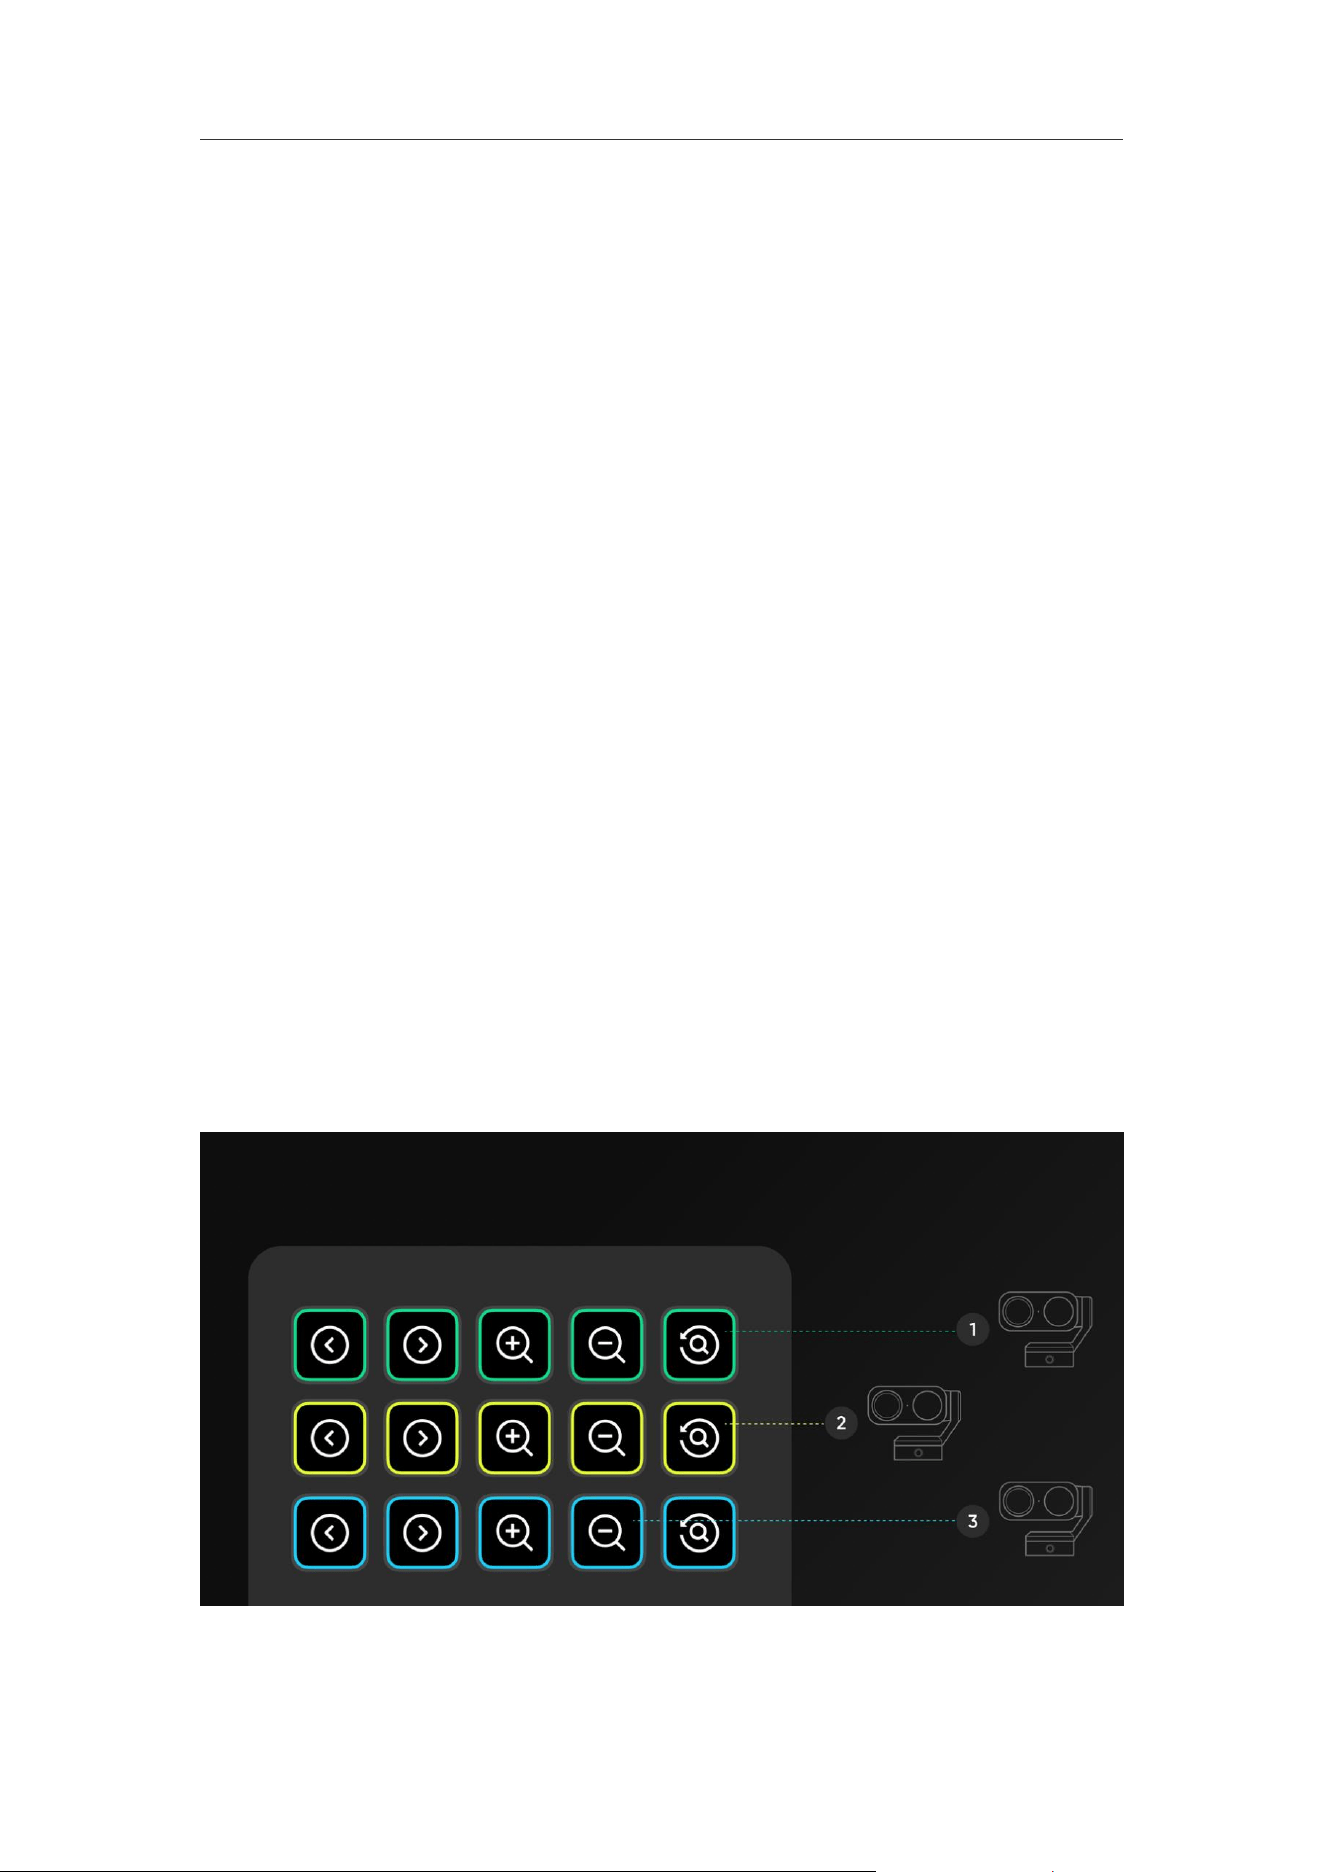
• Preset Keys: Place "Webcam Configuration" keys, select the "Preset" function,
and specify sub-options (e.g., Preset 1, Preset 2).
○ Saving a Preset: First, adjust all parameters in the client (e.g., Beautify,
Filters, Image settings, etc.). On the Stream Deck, click the corresponding
preset key to save all current settings.
○ Calling a Preset: When needed, press the key to switch to the saved
settings with one click.
○ Updating a Preset: After modifying parameters in the client, return to the
Stream Deck and long-press the corresponding preset key for 3 seconds to
refresh and save the new settings.
○ Examples:
Link 2C Pro & Link 2 Pro User Manual
37
Preset 1: General Live Stream settings (Enable Beautify, Makeup, Auto
Tracking).
Preset 2: Green Screen Live Stream settings (One-click keying and
virtual background replacement).
• Navigation Keys: You can place the default Stream Deck "Previous Page" and
"Next Page" navigation keys in the corners of the panel to switch between
different control pages.
Notes
When calling functions involving Beautify, Makeup, Virtual Backgrounds, Filters, and
certain image parameters via Stream Deck, ensure the client is running in the
background for the settings to take effect.
Multi-Camera Real-Time Control
You can use Stream Deck as a real-time control console to adjust camera angles and
various settings without ever opening the settings menu.

Link 2C Pro & Link 2 Pro User Manual
38
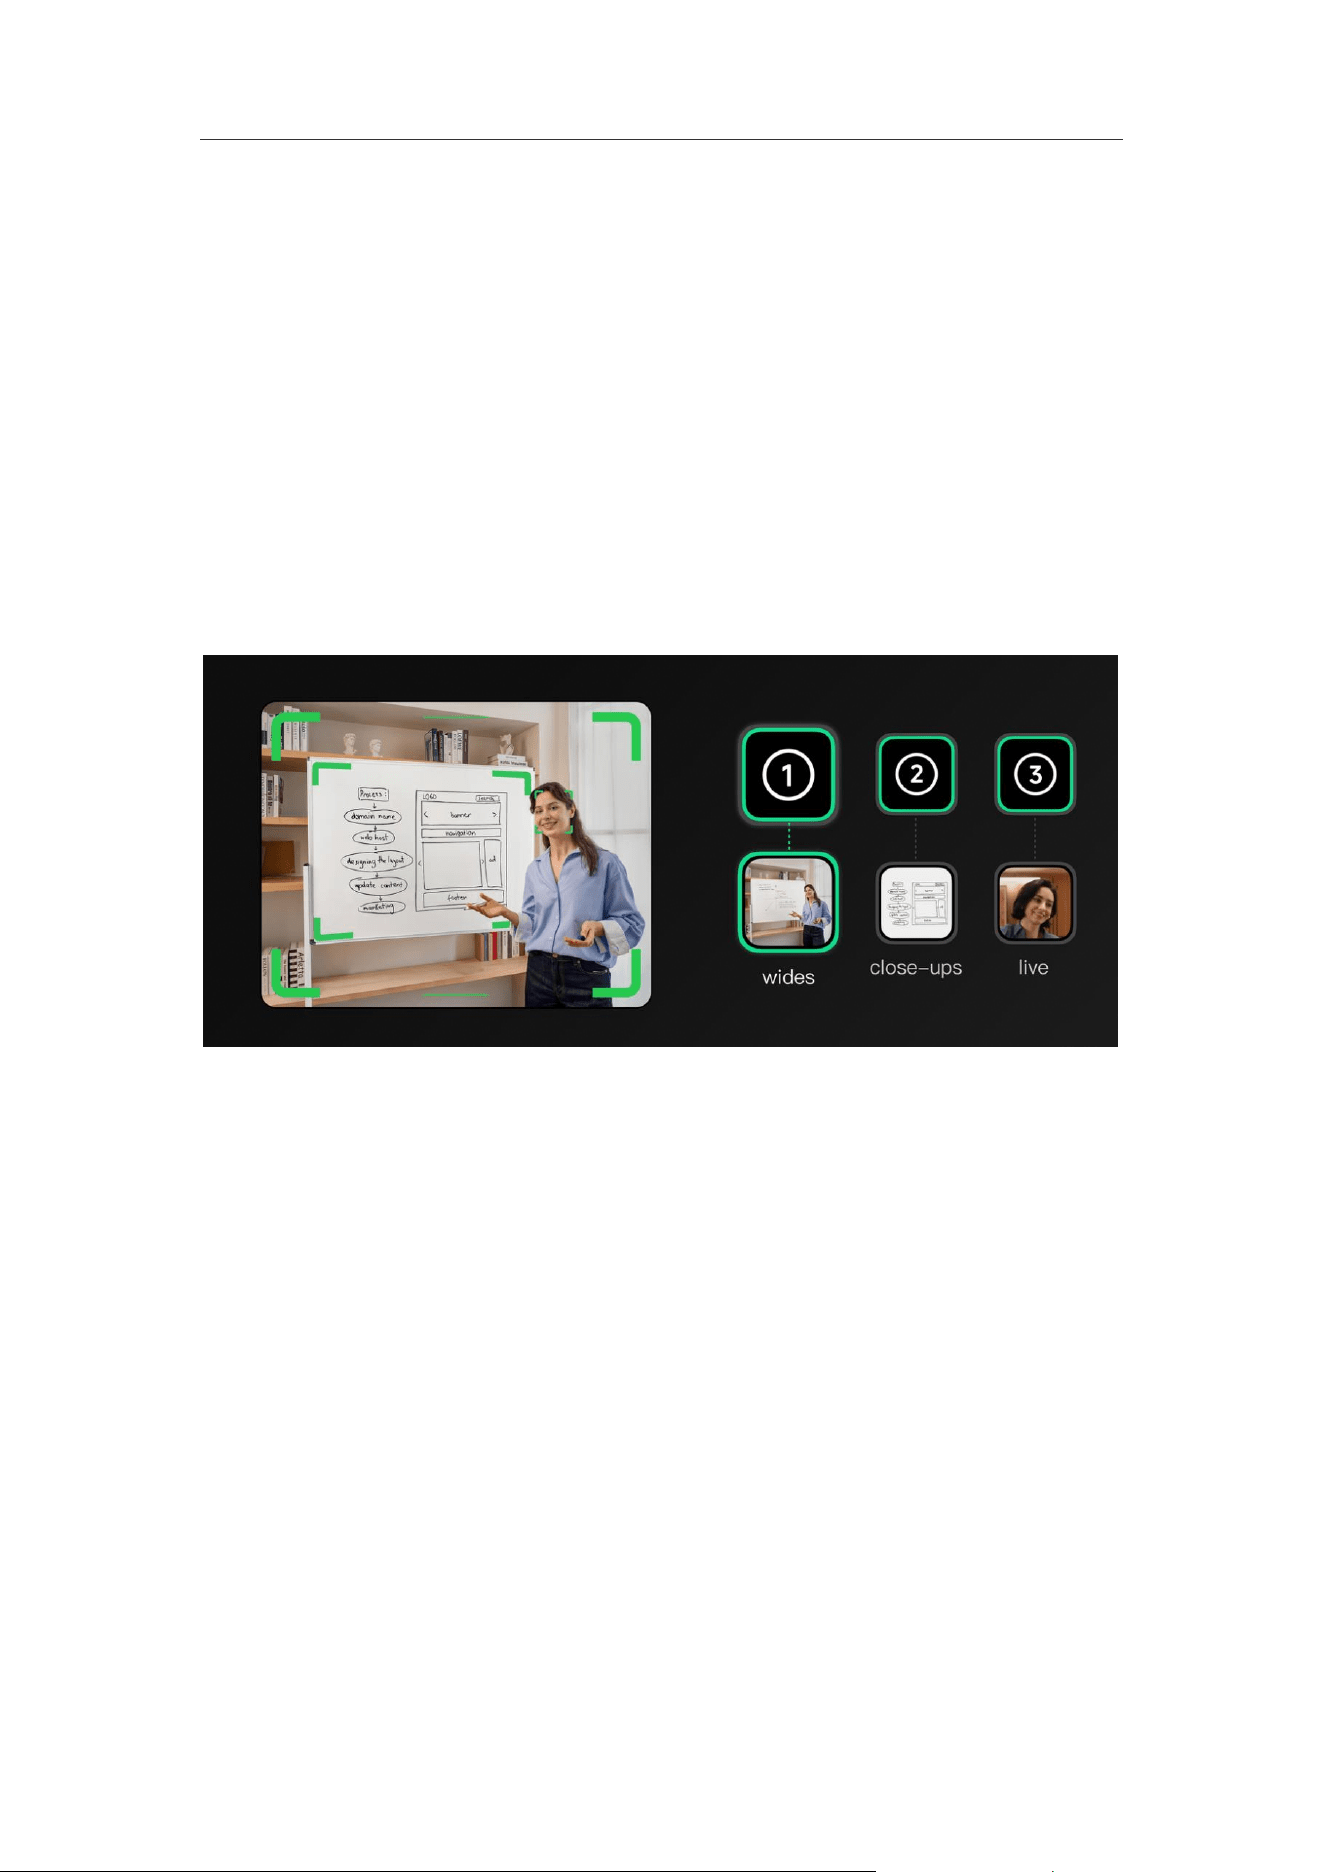
Tip 1: Preset Workflow
Set up one-tap switches for multiple cameras, saving time and allowing for easier
use.
Preset Button Operation Logic:
• First Click (when the button has no preset): Save the current state of all storable
camera settings as a new preset.
• Subsequent Clicks (when the button already has a preset): Quickly switch to the
saved state of the preset with a single click.
• Long press for 3 seconds (when the button already has a preset): Overwrite the
existing preset with the camera’s current new state.
Tips:
1. Feature Permissions: The scope of preset content stored and called via Stream
Deck depends on the current operating environment.
○ Hardware only (without running the Link Controller client): You can only
preset and call parameters directly related to the camera hardware, such as
gimbal position, digital zoom, and AI modes (including AI Tracking/Auto
Framing, Whiteboard Mode, and Deskview Mode).
○ Full functionality (with the Link Controller client running in the background):
You can preset and call all software parameters, including the hardware
parameters and AI modes mentioned above, as well as effect settings (such
as virtual background, filters, makeup, beautify), and image settings.
2. Operation Interval: When switching between different presets using Stream Deck,
it is recommended to allow at least 3 seconds between operations. Clicking too
quickly in succession may cause some commands to fail due to device
response delay.
Operation Workflow:
• Set up the shot: In the Insta360 software or on the Stream Deck, point Camera
A at the face. Adjust the exposure to ensure the face is well-lit.
• Save to Stream Deck:
1. Drag the "Webcam Configuration" action from the Insta360 list onto a key.
2. In the Stream Deck software, select "Preset."
Link 2C Pro & Link 2 Pro User Manual
39
3. Choose Camera A.
4. Name the key: "Camera A: Close-up."
• Create a wide-angle shot: Now, create a new preset, adjust the camera to a wider
angle. Long-press the preset key for 3 seconds to save it, and name it "Camera B:
Wide."
• Repeat: You can point Camera C at the presentation whiteboard and repeat the
steps above to save the preset.
• Result: You can now instantly switch between wide shots and close-ups for any
guest with a single button press, without affecting the quality of the independent
recording.
Tip 2: Real-Time Manual Adjustments During Recording
You can adjust guest framing and image settings during recording without opening
the client software.
• Gimbal Adjustment: Drag the "Adjust Webcam" action to the Deck and select
gimbal movement. This creates a "joystick" on your Stream Deck
(Up/Down/Left/Right/Zoom). If a guest moves out of frame, you can physically
move the camera gimbal to follow them.
• Image Settings: Drag the "Webcam Configuration" action to a key.
○ Configure it to control Exposure or White Balance.
○ If a camera shot looks too dark during recording, tap this key to immediately
brighten the raw hardware footage.

Link 2C Pro & Link 2 Pro User Manual
40
Advanced Application — Multi-Camera Live Streaming
In professional podcasts, interviews, or multi-camera production scenarios, you may
need to record separate video streams for each webcam (known as "Isolated
Recording" or "ISO Recording") to allow individual adjustment of each camera angle
during post-production. The following introduces two methods to achieve this in
OBS Studio. You need to follow the specific workflow below. This workflow supports
recording up to three cameras simultaneously.
Pre-recording Checklist:
• GPU Performance: Ensure your computer has a dedicated graphics card (e.g.,
NVIDIA RTX series) to handle multi-channel video encoding.
• Audio Test: Before starting the official recording, be sure to test whether each
microphone is accurately recording to an independent audio track.
• Disk Space: ISO recording consumes a significant amount of space. Please
reserve 3–4 times the storage space required for a regular recording.
In professional podcasts, interviews, or multi-camera production scenarios, you may
need to record the footage from each Insta360 Link camera into a separate video file
(ISO recording) to allow for independent adjustments during post-production. The
following section introduces two methods to achieve this in OBS Studio.
Method 1: Using the "Source Record" Plugin (Recommended)
This method uses a free plugin to create independent video files for each camera.
1. Install the Plugin: Download the "Source Record" plugin from the official OBS
Resources forum. After installation, restart OBS.
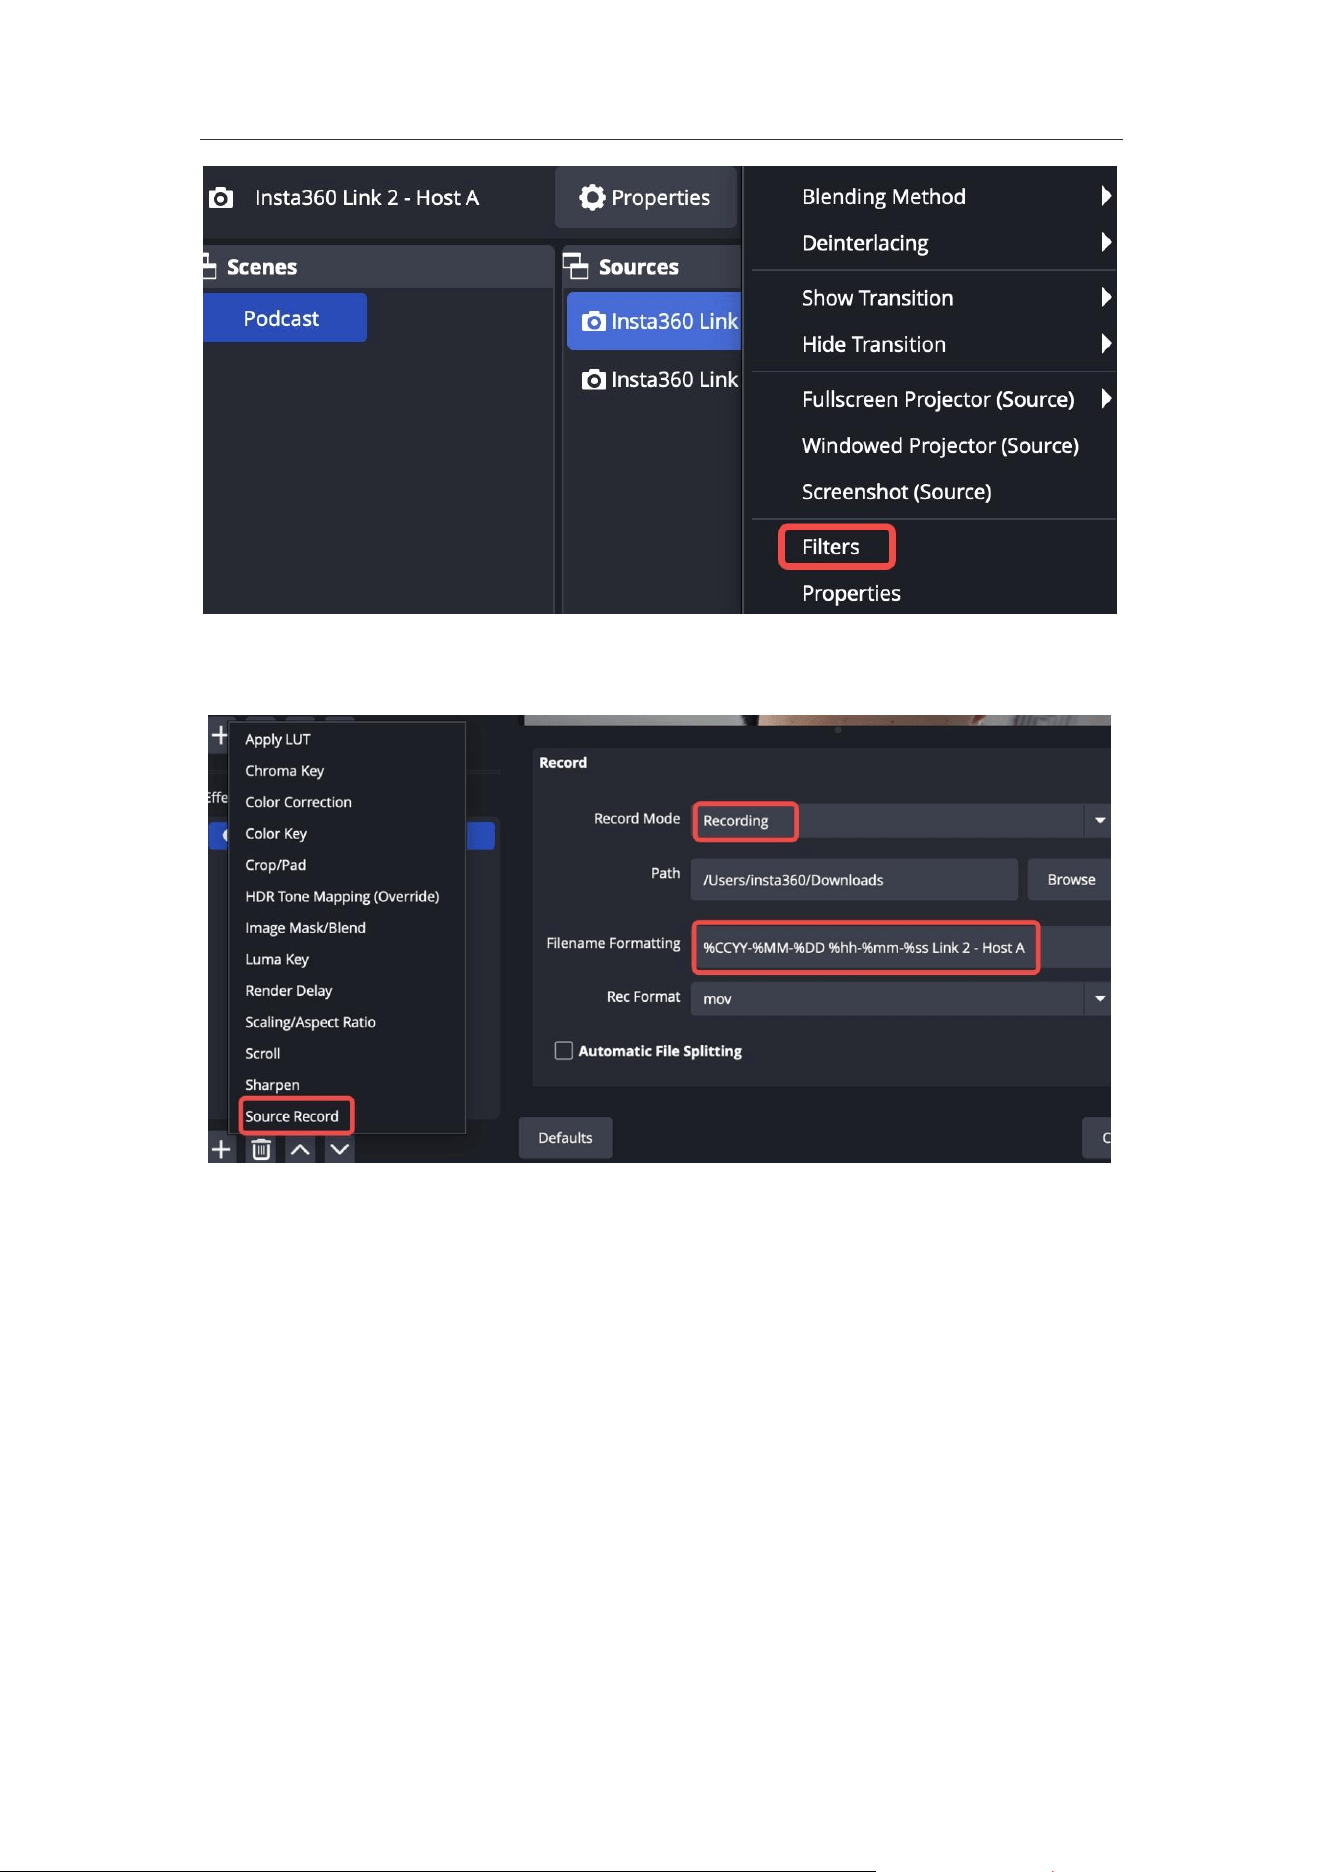
2. Add a Filter:
• Add your camera source to a scene.
• In the "Sources" list, right-click Camera A > select "Filters."
Link 2C Pro & Link 2 Pro User Manual
41
• Click the "+" icon under "Effect Filters" and select the Source Record plugin.
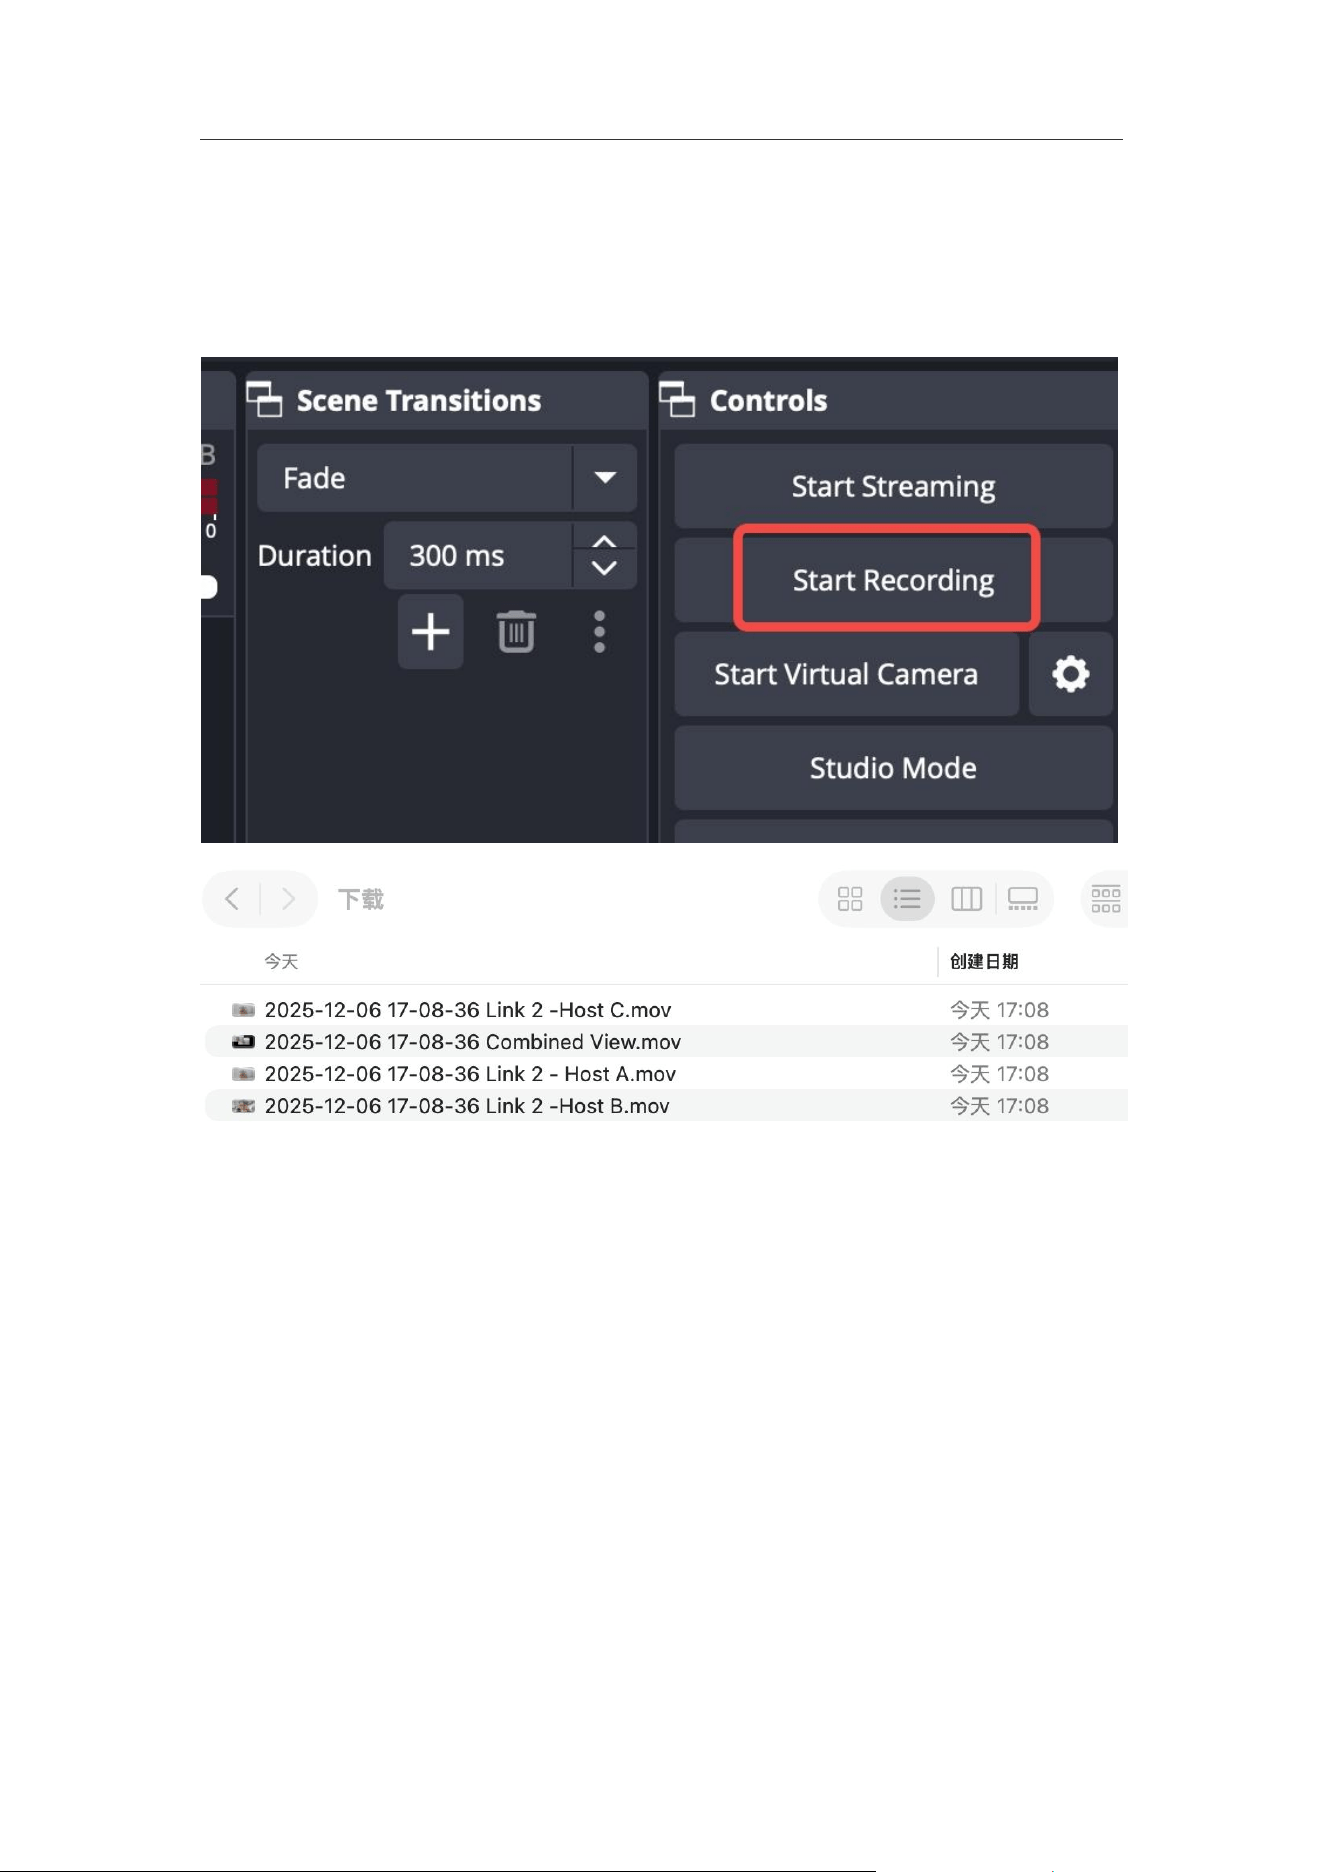
3. Encoding Settings:
• Name: Give this recording source a name, such as "Host View."
• Record Mode: Set to "Recording" so it starts simultaneously when the main OBS
recording button is clicked.
• Encoder: To reduce the load on your computer, ensure you select a hardware
encoder:
○ Windows: Select NVENC (NVIDIA graphics cards) or Hardware Encoding
(AMD graphics cards).
○ macOS: Select the Apple VT H264 Hardware Encoder.
○ Avoid using x264 software encoding for all cameras, as this may lead to
insufficient performance.
Link 2C Pro & Link 2 Pro User Manual
42
4. Repeat Settings: Repeat the steps above for any other Link cameras in the scene.
5. Start Recording: Once you click "Start Recording" in OBS, an independent
lossless video file will be generated for each camera in addition to the main
output file.
Tips: This method requires encoding four videos simultaneously, which demands
high computer performance. If your computer resources are limited and you want to
ensure audio-video synchronization, please consider Method 2.
Method 2: "Ultra-Wide" Canvas
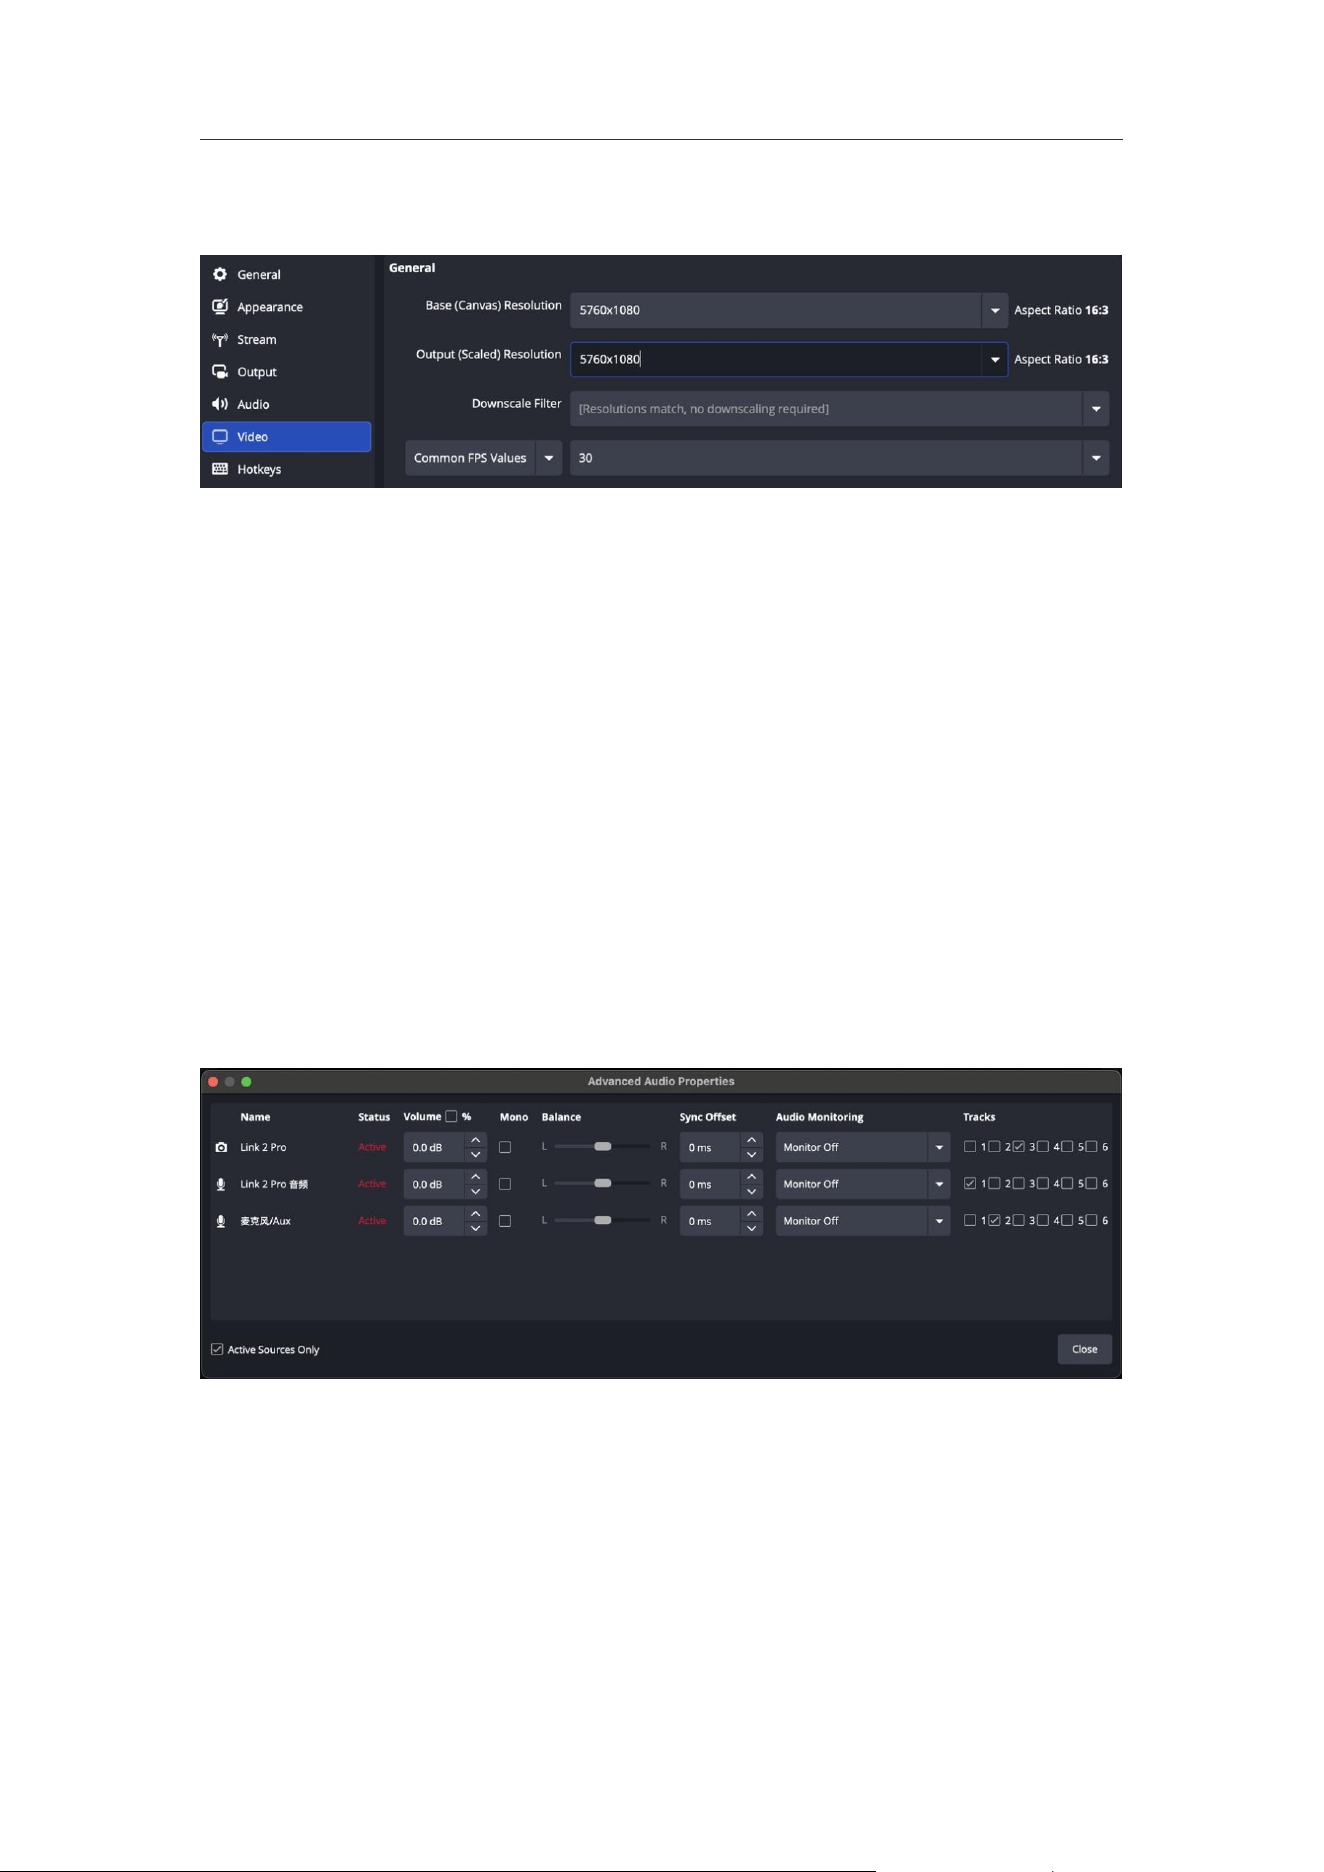
1. Change Canvas Size: Go to "Settings" > "Video" tab in the bottom-right corner of
the OBS client.
• Set "Base (Canvas) Resolution" to 5760x1080 (i.e., three 1920x1080 frames side-
by-side).
Link 2C Pro & Link 2 Pro User Manual
43
• Set "Output (Scaled) Resolution" to 5760x1080.
2. Arrange Cameras: In the scene, arrange the three camera sources side-by-side
from left to right.
3. Post-production Editing: Import the resulting ultra-wide video file into editing
software (e.g., Adobe Premiere Pro, DaVinci Resolve). Duplicate the video track
and use the cropping tool to isolate each individual camera angle.
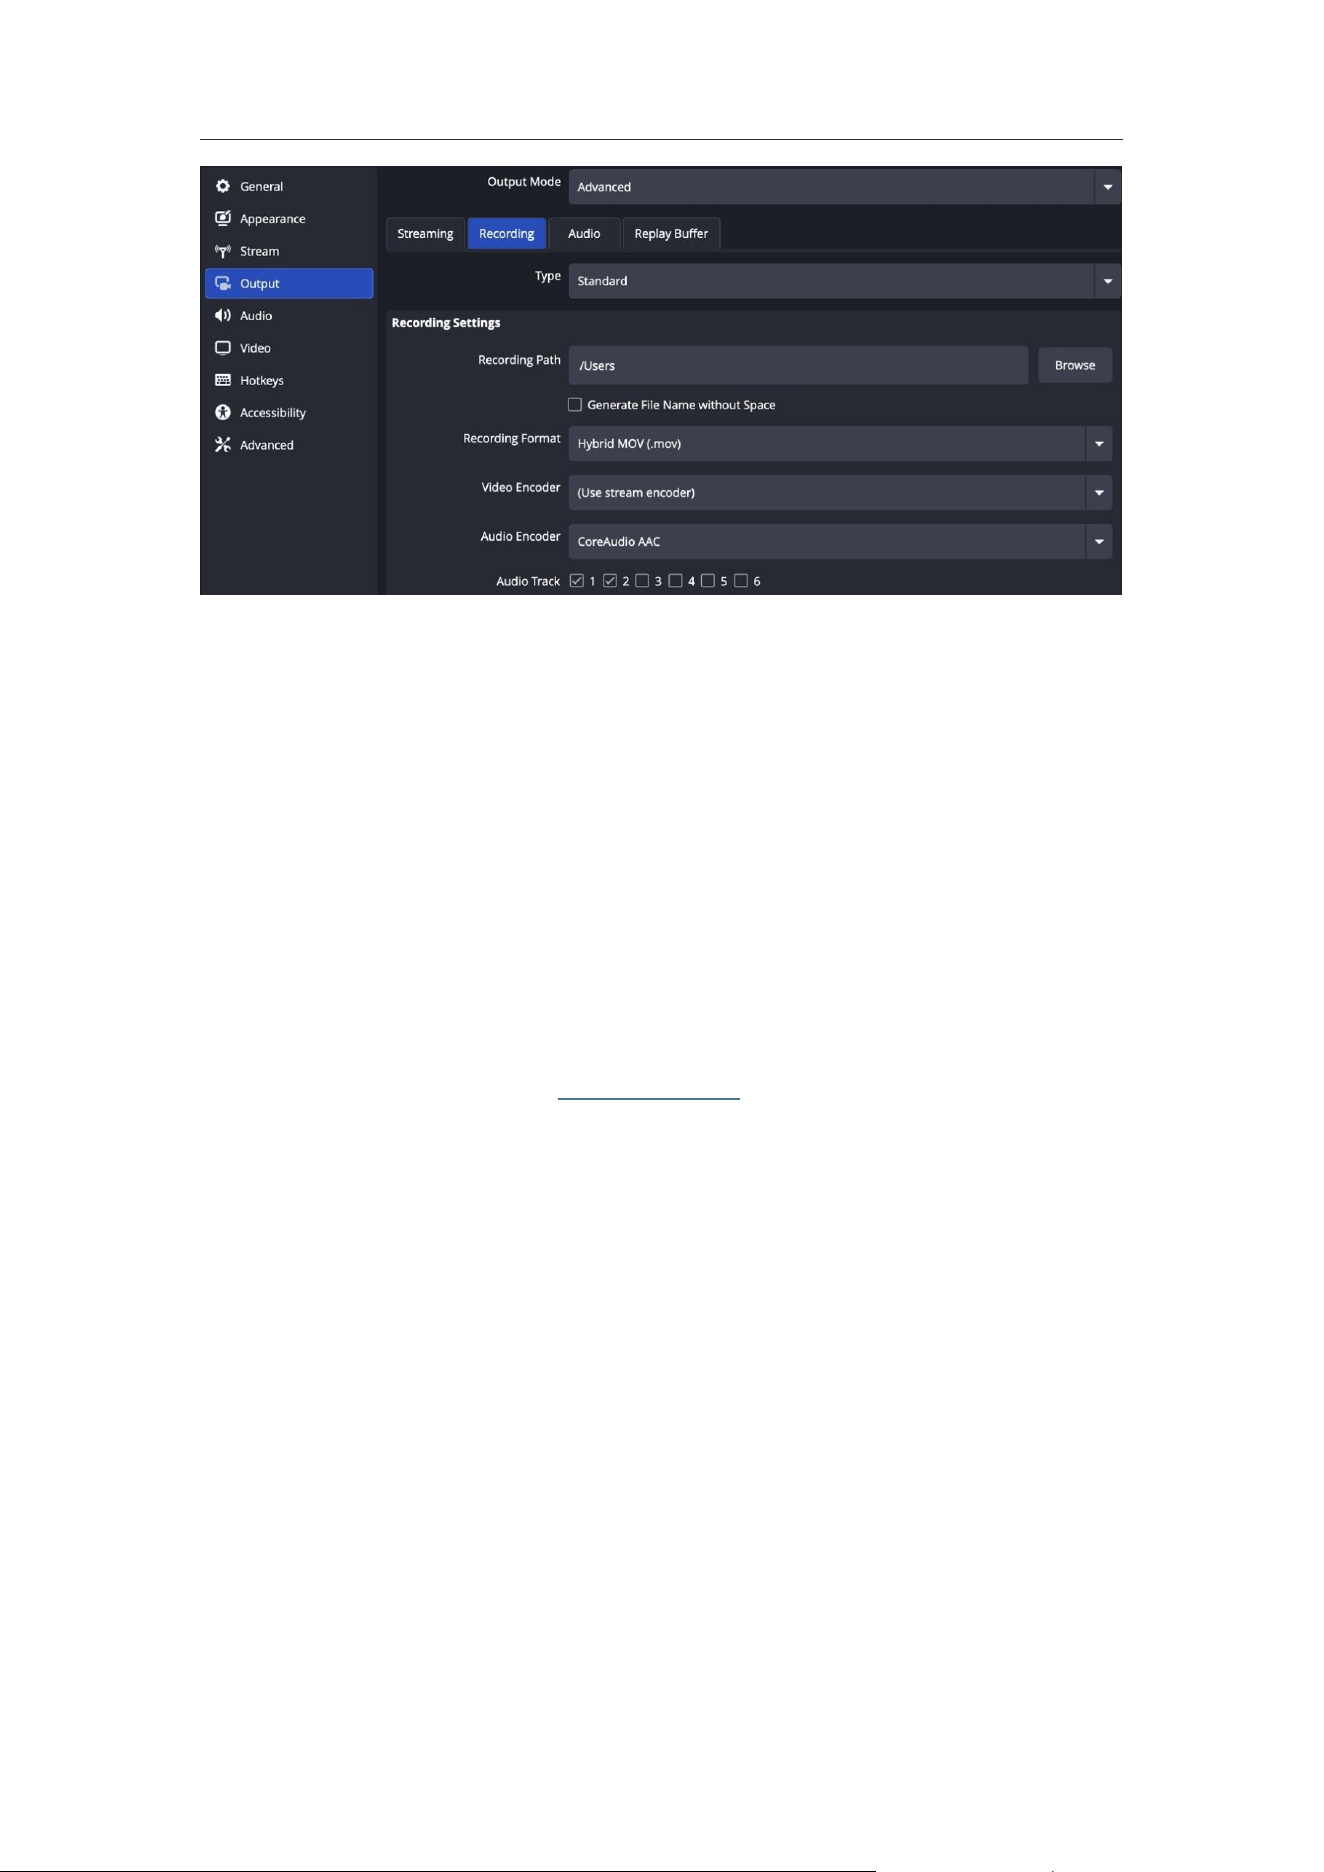
4. Audio Separation Settings
For podcasts, independent audio tracks are just as important as the video. Please
complete the following settings in OBS:
• Go to the top menu bar "Edit" > "Advanced Audio Properties."
• In the "Tracks" area, assign an exclusive track to each microphone (e.g., for
Microphone A, check only Track 1; for Microphone B, check only Track 2).
• Go to "Settings" > "Output", set "Output Mode" to "Advanced", and under the
"Recording" tab, check the independent audio tracks you want to record (e.g.,
Track 1, Track 2). After recording, you will obtain audio files with separate tracks
for editing.
Link 2C Pro & Link 2 Pro User Manual
44
Integration with Wave
Detach the main body of the Link 2 Pro from the magnetic mount and attach it
magnetically to the top of the Insta360 Wave microphone. This setup is ideal for
meetings or demonstration scenarios with specific requirements for audio pickup
quality. For detailed instructions, please refer here.
Link 2C Pro & Link 2 Pro User Manual
45
Maintenance and Care
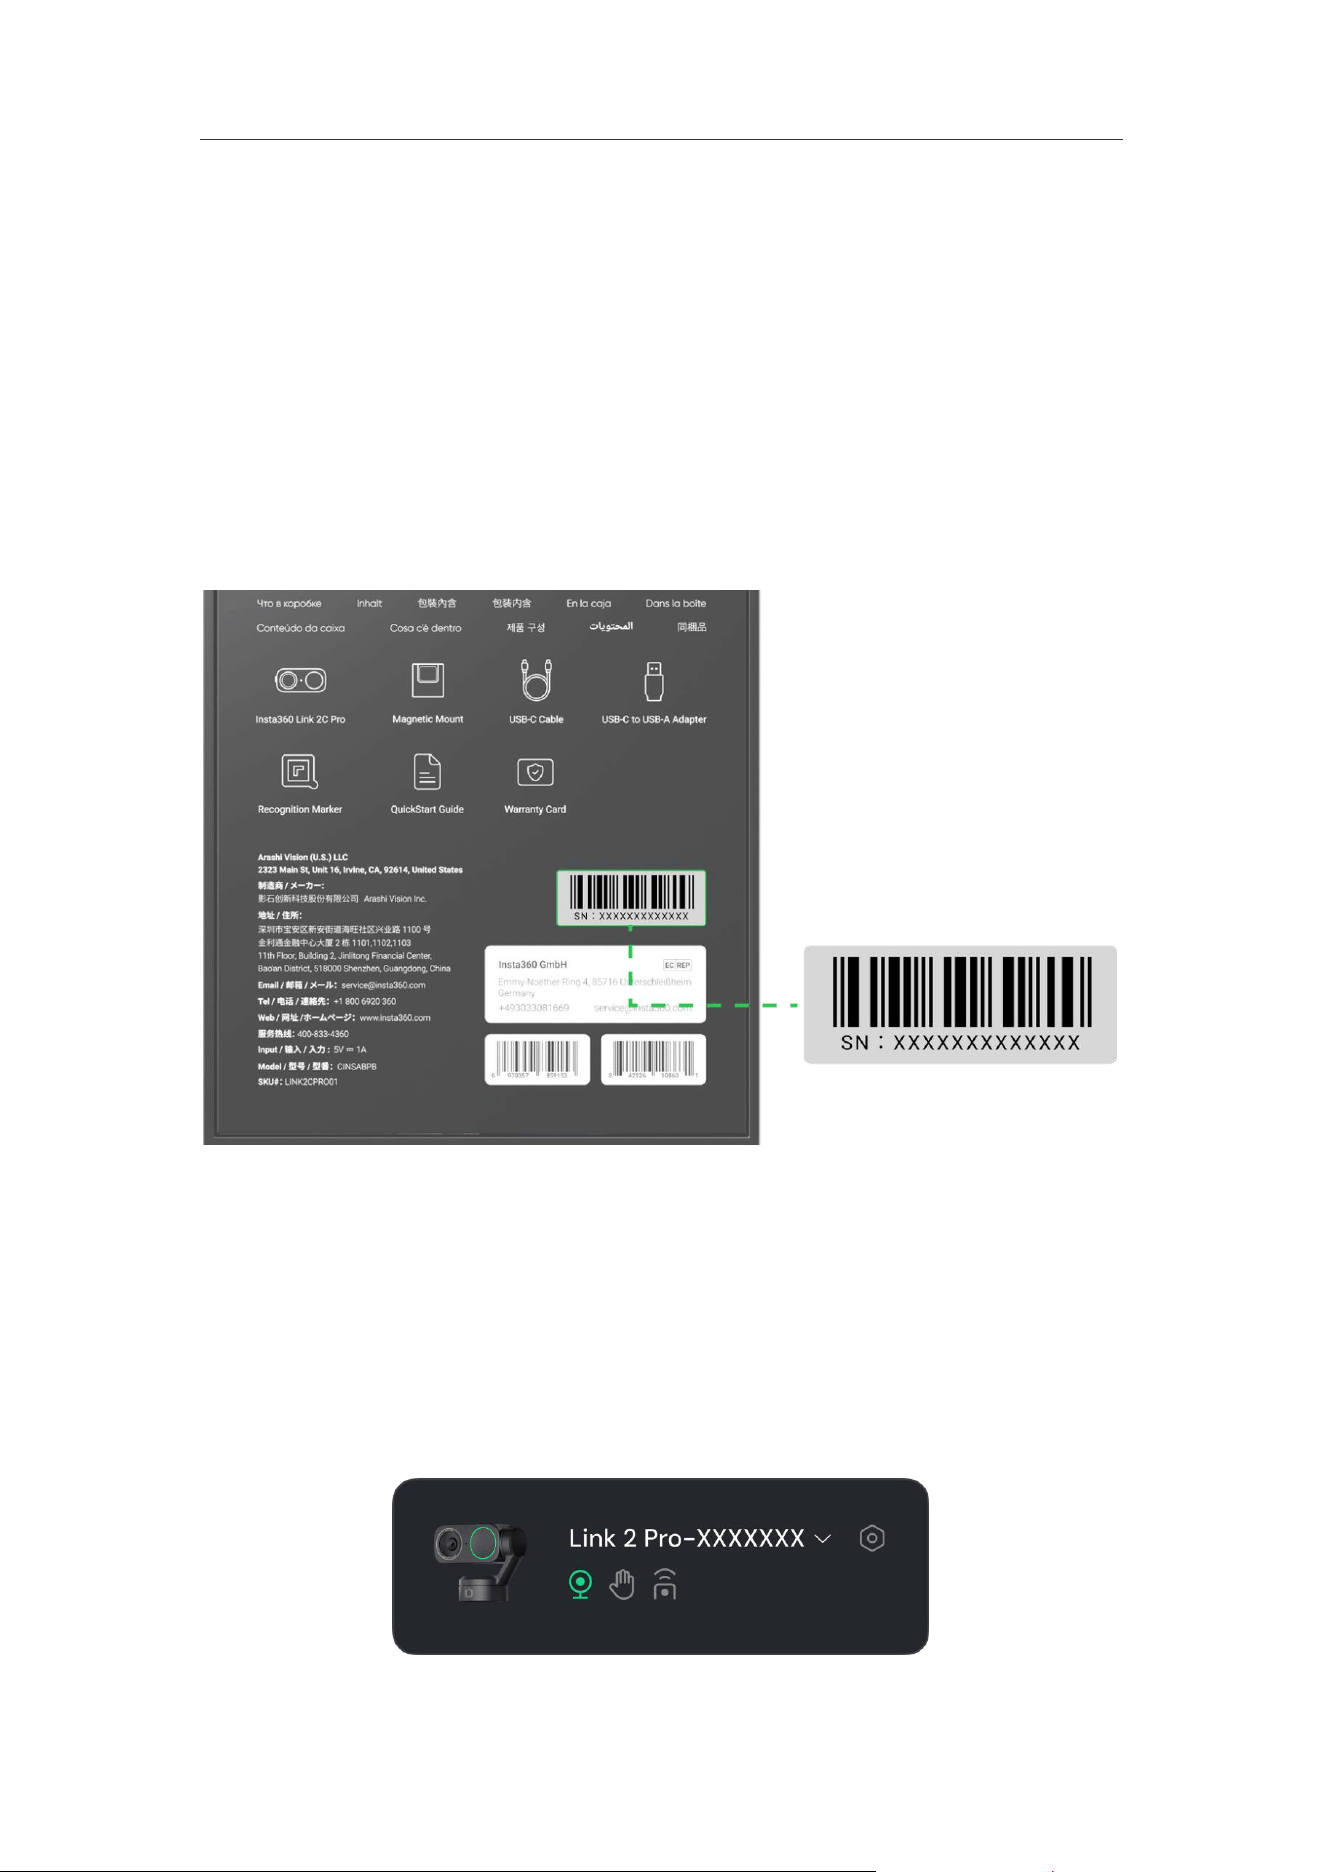
Checking the Serial Number (SN)
Method 1: Via the product packaging
Check the back of the packaging box, where the corresponding serial number label is
attached.
Method 2: Via the client
1. Ensure the camera is connected to the Insta360 Link Controller client.
2. The serial number of the connected device is displayed in the upper-right corner
of the client.
Link 2C Pro & Link 2 Pro User Manual
46
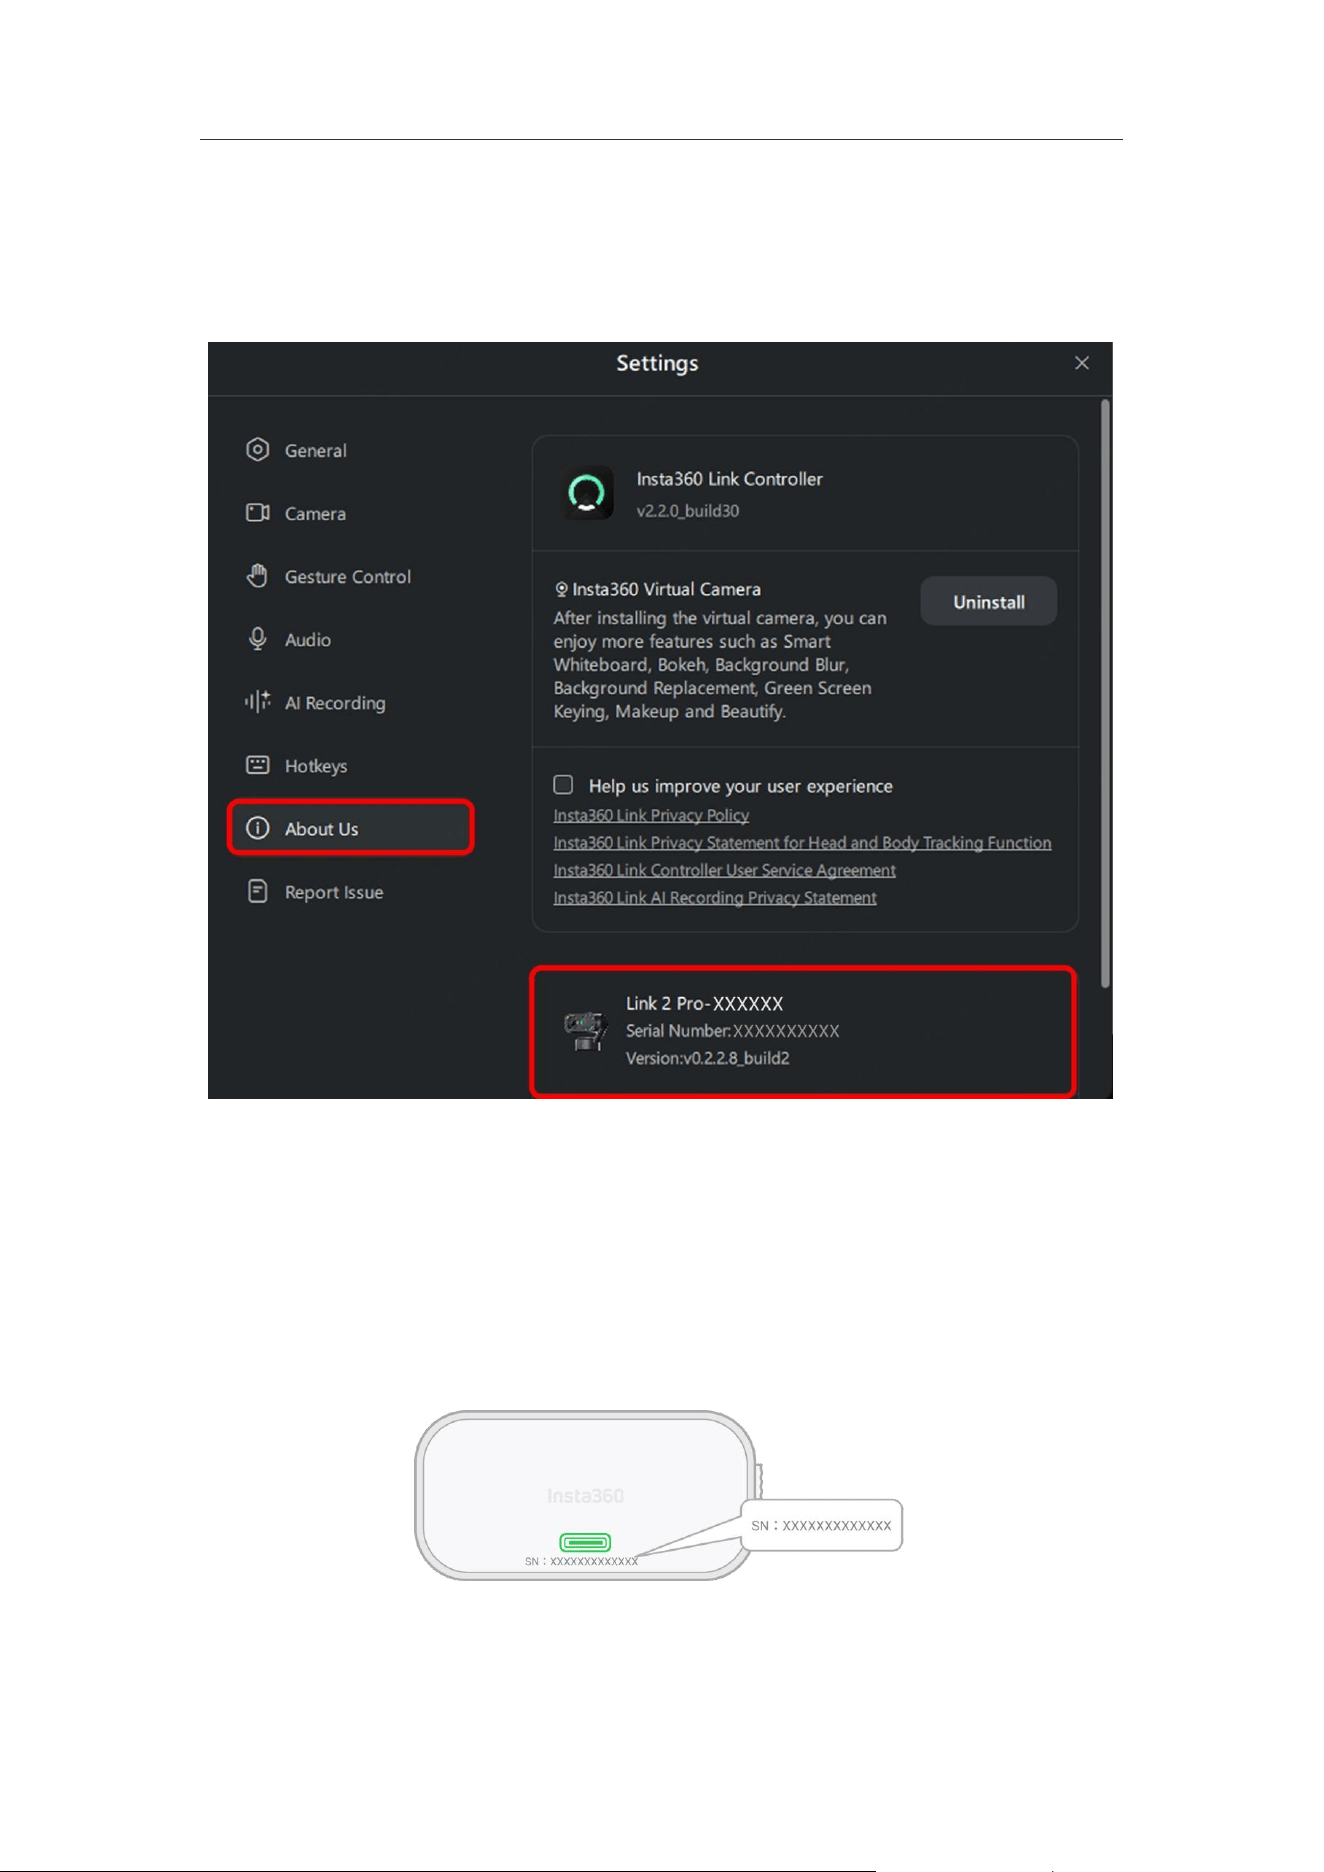
Alternatively, click the "..." icon in the control bar at the top-right of the client window,
then go to "More Settings" > "About Us" to view the serial number.
Method 3: Via the camera body
Link 2C Pro: The serial number is located below the USB-C port.

Link 2C Pro & Link 2 Pro User Manual
47
Link 2 Pro: The serial number is located on the bottom of the gimbal base.
Log Upload
To help you quickly locate and resolve issues encountered during use, we provide a
convenient log upload feature. You can upload log files from the device, virtual
camera, or Link Controller client using either of the following methods.
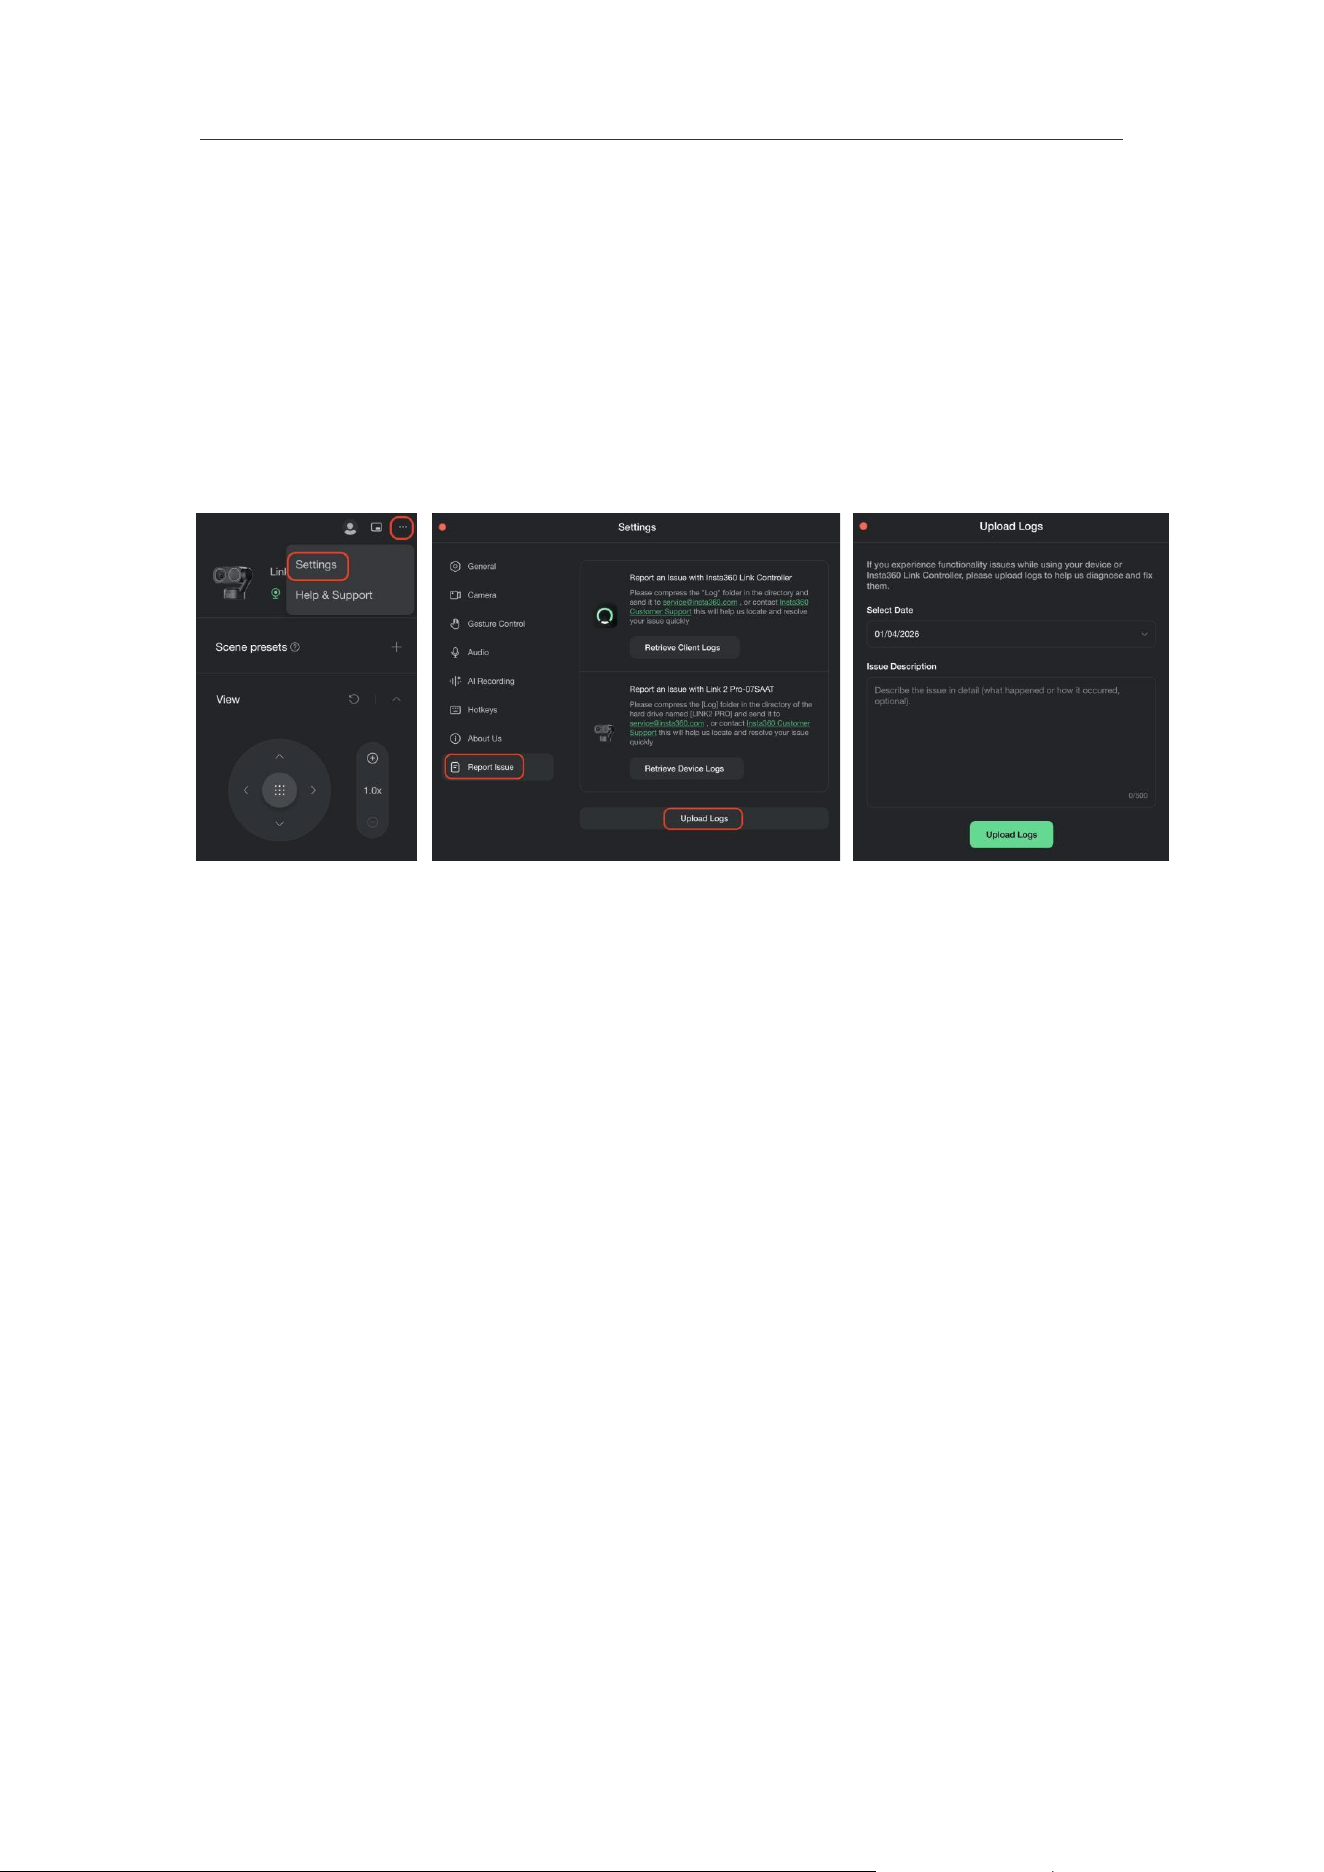
Method 1: Upload directly through the client
This method allows you to upload all related logs at once when the camera is
properly connected to the client.
1. Open the Link Controller client and click "More Settings" (… icon) in the upper-
right corner.
2. Select "Report Issue".
3. Click "Upload Logs".
4. In the pop-up window, select the date when the issue occurred and briefly
describe the problem you encountered.
5. Click "Upload Logs" and wait for the upload to complete.
6. After a successful upload, click "Copy Log ID" and provide this log ID to
the Insta360 support team.
Link 2C Pro & Link 2 Pro User Manual
48
Tip: When the camera and client are properly connected, this method can upload
device logs, virtual camera logs, and Link Controller client logs all at once. During the
log upload process, the camera will enter USB drive mode. Be sure to wait until the
upload progress is complete and a success message is shown before manually
unplugging and reconnecting the USB cable to restart the camera. Do not disconnect
the connection before the upload is finished, as this may cause log corruption or
upload failure.
Method 2: Manually obtain and export log files
If you need to manually check or submit log files, use this method.
1. Open the Link Controller client and click "More Settings" in the upper-right corner.
2. Select "Report Issue".
3. Click "Retrive Client Logs". The system will automatically generate a log file
package locally on your computer.
4. You can directly provide this file package to the support team.
○ The logs exported in this step include Link Controller client logs and virtual
camera logs.
○ To export the device’s own logs separately, on the "Report Issue" page,
locate the connected device name and click the "Retrive Device Logs"
button below it.

Link 2C Pro & Link 2 Pro User Manual
49
Firmware Update
Upgrade via Client
Download and install the client software and connect the device to your computer
using the official data cable.
Open the client, go to "More Settings" > "About Us" to check the current version.
When a new version is detected, click "Update Now" to download the latest firmware
and follow the prompts to complete the installation.
Upgrade via U-Disk Mode
1. Connect the device to the computer. Triple-tap the Touch Button and wait for the
indicator light to flash, then long-press for 5 seconds. Once the indicator light
turns solid blue, the camera has entered U-Disk Mode. Go to the Download page
on the official Insta360 website and download the latest firmware version from
the corresponding product page.
2. After downloading, open the folder and copy the file into the U-disk named after
the device.
The indicator light will turn solid green once the firmware update is successful.
Tips:
• Do not disconnect the USB cable during the firmware update.
• Do not operate the device during the firmware update.
Storage and Maintenance
• This product contains magnets. To avoid magnetization effects, please keep it
away from devices susceptible to interference, such as pacemakers.
• Do not manually force, hit, or collide with this product.
• Do not submerge this product in water.
• Clean with a dry cloth. Do not use flammable liquid cleaners.
• Do not use this product in environments with extreme temperatures, high
humidity, heavy dust or dirt, or in places where it may be exposed to moisture.