1
Outdoor Lifestyles • ODCASTLEWD-50 Install Manual • 4170-900 • Rev E • 3/26
WOODBURNING FIREPLACE
Fire Risk.
WARNING
For use with solid wood fuel only.
Other fuels may overre and generate poisonous
gases (i.e. carbon monoxide).
Installation Manual
Installation and Fireplace Setup
WARNING
HOT SURFACES!
Glass and other surfaces are hot during
operation AND cool down.
Hot glass will cause burns.
• DO NOT touch glass until it is cooled
• NEVER allow children to touch glass
• Keep children away
• CAREFULLY SUPERVISE children in same room as
replace.
• Alert children and adults to hazards of high temperatures.
High temperatures may ignite clothing or other ammable
materials.
• Keep clothing, furniture, draperies and other ammable
materials away.
INSTALLER: Leave this manual with party responsible for use and operation.
OWNER: Retain this manual for future reference.
• DO NOTstoreorusegasolineorotheram-
mablevaporsandliquidsinthevicinityofthis
or any other appliance.
•
DO NOToverre.Overringwillvoidyour
warranty.
• Comply with all minimum clearances to com-
bustiblesasspecied.Failuretocomplymay
causehousere.
WARNING: If the information in these
instructions is not followed exactly, a re
or explosion may result causing property
damage, personal injury, or death.
Installationandserviceofthisapplianceshouldbeperformedby
qualifiedpersonnel.Hearth&HomeTechnologiesrecomendsHHT
FactoryTrainedorNFIcertifiedprofessionals.
Model(s):
ODCASTLEWD-50
NOTICE: DO NOT discard this manual!

2 Outdoor Lifestyles • ODCASTLEWD-50 Install Manual • 4170-900 • Rev E • 3/26
Safety Alert Key:
• DANGER! Indicatesahazardoussituationwhich,ifnotavoidedwill result in death or serious injury.
• WARNING!Indicatesahazardoussituationwhich,ifnotavoidedcould result in death or serious injury.
• CAUTION! Indicatesahazardoussituationwhich,ifnotavoided,couldresultinminorormoderateinjury.
• NOTICE:Indicatespracticeswhichmaycausedamagetothereplaceortoproperty.
Table of Contents
1 Product Specic & Important Safety Information
A.ApplianceCertication 4
B.Non-CombustibleMaterials 4
C.CombustibleMaterials 4
2 Getting Started
A.TypicalFireplaceSystem 5
B. Design and Installation Considerations 6
1.SelectingFireplaceLocations 6
2.LocatingFireplace&Chimney 7
C.ToolsandSuppliesNeeded 8
D.InspectFireplaceandComponents 8
E.FireplaceSystemRequirements 8
3 Framing and Clearances
A. Appliance Dimensions/Weight 9
B.Clearances 10
MinimumClearancestoCombustibles 10
C.ConstructtheChase 11
D.FrametheFireplace 12
E.SecureandLeveltheFireplace 14
F. ProtectiveMetalHearthStrips 14
G.OutsideAirKit 14
4 Chimney and Termination Installation
A.ChimneyRequirements 16
B.Clearances 18
C.InstallationNotes 18
D.FrameOpenings 18
E.CutRoofOpening 18
F. InstallFirestop 18
G.AssembleChimneySections 19
H.UsingOsets/Returns 19
I. OsetElbowInstallation 20
J. SupplementarySupport&Stabilizer 20
K.InstallAtticInsulationShield 21
L. InstallRoofRadiationShields 21
M.AttachFlashing 21
Field-ConstructedChaseTopFlashing 22
N.FinishTop 23
O.ChimneyTerminationRequirements 24
5 Shrouds
A.ShroudRequirements 25
B.HouseStyleShroud 26
C.Arch/MailboxStyleShroud 27
D.PyramidStyleShroud 27
6 Finishing
A.FinishingMaterial 28
B.HearthExtension,BuildingandFinishing 30
1.FireplaceInstalledFlushontheFloor
andHearthExtensionRaisedto
BottomofFireboxOpening 30
2.RaisedHearthExtensionandRaisedFireplace 31
3.FireplaceOpeningandHearthExtensionFlush
withtheFloor 32
C.Non-CombustibleSealantMaterial 33
D.MantelandWallProjections 34
E.Sidewalls/Surrounds 35
7 Fireplace Setup
A.RefractoryPanelKitInCrate 36
B.InstallHearthMoldedBrickPanel 36
C.InstallBackMoldedBrickPanel 36
D.InstallSideMoldedBrickPanel 36
E.FirebrickInstallation 37
F. InstallScreens 39
G.InstallMortar(Optional) 39
H.Grate 39
I. GasLog/LighterProvision 40
J. WoodBurningInserts 40
8 Reference Materials
A.ChimneyComponents 41
B.OptionalComponents 41
►
3
Outdoor Lifestyles • ODCASTLEWD-50 Install Manual • 4170-900 • Rev E • 3/26
Customer:
Lot/Address
Model (circle one): ODCASTLEWD-50
YES IF NO, WHY?
Protective hearth strips installed per manual requirements. (Pg. 14)
Outside air kit installed. (Pg. 15)
Attic insulation shield installed.
Shroud is installed properly per instructions.
Hearth extension installed per manual requirements.
Comments communicated to party responsible
4170-982 • Rev A • 8-15-25
Hearth & Home Technologies recommends the following:
Fireplace Install
Chimney Section 4 & 5 (Pg. 16)
Shrouds
Section 6 (Pg. 26)
Finishing
Section 7 (Pg. 28)
Fireplace Setup
Section 8 (Pg. 35)
Verified all clearances meet installation manual requirements.
Mantels and wall projections comply with installation manual requirements.
All packaging and protective materials removed.
Optional doors properly installed.
Molded brick panels installed correctly.
Grate is properly installed.
Firescreen installed properly.
ATTENTION INSTALLER:
Follow this Standard Work Checklist
This standard work checklist is to be used by the installer in conjuction with, not instead of, the instructions contained in this installation
manual.
Date Installed:
Location of Fireplace:
Installer:
Dealer/Distributor Phone #
Serial #:
Roof flashing installed.
Termination installed.
• Photographing the installation and copying this checklist for your file.
Combustible materials not installed in non-combustible areas.
__________________________ by ______________________on _________
(Builder/Gen. Contractor) (Installer) (Date)
Comments: Further description of the issues, who is responsible (Installer/Builder/Other Trades, etc.) and corrective action needed:
WARNING! Risk of Fire or Explosion! Failure to install fireplace acording to these instructions can lead to a fire or
explosion.
Manual bag and all of its contents are removed from the fireplace and given to the party
responsible for use and operation.
Verified that the chase is insulated and sealed. (Pg. 11)
Verified clearances to combustibles. (Pg. 10)
Fireplace is leveled and secured. (Pg. 14)
Hearth extension size/height decided. (Pg. 29)
Chimney configuration complies with diagrams.
Chimney installed, locked and secured in place with proper clearance.
Chimney air kit installed.
Firestops installed.
• That this checklist remain visible at all times on the fireplace until the installation is complete.
4 Outdoor Lifestyles • ODCASTLEWD-50 Install Manual • 4170-900 • Rev E • 3/26
WARNING! Risk of Fire! Hearth & Home Technologies
disclaims any responsibility for, and the warranty and
agency listing will be voided by the following actions.
DO NOT:
• installoroperatedamagedreplace
• modifyreplace
• install other than as instructed by Hearth & Home
Technologies
• operate the fireplace without fully assembling all
components
• overre
• install any component not approved by Hearth & Home
Technologies
• install parts or components not Listed or approved
Improper installation, adjustment, alteration, service or
maintenance can cause injury or property damage. For
assistance or additional information,consult aqualied
installer, service agency or your dealer.
B. Non-Combustible Materials
• Materials which will not ignite and burn, composed of
anycombinationofthefollowing:
- Steel - Iron
- Brick - Tile
- Concrete - Slate
- Glass - Plasters
• MaterialsreportedaspassingASTM E 136, Standard
Test Method for Behavior of Metals, in a Vertical Tube
Furnace at 750° C
C. Combustible Materials
• Materialsmadeoforsurfacedwithanyofthefollowing
materials:
- Wood - Compressed paper
- Plantbers - Plastic
- Plywood/OSB - Sheetrock(drywall)
• Anymaterialthatcanigniteandburn;ameproofedor
not, plastered or un-plastered
1 1
Product Specic & Important Safety Information
WARNING: This product and the fu-
els used to operate this product (wood
and wood pellets), and the products of
combustion of such fuels, can expose
you to chemicals including carbon black,
which is known to the State of California
to cause cancer and carbon monoxide,
which is known to the State of California to
cause birth defects or other reproductive
harm. For more information go to: www.
P65Warnings.ca.gov.
A. Appliance Certication
Thisreplacesystemhasbeentestedandlistedinac-
cordancewithUL127standardsbyUnderwritersLabo-
ratories Inc. for installation and operation in the United
States.
ThisreplacemaybeinstalledinsleepingroomsEX-
CEPTinmanufacturedhomes.Ifinstalledwithagaslog
set,provisionsfortheNationalFuelGasCodemustbe
met.
Thisreplacehasbeentestedandlistedforusewith
theoptionalcomponentsspeciedinthismanual.These
optionalcomponentsmaybepurchasedseparatelyand
installedatalaterdate.Theoutsideairkitsmustbe
installedatthetimeofreplaceinstallation.
5
Outdoor Lifestyles • ODCASTLEWD-50 Install Manual • 4170-900 • Rev E • 3/26
2 2
Getting Started
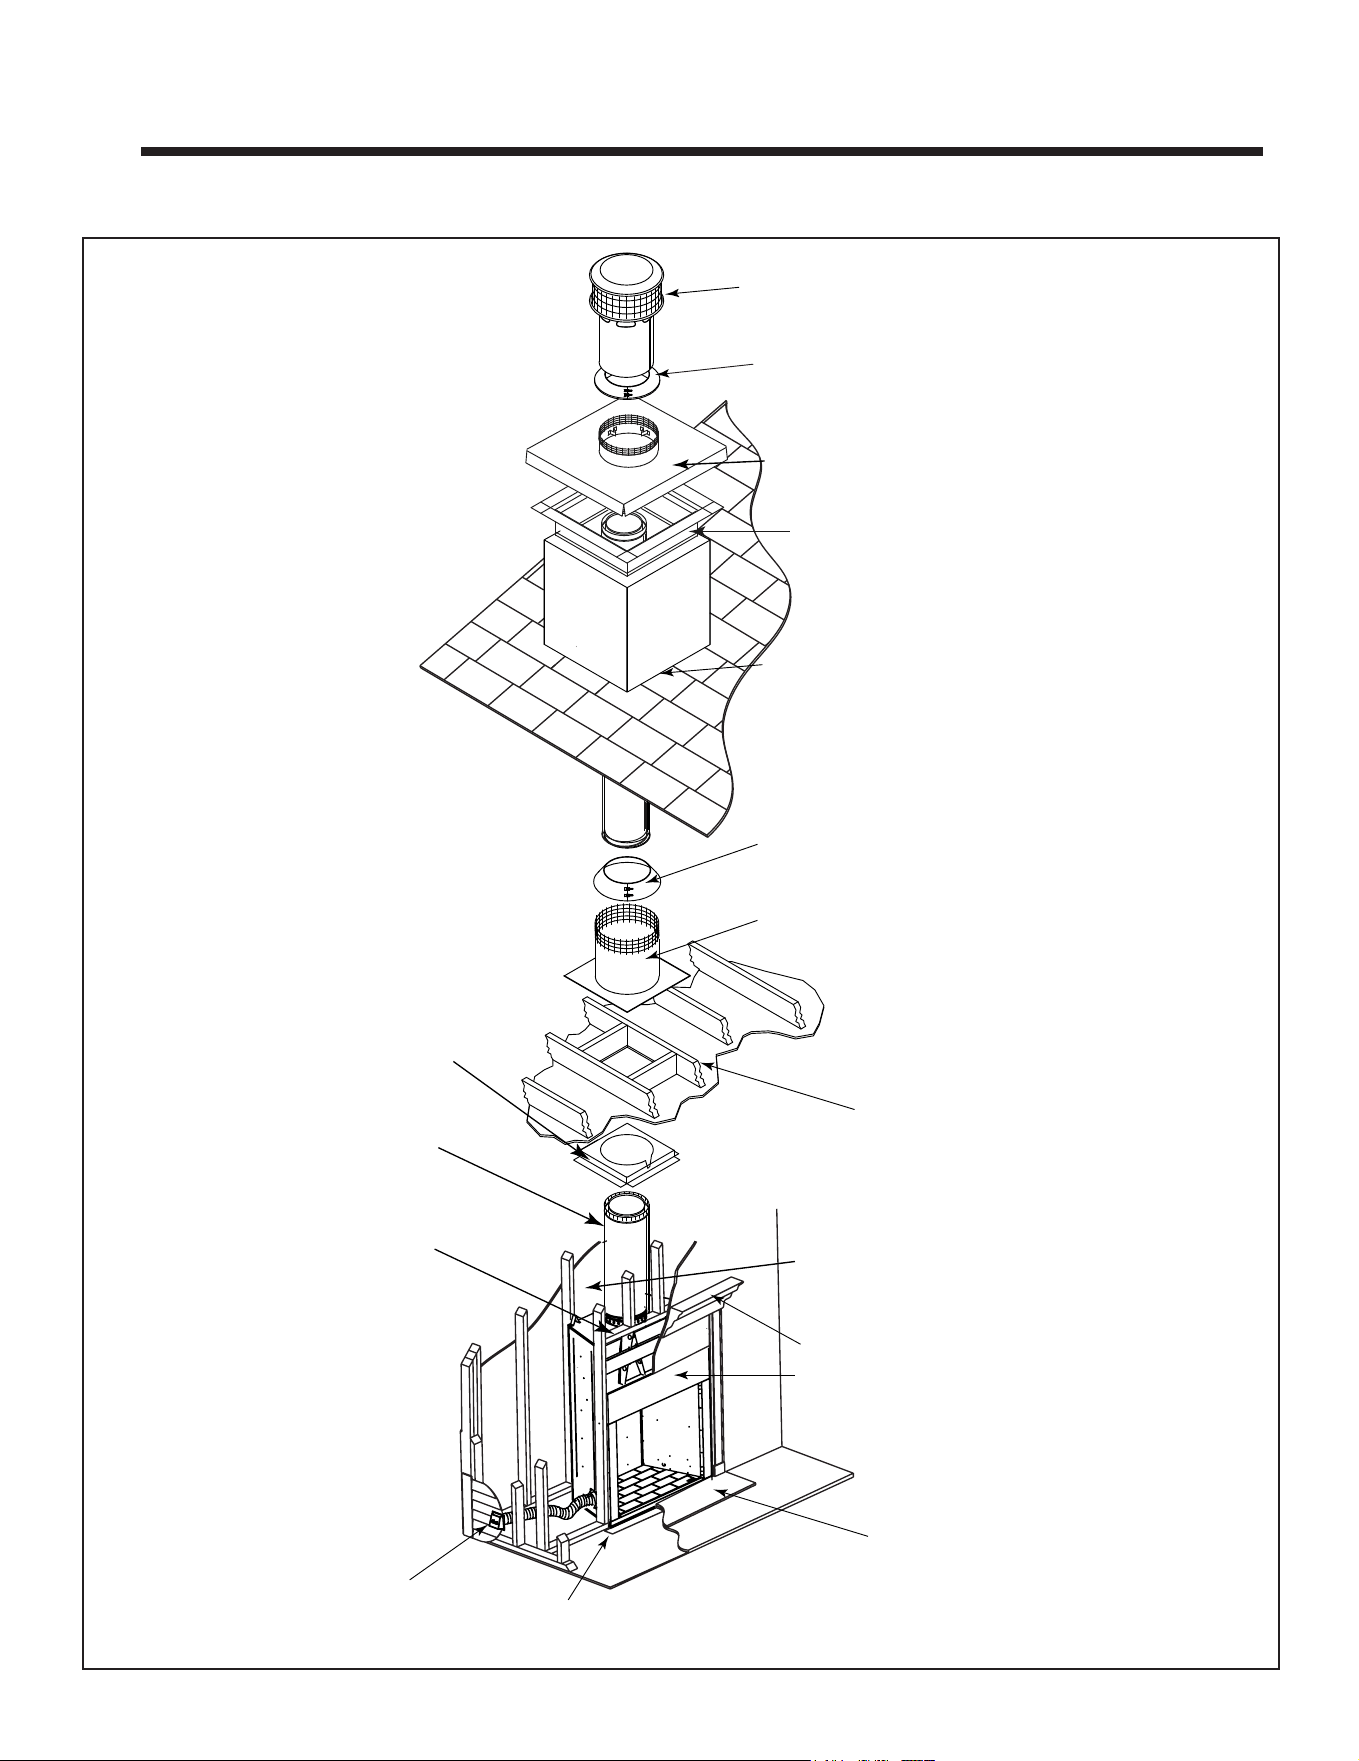
Additional lateral
support for chimney
above roof (or enclosed
in chase) if needed
Ceiling firestop
on floor of attic
Support straps
on rafter supports
chimney (not shown)
Termination cap
Chimney penetrates roof
preferably without affecting
roof rafters
Framing headed off
in ceiling joists
Enclosed space above
and around fireplace
Mantel and surround
Decorative facing
and trim
Hearth extension
Factory-built fireplace
Protective metal
hearth strip(s)
Combustible
framing/header
on top of
V-shaped
standoffs
(spacers)
Chimney system
Attic insulation shield must be used
here to keep insulation away
from chimney if attic is insulated
Attic Shield Collar
Storm Collar
Outside Air
(both sides)
Chase Top Flashing
(4) Roof Radiation Shields
A. Typical Fireplace System
Figure 2.1 Typical Fireplace System
6 Outdoor Lifestyles • ODCASTLEWD-50 Install Manual • 4170-900 • Rev E • 3/26
A*
F
D
B
C
1/2 in. (13 mm) all
configurations
1-1/2 in. min. air space
from fireplace to
combustible materials.
1/2 in. min. air space at
nailing flanges.
Note:
In an exterior chase
or projecting into a
garage
Across a
corner
As a
room
divider
Along a wall
92 in.
(2337 mm)
G
B
E
48 in.
(1219 mm)
MINIMUM
24 in. (610 mm)
from fireplace opening to
any perpendicular wall
A
B
G
G
B
)
)
)
)
)
)
)
)
)
)
)
)
)
)
)
)
)
)
)
)
)
)
)
)
)
)
)
)
)
)
)
)))))))))))))))
)
)
)
)
)
)
)
)))))))))))))))
)
)
)
)
)
)
)
)
)
)
)
)
)
)
)
)
)
)
)
)
)
)
)
)
)
)
)
)
)
)
)
)
))
)
))
)
)
)
)
)
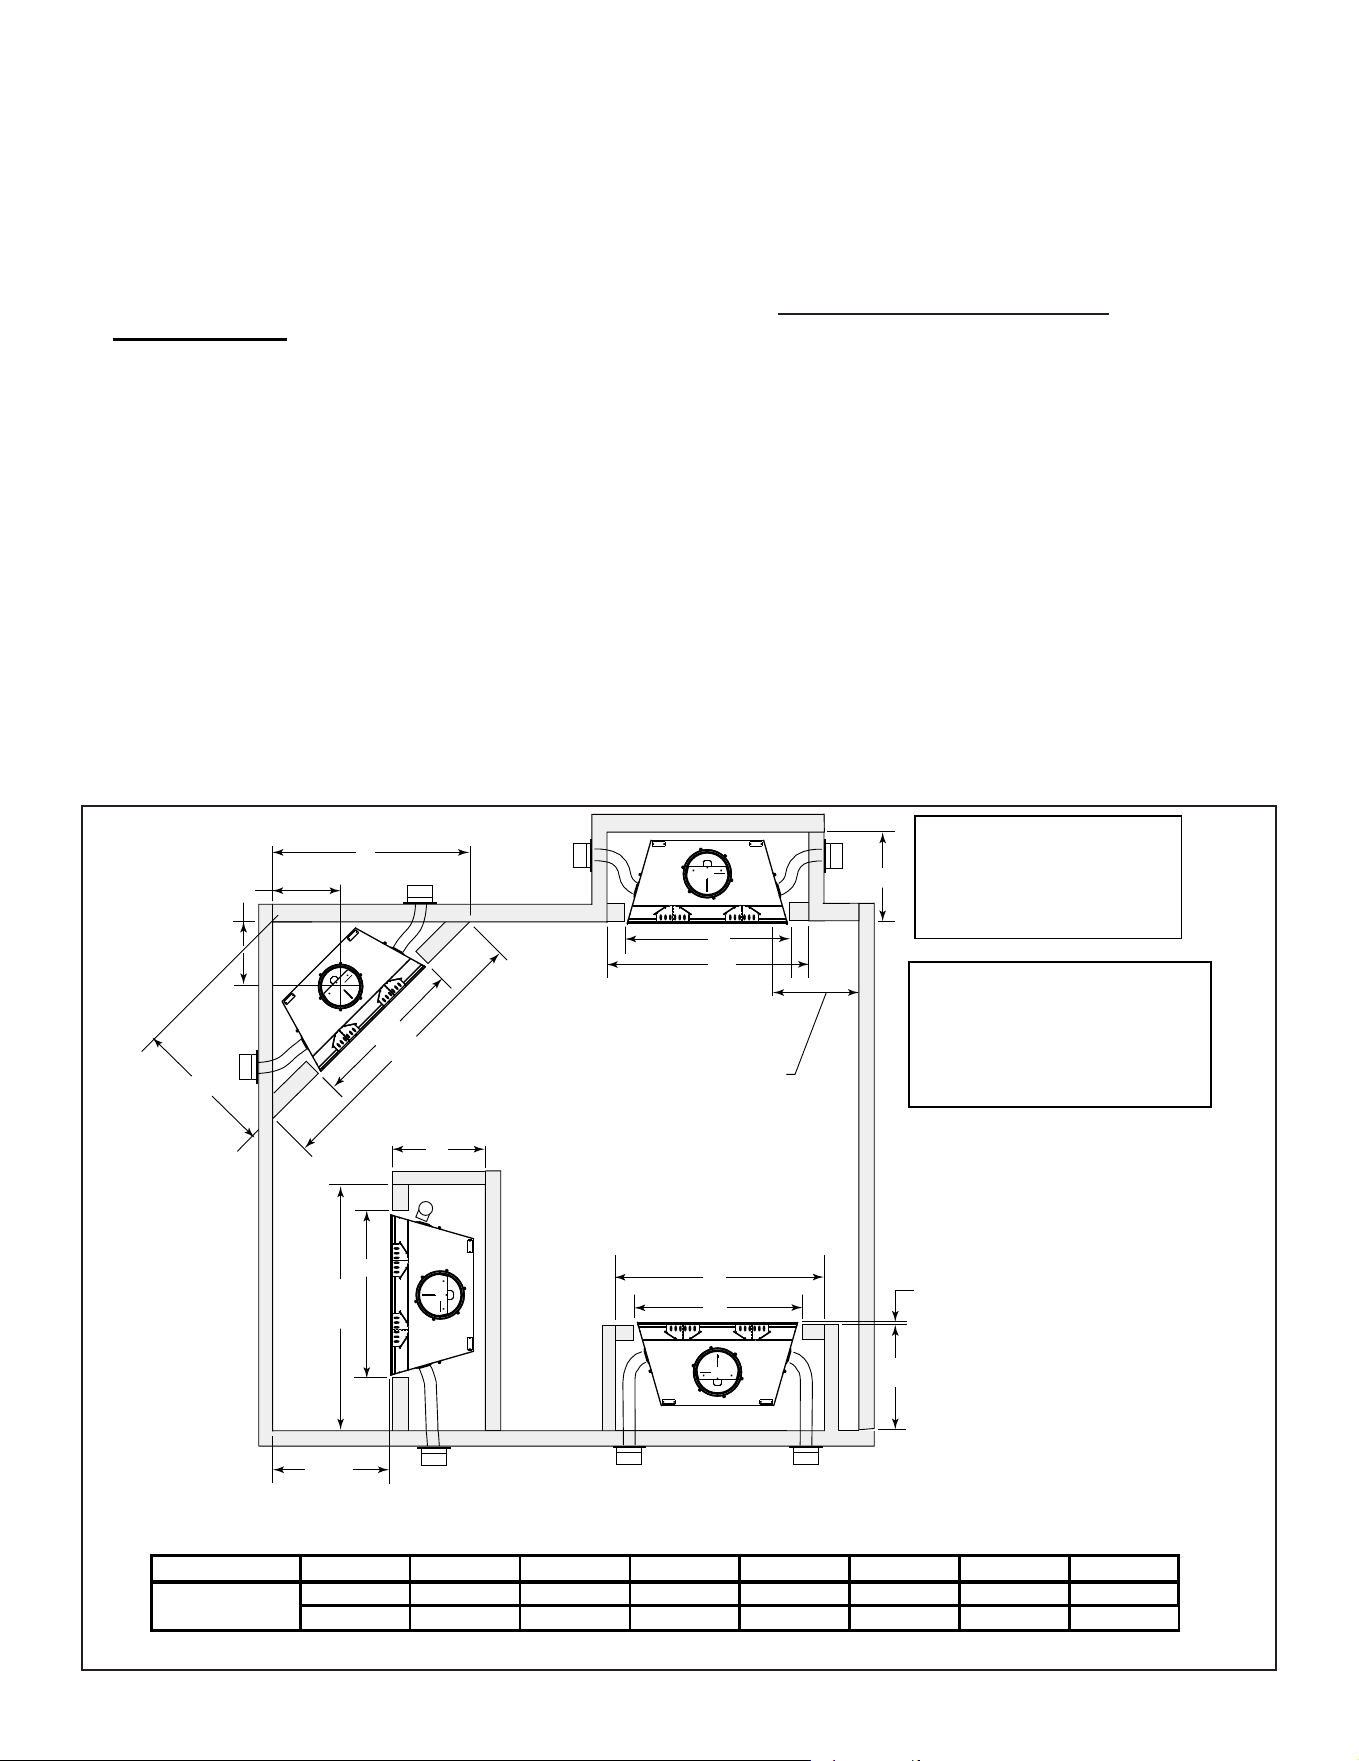
Model # A B C D E F G
in.
85-7/8 61-7/8 103-1/4 51-5/8 25-1/4 73 28-1/2
mm
2181 1572 2623 1311 641 1854 724
ODCASTLE-50
*
12 in. (305 mm) extra space
included for each outside air
connection. If outside air duct has
no bend, this dimension may be
reduced as long as minimum
clearances are met.
Figure 2.2 Fireplace Locations
B. Design and Installation Considerations
NOTICE: Check building codes prior to installation.
• InstallationMUSTcomplywithlocal,regional,stateand
national codes and regulations.
• Consultinsurancecarrier,localbuildinginspector,re
ocialsorauthoritieshavingjurisdictionoverrestrictions,
installation inspection and permits.
• Before installing,determinethefollowing:
- Wherethereplaceistobeinstalled.
- Theventsystemcongurationtobeused.
- Gas supply piping.
- Electrical wiring.
- Framingandnishingdetails.
- Whetheroptionalaccessories-devicessuchasa
fan, wall switch or remote control - are desired
1. Selecting Fireplace Locations
Thisreplacemaybeusedasaroomdivider,installed
alongawall,acrossacornerorusedinanexteriorchase.
See Figure 2.2.
Locatingthereplaceinabasementshouldbeavoided.
Locatingnearfrequentlyopeneddoors,centralheat
outletsorreturns,orotherlocationsofconsiderableair
movementcanaecttheperformance.
Considerationshouldbegiventothesefactorsbefore
deciding on a location.
NOTICE:
A minimum 1-1/2 in. air clearance at the back and
a minimum 1-1/2 in. air clearance to the sides of the
replaceassemblymustbemaintained.
Chimney sections at any level require a 2 in.
minimum air space clearance between the framing
and chimney sections.
NOTICE:
• Illustrationsandphotosreecttypicalinstallationsand
are FOR DESIGN PURPOSES ONLY.
• Illustrations/diagrams are not drawn to scale.
• Actual installation/appearance may vary due to individual
design preference.
• Hearth & Home Technologies reserves the right to alter
its products.
NOTICE: In addition to these framing dimensions, also
reference the following section:
• Clearances (Section 3).
7
Outdoor Lifestyles • ODCASTLEWD-50 Install Manual • 4170-900 • Rev E • 3/26
2. Locating Fireplace & Chimney
Locationofthereplaceandchimneywillaectperfor-
mance.
• Installwithinthewarmairspaceenclosedbythebuilding
envelope.Thishelpstoproducemoredraft,especially
duringlightinganddie-downofthere.
• Installingthereplaceinabasementisnotrecommended.
• Penetratethehighestpartoftheroof.Thisminimizes
theeectsofwindloading.
• Locate termination cap away from trees, adjacent
structures,unevenrooflinesandotherobstructions.
• Minimizetheuseofchimneyosets.
• Considerthereplacelocationrelativetooorandceiling
and attic joists.
• Takeintoconsiderationtheterminationrequirementsin
Section4.
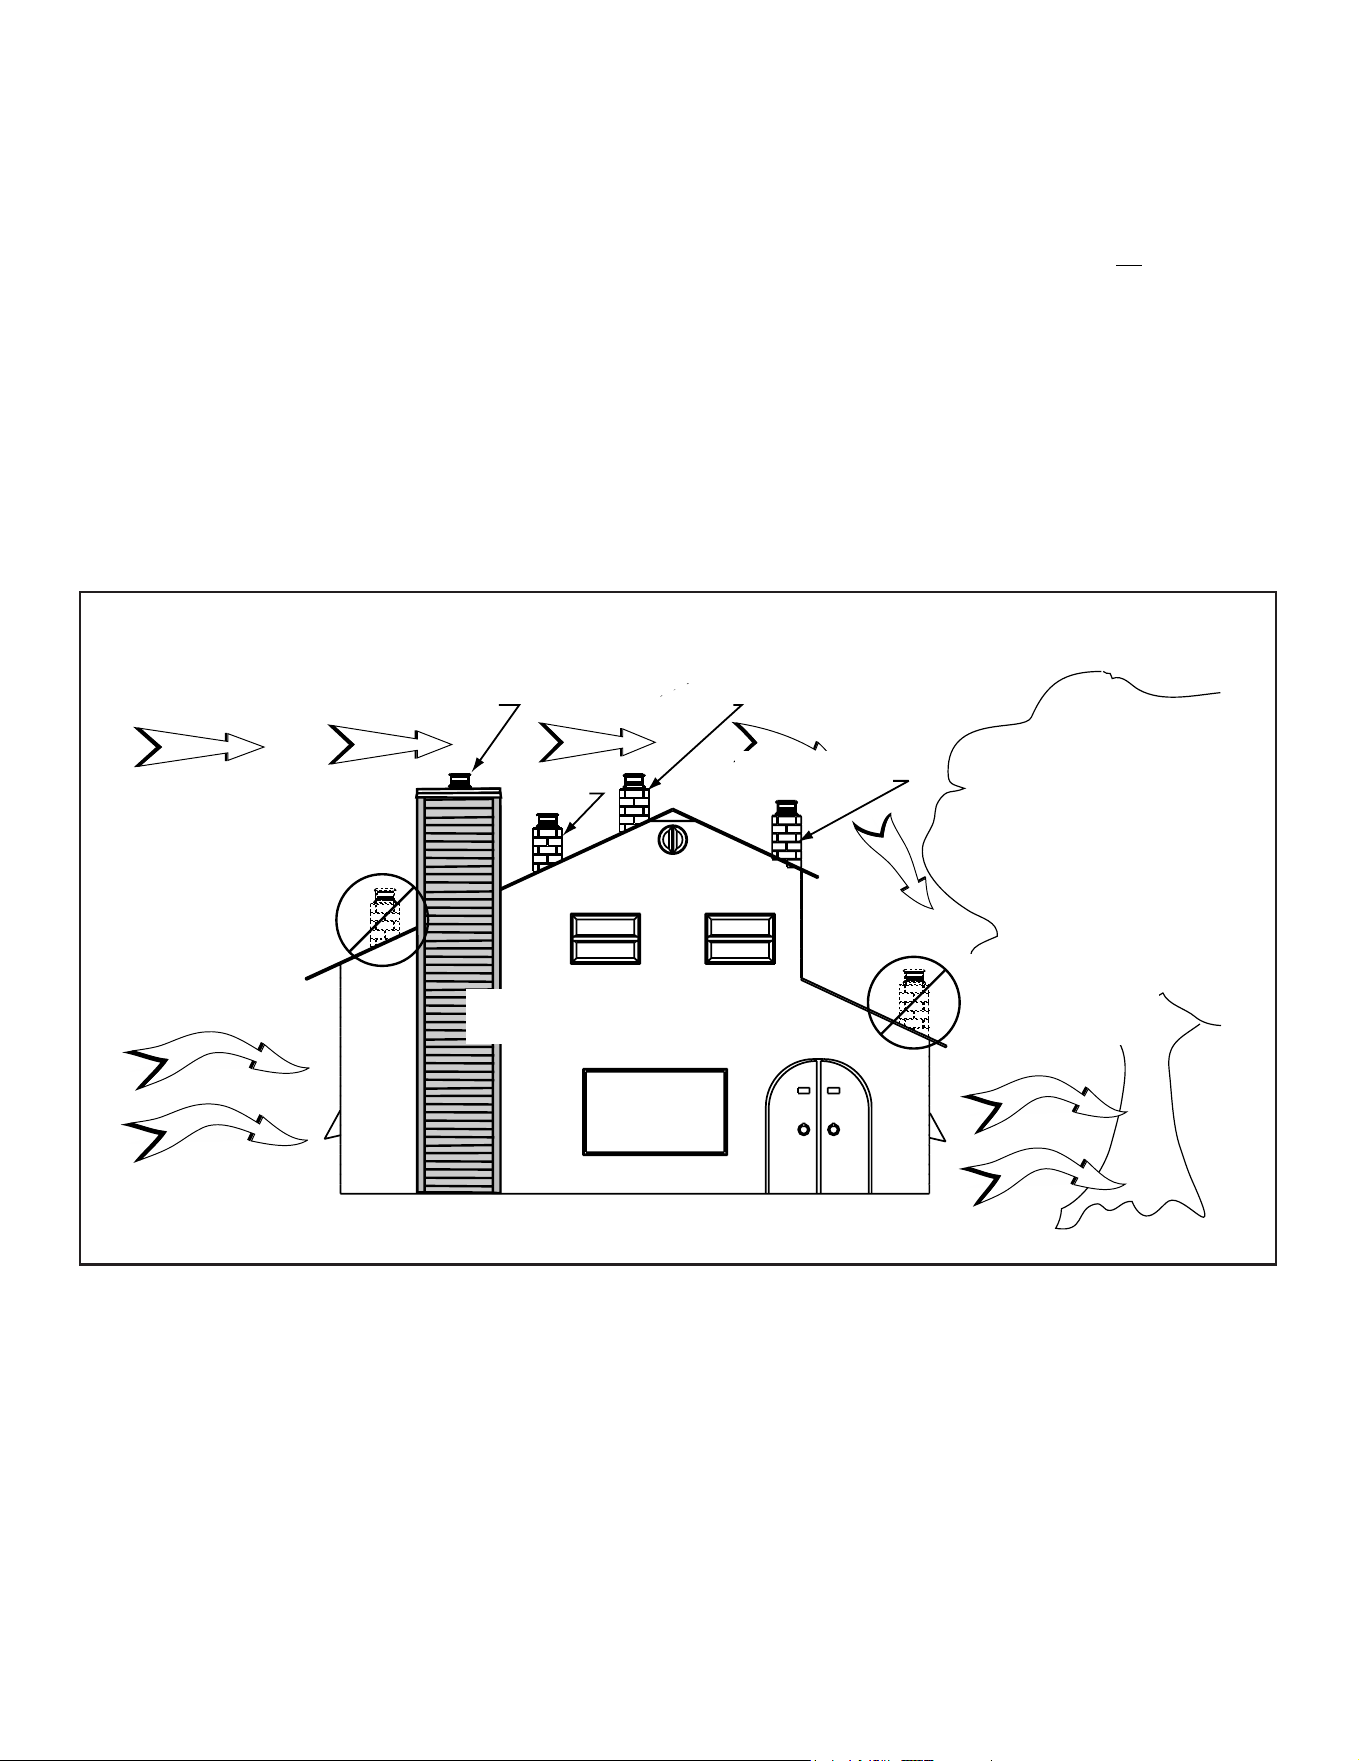
Marginal Location:
• Below peak
Location NOT recommended:
• Not the highest point of the roof
• Wind loading possible
Multi-level Roofs
Windward
Leeward
Recommended Location:
• Above peak
Recommended:
• Insulated exterior chase
in cooler climates
Recommended Location:
• Above peak
• Inside heated space
Location NOT recommended:
• Too close to tree
• Below adjacent structure
• Lower roof line
• Avoid outside wall
Marginal Location:
• Wind loading possible
Not recommended in basement due
to high negative pressure concerns
that effect draft
Figure 2.3 Recommended Chimney Locations
• Installtheoutsideairkitwiththeintakefacingprevailing
winds during the heating season.
• Ensure adequateoutdoor airfor allcombustion
appliancesandexhaustequipment.
• Ensurefurnaceandairconditioningreturnventsarenot
locatedintheimmediatevicinityofthereplace.
• Avoidinstallingthereplaceneardoors,walkwaysor
small isolated spaces.
• Recessedlightingshouldbea“sealedcan”design.
• Attic hatches weather stripped or sealed.
• Atticmountedductworkandairhandlerjointsandseams
taped or sealed.

8 Outdoor Lifestyles • ODCASTLEWD-50 Install Manual • 4170-900 • Rev E • 3/26
C. Tools and Supplies Needed
Beforebeginningtheinstallationbesurethefollowing
toolsandbuildingsuppliesareavailable:
Reciprocating saw Framing material
Pliers Non-combustiblesealant
Hammer Gloves
Phillipsscrewdriver Framingsquare
Flatbladescrewdriver Electricdrillandbits
Plumbline Safetyglasses
Level Tapemeasure
1/2-3/4in.length,#6or#8self-drillingscrews
Misc.screwsandnails
D. Inspect Fireplace and Components
WARNING! Risk of Fire and/or Explosion! Damaged
parts could impair safe operation. DO NOT install dam-
aged,incompleteorsubstitutecomponents.Keepre-
place dry.
• Removereplaceandcomponentsfrompackagingand
inspect for damage.
• Vent system components and doors are shipped in
separatepackages.
• Report to your dealer any parts damaged in shipment.
• Read all the instructions before starting the
installation. Follow these instructions carefully
during the installation to ensure maximum safety
and benet.
E. Fireplace System Requirements
Fireplacesystemrequirementsconsistofthefollowing:
• Fireplace
- Refractory(required,soldseparately)
WDR3850-T-NGRefr.Trad.NaturalGray
WDR3850-T-AVRefr.Trad.AntlerVelvet
WDR3850-T-BKRefr.Trad.BlackOnyx
WDR3850-T-BRRefr.Trad.MasonryBrown
WDR3850-H-NGRefr.Herr.NaturalGray
WDR3850-H-AVRefr.Herr.AntlerVelvet
WDR3850-H-BKRefr.Herr.BlackOnyx
WDR3850-H-BRRefr.Herr.MasonryBrown
- Firescreen(includedwithreplace)
- HearthExtension(required,soldseparately)
- Grate(includedwithreplace)
• OutsideAirSystem
- AirInletHoodx2(includedwithreplace)
- Flex(required,soldseparately
• Chimney System
- Atticinsulationshield(soldseparately)
- Chimneyterminationcap(required,soldseparately)
• Non-combustiblenishmaterial
• Drainage Pan (required on wood surfaces, sold
separately)
9
Outdoor Lifestyles • ODCASTLEWD-50 Install Manual • 4170-900 • Rev E • 3/26
3 3
Framing and Clearances
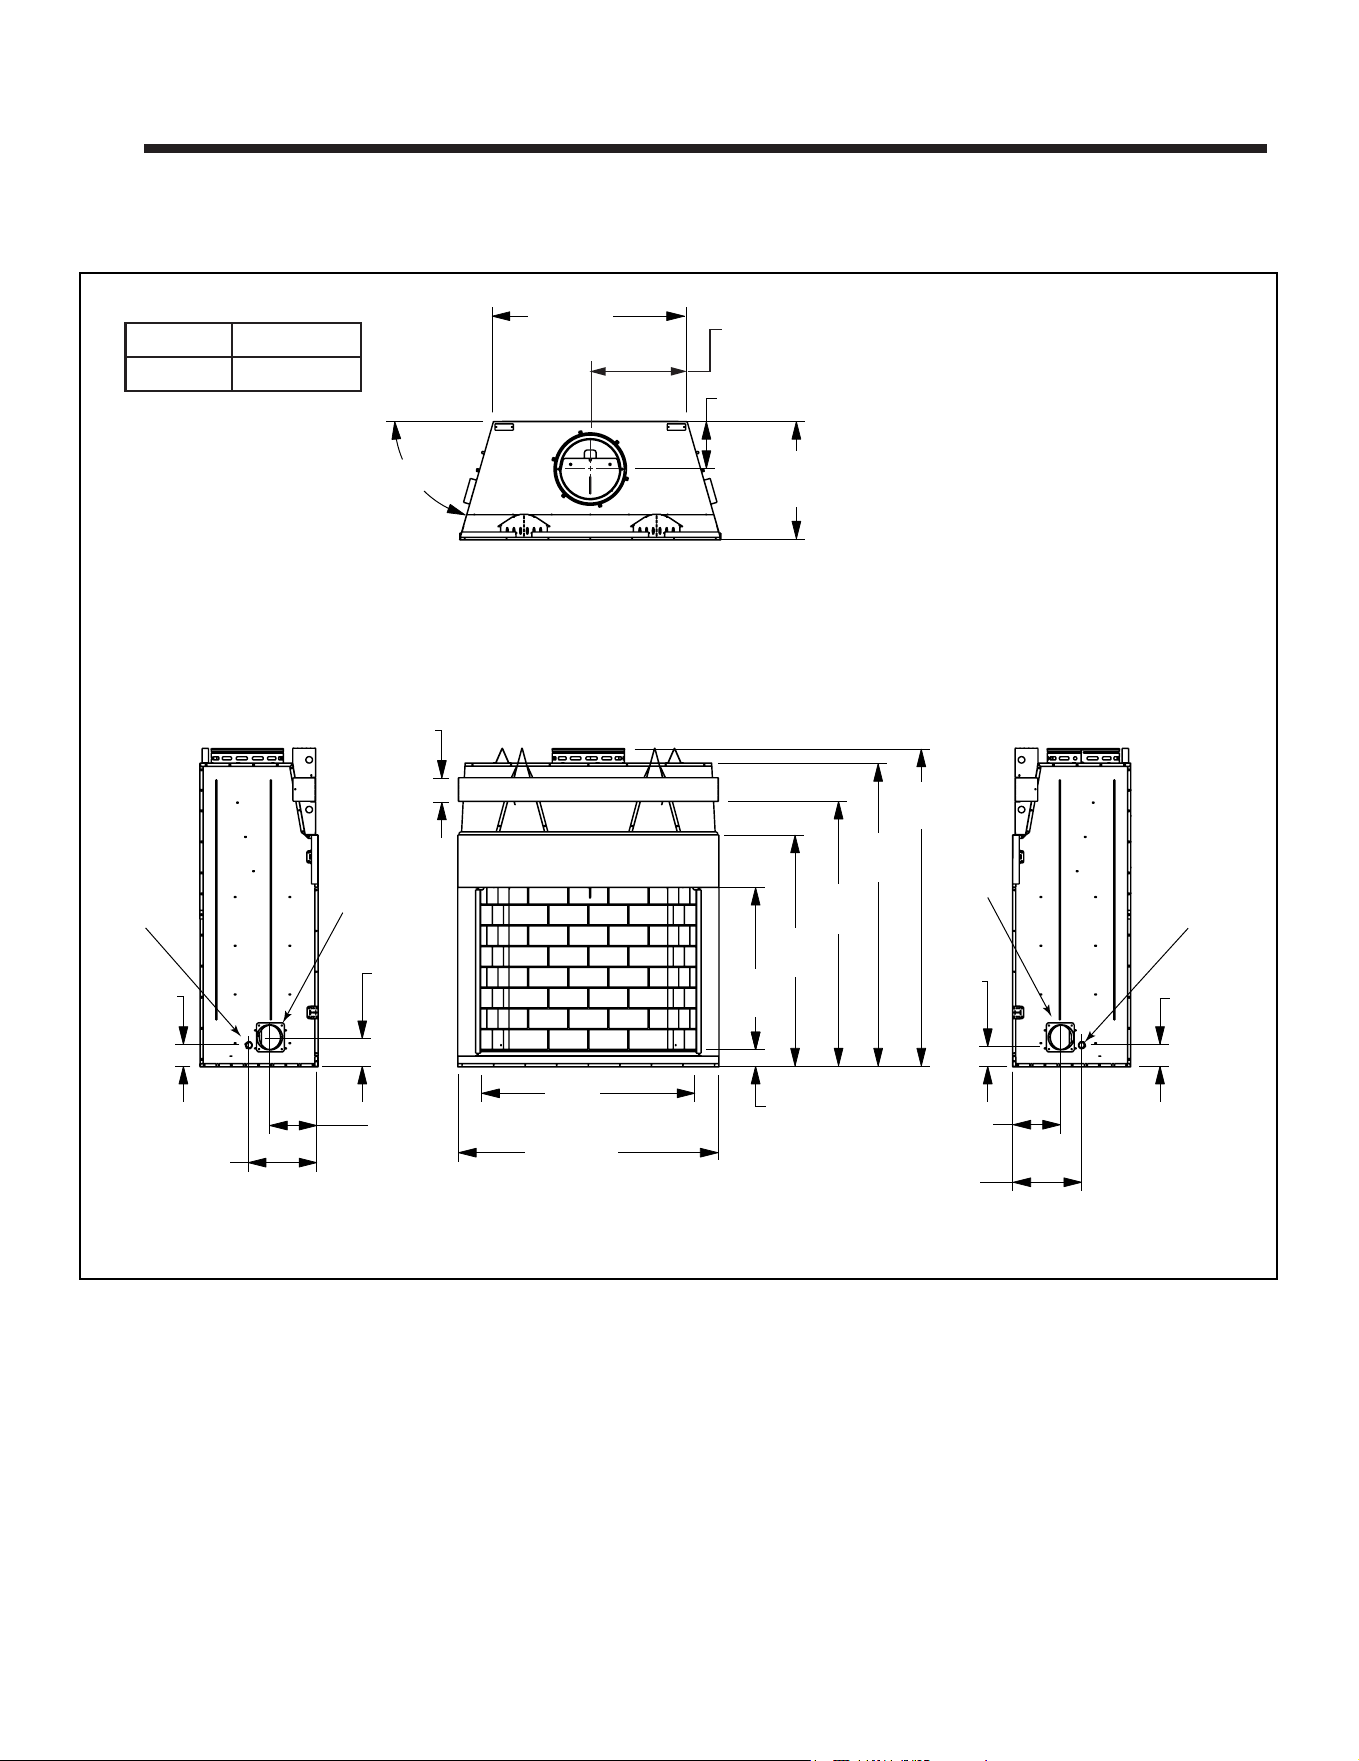
A. Appliance Dimensions/Weight
16 1/8 in.
408 mm
Gas Line
Knockout
11 1/8 in.
282 mm
6 7/8 in.
175 mm
5 in.
129 mm
50 in.
1270 mm
60 7/8 in.
1546 mm
3 3/4 in.
97 mm
38 in.
965 mm
54 in.
1372 mm
74 1/8 in.
1883 mm
70 3/4 in.
1797 mm
16 1/8 in.
408 mm
11 1/8 in.
282 mm
6 7/8 in.
175 mm
5 in.
129 mm
45 1/8 in.
1146 mm
11 in.
281 mm
27 1/2 in.
699 mm
74° TYP.
Gas Line
Knockout
22 1/2 in.
572 mm
61 7/8 in.
1572 mm
5 1/2 in.
140 mm
Outside
Air
Outside
Air
Figure 3.1 Appliance Dimensions
Model Pounds
ODCASTLEWD-50
385
Appliance Weight Table
10 Outdoor Lifestyles • ODCASTLEWD-50 Install Manual • 4170-900 • Rev E • 3/26
1/2 in. air space
established by
spacers
Chase Top
Flashing
Roof
Radiation Shield
1/2 in.
Air Space
Spacers furnished with
complete Chase Top Flashing
(May be field-fabricated)
1/2
Storm collar must
be installed 1 in.
off chase top
CHASE TOP CLEARANCES
1 1/2” Ventilation Opening
around Chimney Pipe
(insulation)
0 in. to level
of standoffs
Attic
Insulation Shield
(ceiling)
(roof)
(attic)
(ceiling)
Attic Shield Collar
Ceiling Firestop
Storm Collar
Chase Top Flashing
1-1/2 in. (38 mm)
to back & sides
of appliance
(except at nailing
flanges where it is
1/2 in. [13 mm])
Must have 2 in. (51 mm)
minimum clearance
to any combustible materials
including header
0 in.
to floor
2 in. (51 mm) min.
Shaded areas
represent
2 in. (51 mm) min.
air space clearance
required around pipe
Combustible Object
48 in.
1219 mm
1 in.
B. Clearances
WARNING! Risk of Fire!
You must comply with all minimum air space clearances
tocombustiblesasspeciedinFigure3.2.DO NOT pack
required air spaces with insulation or other materials.
Framing or nishing material used on the front of, or in
frontof,thereplacecloserthantheminimumslistedmust
be constructed entirely of non-combustible materials (i.e.,
steel studs, concrete board, etc.). Failure to comply may
causere.
Figure 3.2 Clearances to Combustible Materials
Minimum Clearances to Combustibles
WITHIN ENCLOSURE AREA
Fireplacetobackwall 1-1/2in.(38mm)
Fireplace to sidewall 1-1/2in.(38mm)
Topstandostoheader 0in.(0mm)
Door opening to sidewall 24in.(610mm)
MANTEL
Mantelminimumheight 63-3/4in.(1619mm)
Maximummanteldepth 12in.(305mm)
11
Outdoor Lifestyles • ODCASTLEWD-50 Install Manual • 4170-900 • Rev E • 3/26
C. Construct the Chase
Achaseisaverticalboxlikestructurebuilttoenclosethe
replaceand/oritsventsystem.Verticalchimneysthat
runontheoutsideofabuildingmustbeinstalledinsidea
chase.
Incoldclimates,Hearth&HomeTechnologiesrecom-
mendsthatthechasebewellinsulatedusingbatttype
insulationbetweenthejoists.
Constructionofthechasemayvarywiththetypeofbuild-
ing.Theseinstructionsarenotsubstitutesfortherequire-
mentsoflocalbuildingcodes.LocalbuildingcodesMUST
bechecked.
Chasesshouldbeconstructedinthemannerofalloutside
wallsofthehometopreventcoldairdraftingproblems.
Thechaseshouldnotbreaktheoutsidebuildingenvelope
inanymanner.Allouterwallsneedtobeinsulated.
Buildingcodesrequirefalseceilingandceilingrestops/
atticshieldsateachoorofthechaseorevery10ft(3048
mm)ofclearspacetocontrolspreadofre.
Walls,ceiling,baseplateandcantileveroorattherst
levelofthechaseshouldbeinsulated(seeFigure3.3.)
Vaporandairinltrationbarriersshouldbeinstalledinthe
chase as per regional codes for the rest of the home. Ad-
ditionally,Hearth&HomeTechnologiesrecommendsthat
theinsidesurfacesbedrywalledandtaped(ortheuseof
anequivalentmethod)formaximumairtightness.
Holesandotheropeningsshouldbecaulkedwithhigh
temperaturecaulkorstuedwithunfacedberglass
insulation.
Ceiling
Firestop
Metal Chase Top
Round Termination Cap
False Ceiling
Insulation in the
outside walls
of the chase
Attic
Insulation
Shield
Chimney
Ceiling
Firestop
Tabs
False Ceiling
False Ceiling
Insulation
Insulation
Storm Collar
Figure 3.3 Chase Assembly
1 2 3
All outside walls should be insulated.
Figure 3.4 Chase Constructions
1. Fireplaceandchimneyenclosedinanexteriorchase.
2. Chimneyosetthroughexteriorwallandenclosedinchase.
3. Chaseconstructedonroof.
• Thechaseisconstructedusingframingmaterialsmuch
thesameasthewallsinyourhome.Avarietyofsiding
materials may be used including brick, stone, veneer
brick,orstandardsidingmaterials.
• In constructing the chase, several factors must be
considered:
- Maintain a 2 in. (51 mm) air space around the
chimney.
- The chase top must be constructed of non-
combustiblematerial.
- Incoldclimates,arestopspacerandatticinsulation
shieldshouldbeinstalledinaninsulatedfalseceiling
at the 8 ft. (2438 mm) level above the replace
assembly.Thisreducesheatlossthroughthechase.
- In cold climates, the walls of the chase should be
insulatedtothelevelofthefalseceilingasshownin
Figure3.3.Thiswillhelpreduceheatlossfromthe
homearoundthereplace.
ThreeexamplesofchaseapplicationsareshowninFig-
ure3.4.
WARNING! You must install false ceilings and ceil-
ing restops at each oor of the chase or every 10 ft
(3.05 m) to control spread of re.
WARNING! Risk of Fire! DO NOT sealareabetweenre
stop opening and chimney pipe except where they enter
the attic or leave the warm air envelope of the home (use
600° F sealant).
WARNING! Risk of Fire! You must maintain a minimum
2 in. (51 mm) air space clearance to insulation and oth-
er materials surrounding the chimney system.
• Insulationandothermaterialsmustbermlysecuredto
prevent accidental contact with chimney system.
• The chase must be properly blocked to prevent blown
insulation or other combustibles from entering and
makingcontactwithreplaceorchimney.
• Failure to prevent contact between insulation or other
materials and chimney system may cause overheating
andre.
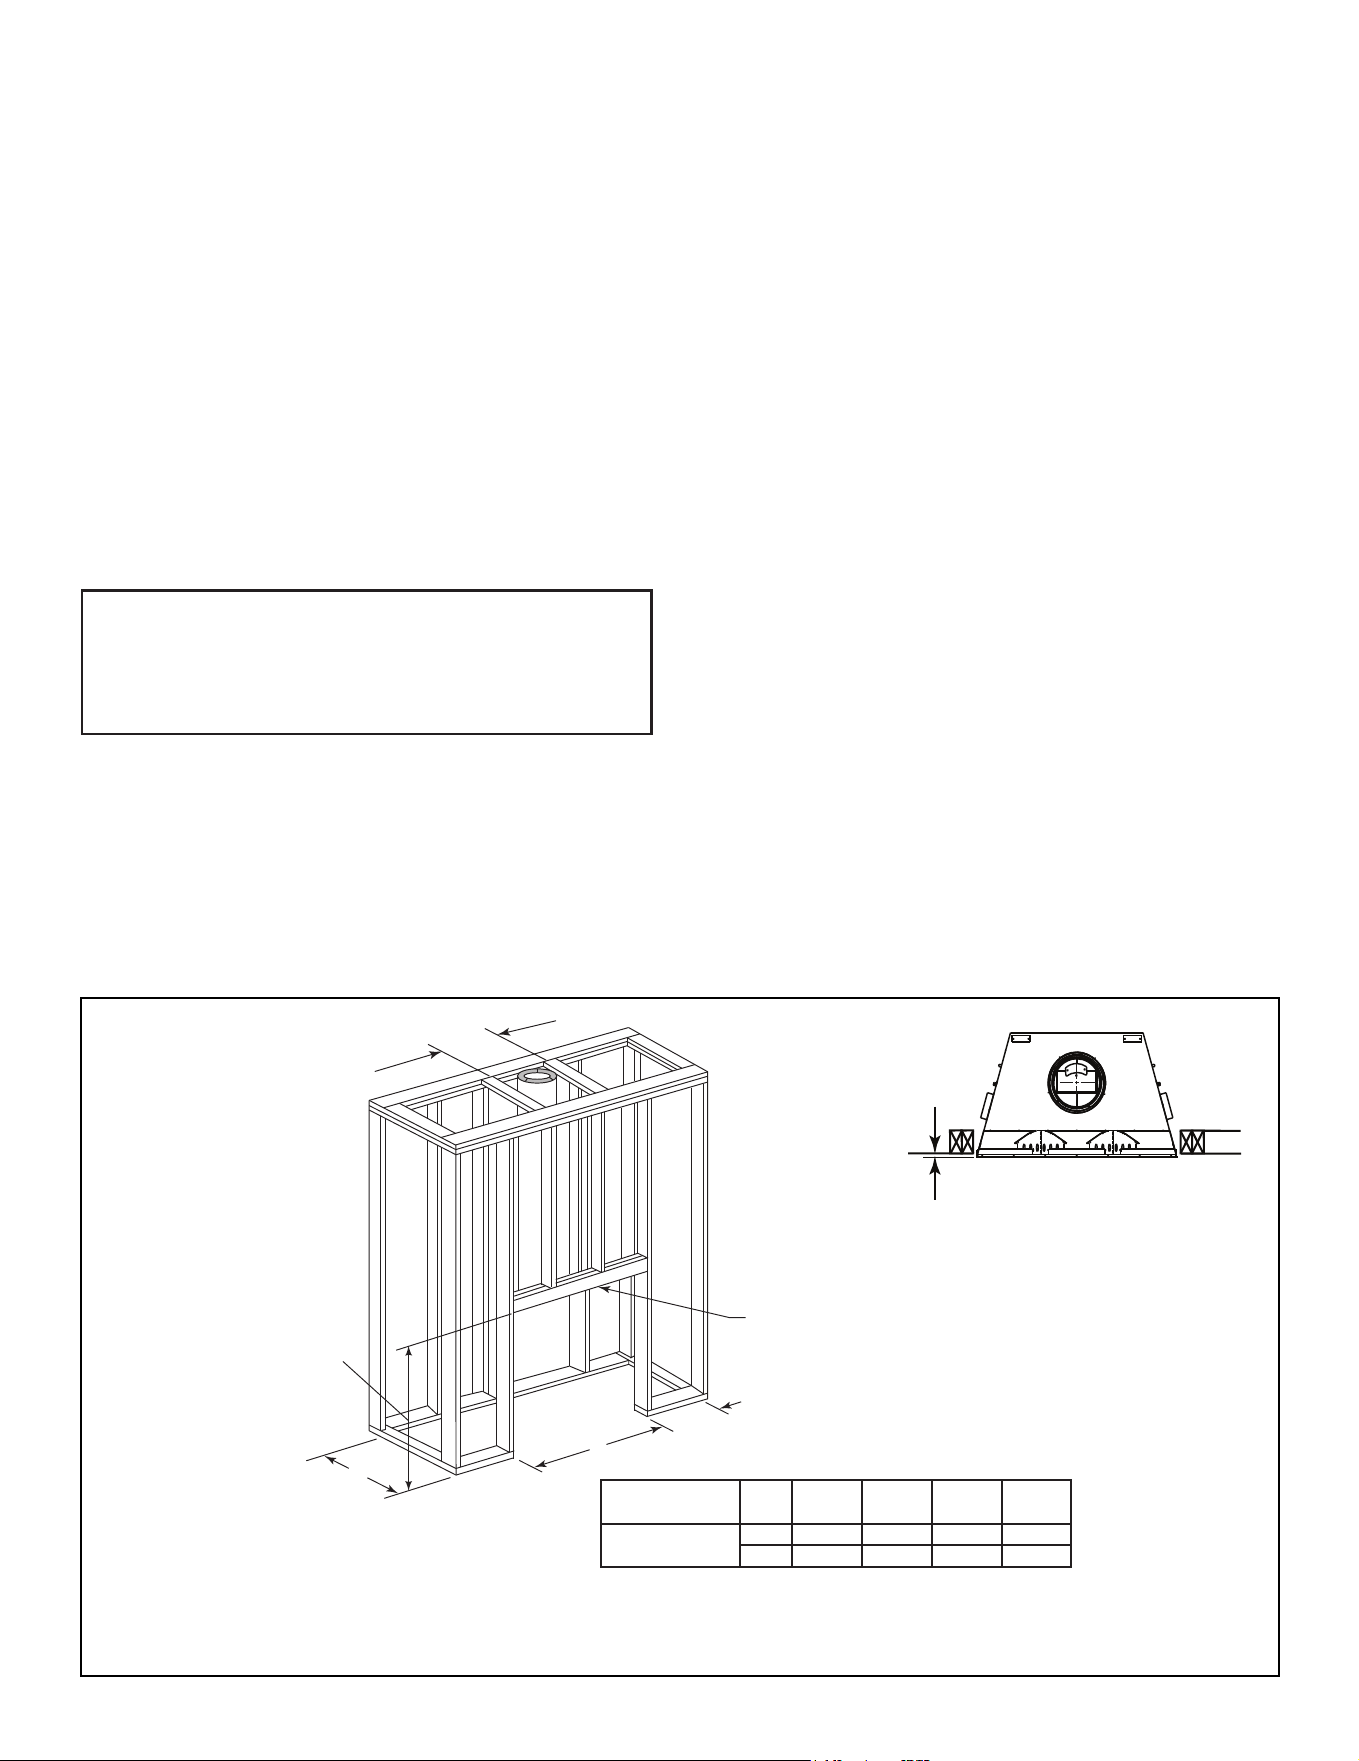
12 Outdoor Lifestyles • ODCASTLEWD-50 Install Manual • 4170-900 • Rev E • 3/26
WARNING! Risk of Fire! You must comply with all
minimum air space clearances to combustibles. DO NOT
pack required air spaces with insulation or other materi-
als.
WARNING! Risk of Fire! Comply with all minimum clear-
ancesspecied.
• A minimum 1-1/2 in. (38 mm) air clearance must be
maintained at the back and sides of the replace
assembly.
• Chimneysectionsatanylevelrequirea2in.(51mm)
minimum air space clearance between the framing and
chimney section.
CAUTION! Risk of Cuts/Abrasions. Wear protective gloves
and safety glasses during installation. Sheet metal edges
are sharp.
B
A
Header MUST NOT be notched!
D
D = extra space needed for outside air connection.
If outside air duct has no bend, this dimension may be
reduced as long as minimum clearances are met.
Header will sit on
top of front standoffs
after fireplace is
installed.
21 in (533 mm)
framing
* If interior of chase will be drywalled, add the thickness to this
measurement.
** Rough opening dimension to be able to get fireplace installed.
C
Model A B* C** D
in. 61-7/8 28-1/2 74-1/2 12
ODCASTLEWD-50
mm 1572 724 1892 305
Figure 3.5 Framing the Fireplace
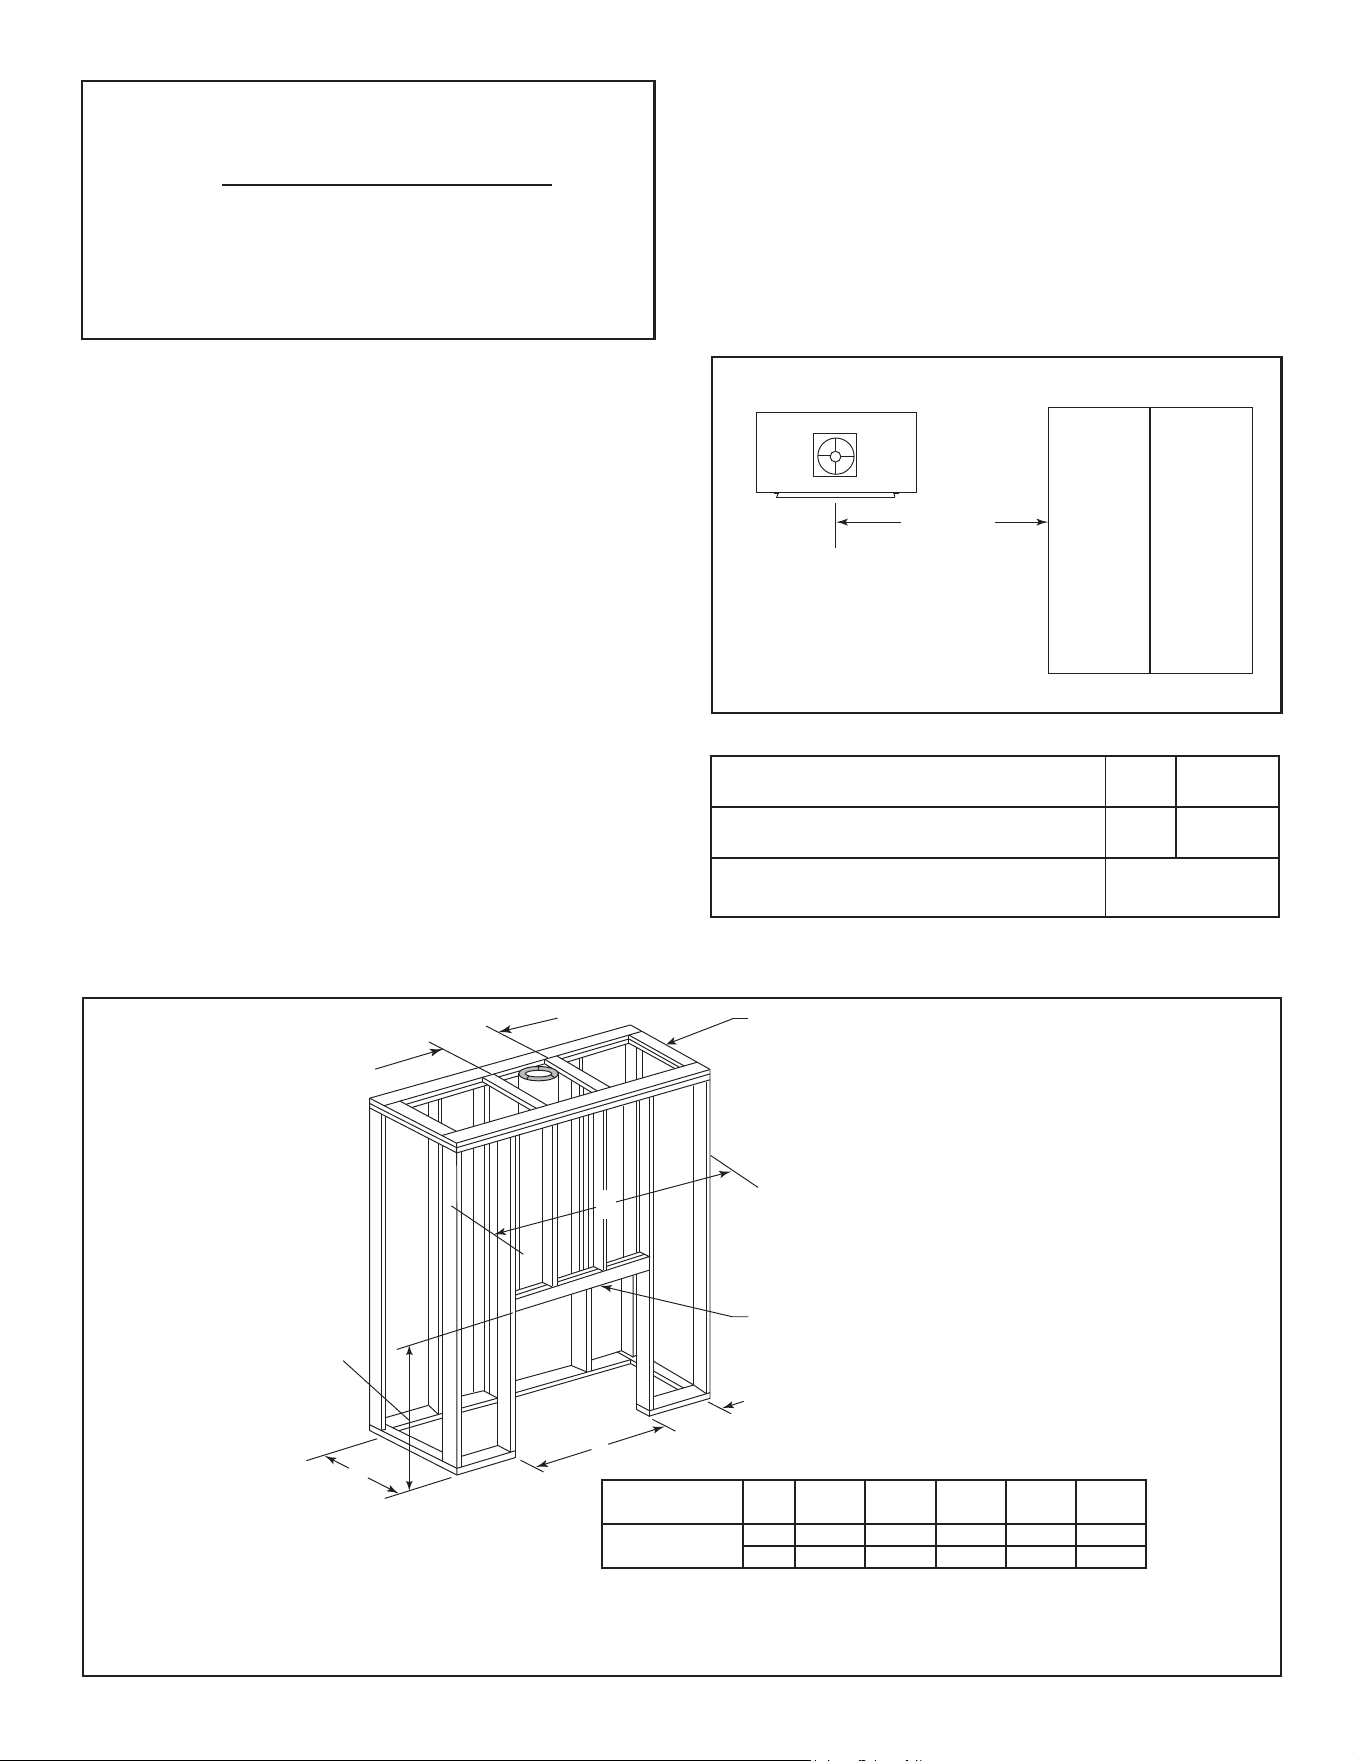
D. Frame the Fireplace
NOTICE: Hearth extension design must be determined
beforeinstallationofreplace.
Ifthereplaceisplacedontheoor,themaximumheight
ofanishedraisedhearthis3-3/4”,ifyouwantahigher
raisedhearththereplacemustbeplacedonaplatform.
Figure3.5showsatypicalframing(using2x4lumber)of
thereplace,assumingcombustiblematerialsareused.
Allrequiredclearancestocombustiblesaroundthere-
placemustbeadheredto.SeeFigure3.2.Anyframing
acrossthetopofthereplacemustbeabovethelevelof
thetopstandos.(Norecessabovestandos.)
The
nishedcavitydepthmustbenolessthan28-1/2in.
(724mm)fromthenishedbackwalltotheoutsideoffront
wallframing.Framingmustextendstraightupalltheway
to the ceiling.
Note: Before framing up the chase, consider where
andhowthechimneywillrun.Ifthereareobstacles
thatmightbeintheway,itmaybenecessarytomake
thechaselargerthanshowntoallowosetstobeused.
Refertoosetchartonpage18.
1/2 in.
(13 mm)
Fireplace must be set out
1/2 in. (13 mm) in front of
the face of the framing
material.
13
Outdoor Lifestyles • ODCASTLEWD-50 Install Manual • 4170-900 • Rev E • 3/26
Figure 3.15 Freestanding Fireplace Location
FREESTANDING
INSTALLATION
(Combustible Structure)
(Enclosed Fireplace)
10 ft Min.
From Termination
Note:
• Illustrationsandphotosreecttypicalinstallations
and are FORDESIGNPURPOSESONLY.
• Illustrations/diagrams are not drawn to scale.
• Actual installation/appearance may vary due to
individualdesignpreference.
• Hearth&HomeTechnologiesreservestherightto
alter its products.
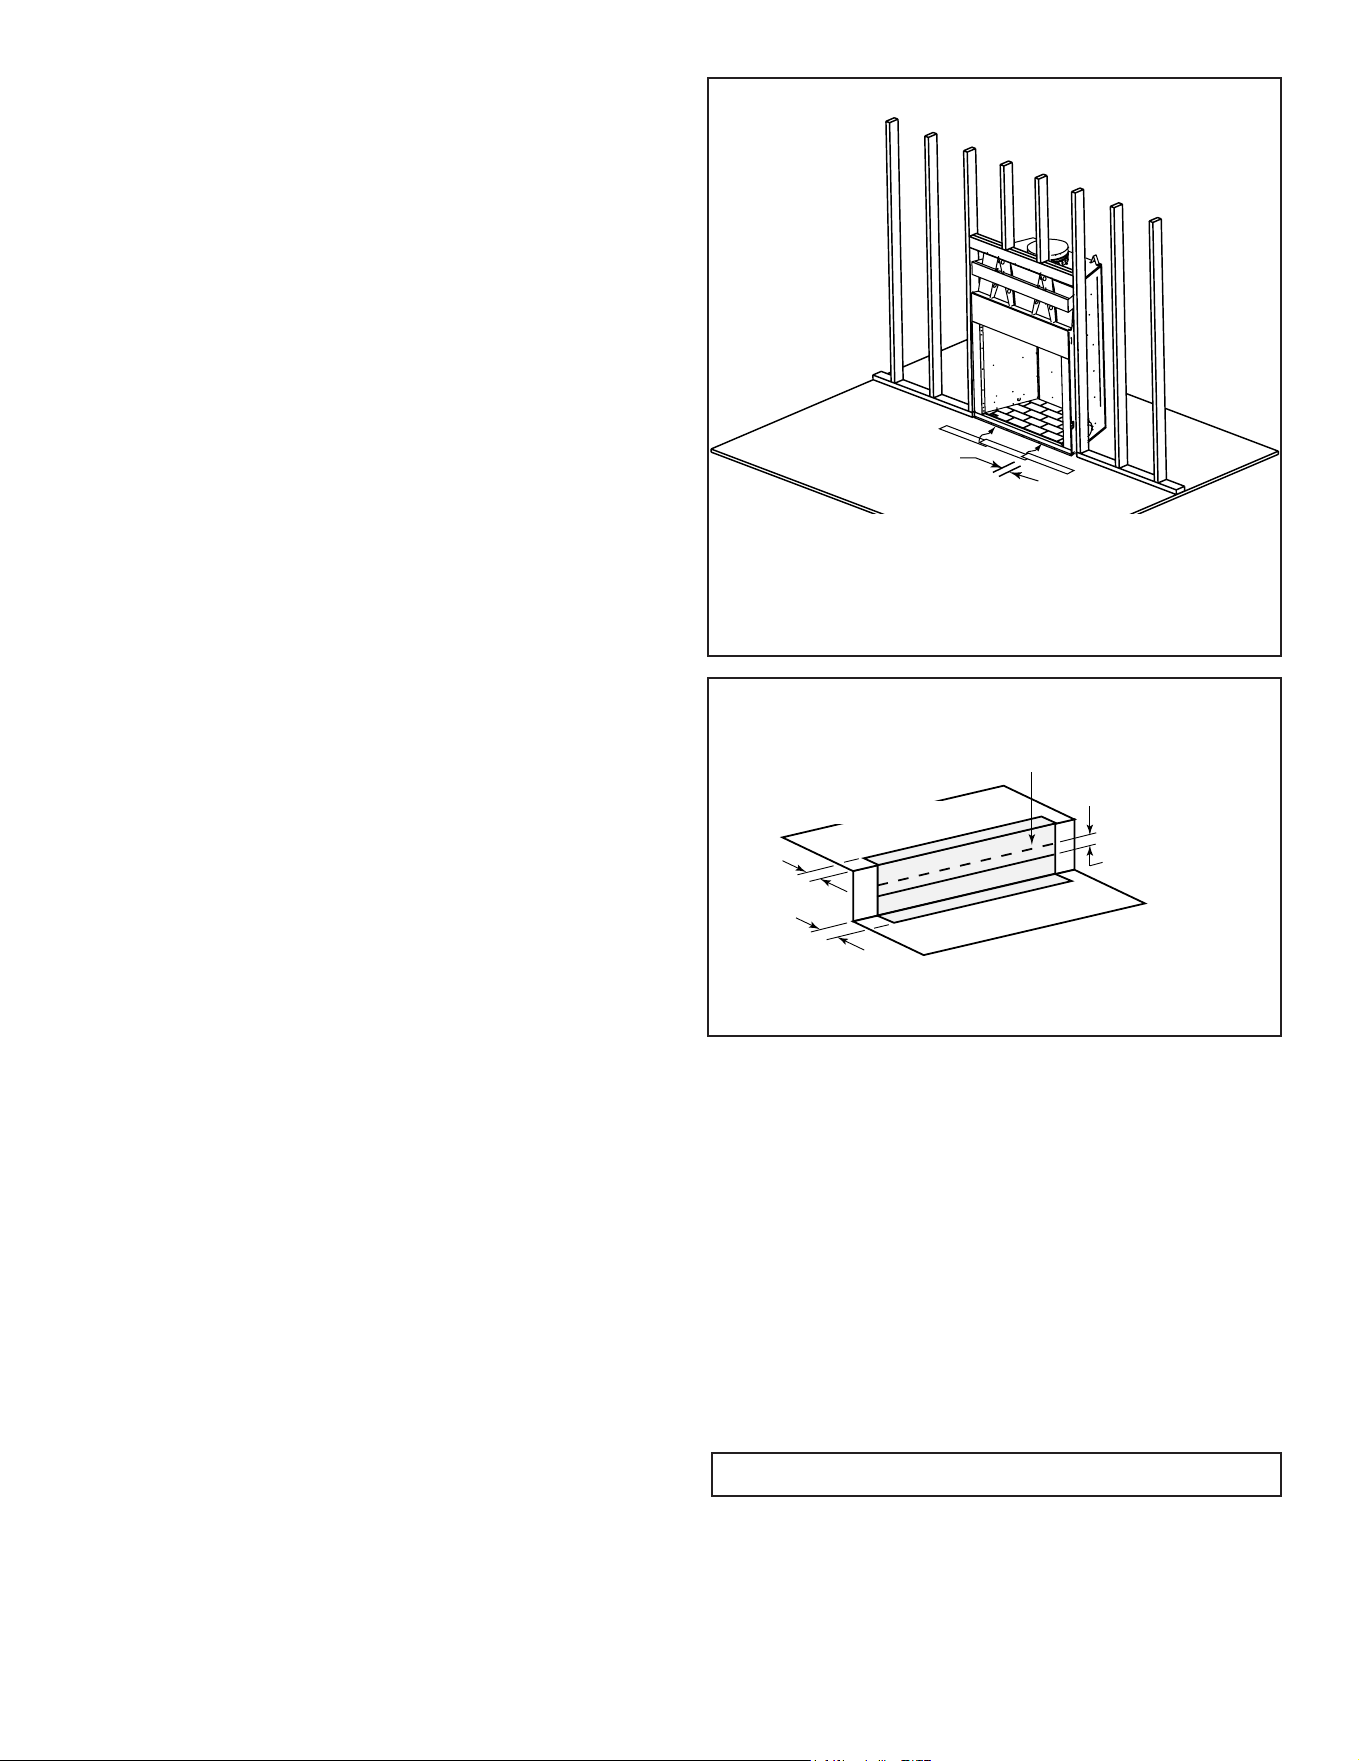
• Freestanding Installations (see Figure 3.14 and 3.15)
Wheninstallingthisreplaceasafreestandingreplace
in your yard, it must be enclosed to prevent impact
damage to the fireplace. Freestanding applications
allow for a reduction in the minimum vent run. Non-
combustibleframingandanextendedsmokeshieldare
required.SeeTable3.1andFigure3.14.
• Porch and Patio Installations
Thereplacewillnotperformasanexteriorwall.Hearth
& Home Technologies recommends that the replace
chase be constructed outside the structure’sweather
envelope. Where the platform meets the wall, use
a ashing detail similar to that required for attached
decks.Chaseplatforms,includingheathsshouldslope
awayfromthestructureat1/8in.to1/4in.perfoot.The
replacecanbeshimmedlevel.
When Installed on Surfaces Where Water May Collect
or Cause Damage:
Hearth & Home Technologies recommends that a
drainagepanbeplacedundertheunit(soldseparately).
B
A
Header MUST NOT be notched!
D
21 in (533 mm)
framing
E
Model A B* C** D E
in. 61-7/8 28-1/2 74-1/2 12 85-7/8
ODCASTLEWD-50
mm 1572 724 1892 305 2181
C
D = extra space needed for outside air connection.
If outside air duct has no bend, this dimension may be
reduced as long as minimum clearances are met.
E = Minimum width for non-combustible enclosure.
Minimum height is 70 inches. Framing outside
minimum dimensions can be combustible material.
Header will sit on
top of front standoffs
after fireplace is
installed.
* If interior of chase will be drywalled, add the thickness to this
measurement.
** Rough opening dimension to be able to get fireplace installed.
Freestanding structure less than 18 ft.
must be made of out of non-combustible
materials.
Figure 3.14 Freestanding Framing
Non-combustible enclosure minimum straight
height
10ft 3.05 m
Non-combustible enclosure minimum straight
heightwithsingleoset/return
10ft. 3.05 m
Ifventrunislessthan18ft.anextendedsmoke
shield needs purchased and used.
ODCASTLE-FSK50
Table 3.1 Reduced Chimney Requirements
This can be constructed of metal, adhesive polymer
membrane (such as ice and water shield) or other
suitablematerials.Ameansofdrainageoutofthepan
suchastubesorweepholesshouldbeprovided.Aslope
of 1/8 in. to 1/4 in. per foot towards the drain port is
suggested.Thereplacecanbeshimmedlevel.Hearths
shouldslopeawayfrom the frontofthereplace and
chaseat1/8in.to1/4in.perfoot.Sparkstripsmustbe
usedontopofanycombustiblehearthmaterialsused
for moisture management.
14 Outdoor Lifestyles • ODCASTLEWD-50 Install Manual • 4170-900 • Rev E • 3/26
E. Secure and Level the Fireplace
This replace may be placed on either a combustible or
noncombustiblecontinuousatsurface.Slidethereplace
intoposition.Besuretoprovidetheminimum1-1/2in.air
clearanceatthesidesandbackofthereplace.
Thereplaceshouldbepositionedsothefaceofthenon-
combustiblematerialonthereplacewillbeushwiththe
face of the drywall on the walls.
Levelthereplaceandshimasnecessary.
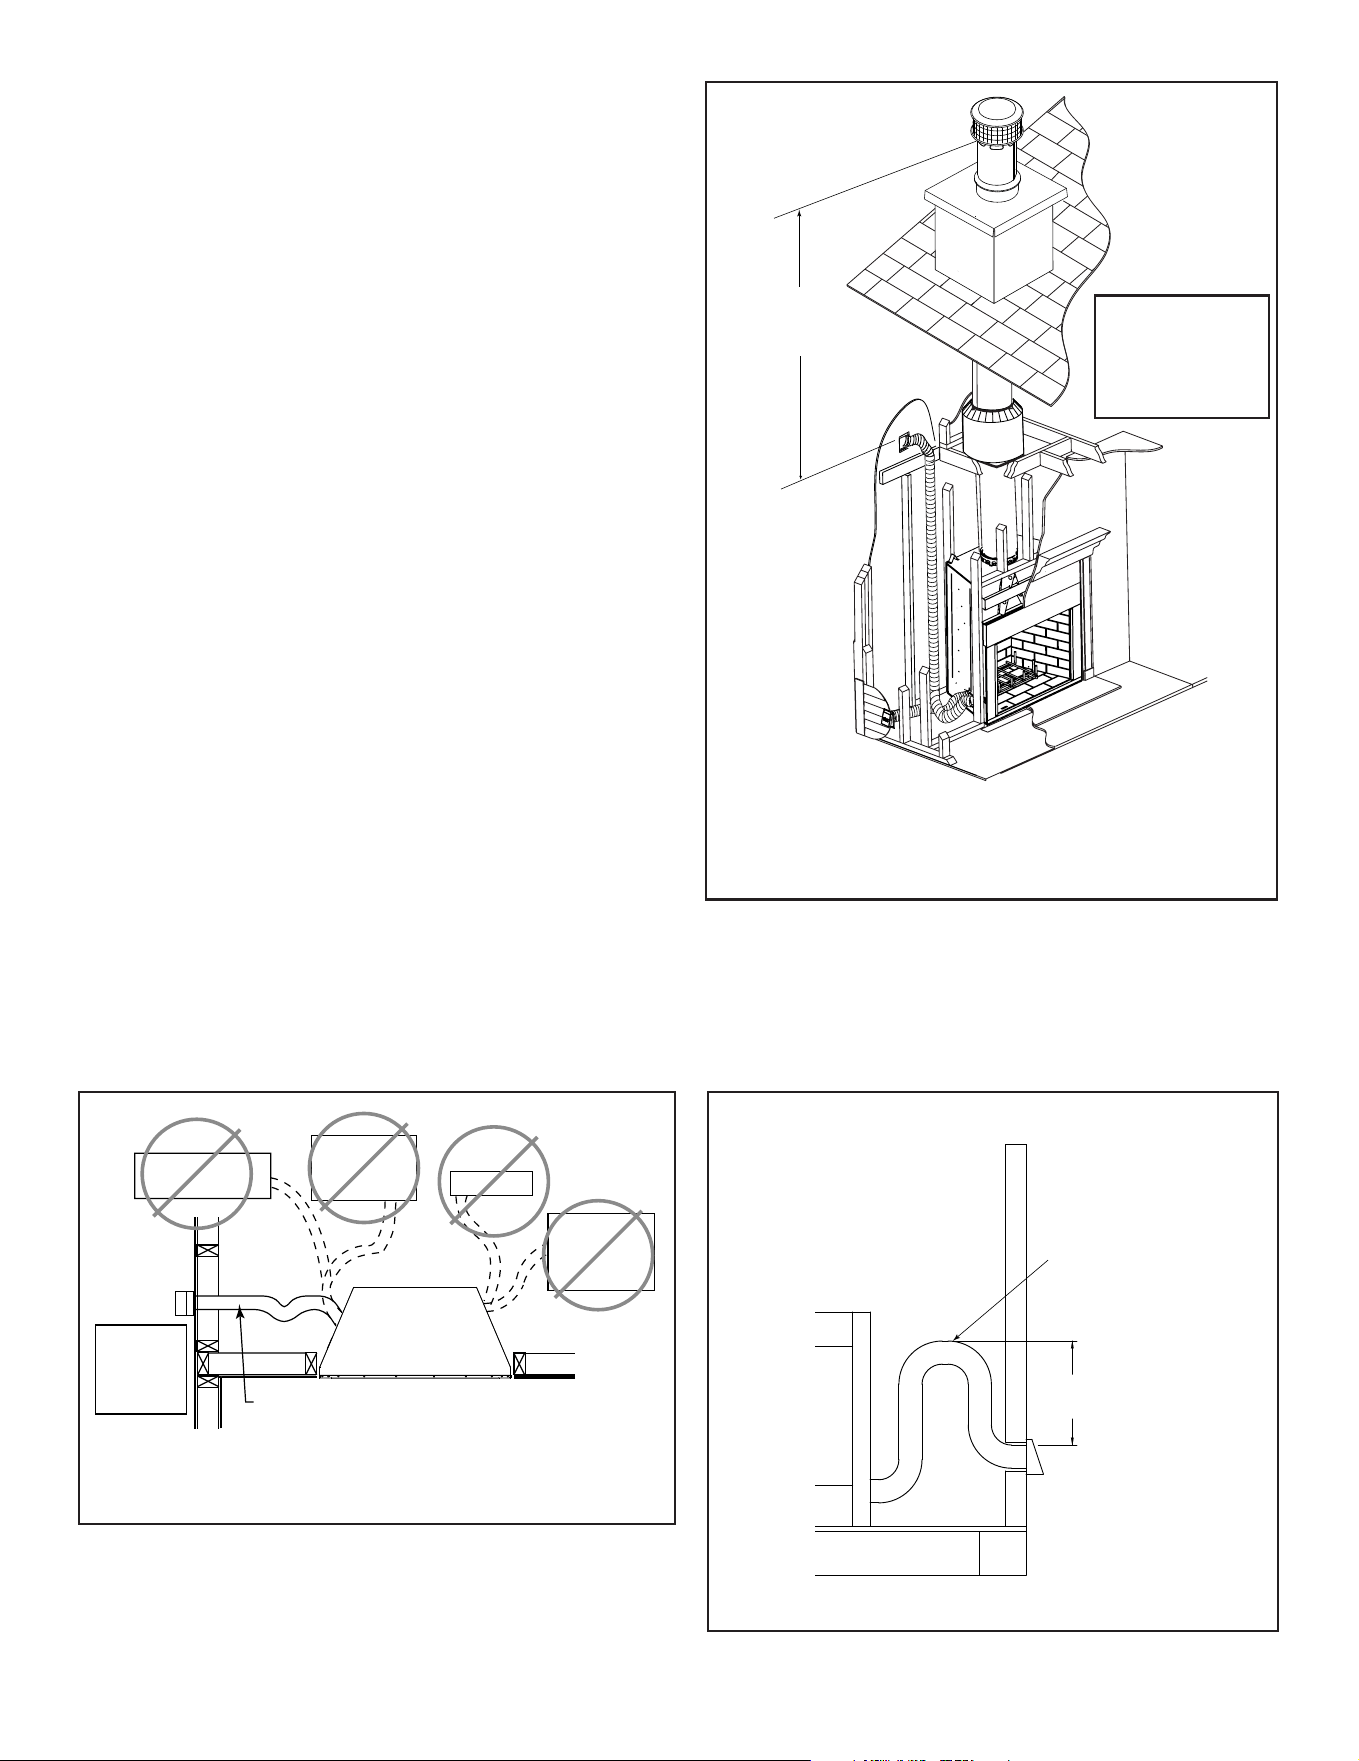
F. Protective Metal Hearth Strips
• Locatethethreeprotectivemetalhearthstripsmeasuring
approximately26in.x4in.(660mmx102mm)included
withthisreplace.
• Slideeachmetalstrip2in.(51mm)underfrontedgeof
replace.
• Overlapstripsinthemiddleofreplaceopeningby1in.
(25mm)minimum.
• Metal strips must extend beyond the front and sides
of the replace opening by at least 2 in. (51 mm),
Figure3.6).
• Protectthefrontofaplatformelevatedabovethehearth
extensionwithmetalstrips(notincludedwithreplace)
per Figure 3.7. See Section 6 for hearth extension
instructions.
WARNING! Risk of Fire! Protective metal hearth
strips MUST be installed on combustible surfaces. DO
NOT cover metal strips with combustible materials.
Sparksorembersmayigniteooring.
WARNING! Risk of re! High temperatures, sparks,
embers or other burning material falling from the
replacemayigniteooringorconcealedcombustible
surfaces.
• Protective metal hearth strips MUST be installed.
• Hearth extensions MUST be installed exactly as
specied.
WARNING! Risk of Fire! Prevent contact with sagging,
loose insulation.
• DO NOT install against vapor barriers or exposed
insulation.
• Secure insulation and vapor barriers.
• Provide minimum air space clearances at the sides and
backofthereplaceassembly.
1 in. (25 mm) overlap
Minimum
Metal strips are placed 2 in. (51 mm)
under the front of the fireplace and must
extend beyond the front and sides of
fireplace opening by 2 in. (51 mm).
Figure 3.6 Position the Protective Metal Hearth Strips
Raised Platform
Floor
2 in.
(51 mm)
1 in. (25 mm) min.
overlap
2 in.
(51 mm)
Top piece must overlap
bottom piece
Figure 3.7 Protect the Front of an Elevated Platform
G. Outside Air Kit (Required on both sides)
Outsideairkitsmustbeusedforcombustionandtopro-
vide cooling air to prevent overheating. Hearth & Home
Technologiesrecommendsyouutilizetheshortestductrun
tooptimizetheperformanceoftheoutside air kit andin-
stallaP-Trap(seeFigure3.10).Theoutsideairinlethoods
shouldbepositionedinamannerthatwillnotallowsnow,
leaves,etc.toblocktheinlet.Insomeinstallationstheair
ductmayneedtoberunvertically.Insuchaninstallation,
a3ft(914mm)heightdierencemustbemaintainedfrom
the top of the uppermost chimney section to the outside air
inlet hoods.
Note: Maximumlengthis40feet.
15
Outdoor Lifestyles • ODCASTLEWD-50 Install Manual • 4170-900 • Rev E • 3/26
3 ft min. from
top of uppermost
chimney section
to air inlet.
Figure 3.8 Outside Air Inlet Locations
Outside air is re-
quired to be in-
stalled on both
sides (right side
not shown)
CAUTION! Risk of Cuts/Abrasions. Wear protective
gloves and safety glasses during installation. Sheet metal
edges are sharp.
CAUTION! Risk of Fire or Asphyxiation! DO NOT draw
outsidecombustionairfromwall,oororceilingcavity,or
enclosed spaces such as an attic or garage.
• DO NOT place outside air inlet hood close to exhaust
vents or chimneys. Fumes or odor could be drawn into
theroomthroughthereplace.
• Locate outside air inlet hood to prevent blockage from
leaves, snow/ice, or other debris. Blockages could cause
combustion air starvation and unit overheat.
Figure 3.8 Outside Air Installation
Outlet placed
higher than 3 ft
below the
termination cap
Attic space
Garage or
combustible
liquids storage
Outlet blocked by
snow, leaves, etc.
Clear area
outside
house or in
ventilated
crawl space
YES
NO
NO
NO
NO
Factory-built
fireplace
• Use UL181 Class 1 or Class 0 rigid or flexible ducting.
• Install with short run and add a P-trap which will help
prevent flow of cold air.
• Secure flex duct with screws or wire ties.
NOTICE: The fireplace provides some outside air for
combustion. Other methods may be necessary if more air
is required.
RefertoFigures3.8and3.9whenplacingtheoutsideair
inlets.
• Cut a 6-1/2in. (165 mm) hole in outside wall to
accommodate air piping.
• Use6in.(152mm)ex(notsupplied)todirectlyconnect
outsideairtoreplaceintake.Insulatethepipetoprevent
frost condensation.
• Use the supplied outside air inlet hoods.
• Seal between the wall and the pipe with silicone to
preventmoisturepenetrationandairleaks.
• Sealbetweentheoutsideairinlethoodsandthehouse
withsiliconetopreventairinltration.
WARNING! Risk of Fire! The outside air kits are in-
stalledonthebothsidesofthereplacetopreventover-
heatingandre.
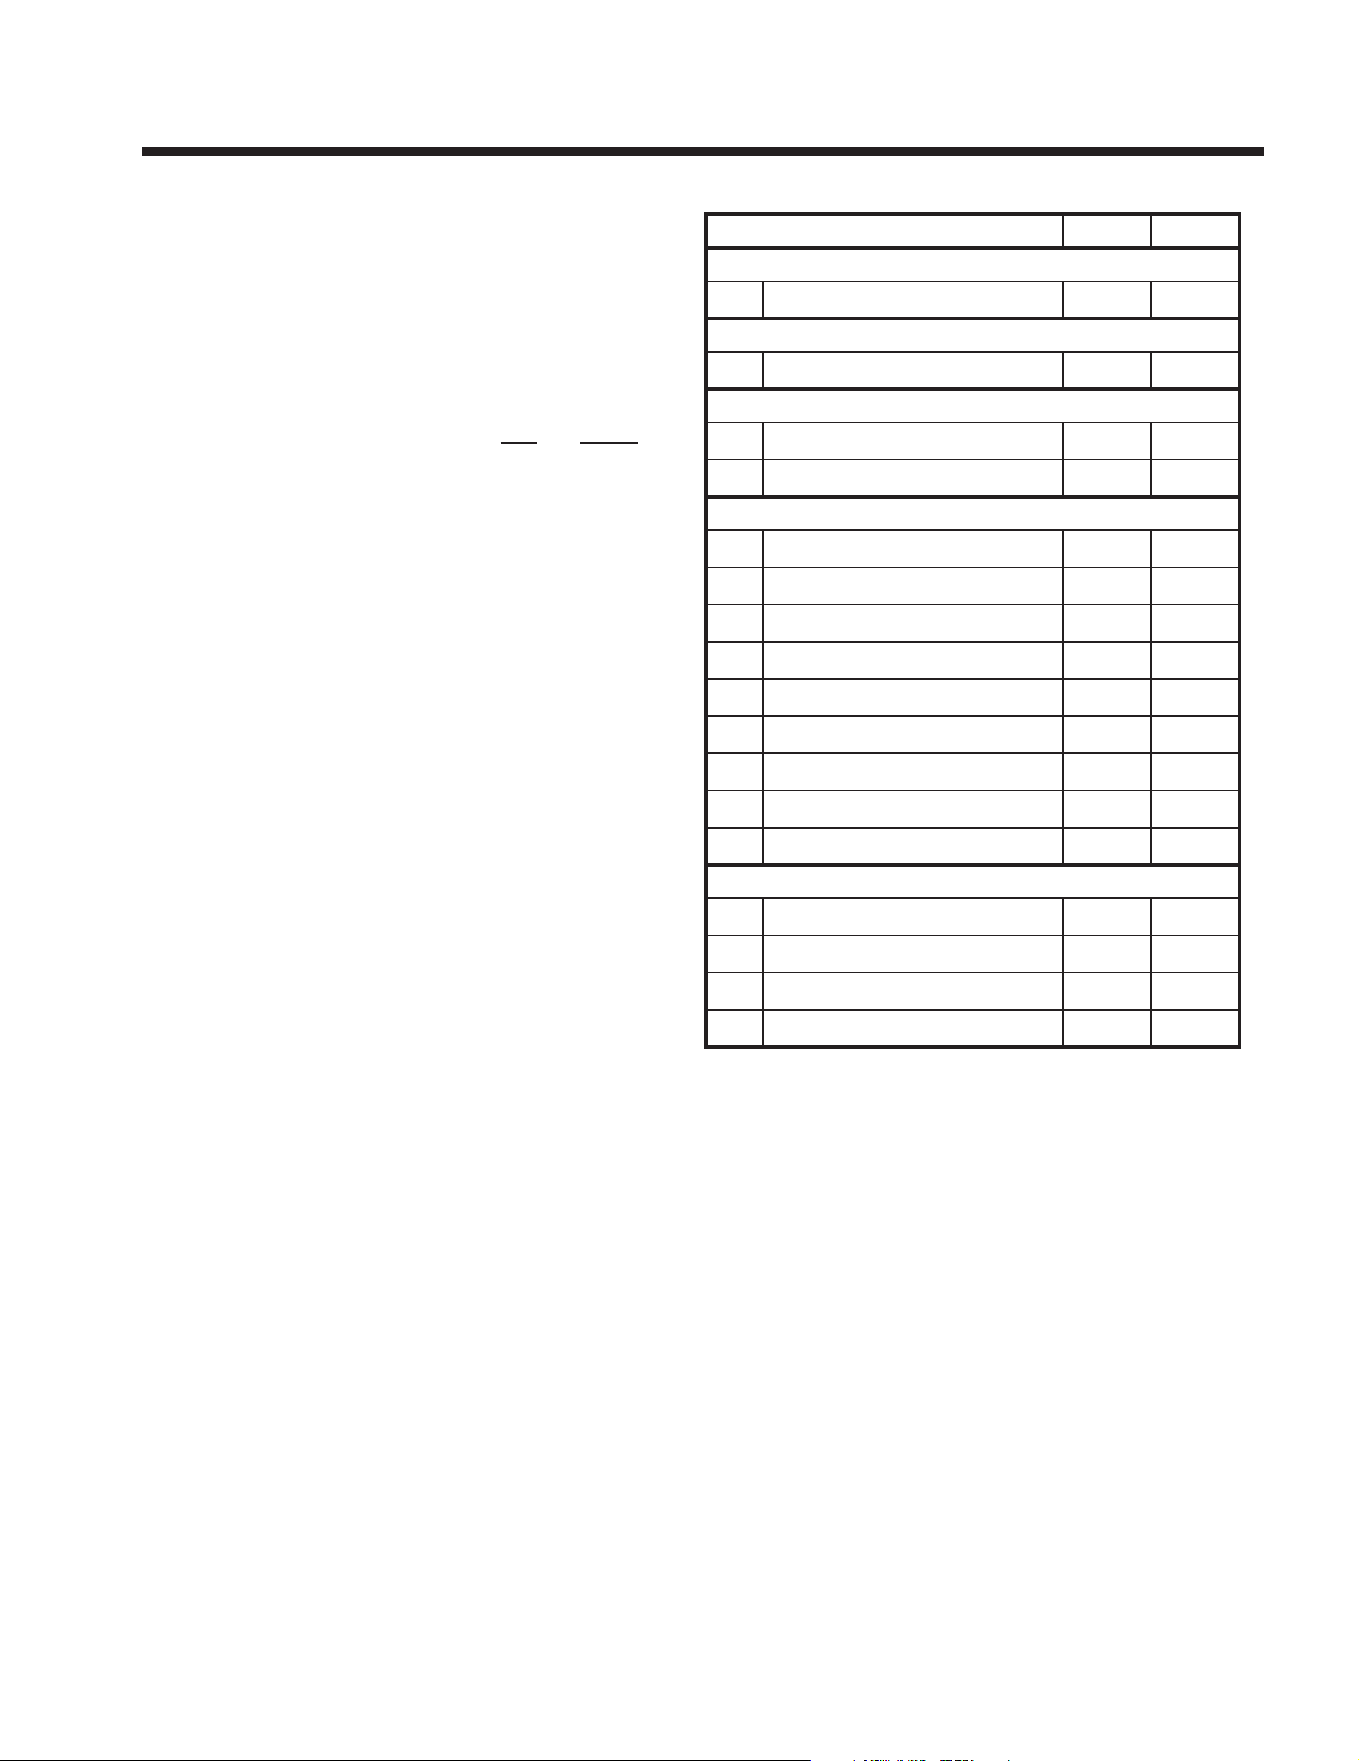
Typical Outside Air
Installation
Typical CAK Installation
Seal
Seal
24” (610 mm) min.
48” (1220 mm) max.
Note: The pipe
cannot lay on top
of the unit.
4” Duct-Use UL181
Class 0 or Class 1
ducting
Recommend
around 24 inches
for a minimum bend
Figure 3.10 P-Trap
16 Outdoor Lifestyles • ODCASTLEWD-50 Install Manual • 4170-900 • Rev E • 3/26
4 4
Chimney and Termination Installation
NOTICE: Chimney performance may vary.
• Trees,buildings,rooflinesandwindconditionsaect
performance.
• Chimney height may need adjustment if smoking or
overdraft occurs.
A. Chimney Requirements
Measureverticaldistancesfromthebaseofthereplace.
WARNING! Risk of Fire! You must maintain 2 in. (51
mm) air space clearance to insulation and other com-
bustible materials around the chimney system. Failure
to do so may cause overheating and re.
Feet Meters
• Minimumoverallstraightheight 18 5.49
• Minimumheightwithoset/return 18.5 5.64
• Maximumheight 50 15.24
• Maximumchimneylengthbetweenanoset
and return
20 6.10
• Maximumdistancebetweenchimney
stabilizers
25 7.62
• Maximumunsupportedchimneylength
betweentheosetandreturn
6 1.83
• Maximumunsupportedchimneyheightabove
thereplace
25 7.62
• Maximumunsupportedchimneyaboveroof 6 1.83
• Minimumheightwithdoubleoset/return 22.5 6.86
Height of Chimney Components in. mm
Stabilizer
14DCA-ST
Firestop
14DCA-FS
Elbows
14DCA-E15-15°Elbow
14DCA-E30-30°Elbow
Miscellaneous
14DCA-ES-ElbowStrap
14DCA-SS-SupplementarySupport
14DCA-IS-InsulationShield
14DCA-RRS-RoofRadiationShield
14DCA-CTF-ChaseTopFlashing
14DCA-CTC-ChaseTopCollar
14DCA-VC1-ChimneyCap
14DCA-SC-StormCollar
14DCA-WS-WallStrap
Chimney Sections*
14DCA-12 101/2 267
14DCA-18 16 1/2 419
14DCA-36 341/2 876
14DCA-48 461/2 1181
*Dimensionsreecteectiveheight.
Table 4.1
17
Outdoor Lifestyles • ODCASTLEWD-50 Install Manual • 4170-900 • Rev E • 3/26
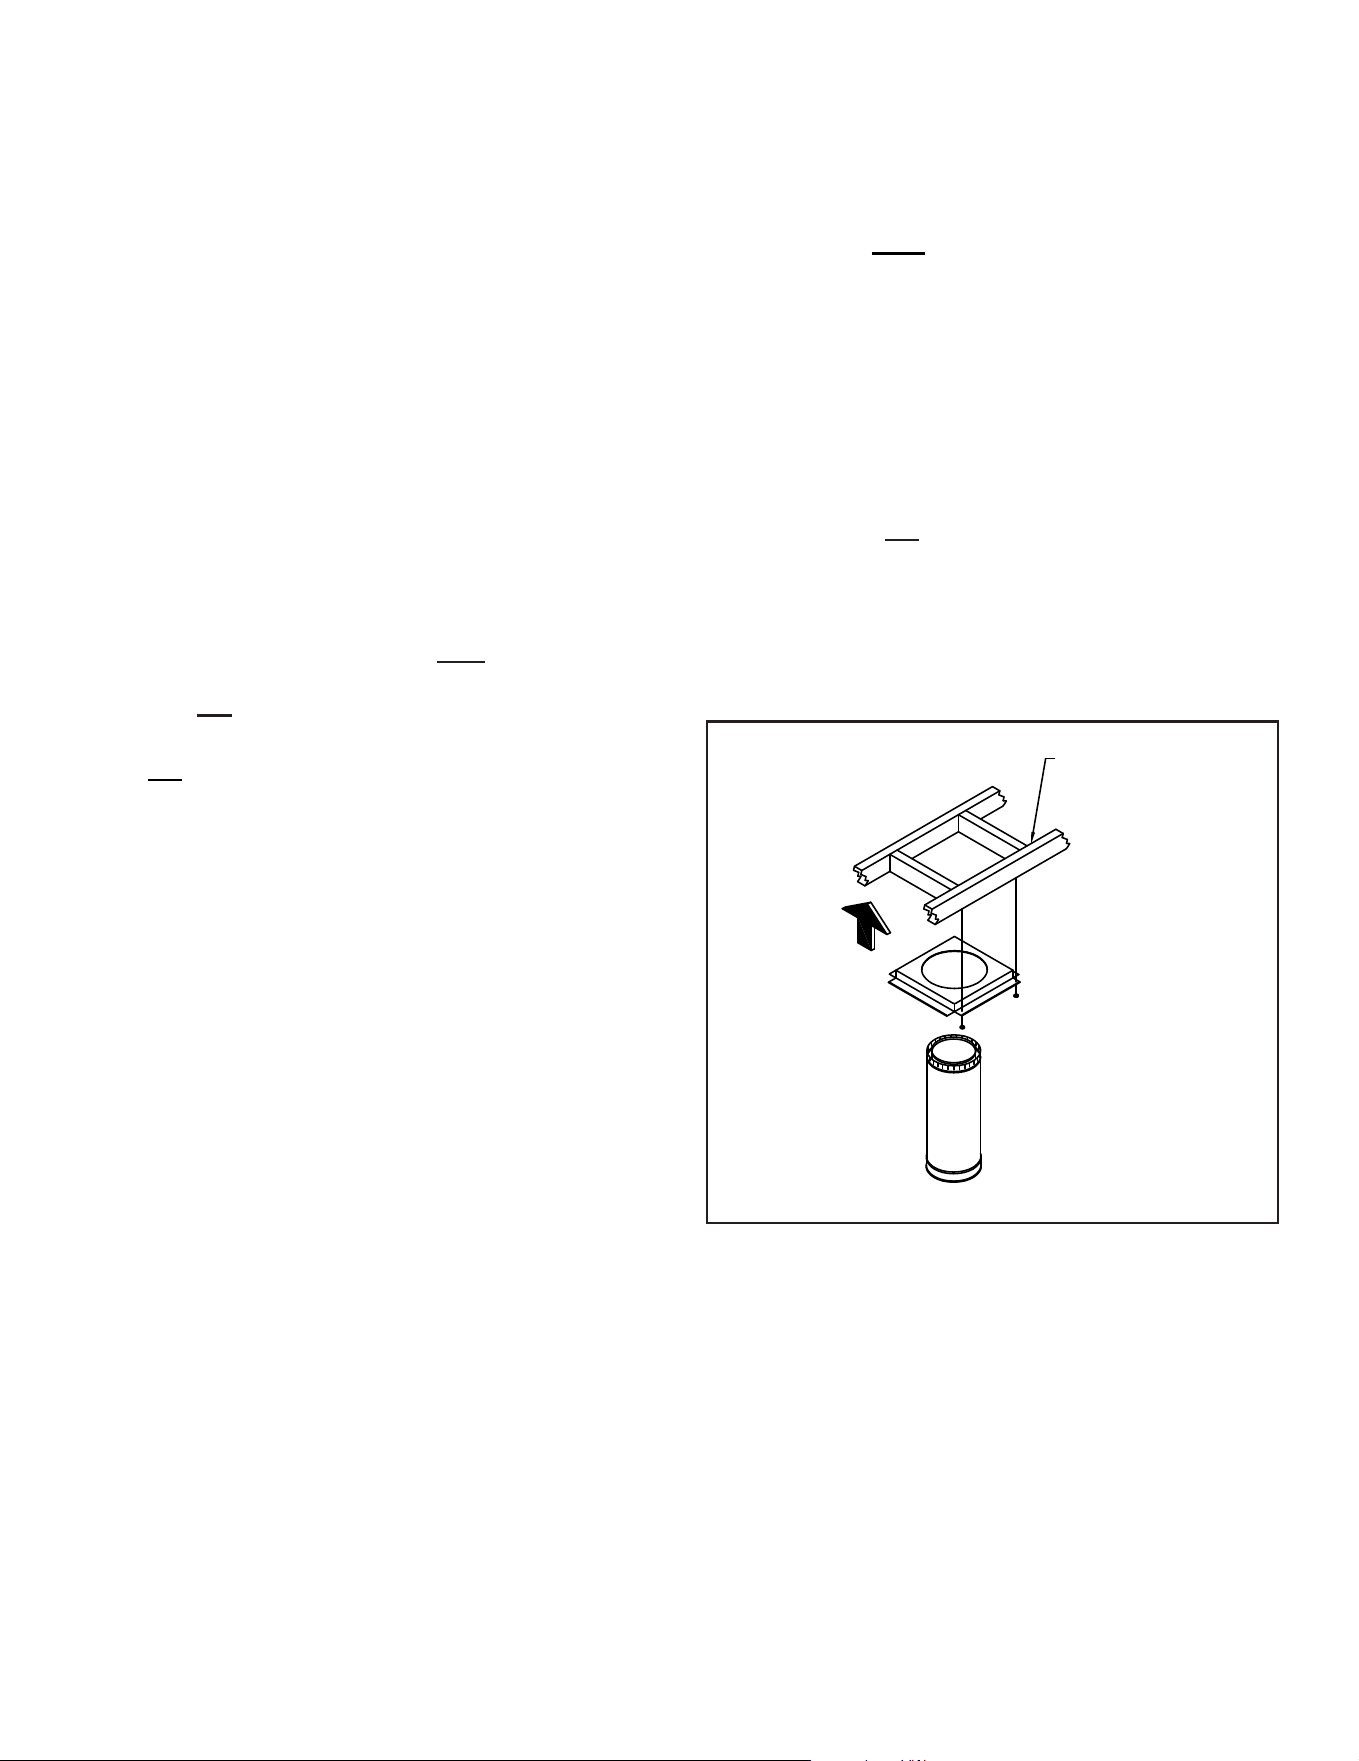
(4) Roof
Radiation
Shields
Chimney Section
Chimney Section
Attic Insulation
Shield & Collar
Square Frame
Firestop
Square Frame
Firestop
Chimney Section
74 1/8 in.
(1883 mm)
Effective
Height
Termination
Cap
Storm
Collar
Chase Top
Flashing
The chimney must be
enclosed from the
fireplace to the attic
maintaining the 2 inch
clearances.
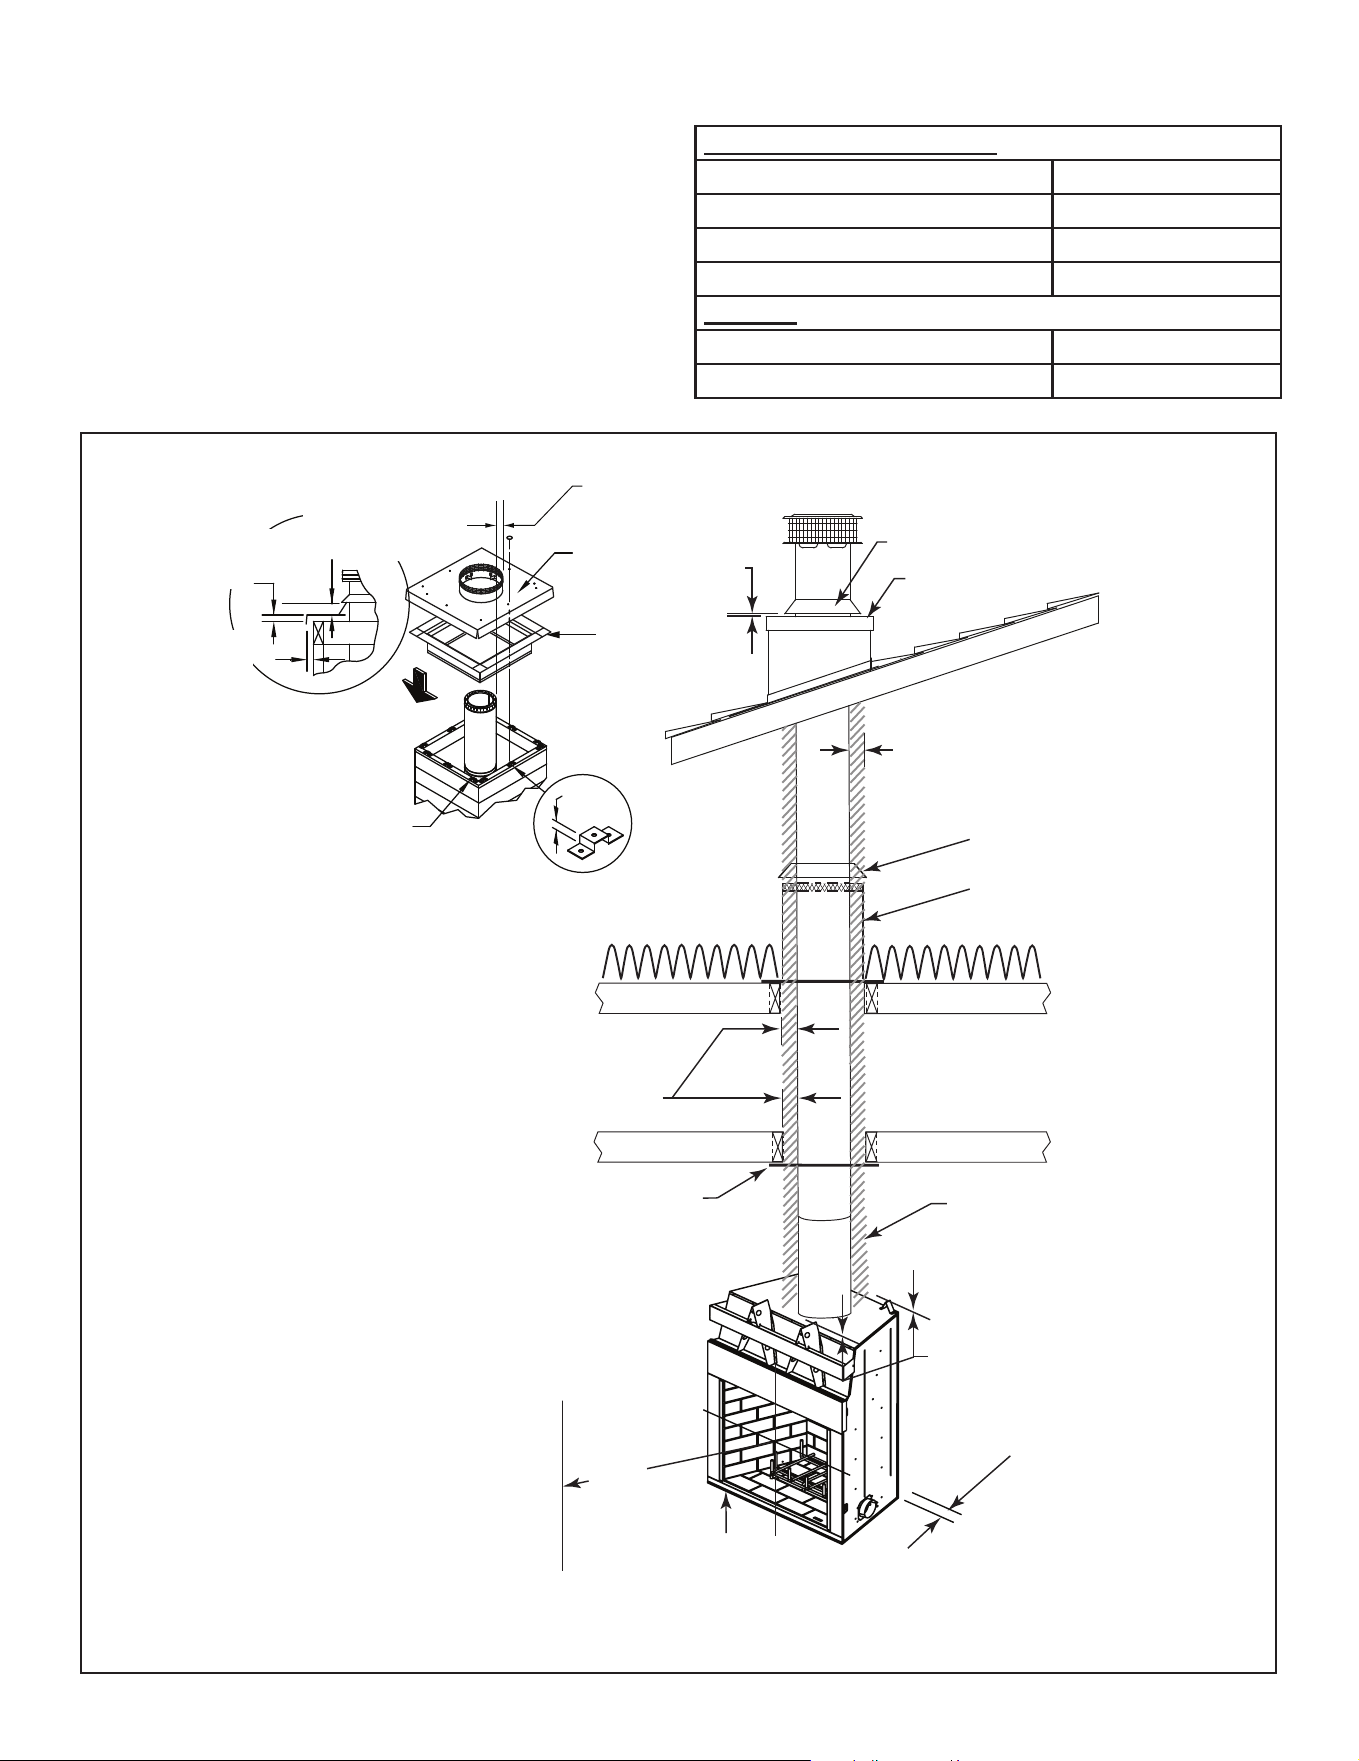
Figure 4.1
Determine the chimney components needed to complete
yourparticularinstallation:
• Measure the total vertical height of the fireplace
installationfromthebaseofthereplaceassemblyto
theapproximatelocationofthebottomofthetermination
cap.
• Subtracttheeectiveheightofthereplaceassembly
(seeFigure4.1)fromthetotalverticalheighttodetermine
theoverallheightofthechimneyinstallation.
• Create a schematic for your application similar to Figure
4.1showingcomponentsrequired(referringtoTable4.1).
• Installaceilingrestopwheneverthechimneypenetrates
aoor/ceiling.
NOTICE: Amaximumoftwoosetandreturnmaybe
used.
CAUTION! Risk of Fire and/or Asphyxiation! DO
NOT connectthisreplacetoachimneyueservicing
another appliance. Do NOT connect to any air distribu-
tion duct or system. These actions could cause over-
heating/reinthe chimneyue,orreleaseofexhaust
fumes into the living areas.
NOTE: This appliance must be run through a chase
only. See following instructions on chase installa-
tions.
18 Outdoor Lifestyles • ODCASTLEWD-50 Install Manual • 4170-900 • Rev E • 3/26
A MAJOR CAUSE OF VENT RELATED FIRES IS FAIL-
URE TO MAINTAIN REQUIRED CLEARANCES (AIR
SPACES) TO COMBUSTIBLE MATERIALS. IT IS OF
THE UTMOST IMPORTANCE THAT DURACHIMNEY II
BE INSTALLED ONLY IN ACCORDANCE WITH THESE
INSTRUCTIONS.
B. Clearances
Alwaysallowatleasta2-inchclearancebetweenDura-
ChimneyIIPipeandanycombustiblematerials.
• Neverllanyrequiredclearancespacewithinsulation
or any other materials.
• Combustible materials include lumber, plywood,
sheetrock,plasterandlath,furniture,curtains,electrical
wiring,andbuildinginsulation.
C. Installation Notes
Proper planning for your DuraChimney II installation will
resultingreatersafety,eciency,andconvenience,as
wellassavingtimeandmoney.Youmust use only autho-
rized DuraChimney II parts to maintain a listed chimney
system. Do notmixpartsortrytomatchwithotherprod-
uctsoruseimprovisedsolutions.
• Do notinstalldamagedormodiedparts.
• Practice good workmanship. Sloppy work could
jeopardizeyourchimney’ssafety.
• Keep electrical wiring and building insulation away
from all chimneys.
• When deciding the location of your chimney, try to
avoidmodicationstoroofbeamsandotherstructural
componentsofthebuilding.
Ifyouhaveanyquestions,contacteitheryourdealeror
Simpson Dura-Vent directly.
D. Frame Openings
• Fromtheceiling,dropaplumbbobtothecenterofthe
replace’sueoutletandmarkthiscenterpointonthe
ceiling.
• Markappropriatecuttinglinesaroundthecenterpoint.
Cutasquareholeintheceiling.Framealevel,square,
21in.x21in. (533 mm x 533 mm) opening centered
overtheholethatyouhavecut.
• Frameopeningsateachoorlevelabovethereplace
(Figure4.1).Theseopeningsaretoholdtherestopand
attic insulation shield.
• Locateeachopeningbydroppingaplumbbobtothe
fourcornersoftheopeningbelow.
• Maintain the minimum 2-inch clearance/air space.
Maintaintheminimumclearancesanddimensionsas
speciedinTable4.1.
E. Cut Roof Opening
Determineandcutanopeningintheroofdirectlyabove
theopeningbelow,andatleast4-incheslargerthanthe
chimney’soutsidediametertoprovideatleasta2-inch
clearance all around the chimney.
• Thechimneymustbecenteredwithinthisopeningand
maintaintheminimum2-inchclearancetocombustibles.
F. Install Firestop
Arestopisrequiredoneachoorpenetrationinmultisto-
ryinstallation.BuildingCodesrequirearestopatevery
oor/ceilinglevel,includingwherethechimneypenetrates
intotheattic.Figure4.1showsatypical2-storyinstalla-
tion with an attic.
Note:arestopisnot installed where the chimney pen-
etrates through the roof.
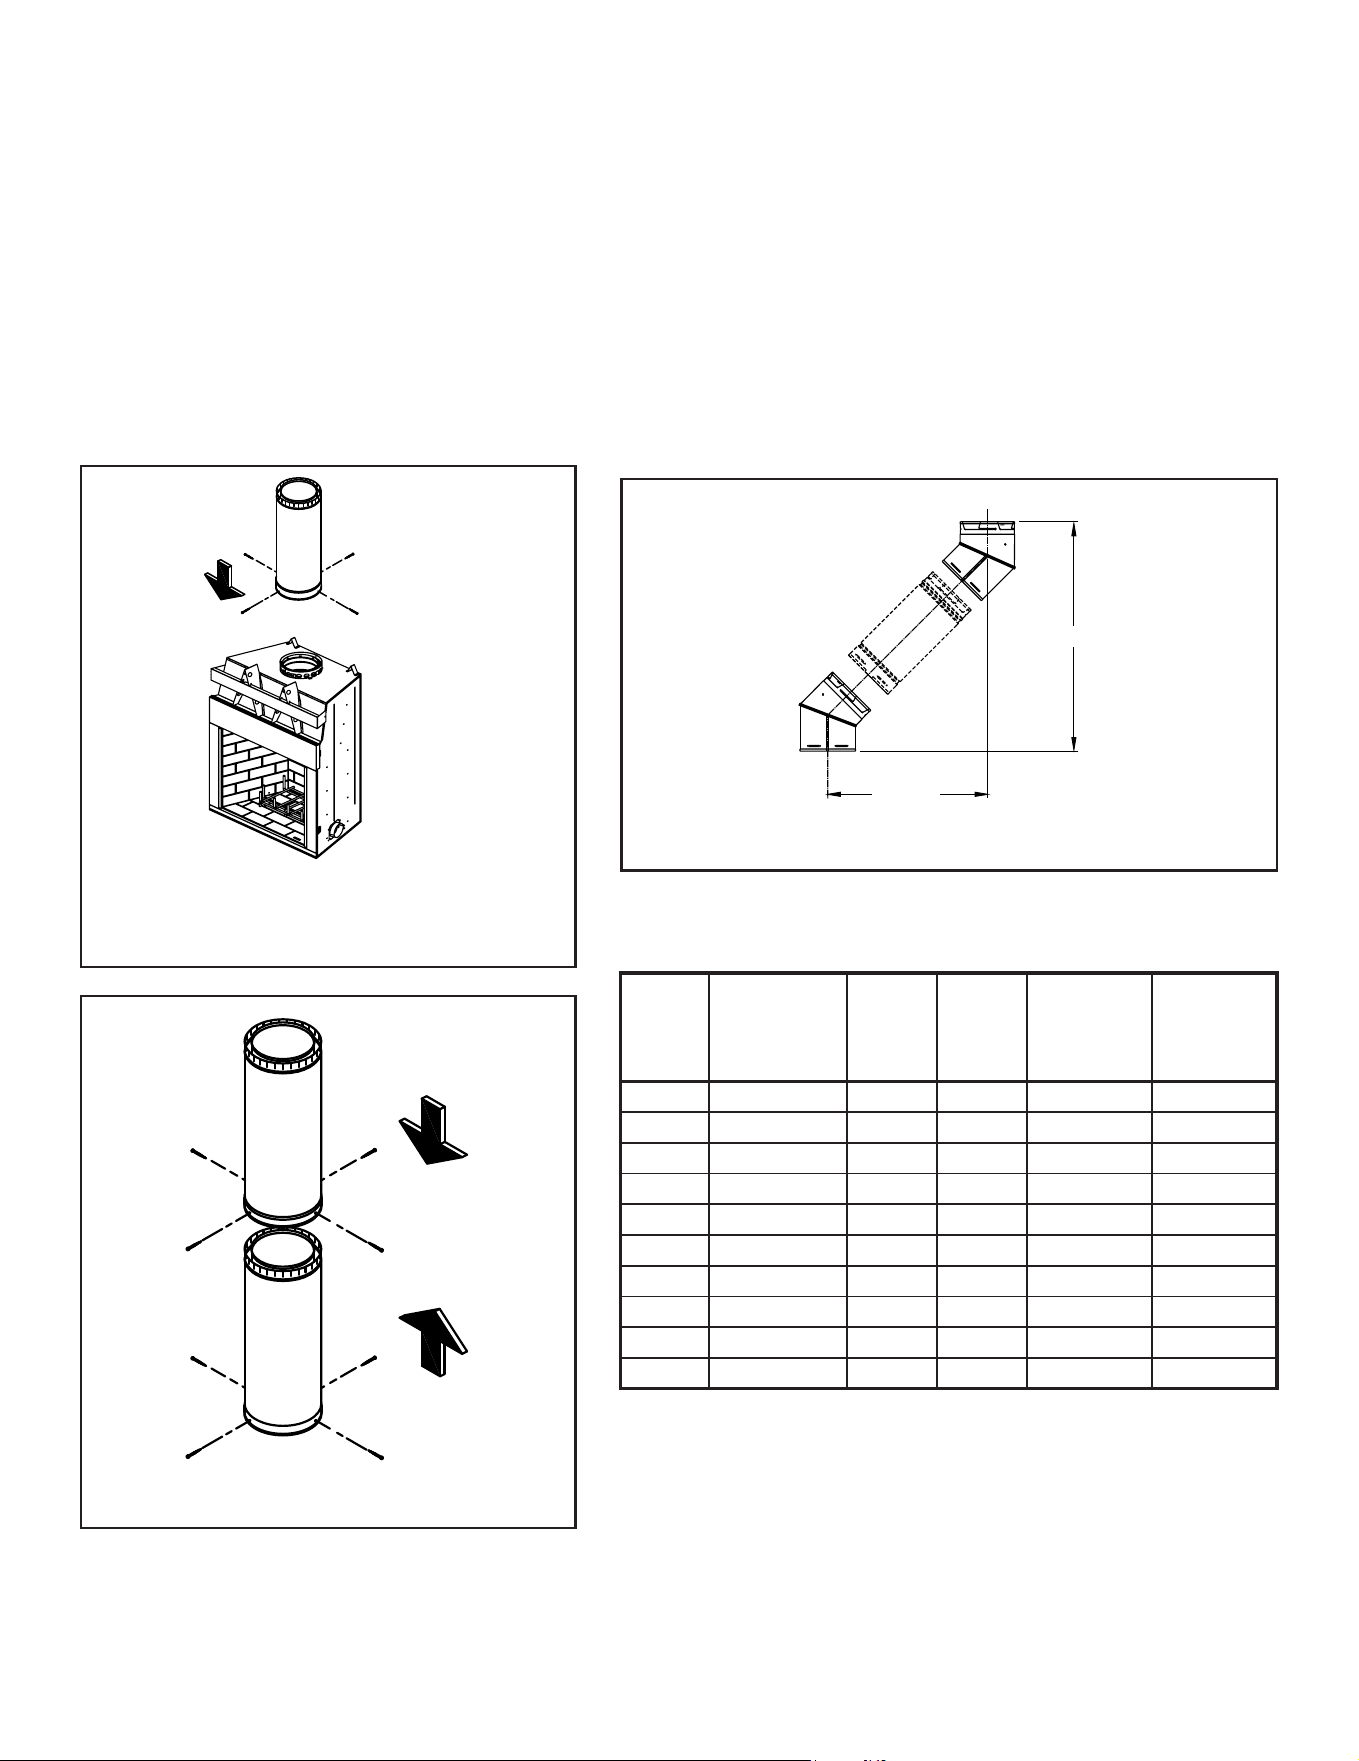
• Therestopisinstalledontheundersideoftheceiling/
oorframing(Figure4.2).
• Useaminimumofone8pennynailorone1-1/4”wood
screw per corner.
Framing
Figure 4.2
19
Outdoor Lifestyles • ODCASTLEWD-50 Install Manual • 4170-900 • Rev E • 3/26
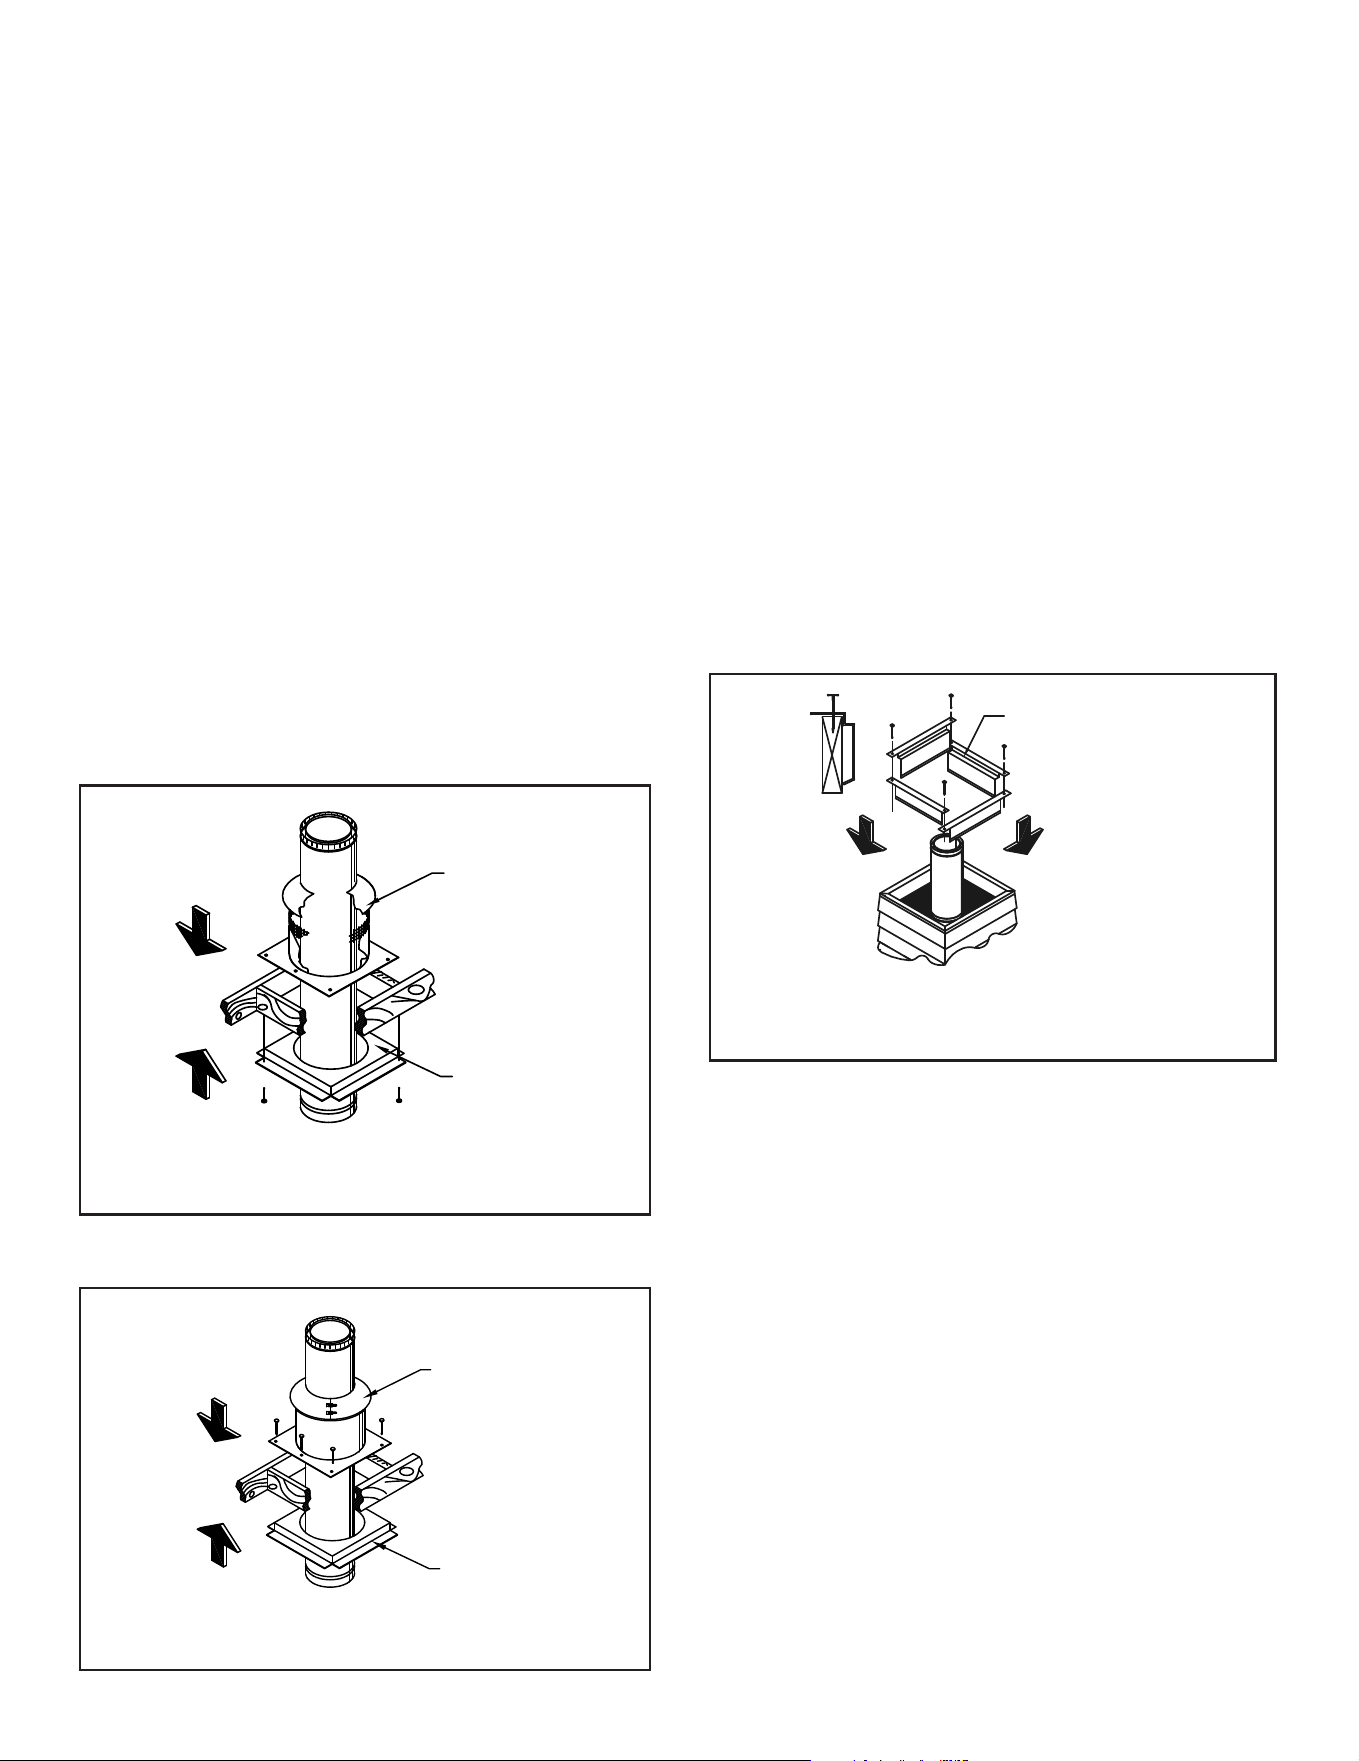
G. Assemble Chimney Sections
• Attach the rst chimney section or oset onto
thetopofthereplace(Figure4.3).Sheetmetal
screwsarerequiredtoconnectchimneysection
to the replace starter collar. Continue to add
additional sections of chimney as needed.
• Use a wall strap every eight feet of chimney
height.
• For each additional chimney section use four
ofthesheetmetalscrews provided tomakea
secureconnectionbetweenthechimneysections
(Figure4.4).Donotpenetratetheinnerlinerof
the chimney.
Figure 4.3
Figure 4.4
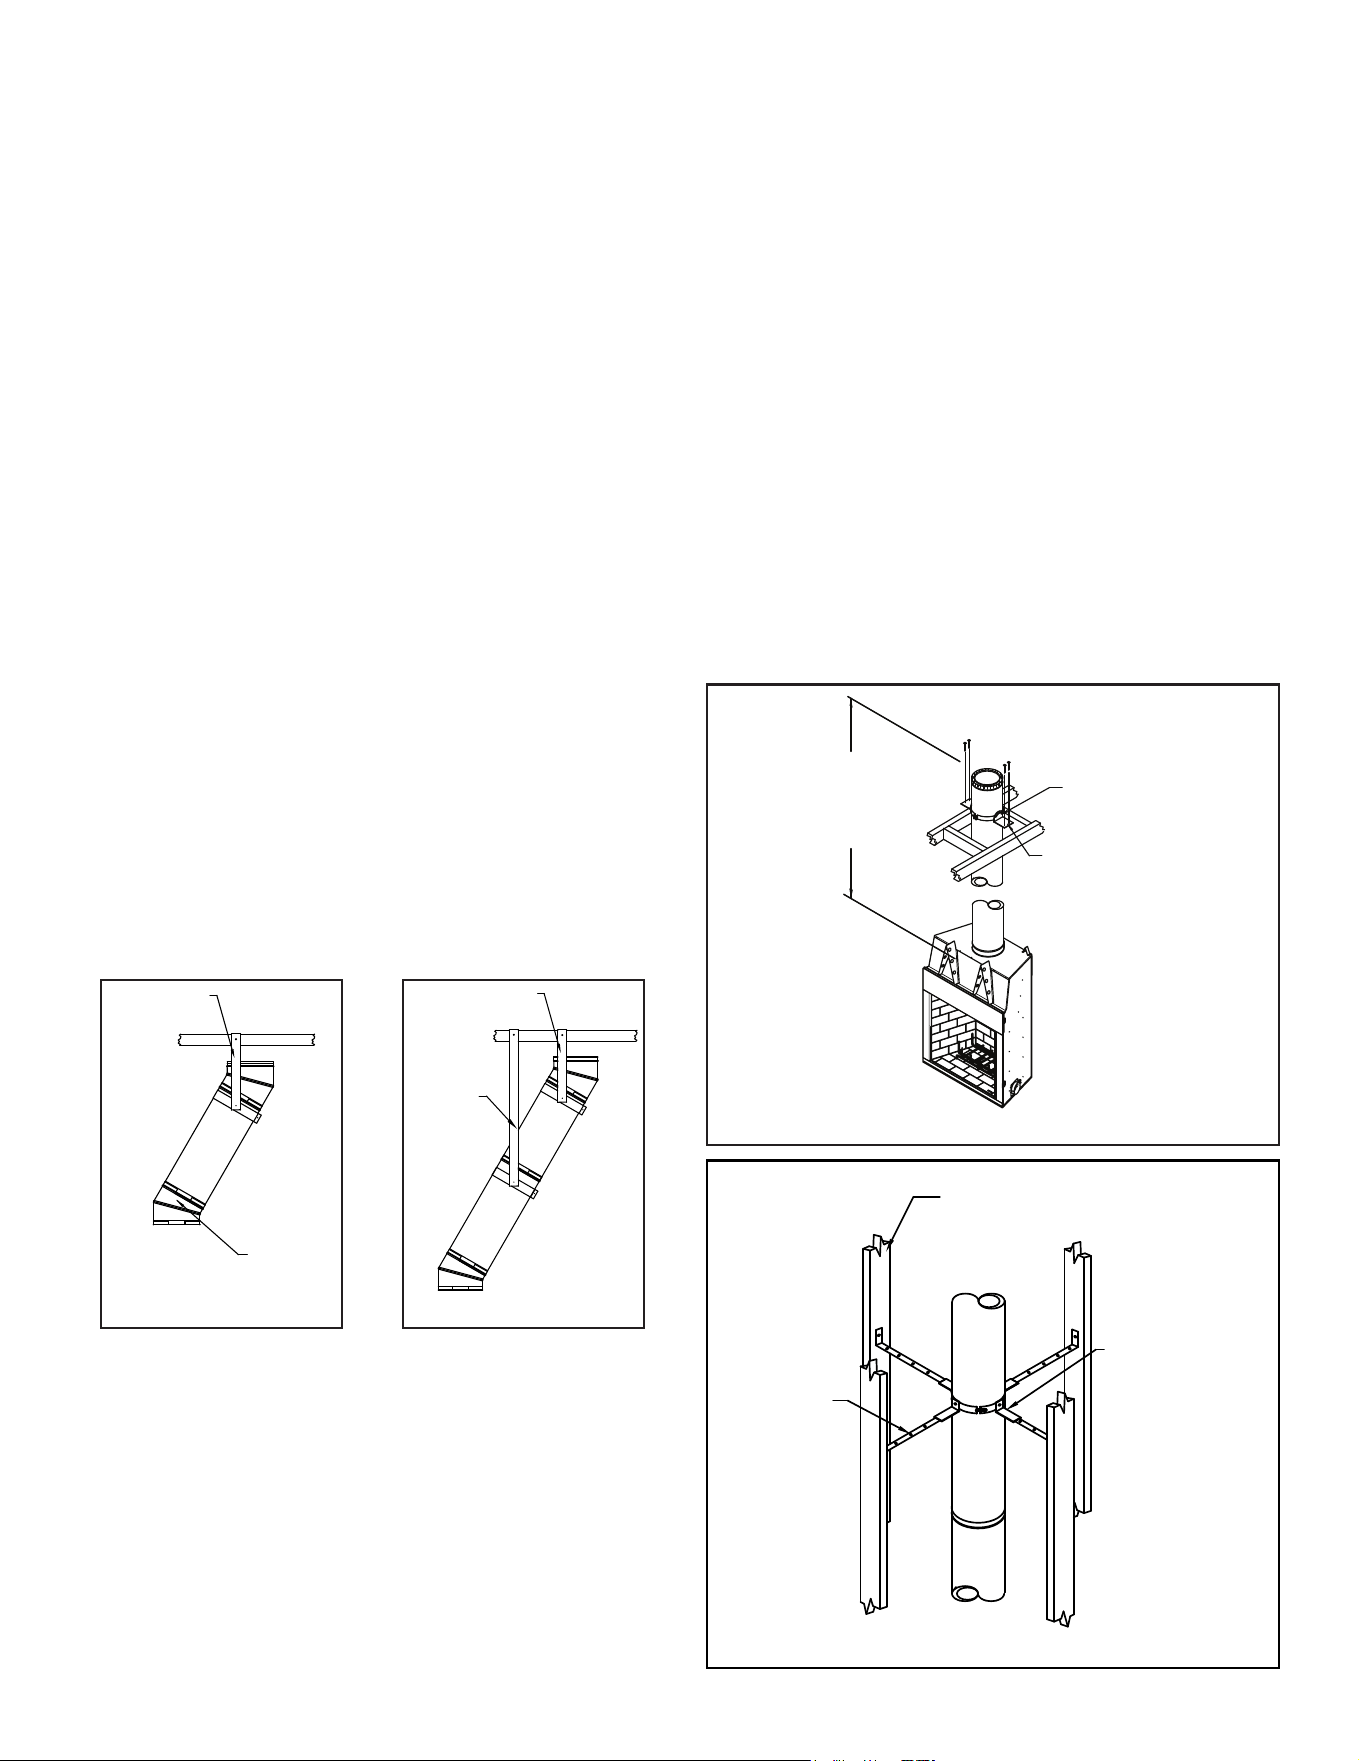
H. Using Osets/Returns
• Useanoset/returntobypassoverheadobstructions.
• Anosetandreturncanbeusedasasingleentityorseparated
bychimneysection(s).
WARNING! Risk of Fire! DO NOT useoset/returnsgreaterthan
30 ft. Chimney draft will be restricted and could cause overheating
andre.
• Measure the shift required to avoid the overhead obstruction
(Oset,Figure4.5).
• FindtheappropriateosetdimensionlistedinTable4.2.
• The rise (see Figure 4.5) coinciding with the oset dimension
measurement in Table 4.2 represents the required vertical
clearanceneededtocompletetheoset/return.
Table 8.2
Elbow
Angle
from
Vertical
Chimney
Length
Between
Elbows
Oset
Inches
Rise
Inches
Oset
Millimeters
Rise
Millimeters
15° 0 25/8 215/8 67 549
15° 12 in./305 mm 51/2 321/4 140 819
15° 18in./457 mm 71/8 38 181 965
15° 36in./914 mm 113/4 553/8 298 1407
15° 48in./1219 mm 147/8 67 378 1702
30° 0 61/4 241/2 159 622
30° 12 in./305 mm 113/4 34 298 864
30° 18in./457 mm 143/4 391/4 375 997
30° 36in./914 mm 233/4 547/8 603 1394
30° 48in./1219 mm 293/4 651/4 756 1657
RISE
OFFSET
Figure 4.5
20 Outdoor Lifestyles • ODCASTLEWD-50 Install Manual • 4170-900 • Rev E • 3/26
Elbow Strap
30° or 15°
Elbow
Figure 4.6
Elbow Strap
1 per
Section
Figure 4.7
I. Oset Elbow Installation
A30°Elbow(measuredfromthevertical)isthelargest
thatcanbeusedinanoset.A30°Elbowmaynotbe
combinedwithanotherElbowtomakeasteeperoset
(e.g.two30°Elbowsarenotallowedtobeputtogetherto
forma60°elbow.).AvoidElbowsifpossible.Atotallyver-
ticalchimneyismoreecient.WhenElbowsareneces-
sarytoavoidobstructionssuchasrafters,ridgepoles,or
joists,youareonlyallowedtouse2pairofElbowsinany
onechimneysystem.Horizontalrunsofchimneyviolate
buildingcodeandarenotallowed.
• Attachelbows
Attach elbow to chimney section or other elbow by
mating the male and female ends with each other and
using four sheet metal screws provided.Attach one
elbowtothechimneysectionbelow,andalignitforthe
oset.Determinetherequiredosetlengthandattach
anappropriatelength(orlengths)ofchimneysection(s)
abovetheelbow.Attach the second elbow above the
chimneysectiontocompletetheoset(Figure4.6).
• Secureoset
Use an elbow strap to secure the oset. Secure the
elbowstrap’sbandtochimneyaroundtheupperportion
ofthetopelbow,thentightenthenutandboltuntilthe
clampisrm.Wraptheelbowstrapendoveranadjacent
joistorrafterandsecureitwithatleasttwo8-pennynails
ortwo#8,1-1/2”screws.Addadditionalelbowstraps
foreachsectionofchimneyintheoset(Figure4.7).
Everychimneysectionintheosetmustbesupported.
Donotaddmorechimneysectionsuntiltheelbowsand
osetaresupported.Besurethatthechimneyremains
vertical.
Chase
Frame
Stabilizer
Plumbers
Tape
Install supplementary
support if height exceeds
50 ft or if required by
fireplace manufacturer
Each supplementary
support holds up to
25 ft. of chimney
Maintain 2 in. clearance
from chimney to framing
Figure 4.8
Figure 4.9
J. Supplementary Support & Stabilizer
Install a supplementary support if total chimney height
isgreaterthan50-feet,orifthereplacemanufacturer
requiresit.Ifadditionalsupportisneeded,installoneor
moresupplementarysupportswhichcaneachsupport25-
feetofchimney(Fig.4.8).
• Clampthesupplementarysupportbandaroundthepipe
usingthenutandboltprovided,andanchorthesupport
tonearbybuildingframing.
• Alwaysmaintainthe2”clearancetocombustiblesfrom
the chimney pipe.A stabilizer is available and may
be required by some replace manufacturers to keep
the chimney vertical and help maintain clearances to
combustibleswithinachase.
• Clampthestabilizertothepipeusingthenutandbolt
provided, and secure legs to nearby framing using
plumber’stapeorguy-wires(Fig.4.9).
Note: The stabilizer does not support the weight of the
chimney,it is onlyusedtokeepchimneycenteredwithin
a chase.
21
Outdoor Lifestyles • ODCASTLEWD-50 Install Manual • 4170-900 • Rev E • 3/26
K. Install Attic Insulation Shield
Theatticinsulationshieldmustbeinstalledwherethe
chimneypassesintoanattic.Itspurposeistopreventde-
brisandinsulationfromgettingtooclosetothechimney.
Inatticareaswherethisshieldcannott,orisnotused
you must enclose the attic portion of the chimney in a
framed enclosure. If the chimney is fully enclosed through
theattic,anatticinsulationshieldisnotrequired.Install
theatticinsulationshieldasfollows:
• Removeanyinsulationfromatticooraroundtheframed
opening.
• Assemblechimneysectionsuntilatleast18inchesof
chimneyextendsabovetherestop.
• Sliptheatticinsulationshieldoverthechimneyuntilthe
basesitssquarelyontheframedopening(Figure4.10).
• Secure the attic insulation shield to the top of the framed
opening using at least two 8-penny nails or two #8,
1-1/2in.woodscrewsperside(Figure4.11).
• Wrap the collar of the attic insulation shield around the
chimney and fasten it loosely. Slide the collar down
tomeettheatticinsulationshield.Tightentheboltsto
securethecollarinplace(Figure4.11).
• Combustiblematerialmaycomeintocontactwiththeattic
insulationshieldaslongastherequiredclearancesare
maintained to the chimney pipe.
Attic
Insulation
Shield
Firestop
Attic
Figure 4.10
Attic
Attic Shield
Collar
Firestop
Figure 4.11
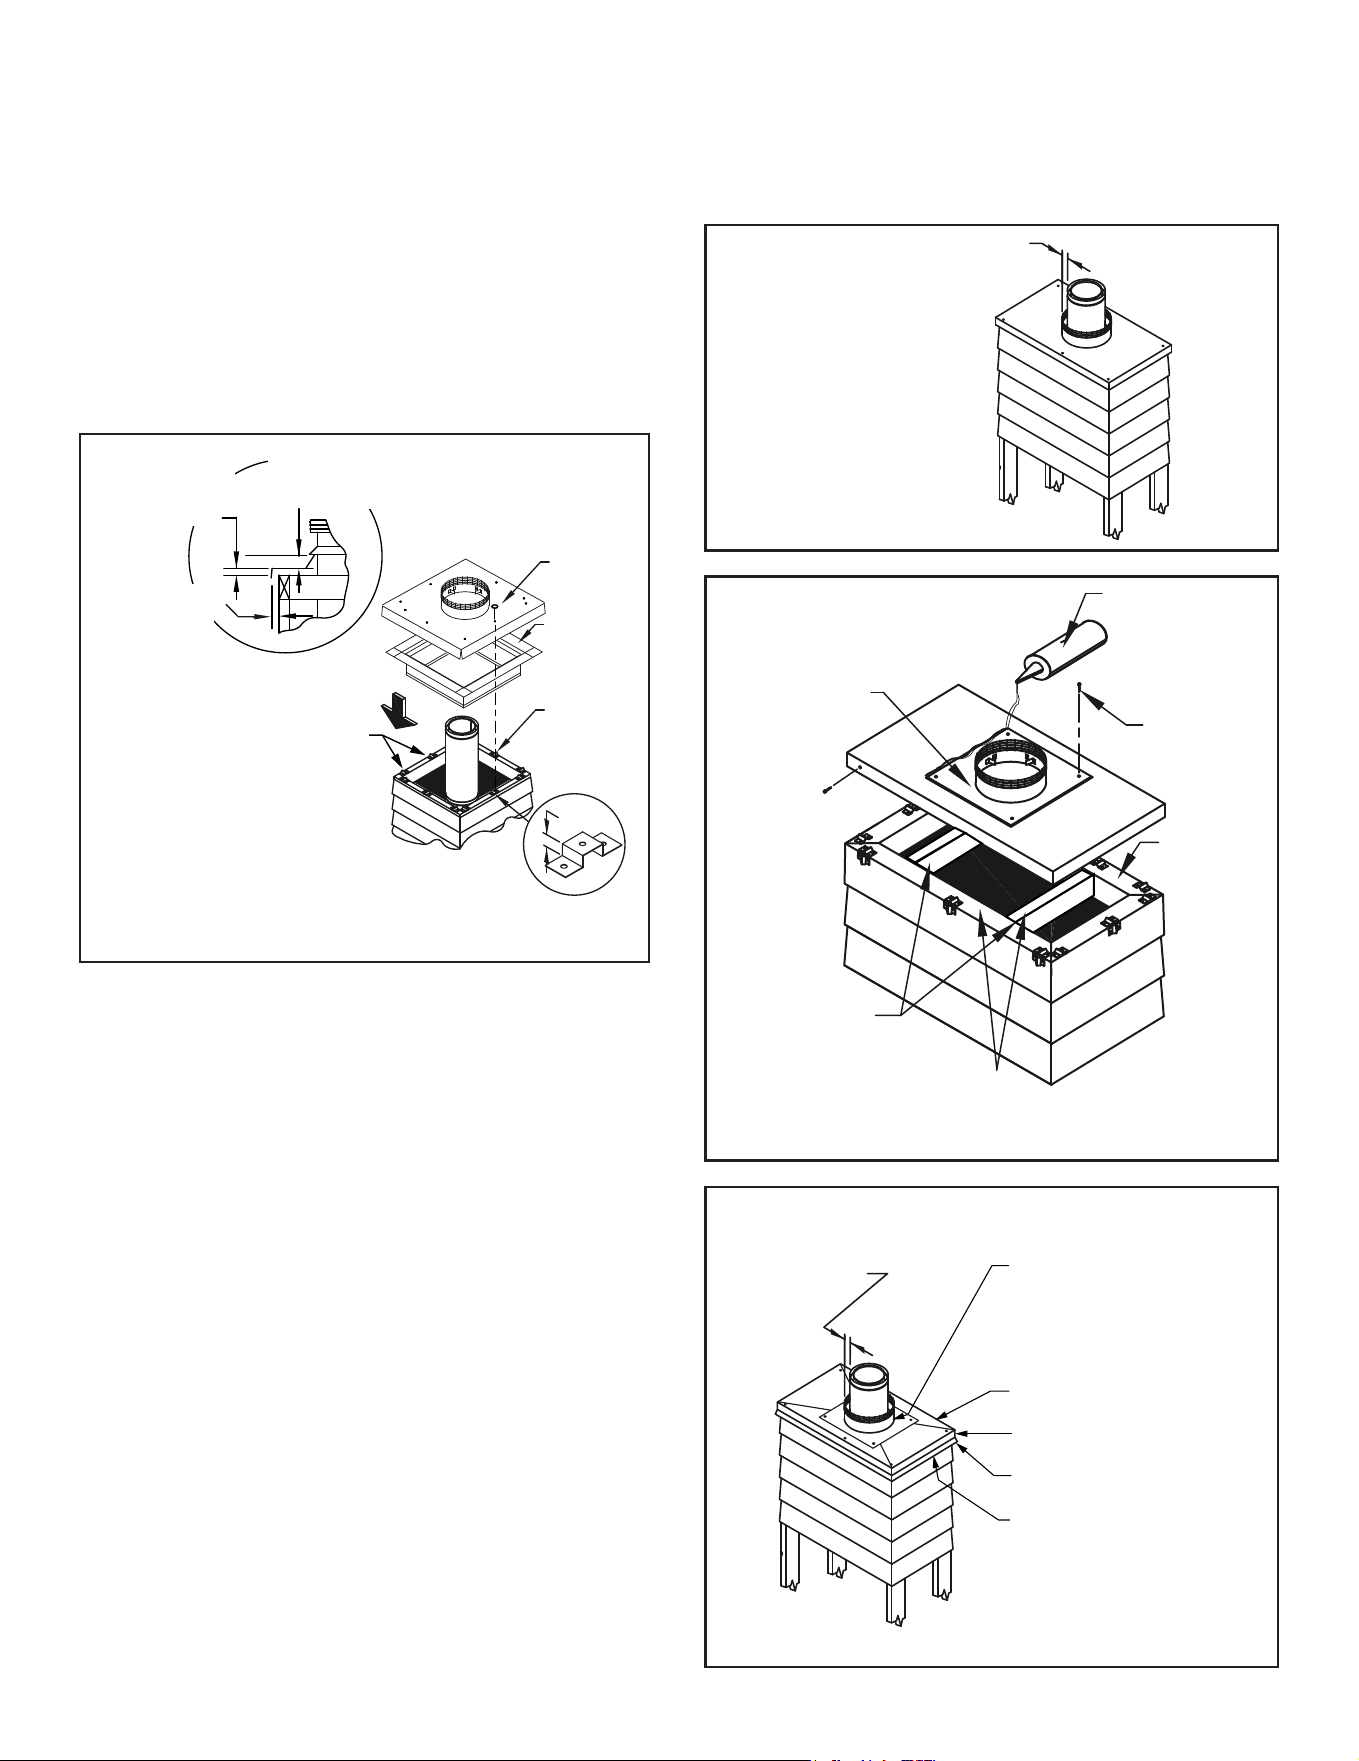
L. Install Roof Radiation Shields
Roofradiationshieldsmustbeusedtoprovideprotection
forrooforchaseframingmembers.
Note: Roof radiation shields do not allow for a reduced
clearancetocombustibles.
Clearancetocombustiblesmustbeaminimumof2”
away from the chimney pipe.
• Install roof radiation shields at either the top of the chase
orwherethechimneypenetratestheroof,whicheveris
the top of the installation.
• Roofradiationshieldsarebuiltwitha1/2”airgapstando
fromthejoistface(Figure4.12).Thecornersoftheroof
radiationshieldsoverlap eachothertoensureproper
position.
• Secure the roof radiation shields to the top of the framing
membersusingscrewsornailsinthecorners.
• Ifframingmembersarefurtherawayfromthechimney
than 2 in., center the roof radiation shield to the chimney
ontheframingmemberandsecureinplacewithscrews
or nails.
(4) Roof
Radiation
Shields
Chase
Enclosure
Figure 4.12
M. Attach Flashing
Forchaseenclosures,usethechasetopashing.The
chasetopashingallowsfora1-1/2in.clearancemain-
tainedfromthechimney(Figure4.14)andprovides
requiredventilationair.
• Chase top ashings (includes chase top collars and
spacingclips)areavailablefromyourHHTdealer.
• Additionalnon-combustiblestructuralsupportscanbe
eld-fabricatedtohelpsupportthechasetopashing
ifneeded,providedtheairventilationrequirementsare
maintained.SeeFigure4.15.
• Ifthechasetopashing(40in.x40in.)doesnotensure
theminimum1/2in.spacingandperimeterventilation
requirementsasshowninFigure4.13.,useachasetop
collarandeld-constructtheashingasneededforthe
chasedimensions.SkiptoField-Constructed Chase
Top Flashing.
22 Outdoor Lifestyles • ODCASTLEWD-50 Install Manual • 4170-900 • Rev E • 3/26
1/2"
Chase top
flashing
Roof
radiation
shields
Required
spacing
clips
Spacing Clips
1/2 in. air space
established by
spacing clips
1/2 in. Air Space
Storm collar must
be installed 1 in.
off chase top
1 1/2 in. ventilation
opening around
chimney pipe
Figure 4.13
Figure 4.14
Chase Top
Collar
Sealant
Additional
Structural Support
Screw or
Pop-rivet
Insect
Screen
Roof Radiation Shields
placed here
Screws
to hold
flashing to
chase top
Figure 4.15
1 1/2 in. ventilation
opening around
chimney pipe
Chase Top Collar
Turn-down
Slope downward
Drip edge
Insect-guard screening
may be added between
chase and chase top
flashing.
Figure 4.16
Field-Constructed Chase Top Flashing
• Field-constructedashingmustbeconstructedof24GA
minimumsheetmetalorothersuitablenon-combustible
materials.
• Theashingmustbeoversizedtoallow1/2in.airgap
around all four sides.
• Include aminimum 1 in.turn down anda 1/2 in.drip
edge(optional)topreventwaterfromseepingintothe
chase.RefertoFigure4.16.
• Additionalnon-combustiblestructuralsupportscanbe
eld-fabricatedtohelpsupportthechasetopashingif
needed, provided the air ventilation requirements are
maintained.SeeFigure4.15.
• Spacingclipscanbeeld-fabricatedasneededoutof
24 GA sheet metal or other suitable non-combustible
material(refertoFigure4.13),orpurchasedfromHearth
&HomeTechnologies.
• Securethechasetopcollarsectiontotheeld-fabricated
ashingwithsheetmetalscrewsorrivets(Figure4.15).
• Seal chase top collar section to flashing with non-
hardening waterproof sealant to ensure a weather tight
connection.SeeFigure4.15.
• Insect-guard screening may be added between the
chaseandashing.
• Installthechasetopashingatthetopofthechasewith
a1/2in.minimumairclearanceothetopofthechase
construction(Figure4.13).
• Spacingclipscanbeeld-fabricatedasneededoutof
24 GA sheet metal or other suitable non-combustible
material(refertoFigure4.13)
• Insect-guard screening may be added between the
chaseandchasetopashing.
• Securethechasetopashingtothechasewithatleast
three screws or nails per side.
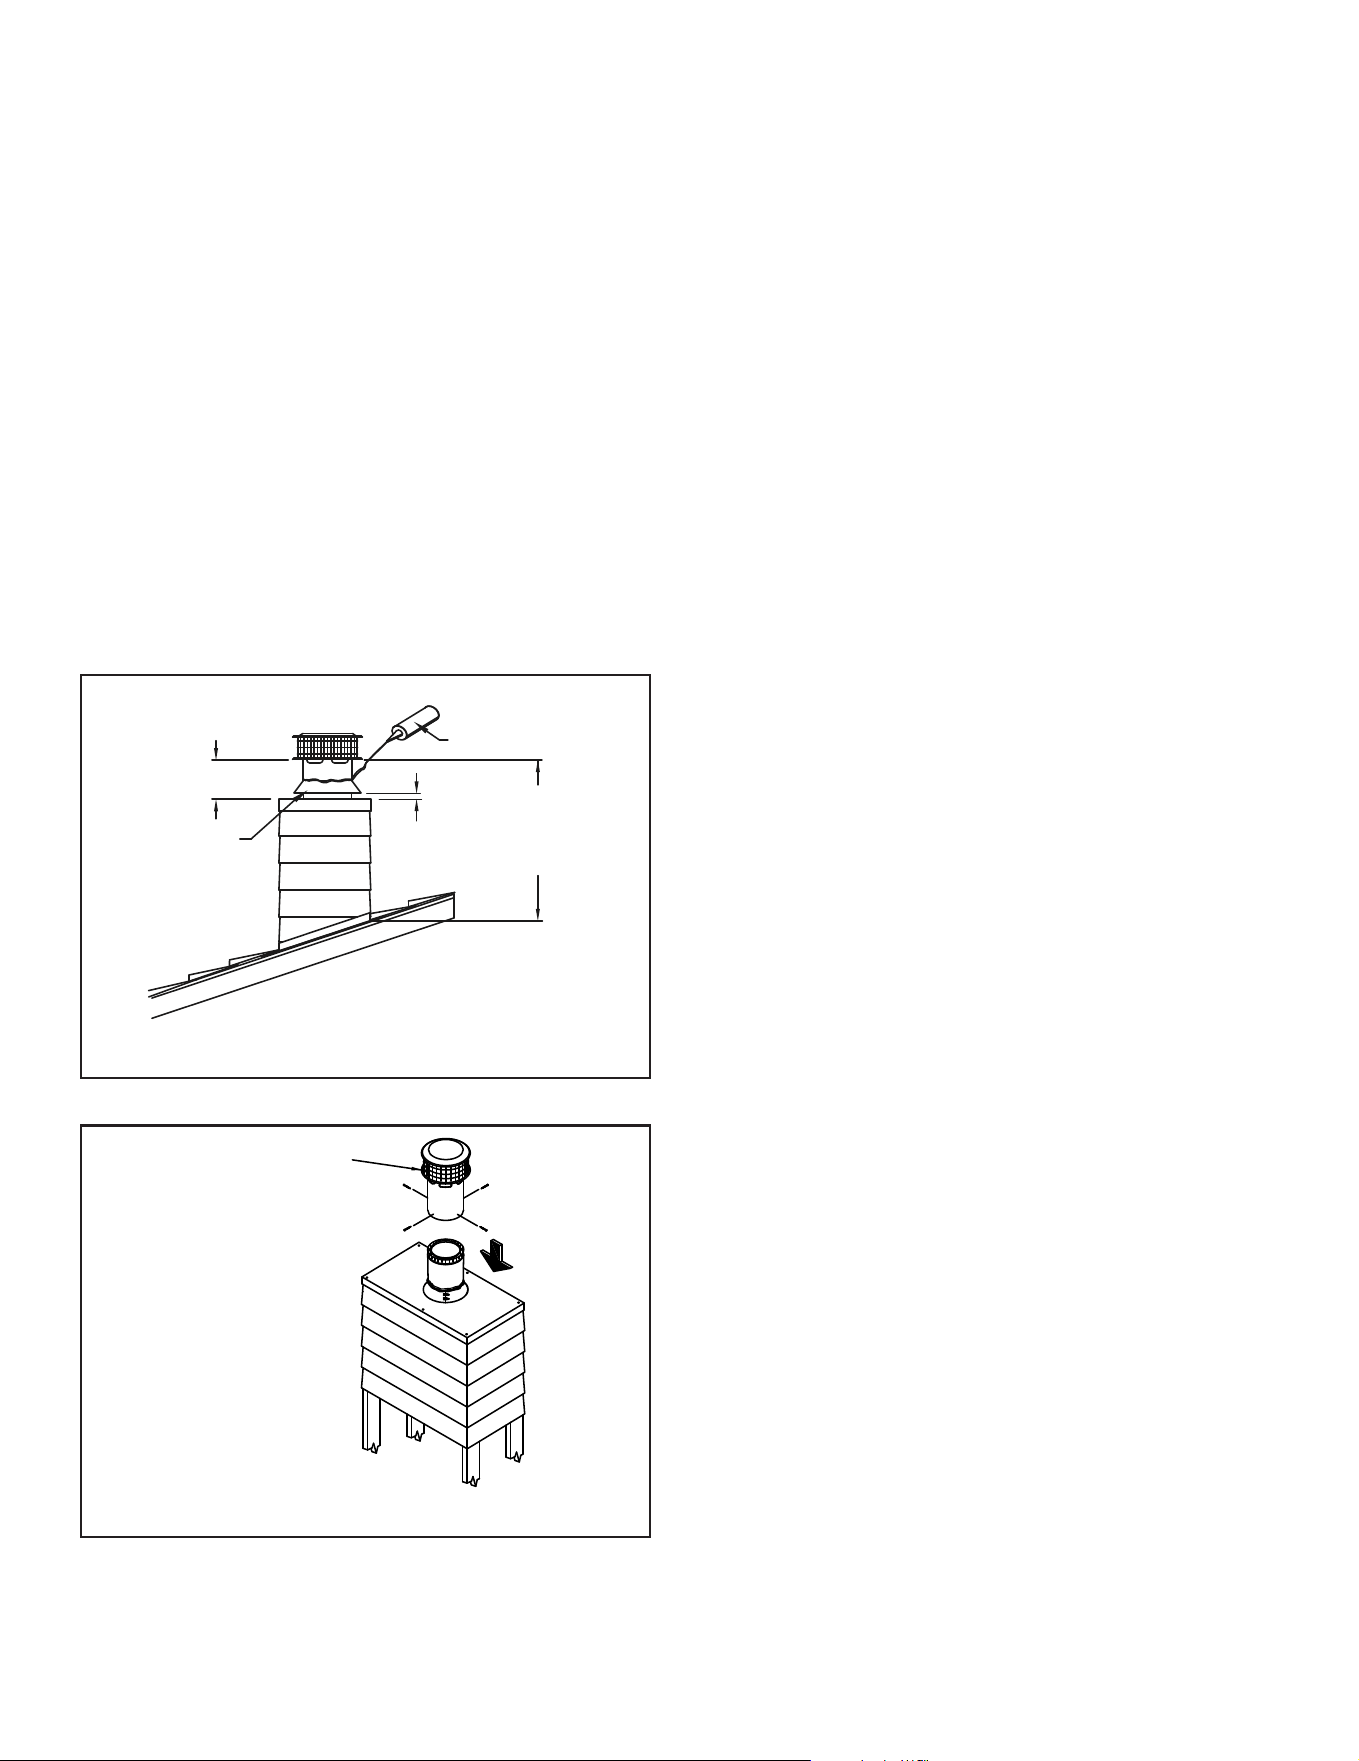
• Wheninstalled,thebottomofthechimneycapmustbe
atleast6in.abovethechasetopashing.
• Securethechasetopashingtothechasewithatleast
three screws or nails per side.
• Wheninstalled,thebottomofthechimneycapmustbe
atleast6in.abovetheashing(Figure4.16).
Note: 30spacingclipsand
20ftinsert-guardscreening
are included with the unit.
23
Outdoor Lifestyles • ODCASTLEWD-50 Install Manual • 4170-900 • Rev E • 3/26
Sealant
6 in. min.
1 in.
min.
Storm
Collar
3 ft. minimum
above roof
opening
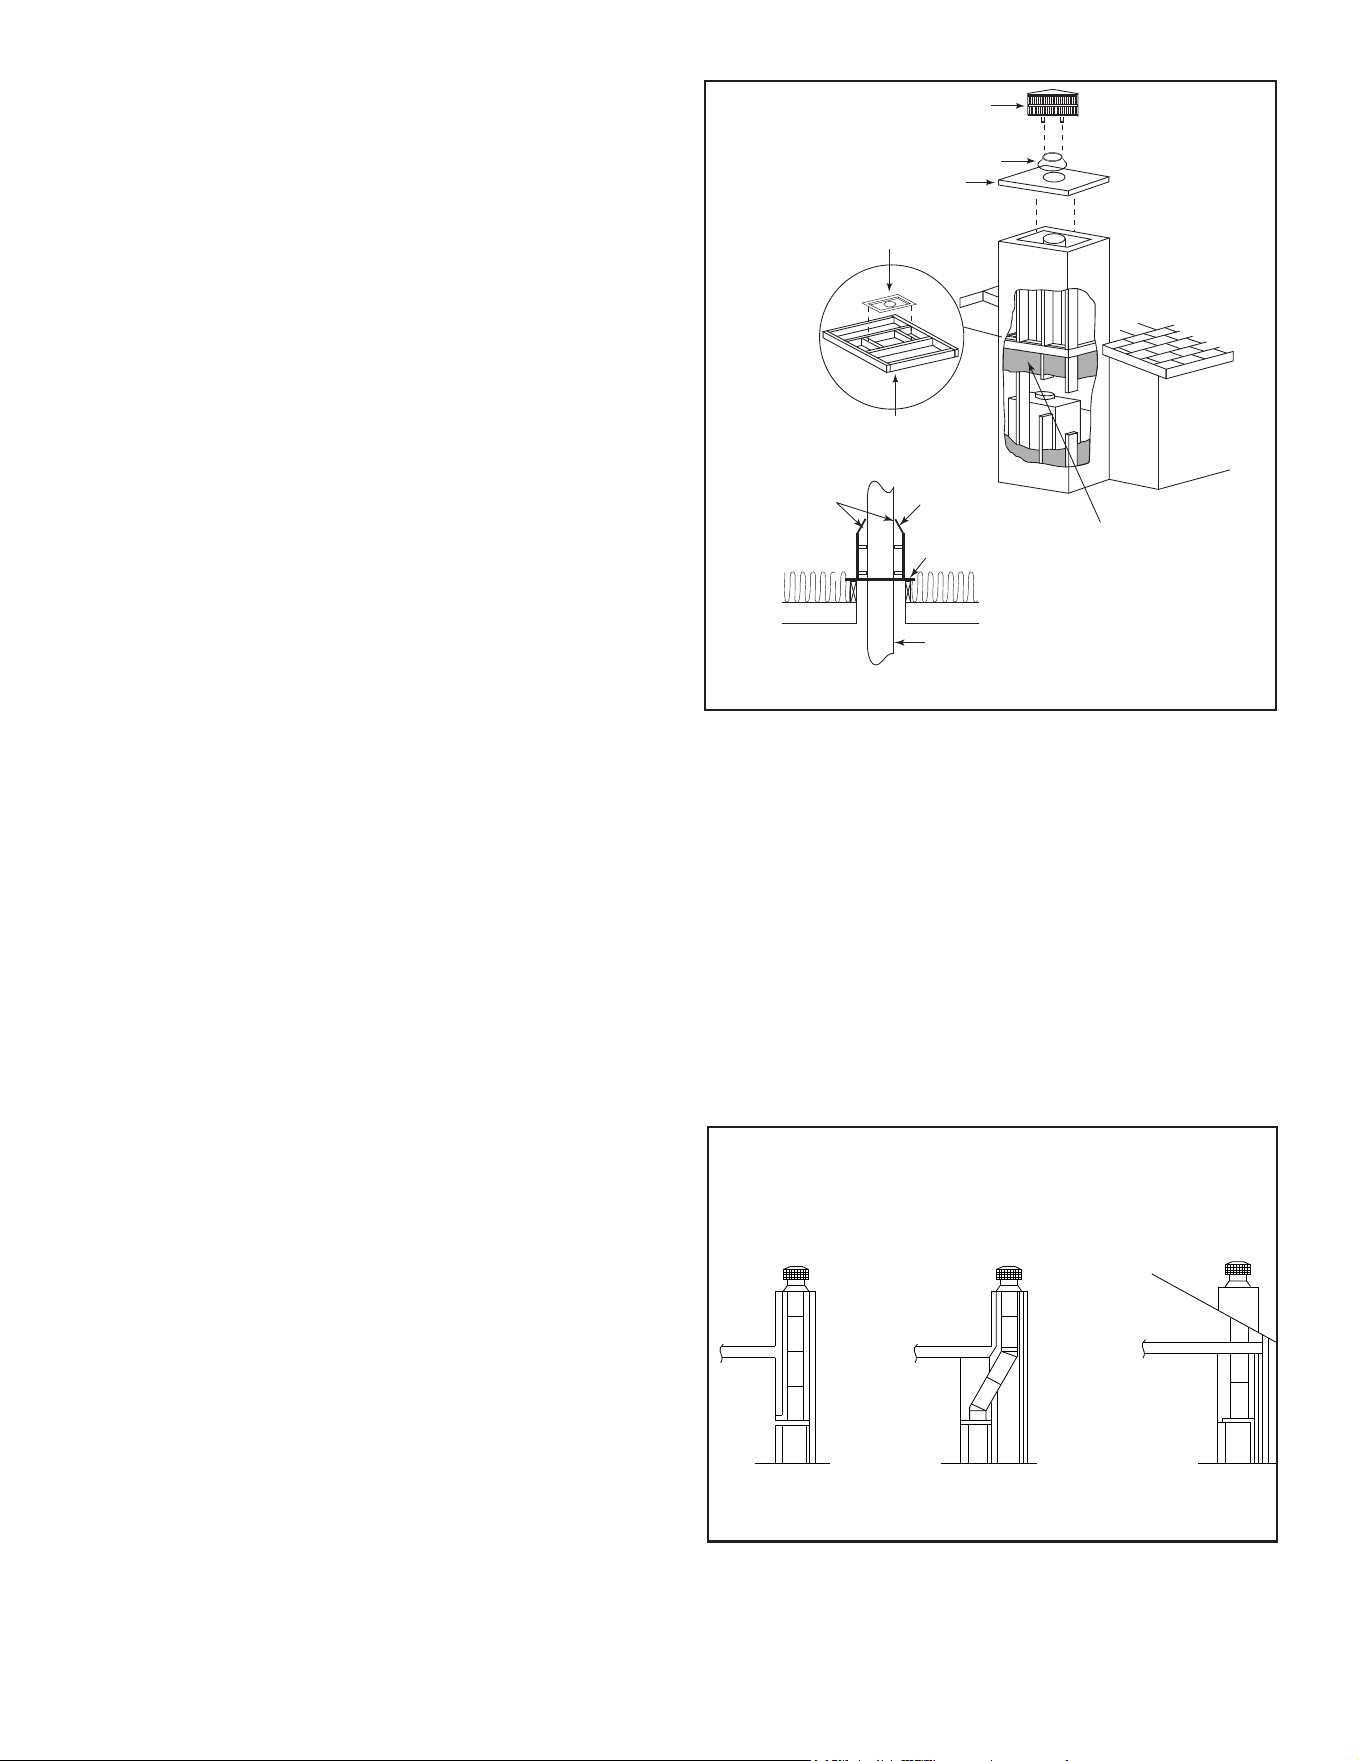
N. Finish Top
• Slidethestormcollardownoverthechimneytothetop
oftheashing.Thestormcollarmustbeinstalled1in.
othechasetopashingtoprovideproperventilation
(Figure4.17).
• Tightentheboltsofthestormcollarandsealthestorm
collar against the chimney with sealant. Be sure chimney
andosetsareproperlysupported.
• Apply a non-hardening waterproof sealant around the
chimney at the point where the storm collar will meet
thechimneyjustabovetheashing(Figure4.17).
• Attachthechimneycapontothetopofthechimneyby
setting the female end of the cap onto the male end of
thelastchimneysection.Securethecapbyusingfour
sheetmetalscrews(provided,Figure4.18.)
• Do not push down from the top portion of the cap as this
may damage the cap. Push from the lower section of the
cap if needed.
• Thechimney cap top can be removed for chimney
cleaning.
Termination
Cap
Figure 4.17
Figure 4.18
24 Outdoor Lifestyles • ODCASTLEWD-50 Install Manual • 4170-900 • Rev E • 3/26
O. Chimney Termination Requirements
• Installacapapprovedandlistedforthisreplacesystem.
• Locatecapwhereitwillnotbecomepluggedbysnoworothermaterials.
• Locate cap away from trees or other structures.
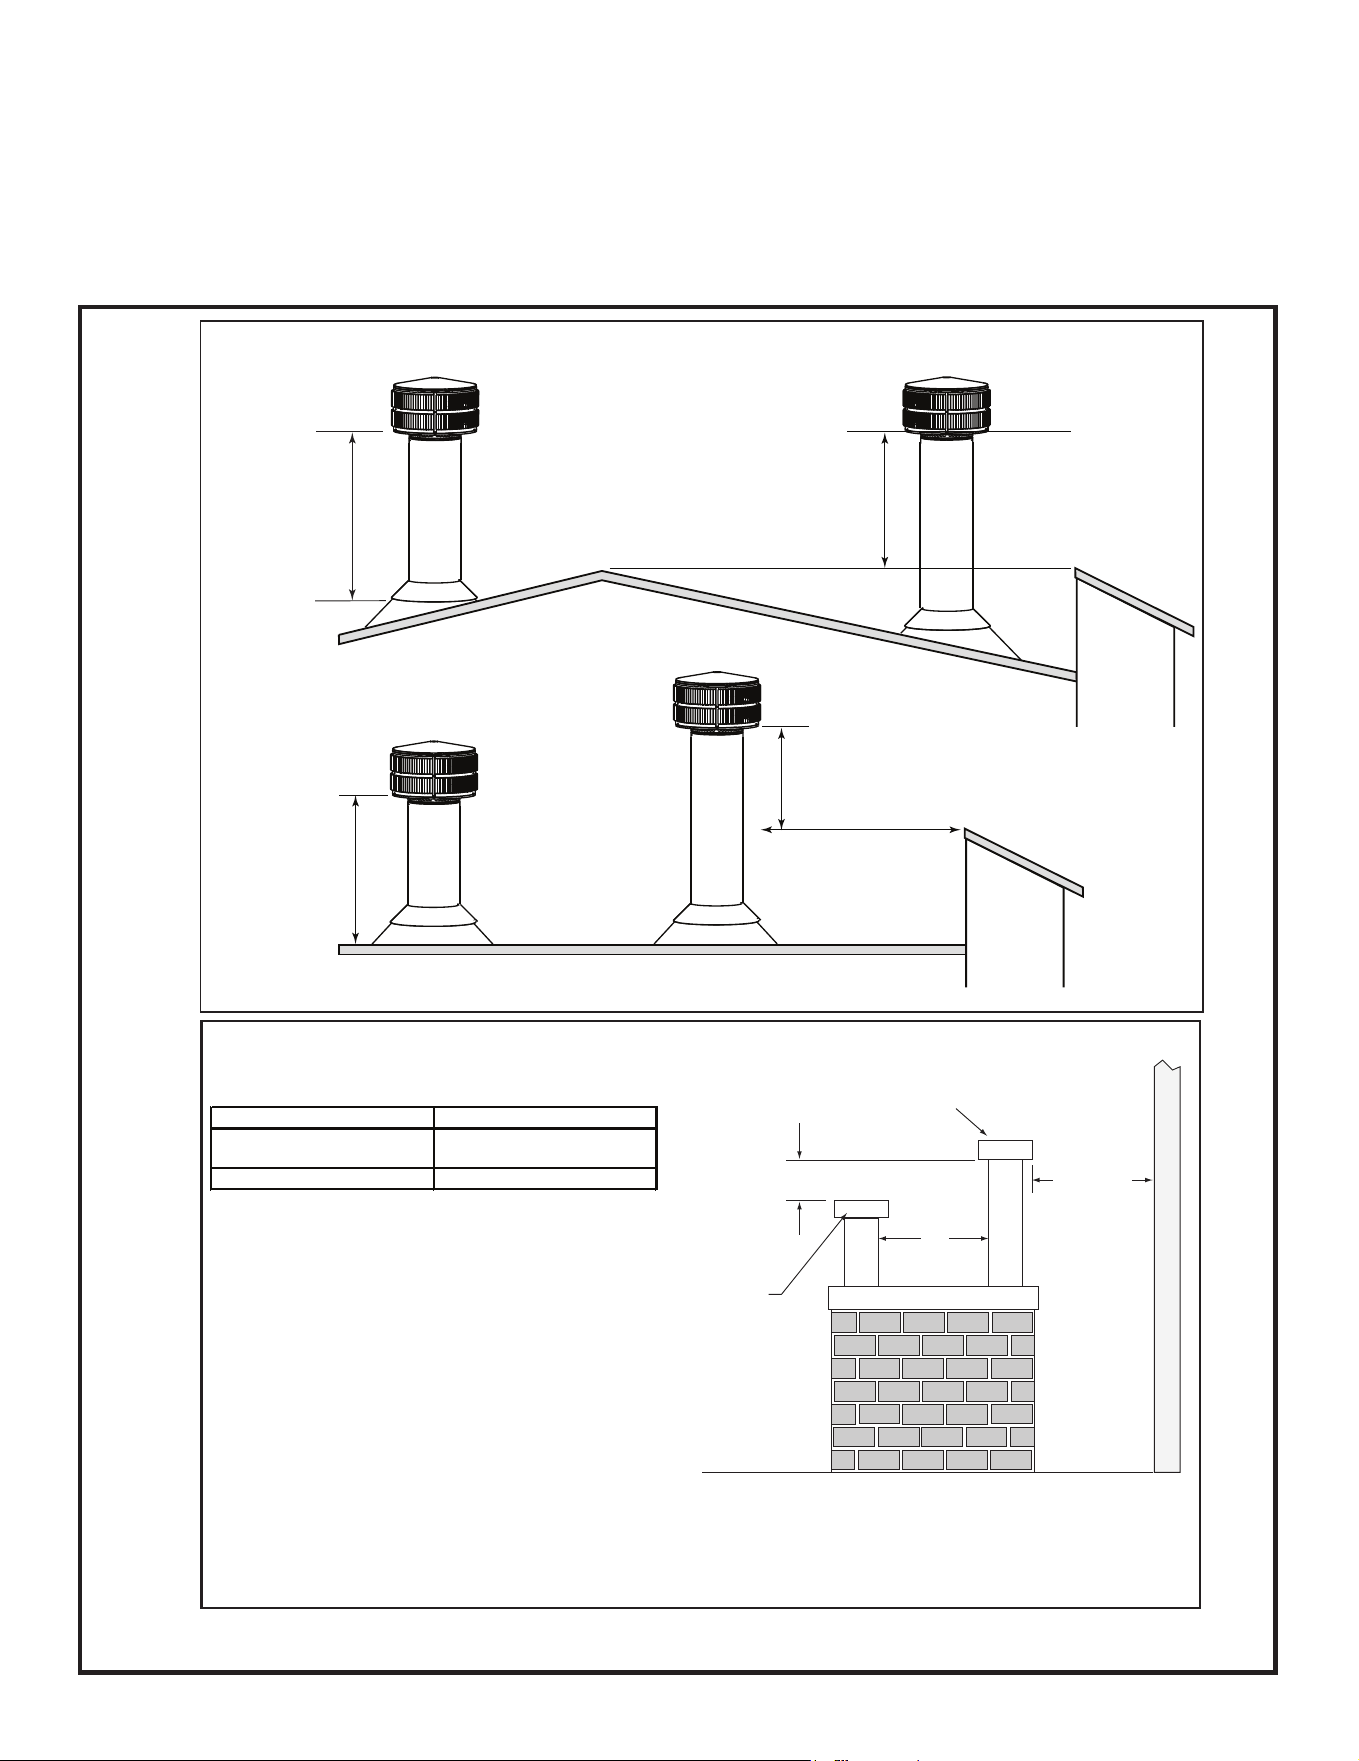
• Thebottomoftheterminationcapmustbeatleast3ft(.91m)abovetheroofANDatleast2ft(.61m)aboveanyportion
ofroofwithin10ft(3.05m)asshowninFigure4.19.
• SeeFigure4.19fordistancerequiredbetweencaps.
Slanted Roofs
Flat Roofs
Chimney must
extend 3 ft (.9 m)
above the roof
Chimney must extend 2 ft (.6 m)
above any portion of the roof or
adjacent structures within
10 ft (3 m) of the chimney
Chimney must
extend 3 ft (.9 m)
above the roof
Chimney must extend 2 ft (.6 m)
above any portion of the roof or
adjacent structures within
10 ft (3 m) of the chimney
Multiple Chimney Locations
A B
6 in. (minimum) up to 20 in.
152 mm/508 mm
18 in. minimum
457 mm
20 in. and over 0 in. minimum
Gas, Wood or Fuel Oil
Termination Cap
Wood
Minimum
(See
illustration
above)
B
Gas
Termination
Cap **
A *
Perpendicular Wall
*
If using decorative cap cover(s), this distance may need to be
increased. Refer to the installation instructions supplied with the
decorative cap cover.
**
In a staggered installation with both gas and wood terminations, the
wood termination cap must be higher than the gas termination cap.
Figure 4.19 Multiple Chimney Locations
25
Outdoor Lifestyles • ODCASTLEWD-50 Install Manual • 4170-900 • Rev E • 3/26
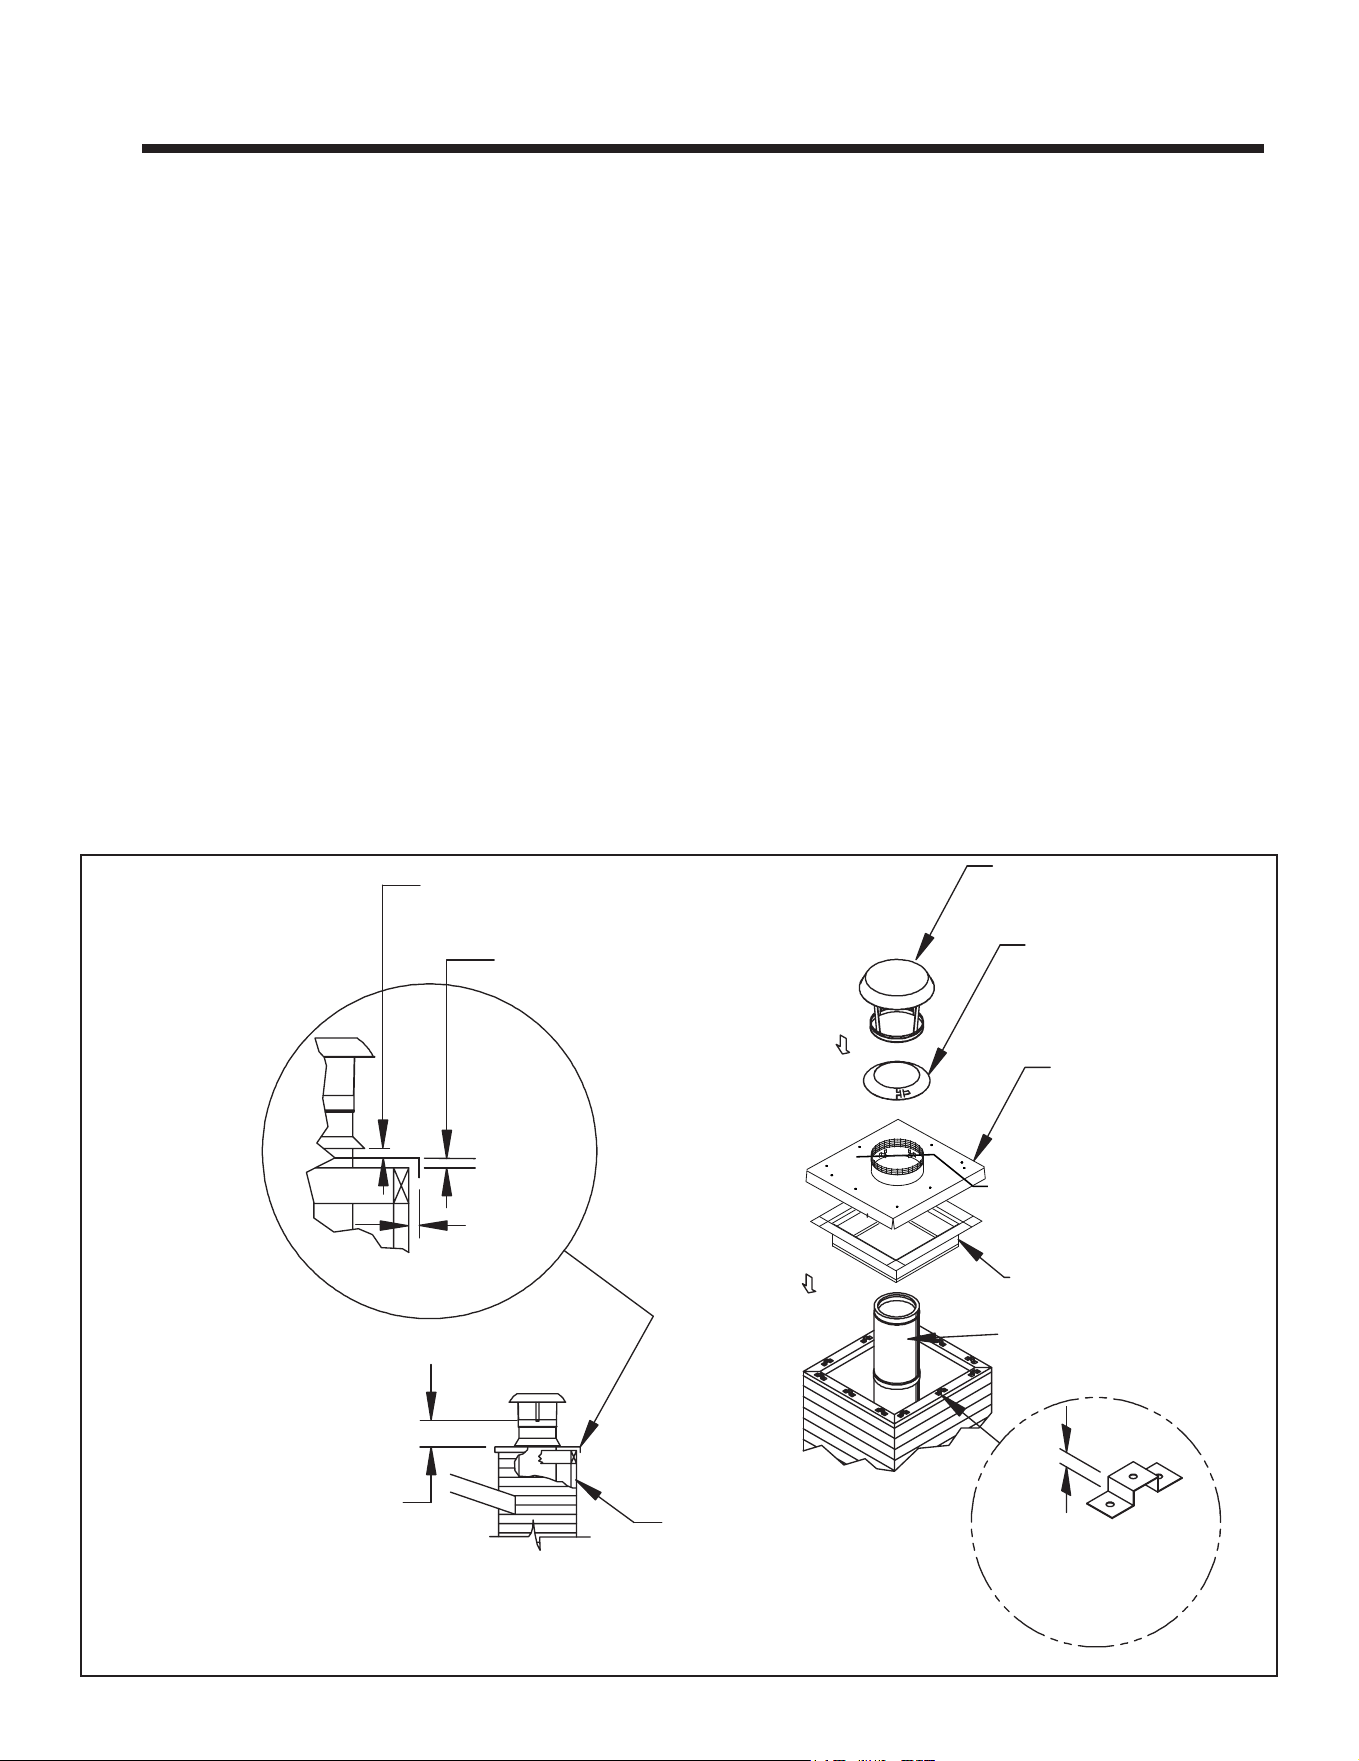
Roof radiation
shields
Allow a 1 in. (25 mm) air gap between
storm collar and chase top flashing
1/2 in. (13 mm) air space
established by spacers
1/2 in.
overhang
14 in. (345 mm)
diameter chimney
must extend at least
6 in. (152 mm) above
chase top flashing.
DuraChimney II
Pipe
1/2 in.
(13 mm)
Spacers for chase
top flashing
Chase Top
Flashing
Storm Collar
20 in. diameter
opening
Chimney Cap
Maintain 2 in. (51 mm)
clearance between
DuraChimney II and
chase enclosure
• Chase top shrouds may be eld constructed where
permittedbyregionalbuildingcodes.
WARNING! Risk of Fire! Shrouds must be constructed as
specied.Improperconstructionmayoverheatchasetop.
NOTICE: Some regional codes require an agency-Listed
shroud.Consultyourlocalbuildingocials.
5 5
Shrouds
A. Shroud Requirements
Figure 5.1 Shroud Requirements
Shroudscaneitherbeeld-fabricatedorfactory-fabri-
cated,buttheymustmeettherequirementsasspecied
intheseinstructions.Shroudsmustbeconstructedofa
minimum24ga(.024in.)stainlesssteel,aluminizedsteel,
galvanizedsteel,orcopper.Othermaterialsmayalsobe
used,suchasbrick,mortar,stucco,stone,etc.provided
theyarecompletelynon-combustible.Checkwithyour
localbuildingcodeauthoritiesforanyadditionalshroud
requirements.Shroudsmustbeabletoberemovedtoal-
low chimney access to properly clean the chimney. Dura-
Chimney II installations which include the use of a shroud
mustcomplywiththefollowingrequirements(Figure5.1)
• DuraChimney II must maintain at least 2 in. (51 mm)
clearancefromcombustiblematerials.
• Thechaseenclosuremustbeventilated.
• Thechasetopashingoreld-fabricatedchasepanmust
beused.Field-fabricatedchasepansareacceptableif
theymeettheserequirements:
- Materialmustbe24ga(.024in)galvanizedsteelor
equivalent.
- Chasepanmusthaveopening3in.(76mm)larger
than outside diameter of chimney pipe with at least
a1/2in.(13mm)upturnedange/collar.
- Chasepanmustoverhangchaseby1/2in.(13mm)
persideforproperairow.
- Chasepanmusthavea1in.(25mm)downturned
outsideedge(weatherprotection).
26 Outdoor Lifestyles • ODCASTLEWD-50 Install Manual • 4170-900 • Rev E • 3/26
• Field-fabricated spacing clips (1/2 in./13 mm tall, 24
ga/.024in.galvanizedsteel)mustbeusedtosupport
thechasetopashingorchasepan,inordertoprovide
airow.
• 14in.(345mm)DuraChimneyIIpipemustextendat
least6in.(152mm)abovethechasepan/ashing.
• ADuraChimneyIIcapmustbeusedinsidetheshroud.
• Theshroudmustnotbeindirectcontactwithanyofthe
DuraChimneyIIcomponents(otherthanthechasetop
ashing).
• Allopenareasoftheshroudmustbecoveredwith1/2
in.(13mm)stainlessorgalvanizedsteelmeshscreen
topreventdebrisfromenteringtheshroud.
• Shrouds must follow the dimensional requirements
specied inTables 5.1, 5.2 or 5.3, depending on the
styleofshroudused.Thethreebasicshroudstylesare
1) House, 2)Arch or Mailbox, and 3) Pyramid. Most
factory-fabricatedshroudswillfallunderoneofthese
basicstylecategories.
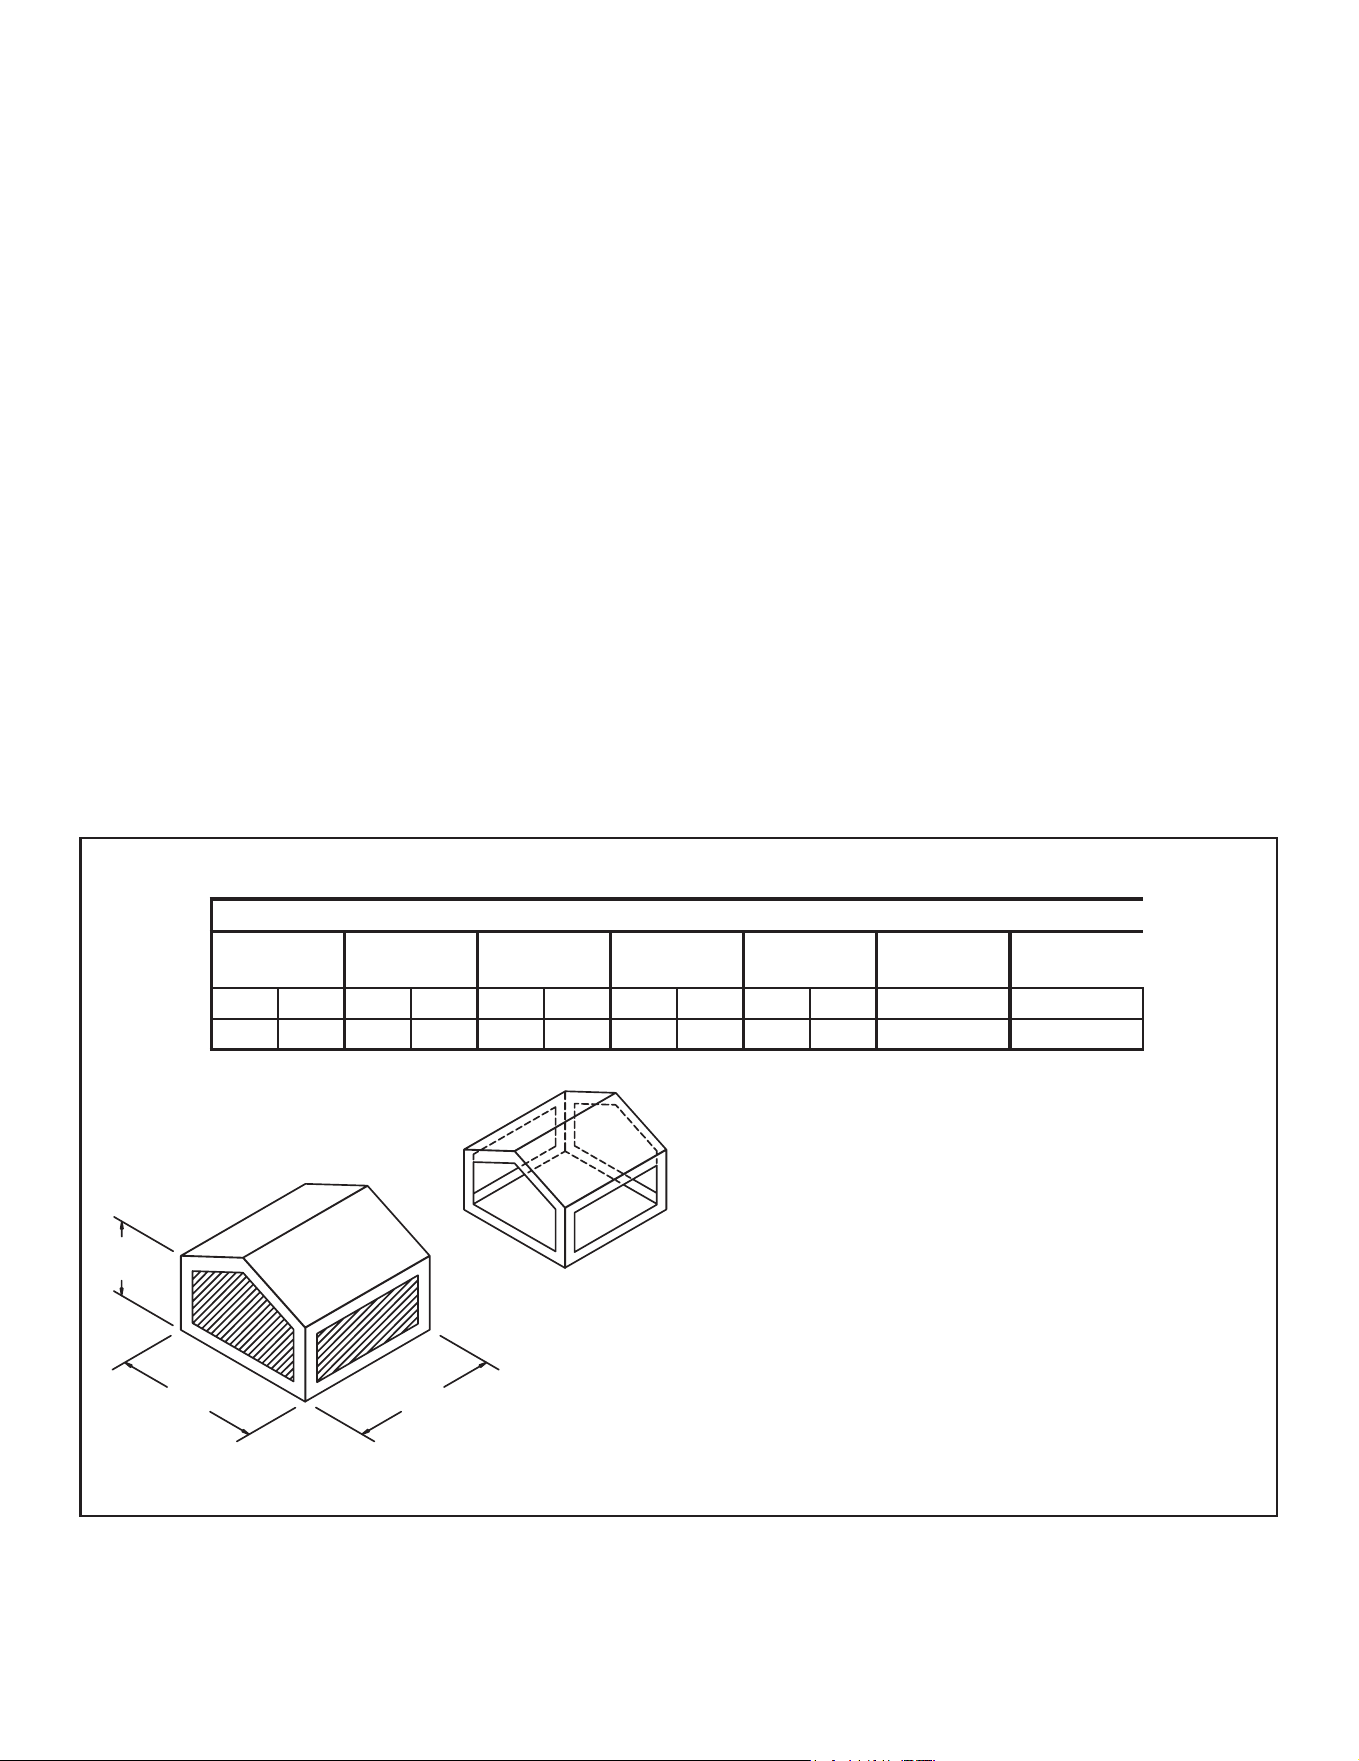
B. House Style Shroud
Thehouse-styleshroudisroughlysquareorrectangular
withaclosedtopandexhaustopeningsonfoursides
(Figure5.2).Table5.1liststheminimumshrouddimen-
sions, the minimum open area per side, and the minimum
total open area for the shroud.
H
W
L
Shaded area represents screened open area. Actual
shape of shroud may vary as long as minimum dimen-
sions and minimum open area requirements are met.
H: Minimum height of shroud
L: Minimum length of shroud
W: Minimum width of shroud
Figure 5.2 House-Style Shroud Minimum Dimensions
House Style Shroud Minimum Dimensions
Chimney
Diameter Chimney Area Min Height H Min Length L Min Width W
Min Open Area
per side
Min Total Open
Area
in mm in mm in mm in mm in mm sq in sq in
14 355.6 154 3911.6 24 609.6 32 812.8 32 812.8 260 1040
Table 5.1
27
Outdoor Lifestyles • ODCASTLEWD-50 Install Manual • 4170-900 • Rev E • 3/26
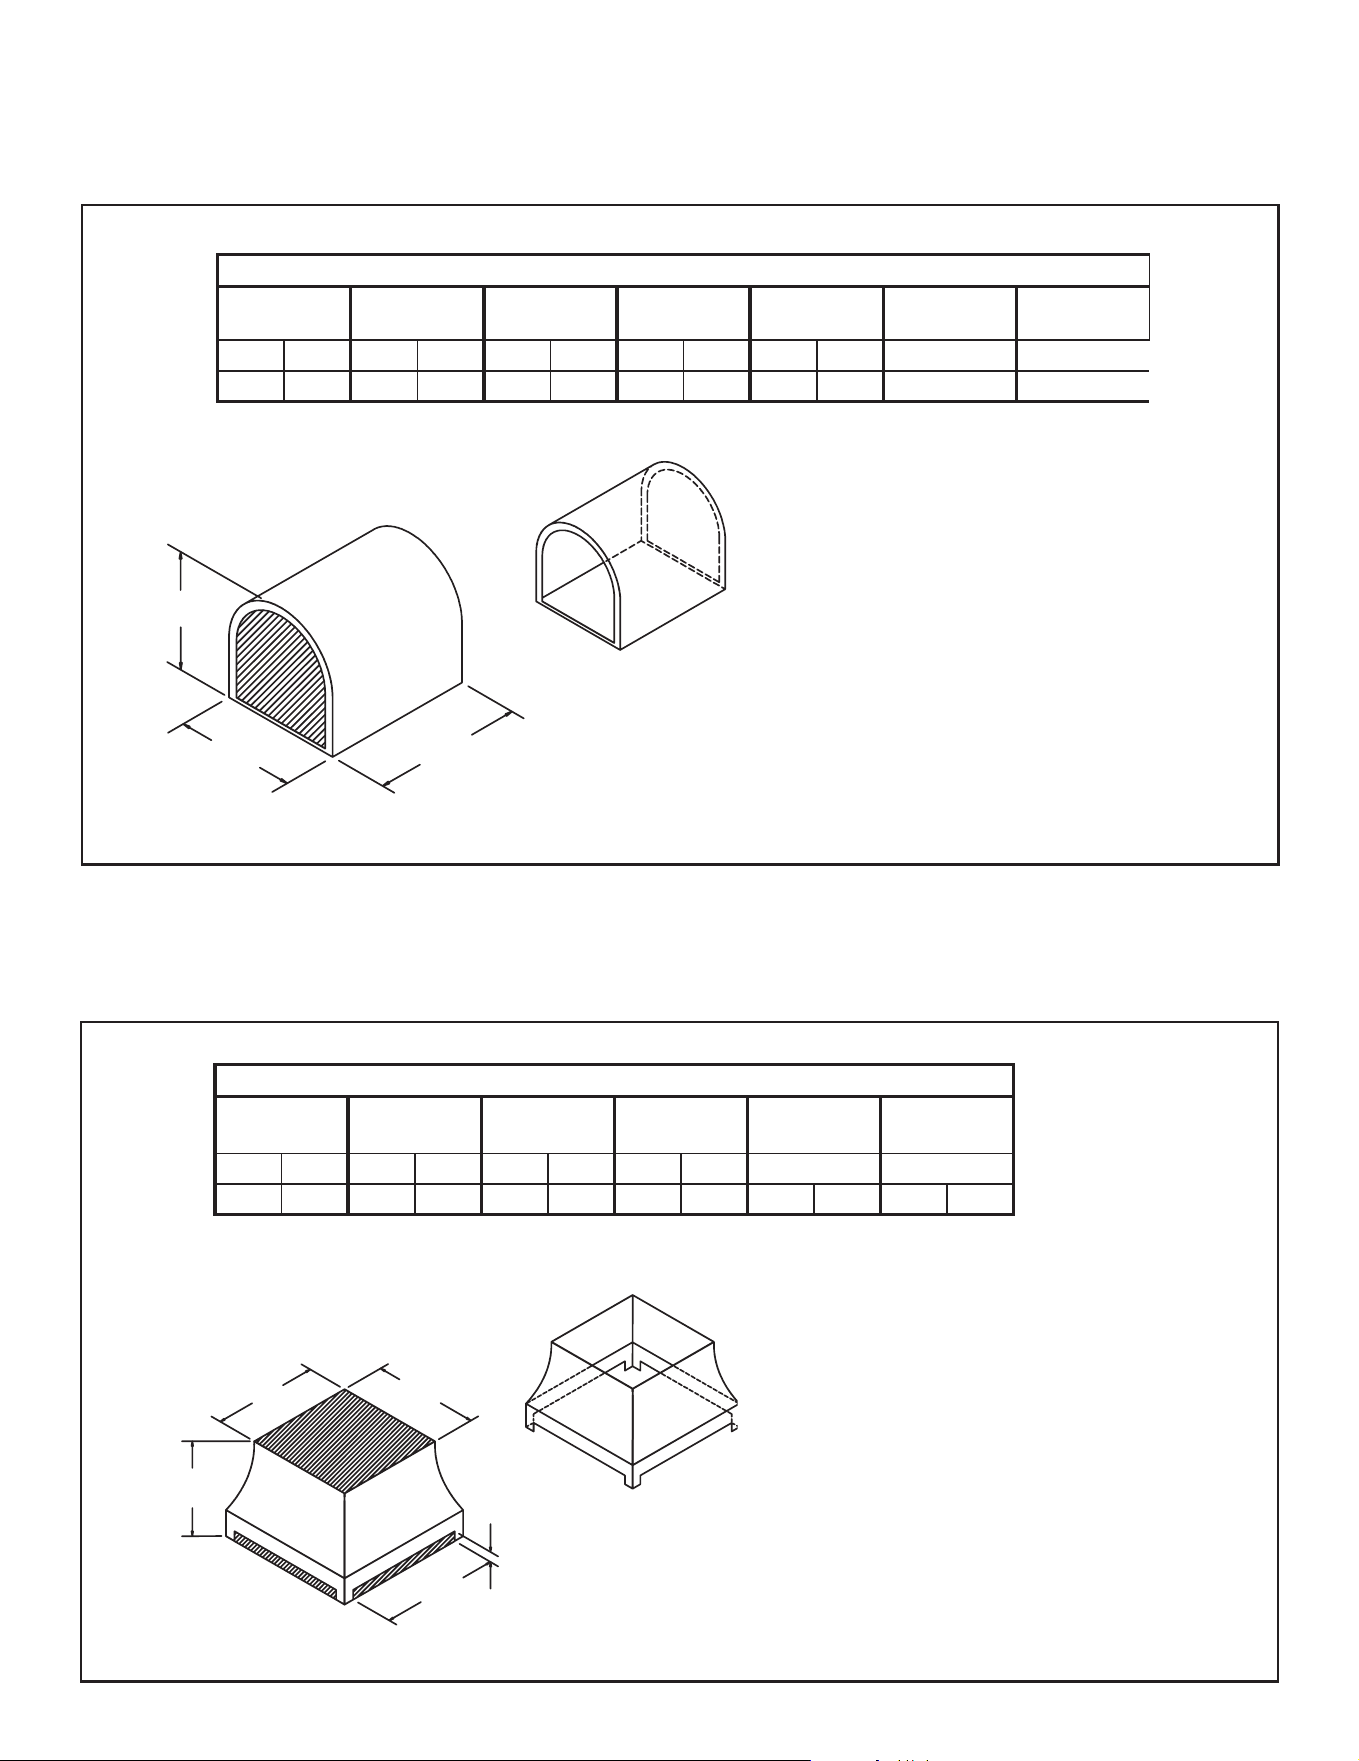
C. Arch / Mailbox Style Shroud
Thearchormailboxstyleshroudgenerallyhastwosolidsidesandasolidtop.Theexhaustopeningsareonthetwoopen
endsofthearch(Figure5.3).Table5.2liststheminimumshrouddimensions,theminimumopenareaperside,andthe
minimum total open area for the shroud.
Shaded area represents screened open area. Actual
shape of shroud may vary as long as minimum dimen-
sions and minimum open area requirements are met.
H
W
L
H: Minimum height of shroud
L: Minimum length of shroud
W: Minimum width of shroud
Figure 5.3 Arch/Mailbox-Style Shroud Minimum Dimensions
Table 5.2
Arch / Mailbox Style Shroud Minimum Dimensions
Chimney
Diameter Chimney Area Min Height H Min Length L Min Width W
Min Open Area
per side
Min Total Open
Area
in mm in mm in mm in mm in mm sq in sq in
14 355.6 154 3911.6 24 609.6 32 812.8 32 812.8 520 1040
D. Pyramid Style Shroud
Thepyramidstyleshroudisroughlysquareorrectangularwithanopentopforexhaustaswellasopeningsalongthe
baseofthefoursides(Figure5.4).Table5.3liststheminimumshrouddimensions,includingtheminimumheightand
lengthofthebaseopening.
Shaded area represents screened open area. Actual
shape of shroud may vary as long as minimum dimen-
sions and minimum open area requirements are met.
H2
W
B
H1
L
L: Minimum length of shroud top opening
W: Minimum width of shroud top opening
H1: Minimum total height of shroud
B: Minimum length of opening along base
H2: Minimum height of opening along base
Figure 5.4 Pyramid-Style Shroud Minimum Dimensions
Table 5.3
Pyramid Style Shroud Minimum Dimensions
Chimney
Diameter Min Height H1 Min Length L Min Width W Min Base B Min Height H2
in mm in mm in mm in mm in mm in mm
14 355.6 24 609.6 32 812.8 32 812.8 22 558.8 2 50.8
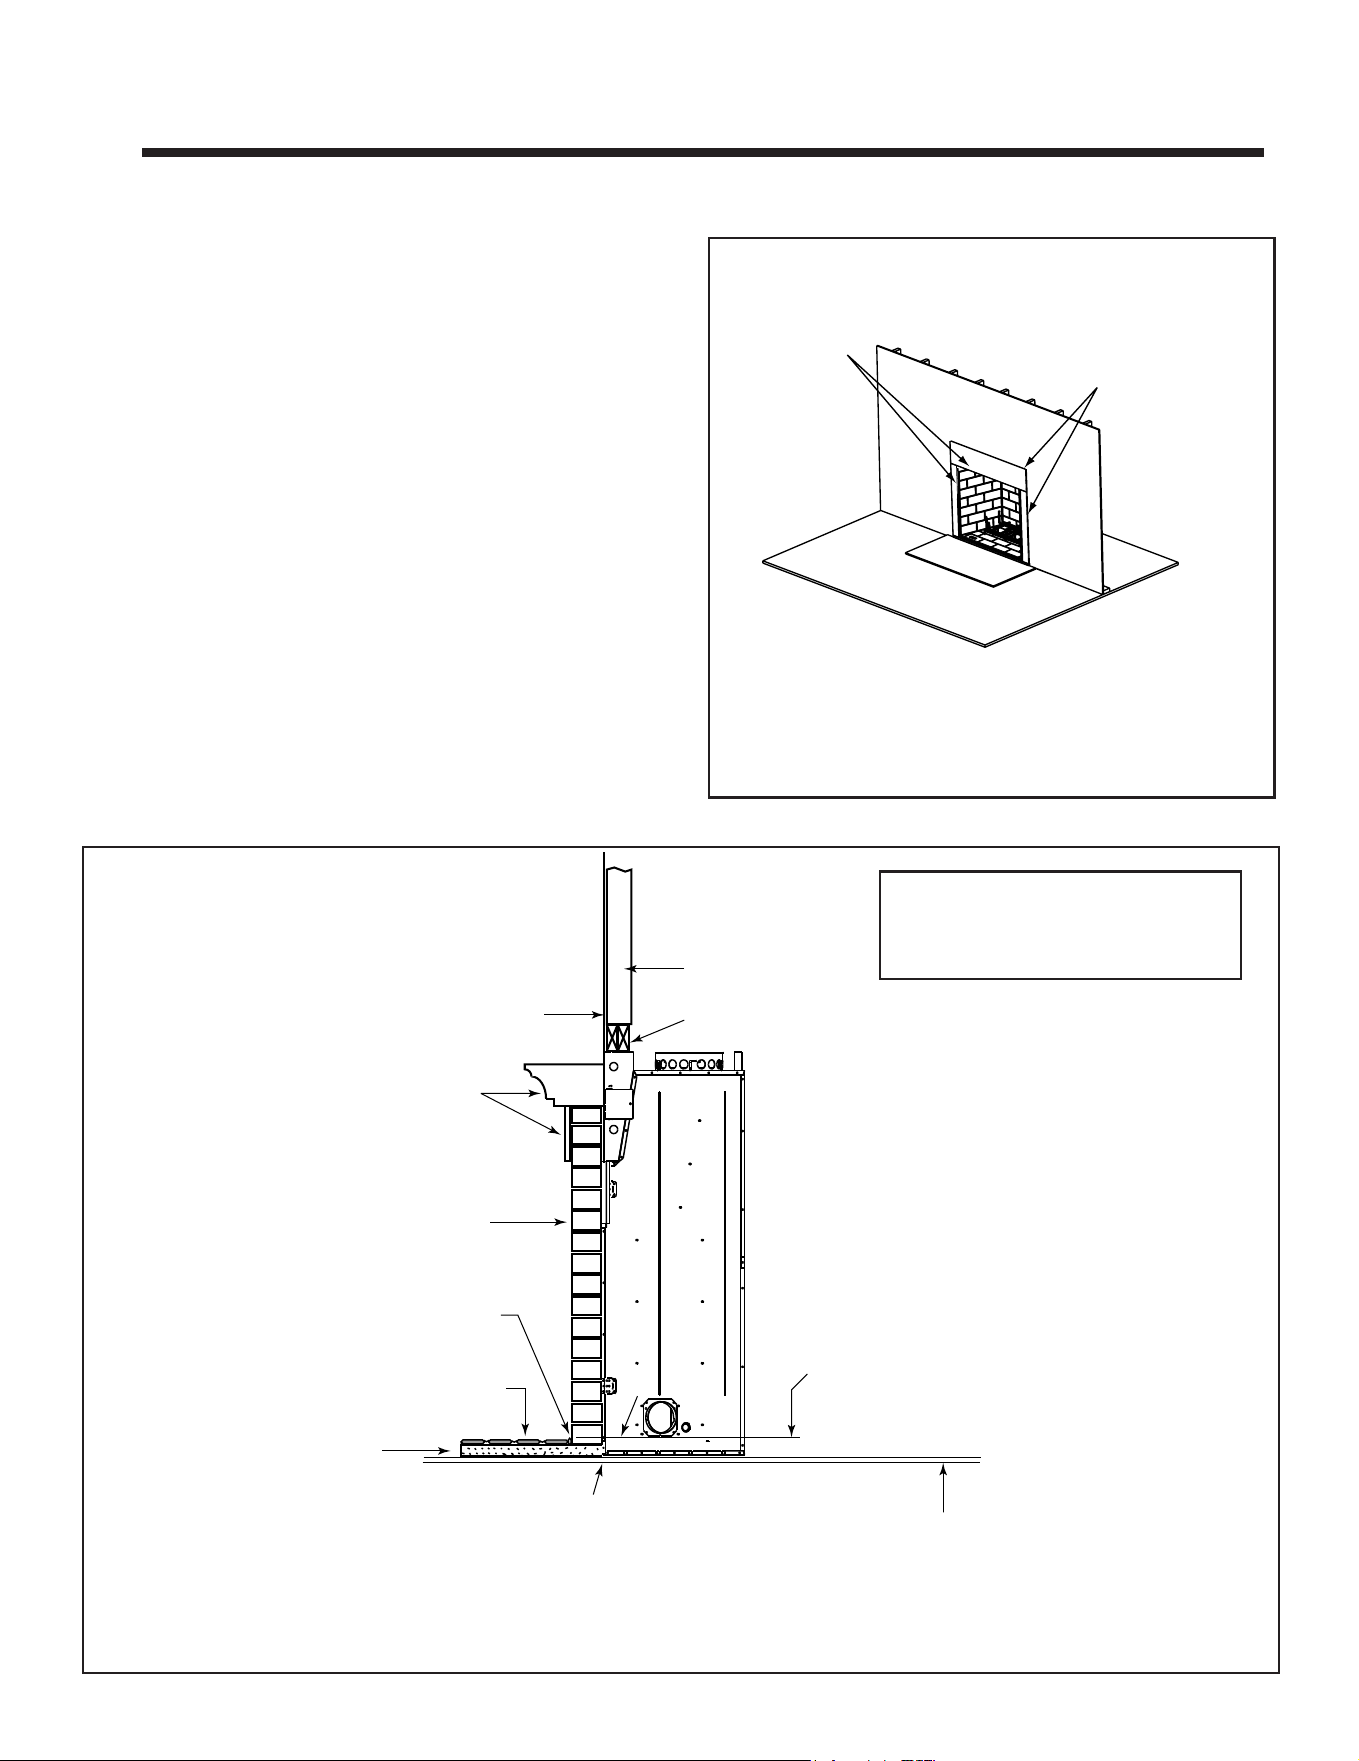
28 Outdoor Lifestyles • ODCASTLEWD-50 Install Manual • 4170-900 • Rev E • 3/26
6 6
Finishing
A. Finishing Material
RefertoSections1.B.andSections1.C.forcombustible/
non-combustiblematerials.RefertoFigure6.1fornon-
combustiblezone.
WARNING! Risk of Fire! You must maintain clearances.
• DO NOT covermetal replace frontwithcombustible
materials.
• Installcombustiblematerialsonlytospeciedclearances
on top front and side edges.
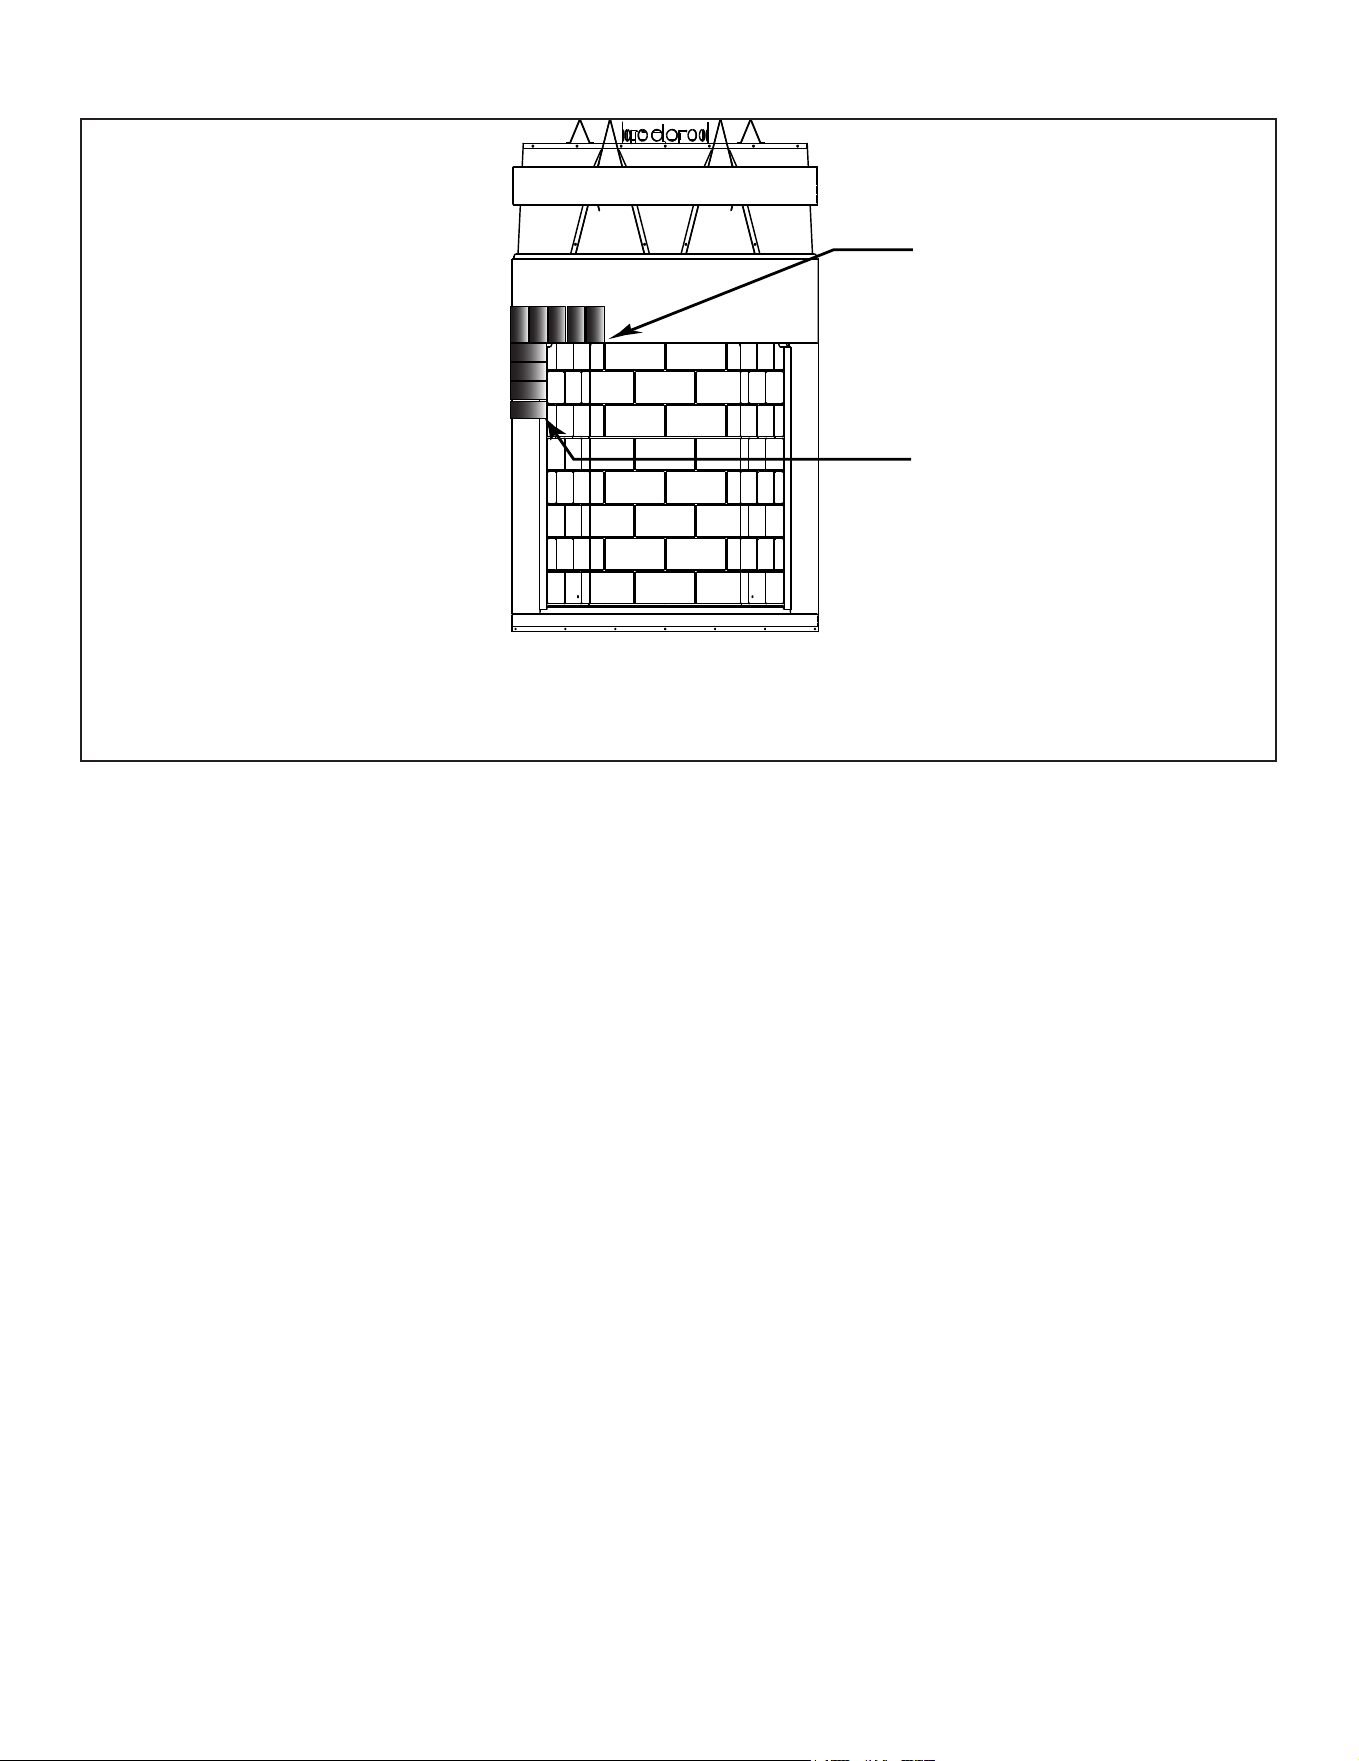
Metal strips are placed 2 in. (51 mm)
under the front of the fireplace and must
extend beyond the front and sides of
fireplace opening by 2 in. (51 mm)
Continuous,
non-combustible sealant
Floor constructed of wood or
other combustible material
1 in. Micore
or equivilent
insulation &
1/2 in. Durock
Bottom of fireplace opening
and finished hearth may be
the same height
Finished combustible wall
Combustible material
Non-combustible
decorative facing
Tile, stone or other
non-combustible material
Hearth
Refractory
2 x 4 header, flush with
front of stand-offs
2 x 4 stud wall
Figure 6.2 Decorative Facing
Note: We recommend mor-
tar be applied after facing
materials are installed.
• Applymetallathtothemetalfaceornon-combustible
boardwithcorrosion-resistant,self-drilling,self-tapping
screwscapableofpenetratingthemetalsurfaceofthe
replacefaceinpreparationfornalnishingmaterial.
• Completeframingandapplydrywalloverframing.
• A bead of 300° F minimum non-combustible sealant
mustbeusedtocloseoanygapsatthetopandsides
between the replace and drywall to prevent cold air
leaks.
• Largegapscanbebridgedwithberglassropegasket.
These metal surfaces
must be covered
with non-combustible
material.
High temperature
sealant around
edge of fireplace
and drywall.
Figure 6.1 Non-combustible Facing
Note:
IfLintelBarisusedmakesure
itdoesnotcovercombustible
material.
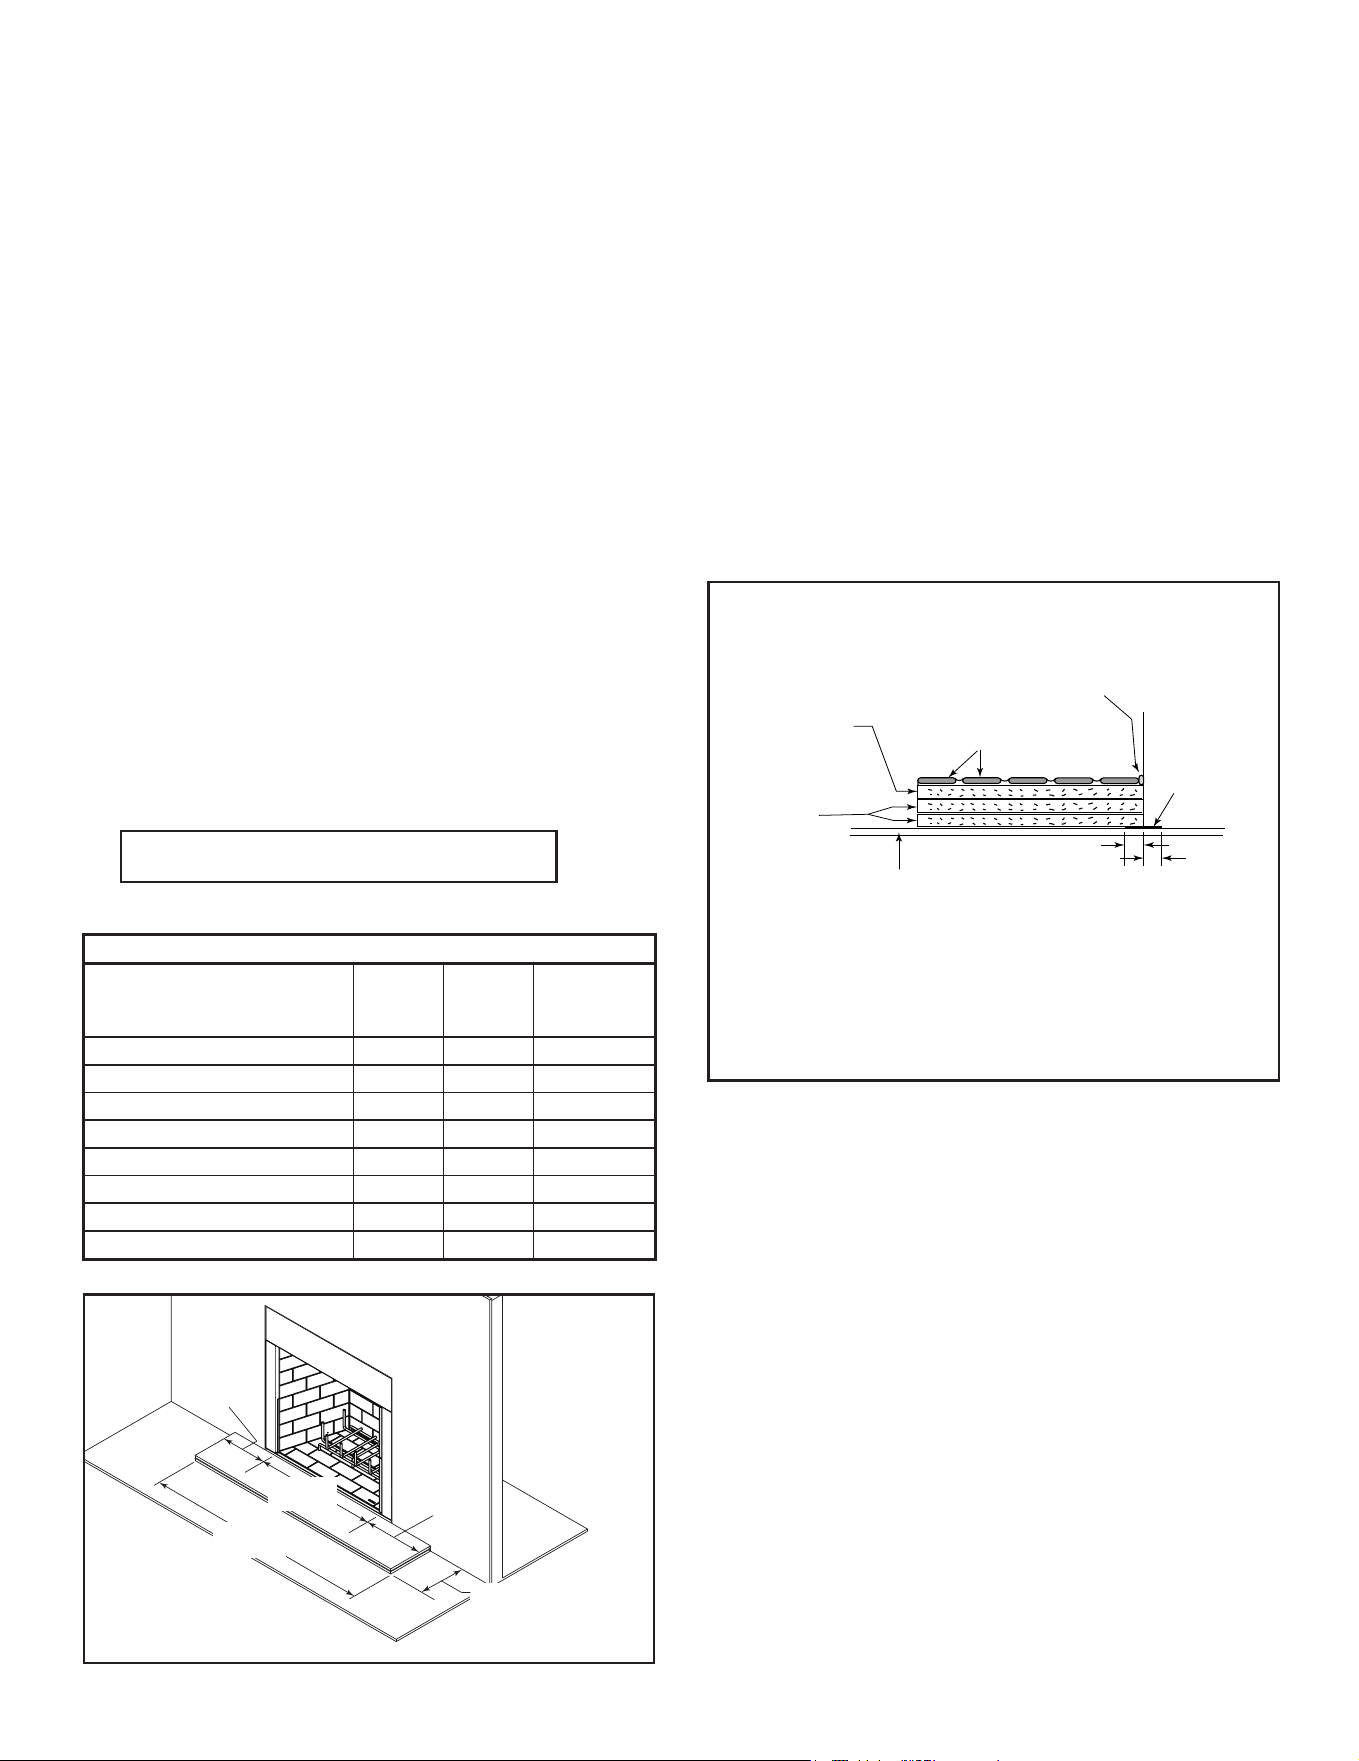
29
Outdoor Lifestyles • ODCASTLEWD-50 Install Manual • 4170-900 • Rev E • 3/26
The noncombustible finishing
material across the top of
fireplace opening will be even
with lower edge of metal face.
Noncombustible finishing
materials MUST overlap
side faces by 1 1/4 in. (32 mm)
to cover the edges of the
panels. Finished opening
should be 50 x 38 in. (1270
mm x 965 mm) to allow for
door installation.
If Mortar is applied, it should be applied after
finishing material is installed. Mortar will be
applied between finishing materials and
molded brick edges, bottom and sides.
The seam between finishing materials and
firebox top must be sealed with non-
combustible sealant.
The surface of the finished hearth extension and
the surface of the hearth panel should be level.
Figure 6.3 Facing Materials and Mortar
VERY IMPORTANT: Allow the mortar 72 hours to cure before operating the replace.
30 Outdoor Lifestyles • ODCASTLEWD-50 Install Manual • 4170-900 • Rev E • 3/26
B. Hearth Extension, Building and Finishing
Table 6.1
R = 1/k x inches of thickness
Table 6.2
WARNING! Risk of Fire! High temperatures, sparks, em-
bers or other burning material falling from the replace
mayigniteooringorconcealedcombustiblesurfaces.
• Protective metal hearth strips MUST be installed.
• Hearth extensions MUST be installed exactly as
specied.
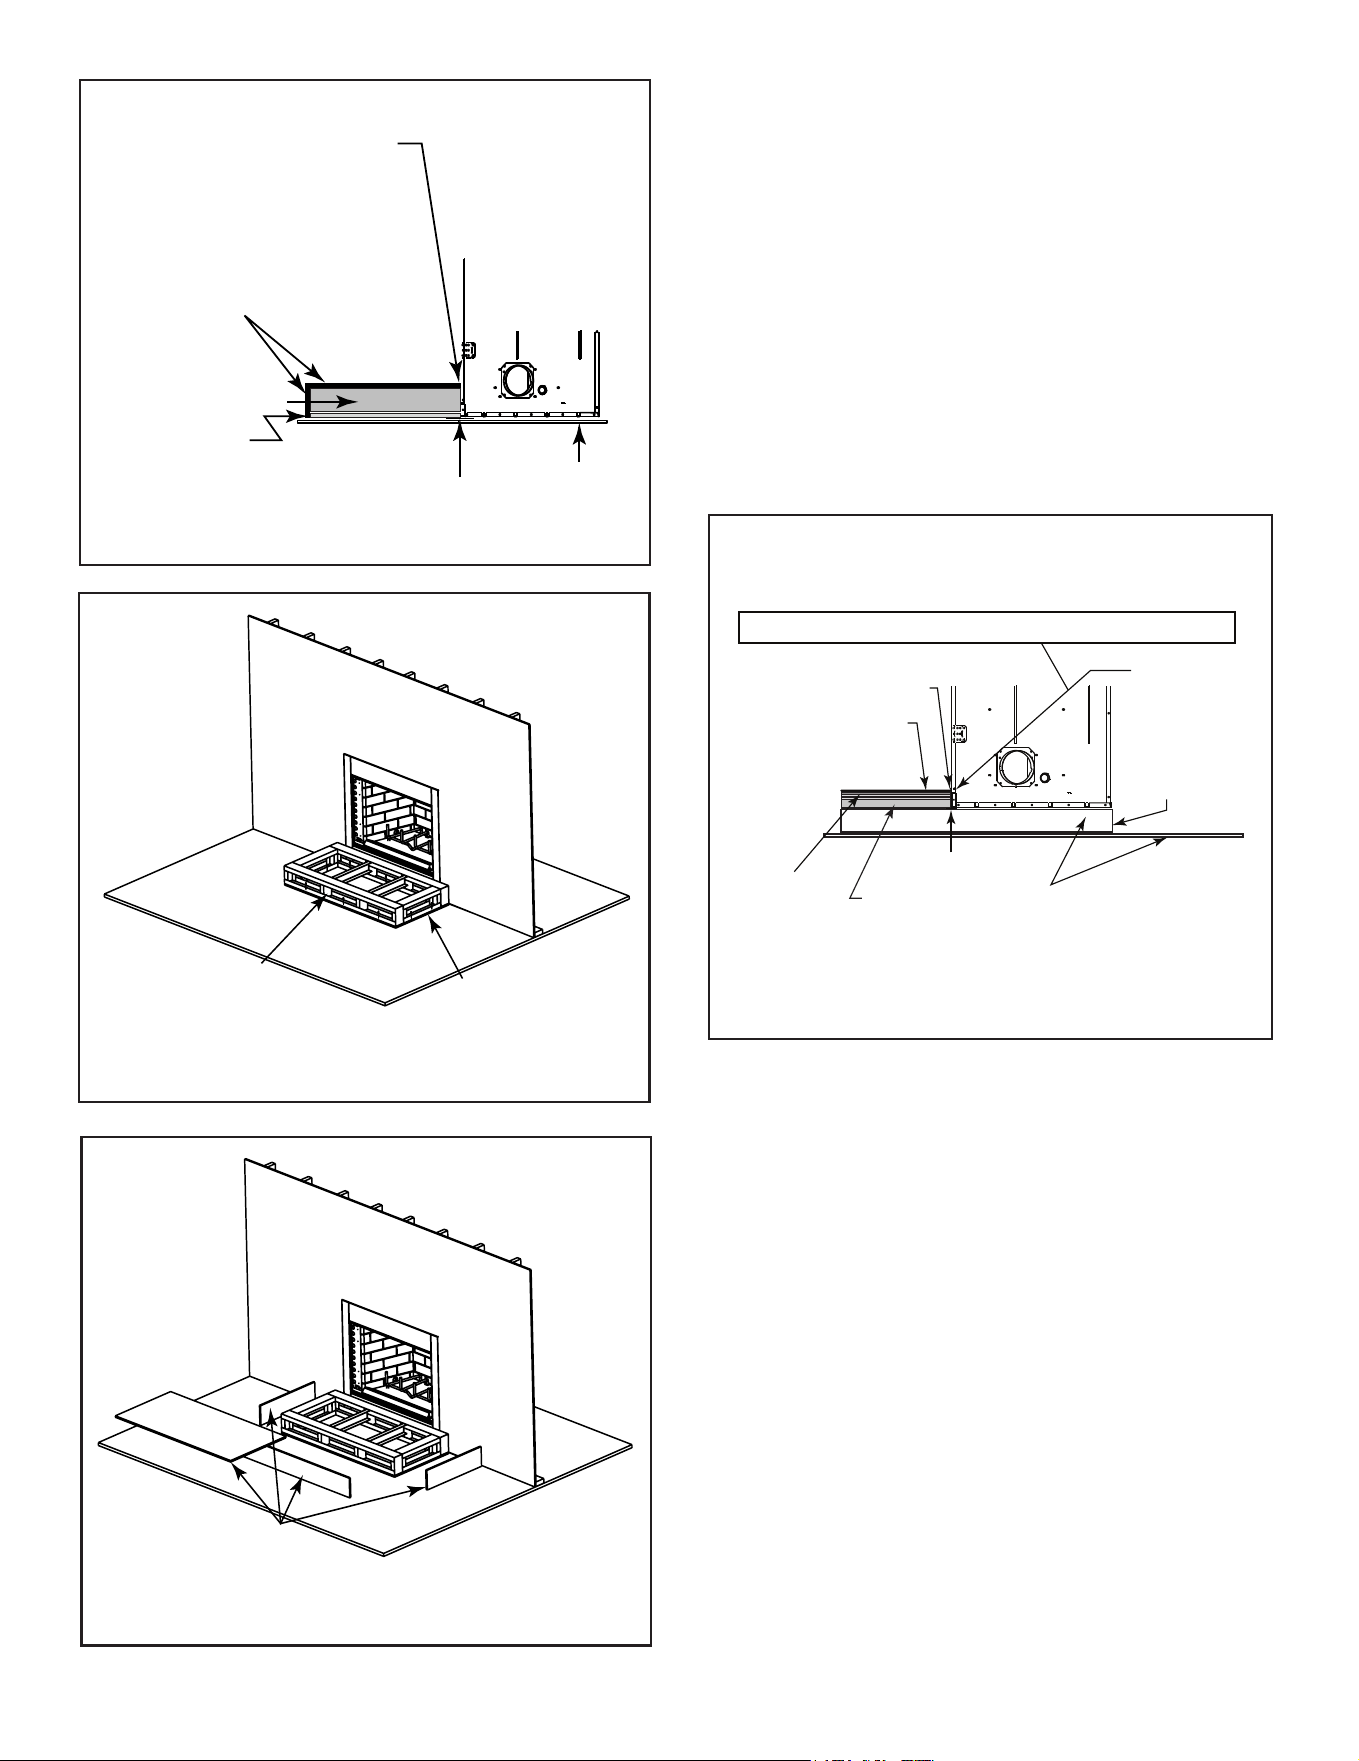
Ahearthextensionmustbeinstalledwithallreplacesto
protectthecombustibleoorinfrontofthereplacefrom
bothradiantheatandsparks.
• YouMUSTuseahearthextensionwiththisreplace.
• RefertoFigure6.4forminimumdimensions.
• Thisreplacehasbeentestedandapprovedforusewith
ahearthextensioninsulatedtoaminimumRvalueof
2.32.
• ThehearthextensionmaterialMUSTbecoveredwith
tile,stoneorothernon-combustiblematerial.
• Manufactured hearth materials will usually have a
published R value (resistance to heat) or k value
(conductivityofheat).RefertotheformulainTable6.1
toconvertakvaluetoanRvalue,
• Refer to Table 6.2 for hearth extension insulation
alternatives.
74 in.
(1880 mm)
50 in.
(1270 mm)
12 in.
(305 mm)
12 in.
(305 mm)
20 in. (508 mm) Minimum
Figure 6.4 Standard Hearth Extension Dimensions
* 2 in. (51 mm)
Continuous,
non-combustible sealant
Tile, stone or other
non-combustible material
Floor constructed of wood or
other combustible material
1 in. Micore and 1/2
in. Durock or
equivalent insulation
(see Table)
Fireplace
Protective
Metal Hearth
Strip
Durock
*
*
Note: The bottom of the fireplace opening is 3-3/4 in. (95.3mm) above
the bottom of the fireplace. Finished hearth must NOT extend above this
level.
Figure 6.5 Standard Hearth Extension Construction
1. Fireplace Installed Flush on the Floor and
Hearth Extension Raised to Bottom of Firebox
Opening
Non-combustibleooringaminimumof20in.(508mm)
infrontofand12in.(305mm)toeachsideofthefuel
openingisrequired.
The hearth framing must be constructed of non-com-
bustiblematerials(suchasmetalframingorequivalent
material)and placed onHX3(s) or HX4(s)and 1/2 in.
Durock,orequivalentmaterial.SeeFigures6.4and6.5.
When creating the platform, allow for the thickness
of the non-combustible nishing materials.
Sealgapsbetweenthehearthextensionandthefront
ofthereplacewithabeadofnon-combustiblesealant
or grout.
Note:Forinstallations
withvinylooring,special
clearance recommenda-
tions apply.
VinylFlooringissensitivetoheat.A48inchminimum
depthhearthextensionisrecommendedwhenusingvi-
nylooringuptothewall.SeeFigure6.5.
Notice: Clearances that do not meet the minimum
guidelinescouldresultindamageorbucklingtothevi-
nylooringandisdoneattheinstaller’sorhomeown-
er’srisk.
Hearthand HomeTechnologiesdoes not recommend
adhesivebasedvinylooringduetothermalexpansion.
Floating-styleooringcanbeused,butwillreachtem-
peraturesupto110°Finaroomwithambienttempera-
turesof70°F.Consultooringspecicationstoensure
compatibility.
Vinyl Flooring
Hearth Extension Insulation Alternatives, R Value = 2.32
Material
k per inch
thick
r per inch
thick
Minimum
thickness
required
Hearth&HomeHX3,HX4 0.49 2.06 1-1/8in.
USGMicore300™ 0.49 2.06 1-1/8in.
USGDurock™CementBoard 1.92 0.52 4-1/2in.
CementMortar 5.0 0.20 11-5/8in.
CommonBrick 5.0 0.20 11-5/8in.
CeramicTile 12.50 0.08 29 in.
Armstrong™ Privacy Guard Plus 0.46 2.18 1-1/16 in.
Marble 14.3-20.0 0.07-0.05 33-1/8 - 46-1/2 in.
31
Outdoor Lifestyles • ODCASTLEWD-50 Install Manual • 4170-900 • Rev E • 3/26
Note: The bottom of the fireplace opening is 3-3/4 in. (95.3mm) above the bottom of the
fireplace. Finished hearth must NOT extend above this level.
Bottom of
fireplace opening
Platform must be built
to raise the bottom of
the fireplace opening
to the level of the
desired hearth height.
Protective Metal
Hearth Strips
Floor and platform constructed of
wood or other combustible material
Continuous,
non-combustible sealant
Tile, stone or other
non-combustible finishing
material
Non-combustible
Framing Material
1 in. Micore or
equivalent insulation
& 1/2 in. Durock
20 in. minimum
Hearth Extension
Noncombustible
Framing Material
HX4 or
equivalent
Figure 6.7 Raised Platform Hearth Extension-Framing
Non-combustible
Finishing Materials
Figure 6.8 Raised Platform Hearth Extension-Finishing
Figure 6.6 Raised Platform Hearth Extension Detail
2. Raised Hearth Extension and Raised Fire-
place
Non-combustibleooringaminimumof20in.(508mm)
infrontofand12in.(305mm)toeachsideofthefuel
openingisrequired.
The hearth framing must be constructed of non-com-
bustiblematerials(suchasmetalframingorequivalent
material)andplacedon HX3(s)orHX4(s)and1/2in.
Durock,orequivalentmaterial.SeeFigure6.9.
When creating the platform, allow for the thickness
of the non-combustible nishing materials.
Sealgapsbetweenthehearthextensionandthefront
ofthereplacewithabeadofnon-combustiblesealant
or grout.
Figure 6.9 Raised Hearth Extension and Fireplace Framing
Materials
Floor
Noncombustible
Framing Material
Noncombustible
Finishing Material
Protective Metal
Hearth Strips
1 in. Micore and
1/2 in. Durock
or equivalent
insulation
20 in. Min.
Hearth Extension
Note: The bottom of the fireplace
opening is 3-3/4 in. (95.3 mm)
above the bottom of the
fireplace. Finished hearth must
NOT extend above this level.
3. Fireplace Opening and Hearth Extension
Flush with the Floor
Non-combustibleooringaminimumof30in.(762mm)
infrontofand12in.(305mm)toeachsideofthefuel
openingisrequired.
The hearth framing must be constructed of non-com-
bustiblematerials(suchasmetalframingorequivalent
material)andplacedon HX3(s)orHX4(s)and1/2in.
Durock,orequivalentmaterial.SeeFigure6.10.
When creating the platform, allow for the thickness
of the non-combustible nishing materials.
Sealgapsbetweenthehearthextensionandthefront
ofthereplacewithabeadofnon-combustiblesealant
or grout.
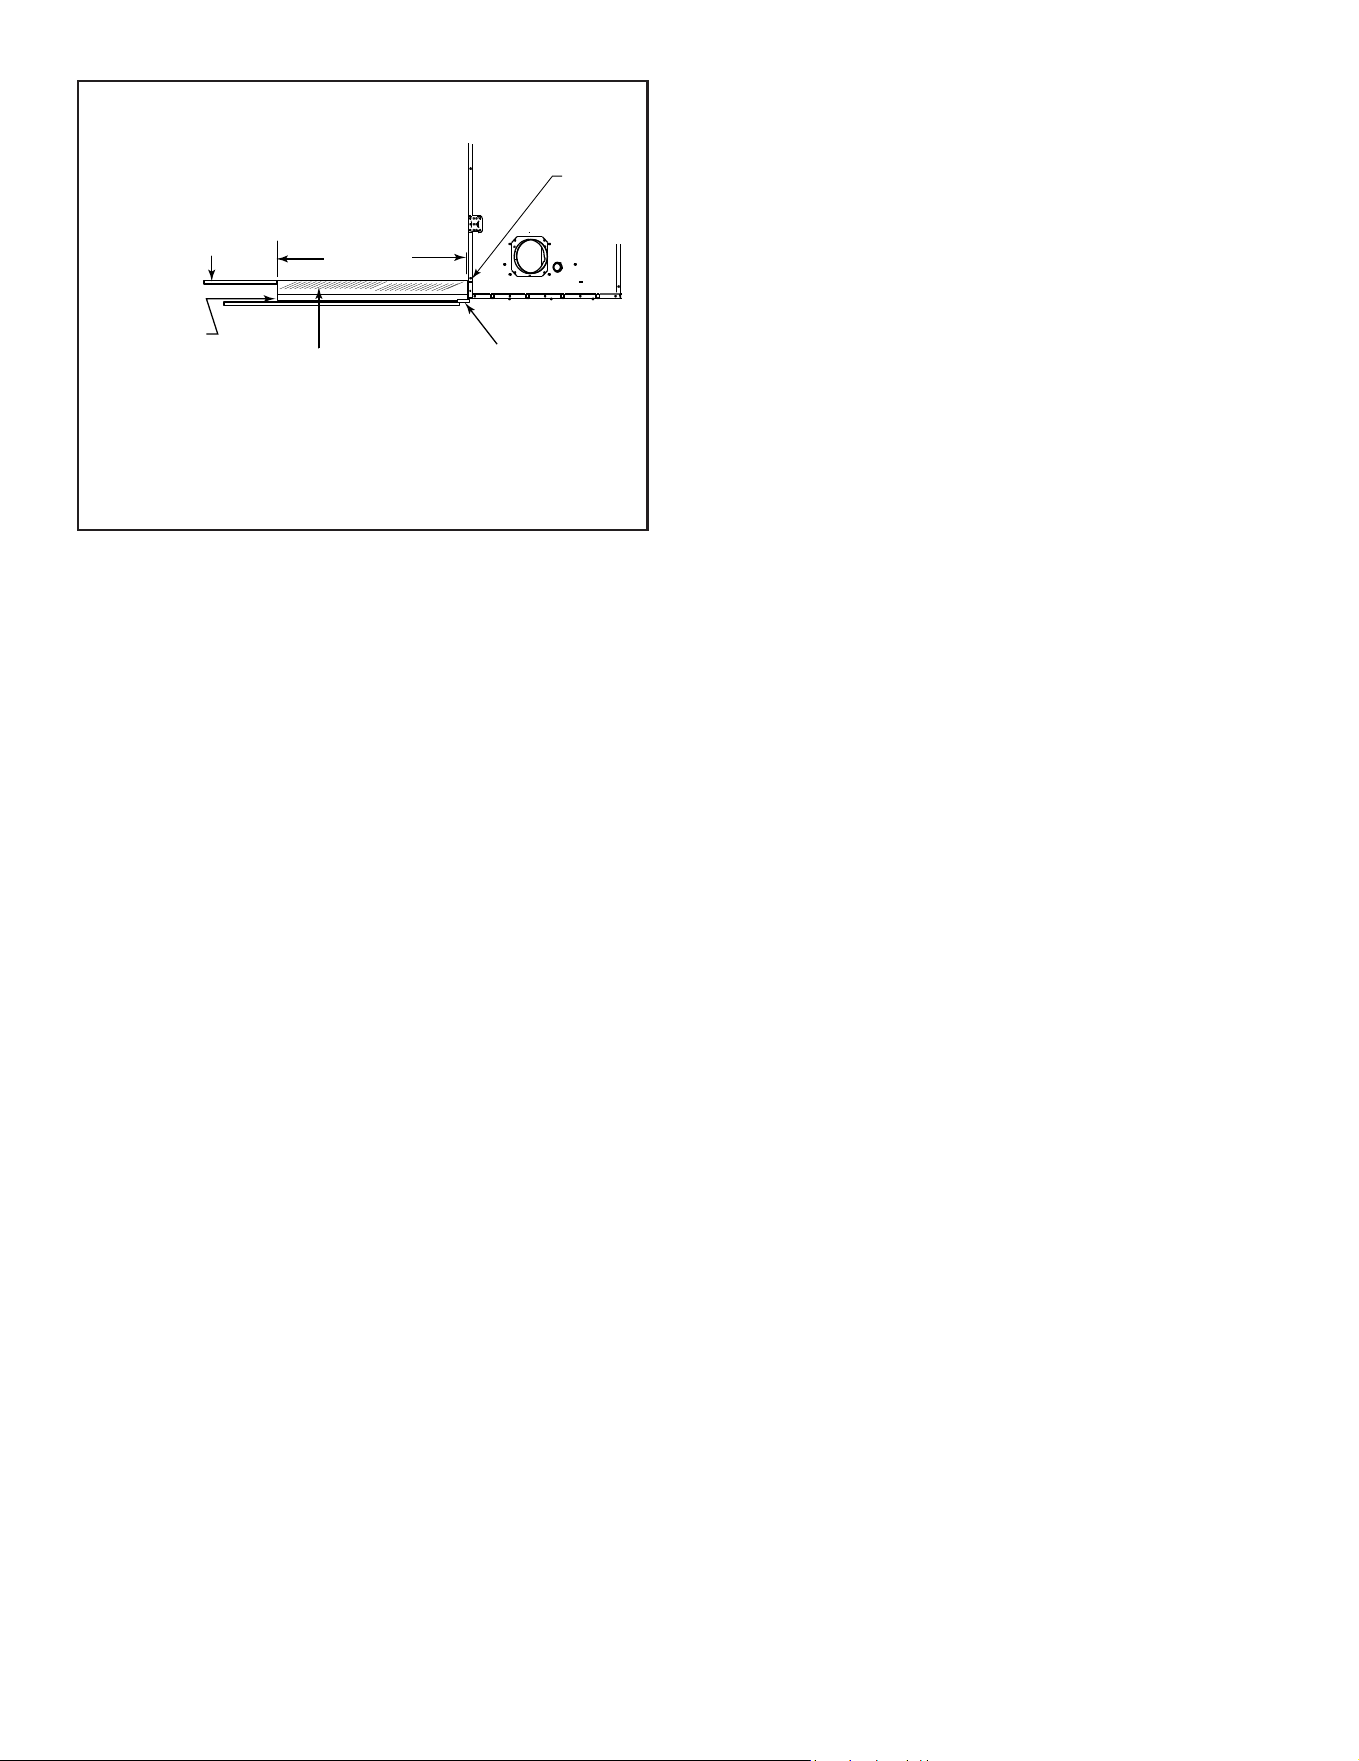
32 Outdoor Lifestyles • ODCASTLEWD-50 Install Manual • 4170-900 • Rev E • 3/26
Non-combustible Finishing Material
Protective Metal
Hearth Strip
30 in. Min.
Hearth Extension
1 in. Micore and
1/2 in. Durock
or equivalent
insulation
Finished
Floor
Note: The bottom of the fireplace opening
is 3-3/4 in. (95.3mm) above the bottom of
the fireplace. Finished hearth must NOT
extend above this level.
Bottom of
Fireplace
Opening
Figure 6.10 Flush Hearth Extension Side View
33
Outdoor Lifestyles • ODCASTLEWD-50 Install Manual • 4170-900 • Rev E • 3/26
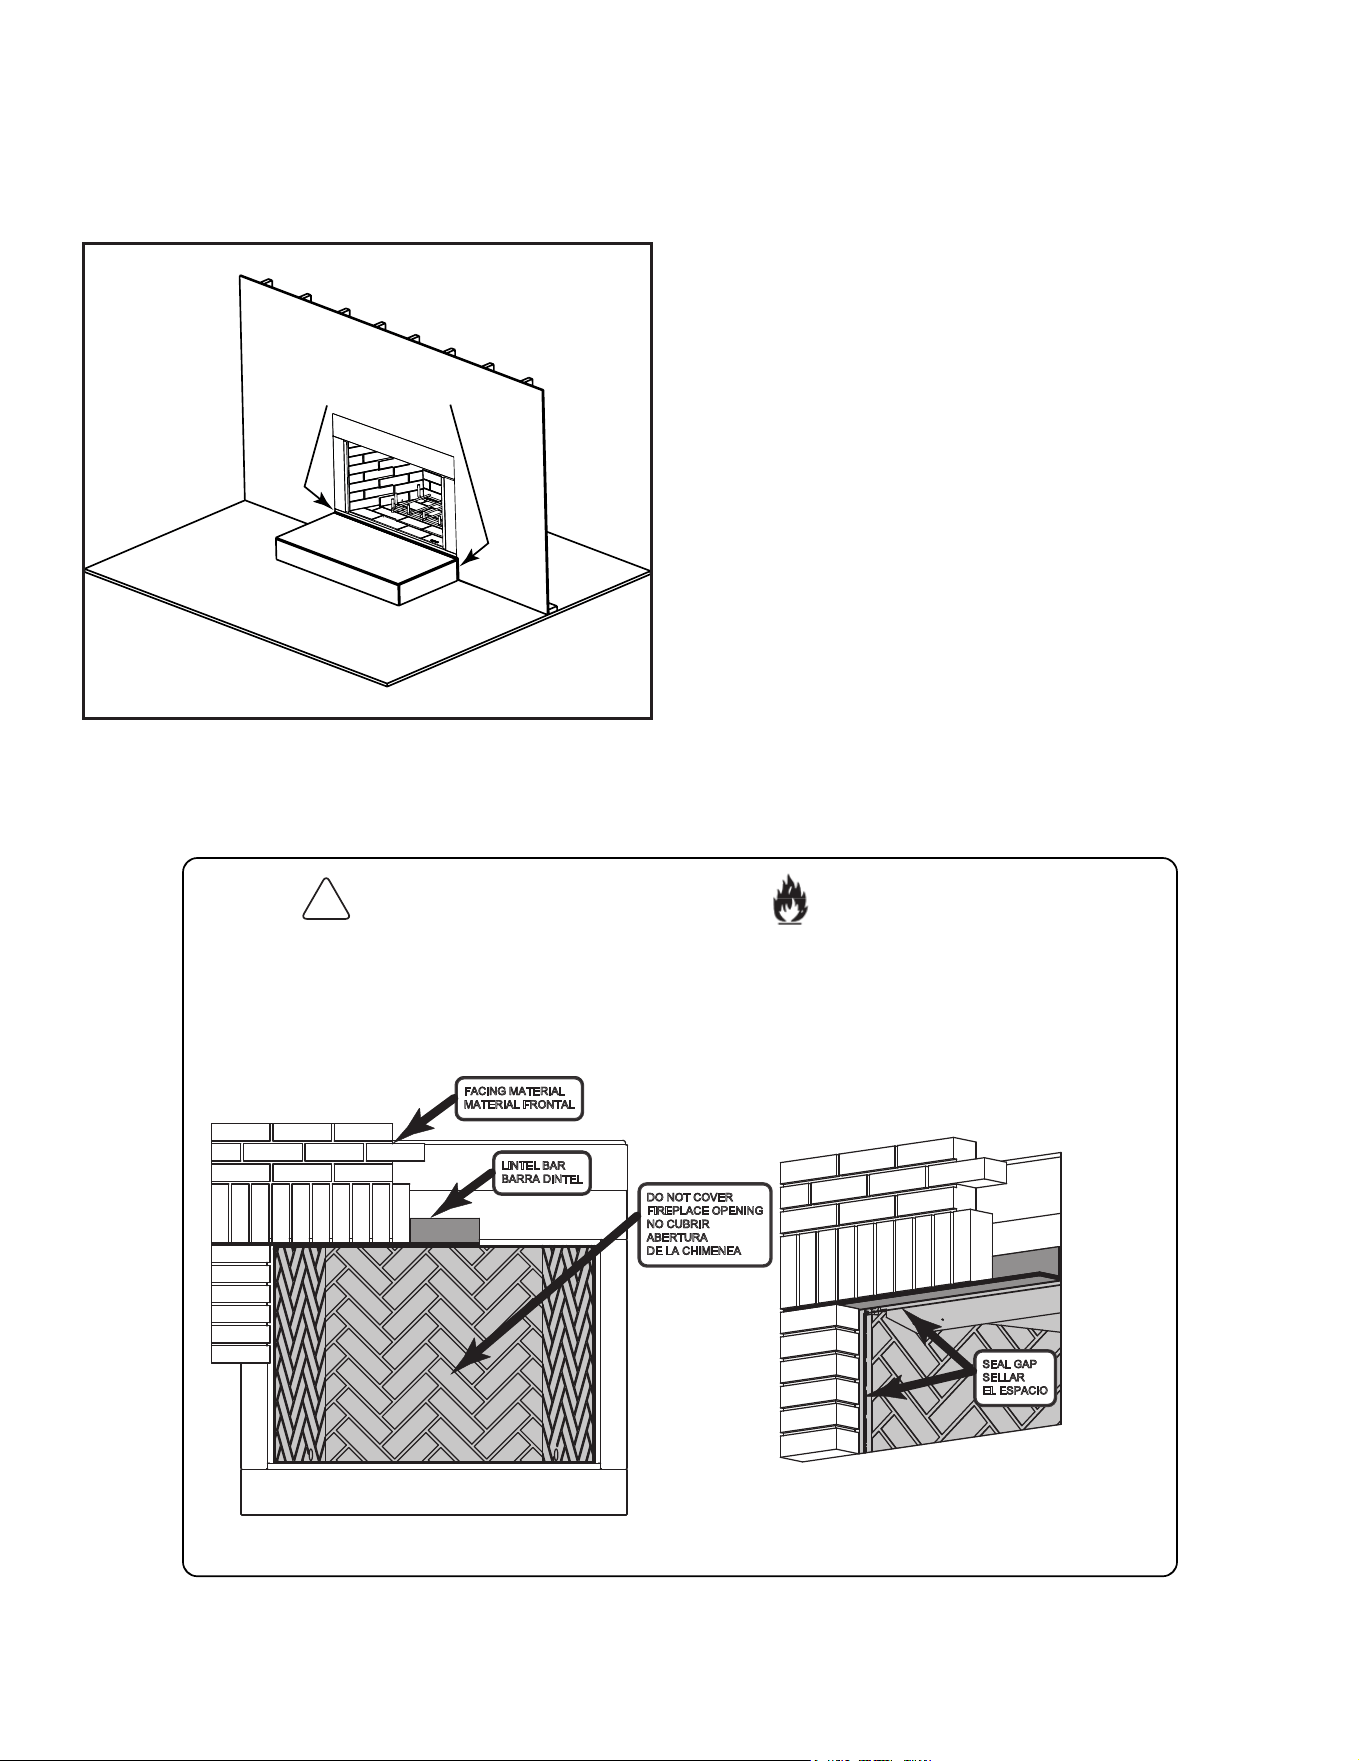
C. Non-Combustible Sealant Material
After completing the framing and applying the facing
materialsovertheframing,abeadofnon-combustible
sealantmustbeusedtocloseoanygapsatthetop
andsidesbetweenthereplaceandhearth.
WARNING! Risk of Fire!
Hearth & Home Technologies is not responsible for
discoloration, cracking or other material failures of
nishingmaterialsduetoheatexposureorsmoke.
• Choosenishingmaterialscarefully.
Non-combustible Sealant
Figure 6.11 Place Non-combustible Sealant
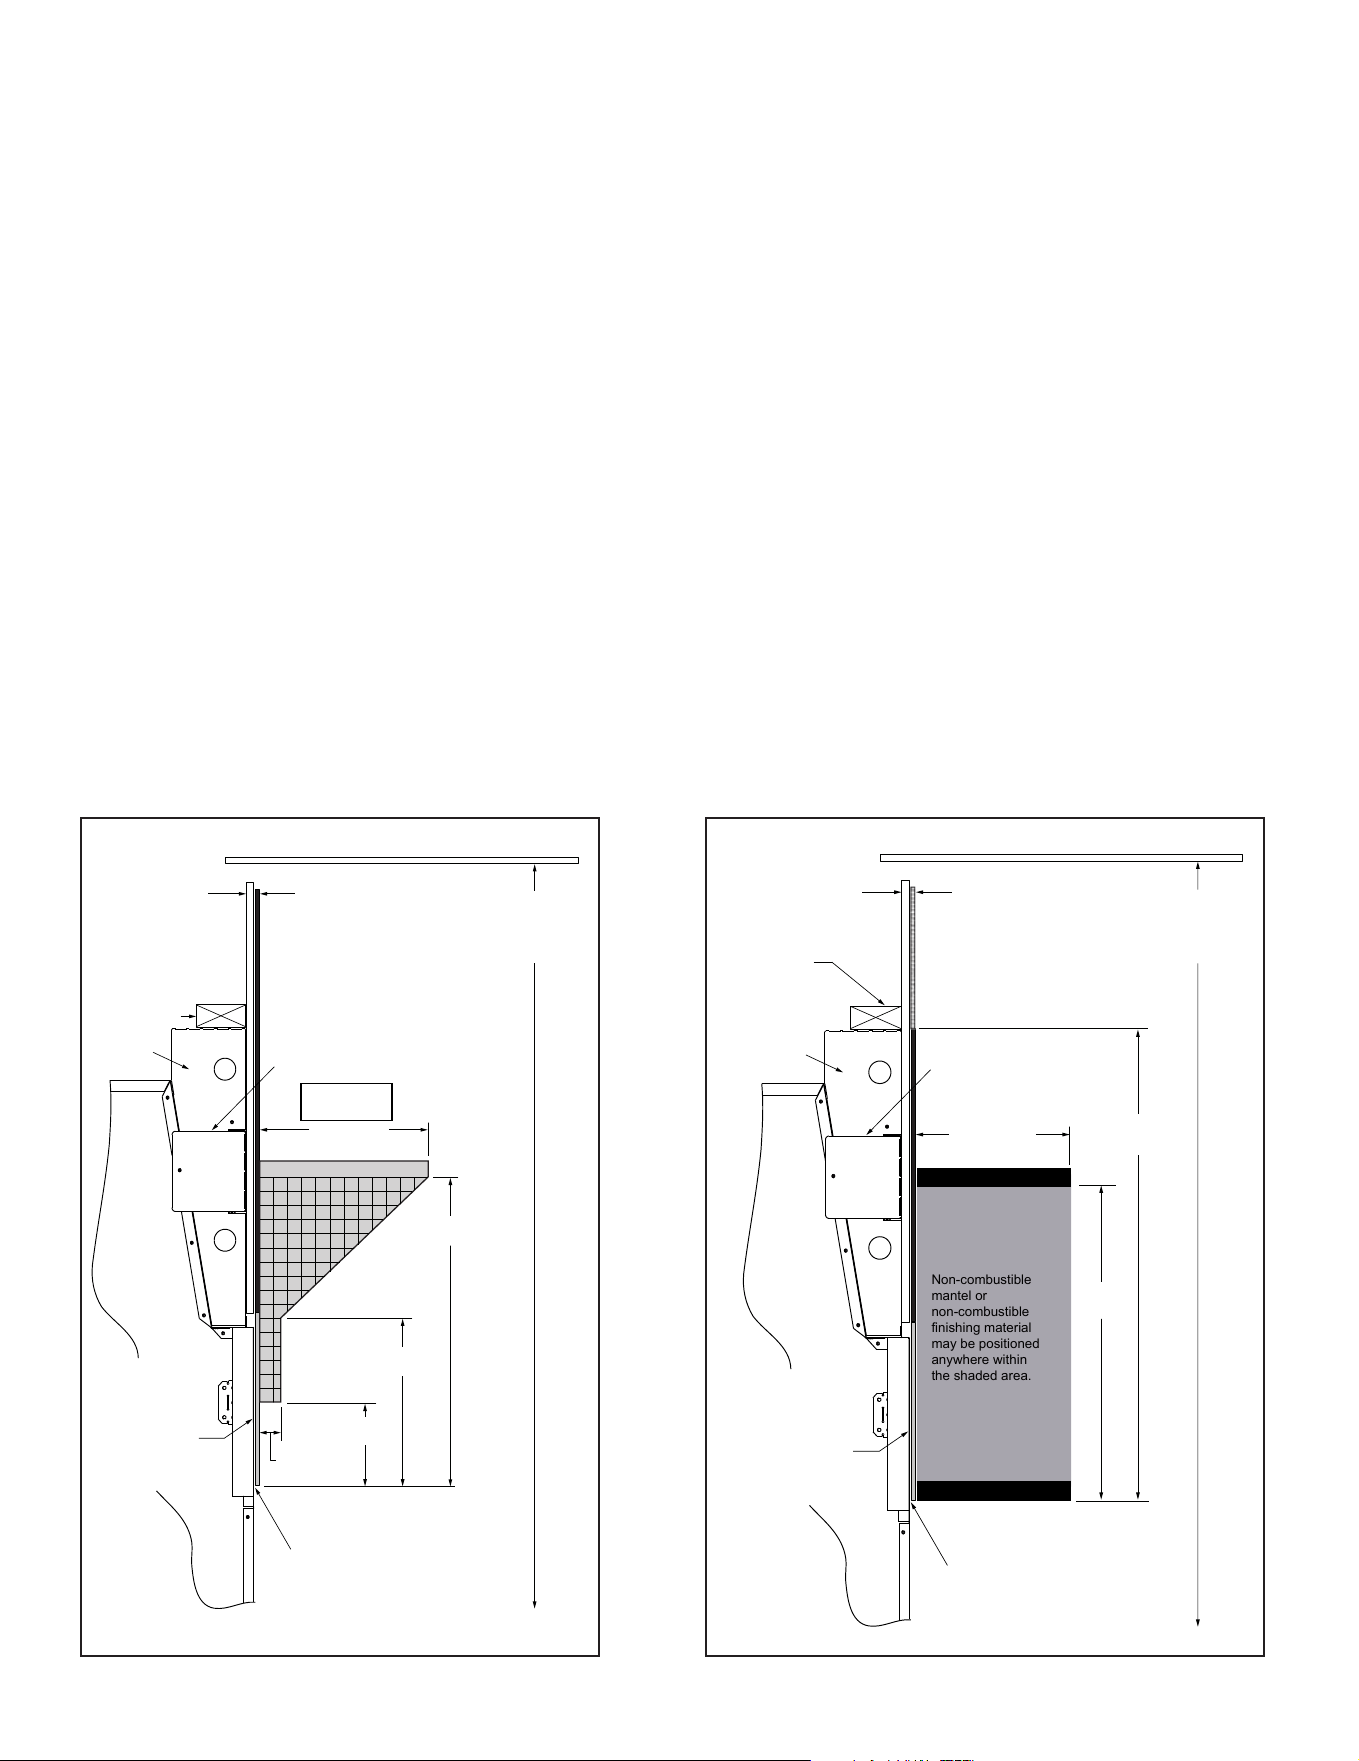
LINTEL BAR
BARRA DINTEL
DO NOT COVER
FIREPLACE OPENING
NO CUBRIR
ABERTURA
DE LA CHIMENEA
SEAL GAP
SELLAR
EL ESPACIO
FACING MATERIAL
MATERIAL FRONTAL
There must be NO GAPS OR VOIDS between facing
material and appliance front. Seal gaps or voids
with mortar, grout, or high temperature sealant.
NO debe haber ESPACIOS NI VACÍOS entre el
material de revestimiento y el frente del aparato.
Selle los huecos o vacíos con mortero, lechada o
sellador de alta temperatura.
4017-289 rev D
DO NOT COVER FIREPLACE OPENING with
finishing material.
No cubra el hueco de la chimenea con materiales
de acabado.
WARNING
ADVERTENCIA
!
Risk of Fire!
Riesgo de Incendio!
**REMOVE LABEL BEFORE APPLYING FINISHING**
**RETIRE LA ETIQUETA ANTES DE APLICAR EL ACABADO**
NON-COMBUSTIBLE label attached to rescreen by manufacturer.
34 Outdoor Lifestyles • ODCASTLEWD-50 Install Manual • 4170-900 • Rev E • 3/26
Non-combustible
mantel or
non-combustible
finishing material
may be positioned
anywhere within
the shaded area.
7 ft (2134 mm)
minimum
base of fireplace
to ceiling
Non-Combustible Wall
Metal stud wall
above the fireplace
up to ceiling (7 ft. min.)
Measured from top of fireplace opening
22 in.
559 mm
Non-Combustible
Mantel
Non-Combustible
Decorative Facing
to top of standoffs
WARNING:
Seal joint with non-combustible
sealant to prevent heat from being
drawn into the wall cavity.
Standoffs
Non-combustible
Decorative Facing
such as:
Steel, iron, brick,
tile, concrete, slate,
glass, plasters.
DO NOT cover any
air openings in the face
of the fireplace.
Combustible
Decorative Facing
12 in./305 mm
Deep
Metal support to
stablize wall and mantel
Figure 6.13 Mantel Specications - Non-Combustible
D. Mantel and Wall Projections
The combustible mantel may have a maximum depth of
12 in. (305 mm) positioned 22 in. (559 mm) above the
replaceopening.Combustibletrimpiecesthatprojectno
morethan11/2in.(38mm)fromthefaceofthereplace
canbeplacednocloserthan6in.(152mm)fromthetop
ofthedecorativefront.Combustibletrimmustnotcover:
• themetalsurfacesofthereplace
• where the non-combustible board is placed over the
metal surfaces
• thespacebetweenthemetalfaceofthereplaceand
framingmembers
WARNING! Risk of Fire!
Youmustsealaroundthenishingmaterialtoreplace.
Hearth & Home Technologies is not responsible for
discoloration,crackingorothermaterialfailuresofnishing
materials due to heat exposure or smoke.
• Choosenishingmaterialscarefully.
Anon-combustiblemantelcanbeplacedlowerthanFigure
6.13,butallbuildingmaterialsthatconstructthewallmust
bechangedtonon-combustible.
7 ft (2134 mm)
minimum
base of fireplace
to ceiling
Combustible Wall
2 x 4 stud wall
Standoffs
Measured from top of fireplace opening
12 in./305 mm
1 1/2 in./38 mm
maximum
Mantel
22 in./559 mm
minimum
Combustible
Decorative Facing
6 in./152 mm
minimum
12 in./305 mm
minimum
Grid represents
1 in. squares
Non-combustible
Decorative Facing
such as:
Steel, iron, brick,
tile, concrete, slate,
glass, plasters.
DO NOT cover any
air openings in the face
of the fireplace.
Metal support to
stablize wall and mantel
WARNING:
Seal joint with non-combustible
sealant to prevent heat from being
drawn into the wall cavity.
Figure 6.12 Mantel Specications - Combustible
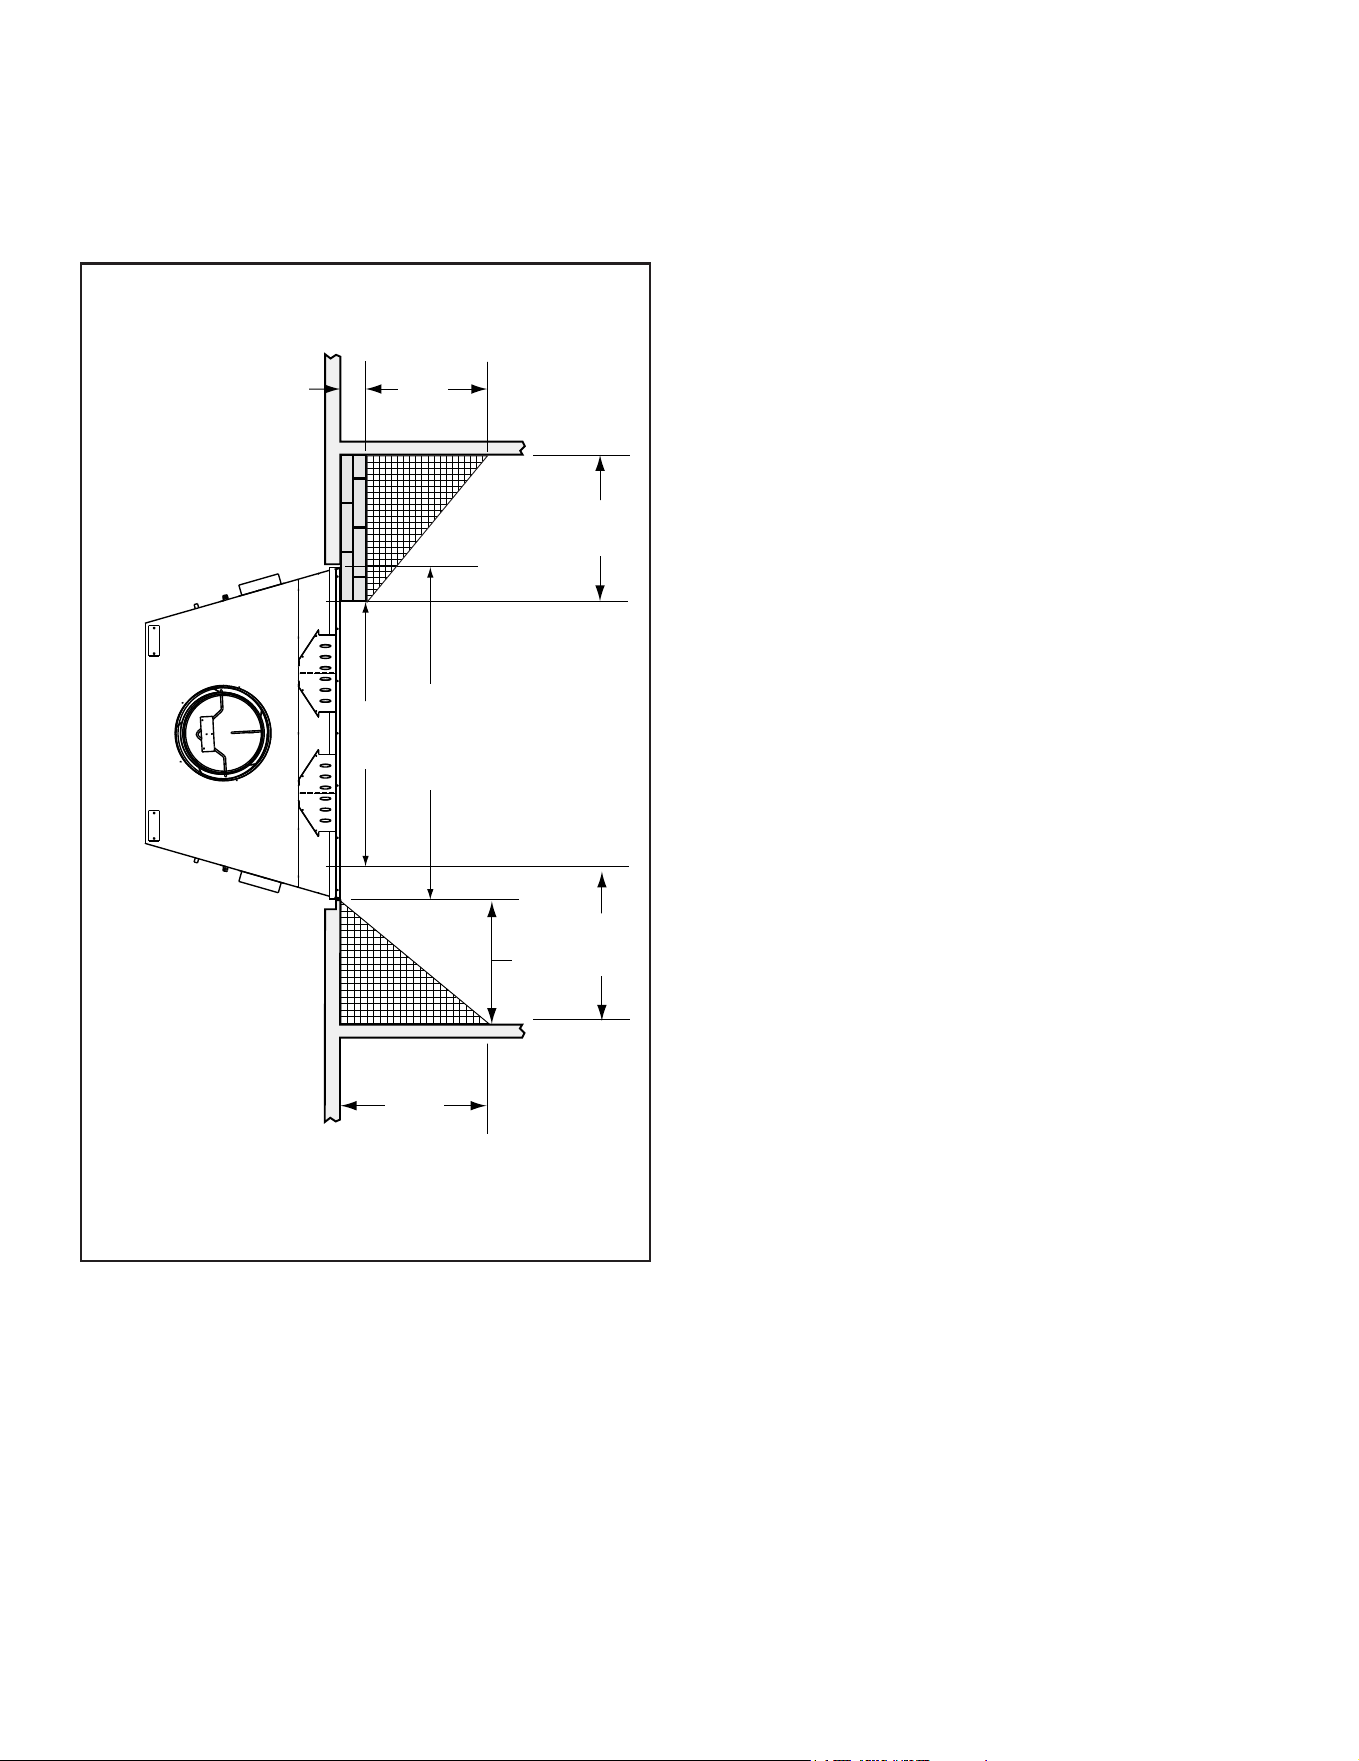
35
Outdoor Lifestyles • ODCASTLEWD-50 Install Manual • 4170-900 • Rev E • 3/26
18 1/2 in.
[470 mm]
19 3/4 in.
[500 mm]
4 in.
[102 mm]
50° angle
39° angle
24 in.
[610 mm]
BRICK
FRONT
FLUSH
FRONT
24 in.
[610 mm]
22 3/8 in.
[568 mm]
46 7/8 in.
(1191 mm)
36 in.
[914 mm]
Note: Grid depicts 1 inch squares.
Figure 6.14 Mantel Leg, Surround or Wall Projection (acceptable
on both sides of opening)
E. Sidewalls/Surrounds
• Locateadjacentcombustiblesidewallsaminimumof24
in.(610mm)fromreplaceopening.
• Mantle leg, surround, stub wall, whether combustible
or non-combustible, may be constructed as shown in
Figure6.14.
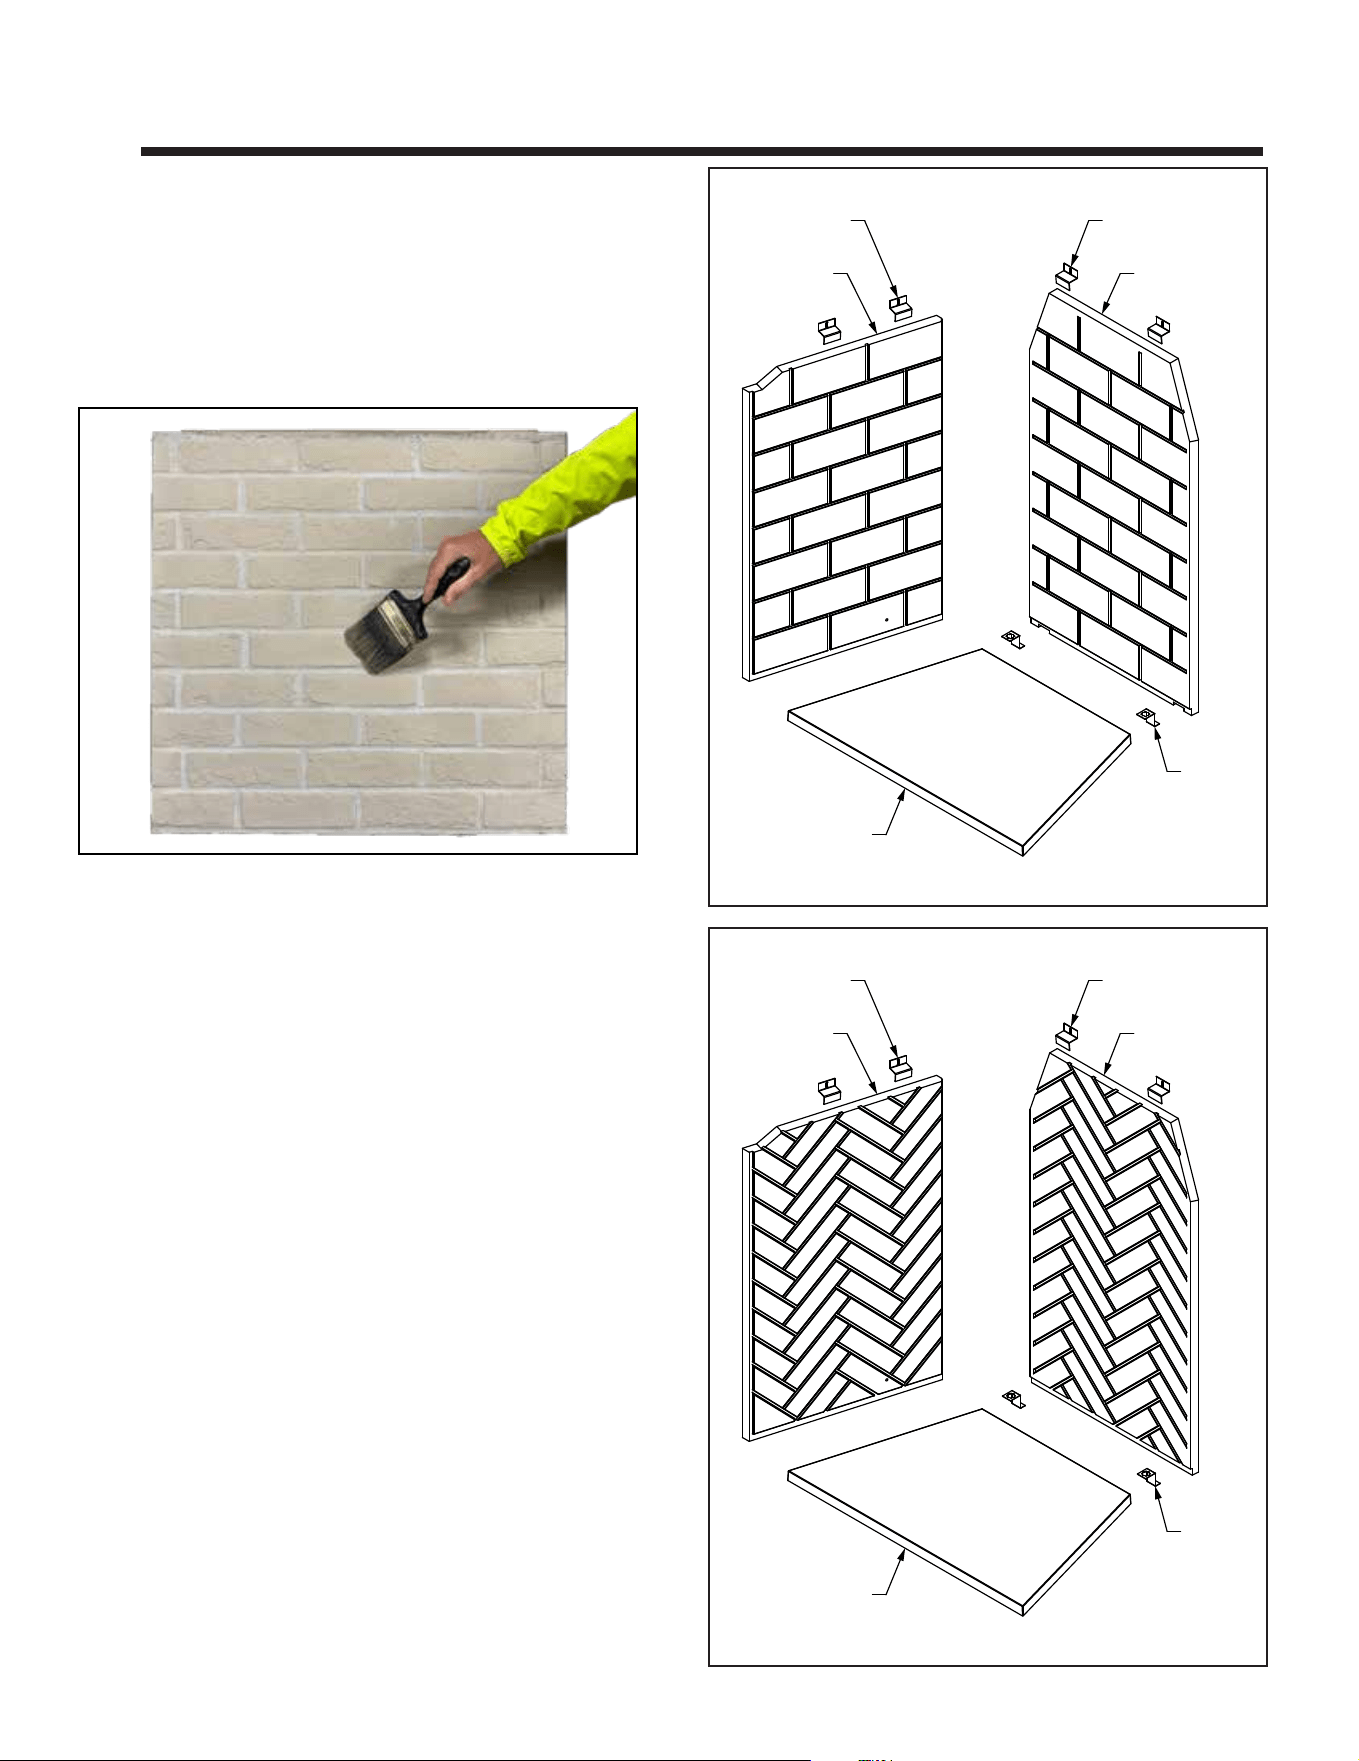
36 Outdoor Lifestyles • ODCASTLEWD-50 Install Manual • 4170-900 • Rev E • 3/26
7 7
Fireplace Setup
C. Install Hearth Refractory Panel
• Placehearthintothereplacewithgaptoback.
• RefertoFigure7.1.
• Set the grate retainers centered along back edge of
hearth and spaced to match the grate.
• Pushhearthtomeetbackandsecuregrateretainers.
B. Install Back Refractory Panel
• Removescreenrods.
• Removesmokeshield.
• Installthebackrefractory.Centerfromsidetoside.
• Securebackrefractoryatthetopedgeusingrefractory
retainersprovidedwiththereplace.Holesforscrews
willneedtobedrilled.
• Tightentheseandallpreviouslyinstalledbrackets.
D. Install Side Refractory Panel
• Ifagaslineistobeinstalled,removetheknockoutsin
the inner rebox and in the outer shell on the side of
your choice. Refer to dimension drawings for location of
knockoutsandSection7.4.forgasprovisions.
• Install side panel, tapered edge to the front. Align the
frontedgewiththefrontofthecolumn(orbuttedtothe
surroundifinstalled).
• Tightentheseandallpreviouslyinstalledbrackets.
• Installsecondsidepanelfollowingthestepsabove.
• Replacesmokeshield.
REFRACTORY
RETAINER
REFRACTORY
RETAINER
REFRACTORY
BACK
REFRACTORY
SIDE
GRATE
RETAINER
REFRACTORY
HEARTH
REFRACTORY
RETAINER
REFRACTORY
RETAINER
REFRACTORY
BACK
REFRACTORY
SIDE
GRATE
RETAINER
REFRACTORY
HEARTH
Figure 7.1 Traditional Refractory Panel
Figure 7.2 Herringbone Refractory Panel
A. Refractory Panel Kit in Crate
• TheRefractoryPanelsareshippedinasturdycratewith
3to4traysforindividualRefractoryPanels.
• RemovethelidfromcratetoaccessRefractoryPanels.
• Removeallcornerbracketsfromthecrate.
• Use aclean paintbrush to remove any accumulated
dustfromRefractoryPanelbeforeremovingitfromthe
crate.SeeFigure7.
Figure7CleanRefractoryPanel

37
Outdoor Lifestyles • ODCASTLEWD-50 Install Manual • 4170-900 • Rev E • 3/26
E. Firebrick Installation
• Theinteriorofthereplacemustbenishedwitheither
refractorypanelsorrebrickinstalledwithmortar.
• Use an indoor/outdoor medium duty refractory mortar
meetingASTMC199.FirebrickmustmeetASTMC27
andC1261.Alsorebrickinstallationshouldcomplywith
local and/or regional codes.
• It is highly recommended that rebrick be laid up by
someonewithmasonryexperience.Itisrecommended
tointerlacerebricksinthejointbetweenthebackand
side walls. Use minimum 1/8” grout spacing. Some
rebrickswillneedtobecut-to-sizeforpropert-up.
• Mortarmaybeusedtolltheleadingedgesoftheside
wallstothenon-combustiblereplacefacingmaterial.
• Startinstallingrebrickatthefrontedgeoftherebox
oorandworktowardtheback.Leave1/2”expansion
gapsfromrebricktothereboxsidesandback.These
gapswillallowroomforrebricktoexpandduringuse
andshouldnotbelledwithmortar.Theseexpansion
gapswillbehiddenbybackandsiderebrick.
• Installrebrickagainstthebackwalloftherebox.Leave
1/2”expansiongapstothereboxsides.
• Install rebrickagainst bothside walls of the rebox.
Startinstallingrebrickfromthefrontoftherebox.
• Itisnotunusualforinstalledrebricktodevelopheat
stresscracksintherebrickormortar.
• If installing an approved front or door, please double
check the dimensions needed in the installation
instructionstoensurethefrontordoorwilltafterthe
rebrickhasbeeninstalled.
Firebrick and Mortar SKUs
SKUs Firebrick Size Color
FB-ST-CM 9”x4-1/2”x1-1/4” Cream
FB-SP-CM 9”x2-1/4”x1-1/4” Cream
FB-ST-BK 9”x4-1/2”x1-1/4” Black
FB-ST-RD 9”x4-1/2”x1-1/4” Red
FB-SP-RD 9”x2-1/4”x1-1/4” Red
MMMORTR (Need 3-5 buckets per unit)
Firebrick Usage Estimates
Firebox
Size
Qty of Split (ST)
9”x4-1/2”x1-1/4”
Qty of Soaps (SP)
9”x2-1/4”x1-1/4”
36” 100 190
42” 105 210
50” 125 230
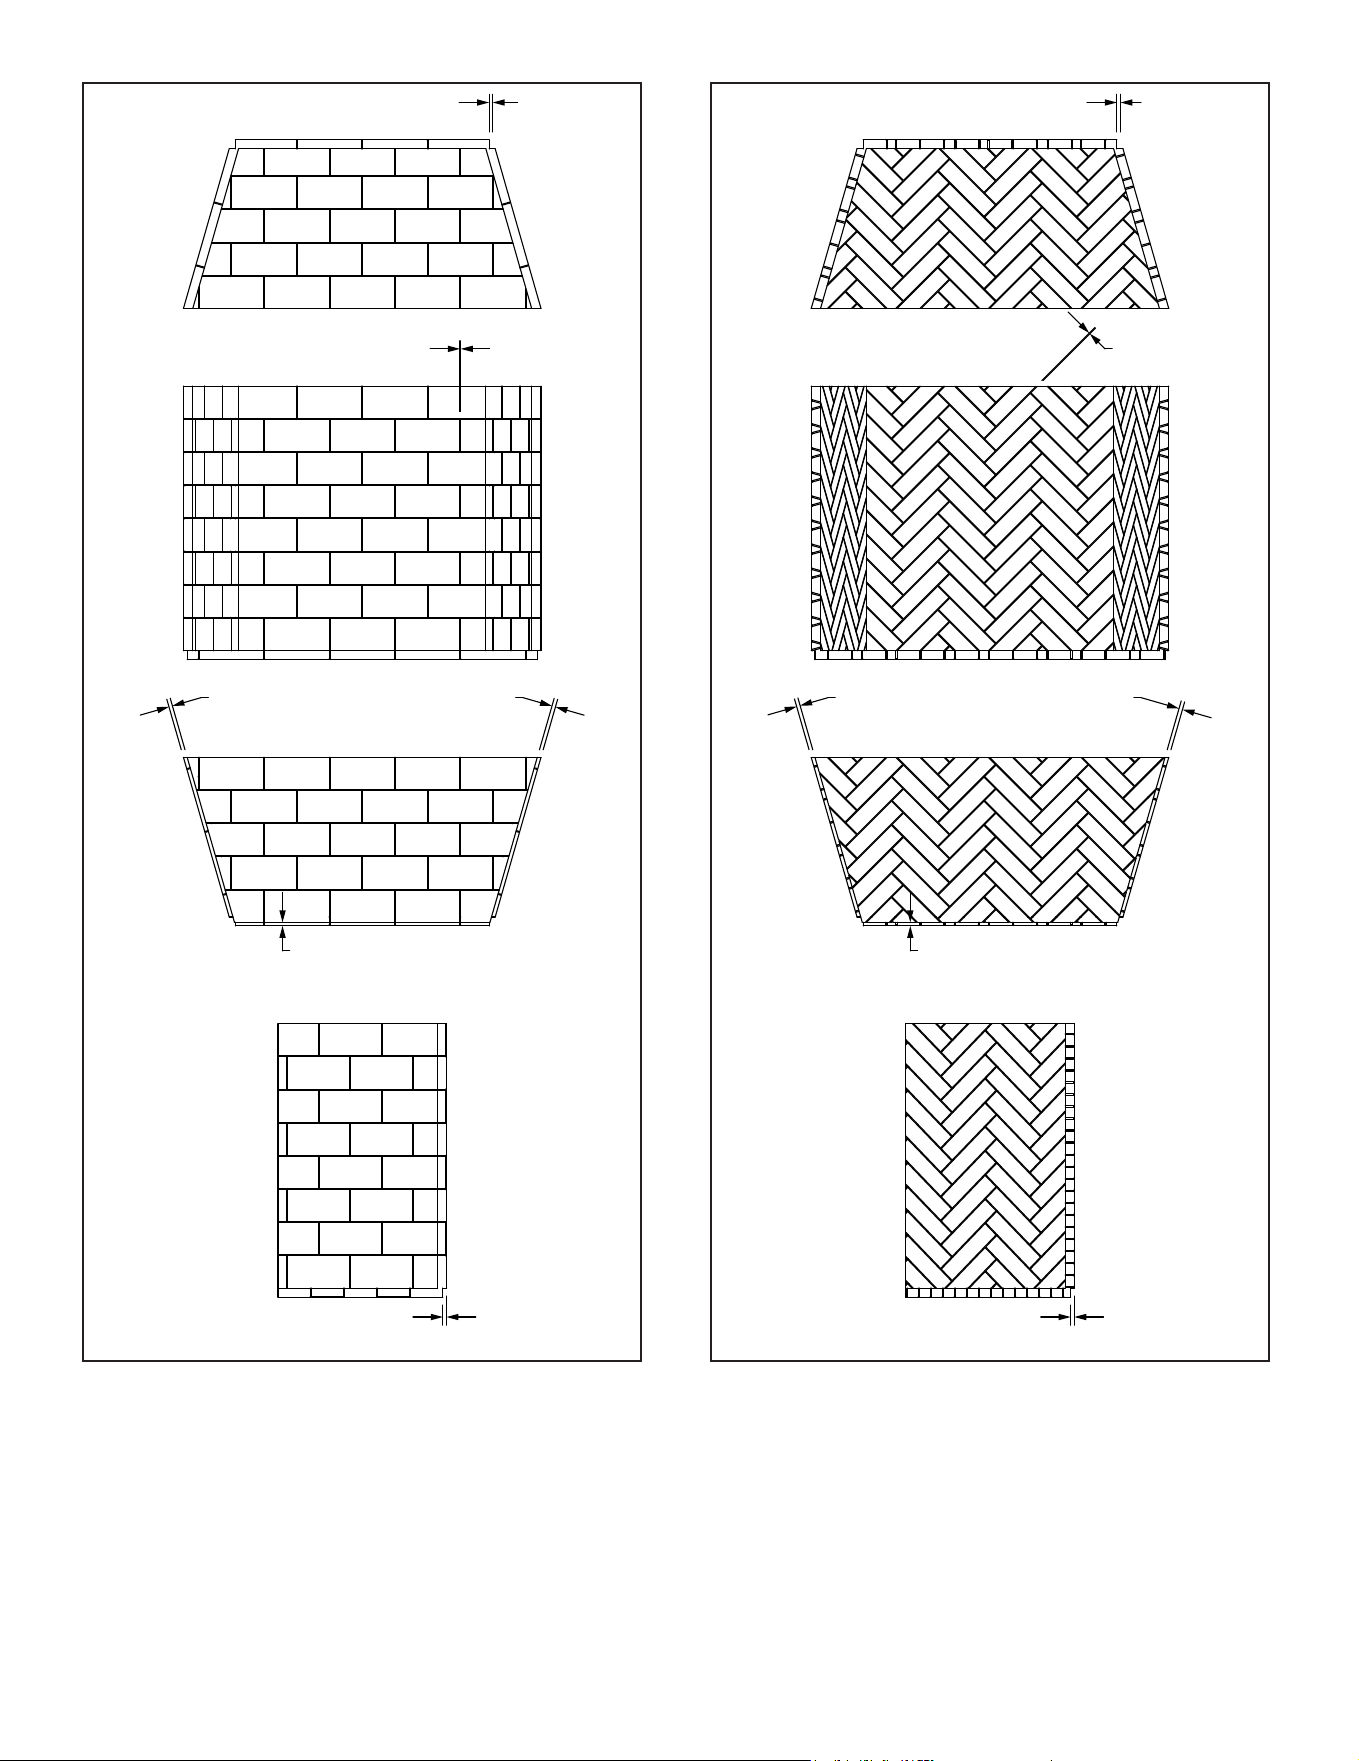
38 Outdoor Lifestyles • ODCASTLEWD-50 Install Manual • 4170-900 • Rev E • 3/26
1/2”
Expansion Gap
1/2”
Expansion Gap
1/8”
Grout Joint
1/2”
Expansion Gap
1/2”
Expansion Gap
1/2”
Expansion Gap
Front View
Bottom View
Top View
Side View
1/2”
Expansion Gap
1/2”
Expansion Gap
1/8”
Grout Joint
1/2”
Expansion Gap
1/2”
Expansion Gap
1/2”
Expansion Gap
Front View
Bottom View
Top View
Side View
Herringbone Firebrick LayoutTraditional Firebrick Layout
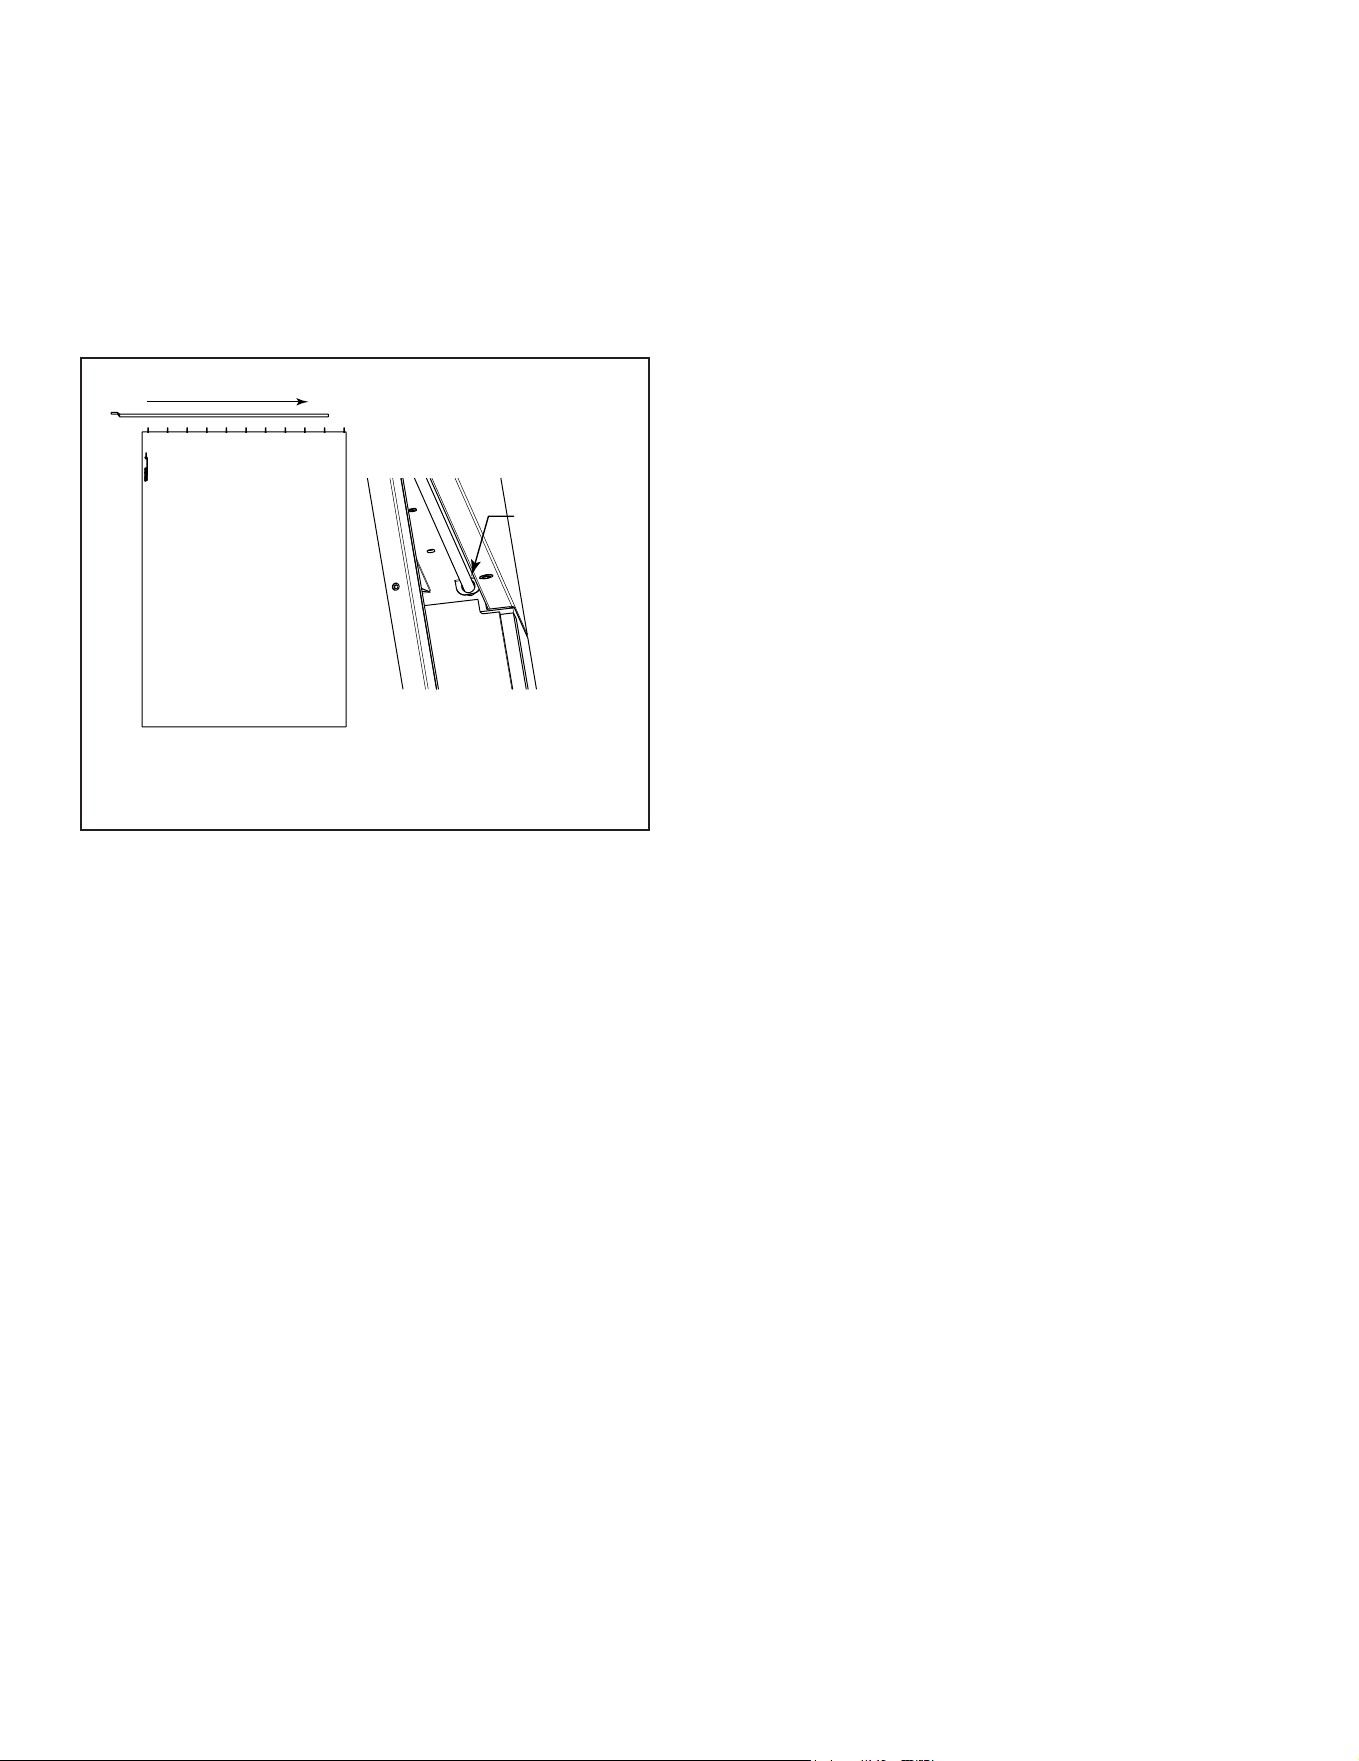
39
Outdoor Lifestyles • ODCASTLEWD-50 Install Manual • 4170-900 • Rev E • 3/26
F. Install Screens
• Lay one screen panelat andslide theround end of
the rod through the rings starting at the handle side of
screen.Leavethelastringotherod.
• Inserttherodthroughtheholeinthebracket.Slipthe
lastringovertherodontheothersideofthebracket.
• Fastentheatendofthescreenrodbackinplaceusing
thescrewremovedearlier.
• Repeat for the other screen panel.
Center of Fireplace Opening
Round end of Rod through rings,
then into Screen Rod Clip
Rod Screen
Clip
Inside
Firebox
Top of Fireplace
G. Install Mortar (Optional)
The brick panels have been designed for installation
withouttheuseofmortarbeingnecessary.Ifthelookof
mortarispreferred,itisavailableandcanbeinstalled.
Followthedirectionsonthecontainerformixing.
H. Grate
• Installthegrateifagaslogsetisnotgoingtobeinstalled.
• PositionthereargratebarintheGrateRetainer.
• Positionthetopofthegrateretaineroverthereargrate
barandfasteninplacewithscrewprovided.
Figure 7.3 Install Screens
Note: Herringbonerefractorymayrequiretwobuckets
ofmortar.TheTranditionalrequiresonlyone.
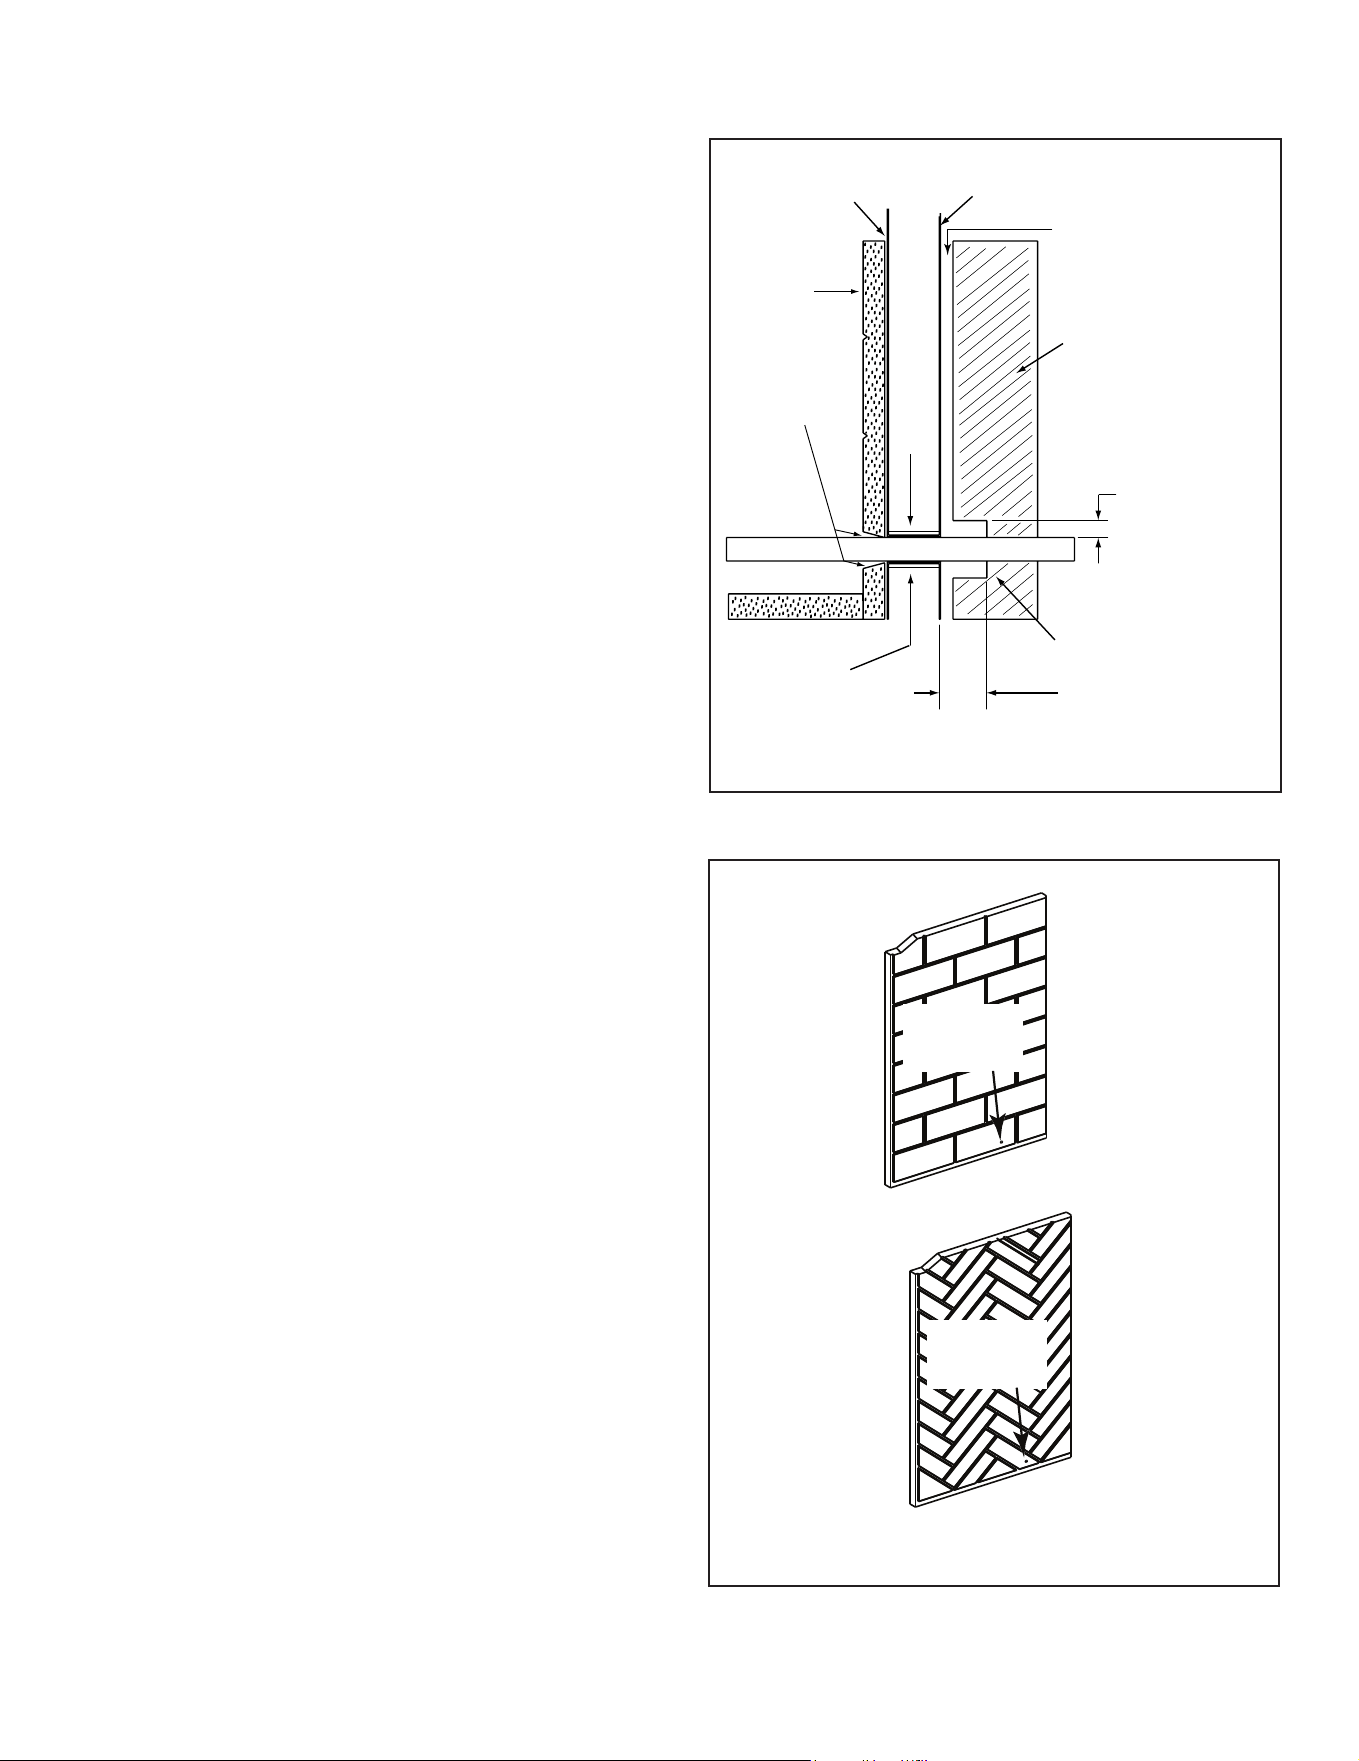
40 Outdoor Lifestyles • ODCASTLEWD-50 Install Manual • 4170-900 • Rev E • 3/26
I. Gas Log/Lighter Provision
WARNING! Fire and/or Asphyxiation Risk! Use with
solidwoodfuelordecorativegasapplianceonly.Gasre
generates fumes.
• Damper must be locked fully open when gas logs are
installed
Firebox
Repack
insulation
knockout
Combustible
materials
Maintain air clearance
to combustibles.
Gas line
Combustible materials
may be located at zero
clearance to gas line
beyond 4 in. (102 mm)
from fireplace side.
Gas line
1 1/2 in. (38 mm)
air space around
pipe
Refractory
Seal with
fireplace mortar
or non-combust-
ible sealant
4 in.
(102 mm)
Outer shell
of fireplace
Figure 7.4 Gas Line Installation
J. Wood Burning Inserts
WARNING! Risk of Fire! Improper installation of wood in-
sertsmaycausereplaceorchimneysystemtooverheat.
Ifawoodburninginsertisbeinginstalledinthisreplace,
Hearth&HomeTechnologiesrecommendsfullrelineof
the chimney.
• Cooling air openings at the top of the chimney must not
beobstructedinanymanner.
• Hearth&HomeTechnologiesrecommendssecuringthe
relineatthetopoftheueandusingthecapcertiedfor
usewiththisreplacesystem.
Figure 7.5 Gas Line Dimples
Acertiedgasloglighterordecorativegaslogsetcanbe
installedinthisreplace.
Vented Gas Logs
Unvented Gas Logs
CAUTION! Ifanunventedgasapplianceisinstalledin
thereplace,thegasappliancemustonlybeoperated
with the replace glass door fully open (if included).
Onlyunventedgaslogsetswhichhavebeenfoundto
complywiththe standard forunventedroom heaters,
ANSIZ211.11.2,aretobeinstalledinthisreplace.If
anunventedgasapplianceisinstalleditmustincorpo-
rateanautomaticshutodevice,andmustbeinstalled
inaccordancewiththeNationalFuelGasCodeZ223.1,
Latest edition.
• Maximuminputis100,000BTU/hr.
• Decorative gas appliance must be certied to ANSI
Z21.60/CSA 2.26 “Standard for Decorative Gas
AppliancesforInstallationinVentedFireplaces”.
• MustbeinstalledinaccordancewiththeNational Fuel
Gas Code, ANSI Z223.1 and Natural Gas Installation
Code, CAN/CGA-B149.1-M95 or the Propane
Installation Code, CAN/CGA-B149.2-M95.
• Agaslogsetmustincorporateagasshuto.
• GasLogsetrequiresthedampertobelockedfullyopen.
• Alistedautomaticdampersystemwithsafetyinterlock
may be used in this replace with only compatible,
listedgaslogsets.Seedampersystemmanufacturer’s
instructions.
• Knockoutsareprovidedonbothsidesofthereplace
andinrefractoriesamasonryholesawofatleast1in.
(26mm)mustbeusedtomaketheholeatthegasline
dimplelocationfor1/2in.(13mm)ironpipe.
• Seal refractoryaroundpipe with replacemortaror a
non-combustiblesealant.
WARNING! Do Not operate an unvented gas log set in this
replacewiththechimneyremoved.
Gas Line
Dimple
Gas Line
Dimple
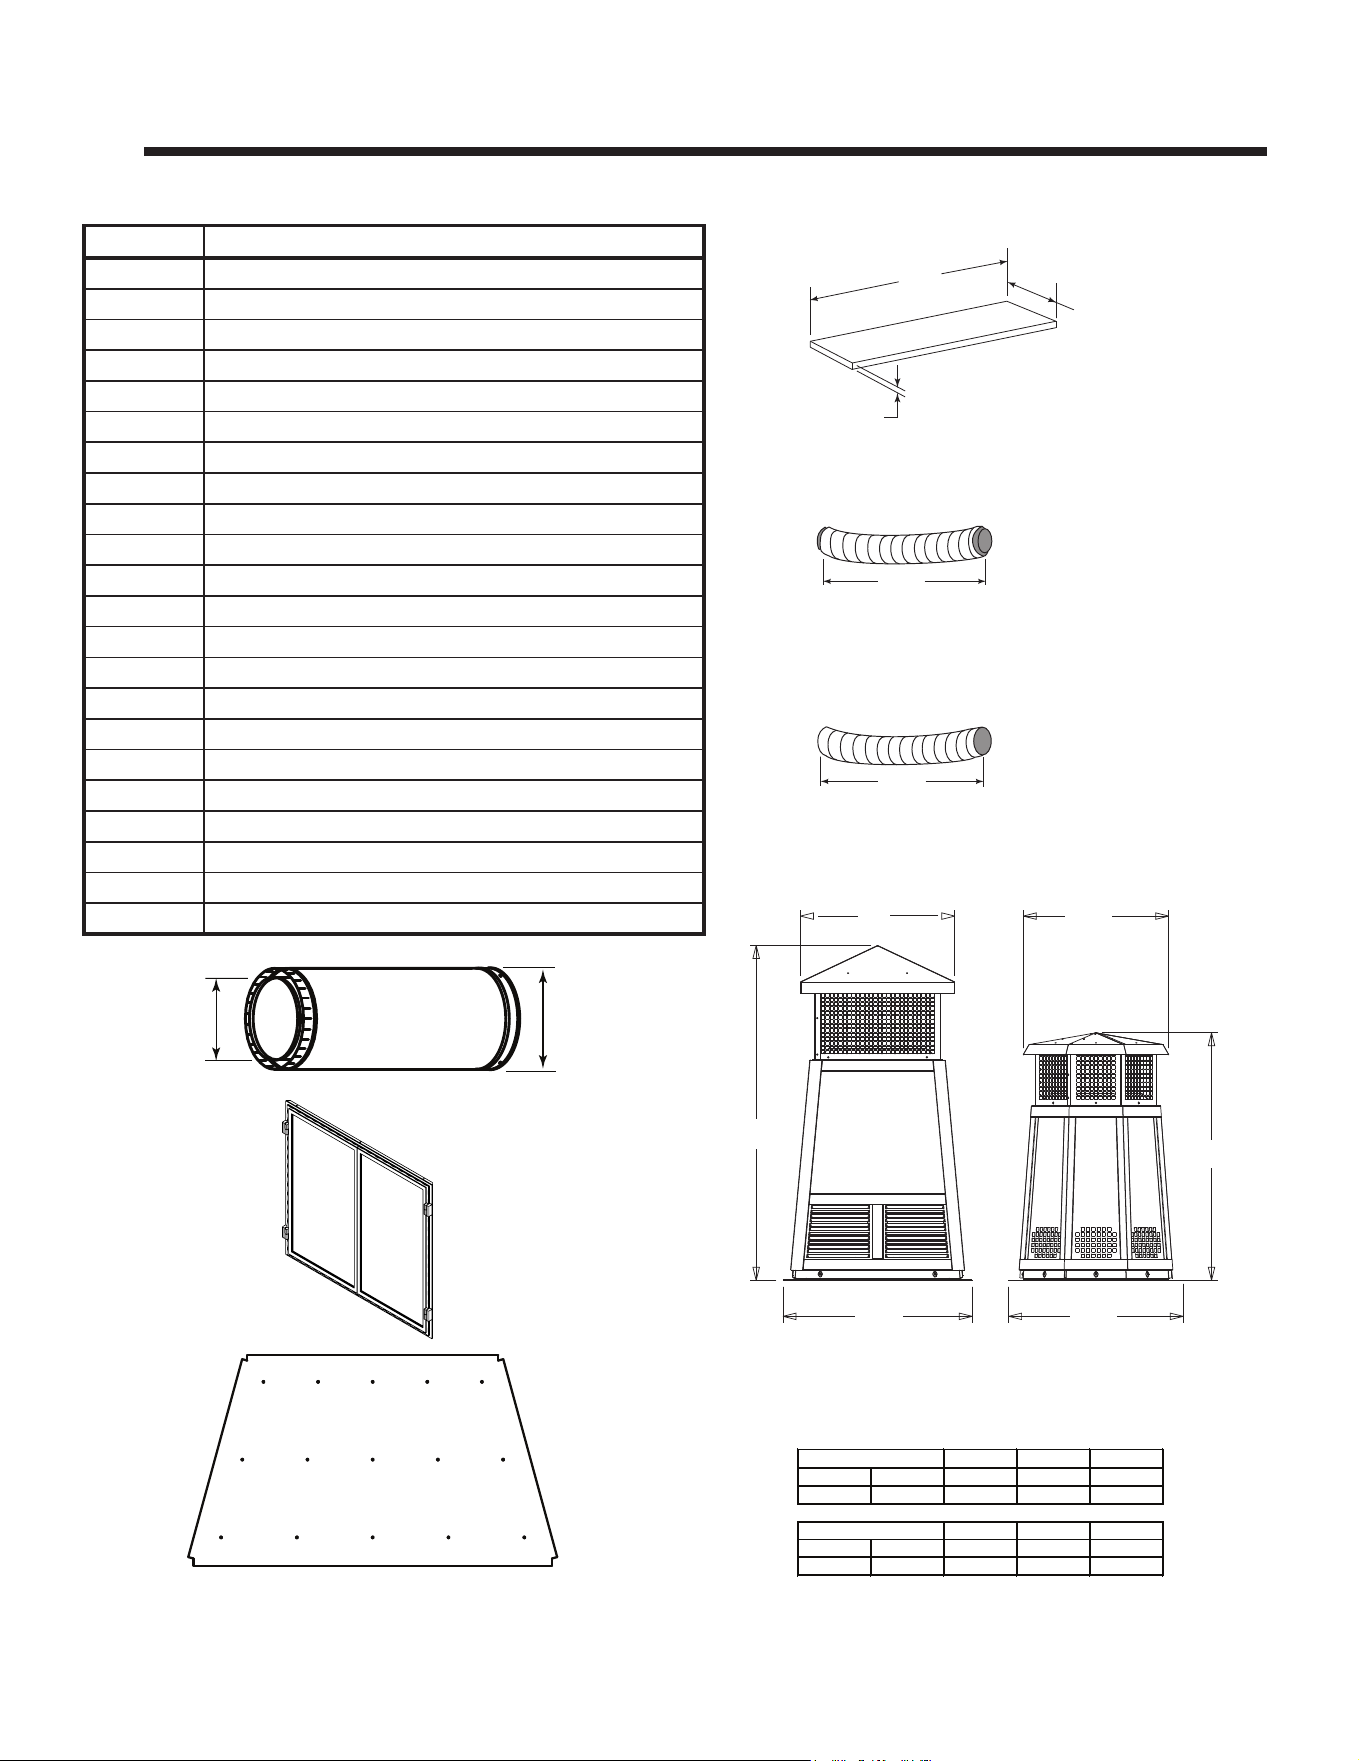
41
Outdoor Lifestyles • ODCASTLEWD-50 Install Manual • 4170-900 • Rev E • 3/26
8 8
Reference Materials
B. Optional Components
20 in.
(508 mm)
66 in.
(1676 mm)
1/2 in.
(13 mm)
HX4 Hearth Extension
ID6 Insulated Duct 6 in. (152 mm) i.d.
42 in.
(1067 mm)
42 in.
(1067 mm)
UD6 Uninsulated Duct 6 in. (152 mm) i.d.
(Required/shipped separately)
ODGF50BZ
Glass Doors
(optional)
A. Chimney Components
14 in.
(356 mm)
-i.d.-
17 in.
(432 mm)
-o.d.-
Duravent Pipe Dimensions
B
A
C
B
C
A
DTS146-BK/CP DTO146-BK/CP
Decorative Caps
A B C
DTO146-BK/CP
in
46 22-3/4 26
mm
1168 577 660
DTS146-BK/CP
A B C
in
46 21-3/16 26
mm
1168 538 660
See your Outdoor Lifestyles dealer for a complete list of optional components.
ODCASTLEWD-50DP Drain Pan
Catalog # Description
14DCA-12 Pipe 12 inch
14DCA-18 Pipe18inch
14DCA-36 Pipe36inch
14DCA-48 Pipe48inch
14DCA-E15 15degreeElbow
14DCA-E30 30degreeElbow
14DCA-ES ElbowStrap
14DCA-SS Supplementary Support
14DCA-ST Stabilizer
14DCA-FS Firestop
14DCA-IS Insulation Shield
14DCA-RRS Roof Radiation Shield
14DCA-CTF ChaseTopFlashing
14DCA-VC1 Chimney Cap
14DCA-SC Storm Collar
14DCA-WS Wall Strap
14DCA-CTC ChaseTopCollar
CT14-A Adapter-mayonlybeusedwiththefollowingcoppercaps
DTO146-BK TallOctagonDecorativeCap-Black
DTO146-CP TallOctagonDecorativeCap-Copper
DTS146-BK TallSquareDecorativeCap-Black
DTS146-CP TallSquareDecorativeCap-Copper

42 Outdoor Lifestyles • ODCASTLEWD-50 Install Manual • 4170-900 • Rev E • 3/26
OutdoorLifestyles,abrandofHearth&HomeTechnologies
7571-215thStreetWest,Lakeville,MN55044
www.hearthnhome.com
PleasecontactyourOutdoorLifestylesdealerwithanyquestionsorconcerns.
ForthelocationofyournearestOutdoorLifestylesdealer,pleasevisitwww.hearthnhome.com.