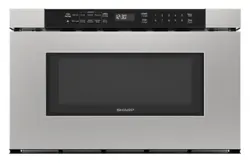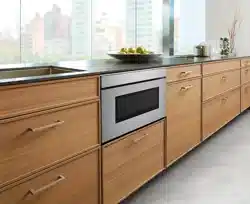
ConveCtion MiCrowave Drawer
SMD2499FS
OPERATION MANUAL
CONVECTION MICROWAVE DRAWER
MODEL: SMD2499FS
REGISTER YOUR PRODUCT ..................................... 2
CONSUMER LIMITED WARRANTY .............................. 3
PRECAUTIONS TO AVOID POSSIBLE EXPOSURE
TO EXCESSIVE MICROWAVE ENERGY ......................... 4
IMPORTANT SAFETY INSTRUCTIONS .......................... 5
INFORMATION YOU NEED TO KNOW ........................... 8
PART NAMES .....................................................12
BEFORE OPERATING ............................................15
CONNECTING YOUR APPLIANCE...............................16
MICROWAVE OVEN COOKING ..................................17
CONVECTION COOKING - PRESETS ...........................23
CONVECTION COOKING - MANUAL ............................ 27
SPEED COOK – MICROWAVE &
CONVECTION COMBINATION ................................... 31
OTHER FEATURES ............................................... 32
CLEANING AND CARE ...........................................35
BEFORE YOU CALL FOR SERVICE ............................. 36
AUTO-TOUCH GUIDE .............................................37
CUSTOMER ASSISTANCE UNITED STATES ONLY
REGISTER YOUR PRODUCT
Registering your new product is easy and offers benets that help you get the most
out of your Sharp product including:
9 Convenience: If you ever need warranty support, your product information is already on le.
9 Communication:Stay up to date with important notications and special offers from SHARP.
9 Support: Quickly access support content including Owner’s Manuals, FAQ’s,
How-to Videos, and much more.
3 EASY WAYS TO REGISTER TODAY!
PRODUCT SUPPORT
If you have questions about the setup or operation of your product, please refer to
the corresponding section within this manual.
Additionally, visit https://support.sharpusa.com/s/ to access exclusive content about
your product including:
Æ FAQ’s and How-To Videos
Æ Find or Request Service
Æ Extended Warranty Options
Æ Downloads including the Installation Guide, Spec Sheet, and Owner’s Manual
CONTACT US
If at any time you have questions or comments concerning your SHARP product,
please contact the SHARP Customer Assistance Center. We are available to
assist you through multiple contact methods for your convenience:
Scan this QR Code on your mobile device Visit http://www.sharpusa.com/register
ONLINE
Visit our sites to
learn more about
your product at
sharpusa.com and
sbl.sharpusa.com
See the Contact Us section on our sites
U.S. | https://support.sharpusa.com/s/
Contact a Sharp Advisor on the phone
Contact a Sharp Advisor on the phone
CALL US
US 800-BE-SHARP
800-237-4277
Mon-Fri: 7am-7pm CST
Sat-Sun: 9am-7pm CST
CALL US
US 800-BE-SHARP
800-237-4277
Mon-Fri: 7am-7pm CST
Sat-Sun: 9am-7pm CST
EMAIL
Available 24/7
US: sharpusa.com
CHAT ONLINE
Mon-Fri: 7am-7pm CST
Sat-Sun: 9am-7pm CST
SCAN
Use the camera or
QR code scanning
application on your
mobile device
TGANEB010MRR2 Sep 24, 2025
2E
E
REGISTER YOUR PRODUCT

3 E
E
CONSUMER LIMITED WARRANTY
3
SHARP
®
CONSUMER LIMITED WARRANTY
SHARP ELECTRONICS CORPORATION ( " Sharp") warrants to the first consumer pur chaser that t his Sharp brand product (the
"Product"), when shipped in its original container, will be free from defective workmanship and materials, and agrees that it
will,
at its option, either repair the defect or replace the defective Product or part thereof with a new or remanufactured equival
ent at no
charge to the purc ha ser for parts or labor for the period(s) set forth below.
This warranty does not apply to any cosmetic or appearance items of t he Product nor to the additional excluded item(s) set fo
rth below
nor to any Product the exterior of which has been damaged or defaced, which has been subjected to misuse, abnormal service, o
r
handling, or which has been altered or modified in design or construction. In order to enforce the rights under this limited
warr
anty,
the purchaser should follow the steps set forth below and provide proof of purchase to the servicer.
The limited warranty described herein is in addition to whatever implied warranties may be granted to purchasers by law. ALL
IMPLIED WARRANTIES INCLUDING THE WARRAN TIES OF MERCHANTABILITY AND FITNESS FOR USE ARE
LIMITED TO THE PERIOD(S) FROM THE DATE OF PURCHASE SET FORTH BELOW. Some states do not allow limitations
on how long an implied warranty lasts, so the above limitation may not apply to you.
Neither the sales personnel of the seller nor any other person is authorized to make any warranties other than those describe
d herein,
or t o extend the duration of any warranties beyond the time period described above on behalf of Sharp. The warranties des
cribed
herein should be the sole and exclusive warranties granted by Sharp and should be the sole and exclusive remedy avail a ble to
t he
purchaser. Correction of defects, in the manner and for the period of time described herein, should constitute complete
fulfillment of
all liabilities and responsibilities of Sharp to the purchaser with respect to the Product, and should constitute full satisf
action of all
claims, whether base d on contract, negligence, st rict liability or otherwise. In no event should Sharp be liable, or in any w
ay responsible,
for any damages or defects in the Product which were caused by repairs or attempted repairs performed by anyone other than a
Sharp
authorized servicer. Nor should Sharp be liable or in any way responsible for any inc i
dental or consequential economi c or property
damage. Some states do not allow the exclusion of inci dental or consequential da mages, so the above exclusion may not apply t
o you.
THIS LIMITED WARRANTY IS VALID ONLY IN THE FIFTY (50) UNITED STATES, THE DISTRICT OF COLUMBIA AND
PUERTO RICO.
SMD2499FS, Home Use
Convection
Microwave Drawer
TM
Oven (Be sure to have this
information
available when you need service for your product.)
One (1) year parts and labor, including in
-
home service.
Product m ust be
accessible to provide service.
The warranty period continues for an additional four (4) years, for a total of five (5)
years, with respect to the magnetron tube in the Product for parts only; labor and service
are not provided free of charge for this ad ditional period.
Commercial, non
-
residential, or us e inconsistent with published installation and product
operational instructions.
Non
-
functional accessorie s, light bulb, service calls to your home to instruct how to use
your
Convection M
icrowave
Drawer
appliance, replace or repair house fuses or to correct
house wiring, improper commercial use, installation, or maintenance, damage to the product
caused by
delivery, accident, modifications, fi re, floods or acts of God.
In
-
home service is pr ovided for one (1) year from date of purchase. Service can be arranged
by calling 1
-
800
-
BE
-
SHARP. Be sure to have Proof of Purchase, Model, a nd Serial Number
available.
TO OBTAIN SUPPLY, ACCESSORY OR PRODUCT INFORMA TION, CALL 1
-
800
-
BE
-
SHAR P or visit
www.sharpusa.com
.
SAVE THE PROOF OF PURCHASE AS IT IS NEEDED
SHOULD
YOUR
OVEN
EVER REQUIRE WARRANTY
SERVICE.
Product model number &
description:
Warranty period for this product:
Additional item( s) ex cluded from
warranty coverag e:
What to do to o btain service:
4E
E
PRECAUTIONS TO AVOID POSSIBLE EXPOSURE
TO EXCESSIVE MICROWAVE ENERGY
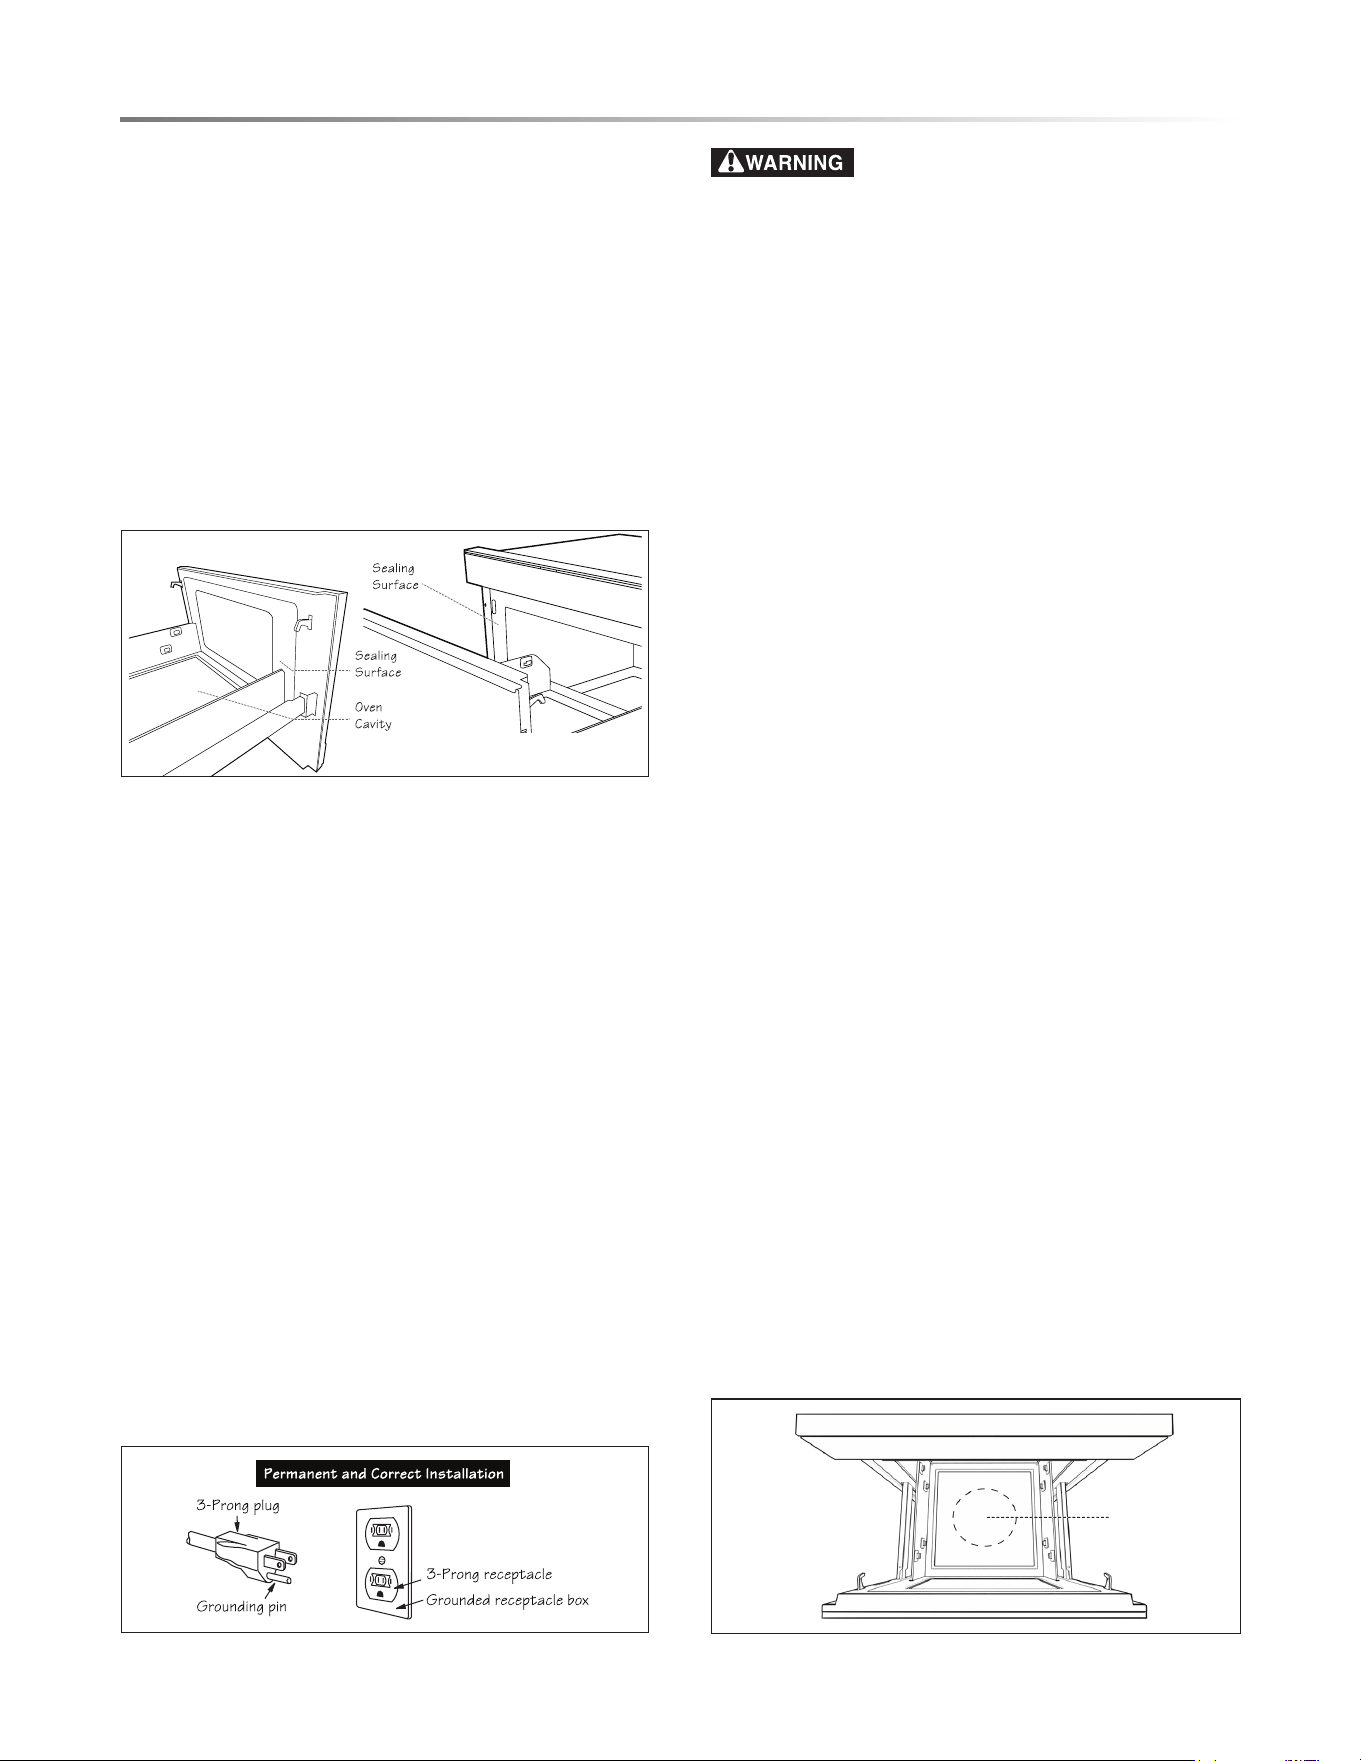
(a) Do not attempt to operate this oven with the door open since open-door operation can result in harmful
exposure to microwave energy. It is important not to defeat or tamper with the safety interlocks.
(b) Do not place any object between the oven front face and the door or allow soil or cleaner residue to
accumulate on sealing surfaces.
(c) Do not operate the oven if it is damaged. It is particularly important that the oven door close properly and
that there is no damage to the: (1) door (bent), (2) hinges and latches (broken or loosened), (3) door seals
and sealing surfaces.
(d) The oven should not be adjusted or repaired by anyone except properly qualied service personnel.

5 E
E
E
E
E
IMPORTANT SAFETY INSTRUCTIONS
CAUTION FOR WIRELESS LAN
CAUTION FOR USAGE ABOUT WI-FI
• If you are using in the following areas, the operation cannot
be guaranteed: near Bluetooth
®
wireless communications
devices using the same frequency (2.4 or 5 GHz) as this
product or specied low power wireless devices. There may
also be issues in locations with devices, such as microwave
ovens, that emit a magnetic eld; as well as in areas with static
electricity or radio disturbance, all of which can interfere
with the Wi-Fi signal.
• Wireless connection and performance cannot be guaranteed
for all routers or housing environments. In the following
places, it is possible the Wi-Fi cannot reach or is disconnected:
inside of a building made with concrete, reinforced metal, near
an obstruction (e.g., a wall) or near a wireless communications
device using the same frequency.
• Wireless LAN of this product corresponds to channels 1-13.
It is not available to communicate with routers set up to other
channels.
CAUTION FOR PERSONAL INFORMATION
(RELATED TO SECURITY)
• Using a wireless LAN device has the possibility of
interception when using Wi-Fi, regardless of password setting.
• Depending on the location where you are connecting your
oven, ensure you have the right/authority to connect the
appliance to the available Wi-Fi network.
• If disposing of unit, giving or selling to a third party, be sure
to Reset Wi-Fi Settings as described in this manual. The
wireless LAN function of the unit should be initialized (reset)
in case of handover to a third party to avoid illegal access
from unauthorized parties.
MINIMUM REQUIREMENTS FOR WI-FI/ROUTER
SPECIFICATIONS:
• IEEE 802.11 b/g/n compatible WLAN
• 72.2Mbps receive and transmit PHY rate using 20MHz
bandwidth
• 150Mbps receive and transmit PHY rate using 40MHz
bandwidth
• 802.11i (WPA, WPA2). Open, shared key, and pair-wise key
authentication services
• Wi-Fi WPS support
• WPA2-AES is the recommended encryption method
IMPORTANT REGULATORY
INFORMATION
CAUTIONCAUTION
Any changes or modications to the appliance
not expressly approved by the party responsible for compliance
could void the user’s authority to operate the appliance.
Note: This equipment has been tested and found to comply with
the limits for a Class B digital device, pursuant to Part 15 of
the FCC Rules. These limits are designed to provide reasonable
protection against harmful interference in a residential instal-
lation. This equipment generates, uses and can radiate radio
frequency energy and, if not installed and used in accordance
with the instructions, may cause harmful interference to radio
communications. However, there is no guarantee that interfer-
ence will not occur in a particular installation. If this equipment
does cause harmful interference to radio or television reception,
which can be determined by turning the equipment off and on,
the user is encouraged to try to correct the interference by one
or more of the following measures:
• Reorient or relocate the receiving antenna.
• Increase the separation between the equipment and receiver.
• Connect the equipment to an outlet on a circuit different from
that to which the receiver is connected.
• Consult the dealer or an experienced radio/TV technician
for help.
SHARP HOME USE CONVECTION MICROWAVE
DRAWER MODEL# SMD2499FS
This device complies with Part 15 of the FCC Rules. Operation
is subject to the following two conditions: (1) This device may
not cause harmful interference, and (2) this device must accept
any interference received, including interference that may cause
undesired operation.
• Contains FCC: RX3-BZ02
• Contains IC: 2878F-BZ02
Responsible Party:
Sharp Electronics Corporation
100 Paragon Drive, Montvale, NJ 07645
TEL: 1-800-BE-SHARP
www.sharpusa.com

6E
E
E
E
E
IMPORTANT SAFETY INSTRUCTIONS
READ ALL INSTRUCTIONS BEFORE USING
When using the appliance, basic safety precautions should
be followed, including the following:
To reduce the risk of burns, electric shock,
re, injury to persons or exposure to excessive microwave
energy:
1 Read all instructions before using the appliance.
2 Read and follow the specic “PRECAUTIONS TO
AVOID POSSIBLE EXPOSURE TO EXCESSIVE
MICROWAVE ENERGY” on page 4.
3 This appliance must be properly grounded. See page 8
for GROUNDING INSTRUCTIONS.
4 Install or locate this appliance only in accordance with
the provided Installation Manual.
5 Some products such as whole eggs in shell and sealed
containers (for example, closed glass jars) are able to
rupture and should not be heated in the appliance.
6 Use this appliance only for its intended use as described
in this manual. Do not use corrosive chemicals or vapors
in this appliance. This appliance is specically designed
to heat, cook or dry food. It is not designed for use in
industrial, laboratory or marine environments.
7 HOT CONTENTS CAN CAUSE SEVERE BURNS.
DO NOT ALLOW CHILDREN TO USE THE
MICROWAVE OVEN. Use caution when removing
hot items.
8 Do not operate this appliance if it has a damaged cord
or plug, if it is not working properly or if it has been
damaged or dropped.
9 This appliance should be serviced only by qualied
service personnel. Contact nearest Sharp Authorized
Servicer for examination, repair or adjustment.
10 Do not cover or block any openings on the appliance.
11 Do not store or use this appliance outdoors. Do not use
this product near water, such as near a kitchen sink, in a
wet basement, near a swimming pool or similar locations.
12 Do not immerse cord or plug in water.
13 Keep cord away from heated surfaces.
14 Do not climb or sit on the appliance.
15 Be sure that ngers or other objects or materials are
not around the appliance opening when the appliance
is closed.
16 Do not let cord hang over edge of table or counter.
17 Do not put ngers or clothes around the drawer guides
when the appliance is opened or closed. They could be
caught in the guides when the appliance is closed.
18 Be sure that the food and container are shorter than the
drawer before closing it. You can refer to the height of
the side walls of the drawer.
19 When cleaning appliance sealing surfaces that
come together on closing the drawer, use only mild,
nonabrasive soaps or detergents applied with a sponge
or soft cloth. See cleaning instructions on page 35.
20 To reduce the risk of re in the appliance cavity:
a Do not overcook food. Carefully attend appliance
when paper, plastic or other combustible materials
are placed inside the appliance to facilitate cooking.
b Remove wire twist-ties from paper or plastic bags
before placing bag in appliance.
c If materials inside the appliance ignite, keep
appliance door closed, turn microwave off and shut
off power at the fuse or circuit breaker panel.
d Do not use the appliance for storage purposes. Do
not leave paper products, cooking utensils, or food
in the appliance when not in use.
21 Liquids, such as water, coffee or tea are able to be
overheated beyond the boiling point without appearing
to be boiling due to surface tension of the liquid. Visible
bubbling or boiling when the container is removed from
the appliance is not always present. THIS COULD
RESULT IN VERY HOT LIQUIDS SUDDENLY
BOILING OVER WHEN A SPOON OR OTHER
UTENSIL IS INSERTED INTO THE LIQUID.
To reduce the risk of injury to persons:
a Do not overheat the liquid.
b Stir the liquid both before and halfway through
heating it.
c Do not use straight-sided containers with narrow
necks. Use a wide-mouthed container.
d After heating, allow the container to stand in the
appliance at least for 20 seconds before removing
the container.
e Use extreme care when inserting a spoon or other
utensil into the container.

7 E
E
E
E
E
IMPORTANT SAFETY INSTRUCTIONS
22 If Arcing (sparks inside the oven cavity) occurs, touch
STOP/CLEAR.
Check the following:
• Ensure that all cookware is microwave-safe if using
MICROWAVE or SPEED COOK functions.
• If using the top or bottom racks (for Convection and
Speed Cook functions), ensure they are properly
placed inside of the oven cavity and not touching the
walls of the oven interior.
• If using aluminum foil (safe for Convection cooking
modes only), ensure foil is properly molded on top of
the food item with no edges turned up.
SAVE THESE INSTRUCTIONS
• No metal twist-ties, poultry pins or cookware with
metal decorative trim are used inside the oven.
• No recycled paper towels (may contain bits of metal
particles) are used to cover food or clean the oven.
23 When using Speed Cook functions, the exterior of the
appliance may also become hot.
24 If the appliance light fails, consult a SHARP
AUTHORIZED SERVICER.
8E
E
E
E
E
ABOUT UNPACKING AND YOUR
CONVECTION MICROWAVE DRAWER
A minimum of two people are required to handle the oven.
Use the two handles located on each side of the oven to lift.
1 Remove all packing materials from inside the Convection
Microwave Drawer and on the Drawer door.
2 Remove the feature sticker, if there is one. Check the drawer
for any damage, such as misaligned or bent drawer, damaged
drawer seals and sealing surfaces, broken or loose drawer
guides and dents inside the cavity or on the front side of the
drawer. If there is any damage, do not operate the Convection
Microwave Drawer and contact your dealer or a SHARP
AUTHORIZED SERVICER.
RADIO OR TV INTERFERENCE
Should there be any interference caused by the Convection
Microwave Drawer to your radio or TV, check that the
Convection Microwave Drawer is on a different electrical circuit,
relocate the radio or TV as far away from the drawer as feasible
or check position and signal of receiving antenna.
GROUNDING
INSTRUCTIONS
The electrical requirements are a 120 volt 60 Hz, AC only,
15 amp. or more protected electrical supply.
It is recommended that a separate circuit serving only the
Convection Microwave Drawer be provided. This appliance
must be grounded. The Convection Microwave Drawer
is equipped with a cord having a grounding wire with a
grounding plug. It must be plugged into a wall receptacle
that is properly installed and grounded in accordance with
the National Electrical Code and local codes and ordinances.
In the event of an electrical short circuit, grounding reduces
risk of electric shock by providing an escape wire for the
electric current.
Improper use of the grounding plug can result
in a risk of electric shock. Do not use an extension cord. If
the power supply cord is too short, have a qualied electri-
cian or serviceperson install an outlet near the appliance.
If you have any questions about the grounding or electrical
instructions, consult a qualied electrician or serviceperson.
ABOUT YOUR CONVECTION MICROWAVE
DRAWER
A LWAYS have food in the Convection Microwave Drawer when
it is on to absorb the microwave energy.
The vent under the Convection Microwave Drawer must not be
blocked. During microwaving, steam may come from the left side
lower vent (when facing the product).
When using the Convection Microwave Drawer at power levels
below 100%, you may hear the magnetron cycling on and off. It
is normal for the exterior of the Convection Microwave Drawer
to be warm to the touch when cooking or reheating.
Condensation is a normal part of microwave cooking and the
amount being vented is directly related to the moisture content
of the food and room humidity. A cooler room will produce more
condensation. Attention should be paid to the vented area after
each use of the product and wiped down if needed.
After using Convection or Speed Cook, you will hear the sound of
the cooling fan. The fan may continue to operate for an extended
period of time, depending on the oven temperature. Be aware that,
unlike microwave-only ovens, convection microwave ovens have
a tendency to become hot during Convection and Speed Cook.
The oven is for food preparation only. It should not be used to dry
clothes or newspapers.
When using recipes or package directions, check food a minute or
two before the minimum time and add time accordingly.
When opening or closing the Convection Microwave Drawer
quickly, food in the Convection Microwave Drawer may be spilled.
To clean, please refer to the Cleaning and Care section on page 35.
ABOUT MICROWAVE COOKING
IMPORTANT - FOOD PLACEMENT
• Microwave cooking. Place all items directly on the bottom
center of the drawer to allow maximum cooking performance.
Do not elevate or microwave on the racks unless specied
otherwise. Arrange food carefully. Place thickest areas
toward outside of dish.
INFORMATION YOU NEED TO KNOW
Place Food

9 E
E
E
E
E
• Speed cook. This cook setting uses a low percentage
microwave power plus convection heating which allows
placements on racks. Follow instructions as noted under
Speed Cook.
ALSO NOTE:
• Watch cooking time. Cook for the shortest amount of time
indicated and add more as needed. Food severely overcooked
can smoke or ignite.
• Do not use metal dishes for microwave cooking. There is a
risk of electric discharge or ignition.
• Cover foods while cooking. Check recipe or cookbook for
suggestions, such as paper towels, wax paper, microwave
plastic wrap or a lid. Covers prevent spattering and help
foods to cook evenly.
• Stir foods from outside to center of dish once or twice during
cooking, if possible.
• For best microwave cooking results, please ensure that the
food to be microwaved is placed in the center of the oor of
the microwave drawer. Do not elevate or place on the rack.
• Turn foods over once during microwaving to speed cooking
of such foods as chicken and hamburgers. Large items like
roasts must be turned over at least once.
• Rearrange foods such as meatballs halfway through cooking
both from top to bottom and from right to left.
• Add standing time. Remove food from Convection
Microwave Drawer and stir, if possible. Cover for standing
time to allow food to nish cooking without overcooking.
• Check for doneness. Look for signs indicating that cooking
temperatures have been reached.
Doneness signs include:
- Food steams throughout, not just at edge.
- Center bottom of dish is very hot to the touch.
- Poultry thigh joints move easily.
- Meat and poultry show no pinkness.
- Fish is opaque and akes easily with a fork.
ABOUT SAFETY
• Check foods to see that they are cooked to the United States
Department of Agricultureʼs recommended temperatures.
145˚F - Fish
160˚F - Pork, ground beef/veal/lamb, egg dishes
165˚F - Whole, pieces and ground turkey/chicken/duck
Leftover, ready-to-reheat refrigerated, deli and
carry-out fresh food
To test for doneness, insert a meat thermometer in a thick
or dense area away from fat or bone. NEVER leave the
thermometer in the food during cooking, unless it is approved
for microwave use.
• ALWAYS use potholders to prevent burns when handling
utensils that are in contact with hot food. Enough heat from
the food can transfer through utensils to cause skin burns.
• Avoid steam burns by directing steam away from the face and
hands. Slowly lift the farthest edge of a dish’s covering and
carefully open popcorn and oven cooking bags away from
the face.
INFORMATION YOU NEED TO KNOW
10E
E
E
E
E
INFORMATION YOU NEED TO KNOW
• After cooking, the surfaces of the drawer, oven cavity and Convection Microwave Drawer guides will be extremely hot. Use caution
to avoid contact of skin with hot surfaces to prevent burns and injury.
• Stay near the Convection Microwave Drawer while it’s in use and check cooking progress frequently so that there is no chance of
overcooking food.
• NEVER use the Convection Microwave Drawer for storing cookbooks or other items.
• Select, store and handle food carefully to preserve its high quality and minimize the spread of foodborne bacteria.
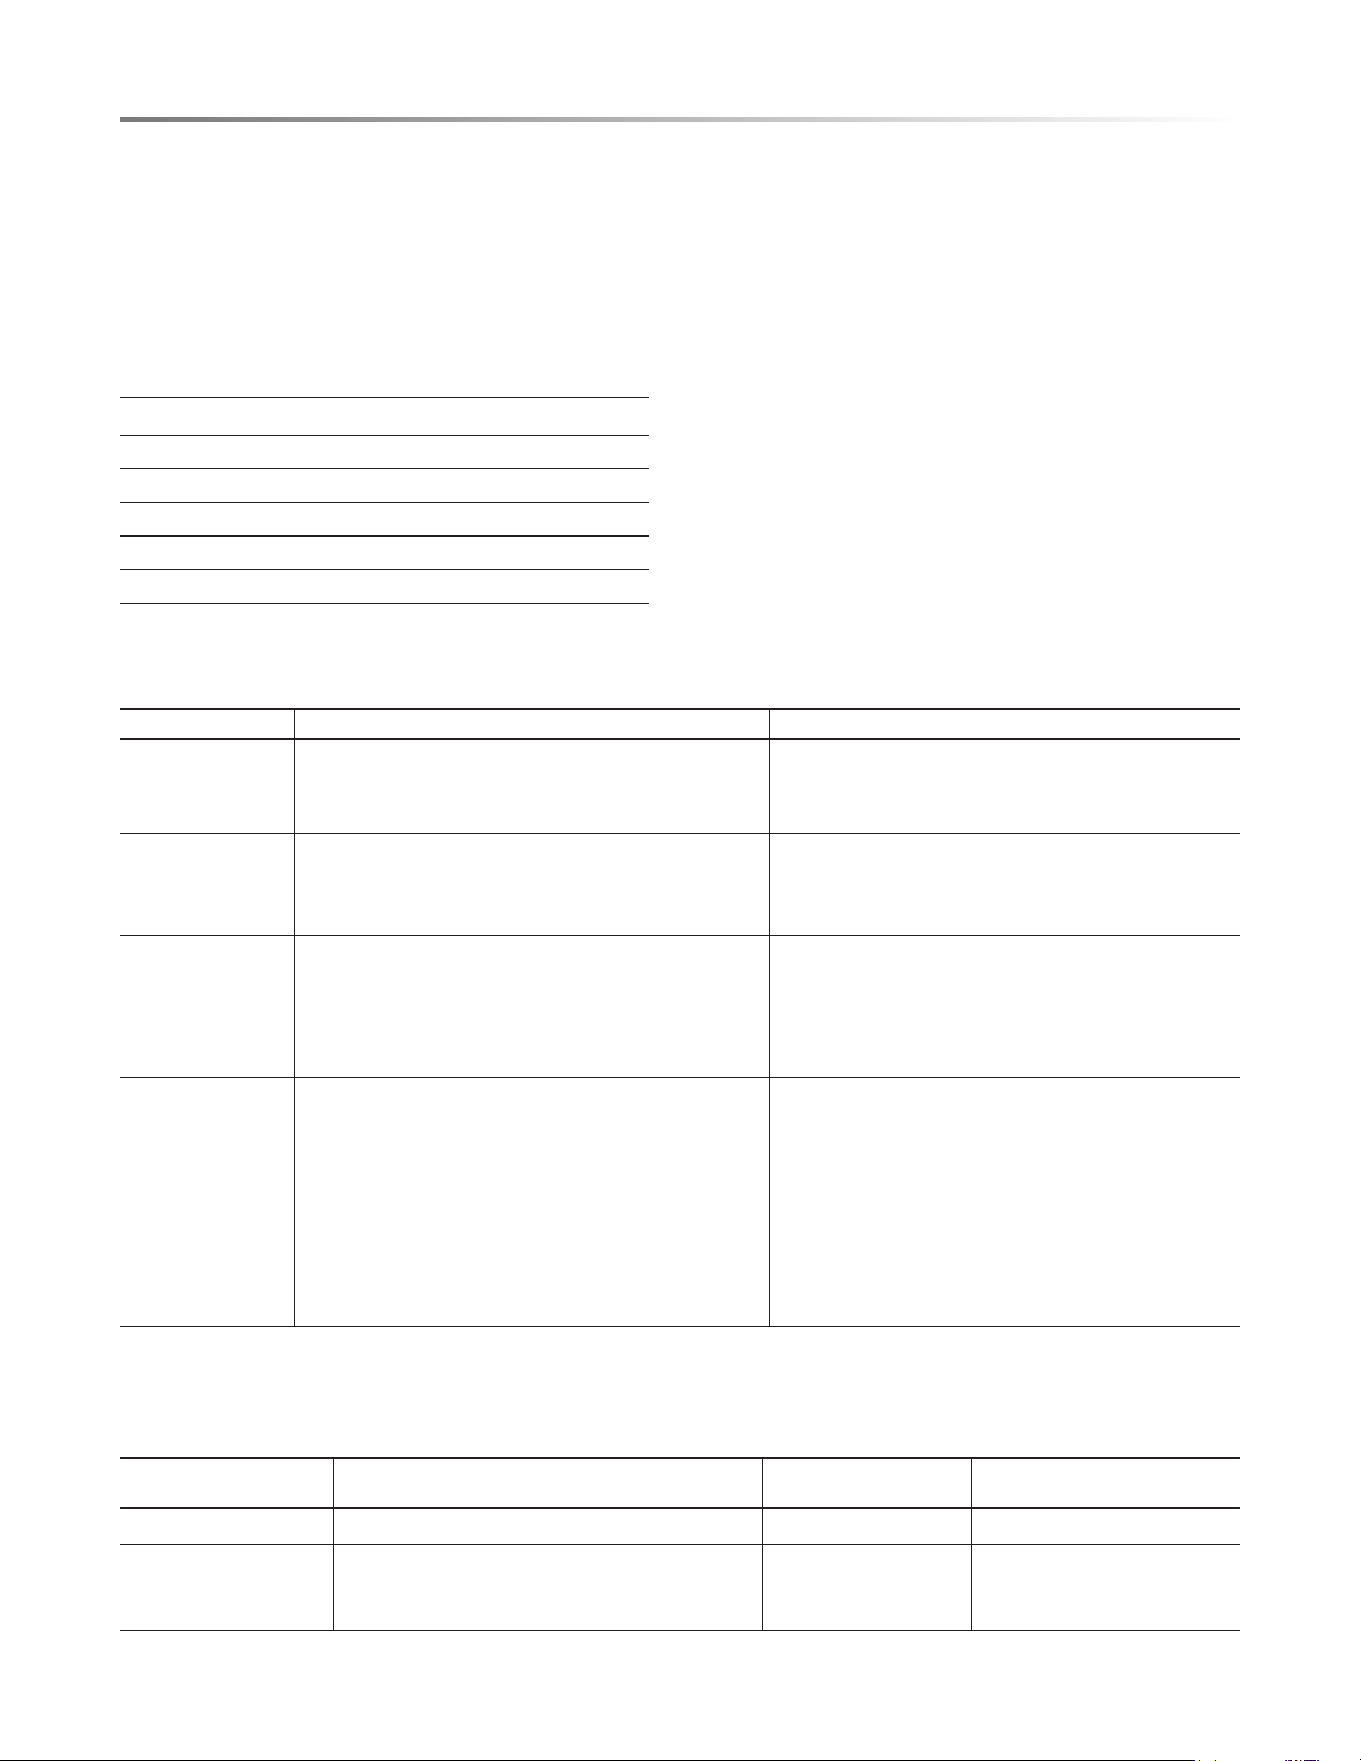
SPECIFICATION
Voltage (Volts/A mps) 120V / 20A
Frequency 60 Hz
Microwave Output power (watts) 900W
Top Grill Ring Heater Wattage 1000W
Top 6 Pass Heater (3x 2-pass heaters) 1500W (3 x 500W)
Back Ring Heater Wattage 1500W
Note: Cooking times may vary depending on the microwave safe containers used.
ABOUT FOODS
FOOD DO DON’T
Eggs, sausages,
fruits & vegetables
• Puncture egg yolks before cooking to prevent bursting.
• Pierce skins of potatoes, apples, squash, hot dogs
and sausages so that steam escapes.
• Cook eggs in shells.
• Reheat whole eggs.
• Dry nuts or seeds in shells.
Popcorn • Use specially bagged popcorn for the microwave.
• Listen while popping corn for the popping to slow
to 1 or 2 seconds or use special POPCORN pad.
• Pop popcorn in regular brown bags or glass bowls.
• Exceed maximum time on popcorn package.
Baby food • Transfer baby food to small dish and heat
carefully, stirring often. Check temperature
before serving.
• Put nipples on bottles after heating and shake
thoroughly. Test temperature on wrist before feeding.
• Heat disposable bottles.
• Heat bottles with nipples on.
• Heat baby food in original jars.
General • Cut baked goods with lling after heating to
release steam and avoid burns.
• Stir liquids briskly before and after heating to
avoid eruption.
• Use deep bowl when cooking liquids or cereals
to prevent boilovers.
• Food should be shorter than the Convection
Microwave Drawer. Please refer to the height of
side walls of the drawer.
• Heat or cook in closed glass jars or airtight containers.
• Can in the microwave as harmful bacteria may not be
destroyed.
• Deep fat fry.
• Dry wood, gourds, herbs or wet papers.
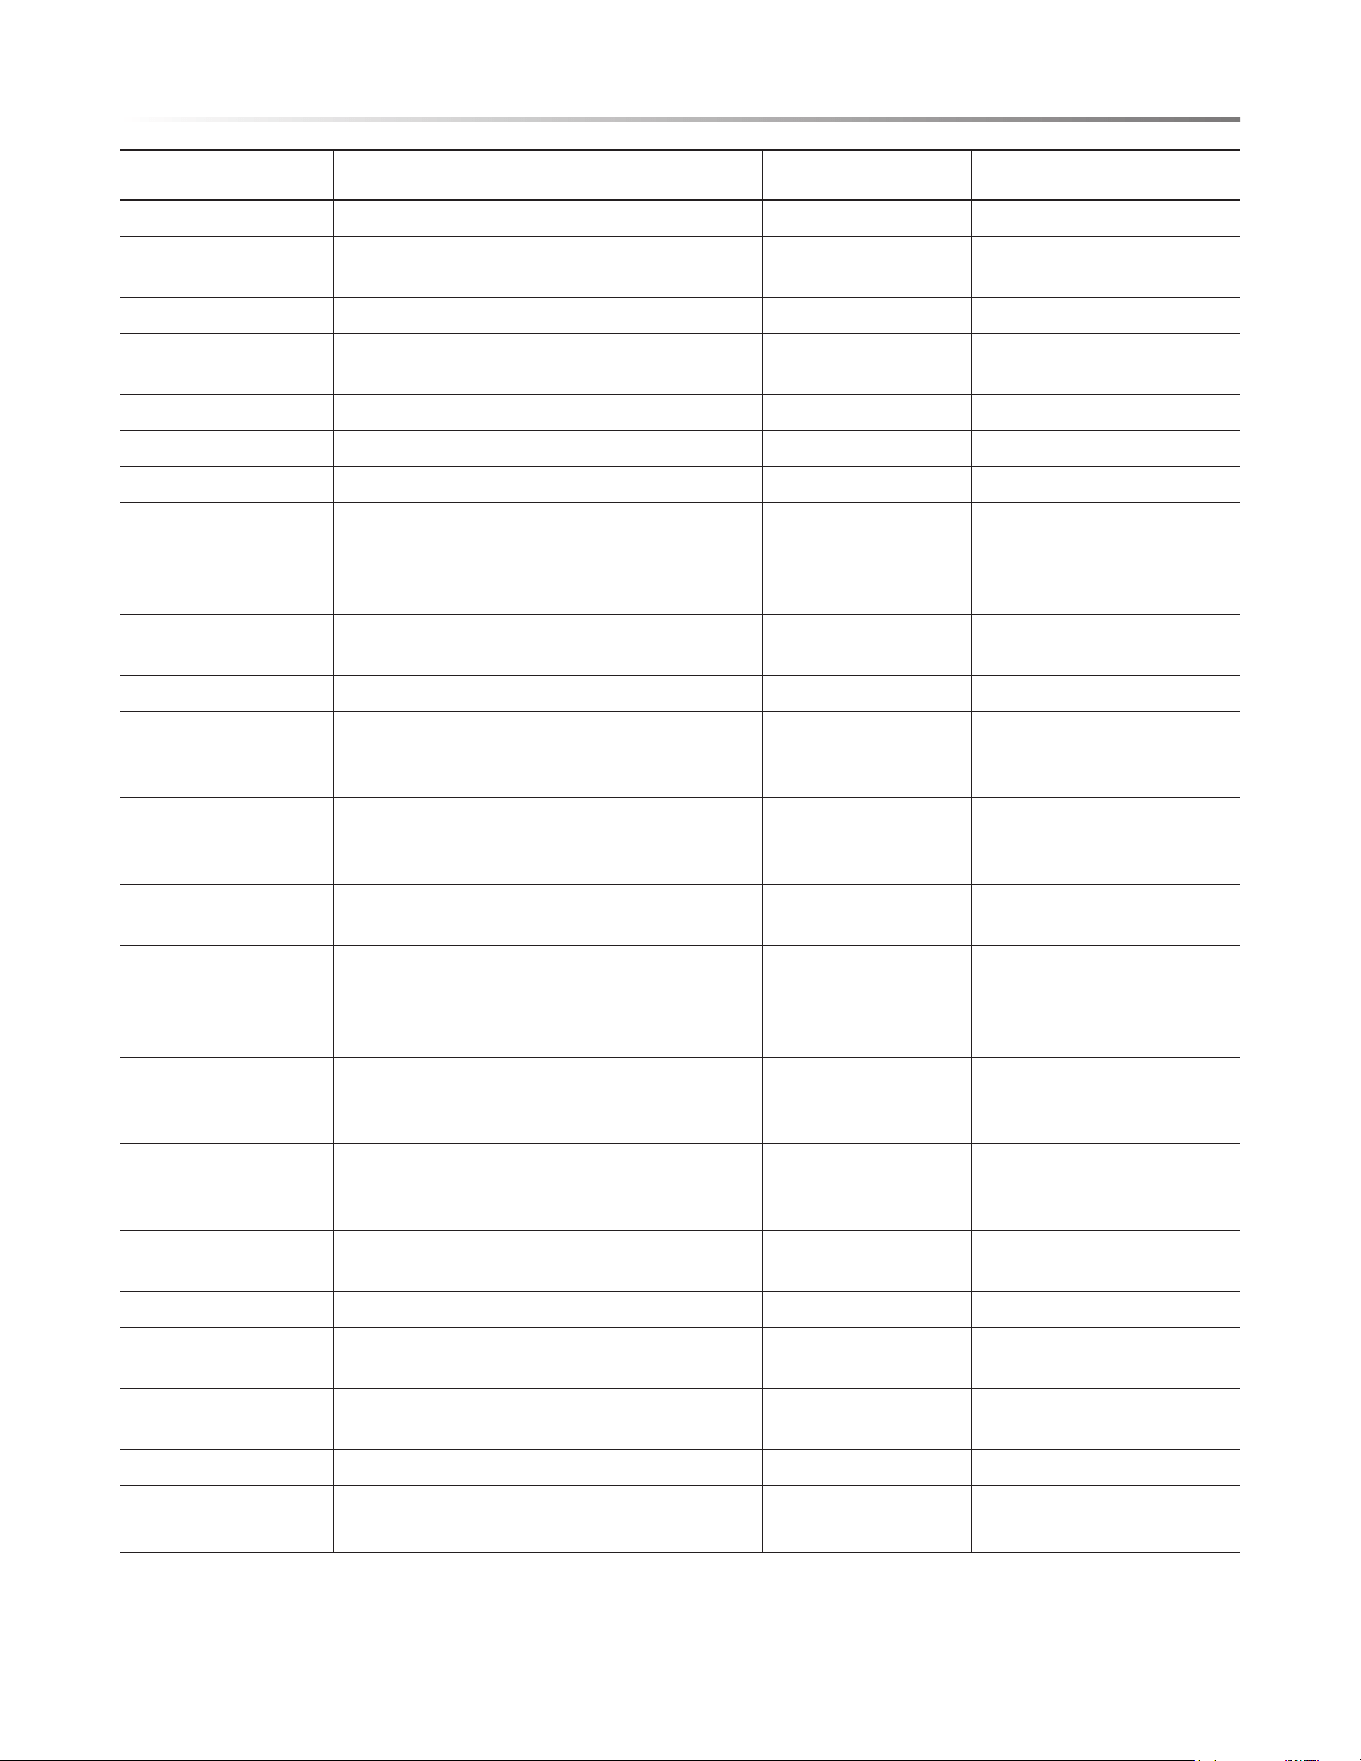
ABOUT UTENSILS AND COVERINGS
It is not necessary to buy all new cookware. Many pieces already in your kitchen can be used successfully in your new convection
microwave oven. The chart below will help you decide what utensils and coverings should be used in each mode.
UTENSILS AND
COVERINGS
MICROWAVE ONLY CONVECTION SPEED COOK
Aluminum foil NO YES. To cover YES. To cover
Aluminum containers NO YES. Grill - No cover YES. Uncovered and only 3/4
lled, maintaining 1" space be-
tween container walls and food.
11 E
E
E
E
E
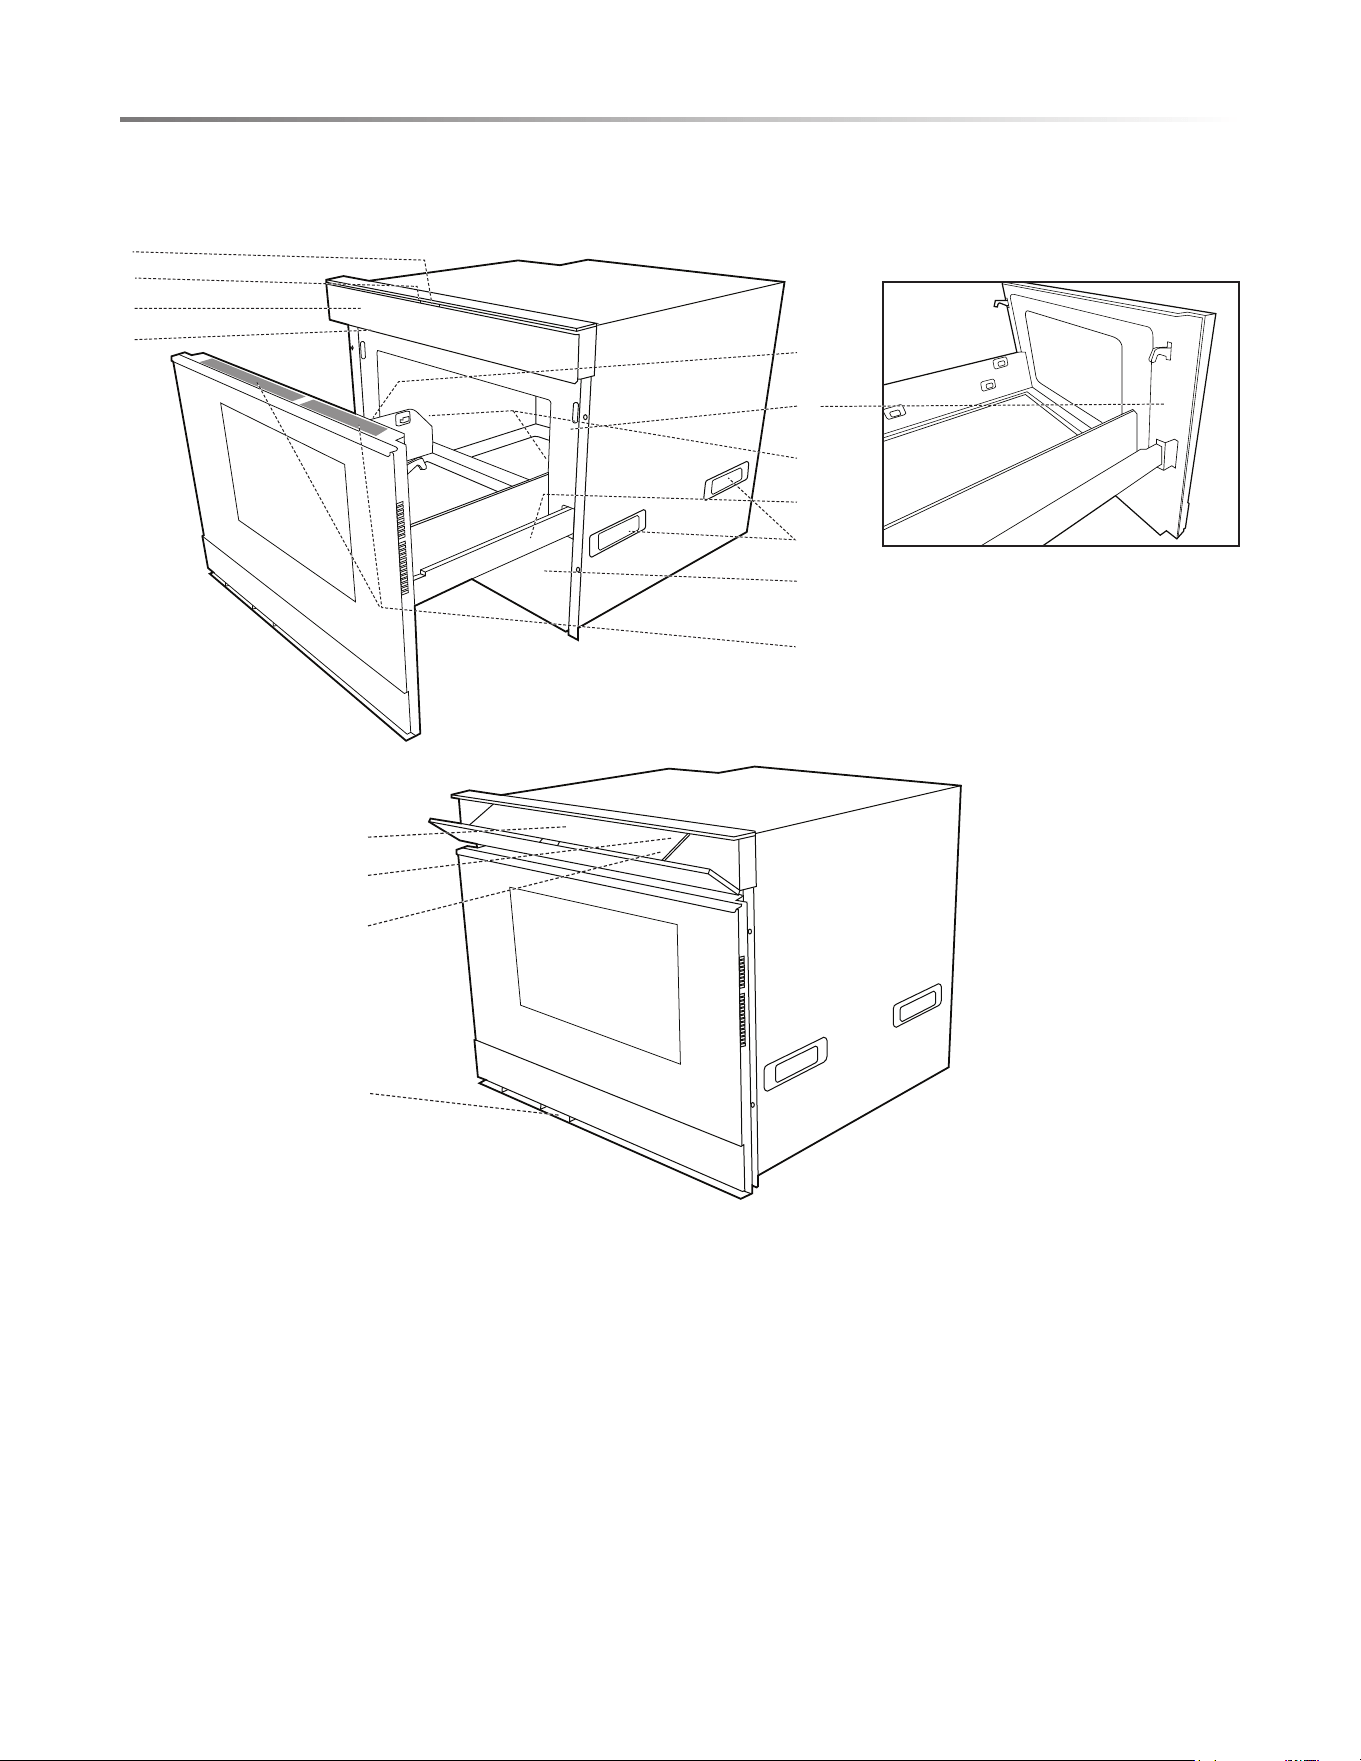
INFORMATION YOU NEED TO KNOW
UTENSILS AND
COVERINGS
MICROWAVE ONLY CONVECTION SPEED COOK
Browning dish NO NO NO
Glass ceramic
(Pyroceram
®
)
YES. Excellent YES. Excellent YES. Excellent
Glass, heat-resistant YES. Excellent YES. Excellent YES. Excellent
Glass, non-heat-
resistant
NO NO NO
Lids, glass YES YES. Grill - No cover YES
Lids, metal NO YES. Grill - No cover NO
Metal cookware NO YES NO
Metal, misc: dishes
with metallic trim,
screws, bands, handles.
Metal twist ties
NO NO NO
Oven cooking bags YES. For large meats or foods that need tender-
izing. DO NOT use metal twist ties.
YES. Grill - No cover YES. Do not use metal twist
ties.
Paper plates YES. For reheating. NO NO
Paper towels YES. To cover for reheating and cooking. Do
not use recycled paper towels which may contain
metal llings.
NO NO
Oven-safe paper YES YES. For temperatures
up to 400°F. Do not use
for broiling.
YES. For temperatures
up to 400°F.
Food storage bags/
brown paper bags
NO NO NO
Microwave-safe
plastic containers
YES. For reheating and defrosting. Some
microwave-safe plastics are not suitable for cook-
ing foods with high fat and sugar content. Follow
manufacturer's directions.
NO NO
Plastic, Thermoset
®
YES YES. For temperatures
up to 425°F. Do not use
for broiling.
YES
Plastic wrap YES. Use brands specially marked for microwave
use. DO NOT allow plastic wrap to touch food.
Vent so steam can escape.
NO NO
Pottery, porcelain
stoneware
YES. Check manufacturer's recommendation for
being microwave-safe.
YES YES. Must be microwave-safe
and oven-safe.
Styrofoam YES. For reheating. NO NO
Microwave-safe
thermometers
YES NO NO
Regular cooking
thermometers
NO. Regular cooking thermometers contain
mercury that may cause arcing in the oven cavity.
YES YES
Wax paper YES. For covering. NO NO
Wicker, wood, straw YES. With short cook times. For reheating foods
with little or no fat or sugar content. Could char.
NO NO
12E
E
E
E
E
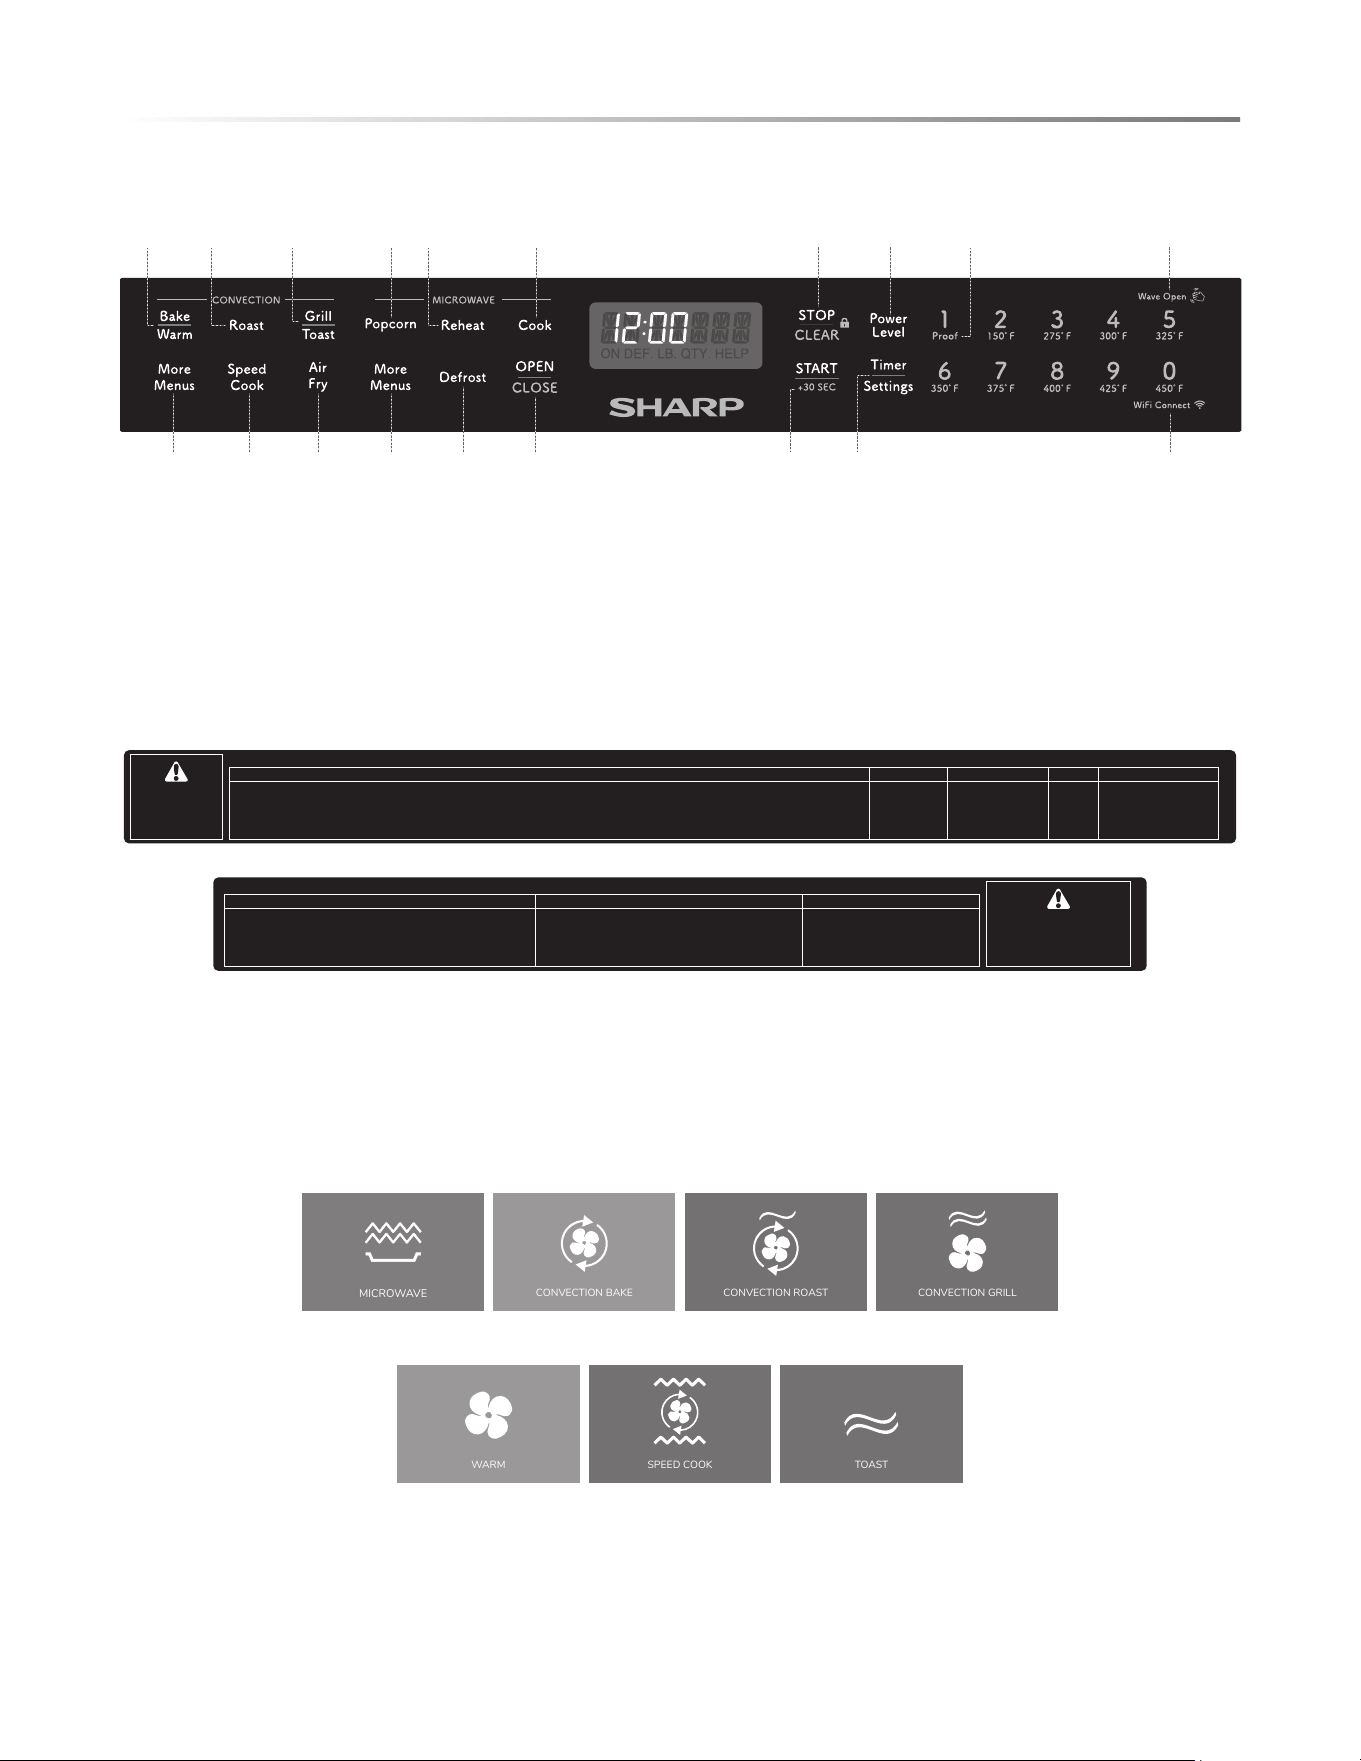
PART NAMES
CONVECTION MICROWAVE DRAWER
3
4
1
2
15
13
14
12
5
7
8
6
10
11
9
1 Easy Wave Open indicator
2 Wi-Fi indicator
3 Hidden control panel door
4 Easy Wave Open sensor
5 Nameplate: Open the Convection Microwave Drawer fully.
The label is located at the bottom left side of the oven face
plate.
6 Drawer sealing surfaces
7 Drawer lights
8 Convection Microwave Drawer guides
9 Handles
10 Vent
11 Menu labels
12 Glass touch control
13 Easy Wave Open button
14 Wi-Fi Connect button
15 Built-In ush mount
The glass touch control is hidden behind the control panel door on the top front face of the unit. To open, push in on the control panel.
The panel will release and gently oat to open. To close, push the panel upward to the closed position. The panel will be secured by
magnetic latches in both open and closed positions.
13 E
E
E
E
E
GLASS TOUCH CONTROL
MENU LABELS
CONVECTION MICROWAVE OVEN APP
Numbers next to the glass touch control illustration indicate pages on
which there are feature descriptions and usage information.
23-26 31 30 21-22 20 15 32 1632
18
1715 15
1827-29 29-3028 18 28-29
PART NAMES
WARNING!
HOT
SURFACES
CONVECTION
TLAB-B143MRR0
MORE MENUS SPEED COOK AIR FRY WARM TOAST
1. Biscuits
2. Dinner Rolls
3. Crescent Rolls
4. Cookies
5. Brownies
6. Layered Cake
7. Fish Fillet
8. Breaded Shrimp
9. Beef Burger
10. Turkey Burger
11. Veggie Burger
12. Frozen Thin Pizza
13. Frozen Classic Pizza
14. Frozen Rising Pizza
15. Fresh on Pizza Stone
16 Beef Roast
17. Flank Steak
18. Pork Tenderloin
19. Pork Chop
20. Bacon
21. Chicken Drummies
22. Boneless Chicken Breast
23. Whole Chicken
24. Turkey Breast
1. Speed Bake
2. Speed Roast
3. Speed Grill
1. Chicken Tenders
2. French Fries
3. Mozzarella Sticks
4. Tater Tots
1. 90°F
2. 150°F
3. 200°F
1. Light
2. Medium
Light
3. Medium
4. Medium
Dark
5. Dark
MICROWAVE
AVERTISSEMENT!
CHAUD
SURFACES
TLAB-B139MRR0
COOK MORE MENUS DEFROST
1. Baked Potato
2. Sweet Potato
3. Fish/Seafood
4. Brown Rice
5. White Rice
6. Quick Fresh Vegetables
7. Longer Fresh Vegetables
8. Steamer Bag
9. Frozen Vegetables
10. Ground Meat
11. Frozen Entrée
Melt
1. Butter
2. Chocolate
Soften
3. Ice Cream
4. Cream
Cheese
Warm
5. Syrup
6. Dessert
Toppings
7. Beverage
Reheat
8. Hot Water
9. Hot Cereal
1. Ground Meat
2. Steaks/Chops
3. Boneless
Poultry
4. Bone-in Poultry
5. Roast
6. Casserole and
Soup
MICROWAVE
CONVECTION BAKE
CONVECTION ROAST
CONVECTION GRILL
WARM
SPEED COOK
TOAST
14E
E
E
E
E
ACCESSORIES
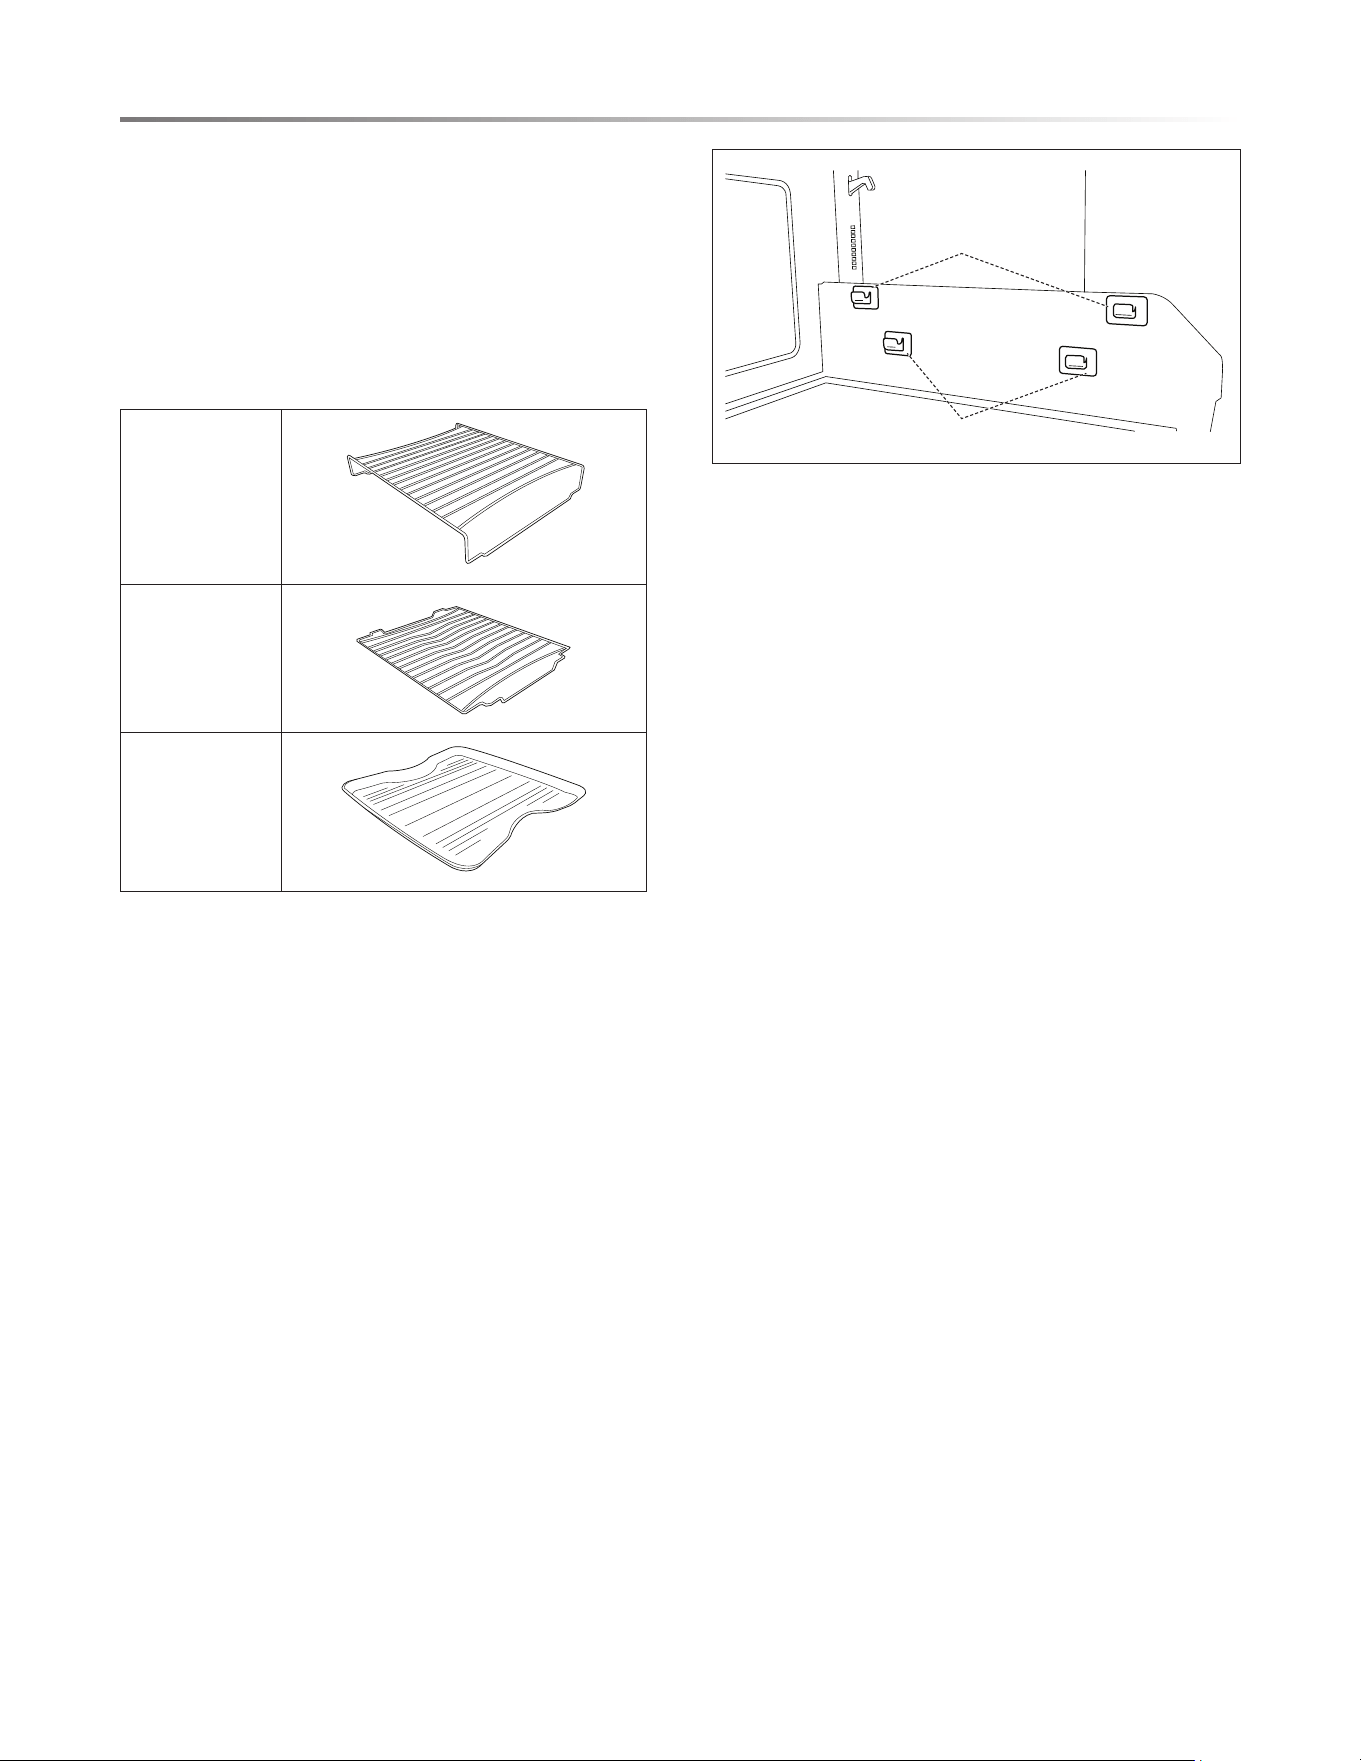
The Top and Bottom Racks and Cook Tray are designed
specically for use in the Convection Microwave Drawer with
Microwave-only, Air Fry, Convection and Speed Cook modes.
Note: The provided accessories are specically designed to be
used safely with microwave cooking functions. DO NOT place
any other metal cookware inside the oven cavity when using
Microwave-only and Speed Cook (convection and microwave
power) cook functions.
Top Ra ck
Bottom Rack
Cook/Drip Tray
• Always use microwave-safe and oven-safe cookware when
using Speed Cook functions as the oven combines microwave
and conventional oven power.
• Always use potholders to prevent burns when handling
utensils that are in contact with hot food. Enough heat from
the food can transfer through utensils to cause skin burns.
• Be sure your accessories are clean and free of any food residue
before each use to avoid damage to the accessories.
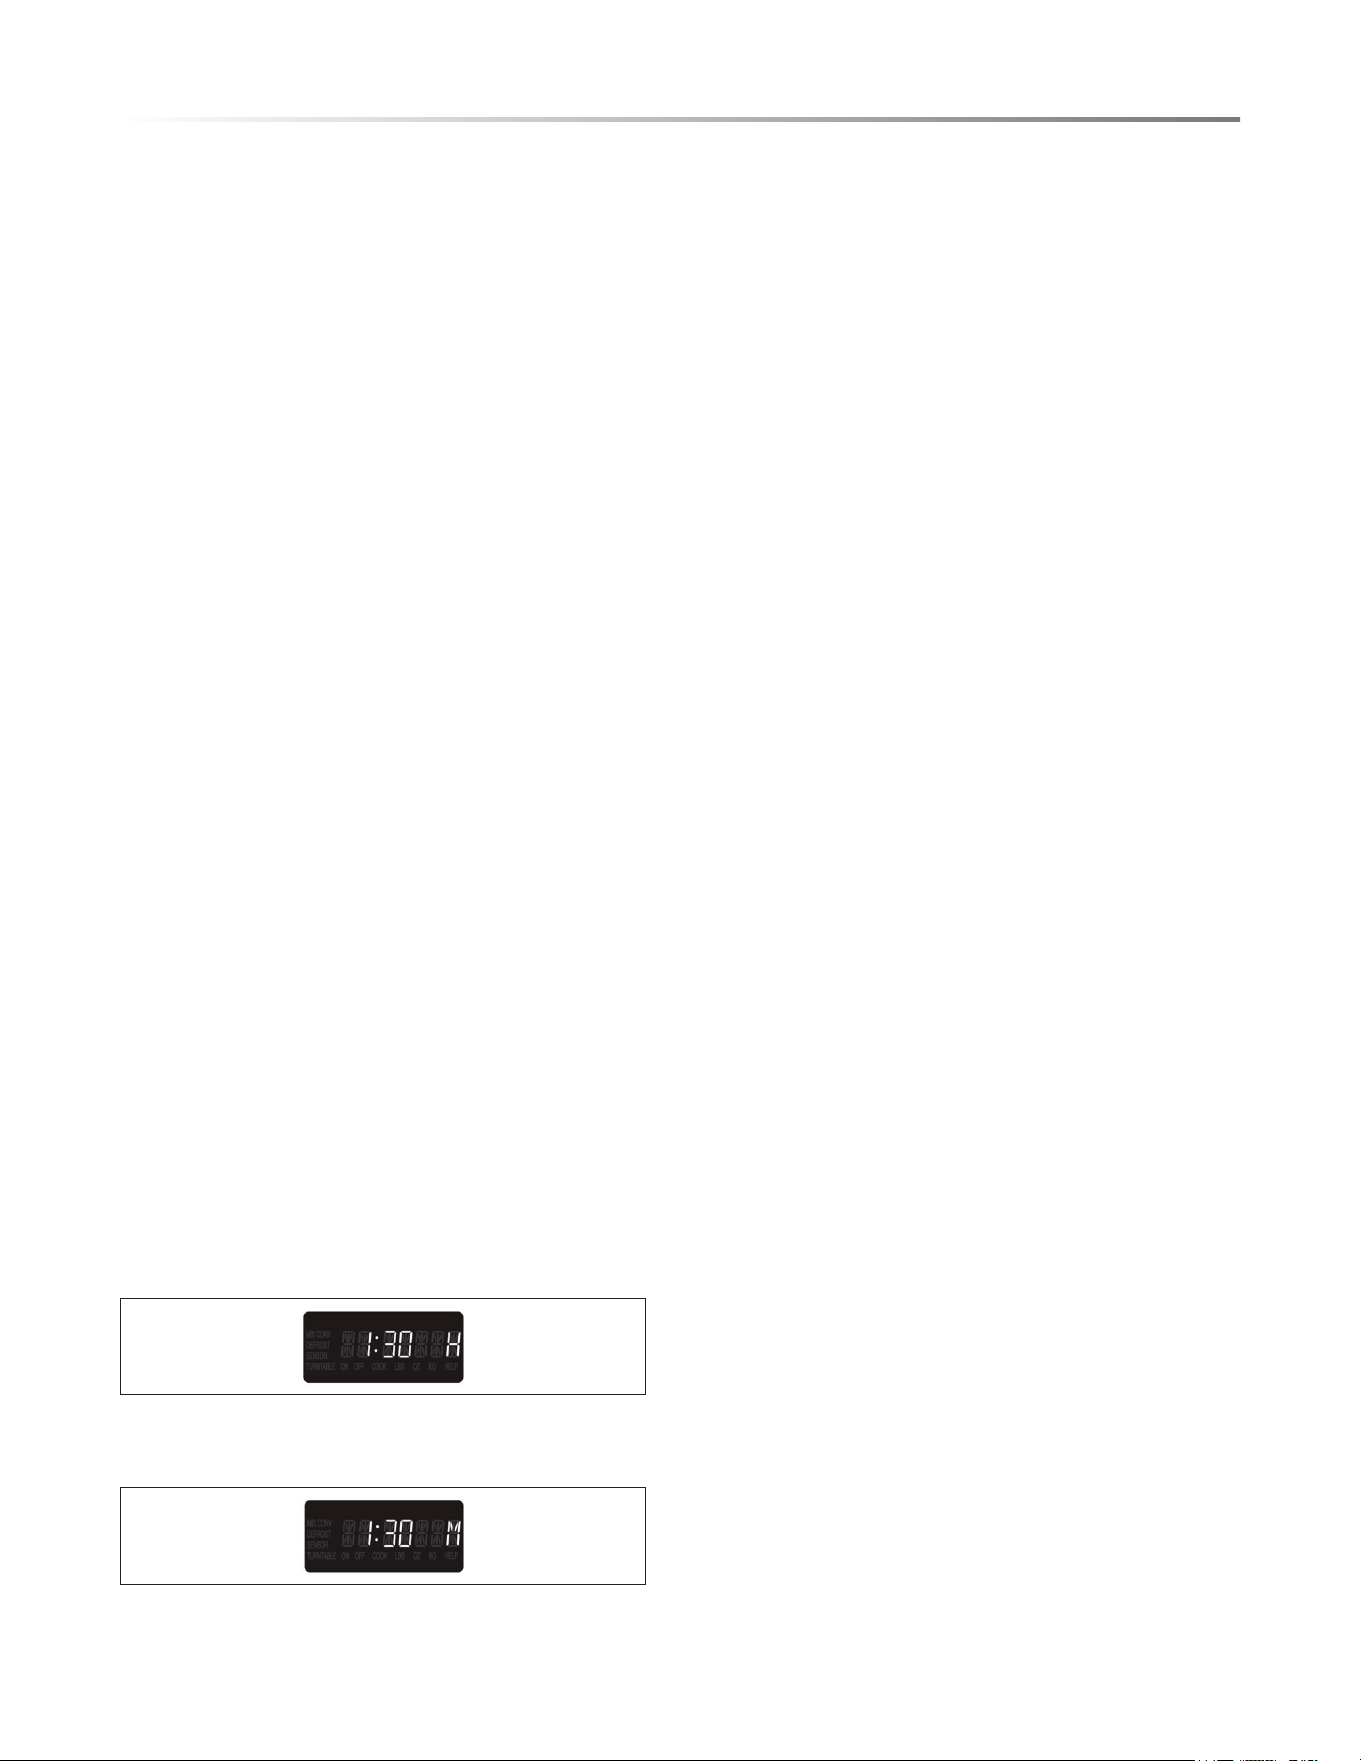
Upper Position
Lower Position
Use the correct accessories provided for each cooking mode.
Place accessories in the correct installation position and
direction.
CONVECTION BAKE AND SPEED BAKE
• Use both racks for two level cooking.
FOR ONE LEVEL COOKING:
• To cook smaller food items, place the Top Rack in the lower
position.
• To cook larger items such as bread loaves and Bundt cakes,
place the Bottom Rack in the lower position.
CONVECTION ROAST AND SPEED ROAST
• Use the Cook Tray as a drip tray to collect juices by placing
the tray in the bottom of the oven cavity.
FOR ONE LEVEL COOKING:
• To cook larger food, place the Bottom Rack in the lower
position and set the drip tray in the bottom of the oven.
• To cook smaller food, place the Top or Bottom rack in the
lower position, set the food directly on the Drip Tray and
place the Drip Tray on the rack.
CONVECTION GRILL AND SPEED GRILL
• Use the Top Rack in either the upper or the lower position.
• Use the Bottom Rack in the lower position.
AIR FRY
• Use the Top Rack in the lower position. See app for menu
item instructions.
DEFROST
• All Defrost modes use Microwave power. Ensure that any
food items are placed inside of microwave-safe cookware
before defrosting.
• Use a Drip Tray if desired for easier clean-up when defrost-
ing Ground Meat, Steaks/Chops, Boneless Poultry, Bone-in
Poultry and Roast.
• To defrost Casserole/Soup, place the cookware directly on
the bottom of the oven without the Drip Tray.
PART NAMES
15 E
E
E
E
E
BEFORE OPERATING
Before operating your new Convection Microwave Drawer, make
sure you read and understand this operation manual completely.
• Before the Convection Microwave Drawer can be used, follow
these steps:
1 Plug in the Convection Microwave Drawer. ENJOY YOUR
OVEN TOUCH CLEAR will appear.
2 Touch the STOP/CLEAR pad. : will appear.
3 Set clock.
TO SET THE CLOCK
1 Touch TIMER/SETTINGS pad once.
2 Touch number pads for correct time of day, touch START/
+30 SEC.
This is a 12 hour clock. If you attempt to enter an incorrect
clock time, ERROR will appear in the display. Touch the STOP/
CLEAR pad and re-enter the time.
• If the electrical power supply to your Convection Microwave
Drawer should be interrupted, the display will intermittently
show ENJOY YOUR OVEN TOUCH CLEAR after the power
is reinstated. If this occurs during cooking, the program
will be erased. The time of day will also be erased. Simply
touch STOP/CLEAR pad and reset the clock for the correct
time of day.
Note:
• The Convection Microwave Drawer can be programmed with
the drawer open except for START/+30 SEC.
TIME INCREMENTS
CONVECTION VS. MICROWAVE
The Convection Microwave Drawer contains two different
categories of cooking, convection and microwave. Due to their
inherent differences, the time increments needed for their cook-
ing are not the same. Convection items tend to cook longer and
microwave items tend to cook quickly. Depending on which
category you are using, the display provides an indicator to easily
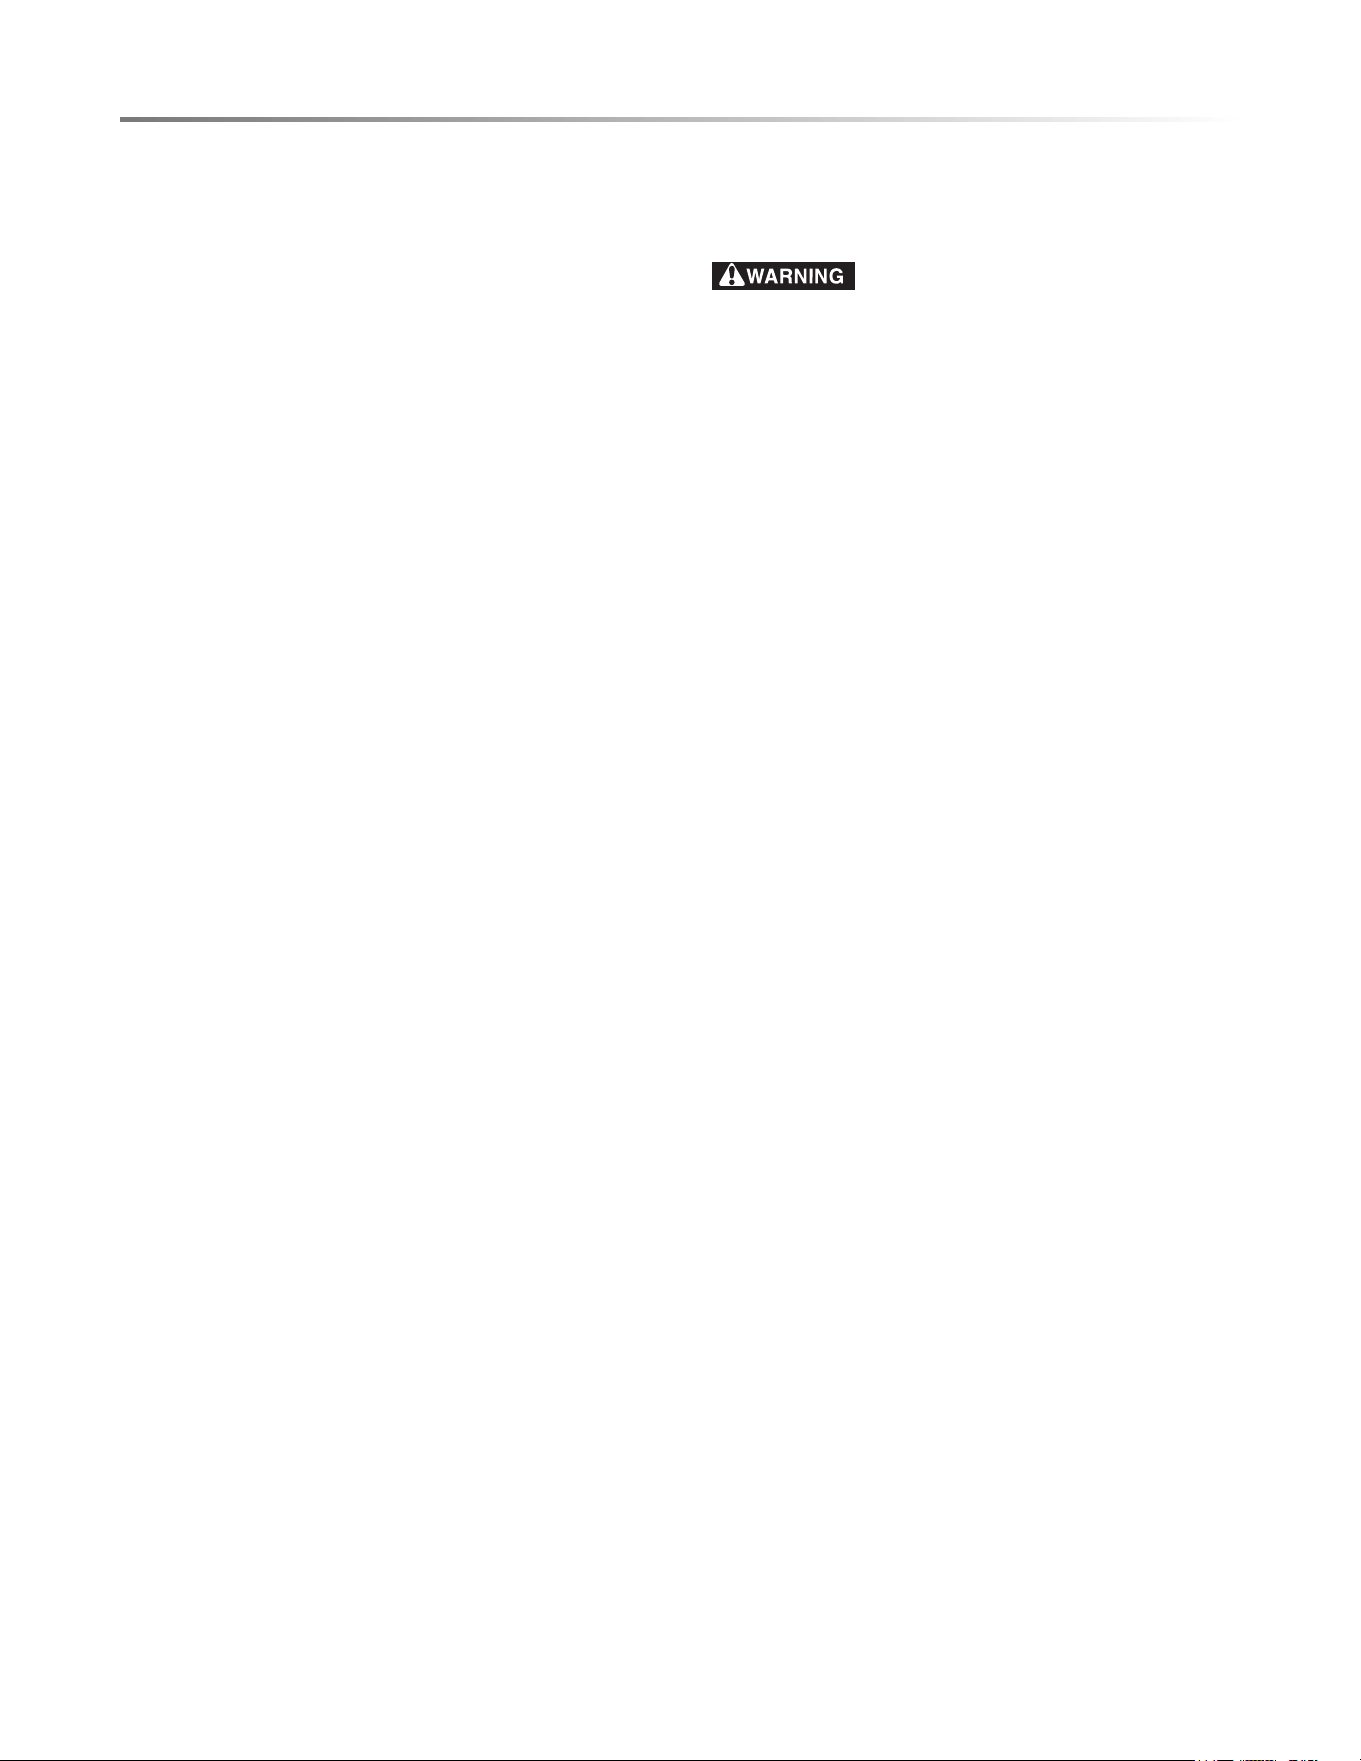
distinguish which time increment is being used.
For convection cooking items, "H" will be displayed. This
represents the time increments of Hours and Minutes. Hours
will be shown to the left of the colon, minutes to the right.
For microwave cooking items, "M" will be displayed. This
represents the time increments of Minutes and Seconds. Minutes
will be shown to the left of the colon and seconds to the right.
STOP/CLEAR
Touch the STOP/CLEAR pad to:
1 Erase if you make a mistake during programming.
2 Cancel timer.
3 Stop the Convection Microwave Drawer temporarily during
timed cooking.
4 Return the time of day to the display.
5 Cancel a program during cooking, touch twice for timed
cooking.
OPEN OR CLOSE CONVECTION
MICROWAVE DRAWER
The Convection Microwave Drawer may be opened by any of
the following methods:
• Touch the OPEN/CLOSE pad on the glass touch control.
Touch OPEN/CLOSE again or gently push on the drawer
to close.
• Wave twice on top left side of the drawer to open the oven
drawer. The Easy Wave Open only works to open the drawer.
Gently push on drawer or touch OPEN/CLOSE to close.
• Touch the OPEN DRAWER button on the app after pairing
your appliance to the SHARP HOME™ App. The app only
works to open the drawer. Gently push on drawer or touch
OPEN/CLOSE to close.
Do not pull the drawer by hand, except in the case of a power
failure.
EASY WAVE OPEN ON/OFF
Easy Wave Open's default setting is OFF when plugged in. The
white light on the center of the panel will illuminate once Easy
Wave Open has been activated. When Control Lock is activated,
the Easy Wave Open function is off.
To use the Easy Wave Open function, simply wave your hand
in front of the sensor twice in consecutive motions. This can be
either up and down or side to side motions.
EASY WAVE OPEN ON
• Hold Number 5 on the glass touch control for 3 seconds. The
display shows EASY WAVE OPEN ON.
EASY WAVE OPEN OFF
• Hold Number 5 on the glass touch control for 3 seconds. The
display shows EASY WAVE OPEN OFF.
16E
E
E
E
E
CONNECTING YOUR APPLIANCE
The Convection Microwave Drawer combines the technological
enhancements of smart home connectivity with Sharp’s innova-
tive Convection Microwave Drawer design:
• Wi-Fi Connectivity
• Mobile App and WWA
Your Convection Microwave Drawer may be operated remotely
through a mobile device using the SHARP HOME™ App in
addition to conventional operation in a non-connected capacity
using the Glass Touch Control on the oven door. To use the app,
the appliance must be connected to your home network.
WI-FI CONNECT
Your Convection Microwave Drawer is equipped with Wi-Fi
connectivity. The oven's Wi-Fi will need to be turned ON in
order to complete the Pairing process.
For instructions and how-to-pair please visit: https://support.
sharpusa.com/s/.
TURN OVEN'S WI-FI ON
• Touch the Number 0 (WiFi Connect) pad and hold for 3 seconds.
TURN OVEN'S WI-FI OFF
• Touch the Number 0 (WiFi Connect) pad and hold for 3 seconds.
FAVORITES:
The SHARP HOME™ App lets you select and store your
Favorite Smart Cook items in your FAVORITES section. Click
on the heart icon to add your most frequently prepared dishes.
REMOTE START SAFETY INFORMATION
In order to operate the Convection Microwave Drawer with the
SHARP HOME™ App, you must enable the Remote Start feature.
The oven is preset to Remote Start OFF. It must be turned ON to
utilize.
• Touch the TIMER/SETTINGS pad 3 times to access the
Remote Start function to turn on or off.
When using mobile device operation to control the appliance
remotely, be sure to follow all safety procedures and guidelines
as instructed in the Operation Manual. Failure to do so may result
in personal injury, death or damage to property.
IMPORTANT NOTE:
There is a 3-minute window after opening and closing the
drawer in which you may operate the oven remotely with the
app. After 3 minutes of inactivity, you must operate the oven
manually at the control panel or open and close the drawer again
to operate remotely.
• If you activate the appliance remotely, your oven will remain
ON and in cooking mode even if your mobile device or home
Wi-Fi become disabled.
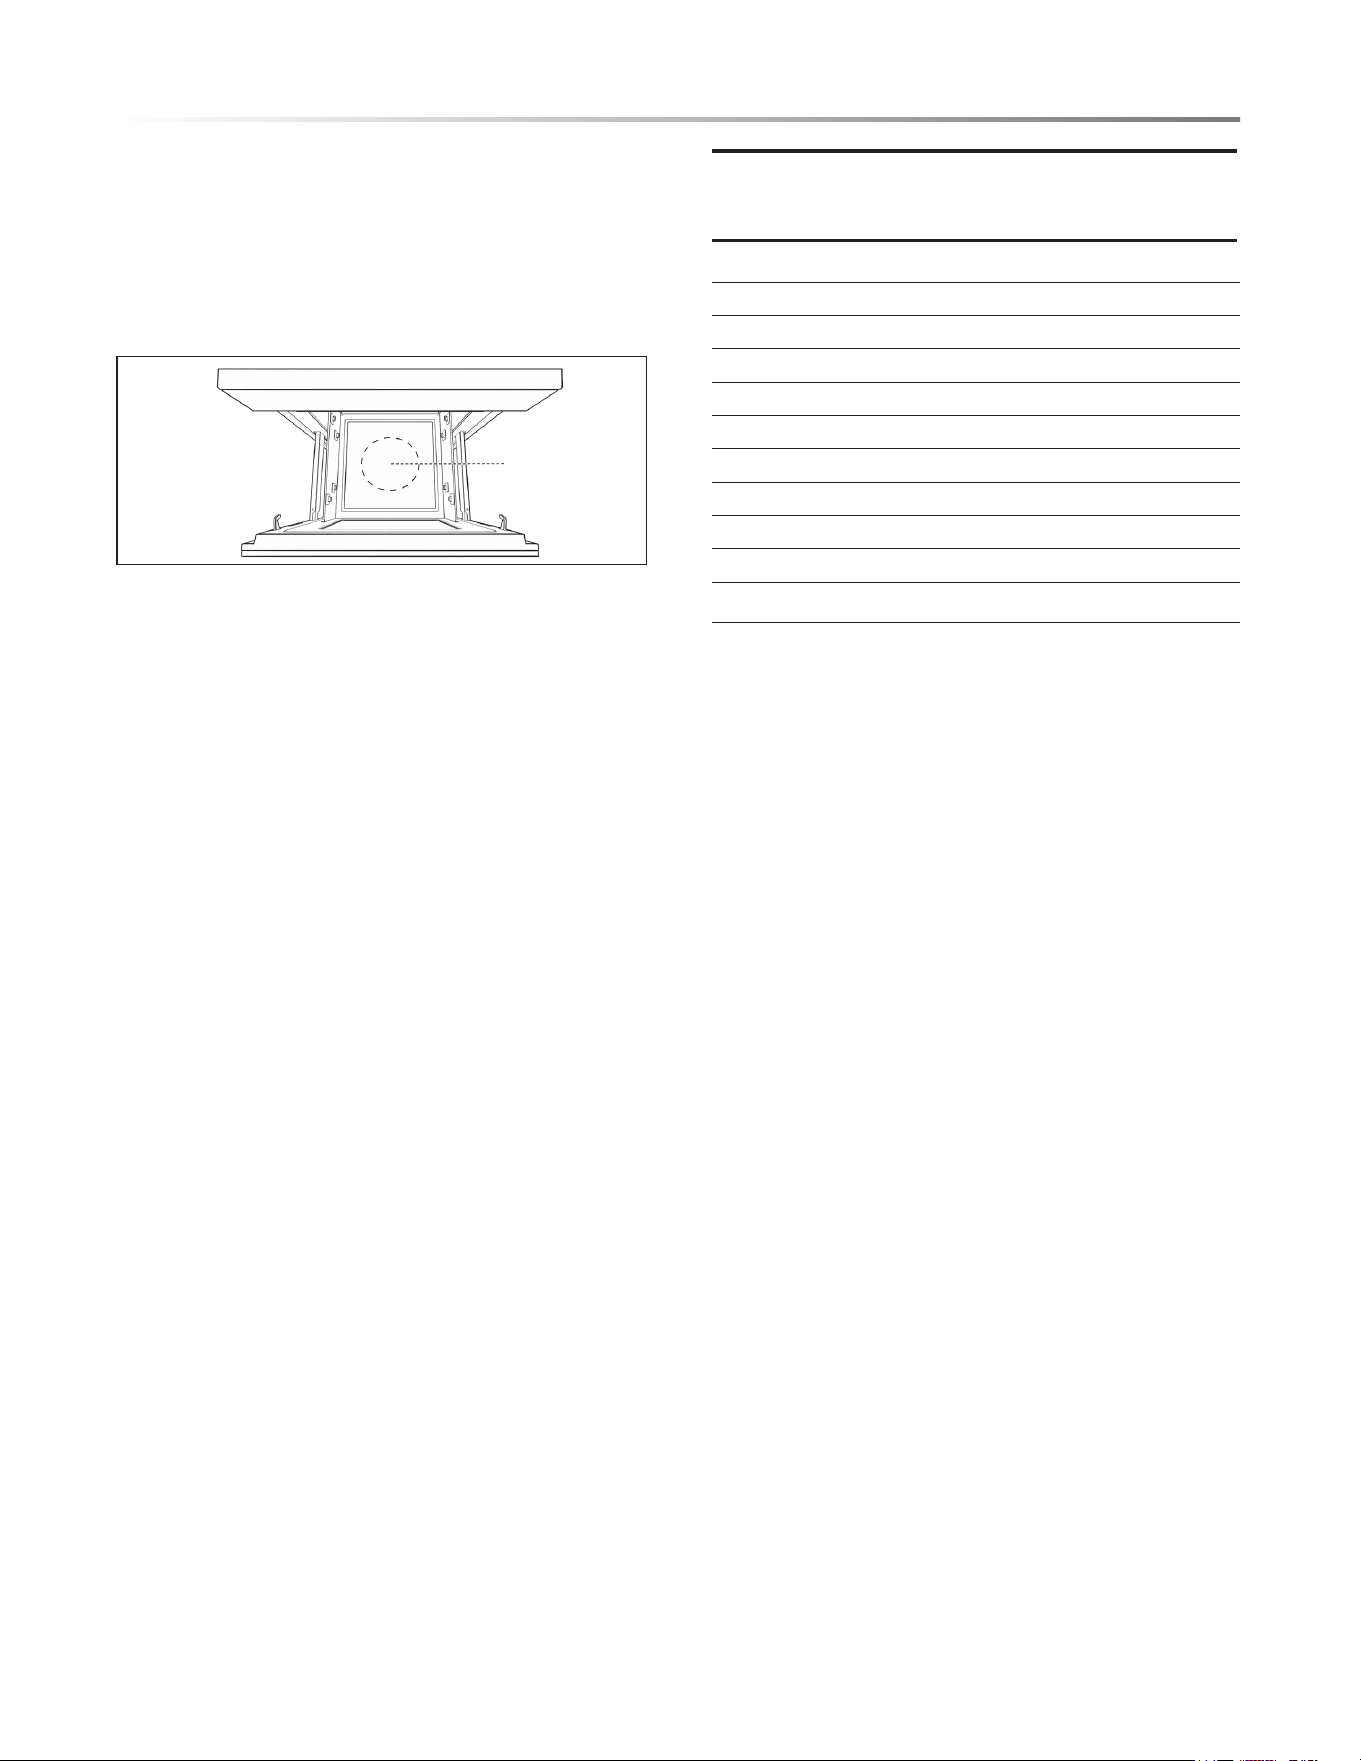
ALWAYS ensure the oven cavity is prepared for cooking when
operating the oven remotely with the app. Risk of oven damage or
re could occur. NEVER use the oven interior as a storage device
for unrelated items or cook using the app remotely if the cavity
is not properly prepared. ALWAYS have food in the Convection
Microwave Drawer when it is on to absorb the microwave energy.
Touching the STOP/CLEAR pad ONCE on the oven control
panel will pause the preheat or cook cycle whether initiated on
the oven control panel or with Remote Start on the app.
Convection and SPEED COOK functions
produce high heat temperatures. ALWAYS MONITOR OVEN
USE WHEN USING THE APP TO CONTROL THE OVEN.
PAIRING
Pairing may be used to pair a new mobile device to the oven
after the oven has already been connected to your home network.
For instructions and how-to-pair please visit: https://support.
sharpusa.com/s/.
• Touch the TIMER/SETTINGS pad 4 times to access the
Pairing function.
WI-FI INFORMATION
Wi-Fi Information provides your oven’s MAC address on your
home network. This information may be requested if you contact
SHARP Customer Assistance.
• Touch the TIMER/SETTINGS pad 5 times to access the
Wi-Fi Information function.
WI-FI FIRMWARE UPDATES
From time to time, updates to the oven’s software will be
released. Notications will be sent via the SHARP HOME™
App for these updates. Firmware updates will be available
through your oven. Please visit: https://support.sharpusa.com/s/
for more information.
• Touch the TIMER/SETTINGS pad 6 times to access the
Wi-Fi Firmware Update function.
WI-FI RESET
Your oven’s Wi-Fi settings may be cleared by using the Wi-Fi
Reset function. Clearing of settings may need to be performed
when a new router or Wireless LAN is installed in the home or
if transferring ownership of the oven. See also CAUTION FOR
PERSONAL INFORMATION (RELATED TO SECURITY)
on page 5 for further information.
• Touch the TIMER/SETTINGS pad 7 times to access the
Wi-Fi Reset function.
OVEN CONTROL HIERARCHY
Touching the STOP/CLEAR pad ONCE on the oven control
panel will pause the preheat or cook cycle whether initiated on
the oven control panel or with Remote Start on the app.
Touching the STOP/CLEAR pad TWICE on the oven control
panel will cancel and clear all preheat and cook cycle settings
including those initiated with Remote Start on the app.
17 E
E
E
E
E
ABOUT MICROWAVE COOKING
IMPORTANT - FOOD PLACEMENT
• Microwave cooking. Place all items directly on the bottom center of
the drawer to allow maximum cooking performance. Do not elevate
or microwave on the racks unless specied otherwise. Arrange
food carefully. Place thickest areas toward outside of dish.
• Speed cook. This cook setting uses a low percentage microwave
power plus convection heating which allows placements on
racks. Follow instructions as noted under Speed Cook.
TIME COOKING
Your Convection Microwave Drawer can be programmed for
99 minutes 99 seconds (99.99). Always enter the seconds after
the minutes, even if they are both zeros.
• Suppose you want to cook for 5 minutes at 100%.
1 Enter cooking time 5 0 0.
2 To cook at 100% power (High), touch START/+30 SEC pad.
TO SET POWER LEVEL
There are eleven preset power levels.
Using lower power levels increases the cooking time, which is
recommended for foods such as cheese and milk and long, slow
cooking of meats. Consult a microwave cookbook or recipes for
specic recommendations.
• Suppose you want to defrost for 5 minutes at 30%.
1 Enter defrost time 5 0 0.
2 Touch POWER LEVEL pad 8 times.
3 Touch START/+30 SEC pad.
TOUCH POWER
LEVEL PAD NUMBER
OF TIMES FOR
DESIRED POWER
APPROXIMATE
PERCENTAGE OF
POWER
COMMON
WORDS
FOR POWER
LEVELS
POWER LEVEL x 1 100% High
POWER LEVEL x 2 90%
POWER LEVEL x 3 80%
POWER LEVEL x 4 70% Medium High
POWER LEVEL x 5 60%
POWER LEVEL x 6 50% Medium
POWER LEVEL x 7 40%
POWER LEVEL x 8 30% Med Low/Defrost
POWER LEVEL x 9 20%
POWER LEVEL x 10 10% Low
POWER LEVEL x 11 0%
SENSOR SETTINGS
Sharp's Sensor is a semi-conductor device that detects the vapor
(moisture and humidity) emitted from the food as it heats. The
sensor adjusts the cooking times and power levels for various
foods and quantities.
USING SENSOR SETTINGS:
1 After the Convection Microwave Drawer is plugged in, wait
2 minutes before using any sensor setting.
2 Be sure the exterior of the cooking container and the interior
of the Convection Microwave Drawer are dry. Wipe off any
moisture with a dry cloth or paper towel.
3 The sensor works with foods at normal storage temperature.
For example, popcorn would be at room temperature.
4 Any sensor selection can be programmed with More or Less
Time Adjustment. See page 33.
5 More or less food than the quantity listed in the charts should be
cooked following the guidelines in any microwave cookbook.
6 During the rst part of sensor use, the food name will appear
on the display. Do not open the Convection Microwave Drawer
or touch STOP/CLEAR during this part of the cycle. The
measurement of vapor will be interrupted. If this occurs, an
error message will appear. To continue cooking, touch the
STOP/CLEAR pad and cook manually.
When the sensor detects the vapor emitted from the food,
the remainder of cooking/reheating time will appear. The
Convection Microwave Drawer may be opened when the
remaining time appears on the display. At this time, you may
stir or season food, as desired.
7 Except for Popcorn, if the sensor does not detect vapor prop-
erly when cooking other foods, ERROR will be displayed,
and the microwave will turn off.
8 Check food temperature after cooking. If additional time is
needed, continue to cook manually.
9 Each food has a cooking hint. Touch the TIMER/ SETTINGS
pad when the HELP indicator is lighted in the display.
MICROWAVE OVEN COOKING
Place Food
18E
E
E
E
E
COVERING FOODS:
Some foods cook best when covered. Only use the recommended
covers for these foods. See pages 10-11 for recommendations.
You may refer to the hints by touching the TIMER/SETTINGS
pad. Some recommended covers are:
1 Casserole lid.
2 Plastic wrap: Use plastic wrap recommended for microwave
cooking. Cover dish loosely, allowing approximately
1
/2 inch
to remain uncovered to allow steam to escape. Plastic wrap
should not touch food.
3 Wax paper: Cover dish completely, folding excess wrap under
dish to secure. If dish is wider than paper, overlap two pieces
at least one inch to cover.
Be careful when removing any covering to allow steam to escape
away from you.
POPCORN, REHEAT CHART
FOOD AMOUNT PROCEDURE
Popcorn Only 1 package at a time Place only one microwave popcorn package in the microwave (correct side facing
up). After cooking, remove and open carefully, allowing steam to escape.
2.85 - 3.5 oz
(Regular/Regular light)
Touch POPCORN pad once.
1.2 - 1.75 oz
(Mini/Snack)
Touch POPCORN pad twice.
Reheat 4 - 36 oz Use microwave-safe cookware and cover with a lid, plastic wrap or wax paper. Vent
to release steam/moisture. After reheating, stir, cover and let stand for 2 to 3 minutes.
Note: The tighter the cover, the hotter the food will be. However, it is necessary to
leave a small vent for the steam/moisture to escape from the food as it heats.
MICROWAVE OVEN COOKING
SENSOR
POPCORN, REHEAT, COOK
You can cook or reheat many foods and don’t need to calculate
cooking time or power level.
• Suppose you want to cook baked potatoes.
1 Touch Cook pad once.
2 See Menu Label. Select desired food by touching number
pad. Ex: Touch 1 for baked potatoes.
3 Touch START/+30 SEC pad.
Note:
• To heat or cook other foods or foods above or below the
quantity allowed on the chart, cook manually.
19 E
E
E
E
E
MICROWAVE OVEN COOKING
COOK CHART
FOOD AMOUNT PROCEDURE
1 Baked Potatoes
2 Sweet Potatoes
1 - 6 medium
1 - 6 medium
Pierce potatoes at least 3 times each on the top, bottom and sides, allowing steam to
escape. Place potatoes on a paper towel in the microwave. After cooking, remove potatoes,
wrap in aluminum foil and let stand for 5 to 10 minutes.
3 Fish/Seafood 0.25 - 2.0 lb Place sh or seafood on a shallow glass dish. Arrange food in a ring. Roll thin llet
edges underneath. Cover with plastic wrap and vent. After cooking, let stand covered
for 3 minutes.
4 Brown Rice
5 White Rice
0.5 - 2.0 cups
0.5 - 2.0 cups
Place 1 part rice and 2 parts water into a deep microwave-safe dish. Cover with a lid or
plastic wrap. After cooking, stir, cover and let stand for 3 to 5 minutes or until all liquid
has been absorbed. Tip: "Less is More" when it comes to stirring of rice. Less stirring
allows the grains to maintain a ufer texture.
Rice Water Size of casserole
0.5 cup ................. 1 cup ................... 1.5 quar ts
1 cup .................... 2 cups .................. 2 quarts
1.5 cups ................ 3 cups .................. 2.5 or 3 quarts
2 cups ................... 4 cups .................. 3 quarts or larger
6 Quick Fresh Vegetables
Broccoli
Brussels sprouts
Cabbage
Cauliower (owerets)
Cauliower (whole)
Spinach
Zucchini
Baked apples
0.25 - 2.0 lb
0.25 - 2.0 lb
0.25 - 2.0 lb
0.25 - 2.0 lb
1 medium
0.25 - 1.0 lb
0.25 - 2.0 lb
2 - 4 medium
Wash vegetables and place in a microwave-safe dish. Do not add water to freshly washed
vegetables. For tender vegetables, cover with a lid. For tender-crisp vegetables, cover
with plastic wrap. After cooking, stir, cover and let stand for 2 to 5 minutes.
7 Longer Fresh Vegetables
Ca rrot s, sliced
Corn on the cob
Green beans
Winter squash:
diced
halves
0.25 - 1.5 lb
2 - 4
0.25 - 1.5 lb
0.25 - 1.5 lb
1 - 2 halves
Wash vegetables and place in a microwave-safe dish. Add 1–3 tablespoons of water. For
tender vegetables, cover with a lid. For tender-crisp vegetables, cover with plastic wrap.
After cooking, stir, cover and let stand for 2 to 5 minutes.
8 Steamer Bag 6 - 17 oz Prepare bag according to package instructions. Place bag in the microwave (correct
side facing up). After cooking, remove and open carefully, allowing steam to escape.
9 Frozen Vegetables 0.25 - 1.25 lb Place vegetables in a microwave-safe dish. Do not add water. Cover with a lid or plastic
wrap. After cooking, stir, cover and let stand for 3 minutes.
10 Ground Meat 0.25 - 2.0 lb Use this setting to cook beef and turkey patties or ground meat. Place patties on a
microwave-safe plate and cover with wax paper. Place ground meat in a microwave-safe
dish and cover with wax paper or plastic wrap. Flip or stir food when instructed. After
cooking, let stand covered for 2 to 3 minutes. Tip: If cooking ground meat in a casserole
dish (not a patty), stir from the outer edges of the dish toward the center once or twice
during cooking, if possible.
11 Frozen Entrée 6 - 17 oz Remove entrée from outer packaging and follow package instructions for covering. After
cooking, let stand for 1 to 3 minutes.
20E
E
E
E
E
DEFROST
Use this feature to defrost the foods shown in the DEFROST
CH A RT below.
1 Touch DEFROST pad.
2 See Menu Label. Select desired food by touching the number
pad. Ex: Touch 2 for steaks/chops.
3 Enter weight by touching number pads.
4 Touch START/+30 SEC pad.
The oven will stop so that the food can be checked.
5 After the rst stage, open the Convection Microwave Drawer
to turn steak over. Close the Convection Microwave Drawer.
Touch START/+30 SEC pad.
6 After each audible signal, turn food over and select
START/+30 SEC again.
After defrost cycle ends, cover and let stand as indicated in the
cha r t b elow.
Note:
• Defrost can be programmed with More or Less Time Adjust-
ment. See page 33.
• To defrost other foods or foods above or below the weights
allowed on the DEFROST CHART, see MANUAL
DEFROST below.
• Check foods when oven signals. After nal stage, small
sections may still be icy. Let stand to continue thawing. Do
not cook until all ice crystals are thawed.
DEFROST CHART
FOOD AMOUNT PROCEDURE
1 Ground Meat 0.5 - 2.0 lb Note: If possible, remove food from packaging before defrosting. If not, remove during the rst
pause. Use the number pads to enter the weight. Place frozen ground meat on the cook tray. Remove
thawed pieces and ip when instructed. After defrosting, let stand for 10 minutes.
2 Steaks/Chops 0.5 - 3.0 lb Note: If possible, remove food from packaging before defrosting. If not, remove during the rst
pause. Use the number pads to enter the weight. Place frozen steaks/chops on the cook tray. Remove
thawed pieces, ip and rearrange food when instructed. After defrosting, let stand covered for
10 to 20 minutes.
3 Boneless Poultry 0.5 - 2.0 lb Note: If possible, remove food from packaging before defrosting. If not, remove during the
rst pause. Use the number pads to enter the weight. Place frozen boneless poultry on the cook
tray. Remove thawed pieces, ip and rearrange food when instructed. After defrosting, let stand
covered for 10 to 20 minutes.
4 Bone-in Poultry 0.5 - 3.0 lb Note: If possible, remove food from packaging before defrosting. If not, remove during the rst
pause. Use the number pads to enter the weight. Place frozen bone-in poultry on the cook tray.
Remove thawed pieces, ip and rear range food when instructed. After defrosting, let stand covered
for 10 to 20 minutes.
5 Roast 2.0 - 4.0 lb Note: If possible, remove food from packaging before defrosting. If not, remove during the rst
pause. Use the number pads to enter the weight. Place frozen roast on the cook tray. Flip food
and cover defrosted parts with foil when instructed. After defrosting, let stand covered for 30 to
60 minutes.
6 Casserole/Soup 1 - 6 cups Use the number pads to enter the amount. Place frozen casserole/soup in a microwave-safe dish.
Remove thawed pieces and stir food when instructed. After defrosting, let stand covered for 5 to
10 minutes. Tip: Stir soups and appropriate casseroles from the outer edges toward the center to
ensure even distribution of heat.
MICROWAVE OVEN COOKING
MANUAL DEFROST
If the food that you wish to defrost is not listed on the DEFROST
CHART or is above or below the limits in the AMOUNT column
on the DEFROST CHART, you need to defrost manually.
You can defrost any frozen food, either raw or previously cooked, by
using POWER LEVEL at 30%. Follow the exact 3-step procedure
found under TO SET POWER LEVEL on page 17. Estimate defrost-
ing time and touch POWER LEVEL pad eight times for 30% power.
For either raw or previously cooked frozen food, the rule of thumb is
approximately 4 minutes per pound. For example, defrost 4 minutes
for 1 pound of frozen spaghetti sauce.
Always stop the oven periodically to remove or separate the portions
that are defrosted. If food is not defrosted at the end of the estimated
defrosting time, program the oven in 1 minute increments on
POWER LEVEL 30% until totally defrosted.
When using plastic containers from the freezer, defrost only long
enough to remove from the plastic in order to place in a microwave-
safe dish.
21 E
E
E
E
E
MICROWAVE OVEN COOKING
MORE MENUS (MICROWAVE)
MELT / SOFTEN / WARM
These features automatically compute the correct heating time
and microwave power level for melting, softening and warming
foods shown in the chart below.
1 Touch MORE MENUS pad once.
2 See Menu Label. Select desired food by touching number
pad. Ex: Touch 2 for chocolate.
3 Repeat touching same number pad to select quantity.
Ex: Touch 2 two more times for 1 square.
4 Touch START/+30 SEC pad.
Note:
• Melt/Soften/Warm can be programmed with More or Less
Time Adjustment. See page 33.
• To melt, soften or warm other food or foods above or below the
quantity allowed on the MELT/SOFTEN/WARM CHART,
use manual operation.
MELT/SOFTEN/WARM CHART
FOOD AMOUNT PROCEDURE
Melt
Place butter in a glass microwave-safe dish and cover with plastic wrap.
1 Butter
2 tbsp
0.5 cup
After touching MORE MENUS, touch 1 two times for 2 tbsp.
After touching MORE MENUS, touch 1 three times for 0.5 cup.
2 Chocolate
1 cup chips
1 square
Place chocolate in a glass microwave-safe dish and cover with plastic wrap.
Stir food when instructed. After cooking, stir again to ensure that chocolate is melted.
After touching MORE MENUS, touch 2 two times for 1 cup chips.
After touching MORE MENUS, touch 2 three times for 1 square.
Soften
Remove the ice cream lid and place container directly in the drawer. Do not cover.
3 Ice cream
1 pint
1.5 qt
After touching MORE MENUS, touch 3 two times for 1 pint.
After touching MORE MENUS, touch 3 three times for 1.5 quarts.
4 Cream cheese
3 oz
8 oz
Remove cream cheese from its original packaging and place in a microwave-safe dish.
Do not cover.
After touching MORE MENUS, touch 4 two times for 3 oz
After touching MORE MENUS, touch 4 three times for 8 oz
Warm
Place syrup or dessert topping in a glass microwave-safe dish. Do not cover.
5 Syrup 0.25 cup
0.5 cup
After touching MORE MENUS, touch 5 two times for 0.25 cup.
After touching MORE MENUS, touch 5 three times for 0.5 cup.
6 Dessert Toppings 0.25 cup
0.5 cup
After touching MORE MENUS, touch 6 two times for 0.25 cup.
After touching MORE MENUS, touch 6 three times for 0.5 cup.
22E
E
E
E
E
MICROWAVE OVEN COOKING
BEVERAGE REHEAT / HOT WATER / HOT CEREAL CHART
FOOD AMOUNT PROCEDURE
7 Beverage Reheat 0.5 - 2 cups Use this setting to restore cooled beverages to a preferable drinking temperature. Touch number
7 pad for a 0.5 cup increase per touch. To avoid boiling over, carefully stir after heating.
8 Hot Water 1 - 6 cups Use this setting to heat cold water (for instant coffee or tea) to a temperature slightly below
boiling. Touch number 8 pad for 1 cup increase per touch. To avoid boiling over, carefully stir
after heating.
9 Hot Cereal 1 - 6 servings Use this setting for individual packets or bulk cereal such as oatmeal, oat bran, cream of wheat,
farina or wheatena. Touch number 9 pad for 1 serving increase per touch. Follow package
instructions for quantity of water or milk. Stir food when instructed. After cooking, stir, cover
and let stand for 2 minutes. Tip: Cooking cereal in the microwave can cause high boiling. To
avoid boiling over, choose a large container.
BEVERAGE REHEAT / HOT WATER / HOT
CEREAL
These features enable you to reheat coffee or tea to restore to a
more suitable drinking temperature or to make instant coffee,
tea or hot cereal.
• Suppose you want to make 2 cups of coffee.
1 Touch MORE MENUS pad once.
2 See Menu Label. Make selection by touching number pad.
Ex: Touch 8 to make coffee.
3 Repeating touching same number pad to select quantity.
Ex: Touch 8 two more times for 2 cups of coffee.
4 Touch START/+30 SEC pad.
Note:
• Beverage Reheat/Hot Water/Hot Cereal can be programmed
with More or Less Time Adjustment. See page 33.
• Should you attempt to enter more or less than the allowed
amount, an error message will appear in the display.
23 E
E
E
E
E
CONVECTION COOKING - PRESETS
Sharp's innovative design combines convection and microwave
cooking to create dishes that range from convenience food items
to delicious gourmet meals.
MORE MENUS (CONVECTION)
The following pages provide instructions for using the Convec-
tion cooking modes available in More Menus to Bake, Grill and
Roast foods with preset temperature and cooking times.
Touch TIMER/SETTINGS pad anytime HELP is illuminated
on the oven display for details on food selection quantity.
CAUTIONCAUTION
The oven cabinet, cavity, door, tray, racks and
dishes will become hot. To PREVENT BURNS, use thick oven
gloves when removing the food from the oven.
CONVECTION BAKE
Convection Bake automatically bakes breads and desserts.
• To bake biscuits:
1 Touch the MORE MENUS pad.
2 See Menu Label. Make selection by touching number pad.
Ex: Touch 1 for biscuits.
3 Touch START/+30 SEC pad to begin preheating.
After the preheat cycle ends, an audible signal will sound 4 beeps
to indicate the preheat cycle is complete. Open the drawer to
place food inside the oven.
4 Touch START/+30 SEC pad to begin cooking.
CONVECTION ROAST
Convection Roast automatically roasts certain cuts of beef, pork
and poultry.
• To roast pork tenderloin:
1 Touch the MORE MENUS pad.
2 Make selection by touching number pad. Ex: touch 1 8 for
pork tenderloin. See Menu Label.
3 Touch START/+30 SEC pad to begin preheating.
After the preheat cycle ends, an audible signal will sound 4 beeps
to indicate the preheat cycle is complete. Open the drawer to
place food inside the oven.
4 Touch START/+30 SEC pad to begin cooking.
CONVECTION GRILL
Convection Grill automatically grills certain cuts of sh, poultry,
beef, pork and burger patties.
• To grill hamburgers:
1 Touch the MORE MENUS pad.
2 See Menu Label. Make selection by touching number pad.
Ex: Touch 1 0 for turkey burgers.
3 Touch START/+30 SEC pad to begin preheating.
After the preheat cycle ends, an audible signal will sound 4 beeps
to indicate the preheat cycle is complete. Open the drawer to
place food inside the oven.
4 Touch START/+30 SEC pad to begin cooking.
MORE MENUS (CONVECTION) CHART
SETTING/FOOD AMOUNT METHOD PROCEDURE
1 Biscuits
(Canned)
8 - 16 biscuits Convection
Bake
Place the bottom rack in the lower position and begin preheating. Evenly space 8 to
16 large canned biscuits on a sheet tray. Place on the rack after preheating the drawer.
If using 2 sheet trays, place the bottom rack in the lower position and begin preheating.
After preheating, place the rst sheet tray on the bottom rack. Then, place the top rack
in the upper position. Place the second sheet tray on the top rack. Tips: Different sizes
and brands vary in time. Biscuits are done when golden brown on top. To cook more
than 16, put additional biscuits on a sheet tray on the top rack in the upper position.
2 Dinner Rolls
(Frozen)
10 - 20 rolls Convection
Bake
Follow package instructions to thaw and proof dinner rolls (generally set out for 3
hours at room temperature). Place the bottom rack in the lower position and begin
preheating. Evenly space 10 to 20 thawed/proofed dinner rolls on a sheet tray. Place
on the rack after preheating the drawer.
If using 2 sheet trays, place the bottom rack in the lower position and begin preheating.
After preheating, place the rst sheet tray on the bottom rack. Then, place the top rack
in the upper position. Place the second sheet tray on the top rack. Tips: Different sizes
and brands vary in time. Dinner rolls are done when golden brown on top. For added
avor, brush the tops with melted butter when hot out of the drawer. To cook more
than 20, put additional dinner rolls on a sheet tray on the top rack in the upper position.
3 Crescent
Rolls
(Canned)
4 - 8 rolls Convection
Bake
Place the bottom rack in the lower position and begin preheating. Evenly space 4 to
8 canned crescent rolls on a sheet tray. Place on the rack after preheating the drawer.
If using 2 sheet trays, place the bottom rack in the lower position and begin preheating.
After preheating, place the rst sheet tray on the bottom rack. Then, place the top rack
in the upper position. Place the second sheet tray on the top rack. Tips: Different sizes
and brands vary in time. Crescent rolls are done when golden brown on top. To cook
more than 8, put additional rolls on a sheet tray on the top rack in the upper position.

24E
E
E
E
E
CONVECTION COOKING - PRESETS
MORE MENUS (CONVECTION) CHART
SETTING/FOOD AMOUNT METHOD PROCEDURE
4 Cookies 6 - 12 cookies
(pre-packaged
cookie dough
mix)
Convection
Bake
Place the bottom rack in the lower position and begin preheating. (Following spacing
guidelines on the package) place 6 to 12 cookies on a sheet tray. Place on the rack
after preheating the drawer. If using 2 sheet trays, place the bottom rack in the lower
position and begin preheating. After preheating, place the rst sheet tray on the bottom
rack. Then, place the top rack in the upper position. Place the second sheet tray on
the top rack. Tips: Different sizes and brands vary in time. Cookies are done when
the edges are rm. To cook more than 12, put additional cookies on a sheet tray on
the top rack in the upper position.
5 Brownies 1 pan
(8x8-inch)
Speed Bake Place the top rack in the lower position and begin preheating. Grease an 8x8-inch
microwave-safe baking dish and add brownie mix. Place on the rack after preheating
the drawer. Tips: ALWAYS use glass or silicone bakeware and microwave-safe dishes
with SPEED COOK as the drawer uses microwave and convection during cooking.
Different size pans vary in time. Brownies are done when a toothpick inserted in the
center comes out clean. Placing the rack in the drawer during preheating allows for
faster and more even cooking.
6 Layered
Cake
1 or 2 pans
(8-inch round)
Convection
Bake
Place the bottom rack in the lower position and begin preheating. Grease 2 (8-inch
round) cake pans. After preheating, place the rst pan in the center of the bottom rack.
Then, place the top rack in the upper position. Place the second pan in the center of
the top rack. If only using 1 pan, place on the top rack in the lower position. Tips:
Different size pans vary in time. Cake is done when a toothpick inserted in the center
comes out clean. Placing the rack in the drawer during preheating allows for faster
and more even cooking.
7 Fish Fillet 2 - 4 llets
(6 - 10 oz each)
Convection
Grill
Place on the top rack in the upper position and begin preheating. Season as desired,
and evenly space 2 to 4 llets on the cook tray. Place on the rack after preheating
the drawer. Tips: This setting works well for thicker llets such as salmon and cod.
Different thickness of llets cook differently. Monitor doneness during cooking.
8 Breaded
Shrimp
6 - 18 pieces Air Fry Place the top rack in the lower position and begin preheating. Evenly space 6 to 18
breaded shrimp on a sheet tray. Place on the rack after preheating the drawer. Tips:
Different sizes and brands vary in time. Shrimp are done when golden brown.
9 Beef Burger 2 - 6 patties
(
1
/2-inch thick,
6 oz each)
Convection
Grill
Place the cook tray on the bottom of drawer. Then, place the top rack in the upper
position and begin preheating. Season as desired, and evenly space 2 to 6 patties directly
on the rack after preheating the drawer. When the drawer pauses, ip patties over and
touch START. After cooking, let stand for 2 to 3 minutes. Tips: Different thickness
of patties cook differently. Monitor doneness during cooking. For cheeseburgers, add
cheese on top of patty. Leave in the drawer (with the door closed) for an additional
2 to 3 minutes after cooking ends. Remove from the drawer when nished. Placing
the rack in the drawer during preheating allows for faster and more even cooking.
10 Turkey
Burger
2 - 6 patties
(
1
/2-inch thick,
6 oz each)
Convection
Grill
Place the top rack in the lower position and begin preheating. Evenly space 2 to 6
patties on the cook tray and season as desired. Place on the rack after preheating the
drawer. When the drawer pauses, ip patties over and touch START. After cooking, let
stand for 2 to 3 minutes. Tips: Different thickness of patties cook differently. Moni-
tor doneness during cooking. For cheeseburgers, add cheese on top of patty. Leave
in the drawer (with the door closed) for an additional 2 to 3 minutes after cooking
ends. Remove from the drawer when nished. Placing the rack in the drawer during
preheating allows for faster and more even cooking.
11 Veggie
Burger
2 - 6 patties
(3 - 4 oz each)
Convection
Grill
Place the cook tray on the bottom of drawer. Then, place the top rack in the upper
position and begin preheating. Season as desired, and evenly space 2 to 6 patties directly
on the rack after preheating the drawer. When the drawer pauses, ip patties over and
touch START. After cooking, let stand for 2 to 3 minutes. Tips: Different thickness
of patties cook differently. Monitor doneness during cooking. For cheeseburgers, add
cheese on top of patty. Leave in the drawer (with the door closed) for an additional
2 to 3 minutes after cooking ends. Remove from the drawer when nished. Placing
the rack in the drawer during preheating allows for faster and more even cooking.

25 E
E
E
E
E
CONVECTION COOKING - PRESETS
MORE MENUS (CONVECTION) CHART
SETTING/FOOD AMOUNT METHOD PROCEDURE
12 Frozen Thin
Crust Pizza
1 (12-inch) Convection
Roast
Place the top rack in the lower position and begin preheating. Place one 12-inch frozen
pizza directly on the rack after preheating the drawer. Tips: Different brands vary in
time. Pizza is done when cheese is melted and crust is golden brown. Placing the rack
in the drawer during preheating allows for faster and more even cooking.
13 Frozen
Classic Crust
Pizza
1 (12-inch) Convection
Roast
Place the top rack in the upper position and begin preheating. Place one 12-inch frozen
pizza directly on the rack after preheating the drawer. Tips: Different brands vary in
time. Pizza is done when cheese is melted and crust is golden brown. Placing the rack
in the drawer during preheating allows for faster and more even cooking.
14 Frozen
Rising Crust
Pizza
1 (12-inch) Convection
Roast
Place the top rack in the lower position and begin preheating. Place one 12-inch frozen
pizza directly on the rack after preheating the drawer. Tips: Different brands vary in
time. Pizza is done when cheese is melted and crust is golden brown. Placing the rack
in the drawer during preheating allows for faster and more even cooking.
15 Fresh Pizza
on Pizza
Stone
1 (12-inch) Convection
Roast
Place the top rack in the lower position and begin preheating. Fit dough onto a pizza
stone or a 12-inch crisper pan, and add desired toppings. Place on the rack after
preheating the drawer. Tips: Premade raw dough or homemade dough can be used.
For crispier crust, parbake dough for 5 to 8 minutes before adding toppings.
16 Beef Roast 2.0 - 4.0 lb Convection
Roast
Place the cook tray on the bottom of the drawer. Then, place the bottom rack in the
lower position. Use the number pads to enter the weight and begin preheating. Season
roast as desired. Place directly on the rack after preheating the drawer. Tip: Cover-
ing the roast with foil and letting it stand after cooking allows juices to redistribute,
creating a moist interior while maintaining a crispy, browned exterior.
17 Flank Steak 1.5 - 4.0 lb Convection
Grill
Place the top rack in the upper position. Set the cook tray on the rack and begin
preheating. Season steak as desired. Place on the cook tray after preheating the drawer.
Tips: Placing the cook tray in the drawer during preheat aids in the browning of the
steak and allows for faster and more even cooking. If using a glaze or sauce with high
sugar content, for example barbeque sauce, use the top rack in the lower position to
prevent burning of glaze or sauce.
18 Pork
Tenderloin
0.75 - 1.5 lb Convection
Roast
Place the cook tray on the bottom of drawer. Then, place the bottom rack in the lower
position and begin preheating. Season tenderloin as desired. Place directly on the
rack after preheating the drawer. Tips: Different thickness tenderloins vary in time.
The best way to tell if pork tenderloin has reached the desired temperature is to use
an instant-read thermometer. Placing the rack in the drawer during preheating allows
for faster and more even cooking.
19 Pork Chop
(Boneless)
2 - 5 pieces
(
1
/2-inch thick,
6 - 9 oz each)
Convection
Grill
Place the top rack in the upper position and begin preheating. Evenly space 2 to 5
chops on the cook tray and season as desired. Place on the rack after preheating the
drawer. When the drawer pauses, turn chops over and touch START. After cooking,
let stand for 2 to 3 minutes. Tips: Different thickness chops vary in time. If using
stuffed chops, cooking time will be longer. Add additional cooking time as required.
The best way to tell if pork chops have reached the desired temperature is to use an
instant-read thermometer. Placing the rack in the drawer during preheating allows for
faster and more even cooking.

26E
E
E
E
E
CONVECTION COOKING - PRESETS
MORE MENUS (CONVECTION) CHART
SETTING/FOOD AMOUNT METHOD PROCEDURE
20 Bacon 3 - 8 slices Speed Bake Set bacon on the cook tray. Place the cook tray on the bottom of drawer. When the
drawer pauses, turn bacon over and touch START. After cooking, let stand for 2 to
3 minutes. Note: If using another dish instead of the provided cook tray, ensure that
it is oven-safe. ALWAYS use glass or silicone bakeware and microwave-safe dishes
with SPEED COOK, as the drawer uses both microwave and convection power during
cooking. Tips: Different thickness of bacon cooks differently. Monitor during cooking
for desired level of crispness. For crispy bacon, let the drawer run a full cook cycle of
20 minutes. This setting works well for thin and regular thickness. Never pour bacon
grease in the sink for disposal. Allow it to cool thoroughly to be safely disposed of
in the trash (collecting in an empty coffee can works well).
21 Chicken
Drummies
1.0 - 2.5 lb
(3 - 6 large
drumsticks)
Convection
Grill
Place the top rack in the lower position and begin preheating. Evenly space drumsticks
on the cook tray and season as desired. Place on the rack after preheating the drawer.
When the drawer pauses, turn drumsticks over and touch START. After cooking, let
stand for 2 to 3 minutes. Tips: This setting works well for pre-marinated or plain
drumsticks. Placing the rack in the drawer during preheating allows for faster and
more even cooking.
22 Boneless
Chicken
Breast
1.0 - 3.5 lb
(1 - 3 large
breast pieces)
Convection
Grill
Place the top rack in the lower position and begin preheating. Place chicken breast
on the cook tray and season as desired. Place on the rack after preheating the drawer.
When the drawer pauses, turn chicken over and touch START. After cooking, let
stand for 2 to 3 minutes. Tips: This setting works well for skin-on and skinless cuts
of chicken. Placing the rack in the drawer during preheating allows for faster and
more even cooking.
23 Whole
Chicken
2.5 - 7.5 lb Speed
Roast
Place the cook tray on the bottom of drawer. Then, place the bottom rack in the lower
position. Use the number pads to enter the weight and begin preheating. Season chicken
as desired. Place directly on the rack after preheating the drawer. Tips: ALWAYS use
glass or silicone bakeware and microwave-safe dishes with SPEED COOK, as the
drawer uses both microwave and convection power during cooking. Use an instant-read
thermometer to ensure the internal temperature of 165°F has been reached.
24 Turkey
Breast
1.0 - 3.5 lb Speed
Roast
Place the cook tray on the bottom of drawer. Then, place the bottom rack in the lower
position. Use the number pads to enter the weight and begin preheating. Season
turkey breast as desired. Place directly on the rack after preheating the drawer. Tips:
Covering the turkey breast with foil and letting it stand after cooking allows juices to
redistribute, creating a moist interior while maintaining a crispy, browned exterior.
Use an instant-read thermometer to ensure the internal temperature of 165°F has
been reached.
27 E
E
E
E
E
CONVECTION COOKING - MANUAL
CAUTIONCAUTION
The oven cabinet, cavity, door, tray, racks and
dishes will become hot. To PREVENT BURNS, use thick oven
gloves when removing the food from the oven.
During convection heating, hot air is circulated throughout the
oven cavity to brown and crisp foods quickly and evenly. This
oven can be programmed for ten different preset convection
cooking temperatures for up to 2 hours.
RECIPE CONVERSION
When using Convection cooking, adjust temperature and cook
time to avoid overcooking.
Temperat ure - Reduce by 25˚F
Time - Monitor foods regularly for doneness. Convection ovens
cook more rapidly than conventional ovens.
CONVECTION BAKE
BAKE 90˚F - 450˚F 2 hour max
cook time
Cookies, cakes,
biscuits, pizzas
and chicken
nuggets
BAKE PROOF
(number 1 pad)
90˚F 2 hour max
cook time
Use for proong
bread doughs
BAKE WITH PREHEAT
1 Touch BAKE/WARM pad once.
2 Touch 1 pad to preheat.
3 Select desired temperature by touching number pads 1-0.
Ex: To bake at 450˚F, touch the 0 pad.
4 Touch START/+30 SEC pad to begin preheating the oven.
An audible signal will sound 4 beeps to indicate that the preheat
cycle is complete. Carefully open the drawer and set food inside
of the oven.
Note: If the oven drawer is not opened within 20 minutes after
preheating has completed, the oven will turn OFF automatically.
5 Enter desired cook time in HOURS and MINUTES by touch-
ing number pads. Ex: Touch 1 2 5 to bake for 1 hour and 25
minutes. Time will display as 1:25 H.
IMPORTANT: If you wish to change the time entry, simply
touch the pads to enter new desired time WHILE TIME
DISPLAY IS BLINKING on the oven. DO NOT TOUCH
STOP/CLEAR. Touching STOP/CLEAR will cancel the
Convection Cook cycle. If time is entered after STOP/CLEAR
is touched, a microwave cycle will be initiated. This can be
dangerous if non-microwave-safe cookware is being used.
6 Touch START/+30 SEC pad to begin cooking.
To adjust temperature before starting the cook cycle, touch
BAKE/WARM again before touching START/+30 SEC,
Note:
• The maximum cooking time available is 2 hours. If you enter
a time above this duration, the following message will display:
ERROR 2 HOUR MAX TIME TOUCH CLEAR.
• The oven displays cooking countdown in Hours and Minutes.
Touch BAKE/WARM during the cooking cycle to view
temperature.
• Time and temperature cannot be adjusted once cooking cycle
has started. In order to modify time or temperature, touch
STOP/CLEAR to cancel current settings and end cooking
cycle.
BAKE WITHOUT PREHEAT
1 Touch BAKE/WARM pad once.
2 Touch 2 pad to select no preheat.
3 Select desired temperature by touching number pads 2-0.
Ex: To bake at 375˚F, touch the 7 pad.
4 Enter desired cook time in HOURS and MINUTES by touch-
ing number pads. Ex: Touch 1 2 5 to bake for 1 hour and 25
minutes. Time will display as 1:25 H.
IMPORTANT: If you wish to change the time entry, simply
touch the pads to enter new desired time WHILE TIME
DISPLAY IS BLINKING on the oven. DO NOT TOUCH
STOP/CLEAR. Touching STOP/CLEAR will cancel the
Convection Cook cycle. If time is entered after STOP/CLEAR
is touched, a microwave cycle will be initiated. This can be
dangerous if non-microwave-safe cookware is being used.
5 Place food inside the oven. Touch START/+30 SEC pad to
begin cooking.
To adjust temperature before starting the cook cycle, touch
BAKE/WARM again before touching START/+30 SEC,
Note:
• If the oven drawer is not opened within 10 minutes after
the time entry has been selected, the oven will turn OFF
automatically. The oven does not give instruction to open the
drawer and set food inside, only to touch start.
• The maximum cooking time available is 2 hours. If you enter
a time above this duration, the following message will display:
ERROR 2 HOUR MAX TIME TOUCH CLEAR.
• The oven displays cooking countdown in Hours and Minutes.
Touch BAKE/WARM during the cooking cycle to view
temperature.
• Time and temperature cannot be adjusted once cooking cycle
has started. In order to modify time or temperature, touch
STOP/CLEAR to cancel current settings and end cooking
cycle.

28E
E
E
E
E
CONVECTION COOKING - MANUAL
BAKE PROOF BREADS
1 Touch and hold the BAKE/WARM pad for 3 seconds. WARM
will display on the oven.
2 Touch 1 pad to proof at 90˚F.
3 Enter desired time in HOURS and MINUTES by touching
number pads. Ex: Touch 1 1 5 to proof dough for 1 hour and
15 minutes. Time will display as 1:15 H.
IMPORTANT: If you wish to change the time entry, simply
touch the pads to enter new desired time WHILE TIME
DISPLAY IS BLINKING on the oven. DO NOT TOUCH
STOP/CLEAR. Touching STOP/CLEAR will cancel the
Convection Cook cycle. If time is entered after STOP/CLEAR
is touched, a microwave cycle will be initiated. This can be
dangerous if non-microwave-safe cookware is being used.
4 Touch START/+30 SEC pad to begin cooking.
Note:
• If the oven drawer is not opened within 10 minutes after
the time entry has been selected, the oven will turn OFF
automatically. The oven does not give instruction to open the
drawer and set food inside, only to touch start.
• The maximum cooking time available is 2 hours. If you enter
a time above this duration, the following message will display:
ERROR 2 HOUR MAX TIME TOUCH CLEAR.
• Proof is also available as one of the Convection Warm func-
tions. See page 29 for more details.
CONVECTION ROAST
375˚F - 450˚F 2 hour max
cook time
Turkey, poultry and
pork
ROAST WITH PREHEAT
1 Touch ROAST pad once.
2 Touch 1 pad to select preheat.
3 Select desired temperature by touching number pads 7-0.
Ex: To roast at 375˚F, touch the 7 pad.
4 Touch START/+30 SEC pad to begin preheating the oven.
An audible signal will sound 4 beeps to indicate that the preheat
cycle is complete. Carefully open the drawer and set food inside
of the oven.
Note: If the oven drawer is not opened within 20 minutes after
preheating has completed, the oven will turn OFF automatically.
5 Enter desired cook time in HOURS and MINUTES by
touching number pads. Ex: Touch 2 0 0 to roast for 2 hours.
Time will display as 2:00 H.
IMPORTANT: If you wish to change the time entry, simply
touch the pads to enter new desired time WHILE TIME
DISPLAY IS BLINKING on the oven. DO NOT TOUCH
STOP/CLEAR. Touching STOP/CLEAR will cancel the
Convection Cook cycle. If time is entered after STOP/CLEAR
is touched, a microwave cycle will be initiated. This can be
dangerous if non-microwave-safe cookware is being used.
6 Touch START/+30 SEC pad to begin cooking.
To adjust temperature before starting the cook cycle, touch
ROAST again before touching START/+30 SEC.
Note:
• The maximum cooking time available is 2 hours. If you enter
a time above this duration, the following message will display:
ERROR 2 HOUR MAX TIME TOUCH CLEAR.
• The oven displays cooking countdown in Hours and Minutes.
Touch ROAST during the cooking cycle to view temperature.
• Time and temperature cannot be adjusted once cooking cycle
has started. To modify time or temperature, touch STOP/
CLEAR to cancel current settings and end cooking cycle.
ROAST WITHOUT PREHEAT
1 Touch ROAST pad once.
2 Touch 2 pad to select no preheat.
3 Select desired temperature by touching number pads 7-0.
Ex: To roast at 375˚F, touch the 7 pad.
4 Enter desired cook time in HOURS and MINUTES by
touching number pads. Ex: Touch 3 5 to roast for 35 minutes.
Time will display as :35 H.
IMPORTANT: If you wish to change the time entry, simply
touch the pads to enter new desired time WHILE TIME
DISPLAY IS BLINKING on the oven. DO NOT TOUCH
STOP/CLEAR. Touching STOP/CLEAR will cancel the
Convection Cook cycle. If time is entered after STOP/CLEAR
is touched, a microwave cycle will be initiated. This can be
dangerous if non-microwave-safe cookware is being used.
5 Place food inside the oven. Touch START/+30 SEC pad to
begin cooking.
To adjust temperature before starting the cook cycle, touch
ROAST again before touching START/+30 SEC.
Note:
• If the oven drawer is not opened within 10 minutes after
the time entry has been selected, the oven will turn OFF
automatically.
• The maximum cooking time available is 2 hours. If you enter
a time above this duration, the following message will display:
ERROR 2 HOUR MAX TIME TOUCH CLEAR.
• The oven does not give instruction to open the drawer and
set food inside, only to touch start
• The oven displays cooking countdown in Hours and Minutes.
Touch ROAST during the cooking cycle to view temperature.
• Time and temperature cannot be adjusted once cooking cycle
has started. To modify time or temperature, touch STOP/
CLEAR to cancel current settings and end cooking cycle.
29 E
E
E
E
E
CONVECTION COOKING - MANUAL
CONVECTION GRILL
450˚F 30 minutes max
cook time
Fish, vegetables,
burgers and steaks
GRILL WITH PREHEAT
1 Touch GRILL/TOAST pad once.
2 Touch 1 pad to select preheat.
3 Touch START/+30 SEC pad to begin preheating the oven.
An audible signal will sound 4 beeps to indicate that the preheat
cycle is complete. Carefully open the drawer and set food inside
of the oven.
Note: If the oven drawer is not opened within 20 minutes after
preheating has completed, the oven will turn OFF automatically.
4 Enter desired cook time in MINUTES by touching number
pads. Ex: Touch 2 0 to grill for 20 minutes. Time will display
as :20 H.
IMPORTANT: If you wish to change the time entry, simply
touch the pads to enter new desired time WHILE TIME
DISPLAY IS BLINKING on the oven. DO NOT TOUCH
STOP/CLEAR. Touching STOP/CLEAR will cancel the
Convection Cook cycle. If time is entered after STOP/CLEAR
is touched, a microwave cycle will be initiated. This can be
dangerous if non-microwave-safe cookware is being used.
5 Touch START/+30 SEC pad to begin cooking.
Note:
• The maximum cooking time available is 30 minutes. If
you enter a time above this duration, the following message
will display: ERROR 30 MINUTES MAX TIME TOUCH
CLEAR.
• The oven displays cooking countdown in Minutes. Touch
GRILL/TOAST during the cooking cycle to view temperature.
• Time cannot be adjusted once cooking cycle has started. To
modify time, touch STOP/CLEAR to cancel current settings
and end cooking cycle.
GRILL WITHOUT PREHEAT
1 Touch GRILL/TOAST pad once.
2 Touch 2 pad to select no preheat.
3 Enter desired cook time in MINUTES by touching number
pads. Ex: Touch 2 0 to grill for 20 minutes. Time will display
as :20 H.
IMPORTANT: If you wish to change the time entry, simply
touch the pads to enter new desired time WHILE TIME
DISPLAY IS BLINKING on the oven. DO NOT TOUCH
STOP/CLEAR. Touching STOP/CLEAR will cancel the
Convection Cook cycle. If time is entered after STOP/CLEAR
is touched, a microwave cycle will be initiated. This can be
dangerous if non-microwave-safe cookware is being used.
4 Place food inside the oven. Touch START/+30 SEC pad to
begin cooking.
Note:
• If the oven drawer is not opened within 10 minutes after
the time entry has been selected, the oven will turn OFF
automatically. The oven does not give instruction to open the
drawer and set food inside, only to touch start.
• The oven displays cooking countdown in Minutes. Touch
GRILL/TOAST during the cooking cycle to view tempera-
ture.
• Time cannot be adjusted once cooking cycle has started. To
modify time, touch STOP/CLEAR to cancel current settings
and end cooking cycle.
CONVECTION WARM
Proof bread doughs and keep cooked food warm for up to 4
hours while preserving texture and avor to deliver meals that
taste fresh-from-the-oven. There is no preheat with WARM.
Dishes should be covered to retain moisture. Plastic wrap, foil
and glass lids are recommended. See ABOUT UTENSILS AND
COVERINGS section for details.
90°F - 200°F
[1] 90°F Proong dough and warming plates
[2] 150°F Warming roasts, pastries, breads, quiches and
vegetable casserole dishes
[3] 200°F Warming poultry, pork, mashed potatoes,
dense casseroles, e.g., lasagna
1 Touch and hold the BAKE/WARM pad for 3 seconds. WARM
will display on the oven.
2 See Menu Label. Make selection by touching number pads 1-3.
To change temperature, touch STOP/CLEAR to begin again.
3 Enter desired time in HOURS and MINUTES by touching
number pads. Ex: Touch 3 3 0 to warm for 3 hours and 30
minutes. Time will display as 3:30 H.
IMPORTANT: If you wish to change the time entry, simply
touch the pads to enter new desired time WHILE TIME
DISPLAY IS BLINKING on the oven. DO NOT TOUCH
STOP/CLEAR. Touching STOP/CLEAR will cancel the
Convection Cook cycle. If time is entered after STOP/CLEAR
is touched, a microwave cycle will be initiated. This can be
dangerous if non-microwave-safe cookware is being used.
4 Place food inside the oven. Touch START/+30 SEC pad to
begin warming.
Note:
• The maximum warming time available is 4 hours. If you
enter a time above this duration, the following message will
display: ERROR 4 HOURS MAX TIME TOUCH CLEAR.
• Touch BAKE/WARM during the cooking cycle to view
temperature (once cooking has started, it is not necessary to
hold the pad for 3 seconds).
30E
E
E
E
E
CONVECTION COOKING - MANUAL
CONVECTION TOAST
Toast breads and bagels perfectly by selecting desired level
of browning with pre-timed options. There is no preheat with
TOAST. Temperature: 450°F.
TOAST: 1 - 4 pieces
Presets: [1] Light
[2] Medium light
[3] Medium
[4] Medium dark
[5] Dark
1 Touch and hold the GRILL/TOAST pad for 3 seconds.
TOAST will display on the oven.
2 See Menu Label. Make selection by touching number pads
1-5. Ex: Touch 3 to select Medium browning. Place food on
the top rack in the upper position.
3 Touch START/+30 SEC to begin cooking. Time will display
as : 05 H.
Note:
• To change desired level of browning, touch STOP/CLEAR
to begin again.
• Touch GRILL/TOAST during the cooking cycle to view
selected browning level (once cooking has started, it is not
necessary to hold the pad for 3 seconds).
CONVECTION AIR FRY
AIR FRY uses convection fans to cook foods with moist, soft
interiors and perfectly crisped exteriors without using cooking
oil. There are many reasons to use your Convection Microwave
Drawer to air fry foods.
Convenience. Using your Convection Microwave Drawer for
your air fry needs saves you from needing another appliance.
Large Batch Cooking. You’ll be able to cook large batches
that would otherwise take several small batches in a traditional
air fryer.
Viewing Window. The Convection Microwave Drawer has a
viewing window through which you can monitor your food
cooking.
There are four preset selections of convenience foods to cook
with AIR FRY.
1 Touch AIR FRY pad once.
2 See Menu Label. Make selection by touching number pads
1-4. To change menu item, touch STOP/CLEAR to begin
again.
3 Touch START/+30 SEC pad to preheat the oven. An audible
signal will sound 4 beeps to indicate that the preheat cycle
is complete. The estimated preheat time for all preset air fry
foods is 8–11 minutes.
4 Carefully open the drawer and set food inside of the oven and
touch START/+30 SEC pad to begin cooking.
Notes:
• If the oven drawer is not opened within 20 minutes after pre-
heating has completed, the oven will turn OFF automatically.
• Because of the larger oven capacity, the preheat time and
cook times could be slightly longer than the common air
fryers.
AIR FRY CHART
Estimated Preheat Time 8-11 minutes
SETTING/
FOOD
AMOUNT
COOK
TIME
PROCEDURE
1 Chicken
Tenders
3 - 8 pieces 22
minutes
Place the top rack in the lower position and begin preheating. Evenly space 3 to 8 chicken
tenders in a crisper pan or air fry basket. Place on the rack after preheating the drawer. Tips:
Leave space between pieces to allow for crisping. For crispier texture, use a crisper pan instead
of a sheet tray. If using a crisper pan, place the cook tray on the bottom of the drawer to use
as a drip tray for easy clean-up.
2 French
Fries
10 - 24 oz 20
minutes
Place the top rack in the upper position and begin preheating. Evenly space french fries in a
crisper pan or air fry basket. Place on the rack after preheating the drawer. Tips: Leave space
between pieces to allow for crisping. Different size cuts of fries vary in time. Curly and wafe
fries may require additional cooking time, while shoestring fries will require less. For crispier
texture, use a crisper pan instead of a sheet tray. If using a crisper pan, place the cook tray on
the bottom of the drawer to use as a drip tray for easy clean-up.
3 Mozzarella
Sticks
4 - 12 sticks 12
minutes
Place the top rack in the upper position and begin preheating. Evenly space 4 to 12 mozzarella
sticks in a crisper pan or air fry basket. Place on the rack after preheating the drawer. Tips:
Leave space between pieces to allow for crisping. Heat dipping sauce in a microwave-safe
dish using the microwave mode, if desired. For crispier texture, use a crisper pan instead of a
sheet tray. If using a crisper pan, place the cook tray on the bottom of the drawer to use as a
drip tray for easy clean-up.
4 Tater Tots 10 - 24 oz 18
minutes
Place the top rack in the upper position and begin preheating. Evenly space tater tots in a
crisper pan or air fry basket. Place on the rack after preheating the drawer. Tips: Leave space
between pieces to allow for crisping. For crispier texture, use a crisper pan instead of a sheet
tray. If using a crisper pan, place the cook tray on the bottom of the drawer to use as a drip
tray for easy clean-up.
31 E
E
E
E
E
SPEED COOK – MICROWAVE & CONVECTION COMBINATION
The oven has three pre-programmed combination cook modes
to cook with convection and microwave automatically.
IMPORTANT: Always use microwave-safe and oven-safe
cookware when using Speed Cook functions as the oven com-
bines microwave and conventional oven power. See ABOUT
UTENSILS AND COVERINGS pages 10-11.
Speed Cook provides great results for most items that do not
require conventional oven methods.
The combination of microwave power with convection heat
decreases cooking time while producing moist and juicy inte-
riors and perfectly browned and crisped exteriors.
• Speed Bake is recommended for delicate items such as cake,
breads and sh.
• Speed Roast works wonderfully for dense meats, larger
pieces of poultry, beef and pork.
• Speed Grill is ideal for burgers, chicken drumsticks and
thick pork chops.
The temperatures for Speed Bake and Speed Roast may be
adjusted. The temperature for Speed Grill is preset at 450˚F.
Microwave power levels for Speed Bake, Speed Roast and Speed
Grill are preset.
For instructions on rack and tray placement, see ACCESSORIES
on page 14 for details.
OVE N T E M P.
MICROWAVE
POWER
COOK TIME
MAX.
1 Speed
Bake
Auto Set for 350˚F
Adjustable from
90˚F - 450˚F
20% 2 hours
2 Speed
Roast
Auto Set for 425˚F
Adjustable from
375˚F - 450˚F
30% 2 hours
3 Speed
Grill
450˚F 20% 30 minutes
SPEED COOK WITH PREHEAT
1 Touch SPEED COOK pad once.
2 See Menu Label. To select modes: Bake, Roast or Grill, touch
number pads 1-3. Ex: Touch 3 to cook with SPEED GRILL.
3 Touch 1 pad to select preheat.
4 Touch START/+30 SEC pad to begin preheating the oven.
An audible signal will sound 4 beeps to indicate that the preheat
cycle is complete. Carefully open the drawer and set food inside
of the oven.
Note: If the oven drawer is not opened within 20 minutes after
preheating has completed, the oven will turn OFF automatically.
5 Enter desired time in MINUTES by touching the number
pads. Ex: Touch 2 0 to grill for 20 minutes. Time will display
as :20 H.
IMPORTANT: If you wish to change the time entry, simply
touch the pads to enter new desired time WHILE TIME
DISPLAY IS BLINKING on the oven. DO NOT TOUCH
STOP/CLEAR. Touching STOP/CLEAR will cancel the
Convection Cook cycle. If time is entered after STOP/CLEAR
is touched, a microwave cycle will be initiated. This can be
dangerous if non-microwave-safe cookware is being used.
6 Touch START/+30 SEC pad to begin cooking.
Note:
• Refer to the chart at the left to view maximum cooking times
available. An error message will display if a time above the
maximum cook time allowed is entered.
• Touch SPEED COOK to view oven temperature and micro-
wave power.
• Time cannot be adjusted once cooking cycle has started. To
modify time, touch STOP/CLEAR to cancel current settings
and end cooking cycle.
SPEED COOK WITHOUT PREHEAT
1 Touch SPEED COOK pad once.
2 See Menu Label. To select modes: Bake, Roast or Grill, touch
number pads 1-3. Ex: Touch 1 to cook with SPEED BAKE.
3 Touch 2 pad to select no preheat.
4 Enter desired time in HOURS and MINUTES by touching
the number pads. Ex: Touch 3 0 to bake for 30 minutes. Time
will display as :30 H.
IMPORTANT: If you wish to change the time entry, simply
touch the pads to enter new desired time WHILE TIME
DISPLAY IS BLINKING on the oven. DO NOT TOUCH
STOP/CLEAR. Touching STOP/CLEAR will cancel the
Convection Cook cycle. If time is entered after STOP/CLEAR
is touched, a microwave cycle will be initiated. This can be
dangerous if non-microwave-safe cookware is being used.
5 Place food inside the oven. Touch START/+30 SEC pad to
begin cooking at the preset temperature of 350˚F.
To adjust temperature before starting, touch BAKE/WARM
again before touching START/+30 SEC to begin the cook
cycle. Ex: To change the temperature, touch BAKE/WARM
then touch 3 to change temperature to 275˚F. Then, touch
START/+30 SEC to begin cooking or touch another tempera-
ture using pads 2-0 to select a different temperature.
Note:
• If the oven drawer is not opened within 10 minutes after
the time entry has been selected, the oven will turn OFF
automatically. The oven does not give instruction to open the
drawer and set food inside, only to touch start
• Refer to the chart at the left to view maximum cooking times
available. An error message will display if a time above the
maximum cook time allowed is entered.
• Touch SPEED COOK to view oven temperature and micro-
wave power.
• Time and temperature cannot be adjusted once cooking cycle
has started. In order to modify time or temperature, touch
STOP/CLEAR to cancel current settings and end cooking cycle.

32E
E
E
E
E
TIMER / SETTINGS
If the electrical power supply to your Convection Microwave
Drawer should be interrupted, the display will intermittently
show ENJOY YOUR OVEN TOUCH CLEAR after the power
is reinstated. If this occurs, the SETTINGS option you input will
be erased. Simply touch STOP/CLEAR pad and reset.
TIMER
1 Touch TIMER/SETTINGS pad 2 times.
2 Enter time.
3 Touch START/+30 SEC pad.
To cancel timer, touch STOP/CLEAR.
AUDIBLE SIGNAL ELIMINATION
At the end of timed cooking, an audible signal will sound. This
sound can be turned "OFF" along with the keypad.
TO TURN SOUND OFF
1 Touch TIMER/SETTINGS pad 8 times.
2 Touch START/+30 SEC pad. The display shows SOUND
OFF.
TO RESTORE SOUND
1 Touch TIMER/SETTINGS pad 8 times.
2 Touch START/+30 SEC pad. The display shows SOUND ON.
END OF COOKING REMINDER
At end of timed cooking, the microwave will signal every 10
seconds for the rst minute, and then every 3 minutes for up to
one hour until STOP/CLEAR pad is touched.
TO TURN REMINDER OFF
1 Touch TIMER/SETTINGS pad 9 times. The display shows
REMIND SIGNAL OFF? TOUCH START.
2 Touch START/+30 SEC pad. The display shows REMIND
SIGNAL OFF.
TO TURN REMINDER SIGNAL BACK ON
1 Touch TIMER/SETTINGS pad 9 times. The display shows
REMIND SIGNAL ON? TOUCH START.
2 Touch START/+30 SEC pad. The display shows REMIND
SIGNAL ON.
Note: If Sound is set to "OFF", End of Cooking Reminders
will also be set to "OFF".
AUTO START
If you wish to program the Convection Microwave Drawer to
begin cooking automatically at a designated time of day, follow
this procedure.
1 Touch TIMER/SETTINGS pad 10 times. The display shows
AUTO START TOUCH START.
2 Touch START/+30 SEC pad.
3 Enter start time.
4 Touch TIMER/SETTINGS pad.
5 Touch the number pads to enter cooking time. Touch POWER
LEVEL pad repeatedly until the desired power level is
reached.
6 Touch START/+30 SEC pad.
DEMONSTRATION MODE
TO SELECT DEMO MODE
1 Touch TIMER/SETTINGS pad 11 times. The display shows
DEMO ON? HOLD START 3 SEC.
2 Hold START/+30 SEC pad for 3 seconds. The display shows
DEMO ON.
TO CANCEL DEMO MODE
1 Touch TIMER/SETTINGS pad 11 times. The display shows
DEMO OFF? TOUCH START.
2 Touch START/+30 SEC pad. The display shows DEMO OFF.
Note:
• Convection Microwave Drawer doesn’t heat in Demo Mode.
• Display counts down quickly.
+30 SEC
(ADDITIONAL TIME FOR MICROWAVE COOKING)
+30 SEC may be used to add additional time by touching the
START/+30 SEC pad on the oven or the +30 SEC button in
the app. On the oven, touch the START/+30 SEC pad to cook
for 30 seconds at 100% power. Cooking time can also be
extended in multiples of 30 seconds by repeatedly touching the
START/+30 SEC pad.
• To use +30 SEC, touch pad within 3 minutes after cooking
completion, after closing the drawer, or after touching the
STOP/CLEAR pad once.
• If the STOP/CLEAR pad is touched twice prior to the end of
cooking, +30 SEC cannot be activated until the drawer has
been opened and then closed.
• SENSOR, DEFROST and MORE MENU: Additional time
may be added only after the cooking cycle has completed by
touching the START/+30 SEC pad on the oven or the +30
SEC button in the app.
If using the app, SENSOR, DEFROST and MORE MENU
items are found under MICROWAVE SMART COOK menu
page.
• MANUAL: Additional time may be added during the cooking
cycle as well as after cooking has completed if used within 3
minutes of cooking completion.
If using the app, MICROWAVE MANUAL menu is found
under the CONVECTION MANUAL COOK menu page.
OTHER FEATURES

33 E
E
E
E
E
OTHER FEATURES
+30 SEC
(ADDITIONAL TIME FOR CONVECTION COOKING)
+30 SEC may be used to add additional time to convection
cooking by touching the START/+30 SEC pad on the oven
or the +30 SEC button in the app. Cooking time can also be
extended in multiples of 30 seconds by repeatedly touching
the START/+30 SEC pad.
• To use +30 SEC, touch the button within 3 minutes after
cooking completion, after closing the drawer or after touching
the STOP/CLEAR pad once.
• If the STOP/CLEAR pad is touched twice prior to the end of
cooking, +30 SEC cannot be activated until the drawer has
been opened and then closed.
• CONVECTION MORE MENUS AND AIR FRY: Additional
time may be added only after the cooking cycle has completed
by touching the START/+30 SEC pad on the oven or the +30
SEC button in the app.
- If using the app, MORE MENU items are found under
CONVECTION SMART COOK menu page.
• MANUAL: Additional time may be added during the cooking
cycle as well as after cooking has completed, if used within
3 minutes of cooking completion.
- If using the app, the MANUAL COOK menu provides
BAKE/WARM, ROAST, GRILL/TOAST, SPEED COOK
and AIR FRY.
Note: TOAST AND AIR FRY Time can be extended +30 SEC
only after cooking has completed if the button is touched within
3 minutes of cooking completion.
CONTROL LOCK
The Control Lock prevents unwanted drawer operation such as
by small children. The Convection Microwave Drawer can be set
so that the control panel and the automatic drawer mechanism
are deactivated or locked.
TO LOCK
Touch STOP/CLEAR pad and hold for 3 seconds. The display
shows LOCK ON.
TO UNLOCK
Touch STOP/CLEAR pad and hold for 3 seconds. The display
shows LOCK OFF.
The Control Lock is canceled when the electrical power supply
to your oven is interrupted. Set the Control Lock again when
power to the oven is restored.
MICROWAVE MULTIPLE SEQUENCE
COOKING
Microwave cooking can be programmed for up to 4 automatic
cooking sequences, switching from one power level setting to
another automatically.
Sometimes cooking directions tell you to start on one power
level and then change to a different power level. Your Convection
Microwave Drawer can do this automatically.
1 First enter cooking time. Then touch POWER LEVEL pad
once for 100% cooking or repeatedly touching POWER
LEVEL pad for a lower power level.
2 Enter second cooking time. Repeat touching POWER
LEVEL pad for desired level. You can follow this procedure
up to 4 times.
3 Touch START/+30 SEC pad.
Note:
• If POWER LEVEL pad is touched once, HIGH will be
displayed.
• If 100% is selected as the nal sequence, it is not necessary
to touch the POWER LEVEL pad.
• If you wish to know power level during cooking, simply touch
the POWER LEVEL pad. As long as your nger is touching
the POWER LEVEL pad, the power level will be displayed.
Note: Multiple sequence cooking is not available for use with
convection cooking mode.
MORE OR LESS TIME ADJUSTMENT
Should you discover that you like any of the REHEAT or
DEFROST settings slightly more done, touch the POWER
LEVEL pad once after touching your selection. The display
will show MORE.
For slightly less done, touch the POWER LEVEL pad twice
after touching your selection. The display will show LESS.
STANDBY MODE
This Convection Microwave Drawer will go into standby mode
after a period of inactivity. The backlight of the display will
automatically dim after 3 minutes if the unit has not been in
operation. If the display is in standby mode, simply touch the
control panel or open/close the door to return the backlight to
maximum brightness.
HELP
Each setting of Popcorn, Reheat, Cook, Defrost and Beverage
has a cooking hint. If you wish to check, touch TIMER/
SETTINGS whenever HELP is lighted in the Interactive Display
for these and other manual operation hints.
34E
E
E
E
E
INDICATORS LENS AND
COLOR LEGEND
WI-FI
STATUS
OVEN STATUS COMMENTS
Wi-Fi Off Wave Open Off Oven on Standby
(out of the box)
Wi-Fi On -
blue light
Wave Open Off Oven on Standby -
Not Cooking
Wi-Fi Off Wave Open On -
white light
Oven on Standby -
Not Cooking
Wi-Fi On -
blue light
Wave Open On -
white light
Oven on Standby -
Not Cooking
Wi-Fi On -
blue light
Cooking -
green light
Microwave - Slow Flash -
Sensor/On Full -
Count Down
Wi-Fi On -
blue light
Cooking -
magenta light
Convection - Slow Flash -
Preheat/On Full -
Count Down
Wi-Fi On -
blue light
Cooking -
red light
Slow Flash - Stopped, Ready
to Open
Wi-Fi On -
blue light
Cooking -
yellow light
Slow Flash - Time is Paused
Wi-Fi On -
blue light
Remote Start
Active -
white light
Flash every 5 second -
Drawer opened, 3 minute
window to remote operate
App/Alexa (Microwave
Mode Only)
OTHER FEATURES
35 E
E
E
E
E
CLEANING AND CARE
• ENSURE THE CONVECTION MICROWAVE DRAWER IS
OFF BEFORE CLEANING TO PREVENT BURNS.
• NEVER USE HARSH, ABRASIVE OR COMMERCIAL
GRADE CLEANERS ON ANY PART OF THE OVEN.
EXTERIOR
The outside surface is precoated metal and glass. Clean the
outside with mild soap and water. Rinse and dry with a soft
cloth. Do not use any type of household or abrasive cleaner.
STAINLESS STEEL SURFACE
The exterior should be wiped often with a soft damp cloth and
polished with a soft dry cloth to maintain its beauty. There are
also a variety of products designed especially for cleaning and
shining the stainless exterior of the oven. We recommend that
the cleaner be applied to a soft cloth and then carefully used on
the stainless exterior rather than sprayed directly on to it. Follow
package directions carefully.
FRONT SIDE OF THE DRAWER
Wipe the window on both sides with a soft damp cloth to remove
any spills or spatters. Metal parts will be easier to maintain if
wiped frequently with a soft damp cloth. Avoid the use of spray
and other harsh cleaners as they may stain, streak or dull the
drawer surface.
TOUCH CONTROL PANEL
If desired, the touch pads may be deactivated before cleaning.
See the Control Lock information on page 33 of this manual.
Wipe the panel with a cloth dampened slightly with water only.
Dry with a soft cloth. Do not scrub or use any sort of chemical
cleaners. Close drawer and follow directions on page 33 for
turning Control Lock off. Touch STOP/CLEAR.
INTERIOR
Before cleaning the Convection Microwave Drawer, touch
and hold the STOP/CLEAR button for 3 seconds to lock
the control pad and the automatic door mechanism. The
drawer can be locked in either the open or closed position.
The display will show LOCK ON. This will prevent the
drawer from accidentally opening or closing during cleaning.
After cleaning, touch and hold the STOP/CLEAR button for
3 seconds to turn the lock off. The display will show
LOCK OFF. Keep the interior of the oven clean and free of any
food particles or liquid spills that can build up on the oven walls,
decreasing the cooking efciency of the appliance.
Never use a metal scouring pad or recycled paper towels that
may ake off and leave metal particles inside the cavity.
INTERIOR - AFTER MICROWAVE COOKING
Cleaning is easy because no heat is generated to the interior
surfaces, so there is no baking and setting of spills or spattering.
To clean the interior surfaces, including drawer sealing surfaces,
wipe with a soft damp cloth. DO NOT USE ABRASIVE OR
HARSH CLEANERS OR SCOURING PADS. For heavier soil,
use mild soap and wipe clean with a soft damp cloth. Do not use
any chemical oven cleaners.
INTERIOR - AFTER CONVECTION, ROAST,
GRILL, SPEED COOK OR AIR FRY
Spatters may occur because of moisture and grease. Wash
immediately after use with hot, soapy water.
Rinse and polish dry. Harder to remove spatters may occur
if oven is not thoroughly cleaned or if there is long time/high
temperature cooking.
After cleaning the interior thoroughly, residual grease may be
removed from the interior ducts and heater by simply operating
the oven on 450˚F for 20 minutes without food. Ventilate the
room if necessary.
CONVECTION MICROWAVE DRAWER
GUIDES
Remove the food crumbs from the Convection Microwave
Drawer guides. Wipe with a soft dry cloth in order to keep the
Convection Microwave Drawer opening and closing smoothly.
ODOR REMOVAL USING MICROWAVE POWER
Occasionally, a cooking odor may remain in the oven. To remove,
combine 1 cup water, grated peel and juice of 1 lemon and
several whole cloves in a 2-cup glass measuring cup. Boil for
several minutes using 100% power. Allow to set in microwave
oven until cool. Wipe interior with a soft cloth.
Note: Do not use the Microwave power if the cavity is empty,
as the microwaves will not be absorbed, increasing risk of re
in the cavity.
TOP AND BOTTOM RACKS/TRAY
The racks and tray can be removed for easy cleaning. Wash them
in mild, sudsy water. For stubborn stains, use a mild cleanser and
a non-abrasive scouring sponge. The racks are dishwasher safe.
The racks may be washed in either the upper or lower section of
the dishwasher, and the tray may be washed in the lower section.
Do not use a self-cleaning oven to clean the racks or tray.
36E
E
E
E
E
Please check the following before calling for service. It may save you time and expense.
PROBLEM POSSIBLE CAUSE SOLUTION
1 Part or all of Convection
Microwave Drawer does
not operate.
• Power cord of Convection Microwave
Drawer is not completely connected to the
electrical outlet.
• Power outage.
• Fuse/circuit breaker at home doesn’t work.
• Convection Microwave Drawer is in Demo
Mode.
• Make sure the power cord is tightly connected
to the outlet.
• Check house lights to be sure. Call your local
electric company for service.
• Replace the fuse or reset the circuit breaker.
• See page 32 for how to cancel Demo Mode.
2 Food in Convection
Microwave Drawer is
not heated.
• No power to the appliance.
• Drawer controls improperly set.
• Drawer is in Demo Mode.
• See SOLUTION for PROBLEM 1.
• Check if the controls have been properly set.
• See page 32.
3 Convection Microwave
Drawer light does not
work.
• Light bulb is loose or burned out. • Call for service.
4 Touch controls will not
operate.
• Control Lock is on. • See page 33 to unlock.
5 Display ashes.
• Power failure. • Touch STOP/CLEAR pad and reset the clock. If
the Convection Microwave Drawer was in use,
you must reset the cooking function.
6 Steam from the vent.
• During microwaving, water vapor may come
from the left side of the vent (when facing
the microwave).
7 Fan noise.
• After using Convection or Speed Cook,
you will hear the sound of the cooling fan.
The fan may continue to operate for an
extended period of time, depending on the
oven temperature.
• Once the oven has been properly cooled, the
fan will turn off.
BEFORE YOU CALL FOR SERVICE
37 E
E
E
E
E
AUTO-TOUCH GUIDE
MORE MENUS (CONVECTION)
CONVECTION - BAKE, ROAST, GRILL
1 Touch the MORE MENUS pad.
2 See Menu Label. Make selection by touching number pad.
Ex: Touch 1 for biscuits.
3 Touch START/+30 SEC pad to begin preheating.
After the preheat cycle ends, an audible signal will sound 4 beeps
to indicate the preheat cycle is complete. Open the drawer to
place food inside the oven.
4 Touch START/+30 SEC pad to begin cooking.
CONVECTION BAKE OR ROAST
WITH PREHEAT
1 Touch desired function (BAKE or ROAST) pad once.
2 Touch 1 pad to preheat.
3 Select desired temperature by using the number pads (2-0 for
Bake, 7-0 for ROAST).
4 Touch START/+30 SEC pad to begin preheating the oven.
After the preheat cycle ends, an audible signal will sound 4 beeps
to indicate the preheat cycle is complete. Open the drawer to
place food inside the oven.
5 Enter desired cook time in HOURS and MINUTES by using
number pads.
6 Touch START/+30 SEC pad
WITHOUT PREHEAT
1 Touch desired function (BAKE or ROAST) pad once.
2 Touch 2 pad to select no preheat.
3 Select desired temperature by using the number pads (2-0 for
Bake, 7-0 for ROAST).
4 Enter desired cook time in HOURS and MINUTES by using
number pads.
5 Touch START/+30 SEC pad.
CONVECTION GRILL
WITH PREHEAT
1 Touch GRILL pad once.
2 Touch 1 pad to preheat.
3 Touch START/+30 SEC pad to begin preheating the oven.
After the preheat cycle ends, an audible signal will sound 4 beeps
to indicate the preheat cycle is complete. Open the drawer to
place food inside the oven.
4 Enter desired cook time in MINUTES by using number pads.
5 Touch START/+30 SEC pad.
WITHOUT PREHEAT
1 Touch GRILL pad once.
2 Touch 2 pad to select no preheat.
3 Enter desired cook time in MINUTES by using number pads.
4 Touch START/+30 SEC pad.
For more complete information and safety precautions, refer to your Operation Manual.
CONVECTION COOKING
BAKE PROOF BREADS
1 Touch and hold BAKE/WARM pad for 3 seconds.
2 Touch 1 pad to proof at 90°F.
3 Enter desired cook time in HOURS and MINUTES by using
number pads.
4 Touch START/+30 SEC pad.
CONVECTION WARM
1 Touch and hold the BAKE/WARM pad for 3 seconds.
2 Select desired temperature by using number pads 1-3.
3 Enter desired cook time in HOURS and MINUTES by using
number pads.
4 Touch START/+30 SEC pad.
CONVECTION TOAST
Touch & hold GRILL/TOAST pad for 3 seconds. Toast 1-4
pieces. Select from menu below:
1 Light
2 Medium light
3 Medium
4 Medium dark
5 Dark
CONVECTION AIR FRY
1 Touch AIR FRY pad once.
2 Select desired preset food item by using number pads 1-4.
3 Touch START/+30 SEC pad.
SPEED COOK
WITH PREHEAT
1 Touch SPEED COOK pad once.
2 Select modes by using number pads 1-3: Bake, Roast or Grill.
3 Touch 1 pad to select preheat.
4 Touch START/+30 SEC pad to begin preheating the oven.
An audible signal will sound 4 beeps to indicate that the preheat
cycle is complete. Carefully open the drawer and set food inside
of the oven.
5 Enter desired time in HOURS and MINUTES by using
number pads.
6 Touch START/+30 SEC pad.
WITHOUT PREHEAT
1 Touch SPEED COOK pad once.
2 Select modes by using number pads 1-3: Bake, Roast or Grill.
3 Touch 2 pad to select no preheat.
4 Enter desired time in HOURS and MINUTES by using
number pads.
5 Touch START/+30 SEC pad
38E
E
E
E
E
AUTO-TOUCH GUIDE
For more complete information and safety precautions, refer to your Operation Manual.
MICROWAVE COOKING OTHER FEATURES
TO SET THE CLOCK
1 Touch TIMER/SETTINGS pad once.
2 Touch number pads for correct time of day, touch START/
+30 SEC.
If the electrical power supply to your Convection Microwave
Drawer should be interrupted, the display will intermittently
show ENJOY YOUR OVEN TOUCH CLEAR after the power
is reinstated.
+30 SEC
Touch START/+30 SEC for 30 seconds at 100% microwave
power or to add 30 seconds during manual cooking. Continue
to touch for additional 30 seconds.
TIMER/SETTINGS
Touch TIMER/SETTINGS pad.
1 time for Clock.
2 times for Timer.
3 times for Remote Start.
4 times for Pairing.
5 times for Wi-Fi Information.
6 times for Wi-Fi Firmware Update.
7 times for Wi-Fi Reset.
8 times for Sound On/Off.
9 times for End of Cooking Reminder On/Off.
10 times for Auto Start.
11 times for Demo Mode On/Off.
CONTROL LOCK
The Control Lock prevents unwanted drawer operation such as
by small children. The Convection Microwave Drawer can be set
so that the control panel and the automatic drawer mechanism
are deactivated or locked.
TO LOCK
Touch STOP/CLEAR pad and hold for 3 seconds. The display
shows LOCK ON.
TO UNLOCK
Touch STOP/CLEAR pad and hold for 3 seconds. The display
shows LOCK OFF.
STANDBY MODE
This Convection Microwave Drawer will go into standby mode
after a period of inactivity. The backlight of the display will
automatically dim after 3 minutes if the unit has not been in
operation. If the display is in standby mode, simply touch the
control panel or open/close the door to return the backlight to
maximum brightness.
TIME COOKING
HIGH POWER COOKING
1 Enter cooking time by touching number pads.
2 Touch START/+30 SEC pad.
VARIABLE POWER COOKING
1 Enter cooking time by touching number pads.
2 Touch POWER LEVEL pad until desired power level is in
the display.
3 Touch START/+30 SEC pad.
SENSOR (POPCORN, REHEAT, COOK)
Sensor automatically computes the correct time and power level
to cook foods on the Menu Label perfectly.
1 Touch Cook pad once.
2 See Menu Label. Select desired food by touching number pad.
Ex: Touch 1 for baked potatoes.
3 Touch START/+30 SEC pad.
DEFROST
Use this feature to defrost the foods shown on the Menu Label.
1 Touch DEFROST pad.
2 See Menu Label. Select desired food by touching the number
pad. Ex: Touch 2 for steaks/chops.
3 Enter weight by touching number pads.
4 Touch START/+30 SEC pad.
5 After the rst stage, open the Convection Microwave Drawer
to turn steak over. Close the Convection Microwave Drawer.
Touch START/+30 SEC pad.
6 After each audible signal, turn food over and select
START/+30 SEC again.
MORE MENUS (MELT / SOFT / WARM)
Use these features to melt, soften or warm the foods shown on
the Menu Label.
1 Touch MORE MENUS pad once.
2 See Menu Label. Select desired food by touching number pad.
Ex: Touch 2 for chocolate.
3 Repeat touching same number pad to select quantity.
Ex: Touch 2 two more times for 1 square.
4 Touch START/+30 SEC pad.
BEVERAGE REHEAT / HOT WATER / HOT CEREAL
Use this feature for coffee, tea or hot cereal to reheat.
1 Touch MORE MENUS pad once.
2 See Menu Label. Make selection by touching number pad.
Ex: Touch 8 to make coffee.
3 Repeating touching same number pad to select quantity.
Ex: Touch 8 two more times for 2 cups of coffee.
4 Touch START/+30 SEC pad.


TINSEB579MRR4 MAR 4, 2026
SHARP ELECTRONICS CORPORATION • 100 Paragon Drive • Montvale, New Jersey 07645 • USA100 Paragon Drive • Montvale, New Jersey 07645 • USA