
2

3
CONTENTS
SAFETY INSTRUCTIONS
4
PRODUCT OVERVIEW
7
PART LIST
7
INSTALLATION
8
OPERATION
11
REMOTE CONTROL
12
CLEANING AND MAINTENANCE
14
EMPTYING THE INTERNAL WATER TANK
14
TECHNICAL SPECIFICATION
15
PRODUCT FICHE
16
ERROR CODES
16
TROUBLESHOOTING
17
SUPPORT
18
4
SAFETY INSTRUCTIONS
Important!
• Carefully read the instrucons before operang the unit.
• This appliance is for indoor use only.
• Rang: This unit must only be connected to a 220-240 V / 50 Hz
earthed outlet. The fuse rang can be found on the plug itself.
• Installaon must be in accordance with the applicable regulaons of the country where the
unit is used.
• If you have any doubt about the suitability of your electrical supply, have it checked and, if
necessary, modied by a qualied electrician.
• This appliance is not intended for use by persons (including children) with reduced physical,
sensory or mental capabilies. It is also not intended for use by those with a lack of
experience and knowledge unless they have been given supervision or instrucon concerning
the use of the appliance by a person responsible for their safety.
• Children should be supervised to ensure that they do not play with the appliance.
• You must follow the installaon instrucons; Incorrect operaon can result in damage to the
unit, which is not covered under your warranty.
• This air condioner has been tested and is safe to use. However, as with any electrical
appliance, use it with care.
• This appliance is designed for personal comfort and as such should not be le operang
unaended for prolonged periods.
• Do not obstruct any of the venlaon openings.
• The airow should never be restricted, for example, by venng the unit into a condenser box,
reducing the hose diameter, or extending the length of the hose as this can damage the unit.
• Disconnect the power from the appliance before dismantling, assembling or cleaning.
• An authorised service representave should perform any service other than regular cleaning
or lter replacement. Failure to comply could result in a voided warranty.
• Avoid touching any moving parts of the appliance.
• Never insert ngers, pencils or any other objects through the guard.
• WARNING: Do not pierce or burn any part of the unit.
• Do not clean the unit by spraying it or immersing it in water.
• Never connect the unit to an electrical outlet using an extension cord. If an outlet is not
available, one should be installed by a qualied electrician.
• Never operate this appliance if the cord or plug is damaged. Ensure the power cord is not
stretched or exposed to sharp objects/edges.
• A damaged supply cord should be replaced by the manufacturer or a qualied electrician to
avoid a hazard.
• CAUTION: In order to avoid a hazard due to inadvertent reseng of the thermal cut-out, this
appliance must not be supplied through an external switching device, such as a mer, or
connected to a circuit that is regularly switched on and o by the ulity.
• Do not use the appliance for any purpose other than its intended use.

5
• The air condioner unit must always be stored and transported upright; otherwise,
irreparable damage may be caused to the compressor. If there is doubt, we suggest waing
at least 24 hours before starng the unit.
• Avoid restarng the air condioning unit unless 3 minutes have passed since being turned o.
This prevents damage to the compressor.
• Never use the mains plug as a switch to start and turn o the air condioning unit. Use the
provided POWER buon located on the control panel.
• Always place the unit on a dry, stable, at surface.
• The appliance should not be installed in the laundry or wet rooms.
• The appliance must be placed in a room without sources of ignion (for example, open
ames, an operang gas appliance or an operang electric heater).
• R290 refrigerant gas complies with European environmental direcves.
• R290 has a low GWP (Global Warming Potenal) of 3.
• The SF8000E contains about 120g of R290 refrigerant gas, and the SF10000E contains about
170g of R290 refrigerant gas.
• Do not use or store in unvenlated spaces with an area smaller than 5.74 m2 per unit for
SF8000E and 8.13 m2 per unit for SF10000E. Smaller room sizes may be suitable if other
safety measures are implemented and a risk assessment conducted. The room must be
designed to prevent the stagnaon of possible refrigerant leaks, as there could be a re or
explosion hazard if the refrigerant comes into contact with electric heaters, stoves, or other
sources of ignion.
• WARNING: The appliance must be stored in a room without connuously operang ignion
sources, for example, open ames, an operang gas appliance or electric heaters.
• The room must be such as to prevent stagnaon of possible leaks of refrigerant gas, as there
could be a danger of re or explosion should the refrigerant come into contact with electric
heaters, stoves or other ignion sources.
• Only store and use the unit whilst upright; do not lay it down or p it.
• Do not place the unit near any ovens or other heat sources. This may be dangerous and will
make the unit work harder and use more energy.
• Do not place the unit in direct sunlight; this can aect its appearance and cause it to work
harder and be less energy ecient.
• Refrigerant gas may be odourless.
• Do not use the product and contact the retailer for advice if damage has occurred to the unit,
which may have compromised the refrigerant system.
• Any repairs or maintenance must only be conducted by a suitably qualied engineer. Before
opening and servicing the unit, the authorised engineer must possess a copy of the
manufacturer’s service manual and follow the safety informaon contained within it to
ensure all hazards are minimised.
• The refrigerant system should not be perforated or punctured.
• At the end of the unit’s lifeme, always dispose in line with local regulaons.
• Ensure all storage condions in the manual are followed.
• WARNING: Do not use means to accelerate the defrosng process or to clean the unit.
6
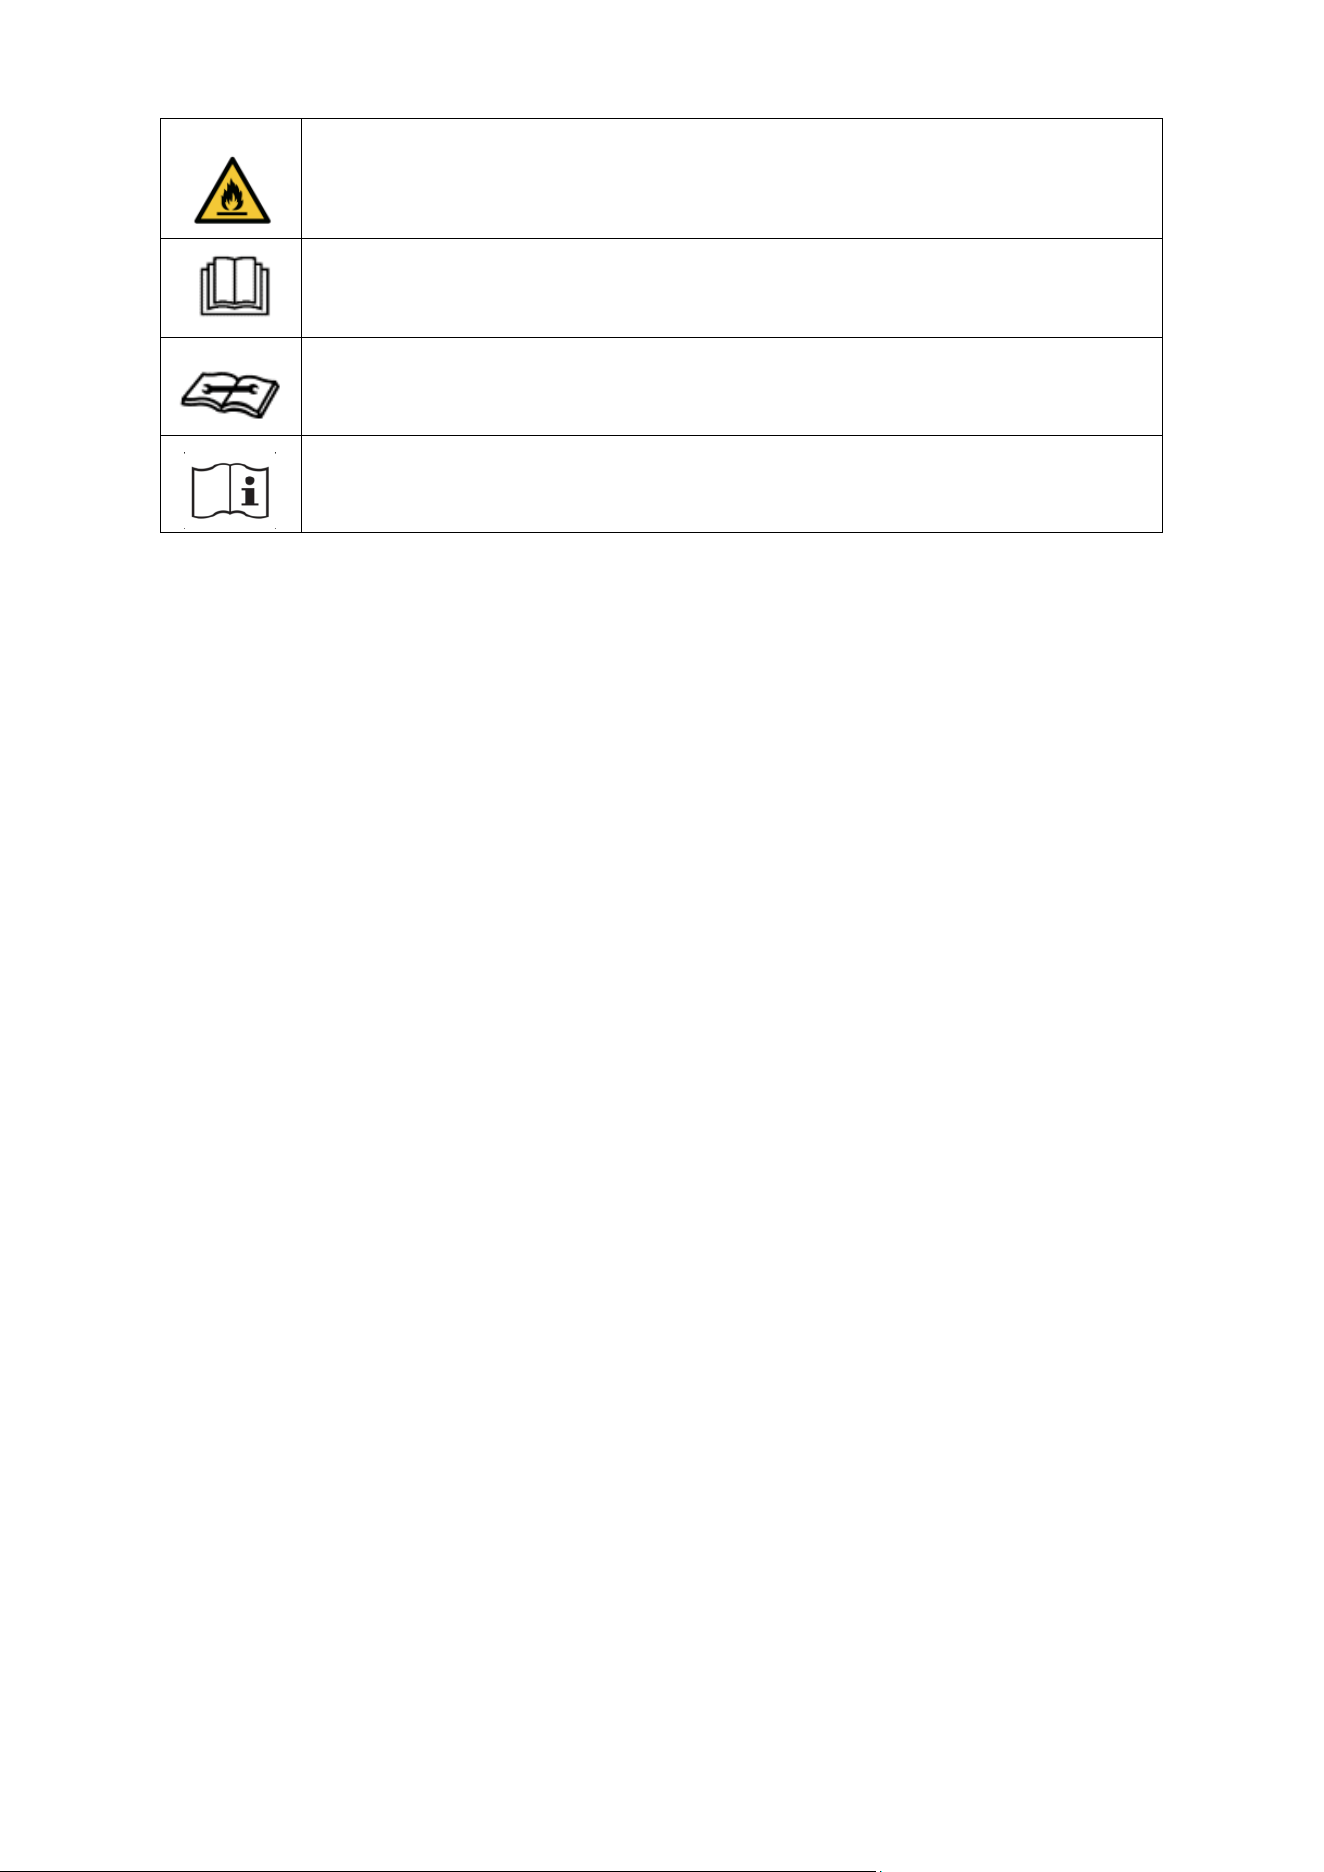
WARNING: This appliance contains ammable refrigerant. If this leaks
and comes into contact with an external ignion source, there is a re
risk.
CAUTION: The operaon manual should be read thoroughly.
CAUTION: Any service personnel working on the unit should read the
service manual prior.
CAUTION: Informaon on operaon and servicing is in the manual.
ENERGY SAVING AND UNIT SAFETY PROTECTION TIPS
• Do not cover or restrict the airow from the outlet or inlet grilles.
• For maximum performance, the minimum distance from a wall or object should be 50cm.
• Keep the lters clean. Under normal condions, lters should only need cleaning once every
three weeks (approximately). Since the lters remove airborne parcles, more frequent
cleaning may be necessary, depending on the air quality.
• For the inial start-up, set the fan speed to maximum and the thermostat to 5 degrees lower
than the current temperature. Aerwards, set the fan switch to low and set the thermostat to
your desired seng.
• To protect the unit, we recommend not using the cooling funcon when the ambient
temperature exceeds 35 °C. The unit's performance may be aected at lower temperatures
than this. If a scorching day is predicted, running the unit overnight in the desired room is
recommended.
FEATURES
• Self-evaporave system – You will not need an external water tank.
• Modern design and simple operaon
• Bright LED screen - Indicates temperature and current mode.
• On/O mer funcon - Allows you to choose when the unit operates.
• Castors and handle for portability.
• Compressor protecon technology for extended life span.
7
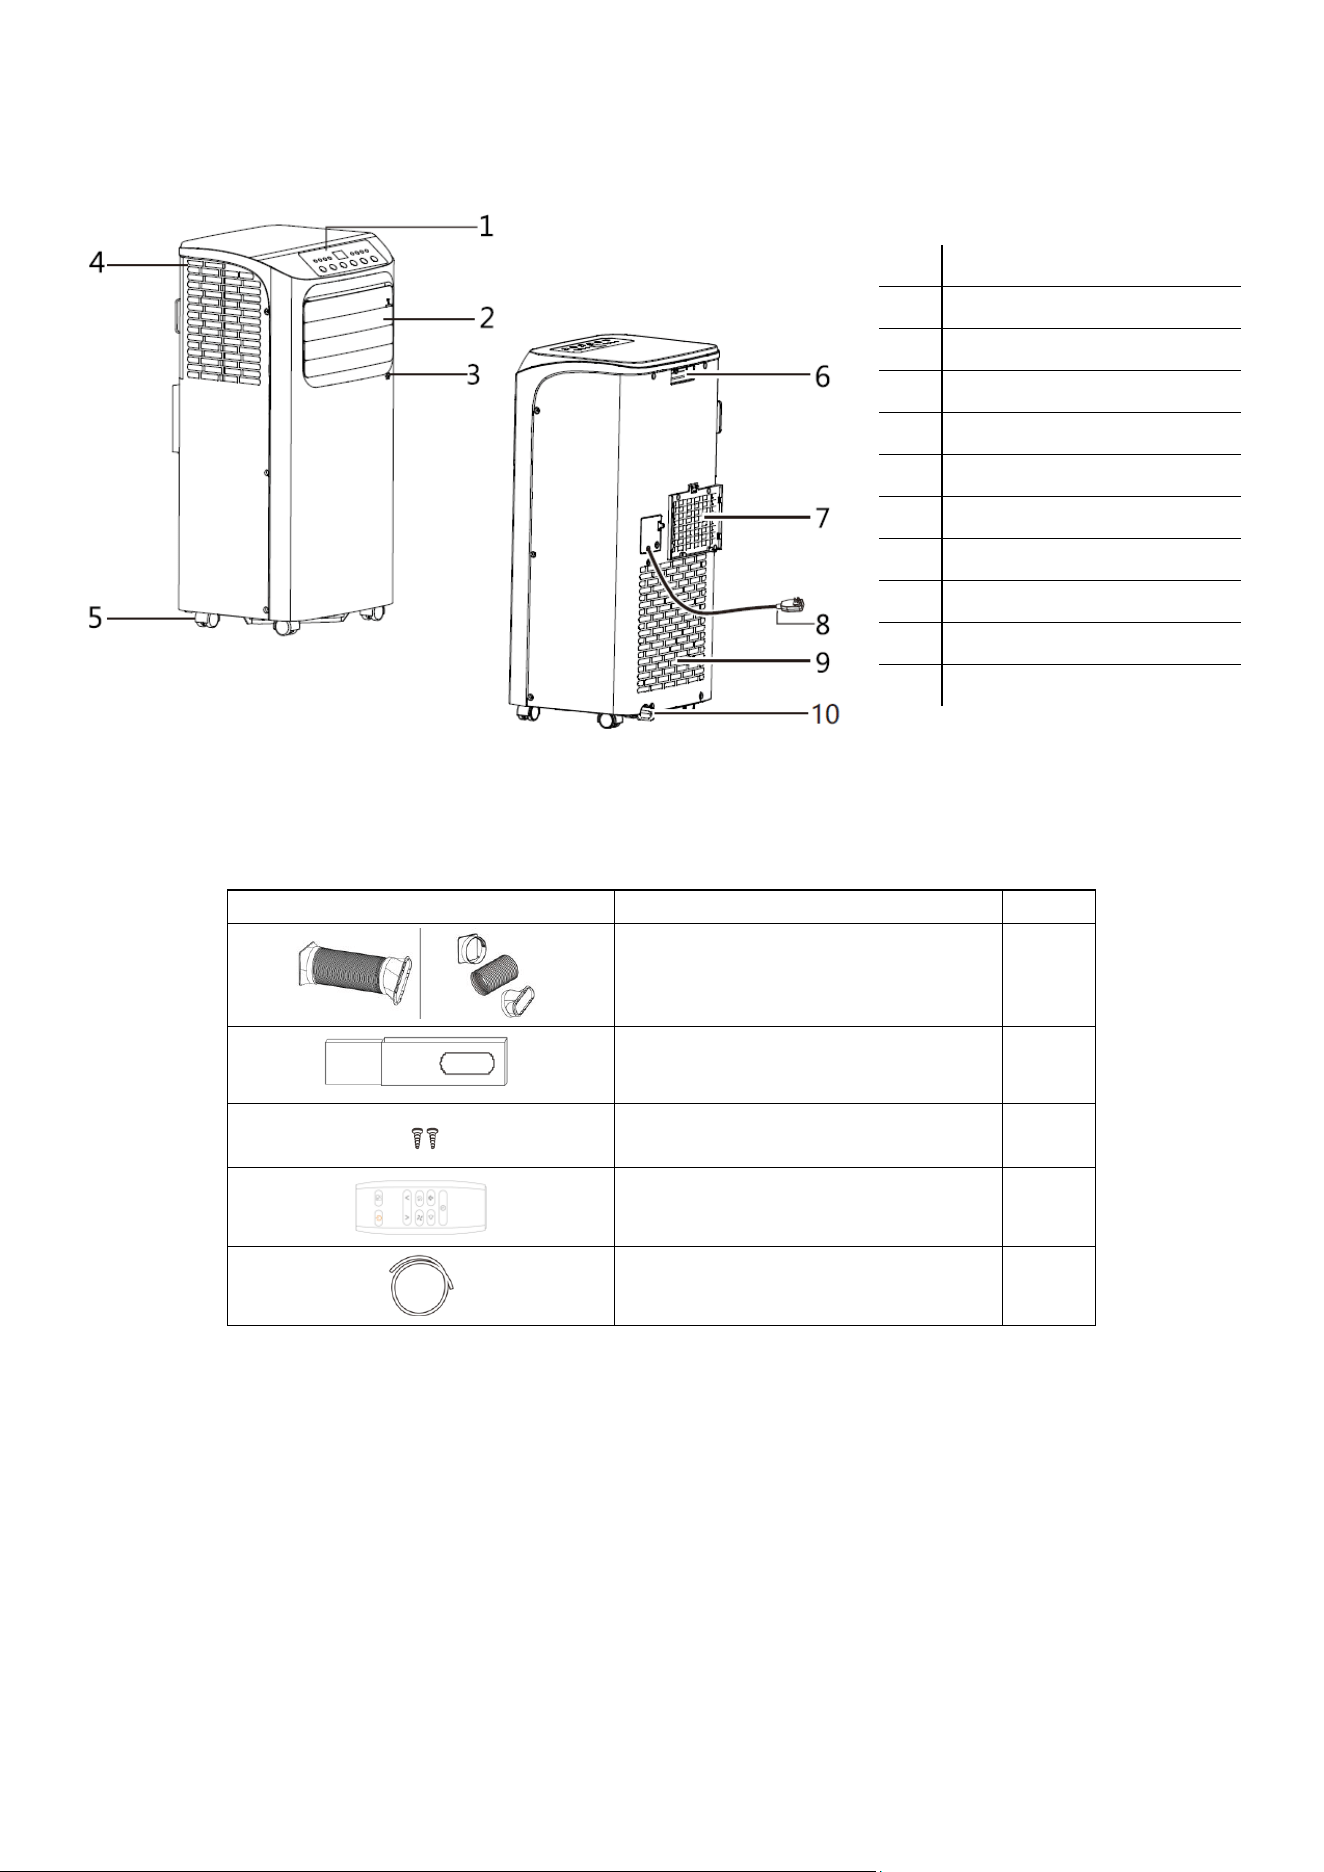
PRODUCT OVERVIEW
PART LIST
IMAGE
DESCRIPTION
QTY
Exhaust hose, Outlet adaptor and
Fishtail adaptor
1
Window slide bar
1
Locking screw
2
Remote
1
Drainage hose
1
IMPORTANT: All diagrams in the manual are for illustraon purposes only.
No.
DESCRIPTION
1
Control Panel
2
Louvres
3
Remote Control Receiver
4
Intake Grille
5
Castors
6
Handle
7
Air Outlet Grille
8
Power Cable
9
Intake Grille
10
Condensate Drain
8
INSTALLATION
WARNING:
Before using this appliance, keep it upright for at least 3-4 hours to allow the gases within
the refrigerant circuit to settle.
This unit can easily be moved from one room to another. While moving the unit, please keep it
upright and on an even surface.
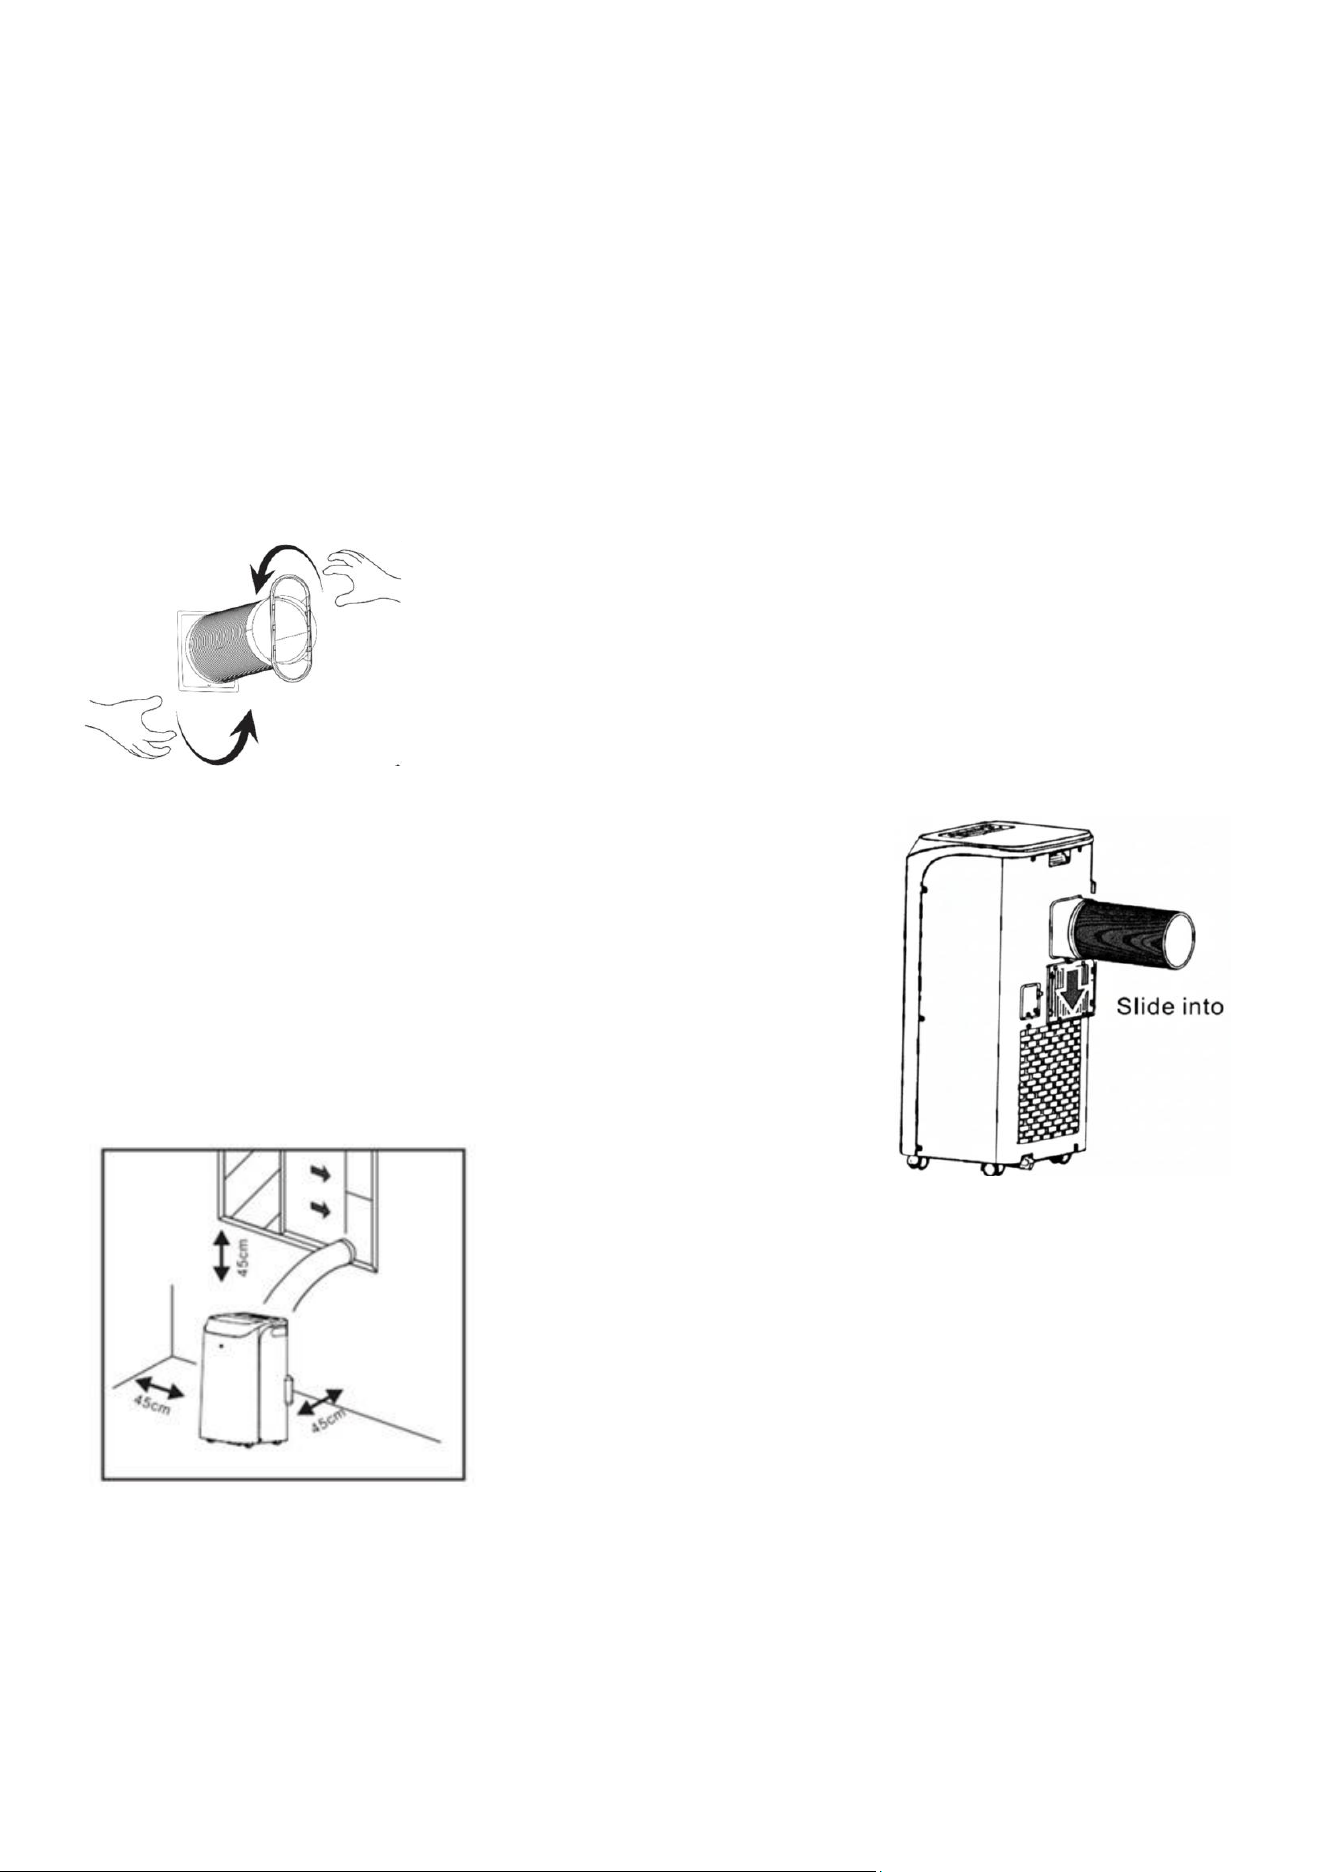
FITTING THE EXHAUST HOSE TO THE UNIT
IMPORTANT:
You only need to attach the exhaust hose when using the unit in cooling mode.
1)
Attach the fishtail connector to the end of the hose by extending the
end and then twisting until firmly attached (At least 3 full rotations).
2)
Attach the Hose to the Outlet adaptor in the same way by extending
the end and then twisting until firmly attached (At least 3 full
rotations).
3)
Slide the Outlet adaptor into position on the rear of the unit.
4)
Make sure the unit is upright, and there are no obstructions
to the air inlets and outlet grilles, with at least 45cm of space
to the sides and rear of the unit. Failure to allow adequate
space for the appliance's air intake can reduce performance
and, in severe cases, cause the unit to freeze.
9
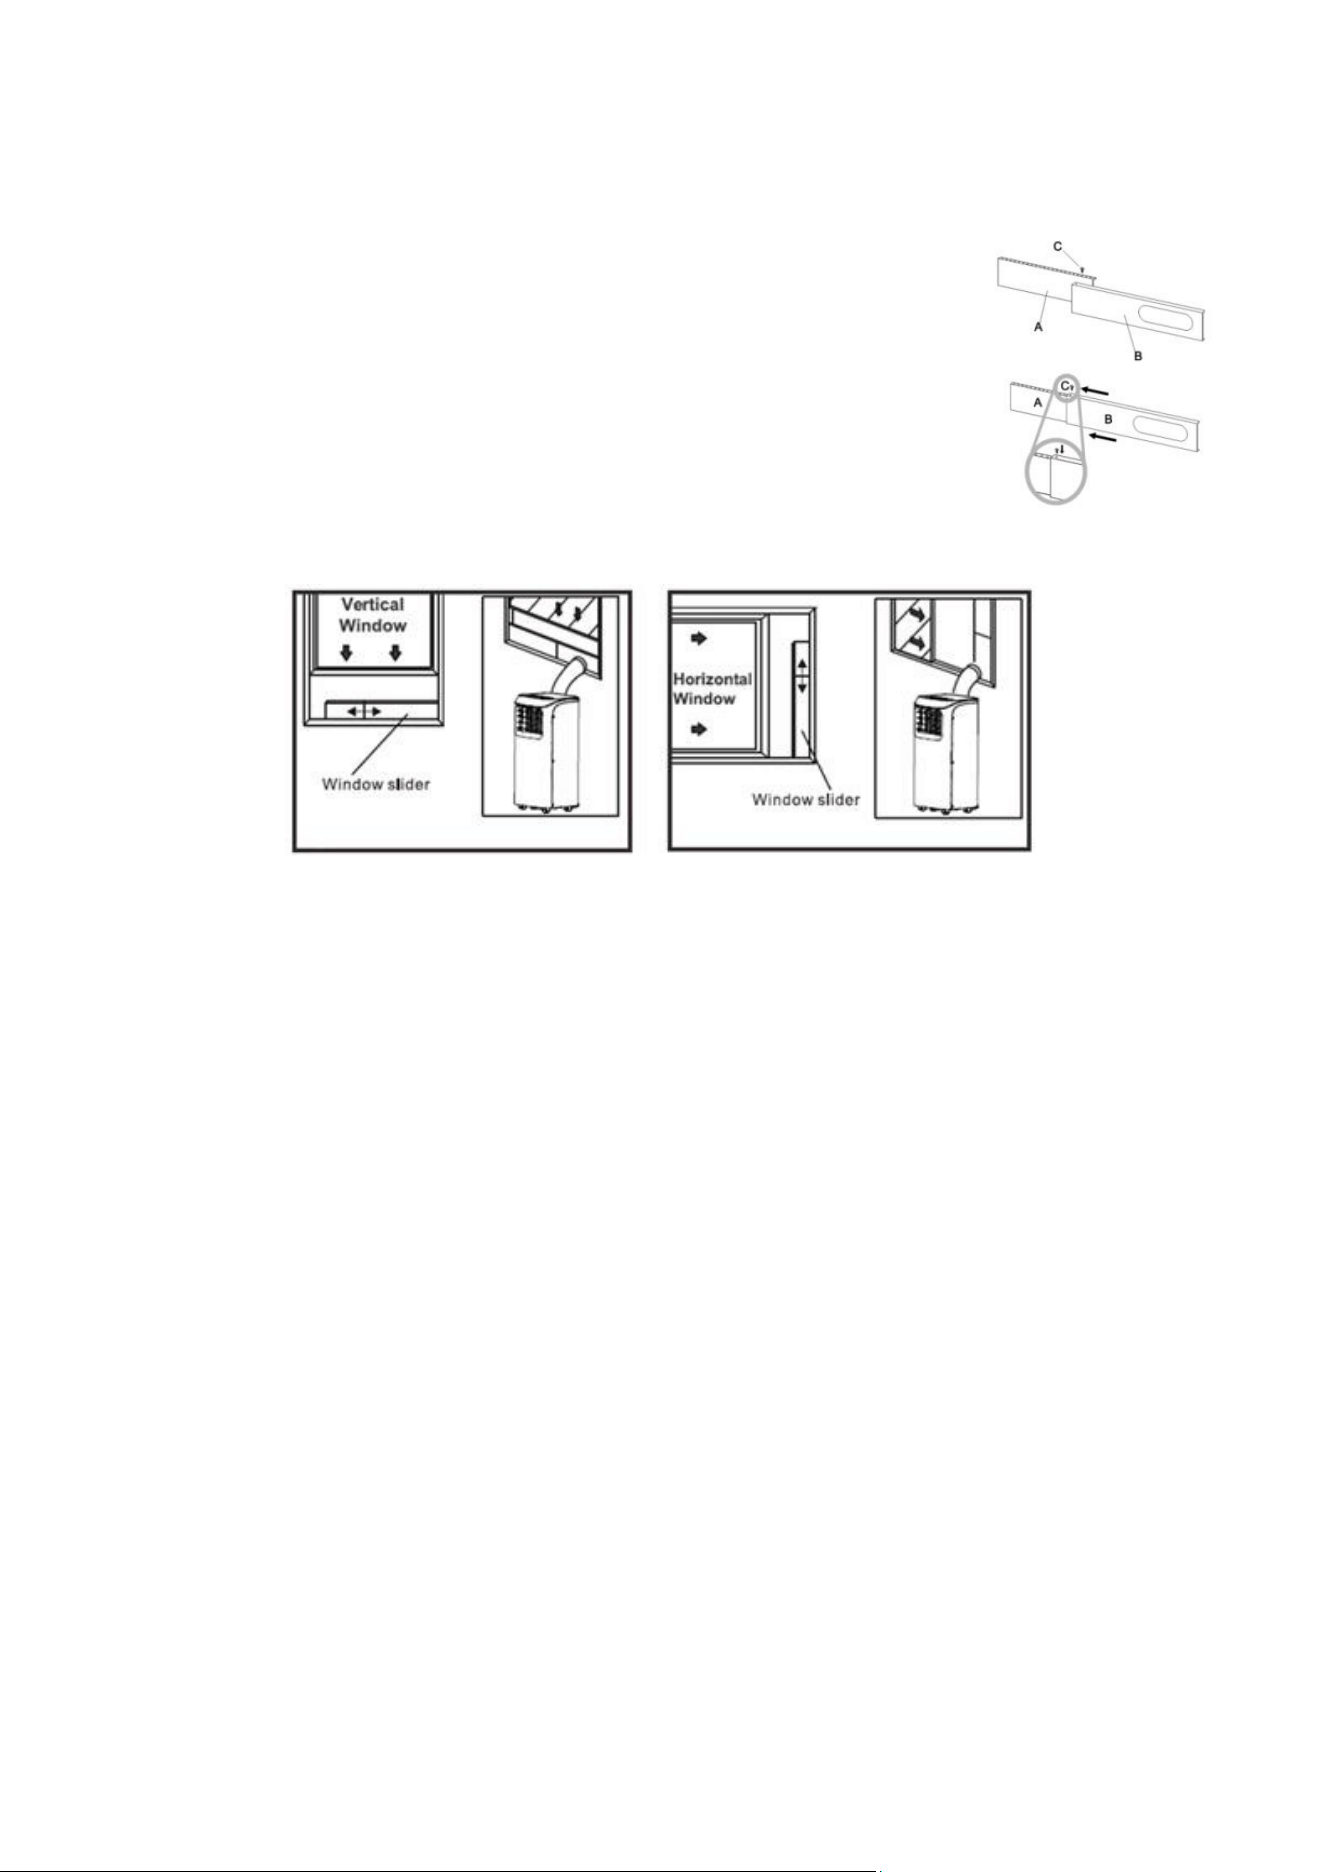
FITTING THE WINDOW KIT
The window slide bar has been designed to t most standard vercal and horizontal window applicaons.
1. Slide panel B into A, and place it in your window.
2. Slide the panels apart unl they are the full width of the window
opening.
3. Use the 2 screws supplied to secure the window slide bar through the
corresponding holes.
4. Clip the Fishtail adaptor into the Slide bar, and close the window onto
the window slide bar to close the window opening (which will prevent
hot air from re-entering the room)
NOTES:
•
The window slide bar is only designed to be installed with sliding or sash windows or
doors. The window kit is not designed to be used with any other window style,
although it may be possible to modify it to work with other windows.
•
The shtail adaptor can be used without the slide bar with most windows/doors.
•
When using the air condioner, ensure that the opening around the shtail adaptor
is as small as possible to ensure the unit's eciency is not reduced.
•
The best form of installaon is through a wall duct. By adequately venng, you expel
hot air from your room while eciently cooling it.
•
Your air condioner should be used without the vent pipe in dry mode. When
using dry mode, ensure an external water tank is used, monitored, and regularly
emptied to prevent overflow.
10
IMPORTANT SAFEGUARDS
•
Please read all safety instructions in this manual.
•
The supplied hose extends from 30 cm to 180 cm.
•
Do not extend the hose, or restrict airflow through it, as this can result in the appliance
overheating, which can result in internal damage to the appliance.
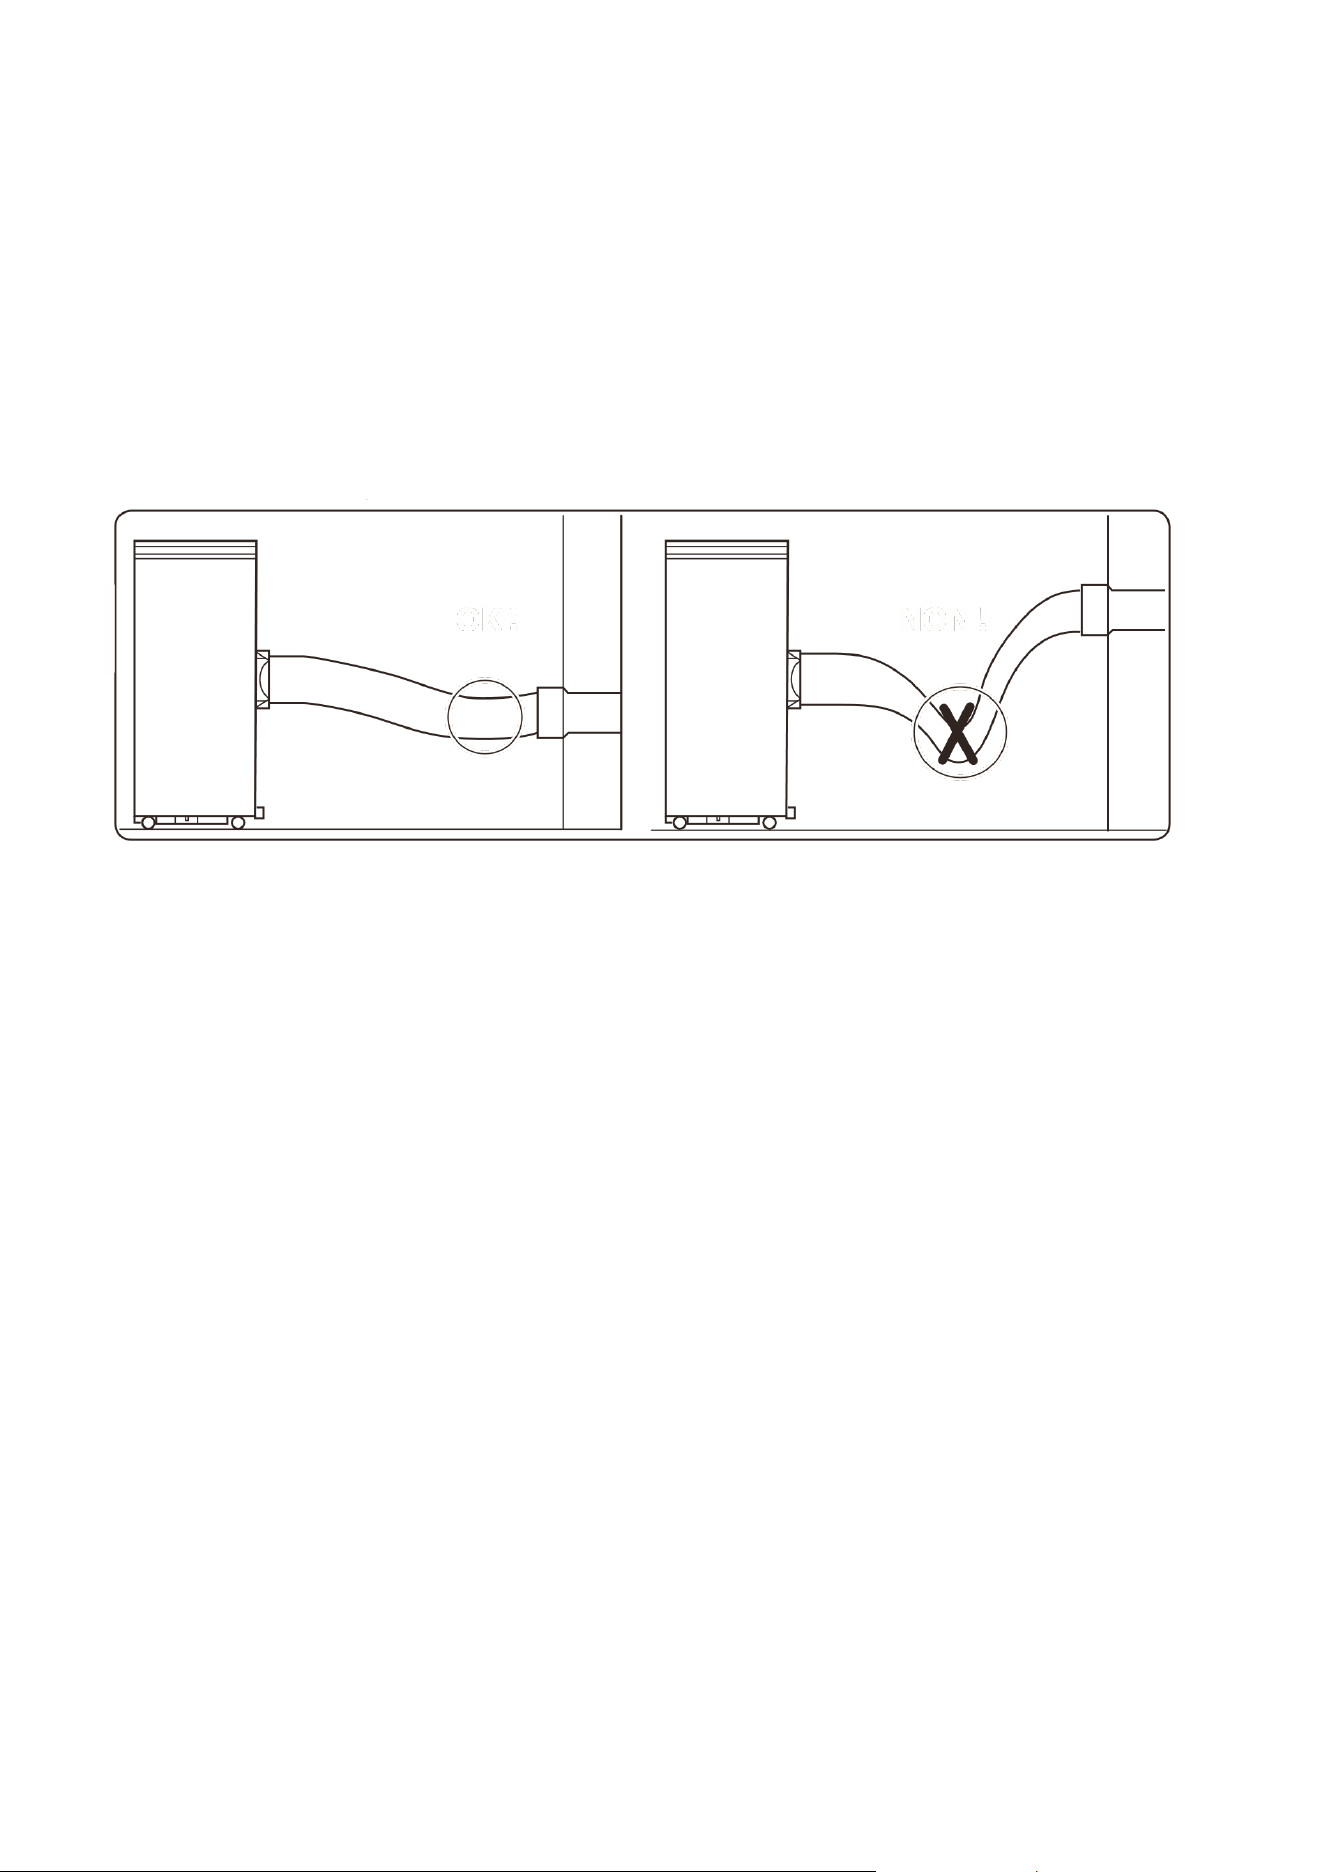
•
Keep the hose as straight and short as possible and avoid bending or angling the air hose
by more than 30 degrees to maintain the unit's performance. Excessive bends in the
hose may prevent the unit from expelling hot air, leading to internal damage.
•
To avoid bending the hose, the unit can be raised using a stable, flat structure.
•
Failure to follow any of the setup and installation instructions will result in an invalidated
warranty.
11
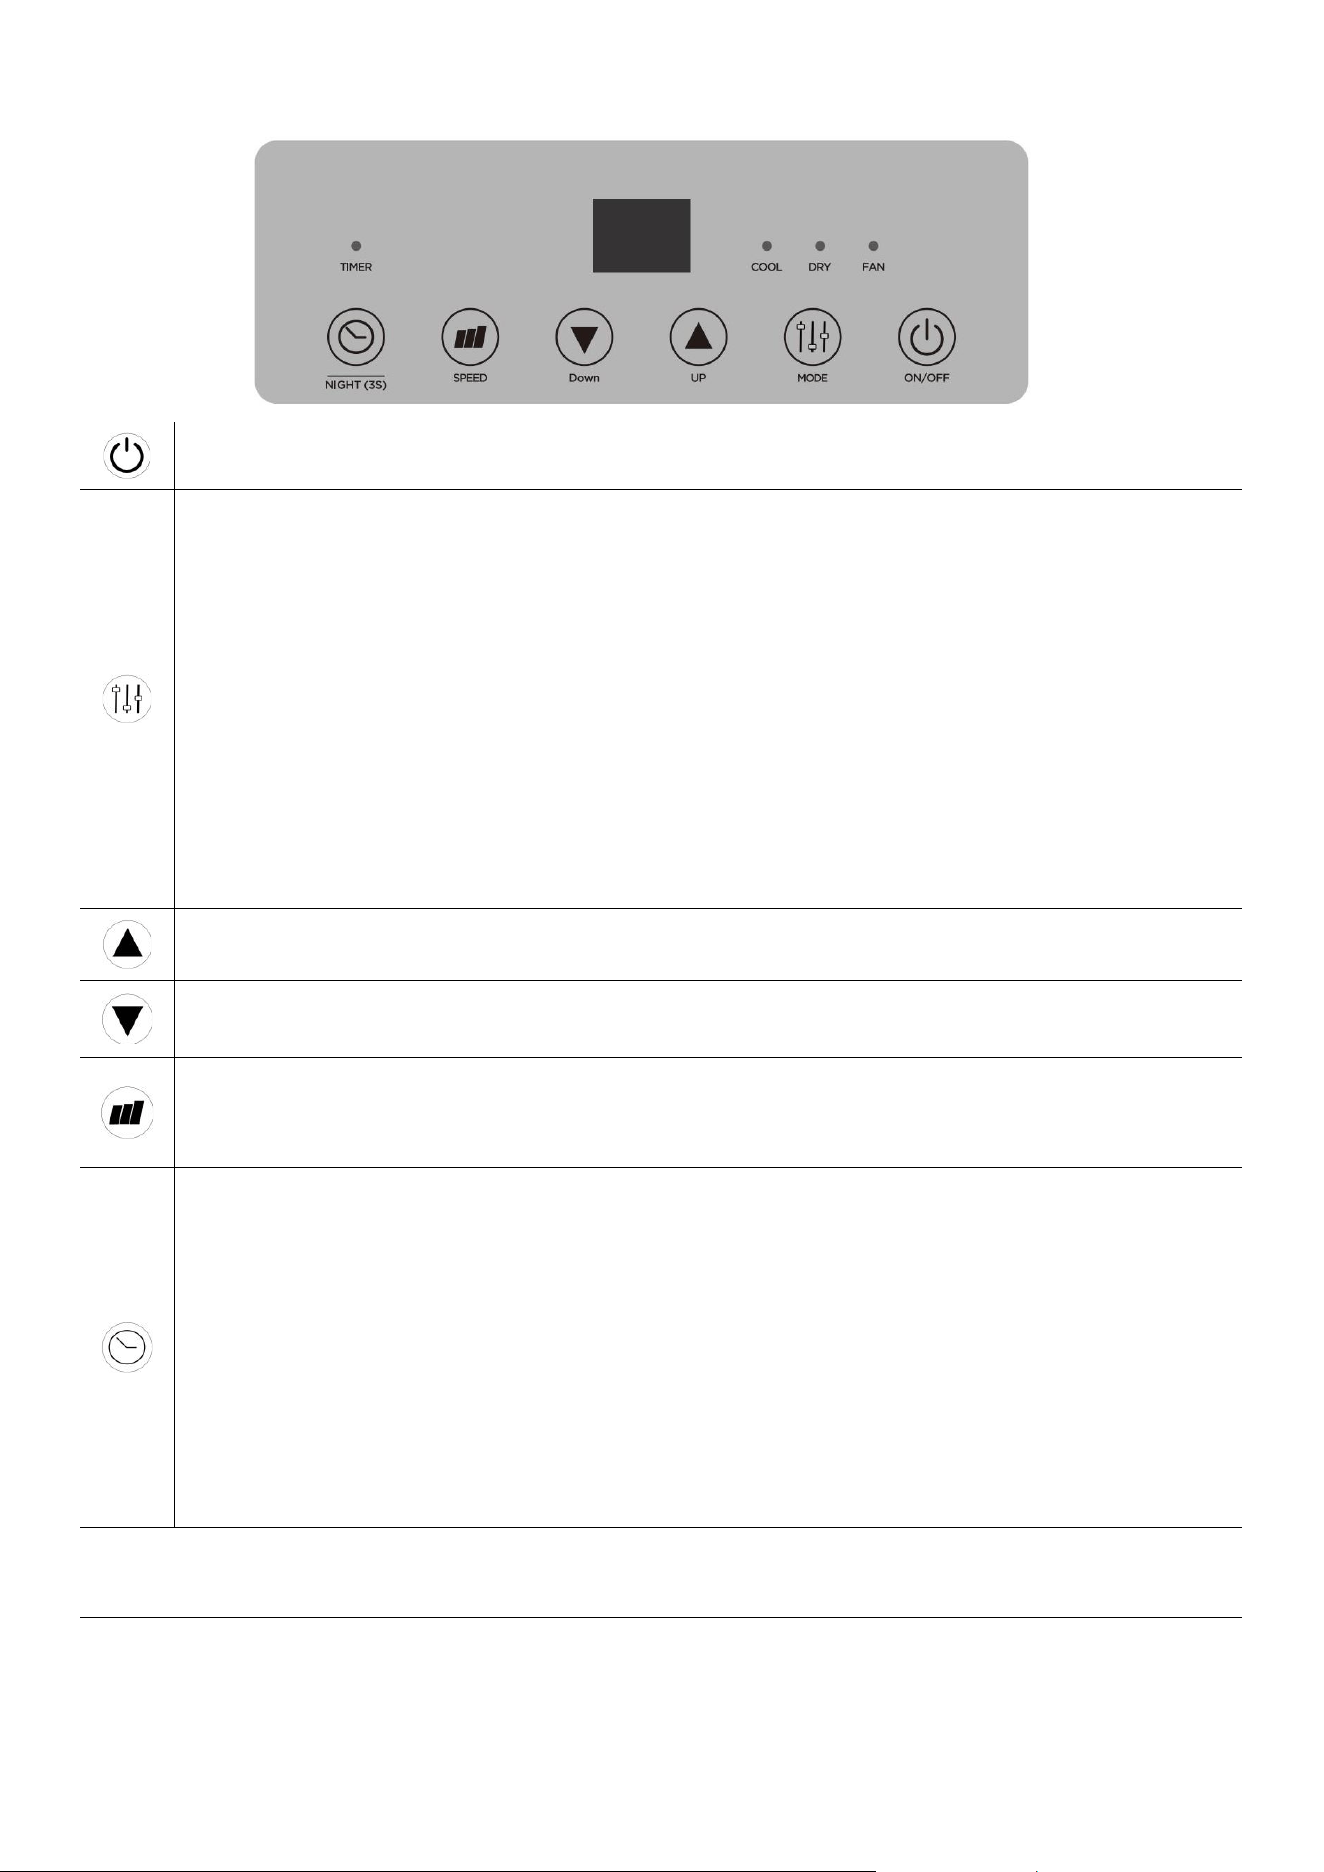
OPERATION
ON/OFF: Press once to turn the unit on and once to turn it o. Aer the rst use, the unit will remember
the last mode used, and that mode will be acve when you turn the unit on again.
MODE: Press repeatedly to cycle through available modes.
COOL: Press the MODE buon unl the cool indicator is illuminated. Then use the UP and DOWN buons
to select your desired room temperature. The temperature can be set between 16°C and 31°C. The fan
speed can be adjusted using the speed buon.
FAN: You do not need the exhaust aached in this mode, but you can keep it aached if you like. Press
the mode buon unl the fan indicator is illuminated. The fan speed can be adjusted using the Speed
buon.
DRY: This mode is ideal for reducing the humidity in your home. To prevent the unit from turning o in
high-humidity environments, it is advisable to set it up for connuous drainage. The temperature can be
set between 16°C and 31°C, and should be set below the current room temperature for the compressor
to work. You do not need the exhaust aached in this mode.
UP: Press to increase the desired room temperature and extend the mer duraon.
DOWN: Press to decrease the desired room temperature and shorten the mer duraon.
SPEED: Press to change the fan speeds. These appliances have 2 speeds: Low (F1 on the display) and High
(F2). Note: The extracon fan supplying the vent hose automacally adjusts its speed based on internal
temperatures.
TIMER: The mer can be used to start or stop the unit.
POWER ON TIMER
Select your desired mode, then turn o the unit using the ON/OFF buon. Press the TIMER buon to set
the power-on mer. Use the UP and DOWN buons to adjust the mer duraon (1 to 24 hours). The
Timer indicator will turn on, and the unit will start aer the selected number of hours.
POWER OFF TIMER
With the appliance running and set to the desired sengs, press the TIMER buon to set the power-o
mer. Use the UP and DOWN buons to adjust the mer duraon (1 to 24 hours). The mer indicator
will illuminate, and the unit will stop aer a selected number of hours.
TURN OFF DISPLAY:
Hold the TIMER buon for 3 seconds to turn o the display. This is ideal for dark bedrooms. Hold the buon again
to turn the display back on.
SWITCH BETWEEN CELSIUS / FAHRENHEIT
Hold down the up and down buons for 3 seconds to switch the appliance between Fahrenheit and Celsius
temperature display.
12
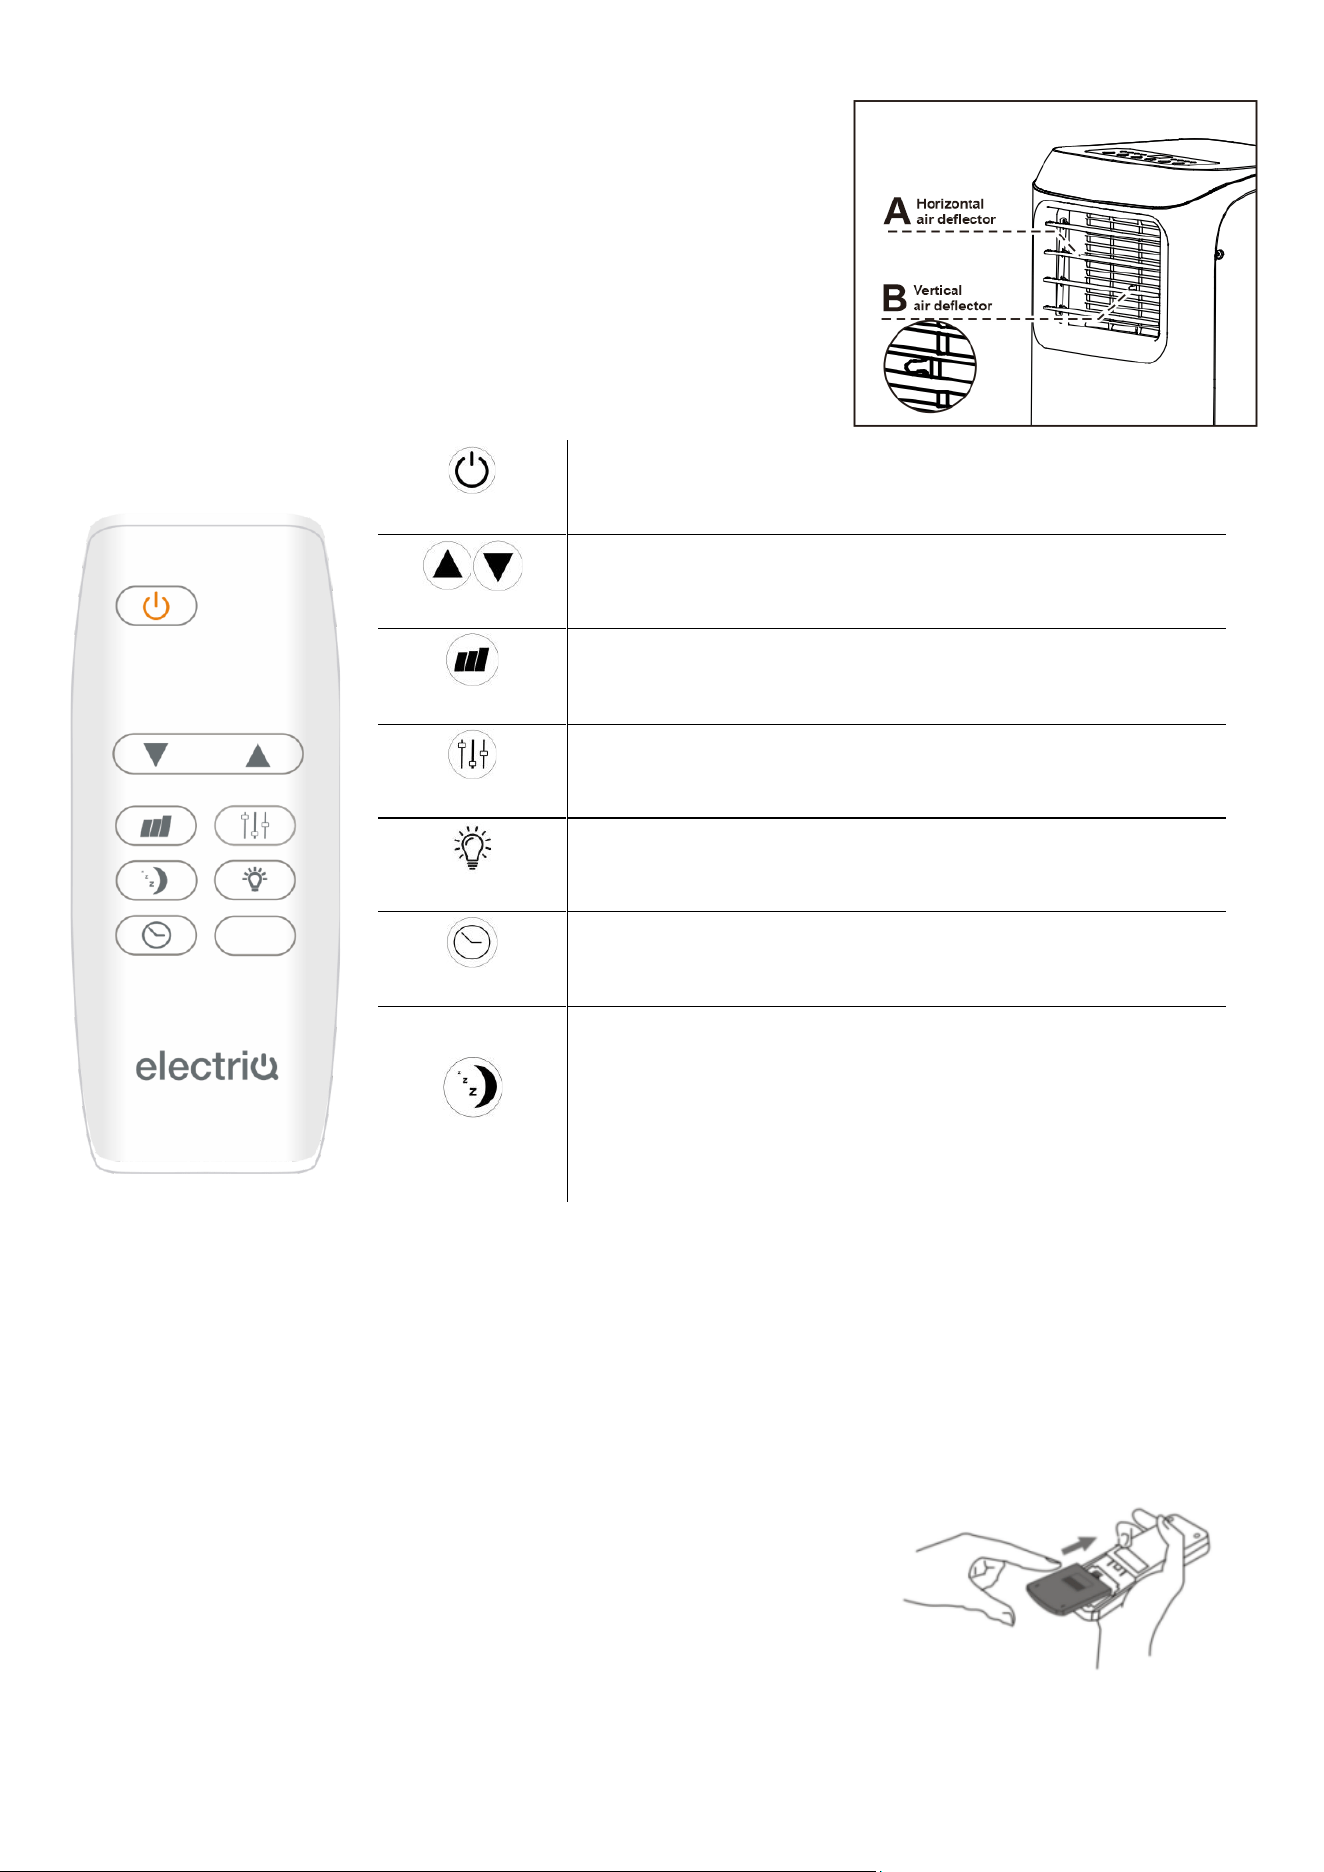
ADJUSTING THE MANUAL LOUVRES
You can manually adjust the louvres to change the airow direcon.
Carefully adjust using your hand to your desired posion.
REMOTE CONTROL
IMPORTANT: The remote will not work if you are further than 7 metres away. Always point the remote at
the unit in use. Ensure the baeries are securely installed in the remote when in use.
REPLACING THE BATTERIES
Remove the baery cover, insert 2 x AAA baeries following the correct
polarity, then reaach the baery cover securely. Do not use the remote
if the baery cover does not securely aach.
ON/OFF
Used to turn the appliance on and o.
UP and DOWN
Used for adjusng the desired room temperature and
mer duraon
SPEED
Used to adjust the fan speed between Low (F1) and High
(F2)
MODE
Used to change between Cooling, Dry and Fan Modes.
LIGHT
This will turn the display on and o.
TIMER
Used to set the Power on or power o mer, adjusng the
duraon with the UP and DOWN buons.
SLEEP
This funcon is only available on the remote when the
unit is in Cool or Dry modes. When acvated, it will reduce
the fan speed and dim the display. The unit will increase
the desired room temperature by 1 degree per hour for 2
hours, then maintain it for 6 hours before turning the
appliance o.

13
MULTI PROTECTIVE FUNCTIONS
FROST PROTECTION
In COOL and DRY modes, if the exhaust temperature is too low, the machine will automatically stop until
the temperature rises.
OVERFLOW PROTECTION
When the water in the internal water tank exceeds the maximum level, the machine will stop operating,
and the LCD will display "HL". To resume operation, empty the internal water tank. After emptying the
water, the machine will automatically return to its original state.
AUTO-DEFROST
The machine has an automatic defrosting function. If the temperature of the internal coils drops too low
during operation, the unit will enter auto defrost.
AUTOMATIC THERMAL PROTECTION
To protect the machine's service life, it features automatic thermal protection. If the unit's temperature is
outside the specified range, the compressor and the lower motor will stop. After the machine's
temperature returns to normal, the appliance will automatically resume regular operation.
COMPRESSOR PROTECTION
There is a 3-minute delay before starting the compressor after it has stopped running to prevent damage.
POWER DOWN MEMORY
If power is cut to the unit, upon restoration, the air conditioner will resume operation with the same
settings as before the power interruption (after the compressor protection period).
NOTE: Any timer set before the power interruption will not be saved.
14
CLEANING AND MAINTENANCE
PLEASE SHUT OFF THE UNIT AND UNPLUG FROM THE MAINS BEFORE CLEANING OR PERFORMING
ANY MAINTENANCE
CLEAN THE SURFACE
Clean the machine's surface with a wet, soft cloth. Do not use chemicals such as benzene, alcohol, or
gasoline, as acidic, corrosive, or alkaline substances may cause damage to the surface and/or the
internal workings of the machine.
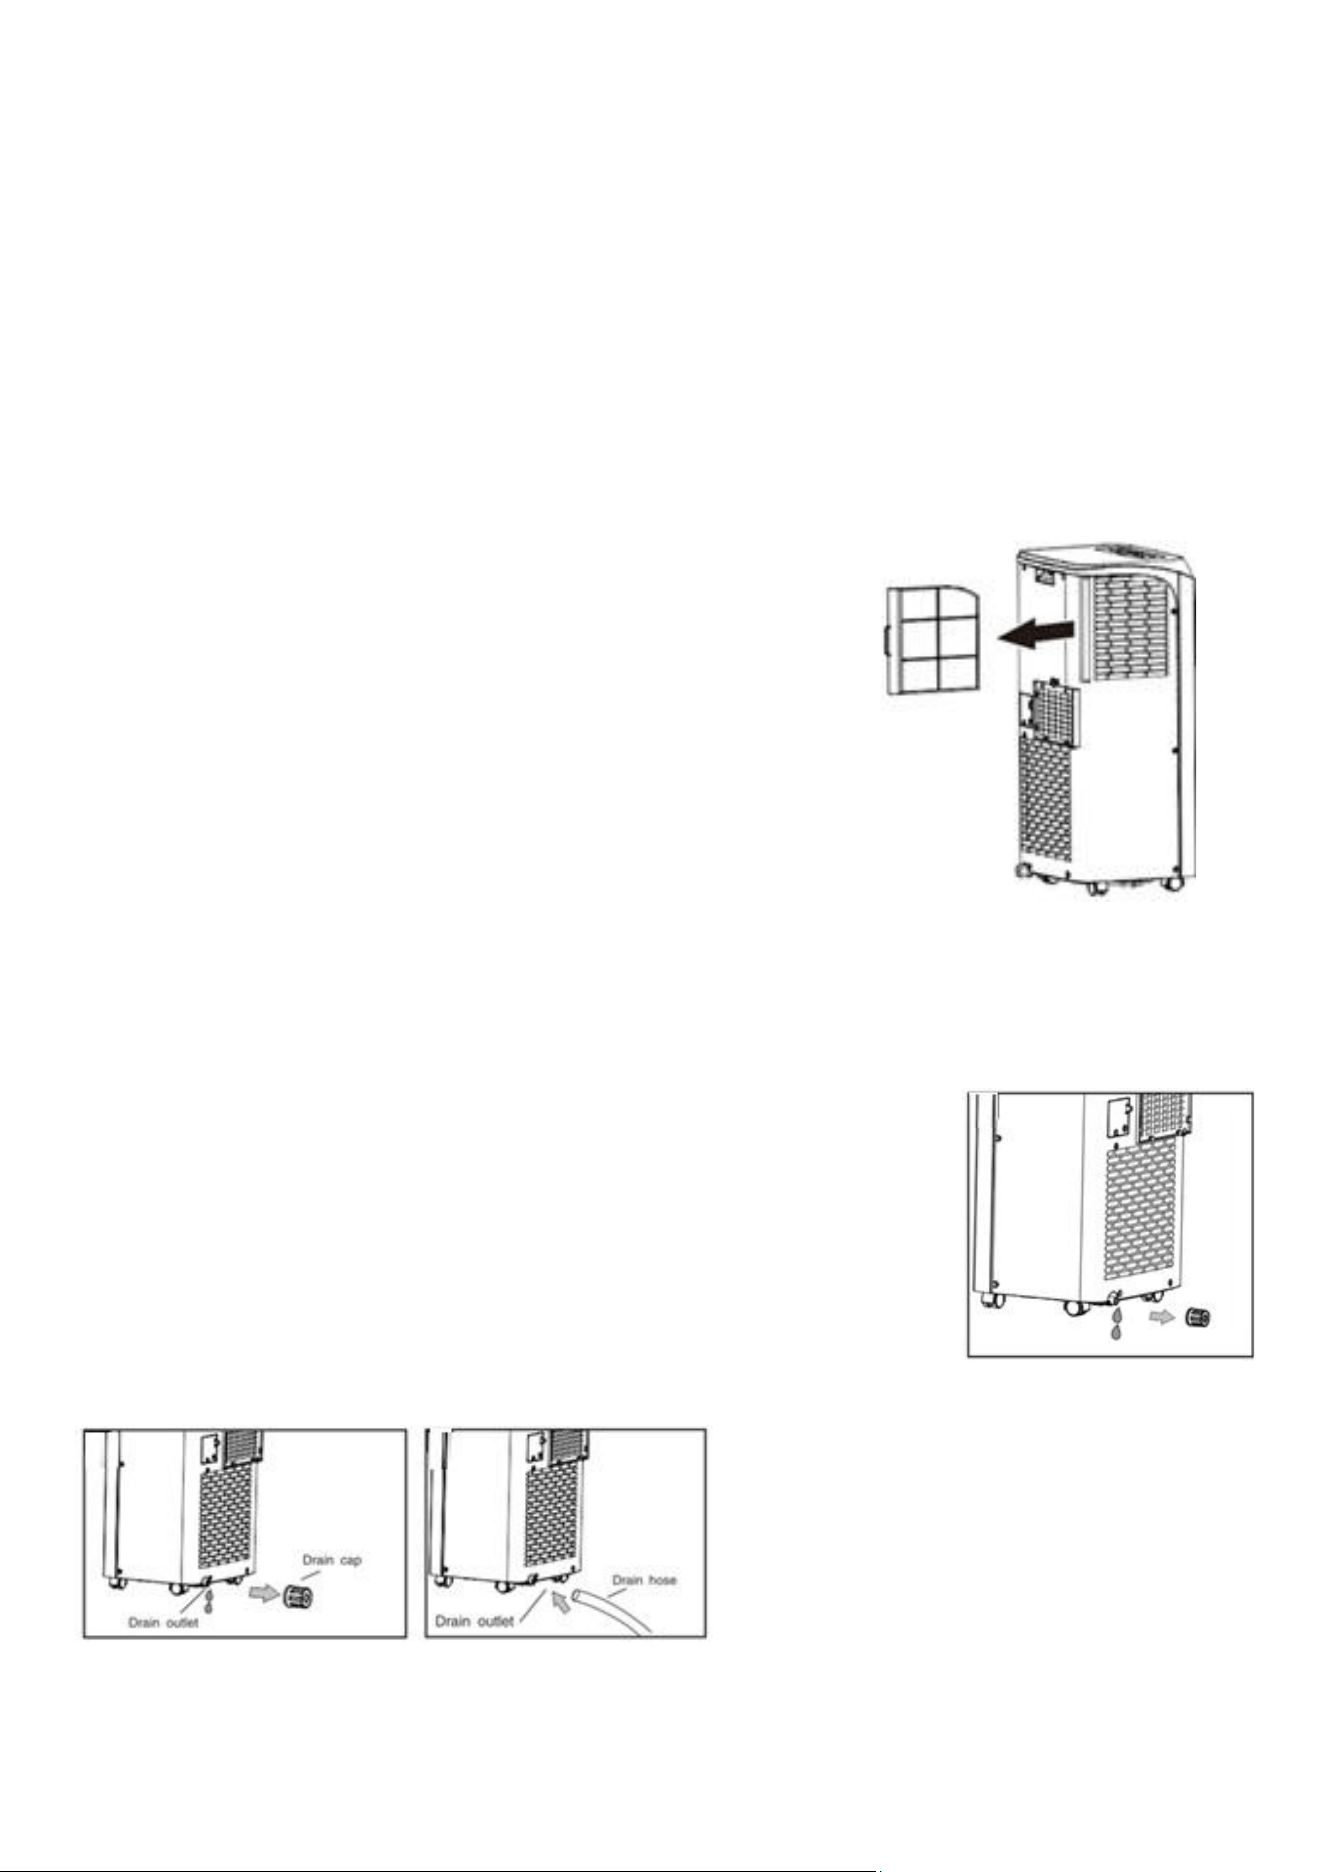
AIR FILTER CLEANING
If the filter screen is clogged with dust, the air conditioner's
effectiveness is reduced. The filter screen should be cleaned every 2
weeks or as often as needed in your environment.
CLEAN THE TWO FILTER SCREEN FRAMES
Remove the filter screens by gently pulling the base outwards to unclip
them from the appliance. Once removed, put the evaporator filter
screen into warm water with neutral detergent (about 40 °C /104°F)
and dry it in the shade after rinsing it clean.
EMPTYING THE INTERNAL WATER TANK
When the internal water tank is full, the unit will stop working and display the HL error. There are 2 options
for draining the internal water tank:
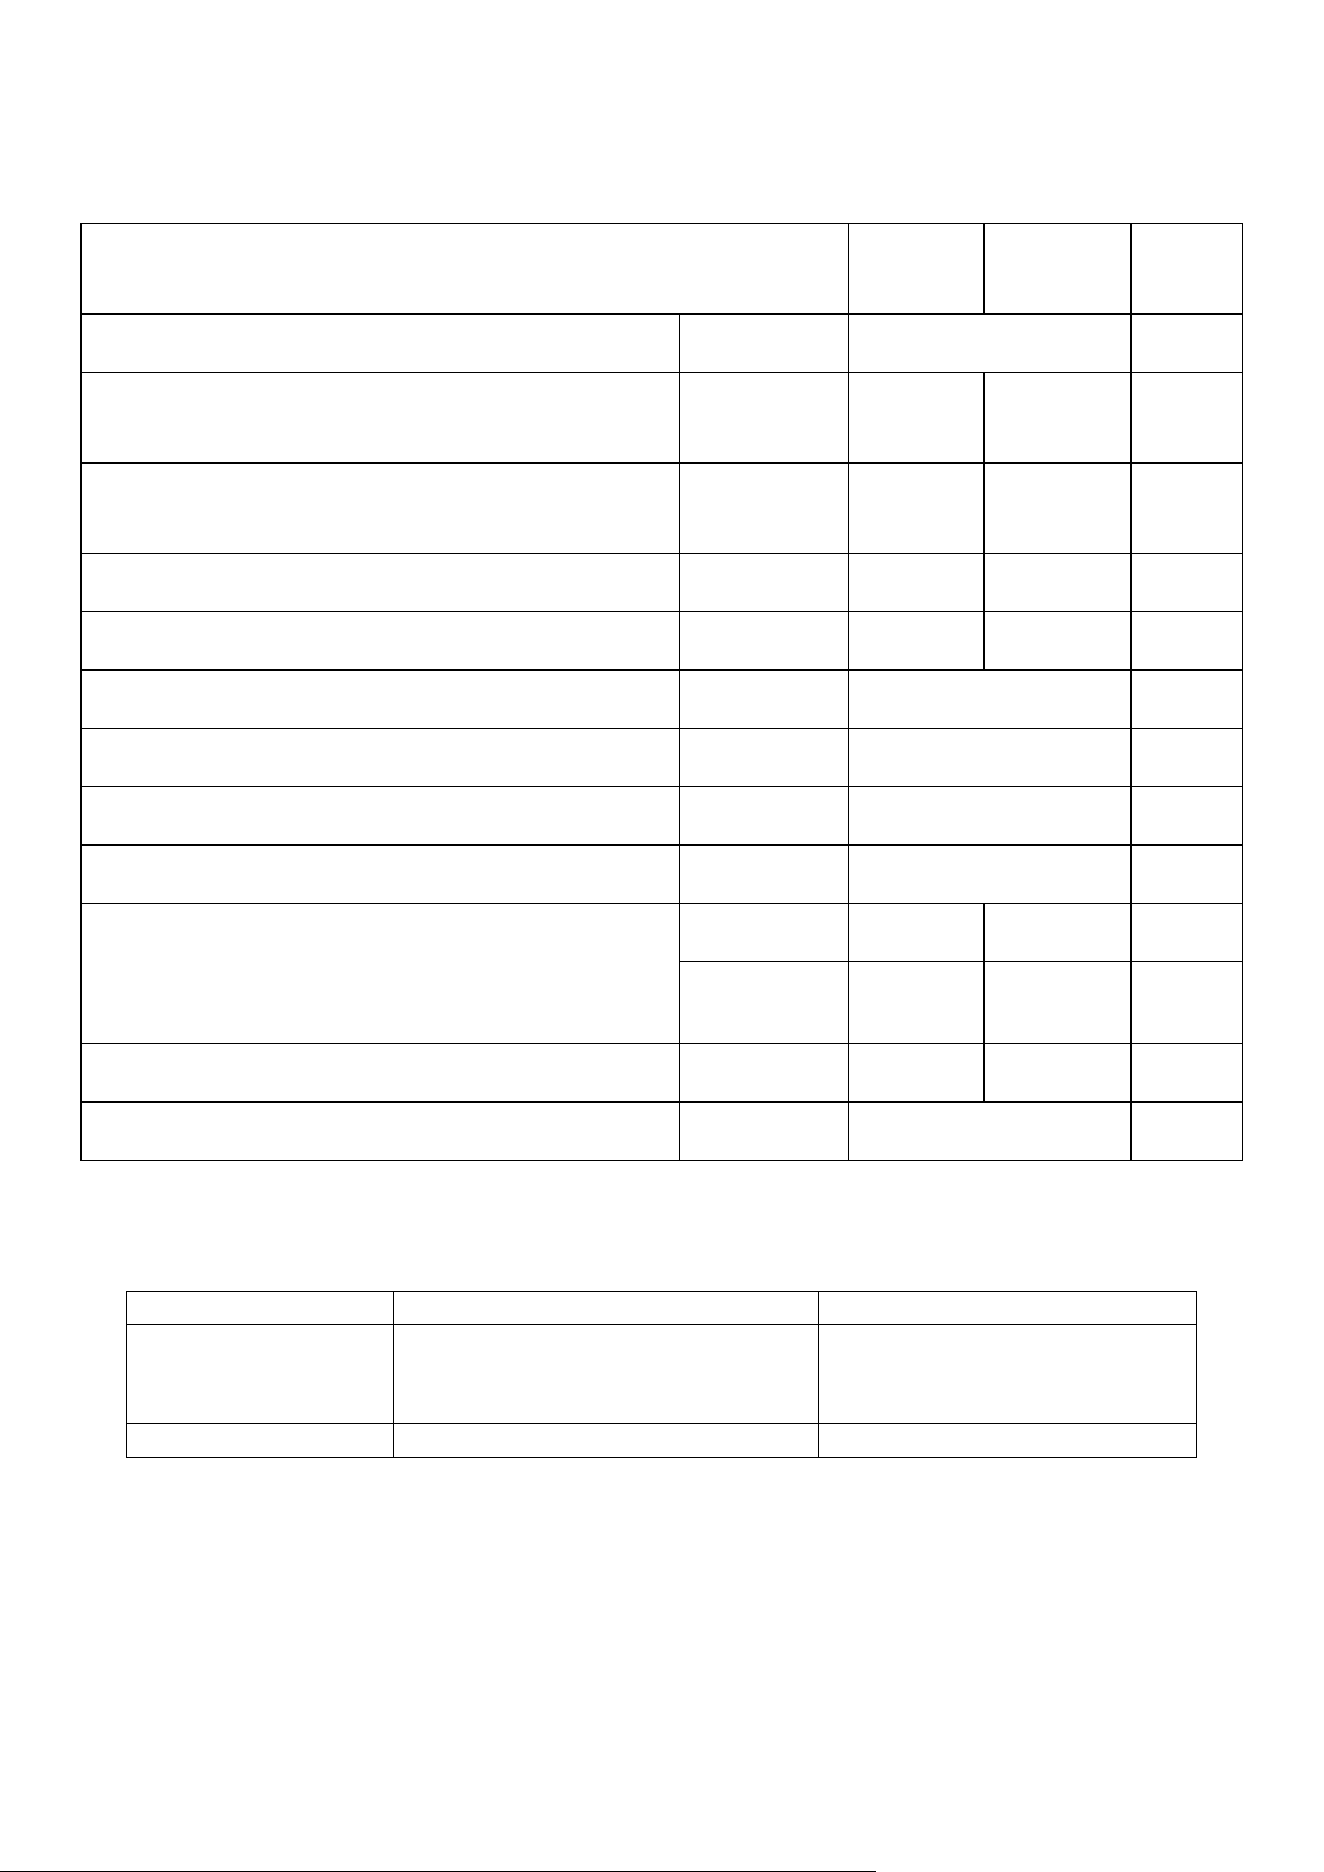
1) MANUAL DRAINAGE:
The unit should be manually drained before any prolonged storage, and
the END-OF-SEASON MAINTENANCE instructions should be followed.
Turn off the unit and unplug. Avoid abrupt movements of the appliance,
as this may cause water in the internal tank to spill out.
Place a tray in a drainage area under the drain port. Remove the cap
from the drain port - water will drain from the internal tank. Once the
tank is empty, replace the cap.
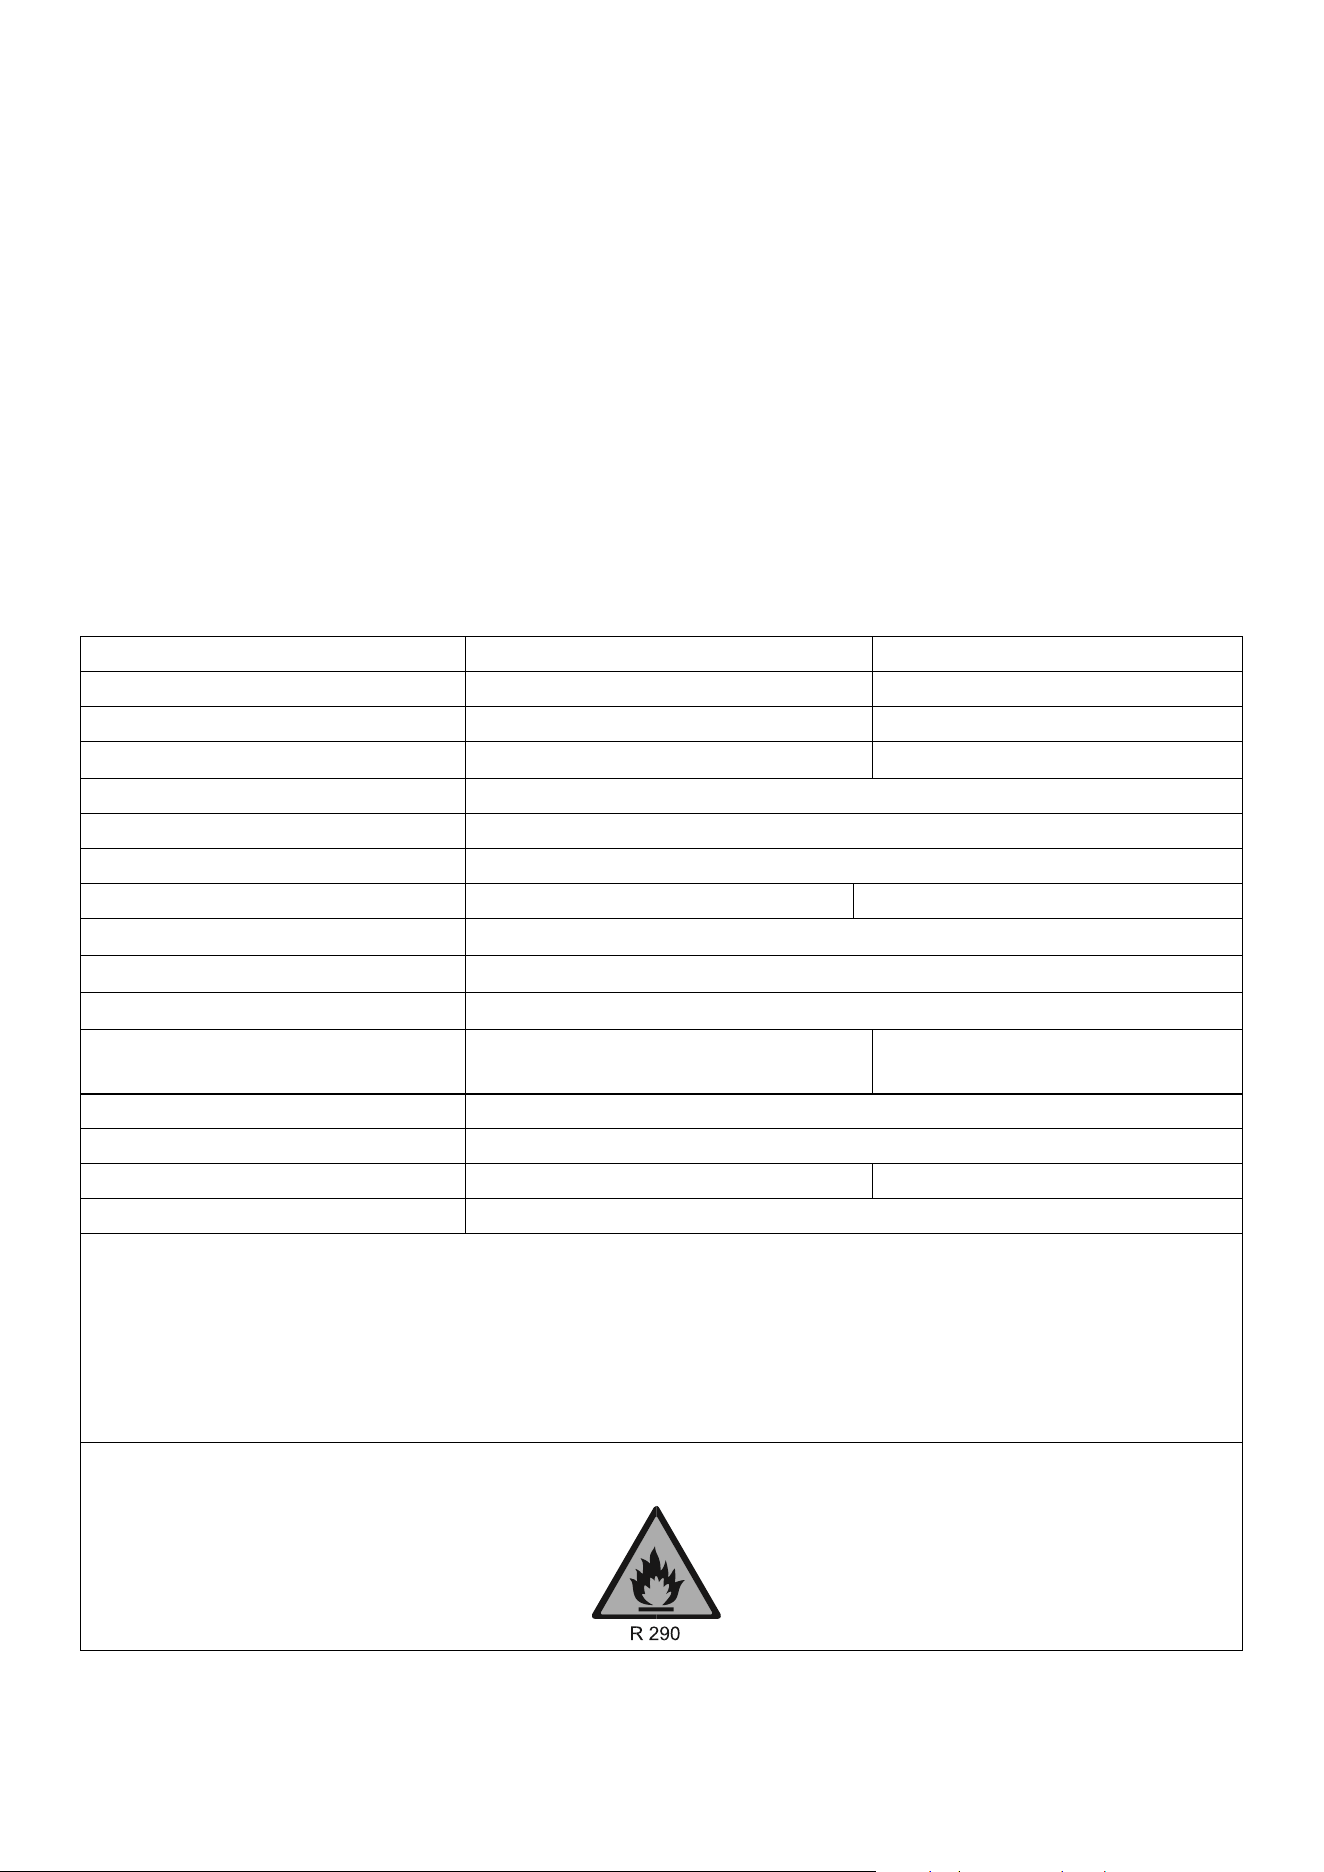
2) CONTINUOUS DRAINAGE:
Remove the cap from the drain port.
Connect a drainage pipe (12.7mm
internal diameter) to the drain port. You
can plumb this pipe into your current
plumbing system, lead it outside, use
gravity fall, or use an external water
pump.
15
END-OF-SEASON MAINTENANCE
1.
Remove the cap from the drainage holes and empty the internal tank. You can also drain
the water by leaning the unit backwards.
2.
Run the unit in fan mode, with a low fan speed, with the cap sll removed and a container
under the drain port.
3.
Keep the unit in this mode for half a day - unl the conduit is dry. Doing this helps to keep
the inside of the unit dry and prevents mould from developing.
4.
Turn o the unit and disconnect the plug.
5.
Replace the rubber stopper.
6.
Coil the cable, bind it together, and put it into the cable storage compartment.
7.
Separate the vent pipe and store it safely.
8.
Cover the unit and keep it in a dry place.
9.
Take the baeries out of the remote control and store or dispose of them safely.
10.
Keep all accessories with the unit ready for next season.
TECHNICAL SPECIFICATION
Model
SF8000E-V5
SF10000E-V2
Cooling capacity:
7,000 BTU
9,000 BTU
Rated Input:
900W
1380w
Running Current:
4.2A
6.7A
Fan:
2 speeds
Airflow:
250m
3
/h
EER Rate:
2.6 / A
Refrigerant:
R290/120g
R290/170g
Sound Power Level:
63dB(A)
Sound Pressure Level*:
53 - 54dB(A)
Thermostat:
16-31˚C
Maximum Allowable Pressure of
suction/ exhaust side:
2.1/4.2Mpa
2.1/4.2Mpa
Maximum Allowable Pressure
5 Mpa
Power Supply:
AC 220-240V/50 Hz
Net Weight:
18.7 kg
21.7kg
Dimension(L*D*H):
336*296*691 mm
* Measured at a distance of 1m in accordance with EN ISO 11201:2010
Sound power provides a consistent measure of an appliance's acoustic output, allowing easy comparison between
appliances. In contrast, sound pressure provides a measure of the intensity of sound perceived by people in the
vicinity of the appliance, making it the ideal metric for assessing an appliance's impact on noise in an area.
The unit must be vented outside when in air-cooling mode. For the purposes of EU regulation EN12102, this is a
local air conditioner that produces less than 65dB(A) sound energy.
16
PRODUCT FICHE
SF8000E-
V5
SF10000E-
V2
Description
Symbol
Value
Unit
Rated capacity for cooling
P
rated
for
cooling
2
2.6
kW
Rated capacity for heating
P
rated
for
heating
-
-
kW
Rated power input for cooling
P
EER
0.8
1.1
kW
Rated power input for heating
P
COP
-
-
kW
Rated Energy eiciency ratio
EERd
2.6
—
Rated Coeicient of performance
COPd
-
—
Power consumption in thermostat-o mode
P
TO
100
W
Power consumption in standby mode
P
SB
0.5
W
Electricity consumption of single/double duct
appliances
(indicate for cooling and heating separately)
DD: Q
DD
-
-
kWh/a
SD: Q
SD
0.8
1.1
kWh/h
Sound power level
L
WA
63
64
dB
Global warming potential
GWP
3
kgCO
2
eq.
FAULT CODES
CODE
PROBLEM
SOLUTION
E1 or E2
Internal temperature outside normal
range.
Leave unplugged for 30 minutes.
If this does not resolve, contact
customer services.
HL
Water tank full
Empty the internal tank.
17
TROUBLESHOOTING
Do not repair or disassemble the air condioner. Unqualied repair will invalidate the
warranty and may lead to failure, causing injuries and property damage. Only use it as directed
in this user manual and only perform operaons advised here.
Problems
Reasons
Solutions
The air conditioner
does not work.
There is no electricity.
Please turn it on after connecting it to a power
outlet.
The display shows "HL".
Discharge the water inside.
The ambient temperature is too low or too high.
Only use the machine within a temperature
range of 10-35 °C (50-95°F).
In cooling mode, the room temperature is lower
than the desired temperature.
Change the desired temperature.
In dry mode, the ambient temperature is low.
The ambient temperature must be above
17 °c. (62 °F).
The unit only works for
a short time.
Bends or blockage in the exhaust hose
Correct the venting as per the instructions in
this manual.
The cooling effect
is not good.
There is direct sunlight.
Use curtains to reduce the direct sunlight.
Doors or windows are open; there are a lot of
people; or in cooling mode, there are other
sources of heat (e.g. fridges)
Close doors and windows; increase air
conditioning power
The filter screen is dirty.
Clean or replace the filter screen.
The air inlet or outlet is blocked.
Clear obstructions: make sure venting is correct
as described in this user manual, and the hose is
not bent
The exhaust hose is not attached to the unit.
Attach the hose and vent the unit correctly.
Loud Noise
The air conditioner is not placed on a flat surface.
Put the air conditioner on a flat, soft surface (to
reduce noise).
Unpleasant Odour
There is an unpleasant odour in the room
Clean the filters and ensure the unit's interior is
clean.
The compressor does
not work.
Overheat protection.
Wait 3 minutes for the temperature to drop,
then restart the machine.
The remote control
does not work.
The distance between the machine and the
remote control is too far.
Bring the remote control close to the air
conditioner and ensure it faces the receiver
directly.
The remote control is not aligned with the
receiver.
Batteries are dead.
Replace batteries.
Others
No refrigerant or there is minimal refrigerant.
Refer to the Service Centre (check leakage,
welding, vacuum pump, charge refrigerant
according to nameplate)
Anti-freezing protection
Waiting for defrosting.
The function will recover automatically. No user
input is needed.
High-pressure protection.
Once the internal gas pressure drops, it will
function normally. No user input is needed.
If problems not listed in the table occur or recommended soluons do not work, please get in touch
with the service centre.
1.
Has the unit been standing upright for at least 2 hours?
2.
Is the unit plugged into the mains?
3.
Is the fuse OK?
4.
Switch the unit o and wait three minutes to see if the issue is resolved.
Restart the unit.
5.
Check if the water tank is full.
18
Disposal: Do not dispose this product as unsorted municipal waste. Collection of such
waste must be handled separately, as it requires special treatment. Recycling facilities
are now available to all customers, where you can deposit your old electrical products.
Customers will be able to take any old electrical equipment to participating civic
amenity sites run by their local councils. Please remember that this equipment will be
further handled during the recycling process, so please be considerate when
depositing your equipment. Please get in touch with the local council for details of
your local household waste recycling centres.
electriQ UK SUPPORT
www.electriQ.co.uk/support
Please consult the troubleshooting section before calling the service line. Call the number below if the
unit fails to operate or complete the online form.
0330 390 3061
Office hours: 9 AM - 5 PM, Monday to Friday
www.electriQ.co.uk
Unit 2A, Trident Business Park,
Neptune Way, Leeds Road, Hudderseld, HD2 1UA.
V20251222RL