1.2ºL
Club Path
90.8 MPH
Club Speed
0.3ºR
Face to Path
-2.3º
Attack Angle

E19-QB344-ISS1.1
X3C USER MANUAL
Notices:
The following notices and general precautions must be observed during the
operation, service and repair of this equipment. Failure to comply with these
precautions or with warnings elsewhere in the manual violates standards of
the design, manufacture and intended use of the equipment. FlightScope
accepts no liability for failure to comply with these notices.
Operation of the device in any country may require approval in accordance
with local telecommunications and safety regulations.
The equipment has been designed for sheltered or clear weather use.
Electrostatic Discharge (ESD) Notice: This product is sensitive to electrostatic
discharge, which may occur when it is touched. An ESD event may cause the
device to temporarily cease operation. If this happens, simply turn the power
off and then on again to restore functionality. The interruption is a minor
inconvenience and does not affect the overall reliability of your product.
Copyright: ©2024 FlightScope(Pty)Ltd. All rights reserved.
The information presented in this document may not be copied or reproduced
in any form whatsoever without prior written consent of FlightScope
®
.
FlightScope
®
reserves all the rights to information published in this document.
Titles of information and any copies thereof shall remain the property of
FlightScope
®
. FlightScope
®
is a registered trademark. Patents and patents
pending.
i

Japanese caution: for Indoors use only.
++++++本機器の使用に係る注意事項++++++
本機器が使用する10.5GHz帯の電波は、
免許を受けて屋外で稼働する一部無線局も利用しています。
これら無線局の稼働を妨げないよう、
本機器は屋内(住宅、ビル、マンション内部等)でのみご利用ください。
万一、無届で本機器を屋外使用すると電波法違反として罰則を受けることがあります。
(地方総合通信局に申請し無線局免許を取得すれば屋外でも使用できるようになります。
詳しくは販売元にお問い合わせください)
FCC Statement
Changes or modifications not expressly approved by FlightScope (Pty) Ltd
could void the user’s authority to operate the equipment.
This equipment has been tested and found to comply with the limits for a
Class B digital device, pursuant to part 15 of the FCC rules. These limits are
designed to provide reasonable protection against harmful interference in an
office or residential installation. This equipment generates, uses and can
radiate radio frequency energy and, if not installed and used in accordance
with the instructions, may cause harmful interference to radio communica-
tions. However, there is no guarantee that interference will not occur in a
particular installation.
ii

If this equipment does cause harmful interference to other electronic equip-
ment, which can be determined by turning this equipment off and on, the user
is encouraged to try to correct the interference by one or more of the following
measures:
Increase the separation between the equipment causing and experiencing the
interference. Install a radio frequency shield between the equipment causing
and experiencing the interference. Consult your dealer for help.
This device complies with Part 15 of the FCC Rules.
Operation is subject to the following two conditions:
(1) This device may not cause harmful interference.
(2) This device must accept any interference received, including
interference that may cause undesired operation.
IC Statement
This device complies with Industry Canada license-exempt RSS standard(s).
Operation is subject to the following two conditions: (1) this device may not
cause interference, and (2) this device must accept any interference, including
interference that may cause undesired operation of the device.
Déclaration IC
Cet appareil est conforme au CNR-310 d’Industrie Canada. Son exploitation
est autorisée aux deux conditions suivantes : (1) l’appareil ne doit pas produire
de brouillagepréjudiciable, et (2) l’utilisateur de l’appareil doit accepter tout
brouillage radioélectrique subi, même si le brouillage est susceptible d’en
compromettre le fonctionnement.
iii

This guide will help you set up and use the
FlightScope X3C.
The FlightScope X3C is battery operated
and connects by Wi-Fi to your tablet or
PC, or by Ethernet cable to your PC.
iv

Welcome
Package Contents
Feature Overview
Product Overview
LED Indicators
X3C Safety
The Battery
Self-Leveling Feet
Tilt Angle
Roll Angle
Set Up Tips
Switching On
Position & Alignment
Aim the X3C
Using the System
Compatible Devices
Software Applications
Communications
First Time Use
. . . . . . . . . . . . . . . . . . . . . . . . . . . . . . . . . . . . . . . . . . 1
. . . . . . . . . . . . . . . . . . . . . . . . . . . . . . . . . . . . 2
. . . . . . . . . . . . . . . . . . . . . . . . . . . . . . . . . . . . 3
. . . . . . . . . . . . . . . . . . . . . . . . . . . . . . . . . . . . 4
. . . . . . . . . . . . . . . . . . . . . . . . . . . . . . . . . . . . . . 6
. . . . . . . . . . . . . . . . . . . . . . . . . . . . . . . . . . . . . . . 10
. . . . . . . . . . . . . . . . . . . . . . . . . . . . . . . . . . . . . . . 11
. . . . . . . . . . . . . . . . . . . . . . . . . . . . . . . . . . . 14
. . . . . . . . . . . . . . . . . . . . . . . . . . . . . . . . . . . 15
. . . . . . . . . . . . . . . . . . . . . . . . . . . . . . . . . . . 16
. . . . . . . . . . . . . . . . . . . . . . . . . . . . . . . . . . 17
. . . . . . . . . . . . . . . . . . . . . . . . . . . . . . . . . . . . . . 20
. . . . . . . . . . . . . . . . . . . . . . . . . . . . . . . . . 22
. . . . . . . . . . . . . . . . . . . . . . . . . . . . . . . . . . . . . . 25
. . . . . . . . . . . . . . . . . . . . . . . . . . . . . . . . . . . . 26
. . . . . . . . . . . . . . . . . . . . . . . . . . . . . 26
. . . . . . . . . . . . . . . . . . . . . . . . . . . 27
. . . . . . . . . . . . . . . . . . . . . . . . . . . . . . . 28
. . . . . . . . . . . . . . . . . . . . . . . . . . . . . . . . 29
Contents
v

Set Operating Mode
Normal Play Modes, Short Game Modes
Set units, distances, height & altitude
Units
Sensor to Tee Distance
Tee Surface Height
Altitude
Marking the Ball for Indoor Measurements
Switching Off
Care & Maintenance
Basic Care
Storage & Transport
Damage
Cleaning
Trouble Shooting
Physical Specifications
Electrical Specifications
Notes
Serial Number & Purchase Date
. . . . . . . . . . . . . . . . . . . . . . . . . . . . . . . . . . 31
. . . . . . . . . . . . . . . . . . . . . 32
. . . . . . . . . . . . . . . . . . . . . . . . . . . . . . . . . . . . . . . . . . . 32
. . . . . . . . . . . . . . . . . . 32
. . . . . . . . . . . . . . . . . . . . . . . . . . . . . . . . . . . . . . 32
. . . . . . . . . . . . . . . . . . . . . . . . . . . 33
. . . . . . . . . . . . . . . . . . . . . . . . . . . . . 33
. . . . . . . . . . . . . . . . . . . . 34
. . . . . . . . . . . . . . . . . . . . . . . . . . . . . . . . . . . . . 34
. . . . . . . . . . . . . . . . . . . . . . . . . . . . . . . . . . 35
. . . . . . . . . . . . . . . . . . . . . . . . . . . . . . . . . . 36
. . . . . . . . . . . . . . . . . . . . . . . . . . . . 36
. . . . . . . . . . . . . . . . . . . . . . . . . . . . . . . . . . . . 36
. . . . . . . . . . . . . . . . . . . . . . . . . . . . . . . . . . . . 37
. . . . . . . . . . . . . . . . . . . . . . . . . . . . . . . . . . . . 39
. . . . . . . . . . . . . . . . . . . . . . . . . . . . . . . . . 40
. . . . . . . . . . . . . . . . . . . . . . . . . . . . . . . . 42
. . . . . . . . . . . . . . . . . . . . . . . . . . . . . . . . . . . . . . . . . . . 43
. . . . . . . . . . . . . . . . . . . . . . . . . . . 44
. . . . . . . . . . . . . . . . . . . . . . . . . . . 46
vi

Welcome
Congratulations on purchasing the FlightScope X3C, featuring brand new
Fusion Tracking technology.
The X3C can be used for equipment or player testing, from tee drives to
chipping and putting, and operates indoors and outdoors.
Typical applications include:
• Teaching
• Club fitting
• Practice and self-assessment
• Equipment testing
• Equipment retail
• Golf game simulation
FlightScope will fully support you in your use and enjoyment of the system.
FlightScope’s ongoing R&D commitment also means that new features and
levels of performance will be readily available to you when new developments
are made. We look forward to being your technology partner as you and your
customers Master your Passion
®
.
1
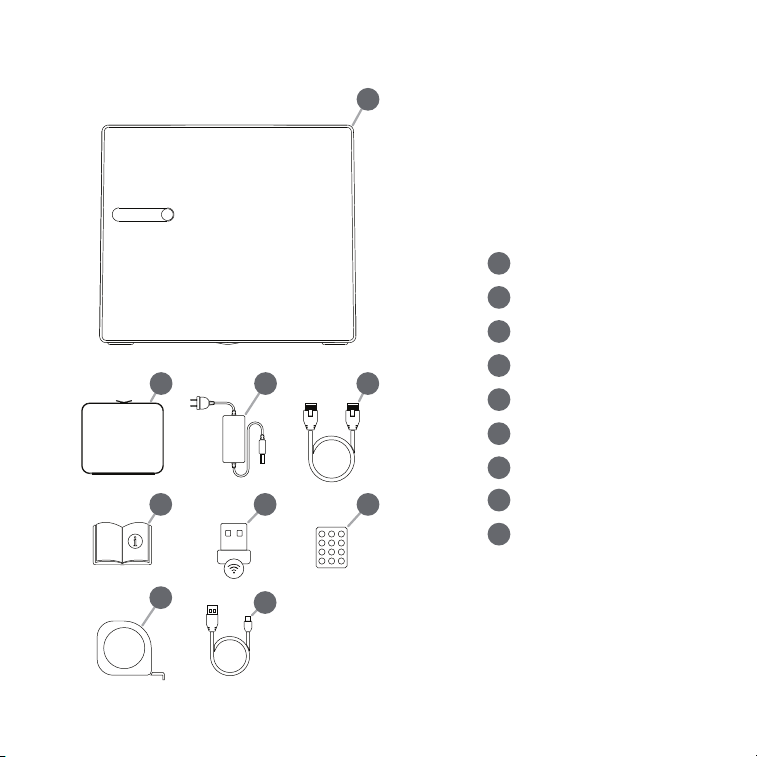
A
B
C
X3C unit
sleeve
AC adaptor
D
ethernet cable
E
user manual
F
connection adaptor
G
aluminum stickers
B C D
H
tape measure
E F G
H
I
I
USB cable (support)
A
Package Contents
2
Fusion Tracking technology
Patented technology that combines
tracking radar and image processing
Multi-frequency radar
Direct distance measurement for
more accurate ball & club tracking
Chipping & putting data
Short game tracking to complete
game improvement
Built-in image processing
Boresight camera for radar & image
processing, data fusion
Improved Wi-Fi
Connect multiple listener devices
through an existing Wi-Fi network
Feature Overview
3
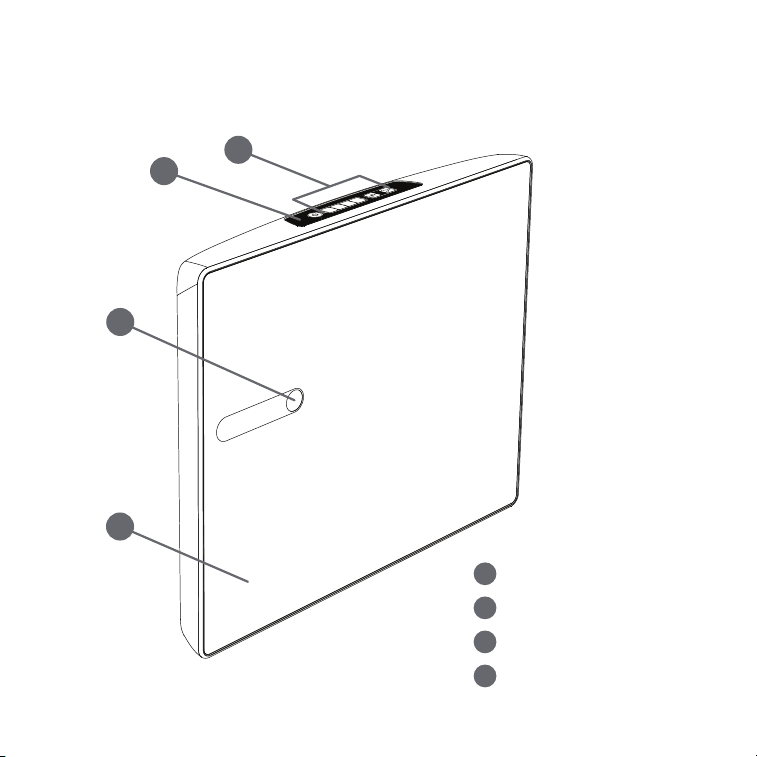
A
B
C
user interface
LED indicators
built-in camera
D
front face
C
B
D
A
Product Overview
4
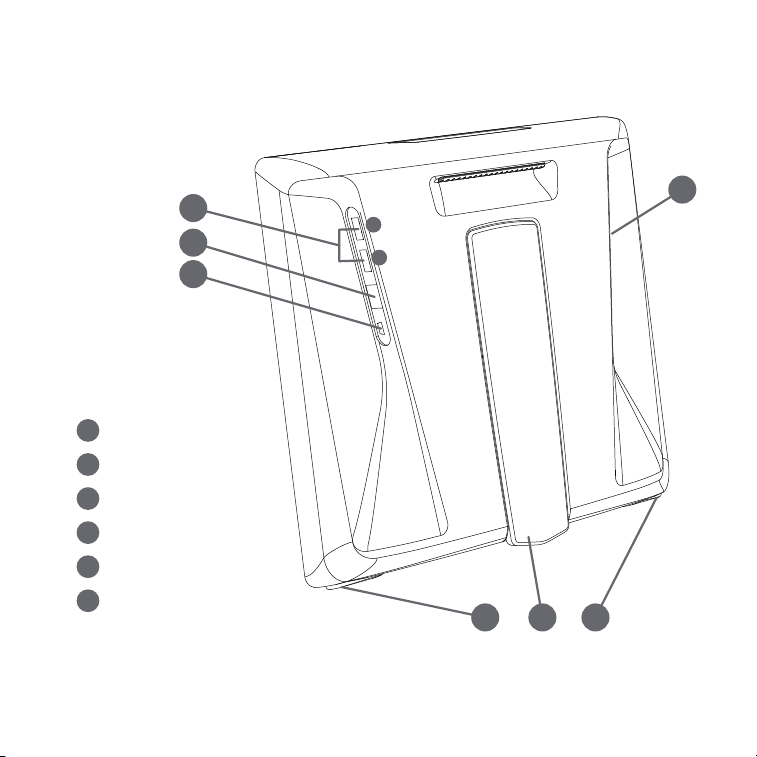
USB 1 & 2
ethernet
support USB
self leveling feet
back leg
DC input
E
F
G
H
I
J
F
G
E
1
2
H I
J
H
5
Connection
State
Color
Off
No light
Ready
Blue solid
Connected
Green solid
LED Indicators
6
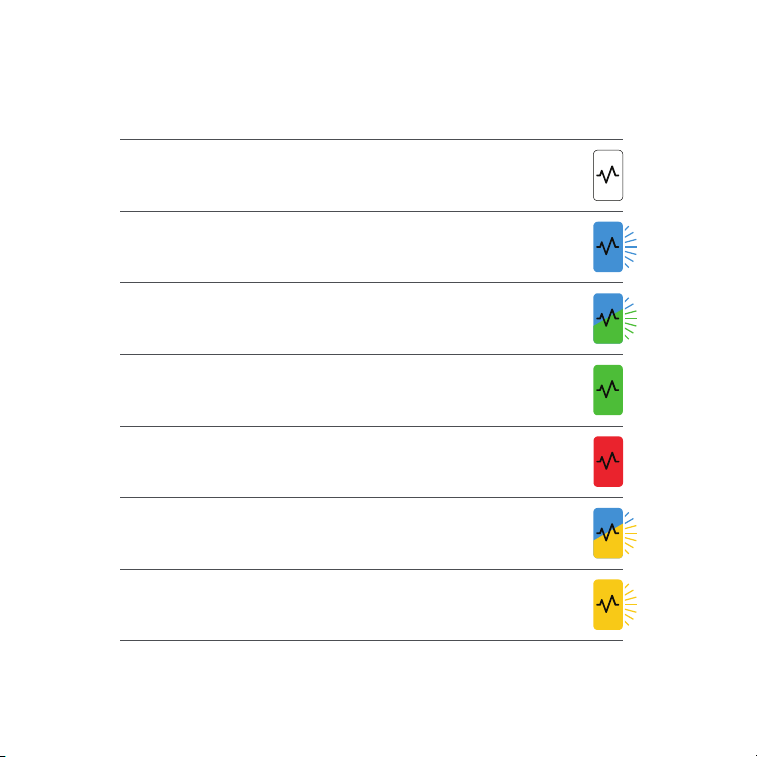
System Off
No light
Power on, switching on
Blue flashing
Standby mode
Green solid
Armed, ready to measure
Red solid
State
Color
Processor start-up Flashing blue & green
30-60 seconds
Processor shutdown Flashing blue & yellow
15-30 seconds
Error Flashing yellow
Status
7
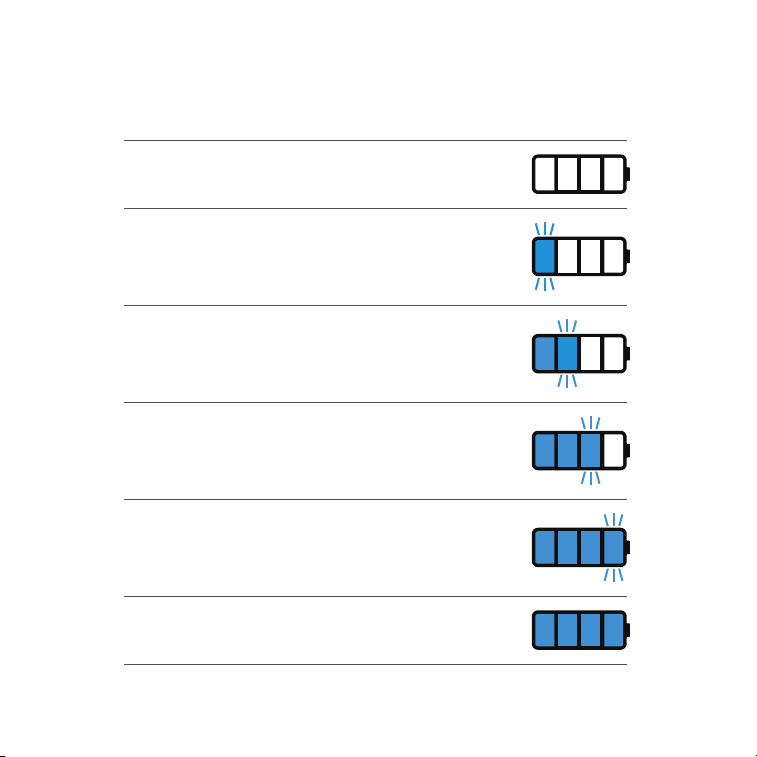
Off
White/no light
Charging 0-25%
Blue flashing
Charging 25-50%
Blue solid
second flashing
Charging 50-75%
Blue solid
third flashing
Charging 75-100%
Blue solid
fourth flashing
State
Color
Fully charged
Blue solid
Battery - Charging Status
8
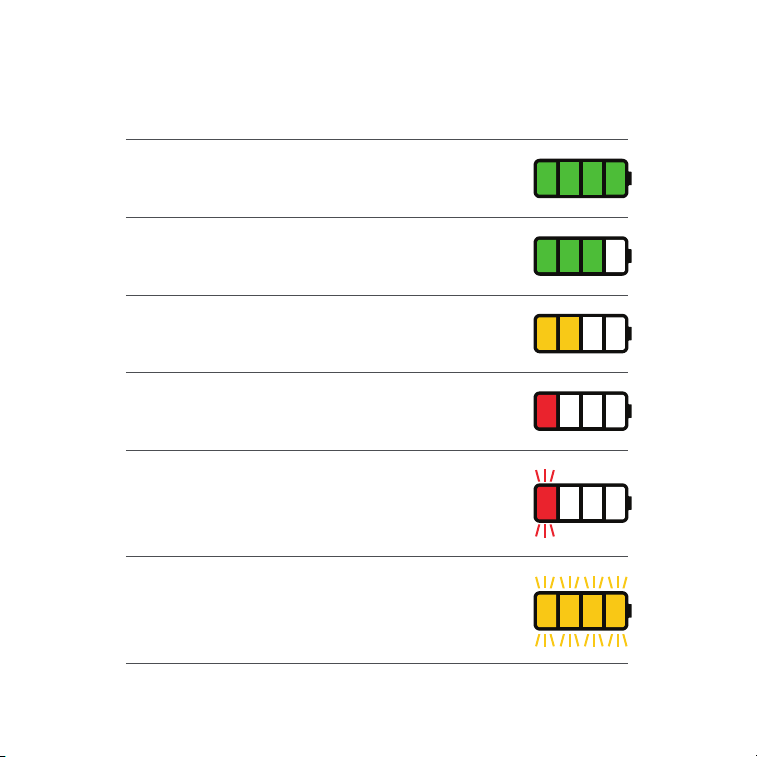
On battery 50-75% Green solid
On battery 25-50%
Yellow solid
On battery 10-25%
Red solid
Charge low, under 10%
Red flashing
On battery 75-100%
Green solid
State
Color
Battery fault, dead or overheating
Yellow flashing
Battery - Remaining Charge
9

X3C Safety
Lithium Battery
The X3C contains a rechargeable lithium ion battery.
The battery is not user replaceable. If necessary a battery must be replaced
ONLY at a FlightScope Repair Center. The product and its battery must be
recycled or disposed of properly.
Air Transport
The X3C battery meets the existing FAA and IATA specifications for the X3C
to pass as carry-on or as checked luggage on passenger airlines
(below 100 W-h). Always switch the X3C off before packing for a flight.
Electrical Shock Hazard
Do not exposethe AC adapter and main power connections to rainor wet
conditions. This may cause a lethal electrical shock.
Handling
Keep fingers clear when closing the X3C leg. If closed incorrectly, pinching of
fingers or hand may occur. See back leg operation illustrated in Switching Off
section of manual.
10
The Battery
The X3C is delivered with some power stored in its internal battery. The
battery should however be fully charged for 8-10 hours with the included
power adapter before first use.
WARNING
Using damaged mains cords or chargers, or charging when
moisture is present, can cause electric shock.
CAUTION
Do not use a power adapter other than the one supplied or specified by
FlightScope. If an adapter with incorrect voltage rating is used, the X3C
electronics can be damaged. If an adapter with insufficient current rating is
used, the adapter may overheat and become damaged.
NOTE
1. The power adapter may become warm during normal use.
Always allow adequate ventilation around the power adapters
during use.
2. If the X3C is left switched on, the battery will drain and might
become completely discharged.
If battery is completely discharged, you must charge the battery
with the system “OFF” for at least 30 minutes before using.
11
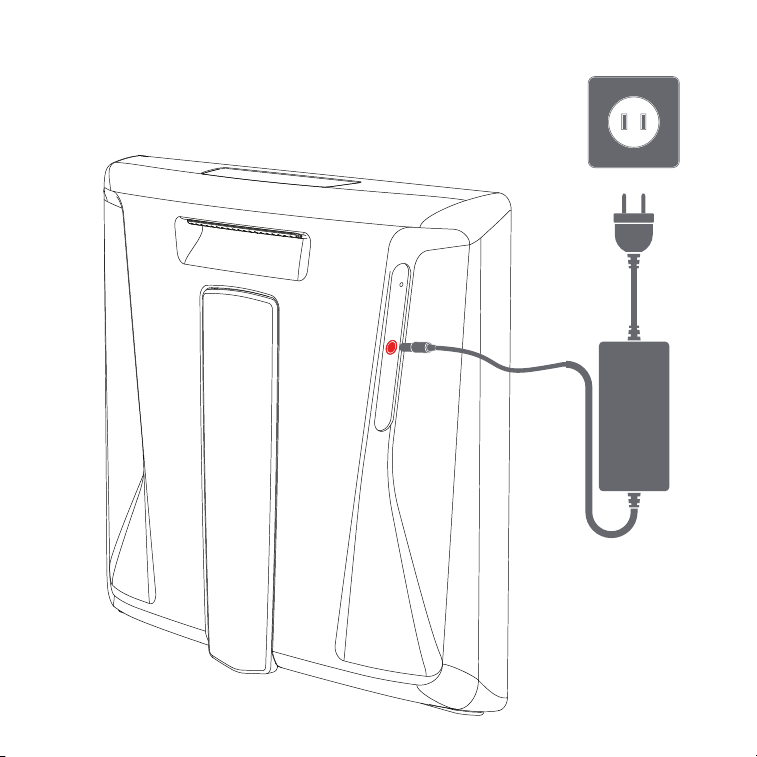
Battery Charging
12

Charging the X3C to full capacity takes up to 10 hours using the supplied
power adapter.
1. Connect the included power adapter to a wall outlet and plug the
power lead into X3C power connector.
2. The battery indicators will show the battery level in BLUE
(see LED Indicators – Battery).
NOTE:
Charging time is approximately 8-10 hours.
Contact Support at FlightScope if battery needs replacement.
Battery Safety & Care
Don’t attempt to replace the X3C battery yourself. The X3C battery should be
replaced only by an authorized FlightScope Repair Center.
A defective or end of life battery must be recycled or disposed of separately
from household waste.
Do not burn the battery.
13
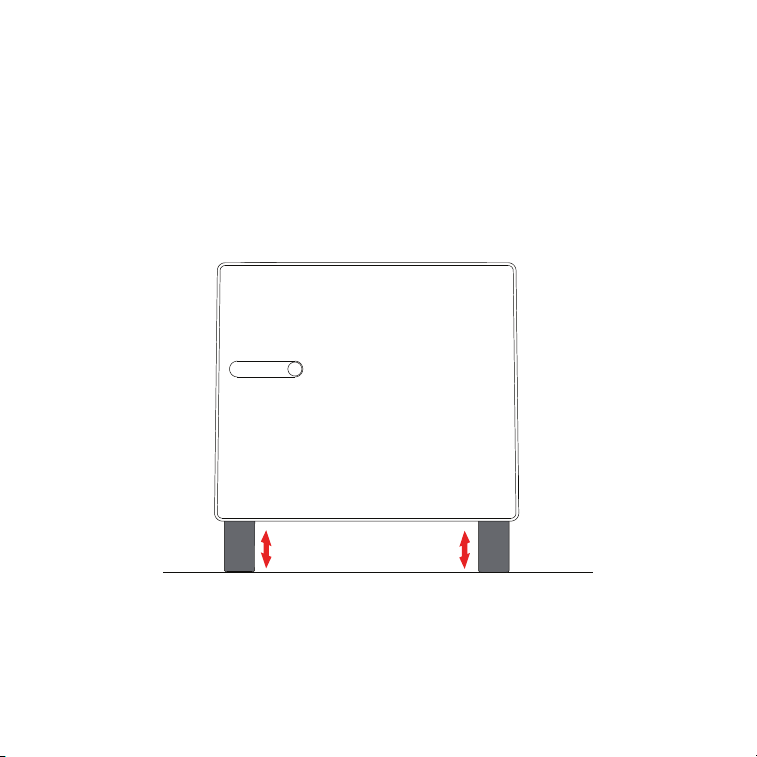
Self-Leveling Feet
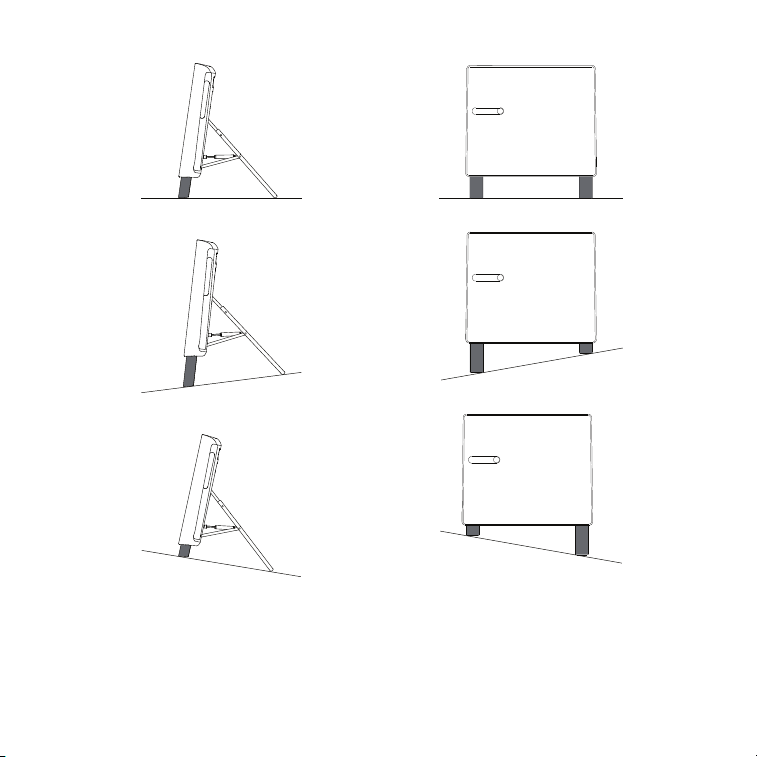
The X3C’s self-leveling feet automatically adjust tilt and roll angles to
compensate for uneven surfaces.
14
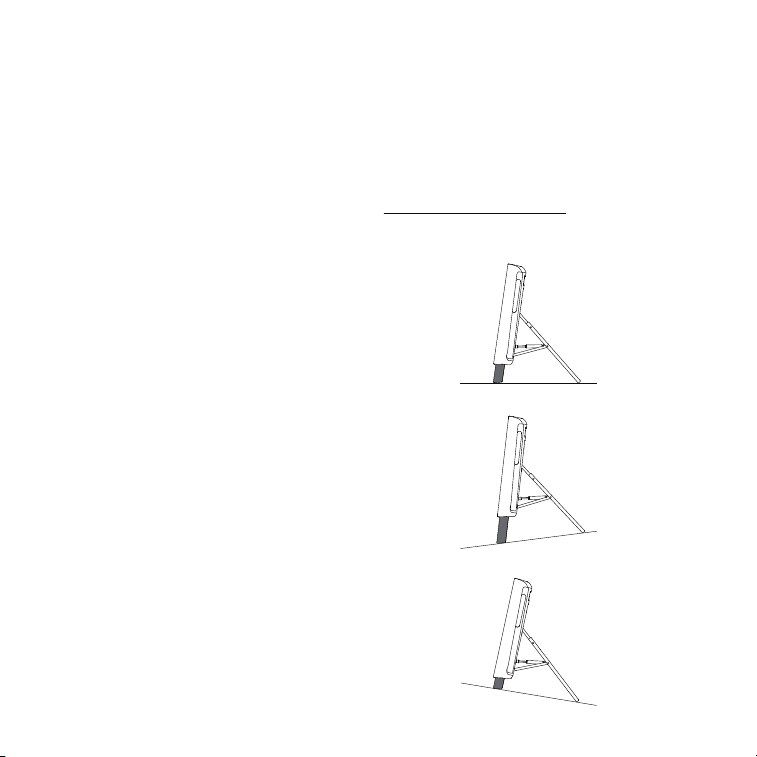
Tilt Angle
The X3C’s operating tilt angle is optimized by the app for best tracking
performance and can vary. The default settings are 4° for Normal golf mode
and 2° for Short Game.
Ground slope MUST be less than 5˚ for self-leveling function.
FLAT
(Actuators extend mid-way)
DOWN SLOPE
(Actuators extend more)
UP SLOPE
(Actuators extend less)
15
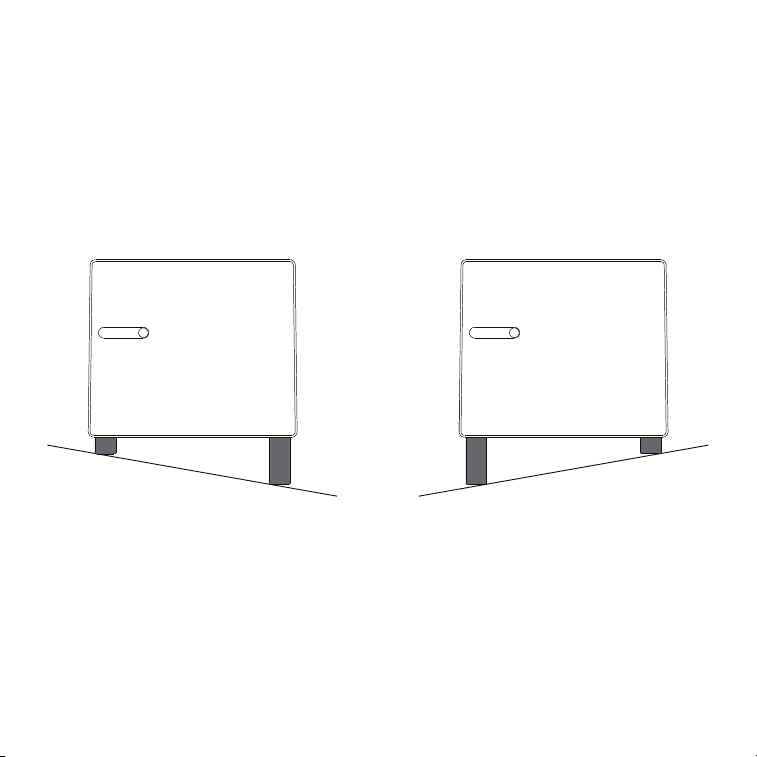
Roll Angle
- Sensor operating roll angle is 0˚.
- Ground slope must be < 3˚ for self-leveling to function.
Left slope 3º max Right slope 3º max
16
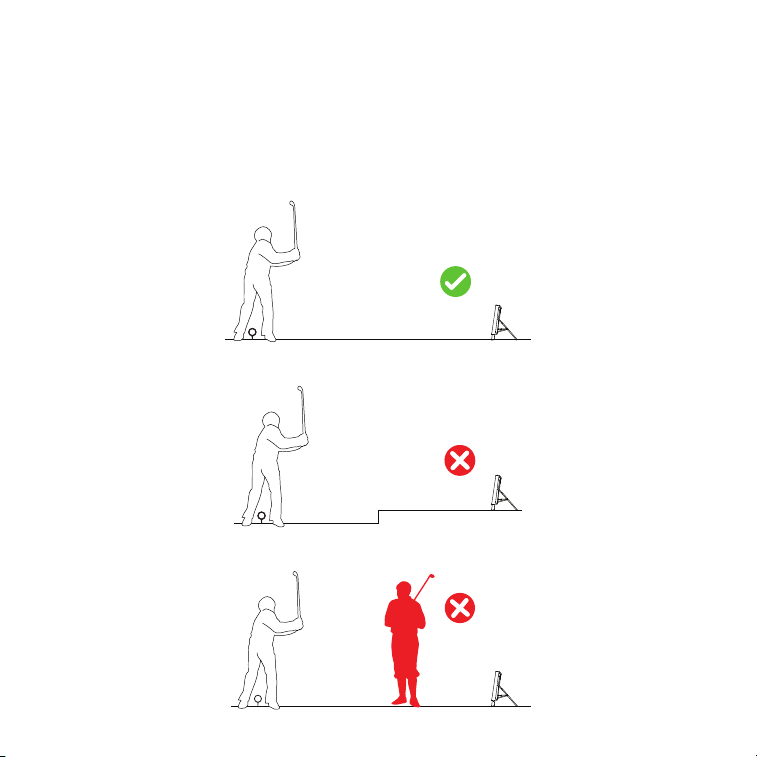
Set Up Tips
1. Use the X3C on reasonably leveled surfaces. Ensure that there are no
obstructions or steps in front of the unit, and it has a clear unobstructed
view of the club swing and ball trajectory.
17
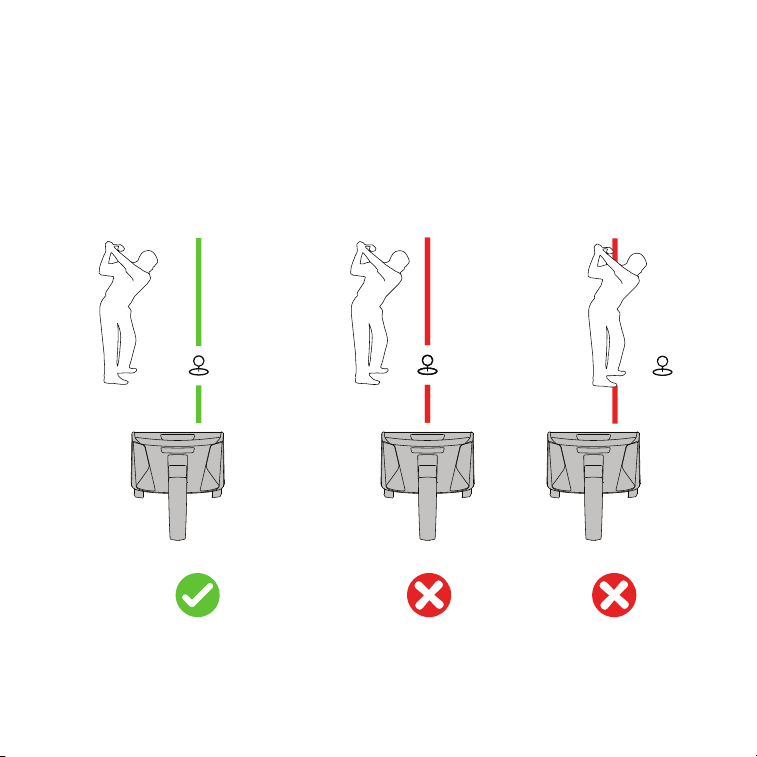
2. Remember to set the correct mode (‘Limited flight’ or ‘Outdoor’).
Align the X3C so that the camera is in line with the ball.
18
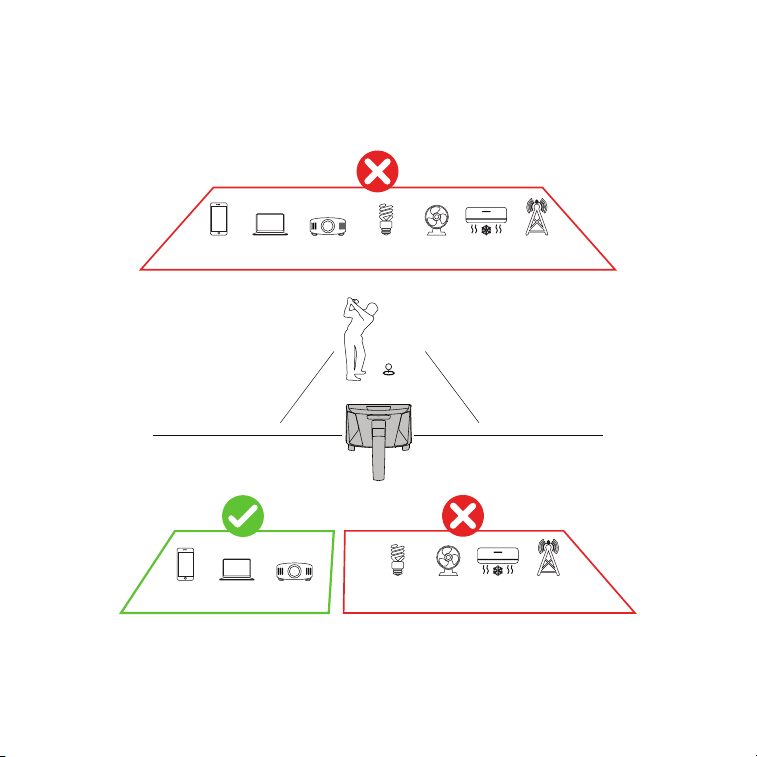
3. Certain items can cause false triggers (ghost shots) depending on their
position in relation to the X3C. The below illustration shows these items
and where they may cause false triggers.
• Try to prevent false triggers by switching such lights or machines off, or
install a wire mesh screen in the light covers or over the interfering machines.
behind
in front
phones computers projectors fluorescent
lights
fans aircon signal
towers
phones computers projectors
fluorescent
lights
fans aircon signal
towers
19
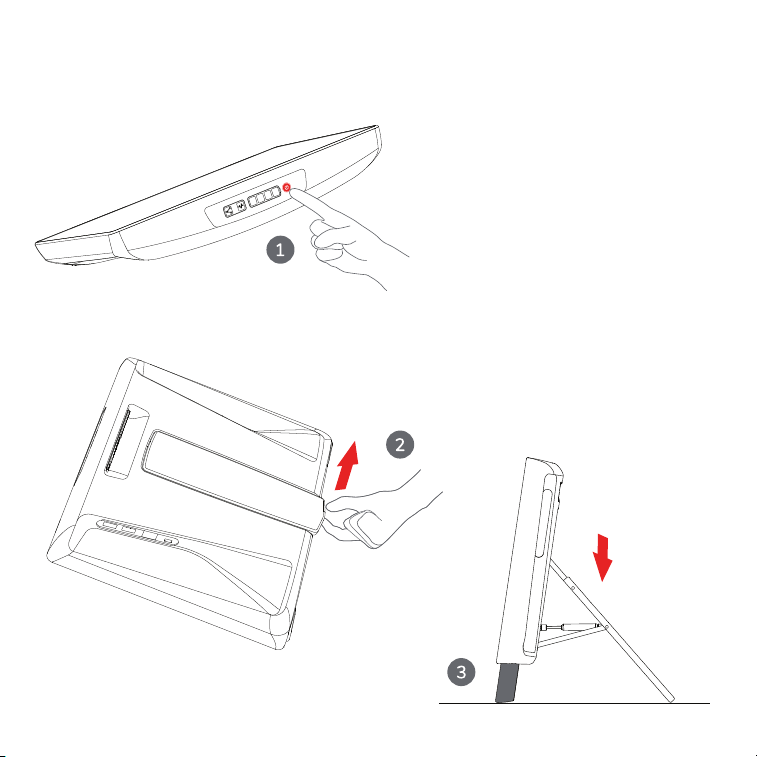
Switching On
To switch the system ON:
Press and hold the power
button until a beep is heard
and the user interface
illuminates.
Open leg by lifting the bottom
edge. The feet will then
extend automatically .
Once feet are fully extended
place the device on ground or
floor in its intended operating
position.
20
While starting up, the device will automatically adjust its level according to the
slope of the ground or floor.
21
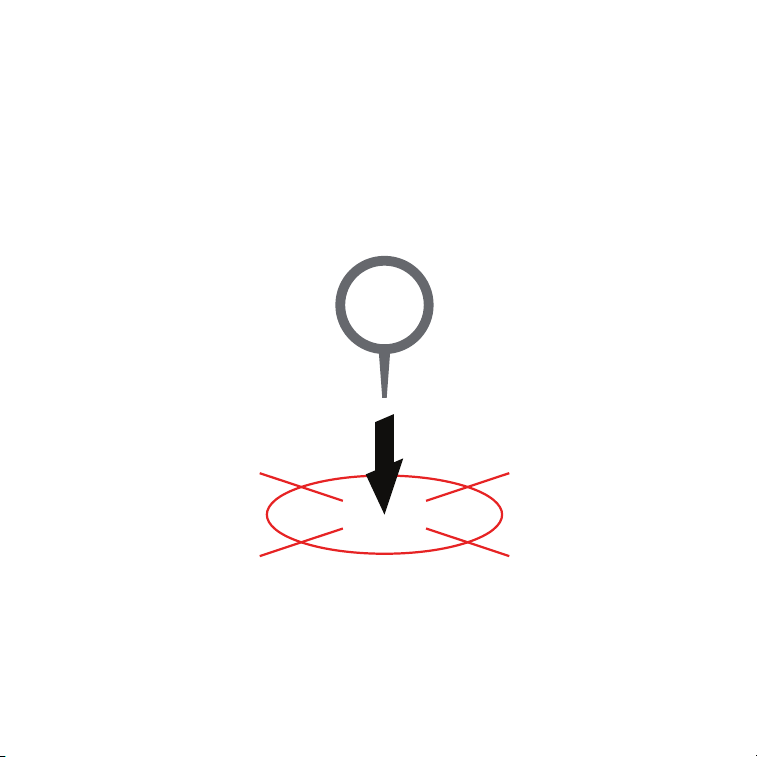
Position & Alignment
1. Choose your tee position.
22
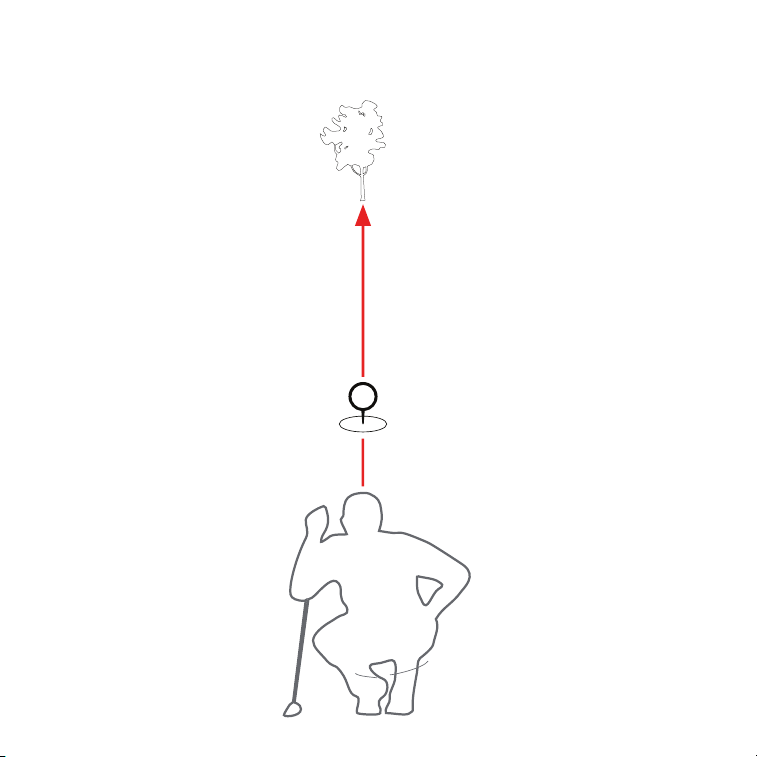
2. Select a target line from the ball to a target
(a tree in the distance, flag, or other marker).
23
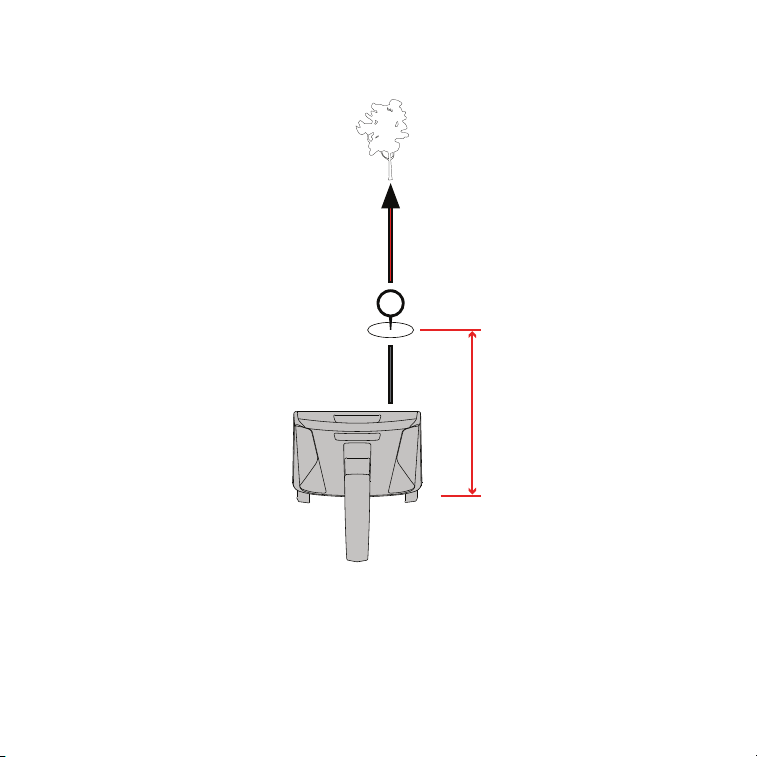
3. Place the X3C behind the tee, with X3C’s internal
camera hole over the target line.
Distance behind tee:
Normal golf shots: 9ft. to 14 ft. ( 2.7 - 4.2m )
Short Game (putts, chips): 5ft ( 1.5m )
24
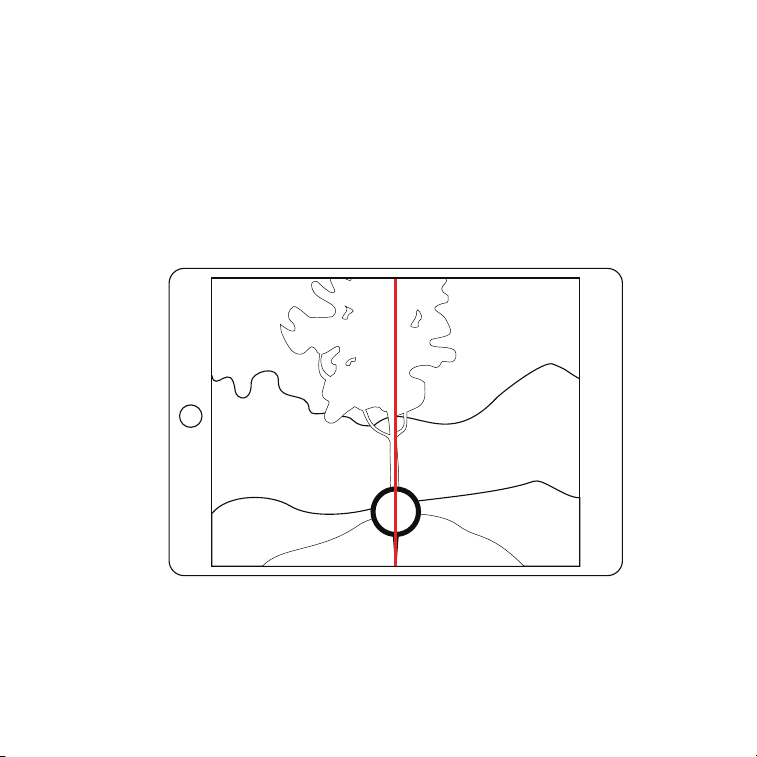
Aim the X3C
a. On the app, select Alignment and view the image.
b. Move and rotate the X3C to point the image center line
(vertical line visible on your iPad screen) along the target line.
Make sure the vertical line is in line with both the ball and target.
Distance behind tee:
Normal golf shots: 9ft. to 14 ft. ( 2.7 - 4.2m )
Short Game (putts, chips): 5ft ( 1.5m )
25
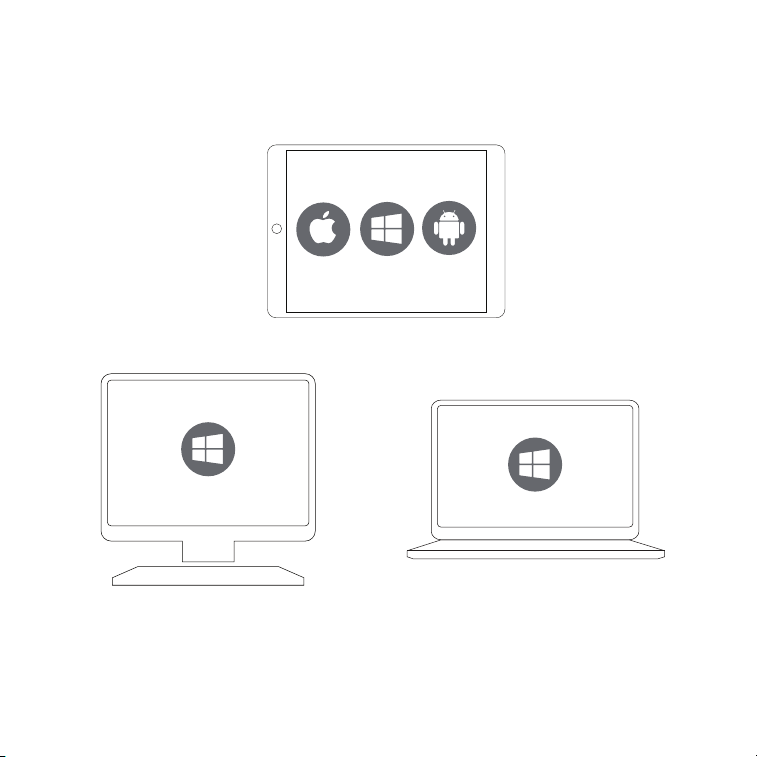
PC
laptops
iPads & Tablets
Using the System
Compatible Devices
Go to
flightscope.com/products
for minimum system requirements and compatible devices.
26

Short Game (X3C Only)
Providing chipping and putting data for complete lessons, short
game data is automatically synced with customizable video recording.
Video Lessons
Featuring a customizable interface, data and video are combined for
an all-in-one lesson recording solution.
FlightScope Skills
Play FlightScope Combines or create customizable challenges for
player benchmarking.
FlightScope VX
A comprehensive teaching, fitting and training app with 3D views of
ball flight and club data.
Software Applications
To download visit
your app store:
27

Communications
Ethernet Port
Use the supplied Ethernet cable to connect a
PC Desktop or Laptop to the X3C.
USB Ports
Insert a Wi-Fi adapter into one of the USB ports to create a Wi-Fi
connection to the X3C.
The USB Mini port connector is reserved for technical servicing.
28

First Time Use
The easiest way to connect your X3C and your PC or tablet computer is by
using the QR code feature.
QR Code
The App should prompt you to connect by scanning the QR code before
starting a session.
If not, then you can navigate to the Scan QR code in the app. In both cases,
make sure your X3C is turned on.
To navigate to the QR code in the app:
1. Open App and navigate to setup/device settings/QR code.
This could be before or during a session depending on
the App being used.
2. Click the scan button.
3. Scan the QR code located on the side of your X3C.
29

If you are unable to use the QR code feature, then you may still connect
manually in your Wifi settings on your device.
Manual WiFi connection
1. Note the X3C’s serial number (example: X3C-010234).
2. Switch the X3C and PC or Tablet ON.
3. On your PC or Tablet, find and select your FlightScope X3C unit
from the list of connected devices in the Wi-Fi networks.
The serial number will be displayed.
4. Enter the unit’s 10-digit serial number in the Password field, e.g.
X3C-010234 (including the capital “X” and the dash (-)
characters).
NOTE
For both QR code and Manual methods, once the connection has been made
the first time, the software will remember the settings and reconnect
automatically when the X3C is turned on.
30

Set Operating Mode
Setup must be done every time the unit is used. Setup includes:
• operating mode
• unit position and alignment in relation to the tee
• units of measurement (metric, imperial, etc.)
Play Modes
Mode When to use
Limited flight Where ball flight is limited to 8 ft.
(2.4 meters) or more, but less than 44 yards
(40 meters). For example with simulator setups.
Outdoor On a driving range or golf course
where ball flight is unrestricted.
31

Short Game Modes
Mode When to use
Putting When practicing putts on a putting green or
putting surface (i.e. indoor putting green).
Chipping When practicing bump and run chips on a green.
Set units, distances, height & altitude
Setup opens the Software Settings screen.
The software applications that are compatible with the X3C require certain
settings to be entered by the user before use.
Units
Select Metric or Imperial units.
Sensor to Tee Distance
Enter the distance between the X3C face to the tee/hitting position in the
software.
TIP: Always tee up within 6 inches (15 cm) of the specified position for
optimum performance.
32

Tee Surface Height
Enter the height of the hitting surface above the surface on which the X3C is
placed, e.g. 2.5 cm / 1’’ if a mat of such thickness is used.
Altitude
Enter the altitude (height above sea level) of the location.
Save and close to continue. The system is now ready for use.
33
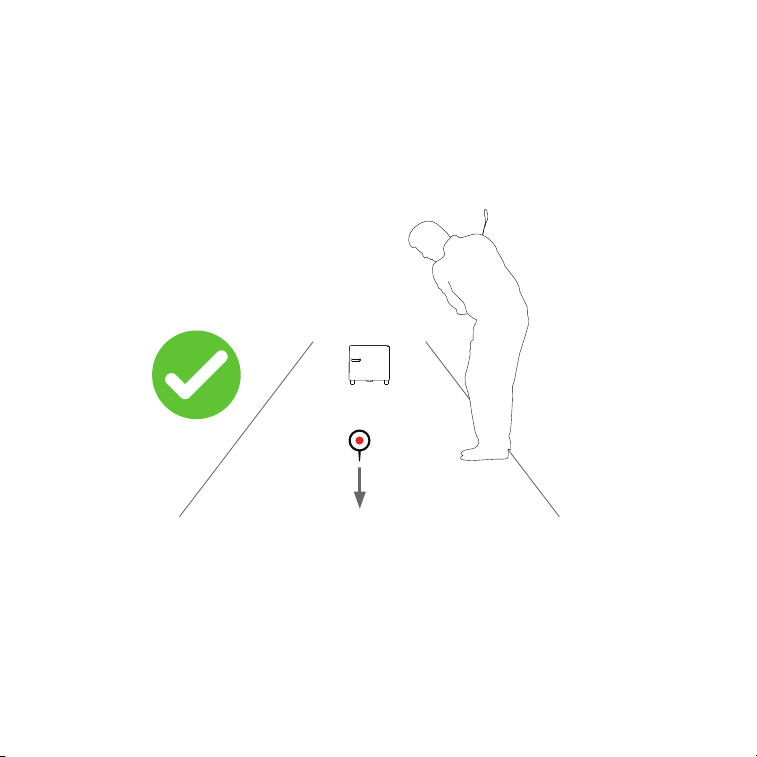
Marking the Ball for Indoor Measurements
Metallic stickers are included with the X3C’s accessories. These must be used
in Limited flight mode as follows:
Mark the ball with a single sticker for spin measurement.
Tee ball up with dot facing forward (towards the target/net/screen).
NOTES
Spin values and carry distances may be inaccurate if unmarked balls are used
in Limited flight mode.
Do not use marked balls with Short Game applications (chipping and putting).
34
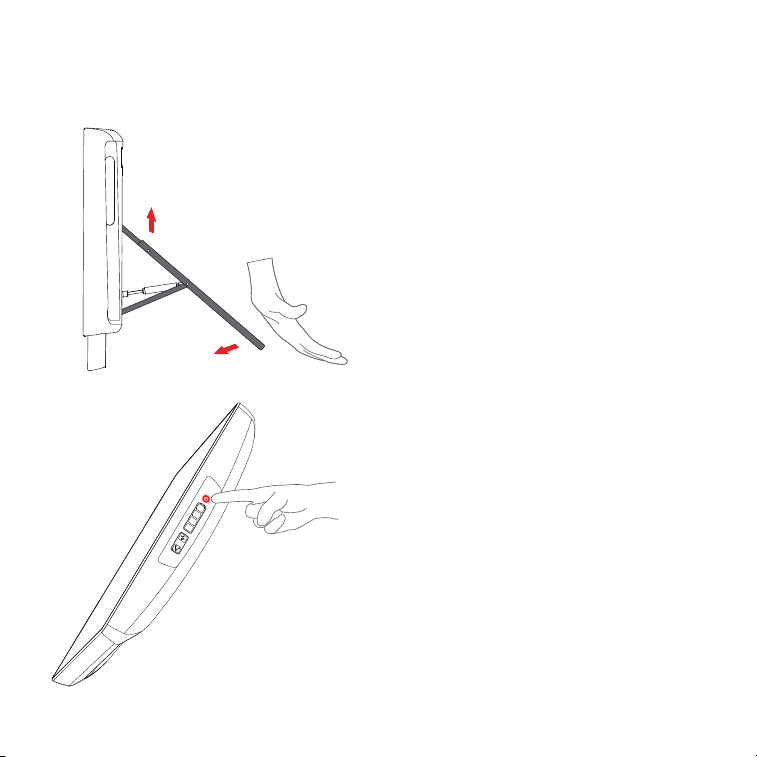
Switching Off
To switch the system OFF:
Lift up the X3C device and push
the leg back to its closed position.
The device will proceed to retract
its feet.
CAUTION
Keep fingers clear as illustrated.
To shut down the device, press the
power button until a beep is heard.
NOTE
The shut down time can be up to
30 seconds.
35

Care & Maintenance
Basic care
The FlightScope X3C sensor is a sensitive and complex electronics unit and
should be handled with care. There are fragile components inside the sensor
that can be damaged by improper or rough handling and impact.
Make sure to store and transport the sensor with suitable protection and care,
for example in the padded carry bag or the original shipping packaging.
Storage & Transportation
• Store and transport the sensor in its carry bag or other suitable
packaging when not in use.
• If the sensor is unused for a long period, remember to fully charge
the battery before using again.
36
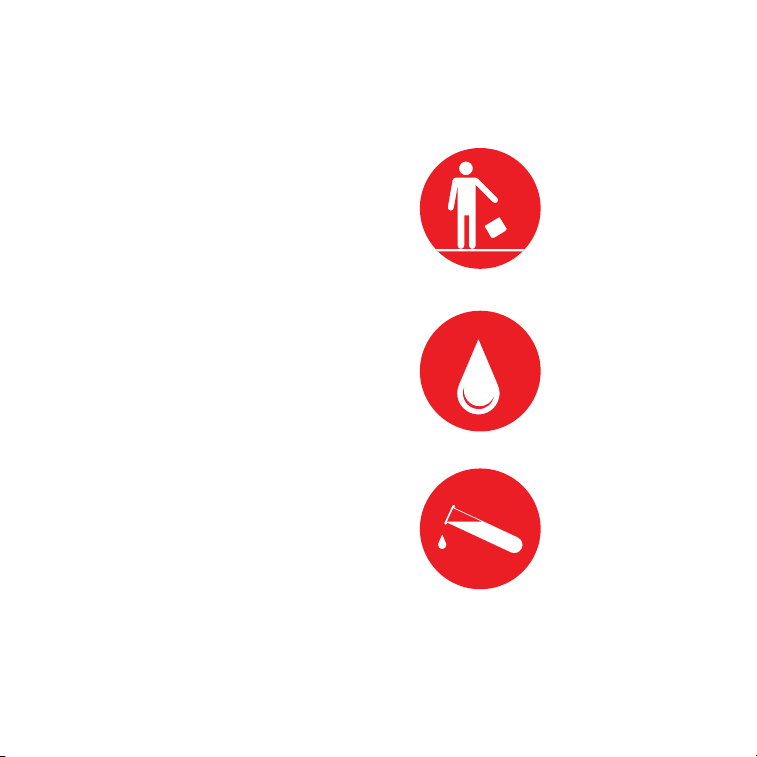
Damage
The following may cause damage to your X3C unit:
Physical impact
Internal water damage
Solvent chemicals
37
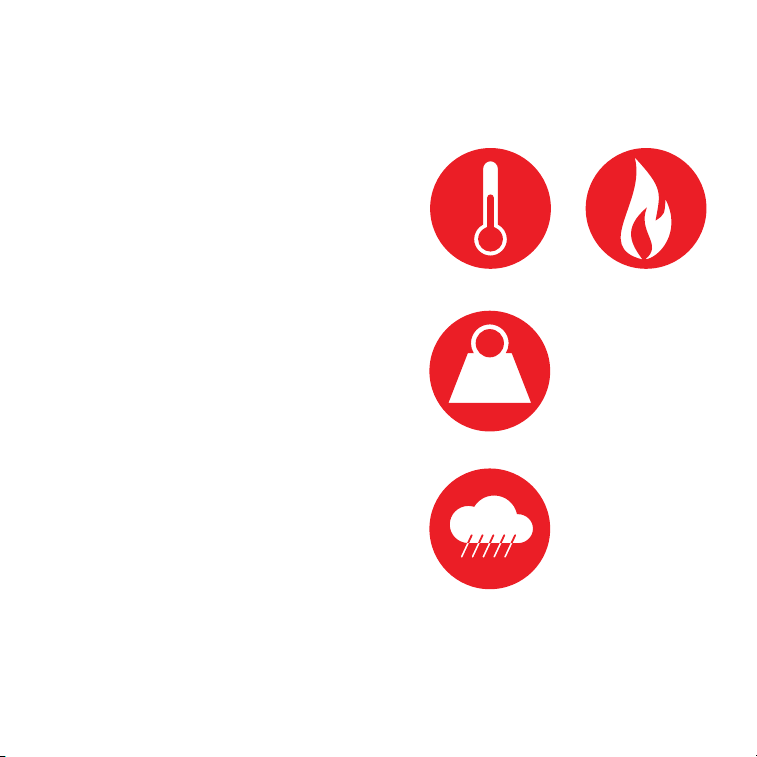
lb
Heat and flames
Excessive weight loading
Moisture and liquids
38
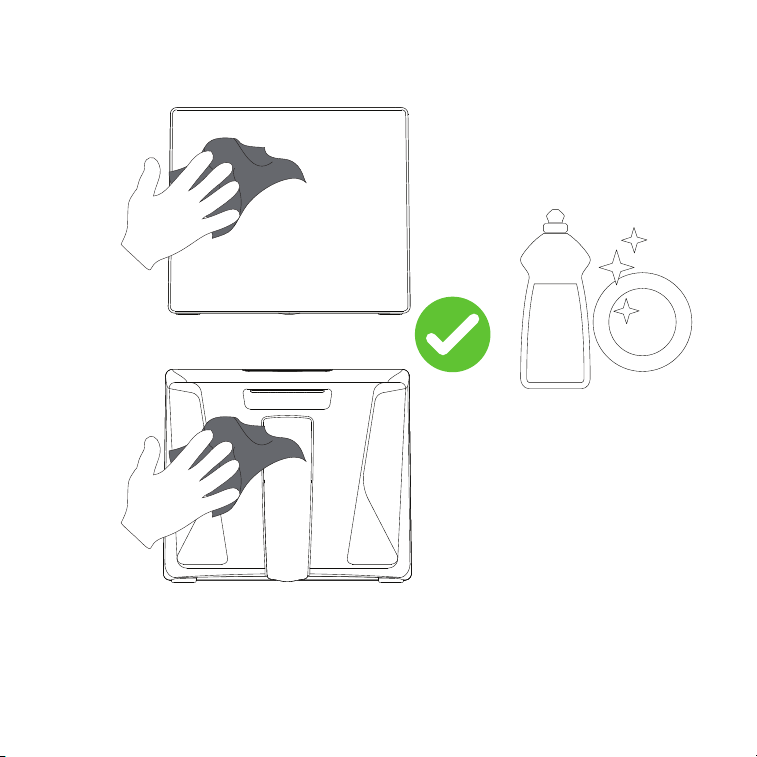
Use a soft damp cloth to clean the sensor including the feet every time after
use to remove dirt.
Cleaning
39

Troubleshooting
Symptom Possible cause and remedy
Unit does not switch on Make sure that the battery is charged, or
otherwise connected to a main power
source with the AC adapter. Make sure
the leg is extended.
Low battery run time Rechargeable batteries lose capacity over
time. If your batteries have become too
poor to use, contact FlightScope Support
for a new battery.
Batteries run down Make sure to charge batteries for 8-10
hours until full. When stored for a length
of time, batteries will lose charge due to
self-discharge. If a unit has not been used
for a while, it is recommended to first
charge the batteries or run it with the AC
power adapter.
40

Symptom Possible cause and remedy
Shot is not displayed Check that the correct mode e.g. ‘Indoor’
or ‘Outdoor’, is selected.
Check that the sensor is switched on and
positioned correctly behind the tee from
which the shot is played.
Ensure that your PC/Tablet and the sensor
is set up and connected.
Sensor not connecting/ed Make sure that the sensor is switched on,
and check that the communications
indicator is flashing.
Check the cable connection, as applicable.
Use the PC or Tablet’s Setup Wizard or
Connection tools to connect to the X3C, if
not connected.
41
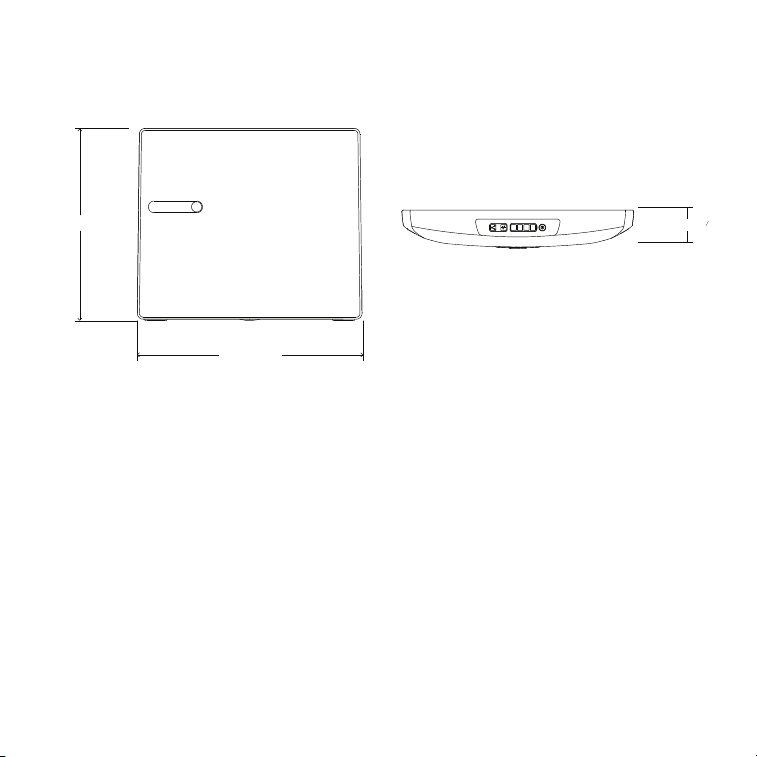
Dimensions: 307 x 263 x 49 mm (W x H x D)
12” x 10” x 17/8”
Mass: 3kg
6 lbs. 10 oz.
Operating tilt: Normal play: 4 degrees
Short game: 2 degrees
Tilt/roll adjustment range: +/- 3 degrees
Ambient temperature: 0ºC to 40ºC (32ºF to 104ºF) (operating)
-10ºC to 55ºC (-14ºF to 130ºF) (non-operating)
Ingress protection: IP53 / NEMA-3
Physical Specifications
307mm / 12”
49mm / 1 ”
7
8
263mm / 10”
42

Electrical Specifications
RF Section
Detection method Low power Doppler speed measurement
Operating frequency Fixed frequencies pre-set in band
10.500 to 10.550 GHz
Transmitter power 10 mW (10 dBm) typical
Carrier/ Modulation CW/None (Emission designator: N0N)
Antenna gain 17 dBi
Antenna beam 25 degrees (vertical) ; 20 degrees (horizontal)
Electromagnetic Compatibility
FCC Class 15, Industry Canada
Communications
Wi-Fi (IEEE 802.11b/g)
USB 2.0
Power Supply
Supply input (AC adapter): 100-240 Vac / 0.2 A / 50/60Hz 1ф
Output (AC adapter): 11-13 V dc ; 3.3A max ; 40W max
Battery: 7.4 V / 13500 mA-h
FlightScope reserves the right to change specifications at any time without notice.
43

Notes:
44

45

MY SERIAL NUMBER:
PURCHASE DATE:
46
myflightscope.com