Operating / Safety Instructions
Consignes d’utilisation / de sécurité
Instrucciones de funcionamiento y seguridad
Call Toll Free for Consumer Information & Service Locations
Pour obtenir des informations et les adresses de nos centres de service après-vente, appelez ce numéro gratuit
Llame gratis para obtener información para el consumidor y ubicaciones de servicio
For English Version
See page 2
●
Version française
Voir page 24
●
Versión en español
Ver la página 46
IMPORTANT
Read Before Using
●
IMPORTANT
Lire avant usage
●
IMPORTANTE
Leer antes de usar
1-877-BOSCH99 (1-877-267-2499) www.boschtools.com
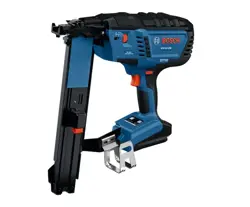
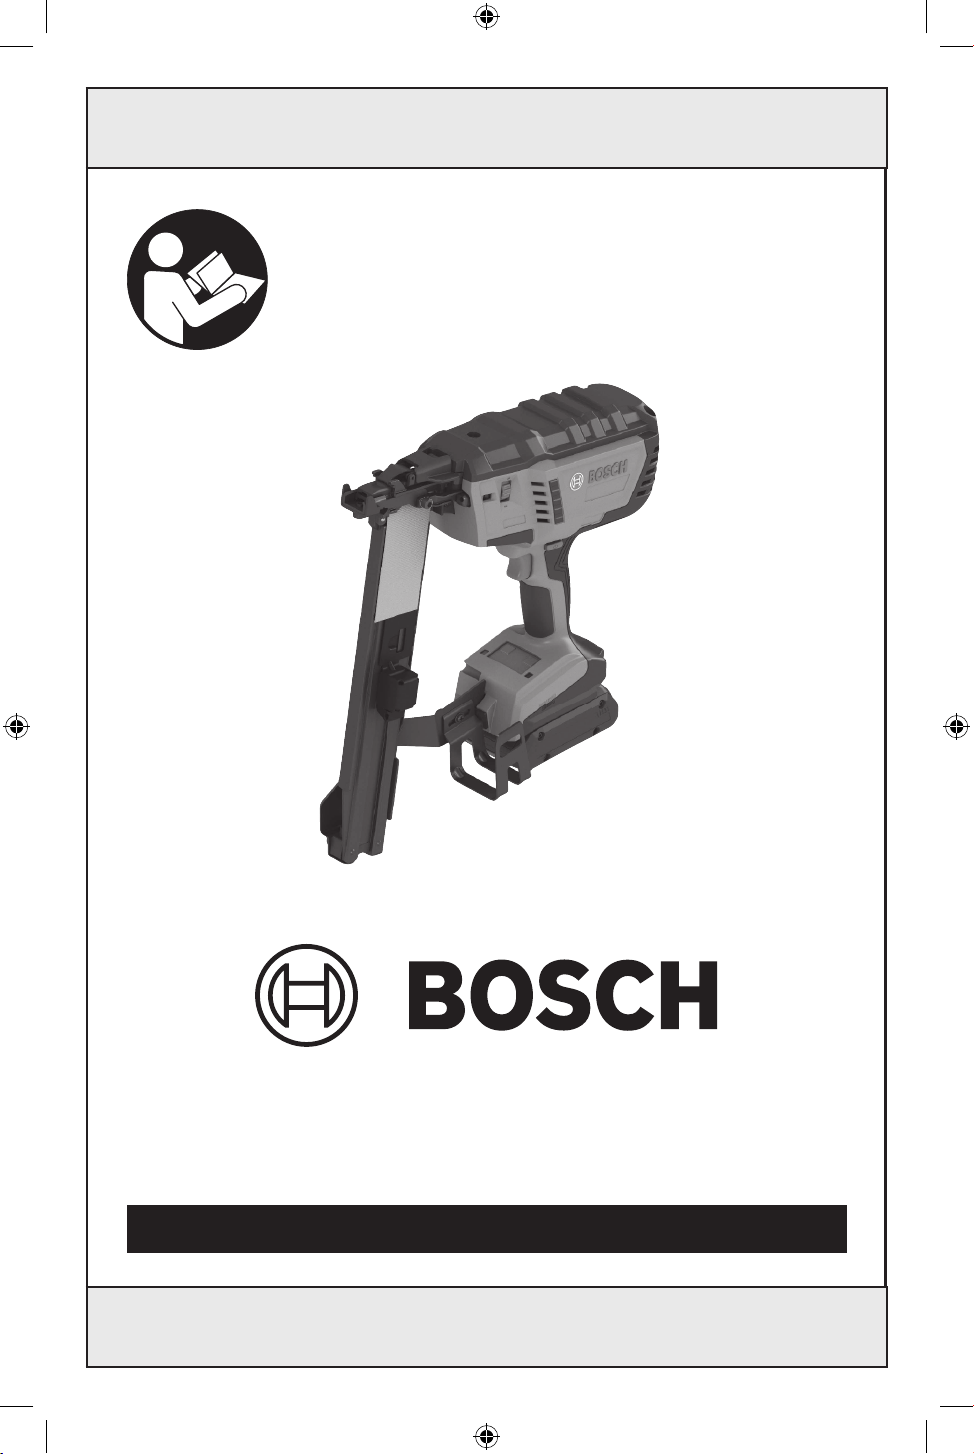
GTH18V-50M
160992AB5S_GTH18V-50M_20241210.indd 1160992AB5S_GTH18V-50M_20241210.indd 1 12/13/2024 11:51:27 AM12/13/2024 11:51:27 AM
2
Safety Symbols
The definitions below describe the level of severity for each signal word.
Please read the manual and pay attention to these symbols.
This is the safety alert symbol. It is used to alert you to po-
tential personal injury hazards. Obey all safety messages that
follow this symbol to avoid possible injury or death.
DANGER indicates a hazardous situation which, if not avoided,
will result in death or serious injury.
WARNING indicates a hazardous situation which, if not avoided,
could result in death or serious injury.
CAUTION indicates a hazardous situation which, if not avoided,
could result in minor or moderate injury.
Table of Contents
General Power Tool Safety Warnings ....3
Cordless Stapler Safety Warning .......5
Additional Safety Warnings ...........5
Disposal .......................7
Intended Use ......................7
Symbols..........................8
Getting to Know Your GTH18V-50M
Medium Crown Stapler............9
Specications ....................10
Assembly ........................11
Inserting and Removing
the Battery Pack .............11
Utility Hook ...................11
Workpiece Contact ..............12
Operation .......................13
Daily Inspection and Testing .......13
Loading and Unloading
the Magazine................13
On/Off Button .................15
User Interface ..................15
Depth of Drive Adjustment ........16
Built-in Work Light ..............16
Stapler Actuation ...............17
Maintenance .....................19
General Maintenance ............19
Service .......................19
Cleaning......................19
Repairs.......................19
Troubleshooting...................20
Jam Clearing ..................20
160992AB5S_GTH18V-50M_20241210.indd 2160992AB5S_GTH18V-50M_20241210.indd 2 12/13/2024 11:51:27 AM12/13/2024 11:51:27 AM

3
General Power Tool Safety Warnings
Read all safety warnings, instructions, illustrations and specications
provided with this power tool. Failure to follow all instructions listed
below may result in electric shock, re and/or serious injury.
SAVE ALL WARNINGS AND INSTRUCTIONS FOR FUTURE REFERENCE.
The term "power tool" in the warnings refers to your mains-operated (corded) power tool or
battery operated (cordless) power tool
1. Work area safety
a. Keep work area clean and well lit. Clut-
tered or dark areas invite accidents.
b. Do not operate power tools in explo-
sive atmospheres, such as in the pres-
ence of ammable liquids, gases or
dust. Power tools create sparks which
may ignite the dust or fumes.
c. Keep children and bystanders away
while operating a power tool. Distrac-
tions can cause you to lose control.
2. Electrical safety
a. Power tool plugs must match the
outlet. Never modify the plug in any
way. Do not use any adapter plugs
with earthed (grounded) power tools.
Unmodied plugs and matching outlets
will reduce risk of electric shock.
b. Avoid body contact with earthed or
grounded surfaces, such as pipes, ra-
diators, ranges and refrigerators. There
is an increased risk of electric shock if
your body is earthed or grounded.
c. Do not expose power tools to rain or
wet conditions. Water entering a power
tool will increase the risk of electric
shock.
d. Do not abuse the cord. Never use the
cord for carrying, pulling or unplugging
the power tool. Keep cord away from
heat, oil, sharp edges or moving parts.
Damaged or entangled cords increase
the risk of electric shock.
e. When operating a power tool outdoors,
use an extension cord suitable for
outdoor use. Use of a cord suitable for
outdoor use reduces the risk of electric
shock.
f. If operating a power tool in a damp
location is unavoidable, use a Ground
Fault Circuit Interrupter (GFCI) pro-
tected supply. Use of a GFCI reduces
the risk of electric shock.
3. Personal safety
a. Stay alert, watch what you are doing
and use common sense when operating
a power tool. Do not use a power tool
while you are tired or under the inu-
ence of drugs, alcohol or medication.
A moment of inattention while operat-
ing power tools may result in serious
personal injury.
b. Use personal protective equipment.
Always wear eye protection. Protective
equipment such as a dust mask, non-
skid safety shoes, hard hat or hearing
protection used for appropriate condi-
tions will reduce personal injuries.
c. Prevent unintentional starting. Ensure
the switch is in the off-position before
connecting to power source and/or
battery pack, picking up or carrying
the tool. Carrying power tools with your
nger on the switch or energizing power
tools that have the switch on invites
accidents.
d. Remove any adjusting key or wrench
before turning the power tool on. A
wrench or a key left attached to a rotat-
ing part of the power tool may result in
personal injury.
e. Do not overreach. Keep proper footing
and balance at all times. This enables
better control of the power tool in unex-
pected situations.
f. Dress properly. Do not wear loose
clothing or jewelry. Keep your hair
and clothing away from moving parts.
Loose clothes, jewelry or long hair can
be caught in moving parts.
g. If devices are provided for the connec-
tion of dust extraction and collection
SAVE THESE INSTRUCTIONS
160992AB5S_GTH18V-50M_20241210.indd 3160992AB5S_GTH18V-50M_20241210.indd 3 12/13/2024 11:51:27 AM12/13/2024 11:51:27 AM
4
SAVE THESE INSTRUCTIONS
General Power Tool Safety Warnings
facilities, ensure these are connected
and properly used. Use of dust collec-
tion can reduce dust-related hazards.
h. Do not let familiarity gained from
frequent use of tools allow you to
become complacent and ignore tool
safety principles. A careless action can
cause severe injury within a fraction of
a second.
4. Power tool use and care
a. Do not force the power tool. Use the
correct power tool for your application.
The correct power tool will do the job
better and safer at the rate for which it
was designed.
b. Do not use the power tool if the switch
does not turn it on and off. Any power
tool that cannot be controlled with
the switch is dangerous and must be
repaired.
c. Disconnect the plug from the power
source and/or remove the battery pack,
if detachable, from the power tool
before making any adjustments, chang-
ing accessories, or storing power tools.
Such preventive safety measures reduce
the risk of starting the power tool ac-
cidentally.
d. Store idle power tools out of the reach
of children and do not allow persons
unfamiliar with the power tool or these
instructions to operate the power tool.
Power tools are dangerous in the hands
of untrained users.
e. Maintain power tools and accessories.
Check for misalignment or binding of
moving parts, breakage of parts and
any other condition that may affect the
power tool's operation. If damaged,
have the power tool repaired before
use. Many accidents are caused by
poorly maintained power tools.
f. Keep cutting tools sharp and clean.
Properly maintained cutting tools with
sharp cutting edges are less likely to
bind and are easier to control.
g. Use the power tool, accessories and
tool bits etc. in accordance with these
instructions, taking into account the
working conditions and the work to be
performed. Use of the power tool for
operations different from those intended
could result in a hazardous situation.
h. Keep handles and grasping surfaces
dry, clean and free from oil and grease.
Slippery handles and grasping surfaces
do not allow for safe handling and con-
trol of the tool in unexpected situations.
5. Battery tool use and care
a. Recharge only with the charger speci-
ed by the manufacturer. A charger that
is suitable for one type of battery pack
may create a risk of re when used with
another battery pack.
b. Use power tools only with specically
designated battery packs. Use of any
other battery packs may create a risk of
injury and re.
c. When battery pack is not in use, keep
it away from other metal objects, like
paper clips, coins, keys, nails, screws
or other small metal objects, that can
make a connection from one terminal
to another. Shorting the battery termi-
nals together may cause burns or a re.
d. Under abusive conditions, liquid may
be ejected from the battery; avoid
contact. If contact accidentally occurs,
ush with water. If liquid contacts
eyes, additionally seek medical help.
Liquid ejected from the battery may
cause irritation or burns.
e. Do not use a battery pack or tool
that is damaged or modied. Dam-
aged or modied batteries may exhibit
unpredictable behavior resulting in re,
EXPLOSION or risk of injury.
f. Do not expose a battery pack or tool to
re or excessive temperature. Expo-
sure to re or temperature above 265°F
(130°C) may cause explosion.
g. Follow all charging instructions and do
not charge the battery pack or tool out-
side the temperature range specied
in the instructions. Charging improperly
or at temperatures outside the speci-
ed range may damage the battery and
increase the risk of re.
160992AB5S_GTH18V-50M_20241210.indd 4160992AB5S_GTH18V-50M_20241210.indd 4 12/13/2024 11:51:27 AM12/13/2024 11:51:27 AM

5
SAVE THESE INSTRUCTIONS
General Power Tool Safety Warnings
Cordless Stapler Safety Warning
a. Always assume that the tool contains
fasteners. Careless handling of the tool
can result in unexpected ring of fasten-
ers and personal injury.
b. Do not point the tool towards yourself
or anyone nearby. Unexpected trigger-
ing will discharge the fastener causing
an injury.
c. Do not actuate the tool unless the tool
is placed rmly against the workpiece.
If the tool is not in contact with the
workpiece, the fastener may be deect-
ed away from your target.
d. Disconnect the tool from the power
source when the fastener jams in the
tool. While removing a jammed fastener,
the stapler may be accidentally activated
if it is plugged in.
e. Use caution while removing a jammed
fastener. The mechanism may be under
compression and the fastener may be
forcefully discharged while attempting to
free a jammed condition.
f. Do not use this tacker for fastening
electrical cables. It is not designed
for electric cable installation and may
damage the insulation of electric cables
thereby causing electric shock or re
hazards.
Additional Safety Warnings
Do not re fasteners into walls or oors
without assuring the area on the opposite
side is clear. A fastener could travel through
the work surface, causing property damage
or injury.
Do not drive fasteners into walls, oors,
or other work areas without knowing what
may be damaged by the driven fastener.
Fasteners driven into live electrical wires,
plumbing, gas piping, or other types of ob-
structions can result in electrocution, explo-
sion, personal injury and/or property dam-
age.
Hold the power tool by identied insulat-
ed gripping surfaces when performing an
operation where the fastener may contact
hidden wiring. Fasteners contacting a “live”
wire may make exposed metal parts of the
power tool “live” and result in electric shock
or electrocution.
Do not tamper with, remove, or cause sta-
pler operating controls to become inopera-
ble. Missing or improperly operating stapler
controls can cause unexpected actuation
and personal injury.
Never keep a nger on the trigger when
not driving fasteners or carrying the tool.
Carry the tool only by the handle. Keeping a
nger on the trigger when carrying the tool,
or when not driving fasteners can result in
unintentional triggering and personal injury.
When loading fasteners ensure that the
fastener heads align with the nosepiece of
the tool. If fasteners are not aligned with the
nosepiece, tool may jam or misre causing
property damage or injury.
6. Service
a. Have your power tool serviced by a
qualied repair person using only
identical replacement parts. This will
ensure that the safety of the power tool
is maintained.
b. Never service damaged battery packs.
Service of battery packs should only
be performed by the manufacturer or
authorized service providers.
160992AB5S_GTH18V-50M_20241210.indd 5160992AB5S_GTH18V-50M_20241210.indd 5 12/13/2024 11:51:27 AM12/13/2024 11:51:27 AM
6
Additional Safety Warnings
SAVE THESE INSTRUCTIONS
Use only the fasteners meeting the criteria
listed in the “Specication” section of this
manual. Fasteners not identied for use with
this tool can cause the tool to malfunction
and result in the risk of injury and/or tool
damage.
Keep hands and feet at least 8 inches
(200mm) away from the nosepiece of the
tool during use. Fasteners may deect and
cause property damage or personal injury.
Do not drive a fastener on top of another
fas tener. This could cause the fastener to be
de ected or the tool to react in an unexpect-
ed manner causing injury.
Do not engage in horseplay. The discharged
fasteners are projectiles capable of causing
serious injury.
Never actuate the stapler unless it is per-
pendicular to the workpiece surface and
the workpiece surface is free of debris.
The fastener may be deected if the stapler
is not in proper contact with the workpiece
resulting in property damage or personal in-
jury.
Do not drive fasteners into unsuitable ma-
terials. Materials that are too hard can cause
the fastener to deect. Brittle materials can
crumble and allow the fastener to break
through. Materials that are too soft can al-
low the fastener to break through. These
conditions can result in property damage or
serious personal injury.
Do not pull the trigger or depress the nose-
piece when loading the stapler. Pulling the
trigger or depressing the nosepiece may
cause misring of the tool resulting in per-
sonal injury and property damage.
Do not use the utility hook or its mounting
location for tether attachments. The util-
ity hook and its mounting location are not
intended to support tethering loads.
Do not use the utility hook if it appears
damaged or deformed. A damaged or de-
formed utility hook may result in unstable
hanging and the tool unexpectedly falling,
causing property damages and personal in-
jury.
Never wedge the nosepiece between two
or more surfaces. Gap between the nose-
piece and multiple work surfaces may allow
deection of the fastener and property dam-
age or personal injury.
Never hold back the nosepiece during op-
eration. Holding the nosepiece back can re-
sult in unexpected actuation and may cause
property damage or serious injury.
Never position your face or body directly
over the stapler during operation. Sudden
recoil can result in impact to the body and
injury.
Do not operate the stapler if it does not
pass daily inspection and testing. Operat-
ing a stapler that does not pass the daily in-
spection and testing may result in property
damage and personal injury.
To reduce the risk of injury, always wear
safety goggles or glasses with side shields.
The operator and other people in the work
area must wear eye protection in accordance
with ANSI Z87.1. Eye protection does not t
all operators in the same way. Make sure
the eye protection chosen has side shields
or provides protection from ying debris
both from the front and sides. The employer
is responsible for enforcing the use of eye
protection by the operator and other people
in the work area. When required, wear head
protection in accordance with ANSI Z89.1.
Some dust created by
power sanding, sawing,
grinding, drilling, and other construction
activities contains chemicals known to
cause cancer, birth defects or other repro-
ductive harm. Some examples of these
chemicals are:
• Lead from lead-based paints,
• Crystalline silica from bricks and ce-
ment and other masonry products, and
• Arsenic and chromium from chemically-
treated lumber.
Your risk from these exposures varies, de-
pending on how often you do this type of
work. To reduce your exposure to these
chemicals: work in a well ventilated area,
and work with approved safety equipment,
such as those dust masks that are specially
designed to lter out microscopic particles.
160992AB5S_GTH18V-50M_20241210.indd 6160992AB5S_GTH18V-50M_20241210.indd 6 12/13/2024 11:51:27 AM12/13/2024 11:51:27 AM

7
Intended Use
Additional Safety Warnings
Use this stapler only as intended. Unintended use may result in personal
injury or property damage.
SAVE THESE INSTRUCTIONS
Disposal
This section is part of Robert Bosch Tool
Corporation’s commitment to preserving our
environment and conserving our natural re-
sources.
Tool Disposal
Do not dispose of power tools and batter-
ies/rechargeable batteries into household
waste!
Battery Disposal
Do not attempt to disassemble the battery
or remove any components projecting from
the battery terminals. Fire or injury may re-
sult. Prior to disposal, protect exposed ter-
minals with heavy insulating tape to prevent
shorting.
Lithium-Ion Batteries
If equipped with a lithium-ion battery, the
battery must be collected, recycled, or dis-
posed of in an environmentally sound man-
ner.
The EPA certied RBRC
Battery Recycling Seal on
the lithium-ion (Li-ion)
battery indicates Robert
Bosch Tool Corporation is
voluntarily participating in
an industry program to col-
lect and recycle these batteries at the end of
their useful life, when taken out of service
in the United States or Canada. The RBRC
program provides a convenient alternative to
placing used Li-ion batteries into the trash
or the municipal waste stream, which may
be illegal in your area.
Please call 1-800-8-BATTERY for informa-
tion on Li-ion battery recycling and disposal
bans/restrictions in your area or return your
batteries to a Bosch/Dremel Service Center
for recycling. Robert Bosch Tool Corpora-
tion’s involvement in this program is part of
our commitment to preserving our environ-
ment and conserving our natural resources.
This is a hand-held, cordless, single sequen-
tial or contact (bump) operated fastening
tool. It is designed to drive specially man-
ufactured fasteners into wood and wood
products.
Use only compatible fasteners according to
the manufacturer's instructions. See “Speci-
cations” table on page 10.
This tool is not intended for electrical cable
installation.
160992AB5S_GTH18V-50M_20241210.indd 7160992AB5S_GTH18V-50M_20241210.indd 7 12/13/2024 11:51:28 AM12/13/2024 11:51:28 AM
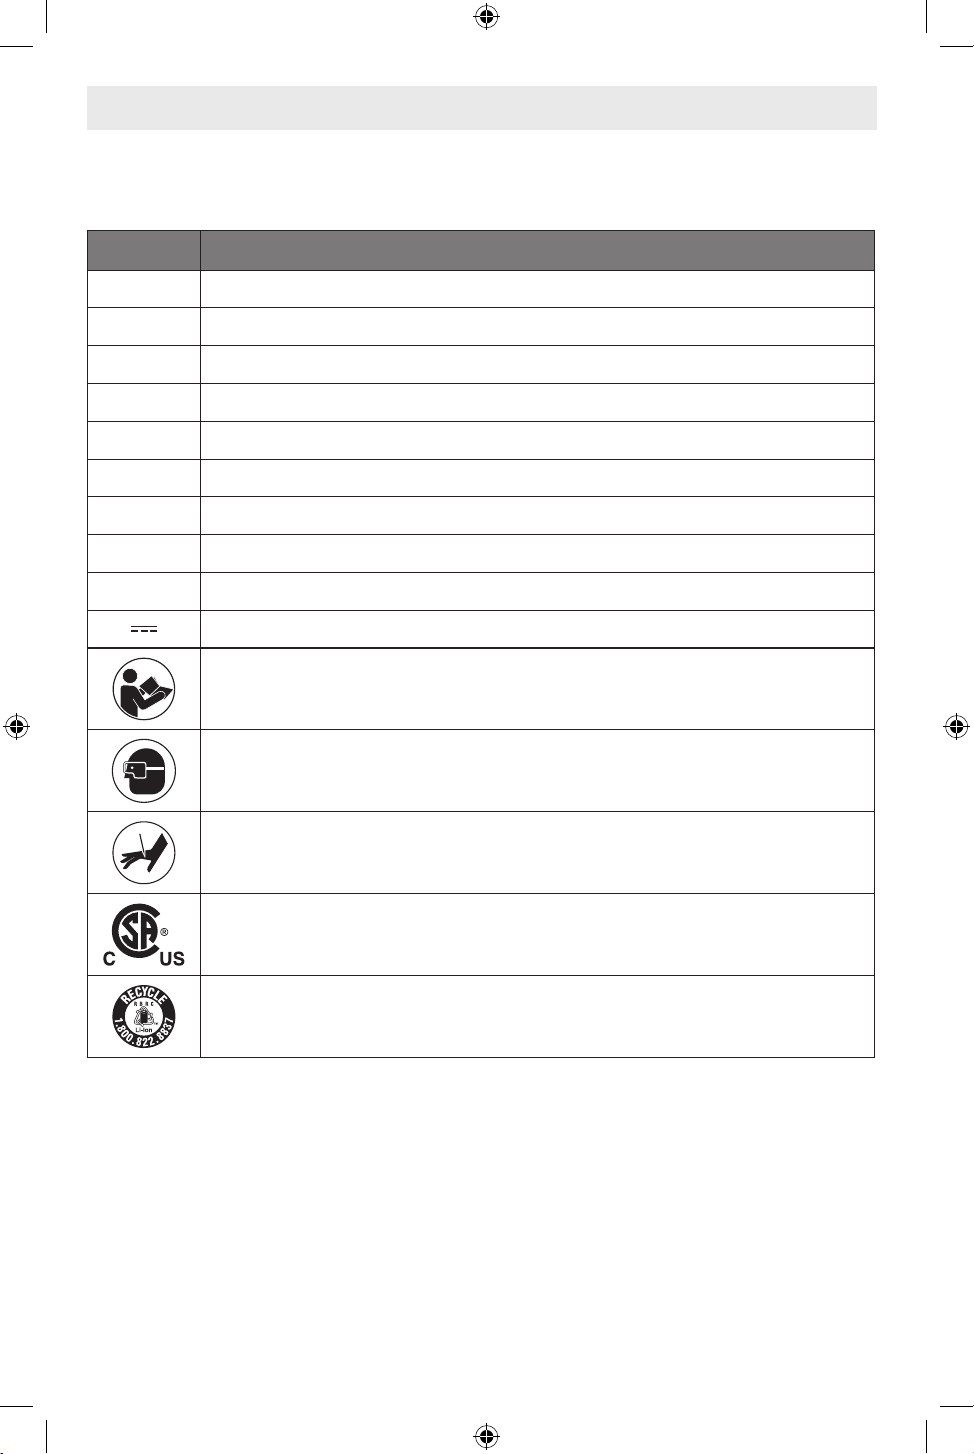
8
Symbols
Important: Some of the following symbols may be used on your tool. Please study them and
learn their meaning. Proper interpretation of these symbols will allow you to operate the
tool better and safer.
Symbol Designation/Explanation
V Volts (voltage)
A Amperes (current)
Hz Hertz (frequency, cycles per second)
W Watt (power)
min Minutes (time)
s Seconds (time)
mm Millimeters (dimension)
F Fahrenheit (temperature)
C Celsius (temperature)
Direct current (type or a characteristic of current)
Alerts user to read manual.
Alerts user to wear eye protection.
Alerts user to puncture hazard.
This symbol designates that this tool is listed by the Canadian Standards
Association, to United States and Canadian Standards.
Designates Li-ion battery recycling program.
160992AB5S_GTH18V-50M_20241210.indd 8160992AB5S_GTH18V-50M_20241210.indd 8 12/13/2024 11:51:28 AM12/13/2024 11:51:28 AM
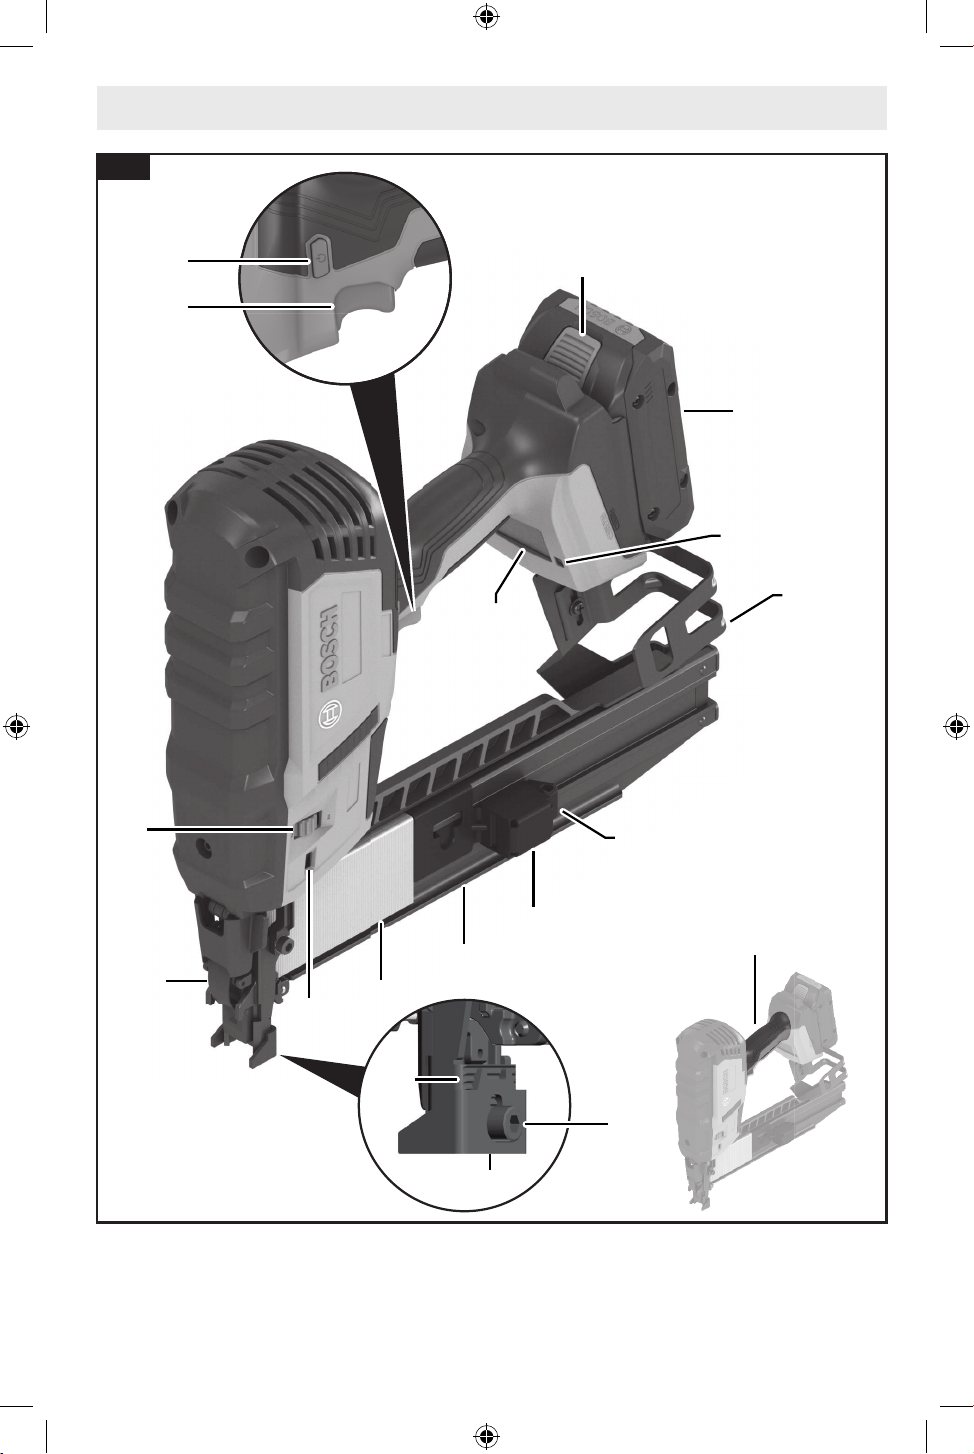
9
1
2
15
4
5
6
7
3
8
9
10
11
13
14
17
16
Fig. 1
Getting to Know Your GTH18V-50M Medium Crown Stapler
12
18
160992AB5S_GTH18V-50M_20241210.indd 9160992AB5S_GTH18V-50M_20241210.indd 9 12/13/2024 11:51:29 AM12/13/2024 11:51:29 AM
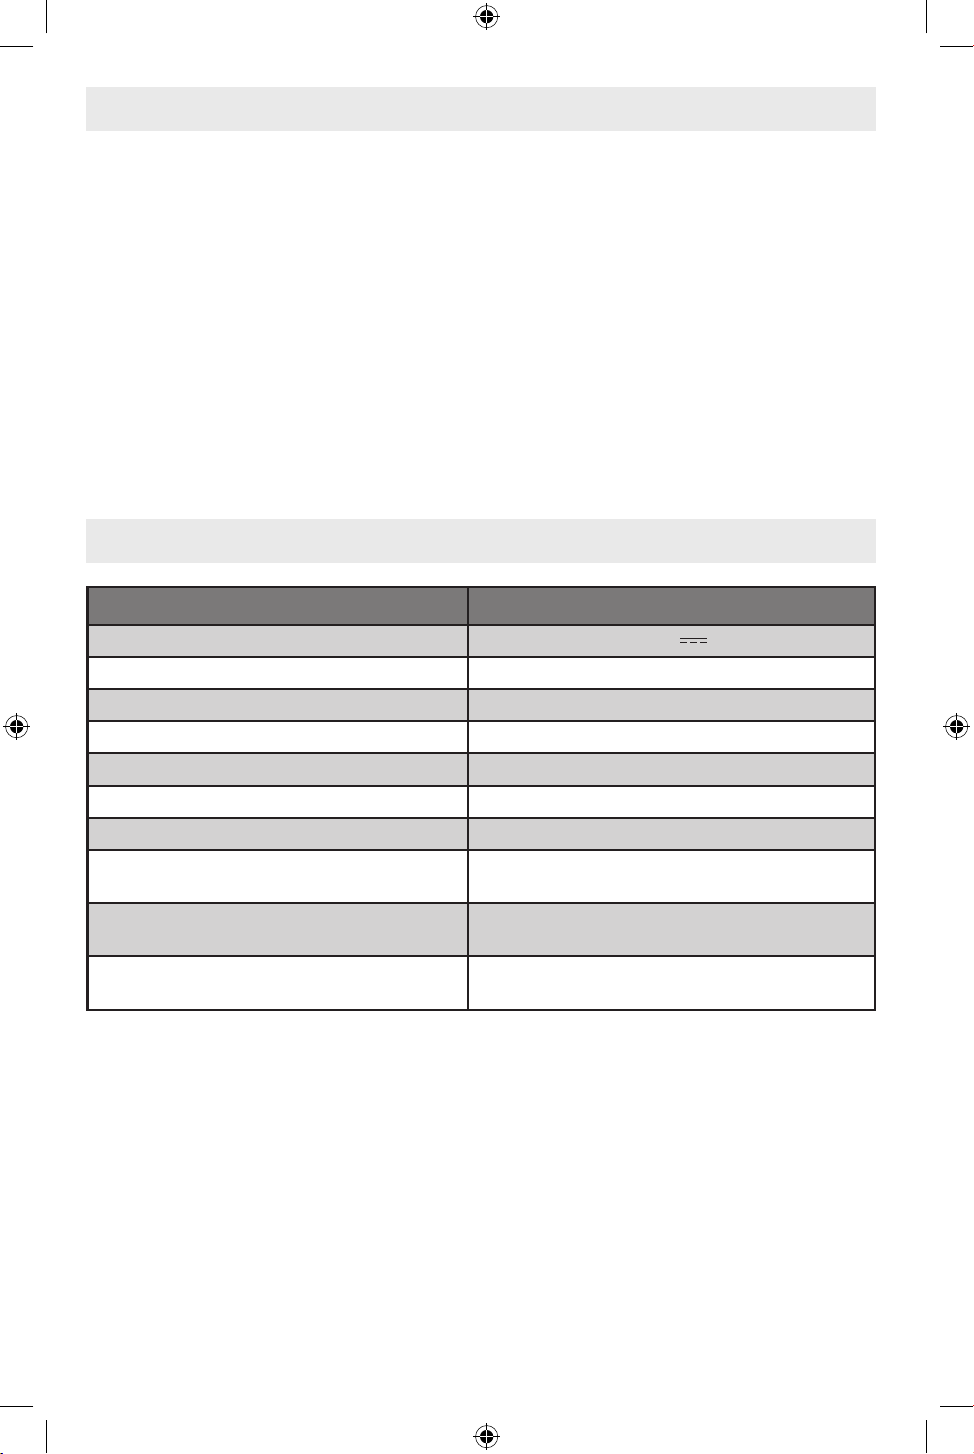
10
Getting to Know Your GTH18V-50M Medium Crown Stapler
1 Workpiece Contact
2 Workpiece Contact Screw
3 Depth Setting Indicator
4 Depth Setting Wheel
5 Trigger
6 On/Off Button
7 Battery Pack Release Button
8 Battery Pack*
9 User Interface
10 LED Work Light
11 Utility Hook
12 Magazine
13 Magazine Slider
14 Magazine Slider Release Lever
15 Nosepiece
16 Handle (insulated grip)
17 Jam Clear Latch
18 Fastener Strip*
Specifications
Model number GTH18V-50M
Voltage rating 18 V
Motor type DC Brushless
Collation angle 0°
Fastener crown width 7/16" (11 mm)
Fastener length range 1" - 2" (25 - 50 mm)
Fastener leg diameter 16 Gauge (1.6 mm)
Magazine capacity 150 Fasteners
Permitted battery temperature during
charging
+32…+113°F (0…+45°C)
Permitted ambient temperature during op-
eration** and storage
-4…+122°F (-20…+50°C)
Recommended ambient temperature dur-
ing charging
+32…+95°F (0…+35°C)
* Using Core18V battery packs 4.0 Ah, 8.0 Ah, 12 Ah
** Performance is limited at temperatures below +32°F (0°C).
Battery Packs/Chargers
Please refer to the battery/charger list included with your tool.
* Not included
160992AB5S_GTH18V-50M_20241210.indd 10160992AB5S_GTH18V-50M_20241210.indd 10 12/13/2024 11:51:29 AM12/13/2024 11:51:29 AM
11
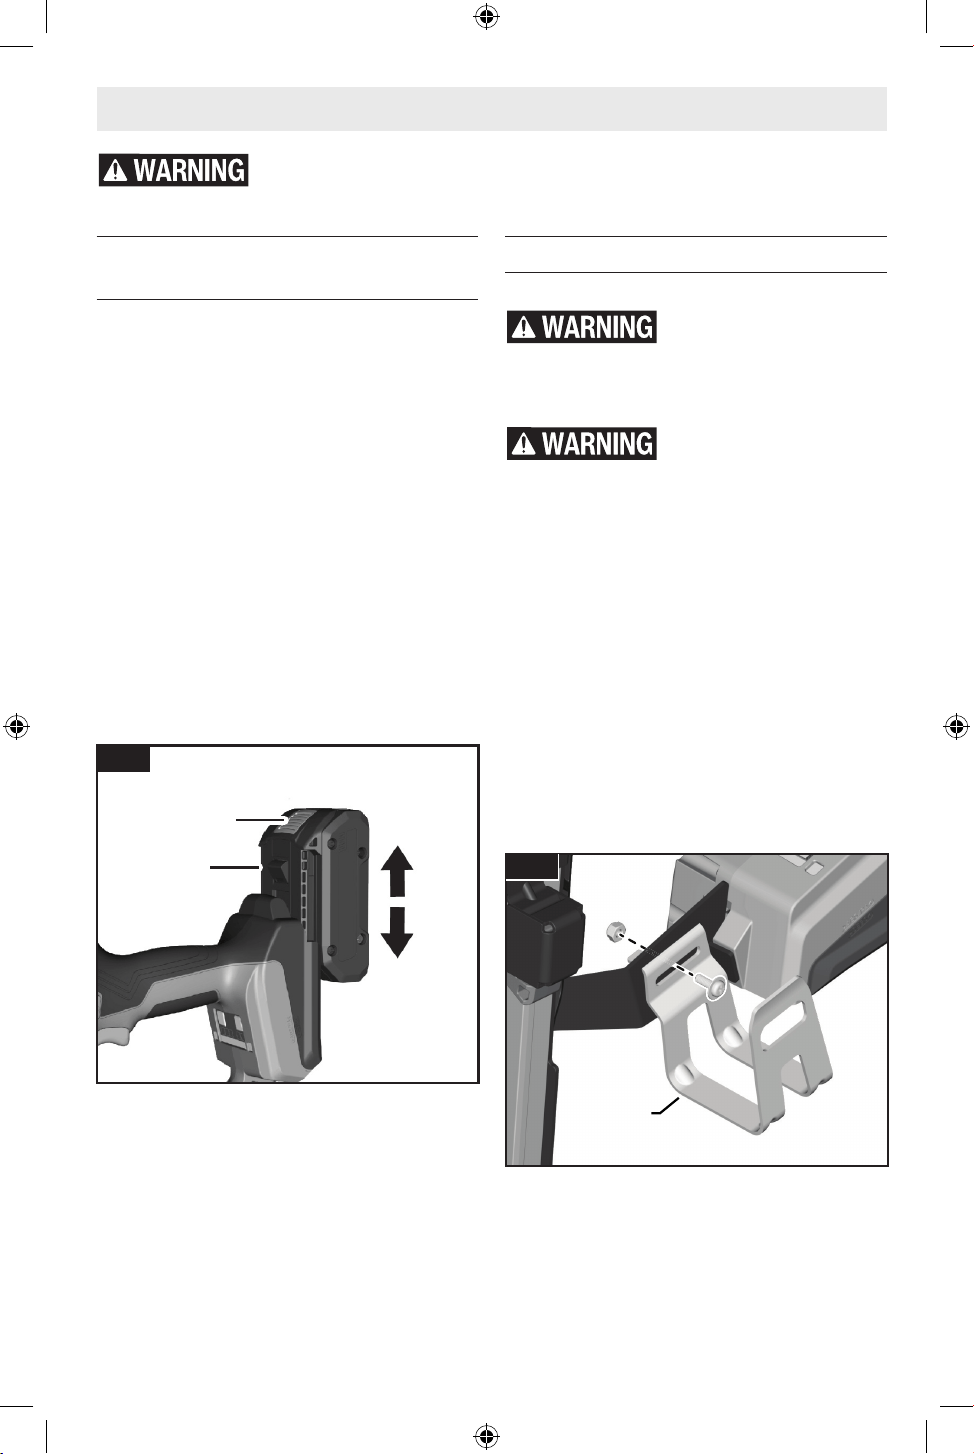
Inserting and Removing the
Battery Pack
(Fig. 2)
To Insert the Battery Pack
1. Slide charged Battery Pack 8 into the
housing until the battery pack locks into
position.
Your tool is equipped with a secondary lock-
ing latch to prevent the battery pack from
completely falling out of the handle, should
it become loose due to vibration.
To Remove the Battery Pack
1. Press the Battery Pack Release Button
7 and slide the Battery Pack 8 from the
housing.
2. Press the Battery Pack Release Button
7 again and slide the Battery Pack 8
completely out of tool housing.
Assembly
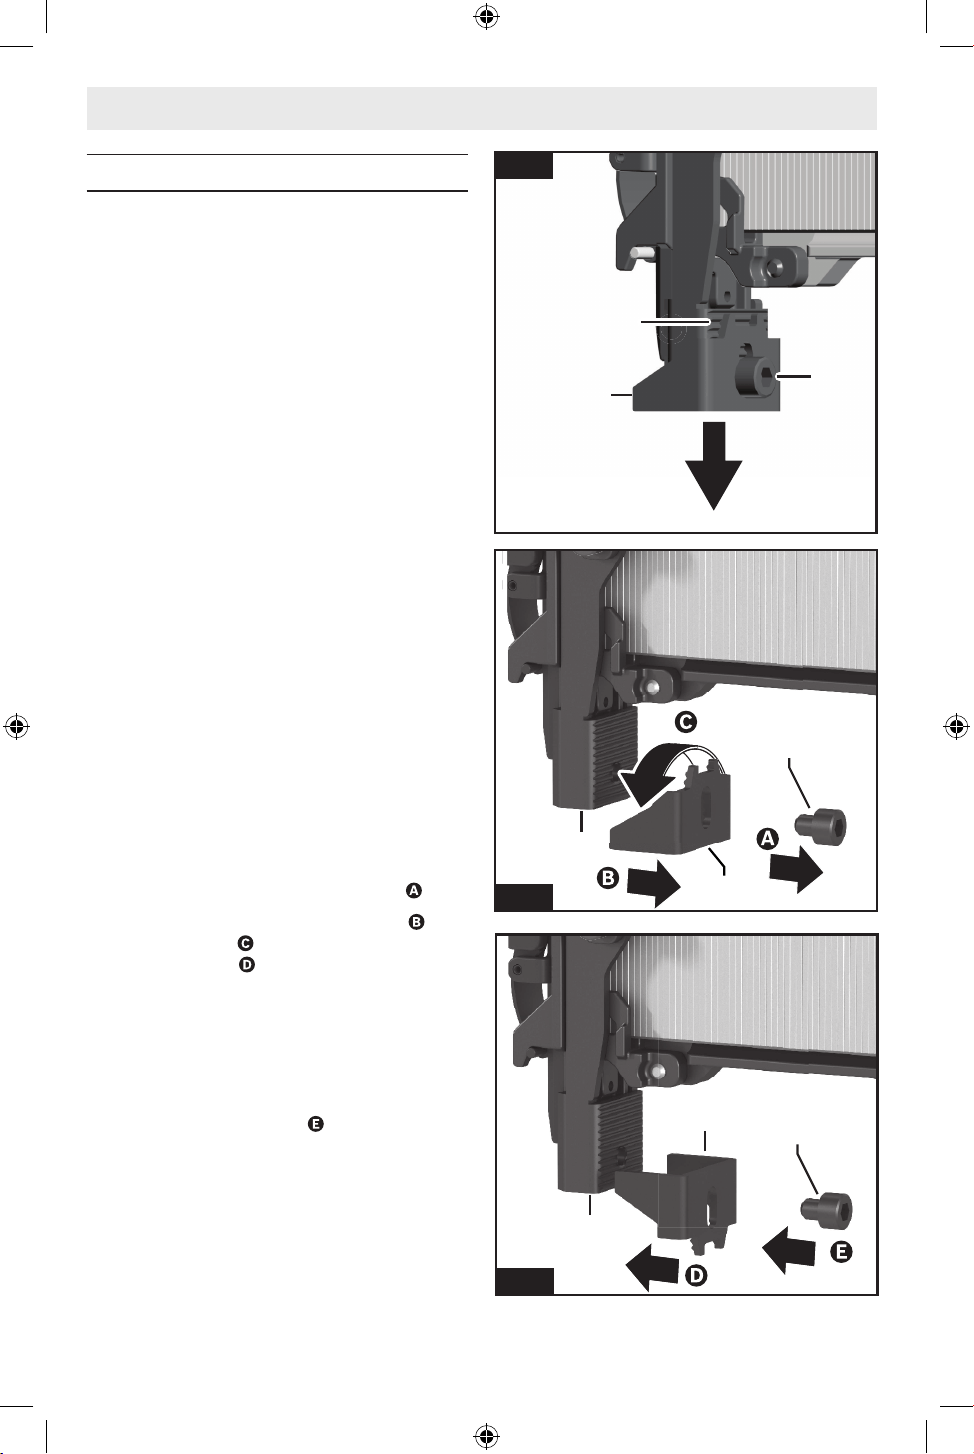
Utility Hook
(Fig. 3)
Do not use the utility
hook or its mounting lo-
cation for tether attachments. The utility
hook and its mounting location are not in-
tended to support tethering loads.
Do not use the utility
hook if it appears dam-
aged or deformed. A damaged or deformed
utility hook may result in unstable hanging
and the tool unexpectedly falling, causing
property damages and personal injury.
The stapler is equipped with a pre-installed
Utility Hook 11 which may be removed then
installed on the other side or removed com-
pletely from the stapler.
Removing the Utility Hook
Using a Phillips head screwdriver and a 7
mm wrench, remove the screw and nut hold-
ing the Utility Hook 11. The Utility Hook 11
may now be reassembled on the other side
of the stapler; ensure screw and nut are
properly tightened.
Disconnect battery pack from tool before assembly, adjustments, trou-
bleshooting or changing accessories. Such preventive safety measures
reduce the risk of starting the tool accidentally, which may result in personal injury.
7
8
Fig. 2
11
Fig. 3
160992AB5S_GTH18V-50M_20241210.indd 11160992AB5S_GTH18V-50M_20241210.indd 11 12/13/2024 11:51:30 AM12/13/2024 11:51:30 AM
12
15
1
2
Fig. 4
Fig. 5
Fig. 6
1
2
2
1
15
Assembly
Workpiece Contact
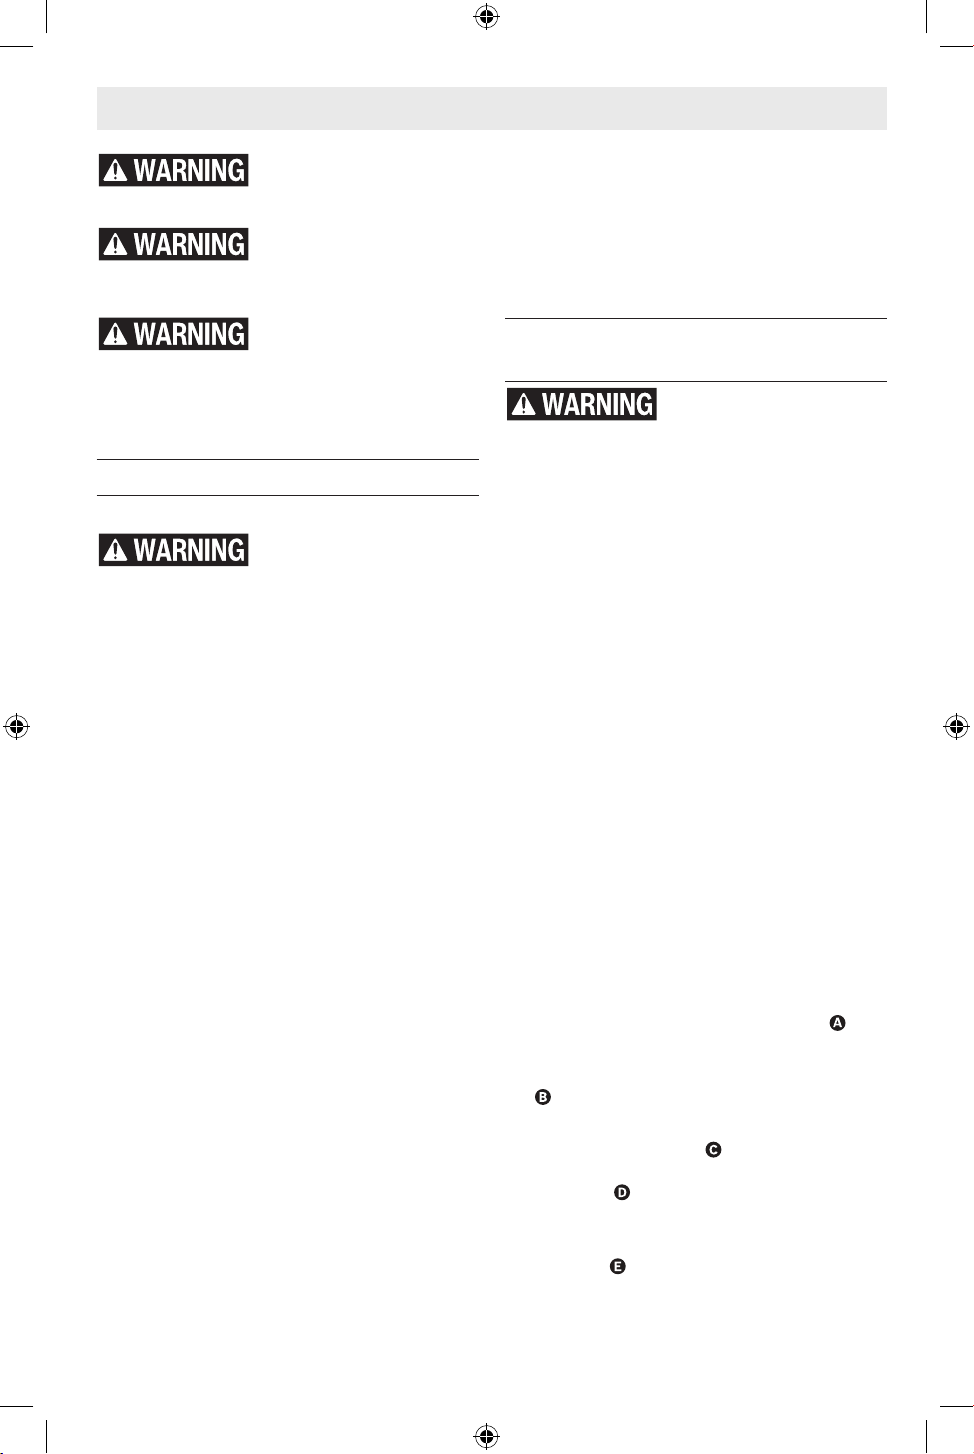
(Fig. 4, Fig. 5, Fig. 6)
Note: Extending and/or reversing the
position of the Workpiece Contact 1 will de-
crease the drive depth of the fastener; see
the "Depth of Drive Adjustment" section on
page 16 to adjust the setting.
Extending the Workpiece Contact
The Workpiece Contact 1 may be extended
out, up to a 1/4", to further decrease the
depth of drive. To adjust the extension of the
Workpiece Contact 1:
1. Loosen the Workpiece Contact Screw 2
using a 4 mm hex key.
2. Adjust the Workpiece Contact 1, forward
or backward, to the desired position;
engage the detents on the Workpiece
Contact 1 and the Nosepiece 15 for
secure positioning and alignment.
3. Retighten the Workpiece Contact Screw
2 using a 4 mm hex key.
Reversing the Position
The Workpiece Contact 1 features two ends:
a smooth end to minimize marring and a
pronged end to increase grip to the work-
piece when driving the fastener. To reverse
the Workpiece Contact 1:
1. Loosen and remove the Workpiece Con-
tact Screw using a 4 mm hex key .
2. Remove the Workpiece Contact 1 ,
rotate it 180° , and reinstall it onto the
Nosepiece 15 .
3. Reinstall the Workpiece Contact Screw
2, adjust the Workpiece Contact 1 to the
desired extension, engaging the detents
on the Workpiece Contact 1 and the
Nosepiece 15 for secure positioning and
alignment, then secure it tightly in place
using a 4 mm hex key .
15
160992AB5S_GTH18V-50M_20241210.indd 12160992AB5S_GTH18V-50M_20241210.indd 12 12/13/2024 11:51:32 AM12/13/2024 11:51:32 AM
13
Use personal protective
equipment. Always wear
eye protection. Protective equipment such
as a dust mask, non-skid safety shoes, hard
hat, or hearing protection used for appropri-
ate conditions will reduce personal injuries.
Daily Inspection and Testing
(Fig. 1)
Do not operate the sta-
pler if it does not pass
daily inspection and testing. Operating a
stapler that does not pass the daily inspec-
tion and testing may result in property dam-
age and personal injury.
1. Remove the Battery Pack 8 and all
staples from the Magazine 12.
2. Inspect all screws, bolts, nuts, and pins
on the stapler. Any loose fasteners must
be tightened.
3. Press the Workpiece Contact 1 against a
workpiece. It must move smoothly.
4. With the Workpiece Contact 1 pressed
against the workpiece, pull the Trigger
5.
5. Insert the Battery Pack 8, ensure there
are no staples in the Magazine 12, then
turn on the stapler.
6. Without pulling the Trigger 5, press the
Workpiece Contact 1 against a work-
piece.
7. Pull the Workpiece Contact 1 away from
the workpiece, allowing it to reset. Pull
the Trigger 5. The stapler must not oper-
ate, and the Status Indicator Display 19
will ash red.
8. Continue to pull and hold the Trigger
5 and push the Workpiece Contact 1
against a workpiece. The stapler must
not operate and the Status Indicator
Display 19 will ash red.
9. If inspections conrm proper operation,
the stapler is ready for use.
Loading and Unloading the
Magazine
Do not pull the Trigger
or depress the Work-
piece Contact when loading or unloading
the stapler. Pulling the Trigger or depress-
ing the Workpiece Contact may cause misr-
ing of the tool, resulting in personal injury
and property damage.
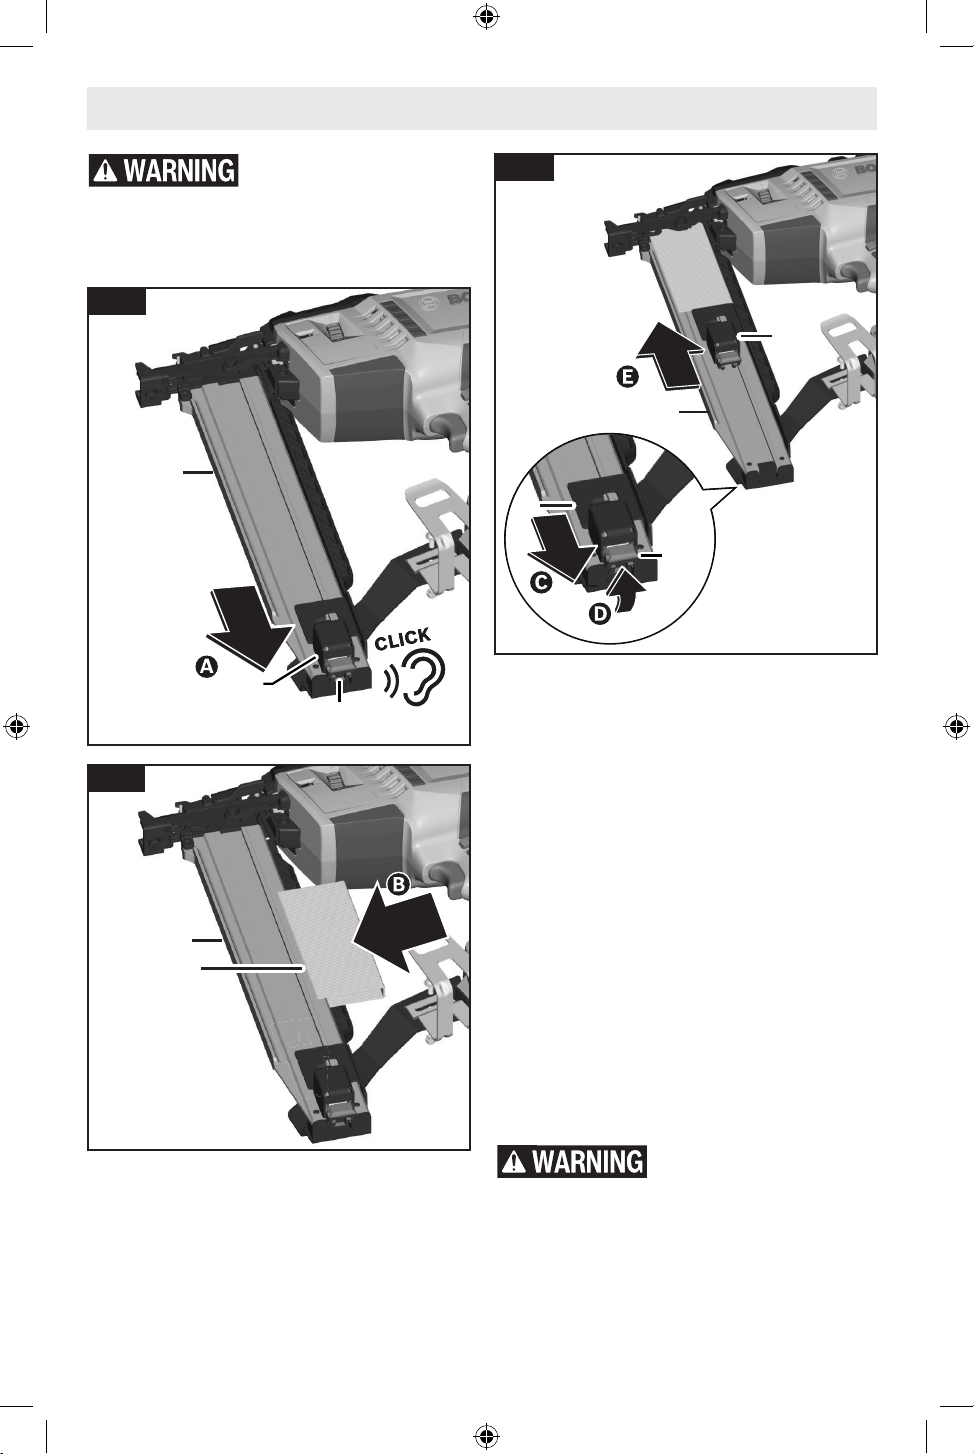
Loading the Magazine
(Fig. 7, Fig. 8, Fig. 9)
When loading the Magazine 12, check that
the Magazine Slider 13 slides smoothly.
If the Magazine Slider 13 does not slide
smoothly, fasteners can be driven at irregu-
lar angles or the stapler may blank-re.
Use Fastener Strips 18 that are unbroken
and have fasteners of the same designation.
1. Remove the Battery Pack 8.
2. Ensure that the Magazine 12 is free of
debris, such as a build-up of saw dust.
3. Position stapler onto a at stable sur-
face and pointed away from yourself and
bystanders.
4. Pull the Magazine Slider 13 to the end
of the Magazine 12 until the Magazine
Slider Release Lever 14 engages and the
Magazine Slider 13 locks in place .
5. Insert the collated Fastener Strip(s) 18
in through the rear of the Magazine 12
.
6. Pull the Magazine Slider 13 to the end
of the Magazine 12 , then pull back
and hold in the Magazine Slider Release
Lever 14 .
7. Slowly allow the Magazine Slider 13 to
spring back until it is resting on the last
fastener .
Always observe the following safety precautions in addition to the
safety instructions on pages 3 through 7. Failure to do so may
result in equipment damage, property damage, or personal injury.
Disconnect battery pack from tool before assembly, adjustments, trou-
bleshooting or changing accessories. Such preventive safety measures
reduce the risk of starting the tool accidentally, which may result in personal injury.
Operation
160992AB5S_GTH18V-50M_20241210.indd 13160992AB5S_GTH18V-50M_20241210.indd 13 12/13/2024 11:51:32 AM12/13/2024 11:51:32 AM
14
13
12
Fig. 7
Unloading the Magazine
(Fig. 7, Fig. 9)
1. Remove the Battery Pack 8.
2. Position stapler onto a at stable sur-
face and pointed away from yourself and
bystanders.
3. Pull the Magazine Slider 13 to the end
of the Magazine 12 until the Magazine
Slider Release Lever 14 engages and the
Magazine Slider 13 locks in place.
4. Remove the collated Fastener Strip(s)
18.
5. Pull the Magazine Slider 13 to the end
of the Magazine 12, then pull back and
hold in the Magazine Slider Release
Lever 14.
6. Slowly allow the Magazine Slider 13 to
spring back to the resting position.
Guide the Magazine Slid-
er by hand until it reach-
es full forward position. Free recoil of the
magazine slider can result in damage to the
slider, magazine, or cause personal injury.
Guide the Magazine Slid-
er by hand until it reach-
es full forward position. Free recoil of the
magazine slider can result in damage to the
slider, magazine, or cause personal injury.
Operation
Fig. 8
13
14
Fig. 9
12
18
13
14
12
160992AB5S_GTH18V-50M_20241210.indd 14160992AB5S_GTH18V-50M_20241210.indd 14 12/13/2024 11:51:33 AM12/13/2024 11:51:33 AM
15
Operation
6
Fig. 10
modes. The selection will be indicated by
either the Single Actuation Indicator 21 or
Bump Actuation Indicator 22.
Battery Low Indicator
The Battery Low Indicator 23 will only illu-
minate once the battery has reached 20%
charge or below. A yellow Battery Low Indi-
cator 23 signies that the battery is 1-20%
full. A red Battery Low Indicator 23 signies
that the battery is 0-1% full.
Regular and Major Service
Indicators
The Regular Service Due Indicator 24 or the
Major Service Due Indicator 25 will illumi-
nate when the stapler is ready for service. It
is recommended to return the stapler, bat-
tery pack and charger to a BOSCH service
facility for inspection and/or service.
Reset Button
The Reset Button 26 is used to reset the
stapler to a normal state after an abnormal
condition is corrected. To reset the stapler,
press and hold the Reset Button 26 for 3
seconds.
Consult the "Troubleshooting" on page 20
for further information on resetting the sta-
pler.
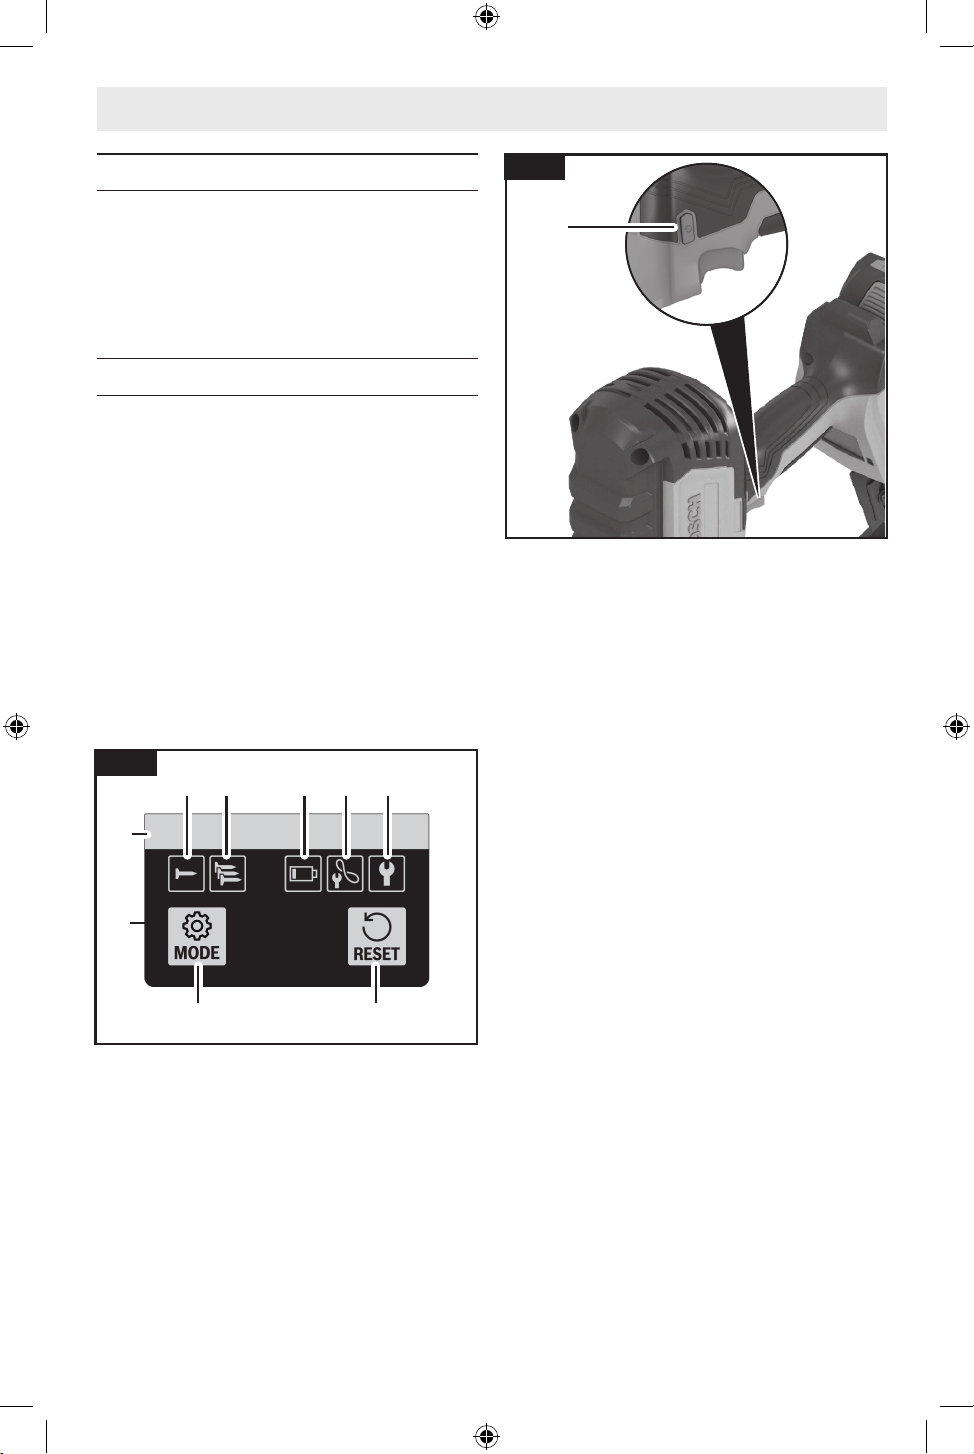
On/Off Button
(Fig. 10)
To switch on the stapler, press the On/Off
Button 6, and the User Interface 9 will turn
on.
To turn off the stapler, press the On/Off But-
ton 6.
User Interface
(Fig. 1, Fig. 11)
The User Interface 9 provides the following
functions:
• Status Indicator 19
• Mode Button 20
• Single Actuation Indicator 21
• Bump Actuation Indicator 22
• Battery Low Indicator 23
• Regular Service Due Indicator 24
• Major Service Due Indicator 25
• Reset Button 26
Status Indicator
The Status Indicator 19 shows the status of
the stapler. A green light indicates that the
stapler is ready for operation. In case the
Status Indicator 19 light color is not green,
consult the "Troubleshooting" on page 20
for further information.
Mode Button
Use the Mode Button 20 to toggle between
single actuation or bump actuation discharge
19
20
26
21 23 24 2522
Fig. 11
9
160992AB5S_GTH18V-50M_20241210.indd 15160992AB5S_GTH18V-50M_20241210.indd 15 12/13/2024 11:51:34 AM12/13/2024 11:51:34 AM
16
Operation
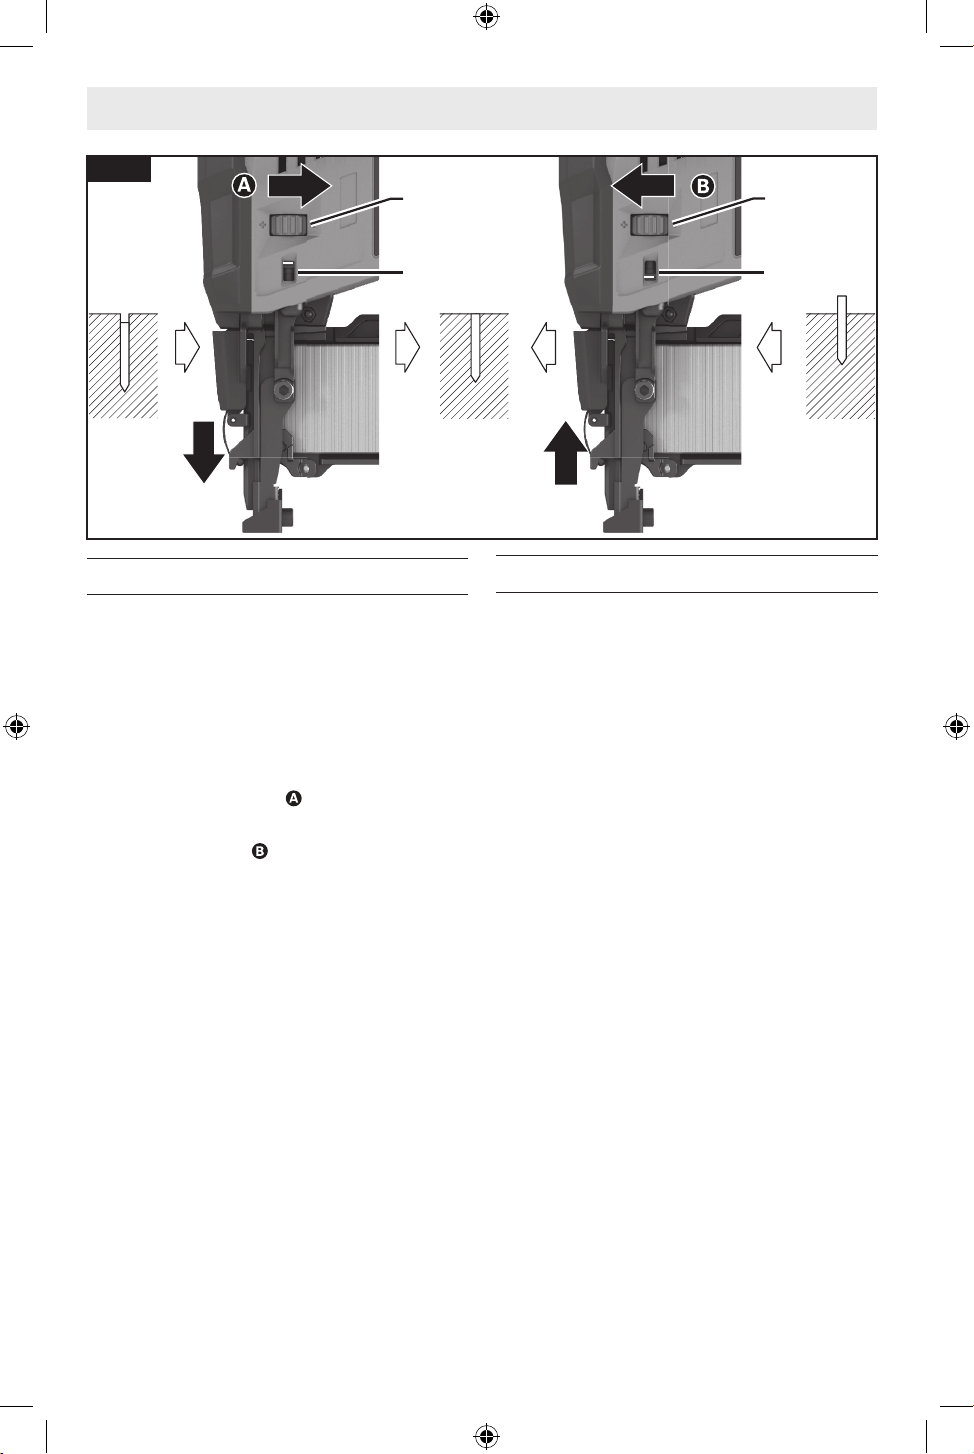
Depth of Drive Adjustment
(Fig. 12)
The depth to which fasteners are driven into
the workpiece can be adjusted using the
Depth Setting Wheel 4 on the side of the
stapler. Use the Depth Setting Indicator 3 to
determine the stapler’s current depth set-
ting.
Turn the Depth Setting Wheel 4 down to de-
crease the drive depth .
Turn the Depth Setting Wheel 4 up to in-
crease drive depth .
4
4
3 3
Fig. 12
Built-in Work Light
(Fig. 1)
Your stapler is equipped with an LED Work
Light 10 for better visibility when using the
stapler.
The LED will stay on for 10 seconds after the
Trigger 5 is pressed.
160992AB5S_GTH18V-50M_20241210.indd 16160992AB5S_GTH18V-50M_20241210.indd 16 12/13/2024 11:51:35 AM12/13/2024 11:51:35 AM
17
Operation
16
8
6
5
1
12
Fig. 13
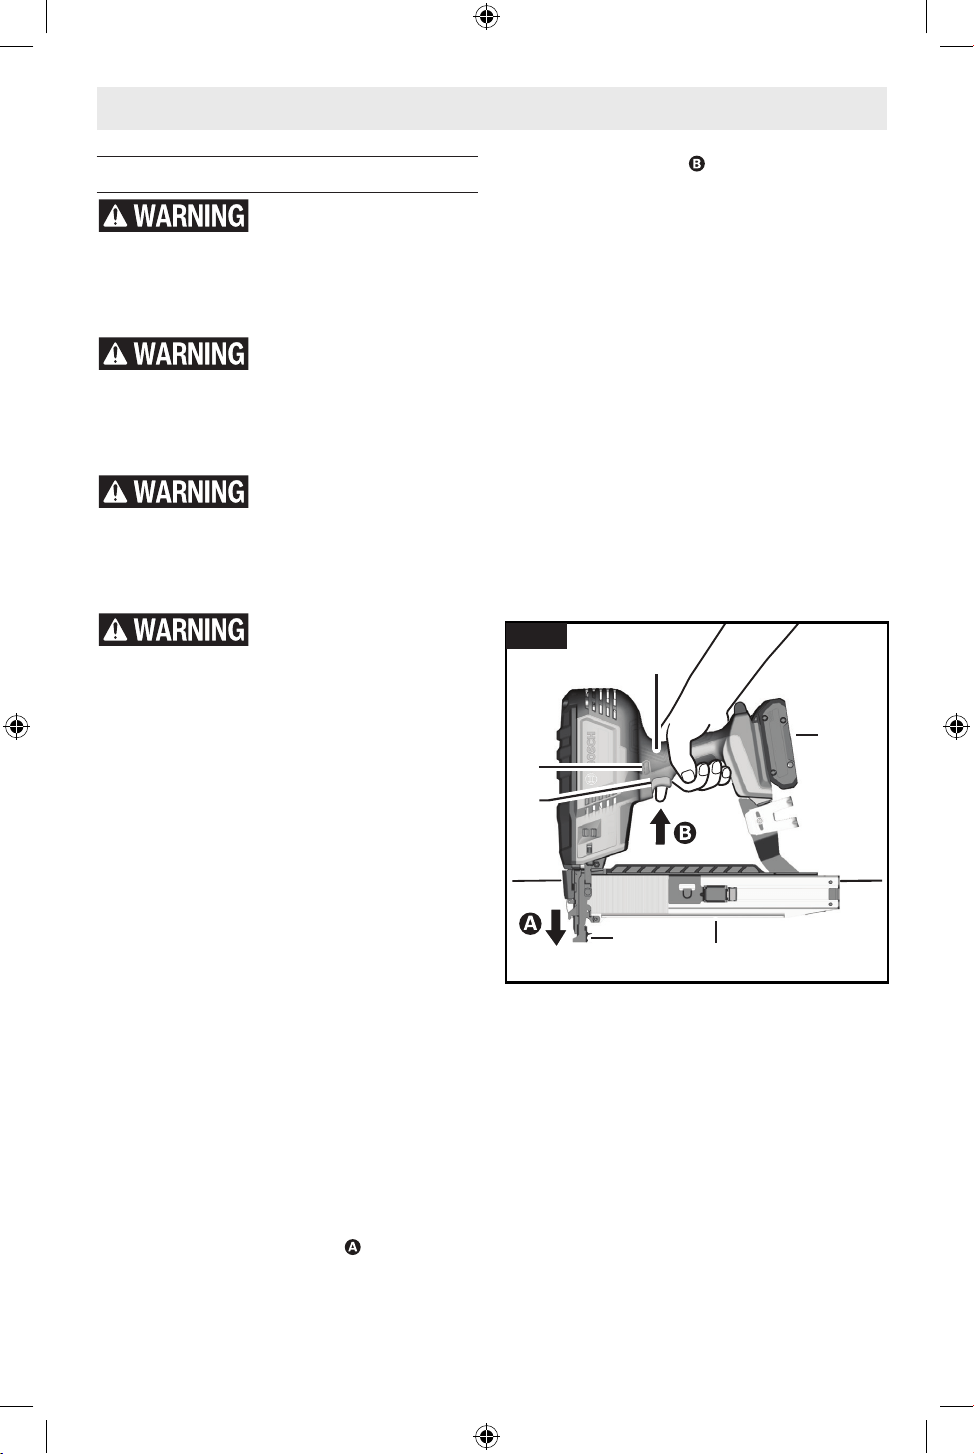
Stapler Actuation
Nosepiece must be in
full contact with the
work surface. Gap between the nosepiece
and the work surface may result in deec-
tion of the fastener and property damage or
personal injury.
Never wedge the nose-
piece between two or
more surfaces. Gap between the nosepiece
and multiple work surfaces may allow de-
ection of the fastener and property damage
or personal injury.
Never hold back the
Workpiece Contact dur-
ing operation. Holding the Workpiece Con-
tact back can result in unexpected actuation
and may cause property damage or serious
injury.
Never position your face
or body directly over the
stapler during operation. Sudden recoil can
result in impact to the body and injury.
This stapler can operate in a single sequen-
tial or contact (bump) actuation mode. Fol-
low the corresponding section for the cor-
rect operational instructions.
Note: The stapler will switch off after 30
minutes of inactivity.
Single Sequential Actuation
(Fig. 1, Fig. 13)
1. Load the Magazine 12. See the "Loading
and Unloading the Magazine" section on
page 13.
2. Insert the Battery Pack 8.
3. Press the On/Off Button 6 to activate
the stapler.
4. Ensure that the stapler is in Single Ac-
tuation mode by checking the indicator
on the User Interface 9.
5. Firmly grip the Handle 16, and hold the
stapler to the work surface.
6. Depress the Workpiece Contact 1 fully
against the work surface . If the Work-
piece Contact 1 is not fully depressed
into the stapler, the stapler will not re.
7. Pull the Trigger 5 to drive the fastener
into the work surface. The Trigger 5
must be pressed within 5 seconds after
the Workpiece Contact 1 is fully de-
pressed. If the Trigger 5 is pulled later,
the stapler will revert to a SAFE mode
and the actuation sequence will have to
be repeated.
8. The stapler will recoil after the fastener
is driven into the work surface. Use
sufcient grip to maintain control and
alignment of the stapler with the work
surface during ring and recoil.
9. Release the Trigger 5, and pull the sta-
pler away from the work surface.
10. To re another fastener, the Trigger
5 and Workpiece Contact 1 must be
released and the ring sequence, steps
5-7, must be repeated.
160992AB5S_GTH18V-50M_20241210.indd 17160992AB5S_GTH18V-50M_20241210.indd 17 12/13/2024 11:51:35 AM12/13/2024 11:51:35 AM
18
Operation
16
8
6
5
1
12
Fig. 14
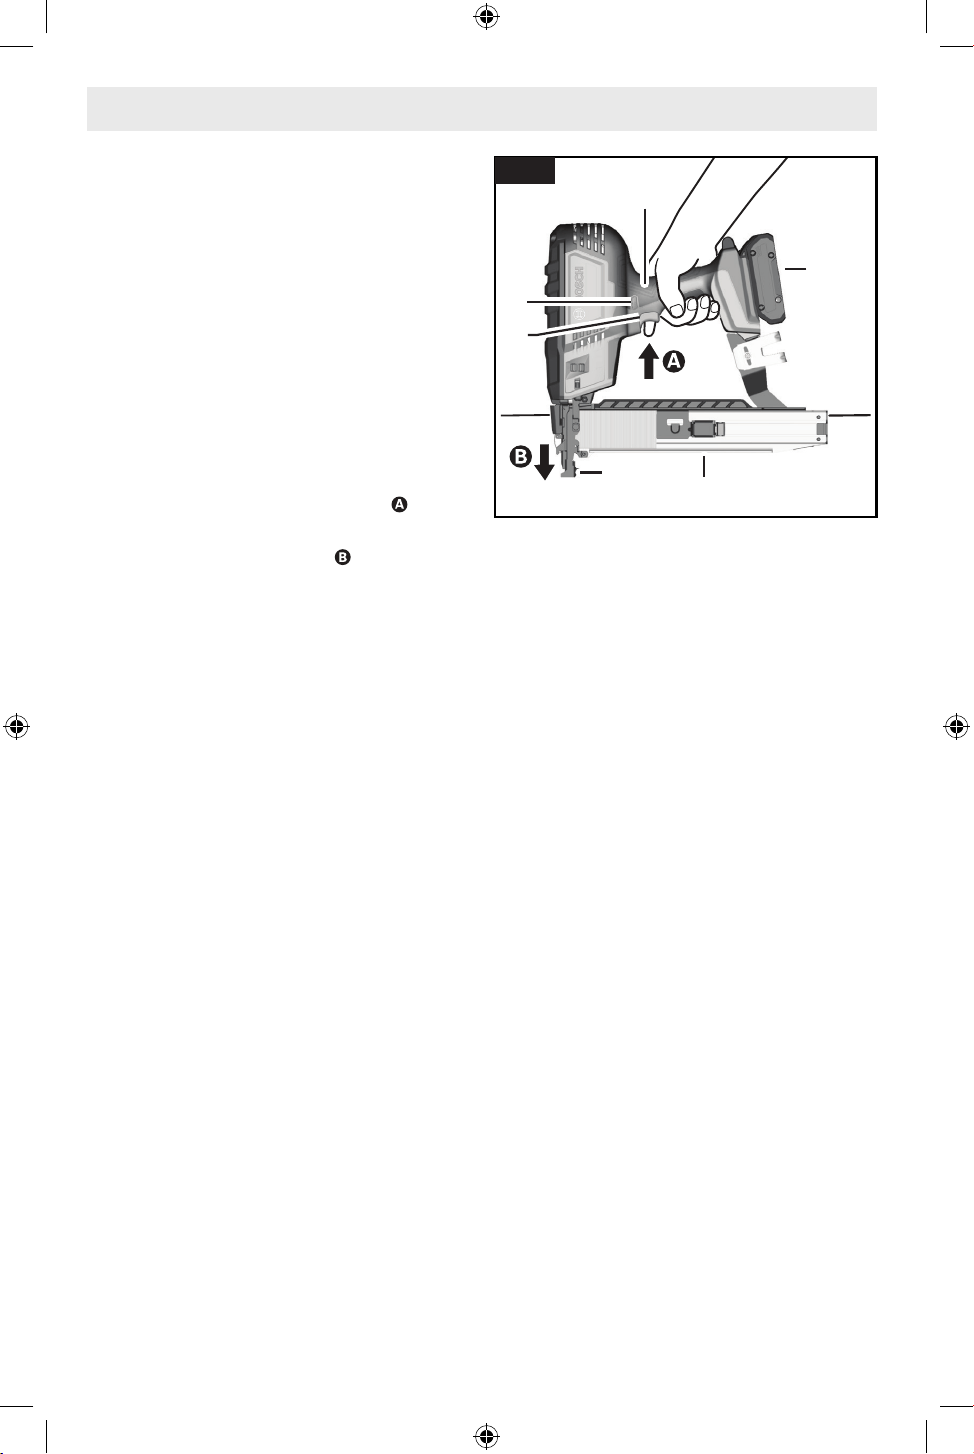
Contact (Bump) Actuation
(Fig. 1, Fig. 14)
1. Load the Magazine 12. See the "Loading
and Unloading the Magazine" section on
page 13.
2. Insert the Battery Pack 8.
3. Press the On/Off Button 6 to activate
the stapler.
4. On the User Interface 9, press the Mode
Button 20 to toggle on Bump Activation
mode; the Bump Actuation Indicator 22
will illuminate.
5. Firmly grip the Handle 16 and pull the
Trigger 5 to activate the stapler .
6. Depress the Workpiece Contact 1 fully
against the work surface to drive
the fastener; do not release the Trigger
5. The Workpiece Contact 1 must be
fully depressed within 5 seconds after
the Trigger 5 is pressed. If the Work-
piece Contact 1 is depressed later, the
stapler will revert to a SAFE mode and
the actuation sequence will have to be
repeated. If the Workpiece Contact 1 is
not fully depressed into the stapler, the
stapler will not re.
7. The stapler will recoil after the fastener
is driven into the work surface. Use
sufcient grip to maintain control and
alignment of the stapler with the work
surface during ring and recoil.
8. Continue to hold in the Trigger 5 and
pull the stapler away from the work
surface.
9. To re another fastener, press the Work-
piece Contact 1 at the next ring loca-
tion; this step may be repeated as long
as the Trigger 5 is continuously held in.
Once the trigger is released, steps 5-8
must be repeated.
160992AB5S_GTH18V-50M_20241210.indd 18160992AB5S_GTH18V-50M_20241210.indd 18 12/13/2024 11:51:35 AM12/13/2024 11:51:35 AM
19
Cleaning
Clean dust and debris from any vents and
fastener magazines. Keep stapler clean, dry
and free of oil or grease. Use only mild soap
and a damp cloth to clean housing, since cer-
tain cleaning agents and solvents are harm-
ful to plastics and other insulated parts.
Some of these include gasoline, turpentine,
lacquer thinner, paint thinner, chlorinated
cleaning solvents, ammonia and household
detergents containing ammonia. Never use
ammable or combustible solvents around
tools.
Remove collation adhesive and clean accu-
mulated dust from the magazine to allow the
fasteners to feed smoothly.
Repairs
For repairs, you may return the stapler, bat-
tery pack and charger to the nearest Bosch
service center, or Authorized Bosch Service
location.
Maintenance
General Maintenance
Keep your stapler, battery pack and charger
in good working order by adopting a regular
maintenance program. Inspect your stapler
for issues such as undue noise, misalign-
ment or binding of moving parts, breakage
of parts, or any other condition that may af-
fect the stapler operation.
This stapler does not contain user-service-
able parts.
It is recommended after 6 months to a year,
depending on use, to return the stapler, bat-
tery pack and charger to a Bosch service fa-
cility for inspection.
If the stapler does not start or operate at
full power with a fully charged battery pack,
clean the contacts on the battery pack. If the
stapler still does not work properly, you may
return the stapler, charger and battery pack
to a Bosch service facility for repairs.
Service
Have your power tool
serviced by a qualied
repair person using only identical replace-
ment parts. This will ensure that the safety
of the power tool is maintained.
To avoid accidents, always disconnect the Battery Pack from the tool
before cleaning or performing any maintenance.
Do not point the tool towards yourself or anyone nearby. Unexpected
triggering will discharge the fastener causing an injury.
160992AB5S_GTH18V-50M_20241210.indd 19160992AB5S_GTH18V-50M_20241210.indd 19 12/13/2024 11:51:35 AM12/13/2024 11:51:35 AM
20
Troubleshooting
Jam Clearing
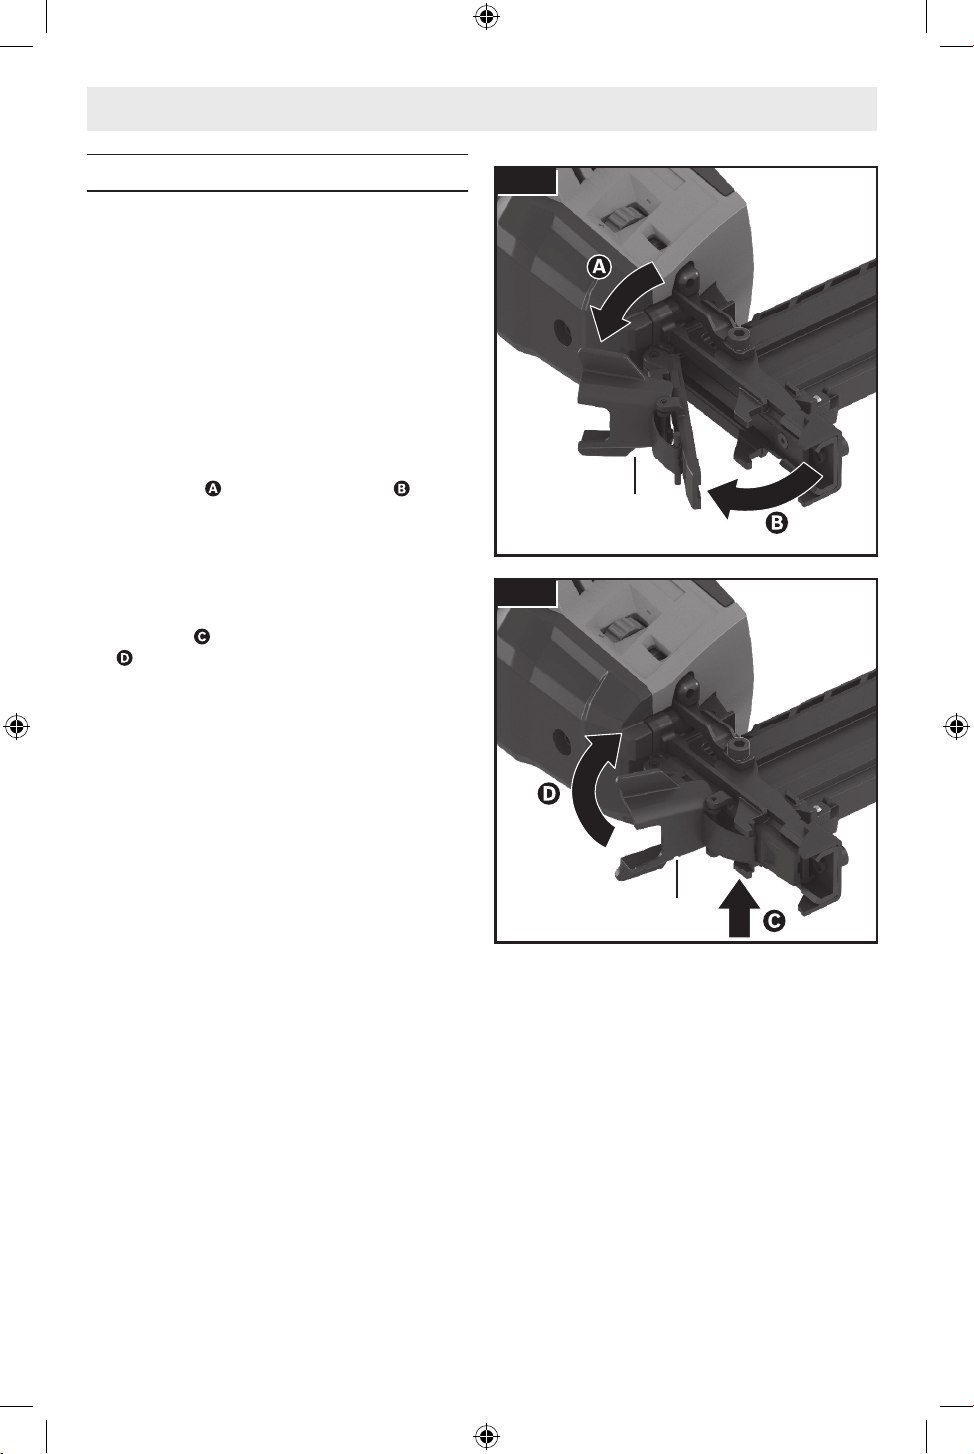
(Fig. 15, Fig. 16)
Follow the jam clearing procedure when a
fastener is jammed:
1. Switch the stapler off by pressing the
On/Off Button 6.
2. Remove the Battery Pack 8 from the
stapler.
3. Remove all fasteners from the Magazine
12. See section “Loading and Unloading
the Magazine” on page 13.
4. Open the Jam Clear Latch 17 by lifting
it upward then rotate it open .
5. Remove the jammed fastener, using
pliers if needed. If necessary, clean any
trapped dirt or debris.
6. Close the Jam Clear Latch 17 by rotat-
ing it closed, ensure that the latch pin is
engaged , then press the latch down
.
7. Rell the Magazine 12. See section
“Loading and Unloading the Magazine”
on page 13.
8. After successfully clearing the jam, fol-
low the section “Daily Inspection and
Testing” on page 13 to ensure normal
operation of the stapler.
NOTE: If the driver blade does not return to
its up position, remove the Battery Pack 8
and we recommend contacting a Bosch ser-
vice center or authorized Bosch service sta-
tion.
17
Fig. 15
17
Fig. 16
160992AB5S_GTH18V-50M_20241210.indd 20160992AB5S_GTH18V-50M_20241210.indd 20 12/13/2024 11:51:36 AM12/13/2024 11:51:36 AM
21
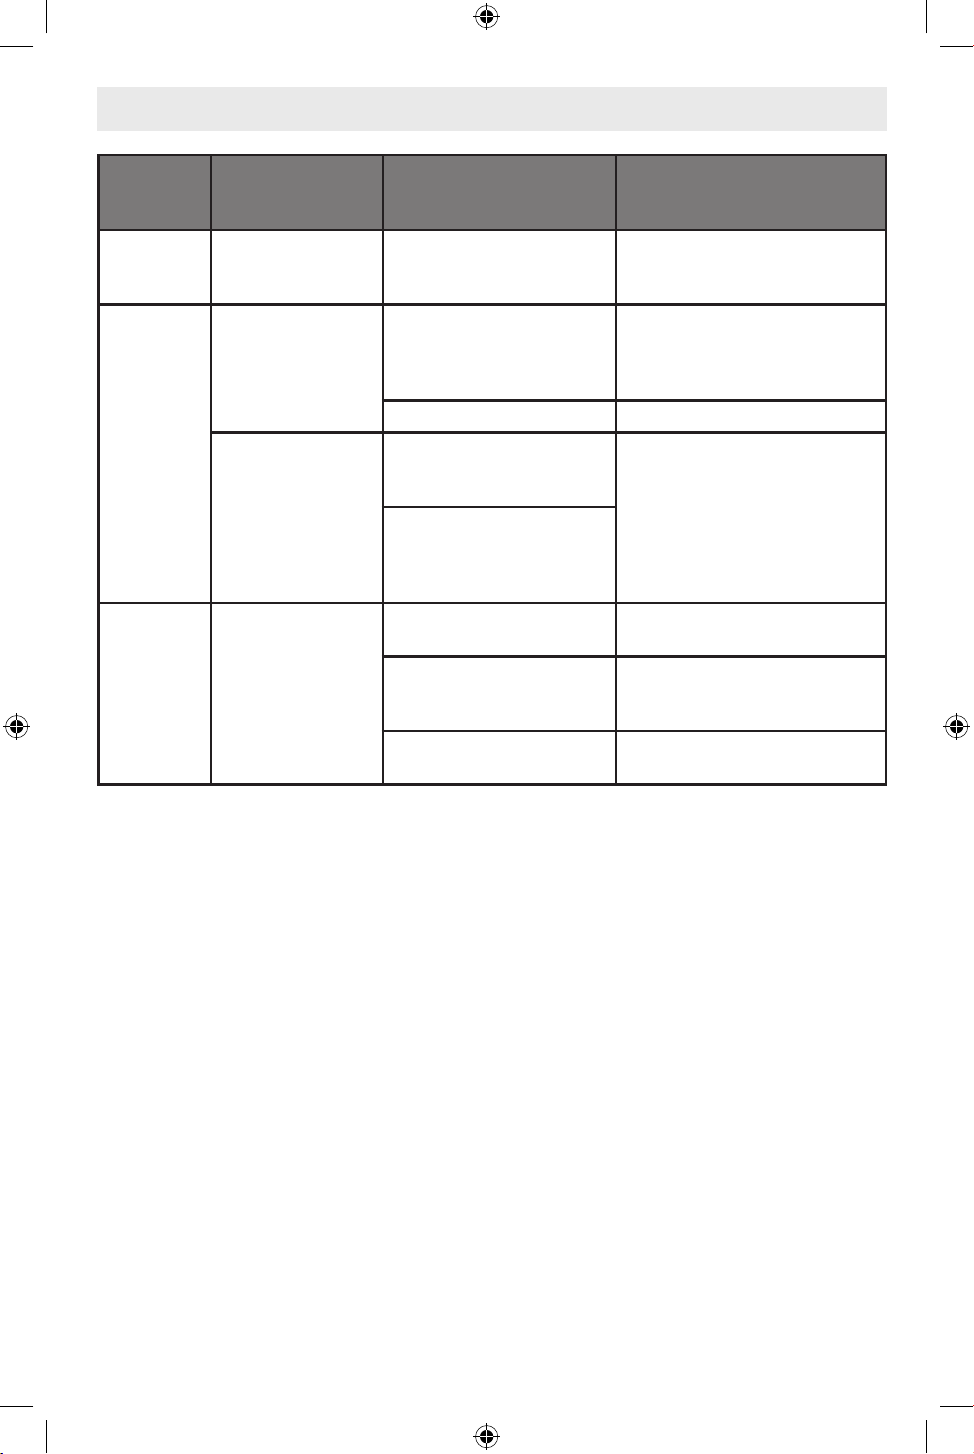
Status
Indicator
Color
Indicator Status Meaning Solution
Green Continuous light
Stapler is energized and
operating. Conditions
are normal.
Stapler is ready for use
Red
Continuous light
Battery pack and tool
temperature too high/
low.
Allow battery and/or stapler
to reach permitted operating
temperature. See “Specica-
tions” section on page 10.
Internal error. Have your tool serviced.
Flashing light
Sequential operation
has not been conducted
correctly.
The status will automatically
reset after a moment. See
“Stapler Actuation” section
on page 17 for correct
sequential operation.
The trigger was not
pressed within 5 sec-
onds after the workpiece
contact was depressed.
Yellow Continuous light
Battery not fully
charged.
Charge battery or replace
with full battery.
Regular Service Due
Indicator light is illumi-
nated.
Have your tool serviced.
Major Service Due Indi-
cator light is illuminated.
Have your tool serviced.
Troubleshooting
160992AB5S_GTH18V-50M_20241210.indd 21160992AB5S_GTH18V-50M_20241210.indd 21 12/13/2024 11:51:36 AM12/13/2024 11:51:36 AM
22
Troubleshooting
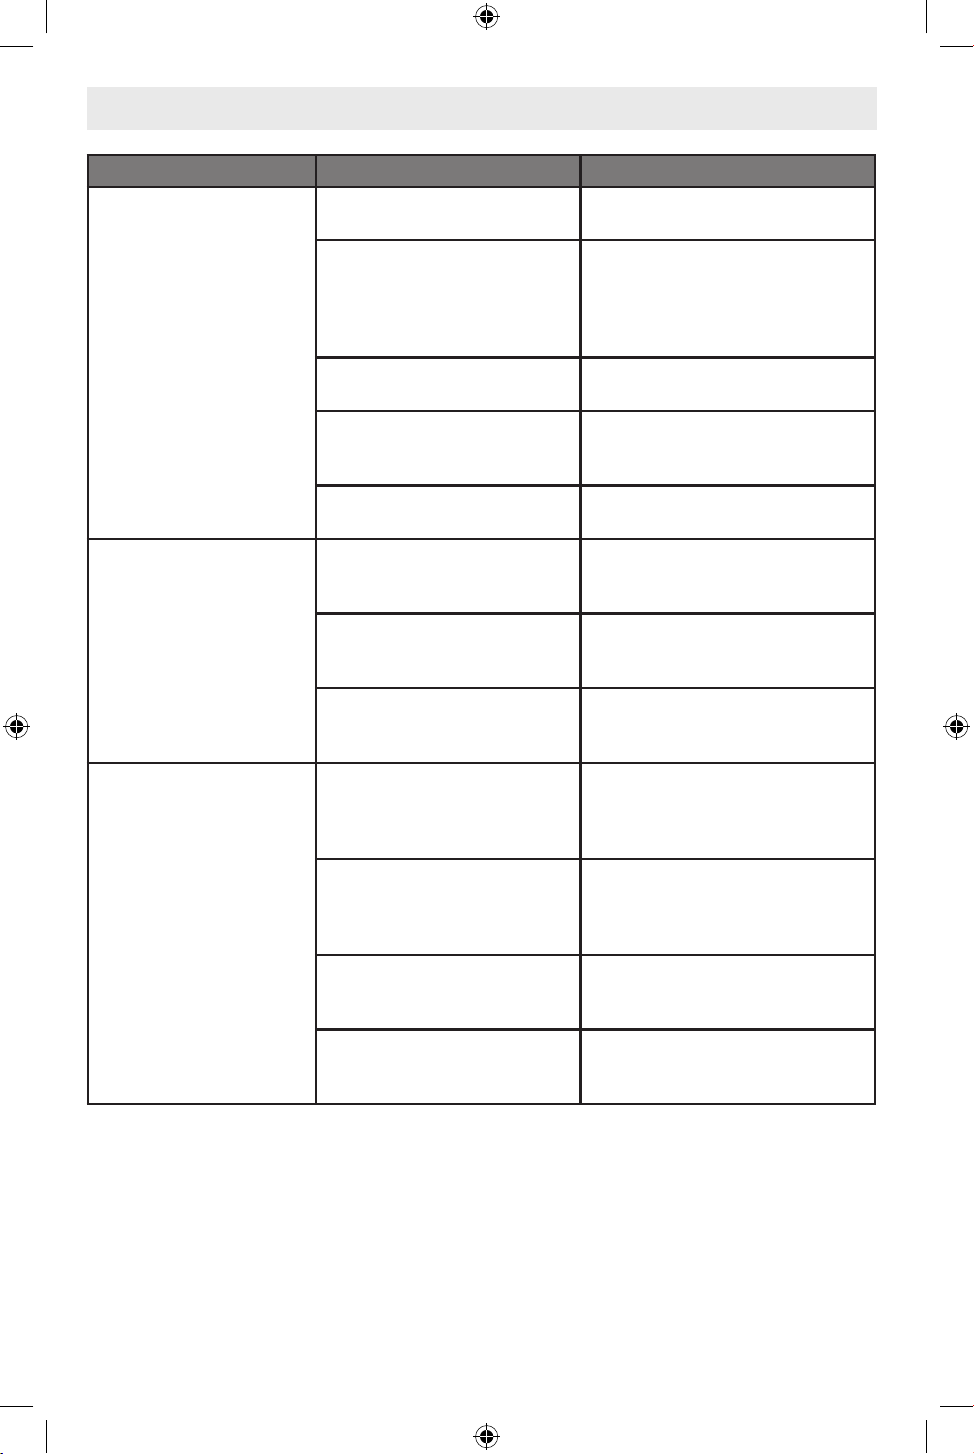
Trouble Cause Action
Stapler does not oper-
ate.
No actuation occurs.
No battery inserted, battery
discharged.
Insert charged battery.
Battery and tool tempera-
ture too low.
Allow battery and tool to warm
up sufciently to permitted
ambient temperature for opera-
tion. See "Specications" on
page 10.
Stapler not switched on.
Press On/Off Button 6 for 1.5
seconds. (See Fig. 1.)
Sequential operation has
not been conducted cor-
rectly.
See "Stapler Actuation" on page
17.
Workpiece contact is not
fully depressed.
See "Stapler Actuation" on page
17.
Fastener does not re.
Actuation occurs.
Fastener jammed: debris,
dirt, or jammed fastener in
nosepiece and/or magazine.
See "Jam Clearing" on page
20.
Fasteners used are not
compatible.
Only use compatible fasteners.
See “Specications” table on
page 10.
Magazine is empty.
Rell the magazine. See "Load-
ing the Magazine" on page
13.
Underdriven fasteners.
Depth of drive is not set
deep enough.
Adjust depth setting wheel
to increase drive depth. See
"Depth of Drive Adjustment" on
page 16.
The Workpiece Contact is
extended too far.
Reduce the Workpiece contact
extension. See "Extending the
Workpiece Contact" on page
12.
Fastener is too long.
Only use compatible fasteners.
See "Specications" on page
10.
The battery is discharged or
defective.
Insert charged battery. See
"To Insert the Battery Pack" on
page 11.
160992AB5S_GTH18V-50M_20241210.indd 22160992AB5S_GTH18V-50M_20241210.indd 22 12/13/2024 11:51:36 AM12/13/2024 11:51:36 AM
23
Troubleshooting
Trouble Cause Action
Overdriven fasteners.
Depth of drive is set too
deep.
Adjust depth setting wheel
to decrease drive depth. See
"Depth of Drive Adjustment" on
page 16.
The Workpiece Contact is
not extended far enough.
Extend the Workpiece contact.
See "Extending the Workpiece
Contact" on page 12.
Fastener is too short.
Only use compatible fasteners.
See "Specications" on page
10.
The driven fasteners
bend or break.
Fastener is too long.
Select shorter fastener. See
“Specications” table on page
10.
Work surface too hard.
Use the stapler only on wood
and wood products.
The driver blade is dam-
aged.
Have your tool serviced.
The stapler skips fasten-
ers.
Fasteners used are not
compatible.
Only use compatible fasteners.
See “Specications” table on
page 10.
Fastener are frequently
jamming.
Fasteners used are not
compatible.
Only use compatible fasteners.
See “Specications” table on
page 10.
The fasteners are old, adhe-
sion between fasteners is
worn.
Use new fastener strips.
Fasteners do not slide
into magazine.
Dust or debris in magazine.
Inspect the magazine and clear
any residual material build-up
or any foreign matter.
160992AB5S_GTH18V-50M_20241210.indd 23160992AB5S_GTH18V-50M_20241210.indd 23 12/13/2024 11:51:36 AM12/13/2024 11:51:36 AM
24
Avertissements généraux relatifs à la sécurité
pour les outils électriques................... 25
Avertissement relatif à la sécurité pour
les agrafeuses sans l ...................... 27
Avertissements supplémentaires concernant
la sécurité................................ 27
Mise au rebut .............................29
Utilisation prévue ............................. 29
Symboles.................................... 30
Familiarisez-vous avec votre agrafeuse pour agrafes
intermédiaires GTH18V-50M................31
Specications ................................32
Assemblage..................................33
Insertion et retrait du bloc-piles ..............33
Crochet utilitaire .......................... 33
Contact avec la pièce à usiner................34
Opération ................................... 35
Inspections et tests quotidiens............... 35
Chargement et déchargement du magasin ..... 35
Bouton de mise sous tension/hors tension ..... 37
Interface utilisateur ........................37
Commutateur de réglage de la profondeur ..... 38
Lampe de travail .......................... 38
Actionnement de l’agrafeuse ................ 39
Entretien .................................... 41
Maintenance générale......................41
Service..................................41
Nettoyage ............................... 41
Réparations .............................. 41
Recherche de la cause des problèmes............. 42
Déblocage d’obstructions...................42
Table des matières
Symboles relatifs à la sécurité
Les définitions ci-dessous décrivent le niveau de gravité pour chaque terme concernant des précautions à prendre.
Veuillez lire le mode d’emploi et lire la signification de ces symboles.
C’est le symbole d’alerte relatif à la sécurité. Il est utilisé pour vous avertir de
l’existence possible d’un risque de blessure. Obéissez à tous les messages
relatifs à la sécurité qui suivent ce symbole pour éviter tout risque de blessure
ou même de mort.
DANGER indique une situation dangereuse qui, si elle n’est pas évitée, causera
la mort d’une personne ou une blessure grave.
AVERTISSEMENT indique une situation dangereuse qui, si elle n’est pas évitée,
pourrait causera la mort d’une personne ou une blessure grave.
MISE EN GARDE indique une situation dangereuse qui, si elle n’est pas évitée,
pourrait causer une blessure légère ou modérée.
160992AB5S_GTH18V-50M_20241210.indd 24160992AB5S_GTH18V-50M_20241210.indd 24 12/13/2024 11:51:37 AM12/13/2024 11:51:37 AM

25
Avertissements généraux relatifs à la sécurité pour les outils électriques
Lisez toutes les consignes de sécurité, instructions, illustrations et spécications
fournies avec cet outil électrique. Le non-respect de toutes les instructions gurant
ci-après pourrait causer un choc électrique, un incendie et/ou des blessures graves.
CONSERVEZ TOUS LES AVERTISSEMENTS ET TOUTES LES INSTRUCTIONS POUR RÉFÉRENCE
FUTURE.
Le terme « outil électrique » dans les avertissements fait référence à votre outil électrique à cordon d’alimentation
électrique branché dans une prise secteur ou à votre outil électrique à piles (sans l).
1. Sécurité de la zone de travail
a. Gardez votre zone de travail propre et bien
éclairée. Des zones encombrées ou sombres sont
propices aux accidents.
b. N’utilisez pas des outils électriques dans
une atmosphère explosive, par exemple en
présence de liquides, de gaz ou de poussières
inammables. Les outils électriques produisent des
étincelles qui risquent de mettre feu aux poussières
ou émanations de fumée.
c. Gardez les enfants et les autres personnes
présentes à une distance susante lorsque
vous utilisez un outil élec-trique. Des distractions
risqueraient de vous faire perdre le contrôle.
2. Sécurité électrique
a. La che de l’outil électrique doit correspondre
à la prise de courant. Ne modiez jamais une
che de quelque façon que ce soit. N’utilisez
pas d’adaptateurs de ches avec des outils
électriques mis à la terre/à la masse. L’emploi
de ches non modiées et de prises de courant
correspondant naturellement aux ches réduira le
risque de choc électrique.
b. Évitez tout contact de votre corps avec des
surfaces mises à la terre ou à la masse telles
que des surfaces de tuyaux, de radiateurs, de
cuisinières et de réfrigérateurs. Il existe un risque
accru de choc électrique si votre corps est en contact
avec la terre ou la masse.
c. N’exposez pas d’outils électriques à la pluie ou à
un environnement humide. La pénétration d’eau
dans un outil électrique augmentera le risque de
choc électrique.
d. N’utilisez pas le cordon de façon abusive.
N’utilisez pas le cordon pour porter, tirer ou
débrancher l’outil électrique. Tenez le cordon
à distance de toute source de chaleur, d’huile,
de bords tranchants ou de pièces mobiles. Des
cordons endommagés ou entortillés augmentent le
risque de choc électrique.
e. Lorsque vous utilisez un outil électrique à
l’extérieur, employez un cordon de rallonge
approprié pour un emploi à l’extérieur. L’utilisation
d’un cordon approprié pour une utilisation à
l’extérieur réduit le risque de choc électrique.
f. Si l’utilisation d’un outil électrique dans un
endroit humide est inévitable, utilisez une
alimentation protégée par un disjoncteur de fuite
à la terre. L’utilisation d’un tel circuit réduit le risque
de choc électrique.
3. Sécurité personnelle
a. Faites preuve de vigilance et de bon sens, et
observez attentivement ce que vous faites
lorsque vous utilisez un outil électrique. N’utilisez
pas un outil électrique si vous êtes fatigué(e)
ou sous l’inuence de drogues, d’alcool ou de
médicaments. Un simple moment d’inattention
pendant que vous utilisez un outil électrique pourrait
causer une blessure grave.
b. Utilisez des équipements de protection
individuelle. Portez toujours des équipements
de protection des yeux. Des équipements de
protection tels qu’un masque de protection contre
la poussière, des chaussures de sécurité anti-
dérapantes, un casque ou un dispositif de protection
de l’ouïe utilisés en fonction des conditions réduiront
le nombre des blessures.
c. Prévenez tout risque de mise en marche
accidentelle. Assurez-vous que l’interrupteur est
dans la position d’arrêt (OFF) avant de connecter
l’appareil à une source d’alimentation et/ou à un
bloc-piles, de le soulever ou de le transporter.
Le fait de transporter des outils électriques avec le
doigt sur l’interrupteur ou de mettre sous tension des
outils électriques avec l’interrupteur en position de
marche invite les accidents.
d. Retirez toute clé de réglage pouvant être
attachée à l’outil avant de mettre l’outil électrique
sous tension. Une clé laissée attachée à une pièce
en rotation de l’outil électrique pourrait causer une
blessure.
CONSERVEZ CES INSTRUCTIONS
160992AB5S_GTH18V-50M_20241210.indd 25160992AB5S_GTH18V-50M_20241210.indd 25 12/13/2024 11:51:37 AM12/13/2024 11:51:37 AM

26
e. Ne vous penchez pas excessivement au-dessus de
l’outil. Veillez à toujours garder un bon équilibre
et un appui stable. Ceci permet de mieux contrôler
l’outil électrique dans des situations inattendues.
f. Portez des vêtements appropriés. Ne portez
pas de bijoux ou de vêtements amples. Gardez
vos cheveux et vos vêtements à une distance
susante des pièces mobiles. Vêtements amples,
bijoux ou cheveux longs pourraient être attrapés par
des pièces mobiles.
g. Si des dispositifs sont fournis pour le
raccordement d’accessoires d’extraction et de
collecte de la poussière, assurez-vous qu’ils
sont connectés et utilisés de façon appropriée.
L’emploi correct des accessoires de collecte de la
poussière peut réduire les dangers associés à la
poussière.
h. Ne laissez pas la familiarité résultant de
l’utilisation fréquente des outils vous inciter à
devenir complaisant(e) et à ignorer les principes
de sécurité relatifs aux outils. Une action
négligente pourrait causer des blessures graves en
une fraction de seconde.
4. Utilisation et entretien de l’outil
électrique
a. N’imposez pas de contraintes excessives à l’outil
électrique. Utilisez l’outil électrique approprié
pour votre application. L’outil électrique correct
fera le travail plus ecacement et avec plus de
sécurité à la vitesse à laquelle il a été conçu pour
fonctionner.
b. N’utilisez pas l’outil électrique si l’interrupteur
de marche/arrêt ne permet pas de le mettre sous
tension/hors tension. Tout outil électrique qui
ne peut pas être contrôlé par son interrupteur est
dangereux et doit être réparé.
c. Débranchez la che de la source d’alimentation
électrique et/ou retirez le bloc-piles de l’outil
électrique (s’il est amovible) avant d’y apporter
de quelconques modications, de changer
d’accessoire ou de ranger l’outil électrique. De
telles mesures de sécurité préventives réduisent
le risque de déclenchement accidentel de l’outil
électrique.
d. Rangez les outils électriques qui ne sont pas
utilisés activement hors de portée des enfants,
et ne laissez aucune personne n’ayant pas lu ces
instructions et ne sachant pas comment utiliser
un tel outil électrique se servir de cet outil. Les
outils électriques sont dangereux quand ils sont
entre les mains d’utilisateurs n’ayant pas reçu la
formation nécessaire à leur utilization.
e. Entretenez de façon appropriée les outils
électriques et les accessoires. Assurez-vous que
les pièces en mouvement sont bien alignées et
qu’elles ne se coincent pas, qu’il n’y a pas de
pièces cassées ou qu’il n’existe aucune situation
pouvant aecter le fonctionnement de l’outil
électrique. Si l’outil électrique est endommagé,
faites-le réparer avant de vous en servir à
nouveau. De nombreux accidents sont causés par
des outils électriques mal entretenus.
f. Gardez les outils de coupe tranchants et propres.
Des outils de coupe entretenus de façon adéquate
avec des bords de coupe tranchants sont moins
susceptibles de se coincer et sont plus faciles à
controller.
g. Utilisez l’outil électrique, les accessoires, les
embouts de l’outil, etc. conformément à ces
instructions, en tenant compte des conditions de
travail et de la tâche à accomplir. L’utilisation de
l’outil électrique pour des opérations diérentes de
celles pour lesquelles il est conçu pourrait causer
une situation dangereuse.
h. Gardez les poignées et les surfaces de préhension
propres, sèches et exemptes de toute trace
d’huile ou de graisse. Les poignées et les surfaces
de préhension glissantes ne permettent pas une
manipulation et un contrôle sûrs de l’outil dans des
situations inattendues.
5. Utilisation et entretien de l’outil
électrique à pile
a. Ne rechargez l’outil qu’avec le chargeur indiqué
par le fabricant. Un chargeur qui est approprié
pour un type de bloc-piles pourrait créer un risque
d’incendie quand il est utilisé avec un autre bloc-
piles.
b. Utilisez votre outil exclusivement avec des
blocs-piles conçus spéciquement pour celui-ci.
L’emploi de tout autre bloc-piles risquerait de causer
des blessures et un incendie.
c. Lorsque le bloc-piles n’est pas utilisé, gardez-
le à une distance susante des autres objets
en métal, comme des trombones, pièces de
monnaie, clés, clous, vis ou autres petits objets
en métal qui pourraient faire une connexion entre
une borne et une autre. Le court-circuitage des
bornes d’une pile pourrait causer des brûlures ou un
incendie.
Avertissements généraux relatifs à la sécurité pour les outils électriques
CONSERVEZ CES INSTRUCTIONS
160992AB5S_GTH18V-50M_20241210.indd 26160992AB5S_GTH18V-50M_20241210.indd 26 12/13/2024 11:51:37 AM12/13/2024 11:51:37 AM

27
d. Dans des conditions d’utilisation abusives, du
liquide pourrait être éjecté de la pile, évitez
tout contact avec celui-ci. En cas de contact
accidentel, lavez avec de l’eau. En cas de
contact de liquide avec les yeux, consultez un
professionnel de santé. Tout liquide éjecté d’une
pile peut causer de l’irritation ou des brûlures.
e. N’utilisez pas un bloc-piles ou un outil qui
est endommagé ou a été modié. Des piles
endommagées ou modiées peuvent se comporter
de façon imprévisible et causer un incendie ou une
EXPLOSION, ou entraîner des blessures.
f. N’exposez pas un bloc-piles ou un outil à un
incendie ou à une température excessive.
L’exposition à un incendie ou à une température
supérieure à 265 °F (130 °C) pourrait causer une
explosion.
g. Suivez toutes les instructions relatives à la
charge et ne chargez pas le bloc-piles ou l’outil en
dehors de la plage de température indiquée dans
les instructions. Une charge dans des conditions
appropriées ou à des températures en dehors de
la plage spéciée pourrait endommager les piles et
augmenter le risque d’incendie.
6. Service après-vente
a. Faites entretenir votre outil électrique par un
réparateur compétent n’utilisant que des pièces
de rechange identiques. Ceci assurera le maintien
de la sécurité de l’outil électrique.
b. Ne tentez jamais de réparer des blocs-piles
endom-magés. La réparation de blocs-piles ne doit
être ef-fectuée que par le fabricant ou un prestataire
de services agréé.
Avertissements généraux relatifs à la sécurité pour les outils électriques
Avertissement relatif à la sécurité pour les agrafeuses sans fil
a. Il faut toujours supposer que l’outil contient des
éléments de xation. Une manipulation imprudente
de l’outil peut entraîner une mise à feu inattendue
des éléments de xation et causer des blessures
corporelles.
b. Ne dirigez pas l’outil vers vous-même ou vers
une autre personne se trouvant à proximité. Un
déclenchement inattendu entraînera l’éjection de
l’élément de xation et causera des blessures.
c. N’actionnez pas l’outil si celui-ci n’est pas
fermement placé contre la pièce à usiner. Si l’outil
n’est pas en contact avec la pièce à usiner, l’élément
de xation peut être dévié de celle-ci.
d. Débranchez l’outil de la source d’alimentation
lorsque l’élément de xation est coincé dans
l’outil. Lors du retrait d’un élément de xation
coincé, l’agrafeuse peut être accidentellement
activée si elle est branchée.
e. Faites preuve de prudence lorsque vous retirez
un élément de xation coincé. Le mécanisme peut
être soumis à une compression, et l’élément de
xation peut être éjecté avec force quand on essaie
de résoudre un problème de coincement.
f. N’utilisez pas cette brocheuse-cloueuse pour
attacher des câbles électriques. Elle n’est pas
conçue pour l’installation de câbles électriques et
peut endommager l’isolation des câbles électriques,
provoquant ainsi des risques de choc électrique ou
d’incendie.
Avertissements supplémentaires concernant la sécurité
N’enfoncez pas d’éléments de xation dans les murs
ou les sols sans vous assurer à l’avance que la zone
du côté opposé est dégagée. Un élément de xation
pourrait traverser la surface de travail et causer des
dommages matériels ou des blessures.
N’enfoncez pas d’éléments de xation dans les murs,
les sols ou d’autres zones de travail sans savoir ce
qui pourrait être endommagé par l’enfoncement de
l’élément de xation. Les éléments de xation enfoncés
dans des ls électriques sous tension, la plomberie,
la tuyauterie de gaz ou d’autres types d’obstructions
peuvent entraîner une électrocution, une explosion, des
blessures corporelles et/ou des dommages matériels.
CONSERVEZ CES INSTRUCTIONS
160992AB5S_GTH18V-50M_20241210.indd 27160992AB5S_GTH18V-50M_20241210.indd 27 12/13/2024 11:51:37 AM12/13/2024 11:51:37 AM
28
Tenez l’outil électrique par ses surfaces de préhension
identiées isolées lorsque vous eectuez une
opération dans le cadre de laquelle l’élément de
xation risque d’entrer en contact avec un l caché.
L’entrée en contact d’un élément de xation avec un l
sous tension pourrait rendre conductrices des parties
en métal exposées de l’outil électrique et causer un choc
électrique à l’opérateur.
Il ne faut pas altérer, retirer ou rendre inopérantes les
commandes de l’agrafeuse. L’absence ou le mauvais
fonctionnement de commandes de l’agrafeuse peut
entraîner un déclenchement inattendu et causer des
blessures.
Ne gardez jamais un doigt sur la gâchette lorsque
vous n’enfoncez pas d’éléments de xation ou lorsque
vous ne transportez pas l’outil. Transportez l’outil
uniquement par la poignée. Le fait de garder un doigt
sur la gâchette lorsque vous transportez l’outil ou lorsque
vous n’enfoncez pas d’éléments de xation peut entraîner
un déclenchement involontaire et causer des blessures
corporelles.
Lors du chargement des éléments de xation, veillez
à ce que les têtes des éléments de xation soient
alignées sur l’embout avant de l’outil. Si les éléments
de xation ne sont pas alignés sur l’embout avant de
l’outil, celui-ci peut se bloquer ou mal fonctionner, et
causer des dommages matériels ou des blessures.
N’utilisez que les éléments de xation répondant aux
critères énumérés dans la section « Spécications
» de ce mode d’emploi. Les éléments de xation non
identiés pour être utilisées avec cet outil peuvent
entraîner un dysfonctionnement de l’outil et causer un
risque de blessure et/ou d’endommagement de l’outil.
Gardez les mains et les pieds à une distance d’au moins
200 mm / 8 po de l’embout avant de l’outil pendant
son utilisation. Des éléments de xation pourraient être
inéchis et causer des dommages matériels ou même des
blessures.
N’enfoncez pas un élément de xation dans un autre
élément de xation. Cela pourrait faire dévier l’élément
de xation ou faire réagir l’outil de manière inattendue et
provoquer des blessures.
Ne vous livrez pas à des chahuts. Quand ils sont éjectés,
les éléments de xation peuvent être des projectiles
capables de causer des blessures graves.
Il ne faut jamais actionner l’agrafeuse si elle n’est pas
perpendiculaire à la surface de la pièce à travailler
et si la surface de la pièce n’est pas exempte de
débris. L’élément de xation peut être dévié s’il n’est pas
correctement en contact avec la pièce à travailler, ce qui
peut entraîner des dommages matériels ou des blessures.
N’enfoncez pas les éléments de xation dans des
matériaux inadaptés. Les matériaux trop durs peuvent
faire dévier l’élément de xation. Les matériaux fragiles
peuvent s’eriter et permettre à l’élément de xation de
passer au travers. Les matériaux trop souples peuvent
permettre à l’élément de xation de passer au travers. Ces
conditions peuvent entraîner des dommages matériels ou
des blessures corporelles graves.
Il ne faut pas appuyer sur la gâchette ou sur la pointe
de l’agrafeuse lors du chargement de l’agrafeuse. Le
fait d’appuyer sur la gâchette ou d’enfoncer l’embout
avant de l’outil peut provoquer des ratés et entraîner des
blessures corporelles et des dommages matériels.
N’utilisez pas le crochet de suspension ou son
emplacement de montage pour attacher des câbles.
Le crochet de suspension et son emplacement de
montage ne sont pas destinés à supporter des charges
de xation.
N’utilisez pas le crochet de suspension de la scie
s’il semble endommagé ou déformé. Un crochet de
suspension endommagé ou déformé peut entraîner une
suspension instable et la chute inattendue de l’outil, ce
qui peut causer des dommages matériels et des blessures
corporelles.
Ne calez jamais l’embout avant de l’outil entre deux
ou plusieurs surfaces. L’espace compris entre l’embout
avant de l’outil et plusieurs surfaces de travail peut
permettre la déviation de l’élément de xation et causer
des dommages matériels ou des blessures corporelles.
Ne retenez jamais l’embout avant de l’outil pendant
l’opération. Le fait de retenir l’embout avant de l’outil
peut entraîner un déclenchement inattendu et causer des
dommages matériels ou des blessures graves.
Ne placez jamais votre visage ou votre corps au-
dessus de l’agrafeuse pendant son fonctionnement.
Un recul soudain peut entraîner un impact sur le corps et
des blessures.
Il ne faut pas utiliser l’agrafeuse si elle n’a pas
été inspectée et testée quotidiennement, et si
son fonctionnement n’a pas été jugé satisfaisant.
L’utilisation d’une agrafeuse qui n’a pas passé l’inspection
et le test quotidiens de façon satisfaisante peut entraîner
des dommages matériels et des blessures.
CONSERVEZ CES INSTRUCTIONS
Avertissements supplémentaires concernant la sécurité
160992AB5S_GTH18V-50M_20241210.indd 28160992AB5S_GTH18V-50M_20241210.indd 28 12/13/2024 11:51:37 AM12/13/2024 11:51:37 AM

29
CONSERVEZ CES INSTRUCTIONS
Avertissements supplémentaires concernant la sécurité
Pour réduire le risque de blessure, portez tou-jours
des lunettes de sécurité ou des lunettes avec écrans
latéraux. L’opérateur et les autres personnes dans la
zone de travail doivent porter des lunettes de protection
conformément à la norme ANSI Z87.1. La protection
oculaire ne convient pas à tous les opérateurs de la même
manière. Assurez-vous que la protection oculaire choisie
a des écrans latéraux ou ore une protection contre les
débris volants à la fois de l’avant et des côtés. L’employeur
est responsable de faire respecter l’utilisation de la
protection oculaire par l’opérateur et les autres personnes
dans la zone de travail. Au besoin, portez une protection
de la tête conformément à la norme ANSI Z89.1.
Des travaux de pon-
çage, de sciage, de
meulage et de perçage réalisés avec un outil électrique
et d’autres travaux de construction peuvent produire
des poussières contenant des produits chimiques qui
sont des causes reconnues de cancer, de malformation
congénitale ou d’autres problèmes reproductifs. Ces
produits chimiques sont, par exemple :
• le plomb provenant de peinture au plomb,
• des cristaux de silice provenant des briques et du
ciment, ainsi que d’autres produits de maçonnerie, et
• de l’arsenic et du chrome provenant de bois de
construction traité par des produits chimiques.
Le niveau de risque causé par de telles expositions varie
en fonction de la fréquence de ces types de travaux.
Pour réduire l’exposition à ces produits chimiques, il est
utile de travailler dans un lieu bien ventilé et de porter
un équipement de sécurité approprié tel que certains
masques à poussière conçus spécialement pour ltrer les
particules microscopiques.
Mise au rebut
Cette section fait partie de l’engagement de Robert Bosch
Tool Corporation à préserver notre environnement et à
conserver nos ressources naturelles.
Mise au rebut de outil
Ne jetez pas les outils électriques et les piles/batteries
rechargeables avec les ordures ménagères!
Mise au rebut des piles
Ne tentez pas de désassembler le bloc-piles ou
d’enlever tout composant faisant saillie des bornes
de piles, ce qui peut provoquer un incendie ou des
blessures. Avant la mise au rebut, protégez les bornes
exposées à l’aide d’un ruban isolant épais pour prévenir
le court-circuitage.
Piles lithium-ion
Si le produit est équipé d’une pile lithium-ion, la pile doit
être ramassée, recyclée ou mise au rebut d’une manière
qui ne soit pas nocive pour l’environnement.
“Le sceau RBRC de recyclage
des piles, homologué par l’EPA
(Agence pour la protection de
l’environnement des États-Unis),
qui se trouve sur les piles au
lithium-ion (Liion) indique que
Robert Bosch Tool Corporation
participe volontairement à un programme industriel de
ramassage et de recyclage de ces piles au terme de leur
vie utile, pourvu qu’elles soient mises hors service aux
États-Unis ou au Canada. Le programme du RBRC ore
une alternative pratique à la mise des piles au Li-ion usées
au rebut ou au ramassage d’ordures municipal, ce qui
pourrait être interdit dans votre région.
Veuillez appeler le 1-800-8-BATTERY pour obtenir de
plus amples renseignements sur le recyclage des piles
au Li-ion et sur les restrictions ou interdictions de mise
au rebut qui s’appliquent à votre région ou renvoyez
vos piles à un Centre de Service Bosch/Dremel pour
recyclage. La participation de Robert Bosch Tool
Corporation à ce programme s’insère dans le contexte de
notre engagement à préserver notre environnement et à
conserver nos ressources naturelles.”
Utilisation prévue
Utilisez cette agrafeuse uniquement de la manière prévue. Une utilisation
inappropriée pourrait causer des blessures ou des dommages matériels.
Il s’agit d’un outil de xation manuel, sans l, à séquence
unique ou par contact (percussion). Il est conçu pour
enfoncer des dispositifs de xation spécialement
fabriquées dans le bois et les produits en bois.
Utilisez uniquement des dispositifs de xation approuvés
en combinaison avec leur guide de xation correspondant.
N’utilisez que des éléments de xation compatibles,
conformément aux instructions du fabricant. Voir le
tableau intitulé « Spécications » à la page 32.
Cet outil n’est pas conçu pour l’installation de câbles
électriques.
160992AB5S_GTH18V-50M_20241210.indd 29160992AB5S_GTH18V-50M_20241210.indd 29 12/13/2024 11:51:37 AM12/13/2024 11:51:37 AM
30
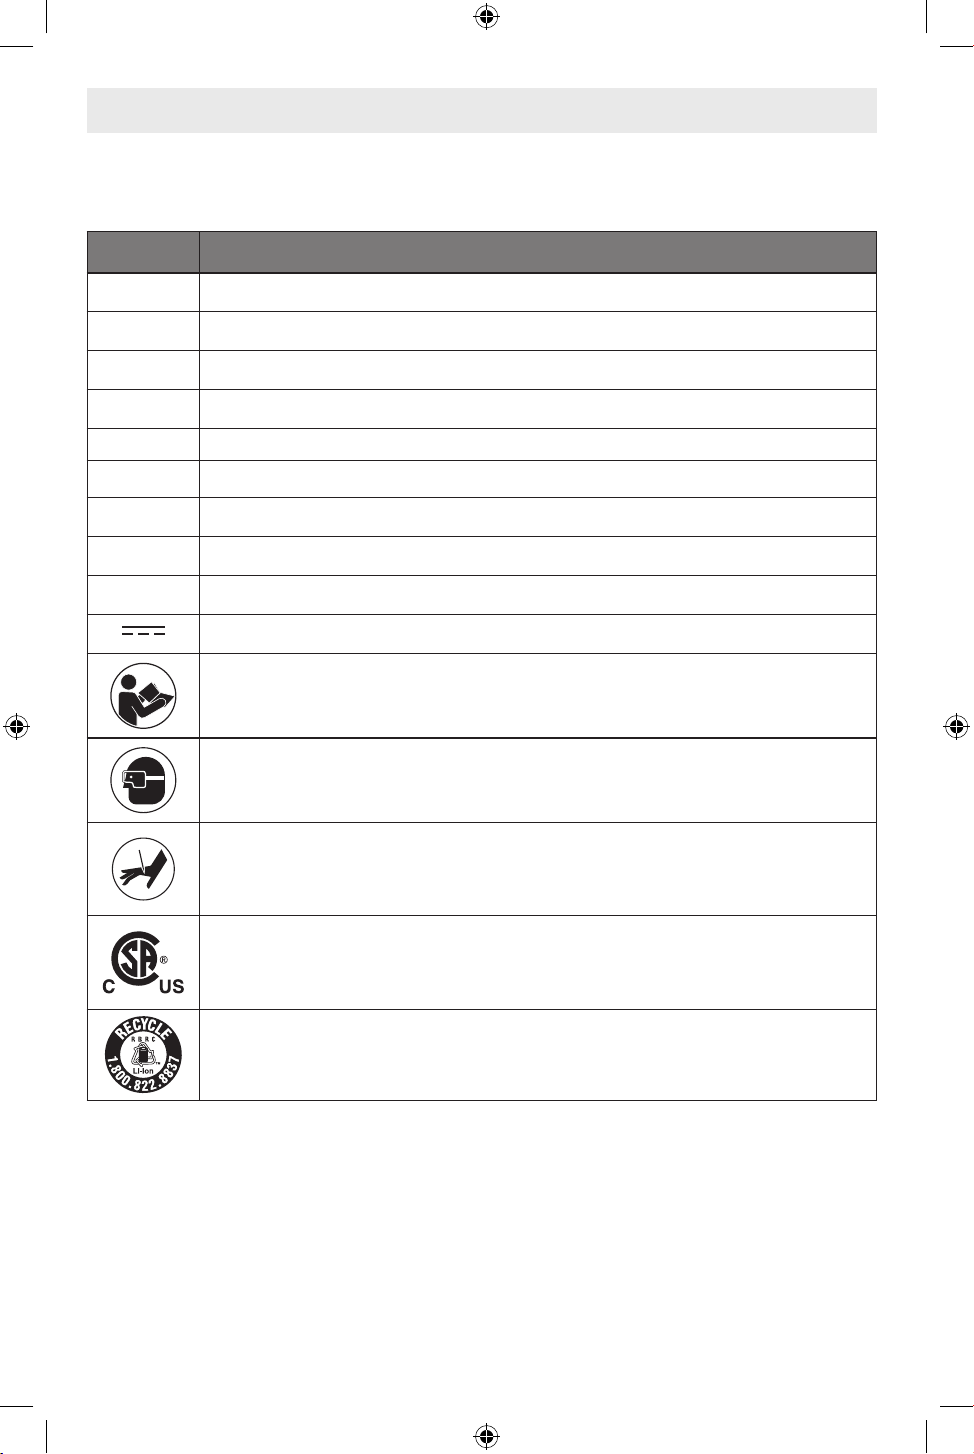
Symboles
Important : Certains des symboles suivants peuvent être utilisés sur votre outil. Veuillez les étudier et apprendre leur
signication. L’interprétation correcte de ces symboles vous aidera à mieux utiliser votre outil et à vous en servir plus
ecacement et en toute sécurité.
Symbole Désignation/Explication
V Volts (tension)
A Ampéres (courant)
Hz Hertz (fréquence, cycles par seconde)
W Watt (puissance)
min Minutes (temps)
s Secondes (temps)
mm Millimètre (dimension)
F Fahrenheit (température)
C Celsius (température)
Courant continu (type ou caractéristique du courant)
Alerte l’utilisateur pour lire le mode d’emploi.
Alerte l’utilisateur pour lui demander de porter un dispositif de protection des yeux.
Avertit l'utilisateur qu'il existe un risque de perforation.
Ce symbole signie que cet outil est approuvé par l’Association canadienne de normalisation selon
les normes des États-Unis et du Canada.
Désigne un programme de recyclage des piles Li-ion.
160992AB5S_GTH18V-50M_20241210.indd 30160992AB5S_GTH18V-50M_20241210.indd 30 12/13/2024 11:51:37 AM12/13/2024 11:51:37 AM
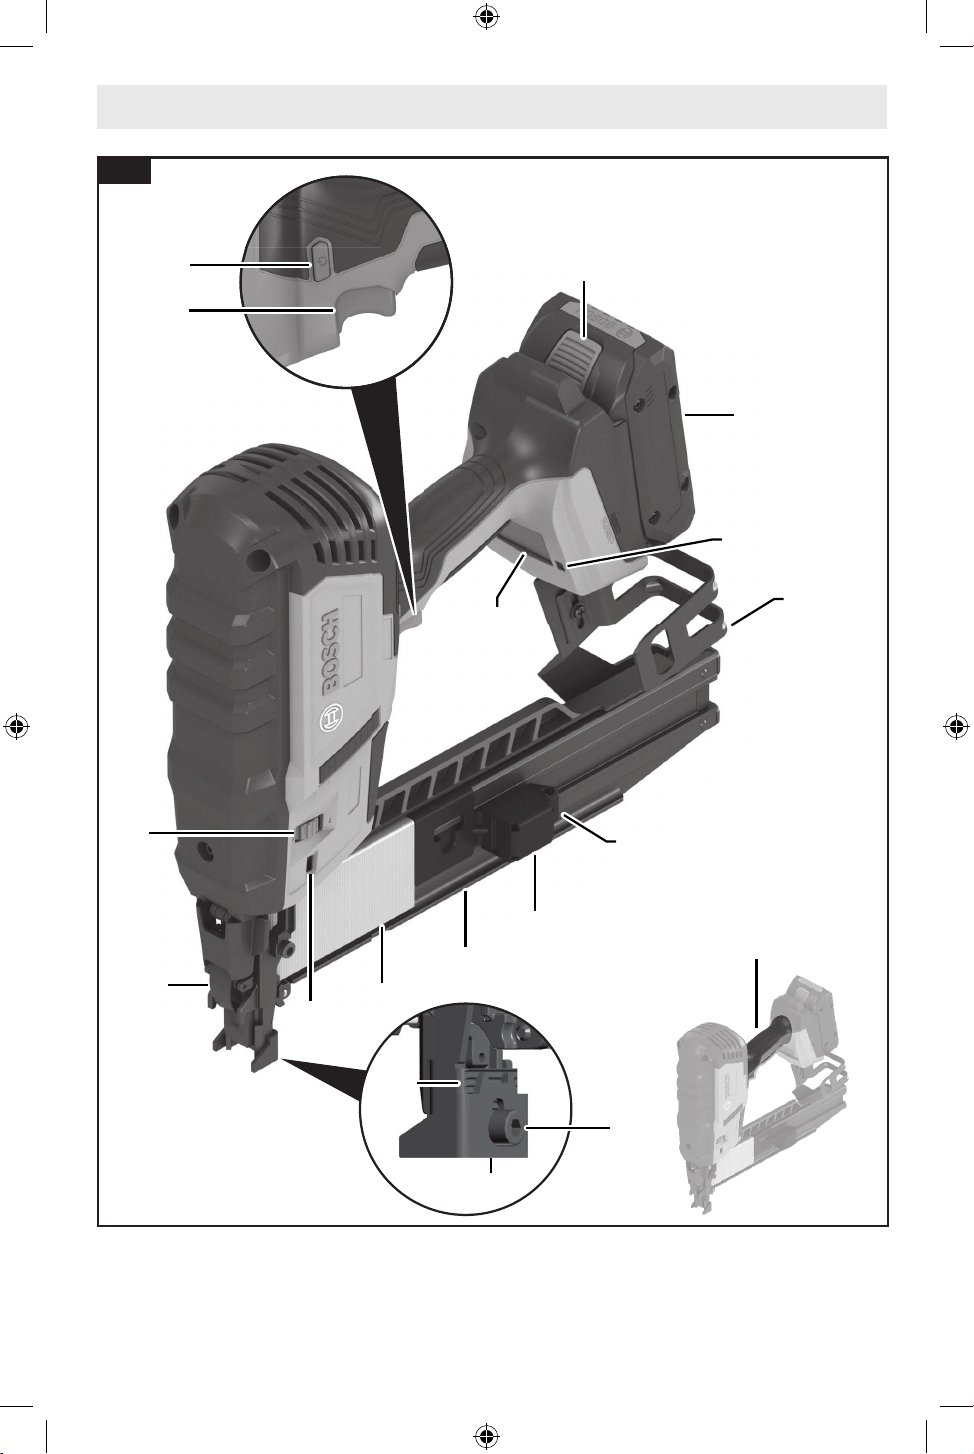
31
Familiarisez-vous avec votre agrafeuse pour agrafes intermédiaires GTH18V-50M
1
2
15
4
5
6
7
3
8
9
10
11
13
14
17
16
Fig. 1
12
18
160992AB5S_GTH18V-50M_20241210.indd 31160992AB5S_GTH18V-50M_20241210.indd 31 12/13/2024 11:51:37 AM12/13/2024 11:51:37 AM
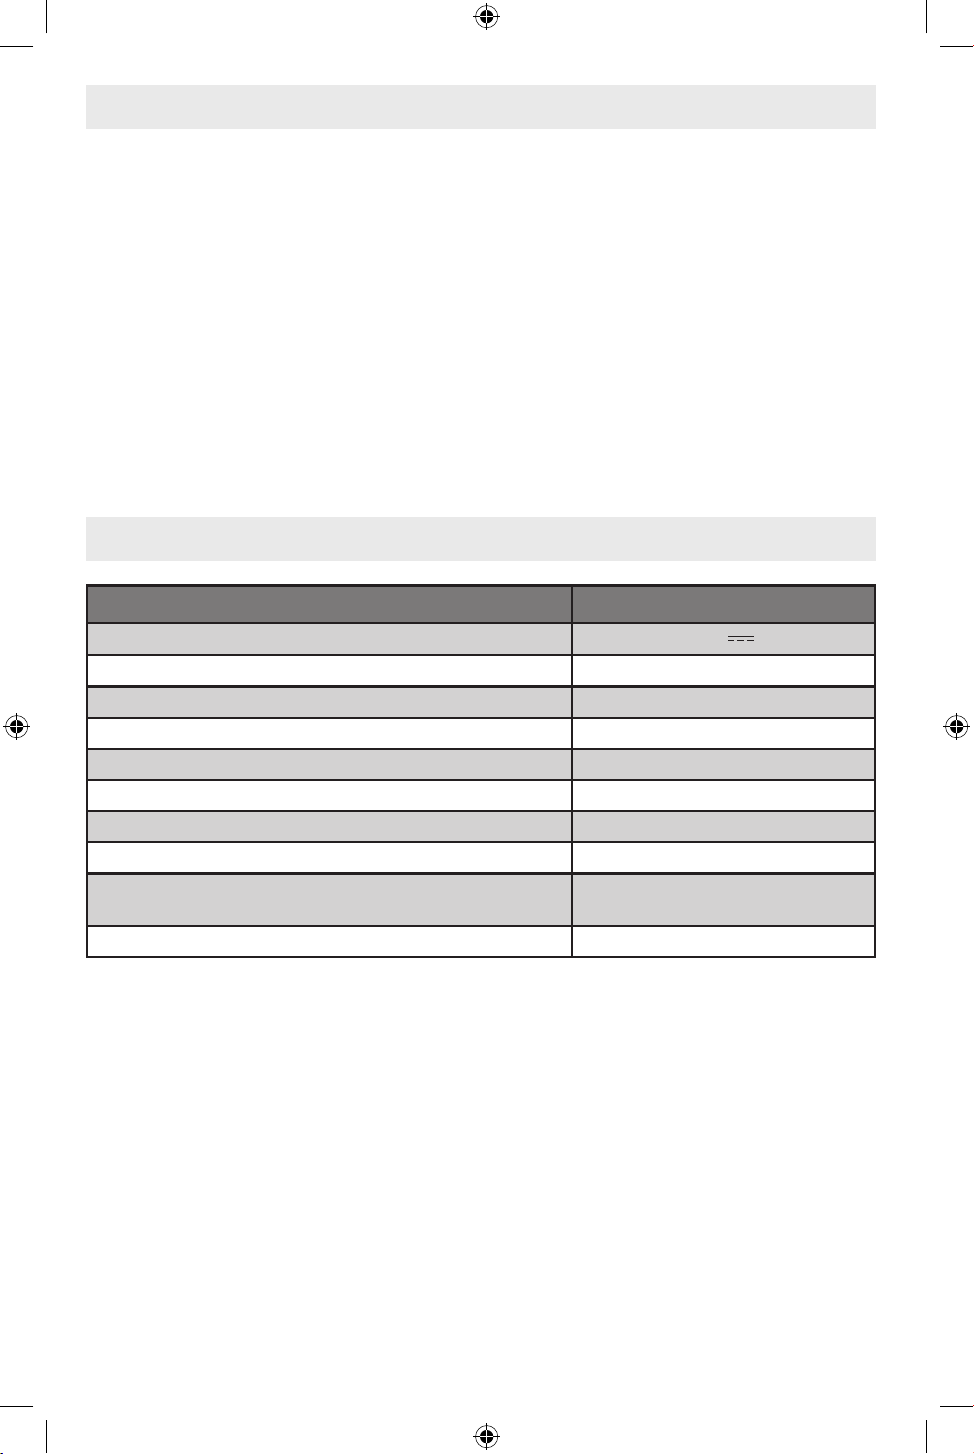
32
Familiarisez-vous avec votre agrafeuse pour agrafes intermédiaires GTH18V-50M
1 Contact avec la pièce à usiner
2 Vis de contact avec l’ouvrage
3 Indicateur de réglage de la profondeur
4 Molette de réglage de la profondeur
5 Gâchette
6 Bouton de mise sous tension/hors tension
7 Bouton d’éjection du bloc-piles
8 Bloc-piles*
9 Interface utilisateur
10 Lampe de travail à DEL
11 Crochet de suspension
12 Chargeur
13 Glissière du magasin
14 Levier de relâchement de la glissière du
magasin
15 Embout avant
16 Poignée (surface de préhension isolée)
17 Loquet d’élimination des blocages
18 Bandes de dispositifs de xation*
Specifications
Numéro de modèle GTH18V-50M
Tension nominale 18 V
Type de moteur c.c. sans balais
Angle de collationnement 0°
Largeur de la couronne de l’élément de xation 7/16 po (11 mm)
Gamme de longueur des dispositifs de xation 1 po - 2 po (25 - 50mm)
Diamètre de la patte de l’élément de xation Calibre 16 (1,6 mm)
Capacité du magasin 150 dispositifs de xation
Température autorisée pour les piles pendant la charge +32…+113°F (0…+45°C)
Température ambiante autorisée pendant le fonctionnement** et le
stockage
-4…+122°F (-20…+50°C)
Température ambiante autorisée pour les piles pendant la charge +32…+95°F (0…+35°C)
* Utilisation de blocs-piles Core18V de 4,0 Ah, 8,0 Ah, 12 Ah
** La cloueuse ne fonctionnera pas en dessous de 32 °F (0 °C)
Blocs-piles/chargeurs
Veuillez consulter la liste des chargeurs/piles accompagnant l’outil.
* Non inclus
160992AB5S_GTH18V-50M_20241210.indd 32160992AB5S_GTH18V-50M_20241210.indd 32 12/13/2024 11:51:37 AM12/13/2024 11:51:37 AM
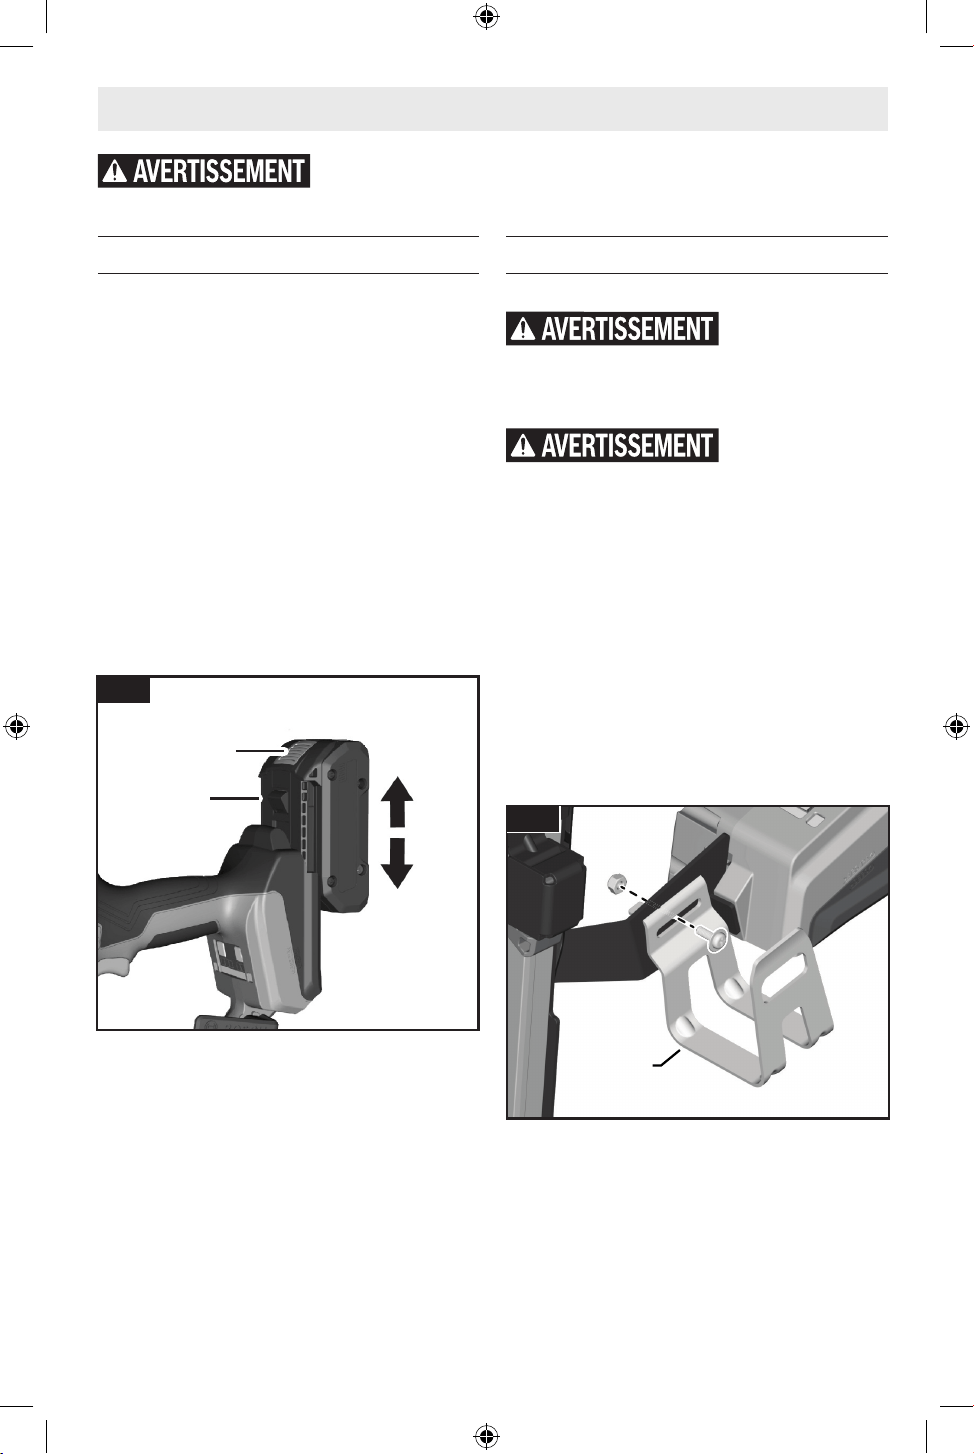
33
Assemblage
Insertion et retrait du bloc-piles
(Fig. 2)
Pour insérer le bloc-piles
1. Faites glisser le bloc-piles 8 chargé dans le boîtier
jusqu’à ce que le bloc-piles se verrouille en position.
Votre outil est équipé d’un loquet de verrouillage
secondaire qui empêche le bloc-piles de se détacher
complètement de la poignée si elle se desserrait sous
l’eet des vibrations.
Pour retirer le bloc-piles
1. Appuyez sur le bouton d’éjection du bloc-piles 7 et
faites glisser le bloc-piles 8 hors du boîtier.
2. Appuyez à nouveau sur le bouton d’éjection du bloc-
piles 7 et faites glisser le bloc-piles 8 complètement
hors du boîtier de l’outil.
Crochet utilitaire
(Fig. 3)
N’utilisez pas le
crochet utilitaire ou
son emplacement de montage pour y placer des
attachements. Le crochet utilitaire et son emplacement
de montage ne sont pas destinés à supporter des charges.
N’utilisez pas le
crochet utilitaire s’il
semble endommagé ou déformé. Un crochet utilitaire
endommagé ou déformé peut entraîner une suspension
instable et une chute inattendue de l’outil pouvant causer
des dommages matériels et des blessures.
L’agrafeuse est équipée d’un crochet utilitaire 11
préinstallé qui peut être retiré, puis installé de l’autre côté
ou retiré complètement de l’agrafeuse.
Retrait du crochet utilitaire
À l’aide d’un tournevis à tête cruciforme et d’une clé de 7
mm, retirez la vis et l’écrou qui maintiennent en place le
crochet utilitaire 11. Le crochet utilitaire 11 pourra alors
être remonté de l’autre côté de l’agrafeuse ; ceci assurera
que la vis et l’écrou sont serrés de façon adéquate.
Débranchez le bloc-piles de l’outil avant d’eectuer tout assemblage, ou réglage,
ou recherche de la cause des problèmes, ou de changer des accessoires. Ces
mesures de sécurité préventives réduisent le risque d’une mise en marche accidentelle de l’outil.
7
8
Fig. 2
11
Fig. 3
160992AB5S_GTH18V-50M_20241210.indd 33160992AB5S_GTH18V-50M_20241210.indd 33 12/13/2024 11:51:38 AM12/13/2024 11:51:38 AM
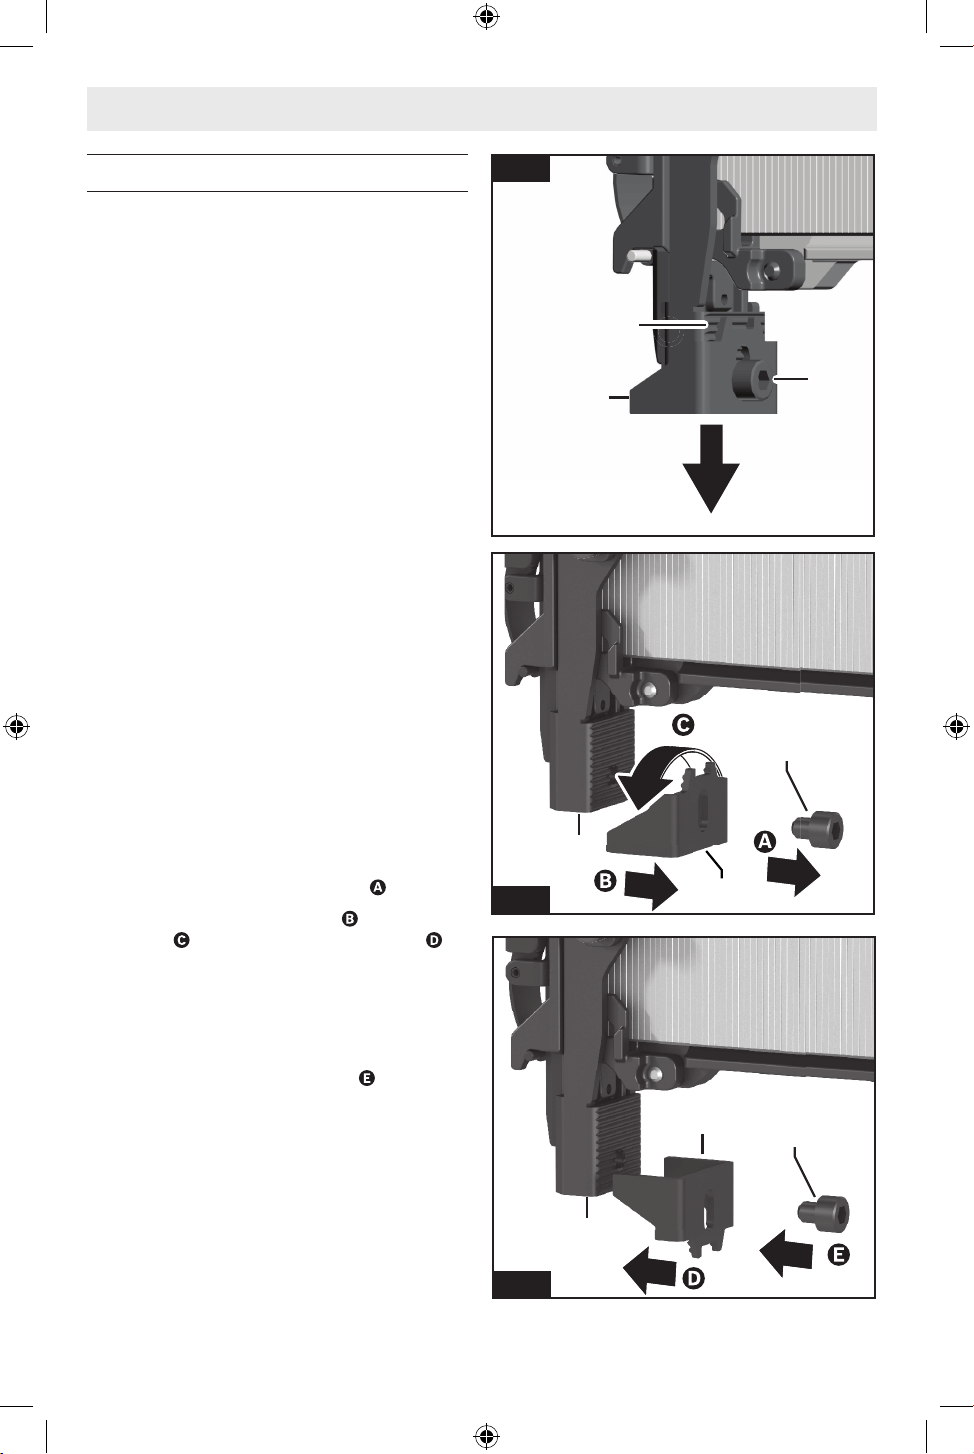
34
Contact avec la pièce à usiner
(Fig. 4, Fig. 5, Fig. 6)
Remarque : L’extension et/ou l’inversion de la position
du contact avec l’ouvrage 1 diminuera la profondeur
d’enfoncement de l’élément de xation ; voir la section
intitulée « Commutateur de réglage de la profondeur » à la
page 38 pour ajuster le réglage.
Extension du contact avec l’ouvrage
Le contact avec l’ouvrage 1 peut être prolongé jusqu’à 1/4
po pour réduire encore plus la profondeur d’enfoncement.
Pour ajuster l’extension du contact avec l’ouvrage 1 :
1. Desserrez la vis de contact avec l’ouvrage 2 à l’aide
d’une clé hexagonale de 4 mm.
2. Ajustez le contact avec l’ouvrage 1, vers l’avant ou
vers l’arrière, jusqu’à la position souhaitée ; engagez
les crans du contact avec l’ouvrage 1 et la pointe 15
pour assurer un positionnement et un alignement
sûrs.
3. Resserrez la vis de xation du contact avec l’ouvrage
2 à l’aide d’une clé hexagonale de 4 mm.
Inversement de la position
Le contact avec l’ouvrage 1 comporte deux extrémités
: une extrémité lisse pour minimiser les marques et une
extrémité avec des crochets pour renforcer la prise sur
l’ouvrage lors de l’enfoncement de l’élément de xation.
Pour inverser le contact avec l’ouvrage 1 :
1. Desserrez et retirez la vis de contact avec l’ouvrage 2
à l’aide d’une clé hexagonale de 4 mm .
2. Retirez le contact avec l’ouvrage 1 , faites-le pivoter
de 180° , C et réinstallez-le sur la pointe 15 .
3. Réinstallez la vis du contact avec l’ouvrage 2, ajustez
le contact avec l’ouvrage 1 à l’extension souhaitée en
engageant les crans sur le contact avec l’ouvrage 1 et
la pointe 15 pour assurer un positionnement et un
alignement sûrs, puis xez-le fermement en place à
l’aide d’une clé hexagonale de 4 mm .
Assemblage
15
1
2
Fig. 4
Fig. 5
Fig. 6
1
2
2
1
15
15
160992AB5S_GTH18V-50M_20241210.indd 34160992AB5S_GTH18V-50M_20241210.indd 34 12/13/2024 11:51:38 AM12/13/2024 11:51:38 AM
35
Opération
Utilisez des équipe-
ments de sécurité per-
sonnelle. Portez toujours une protection oculaire. Le port
d’équipements de sécurité tels que des masques
antipoussières, des chaussures de sécurité
antidérapantes, des casques de chantier et des
protecteurs d’oreilles dans des conditions appropriées
réduira le risque de blessure corporelle.
Inspections et tests quotidiens
(Fig. 1)
Il ne faut pas utiliser
l’agrafeuse si elle n’a
pas été inspectée et testée quotidiennement, et si son
fonctionnement n’a pas été jugé satisfaisant.
L’utilisation d’une agrafeuse qui n’a pas passé l’inspection
et le test quotidiens de façon satisfaisante peut entraîner
des dommages matériels et des blessures.
1. Retirez le bloc-piles 8 et toutes les agrafes du
magasin 12.
2. Inspectez toutes les vis, tous les boulons, tous les
écrous et toutes les goupilles de l’agrafeuse. Tous
les éléments de xation desserrés doivent être
resserrés.
3. Appuyez le contact avec la pièce à usiner 1 contre une
pièce à usiner. Il doit se déplacer en douceur.
4. Le contact avec la pièce à travailler 1 étant appuyé
contre la pièce à travailler, appuyez sur la gâchette 5.
L’agrafeuse ne doit pas fonctionner alors.
5. Insérez le bloc-piles 8 ; assurez-vous qu’il n’y a pas
d’agrafes dans le magasin 12, puis mettez l’agrafeuse
sous tension.
6. Sans tirer sur la gâchette 5, appuyez le contact avec
la pièce à travailler 1 contre une pièce à travailler.
7. Tirez le contact avec la pièce à usiner 1 pour l’éloigner
de la pièce à usiner, an qu’il se réinitialise. Tirez sur
la gâchette 5. L’agrafeuse ne doit pas fonctionner, et
l’indicateur d’état de fonctionnement 19 clignote en
rouge.
8. Continuez à tirer et à tenir la gâchette 5, et poussez
le contact avec la pièce à usiner 1 contre une pièce
à usiner. L’agrafeuse ne doit pas fonctionner, et
l’indicateur d’état de fonctionnement 19 clignote en
rouge.
9. Si les inspections conrment le bon fonctionnement,
l’agrafeuse est prête à l’emploi.
Chargement et déchargement du magasin
Il ne faut pas tirer sur
la gâchette ni appuyer
sur le contact avec la pièce à travailler lors du
chargement ou du déchargement de l’agrafeuse. Le
fait de tirer sur la gâchette ou d’appuyer sur le contact
avec la pièce à usiner peut entraîner une mauvaise mise
en marche de l’outil et provoquer des blessures et des
dommages matériels.
Chargement du magasin
(Fig. 7, Fig. 8, Fig. 9)
Lors du chargement du magasin 12, vériez que la
glissière du magasin 13 coulisse facilement. Si la glissière
du magasin 13 ne coulisse pas facilement, les éléments
de xation peuvent être enfoncés à des angles irréguliers,
ou l’agrafeuse risque de tirer à vide.
Utilisez des bandes de dispositifs de xation 18 qui ne
sont pas brisés et qui ont des dispositifs de xation de la
même désignation.
1. Retirez le bloc-piles 8.
2. Veillez à ce que le magasin 12 ne comporte pas de
débris, tels que de la poussière produire par le sciage.
3. Placez l’agrafeuse sur une surface plane et stable, et
dirigez-la dans le sens opposé à vous-même et aux
autres personnes.
4. Tirez la glissière du magasin 13 vers l’extrémité du
magasin 12 jusqu’à ce que le levier de relâchement
de la glissière du magasin 14 s’enclenche et que la
glissière du magasin 13 se verrouille en place .
5. Insérez la (les) bande(s) de xation assemblée(s) 18
à travers l’arrière du magasin 12 .
6. Tirez la glissière du magasin 13 jusqu’à l’extrémité du
magasin 12 , puis tirez vers l’arrière tout en tenant
le levier de relâchement de la glissière du magasin 14
.
7. Laissez la glissière du magasin 13 revenir lentement
en arrière jusqu’à ce qu’elle repose sur le dernier
élément de xation .
En plus des consignes de sécurité des pages 25 à 29, respectez toujours les
mesures de sécurité suivantes. Le non-respect de ces consignes pourrait entraîner
des dommages matériels ou des blessures.
Débranchez le bloc-piles de l’outil avant d’eectuer tout assemblage ou réglage,
ou de changer des accessoires. Ces mesures de sécurité préventives réduisent le
risque d’une mise en marche accidentelle de l’outil.
160992AB5S_GTH18V-50M_20241210.indd 35160992AB5S_GTH18V-50M_20241210.indd 35 12/13/2024 11:51:38 AM12/13/2024 11:51:38 AM
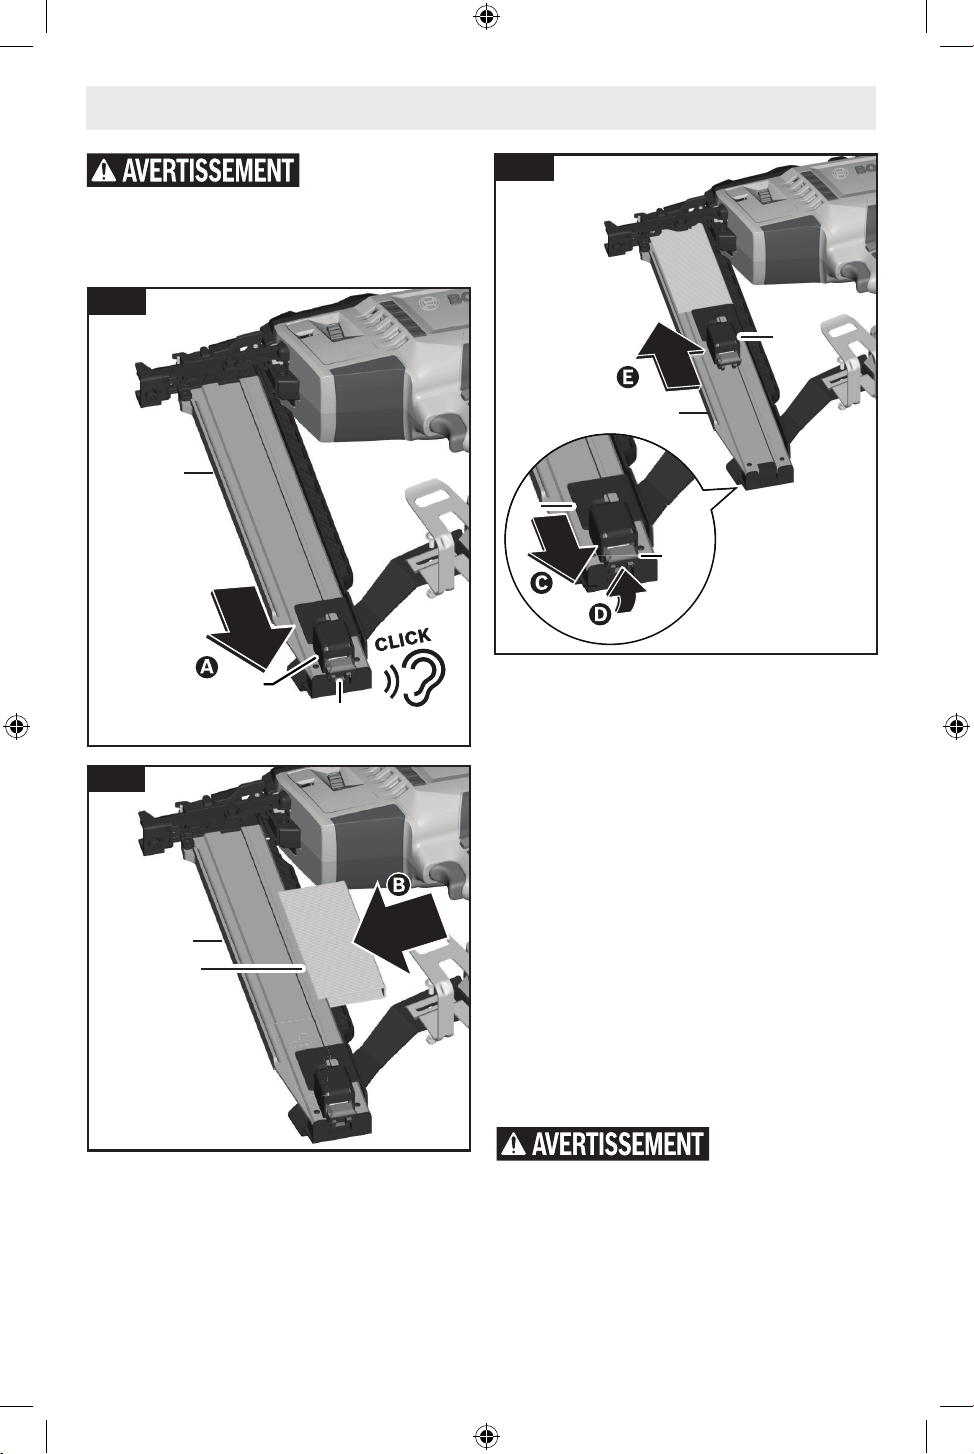
36
Guidez la glissière du
magasin à la main
jusqu’à ce qu’elle atteigne sa position la plus avancée.
Le recul libre de la glissière du magasin peut endommager
la glissière ou le magasin, ou causer des blessures.
Opération
Déchargement du magasin
(Fig.7, Fig. 9)
1. Retirez le bloc-piles 8.
2. Placez l’agrafeuse sur une surface plane et stable, et
dirigez-la dans le sens opposé à vous-même et aux
autres personnes.
3. Tirez la glissière du magasin 13 jusqu’à l’extrémité du
magasin 12 jusqu’à ce que le levier de relâchement
de la glissière du magasin 14 s’enclenche et que la
glissière du magasin 13 se verrouille en place.
4. Retirez la (les) bande(s) de xation assemblée(s) 18.
5. Tirez la glissière du magasin 13 jusqu’à l’extrémité
du magasin 12, puis tirez vers l’arrière le levier de
relâchement de la glissière du magasin 14 tout en
continuant à le tenir.
6. Laissez la glissière du magasin 13 revenir lentement
dans sa position de repos.
Guidez la glissière du
magasin à la main
jusqu’à ce qu’elle atteigne sa position la plus avancée.
Le recul libre de la glissière du magasin peut endommager
la glissière ou le magasin, ou causer des blessures.
13
12
Fig. 7
Fig. 8
13
14
Fig. 9
12
18
13
14
12
160992AB5S_GTH18V-50M_20241210.indd 36160992AB5S_GTH18V-50M_20241210.indd 36 12/13/2024 11:51:38 AM12/13/2024 11:51:38 AM
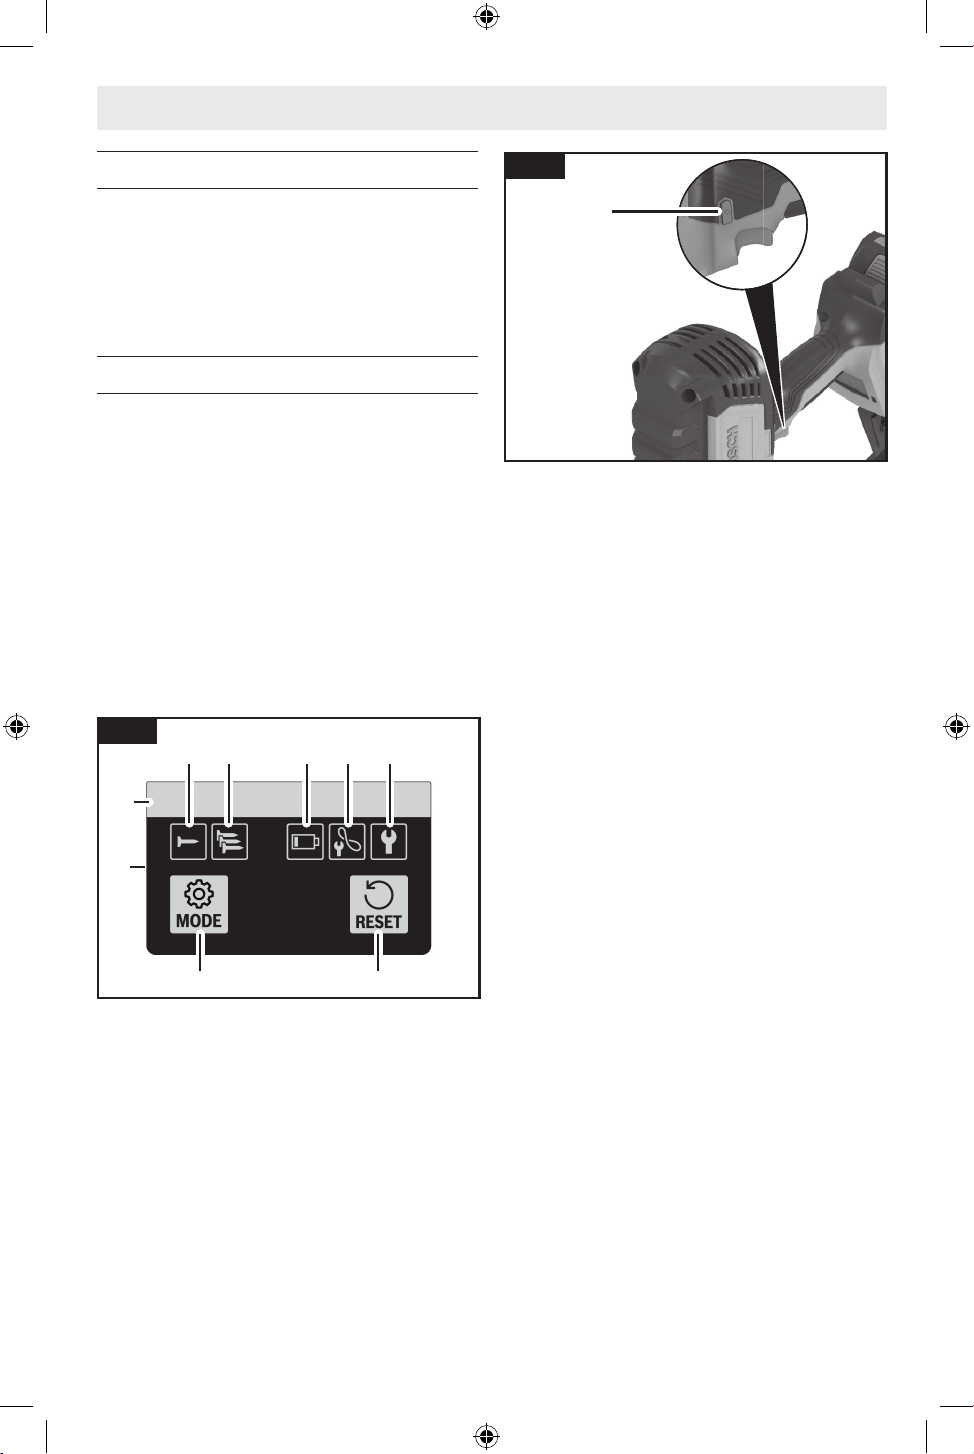
37
Bouton de mise sous tension/hors tension
(Fig. 10)
Pour mettre l’agrafeuse sous tension, appuyez sur le
bouton de mise sous tension/hors tension 6, et l’interface
utilisateur 9 s’allumera.
Pour mettre l’agrafeuse hors tension, appuyez sur le
bouton de mise sous tension 6.
Interface utilisateur
(Fig. 1, Fig. 11)
L’interface utilisateur 9 ore les fonctions suivantes :
• Indicateur d’état de fonctionnement 19
• Bouton de mode 20
• Indicateur d’actionnement unique 21
• Indicateur d’actionnement à percussion 22
• Indicateur de décharge partielle des piles 23
• Indicateur d’échéance pour une opération d’entretien
standard 24
• Indicateur d’échéance pour une opération d’entretien
ponctuelle importante 25
• Bouton de réinitialisation 26
Indicateur d’état de fonctionnement
Le voyant d’état de fonctionnement 19 indique l’état de
fonctionnement de l’agrafeuse. Un voyant vert indique que
l’agrafeuse est prête à fonctionner. Un voyant vert indique
que la cloueuse est prête à fonctionner. Si la couleur du
voyant de l’indicateur d’état de fonctionnement 19 n’est
pas verte, consultez la section « Recherche de la cause
des problèmes » à la page 42 pour plus d’informations.
Bouton de mode
Le bouton de mode 20 permet de basculer entre les
modes d’actionnement unique et d’actionnement par
percussion. La sélection sera indiquée par l’indicateur
d’actionnement unique 21 ou l’indicateur d’actionnement
par percussion 22.
Opération
Indicateur de décharge partielle des piles
L’indicateur de décharge partielle des piles 23 ne s’allume
que lorsque le niveau de charge des piles est de 20 % ou
moins. Un voyant indicateur jaune de décharge partielle
des piles 23 signie que les piles sont chargées à 1-20
% de leur capacité totale. Un voyant indicateur rouge de
décharge partielle des piles 23 signie que les piles sont
chargées à 0-1 % de leur capacité totale.
Indicateurs d’échéances pour des
opérations d’entretien standard et
d’échéances pour des opérations
d’entretien ponctuelles importantes
L’indicateur d’échéance pour une opération d’entretien
standard 24 ou l’indicateur d’échéance pour une
opération d’entretien ponctuelle importante 25 s’allume
lorsque l’agrafeuse est prête à être utilisée. Il est
recommandé de rapporter l’agrafeuse, le bloc-piles et le
chargeur à un centre de service après-vente BOSCH en
vue d’inspection et/ou de réparation.
Bouton de réinitialisation
Le bouton de réinitialisation 26 est utilisé pour remettre
l’agrafeuse dans un état normal après qu’une condition
anormale a été corrigée. Pour réinitialiser l’agrafeuse,
appuyez sur le bouton de réinitialisation 26 et maintenez-
le enfoncé pendant trois secondes.
Consultez la section « Recherche de la cause des
problèmes » à la page 42 pour plus d’informations sur la
réinitialisation de l’agrafeuse.
6
Fig. 10
19
20
26
21 23 24 2522
Fig. 11
9
160992AB5S_GTH18V-50M_20241210.indd 37160992AB5S_GTH18V-50M_20241210.indd 37 12/13/2024 11:51:38 AM12/13/2024 11:51:38 AM
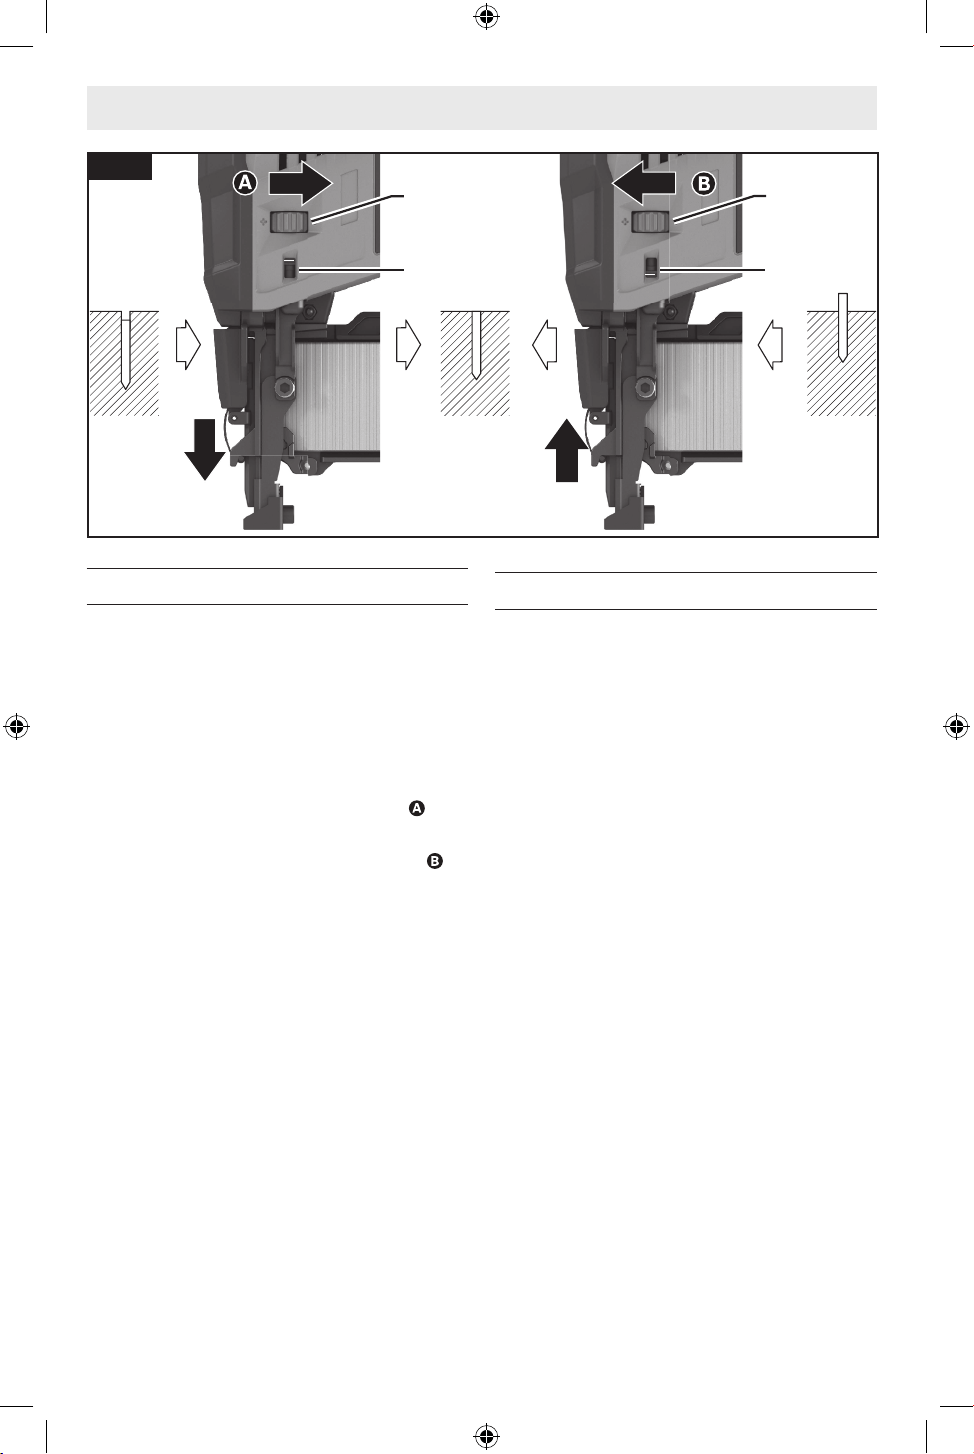
38
Commutateur de réglage de la profondeur
(Fig. 12)
La profondeur à laquelle les éléments de xation sont
enfoncés dans la pièce à travailler peut être réglée à l’aide
de la molette de réglage de la profondeur 4 qui est située
sur le côté de l’agrafeuse. Utilisez l’indicateur de réglage
de la profondeur 3 pour déterminer le réglage actuel de la
profondeur de l’agrafeuse.
Tournez la molette de réglage de la profondeur 4 vers le
bas pour diminuer la profondeur d’enfoncement .
Tournez la molette de réglage de la profondeur 4 vers le
haut pour augmenter la profondeur d’enfoncement .
Opération
Lampe de travail
(Fig. 1)
Votre agrafeuse est munie d’une lampe de travail à DEL
10 pour améliorer la visibilité lorsque vous utilisez
l’agrafeuse.
La DEL restera allumée pendant 10 secondes après que
l’interrupteur 5 aura été enfoncé.
4
4
3 3
Fig. 12
160992AB5S_GTH18V-50M_20241210.indd 38160992AB5S_GTH18V-50M_20241210.indd 38 12/13/2024 11:51:39 AM12/13/2024 11:51:39 AM
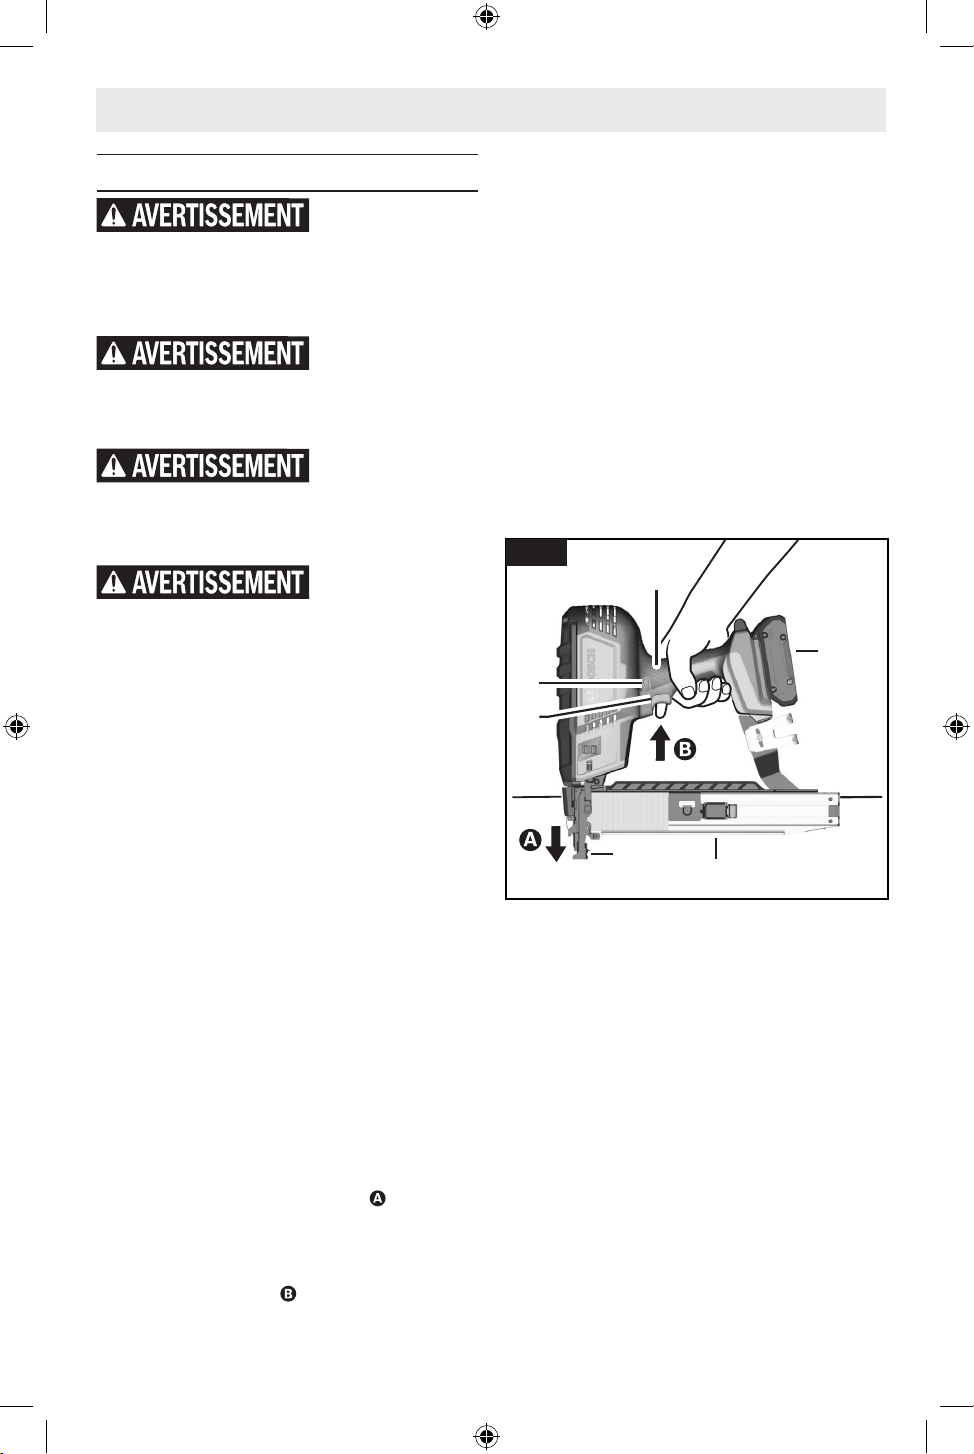
39
Actionnement de l’agrafeuse
L’embout avant doit
être en contact total
avec la surface de travail. L’écart entre l’embout avant et
la surface de travail peut entraîner une déviation de
l’élément de xation ainsi que des dommages matériels
ou des blessures corporelles.
Ne coincez jamais le
nez entre deux
surfaces ou plus. Un espace entre le nez et plusieurs
surfaces de travail peut permettre une déviation de la
xation et des dommages matériels ou des blessures.
Ne retenez jamais le
nez pendant le
fonctionnement. Retenir l’embout peut entraîner un
actionnement inattendu et causer des dommages
matériels ou des blessures graves.
Ne placez jamais votre
visage ou votre corps
au-dessus du capuchon supérieur de l’agrafeuse
pendant son fonctionnement. Un recul soudain peut
entraîner un impact sur le corps et des blessures.
Cette cloueuse peut fonctionner en mode d’actionnement
séquentiel unique ou par contact (percussion). Suivez
la section correspondante an d’obtenir les instructions
correctes pour l’utilisation.
Remarque : L’agrafeuse s’éteint après 30 minutes
d’inactivité.
Actionnement séquentiel unique
(Fig. 1, Fig. 13)
1. Charger le magasin 12. Voir la section « Chargement
et déchargement du magasin » à la page 35.
2. Insérez le bloc-piles 8.
3. Appuyez sur le bouton de mise sous tension/hors
tension 6 pour activer l’agrafeuse.
4. Assurez-vous que l’agrafeuse est en mode
d’actionnement unique en vériant l’indicateur sur
l’interface utilisateur 9.
5. Saisissez fermement la poignée 16 et maintenez
l’agrafeuse sur la surface de travail.
6. Appuyez complètement le contact avec la pièce à
usiner 1 contre la surface de travail . Si le contact
avec la pièce à travailler 1 n’est pas complètement
enfoncé dans l’agrafeuse, celle-ci ne se déclenchera
pas.
7. Tirez sur la gâchette 5 pour enfoncer le dispositif
de xation dans la surface de travail. La gâchette
Opération
5 doit être actionnée dans les 5 secondes qui
suivent l’enfoncement complet du contact avec la
pièce à usiner 1. Si la gâchette 5 est tirée plus tard,
l’agrafeuse repassera dans un mode de SÉCURITÉ, et
la séquence d’actionnement doit être répétée.
8. L’agrafeuse recule une fois que l’élément de xation
est enfoncé dans la surface de travail. Utilisez
une prise susante pour maintenir le contrôle et
l’alignement de l’agrafeuse sur la surface de travail
pendant le tir et le recul.
9. Relâchez la gâchette 5 et tirez sur l’agrafeuse pour
l’éloigner du plan de travail.
10. Pour enfoncer un autre dispositif de xation,
la gâchette 5 et le contact avec la pièce à usiner
1 doivent être relâchés, et la séquence de
déclenchement, étapes 5 à 7, doit être répétée.
16
8
6
5
1
12
Fig. 13
160992AB5S_GTH18V-50M_20241210.indd 39160992AB5S_GTH18V-50M_20241210.indd 39 12/13/2024 11:51:39 AM12/13/2024 11:51:39 AM
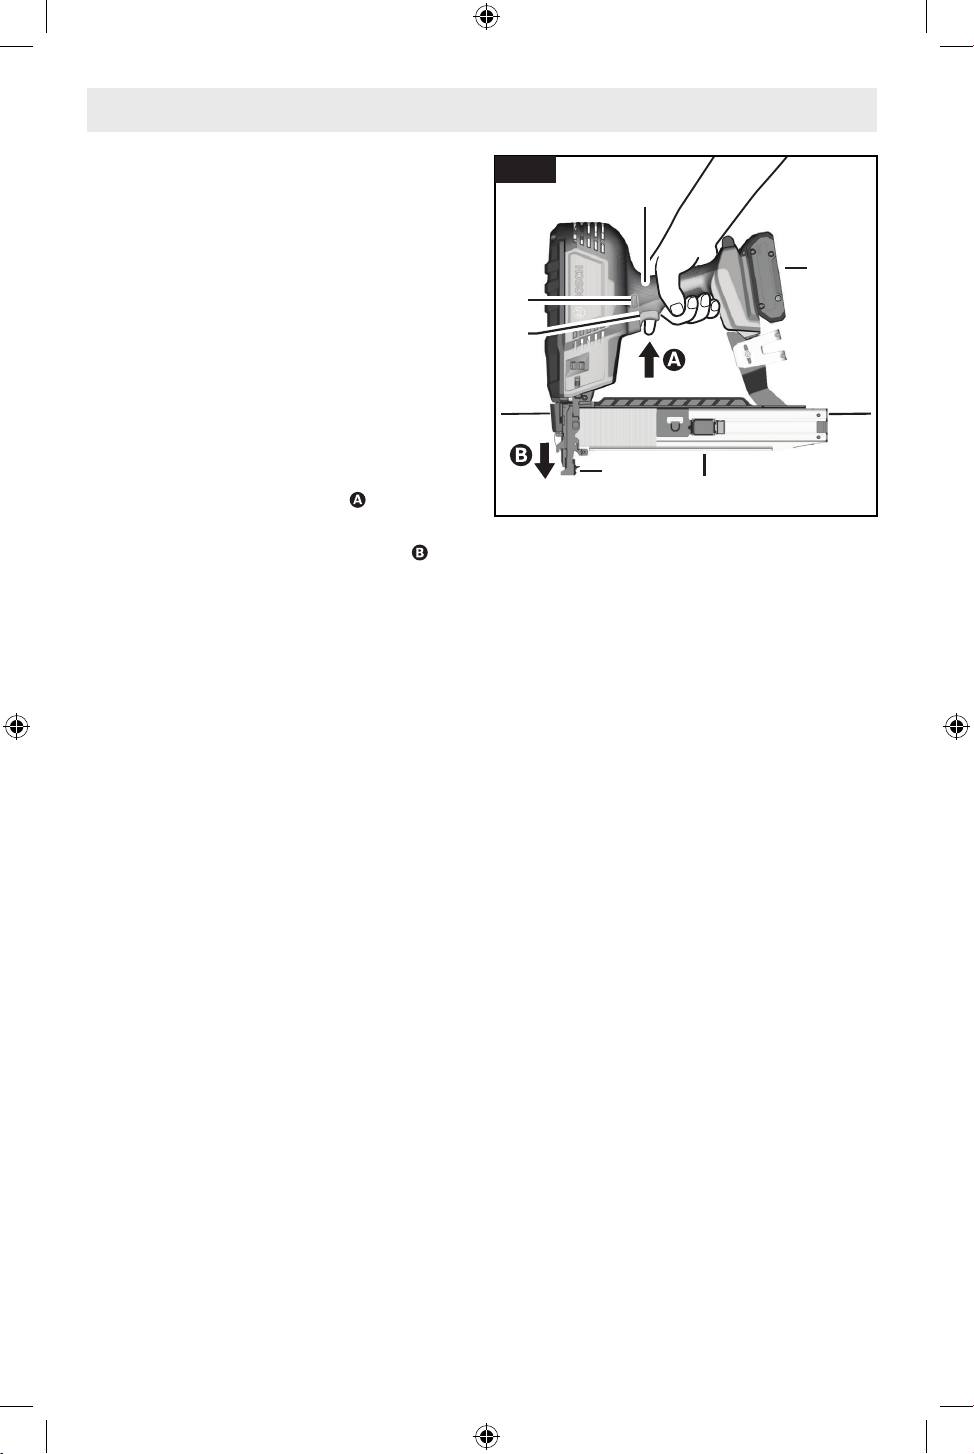
40
Opération
Actionnement par contact (percussion)
(Fig. 1, Fig. 14)
1. Chargez le magasin 12. Voir la section intitulée «
Chargement et déchargement du magasin » à la page
35.
2. Insérez le bloc-piles 8.
3. Appuyez sur le bouton de mise sous tension/hors
tension 6 pour activer l’agrafeuse.
4. Sur l’interface utilisateur 9, appuyez sur le bouton
de mode 20 pour passer en mode d’activation par
percussion ; l’indicateur d’activation du mode à
percussion 22 s’allumera.
5. Saisissez fermement la poignée 16 et tirez sur la
gâchette 5 pour activer l’agrafeuse .
6. Appuyez complètement le contact avec la pièce
à usiner 1 contre la surface de travail pour
enfoncer le dispositif de xation ; ne relâchez pas la
gâchette 5. Le contact avec la pièce à usiner 1 doit
être complètement enfoncé dans les 5 secondes
qui suivent l’actionnement de la gâchette 5. Si
le contact avec la pièce à travailler 1 est enfoncé
ultérieurement, l’agrafeuse repassera dans un mode
de SÉCURITÉ, et la séquence d’actionnement devra
être répétée. Si le contact avec la pièce à travailler
1 n’est pas complètement enfoncé dans l’agrafeuse,
celle-ci ne se déclenchera pas.
7. L’agrafeuse recule une fois que l’élément de xation
est enfoncé dans la surface de travail. Utilisez
une prise susante pour maintenir le contrôle et
l’alignement de l’agrafeuse sur la surface de travail
pendant le tir et le recul.
8. Continuez à maintenir la gâchette 5, et tirez sur
l’agrafeuse pour l’éloigner de la surface de travail.
9. Pour déclencher un autre dispositif de xation,
appuyez sur le contact avec la pièce à usiner 1 à
l’emplacement de déclenchement suivant ; cette
étape peut être répétée tant que la gâchette 5 est
maintenue enfoncée en permanence. Une fois la
gâchette relâchée, les étapes 5 à 8 doivent être
répétées.
16
8
6
5
1
12
Fig. 14
160992AB5S_GTH18V-50M_20241210.indd 40160992AB5S_GTH18V-50M_20241210.indd 40 12/13/2024 11:51:39 AM12/13/2024 11:51:39 AM
41
Nettoyage
Nettoyez la poussière et les débris de tous les évents et
chargeurs d’éléments de xation. Maintenez l’agrafeuse
propre, sèche et exempte d’huile ou de graisse. N’utilisez
que du savon doux et un chion humide pour nettoyer le
boîtier, car certains agents de nettoyage et solvants sont
nocifs pour les plastiques et autres pièces isolées. Il s’agit
notamment de l’essence, de la térébenthine, des diluants
pour laque, des diluants pour peinture, des solvants
de nettoyage chlorés, de l’ammoniac et des détergents
ménagers contenant de l’ammoniac. N’utilisez jamais de
solvants inammables ou combustibles à proximité des
outils.
Retirez l’adhésif de collationnement et nettoyez la
poussière accumulée dans le magasin pour permettre aux
éléments de xation d’avancer en douceur.
Réparations
Pour les réparations, vous pouvez retourner l’agrafeuse, le
bloc-piles et le chargeur au centre de service après-vente
Bosch le plus proche ou à un établissement de service
après-vente agréé par Bosch.
Entretien
Maintenance générale
Maintenez votre agrafeuse, votre bloc-piles et votre
chargeur en bon état de fonctionnement en adoptant un
programme d’entretien régulier. Inspectez votre agrafeuse
pour vous assurer que les pièces en mouvement sont bien
alignées et qu’elles ne se coincent pas, qu’il n’y a pas de
pièces cassées ou qu’il n’existe aucune situation pouvant
aecter le fonctionnement de l’agrafeuse.
Cette agrafeuse ne contient pas de pièces pouvant être
réparées par un utilisateur.
Il est recommandé, après six mois ou un an, en fonction
de l’utilisation, de renvoyer l’agrafeuse, le bloc-piles et le
chargeur à un centre de service après-vente BOSCH en
vue d’inspection.
Si l’agrafeuse ne démarre pas ou ne fonctionne pas à
pleine puissance avec un bloc-piles entièrement chargé,
nettoyez les contacts du bloc-piles. Si l’agrafeuse ne
fonctionne toujours pas correctement, vous pouvez
retourner l’agrafeuse, le chargeur et le bloc-piles àun
centre de service après-vente Bosch pour les faire réparer.
Service
Faites entretenir votre
outil électrique par un
réparateur compétent n’utilisant que des pièces de
rechange identiques. Ceci assurera le maintien de la
sécurité de l’outil électrique
Pour éviter le risque d’accidents, débranchez le bloc-piles de l’outil avant de
procéder au nettoyage ou à l’entretien.
Ne dirigez pas l’outil vers vous-même ou vers une autre personne se trouvant à
proximité. Un déclenchement inattendu entraînera l’éjection de l’élément de xation
et causera des blessures.
160992AB5S_GTH18V-50M_20241210.indd 41160992AB5S_GTH18V-50M_20241210.indd 41 12/13/2024 11:51:39 AM12/13/2024 11:51:39 AM
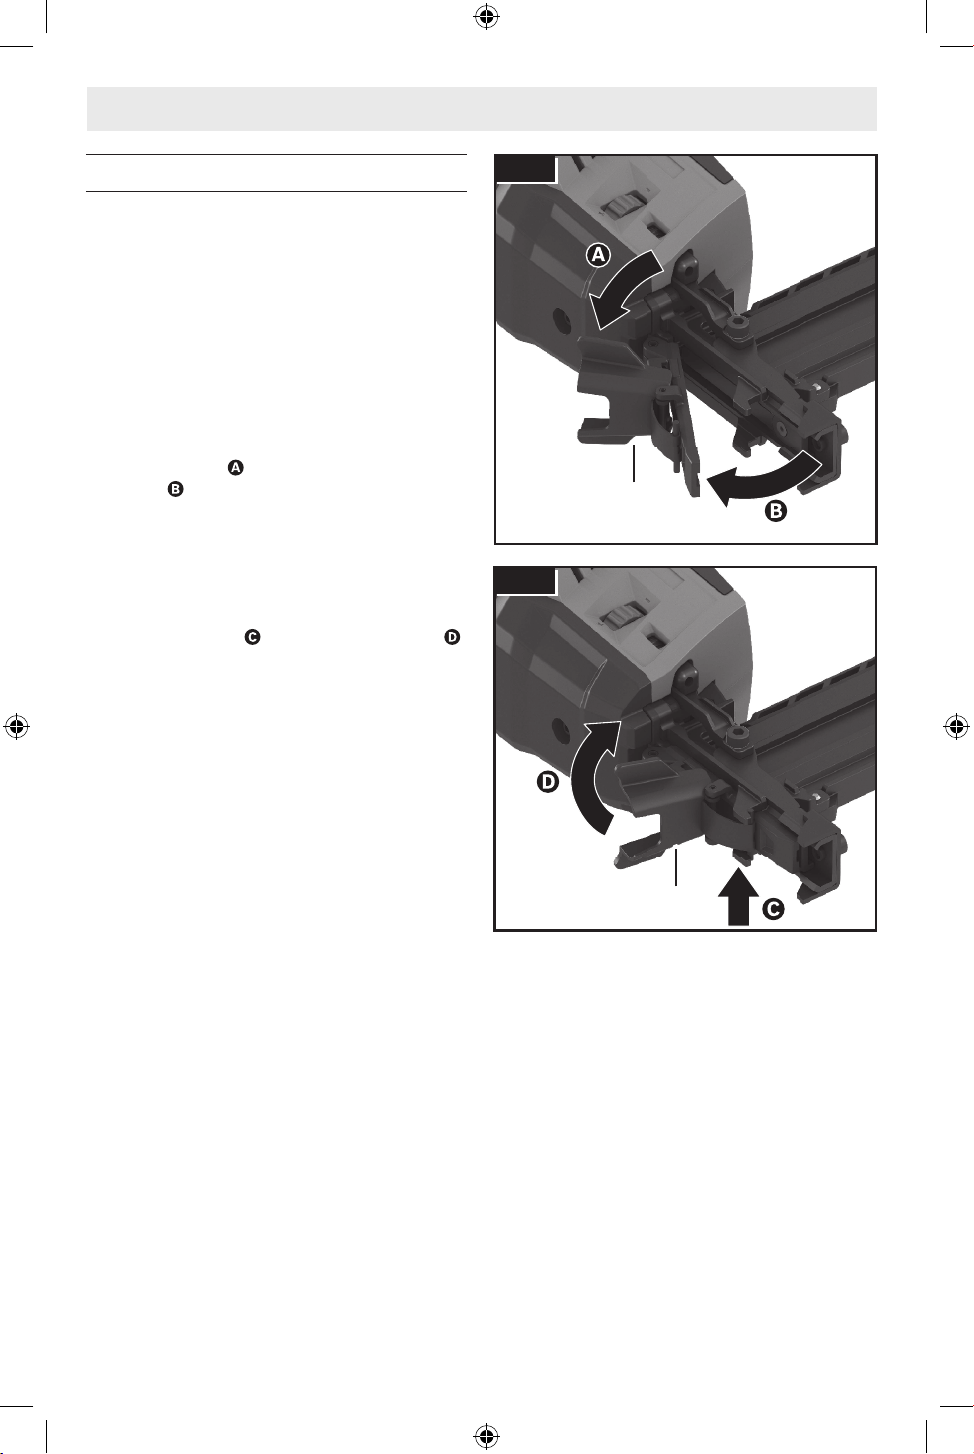
42
Déblocage d’obstructions
(Fig. 15, Fig. 16)
Suivez la procédure d’élimination des coincements
lorsqu’un dispositif de xation est coincé :
1. Mettez l’agrafeuse hors tension en appuyant sur le
bouton de mise sous tension/hors tension 6.
2. Détachez le bloc-piles 8 de l’agrafeuse.
3. Retirez tous les dispositifs de xation du magasin
12. Voir la section intitulée « Chargement et
déchargement du magasin » à la page 35.
4. Ouvrez le loquet d’élimination des coincements 17
en le soulevant , puis en le faisant pivoter pour
l’ouvrir .
5. Retirez le dispositif de xation coincé en utilisant
une pince si nécessaire. Si nécessaire, nettoyez les
saletés ou les débris piégés.
6. Fermez le loquet d’élimination des coincements 17
en le faisant pivoter, assurez-vous que la goupille du
loquet est engagée , puis appuyez sur le loquet .
7. Remplissez le magasin 12. Voir la section intitulée «
Chargement et déchargement du magasin » à la page
35.
8. Après avoir éliminé le coincement, suivez la section
« Inspection et tests quotidiens » à la page 35 pour
assurer le fonctionnement normal de l’agrafeuse.
REMARQUE : Si la lame ne revient pas en position
haute après l’agrafage, retirez le bloc-piles 8. Nous vous
recommandons de contacter un centre de service après-
vente Bosch ou un poste de service après-vente agréé par
Bosch.
17
Fig. 15
17
Fig. 16
Recherche de la cause des problèmes
160992AB5S_GTH18V-50M_20241210.indd 42160992AB5S_GTH18V-50M_20241210.indd 42 12/13/2024 11:51:40 AM12/13/2024 11:51:40 AM
43
Recherche de la cause des problèmes
Couleur
de la DEL Statut de l’indicateur Signication Solution
Vert Éclairage continu
L’agrafeuse est sous tension et
fonctionne. Les conditions sont
normales.
L’agrafeuse est prête à l’emploi
Rouge
Éclairage continu
La température du bloc-piles et
de l’outil est trop élevée/basse.
Laissez la pile et/ou l’agrafeuse atteindre
la température de fonctionnement
autorisée. Voir la section intitulée
« Specications » à la page 32.
Erreur interne. Faites réparer votre outil.
Éclairage clignotant
L’opération séquentielle n’a pas
été eectuée correctement.
L’état de fonctionnement se réinitialise
automatiquement sur « prêt » et
s’achera en vert au bout d’un moment.
Voir la section « Actionnement de
l’agrafeuse » à la page 39 pour obtenir
un fonctionnement séquentiel correct.
La gâchette n’a pas été
actionnée dans les 5 secondes
qui ont suivi l’enfoncement du
contact avec la pièce.
Jaune Éclairage continu
Le bloc-piles n’est pas
complètement chargé.
Chargez le bloc-piles ou remplacez-le
par un autre bloc-piles complètement
chargé.
L’indicateur d’échéance pour
une opération d’entretien
standard est allumé.
Faites réparer votre outil.
L’indicateur d’échéance pour
une opération d’entretien
ponctuelle importante est
allumé.
Faites réparer votre outil.
160992AB5S_GTH18V-50M_20241210.indd 43160992AB5S_GTH18V-50M_20241210.indd 43 12/13/2024 11:51:40 AM12/13/2024 11:51:40 AM
44
Recherche de la cause des problèmes
Problème Cause Action corrective
L’agrafeuse ne fonctionne pas.
Il n’y a pas d’actionnement.
Pas de pile insérée, pile déchargée. Insérez une pile chargée.
Température de la pile et de l’outil
trop basse.
Laissez le bloc-piles et l’outil se
réchauer susamment jusqu’à la
température ambiante permise pour
le fonctionnement. Voir le tableau «
Specications » à la page 32.
L’agrafeuse n’est pas sous tension.
Appuyez sur le bouton de marche/arrêt
6 et maintenez-le enfoncé pendant 1,5
seconde. Voir Fig. 1
L’opération séquentielle ne s’est pas
déroulée correctement.
Voir la section « Actionnement de
l’agrafeuse » à la page 39.
Le contact avec la pièce à usiner
n’est pas complètement enfoncé.
Voir la section « Actionnement de
l’agrafeuse » à la page 39.
L’élément de xation ne
s’enfonce pas.
Un déclenchement se produit.
Le dispositif de xation est coincé :
présence de débris ou de saletés, ou
coincement du dispositif de xation
dans la pointe de l’outil et/ou dans
le magasin.
Voir « Déblocage d’obstructions » à la
page 42.
Les éléments de xation utilisés ne
sont pas compatibles.
N’utilisez que des éléments de
xation compatibles. Voir le tableau «
Specications » à la page 32.
Le magasin est vide.
Remplissez le magasin. Voir «
Chargement du magasin » à la page
35.
Éléments de xation
insusamment enfoncés
La profondeur d’enfoncement
sélectionnée n’est pas susante.
Réglez la molette de réglage de
la profondeur pour augmenter la
profondeur d’enfoncement. Voir
« Commutateur de réglage de la
profondeur » à la page 38.
Le contact avec l’ouvrage est étiré
excessivement.
Réduisez l’extension du contact avec
l’ouvrage. Voir la rubrique intitulée «
Extension du contact avec l’ouvrage » à
la page 34.
L’élément de xation est trop long.
N’utilisez que des éléments de
xation compatibles. Voir le tableau «
Specications » à la page 32.
La pile est déchargée ou
défectueuse.
Insérer la pile chargée. Voir « Pour insérer
le bloc-piles » à la page 33.
160992AB5S_GTH18V-50M_20241210.indd 44160992AB5S_GTH18V-50M_20241210.indd 44 12/13/2024 11:51:40 AM12/13/2024 11:51:40 AM

45
Recherche de la cause des problèmes
Problème Cause Action corrective
Éléments de xation
excessivement enfoncés
La profondeur d’enfoncement
sélectionnée est excessive.
Ajustez la molette de réglage de la
profondeur pour diminuer la profondeur
d’enfoncement. Voir « Commutateur
de réglage de la profondeur » à la page
38.
Le contact avec l’ouvrage n’est pas
assez étendu.
Étendez davantage le contact avec
l’ouvrage. Voir la rubrique intitulée «
Extension du contact avec l’ouvrage » à
la page 34.
L’élément de xation est trop court.
N’utilisez que des éléments de
xation compatibles. Voir le tableau «
Specications » à la page 32.
Les dispositifs de xation
entraînés se plient ou se
cassent.
L’élément de xation est trop long.
Sélectionnez un élément de xation plus
court. Voir le tableau « Specications » à
la page 32.
La cloueuse saute des dispositifs
de xation ou a une avance de cycle
trop importante.
Utilisez l’agrafeuse uniquement sur du
bois et des produits en bois.
La lame de l’outil est endommagée. Faites réparer votre outil.
L’agrafeuse saute des éléments
de xation.
Les éléments de xation utilisés ne
sont pas compatibles.
N’utilisez que des éléments de
xation compatibles. Voir le tableau «
Specications » à la page 32.
Les dispositifs de xation se
coincent fréquemment.
Les éléments de xation utilisés ne
sont pas compatibles..
N’utilisez que des éléments de
xation compatibles. Voir le tableau «
Specications » à la page 32.
Les dispositifs de xation sont
anciens ; l’adhérence entre les
dispositifs de xation est usée.
Utilisez de nouvelles bandes de
dispositifs de xation.
Les éléments de xation ne
glissent pas dans le chargeur.
Poussière ou débris dans le
chargeur.
Inspectez le magasin et éliminez toute
accumulation de matières résiduelles ou
tout corps étranger.
160992AB5S_GTH18V-50M_20241210.indd 45160992AB5S_GTH18V-50M_20241210.indd 45 12/13/2024 11:51:40 AM12/13/2024 11:51:40 AM
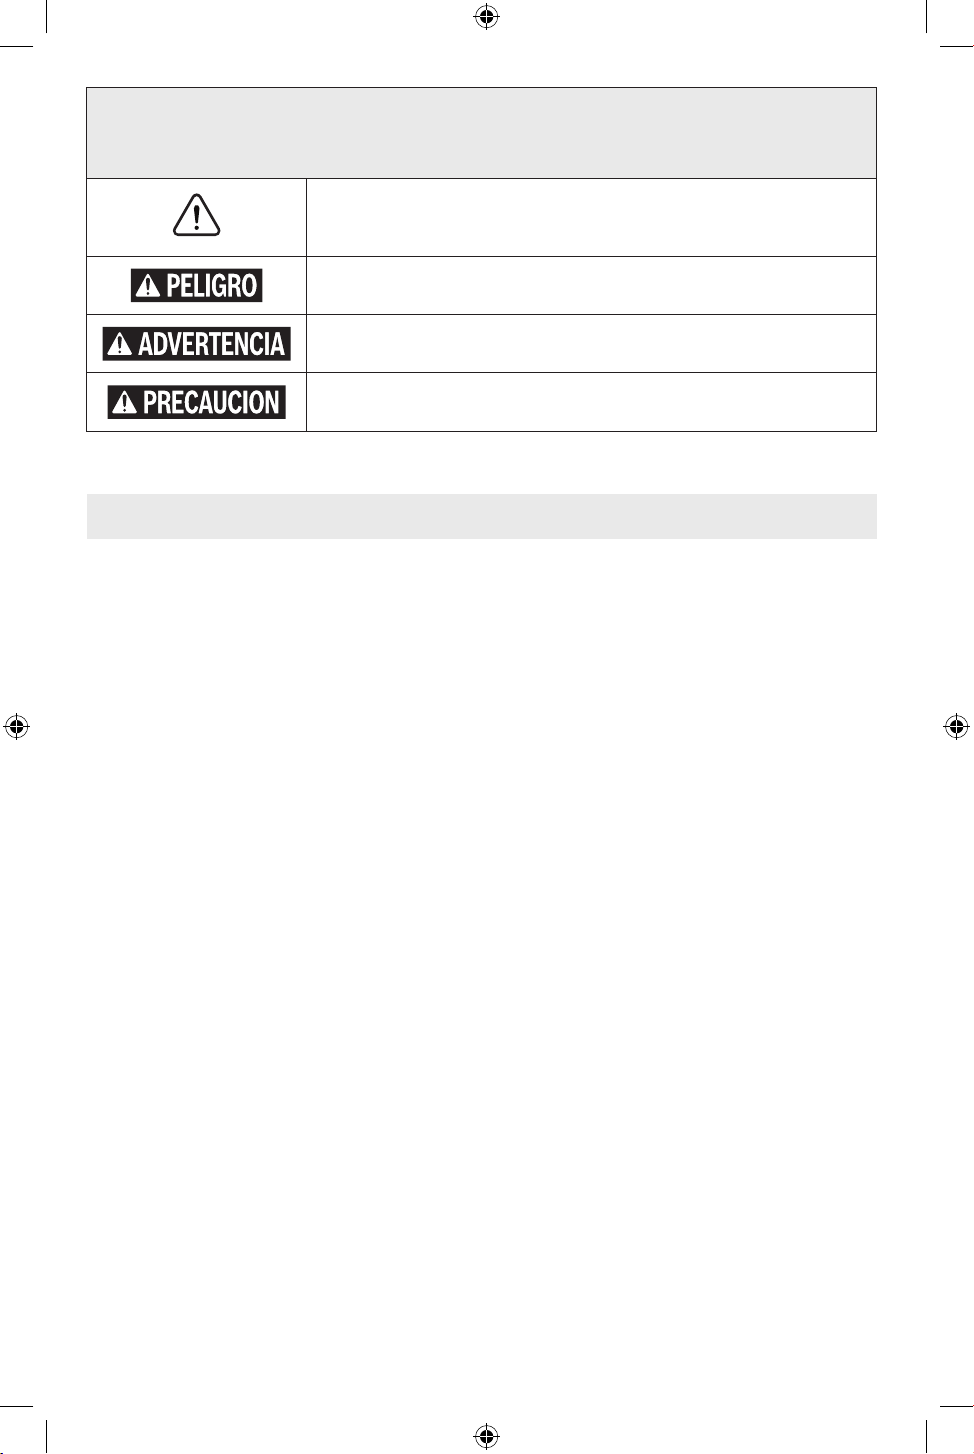
46
Tabla de contenido
Símbolos de seguridad
Las definiciones que aparecen a continuación describen el nivel de gravedad de cada palabra de aviso.
Por favor, lea el manual y preste atención a estos símbolos.
Este es el símbolo de alerta de seguridad. Se utiliza para alertarle a usted de
posibles peligros de lesiones corporales. Obedezca todos los mensajes de
seguridad que sigan a este símbolo para evitar posibles lesiones o la muerte.
PELIGRO indica una situación peligrosa que, si no se evita, causará la muerte o
lesiones graves.
ADVERTENCIA indica una situación peligrosa que, si no se evita, podría causar la
muerte o lesiones graves.
PRECAUCIÓN indica una situación peligrosa que, si no se evita, podría causar
lesiones leves o moderadas.
Advertencias generales de seguridad para
herramientas eléctricas .................... 47
Advertencia de seguridad para grapadoras
inalámbricas ............................. 49
Advertencias de seguridad adicionales............49
Eliminación .............................. 51
Uso previsto..................................51
Símbolos .................................... 52
Familiarización con su grapadora de grapas de corona
medianas GTH18V-50M.................... 53
Especicaciones ..............................54
Ensamblaje .................................. 55
Inserción y remoción del paquete de batería....55
Gancho utilitario .......................... 55
Contacto con la pieza de trabajo ............. 56
Operación ................................... 57
Inspección y pruebas diarias ................ 57
Carga y descarga del cargador
de sujetadores ........................ 57
Botón de encendido y apagado .............. 59
Interfaz del usuario ........................ 59
Luz de trabajo ............................ 60
Interruptor de ajuste de profundidad..........60
Accionamiento de la grapadora .............. 61
Mantenimiento ............................... 63
Mantenimiento general .....................63
Servicio de ajustes y reparaciones............ 63
Limpieza ................................ 63
Reparaciones............................. 63
Resolución de problemas....................... 64
Despeje de atoramientos ................... 64
160992AB5S_GTH18V-50M_20241210.indd 46160992AB5S_GTH18V-50M_20241210.indd 46 12/13/2024 11:51:40 AM12/13/2024 11:51:40 AM

47
Advertencias generales de seguridad para herramientas eléctricas
Lea todas las advertencias de seguridad, instrucciones, ilustraciones y
especicaciones suministradas con esta herramienta eléctrica. Si no se siguen todas
las instrucciones que se indican a continuación, es posible que el resultado sea descargas eléctricas, incendio y/o
lesiones graves.
GUARDE TODAS LAS ADVERTENCIAS E INSTRUCCIONES PARA REFERENCIA FUTURA
La expresión “herramienta mecánica” en las advertencias se reere a su herramienta mecánica alimentada por la red
eléctrica (herramienta alámbrica) o su herramienta mecánica alimentada por baterías (herramienta inalámbrica).
1. Seguridad en el área de trabajo
a. Mantenga el área de trabajo limpia y bien
iluminada. Las áreas desordenadas u oscuras
invitan a que se produzcan accidentes.
b. No utilice herramientas eléctricas en atmósferas
explosivas, tales como las existentes en presencia
de líquidos, gases o polvos inamables. Las
herramientas eléctricas generan chispas, las cuales
es posible que incendien los polvos o los vapores.
c. Mantenga alejados a los niños y a los curiosos
mientras esté utilizando una herramienta
eléctrica. Las distracciones pueden hacerle perder
el control de la herramienta.
2. Seguridad eléctrica
a. Los enchufes de las herramientas eléctricas
deben coincidir con el tomacorriente. No
modique nunca el enchufe de ninguna
manera. No utilice enchufes adaptadores con
herramientas eléctricas conectadas a tierra
(puestas a masa). Los enchufes sin modicar y los
tomacorrientes coincidentes reducirán el riesgo de
descargas eléctricas.
b. Evite el contacto del cuerpo con supercies
conectadas a tierra o puestas a masa, tales
como tuberías, radiadores, estufas de cocina y
refrigeradores. Hay un mayor riesgo de descargas
eléctricas si el cuerpo del operador está conectado a
tierra o puesto a masa.
c. No exponga las herramientas eléctricas a la lluvia
ni a condiciones mojadas. La entrada de agua en
una herramienta eléctrica aumentará el riesgo de
descargas eléctricas.
d. No maltrate el cable. No use nunca el cable para
transportar, jalar o desenchufar la herramienta
eléctrica. Mantenga el cable alejado del calor, el
aceite, los bordes alados o las piezas móviles.
Los cables dañados o enredados aumentan el riesgo
de descargas eléctricas.
e. Cuando utilice una herramienta eléctrica a
la intemperie, utilice un cable de extensión
adecuado para uso a la intemperie. La utilización
de un cable adecuado para uso a la intemperie
reduce el riesgo de descargas eléctricas.
f. Si es inevitable utilizar una herramienta eléctrica
en un lugar húmedo, utilice una fuente de
alimentación protegida por un interruptor de
circuito accionado por corriente de pérdida a
tierra (GFCI, por sus siglas en inglés). El uso de un
GFCI reduce el riesgo de descargas eléctricas.
3. Seguridad personal
a. Manténgase alerta, fíjese en lo que está haciendo
y use el sentido común cuando utilice una
herramienta eléctrica. No utilice una herramienta
eléctrica mientras esté cansado o bajo la
inuencia de drogas, alcohol o medicamentos. Es
posible que un momento de desatención mientras
se estén utilizando herramientas eléctricas cause
lesiones corporales graves.
b. Utilice equipo de protección personal. Use
siempre protección ocular. Los equipos
protectores, tales como una máscara antipolvo,
calzado de seguridad antideslizante, casco o
protección de la audición, utilizados según lo
requieran las condiciones, reducirán las lesiones
corporals.
c. Prevenga los arranques accidentales. Asegúrese
de que el interruptor esté en la posición de
apagado antes de conectar la herramienta
eléctrica a la fuente de alimentación y/o al
paquete de batería, levantar la herramienta
eléctrica o transportarla. Si se transportan
herramientas eléctricas con el dedo en el interruptor
o si se suministra corriente a herramientas
eléctricas que tengan el interruptor en la posición de
encendido se invita a que se produzcan accidents.
d. Retire todas las llaves de ajuste o de tuerca antes
de encender la herramienta eléctrica. Es posible
que una llave de tuerca o de ajuste que se deje sujeta
CONSERVE ESTAS INSTRUCCIONES
160992AB5S_GTH18V-50M_20241210.indd 47160992AB5S_GTH18V-50M_20241210.indd 47 12/13/2024 11:51:40 AM12/13/2024 11:51:40 AM

48
Advertencias generales de seguridad para herramientas eléctricas
CONSERVE ESTAS INSTRUCCIONES
a una pieza rotativa de la herramienta eléctrica cause
lesiones corporales.
e. No intente alcanzar demasiado lejos. Mantenga
un apoyo de los pies y un equilibrio adecuados en
todo momento. Esto permite un mejor control de la
herramienta eléctrica en situaciones inesperadas.
f. Vístase adecuadamente. No se ponga ropa
holgada ni joyas. Mantenga el pelo y la ropa
alejados de las piezas móviles. La ropa holgada, las
joyas o el pelo largo pueden quedar atrapados en las
piezas móviles.
g. Si se proporcionan dispositivos para la conexión
de instalaciones de extracción y recolección de
polvo, asegúrese de que estas estén conectadas
y se utilicen correctamente. El uso de recolección
de polvo puede reducir los peligros relacionados con
el polvo.
h. No deje que la familiaridad obtenida con el
uso frecuente de las herramientas le haga
volverse complaciente e ignorar los principios
de seguridad de las herramientas. Una acción
descuidada puede causar lesiones graves en una
fracción de Segundo.
4. Uso y cuidado de la herramienta
eléctrica
a. No fuerce la herramienta eléctrica. Utilice la
herramienta eléctrica correcta para la aplicación
que vaya a realizar. La herramienta eléctrica
correcta hará el trabajo mejor y con más seguridad a
la capacidad nominal para la que fue diseñada.
b. No utilice la herramienta eléctrica si el
interruptor no la enciende y apaga. Cualquier
herramienta eléctrica que no se pueda controlar con
el interruptor es peligrosa y debe ser reparada.
c. Desconecte el enchufe de la fuente de
alimentación y/o retire el paquete de batería de
la herramienta eléctrica, si es retirable, antes
de hacer cualquier ajuste, cambiar accesorios
o almacenar herramientas eléctricas. Dichas
medidas preventivas de seguridad reducen el
riesgo de arrancar accidentalmente la herramienta
eléctrica.
d. Guarde las herramientas eléctricas que no esté
usando fuera del alcance de los niños y no deje
que las personas que no estén familiarizadas con
la herramienta eléctrica o estas instrucciones
utilicen la herramienta eléctrica. Las herramientas
eléctricas son peligrosas en las manos de los
usuarios no capacitados.
e. Realice mantenimiento de las herramientas
eléctricas y los accesorios. Compruebe si hay
desalineación o atoramiento de las piezas
móviles, rotura de piezas y cualquier otra
situación que pueda afectar al funcionamiento
de la herramienta eléctrica. Si la herramienta
eléctrica está dañada, haga que la reparen antes
de utilizarla. Muchos accidentes son causados
por herramientas eléctricas que reciben un
mantenimiento deciente.
f. Mantenga las herramientas de corte aladas y
limpias. Las herramientas de corte mantenidas
adecuadamente, con bordes de corte alados,
tienen menos probabilidades de atorarse y son más
fáciles de controlar.
g. Utilice la herramienta eléctrica, los accesorios
y las brocas de la herramienta, etc., de acuerdo
con estas instrucciones, teniendo en cuenta las
condiciones de trabajo y el trabajo que se vaya
a realizar. El uso de la herramienta eléctrica para
operaciones distintas a las previstas podría causar
una situación peligrosa.
h. Mantenga los mangos y las supercies de
agarre secos, limpios y libres de aceite y
grasa. Los mangos resbalosos y las supercies
de agarre resbalosas no permiten un manejo y un
control seguros de la herramienta en situaciones
inesperadas.
5. Uso y cuidado de las herramientas a
batería
a. Recargue el paquete de batería solo con el
cargador especicado por el fabricante. Es
posible que un cargador que sea adecuado para un
tipo de paquete de batería cree un riesgo de incendio
cuando se utilice con otro paquete de batería.
b. Utilice las herramientas eléctricas solo con
paquetes de batería designados especícamente.
Es posible que el uso de cualquier otro paquete de
batería cree un riesgo de lesiones e incendio.
c. Cuando el paquete de batería no se esté
utilizando, manténgalo alejado de otros objetos
metálicos, tales como clips sujetapapeles,
monedas, llaves, clavos, tornillos u otros
objetos metálicos pequeños, que puedan
hacer una conexión de un terminal al otro. Si se
cortocircuitan juntos los terminales de la batería, es
posible que se causen quemaduras o un incendio.
d. En condiciones abusivas es posible que se
expulse líquido de la batería; evite el contacto.
160992AB5S_GTH18V-50M_20241210.indd 48160992AB5S_GTH18V-50M_20241210.indd 48 12/13/2024 11:51:40 AM12/13/2024 11:51:40 AM

49
Advertencias generales de seguridad para herramientas eléctricas
CONSERVE ESTAS INSTRUCCIONES
Si se produce contacto accidentalmente,
enjuáguese con agua. Si el líquido entra en
contacto con los ojos, obtenga además ayuda
médica. Es posible que el líquido expulsado de la
batería cause irritación o quemaduras.
e. No utilice un paquete de batería o una
herramienta que estén dañados o modicados.
Es posible que las baterías dañadas o modicadas
exhiban un comportamiento imprevisible que cause
incendio, EXPLOSIÓN o riesgo de lesiones.
f. No exponga un paquete de batería o una
herramienta a un fuego o a una temperatura
excesiva. Es posible que la exposición a un fuego o
a una temperatura superior a 265 °F (130 °C) cause
una explosión.
g. Siga todas las instrucciones de carga y no cargue
el paquete de batería ni la herramienta fuera del
intervalo de temperatura especicado en las
instrucciones. Es posible que la realización de la
carga de manera inadecuada o a temperaturas que
estén fuera del intervalo especicado dañe la batería
y aumente el riesgo de incendio.
6. Servicio de ajustes y reparaciones
a. Haga que su herramienta eléctrica reciba servicio
de ajustes y reparaciones por un técnico de
reparaciones calicado que utilice únicamente
piezas de repuesto idénticas. Esto garantizará
que se mantenga la seguridad de la herramienta
eléctrica.
b. No haga nunca servicio de ajustes y reparaciones
de paquetes de batería dañados. El servicio de
ajustes y reparaciones de los paquetes de batería
deberá ser realizado solo por el fabricante o por
proveedores de servicio autorizados.
Advertencia de seguridad para grapadoras inalámbricas
a. Suponga siempre que la herramienta contiene
sujetadores. Un manejo descuidado de la
herramienta puede causar un disparo inesperado de
sujetadores y lesiones corporales.
b. No apunte la herramienta hacia usted ni hacia
ninguna otra persona que esté cerca. Un
accionamiento inesperado del gatillo descargará el
sujetador y con ello causará una lesión.
c. No accione la herramienta a menos que esté
colocada rmemente contra la pieza de trabajo.
Si la herramienta no está en contacto con la pieza
de trabajo, es posible que el sujetador sea desviado
alejándose de dicha pieza.
d. Desconecte la herramienta de la fuente de
alimentación cuando el sujetador se atore en
la herramienta. Mientras se esté retirando un
sujetador atorado, es posible que la grapadora sea
activada accidentalmente si está enchufada.
e. Tenga precaución cuando retire un sujetador
atorado. Es posible que el mecanismo esté bajo
compresión y que el sujetador sea descargado con
fuerza mientras se intenta solucionar una situación
de atoramiento.
f. No utilice esta clavadora para jar cables
eléctricos. No está diseñada para la instalación de
cables eléctricos y es posible que dañe el aislamiento
de los cables eléctricos y con ello cause peligros de
descargas eléctricas o incendio.
Advertencias de seguridad adicionales
No dispare sujetadores hacia el interior de paredes
o pisos sin asegurarse de que el área ubicada en
lado opuesto esté despejada. Un sujetador podría
desplazarse atravesando la supercie de trabajo y con
ello causar daños materiales o lesiones.
No clave sujetadores en paredes, pisos u otras áreas
de trabajo sin saber lo que pueda ser dañado por
el sujetador que se esté clavando. Los sujetadores
clavados en cables eléctricos que tengan corriente,
plomería, tuberías de gas u otros tipos de obstrucciones
pueden causar electrocución, explosión, lesiones
corporales y/o daños materiales.
160992AB5S_GTH18V-50M_20241210.indd 49160992AB5S_GTH18V-50M_20241210.indd 49 12/13/2024 11:51:40 AM12/13/2024 11:51:40 AM
50
CONSERVE ESTAS INSTRUCCIONES
Agarre la herramienta eléctrica por las supercies de
agarre con aislamiento identicadas cuando realice
una operación en la que es posible que el sujetador
entre en contacto con cables ocultos. Es posible que
los sujetadores que entren en contacto con un cable
que tenga corriente hagan que las partes metálicas
de la herramienta eléctrica que estén al descubierto
tengan corriente y eso cause descargas eléctricas o
electrocución.
No manipule indebidamente, ni retire o haga que
los controles operativos de la grapadora se vuelvan
inoperables. Los controles de la grapadora que
falten o funcionen incorrectamente pueden causar un
accionamiento inesperado y lesiones corporales.
No mantenga nunca un dedo en el gatillo cuando no esté
clavando sujetadores o cuando esté transportando
la herramienta. Transporte la herramienta solo por la
empuñadura. Mantener un dedo en el gatillo cuando se
transporte la herramienta, o cuando no se estén clavando
sujetadores, puede causar un accionamiento accidental
del gatillo y lesiones corporales.
Cuando cargue sujetadores, asegúrese de que las
cabezas de los sujetadores se alineen con la pieza
frontal de la herramienta. Si los sujetadores no
están alineados con la pieza frontal, es posible que la
herramienta se atore o dispare fallidamente, causando
daños materiales o lesiones.
Utilice solo los sujetadores que cumplan con los
criterios indicados en la sección “Especicaciones”
de este manual. Los sujetadores no identicados para
utilizare con esta herramienta pueden hacer que la
herramienta funcione incorrectamente y produzca un
riesgo de lesiones y/o daños a la herramienta.
Mantenga las manos y los pies al menos a 8
pulgadas (200 mm) de distancia de la pieza frontal
de la herramienta durante el uso. Es posible que los
sujetadores se desvíen y causen daños materiales o
lesiones corporales.
No clave un sujetador encima de otro sujetador. Esto
podría hacer que el sujetador sea desviado o que la
herramienta reaccione de manera inesperada y cause
lesiones.
No haga payasadas. Los sujetadores descargados son
proyectiles capaces de causar lesiones graves.
No accione nunca la grapadora, a menos que esté
perpendicular a la supercie de la pieza de trabajo y
que dicha supercie esté libre de residuos. Es posible
que el sujetador sea desviado si la grapadora no está en
contacto adecuado con la pieza de trabajo, lo cual tendrá
como resultado daños materiales o lesiones corporales.
No clave sujetadores en materiales que no sean
adecuados. Los materiales que sean demasiado duros
pueden hacer que el sujetador se desvíe. Los materiales
frágiles pueden desmoronarse y permitir que el sujetador
los atraviese. Los materiales que sean demasiado blandos
pueden permitir que el sujetador los atraviese. Estas
condiciones pueden causar daños materiales o lesiones
corporales graves.
No apriete el gatillo ni presione la pieza frontal cuando
esté cargando la grapadora. Es posible que apretar el
gatillo o presionar la pieza frontal cause un disparo fallido
de la herramienta y eso tenga como resultado lesiones
corporales y daños materiales.
No utilice el gancho utilitario ni su ubicación de
montaje para aditamentos con cable de retención.
El gancho utilitario y su ubicación de montaje no están
diseñados para soportar cargas con cable de retención.
No utilice el gancho utilitario si parece estar dañado
o deformado. Es posible que un gancho utilitario dañado
o deformado tenga como resultado una suspensión
inestable y que la herramienta se caiga inesperadamente,
causando daños materiales y lesiones corporales.
No coloque nunca en cuña la pieza frontal entre dos
o más supercies. Es posible que la holgura entre la
pieza frontal y múltiples piezas de trabajo permita una
desviación del sujetador y eso cause daños materiales o
lesione corporales.
No retenga nunca en posición hacia atrás la pieza
frontal durante la utilización. Si se retiene en
posición hacia atrás la pieza frontal, se puede causar un
accionamiento inesperado y es posible que eso cause
daños materiales o lesiones corporales.
No posicione nunca la cara o el cuerpo sobre la
grapadora durante su utilización. Un retroceso
repentino puede tener como resultado un impacto en el
cuerpo y lesiones.
No utilice la grapadora si no pasa la inspección y
las pruebas diarias. Es posible que la utilización de
una grapadora que no pase la inspección y las pruebas
diarias tenga como resultado daños materiales y lesiones
corporales.
Para reducir el riesgo de lesiones, use siempre gafas
protectoras o anteojos con protectores laterales. El
operador y otras personas en el área de trabajo deben
usar protección para los ojos de acuerdo con ANSI Z87.1.
La protección ocular no se adapta a todos los operadores
de la misma manera. Asegúrese de que la protección
para los ojos elegida tenga protectores laterales o brinde
protección contra escombros voladores tanto desde el
frente como desde los lados. El empleador es responsable
Advertencias de seguridad adicionales
160992AB5S_GTH18V-50M_20241210.indd 50160992AB5S_GTH18V-50M_20241210.indd 50 12/13/2024 11:51:40 AM12/13/2024 11:51:40 AM

51
CONSERVE ESTAS INSTRUCCIONES
de hacer cumplir el uso de protección ocular por parte del
operador y otras personas en el área de trabajo. Cuando
sea necesario, use protección para la cabeza de acuerdo
con ANSI Z89.1.
Cierto polvo generado por
las operaciones de lijado,
aserrado, amolado y taladrado con herramientas
eléctricas, así como por otras actividades de
construcción, contiene sustancias químicas que se
sabe que causan cáncer, defectos de nacimiento u
otros daños sobre la reproducción. Algunos ejemplos
de estas sustancias químicas son:
• Plomo procedente de pinturas a base de plomo,
• Sílice cristalina procedente de ladrillos y cemento y
otros productos de mampostería, y
• Arsénico y cromo procedentes de madera de
construcción tratada químicamente.
El riesgo para usted por causa de estas exposiciones
varía, dependiendo de qué tan a menudo realice este
tipo de trabajo. Para reducir su exposición a estas
sustancias químicas: trabaje en un área bien ventilada
y trabaje con equipo de seguridad aprobado, tal como
máscaras antipolvo que estén diseñadas especialmente
para impedir mediante ltración el paso de partículas
microscópicas.
Eliminación
Esta sección es parte del compromiso de Robert Bosch
Tool Corporation de preservar nuestro medio ambiente y
conservar nuestros recursos naturales.
Eliminación de herramientas
¡No deseche las herramientas eléctricas y las baterías/
baterías recargables en la basura doméstica!
Eliminación de las baterías
No intente desarmar la batería ni quitar ninguno de
los com ponentes que sobresalen de los terminales de
la batería. Se pueden producir lesiones o un incendio.
Antes de desecharla, proteja los terminales que están
al descubierto con cinta adhesiva aislante gruesa para
prevenir cortocircuitos.
Baterías de iones de litio
Si este producto está equipado con una batería de
iones de litio, dicha batería debe recogerse, reciclarse o
eliminarse de manera segura para el medio ambiente.
“El sello de reciclaje de baterías
RBRC certicado por la EPA que
se encuentra en la batería de iones
de litio (ion Li) indica que Robert
Bosch Tool Corporation está
participando voluntariamente en
un programa de la industria para
recoger y reciclar estas baterías al nal de su vida útil,
cuando se retiran de servicio en los Estados Unidos y
Canadá. El programa RBRC proporciona una alternativa
conveniente a tirar las baterías de ion Li usadas a la
basura o a la corriente municipal de aguas residuales, lo
cual quizás sea ilegal en su área.
Tenga la amabilidad de llamar al 1-800-8-BATTERY
para obtener información acerca de las prohibiciones/
restricciones sobre el reciclaje y la eliminación de baterías
de ion Li en su lugar o devuelva las baterías a un Centro de
servicio Bosch/Dremel para reciclarlas. La participación
de Robert Bosch Tool Corporation en este programa es
parte de nuestro compromiso hacia preservar nuestro
medio ambiente y conservar nuestros recursos naturales.”
Advertencias de seguridad adicionales
Uso previsto
Utilice esta grapadora solo tal como está previsto. Es posible que un uso no previsto
tenga como resultado lesiones corporales o daños materiales.
Esta es una herramienta inalámbrica clavadora manual
de sujetadores operada por accionamiento secuencial
sencillo o por contacto (golpeo). Está diseñada para
clavar sujetadores fabricados especialmente en madera y
productos de madera.
Utilice solo sujetadores compatibles de acuerdo con
las instrucciones del fabricante. Consulte la tabla
“Especicaciones” en la página 54.
Esta herramienta no está diseñada para la instalación de
cables eléctricos.
160992AB5S_GTH18V-50M_20241210.indd 51160992AB5S_GTH18V-50M_20241210.indd 51 12/13/2024 11:51:40 AM12/13/2024 11:51:40 AM
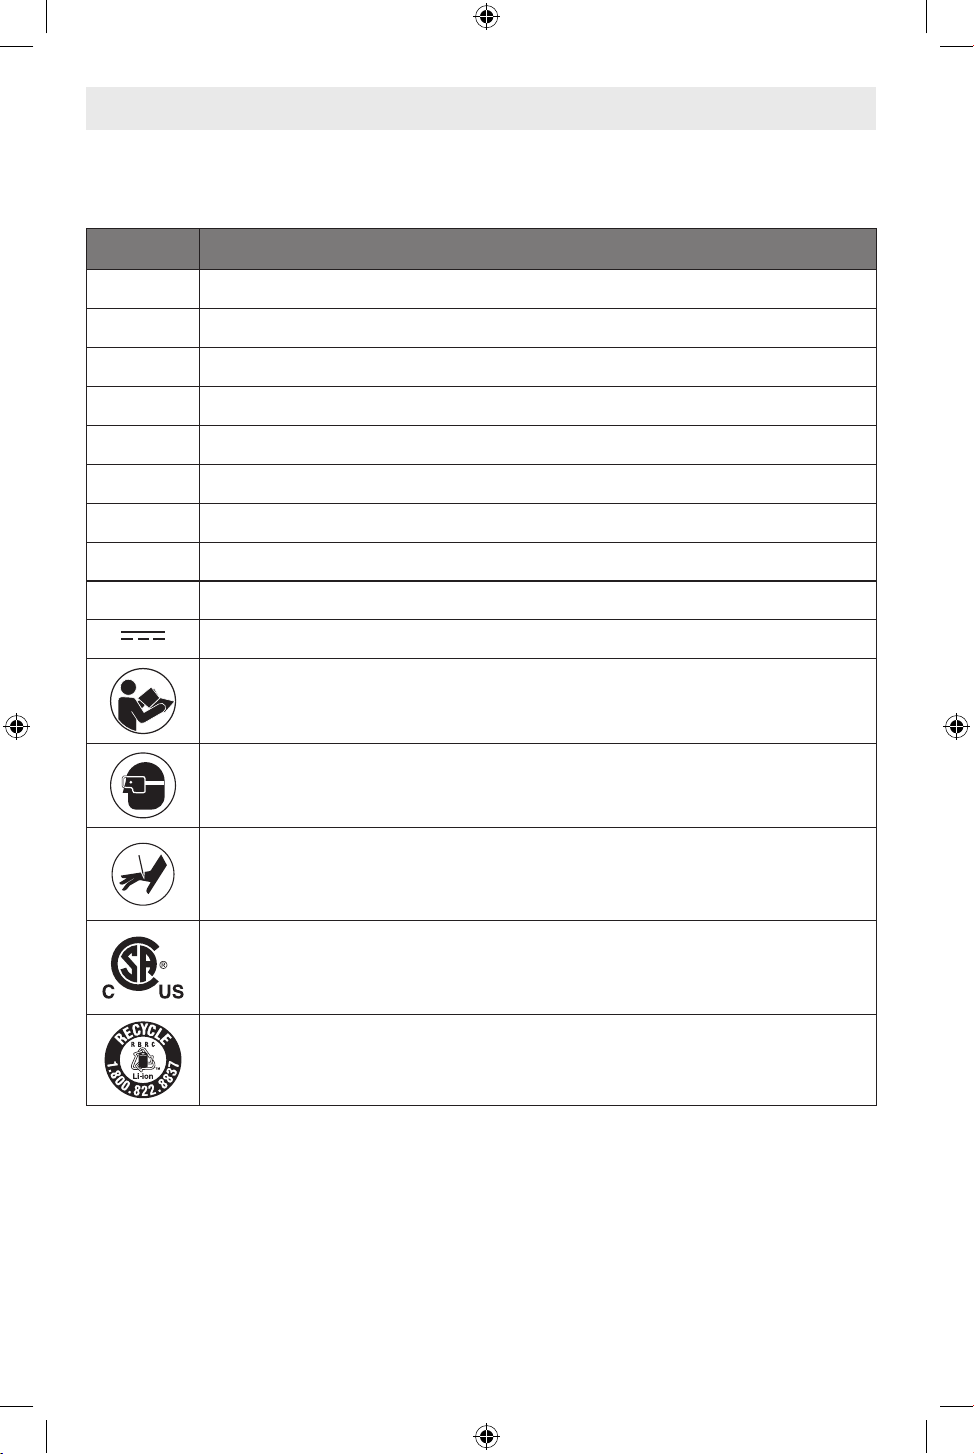
52
Símbolos
Importante: Es posible que se utilicen algunos de los siguientes símbolos en esta herramienta. Por favor, estúdielos
y aprenda su signicado. La interpretación correcta de estos símbolos le permitirá utilizar la herramienta mejor y de
manera más segura.
Symbole Désignation/Explication
V Volts (tension)
A Ampere (corriente)
Hz Hertz (frecuencia, ciclos por segundo)
W Watt (potencia)
min Minutes (temps)
s Secondes (temps)
mm Millimètre (dimension)
F Fahrenheit (température)
C Celsius (température)
Courant continu (type ou caractéristique du courant)
Alerta al usuario para que lea el manual.
Alerta al usuario para que use protección ocular.
Alerta al usuario de un peligro de ponchadura.
Ce symbole indique que cet outil est répertorié par la Canadian Standards Association, et qu’il est
conforme aux normes des États-Unis et du Canada.
Designa un programa de reciclaje de baterías de ion Li.
160992AB5S_GTH18V-50M_20241210.indd 52160992AB5S_GTH18V-50M_20241210.indd 52 12/13/2024 11:51:41 AM12/13/2024 11:51:41 AM
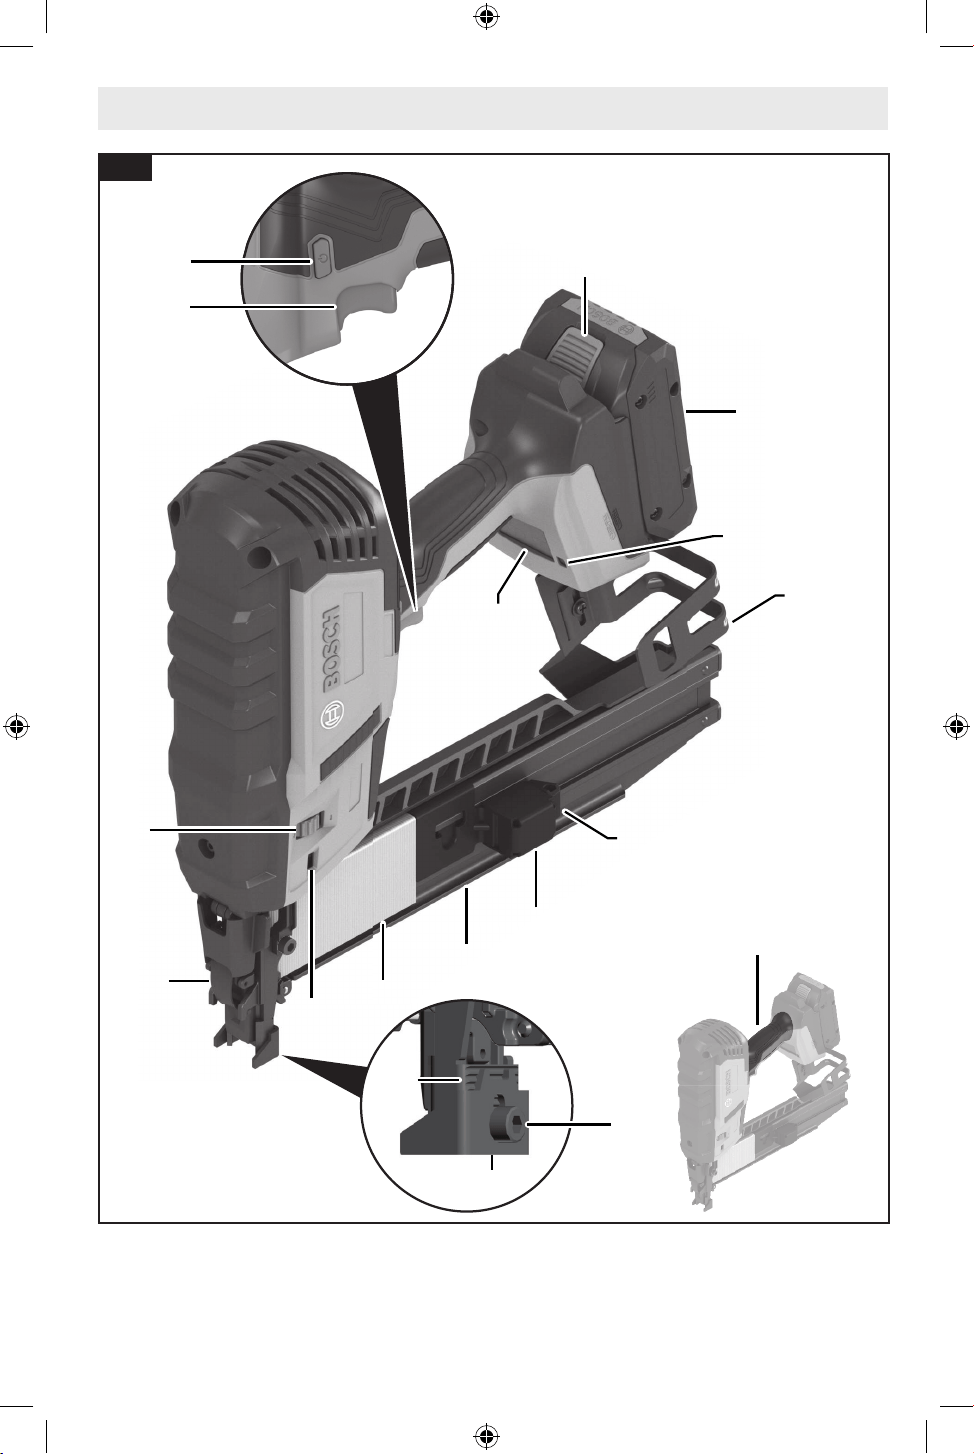
53
Familiarización con su grapadora de grapas de corona medianas GTH18V-50M
1
2
15
4
5
6
7
3
8
9
10
11
13
14
17
16
Fig. 1
12
18
160992AB5S_GTH18V-50M_20241210.indd 53160992AB5S_GTH18V-50M_20241210.indd 53 12/13/2024 11:51:41 AM12/13/2024 11:51:41 AM
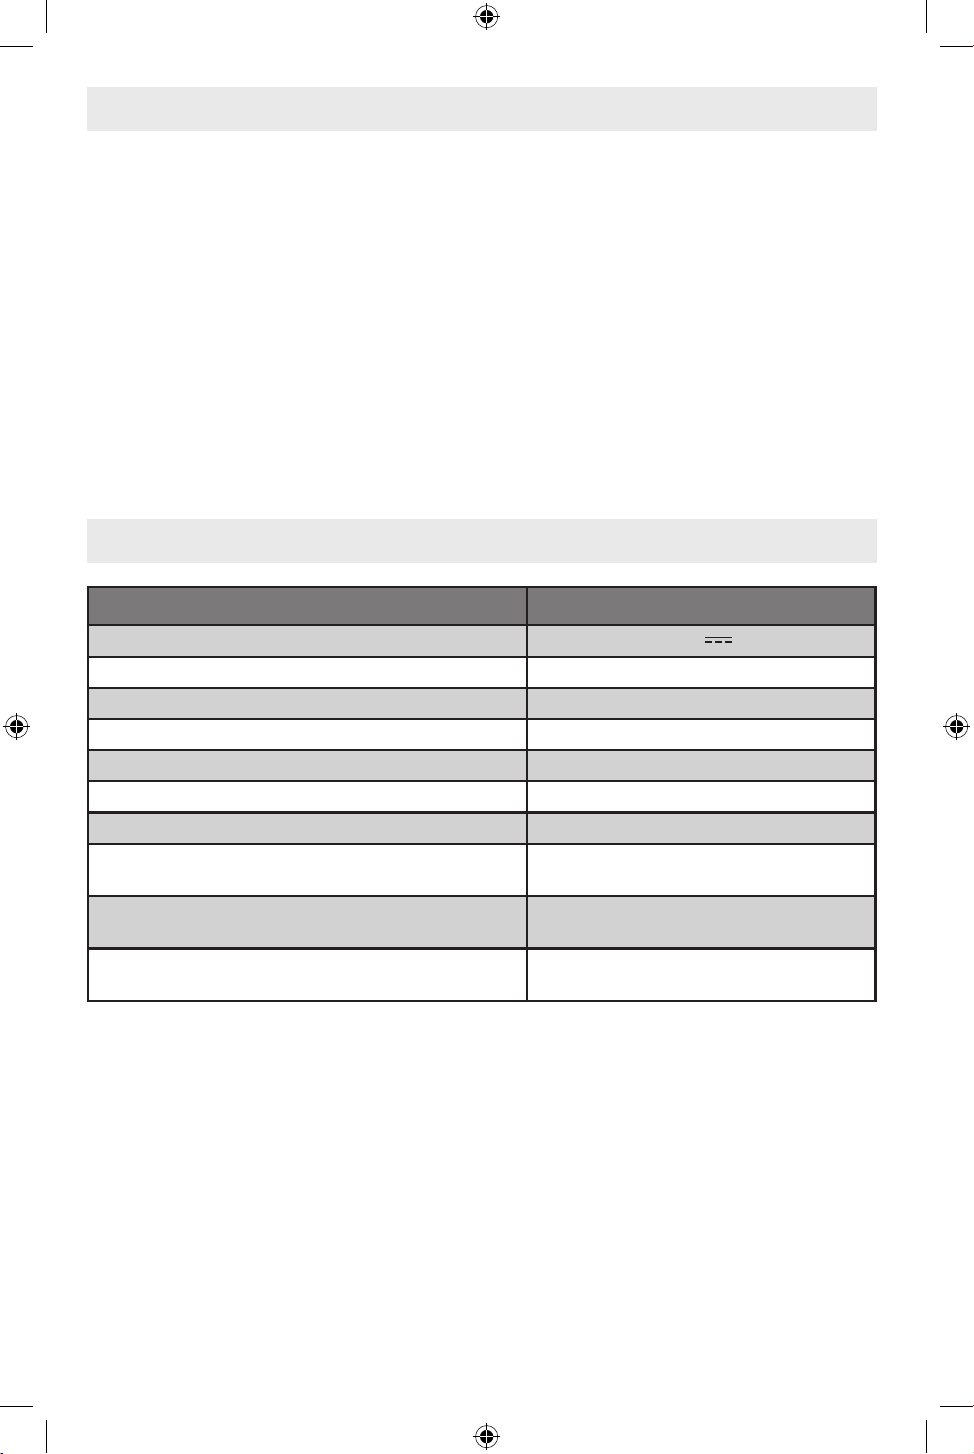
54
1 Contacto con la pieza de trabajo
2 Tornillo del contacto con la pieza de trabajo
3 Indicador de ajuste de profundidad
4 Rueda de ajuste de profundidad
5 Gatillo
6 Botón de ENCENDIDO y APAGADO
7 Botón de liberación del paquete de batería
8 Paquete de batería*
9 Interfaz del usuario
10 Luz de trabajo LED
11 Gancho utilitario
12 Cargador
13 Deslizador del cargador de sujetadores
14 Palanca de liberación del deslizador del
cargador de grapas
15 Pieza frontal
16 Pestillo de despeje de atoramientos
17 Empuñadura (supercie de agarre con
aislamiento)
18 Tiras de sujetadores*
Especificaciones
Numéro de modèle GTH18V-50M
Tensión nominal 18 V
Tipo de motor CC sin escobillas
Ángulo de intercalación 0°
Anchura de la corona de los sujetadores 7/16 pulgadas (11 mm)
Intervalo de longitud de los sujetadores 1 pulgadas - 2 pulgadas (25 - 50 mm)
Diámetro de las patas de los sujetadores Calibre 16 (1,6 mm)
Capacidad del cargador de sujetadores 150 sujetadores
Temperatura permitida de la batería durante el proceso de
carga
+32…+113°F (0…+45°C)
Temperatura amiente permitida durante la utilización** y el
almacenamiento
-4…+122°F (-20…+50°C)
Temperatura ambiente permitida de la batería durante el
proceso de carga
+32…+95°F (0…+35°C)
* Utilizando paquetes de batería Core de 18 V de 4,0, 8,0 y 12 Ah
** La clavadora no funcionará a menos de 32 °F (0 °C)
Paquetes de batería/cargadores
Sírvase consultar la lista de baterías/cargadores, incluida con su herramienta.
Familiarización con su grapadora de grapas de corona medianas GTH18V-50M
* No incluido
160992AB5S_GTH18V-50M_20241210.indd 54160992AB5S_GTH18V-50M_20241210.indd 54 12/13/2024 11:51:41 AM12/13/2024 11:51:41 AM
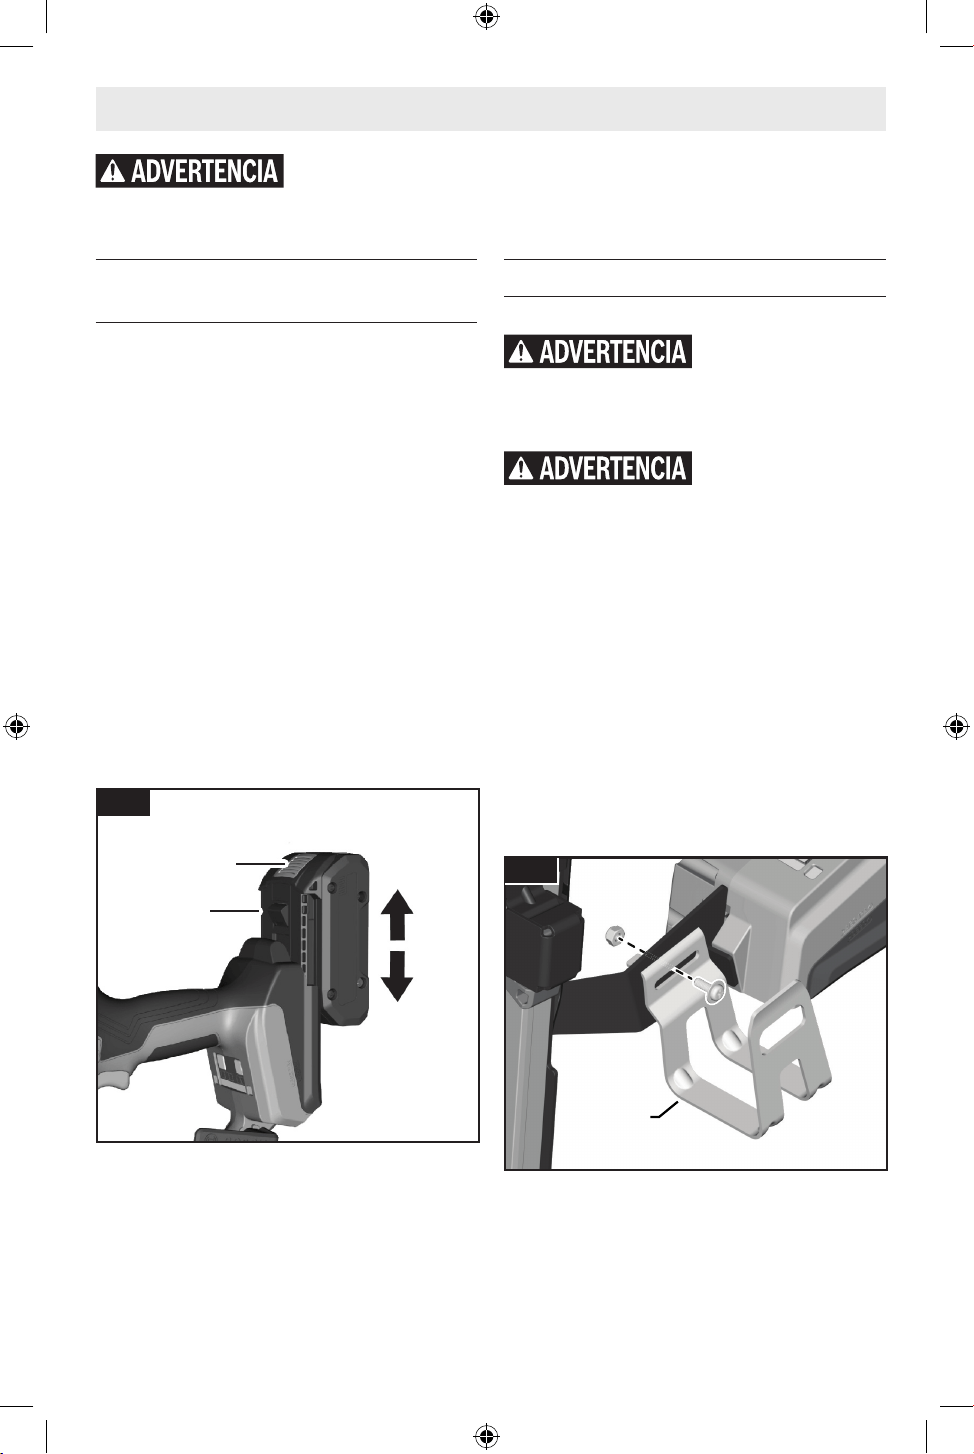
55
Ensamblaje
Inserción y remoción del paquete de
batería
(Fig. 2)
Para insertar el paquete de batería
1. Deslice el paquete de batería cargado 8 hacia el
interior de la carcasa hasta que dicho paquete quede
jo en la posición correcta.
Esta herramienta está equipada con un pestillo de jación
secundario para impedir que el paquete de batería se
salga y se caiga completamente de la empuñadura, en el
caso de que se aoje debido a la vibración.
Para retirar el paquete de batería
1. Presione el botón de liberación del paquete de
batería 7 y deslice el paquete de batería 8 para
retirarlo de la carcasa.
2. Presione de nuevo el botón de liberación del
paquete de batería 7 y deslice el paquete de batería
8 completamente hacia fuera de la carcasa de la
herramienta.
Gancho utilitario
(Fig. 3)
No utilice el gancho
utilitario ni su ubicación
de montaje para aditamentos con cable de retención.
El gancho utilitario y su ubicación de montaje no están
diseñados para soportar cargas con cable de retención.
No utilice el gancho
utilitario si parece estar
dañado o deformado. Es posible que un gancho utilitario
dañado o deformado tenga como resultado una
suspensión inestable y que la herramienta se caiga
inesperadamente, causando daños materiales y lesiones
corporales.
La grapadora está equipada con un gancho utilitario 11
preinstalado que se puede desinstalar y luego instalar en
el otro lado o desinstalar completamente de la grapadora.
Desinstalación del gancho utilitario
Using a Phillips head screwdriver and a 7 mm wrench,
remove the screw and nut holding the Utility Hook 11.
El gancho utilitario 11 se podrá reensamblar ahora en el
otro lado de la grapadora; asegúrese de que el tornillo y la
tuerca estén apretados adecuadamente.
Desconecte el paquete de batería de la herramienta antes de hacer realizar
ensamblaje, ajustes o resolución de problemas, o cambiar accesorios. Dichas medidas
preventivas de seguridad reducen el riesgo de arrancar accidentalmente la herramienta, lo cual puede que tenga como
resultado lesiones corporales.
7
8
Fig. 2
11
Fig. 3
160992AB5S_GTH18V-50M_20241210.indd 55160992AB5S_GTH18V-50M_20241210.indd 55 12/13/2024 11:51:41 AM12/13/2024 11:51:41 AM
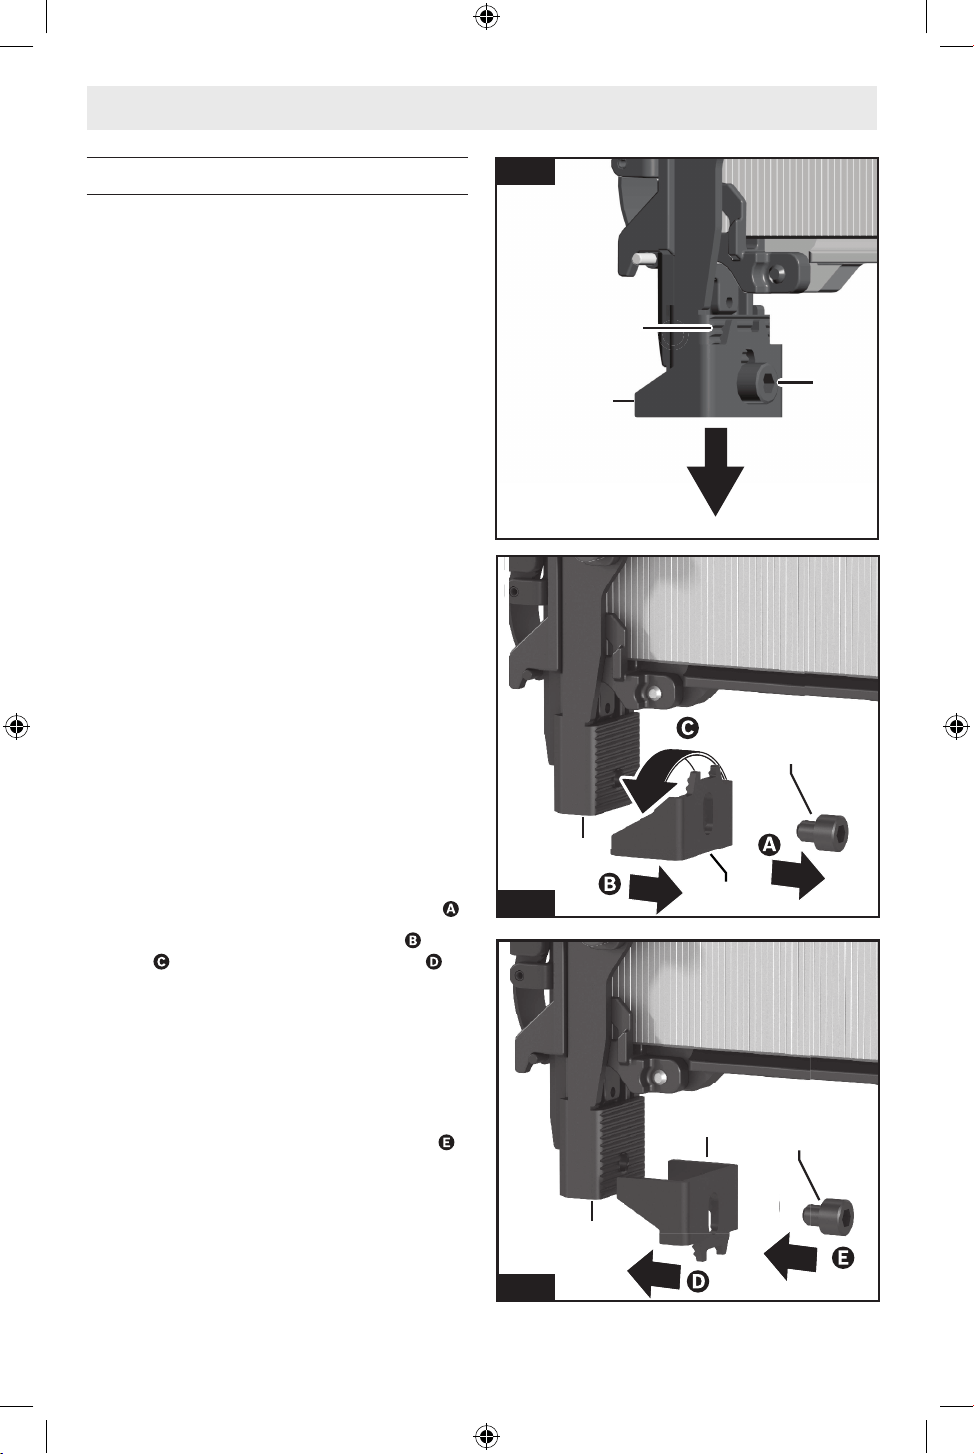
56
Ensamblaje
Contacto con la pieza de trabajo
(Fig. 4, Fig. 5, Fig. 6)
Nota: Al extender y/o invertir la posición del contacto con
la pieza de trabajo 1 se reducirá la profundidad de clavado
del sujetador; consulte la sección "Interruptor de ajuste de
profundidad" en la página 60 para ajustar la profundidad.
Extensión del contacto con la pieza de
trabajo
Es posible extender hacia fuera el contacto con la
pieza de trabajo 1, hasta 1/4 de pulgada, para reducir
adicionalmente la profundidad de clavado. Para ajustar la
extensión del contacto con la pieza de trabajo 1:
1. Aoje el tornillo del contacto con la pieza de trabajo 2
utilizando una llave hexagonal de 4 mm.
2. Ajuste el contacto con la pieza de trabajo 1, hacia
delante o hacia detrás, hasta la posición deseada;
acople los retenes ubicados en el contacto con la
pieza de trabajo 1 y la pieza fontal 15 para lograr un
posicionamiento y una alineación seguros.
3. Reapriete el contacto con el tornillo de la pieza de
trabajo 2 utilizando una llave hexagonal de 4 mm.
Inversión de la posición
El contacto con la pieza de trabajo 1 cuenta con dos
extremos: Un extremo liso para minimizar las marcas y un
extremo con espigas para aumentar el agarre de la pieza
de trabajo al clavar el sujetador. Para invertir el contacto
con la pieza de trabajo 1:
4. Aoje y retire el tornillo del contacto con la pieza de
trabajo 2 utilizando una llave hexagonal de 4 mm .
5. Retire el contacto con la pieza de trabajo 1 , rótelo
180° , y reinstálelo sobre la pieza frontal 15 .
6. Reinstale el tornillo del contacto con la pieza de
trabajo 2, ajuste el contacto con la pieza de trabajo
1 hasta la extensión deseada, acoplando los retenes
ubicados en el contacto con la pieza de trabajo 1 y
la pieza frontal 15 para lograr un posicionamiento y
una alineación seguros, y luego sujete rmemente
el contacto con la pieza de trabajo en la posición
correcta utilizando una llave hexagonal de 4 mm .
15
1
2
Fig. 4
Fig. 5
Fig. 6
1
2
2
1
15
15
160992AB5S_GTH18V-50M_20241210.indd 56160992AB5S_GTH18V-50M_20241210.indd 56 12/13/2024 11:51:41 AM12/13/2024 11:51:41 AM
57
Operación
No utilice la grapadora si
no pasa la inspección y las
pruebas diarias. Es posible que la utilización de una
grapadora que no pase la inspección y las pruebas diarias
tenga como resultado daños materiales y lesiones
corporales.
Inspección y pruebas diarias
(Fig. 1)
No utilice la clavadora si
no pasa la inspección y las
pruebas diarias. Es posible que la utilización de una
clavadora que no pase la inspección y las pruebas diarias
cause daños materiales y lesiones corporales.
1. Retire el paquete de batería 8 y todas las grapas del
cargador de grapas 12.
2. Inspeccione todos los tornillos, pernos, tuercas y
pasadores de la grapadora. Todos los sujetadores
que estén ojos deben ser apretados.
3. Presione el contacto con la pieza de trabajo 1 contra
una pieza de trabajo. Dicho contacto se debe mover
suavemente.
4. Con el contacto con la pieza de trabajo 1 presionado
contra la pieza de trabajo, apriete el gatillo 5. La
grapadora no debe funcionar.
5. Inserte el paquete de batería 8 y asegúrese de que
no haya grapas en el cargador de grapas 12 y luego
encienda la grapadora.
6. Sin jalar el gatillo 5, presione el contacto con la pieza
de trabajo 1 contra una pieza de trabajo.
7. Jale el contacto con la pieza de trabajo 1 de manera
que se aleje de la pieza de trabajo, permitiendo que
se reajuste. Apriete el gatillo 5. La grapadora no debe
funcionar y el visualizador del indicador de estado 19
parpadeará en rojo.
8. Continue apretando y mantenga apretado el gatillo
5 y empuje el contacto con la pieza de trabajo 1
contra una pieza de trabajo. La grapadora no debe
funcionar y el visualizador del indicador de estado 19
parpadeará en rojo.
9. Si las inspecciones conrman que el funcionamiento
es correcto, la grapadora está lista para utilizarse.
Carga y descarga del cargador de
sujetadores
No apriete el gatillo ni
presione el contacto con la
pieza de trabajo cuando esté cargando o descargando
la grapadora. Es posible que apretar el gatillo o presionar
el contacto con la pieza de trabajo cause un disparo fallido
de la herramienta y eso tenga como resultado lesiones
corporales y daños materiales.
Carga del cargador de sujetadores
(Fig. 7, Fig. 8, Fig. 9)
Cuando cargue el cargador de sujetadores 12,
compruebe que el deslizador del cargador de sujetadores
13 se desliza suavemente. Si el seguidor del cargador de
sujetadores 13 no se desliza suavemente, los sujetadores
se pueden clavar con ángulos irregulares o es posible que
la grapadora haga un disparo en vacío.
Utilice tiras de sujetadores 18 que no estén rotas y tengan
sujetadores de la misma designación.
1. Retire el paquete de batería 8.
2. Asegúrese de que el cargador de sujetadores 12 está
libre de residuos, tales como una acumulación de
aserrín.
3. Posicione la grapadora sobre una supercie plana
y estable, apuntada alejándose de usted y de las
personas que estén presentes.
4. Jale el deslizador del cargador de grapas 13 hasta
el extremo del cargador de grapas 12, hasta que la
palanca de liberación del deslizador del cargador de
grapas 14 se acople y el deslizado del cargador de
grapas 13 se bloquee en la posición correcta .
5. Inserte la tira (las tiras) de sujetadores intercalados
18 a través de la parte trasera del cargador de grapas
12 .
6. Jale el deslizador del cargador de grapas 13 hasta el
extremo del cargador de grapas 12 , C y luego jale
hacia atrás y mantenga jalada la palanca de liberación
del deslizador del cargador de grapas 14 .
7. Deje lentamente que el deslizador del cargador de
grapas 13 salte hacia atrás por acción de resorte
hasta que esté descansando sobre el último
sujetador .
Haga caso siempre de las siguientes precauciones de seguridad, además de las
instrucciones de seguridad incluidas en las páginas 47 a 51. Si no lo hace así, es
posible que el resultado sea daños al equipo, daños materiales o lesiones corporales.
Desconecte el paquete de batería de la herramienta antes de ensamblar, ajustar o
cambiar accesorios. Dichas medidas preventivas de seguridad reducen el riesgo de
arrancar la herramienta accidentalmente.
160992AB5S_GTH18V-50M_20241210.indd 57160992AB5S_GTH18V-50M_20241210.indd 57 12/13/2024 11:51:42 AM12/13/2024 11:51:42 AM
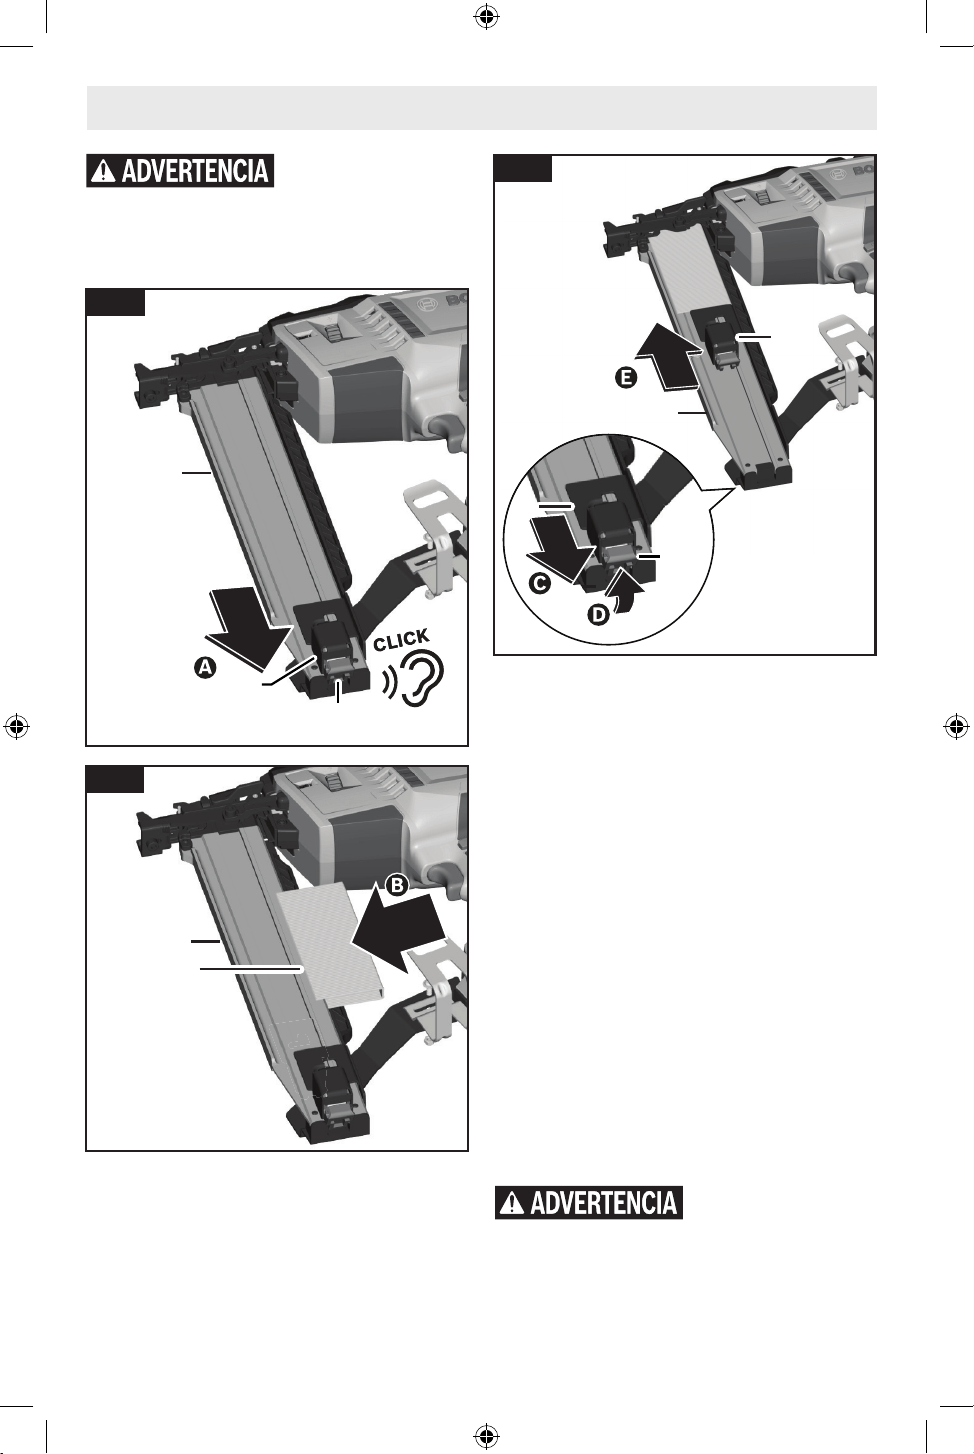
58
Operación
Guíe el deslizador del
cargador de sujetadores a
mano hasta que alcance su posición completamente
hacia delante. Un retroceso libre del seguidor del
cargador de sujetadores puede tener como resultado
daños al seguidor o al cargador de sujetadores, o causar
lesiones corporales.
Descarga del cargador de sujetadores
(Fig. 7, Fig. 9)
1. Retire el paquete de batería 8.
2. Posicione la grapadora sobre una supercie plana y
estable, apuntada de manera que se aleje de usted y
de las personas que estén presentes.
3. Jale el deslizador del cargador de grapas 13 hasta
el extremo del cargador de grapas 12, hasta que la
palanca de liberación del deslizador del cargador de
grapas 14 se acople y el deslizador del cargador de
grapas 13 se bloquee en la posición correcta.
4. Retire la tira (las tiras) de sujetadores intercalados
18.
5. Jale el deslizador del cargador de grapas 13 hasta el
extremo del cargador de grapas 12 y luego jale hacia
atrás y mantenga jalada la palanca de liberación del
deslizador del cargador de grapas 14.
6. Deje lentamente que el deslizador del cargador de
grapas 13 salte hacia atrás por acción de resorte
hasta la posición de descanso.
Guíe el deslizador del
cargador de sujetadores a
mano hasta que alcance su posición completamente
hacia delante. Un retroceso libre del seguidor del
cargador de sujetadores puede tener como resultado
daños al seguidor o al cargador de sujetadores, o causar
lesiones corporales.
13
12
Fig. 7
Fig. 8
13
14
Fig. 9
12
18
13
14
12
160992AB5S_GTH18V-50M_20241210.indd 58160992AB5S_GTH18V-50M_20241210.indd 58 12/13/2024 11:51:42 AM12/13/2024 11:51:42 AM
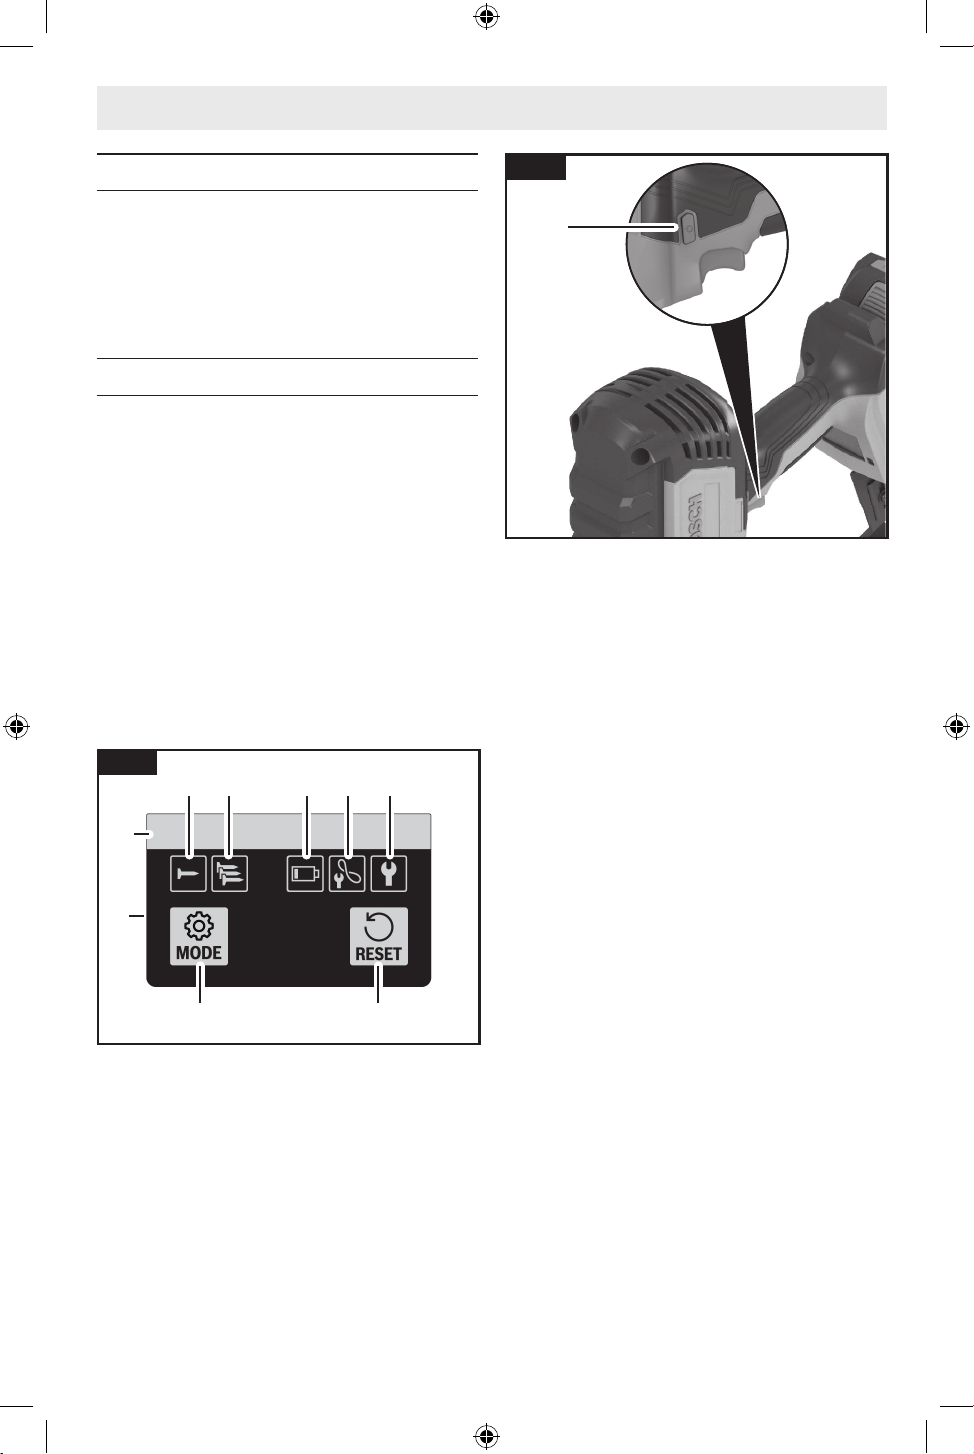
59
Operación
Botón de encendido y apagado
(Fig. 10)
Para encender la grapadora, presione el botón de
encendido y apagado 6 y la interfaz del usuario 9 se
encenderá.
Para apagar la grapadora, presione el botón de encendido
y apagado 6.
Interfaz del usuario
(Fig. 1, Fig. 11)
La interfaz del usuario 9 proporciona las siguientes
funciones:
• Indicador de estado 19
• Botón de modo 20
• Indicador de accionamiento sencillo 21
• Indicador de accionamiento por golpeo 22
• Indicador de batería baja 23
• Indicador de servicio regular pendiente 24
• Indicador de servicio importante pendiente 25
• Botón de reajuste 26
Indicador de estado
El indicador de estado 19 muestra el estado de la
grapadora. Una luz verde indica que la grapadora está
lista para utilizarse. En el caso de que el color de la luz del
indicador de estado 19 no sea verde, consulte la sección
"Resolución de problemas" en la página 64 para obtener
información adicional.
Botón de modo
Utilice el botón de modo 20 para alternar entre los modos
de descarga de accionamiento sencillo o accionamiento
por golpeo. La selección será indicada ya sea por el
indicador de accionamiento sencillo 21 o por el indicador
de accionamiento por golpeo 22.
Indicador de batería baja
El indicador de batería baja 23 solo se iluminará una vez
que la batería haya alcanzado una carga del 20% o menos.
Un indicador de batería baja 23 amarillo signica que la
batería está llena del 1 al 20%. Un indicador de batería
baja 23 rojo signica que la batería está llena del 0 al 1%.
Indicadores de servicio regular pendiente y
servicio importante pendiente
El indicador de servicio regular pendiente 24 o el indicador
de servicio importante pendiente 25 se iluminará cuando
la grapadora esté lista para recibir servicio de ajustes y
reparaciones. Se recomienda devolver la grapadora, el
paquete de batería y el cargador de baterías a un centro
de servicio BOSCH para hacer una inspección y/o servicio
de ajustes y reparaciones.
Botón de reajuste
El botón de reajuste 26 se utiliza para reajustar la
grapadora a un estado normal después de corregir una
situación anormal. Para reajustar la grapadora, presione
y mantenga presionado el botón de reajuste 26 durante
3 segundos.
Consulte la sección "Resolución de problemas" en la
página 64 para obtener información adicional sobre el
reajuste de la grapadora.
6
Fig. 10
19
20
26
21 23 24 2522
Fig. 11
9
160992AB5S_GTH18V-50M_20241210.indd 59160992AB5S_GTH18V-50M_20241210.indd 59 12/13/2024 11:51:42 AM12/13/2024 11:51:42 AM
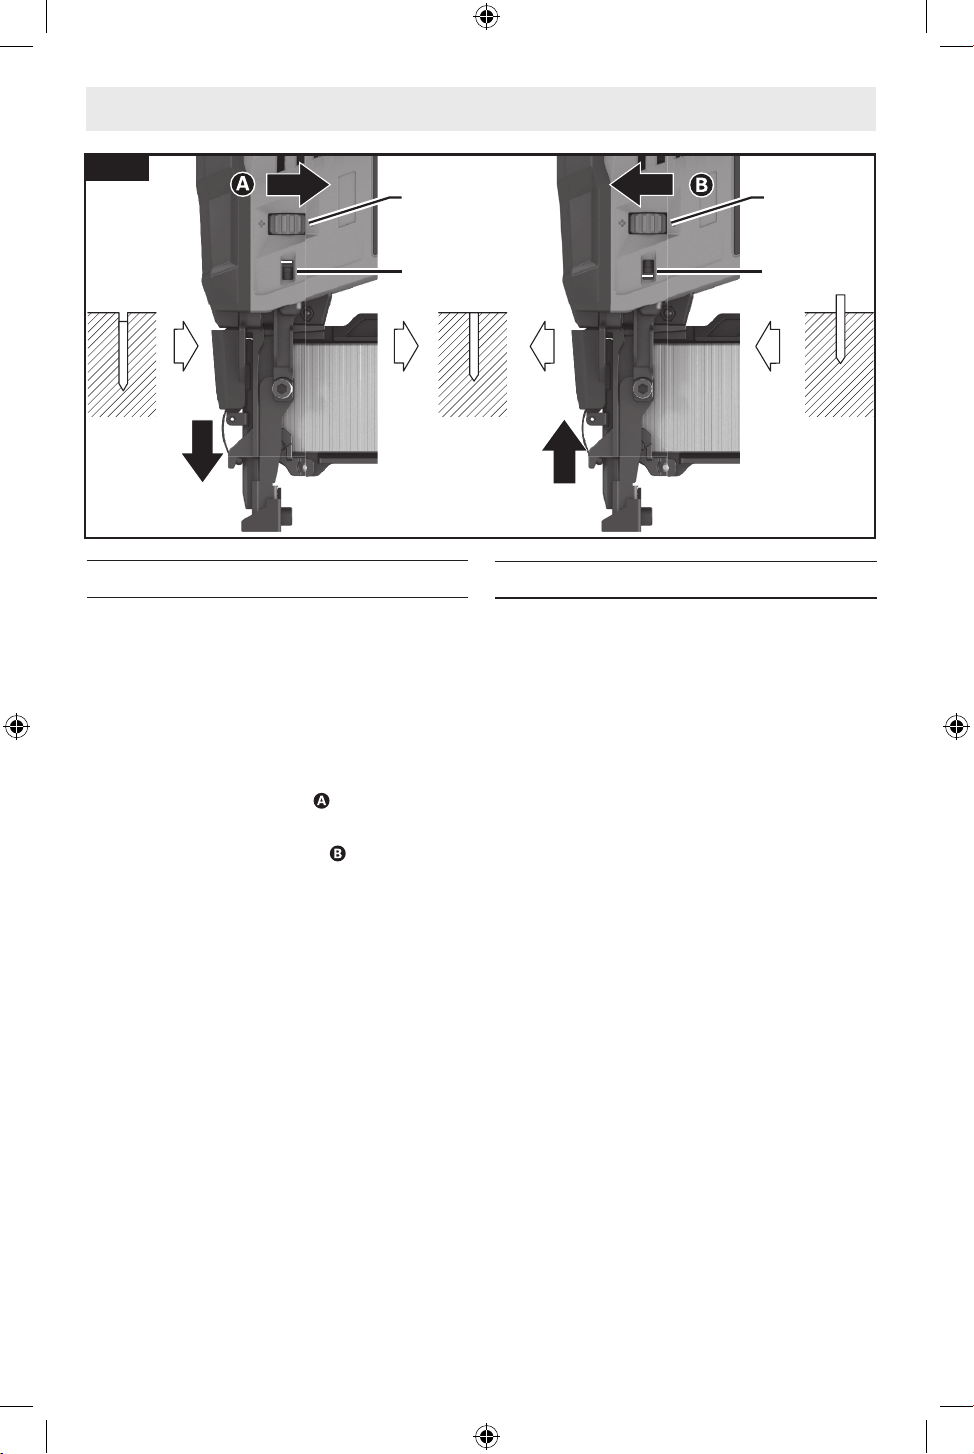
60
Operación
Interruptor de ajuste de profundidad
(Fig. 12)
La profundidad a la cual se clavan los sujetadores en
la pieza de trabajo se puede ajustar utilizando la rueda
de ajuste de profundidad 4 ubicada en un lado de la
grapadora. Utilice el indicador de ajuste de profundidad
3 para determinar el ajuste de profundidad actual de la
grapadora.
Gire hacia abajo la rueda de ajuste de profundidad 4 para
reducir la profundidad de clavado .
Gire hacia arriba la rueda de ajuste de profundidad 4 para
aumentar la profundidad de clavado .
Luz de trabajo
(Fig. 1)
Esta grapadora está equipada con una luz de trabajo
LED 10 para ofrecer una mejor visibilidad durante su
utilización.
La luz LED permanecerá encendida durante 10 segundos
después de presionar el gatillo 5.
4
4
3 3
Fig. 12
160992AB5S_GTH18V-50M_20241210.indd 60160992AB5S_GTH18V-50M_20241210.indd 60 12/13/2024 11:51:42 AM12/13/2024 11:51:42 AM
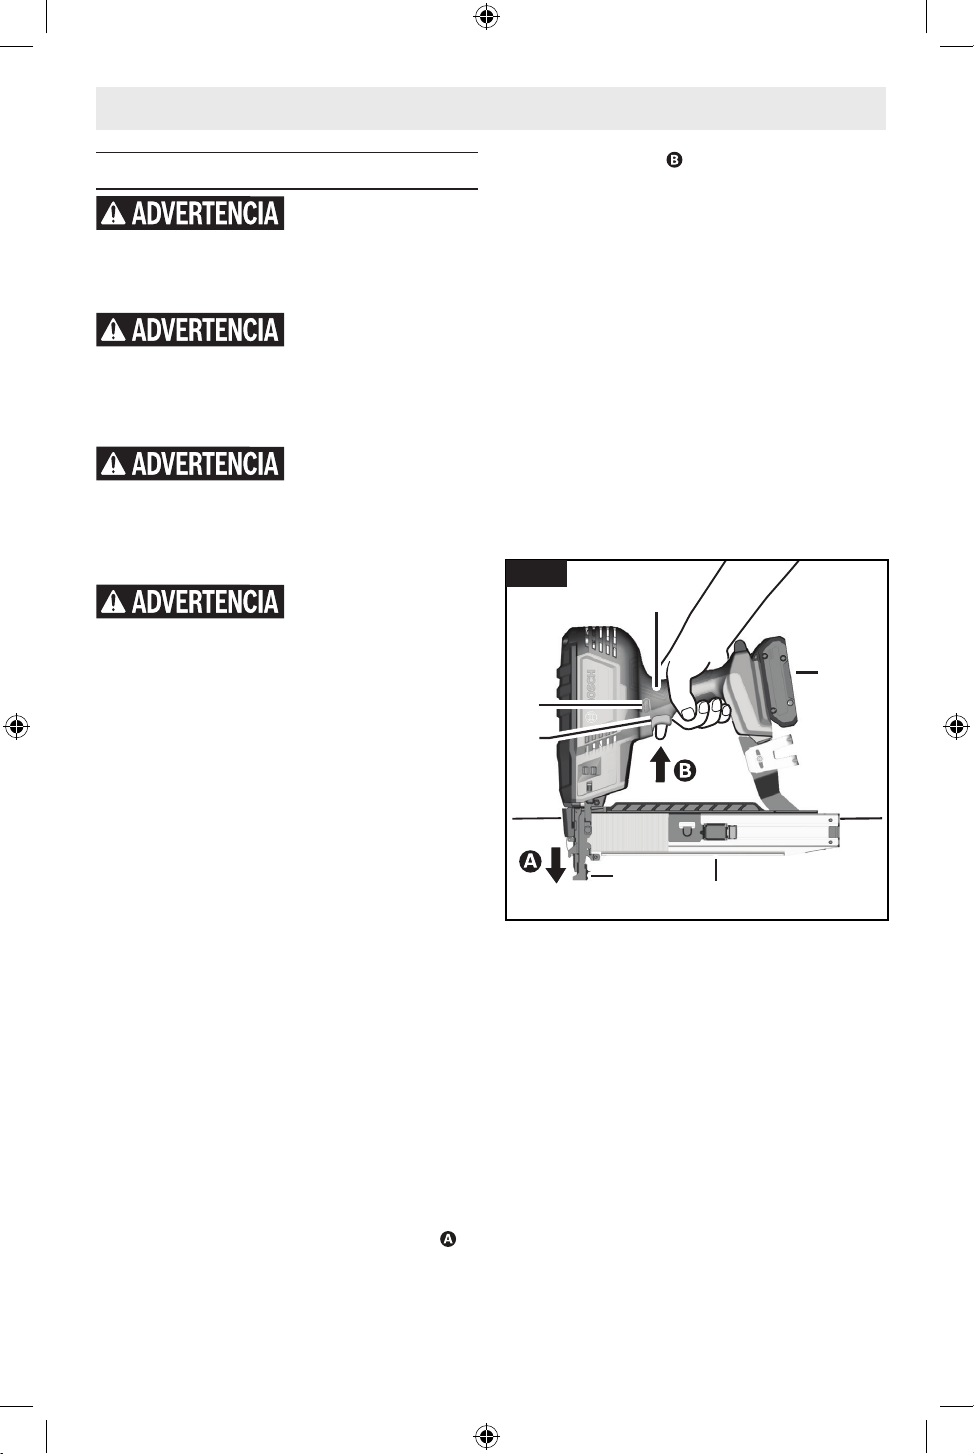
61
Operación
Accionamiento de la grapadora
La pieza frontal debe estar
en contacto completo con
la supercie de trabajo. Es posible que la holgura entre
la pieza frontal y la supercie de trabajo cause desviación
del sujetador y daños materiales o lesiones corporales.
No coloque nunca en cuña
la pieza frontal entre dos o
más supercies. Es posible que la holgura entre la pieza
frontal y múltiples piezas de trabajo permita una
desviación del sujetador y eso cause daños materiales o
lesione corporales.
No retenga nunca en
posición hacia atrás la
pieza frontal durante la utilización. Si se retiene en
posición hacia atrás la pieza frontal, se puede causar un
accionamiento inesperado y es posible que eso cause
daños materiales o lesiones corporales.
No posicione nunca la cara
o el cuerpo sobre la
grapadora durante su utilización. Un retroceso
repentino puede tener como resultado un impacto en el
cuerpo y lesiones.
Esta grapadora puede funcionar en modo de
accionamiento secuencial sencillo o por contacto
(golpeo). Siga la sección correspondiente para obtener
las instrucciones de utilización correctas.
Nota: La grapadora se apagará después de 30 minutos de
inactividad.
Accionamiento secuencial sencillo
(Fig. 1, Fig. 13)
1. Cargue el cargador de sujetadores 12. Consulte
la sección "Carga y descarga del cargador de
sujetadores" en la página 57.
2. Inserte el paquete de batería 8.
3. Presione el botón de encendido y apagado 6 para
activar la grapadora.
4. Asegúrese de que la grapadora esté en el modo de
accionamiento sencillo consultando el indicador
ubicado en la interfaz del usuario 9.
5. Agarre rmemente la empuñadura 16 y sostenga la
grapadora contra la supercie de trabajo.
6. Presione el contacto con la pieza de trabajo 1
completamente contra la supercie de trabajo . Si
el contacto con la pieza de trabajo 1 no se presiona
completamente hacia el interior de la grapadora, esta
no disparará.
7. Apriete el gatillo 5 para clavar el sujetador en la
supercie de trabajo. El gatillo 5 debe ser presionado
dentro del plazo de 5 segundos después de presionar
completamente el contacto con la pieza de trabajo
1. Si el gatillo 5 se aprieta más tarde, la grapadora
revertirá a un modo SEGURO y habrá que repetir la
secuencia de accionamiento.
8. La grapadora retrocederá después de que el
sujetador se haya clavado en la supercie de trabajo.
Use un agarre suciente para mantener el control y
la alineación de la grapadora con la supercie de
trabajo durante el disparo y el retroceso.
9. Suelte el gatillo 5 y jale la grapadora alejándola de la
supercie de trabajo.
10. Para disparar otro sujetador, se deben soltar el
gatillo 5 y el contacto con la pieza de trabajo 1 y se
debe repetir la secuencia de disparo, pasos 5-7.
16
8
6
5
1
12
Fig. 13
160992AB5S_GTH18V-50M_20241210.indd 61160992AB5S_GTH18V-50M_20241210.indd 61 12/13/2024 11:51:43 AM12/13/2024 11:51:43 AM
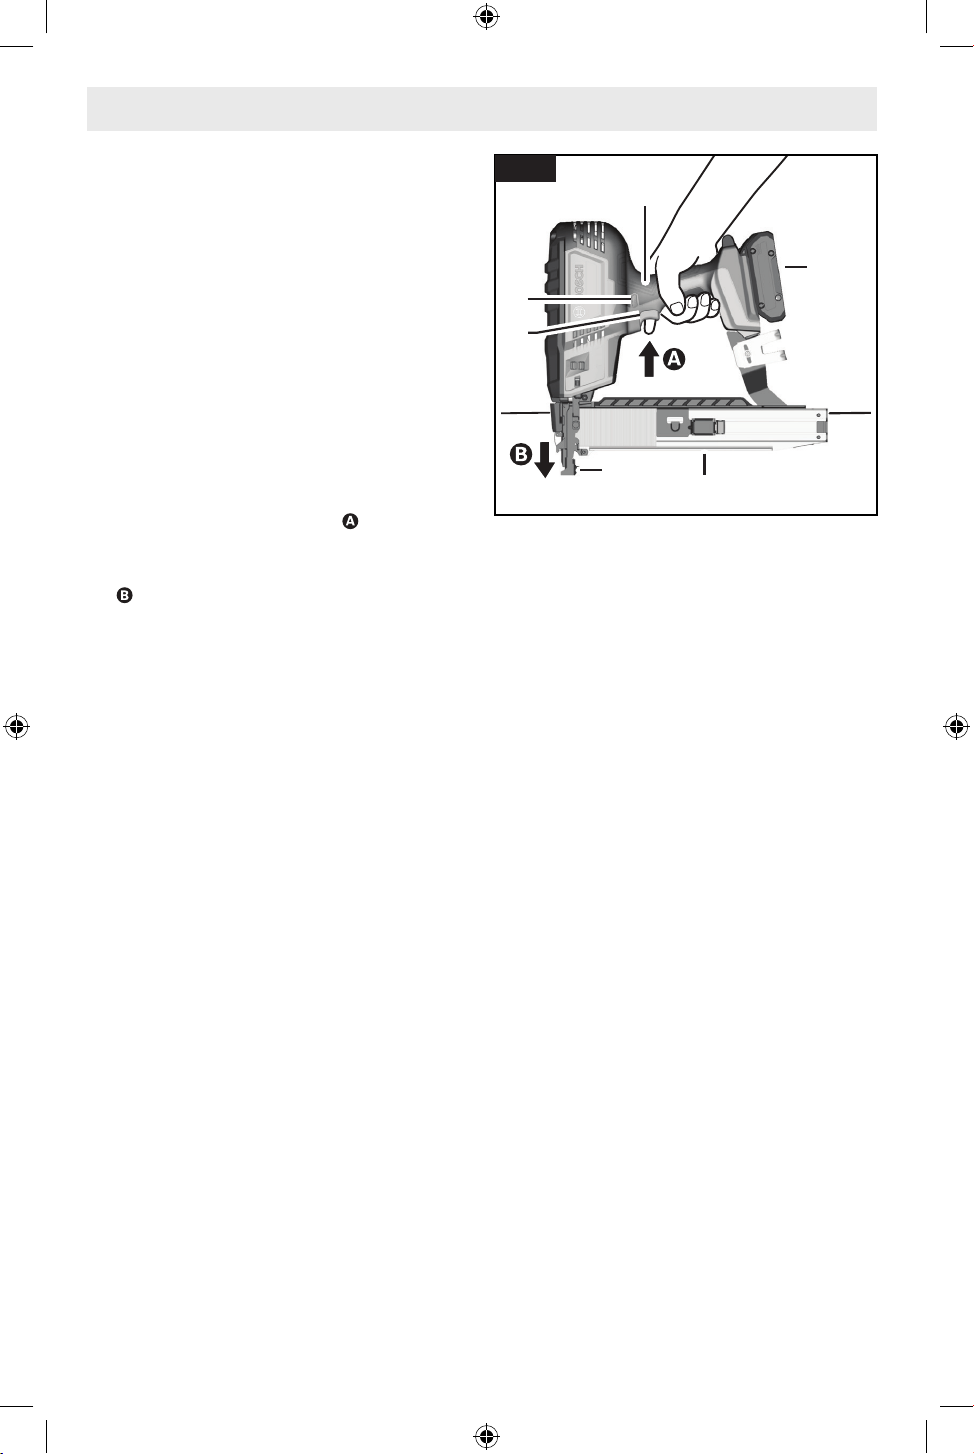
62
Accionamiento por contacto (golpeo)
(Fig. 1, Fig. 14)
1. Cargue el cargador de sujetadores 12. Consulte
la sección "Carga y descarga del cargador de
sujetadores" en la página 57.
2. Presione el botón de encendido y apagado 8 para
activar la grapadora.
3. Presione el botón de encendido y apagado 6 para
activar la clavadora.
4. En la interfaz del usuario 9, presione el botón de
modo 20 para encender el modo de activación por
golpeo; el indicador de accionamiento por golpeo 22
se iluminará.
5. Agarre rmemente la empuñadura 16 y apriete el
gatillo 5 para activar la grapadora .
6. Presione el contacto con la pieza de trabajo 1
completamente contra la supercie de trabajo
para clavar el sujetador; no suelte el gatillo 5.
El contacto con la pieza de trabajo 1 debe ser
presionado completamente dentro del plazo de 5
segundos después de presionar el gatillo 5. Si el
contacto con la pieza de trabajo 1 se presiona más
tarde, la grapadora revertirá a un modo SEGURO y
habrá que repetir la secuencia de accionamiento. Si
el contacto con la pieza de trabajo 1 no se presiona
completamente hacia el interior de la grapadora, esta
no disparará.
7. La grapadora retrocederá después de que el
sujetador se haya clavado en la supercie de trabajo.
Use un agarre suciente para mantener el control y
la alineación de la grapadora con la supercie de
trabajo durante el disparo y el retroceso.
8. Continue manteniendo apretado el gatillo 5 y jale la
grapadora alejándola de la supercie de trabajo.
9. Para disparar otro sujetador, presione el contacto
con la pieza de trabajo 1 en la siguiente ubicación de
disparo; este paso se podrá repetir siempre y cuando
el gatillo 5 se mantenga presionado. Una vez que se
suelte el gatillo, los pasos 5-8 se deben repetir.
Operación
16
8
6
5
1
12
Fig. 14
160992AB5S_GTH18V-50M_20241210.indd 62160992AB5S_GTH18V-50M_20241210.indd 62 12/13/2024 11:51:43 AM12/13/2024 11:51:43 AM
63
Limpieza
Elimine el polvo y los residuos de todas las aberturas
de ventilación y todos los cargadores de sujetadores.
Mantenga la grapadora limpia, seca y libre de aceite o
grasa. Use solo un jabón suave y un paño húmedo para
limpiar la carcasa, ya que ciertos agentes de limpieza y
solventes son dañinos para los plásticos y otras piezas
con aislamiento. Algunos de estos incluyen gasolina,
trementina, diluyente de laca, diluyente de pintura,
solventes de limpieza clorados, amoníaco y detergentes
domésticos que contienen amoníaco. No utilice
nunca solventes inamables o combustibles cerca de
herramientas.
Retire el adhesivo de intercalación y elimine el polvo
acumulado en el cargador de sujetadores para permitir
que los sujetadores avancen suavemente.
Reparaciones
Para hacer reparaciones, usted puede devolver la
grapadora, el paquete de batería y el cargador al centro de
servicio Bosch más cercano o a la ubicación de Servicio
Bosch Autorizada más cercana.
Mantenimiento
Mantenimiento general
Mantenga la grapadora, el paquete de batería y el cargador
en buenas condiciones de funcionamiento, adoptando
un programa de mantenimiento regular. Inspeccione la
grapadora para determinar si hay problemas tales como
ruido indebido, desalineación o atoramiento de las piezas
móviles, rotura de piezas o cualquier otra situación que
pueda afectar al funcionamiento de la grapadora.
Esta grapadora no contiene piezas reparables ni
reemplazables por el usuario.
Se recomienda después de 6 meses a un año,
dependiendo del uso, devolver la grapadora, el paquete
de batería y el cargador de baterías a un centro de servicio
BOSCH para que sean inspeccionados.
Si la grapadora no arranca ni funciona a su potencia
máxima con un paquete de batería completamente
cargado, limpie los contactos del paquete de batería. Si
la grapadora sigue sin funcionar correctamente, usted
puede devolver la grapadora, el cargador y el paquete
de batería a un centro de servicio Bosch para que hagan
reparaciones.
Servicio de ajustes y reparaciones
Haga que su herramienta
eléctrica reciba servicio
de ajustes y reparaciones por un técnico de
reparaciones calicado que utilice únicamente piezas
de repuesto idénticas. Esto garantizará que se mantenga
la seguridad de la herramienta eléctrica.
Para evitar accidentes, siempre desconecte el paquete de baterías de la herramienta
antes de limpiar o realizar cualquier mantenimiento.
No apunte la herramienta hacia usted ni hacia ninguna otra persona que esté cerca.
Un accionamiento inesperado del gatillo descargará el sujetador y con ello causará una
lesión.
160992AB5S_GTH18V-50M_20241210.indd 63160992AB5S_GTH18V-50M_20241210.indd 63 12/13/2024 11:51:43 AM12/13/2024 11:51:43 AM
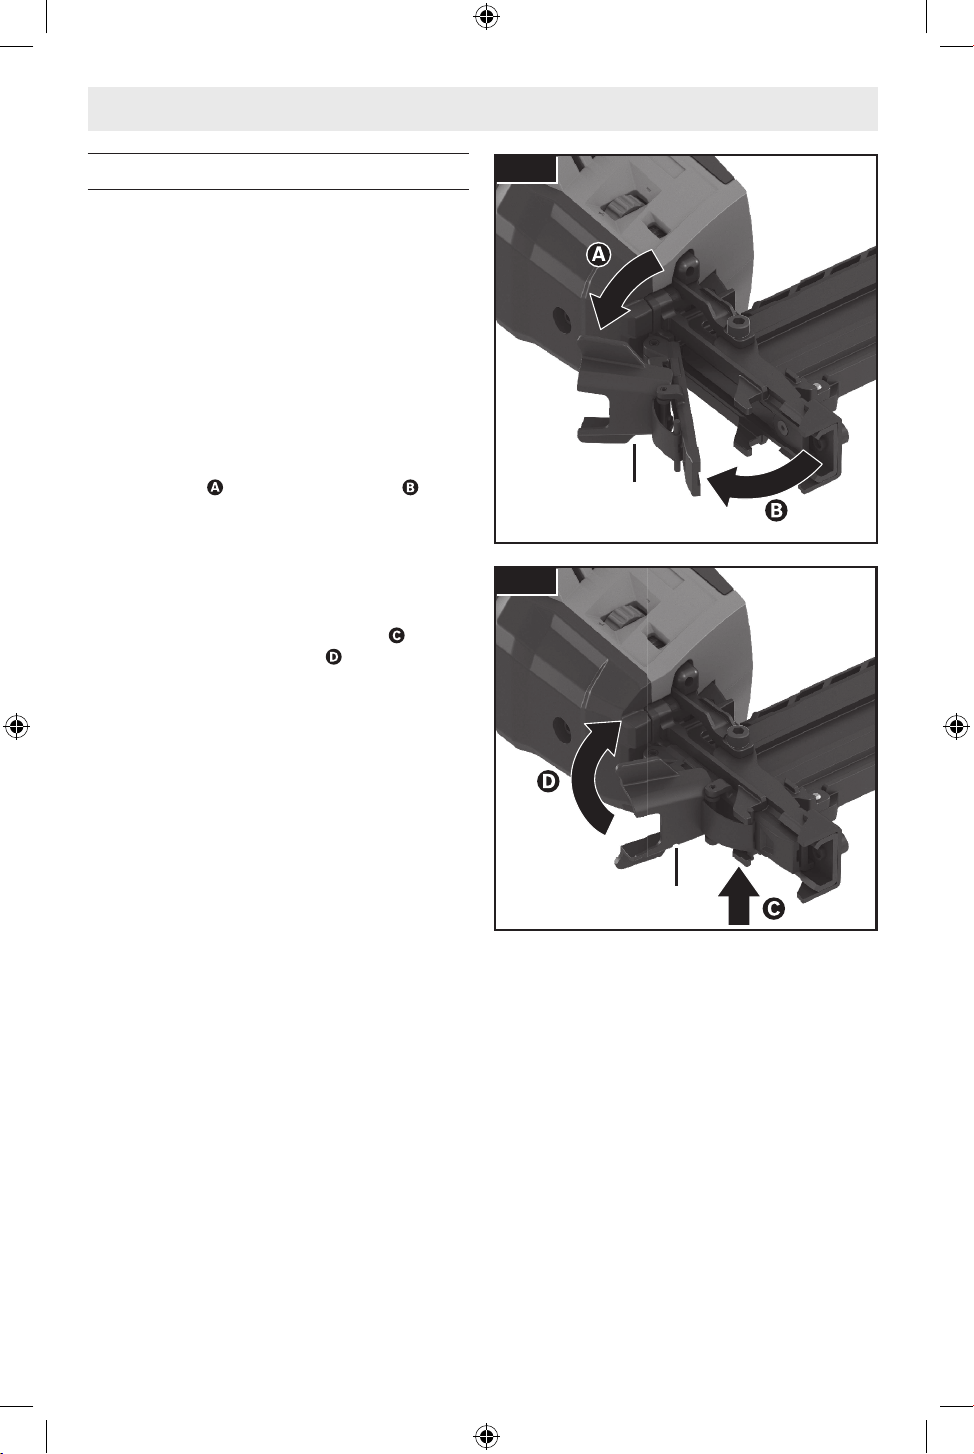
64
Despeje de atoramientos
(Fig. 15, Fig. 16)
Siga el procedimiento de despeje de atoramientos cuando
un sujetador esté atorado:
1. Apague la grapadora presionando el botón de
encendido y apagado 6.
2. Retire el paquete de batería 8 de la grapadora.
3. Retire todos los sujetadores del cargador de
sujetadores 12. Consulte la sección "Carga y
descarga del cargador de sujetadores" en la página
57.
4. Abra el pestillo de despeje de atoramientos 17
levantándolo y luego rótelo para abrirlo .
5. Retire el sujetador atorado, utilizando unos alicates
en caso de que sea necesario. Si es necesario,
elimine toda suciedad o residuos atrapados.
6. Cierre el pestillo de despeje de atoramientos 17
rotándolo hasta que se cierre. Asegúrese de que
el pasador del pestillo esté acoplado y luego
presione hacia abajo el pestillo .
7. Rellene el cargador de sujetadores 12. Consulte
la sección “Carga y descarga del cargador de
sujetadores” en la página 57.
8. Después de despejar exitosamente el atoramiento,
siga la sección “Inspección y pruebas diarias” en la
página 57 para asegurarse de que la grapadora
funcione de manera normal.
NOTA: Si la hoja del atornillador no regresa a su
posición hacia arriba, retire el paquete de batería 8 y
recomendamos contactar a un centro de servicio Bosch
o una estación de servicio Bosch autorizada.
17
Fig. 15
17
Fig. 16
Resolución de problemas
160992AB5S_GTH18V-50M_20241210.indd 64160992AB5S_GTH18V-50M_20241210.indd 64 12/13/2024 11:51:43 AM12/13/2024 11:51:43 AM
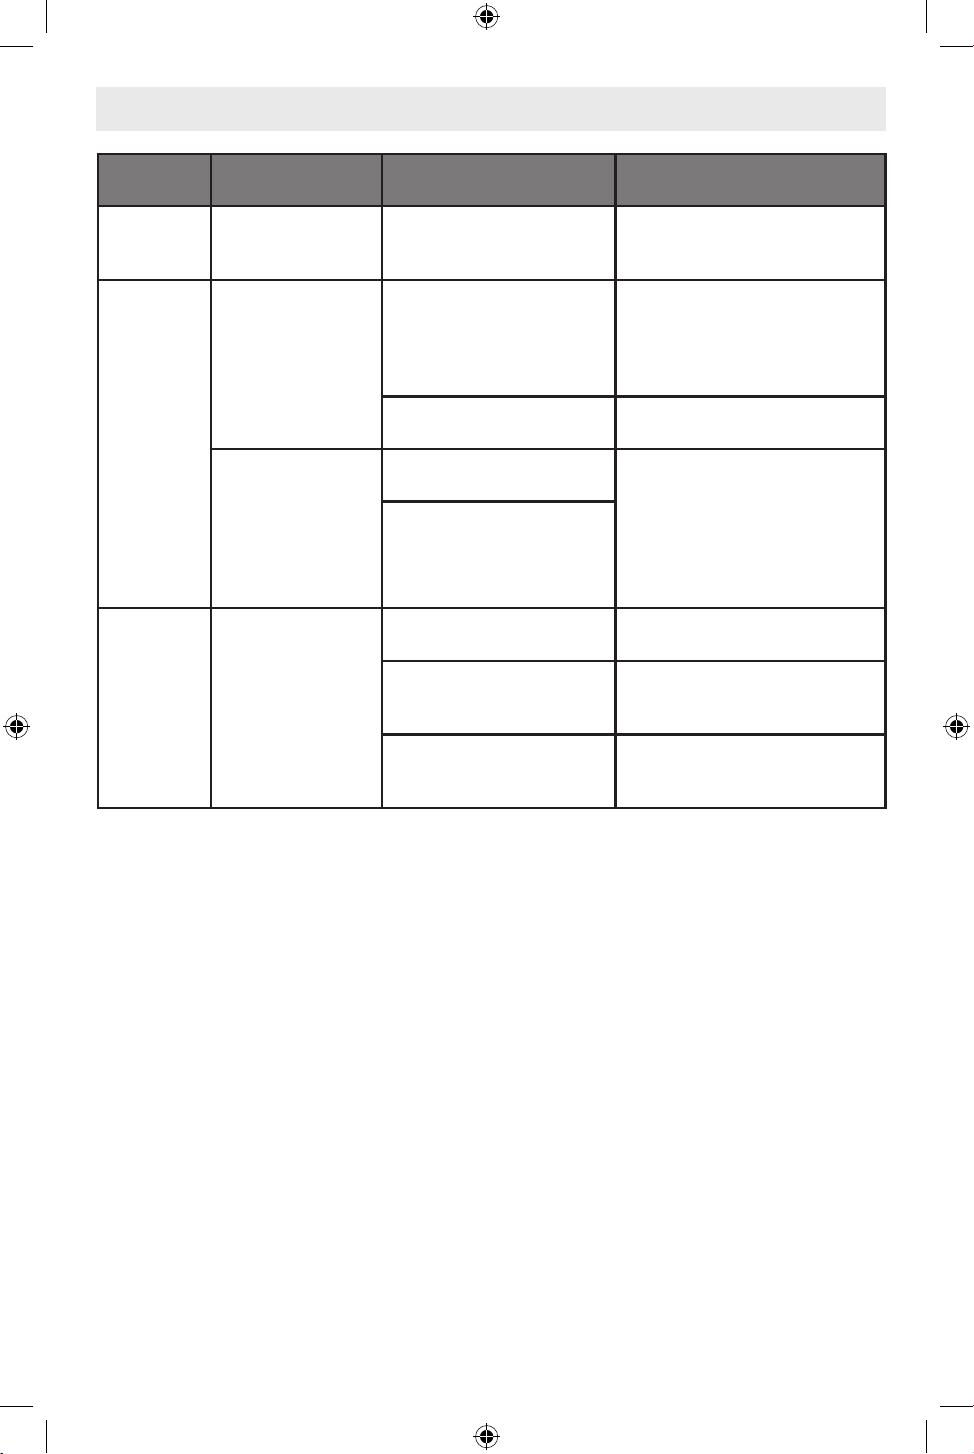
65
Resolución de problemas
Color de la
luz LED Indicador de estado Signicado Solución
Verde Luz continua
La grapadora está con corriente
y funcionando. Las condiciones
son normales.
La grapadora está lista para utilizarse
Rojo
Luz continua
La temperatura del paquete de
batería y de la herramienta es
demasiado alta/baja.
Deje que la batería y/o la grapadora
alcancen la temperatura de
funcionamiento permitida. Consulte
la sección "Especicaciones" en la
página 54.
Error interno.
Haga que su herramienta reciba
servicio de ajustes y reparaciones.
Luz continua
El funcionamiento secuencial no
se ha realizado correctamente.
El estado se reajustará
automáticamente a listo y se mostrará
en verde después de un momento.
Consulte la sección “Accionamiento
de la grapadora” en la página 61
para obtener información sobre el
funcionamiento secuencial correcto.
El gatillo no se presionó dentro
del plazo de 5 segundos
después de presionar el
contacto con la pieza de trabajo.
Amarillo Luz continua
La batería no está
completamente cargada.
Cargue la batería o reemplácela por
una batería llena.
La luz del indicador de servicio
regular pendiente está
iluminada.
Haga que su herramienta reciba
servicio de ajustes y reparaciones.
La luz del indicador de servicio
importante pendiente está
iluminada.
Haga que su herramienta reciba
servicio de ajustes y reparaciones.
160992AB5S_GTH18V-50M_20241210.indd 65160992AB5S_GTH18V-50M_20241210.indd 65 12/13/2024 11:51:43 AM12/13/2024 11:51:43 AM
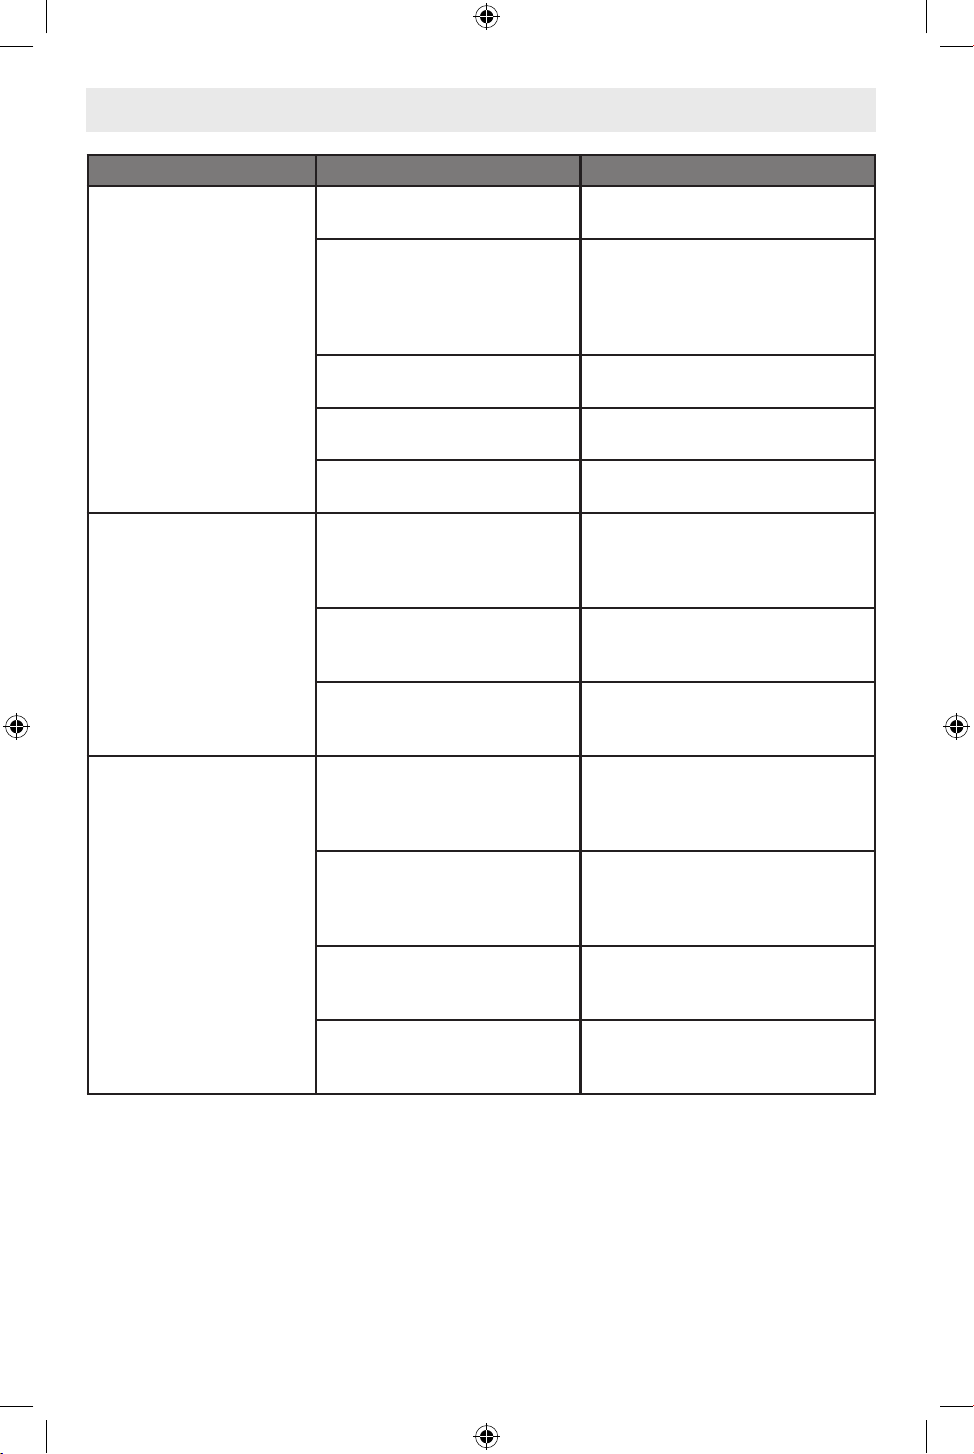
66
Problema Causa Medida correctiva
La grapadora no funciona.
No se produce accionamiento.
No hay batería insertada, la batería
está descargada.
Inserte una batería cargada.
La temperatura de la batería y de la
herramienta es demasiado baja.
Deje que la batería y la herramienta
se calienten sucientemente hasta
la temperatura ambiente permitida
para el funcionamiento. Consulte
"Especicaciones" en la página 54.
La grapadora no está encendida.
Presione el botón de ENCENDIDO y
APAGADO durante 1,5 segundos.
La operación secuencial no se ha
realizado correctamente.
Consulte la sección “Accionamiento de la
grapadora” en la página 61.
El contacto con la pieza de trabajo
no está completamente presionado.
Consulte la sección “Accionamiento de la
grapadora” en la página 61.
El sujetador no se dispara.
Se produce accionamiento.
Sujetador atorado: residuos,
suciedad o sujetador atorado en la
pieza de punta y/o el cargador de
sujetadores.
Consulte "Despeje de atoramientos" en la
página 64.
Los sujetadores utilizados no son
compatibles.
Utilice solo sujetadores compatibles.
Consulte "Especicaciones" en la página
54.
El cargador de sujetadores está
vacío.
Rellene el cargador de sujetadores.
Consulte "Carga del cargador de
sujetadores" en la página 57.
Sujetadores clavados
insucientemente
La profundidad de clavado no
está ajustada lo sucientemente
profunda.
Ajuste la rueda de ajuste de profundidad
para aumentar la profundidad de
clavado. Consulte "Interruptor de ajuste
de profundidad" en la página 60.
El contacto con la pieza de trabajo
está extendido demasiado lejos.
Reduzca la extensión del contacto con
la pieza de trabajo. Consulte "Extensión
del contacto con la pieza de trabajo" en
la página 56.
El sujetador es demasiado largo.
Utilice solo sujetadores compatibles.
Consulte "Especicaciones" en la página
54.
La batería está descargada o
defectuosa.
Inserte una batería cargada. Consulte
"Para insertar el paquete de batería" en la
página 55.
Resolución de problemas
160992AB5S_GTH18V-50M_20241210.indd 66160992AB5S_GTH18V-50M_20241210.indd 66 12/13/2024 11:51:43 AM12/13/2024 11:51:43 AM

67
Problema Causa Medida correctiva
Éléments de xation
excessivement enfoncés.
La profundidad de clavado está
ajustada demasiado profundamente.
Ajuste la rueda de ajuste de profundidad
para reducir la profundidad de clavado.
onsulte "Interruptor de ajuste de
profundidad" en la página 60.
El contacto con la pieza de trabajo
no está extendido lo sucientemente
lejos.
Extienda el contacto con la pieza de
trabajo. Consulte "Extensión del contacto
con la pieza de trabajo" en la página 56.
El sujetador es demasiado corto.
Utilice solo sujetadores compatibles.
Consulte "Especicaciones" en la página
54.
Los sujetadores clavados se
doblan o se rompen.
El sujetador es demasiado largo.
Seleccione un sujetador más corto.
Consulte "Especicaciones" en la página
54.
La clavadora se salta sujetadores
o tiene un avance de ciclo que es
demasiado grande.
Utilice la grapadora solo en madera y
productos de madera.
La hoja impulsora está dañada.
Haga que su herramienta reciba servicio
de ajustes y reparaciones.
La grapadora se salta
sujetadores.
Los sujetadores utilizados no son
compatibles.
Utilice solo sujetadores compatibles.
Consulte "Especicaciones" en la página
54.
Los sujetadores se atoran
frecuentemente.
Los sujetadores utilizados no son
compatibles.
Utilice solo sujetadores compatibles.
Consulte "Especicaciones" en la página
54.
Los sujetadores son viejos, la
adhesión entre los sujetadores está
desgastada.
Utilice tiras de sujetadores nuevos.
Los sujetadores no se deslizan
hacia el interior del cargado.
Polvo o residuos en el cargador.
Inspeccione el cargador de sujetadores
y elimine toda acumulación de material
residual o toda materia extraña.
Resolución de problemas
160992AB5S_GTH18V-50M_20241210.indd 67160992AB5S_GTH18V-50M_20241210.indd 67 12/13/2024 11:51:43 AM12/13/2024 11:51:43 AM
68
Licenses
MIT
FreeRTOS, v10.3.1
Copyright (C) 2020 Amazon.com, Inc. or its afliates. All Rights Reserved.
Permission is hereby granted, free of charge, to any person obtaining a copy of this software and as-
sociated documentation les (the "Software"), to deal in the Software without restriction, including
without limitation the rights to use, copy, modify, merge, publish, distribute, sublicense, and/or sell
copies of the Software, and to permit persons to whom the Software is furnished to do so, subject
to the following conditions:
The above copyright notice and this permission notice shall be included in all copies or substantial
portions of the Software.
THE SOFTWARE IS PROVIDED "AS IS", WITHOUT WARRANTY OF ANY KIND, EXPRESS OR IMPLIED,
INCLUDING BUT NOT LIMITED TO THE WARRANTIES OF MERCHANTABILITY, FITNESS FOR A PAR-
TICULAR PURPOSE AND NONINFRINGEMENT. IN NO EVENT SHALL THE AUTHORS OR COPYRIGHT
HOLDERS BE LIABLE FOR ANY CLAIM, DAMAGES OR OTHER LIABILITY, WHETHER IN AN ACTION OF
CONTRACT, TORT OR OTHERWISE, ARISING FROM, OUT OF OR IN CONNECTION WITH THE SOFT-
WARE OR THE USE OR OTHER DEALINGS IN THE SOFTWARE.
Apache-2.0
GCE-Math, Commit: 8422f5307b0498d09cf626f38acb03fe9f1efd94
Copyright 2016-2023 Keith O'Hara
Licensed under the Apache License, Version 2.0 (the "License");you may not use this le except in
compliance with the License.
You may obtain a copy of the License at http://www.apache.org/licenses/LICENSE-2.0
Unless required by applicable law or agreed to in writing, software distributed under the License
is distributed on an "AS IS" BASIS, WITHOUT WARRANTIES OR CONDITIONS OF ANY KIND, either
express or implied. See the License for the specic language governing permissions and limitations
under the License.
Apache-2.0
CMSIS_5, v5.9.0
Copyright 2009-2020 Arm Limited. All rights reserved.
Licensed under the Apache License, Version 2.0 (the "License");you may not use this le except in
compliance with the License.
You may obtain a copy of the License at http://www.apache.org/licenses/LICENSE-2.0
Unless required by applicable law or agreed to in writing, software distributed under the License
is distributed on an "AS IS" BASIS, WITHOUT WARRANTIES OR CONDITIONS OF ANY KIND, either
express or implied. See the License for the specic language governing permissions and limitations
under the License.
BSD-3-Clause
Inneon TLE987x DFP, v1.4.6
Copyright (c) 2015-2017, Inneon Technologies AG. All rights reserved.
Redistribution and use in source and binary forms, with or without modication,are permitted pro-
vided that the following conditions are met:
Redistributions of source code must retain the above copyright notice, this list of conditions and the
following disclaimer.
Redistributions in binary form must reproduce the above copyright notice, this list of conditions and
the following disclaimer in the documentation and/or other materials provided with the distribution.
Neither the name of the copyright holders nor the names of its contributors may be used to endorse
or promote products derived from this software without specic prior written permission.
THIS SOFTWARE IS PROVIDED BY THE COPYRIGHT HOLDERS AND CONTRIBUTORS "AS IS" AND
ANY EXPRESS OR IMPLIED WARRANTIES, INCLUDING, BUT NOT LIMITED TO, THE IMPLIED WAR-
RANTIES OF MERCHANTABILITY AND FITNESS FOR A PARTICULAR PURPOSE ARE DISCLAIMED.
IN NO EVENT SHALL THE COPYRIGHT HOLDER OR CONTRIBUTORS BE LIABLE FOR ANY DIRECT,
INDIRECT, INCIDENTAL, SPECIAL, EXEMPLARY, OR CONSEQUENTIAL DAMAGES (INCLUDING, BUT
160992AB5S_GTH18V-50M_20241210.indd 68160992AB5S_GTH18V-50M_20241210.indd 68 12/13/2024 11:51:44 AM12/13/2024 11:51:44 AM
69
NOT LIMITED TO, PROCUREMENT OF SUBSTITUTE GOODS OR SERVICES; LOSS OF USE, DATA, OR
PROFITS; OR BUSINESS INTERRUPTION) HOWEVER CAUSED AND ON ANY THEORY OF LIABILITY,
WHETHER IN CONTRACT, STRICT LIABILITY,OR TORT (INCLUDING NEGLIGENCE OR OTHERWISE)
ARISING IN ANY WAY OUT OF THE USE OF THIS SOFTWARE, EVEN IF ADVISED OF THE POSSIBILITY
OF SUCH DAMAGE.
BSD-3-Clause
cmsis_device_f0, v2.3.7
Copyright (c) 2016 STMicroelectronics. All rights reserved.
Redistribution and use in source and binary forms, with or without modication, are permitted pro-
vided that the following conditions are met:
1. Redistributions of source code must retain the above copyright notice, this list of conditions and
the following disclaimer.
2. Redistributions in binary form must reproduce the above copyright notice,this list of conditions
and the following disclaimer in the documentation and/or other materials provided with the dis-
tribution.
3. Neither the name of the copyright holder nor the names of its contributors may be used to endorse
or promote products derived from this software without specic prior written permission.
THIS SOFTWARE IS PROVIDED BY THE COPYRIGHT HOLDERS AND CONTRIBUTORS "AS IS" AND
ANY EXPRESS OR IMPLIED WARRANTIES, INCLUDING, BUT NOT LIMITED TO, THE IMPLIED WAR-
RANTIES OF MERCHANTABILITY AND FITNESS FOR A PARTICULAR PURPOSE ARE DISCLAIMED.
IN NO EVENT SHALL THE COPYRIGHT HOLDER OR CONTRIBUTORS BE LIABLE FOR ANY DIRECT,
INDIRECT, INCIDENTAL, SPECIAL, EXEMPLARY, OR CONSEQUENTIAL DAMAGES (INCLUDING, BUT
NOT LIMITED TO, PROCUREMENT OF SUBSTITUTE GOODS OR SERVICES; LOSS OF USE, DATA, OR
PROFITS; OR BUSINESS INTERRUPTION) HOWEVER CAUSED AND ON ANY THEORY OF LIABILITY,
WHETHER IN CONTRACT, STRICT LIABILITY, OR TORT (INCLUDING NEGLIGENCE OR OTHERWISE)
ARISING IN ANY WAY OUT OF THE USE OF THIS SOFTWARE, EVEN IF ADVISED OF THE POSSIBILITY
OF SUCH DAMAGE.
Apache-2.0
cmsis_device_g0, v1.4.0
Copyright (c) 2016 STMicroelectronics. All rights reserved.
Licensed under the Apache License, Version 2.0 (the "License");you may not use this le except in
compliance with the License.
You may obtain a copy of the License at http://www.apache.org/licenses/LICENSE-2.0
Unless required by applicable law or agreed to in writing, software distributed under the License
is distributed on an "AS IS" BASIS, WITHOUT WARRANTIES OR CONDITIONS OF ANY KIND, either
express or implied.
See the License for the specic language governing permissions and limitations under the License.
MIT
Libxmath, Commit: 24488b16cc0359daada0682a9bd3a11a801d0a01
Copyright (c) 2011-2021 Flatmush <[email protected]>, Petteri Aimonen <Petteri.Aimonen@
gmail.com>, & libxmath AUTHORS libxmath is Copyright (c) 2011-2021 Flatmush <Flatmush@
gmail.com>, Petteri Aimonen <[email protected]>, & libxmath AUTHORS
Permission is hereby granted, free of charge, to any person obtaining a copy of this software and
associated documentation les (the Software), to deal in the Software without restriction, including
without limitation the rights to use, copy, modify, merge, publish, distribute, sublicense, and/or sell
copies of the Software, and to permit persons to whom the Software is furnished to do so, subject
to the following conditions:
The above copyright notice and this permission notice shall be included in all copies or substantial
portions of the Software.
THE SOFTWARE IS PROVIDED AS IS, WITHOUT WARRANTY OF ANY KIND, EXPRESS OR IMPLIED,
INCLUDING BUT NOT LIMITED TO THE WARRANTIES OF MERCHANTABILITY, FITNESS FOR A PAR-
TICULAR PURPOSE AND NONINFRINGEMENT. IN NO EVENT SHALL THE AUTHORS OR COPYRIGHT
HOLDERS BE LIABLE FOR ANY CLAIM, DAMAGES OR OTHER LIABILITY, WHETHER IN AN ACTION OF
CONTRACT, TORT OR OTHERWISE, ARISING FROM, OUT OF OR IN CONNECTION WITH THE SOFT-
WARE OR THE USE OR OTHER DEALINGS IN THE SOFTWARE.
160992AB5S_GTH18V-50M_20241210.indd 69160992AB5S_GTH18V-50M_20241210.indd 69 12/13/2024 11:51:44 AM12/13/2024 11:51:44 AM
70
MIT
MFixedPoint, v8.0.2
Copyright 2018 Geoffrey Hunter
Permission is hereby granted, free of charge, to any person obtaining a copy of this software and as-
sociated documentation les (the "Software"), to deal in the Software without restriction, including
without limitation the rights to use, copy, modify, merge, publish, distribute, sublicense, and/or sell
copies of the Software, and to permit persons to whom the Software is furnished to do so, subject
to the following conditions:
The above copyright notice and this permission notice shall be included in all copies or substantial
portions of the Software.
THE SOFTWARE IS PROVIDED "AS IS", WITHOUT WARRANTY OF ANY KIND, EXPRESS OR IMPLIED,
INCLUDING BUT NOT LIMITED TO THE WARRANTIES OF MERCHANTABILITY, FITNESS FOR A PAR-
TICULAR PURPOSE AND NONINFRINGEMENT. IN NO EVENT SHALL THE AUTHORS OR COPYRIGHT
HOLDERS BE LIABLE FOR ANY CLAIM, DAMAGES OR OTHER LIABILITY, WHETHER IN AN ACTION OF
CONTRACT, TORT OR OTHERWISE, ARISING FROM, OUT OF OR IN CONNECTION WITH THE SOFT-
WARE OR THE USE OR OTHER DEALINGS IN THE SOFTWARE.
Zlib
NanoPb, v0.3.9.9
Copyright (c) 2011 Petteri Aimonen <jpa at nanopb.mail.kapsi.>
This software is provided 'as-is', without any express or implied warranty. In no event will the au-
thors be held liable for any damages arising from the use of this software.
Permission is granted to anyone to use this software for any purpose, including commercial applica-
tions, and to alter it and redistribute it freely, subject to the following restrictions:
1. The origin of this software must not be misrepresented; you must not claim that you wrote the
original software. If you use this software in a product, an acknowledgment in the product docu-
mentation would be appreciated but is not required.
2. Altered source versions must be plainly marked as such, and must not be misrepresented as being
the original software.
3. This notice may not be removed or altered from any source distribution.
newlib, v3.3.0
newlib
v3.3.0
(1) Red Hat Incorporated
Copyright (c) 1994-2009 Red Hat, Inc. All rights reserved.
This copyrighted material is made available to anyone wishing to use, modify, copy, or redistribute
it subject to the terms and conditions of the BSD License. This program is distributed in the hope
that it will be useful, but WITHOUT ANY WARRANTY expressed or implied, including the implied
warranties of MERCHANTABILITY or FITNESS FOR A PARTICULAR PURPOSE. A copy of this license
is available at http://www.opensource.org/licenses. Any Red Hat trademarks that are incorporated
in the source code or documentation are not subject to the BSD License and may only be used or
replicated with the express permission of Red Hat, Inc.
(2) University of California, Berkeley
Copyright (c) 1981-2000 The Regents of the University of California. All rights reserved.
Redistribution and use in source and binary forms, with or without modication, are permitted pro-
vided that the following conditions are met:
— Redistributions of source code must retain the above copyright notice,this list of conditions and
the following disclaimer.
— Redistributions in binary form must reproduce the above copyright notice,this list of conditions
and the following disclaimer in the documentationand/or other materials provided with the dis-
tribution.
— Neither the name of the University nor the names of its contributors may be used to endorse or
promote products derived from this software without specic prior written permission.
THIS SOFTWARE IS PROVIDED BY THE COPYRIGHT HOLDERS AND CONTRIBUTORS "AS IS" AND
ANY EXPRESS OR IMPLIED WARRANTIES, INCLUDING, BUT NOT LIMITED TO, THE IMPLIED WAR-
160992AB5S_GTH18V-50M_20241210.indd 70160992AB5S_GTH18V-50M_20241210.indd 70 12/13/2024 11:51:44 AM12/13/2024 11:51:44 AM
71
RANTIES OF MERCHANTABILITY AND FITNESS FOR A PARTICULAR PURPOSE ARE DISCLAIMED.
IN NO EVENT SHALL THE COPYRIGHT OWNER OR CONTRIBUTORS BE LIABLE FOR ANY DIRECT,
INDIRECT, INCIDENTAL, SPECIAL, EXEMPLARY, OR CONSEQUENTIAL DAMAGES (INCLUDING, BUT
NOT LIMITED TO, PROCUREMENT OF SUBSTITUTE GOODS OR SERVICES; LOSS OF USE, DATA, OR
PROFITS; OR BUSINESS INTERRUPTION) HOWEVER CAUSED AND ON ANY THEORY OF LIABILITY,
WHETHER IN CONTRACT, STRICT LIABILITY, OR TORT (INCLUDING NEGLIGENCE OR OTHERWISE)
ARISING IN ANY WAY OUT OF THE USE OF THIS SOFTWARE, EVEN IF ADVISED OF THE POSSIBILITY
OF SUCH DAMAGE.
(3) David M. Gay (AT&T 1991, Lucent 1998)
David M. Gay, Copyright (c) 1991 by AT&T.
Permission to use, copy, modify, and distribute this software for any purpose without fee is hereby
granted, provided that this entire notice is included in all copies of any software which is or includes
a copy or modication of this software and in all copies of the supporting documentation for such
software.
THIS SOFTWARE IS BEING PROVIDED "AS IS", WITHOUT ANY EXPRESS OR IMPLIED WARRANTY. IN
PARTICULAR, NEITHER THE AUTHOR NOR AT&T MAKES ANY REPRESENTATION OR WARRANTY OF
ANY KIND CONCERNING THE MERCHANTABILITY OF THIS SOFTWARE OR ITS FITNESS FOR ANY
PARTICULAR PURPOSE.
(1003) David M. Gay (AT&T 1991, Lucent 1998)
David M. Gay, Copyright (C) 1998-2001 by Lucent Technologies. All Rights Reserved
Permission to use, copy, modify, and distribute this software and its documentation for any purpose
and without fee is hereby granted, provided that the above copyright notice appear in all copies and
that both that the copyright notice and this permission notice and warranty disclaimer appear in sup-
porting documentation, and that the name of Lucent or any of its entities not be used in advertising
or publicity pertaining to distribution of the software without specic, written prior permission.
LUCENT DISCLAIMS ALL WARRANTIES WITH REGARD TO THIS SOFTWARE, INCLUDING ALL IM-
PLIED WARRANTIES OF MERCHANTABILITY AND FITNESS. IN NO EVENT SHALL LUCENT OR ANY OF
ITS ENTITIES BE LIABLE FOR ANY SPECIAL, INDIRECT OR CONSEQUENTIAL DAMAGES OR ANY DAM-
AGES WHATSOEVER RESULTING FROM LOSS OF USE, DATA OR PROFITS, WHETHER IN AN ACTION
OF CONTRACT, NEGLIGENCE OR OTHER TORTIOUS ACTION, ARISING OUT OF OR IN CONNECTION
WITH THE USE OR PERFORMANCE OF THIS SOFTWARE.
(4) Advanced Micro Devices
Copyright 1989, 1990 Advanced Micro Devices, Inc.
This software is the property of Advanced Micro Devices, Inc (AMD) which specically grants the
user the right to modify, use and distribute this software provided this notice is not removed or
altered.
All other rights are reserved by AMD.
AMD MAKES NO WARRANTY OF ANY KIND, EXPRESS OR IMPLIED, WITH REGARD TO THIS SOFT-
WARE. IN NO EVENT SHALL AMD BE LIABLE FOR INCIDENTAL OR CONSEQUENTIAL DAMAGES
IN CONNECTION WITH OR ARISING FROM THE FURNISHING, PERFORMANCE, OR USE OF THIS
SOFTWARE.
So that all may benet from your experience, please report any problems or suggestions about this
software to the 29K Technical Support Center at 800-29-29-AMD (800-292-9263) in the USA, or
0800-89-1131 in the UK, or 0031-11-1129 in Japan, toll free. The direct dial number is 512-462-4118.
Advanced Micro Devices, Inc.
29K Support Products
Mail Stop 573
5900 E. Ben White Blvd.
Austin, TX 78741
800-292-9263
(7) Sun Microsystems
Copyright (C) 1993 by Sun Microsystems, Inc. All rights reserved.
Developed at SunPro, a Sun Microsystems, Inc. business.
Permission to use, copy, modify, and distribute this software is freely granted, provided that this
notice is preserved.
160992AB5S_GTH18V-50M_20241210.indd 71160992AB5S_GTH18V-50M_20241210.indd 71 12/13/2024 11:51:44 AM12/13/2024 11:51:44 AM
72
(8) Hewlett Packard
(c) Copyright 1986 HEWLETT-PACKARD COMPANY
To anyone who acknowledges that this le is provided "AS IS" without any express or implied war-
ranty:
permission to use, copy, modify, and distribute this le for any purpose is hereby granted without
fee, provided that the above copyright notice and this notice appears in all copies, and that the name
of Hewlett-Packard Company not be used in advertising or publicity pertaining to distribution of the
software without specic, written prior permission. Hewlett-Packard Company makes no representa-
tions about the suitability of this software for any purpose.
(9) Hans-Peter Nilsson
Copyright (C) 2001 Hans-Peter Nilsson
Permission to use, copy, modify, and distribute this software is freely granted, provided that the
above copyright notice, this notice and the following disclaimer are preserved with no changes.
THIS SOFTWARE IS PROVIDED ``AS IS'' AND WITHOUT ANY EXPRESS OR IMPLIED WARRANTIES,
INCLUDING, WITHOUT LIMITATION, THE IMPLIED WARRANTIES OF MERCHANTABILITY AND FITNESS
FOR A PARTICULAR PURPOSE.
(11) Christopher G. Demetriou
Copyright (c) 2001 Christopher G. Demetriou. All rights reserved.
Redistribution and use in source and binary forms, with or without modication, are permitted pro-
vided that the following conditions are met:
1. Redistributions of source code must retain the above copyright notice, this list of conditions and
the following disclaimer.
2. Redistributions in binary form must reproduce the above copyright notice, this list of conditions
and the following disclaimer in the documentation and/or other materials provided with the dis-
tribution.
3. The name of the author may not be used to endorse or promote products derived from this soft-
ware without specic prior written permission.
THIS SOFTWARE IS PROVIDED BY THE AUTHOR ``AS IS'' AND ANY EXPRESS OR IMPLIED WAR-
RANTIES, INCLUDING, BUT NOT LIMITED TO, THE IMPLIED WARRANTIES OF MERCHANTABILITY
AND FITNESS FOR A PARTICULAR PURPOSE ARE DISCLAIMED. IN NO EVENT SHALL THE AUTHOR
BE LIABLE FOR ANY DIRECT, INDIRECT, INCIDENTAL, SPECIAL, EXEMPLARY, OR CONSEQUENTIAL
DAMAGES (INCLUDING, BUT NOT LIMITED TO, PROCUREMENT OF SUBSTITUTE GOODS OR SER-
VICES; LOSS OF USE, DATA, OR PROFITS; OR BUSINESS INTERRUPTION) HOWEVER CAUSED AND
ON ANY THEORY OF LIABILITY, WHETHER IN CONTRACT, STRICT LIABILITY, OR TORT (INCLUDING
NEGLIGENCE OR OTHERWISE) ARISING IN ANY WAY OUT OF THE USE OF THIS SOFTWARE, EVEN IF
ADVISED OF THE POSSIBILITY OF SUCH DAMAGE.
(12) SuperH, Inc.
Copyright 2002 SuperH, Inc. All rights reserved
This software is the property of SuperH, Inc (SuperH) which specically grants the user the right
to modify, use and distribute this software provided this notice is not removed or altered. All other
rights are reserved by SuperH.
SUPERH MAKES NO WARRANTY OF ANY KIND, EXPRESS OR IMPLIED, WITH REGARD TO THIS
SOFTWARE. IN NO EVENT SHALL SUPERH BE LIABLE FOR INDIRECT, SPECIAL, INCIDENTAL OR
CONSEQUENTIAL DAMAGES IN CONNECTION WITH OR ARISING FROM THE FURNISHING, PERFOR-
MANCE, OR USE OF THIS SOFTWARE.
So that all may benet from your experience, please report any problems or suggestions about this
software to the SuperH Support Center via e-mail at [email protected] .
SuperH, Inc.
405 River Oaks Parkway
San Jose
CA 95134
USA
(13) Royal Institute of Technology
Copyright (c) 1999 Kungliga Tekniska Högskolan (Royal Institute of Technology, Stockholm, Swe-
den)
All rights reserved.
160992AB5S_GTH18V-50M_20241210.indd 72160992AB5S_GTH18V-50M_20241210.indd 72 12/13/2024 11:51:44 AM12/13/2024 11:51:44 AM
73
Redistribution and use in source and binary forms, with or without modication, are permitted pro-
vided that the following conditions are met:
1. Redistributions of source code must retain the above copyright notice, this list of conditions and
the following disclaimer.
2. Redistributions in binary form must reproduce the above copyrightnotice, this list of conditions
and the following disclaimer in the documentation and/or other materials provided with the dis-
tribution.
3. Neither the name of KTH nor the names of its contributors may be used to endorse or promote
products derived from this software without specic prior written permission.
THIS SOFTWARE IS PROVIDED BY KTH AND ITS CONTRIBUTORS ``AS IS'' AND ANY EXPRESS OR IM-
PLIED WARRANTIES, INCLUDING, BUT NOT LIMITED TO, THE IMPLIED WARRANTIES OF MERCHANT-
ABILITY AND FITNESS FOR A PARTICULAR PURPOSE ARE DISCLAIMED. IN NO EVENT SHALL KTH
OR ITS CONTRIBUTORS BE LIABLE FOR ANY DIRECT, INDIRECT, INCIDENTAL, SPECIAL, EXEMPLARY,
OR CONSEQUENTIAL DAMAGES (INCLUDING, BUT NOT LIMITED TO, PROCUREMENT OF SUBSTI-
TUTE GOODS OR SERVICES; LOSS OF USE, DATA, OR PROFITS; OR BUSINESS INTERRUPTION)
HOWEVER CAUSED AND ON ANY THEORY OF LIABILITY, WHETHER IN CONTRACT, STRICT LIABILITY,
OR TORT (INCLUDING NEGLIGENCE OR OTHERWISE) ARISING IN ANY WAY OUT OF THE USE OF
THIS SOFTWARE, EVEN IF ADVISED OF THE POSSIBILITY OF SUCH DAMAGE.
(14) Alexey Zelkin
Copyright (c) 2000, 2001 Alexey Zelkin <[email protected]> All rights reserved.
Redistribution and use in source and binary forms, with or without modication, are permitted pro-
vided that the following conditions are met:
1. Redistributions of source code must retain the above copyright notice, this list of conditions and
the following disclaimer.
2. Redistributions in binary form must reproduce the above copyright notice, this list of conditions
and the following disclaimer in the documentation and/or other materials provided with the dis-
tribution.
THIS SOFTWARE IS PROVIDED BY THE AUTHOR AND CONTRIBUTORS ``AS IS'' AND ANY EXPRESS
OR IMPLIED WARRANTIES, INCLUDING, BUT NOT LIMITED TO, THE IMPLIED WARRANTIES OF MER-
CHANTABILITY AND FITNESS FOR A PARTICULAR PURPOSE ARE DISCLAIMED. IN NO EVENT SHALL
THE AUTHOR OR CONTRIBUTORS BE LIABLE FOR ANY DIRECT, INDIRECT, INCIDENTAL, SPECIAL,
EXEMPLARY, OR CONSEQUENTIAL DAMAGES (INCLUDING, BUT NOT LIMITED TO, PROCUREMENT
OF SUBSTITUTE GOODS OR SERVICES; LOSS OF USE, DATA, OR PROFITS; OR BUSINESS INTER-
RUPTION) HOWEVER CAUSED AND ON ANY THEORY OF LIABILITY, WHETHER IN CONTRACT, STRICT
LIABILITY, OR TORT (INCLUDING NEGLIGENCE OR OTHERWISE) ARISING IN ANY WAY OUT OF THE
USE OF THIS SOFTWARE, EVEN IF ADVISED OF THE POSSIBILITY OF SUCH DAMAGE.
(15) Andrey A. Chernov
Copyright (C) 1997 by Andrey A. Chernov, Moscow, Russia. All rights reserved.
Redistribution and use in source and binary forms, with or without modication, are permitted pro-
vided that the following conditions are met:
1. Redistributions of source code must retain the above copyright notice, this list of conditions and
the following disclaimer.
2. Redistributions in binary form must reproduce the above copyright notice, this list of conditions
and the following disclaimer in the documentation and/or other materials provided with the dis-
tribution.
THIS SOFTWARE IS PROVIDED BY THE AUTHOR ``AS IS'' AND ANY EXPRESS OR IMPLIED WARRAN-
TIES, INCLUDING, BUT NOT LIMITED TO, THE IMPLIED WARRANTIES OF MERCHANTABILITY AND
FITNESS FOR A PARTICULAR PURPOSE ARE DISCLAIMED. IN NO EVENT SHALL THE REGENTS OR
CONTRIBUTORS BE LIABLE FOR ANY DIRECT, INDIRECT, INCIDENTAL, SPECIAL, EXEMPLARY, OR
CONSEQUENTIAL DAMAGES (INCLUDING, BUT NOT LIMITED TO, PROCUREMENT OF SUBSTITUTE
GOODS OR SERVICES; LOSS OF USE, DATA, OR PROFITS; OR BUSINESS INTERRUPTION) HOWEVER
CAUSED AND ON ANY THEORY OF LIABILITY, WHETHER IN CONTRACT, STRICT LIABILITY, OR TORT
(INCLUDING NEGLIGENCE OR OTHERWISE) ARISING IN ANY WAY OUT OF THE USE OF THIS SOFT-
WARE, EVEN IF ADVISED OF THE POSSIBILITY OF SUCH DAMAGE.
160992AB5S_GTH18V-50M_20241210.indd 73160992AB5S_GTH18V-50M_20241210.indd 73 12/13/2024 11:51:44 AM12/13/2024 11:51:44 AM
74
(16) FreeBSD
Copyright (c) 1997-2002 FreeBSD Project. All rights reserved.
Redistribution and use in source and binary forms, with or without modication, are permitted pro-
vided that the following conditions are met:
1. Redistributions of source code must retain the above copyright notice, this list of conditions and
the following disclaimer.
2. Redistributions in binary form must reproduce the above copyright notice, this list of conditions
and the following disclaimer in the documentation and/or other materials provided with the dis-
tribution.
THIS SOFTWARE IS PROVIDED BY THE AUTHOR AND CONTRIBUTORS ``AS IS'' AND ANY EXPRESS
OR IMPLIED WARRANTIES, INCLUDING, BUT NOT LIMITED TO, THE IMPLIED WARRANTIES OF MER-
CHANTABILITY AND FITNESS FOR A PARTICULAR PURPOSE ARE DISCLAIMED. IN NO EVENT SHALL
THE AUTHOR OR CONTRIBUTORS BE LIABLE FOR ANY DIRECT, INDIRECT, INCIDENTAL, SPECIAL,
EXEMPLARY, OR CONSEQUENTIAL DAMAGES (INCLUDING, BUT NOT LIMITED TO, PROCUREMENT
OF SUBSTITUTE GOODS OR SERVICES; LOSS OF USE, DATA, OR PROFITS; OR BUSINESS INTER-
RUPTION) HOWEVER CAUSED AND ON ANY THEORY OF LIABILITY, WHETHER IN CONTRACT, STRICT
LIABILITY, OR TORT (INCLUDING NEGLIGENCE OR OTHERWISE) ARISING IN ANY WAY OUT OF THE
USE OF THIS SOFTWARE, EVEN IF ADVISED OF THE POSSIBILITY OF SUCH DAMAGE.
(17) S. L. Moshier
Copyright (c) 1984,2000 S.L. Moshier
Permission to use, copy, modify, and distribute this software for any purpose without fee is hereby
granted, provided that this entire notice is included in all copies of any software which is or includes
a copy or modication of this software and in all copies of the supporting documentation for such
software.
THIS SOFTWARE IS BEING PROVIDED "AS IS", WITHOUT ANY EXPRESS OR IMPLIED WARRANTY. IN
PARTICULAR, THE AUTHOR MAKES NO REPRESENTATION OR WARRANTY OF ANY KIND CONCERN-
ING THE MERCHANTABILITY OF THIS SOFTWARE OR ITS FITNESS FOR ANY PARTICULAR PURPOSE.
(18) Citrus Project
Copyright (c)1999 Citrus Project, All rights reserved.
Redistribution and use in source and binary forms, with or without modication, are permitted pro-
vided that the following conditions are met:
1. Redistributions of source code must retain the above copyright notice, this list of conditions and
the following disclaimer.
2. Redistributions in binary form must reproduce the above copyright notice, this list of conditions
and the following disclaimer in the documentation and/or other materials provided with the dis-
tribution.
THIS SOFTWARE IS PROVIDED BY THE AUTHOR AND CONTRIBUTORS ``AS IS'' AND ANY EXPRESS
OR IMPLIED WARRANTIES, INCLUDING, BUT NOT LIMITED TO, THE IMPLIED WARRANTIES OF MER-
CHANTABILITY AND FITNESS FOR A PARTICULAR PURPOSE ARE DISCLAIMED. IN NO EVENT SHALL
THE AUTHOR OR CONTRIBUTORS BE LIABLE FOR ANY DIRECT, INDIRECT, INCIDENTAL, SPECIAL,
EXEMPLARY, OR CONSEQUENTIAL DAMAGES (INCLUDING, BUT NOT LIMITED TO, PROCUREMENT
OF SUBSTITUTE GOODS OR SERVICES; LOSS OF USE, DATA, OR PROFITS; OR BUSINESS INTER-
RUPTION) HOWEVER CAUSED AND ON ANY THEORY OF LIABILITY, WHETHER IN CONTRACT, STRICT
LIABILITY, OR TORT (INCLUDING NEGLIGENCE OR OTHERWISE) ARISING IN ANY WAY OUT OF THE
USE OF THIS SOFTWARE, EVEN IF ADVISED OF THE POSSIBILITY OF SUCH DAMAGE.
(19) Todd C. Miller
Copyright (c) 1998 Todd C. Miller <[email protected]> All rights reserved.
Redistribution and use in source and binary forms, with or without modication, are permitted pro-
vided that the following conditions are met:
1. Redistributions of source code must retain the above copyright notice, this list of conditions and
the following disclaimer.
2. Redistributions in binary form must reproduce the above copyright notice, this list of conditions
and the following disclaimer in the documentation and/or other materials provided with the dis-
tribution.
3. The name of the author may not be used to endorse or promote products derived from this soft-
ware without specic prior written permission.
160992AB5S_GTH18V-50M_20241210.indd 74160992AB5S_GTH18V-50M_20241210.indd 74 12/13/2024 11:51:44 AM12/13/2024 11:51:44 AM
75
THIS SOFTWARE IS PROVIDED ``AS IS'' AND ANY EXPRESS OR IMPLIED WARRANTIES, INCLUD-
ING, BUT NOT LIMITED TO, THE IMPLIED WARRANTIES OF MERCHANTABILITY AND FITNESS FOR A
PARTICULAR PURPOSE ARE DISCLAIMED. IN NO EVENT SHALL THE AUTHOR BE LIABLE FOR ANY
DIRECT, INDIRECT, INCIDENTAL, SPECIAL, EXEMPLARY, OR CONSEQUENTIAL DAMAGES (INCLUD-
ING, BUT NOT LIMITED TO, PROCUREMENT OF SUBSTITUTE GOODS OR SERVICES; LOSS OF USE,
DATA, OR PROFITS; OR BUSINESS INTERRUPTION) HOWEVER CAUSED AND ON ANY THEORY OF
LIABILITY, WHETHER IN CONTRACT, STRICT LIABILITY, OR TORT (INCLUDING NEGLIGENCE OR
OTHERWISE) ARISING IN ANY WAY OUT OF THE USE OF THIS SOFTWARE, EVEN IF ADVISED OF THE
POSSIBILITY OF SUCH DAMAGE.
(26) Mike Barcroft
Copyright (c) 2001 Mike Barcroft <[email protected]> All rights reserved.
Redistribution and use in source and binary forms, with or without modication, are permitted pro-
vided that the following conditions are met:
1. Redistributions of source code must retain the above copyright notice, this list of conditions and
the following disclaimer.
2. Redistributions in binary form must reproduce the above copyright notice, this list of conditions
and the following disclaimer in the documentation and/or other materials provided with the dis-
tribution.
THIS SOFTWARE IS PROVIDED BY THE AUTHOR AND CONTRIBUTORS ``AS IS'' AND ANY EXPRESS
OR IMPLIED WARRANTIES, INCLUDING, BUT NOT LIMITED TO, THE IMPLIED WARRANTIES OF MER-
CHANTABILITY AND FITNESS FOR A PARTICULAR PURPOSE ARE DISCLAIMED. IN NO EVENT SHALL
THE AUTHOR OR CONTRIBUTORS BE LIABLE FOR ANY DIRECT, INDIRECT, INCIDENTAL, SPECIAL,
EXEMPLARY, OR CONSEQUENTIAL DAMAGES (INCLUDING, BUT NOT LIMITED TO, PROCUREMENT
OF SUBSTITUTE GOODS OR SERVICES; LOSS OF USE, DATA, OR PROFITS; OR BUSINESS INTER-
RUPTION) HOWEVER CAUSED AND ON ANY THEORY OF LIABILITY, WHETHER IN CONTRACT, STRICT
LIABILITY, OR TORT (INCLUDING NEGLIGENCE OR OTHERWISE) ARISING IN ANY WAY OUT OF THE
USE OF THIS SOFTWARE, EVEN IF ADVISED OF THE POSSIBILITY OF SUCH DAMAGE.
(35) - ARM Ltd (arm and thumb variant targets only)
Copyright (c) 2009-2015 ARM Ltd All rights reserved.
Redistribution and use in source and binary forms, with or without modication, are permitted pro-
vided that the following conditions are met:
1. Redistributions of source code must retain the above copyright notice, this list of conditions and
the following disclaimer.
2. Redistributions in binary form must reproduce the above copyright notice, this list of conditions
and the following disclaimer in the documentation and/or other materials provided with the dis-
tribution.
3. The name of the company may not be used to endorse or promote products derived from this
software without specic prior written permission.
THIS SOFTWARE IS PROVIDED BY ARM LTD ``AS IS'' AND ANY EXPRESS OR IMPLIED WARRANTIES,
INCLUDING, BUT NOT LIMITED TO, THE IMPLIED WARRANTIES OF MERCHANTABILITY AND FITNESS
FOR A PARTICULAR PURPOSE ARE DISCLAIMED. IN NO EVENT SHALL ARM LTD BE LIABLE FOR ANY
DIRECT, INDIRECT, INCIDENTAL, SPECIAL, EXEMPLARY, OR CONSEQUENTIAL DAMAGES (INCLUD-
ING, BUT NOT LIMITED TO, PROCUREMENT OF SUBSTITUTE GOODS OR SERVICES; LOSS OF USE,
DATA, OR PROFITS; OR BUSINESS INTERRUPTION) HOWEVER CAUSED AND ON ANY THEORY OF
LIABILITY, WHETHER IN CONTRACT, STRICT LIABILITY, OR TORT (INCLUDING NEGLIGENCE OR
OTHERWISE) ARISING IN ANY WAY OUT OF THE USE OF THIS SOFTWARE, EVEN IF ADVISED OF THE
POSSIBILITY OF SUCH DAMAGE.
(41) Ed Schouten - Free BSD
Copyright (c) 2008 Ed Schouten <[email protected]> All rights reserved.
Redistribution and use in source and binary forms, with or without modication, are permitted pro-
vided that the following conditions are met:
1. Redistributions of source code must retain the above copyright notice, this list of conditions and
the following disclaimer.
2. Redistributions in binary form must reproduce the above copyright notice, this list of conditions
and the following disclaimer in the documentation and/or other materials provided with the dis-
tribution.
160992AB5S_GTH18V-50M_20241210.indd 75160992AB5S_GTH18V-50M_20241210.indd 75 12/13/2024 11:51:44 AM12/13/2024 11:51:44 AM
76
THIS SOFTWARE IS PROVIDED BY THE AUTHOR AND CONTRIBUTORS ``AS IS'' AND ANY EXPRESS
OR IMPLIED WARRANTIES, INCLUDING, BUT NOT LIMITED TO, THE IMPLIED WARRANTIES OF MER-
CHANTABILITY AND FITNESS FOR A PARTICULAR PURPOSE ARE DISCLAIMED. IN NO EVENT SHALL
THE AUTHOR OR CONTRIBUTORS BE LIABLE FOR ANY DIRECT, INDIRECT, INCIDENTAL, SPECIAL,
EXEMPLARY, OR CONSEQUENTIAL DAMAGES (INCLUDING, BUT NOT LIMITED TO, PROCUREMENT
OF SUBSTITUTE GOODS OR SERVICES; LOSS OF USE, DATA, OR PROFITS; OR BUSINESS INTER-
RUPTION) HOWEVER CAUSED AND ON ANY THEORY OF LIABILITY, WHETHER IN CONTRACT, STRICT
LIABILITY, OR TORT (INCLUDING NEGLIGENCE OR OTHERWISE) ARISING IN ANY WAY OUT OF THE
USE OF THIS SOFTWARE, EVEN IF ADVISED OF THE POSSIBILITY OF SUCH DAMAGE.
(46) Synopsis
Copyright (c) 2016, Synopsys, Inc. All rights reserved.
Redistribution and use in source and binary forms, with or without modication, are permitted pro-
vided that the following conditions are met:
1. Redistributions of source code must retain the above copyright notice, this list of conditions and
the following disclaimer.
2. Redistributions in binary form must reproduce the above copyright notice, this list of conditions
and the following disclaimer in the documentation and/or other materials provided with the dis-
tribution.
3. Neither the name of the Synopsys, Inc., nor the names of its contributors may be used to endorse
or promote products derived from this software without specic prior written permission.
THIS SOFTWARE IS PROVIDED BY THE COPYRIGHT HOLDERS AND CONTRIBUTORS "AS IS" AND ANY
EXPRESS OR IMPLIED WARRANTIES, INCLUDING, BUT NOT LIMITED TO, THE IMPLIED WARRANTIES
OF MERCHANTABILITY AND FITNESS FOR A PARTICULAR PURPOSE ARE DISCLAIMED. IN NO EVENT
SHALL THE COPYRIGHT HOLDER OR CONTRIBUTORS BE LIABLE FOR ANY DIRECT, INDIRECT, IN-
CIDENTAL, SPECIAL, EXEMPLARY, OR CONSEQUENTIAL DAMAGES (INCLUDING, BUT NOT LIMITED
TO, PROCUREMENT OF SUBSTITUTE GOODS OR SERVICES; LOSS OF USE, DATA, OR PROFITS; OR
BUSINESS INTERRUPTION) HOWEVER CAUSED AND ON ANY THEORY OF LIABILITY, WHETHER IN
CONTRACT, STRICT LIABILITY, OR TORT (INCLUDING NEGLIGENCE OR OTHERWISE) ARISING IN
ANY WAY OUT OF THE USE OF THIS SOFTWARE, EVEN IF ADVISED OF THE POSSIBILITY OF SUCH
DAMAGE.
(47) Joel Sherrill
Copyright (c) 2016 Joel Sherrill <[email protected]>. All rights reserved.
Redistribution and use in source and binary forms, with or without modication, are permitted pro-
vided that the following conditions are met:
1. Redistributions of source code must retain the above copyright notice, this list of conditions and
the following disclaimer.
2. Redistributions in binary form must reproduce the above copyright notice, this list of conditions
and the following disclaimer in the documentation and/or other materials provided with the dis-
tribution.
THIS SOFTWARE IS PROVIDED BY THE AUTHOR AND CONTRIBUTORS ``AS IS'' AND ANY EXPRESS
OR IMPLIED WARRANTIES, INCLUDING, BUT NOT LIMITED TO, THE IMPLIED WARRANTIES OF MER-
CHANTABILITY AND FITNESS FOR A PARTICULAR PURPOSE ARE DISCLAIMED. IN NO EVENT SHALL
THE AUTHOR OR CONTRIBUTORS BE LIABLE FOR ANY DIRECT, INDIRECT, INCIDENTAL, SPECIAL,
EXEMPLARY, OR CONSEQUENTIAL DAMAGES (INCLUDING, BUT NOT LIMITED TO, PROCUREMENT
OF SUBSTITUTE GOODS OR SERVICES; LOSS OF USE, DATA, OR PROFITS; OR BUSINESS INTER-
RUPTION) HOWEVER CAUSED AND ON ANY THEORY OF LIABILITY, WHETHER IN CONTRACT, STRICT
LIABILITY, OR TORT (INCLUDING NEGLIGENCE OR OTHERWISE) ARISING IN ANY WAY OUT OF THE
USE OF THIS SOFTWARE, EVEN IF ADVISED OF THE POSSIBILITY OF SUCH DAMAGE.
(48) From musl include/elf.h
Copyright (c) 2005-2014 Rich Felker, et al.t
Permission is hereby granted, free of charge, to any person obtaining a copy of this software and as-
sociated documentation les (the "Software"), to deal in the Software without restriction, including
without limitation the rights to use, copy, modify, merge, publish, distribute, sublicense, and/or sell
copies of the Software, and to permit persons to whom the Software is furnished to do so, subject to
the following conditions:
The above copyright notice and this permission notice shall be included in all copies or substantial
portions of the Software.
160992AB5S_GTH18V-50M_20241210.indd 76160992AB5S_GTH18V-50M_20241210.indd 76 12/13/2024 11:51:44 AM12/13/2024 11:51:44 AM
77
THE SOFTWARE IS PROVIDED "AS IS", WITHOUT WARRANTY OF ANY KIND, EXPRESS OR IMPLIED,
INCLUDING BUT NOT LIMITED TO THE WARRANTIES OF MERCHANTABILITY, FITNESS FOR A PAR-
TICULAR PURPOSE AND NONINFRINGEMENT. IN NO EVENT SHALL THE AUTHORS OR COPYRIGHT
HOLDERS BE LIABLE FOR ANY CLAIM, DAMAGES OR OTHER LIABILITY, WHETHER IN AN ACTION OF
CONTRACT, TORT OR OTHERWISE, ARISING FROM, OUT OF OR IN CONNECTION WITH THE SOFT-
WARE OR THE USE OR OTHER DEALINGS IN THE SOFTWARE.
(49) Moerbeek
Copyright (c) 2008 Otto Moerbeek <[email protected]>
Permission to use, copy, modify, and distribute this software for any purpose with or without fee is
hereby granted, provided that the above copyright notice and this permission notice appear in all
copies.
THE SOFTWARE IS PROVIDED "AS IS" AND THE AUTHOR DISCLAIMS ALL WARRANTIES WITH RE-
GARD TO THIS SOFTWARE INCLUDING ALL IMPLIED WARRANTIES OF MERCHANTABILITY AND FIT-
NESS. IN NO EVENT SHALL THE AUTHOR BE LIABLE FOR ANY SPECIAL, DIRECT, INDIRECT, OR CON-
SEQUENTIAL DAMAGES OR ANY DAMAGES WHATSOEVER RESULTING FROM LOSS OF USE, DATA
OR PROFITS, WHETHER IN AN ACTION OF CONTRACT, NEGLIGENCE OR OTHER TORTIOUS ACTION,
ARISING OUT OF OR IN CONNECTION WITH THE USE OR PERFORMANCE OF THIS SOFTWARE.
(50) embedded brains
Copyright (c) 2017 embedded brains GmbH All rights reserved.
Redistribution and use in source and binary forms, with or without modication, are permitted pro-
vided that the following conditions are met:
1. Redistributions of source code must retain the above copyright notice, this list of conditions and
the following disclaimer.
2. Redistributions in binary form must reproduce the above copyright notice, this list of conditions
and the following disclaimer in the documentation and/or other materials provided with the dis-
tribution.
THIS SOFTWARE IS PROVIDED BY THE AUTHOR AND CONTRIBUTORS ``AS IS'' AND ANY EXPRESS
OR IMPLIED WARRANTIES, INCLUDING, BUT NOT LIMITED TO, THE IMPLIED WARRANTIES OF MER-
CHANTABILITY AND FITNESS FOR A PARTICULAR PURPOSE ARE DISCLAIMED. IN NO EVENT SHALL
THE AUTHOR OR CONTRIBUTORS BE LIABLE FOR ANY DIRECT, INDIRECT, INCIDENTAL, SPECIAL,
EXEMPLARY, OR CONSEQUENTIAL DAMAGES (INCLUDING, BUT NOT LIMITED TO, PROCUREMENT
OF SUBSTITUTE GOODS OR SERVICES; LOSS OF USE, DATA, OR PROFITS; OR BUSINESS INTER-
RUPTION) HOWEVER CAUSED AND ON ANY THEORY OF LIABILITY, WHETHER IN CONTRACT, STRICT
LIABILITY, OR TORT (INCLUDING NEGLIGENCE OR OTHERWISE) ARISING IN ANY WAY OUT OF THE
USE OF THIS SOFTWARE, EVEN IF ADVISED OF THE POSSIBILITY OF SUCH DAMAGE.
(51) From musl src/string/strverscmp.c
Copyright (c) 2005-2014 Rich Felker, et al.
Permission is hereby granted, free of charge, to any person obtaining a copy of this software and as-
sociated documentation les (the "Software"), to deal in the Software without restriction, including
without limitation the rights to use, copy, modify, merge, publish, distribute, sublicense, and/or sell
copies of the Software, and to permit persons to whom the Software is furnished to do so, subject
to the following conditions:
The above copyright notice and this permission notice shall be included in all copies or substantial
portions of the Software.
THE SOFTWARE IS PROVIDED "AS IS", WITHOUT WARRANTY OF ANY KIND, EXPRESS OR IMPLIED,
INCLUDING BUT NOT LIMITED TO THE WARRANTIES OF MERCHANTABILITY, FITNESS FOR A PAR-
TICULAR PURPOSE AND NONINFRINGEMENT. IN NO EVENT SHALL THE AUTHORS OR COPYRIGHT
HOLDERS BE LIABLE FOR ANY CLAIM, DAMAGES OR OTHER LIABILITY, WHETHER IN AN ACTION OF
CONTRACT, TORT OR OTHERWISE, ARISING FROM, OUT OF OR IN CONNECTION WITH THE SOFT-
WARE OR THE USE OR OTHER DEALINGS IN THE SOFTWARE.
(52) ucla1
Copyright (c) 1983, 1993 The Regents of the University of California. All rights reserved.
Redistribution and use in source and binary forms, with or without modication, are permitted pro-
vided that the following conditions are met:
1. Redistributions of source code must retain the above copyright notice, this list of conditions and
the following disclaimer.
160992AB5S_GTH18V-50M_20241210.indd 77160992AB5S_GTH18V-50M_20241210.indd 77 12/13/2024 11:51:44 AM12/13/2024 11:51:44 AM
78
2. Redistributions in binary form must reproduce the above copyright notice, this list of conditions
and the following disclaimer in the documentation and/or other materials provided with the dis-
tribution.
3. Neither the name of the University nor the names of its contributors may be used to endorse or
promote products derived from this software without specic prior written permission.
THIS SOFTWARE IS PROVIDED BY THE REGENTS AND CONTRIBUTORS ``AS IS'' AND ANY EXPRESS
OR IMPLIED WARRANTIES, INCLUDING, BUT NOT LIMITED TO, THE IMPLIED WARRANTIES OF MER-
CHANTABILITY AND FITNESS FOR A PARTICULAR PURPOSE ARE DISCLAIMED. IN NO EVENT SHALL
THE REGENTS OR CONTRIBUTORS BE LIABLE FOR ANY DIRECT, INDIRECT, INCIDENTAL, SPECIAL,
EXEMPLARY, OR CONSEQUENTIAL DAMAGES (INCLUDING, BUT NOT LIMITED TO, PROCUREMENT
OF SUBSTITUTE GOODS OR SERVICES; LOSS OF USE, DATA, OR PROFITS; OR BUSINESS INTER-
RUPTION) HOWEVER CAUSED AND ON ANY THEORY OF LIABILITY, WHETHER IN CONTRACT, STRICT
LIABILITY, OR TORT (INCLUDING NEGLIGENCE OR OTHERWISE) ARISING IN ANY WAY OUT OF THE
USE OF THIS SOFTWARE, EVEN IF ADVISED OF THE POSSIBILITY OF SUCH DAMAGE.
(1052) diged
Portions Copyright (c) 1993 by Digital Equipment Corporation.
Permission to use, copy, modify, and distribute this software for any purpose with or without fee is
hereby granted, provided that the above copyright notice and this permission notice appear in all
copies, and that the name of Digital Equipment Corporation not be used in advertising or publicity
pertaining to distribution of the document or software without specic, written prior permission.
THE SOFTWARE IS PROVIDED "AS IS" AND DIGITAL EQUIPMENT CORP. DISCLAIMS ALL WARRAN-
TIES WITH REGARD TO THIS SOFTWARE, INCLUDING ALL IMPLIED WARRANTIES OF MERCHANT-
ABILITY AND FITNESS. IN NO EVENT SHALL DIGITAL EQUIPMENT CORPORATION BE LIABLE FOR
ANY SPECIAL, DIRECT, INDIRECT, OR CONSEQUENTIAL DAMAGES OR ANY DAMAGES WHATSOEVER
RESULTING FROM LOSS OF USE, DATA OR PROFITS, WHETHER IN AN ACTION OF CONTRACT, NEG-
LIGENCE OR OTHER TORTIOUS ACTION, ARISING OUT OF OR IN CONNECTION WITH THE USE OR
PERFORMANCE OF THIS SOFTWARE.
(53) freebsd
Copyright (c) 2015 John Baldwin <[email protected]>. All rights reserved.
Redistribution and use in source and binary forms, with or without modication, are permitted pro-
vided that the following conditions are met:
1. Redistributions of source code must retain the above copyright notice, this list of conditions and
the following disclaimer.
2. Redistributions in binary form must reproduce the above copyright notice, this list of conditions
and the following disclaimer in the documentation and/or other materials provided with the dis-
tribution.
3. Neither the name of the author nor the names of its contributors may be used to endorse or pro-
mote products derived from this software without specic prior written permission.
THIS SOFTWARE IS PROVIDED BY THE REGENTS AND CONTRIBUTORS ``AS IS'' AND ANY EXPRESS
OR IMPLIED WARRANTIES, INCLUDING, BUT NOT LIMITED TO, THE IMPLIED WARRANTIES OF MER-
CHANTABILITY AND FITNESS FOR A PARTICULAR PURPOSE ARE DISCLAIMED. IN NO EVENT SHALL
THE REGENTS OR CONTRIBUTORS BE LIABLE FOR ANY DIRECT, INDIRECT, INCIDENTAL, SPECIAL,
EXEMPLARY, OR CONSEQUENTIAL DAMAGES (INCLUDING, BUT NOT LIMITED TO, PROCUREMENT
OF SUBSTITUTE GOODS OR SERVICES; LOSS OF USE, DATA, OR PROFITS; OR BUSINESS INTER-
RUPTION) HOWEVER CAUSED AND ON ANY THEORY OF LIABILITY, WHETHER IN CONTRACT, STRICT
LIABILITY, OR TORT (INCLUDING NEGLIGENCE OR OTHERWISE) ARISING IN ANY WAY OUT OF THE
USE OF THIS SOFTWARE, EVEN IF ADVISED OF THE POSSIBILITY OF SUCH DAMAGE.
(54) WIDE
Copyright (C) 1995, 1996, 1997, and 1998 WIDE Project. All rights reserved.
Redistribution and use in source and binary forms, with or without modication, are permitted pro-
vided that the following conditions are met:
1. Redistributions of source code must retain the above copyright notice, this list of conditions and
the following disclaimer.
2. Redistributions in binary form must reproduce the above copyright notice, this list of conditions
and the following disclaimer in the documentation and/or other materials provided with the dis-
tribution.
160992AB5S_GTH18V-50M_20241210.indd 78160992AB5S_GTH18V-50M_20241210.indd 78 12/13/2024 11:51:44 AM12/13/2024 11:51:44 AM
79
3. Neither the name of the project nor the names of its contributors may be used to endorse or pro-
mote products derived from this software without specic prior written permission.
THIS SOFTWARE IS PROVIDED BY THE PROJECT AND CONTRIBUTORS ``AS IS'' AND ANY EXPRESS
OR IMPLIED WARRANTIES, INCLUDING, BUT NOT LIMITED TO, THE IMPLIED WARRANTIES OF MER-
CHANTABILITY AND FITNESS FOR A PARTICULAR PURPOSE ARE DISCLAIMED. IN NO EVENT SHALL
THE PROJECT OR CONTRIBUTORS BE LIABLE FOR ANY DIRECT, INDIRECT, INCIDENTAL, SPECIAL,
EXEMPLARY, OR CONSEQUENTIAL DAMAGES (INCLUDING, BUT NOT LIMITED TO, PROCUREMENT
OF SUBSTITUTE GOODS OR SERVICES; LOSS OF USE, DATA, OR PROFITS; OR BUSINESS INTER-
RUPTION) HOWEVER CAUSED AND ON ANY THEORY OF LIABILITY, WHETHER IN CONTRACT, STRICT
LIABILITY, OR TORT (INCLUDING NEGLIGENCE OR OTHERWISE) ARISING IN ANY WAY OUT OF THE
USE OF THIS SOFTWARE, EVEN IF ADVISED OF THE POSSIBILITY OF SUCH DAMAGE.
(55) Roberson
Copyright (c) 2008, Jeffrey Roberson <[email protected]> All rights reserved. Copyright (c) 2008
Nokia Corporation All rights reserved.
Redistribution and use in source and binary forms, with or without modication, are permitted pro-
vided that the following conditions are met:\
1. Redistributions of source code must retain the above copyright notice unmodied, this list of con-
ditions, and the following disclaimer.
2. Redistributions in binary form must reproduce the above copyright notice, this list of conditions
and the following disclaimer in the documentation and/or other materials provided with the dis-
tribution.
THIS SOFTWARE IS PROVIDED BY THE AUTHOR ``AS IS'' AND ANY EXPRESS OR IMPLIED WAR-
RANTIES, INCLUDING, BUT NOT LIMITED TO, THE IMPLIED WARRANTIES OF MERCHANTABILITY
AND FITNESS FOR A PARTICULAR PURPOSE ARE DISCLAIMED. IN NO EVENT SHALL THE AUTHOR
BE LIABLE FOR ANY DIRECT, INDIRECT, INCIDENTAL, SPECIAL, EXEMPLARY, OR CONSEQUENTIAL
DAMAGES (INCLUDING, BUT NOT LIMITED TO, PROCUREMENT OF SUBSTITUTE GOODS OR SER-
VICES; LOSS OF USE, DATA, OR PROFITS; OR BUSINESS INTERRUPTION) HOWEVER CAUSED AND
ON ANY THEORY OF LIABILITY, WHETHER IN CONTRACT, STRICT LIABILITY, OR TORT (INCLUDING
NEGLIGENCE OR OTHERWISE) ARISING IN ANY WAY OUT OF THE USE OF THIS SOFTWARE, EVEN IF
ADVISED OF THE POSSIBILITY OF SUCH DAMAGE.
(56) ucla3
Copyright (c) 1982, 1986, 1990, 1993, 1994 The Regents of the University of California. All rights
reserved. (c) UNIX System Laboratories, Inc.
All or some portions of this le are derived from material licensed to the University of California by
American Telephone and Telegraph Co. or Unix System Laboratories, Inc. and are reproduced herein
with the permission of UNIX System Laboratories, Inc. Redistribution and use in source and binary
forms, with or without modication, are permitted provided that the following conditions are met:
1. Redistributions of source code must retain the above copyright notice, this list of conditions and
the following disclaimer.
2. Redistributions in binary form must reproduce the above copyright notice, this list of conditions
and the following disclaimer in the documentation and/or other materials provided with the dis-
tribution.
3. Neither the name of the University nor the names of its contributors may be used to endorse or
promote products derived from this software without specic prior written permission.
THIS SOFTWARE IS PROVIDED BY THE REGENTS AND CONTRIBUTORS ``AS IS'' AND ANY EXPRESS
OR IMPLIED WARRANTIES, INCLUDING, BUT NOT LIMITED TO, THE IMPLIED WARRANTIES OF MER-
CHANTABILITY AND FITNESS FOR A PARTICULAR PURPOSE ARE DISCLAIMED. IN NO EVENT SHALL
THE REGENTS OR CONTRIBUTORS BE LIABLE FOR ANY DIRECT, INDIRECT, INCIDENTAL, SPECIAL,
EXEMPLARY, OR CONSEQUENTIAL DAMAGES (INCLUDING, BUT NOT LIMITED TO, PROCUREMENT
OF SUBSTITUTE GOODS OR SERVICES; LOSS OF USE, DATA, OR PROFITS; OR BUSINESS INTER-
RUPTION) HOWEVER CAUSED AND ON ANY THEORY OF LIABILITY, WHETHER IN CONTRACT, STRICT
LIABILITY, OR TORT (INCLUDING NEGLIGENCE OR OTHERWISE) ARISING IN ANY WAY OUT OF THE
USE OF THIS SOFTWARE, EVEN IF ADVISED OF THE POSSIBILITY OF SUCH DAMAGE.
(57) Conguration for math routines.
Copyright (c) 2017 ARM Ltd. All rights reserved.
Redistribution and use in source and binary forms, with or without modication, are permitted pro-
vided that the following conditions are met:
160992AB5S_GTH18V-50M_20241210.indd 79160992AB5S_GTH18V-50M_20241210.indd 79 12/13/2024 11:51:44 AM12/13/2024 11:51:44 AM
80
1. Redistributions of source code must retain the above copyright notice, this list of conditions and
the following disclaimer.
2. Redistributions in binary form must reproduce the above copyright notice, this list of conditions
and the following disclaimer in the documentation and/or other materials provided with the dis-
tribution.
3. The name of the company may not be used to endorse or promote products derived from this soft-
ware without specic prior written permission.
THIS SOFTWARE IS PROVIDED BY ARM LTD ``AS IS AND ANY EXPRESS OR IMPLIED WARRANTIES,
INCLUDING, BUT NOT LIMITED TO, THE IMPLIED WARRANTIES OF MERCHANTABILITY AND FITNESS
FOR A PARTICULAR PURPOSE ARE DISCLAIMED. IN NO EVENT SHALL ARM LTD BE LIABLE FOR ANY
DIRECT, INDIRECT, INCIDENTAL, SPECIAL, EXEMPLARY, OR CONSEQUENTIAL DAMAGES (INCLUD-
ING, BUT NOT LIMITED TO, PROCUREMENT OF SUBSTITUTE GOODS OR SERVICES; LOSS OF USE,
DATA, OR PROFITS; OR BUSINESS INTERRUPTION) HOWEVER CAUSED AND ON ANY THEORY OF
LIABILITY, WHETHER IN CONTRACT, STRICT LIABILITY, OR TORT (INCLUDING NEGLIGENCE OR
OTHERWISE) ARISING IN ANY WAY OUT OF THE USE OF THIS SOFTWARE, EVEN IF ADVISED OF THE
POSSIBILITY OF SUCH DAMAGE.
(58) netbsd
Copyright (c) 2007 The NetBSD Foundation, Inc. All rights reserved.
This code is derived from software written by Stephen L. Moshier. It is redistributed by the NetBSD
Foundation by permission of the author.
Redistribution and use in source and binary forms, with or without modication, are permitted pro-
vided that the following conditions are met:
1. Redistributions of source code must retain the above copyright notice, this list of conditions and
the following disclaimer.
2. Redistributions in binary form must reproduce the above copyright notice, this list of conditions
and the following disclaimer in the documentation and/or other materials provided with the dis-
tribution.
THIS SOFTWARE IS PROVIDED BY THE NETBSD FOUNDATION, INC. AND CONTRIBUTORS ``AS IS''
AND ANY EXPRESS OR IMPLIED WARRANTIES, INCLUDING, BUT NOT LIMITED TO, THE IMPLIED
WARRANTIES OF MERCHANTABILITY AND FITNESS FOR A PARTICULAR PURPOSE ARE DISCLAIMED.
IN NO EVENT SHALL THE FOUNDATION OR CONTRIBUTORS BE LIABLE FOR ANY DIRECT, INDIRECT,
INCIDENTAL, SPECIAL, EXEMPLARY, OR CONSEQUENTIAL DAMAGES (INCLUDING, BUT NOT LIM-
ITED TO, PROCUREMENT OF SUBSTITUTE GOODS OR SERVICES; LOSS OF USE, DATA, OR PROFITS;
OR BUSINESS INTERRUPTION) HOWEVER CAUSED AND ON ANY THEORY OF LIABILITY, WHETHER
IN CONTRACT, STRICT LIABILITY, OR TORT (INCLUDING NEGLIGENCE OR OTHERWISE) ARISING IN
ANY WAY OUT OF THE USE OF THIS SOFTWARE, EVEN IF ADVISED OF THE POSSIBILITY OF SUCH
DAMAGE.
(59) neilly
(c) Copyright 2017 Michael R. Neilly All rights reserved.
Redistribution and use in source and binary forms, with or without modication, are permitted pro-
vided that the following conditions are met:
— Redistributions of source code must retain the above copyright notice, this list of conditions and
the following disclaimer.
— Redistributions in binary form must reproduce the above copyright notice, this list of conditions
and the following disclaimer in the documentation and/or other materials provided with the dis-
tribution.
— Neither the names of the copyright holders nor the names of their contributors may be used to
endorse or promote products derived from this software without specic prior written permission.
THIS SOFTWARE IS PROVIDED BY THE COPYRIGHT HOLDERS AND CONTRIBUTORS "AS IS" AND ANY
EXPRESS OR IMPLIED WARRANTIES, INCLUDING, BUT NOT LIMITED TO, THE IMPLIED WARRANTIES
OF MERCHANTABILITY AND FITNESS FOR A PARTICULAR PURPOSE ARE DISCLAIMED. IN NO EVENT
SHALL THE COPYRIGHT OWNER OR CONTRIBUTORS BE LIABLE FOR ANY DIRECT, INDIRECT, INCI-
DENTAL, SPECIAL, EXEMPLARY, OR CONSEQUENTIAL DAMAGES (INCLUDING, BUT NOT LIMITED
TO, PROCUREMENT OF SUBSTITUTE GOODS OR SERVICES; LOSS OF USE, DATA, OR PROFITS; OR
BUSINESS INTERRUPTION) HOWEVER CAUSED AND ON ANY THEORY OF LIABILITY, WHETHER IN
CONTRACT, STRICT LIABILITY, OR TORT (INCLUDING NEGLIGENCE OR OTHERWISE) ARISING IN
ANY WAY OUT OF THE USE OF THIS SOFTWARE, EVEN IF ADVISED OF THE POSSIBILITY OF SUCH
DAMAGE.
160992AB5S_GTH18V-50M_20241210.indd 80160992AB5S_GTH18V-50M_20241210.indd 80 12/13/2024 11:51:44 AM12/13/2024 11:51:44 AM
81
(114) - National Semiconductor Corporation
Copyright (c) 2004 National Semiconductor Corporation
The authors hereby grant permission to use, copy, modify, distribute, and license this software and
its documentation for any purpose, provided that existing copyright notices are retained in all copies
and that this notice is included verbatim in any distributions. No written agreement, license, or roy-
alty fee is required for any of the authorized uses. Modications to this software may be copyrighted
by their authors and need not follow the licensing terms described here, provided that the new
terms are clearly indicated on the rst page of each le where they apply.
Generic License Text
Apache 2.0 License
Apache License
Version 2.0, January 2004
http://www.apache.org/licenses/
TERMS AND CONDITIONS FOR USE, REPRODUCTION, AND DISTRIBUTION
1. Denitions.
"License" shall mean the terms and conditions for use, reproduction, and distribution as dened by
Sections 1 through 9 of this document.
"Licensor" shall mean the copyright owner or entity authorized by the copyright owner that is grant-
ing the License.
"Legal Entity" shall mean the union of the acting entity and all other entities that control, are con-
trolled by, or are under common control with that entity. For the purposes of this denition, "con-
trol" means (i) the power, direct or indirect, to cause the direction or management of such entity,
whether by contract or otherwise, or (ii) ownership of fty percent (50%) or more of the outstanding
shares, or (iii) benecial ownership of such entity.
"You" (or "Your") shall mean an individual or Legal Entity exercising permissions granted by this
License.
"Source" form shall mean the preferred form for making modications, including but not limited to
software source code, documentation source, and conguration les.
"Object" form shall mean any form resulting from mechanical transformation or translation of a
Source form, including but not limited to compiled object code, generated documentation, and con-
versions to other media types.
"Work" shall mean the work of authorship, whether in Source or Object form, made available under
the License, as indicated by a copyright notice that is included in or attached to the work (an ex-
ample is provided in the Appendix below).
"Derivative Works" shall mean any work, whether in Source or Object form, that is based on (or
derived from) the Work and for which the editorial revisions, annotations, elaborations, or other
modications represent, as a whole, an original work of authorship. For the purposes of this License,
Derivative Works shall not include works that remain separable from, or merely link (or bind by
name) to the interfaces of, the Work and Derivative Works thereof.
"Contribution" shall mean any work of authorship, including the original version of the Work and any
modications or additions to that Work or Derivative Works thereof, that is intentionally submitted
to Licensor for inclusion in the Work by the copyright owner or by an individual or Legal Entity au-
thorized to submit on behalf of the copyright owner. For the purposes of this denition, "submitted"
means any form of electronic, verbal, or written communication sent to the Licensor or its represen-
tatives, including but not limited to communication on electronic mailing lists, source code control
systems, and issue tracking systems that are managed by, or on behalf of, the Licensor for the
purpose of discussing and improving the Work, but excluding communication that is conspicuously
marked or otherwise designated in writing by the copyright owner as "Not a Contribution."
"Contributor" shall mean Licensor and any individual or Legal Entity on behalf of whom a Contribu-
tion has been received by Licensor and subsequently incorporated within the Work.
2. Grant of Copyright License. Subject to the terms and conditions of this License, each Contributor
hereby grants to You a perpetual, worldwide, non-exclusive, no-charge, royalty-free, irrevocable copy-
right license to reproduce, prepare Derivative Works of, publicly display, publicly perform, sublicense,
and distribute the Work and such Derivative Works in Source or Object form.
3. Grant of Patent License. Subject to the terms and conditions of this License, each Contribu-
tor hereby grants to You a perpetual, worldwide, non-exclusive, no-charge, royalty-free, irrevocable
160992AB5S_GTH18V-50M_20241210.indd 81160992AB5S_GTH18V-50M_20241210.indd 81 12/13/2024 11:51:44 AM12/13/2024 11:51:44 AM
82
(except as stated in this section) patent license to make, have made, use, offer to sell, sell, import,
and otherwise transfer the Work, where such license applies only to those patent claims licensable
by such Contributor that are necessarily infringed by their Contribution(s) alone or by combination
of their Contribution(s) with the Work to which such Contribution(s) was submitted. If You institute
patent litigation against any entity (including a cross-claim or counterclaim in a lawsuit) alleging that
the Work or a Contribution incorporated within the Work constitutes direct or contributory patent
infringement, then any patent licenses granted to You under this License for that Work shall terminate
as of the date such litigation is led.
4. Redistribution. You may reproduce and distribute copies of the Work or Derivative Works thereof
in any medium, with or without modications, and in Source or Object form, provided that You meet
the following conditions:
— You must give any other recipients of the Work or Derivative Works a copy of this License; and
— You must cause any modied les to carry prominent notices stating that You changed the les;
and
— You must retain, in the Source form of any Derivative Works that You distribute, all copyright, pat-
ent, trademark, and attribution notices from the Source form of the Work, excluding those notices
that do not pertain to any part of the Derivative Works; and
— If the Work includes a "NOTICE" text le as part of its distribution, then any Derivative Works that
You distribute must include a readable copy of the attribution notices contained within such NO-
TICE le, excluding those notices that do not pertain to any part of the Derivative Works, in at least
one of the following places: within a NOTICE text le distributed as part of the Derivative Works;
within the Source form or documentation, if provided along with the Derivative Works; or, within
a display generated by the Derivative Works, if and wherever such third-party notices normally ap-
pear. The contents of the NOTICE le are for informational purposes only and do not modify the
License. You may add Your own attribution notices within Derivative Works that You distribute,
alongside or as an addendum to the NOTICE text from the Work, provided that such additional at-
tribution notices cannot be construed as modifying the License. You may add Your own copyright
statement to Your modications and may provide additional or different license terms and condi-
tions for use, reproduction, or distribution of Your modications, or for any such Derivative Works
as a whole, provided Your use, reproduction, and distribution of the Work otherwise complies with
the conditions stated in this License.
5. Submission of Contributions. Unless You explicitly state otherwise, any Contribution intentionally
submitted for inclusion in the Work by You to the Licensor shall be under the terms and conditions
of this License, without any additional terms or conditions. Notwithstanding the above, nothing
herein shall supersede or modify the terms of any separate license agreement you may have executed
with Licensor regarding such Contributions.
6. Trademarks. This License does not grant permission to use the trade names, trademarks, service
marks, or product names of the Licensor, except as required for reasonable and customary use in
describing the origin of the Work and reproducing the content of the NOTICE le.
7. Disclaimer of Warranty. Unless required by applicable law or agreed to in writing, Licensor
provides the Work (and each Contributor provides its Contributions) on an "AS IS" BASIS, WITHOUT
WARRANTIES OR CONDITIONS OF ANY KIND, either express or implied, including, without limita-
tion, any warranties or conditions of TITLE, NON-INFRINGEMENT, MERCHANTABILITY, or FITNESS
FOR A PARTICULAR PURPOSE. You are solely responsible for determining the appropriateness of
using or redistributing the Work and assume any risks associated with Your exercise of permissions
under this License.
8. Limitation of Liability. In no event and under no legal theory, whether in tort (including negli-
gence), contract, or otherwise, unless required by applicable law (such as deliberate and grossly
negligent acts) or agreed to in writing, shall any Contributor be liable to You for damages, including
any direct, indirect, special, incidental, or consequential damages of any character arising as a result
of this License or out of the use or inability to use the Work (including but not limited to damages
for loss of goodwill, work stoppage, computer failure or malfunction, or any and all other commercial
damages or losses), even if such Contributor has been advised of the possibility of such damages.
9. Accepting Warranty or Additional Liability. While redistributing the Work or Derivative Works
thereof, You may choose to offer, and charge a fee for, acceptance of support, warranty, indemnity, or
other liability obligations and/or rights consistent with this License. However, in accepting such ob-
ligations, You may act only on Your own behalf and on Your sole responsibility, not on behalf of any
other Contributor, and only if You agree to indemnify, defend, and hold each Contributor harmless
160992AB5S_GTH18V-50M_20241210.indd 82160992AB5S_GTH18V-50M_20241210.indd 82 12/13/2024 11:51:44 AM12/13/2024 11:51:44 AM
83
for any liability incurred by, or claims asserted against, such Contributor by reason of your accepting
any such warranty or additional liability.
END OF TERMS AND CONDITIONS
Warranty Disclaimer
This product contains Open Source Software components which underly Open Source Software
Licenses. Please note that Open Source Licenses contain disclaimer clauses. The text of the Open
Source Licenses that apply are included in this manual under "Licenses".
160992AB5S_GTH18V-50M_20241210.indd 83160992AB5S_GTH18V-50M_20241210.indd 83 12/13/2024 11:51:44 AM12/13/2024 11:51:44 AM

160992AB5S 11/2024
© Robert Bosch Tool Corporation
1800 W. Central Road
Mt. Prospect, IL 60056-2230
!160992AB5S!
LIMITED WARRANTY
For details on the terms of the limited warranty for this product, go to https://rb-pt.io/PowerToolWar-
ranty or call 1-877-BOSCH99.
GARANTIE LIMITÉE
Pour tous détails sur les conditions de la garantie limitée pour ce produit, allez sur le site https://rb-pt.io/PowerToolWarranty ou télé-
phonez au 1-877-BOSCH99.
GARANTÍA LIMITADA
Para obtener detalles sobre los términos de la garantía limitada de este producto, visite https://rb-pt.io/PowerToolWarranty o llame al
1-877-BOSCH99.
160992AB5S_GTH18V-50M_20241210.indd 84160992AB5S_GTH18V-50M_20241210.indd 84 12/13/2024 11:51:44 AM12/13/2024 11:51:44 AM

