
Technical Support and E-Warranty Certificate www.vevor.com/support
TRUCK RUNNING BOARDS
MODEL:TR-GTB-012
We continue to be committed to provide you tools with competitive price.
"Save Half", "Half Price" or any other similar expressions used by us only represents an
estimate of savings you might benefit from buying certain tools with us compared to the major
top brands and does not necessarily mean to cover all categories of tools offered by us. You
are kindly reminded to verify carefully when you are placing an order with us if you are
actually saving half in comparison with the top major brands.
- 1
-
MODEL:TR-GTB-012
Have product questions? Need technical support? Please feel free to
contact us:
Technical Support and E-Warranty Certificate
www.vevor.com/support
NEED HELP? CONTACT US!
This is the original instruction, please read all manual instructions
carefully before operating. VEVOR reserves a clear interpretation of our
user manual. The appearance of the product shall be subject to the
product you received. Please forgive us that we won't inform you again if
there are any technology or software updates on our product.
TRUCK RUNNING
BOARDS
- 2
-
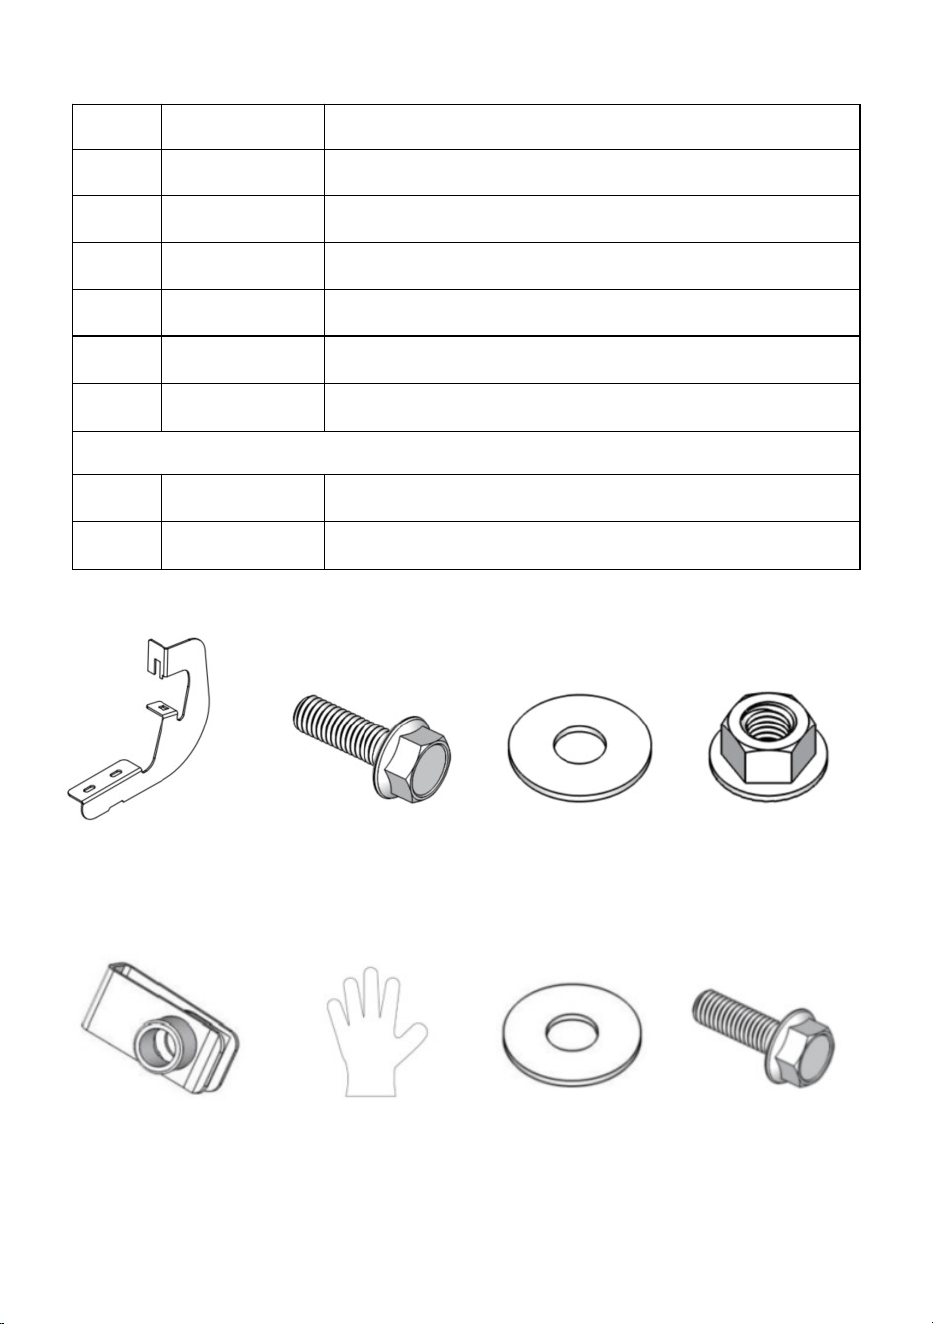
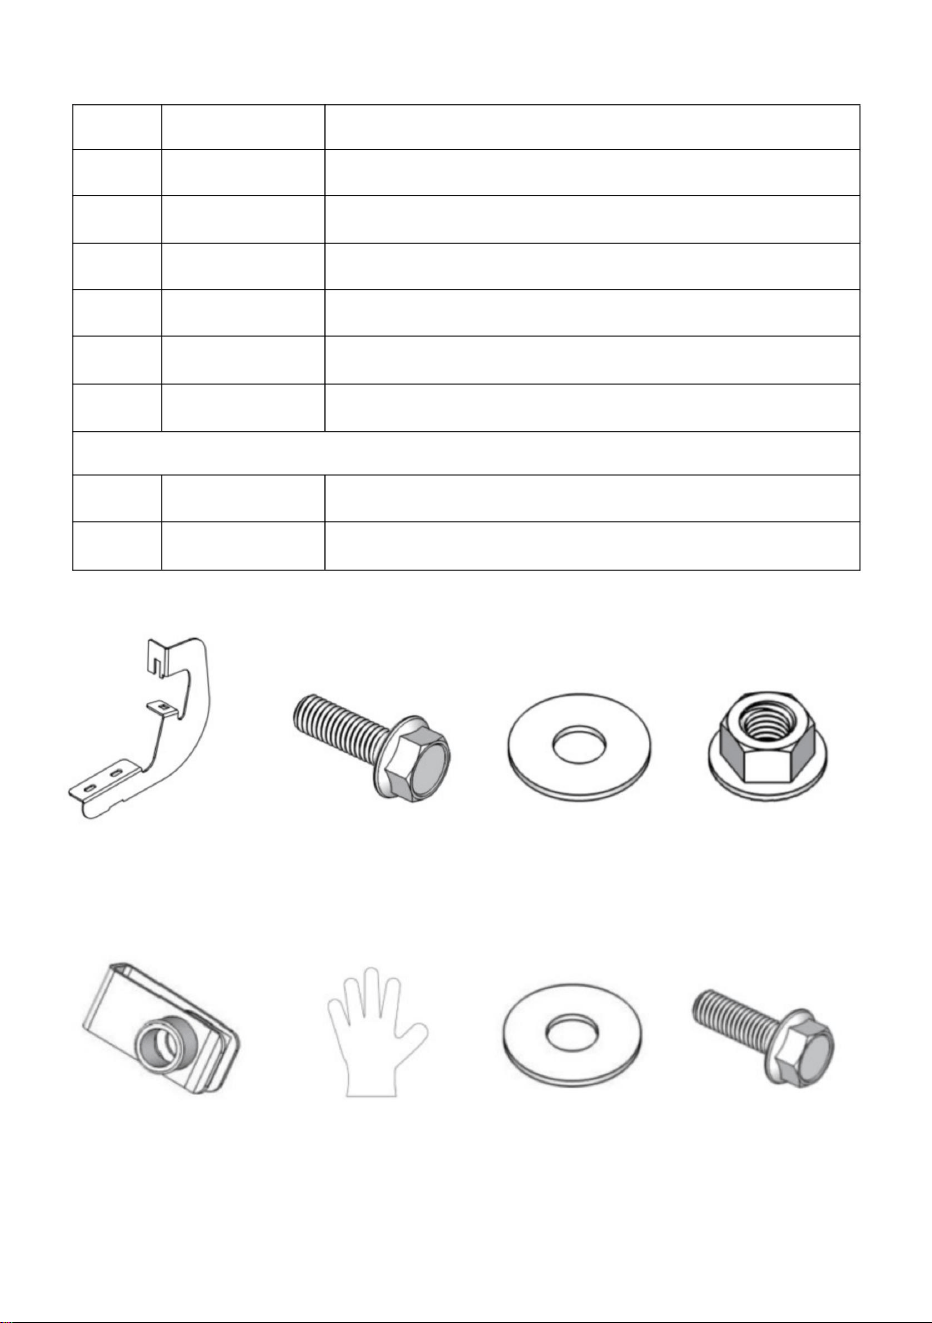
Parts List
Qty Description
A
×8
Mounting Bracket
B
×16
M8 Hexagon Flange Bolt
C
×16
M8 Flat Washer
D
×8
M8 Hexagon Flange Nut
E
×8
M8 Clip Nut
F
×2
Glove
Pre-Install on Step Bar
G
×16
M8 Flat Washer
H
×16
M8 Hexagon Flange Bolt
A B C D
E F G H
- 3
-
CARE AND USE INSTRUCTIONS
1. Before Installation
Read this instruction carefully before starting installation.
Proper tools will improve the quality of installation and reduce the time required.
It is NOT compatible with diesel engine vehicles.
If missing parts or any damage is found, please take a picture and contact us.
Professional installation would be highly recommended.
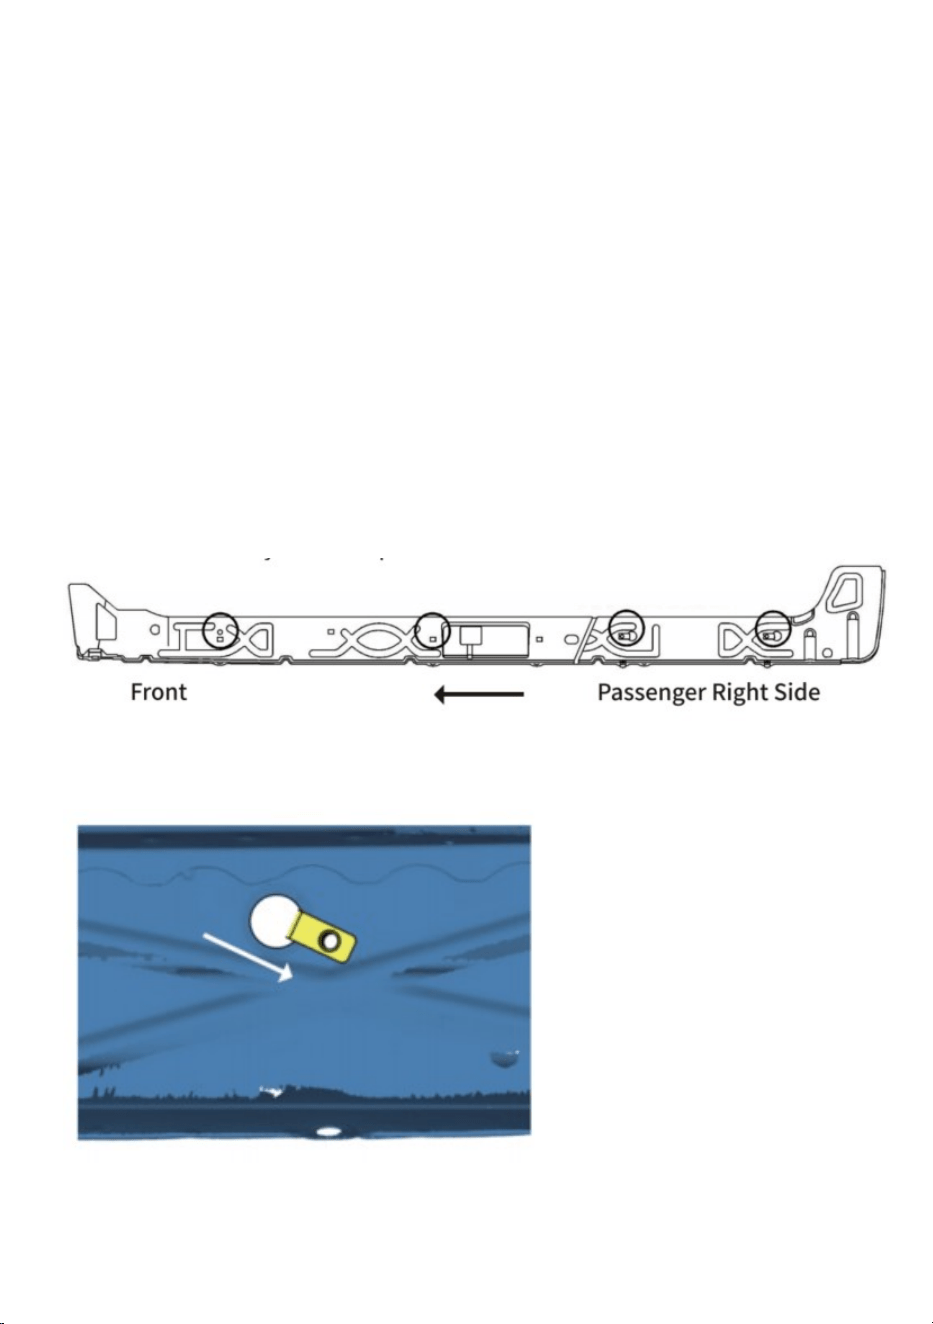
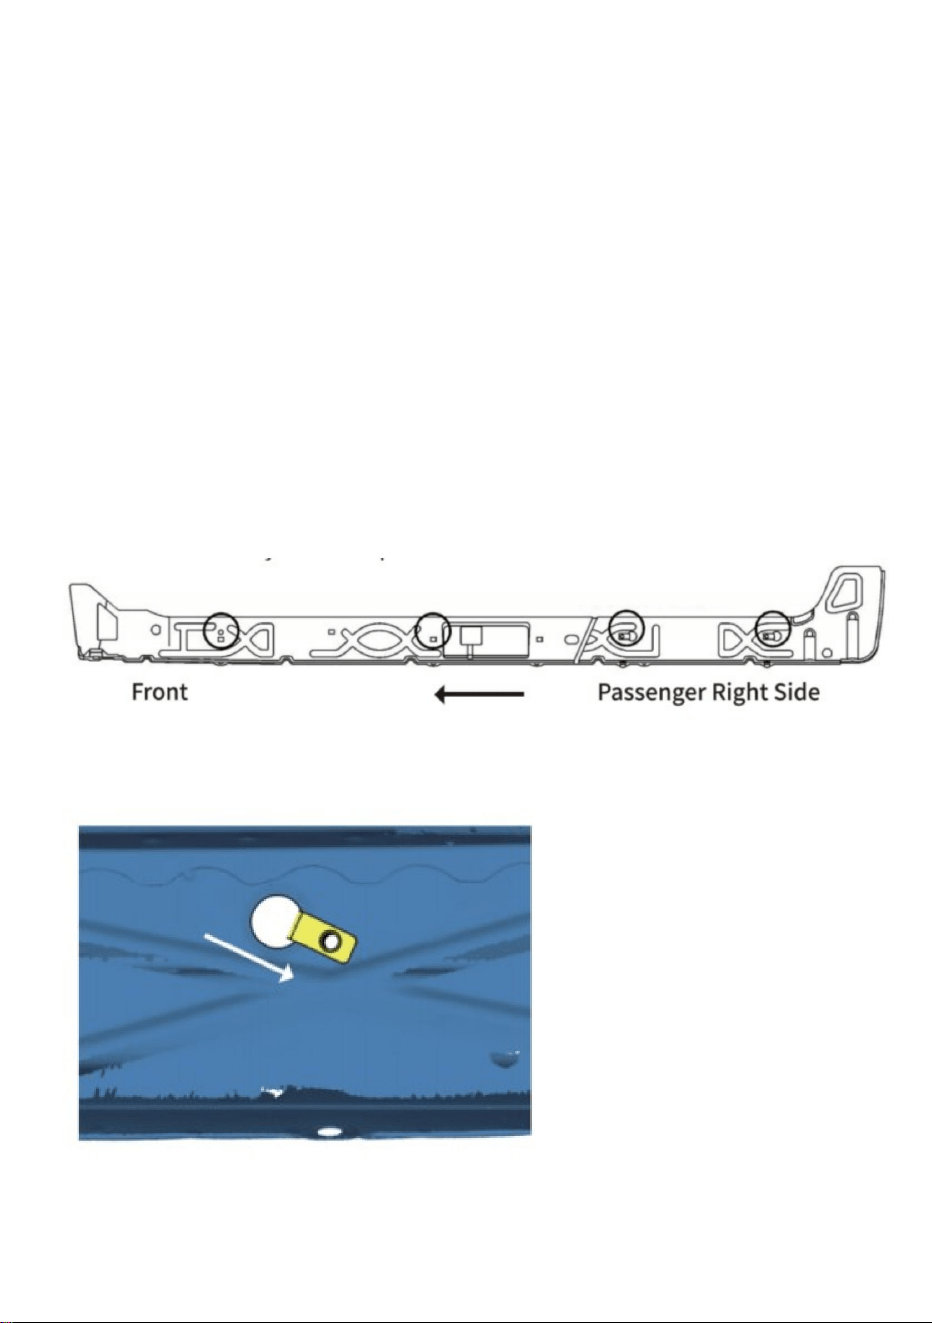
Step1
1 . Locate ( 4 ) mounting positions on each side.
2 . Remove the rubber plugs on the inner rocker panel.
3 . Insert clip nuts onto existing holes in the inner rocker panel.
Note : Some vehicles may equipped with threaded inserts in the rocker panel. Use
them directly in step 2.
Insert the M8 clip nut onto the large hole and over the smaller hole next to it, with
threads inside of the inner rocker panel.

- 4
-
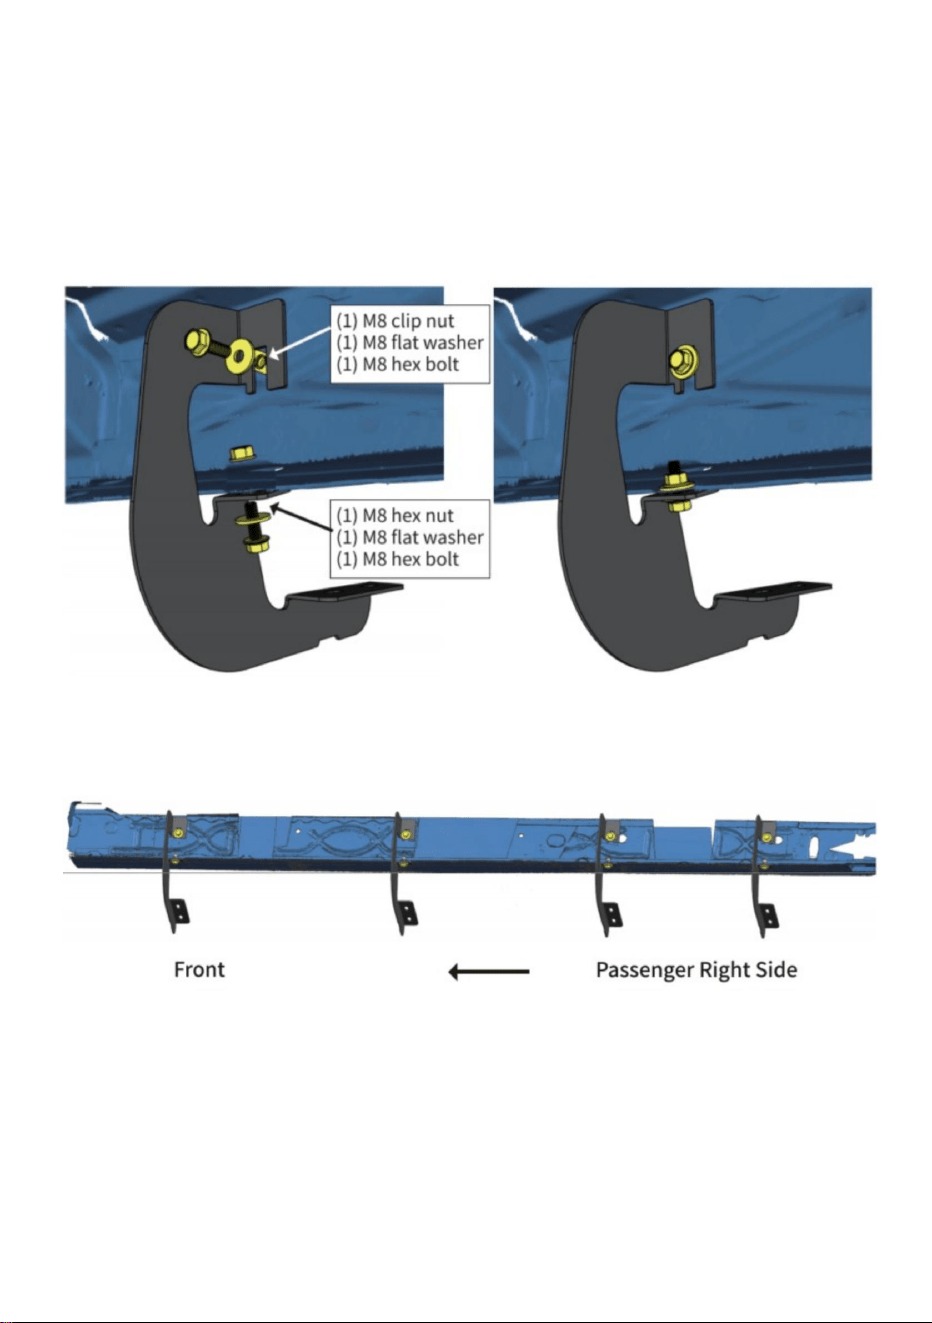
Step2
1 . Attach the bracket to the inner rocker panel and secure it with ( 1 ) M8 hex bolt
and ( 1 ) M8 flat washer.
2 . Secure the bracket to pinch weld with ( 1 ) M8 hex bolt, ( 1 ) M8 flat washer, ( 1 )
M8 hex nut.
3 . Repeat to install the remaining brackets; do not fully tighten.
Note :
For vehicle with factory threaded inserts and weld nuts , clean the rust and dirt
around the threads before installation . Proper lubrication is required.
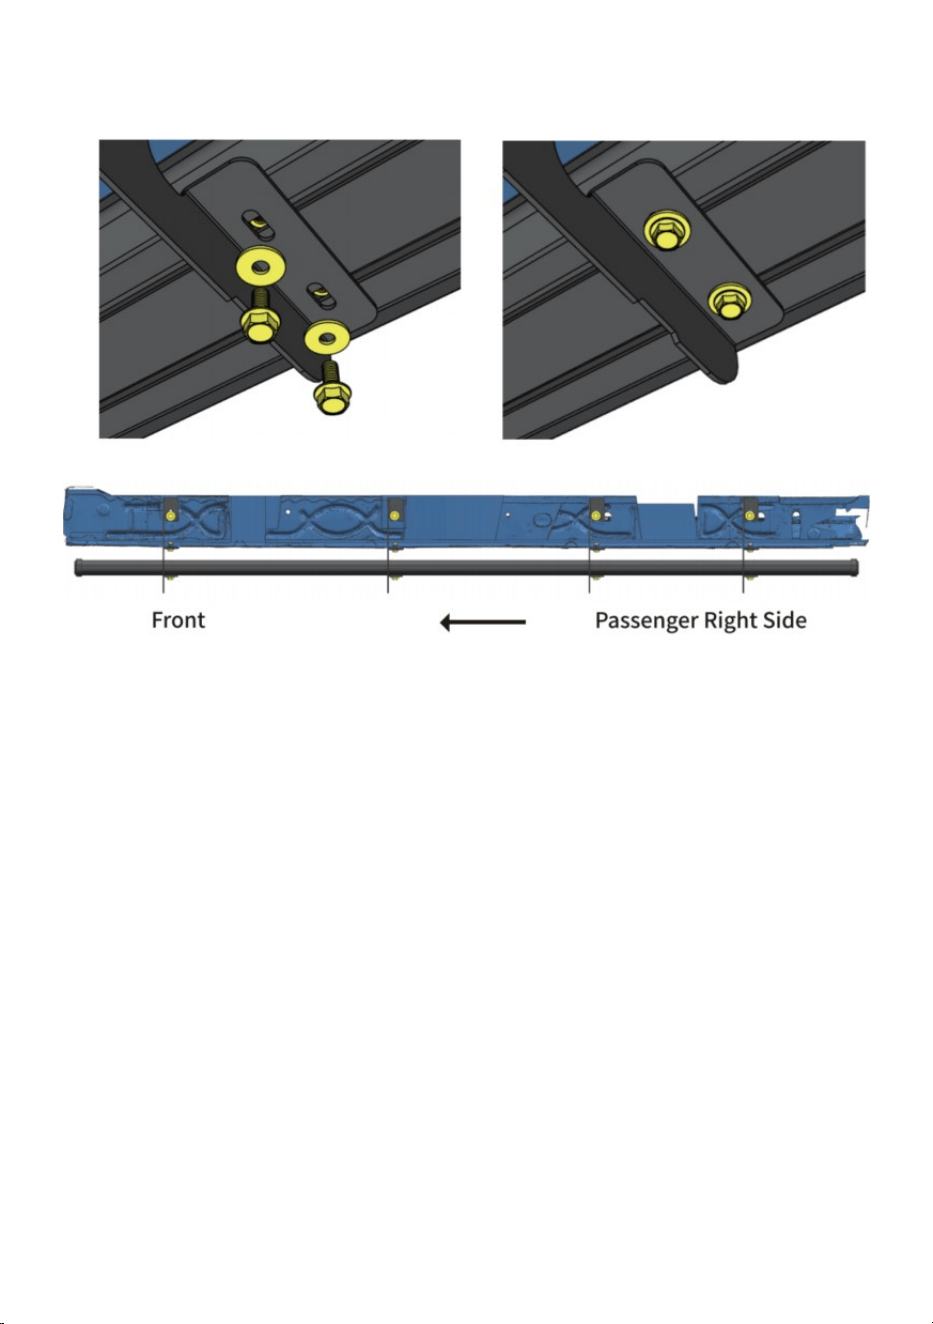
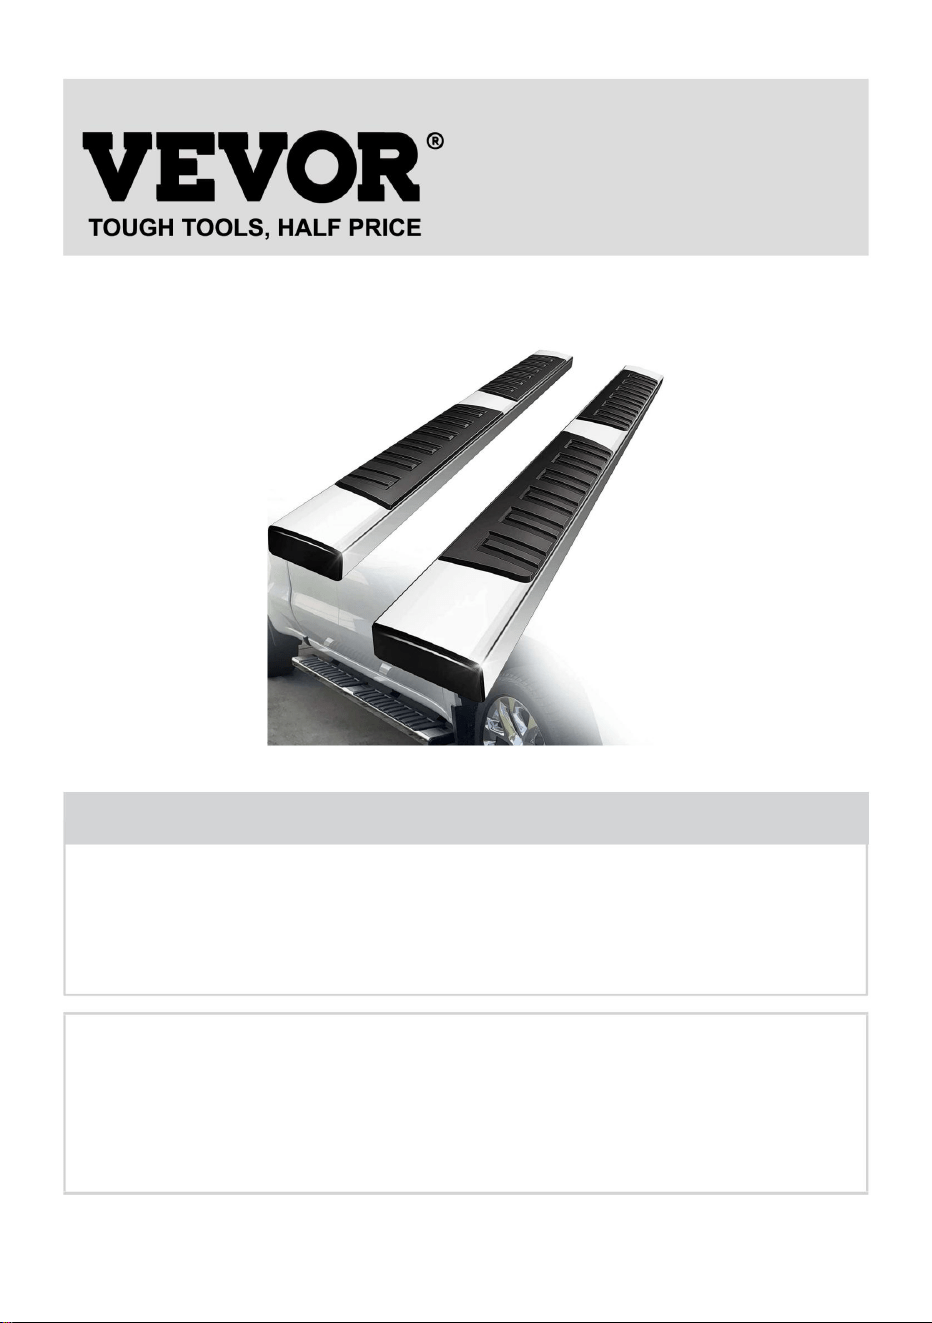
Step3
1 . Remove ( 8 ) M8 hex bolts and ( 8 ) M8 flat washer from the step bar.
2 . Slide mounting tracks to proper positions .
3 . With assistance, lift and attach the step bar to brackets.
Secure the step bar on brackets with ( 8 ) M8 hex bolts and (8) M8 flat washers.
4 . Repeat to install the other side step bar; do not fully tighten it.
- 5
-
Note :
M8(H) Hexagon Flange Bolt and M8(G) Flat Washer Pre-Install on Step Bar.
Step4
1. Tighten M8 hex bolts and nuts on vehicles with 15 ft-lbs torque.
2. Adjust the step bar to level and tighten M8 hex bolts with 15 ft-lbs torque.
3. After the step bar is installed, periodic check to ensure all mounting hardware
remains secure and tight.

- 6
-
Address: Baoshanqu Shuangchenglu 803long 11hao 1602A-1609shi
Shanghai
Imported to AUS: SIHAO PTY LTD. 1 ROKEVA STREETEASTWOOD
NSW 2122 Australia
Imported to USA: Sanven Technology Ltd. Suite 250, 9166 Anaheim
Place, Rancho Cucamonga, CA 91730
REPEC
SHUNSHUN GmbH
Römeräcker 9 Z2021,76351
Linkenheim-Hochstetten,Germany Germany
REPUK
Pooledas Group Ltd
Unit 5 Albert Edward House,
The Pavilions Preston, United Kingdom
Made In China

Technical Support and E-Warranty Certificate
www.vevor.com/support

MARCHEPIEDSDECAMION
Modèle:TRGTB012
Assistancetechniqueetcertificatdegarantieélectroniquewww.vevor.com/support
Nouscontinuonsànousengageràvousfournirdesoutilsàdesprixcompétitifs.
"Économisezlamoitié","Moitiéprix"outouteautreexpressionsimilairequenousutilisonsnereprésente
qu'uneestimationdeséconomiesdontvouspourriezbénéficierenachetantcertainsoutilscheznousparrapport
auxgrandesmarquesetnesignifiepasnécessairementcouvrirtouteslescatégoriesd'outilsproposés.parnous.
Nousvousrappelonsdebienvouloirvérifierattentivementlorsquevouspassezunecommandechez
noussivouséconomisezréellementlamoitiéparrapportauxgrandesmarques.
Machine Translated by Google

Vousavezdesquestionssurlesproduits?Besoind'uneassistancetechnique?N'hésitezpasà
nouscontacter:
Ils'agitdesinstructionsoriginales,veuillezlireattentivementtouteslesinstructionsdu
manuelavantdel'utiliser.VEVORseréserveuneinterprétationclairedenotremanueld'utilisation.
L'apparenceduproduitdépendduproduitquevousavezreçu.Veuilleznouspardonnerque
nousnevousinformeronspluss'ilyadesmisesàjourtechnologiquesoulogiciellessurnotreproduit.
Modèle:TRGTB012
BESOIND'AIDE?CONTACTEZNOUS!
1
CAMIONENCIRCULATION
PLANCHES
Assistancetechniqueetcertificatdegarantie
électroniquewww.vevor.com/support
Machine Translated by Google

Listedespieces
Supportdemontage
UN
F
UN
×16
Qté
Préinstallationsurlabarred'étape
ET
ÉcrouàpinceM8
×16
H
BoulonàbridehexagonaleM8
B
×2
ÉcrouàbridehexagonaleM8
g
×8
C
Description
BoulonàbridehexagonaleM8
RondelleplateM8
×8
B
×8
H
D
F
Gant
×16
×16
RondelleplateM8
C
g
ET
D
2
Machine Translated by Google

INSTRUCTIONSD'ENTRETIENETD'UTILISATION
1.Avantl'installation
Iln'estPAScompatibleaveclesvéhiculesàmoteurdiesel.
Sidespiècesmanquantesoudesdommagessontconstatés,veuillezprendreunephotoetnouscontacter.
Remarque:Certainsvéhiculespeuventêtreéquipésd'insertsfiletésdanslebasdecaisse.Utilisezlesdirectement
àl’étape2.
Insérezl'écrouàclipM8surlegrandtrouetsurlepluspetittrouàcôté,aveclesfiletagesàl'intérieurdubasde
caisseintérieur.
Étape1
1.Localisez(4)lespositionsdemontagedechaquecôté.
Uneinstallationprofessionnelleseraitfortementrecommandée.
Lisezattentivementcesinstructionsavantdecommencerl'installation.
2.Retirezlesbouchonsencaoutchoucdubasdecaisseintérieur.
Desoutilsappropriésaméliorerontlaqualitédel’installationetréduirontletempsrequis.
3.Insérezlesécrousàclipdanslestrousexistantsdupanneaudebasdecaisseintérieur.
3
Machine Translated by Google

ÉcrouhexagonalM8.
nettoyerlarouilleetlasaleté
,
Fixezlabarredemarchesurlessupportsavec(8)boulonshexagonauxM8et(8)rondellesplatesM8.
Pourvéhiculeavecinsertsfiletésd'usineetécrousàsouderautourdesfiletagesavant
l'installation.Unelubrificationadéquateestrequise.
2.Fixezlesupportàlasoudureparpincementavec(1)boulonhexagonalM8,(1)rondelleplateM8,(1)
Note:
3.Avecdel'aide,soulevezetfixezlabarredemarcheauxsupports.
2.Faitesglisserlesrailsdemontagedanslespositionsappropriées.
Étape2
1.Fixezlesupportaupanneauàbasculeintérieuretfixezleavec(1)boulonhexagonalM8et(1)rondelleplateM8.
3.Répétezl'opérationpourinstallerlessupportsrestants;neserrezpascomplètement.
4.Répétezl'opérationpourinstallerl'autrebarredemarchelatérale;neleserrezpascomplètement.
Étape3
1.Retirez(8)boulonshexagonauxM8et(8)rondelleplateM8delabarredemarche.
4
Machine Translated by Google

Note:
2.AjustezlabarredemarcheauniveauetserrezlesboulonshexagonauxM8avecuncouplede15pilb.
BoulonàbridehexagonaleM8(H)etrondelleplateM8(G)préinstalléssurlabarredemarche.
Étape4
1.SerrezlesboulonsetécroushexagonauxM8surlesvéhiculesavecuncouplede15pilb.
3.Unefoislabarredemarcheinstallée,vérifiezpériodiquementpourvousassurerquetoutlematérieldemontage
restesécuriséetserré.
5
Machine Translated by Google

Römeräcker9Z2021,76351
GroupePooledasLtd
SHUNSHUNGmbH
LinkenheimHochstetten,AllemagneAllemagne
Unité5MaisonAlbertEdward,
LesPavillonsPreston,RoyaumeUni
REPRÉSENTANTCE
REPRÉSENTANTDUROYAUMEUNI
Adresse:BaoshanquShuangchenglu803long11hao1602A1609shiShanghai
Importéen
Australie:SIHAOPTYLTD.1ROKEVASTREETESTWOODNSW2122Australie
ImportéauxÉtatsUnis:
SanvenTechnologyLtd.Suite250,9166AnaheimPlace,RanchoCucamonga,CA
91730
FabriquéenChine
6
Machine Translated by Google

Assistancetechniqueetcertificatdegarantie
électroniquewww.vevor.com/support
Machine Translated by Google

Technischer Support und E-Garantiezertifikat www.vevor.com/support
MODELL:TR-GTB-012
LKW-Trittbretter
„Sparen Sie die Hälfte“, „Halber Preis“ oder andere ähnliche von uns verwendete Ausdrücke stellen
lediglich eine Schätzung der Einsparungen dar, die Sie durch den Kauf bestimmter Werkzeuge bei uns im
Vergleich zu den großen Top-Marken erzielen könnten, und bedeuten nicht unbedingt, dass alle
angebotenen Werkzeugkategorien abgedeckt werden von uns. Bitte prüfen Sie bei Ihrer Bestellung
sorgfältig, ob Sie im Vergleich zu den Top-Marken tatsächlich die Hälfte sparen.
Wir sind weiterhin bestrebt, Ihnen Werkzeuge zu wettbewerbsfähigen Preisen anzubieten.
Machine Translated by Google
LKW-LAUF
BOARDS
BRAUCHEN SIE HILFE? KONTAKTIERE UNS!
- 1 -
Haben Sie Fragen zum Produkt? Benötigen Sie technische Unterstützung? Sie können
uns gerne kontaktieren:
Dies ist die Originalanleitung. Bitte lesen Sie alle Bedienungsanleitungen sorgfältig
durch, bevor Sie das Gerät in Betrieb nehmen. VEVOR behält sich eine klare Auslegung
unserer Bedienungsanleitung vor. Das Aussehen des Produkts hängt von dem
Produkt ab, das Sie erhalten haben. Bitte entschuldigen Sie, dass wir Sie nicht erneut
informieren, wenn es zu unserem Produkt technische oder Software-Updates gibt.
MODELL:TR-GTB-012
Technischer Support und E-Garantiezertifikat
www.vevor.com/support
Machine Translated by Google

Liste der Einzelteile
M8-Unterlegscheibe
×8
Beschreibung
×8
M8 Sechskant-Flanschschraube
B
Handschuh
×16
×16
D
H
F
M8-Unterlegscheibe
G
C
UND
D
Montagehalterung
A
F
Menge
×16
Vorinstallation auf der Trittleiste
A
×16
H
M8 Clipmutter
UND
M8 Sechskant-Flanschmutter
M8 Sechskant-Flanschschraube
×2
B
G
×8
C
- 2 -
Machine Translated by Google

PFLEGE- UND GEBRAUCHSANWEISUNGEN
Sollten fehlende Teile oder Schäden festgestellt werden, machen Sie bitte ein Foto und kontaktieren Sie uns.
3 . Stecken Sie die Clipmuttern in die vorhandenen Löcher im inneren Schweller.
Es ist NICHT mit Fahrzeugen mit Dieselmotor kompatibel.
2 . Entfernen Sie die Gummistopfen am inneren Schweller.
Die richtigen Werkzeuge verbessern die Qualität der Installation und verkürzen den Zeitaufwand.
Schritt
1 1 . Suchen Sie (4) Montagepositionen auf jeder Seite.
Setzen Sie die M8-Clipmutter auf das große Loch und über das kleinere Loch daneben, mit dem Gewinde
innerhalb des inneren Schwellerblechs.
Lesen Sie diese Anleitung sorgfältig durch, bevor Sie mit der Installation beginnen.
Eine professionelle Installation wäre sehr zu empfehlen.
1. Vor der Installation
Hinweis: Einige Fahrzeuge sind möglicherweise mit Gewindeeinsätzen im Schweller ausgestattet.
Verwenden Sie sie direkt in Schritt 2.
- 3 -
Machine Translated by Google

- 4 -
Schritt
2 1 . Befestigen Sie die Halterung am inneren Schweller und befestigen Sie sie mit (1) M8-Sechskantschraube
und (1) M8-Unterlegscheibe.
Für Fahrzeuge mit werkseitigen Gewindeeinsätzen und Schweißmuttern um
die Gewinde vor dem Einbau. Eine ordnungsgemäße Schmierung ist erforderlich.
2 . Befestigen Sie die Halterung an der Klemmschweißung mit (1) M8-Sechskantschraube, (1) M8-Unterlegscheibe, (1)
M8 Sechskantmutter.
Entfernen Sie Rost und Schmutz
,
3 . Heben Sie die Trittstange mit Hilfe an und befestigen Sie sie an den Halterungen.
3 . Wiederholen Sie den Vorgang, um die restlichen Halterungen zu installieren. nicht vollständig festziehen.
Befestigen Sie die Trittstange mit (8) M8-Sechskantschrauben und (8) M8-Unterlegscheiben an den Halterungen.
Schritt
3 1 . Entfernen Sie (8) M8-Sechskantschrauben und (8) M8-Unterlegscheiben von der Trittstange.
4 . Wiederholen Sie den Vorgang, um die andere seitliche Trittleiste zu installieren. Ziehen Sie es nicht vollständig fest.
Notiz :
2 . Schieben Sie die Montageschienen in die richtige Position.
Machine Translated by Google
- 5 -
M8(H)-Sechskant-Flanschschraube und M8(G)-Unterlegscheibe an der Stufenstange vorinstallieren.
Schritt 4
1. Ziehen Sie die M8-Sechskantschrauben und -muttern bei Fahrzeugen mit einem Drehmoment von 15 ft-lbs an.
3. Überprüfen Sie nach der Installation der Trittleiste regelmäßig, ob alle Montageteile sicher und fest
sitzen.
Notiz :
2. Stellen Sie die Trittstange waagerecht ein und ziehen Sie die M8-Sechskantschrauben mit einem Drehmoment von 15 ft-lbs fest.
Machine Translated by Google

Adresse: Baoshanqu Shuangchenglu 803long 11hao 1602A-1609shi Shanghai
Importiert
nach AUS: SIHAO PTY LTD. 1 ROKEVA STREETEASTWOOD NSW 2122 Australien
Importiert in die USA:
Sanven Technology Ltd. Suite 250, 9166 Anaheim Place, Rancho Cucamonga, CA
91730
In China hergestellt
UK REP
EG-REP
Linkenheim-Hochstetten,Germany Germany
SHUNSHUN GmbH
Einheit 5 Albert Edward House,
Die Pavillons Preston, Vereinigtes Königreich
Römeräcker 9 Z2021,76351
Pooledas Group Ltd
- 6 -
Machine Translated by Google

Technischer Support und E-Garantiezertifikat
www.vevor.com/support
Machine Translated by Google

Supporto tecnico e certificato di garanzia elettronica www.vevor.com/support
MODELLO:TR-GTB-012
PEDALINI PER CAMION
Continuiamo a impegnarci per fornirvi strumenti a prezzi competitivi.
"Risparmia la metà", "Metà prezzo" o qualsiasi altra espressione simile da noi utilizzata
rappresenta solo una stima del risparmio che potresti trarre dall'acquistare determinati strumenti
con noi rispetto ai principali marchi più importanti e non significa necessariamente coprire tutte
le categorie di strumenti offerti da noi. Ti ricordiamo di verificare attentamente quando
effettui un ordine con noi se stai effettivamente risparmiando la metà rispetto ai migliori marchi principali.
Machine Translated by Google

CAMION IN CORSA
SCHEDE
HO BISOGNO DI AIUTO? CONTATTACI!
- 1 -
Hai domande sul prodotto? Hai bisogno di supporto tecnico? Non esitate
a contattarci:
Queste sono le istruzioni originali, leggere attentamente tutte le
istruzioni del manuale prima dell'uso. VEVOR si riserva una chiara
interpretazione del nostro manuale d'uso. L'aspetto del prodotto sarà
soggetto al prodotto ricevuto. Ti preghiamo di perdonarci se non ti
informeremo più se sono presenti aggiornamenti tecnologici o software sul nostro prodotto.
MODELLO:TR-GTB-012
Supporto tecnico e certificato di garanzia
elettronica www.vevor.com/support
Machine Translated by Google

-2-
Elenco delle parti
Rondella piatta M8
G
C
E
D
UN
Staffa di fissaggio
F
Rondella piatta M8
×8
B
×8
Guanto
×16
×16
D
H
F
Dado flangiato esagonale M8
Bullone flangiato esagonale M8
B
×2
G
×8
C
Descrizione
Bullone flangiato esagonale M8
Qtà
UN
×16
Preinstallare sulla Step Bar
×16
H
Dado a clip M8
E
Machine Translated by Google

- 3 -
ISTRUZIONI PER LA CURA E L'USO
Se si riscontrano parti mancanti o danni, scattare una foto e contattarci.
1. Prima dell'installazione
Leggere attentamente queste istruzioni prima di iniziare l'installazione.
L'installazione professionale sarebbe altamente raccomandata.
Passaggio 1 1 . Individuare le posizioni di montaggio (4) su ciascun lato.
Nota: alcuni veicoli possono essere dotati di inserti filettati nel pannello basculante. Usateli
direttamente nel passaggio 2.
Strumenti adeguati miglioreranno la qualità dell'installazione e ridurranno il tempo richiesto.
Inserisci il dado a clip M8 sul foro grande e sopra il foro più piccolo accanto ad esso, con la filettatura
all'interno del pannello oscillante interno.
2 . Rimuovere i tappi di gomma sul pannello oscillante interno.
NON è compatibile con i veicoli con motore diesel.
3 . Inserire i dadi a clip nei fori esistenti nel pannello oscillante interno.
Machine Translated by Google

2 . Fissare la staffa per saldare con (1) bullone esagonale M8, (1) rondella piatta M8, (1)
3 . Con l'aiuto, sollevare e fissare la barra a gradino alle staffe.
Per veicoli con inserti filettati di fabbrica e dadi saldati attorno alle
filettature prima dell'installazione. È necessaria una lubrificazione adeguata.
,
Fissare la barra gradino sulle staffe con (8) bulloni esagonali M8 e (8) rondelle piatte M8.
Dado esagonale M8.
pulire la ruggine e lo sporco
Passaggio 3 1 . Rimuovere (8) bulloni esagonali M8 e (8) rondella piatta M8 dalla barra a gradino.
3 . Ripetere per installare le staffe rimanenti; non serrare completamente.
4 . Ripetere per installare l'altra barra del gradino laterale; non serrarlo completamente.
2 . Far scorrere i binari di montaggio nelle posizioni corrette.
Passaggio 2 1 . Collegare la staffa al pannello oscillante interno e fissarla con (1) bullone esagonale M8
e (1) rondella piatta M8.
Nota :
-4-
Machine Translated by Google

Passaggio 4 1. Stringere i bulloni e i dadi esagonali M8 sui veicoli con una coppia di 15 piedi-libbre.
Bullone flangiato esagonale M8(H) e rondella piatta M8(G) preinstallati sulla barra gradino.
3. Dopo aver installato la barra a gradino, effettuare un controllo periodico per garantire che tutti gli
accessori di montaggio rimangano sicuri e serrati.
Nota :
2. Regolare la barra gradino per livellarla e serrare i bulloni esagonali M8 con una coppia di 15 piedi-libbre.
-5-
Machine Translated by Google

Indirizzo: Baoshanqu Shuangchenglu 803long 11hao 1602A-1609shi
Shanghai
Importato in AUS: SIHAO PTY LTD. 1 ROKEVA STREETEASTWOOD
NSW 2122 Australia
Importato negli Stati Uniti: Sanven Technology Ltd. Suite 250, 9166
Anaheim Place, Rancho Cucamonga, CA 91730
Made in China
REP.CE
REP. DEL REGNO UNITO
SHUNSHUN GmbH
Linkenheim-Hochstetten,Germania Germania
Unità 5 Casa Albert Edward,
I padiglioni Preston, Regno Unito
Römeräcker 9 Z2021,76351
Gruppo Pooledas Ltd
-6-
Machine Translated by Google

Supporto tecnico e certificato di garanzia
elettronica www.vevor.com/support
Machine Translated by Google

Soportetécnicoycertificadodegarantíaelectrónicawww.vevor.com/support
"Ahorreamitaddeprecio","Amitaddeprecio"ocualquierotraexpresiónsimilarutilizadapornosotrossolo
representaunaestimacióndelosahorrosquepodríabeneficiarsealcomprarciertasherramientasconnosotrosen
comparaciónconlasprincipalesmarcasynosignificanecesariamentecubrirtodaslascategoríasdeherramientas
ofrecidas.pornosotros.Lerecordamosque,cuandorealiceunpedidoconnosotros,verifiquecuidadosamente
sirealmenteestáahorrandolamitadencomparaciónconlasprincipalesmarcas.
Seguimoscomprometidosaproporcionarleherramientasaprecioscompetitivos.
MODELO:TRGTB012
ESTRIBOSPARACAMIONES
Machine Translated by Google

CAMIÓNENMARCHA
TABLAS
Soportetécnicoycertificadodegarantía
electrónicawww.vevor.com/support
¿NECESITASAYUDA?¡CONTÁCTENOS!
MODELO:TRGTB012
¿Tienepreguntassobreelproducto?¿Necesitasoportetécnico?Siéntetelibrede
contactarnos:
Estassonlasinstruccionesoriginales;leaatentamentetodaslasinstrucciones
delmanualantesdeoperar.VEVORsereservaunainterpretaciónclaradenuestro
manualdeusuario.Laaparienciadelproductoestarásujetaalproductoque
recibió.Perdonequenoleinformaremosnuevamentesihayactualizacionesde
tecnologíaosoftwareennuestroproducto.
1
Machine Translated by Google

Listadepartes
Guante
×16
×16
PernodebridahexagonalM8
×2
GRAMO
F
D
h
ArandelaplanaM8
×8
×8
B D
Soportedemontaje
A
F
GRAMO
ArandelaplanaM8
C
Y
×16
TuercadeclipM8
Y
h
×16
Preinstalaciónenlabarradepasos
Cantidad
A
×8
Descripción
PernodebridahexagonalM8
TuercaconbridahexagonalM8
C
B
2
Machine Translated by Google

Lasherramientasadecuadasmejoraránlacalidaddelainstalaciónyreduciráneltiemponecesario.
Nota:Algunosvehículospuedenestarequipadosconinsercionesroscadasenelpaneldebalancines.
Úsalosdirectamenteenelpaso2.
2.Retirelostaponesdegomadelpanelbasculanteinterior.
InsertelatuercadeclipM8enelorificiograndeysobreelorificiomáspequeñoallado,conlasroscas
dentrodelpanelbasculanteinterior.
NOescompatibleconvehículosconmotordiésel.
3.Insertetuercasdeclipenlosorificiosexistentesenelpanelbasculanteinterior.
Sifaltanpiezasoseencuentraalgúndaño,tomeunafotografíaycontáctenos.
1.Antesdelainstalación
Leaatentamenteestasinstruccionesantesdecomenzarlainstalación.
Serecomiendaencarecidamentelainstalaciónprofesional.
Paso1
1.Ubique(4)posicionesdemontajeencadalado.
3
INSTRUCCIONESDECUIDADOYUSO
Machine Translated by Google

3.Repitaparainstalarlossoportesrestantes;noaprietecompletamente.
3.Conayuda,levanteyfijelabarradepasoalossoportes.
Paso3
1.Retirelos(8)pernoshexagonalesM8ylas(8)arandelasplanasM8delabarraescalonada.
Asegurelabarradepasoenlossoportescon(8)pernoshexagonalesM8y(8)arandelasplanasM8.
Nota:
4.Repitaparainstalarlaotrabarradepasolateral;noloaprietecompletamente.
2.Deslicelosrielesdemontajealasposicionesadecuadas.
Paso2
1.Fijeelsoportealpanelbasculanteinterioryasegúrelocon(1)pernohexagonalM8y(1)arandelaplanaM8.
Paravehículosconinsercionesroscadasdefábricaytuercassoldadas
alrededordelasroscasantesdelainstalación.Serequiereunalubricaciónadecuada.
2.Asegureelsoporteparasoldarcon(1)pernohexagonalM8,(1)arandelaplanaM8,(1)
TuercahexagonalM8.
limpiarelóxidoylasuciedad
,
4
Machine Translated by Google

Paso4
1.AprietelospernosytuercashexagonalesM8enlosvehículosconunatorsiónde15pieslibras.
Nota:
3.Despuésdeinstalarlabarradepaso,verifiqueperiódicamenteparagarantizarquetodoslosaccesoriosdemontaje
permanezcansegurosyapretados.
2.AjustelabarradepasoparanivelaryaprietelospernoshexagonalesM8conunatorsiónde15pieslibras.
PernoconbridahexagonalM8(H)yarandelaplanaM8(G)preinstaladosenlabarraescalonada.
5
Machine Translated by Google

Dirección:BaoshanquShuangchenglu803long11hao1602A1609shi
Shanghai
ImportadoaAUS:SIHAOPTYLTD.1ROKEVASTREETEASTWOOD
NSW2122Australia
ImportadoaEE.UU.:SanvenTechnologyLtd.Suite250,9166
AnaheimPlace,RanchoCucamonga,CA91730
Hechoenchina
6
REPRESENTANTEDELREINOUNIDO
REPRESENTANTEDELACE
Unidad5CasaAlbertEdward,
LinkenheimHochstetten,AlemaniaAlemania
ThePavilionsPreston,ReinoUnido
GrupoPooledasLtd
Römeräcker9Z2021,76351
SHUNSHUNGmbH
Machine Translated by Google

Soportetécnicoycertificadodegarantía
electrónicawww.vevor.com/support
Machine Translated by Google

Wsparcie techniczne i certyfikat e-gwarancji www.vevor.com/support
„Zaoszczędź o połowę”, „o połowę ceny” lub inne podobne wyrażenia używane przez nas przedstawiają jedynie
szacunkową oszczędność, jaką możesz zyskać kupując u nas określone narzędzia w porównaniu z głównymi najlepszymi
markami i niekoniecznie oznaczają uwzględnienie wszystkich kategorii oferowanych narzędzi przez nas. Przypominamy,
aby podczas składania zamówienia u nas dokładnie sprawdzić, czy faktycznie oszczędzasz połowę w porównaniu
z czołowymi markami.
Nadal dokładamy wszelkich starań, aby zapewnić Państwu narzędzia w konkurencyjnej cenie.
MODEL:TR-GTB-012
NAKŁADKI DO SAMOCHODÓW CIĘŻAROWYCH
Machine Translated by Google

JAZDA CIĘŻARÓWKĄ
DESKI
Wsparcie techniczne i certyfikat e-gwarancji
www.vevor.com/support
POTRZEBUJĘ POMOCY? SKONTAKTUJ SIĘ Z NAMI!
MODEL:TR-GTB-012
Masz pytania dotyczące produktu? Potrzebujesz wsparcia technicznego? Śmiało możesz się z nami
skontaktować:
To jest oryginalna instrukcja. Przed przystąpieniem do obsługi prosimy o dokładne
zapoznanie się ze wszystkimi instrukcjami. VEVOR zastrzega sobie jasną interpretację naszej
instrukcji obsługi. Wygląd produktu zależy od produktu, który otrzymałeś. Proszę wybaczyć
nam, że nie będziemy ponownie informować Państwa, jeśli pojawią się jakieś aktualizacje technologii
lub oprogramowania naszego produktu.
- 1 -
Machine Translated by Google

Rękawica
×16
×16
Śruba kołnierzowa M8 z łbem sześciokątnym
×2
G
F
D
H
Podkładka płaska M8
×8
×8
B D
Uchwyt montażowy
A
F
G
Podkładka płaska M8
C
I
×16
Nakrętka zaciskowa M8
I
H
×16
Wstępnie zainstaluj na pasku schodkowym
Ilość
A
×8
Opis
Śruba kołnierzowa M8 z łbem sześciokątnym
Sześciokątna nakrętka kołnierzowa M8
C
B
- 2 -
Lista części
Machine Translated by Google

3. Włóż nakrętki zaciskowe do istniejących otworów w wewnętrznym panelu wahacza.
NIE jest kompatybilny z pojazdami z silnikiem Diesla.
2. Wyjmij gumowe zatyczki z wewnętrznego panelu wahaczy.
Odpowiednie narzędzia poprawią jakość montażu i skrócą czas jego montażu.
Włóż nakrętkę zaciskową M8 do dużego otworu i nad mniejszym otworem obok, z gwintami wewnątrz
wewnętrznego panelu wahacza.
Krok 1
1 . Zlokalizować (4) pozycje montażowe po każdej stronie.
Profesjonalny montaż byłby wysoce zalecany.
Przeczytaj uważnie niniejszą instrukcję przed rozpoczęciem instalacji.
1. Przed instalacją
Uwaga: Niektóre pojazdy mogą być wyposażone w gwintowane wkładki w panelu wahacza. Użyj ich
bezpośrednio w kroku 2.
W przypadku stwierdzenia brakujących części lub jakichkolwiek uszkodzeń, prosimy o zrobienie zdjęcia i skontaktowanie się z nami.
- 3 -
INSTRUKCJA OBSŁUGI I UŻYTKOWANIA
Machine Translated by Google
,
3. Powtórz, aby zainstalować pozostałe wsporniki; nie dokręcaj całkowicie.
4. Powtórz tę czynność, aby zamontować drugi stopień boczny; nie dokręcaj go całkowicie.
Krok 3
1. Wymontuj (8) śruby sześciokątne M8 i (8) płaską podkładkę M8 z pręta stopnia.
Notatka :
Krok 2
1. Przymocuj wspornik do wewnętrznego panelu wahacza i zabezpiecz go za pomocą (1) śruby sześciokątnej M8 i (1)
płaskiej podkładki M8.
2. Przesuń szyny montażowe do odpowiednich pozycji.
Do pojazdów z fabrycznymi wkładkami gwintowanymi i nakrętkami do
przyspawania wokół gwintów przed montażem. Wymagane jest odpowiednie smarowanie.
2. Przymocuj wspornik do spoiny zaciskowej za pomocą (1) śruby sześciokątnej M8, (1) podkładki płaskiej M8, (1)
3. Z pomocą podnieś i przymocuj poręcz do wsporników.
oczyścić z rdzy i brudu
Nakrętka sześciokątna M8.
Przymocuj drążek schodkowy do wsporników za pomocą (8) śrub sześciokątnych M8 i (8) podkładek płaskich M8.
- 4 -
Machine Translated by Google

Krok 4 1.
Dokręcić śruby i nakrętki sześciokątne M8 w pojazdach momentem obrotowym 15 ft-lbs.
Notatka :
3. Po zamontowaniu poręczy należy okresowo sprawdzać, czy wszystkie elementy montażowe są dobrze zamocowane.
2. Wypoziomuj wspornik stopnia i dokręć śruby sześciokątne M8 momentem obrotowym 15 ft-lbs.
Sześciokątną śrubę kołnierzową M8(H) i płaską podkładkę M8(G) należy wstępnie zamontować na wsporniku stopnia.
- 5 -
Machine Translated by Google

Adres: Baoshanqu Shuangchenglu 803long 11hao 1602A-1609shi Szanghaj Import do
Australii:
SIHAO PTY LTD. 1 ROKEVA STREETEASTWOOD NSW 2122 Australia Import do USA: Sanven
Technology Ltd. Suite
250, 9166 Anaheim Place, Rancho Cucamonga, CA 91730
Wyprodukowano w Chinach
- 6 -
REPREZENT KE
REPUBLIKA Wielkiej Brytanii
Jednostka 5 Dom Alberta Edwarda,
Linkenheim-Hochstetten, Niemcy Niemcy
Pawilony Preston, Wielka Brytania
Pooledas Group Ltd
Römeräcker 9 Z2021,76351
SHUNSHUN GmbH
Machine Translated by Google

Wsparcie techniczne i certyfikat e-gwarancji
www.vevor.com/support
Machine Translated by Google

TRUCKLOOPPLANKEN
We blijven ons inzetten om u gereedschap tegen een concurrerende prijs te bieden.
'Bespaar de helft', 'Halve prijs' of andere soortgelijke uitdrukkingen die door ons worden gebruikt
vertegenwoordigen slechts een schatting van de besparingen die u zou kunnen profiteren als u bepaalde
gereedschappen bij ons koopt in vergelijking met de grote topmerken en betekenen niet noodzakelijkerwijs dat
ze alle categorieën van aangeboden gereedschappen dekken. door ons. Wij verzoeken u vriendelijk om
bij het plaatsen van een bestelling bij ons goed na te gaan of u daadwerkelijk de helft bespaart in vergelijking met de grote topmerken.
Technische ondersteuning en e-garantiecertificaat www.vevor.com/support
MODEL: TR-GTB-012
Machine Translated by Google
- 1 -
MODEL: TR-GTB-012
Heeft u productvragen? Technische ondersteuning nodig? Neem dan gerust
contact met ons op:
Dit is de originele instructie. Lees alle instructies in de handleiding
zorgvuldig door voordat u ermee aan de slag gaat. VEVOR behoudt zich een
duidelijke interpretatie van onze gebruikershandleiding voor. Het uiterlijk
van het product is afhankelijk van het product dat u heeft ontvangen. Vergeef ons
alstublieft dat we u niet opnieuw zullen informeren als er technologie- of software-updates zijn voor ons product.
Technische ondersteuning en e-
garantiecertificaat www.vevor.com/support
VRACHTWAGEN LOOPT
BORDEN
HULP NODIG? NEEM CONTACT MET ONS OP!
Machine Translated by Google

Aantal
×16
Pre-installatie op Step Bar
A
Montagebeugel
A
F
M8 Klemmoer
EN
×16
H
M8 zeskantflensbout
B
×2
M8 zeskantflensmoer
G
×8
C
Beschrijving
M8 zeskantflensbout
M8 platte sluitring
×8
B
×8
D
H
F
Handschoen
×16
×16
M8 platte sluitring
C
G
EN
D
- 2 -
Onderdelen lijst
Machine Translated by Google

Lees deze instructie zorgvuldig door voordat u met de installatie begint.
Een professionele installatie wordt ten zeerste aanbevolen.
Stap1
1 . Zoek ( 4 ) montageposities aan elke kant.
Steek de M8 klemmoer op het grote gat en over het kleinere gat ernaast, met de schroefdraad aan de
binnenkant van het binnenste rockerpaneel.
Als er ontbrekende onderdelen of schade worden aangetroffen, maak dan een foto en neem contact met ons op.
1. Vóór installatie
Het is NIET compatibel met voertuigen met dieselmotor.
Opmerking: Sommige voertuigen zijn mogelijk uitgerust met inzetstukken met schroefdraad in het
dorpelpaneel. Gebruik ze direct in stap 2.
3. Steek clipmoeren in de bestaande gaten in het binnenste rockerpaneel.
Het juiste gereedschap verbetert de kwaliteit van de installatie en verkort de benodigde tijd.
2. Verwijder de rubberen pluggen op het binnenste rockerpaneel.
- 3 -
VERZORGINGS- EN GEBRUIKSINSTRUCTIES
Machine Translated by Google

- 4 -
M8 zeskantmoer.
reinig de roest en het vuil
,
Zet de treeplank vast op de beugels met (8) M8 zeskantbouten en (8) M8 platte ringen.
Voor voertuigen met fabrieksinzetstukken met schroefdraad en
lasmoeren rond de schroefdraad vóór installatie. Een goede smering is vereist.
2. Zet de beugel vast op de klemlas met ( 1 ) M8 zeskantbout, ( 1 ) M8 platte sluitring, ( 1 )
Opmerking :
3. Til met hulp de opstapstang op en bevestig deze aan de beugels.
2. Schuif de montagerails naar de juiste posities.
Stap2
1 . Bevestig de beugel aan het binnenste rockerpaneel en zet deze vast met (1) M8 zeskantbout en
(1) M8 platte ring.
3. Herhaal dit om de resterende beugels te installeren; niet volledig vastdraaien.
4. Herhaal dit om de andere zijstapbalk te installeren; draai hem niet helemaal vast.
Stap3
1 . Verwijder (8) M8 zeskantbouten en (8) M8 platte sluitring van de treeplank.
Machine Translated by Google

- 5 -
Opmerking :
2. Stel de trapstang af zodat deze waterpas staat en draai de M8 zeskantbouten vast met een koppel van 15 ft-lbs.
M8(H) zeshoekige flensbout en M8(G) platte ring vooraf installeren op treeplank.
Stap4 1.
Draai de M8 zeskantbouten en -moeren op voertuigen vast met een koppel van 15 ft-lbs.
3. Nadat de opstapstang is geïnstalleerd, dient u periodiek te controleren of al het bevestigingsmateriaal goed
vastzit en goed vastzit.
Machine Translated by Google

Römeräcker 9 Z2021,76351
Pooledas Group Ltd
SHUNSHUN GmbH
Linkenheim-Hochstetten, Duitsland Duitsland
Eenheid 5 Albert Edward Huis,
De paviljoens Preston, Verenigd Koninkrijk
- 6 -
Adres: Baoshanqu Shuangchenglu 803long 11hao 1602A-1609shi Shanghai
Geïmporteerd in AUS: SIHAO PTY LTD. 1 ROKEVA STREETEASTWOOD NSW
2122 Australië
Geïmporteerd in de VS: Sanven Technology Ltd. Suite 250, 9166 Anaheim
Place, Rancho Cucamonga, CA 91730
Gemaakt in China
EG REP
Britse REP
Machine Translated by Google

Technische ondersteuning en e-
garantiecertificaat www.vevor.com/support
Machine Translated by Google

Teknisk support och e-garanticertifikat www.vevor.com/support
Vi fortsätter att vara engagerade i att ge dig verktyg till konkurrenskraftiga priser.
"Spara hälften", "halva priset" eller andra liknande uttryck som används av oss
representerar bara en uppskattning av besparingar du kan dra nytta av att köpa vissa verktyg
hos oss jämfört med de stora toppmärkena och betyder inte nödvändigtvis att täcka alla
kategorier av verktyg som erbjuds av oss. Du påminns vänligen om att noggrant
kontrollera när du gör en beställning hos oss om du faktiskt sparar hälften i jämförelse med de främsta stora varumärkena.
MODELL:TR-GTB-012
LASTBORDAR
Machine Translated by Google

BRÄDER
LASTBIL KÖR
Teknisk support och e-garanticertifikat
www.vevor.com/support
BEHÖVS HJÄLP? KONTAKTA OSS!
Detta är den ursprungliga instruktionen, läs alla instruktioner
noggrant innan du använder den. VEVOR reserverar sig för en tydlig
tolkning av vår användarmanual. Utseendet på produkten är
beroende av den produkt du fått. Ursäkta oss att vi inte kommer att
informera dig igen om det finns någon teknik eller mjukvaruuppdateringar på vår produkt.
MODELL:TR-GTB-012
Har du produktfrågor? Behöver du teknisk support? Kontakta oss
gärna:
- 1 -
Machine Translated by Google
Delarlista
Handske
×16
×16
M8 sexkantsflänsbult
×2
G
F
D
H
M8 platt bricka
×8
×8
B D
Monteringsfäste
A
F
G
M8 platt bricka
C
OCH
×16
M8 Clip Mutter
OCH
H
×16
Förinstallera på Step Bar
Antal
A
×8
Beskrivning
M8 sexkantsflänsbult
M8 sexkantsflänsmutter
C
B
- 2 -
Machine Translated by Google
SKÖTSEL OCH ANVÄNDNINGSINSTRUKTIONER
Rätt verktyg kommer att förbättra kvaliteten på installationen och minska den tid som krävs.
Obs: Vissa fordon kan vara utrustade med gängade insatser i vipppanelen. Använd dem
direkt i steg 2.
2 . Ta bort gummipluggarna på den inre vipppanelen.
Sätt in M8-clipsmuttern i det stora hålet och över det mindre hålet bredvid, med gängor
inuti den inre vipppanelen.
Den är INTE kompatibel med dieselmotorfordon.
3 . Sätt i klämmuttrarna i befintliga hål i den inre vipppanelen.
Om saknade delar eller någon skada hittas, ta en bild och kontakta oss.
1. Före installation
Läs denna instruktion noggrant innan du påbörjar installationen.
Professionell installation skulle starkt rekommenderas.
Steg
1 1 . Leta reda på ( 4 ) monteringspositioner på varje sida.
- 3 -
Machine Translated by Google

3 . Upprepa för att installera de återstående fästena; dra inte åt helt.
3 . Lyft och fäst stegstången på fästen med hjälp.
Steg 3
1 . Ta bort ( 8 ) M8 sexkantsbultar och ( 8 ) M8 plattbricka från stegstången.
Fäst stegstången på fästena med ( 8 ) M8 sexkantsbultar och (8) M8 plana brickor.
Notera :
4 . Upprepa för att installera den andra stegstången på sidan; dra inte åt den helt.
2 . Skjut monteringsspåren till rätt positioner.
Steg 2
1 . Fäst fästet på den inre vipppanelen och fäst den med ( 1 ) M8 sexkantsbult och ( 1 ) M8 platt
bricka.
För fordon med fabriksgängade insatser och svetsmuttrar runt
gängorna före installation. Rätt smörjning krävs.
2 . Fäst fästet för nypsvetsning med ( 1 ) M8 sexkantsbult, ( 1 ) M8 platt bricka, ( 1 )
M8 sexkantmutter.
rengör rost och smuts
,
- 4 -
Machine Translated by Google

Steg 4
1. Dra åt M8 sexkantsbultar och muttrar på fordon med 15 ft-lbs vridmoment.
Notera :
3. Efter att stegstången har installerats, kontrollera regelbundet för att säkerställa att all
monteringsutrustning förblir säker och åtdragen.
2. Justera stegstången till nivå och dra åt M8 sexkantsbultar med 15 ft-lbs vridmoment.
M8(H) sexkantsflänsbult och M8(G) platt bricka förinstalleras på stegstången.
- 5 -
Machine Translated by Google

Tillverkad i Kina
Adress: Baoshanqu Shuangchenglu 803long 11hao 1602A-1609shi
Shanghai
Importerad till AUS: SIHAO PTY LTD. 1 ROKEVA STREETEASTWOOD
NSW 2122 Australien
Importerad till USA: Sanven Technology Ltd. Suite 250, 9166
Anaheim Place, Rancho Cucamonga, CA 91730
- 6 -
UK REP
EC REP
Enhet 5 Albert Edward House,
Linkenheim-Hochstetten, Tyskland, Tyskland
The Pavilions Preston, Storbritannien
Pooledas Group Ltd
Römeräcker 9 Z2021,76351
SHUNSHUN GmbH
Machine Translated by Google

Teknisk support och e-garanticertifikat
www.vevor.com/support
Machine Translated by Google
