48 6378 0005 /AV
CDA 565FS - CDA 564FW - CF 5015APW - CF5015APS
CFG1501W - CFG1501S - CFG4501W - CFG4501S
EN /
Refrigerator
User manual
Please read these instructions first before using your appliance
Thank you for choosing a Beko appliance.
Please take some time to read this user manual before using your appliance,
to ensure you know how to safely operate the controls and functions.
Carefully follow all unpacking and installation instructions to ensure the
appliance is correctly connected and fitted prior to use.
Please write your product model and serial number on the last page of this
user manual, and store in a safe location close to the appliance for easy future
reference.
This user manual may also be applicable for several other models. Differences
between models will be listed.
If you have any questions or concerns, please call our contact centre or find
help and information online at www.beko.co.uk
Symbols and their descriptions
This instruction manual contains the following symbols:
C Important information or useful usage tips.
A Warning against dangerous conditions for life and property.
B Warning against electric voltage.
A
A
A
C
SUPPLIER’S NAME
MODEL IDENTIFIER
(*)
INFORMATION
C
The model information as stored in the product data base
can be reached by entering following website and searching
for your model identifier (*) found on energy label.
https://eprel.ec.europa.eu/
EN
3
1 Your refrigerator 4
2 Warnings 5
Electrical requirements ...........................6
Warning! This appliance must be
earthed .......................................................... 6
Energy saving tips ..................................... 7
Compliance with WEEE Directive and
Disposing of the Waste Product: .......8
Compliance with rohs directive: .........8
Package information ................................ 8
3 Installation 9
Transportation Instructions ..................9
Important ......................................................9
Installation Instructions .........................9
Changing the illumination lamp ....... 11
Reversing The Doors .............................12
4 Before operating 15
Final Check .................................................15
5 Using your refrigerator 16
Temperature Control And
Adjustment ................................................16
Thermostat setting button ................. 16
Suggested Arrangement Of Food In
The Fridge/Freezer .................................17
Storing Frozen Food ...............................18
Freezing Fresh Food ...............................18
Making Ice Cubes .....................................18
Defrosting ..................................................19
6 Maintenance and
cleaning 20
7 Do's and Don'ts 21
Problem Solvıng ...................................... 22
EN
4
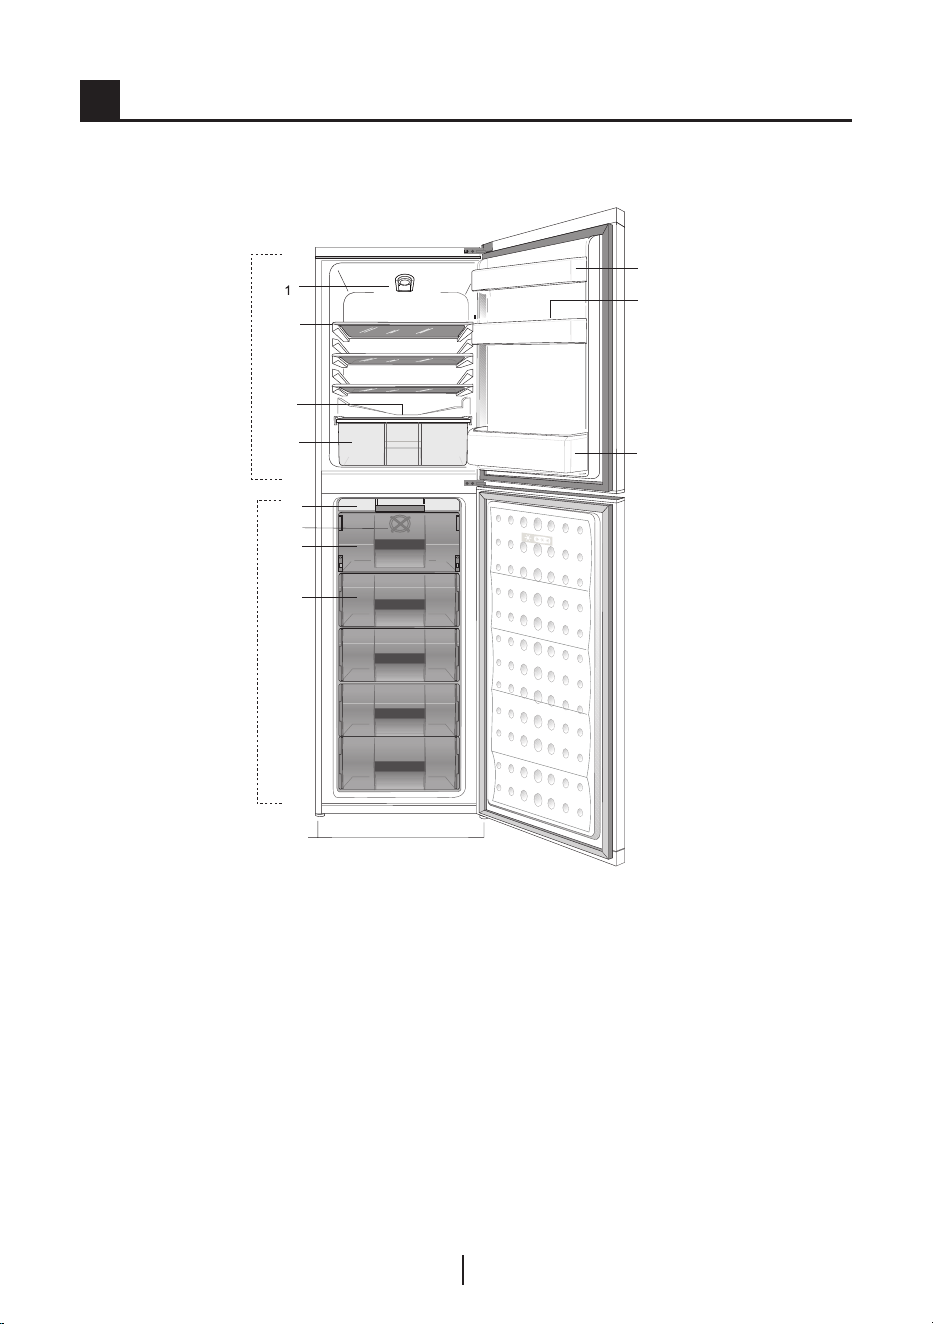
1 Your refrigerator
Congratulations on your choice of a Beko quality Appliance which has been
designed to give you service for many years.
1. Temperature setting knob
2. Cabinet shelves
3. Defrost water collection channel
4. Salad crisper
5. Ice bank
6. Freezer fan
7. Fast freeze compartment
8. Frozen food storage drawers
9. Adjustable feet
10. Door shelves
11. Egg tray
12. Bottle shelf
13. Fridge compartment
14. Freezer compartment
C Figures that take place in this instruction manual are schematic and may not
correspond exactly with your product. If the subject parts are not included in the
product you have purchased, then it is valid for other models.
5
6
7
8
9
10
12
3
4
2
11
13
14
EN
5
2 Warnings
• Do not connect your
appliance to the electricity
supply until all packing and
transit protectors have been
removed.
• If transported horizontally
leave to stand upright for at
least 4 hours before switching
on to allow compressor oil to
settle
• If you are discarding an old
refrigerator with a lock or latch
fitted to the door, disable the
lock/latch, ensure that it is left
in a safe condition to prevent
the entrapment of young
children.
• This fridge/freezer must
only be used for its intended
purpose i.e the storing and
freezing of edible foodstuff.
• Do not dispose of the
appliance on a fire. At Beko,
the care and protection
of our environment is an
ongoing commitment. This
appliance which is among
the latest range introduced
is particularly environment
friendly. Your appliance
contains non CFC / HFC
natural substances in the
cooling system (Called
R600a) and in the insulation
(Called cyclopentane) which
are potentially flammable if
exposed to fire. Therefore,
take care not to damage, the
cooling circuit / pipes of the
appliance in transportation
and in use. In case of damage
do not expose the appliance
to fire or potential ignition
source and immediately
ventilate the room where the
appliance is situated.
• We suggest you contact your
local authority for disposal
information and facilities
available.
• To obtain the best possible
performance and trouble free
operation from your appliance
it is very important to carefully
read these instructions.
• On delivery, check to make
sure that the product is not
damaged and that all the parts
and accessories are in perfect
condition.
• Ensure that the plug remains
readily accessible. Do not use
multiple adapter or extension
cable.
• Failure to observe these
instructions may invalidate
your right to free service
during the guarantee period.
• Keep ventilation openings, in
the appliance enclosure or in
the built-in structure, clear of
obstruction.
• Do not damage the refrigerant
circuit.
• Do not use electrical
appliances inside the food
storage compartments of the
appliance, unless they are of
the type recommended by the
manufacturer.

EN
6
• We suggest you keep these
instructions in a safe place for
easy reference.
• This appliance can be used
by children aged from 8 years
and above and persons with
reduced physical, sensory
or mental capabilities or
lack of experience and
knowledge if they have
been given supervision or
instruction concerning use
of the appliance in a safe
way and understand the
hazards involved. Children
shall not play with the
appliance. Cleaning and user
maintenance shall not be
made by children without
supervision.
• Children should be supervised
to ensure that they do not
play with the appliance.
Electrical requirements
Before you insert the plug into
the wall socket make sure that
the voltage and the frequency
shown on the rating plate inside
the appliance corresponds to
your electricity supply.
Rating label is on the left hand
side of fridge inner liner.
We recommend that this
appliance be connected to the
mains supply via a suitable
switched and fused socket. The
appliance must be positioned
so that the plug is accessible.
WARNING:
When positioning the
appliance ensure the supply
cord is not trapped or damaged.
Should the mains lead of the
appliance become damaged or
should it need replacing at any
time, it must be replaced by a
special purpose made mains
lead which can only be obtained
from a Beko authorised service
agent.
Warning! This appliance
must be earthed
If the fitted moulded plug is
not suitable for your socket,
then the plug should be cut
off and an appropriate plug
fitted. Destroy the old plug
which is cut off as a plug with
bared cord could cause a shock
hazard if inserted into a socket
elsewhere in the house.
The moulded plug on this
appliance incorporates a 13
A fuse. Should the fuse need
to be replaced an ASTABEAB
approved BS 1362 fuse of the
same rating must be used. Do
not forget to refit the fuse
cover. In the event of losing the
fuse cover the plug must not be
used until a replacement fuse
cover has been fitted.
Colour of the replacement
fuse cover must be the same
colour as that visible on the pin
face of the plug. Fuse covers
are available from any good
electrical store.
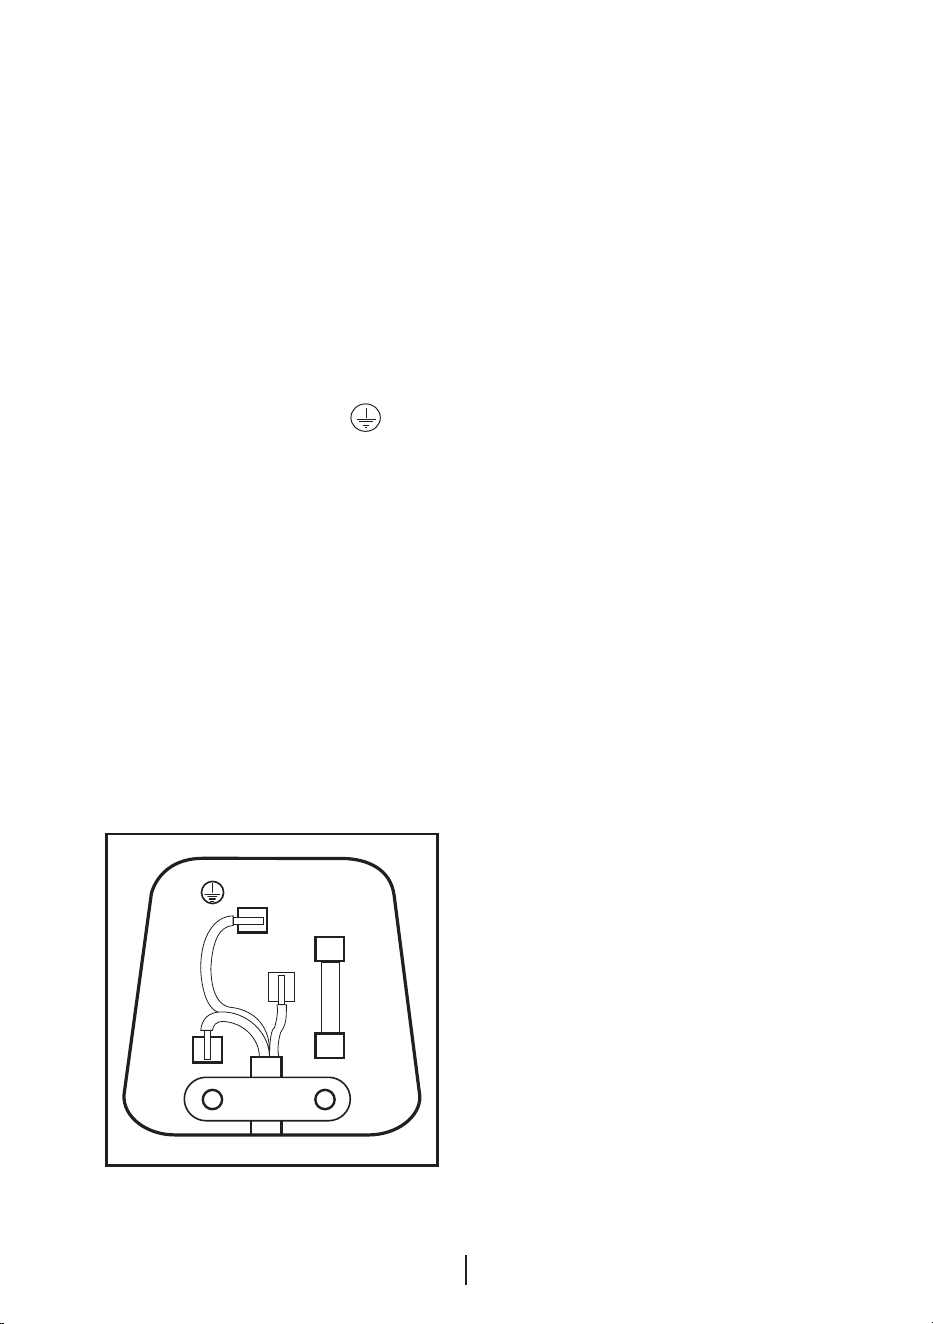
EN
7
FITTED WITH
BS 1362 13A FUSE ALWAYS
FIT BS 1362 REPLACEMENT
CARTRIDGE FUSE
GREEN &
YELLOW
OR
GREEN
N
BLUE
OR
BLACK
L
BROWN
OR
RED
22mm.
6mm.
6mm.
6mm.
32mm.
12mm.
FUSE
CORD GRIP
Important! Fitting A
Different Plug
1. As the colours of the wires
in the mains lead of this
appliance may not correspond
with the coloured markings
identifying the terminals in
your plug proceed as follows:
(See diagram).
2. Connect the green-yellow
or green (Earth) wire to the
terminal in the plug marked
‘E’ or with the symbol or
coloured green and yellow or
green.
3. Connect the blue (Neutral)
wire to the terminal in the plug
marked ‘N’ or coloured black.
4. Connect the brown (Live) wire
to the terminal in the plug
marked ‘L’ or coloured red.
5. With alternative plugs a 13
A fuse must be fitted either
in the plug or adaptor or in
the main fuse box. If in doubt
contact a qualified electrician.
Energy saving tips
1. Ensure your appliance is
installed in a well ventilated
area.
2. Ensure the time between
buying chilled/frozen food
and placing them in your
appliance is kept at minimum,
particularly in summer. We
recommend you use a cool
bag or a special carrier bag to
carry perishable food.
3. Do not leave the door (s) of
your appliance open longer
than necessary and ensure
they are closed properly after
each opening.
4. Defrost frozen food in the
fridge compartment, so that
frozen food acts as an ice pack
to assist cooling in the fridge.
5. Energy consumption of this
appliance is measured while
freezer compartment is
loaded without use of top
shelf lid and the drawers
except the bottom drawer.
It is advised that freezer
compartment is loaded
without use of drawers except
the bottom drawer in order
to achieve maximum loading
capacity.
EN
8
Compliance with WEEE
Directive and Disposing of
the Waste Product:
This product complies
with EU WEEE
Directive (2012/19/
EU). This product
bears a classification
symbol for waste
electrical and electronic
equipment (WEEE).This product
has been manufactured with
high quality parts and materials
which can be reused and are
suitable for recycling. Do not
dispose of the waste product
with normal domestic and other
wastes at the end of its service
life. Take it to the collection
center for the recycling of
electrical and electronic
equipment. Please consult your
local authorities to learn about
these collection centers.
Compliance with rohs
directive:
The product you have
purchased complies with EU
RoHS Directive (2011/65/EU).
It does not contain harmful and
prohibited materials specified
in the Directive.
Package information
Packaging materials of the
product are manufactured
from recyclable materials in
accordance with our National
Environment Regulations. Do
not dispose of the packaging
materials together with the
domestic or other wastes. Take
them to the packaging material
collection points designated by
the local authorities.
EN
9
3 Installation
Transportation
Instructions
1. The appliance should be
transported only in a vertical upright
position. The packing as supplied
must be intact during transportation.
2. If during the course of
transport the appliance has to be
transported horizontally, it must only
be laid on its right hand side when
standing in the front of the appliance.
After bringing it to upright position,it
must not be operated for at least 4
hours to allow the system to settle.
3. Failure to comply with the
above instructions could result in
damage occuringto the appliance.
The manufacturer will not be held
responsible if these instructions are
disregarded.
4. The appliance must be
protected against rain, moisture and
other atmospheric influences.
5. When positioning your
appliance take care not to damage
your flooring, pipes, wall coverings
etc. Do not move the appliance by
pulling by the door or handle.
6. Empty any water in the drain
tray before moving. See section
‘Defrosting’ and ‘Care & cleaning’ for
further information.
7. Make sure that the defrost
water pipe at the back of the product
is fixed to the plastic evaporating pan
on the top of the compressor, to avoid
defrost water spillage on the floor.
Important :
Care must be taken while cleaning
/carrying the appliance to avoid
touching the bottom of the condenser
metal wires at the back of the
appliance as you might injure your
fingers and hands.
Do not attempt to sit or stand on top
of your appliance as it is not designed
for such use. You could injure yourself
or damage the appliance.
Important :
Make sure that mains cable is not
caught under the appliance during and
after carrying / moving the appliance,
to avoid the mains cable becoming cut
or damaged.”
Important :
This appliance is not designed for
stacking with any otherappliance.
When positioning your appliance,
take care not to damage your flooring,
pipes,wall coverings etc.
Do not allow children to play with
the appliance or tamper with the
controls. BEKO declines to accept any
liability should the instructions not be
followed.
Important
Installation Instructions
1. The space in the room where
the appliance is installed must not be
smaller than 10 cubic metres.
2. This appliance has been
designed to operate in ambient
temperatures up to 32 degrees C
(90 degrees F) and is equipped with
Advanced Electronic Temperature
Control System [AETCS] which
EN
10
ensures that at the advised setting
[4 - four on the knob] the frozen food
in the freezer will not defrost even
if the ambient temperature falls as
low as -15 °C. When first installed the
product MUST NOT be placed in low
ambient temperatures because the
freezer will not reduce to it’s standard
operating temperature. Once it
has reached its steady operating
state it can be re-located. So you
may then install your appliance in a
garage or an unheated room without
having to worry about frozen food in
the freezer being spoilt. However at
low ambient temperatures mentioned
above, fridge contents are likely to
freeze, so check and consume food
in the fridge accordingly. When the
ambient temperature returns to
normal, you may change the knob
setting to suit your needs. If the
ambient temperature is below 0°C,
the food in the fridge compartment
will freeze. So, we recommend you
don’t use the fridge compartment
in such low ambient conditions.
You can continue using the freezer
compartment as usual.
3. Do not place the appliance
near cookers, radiators or in direct
sunlight as this will cause your
appliance to work harder. If installed
next to a source of heat or freezer,
maintain the following minimum side
clearances:
From Cookers 50 mm (2”)
From Radiators 300 mm (12”)
From Freezers 25 mm (1”)
4. Make sure that sufficient room
is provided around the appliance to
ensure free air circulation. Fit the
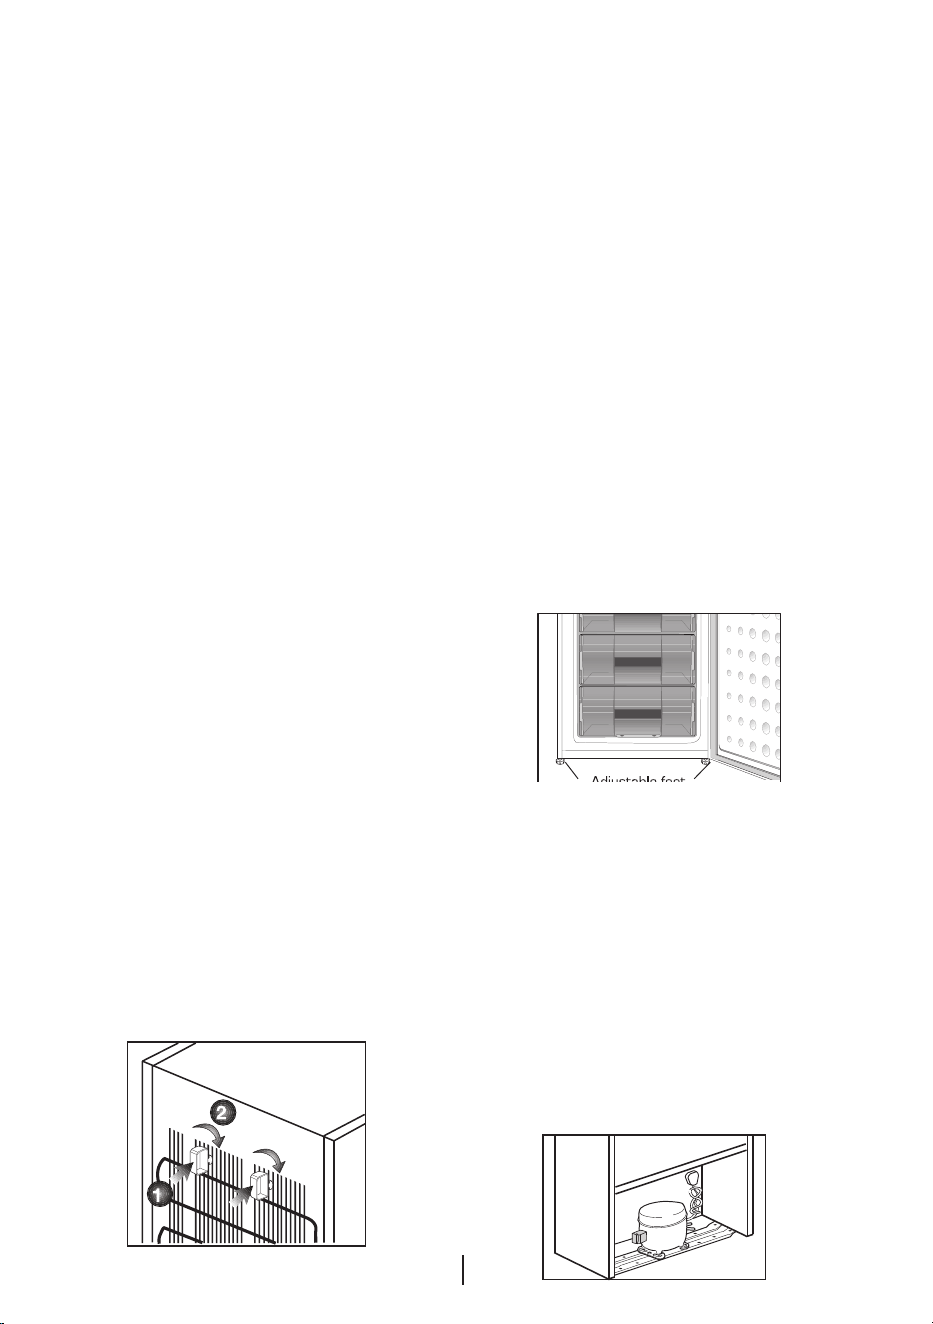
Two plastic wall spacers supplied
with the appliance rotating 1/4 turn
to the condenser at the back of the
appliance (See Diagram).
5. The fridge/freezer should
be located on a smooth surface.
The two front feet can be adjusted
as required. To ensure that your
appliance is standing upright adjust
the two front feet by turning
clockwise or anti-clockwise, until
the product is in firm contact with
the floor. Correct adjustment of feet
avoids excessive vibration and noise.
6. Refer to cleaning and care
section to prepare your appliance for
use.A special receptacle is supplied to
store the mains plug during transit.
The receptacle is fixed at the back
of the cabinet, on the side of the
compressor. (See diagram) Gently
remove the plug from the receptacle.
Never pull the mains cord, you may
damage the appliance. In the case
of transportation, ensure you locate
the plug in the receptacle provided to
avoid transit damage.

EN
11
WARNING:
Do not locate extension sockets
or charging transformers/power
supplies or Lithium-Iron battery
operated products adjacent to the
compressor as they could overheat.
Changing the illumination
lamp
To change the Bulb/LED used for
illumination of your refrigerator, call
your AuthorisedService.
The lamp(s) used in this appliance
is not suitable for household room
illumination. The intended purpose
of this lamp is to assist the user to
place foodstuffs in the refrigerator/
freezer in a safe and comfortable
way.The lamps used in this appliance
have to withstand extreme physical
conditions such as temperatures
below -20 °C.
(only chest and upright freezer)

EN
12
Reversing The Doors
We recommend that you reverse
doors before switching on for the first
time.
Tools required: Small and medium size
flat and cross-headed screwdrivers, a
pair of pliers.
Spare Parts supplied in the plastic
bag: The following parts, which are
exclusively for left hand side fitted
hinge operation are supplied in a
plastic bag with the appliance:
- Upper door top trim hinge covers
– there are 2 different parts, one for
each side of top trim.
- Upper door middle hinge bushing/
door stopper assembly.
We suggest you keep all the parts
supplied in the plastic bag and also
parts, which have been removed
when reversing doors, in a safe place
for possible future, re-use.
IMPORTANT:
We suggest you ask somebody to
help you when moving the appliance
around and to hold doors when
removing / re-fitting hinges and doors
to avoid any injury and damage to the
product.
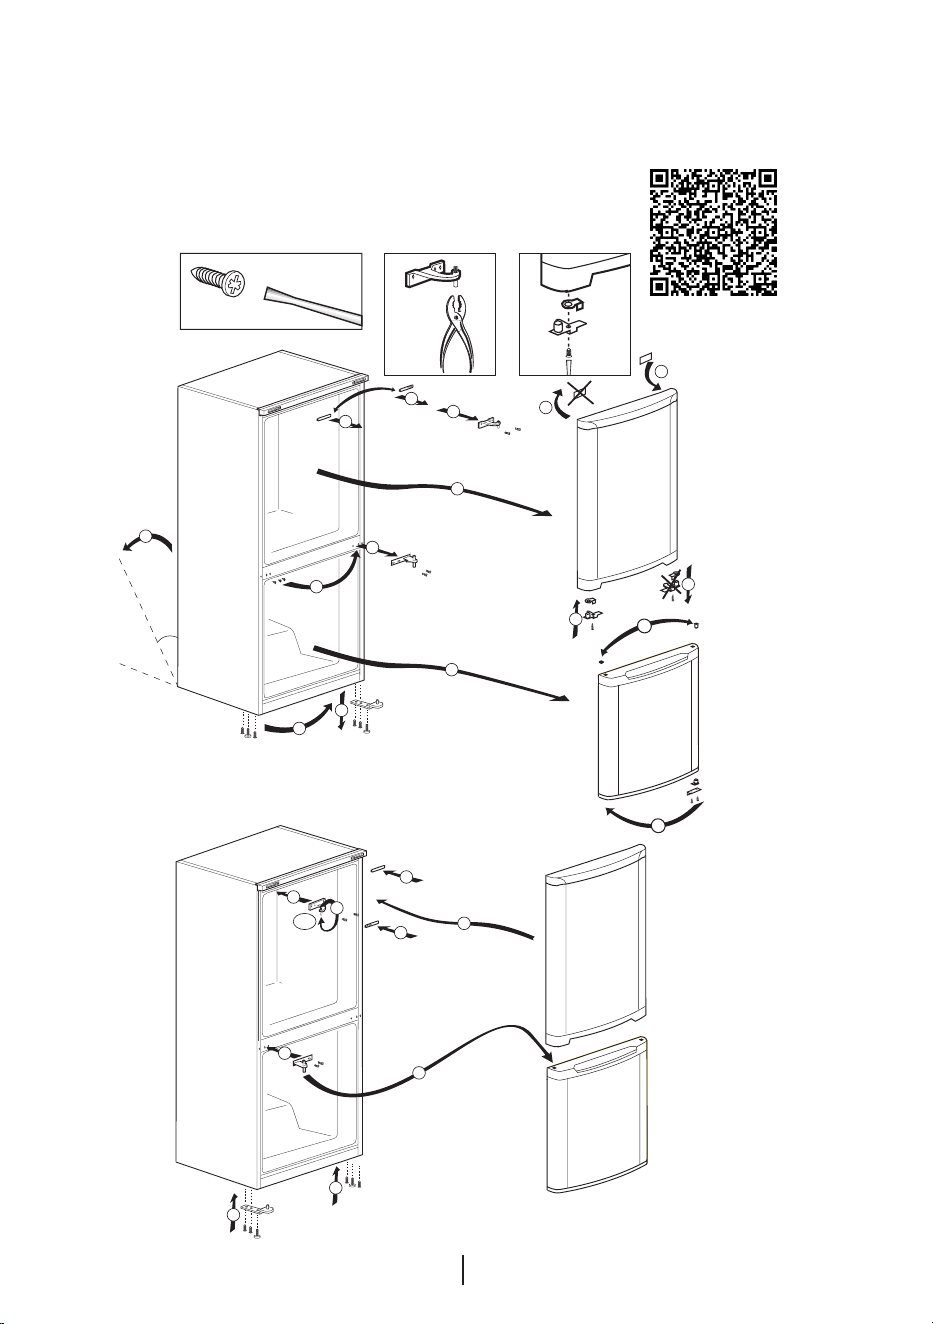
Please refer to diagrams supplied.
To follow numbers in brackets below,
refer to the main diagram.
1. Switch off the appliance at the
socket outlet and pull out the mains
plug.
2. Remove all loose items and
fittings and food, if any, from inside
the appliance and door racks.
3. Gently prise off plastic hinge
cover of upper door top trim and
hinge covers on both sides of front
top panel using a small flat-headed
screwdriver. (1)
4. Gently tilt the appliance back
against a strong wall on its rear side
sufficiently to allow the lower hinge
to be removed. Take care to protect
the appliance, your wall and floor
coverings. You can utilise the original
packaging to do this. Once you tilt the
appliance back, check to make sure
the appliance is completely stable and
safe before you carry on. (2)
5. Unscrew and remove the
lower hinge using a cross-headed
screwdriver while holding the lower
door firmly.(3)
6. Remove lower door carefully
off the middle hinge and stand door
upright in a safe place.(4)
7. Open upper door and unscrew
and remove the middle hinge while
holding the upper door firmly. Use a
flat-headed screwdriver. Middle hinge
will need to be rotated 180 degrees
before re-fitting on the opposite side.
(5)
8. Remove upper door carefully
off the upper hinge and stand door
upright in a safe place.(6)
9. Unscrew and remove the
upper hinge using a flat-headed
screwdriver.(7)
10. Rotate the upper hinge 180
degrees and then unscrew and
remove the hinge pin using a pair of
pliers and re-fit to opposite side of
hinge.(8)
11. Reposition plugs and hinge
pin bushings on top of doors on the
opposite side of both doors. Use small
flatheaded screwdrivers to remove
plugs and bushings. Take care not to
mark doors.(9)

EN
13
12. Reposition left hand side feet
on the opposite side.(10)
Unscrew and remove the bottom
door hinge pin bushing/door
stopper using a cross-headed
screwdriver. (11)Unscrew and
remove the upper door middle
hinge pin bushing/door stopper
using a cross-headed screwdriver.
IMPORTANT:This part cannot be
used on the opposite side; left hand
side middle hinge pin bushing/door
stopper part is supplied in the plastic
bag.(11)
13. Re-fit the upper hinge on the
left hand side using flat-headed
screwdriver.(12)
14. Fit upper door left hand side
middle hinge pin bushing/door
stopper supplied in the plastic bag
using cross-headed screwdriver.(13)
15. Reposition three small plastic
plugs on the left hand side, which are
covering middle hinge holes, on the
opposite side to cover holes left
empty.(14)
16. Locate and re-fit upper door to
upper hinge and hold the door firmly.
(15)
17. Locate the middle hinge pin
to middle hinge pin bushing of upper
door on the left hand side and re-fit
the middle hinge.(16) First fit the
left screw when the door is closed
and then fit the right screw after
opening the door for access.
18. Reposition the screw fitted to
lower hinge hole on the left hand side
at the bottom of the cabinet on the
opposite side.(17)
19. Locate and re-fit lower door
to middle hinge pin and then re-fit
the lower hinge on the left hand side.
(18),(19)
20. Carefully stand the appliance
upright and adjust the two front feet
if necessary.
21. Check that doors open and
close easily, they are aligned correctly
and that there are no gaps allowing
ir into the cabinet. If there are gaps
between the door seal and the
cabinet, adjust the door seal by gently
pulling away from the door using
fingers.
22. Check that all the hinge screws
are tightened. Avoid over tightening
the screws.
23. Put all items, fittings back in
the appliance.
24. Fit upper door top trim and
front top panel plastic hinge covers.
Upper door top trim hinge covers are
supplied in the plastic bag.(20)
25. Wait for at least 4 hours to
allow the system to settle before
switching on.
26. Once the correct storage
temperatures have been reached in
the appliance, put back all the food.
EN
14
5
14
3
11
13
9
20
3
10
7
11
45 °
2
4
6
1
1
(item 7) (item 10) (item 15)
18
16
19
17
180°
8
12
20
20
15
Scan to watch video showing how
to reverse doors.
EN
15
4 Before operating
Final Check
Before you start using the fridge/
freezer check that:
1. For a freestanding appliance;
‘this refrigerating appliance is not
intended to be used as a built-in
appliance’ ;.
2. The feet have been adjusted
for perfect levelling.
3. The interior is dry and air can
circulate freely at the rear of the
cabinet.
4. Clean the interior as
recommended under “CLEANING AND
CARE.”
5. Insert the plug into the wall
socket and switch on the electricity
supply.
• When the door is open the fridge
interior light will come on.
6. You will hear a noise as the
compressor starts up. The liquid and
gases sealed within the refrigeration
system may also give rise to noise,
whether the compressor is running
or not which is quite normal.“Due
to operation of the fan inside the
frost free freezer compartment,
overall noise level is slightly higher
in comparison to non-frost free
appliances. This is quite normal and is
not a fault.”
7. Set the setting knob half way
between min and max.
8. Front edges of the cabinet may
feel warm. This is normal. These areas
are designed to be warm to avoid
condensation.
9. Do not load the appliance
immediately it is switched on. Wait
until the correct storage temperature
has been reached. We recommend
that you check the temperature
with an accurate thermometer
(see; Temperature Control and
Adjustment)”
10. When the freezer reaches the
desired temperature the freezer fan
will stop. When the freezer fan is on,
the noise will be louder when the
freezer door is opened.
11. Avoid spillage of food
particularly small items like rice,
peas, beans through the fan guard as
they may cause the cooling system
to block and therefore operate less
efficiently.
12. Since hot and humid air will not
directly penetrate into your product
when the doors are not opened,
your product will optimize itself in
conditions sufficient to protect your
food. In this energy saving function,
functions and components such as
compressor, fan, heater, defrost,
lighting, display and so on will operate
according to the needs to consume
minimum energy while maintaining
the freshness of your foodstuff.
EN
16
5 Using your refrigerator
Temperature Control And
Adjustment
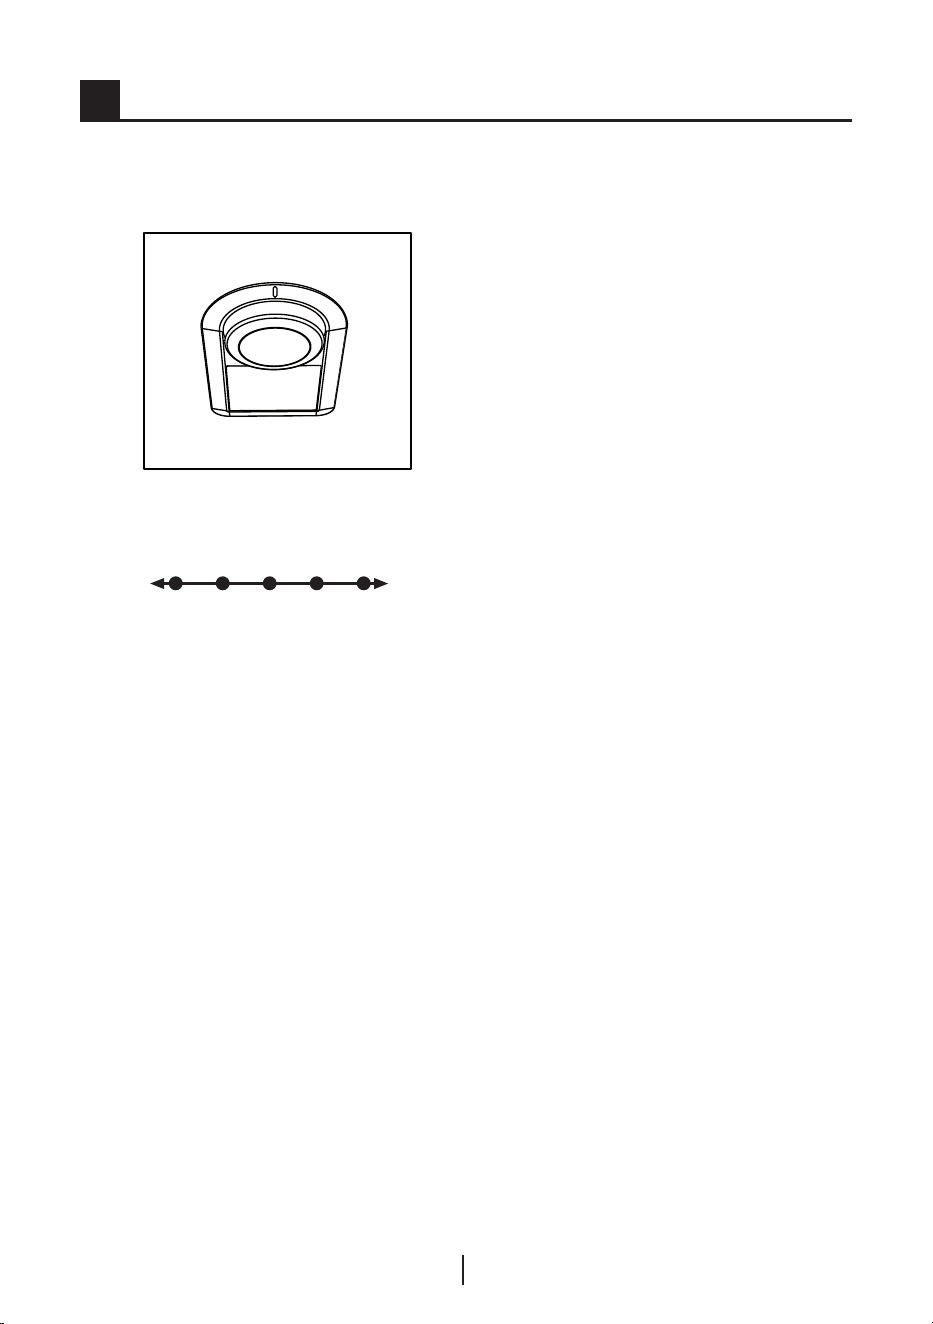
The operating temperature is
regulated by the temperature control.
Warm Cold
1 2 3 4 5
(Or) Min. Max.
1=Lowest cooling setting
(Warmest setting).
5=Highest cooling setting
(Coldest setting).
The average temperature inside the
fridge should be around +5°C.
Please choose the setting according
to the desired temperature.
Please note that there will be
different temperatures in the cooling
area.
The coldest region is immediately
above the vegetable compartment.
The interior temperature also
depends on ambient temperature,
the frequency with which the door is
opened and the amount of foods kept
inside.
Frequently opening the door causes
the interior temperature to rise.
For this reason, it is recommended
to close the door again as soon as
possible after use.
Thermostat setting button
The interior temperature of your
refrigerator changes for the following
reasons;
• Seasonal temperatures,
• Frequent opening of the door and
leaving the door open for long
periods,
• Food put into the refrigerator
without cooling down to the room
temperature,
• The location of the refrigerator in
the room (e.g. exposing to sunlight).
• You may adjust the varying interior
temperature due to such reasons
by using the thermostat. Numbers
around the thermostat button
indicates the cooling degrees.
• If the ambient temperature is higher
than 25°C, turn the thermostat
button to maximum position.
• If the ambient temperature is lower
than 25°C, turn the thermostat
button to minimum position.
EN
17
Suggested Arrangement
Of Food In The Fridge/
Freezer
2. The freezer compartment
is rated and suitable for
the freezing of fresh food and
storage of pre-frozen food. The
recommendation for storage
as stated on the food packaging
should be observed at all times.
3. Cooked dishes must be stored
in airtight covered containers.
4. Fresh wrapped produce can be
placed on the shelf. Fresh fruit and
vegetables should be cleaned and
stored in the crisper bins.
5. Bottles can be placed in the
door section.
6. To store raw meat, wrap in
polythene bags and place on the
lowest shelf. Do not allow to come
into contact with cooked food to avoid
contamination. For safety, only store
raw meat for two to three days.
7. Keep the food packed wrapped
or covered. Allow hot food and
beverages to cool before placing them
in the fridge. Do not store explosive
substances. High proof alcohol
must be stored upright in sealed
containers. Left over canned food
should not be stored in the can.
8. Fizzy drinks should not be
frozen and products such as flavoured
water ices should not be consumed
too cold.
9. Some fruit and vegetables
suffer damage if kept at
temperatures near 0°C. Therefore
wrap pineapples, melons, cucumbers,
tomatoes and similar produce in
polythene bags.
10. Place chilled cooked food and
similar food near the rear of the
fridge inner liner where the cold wall
is located.
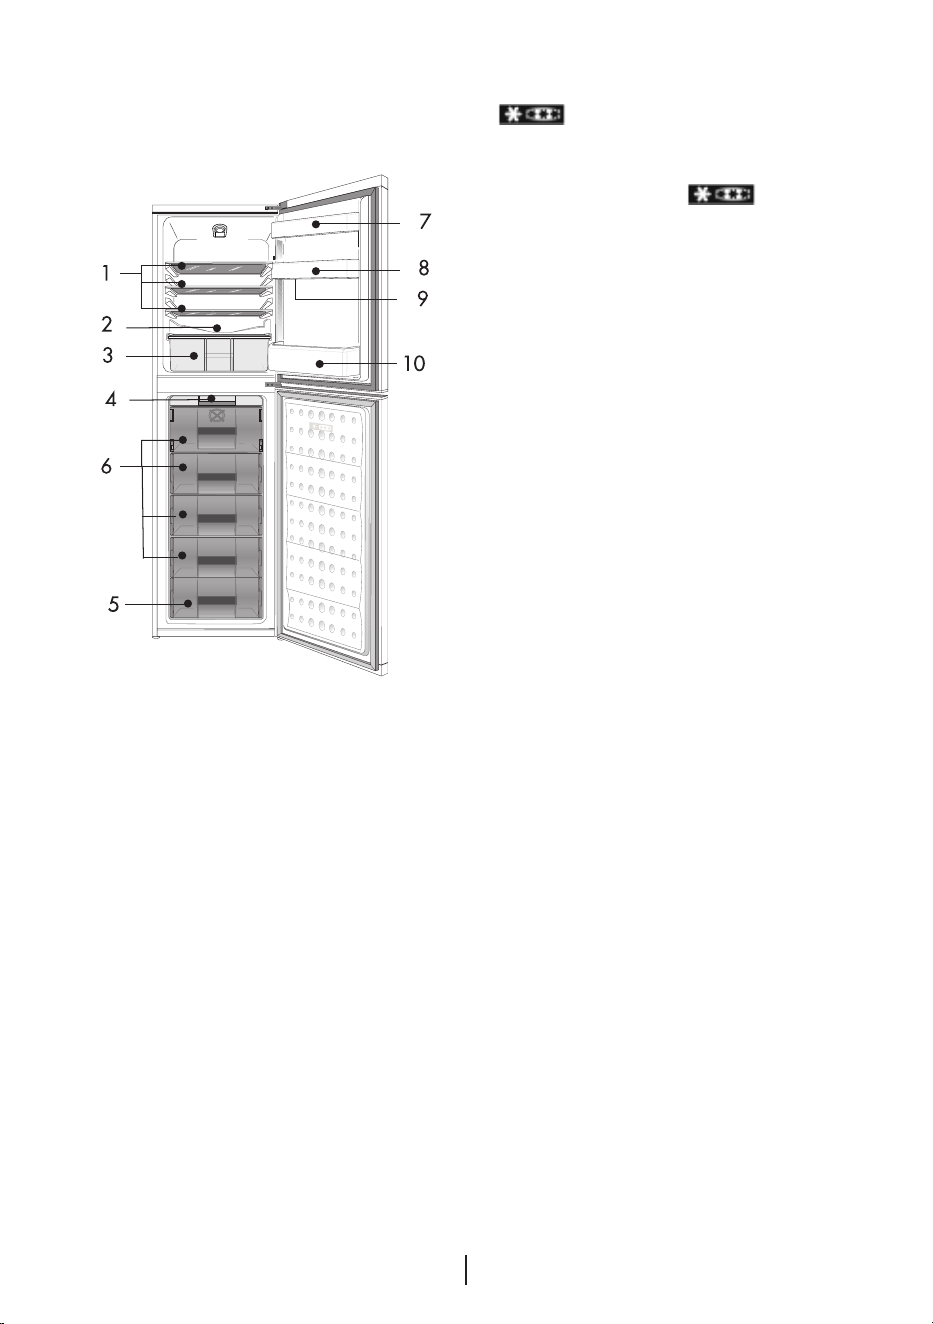
Arrangement Examples (See
diagram)
1. Baked, chilled cooked food,
dairy products, cans.
2. Meat, sausages, cold cuts.
3. Fruit, vegetables, salads.
4. Making, storing ice cubes.
5. Frozen food.
6. Frozen food and freezing of
fresh food.
7. Butter, cheese.
8. Small bottles, cans, tubes.
9. Eggs.
10. Tall/Large bottles.
The following guidelines and
recommendations are suggested to
obtain the best results and storage
hygiene.
1. The fridge compartment is for
the short term storage of fresh food
and drinks.
EN
18
11. Shelves, racks, crisper bins,
drawers, flaps, bottle grippers are all
removable.
12. Do not leave frozen food at
room temperature to thaw; the best
way to defrost food is to put it in the
fridge to thaw slowly. Make sure you
avoid defrosting food or food juices
drip onto other food.
13. For hygiene reasons, always
wrap food using a suitable packaging
material before storing in your
appliance to avoid contact with the
appliance surface.
Storing Frozen Food
Prepacked commercially frozen
food should be stored in accordance
with the frozen food manufacturer’s
instructions for a frozen food
storage compartment.
To ensure that the high quality
achieved by the frozen food
manufacturer and the food retailer is
maintained, the following should be
remembered:
1. Put packets in the freezer as
quickly as possible after purchase.
2. Ensure that contents are
labelled and dated.
3. Do not exceed “Use By”, “Best
Before” dates on the packaging.
If there is a power failure do not
open the door. Frozen food should not
be affected if the failure lasts for less
than 20 hrs. If the failure is longer,
then the food should be checked and
either eaten immediately or cooked
and then re-frozen.
Freezing Fresh Food
Please observe the following
instructions to obtain the best results.
Do not freeze too large a quantity at
any one time. The quality of the food
is best preserved when it is frozen
right through to the core as quickly as
possible.
Do not exceed the freezing capacity
of your appliance in 24 h which is 4 kg
(8.8 lb)
Placing warm food into the freezer
compartment causes the refrigeration
compressor to operate continuously
until the food is frozen solid. This can
temporarily lead to excessive
cooling of the refrigeration
compartment.
When freezing fresh food turn the
thermostat knob towards MAX. Small
quantities of food up to 1/2 kg. (1 lb)
can be frozen without having to rotate
the temperature control knob.
You may place fresh food to be frozen
in any part of the freezer.
Take special care not to mix already
frozen food and fresh food.
Making Ice Cubes
Fill the ice - cube tray 3/4 full with
water and place it in the Ice Bank.
Loosen frozen trays with the handle
of a spoon, never use sharp edged
objects such as knives, forks. Store
ice-cubes in the Ice Bank.
Note: If freshly made ice cubes are
not consumed for several weeks
and stored in Ice Bank, they will
slowly reduce in size and eventually
disappear completely.
EN
19
Defrosting
A) Fridge Compartment
The fridge compartment defrosts
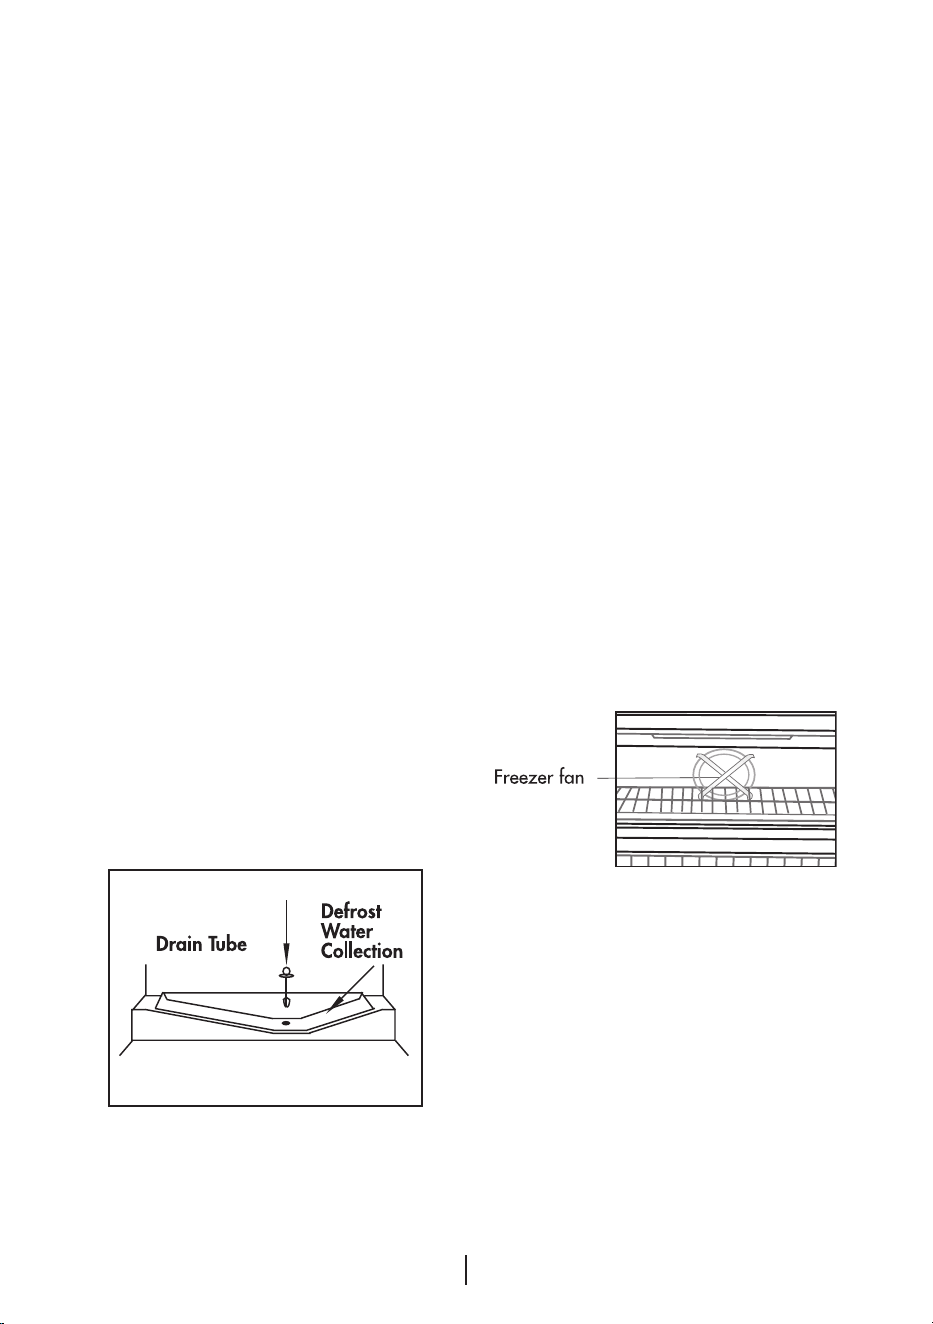
automatically. The defrosting water
runs to the drain tube via a collection
container at the back of the appliance
(1). (see diagram) During defrosting
water droplets may form at the back
of the fridge compartment where
concealed evaporator is located.
Some droplets may remain on the
liner and refreeze when defrosting is
completed. Do not allow items in the
fridge to touch the back wall as the
water droplets will make them wet.
Do not use pointed or sharp edged
objects such as knives, forks to remove
the droplets which have frozen.
If at any time the defrost water does
not drain from the collection channel,
check to ensure that no food particles
have blocked the drain tube. The drain
tube can be cleared by pushing the
special plastic plunger provided down
the drain tube (2). If the frost layer
reaches about 1/4”(7 mm), reduce
the setting (i.e. from 4 to 1) to restart
automatic defrosting.
B) Freezer Compartment
The freezer compartment defrosts
automatically.
Warnings!
• The fan inside the freezer
compartment circulates cold air.
Never insert any object through the
guard. Do not allow children to play
with the freezer fan.
• Never store products that contain
inflammable propellant gas (eg
dispensers, spray cans etc.) or
explosive substances.
• Don’t cover the shelves with any
protective materials, which may
obstruct air circulation.
• Do not allow children to play with
the appliance or tamper with the
controls.
• Do not obstruct the freezer fan
guard to ensure that you obtain the
best possible performance from
your appliance.
Warning:
Do not use any copper pots or dıshes
ınsıde the cabinet !
Do not load any food wıthout
packaging.!
EN
20
6 Maintenance and cleaning
• We recommend that you switch off
the appliance at the socket outlet
and pull out the mains plug before
cleaning.
• Never use any sharp abrasive
instrument, soap, household
cleaner, detergent and wax polish
for cleaning.
• Use luke warm water to clean the
cabinet of the appliance and wipe it
dry.
• Use a damp cloth wrung out in
a solution of one teaspoon of
bicarbonate of soda to one pint of
water to clean the interior and wipe
it dry.
• Make sure that no water enters the
lamp housing.
• If the appliance is not going to be
used for a long period of time switch
it off, remove all food, clean it and
leave the door ajar.
• Any dust that gathers on the
condenser, which is located at the
back of the appliance, should be
removed once a year with a vacuum
cleaner.
• Check door seals regularly to ensure
they are clean and free from food
particles.
• Removal of door tray
• To remove door racks, remove all the
contents and then simply push the
door rack upwards from the base.
• To remove a freezer drawer, pull
it as far as possible, and then tilt
it upwards, and then pull it out
completely.
• To remove the freezer flap door, first
open the door 3” and then gently
pull it off. Make sure that the flap is
in place before closing the freezer
door.
• Make sure that the special plastic
container (drain tray) at the back of
the appliance which collects defrost
water is clean at all times. If you
want to remove the tray to clean it
follow the instructions below :
• Switch off at the socket outlet and
pull out the mains plug.
• Push the lug down with the tip of
a screw driver & pull out with a jerk
movement
• Clean the drain tray and wipe it dry.
• Reassemble reversing the sequence
and operations.
• Avoid spillage of food particularly
small items like rice, peas, beans
through the fan guard as they
may cause the cooling system to
block and therefore operate less
efficiently.
ANever use cleaning agents or water
that contain chlorine to clean the
outer surfaces and chromium coated
parts of the product. Chlorine causes
corrosion on such metal surfaces.
EN
21
7 Do's and Don'ts
Do- Clean your appliance regularly
(See “Cleaning and Care”)
Do- Keep raw meat and poultry
below cooked food and dairy products.
Do- Take off any unusable leaves on
vegetables and wipe off any soil.
Do- Leave lettuce, cabbage, parsley
and cauliflower on the stem.
Do- Wrap cheese firstly in
greaseproof paper and then in a
polythene bag excluding as much air
as possible. For best results take out
of the fridge compartment an hour
before eating.
Do- Wrap raw meat and poultry
loosely in polythene or aluminium foil.
This prevents drying.
Do- Wrap fish and offal in polythene
bags.
Do- Wrap food which have a strong
odour or can dry out in polythene
bags, aluminium foil or place in an
airtight container.
Do- Wrap bread well to keep it fresh.
Do- Chill white wines, beer, lager and
mineral water before serving.
Do- Check contents of the freezer
every so often.
Do- Keep food for as short a time as
possible and adhere to “Best Before”,
“Use by” etc. dates.
Do- Store commercially frozen food
in accordance with the instructions
given on the packets that you buy.
Do- Always choose high quality fresh
food and be sure it is thoroughly clean
before you freeze it.
Do- Prepare fresh food for freezing
in small portions to ensure rapid
freezing.
Do- Wrap all food in aluminium foil
or freezer quality polythene bags and
make sure any air is excluded.
Do- Wrap frozen food when you buy
it and put it in to the freezer as soon
as possible.
Do- Defrost food in the fridge
compartment.
Do- Remove ice cream from the
freezer 10-20 minutes before serving.
Don’t- Store bananas in your fridge
compartment.
Don’t- Store melon in your fridge. It
can be chilled for short periods as long
as it is wrapped to avoid it flavouring
other food.
Don’t- Store poisonous or any
dangerous substances in your
appliance. It has been designed for the
storage of edible foodstuffs only.
Don’t- Consume food which has
been stored for an excessive time in
the fridge.
Don’t- Store cooked and fresh food
together in the same container. They
should be packaged and stored
seperately.
Don’t- Let defrosting food or food
juices drip onto food.
Don’t- Leave the door open for long
periods as this will make the appliance
more costly to run and cause excessive
ice formation.
Don’t- Put hot food into the
appliance. Let it cool down first.
Don’t- Put liquid-filled bottles or
sealed cans containing carbonated
liquids into the freezer as they may
burst.

EN
22
Don’t- Exceed the maximum freezing
loads (6 kg in any 24 hours) when
freezing fresh food.
Don’t- Give children ice-cream and
water ices direct from the freezer. The
low temperature may cause ‘freezer
burns’ on lips.
Don’t- Freeze fizzy drinks.
Don’t- Try to keep frozen food which
has thawed, it should be eaten within
24 hours or cooked and refrozen.
Don’t- Remove items from the
freezer with wet hands.
Don’t- Close the freezer door before
placing the compartment cover in its
place.
Don’t- Leave frozen food at room
temperature to thaw; the best way to
defrost food is to put it in the fridge
to thaw slowly. Make sure you avoid
defrosting food or food juices drip
onto other food.
Problem Solvıng
If the appliance does not operate
when switched on, check whether:
• The plug is inserted properly in the
socket and that the power supply
is on. (To check the power supply
to the socket, plug in another
appliance)
• The fuse has blown/circuit breaker
has tripped/main distribution switch
has been turned off.
• The temperature control has been
set correctly and not to “0” (OFF)
• New plug is wired correctly if you
have changed the fitted moulded
plug.
If the appliance is still not operating
after the above checks, please refer
to the section on “How To Obtain
Service”.
Please ensure that above checks
have been made as a charge will be
made if no fault is found.

EN
23
BEKO UK AND IRELAND STANDARD MANUFACTURER GUARANTEE
TERMS AND CONDITIONS
Your new Beko product is guaranteed against faulty materials, defective
components or manufacturing defects.
The standard guarantee starts from the date of original purchase of the product,
and lasts for a period of twelve (12) months unless Beko plc (the “Manufacturer”)
agrees to extend the guarantee for the product in writing.
If you have purchased an American style Fridge freezer, the standard guarantee
starts from the date of original purchase of the product, and lasts for a period of
twenty four (24) months unless Beko plc (the “Manufacturer”) agrees to extend
the guarantee for the product in writing.
If you have any questions about the guarantee on your product (including how
long it is valid), please contact your retailer or our contact centre on
0333 207 971(UK and Northern Ireland) or 01 862 3411 (Republic of Ireland)
This guarantee does not in any way diminish or affect your statutory rights
in connection with the product. This guarantee is in addition to your statutory
rights as a consumer. If you have any questions about these rights, please contact
the retailer from which you purchased the product. In certain circumstances,
it is possible that your statutory rights may offer additional or higher levels of
protection than those offered under the terms of this guarantee.
What is covered by this guarantee?
• Repairs to the product required as a result of faulty materials, defective
components or manufacturing defects.
• Functional replacement parts to repair a product.
• The costs of a Beko Approved Engineer to carry out the repair.
What is not covered?
• Transit and delivery damage.
• Cabinet or appearance parts, including but not limited to control knobs, flaps and
handles.
• Accessories and/or consumable items including but not limited to ice trays,
scrapers, cutlery baskets, filters and light bulbs.
• Repairs necessary as a direct or indirect result of:
- Accidental damage, misuse or abuse of a product.
- An attempted repair of a product by anyone other than a Beko Approved
Engineer (the “Engineer”).
- Installation or use of a product where such installation or use fails to
meet the requirements contained in this guarantee or the User Instructions
Booklet.

EN
24
• Repairs to a product operated at any time on commercial or non-residential
household premises (unless we have previously agreed to the installation
environment).
This guarantee is limited to the cost of repairing the product. To the extent
permitted by law, the Manufacturer does not accept and will not be held liable
for any financial loss incurred in connection with the failure of any product to
operate in accordance with the expected standards. Such financial loss includes
but is not limited to loss arising from:
• Time taken off work.
• Damaged food, clothing or other items.
• Meals taken at restaurants or from takeaways.
• General compensation for inconvenience.
Important Notes
1. Your product is designed and built for domestic household use only.
2. The guarantee will automatically be void if the product is installed or is
used in commercial or non-residential domestic household premises, unless
we have previously agreed to the installation environment.
3. The product must be correctly installed, located and operated in
accordance with the instructions contained in the User Instructions Booklet
provided with your product.
4. Professional installation by a qualified Electrical Domestic Appliance
Installer is recommended for all Washing Machines, Dishwashers and Electric
Cookers (as incorrect installation may result in you having to pay for the cost of
repairing the product).
5. Gas Cookers must be professionally installed by a Gas Safe (or Gas
Networks Ireland for Republic of Ireland) registered gas installer.
6. This guarantee is given in respect of products purchased and used
within the United Kingdom and the Republic of Ireland.
7. This guarantee is effective from the initial date of purchase of a new
product from an authorised retailer and will be void if the product is resold.
8. This guarantee does not apply to graded sales (where the product is
purchased as a “second”).
9. Possession of a copy of these terms and conditions does not necessarily
mean that a product has the benefit of this guarantee. If you have any
questions, please call our Call Centre on the number set out above.
10. The Manufacturer reserves the right to terminate the guarantee if its
staff or representatives are subjected to physical or verbal abuse in the course
of carrying out their duties.
11. Optional extras, where available (i.e. extendable feet) are supplied on a
chargeable basis only.

EN
25
Does Beko offer replacements?
This is a repair-only guarantee. On occasion, the Manufacturer may at its sole
discretion, replace your product with a new product instead of carrying out a
repair. Where a replacement is offered, this would normally be an identical model
but when this is not possible, a model of similar specification will be provided.
The Manufacturer will cover the costs and arrange for the delivery of the new
product and for the return of the old product. Any costs related to disconnecting
the faulty product and installing the replacement product will not be borne by
the Manufacturer unless previously agreed to in writing. The original guarantee
will continue to apply to the replacement product; the new product will not
come with a new guarantee.
When will the repair take place?
Our Engineers work Monday to Friday 9.00am to 5.00pm. Appointments
outside these hours may be possible at the sole discretion of the Manufacturer
but cannot be guaranteed. Whilst our Engineers will endeavour to minimize
inconvenience and to meet requests for specific timed appointments, this
cannot be guaranteed. We will not be liable for delays or if it is unable to carry
out a repair because a convenient appointment cannot be arranged.
Will there be any charge for the repairs?
It is your responsibility to provide evidence to the Engineer that your product is
covered by this guarantee with a proof of purchase. The Manufacturer reserves
the right to charge for the reasonable cost of any service call if:
• You cannot provide evidence that your product is covered by this guarantee.
• Where a service call has been made and the engineer finds that there is no fault
with your product.
• That your product has not been installed or operated in accordance with the
User Instructions Booklet.
• That the fault was caused by something other than faulty materials, defective
components or manufacturing defects.
• For missed appointments.
Payment of these costs are due immediately upon the Engineer providing you
with an invoice. The Manufacturer reserves the right to terminate the guarantee
if you fail to pay the costs for the service call in a timely manner.
If you are a resident of the United Kingdom, this guarantee will be governed
by English law and subject to the English Courts, save where you live in another
part of the United Kingdom, in which case the law and courts of that location
will apply.
EN
26
If you are resident in the Republic of Ireland, this guarantee will be governed by
Irish law and the Irish courts will have jurisdiction.
This guarantee is provided by Beko plc. Beko House, 1 Greenhill Crescent,
Watford, Hertfordshire. WD18 8QU.
Beko plc is registered in England and Wales with company registration
number 02415578
BEKO UK AND IRELAND BUILT-IN APPLIANCES GUARANTEE TERMS
AND CONDITIONS
If you have purchased a built-in or integrated appliance, and registered it
within 90 days of purchase by completing the online registration form, then
the standard 12 month guarantee will be extended to 24 months, under the
same terms and conditions as detailed in our Standard Guarantee Terms and
Conditions.
HOW TO OBTAIN SERVICE FOR YOUR APPLIANCE
Please keep your purchase receipt or other proof of purchase details in a safe
place; you will need to have this documentation available should the product
require attention under guarantee.
Please take a few moments to complete the details below, as you will need this
information when you call us, or to use our online services. When you call us you
may be required to input your serial number into your telephone keypad. For
help please visit beko.co.uk/support/model-finder
• The product model number is printed on the Operating Instruction Booklet /
User guide
• The product model and serial number is printed on the Rating Label affixed to
the appliance.
• The Retailer (Purchased from) and Date of purchase will be printed on your
purchase receipt or other proof of purchase paperwork
Recording of these details alone will not count as proof of purchase. A valid
proof of purchase is required for requesting service under guarantee.
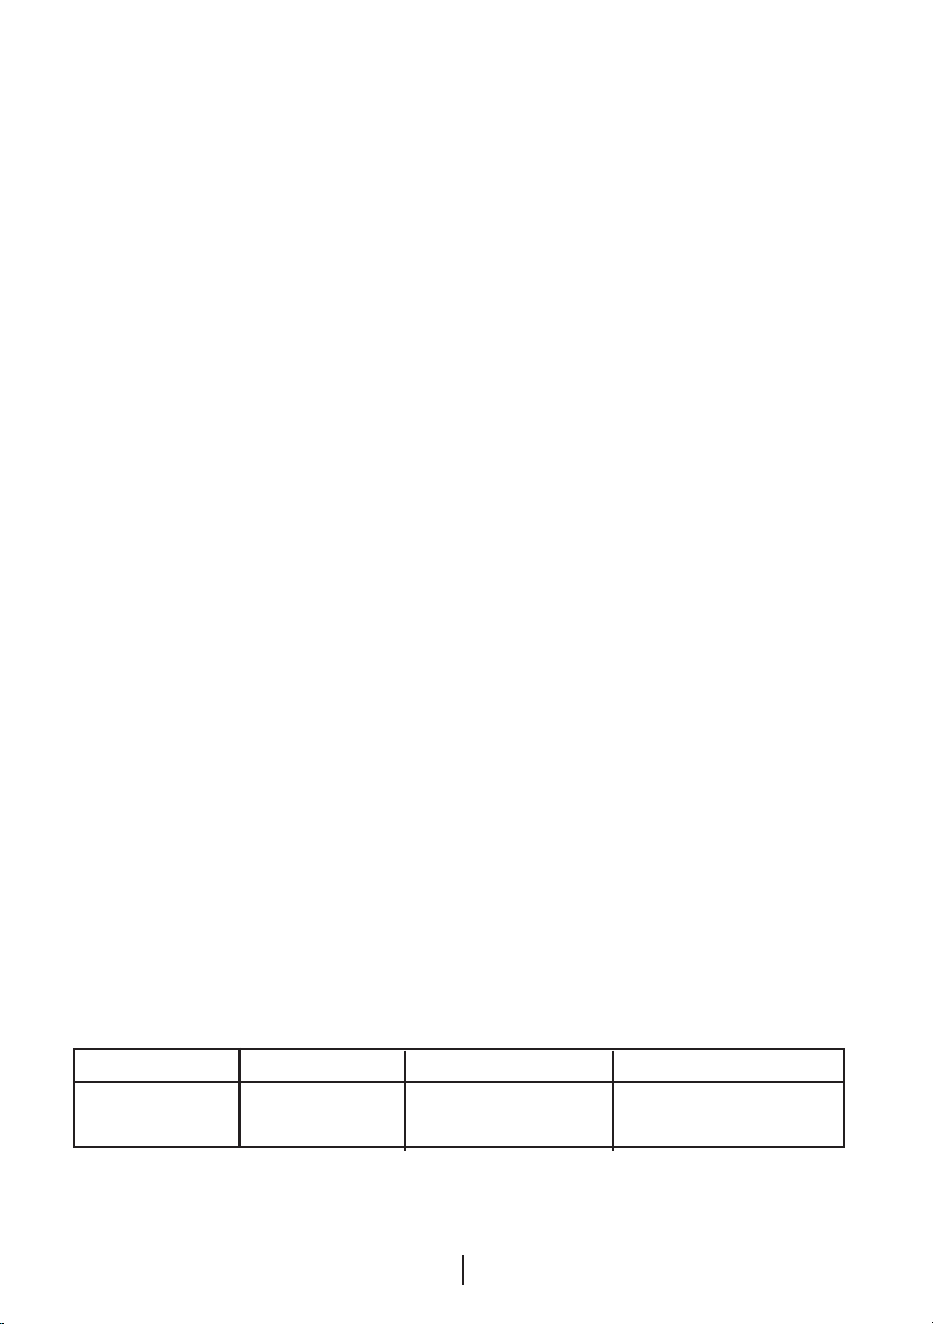
Model number Serial number Purchased from Date of purchase

EN
27
For service under guarantee or for product advice please call our
Contact centre
Before requesting service please check the troubleshooting guide in the
Operating Instructions booklet, as a charge may be levied where no fault is
found, and even though your product may still be under guarantee.
After arranging service the area around the product must be easily accessible
to the Engineer, without the need for cabinets or furniture to be removed or
moved.
It is your responsibility to ensure our Engineers have a clean and safe
environment to carry out any repairs.
Please have your Model number and Serial number available when you call us,
as you may be required to input your serial number into your telephone keypad
during your call.
UK Mainland & Northern Ireland:
0333 207 9710
Landline or mobile calls to 0333 numbers cost no more than calls to geographic
numbers 01 or 02, and are charged at the basic rate. Calls from landlines and
mobiles are included in free call packages but please check with your telephone
service provider for exact call charges.
Republic of Ireland:
01 862 3411
Service once the manufacturers guarantee has expired
If you have purchased an extended guarantee please refer to the instructions
contained within the extended guarantee agreement document, otherwise
please call us using the appropriate number above, where service can be
obtained at a charge.

EN
28
Should you experience any difficulty in obtaining service please call us on 0333
207 9710 or 01 862 3411
Contact us though our website
Send us a secure message through our online contact us form. Please visit our
website, click Contact Us and choose a product support topic from the list of
options. Complete the required details and click send message.
Product registrations
For UK registrations please visit beko.co.uk/register and for the Republic of
Ireland visit beko.ie/register.
EN
29
DISCLAIMER / WARNING
Some (simple) failures can be adequately
handled by the end-user without any safety
issue or unsafe use arising, provided that
they are carried out within the limits and in
accordance with the following instructions (see
the “Self-Repair” section).
Therefore, unless otherwise authorized in the
“Self-Repair” section below, repairs shall be
addressed to registered professional repairers
in order to avoid safety issues. A registered
professional repairer is a professional
repairer that has been granted access to the
instructions and spare parts list of this product
by the manufacturer according to the methods
described in legislative acts pursuant to
Directive 2009/125/EC.
However, only the service agent (i.e.
authorized professional repairers) that
you can reach through the phone number
given in the user manual/warranty card
or through your authorized dealer may
provide service under the guarantee
terms. Therefore, please be advised that
repairs by professional repairers (who
are not authorized by Beko) shall void the
guarantee.
Self-Repair
Self-repair can be done by the end-user with
regard to the following spare parts: door
handles,door hinges, trays, baskets and door
gaskets (an updated list is also available in
support.beko.com as of 1st March 2021).
Moreover, to ensure product safety and to
prevent risk of serious injury, the mentioned self-
repair shall be done following the instructions
in the user manual for self-repair or which are
available in support.beko.com. For your safety,
unplug the product before attempting any self-
repair.
Repair and repair attempts by end-users for parts
not included in such list and/or not following the
instructions in the user manuals for self-repair or
which are available in support.beko.com, might
give raise to safety issues not attributable to
Beko, and will void the warranty of the product.
Therefore, it is highly recommended that end-
users refrain from the attempt to carry out repairs
falling outside the mentioned list of spare parts,
contacting in such cases authorized professional
repairers or registered professional repairers. On
the contrary, such attempts by end-users may
cause safety issues and damage the product
and subsequently cause fire, flood, electrocution
and serious personal injury to occur.
By way of example, but not limited to, the
following repairs must be addressed to
authorized professional repairers or registered
professional repairers: compressor, cooling
circuit, main board,inverter board, display board,
etc.
The manufacturer/seller cannot be held liable in
any case where end-users do not comply with
the above.
The spare part availability of the refrigerator that
you purchased is 10 years.
During this period, original spare parts will be
available to operate the refrigerator properly
The minimum duration of guarantee of the
refrigerator that you purchased is 12 months.
This product is equipped with a lighting source
of the “G” energy class.
The lighting source in this product shall only be
replaced by professional repairers.