I
OxySmart
Fingertip Oximeter
User Manual
Model: PC-60FW

II
Notes
Please read the manual very carefully before
using this device. Failure to follow these
instructions can cause measuring abnormality
or damage to the Oximeter.
The contents contained in this manual are
subject to change without notice.
Information furnished by our company is
believed to be accurate and reliable. However,
no responsibility is assumed by us for its use, or
any infringements of patients or other rights of
third parties that may result from its use.
Instructions for Safe Operation
Check the device to make sure that there is no
visible damage that may affect user’s safety or
measurement performance with regard to
sensors and clips. It is recommended that the
device should be inspected minimally before
each use. If there is obvious damage, stop
using the device.

III
Special attention should be paid while the
Oximeter is used constantly under the
ambient temperature over 37°C, burning hurt
may occur because of over-heating of the
sensor at this situation.
Necessary maintenance must be performed
only by qualified service technicians. Users
are not permitted to service this device.
The Oximeter must not be used with devices
and accessories not specified in User Manual.
Cautions
Explosive hazard—DO NOT use the Oximeter
in environment with inflammable gas such as
some ignitable anesthetic agents.
DO NOT use the Oximeter while the patient is
under MRI or CT scanning. This device is NOT
MRI Compatible.
Warnings
Discomfort or pain may appear if using the
Oximeter continuously on the same location
for a long time, especially for patient with
poor microcirculation. It is recommended that

IV
the Oximeter should not be applied to the
same location for longer than 2 hours. If any
abnormal condition is found, please change
the position of Oximeter.
DO NOT clip this device on edema or tender
tissue.
The light (the infrared light is invisible)
emitted from the device is harmful to the eyes.
Do not stare at the light.
The Oximeter is not a treatment device.
Local laws and Regulations must be followed
when disposing of the device.
Attentions
Keep the Oximeter away from dust, vibration,
corrosive substances, explosive materials, high
temperature and moisture.
The device should be kept out of the reach of
children.
If the Oximeter gets wet, please stop using it
and do not resume operation until it is dry and
checked for correct operation. When it is
carried from a cold environment to a warm

V
and humid environment, please do not use it
immediately. Allow at least 15 minutes for
Oximeter to reach ambient temperature.
DO NOT operate the button on the front panel
with sharp materials or sharp point.
DO NOT use high temperature or high pressure
steam disinfection on the Oximeter. Refer to
the instructions regarding cleaning and
disinfection.
The equipment is IP22 with protection against
harmful solid foreign objects and ingress of
liquid.
Please pay attention to the effects of lint, dust,
light (including sunlight), etc.
Declaration of Conformity
The manufacturer hereby declares that this device
complies with the following standards:
IEC 60601-1: 2012 Medical electrical
equipment-Part 1: General requirements for basic

VI
safety and essential performance;
ISO 80601-2-61: 2017 Medical electrical
equipment-Part 2-61: Particular requirements for
basic safety and essential performance of pulse
oximeter equipment.
And it also follows the provisions of the council
directive MDD 93/42/EEC.
Caution: U.S. federal law restricts this device
to sale or use by or on the order of a physician.

VII
Table of Contents
1 Overview.............................................. 1
2 Battery Installation..............................3
3 Operation............................................. 4
4 Wireless................................................9
5 Technical Specifications....................14
6 Packing List........................................ 17
7 Repair and Maintenance.................. 18
8 Troubleshooting................................ 21
9 Key of Symbols.................................. 22
10 Frequently Asked Questions.......... 23
Appendix EMC.......................................27
1
1 Overview
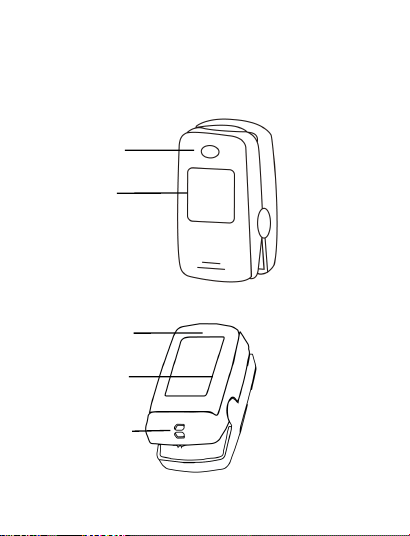
1.1 Appearance
Figure 1 Front View
Display Key
Nameplate
Lanyard Hole
Battery Cover
Display Screen
Figure 2 Rear View

2
Note: the appearance is for demonstration only,
please refer to the oximeter you purchased.
1.2 Intended Use
This Fingertip Oximeter is intended for measuring
the pulse rate and functional oxygen saturation
(SpO
2
) through a patient’s finger. It is applicable
for checking SpO
2
and pulse rate of adult and
pediatric patients in homes and medical clinics.
1.3 Configuration
SpO2, PR, PI
Plethysmogram
Auto on/off
PR and PI shifts
Pulse bar
Over-limits setting
Pulse beep
Measuring Mode: Continuous
Record list
Wireless function
3
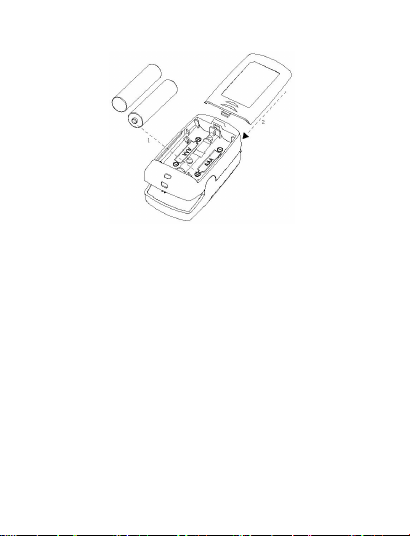
2 Battery Installation
Figure 3 Battery Installation
1. Refer to Figure 3, insert two AAA size batteries
into the battery compartment properly, and
note the polarity markings.
2. Replace the cover.
Please make sure that the batteries are
correctly installed. Incorrect installation may
cause the device not to work.
Please remove batteries if the device is not
being used for more than 7 days to prevent and
avoid potential damage from the battery leaking.
Any such damage is not covered under the
4
product warranty.
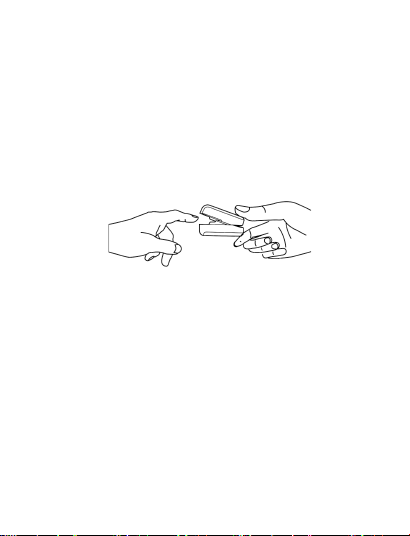
3 Operation
1. Start. Open the clip and put finger inside the
rubber cushions of the clip (make sure the finger is
in the correct position), and then clip the finger, as
shown in figure 4.
Figure 4 Put finger into the Oximeter
Wait 2 seconds, the Oximeter will power on
automatically and start to measure;
If you connect device to App, you can also check
readings in App.
2. END. When finger is out, the Oximeter shuts
down automatically.
5
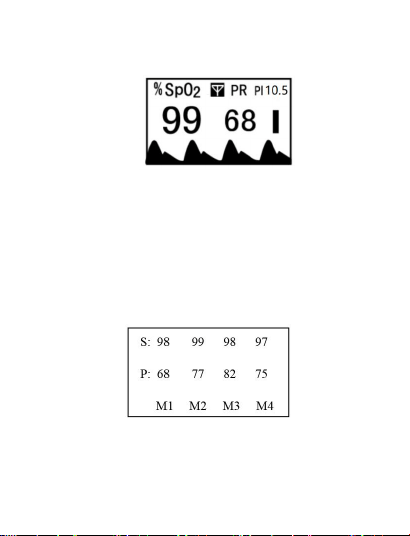
3. Readings display screen
The screen displays as below
:
Figure 5
4. Recording & recall
Recording & recall functions are available. At power
off status, pressing Display key can bring up record
list display screen, as shown in figure 7. In record
list screen, press Display key to shift the records
page.
Figure 6
If the time from displaying valid readings to the end
of measurement is less than 5 seconds, then no
6
recording will be done.
Up to 12 groups of records can be stored in the
record list, the newest record is marked as M1,
and the oldest record is marked as M12. The new
record will override the previous record.
If the batteries are removed from the device, then
the records will be not kept or volatile.
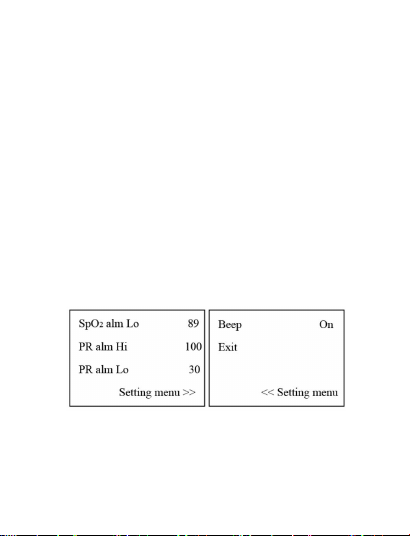
5. Menu
When finger is in oximeter, long time pressing
display key can enter the setup menu screen.
Figure 7
Menu setup: Short time press Display Key to
choose the setting item; Longtime press Display
Key to active the setting item, then short time

7
press it to modify the setting parameter; Next,
longtime press Display Key to confirm the
modification and exit from this setting item. At
last, move the setting item to “Save, exit menu”,
and long time pressing Display Key to store the
modification and exit from the setup menu.
“Beep”
:
Pulse beep option. If it is set to on, every
pulse beat makes a beep.
when beep is on and over-limits indication sound
is activated, then Display key will work as the
Mute key, and short time pressing it can mute the
over-limits indication sound and pulse beep for 90
seconds.
Data transmission
The user could effectively transmit the data to
App via Bluetooth.
Attention to the operation
The finger should be put into the sensor
correctly.
Do not shake the finger and relax during
measurement.

8
Do not put wet finger directly into sensor.
Avoid placing the device on the same limb
which is wrapped with a cuff for blood
pressure measurement or during venous
infusion.
Do not let anything block the emitting light
from device, i.e. do not use finger nail
polish/paints.
Vigorous exercise and electrosurgical device
interference may affect the measuring
accuracy.
Nail polish may affect the measuring
accuracy, and too long fingernail may cause
failure of measurement or inaccurate result.
Existence of high intensive light sources,
such as fluorescence light, ruby lamb,
infrared heater or strong sunshine, etc. may
cause inaccuracy of measurement result.
Please put an opaque cover on the sensor or
change the measuring site if necessary.
If the first reading appears with poor
waveform (irregular or not smooth), then
the reading is unlikely true, the more stable
9
value is expected by waiting for a while, or a
restart is needed when necessary.
4 Wireless
The wireless icon Definition
The icon of
Definition
flashes
The device is being to establish a
wireless connection with the
surrounding host.
Successful wireless connection
between the device and a host is
established.
No display
icon
1. "Wireless" function is disabled;
2. The device fails to setup a
wireless connection with the
surrounding host within 3 minutes;
3.Hardware failure of wireless
transmission function while the
“Wireless” function is enabled.

10
4.1 Download the App
App name: ViHealth Mobile
iOS: App Store
Android: Google Play
4.2 Install the App
Install the app on an Apple product or
Android-powered device, including smart phones
and tablets.
4.3 Compatibility
The ViHealth app is compatible with iOS versions
9.0+ and Android versions 5.0+.
The compatible smart device models are listed
below:
Brand
Model
Apple
iPhone5/S, iPhone SE,
iPhone6/S/Plus, iPhone7/Plus,
iPhone8/Plus, iPhone X, iPhone XS,
iPhone XS Max, iPhone XR, iPhone11,
iPhone11 Pro, iPhone11 Pro Max
iPad 5/6/7, iPad Mini 1/2/3/4/5, iPad

11
Air 1/2/3, iPad Pro 1/2/3/4
Samsung
Galaxy S5/6/7/8/9/10, Note 3/5,J7
Huawei
P9/10/20/30/40, Mate 10/Pro, Mate
20/Pro, Mate 30/Pro
OnePlus
OnePlus 5/6/7
LG
G7
Google
Pixel 1/2/3/4
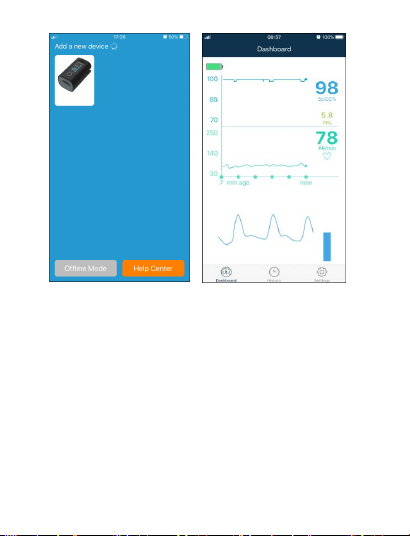
4.4 Connecting to the device
1. Keep the device on measuring.
2. Run ViHealth App on your smart device.
3. Click the device icon when ViHealth finds your
Pulse Oximeter (see figure 8).
4. Follow the screen guide to start pairing.
5. Once paired, you can log on to ViHealth.
Caution: Do NOT pair the device in your smart
device settings.
For more details about ViHealth App, please refer
to the ViHealth App user manual.
12
Figure 8 Figure 9
4.5 Real-time Monitoring
The ViHealth app supports monitoring SpO2 and
HR in real-time on the Dashboard screen (see
figure 9).
13
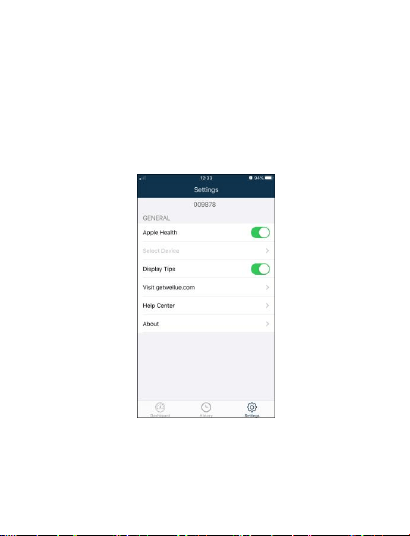
4.6 Syncing Data to Apple Health
To enable/disable syncing measurement data to
Apple Health App, tap [Setting]-> [Apple
Health]->[On/Off].
The measurement data will be transferred to
Apple Health App when ViHealth App is running.
Figure 10
Note: Refer the ViHealth user manual for more
details.

14
5 Technical Specifications
A. SpO
2
Measurement
Transducer: dual-wavelength LED sensor with
wavelength:
Red light: 663 nm, Infrared light: 890 nm.
Maximal average optical output power:
≤2mW
SpO
2
display range: 35%~100%
SpO
2
measuring accuracy:
≤ 2% for SpO
2
range from 70% to 100%
B. Pulse Rate measurement
PR display range: 30bpm~240bpm
PR measuring accuracy: ±2bpm or ±2%
(whichever is greater)
C. Perfusion Index(PI) Display range
0%~20%
D. Preset over-limits
SpO
2
low limit: 90%
Pulse Rate: high limit: 120bpm
low limit: 50bpm

15
E. Over-limit settings
SpO
2
:
low limit setting range: 85%~99%, step: 1%
Default setting: 90%
Pulse Rate:
Low limit setting range: 30~60bpm,
step: 1bpm;
High limit setting range: 100~240bpm,
step: 5bpm;
Default setting: high: 120bpm; low: 50bpm
F. Audible & visual alert function
When measuring, if SpO
2
value or pulse rate
value exceeds the preset limit, the device will
alert with beep automatically and the value
which exceeds limit will flash on the screen.
G. Power supply requirement:
2 x LR03 (AAA) alkaline batteries
Supply voltage: 3.0VDC
Operating current: ≤40mA
H. Environmental Conditions:

16
Operating Temperature: 5°C ~40°C
Operating Humidity: 30%~80%
Atmospheric pressure: 70kPa~106kPa
I. Low Perfusion Performance:
The accuracy of SpO
2
and PR measurement
still meet the precision described above when
the modulation amplitude is as low as 0.6%.
J. Ambient Light Interference:
The difference between the SpO
2
value
measured in the condition of indoor natural
light and that of darkroom is less than ±1%.
K. Dimensions:
56 mm (L) × 34 mm (W) × 30 mm (H)
Net Weight: approx. 60g
L. Display: OLED
M. Classification
The type of protection against electric shock:
Internally powered equipment.
The degree of protection against electric shock:

17
Type BF applied parts.
The degree of protection against harmful solid
foreign objects and ingress of liquid:
The equipment is IP22 with protection against
harmful solid foreign objects and ingress of
liquid.
Electro-Magnetic Compatibility: Group I, Class
B
6 Packing List
1) Fingertip Oximeter
2) User Manual
3) Batteries
4) Pouch
5) Lanyard
Note: the items and its quantity are subject to
change, please refer to your subject in hand.

18
7 Repair and Maintenance
7.1 Maintenance
The expected service life (not a warranty) of this
device is 5 years. In order to ensure its long
service life, please pay attention to the
maintenance.
Please change the batteries when the
low-voltage indicator lightens.
Please clean the surface of the device before
using, with 75% alcohol wipes, then let it air
dry or wipe it dry. Do not allow liquid to enter
the device.
Please take out the batteries if the Oximeter
will not be used any more than 7 days.
The recommended storage environment of the
device:
ambient temperature: -20ºC ~60ºC, relative
humidity 10%~95%, atmospheric pressure:
50kPa~107.4kPa.
The Oximeter is calibrated in the factory

19
before sale, so there is no need to calibrate it
during its life cycle. Any SpO
2
simulators should
not be used to validate the accuracy of the
Oximeter, they can only be used as functional
testers to verify its precision. The SpO
2
accuracy claimed in this manual is supported
by the clinical study conducted by inducing
hypoxia on healthy, non-smoking, light-to-dark
skinned subjects in an independent research
laboratory.
If it is necessary to verify the precision of the
Oximeter routinely, the user can do the
verification by means of SpO
2
simulator, or it
can be done by the local third party test house.
Please note that the specific calibration curve
(so called R-curve) should be selected when
use of SpO
2
simulator, e.g. for Index 2 series
SpO
2
simulator from Fluke Biomedical
Corporation, please set "Make" to
"DownLoadMake: KRK", then the user can use
this particular R-curve to test the Oximeter. If
the SpO
2
simulator does not contain "KRK"
R-curve, please ask the manufacturer for

20
helping to download the given R-curve into the
SpO
2
simulator.
High-pressure sterilization cannot be used on
the device.
Do not immerse the device in liquid.
It is recommended that the device should be
kept in a dry environment. Humidity may
reduce the life of the device, or even damage
it.
7.2 Cleaning and Disinfecting Instruction
Surface-clean sensor with a soft cloth damped
with a solution such as 75% isopropyl alcohol,
if low-level disinfection is required, use a mild
bleach solution.
Then surface-clean with a cloth damped ONLY
with clean water and dry with a clean, soft
cloth.
Caution:
Do not sterilize by irradiation steam, or ethylene oxide.
Do not use the Oximeter if it is damaged.

21
8 Troubleshooting
Problem:
1. The SpO
2
and Pulse Rate display instable
2. Can not turn on the device
3. No display
4. Display direction doesn’t change or changes
insensitively.
5. No display of the wireless icon “ ”
Solution
1. Place the finger correctly inside and try again.
2. Changing batteries.
3. Let the patient keep calm.
4. Please shake the Oximeter with a certain force
to make the movable metal ball move freely. If the
problem still exists, maybe the orientation-sensor
is not working properly.
5. Hardware failure of wireless transmission
function.
6. If the above problem still exists please contact
the local service center.
22
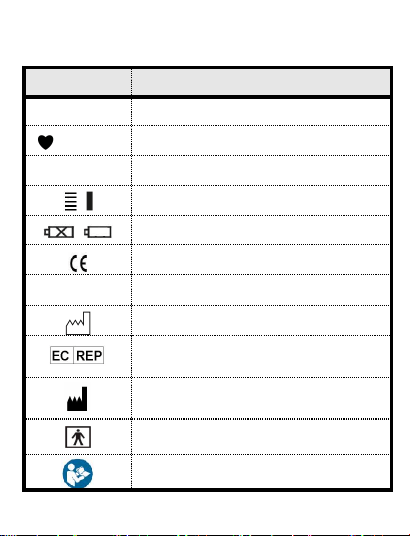
9 Key of Symbols
Symbol
Description
%SpO
2
Pulse oxygen saturation
BPM/PR
Pulse rate (beats per minute)
PI%
Perfusion Index (%)
/
Pulse Strength Bar Graph
/
Low battery voltage
CE mark
SN
Serial number
Date of manufacture
Authorised representative in the
European community
Manufacturer (including
address)
BF type applied part
Attention ─ refer to User Manual

23
Follow WEEE regulations for
disposal
Wireless icon
10 Frequently Asked Questions
1. Q: What's SpO
2
?
A: SpO
2
means the saturation percentage of
oxygen in the blood.
2. Q: What's the normal range of SpO
2
value for
healthy people?
A: The normal range varies by individual, but
usually over 95%, otherwise, please consult your
physician.
3. Q: What's the normal range of PR value for
healthy people?

24
A: Usually, the normal range is 60bpm~100bpm.
4. Q: Why do the display value of SpO
2
and PR
vary with time?
A: The measured SpO
2
and PR value changes in
correspondence with the change of patient's
physiological conditions.
5. Q: What to do if there is no SpO
2
and PR
reading?
A: Do not shake the finger, and keep calm
during the measurement. Please also avoid the
Oximeter and the cuff on the same limb for blood
pressure and oxygen saturation measurement
simultaneously.
6. Q: How to confirm that the SpO
2
reading is true
or accurate?
A: Hold breath for a while (50 seconds or more),

25
if the SpO
2
value significantly decreases, it means
that the SpO
2
reading truly reflects the
physiological condition change.
7. Q: When to replace the batteries?
A: The icon of low battery will appear on the
screen when the battery voltages are low. By then,
batteries need to be replaced.
8. Q: What to do if the Oximeter is moistened or
sprayed by water?
A: Remove the batteries immediately and dry
the Oximeter completely with a hair dryer.
9. Q: What factors will affect the SpO
2
accuracy?
A: a) Intravascular dyes such as indocyanine
green or methylene blue;
b) Exposure to excessive illumination, such as
surgical lamps, bilirubin lamps, fluorescent lights,

26
infrared heating lamps, or direct sunlight;
c) Vascular dyes or external used color-up product
such as nail enamel or color skin care;
d) Excessive patient movement;
e) Placement of a sensor on an extremity with a
blood pressure cuff, arterial catheter, or
intravascular line;
f) Exposure to the chamber with High pressure
oxygen;
g) There is an arterial occlusion proximal to the
sensor;
h) Blood vessel contraction caused by
peripheral vessel hyperkinesias or body
temperature decreasing;
i) Low perfusion condition (Perfusion Index is

27
small).
Please contact the local distributor or
manufacturer if necessary.
Appendix EMC
The equipment meets the requirements of IEC
60601-1-2:2014.
Table 1
Guidance and manufacturer’s
declaration-electromagnetic emission
The Fingertip Oximeter is intended for use in the
electromagnetic environment specified below. The
customer or the user of the Fingertip Oximeter should
assure that it is used in such an environment.
Emissions test
Complianc
e
Electromagnetic
environment-guidanc
e

28
RF emissions
CISPR 11
Group 1
The Fingertip
Oximeter uses RF
energy only for its
internal function.
Therefore, its RF
emissions are very low
and are not likely to
cause any interference
in nearby electronic
equipment.
RF emissions
CISPR 11
Class B
The Fingertip
Oximeter suitable for
use in all
establishments,
including domestic
establishments and
those directly network
that supplies buildings
used for domestic
purposes.
Harmonic
emissions
IEC61000-3-2
N/A
Voltage
fluctuations/flick
er emissions
IEC61000-3-3
N/A

29
Table 2
Guidance and manufacturer’s
declaration-electromagnetic emission
The Fingertip Oximeter is intended for use in the
electromagnetic environment specified below. the
customer or the user of the Fingertip Oximeter
should assure that it is used in such an environment.
Immunity
test
IEC60601 test
level
Complia
nce
level
Electromagne
tic
environment
-guidance
Electrostati
c
discharge(E
SD)
IEC61000-4
-2
±8 kV contact
±15kV air
±8 kV
contact
±15kV
air
Floors should
be wood,
concrete or
ceramic tile. if
floors are
covered with
synthetic
material, the
relative
humidity
should be at
least 30%

30
Electrical
fast
transient/
burst
IEC61000-4
-4
±2kV for power
Supply lines
±1 kV for
input/output
lines
N/A
N/A
Surge
IEC
61000-4-5
±1kV line (s) to
line(s)
±2kV line(s) to
earth
N/A
N/A
Voltage
dips, short
interruptio
ns and
voltage
variations
on power
supply
input lines
IEC61000-4
-11
<5% U
T
(>95% dip in
U
T
) for 0.5
cycle
<40% U
T
(60% dip in U
T
)
for 5 cycles
<70% U
T
(30% dip in U
T
)
for 25 cycles
<5% U
T
(>95% dip in
U
T
) for 5 s
N/A
N/A

31
Power
frequency(
50Hz/60Hz)
magnetic
field
IEC61000-4
-8
3A/m
3A/m
Power
frequency
magnetic
fields should
be at levels
characteristic
of a typical
location in a
typical
commercial or
hospital
environment.
NOTE : U
T
is the a.c. mains voltage prior to
application of the test level.
Table 3
Guidance and manufacturer’s declaration –
electromagnetic immunity
The Fingertip Oximeter is intended for use in the
electromagnetic environment specified below. The
customer or the user of The Fingertip Oximeter
should assure that it is used in such an
electromagnetic environment.

32
Immunity
test
IEC60601
test level
Complianc
e level
Electromagnetic
environment
-guidance
Conducte
d RF
IEC61000-
4-6
Radiated
RF
IEC61000-
3 Vrms
150 kHz
to 80
MHz
3 V/m
80 MHz
N/A
3 V/m
Portable and
mobile RF
communications
equipment should
be used no closer
to any part of The
Fingertip
Oximeter,
including cables,
than the
recommended
separation
distance
calculated from
the equation
applicable to the
frequency of the
transmitter.
33
4-3
to 2.5
GHz
Recommended
separation
distance
d=1.2
P
d=1.2
P
80MHz
to 800MHz
d=2.3
P
800MHz
to 2.5GHz
Where P is the
maximum output
power rating of
the transmitter in
watts (W)
according to the
transmitter
manufacturer and
d is the
recommended
separation
distance in metres

34
(m).
b
Field strengths
from fixed RF
transmitters, as
determined by an
electromagnetic
site survey ,
a
should be less
than the
compliance level
in each frequency
range .
b
Interference may
occur in the
vicinity of
equipment
marked with the
following symbol.

35
NOTE 1: At 80 MHz and 800 MHz, the higher
frequency range applies.
NOTE 2: These guidelines may not apply in all
situations. Electromagnetic propagation is affected
by absorption and reflection from structures, objects
and people.
a: Field strengths from fixed transmitters, such as
base stations for radio (cellular / cordless)
telephones and land mobile radios, amateur radio,
AM and FM radio broadcast and TV broadcast cannot
be predicted theoretically with accuracy. To assess
the electromagnetic environment due to fixed RF
transmitters, and electromagnetic site survey should
be considered. If the measured field strength in the
location in which The Fingertip Oximeter is used
exceeds the applicable RF compliance level above,
The Fingertip Oximeter should be observed to verify
normal operation. If abnormal performance is
observed, additional measures may be necessary,
such as re-orienting or relocating The Fingertip

36
Oximeter.
b: Over the frequency range 150 kHz to 80 MHz, field
strengths should be less than 3V/m.
Table 4
Recommended separation distances between
portable and mobile RF communication the
equipment
The Fingertip Oximeter is intended for use in an
electromagnetic environment in which radiated RF
disturbances are controlled. The customer or the
user of The Fingertip Oximeter can help prevent
electromagnetic interference by maintaining a
minimum distance between portable and mobile RF
communications equipment (transmitters) and the
Fingertip Oximeter as recommended below,
according to the maximum output power of the
communications equipment.

37
Rated
maximum
output
power of
transmitter
W(Watts)
Separation distance according to
frequency of transmitter M(Meters)
150kHz to
80MHz
d=1.2
P
80MHz to
800MHz
d=1.2
P
80MHz to
2,5GHz
d=2.3
P
0,01
N/A
0.12
0.23
0,1
N/A
0.38
0.73
1
N/A
1.2
2.3
10
N/A
3.8
7.3
100
N/A
12
23

38
For transmitters rated at a maximum output power
not listed above, the recommended separation
distance d in meters (m) can be determined using
the equation applicable to the frequency of the
transmitter, where P is the maximum output power
rating of the transmitter in watts (W) according to
the transmitter manufacturer.
NOTE 1 : At 80 MHz and 800 MHz, the separation
distance for the higher frequency range applies.
NOTE 2 : These guidelines may not apply in all
situations. Electromagnetic propagation is affected
by absorption and reflection from structures, objects
and people.