VERSION A0
Core
RSHGWSN-W02W-G1
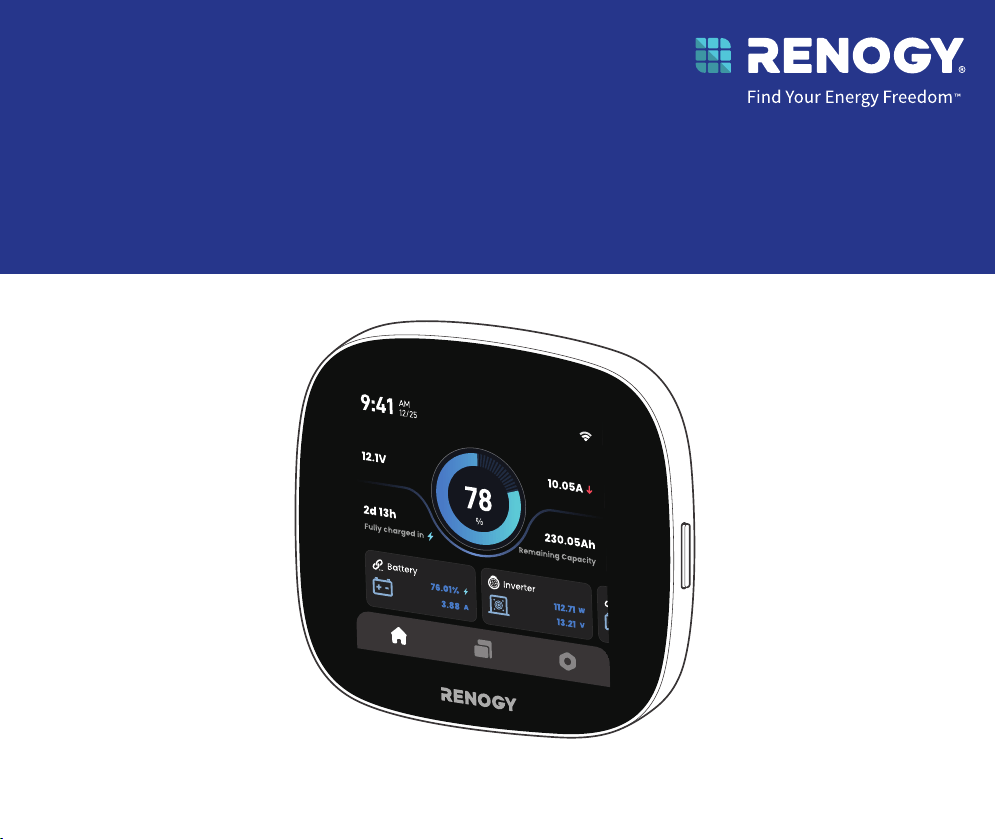
RENOGY ONE
QUICK GUIDE
Before Getting Started
Renogy ensures the accuracy, suiciency, and the applicability of information in the quick guide at the time
of printing due to continual product improvements that may occur.
The quick guide provides important operation and maintenance instructions for Renogy ONE Core (hereinaer
referred to as Core).
Read the quick guide carefully before operation and save it for future reference. Failure to observe the
instructions or precautions in the quick guide can result in electrical shock, serious injury, or death, or can
damage the Renogy ONE Core, potentially rendering it inoperable.
Renogy assumes no responsibility or liability for personal and property losses, whether directly and
indirectly, caused by the user’s failure to install and use the product in compliance with the quick guide.
Renogy is not responsible or liable for failures, damages, or injuries resulting from repair attempted by
unqualified personnel, improper installation and operation.
The illustrations in the quick guide are for demonstration purposes only. Details may appear slightly
dierent depending on product revision and market region.
Renogy reserves the right to change the information in the quick guide without notice. For the latest quick
guide, visit renogy.com.
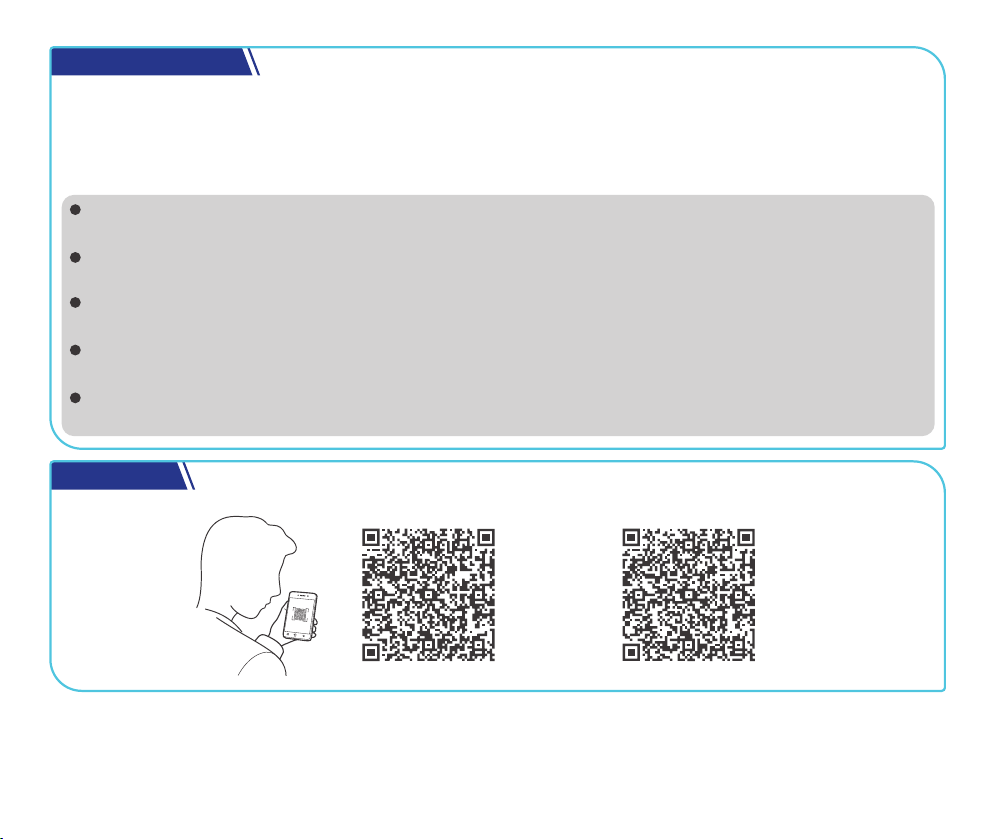
Online Manual
User ManualQuick Guide
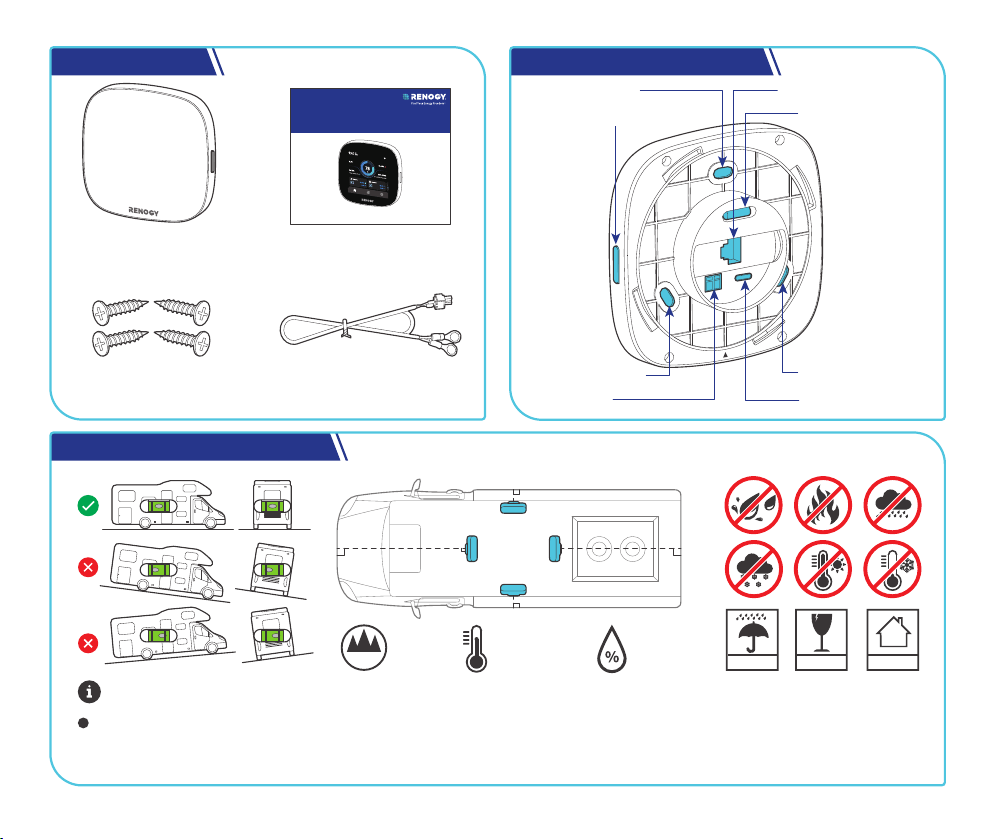
To enable the RV leveling function on Renogy ONE Core, ensure it is installed in a spot with the screen pointing to
the front, rear, le, or right side of the RV, vertically to the RV floor. It is recommended that RV leveling blocks
should be used during the leveling process.
NOTE
Installation Site and Environment
What’s In the Box? Get to Know RENOGY ONE Core
RENOGY ONE Core × 1
Mounting Screws × 4
(1 extra)
Power Cable (5m) × 1
M3.5*14mm
VERSION A0
Core
RSHGWSN-W02W-G1
RENOGY ONE
QUICK GUIDE
Quick Guide × 1
On/O Button
Mounting Holes
Mounting Holes
Power Port
Mounting Holes
Type-C Port
Bubble Level
Communication Port
KEEP DRY FRAGILE
INDOOR
90°
90°
90°
90°
-4°F to 158°F
-20°C to 70°C
0% to 95%
≤5000m
Altitude
- 1 -
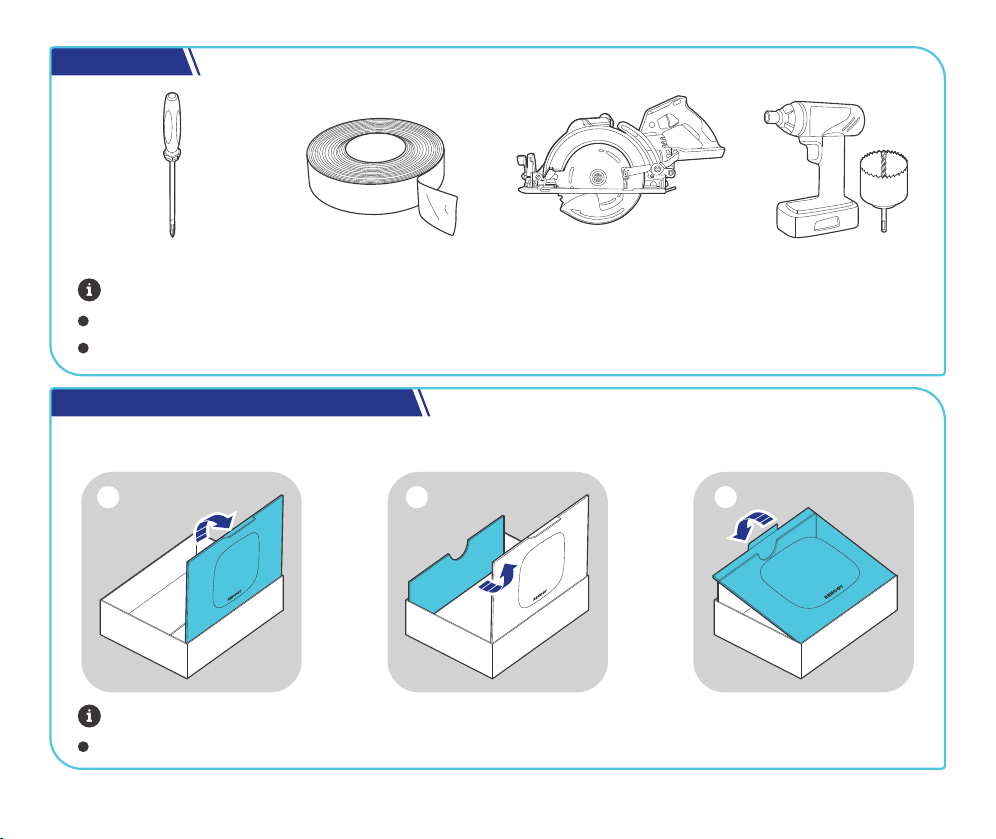
Tools are required only when the Core is flush mounted on a wall.
You can use either a skill saw or an electric drill with hole saw.
NOTE
The RV leveling function is unavailable on Core when it is placed on a table.
NOTE
Step 1 (A). Place Renogy ONE Core on a Table
1 2 3
The package box is environmentally friendly. You can use it as a bracket to hold the Core when installing it on the wall is
not required.
Required Tools
Phillips Screwdriver (#1) Insulation Tape Skill Saw Impact Drill with
Hole Saw, 2.17in/55mm
- 2 -
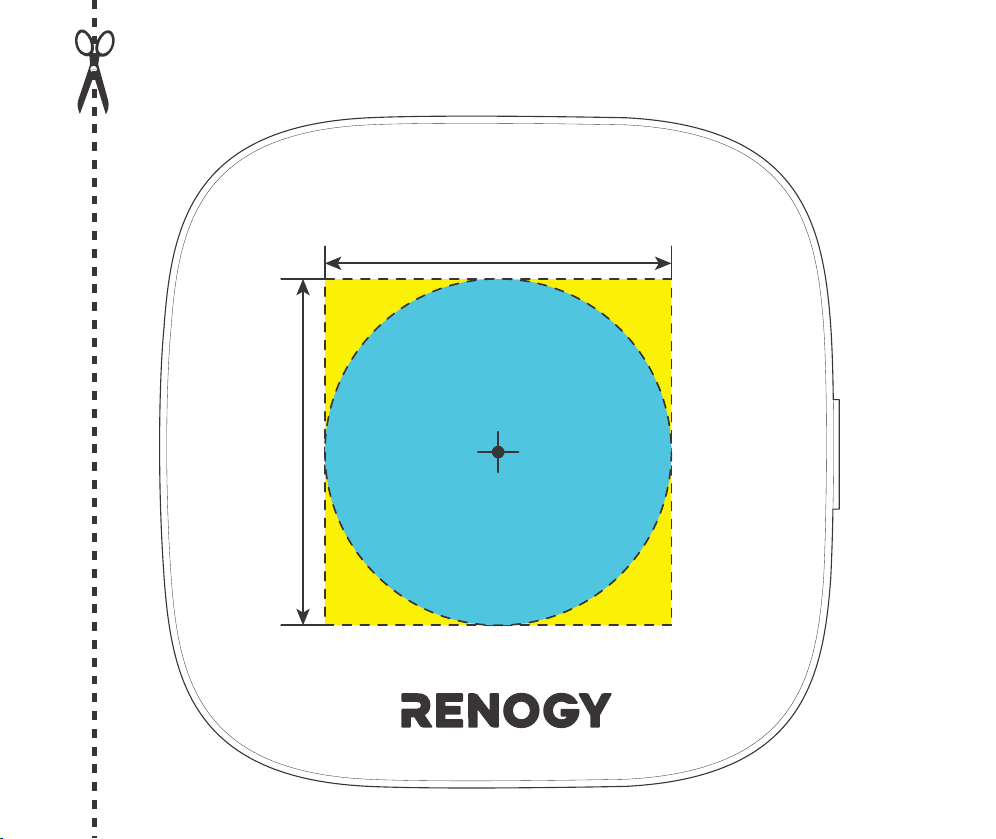
Please tear o this piece of paper and paste it to the mounting location for drilling holes.
Mounting Template
2.17in (55mm)
2.17in
(55mm)
- 3 -

- 4 -
You can also use another piece of paper as the mounting template. The installation hole comes in 2.17 in ×
2.17 in (55 mm x 55 mm).
NOTE
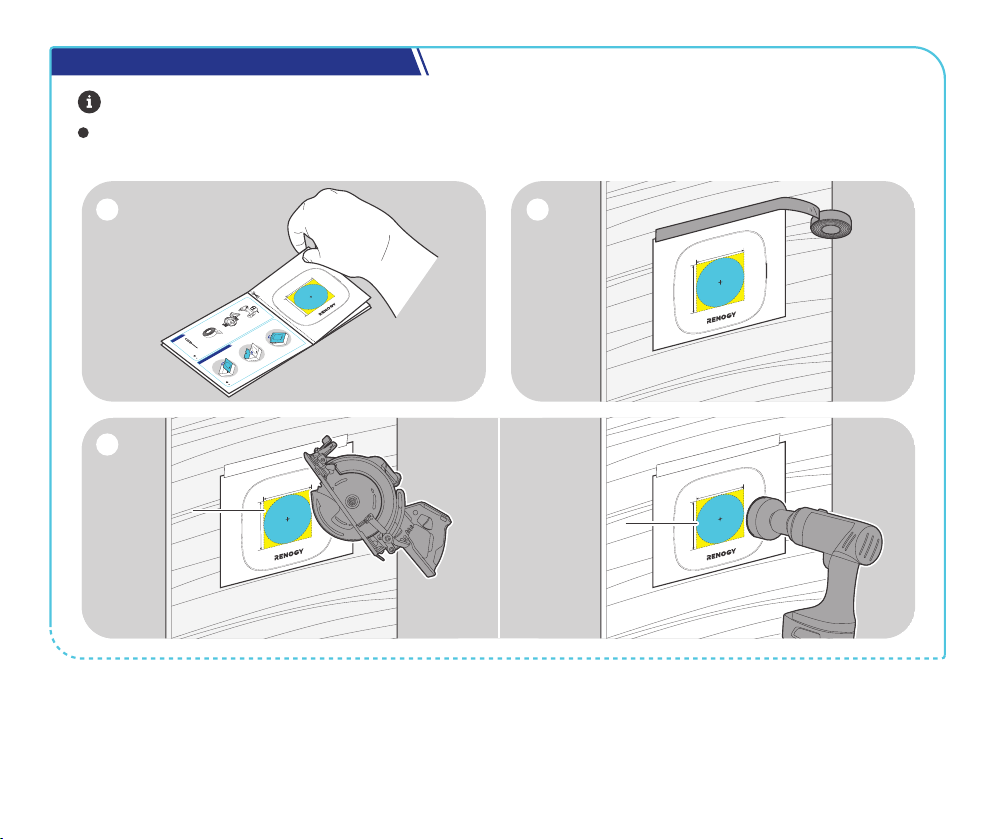
Step 1 (B). Mount Renogy ONE Core on a Wall
Tools are required only when the Core is flush mounted on a wall.
NOTE
The RV leveling function is unavailable on Core when it is placed on a table.
NOTE
Step 1 (A). Place Renogy ONE Core on a Table
1
2
3
The package box is environmentally friendly. You can use it as a bracket to hold the Core when installing it on the wall is
not required.
Required Tools
Phillips Screwdriver (#1) Insulation Tape
Skill Saw or Electric Drill and Hole Saw (55mm)
Please tear o this piece of paper and paste it to the mounting location for drilling holes.
Mounting Template
2.17in (55mm)
2.17in
(55mm)
Please tear o this piece of paper and paste it to the mounting location for drilling holes.
Mounting Template
2.17in (55mm)
2.17in
(55mm)
Yellow Area
Please tear o this piece of paper and paste it to the mounting location for drilling holes.
Mounting Template
2.17in (55mm)
2.17in
(55mm)
Blue Area
Please tear o this piece of paper and paste it to the mounting location for drilling holes.
Mounting Template
2.17in (55mm)
2.17in
(55mm)
1 2
3
- 5 -

Click
Mounting Screws
4 5 6
7 8 9
45°
10 11 12
- 6 -

NOTE
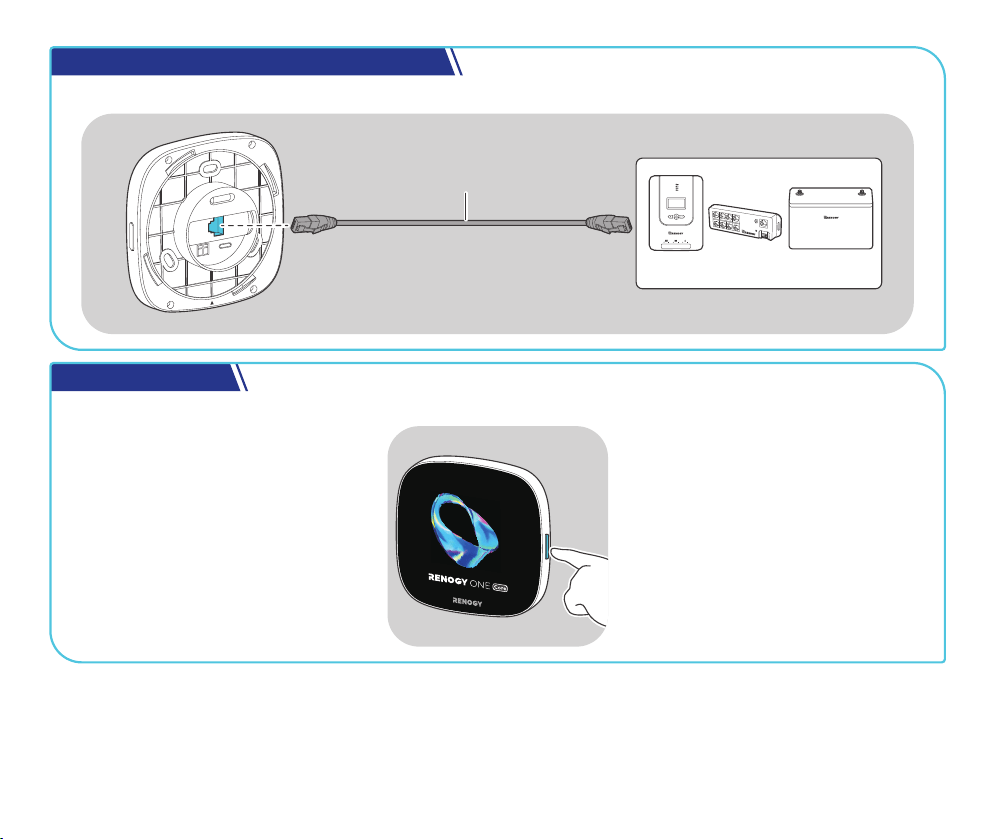
When installing the power cable, always connect the negative first, and then the positive.
Step 2. Connect Renogy ONE Core to a Power Supply
Battery Combiner Box
Power Cable
(included)
5V, DC
Type-C Cable (optional)
Battery Combiner Box
Power Cable
(included)
DC Power
(8~60V)
5V, DC
Type-C Cable
(optional)
You can connect Renogy ONE Core to a power supply through the included power cable or a Type-C cable (not
included).
Installed on a Wall
Installed on a Table
- 7 -
Step 3. Install a Communication Cable (Optional)
Devices (RS-485)
+
-
HUB
RJ45 Ethernet Cable
(Max length: 6 m)
For details, see the Renogy ONE Core User Manual by scanning the QR code in the guide.
Long press the On/O Button for 5s to power the Core on or o.
5s
Step 4. Power On/O
- 8 -
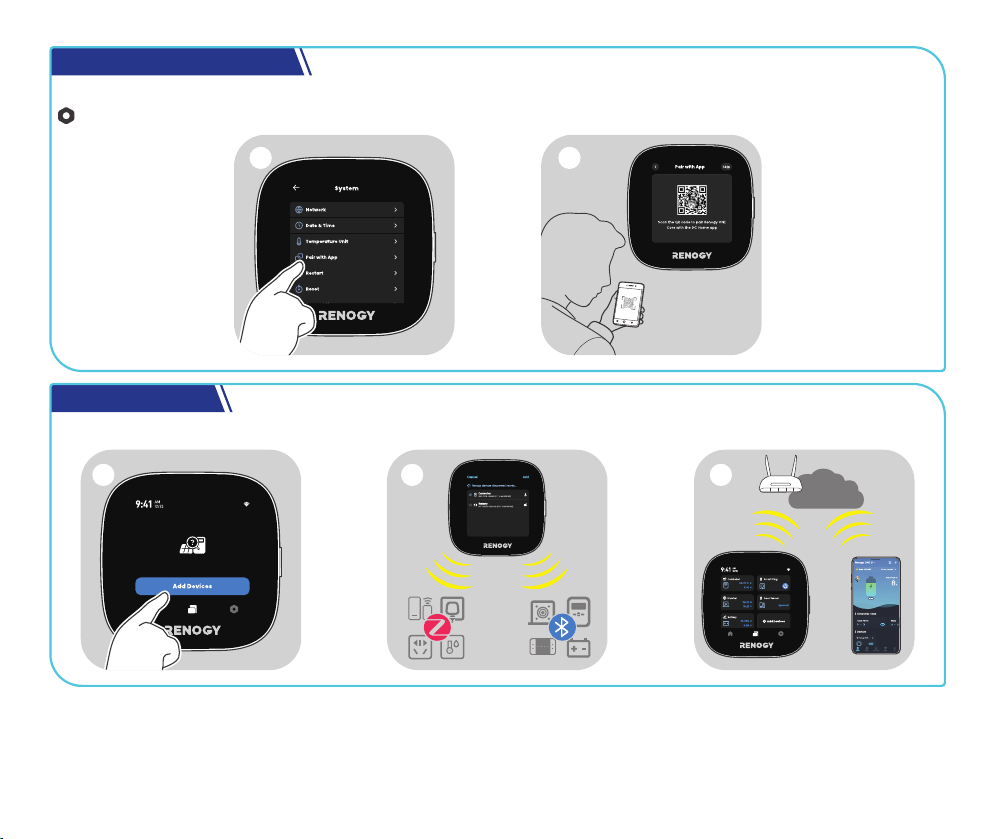
For initial startup, follow the startup wizard on the Core to pair it with the DC Home app. Alternatively, go to
> System > Pair with App.
Step 5. Pairing with DC Home
1 2
Renogy ONE Core can connect to Bluetooth, Bluetooth mesh, and Zigbee Renogy devices concurrently.
Internet
1 2 3
Step 6. Add Devices
- 9 -
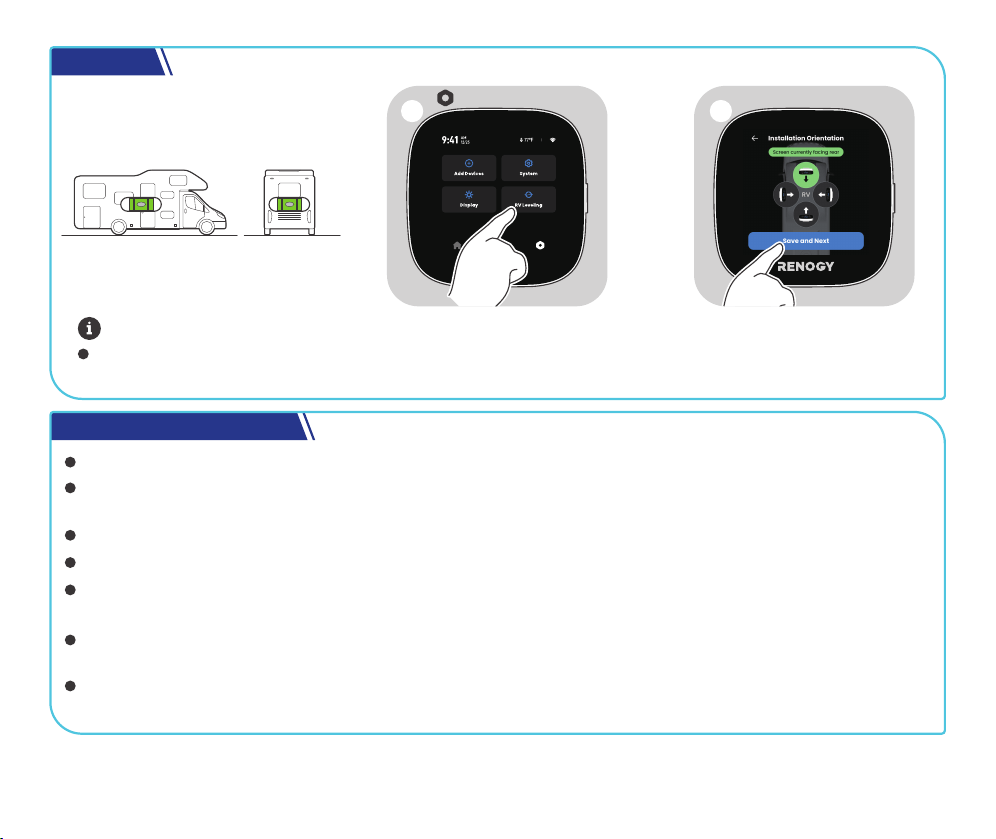
1 2
RV Leveling
Important Safety Instructions
You can use an extended power cable on demand. For details, see Renogy ONE Core User Manual by scanning the
QR code in the guide.
Keep Renogy ONE Core out of the reach of children.
Do not dispose of Renogy ONE Core as household waste. Comply with local, state, and federal laws and
regulations and use recycling channels as required.
Do not expose Renogy ONE Core to flammable or harsh chemicals or vapors.
There are no serviceable parts in Renogy ONE Core. Do not open, dismantle, repair, tamper with, or modify it.
Confirm the polarities of the devices before connecting Renogy ONE Core to a power supply. A reverse
polarity contact can result in damage to the Core, thus voiding the warranty.
Ensure that the connected DC power supply rates at 8V to 60V. Connecting the Core to a power source beyond
the range results in a power-on failure or permanent damage to the Core.
> RV Leveling
NOTE
RV leveling calibration on Renogy ONE Core is required each time the installation site for the Core is
changed.
- 10 -
FCC Statement
FCC Radiation Exposure Statement
RSS Standard
This device complies with Part 15 of the FCC Rules. Operation is subject to the following two conditions:
(1) This device may not cause harmful interference, and
(2) This device must accept any interference received, including interference that may cause undesired operation.
Warning: Changes or modifications not expressly approved by the party responsible for compliance could void the
user's authority to operate the equipment.
This equipment has been tested and found to comply with the limits for a Class B digital device, pursuant to Part 15 of
the FCC Rules. These limits are designed to provide reasonable protection against harmful interference in a residential
installation. This equipment generates uses and can radiate radio frequency energy and, if not installed and used in
accordance with the instructions, may cause harmful interference to radio communications. However, there is no
guarantee that interference will not occur in a particular installation. If this equipment does cause harmful interference
to radio or television reception, which can be determined by turning the equipment o and on, the user is encouraged
to try to correct the interference by one or more of the following measures:
(1) Reorient or relocate the receiving antenna.
(2) Increase the separation between the equipment and receiver.
(3) Connect the equipment into an outlet on a circuit dierent from that to which the receiver is connected.
(4) Consult the dealer or an experienced radio/TV technician for help.
This equipment complies with FCC radiation exposure limits set forth for an uncontrolled environment. This equipment
should be installed and operated with minimum distance 20cm between the radiator & your body.
This device complies with Industry Canada license exempt RSS standard(s). Operation is subject to the following two
conditions:
(1) This device may not cause interference, and
(2) This device must accept any interference, including interference that may cause undesired operation of the device.
The device is compliance with RF exposure guidelines, users can obtain Canadian information on RF exposure and
compliance. The minimum distance from body to use the device is 20cm.
- 11 -
Renogy ONE Core Quick Guide © 2023 Renogy. All rights reserved.
RENOGY
and are registered trademarks of Renogy.
All information in the quick guide is subject to copyright and other intellectual property rights of Renogy
and its licensors. The quick guide may not be modified, reproduced, or copied, in whole or in part, without
the prior written permissions of Renogy and its licensors.
The registered trademarks in the quick guide are the property of Renogy. The unauthorized use of the
trademarks is strictly prohibited.
Disclaimer
To discuss inaccuracies or omissions in this quick guide or user manual, visit or contact us at:
contentservice@renogy.com
renogy.com/support/downloads
For technical questions about your product in the U.S., contact the Renogy technical support team through:
For technical support outside the U.S., visit the local website below:
1(909)2877111
renogy.com/contact-us
ca.renogy.comCanada
uk.renogy.com
United Kingdom
au.renogy.com
Australia
kr.renogy.com
South Korea
www.renogy.cnChina
renogy.jp
Japan
de.renogy.com
Germany
eu.renogy.com
Other Europe
Renogy Support
- 12 -
Renogy Empowered
Live Sustainably with Renogy
RENOGY.COM
Renogy reserves the right to change the contents of this manual without notice.
FCC ID: 2ANPBGWSN-W02W
IC: 23590-RSHGWSNW02W
Renogy aims to empower people around the world through education and distribution of DIY-friendly renewable
energy solutions.
Renogy Power Plus allows you to stay in the loop with upcoming solar energy innovations, share your experiences
with your solar energy journey, and connect with like-minded people who are changing the world in the Renogy
Power Plus community.
We intend to be a driving force for sustainable living and energy independence.
In support of this eort, our range of solar products makes it possible for you to minimize your carbon footprint by
reducing the need for grid power.
Did you know? In a given month, a 1kW solar energy system will...
Save 170 pounds of coal from being burned
Save 300 pounds of CO2 from being released into the atmosphere
Save 105 gallons of water from being consumed
@Renogy Solar @Renogy@renogyoicial
Renogy Power
PLUS
eVatmaster Consulting GmbH
60325 Frankfurt am Main, Germany
Battinastr. 30
EC REP
Manufacturer: RENOGY New Energy Co.,Ltd
Address: No.66, East Ningbo Road Room 624-625
Taicang German Overseas Students Pioneer Park
JiangSu 215000 CN
EVATOST CONSULTING LTD
Centre, Taffs Well, Cardiff, Wales, CF15 7QR
Suite 11, First Floor, Moy Road Business
UK REP
Manufacturer: RENOGY New Energy Co.,Ltd
Address: No.66, East Ningbo Road Room 624-625
Taicang German Overseas Students Pioneer Park
JiangSu 215000 CN