
HCF420W,
HCF520W, HCF720W
Chest Freezer
USER & INSTALLATION GUIDE NZ AU

2
3
WARNING!
Risk of fire/flammable material
• This appliance contains flammable refrigerant isobutane
(R600a).
READ AND SAVE THIS GUIDE
SAFETY AND WARNINGS
This appliance can be used by children aged from 8 years and above and persons with reduced physical,
sensory or mental capabilities or lack of experience and knowledge if they have been given supervision
or instruction concerning use of the appliance in a safe way and understand the hazards involved.
Children shall not play with the appliance.
Children must not clean or maintain the appliance without supervision.
Cleaning and user maintenance shall not be made by children without supervision.
The appliance must be positioned so that the plug is accessible.
lf the supply cord is damaged, it must be replaced by the manufacturer, its service agent or similarly
WARNING: Keep ventilation openings, in the appliance enclosure or in the built in structure, clear
of obstruction.
WARNING: Do not use mechanical devices or other means to accelerate the defrosting process, other
than those recommended by the manufacturer.
WARNING: Do not damage the refrigerant circuit.
WARNING: Do not use electrical appliances inside the food storage compartments of the appliance,
unless they are of the type recommended by the manufacturer.
If the light is damaged, it must be replaced by the manufacturer, a service agent, or a
This chest freezer is suitable for unheated rooms and outbuildings, provided temperatures do not
fall below -15°C.
instructions. Contact a professional or our after-sales service for disposal.
A built-in switch controls the light in models equipped with lighting. The light turns on automatically
Regulations require this appliance to be earthed.
The on the product or packaging indicates that it must not be disposed of with household waste.
Instead, take it to a designated collection point for recycling electrical and electronic equipment.
WARNING: When positioning the appliance, ensure the supply cord is not trapped or damaged.
WARNING: Do not locate multiple portable socket outlets or portable power supplies at the rear
of the appliance.
Children aged 3 to 8 may load and unload the appliance only under supervision.
This appliance is intended to be used in household and similar applications such as:
staff kitchen areas in shops, offices and other working environments;
4
farm houses and by clients in hotels, motels and other residential type environments;
bed and breakfast type environments;
catering and similar non retail applications.
To avoid food contamination, follow these instructions:
Avoid keeping the door open for long periods, as this raises the internal temperature.
Regularly clean surfaces that come into contact with food, as well as any accessible
drainage systems.
Store raw meat and fish in sealed containers to prevent contact with or dripping onto other food.
If the appliance will be unused for a long time, switch it off, defrost, clean, dry, and leave the door
open to prevent mould growth.
This refrigerating appliance is not intended to be used as a built in appliance.
It is hazardous for anyone other than an Authorised Service Person to service this appliance. In
Queensland – the authorized Service Person MUST hold a Gas Work Authorisation for hydrocarbon
refrigerants, to carry out Servicing or repairs which involve the removal of covers.
WARNING: Risk of child entrapment. Before you throw away your old refrigerator or freezer, the doors
and panels should be removed and the racks left in place so that children may not easily climb inside
SAFETY AND WARNINGS
Before Use
This appliance is intended strictly for household use, for storing food only.
If the appliance is damaged when unpacked, please contact your dealer.
5
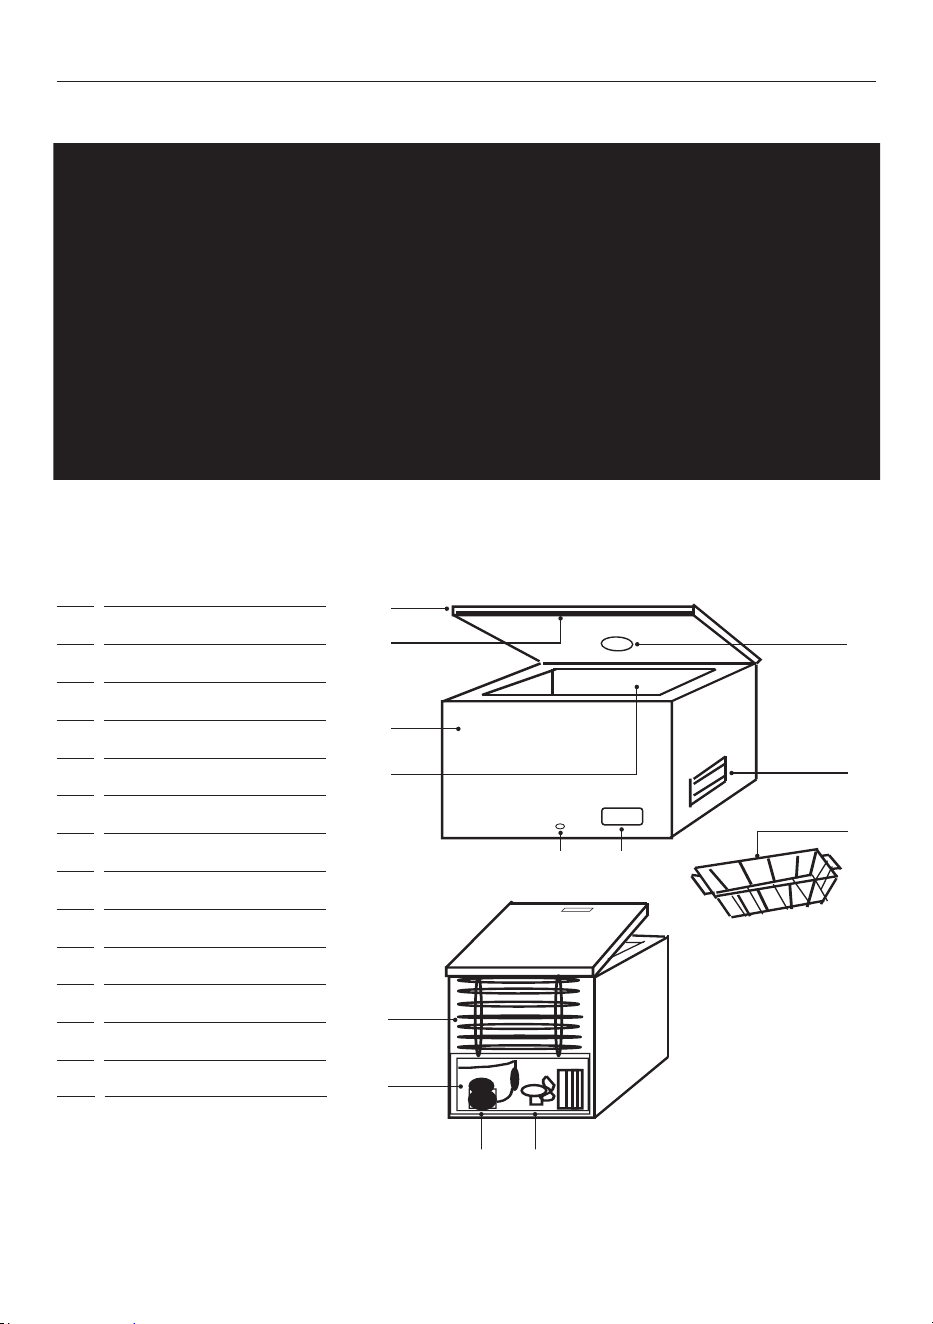
OVERVIEW
A Door
B Gasket
C Cabinet
D Storage compartment
E Ventilation grille
F Control panel
G Basket
H Compressor compartment
I Compressor
J Fan*
K External condenser*
L Drain plug
*some models only
A
B
C
D E
L
JI
H
K
F
G
Control Panel
Product Overview
M
M
Light
6
INSTALLATION
Fully unpack the appliance and remove all packaging materials. Dispose of packaging safely and keep it
out of reach of children.
Install the appliance in a dry, well-ventilated area. Avoid direct sunlight and keep it away
from heat sources.
The electricity supply must match the rating plate and comply with local regulations.
Wait at least two hours after installation before switching on the appliance. This allows the refrigerant
circuit to stabilise.
Install the appliance in a location with an ambient temperature matching the climate class shown on
the rating plate.
Insert the plug in the socket. Wait
until all indicators light up and
then be displayed.
Allow two hours for the internal
temperature to stabilise before
placing food inside.
Climate Class
Ambient Temperature
SN
+10 ºC to 32ºC
N
+16 ºC to 32ºC
ST
+16 ºC to 38ºC
T
+16 ºC to 43ºC
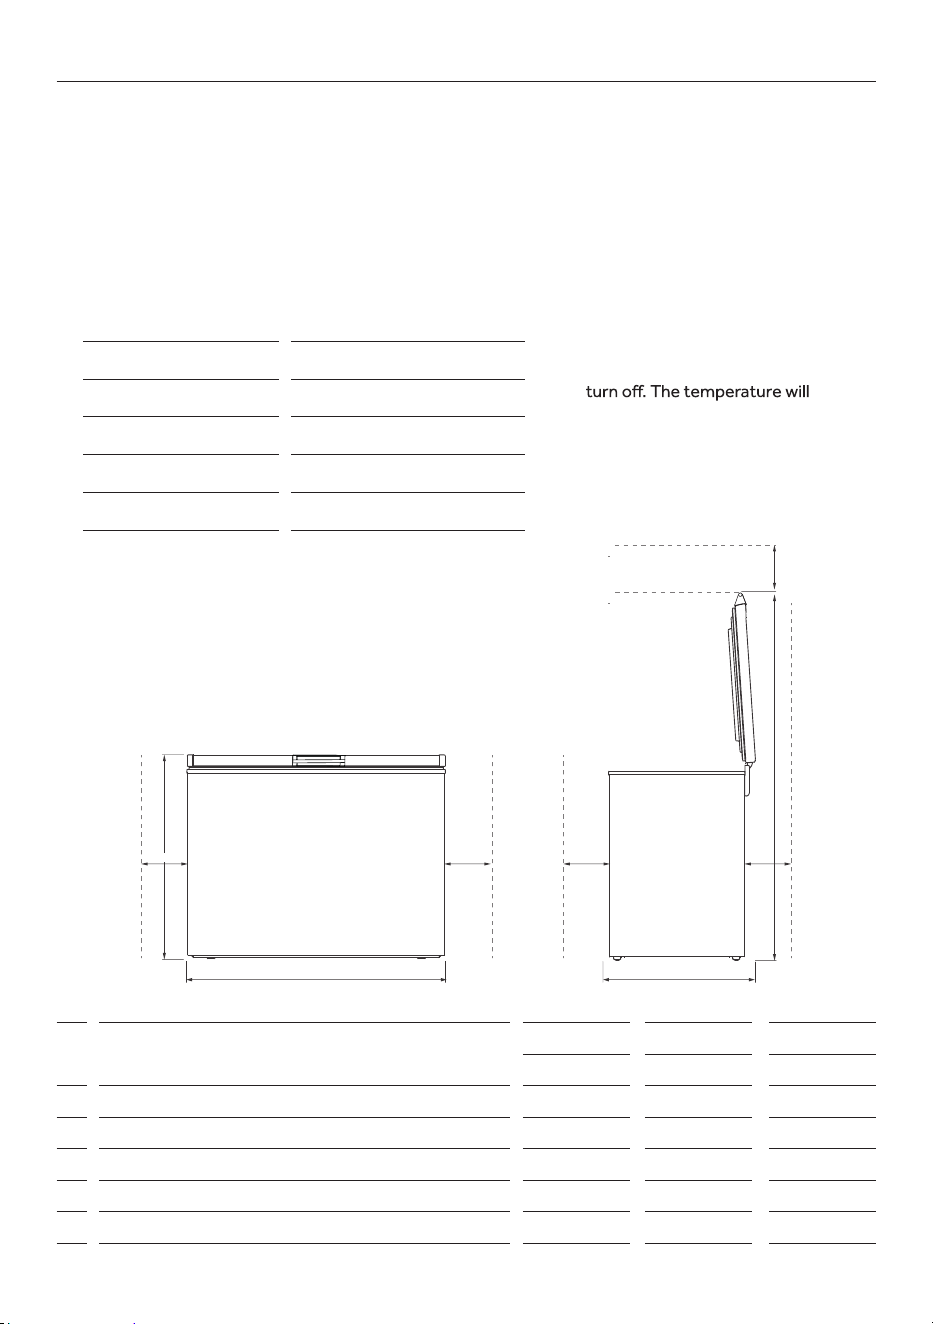
Dimensions
HCF420W HCF520W HCF720W
MM MM MM
A Height 845 845 845
B Width 1320 1545 2042
C Depth (including handle) 750 750 780
D Overall height (lid open) 1530 1530 1555
E Clearances (front, rear, sides, top of lid when open) 50 50 50
A
B C
D
E E E E
E

4. Attach the screw covers to the bottom of the handle.
Installing the door handles (if required)
1. Use a screwdriver to remove the
mounting screws from the front of
the door. Keep these nearby.
2. Align the handle buckle with the
holes in the top of the door, and
push the handle against the door.
3. Use the mounting screws that
were removed in Step 1 to fix the
handle to the door.
4. Attach the screw covers to the
bottom of the handle.
INSTALLATION
7
FIRST USE
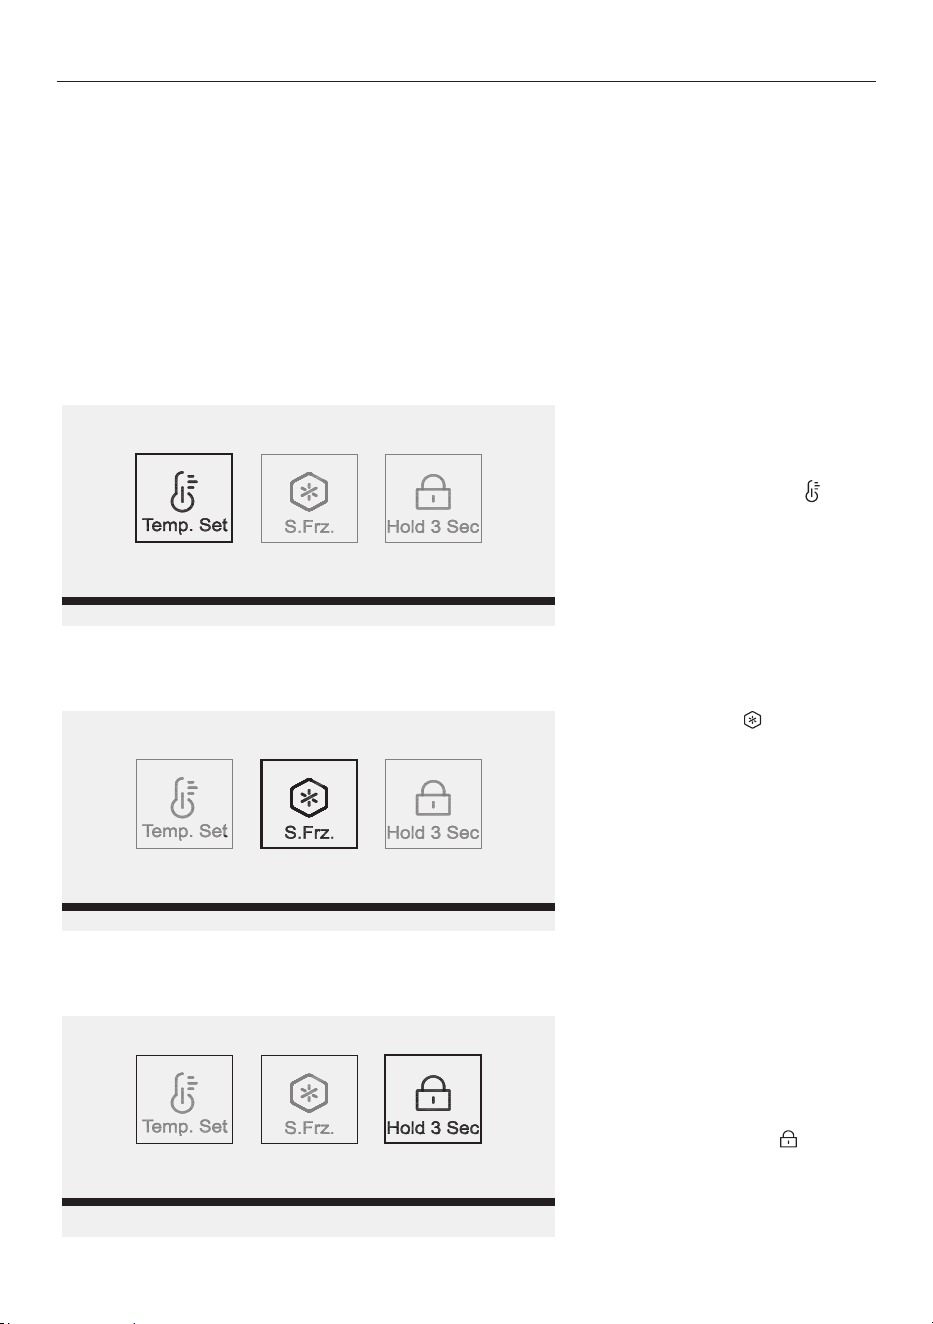
Adjusting the temperature
Press the Temp. Set button to
adjust the temperature.
The default recommended setting
is -18°C.
Setting Super Freeze
Press S. Frz. button until the
indicator lights up
The Super Freeze function will switch
off automatically after 71 hours to
save energy. Power consumption will
increase while Super Freeze is active.
While in Super Freeze mode, the temperature
inside the freezer will target -26°C.
Note: actual temperature reached will be
dependent on factors like ambient temperature.
.
Locking the control panel
To lock or unlock the control panel,
press Hold 3 Sec button for 3
seconds.
Guidance on Freezing Food
Wrap or seal food in aluminium foil, airtight containers, or freezer-safe storage bags before freezing.
Allow hot food to cool prior to placing it in the appliance.
Smaller portions freeze faster. The recommended maximum portion size is 2.5 kg.
Avoid placing warm food directly against frozen items. This could cause defrosting and reduce shelf life.
The capacity of the appliance, as shown on the rating plate, should not be exceeded.
When freezing large amounts of fresh food, activate the Super Freeze function (if available) at least 24
hours in advance.
Storage times for frozen products vary by type and packaging. Always follow the instructions on the label.
8
CLEANING AND MAINTENANCE
Cleaning
If the appliance will be unused for a long time, leave the door open to prevent unpleasant odours.
To ensure food safety, use and clean the freezer regularly as described below.
Clean the inside of your freezer at least once a year.
Use warm water and baking soda solution about a tablespoon of baking soda to litre/quart of water.
Rinse thoroughly with water and wipe dry.
Do not use cleaning powders or other abrasive cleaners.
Do not wash removable parts in a dishwasher.
Do not use harsh chemicals, abrasives, ammonia, chlorine bleach, concentrated detergents, solvents, or
metal scouring pads. These may damage or discolour the freezer.
Never use metallic scouring pads, brushes, abrasive cleaners, or alkaline solutions on any surface.
Clean the door gasket every three months with the baking soda solution as above. Keep it clean and
brushes to clean. If needed, removable shelves, trays, drawers, and similar accessories can be taken out
and washed in the sink.
Defrosting
The appliance should be defrosted once the thickness of ice on the walls reaches 5–6 mm.
Do not use sharp or powered tools to assist in defrosting, unless they are approved by the manufacturer
or service centre.
To remove ice from the inner walls, use a plastic or wood scraper without sharp edges. Never use a
metal scraper. Follow the below guidance:
Unplug the appliance.
Dry your hands thoroughly to prevent injury from ice. Gloves are recommended.
Transfer all frozen food to a container or cool box. Place ice blocks on top to keep items cold, and
store in a cool, dry area.
Place a tray or towel in front of the drain plug at the front of the product.
Remove the drain plug from the front of the appliance and then remove the drain plug from the
interior of the appliance to allow excess water to drain out.
Gently scrape ice from the interior and place it in the kitchen sink to melt.
Thoroughly clean the inside of the appliance compartment, rinse it with warm water and remove any
spilt food or liquids.
Replace the drain plug (if applicable).
Close the appliance door, replace the plug in the socket and turn the appliance on.
Refill the appliance.
To prevent food from thawing, complete the defrosting process within two hours to avoid
temperature increases that can reduce shelf life.
Energy Saving Tips
Over time, frost or ice may form on the interior walls, increasing energy use. To maintain efficiency,
defrost the freezer regularly.
9

TROUBLESHOOTING
Is the door difficult to open?
z
After closing the door, it may be dicult to open again for a few minutes. This is normal and indicates
the seal is functioning properly. Wait a few minutes, and the door will open easily.
Appliance not operating (not running or cooling)
z
Is there a power failure.
z
Is the plug undamaged and rmly connected to the socket?
Appliance isn’t cooling properly / 'HH' appears on display
z
Is the door of the appliance closed properly?
z
Is there heavy ice formation on the inner walls?
z
Is the appliance exposed to direct sunlight or heat?
z
Has too much warm food been placed in the appliance?
z
You can nd the climate class on the rating label on the back of the appliance. It shows the ambient
temperatures suitable for proper operation.
The appliance makes noise
z
This sound comes from the compressor motor and refrigerant moving through the system. These
noises are normal.
Condensation builds up on the outer walls
z
Under certain atmospheric conditions, condensation can form on the appliance’s outer walls. This is
normal and won’t aect performance.
Climate Class
Ambient Temperature
SN
+10 ºC to 32ºC
N
+16 ºC to 32ºC
ST
+16 ºC to 38ºC
T
+16 ºC to 43ºC
10
CUSTOMER SERVICE
We recommend our Haier Customer Service and the use of original spare parts.
If you have a problem with your appliance, please first check the Troubleshooting section. If you cannot find
a solution there, please contact:
z
Your local dealer
z
The Service & Support area at
www.haier.com.au or
www.haier.co.nz
where you can activate the service claim and also find FAQs.
To contact our Service, ensure that you have the following data available.
The information can be found on the rating plate at the door.
Model
Serial No.
Complete and keep for safe reference:
Model
Serial No.
Purchase Date
Purchaser
Dealer
Suburb
To wn
Country
11

0070521052 06.25
WWW.HAIER.COM.AU
WWW.HAIER.CO.NZ
条形码尺寸40*8mm,由厂家生成。