
KEEP THIS MANUAL FOR FUTURE REFERENCE
GS6000i
Rev:00
Model#
P/N: 00066-MA90-00
1-787-251-3131

TABLE OF CONTENTS
LIMITED WARRANTY
INTRODUCTION
SAFETY
ATTENTION
DISCLAIMERS
INTENDED USE
MAIN SPECIFICATIONS
WHAT' S INSIDE THE BOX
GET TO KNOW YOUR GS4800i
USING YOUR PORTABLE POWER STATION (PPS)
USING USBS AND 12V DC OUTPUTS
RECHARGING YOUR PORTABLE POWER STATION (PPS)
UPS MODE
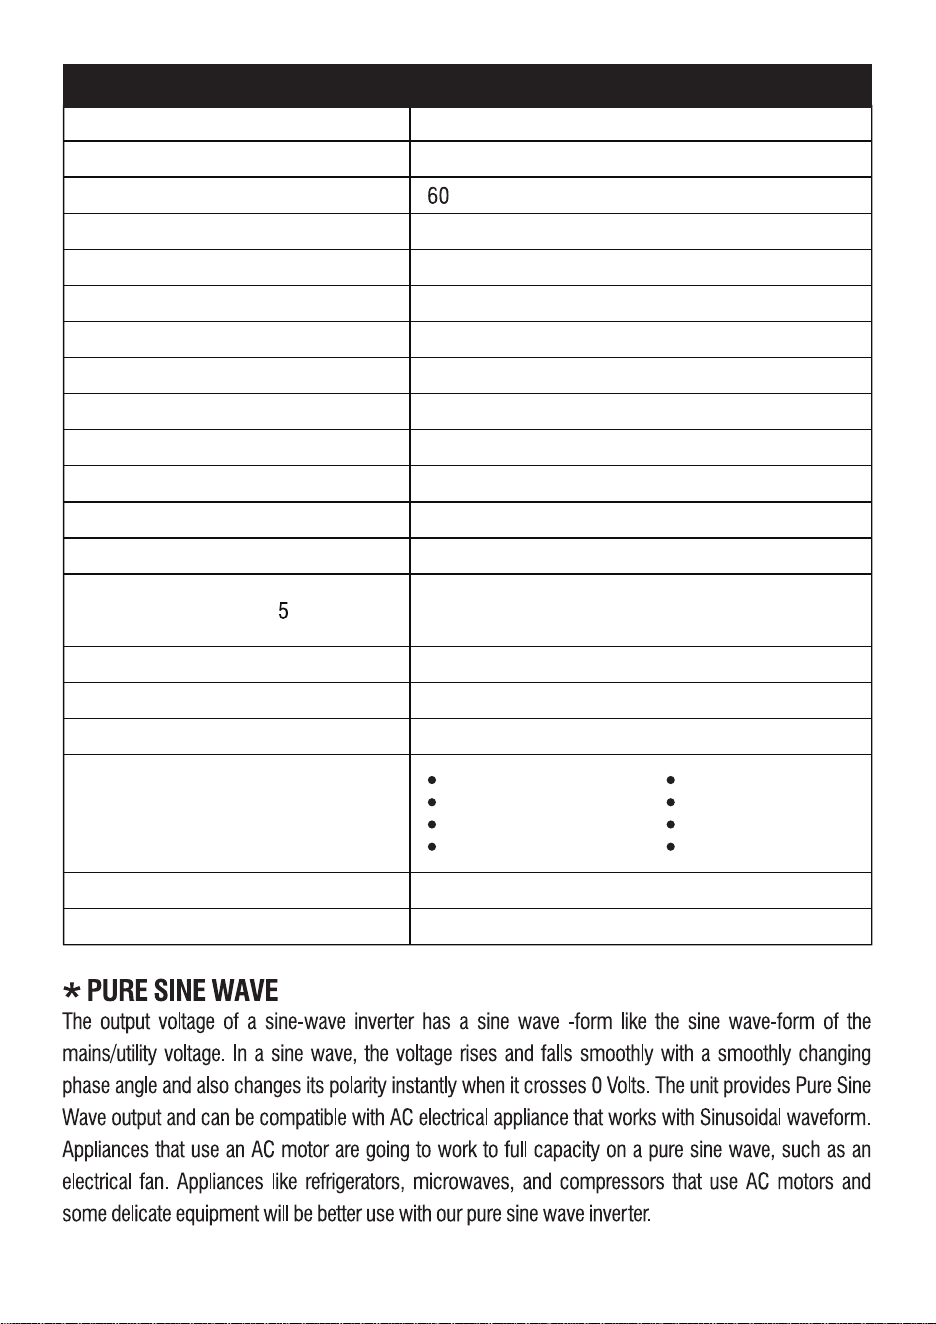
PURE SINE WAVE
GENERAL SAFETY PRECAUTIONS
WARRANTY TERMS
WARRANTY EXCLUSIONS
2
1
09
08
07
1.AC Charging (using the included AC wall charging cable)
1
2.Solar Panel Charging (using the included solar charging cable)
1
3.Car Charging (using the included solar charging cable)
1
07
05
04
04
03
02
02
02
INTRODUCTION
SAFETY
s
1-787-251-3131, or
www.tuplantapr.com
ATTENTION
03

The GS6000i Portable Power Station is a power supply for electronic devices with a maximum
power consumption of 3600W. Our product is not suited for use with equipment that relates to
one's own personal safety and relies heavily on electricity, such as medical devices, equipment
for nuclear facilities, manufacture of air and spacecraft, etc. We assume no liability for accidents
involving personal safety, fires, or machine failures caused by using our product with the
aforementioned devices.
DISCLAIMERS
INTENDED USE
04
Our company cannot be held liable for damages caused by fire, earthquake, use by a third par
ty,
other accidents, intentional misconduct on the part of the customer, abuse or other abnormal
conditions. Do not repair any damage to the AC plug or power supply on your own. The warranty
covers all terms and conditions of the warranty. Contents that are not specified in the warranty
terms and conditions are beyond our responsibility. Our company assumes no liability for damage
caused by incorrect use or non-compliance with this instruction manual.

GENERAL SAFETY PRECAUTIONS
-Use and store the unit only in a clean and dry environment. DO NOT use and store in dusty
or wet environment.
-Check the unit prior to every use. DO NOT use the unit if it is damaged or broken.
-DO NOT use the unit if the power cord is damaged or broken.
-DO NOT use or store the unit in an area or environment with high temperature.
-D0 NOT charge the unit via power supply systems that operate outside of 100-120V.
-DO NOT place the unit on its side or upside down while in use or storage.
-Keep the unit away from children. DO NOT let children use the power supply unit.
-Keep this product away from pets.
-Should fluid from inside of the unit come in contact with your skin or clothing, wash the
affected areas with tap water
-In a storm, unplug the power cord from the socket.
-DO NOT charge, use or store the unit in a bathroom or in an area exposed to rain or
moisture.
-DO NOT disassemble, repair or modify the unit or the battery.
-D0 NOT place the unit close to or in a fire or expose it to heat. Keep out of direct sunlight.
Only use the output socket to power external devices. Never connect the output to mains
power under any circumstances.
-D0 NOT touch the unit or the plug-in points if your hands are wet.
-D0 NOT use any inappropriate or damaged power cords.
-D0 NOT operate the unit above the specified input voltage.
-DO NOT use the unit if it is not functioning correctly.
-DO NOT move the unit if it is recharging or in use.
-D0 NOT connect any metalic objects to the AC input or output.
-DO NOT rub your eyes if fluid from inside the unit gets on your hands
-D0 NOT dispose the unit together with household waste.
05
-Make sure that the device you are connecting is switched off before you connect it.
-Only charge, use and store the unit within ambient temperature of 0 to 40°C(32°F-104°F)
-Make sure that the unit is properly secured when transporting it in a motor vehicle.
-lf rust, peculiar odors, overheating or other abnormal circumstances are observed, stop
using the unit immediately and contact our customer service team.
-Carefully read the instructions for the electric devices that you intend to connect to your
portable power station.
-Turn the unit off immediately if it has accidentally fallen, was dropped or was exposed to
vibrations.
06
GS6000i
High Temperature
Low Temperature
Over Load Protection
Over Voltage
Model Number
Under Voltage
Overcharge
Overcurrent
Short Circuit
Warranty
Net Weight
5 Years (Residential)
90.4lbs
FCC-MSDS-BC-UN38.3Certifications
-10°C to 40°C (14°F to 104°F)
Discharging Temperature
Charging Temperature
0°C to 40°C (32°F to 104°F)
4000+ Cycles at 80% CapacityLife Cycle
Pure Sine Wave
Sine Wave Type
60HzAC Output Frequency
120V
AC Output Voltage
1,200,000mAh
Total mAh
LiFePO4
Battery Cell Chemistry
20Ah, 3.2VBattery Cell
4204WRated Output(AC+DC)
604WRated Output(DC)
3600WRated Output(AC)
00W
Peak Output(AC)
3840Wh (80Ah,48V)
0% To 80% Within 2.3hrs
0% To 100% Within 3.2hrs
Capacity
Wall Charging Time at 1 00W Input
MAIN SPECIFICATIONS
BMS Protections
07
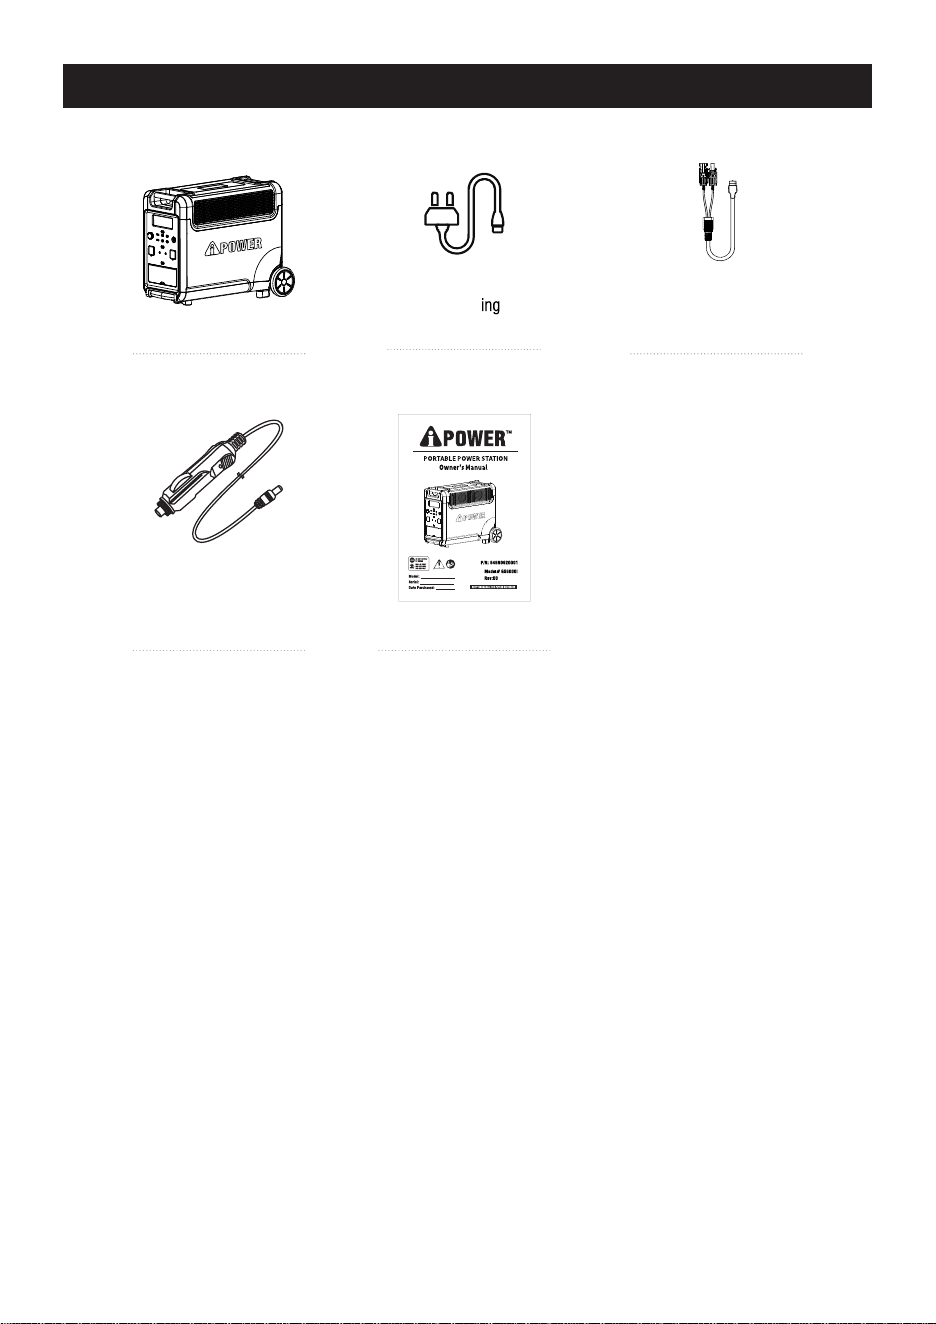
Solar Charging Cable XT90
Female Socket to MC4
Portable Power Station
AC Wall Charg
Cable
IEC 60320 C13
Female Socket to 5-20P
Car Charging Cable XT90
Female Socket to Cigarette
Lighter Male Plug
User Manual
WHAT'S INSIDE THE BOX
08
6
4
5
1
8
3
2
7
13
11
14
12
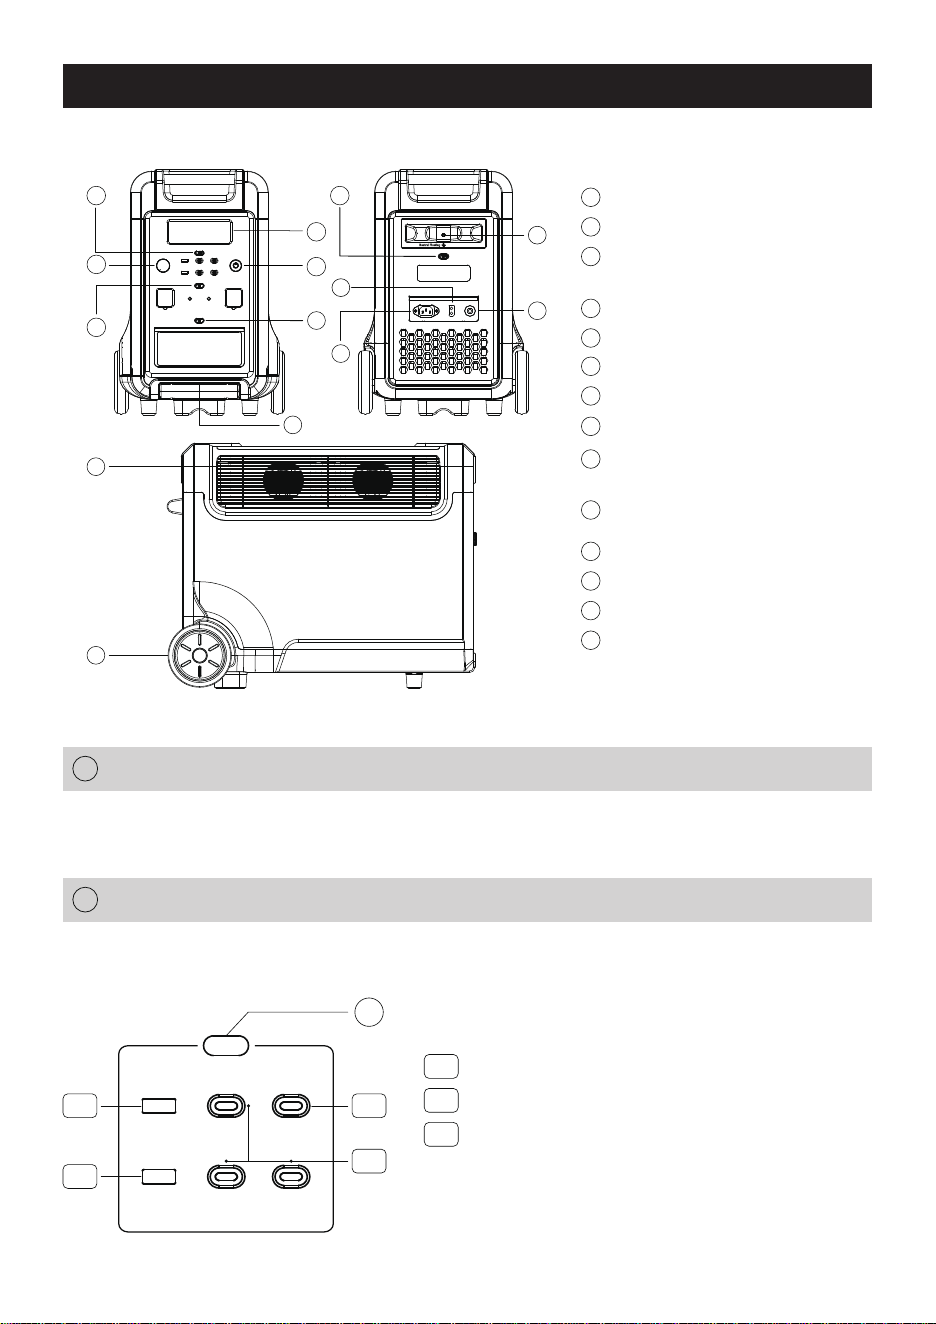
GET TO KNOW YOUR GS6000i
USB Power ON/OFF Button
1
3
12V DC Power ON/OFF Button
Charging (Input) Power Knob
2
LCD Display (Data Center)
4
Main Power ON/OFF Button
5
AC Power ON/OFF Button
6
AC input (wall charging)
9
Telescopic Handle
10
Ground Terminal
11
Overload Protection Circuit Breaker
12
Cooling Fans
13
Wheels
14
7
LED Light ON/OFF Button
(switch to different modes)
XT90 DC Input
(for solar panel and car charging)
8
Main Power ON/OFF Button (with LED Indicator Light)
1
Instructions: Press and hold the power button for 3S to turn on the system. Turn on the LCD display,
and press and hold again for 3s to turn off.
2.2
2.1
USB ON/OFF
2.3
2
2.3
USB-A QC3.0 (x2) 5V/3A, 9V/2A, 12V/1.5A, 36W Max
USB-C 20W (x3), 5V/3A, 9V/2.22A, 12V/1.67A, 60W Max
USB-C 100W, 5V/3A, 9V/3A, 12V/3A, 15V/3A, 20V/5A,
100W Max
NOTE: Max output from this section is 196W
2.1
2.2
USB Power ON/OFF Button (with LED Indicator Light)
2
Instructions: Short press the USB button to turn on the USB DC output port, and short press it
again to turn it off.
PD 100W
PD 20W
PD 20W
PD 20W
2.1
QC 3.0
QC 3.0
9
10
09
LED Light ON/OFF Button (with LED Indicator Light)
3
-Press the button once to turn light ON
-Press the button again to enter to the SOS mode
-Press the button third time to enter to the blinkingmode
At any mode, long press will turn light OFF
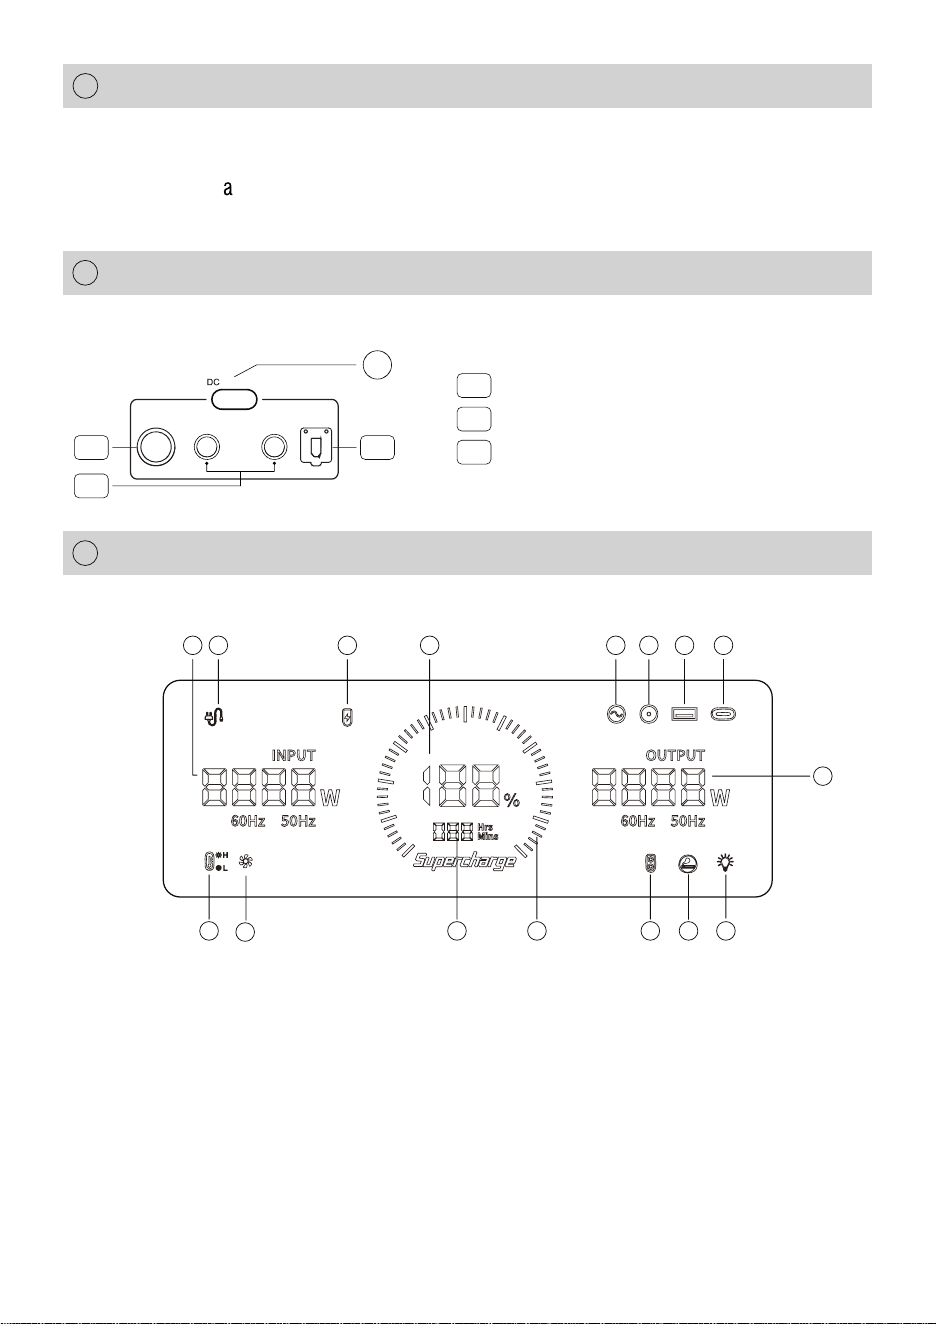
LCD Display (Data Center)
5
Display the product's battery level and usage status tips.
12V DC Power ON/OFF Button (with LED Indicator Light)
4
Instructions: Short press the DC button to turn on the DC output port, and short press it again
to turn it off.
Cigarette lighter output 12V/10A, 120W Max
DC5521 (x2) output 12V/3A, 72W Max
XT60 output 12V/25A, 300W Max
NOTE: Max output from this section is 408W
4.1
4.1
4.2
4.3
4.2
4.3
1.Charging (Input) Power in Total
2.Connected to the AC Main IEC 60320 C14
3.XT90 Input
4.Battery Level Percentage
5.AC Output
6.DC5521 (12V) Output
7.USB-A Output
8.USB-C Output
9.High/Low Temperature Protection
10.Fan Status
11.Remain Using/Recharging Time
12.Battery Level Progress Bar
13.XT60 (12V) Output
14.Cigarette lighter (12V) Output
15.LED Light
16.Output Power in Total
ON/OFF
16
1
5
8
7
62 3
4
41 5111 1312
10
9
4
10
Power display: When the product is in the charging state, the battery level progress bar rotates
continuously in the form of a clockwise marquee, and the battery level percentage gradually
increases; when the product battery level is 0, the battery level percentage icon flashes.
Input and output status: When the product is working, the total input power, total output power
and the cursor corresponding to the working area will be displayed on the screen.
Alarm prompt: See the following troubleshooting table for details.
Charging (Input) Power Knob
Cooling Fan (Suction/Exhaust Ports)
6
7
When the product is connected to the AC mains for charging, the charging power can be adjusted
according to the actual input voltage. The clockwise rotation of the knob increases the input
power, and the counterclockwise rotation decreases the input power. More input power, means
faster charging or shotter time. It is worth noting that charging this product at low power is
beneficial for extending battery life.
When the product reaches the temperature threshold set by the system, the cooling fan will
automatically run, accompanied by a certain fan noise (fan noise below 60dB is normal). Do
not block the cooling suction/exhaust port during use of this product, and do not place any
object within the range of 12 inch.
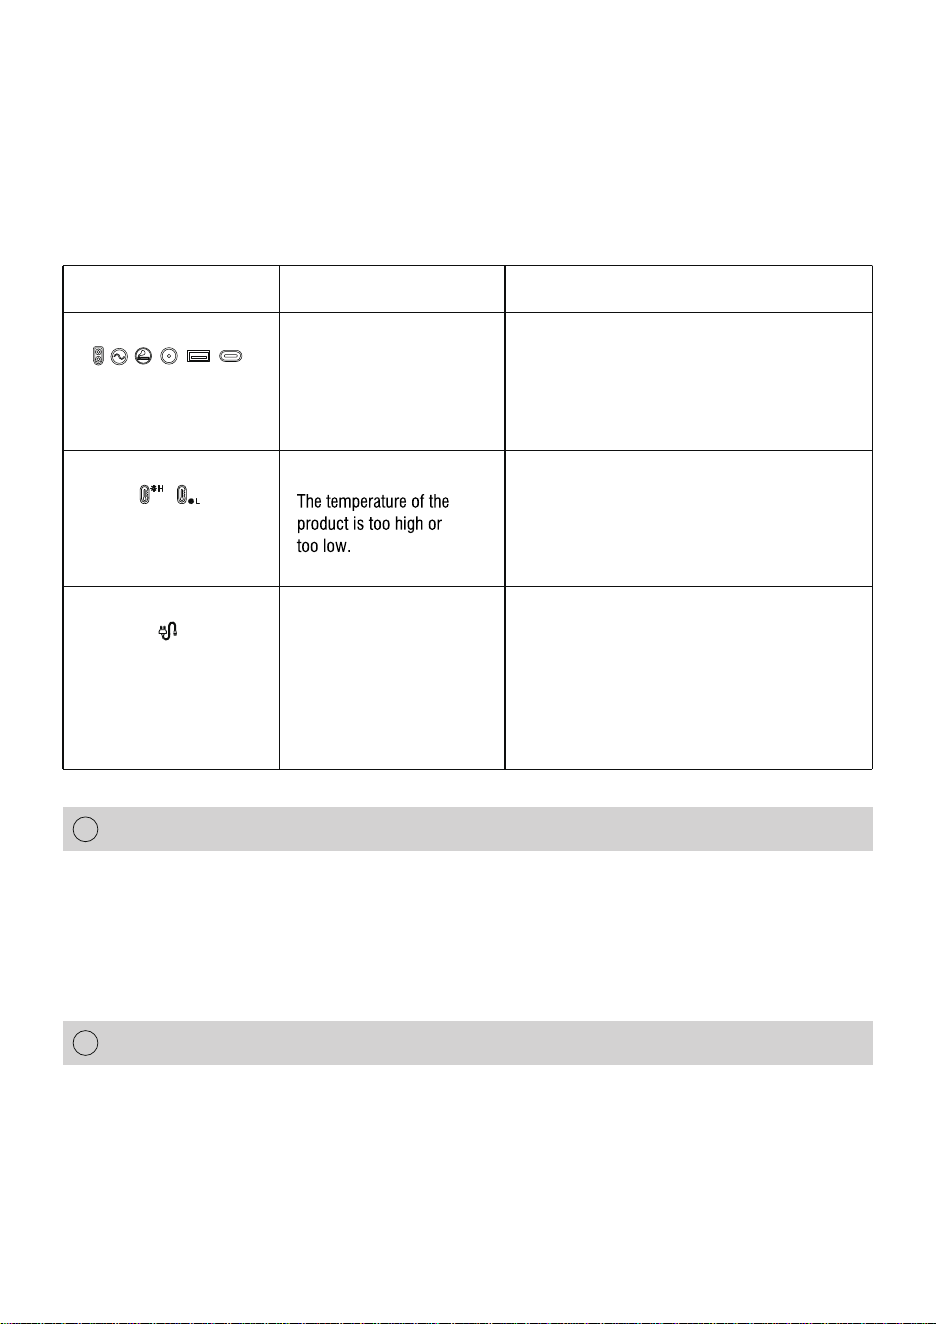
Phenomenon
The icon of connecting to
the AC main flashes and
the product cannot be
charged.
The temperature warning
icon flashes and beeps.
The above output icons
flashes and beeps.
Cause
The output exceeds the
standard and it’s
short-circuited.
The charging cable is poorly
connected.
Processing method
The overload protection function is enabled.
Take the product out of the charging state
remove all loads, turn the power off, wait
for the device to reach a suitable working
temperature, then the alarm is removed.
Remove the load, and then short press the
switch (button) in the area corresponding to
the icon to remove the alarm.
11
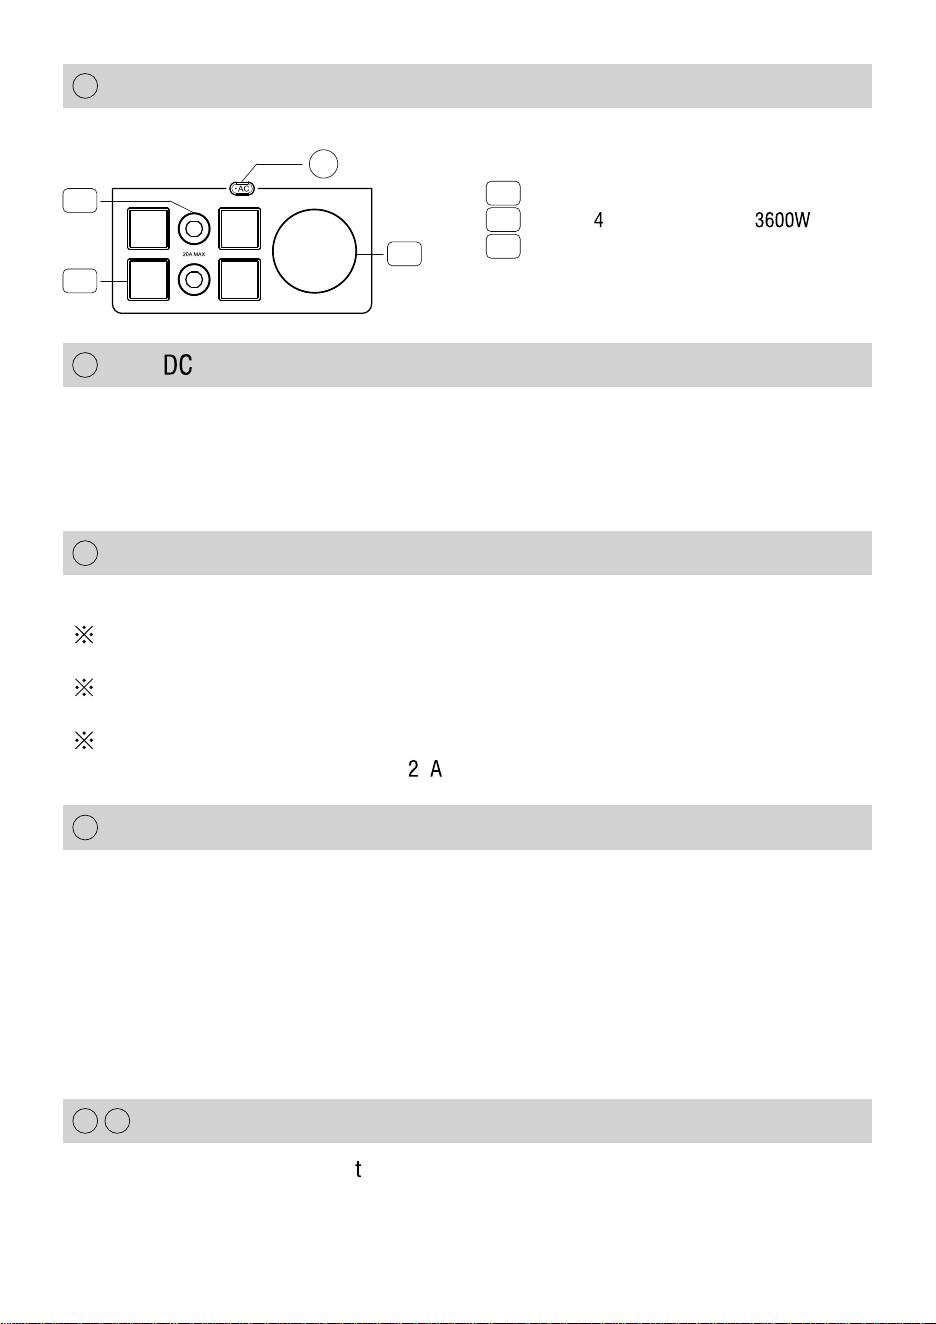
20A (x2) Circuit Breaker
5-20R (x ) output 120V/20A, Max
TT-30R output 120V/30A, 3600W Max
NOTE: Max output from this section is 3600W
8.1
8.2
8.3
AC Power ON/OFF Button (with LED Indicator Light)
Press the AC button to enable the AC output function.
AC Input (IEC 60320 C14 Male Plug)
Overload Protection Circuit Breaker
1500W fast charging with a household socket can perform a 100% charge within 3.2 hours.
When the power supply current is unstable due to lightning or other reasons,and there is a large
current input at the AC Input, in order to protect the product, the overload protection function
(safety circuit breaker) will activate and cut off the AC input port.
Please follow the sequence below to restore the AC input function:
1) Turn off the main power ON/OFF button and unplug all electrical loads.
2) After confirming that there is no abnormality in each part, turn on the main power ON/OFF
button.
3) Press the overload protection button, connect the electrical loads.
The charging of this product can directly use the socket on the wall, etc. Please do not use
extension cords and cable taps to connect several devices at the same time.
Using a cable tap to charge several devices at the same time will cause a large current to flow,
causing cable breakage and fire risk.
Do not use the same socket to connect other devices while charging this product. In
general, when the AC input exceeds
0 , the safety circuit breaker will trip.
Handle & Wheels
8
10
11
12
13
This product is designed for easy ransportand mobility with telescoping handle & wheels.
9
XT90 Input (Solar Panel and Car Charging)
This interface supports solar panel input or car charging input.
The input of the solar panel can be up to 2000W and the maximum voltage is 160V.
It would be outside the scope of warranty, if the equipment is damaged by exceeding the maximum
voltage.
8.3
8.1
8.2
8
30A MAX
12

Ground Terminal
14
A ground terminal has been provided on this model to ground this product. Grounding your unit
must be properly connected to an appropriate ground to help prevent electric shock.
The ground system of this product is Neutral Floating which means Neutral circuit IS NOT
electrically connected to the frame/ ground of the Power Station.
Failure to properly ground this pr
oduct can result in electric shock.
For remote grounding, connect a length of heavy gauge copper wire between the Power
Station’s ground terminal and a copper rod driven into the ground. We strongly recommend that
you consult with a qualified electrician to ensure compliance with local electrical codes.
13
Press and hold the main power ON/OFF button for 3S to turn on the unit. The button will illuminate
when it is ON. The LCD display (Data Center) lights up and displays necessary information. The
unit is now in standby mode and ready to use. Double click the main power button to deactivate
the LCD display to save energy (Energy Saving Mode). Press and hold the main power ON/OFF
button for 3S to turn off the unit.
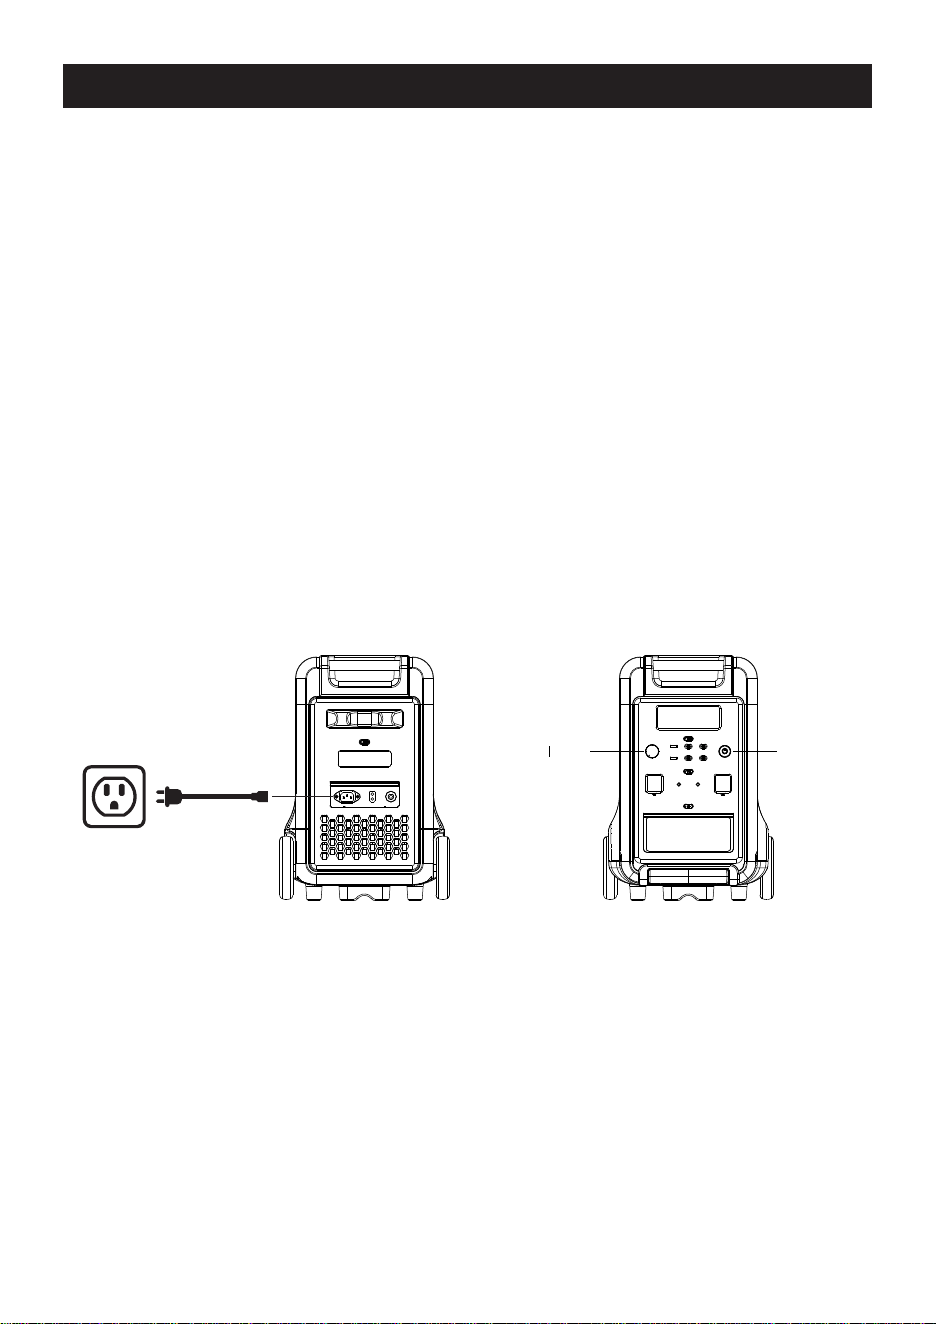
USING YOUR PORTABLE POWER STATION (PPS)
Before use, plug your PPS into the wall until it is fully charged.
1. Make sure the appliance you are plugging in is turned off.
2. Connect the power cable plug of the electrical appliance to the AC outlet (s) of the PPS.
3. Press and hold the main power ON/OFF button for 3S to turn on the PPS. The button will
illuminate when it is ON.
4. Press AC power ON/OFF button. The button will illuminate when it is ON. The LCD display
indicates AC output icon ( ).
5. Turn AC appliance ON. The LCD Display will display real-time wattage of the appliances.
6- When finished:
-Turn off AC appliance
-Press AC power ON/OFF button to turn the AC outlets off (If you leave the AC Power button ON
it will drain the battery)
-Press and hold the main power ON/OFF button for 3S to turn off the PPS and remove power cable.
USING AC OUTPUT (120V)
NOTICE: If the total output exceeds 5400W, the power station will automatically shut off. Please
ensure the power consumption is less than 5400W, then press the AC power ON/Off button.
WARNING: The AC outlets, AC voltage, and frequency are different according t
o different countries,
please carefully check whether the product specifications are consistent with the appliance
specifications before use, otherwise, it can lead to dangerous situations.
AC Power
ON/OFF Button
Main Power ON/OFF Button
14
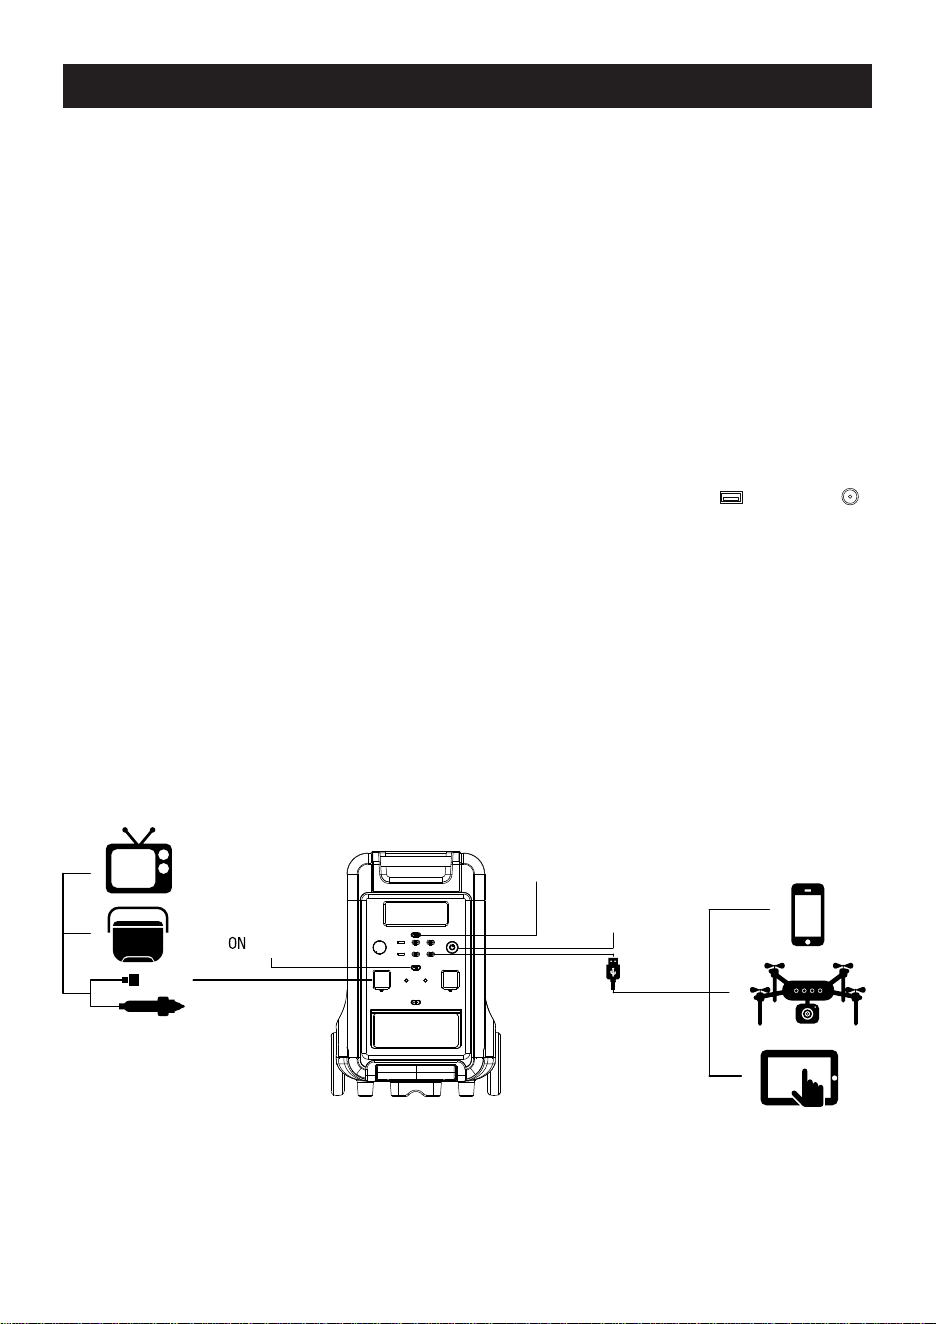
Before use, plug your PPS into the wall until it is fully charged.
1. Make sure the electric device that you are plugging in is turned off.
2. Connect the power cable plug of the DC electrical device to the DC outlets or USBs of
the PPS including:
USB-A QC3.0 (Qty:2)
USB-C PD-20W (Qty:3)
USB-C PD-100W (Qty:1)
DC5521 outlet (Qty:2)
XT60 outlet (Qty:1)
Cigarette lighter (automotive) outlet (Qty:1)
3. Press and hold the main power ON/OFF button for 3S to turn on the PPS. The button will
illuminate when it is ON.
4. Press USB power ON/OFF button for USBs or DC power ON/OFF button for DC Outlets. The
buttons will illuminate when they are ON. The LCD display indicates USB icon or DC icon .
The LCD Display will display real-time wattage of DC electric devices.
When finished:
-Turn off DC electric device
-Press DC power ON/OFF button and USB power ON/OFF button to turn off the DC outlets and
USBs (If you leave the buttons ON it will drain the battery)
-Press and hold the main power ON/OFF button for 3S to turn off the PPS and remove power cable
Main Power
ON/OFF Button
12V DC Power
/OFF Button
USB Power
ON/OFF Button
NOTICE: If the total output exceeds the wattage output of the DC outlet, the power station will
automatically shut off. Please ensure the power consumption is less what the outlet is rated for
before using the device.
USING USBS AND 12V DC OUTPUTS
15
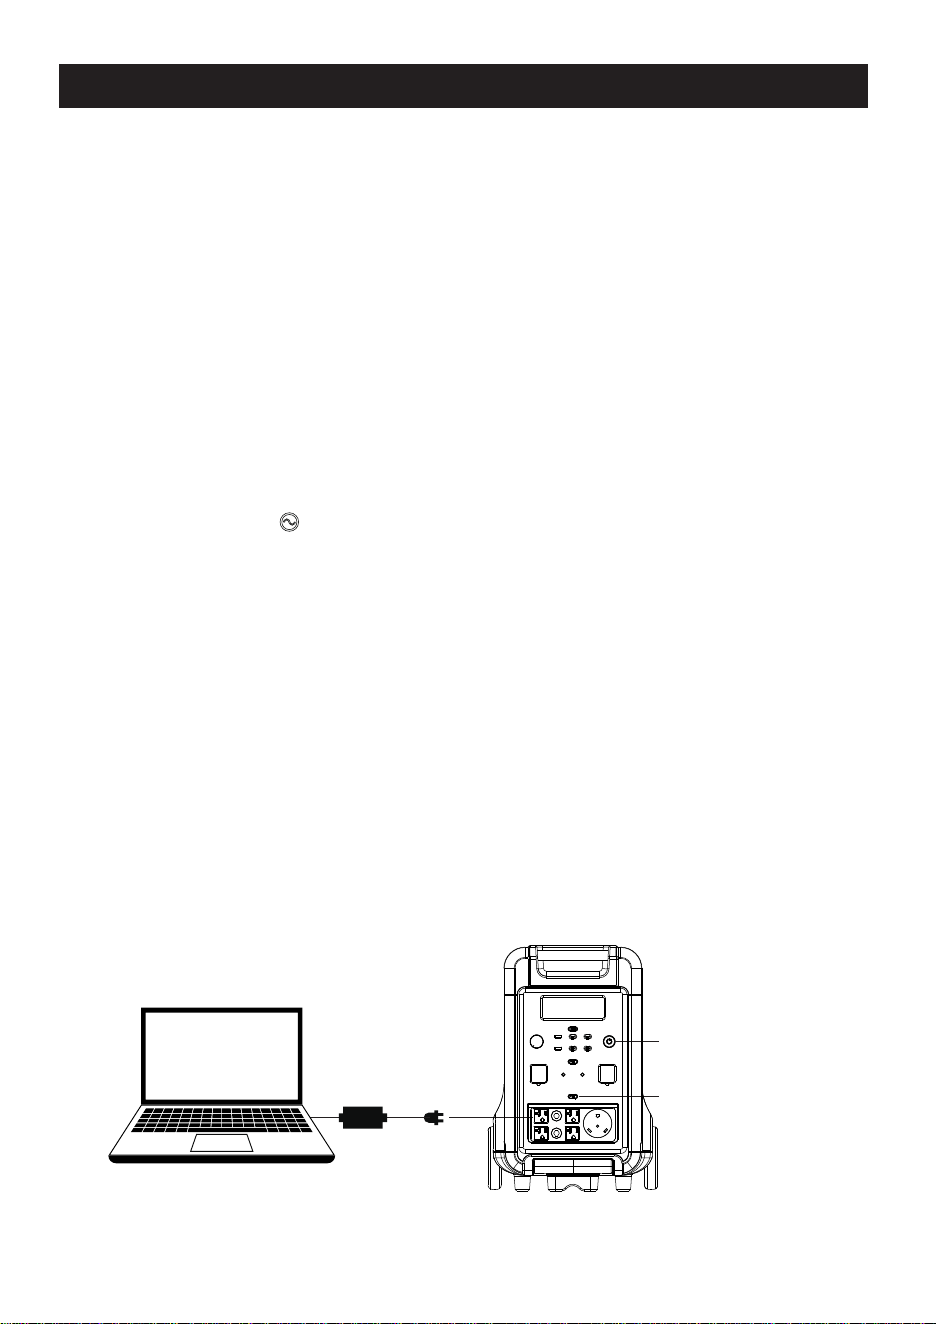
Your PPS can be recharged by:
1.AC Charging (using the included AC wall charging cable)
RECHARGING YOUR PORTABLE POWER STATION (PPS)
-Plug your PPS into the standard wall outlet to charge the unit.
-Press and hold the main power ON/OFF button for 3S to turn on the PPS. The button will illuminate
when it is ON.
-Use the charging (input) power knob to adjust charging power. The charging power is adjusted
according to the actual input voltage. The clockwise rotation of the knob increases the input power,
and the counterclockwise rotation decreases the input power. More input power means faster
charging or shorter charging time. It only takes 3.2 hours to fully charge from 0 to 100% when the
input power knob is on 1500W. It is worth noting that charging this product at low power is
beneficial for extending battery life.
-Power display in LCD display (Data Center): When the product is in the charging state, the battery
level progress bar rotates continuously in the form of clockwise marque, and the battery level
percentage gradually increases; when the product battery level is 0, the battery level percentage
icon flashes. When the product is working, the total input power, total output power and the cursor
corresponding to the working area will be displayed on the screen.
Wall AC Outlet
Charging ( nput)
Power Knob
Main Power
ON/OFF Button
16

Option One: One Solar Panel
Option Two: Two Solar Panels (In Series)
Solar Charging
Cable XT90 to MC4
(Included in Accessories)
Solar Charging
Cable XT90 to MC4
(Included in Accessories)
Solar Panel (Not Included in Accessories)
Portable Power
Station
Portable Power
Station
Solar Panel
(Not Included in Accessories)
Solar Panel
(Not Included in Accessories)
AC Input XT90
Input
The charging power of the solar panel is determined according to the weather and other
conditions.
The solar panel voltage exceeding 160V will damage the equipment and may be out of warranty.
We recommend the foll wing charging options:
AC Input XT90
Input
2.Solar Panel Charging (using the included solar charging cable)
Under condition of sunlight, this product can be connected to the solar panel and can be charged
thr ugh the solar panels.
The input of the solar panel can be maximum 2000W, maximum voltage 160V.
17
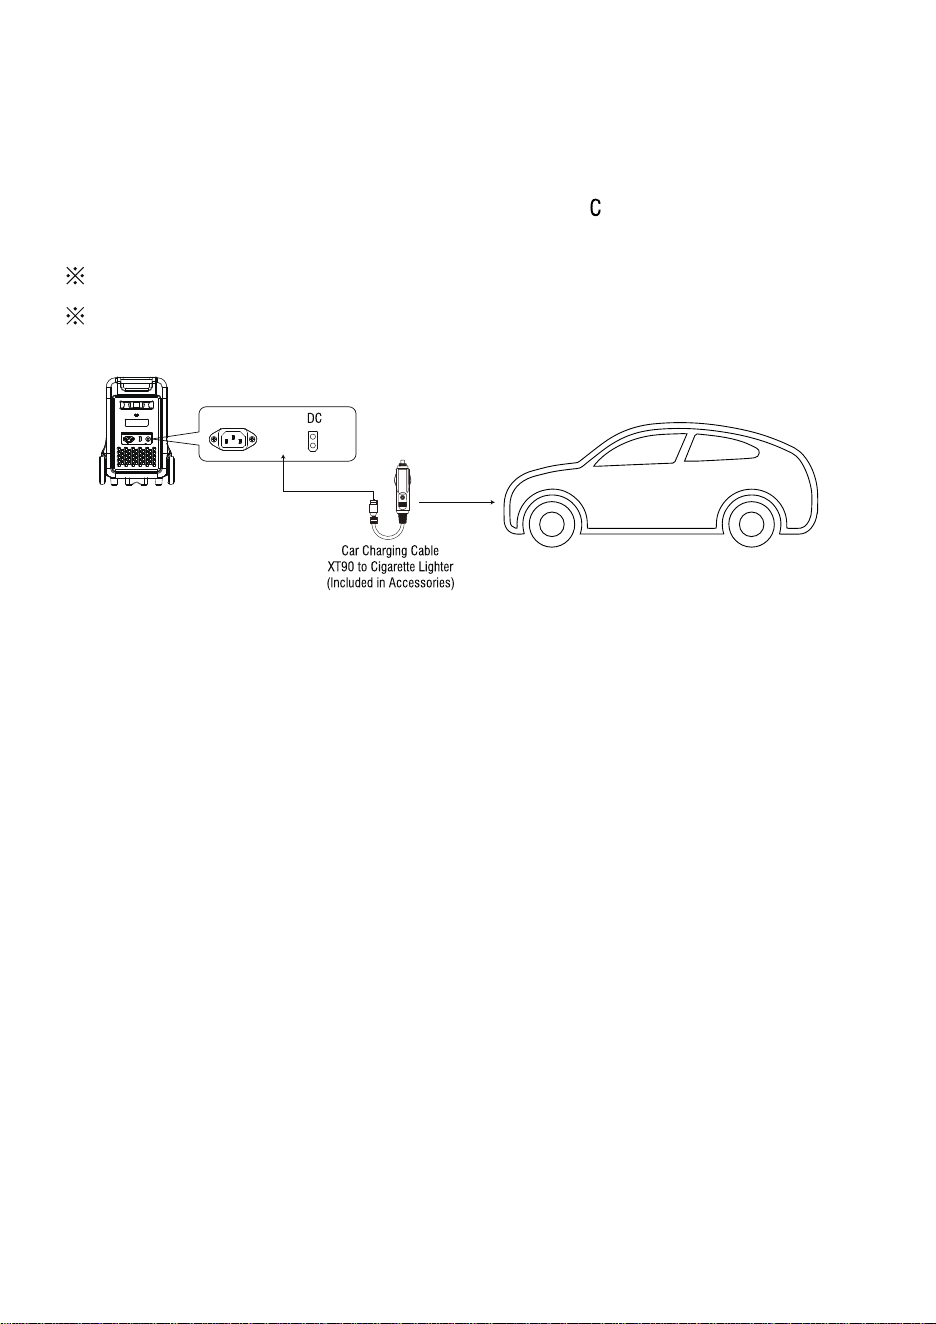
Please do it when the car started, otherwise the car battery may be exhausted.
Vehicle charging power is usually in the range of 90W-120W, and the charging time is long.
If fast charging is required, the AC mains charging is recommended.
AC Input XT90 Input
Portable Power
Station
3.Car Charging (using the included solar charging cable)
This product uses car charging cable, which can be used for mobile charging by the cigarette
lighter in the car.
Connect the car charging cable to the cigarette lighter in the car and the XT90 interface on the
side of the product, turn on the engine of the car, and the L D display of this product will
display the input power.
18
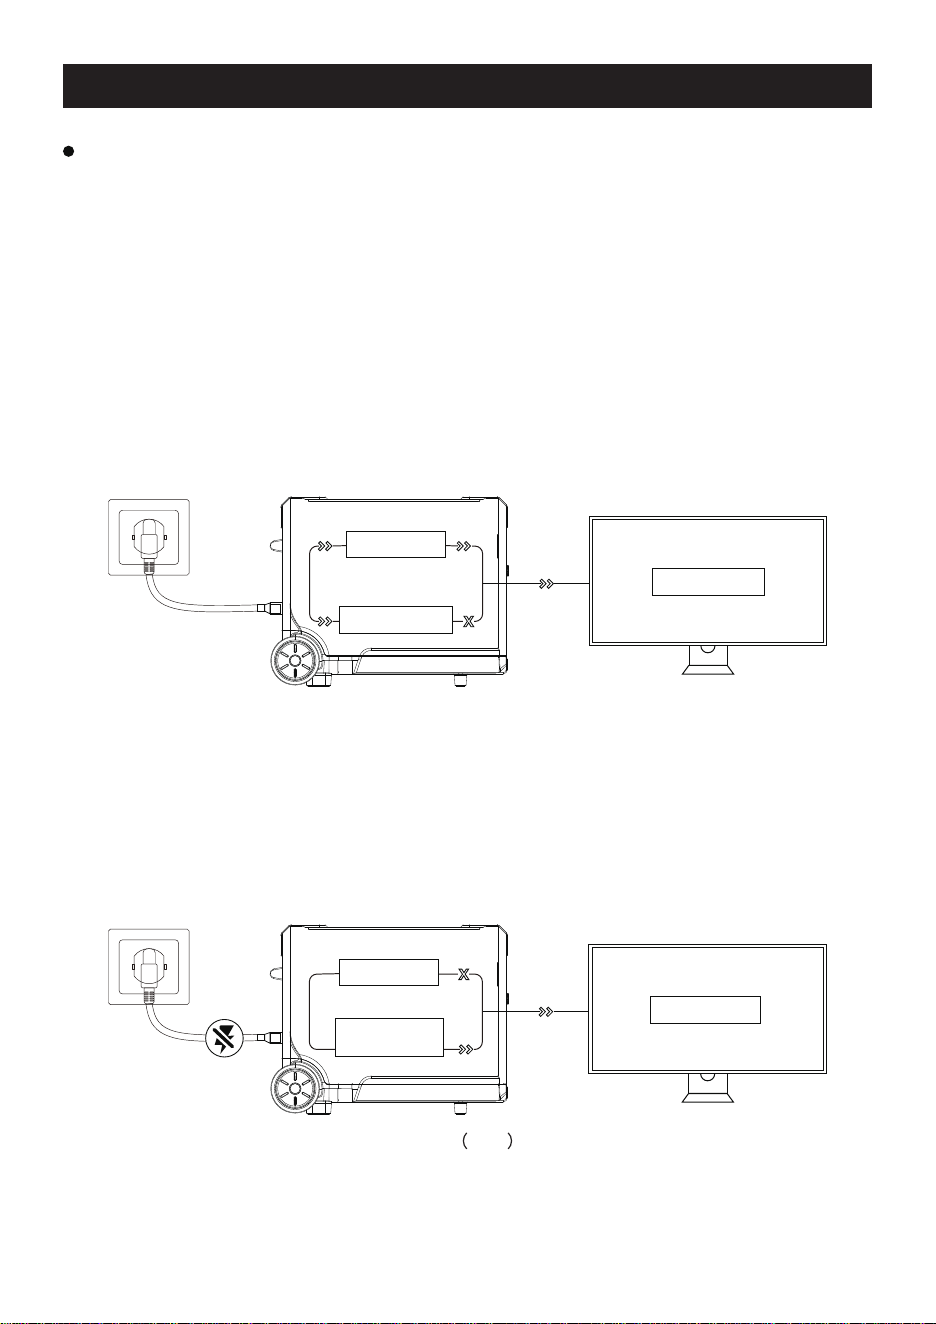
UPS Feature
load/Equipment
Bypass circuit
Battery charging
(Pic 1)
Pic 2
load/Equipment
Bypass circuit
Bidirectional
inverter circuit
UPS MODE
As shown in Pic 2 below, when the AC mains at the socket end is disconnected, the bypass
output inside the product stops working, the product switches to a bidirectional inverter circuit
within 10ms, and the circuit outputs supply power to the electrical appliance to ensure that the
electrical appliance is uninterrupted and works normally during the process.
This product has the function of backup uninterruptible power supply. The usage and operation
precautions are as follows:
As shown in Pic 1 below, when the product is connected between the wall socket and the
electrical appliance, and the power supp
ly and AC switch of the product are in the ON state,
the product enters the UPS working mode. The AC mains in the socket supplies power to the
electrical appliance through the bypass circuit, and also charges the product. In this working
state:
-The rated power of the electrical appliance must be lower than 1500W (only 100V~120V),
otherwise overload protection may be triggered.
19

20
LIMITED WARRANTY
KEEP YOUR RECEIPT. Proof of purchase will be required to substantiate any warranty claim.
WHAT IS COVERED: A-iPower/TuplantaPR warrants to the original retail purchaser that this
product is free of defects in material and workmanship and agrees, at A-iPower/TuplantPR’s
direction, to either repair, provide replacement parts for, or replace (without charge for parts or
labor) any product or component with a material defect for a period of 5 years from the date of
purchase, subject to exclusions noted herein. Warranty service and replacement parts are
warranted only for the duration of the warranty on the original product. All replaced parts or
products become the property of A-iPower/TuplantaPR.
WARRANTY TERMS
We will provide 5 years limited warranty for A-iPower portable power station products
purchased through any authorized A-iPower dealer in Puerto Rico that fails to operate during
the applicable warranty period due to any defect in workmanship or material. If a valid claim is
made during the applicable period, A-iPower/TuplantaPR, at its option, will either (1) repair the
product, or (2) exchange the product with a product that is of equal value. A replacement prod-
uct assumes the remaining warranty of the original product or ninety (90) days from the date of
replacement, whichever is greater. For questions regarding coverage, please contact:
TUPLANTAPR
AVENUE LOMAS VERDES IH-5 BAYAMON PUERTO RICO
www.tuplantapr.com
1-787-251-3131
Please have the necessary information available - Model Number, Serial Number and Proof of
Purchase.
WARRANTY EXCLUSIONS
This warranty does not cover the followings:
This warranty will not cover repair when normal use has exhausted the lifetime of a part(s) or
the unit.
-Installation and Maintenance - this warranty does not cover improper or unauthorized assembly,
alteration, modification, or any other damage resulting from misuse or neglect.
-Cosmetic defects such as scratches to paint, decals, etc.
-Costs of normal maintenance and adjustments.
-Repairs or diagnostics performed by individuals other than an A-iPower's Authorized Service
Dealer (unless approved by A-iPower)

21
-Failures due to normal wear and tear, accident, misuse, abuse, negligence, or improper use.
-Failures caused by any external cause or act of God, including but not limited to, collision, theft,
vandalism, riot, war, fire, freezing, lightning, earthquake, windstorm, hail, water, flood, tornado,
or hurricane.
-Damage related to rodent and/or insect infestation.
-Any incidental, consequential or indirect damage caused by defects in materials or workman-
ship, or any delay in repair or replacement of the defective part(s).
-Failure due to misapplication.
-Telephone, cellular phone, facsimile, internet access, or other communication expenses.
-Expenses related to “customer instruction" or troubleshooting where no manufacturing defect is
found.
-Overnight freight or special shipping costs for replacement part(s).
-Overtime, holiday or emergency labor.
MERCHANDISE RETURN GUIDELINES
-All products must be returned in original or equivalent packaging, if determined by
A-iPower/TuplantaPR Customer Service. Improperly packaged returns will not be accepted.
-Must have adequate packing for transportation.
-Return to address provided in return authorization, using the parcel service required. Units
returned without authorization will not be rewarded.
-Please Note: Refunds will not be granted for items that have been modified or damaged by
abuse or usage not in accordance with product instructions.
