
IT
LIBRETTO DI INSTALLAZIONE
EN
INSTALLATION MANUAL
FR
MANUEL D’INSTALLATION
DE
INSTALLATIONSANLEITUNG
NL
INSTALLATIE-INSTRUCTIES
ES
MANUAL DE INSTALACIÓN
PT
LIVRO DE INSTRUÇÕES PARA INSTALAÇÃO
RU
РУКОВОДСТВО ПО УСТАНОВКЕ
SV
INSTALLATIONSHANDBOK
DA
INSTALLATIONSVEJLEDNING
PL
INSTRUKCJA INSTALACJI
NO
INSTALLASJONSVEILEDNING
FI
ASENNUSOHJEET
UK
ІНСТРУКЦІЯ ЗІ ВСТАНОВЛЕННЯ
AR
بيتك بيكرتلا
HOBD682D2
HOBD482D2
HOBD472D2
HOBDE482D2
HOBD382MB2
HOBD382N2

2
IT
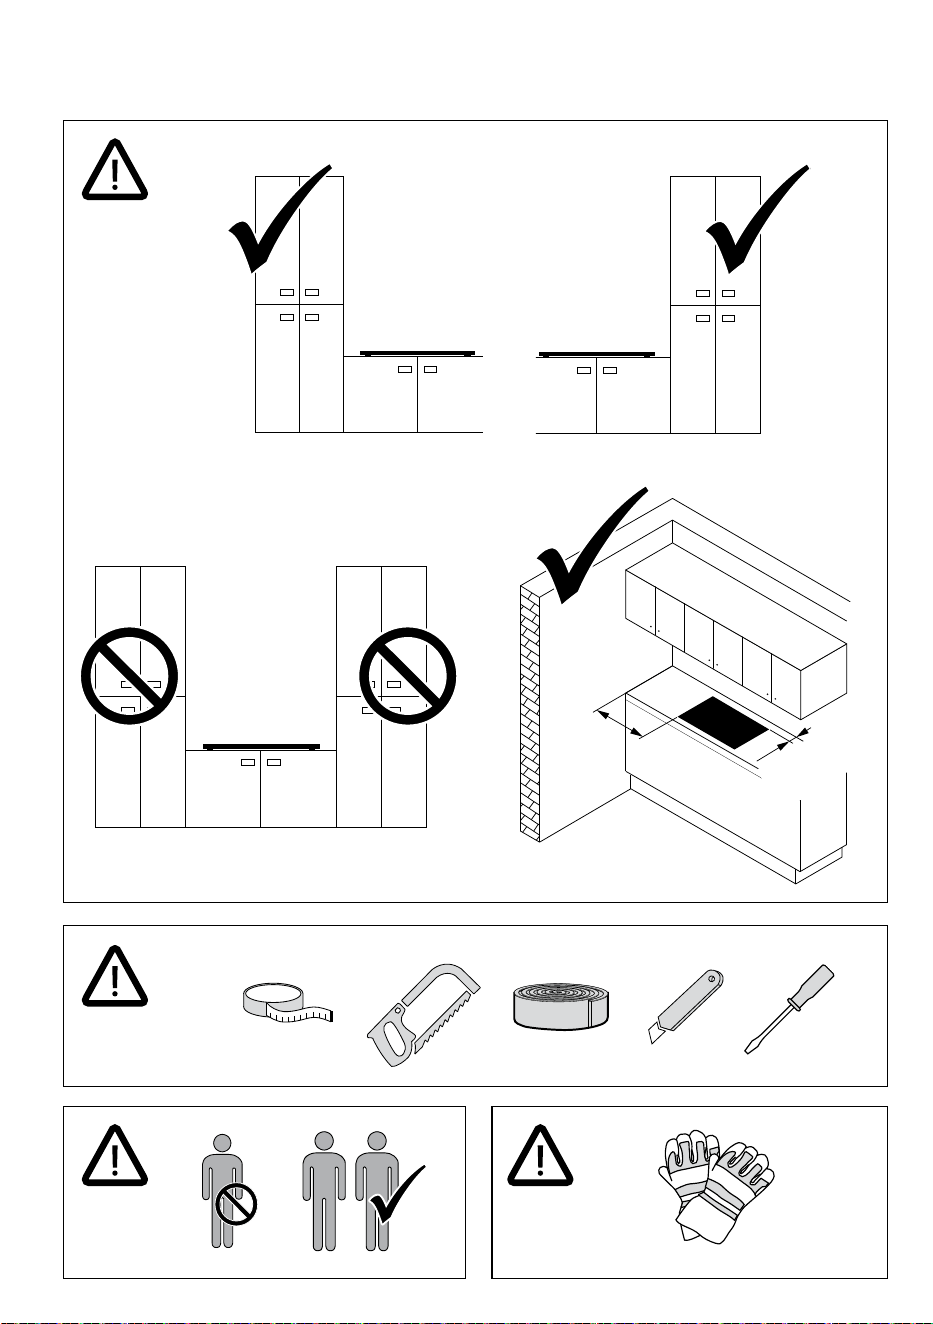
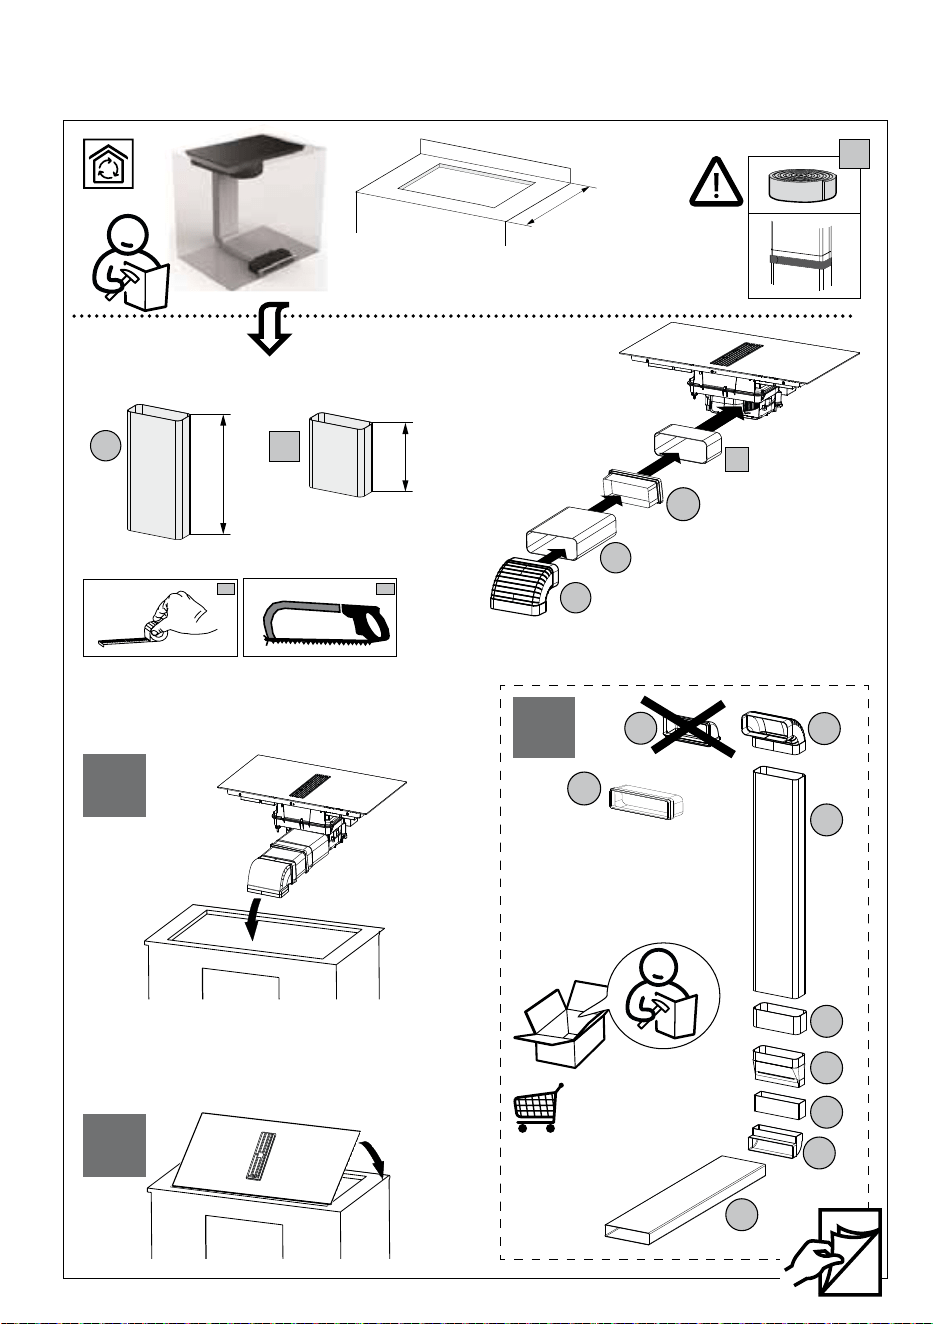
Avvertenza! Prima di procedere all'in-
stallazione, leggere le informazioni sulla
sicurezza contenute nel Manuale d'uso.
EN
Warning! Before proceeding with instal-
lation, read the safety information in the
User Manual.
FR
Avertissement ! Avant de procéder à l’in-
stallation, veuillez lire les informations
sur la sécurité contenues dans le ma-
nuel de l’utilisateur.
DE
Warnhinweis! Vor der Montage die in
der Bedienungsanleitung enthaltenen
Sicherheitsinformationen lesen.
NL
Waarschuwing! Lees de veiligheidsinfor-
matie in de gebruikershandleiding alvo-
rens het apparaat te installeren.
ES
¡Advertencia! Antes de proceder a la in-
stalación, lea las indicaciones de seguri-
dad del manual de instrucciones.
PT
Aviso! Antes de proceder à instalação,
leia a informação de segurança no Ma-
nual do Utilizador.
RU
Предупреждение! Прежде чем
приступить к установке, прочитайте
информацию о безопасности в
Инструкциях по эксплуатации.
SV
Varning! Läs säkerhetsföreskrifterna i
bruksanvisningen innan apparaten in-
stalleras.
DA
Advarsel! Læs sikkerhedsreglerne i
brugsanvisningen inden installation.
PL
Ostrzeżenie! Przed przystąpieniem do
instalacji należy przeczytać informacje
dotyczące bezpieczeństwa znajdujące
się w instrukcji obsługi.
NO
Advarsel! Les sikkerhetsinstruksjonene i
bruksveiledningen før apparatet installe-
res.
FI
Varoitus! Ennen laitteen asentamista lue
käyttöoppaassa olevat turvallisuustiedot.
UK
Попередження. Перш ніж
розпочинати встановлення, необхідно
уважно прочитати інформацію з
техніки безпеки, наведену в інструкції
з експлуатації.
AR
ريذحت !لبق ةعباتم تيبثتلا ، أرقا تامولعم
ةمسلا يف ليلد مدختسملا.
2
3
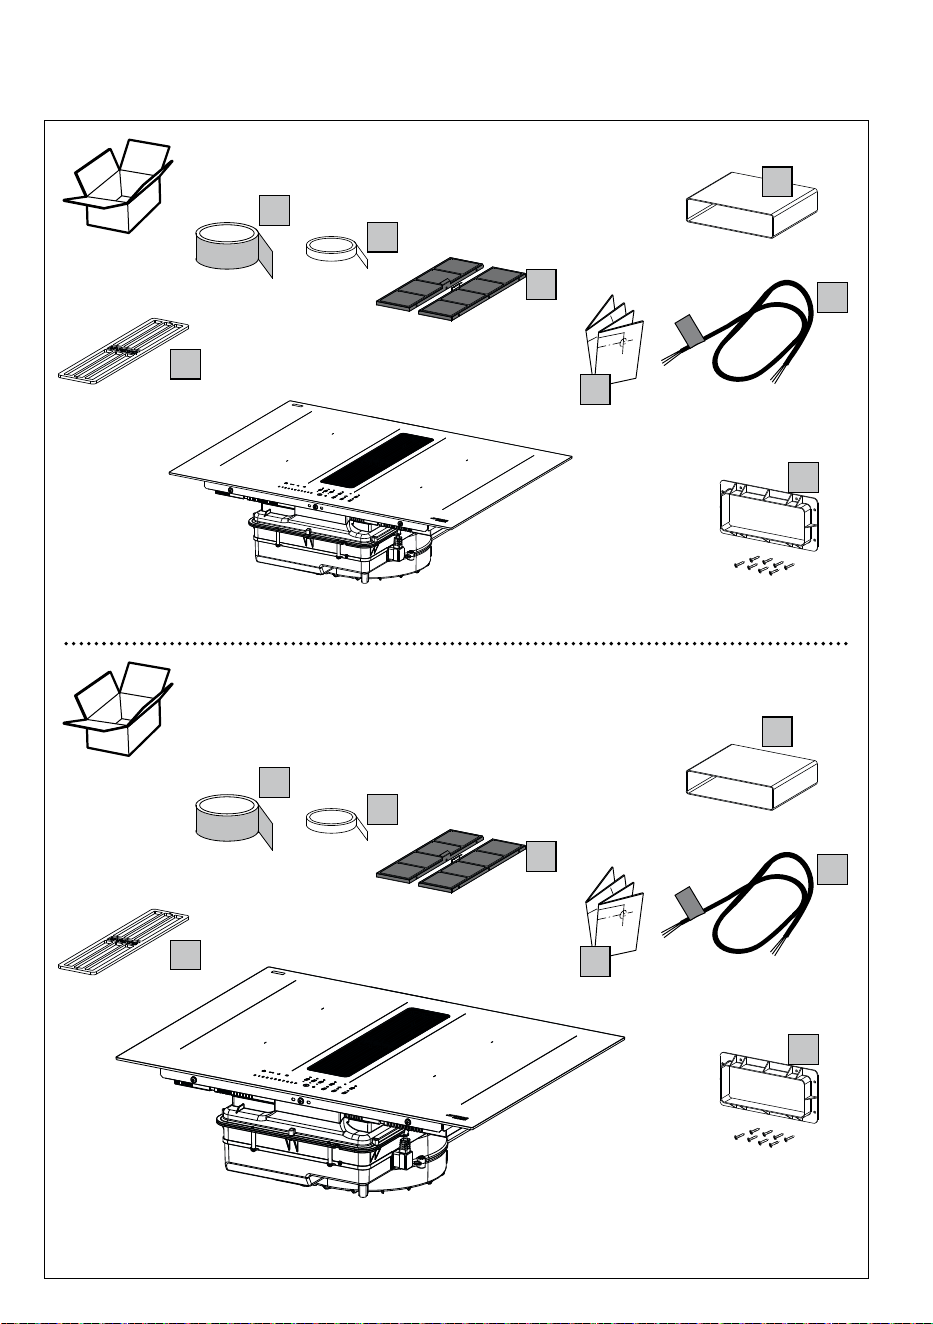
A
A
B
B
1X
1X
N
N
D
D
E
E
F
F
13
13
L
L
H
H
8x 3,5x16
8x 3,5x16
T1
T1
HOBD382MB2
HOBD482D2
HOBD472D2
HOBD382N2
4
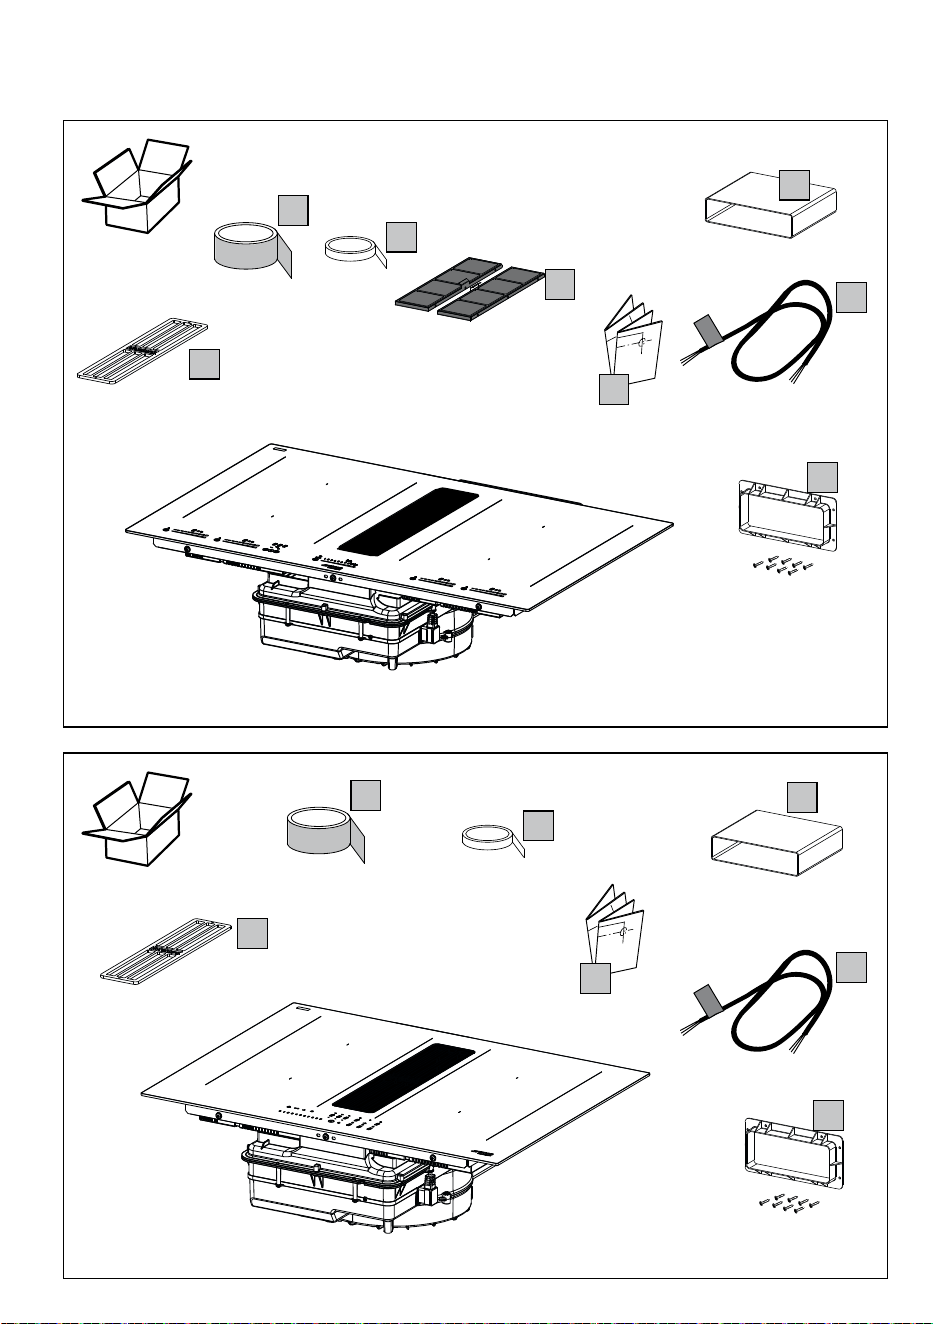
A
B
1X
N
D
E
F
13
L
H
8x 3,5x16
T1
HOBD682D2
HOBDE482D2
1X
N
A
D
E
B
13
L
H
8x 3,5x16
T1
5
HOBD472D2
HOBD682D2
HOBD482D2
HOBD382MB2
HOBDE482D2
HOBD382N2
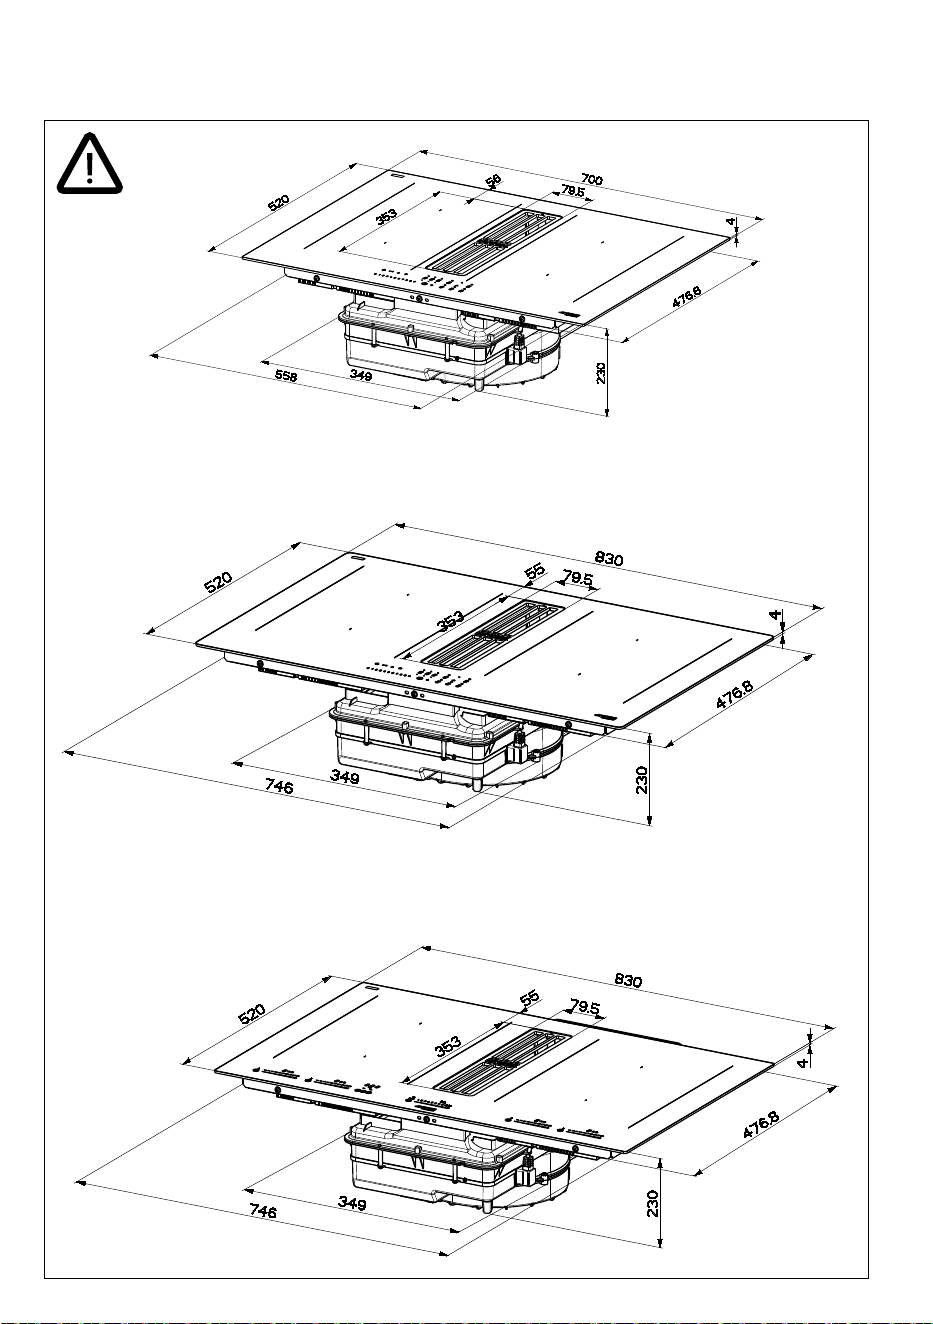
6
150
mm
MIN.
40 mm
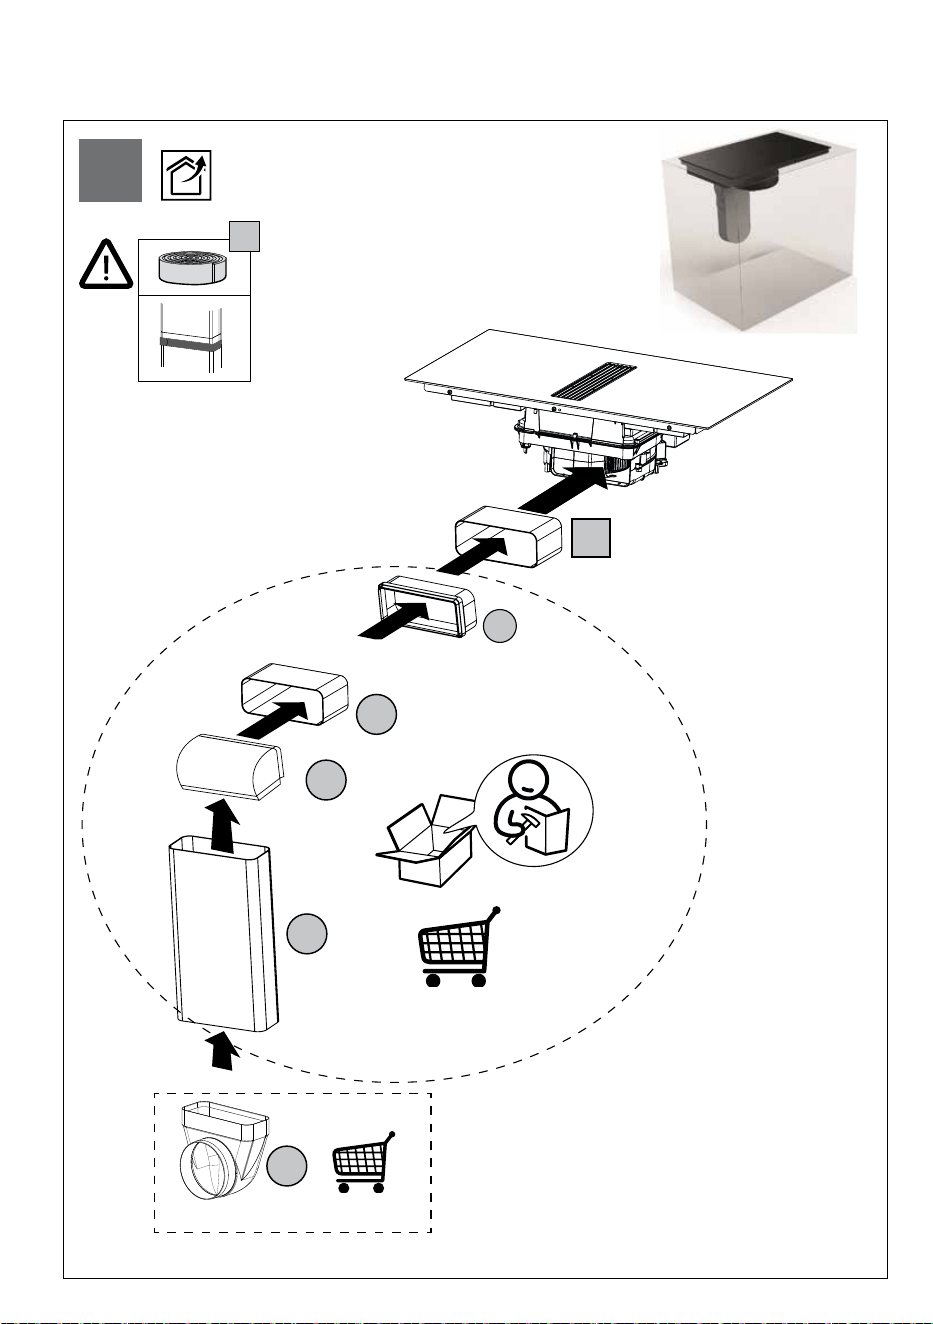
7
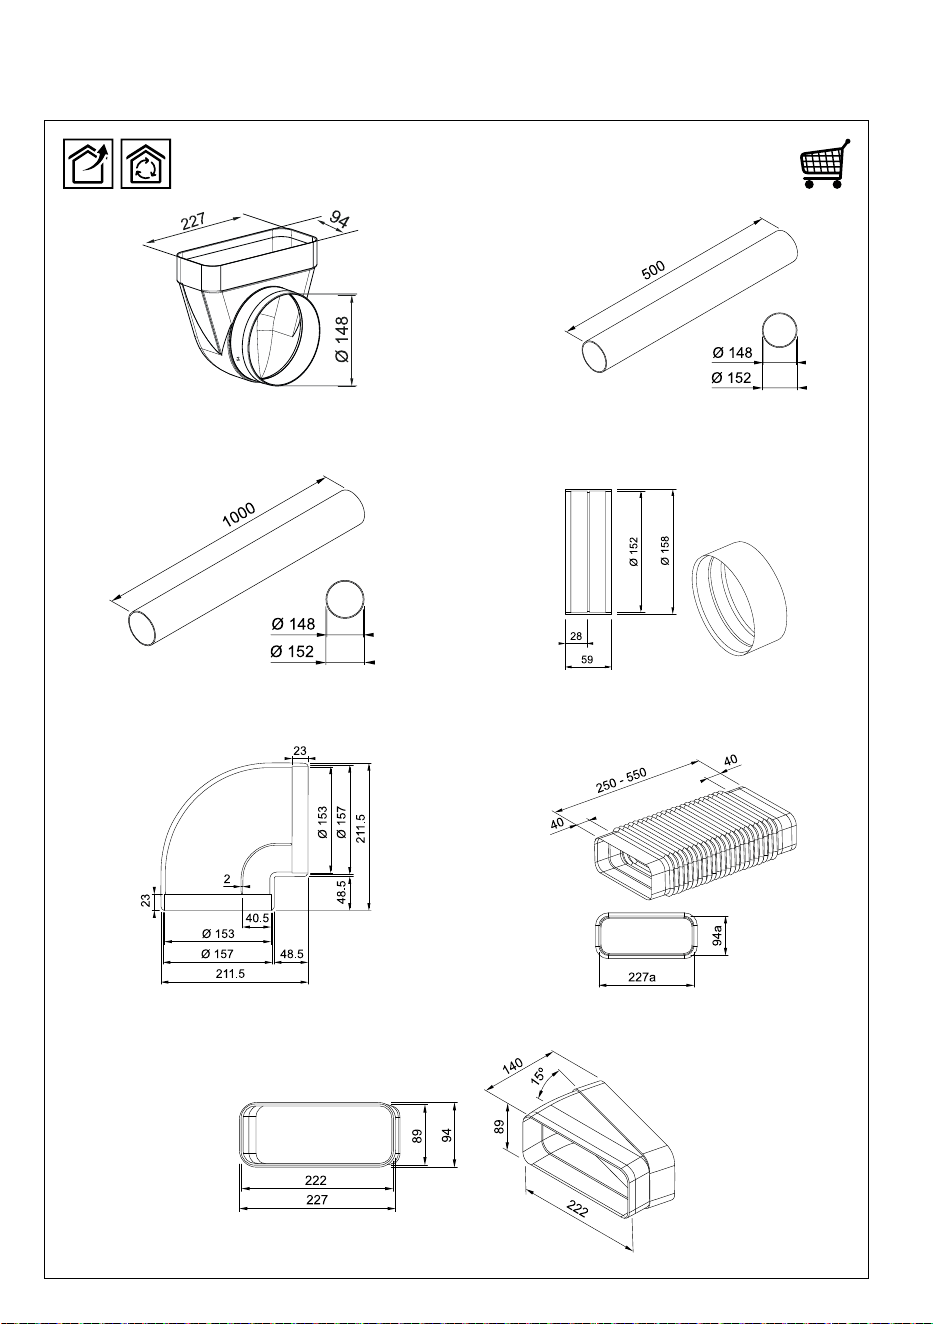
KITRDEF
KITFLEXP
KITFIT15
KITCP90
KITROUNPCONKRP1000
KRP500

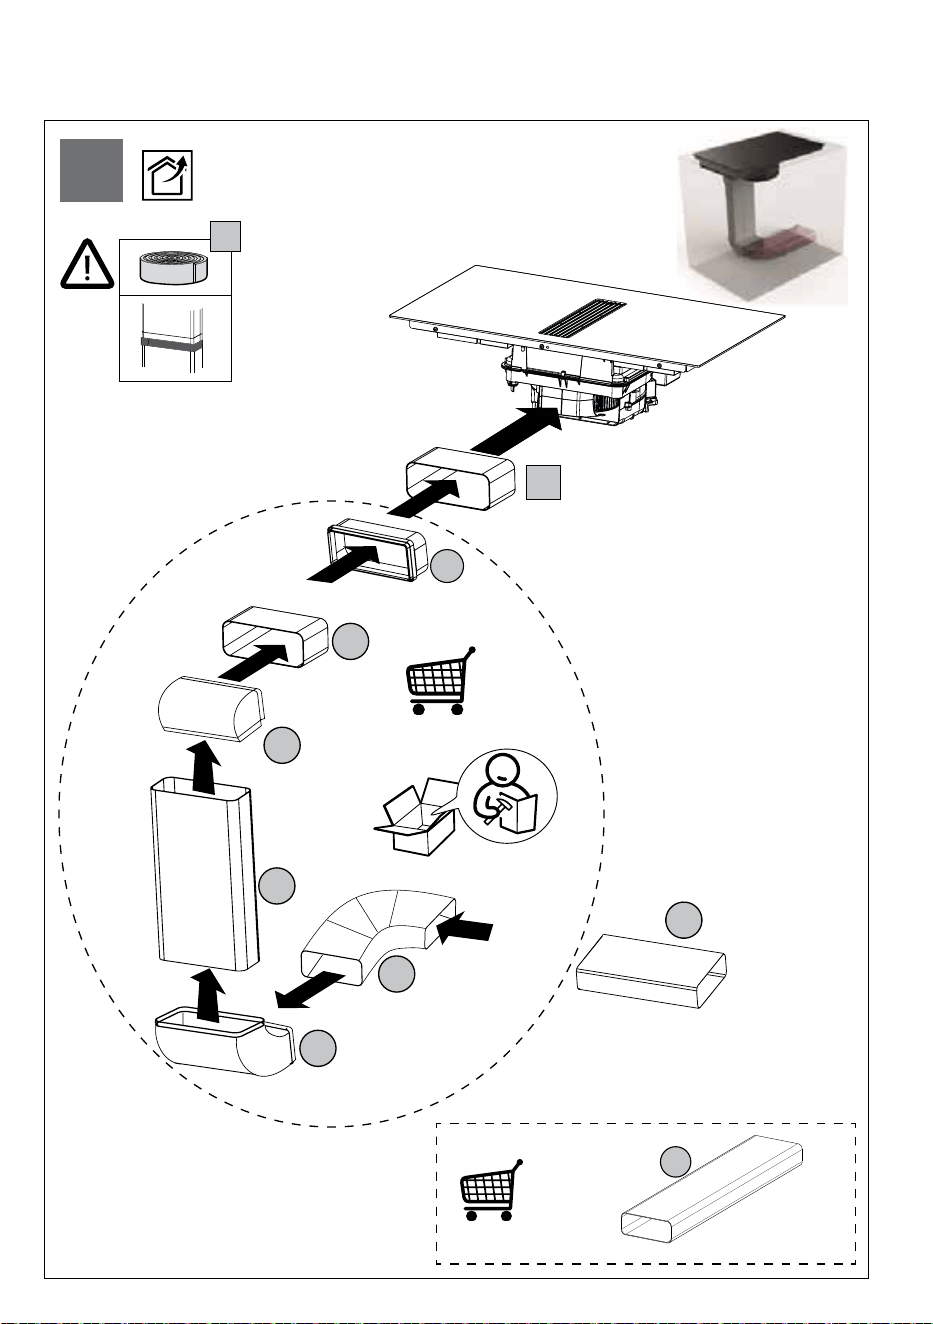
8
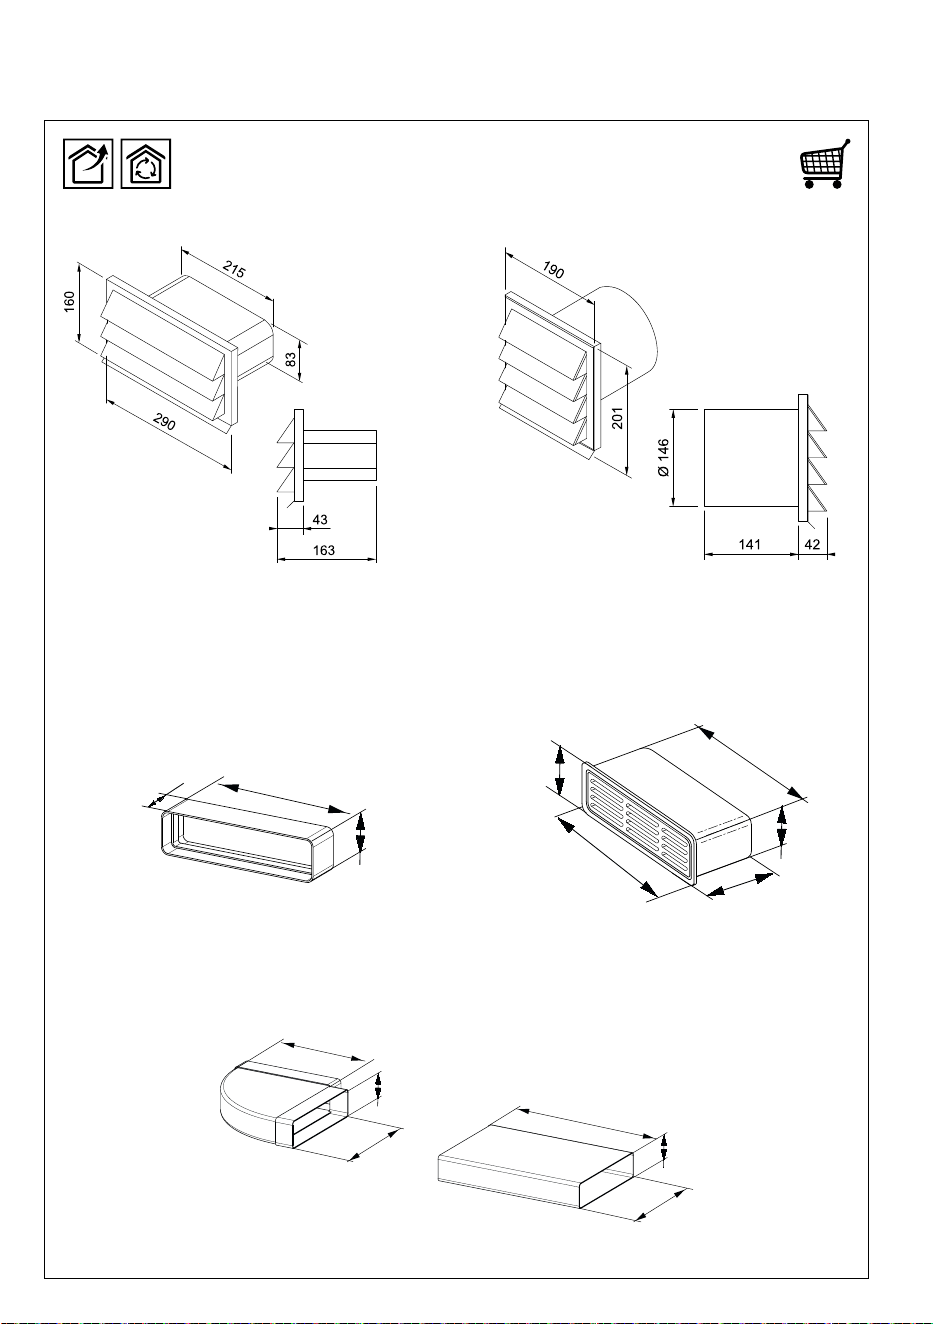
KITDT50X10KITCH90
KITRRFITKITCV90
KITRECPCON
KITPR90
CON90H
9
KITREBFLOW
KITEHOBD4
CON60H
GRI60H
KITSEBL

10
11
8x 3,5x16
PP
PP
PP
13
L
D
H
F
T1
GRIX6H
G
2x M4x40
T2
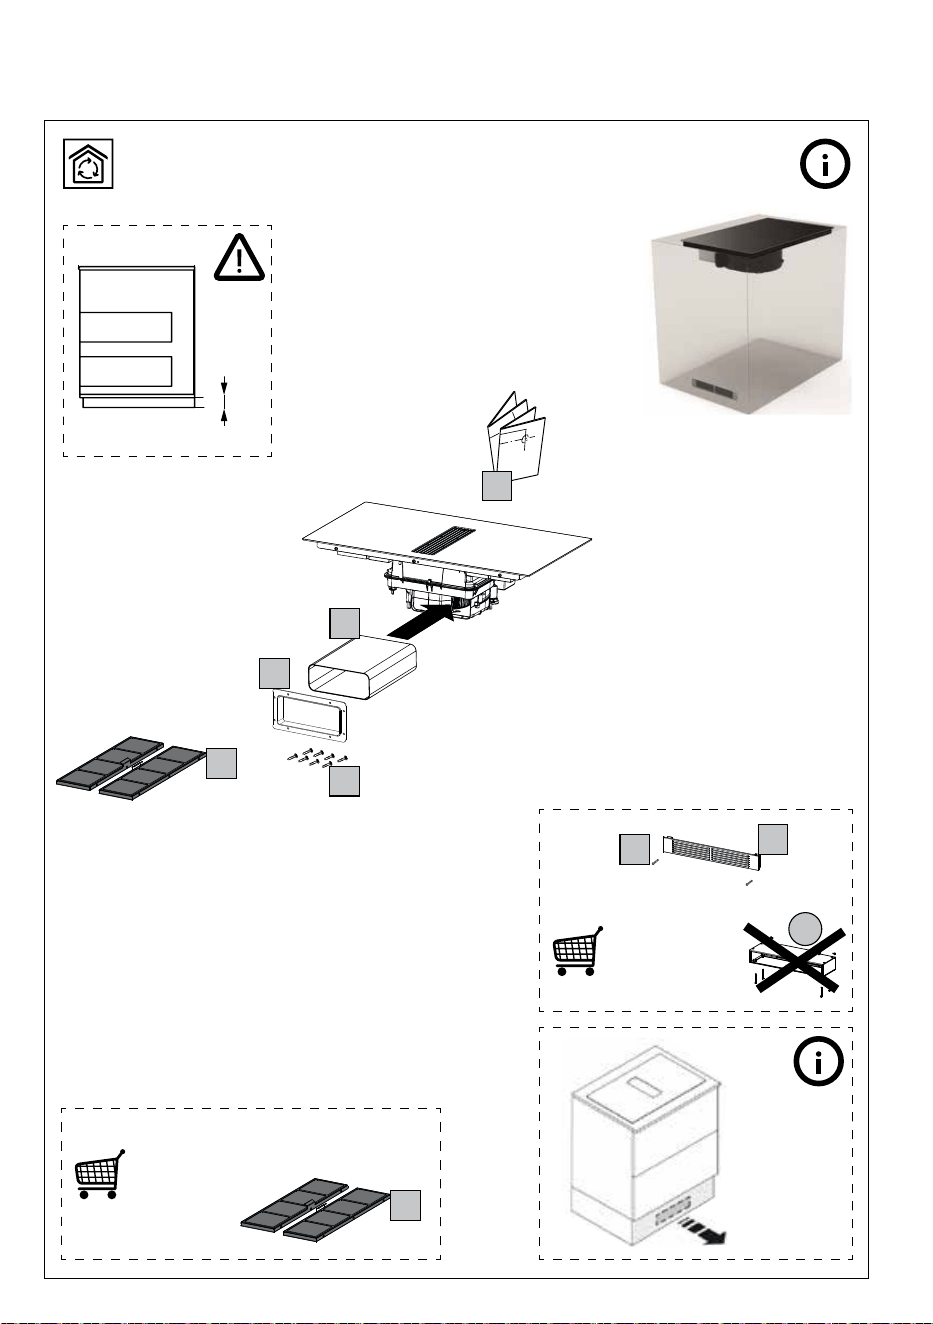
i
>110 cm2
FLTHOBD2
FLTSTDHOBD2
F
HOBDE482D2
mm
Min.
600
60
100
60
100
600 700 700

12
PP
PP
PP
D
F
mm
Min.
600
60
100
60
100
600 700 700
>110 cm2
G
2x M4x40
T2
i
GRIX6H
Bellucci, Daniele
05-Apr-2022
Released
b
c
d
e
f
g
h
a
w
KITRHOBD6
FLTHOBD2
FLTSTDHOBD2
F
HOBDE482D2
13
mm
Min.
600
60
100
60
100
600 700 700
PP
PP
PP
D
F
G
2x M4x40
T2
i
GRIX6H
Bellucci, Daniele
05-Apr-2022
Released
b
c
d
e
f
g
h
a
w
KITRHOBD6
FLTHOBD2
FLTSTDHOBD2
F
HOBDE482D2
14
PP
PP
PP
D
Bellucci, Daniele
05-Apr-2022
Released
w
CON90H
x1
KITPR90
15
PP
PP
PP
Bellucci, Daniele
29-Mar-2022
Released
D
x y
z
j
y
Bellucci, Daniele
05-Apr-2022
Released
w
600
60
100
60
100
600 700 700
mm
Min.
KITEHOBD10
16
120
101
400
400
=
=
mm
mm
mm
mm
860
80
300
80
300
900
860
80
300
80
300
900
600
60
100
60
100
600
700 700
600
60
100
60
100
600
700 700
mm
mm
mm
mm
mm
mm
mm
mm
mm
mm
mm
mm
mm
mm
120
101
400
400
=
=
17
A
B
832+1
750
5+1
R 4+1
490
522+1
750
490
832+1
750
5+1
R11+1
490
522+1
750
490
mm
mm
mm
mm
mm
mm
mm
mm
702+1
560+1
802+1
5+1
R4+1
490+1
492+1
522+1
A
B
832+1
802+1
560+1
5+1
R11+1
492+1
490+1
522+1
70
70
40
40
SLIMTOP
5
+
1
FLUSHMOUNT
SLIM TOP
SLIMTOP
5+1
FLUSHMOUNT
HOBD482D2
HOBD682D2
HOBD382MB2
HOBDE482D2
HOBD382N2

18
A
B
HOBD472D2
702+1
560+1
5+1
R4+1
490+1
522+1
70
40
560+1
490+1
70
40
702+1
560+1
802+1
5+1
R4+1
490+1
492+1
522+1
A
B
832+1
802+1
560+1
5+1
R11+1
492+1
490+1
522+1
70
70
40
40
SLIMTOP
5
+
1
FLUSHMOUNT
SLIM TOP
SLIMTOP
5+1
FLUSHMOUNT
19
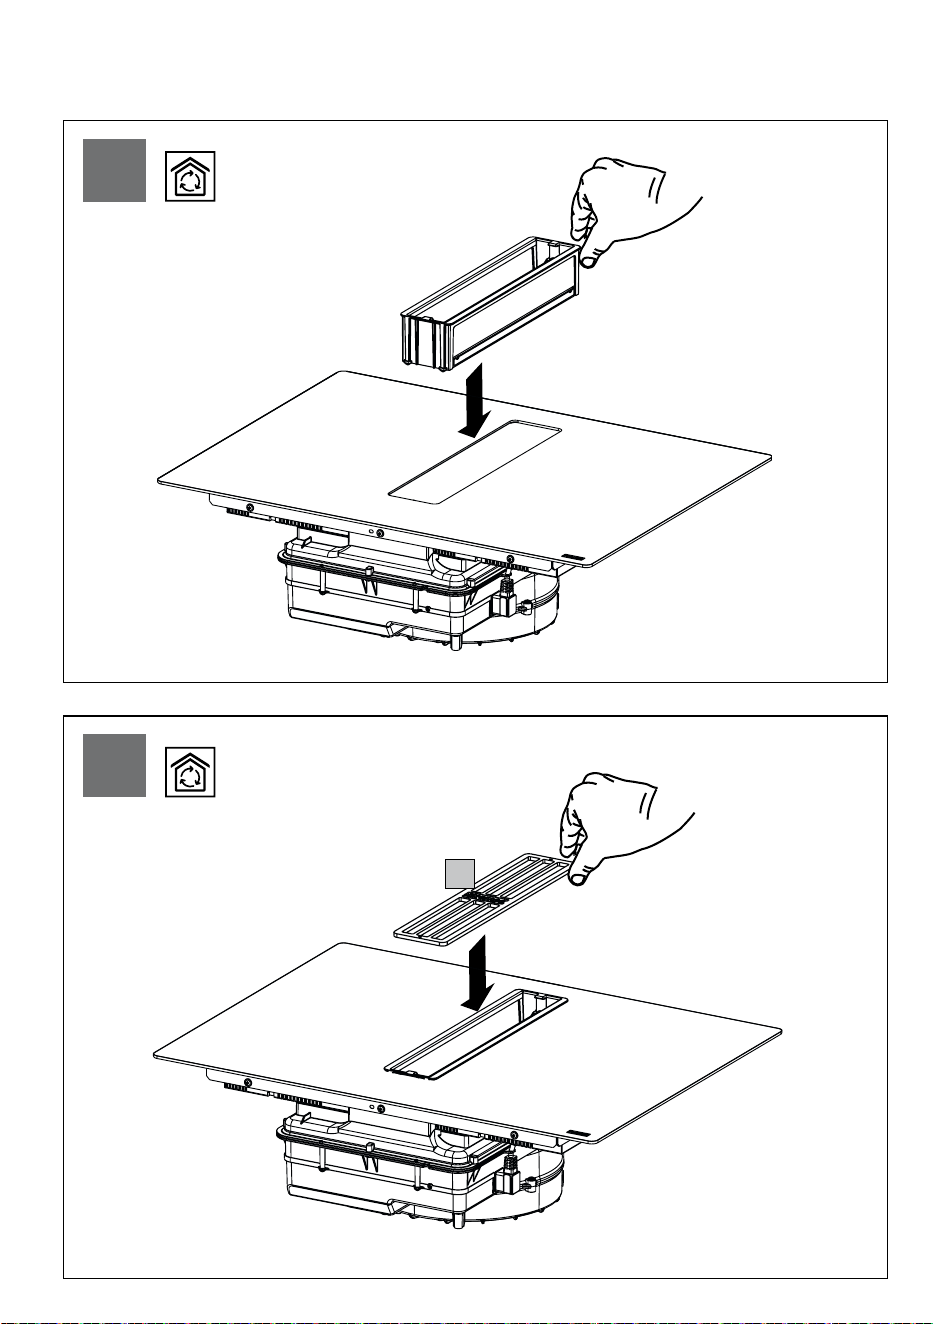
1
A
20
2
21
110
104
Completamente
adesiva
991.0635.822_01
D00007200_00
123456
L1
1,5 Nm
PEN1 N2L2
Three-phase
Bi-phase
Mono-phase
H05V2V-2F
H05V2V2-F
5 x 2.5 mm²
N
Three-phase
Bi-phase
Mono-phase
H05V2V-2F
Min.
28 mm
min.
100 mm
55 mm
max.
R 5 mm
520 mm
900 mm
min.
500 mm
490
+2
mm
mm
880
+2
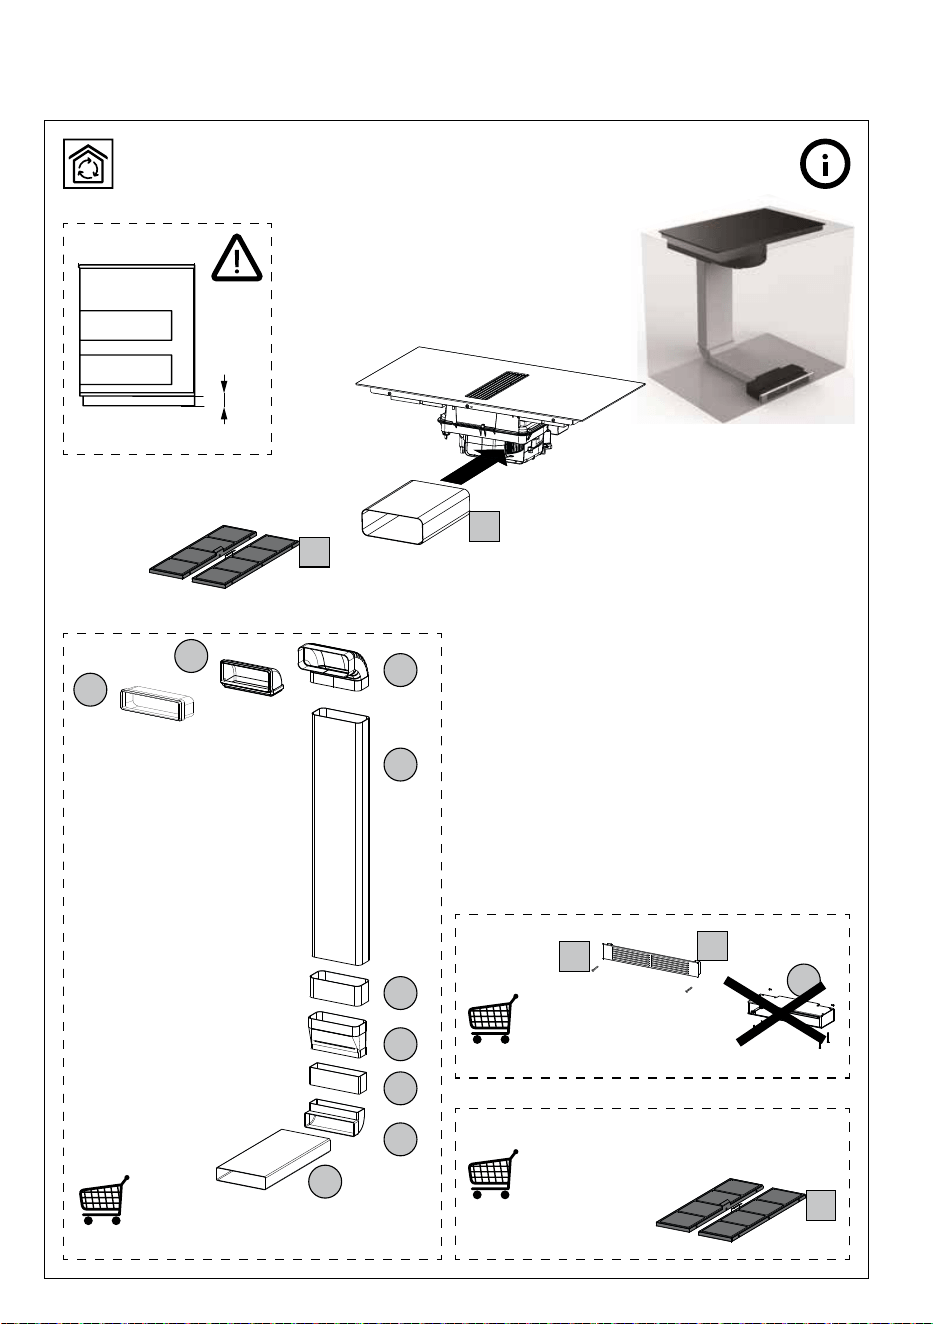
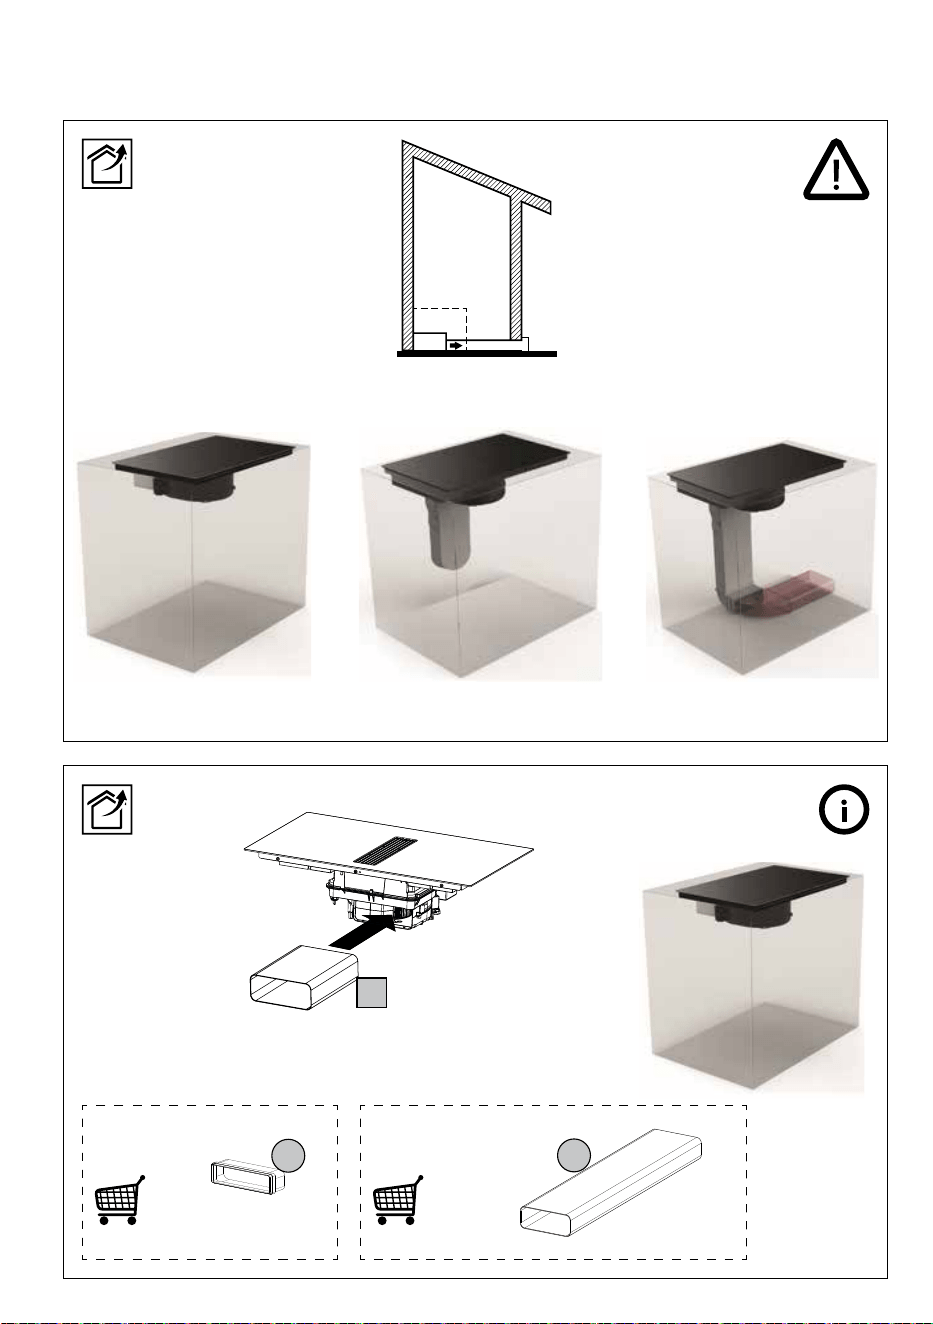
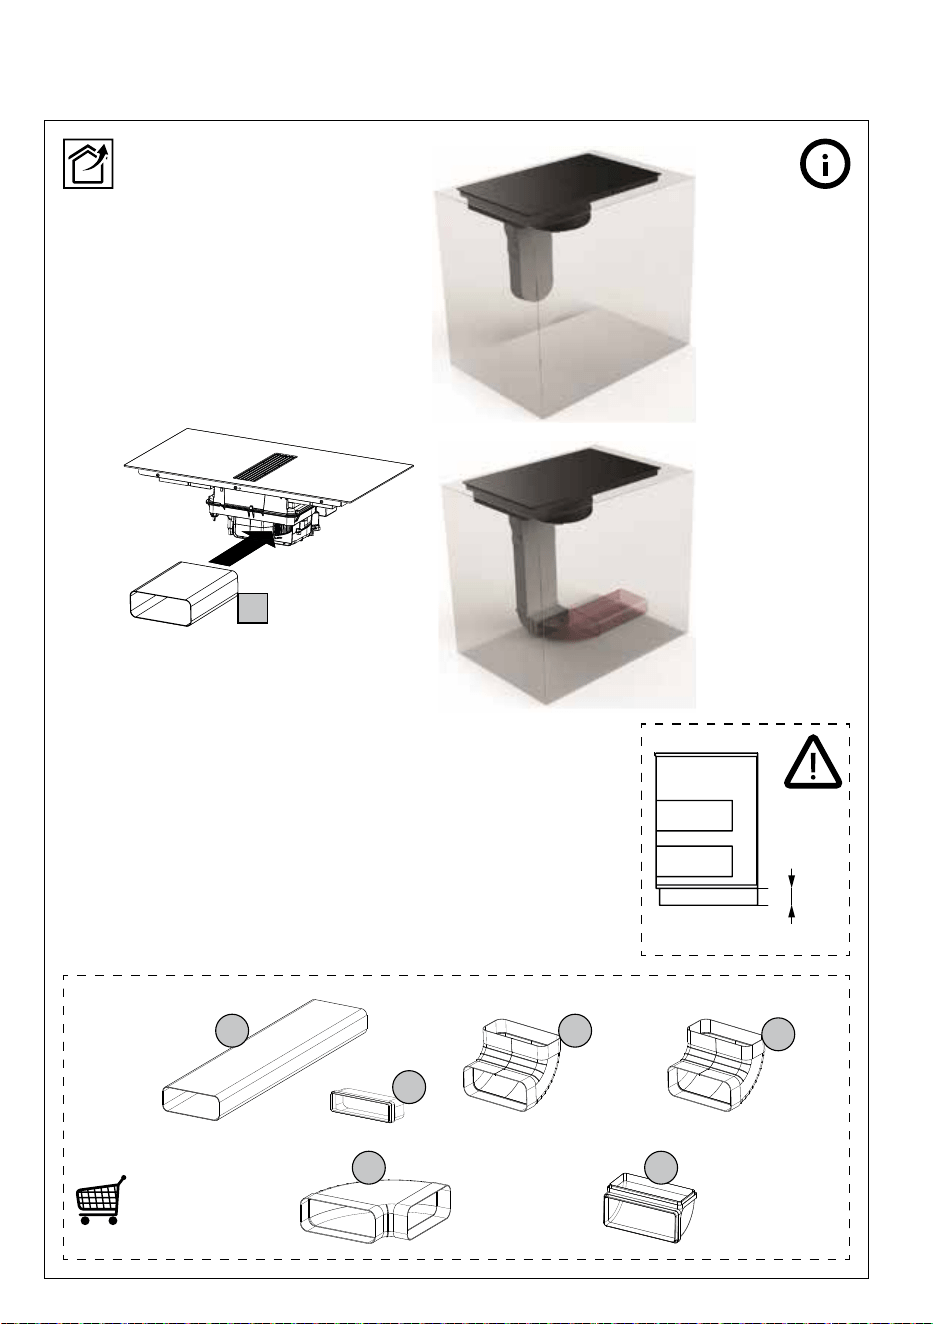
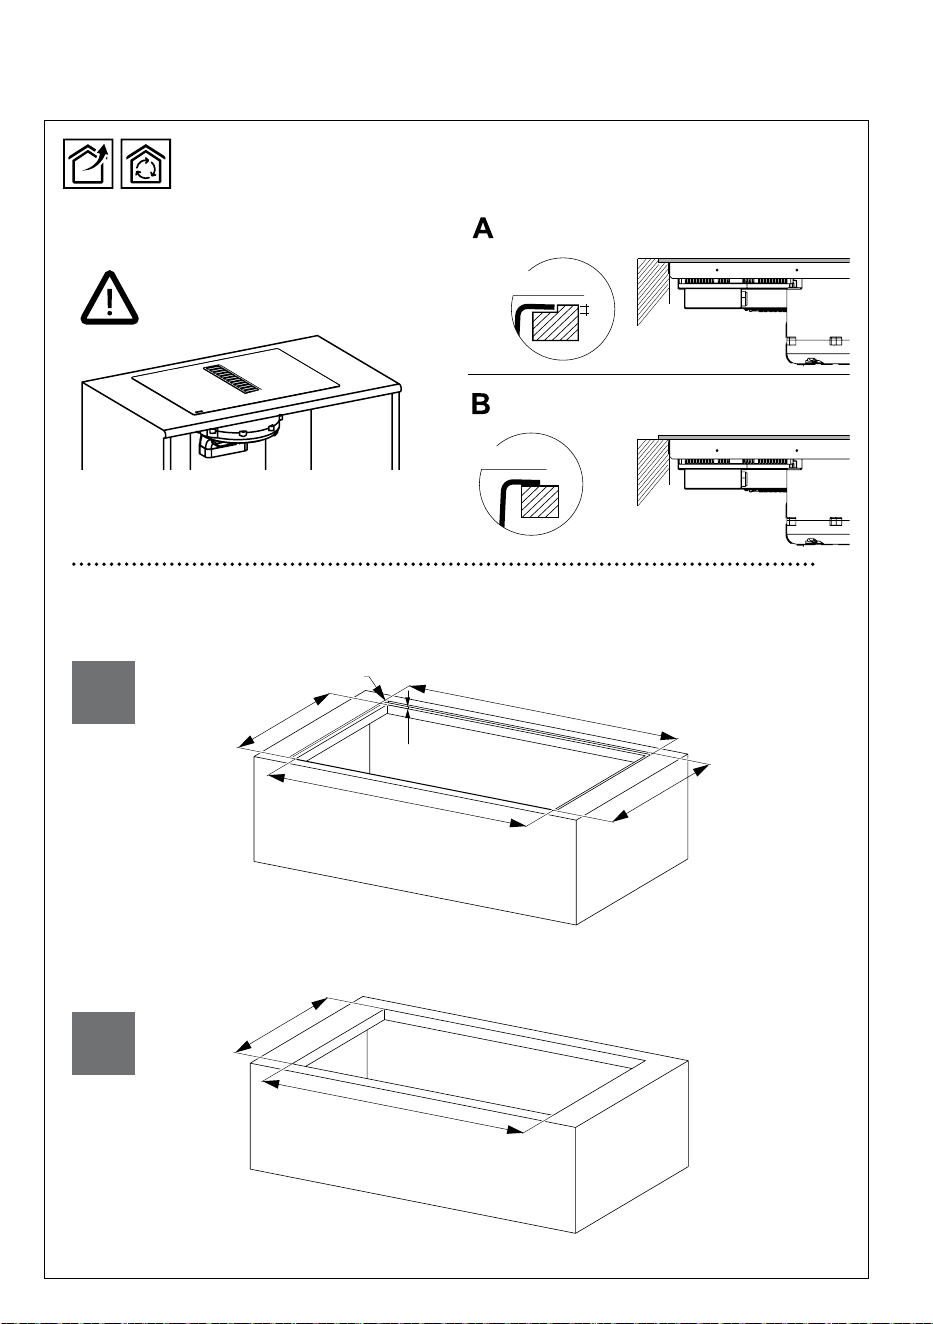
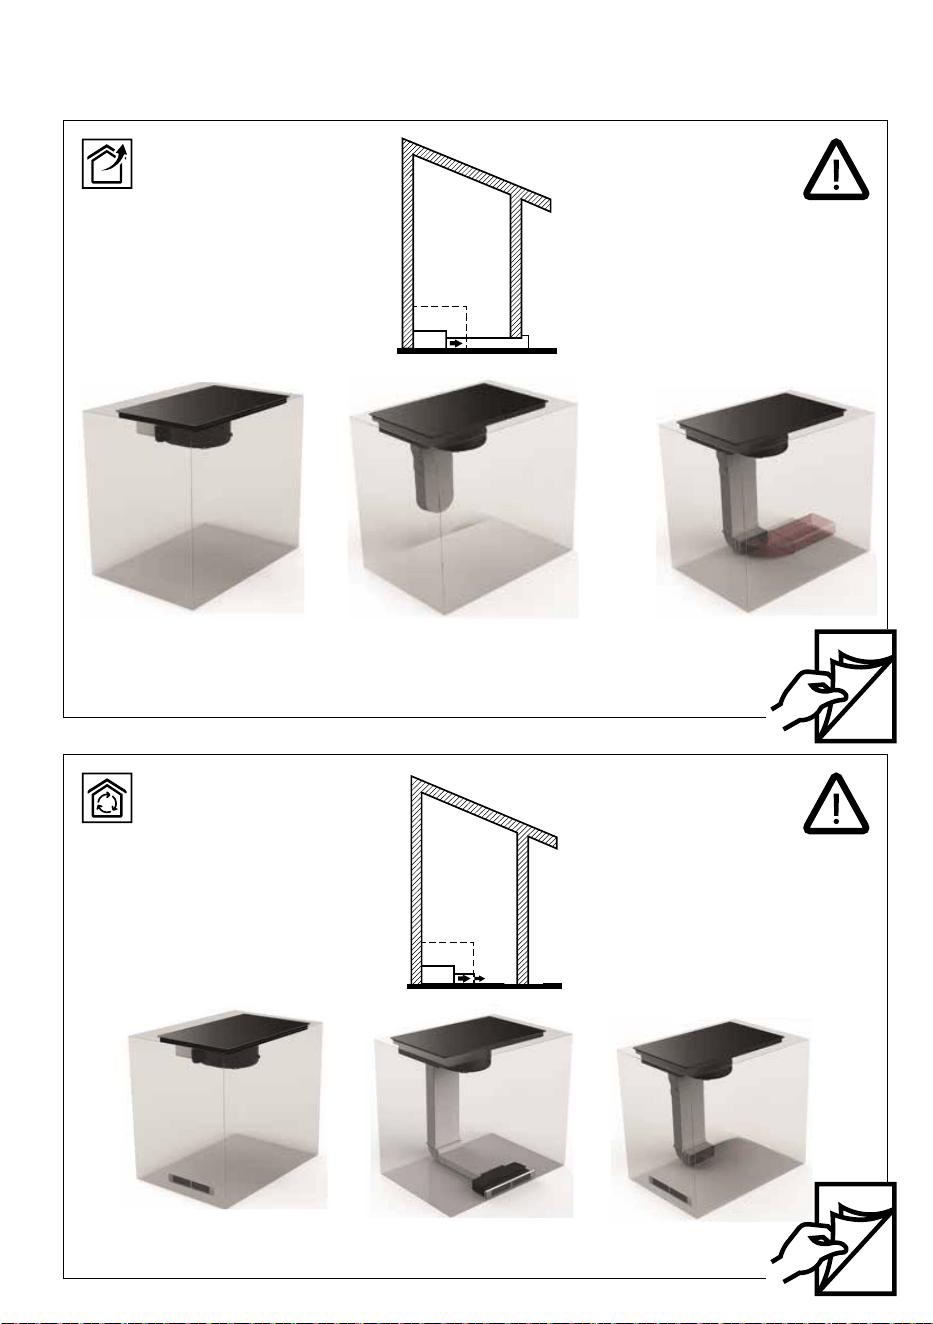
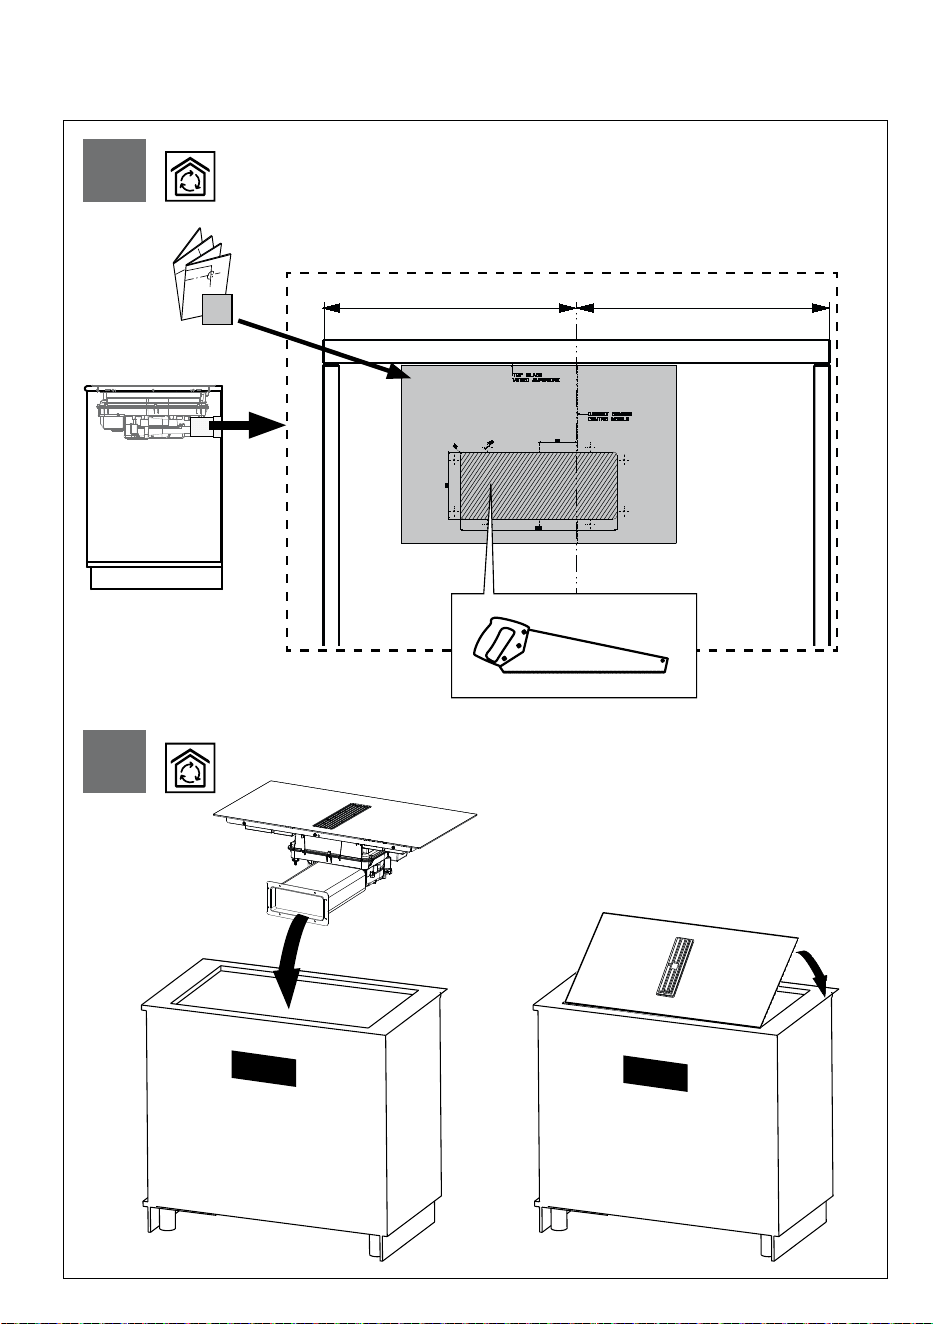
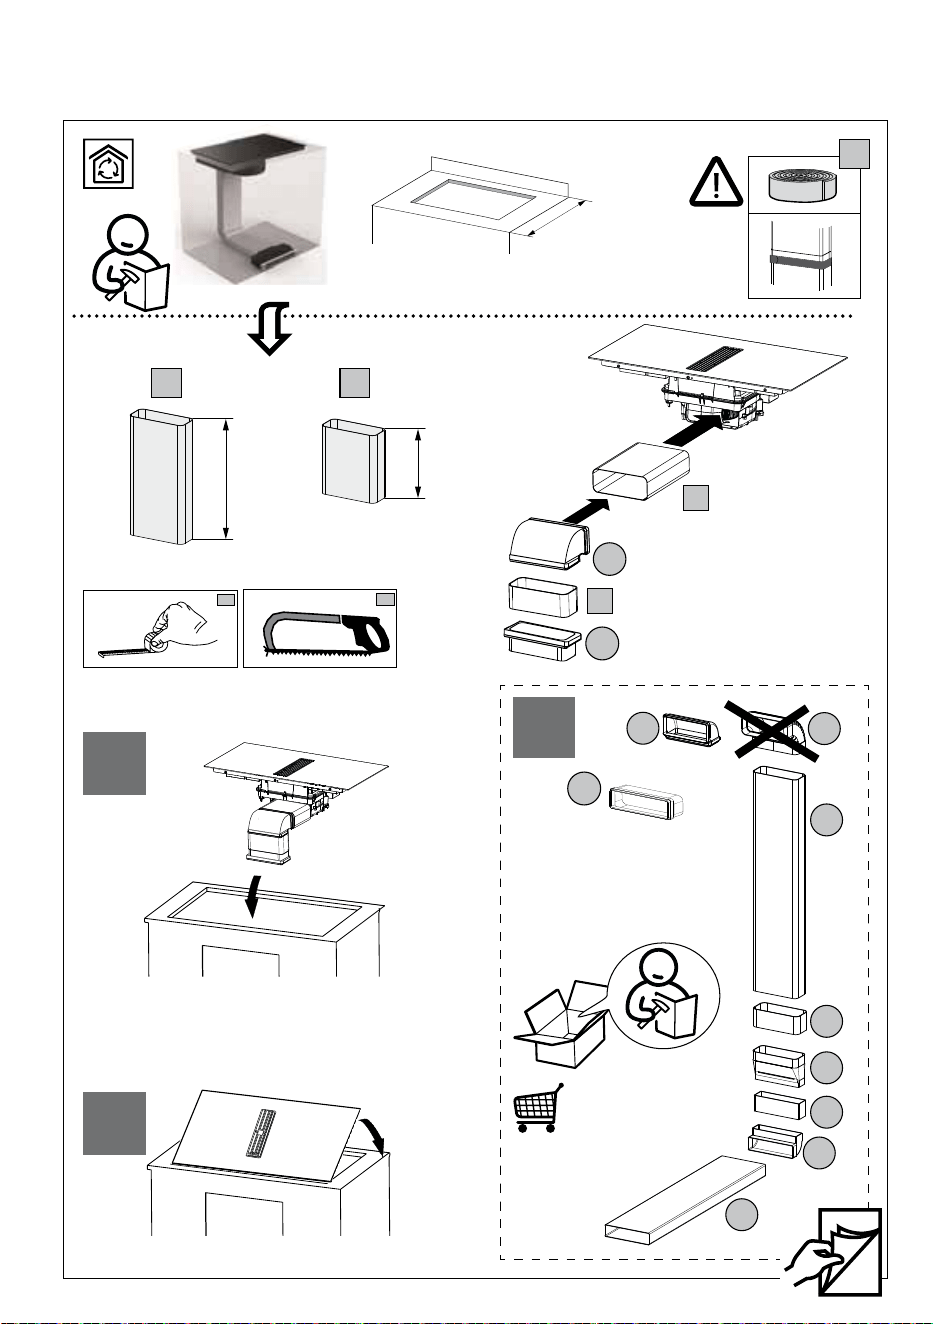
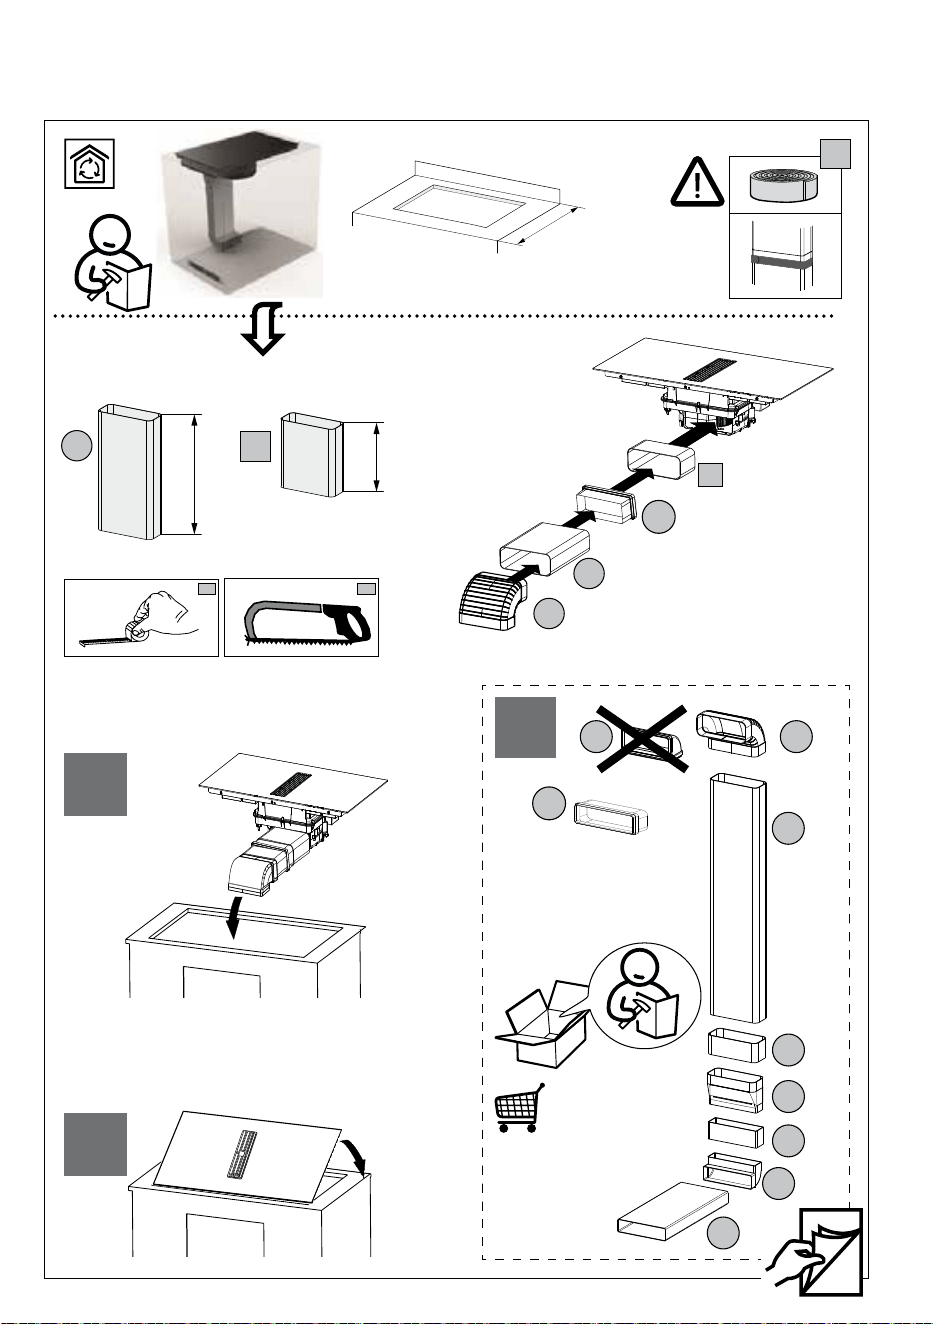
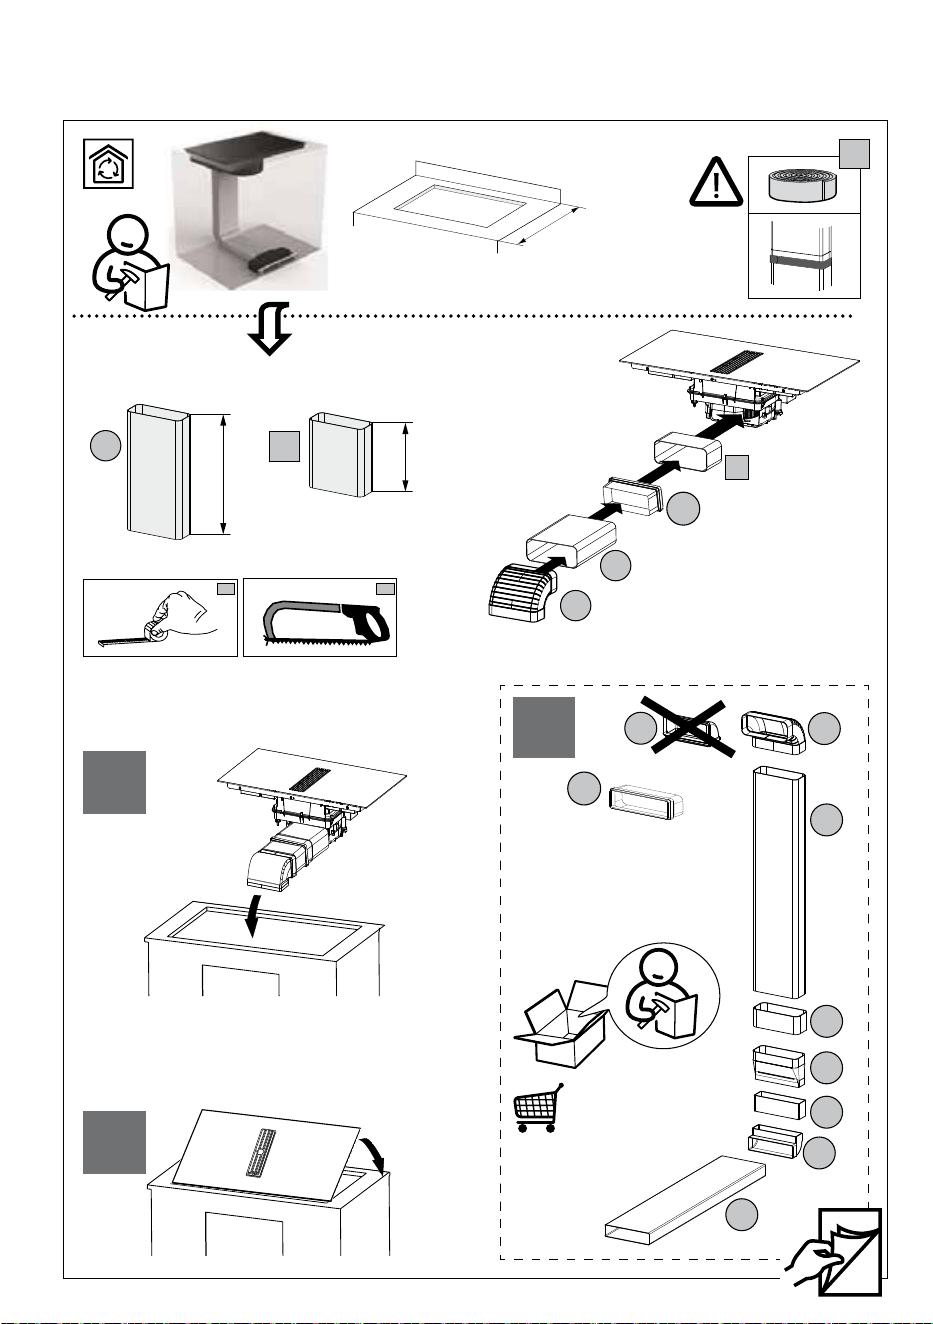
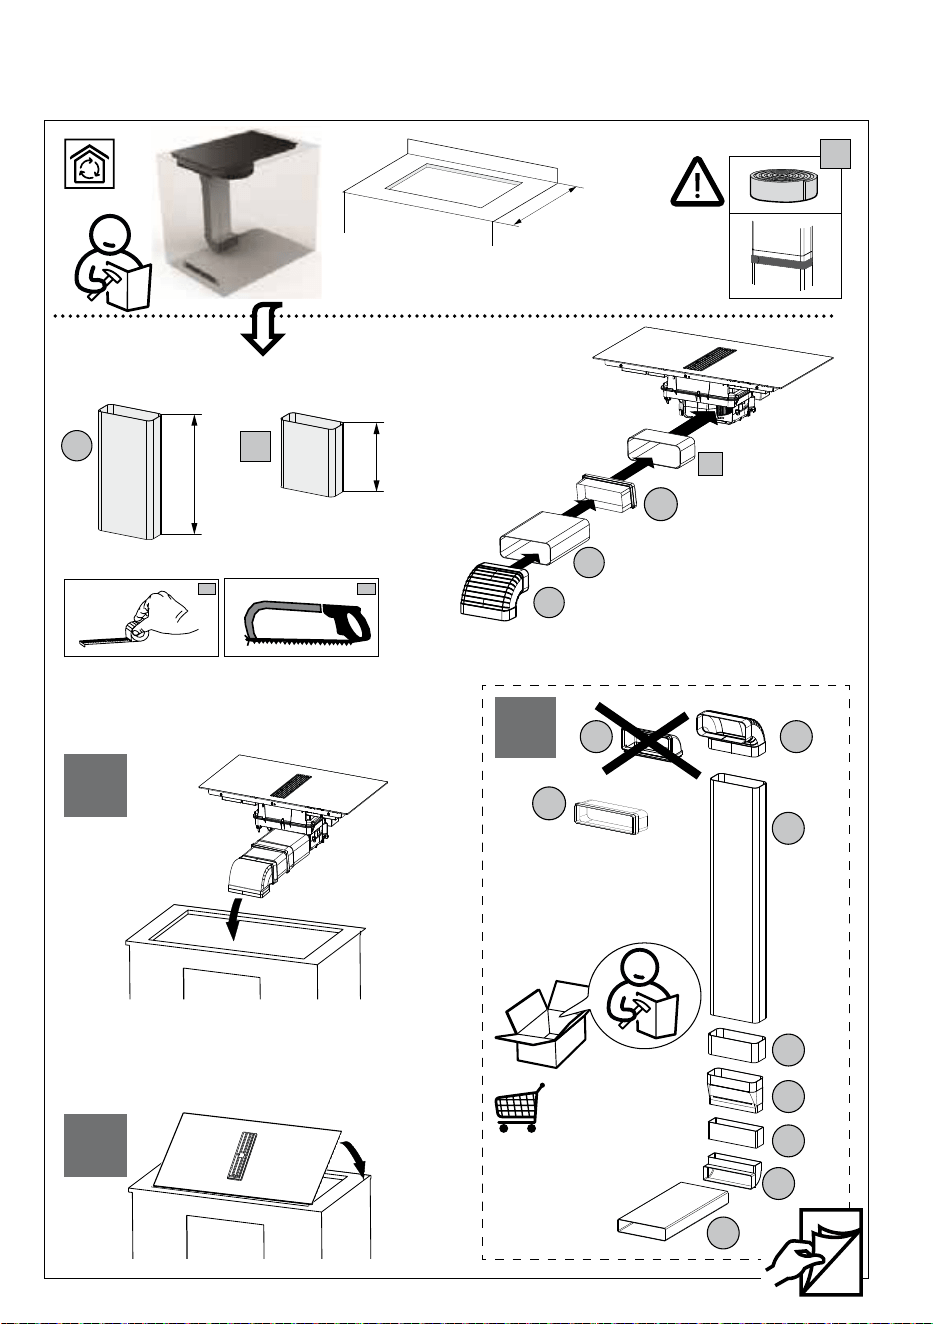
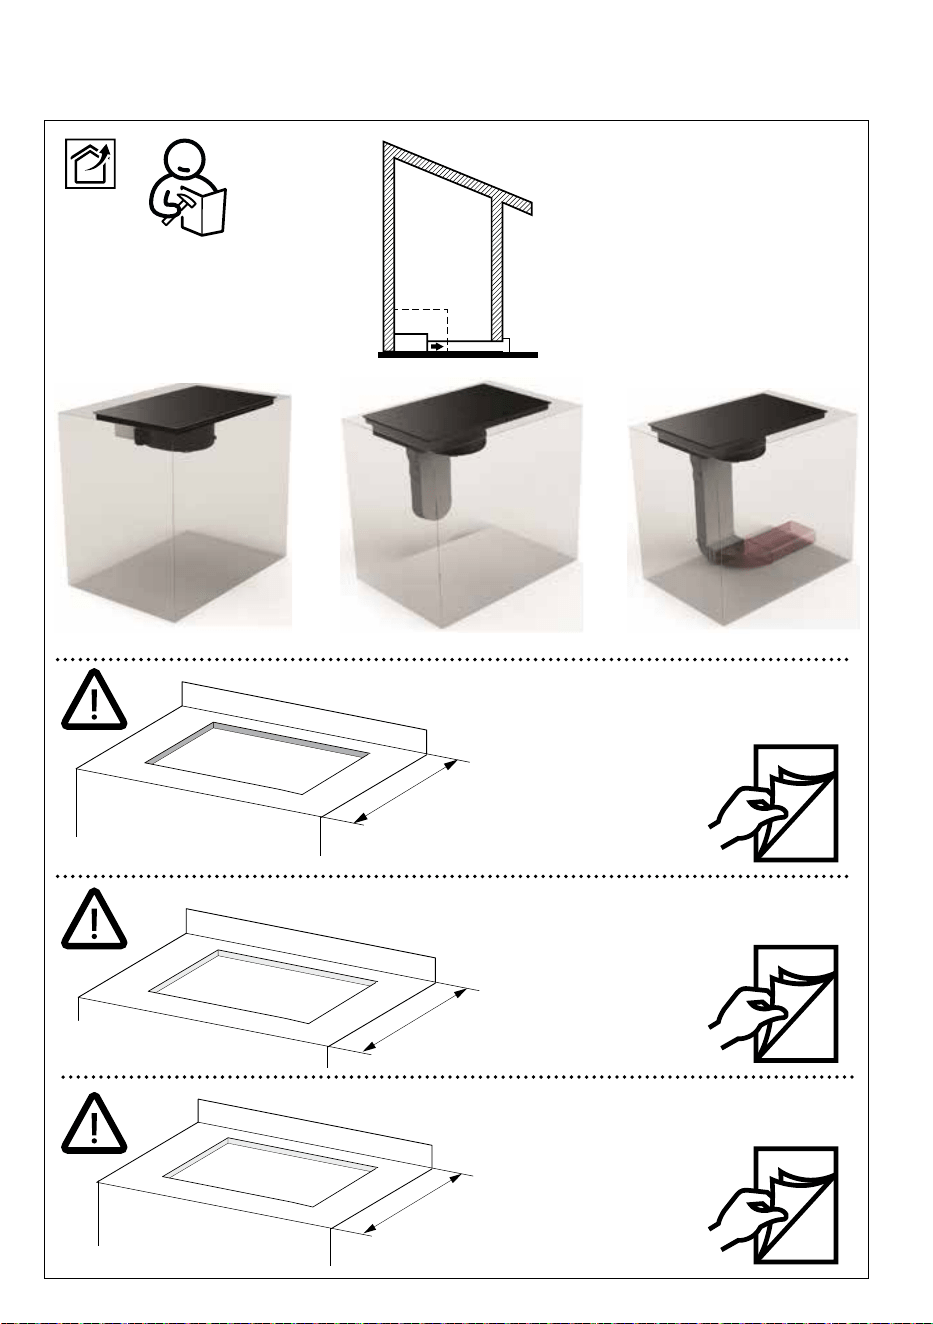
• For further information on the installa-
tion, please refer to the Assembly In-
structions.
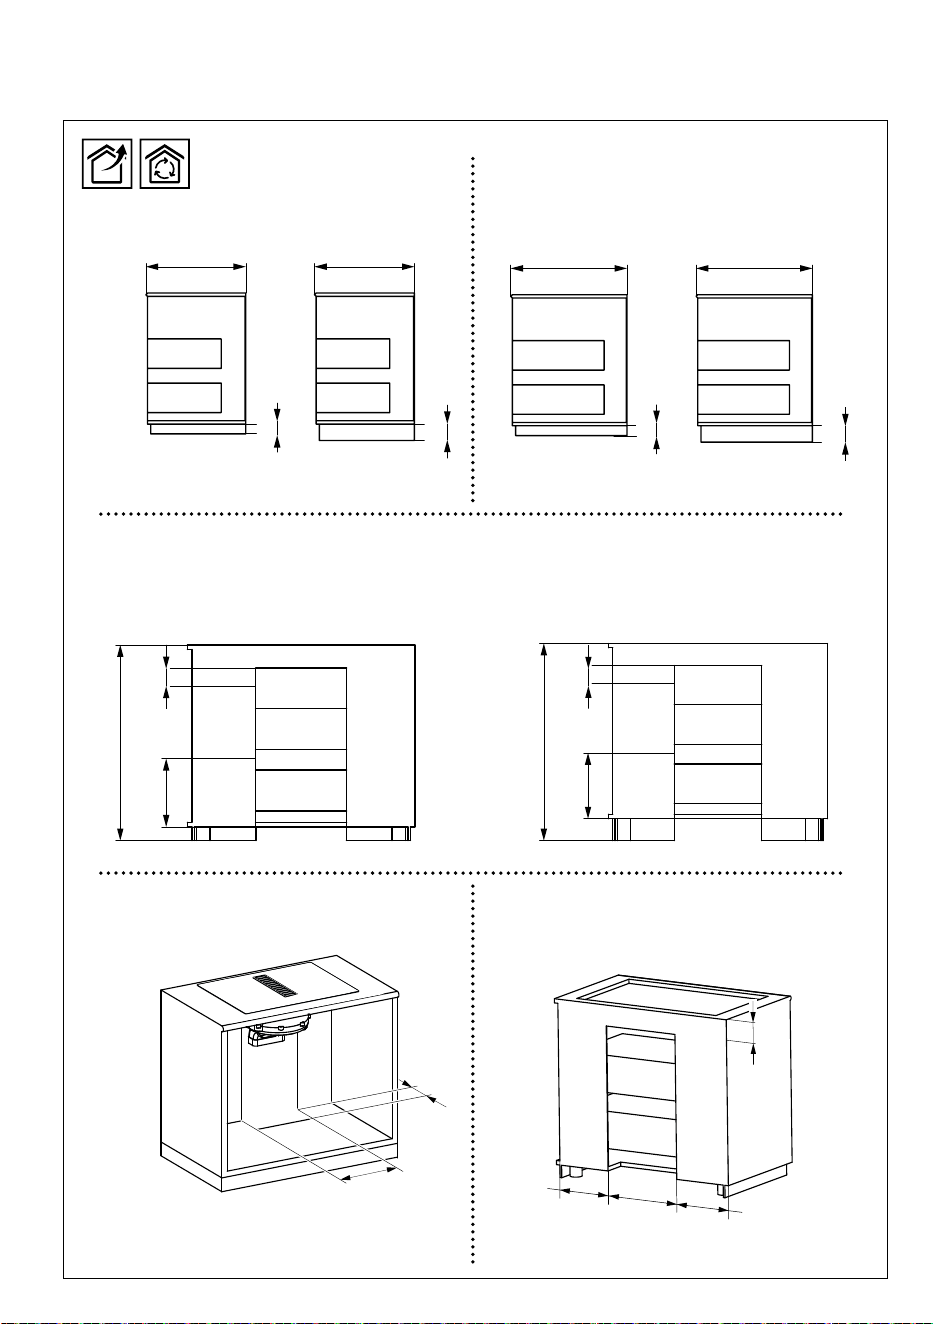
• If there is no oven beneath the hob, in-
stall a separation panel under the ap-
pliance according to the Assembly In-
structions.
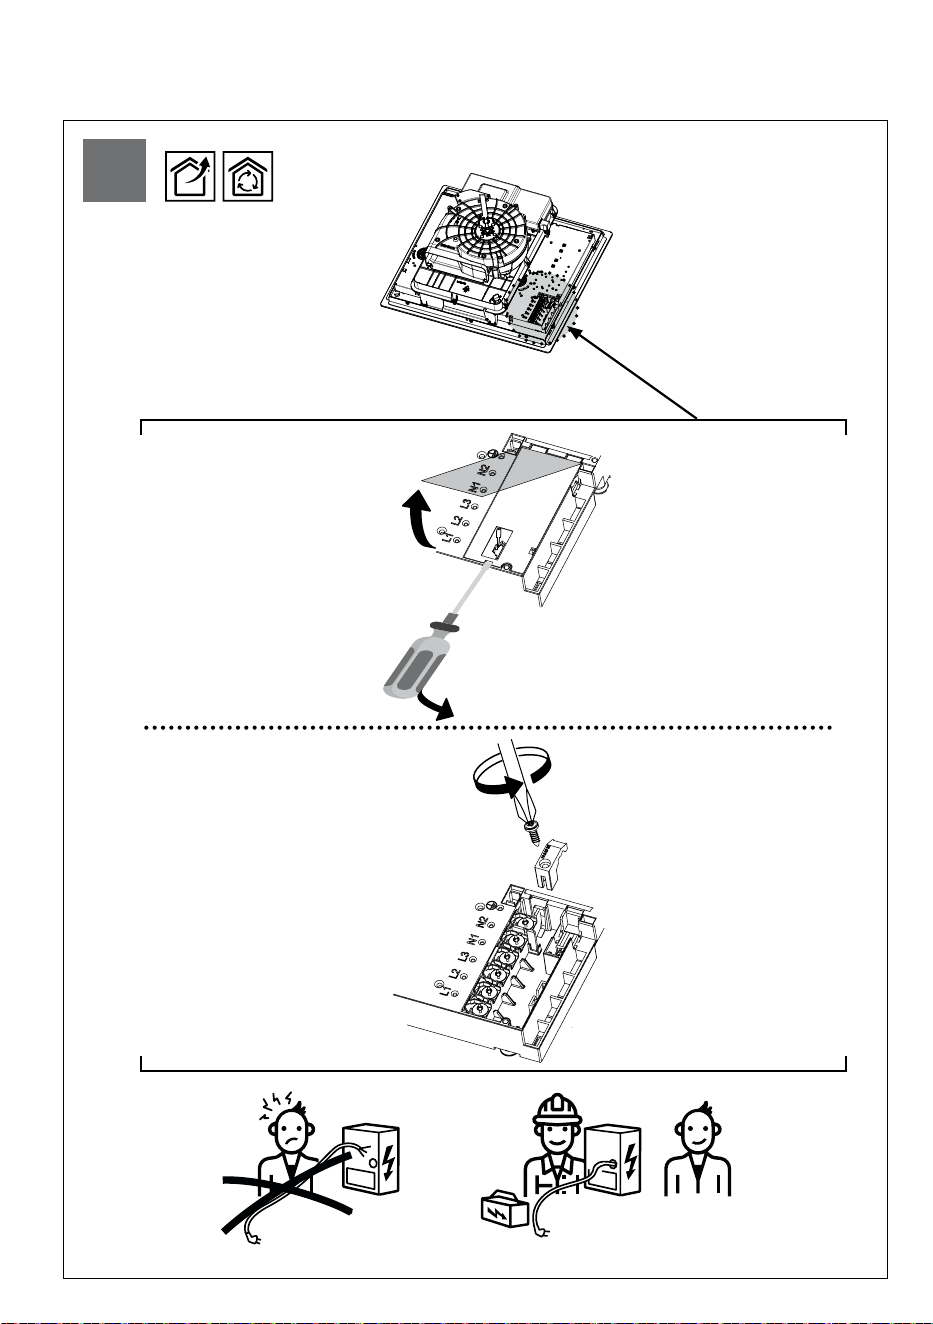
3. ELECTRICAL
CONNECTIONS
WARNING: All electrical connec-
tions must be carried out by an au-
thorised installer.
• Before making the connections, check
that the rated voltage of the appliance
indicated on the relevant rating plate
corresponds to the power supply
voltage. The rating plate is affixed to
the underside of the hob.
• Follow the connection diagram (loc-
ated on the underside of the hob).
• Only use original components sup-
plied by the spare parts service.
• The appliance is supplied with a
power cable.
• If damaged, replace the power supply
cables with original spare cables.
Contact the After Sales Service.
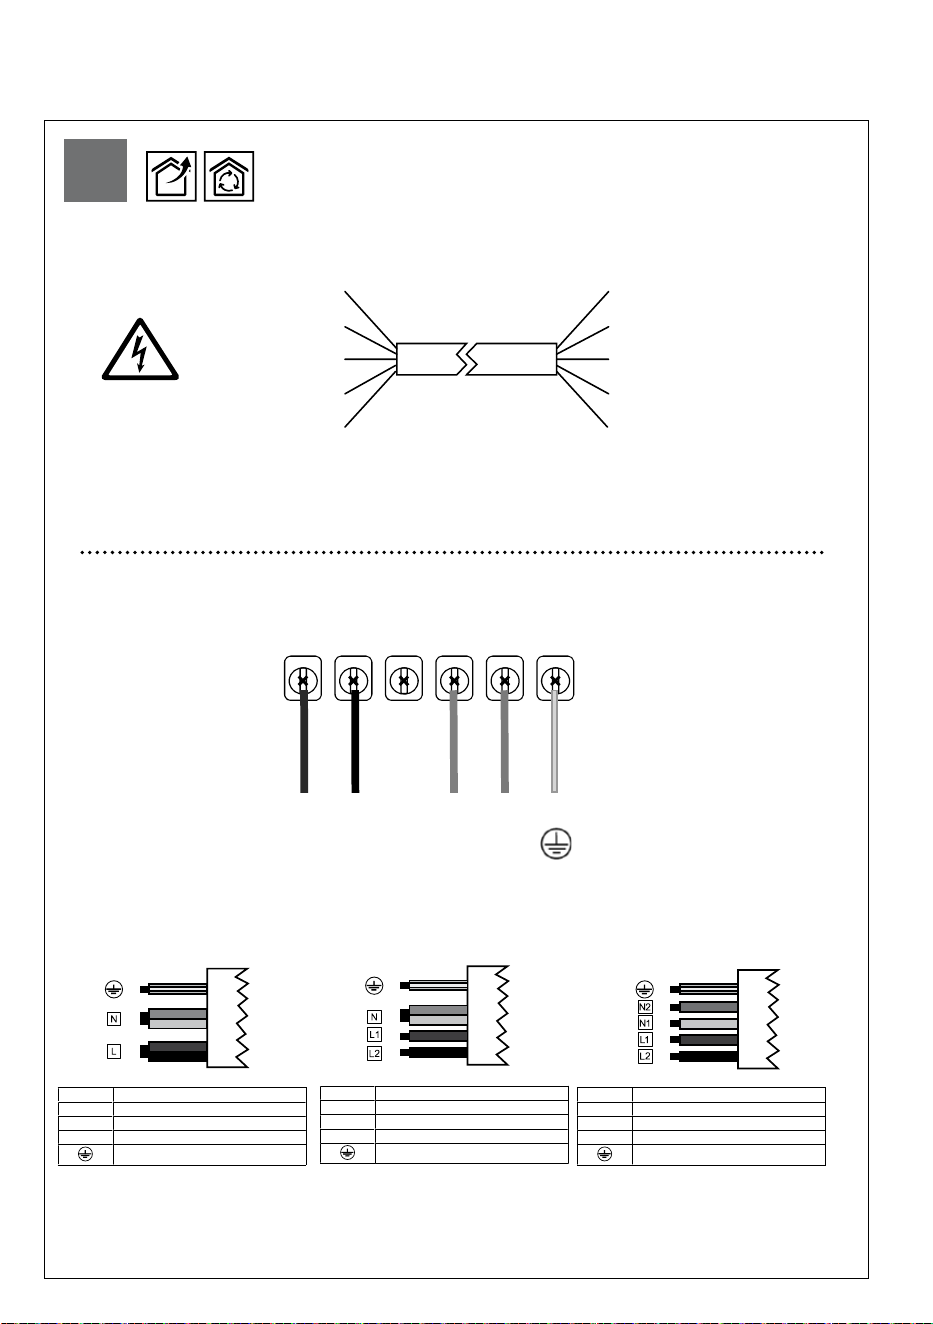
Caution! Do not weld any of the
cables!
Electrical connection
• The wire connection must be per-
formed by a specialised technician.
• This device has a Y-shaped connec-
tion with an H05V2V2-F cable. Min.
wire section: 5x2,5 mm².
• Connection terminals can be ac-
cessed by removing junction box
cover.
• Make sure the specifications of the
household electrical system (voltage,
maximum power and current) are
compatible with those of the appli-
ance.
• Connect the appliance as shown in
the diagram (in accordance with the
mains voltage and country standard
reference).
Connection diagram
220V - 240V 1N ~
L
Black
L
Brown
N
Blue
N
Grey
Yellow / Green
6
380V - 415V 2N ~
L1
Brown
L2
Black
N
Blue
N
Grey
Yellow / Green
380V - 415V 2N ~
L1
Brown
L2
Black
N1
Blue
N2
Grey
Yellow / Green
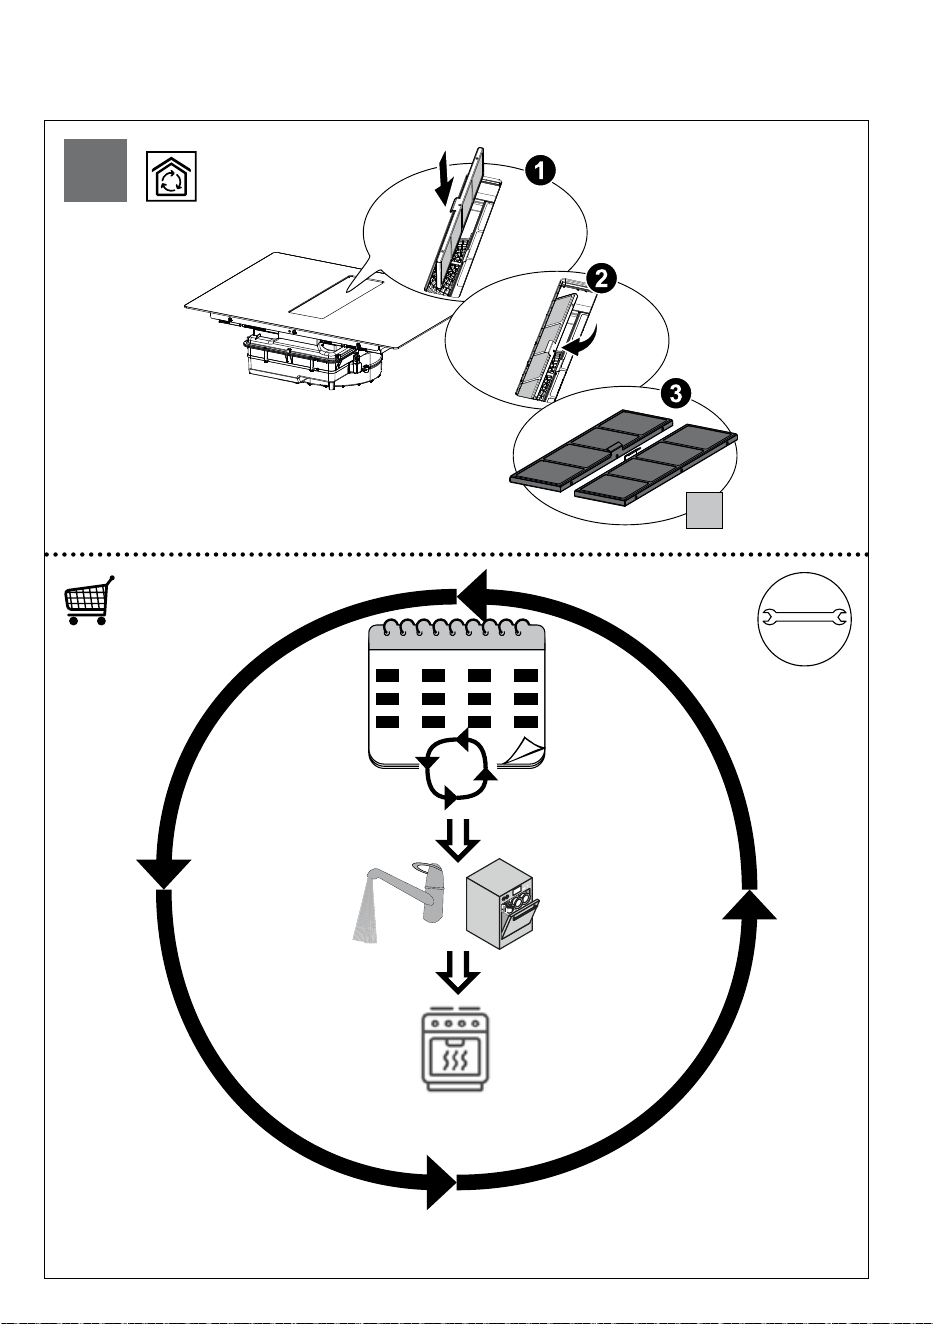
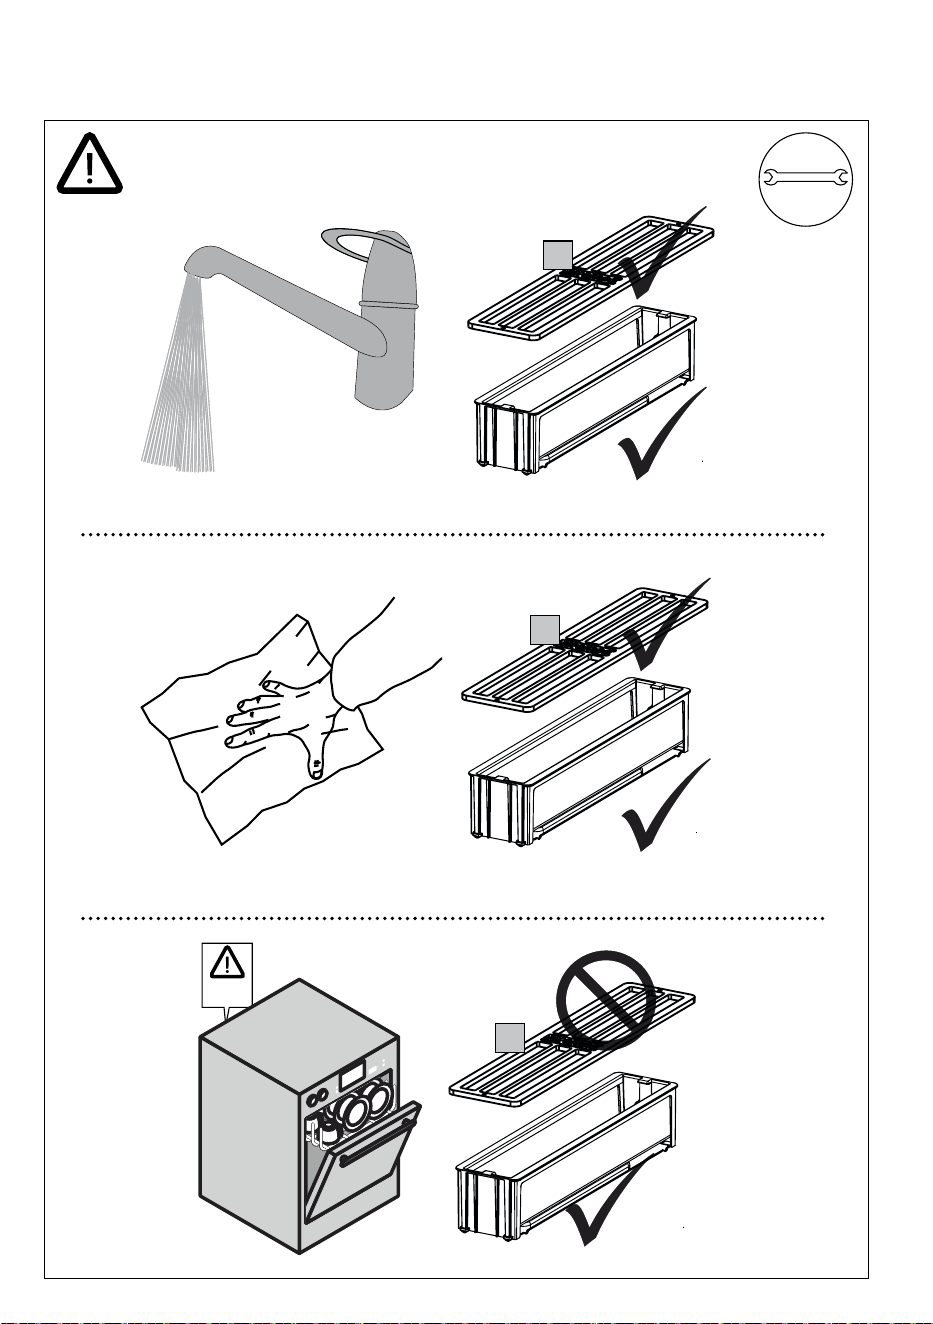
4. CLEANING AND
MAINTENANCE
• Never use abrasive sponges, wire
wool, hydrochloric acid or other
products that might scratch or mark
the surface.
• Do not consume any food that falls ac-
cidentally or builds up on the surface
and the functional or aesthetic ele-
ments of the hob.
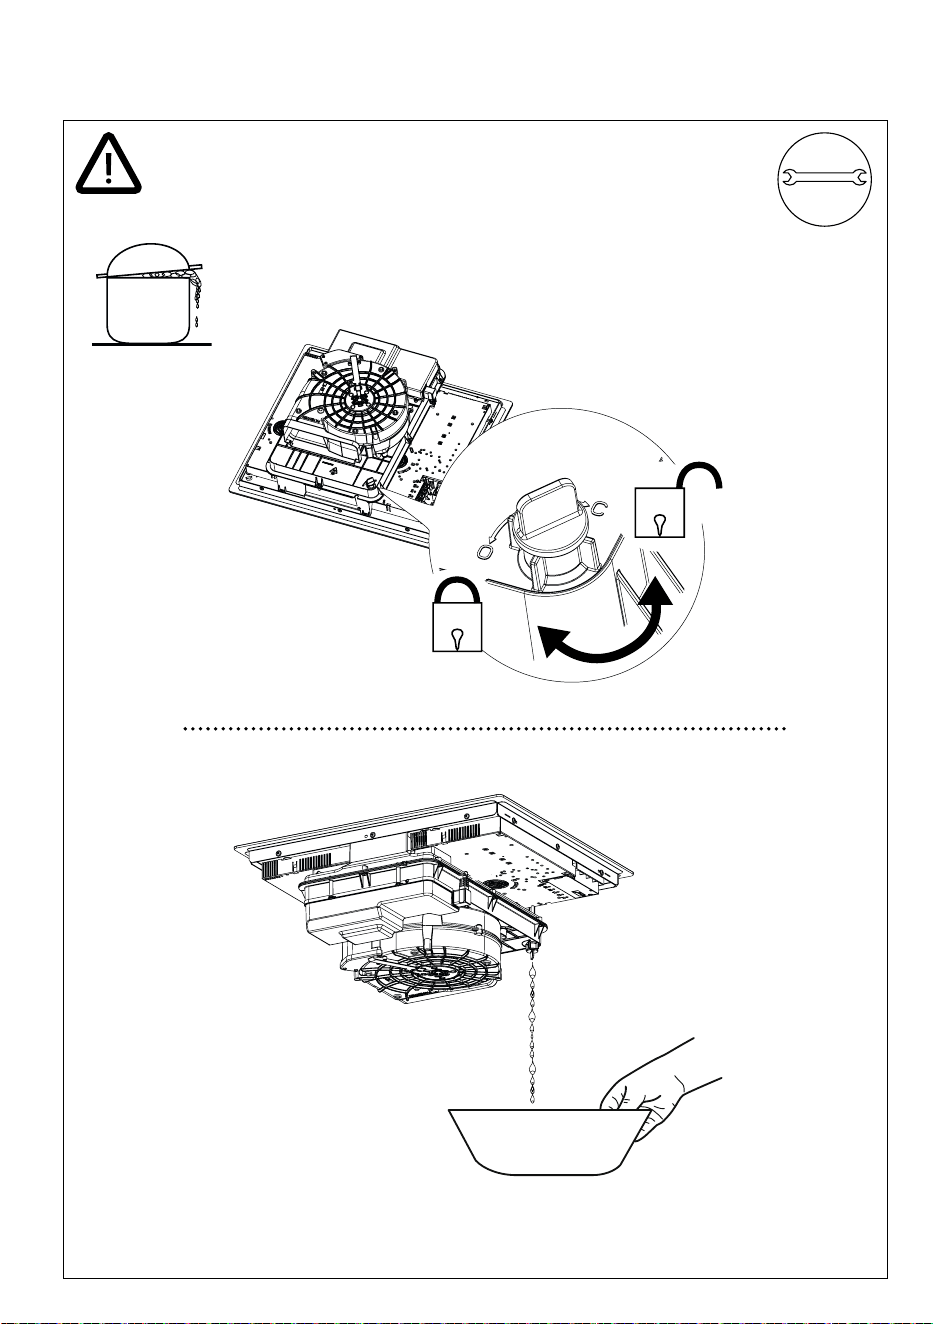
• Switch off or unplug the appliance
from the mains supply before carrying
out any maintenance work.
• Clean the appliance after every use to
prevent any residual food from burn-
ing on to it. It is much harder work to
remove encrusted and burned-on dirt.
• For everyday dirt, use a soft cloth or
sponge and a suitable detergent. Fol-
low the manufacturer’s recommenda-
tions regarding detergents to be used.
The use of neutral detergents is re-
commended.
• Remove all traces of encrusted dirt ,
e.g. milk that has boiled over, using a
scraper suitable for ceramic glass,
while the hob is still hot. Follow the
manufacturer’s recommendations re-
garding the type of scraper to be used.
• Remove food containing sugar, e.g.
jam that has spilled during cooking,
using a scraper suitable for ceramic
glass, while the hob is still hot. If this
residue is not removed, it may dam-
age the ceramic glass surface.
• Remove any melted plastic using a
scraper suitable for ceramic glass
while the hob is still hot. If this residue
is not removed, it may damage the
ceramic glass surface.
• Remove limescale using a small
amount of descaler, e.g. vinegar or
lemon juice, once the hob has cooled
down. Then, clean again with a damp
cloth.
• Do not cut or prepare foodstuffs on the
surface and do not drop hard objects
onto it. Do not drag pans or plates over
the surface.
• Do not use steam cleaning equip-
ment.
Maintenance and repairs
• Make sure that any maintenance on
the electrical components is only car-
ried out by the manufacturer or by the
service technicians.
• Make sure that damaged cables are
only replaced by the manufacturer or
by the service technicians.
7
380V - 415V 2N ~
L1
Brown
L2
Black
N
Blue
N
Grey
Yellow / Green
380V - 415V 2N ~
L1
Brown
L2
Black
N1
Blue
N2
Grey
Yellow / Green
4. CLEANING AND
MAINTENANCE
• Never use abrasive sponges, wire
wool, hydrochloric acid or other
products that might scratch or mark
the surface.
• Do not consume any food that falls ac-
cidentally or builds up on the surface
and the functional or aesthetic ele-
ments of the hob.
• Switch off or unplug the appliance
from the mains supply before carrying
out any maintenance work.
• Clean the appliance after every use to
prevent any residual food from burn-
ing on to it. It is much harder work to
remove encrusted and burned-on dirt.
• For everyday dirt, use a soft cloth or
sponge and a suitable detergent. Fol-
low the manufacturer’s recommenda-
tions regarding detergents to be used.
The use of neutral detergents is re-
commended.
• Remove all traces of encrusted dirt ,
e.g. milk that has boiled over, using a
scraper suitable for ceramic glass,
while the hob is still hot. Follow the
manufacturer’s recommendations re-
garding the type of scraper to be used.
• Remove food containing sugar, e.g.
jam that has spilled during cooking,
using a scraper suitable for ceramic
glass, while the hob is still hot. If this
residue is not removed, it may dam-
age the ceramic glass surface.
• Remove any melted plastic using a
scraper suitable for ceramic glass
while the hob is still hot. If this residue
is not removed, it may damage the
ceramic glass surface.
• Remove limescale using a small
amount of descaler, e.g. vinegar or
lemon juice, once the hob has cooled
down. Then, clean again with a damp
cloth.
• Do not cut or prepare foodstuffs on the
surface and do not drop hard objects
onto it. Do not drag pans or plates over
the surface.
• Do not use steam cleaning equip-
ment.
Maintenance and repairs
• Make sure that any maintenance on
the electrical components is only car-
ried out by the manufacturer or by the
service technicians.
• Make sure that damaged cables are
only replaced by the manufacturer or
by the service technicians.
7
3
22
39
23
23
600 mm
600 mm
700 mm
≥ 800 mm
PP
PP
PP
PP
PP
PP
PP
PP
PP
D
D
D
150 mm
250 mm
350 mm
a
b
28
1
24
PP
PP
PP
H
D
E
2
MIN.
25 mm
MIN.
25 mm
MIN.
25 mm
MIN.
25 mm
MIN.
25 mm
25
==
13
L
www.elica.com
www.shop.elica.com
*
KIT0180522
13
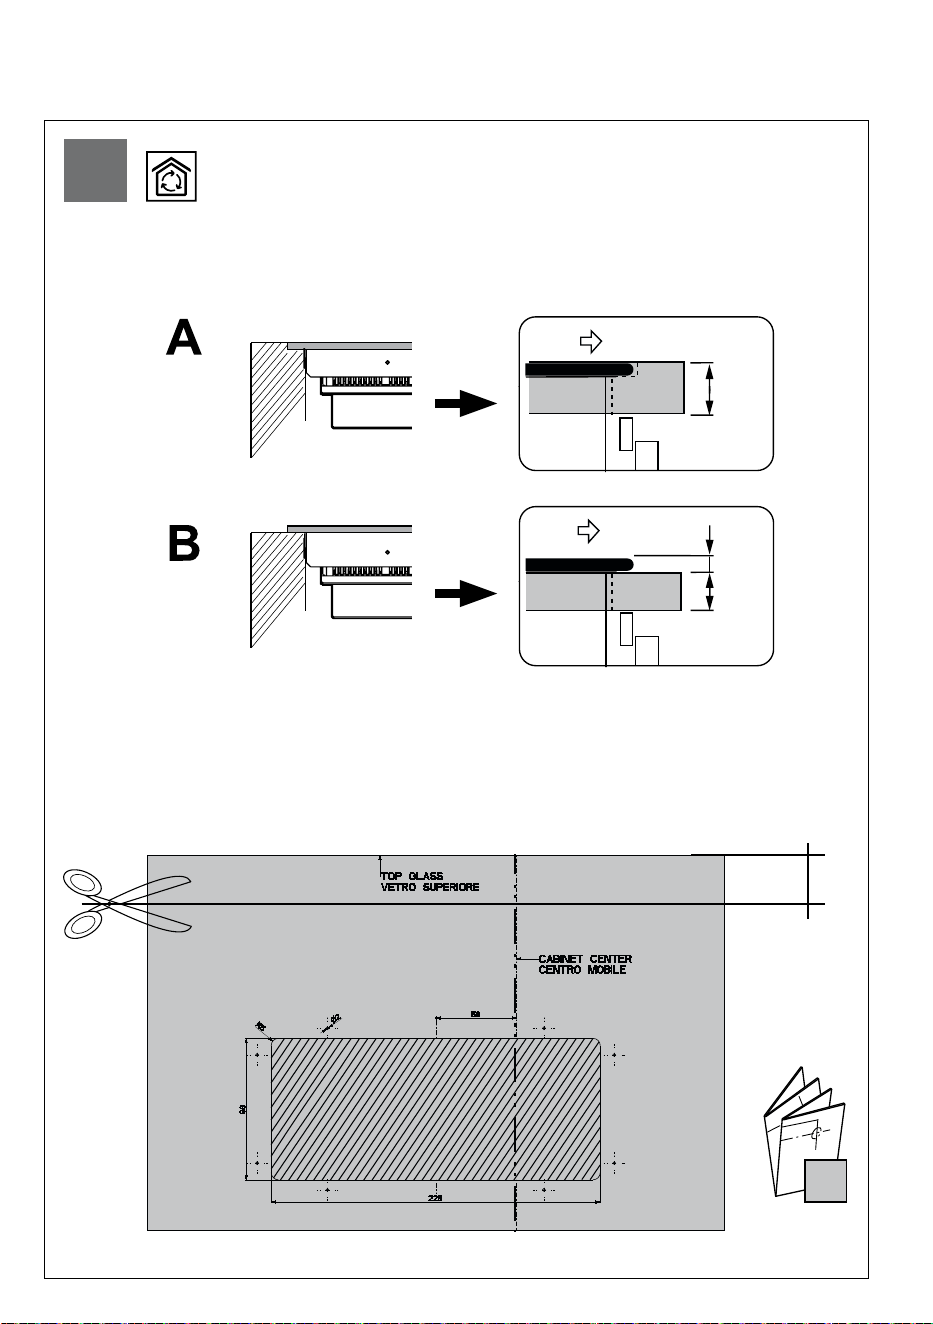
TOP GLASS
TOP GLASS
X
b
X = b
1
1
1
1
inst.A
1x
TOP GLASS
.1
X
b
5mm
X =5mm+b
inst.B
TOP GLASS
.2
*
*
www.elica.com
www.shop.elica.com
*
KIT0180522
13
TOP GLASS
TOP GLASS
X
b
X = b
1
1
1
1
inst.A
1x
TOP GLASS
.1
X
b
5mm
X =5mm+b
inst.B
TOP GLASS
.2
*
*
X1
3
26
13
L
M = 6x
2,9x12,7
A
C
D
E
B
L = 2x
4x8
N = 2x
==
2
1
3
4
5
4
5
27
M = 6x
2,9x12,7
A
C
D
E
B
L = 2x
4x8
N = 2x
M = 6x
2,9x12,7
A
C
D
E
B
L = 2x
4x8
N = 2x
8x
T1
36
6
7
E
28
29
31
33
600 mm
600 mm
700 mm
≥ 800 mm
29
a
b
600 mm
600 mm
a
75 mm
50 mm
D
1x
75 mm
D
1x
50 mm
1
2
D
D
PP
PP
PP
w
E
KITRHOBD6
3
b
c
d
e
f
g
h
a
Bellucci, Daniele
05-Apr-2022
Released
w
36
30
a
b
600 mm
600 mm
a
75 mm
50 mm
D D
1x 1x
75 mm
50 mm
1
2
D
D
PP
PP
PP
w
E
KITRHOBD6
3
b
c
d
e
f
g
h
a
Bellucci, Daniele
05-Apr-2022
Released
w
35
31
700 mm
a
b
D
1x1x
45 mm
80 mm
c
1
2
D
b
c
80 mm
45 mm
w
E
KITRHOBD6
3
b
c
d
e
f
g
h
a
Bellucci, Daniele
05-Apr-2022
Released
w
36
32
E
a
b
D
1x1x
45 mm
80 mm
c
700 mm
1
2
D
b
c
80 mm
45 mm
w
KITRHOBD6
3
b
c
d
e
f
g
h
a
Bellucci, Daniele
05-Apr-2022
Released
w
35
33
E
≥ 800 mm
D
1x1x
45 mm
180 mm
c
a
b
1
2
D
b
c
180 mm
45 mm
w
KITRHOBD6
3
b
c
d
e
f
g
h
a
Bellucci, Daniele
05-Apr-2022
Released
w
36
34
≥ 800 mm
D
1x1x
45 mm
180 mm
c
a
b
1
2
D
b
c
180 mm
45 mm
w
E
KITRHOBD6
3
b
c
d
e
f
g
h
a
Bellucci, Daniele
05-Apr-2022
Released
w
35
35
Bellucci, Daniele
19-Oct-2023
Released
375
58
G
T2 T2
G
8.a
G
2x M4x40
T2
i
GRIX6H
36
58
375
Bellucci, Daniele
19-Oct-2023
Released
G
G
T2 T2
8.b
G
2x M4x40
T2
i
GRIX6H
37
b c da
b c da
b c da
b c da
Max. 70° Max. 70°
120min - Max. 70°
Max. 8
FLTHOBD2
4
4M
9
F
38
B
10
11
39
40
41
42
600 mm
600 mm
700 mm
≥ 800 mm
40
600 mm
600 mm
a
b
a
b
PP
PP
PP
D
50 mm
D
D
2x
PP
PP
PP
PP
PP
PP
DD
j
PP
PP
PP
PP
PP
PP
D
50 mm
50 mm
4x
CON90H
KITEHOBD10
w
43
E

41
700 mm
PP
PP
PP
D
D
x
y
a
b
a
b
PP
PP
PP
D
PP
PP
PP
D
50 mm
80 mm
KITEHOBD10
w
w
CON90H
43
4y
E
42
≥ 800 mm
PP
PP
PP
D
a
b
a
b
PP
PP
PP
D
50 mm
PP
PP
PP
DD
PP
PP
PP
D
50 mm
D
x
y
180 mm
KITEHOBD10
w
w
CON90H
43
4z
E

43
KITPR90
x1
PP
PP
PP
D
w
Bellucci, Daniele
05-Apr-2022
Released
CON90H
w
6x
E
5
44
D
x
x
h
y
KITRDEF
w
KITEHOBD10
6y
E
45
D
x
x
x1
y
y
KITPR90
x1
z
w
KITEHOBD10
6z
E

46
B
7
8
47
55°
b c da
b c da
b c da
b c da
b c da
b c da
E F GD
E F GD
E F GD
E F GD
E F GD
E F GD
B
B
B
48


991.0703.169_01 - D000000009342_00 - 230510
991.0720.065_04 - 250619 - D000000009739_03