
WT9011DCL BT5.0 | manual v23-607 | www.wit-motion.com
- 2 -
Tutorial Link
Google Drive
Link to instructions DEMO:
WITMOTION Youtube Channel
WT9011DCL-BT5.0 Playlist
If you have technical problems or cannot find the information that you need in the
provided documents, please contact our support team. Our engineering team is
committed to providing the required support necessary to ensure that you are
successful with the operation of our AHRS sensors.
Contact
Technical Support Contact Info
Application
● Unmanned/Assisted Driving
● Large-scale farming automated farming
● Safety monitoring for working at heights
● Unmanned aerial vehicle
● Industrial attitude monitoring
● Human motion tracking/capture
● Robot, Automated Guided Transporter
● Pedestrian Navigation
● Truck-mounted Satellite Antenna Equipment

WT9011DCL BT5.0 | manual v23-607 | www.wit-motion.com
- 3 -
Contents
Tutorial Link .................................................................. - 2 -
Contact ........................................................................ - 2 -
Application .................................................................... - 2 -
Contents ....................................................................... - 3 -
1 Introduction .............................................................. - 5 -
1.1 Warning Statement ............................................. - 6 -
1.2 LED Status ........................................................ - 6 -
2 Use Instructions with Android Phone ............................ - 7 -
2.1 APP Installation .................................................. - 7 -
2.2 Connection ........................................................ - 8 -
2.3 Calibration ....................................................... - 11 -
2.3.1 Acceleration Calibration ............................... - 11 -
2.3.2 Magnetic Field Calibration ............................ - 12 -
2.4 Multi-connection ............................................... - 13 -
3 Use Instructions with iPhone ..................................... - 14 -
3.1 How to install ................................................... - 14 -
3.2 How to setup ................................................... - 15 -
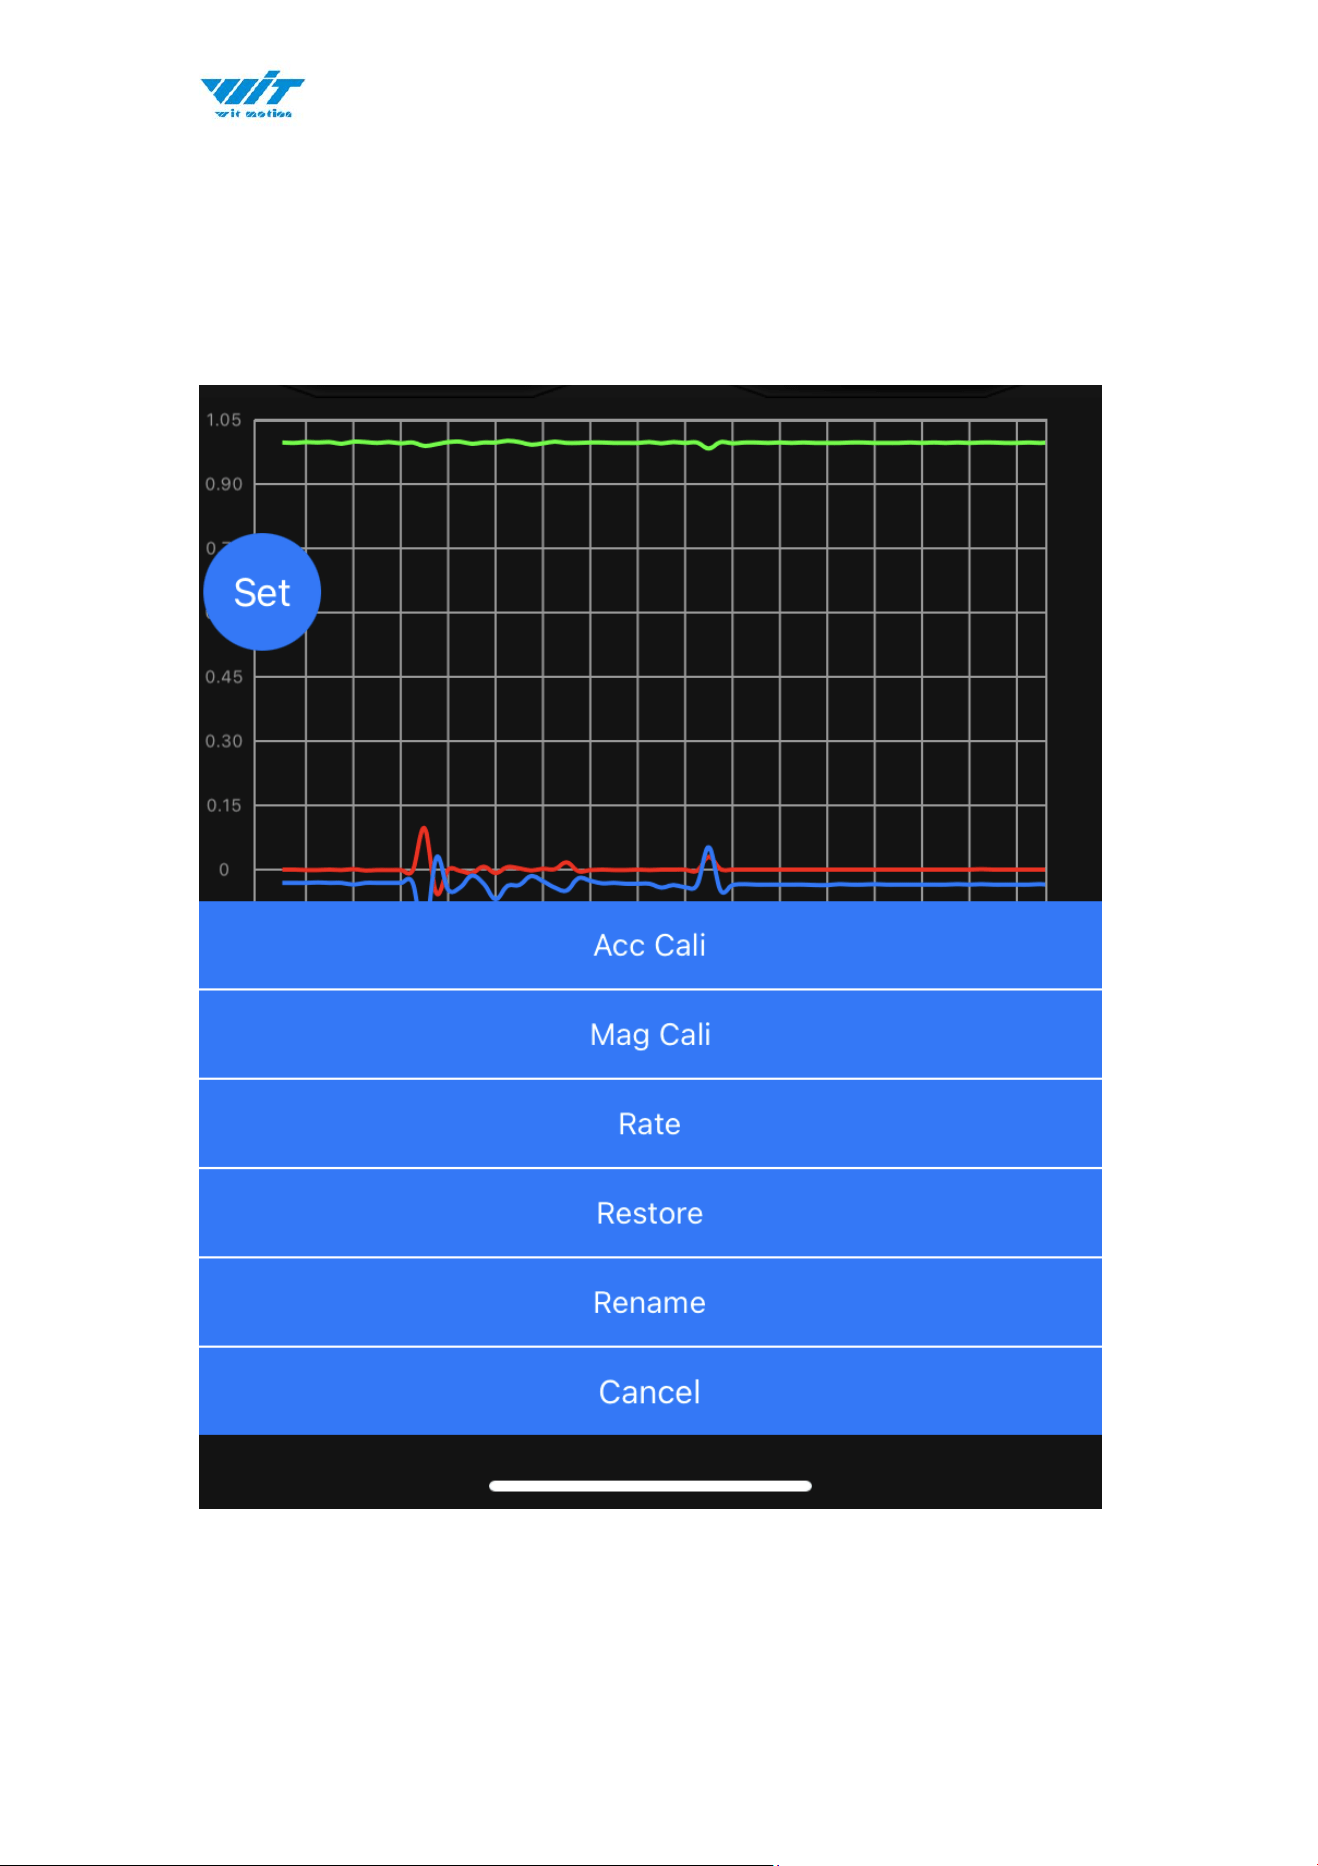
3.3 How to configure .............................................. - 17 -
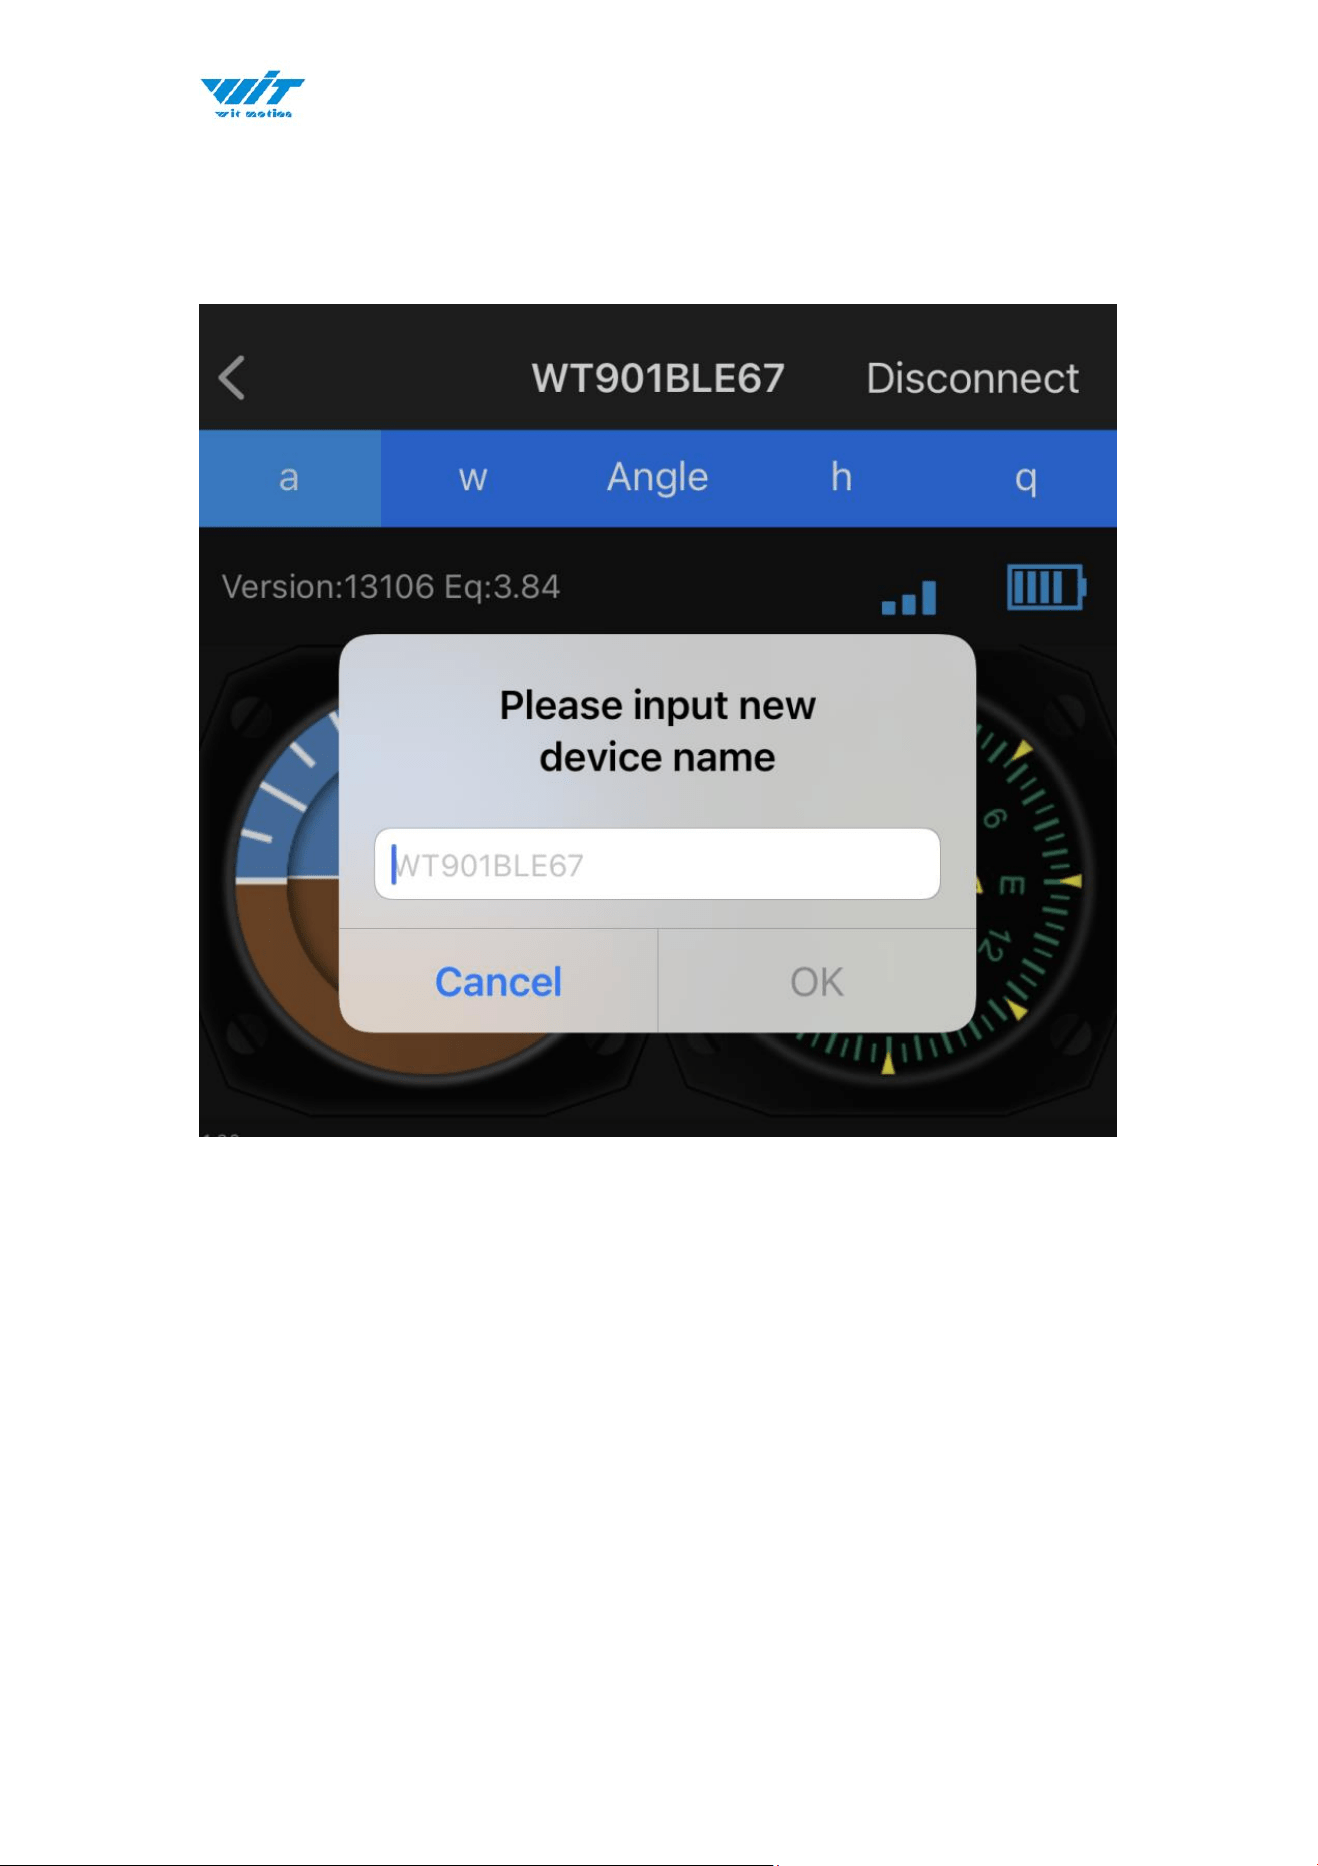
3.3.1 Rename ..................................................... - 18 -
3.4 Data Recording ................................................ - 19 -
4 Use Instructions with PC ........................................... - 22 -
4.1 PC Connection .................................................. - 22 -
4.1.1 Serial Connection ........................................ - 22 -
4.1.2 BLE 5.0 Adapter Connection ......................... - 25 -
4.2 Software Introduction ....................................... - 28 -
4.2.1 Main Menu ................................................. - 28 -

WT9011DCL BT5.0 | manual v23-607 | www.wit-motion.com
- 4 -
4.2.2 Menu of Configuration ................................. - 29 -
4.3 Calibration ....................................................... - 31 -
4.3.1 Accelerometer Calibration ............................ - 31 -
4.3.2 Magnetic Field Calibration ............................ - 33 -
4.3.3 Gyroscope Automatic Calibration ................... - 35 -
4.3.4 Reset Z-axis Angle ...................................... - 35 -
4.3.5 Reset Height to 0 ........................................ - 35 -
4.4 Configuration ................................................... - 36 -
4.4.1 Data Recording ........................................... - 36 -
4.4.2 Data Playback ............................................ - 38 -
4.4.3 Placement Direction .................................... - 40 -
4.4.4 Bandwidth.................................................. - 41 -
4.4.5 6-axis/ 9-axis Algorithm .............................. - 43 -
5 Instructions of 2023 New Software ............................ - 44 -
6 Multiple-Connection Instructions ................................ - 46 -
6.1 Connection Instructions ...................................... - 47 -
6.1 Software Setting .............................................. - 49 -
6.1.1 Data Configuration ...................................... - 49 -
6.1.2 Calibrate .................................................... - 51 -
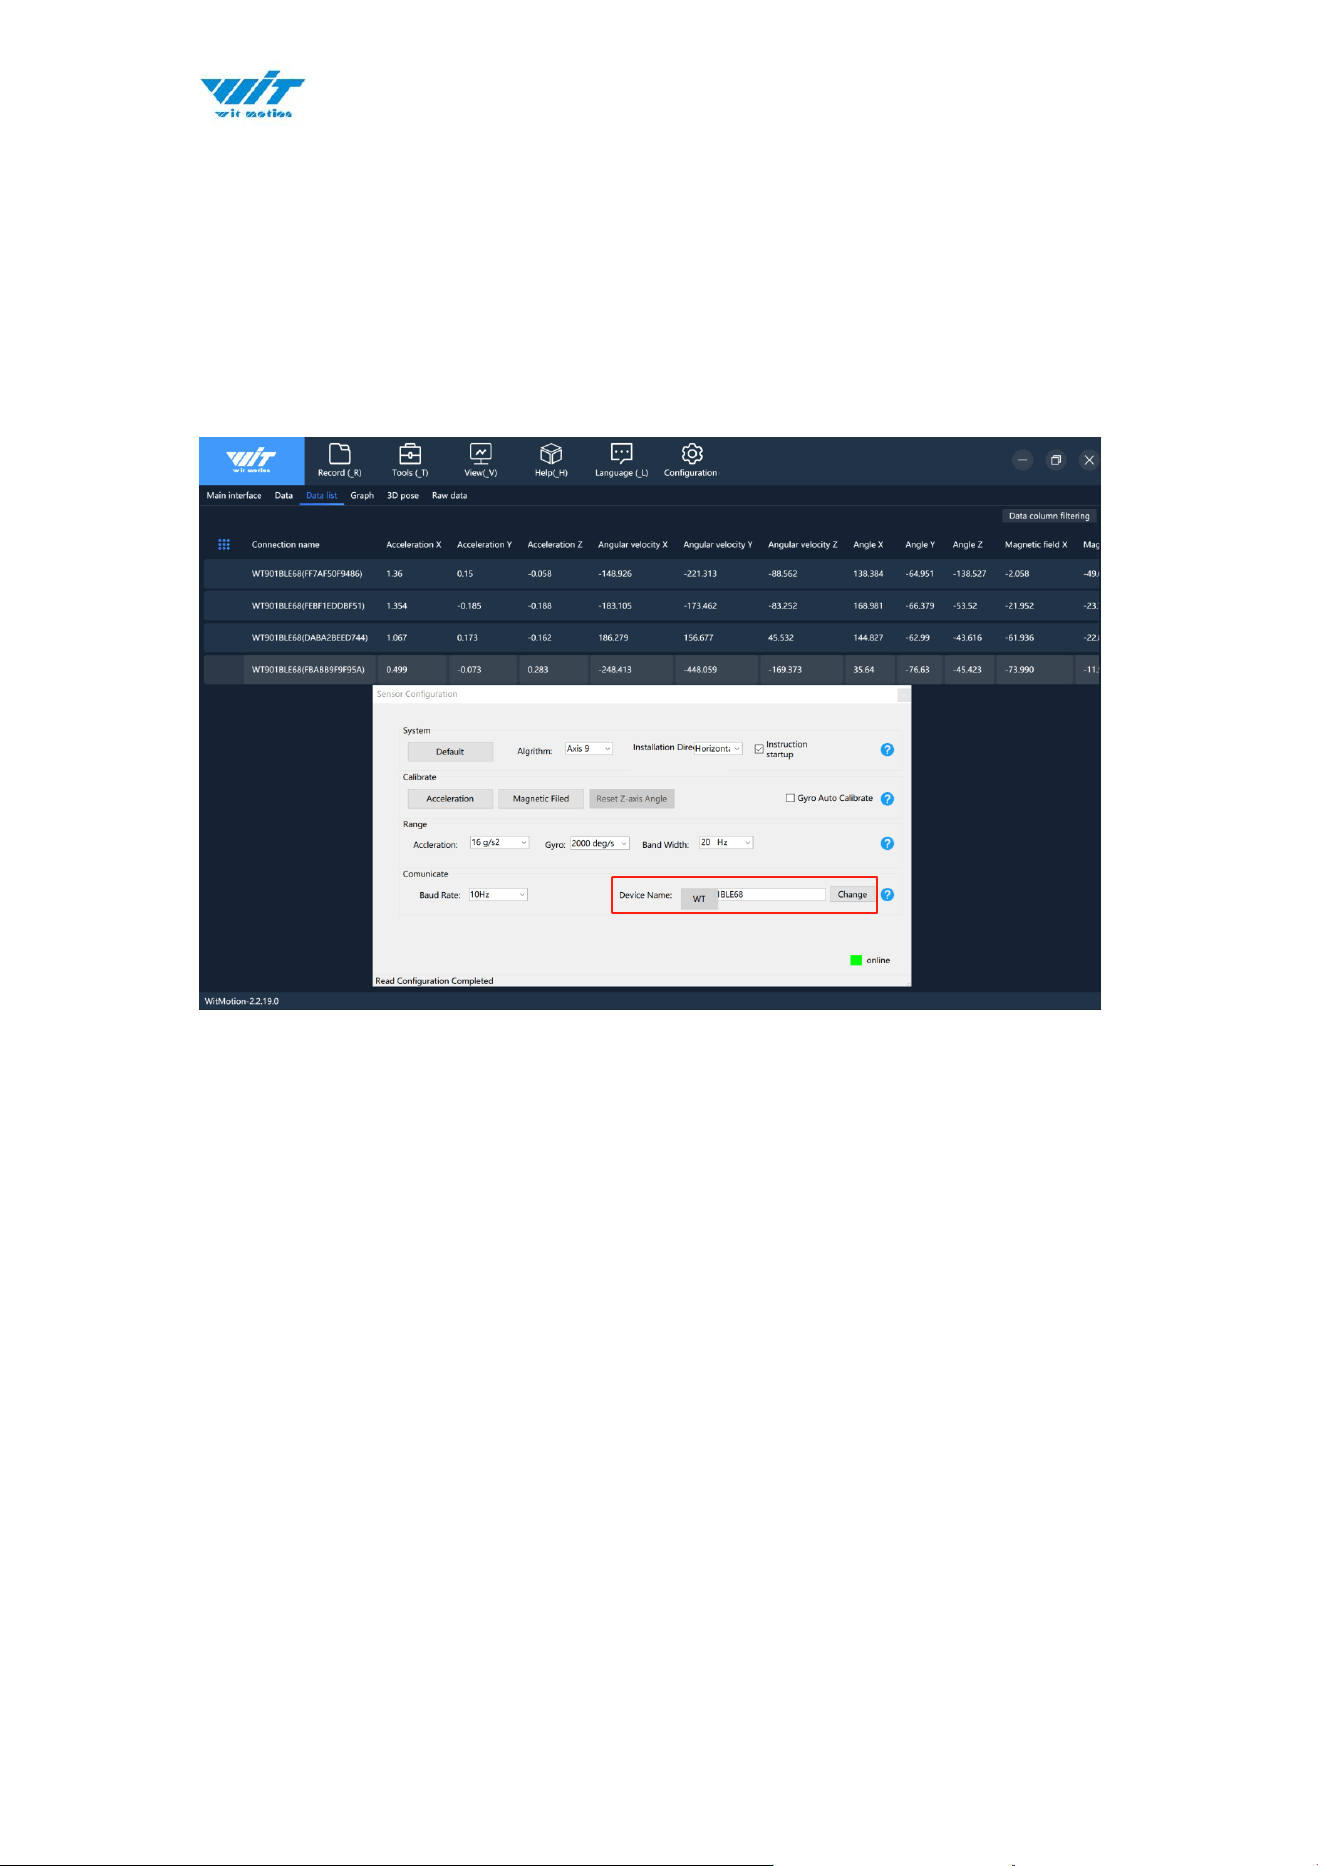
6.1.3 Device name Edition .................................... - 52 -
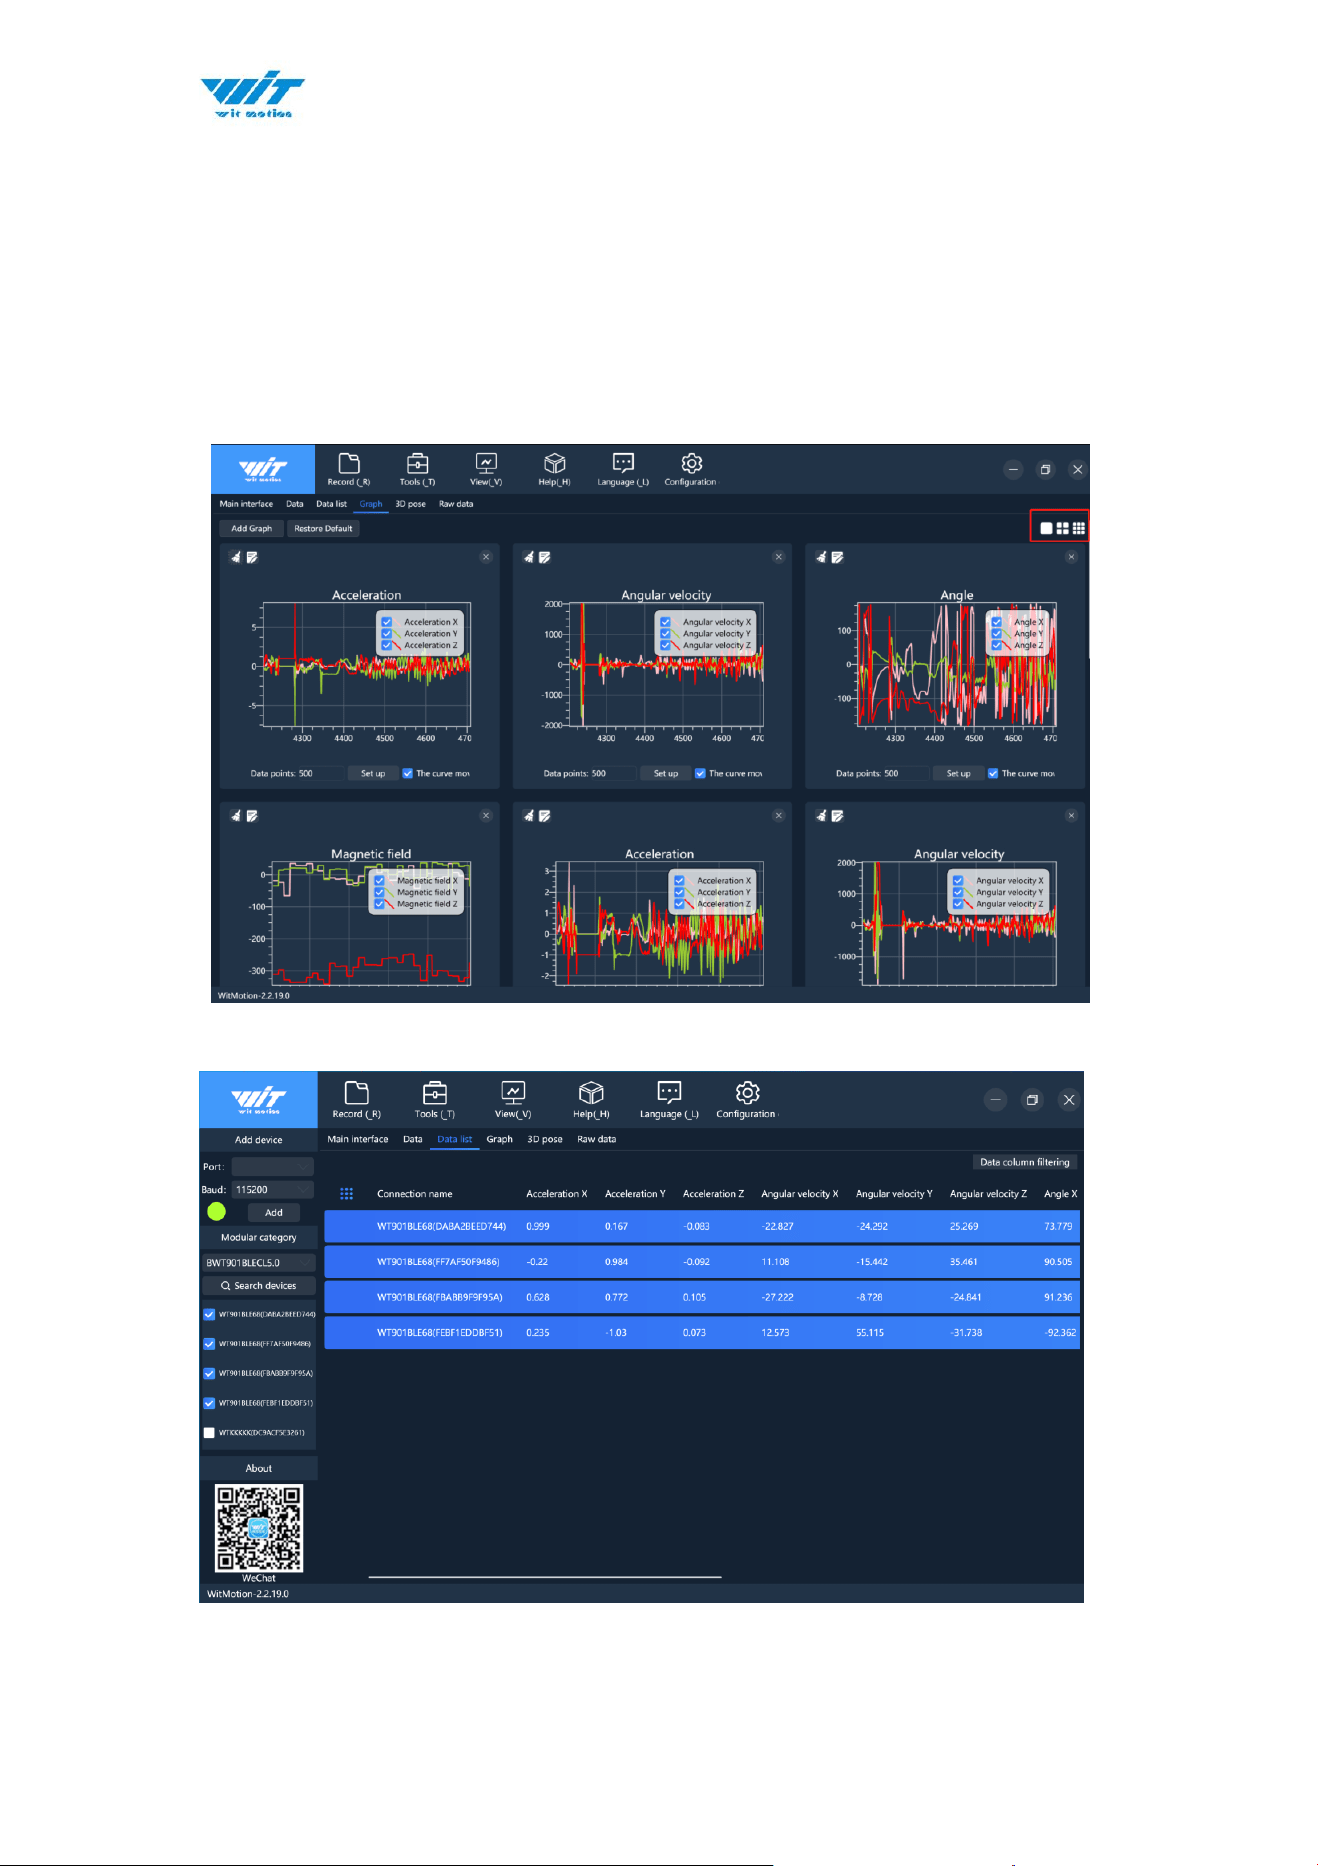
6.1.4 Curve Display ............................................. - 53 -
6.1.5 Data Recording ........................................... - 54 -

WT9011DCL BT5.0 | manual v23-607 | www.wit-motion.com
- 5 -
1 Introduction
The WT9011DCL-BLE5.0 is a multi-sensor device detecting acceleration,
angular velocity, angle as well as magnetic filed. The robust housing and the
small outline makes it perfectly suitable for industrial retrofit applications
such as condition monitoring and predictive maintenance. Configurationuring
the device enables the customer to address a broad variety of use cases by
interpreting the sensor data by smart algorithms.
WT9011DCL-BLE5.0’s scientific name is AHRS IMU sensor. A sensor
measures 3-axis angle, angular velocity, acceleration, magnetic field. Its
strength lies in the algorithm which can calculate the three-axis angle
accurately.
It is employed where the highest measurement accuracy is required.
WT9011DCL-BT5.0 offers several advantages over competing sensor:
• Heated for best data availability: new WITMOTION patented zero-bias
automatic detection calibration algorithm outperforms traditional
accelerometer sensor
• High precision Roll Pitch Yaw (X Y Z axis) Acceleration + Angular Velocity +
Angle + Magnetic Field output
• Low cost of ownership: remote diagnostics and lifetime technical support by
WITMOTION service team
• Developed tutorial: providing manual, datasheet, demo video, free software
for Windows computer, APP for Android smartphones
• WITMOTION sensors have been praised by thousands of engineers as a
recommended attitude measurement solution

WT9011DCL BT5.0 | manual v23-607 | www.wit-motion.com
- 6 -
1.1 Warning Statement
➢ Putting more than 5 Volt across the sensor wiring of
the main power supply can lead to permanent damage
to the sensor.
➢ For proper instrument grounding: use WITMOTION
with its original factory-made cable or accessories.
➢ Do not access the I2C interface.
➢ Do not change the baud rate because WitMotion
Bluetooth sensor’s baud rate is fixed.
1.2 LED Status
LED
Status
Remark
Red
Keeping on
Charging (powered by offered Type-C
wire)
Green
Flashing once every
one second
Standby
Flashing once every
two seconds
Pairing succeeds
WT9011DCL BT5.0 | manual v23-607 | www.wit-motion.com
- 7 -
2 Use Instructions with Android Phone
For APP configuration introduction, please referring to the link.
https://drive.google.com/file/d/122Es4QPLi5R-O4TjN43FMFRcaNK9eSY8/view
?usp=share_link
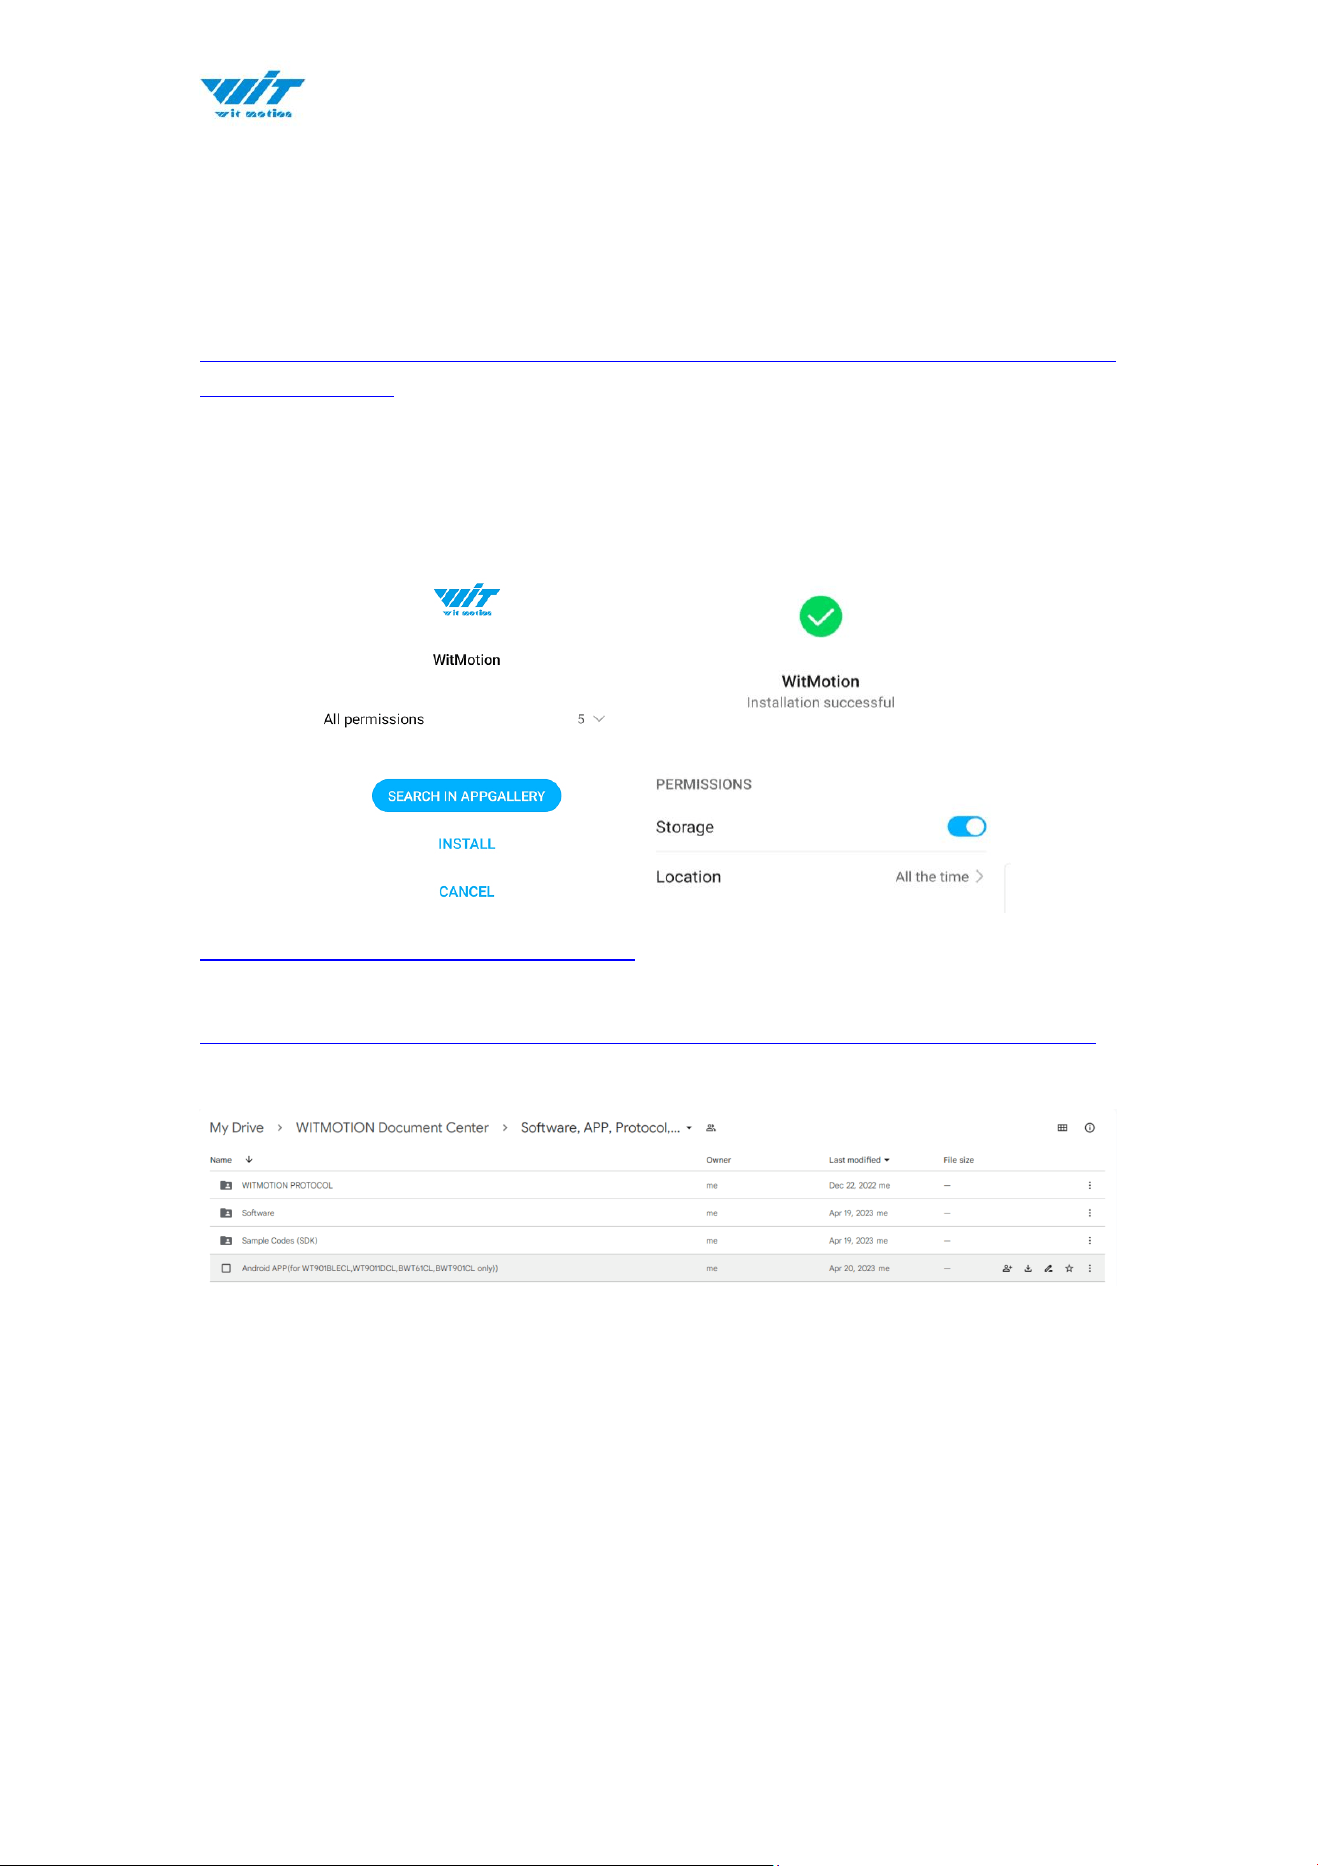
2.1 APP Installation
Install the APK file, give permission of Location and Storage
WITMOTION 2023v New Android APP
Link to check the tutorial video.
https://youtube.com/playlist?list=PL43tdDrVL_VBMU2CrEZfC0MxA0aRz-EY1
About Android APP:
1. It is required to allow for application positioning (Always allowed), and turn
on the positioning function and Bluetooth.
Note: Paired devices can be searched without turning on positioning, but
according to Google's requirements, if APP installed on a higher version of
Android (6.0) mobile phone is paired with a Bluetooth device, positioning must
be allowed when using Bluetooth at the same time.
2. After turning on Bluetooth, it takes about one minute to search for
authorization to find Bluetooth.

WT9011DCL BT5.0 | manual v23-607 | www.wit-motion.com
- 11 -
2.3 Calibration
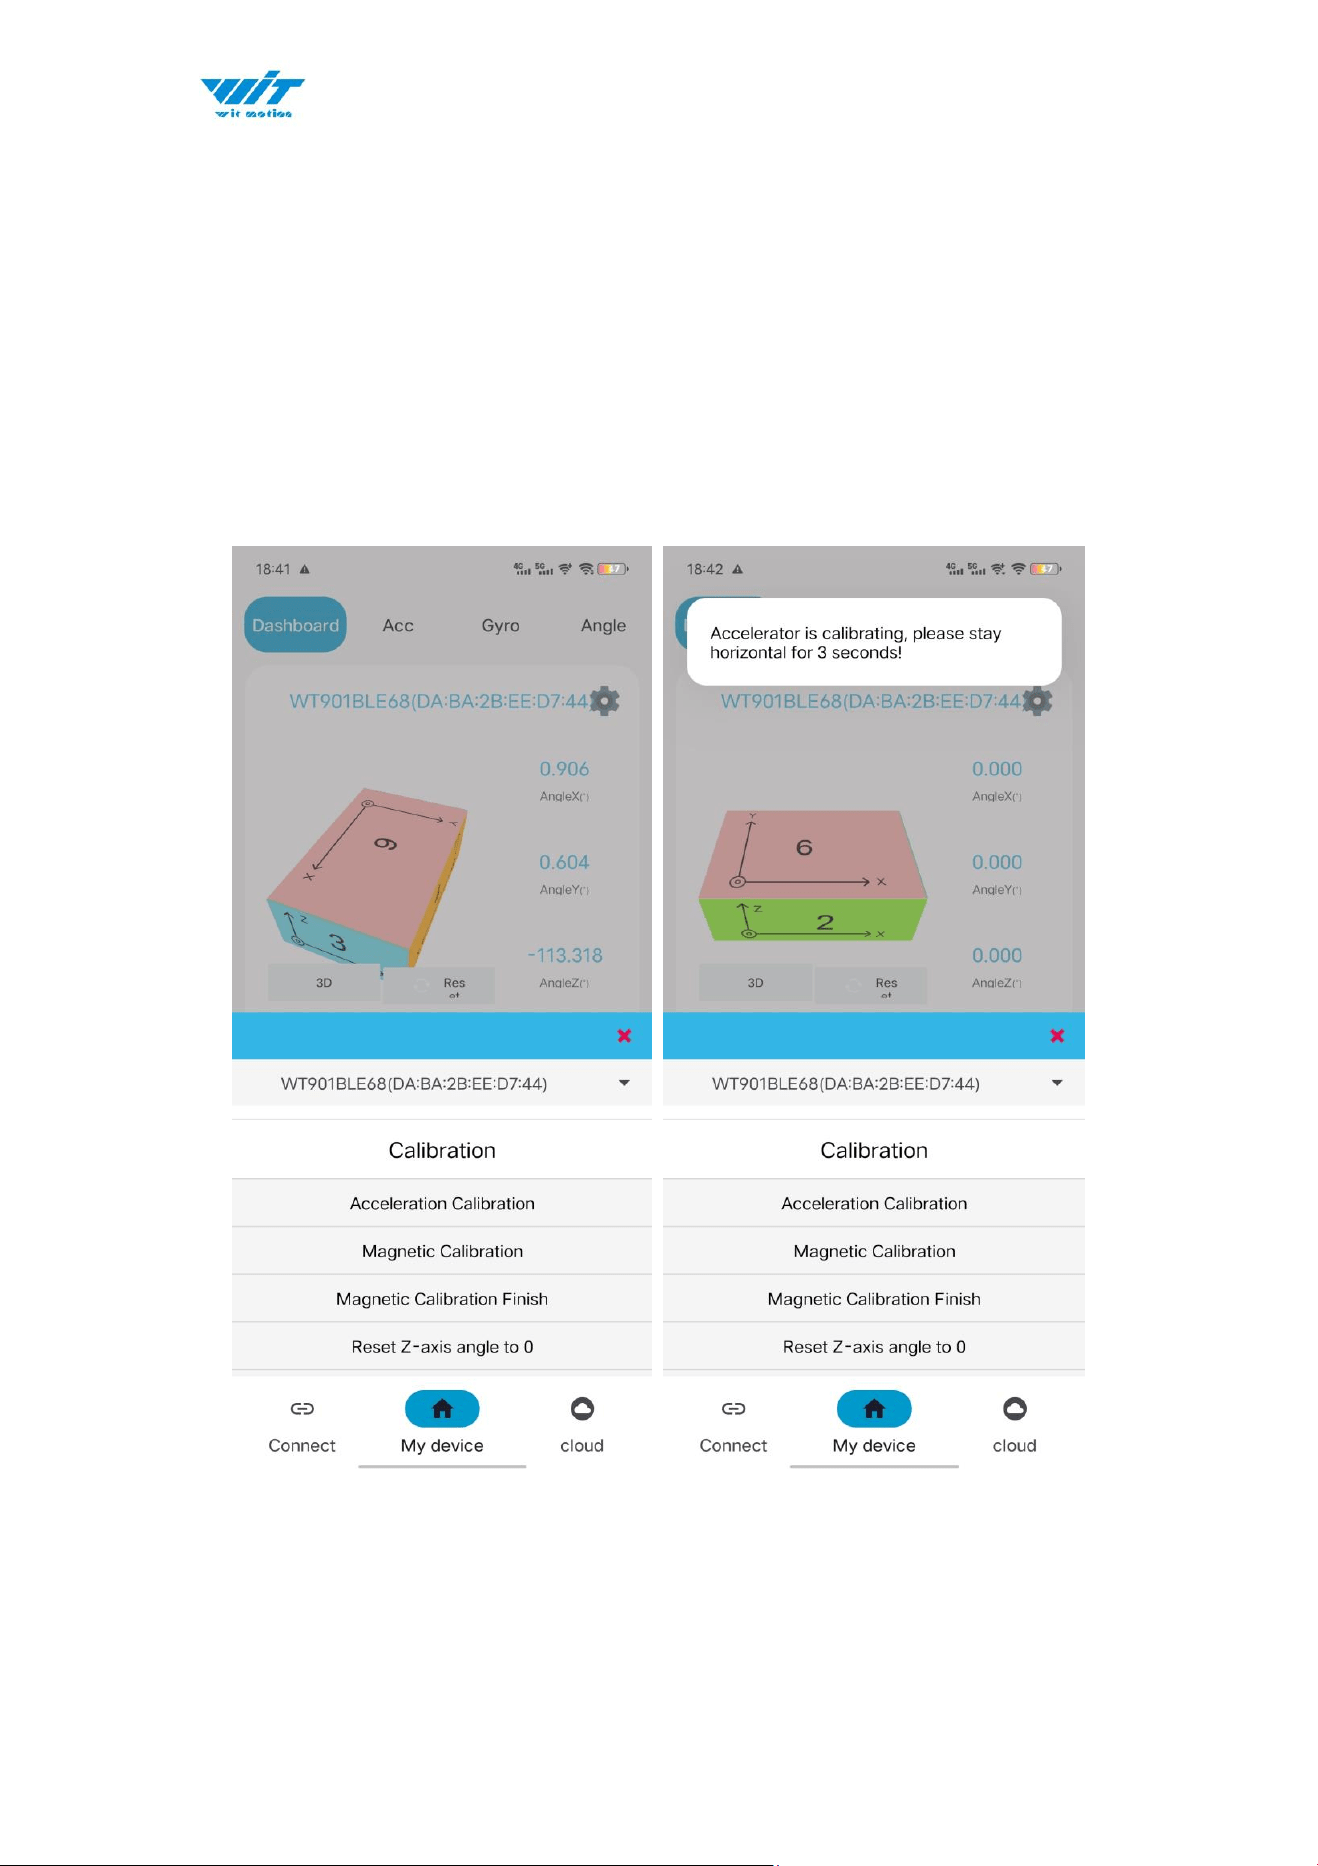
2.3.1 Acceleration Calibration
Step 1. Keep the module horizontally stationary
Step 2. Click the “Calibration” menu
Step 3. Click the “Acceleration Calibration” and wait for 3 seconds
Step 5. Check the result--confirm if there is 1g on Z-axis acceleration
WT9011DCL BT5.0 | manual v23-607 | www.wit-motion.com
- 12 -
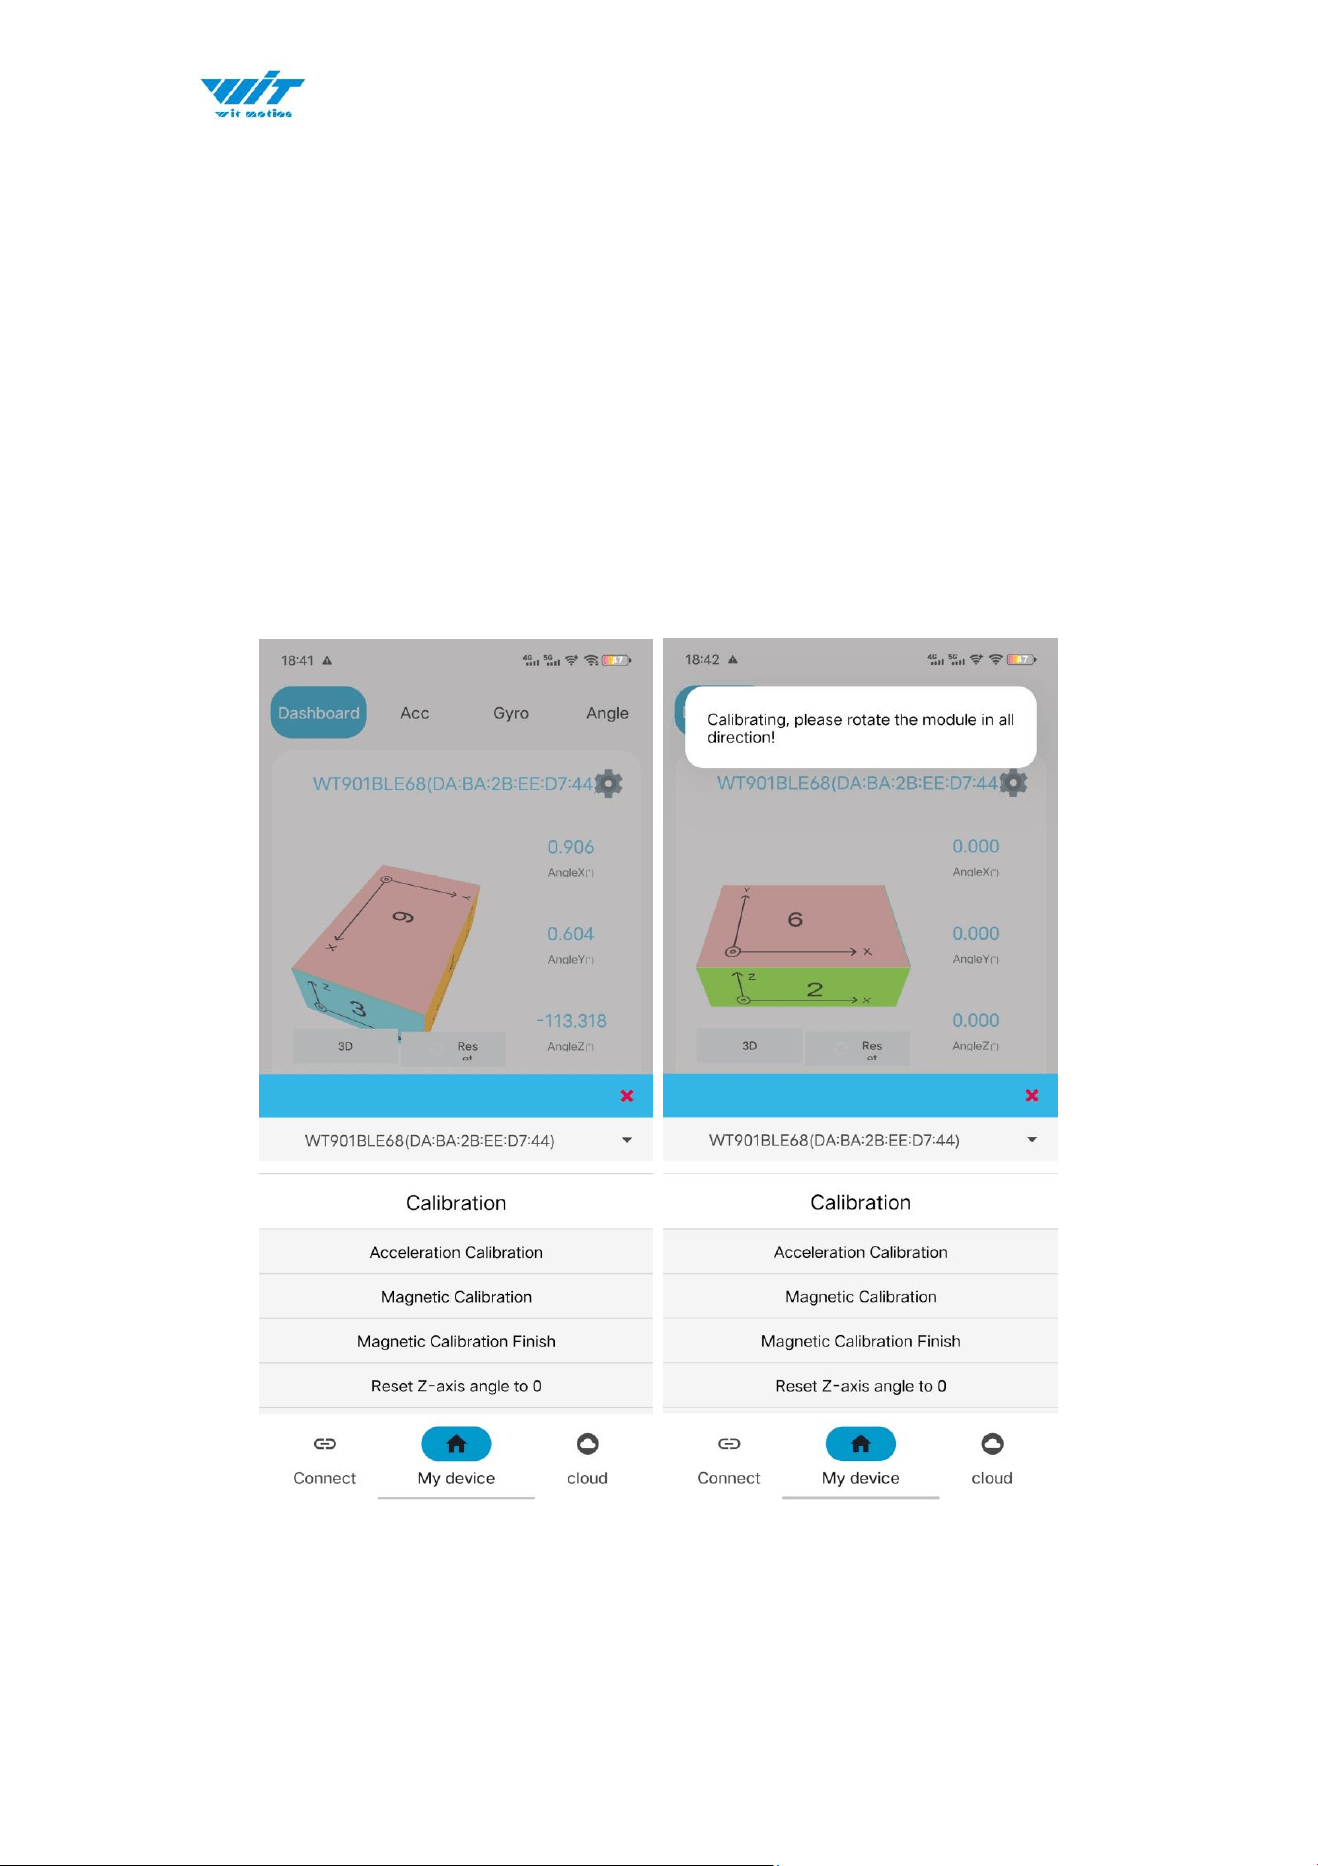
2.3.2 Magnetic Field Calibration
Step 1. Click the "Calibration" menu
Step 2. Click the "Magnetic calibration" button
Step 3. Slowly rotate the module 360° around X, Y, Z, 3-axis accordingly
Step 4. After rotation, click “Finish”
Check the result: The Z-axis angle will have less drift than before.
Notice: If there is drift of Z-axis, please stay away from the objective that can
create magnetic field interference.

WT9011DCL BT5.0 | manual v23-607 | www.wit-motion.com
- 13 -
2.4 Multi-connection
Link to the multi-connection video demo.
https://youtu.be/7M6R5Tjrz8U
As with PC software, we recommend up to 4 devices multi-connection.
Below is the different phones’ actual measure distance.
BD= Best distance; MD=Max distance
WT9011DCL
Single device
Two devices
Three devices
Four devices
Phone
BD/m
MD/m
BD/m
MD/m
BD/m
MD/m
BD/m
MD/m
Samsung
Android 13
56m
108m
Honor
Android 12
49m
90m
Redmi
Android 10
18.5m
33m
Vivo
Android 12
56m
76m
Oppo
Android 13
35m
64m
Xiaomi
Android 11
30m
50m
iPhone
Ios16.4.1
14m
34m
Lenovo
Android 11
38m
58m
WT9011DCL BT5.0 | manual v23-607 | www.wit-motion.com
- 14 -
3 Use Instructions with iPhone
The new version of iOS APP has been launched. There will be many function
coming out soon in future.
NOTICE:
The existing function of history recording is in instructions at present.
Your understanding would be highly appreciated.
If you phone comes with txt reader, the recorded file can be easily opened.
A txt recorder like Micro Software.
https://www.youtube.com/playlist?list=PL43tdDrVL_VCgrQJTaODOhkkbmTkS
1kMs
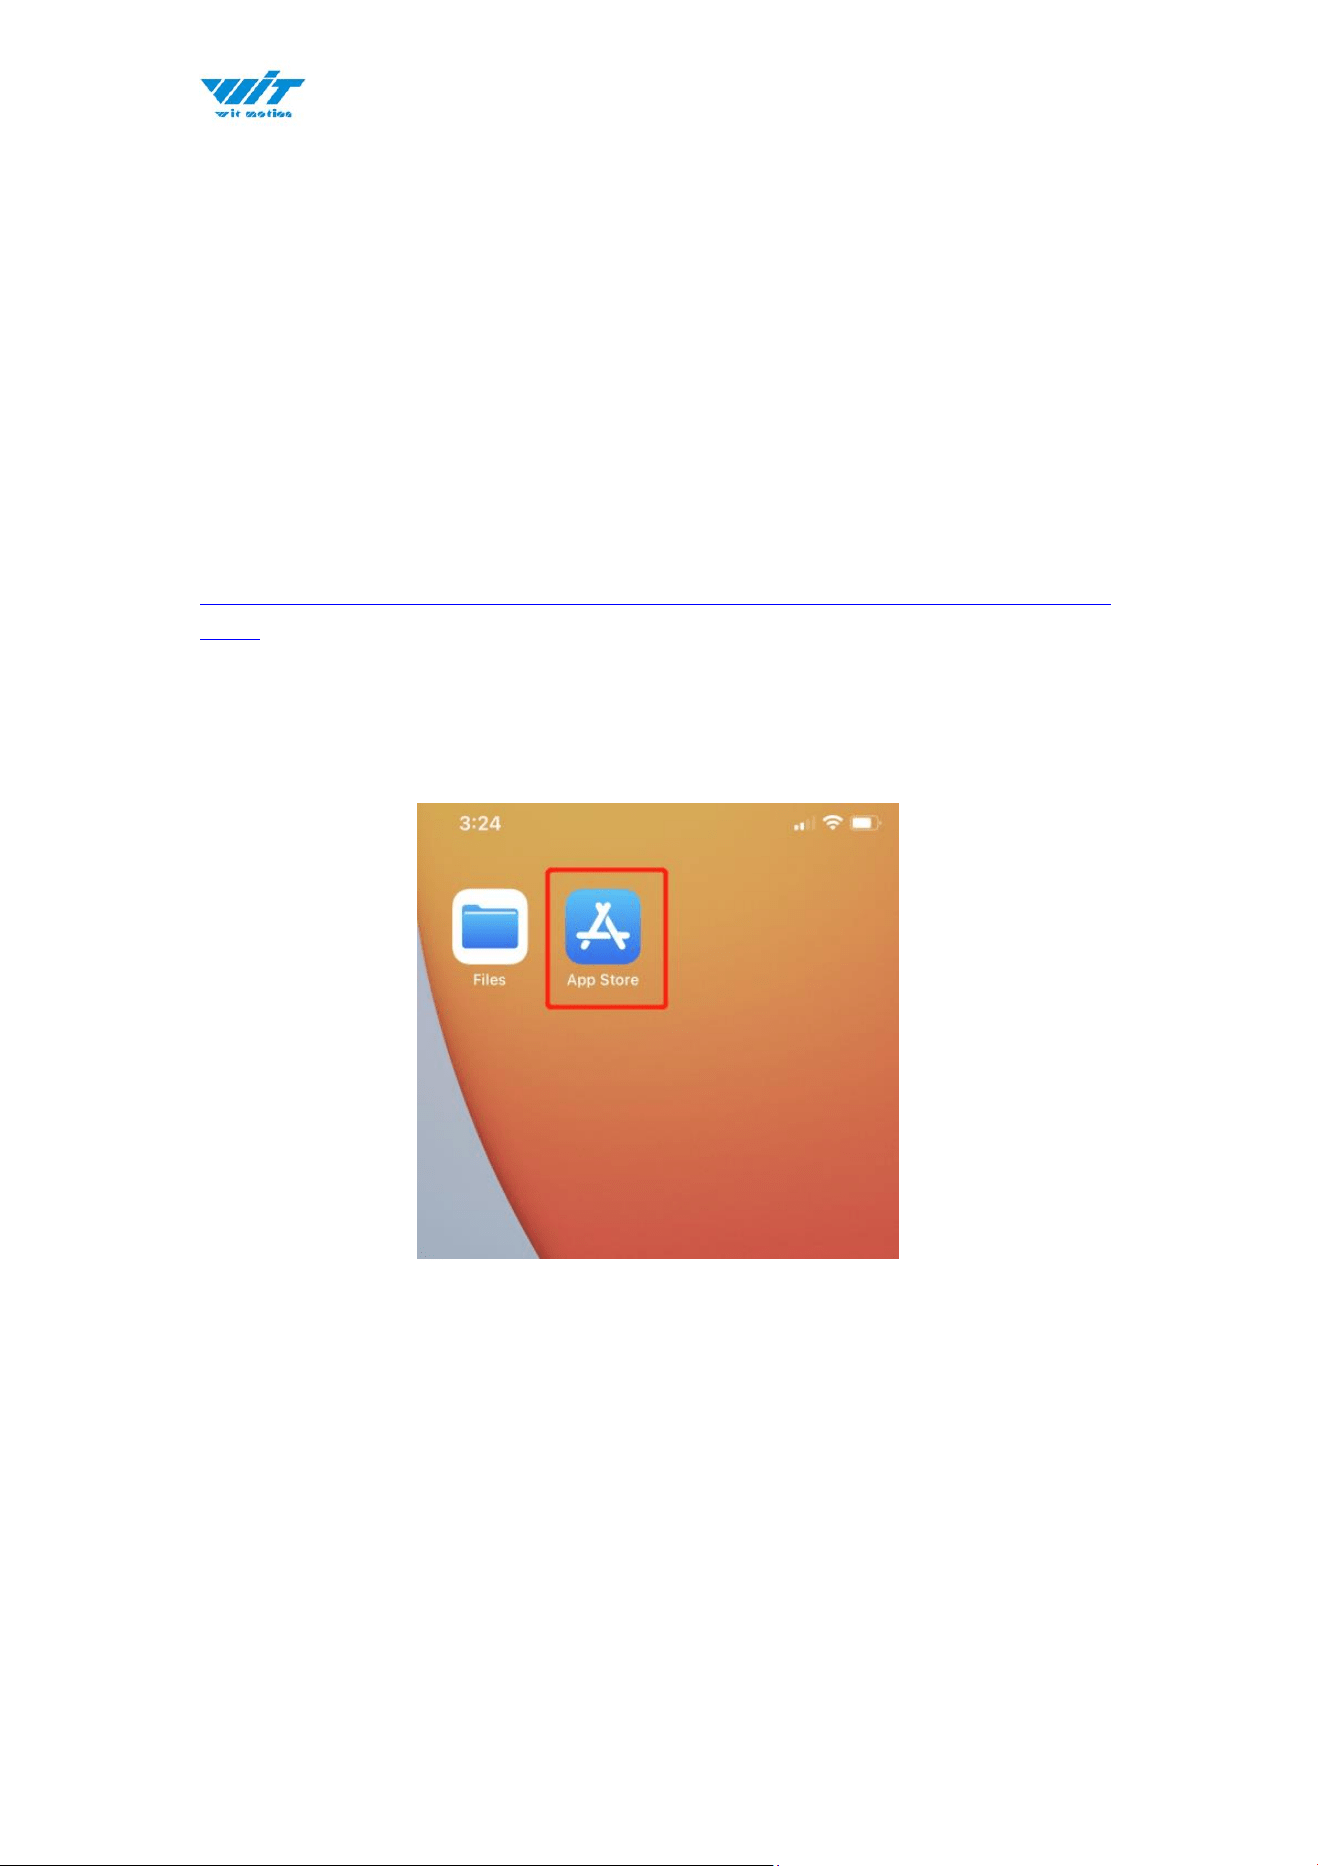
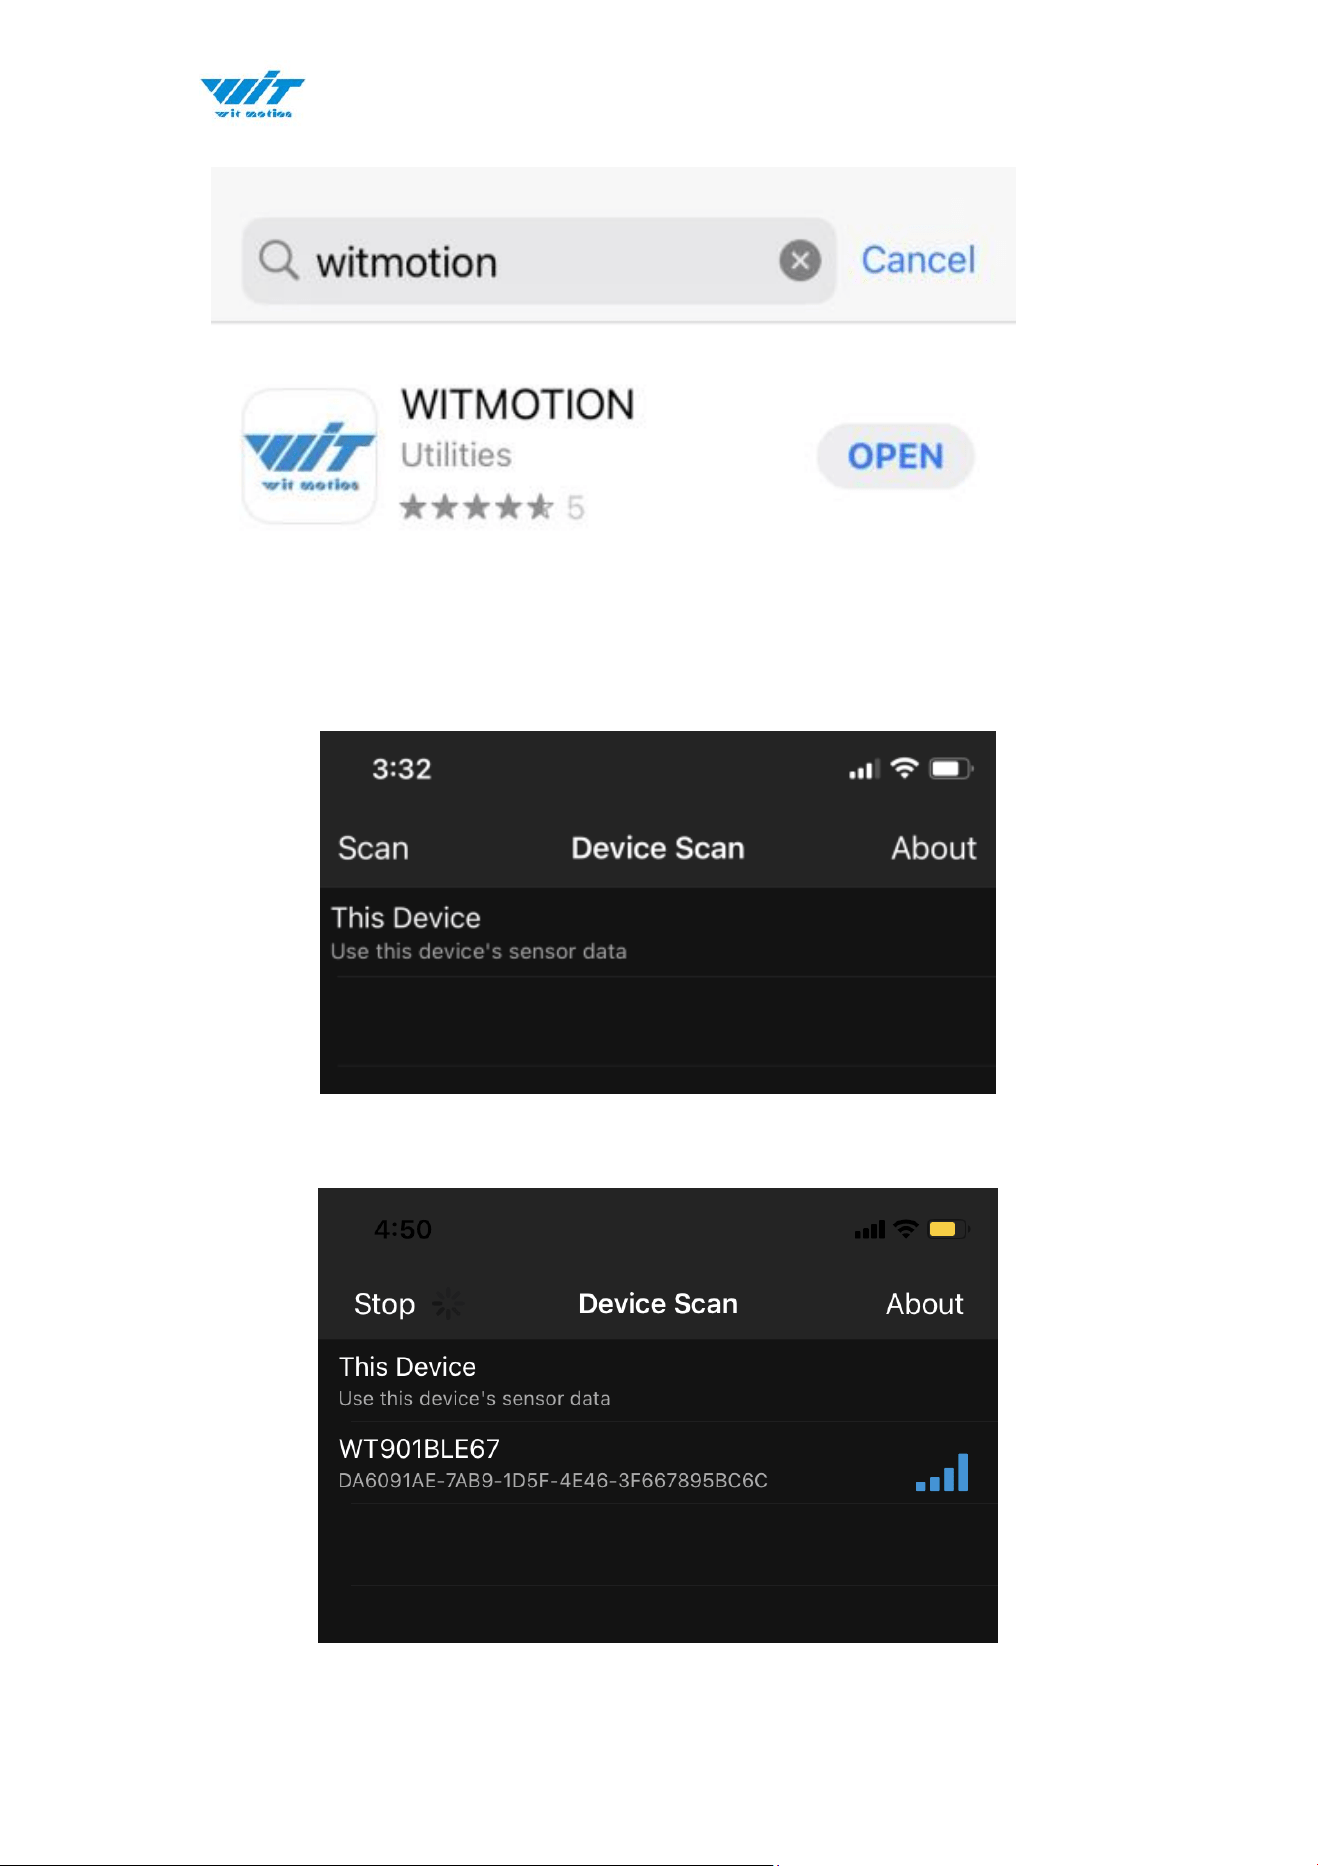
3.1 How to install
Step 1. Search “WITMOTION” on iOS App Store, and install the APP

WT9011DCL BT5.0 | manual v23-607 | www.wit-motion.com
- 19 -
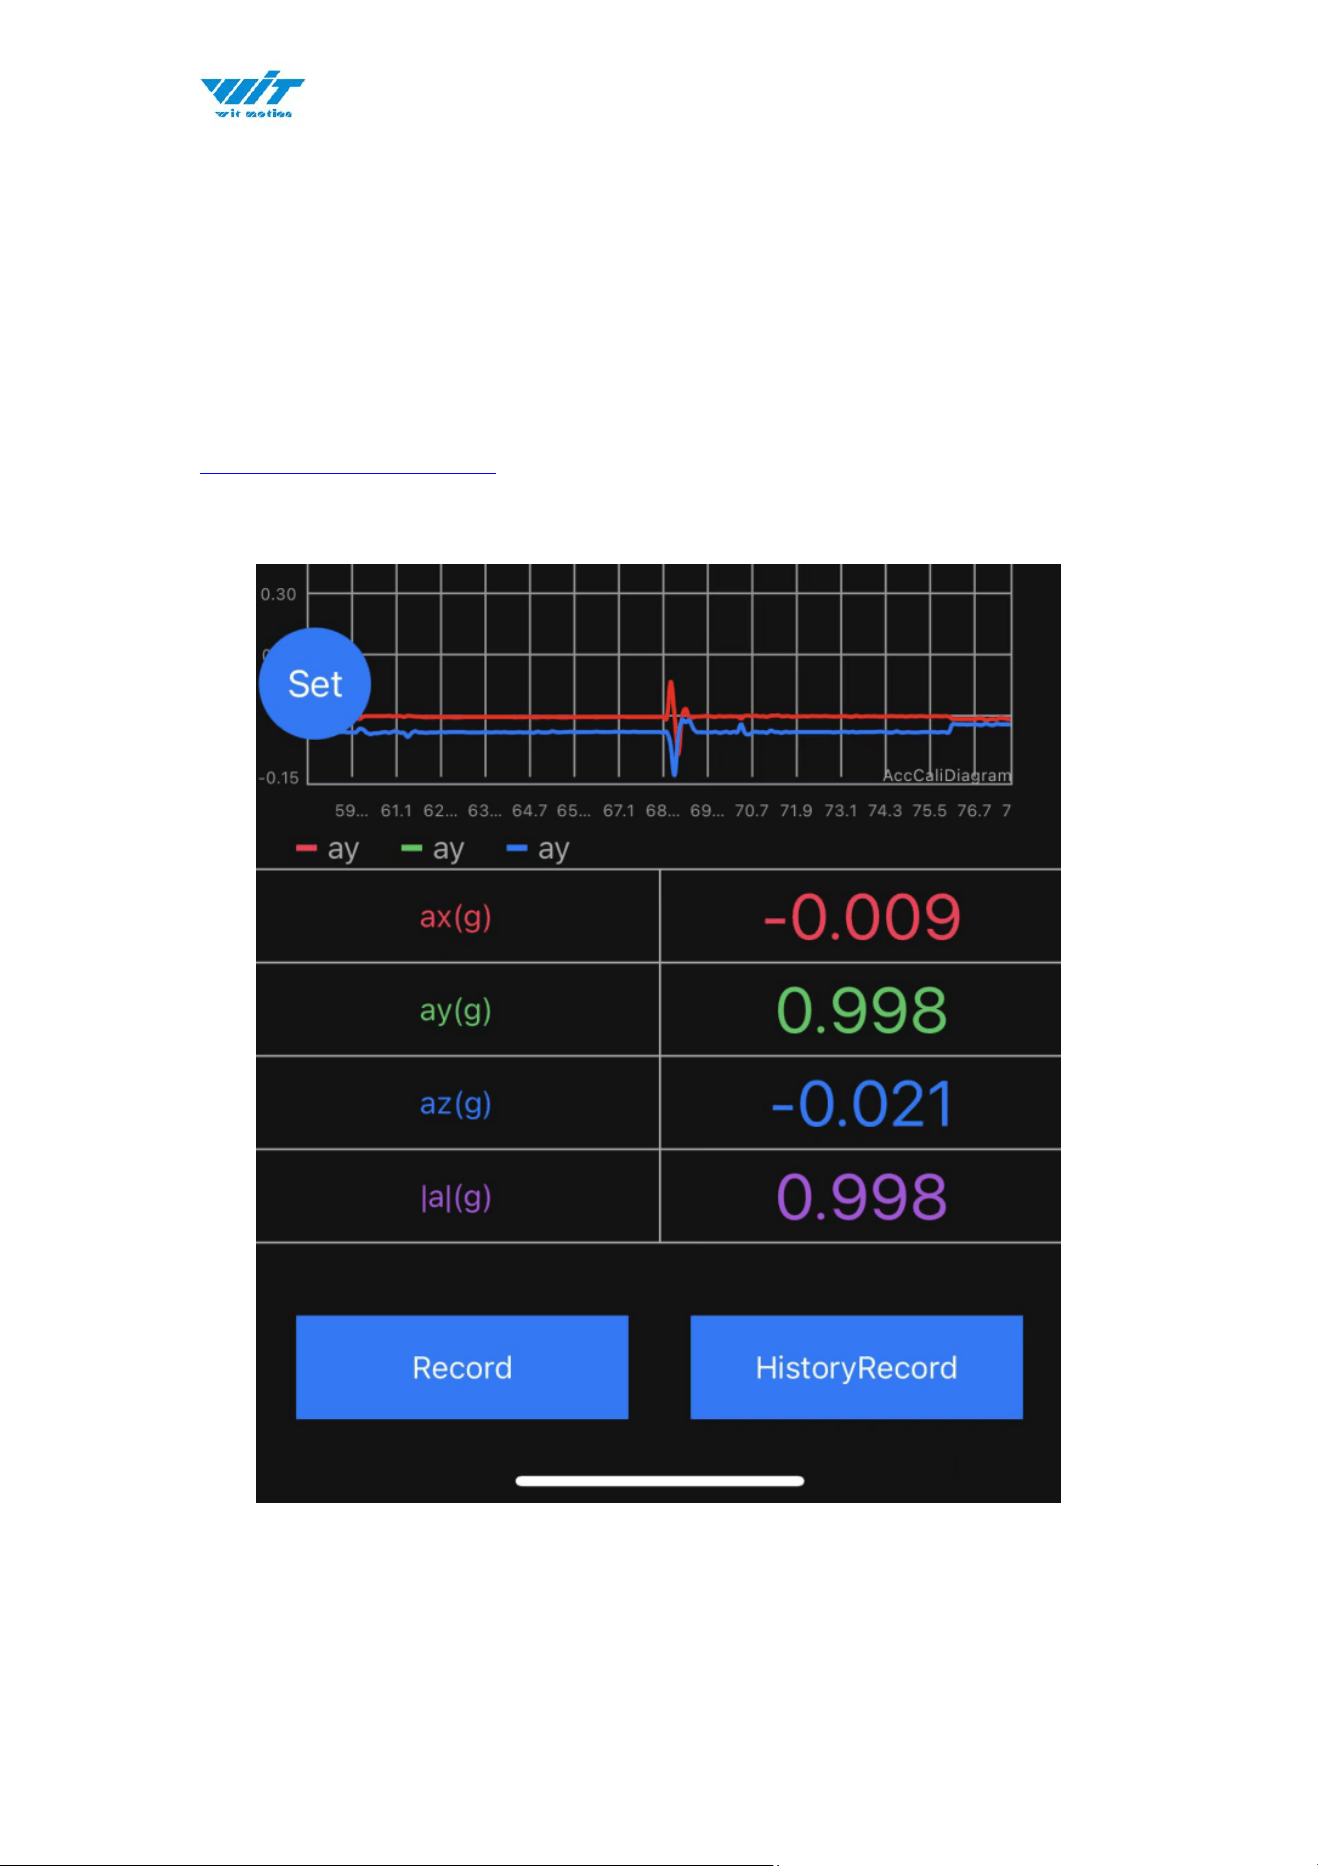
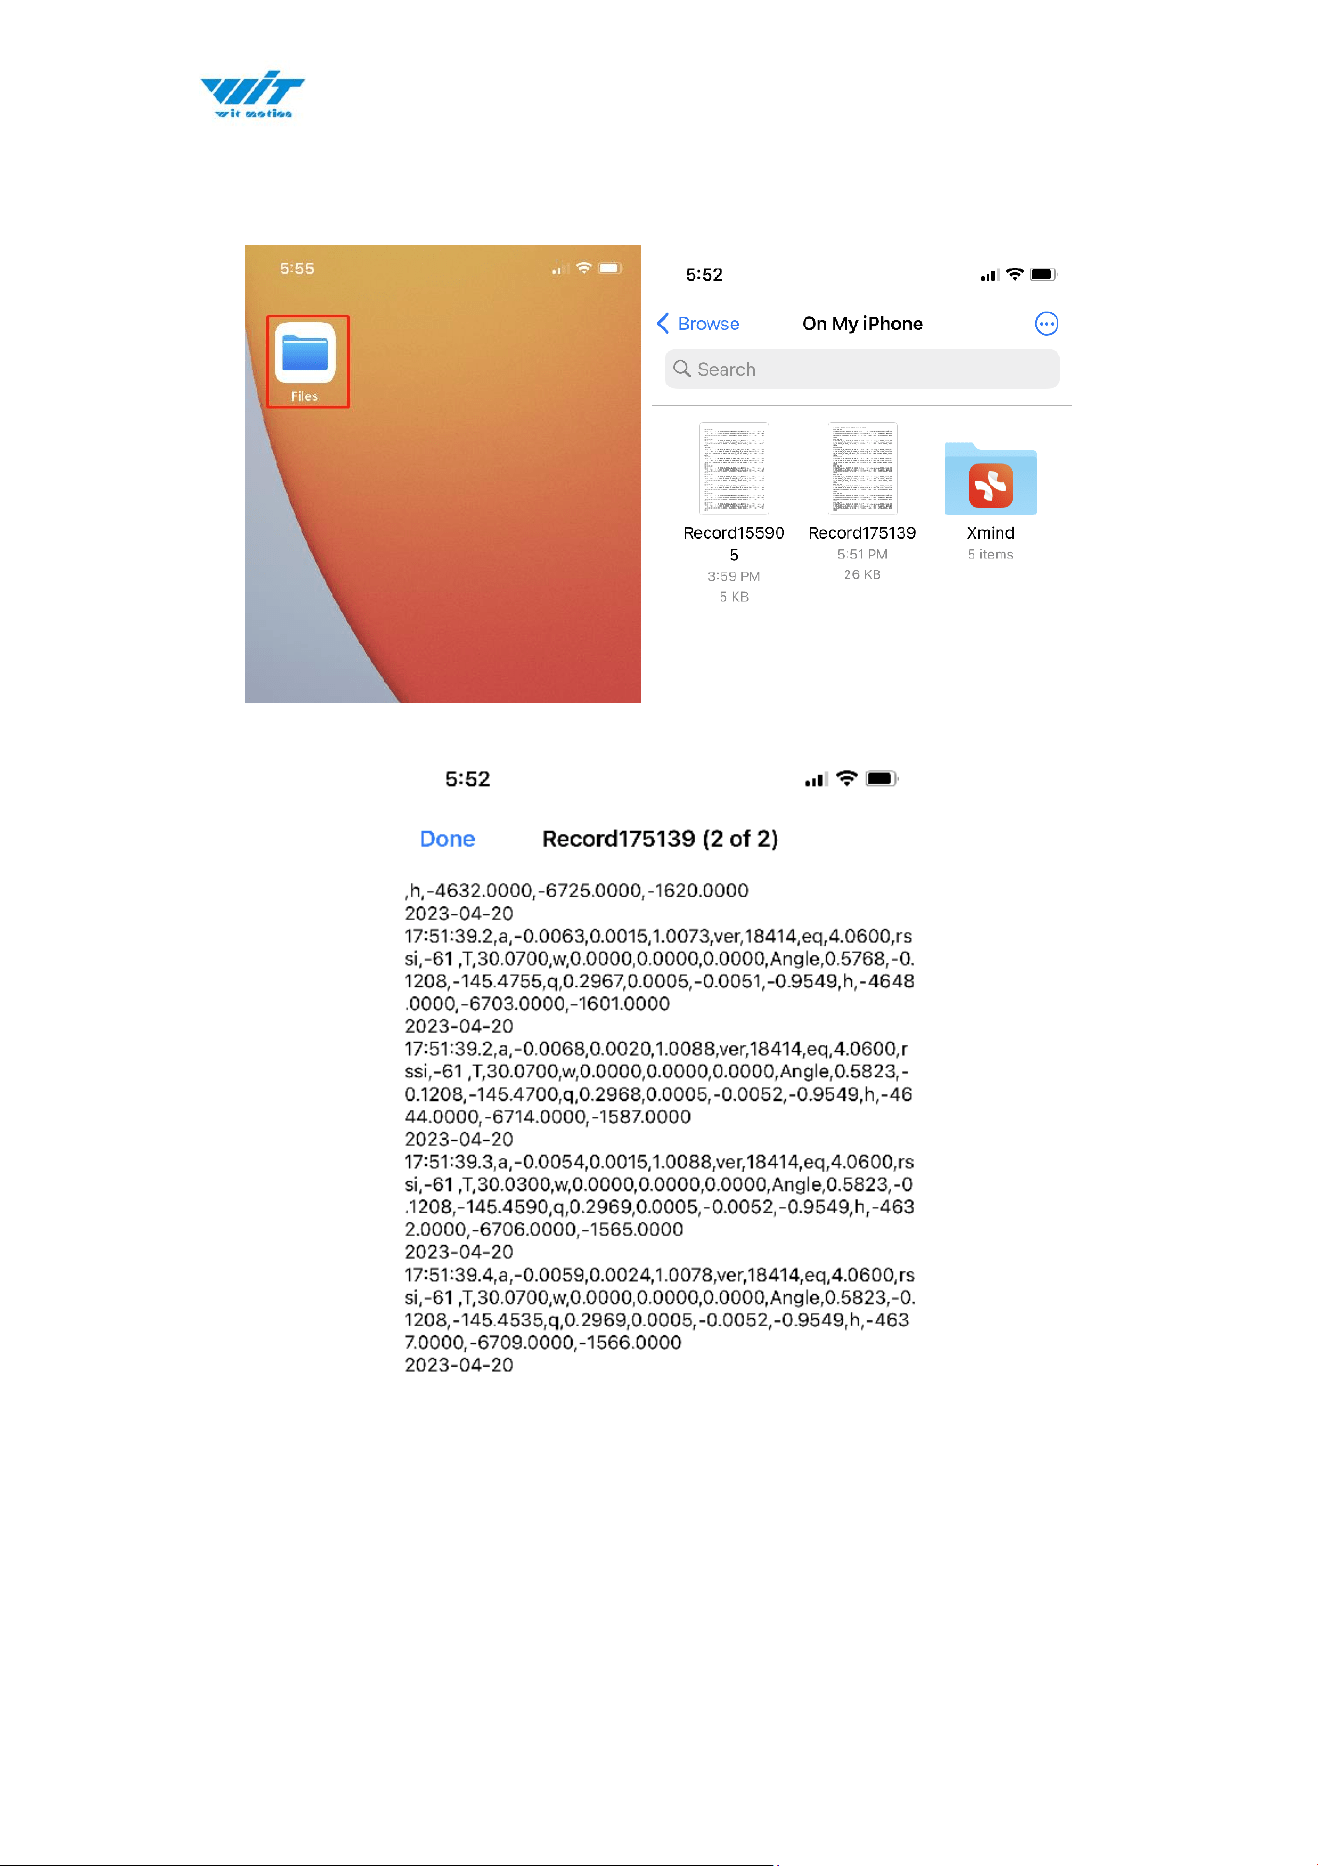
3.4 Data Recording
The data can be easily recorded by simply press the button of record.
The recorded file can be txt format at present. You can send the record file to
the computer and then paste the data to an excel file for intuitive reviewing.
P.S If you meet any problem, please reach our team at
support@wit-motion.com
Step1. Click “ Record”
Step2. When you finish the record, click “End”.
WT9011DCL BT5.0 | manual v23-607 | www.wit-motion.com
- 20 -
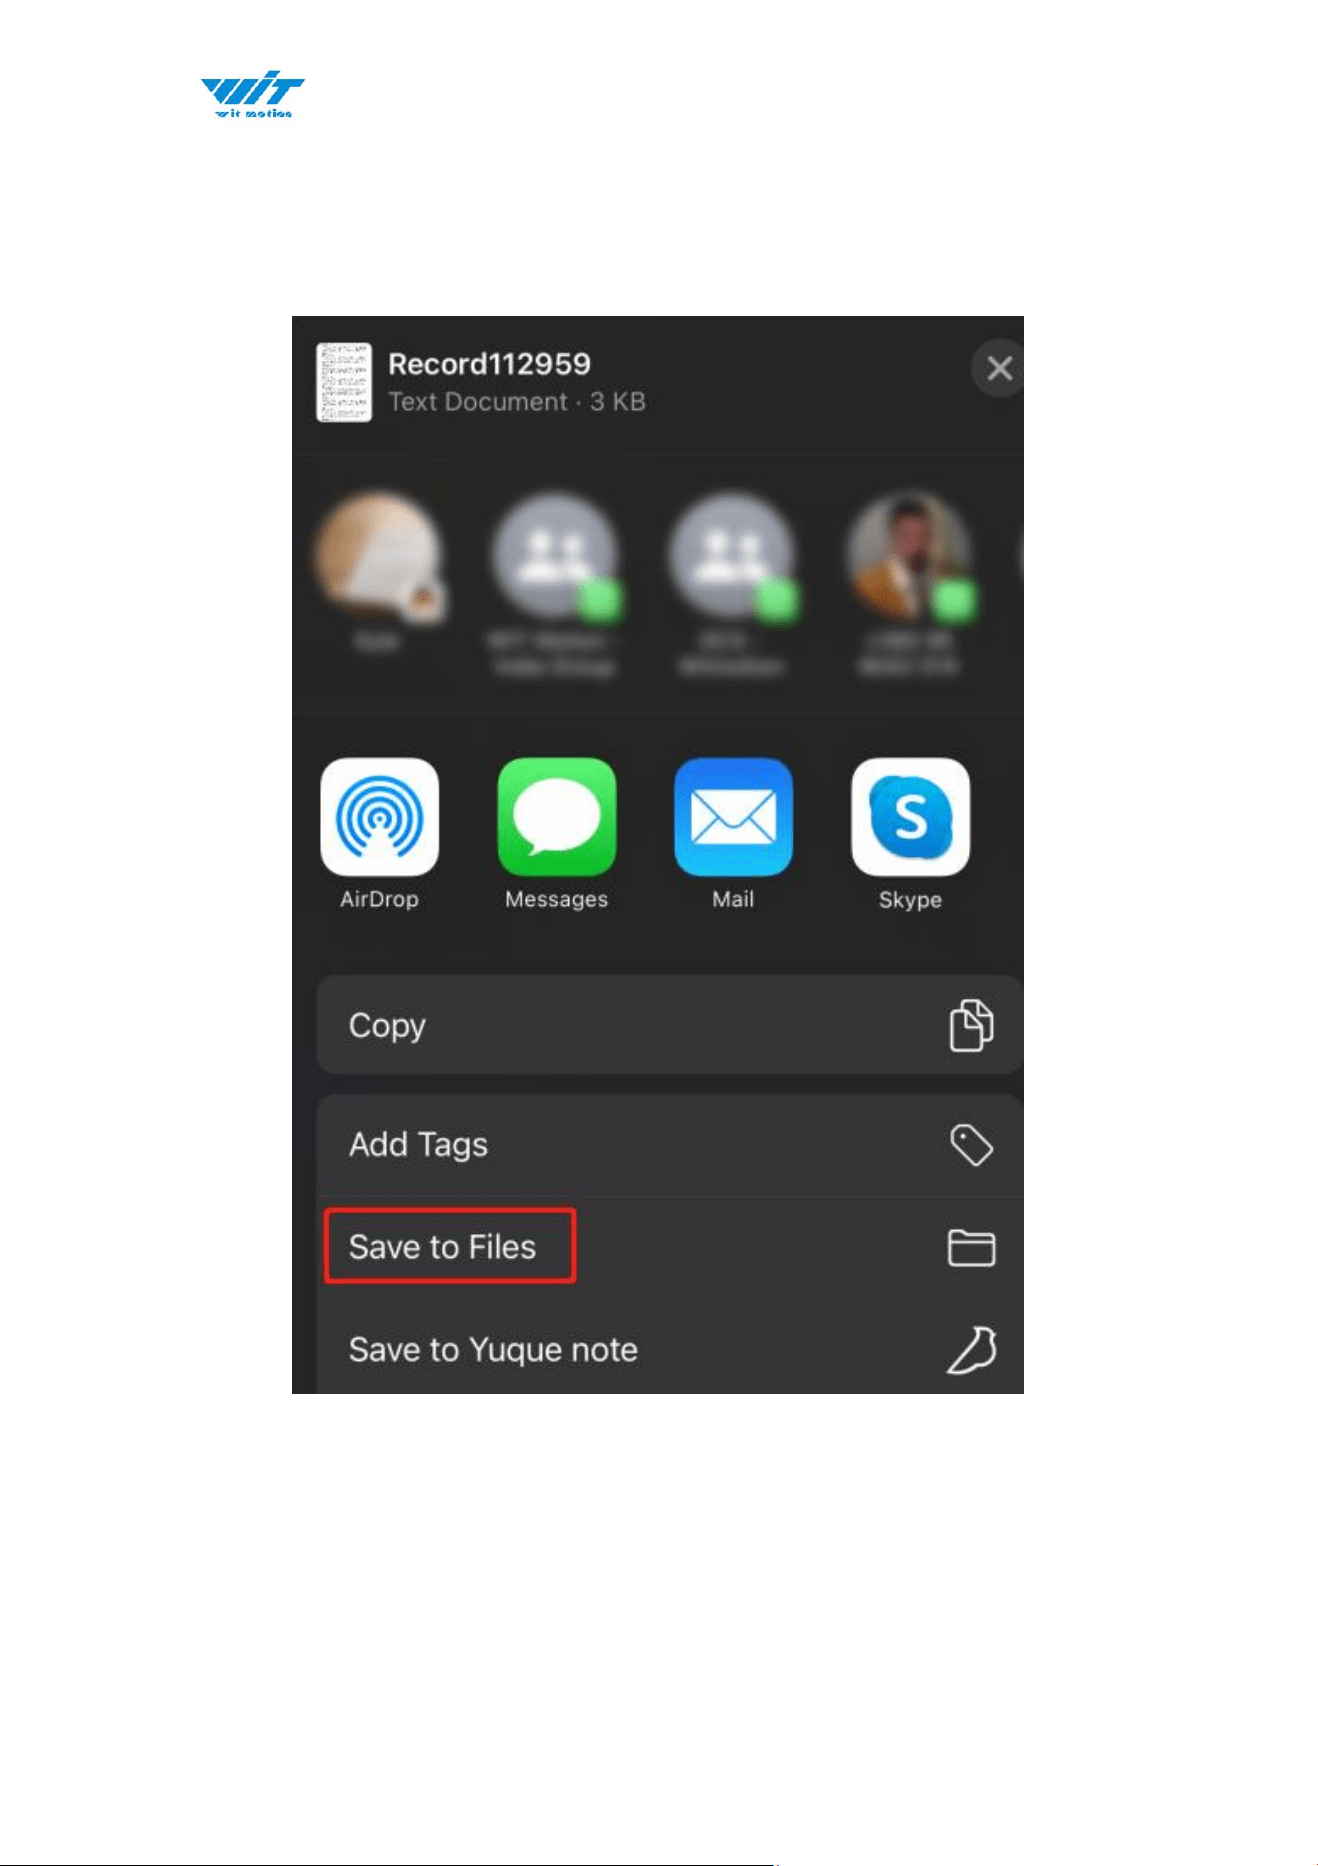
Step3. Once you finished the record, you need to save the file. We recommend
you choose the button “Save to Files”, the file will save the on your mobile
desktop folder.
PS: We tried all saving methods and found this method to be convenient.
WT9011DCL BT5.0 | manual v23-607 | www.wit-motion.com
- 22 -
4 Use Instructions with PC
4.1 PC Connection
PC software is only compatible with Windows system.
Link to download software
Instructions Video link
4.1.1 Serial Connection
Step 1. Connect the sensor with offered Type-C wire.
(Warm Reminder:If you wanna use a longer cable, it should be a standard
Type-C data cable)
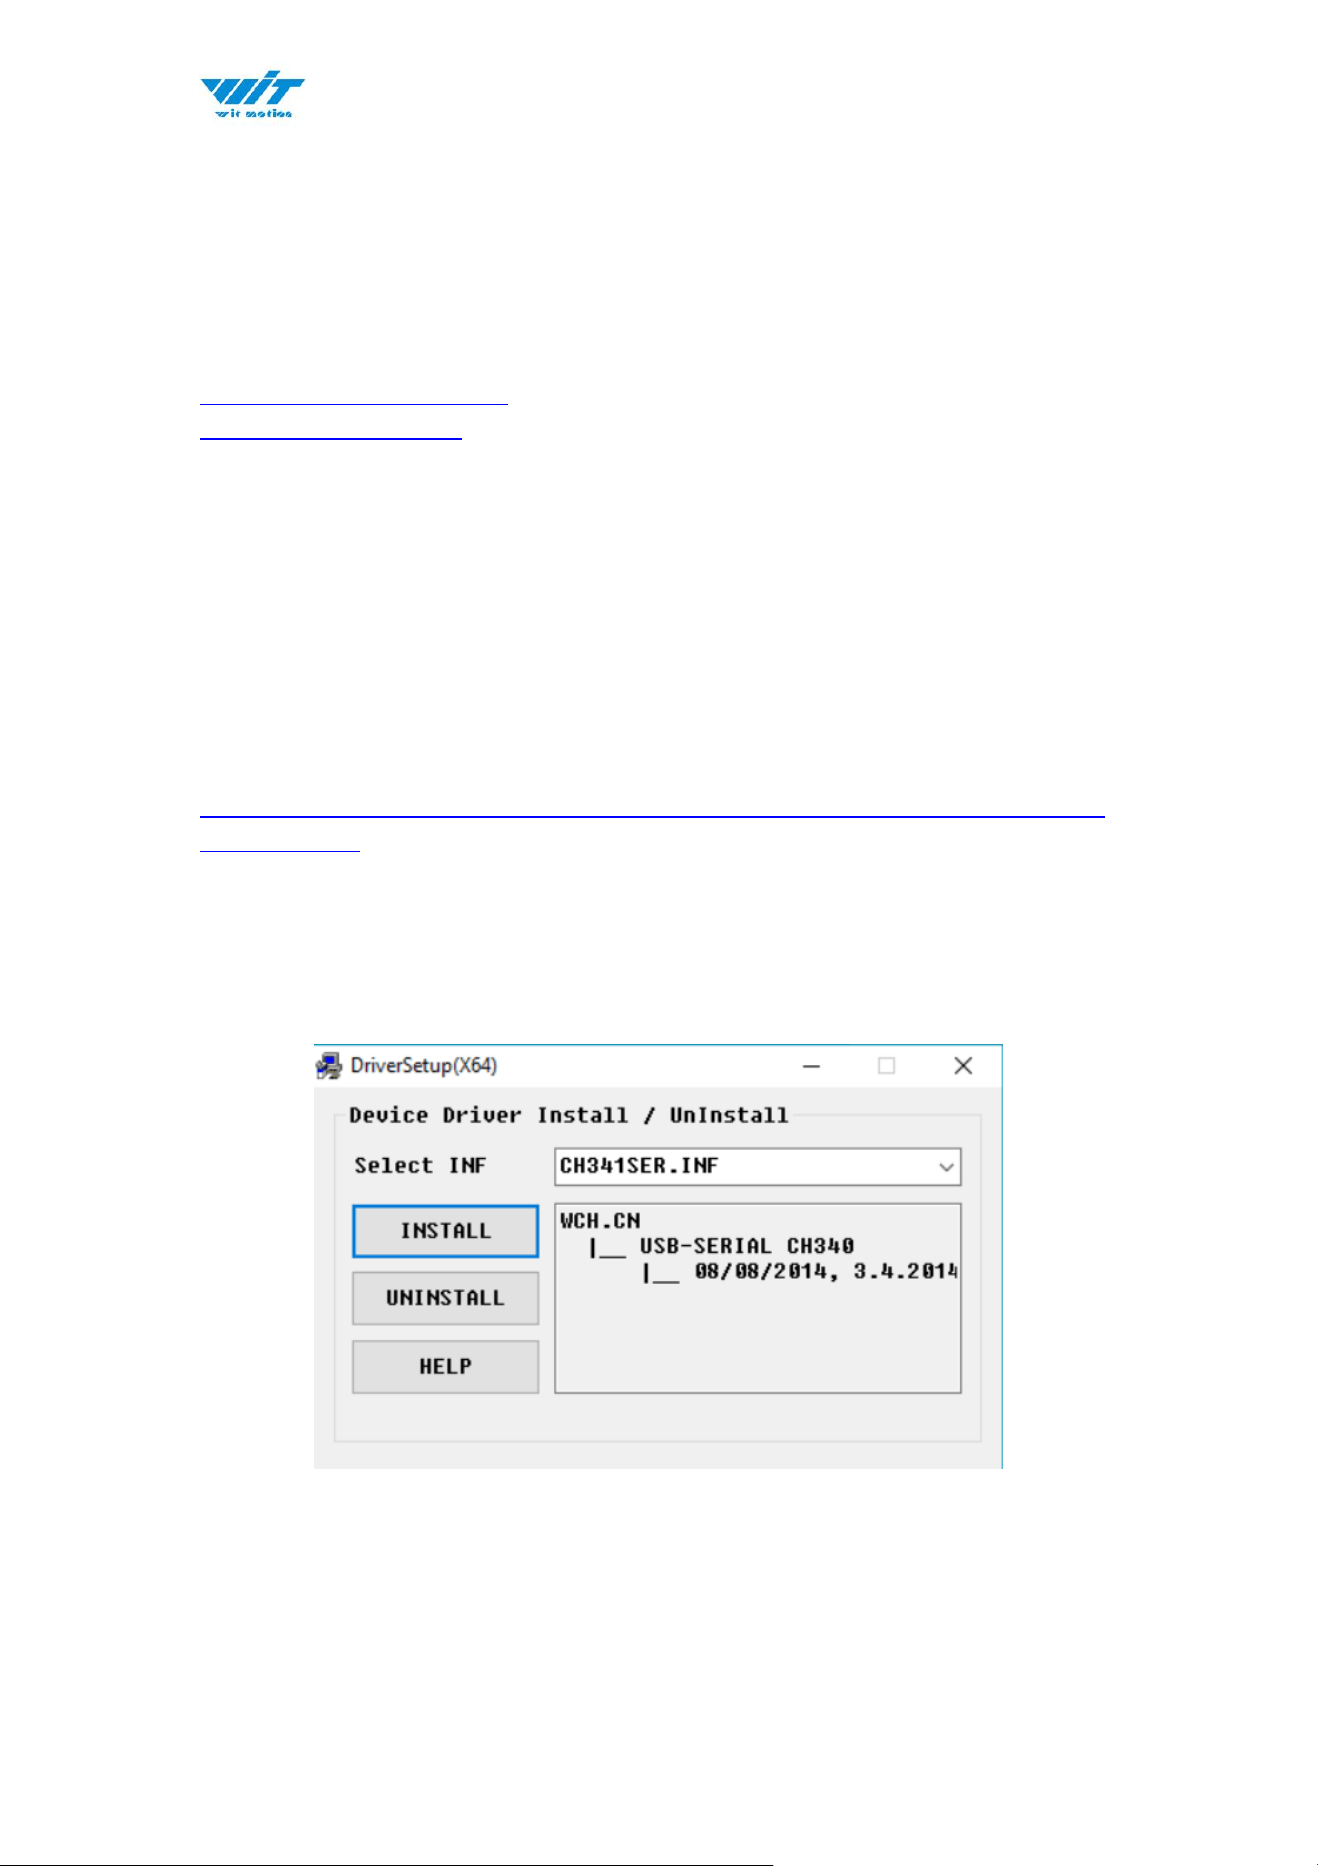
Step 2. Unzip the software and install the driver CH340
https://drive.google.com/file/d/1I3hl9Thsj9aXfG6U-cQLpV9hC3bVEH2V/view
?usp=sharing
*How to Install and update the CH340 driver
Click the "Uninstall" button first. Then click on the "Install" button.
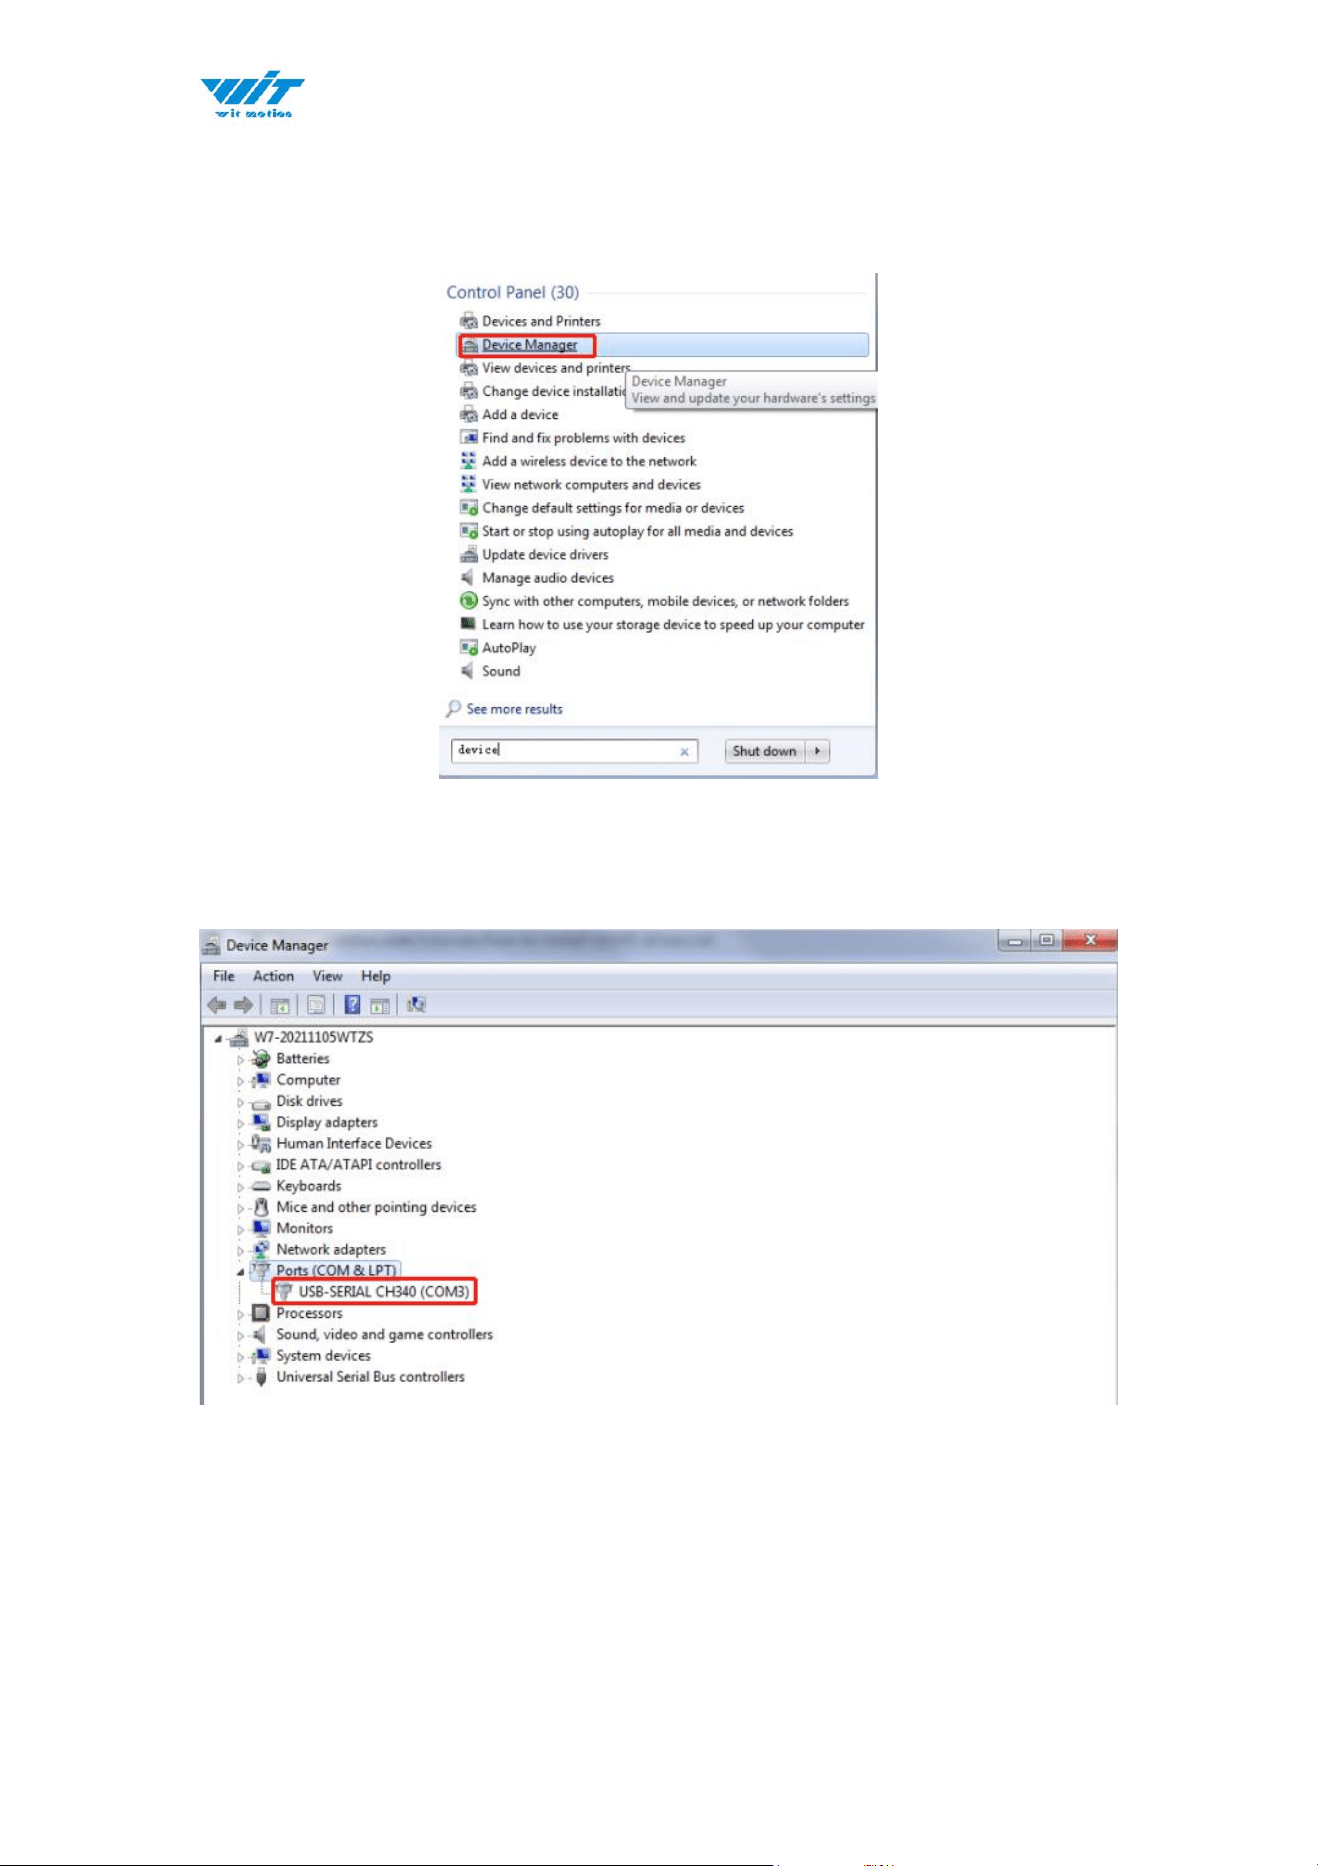
*How to verify your driver is working
1)To check that the CH340 enumerates to a COM port, you can open the device
WT9011DCL BT5.0 | manual v23-607 | www.wit-motion.com
- 23 -
manager. You can click the Start or ⊞ (Windows) button and type "device
manager to quickly search for the application.
2)After opening the device manager, you will need to open the Ports (COM &
LPT) tree. The CH340 should show up as USB-SERIAL CH340 (COM##).
Depending on your computer, the COM port may show up as a different number.

WT9011DCL BT5.0 | manual v23-607 | www.wit-motion.com
- 25 -
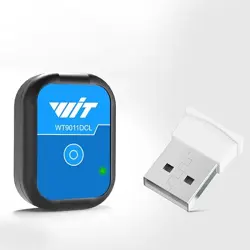
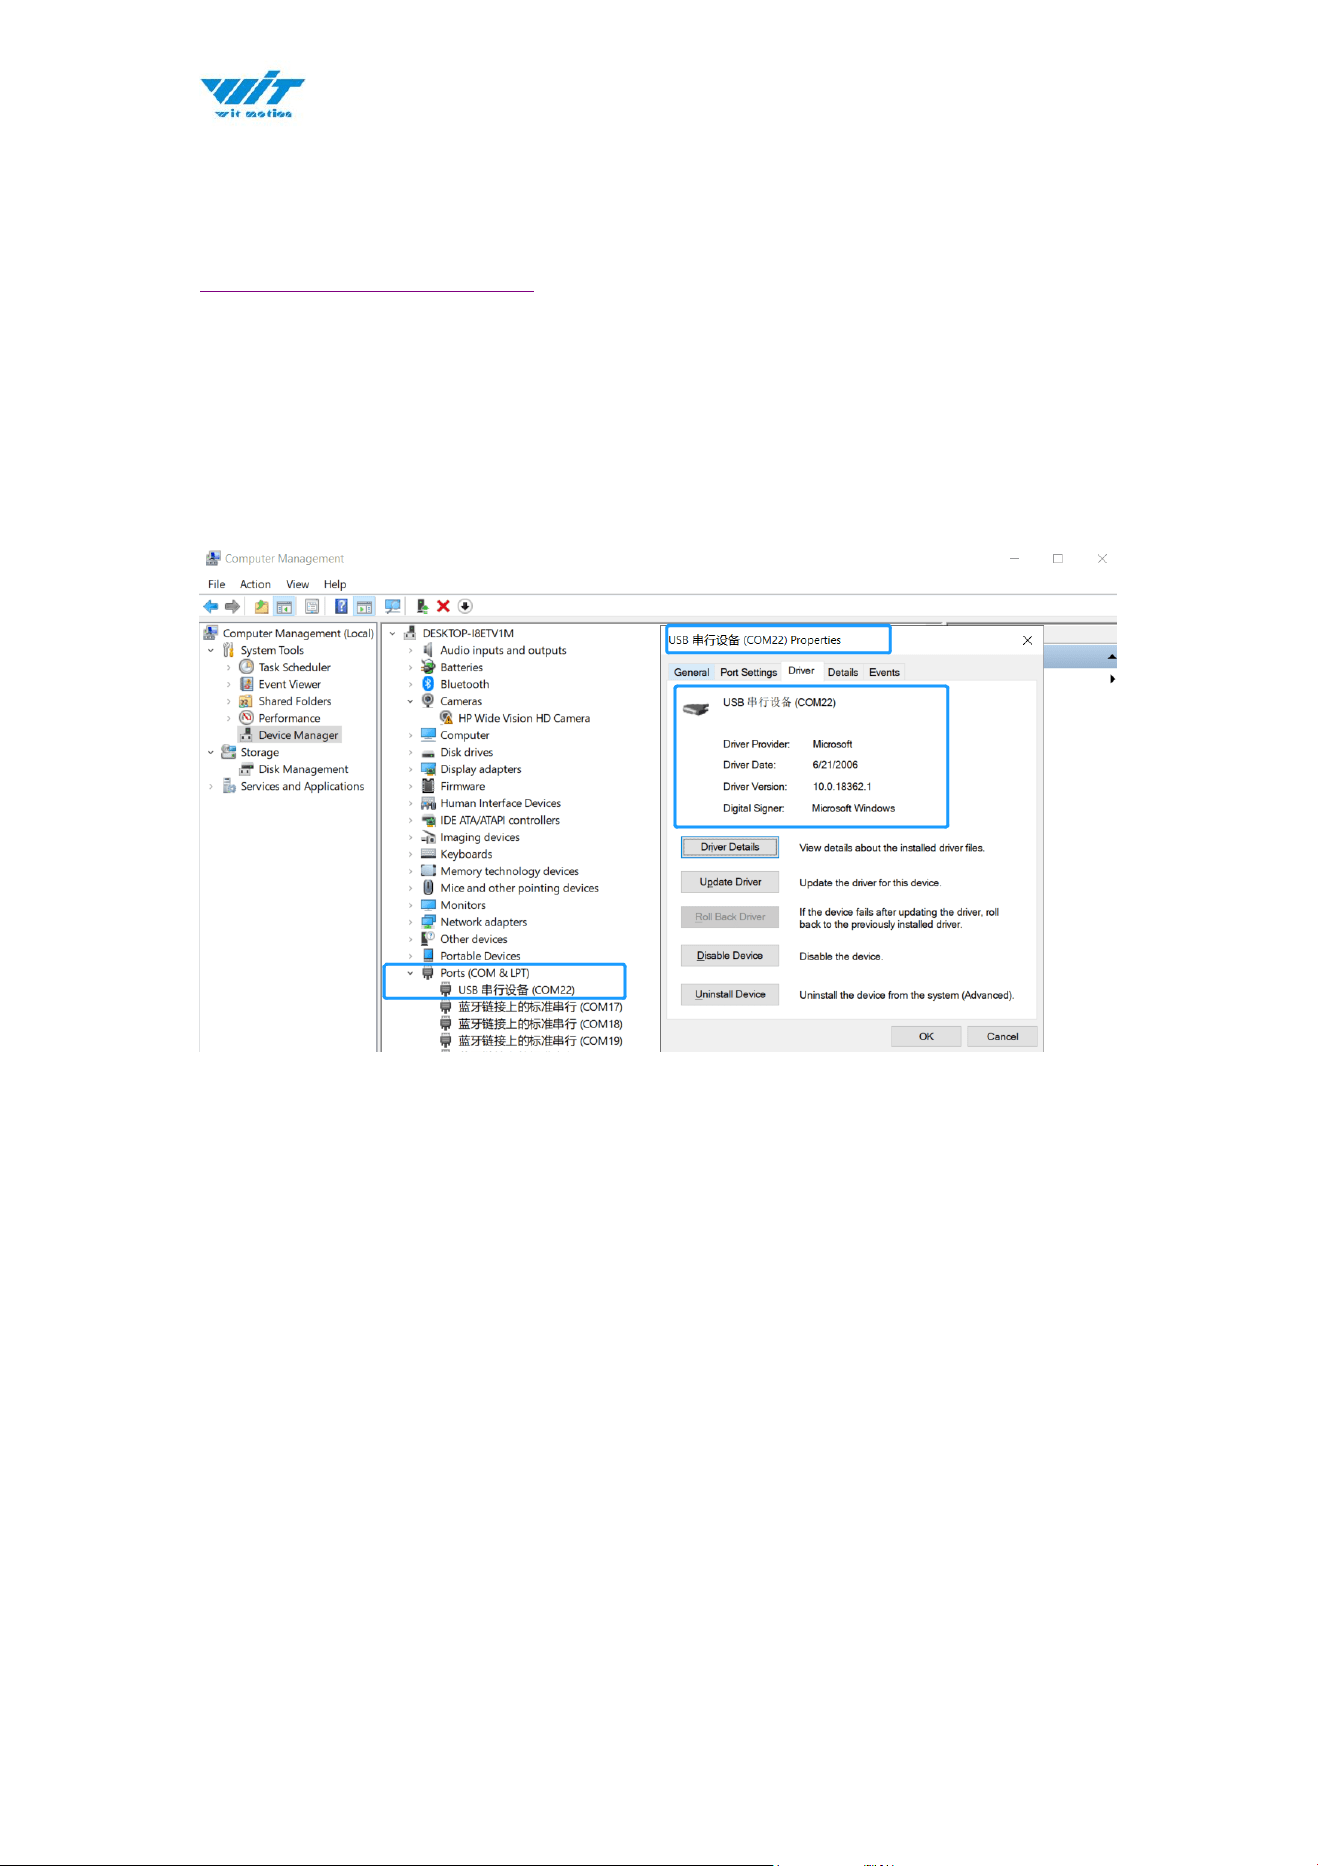
4.1.2 BLE 5.0 Adapter Connection
Adapter’s CP2102 driver link
Note: If you use the Windows 10 OS computer, there is no need to install the
driver.
Step 1. Insert adapter into the USB port in the beginning and confirm if there is
a port generated in the device manager.

WT9011DCL BT5.0 | manual v23-607 | www.wit-motion.com
- 28 -
4.2 Software Introduction
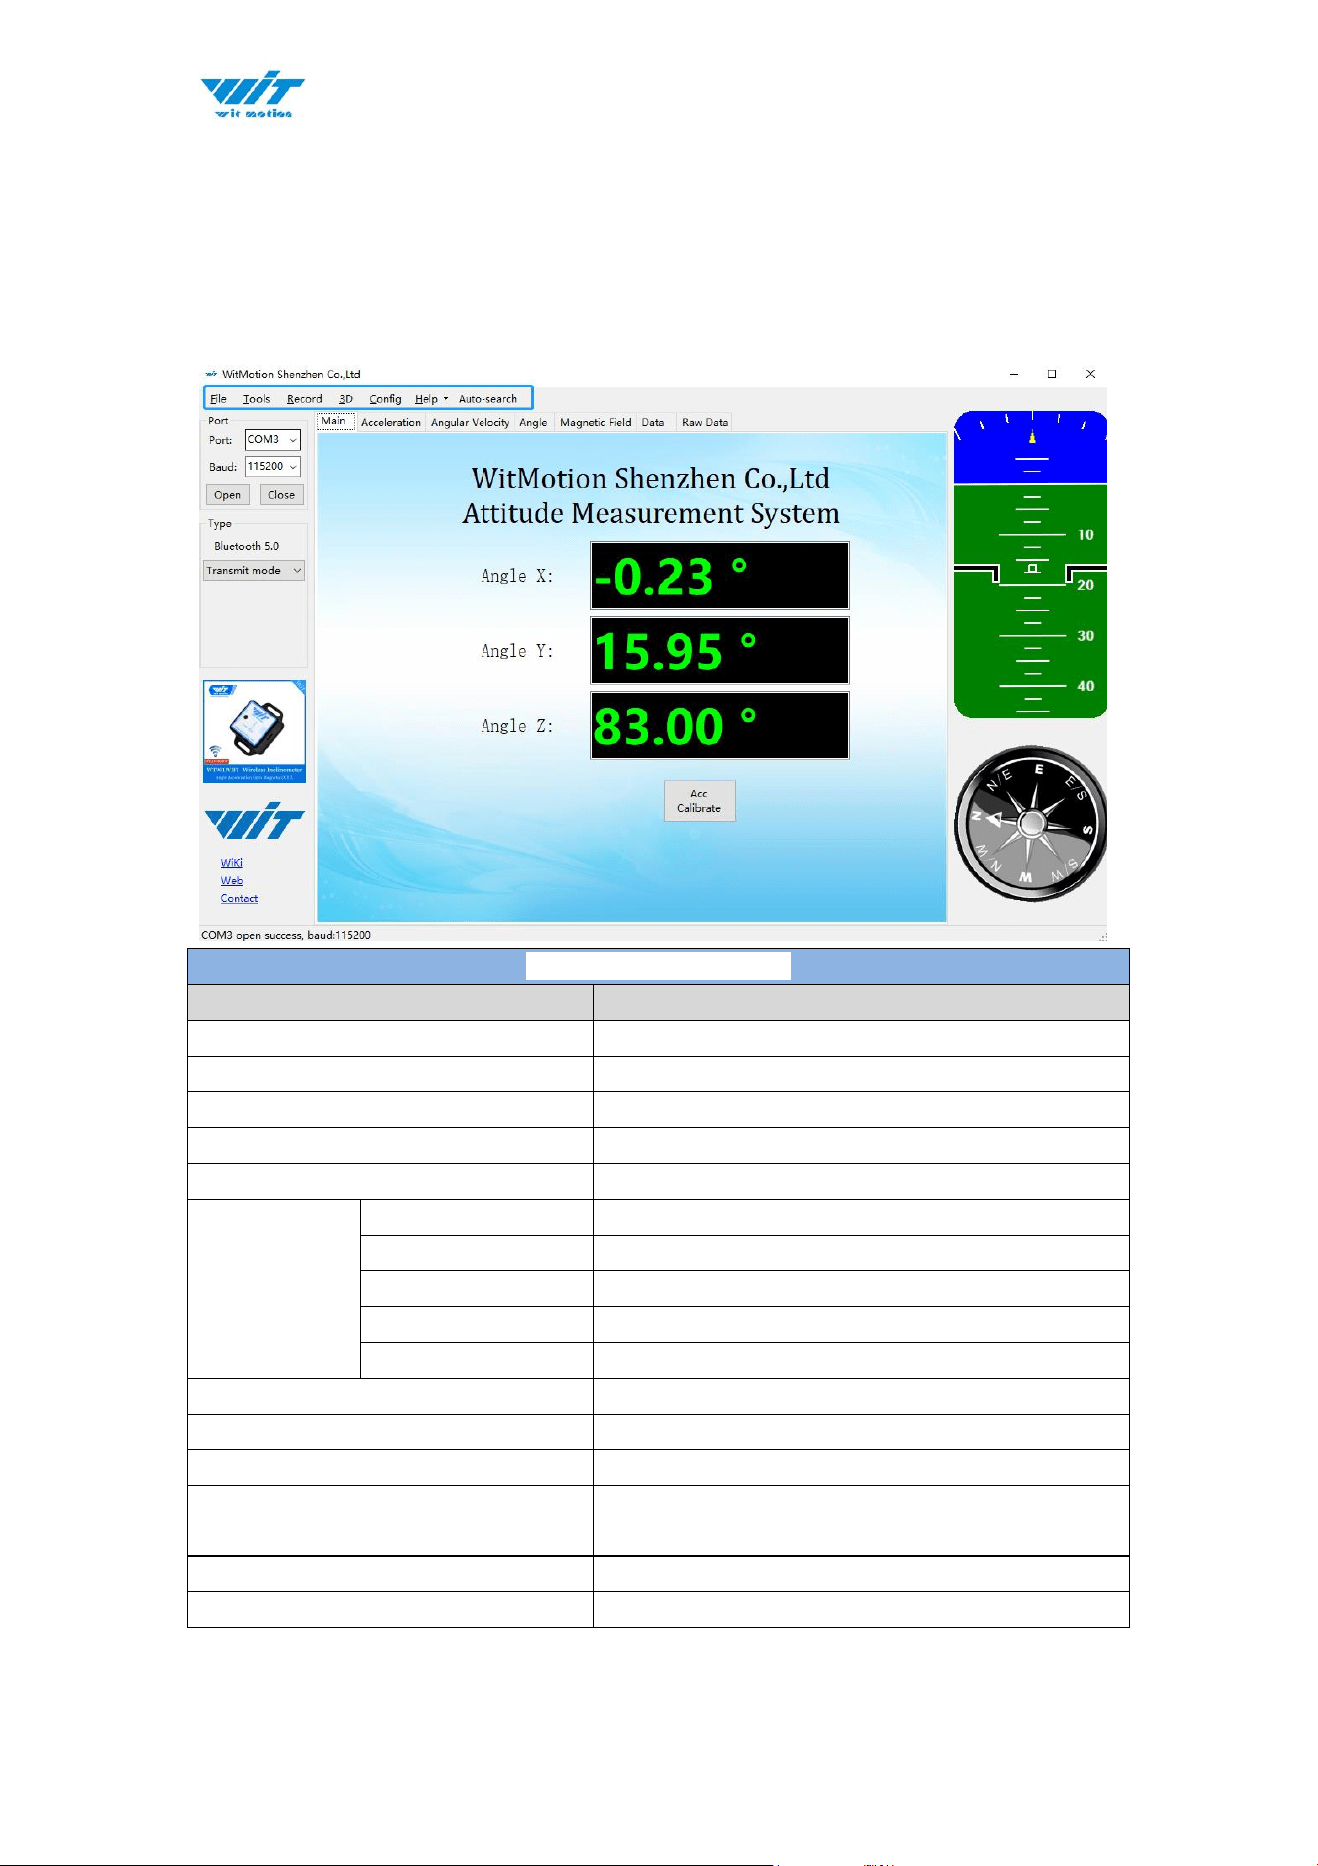
4.2.1 Main Menu
Main Menu of software
Button
Function
File
Launch recorded HEX file (Bin format)
Tools
Hide or display tools box on left side
Record
Record function
3D
3D DEMO
Config
Configuration setting
Help
Language
English or Chinese
Bluetooth Set
Binding device or unbind
Firmware update
Option for firmware update
About Minimu
Info about Minimu.exe
Factory test
For manufacturer internal test only
Auto-search
Auto searching the sensor
Port
Com port selection
Baud
Baud rate selection
Type
Fixed setting as Bluetooth 5.0 for
WT9011DCL BLE5.0
Open
Open com port
Close
Close com port
WT9011DCL BT5.0 | manual v23-607 | www.wit-motion.com
- 29 -
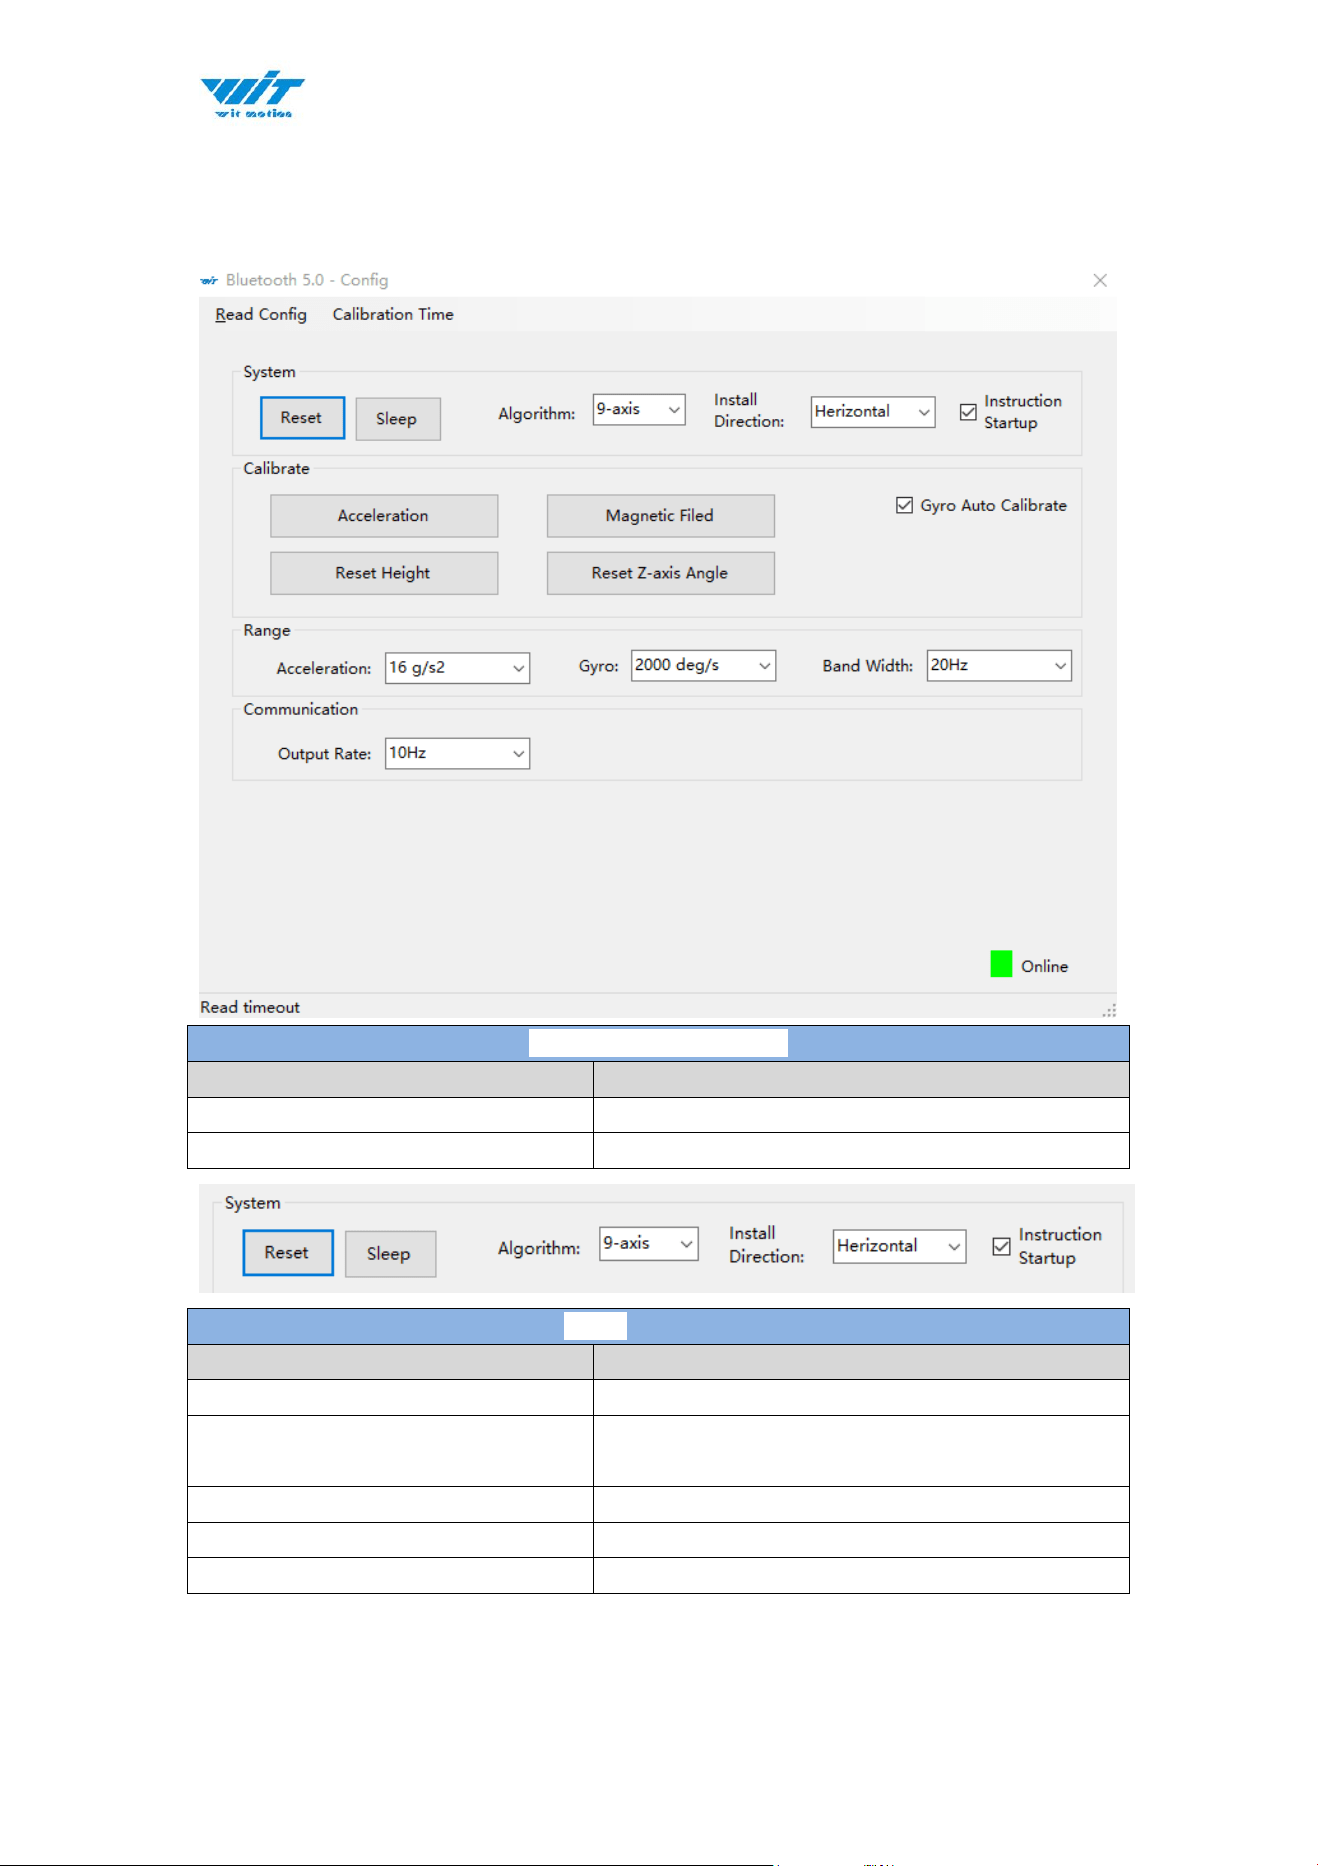
4.2.2 Menu of Configuration
Menu of Configuration
Button
Function
Read Config
Reading the current configuration
Calibrate Time
Calibration time of chip
Menu of System
Button
Function
Reset
Reset to factory setting
Sleep
Sleep function, not available for Bluetooth
sensor series
Algorithm
6-axis algorithm or 9-axis
Installation Direction
Vertical or horizontal installation
Instruction Start-up
Instructions sending to start-up the sensor
WT9011DCL BT5.0 | manual v23-607 | www.wit-motion.com
- 30 -
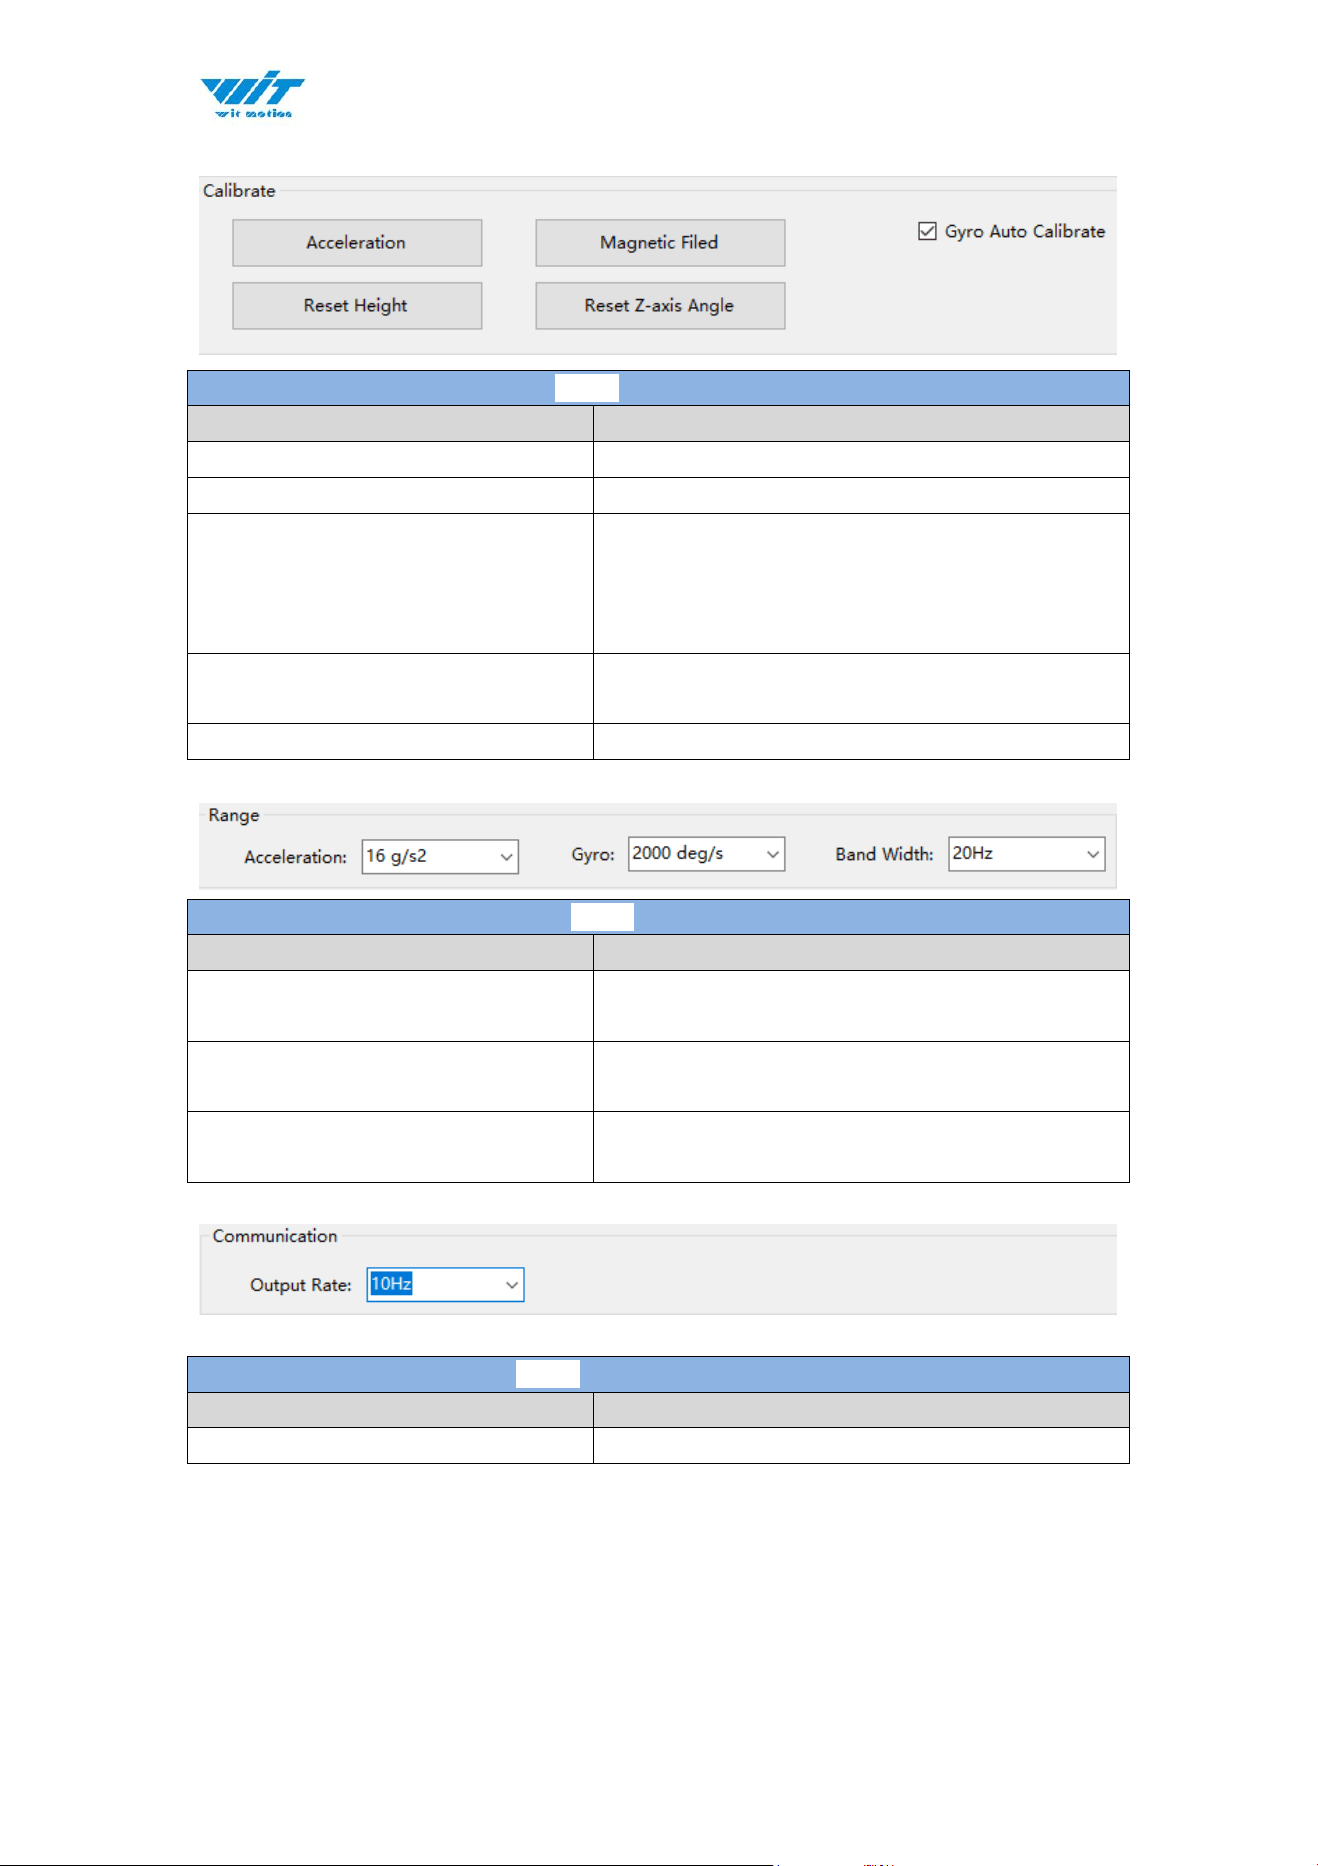
Menu of Calibrate
Button
Function
Acceleration
Accelerometer calibration
Magnetic Field
Magnetometer calibration
Reset Height
Reset height data to 0
(only for sensor built-in barometer,
including WT901B, WTAHRS2, WTHARS1,
HWT901B)
Reset Z-axis Angle
Reset Z-axis angle to 0 degree, not available
for WT9011DCL BLE5.0 in 9-axis algorithm
Gyro Auto Calibrate
Auto-calibration of gyroscope
Menu of Range
Button
Function
Acceleration
Acceleration measurement range
(2/4/8/16g/s2)
Gyro
Gyroscope measurement range
(250/500/1000/2000 deg/s)
Band Width
Bandwidth range
(5/10/20/42/98/188/256Hz)
Menu of Communication
Button
Function
Output Rate
Return rate selection

WT9011DCL BT5.0 | manual v23-607 | www.wit-motion.com
- 31 -
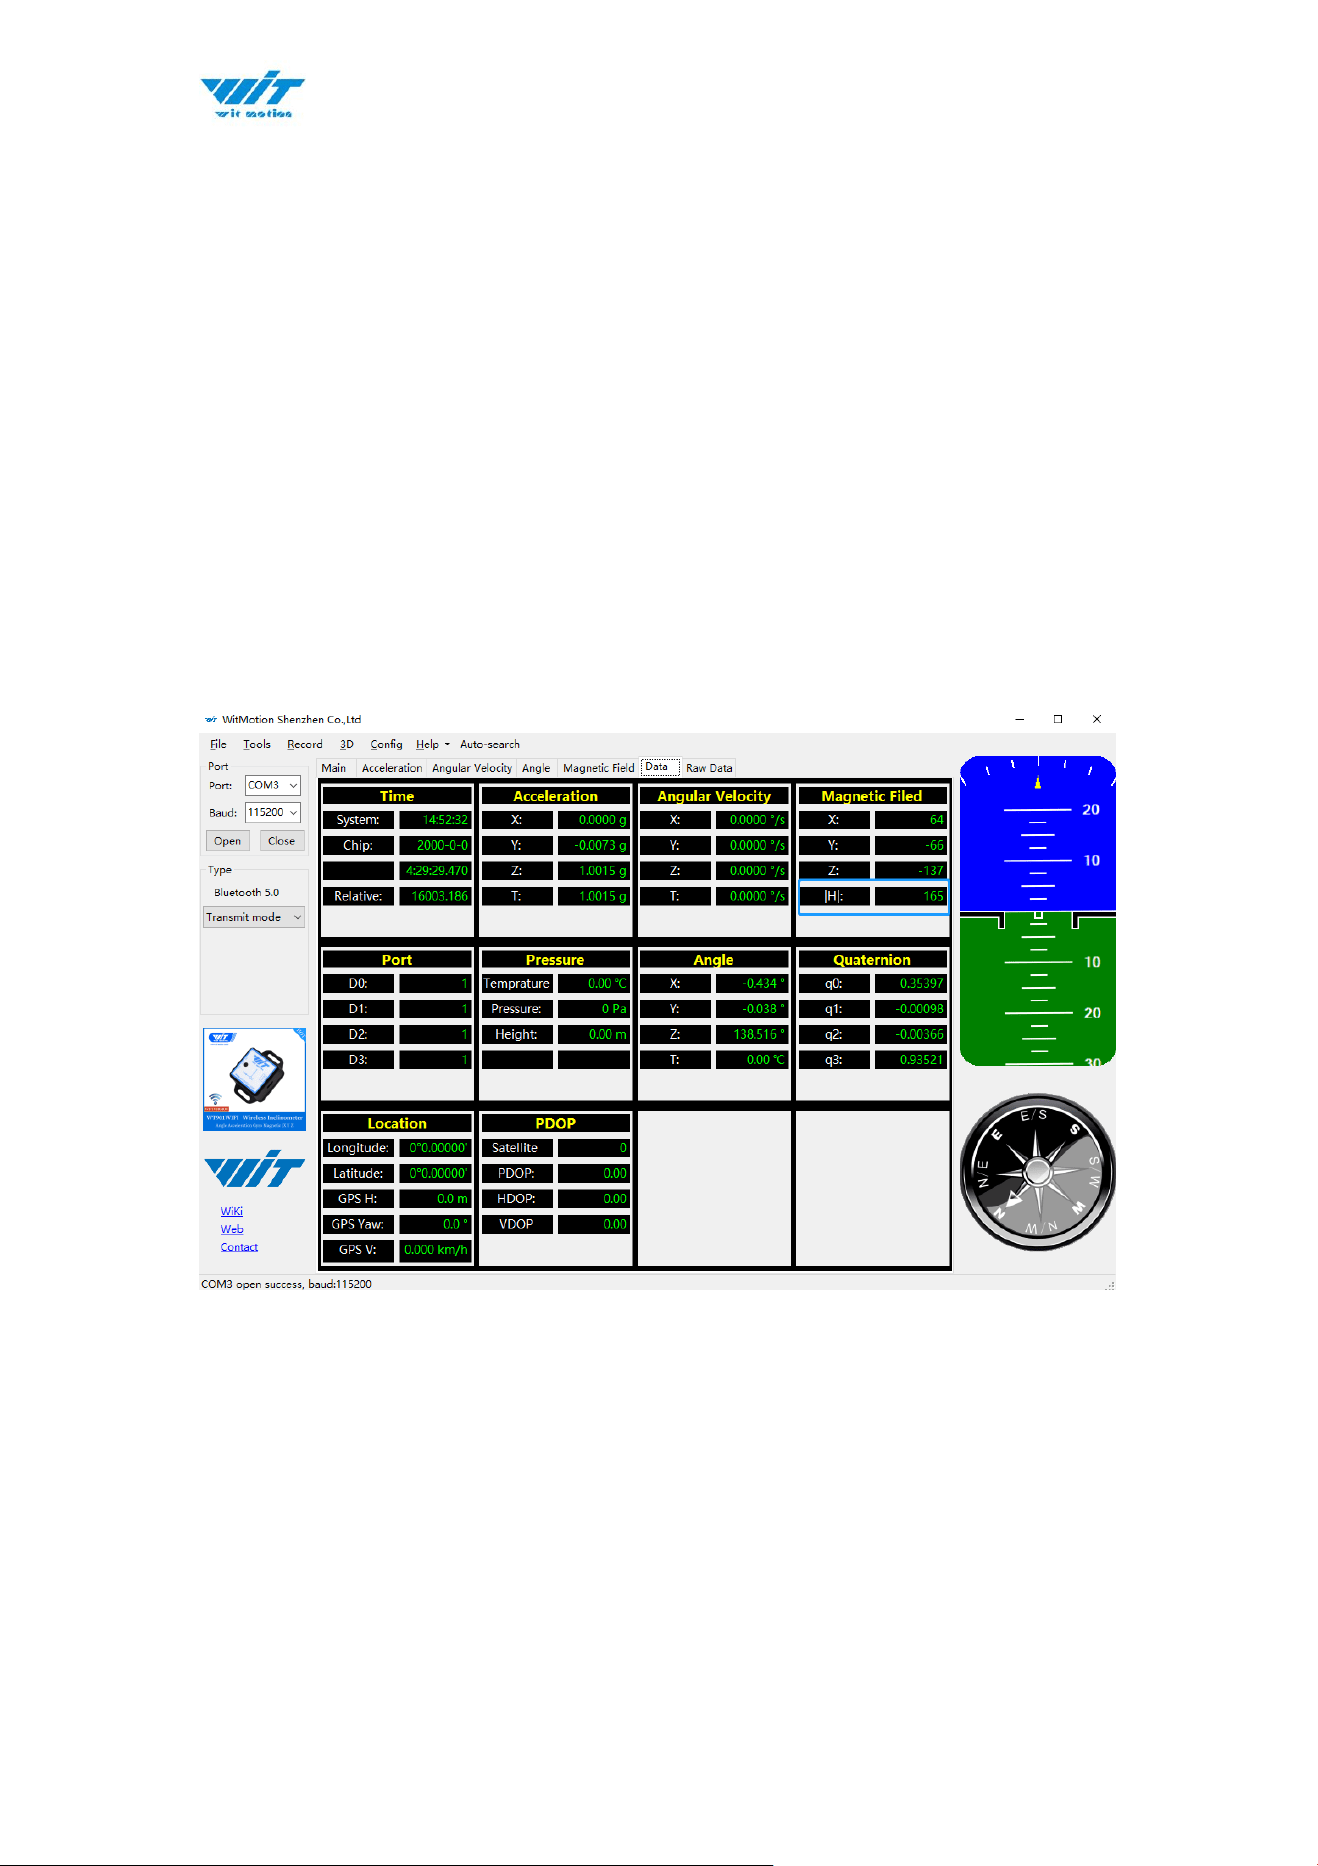
4.3 Calibration
Preparation: Ensuring the sensor is “Online”.
Calibration on PC software:
It is required to calibrate for the first time usage.
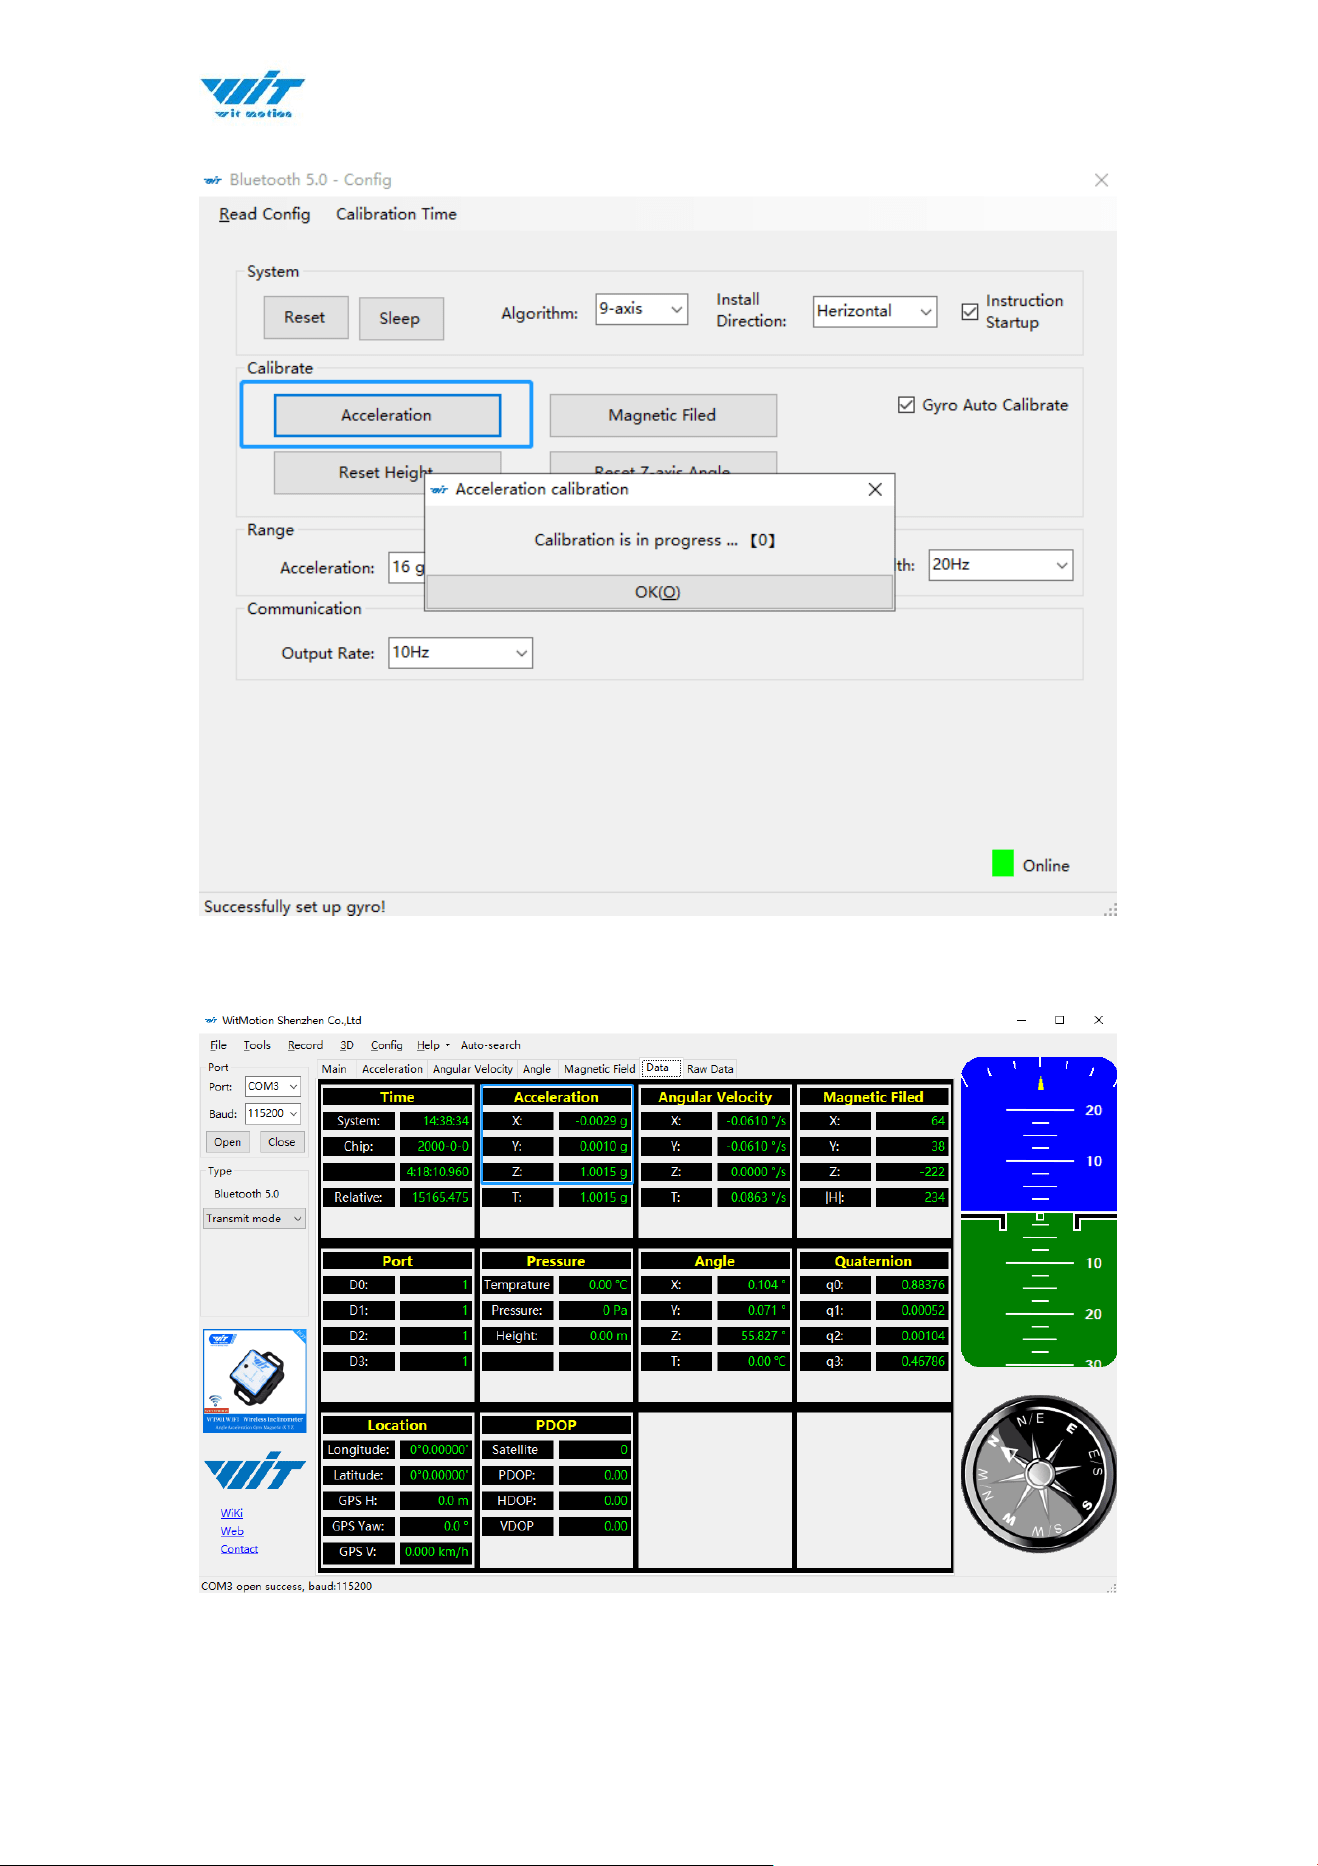
4.3.1 Accelerometer Calibration
Purpose:
The accelerometer calibration is used to remove the zero bias of the
accelerometer. Before calibration, there will be different degrees of bias error.
After calibration, the measurement will be accurate.
Methods:
Step 1. Keep the module horizontally stationary
Step 2. Click the acceleration in the “Config” and wait for 5 seconds
Step 3. Calibration done if OK shows
WT9011DCL BT5.0 | manual v23-607 | www.wit-motion.com
- 33 -
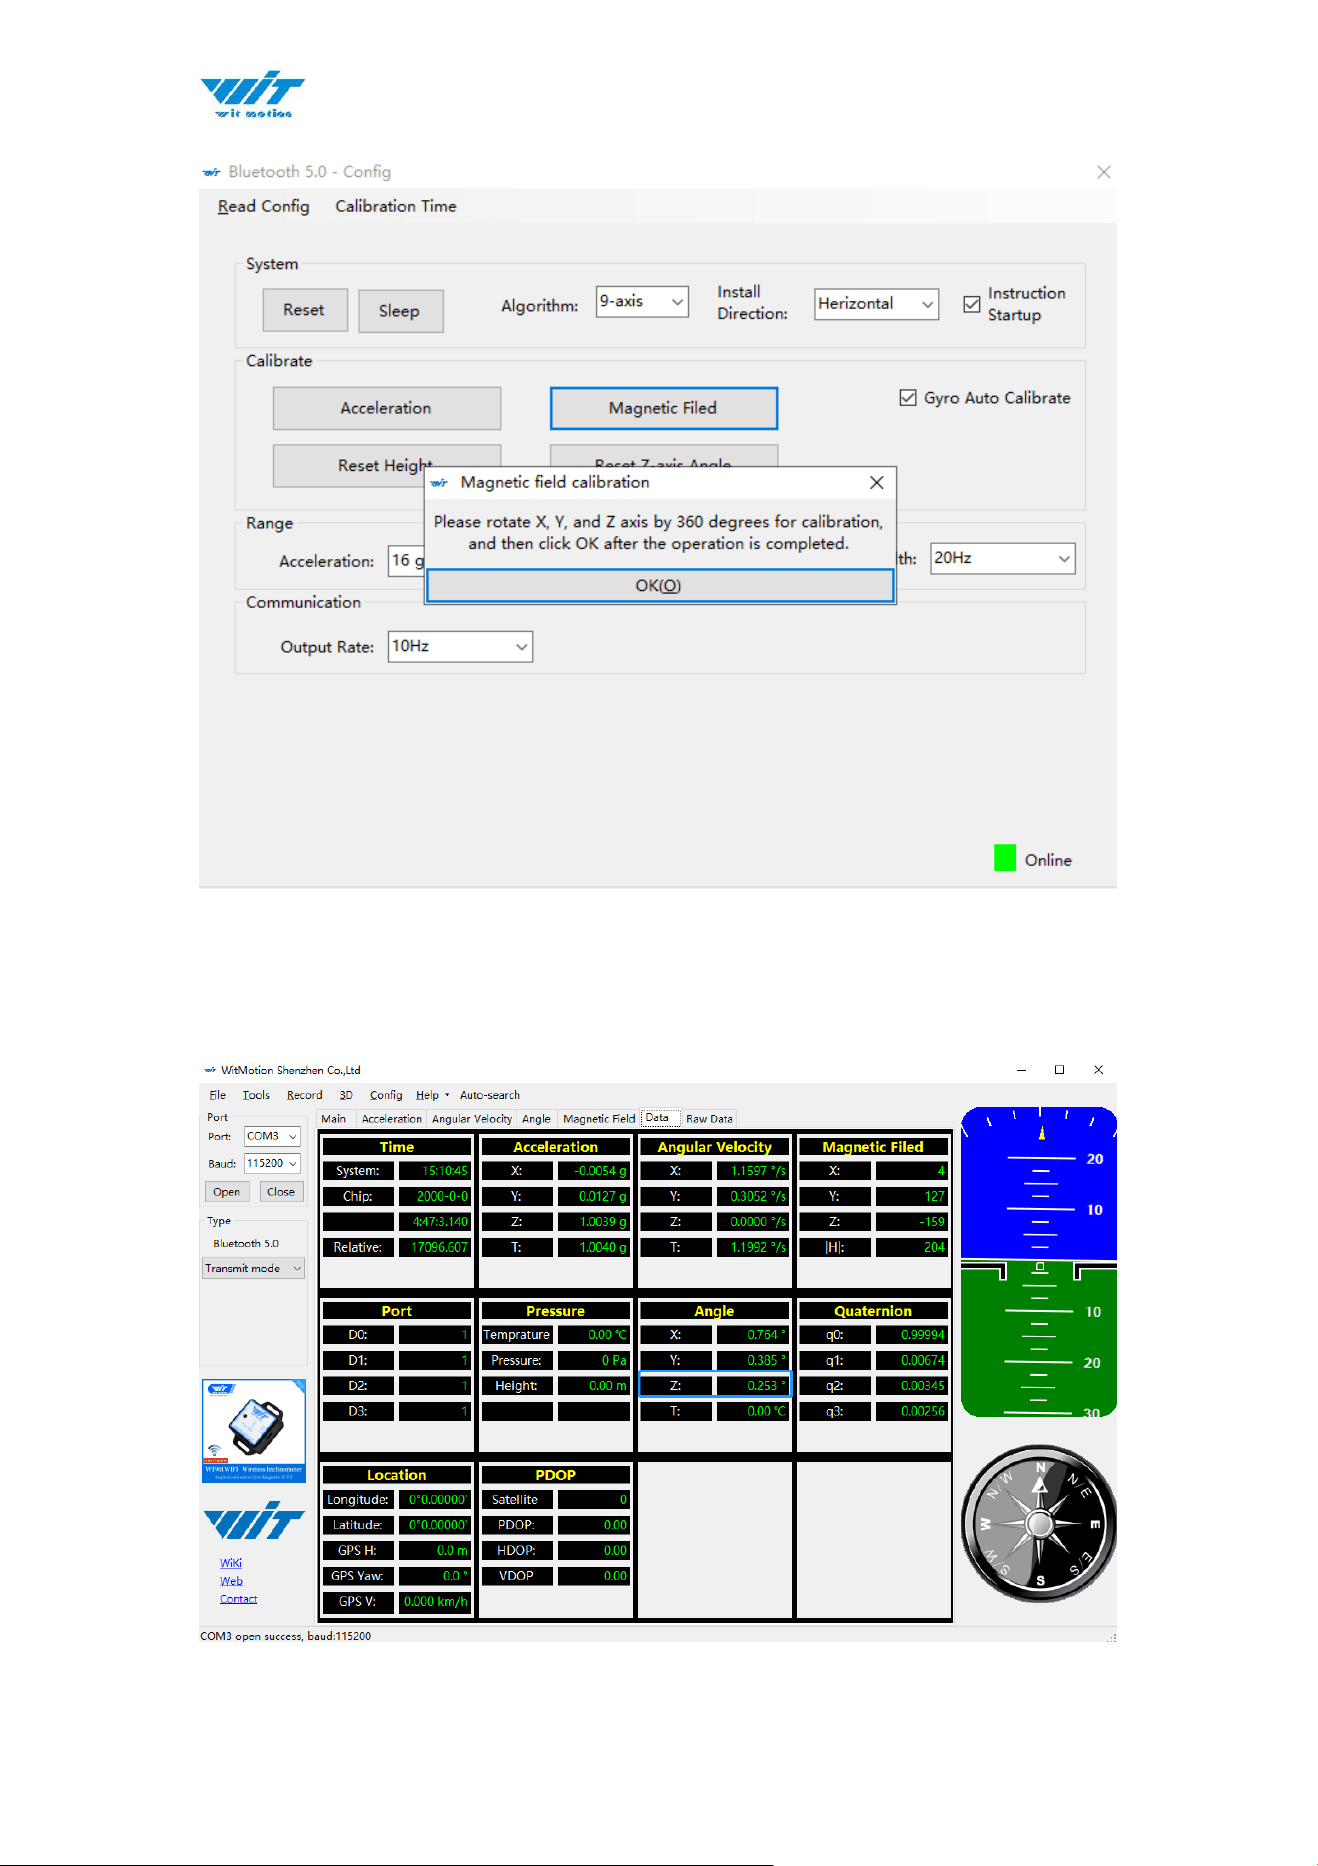
4.3.2 Magnetic Field Calibration
Purpose:
Magnetic calibration is used to remove the zero bias of the magnetic field
sensor. Usually, the magnetic field sensor will have a large zero error when it is
manufactured. If it is not calibrated, it will bring a large measurement error,
which will affect the accuracy of the measurement of the z-axis angle of the
heading angle.
Preparation:
1. Sensors should be 20cm away from magnetic and iron and other materials
2. The value of H in magnetic field must be lower than 350.
Methods:
Step 1. Open the Config menu.
Step 2. Click the “magnetic field” and slowly rotate the sensor 360° around X,
Y, Z, 3-axis accordingly.

WT9011DCL BT5.0 | manual v23-607 | www.wit-motion.com
- 35 -
4.3.3 Gyroscope Automatic Calibration
The gyroscope calibration is to calibrate the angular velocity, and the sensor
will calibrate automatically.
It is recommended that the automatic calibration of gyroscopes can be
inactivated only if the module rotates at a constant speed.
4.3.4 Reset Z-axis Angle
Note:If you want to avoid magnetic interference, you can change the algorithm
to 6-axis,function of resetting Z-axis angle can be used.
The z-axis angle is an absolute angle, and it takes the northeast sky as the
coordinate system can not be relative to 0 degree.
Z axis to 0 is to make the initial angle of the z axis angle is relative 0 degree.
When the module is used before and z - axis drift is large, the z - axis can be
calibrated. When the module is powered on, the Z axis will automatically return
to 0.
Calibration methods as follow: firstly keep the module static, click the “Reset
Z-axis Angle” in the “Config”, you will see the angle of the Z axis backs to 0
degree in the “Data”.
4.3.5 Reset Height to 0
Only available for the module built-in barometer like WT901B, HWT901B,
WTGAHRS1, WTGAHRS2.
WT9011DCL BT5.0 | manual v23-607 | www.wit-motion.com
- 36 -
4.4 Configuration
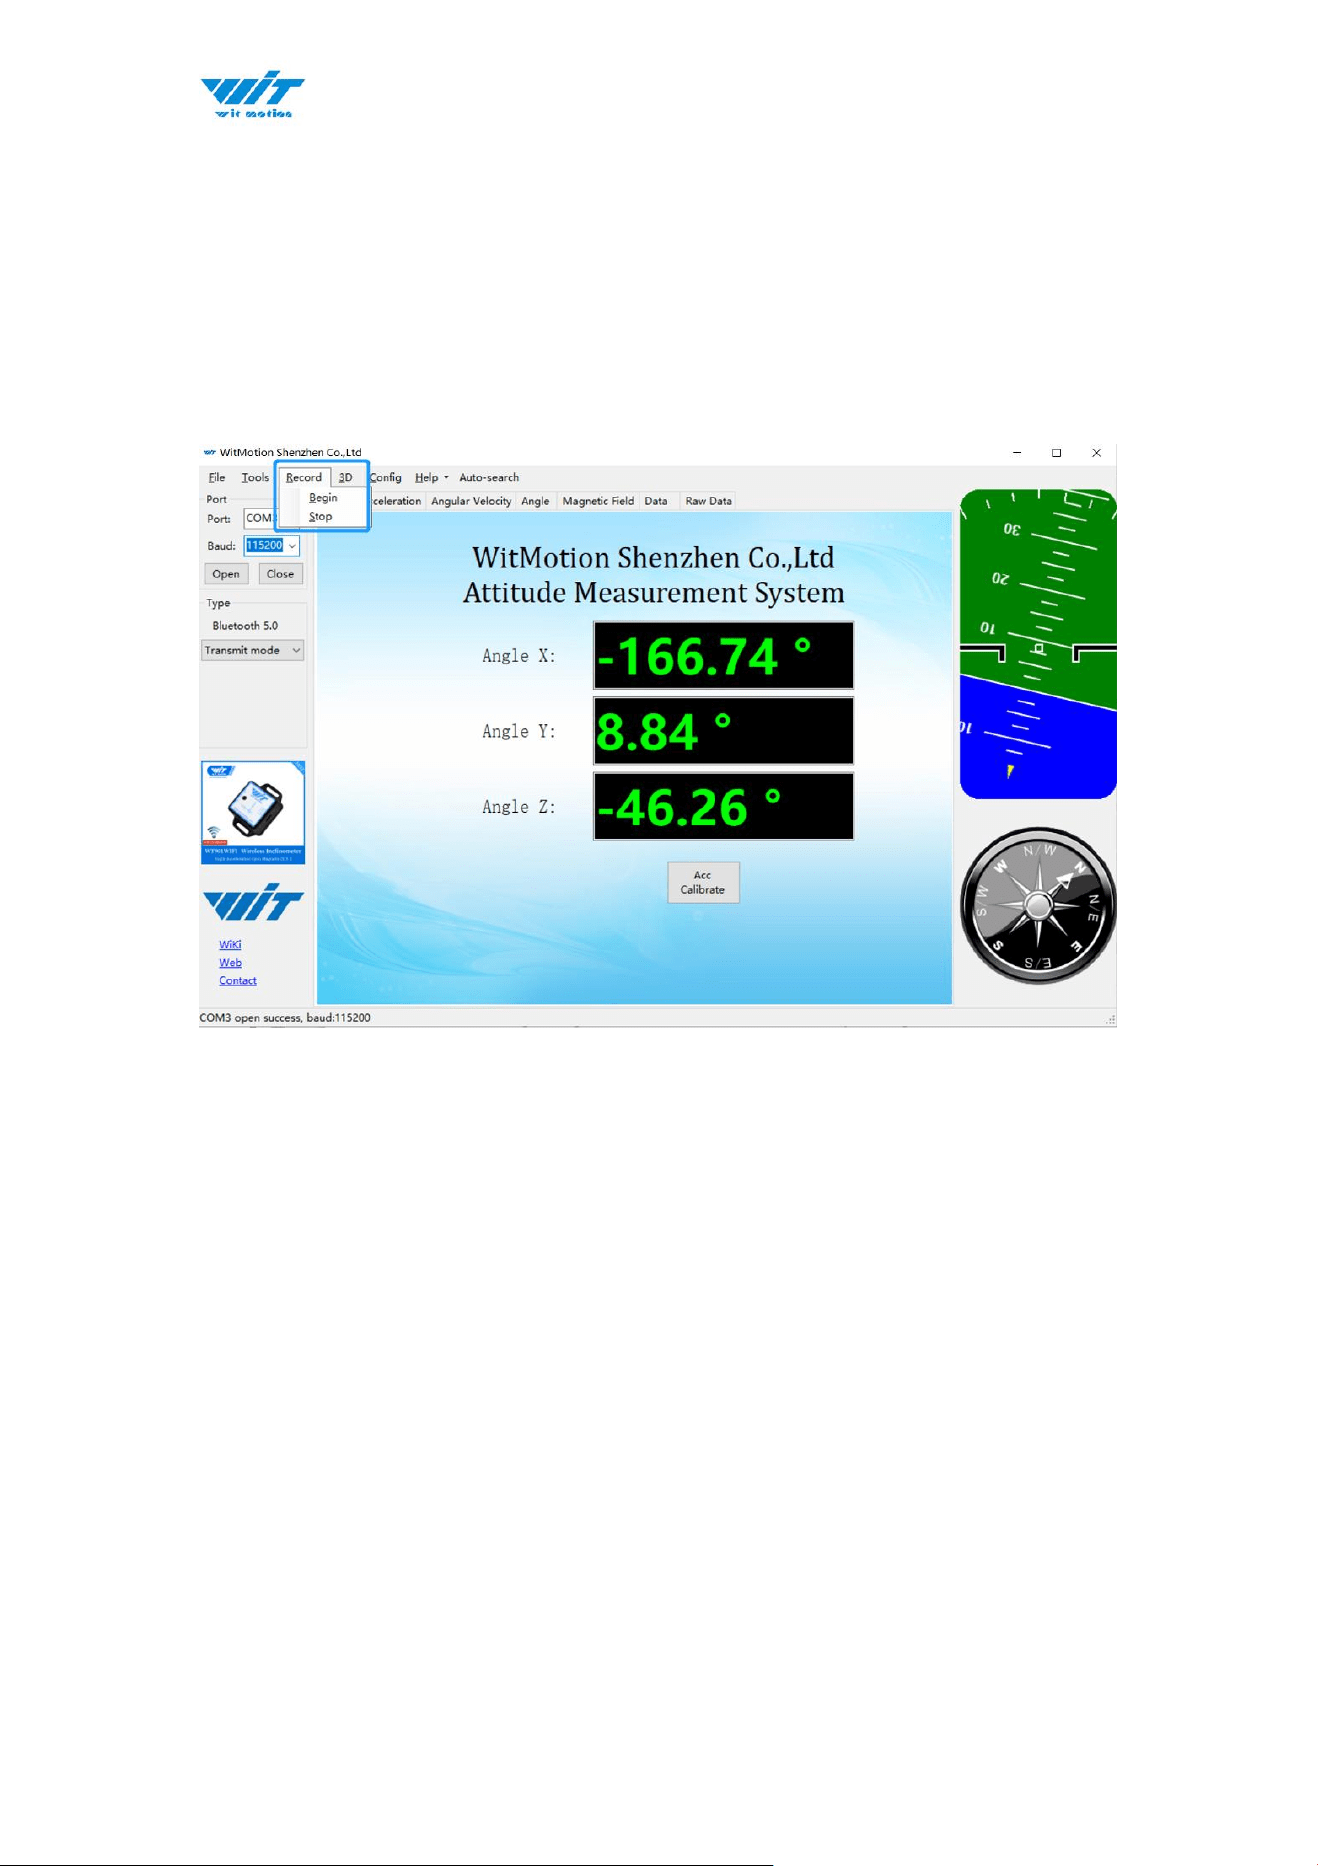
4.4.1 Data Recording
There is no memory chip in the sensor module, and the data can be recorded
and saved on the computer.
Method is as follows: Click “Record” and “Start” will save the data as a TXT
file. The saved file is in the directory of the upper computer program Data.tsv:
the beginning of the file has the value corresponding to the data.

WT9011DCL BT5.0 | manual v23-607 | www.wit-motion.com
- 38 -
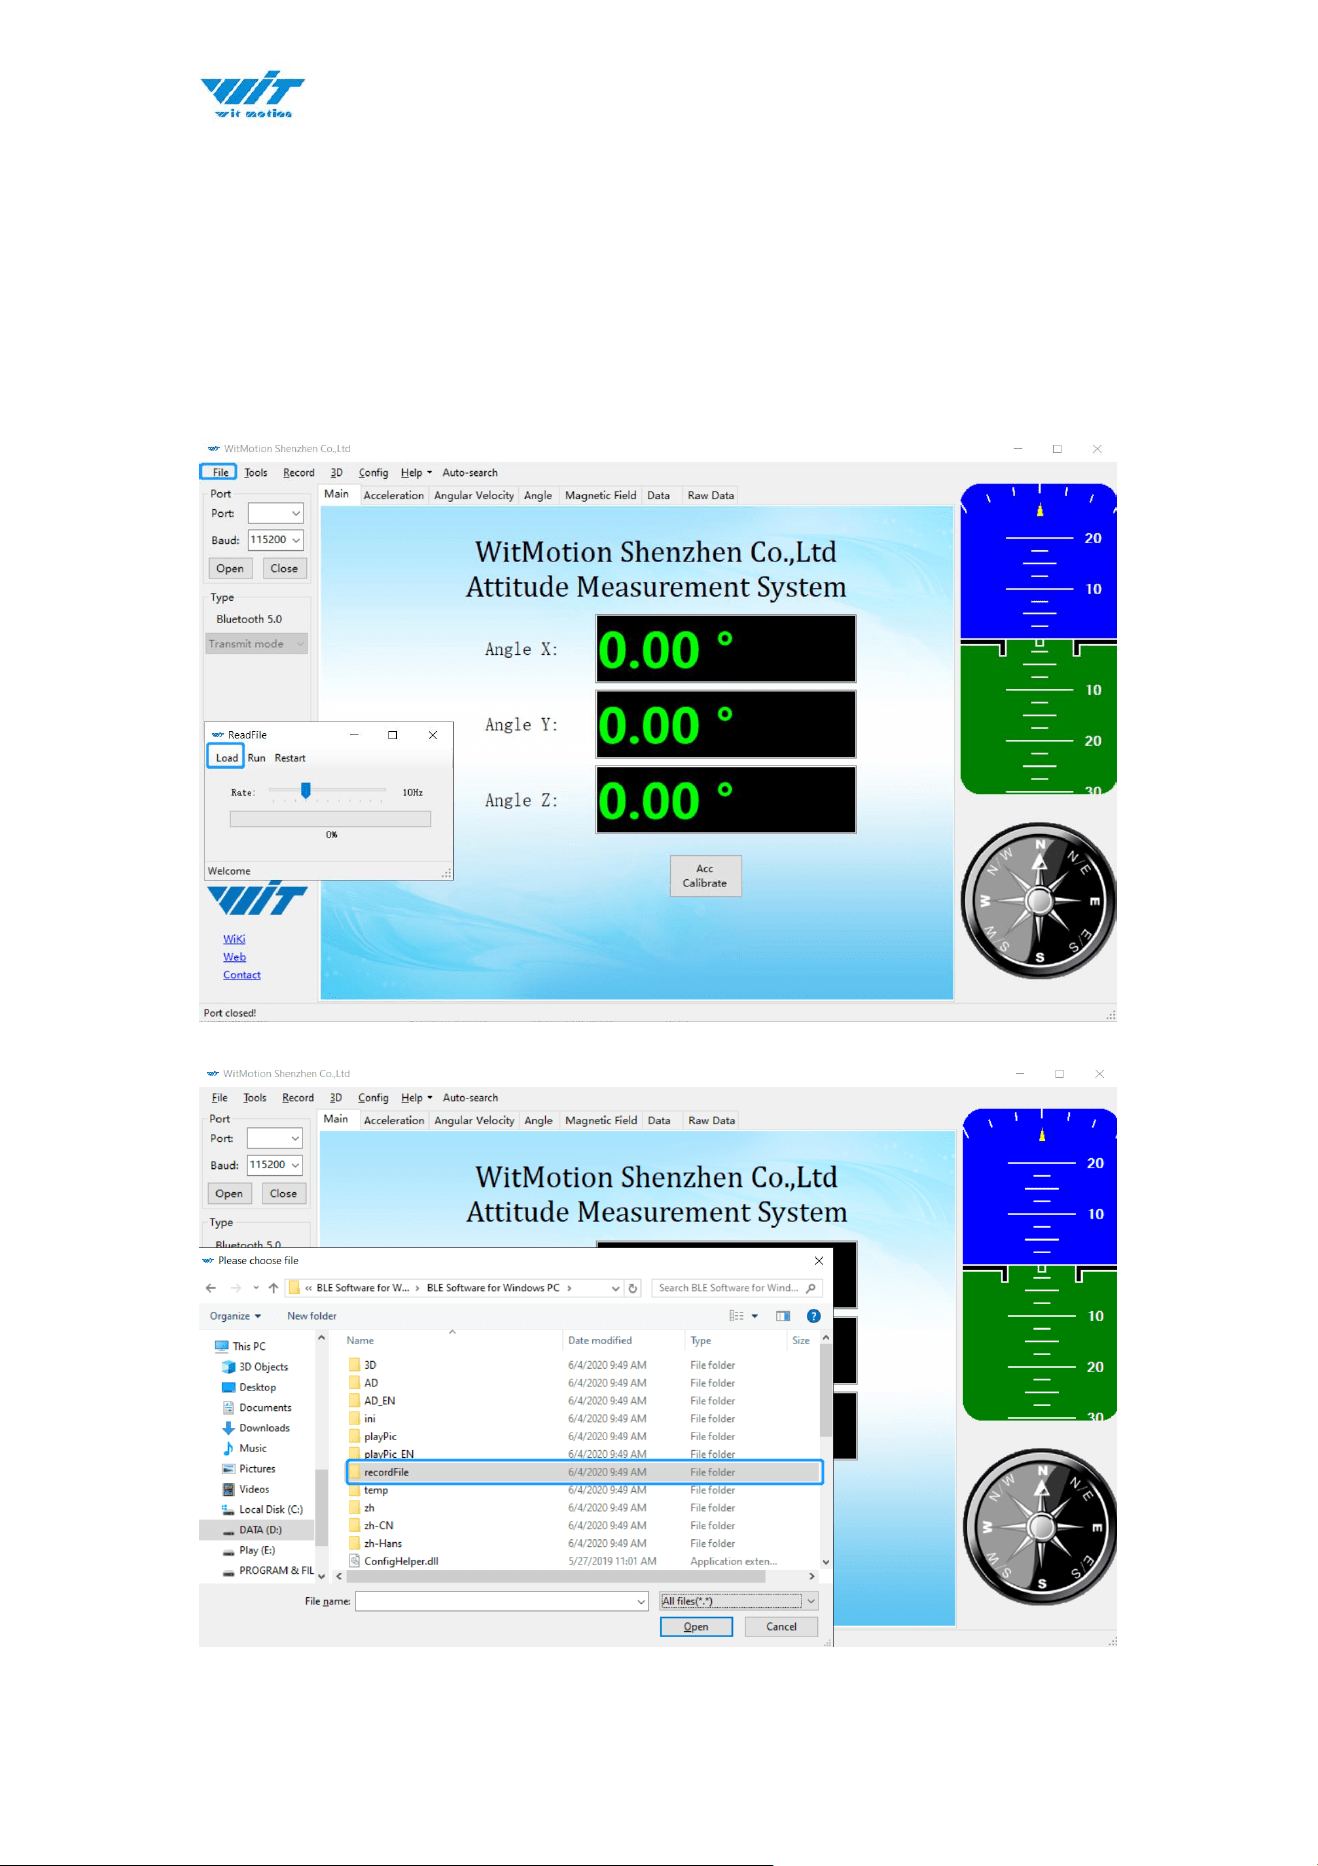
4.4.2 Data Playback
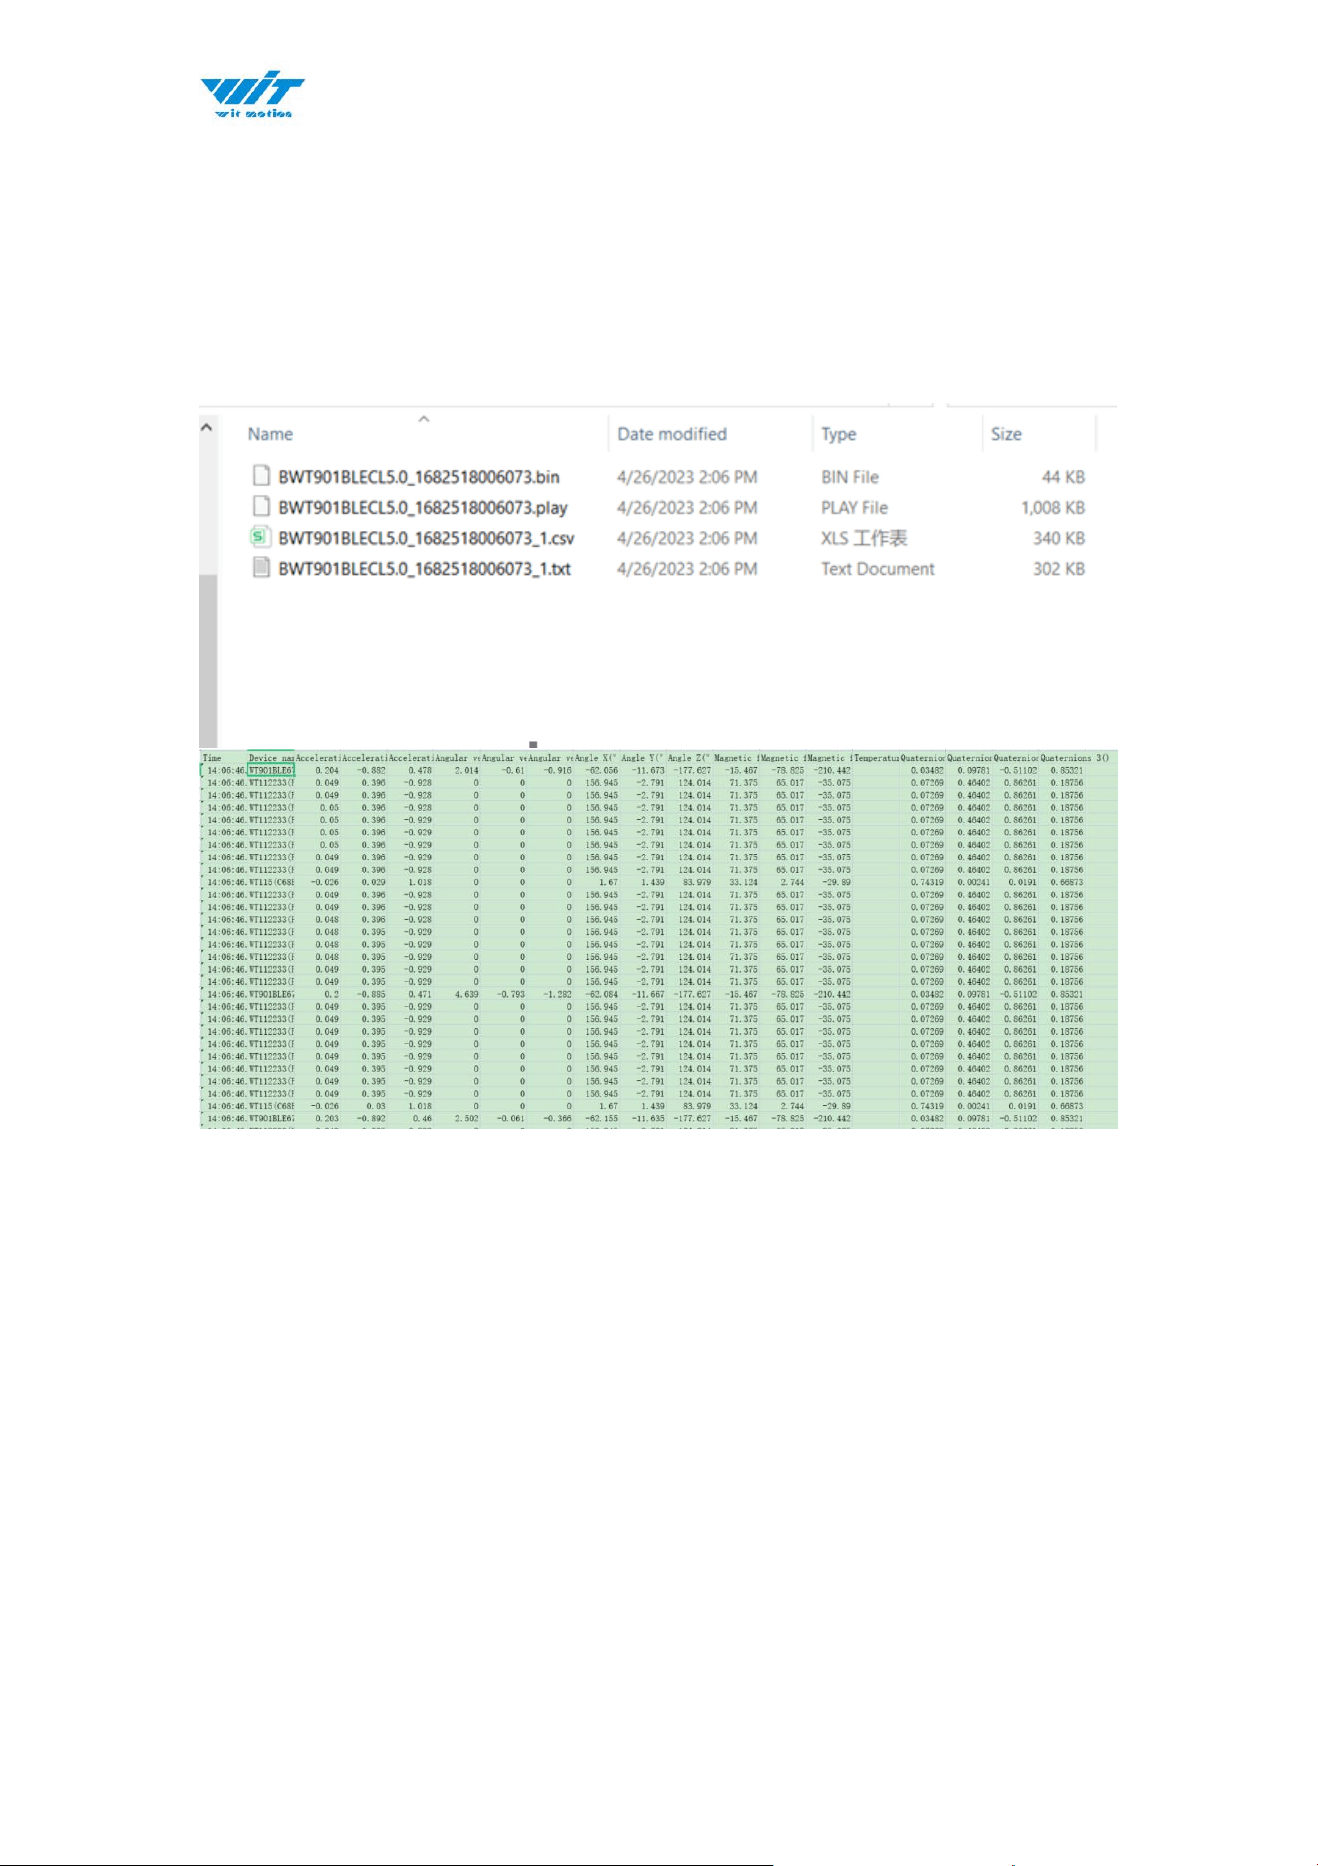
New function: When creating recorded file each time, there will a BIN file
created in the folder of record file in path of installed software meanwhile.
Recorded data playback method:
Step 1: Disconnect the sensor
Step 2: Click “File” Button and then click “Load”
Step 3: Choose the original path of software installation and load the Bin file

WT9011DCL BT5.0 | manual v23-607 | www.wit-motion.com
- 40 -
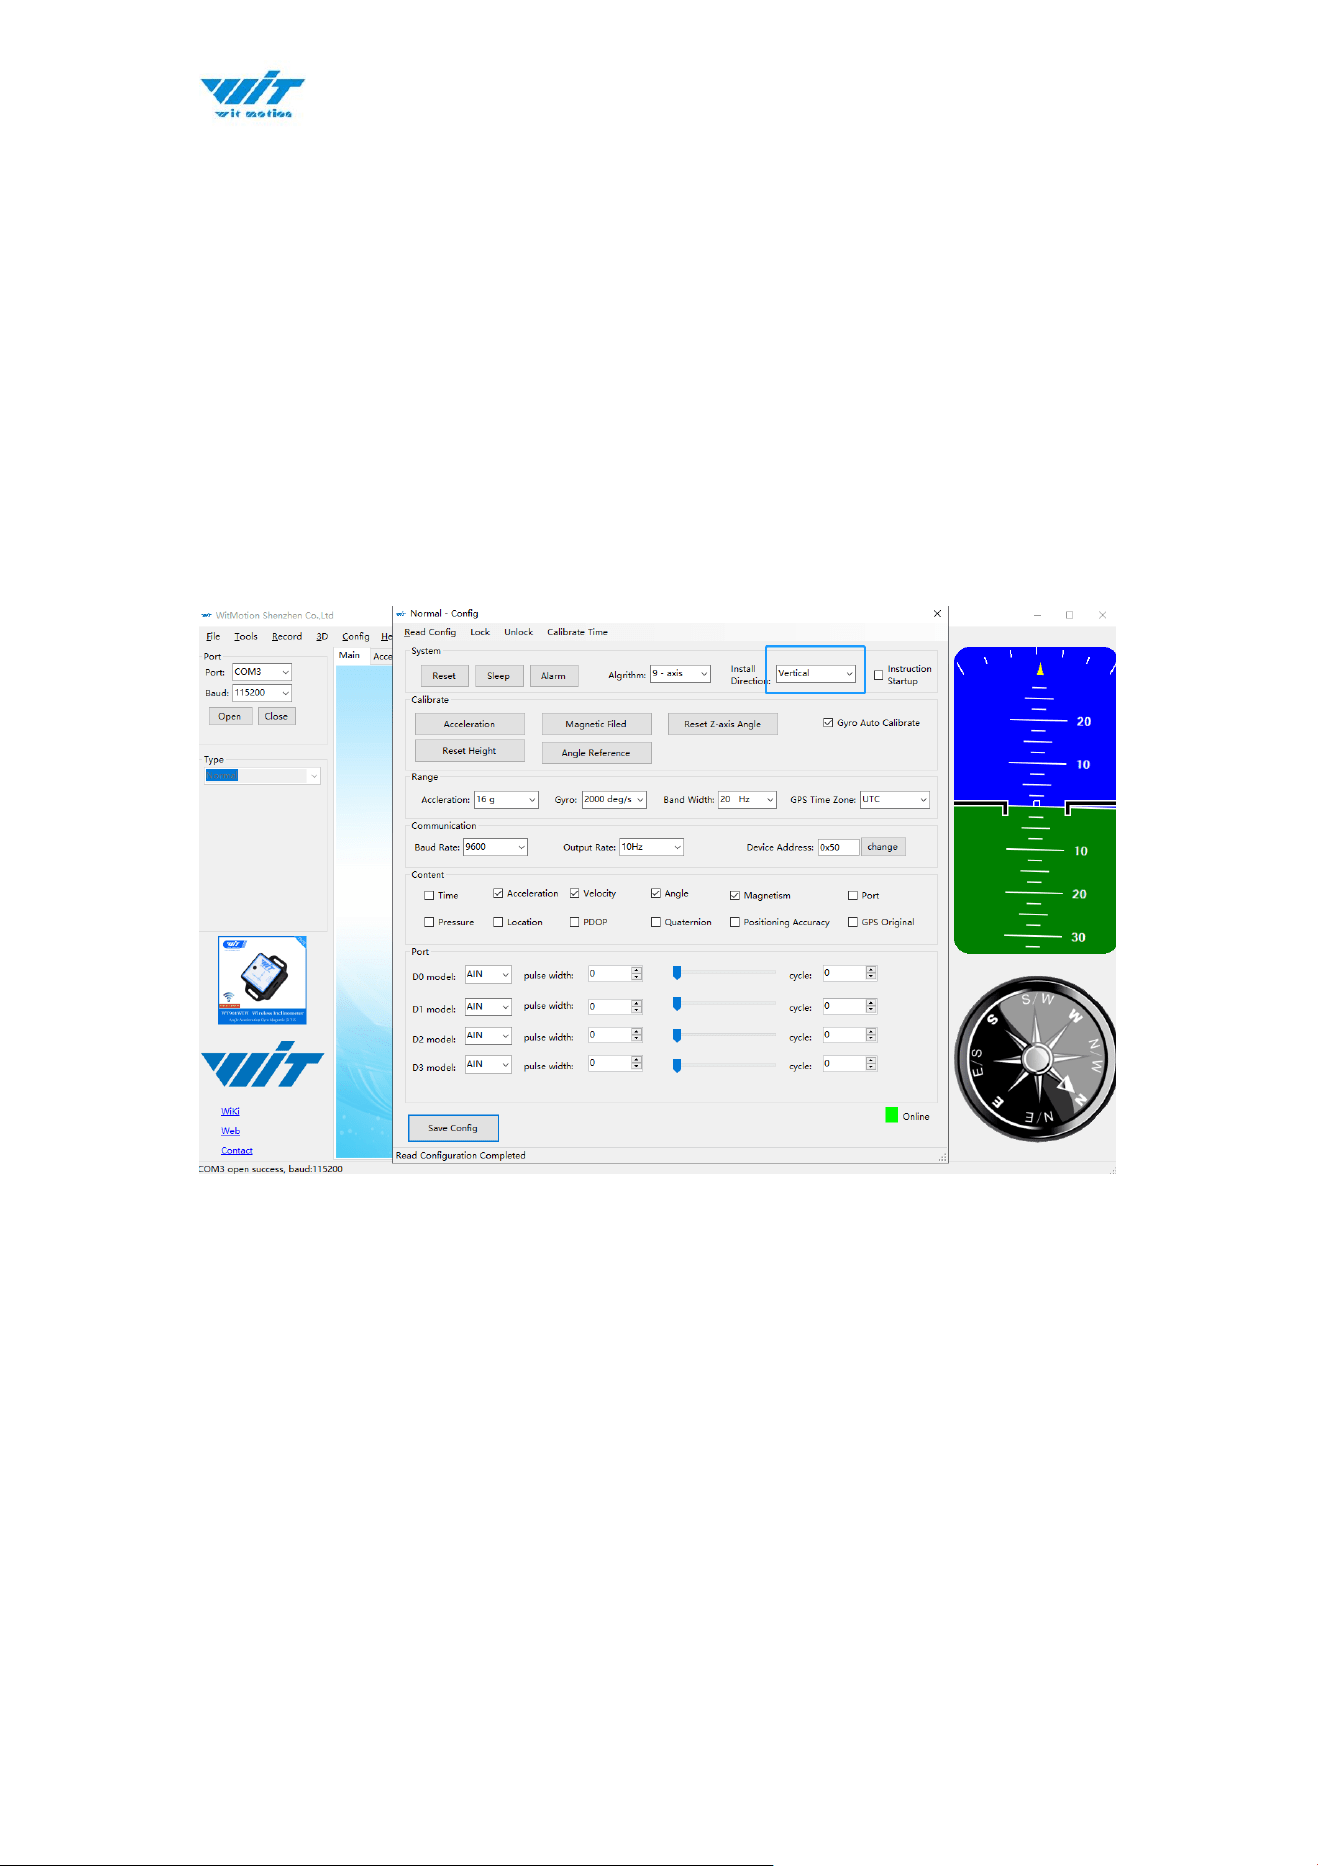
4.4.3 Placement Direction
The default installation direction of the module is horizontal. When the module
needs to be installed vertically, the vertical installation can be set.
Step 1: Rotate the module 90 degrees around the X-axis
Step 2: Place the sensor 90 degrees vertically
Step 3: Click “Vertical” as install directions on the “Config” menu
WT9011DCL BT5.0 | manual v23-607 | www.wit-motion.com
- 41 -
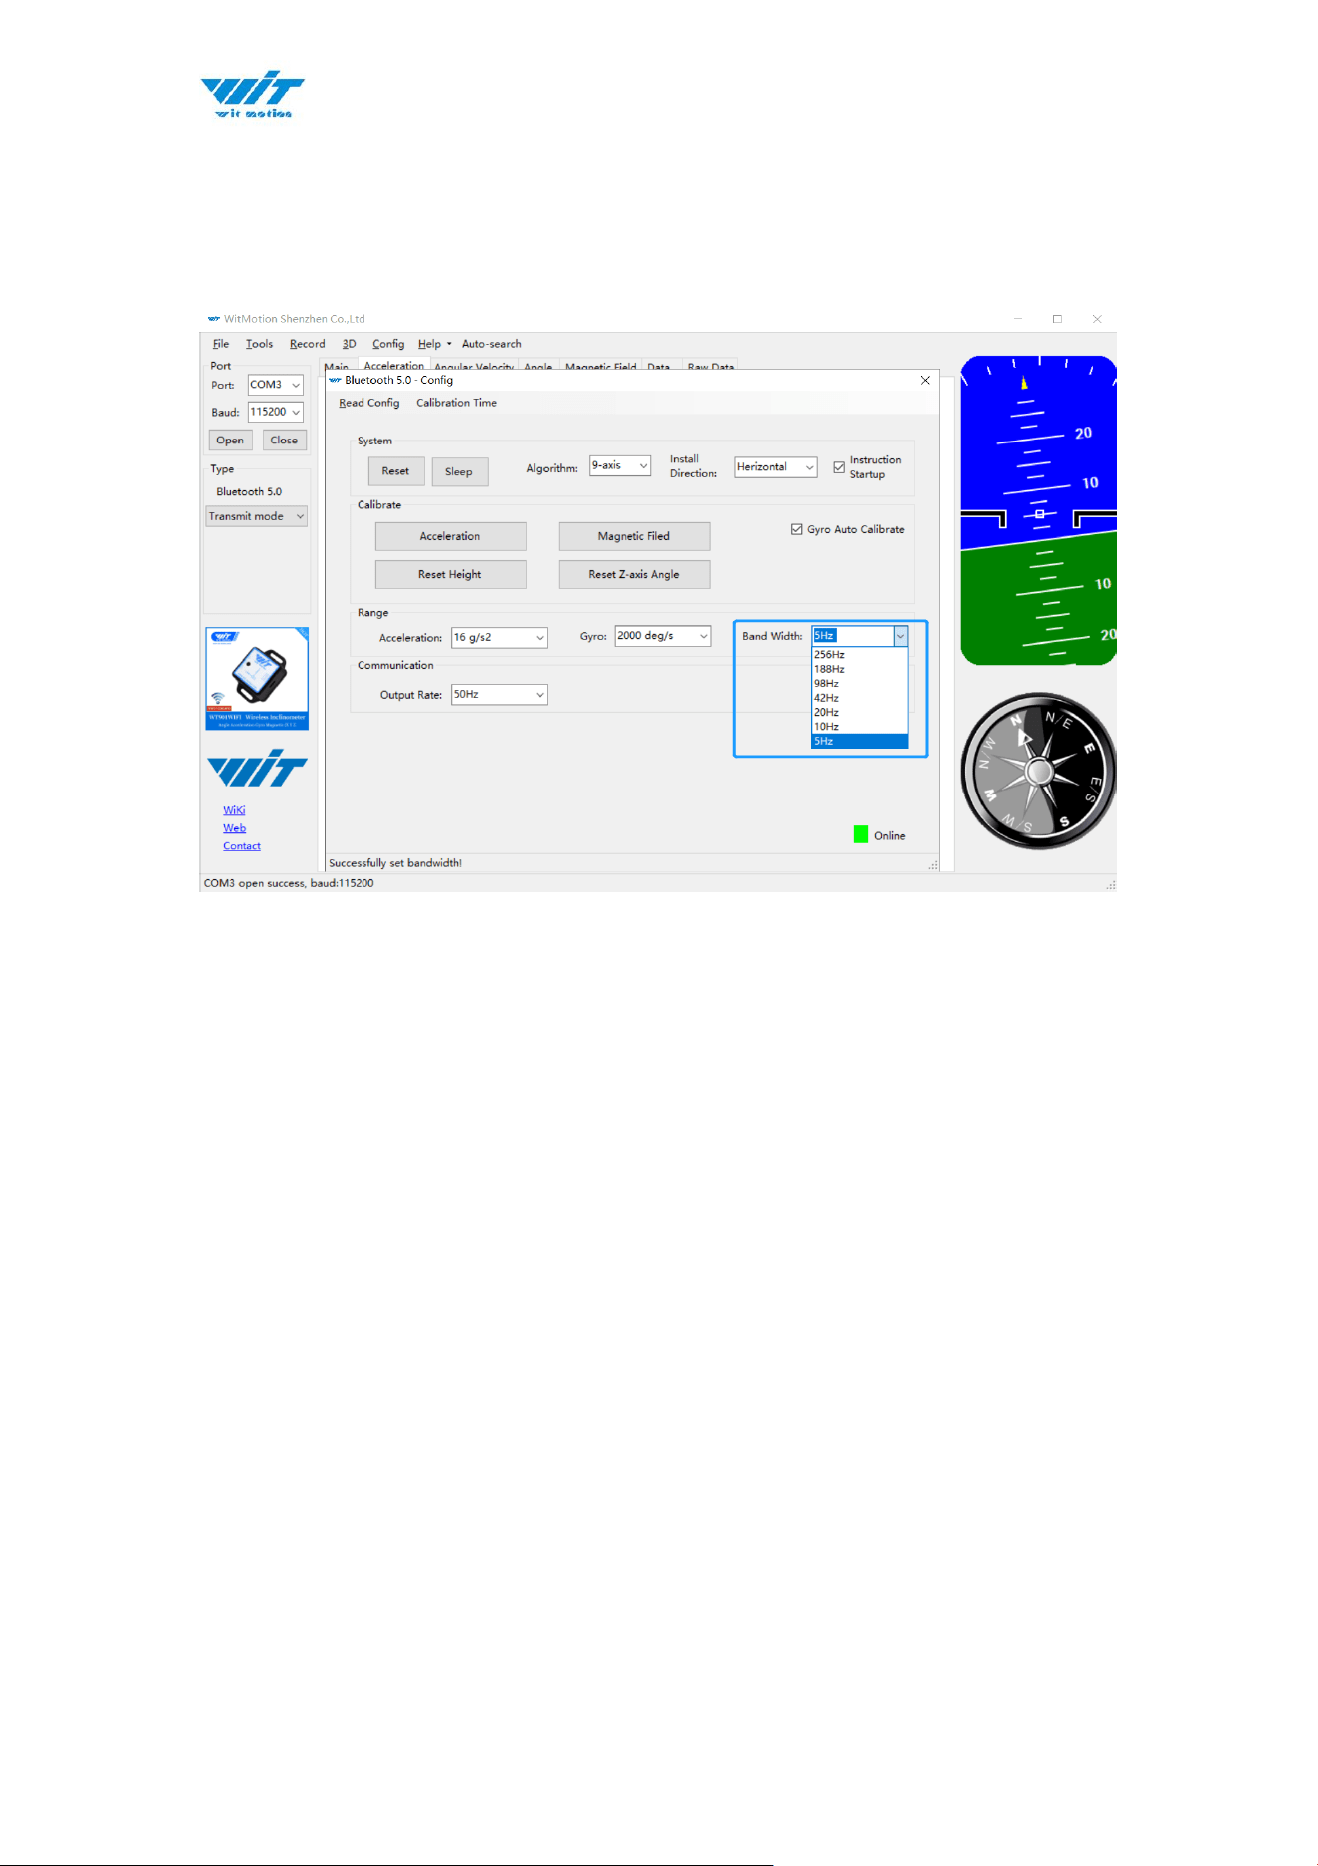
4.4.4 Bandwidth
Default bandwidth is 20Hz.
Explanation:
1. The higher rate of bandwidth setting will lead to higher fluctuation in data
waveform. Conversely, the lower rate of bandwidth, data will become more
fluent.
For example:
Bandwidth as 50Hz, Output rate as 5Hz. The waveform is very steady.

WT9011DCL BT5.0 | manual v23-607 | www.wit-motion.com
- 42 -
Bandwidth as 256Hz, Output rate as 50Hz. The waveform will show more
fluctuation.
2. The higher rate of bandwidth will solve the data-repeating problem.
For example, if the bandwidth setting is 20Hz, retrieval rate as 50Hz, there will
be 5 repeating data.
If you prefer there is no repeating data, it is required to increase the bandwidth
more than 50Hz.
WT9011DCL BT5.0 | manual v23-607 | www.wit-motion.com
- 43 -
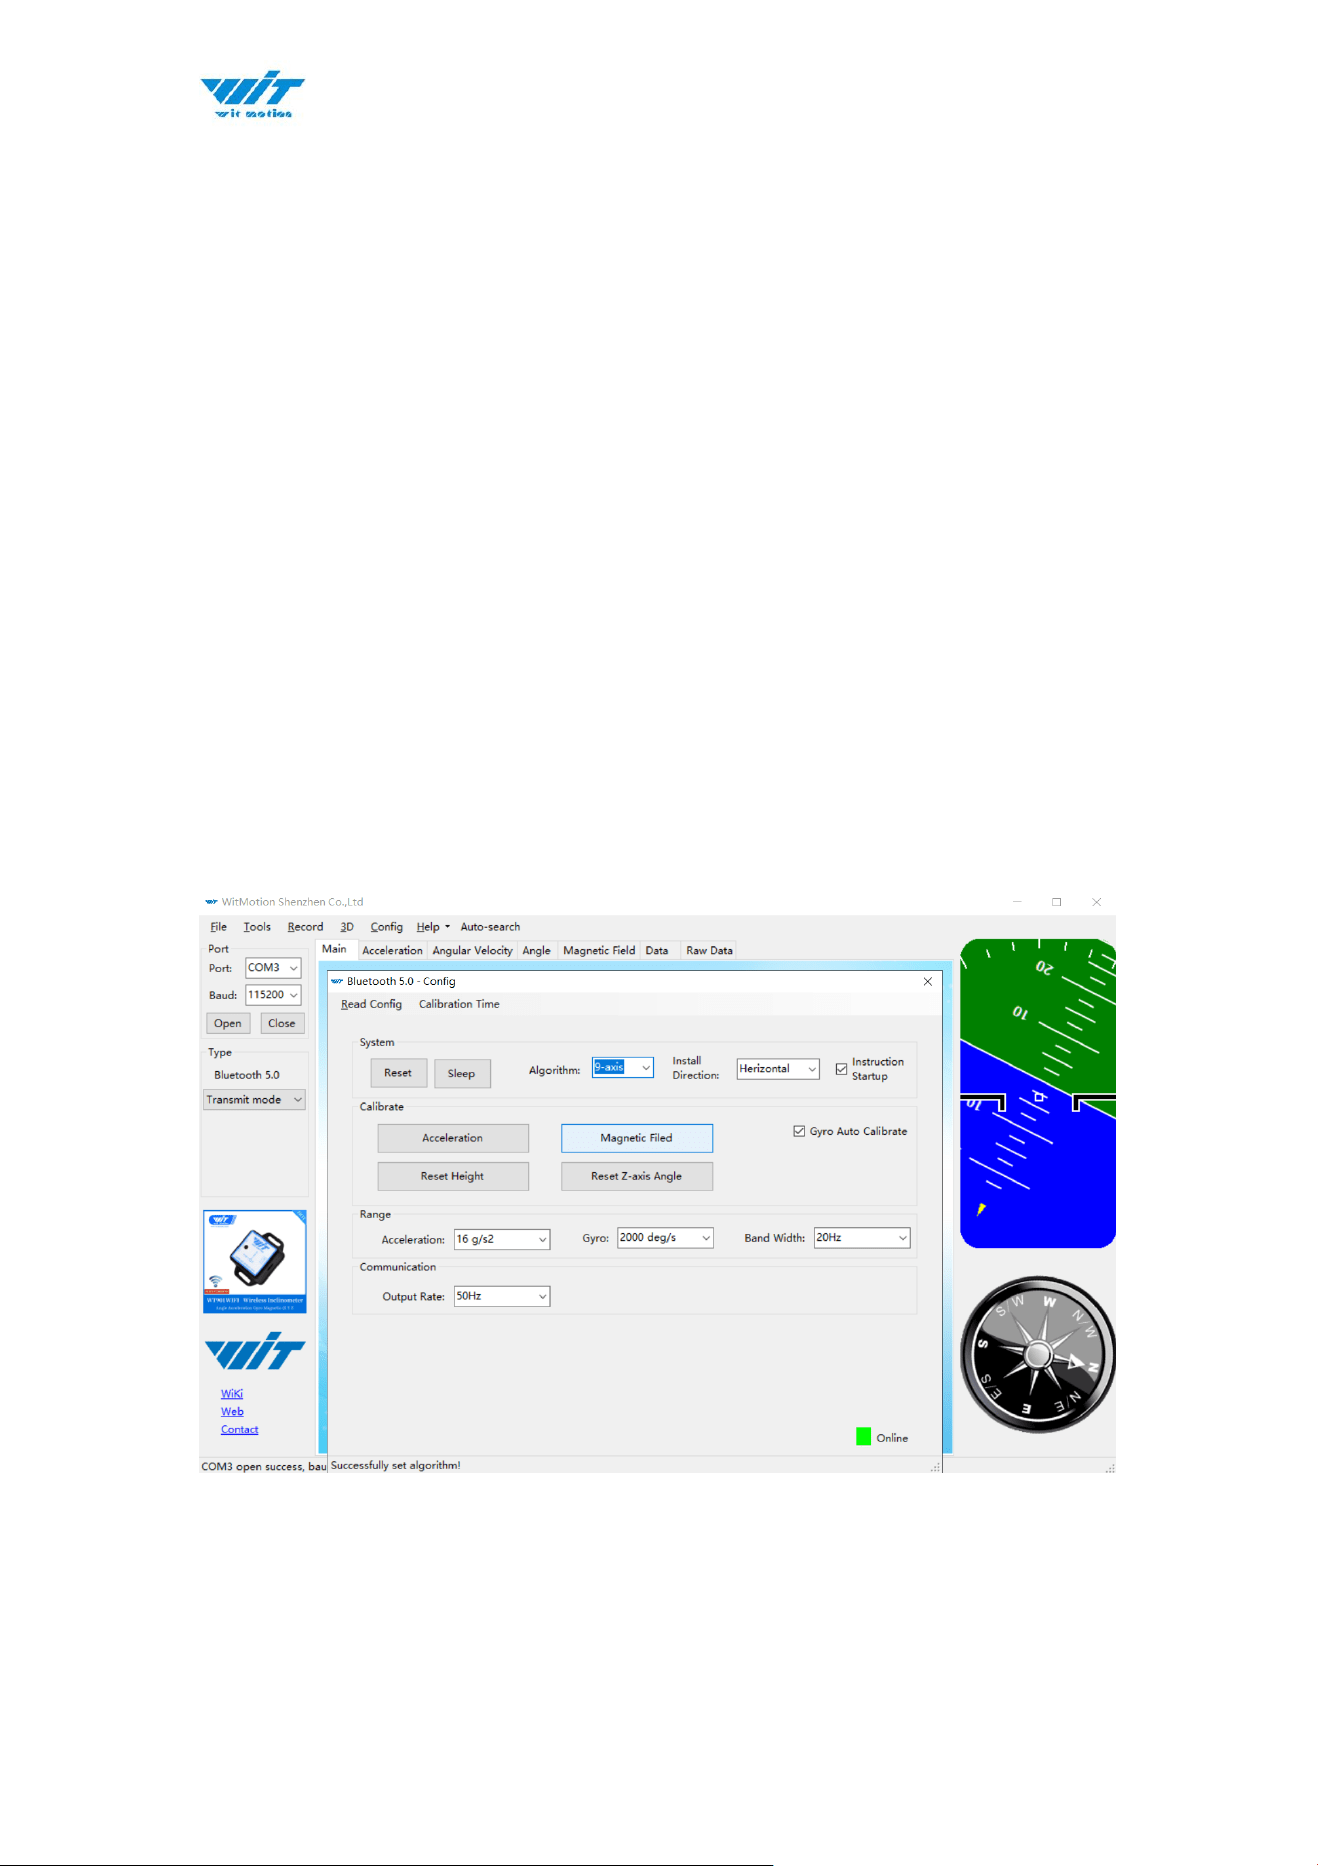
4.4.5 6-axis/ 9-axis Algorithm
6-axis algorithm: Z-axis angle is mainly calculated based on angular velocity
integral. There will be calculated error on Z-axis angle.
9-axis algorithm: Z-axis angle is mainly calculated and analyzed based on the
magnetic field. Z-axis angle will have few drift.
The default algorithm of WT9011DCL is 9-axis. If there is magnetic field
interference around installed environment, it is recommended to switch to
6-axis algorithm to detect the angle.
Method:
Step 1: Switch to the"6-axis" algorithm on the “Config” menu.
Step 2: Proceed with the “Accelerometer calibration” and “Reset Z-axis angle”
calibration.
After the calibration is completed, it can be used normally.
WT9011DCL BT5.0 | manual v23-607 | www.wit-motion.com
- 44 -
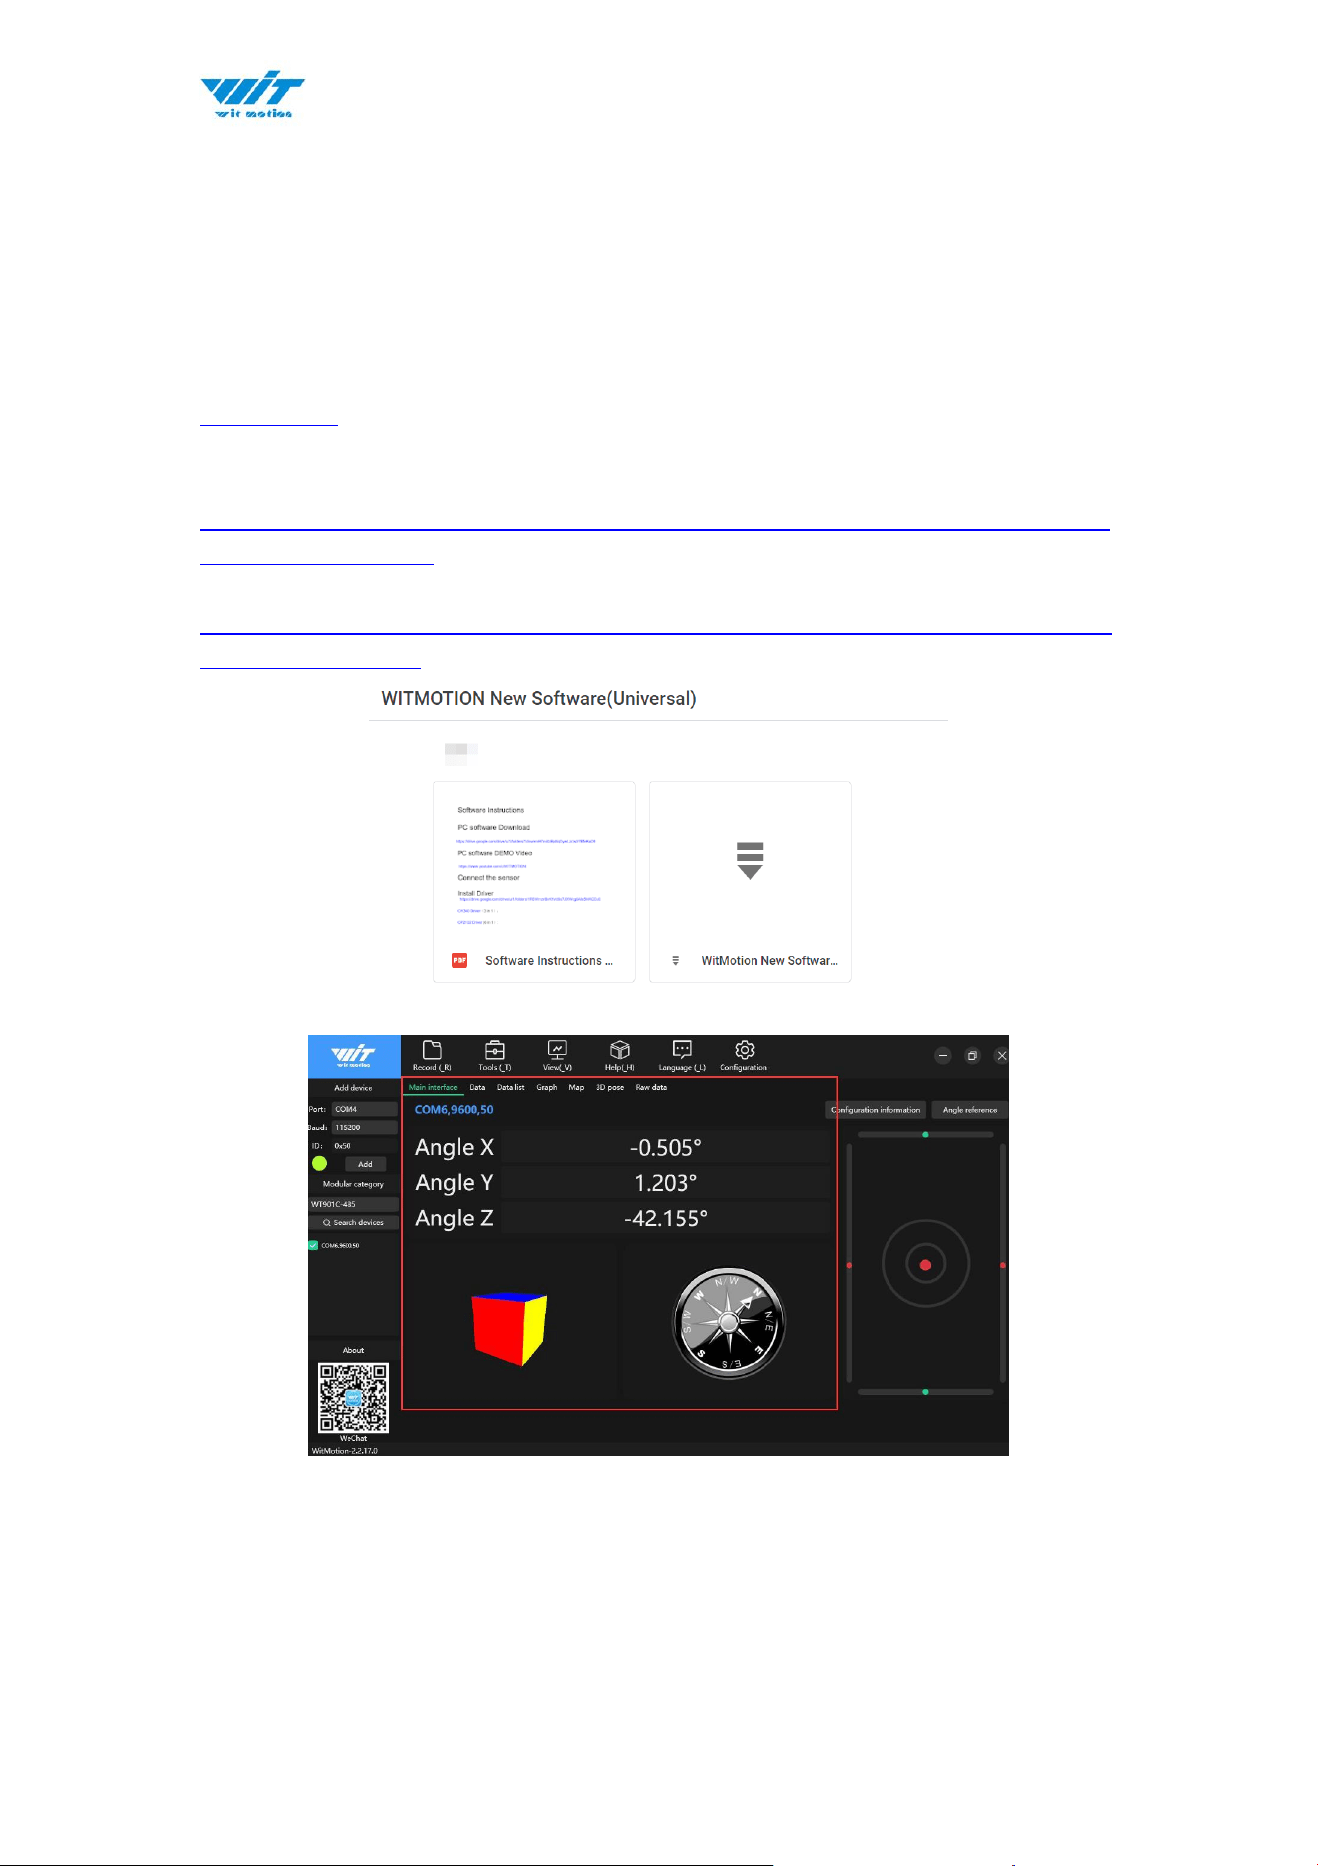
5 Instructions of 2023 New Software
In order to improve the user experience and our customer service, we develop
a new version PC software.
Link to check the PC Software connection video demo.
Video demo
Below is the new software link.
https://drive.google.com/drive/folders/1dnwmnH7mi4zBpNqDywLzrzsV7BfeK
aD9?usp=drive_link
Below is the universal instruction download link.
https://drive.google.com/file/d/18OntSUDU1m4vNhcRXvmTeFN1rAK3jcmZ/vi
ew?usp=drive_link
Note:
The 2022 old version software will be reserved for use. You can check
“Chapter 3 Use Instructions with PC” for more details.

WT9011DCL BT5.0 | manual v23-607 | www.wit-motion.com
- 46 -
6 Multiple-Connection Instructions
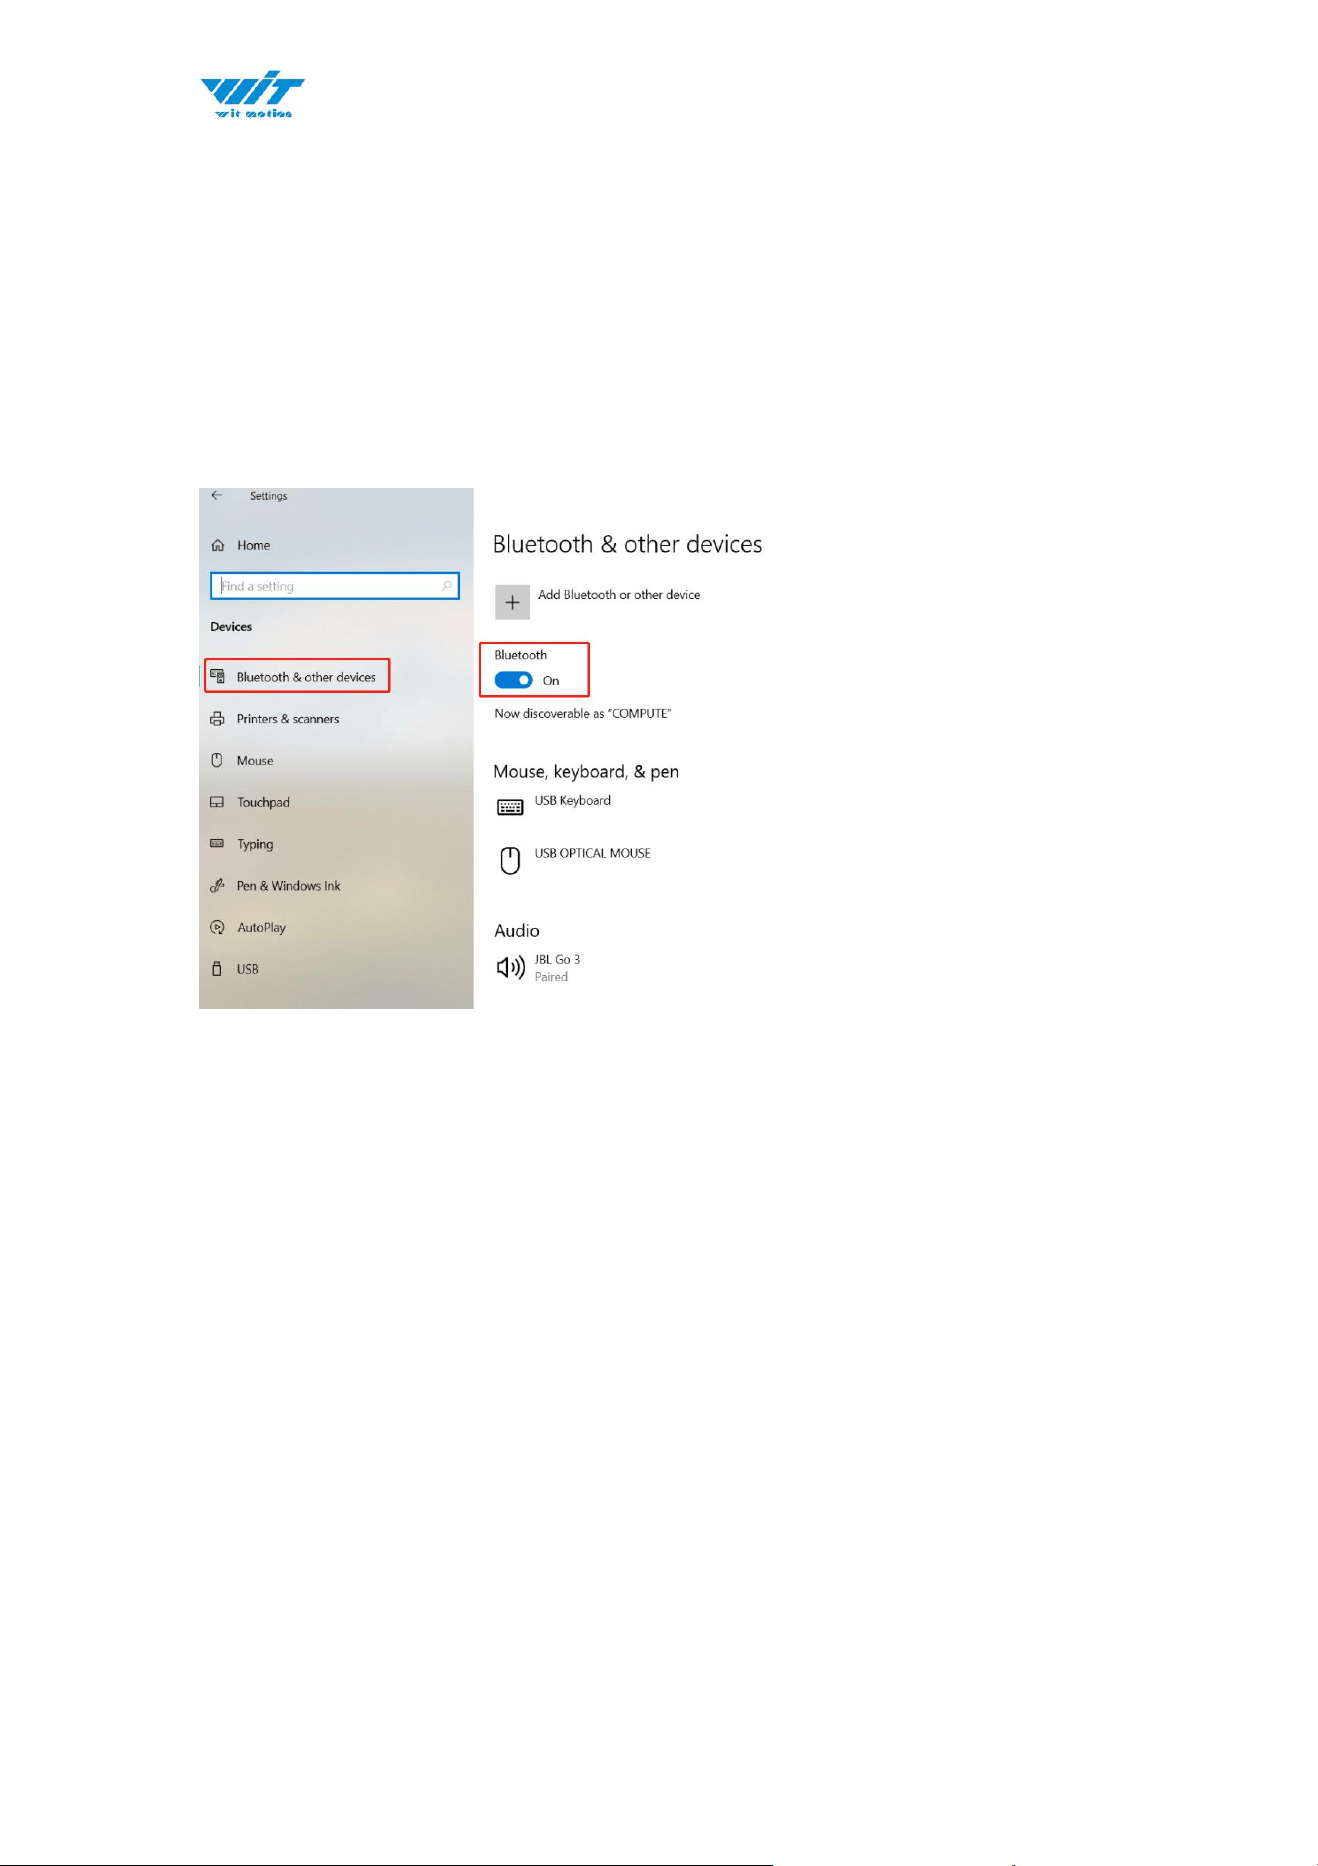
The WT9011DCL can be connected via laptop’s Bluetooth. It is required to use
the WitMotion New Software. The maximum is up to 4 units in the same time via
connection.
PS. It is required to turn on the laptop’s Bluetooth.
Because Bluetooth is limited, sometimes the data lag when you’re using
Bluetooth to multi-connect, and the Bluetooth range will be less. Of course, the
different phone has a different range.
If you need longer Bluetooth range when multi-connection (up to 30m), please
use our BLE 5.0 adapter (refer to the chapter4.1.2 BLE 5.0 Adapter Connection)
WT9011DCL BT5.0 | manual v23-607 | www.wit-motion.com
- 47 -
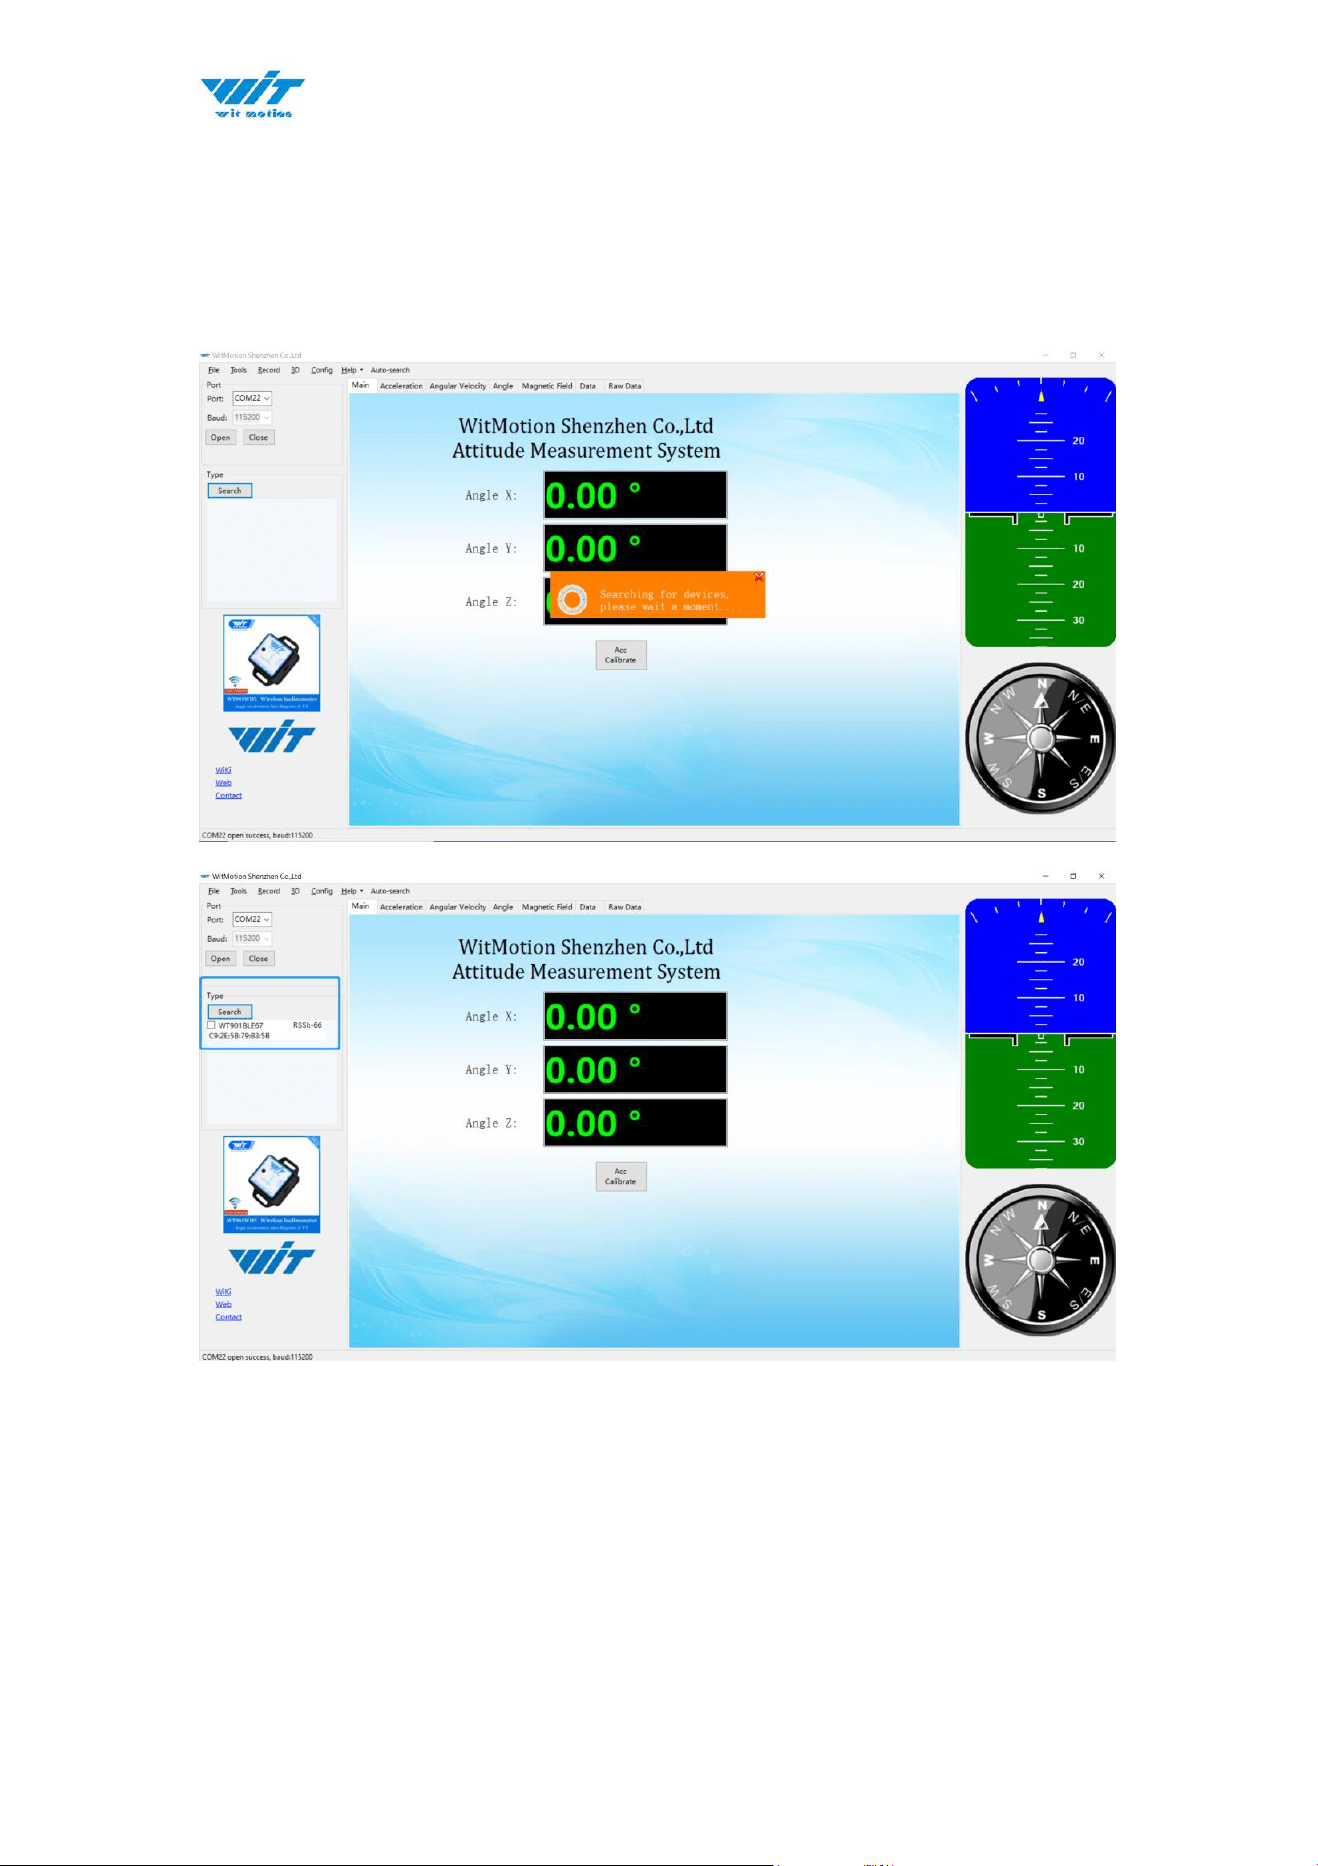
6.1 Connection Instructions
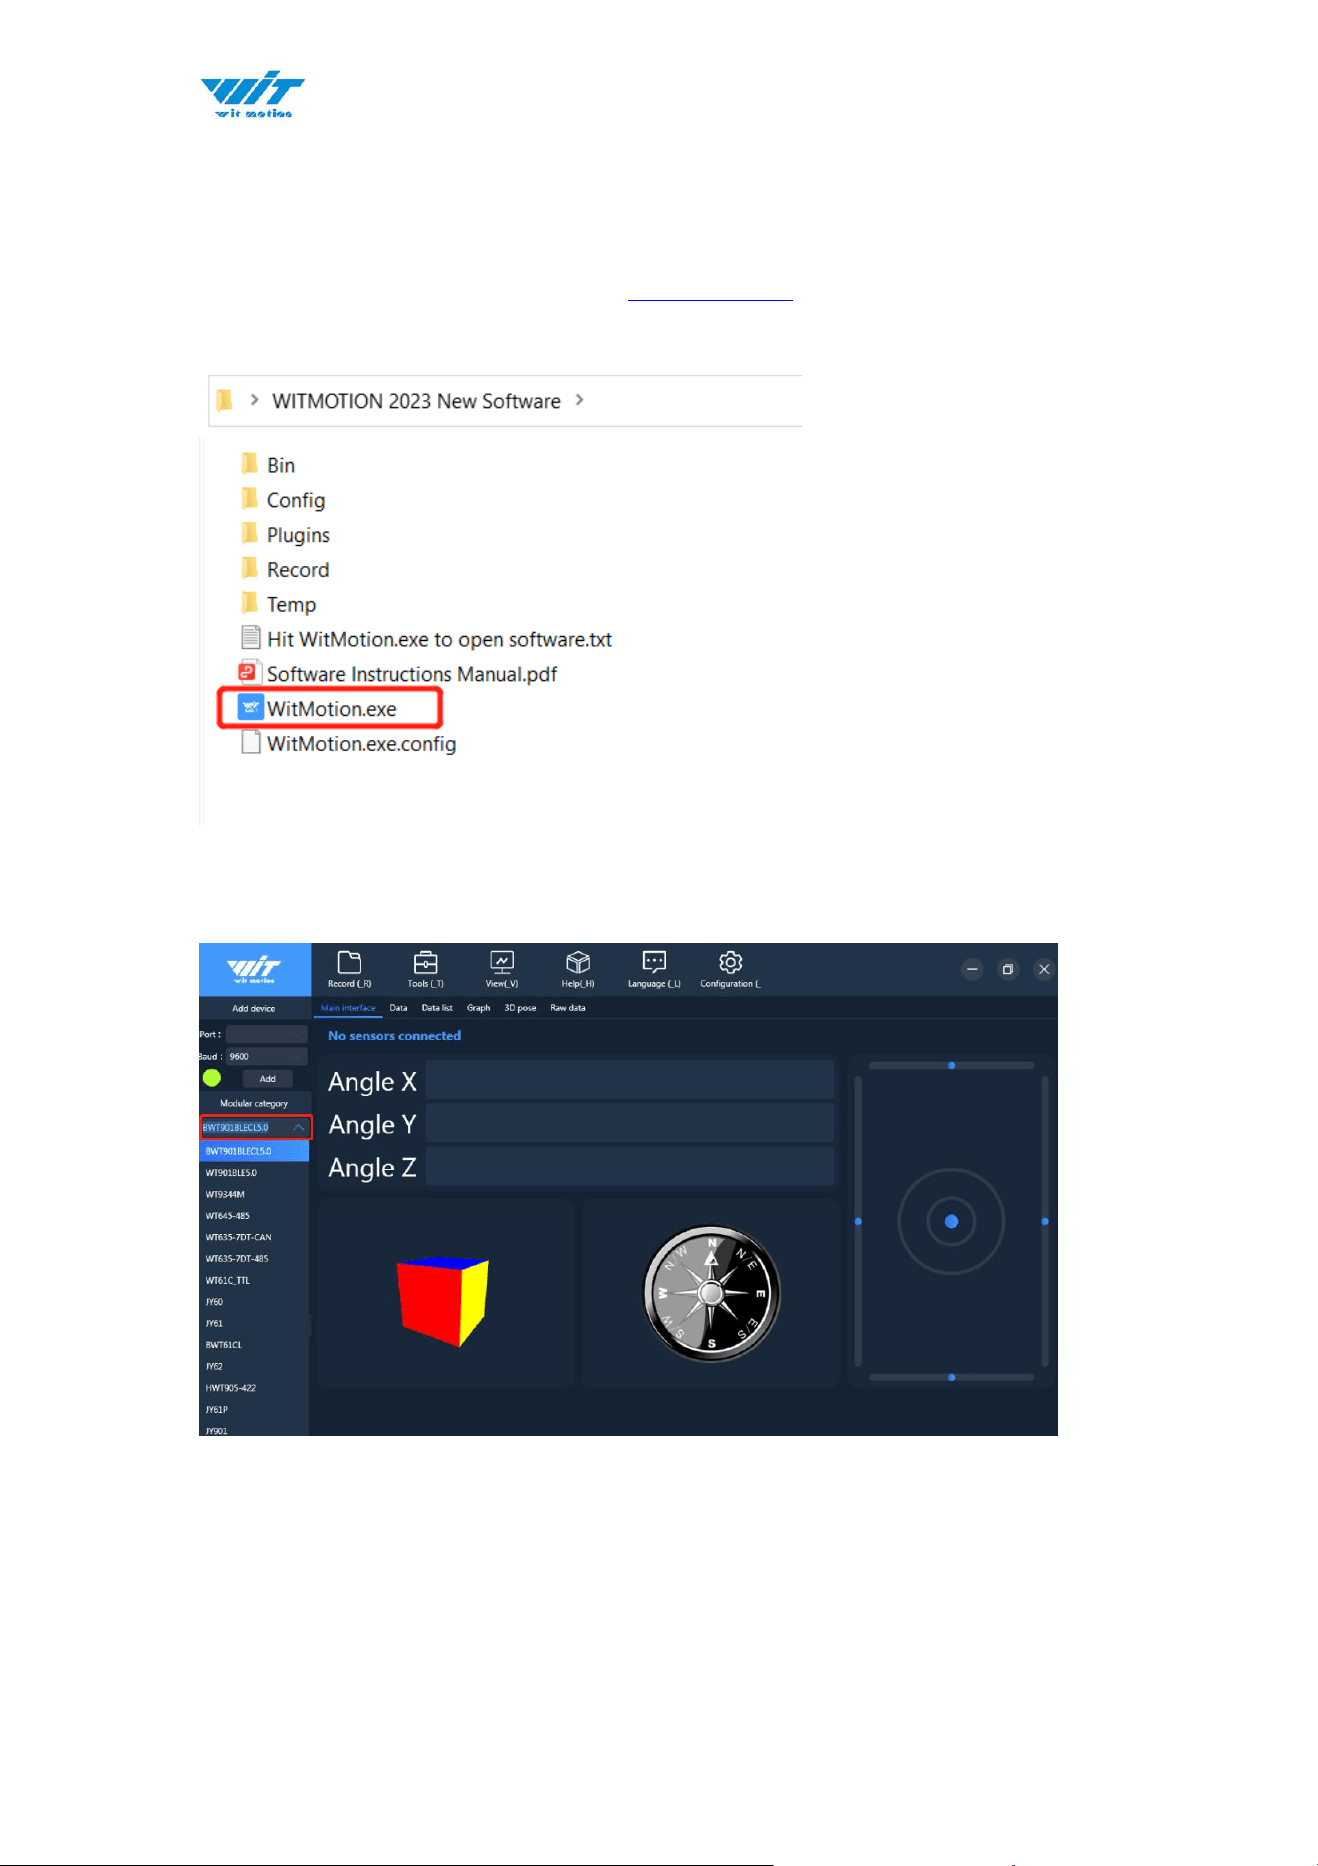
1. Install WitMotion New Software (Download link).
2. Open the WitMotion New Software and the laptop’s Bluetooth.
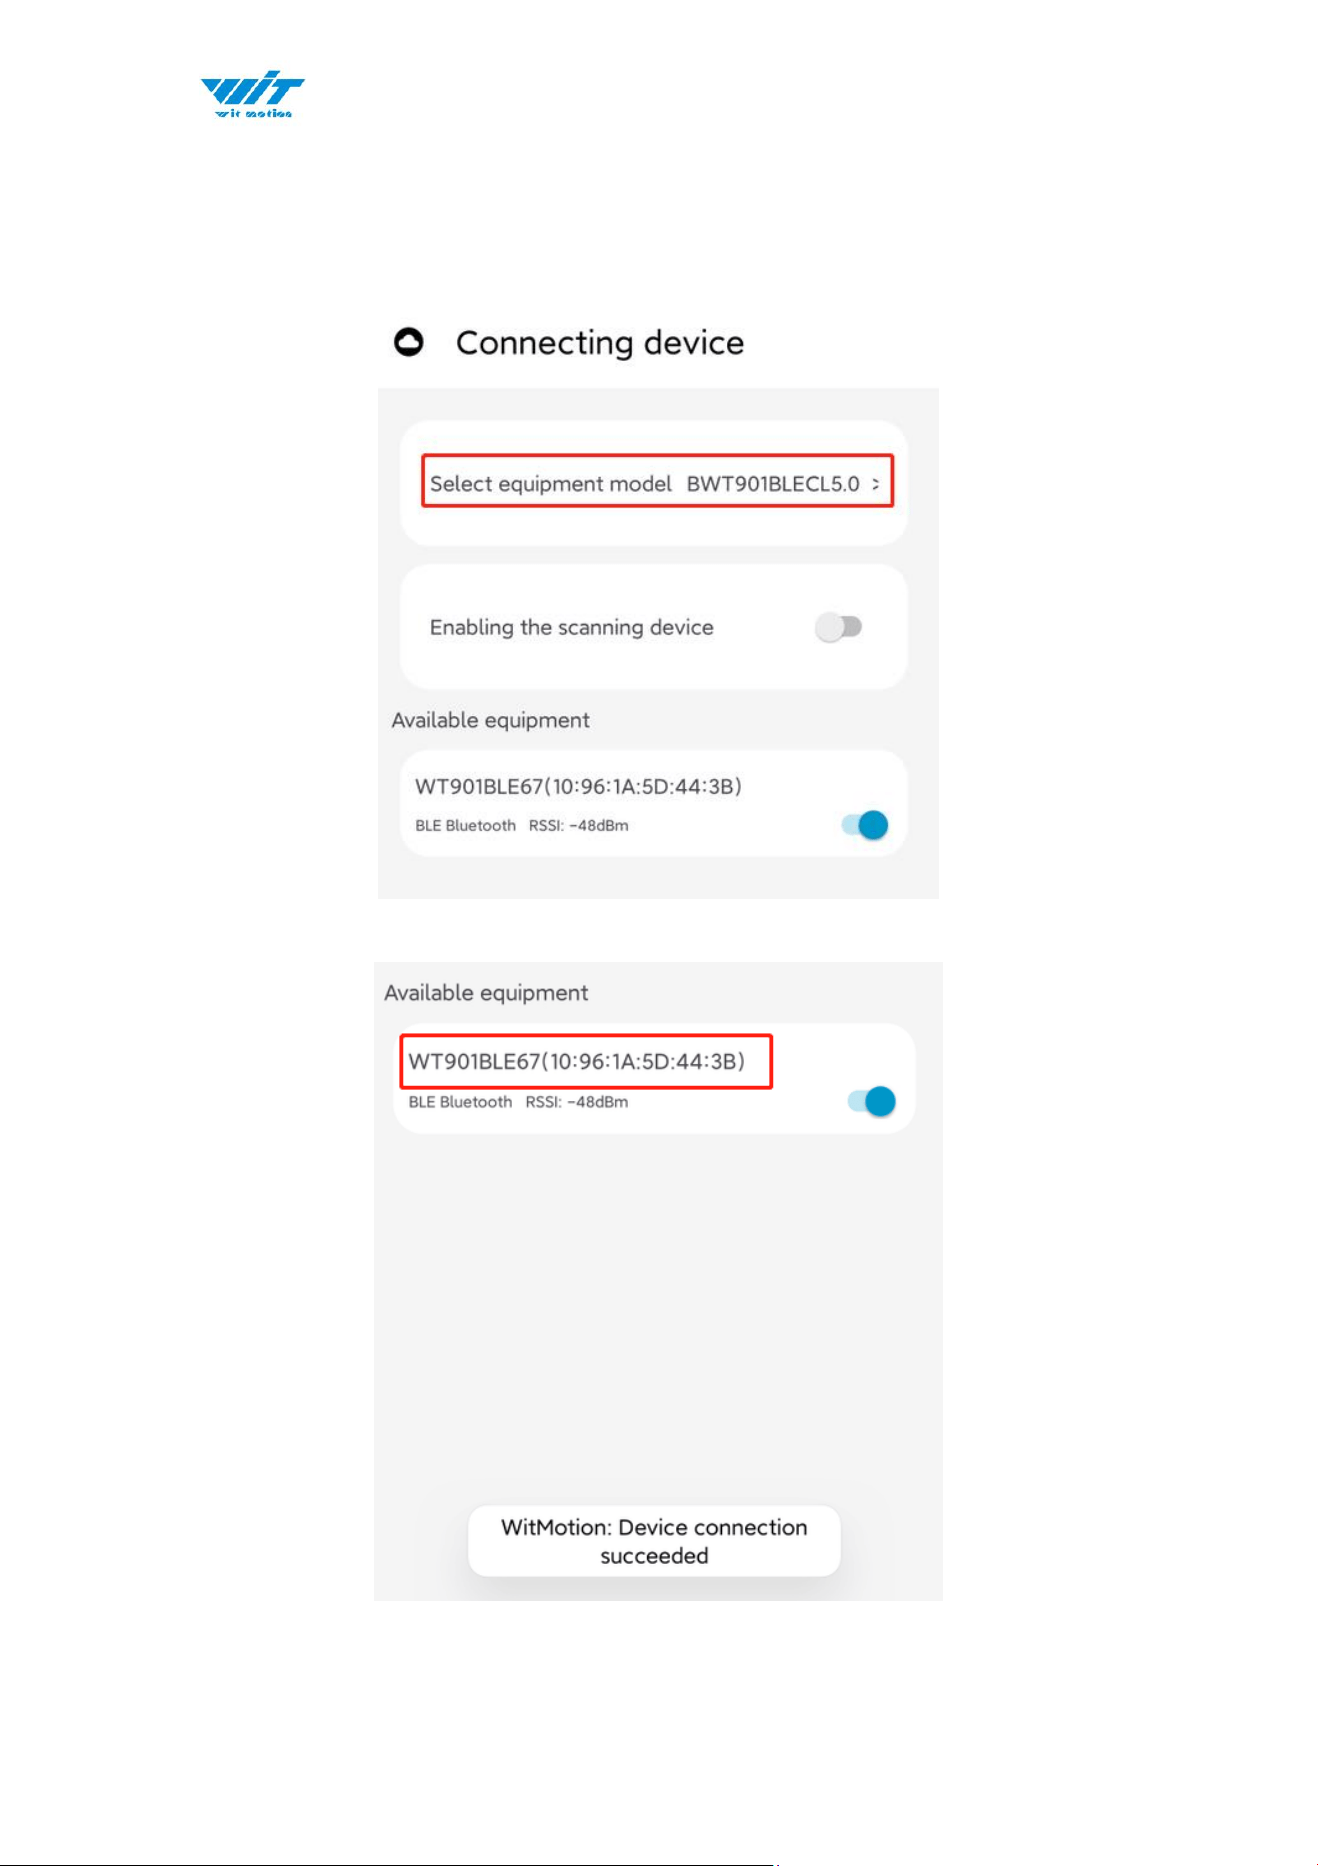
3. Choose module ”WT901BLECL5.0”.
The WT9011DCL and the WT901BLECL are the BLE5.0 sensors, you can
input the WT901BLECL to connect the WT9011DCL.
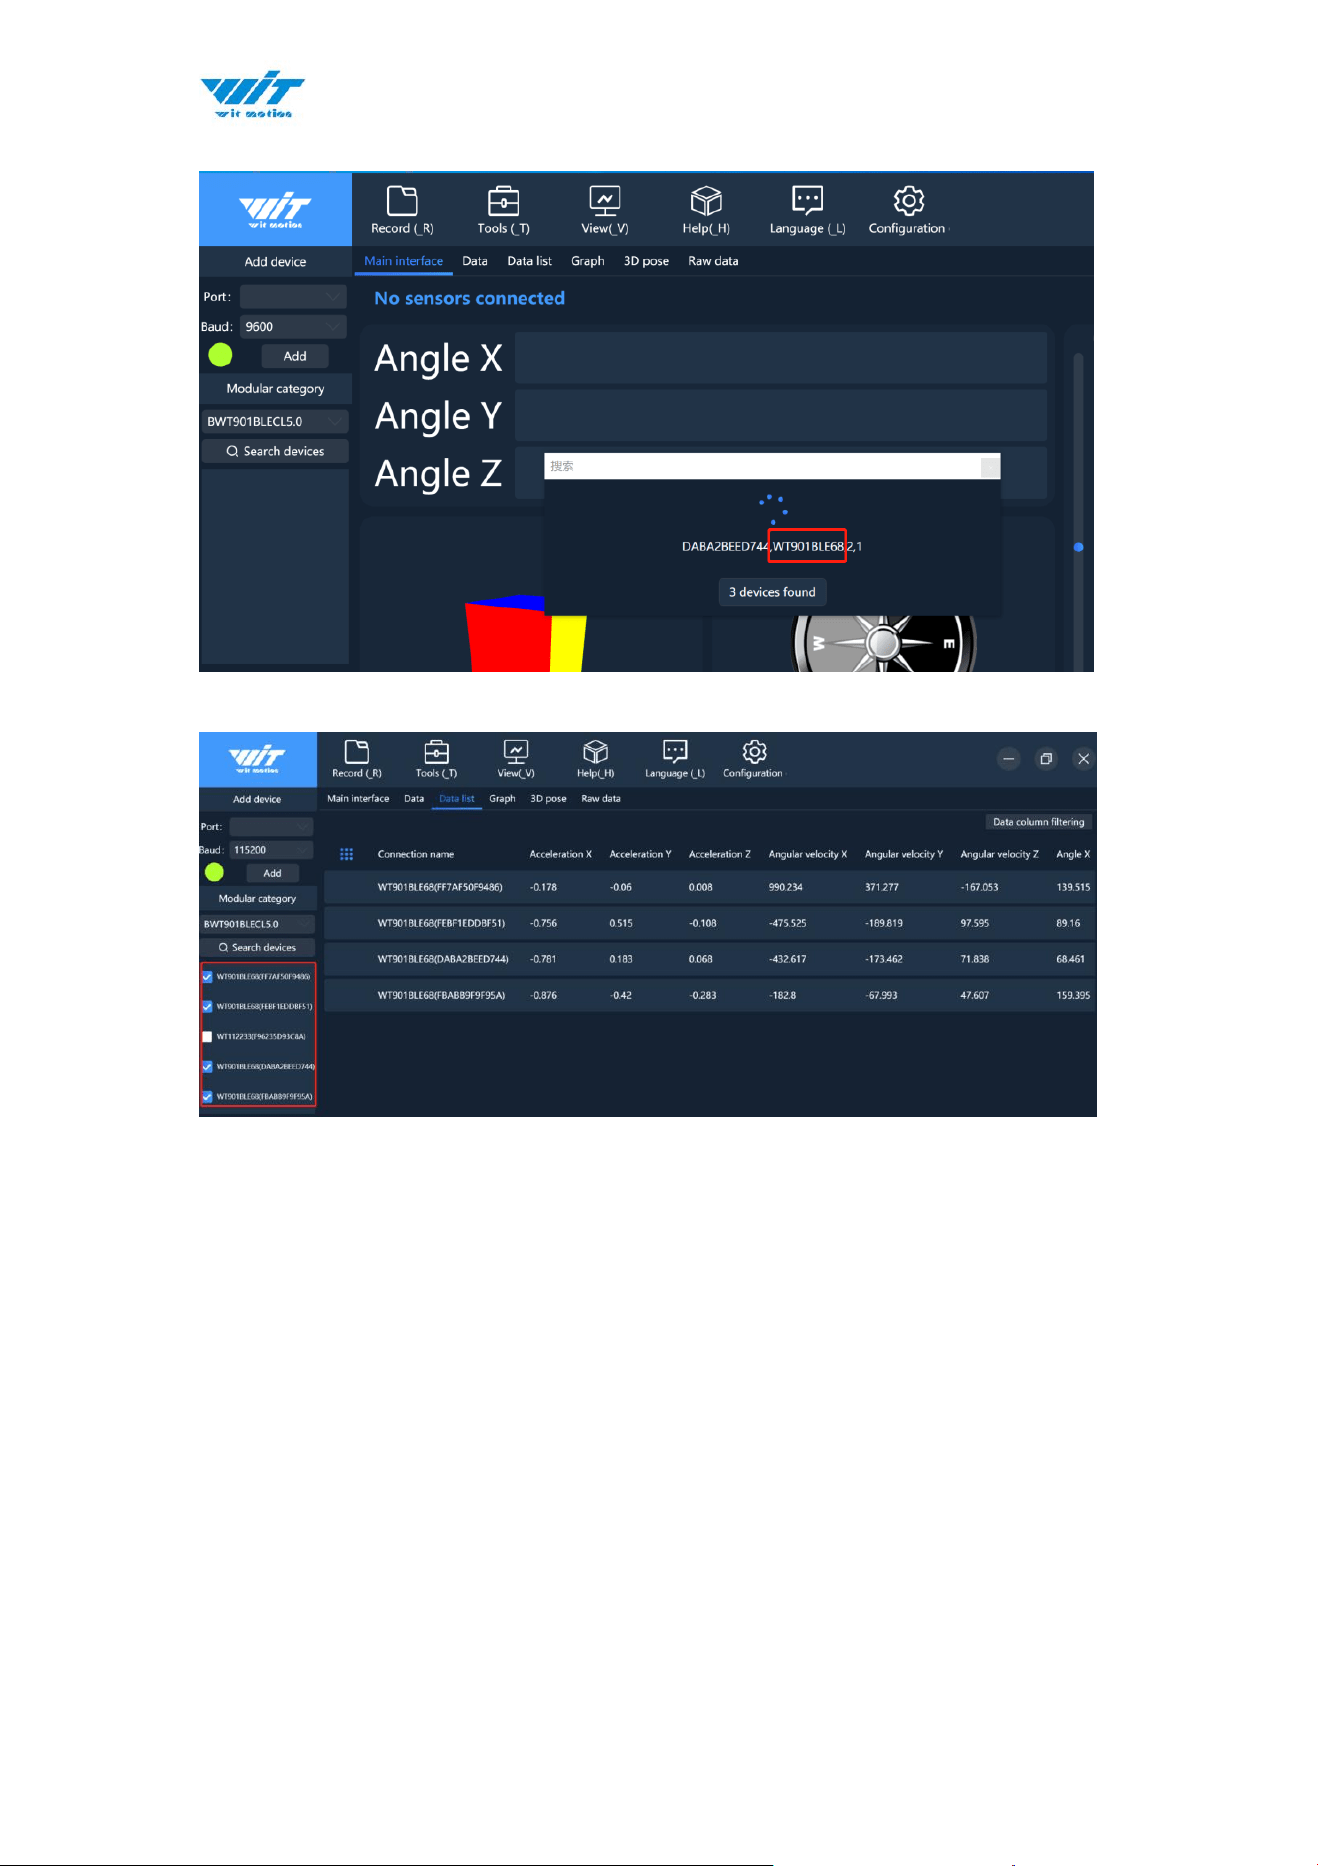
4. Open all sensors.
5. Click “Search devices”, the software will auto-search. Once it searches
“WT901BLE68”, close the pop-up, and then wait for a minute, you can see
the data.
WT9011DCL BT5.0 | manual v23-607 | www.wit-motion.com
- 49 -
6.1 Software Setting
For software introduction including button and functions setting, please
referring to the below link.
https://drive.google.com/file/d/18OntSUDU1m4vNhcRXvmTeFN1rAK3jcmZ/vi
ew?usp=share_link
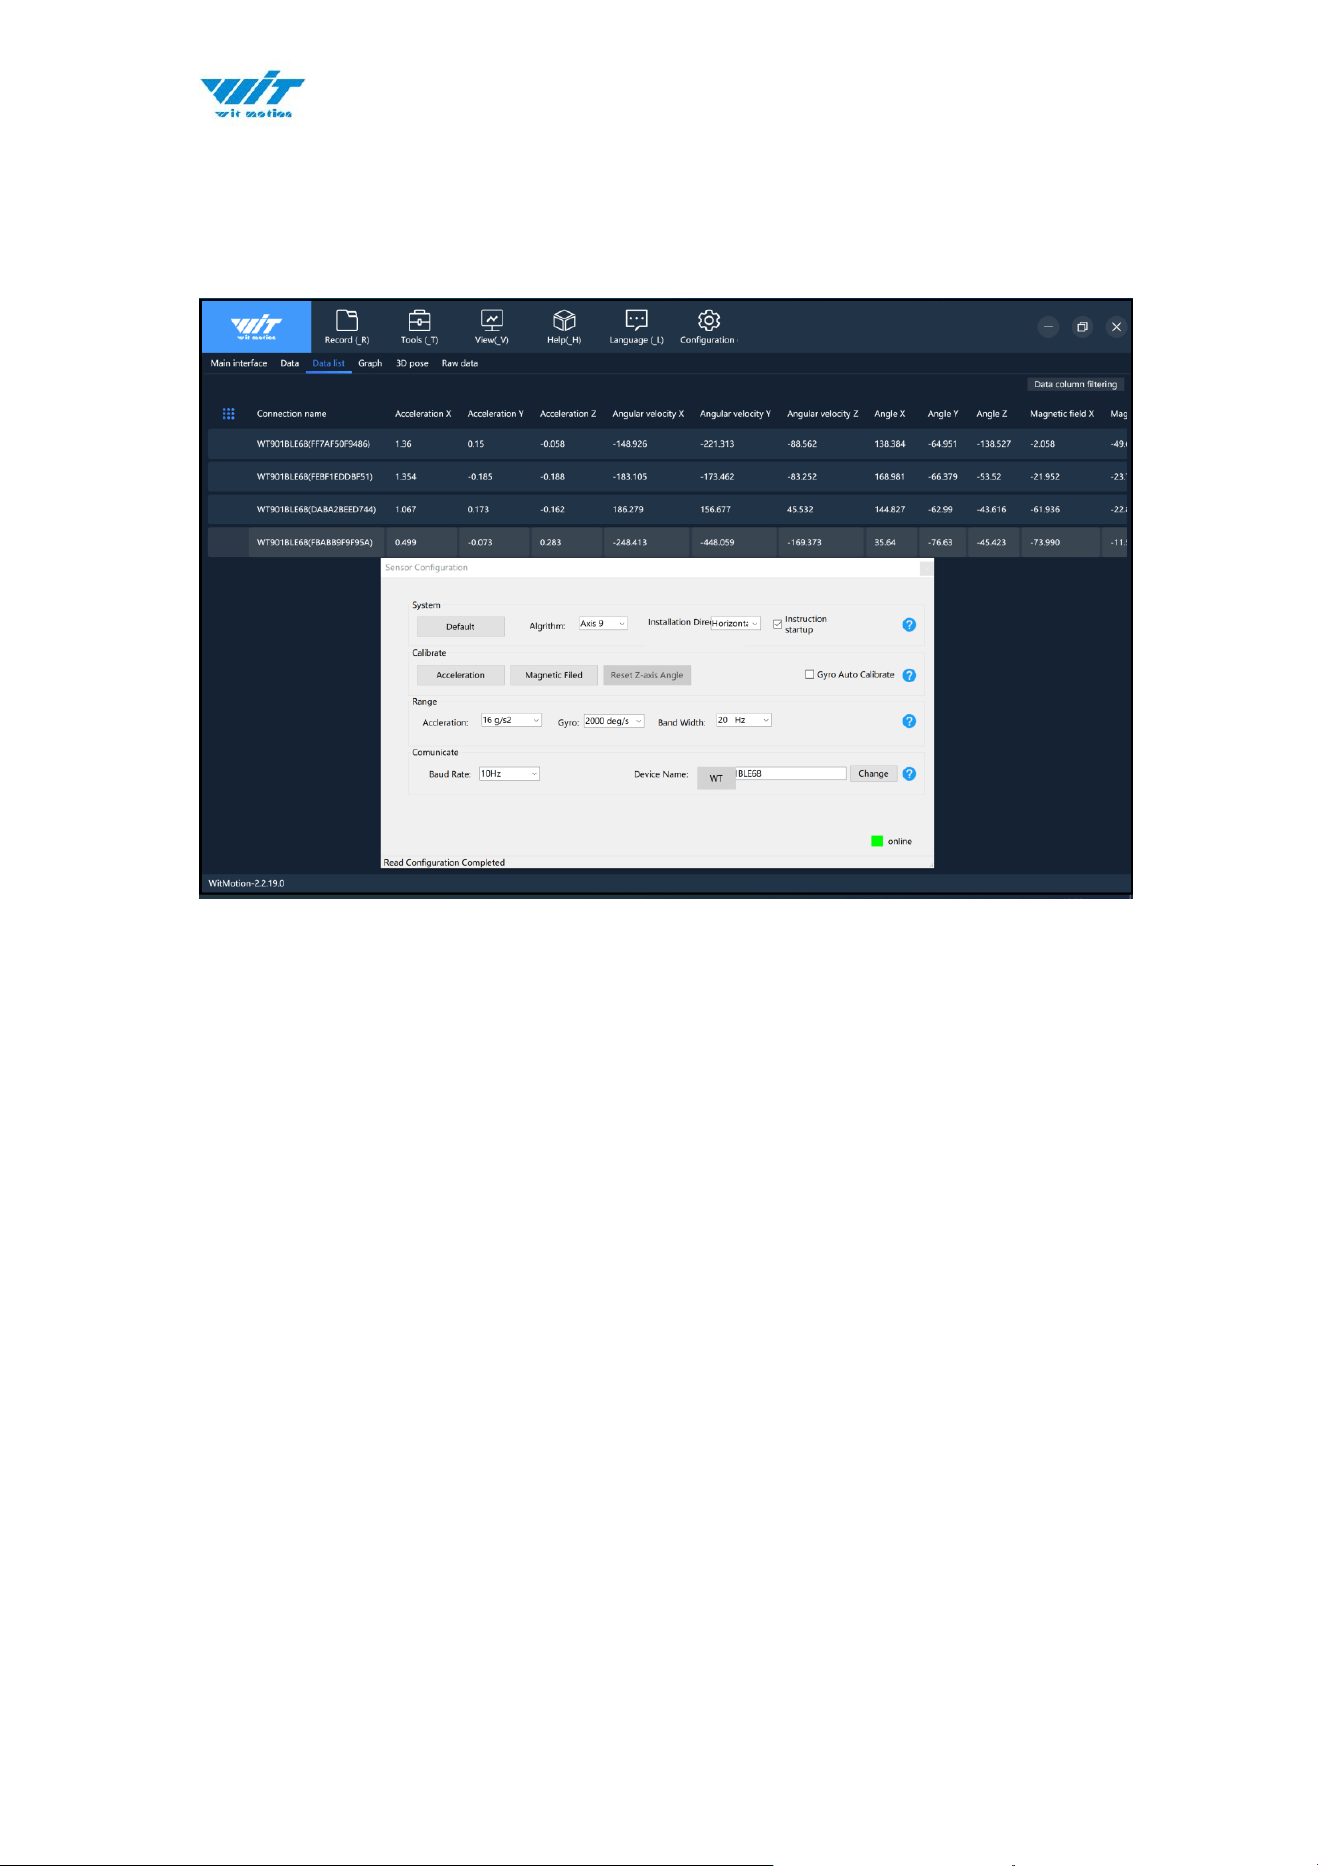
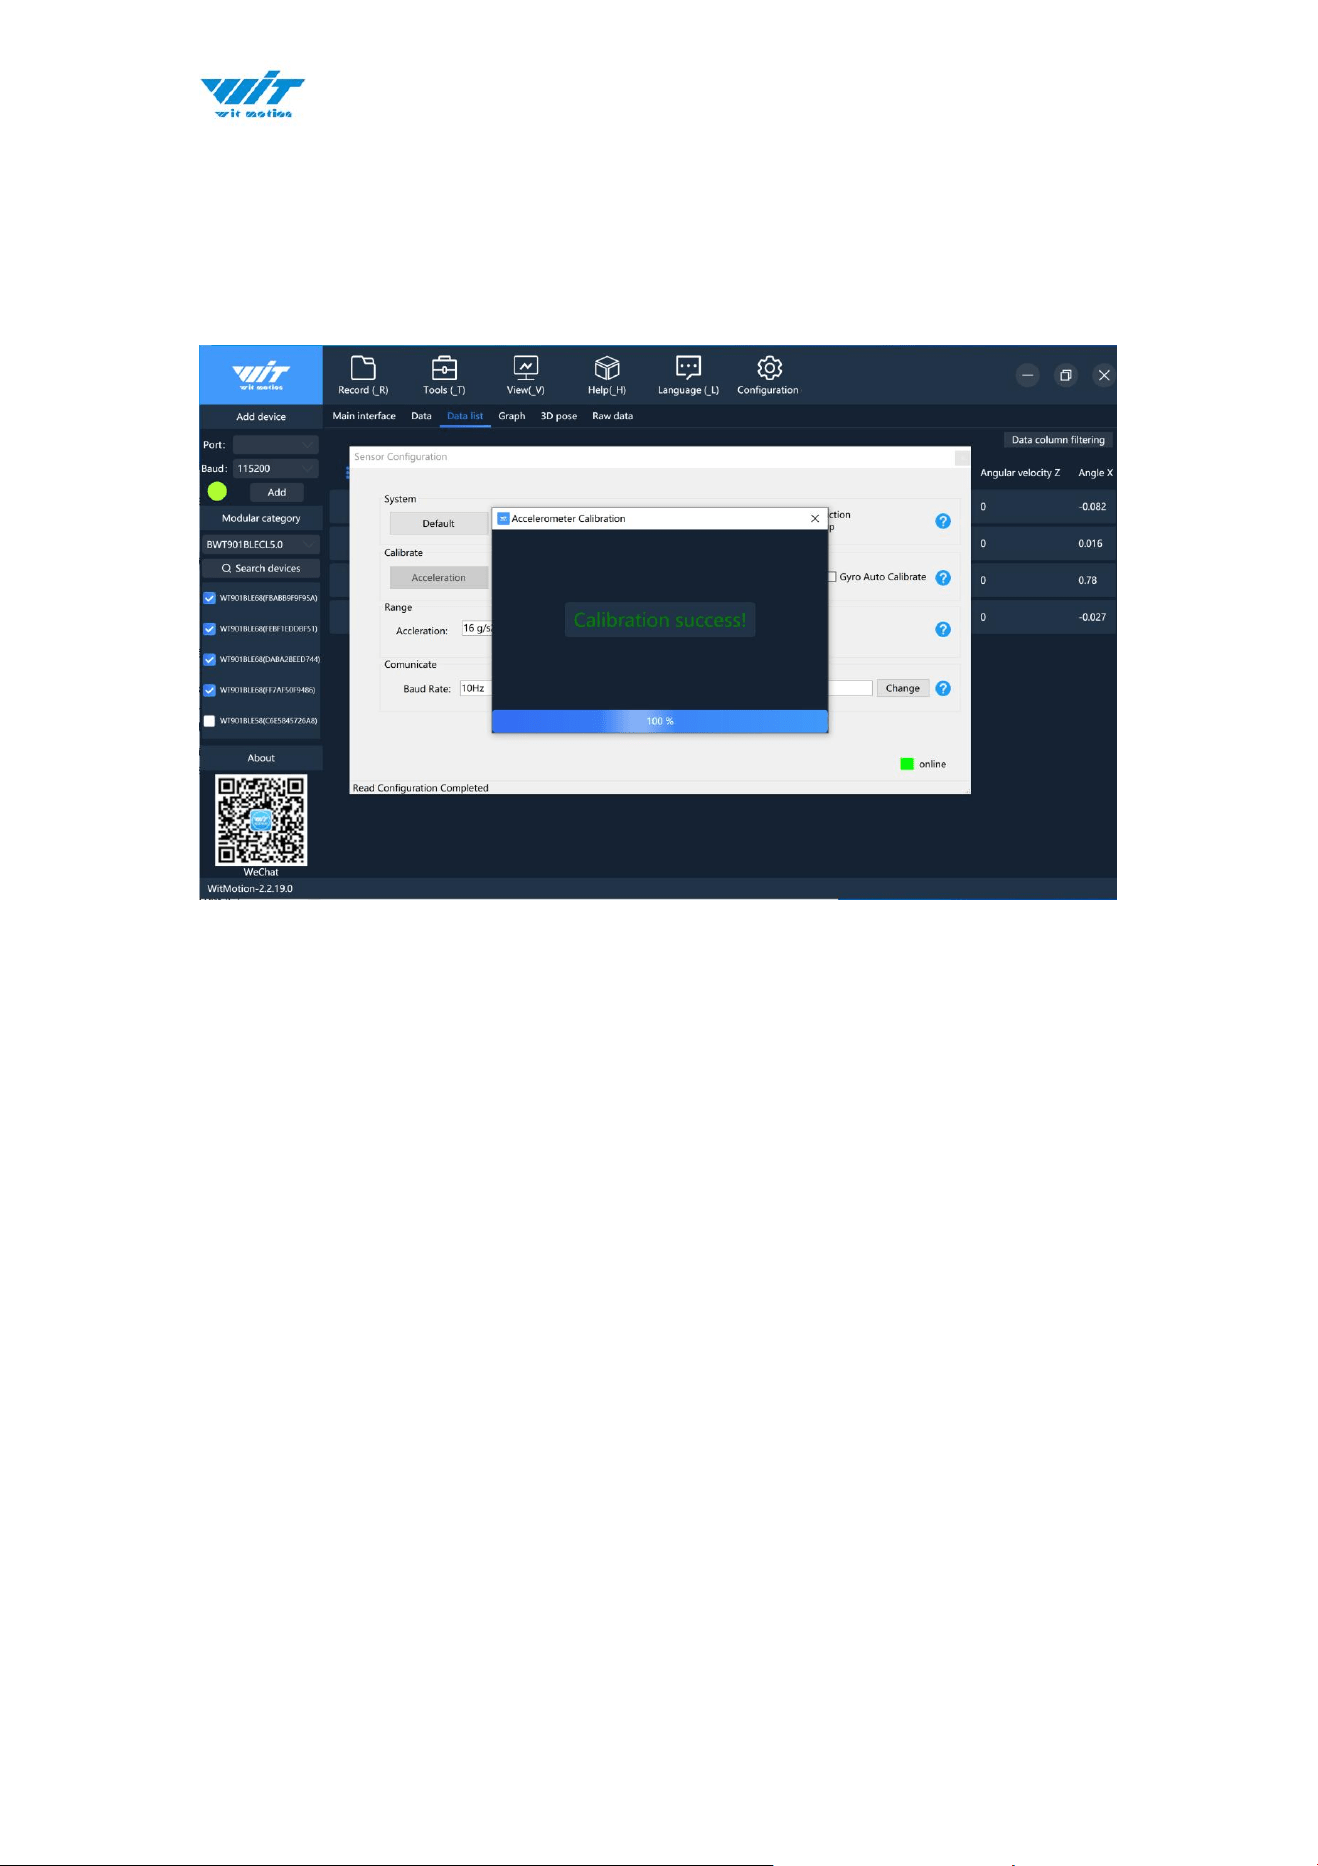
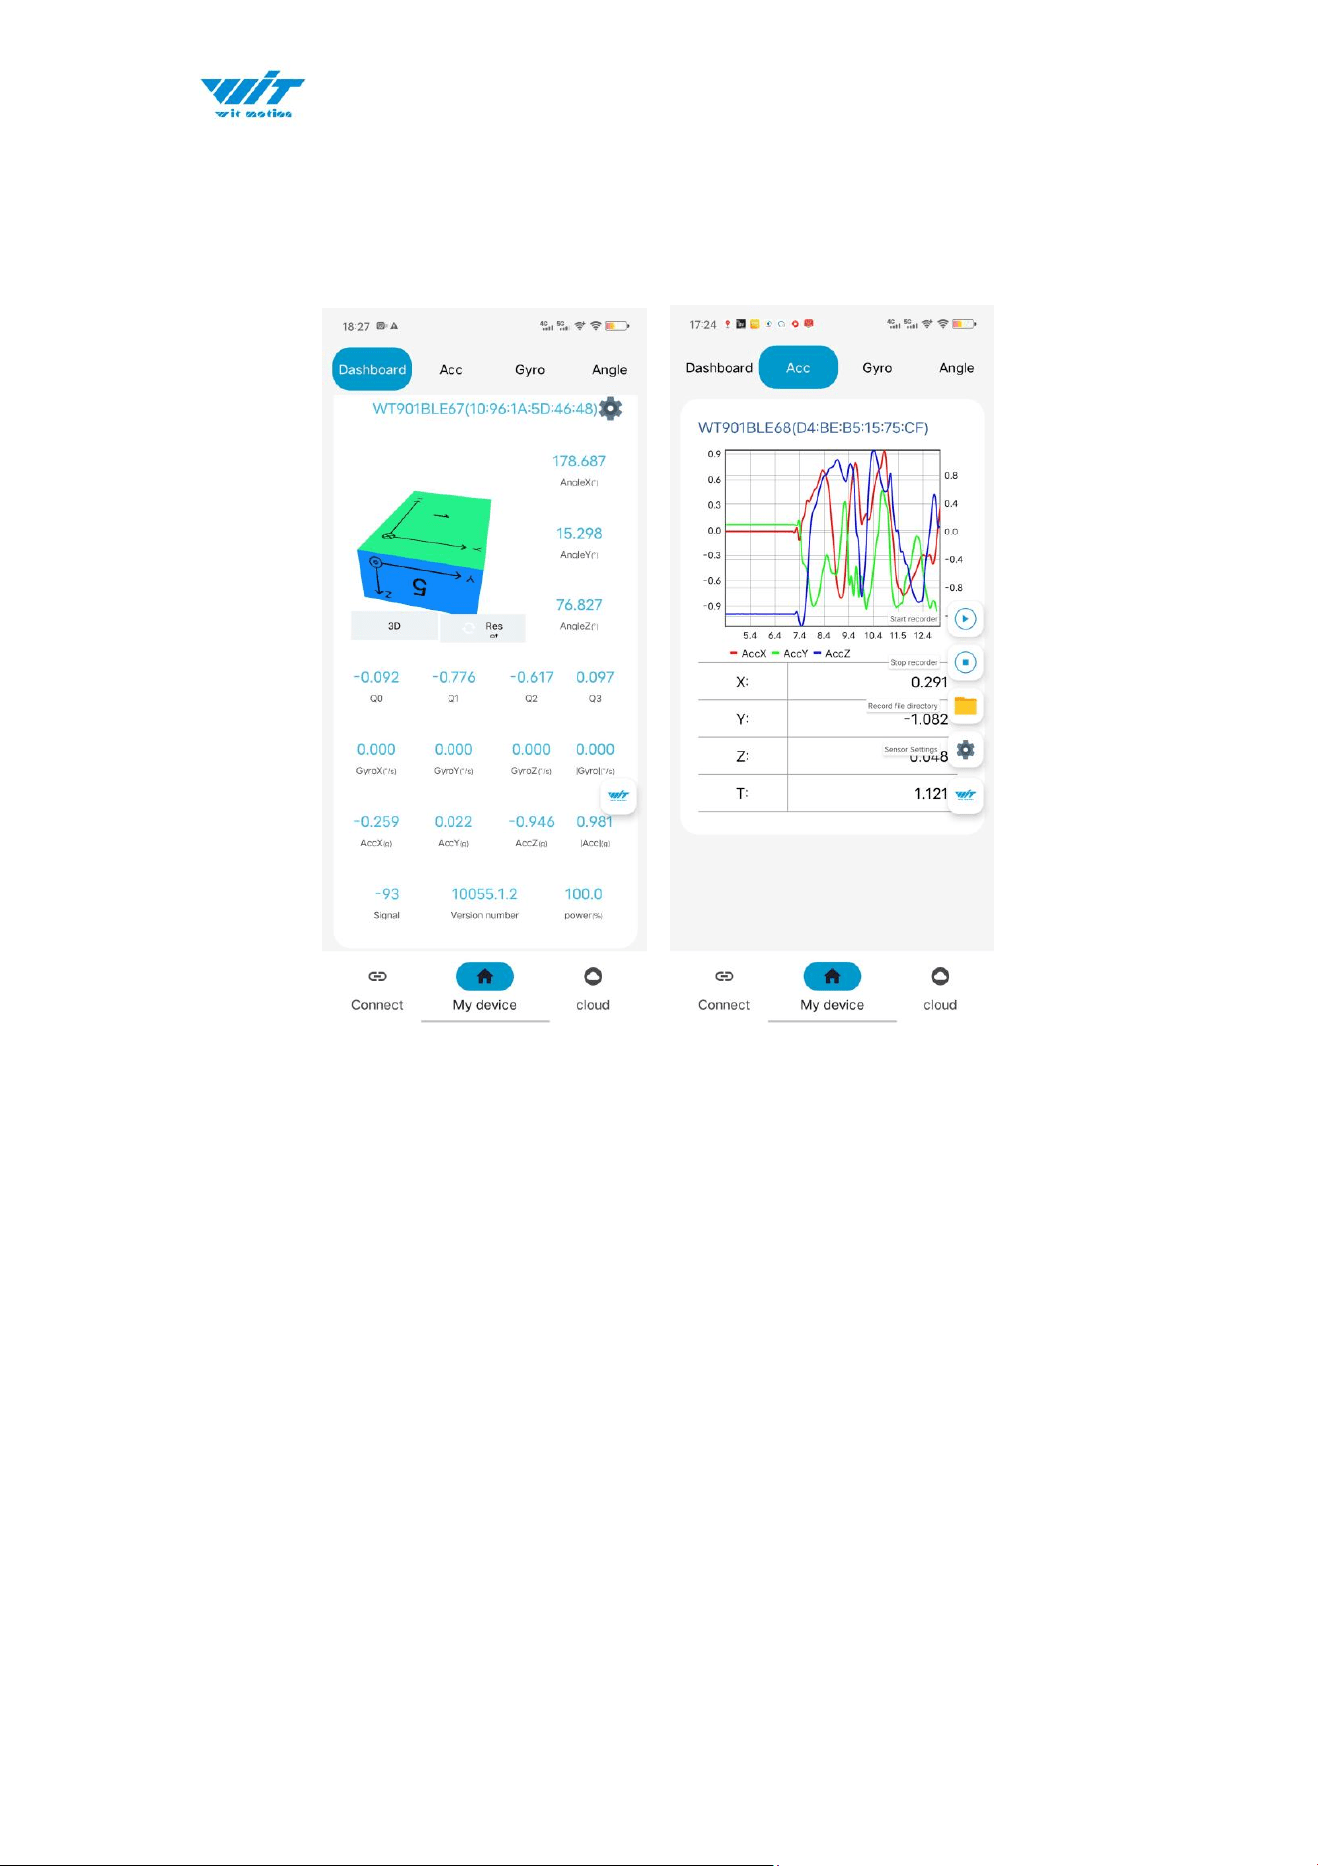
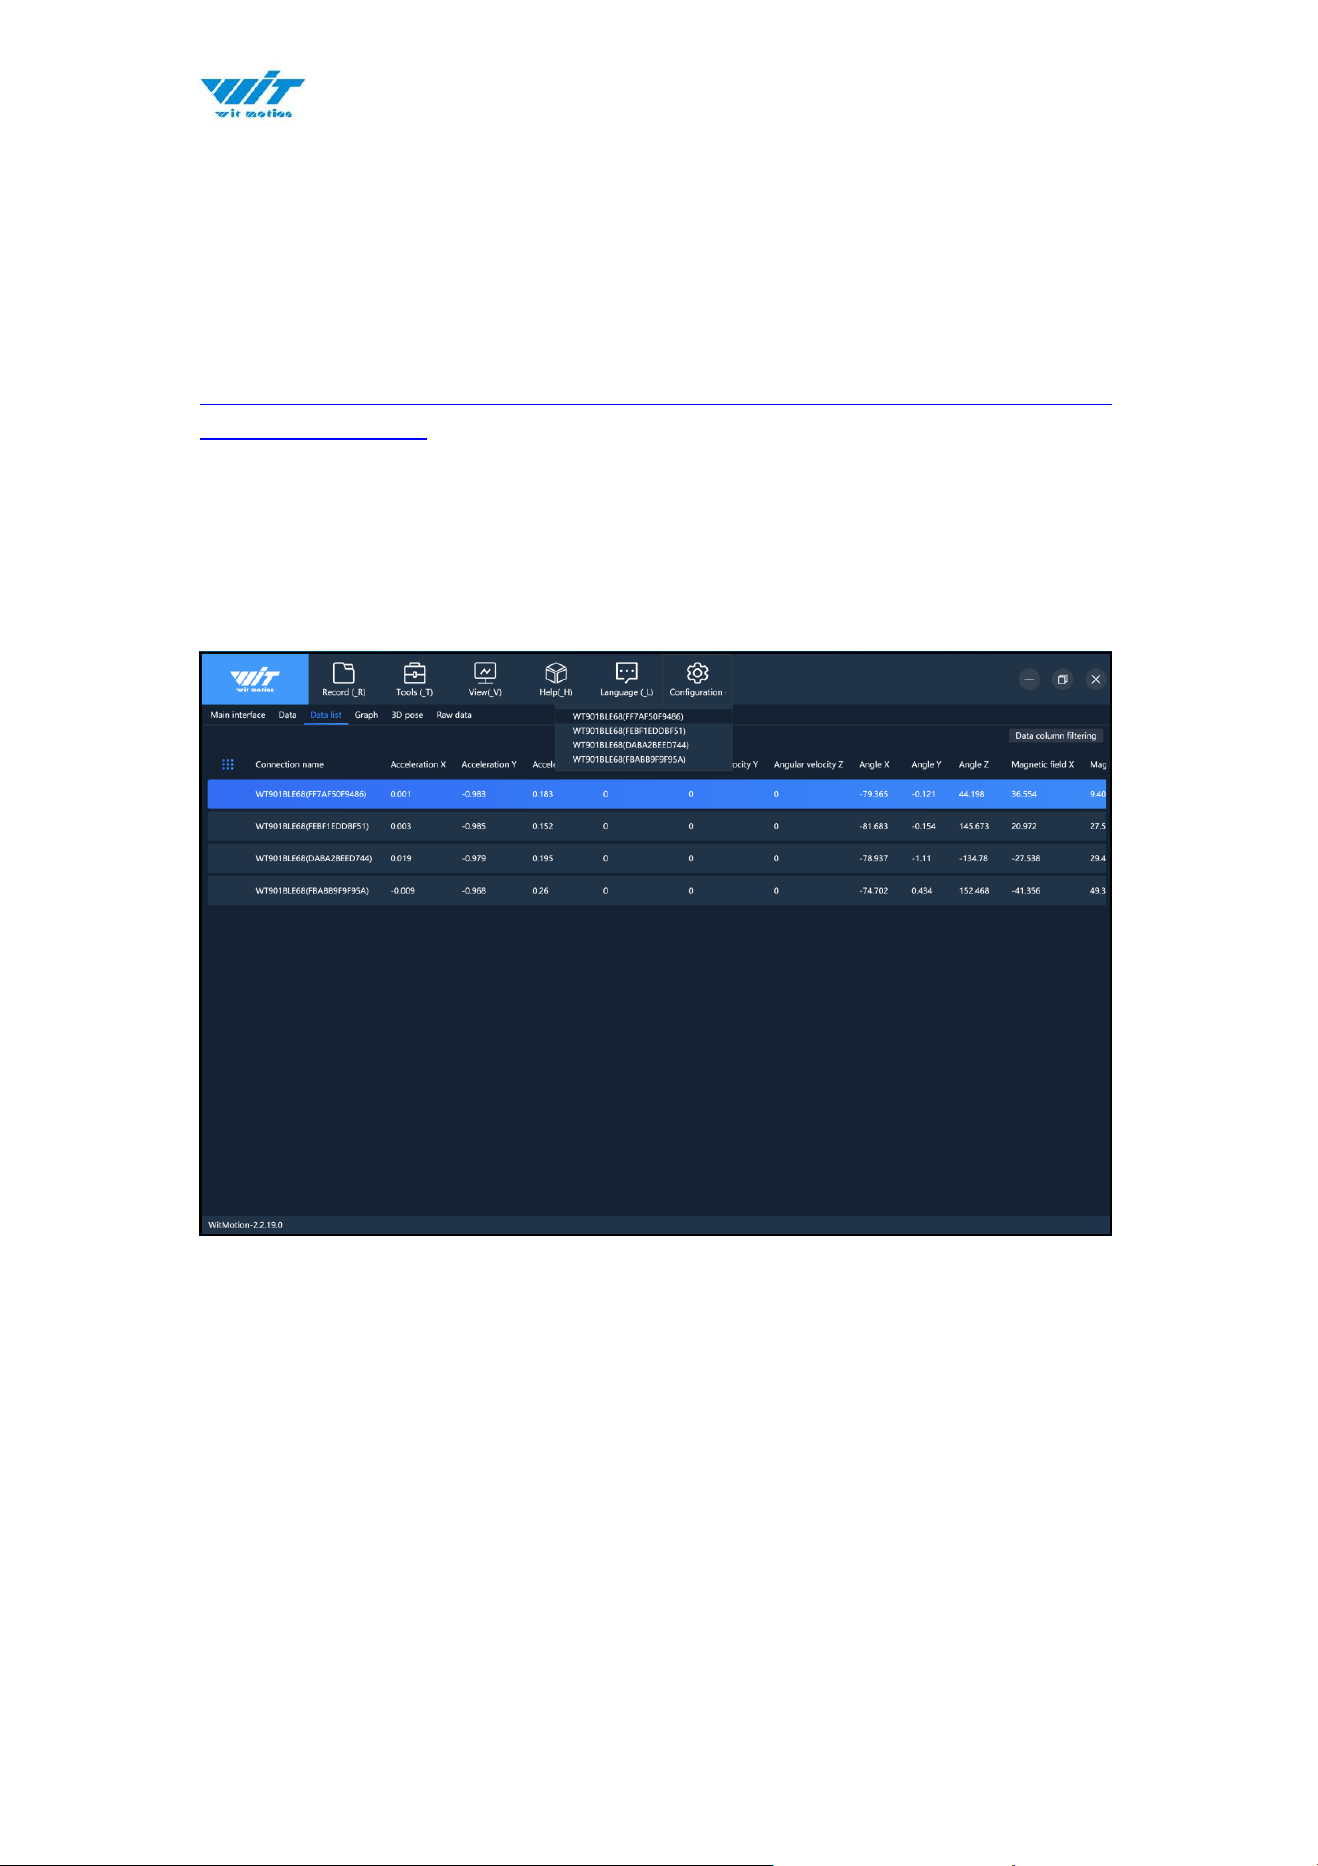
6.1.1 Data Configuration
Click the corresponding sensor, you can configure the individual sensor
separately, record and so on.