Lighting made better.
support@sunco.com
(844) 334-9938
SKU: DL_G56-12W
User Manual
5/6” LED
Gimbal Retrot
Downlight
Gimbal Downlight
1
Let there be light!
(literally)
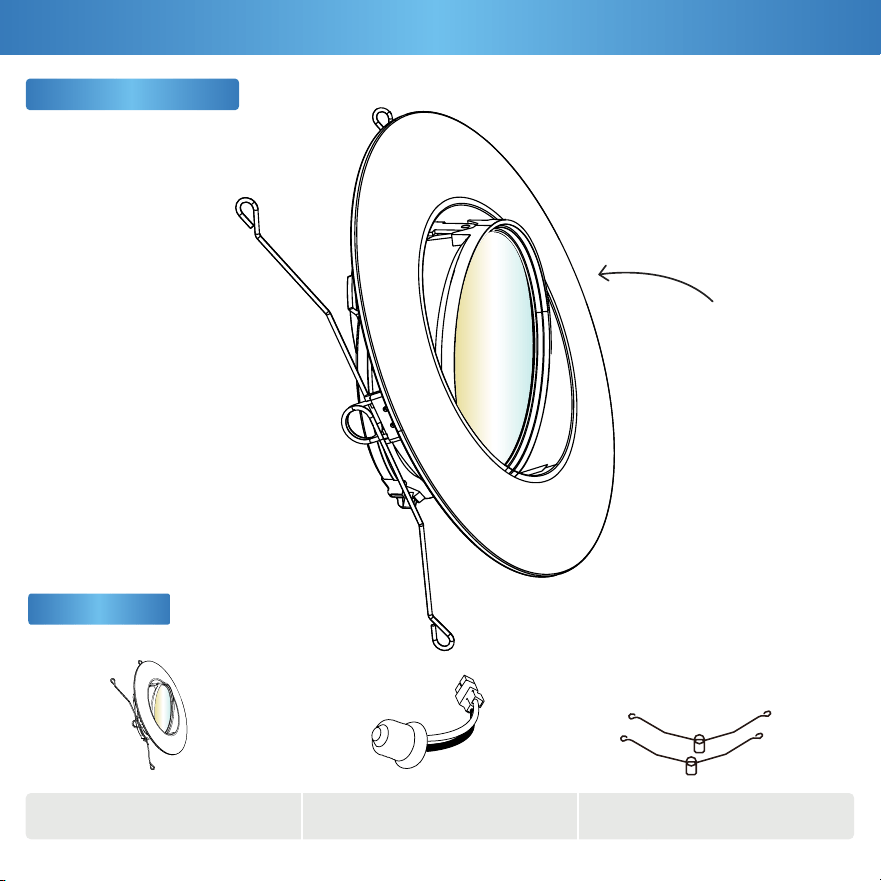
What’s in the Box?
x1 x1
Light Fixture
TP24 to E26
Adapter
Spring Clips
Accessories
C
BA
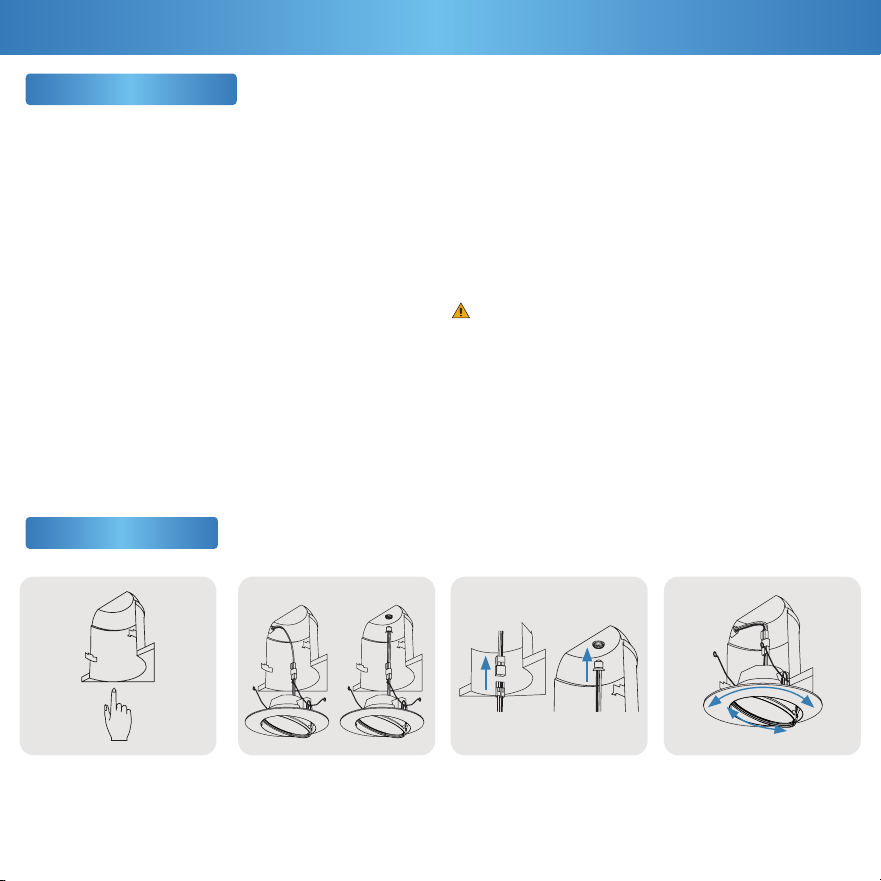
Locate the recessed
housing.
Connect the adapter with
lamp base connector.
Determine type of
connector available.
Push downlight into
can until secure.
Step 1 Step 2 Step 3 Step 4
This device complies with Part 15 of the FCC rules.
Operation is subject to the following two conditions:
1) This device may not cause harmful interference.
2) This device must accept any interference that
may cause undesired operation. Please review
all instructions carefully prior to installation.
• Turn o circuit breaker before installing this fixture.
• This product should be installed by a person familiar with
the construction and operation of the product and hazards
involved. Safety eyeglasses and gloves are recommended.
• Abide by related regional and local laws or regulations.
• Proper grounding is required to ensure safety.
• Do not alter, relocate, or remove wiring during installation.
• Do not make or alter any open holes in wiring enclosure or
electrical components during installation.
• Check for shipping damage before installing. If the
product is damaged, do not use it.
• Keep fixture away from corrosive substances.
• Suitable for damp locations at temperatures ranging from
-4°F to 113°F. Not for use where directly exposed to water.
• Clean the fixture regularly to ensure proper operation. Do
not clean with harsh solvents.
• Use safety precautions and abide by regional and local
laws or regulations.
• This product is not compatible with 3rd party sensors.
• This product is not compatible with photo controls.
• This product is not compatible with occupancy sensors.
• This product is not compatible with timing devices.
To reduce the risk of fire, electric shock, or physical injury:
2
Safety Information
Quickstart Guide
2
Before You Start
21
WARNING:
Cancer & Reproductive Harm- www.P65Warnings.ca.gov
45°
360°
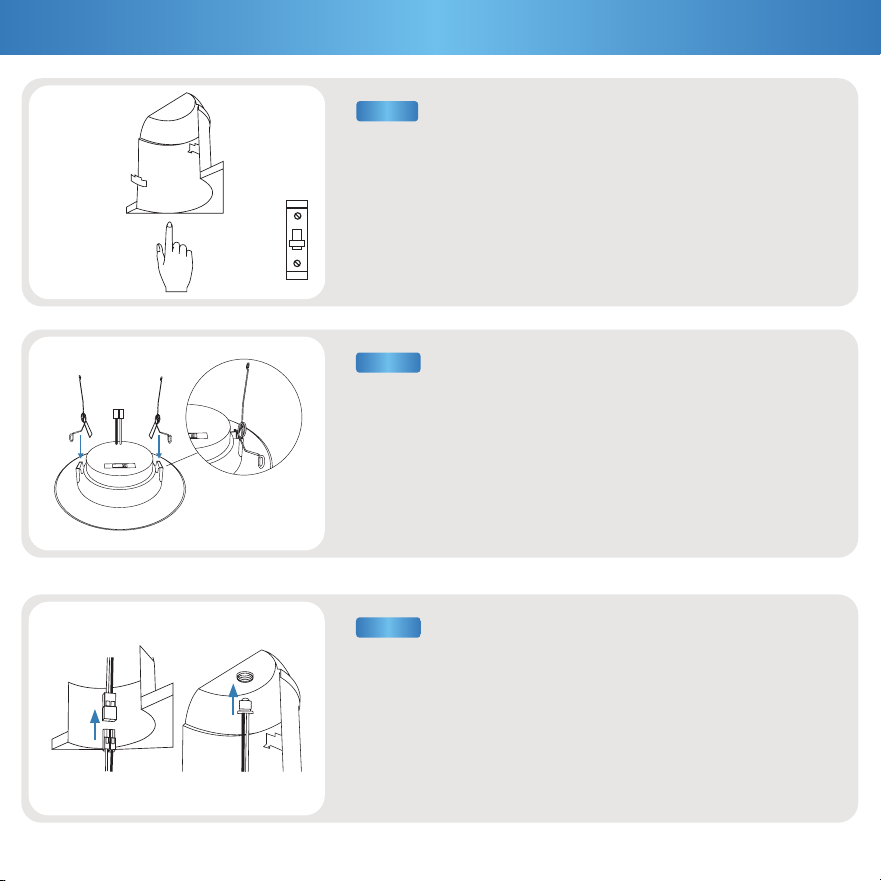
a. Turn off the circuit breaker before installation.
b. Locate the housing and remove the previous fixture.
NOTE: Light fixture may be hot! Allow time for fixture
to cool after the power is off.
3
Installation Guide
STEP 1
ON
OFF
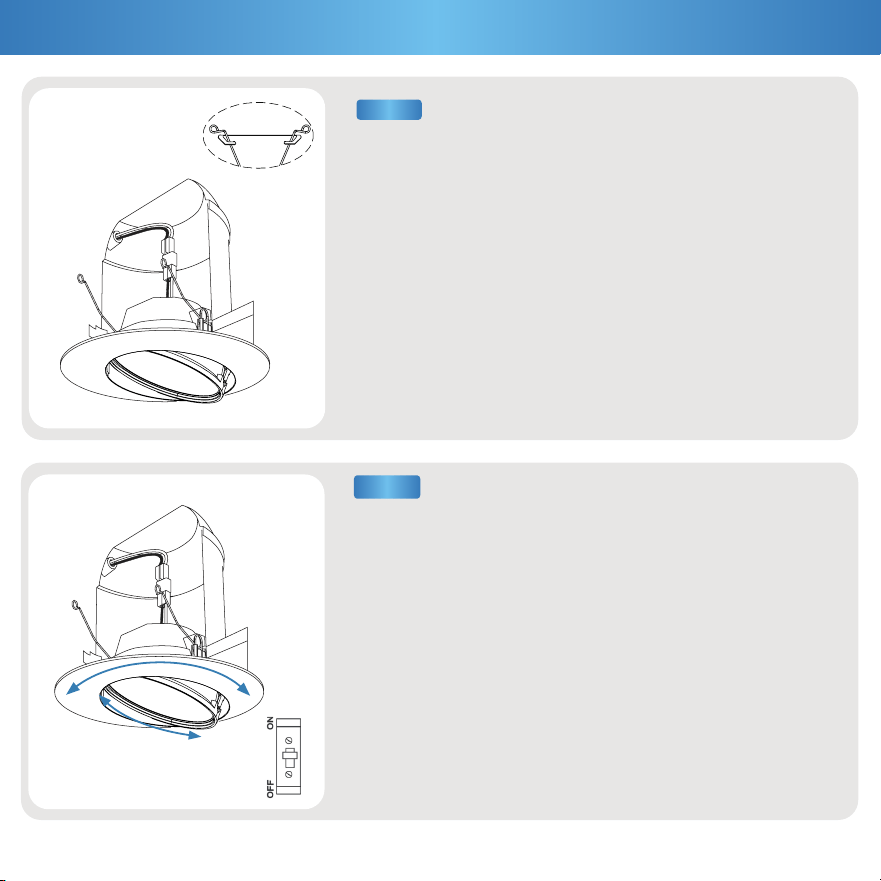
a. Determine the type of connector available, then
connect the wires.
(1) TP24 Connector
(2) E26 Base
STEP 3
(1)
(2)
a. Install the spring clips (C) to the luminaire.
STEP 2
C
STEP 4
4
Installation Guide (Cont.)
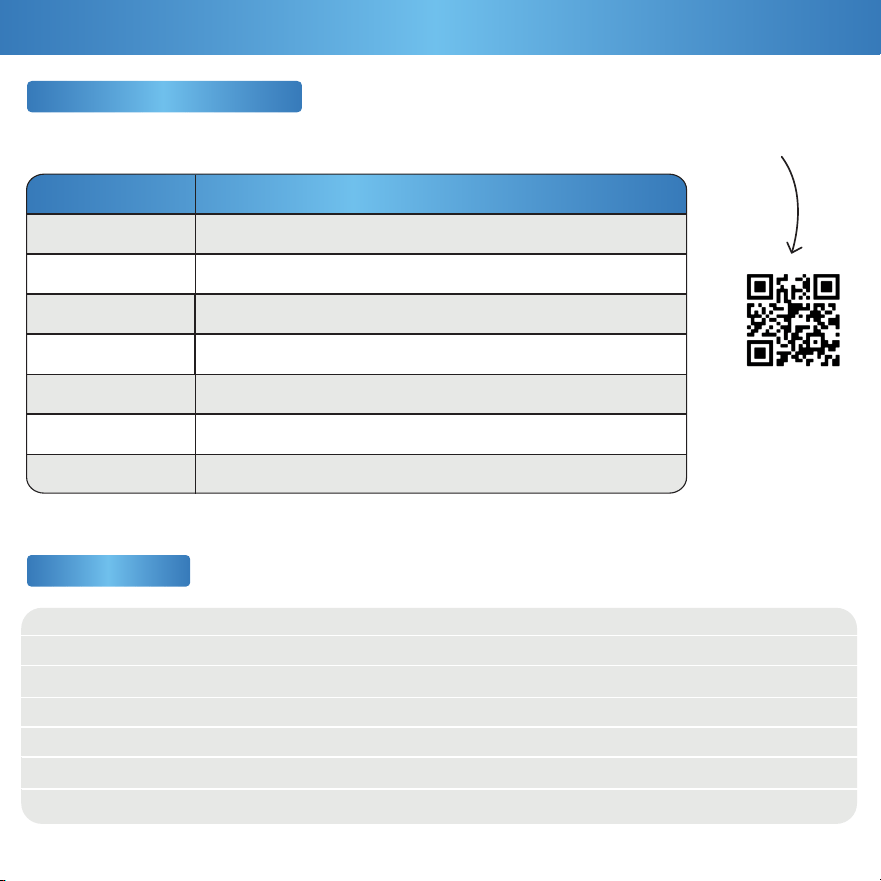
a. Line up the trim ring with opening, then push the downlight
into the can. Ensure that both ends of each spring are
installed into the C-clips (1).
b. Tuck all the wires into the can.
STEP 5
(1)
45°
360°
a. Adjust the gimbal position to aim the light. The gimbal
rotates 360° and tilts 45°.
b. Turn on circuit breaker and test light.
Voltage
Wattage
Beam Angle
Efficacy
Power Factor
Material
Dimmable
120 V
12 W
120°
67 lm/W
0.8
PA + PS (Lens)
Yes
50,000 Hours
800 lm
Damp
80+
Indoor
Yes
7 Years
Average Lifetime
Lumens
Moisture Rating
CRI
Usage
IC Rated
Warranty
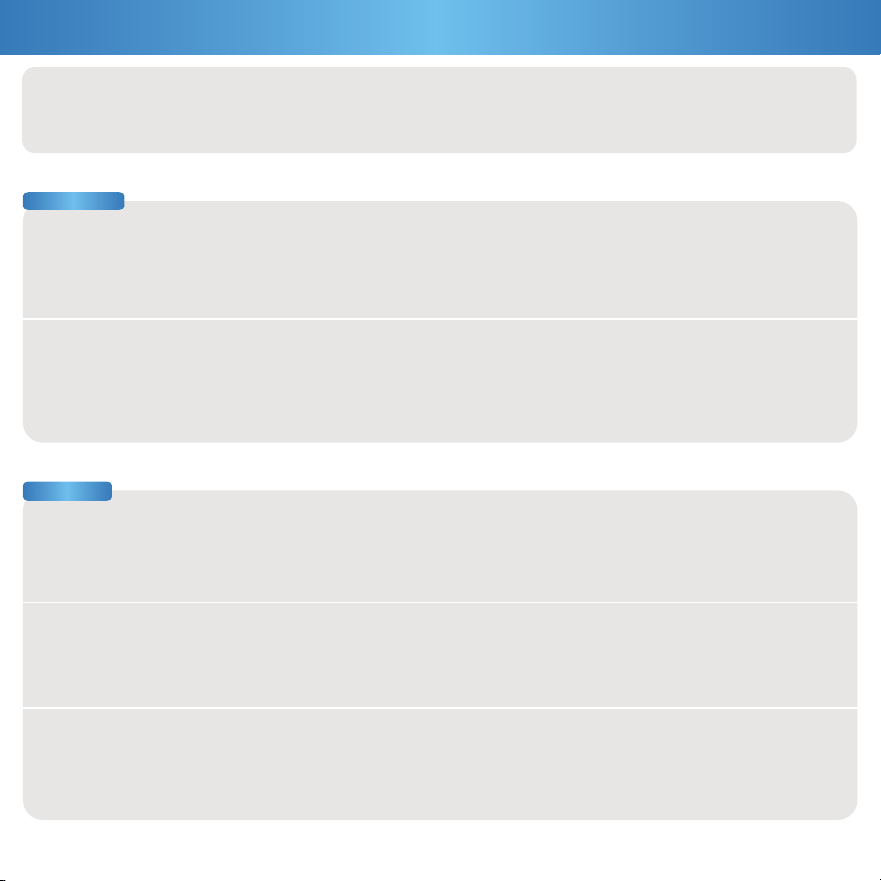
Recommended Dimmers
Specifications
5
Product Details
Scan for the full
compatible dimmer list!
Brand
Model
6672-1LW
DSL06-1LZ
AYCL-153P-WH
DVCL-153PR-WH
MACL-153M-WH
SCL-153P-WH
LUTRON
6674-10W
LUTRON
LUTRON
LEVITON
LEVITON
LEVITON
LUTRON
Feeling in the dark about an issue with your product? No
worries! Our troubleshooting section is here to shed some light
and provide you with easy-to-follow solutions for any problem.
If you still need some assistance, please feel free to
contact us with any questions. Our team of lighting experts
are happy to help brighten your day.
6
Common Troubleshooting
Light isn’t bright enough.
Light not dimming to lowest setting.
Light not dimming smoothly.
Double check if fixture is properly connected
and circuit breaker hasn’t been tripped.
Check light-dimmer compatibility. Consider
purchasing compatible switch if necessary.
Verify dimmer compatibility with fixture.
Light isn’t turning on.
Light not compatible with dimmer switch.
Check proper wattage and for unobstructed fixture.
Ensure minimum dimmer load requirement is met.
Installation
Dimming
7
Common Troubleshooting
Fixture buzzing with appliances or electronic devices.
Fixture buzzing when dimmed.
Look for nearby interferences that can cause buzzing.
Such as televisions, radios, computers, etc.
Light flickering with other lights on the same circuit.
Check that the lights on the same circuit are not
overloading the circuit.
Light flickering when turned on.
Light flickering when dimmed.
Verify dimmer switch compatibility.
Fixture buzzing with power outages. Verify light is connected to surge protector securely.
Verify dimmer switch compatibility.
Verify fixture compatibility and that it is grounded.
Light is flickering when turning on. Check that fixture wiring connections are secure.
Flickering
Buzzing
UNIT:cd
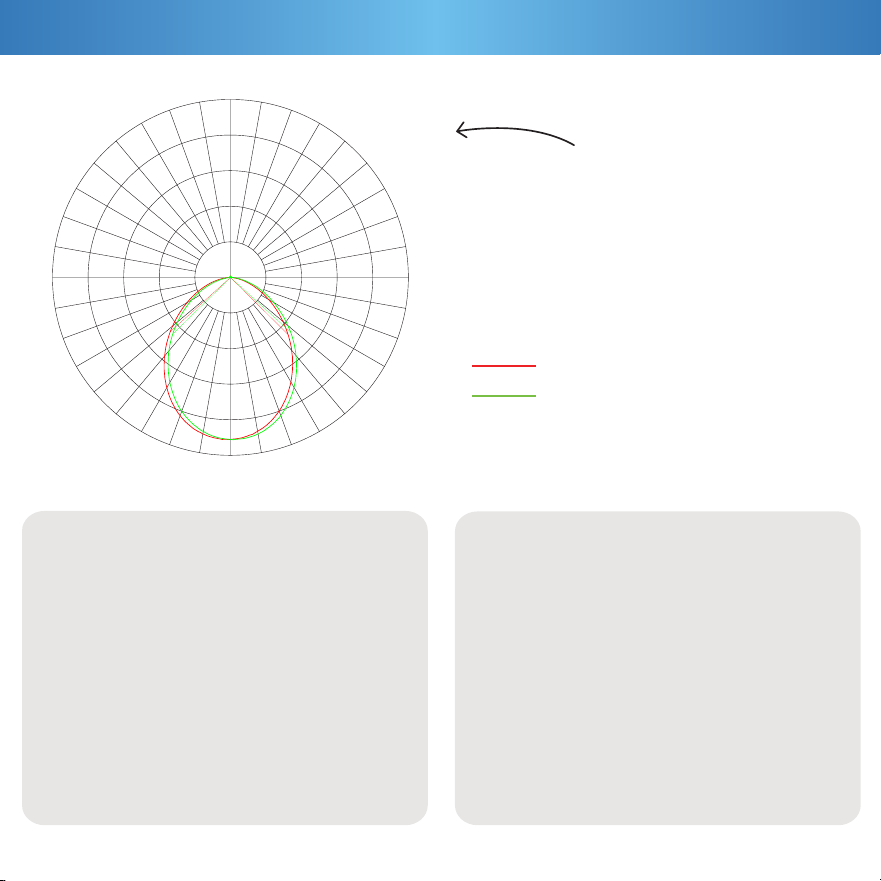
AVERAGE BEAM ANGLE (50%): 93.3 DEG
Luminous Intensity Distribution 1
C0/180
C90/270
93.3°
93.3°
Lighting distribution angle refers to the spread of light
emitted from a light source. It is an important factor to
consider when selecting a fixture or bulb, as it aects the
way it will illuminate an area. There are two main types of
lighting distribution angles:
A symmetric lighting distribution emits light evenly
in all directions, creating a cone-shaped pattern that
provides a pool of light. This type of lighting is ideal for
general lighting and illuminating large areas. Common
applications for symmetric lighting include general area
illumination, security lighting, and perimeter
lighting. Symmetric lighting is also used to a certain
degree in up-lighting.
An asymmetric lighting distribution angle, also known
as beam angle, creates a pattern that focuses light in a
specific direction. This type of lighting is ideal for task
lighting as it reduces glare and light spill in other areas.
Common applications include task lighting in spaces such
as landscape settings, retail stores, museums,
and much more.
It is important to note that the lighting distribution angle
can also be aected by other factors such as the
reflector design of the light source, the type of lens used,
and the distance between the light source and the surface
being illuminated.
N a lighting nerd?
No worries, you can skip this page
8
Light Distribution Angle
0
30
60
90
120
150
-/+180
-150
-120
-90
-60
-30
0
100
200
300
400
500
Update Light
Distribution Angle

support@sunco.com
(844) 334-9938
Lighting made better.
REV1.0

