To reduce the risk of injury, the user must read and understand the Operator’s
Manual before using this product. Save these instructions for future reference.
9 GALLON
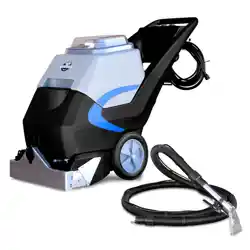
CARPET EXTRACTOR
Operations Manual
W
A
R
R
A
N
T
Y
MODEL NUMBER: TEX9

2
Table of Contents
1. SAFETY INFORMATION
1.1 Fire Safety
2. OPERATING SAFETY
2.1 Service Safety
2.2 Usage Safety
3. EQUIPMENT PERFORMANCE
3.1 Carpet Extractor Design
3.2 Specifications
3.3 Carpet Extractor Parts
4. BEFORE YOU START
4.1 Filling the Solution Tank
5. OPERATION
6. UPHOLSTERY CONNECTION
7. MAINTENANCE
8. ROLLER BRUSH REPLACEMENT
9. CHARGING THE BATTERY
10. TROUBLESHOOTING
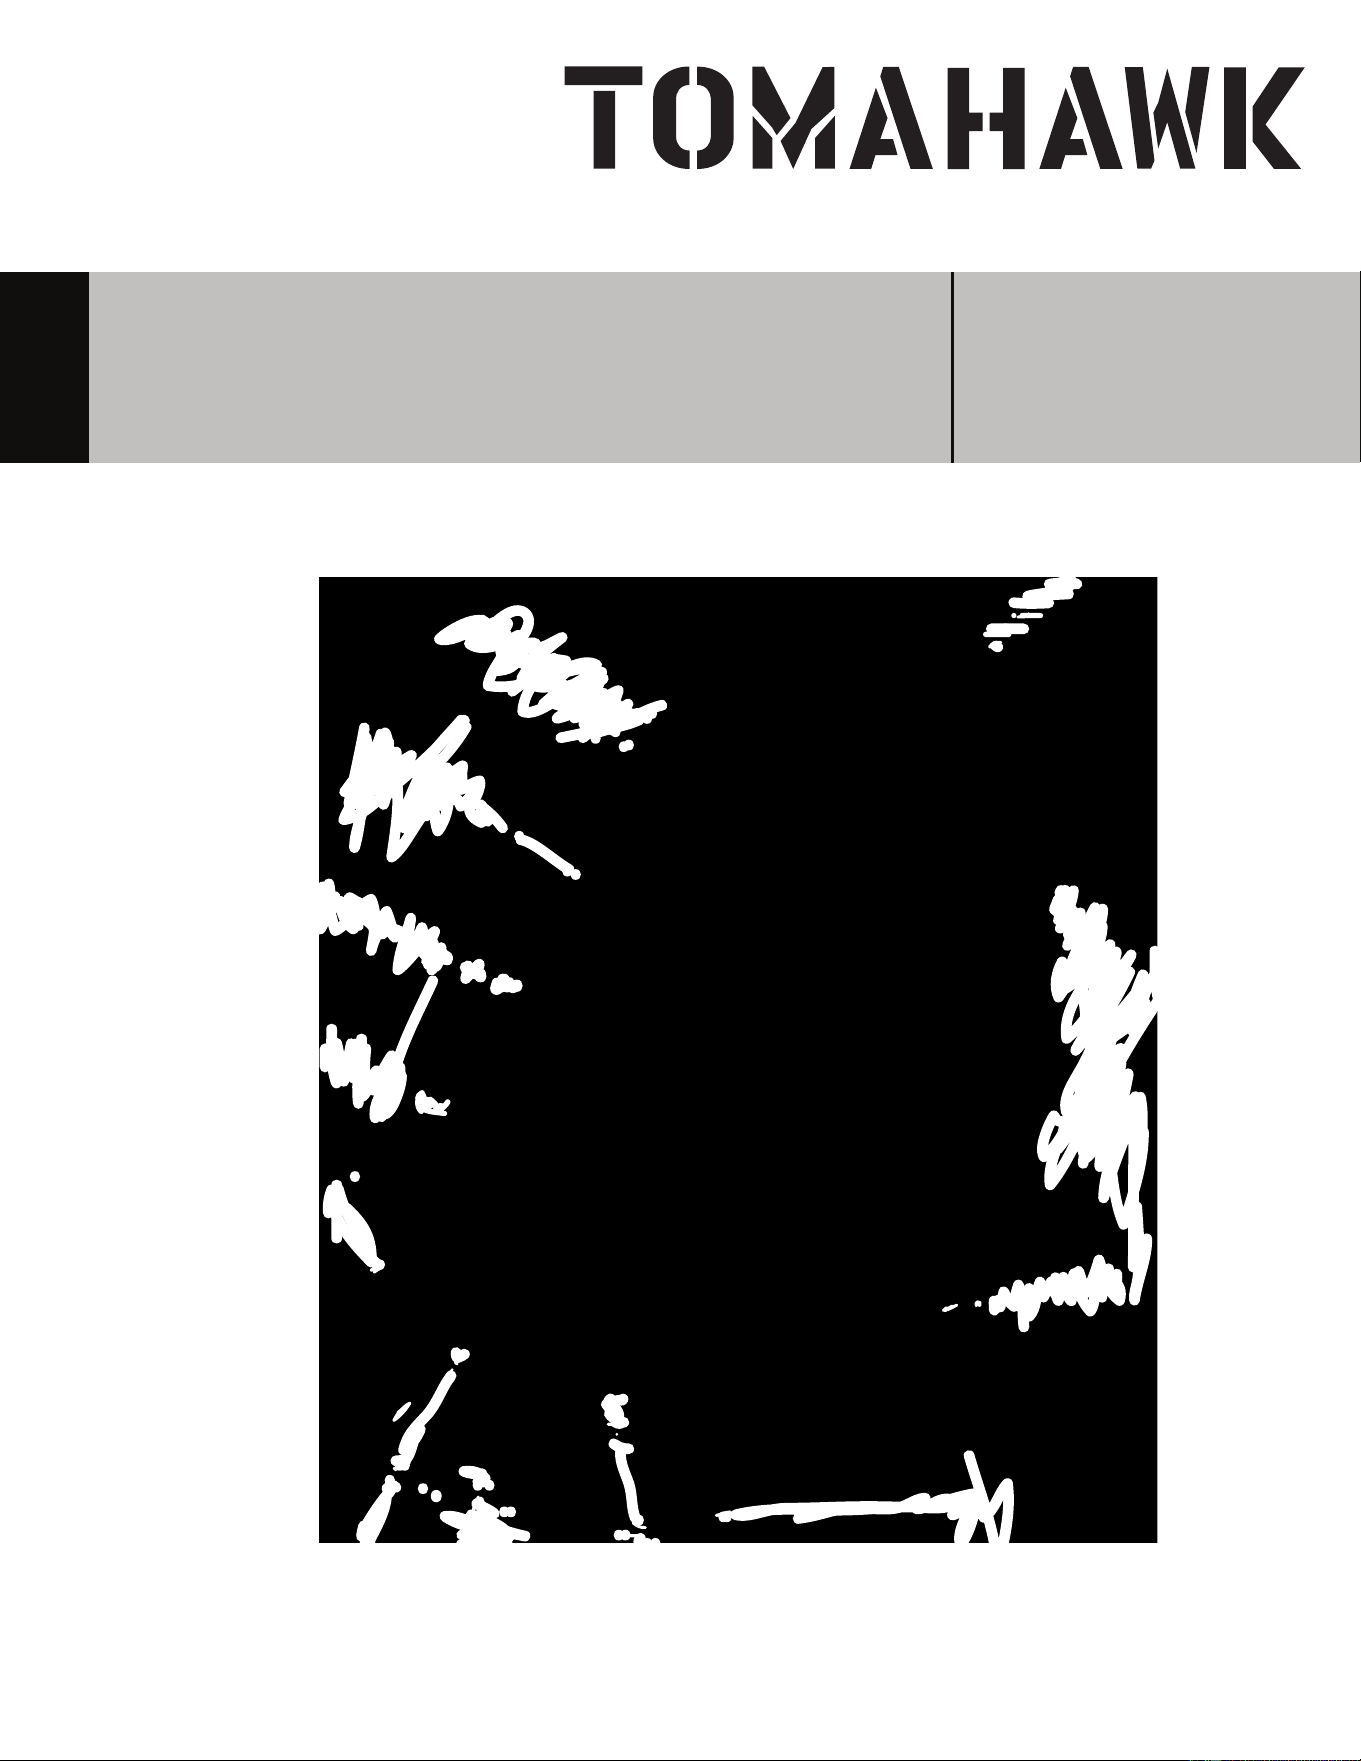
7.1 Maintenance Record
11. REPLACEMENT PARTS
12. WARRANTY
12.1 Warranty Claims
13. SERVICE CENTERS
4
5
5
6
6
7
7
7
8
9
9
9
10
10
10
11
11
12
12
14
14
14
3
Register Your Equipment
Thank you for purchasing TOMAHAWK® equipment! Your product is covered by the
TOMAHAWK® Warranty policy, but in order to activate your warranty, we need you to register
your product. In addition to activating your equipment warranty, product registration will
grant you access to important product updates, streamlined customer service and more.
INCLUDED WITH YOUR REGISTRATION
☑ Equipment Warranty Activation
☑ Product Updates
☑ Streamlined Customer Service
☑ Exclusive Discounts and Sales
STEPS TO REGISTER YOUR EQUIPMENT
1. Visit www.tomahawk-power.com
2. Choose “Product Registration” at the bottom of the page
3. Enter your equipment’s serial number to get started
4. Provide all required information
5. Submit Registration
Equipment Resources
TOMAHAWK® Customer Service doesn’t stop at checkout. We understand to keep a job-site
running smoothly - the proper equipment, spare parts, instruction manuals, and more are
needed at the drop of a hat. Visit www.tomahawk-power.com to gain access to the incredible
resources below.
How To Video Library
More of a visual person? Visit our Video Library for equipment
assembly instructions, troubleshooting tips, and more!
Found at the TOMAHAWK® Resource Center
Manual and Assembly Guide Library
Visit our Manual Library if you are looking for a lost
operations manual or a particular spare part?
Found on the TOMAHAWK® Manuals Page
Service Requests
In need of a quick fix or a service center referral? Submit a
Service Request and a TOMAHAWK® Technician will respond
shortly to get you the help you need.
Choose “Service Request” at the bottom of www.tomahawk-power.com
This manual provides information and procedures to safely operate and maintain this
model. For your own safety and protection from injury, carefully read, understand and
observe the safety instructions described in this manual.
Keep this manual or a copy of it with the machine. If you lose this manual or need an
additional copy, please contact TOMAHAWK® or visit www.tomahawk-power.com This
machine is built with user safety in mind; however, it can present hazards if improperly
operated and serviced. Follow operating instructions carefully. If you have questions about
operating or servicing this equipment, please contact TOMAHAWK®.
The information contained in this manual is based on machines in production at the time of
publication. TOMAHAWK® reserves the right to change any portion of this information
without notice.
No part of this publication may be reproduced in any form or by any means, electronic or
mechanical, including photocopying, without express written permission from
TOMAHAWK®.
Any type of reproduction or distribution not authorized by TOMAHAWK® represents an
infringement of valid copyrights and will be prosecuted. We expressly reserve the right to
make technical modifications, even without due notice, which aim at improving our
machines or their safety standards.
1. SAFETY INFORMATION
This manual contains DANGER, WARNING, CAUTION, and NOTE callouts which must be
followed to reduce the possibility of personal injury, damage to the equipment, or improper
service.
This is the safety alert symbol. It is used to alert you to potential personal injury
hazards. Obey all safety messages that follow this symbol to avoid possible injury
or death.
DANGER indicates an imminently hazardous situation which, if not avoided, will
result in death or serious injury.
WARNING indicates a potentially hazardous situation which, if not avoided, could
result in death or serious injury.
CAUTION indicates a potentially hazardous situation which, if not avoided, may
result in minor or moderate injury.
DANGER
WARNING
CAUTION
4

5
1.1 Fire Safety
If your machine catches fire, turn o the electric supply. Using a dry powder or C02 fire
extinguisher, put out the fire. If the fire cannot be put out, keep away and call the fire
department. If you are in any doubt about the safety condition of your machine, please
consult TOMAHAWK®.
2. OPERATING SAFETY
Familiarity and proper training are required for the safe operation of equipment!
Equipment operated improperly or by untrained personnel can be dangerous! Read
the operating instructions contained in both this manual and the engine manual and
familiarize yourself with the location and proper use of all controls. Inexperienced operators
should receive instruction from someone familiar with the equipment before being allowed
to operate the machine.
2.1 General Notes
2.1.1 NEVER allow anyone to operate this equipment without proper training. People
operating this equipment must be familiar with the risks and hazards associated with it.
2.1.2 NEVER use accessories or attachments for this equipment, which are not
recommended by TOMAHAWK®. Damage to the equipment and/or injury to user may occur.
2.1.3 NEVER leave machine running unattended.
2.1.4 ALWAYS be sure operator is familiar with proper safety precautions and operation
techniques before using machine.
2.1.5 ALWAYS wear hearing protection when operating equipment.
2.1.6 ALWAYS wear protective clothing appropriate to the job site when operating
equipment.
2.1.7 ALWAYS wear hearing protection when operating equipment.
2.1.8 ALWAYS store equipment properly when it is not being used. Equipment should be
stored in a clean, dry location out of the reach of children.
2.1.9 ALWAYS operate machine with all safety devices and guards in place and in working
order. DO NOT modify or remove safety devices. DO NOT operate machine if any safety
devices or guards are missing or inoperative.
2.1.10 ALWAYS read, understand, and follow procedures in Operator's Manual before
attempting to operate equipment.
WARNING

6
2.2 Service Safety
For your own personal protection and for the safety of those around you, please read
and ensure you fully understand the following safety information. It is the
responsibility of the operator to ensure that he/she fully understands how to operate
this equipment safely. If you are unsure about the safe and correct use of this equipment
consult your supervisor.
2.2.1 DO NOT attempt to clean or service machine while it is running. Rotating parts can
cause severe injury.
2.2.2 ALWAYS replace worn or damaged components with spare parts designed and
recommended by TOMAHAWK®.
2.2.3 ALWAYS keep machine clean and labels legible. Replace all missing and hard-to-read
labels. Labels provide important operating instructions and warn of dangers and hazards.
2.2.4 Cordon off the work area and keep members of the public and unauthorized
personnel at a safe distance.
2.2.5 Personal Protective Equipment (PPE) must be worn by the operator whenever this
equipment is being used.
2.2.6 Make sure you know how to safely switch this machine OFF before you switch it ON in
case you get into difficulty.
2.2.7 Always switch OFF before transporting, moving it around the site, or servicing it.
2.2.8 During use, the battery may become very hot, allow the battery to cool before
touching it.
2.2.9 NEVER pull or guide the machine using the cable and never pull on the cable to
disconnect the plug.
2.2.10 DO NOT operate the machine when you are ill, feeling tired, or when under the
influence of alcohol or drugs.
2.2.11 Ensure that any trailing cable is protected against damage and not liable to be
tripped over or trapped underneath the machine.
2.2.12 DO NOT use this machine in dangerous conditions.
2.3 Usage Safety
2.3.1 Before using the machine, discharge the sewage and fill the clean water tank with
fresh water. If sewage is not discharged before adding clean water and using the machine,
its performance will decline. This may cause slower operation, reduced suction power, and,
in the worst case, overheating of the motor, which can damage the machine's main unit.
WARNING
7
3. EQUIPMENT PERFORMANCE
3.1 Carpet Extractor Design
The Tomahawk TEX9 Carpet Extractor is a powerful 3-in-1 commercial cleaning
machine designed for deep carpet cleaning, upholstery, and hard-to-reach areas. Built
with a durable 9-gallon solution tank, the TEX9 makes it easy to spray, scrub, and
extract dirt, stains, and odors in one simple process. Perfect for hotels, offices,
schools, auto detailing, and property maintenance, this extractor delivers professional
results every time.
3.2 SPECIFICATIONS
MODEL
TEX9
Product Size
3 x 1.45 x 2.91 ( 1055 x 455 x 890 mm)
Packing Size with Pallet
3.67 x 1.86 x 3.44 (1120 x 560 x 1050 mm)
Gross/Net Weight
156 (70.66 kg) / 107 lbs (48.5 kg)
Voltage/ Frequency
120 V/ 60Hz
Power
2320 W
Power Cord Length
59 Ft (18 m)
Brush Speed
1400 RPM
Brush Motor
15.78 in (400 mm)
Brush Width
1000 w x2
Sucon Motor
Sucon Rake Width
18.11in (460 mm)
20 KPA
Vacuum Level
11830
3
/h (335 m
3
/h)
130 W
Air Volume
116 PSI
Water Pump
9.2 Gal (35L)
9.2 Gal (35L)
Water Pressure
190 W
Clear Water Tank Capacity
Sewage Tank Capacity

8
3.3 Carpet Extractor Parts
1. Control Panel
2. Power Cable
3. Wheel
4. Roller Brush
5. Portable Suction Head Adapter
6. Suction Head
7. External Suction Port For
Upholstery Tool
8. Suction Height Adjustment
9. Solution Tank
10. Solution Tank Cover
11. Dirty Water Tank
12. Dirty Tank Cover
1
9
8

9
4. BEFORE YOU BEGIN
4.1 Vacuum the carpet thoroughly to remove dust, dirt, and surface debris.
4.2 Plug the power cord into a properly grounded wall outlet.
4.2 Filling the Solution Tank
4.2.1 Release the dome clamp and li the upper recovery tank off the machine.
Set it aside.
4.2.2 Using a clean bucket, hose, or the recovery tank itself, fill the solution tank
with hot water.
4.2.3 The solution tank holds 9 gallons (35 liters) of cleaning solution.
4.2.4 Add a non-foaming cleaning concentrate formulated for hot water extractors,
following the mixing instructions on the product label.
4.2.5 Place the recovery tank back onto the machine.
4.2.6 Position the dome on top of the recovery tank, ensuring it is properly seated for a
secure vacuum seal.
4.2.7 Fasten the dome clamp tightly to secure the dome in place.
5. OPERATION
NOTE: Aer opening the box, carefully remove the machine. Check that it is not damaged
and that all carpet accessories are included.
5.1 Turn on the machine by pressing the 3 power switches to “ON’”.
5.2 To begin cleaning, pull the machine straight back. Do not push down on the handle.
FIGURE 1
5.3 Press the solution spray button to apply cleaning solution as you move or add solution
to the clean water tank.
5.4 While cleaning, check the recovery tank for foam buildup:
▪ If foam is excessive, add a defoamer solution to the recovery or empty the tank.
▪ Empty the recovery tank when it is about ¾ full(7-8 Gallons).
▪ If overfilled, dirty water may flow back onto the carpet when the vacuum is running.
▪ Using the black hose, empty dirty water into the drain.
Vaccum
ON/OFF Switch
Water ON/OFF
Switch
Rolling Brush ON/OFF Switch
FIGURE 1
6. UPHOLSTERY CONNECTION
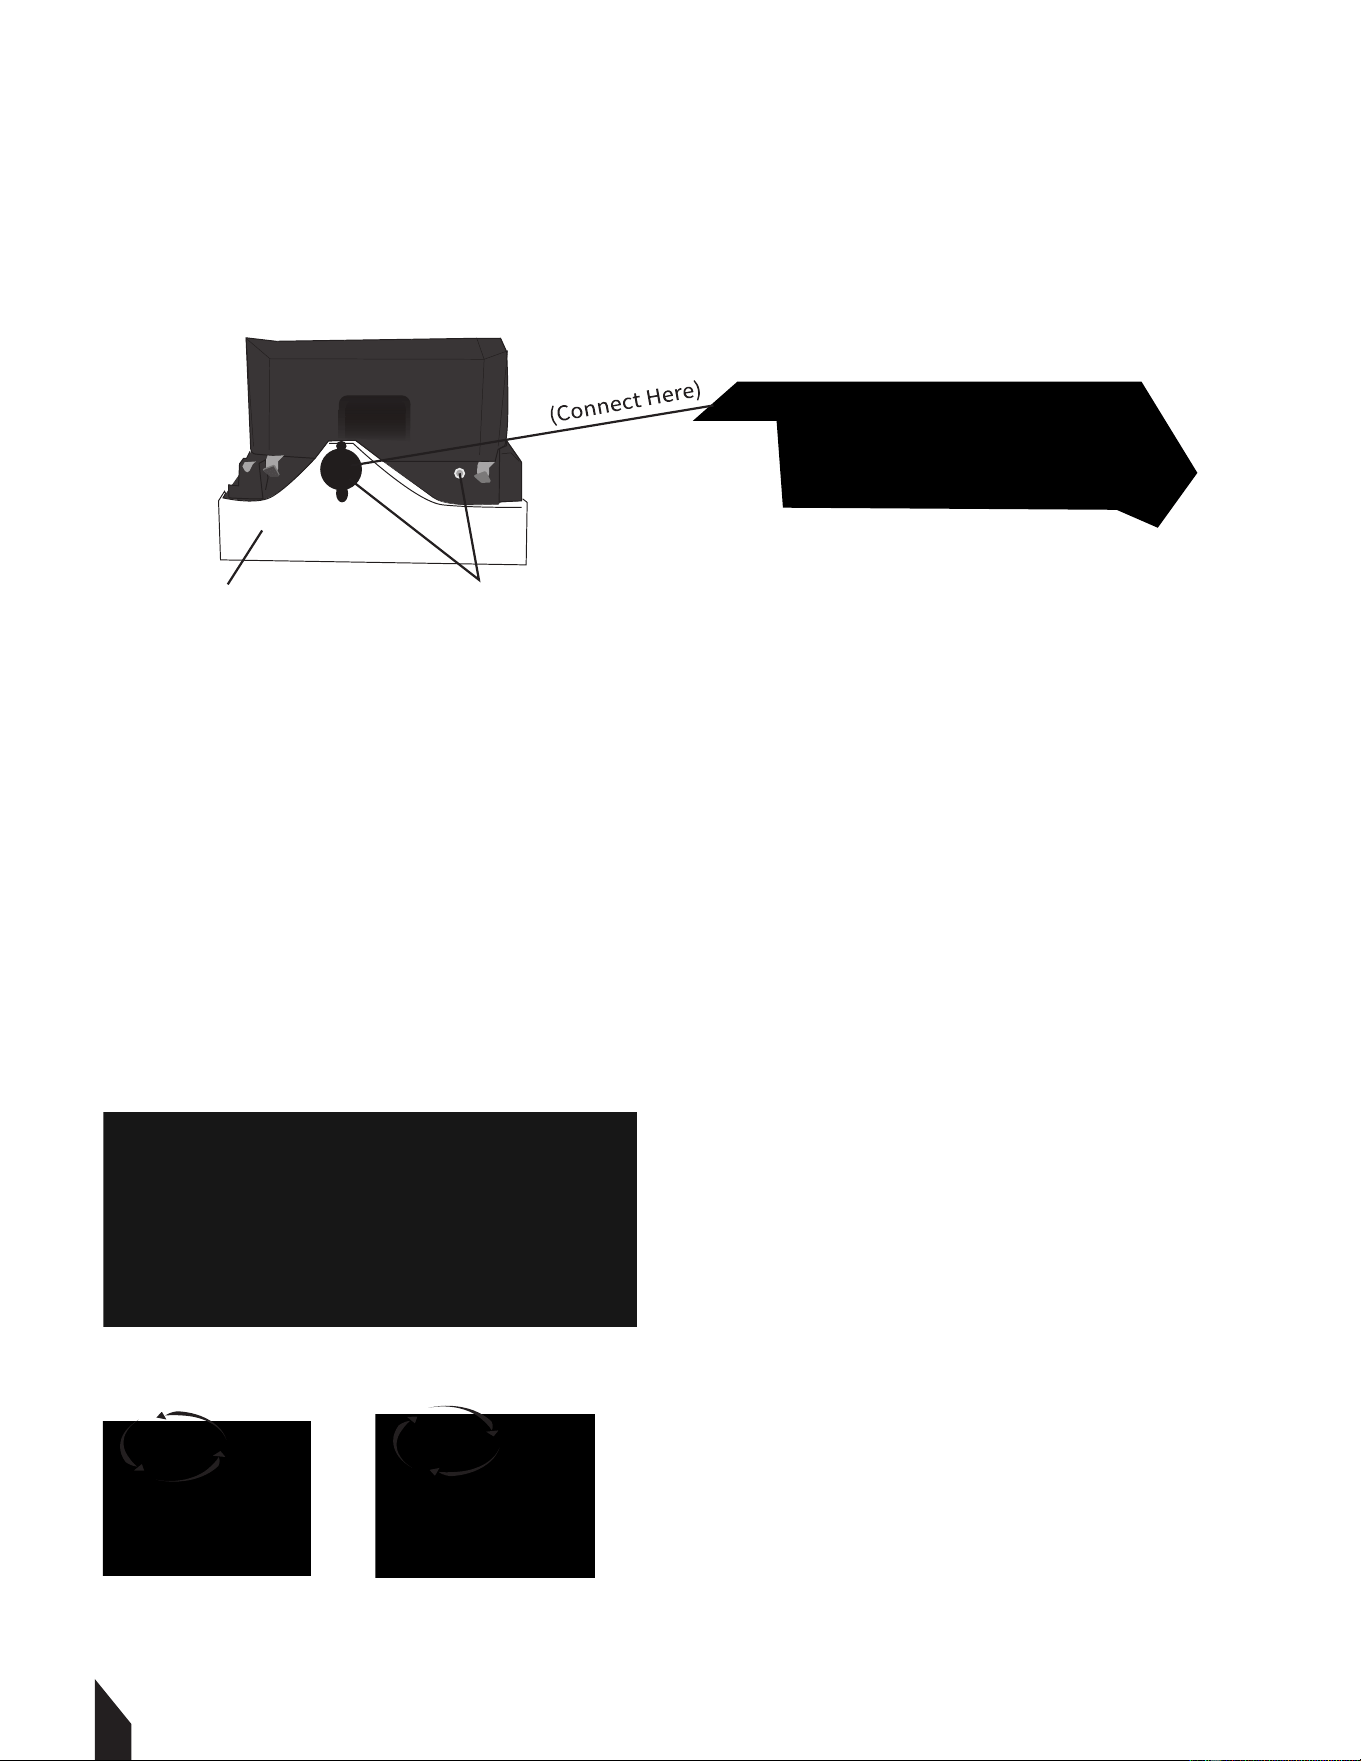
6.1 Connect the solution hose from the upholstery tool. FIGURE 2
6.2 Attach it securely to the brass solution fitting located on the back of the machine.
6.3 Connect the quick-connect water pipe to the matching quick connector on
the machine.
6.4 To activate Upholstery Adapter turn on the vacuum + water switch.
7. MAINTENANCE
7.1 Keep the machine clean at all times.
7.2 Add 2 gallons of hot water (below 50 °C) to the water tank, then run the pump, nozzle,
and suction head for 1 minute to prevent alkaline buildup.
7.3 Clean the floating ball rack in the sewage tank, removing all dirt and lint to keep the
airflow outlet clear. FIGURE 3
7.4 Check and clean the inlet filter screen on the water tank for any lint or debris.
7.5 Rinse monthly with vinegar solution (1 part vinegar to 3 parts water) to remove
residual alkaline cleaning solution.
7.6 Open the drain valve before storing the machine.
NOTE: To clean float rack reference FIGURE 4.
10
A. Spin Clockwise to disassembly oat rack.
B. Spin Counterclockwise to install oat rack.
Open the lid to clean the lter
FIGURE 2
FIGURE 4
A B
FIGURE 3
Water Sucker
Upholstery Adapter
13 External Casing + Suction Rake
11
8. ROLLER BRUSH REPLACEMENT
8.1 Turn off the power and put on protective gloves. Always follow safe
operating practices.
8.2 Push the handrail down until the roller brush lis off the ground.
8.3 Slide the brush limit slider forward to release and remove the brush. FIGURE 5
9. CHARGING THE BATTERY
NOTE: To extend the battery's lifespan and ensure optimal performance, charge the
battery aer the machine has been used for at least 30 minutes. Avoid leaving the battery
uncharged for long periods. The following charging instructions apply to the charger that
comes with this machine. Be sure to use the specified charger to prevent battery damage.
9.1 Charging Precautions:
• If the digital meter shows a reading below 21, charge the battery immediately.
• To charge, insert the charger into the machine's charging port and connect it to a 120V
power supply.
• Ensure the machine is in a well-ventilated area during charging. Open the side of the recovery
tank for better ventilation.
• When the digital meter shows a reading of 26, charging is complete.
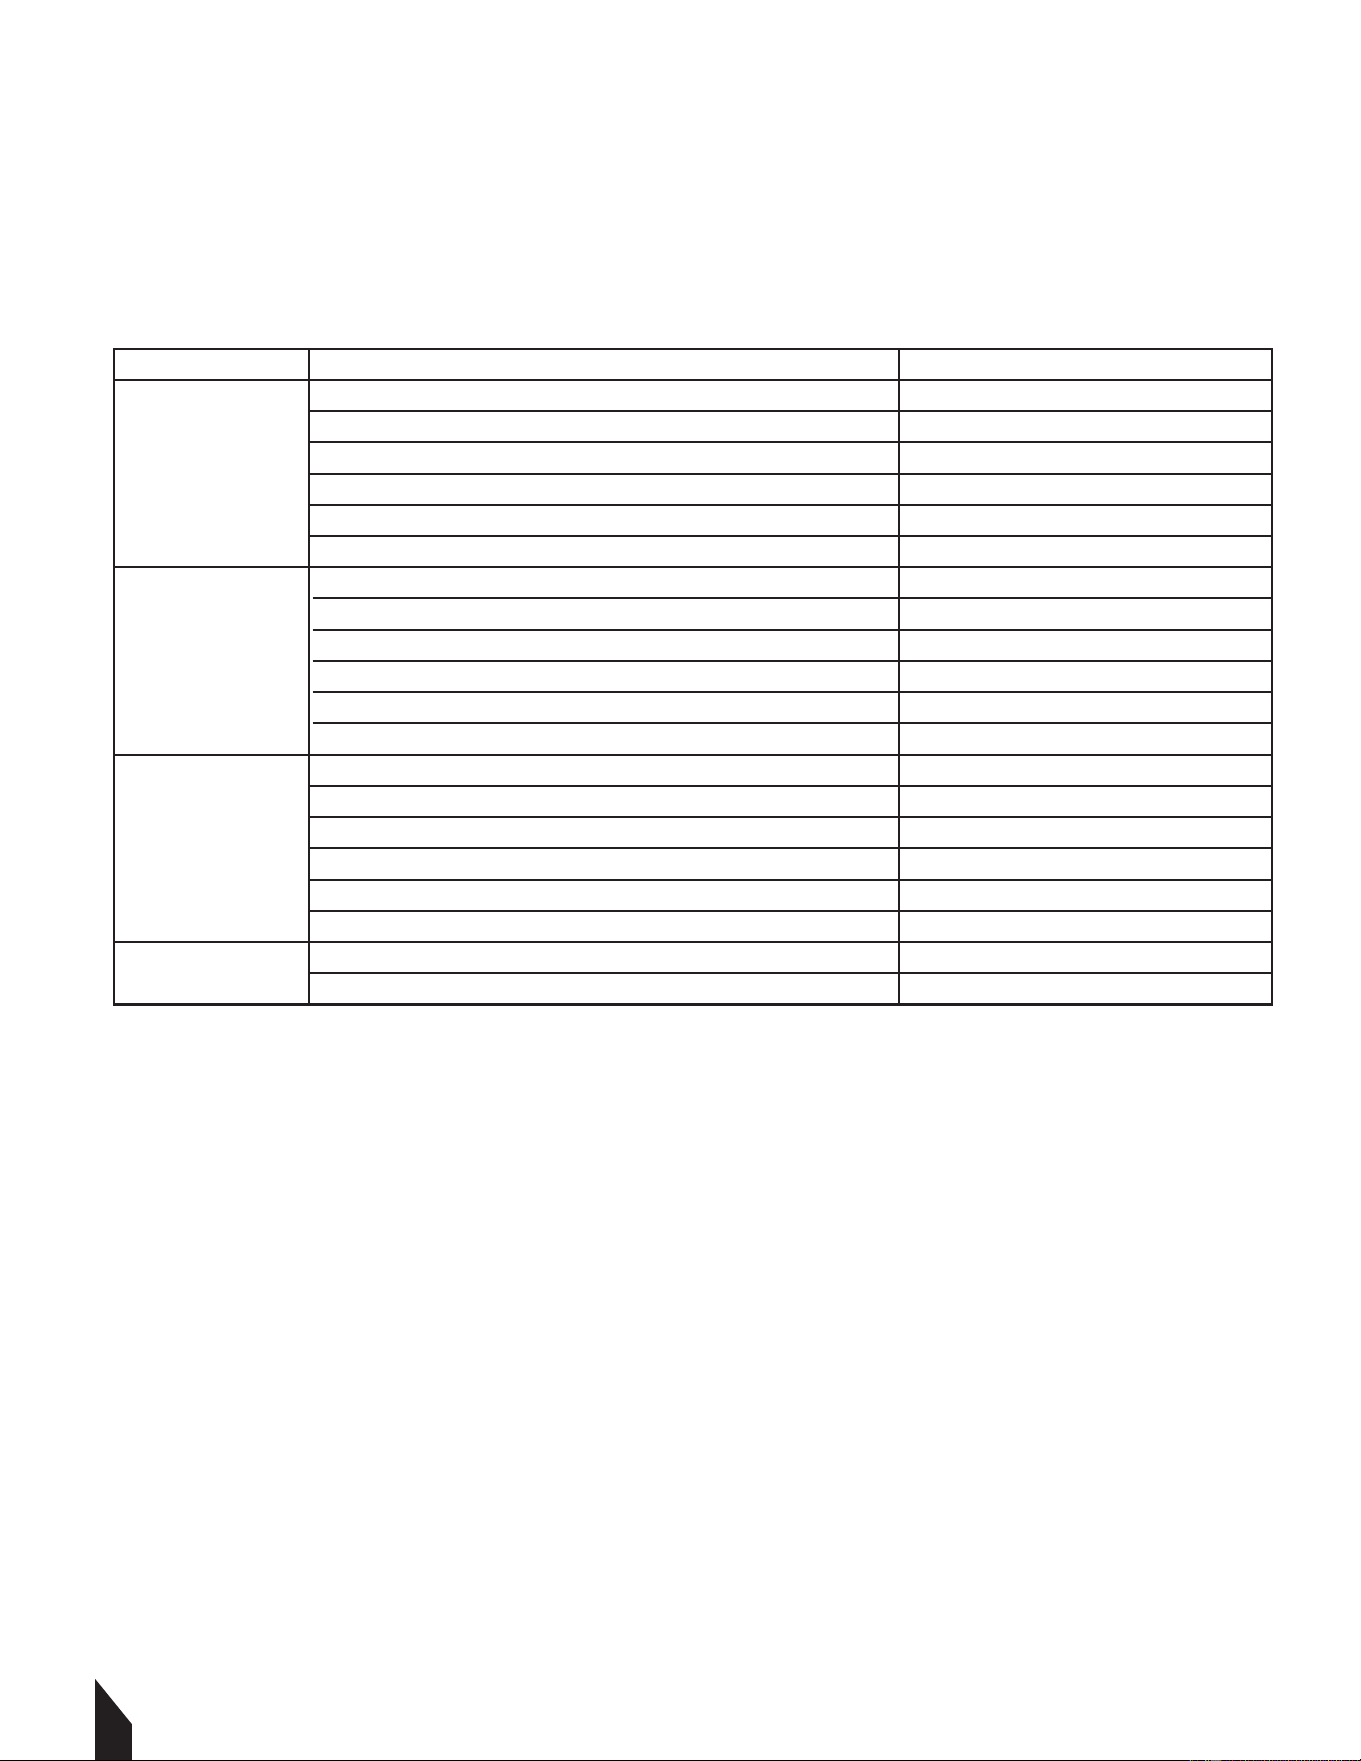
Charger Type
Output Voltage
Output Current
Lead-Acid Battery Charger
24v
15a
Automatic Power-Off Circuit
Suitable for Deep Cycle Battery Charging
Battery Specifications
FIGURE 5
12
10. TROUBLESHOOTING
10.1 Maintenance Record
TOMAHAWK® tools are assembled with care and will provide years of service when properly
maintained. Preventative maintenance and routine service are essential to the long life of
your equipment. Adhere to reading through this manual thoroughly. You will find that you
can do some of the regular maintenance yourself. However, when in need of parts or major
service, be sure to contact a TOMAHAWK® Technician. For your convenience we have
provided this space to record relevant data about your TOMAHAWK® equipment.
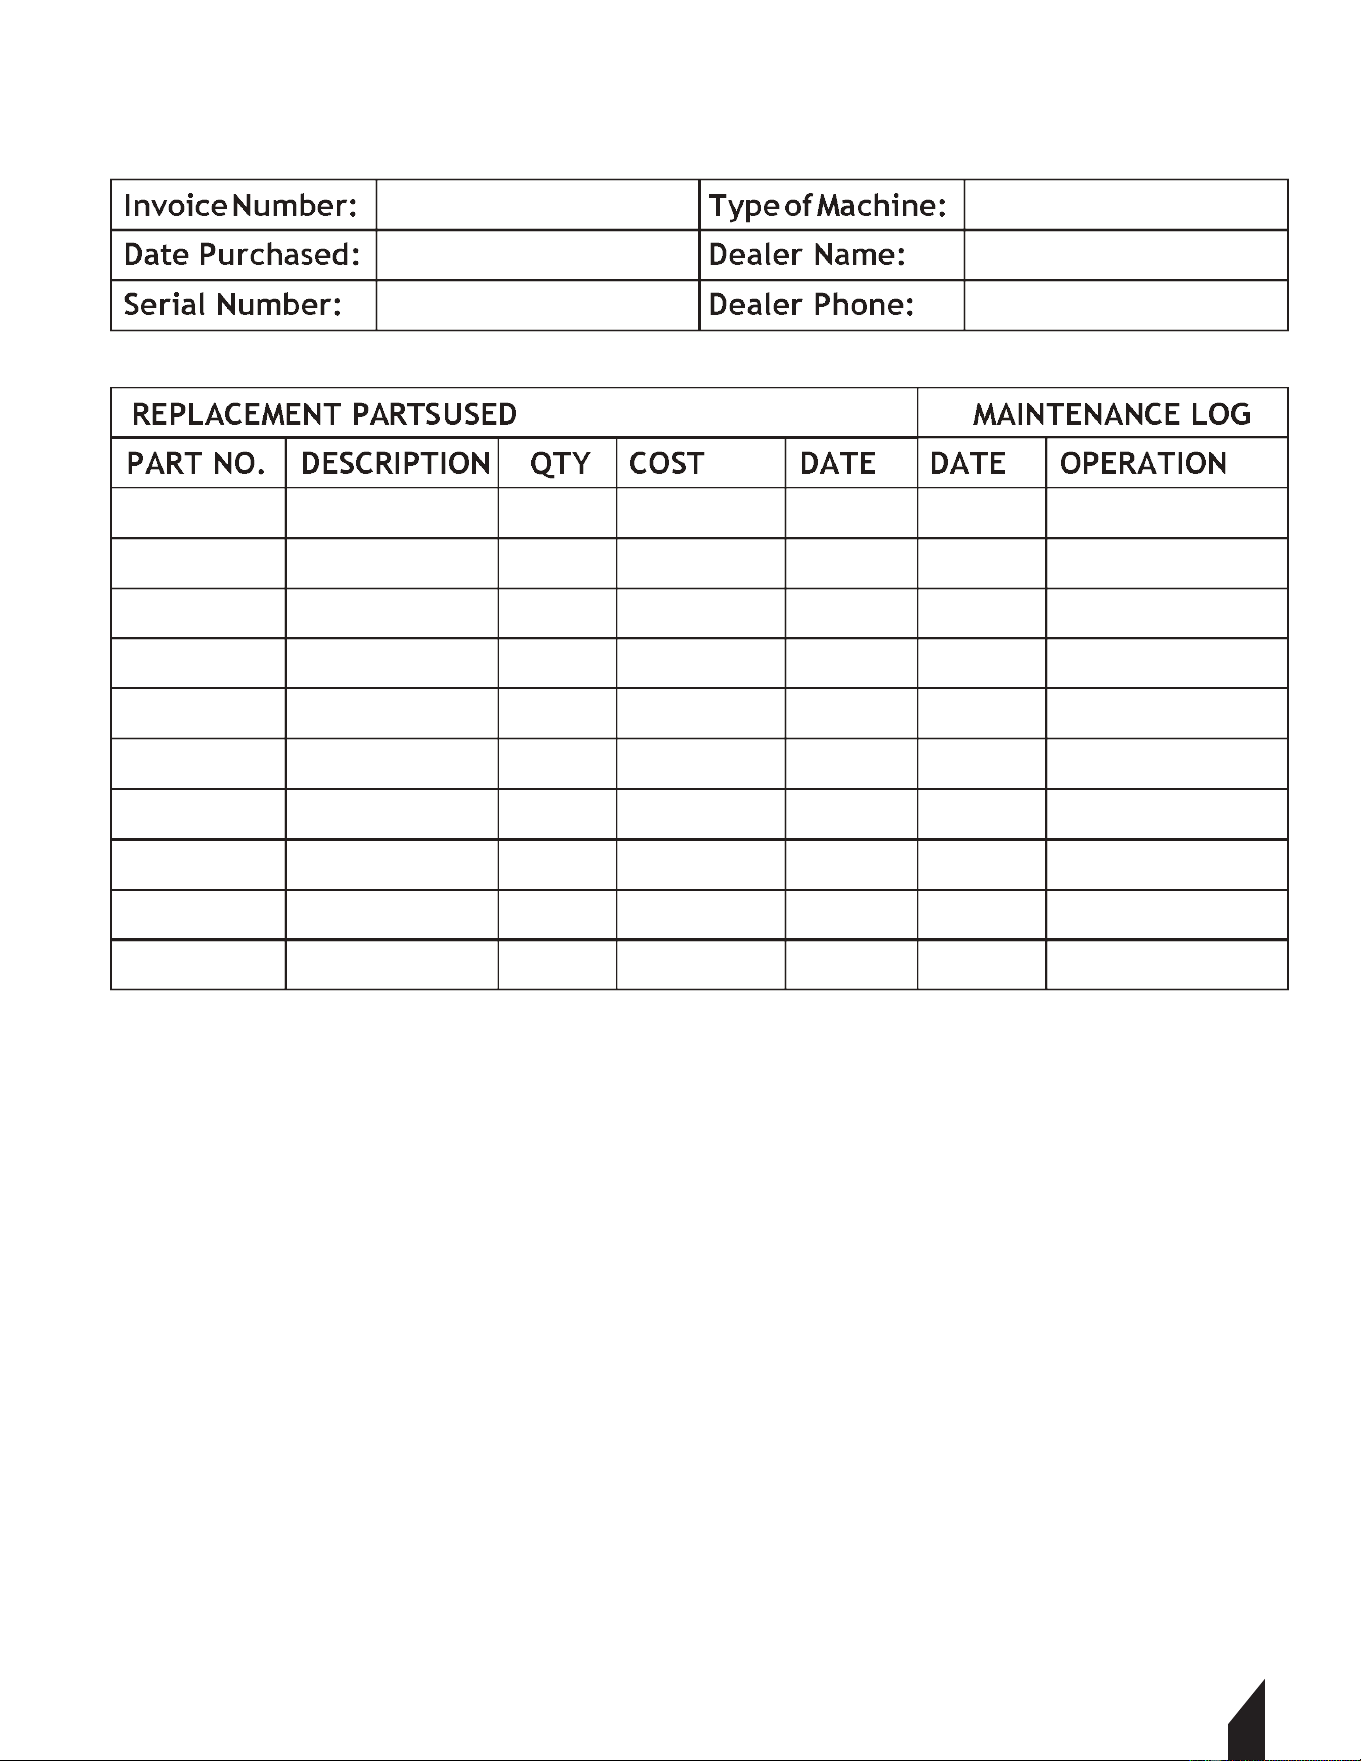
No Power
Weak or No
Suction
Spray Issues
Brush Issues
Power problem
House/building short circuit trips
Electric wire problem
Switch is damaged
Loose or poor contact at terminals
Drain valve is open
Unsealed joint between sewage tank cover and tank
Vacuum tube joint is loose
Suction pipe is blocked
Dirt on oating ball rack
Suction pipe is defective
Vacuum motor installation is loose
Nozzle is blocked
Filter screen at tank inlet is blocked
Electromagnetic drain valve is blocked
Rectier is damaged
Pump motor is damaged
Foreign material in pump
Roller brush drive belt is loose or deformed
Brush motor is damaged
Check power source
Check, repair, or replace
Check/repair
Repair or replace
Tighten connections
Close drain valve
Screw down to seal
Insert and tighten
Wash suction pipe
Remove dirt
Replace suction pipe
Tighten screws
Wash nozzle
Clean lter
Repair or replace
Repair or replace
Repair or replace
Remove material
Repair or replace belt
Repair or replace
Solution
Possible Cause
Trouble
11. REPLACEMENT PARTS
11.1
11.2
11.3
13

14
14
12. EQUIPMENT WARRANTY
Your new TOMAHAWK® equipment is warranted to the original purchaser for a period of one-year
(12 months) from the original date of purchase. The TOMAHAWK® warranty is against defects in
design, materials and workmanship.
Any modifications made will void the manufacturer
warranty. Any Modification made to the unit will void manufacturer warranty.
The following are not covered under the warranty:
12.1.1 Damage caused by abuse, misuse, dropping or other similar damage caused by or as a
result of failure to follow assembly, operation or user maintenance instructions.
12.1.2 Alterations, additions or repairs carried out by persons other than TOMAHAWK® or their
recognized agents.
12.1.3 Transportation or shipment costs to and from TOMAHAWK® or their recognized agents, for
repair or assessment against a warranty claim, on any machine.
12.1.4 Materials and/or labor costs to renew, repair or replace components due to fair
wear and tear.
12.1.5 TOMAHAWK® and/or their recognized agents, directors, employees or insurers will not be
held liable for consequential or other damages, losses or expenses in connection with or by
reason of or the inability to use the machine for any purpose.
12.2 Warranty Claims
Before submitting any warranty claim, you will need to register your
new TOMAHAWK® equipment through www.tomahawk-power.com or
email support@tomahawk-power.com.
Follow the steps on page 3 or scan this QR codes to complete the
equipment registration. Aer registration is complete, all warranty
claims should firstly be directed to TOMAHAWK® hrough the online Service Request form found
at www.tomahawk-power.com/pages/service-request.
13. SERVICES CENTERS
Our service centers are equipped to handle your equipment maintenance and repair needs
efficiently. With a network of authorized local service locations , you can find expert support
and genuine parts needed to keep your equipment running smoothly. All locations are listed on
the webpage https://tomahawk-power.com/pages/find-a-service-center.
For Service Call (866) 577- 4476
9 GALLON
CARPET EXTRACTOR
Parts Manual
MODEL NUMBER: TEX9

17
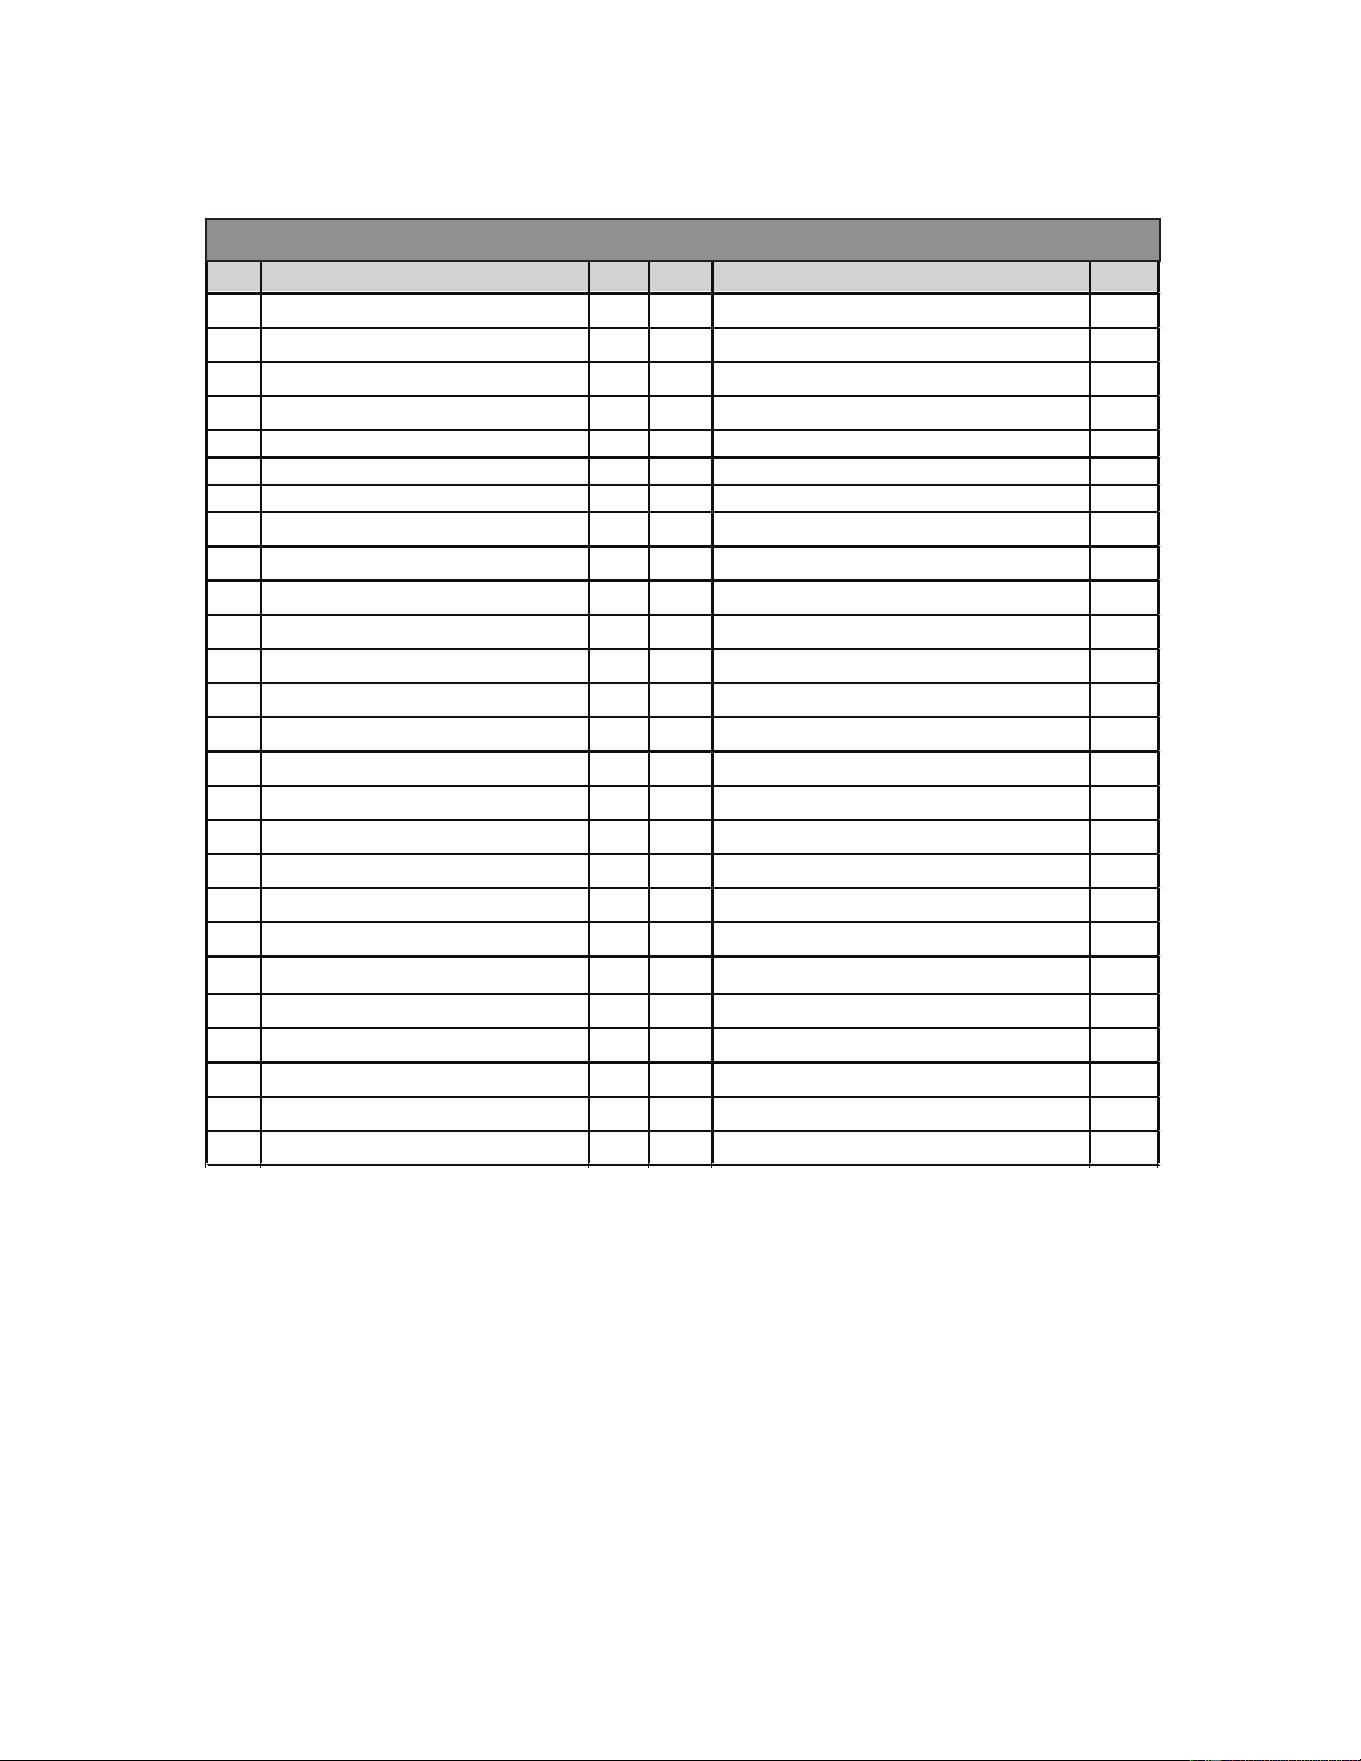
No. Description Qty No. Description Qty
1
2 Clear Water Tank 1 24 Wire Hook (Adhesive) 1
3 Tm4*10 2 25 Pm5*16 2
4 Crimp Plate 2 26 Wire Hook (Iron) 1
22 Wire Hook Fixing Plate 1
7*1.75m*1. 5m 7-Core Wire 1 23 30 Niu Keychain 1
5 Round Filter 1 27 2 Points Outer Tooth
∅
10 1
1
6
Upper And Lower Water Tank 1 28 6*10 Transparent Tube
7 Clear Water Tank Cover 1 29 2 Points Of External Teeth
∅
10 Elbow
2
7-1. Tm4*16 1 30 Power Cord 1
7-2. M4 Self-Locking Female 1 31 Kcm6*10 6
8 Steel 5.0 Hanging Bead Chain 1 32 Kcm6*25 6
9 6.0 Steel Double Ring 2 33 Six-Hole Hinge 2
9-1. Ta4*12 1 34
∅
6*12*1 Flat 6
10 Clear Water Tank Locking Plate 2 35 M6 Self-Locking Female 6
11 M6*22t Screw 2 36 Suction Motor Gasket 2
12 Kcm5*10 2 37 Suction Motor(119625-00) 2
13 Hm5*16 2 38
∅
5 Spring 5
14
∅
6*12*1 Flat Medium 2 39 Cm5*30 5
14-1. 06 Bullet 2 40 Suction Motor Nozzle Gasket 1
15 8
a Overload Protection 1 41 Suction Motor Connector 1
16 Water Machine Switch 3 42 Air-Absorbing Motor Acoustic Foam 1
17 Switch Panel 1 43 High Temperature Tubes (Red
210 Mm) 1
18 Pg9 Extension 1 44 41-57 Hose Clamp 1
19 15a Overload Protection 1 45 Suction Pipe(
∅
38*710) 1
20 Tm4*10 6 46 41-57 Hose Clamp 1
21 Pg13.5 Extension 2 1
BASE ASSEMBLY
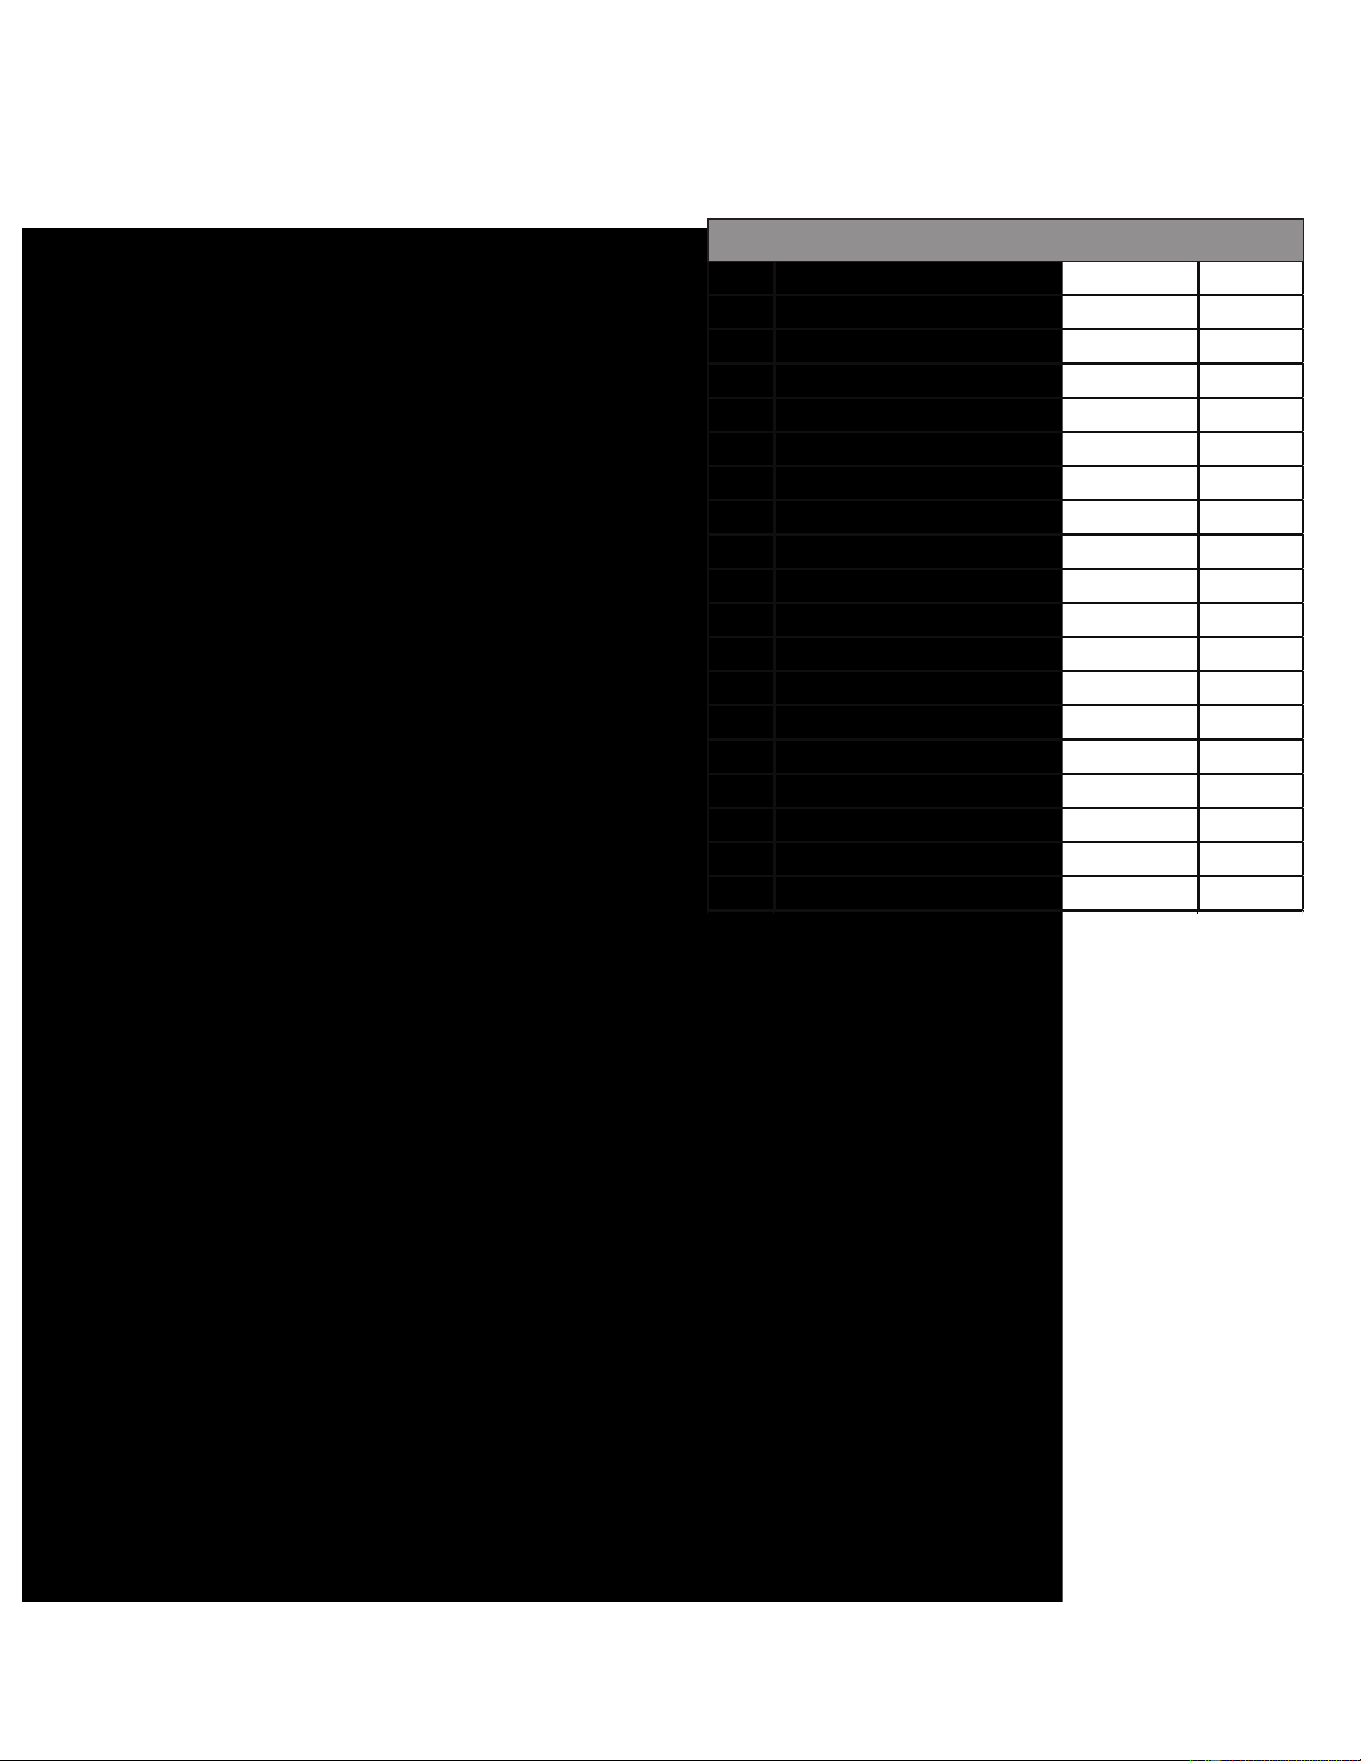
No. Description Qty
1 Transparent Cover For Sewage Tank 1
2 Pm 4*12 2
3 Sewage Inlet Transparent Cover 1
4 Sewage Inlet Gasket 1
5 Support Frame Upper Cover 1
6
∅
4*40 cm Round Sealing Strip 1
7 Lower Cover Of Support Frame 1
8 Pa 3*10 screws 1
9 Strainer Holder 1
10
∅
48.5 Float (20 g) 1
11 Float Holder 1
12 Round Seal O 8*1m 1
13 Sewage Tank Water Stopper 1
14 Pipe Clamp Holder 1
15 TM4*12 2
16 Sewage Pipe 1
17 Throat Clamp (21-44 mm) 1
18 Sewage Tank
SEWAGE TANK ASSEMBLY
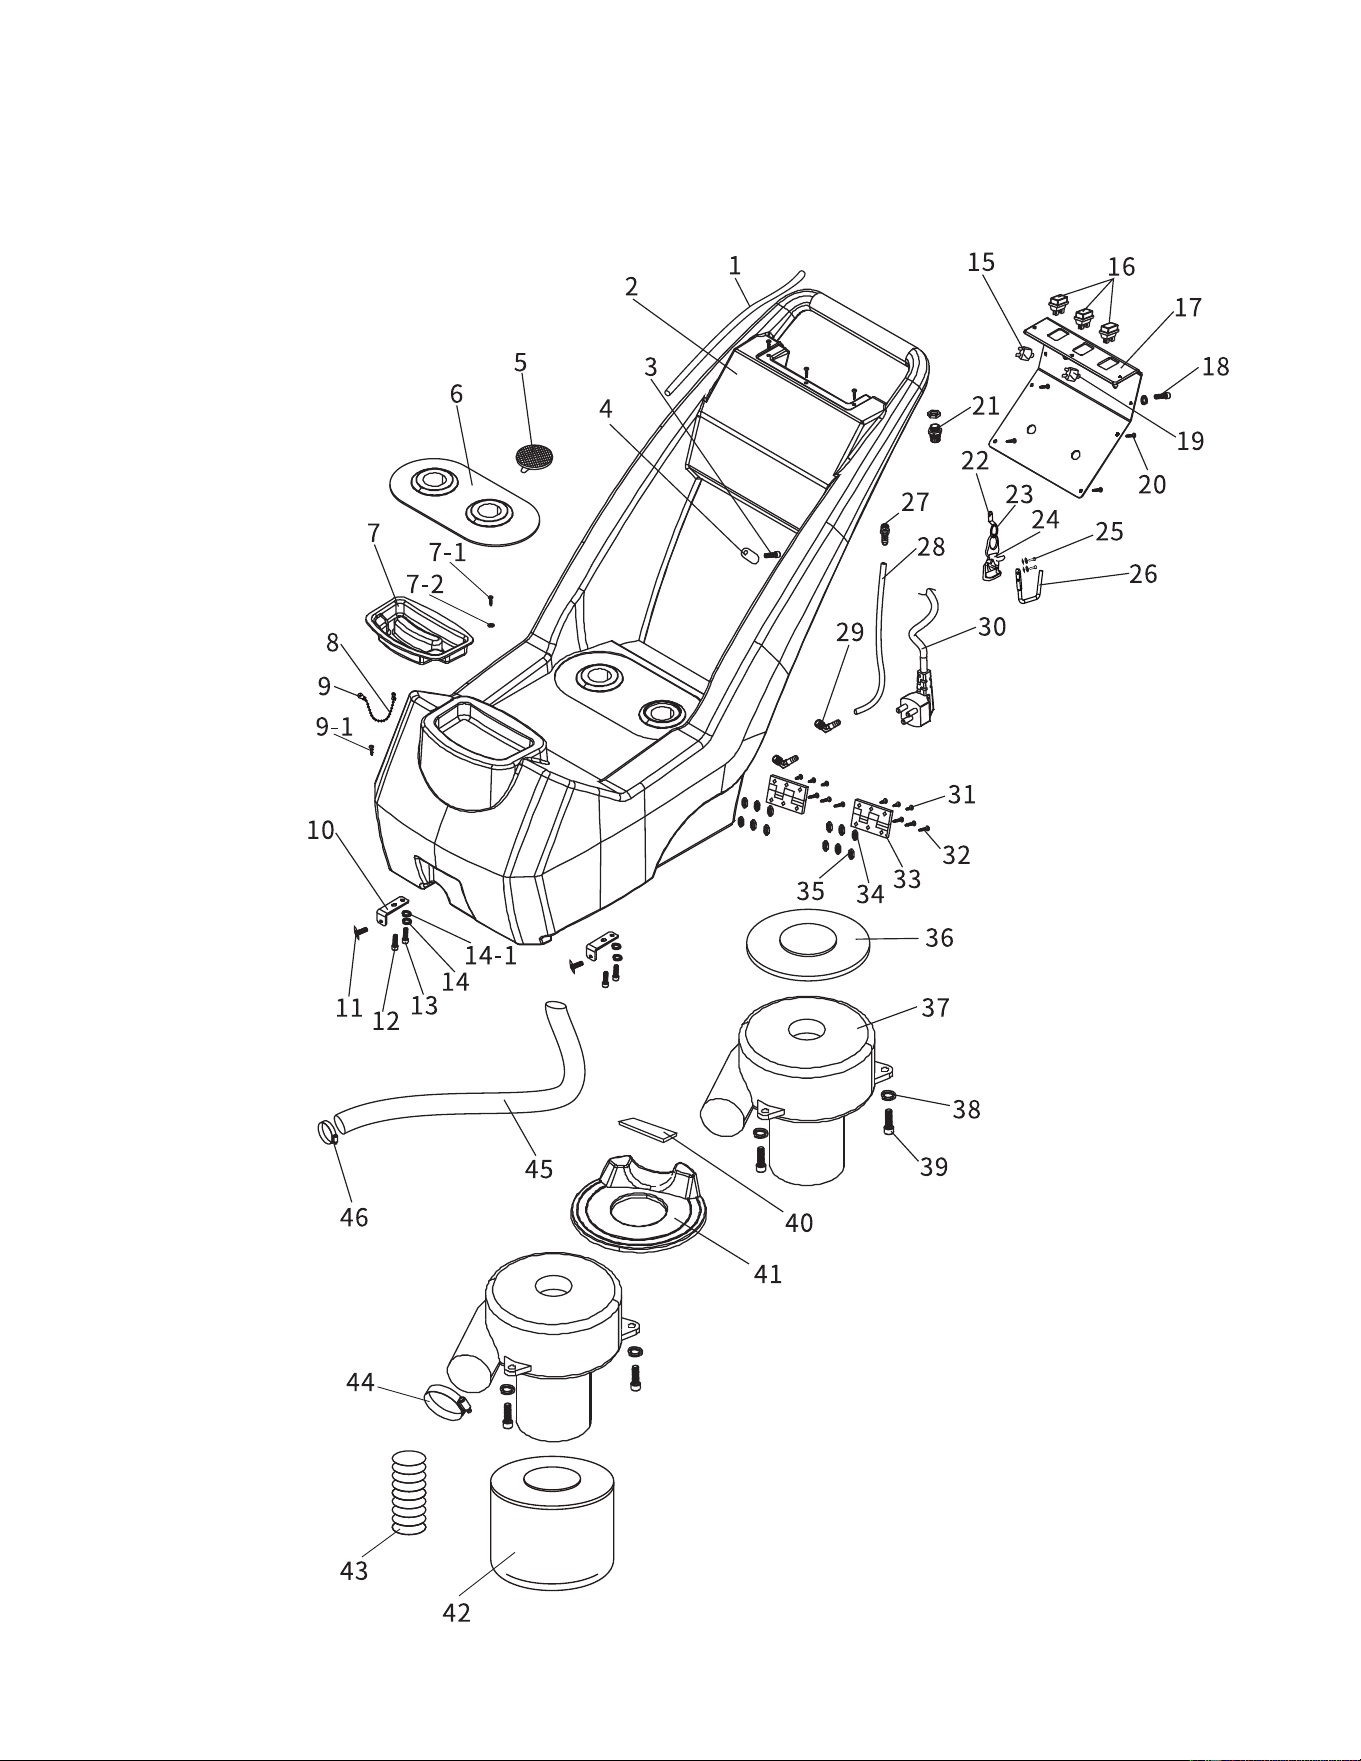

NO. Description Qty NO. Description Qty
1 M6 Self-Locking Female 4 46 1 Part Quick Coupling (Female) 1
2 HM 6*16 4 46-1 1 Part Inner Thread
∅
10 Elbow (Quick Connect) 1
3 Right Side Plate 1 46-2
∅
10 Mesh Pipe(190mm) 1
4 Cm 6*20 4 47 Tm 4*10 1
5 Fixed Bracket Right 1 48 Water Retaining Rubber 1
6 Fixed Bracket Le 1 49 Front Cover 1
7 Le Side Plate 1 50 Back Cover 1
8 2 Points Outer Tooth
∅
10 Straight(Quick Connect) 1 51 Pm 4*10 10
8-1 6*10 Silicone Tube(190mm) 1 52 Suction Grate Seal (600mm) 1
9 Pm 5*20 4 53 1.1*10*41*19n28 #Spring 2
10 4 Points Pipe Code 2 54 Tm4*10 2
11 M5 Self-Locking Female 4 55 N
ozzle
With Screen (110067) 4
12 3-In-1 Flter 1 56 Water Spraying Square Pipe 1
13 2 Points External Tooth
∅
10 Elbow(Quick Connect) 1 56-1 2 Points Outer Tooth
∅
10 Elbow(Quick Connect) 1
14 2-Part External Thread
∅
10 Elbow(Quick Connect) 1 57 Hole Card 31# 2
15 2 Points Solenoid Valve (2w-025-08) 1 58 Oil Seal 12*32*7 1
16 Cm5*20 2 59 6201 Bearing 2
17 M5 Self-Locking Female 2 60 Rolling Brush Sha 1
18 Battery Valve Fxing Piece 1 61 Roll
ing
Brush Sha 1
18-1 Km5*10 2 62 Rolling Brush Stopper 1
19 Cm 6*30 2 63 Ta4*12 2
20 Cm 5*30 4 64 Belt(148j) 1
21 Water Pump (Ec-203-300a) 1 65 Belt Pulley Large 1
22 M5 Self-Locking Female 4 65-1 Tm4*12 1
23 3-Part Male
∅
10 Elbow (Quick Connect) 1 65-2 Fixed Pin 1
24 3-Points External Thread
∅
L0 Tee (Quick Connect) 1 66 Corrugated Medium 24*31 1
24-1
∅
10 Mesh Pipe(210mm) 1 67 Pulley Sha 1
24-2
∅
10 Mesh Pipe(320mm) 1 68 6201 Bearing 1
25 Cm 6*40 2 69
∅
1
0
Cotter Card 1
26 Rolling Brush Motor Yc712-4 1 70 Rolling Brush Fixing Plate Le 1
27 Belt Pulley(Small) 1 71 Pm5*10 6
28 M 5*8 Machine Meter 1 72 Belt Stopper 1
29 M 5*5 Machine Meter 1
30 Base Plate 1
31 Pm 5*10 1
32 Rolling Brush Fixing Plate(Right) 1
33 Rolling Brush Limit Assembly 1
34 Adjustment Handle 1
35 Adjustment Lever 1
36 Pm 5*10 2
37 Ta 4*2 2
38 Adjustment Slot 1
39 6*10 Silicone Tube (460mm) 1
40 Wheel Axle 1
41 Base 1
41-1 16a Terminal (
7
Positions) 1
42
∅
12*22*6 Axle Sleeve (Sc2a) 2
43 10*175 Wheel (Deluxe Water Machine Wheel) 2
44
∅
6*20*1 Flat 1
45 Hm 6*16 2
CLEAR WATER TANK ASSEMBLY
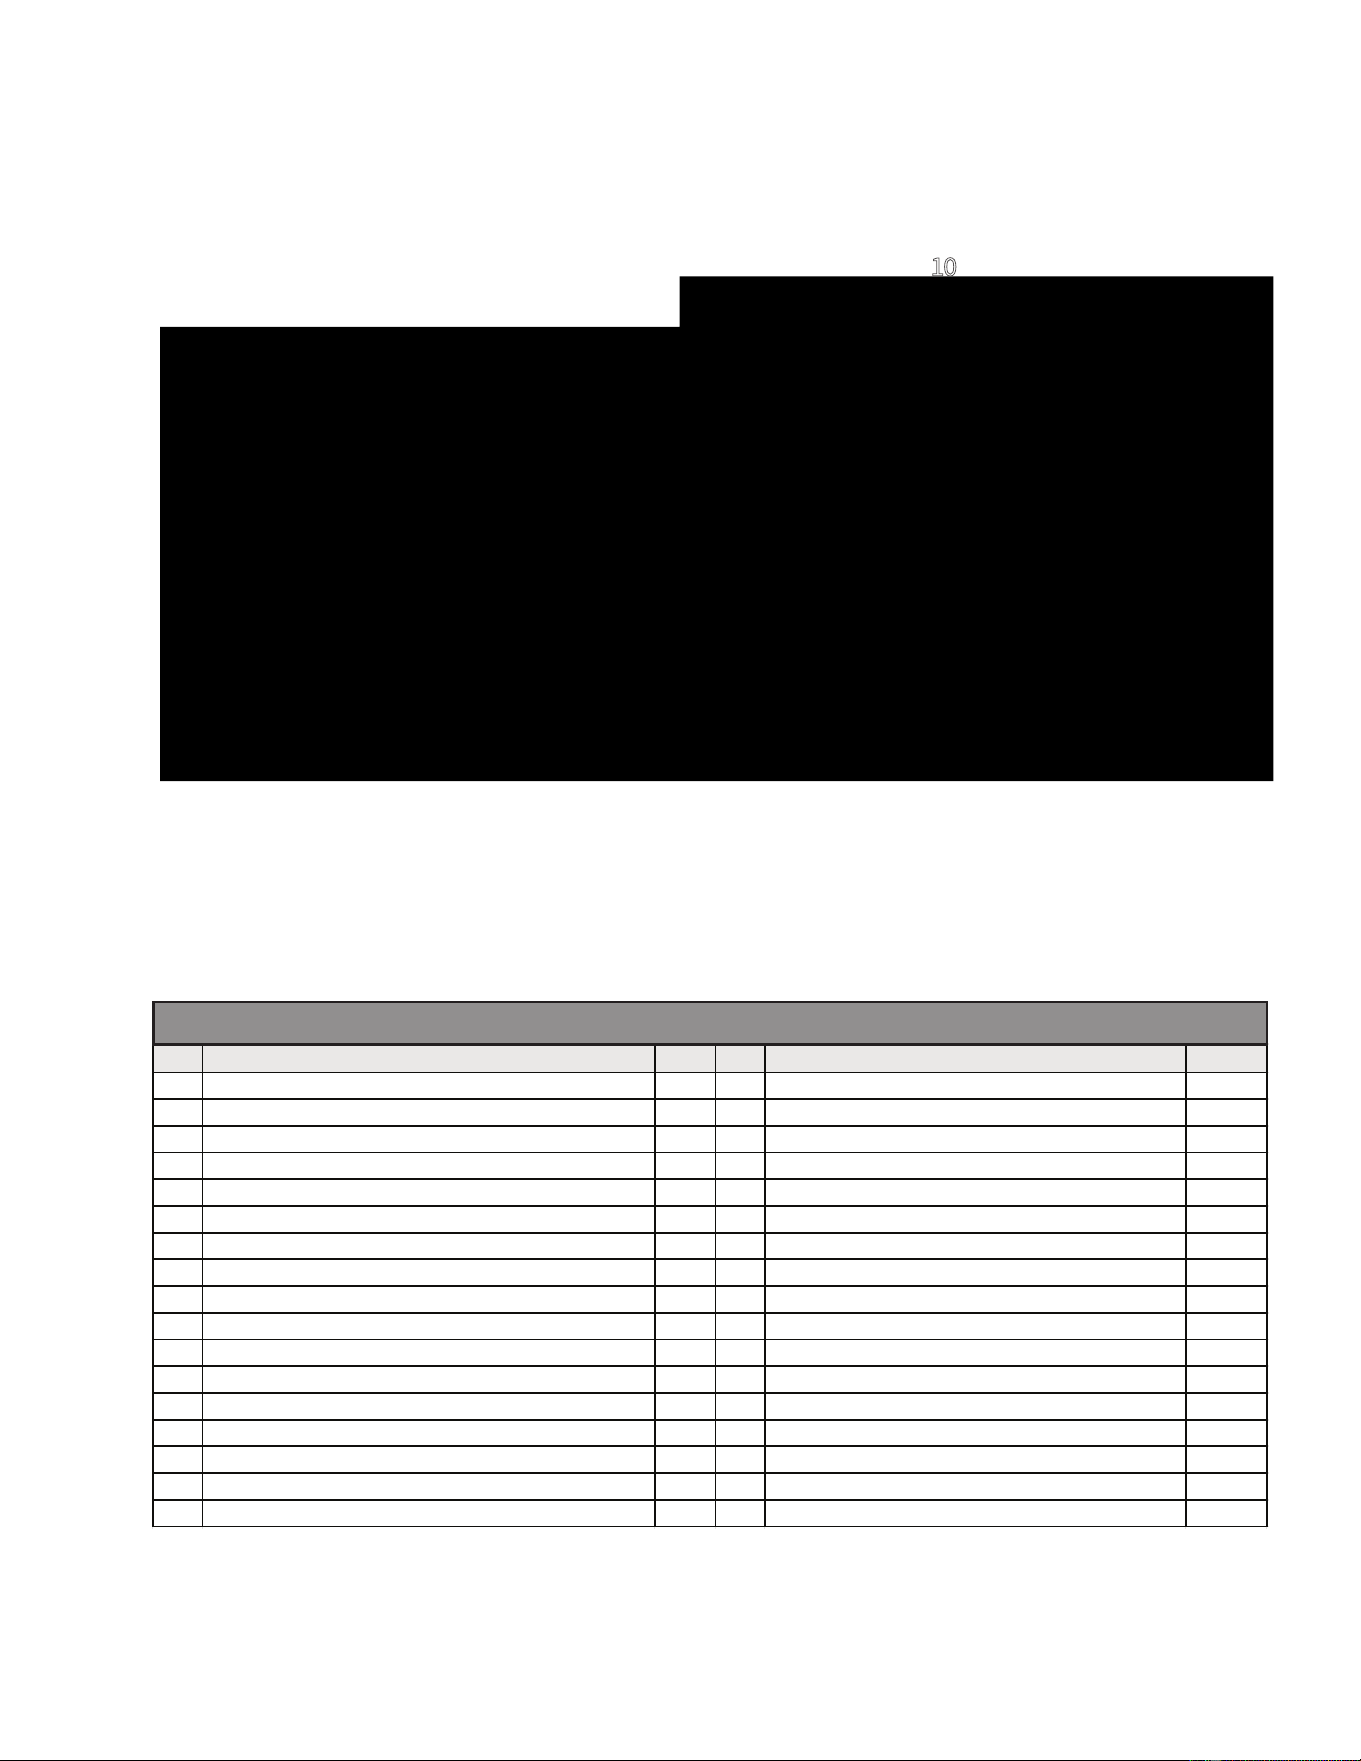
10
Description
Qty
No. Description Qty
1 Long Connector(Solid) 2 18 11*2.4 O-Ring 1
2
∅
40 Hose (4m) 1 19 14*2.4 O-Ring 1
3 5*300mm Taping 10 20 Water Spray Switch Brass Rod 1
4 1 min
∅
6 Quick Coupling(Male) 2 21 Water Spray Switch Grip 1
5
∅
4*8 Black Hose (4.2m) 1 22 M3 Self-Locking Nut 1
6 Stainless Steel Hose 1 23 Steel
∅
4*8*1 Meson 1
7 Steel Cm5*25 1 24 3*3*20*
∅
3.4 1
8 Water Spray Switch Fixing Ring 1 25 Water Spray Switch Steel Pipe Link Bolt 1
9 Steel M5 Nut 1 26 Water Spray S
witch
Steel Pipe Link Nut 1
10 Plastic Suction Pick 1 27 Water Spray Switch Steel Pipe Forcing Mother 1
11 1 Min
∅
6 Quick Coupling(Female) 1 28
∅
5 Steel Pipe(Bent) 1
12 4*8 Black Rubber Hose(12cm) 1 29 Small Suction Nozzle Mounting Joint 1
13 I Min
∅
6 Outer Tooth Straight Through 1 30
∅
12 Screw 1
14 Water Spray Switch Holder 1 31 Seal Gasket 2
15 Water Spray Switch Spring 1 32 Strainer 1
16 7*2 O-Ring 2 33 A Nozzle (Toothless) 1
17 Water Spray S
witch
Brass Nut 1
DISCONNECTION DIAGRAM OF PORTABLE SUCTION HEAD COMPONENTS
IN LESS TIME
Rammers
22” Floor Sweepers
Trash Water Pumps
Part#:
TW2H
TW3H
TW4H
3" Pump, Honda GX270, 375 GPM, Elevation:
89ft, Suction: 25ft
2" Pump, Honda GX160, 164 GPM, Elevation:
85ft, Suction: 26ft
4" Pump, Honda GX390, 580 GPM, Elevation:
91ft, Suction: 26ft
HAVE QUESTIONS?
Contact us. We’re here to help!
Email us at [email protected]
Part#:
Part#:
SWEEPERS
Electric Scrubber Vacuums
Fan Vest
Electric Mop
Part#:
Part#:
FLOORING& MORE
(866) 577-4476
Equipment Guide
Assorted Brush ChoicesAssorted Brush ChoicesAssorted Brush Choices
Submersible Pump
1 HP, 2" Outlet, 73 GPM, 39 ft Max Head
0.275" Solids Capacity, 32°F to 104°F
1/2 HP, 2” Outlet, 66 GPM, 49.2 ft Max Head,
0.275" Solids Capacity, 32°F to 104°F
6-30 Hrs Run Time,4 Hrs Charge Time,
IP55 Rating, 105 L/S - 36L/S Air Flow
6-30 Hrs Run Time,4 Hrs Charge Time,
IP55 Rating, 105 L/S - 36L/S Air Flow
71dB,1060W, 120V, 99 CFM,
6 Qt Capacity, HEPA 13
<67dB, 500W, 18V, 6 Qt Capacity,
Up to 1 Hr Life, HEPA 13
TDP750
TDP400
40015-KIT
40020-KIT
TVAC6PLUS
TVAC6MAX
eTOS22
38” Floor Sweeper
Part#: TOS38
Part#: TAS850e
Part#: TMOP18e
31" - 38" Sweeping Distance
14.5 Gals Hopper Bin, Manual Push,
12" Wheel Size, 60lbs, Sweeping Dirt and Debris
from 1/32'' to a 4''
30” Floor Sweeper
Part#: eTOS30
31" Sweeping Distance,
6 hrs Battery Life, 13.5 Gals Hopper Bin,
1 Gallon Solution Tank, 12" Wheel Size,
41" Handle Length, 53lbs
22" Sweeping Distance,
27,000ft²/hr Working Efficiency, 3-4 hours Charge
Time, 5 hrs Battery Life, 6 Gals Hopper Bin,
18V / 5Ah, 17.8 lbs
32,560 sq ft per hour
Up to 3 hrs Battery Life, 16 Sewage Hopper Bin,
14 Gallon Solution Tank, 0-3.7 mph Forward Speed,
33.4 inches Cleaning Width, 441lbs
8.3" Brush Size, 36V, 18"
Working Width, 6 hrs Battery Life, 1.71 Gals
Recovery Tank, 1.05 Gal Solution Tank, 500-10750
ft Working Efficiency, 18 lb Brush Pressure, 67 db
3.7 Gal. Tank, Tomahawk 3HP 2 Stroke Engine,
Horizontal Reach: 40ft, Vertical Reach: 25+ft,
50-100 microns, 490 CFM / 220 MPH Air Speed
5 Gal. Tank, Tomahawk 3HP 2 Stroke Engine,
1.8 HP / 23 cc, 50-400 PSI, Up to 30 ft Reach,
Stainless Steel Wand, 2.5 GPM, 26 Lbs
5 Gal, 36V / 7.5 Ah, 50-400 PSI, Up to 30 ft
Reach, Stainless Steel Wand, 2.5 GPM, 2 Hr
Charge Time, 25 Lbs
4 Gal. Tank, 0.7 kW/7.5 Ah, 2hrs @ 1/2 Load, 1hr
at Full Load, Spray Reach of 25 - 30ft, 100 - 300
microns, 400 CFM / 150 MPH Air Speed
QUIET INVERTER SERIES
QUIET INVERTER SERIES
Fertilizer SpreadersBackpack Sprayer
Power Wheelbarrow
Backpack Foggers
4,000 - 7,000 Watt Series
10,500 - 17,000 Watt Series
Skid Sprayer
Part#:
QUIET INVERTER SERIES
OUTDOOR POWER GENERATORSPEST CONTROL
www.tomahawk-power.com
(866) 577-4476
ASSEMBLED IN THE
PARTS SOURCED GLOBALLY
USA
TG2000i
TG3000i
TG4500iEFI
2,000 - 4,500 Watt Series
Equipment Guide
4,000w Max / 3,500w Rated, Honda
Engine
5,500w Max / 5,000w Rated, 120/220V
7,000w Max / 6,500w Rated, Honda
Engine
TG4000H
TG5500i
TG7000H
17,000w Max / 14,500w Rated
120/240V, Run Time 14hrs @ 25% Load,
CARB Compliant, GFCI, CO Detector,
Voltage Selector, Electric Start
10,500w Max / 8,500w Rated
120/220V, Run Time 14.5hrs @ 25% Load
TG9000i
TG17000i
92
63
2,200w Max / 2,000w Rated
3,300w Max / 3,000w Rated,
120/220V, 30 AMP Twist Lock
4,500w Max / 3,800w Rated
20A (120V), Electric, Remote
Part#:
eTMD14
TMD14
Part#:
eTPS25
TPS25
Part#:
CKART260e
CKART300e
4 Gal.Tank, Powered by Tomahawk 3HP
2 Stroke Engine, Horizontal Reach of 30 ft,
Displacement of 63.3 cc, MPA of 1.0 - 2.5
5 Gal.Tank, 0.7 kW/7.5 Ah, 36V, Spray Reach
of 25 - 30 ft, Up to 2 Hrs at Half Load,
1 hr at Full Load, 2 Hrs Charge Time
Part#:
eTGS30
TGS30
Welder Generators
120 Amp Welder, 60% Duty Cycle,
2000w, Includes Wheel Kit
210 Amp Welder, 60% Duty Cycle,
2000w, Includes Wheel Ki
t
Part#:
TWG120A
TWG210A
TBS500
2.8GPM Suction Capacity,
Honda GX35 4 Stroke, 500PSI Working Pressure,
Twin Pumping Brass Pump, 100ft Spray Hose,
8ft Suction Hose, 1.6HP, 35CC, 82DB @ 22ft
570 lbs Max Load, 40V DC , 3.2 hrs
Battery Life, 6 km/h Fwd., 2 km/h Rev.
660 lbs Max Load, 40V DC , 3.2 hrs
Battery Life, 6 km/h Fwd., 2 km/h Rev.

TOMAHAWK®, LLC
San Diego, CA
Sales Support
(866) 577-4476
Equipment Support
(866) 577-4476
www.tomahawk-power.com
Tomahawk understands to keep a job-site running smoothly the proper equipment and
spare parts are needed at the drop of a hat. With same day shipping and faster
delivery times, count on Tomahawk to keep you powered throughout the day! With
long lasting parts and engines, Tomahawk equipment will be the star of your fleet for
years to come. Visit www.tomahawk-power.com to get started today!
Power Your World
FACEBOOK
facebook.com/TomahawkPowerUSA
YOUTUBE
youtube.com/TomahawkPower
INSTAGRAM
@tomahawkpower