
WIRE STRIPPING MACHINE
MODEL: SD-004
Technical Support and E-Warranty Certificate
www.vevor.com/support


- 1 -
MODEL:SD-004
This is the original instruction, please read all manual instructions
carefully before operating. VEVOR reserves a clear interpretation of our
user manual. The appearance of the product shall be subject to the
product you received. Please forgive us that we won't inform you again if
there are any technology or software updates on our product.
WIRE STRIPPING
MACHINE
- 2 -
Warning-To reduce the risk of injury, user must read
instructions manual carefully.
INSTRUCTIONS
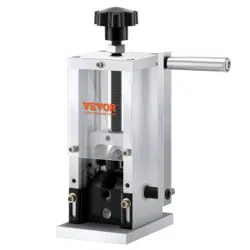
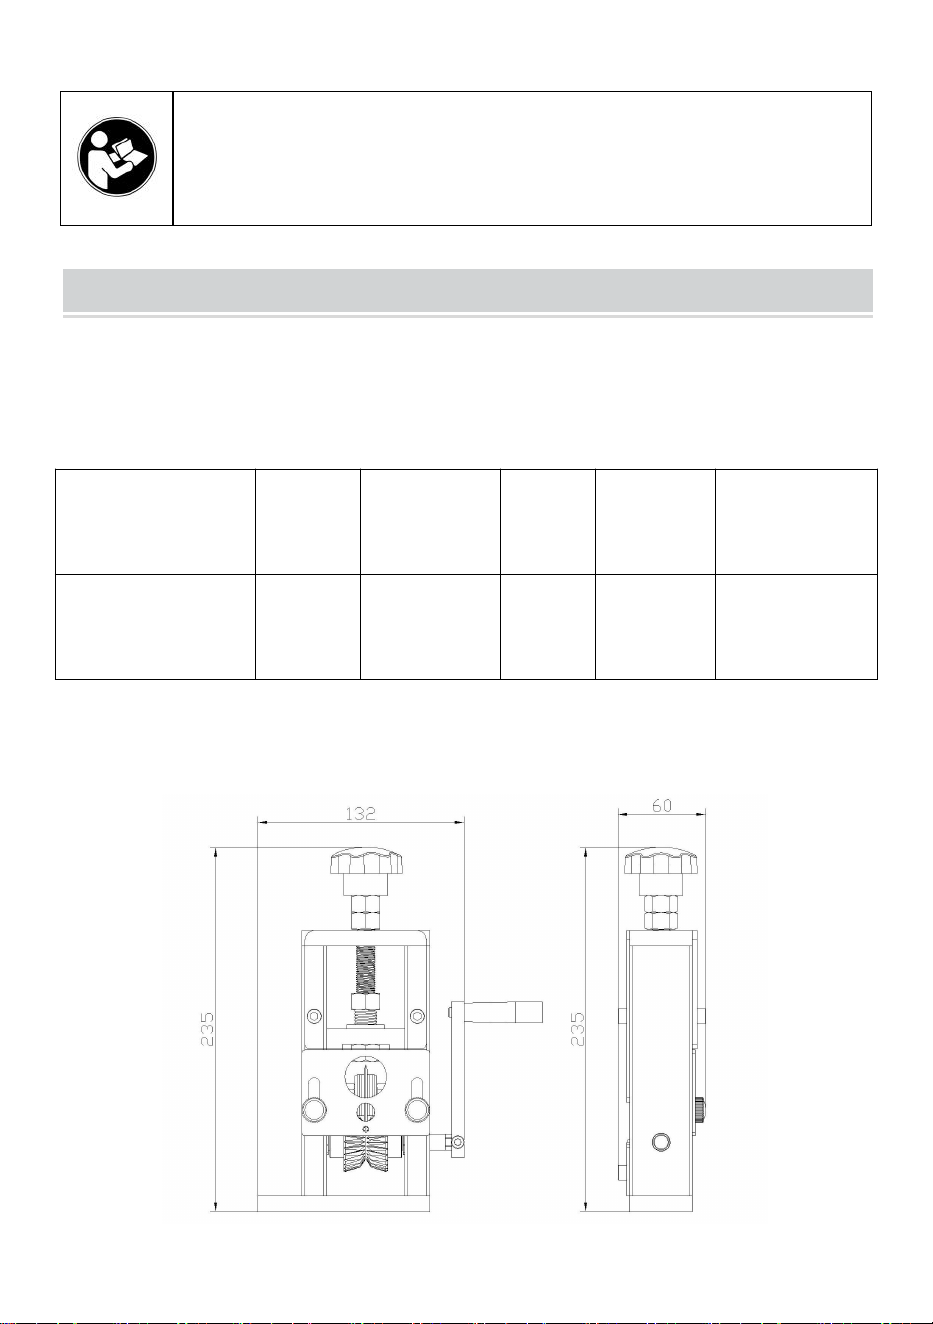
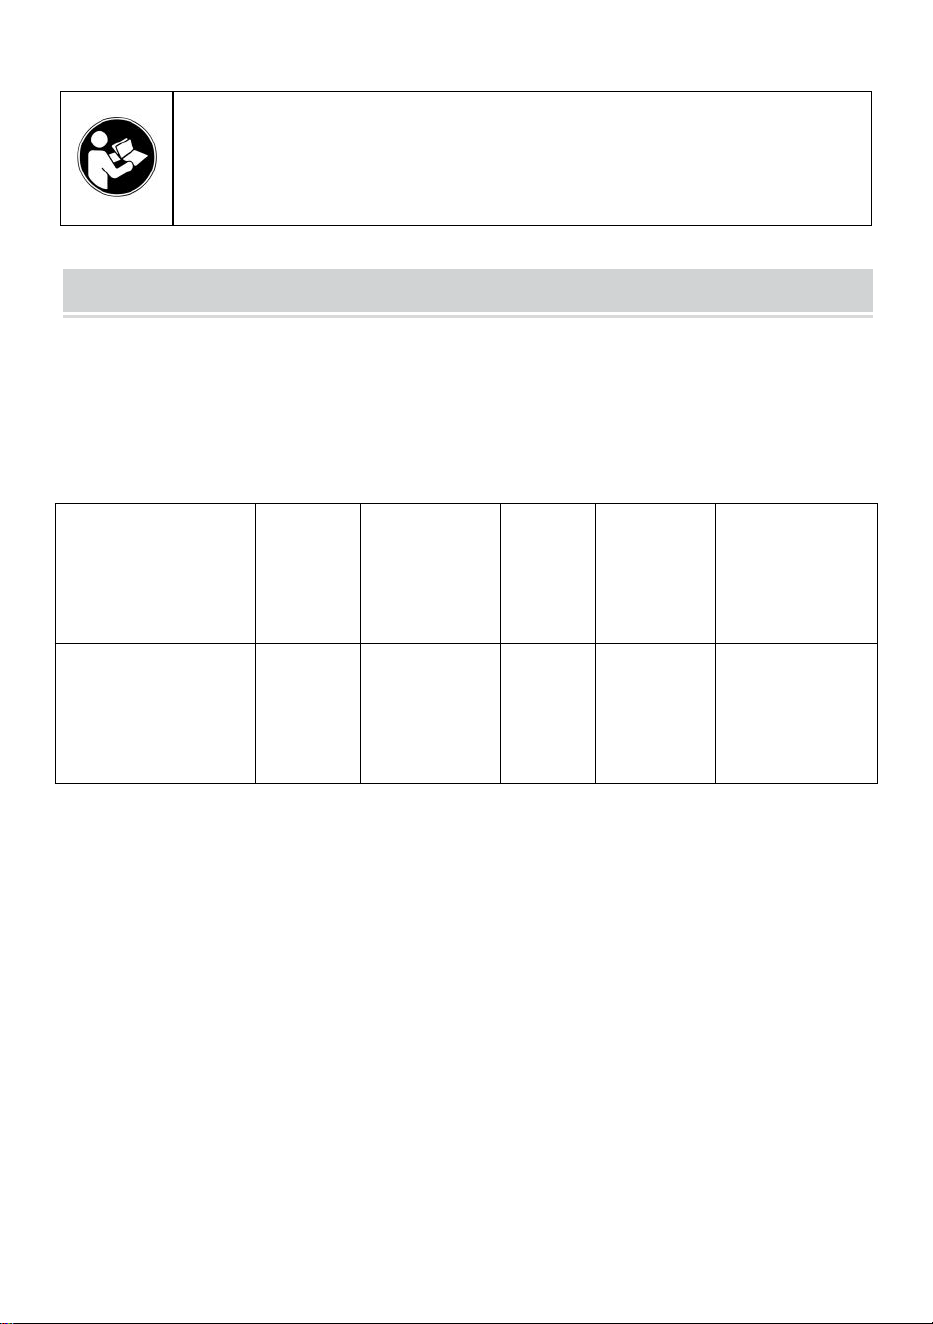
This stripping machine is simple in structure, easy to operate and
carry, light in appearance, beautiful, practical in performance, large in
stripping range, and is a cost-effective machine.
Name
Model
Dimension
(mm)
L*W*H
Weight
(kg)
Stripping
Range
(mm)
Remarks
Aluminum Alloy
Manual Stripping
Line Machine
SD-004
132x60x235
1.7
φ1.5~
φ25
(except
armoured
silicone cables)
Dimension
- 3 -
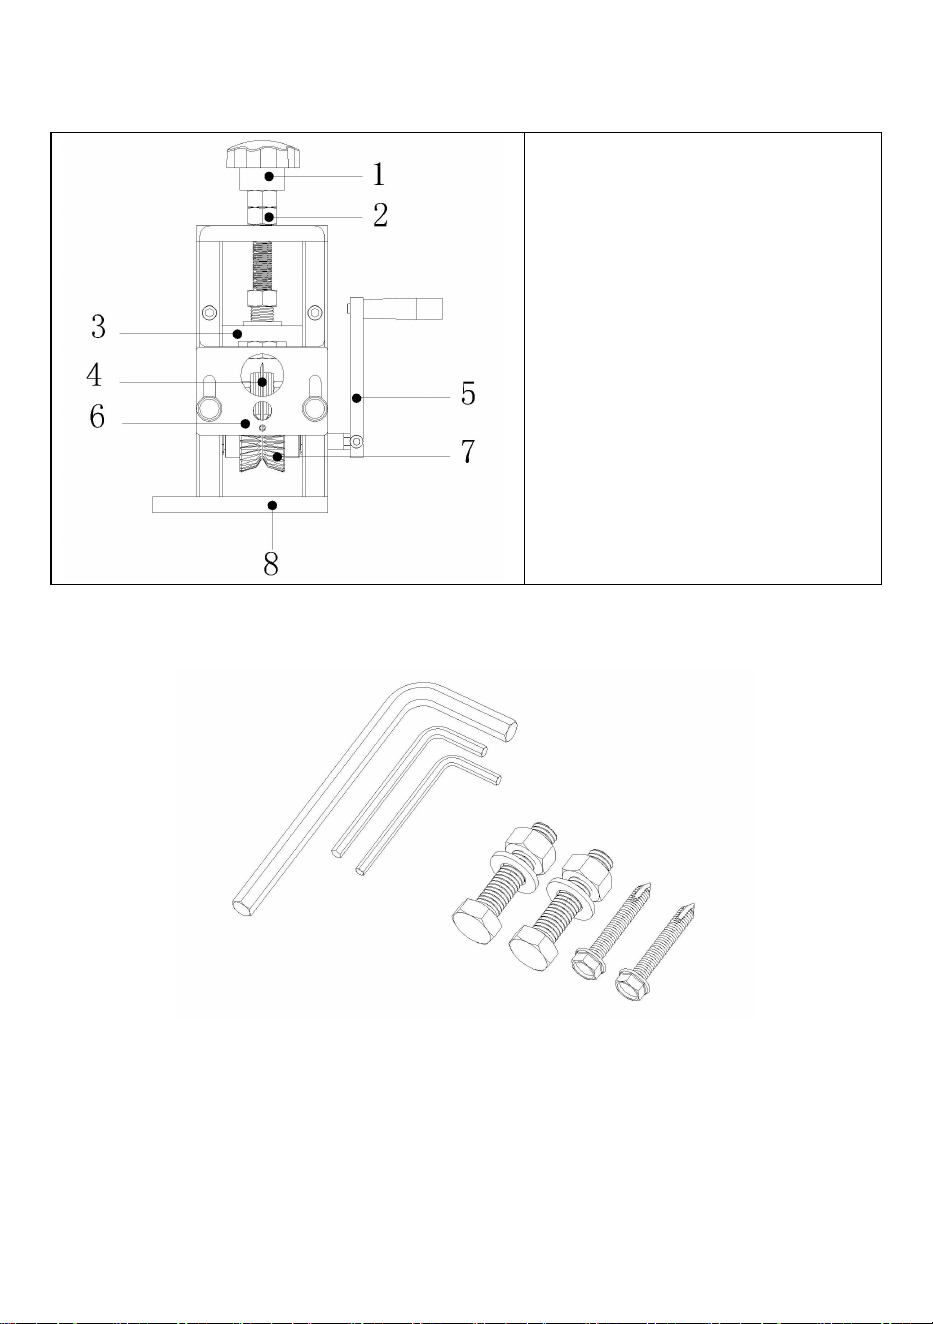
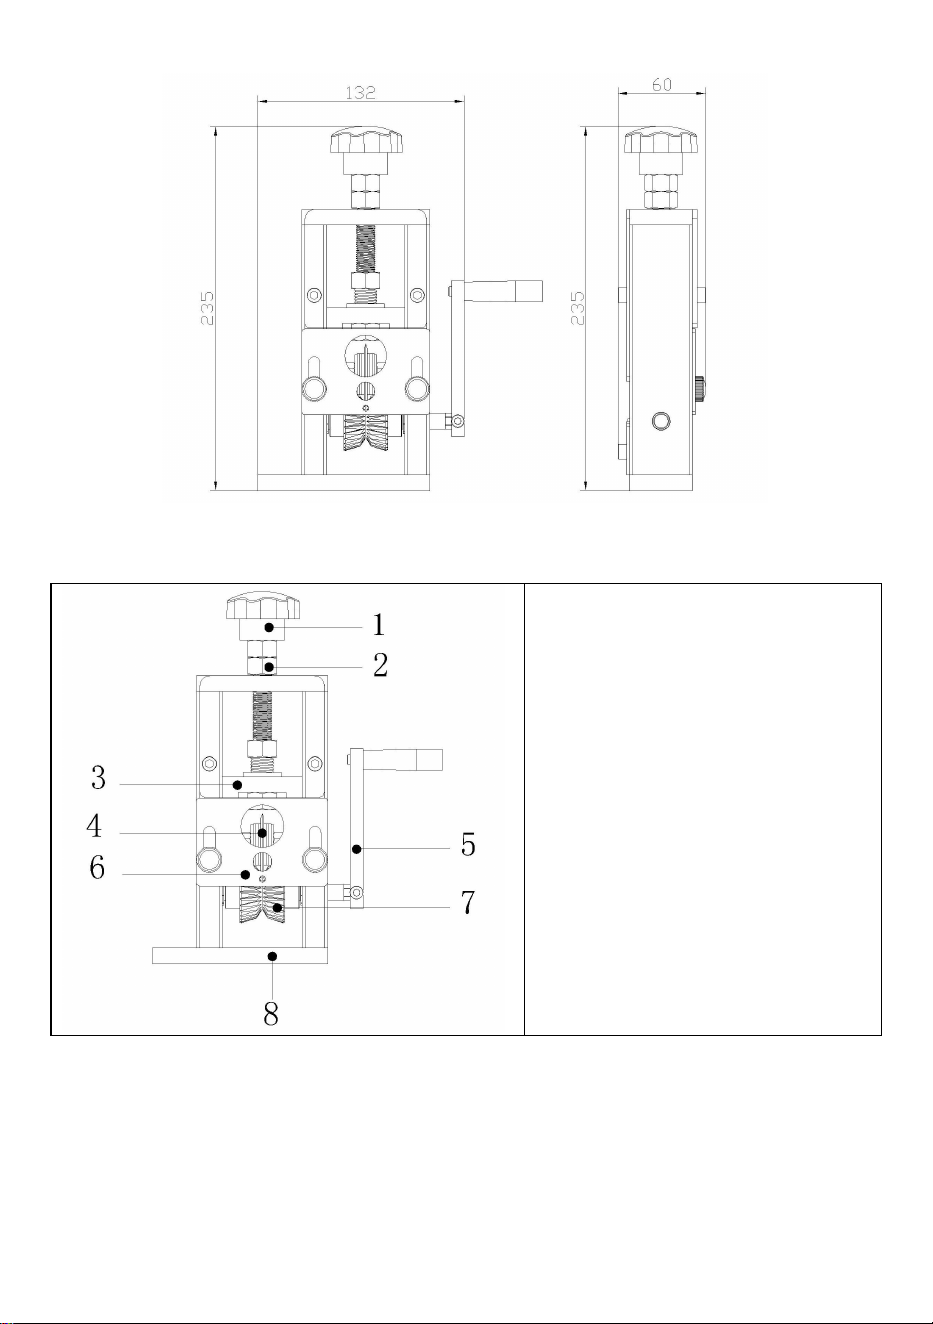
Main components
1:M12 Plastic Nut
2:Blade Height Adjustment
Lock Nut
3:Blade Mounting U-Block
4:Blade
5:Hand Crank
6:Incoming Board
7:Rolling Gear
8:Baseboard
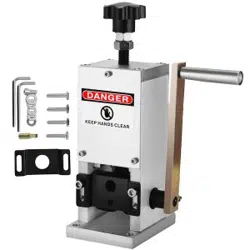
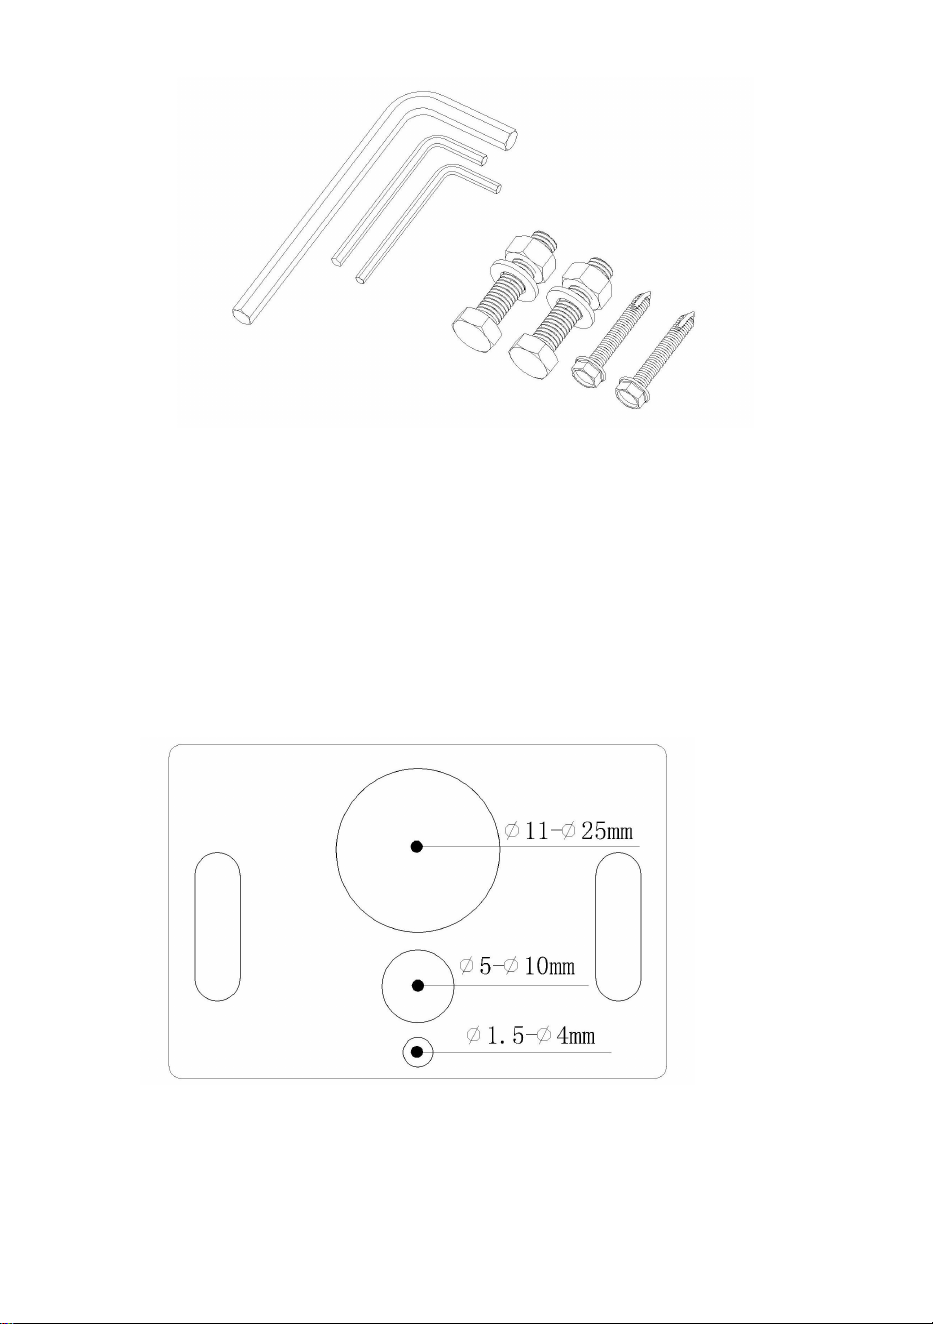
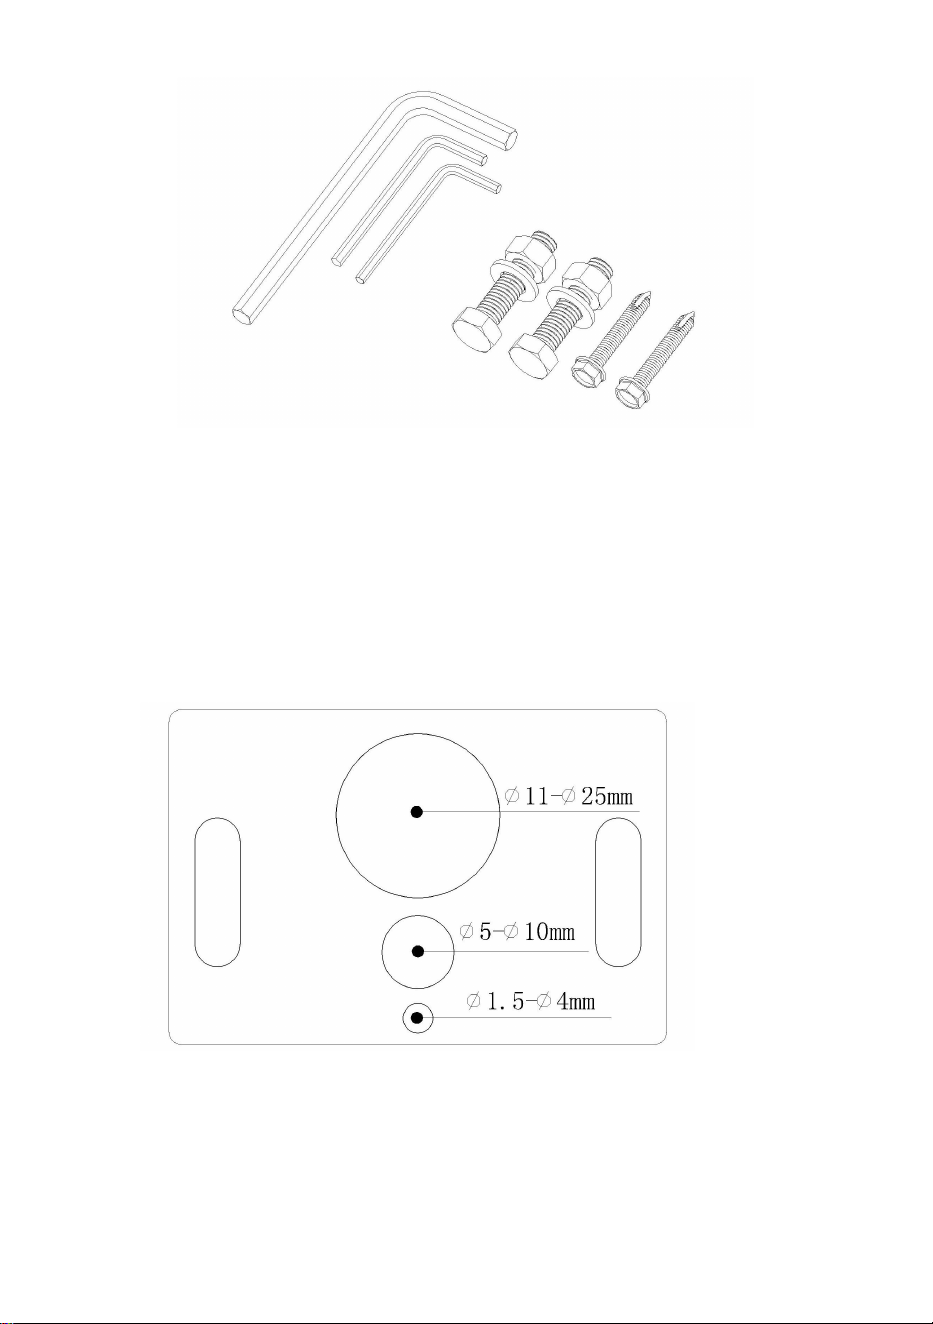
Accessories
5(#) hexagon wrench for M6 Allen screws
2(#) hexagon wrench for M4 stud screws
3(#) hexagon wrench for M6 stud screws
M8*30 hexagon screw with washer and nut two sets
Hexagon flange face self-drilling tapping screw M5*32
- 4 -
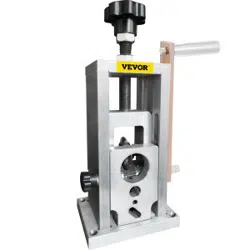
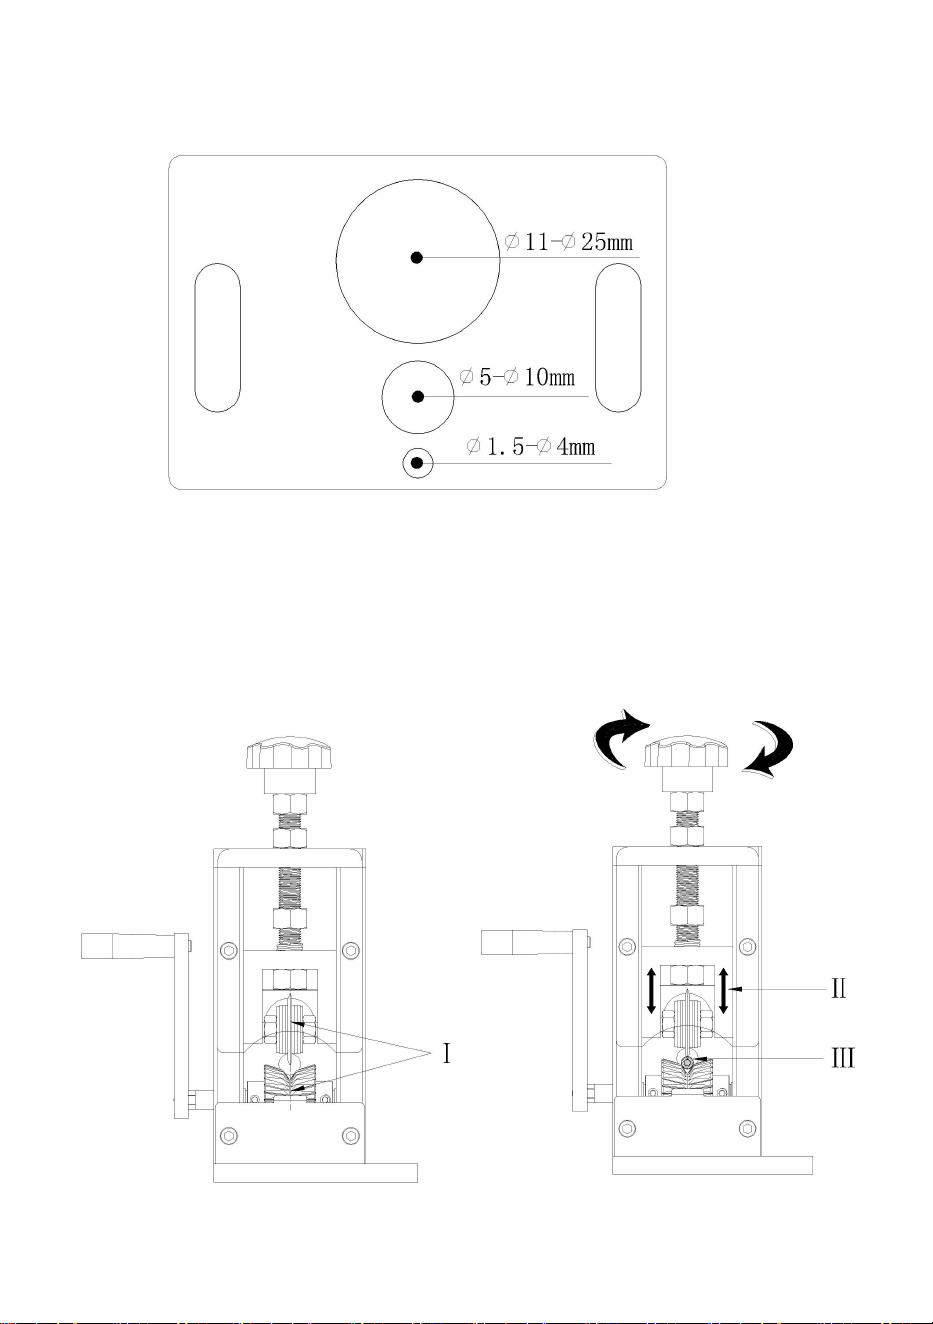
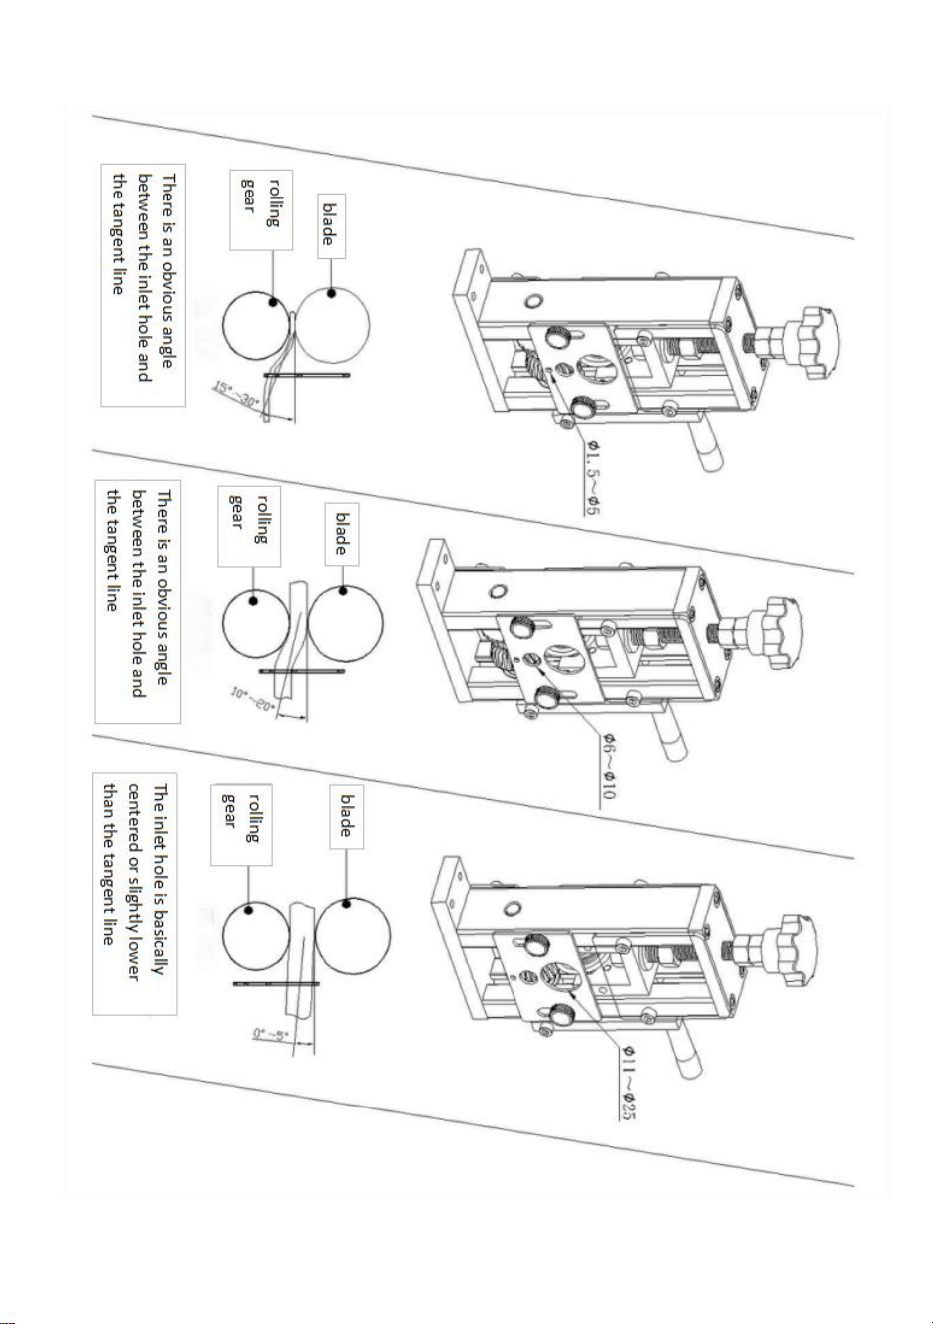
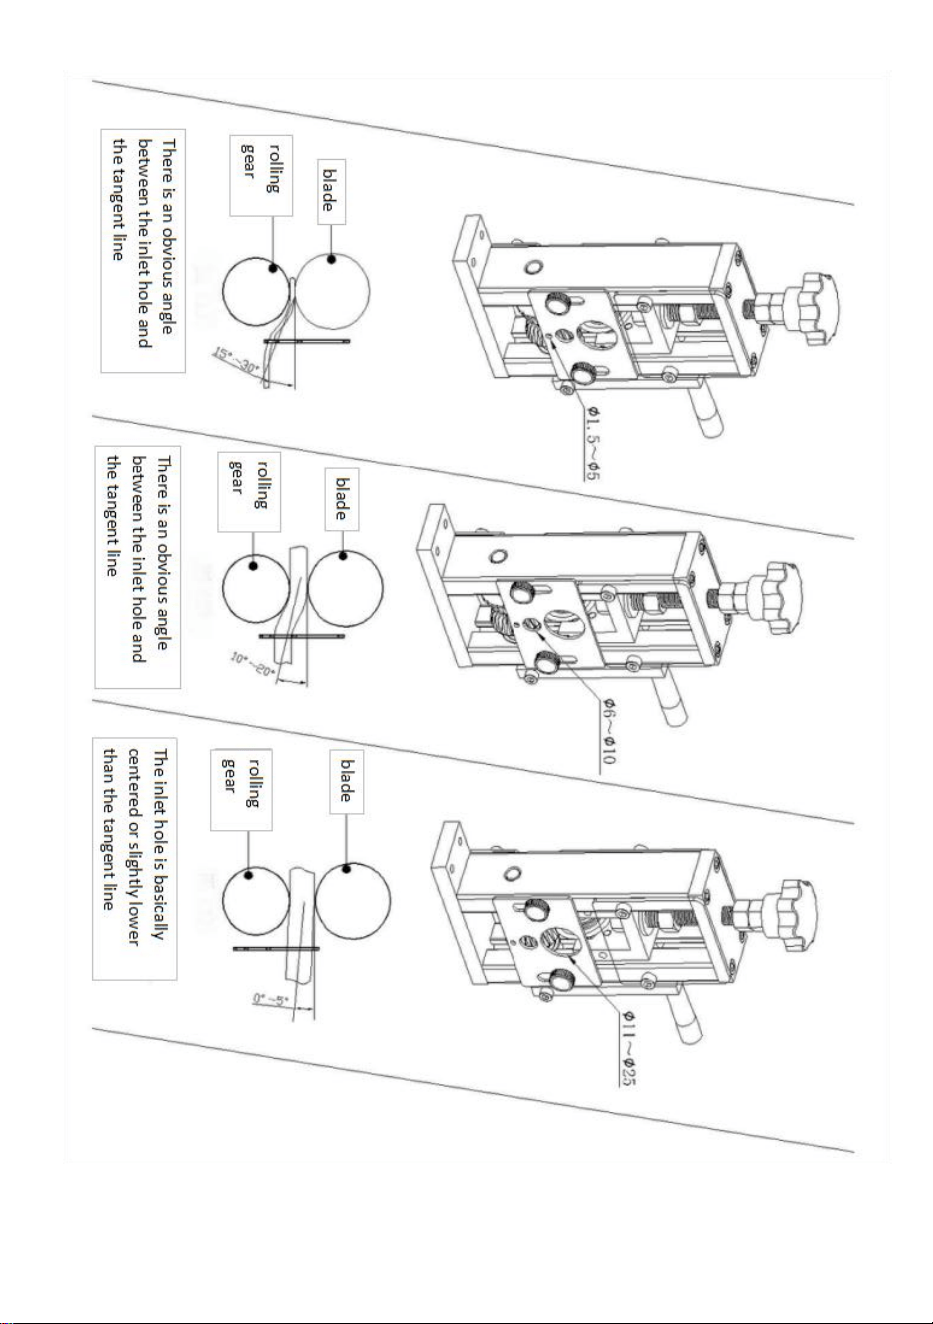
SD-004 stripping range:
SD-004 Instruction:
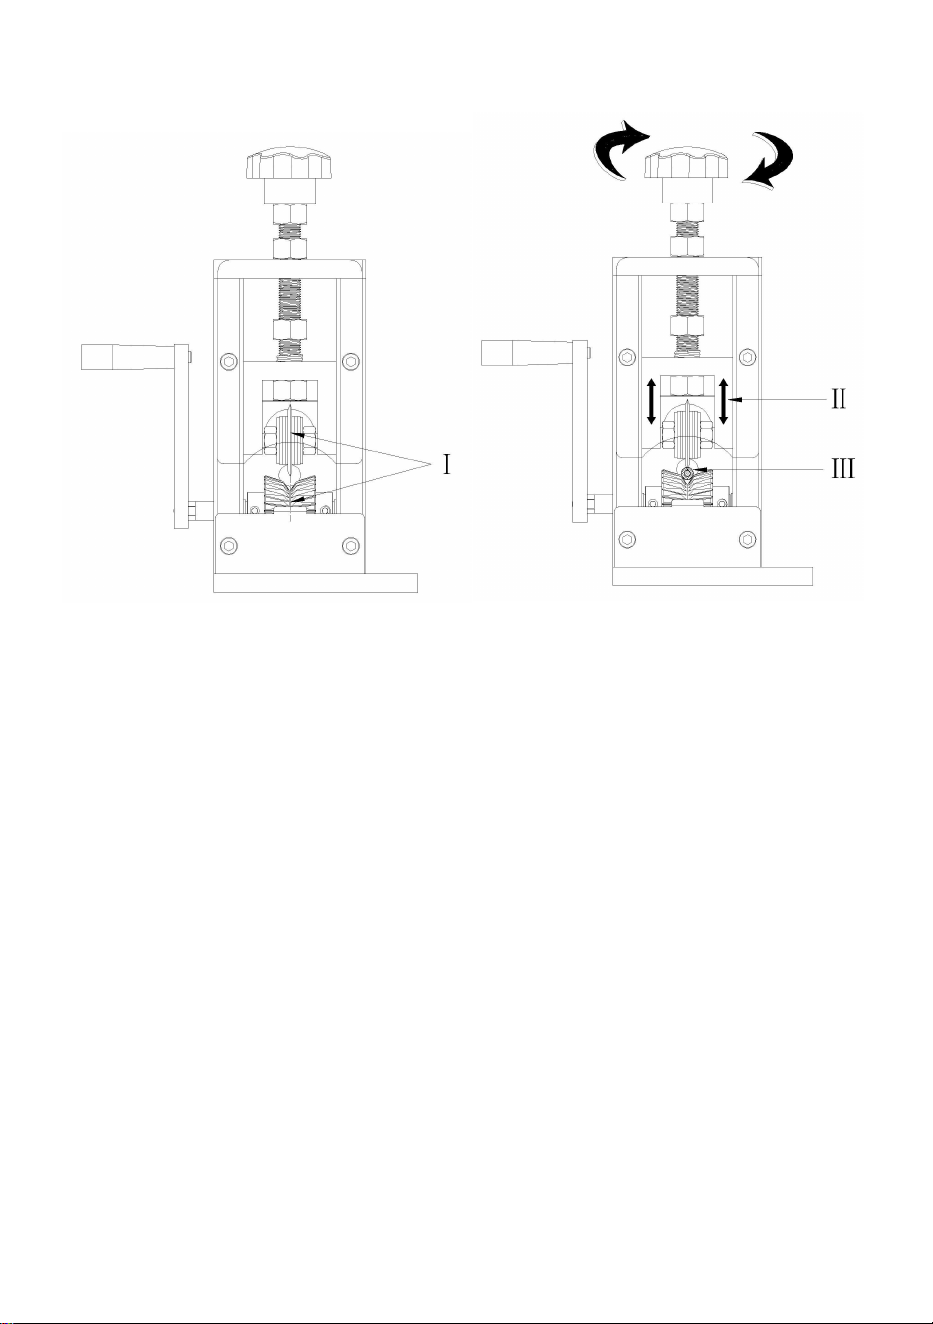
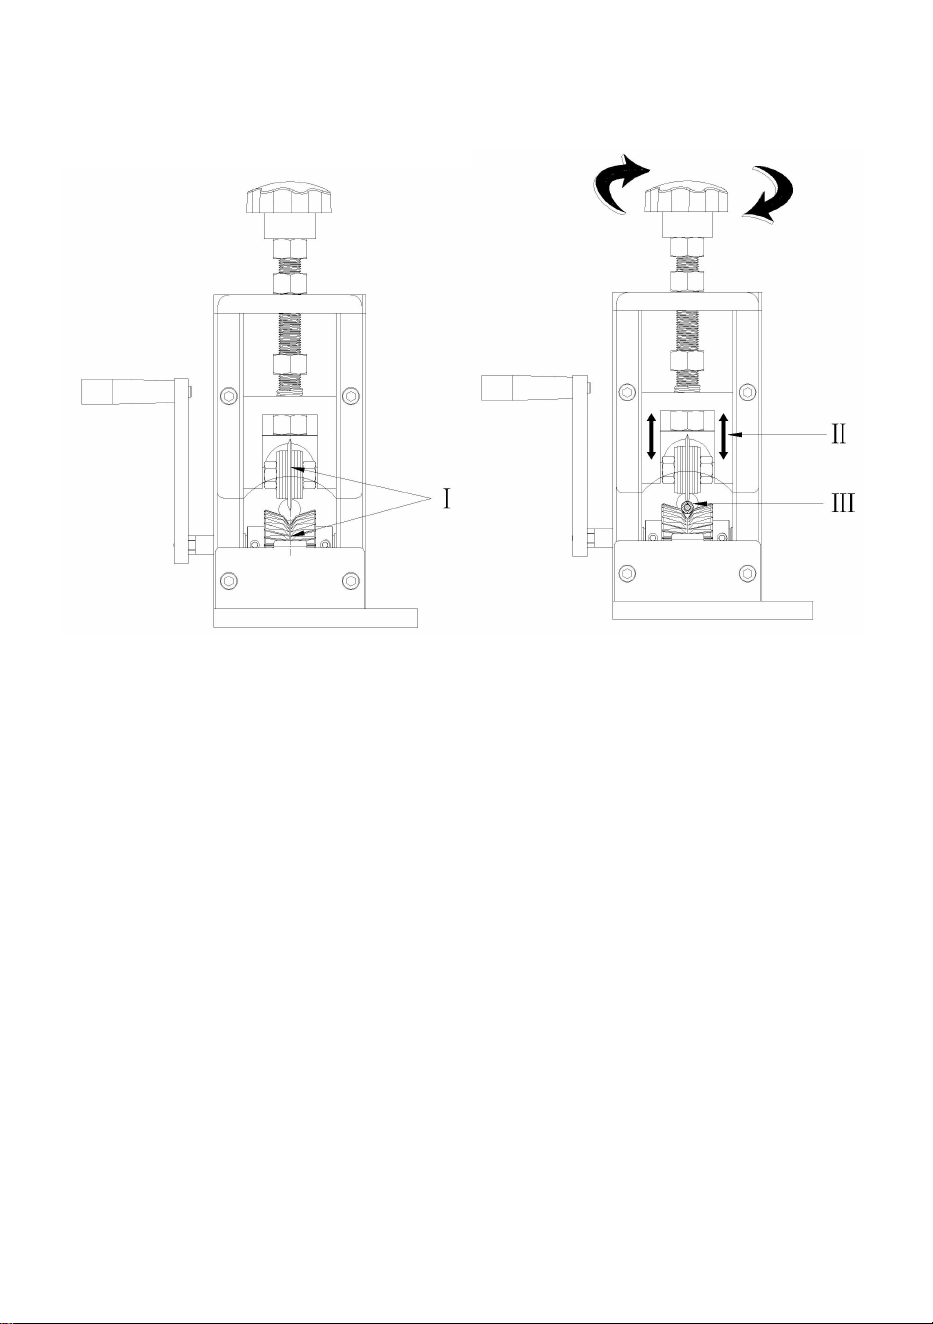
Ⅰ:The center of the blade edge must be collinear with the center of the
V-groove (the groove formed between two rolling gear) when stripping.
- 5 -
Ⅱ
:Depending on the wire thickness, adjust the height of the slider and
blade by turning the plastic handle nut.
Ⅲ
:It is best to make the blade peel off the insulation of the wire and cable
without damaging the copper core.
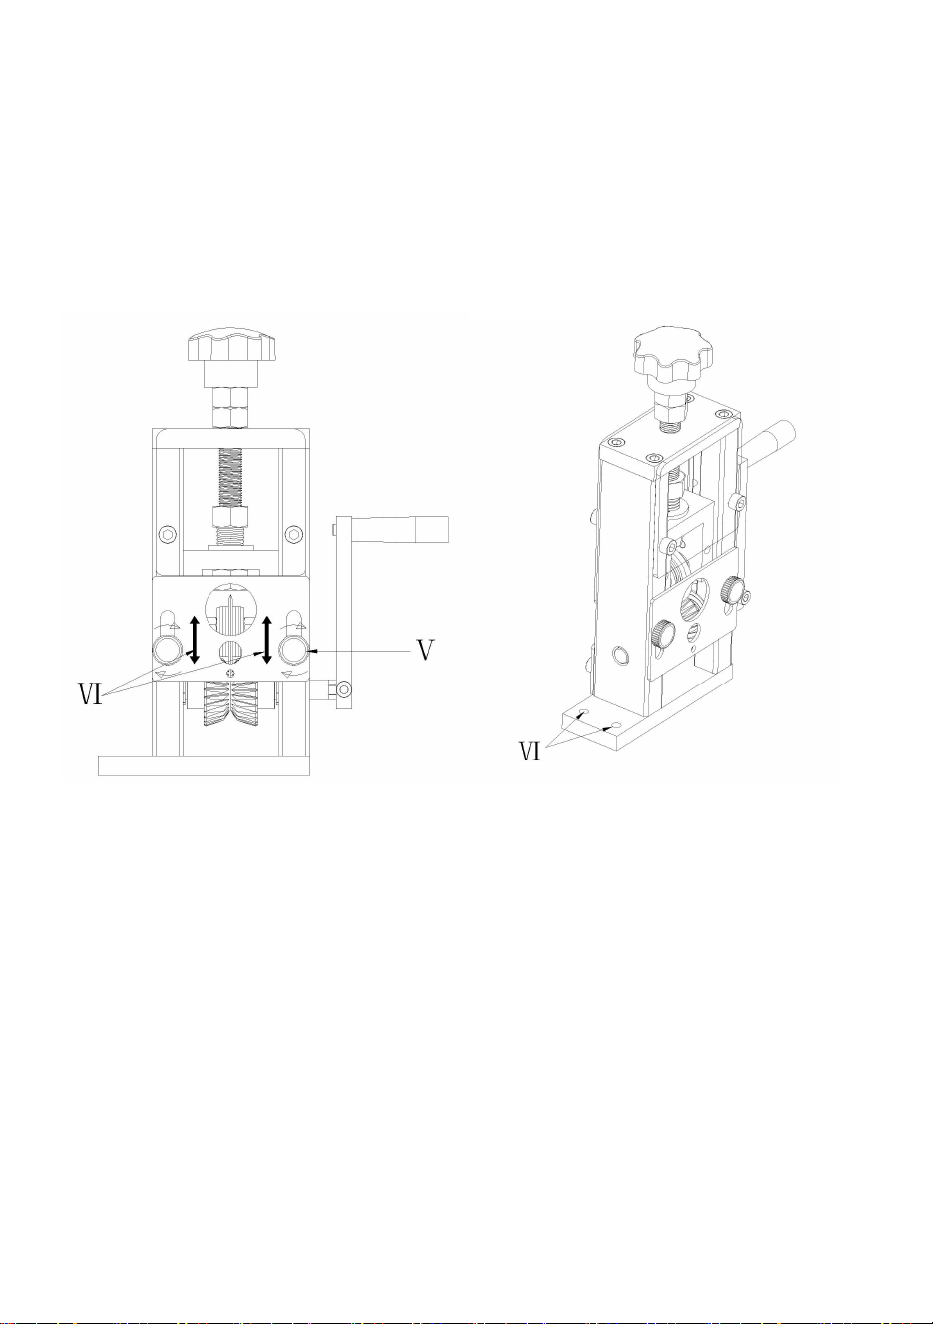
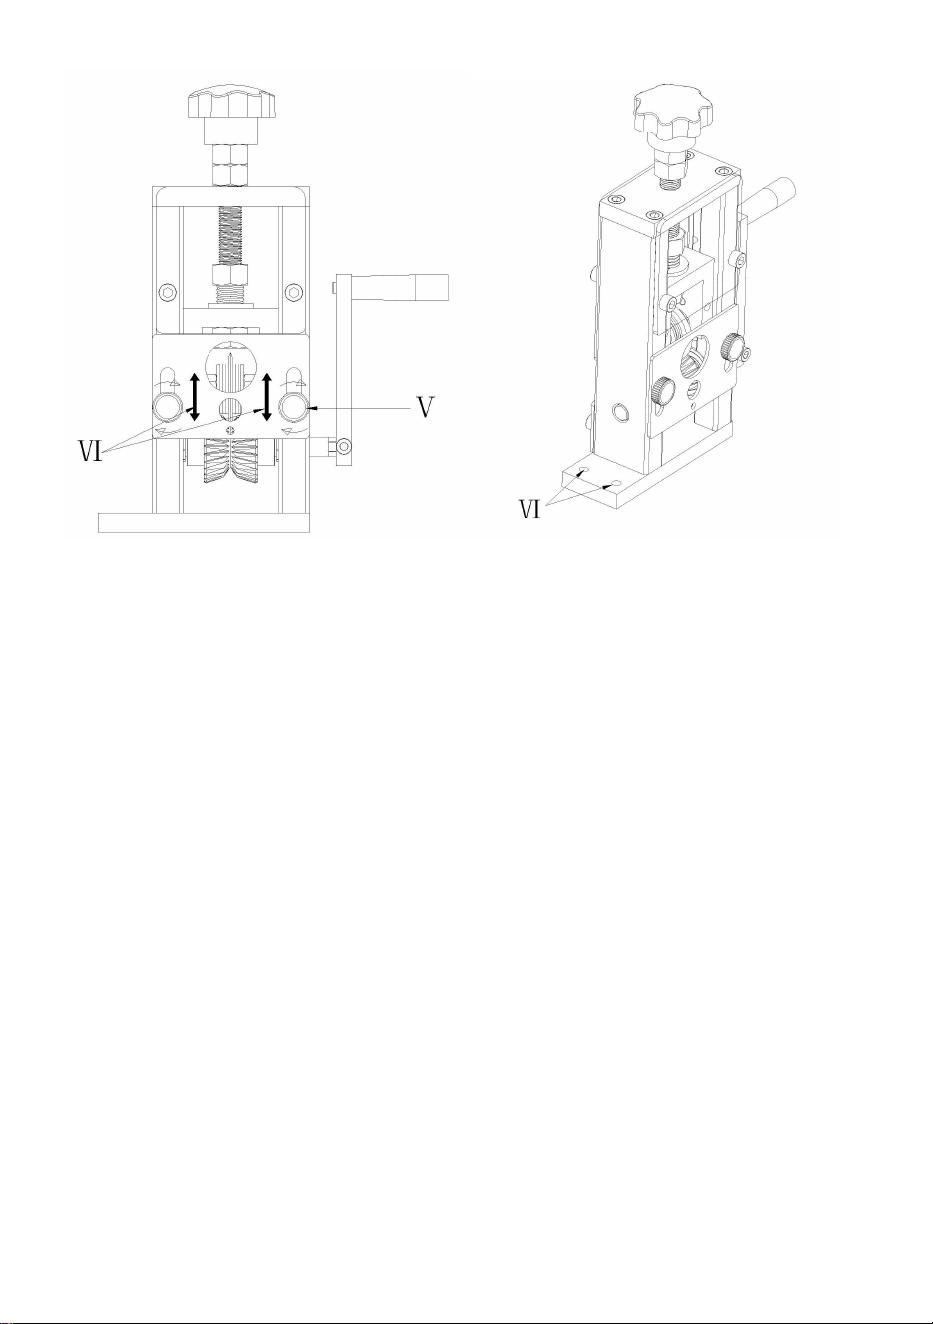
Ⅳ
:Loosen the fixing screws of the wire feeding plate counterclockwise
(both left and right sides should be loosened), adjust the height of the wire
feeding hole to the appropriate height according to the thickness of the wire,
and then tighten the fixing screws of the wire feeding plate clockwise.
XV: Fixed screws for wire insertion board
Ⅴ: Fixed screws for wire insertion board
Ⅵ
:Machine mounting holes
- 6 -

- 7 -
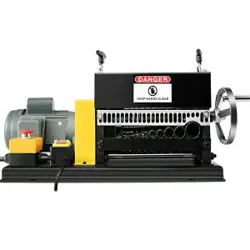
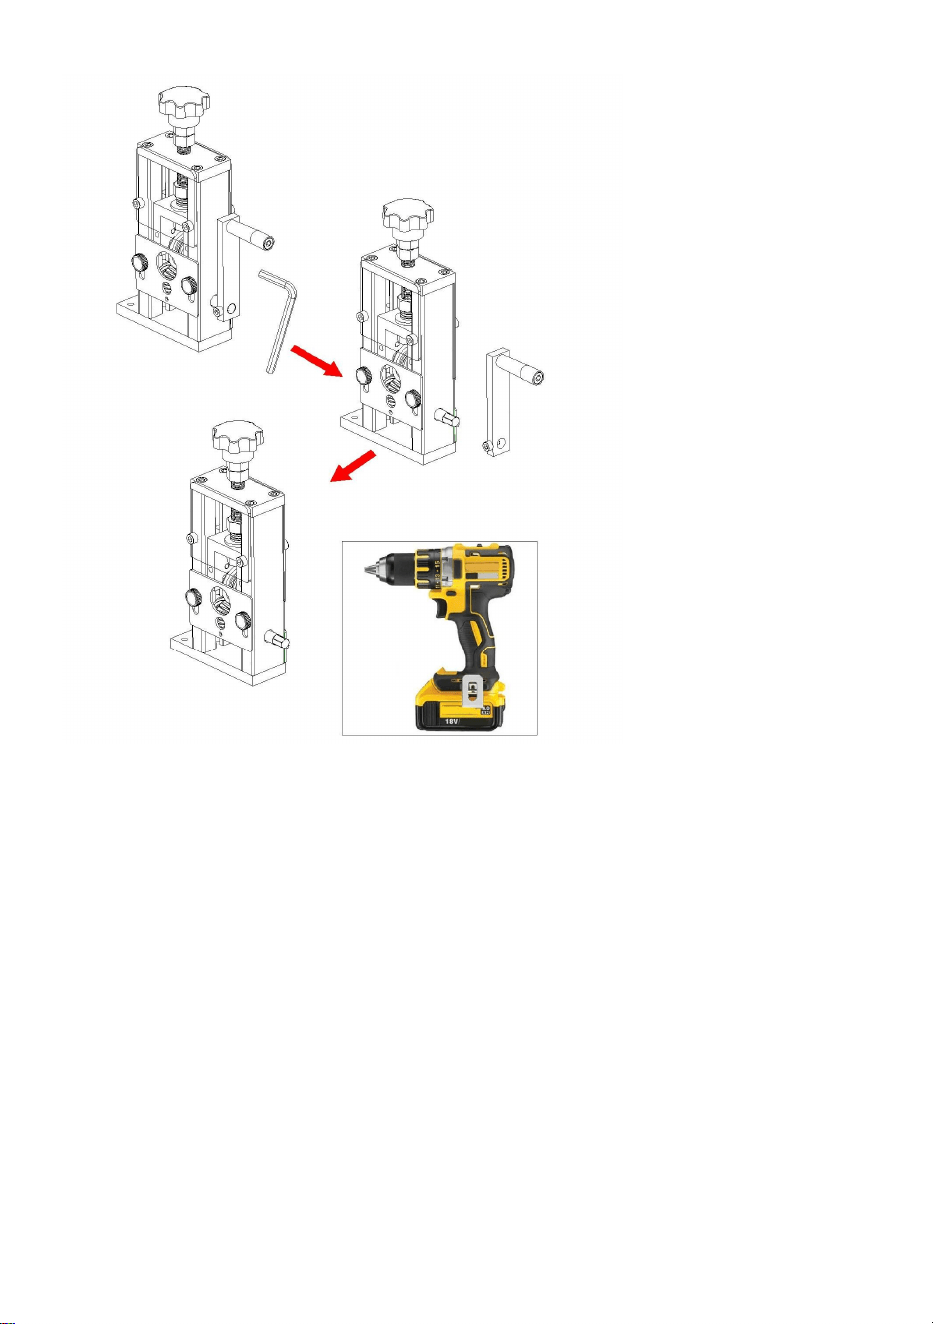
First use wrench to loosen the handle fastening screw, remove the
handle, and then replace the electric drill to realize the electric
stripping.
3: If the stripping machine fails to strip the wire during the stripping
process, there may be several reasons:
1. The diameter of the stripped wire is too small
2. The center of the blade and the center of the V-groove
formed by the two rolling gear are not on a line
3. Maybe the blade edge is not sharp
Do not put your hand into the machine when it is running (be
sure to stop the machine first, press the stop button and then check
and debug and troubleshoot the machine). Do not touch the cutting
edge directly with your hand to avoid cutting the handle.

- 8 -
Manufacturer: Shanghaimuxinmuyeyouxiangongsi
Address: Shuangchenglu 803nong11hao1602A-1609shi, baoshanqu,
shanghai 200000 CN.
Imported to AUS: SIHAO PTY LTD. 1 ROKEVA STREETEASTWOOD NSW
2122 Australia
Imported to USA: Sanven Technology Ltd. Suite 250, 9166 Anaheim Place,
Rancho Cucamonga, CA 91730
REP
EC
E-CrossStu GmbH
Mainzer Landstr.69, 60329 Frankfurt am Main.
REP
UK
YH CONSULTING LIMITED.
C/O YH Consulting Limited Office 147, Centurion House,
London Road, Staines-upon-Thames, Surrey, TW18 4AX


Technical Support and E-Warranty Certificate
www.vevor.com/support

MACHINE À DÉNUDER LES FILS
MODÈLE : SD-004
Assistance technique et certificat de garantie électronique
www.vevor.com/support


- 1 -
MODÈLE : SD-004
Ceci est le mode d'emploi d'origine. Veuillez lire attentivement l'intégralité
du manuel avant utilisation. VEVOR se réserve le droit d'interpréter
clairement ce manuel d'utilisation. L'apparence du produit dépend du
produit que vous avez reçu. Veuillez nous excuser pour les éventuelles
mises à jour technologiques ou logicielles.
WIRE STRIPPING
MACHINE

- 2 -
Avertissement - Pour réduire le risque de blessure, l'utilisateur
doit lire attentivement le manuel d'instructions.
INSTRUCTIONS
Cette machine à dénuder est de structure simple, facile à utiliser et à
transporter, légère en apparence, belle, pratique en termes de
performances, large en termes de plage de dénudage et constitue
une machine rentable.
Nom
Modèle
Dimension
( mm)
L * l * H
Poids
(kg)
Plage de
dénudage
( mm )
Remarques
Machine de
dénudage manuel
d'alliages
d'aluminium
SD-004
132 x 60 x 2
35
1. 7
φ 1,5 ~
φ 25
(sauf câbles en
silicone
blindés)
Dimension

- 3 -
Composants principaux
1 : Écrou en plastique M12 2 :
Contre-écrou de réglage de la
hauteur de la lame
3 : Bloc en U de montage de
lame 4 : Lame
5 : Manivelle 6 : Carte entrante
7: Engrenage roulant 8:
Plinthe
Accessoires

- 4 -
Clé hexagonale 5(#) pour vis Allen M6
Clé hexagonale 2(#) pour vis à goujon M4
Clé hexagonale 3(#) pour vis à goujon M6
Vis hexagonales M8*30 avec rondelle et écrou deux jeux
Vis autotaraudeuse à tête hexagonale à bride M5*32
Plage de décapage SD-004 :
Instructions SD-004 :
Ⅰ :Le centre du bord de la lame doit être colinéaire avec le centre de la

- 5 -
rainure en V (la rainure formée entre deux engrenages roulants ) lors du
décapage.
Ⅱ
: En fonction de l' épaisseur du fil , ajustez la hauteur du curseur et de
la lame en tournant l'écrou de la poignée en plastique.
Ⅲ
: Il est préférable de faire décoller la lame de l'isolant du fil et du câble
sans endommager le noyau en cuivre.

- 6 -
Ⅳ
: Desserrez les vis de fixation de la plaque d'alimentation du fil dans
le sens inverse des aiguilles d'une montre (les côtés gauche et droit
doivent être desserrés), ajustez la hauteur du trou d'alimentation du fil à la
hauteur appropriée en fonction de l'épaisseur du fil, puis serrez les vis de
fixation de la plaque d'alimentation du fil dans le sens des aiguilles d'une
montre.
XV : Vis fixes pour carte d'insertion de fils
Ⅴ: Vis fixes pour carte d'insertion de fils
Ⅵ
: Trous de montage de la machine

- 7 -

- 8 -
Utilisez d'abord une clé pour desserrer la vis de fixation de la poignée,
retirez la poignée, puis remplacez la perceuse électrique pour réaliser
le dénudage électrique.
3 : Si la machine à dénuder ne parvient pas à dénuder le fil pendant le
processus de dénudage, il peut y avoir plusieurs raisons :
4. Le diamètre du fil dénudé est trop petit
5. Le centre de la lame et le centre de la rainure en V formée
par les deux engrenages roulants ne sont pas alignés
6. Peut-être que le tranchant de la lame n'est pas tranchant
Ne mettez pas vos mains dans la machine en fonctionnement
(arrêtez-la d'abord, appuyez sur le bouton d'arrêt, puis vérifiez,
dépannez et corrigez les erreurs). Ne touchez pas directement le
tranchant avec vos mains pour éviter de couper la poignée.

- 9 -
Fabricant : Shanghaimuxinmuyeyouxiangongsi
Adresse : Shuangchenglu 803nong11hao1602A-1609shi, baoshanqu,
shanghai 200000 CN.
Importé en Australie : SIHAO PTY LTD. 1 ROKEVA STREET, ASTWOOD
NSW 2122, Australie
Importé aux États-Unis : Sanven Technology Ltd. Suite 250, 9166 Anaheim
Place, Rancho Cucamonga, CA 91730
REP
EC
E-CrossStu GmbH
Mainzer Landstr.69, 60329 Frankfurt am Main.
REP
UK
YH CONSULTING LIMITED.
C/O YH Consulting Limited Office 147, Centurion House,
London Road, Staines-upon-Thames, Surrey, TW18 4AX


Assistance technique et certificat de garantie électronique
www.vevor.com/support

ABISOLIERMASCHINE
MODELL: SD-004
Technischer Support und E-Garantie-Zertifikat
www.vevor.com/support


- 1 -
MODELL:SD-004
Dies ist die Originalanleitung. Bitte lesen Sie alle Anweisungen sorgfältig
durch, bevor Sie das Gerät in Betrieb nehmen. VEVOR behält sich das
Recht vor , die Bedienungsanleitung klar und deutlich zu interpretieren.
Das Aussehen des Produkts hängt vom gelieferten Produkt ab. Bitte
haben Sie Verständnis dafür, dass wir Sie nicht erneut über Technologie-
oder Software-Updates informieren.
WIRE STRIPPING
MACHINE

- 2 -
Warnung: Um das Verletzungsrisiko zu verringern, muss der
Benutzer die Bedienungsanleitung sorgfältig lesen.
INSTRUCTIONS
Diese Abisoliermaschine ist einfach aufgebaut, leicht zu bedienen
und zu tragen, sieht leicht aus, ist schön, praktisch in der Leistung,
hat einen großen Abisolierbereich und ist eine kostengünstige
Maschine.
Name
Modell
Dimension
( mm)
L * B * H
Gewich
t (kg)
Abisolierb
ereich
( mm )
Bemerkungen
Manuelle
Abisolierlinie aus
Aluminiumlegierung
SD-004
132 x 60 x 2
35
1. 7
φ 1,5 ~
φ 25
(außer
gepanzerte
Silikonkabel)
Dimension

- 3 -
Hauptkomponenten
1: M12-Kunststoffmutter 2:
Kontermutter zur Einstellung
der Klingenhöhe
3: U -Block zur
Klingenmontage 4: Klinge
5: Handkurbel 6:
Eingangsplatine
7: Rollgetriebe 8: Fußleiste
Zubehör
- 4 -
5(#) Sechskantschlüssel für M6-Inbusschrauben
2(#) Sechskantschlüssel für M4-Stiftschrauben
3(#) Sechskantschlüssel für M6-Stiftschrauben
M8*30 Sechskantschraube mit Unterlegscheibe und Mutter, zwei
Sätze
Selbstbohrende Sechskant-Blechschraube mit Flanschfläche M5*32
SD-004 Abisolierbereich :
SD-004 Anleitung :
Ⅰ : Beim Abisolieren muss die Mitte der Klingenkante kollinear mit der
- 5 -
Mitte der V-Nut (der Nut zwischen zwei Rollrädern ) sein.
Ⅱ: Passen Sie die Höhe des Schiebers und der
Klinge je nach Drahtstärke durch Drehen der Kunststoff-Griffmutter an.
Ⅲ: Am besten lässt man die Klinge die Isolierung von Draht und Kabel
abziehen, ohne den Kupferkern zu beschädigen.

- 6 -
Ⅳ : Lösen Sie die Befestigungsschrauben der Drahtzufuhrplatte gegen
den Uhrzeigersinn (sowohl die linke als auch die rechte Seite sollten gelöst
werden), stellen Sie die Höhe des Drahtzufuhrlochs entsprechend der
Dicke des Drahts auf die entsprechende Höhe ein und ziehen Sie dann die
Befestigungsschrauben der Drahtzufuhrplatte im Uhrzeigersinn fest.
XV : Feste Schrauben für die Kabeleinführungsplatte
Ⅴ: Feste Schrauben für die Kabeleinführungsplatte
Ⅵ: Befestigungslöcher der Maschine

- 7 -

- 8 -
Lösen Sie zunächst mit einem Schraubenschlüssel die
Befestigungsschraube des Griffs, entfernen Sie den Griff und setzen
Sie dann die elektrische Bohrmaschine wieder ein, um die elektrische
Abisolierung durchzuführen.
3 : Wenn es der Abisoliermaschine beim Abisolieren nicht gelingt, den
Draht abzuisolieren, kann dies mehrere Gründe haben:
7. Der Durchmesser des abisolierten Kabels ist zu klein
8. Die Mitte der Klinge und die Mitte der V-Nut, die durch die
beiden Rollräder gebildet wird , liegen nicht auf einer
Linie
9. Vielleicht ist die Klingenkante nicht scharf
Stecken Sie Ihre Hand nicht in die laufende Maschine (halten
Sie die Maschine unbedingt zuerst an, drücken Sie die Stopptaste
- 9 -
und überprüfen Sie anschließend die Maschine, um Fehler zu
beheben). Berühren Sie die Schneide nicht direkt mit der Hand, um
ein Einschneiden des Griffs zu vermeiden.
Hersteller: Shanghaimuxinmuyeyouxiangongsi
Adresse: Shuangchenglu 803nong11hao1602A-1609shi, baoshanqu,
Shanghai 200000 CN.
Importiert nach AUS: SIHAO PTY LTD. 1 ROKEVA STREETEASTWOOD
NSW 2122 Australien
Importiert in die USA: Sanven Technology Ltd. Suite 250, 9166 Anaheim
Place, Rancho Cucamonga, CA 91730
REP
EC
E-CrossStu GmbH
Mainzer Landstr.69, 60329 Frankfurt am Main.
REP
UK
YH CONSULTING LIMITED.
C/O YH Consulting Limited Office 147, Centurion House,
London Road, Staines-upon-Thames, Surrey, TW18 4AX


Technischer Support und E-Garantie-Zertifikat
www.vevor.com/support

MACCHINA SPELAFILI
MODELLO: SD-004
Supporto tecnico e certificato di garanzia elettronica
www.vevor.com/support


- 1 -
MODELLO:SD-004
Questa è l'istruzione originale, si prega di leggere attentamente tutte le
istruzioni del manuale prima di utilizzare. VEVOR si riserva una chiara
interpretazione del nostro manuale utente. L'aspetto del prodotto sarà
soggetto al prodotto ricevuto. Vi preghiamo di perdonarci se non vi
informeremo di nuovo se ci sono aggiornamenti tecnologici o software sul
nostro prodotto.
WIRE STRIPPING
MACHINE

- 2 -
Attenzione: per ridurre il rischio di lesioni, l'utente deve leggere
attentamente il manuale di istruzioni.
INSTRUCTIONS
Questa macchina spelafili è semplice nella struttura, facile da usare e
trasportare, leggera nell'aspetto, bella, pratica nelle prestazioni,
ampia nella gamma di spelafili ed è una macchina conveniente.
Nome
Modello
Dimensione
( mm)
L * P * A
Peso
(kg)
Intervallo
di
spogliatur
a ( mm )
Osservazioni
Macchina per la
linea di spogliatura
manuale in lega di
alluminio
Codice
SD-004
Dimensioni :
132x60x2,35
1. 7
φ 1 .5 ~
φ25
(tranne cavi in
silicone
corazzati)
Dimensione

- 3 -
Componenti principali
1: Dado in plastica M12 2:
Dado di bloccaggio per la
regolazione dell'altezza della
lama
3: Blocco a U per montaggio
lama 4: Lama
5: Manovella 6: Scheda in
arrivo
7: Carrello di rotolamento 8:
Battiscopa
Accessori

- 4 -
Chiave esagonale da 5(#) per viti a brugola M6
2(#) chiave esagonale per viti prigioniere M4
Chiave esagonale da 3(#) per viti prigioniere M6
Vite esagonale M8*30 con rondella e dado due set
Vite autofilettante con flangia esagonale M5*32
Intervallo di stripping SD-004 :
Istruzioni SD-004 :
Ⅰ :Il centro del bordo della lama deve essere allineato con il centro della
- 5 -
scanalatura a V (la scanalatura formata tra due ingranaggi volventi )
durante la spogliatura.
Ⅱ
: A seconda dello spessore del filo , regolare l'altezza del cursore e
della lama ruotando il dado dell'impugnatura in plastica.
Ⅲ
: È meglio far sì che la lama stacchi l'isolamento del filo e del cavo
senza danneggiare il nucleo di rame.

- 6 -
Ⅳ
: Allentare le viti di fissaggio della piastra di alimentazione del filo in
senso antiorario (allentare sia il lato sinistro che quello destro), regolare
l'altezza del foro di alimentazione del filo all'altezza appropriata in base allo
spessore del filo, quindi serrare le viti di fissaggio della piastra di
alimentazione del filo in senso orario.
XV : Viti fisse per scheda inserimento fili
Ⅴ: Viti fisse per la scheda di inserimento fili
Ⅵ
: Fori di montaggio della macchina
- 7 -

- 8 -
Per prima cosa, utilizzare una chiave inglese per allentare la vite di
fissaggio della maniglia, rimuovere la maniglia e quindi sostituire il
trapano elettrico per realizzare la spelatura elettrica.
3 : Se la macchina spelafili non riesce a spelare il filo durante il
processo di spelatura, le cause potrebbero essere diverse:
10. Il diametro del filo spelato è troppo piccolo
11. Il centro della lama e il centro della scanalatura a V
formata dai due ingranaggi rotanti non sono allineati
12. Forse il filo della lama non è affilato
Non mettere le mani nella macchina quando è in funzione
(assicurarsi di fermare prima la macchina, premere il pulsante di
arresto e quindi controllare, eseguire il debug e risolvere i problemi
della macchina). Non toccare il tagliente direttamente con le mani
- 9 -
per evitare di tagliare l'impugnatura.
Produttore: Shanghaimuxinmuyeyouxiangongsi
Indirizzo: Shuangchenglu 803nong11hao1602A-1609shi, baoshanqu,
shanghai 200000 CN.
Importato in AUS: SIHAO PTY LTD. 1 ROKEVA STREETEASTWOOD NSW
2122 Australia
Importato negli USA: Sanven Technology Ltd. Suite 250, 9166 Anaheim
Place, Rancho Cucamonga, CA 91730
REP
EC
E-CrossStu GmbH
Mainzer Landstr.69, 60329 Frankfurt am Main.
REP
UK
YH CONSULTING LIMITED.
C/O YH Consulting Limited Office 147, Centurion House,
London Road, Staines-upon-Thames, Surrey, TW18 4AX


Supporto tecnico e certificato di garanzia elettronica
www.vevor.com/support

MÁQUINA PELADORA DE CABLES
MODELO: SD-004
Soporte técnico y certificado de garantía electrónica
www.vevor.com/support


- 1 -
MODELO: SD-004
Estas son las instrucciones originales; lea atentamente todas las
instrucciones del manual antes de utilizarlo. VEVOR se reserva el
derecho de interpretar su manual de usuario. La apariencia del producto
dependerá del producto que haya recibido. Le rogamos que nos disculpe
si no le informamos de nuevo si hay actualizaciones tecnológicas o de
software en nuestro producto.
WIRE STRIPPING
MACHINE
- 2 -
Advertencia: Para reducir el riesgo de lesiones, el usuario
debe leer atentamente el manual de instrucciones.
INSTRUCTIONS
Esta máquina peladora tiene una estructura simple, es fácil de operar
y transportar, es liviana en apariencia, hermosa, práctica en
rendimiento, tiene un amplio rango de pelado y es una máquina
rentable.
Nombre
Modelo
Dimensión
( mm)
Largo *
Ancho * Alto
Peso
(kg)
Rango de
decapado
( mm )
Observaciones
Máquina de línea
de pelado manual
de aleación de
aluminio
SD-004
132 x 60 x 2
35
1.7
φ 1 .5 ~
φ 25
(excepto
cables de
silicona
blindados)
Dimensión
- 3 -
Componentes principales
1: Tuerca de plástico M12 2:
Tuerca de seguridad para
ajuste de altura de la cuchilla
3: Bloque en U para montaje
de cuchillas 4: Cuchilla
5: Manivela 6: Tablero de
entrada
7: Engranaje rodante 8:
Zócalo
Accesorios

- 4 -
Llave hexagonal 5(#) para tornillos Allen M6
2(#) llave hexagonal h para tornillos prisioneros M4
Llave hexagonal 3(#) para tornillos prisioneros M6
Tornillo hexagonal M8*30 con arandela y tuerca, dos juegos
Tornillo autorroscante con brida hexagonal M5*32
Rango de pelado SD-004 :
Instrucciones SD-004 :
Ⅰ :El centro del borde de la cuchilla debe estar colineal con el centro de

- 5 -
la ranura en V (la ranura formada entre dos engranajes rodantes ) al pelar.
Ⅱ
: Dependiendo del grosor del alambre , ajuste la altura del control
deslizante y la cuchilla girando la tuerca del mango de plástico.
Ⅲ
: Lo mejor es hacer que la cuchilla retire el aislamiento del cable y del
alambre sin dañar el núcleo de cobre.
- 6 -
Ⅳ
: Afloje los tornillos de fijación de la placa de alimentación de
alambre en sentido antihorario (deben aflojarse tanto el lado izquierdo
como el derecho), ajuste la altura del orificio de alimentación de alambre a
la altura adecuada de acuerdo con el grosor del alambre y luego apriete
los tornillos de fijación de la placa de alimentación de alambre en el
sentido de las agujas del reloj.
XV : Tornillos fijos para placa de inserción de cables
Ⅴ: Tornillos fijos para placa de inserción de cables
Ⅵ
: Orificios de montaje de la máquina

- 7 -

- 8 -
Primero use una llave para aflojar el tornillo de fijación del mango,
retire el mango y luego reemplace el taladro eléctrico para realizar el
pelado eléctrico.
3 : Si la máquina peladora no logra pelar el cable durante el proceso de
pelado, puede haber varias razones:
13. El diámetro del cable pelado es demasiado pequeño
14. El centro de la cuchilla y el centro de la ranura en V
formada por los dos engranajes rodantes no están en
línea.
15. Quizás el filo de la cuchilla no esté afilado
No introduzca la mano en la máquina mientras esté en
funcionamiento (asegúrese de detenerla primero, presionar el botón
de parada y luego revisarla, depurarla y solucionar los problemas).
- 9 -
No toque el filo directamente con la mano para evitar cortarse el
mango.
Fabricante: Shanghaimuxinmuyeyouxiangongsi
Dirección: Shuangchenglu 803nong11hao1602A-1609shi, baoshanqu,
shanghai 200000 CN.
Importado a AUS: SIHAO PTY LTD. 1 ROKEVA STREET, EASTWOOD,
NSW 2122, Australia
Importado a EE. UU.: Sanven Technology Ltd. Suite 250, 9166 Anaheim
Place, Rancho Cucamonga, CA 91730
REP
EC
E-CrossStu GmbH
Mainzer Landstr.69, 60329 Frankfurt am Main.
REP
UK
YH CONSULTING LIMITED.
C/O YH Consulting Limited Office 147, Centurion House,
London Road, Staines-upon-Thames, Surrey, TW18 4AX


Soporte técnico y certificado de garantía electrónica
www.vevor.com/support

MASZYNA DO ŚCIĄGANIA IZOLACJI Z
PRZEWODÓW
MODELE: SD-004
Wsparcie techniczne i certyfikat e-gwarancji
www.vevor.com/support


- 1 -
MODEL:SD-004
To jest oryginalna instrukcja, przed użyciem należy uważnie przeczytać
wszystkie instrukcje. VEVOR zastrzega sobie jasną interpretację naszej
instrukcji obsługi. Wygląd produktu będzie zależał od produktu, który
otrzymałeś. Prosimy o wybaczenie, że nie poinformujemy Cię ponownie,
jeśli w naszym produkcie pojawią się jakiekolwiek aktualizacje
technologiczne lub oprogramowania.
WIRE STRIPPING
MACHINE

- 2 -
Ostrzeżenie: Aby zminimalizować ryzyko obrażeń, użytkownik
powinien uważnie przeczytać instrukcję obsługi.
INSTRUCTIONS
Ta maszyna do zdejmowania izolacji ma prostą konstrukcję, jest łatwa
w obsłudze i przenoszeniu, wygląda lekko, ładnie się prezentuje, jest
praktyczna, ma duży zakres pracy i jest urządzeniem ekonomicznym.
Nazwa
Model
Wymiar
( mm)
Dł. * Szer. *
Wys.
Waga
(kg)
Zakres
zdejmowa
nia izolacji
( mm )
Uwagi
Maszyna do
ręcznego ściągania
izolacji ze stopu
aluminium
SD-004
Wymiary :
132x60x235
1.7
φ1 .5 ~
φ25
(z wyjątkiem
(kable
silikonowe
pancerne)
Wymiar

- 3 -
Główne składniki
1: Nakrętka plastikowa M12 2:
Nakrętka blokująca do
regulacji wysokości ostrza
3: Blokada mocowania ostrza
w kształcie litery U 4: Ostrze
5: Korba ręczna 6: Płyta
przychodząca
7: Koło zębate 8: Listwa
przypodłogowa
Akcesoria
- 4 -
Klucz imbusowy 5(#) do śrub imbusowych M6
2(#) klucz imbusowy do śrub szpilkowych M4
3(#) klucz imbusowy do śrub szpilkowych M6
Śruba sześciokątna M8*30 z podkładką i nakrętką, dwa zestawy
Wkręt samowiercący z kołnierzem sześciokątnym M5*32
Zakres zdejmowania izolacji SD-004 :
Instrukcja SD-004 :
I :Podczas zdejmowania izolacji środek krawędzi ostrza musi być

- 5 -
współliniowy ze środkiem rowka w kształcie litery V (rowek utworzony
pomiędzy dwoma kołami zębatymi ).
II: W zależności od grubości drutu wyreguluj wysokość suwaka i ostrza,
obracając plastikową nakrętkę uchwytu.
III: Najlepiej jest zdjąć ostrzem izolację przewodu i kabla, nie uszkadzając
miedzianego rdzenia.

- 6 -
I : Odkręć śruby mocujące płytę podającą drut przeciwnie do ruchu
wskazówek zegara (powinny być odkręcone zarówno lewa, jak i prawa
strona), dostosuj wysokość otworu podającego drut do odpowiedniej
wysokości w zależności od grubości drutu, a następnie dokręć śruby
mocujące płytę podającą drut zgodnie z ruchem wskazówek zegara.
XV : Stałe śruby do płytki wprowadzania przewodów
Ⅴ: Śruby stałe do płytki wprowadzania przewodów
Ⅵ: Otwory montażowe maszyny

- 7 -

- 8 -
Najpierw poluzuj śrubę mocującą uchwyt za pomocą klucza, zdejmij
uchwyt, a następnie ponownie użyj wiertarki elektrycznej, aby
wykonać zdejmowanie izolacji.
3 : Jeżeli urządzenie do zdejmowania izolacji nie usunie izolacji z
przewodu w trakcie procesu zdejmowania izolacji, przyczyn może być
kilka:
16. Średnica odizolowanego przewodu jest zbyt mała
17. Środek łopatki i środek rowka w kształcie litery V
utworzonego przez dwa koła toczne nie leżą na jednej
linii
18. Być może krawędź ostrza nie jest ostra
Nie wkładaj ręki do maszyny, gdy jest uruchomiona (najpierw
zatrzymaj maszynę, naciśnij przycisk stop, a następnie sprawdź,

- 9 -
usuń błędy i rozwiąż problemy z maszyną). Nie dotykaj ostrza
tnącego bezpośrednio ręką, aby uniknąć przecięcia uchwytu.
Producent: Shanghaimuxinmuyeyouxiangongsi
Adres: Shuangchenglu 803nong11hao1602A-1609shi, baoshanqu, szanghaj
200000 CN.
Importowane do AUS: SIHAO PTY LTD. 1 ROKEVA STREETEASTWOOD
NSW 2122 Australia
Importowane do USA: Sanven Technology Ltd. Suite 250, 9166 Anaheim
Place, Rancho Cucamonga, CA 91730
REP
EC
E-CrossStu GmbH
Mainzer Landstr.69, 60329 Frankfurt am Main.
REP
UK
YH CONSULTING LIMITED.
C/O YH Consulting Limited Office 147, Centurion House,
London Road, Staines-upon-Thames, Surrey, TW18 4AX


Wsparcie techniczne i certyfikat e-gwarancji
www.vevor.com/support

DRAADSTRIPMACHINE
MODEL: SD-004
Technische ondersteuning en e-garantiecertificaat
www.vevor.com/support


- 1 -
MODEL:SD-004
Dit is de originele instructie, lees alle handleidingen zorgvuldig door
voordat u het product gebruikt. VEVOR behoudt zich een duidelijke
interpretatie van onze gebruikershandleiding voor. Het uiterlijk van het
product is afhankelijk van het product dat u hebt ontvangen. Vergeef ons
dat we u niet opnieuw zullen informeren als er technologie- of
software-updates voor ons product zijn .
WIRE STRIPPING
MACHINE

- 2 -
Waarschuwing: om het risico op letsel te verkleinen, moet de
gebruiker de gebruiksaanwijzing zorgvuldig lezen.
INSTRUCTIONS
Deze stripmachine heeft een eenvoudige structuur, is gemakkelijk te
bedienen en te vervoeren, is licht van uiterlijk, mooi, praktisch in
gebruik, heeft een groot stripbereik en is een kosteneffectieve
machine.
Naam
Model
Dimensie
( mm)
L * B * H
Gewich
t (kg)
Stripbereik
( mm )
Opmerkingen
Handmatige
striplijnmachine
voor
aluminiumlegering
SD-004
132x60x2 35
1.7
φ 1 .5 ~
φ25
(behalve
gepantserde
siliconenkabels
)
Dimensie

- 3 -
Hoofdcomponenten
1:M12 kunststof moer 2:
Borgmoer voor
bladhoogteverstelling
3:Bladmontage U -blok 4:
Blad
5:Handcrank 6:Inkomende
printplaat
7: Rollend materiaal 8:Plint
Accessoires

- 4 -
5(#) inbussleutel voor M6 inbusschroeven
2(#) inbussleutel voor M4-schroefdraadbouten
3(#) inbussleutel voor M6-schroefdraadbouten
M8*30 zeskantschroef met ring en moer twee sets
Zeskant flensvlak zelfborende tapschroef M5*32
SD-004 stripbereik :
SD-004 Instructie :
Ⅰ :Het midden van de snijkant van het mes moet in lijn liggen met het

- 5 -
midden van de V-groef (de groef die tussen twee rollende tandwielen wordt
gevormd ) bij het strippen.
Ⅱ
: Afhankelijk van de dikte van de draad , kunt u de hoogte van de
schuif en het mes aanpassen door aan de moer van de kunststof
handgreep te draaien.
Ⅲ
:Het is het beste om het mes de isolatie van de draad en de kabel los
te maken zonder de koperen kern te beschadigen.

- 6 -
Ⅳ
: Draai de bevestigingsschroeven van de draadaanvoerplaat tegen
de klok in los (zowel de linker- als de rechterkant moeten worden
losgedraaid), pas de hoogte van het draadaanvoergat aan op de juiste
hoogte, afhankelijk van de dikte van de draad, en draai vervolgens de
bevestigingsschroeven van de draadaanvoerplaat met de klok mee vast.
XV : Vaste schroeven voor draadinvoerbord
Ⅴ: Vaste schroeven voor draadinvoerbord
Ⅵ
: Montagegaten voor de machine

- 7 -

- 8 -
Draai eerst de bevestigingsschroef van de handgreep los met een
sleutel, verwijder de handgreep en plaats vervolgens de elektrische
boormachine terug om de elektrische stripping uit te voeren.
3 : Als de stripmachine de draad niet stript tijdens het stripproces,
kunnen daar verschillende redenen voor zijn:
19. De diameter van de gestripte draad is te klein
20. Het midden van het blad en het midden van de V-groef
gevormd door de twee rollende tandwielen liggen niet
op één lijn
21. Misschien is de snijkant van het mes niet scherp
Steek uw hand niet in de machine als deze draait (zorg ervoor
dat u eerst de machine stopt, op de stopknop drukt en vervolgens de
machine controleert, debugt en problemen oplost). Raak de snijkant

- 9 -
niet rechtstreeks met uw hand aan om te voorkomen dat u in de
handgreep snijdt.
Fabrikant: Shanghaimuxinmuyeyouxiangongsi
Adres: Shuangchenglu 803nong11hao1602A-1609shi, baoshanqu, shanghai
200000 CN.
Geïmporteerd naar AUS: SIHAO PTY LTD. 1 ROKEVA
STREETEASTWOOD NSW 2122 Australië
Geïmporteerd naar de VS: Sanven Technology Ltd. Suite 250, 9166 Anaheim
Place, Rancho Cucamonga, CA 91730
REP
EC
E-CrossStu GmbH
Mainzer Landstr.69, 60329 Frankfurt am Main.
REP
UK
YH CONSULTING LIMITED.
C/O YH Consulting Limited Office 147, Centurion House,
London Road, Staines-upon-Thames, Surrey, TW18 4AX


Technische ondersteuning en e-garantiecertificaat
www.vevor.com/support

TRÅDAVISOLERINGSMASKIN
MODELL: SD-004
Teknisk support och e-garanticertifikat
www.vevor.com/support


- 1 -
MODELL: SD-004
Detta är den ursprungliga instruktionen, läs alla instruktioner noggrant
innan du använder den. VEVOR reserverar sig för en tydlig tolkning av vår
användarmanual. Utseendet på produkten är beroende av den produkt du
fått. Ursäkta oss att vi inte kommer att informera dig igen om det finns
någon teknik eller mjukvaruuppdateringar på vår produkt.
WIRE STRIPPING
MACHINE

- 2 -
Varning - För att minska risken för skada måste användaren
läsa instruktionerna noggrant.
INSTRUCTIONS
Denna strippningsmaskin är enkel i strukturen, lätt att använda och
bära, lätt till utseendet, vacker, praktisk i prestanda, stor i
strippningsintervall och är en kostnadseffektiv maskin.
Namn
Modell
Dimensioner
a
( mm)
L * B * H
Vikt
(kg)
Avisolerin
gsområde
( mm )
Anmärkningar
Manuell
avisoleringsmaskin
av
aluminiumlegering
SD-004
132 x 60 x 2
35
1. 7
φ 1,5 ~
φ 25
(utom
bepansrade
silikonkablar)
Dimensionera

- 3 -
Huvudkomponenter
1:M12 plastmutter 2:
Låsmutter för
bladhöjdsjustering
3: Bladmontering U -Block 4:
Blade
5:Handvev 6:Inkommande
styrelse
7: Rolling Gear 8:
Baseboard
Tillbehör

- 4 -
5(#) sexkantnyckel för M6 insexskruvar
2(#) sexkantnyckel h för M4-bultskruvar
3(#) sexkantnyckel för M6-bultskruvar
M8*30 sexkantskruv med bricka och mutter två set
Sexkantig flänsyta självborrande gängskruv M5*32
SD-004 strippningsområde :
SD-004 Instruktion :
Ⅰ : Mitten av bladeggen måste vara i linje med mitten av V-spåret

- 5 -
(spåret som bildas mellan två rullande kugghjul ) vid strippning.
Ⅱ
: Beroende på trådtjockleken , justera höjden på reglaget och bladet
genom att vrida plasthandtagets mutter.
Ⅲ: Det är bäst att få bladet att dra av isoleringen av tråden och kabeln
utan att skada kopparkärnan.

- 6 -
Ⅳ
:Lossa fästskruvarna på trådmatarplattan moturs (både vänster och
höger sida ska lossas), justera höjden på trådmatningshålet till lämplig höjd
enligt tjockleken på tråden och dra sedan åt fästskruvarna på
trådmatarplattan medurs.
XV : Fasta skruvar för trådinsättningskort
Ⅴ: Fasta skruvar för trådinsättningskort
Ⅵ
: Maskinmonteringshål

- 7 -
- 8 -
Använd först en skiftnyckel för att lossa handtagets fästskruv, ta bort
handtaget och byt sedan ut den elektriska borren för att realisera den
elektriska avskalningen.
3 : Om strippningsmaskinen misslyckas med att strippa tråden under
strippningsprocessen kan det finnas flera anledningar:
22. Diametern på den avskalade tråden är för liten
23. Mitten av bladet och mitten av V-spåret som bildas av de
två rullande kugghjulen är inte på en linje
24. Kanske är kniveggen inte vass
Stick inte in handen i maskinen när den är igång (se till att
stoppa maskinen först, tryck på stoppknappen och kontrollera sedan
och felsök och felsök maskinen). Rör inte skäreggen direkt med
handen för att undvika att skära av handtaget.
- 9 -
Tillverkare: Shanghaimuxinmuyeyouxiangongsi
Adress: Shuangchenglu 803nong11hao1602A-1609shi, baoshanqu,
shanghai 200000 CN.
Importerad till AUS: SIHAO PTY LTD. 1 ROKEVA STREETEASTWOOD
NSW 2122 Australien
Importerad till USA: Sanven Technology Ltd. Suite 250, 9166 Anaheim Place,
Rancho Cucamonga, CA 91730
REP
EC
E-CrossStu GmbH
Mainzer Landstr.69, 60329 Frankfurt am Main.
REP
UK
YH CONSULTING LIMITED.
C/O YH Consulting Limited Office 147, Centurion House,
London Road, Staines-upon-Thames, Surrey, TW18 4AX


Teknisk support och e-garanticertifikat
www.vevor.com/support