1
ITEM #7045075
MODEL #40201
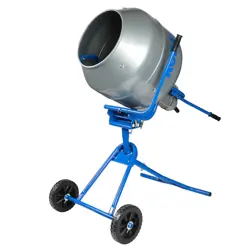
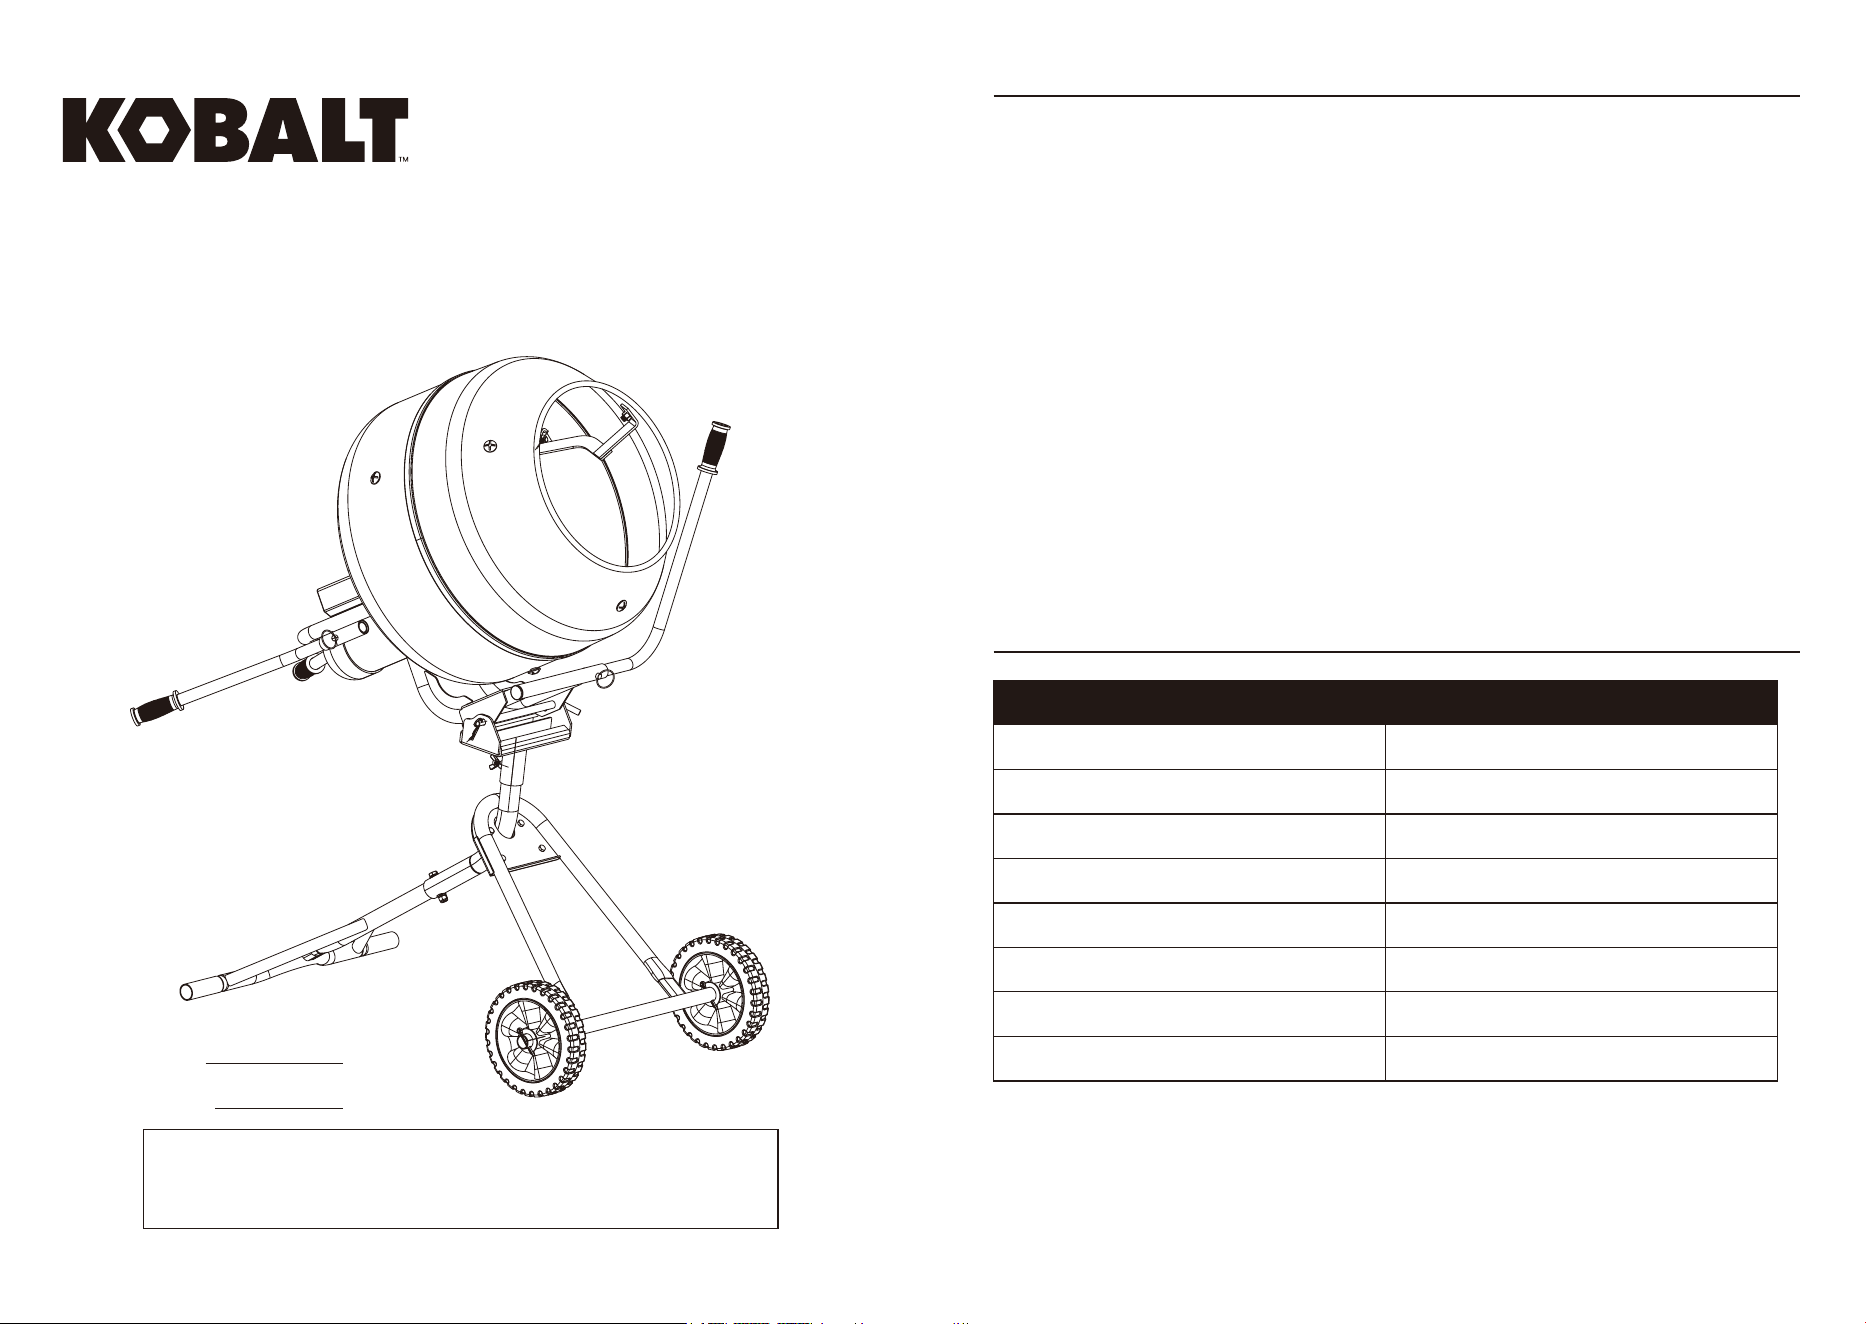
5 CU. FT. STEEL DRUM
CONCRETE MIXER
KOBALT and logo design are trademarks or
registered trademarks of LF, LLC. All rights
reserved.
ATTACH YOUR RECEIPT HERE
Serial Number
Purchase Date
DF25275
Thank you for purchasing this KOBALT product.
Questions, problems or missing parts?
Before returning, contact us on:
888-356-2258, 8 a.m. - 8 p.m., EST, Monday - Sunday or [email protected].
Español p. 16
2 3
TABLE OF CONTENTS
PRODUCT SPECIFICATIONS
PACKAGE CONTENTS
Product Specifications...........................................................................................................................
Package Contents .................................................................................................................................
Hardware Contents................................................................................................................................
Important Safety Instructions..................................................................................................................
Preparation............................................................................................................................................
Assembly Instructions ............................................................................................................................
Operating Instructions ..........................................................................................................................
Care and Maintenance..........................................................................................................................
Troubleshooting.....................................................................................................................................
Warranty.................................................................................................................................................
2
3
4
4
6
7
10
14
14
15
Total Drum Capacity
Mixing Weight
Total Mixing Capacity
Drum Speed
Mixer Weight
Wheel Size
Motor
Dump Height
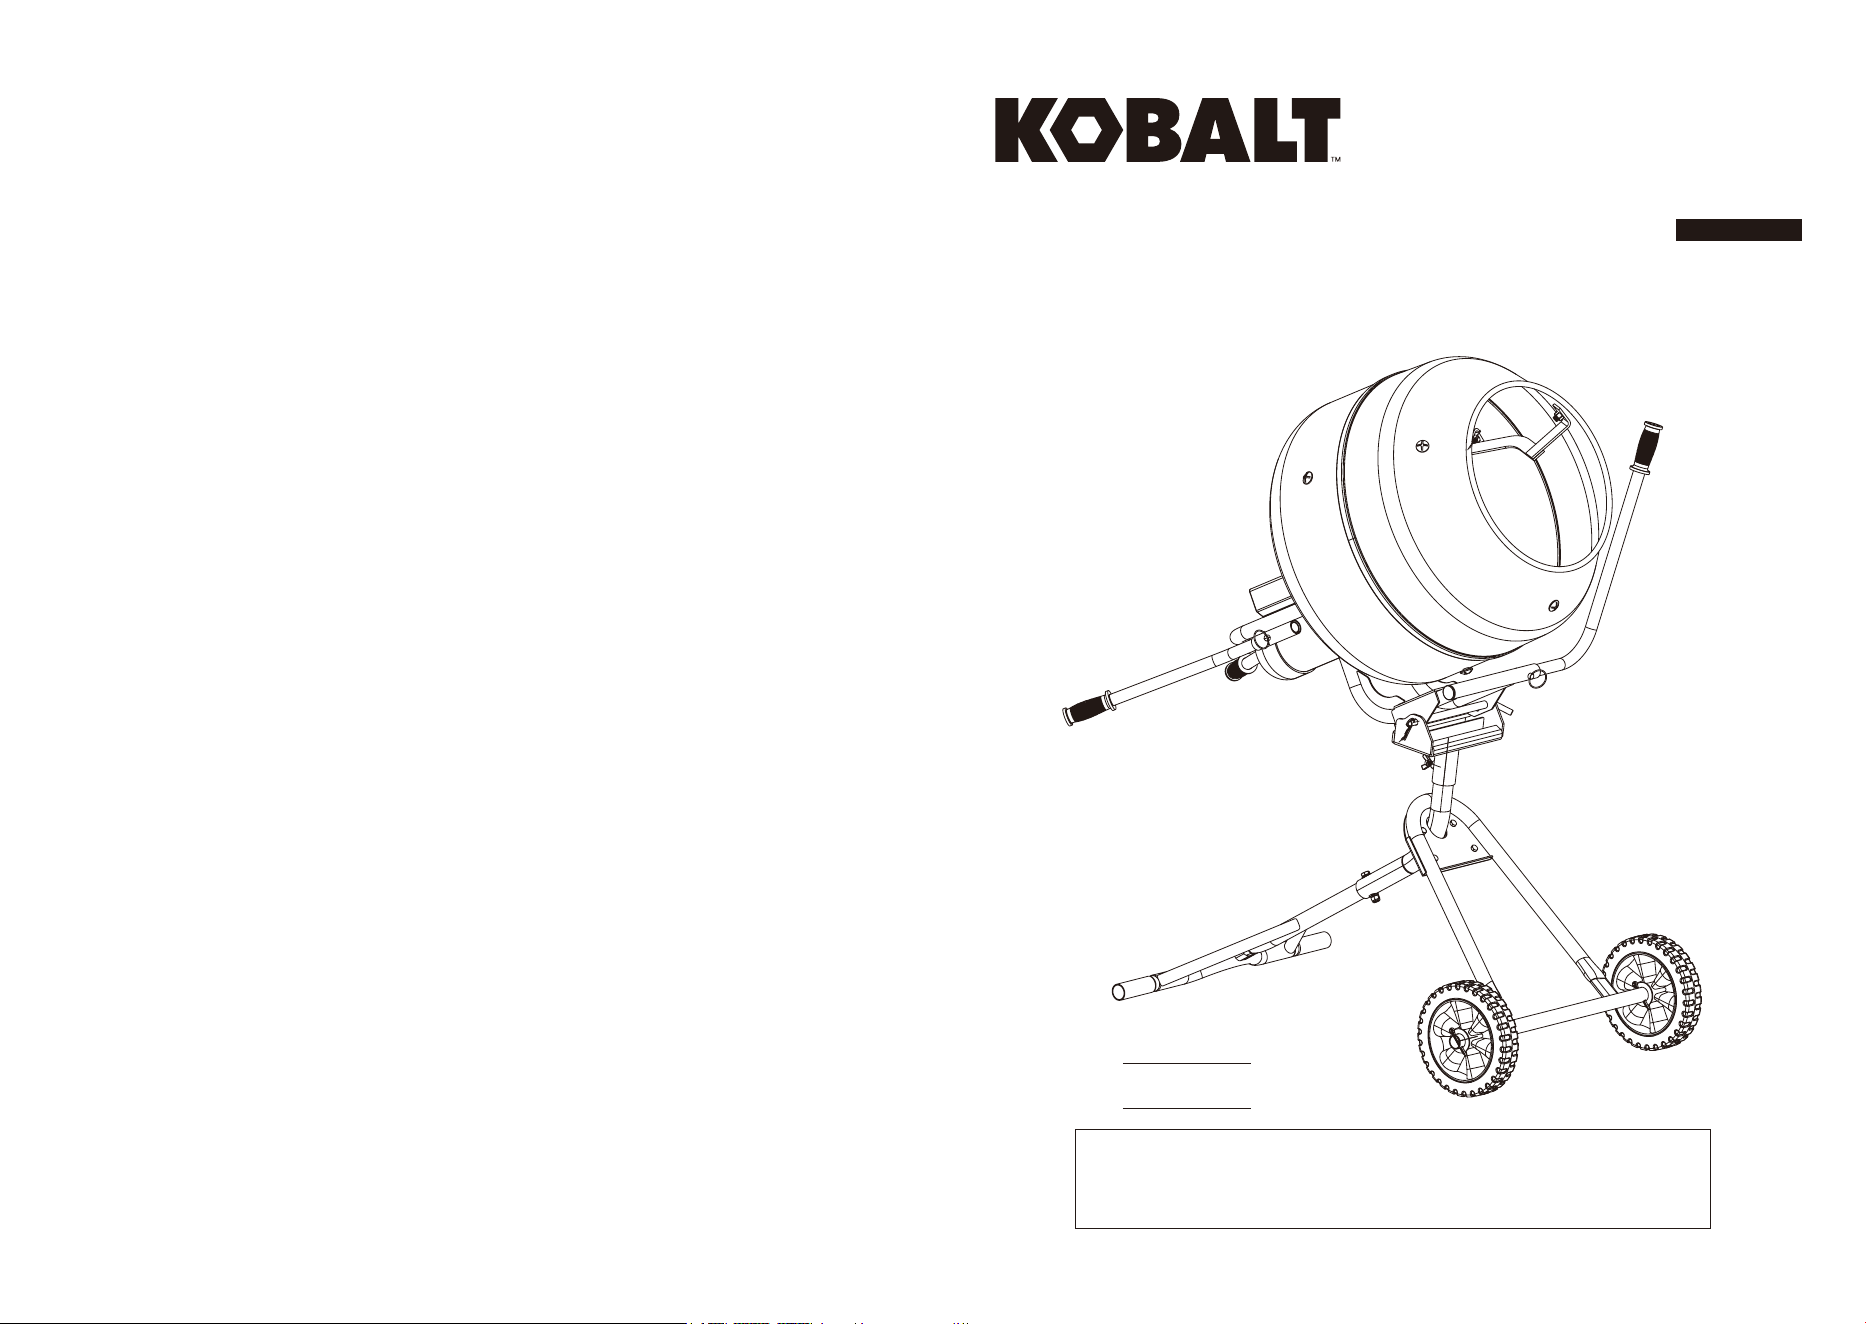
COMPONENT
5 Cu. Ft.
300 lbs.
2.5 Cu. Ft.
25 RPM
130 lbs.
10 in.
120 V AC, 60Hz, 5.3A
22.75 in.
SPECIFICATIONS
F
I
K
M
H
FF
D
G
C
A
B
E
J
L
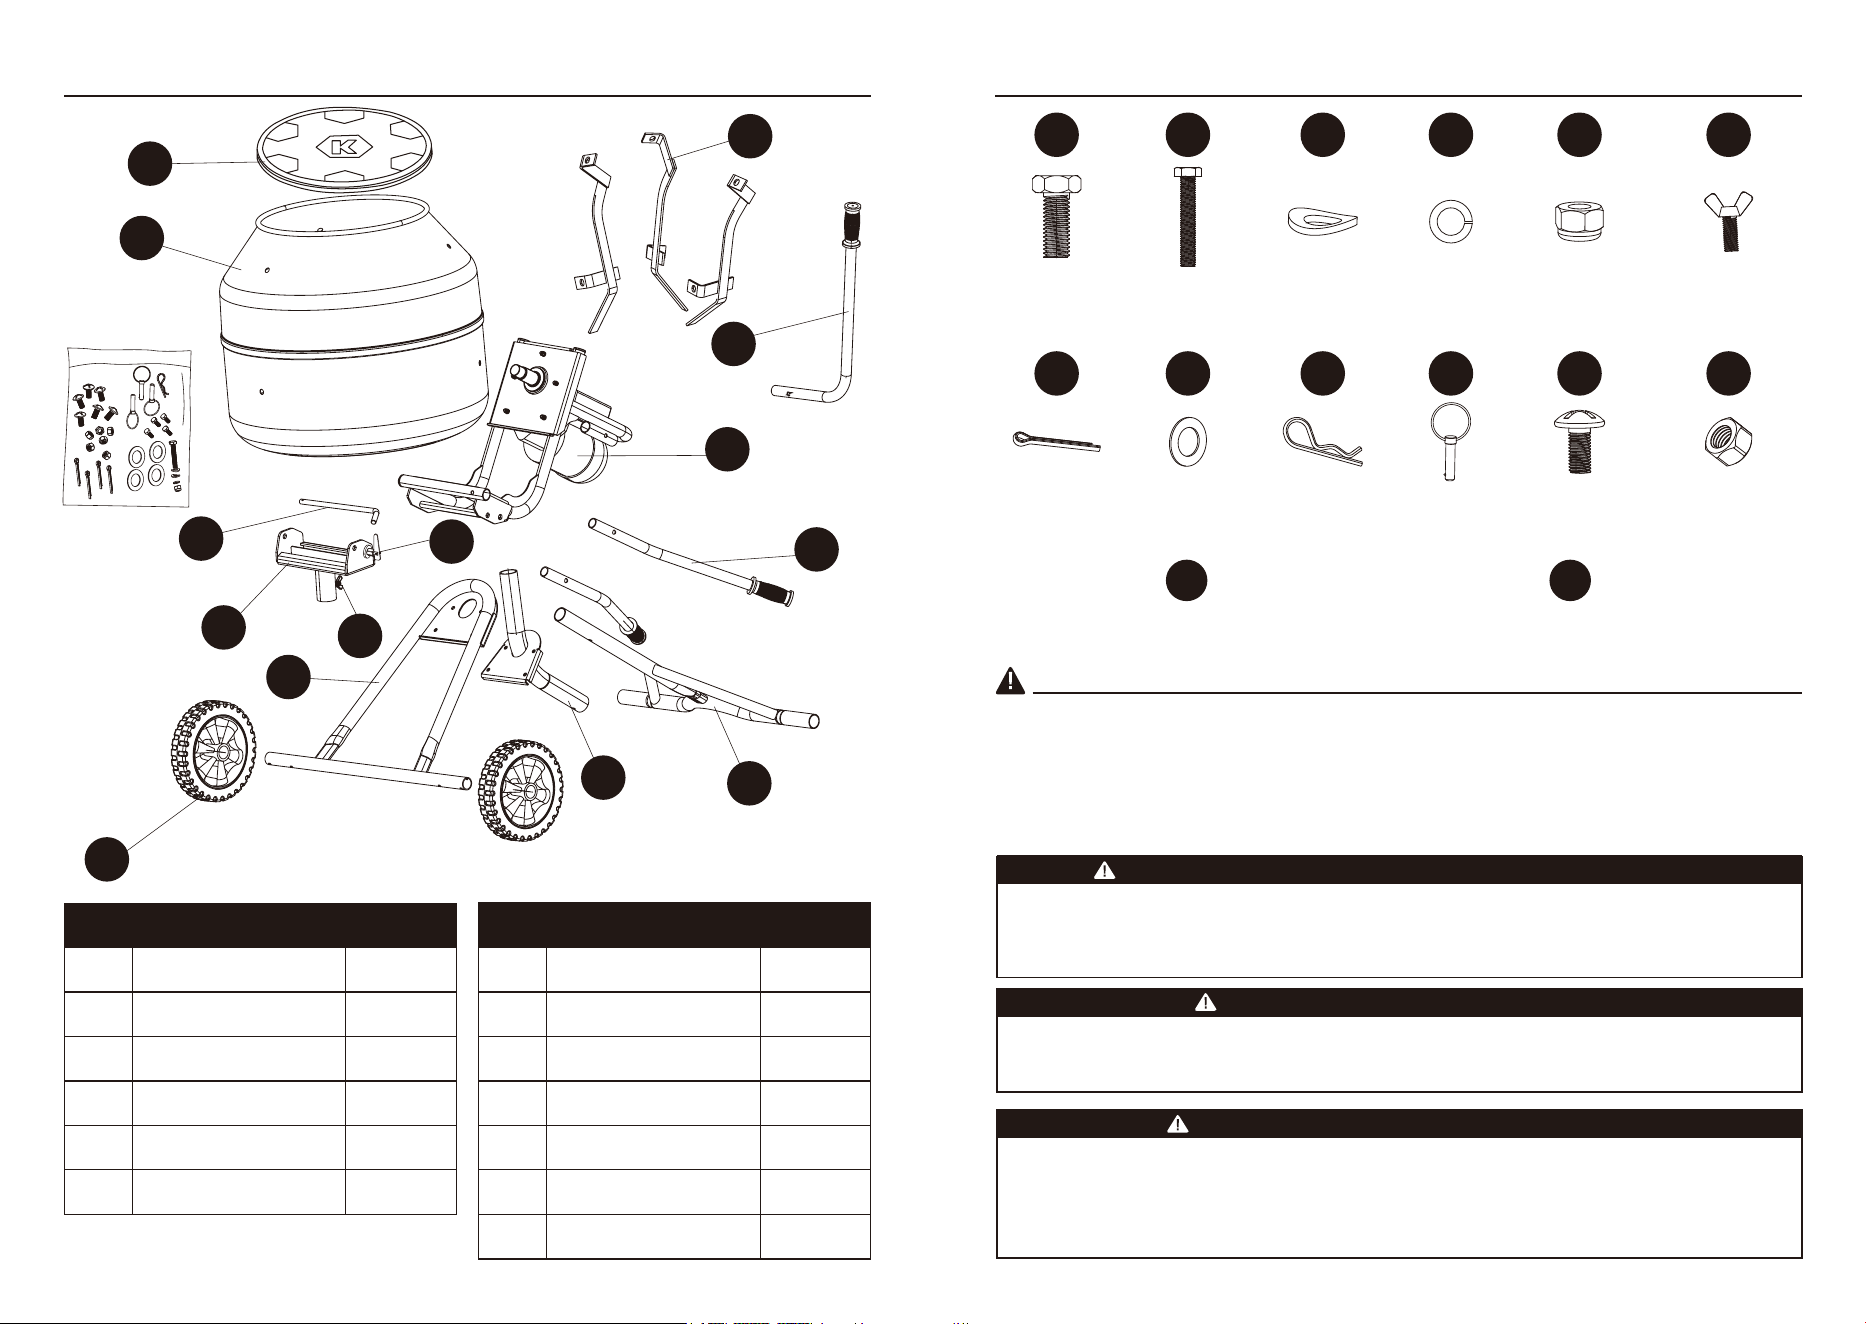
Support Pole Assembly
Front Leg
Rear Leg
Pivot Bracket
Wheel
Motor Assembly
A
B
C
D
E
F
1
1
1
1
2
1
DESCRIPTIONPART QUANTITY
Lock Handle
Pivot Shaft
Handle
Front Handle
Drum
Mixing Blade
Drum Cover
G
H
I
J
K
L
M
1
1
2
1
1
3
1
DESCRIPTIONPART QUANTITY
• Do not exceed mixing weight of 300 lbs.
• Do not exceed total mixing capacity of 2.5 cu. ft.
Hardware

4 5
• Read all the instructions before using the appliance.
• To reduce the risk of injury, close supervision is necessary when the appliance is used near children.
• Do not come into contact with moving parts.
• Keep loose clothing and other loose items away from moving parts.
• To disconnect, turn all controls to the off (“O”) position, then disconnect plug from outlet.
• Do not unplug by pulling on cord. To unplug, grasp the plug, not the cord.
• Unplug power cord when not in use and before servicing or cleaning.
• Connect to a properly grounded outlet only. (See Grounding Instructions.)
• Do not operate any appliance with a damaged cord or plug, or after the appliance
malfunctions or is dropped or damaged in any manner.
• Only use attachments recommended or sold by the manufacturer.
• Store indoors. Do not expose to rain. Household type.
This appliance must be grounded. In the event of malfunction or breakdown, grounding provides a
path of least resistance for electric current to reduce the risk of electric shock. This appliance is for use
on a nominal 120 V circuit and is equipped with a cord having an equipment-grounding conductor and
a grounding plug. The plug must be plugged into an appropriate outlet that is properly installed and
grounded in accordance with all local codes and ordinances. A qualified electrician should be
consulted if there is any doubt as to whether an outlet box is properly grounded.
Improper connection of the equipment-grounding conductor can result in a risk of fire or electric shock.
The conductor with insulation having an outer surface that is green with or without yellow stripes is the
equipment-grounding conductor. If repair or replacement of the cord or plug is necessary, do not
connect the equipment-grounding conductor to a live terminal. Check with a qualified electrician or
serviceman if the grounding instructions are not completely understood, or if in doubt as to whether
the appliance is properly grounded. Do not modify the plug provided with the appliance. If it will not fit
the outlet, have a proper outlet installed by a qualified electrician.
HARDWARE CONTENTS (NOT TO SCALE)
IMPORTANT SAFETY INSTRUCTIONS
GROUNDING INSTRUCTIONS
SAVE THESE INSTRUCTIONS
SAFETY INFORMATION
• Carefully read the caution and warning messages.
Follow owner’s manual to ensure proper assembly of mixer, using the parts list in conjunction
with procedures.
• Retain these instructions for future reference.
• Parts may have sharp edges. Wear gloves when assembling the mixer.
• Keep out of reach of children.
• Review these instructions before operating mixer.
• All bolts should be fastened with the nuts facing toward the center of the mixer.
• Do not tighten fasteners until final alignment is achieved.
• Safety glasses and gloves should be worn while operating this mixer.
• All wiring, electrical connections, and system grounding must comply with the National
Electrical Code (NEC) and with any local codes and ordinances. Contact a local
licensed electrician for further information.
• Do not plug in or unplug the motor while standing on damp or wet ground.
• A Ground Fault Interrupter (GFI) protected circuit is recommended for all outdoor
• Keep motor operating area as dry as possible.
• Always disconnect the power before servicing.
electrical devices.
CAUTION - ALWAYS START MIXER EMPTY
WARNING - ELECTRICAL PRECAUTIONS
WARNING - RISK OF ELECTRICAL SHOCK
DANGER
NOTE: Do not use grounding adaptors with this product.
M8 X 20 Bolt
Qty. 4
AA
M10 X 60 Bolt
Qty. 1
BB
Arc Washer
Qty. 2
CC
Lock Washer
Qty. 1
DD
M10 Nut
Qty. 1
EE
M10 X 30 Bolt
Qty. 1
FF
Cotter Pin
Qty. 4
GG
Large Washer
Qty. 4
HH
Pivot Shaft Pin
Qty. 1
II
Lock Pin
Qty. 3
JJ
M12 X 25 Screw
Qty. 6
KK
M12 Nut
Qty. 6
LL
FF D
* M10 X 30 bolt has been installed on the pivot bracket already.
When using electric appliances, basic precautions should always be followed, including the following:
WARNING:

6 7
• See Care and Maintenance section for cleaning
instructions.
• Do not use multiple extension cords.
• Do not use a cord of more than 145 ft.
• Do not use a cord gauge of less than 16 AWG.
• For safe use, plug the mixer into a GFCI
receptacle. The connection to an extension cord
should be kept dry and off the ground.
SAFETY INFORMATION
AA
B
A
C
BB
CC
A
DD
EE
A
D
FF
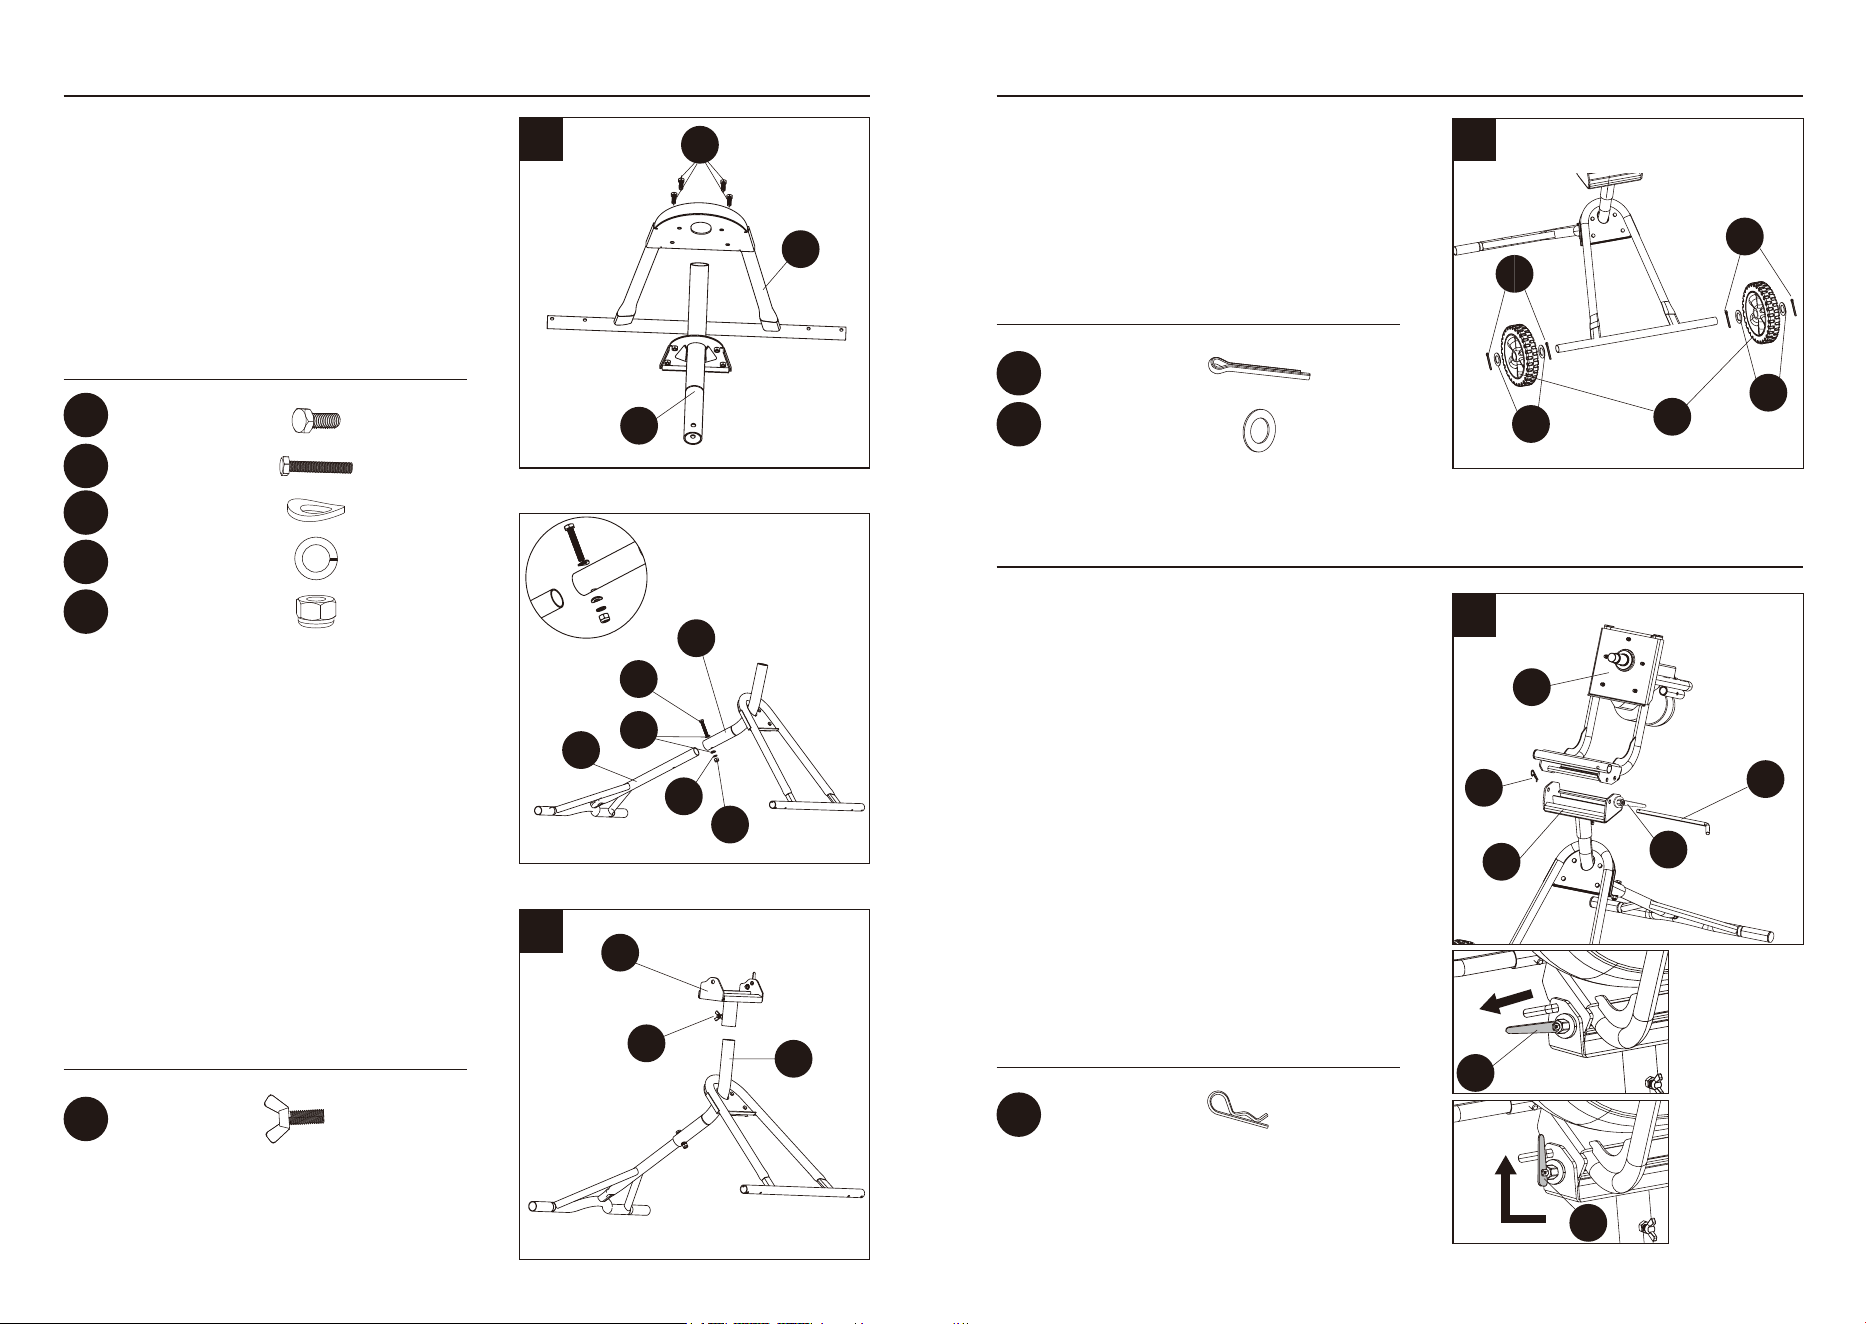
1. Attach support pole assembly (A) to the front
leg (B) using four M8 X 20 Bolts (AA). Tighten
securely. Slide the rear leg (C) into the support
pole assembly (A). Align the holes in the
support pole assembly (A). Install rear leg (C)
and front leg assembly together using M10 X 60
bolt (BB), arc washer (CC), lock washer (DD)
and M10 nut (EE). Tighten securely.
2. Slide the pivot bracket (D) onto the top of the the
support pole assembly (A) of the mixer frame.
Tighten securely with the M10 X 30 bolt (FF).
ASSEMBLY INSTRUCTIONS
1
Hardware Used
M8 X 20 Bolt x 4
AA
M10 X 60 Bolt x 1
BB
Arc Washer x 2
CC
Lock Washer x 1
DD
M10 Nut x 1
EE
PREPARATION
2
Hardware Used
M10 X 30 Bolt x 1
FF
An outdoor-use extension cord should be used. An outdoor-use extension cord is marked with the
suffix letter “W” and with a tag stating “Suitable for Use with Outdoor Appliances.” Care must be
exercised in its use. The marked electrical rating of the detachable power-supply cord or extension
cord should be at least as great as the electrical rating of the appliance. See above chart for recom-
mended gauges. The extension cord should be a grounding-type 3-wire cord and should be arranged
so that it cannot be tripped over, snagged, or pulled on unintentionally (especially by children).
Before begining assembly or operation of this product, make sure all parts are present. Compare with
package contents list and hardware contents list. If any part is missing or damaged, do not attempt to
assemble or operate this product.
• Esimated Assembly Time: 45 - 90 minutes for one person.
• Tools Required for Assembly (not included): 12 mm (15/32 in.) socket or wrench, 10 mm (3/8 in.)
socket or wrench, 8 mm (5/16 in.) socket or wrench, needle nose pliers and hammer.
POWER CORD SAFETY
Recommended Electrical
Cord Gauge & Maximum Length
0 - 55 ft.
Gauge
(AWG)
16 14 12
55 - 90 ft. 90 - 145 ft.
GROUNDING
120 V GROUNDED OUTLET
GROUNDING PIN
ASSEMBLING THE FRAME
Fig.1
Fig.2
Fig.3
Fig.4

8 9
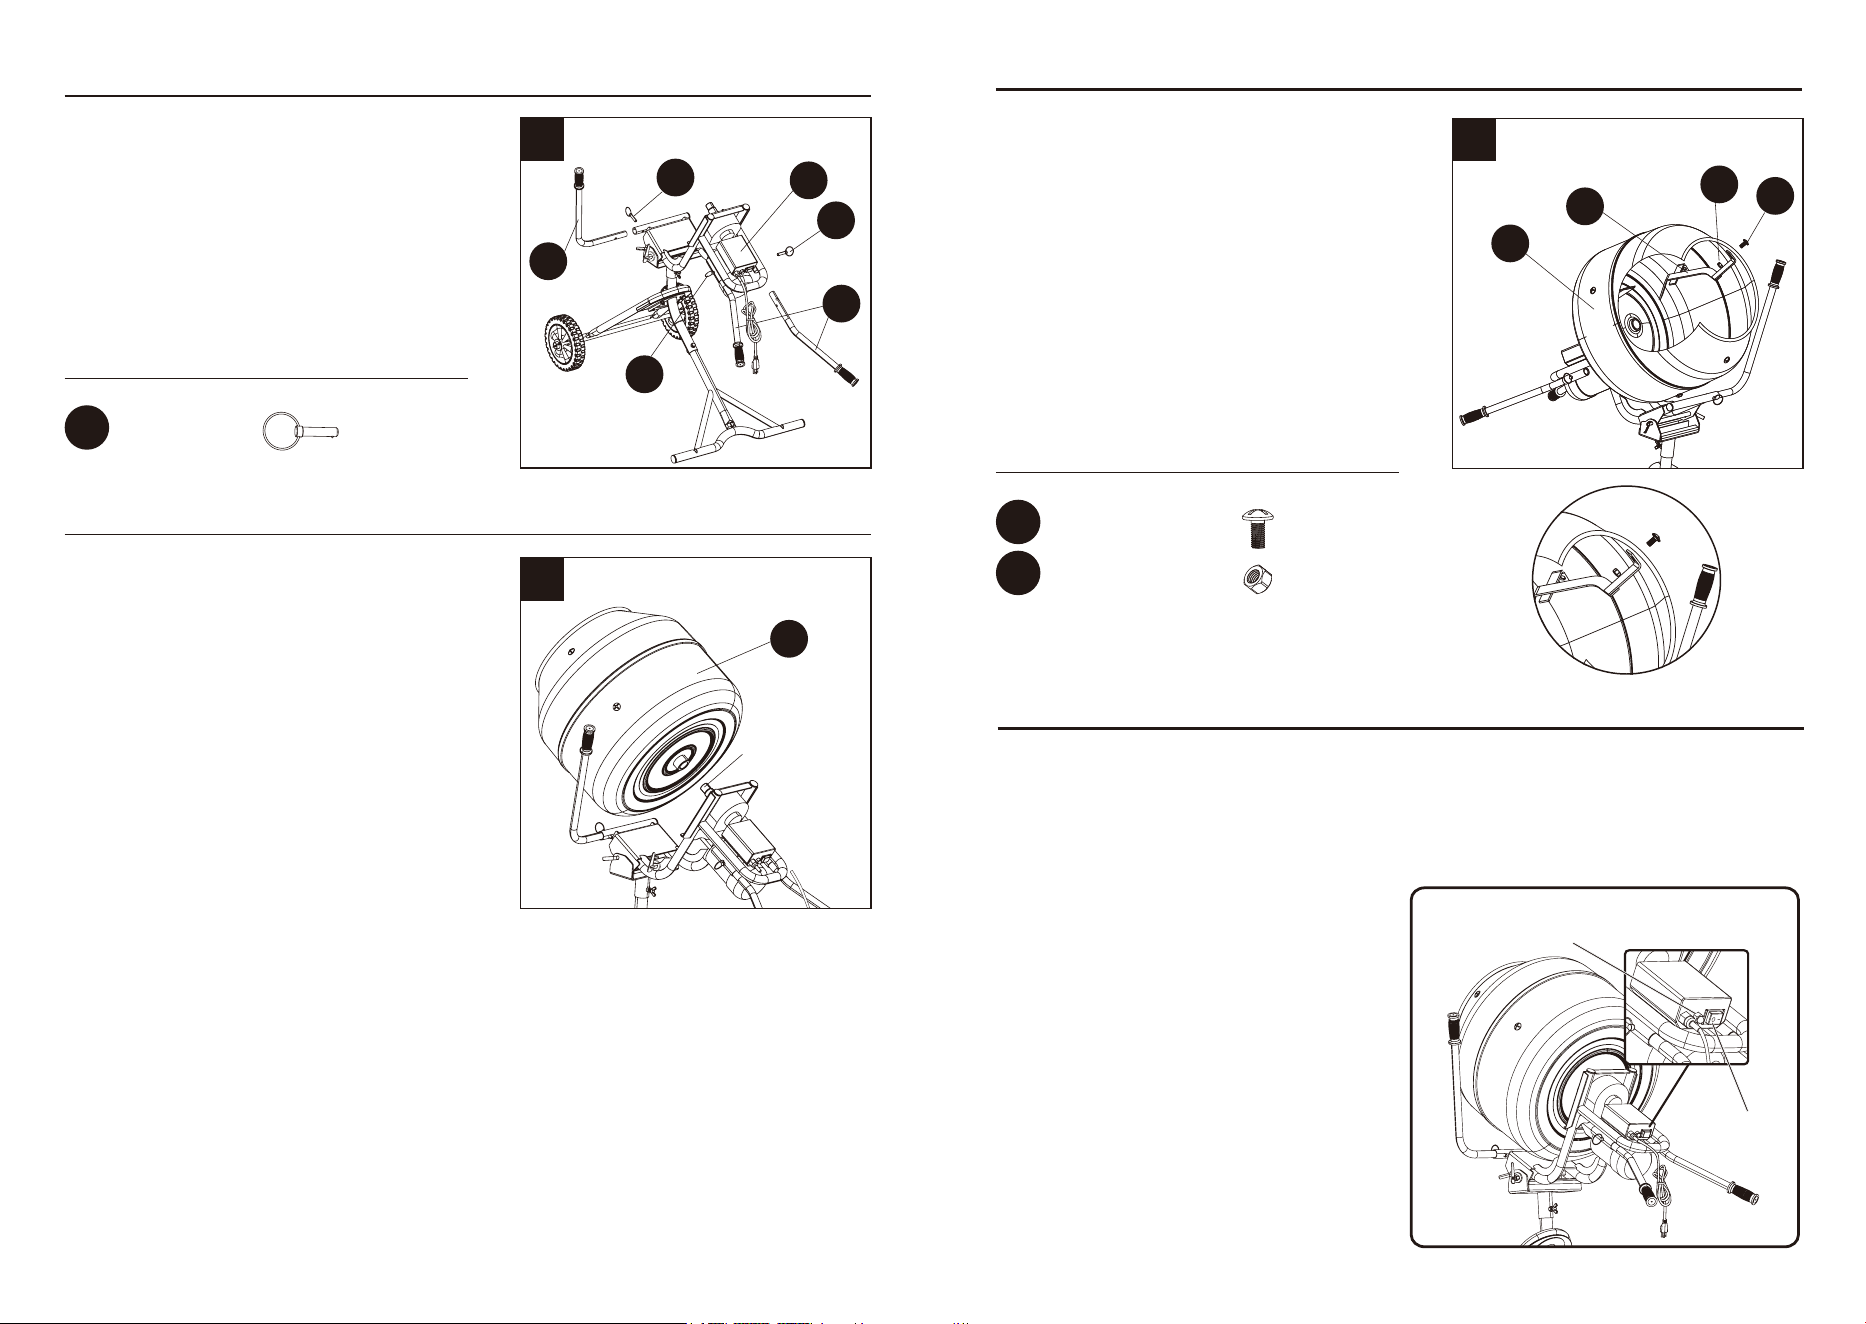
3. Assemble wheels (E) to mixer frame using
cotter pin (GG) and large washer (HH). Using
pliers, bend the ends of the cotter pins (GG) to
secure the wheel (E) in place. Repeat the
process on the other side to install second
wheel.
3
4
ASSEMBLY INSTRUCTIONS
4. Turn the lock handle (G) to the horizontal unlocked
position. With the help of a second person, hold
the motor assembly (F) above the pivot bracket
(D).
INSTALLING THE MOTOR ASSEMBLY
Hardware Used
Cotter Pin x 4
GG
Large Washer x 4
HH
Hardware Used
Pivot Shaft Pin x 1
II
5. Slide the handle (I) through the openings at the
rear of the motor assembly (F) Install the lock pin
(JJ) into the hole in the handle to secure it in place.
Press down firmly on the lock pin (JJ) and make
certain it is secure. Repeat the process to secure
the front handle (J) to the front of the motor
assembly (F).
6. With the help of a second person, place the drum
(K) onto the motor shaft. Screw the drum (K) onto
the motor shaft by turning it clockwise. Tighten
securely.
ASSEMBLY INSTRUCTIONS
5
B
Hardware Used
Lock Pin x 3
JJ
SECURING THE DRUM
6
Note: One side of the motor assembly (F) has two
holes and the other has one. The side with two
holes should be on the same side as the lock
handle (G) .
Align the holes on the motor assembly (F) with the
hole and lock handle (G) on the pivot bracket (D).
Lower the motor assembly (F) into place.
Turn the lock handle (G) to the vertical locked
position and allow it to enter the hole in the motor
assembly (F) to secure.
Insert the pivot shaft (H) through the holes in the
pivot bracket (D) and the motor assembly (F) and
secure it with the pivot shaft pin (II).
NOTE: The drum is heavy weight 42 lbs. To avoid
back injury, lift with your legs, not your back, and
get help when needed.
CAUTION:
Double check all setups. Make sure that the legs,
pivot bracket, wheels, motor assembly, and handles
are installed correctly prior to installing the drum.
Tighten the bolt at the rear of the pivot bracket to
prevent the drum from rotating.
GG
GG
HH
E
II
F
D
JJ
J
JJ
F
I
K
JJ
G
G
G
HH
H
Locked Position
Unlocked Position
Motor shaft
Fig.5
Fig.6
Fig.7
10 11
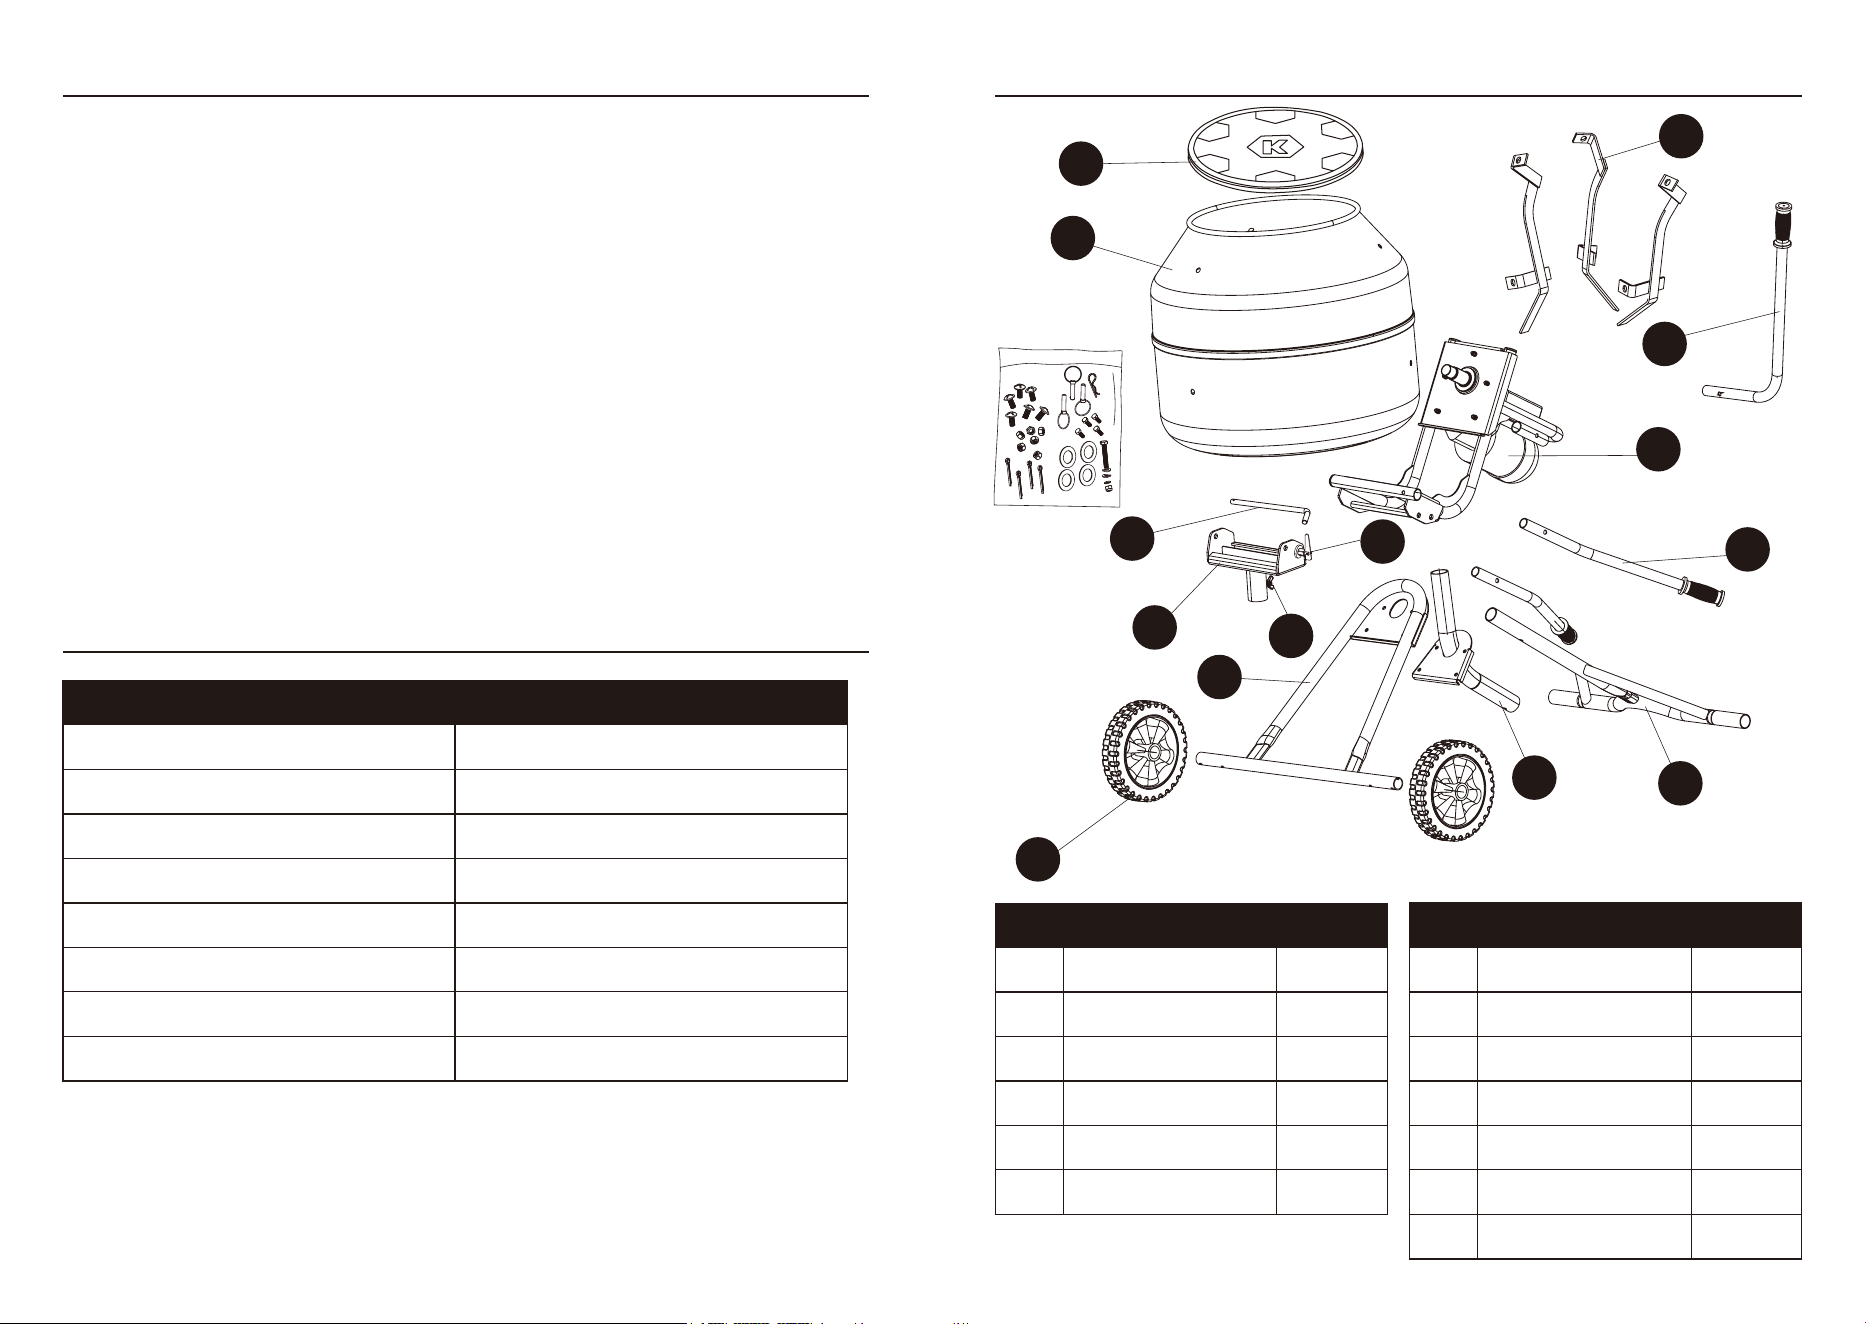
7
ASSEMBLY INSTRUCTIONS
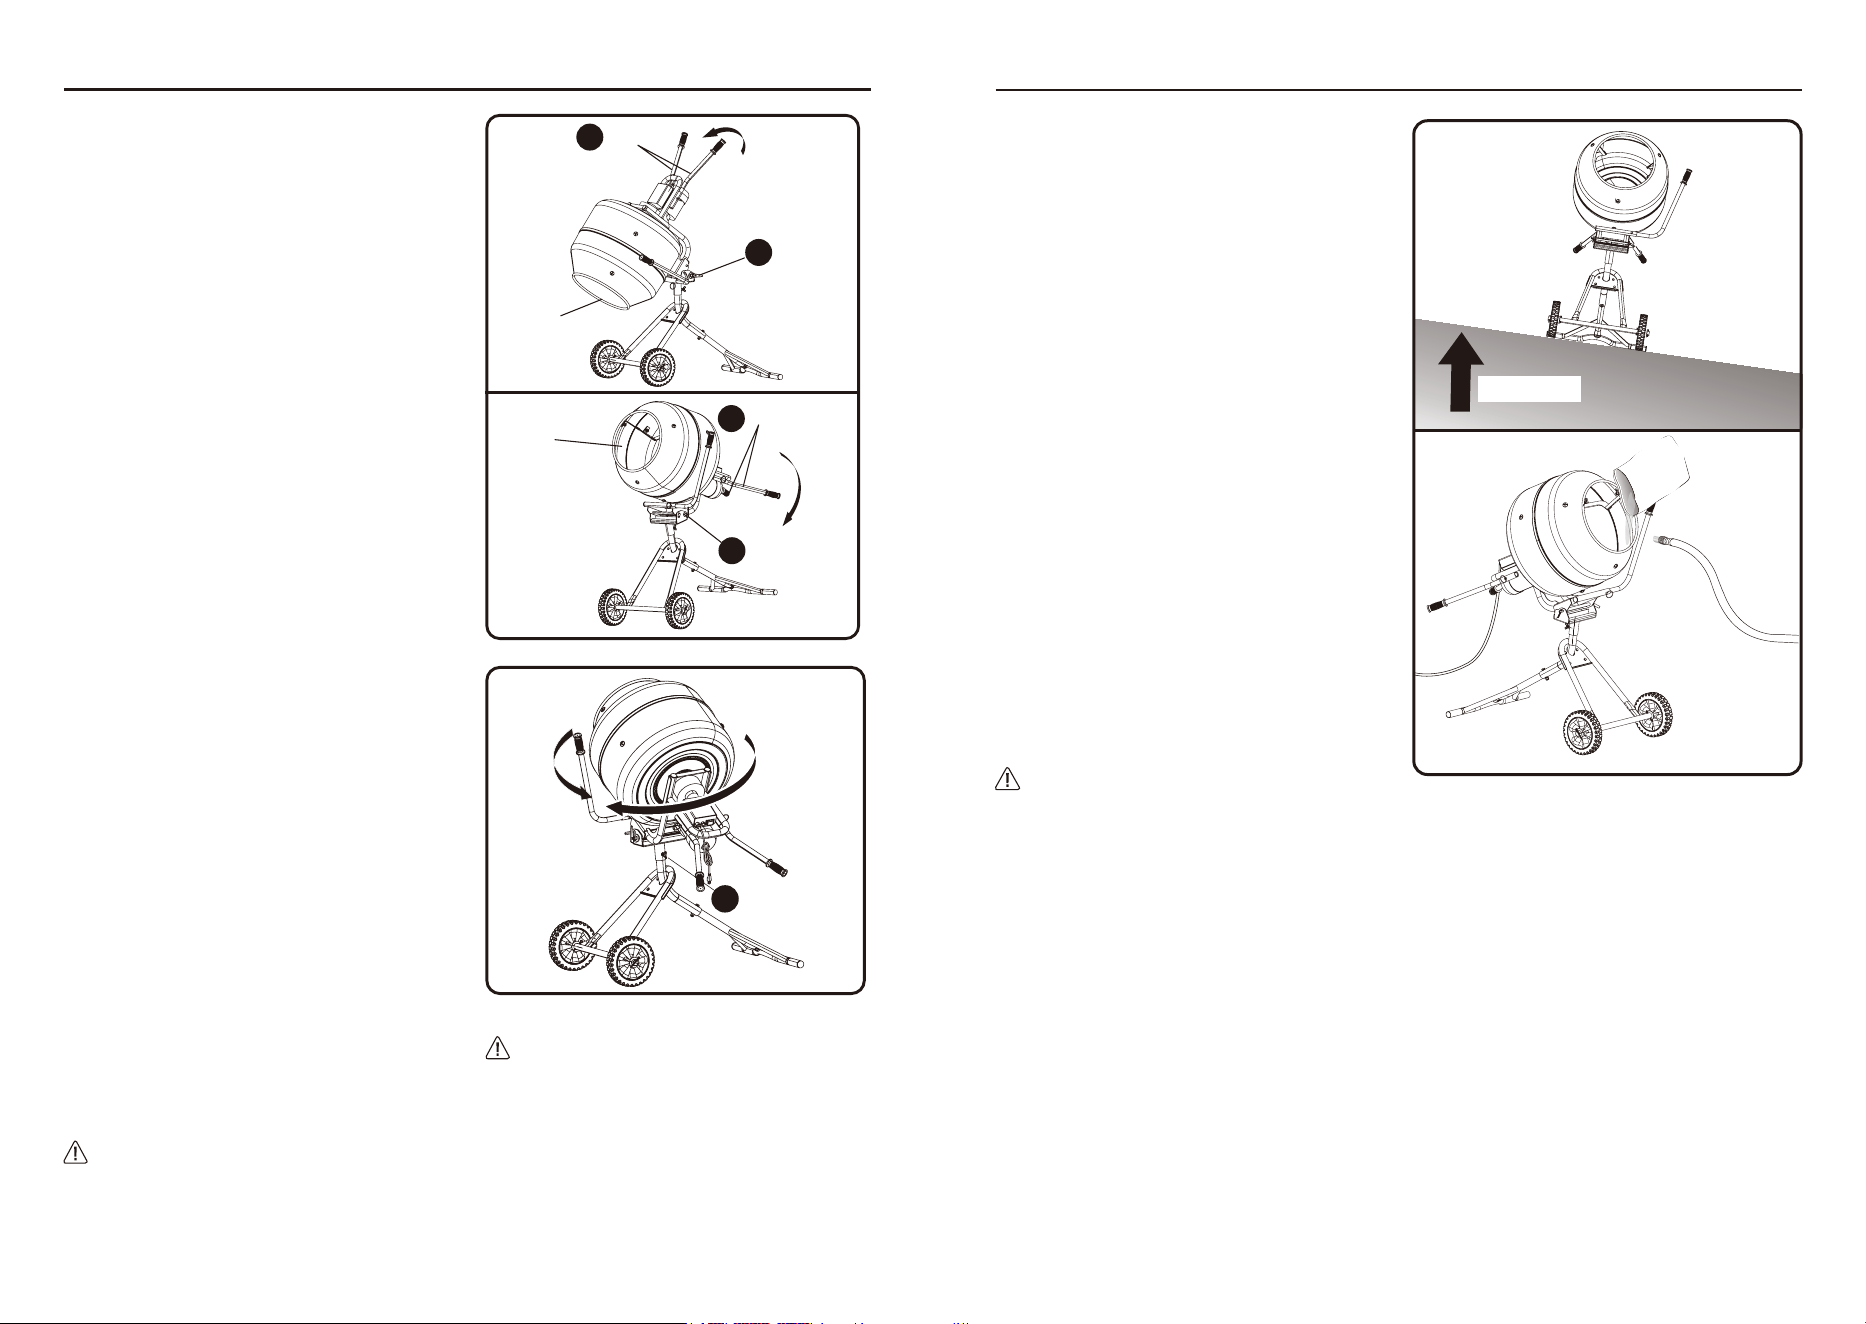
INSTALLING THE MIXING BLADES
7. Place the mixing blades (L) into the drum (K) with
the angled ends pointing toward the inside of the
drum. Align the holes in the blades with the holes
in the drum. Install M12 nuts (LL) and M12 X 25
Screw (KK) as shown. Tighten securely.
Hardware Used
M12 X 25 Screw x 6
KK
M12 Nut x 6
LL
KK
LL
K
L
OPERATION
TURNING THE MIXER ON AND OFF
OVERLOAD PROTECTION
CIRCUIT BREAKER
RESET BUTTON
ON/OFF
BUTTON
FF
Fig. 12
Bolt
Fig.8
Fig.9
I
G
I
G
HANDLES
HANDLE
Fig. 10
Fig. 11
DRUM
OPENING
DRUM
OPENING
LOCK
HANDLES
LOCK
HANDLES
WARNING: When adjusting the drum angle,
keep hands and power cords clear of pinch
points. Ignoring this warning may result in
pinched fingers or damaged cords.
WARNING: To reduce the risk of accidental
starting, property damage, or serious
personal injury, always unplug the mixer and
empty the drum before moving it.
CAUTION: Do not over-tilt the mixer. Use
caution when moving it across thresholds or
uneven surfaces.
See Figure 9.
The on/off switch, located on the back of the
motor assembly, controls the mixer.
• ON: When switched on, the mixer begins to spin.
• OFF: When switched off, the mixer stops.
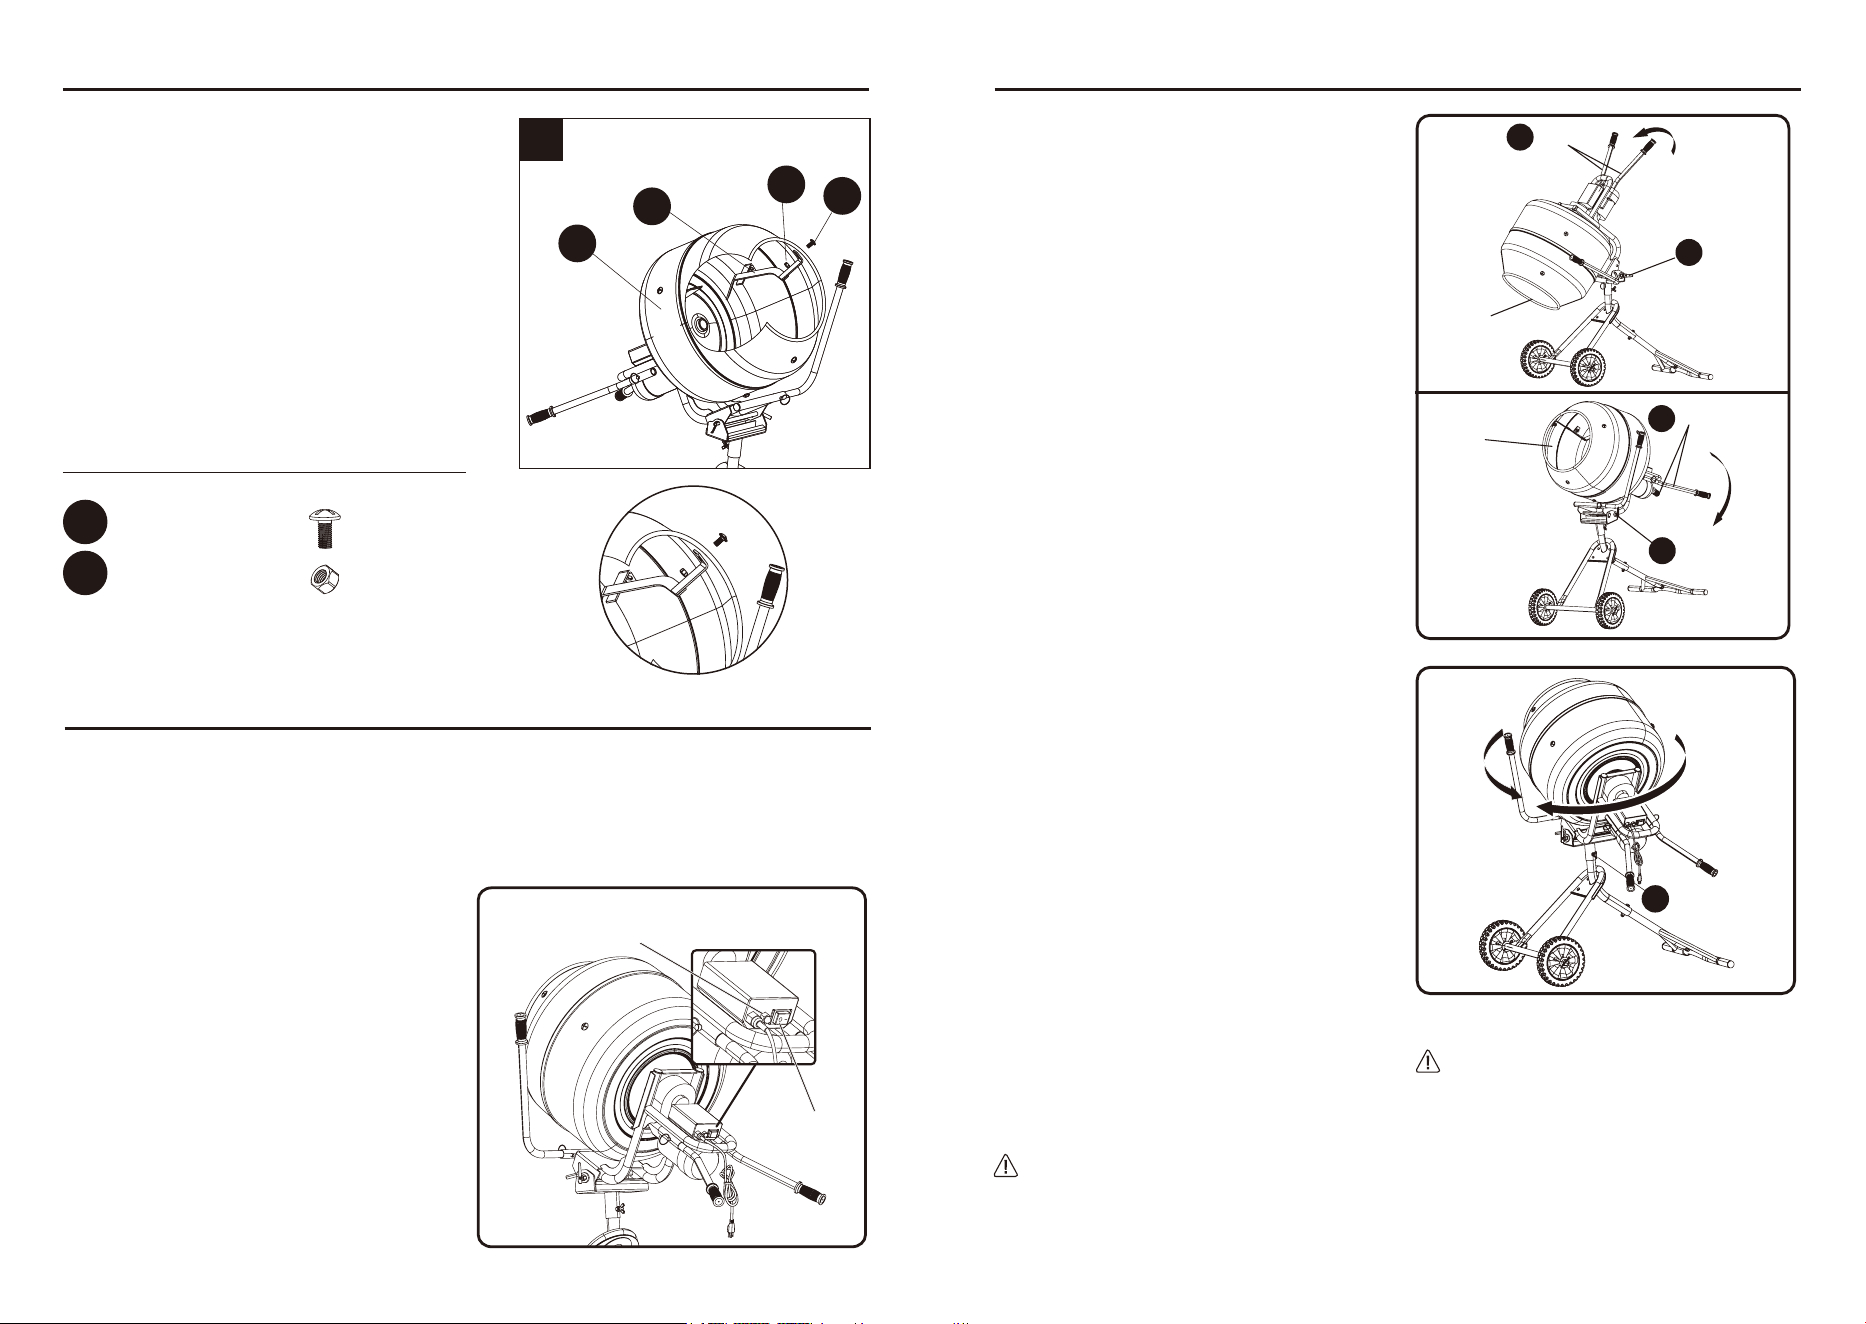
ROTATING THE DRUM
MOVING THE MIXER
See Figure 12.
If the mixer becomes overloaded or the motor
overheats, the circuit breaker will trip and the mixer
will shut off automatically.
To rotate the drum:
1. Turn the mixer OFF.
2. Loosen the bolt (FF) on the back of the pivot
bracket.
3. Firmly grasp the handles and rotate the drum to
the left or right.
4. Tighten the bolt (FF) on the rear of the pivot
bracket to secure the drum.
1. Empty the drum.
2. Unplug the mixer.
3. Press down on the handles to raise the drum
opening.
4. Lock the drum in place.
5. Tighten the bolt at the rear of the pivot bracket to
prevent rotation.
6. Tilt the mixer away from you until it balances on
the wheels, then roll it to the desired location.
Do not tilt the mixer forward or sideways while
moving.
NOTE: Wrap the cord to prevent it from dangling or
creating a tripping hazard.
RAISING AND LOWERING THE
DRUM OPENING
See Figures 10–11.
To lower the drum opening:
1. Turn the lock handle (G) to the horizontal
unlocked position.
2. Lift the handles (I) upward to lower the drum
opening.
NOTE: Keep the drum in this position when
emptying or cleaning the mixer.
To raise the drum opening:
1. Press down on the handles (I) to raise the
drum opening.
3. Turn the lock handle (G) to the vertical
locked position and allow it to engage with the
hole in the motor assembly.
NOTE: Keep the drum in this position when
adding or mixing materials.
CAUTION:
Regularly inspect the mixer and the material being
processed. Do not allow material to dry or harden
inside the drum or on any part of the mixer. Failure
to do so may cause damage to the equipment or
lead to malfunction.
CAUTION:
Exercise caution when working with fast-setting
materials, such as quick-set concrete. Even a few
minutes of inactivity may allow the material to set.
Setting times vary—always follow the material
manufacturer’s instructions.
• Allow the motor to cool before restarting.
• Once cooled, press the circuit breaker reset
button, then turn the motor back on to resume
mixing.
• If the mixer still does not operate, unplug it and
reduce the batch load.
Do not force the mixer.
NOTE: The drum can rotate a full 360° around
the frame.
OPERATION INSTRUCTIONS
OPERATION INSTRUCTIONS
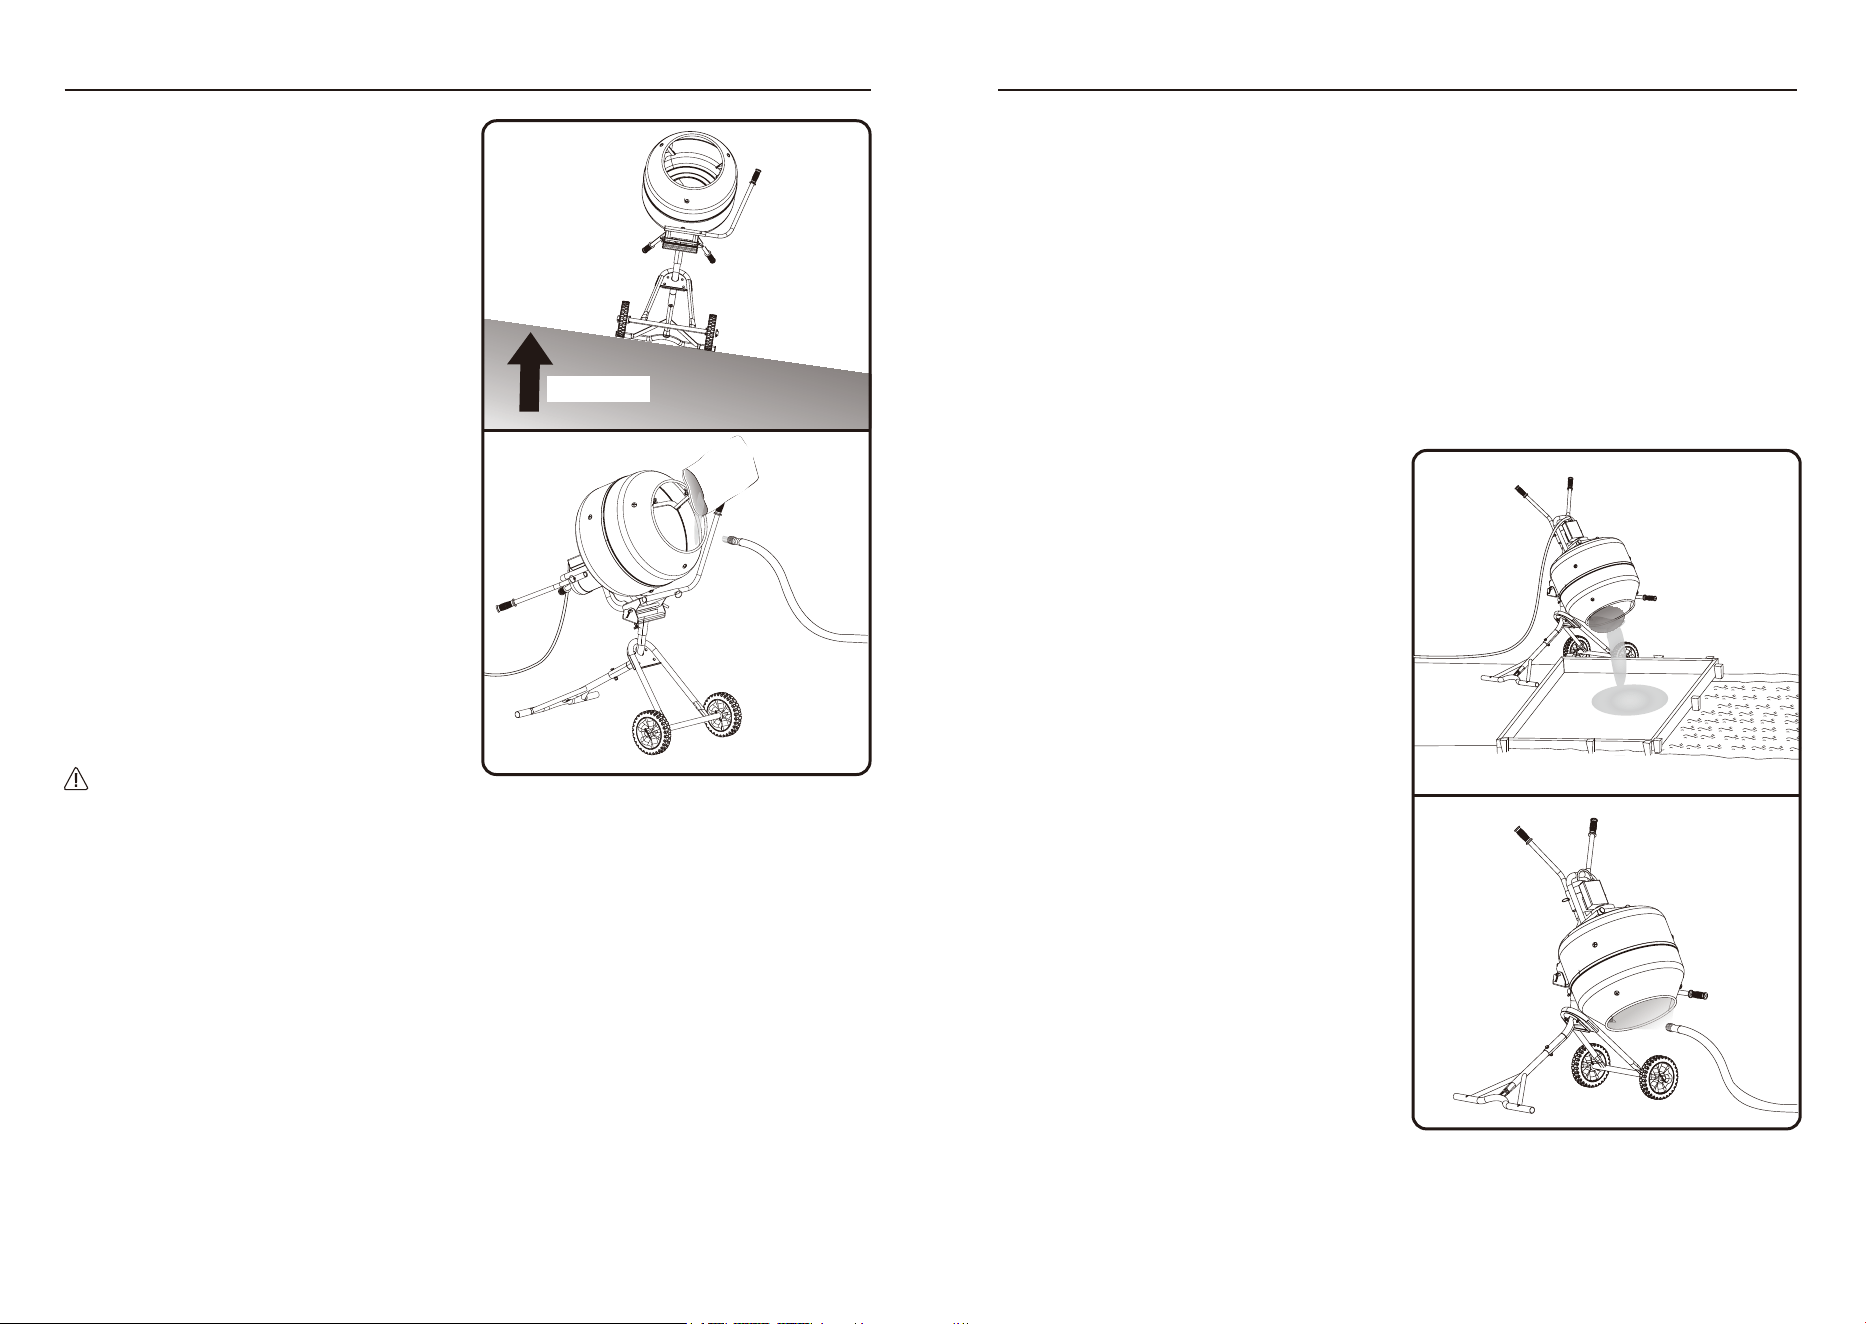
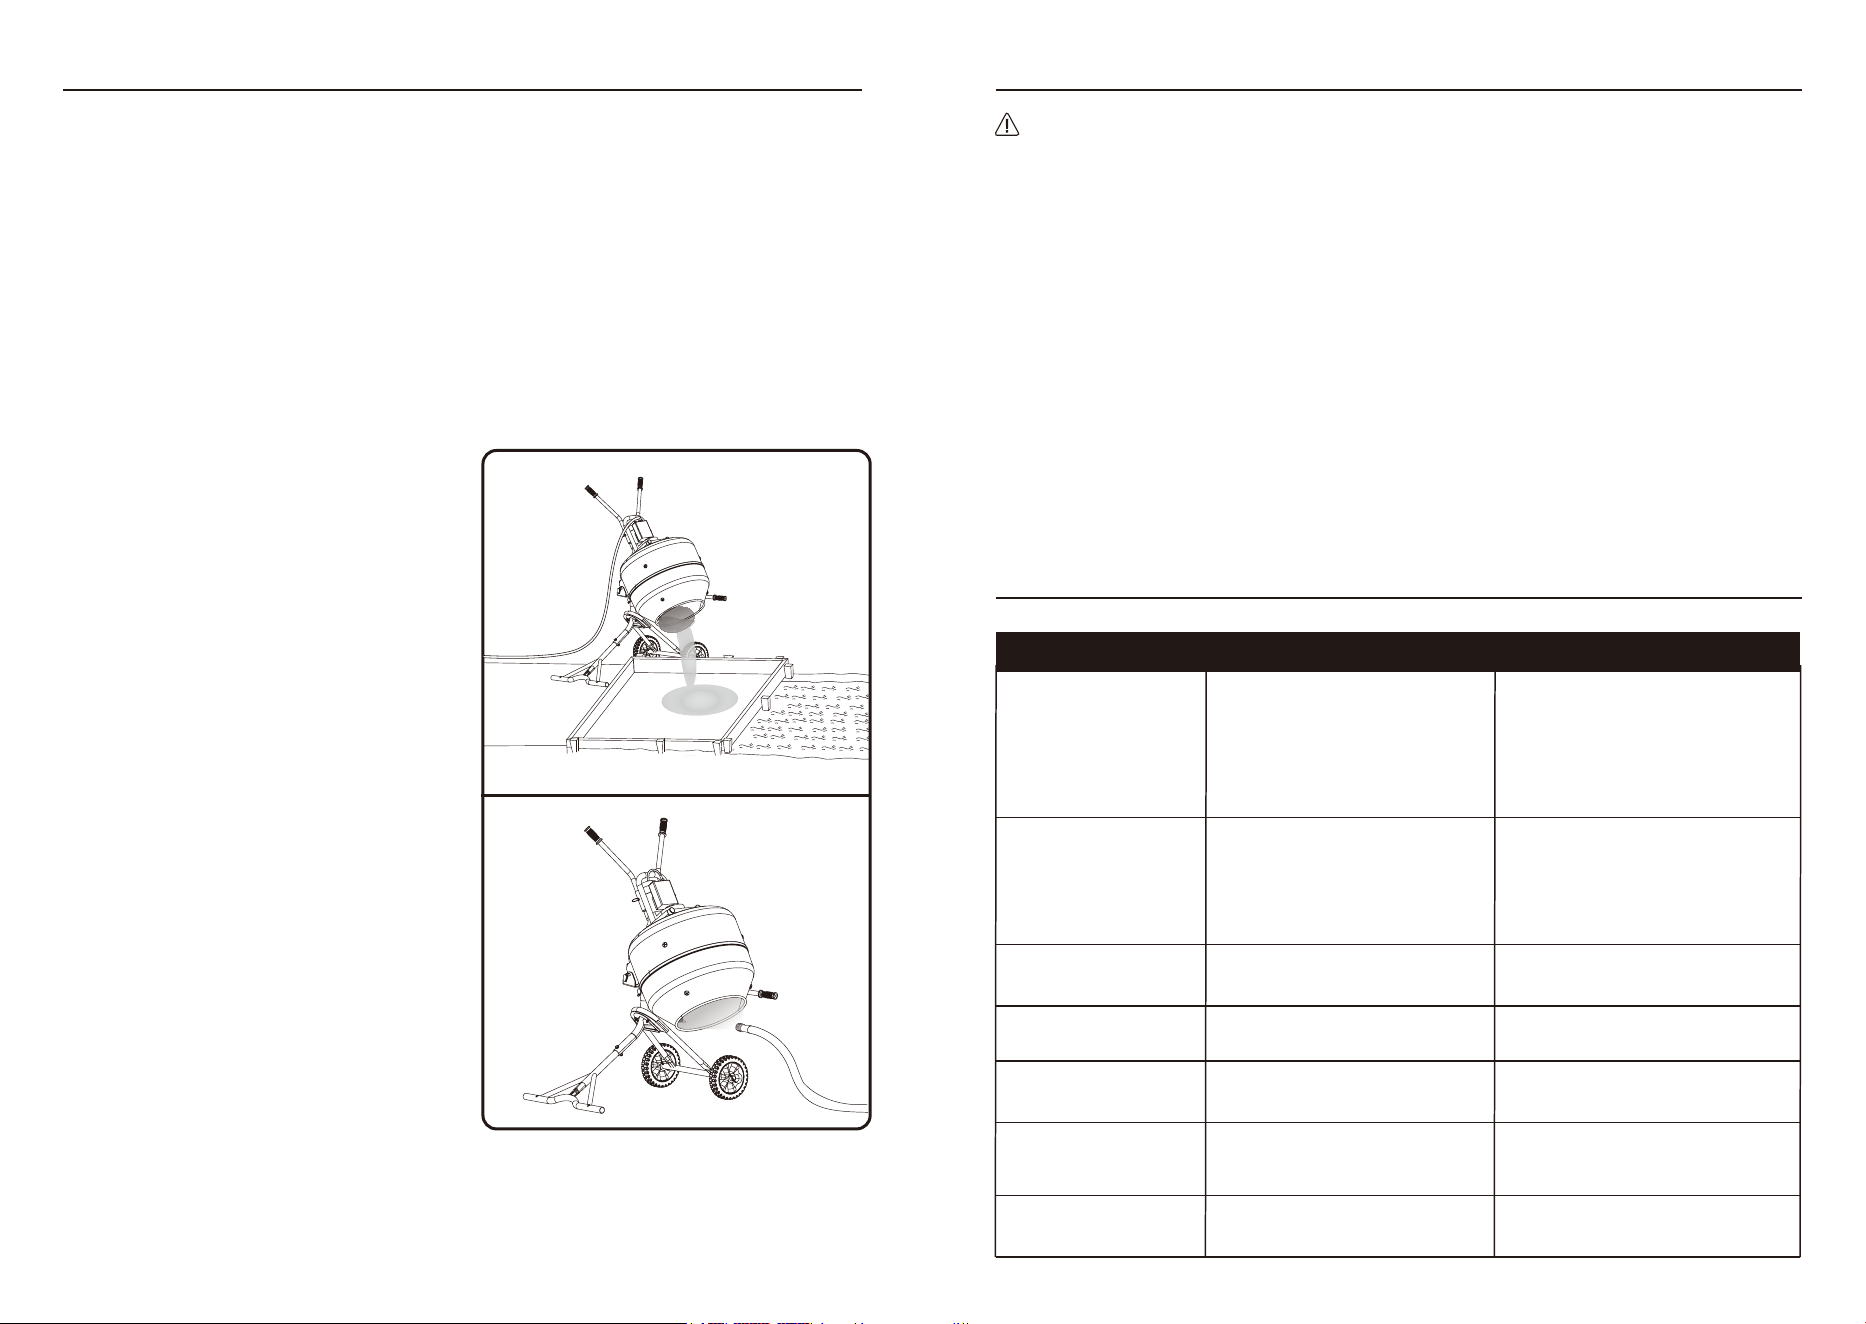
Move the mixer to the work area and place it on a
flat, level surface.
1. Press down on the handles to raise the drum
opening.
2. Lock the drum in place.
3. Plug the mixer into a power source.
4. Turn the mixer ON and allow the drum to spin.
5. Carefully pour dry and wet materials into the
drum. Follow the material manufacturer’s
instructions for specific mixing guidelines. Mixing
times will vary.
NOTE: For maximum stability and to reduce
tipping hazards, never operate the mixer on slopes
or uneven surfaces.
NOTE: To protect the motor and ensure even
mixing, always start the motor before adding
materials to the drum.
NOTE: The mixer has a batch capacity of 300 lbs.
(2.5 cu. ft). Do not overload the mixer.
6.When mixing is complete, empty the drum, turn
off the motor, and clean the mixer.
Add and mix materials as described in the previous section.
1. Turn the mixer OFF.
2. Loosen the bolt on the back of the pivot bracket.
3. Carefully rotate the drum so it faces away from the frame and toward the work area.
4. Tighten the bolt at the rear of the pivot bracket to secure the drum in place.
5. Unlock the drum by turning the lock handle to the horizontal unlocked position.
6. Slowly lift the handles to lower the drum opening.
7. Once the drum is empty or the job is complete, raise the drum opening and lock it in place.
8. Clean the mixer as described in the cleaning section.
See Figure 16.
1. Unplug the mixer.
2. Empty the drum.
3. Unlock the drum by turning the lock handle to
the horizontal unlocked position.
4. Lift the handles to lower the drum opening.
5. Using a garden hose, spray clean water into the
drum to rinse away any remaining material.
6. Dispose of concrete, rinse water, and other
waste only in designated areas. Local, state, or
federal regulations may prohibit disposal in storm
drains, roadsides, landfills, or other locations.
Consult your local waste authority for proper
disposal options.
7. Clean the exterior of the unit with a cloth and
warm water.
NOTE: If needed, clean the motor assembly with a
dry cloth only. Avoid allowing water into the motor
assembly.
8.Dry the unit completely before storing for future
use.
ADDING/MIXING MATERIALS
See Figures 14.
EMPTYING THE DRUM
CLEANING THE DRUM
See Figures 15.
Fig. 13
5° MAXIMUM
12 13
Fig. 14
CEMENT
Fig. 16
Fig. 15
• To prevent tipping hazards, operate the mixer only on a flat, stable surface. Using the mixer
on slopes or uneven ground increases the risk of tipping, which may cause severe injury. Never
operate on an incline greater than 5°. Always ensure the mixer is stable before and after
starting the motor.
• Keep hands and all body parts away from the drum while it is spinning. Contact with moving
parts can cause serious injury.
• Never leave the mixer running unattended. Always unplug the mixer and empty the drum
before leaving the work area or when the mixer is out of sight.
• Prepare and mix materials only in accordance with the material manufacturer’s instructions.
WARNING:
CAUTION:
• Regularly inspect the mixer and the material being processed. Do not allow material to dry or
harden inside the drum or on any part of the mixer. Failure to do so may cause damage to the
equipment or lead to malfunction.
• Exercise caution when working with fast-setting materials, such as quick-set concrete. Even a
few minutes of inactivity may allow the material to set. Setting times vary—always follow the
material manufacturer’s instructions.
CAUTION:
• Do not exceed the mixer’s batch capacity. Overfilling the drum may damage the motor.
• Always keep the drum opening in view when filling or emptying the mixer. Some materials harden
quickly and may cause property damage or personal injury if spilled.
OPERATION INSTRUCTIONSOPERATION INSTRUCTIONS

• When servicing, use only authorized replacement parts. Using unauthorized parts may create
hazards or damage the product.
• Avoid contact of brake fluids, gasoline, petroleum-based products, penetrating oils, or similar
chemicals with plastic parts. Such substances can weaken or destroy plastic, potentially
causing serious personal injury.
WARNING:
CAUTION:
Regularly inspect the entire product for damaged, missing, or loose parts such as screws, nuts,
bolts, and caps. Ensure all fasteners and caps are securely tightened. Do not operate the product
until all missing or damaged parts have been properly replaced. For assistance, contact customer
service or a qualified service center.
GENERAL MAINTENANCE
Avoid using solvents to clean plastic parts, as most plastics can be damaged by commercial
solvents. Use clean cloths to remove dirt, dust, oil, grease, and other contaminants.
LUBRICATION
All bearings in this product are pre-lubricated with high-quality grease sufficient for the unit’s
lifetime under normal operating conditions. No additional lubrication is necessary.
14 15
Mixer won’t start. 1. Power supply not connected.
2. On/off switch is in the off position.
3. Motor overloaded and circuit breaker is
tripped.
1. Connect to power supply.
2. Set the ON/OFF switch to the ON position.
3. Allow motor to cool, press the circuit
breaker reset button and put on/off switch
in on position.
NOTE: If the mixer still fails to start, unplug
the tool and reduce or remove the batch load.
Do not force the mixer.
NOTE: If the mixer still fails to start, unplug
the tool and reduce or remove the batch load.
Do not force the mixer.
Mixer stops during operation. 1. Power supply is disconnected.
2. Motor overloaded and circuit breaker is
tripped.
1. Reconnect power supply.
2. Allow motor to cool, press the circuit
breaker reset button and put on/off switch
in on position.
Excessive noise or vibration while
drum is spinning.
Pivot shaft and/or lock handle is not
secure.
Stop the motor and fully insert the pivot
shaft and/or lock handle to lock the drum
in place.
Drum lowers unexpectedly during
operation.
Overheating motor. 1. Overloading the mixer.
2. Poor ventilation around motor.
3. Continuous use without breaks.
1. Mix smaller batches.
2. Ensure air vents are clean and unobstructed.
3. Allow cooling periods between mixes.
Drum rotates but poor mixing.
Drum jammed / material
stuck inside.
1. Overloaded drum (too much material)
2. Incorrect mixing ratio of cement, sand,
and water.
3. Mixing blades worn or bent.
1. Concrete left inside too long before cleaning.
2. Mix too dry causing clumps.
3. Foreign objects stuck in drum.
1. Reduce load to recommended capacity.
2. Follow correct mixing ratios.
3. Replace or straighten Mixing blades.
1. Always clean immediately after use.
2. Adjust water ratio in the mix.
3. Remove obstructions manually (with power off).
Pivot shaft and/or lock handle is not
secure.
Stop the motor and fully insert the pivot
shaft and/or lock handle to lock the drum
in place.
PROBLEM POSSIBLE CAUSE SOLUTION
Printed in Vietnam
WARRANTY
Three year limited warranty:
The manufacturer warrants this product against defects in materials and workmanship for
3 years from date of purchase. If within this period a product is found to be defective in
material or workmanship, the product must be returned with a copy of the bill of sale as
proof of purchase to the place of purchase. The manufacturer will, at its option, repair,
replace or refund the purchase price to the consumer. This warranty does not cover the
product becoming defective due to misuse, accidental damage, improper handling and/or
installation and specifically excludes liability for direct, incidental or consequential
damages. As some states do not allow exclusions or limitations on how long an implied
warranty lasts, the above exclusion and limitation may not apply to you. This warranty
gives you specific rights and you may also have other rights which vary from state to state.
For replacement parts, call our customer service department at 888-3KOBALT
(888-356-2258), 8:00 a.m. - 8:00 p.m., EST, Monday-Sunday. You could also contact
us at [email protected].
CARE AND MAINTENANCE
TROUBLESHOOTING
1716
ARTÍCULO #7045075
MODELO #40201
MEZCLADORA DE
CONCRETO CON
TAMBOR DE ACERO DE
0.14 METROS CÚBICOS
KOBALT y el diseño del logotipo son marcas
comerciales o marcas registradas de LF,
LLC. Todos los derechos reservados.
ADJUNTE SU RECIBO AQUÍ
Número de serie
Fecha de compra
DF25275
Gracias por comprar este producto de KOBALT.
¿Tiene preguntas, se presentó un problema o faltan piezas?
Antes de volver a la tienda, póngase en contacto al:
888-356-2258, lunes a domingo de 8 a.m. a 8 p.m., hora estándar del Este, o escriba a [email protected].
ÍNDICE
ESPECIFICACIONES DEL PRODUCTO
Especificaciones del producto.....................................................................................................................................
Contenido del paquete ................................................................................................................................................
Aditamentos.................................................................................................................................................................
Instrucciones importantes de seguridad.......................................................................................................................
Preparación..................................................................................................................................................................
Instrucciones de ensamblaje .......................................................................................................................................
Instrucciones de funcionamiento .................................................................................................................................
Cuidado y mantenimiento:............................................................................................................................................
Solución de problemas.................................................................................................................................................
Garantía.......................................................................................................................................................................
17
18
19
19
21
22
25
29
29
30
Capacidad total del tambor
Peso de la mezcla
Capacidad total de mezcla
Velocidad del tambor
Peso de la mezcladora
Tamaño de la rueda
Motor
Altura de descarga
COMPONENTE
0.14 m3
136.07 kg
0.07 m3
25 RPM
58.97 kg
25.4 cm
120V CA, 60 Hz, 5.3 A
57.78 cm
ESPECIFICACIONES
• No exceda el peso de mezcla de 136.07 m.
• No exceda la capacidad de mezcla total de 0.07 metros cúbicos.
18 19
ADITAMENTOS (NO SE MUESTRAN A ESCALA)
CONTENIDO DEL PAQUETE
F
I
K
M
H
FF
D
G
C
A
B
E
J
L
Ensamble de poste de soporte
Pata delantera
Pata posterior
Soporte de pivote
Rueda
Ensamble de motor
A
B
C
D
E
F
1
1
1
1
2
1
DESCRIPCIÓNPIEZA CANTIDAD
Mango de bloqueo
Eje de pivote
Mango
Mango delantero
Tambor
Paleta mezcladora
Cubierta del tambor
G
H
I
J
K
L
M
1
1
2
1
1
3
1
DESCRIPCIÓNPIEZA CANTIDAD
INFORMACIÓN DE SEGURIDAD
• Lea atentamente los mensajes de precaución y advertencia.
Siga el manual del propietario para garantizar el ensamblaje correcto de la mezcladora y utilice la lista
de piezas junto con los procedimientos.
• Guarde estas instrucciones para referencia futura.
• Algunas piezas pueden presentar bordes filosos. Use guantes al ensamblar la mezcladora.
• Mantenga alejado del alcance de los niños.
• Revise estas instrucciones antes de operar la mezcladora.
• Todos los pernos deben apretarse con las tuercas orientadas hacia el centro de la mezcladora.
• No apriete los sujetadores hasta lograr la alineación final.
• Se deben usar gafas de seguridad y guantes mientras se opera esta mezcladora.
• No enchufe ni desenchufe el motor mientras esté parado sobre un piso húmedo o mojado.
• Se recomienda un interruptor de circuito de falla de puesta a tierra (GFI, por sus siglas en inglés)
para todos los dispositivos eléctricos al aire libre.
• Mantenga el área de operación del motor lo más seca posible.
• Siempre desconecte la alimentación antes de realizar mantenimiento.
PRECAUCIÓN: SIEMPRE HAGA FUNCIONAR LA MEZCLADORA VACÍA
ADVERTENCIA: PRECAUCIONES ELÉCTRICAS
ADVERTENCIA: RIESGO DE DESCARGA ELÉCTRICA
Aditamentos
Perno M8 X 20
Cant. 4
AA
Perno M10 X 60
Cant. 1
BB
Arandela
arqueada
Cant. 2
CC
Arandela de
seguridad
Cant. 1
DD
Tuerca M10
Cant. 1
EE
Perno M10 X 30
Cant. 1
FF
Pasador de
chaveta
Cant. 4
GG
Arandela
grande
Cant. 4
HH
Pasador del eje
del pivote
Cant. 1
II
Pasador de
bloqueo
Cant. 3
JJ
Tornillo M12 X 25
Cant. 6
KK
Tuerca M12
Cant. 6
LL
FF D
*El perno M10 X 30 ya se ha instalado en el soporte del pivote .
• Todo el cableado, las conexiones eléctricas y la conexión a tierra del sistema deben cumplir con el
Código Eléctrico Nacional (NEC, por sus siglas en inglés) y con todos los códigos y ordenanzas
locales. Póngase en contacto con un electricista autorizado local para obtener más información.

20 21
• Lea todas las instrucciones antes de usar el artefacto.
• Para reducir el riesgo de lesiones, es necesario supervisar cuando los niños están cerca del artefacto.
• No entre en contacto con las piezas móviles.
• Mantenga la ropa suelta y otros elementos sueltos lejos de las piezas móviles.
• Para desconectar, gire los controles a la posición de apagado ("O") y luego desconecte el enchufe
del tomacorriente.
• No jale del cable para desenchufarlo. Para desenchufarlo, tome el enchufe, no el cable.
• Desenchufe el cable de alimentación cuando no esté en uso y antes del mantenimiento o la limpieza.
• Conéctelo solo a un tomacorriente con la debida puesta a tierra. (Consulte las instrucciones de
puesta a tierra).
• No use ningún electrodoméstico si el cable o enchufe están dañados ni después de que presente
fallas, haya sufrido caídas o algún tipo de daño.
• Use solo accesorios recomendados o vendidos por el fabricante.
• Almacénelo en interiores. No lo exponga a la lluvia. De tipo doméstico.
Este electrodoméstico debe tener una puesta a tierra. En caso de mal funcionamiento o rotura, la
puesta a tierra hace que pase la menor resistencia de corriente eléctrica para disminuir el riesgo de
descarga eléctrica. Este electrodoméstico está diseñado para usarse en un circuito nominal de 120V
y está equipado con un cable que tiene un conductor de conexión a tierra del equipo y un enchufe de
conexión a tierra. El enchufe debe conectarse solo a un tomacorriente correctamente instalado y con
puesta a tierra que cumpla todas las ordenanzas y códigos locales. Si existe alguna duda sobre si
una caja de tomacorriente está correctamente conectada a tierra, se debe consultar a un electricista
calificado.
La conexión inapropiada del conductor a tierra del equipo puede causar riesgo de incendio o
descarga eléctrica. El conductor con aislamiento que tiene una superficie exterior verde con o sin
rayas amarillas es el conductor a tierra del equipo. Si necesita reparar o reemplazar el cable o el
enchufe, no conecte el conductor a tierra del equipo a un terminal activo. Verifique con un electricista
calificado o un técnico si no comprendió completamente las instrucciones de puesta a tierra o si tiene
dudas de si el electrodoméstico tiene una puesta a tierra adecuada. No modifique el enchufe incluido
en el electrodoméstico. Si el enchufe no encaja en el tomacorriente, pídale a un electricista calificado
que instale el tomacorriente adecuado.
• Consulte la sección Cuidado y mantenimiento para
obtener instrucciones de limpieza.
• No utilice varias extensiones eléctricas.
• No utilice un cable de más de 44.19 m.
• No utilice un calibre de cable inferior a 16 AWG.
• Para un uso seguro, conecte la mezcladora a un
tomacorriente GFCI. Debe mantener la conexión de
la extensión eléctrica seca y separada del suelo.
INFORMACIÓN DE SEGURIDAD
INSTRUCCIONES IMPORTANTES DE SEGURIDAD
INSTRUCCIONES DE PUESTA A TIERRA
GUARDE ESTAS INSTRUCCIONES
PREPARACIÓN
PELIGRO
Se debe utilizar una extensión eléctrica para uso en exteriores. Una extensión eléctrica para uso en exterior está marcada
con el sufijo "W" y con una etiqueta que dice "Adecuada para usar con electrodomésticos para exteriores". Se debe tener
cuidado al utilizarla. La clasificación eléctrica marcada en el cable de suministro de electricidad o la extensión eléctrica debe
ser al menos equivalente a la del electrodoméstico. Consulte la tabla anterior para conocer los calibres recomendados. La
extensión eléctrica debe ser un cable de 3 conductores con puesta a tierra y debe colocarse de manera que no se pueda
tropezar con ella, engancharse o tirar de ella accidentalmente (especialmente los niños).
Antes de comenzar a ensamblar u operar este producto, asegúrese de tener todas las piezas.
Compare con la lista del contenido del paquete y la lista de aditamentos. No intente ensamblar o usar
el producto si falta alguna pieza o si estas están dañadas.
• Tiempo estimado de ensamblaje: 45 a 90 minutos para una persona.
• Herramientas necesarias para el ensamblaje (no incluidas): dado o llave inglesa de 12 mm
(15/32 pulg.), dado o llave inglesa de 10 mm (3/8 pulg.), dado o llave inglesa de 8 mm (5/16 pulg.),
alicates de punta fina y martillo.
SEGURIDAD PARA EL CABLE DE ALIMENTACIÓN
NOTA: no utilice adaptadores de puesta a tierra con este producto.
Calibre de cable eléctrico recomendado
y longitud máxima
0 a 16.76 m
Calibre
(AWG)
16 14 12
16.76 m a 27.43 m 27.43 m a 44.19 m
PUESTA A TIERRA
TOMACORRIENTE CON
PUESTA A TIERRA DE
120V
CLAVIJA DE
PUESTA A TIERRA
Fig. 1
Al usar electrodomésticos, siempre se deben respetar las siguientes medidas de precaución básicas:
ADVERTENCIA:
22
AA
B
A
C
BB
CC
A
DD
EE
A
D
FF
1. Fije el ensamble del poste de soporte (A) a la pata
delantera (B) con cuatro pernos M8 X 20 (AA). Apriete
firmemente. Deslice la pata posterior (C) en el
ensamble del poste de soporte (A). Alinee los orificios
en el ensamble del poste de soporte (A). Instale la
pata posterior (C) y el ensamble de la pata delantera
con un perno M10 X 60 (BB), una arandela arqueada
(CC), una arandela de seguridad (DD) y una tuerca
M10 (EE). Apriete firmemente.
2. Deslice el soporte de pivote (D) sobre la parte
superior del ensamble del poste de soporte (A)
de la estructura de la mezcladora. Apriete
firmemente con el perno M10 X 30 (FF).
INSTRUCCIONES DE ENSAMBLAJE
1
Aditamentos utilizados
Perno M8 X 20 x 4
AA
Perno M10 X 60 x 1
BB
Arandela arqueada x 2
CC
Arandela de seguridad x 1
DD
Tuerca M10 x 1
EE
2
Aditamentos utilizados
Perno M10 X 30 x 1
FF
ENSAMBLAJE DE LA ESTRUCTURA
Fig. 2
Fig. 3
Fig. 4
23
3. Ensamble las ruedas (E) a la estructura de la
mezcladora con un pasador de chaveta (GG) y
una arandela grande (HH). Con unos alicates,
doble los extremos de los pasadores de
chaveta (GG) para asegurar la rueda (E) en su
lugar. Repita el proceso para el otro lado para
instalar la segunda rueda.
3
4
INSTRUCCIONES DE ENSAMBLAJE
4. Gire el mango de bloqueo (G) a la posición
desbloqueada horizontal. Con la ayuda de una
segunda persona, mantenga el ensamble del
motor (F) sobre el soporte del pivote (D).
INSTALACIÓN DEL ENSAMBLE DEL MOTOR
Aditamentos utilizados
Pasador de chaveta x 4
GG
Arandela grande x 4
HH
Aditamentos utilizados
Pasador del eje
del pivote
x 1
II
Nota: un lado del ensamble del motor (F) tiene dos
orificios y el otro lado tiene uno. El lado con dos
orificios debe estar del mismo lado que el mango
de bloqueo (G).
Alinee los orificios del ensamble del motor (F) con
el orificio y el mango de bloqueo (G) en el soporte
del pivote (D). Baje el ensamble del motor (F) a su
lugar.
Gire el mango de bloqueo (G) a la posición de
bloqueo vertical y permita que ingrese en el orificio
en el ensamble del motor (F) para asegurarlo.
Inserte el eje del pivote (H) a través de los orificios
en el soporte del pivote (D) y el ensamble del
motor (F) y asegúrelo con el pasador del eje del
pivote (II).
GG
GG
HH
E
II
F
D
G
G
G
HH
H
Posición de bloqueo
Posición sin bloqueo
Fig. 5
Fig. 6
25
7
INSTRUCCIONES DE ENSAMBLAJE
INSTALACIÓN DE LAS PALETAS MEZCLADORAS
7. Coloque las paletas mezcladoras (L) en el
tambor (K) con los extremos en ángulo
apuntando hacia el interior del tambor.
Alinee los orificios de las paletas con los
orificios del tambor. Instale tuercas M12 (LL)
y el tornillo M12 X 25 (KK) como se muestra.
Apriete firmemente.
Aditamentos utilizados
Tornillo M12 X 25 x 6
KK
Tuerca M12 x 6
LL
KK
LL
K
L
ENCENDIDO Y APAGADO DE LA MEZCLADORA
PROTECCIÓN CONTRA SOBRECARGA
BOTÓN DE REINICIO DEL
INTERRUPTOR DE CIRCUITO
BOTÓN
ON/OFF
(encendido/
apagado)
Fig. 8
Fig. 9
Consulte la Figura 9.
El interruptor de encendido/apagado, ubicado en la parte
posterior del ensamble del motor, controla la mezcladora.
• ENCENDIDO: cuando se enciende, la mezcladora
comienza a girar.
• APAGADO: cuando se apaga, la mezcladora se
detiene.
Si la mezcladora se sobrecarga o el motor se
sobrecalienta, el interruptor de circuito se disparará y la
mezcladora se apagará automáticamente.
PRECAUCIÓN:
Inspeccione periódicamente la mezcladora y el material que se
está procesando. No permita que el material se seque o
endurezca dentro del tambor o en ninguna parte de la
mezcladora. De no hacerlo, se podrían producir daños en el
equipo o provocar un mal funcionamiento.
PRECAUCIÓN:
Tenga cuidado al trabajar con materiales de fraguado
rápido, como el concreto de fraguado rápido. Incluso
unos pocos minutos de inactividad pueden hacer que el
material se endurezca. Los tiempos de fraguado varían;
siga siempre las instrucciones del fabricante del material.
• Deje que el motor se enfríe antes de reiniciarlo.
• Una vez enfriado, presione el botón de reinicio del
interruptor de circuito y luego vuelva a encender el
motor para reanudar la mezcla.
• Si la mezcladora aún no funciona, desconéctela y
reduzca la carga del lote.
No fuerce la mezcladora.
24
5. Deslice el mango (I) a través de las aberturas
en la parte posterior del ensamble del motor
(F). Instale el pasador de bloqueo (JJ) en el
orificio del mango para asegurarlo en su lugar.
Presione firmemente el pasador de bloqueo
(JJ) y asegúrese de que esté firme. Repita el
proceso para fijar el mango delantero (J) a la
parte delantera del ensamble del motor (F).
6. Con la ayuda de una segunda persona,
coloque el tambor (K) sobre el eje del motor.
Atornille el tambor (K) en el eje del motor al
girarlo en dirección de las manecillas del
reloj. Apriete firmemente.
INSTRUCCIONES DE ENSAMBLAJE
5
B
Aditamentos utilizados
Pasador de
seguridad
x 3
JJ
ASEGURAMIENTO DEL TAMBOR
6
NOTA: el tambor pesa 19.05 kg. Para evitar
lesiones de espalda, levántelo con las piernas,
no con la espalda, y busque ayuda cuando la
necesite.
PRECAUCIÓN:
Verifique nuevamente todas las configuraciones. Asegúrese
de que las patas, el soporte del pivote, las ruedas, el
ensamble del motor y los mangos estén instalados
correctamente antes de instalar el tambor. Apriete el perno
en la parte posterior del soporte del pivote para evitar que el
tambor gire.
JJ
J
JJ
F
I
K
JJ
Eje del motor
Fig. 7
INSTRUCCIONES DE FUNCIONAMIENTO
26
FUNCIONAMIENTO
FF
Fig. 12
Perno
I
G
I
G
MANIJAS
MANIJAS
Fig. 10
Fig. 11
ABERTURA
DEL
TAMBOR
ABERTURA DEL
TAMBOR
MANGOS DE
BLOQUEO
MANGOS DE
BLOQUEO
ADVERTENCIA: al ajustar el ángulo del tambor,
mantenga las manos y los cables de alimentación
alejados de los puntos de pellizco. Ignorar esta
advertencia puede provocar pellizcos en los dedos
o daños en los cables.
ADVERTENCIA: para reducir el riesgo de
arranque accidental, daños materiales o
lesiones personales graves, siempre
desenchufe la mezcladora y vacíe el tambor
antes de moverla.
PRECAUCIÓN: no incline demasiado la
mezcladora. Tenga cuidado al moverls por
umbrales o superficies irregulares.
GIRO DEL TAMBOR
MOVIMIENTO DE LA MEZCLADORA
Consulte la figura 12.
Para girar el tambor:
1. Apague la mezcladora.
2. Afloje el perno (FF) en la parte posterior del
soporte del pivote.
3. Sujete firmemente los mangos y gire el tambor
hacia la izquierda o hacia la derecha.
4. Apriete el perno (FF) en la parte posterior del
soporte del pivote para asegurar el tambor.
1. Vacíe el tambor.
2. Desenchufe la mezcladora.
3. Presione los mangos hacia abajo para levantar
la abertura del tambor.
4. Asegure el tambor en su lugar.
5. Apriete el perno en la parte posterior del soporte
del pivote para evitar la rotación.
6. Incline la mezcladora en dirección opuesta a
usted hasta que quede equilibrada sobre las
ruedas, luego gírela hasta la ubicación deseada.
No incline la mezcladora hacia adelante ni hacia
los lados mientras la mueve.
Mueva la mezcladora al área de trabajo y
colóquela sobre una superficie plana y nivelada.
1. Presione los mangos hacia abajo para levantar
la abertura del tambor.
2. Asegure el tambor en su lugar.
3. Conecte la mezcladora a una fuente de energía.
4. Encienda la mezcladora y deje que el tambor
gire.
5. Vierta cuidadosamente los materiales secos y
húmedos en el tambor. Siga las instrucciones del
fabricante del material para obtener pautas de
mezcla específicas. Los tiempos de mezcla varían.
NOTA: para lograr la máxima estabilidad y reducir
los riesgos de vuelco, nunca opere la mezcladora
en pendientes o superficies irregulares.
NOTA: para proteger el motor y asegurar una
mezcla uniforme, siempre arranque el motor antes
de agregar materiales al tambor.
NOTA: la mezcladora tiene una capacidad de lote
de 136.07 kg (0.07 metros cúbicos). No
sobrecargue la mezcladora.
6. Una vez finalizada la mezcla, vacíe el tambor,
apague el motor y limpie la mezcladora.
NOTA: envuelva el cable para evitar que quede
colgando o cree un peligro de tropiezo.
SUBIR Y BAJAR LA
ABERTURA DEL TAMBOR
Consulte las Figuras 10 y 11.
Para bajar la abertura del tambor:
1. Gire el mango de bloqueo (G) a la posición
horizontal desbloqueada.
2. Levante los mangos (I) para bajar la abertura
del tambor.
NOTA: mantenga el tambor en esta posición al
vaciar o limpiar la mezcladora.
Para levantar la abertura del tambor:
1. Presione los mangos (I) para levantar la
abertura del tambor.
2. Gire el mango de bloqueo (G) a la posición de
bloqueo vertical y deje que se enganche en el
orificio del ensamble del motor.
NOTA: mantenga el tambor en esta posición al
agregar o mezclar materiales.
AGREGADO Y MEZCLA DE MATERIALES
Consulte la Figura 14.
NOTA: el tambor puede girar 360° alrededor
de la estructura.
Fig. 13
5° MÁXIMO
27
Fig. 14
CEMENT
• Para evitar riesgos de vuelco, utilice la mezcladora únicamente sobre una superficie plana y
estable. El uso de la mezcladora en pendientes o terrenos irregulares aumenta el riesgo de vuelco, lo
que puede causar lesiones graves. Nunca opere en una pendiente mayor a 5°. Asegúrese siempre
que la mezcladora esté estable antes y después de poner en marcha el motor.
• Mantenga las manos y todas las partes del cuerpo alejadas del tambor mientras esté girando. El
contacto con piezas móviles puede provocar lesiones graves.
• Nunca deje la mezcladora funcionando sin supervisión. Desenchufe siempre la mezcladora y vacíe
el tambor antes de abandonar el área de trabajo o cuando la mezcladora esté fuera de la vista.
• Prepare y mezcle los materiales únicamente de acuerdo con las instrucciones del fabricante del
material.
ADVERTENCIA:
PRECAUCIÓN:
• Inspeccione periódicamente la mezcladora y el material que se está procesando. No permita que el
material se seque o endurezca dentro del tambor o en ninguna parte de la mezcladora. De no hacerlo,
podrían producirse daños en el equipo o provocar un mal funcionamiento.
• Tenga cuidado al trabajar con materiales de fraguado rápido, como el concreto de fraguado rápido.
Incluso unos pocos minutos de inactividad pueden hacer que el material se endurezca. Los tiempos de
fraguado varían; siga siempre las instrucciones del fabricante del material.
PRECAUCIÓN:
• No exceda la capacidad de lote de la mezcladora. Llenar demasiado el tambor puede dañar el motor.
• Mantenga siempre la abertura del tambor a la vista al llenar o vaciar la mezcladora. Algunos materiales se
endurecen rápidamente y pueden provocar daños materiales o lesiones personales si se derraman.
INSTRUCCIONES DE FUNCIONAMIENTO
INSTRUCCIONES DE FUNCIONAMIENTO
• Al realizar mantenimiento, utilice solo piezas de repuesto autorizadas. El uso de piezas no autorizadas
puede crear peligros o dañar el producto.
• Evite el contacto de líquidos de frenos, gasolina, productos derivados del petróleo, aceites penetrantes o
productos químicos similares con piezas de plástico. Estas sustancias pueden debilitar o destruir el plástico,
lo que podría causar lesiones personales graves.
ADVERTENCIA:
PRECAUCIÓN:
Inspeccione periódicamente todo el producto para detectar piezas dañadas, faltantes o sueltas, como tornillos,
tuercas, pernos y tapas. Asegúrese de que todos los sujetadores y tapas estén bien apretados. No opere el
producto hasta que todas las piezas faltantes o dañadas se hayan reemplazado adecuadamente. Para obtener
ayuda, póngase en contacto con el Servicio al Cliente o un centro de servicio calificado.
MANTENIMIENTO GENERAL
Evite utilizar disolventes para limpiar piezas de plástico, ya que la mayoría de los plásticos pueden dañarse con
los solventes comerciales. Utilice paños limpios para eliminar la suciedad, el polvo, el aceite, la grasa y otros
contaminantes.
LUBRICACIÓN
Todos los rodamientos de este producto están prelubricados con una cantidad de grasa de alta calidad
suficiente para que permanezcan en condiciones de operación normales durante toda la vida útil de la unidad.
No es necesaria lubricación adicional.
Agregue y mezcle los materiales como se describe en la sección anterior.
1. Apague la mezcladora.
2. Afloje el perno en la parte posterior del soporte del pivote.
3. Gire con cuidado el tambor para que quede alejado de la estructura y hacia el área de trabajo.
4. Apriete el perno en la parte posterior del soporte del pivote para asegurar el tambor en su lugar.
5. Desbloquee el tambor al girar el mango de bloqueo a la posición de desbloqueo horizontal.
6. Levante lentamente los mangos para bajar la abertura del tambor.
7. Una vez que el tambor esté vacío o el trabajo esté completo, levante la abertura del tambor
y bloquéela en su lugar.
8. Limpie la mezcladora como se describe en la sección de limpieza.
Vea la Figura 16.
1. Desenchufe la mezcladora.
2. Vacíe el tambor.
3. Desbloquee el tambor al girar el mango de
bloqueo a la posición de desbloqueo horizontal.
4. Levante los mangos para bajar la abertura del
tambor.
5. Con una manguera para jardín, rocíe agua
limpia en el tambor para enjuagar cualquier
material sobrante.
6. Deseche el concreto, el agua de enjuague
y otros residuos solo en las áreas designadas.
Las regulaciones locales, estatales o federales
pueden prohibir la eliminación en desagües
pluviales, bordes de carreteras, vertederos u otros
lugares. Consulte a su autoridad local de gestión
de residuos para conocer las opciones de
eliminación adecuadas.
7. Limpie el exterior de la unidad con un paño
y agua tibia.
NOTA: si es necesario, limpie el ensamble del
motor únicamente con un paño seco. Evite que
entre agua en el ensamble del motor.
8. Seque la unidad completamente antes de
guardarla para usarla en el futuro.
VACIADO DEL TAMBOR
LIMPIEZA DEL TAMBOR
Consulte la Figura 15.
28
Fig. 16
Fig. 15
29
La mezcladora no enciende. 1. El suministro de electricidad no está conectado.
2. El interruptor de encendido y apagado
está en la posición de apagado.
3. El motor está sobrecargado y se disparó el interruptor
de circuito.
1. Conecte la unidad al suministro de electricidad.
2. Coloque el interruptor de encendido y apagado en la
posición de encendido.
3. Deje que el motor se enfríe, presione el botón de reinicio
del interruptor de circuito y coloque el interruptor de
encendido y apagado en la posición de encendido.
NOTA: si la mezcladora sigue sin arrancar, desenchufe la
herramienta y reduzca o retire la carga del lote. No fuerce
la mezcladora.
NOTA: si la mezcladora sigue sin arrancar, desenchufe la
herramienta y reduzca o retire la carga del lote. No fuerce
la mezcladora.
La mezcladora se detiene
durante el funcionamiento.
1. La fuente de alimentación está desconectada.
2. El motor está sobrecargado y se disparó el interruptor
de circuito.
1. Vuelva a conectar el suministro de electricidad.
2. Deje que el motor se enfríe, presione el botón de
reinicio del interruptor de circuito y coloque el interruptor
de encendido y apagado en la posición de encendido.
Ruido o vibración excesivos mientras el
tambor está girando.
El eje del pivote o el mango de bloqueo no
están seguros.
Detenga el motor e inserte completamente el eje del
pivote o el mango de bloqueo para bloquear el tambor en
su lugar.
El tambor baja inesperadamente
durante el funcionamiento.
El motor se sobrecalienta. 1. Sobrecarga de la mezcladora.
2. Mala ventilación alrededor del motor.
3. Uso continuo sin interrupciones.
1. Mezcle lotes más pequeños.
2. Asegúrese de que las rejillas de ventilación estén limpias
y sin obstrucciones.
3. Permita períodos de enfriamiento entre mezclas.
El tambor gira pero la mezcla
es deficiente.
El tambor está atascado o hay
material atascado en el interior.
1. El tambor está sobrecargado (demasiado material).
2. Proporción incorrecta de mezcla de cemento, arena
y agua.
3. Las paletas mezcladoras están desgastadas o
dobladas.
1. El concreto se dejó demasiado tiempo en el interior
antes de limpiarlo.
2. Mezcla demasiado seca y que provoca grumos.
3. Hay objetos extraños atascados en el tambor.
1. Reduzca la carga a la capacidad recomendada.
2. Siga las proporciones de mezcla correctas.
3. Reemplace o enderece las paletas mezcladoras.
1. Limpie siempre el producto de inmediato después de cada uso.
2. Ajuste la proporción de agua en la mezcla.
3. Retire las obstrucciones manualmente (con la alimentación
apagada).
El eje del pivote o el mango de bloqueo no
están seguros.
Detenga el motor e inserte completamente el eje del
pivote o el mango de bloqueo para bloquear el tambor en
su lugar.
PROBLEMA CAUSA POSIBLE SOLUCIÓN
CUIDADO Y MANTENIMIENTO
SOLUCIÓN DE PROBLEMAS
INSTRUCCIONES DE FUNCIONAMIENTO

30
Impreso en Vietnam
GARANTÍA
Tres años de garantía limitada:
El fabricante garantiza que este producto está libre de defectos en los materiales y la
mano de obra por 3 años a partir de la fecha de compra. Si dentro de este período un
producto presenta defectos en el material o la fabricación, se debe devolver el producto,
junto con una copia del recibo de venta como prueba de la adquisición, al lugar donde se
compró. El fabricante, a su elección, reparará, reemplazará o reembolsará el monto de la
compra al comprador. Esta garantía no cubre daños al producto debido al mal uso, daño
accidental, manipulación y/o instalación inadecuada y excluye específicamente toda
responsabilidad por daños directos, accidentales o resultantes. Algunos estados no
permiten exclusiones o limitaciones con respecto a cuánto dura una garantía, de modo
que la exclusión y la limitación anteriores pueden no aplicarse a usted. Esta garantía le
otorga derechos específicos, pero podría tener también otros derechos que varían según
el estado.
Para obtener piezas de repuesto, llame a nuestro Departamento de Servicio al Cliente al
888-3KOBALT (888-356-2258), de lunes a domingo de 8:00 a.m. a 8:00 p.m., hora
estándar del Este. También puede ponerse en contacto con nosotros a través de
