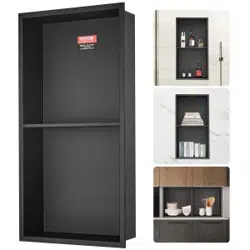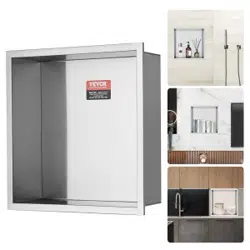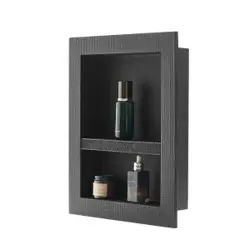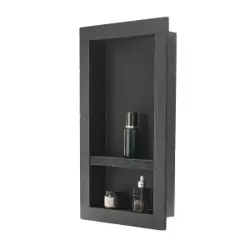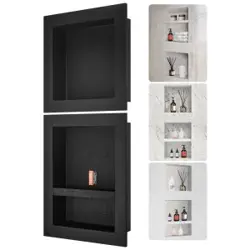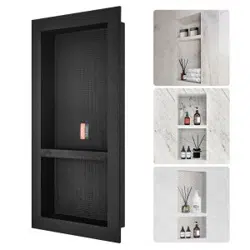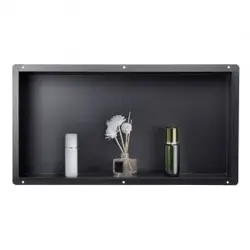

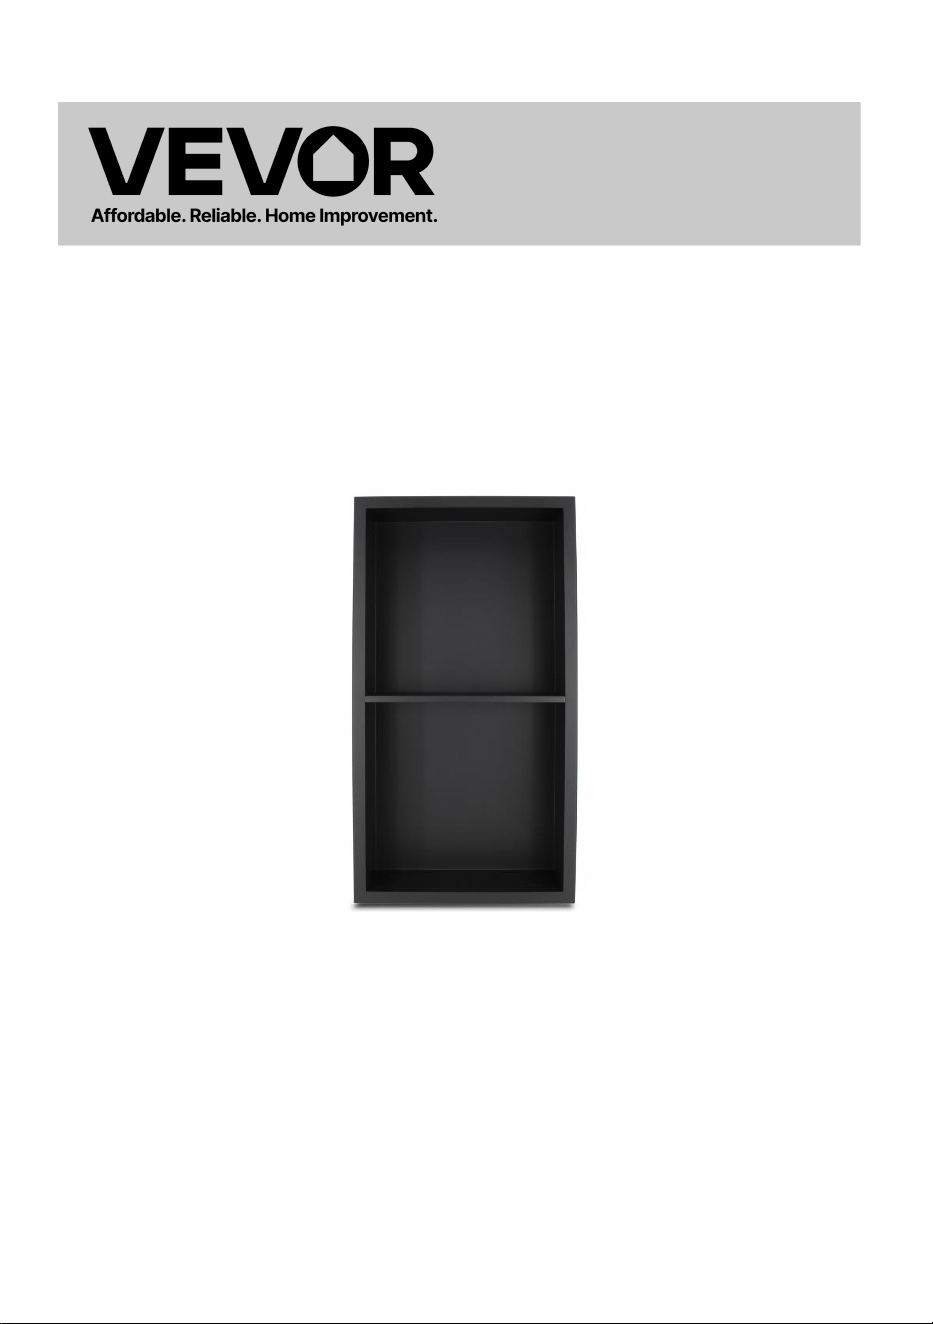
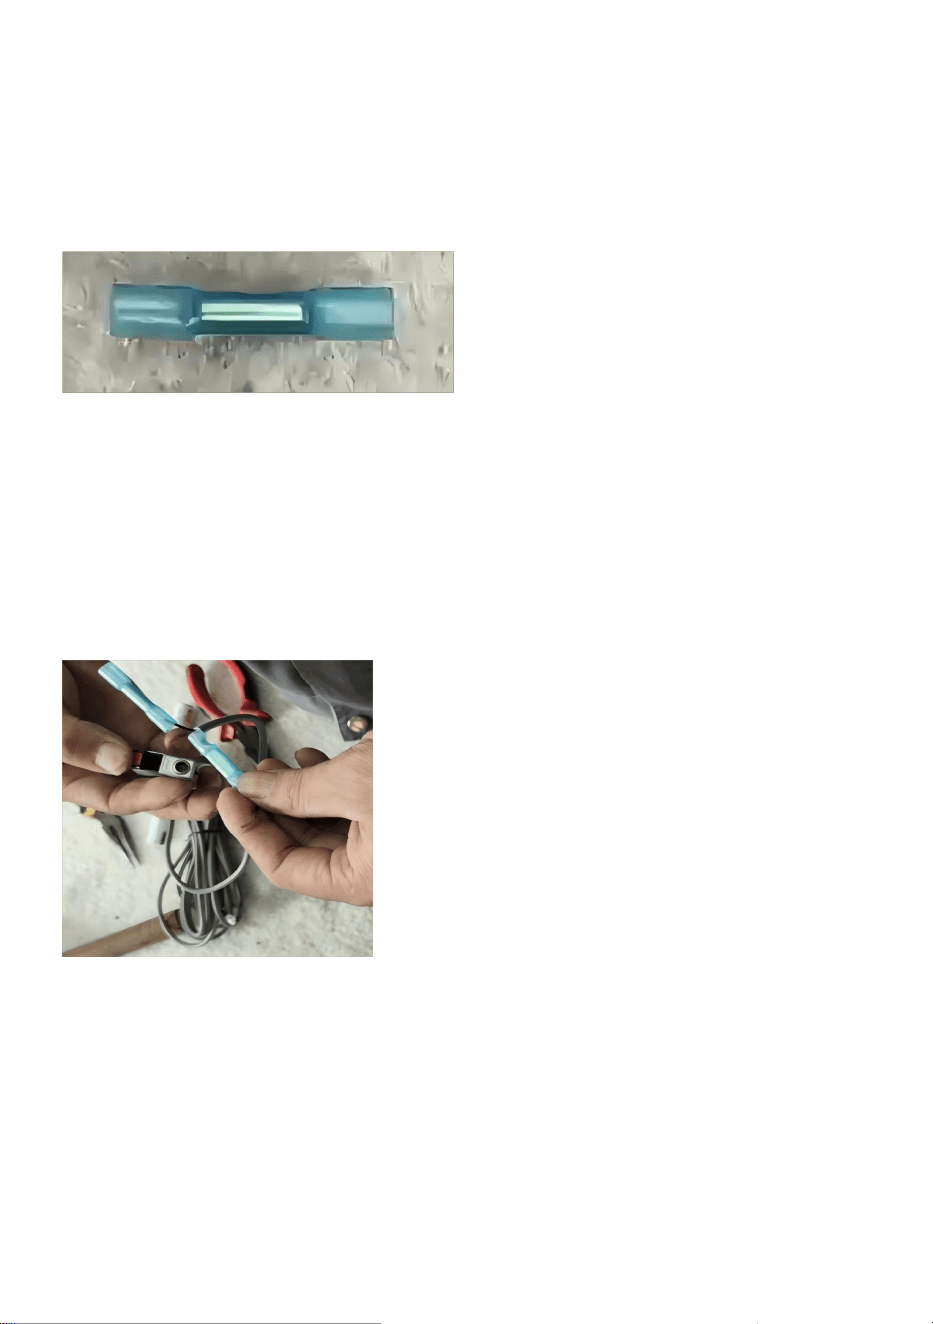
SHOWER NICHE
MODEL:
BA-306010-MB/BA2-306010-BR/BA-303010-MB/BAL-306010-MB/BTF-
306010-MB
Technical Support and E-Warranty Certificate
www.vevor.com/support

- 1 -
MODEL:BA-306010-MB/BA2-306010-BR/BA-303010-MB/BAL-306010-
MB/BTF-306010-MB
This is the original instruction, please read all manual instructions
carefully before operating. VEVOR reserves a clear interpretation of our
user manual. The appearance of the product shall be subject to the
product you received. Please forgive us that we won't inform you again if
there are any technology or software updates on our product.
SHOWER NICHE

- 2 -
Warning-To reduce the risk of injury, user must read
instructions manual carefully.
WARNING:
Please read this manual carefully before using the product. Failure to do so
may result in serious injury.
WARNING:
Read this material before using this product. Failure to do so can result in
serious injury.
Assembly precautions
1.Assemble only according to these instructions. Improper assembly can
create hazards.
2. Wear ANSI-approved safety goggles and heavy-duty work gloves during
assembly.
3.Keep assembly area clean and well lit.
4.Keep bystanders out of the area during assembly.
5.Do not assemble when tired or when under the influence of alcohol,
drugs or medication.
6.Weight capacity and other product capabilities apply to properly and
completely assembled product only.
7. For additional information regarding the parts listed in the following
pages, please refer to the Assembly Diagram of this manual. Unwrap and
- 3 -
separate all parts in a clean work area.
SAVE THIS MANUAL
The following installation details are applicable for existing wall
before tiling , do not cover every possible situation Always consult
with licenced professional during preparation and installation.
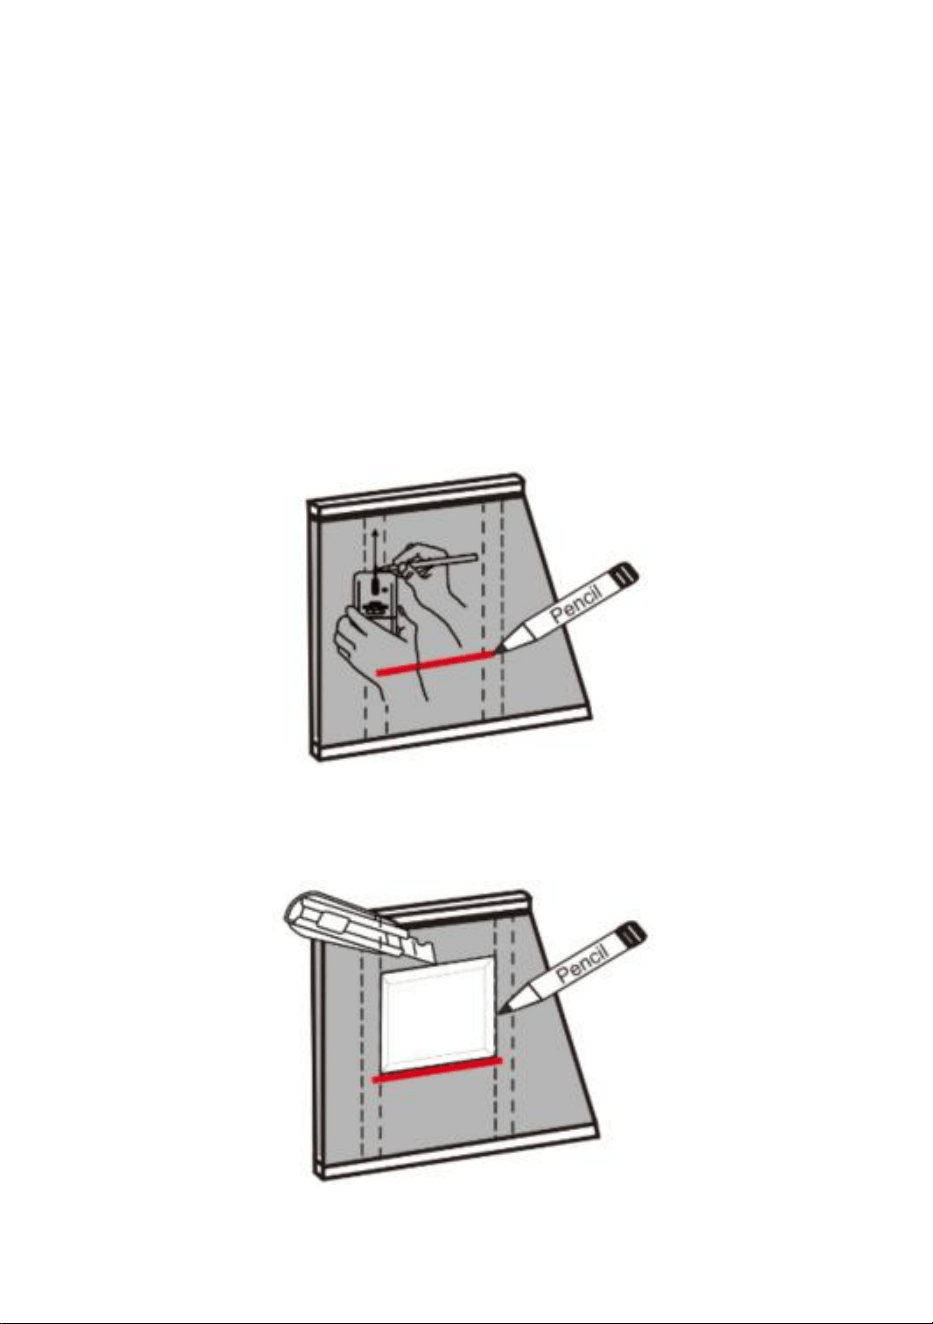
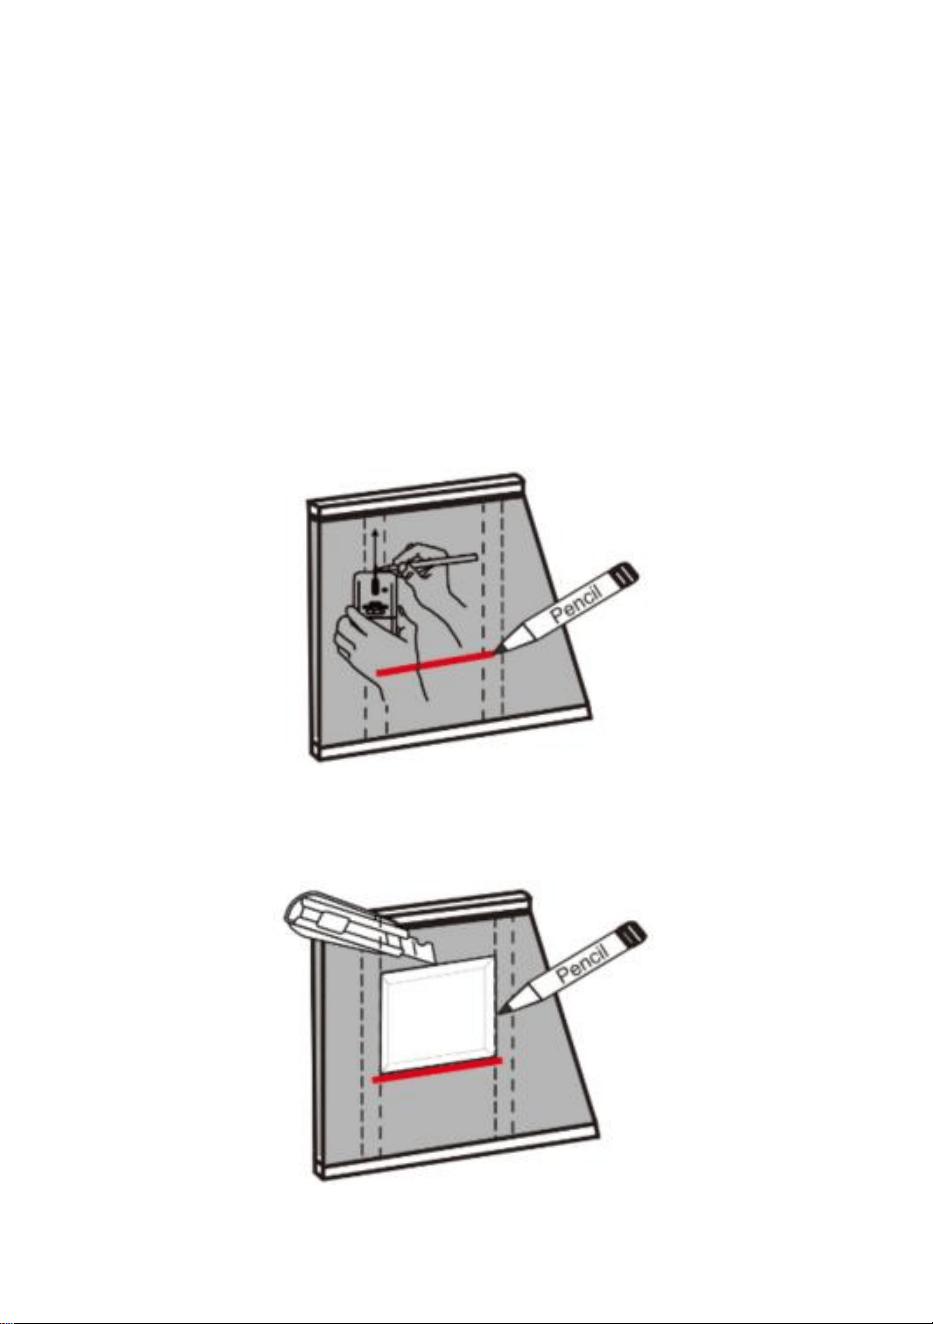
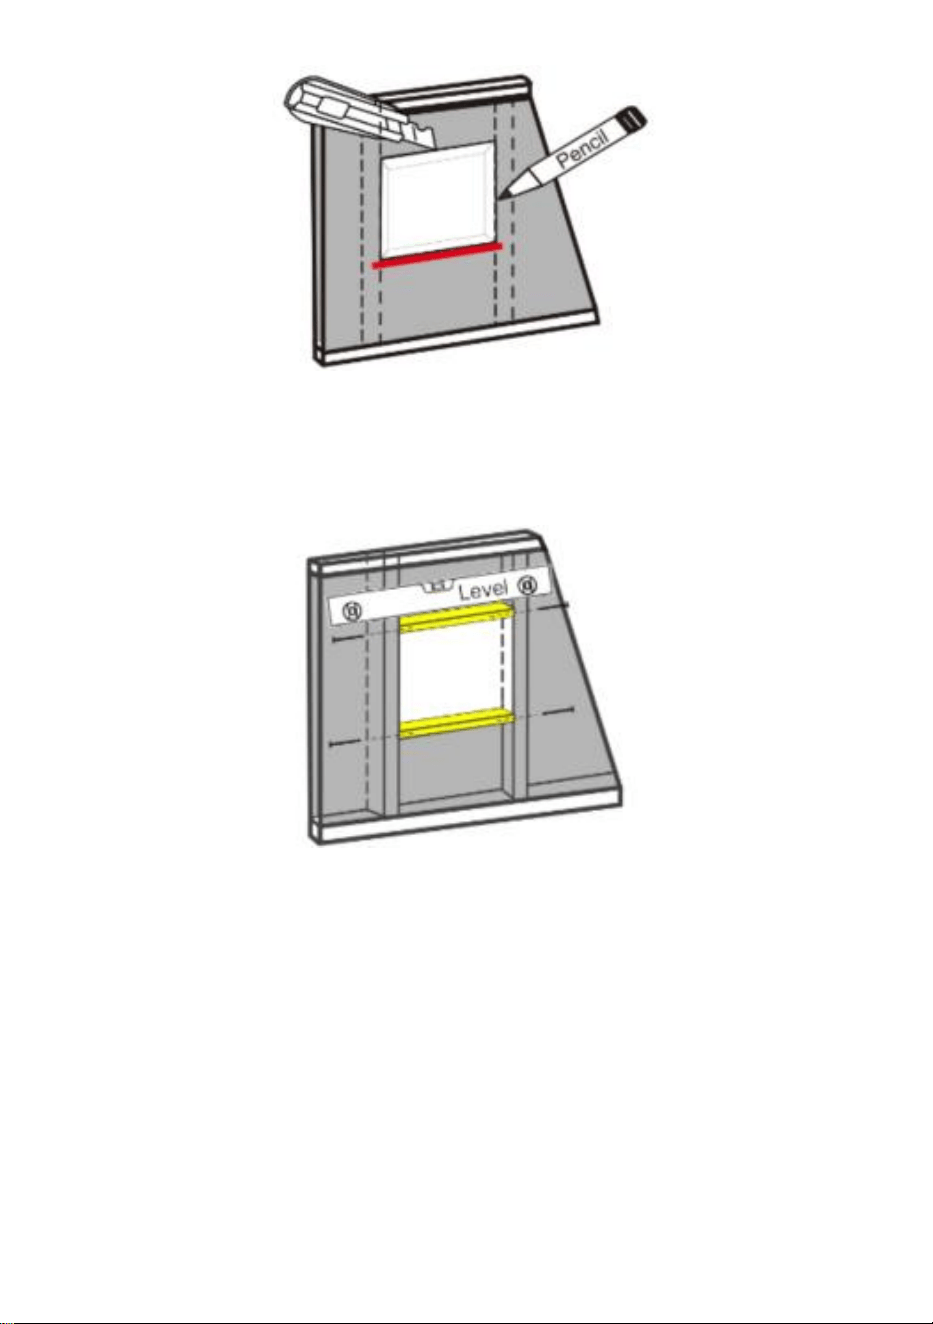
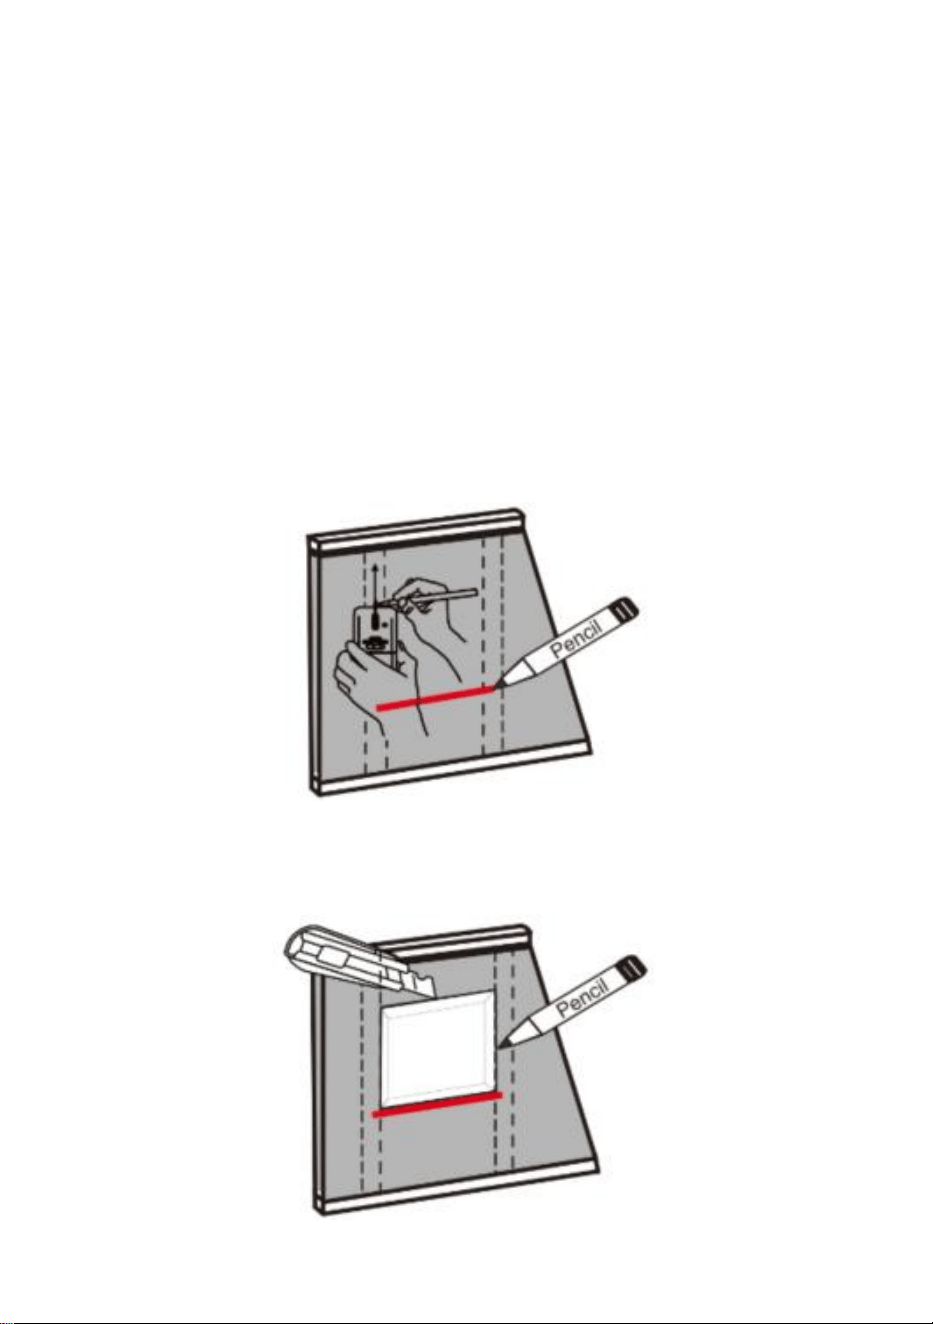
1. Locate and mark the center lines of adjacent framing studs using a stud
finder or by tapping the wall . Draw level line between the two wall studs at
your desired height of niche.
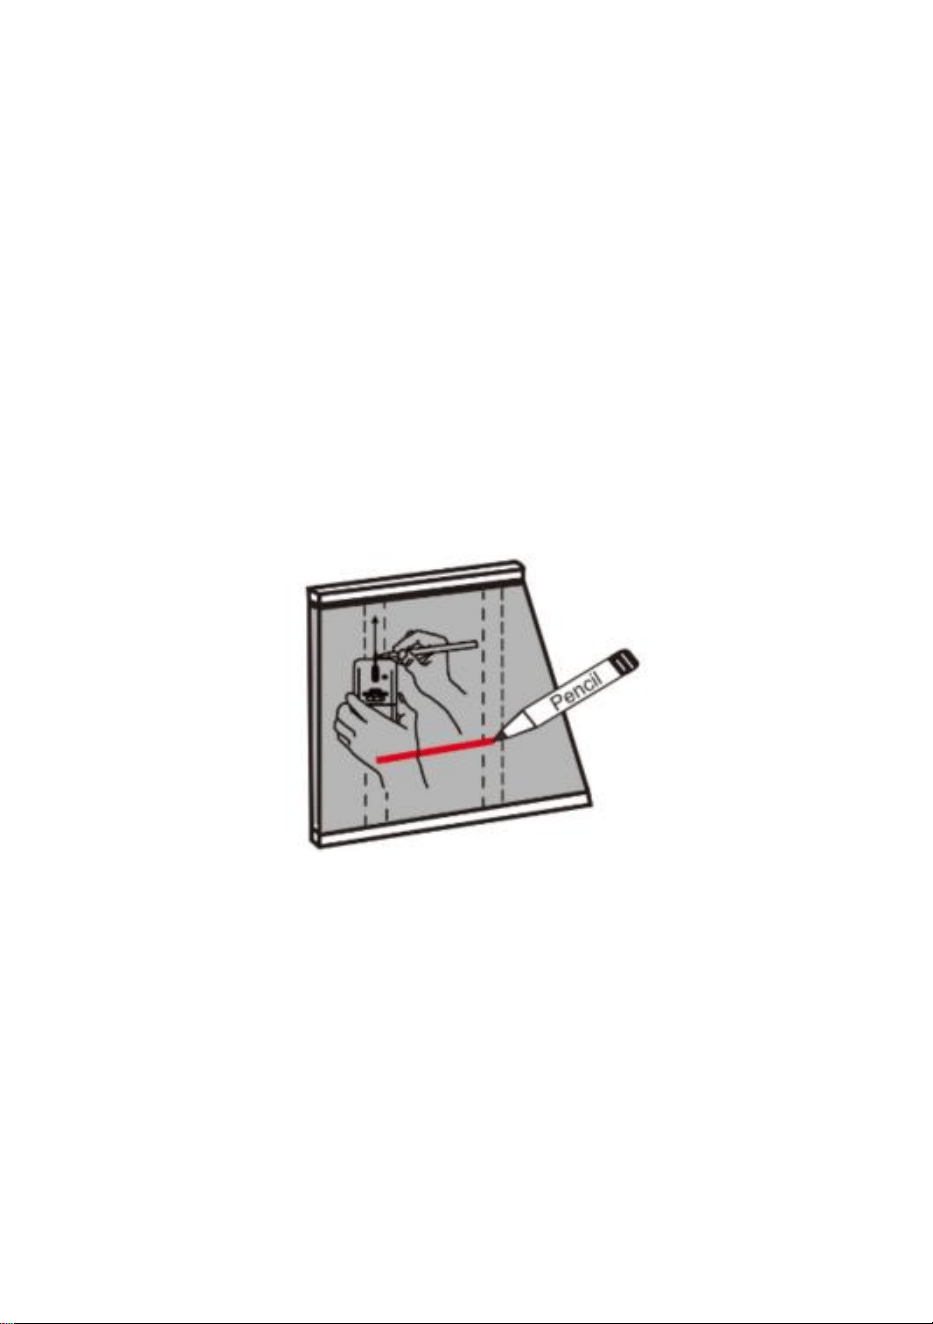
2. Trace the cut line with pencil,above the center line , cut out a cave on the
wall board along the traced line . Be sure the top and bottom lines are
level.

- 4 -
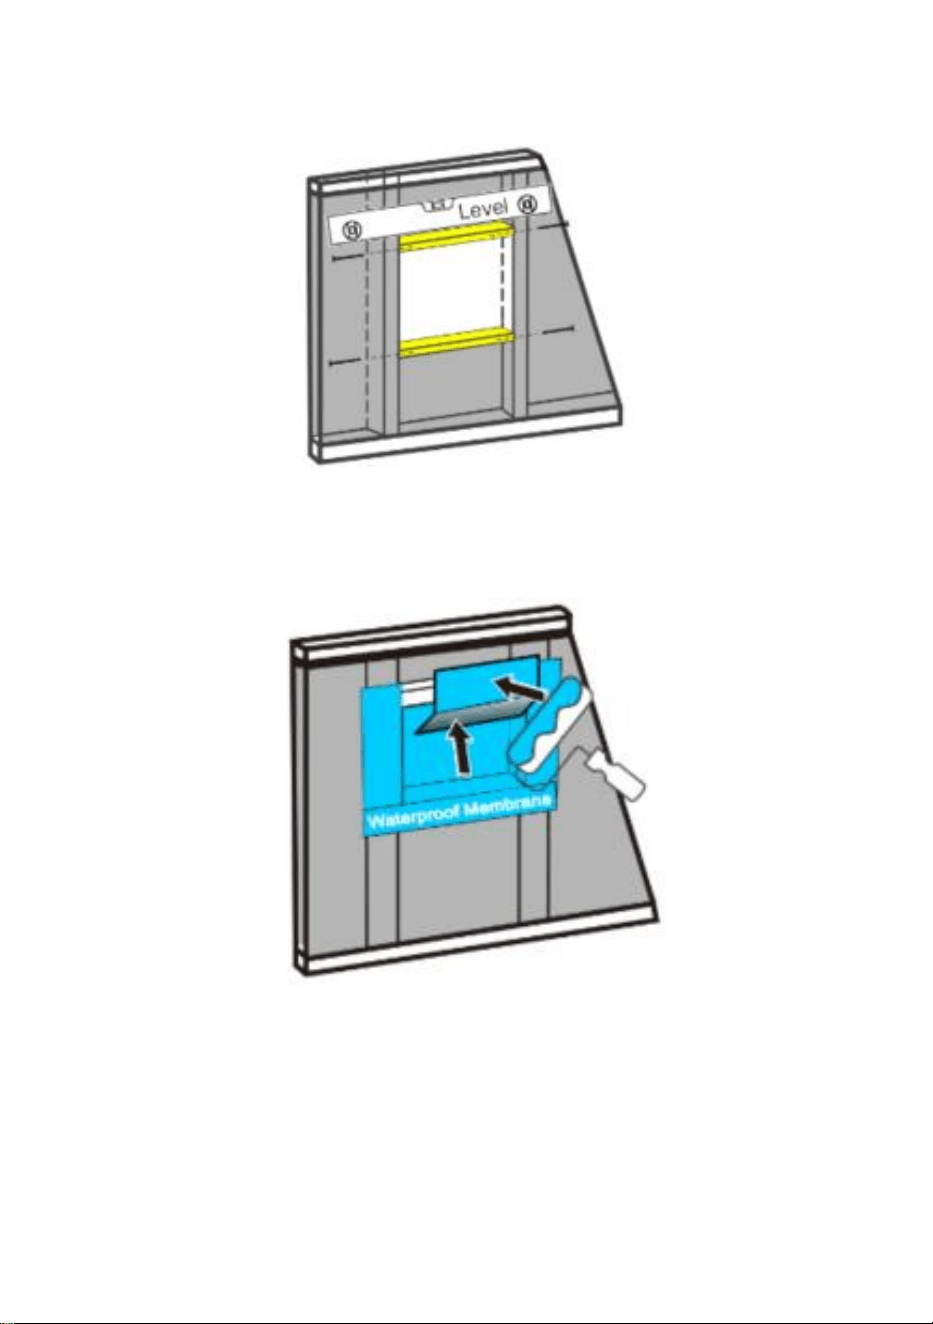
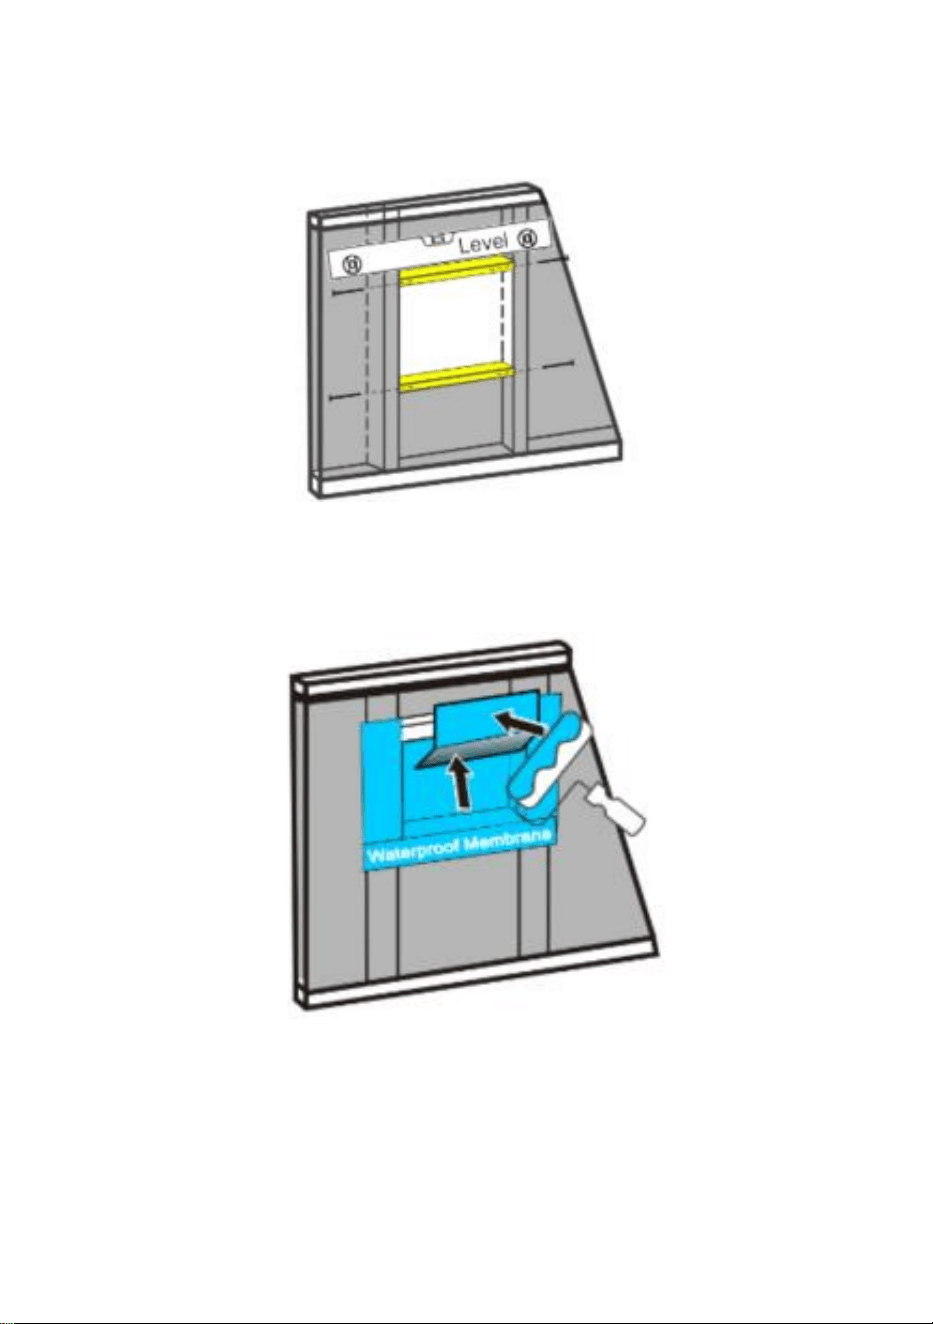
3. Level and fasten the surrounding framing to adjacent vertical studs
make the dimension matches the niche flange.
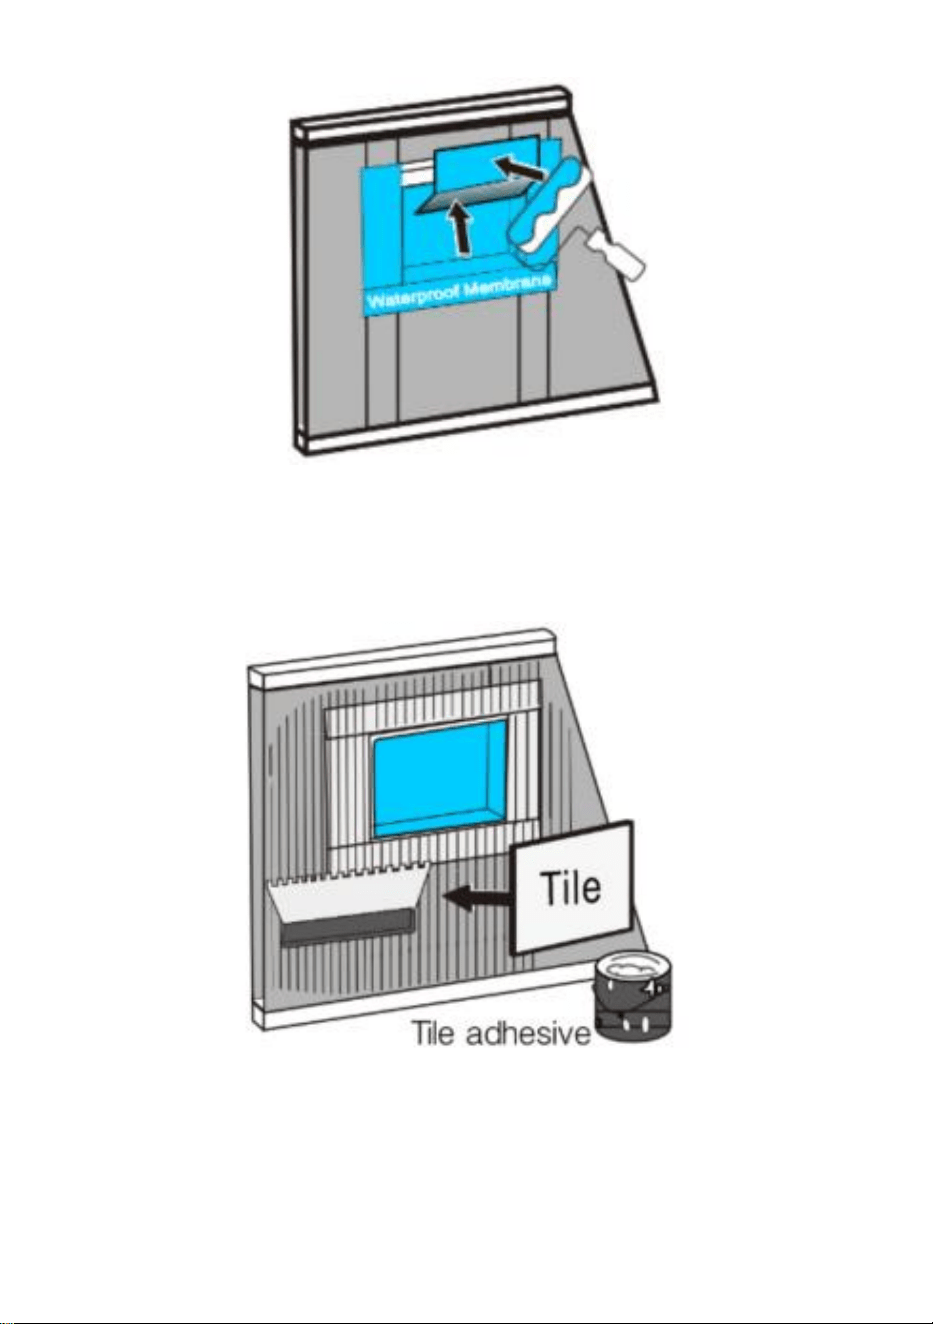
4. Glue waterproofing membrane inside to seal the whole cave and extend
6inch to four sides of surrounding wall. Create watertight seal cave is
very important.
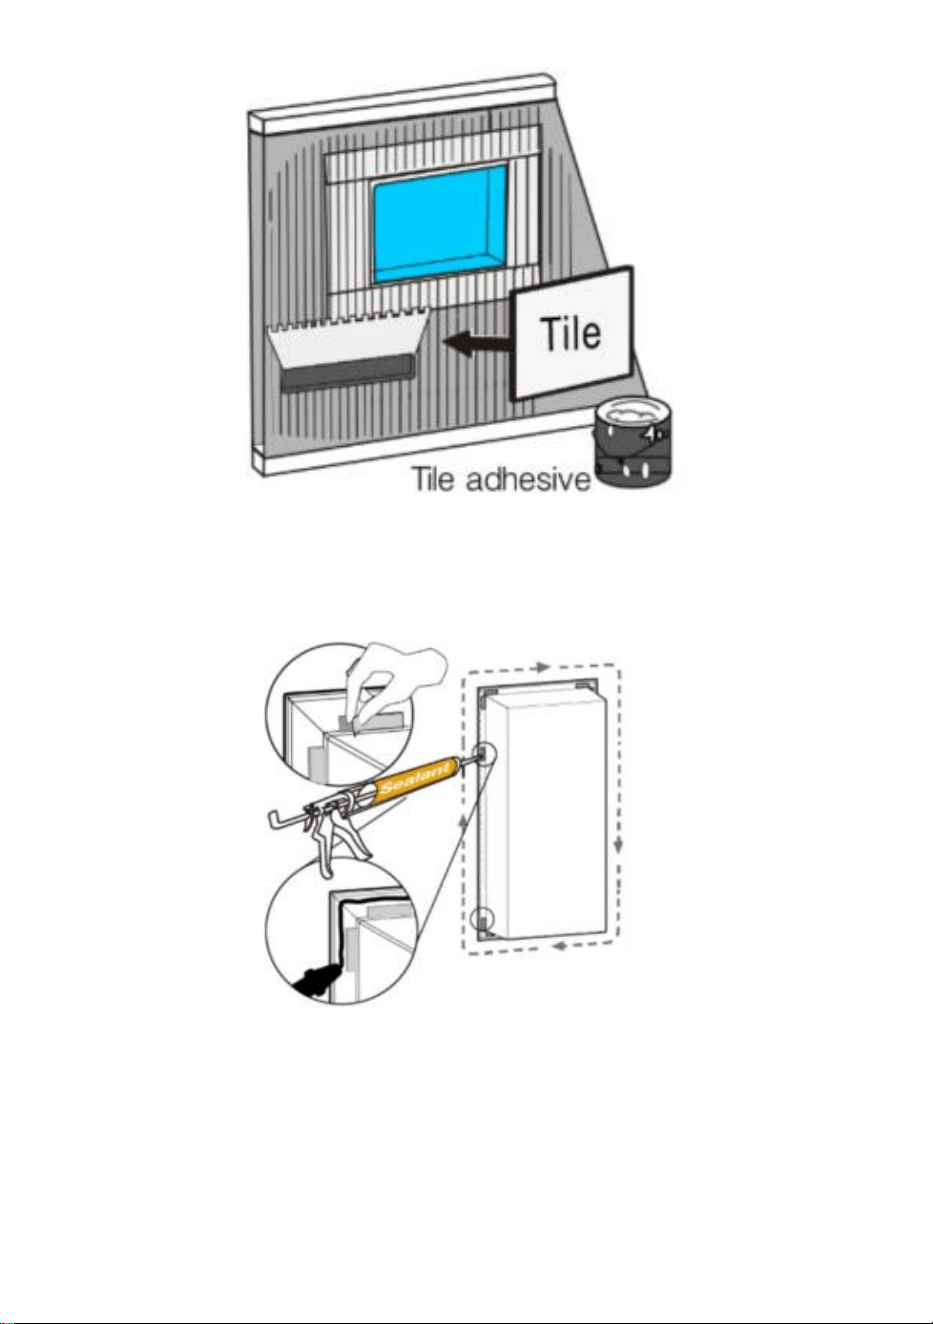
5. Apply your setting material and set your tile, marble or stone directly to
shower wall. It is best for tile to be symmetric around the cave. The tile line
can end right on the niche for a very clean look.

- 5 -
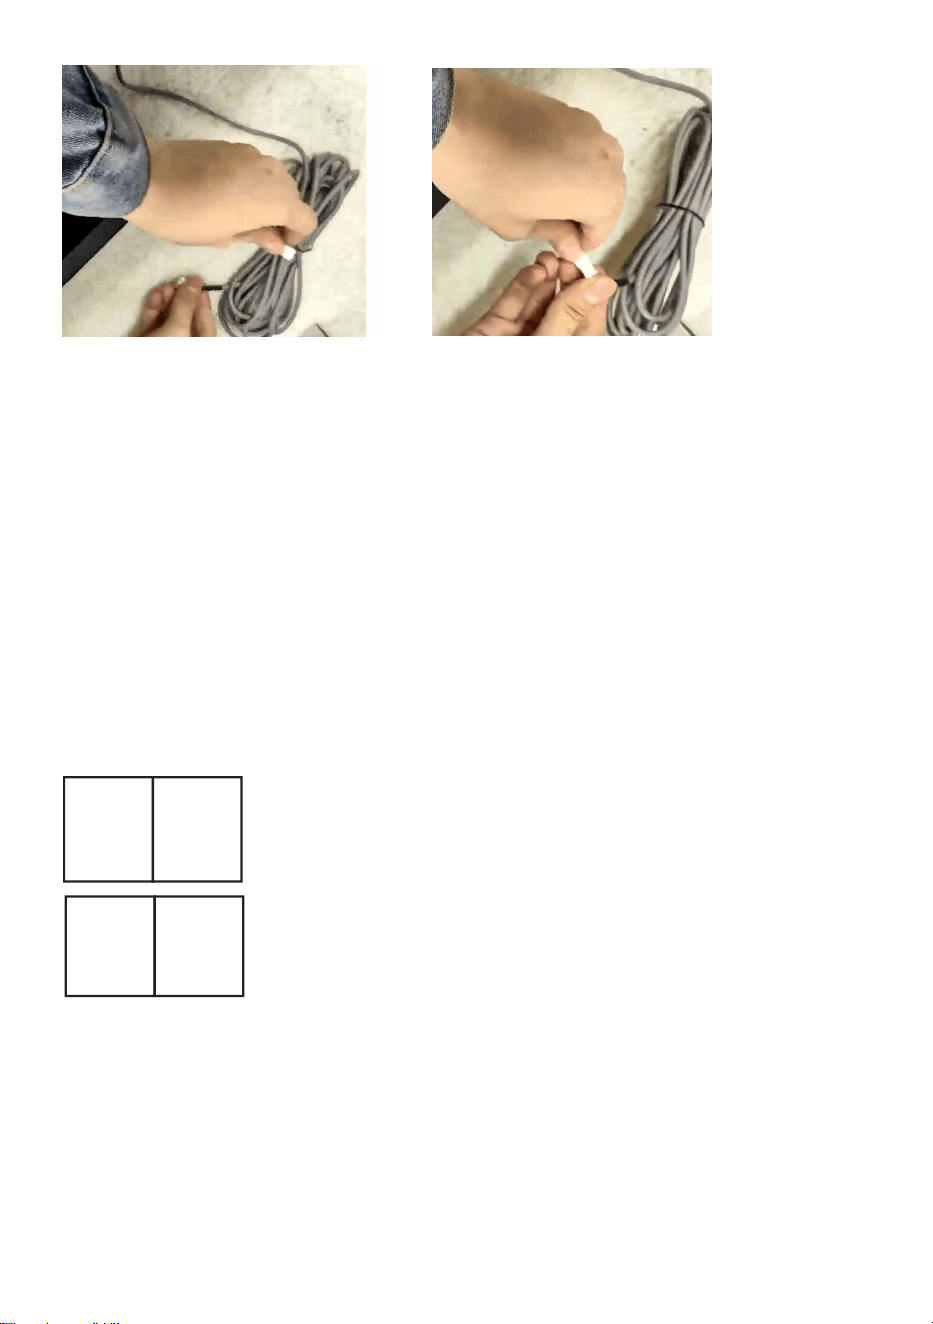
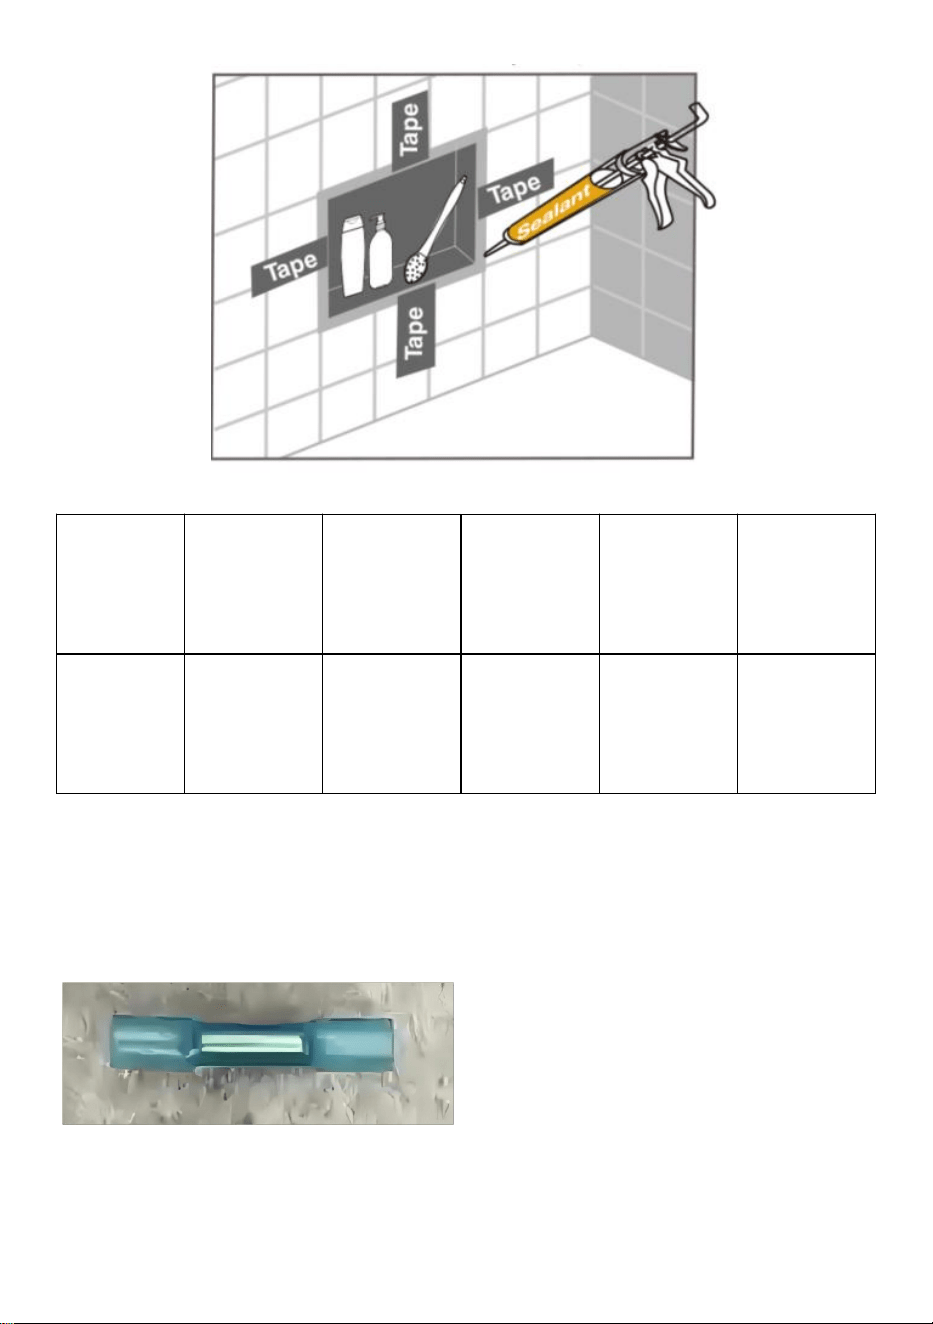
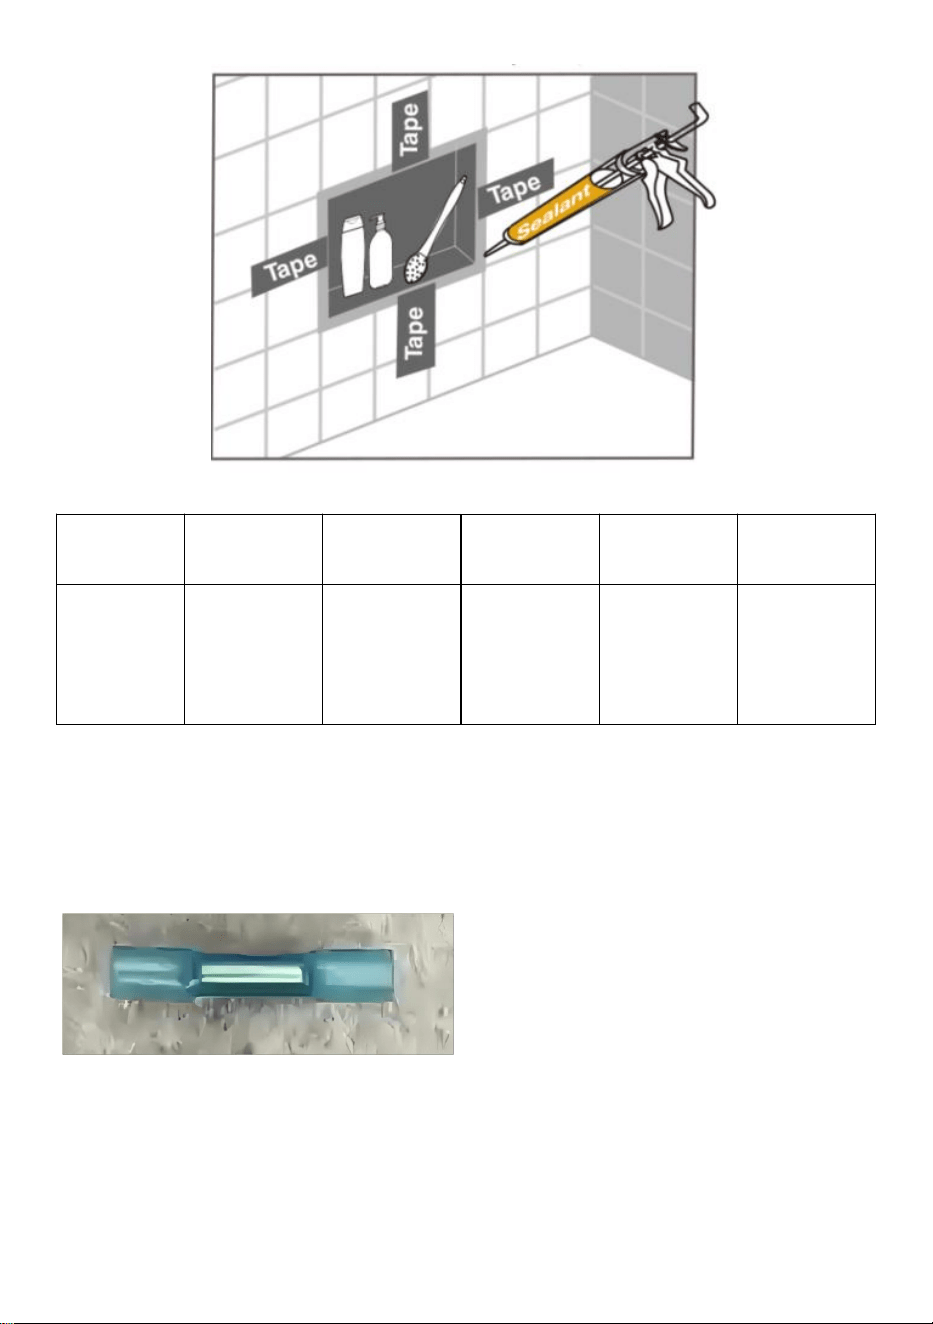
6. Remove the protective film of the tape , apply a uninterrupted bead of
silicon sealant from the inside corner of the niche to the edge Ensure
sealant applied thickness.
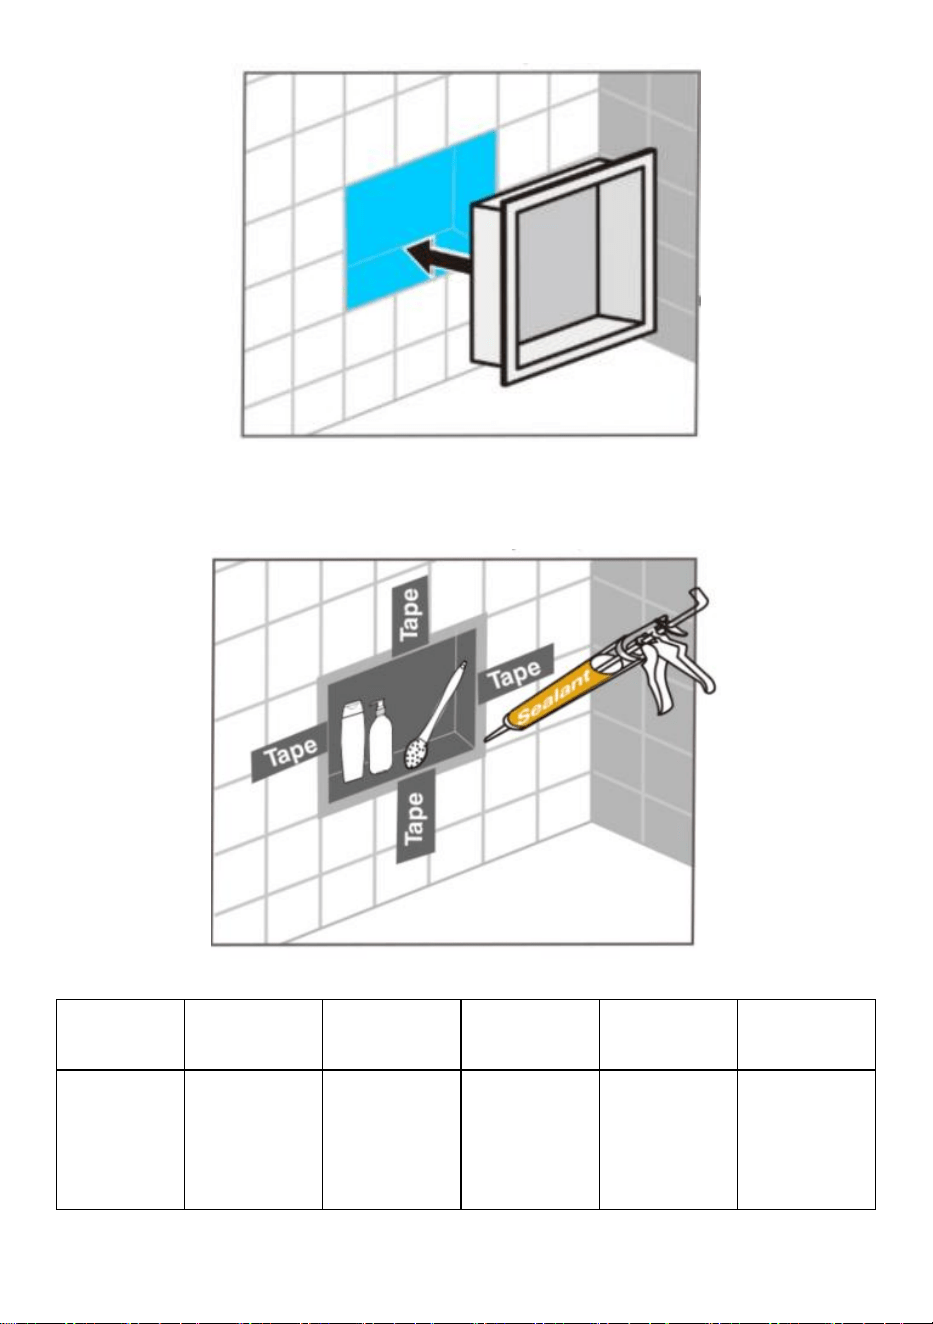
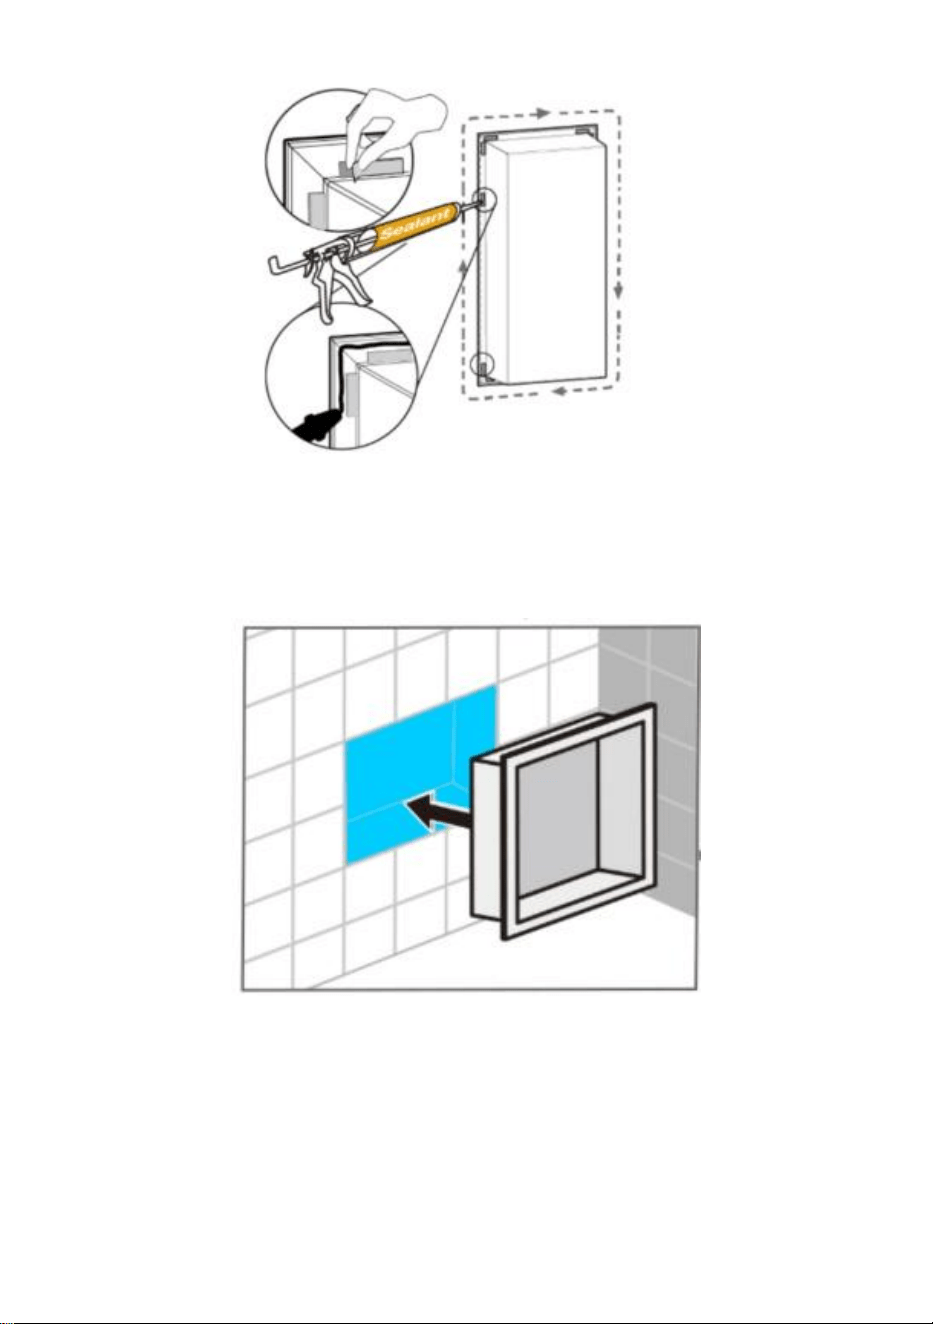
7. Insert the niche fixture into the cave . Press the flange tightly and
ensure the niche plumb and level . Wipe off the excess sealant along the
perimeter edges.
8.
- 6 -
8. Tape the flanges with wall to hold the niche in place until the sealant
cured.
Model
BA-306010
-MB
BA2-30601
0-BR
BA-303010
-MB
BAL-30601
0-MB
BTF-30601
0-MB
Product
Size
(inch)
4*13*25
4*13*25
4*13*13
4*13*25
4*13*25

- 7 -
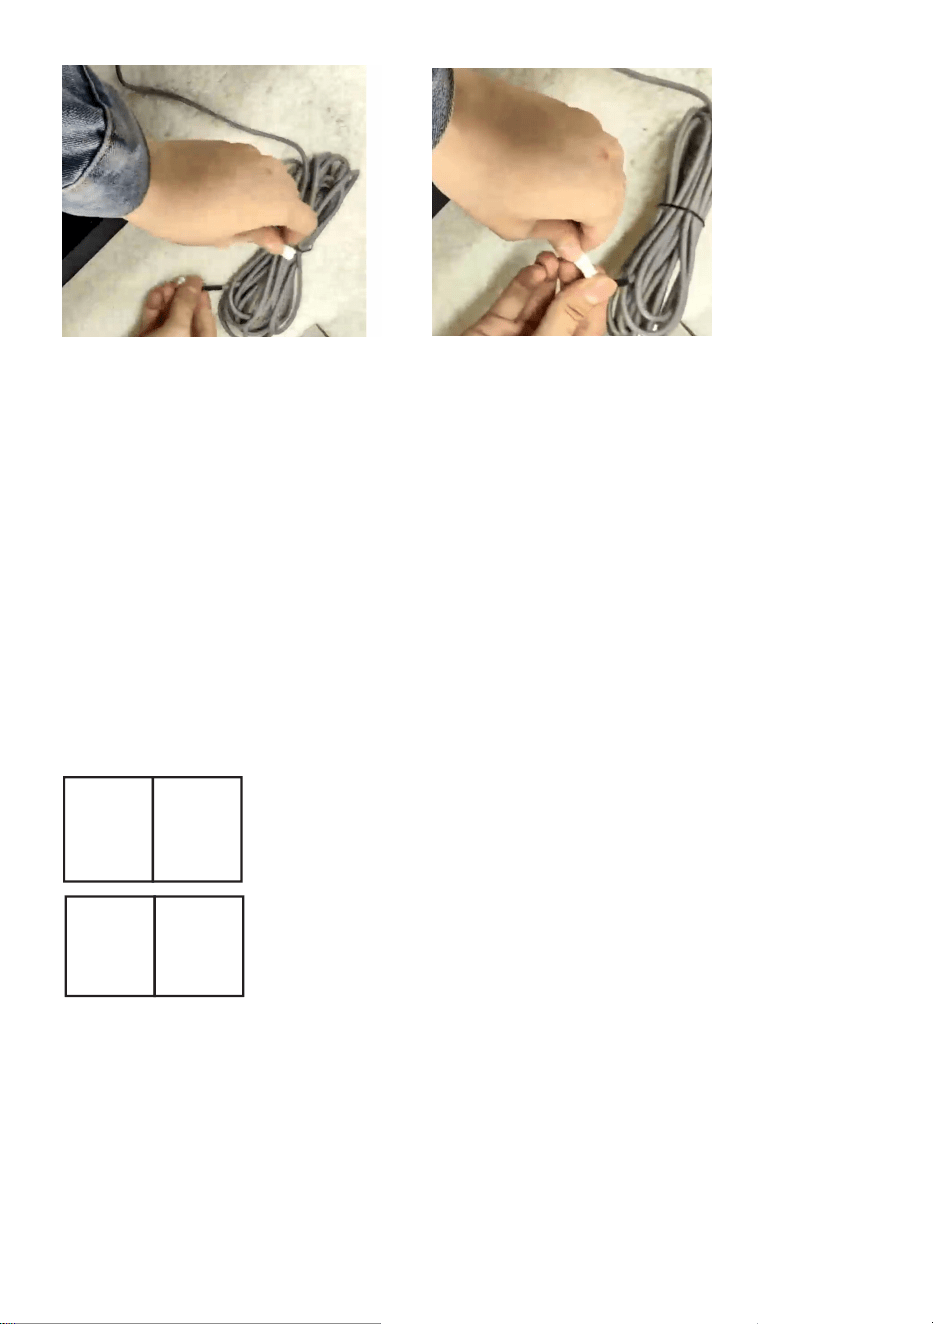
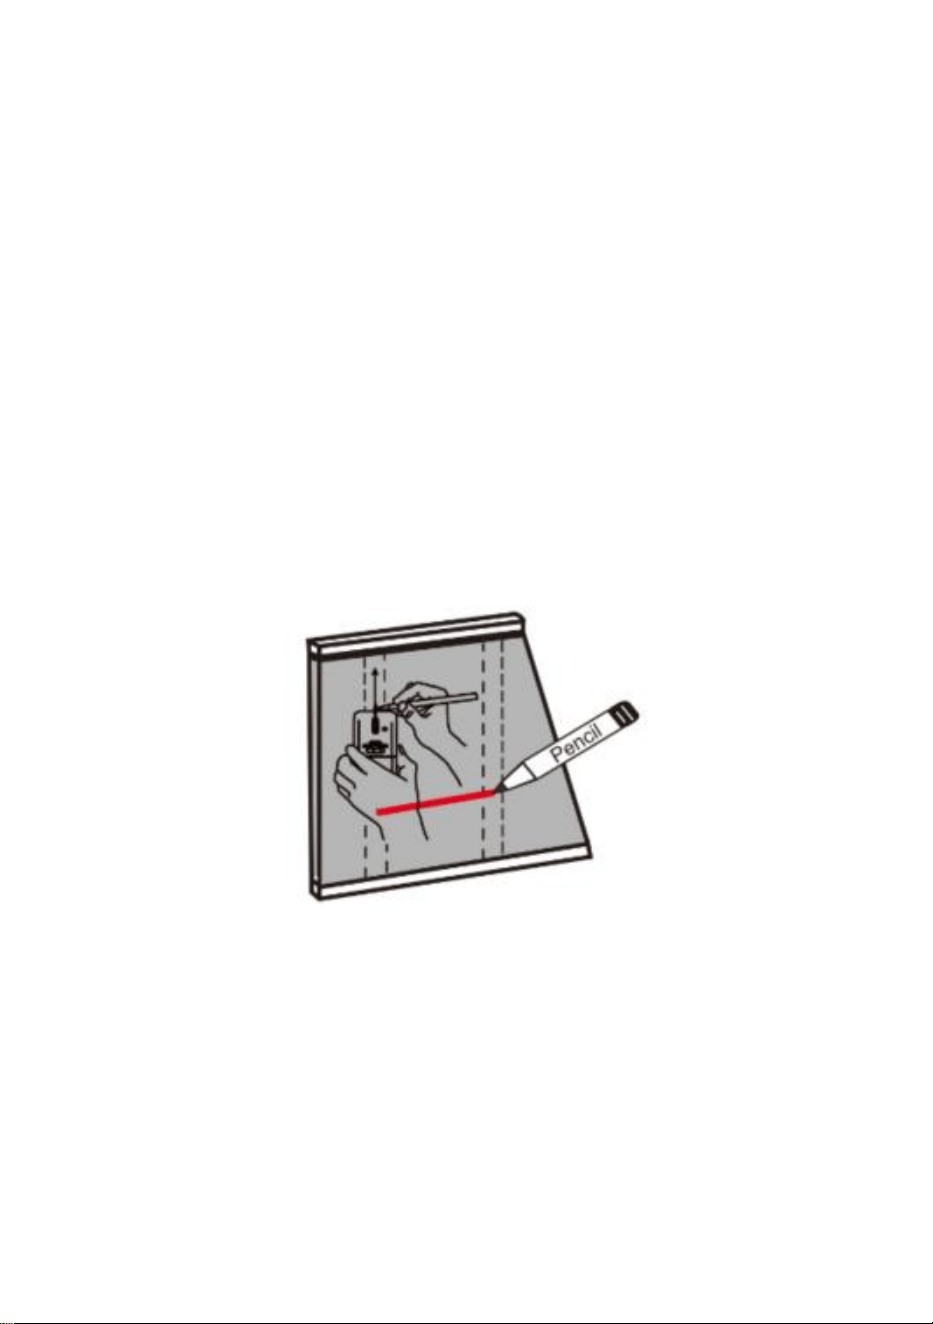
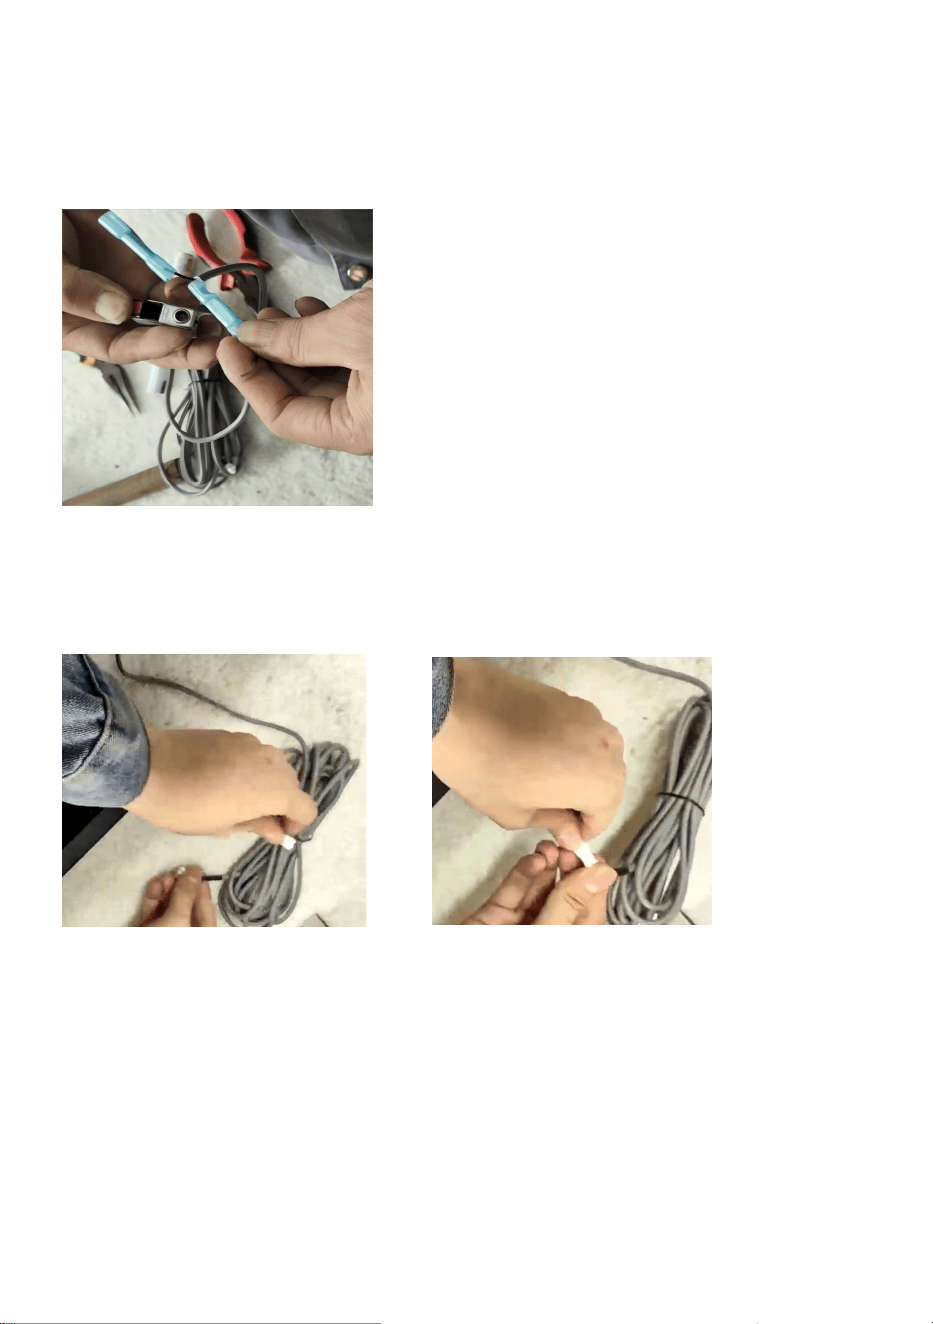
The BAL-306010-MB is equipped with LED light strips, and the installation of the
light strips is as follows:
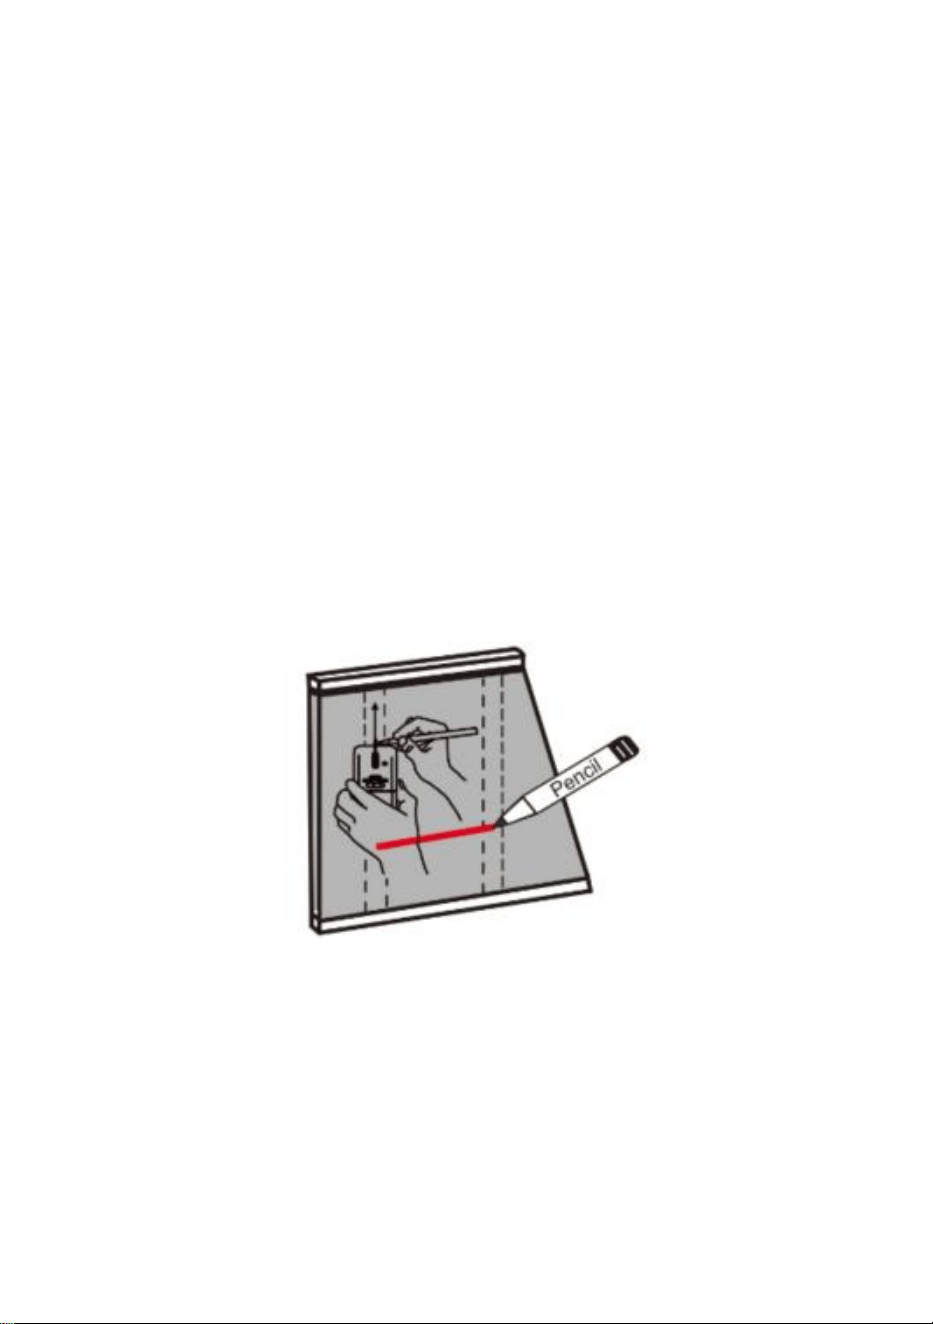
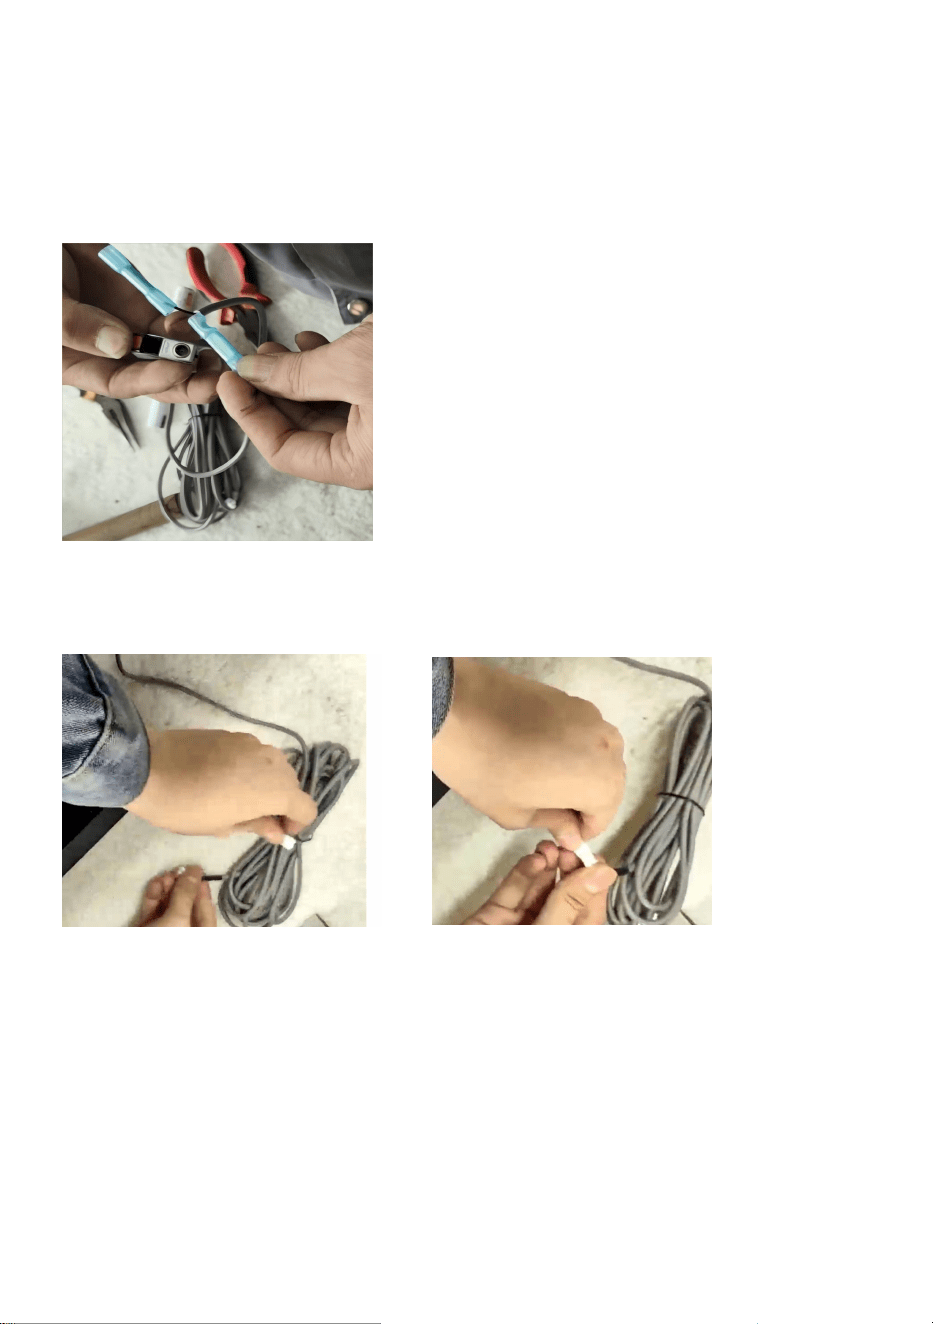
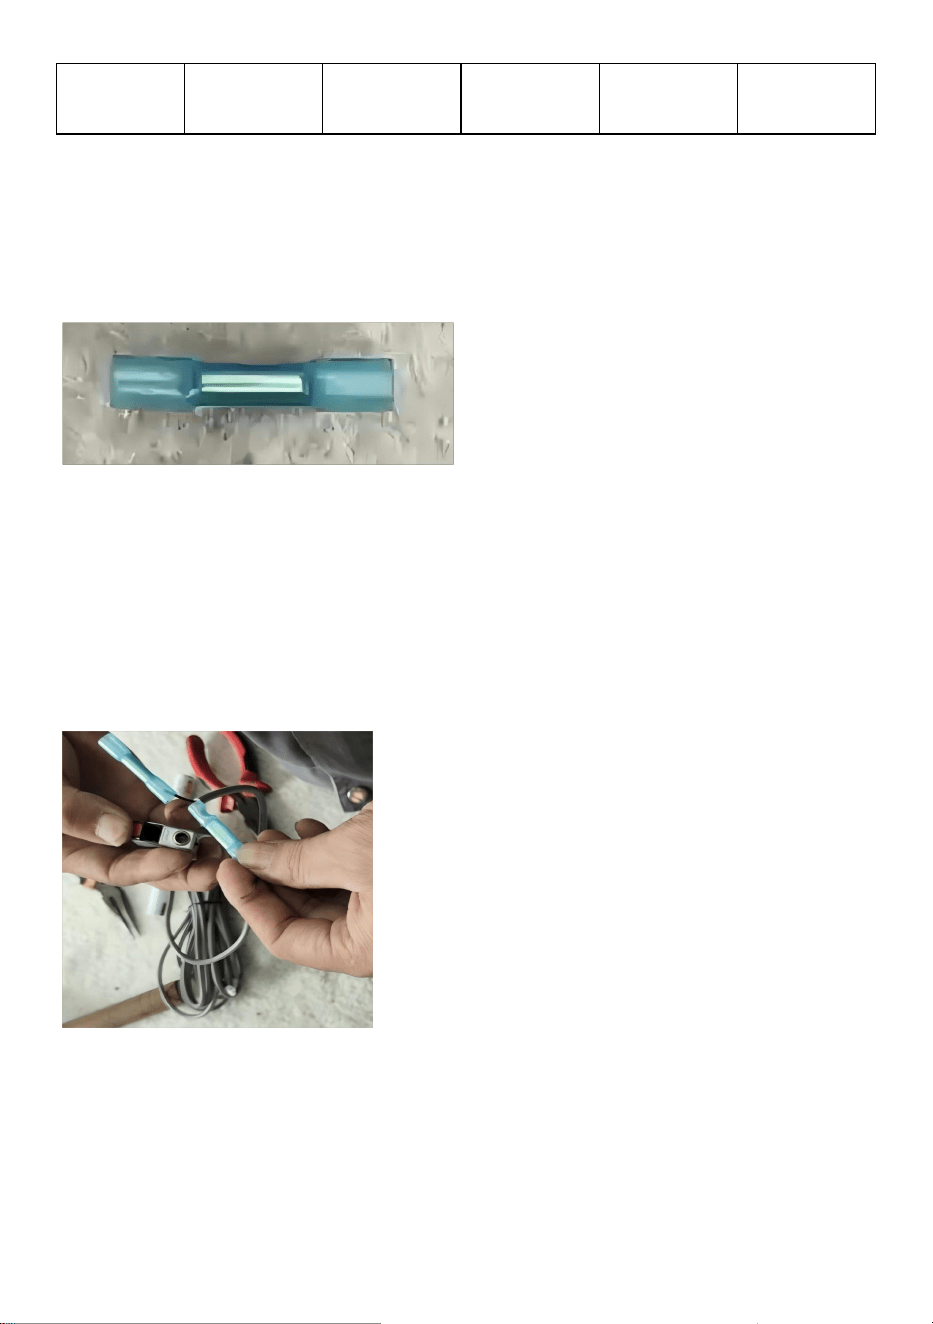
1. Use the wiring terminal shown in Figure A;
A
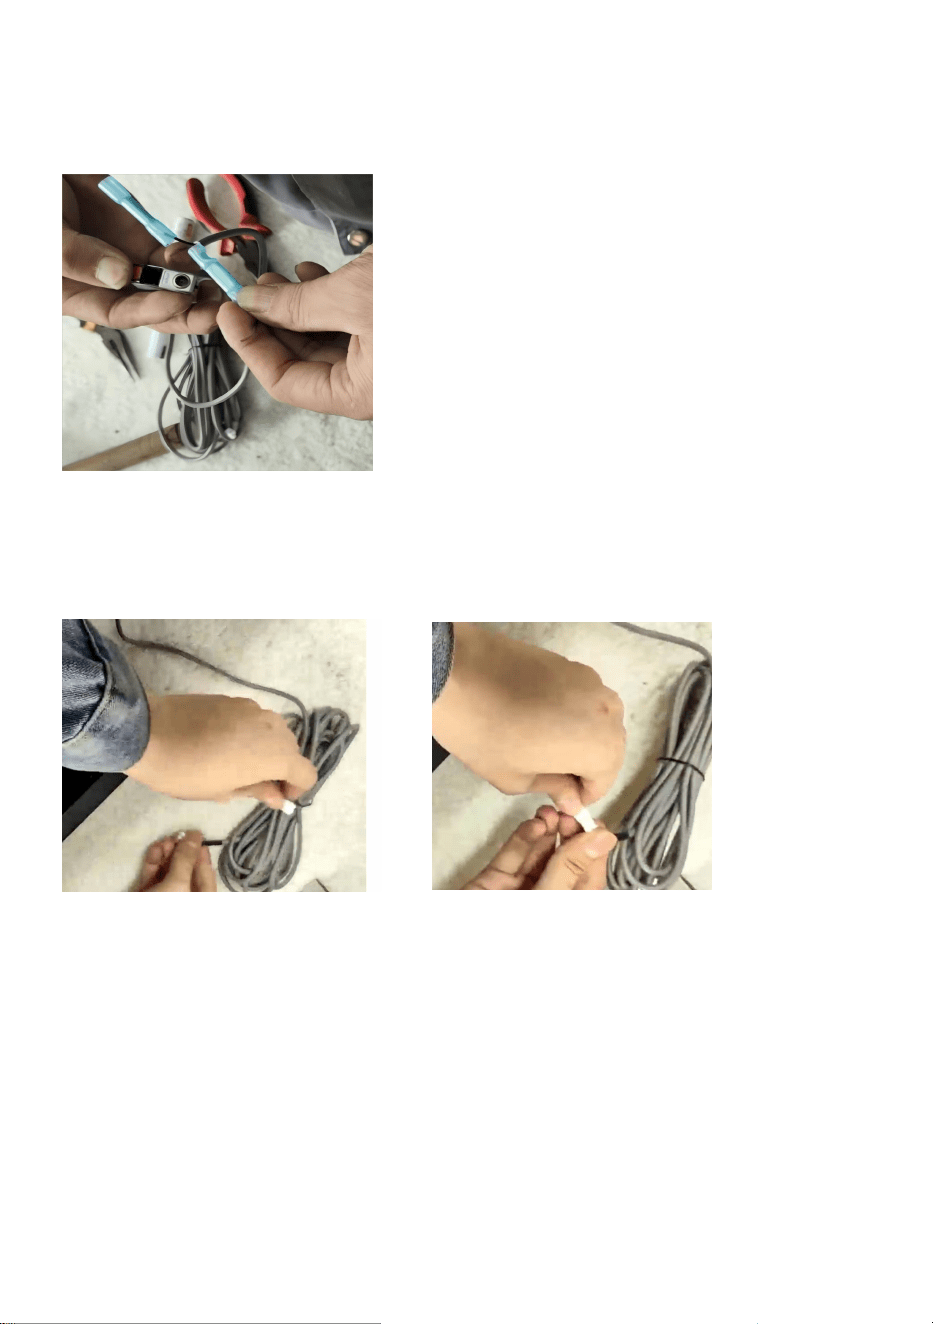
2. Pass the two ends of the power cord through the terminal block and secure it
with a tool;
B
3. Connect the white wiring terminals and hear a "click" sound to indicate
that they are installed properly, as shown in Figures C and D.
- 8 -
C D
Manufacturer: Shanghaimuxinmuyeyouxiangongsi
Address: Shuangchenglu 803nong11hao1602A-1609shi, baoshanqu,
shanghai 200000 CN.
Imported to AUS: SIHAO PTY LTD. 1 ROKEVA STREETEASTWOOD
NSW 2122 Australia
Imported to USA: Sanven Technology Ltd. Suite 250, 9166 Anaheim
Place, Rancho Cucamonga, CA 91730
REP
UK
YH CONSULTING LIMITED. C/O YH Consulting
Limited Office 147, Centurion House, London
Road, Staines-upon-Thames, Surrey, TW18 4AX
REP
EC
E-CrossStu GmbH
Mainzer Landstr.69,
60329 Frankfurt am Main.

- 9 -

- 10 -
Technical Support and E-Warranty Certificate
www.vevor.com/support

- 11 -
NICCHIA DOCCIA
MODELLO: BA-306010-MB
/BA2-306010-BR/BA-303010-MB/BAL-306010-MB/BTF-306010-MB
Supporto tecnico e certificato di garanzia elettronica
www.vevor.com/support

- 12 -

- 1 -
MODELLO:BA-306010-MB
/BA2-306010-BR/BA-303010-MB/BAL-306010-MB/BTF-306010-MB
Questa è l'istruzione originale, si prega di leggere attentamente tutte le
istruzioni del manuale prima di utilizzare. VEVOR si riserva una chiara
interpretazione del nostro manuale utente. L'aspetto del prodotto sarà
soggetto al prodotto ricevuto. Vi preghiamo di perdonarci se non vi
informeremo di nuovo se ci sono aggiornamenti tecnologici o software sul
SHOWER NICHE

- 2 -
nostro prodotto.
Attenzione: per ridurre il rischio di lesioni, l'utente deve leggere
attentamente il manuale di istruzioni.
AVVERTIMENTO:
Si prega di leggere attentamente questo manuale prima di utilizzare il
prodotto. La mancata osservanza di questa precauzione potrebbe causare
gravi lesioni.
AVVERTIMENTO:
Leggere questo materiale prima di utilizzare questo prodotto. La mancata
osservanza di questa precauzione può causare gravi lesioni.
Precauzioni di montaggio
1. Assemblare solo secondo queste istruzioni. Un assemblaggio improprio
può creare pericoli.
2. Durante il montaggio, indossare occhiali di sicurezza omologati ANSI e
guanti da lavoro resistenti.
3. Mantenere l'area di assemblaggio pulita e ben illuminata.
4. Tenere gli astanti fuori dall'area durante l'assemblaggio.
5. Non riunirsi quando si è stanchi o sotto l'effetto di alcol, droghe o
farmaci.
6. La capacità di peso e le altre caratteristiche del prodotto si applicano
solo al prodotto correttamente e completamente assemblato.
- 3 -
7. Per ulteriori informazioni sulle parti elencate nelle pagine seguenti, fare
riferimento allo schema di montaggio di questo manuale. Disimballare e
separare tutte le parti in un'area di lavoro pulita.
SALVA QUESTO MANUALE
I seguenti dettagli di installazione sono applicabili alle pareti esistenti
prima della piastrellatura, ma non coprono tutte le possibili situazioni.
Consultare sempre un professionista autorizzato durante la
preparazione e l'installazione.
1. Individuare e contrassegnare le linee centrali dei montanti di intelaiatura
adiacenti utilizzando un cercatore di montanti o picchiettando il muro.
Tracciare una linea di livello tra i due montanti del muro all'altezza
desiderata della nicchia.
2. Traccia la linea di taglio con la matita, sopra la linea centrale, ritaglia una
grotta sul pannello del muro lungo la linea tracciata. Assicurati che le linee
superiore e inferiore siano livellate.

- 4 -
4. Livellare e fissare la struttura circostante ai montanti verticali adiacenti
in modo che le dimensioni corrispondano alla flangia della nicchia.
4. Incollare la membrana impermeabilizzante all'interno per sigillare l'intera
grotta ed estenderla di 6 pollici ai quattro lati del muro circostante. Creare
una grotta di tenuta stagna è molto importante.

- 5 -
5. Applica il tuo materiale di posa e posa le tue piastrelle, marmo o pietra
direttamente sulla parete della doccia. È meglio che le piastrelle siano
simmetriche attorno alla grotta. La linea delle piastrelle può finire proprio
sulla nicchia per un aspetto molto pulito.
6. Rimuovere la pellicola protettiva del nastro, applicare uno strato
ininterrotto di sigillante siliconico dall'angolo interno della nicchia fino al
bordo. Assicurarsi che lo spessore del sigillante applicato sia uniforme.

- 6 -
9. Inserire l'apparecchio di nicchia nella grotta. Premere saldamente la
flangia e assicurarsi che la nicchia sia a piombo e a livello. Pulire il
sigillante in eccesso lungo i bordi perimetrali.
10.
8. Fissare le flange al muro con del nastro adesivo per tenere ferma la
nicchia finché il sigillante non si è indurito.
- 7 -
Modello
BA-306010
-MB
BA2-30601
0-BR
BA-303010
-MB
Codice
articolo:
BAL-30601
0-MB
Codice
articolo:
BTF-30601
0-MB
Dimensio
ni del
prodotto
( pollici )
Dimensioni
: 4*13*25
Dimensioni
: 4*13*25
Dimensioni
: 4*13*13
Dimensioni
: 4*13*25
Dimensioni
: 4*13*25
Il BAL-306010-MB è dotato di strisce luminose a LED e l'installazione delle strisce
luminose è la seguente:
1. Utilizzare il terminale di cablaggio mostrato nella Figura A;
UN
- 8 -
2. Far passare le due estremità del cavo di alimentazione attraverso il morsetto e
fissarlo con un utensile;
B
3. Collegare i terminali bianchi del cablaggio e sentire un "clic" che indica
che sono installati correttamente, come mostrato nelle Figure C e D.
CD
Produttore: Shanghaimuxinmuyeyouxiangongsi
Indirizzo: Shuangchenglu 803nong11hao1602A-1609shi, baoshanqu,
shanghai 200000 CN.

- 9 -
Importato in AUS: SIHAO PTY LTD. 1 ROKEVA STREETEASTWOOD
Nuovo Galles del Sud 2122 Australia
Importato negli USA: Sanven Technology Ltd. Suite 250, 9166 Anaheim
Luogo, Rancho Cucamonga, CA 91730
REP
UK
YH CONSULTING LIMITED. C/O YH Consulting
Limited Office 147, Centurion House, London
Road, Staines-upon-Thames, Surrey, TW18 4AX
REP
EC
E-CrossStu GmbH
Mainzer Landstr.69,
60329 Frankfurt am Main.

- 10 -
Supporto tecnico e certificato di garanzia elettronica
www.vevor.com/support

- 11 -
NICHO DE DUCHA
MODELO: BA-306010-MB
/BA2-306010-BR/BA-303010-MB/BAL-306010-MB/BTF-306010-MB
Soporte técnico y certificado de garantía electrónica
www.vevor.com/support

- 12 -

- 1 -
MODELO:BA-306010-MB
/BA2-306010-BR/BA-303010-MB/BAL-306010-MB/BTF-306010-MB
Estas son las instrucciones originales; lea atentamente todas las
instrucciones del manual antes de utilizarlo. VEVOR se reserva el
derecho de interpretar su manual de usuario. La apariencia del producto
dependerá del producto que haya recibido. Le rogamos que nos disculpe
si no le informamos de nuevo si hay actualizaciones tecnológicas o de
SHOWER NICHE

- 2 -
software en nuestro producto.
Advertencia: Para reducir el riesgo de lesiones, el usuario
debe leer atentamente el manual de instrucciones.
ADVERTENCIA:
Lea este manual detenidamente antes de utilizar el producto. De lo
contrario, podría sufrir lesiones graves.
ADVERTENCIA:
Lea este material antes de usar este producto. De lo contrario, podría sufrir
lesiones graves.
Precauciones de montaje
1. Ensamble únicamente según estas instrucciones. Un montaje incorrecto
puede causar peligros.
2. Use gafas de seguridad aprobadas por ANSI y guantes de trabajo
resistentes durante el montaje.
3. Mantenga el área de montaje limpia y bien iluminada.
4. Mantenga a los transeúntes fuera del área durante el montaje.
5. No realice el montaje cuando esté cansado o bajo la influencia de
alcohol, drogas o medicamentos.
6. La capacidad de peso y otras capacidades del producto se aplican
únicamente a productos ensamblados de manera correcta y completa.
7. Para obtener más información sobre las piezas que se enumeran en las
- 3 -
páginas siguientes, consulte el diagrama de montaje de este manual.
Desembale y separe todas las piezas en un área de trabajo limpia.
GUARDE ESTE MANUAL
Los siguientes detalles de instalación se aplican a las paredes
existentes antes de colocar las baldosas y no cubren todas las
situaciones posibles. Siempre consulte con un profesional
autorizado durante la preparación y la instalación.
1. Localice y marque las líneas centrales de los montantes adyacentes del
marco con un detector de montantes o golpeando la pared. Dibuje una
línea de nivel entre los dos montantes a la altura deseada del nicho.
2. Traza la línea de corte con un lápiz. Por encima de la línea central,
recorta una cavidad en el panel de pared a lo largo de la línea trazada.
Asegúrate de que las líneas superior e inferior estén niveladas.

- 4 -
5. Nivele y fije el marco circundante a los montantes verticales adyacentes
de manera que la dimensión coincida con la brida del nicho.
4. Pegue la membrana impermeabilizante en el interior para sellar toda la
cueva y extenderla 6 pulgadas. A los cuatro lados del muro circundante.
Es fundamental crear un sello hermético en la cueva.

- 5 -
5. Aplique el material de instalación y fije el azulejo, mármol o piedra
directamente a la pared de la ducha. Es recomendable que los azulejos
sean simétricos alrededor del nicho. La línea de azulejos puede terminar
justo en el nicho para una apariencia impecable.
6. Retire la película protectora de la cinta, aplique un cordón
ininterrumpido de sellador de silicona desde la esquina interior del nicho
hasta el borde. Asegúrese de que el sellador aplicado tenga el espesor
adecuado.
- 6 -
11. Inserte el nicho en la cueva. Presione la brida firmemente y asegúrese
de que el nicho esté a plomo y nivelado. Limpie el exceso de sellador a lo
largo de los bordes perimetrales.
12.
8. Pegue con cinta las bridas a la pared para mantener el nicho en su lugar
hasta que el sellador se seque.
- 7 -
Modelo
BA-306010
-MB
BA2-30601
0-BR
BA-303010
-MB
BAL-30601
0-MB
BTF-30601
0-MB
Tamaño
del
producto
( pulgadas
)
4*13*25
4*13*25
4*13*13
4*13*25
4*13*25
El BAL-306010-MB está equipado con tiras de luz LED y la instalación de las tiras
de luz es la siguiente:
1. Utilice el terminal de cableado que se muestra en la Figura A;
A

- 8 -
2. Pase los dos extremos del cable de alimentación a través del bloque de
terminales y fíjelo con una herramienta;
B
3. Conecte los terminales del cableado blanco y escuche un sonido de
"clic" que indica que están instalados correctamente, como se muestra en
las Figuras C y D.
CD
Fabricante: Shanghaimuxinmuyeyouxiangongsi
Dirección: Shuangchenglu 803nong11hao1602A-1609shi, baoshanqu,
Shanghái 200000 CN.

- 9 -
Importado a AUS: SIHAO PTY LTD. 1 ROKEVA STREET, EASTWOOD
NSW 2122 Australia
Importado a EE. UU.: Sanven Technology Ltd. Suite 250, 9166 Anaheim
Lugar, Rancho Cucamonga, CA 91730
REP
UK
YH CONSULTING LIMITED. C/O YH Consulting
Limited Office 147, Centurion House, London
Road, Staines-upon-Thames, Surrey, TW18 4AX
REP
EC
E-CrossStu GmbH
Mainzer Landstr.69,
60329 Frankfurt am Main.

- 10 -
Soporte técnico y certificado de garantía electrónica
www.vevor.com/support

- 11 -
DUSCHNISCH
MODELL: BA-306010-MB
/BA2-306010-BR/BA-303010-MB/BAL-306010-MB/BTF-306010-MB
Teknisk support och e-garanticertifikat
www.vevor.com/support

- 12 -

- 1 -
MODELL: BA-306010-MB
/BA2-306010-BR/BA-303010-MB/BAL-306010-MB/BTF-306010-MB
Detta är den ursprungliga instruktionen, läs alla instruktioner noggrant
innan du använder den. VEVOR reserverar sig för en tydlig tolkning av vår
användarmanual. Utseendet på produkten är beroende av den produkt du
fått. Ursäkta oss att vi inte kommer att informera dig igen om det finns
någon teknik eller mjukvaruuppdateringar på vår produkt.
SHOWER NICHE

- 2 -
Varning - För att minska risken för skada måste användaren
läsa instruktionerna noggrant.
VARNING:
Läs denna bruksanvisning noggrant innan du använder produkten.
Underlåtenhet att göra det kan leda till allvarliga skador.
VARNING:
Läs detta material innan du använder denna produkt. Underlåtenhet att
göra det kan resultera i allvarliga skador.
Försiktighetsåtgärder vid montering
1. Montera endast enligt dessa instruktioner. Felaktig montering kan skapa
faror.
2. Bär ANSI-godkända skyddsglasögon och kraftiga arbetshandskar vid
montering.
3. Håll monteringsområdet rent och väl upplyst.
4. Håll åskådare borta från området under monteringen.
5. Sätt dig inte ihop när du är trött eller påverkad av alkohol, droger eller
medicin.
6. Viktkapacitet och andra produktegenskaper gäller endast för korrekt och
färdigmonterad produkt.
7. För ytterligare information om delarna som listas på följande sidor, se
monteringsdiagrammet i denna manual. Packa upp och separera alla delar
- 3 -
på ett rent arbetsområde.
SPARA DENNA MANUAL
Följande installationsdetaljer är tillämpliga för befintlig vägg före
kakelsättning, täcker inte alla möjliga situationer. Rådgör alltid med
en licensierad fackman under förberedelse och installation.
1. Lokalisera och markera mittlinjerna för intilliggande ramreglar med hjälp
av en dubbsökare eller genom att knacka på väggen. Dra en nivålinje
mellan de två väggreglarna på önskad nischhöjd.
2. Rita snittlinjen med penna, ovanför mittlinjen, skär ut en grotta på
väggskivan längs den spårade linjen. Se till att de övre och nedre linjerna
är jämna.
- 4 -
6. Jämna ut och fäst den omgivande ramen på intilliggande vertikala reglar
så att dimensionen matchar nischflänsen.
4. Limma vattentätande membran inuti för att täta hela grottan och förlänga
6 tum till fyra sidor av omgivande vägg. Skapa en vattentät tät grotta är
mycket viktigt.
5. Applicera ditt inställningsmaterial och placera ditt kakel, marmor eller
sten direkt på duschväggen. Det är bäst att kakel är symmetriskt runt
grottan. Kakellinjen kan sluta precis på nischen för ett mycket rent
utseende.
- 5 -
6. Ta bort skyddsfilmen från tejpen, applicera en oavbruten sträng av
silikontätningsmedel från det inre hörnet av nischen till kanten. Se till att
tätningsmedlet applicerats tjockt.
13. Sätt in nischfixturen i grottan. Pressa flänsen hårt och se till att nischen
står i nivå. Torka av överflödigt tätningsmedel längs omkretskanterna.
14.

- 6 -
8. Tejpa fast flänsarna med vägg för att hålla nischen på plats tills
tätningsmedlet har härdat.
M odel
BA-306010
-MB
BA2-30601
0-BR
BA-303010
-MB
BAL-30601
0-MB
BTF-30601
0-MB
Produktst
orlek
( tum )
4*13*25
4*13*25
4*13*13
4*13*25
4*13*25
- 7 -
BAL-306010-MB är utrustad med LED-ljusremsor, och installationen av
ljusremsorna är som följer:
1. Använd kabelanslutningen som visas i figur A;
A
2. För de två ändarna av nätsladden genom kopplingsplinten och fäst den med ett
verktyg;
B
3. Anslut de vita kabelanslutningarna och hör ett "klick"-ljud för att indikera
att de är korrekt installerade, som visas i figurerna C och D.
- 8 -
CD
Tillverkare: Shanghaimuxinmuyeyouxiangongsi
Adress: Shuangchenglu 803nong11hao1602A-1609shi, baoshanqu,
shanghai 200 000 CN.
Importerad till AUS: SIHAO PTY LTD. 1 ROKEVA STREETEASTWOOD
NSW 2122 Australien
Importerad till USA: Sanven Technology Ltd. Suite 250, 9166 Anaheim
Place, Rancho Cucamonga, CA 91730
REP
UK
YH CONSULTING LIMITED. C/O YH Consulting
Limited Office 147, Centurion House, London
Road, Staines-upon-Thames, Surrey, TW18 4AX
REP
EC
E-CrossStu GmbH
Mainzer Landstr.69,
60329 Frankfurt am Main.

- 9 -

- 10 -
Teknisk support och e-garanticertifikat
www.vevor.com/support

- 11 -
DOUCHE NIS
MODEL: BA-306010-MB
/BA2-306010-BR/BA-303010-MB/BAL-306010-MB/BTF-306010-MB
Technische ondersteuning en e-garantiecertificaat
www.vevor.com/support

- 12 -

- 1 -
MODEL: BA-306010-MB
/BA2-306010-BR/BA-303010-MB/BAL-306010-MB/BTF-306010-MB
Dit is de originele instructie, lees alle handleidingen zorgvuldig door
voordat u het product gebruikt. VEVOR behoudt zich een duidelijke
interpretatie van onze gebruikershandleiding voor. Het uiterlijk van het
product is afhankelijk van het product dat u hebt ontvangen. Vergeef ons
dat we u niet opnieuw zullen informeren als er technologie- of
SHOWER NICHE

- 2 -
software-updates voor ons product zijn .
Waarschuwing: om het risico op letsel te verkleinen, moet de
gebruiker de gebruiksaanwijzing zorgvuldig lezen.
WAARSCHUWING:
Lees deze handleiding zorgvuldig door voordat u het product gebruikt. Als
u dit niet doet, kan dit leiden tot ernstig letsel.
WAARSCHUWING:
Lees dit materiaal voordat u dit product gebruikt. Als u dit niet doet, kan dit
leiden tot ernstig letsel.
Voorzorgsmaatregelen bij de montage
1. Monteer alleen volgens deze instructies. Onjuiste montage kan gevaren
opleveren.
2. Draag tijdens de montage een ANSI-goedgekeurde veiligheidsbril en
stevige werkhandschoenen.
3. Zorg ervoor dat de montageplek schoon en goed verlicht is.
4. Houd omstanders uit de buurt tijdens de montage.
5. Ga niet in de winkel staan als u moe bent of onder invloed van alcohol,
drugs of medicijnen.
6. Het draagvermogen en andere producteigenschappen gelden alleen
voor een correct en volledig gemonteerd product.
7. Voor aanvullende informatie over de onderdelen die op de volgende
- 3 -
pagina's worden vermeld, raadpleegt u het montageschema van deze
handleiding. Pak alle onderdelen uit en scheid ze in een schone
werkruimte.
BEWAAR DEZE HANDLEIDING
De volgende installatiedetails zijn van toepassing op bestaande
muren vóór het betegelen. Ze bestrijken niet alle mogelijke situaties.
Raadpleeg altijd een erkende professional tijdens de voorbereiding
en installatie.
1. Zoek en markeer de middellijnen van aangrenzende frame-studs met
behulp van een stud finder of door op de muur te tikken. Teken een
waterpaslijn tussen de twee muurstuds op de gewenste hoogte van de nis.
2. Trek de snijlijn over met een potlood, boven de middellijn, snijd een grot
uit op het wandbord langs de getrokken lijn. Zorg ervoor dat de bovenste
en onderste lijnen waterpas zijn.
- 4 -
7. Maak het omringende frame waterpas en bevestig het aan de
aangrenzende verticale stijlen. Zorg ervoor dat de afmetingen
overeenkomen met de nisflens.
4. Lijm het waterdichte membraan aan de binnenkant om de hele grot af te
dichten en verleng de grot met 15 cm aan vier zijden van de omringende
muur. Maak een waterdichte afdichting grot is erg belangrijk.
- 5 -
5. Breng uw instelmateriaal aan en plaats uw tegels, marmer of steen
direct op de douchewand. Het is het beste als de tegels symmetrisch rond
de grot liggen. De tegellijn kan direct op de nis eindigen voor een zeer
strakke look.
6. Verwijder de beschermfolie van de tape en breng een ononderbroken
rups siliconenkit aan vanaf de binnenhoek van de nis tot aan de rand. Zorg
ervoor dat de aangebrachte kitdikte gelijk is.

- 6 -
15. Plaats de nisbevestiging in de grot. Druk de flens stevig aan en zorg
ervoor dat de nis loodrecht en waterpas is. Veeg de overtollige kit langs de
omtrekranden weg.
16.
8. Plak de flenzen vast aan de muur om de nis op zijn plaats te houden
totdat de kit is uitgehard.
- 7 -
Model
BA-306010
-MB
BA2-30601
0-BR
BA-303010
-MB
BAL-30601
0-MB
BTF-30601
0-MB
Productaf
meting
( inch )
4*13*25
4*13*25
4*13*13
4*13*25
4*13*25
De BAL-306010-MB is uitgerust met LED-lichtstrips. De installatie van de
lichtstrips is als volgt:
1. Gebruik de bedradingsklem die in Afbeelding A is afgebeeld;
A

- 8 -
2. Leid de twee uiteinden van het netsnoer door het aansluitblok en zet het vast
met een gereedschap;
B
3. Sluit de witte bedradingsklemmen aan en hoor een klikgeluid. Dit geeft
aan dat ze correct zijn geïnstalleerd, zoals weergegeven in afbeelding C
en D.
CD
Fabrikant: Shanghaimuxinmuyeyouxiangongsi
Adres: Shuangchenglu 803nong11hao1602A-1609shi, baoshanqu,
Sjanghai 200000 CN.
Geïmporteerd naar AUS: SIHAO PTY LTD. 1 ROKEVA

- 9 -
STREETEASTWOOD
NSW 2122 Australië
Geïmporteerd naar de VS: Sanven Technology Ltd. Suite 250, 9166
Anaheim
Plaats, Rancho Cucamonga, CA 91730
REP
UK
YH CONSULTING LIMITED. C/O YH Consulting
Limited Office 147, Centurion House, London
Road, Staines-upon-Thames, Surrey, TW18 4AX
REP
EC
E-CrossStu GmbH
Mainzer Landstr.69,
60329 Frankfurt am Main.

- 10 -
Technische ondersteuning en e-garantiecertificaat
www.vevor.com/support

- 11 -
NICHE DE DOUCHE
MODÈLE: BA-306010-MB
/BA2-306010-BR/BA-303010-MB/BAL-306010-MB/BTF-306010-MB
Assistance technique et certificat de garantie électronique
www.vevor.com/support

- 12 -

- 1 -
MODÈLE : BA-306010-MB
/BA2-306010-BR/BA-303010-MB/BAL-306010-MB/BTF-306010-MB
Ceci est le mode d'emploi d'origine. Veuillez lire attentivement l'intégralité
du manuel avant utilisation. VEVOR se réserve le droit d'interpréter
clairement ce manuel d'utilisation. L'apparence du produit dépend du
produit que vous avez reçu. Veuillez nous excuser pour les éventuelles
mises à jour technologiques ou logicielles.
SHOWER NICHE

- 2 -
Avertissement - Pour réduire le risque de blessure, l'utilisateur
doit lire attentivement le manuel d'instructions.
AVERTISSEMENT:
Veuillez lire attentivement ce manuel avant d'utiliser le produit. Le
non-respect de ces instructions peut entraîner des blessures graves.
AVERTISSEMENT:
Veuillez lire attentivement ce document avant d'utiliser ce produit. Le
non-respect de ces instructions peut entraîner des blessures graves.
Précautions de montage
1. Assembler uniquement conformément à ces instructions. Un
assemblage incorrect peut entraîner des dangers.
2. Portez des lunettes de sécurité approuvées ANSI et des gants de travail
robustes pendant l'assemblage.
3. Gardez la zone de montage propre et bien éclairée.
4. Gardez les spectateurs hors de la zone pendant le montage.
5. Ne montez pas lorsque vous êtes fatigué ou sous l'influence de l'alcool,
de drogues ou de médicaments.
6. La capacité de poids et les autres capacités du produit s'appliquent
uniquement au produit correctement et complètement assemblé.
7. Pour plus d'informations sur les pièces listées dans les pages suivantes,
veuillez vous référer au schéma d'assemblage de ce manuel. Déballez et
- 3 -
séparez toutes les pièces dans un espace de travail propre.
CONSERVEZ CE MANUEL
Les détails d'installation suivants s'appliquent au mur existant avant
le carrelage, ils ne couvrent pas toutes les situations possibles.
Consultez toujours un professionnel agréé lors de la préparation et
de l'installation.
1. Repérez et marquez les axes des montants adjacents à l'aide d'un
détecteur de montants ou en tapotant le mur. Tracez une ligne horizontale
entre les deux montants, à la hauteur souhaitée de la niche.
2. Tracez la ligne de coupe au crayon. Au-dessus de la ligne centrale,
découpez une cavité sur le panneau mural le long de la ligne tracée.
Assurez-vous que les lignes supérieure et inférieure sont de niveau.
- 4 -
8. Nivelez et fixez le cadre environnant aux montants verticaux adjacents
pour que la dimension corresponde à la bride de la niche.
4. Collez la membrane d'étanchéité à l'intérieur pour sceller toute la grotte
et étendre sur 6 pouces sur les quatre côtés du mur d'enceinte. Il est
essentiel de créer une grotte étanche.
5. Appliquez votre produit de pose et posez votre carrelage, marbre ou
pierre directement sur le mur de la douche. Il est préférable de poser le
carrelage symétriquement autour de la niche. La ligne de carrelage peut se
terminer directement sur la niche pour un rendu impeccable.

- 5 -
6. Retirez le film protecteur du ruban adhésif, appliquez un cordon
ininterrompu de mastic silicone du coin intérieur de la niche jusqu'au bord.
Assurez-vous de l'épaisseur du mastic appliqué.
17. Insérez la niche dans la cavité. Appuyez fermement sur la bride et
assurez-vous que la niche est d'aplomb et de niveau. Essuyez l'excédent
de mastic le long des bords.
18.

- 6 -
8. Collez les brides au mur pour maintenir la niche en place jusqu'à ce que
le mastic durcisse.
Modèle
BA-306010
-MB
BA2-30601
0-BR
BA-303010
-MB
BAL-30601
0-MB
BTF-30601
0-MB
Taille du
produit
( pouce
4*13*25
4*13*25
4*13*13
4*13*25
4*13*25
- 7 -
s )
Le BAL-306010-MB est équipé de bandes lumineuses LED, et l'installation des
bandes lumineuses est la suivante :
1. Utilisez la borne de câblage illustrée à la figure A ;
UN
2. Passez les deux extrémités du cordon d'alimentation à travers le bornier et
fixez-le avec un outil ;
B
3. Connectez les bornes de câblage blanches et entendez un « clic » pour
indiquer qu'elles sont correctement installées, comme illustré dans les
figures C et D.

- 8 -
CD
Fabricant : Shanghaimuxinmuyeyouxiangongsi
Adresse : Shuangchenglu 803nong11hao1602A-1609shi, baoshanqu,
Shanghai 200 000 CN.
Importé en Australie : SIHAO PTY LTD. 1 ROKEVA STREET, ASTWOOD
NSW 2122 Australie
Importé aux États-Unis : Sanven Technology Ltd. Suite 250, 9166
Anaheim
Lieu, Rancho Cucamonga, CA 91730
REP
UK
YH CONSULTING LIMITED. C/O YH Consulting
Limited Office 147, Centurion House, London
Road, Staines-upon-Thames, Surrey, TW18 4AX
REP
EC
E-CrossStu GmbH
Mainzer Landstr.69,
60329 Frankfurt am Main.

- 9 -

- 10 -
Assistance technique et certificat de garantie électronique
www.vevor.com/support

- 11 -
DUSCHNISCHE
MODELL: BA-306010-MB
/BA2-306010-BR/BA-303010-MB/BAL-306010-MB/BTF-306010-MB
Technischer Support und E-Garantie-Zertifikat
www.vevor.com/support

- 12 -

- 1 -
MODELL:BA-306010-MB
/BA2-306010-BR/BA-303010-MB/BAL-306010-MB/BTF-306010-MB
Dies ist die Originalanleitung. Bitte lesen Sie alle Anweisungen sorgfältig
durch, bevor Sie das Gerät in Betrieb nehmen. VEVOR behält sich das
Recht vor , die Bedienungsanleitung klar und deutlich zu interpretieren.
Das Aussehen des Produkts hängt vom gelieferten Produkt ab. Bitte
haben Sie Verständnis dafür, dass wir Sie nicht erneut über Technologie-
SHOWER NICHE

- 2 -
oder Software-Updates informieren.
Warnung: Um das Verletzungsrisiko zu verringern, muss der
Benutzer die Bedienungsanleitung sorgfältig lesen.
WARNUNG:
Bitte lesen Sie dieses Handbuch vor der Verwendung des Produkts
sorgfältig durch. Andernfalls kann es zu schweren Verletzungen kommen.
WARNUNG:
Lesen Sie dieses Material, bevor Sie dieses Produkt verwenden.
Andernfalls kann es zu schweren Verletzungen kommen.
Vorsichtsmaßnahmen bei der Montage
1. Nur gemäß dieser Anleitung zusammenbauen. Unsachgemäße
Montage kann zu Gefahren führen.
2. Tragen Sie während der Montage eine ANSI-geprüfte Schutzbrille und
strapazierfähige Arbeitshandschuhe.
3.Halten Sie den Versammlungsbereich sauber und gut beleuchtet.
4. Halten Sie während der Montage unbeteiligte Personen vom Bereich
fern.
5. Nicht zusammenbauen, wenn Sie müde sind oder unter dem Einfluss
von Alkohol, Drogen oder Medikamenten stehen.
6. Gewichtskapazität und andere Produkteigenschaften gelten nur für
ordnungsgemäß und vollständig montierte Produkte.

- 3 -
7. Weitere Informationen zu den auf den folgenden Seiten aufgeführten
Teilen finden Sie im Montagediagramm dieses Handbuchs. Packen Sie
alle Teile an einem sauberen Arbeitsplatz aus und trennen Sie sie
voneinander.
BEWAHREN SIE DIESES HANDBUCH AUF
Die folgenden Installationsdetails gelten für vorhandene Wände vor
dem Fliesenlegen und decken nicht jede mögliche Situation ab.
Konsultieren Sie bei der Vorbereitung und Installation immer einen
zugelassenen Fachmann.
1. Suchen und markieren Sie die Mittellinien der benachbarten
Rahmenpfosten mit einem Pfostensucher oder durch Klopfen an die Wand.
Zeichnen Sie eine waagerechte Linie zwischen den beiden Wandpfosten
auf der gewünschten Nischenhöhe.
2. Zeichnen Sie die Schnittlinie mit Bleistift oberhalb der Mittellinie nach
und schneiden Sie entlang der nachgezeichneten Linie eine Aussparung in
die Wandplatte. Achten Sie darauf, dass die obere und untere Linie auf
gleicher Höhe sind.

- 4 -
9. Richten Sie den umgebenden Rahmen nivellieren und befestigen Sie
ihn an den angrenzenden vertikalen Pfosten, sodass die Abmessungen mit
dem Nischenflansch übereinstimmen.
4. Kleben Sie eine wasserdichte Membran hinein, um die gesamte Höhle
abzudichten und 6 Zoll zu verlängern an vier Seiten der umgebenden
Wand. Das Erstellen einer wasserdichten Abdichtung der Höhle ist
sehr wichtig.

- 5 -
5. Tragen Sie Ihr Verlegematerial auf und verlegen Sie Ihre Fliesen,
Marmor oder Steine direkt an der Duschwand. Die Fliesen sollten am
besten symmetrisch um die Nische herum angeordnet sein. Für ein
besonders sauberes Ergebnis kann die Fliesenlinie direkt in der Nische
enden.
6. Entfernen Sie die Schutzfolie des Klebebands und tragen Sie eine
ununterbrochene Raupe Silikondichtmittel von der Innenecke der Nische
bis zum Rand auf. Achten Sie auf die aufgetragene Dichtmitteldicke.

- 6 -
19. Setzen Sie die Nischenarmatur in die Nische ein. Drücken Sie den
Flansch fest an und stellen Sie sicher, dass die Nische lotrecht und
waagerecht ist. Wischen Sie überschüssiges Dichtmittel an den Kanten ab.
20.
8. Kleben Sie die Flansche mit Klebeband an die Wand, um die Nische an
ihrem Platz zu halten, bis das Dichtungsmittel ausgehärtet ist.

- 7 -
Modell
BA-306010
-MB
BA2-30601
0-BR
BA-303010
-MB
BAL-30601
0-MB
BTF-30601
0-MB
Produktgr
öße
( Zoll )
4*13*25
4*13*25
4*13*13
4*13*25
4*13*25
Der BAL-306010-MB ist mit LED-Lichtstreifen ausgestattet und die Installation der
Lichtstreifen erfolgt wie folgt:
1. Verwenden Sie die in Abbildung A gezeigte Verdrahtungsklemme.
A
- 8 -
2. Führen Sie die beiden Enden des Netzkabels durch den Klemmenblock und
befestigen Sie es mit einem Werkzeug.
B
3. Schließen Sie die weißen Kabelklemmen an. Hören Sie ein
„Klick“-Geräusch, das anzeigt, dass sie richtig installiert sind, wie in den
Abbildungen C und D gezeigt.
CD
Hersteller: Shanghaimuxinmuyeyouxiangongsi
Adresse: Shuangchenglu 803nong11hao1602A-1609shi, baoshanqu,
Shanghai 200.000 CN.
Importiert nach AUS: SIHAO PTY LTD. 1 ROKEVA STREETEASTWOOD

- 9 -
NSW 2122 Australien
Importiert in die USA: Sanven Technology Ltd. Suite 250, 9166 Anaheim
Place, Rancho Cucamonga, CA 91730
REP
UK
YH CONSULTING LIMITED. C/O YH Consulting
Limited Office 147, Centurion House, London
Road, Staines-upon-Thames, Surrey, TW18 4AX
REP
EC
E-CrossStu GmbH
Mainzer Landstr.69,
60329 Frankfurt am Main.

- 10 -
Technischer Support und E-Garantie-Zertifikat
www.vevor.com/support

- 11 -
NISZA PRYSZNICOWA
MODEL: BA-306010-MB
/BA2-306010-BR/BA-303010-MB/BAL-306010-MB/BTF-306010-MB
Wsparcie techniczne i certyfikat e-gwarancji
www.vevor.com/support

- 12 -

- 1 -
MODELU:BA-306010-MB
/BA2-306010-BR/BA-303010-MB/BAL-306010-MB/BTF-306010-MB
To jest oryginalna instrukcja, przed użyciem należy uważnie przeczytać
wszystkie instrukcje. VEVOR zastrzega sobie jasną interpretację naszej
instrukcji obsługi. Wygląd produktu będzie zależał od produktu, który
otrzymałeś. Prosimy o wybaczenie, że nie poinformujemy Cię ponownie,
jeśli w naszym produkcie pojawią się jakiekolwiek aktualizacje
SHOWER NICHE

- 2 -
technologiczne lub oprogramowania.
Ostrzeżenie: Aby zminimalizować ryzyko obrażeń, użytkownik
powinien uważnie przeczytać instrukcję obsługi.
OSTRZEŻENIE:
Przed użyciem produktu należy uważnie przeczytać tę instrukcję.
Nieprzestrzeganie jej może skutkować poważnymi obrażeniami.
OSTRZEŻENIE:
Przeczytaj ten materiał przed użyciem tego produktu. Nieprzestrzeganie
tego może spowodować poważne obrażenia.
Środki ostrożności podczas montażu
1. Montaż należy wykonywać wyłącznie zgodnie z niniejszą instrukcją.
Nieprawidłowy montaż może stwarzać zagrożenia.
2. Podczas montażu należy nosić okulary ochronne zatwierdzone przez
ANSI oraz wytrzymałe rękawice robocze.
3. Utrzymuj miejsce zgromadzenia w czystości i zapewnij dobre
oświetlenie.
4. Nie dopuść, aby osoby postronne przebywały w pobliżu podczas
montażu.
5. Nie przychodź na spotkania, jeśli jesteś zmęczony lub pod wpływem
alkoholu, narkotyków lub leków.
6. Podane parametry wagowe i inne parametry produktu odnoszą się
- 3 -
wyłącznie do produktu prawidłowo i kompletnie zmontowanego.
7. Aby uzyskać dodatkowe informacje dotyczące części wymienionych na
kolejnych stronach, zapoznaj się ze schematem montażu w tym
podręczniku. Rozpakuj i oddziel wszystkie części w czystym miejscu pracy.
ZAPISZ TĘ INSTRUKCJĘ
Podane poniżej szczegóły dotyczące montażu odnoszą się do
istniejącej ściany przed położeniem płytek i nie obejmują wszystkich
możliwych sytuacji. Zawsze konsultuj się z licencjonowanym
fachowcem podczas przygotowań i montażu.
1. Zlokalizuj i zaznacz linie środkowe sąsiadujących słupków
konstrukcyjnych za pomocą wykrywacza słupków lub stukając w ścianę.
Narysuj linię poziomu między dwoma słupkami ściennymi na żądanej
wysokości wnęki.
2. Narysuj linię cięcia ołówkiem, nad linią środkową, wytnij jaskinię na
płycie ściennej wzdłuż narysowanej linii. Upewnij się, że górna i dolna linia
są równe.
- 4 -
10. Wypoziomuj i zamocuj otaczającą konstrukcję do sąsiednich
pionowych słupków, tak aby wymiar odpowiadał kołnierzowi wnęki.
4. Przyklej membranę wodoodporną wewnątrz, aby uszczelnić całą
jaskinię i wydłużyć ją o 6 cali do czterech stron otaczającej ściany.
Stworzenie wodoszczelnego uszczelnienia jaskini jest bardzo ważne.

- 5 -
5. Nałóż materiał montażowy i połóż płytki, marmur lub kamień
bezpośrednio na ścianie prysznica. Najlepiej, aby płytki były symetryczne
wokół jaskini. Linia płytek może kończyć się dokładnie na wnęce, aby
uzyskać bardzo czysty wygląd.
6. Zdejmij folię ochronną z taśmy, nałóż nieprzerwaną warstwę
uszczelniacza silikonowego od wewnętrznego narożnika wnęki do
krawędzi. Sprawdź grubość nałożonego uszczelniacza.

- 6 -
21. Włóż element wyposażenia niszy do jaskini. Mocno dociśnij kołnierz i
upewnij się, że nisza jest pionowa i pozioma. Wytrzyj nadmiar
uszczelniacza wzdłuż krawędzi obwodowych.
22.
8. Przyklej kołnierze do ściany, aby przytrzymać wnękę na miejscu, aż do
momentu utwardzenia uszczelniacza.

- 7 -
Model
BA-306010
-MB
BA2-30601
0-BR
BA-303010
-MB
BAL-30601
0-MB
BTF-30601
0-MB
Rozmiar
produktu
( cale )
4*13*25
4*13*25
4*13*13
4*13*25
4*13*25
Oprawa BAL-306010-MB wyposażona jest w paski świetlne LED. Montaż pasków
świetlnych przebiega w następujący sposób:
1. Użyj zacisku kablowego pokazanego na rysunku A;
A
- 8 -
2. Przeciągnij oba końce przewodu zasilającego przez listwę zaciskową i
zabezpiecz je narzędziem;
B
3. Podłącz białe zaciski przewodów i usłysz dźwięk „kliknięcia”, który
będzie oznaczał, że zostały zamontowane prawidłowo, jak pokazano na
rysunkach C i D.
płyta CD
Producent: Shanghaimuxinmuyeyouxiangongsi
Adres: Shuangchenglu 803nong11hao1602A-1609shi, baoshanqu,
Szanghaj 200000 CN.

- 9 -
Importowane do AUS: SIHAO PTY LTD. 1 ROKEVA
STREETEASTWOOD
NSW 2122 Australia
Importowane do USA: Sanven Technology Ltd. Suite 250, 9166 Anaheim
Miejsce, Rancho Cucamonga, CA 91730
REP
UK
YH CONSULTING LIMITED. C/O YH Consulting
Limited Office 147, Centurion House, London
Road, Staines-upon-Thames, Surrey, TW18 4AX
REP
EC
E-CrossStu GmbH
Mainzer Landstr.69,
60329 Frankfurt am Main.

Wsparcie techniczne i certyfikat e-gwarancji
www.vevor.com/support