中文P34
1. Please refer to this Guide for initial printer setup.
2. Hot! Avoid touching the heating nozzle in operation.
3. Moving parts in the printer may cause injuries. Do not wear
gloves or other sources of entanglement in operation.
1. 请参照本指南完成打印机的初始准备。
2. 高温危险!打印机喷嘴在工作时会被加热,操作时请避免接触!
3. 可动部件可能会造成卷入挤压和切割伤害。操作机器时请不要
佩戴手套或缠绕物。
Do not power on the printer until installation is completed.
请勿在打印机安装完成之前通电。
安全提示
Safety Notice
用户使用手册
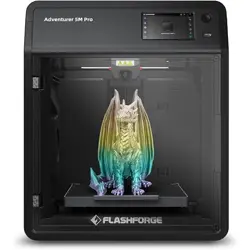
Adventurer 5M Pro / 冒险家5M Pro
User Guide
EN/CN-A01
CONTENTS
01
Notice
1. Equipment Introduction
1.1 - Printer Components
1.2 - Printer Parameters
2. Initial Setup
2.1 - Unboxing
2.2 - Packing List
2.3 - Installing the Spool Holder
2.4 - Unlocking the Build Plate
2.5 - First Print
3. Software Introduction & Installation
4. Printing
4.1 - Filament Loading and Changing
4.1.1 - Filament Loading
4.1.2 - Filament Changing
4.2 - Network Connection
4.2.1 - Wireless Network Connection
4.2.2 - Wired Network Connection
4.3 - Printing Methods
4.3.1 - Printing via USB
4.3.2 - Printing via Wi-Fi transfer
4.3.3 - Printing via Cloud
4.4 - Camera Connection
4.5 - Model Removal After Printing
5. Introduction to Auxiliary Functions
5.1 - Leveling and Calibration
5.2 - Air Filtration
5.3 - Other Function Settings
6. Maintenance
6.1 - Suggestions on Platform Plate Usage
6.2 - Suggestions on Nozzle Usage
6.3 - General Maintenance
7. Q&A
8. Help and Support
02
04
04
05
06
06
08
09
10
11
14
19
19
19
19
22
22
22
23
23
23
24
26
27
27
27
28
28
29
29
29
29
30
33
NOTICE
SAFETY NOTICE: PLEASE CAREFULLY READ AND STRICTLY FOLLOW
ALL THE SAFETY WARNINGS AND NOTICES BELOW ALL THE TIME.
WORK ENVIRONMENT SAFETY
Please keep the workspace clean and tidy.
Please ensure the equipment operates away from combustible gases, liquids, and
dust. High temperatures generated during operation may react with combustible
gases, liquids, or airborne dust, potentially causing fires.
Children and untrained individuals should not operate the equipment alone.
Note: Each 3D printer undergoes printing tests before leaving the factory. Filament
residue on the nozzle or slight scratches on the build plate are normal and do
not affect usage.
ELECTRICAL SAFETY
PERSONAL SAFETY
Do not touch the extruder, build plate, etc., during printing.
Do not touch the extruder and build plate after finishing printing to avoid high
temperature burns or mechanical damage.
Do not wear scarves, masks, gloves, jewelry, or other objects that can easily get
tangled into the equipment while operating it.
Do not operate the equipment while you are tired or under the influence of drugs,
alcohol or medication.
Please properly ground the equipment. Do not modify the plug. Ungrounded
equipment/improperly grounded equipment/modified plug will inevitably increase
the risk of electric leakage.
Avoid exposing the equipment to damp or direct sunlight environments. Humidity
will increase the risk of electric leakage. Exposure to sunlight will accelerate the
aging of plastic parts.
Make sure to only use the power cord provided by Flashforge.
Do not use the equipment during thunderstorms.
Please turn off the equipment and unplug it if it is not in use for a long time.
Keep the inside of the equipment clean. Do not drop metal objects into the grooves
at the bottom of the build plate.
Please clean up filament debris in time. It is recommended to operate this outside
the equipment.
Any modification of the equipment by yourself will void the warranty.
Please keep the distance between the extruder and build plate for at least 50mm
during filament loading. Too-close distance may cause nozzle clogs.
Please operate the equipment in a well-ventilated environment.
Do not use the equipment for illegal activities.
Do not use the equipment to make food storage containers.
Do not place printed models into your mouth.
CAUTIONS
02
EQUIPMENT ENVIRONMENT REQUIREMENTS
EQUIPMENT PLACEMENT REQUIREMENTS
COMPATIBLE FILAMENT REQUIREMENTS
FILAMENT STORAGE REQUIREMENTS
LEGAL STATEMENT
The equipment must be placed in a dry and well-ventilated environment.
A distance of at least 35cm must be reserved around the front, back, left and right
sides of the equipment. Recommended storage temperature: 0-40°C
When using this equipment, it's recommended to use Flashforge's filaments.
If non-Flashforge filaments are used, there will be certain differences in material
properties, and print parameters may need adjustments.
Please store filaments in a dry and dust-free environment after unpacking. It is
recommended to use the matching filament dry box for storage.
Room temperature: 15-30℃; Humidity: 20-70RH%
Users are not authorized to make any modifications to this User Guide.
Flashforge shall not be held responsible for any safety incidents resulting from the
disassembly or modification of the equipment by the customer. No one is allowed
to modify or translate this Guide without Flashforge's permission. This Guide is
protected by copyright, and Flashforge reserves the right of the final interpretation
of this Guide.
First Edition (September 2023)
Copyright © 2023 Zhejiang Flashforge 3D Technology Co., Ltd. All Rights Reserved.
03
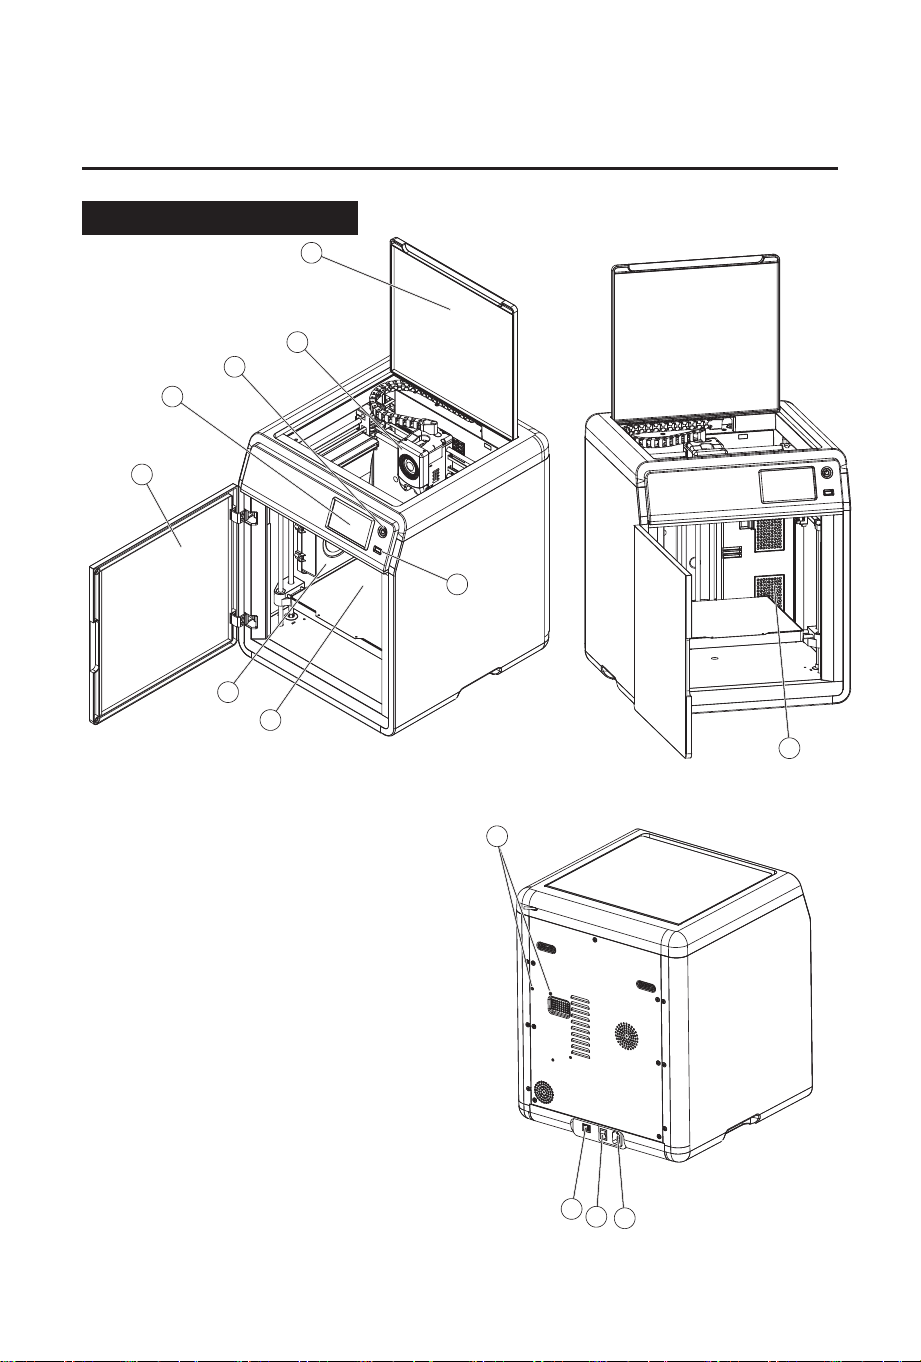
1
2
3
4
5
9
10
7
8
6
11
12
13
1. Top Cover
2. Extruder
3. Switch Button
4. Touch Screen
5. Front Door
6. Auxiliary Cooling Fan
7. Build Plate
8. USB Port
9. Air Filter
10. Screw Holes for Spool Holder
11. Ethernet Input
12. Power Switch
13. Power Socket
1.Equipment Introduction
1.1 Printer Components
04
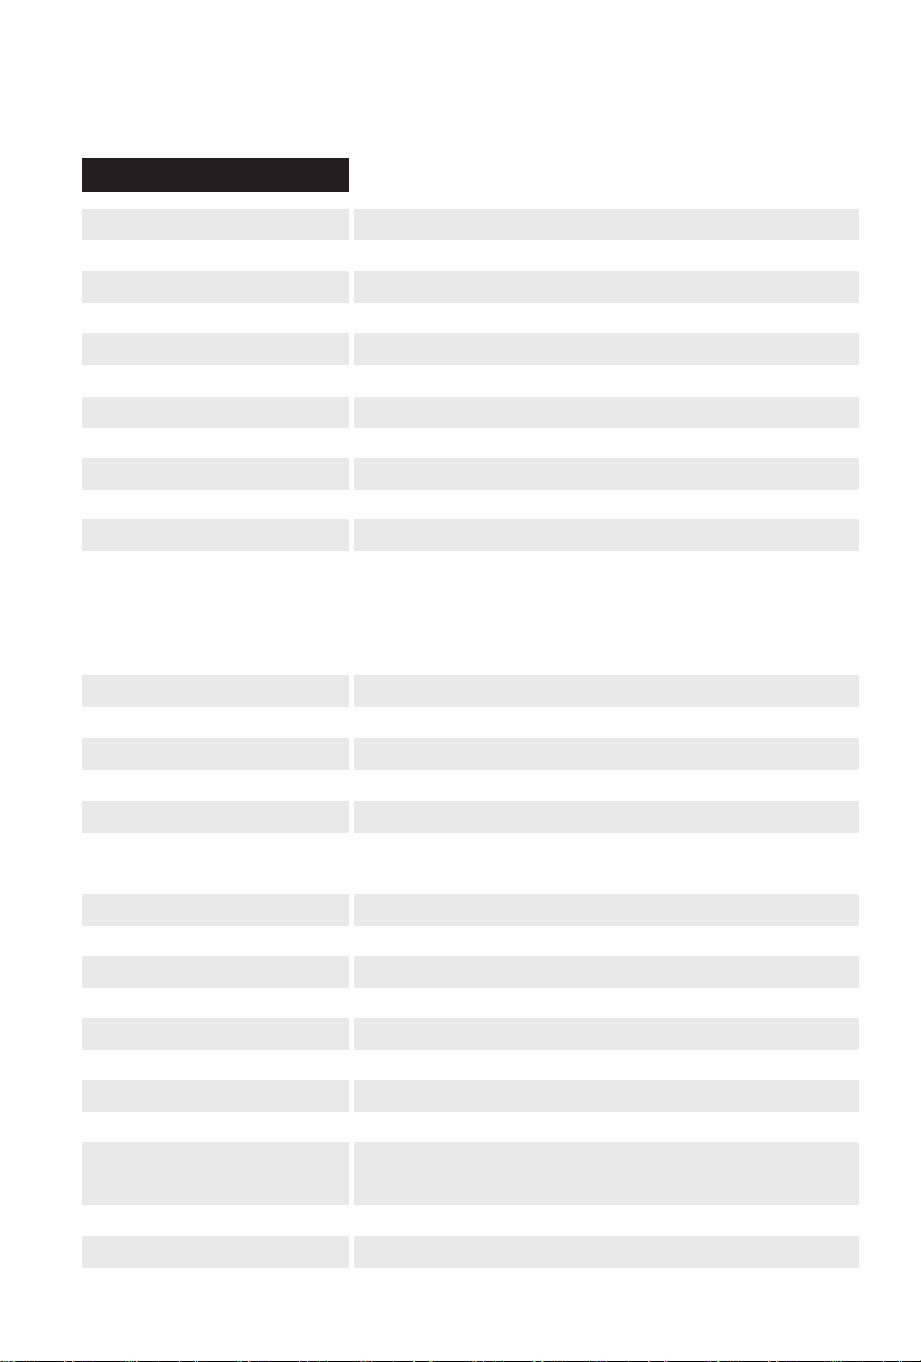
Machine Name
Extruder Quantity
Printing Precision
Positioning Accuracy
Layer Thickness
Build Volume
Nozzle Diameter
Printing Speed
Max. Acceleration
Max. Travel Speed
Max. Extruder Temperature
Supported Filament
Power Supply
Device Size
Net Weight
Connectivity
Operating Temperature
Compatible Operating System
Compatible Slicing Software
Max. Platform Temperature
Leveling Method
Filament Run-out Reminder
Power Loss Recovery
Smart Touch Screen
Remote Video Monitoring
Time-lapse Video
Air Filtration
Build Plate
Automatic Shutdown
Adventurer 5M Pro
1
±0.2mm [testing based on 100mm cubes]
X/Y-axis: 0.0125mm; Z-axis: 0.0025mm
0.1-0.4mm
220 x 220 x 220mm
0.4mm [default]; 0.6/0.8/0.25mm [optional]
10-300mm/s
20000mm/s²
600mm/s
280℃
*PLA/*PETG/*TPU [0.4mm nozzle]
ASA/ABS
PLA-CF/PETG-CF [0.6/0.8mm nozzle]
Input: AC 100~240V, 50/60Hz, 350W
380 x 400 x 453mm [excluding the spool holder]
14.6kg
USB/Wi-Fi/Ethernet
15-30℃
Windows 7/8/10/11; Linux: Support version Ubuntu
20.04 or later; Mac OS: Support version 10.9 or later.
FlashPrint 5 / Orca / Prusa / Cura
110℃
One-click auto leveling
√
√
4.3-inch
√
√
Internal circulation + external circulation
[HEPA + activated carbon]
PEI flexible steel plate
√
Note: Materials marked with * are recommended for printing.
1.2 Printer Parameters
05
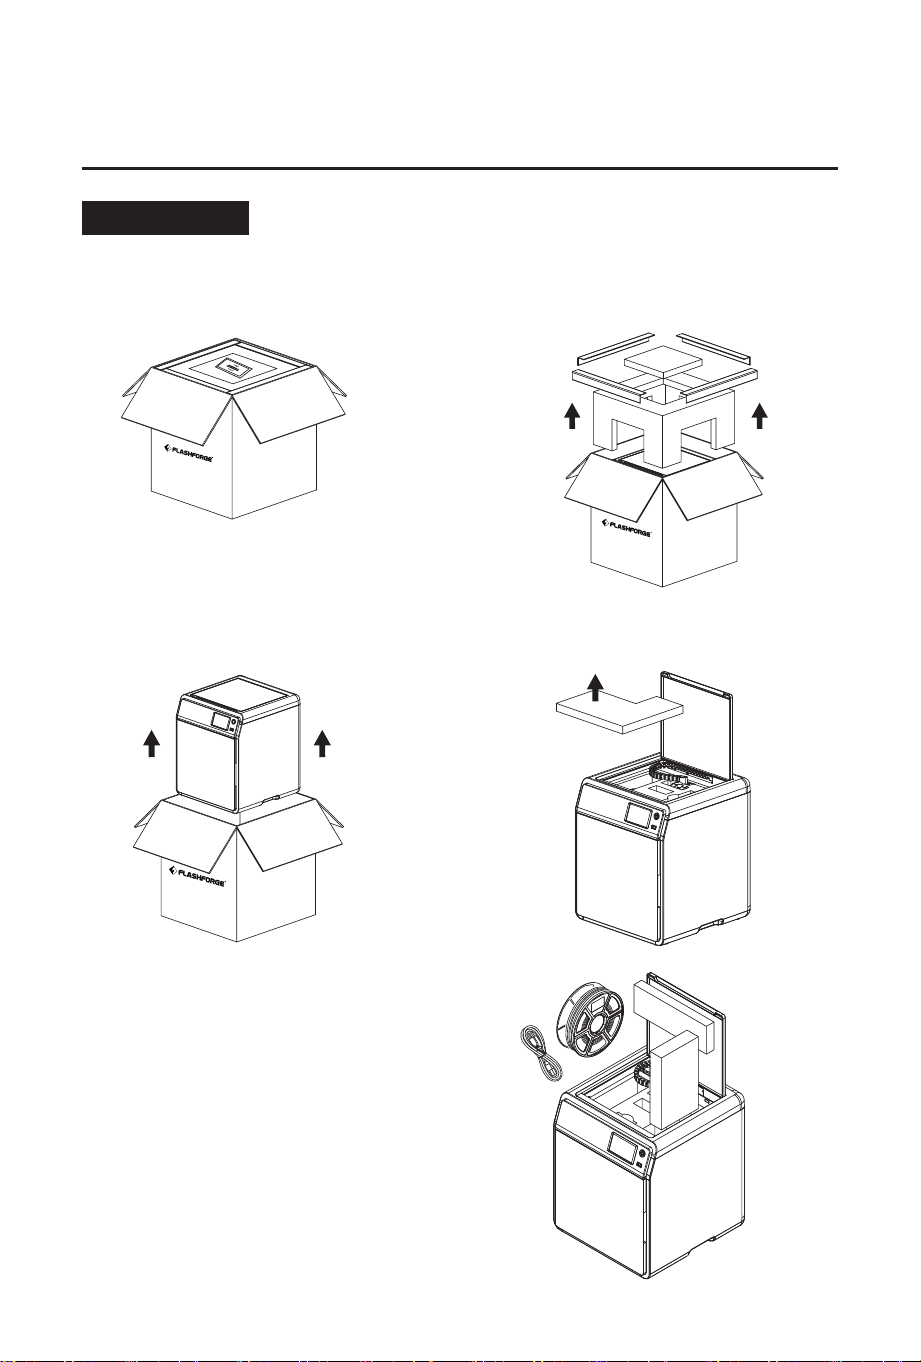
1. Open the box.
Safety Notice: Do not power on the printer until installation is completed.
2. Remove the upper foam packaging,
Quick Start Guide and After-sales
Service Card.
3. Take out the machine, place it on a
level workspace and remove the
packaging bags and tapes.
4. Open the top cover and remove the
upper protective foam.
5. Remove the filament, power cable, and
accessory box from the chamber protective
foam. Remove the inner protective foam
from the extruder.
2. Initial Setup
2.1 Unboxing
06
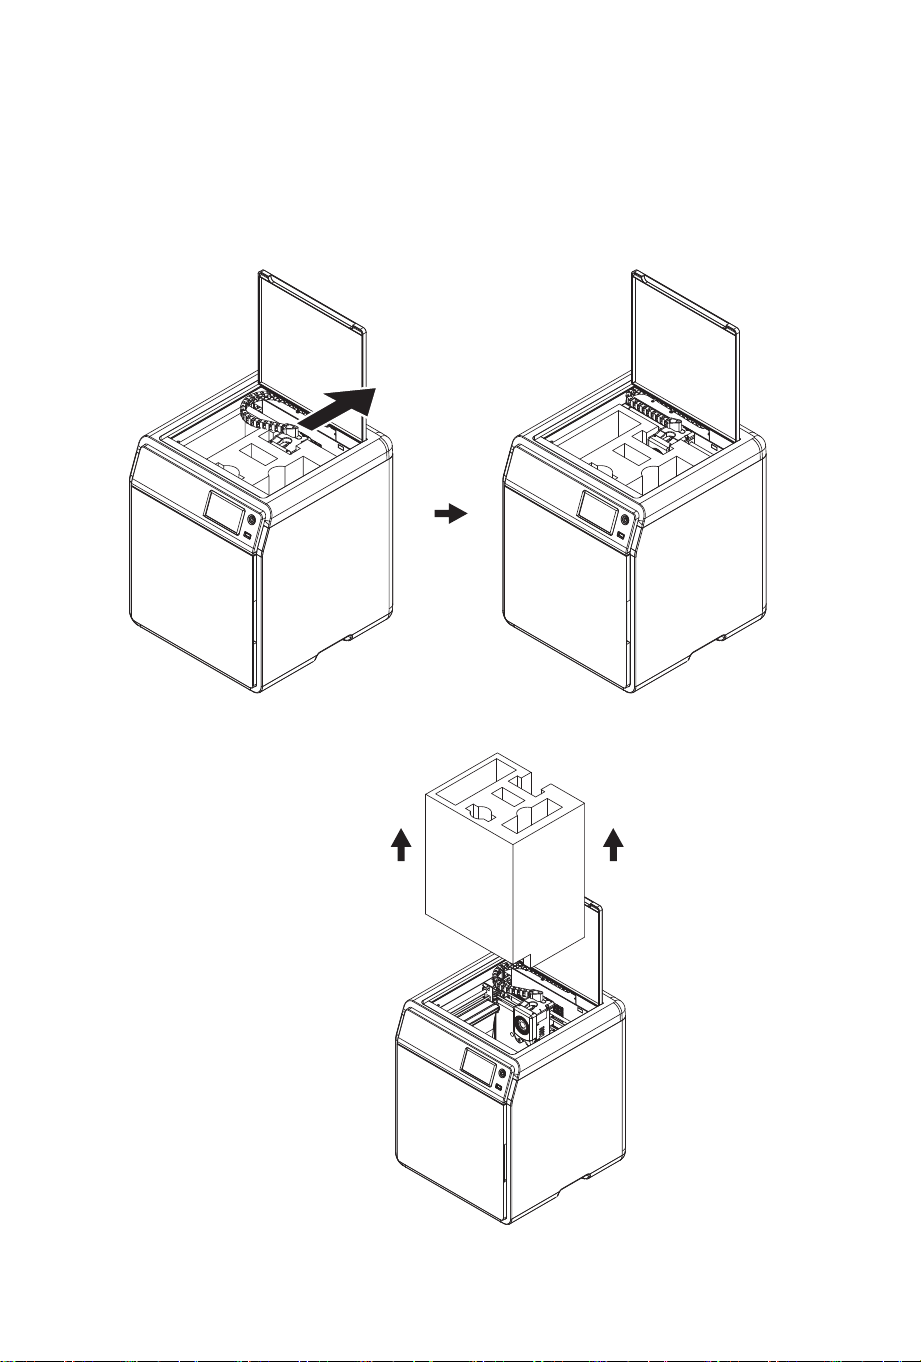
7. Remove the foam.
6. Move the extruder and chain according to the arrow direction.
07
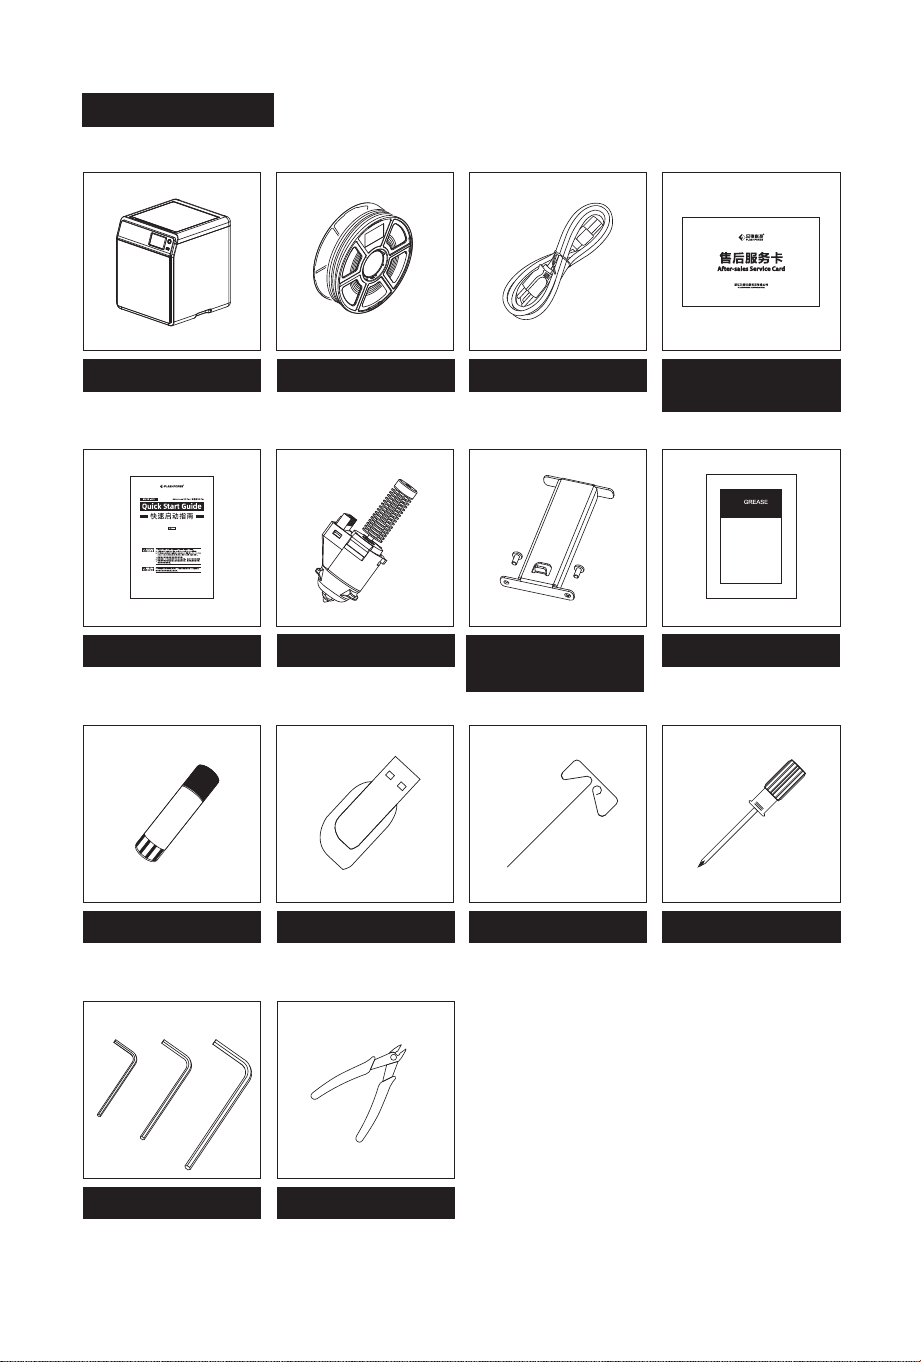
3D Printer
Filament
After-sales
Service Card
Spool Holder
(with 2 screws)
0.6mm Nozzle
Quick Start Guide
Grease
Power Cable
USB Disk
Glue
Diagonal Pliers
Allen Wrench
2.0 2.5 3.0
Screwdriver
Unclogging Pin Tool
2.2 Packing List
08
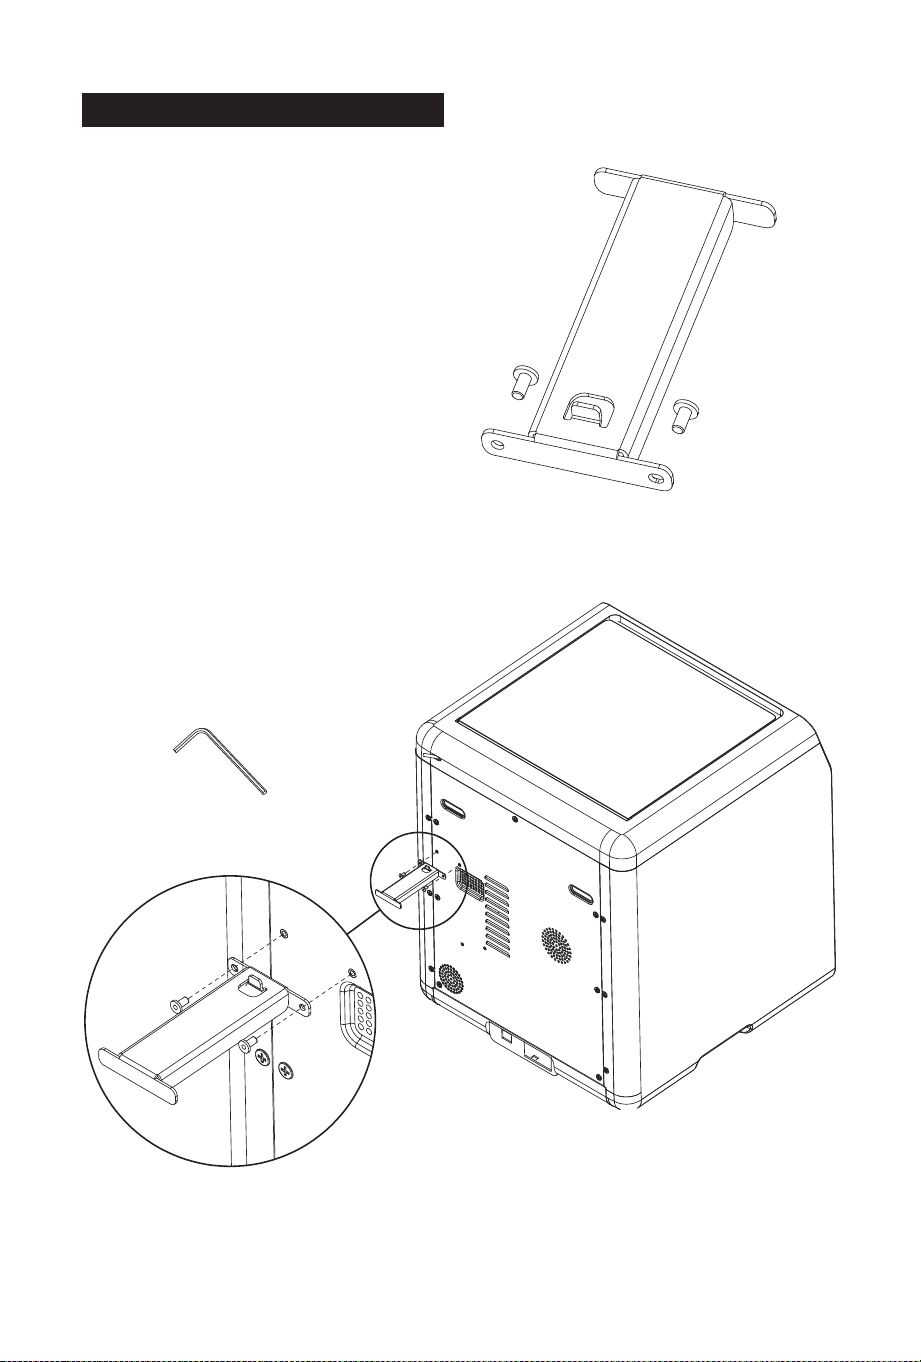
1. Take out the two screws and spool holder
from the accessory box.
2. Install the spool holder at the position shown
in the figure with the two screws.
(Note: Please tighten them using a 2.0mm
Allen wrench.)
2.3 Installing the Spool Holder
09
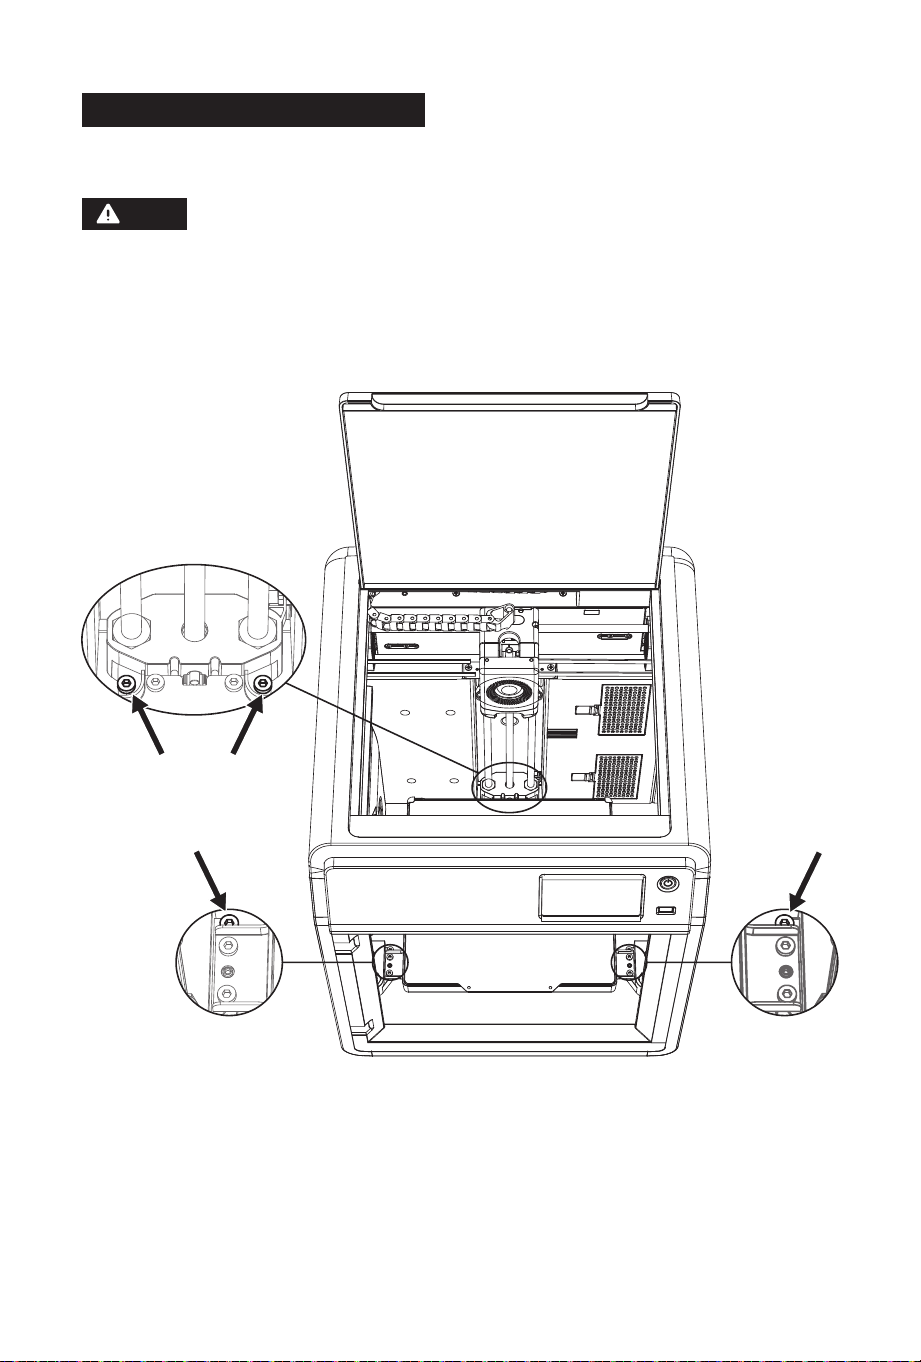
Please ensure the platform has been cleared up!
Please use a 2.0mm Allen wrench to remove four screws which lock the build plate (as indicated
by the arrow).
Note
2.4 Unlocking the Build Plate
10
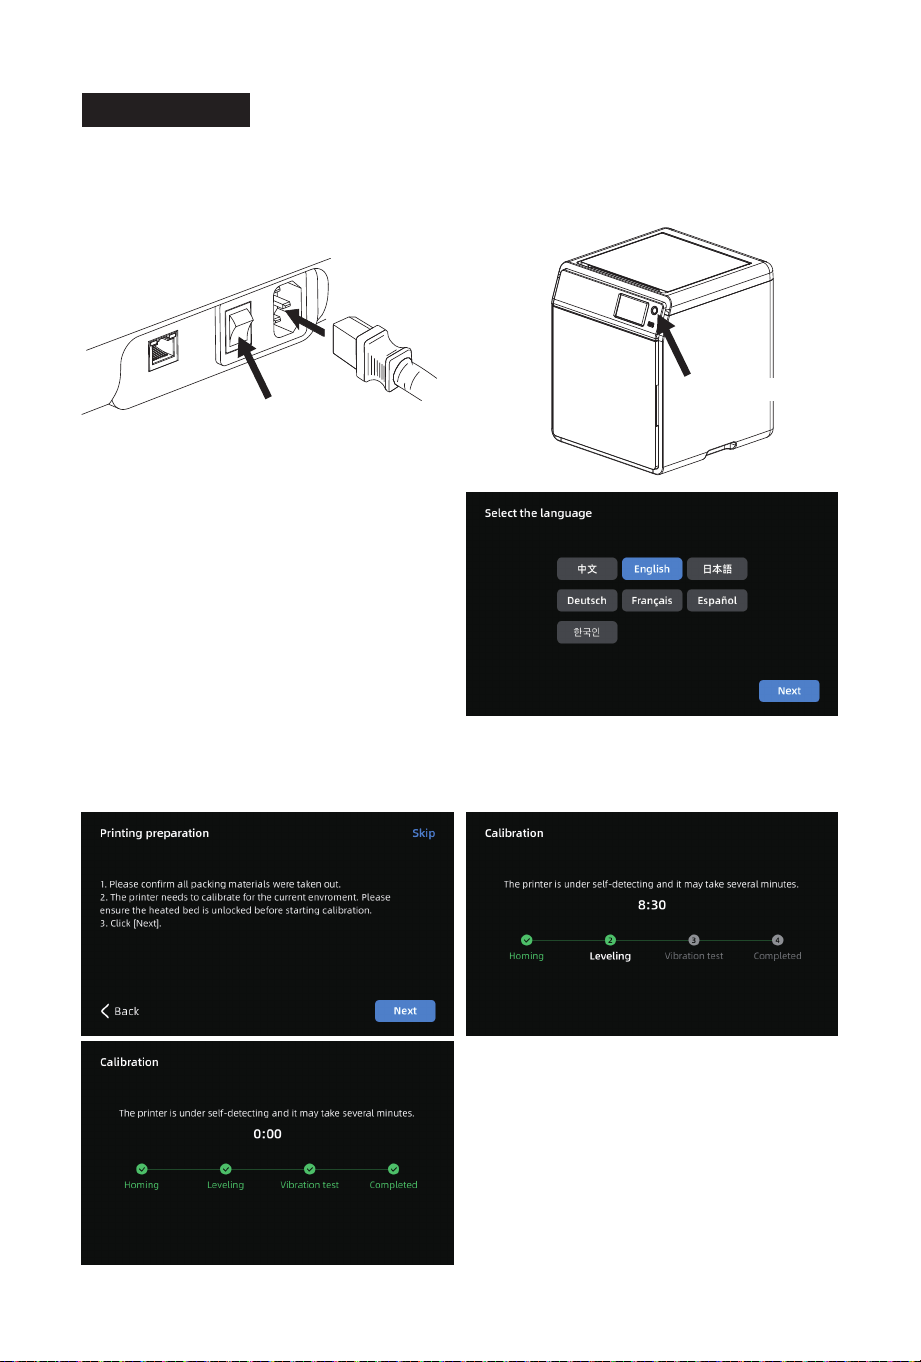
1. Connect the power, turn on the power switch, and press the
switch button to turn on the screen.
* The interface layout may change whenever there is an upgrade of firmware.
Power Switch
2. Following the guide on the screen, select
the language.
3. Click [Next] according to screen prompts and the machine will perform the first calibration.
Vibrations and noise during calibration are normal. (Note: Please keep the machine on a
stable surface and do not move it during calibration.)
2.5 First Print
Switch Button
11
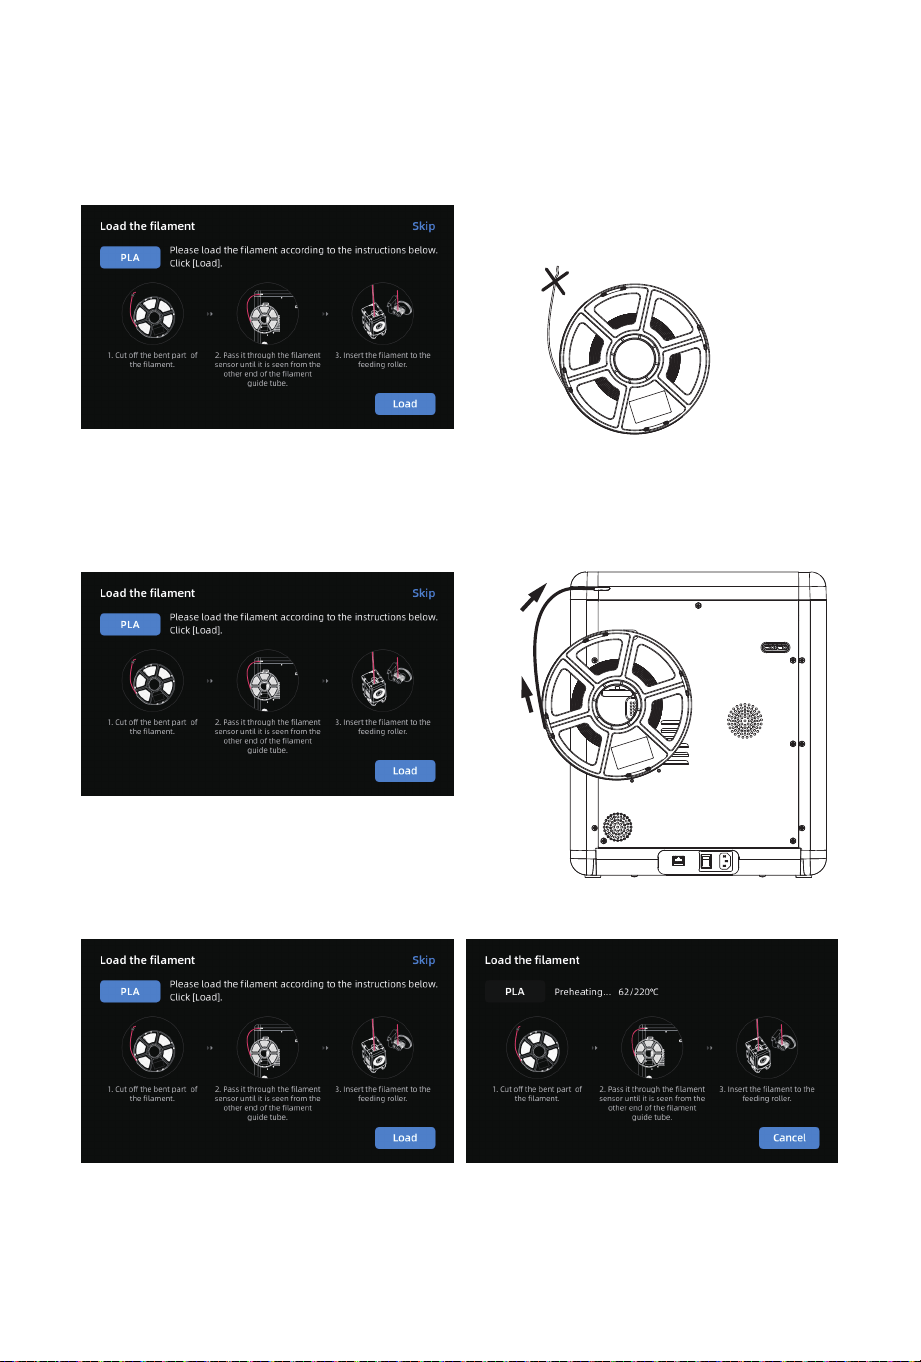
4. Load filament following the on-screen startup boot:
a. Cut off the bent part of the filament end.
b. Hang the filament on the spool holder. Pass it through the filament sensor until it’s seen from
the other end of the filament guide tube. Push it forward to the feed roller, until it can not go
further. (*Please use PLA filament for the first print on initial setup).
C1. Click [Load] and select [PLA] for the first print. C2. Wait for the extruder to heat up.
12
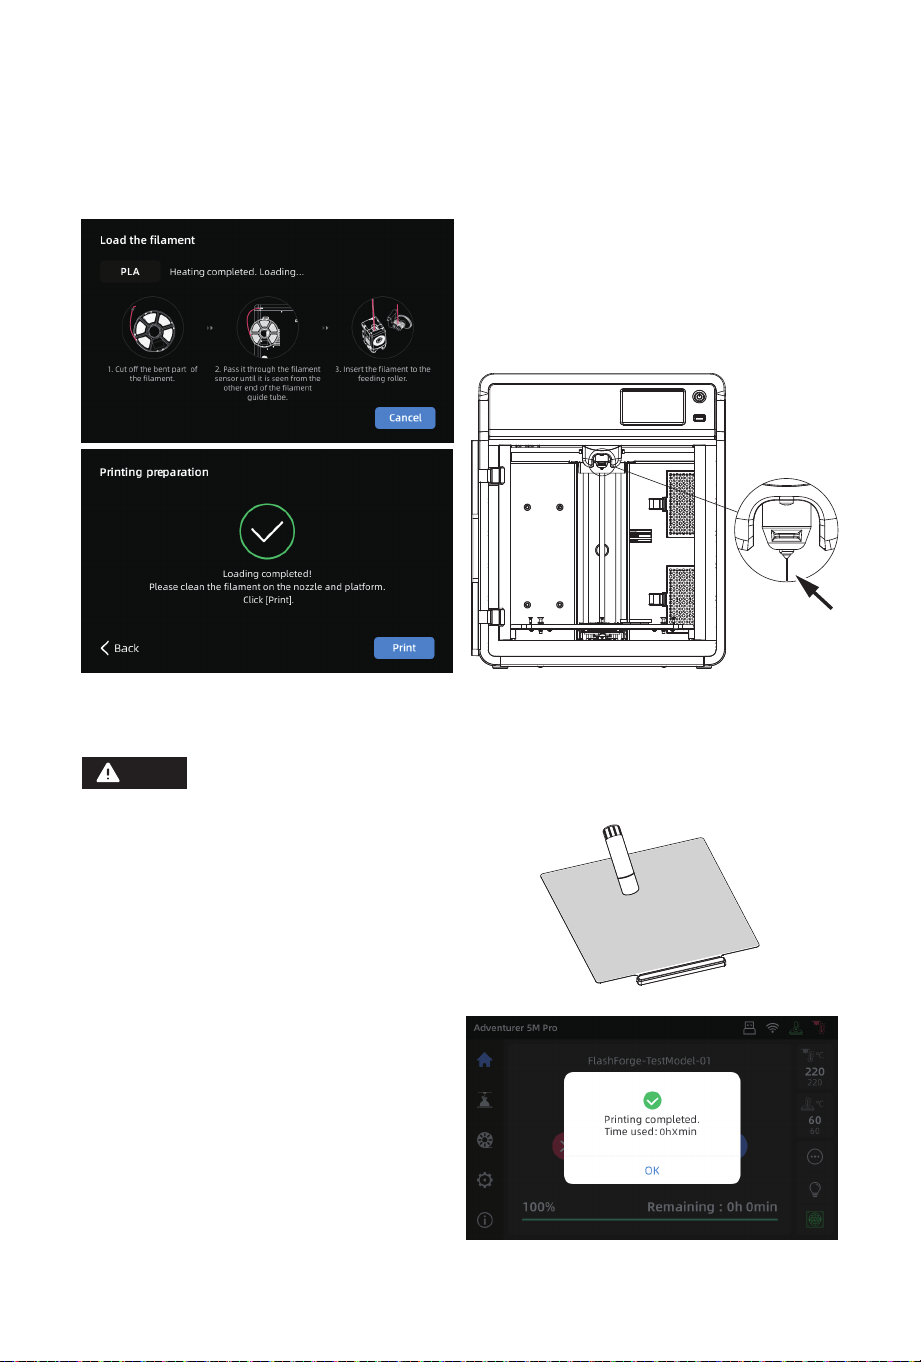
6. Click [Print] and the machine starts printing
the built-in file (configured for PLA material).
5. Please clear the filament residues on the nozzle
and platform. Users must apply glue to the
platform so as to improve adhesion for the
first print.
C3. Feeding will begin after heating. Successful filament extrusion from the nozzle indicates
successful loading. Lastly, confirm the filament guide tube is properly inserted.
If no filament is extruded, manually insert the filament into the inlet and click
[Back] to retry. Feel for filament movement until it is extruded.
Note
13
Note
3. Software Introduction & Installation
Before printing 3D model files, you need to configure slicing presets for the corresponding printer.
Recommended slicing software: OrcaSlicer / FlashPrint 5
Before reading the brief instructions, please ensure you have reviewed the Quick
Start Guide and completed the first print.
Slicing Software Instructions for Adventurer 5M Series
Pre-printing Steps:
Obtain the 3D file
(STEP/STL/OBJ)
Download and
install the slicing
software
Use the slicing software
to convert the file into
the machine-readable
format
Import the sliced file via
a USB flash drive or
network transfer to the
printer for printing
This slicing software, created by the open-source community, offers more open configuration
options. Experienced users are recommended to use this slicing software.
1. Download the latest slicing software from the official website:
https://github.com/SoftFever/OrcaSlicer/releases.
2. Find the OrcaSlicer software package on the USB flash drive and install the version that matches
your system.
Files can be imported by project, requiring a click on the project file each time you open it.
Alternatively, configs can be imported, eliminating the need to do so each time, but this may not
be compatible with higher software versions.
Open-source Slicing Software
OrcaSlicer
01 02 03 04
Download and Installation Instructions
Note
14
* The steps are illustrated for one machine type.
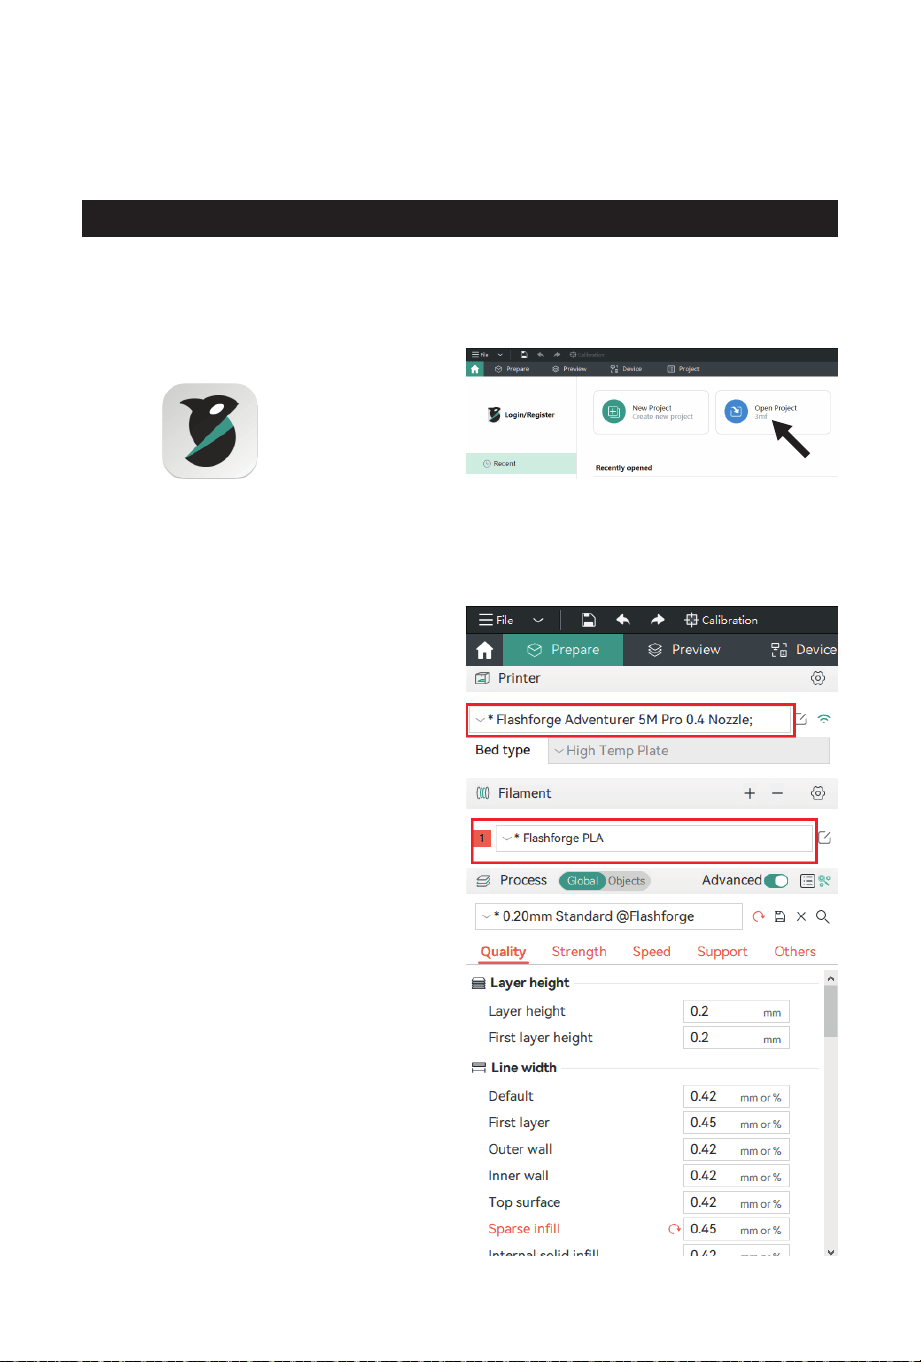
How to Use OrcaSlicer (Import Project Files)
1. Open the installed OrcaSlicer. 2. Click [Open Project].
3. The profile should be in .3mf format. You
can find the corresponding file on the USB
flash drive. Drag it directly into OrcaSlicer,
or open it directly (if the machine is not
configured with a USB flash drive, please
download the corresponding profile from
Flashforge's official website).
4. After importing the profile, the software
interface will display the corresponding
printer, and you can select the desired
printing material.
15
* The steps are illustrated for one machine type.
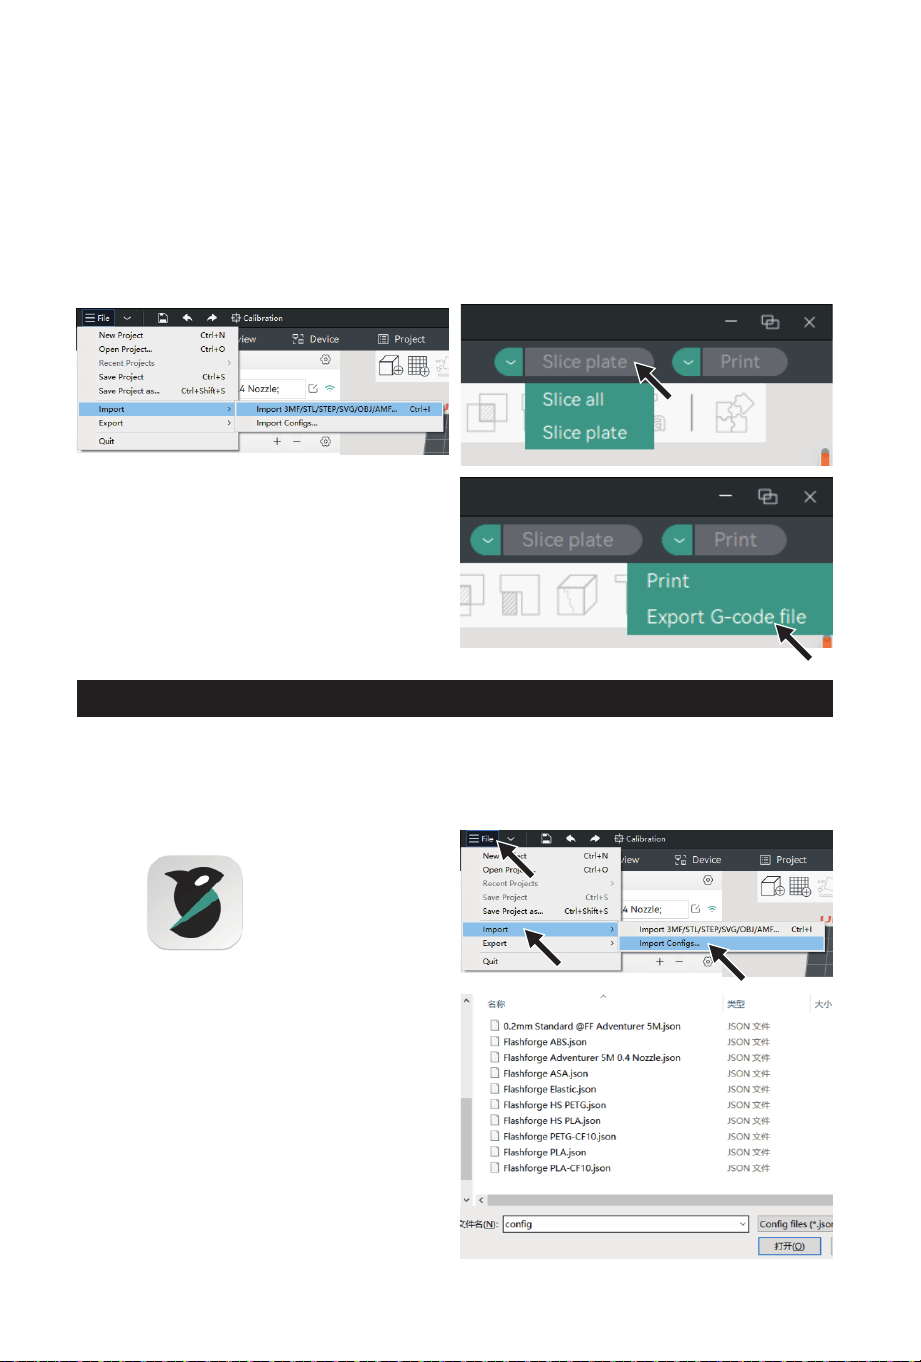
5. Select the model file to be printed. You can
drag it directly into the software, or click
[File] - [Import] to import the model file
(STL/STEP/OBJ/3MF, etc.).
6. Click [Slice all]. Once slicing is completed, click
[Export G-code file], save the file to a USB flash
drive, and then insert it into the printer for
printing.
How to Use OrcaSlicer (Import Configs)
1. Open the installed OrcaSlicer.
3. The config file should be in .json format. You
can find the corresponding files on the USB
flash drive, select all, and open it (if the
machine is not configured with a USB flash
drive, please download the corresponding
config files from Flashforge's official website).
2. Click [File] - [Import] - [Import Configs...].
16
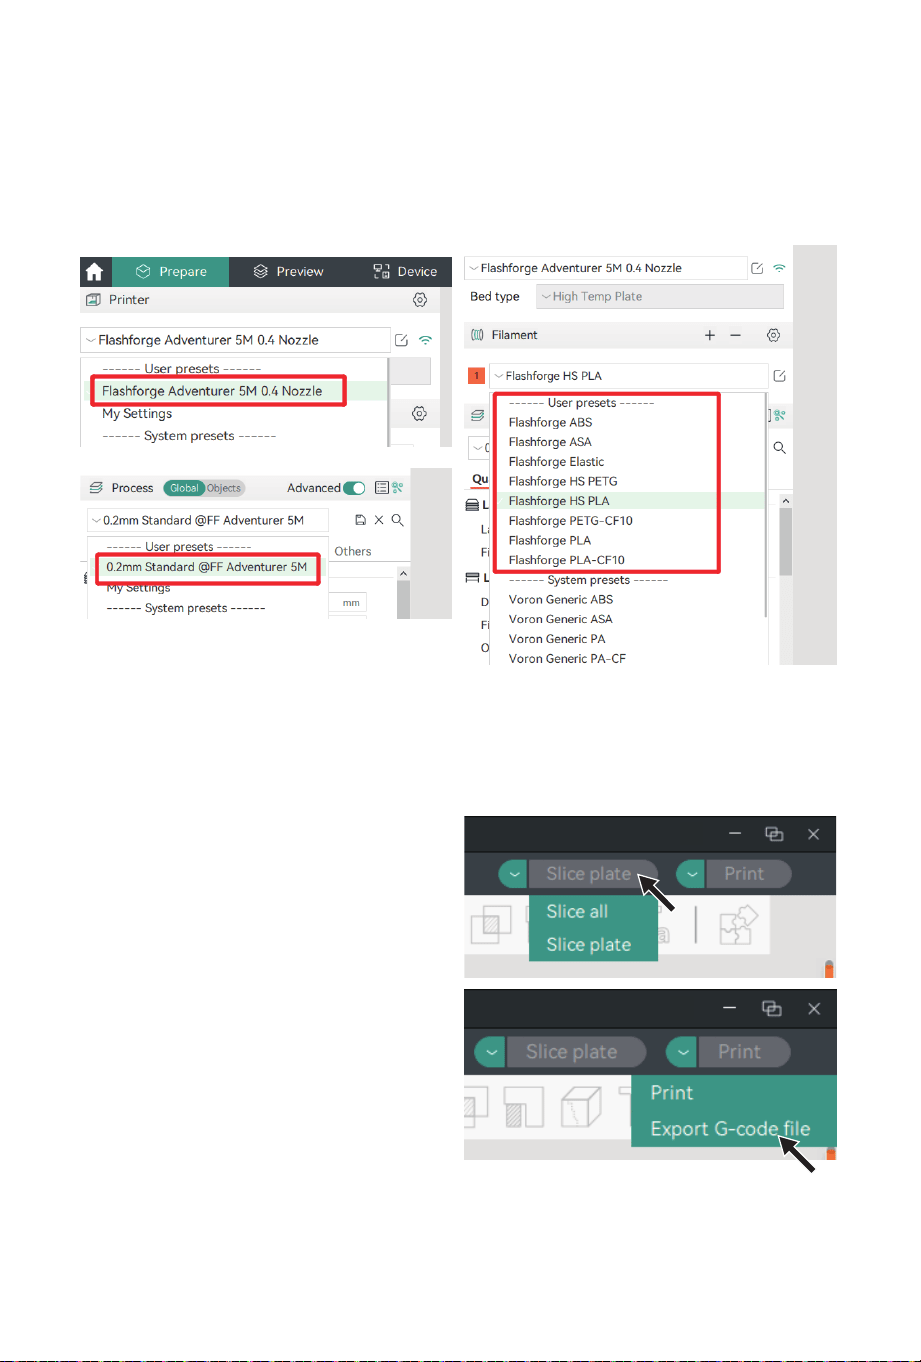
4. After importing, the corresponding printer, available filaments, and recommended parameters
will be displayed.
5. Select the model file to be printed. You can drag it directly into the software, or click [File] -
[Import] to import the model file (STL/STEP/OBJ/3MF, etc.).
6. Click [Slice all]. Once slicing is completed,
click [Export G-code file], save the file to a
USB flash drive, and then insert it into the
printer for printing.
17
The slicing profiles available in FlashPrint 5 are configured based on extensive
testing with various types of filaments. We recommend using the recommended
temperature settings provided in the profiles. If you believe a specific filament
requires a different temperature, you can make minor adjustments and print
smaller objects at the set temperature for testing to ensure smooth operation.
1. Download the latest slicing software from the official website:
https://www.flashforge.com/download-center.
2. Find the FlashPrint 5 software package on the USB flash drive and
install the version that matches your system.
Download Instructions
* The steps are illustrated for one machine type.
FlashPrint 5 is not open-source. It is user-friendly and suitable for users with no 3D printing
experience or those who don't require parameter adjustments.
Flashforge's Official Slicing Software - FlashPrint 5
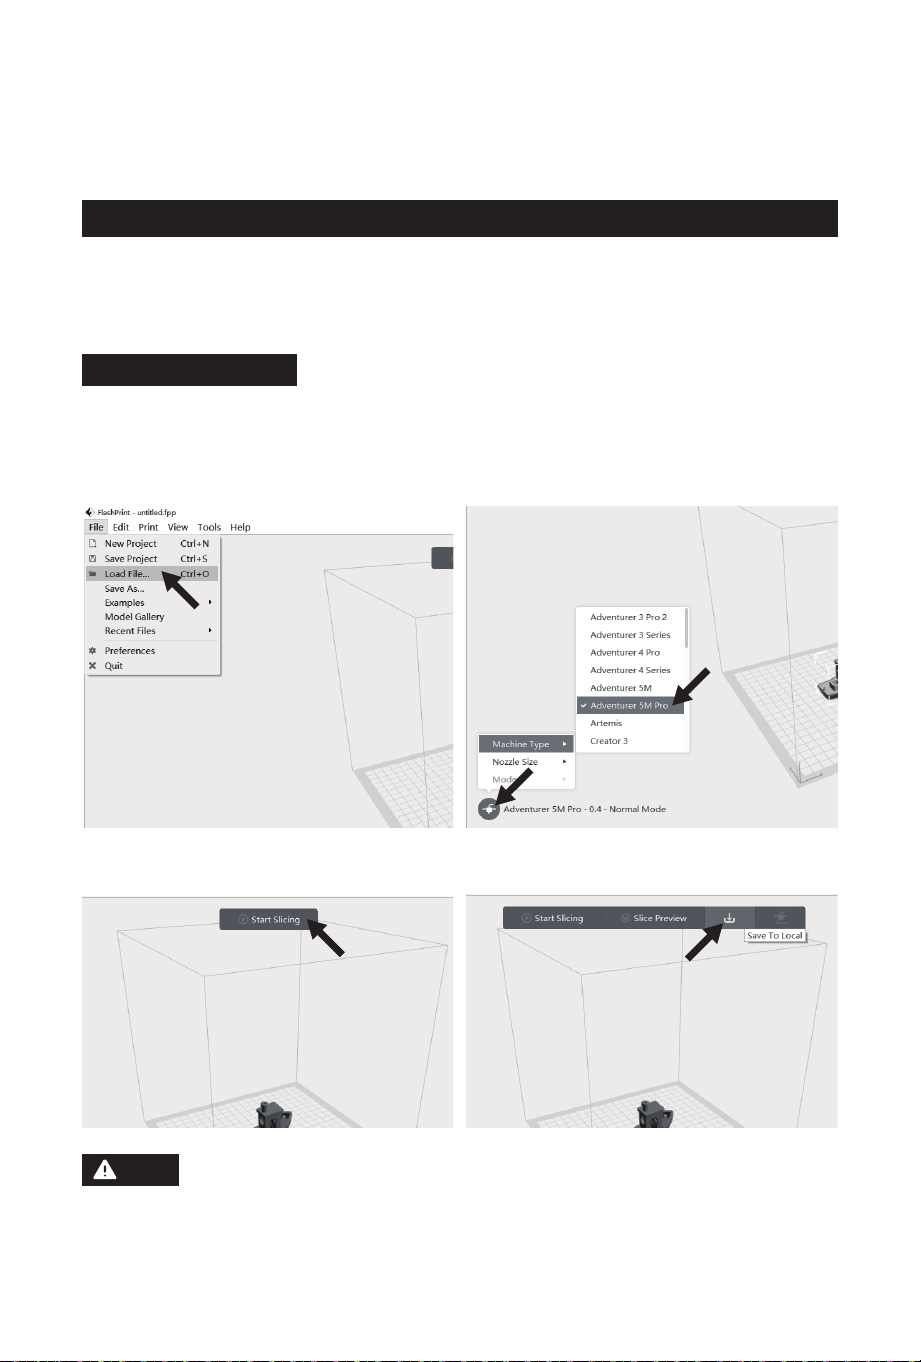
1. After installing the slicing software, import
the model file.
2. Select the corresponding printer type.
3. Click [Start Slicing]. 4. After slicing is completed, save the file to a
USB flash drive for printing.
Note
18
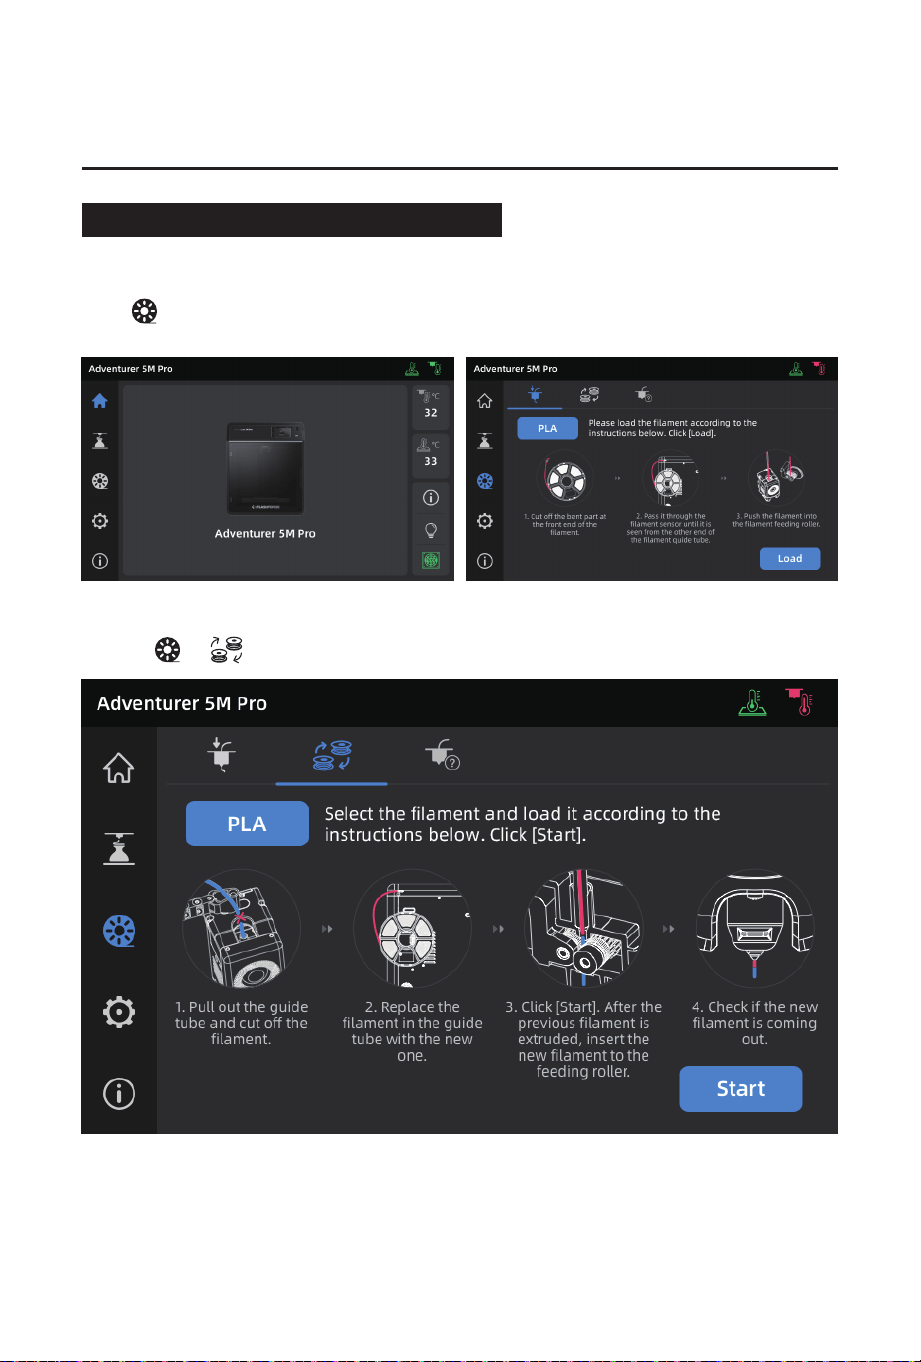
4.1 Filament Loading and Changing
Click [ ] to enter the filament loading interface and follow on-screen instructions to complete
filament loading.
4. Printing
4.1.1 Filament Loading
1. Click [ ] - [ ], and follow on-screen instructions to complete filament changing.
4.1.2 Filament Changing
19
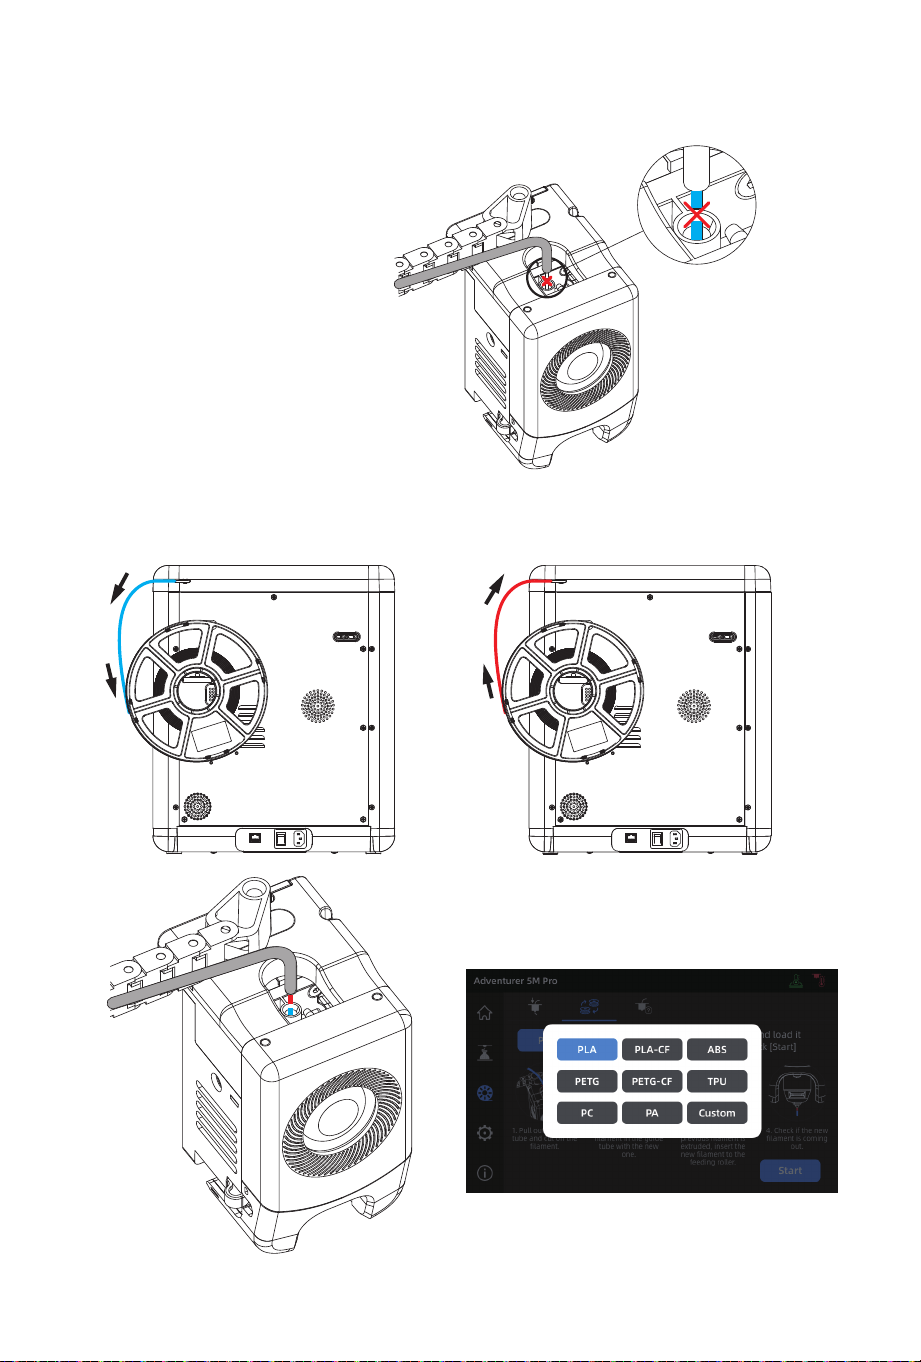
2. Pull out the filament guide tube
as shown, and cut the filament.
3. Pull out the cut filament, and insert the new filament into the filament guide tube. If the
material type is changed, click [PLA] to select the corresponding material type.
20
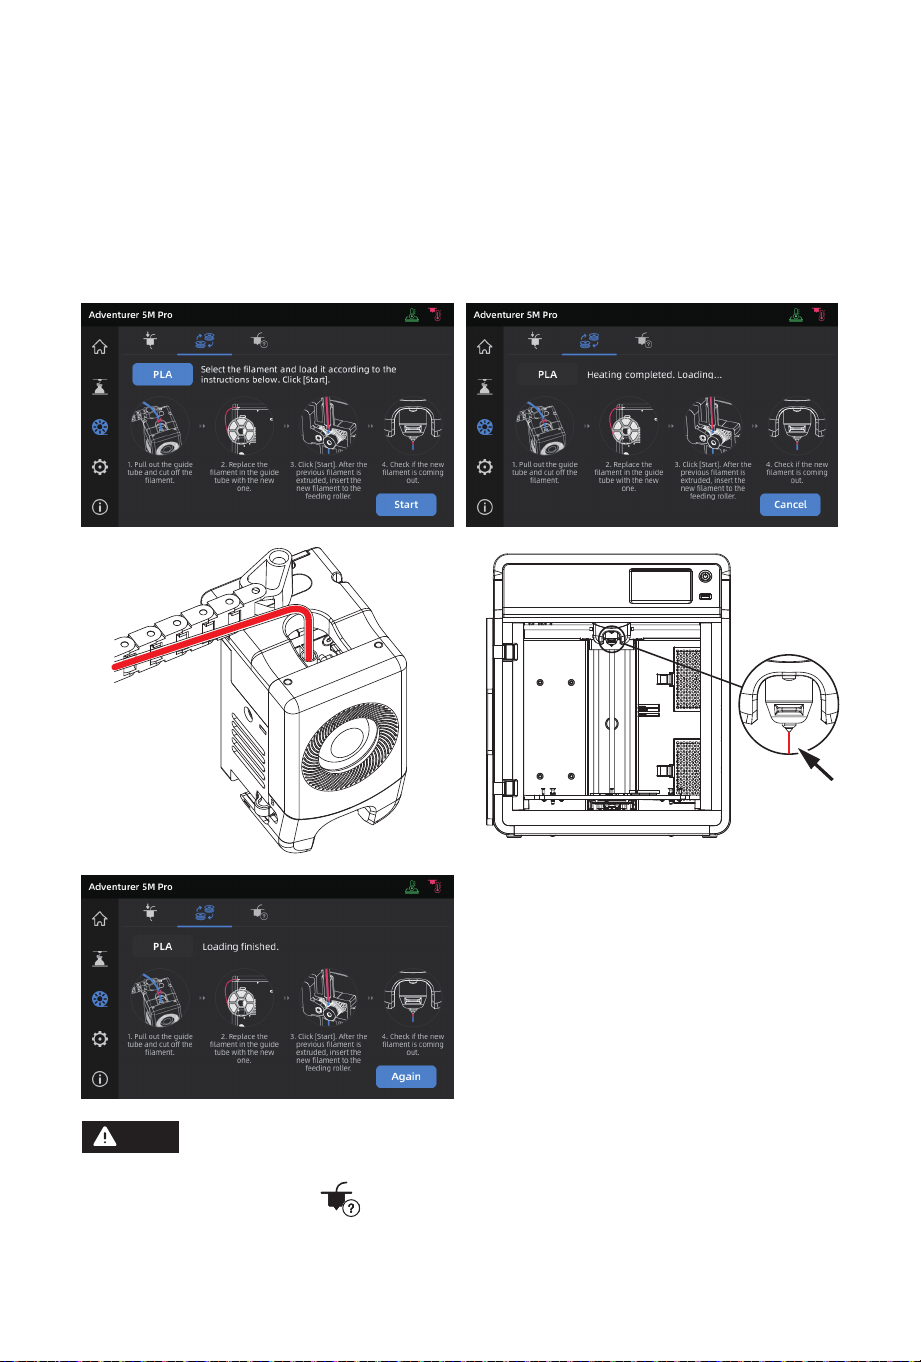
4. Click [Start], wait for the extruder to heat up and filament feeding will begin. When you see the
previous filament is extruded, insert the new filament and observe its flow and the extrusion.
If the new filament smoothly comes out of the nozzle, the filament change is successful. If not,
hold the filament by hand, insert it into the inlet, and click [Again] to retry. Feel for filament
movement until it is extruded. After successful loading, insert the filament guide tube into the
inlet.
1. If the previous filament roll is completely used up and there is no filament in the
guide tube, you can proceed with the loading process directly.
2. When changing filament, try to clear out the old filament using the new filament.
3. You can click [ ] to view the nozzle usage guide on the screen.
Note
21
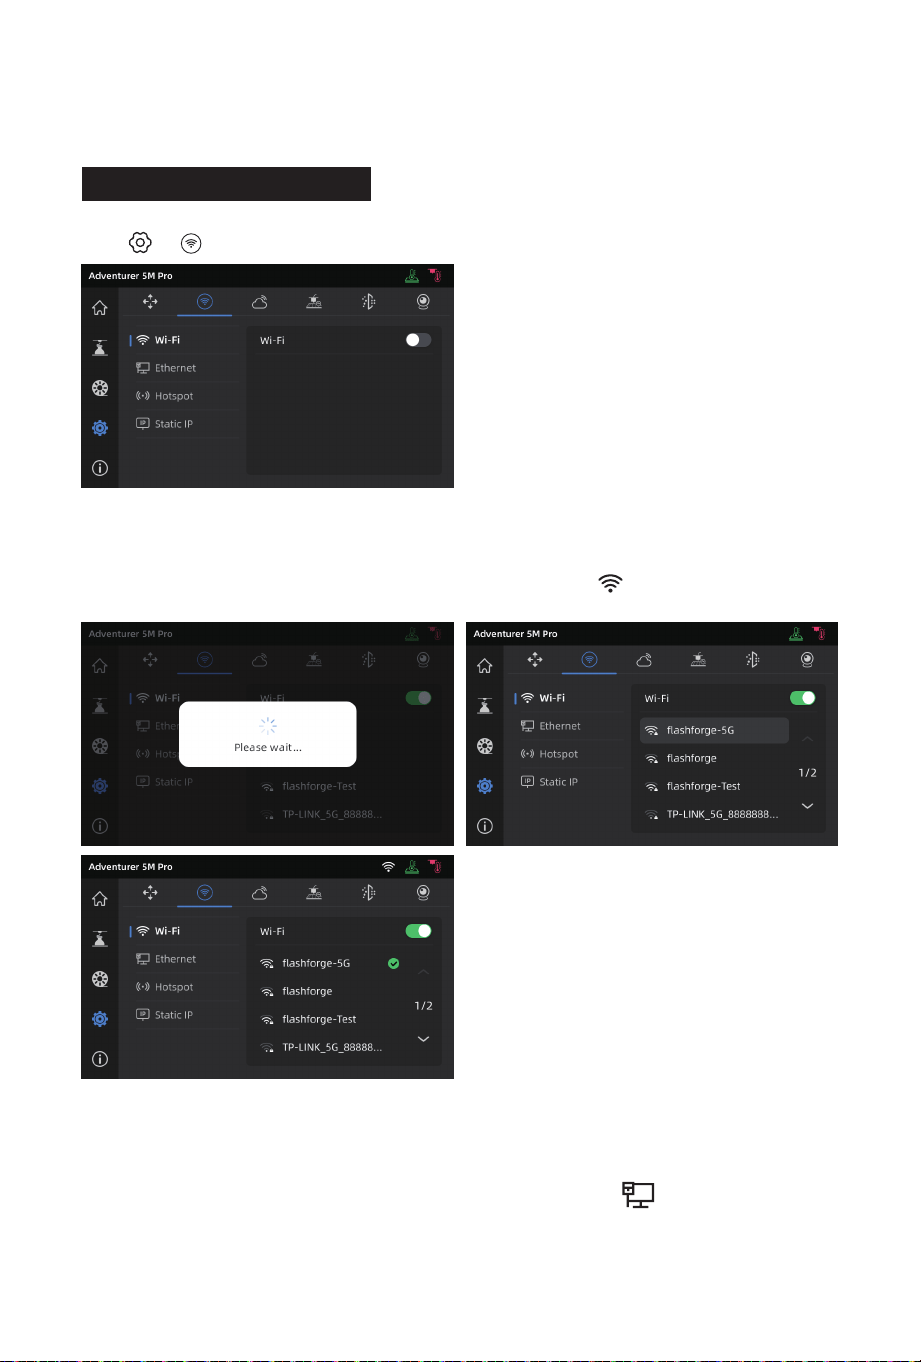
4.2 Network Connection
Click [ ] - [ ] to enter the network connection interface.
4.2.1 Wireless Network Connection
Turn on the Wi-Fi switch, and tap to connect to the corresponding wireless network.
Once connected successfully, the network will be marked, and an [ ] icon will appear at the top
right corner of the screen.
1. Select [Ethernet] and plug the network cable into the Ethernet port on the back of the printer
following on-screen instructions.
2. Once connected successfully, it will display as [Connected], and an [ ] icon will appear at the
top right corner of the screen.
4.2.2 Wired Network Connection
22
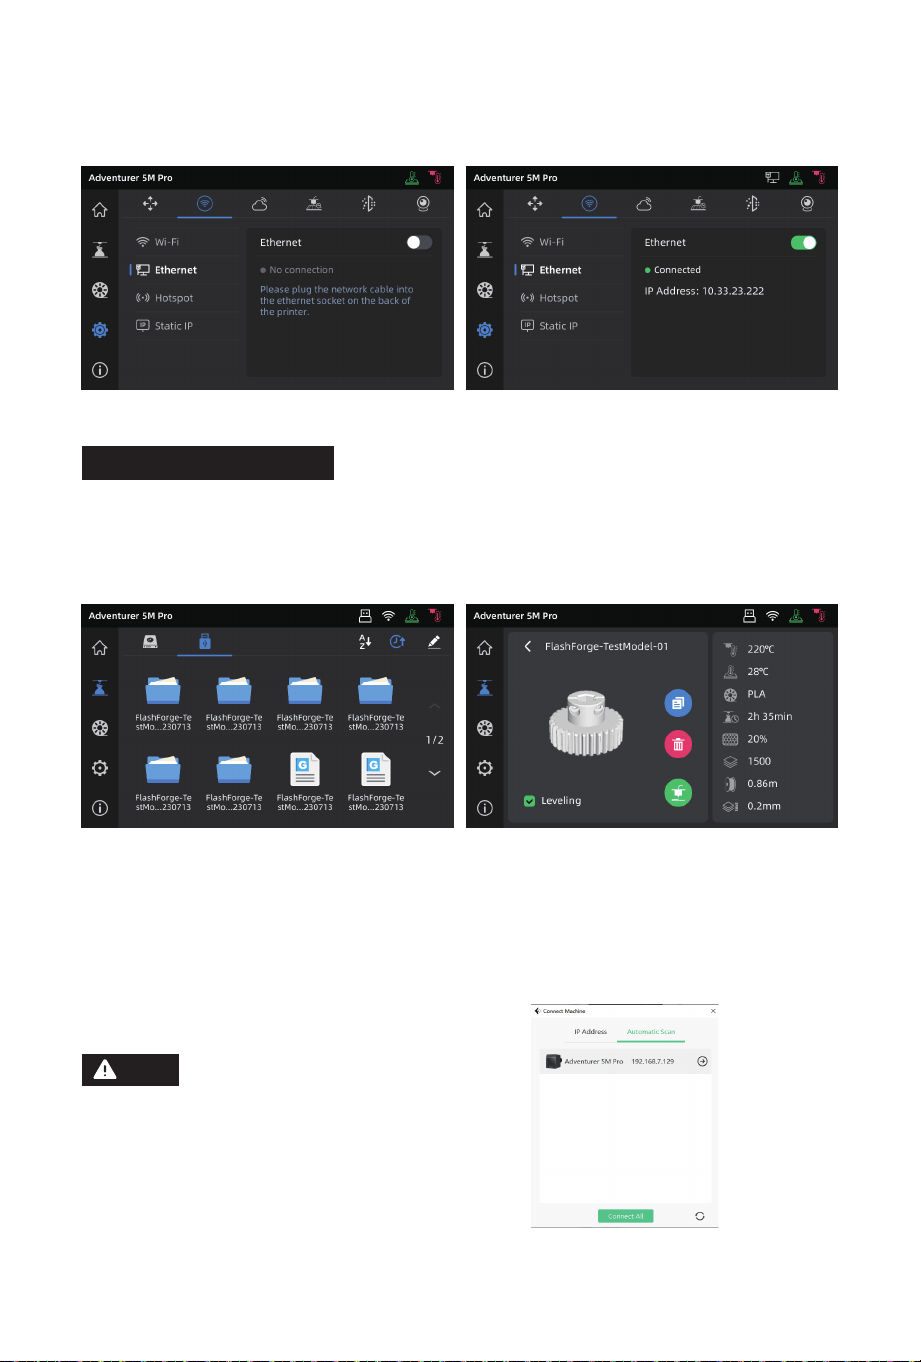
The printer and the computer must be
connected to the same network.
4.3 Printing Methods
4.3.1 Printing via USB
The printer supports printing via USB. Save the sliced file to a USB flash drive, insert it into the
printer, and select the corresponding file to start printing.
4.3.2 Printing via Wi-Fi transfer
After successfully connecting the printer to the network, open FlashPrint 5. After finishing slicing,
click [Print] in the menu and select the Adventurer 5M Pro as the machine to connect to. You can
connect it to the printer by entering the IP address or by automatic scanning.
Note
23
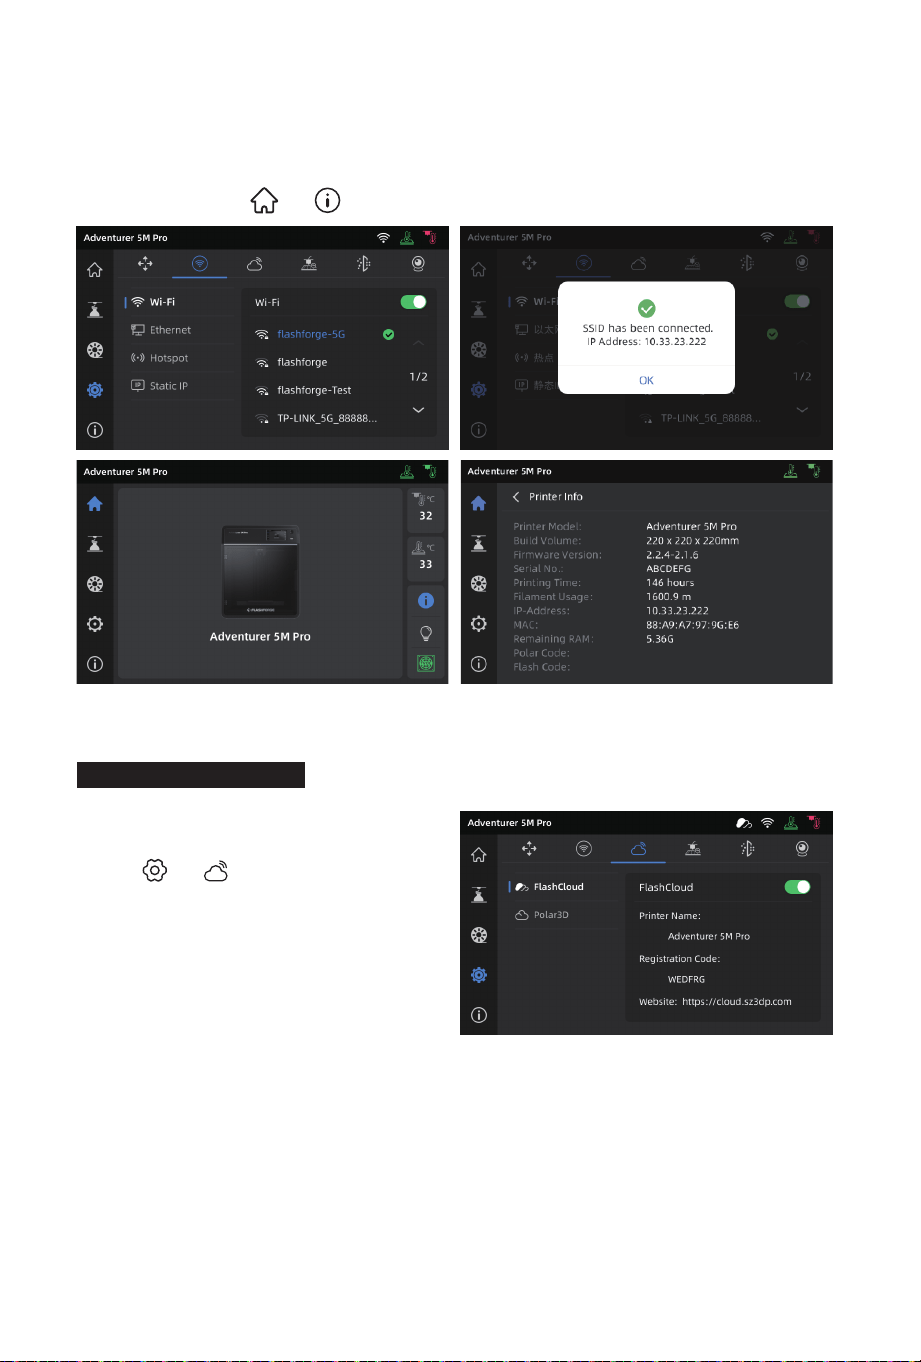
The IP address can be viewed by long-pressing the connected network or in the Printer Info
interface by clicking [ ] - [ ].
4.3.3 Printing via Cloud
1. Click [ ] - [ ], turn on the FlashCloud
switch, and view the registration code.
2. Open the FlashCloud website and register an account. After email activation, you can log in and
use. FlashCloud: https://cloud.sz3dp.com/
3. Click [My Printer] - [Add Printer]. On the Add Printer page, enter the registration code (cloud
registration code) and name the printer. After clicking [OK], the information will appear on the
printer's FlashCloud interface.
Printing via FlashCloud
24
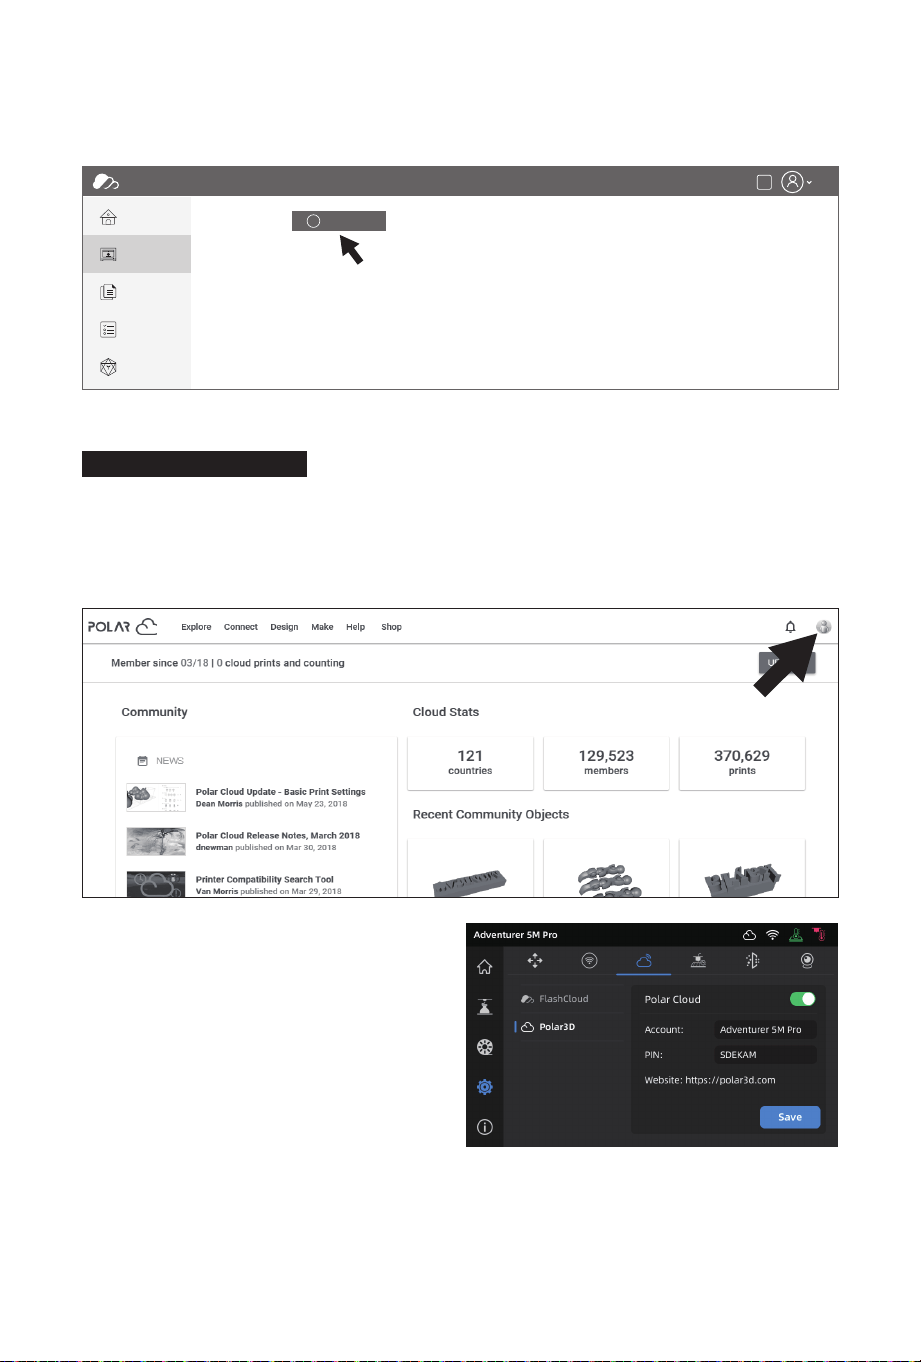
Open the Polar Cloud website and register an account.
Polar Cloud: https://polar3d.com
Note: Polar Cloud service may not be available outside the United States.
After logging in, click the icon at the top right corner, click [Settings], and click [PIN Code] in the
menu to find the PIN code.
Printing via Polar Cloud
FlashCloud
Home
My Printer
My Model
My Job
Model Library
My Printer The current printer is empty, please add a printer
Name Registration Code Type
Cn
+ Add Printer
After connecting the Adventurer 5M Pro to
the network, simply turn on the Polar Cloud
switch and enter your account and PIN code.
25
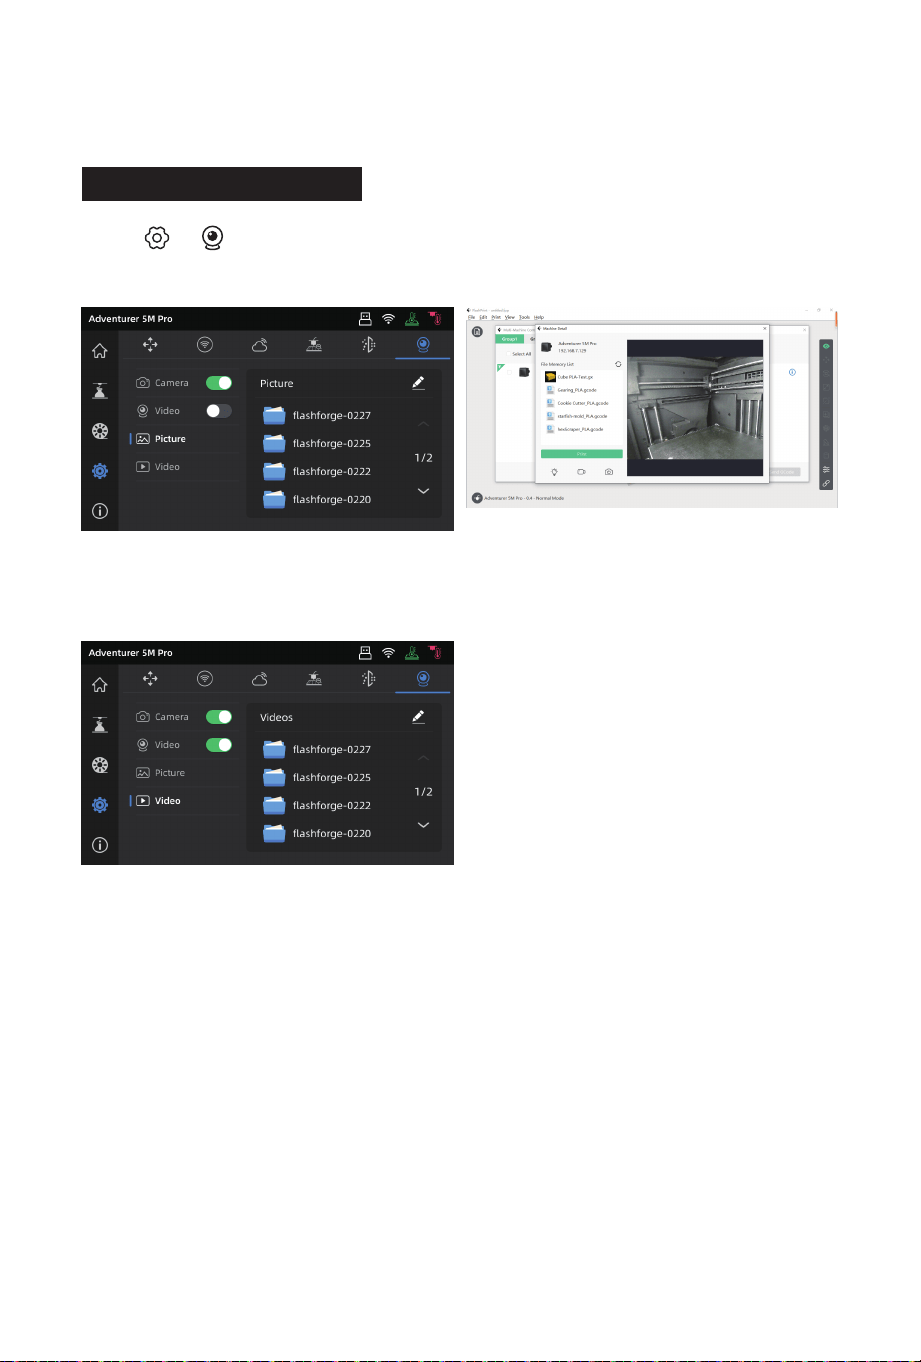
4.4 Camera Connection
1. Click [ ] - [ ] to turn on the camera
switch.
3. Turn on the video switch, and video files will be
generated after the model is printed. You can
export them to a USB flash drive for viewing.
2. After the printer is connected to FlashPrint 5,
you can view real-time images via FlashPrint 5
- [Multi-Machine Control].
26
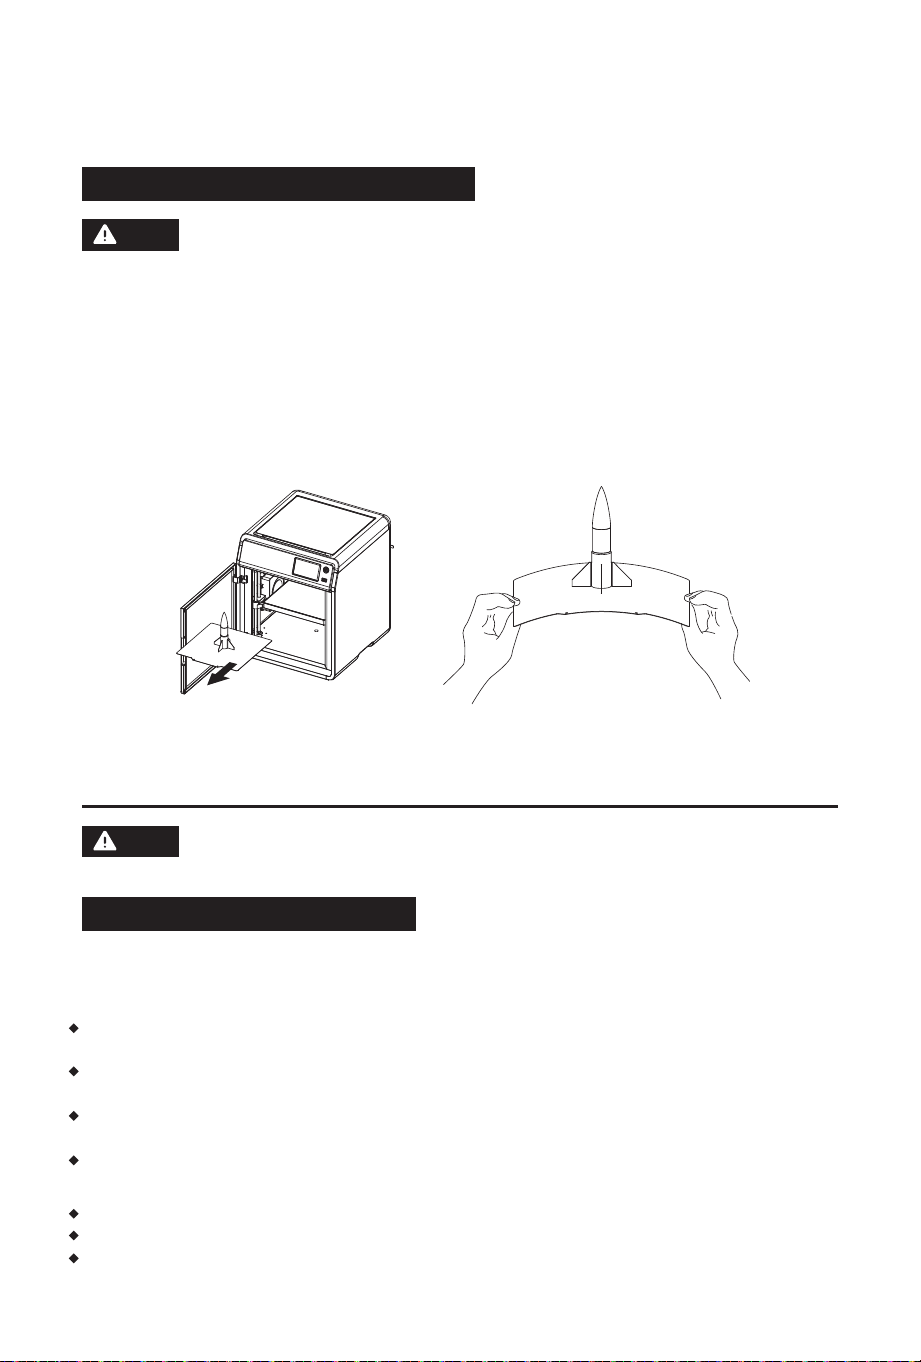
4.5 Model Removal After Printing
5.1 Leveling and Calibration
When printing is completed, the nozzle and build plate may still be at a high
temperature. It is recommended to allow them to cool down before removing
the model.
After printing is completed, directly take out the flexible steel plate and bend the platform to
remove the model. Ensure there is no residual filament on the platform before the next print.
During the first startup, equipment calibration will be performed. During subsequent use, choose
leveling or vibration compensation as needed.
When to perform leveling:
If continuously printing with PLA material, perform automatic leveling once with no need to do so
before each print. However, performing leveling can inevitably improve the printing success rate;
When switching between different materials (e.g., from PLA to ABS), please perform leveling before
each print;
If the platform-nozzle distance is too far (poor adhesion) or too close (no filament extrusion), please
perform automatic leveling;
After replacing the build plate or nozzle, please perform automatic leveling.
When to perform vibration compensation:
When there is noticeable ghosting and ringing on 3D prints;
After adjusting the tension of the synchronous belt;
When the printer has been unused for a long time and is now being restarted.
Tips on Model Removal:
1. Please take the platform plate outside the printer for model removal to prevent model debris
from accumulating inside the printer. It's recommended to keep the chamber clean.
2. For models printed with TPU or other flexible materials, it is recommended to use a scraper
for removal, which ensures you can remove the flexible model from the bed without causing
damage.
The interface layout may change whenever there is an upgrade
of firmware.
5. Introduction to Auxiliary Functions
Note
Note
27
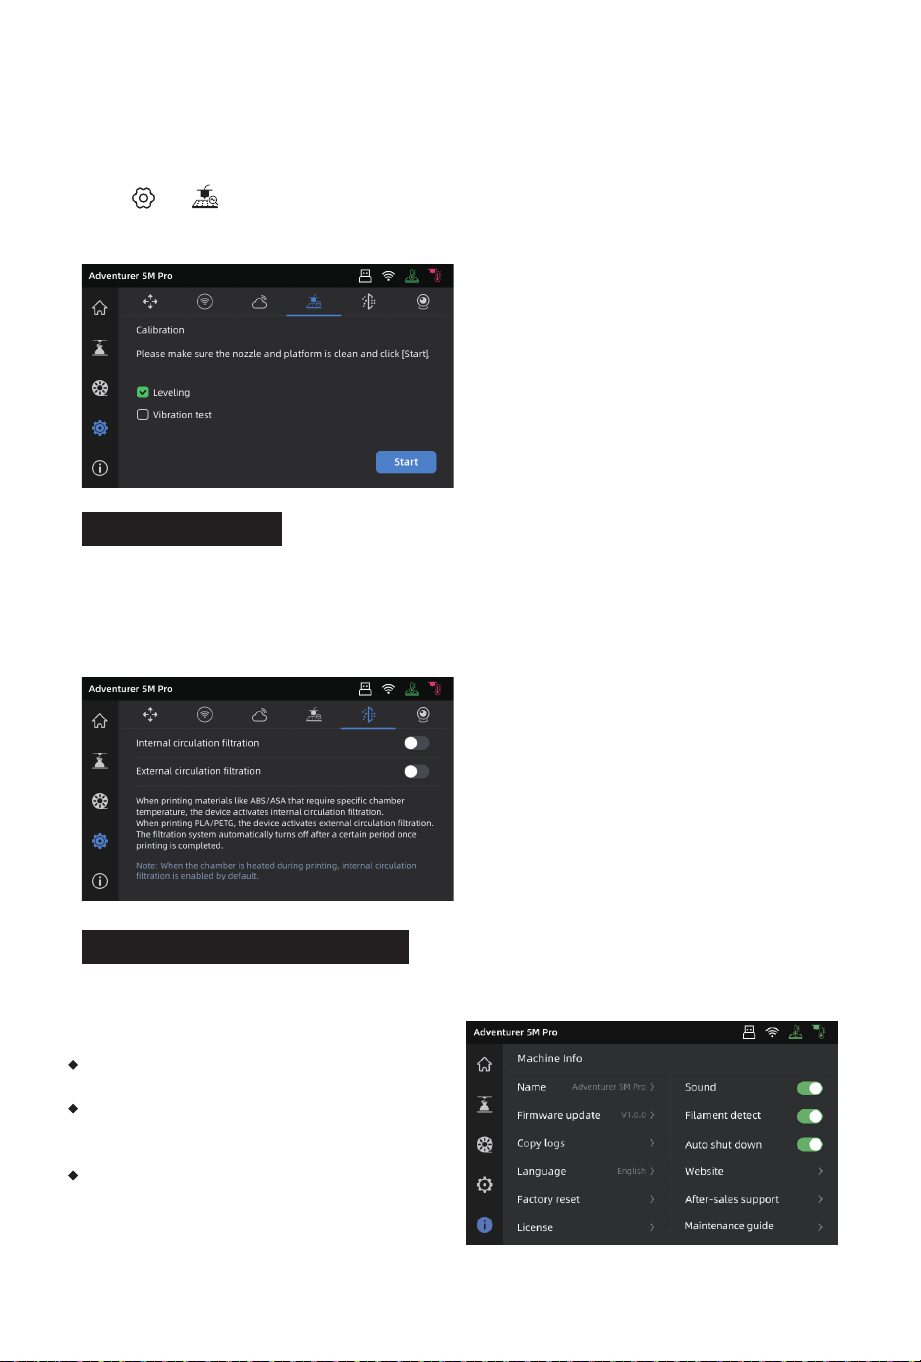
5.2 Air Filtration
Instructions:
Click [ ] - [ ] to enter the leveling and calibration interface. Choose [Leveling] or [Vibration
test], click [Start], and the printer will automatically perform the corresponding operation.
(Note: Before calibration, ensure there are no foreign objects on the platform or at the nozzle tip.)
The printer has internal&external circulation air filtration mechanisms for different materials.
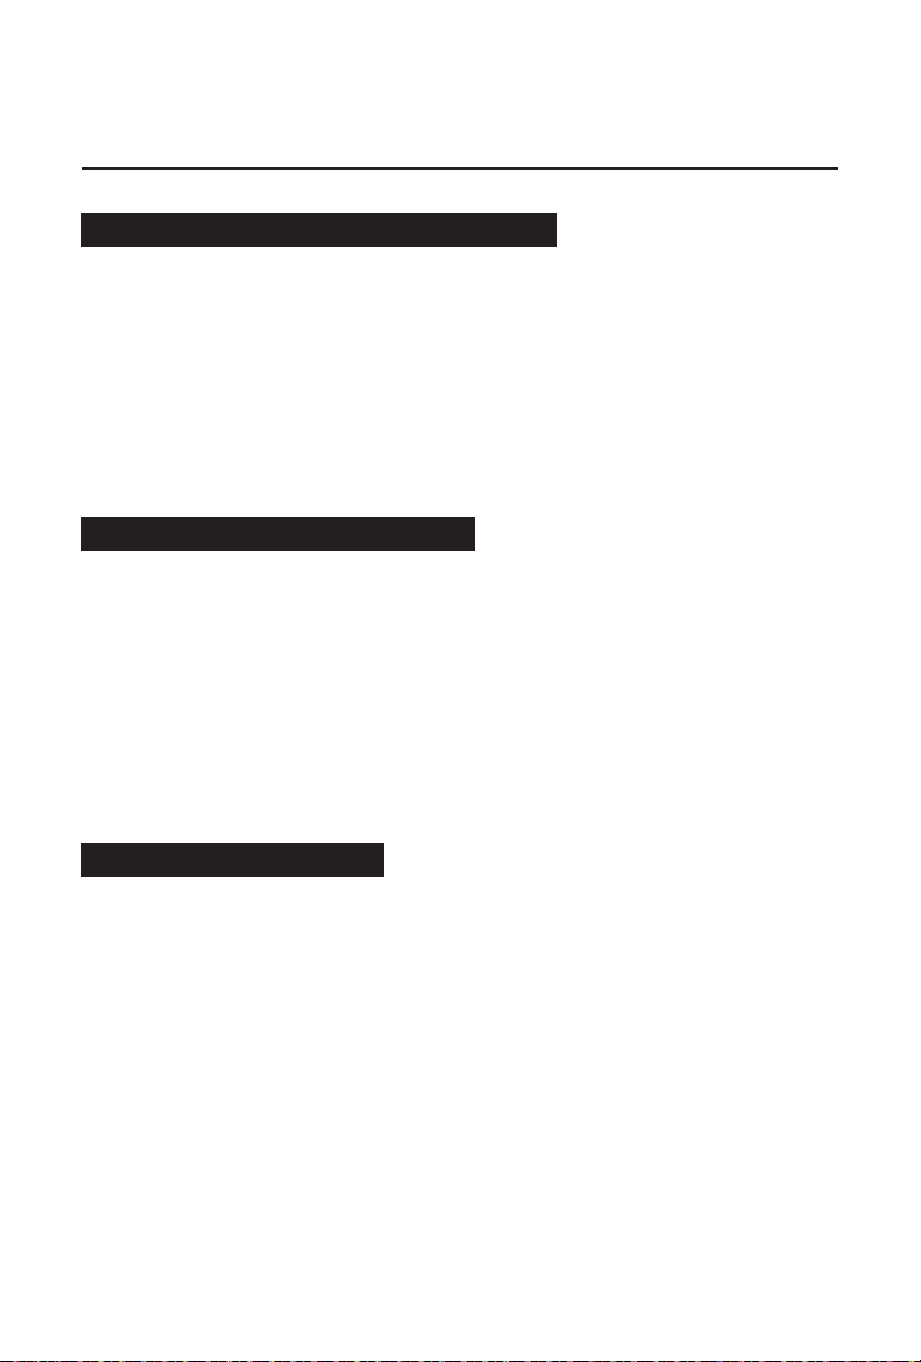
5.3 Other Function Settings
In the information interface, you can enable or disable sound, filament detection and auto
shutdown, and perform firmware updates.
When [Filament detect] is enabled, the printer
will stop printing if filament runs out mid-print.
When [Auto shut down] is enabled, the printer
will power off automatically 30 minutes after
completing a print job.
When connected to a wireless network, click
[Firmware update] to view the current version,
check for updates, and perform online firmware
updates.
During printing, the printer can automatically choose between internal circulation filtration or
external circulation filtration based on the detected printing material. (Note: Files exported from
third-party slicing software cannot be automatically recognized and require manual selection.)
28
6.1 Suggestions on Platform Plate Usage
1. Powder coated PEI plate requires glue and is suitable for printing PLA/PETG/PLA-CF/PETG-CF/
ABS/ASA. TPU printing does not require glue. This plate comes with the printer.
2. PEI film plate is suitable for printing PLA/TPU without glue. For PETG, it's recommended to use
glue. This plate can be purchased separately.
3. PC sticker platform plate is suitable for printing PC/ABS/ASA. This plate can be purchased
separately.
4. After applying glue to the platform plate, it can be cleaned with water.
5. If the platform plate gets oily, it can be cleaned with a dish detergent.
6. If the platform plate deforms significantly after long-term use, it's recommended to replace it
with a new one.
6. Maintenance
6.2 Suggestions on Nozzle Usage
1. Please use one nozzle for the same type of material to avoid clogs and extend nozzle lifespan,
especially when working with fiber-reinforced materials and PETG. Please avoid mixing them
with other materials.
2. When switching to a different material with the same nozzle, if the new material's printing
temperature is lower, adjust the setting to a higher temperature for filament extrusion to purge
old filament from the nozzle.
3. When switching to a different material with a higher printing temperature, just load the new
filament.
4. To clean residual filament inside the nozzle, you can perform multiple filament loading or
manually clear any remaining filament using the unclogging pin tool.
5. After replacing the nozzle, please perform leveling again.
6.3 General Maintenance
1. Please apply lubricating oil to the guide rails after 200 hours of printing.
2. Please replace the filter cotton every 300 hours of printing or when it appears darker in color.
3. Please clean the filament residue inside the equipment chamber in time.
29
Q1. How to unclog the nozzle?
Method 1: Click [Load] and heat the nozzle to the printing temperature of the used filament. After
heating, remove the filament guide tube, and check if the filament is bent or filament
tip is not smooth. If so, trim and insert the guide tube and filament into the nozzle, then
click [Load] and check.
Method 2: If Method 1 doesn't work, use the unclogging pin tool.
Method 3: If Method 2 doesn't work, please replace the nozzle.
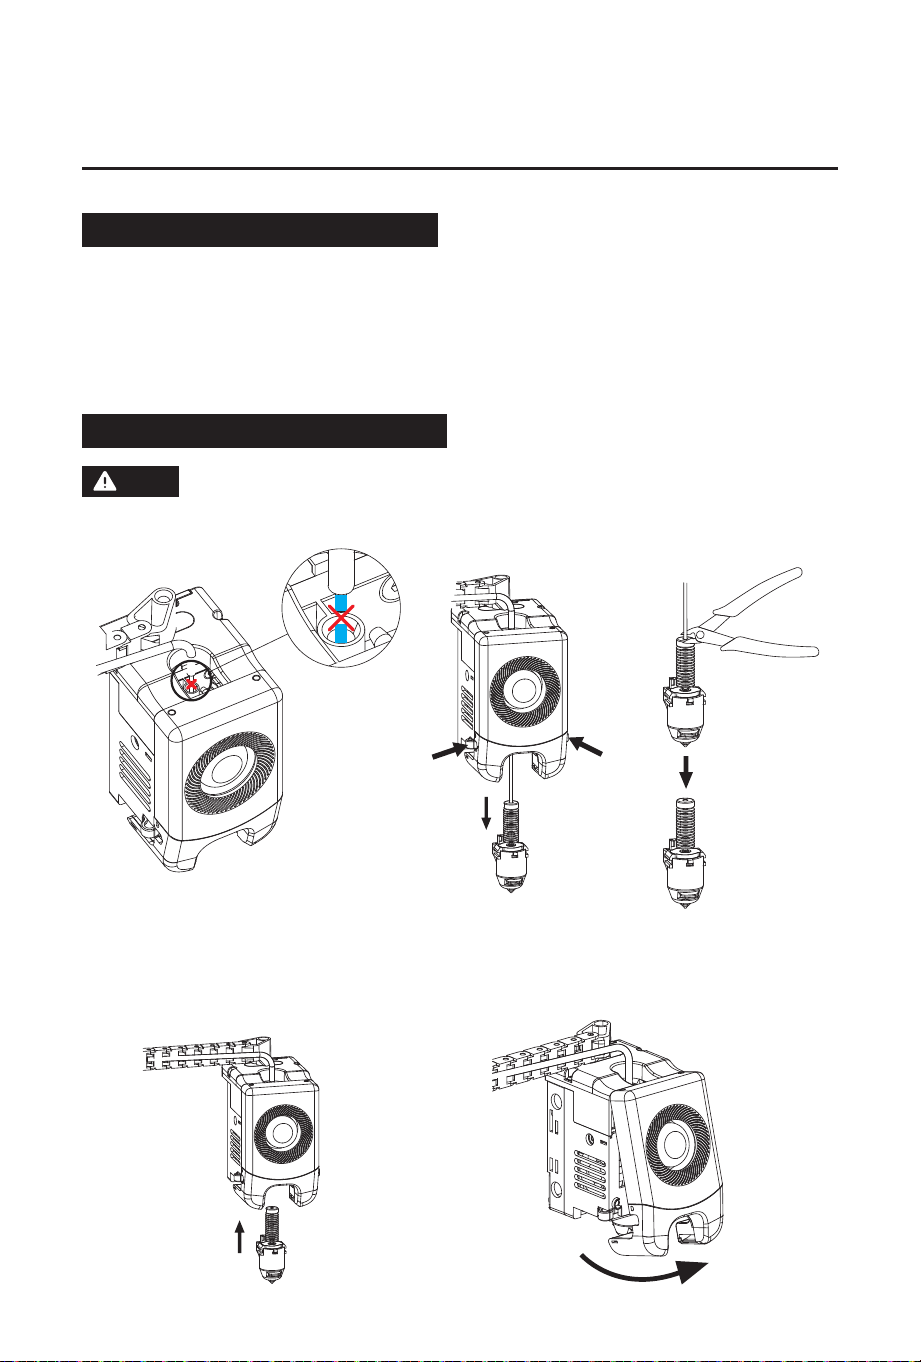
7. Q&A
Please power off the printer before replacing the nozzle!
Q2. How to replace the nozzle?
1. Remove the filament guide tube and
cut the filament.
2. Press the left and right buckles and remove the
nozzle. Trim the filament along the nozzle top.
3. Insert the new nozzle into the extruder and you can hear a "click" sound indicating the buckle
position has changed. Ensure that the nozzle slot aligns flush with the bottom of the extruder.
Note: If you have trouble aligning the nozzle, you can press the buckles during installation or
remove the front cover of the extruder (grab the lower part of the front cover with your hand
and lift it upward slightly) to check the position.
Note
30
Q3. Is leveling required after nozzle replacement?
Yes. It is recommended to perform automatic leveling to ensure high print quality as slight errors
may occur during nozzle installation. The equipment defaults to the leveling operation before
each print.
4. Power up the printer, click [ ] to enter the loading interface, and follow the on-screen
instructions to complete filament loading (refer to 4.1.1). Filament coming out of the new
nozzle smoothly indicates a successful nozzle replacement.
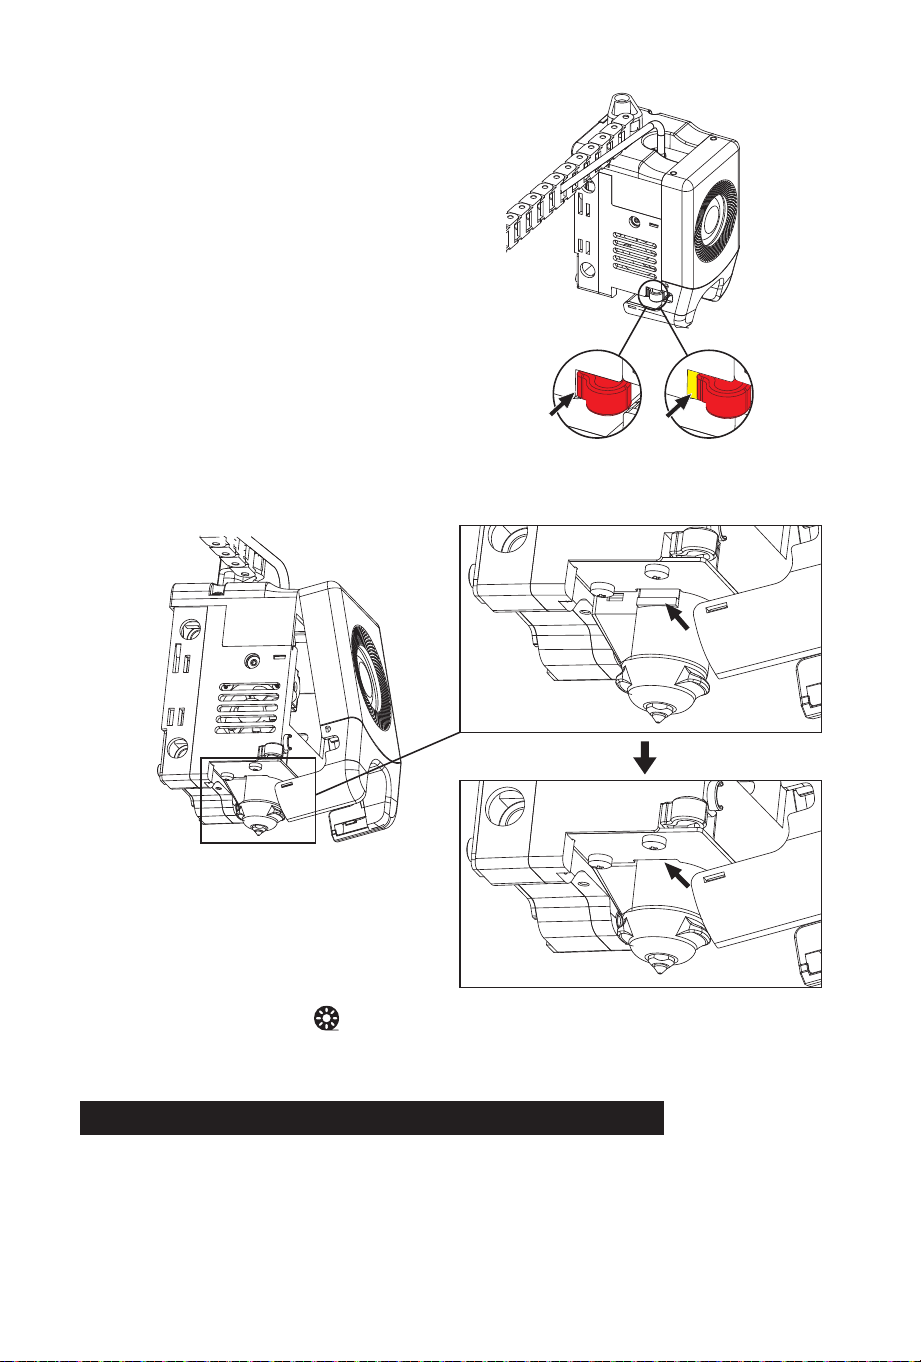
Whether it is installed in place is judged as follows:
1. Ensure the nozzle is pressed to the bottom
firmly during installation.
2. Check if it is properly installed:
a. Check the red buckle positions on the
left and right.
b. Check if the nozzle slot is flush with the bottom of the extruder (if your view is obstructed,
you can remove the front cover of the extruder to observe).
31
√
X

Q10. What to do with the Wi-Fi connection failure?
1. Please check if the Wi-Fi name contains special characters. If so, modify it and try again.
2. Please check if the password contains special characters. If so, modify it and try again.
Q9. What to do if print files can not be found and the screen displays
only folders after inserting the USB flash drive?
The USB flash drive format is incorrect. The printer supports the FAT32 file system. Please format the
USB flash drive to FAT32.
Q8. What to do if the printed model warps or doesn't adhere well?
Method 1: Increasing the platform temperature can improve the adhesion between the platform
and the model.
Method 2: Adding a brim during model slicing can alleviate the issue.
Method 3: Apply glue.
Method 4: Clean the platform to remove any oil or dirt.
Method 5: Check if the platform is level. The leveling and calibration function can be used.
Q7. Is it safe to print with ABS material?
ABS can release toxic gases during heating. It is recommended to enable internal-circulation air
filtration during or after printing. If conditions permit, consider printing in a well-ventilated area.
It is recommended to print non-toxic materials such as PLA in children's activity places.
Q6. Can filaments from other brands be used?
Yes. You can use filaments from other brands, but certain parameter adjustments are required due
to slight temperature differences in different filaments.
Q5. What to do if the nozzle position is too high (far from the
platform) or too low (hitting the platform) during printing?
How to level it?
Please check if the platform is properly installed and there is no excessive residue on the nozzle. If
these issues exist, address them first. Then, go to the settings interface, select the leveling option,
and perform automatic leveling or enable automatic leveling before printing.
Q4. What to do if the extruder moves but doesn't extrude filament at
the beginning of printing after clicking the model for printing?
1. Observe the filament guide tube to check if filament has entered the nozzle. If not, please click
[Load] until filament comes out.
2. Check if the nozzle is clogged. If so, please refer to the solution of Q1.
32
Changing different filaments may leave minor impurities in the nozzle, leading to
clogs. As this can be solved by just unclogging it, it's not owing to a quality issue.
If you encounter this problem during use, please contact customer support and
follow their guidance for unclogging.
8. Help and Support
Flashforge's professional after-sales service personnel and salesmen are on standby for you at
any time and are ready to help you with any problem you may have with the printer. If the issues
or questions are not covered in this User Guide, you can seek for solutions on our official website
or contact us by phone.
There are instructions and solutions to common issues that can be found on our official website.
Many questions are answered at Flashforge's English official website - www.flashforge.com.
The Flashforge after-sales service team can be reached by phone from 8:00 AM to 5:00 PM, from
Monday to Saturday. In case you contact us during off-duty time, your inquiry will be answered the
next working day immediately. We apologize for any inconvenience this may cause.
After-sales Service Tel: 400-886-6023
E-mail: support@flashforge.com
Address: No. 518, Xianyuan Road, Wucheng District, Jinhua City, Zhejiang Province, China
Note: Please provide the product serial number which can be found on the barcode at the back
of the printer when contacting customer support.
S/N: FFAD******
Q12. Why is the boot screen white?
If the startup sound can be heard, please replace the screen or cable. If not, please contact our
after-sales personnel.
Q11. Firmware update precaution.
Do not power off the printer or disconnect from the network during firmware download or update
to prevent update failures.
Note
33