
Roborock Q7 Series
Read this user manual with diagrams carefully before using
this product and store it properly for future reference.
Robotic Vacuum Cleaner User Manual

02
Contents
English 02
Français 14
Español (Latinoamérica) 28
Português (Brasil) 42
03 Safety Information
04 Battery and Charging
04 International Symbols Explanation
05 FCC/IC Statement
06 Product Overview
07 Installation
08 Connecting to the App
08 Instructions for Use
09 Routine Maintenance
10 Basic Parameters
11 Environment Protection Information
12 Common Issues

03
WARNING
CAUTION
• For the purposes of recharging the battery, only use with roborock AED08LRR or SPCDZ03RR (use with roborock BLJ18WD200080P-U
power supply) docking station.
• The product must be switched off and the plug must be removed from socket outlet when not in use, before cleaning or maintaining the
product.
• To reduce the risk of electric shock, this appliance has a polarized plug (one blade is wider than the other). This plug will fit in a polarized
outlet only one way. If the plug does not fit fully in the outlet, reverse the plug. If it still does not fit, contact a qualified electrician to install
the proper outlet. Do not change the plug in any way.
• The docking station can only be used to charge the robotic vacuum cleaner equipped with a 14.4 V/3200 mAh (TYP) lithium-ion battery.
• Only use the product in accordance with the User Manual. Any loss or damage caused by improper use will be borne by the user.
• Do not allow to be used as a toy. Close attention is necessary when used by or near children.
• Do not rinse the robot and the dock.
• Do not use the product to clean hard or sharp objects (such as decoration wastes, glass, and nails) to avoid scratching the robot, the dock
or the floor.
• Make sure dustbin, washable filter, dust bag, side brush, mop cloth, main brush and main brush cover are installed in place before cleaning.
• Do not sit or stand on the robot or dock.
• To prevent corrosion or damage, do not use any disinfectant and only use cleaning solution recommended by Roborock.
• Do not put any low objects (such as shoes, mats) near raised areas like stairs. Otherwise, the robot may fall down caused by malfunctional
sensors.
• To prevent water damage, make sure that the floor where the robot operates is free of water.
• Do not operate the product in a room where an infant or child is sleeping.
• Before using the product, move sundries such as wires and any unstable, fragile, precious, or dangerous items from the floor to prevent
them from being pulled by the robot and causing personal injury or property damage.
• Keep hair, loose clothing, fingers, and all body parts of people and pets away from seams, openings and moving parts of the product to
avoid possible injury.
• Do not carry the robot using vertical bumper, side brush or bumper.
• Place the dock on a hard, flat floor. Keep the dock, robot, and power cord away from fire and heat sources like a heating radiator. Avoid
humid and narrow spaces or locations where the robot may be suspended in the air.
Safety Information

04
• Do not wipe the charging contacts with wet cloth or wet hands.
• If the product is left unused for a long period, store it in a cool, dry place after having it fully charged, unplugged, and switched off.
Recharge it at least every three months to avoid battery overdischarge.
• Do not use the product when the temperature is higher than 40°C (104°F) or lower than 4°C (39°F), or if there is any liquid or sticky
substance on the floor.
• Do not discard waste batteries. Leave them with a professional recycling organization.
• To transport the product, be sure to unplug the dock, switch off the robot, and empty water tanks. Use of the original packaging is advised.
• Be sure that the supply voltage meets the requirements listed on the dock.
Battery and Charging
International Symbols Explanation
• This product can be used by children aged from 8 years and above and persons with reduced physical, sensory or mental capabilities
or lack of experience and knowledge if they have been given supervision or instruction concerning use of the product in a safe way and
understand the hazards involved. Children shall not play with the product. Cleaning and user maintenance shall not be made by children
without supervision.
• Do not dismantle, repair or modify the battery or charging dock.
• If the dock is placed in an area susceptible to thunderstorms or with unstable voltage, take protection measures.
• Do not use the product on high pile carpets. Product effectiveness may also be reduced on dark carpets.
• Do not place any object on top of the robot or dock, near the suction inlet of the dock, or cover them with any item (including dust-proof
cover).
• Do not use this product on elevated surfaces without barriers such as the floor of a loft, an open-ended terrace, a slide, or top of furniture.
• Do not use the dock to pick up stones, paper scraps, or other objects that may block the air duct.
• Do not operate the product if it has been damaged in any way. Contact customer service for help.
• Always operate the device in well-ventilated areas to prevent overheating.
• Roborock disclaims all liability for indirect, punitive, incidental, or consequential damages resulting from the use, misuse, or inability to use
this product. This disclaimer does not affect any statutory rights that may not be disclaimed under applicable law.
~ – ALTERNATING CURRENT symbol [symbol IEC 60417-5032 (2009-02)]
– DIRECT CURRENT symbol [symbol IEC 60417-5031 (2009-02)]
– For indoor use only.
05
FCC/IC Statement
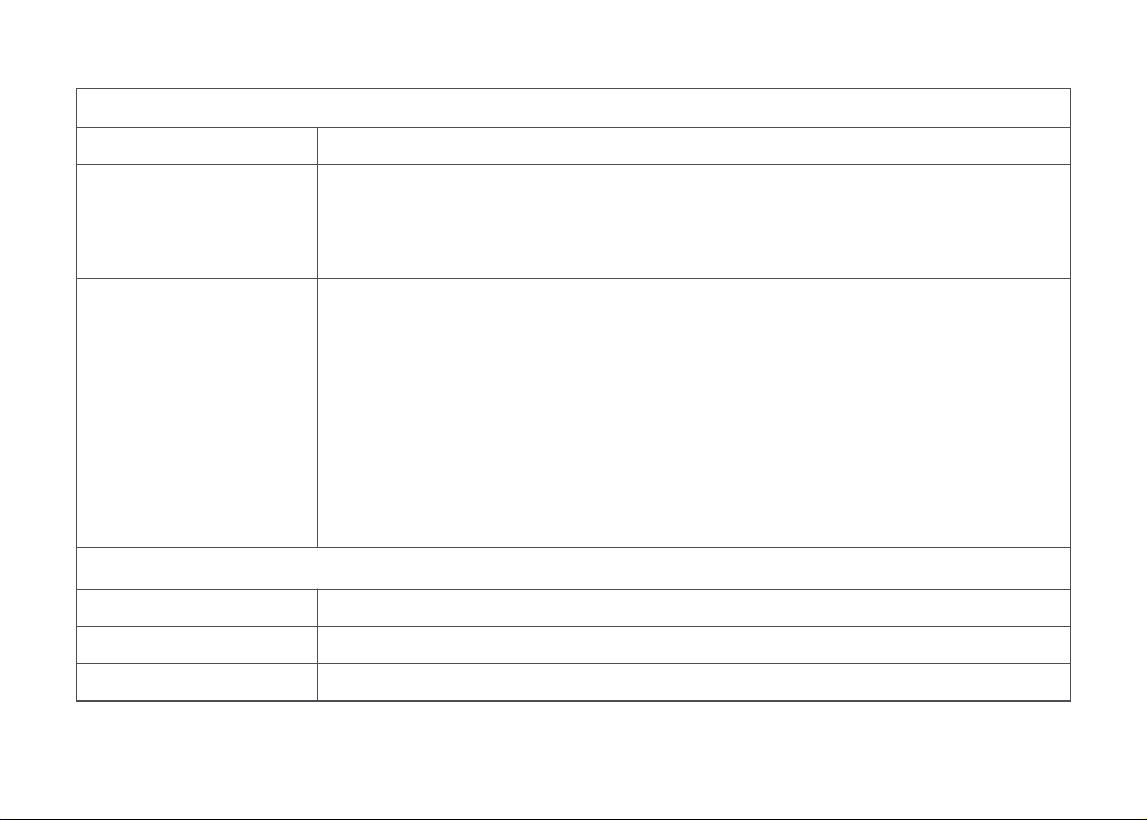
Compliance Information
Product Name Robotic Vacuum Cleaner with Charging Dock
Robotic Vacuum Cleaner Model: RRA0TCP
Docking Station Model: SPCDZ03RR
Power Supply Model: BLJ18WD200080P-U
Auto-Empty Dock Model: AED08LRR
Product Model
Compliance Statement
Correspondence of the responsible party in USA
Roborock Technology Co.
ROOM 1227, 12TH FLOOR, 1000 N. WEST STREET, WILMINGTON, DE 19801
support@roborock.com
Company
Address
Email
This device complies with Part 15 of the FCC Rules.
Operation is subject to the following two conditions:
(1) this device may not cause harmful interference, and
(2) this device must accept any interference received, including interference that may
cause undesired operation.
This device contains licence-exempt transmitter(s)/receiver(s) that comply with
Innovation, Science and Economic Development Canada’s licence-exempt RSS(s).
Operation is subject to the following two conditions:
(1) This device may not cause interference.
(2) This device must accept any interference, including interference that may cause
undesired operation of the device.
06
Product Overview
A
A1
Robot (Top View)
Press any button to pause a running robot.Note:
Power cord can exit at either side.Note:
A1-1—LiDAR Sensor
A1-2—Bumper
A1-3—Dock Locator
A1-4—Charging Contacts
A3
Dustbin and Water Tank
Combo Unit
A3-1—Water Tank
A3-2—Water Tank Stopper
A3-3—Release Buttons
A3-4—Washable Filter
A3-5—Dustbin
A3-6—Filling Port
A3-7—Filter Holder
A3-8—Filter Holder Latches
A2
Robot (Bottom View)
A2-1—Side Brush
A2-2—Cliff Sensors
A2-3—Omnidirectional Wheel
A2-4—Main Brush Cover Latches
A2-5—Main Brush
A2-6—Main Wheels
A2-7—Mop Module
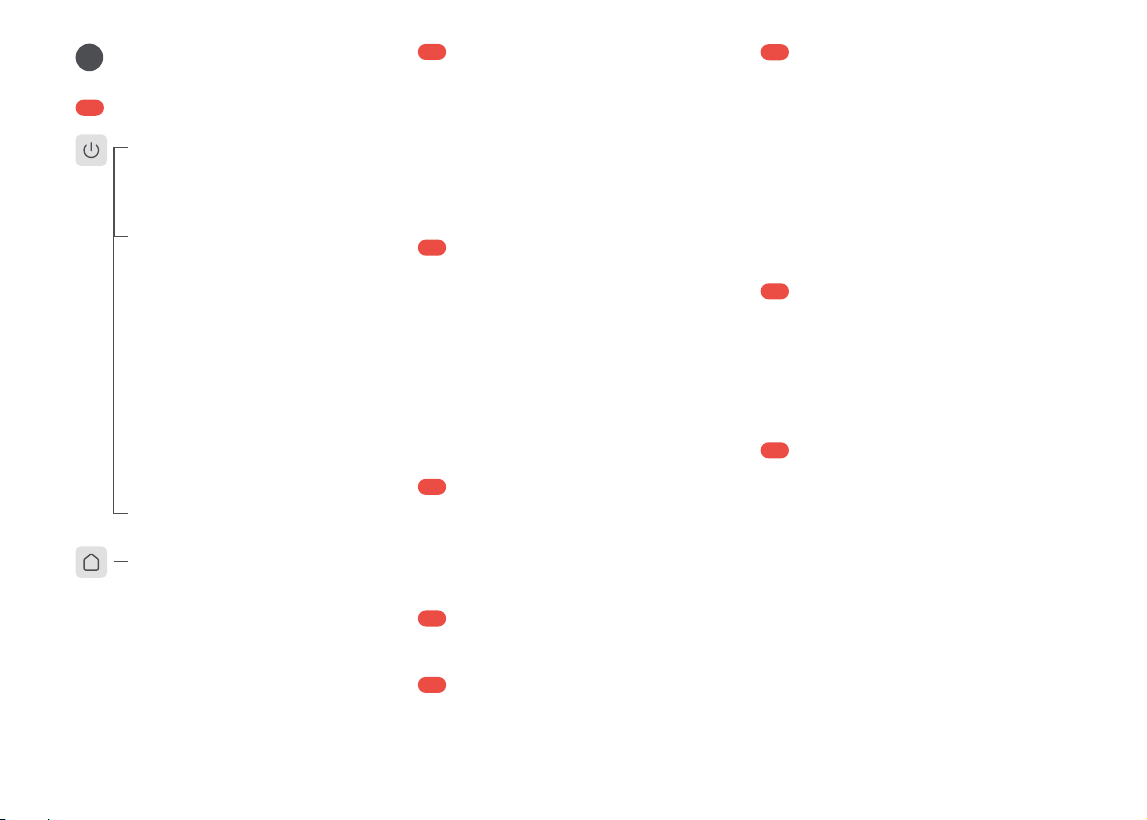
Power Indicator Light
Power/Clean
• Press and hold to turn the robot
on or off
• Press to start cleaning
Dock
• Press to start docking
A6
Power Cord
A7
Auto-Empty Dock
A8
Auto-Empty Dock (Top Cover
Open)
A9
Auto-Empty Dock (Back View)
A5
Moisture-Proof Mat
• Steady white: Waiting for orders/
Paused/WiFi connected/Cleaning/
Docking/Mapping/Emptying
• Breathing white: Starting up/
Charging (battery level > 20%)
• Flashing white slowly: Waiting for
WiFi connection
• Flashing white quickly: Updating/
Connecting
• Steady red: Battery level < 20%
• Breathing red: Charging (battery
level < 20%)
• Flashing red: Error
• Steady white: Powered on while the
robot is not docked
• Flashing white slowly: Emptying
• Steady red: Dust bag is not in place
• Off: Powered off or the robot is
charging
A7-1—Dock Cover
A7-2—Dustbin
A7-3—Status Indicator Light
A8-1—Disposable Dust Bag
A8-2—Charging Contacts
A8-3—Dock Location Beacon
A8-4—Suction Inlet
A9-1—Power Port
A9-2—Power Cord Storage Slot
A9-3—Cord Outlets
A4
Mop Module
A4-1—Mop Cloth Mount
A4-2—Mop Cloth Mount Latches
A4-3—Mop Cloth
A4-4—Hook and Loop Pads
A5-1—Moisture-Proof Mat Adhesive Tape
07
• When using the robot for the first time, follow it
throughout its whole cleaning route and watch for
potential problems. The robot will be able to clean by
itself in future uses.
• To prevent excessive buildup of dirt on the mop cloth,
floors should be vacuumed at least three times before
the first mopping cycle.
Notes:
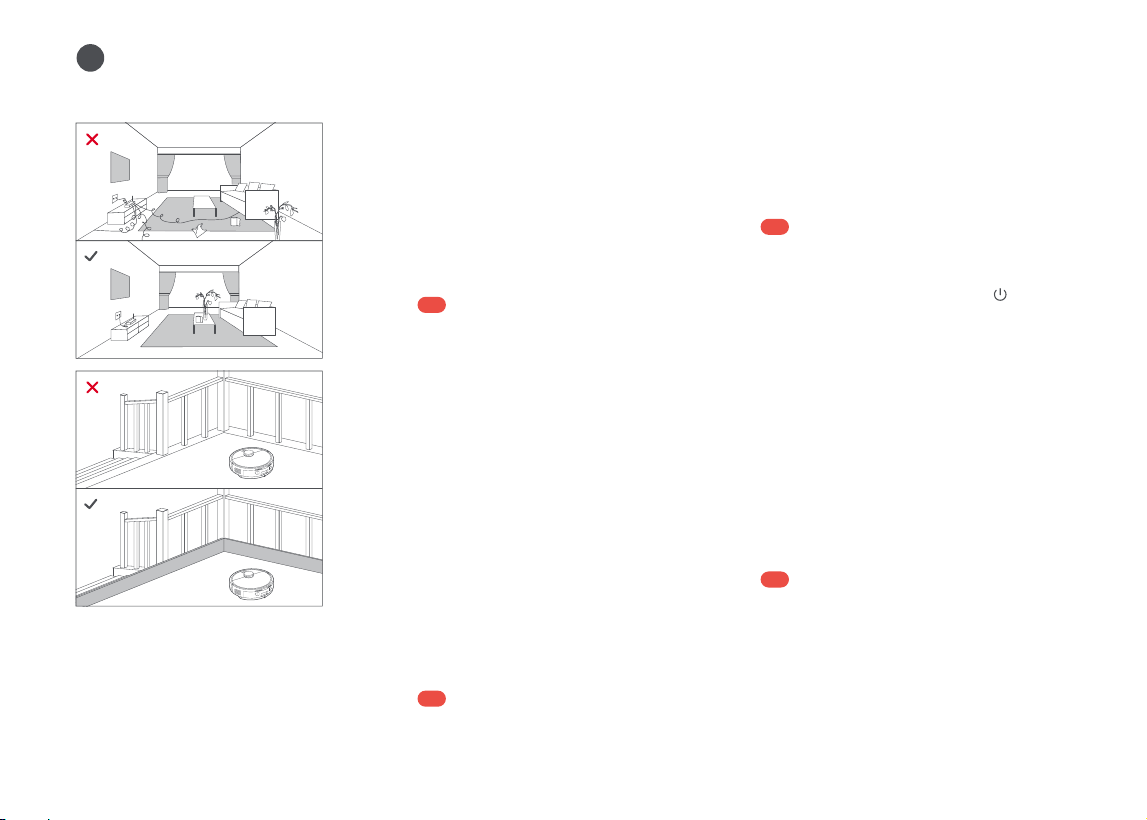
• Keep at least 0.5 m (1.6 ft) of clearance on either side,
1.5 m (4.9 ft) in front.
• If the power cord hangs vertically to the ground, it
may be caught by the robot, causing the dock to be
moved or disconnected.
• Keep the dock away from direct sunlight or anything
that may block the dock location beacon, otherwise
the robot may fail to return to the dock.
Notes:
• Always place the moisture-proof mat on wooden floors.
• When necessary, remove the double-sided adhesive
tape slowly to reduce residue glue.
• The moisture-proof mat attaches best to smooth
surfaces.
Notes:
• The robot may not be turned on when the battery
is low. In this case, place the robot to the dock for
charging.
• The robot cannot be turned off when it is being
charged.
Notes:
Installation
B
Important Information
1. Tidy cords, hard or sharp objects (such as
nails and glass), and loose items from the
ground and move any unstable, fragile,
precious, or dangerous items to prevent
personal injury or property damage due
to items becoming tangled in, struck by,
or knocked over by the robot.
2. When using the robot in a raised area
(such as in a duplex apartment), always
use a physical security barrier to prevent
accidental falls that may result in
personal injury or property damage.
Place the dock on a hard, flat floor, flat
against a wall. Connect the power cord with
the dock and tidy up the excess cord. Make
sure that the location has good WiFi
coverage for a better experience with the
mobile app. Plug in and make sure that the
status indicator light is on.
B1-1—
B1-2—
B1
Positioning the Dock
More than 1.5 m (4.9 ft)
More than 0.5 m (1.6 ft)
After fixing the dock in place, use a dry cloth
to clean the area where the moisture-proof
B2
Attach the Moisture-Proof Mat
mat will be located. Tear off the double-sided
tape at the bottom of the moisture-proof
mat, and stick the mat on the floor.
Before using, be sure to remove the film on
the dock locators on the front of and at the
rear of the robot. Press and hold to
power on the robot. Wait until the power
indicator light is steady white, and then
place the robot to the dock. The robot is
equipped with a built-in high-performance
lithium-ion rechargeable battery pack. To
maintain battery performance, keep the
robot charged.
B3
Powering On & Charging
B4
Starting Mopping
Note: To prevent excessive buildup of dirt on the mop
cloth, floors should be vacuumed at least three times
before the first mopping cycle.
B4-1—
Remove the dustbin and water tank
combo unit, open the water tank
stopper, and fill the water tank with
tap water before reinstalling the
stopper. Do not immerse the unit
into the water directly.
08
Turn on the robot, then press and hold
and simultaneously for three seconds
until you hear the “Entering network
configuration mode” voice message. The
robot will then wait for a connection.
2. Reset WiFi
Instructions for Use
Open the Roborock app, tap the “Add
Device” or “+” button and add your device
following the in-app guide.
Notes:
• The actual process may vary due to ongoing app
updates. Follow the instructions provided in the app.
• Only 2.4 GHz WiFi is supported.
3. Add device
Note: The robot cannot be turned off when it is being
charged.
Press and hold to turn on the robot. The
power indicator light will come on, and the
robot will wait for orders.
Press and hold to turn off the robot and
complete the cleaning cycle.
Turning On/Off
When the robot is running, press any
button to pause it, press to resume
cleaning. Press on a paused robot to
send it back to the dock for charging.
Pause
Note: Placing a paused robot on the dock manually will
end the current cleanup.
• To avoid deformation, only use cold water.
• Do not rinse or immerse the dustbin and water tank
combo unit with water.
• To prevent damage, do not use any disinfectant and
only use cleaning solution recommended by Roborock.
• Dampen the mop cloth and wring it until it stops
dripping. Install the mop onto the mop cloth mount
and stick it flat in place. After mopping, empty the
water tank of unused water immediately.
• All combo units are subject to water-based tests before
leaving the factory. It is normal that a small amount of
water remains in the unit.
Notes:
B4-3—
Align the positioning hole and install
the mop cloth mount into the bottom
of the combo unit.
B4-4—
Reinstall the combo unit into the
robot in place.
Connecting to the App
Search for “Roborock” in the App Store or
Google Play or scan the QR code to
download and install the app.
1. Download the App
Notes:
• Before cleaning, tidy cords (including the power cord
of the dock) and valuables from the floor. Loose
items may be dragged by the robot, resulting in the
disconnection of electrical appliances or damage of
cords and property.
• Before starting each cleaning task, make sure that the
mop cloths have been properly installed.
• To make sure the robot returns to the dock
automatically, start the robot from the dock and do
not move the dock during cleaning.
• Cleaning cannot start if the battery level is too low.
Allow the robot to charge before starting a cleanup.
• If the battery runs low during a cleaning cycle, the
robot will automatically return to the dock. After
charging, the robot will resume where it left off.
Press to start cleaning. The robot will plan
its cleaning route and in each room, it firstly
draws out edges and then fills the room in a
zigzag pattern. In so doing, the robot cleans
all rooms one by one, thoroughly and
efficiently.
Starting Cleaning
After cleaning, the robot will return to the
dock and auto-emptying will automatically
begin.
Emptying
B4-2—
Dampen the mop cloth and wring it
until it stops dripping. Install the
mop onto the mop cloth mount and
stick it flat in place.
Notes:
• If you cannot connect to the robot due to your router
configuration, a forgotten password, or any other
reason, reset the WiFi and add your robot as a new
device.
• If you want to disconnect WiFi, reset the WiFi and make
sure the WiFi is successfully resetted. Then wait for 5
minutes and WiFi will be automatically disabled. lf you
want to reconnect, reset the WiFi before proceeding.
09
Note: Do not use chemicals such as cleaning fluids and
sprays to clean these sensors.
*
Clean as required.
C3
Robot Sensors
*
Clean monthly and replace every 3-6 months.
C2
Side Brush
Unscrew the side brush screw. Remove and
clean the side brush. Then, reinstall the
brush and tighten the screw.
Use a soft, dry cloth to wipe and clean all
sensors, including:
C3-1—
Dock Locator
C3-2—
Cliff Sensors
C1-3—
Reinstall the main brush and main
brush cover, and press the cover
securely.
Notes:
• It is recommended to wipe the main brush with a wet
cloth. If the main brush is soaked, air-dry it away from
direct sunlight.
• Do not use corrosive cleaning fluid or disinfectant to
clean the main brush.
Notes:
• The robot will not go to sleep when it is charging.
• The robot will automatically shut down if left sleep for
more than 12 hours.
If the robot is paused for over 10 minutes, it
will go to sleep, and the power indicator
light will flash every few seconds. Press any
button to wake the robot up.
Sleep
The default Do Not Disturb (DND) period is
from 22:00 to 08:00. You can use the app to
modify the DND period or disable the
mode. In DND mode, the robot will not play
voice messages.
DND Mode
Notes:
• When emptying has been left unused for a long period,
empty the dustbin manually and make sure the air inlet
is clear for optimal emptying performance.
• Do not use without dust bag installed in place or dock
cover closed.
If the robot does not respond when a button
is pressed or cannot be turned off, power it
on and press and hold for five seconds.
After hearing a voice message, press and
hold for five seconds. The robot will then
restart and be restored to factory settings.
Restoring Factory Settings
Note: After this process, existing settings such as
scheduled cleaning and WiFi will be restored to factory
settings.
Routine Maintenance
C
*
Clean every 2 weeks and replace every 6-12 months.
C1
Main Brush
C1-1—
Turn over the robot and press the
main brush cover latches to remove
the main brush cover.
C1-2—
Remove the main brush and clean it.
Notes:
• The robot will go to sleep automatically if left in a
malfunctioning state for over 10 minutes.
If an error occurs, the power indicator light
will flash red. A pop-up notification will appear
in the app and a voice alert may sound.
Error
Charging
Note: If the robot fails to find the dock, it will
automatically return to its starting position. In this case,
place the robot to the dock manually to charge.
After cleaning, the robot will automatically
return to the dock for charging. During
cleaning, the robot will return to the dock to
charge when the battery level is low. Press
to send the paused robot back to the dock.
The power indicator light will breathe during
robot charging.
• Placing a malfunctioning robot on the dock manually
will end the current cleanup.
Note: The omnidirectional wheel bracket cannot be
removed.
*
Clean as required.
C4
Omnidirectional Wheel
C4-1—
Use a tool, such as a small
screwdriver, to pry out the axle and
take out the wheel.
C4-2—
Rinse the wheel and the axle with
water to remove any hair and dirt.
Air-dry, reinstall, and press the wheel
and axle back in place.
10
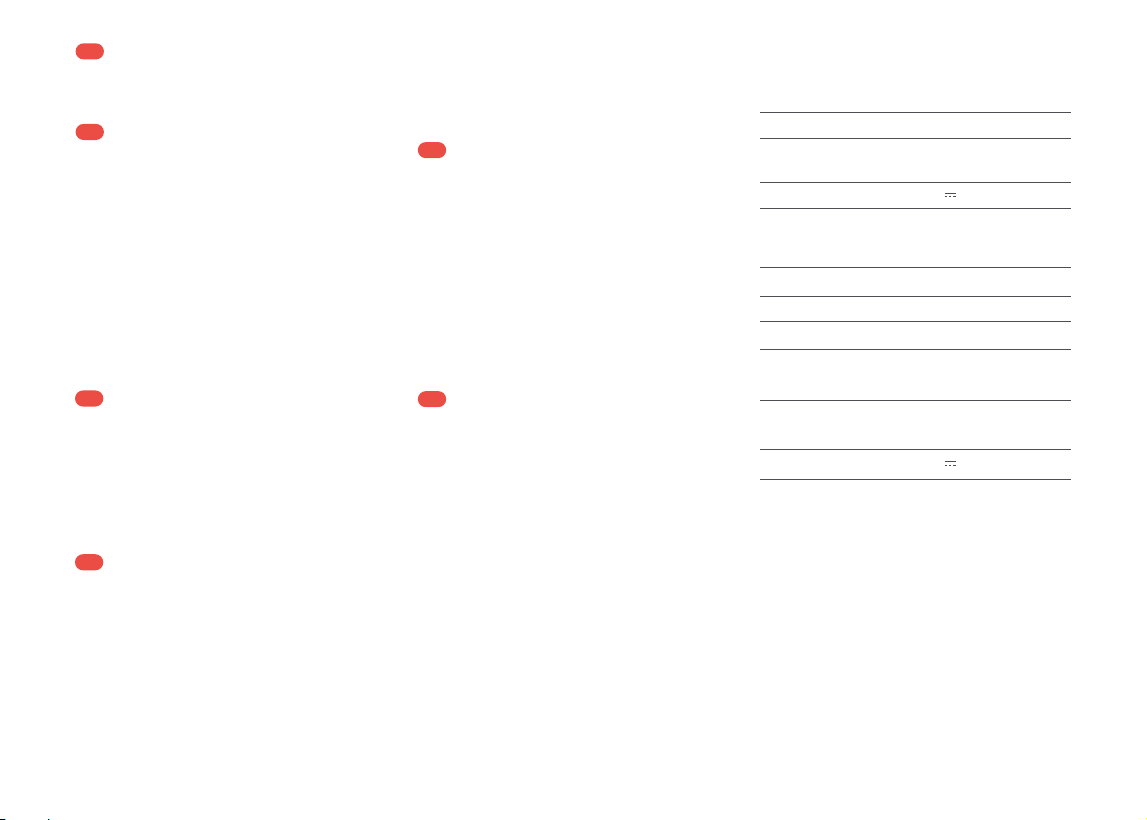
Basic Parameters
Robot
3.5A
0.3A
60 Hz
Rated Input
(Dust Collection)
Rated Input
(Charge)
Auto-Empty Dock
AED08LRRModel
120V~
Rated Input Voltage
Rated Frequency
Rated Output
RRA0TCPModel
14.4V/3200mAh (TYP)
lithium-ion battery
Battery
Rated Input
*
To ensure optimal emptying performance, replace
the dust bag when it is full.
C9
Auto-Empty Dock
C9-1—
Open the dock cover, lift the dust
bag out of the dock and discard it.
C9-3—
Install a new dust bag in place and
close the dock cover.
C9-4—
Wipe the dock location beacon and
charging contacts with a soft, dry
cloth to keep them clean.
C9-2—
Clean the filter with a dry cloth.
*
Clean after each use and replace every 3-6 months.
C7
Mop Cloth
Note: Do not touch the surface of the filter with hands,
brushes, or sharp objects to avoid potential damage.
C8-1—
Open the lid of the dustbin and
water tank combo unit as shown,
press the filter holder latches to pull
out the filter holder.
C8-2—
Remove the filter from the filter
holder, rinse the filter repeatedly
and tap it to remove as much dirt as
possible.
C8-3—
Allow at least 24 hours for the filter to
dry thoroughly before reinstalling it.
*
Clean every 2 weeks and replace every 6-12 months.
C8
Washable Filter
C7-1—
Remove the mop cloth mount in the
direction shown in the picture.
C7-2—
Remove the mop cloth from the
mount.
C7-3—
Wash the mop cloth and then air-dry it.
*
Clean as required.
C10
Charging Contacts
Use a soft, dry cloth to wipe the charging
contacts on the robot and the dock.
Note: After mopping, empty the water tank, wash the
mop cloth, and air-dry them to prevent odors.
C6-1—
Press the release button to take out
the unit.
C6-2—
Open the lid of the unit, empty the
dustbin and clean it.
C6-3—
Open the water tank stopper and
empty the tank.
C6-4—
Reinstall the unit in the robot.
*
Clean as required.
C6
Dustbin and Water Tank
Combo Unit
*
Clean as required.
C5
Main Wheels
Clean the main wheels with a soft, dry cloth.
20V 0.8A
20V 0.8A

11
Removing the battery
The chemical substances contained in the
built-in lithium-ion battery of this product
can cause environmental pollution. Remove
the battery before disposing of this product
and hand it to a professional battery
recycling facility for centralized disposal.
1. Operate the robot without connecting to
the dock until it runs out of battery.
2. Turn off the robot.
3. Unscrew the battery cover.
4. Remove the battery cover.
5. Press the latch to pull out the battery
connector and remove the battery.
Notes:
• Before removing the battery, make sure it is fully
drained and the robot is disconnected from the dock.
• Remove the entire battery pack. Avoid damaging the
battery pack casing to avoid short-circuits or leakage
of hazardous substances.
• In the event of accidental contact with battery fluid,
rinse thoroughly with water and seek immediate
medical care.
Environment
Protection Information
How to remove the battery:
*
The following information applies only when disposing
of the robot and should not be followed for day-to-day
operations.
12
Unable to power on
Unable to charge
Unable to connect to WiFi
Unable to return to dock
Noise during cleaning
Abnormal behavior
Scheduled cleaning is not working
Robot becomes offline
Poor cleaning performance
and/or dust leakage
The robot does not resume
cleaning after recharging
Issue
• Battery low. Put the robot on the dock and charge it before use.
• Battery temperature too low or too high. Only use the robot within the range of 4-40°C (39-104°F).
• Dock not connected to power. Check whether both ends of the power cord are properly connected.
• Poor contact. Clean the charging contacts of the dock and the robot.
• Battery temperature too low or too high. Only use the robot within the range of 4-40°C (39-104°F).
• WiFi disabled. Reset the WiFi and try again.
• Poor WiFi signal. Move the robot to an area with better WiFi.
• Abnormal WiFi connection. Reset the WiFi, download the latest app version and retry.
• Unable to connect to WiFi abruptly. There may be an error with your router settings. Contact
Roborock customer service for help with troubleshooting.
• Too many obstacles near the dock. Clear them up or move the dock to an open area.
• Robot too far from the dock. Place it closer and retry.
• The main brush, side brush, or main wheels may be jammed. Turn off the robot and clean them.
• The omnidirectional wheel may be jammed. Use a screwdriver to remove it for cleaning.
• Restart the robot.
• Keep the robot charged. Scheduled cleaning can only begin when the battery level is above 20%.
• Check that your robot is connected to Roborock app and is always within WiFi coverage.
• The dustbin is full and needs emptying.
• The filter is blocked and needs cleaning.
• The main brush is tangled up. Clean it.
• Make sure that the robot is not in DND mode. DND mode will prevent auto top-up.
• If the robot is placed manually on the dock or sent to dock by pressing buttons, it will not be able to
resume cleaning.
Solution
Common Issues
13
Common Issues
Slow charging
Unable to auto-empty
Reduced emptying performance
or unusual noise when emptying
The status indicator light is steady red
Is power always being drawn when the
robot is on the dock?
Does the robot need to be charged for at
least 16 hours for the first three uses?
• When used at high or low temperatures, the robot will automatically reduce its charging
speed to extend battery life.
• Charging contacts dirty. Wipe them with a soft, dry cloth.
• Auto-emptying is disabled. Check in-app settings.
• Dust bag is not installed. Check and install.
• Auto-emptying will not be triggered if the robot returns to the dock without cleaning.
• The robot will not auto-empty after returning to the dock in DND mode. Adjust the cleaning
time or DND period.
• The main brush or main brush cover is not properly installed. Check and install in place.
• The filter, air duct, disposable dust bag, suction inlet, air inlet, or dustbin is blocked. Clean
to remove blockages.
• The dust bag is not in place. Check and install in place.
• The robot will draw power while it is docked to maintain battery performance, but the
power consumption is extremely low.
• No. Lithium-ion batteries have no memory effect. The robot can be used once fully charged.
Issue
Solution
No or little water during mopping
The robot begins to miss certain spots
The robot cannot return to the charging
dock when it has been moved manually
• Use the mobile app to increase the water flow.
• Check whether there is water in the water tank and check the manual for instructions on how
to correctly install the dustbin and water tank combo unit, mop cloth mount and mop cloth.
• The cliff sensors may be dirty. Clean them with a soft, dry cloth.
• After a significant position change, the robot will re-generate the map. If the charging dock
is too far away, it may not be able to return to recharge and must be placed on the charging
dock manually.
