
PANTONE 648C
www.masport.com
Part No:548046.F.2
Barbecues
Masport 4/6 Burner
OWNER’S MANUAL
Please read these instructions carefully before assembly,
to reduce risk of fire, burn hazard or other injury.
)TSTYNSXYFQQNSTWHTSSJHYYTYMJHTSXZRJWUNUNSLTWLFX
XZUUQ^X^XYJRTKFGTFYTWHFWF[FS
Keep these instructions in a safe place for future use.
This manual covers a range of barbecues which include: MB4000,
S/S4, MB5000, MB6000, MB4400, and MB6600.
548046.F.2 - Masport 4/6 Burner - April 13, 2021
2
SAFETY AND WARRANTY
INFORMATION
KEEP THE INSTRUCTIONS IN A SAFE PLACE FOR
FUTURE USE.
DO NOT OPERATE THIS BBQ BEFORE IT HAS BEEN
ASSEMBLED CORRECTLY AND YOU HAVE READ AND
UNDERSTOOD THESE INSTRUCTIONS.
These instructions are intended as a general guide and do
not supersede national or local codes in any way. Contact
local authorities for clarity of laws relating to the operation
of this appliance.
SYMBOLS IN THIS OWNER’S MANUAL
Possible hazard or hazardous situation.
Not observing this instruction can lead to injuries or
cause damage to property.
Important information on proper handling.
Not observing this instruction can lead to faults in
the BBQ.
User information. This information helps you to use all
the functions correctly.
Failure to follow these instructions could r
esult in fire or
explosion which could cause property damage, personal
injury or death.
Accessible parts may be very hot. Keep young children away
from the hot appliance at all times (even while cooling down).
Some parts of this grill may have sharp edges especially as
mentioned in this manual! Wear suitable protective gloves if
necessary.
Assembled parts sealed by the manufacturer must not be
altered by the user. Any modification of the appliance by
unauthorised persons may be dangerous.
IMPORTANT SAFETY INFORMATION
Please read and understand this manual fully before assembly and
use.
• The Manufacturer’s Warranty may be voided by the incorrect use
of this product.
• The Manufacturer or their Agents can accept no liability for the
unsuitability of, or any damage to, food that is cooked on this
appliance.
• Use the correctly specified fuel with this barbecue. Check with
your dealer for the specific fuel for which this barbecue has been
designed.
OWNER’S MANUAL
• The operator must understand all the safety requirements detailed
in this manual before using the barbecue.
• If you have any queries regarding these instructions, contact your
local dealer for clarification before you use your barbecue.
• The unit must be corr
ectly assembled before use. Failur
e to follow
the manual’
s instructions could result in serious damage or injury.
PERSONAL SAFETY
• The use of alcohol, prescription or non-prescription drugs may
impair the consumer’s ability to properly assemble or safely
operate this barbecue.
• The barbecue should be carefully checked for operational use
every time before use.
• Never try to move the barbecue when it is on, or before it has had
time to cool down.
• The person operating this barbecue should pay constant attention
to the food being cooked.
• Do not leave the barbecue unattended when it is alight. The
person should remain at the barbecue at all times when it is
alight/cooking.
CONTENTS
SAFETY AND WARRANTY INFORMATION 2
PARTS DIAGRAM, PARTS LIST & FIXTURES 4
ASSEMBLY INSTRUCTIONS 8
LEAK TESTING 24
INSTALLATION 24
OPERATION 25
TROUBLESHOOTING 28
CARE AND MAINTENANCE 29
TECHNICAL DATA 32
548046.F.2 - Masport 4/6 Burner - April 13, 2021

3
THIRD PARTY SAFETY
• The operator is r
esponsible for the safety of all thir
d parties while
the barbecue is in use.
• Onlookers should be kept a safe distance away from the
barbecue when it is in use.
• Keep children and animals well away while the barbecue is in use
and while it is cooling down.
LOCA
TION
• Do not use indoors. Barbecue units are designed for OUTDOOR
USE ONL
Y.
• Use in a weather
-protected area, preferably under shelter.
• Ensur
e that the barbecue is on an even and secure surface befor
e
operating. Use the castor locks if fitted to lock the wheels in
place.
• Do not use within one metre of any flammable surface of
structur
e.
BURN AWARENESS
• Parts of the barbecue do get extremely hot and could cause
serious bur
ns – touch test the surface before applying a firm grip.
• The hood handle can become hot! The use of cooking gloves and
long sleeves ar
e advised.
• If cooking with the hood closed, be very careful opening the hood,
a sudden rush of hot air could bur
n an unprotected arm.
GAS AWARENESS
• Ensur
e all gas couplings and hoses ar
e in good condition and
have been corr
ectly fitted.
• Leak test all gas lines and connections befor
e use.
• Do not stor
e flammable materials near this barbecue.
• Do not place the gas bottle under
neath the barbecue directly.
• Do not stor
e spare LPG cylinders under or near this barbecue.
• Do not place or use aer
osols near this barbecue.
• Do not store or use gasoline or other flammable vapours or liquids
in the vicinity of this barbecue.
• Ensur
e that the gas is tur
ned OFF at the cylinder after use and
while the barbecue is unattended.
• When tur
ning off the barbecue, shut of
f the gas at the supply
sour
ce before turning off all the burner controls.
• Do not stor
e gas cylinders below gr
ound level. ULPG is heavier
than air
. Should a leak occur
, the gas will collect and could ignite
due to pr
esence of a flame or electric spark.
ELECTRICAL AWARENESS
•
Symbol lEC 60417 -5172 (2003-2) Class II
equipment.
• This appliance is not intended for use by persons
(including childr
en) with r
educed physical, sensory or
mental capabilities, or lack of experience and knowledge, unless
they have been given supervision or instruction concerning use of
the appliance by a person r
esponsible for their safety
.
•
Children should be supervised to ensur
e they do not play with the
appliance.
•
If the supply cord is damaged, it must be r
eplaced by
the manufactur
er
, its service agent or similarily qualified persons in
or
der to avoid a hazard.
•
BBQs with Grill Lights & USB parts run on AC power
. It is
IMPOR
TANT to ensure the car
e is taken to the location of the
BBQ. See section in this manual which refers to “Location”.
•
Turn power OFF when not in use.
•
A
void using in wet conditions.
•
If an external lead is being used, ensure that it is cor
ectly rated
and meets curr
ent safety certification requirements.
•
Ensure the power is turned OFF befor
e connecting and
disconnecting any components on the BBQ.
• Ensure power leads are kept away from any hot parts of the BBQ.
•
Do not place the power lead wher
e hot oil or fat can drip onto the
lead.
FOR YOUR SAFETY AND OTHERS
If you smell gas:
•
Shut off the gas supply to the barbecue.
•
Extinguish any open flame (candles, cigarettes, etc.)
•
Clear the area to allow the unburned gas to dissipate.
Be aware of the reason for the gas smell, address this before
continuing. Should the gas odour come from the LPG cylinder,
immediately contact the fire department from an elevated safe
distance.
Connecting the gas cylinder to the barbecue, refer to that section in
the manual.
Leak testing, refer to that section in the manual.
SAFETY EQUIPMENT
When cooking with oil/grease, fire extinguishing materials should be
readily accessible.
In the event of an oil/grease fire do not attempt to extinguish with
water or alcohol. Use type BC dry chemical fire extinguisher or
smother the fire with dirt, sand or baking soda.
RAIN HAZARD
In the event of rain while cooking with oil/grease, turn off the gas
supply and all burners, cover the barbecue as soon as possible.
Move people/animals away from around the barbecue. Do not
attempt to move the barbecue until it has cooled and can safely be
moved.
INSTALLATION
This Cooking Appliance is For Outdoor Use Only and
shall not be used in a building, garage or any other enclosed
area.
NOTE!
Read carefully the pages containing the parts and assembly
before assembling your gas grill.
THE LOCATION FOR YOUR GRILL
Do not use your gas grill in garages, porches, breezeways, sheds
or other enclosed areas. Your gas grill is to be used outdoor only, at
least 43cm from the back and side to any combustible surface. The
grill should not be placed under any surface that will burn. Do not
obstruct the flow of combustion and ventilation air around the grill
housing. Keep this barbecue away from any flammable materials!
(Refer to page 20).
GAS AND REGULATOR INFORMATION
Gas grills are used safely by millions of people when following
simple safety precautions. This barbecue is designed for ULPG
use only. Bottle size of 4.5kg or greater is recommended for use
with this barbecue. The regulator must have an outlet pressure of
2.75kPa. You must have the correct regulator and bottle for the
barbecue to operate safely and efficiently. The items used in the fuel
system are designed for operation with the grill.
(See parts list for replacement items).
WARRANTY
Refer to the warranty supplied with this BBQ. Should any part fail
due to defective workmanship or faulty materials within the specified
period from the date of purchase, Masport will replace or repair the
defective part free of charge. Refer to the warranty for details. Do
not use a BBQ that is unsafe.
548046.F.2 - Masport 4/6 Burner - April 13, 2021
4
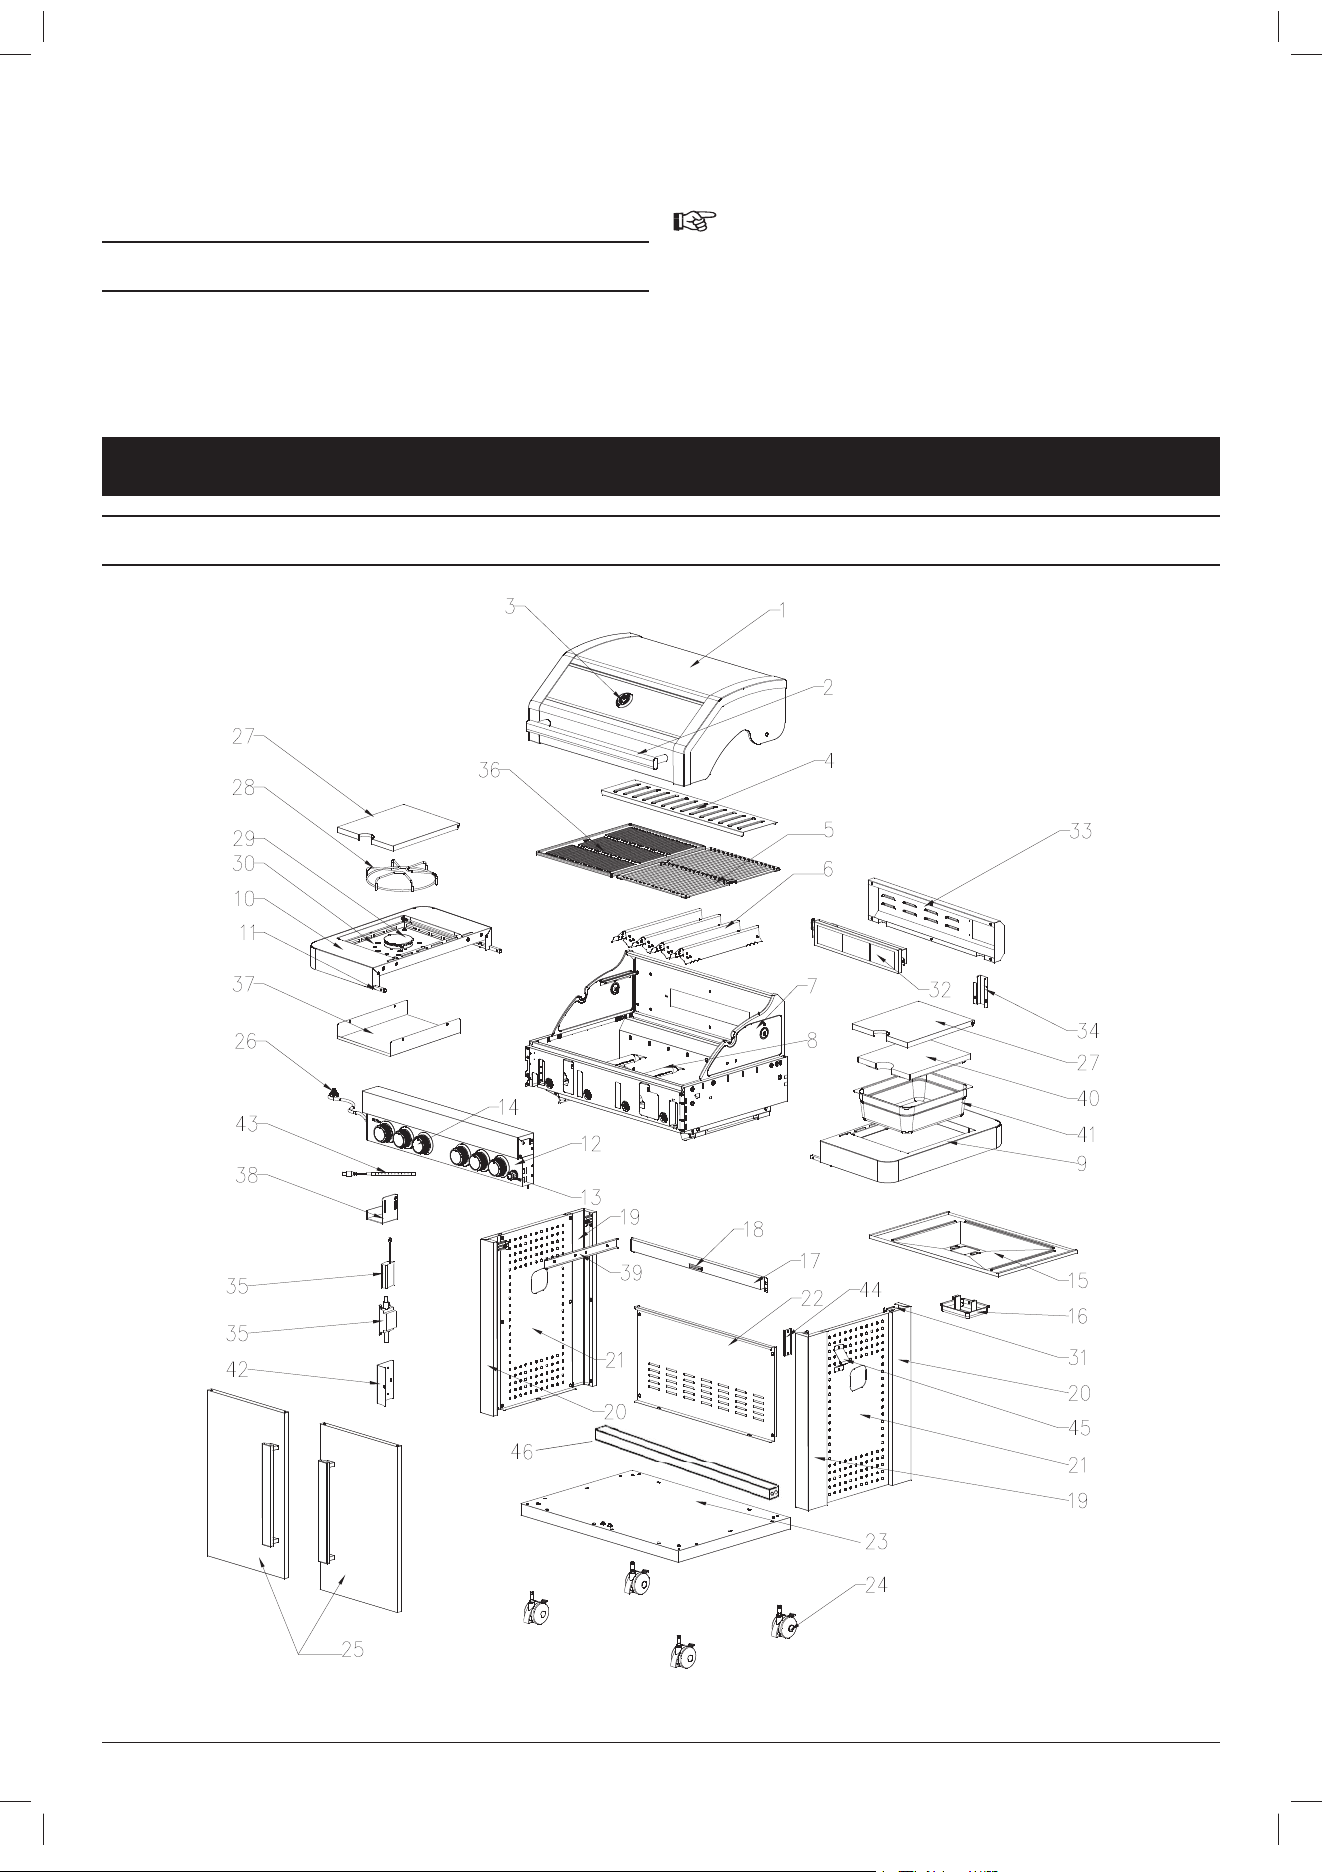
PARTS DIAGRAM, PARTS LIST & FIXTURES
4 BURNER (WITH REARBURNER) PARTS DIAGRAM
*IMAGE IS FOR ILLUSTRATION PURPOSE ONLY AND MAY SHOW COMPONENTS THAT ARE NOT INCLUDED ON ALL MODELS OF BBQ.
LPG CYLINDER
The cylinder manufacturer/distributor is responsible for the safety
and performance of the LPG cylinder. This is not included in the
Masport BBQ warranty. Do not use a cylinder that is unsafe.
DISPOSAL OF PACKAGING
Remove all protective packaging including any protective film from
stainless steel surfaces.
Make sure you properly dispose of, or recycle the packaging
material where possible to comply with applicable waste disposal
laws in your area.
NOTE!
The images/instructions in the next few pages cover many
models of BBQ, please ignore instructions for features that are
not included with your BBQ
548046.F.2 - Masport 4/6 Burner - April 13, 2021

5
4 BURNER WITH REARBURNER PARTS LIST
Item No. Description Qty
1 Lid 1
2 Lid handle 1
3 Thermometer 1
4 Warming rack 1
5 Cast iron cooking grids 1
6 Heat distribution panel 4
7 Firebox assembly 1
8 Main burner tube assembly 4
9 Right side table 1
10 Side burner layer 1
11 Reinforced bar 4
12 Control, panel assembly 1
13 Rear burner electronic ignition button 1
14 Control knob 6
15 Grease tray 1
16 Grease cup assembly 1
17 Cart front beam 1
18 Door magnet 1
19 Leg - B 2
20 Leg - A 2
21 Side low panel 2
22 Rear side low panel 1
23 Bottom panel assembly 1
24 Swivel caster 4
25 Door assembly 2
26 Side burner nozel base 1
27 Side buner cover 1
28 Side burner cooking grid 1
29 Side burner assembly 1
30 Side buner insert tray 1
31 Cart attachment braket 4
32 Rear burner assembly 1
33 Rear burner windshield cover 1
34 Rear burner bellows protective cover 1
35 Battery holder/adampter 1
36 Cast iron cooking plate 1
37 Bottom panel of side burner 1
38 Gas cylinder hook 1
39 Fix beam for gas cylinder 1
40 Chopping board 1
41 Ice box 1
42 Fix panel for adapter 0
43 Not Required/included 0
44 Fix panel for bottle opener 1
45 Bottle opener 1
46 Support bar 1
548046.F.2 - Masport 4/6 Burner - April 13, 2021
6
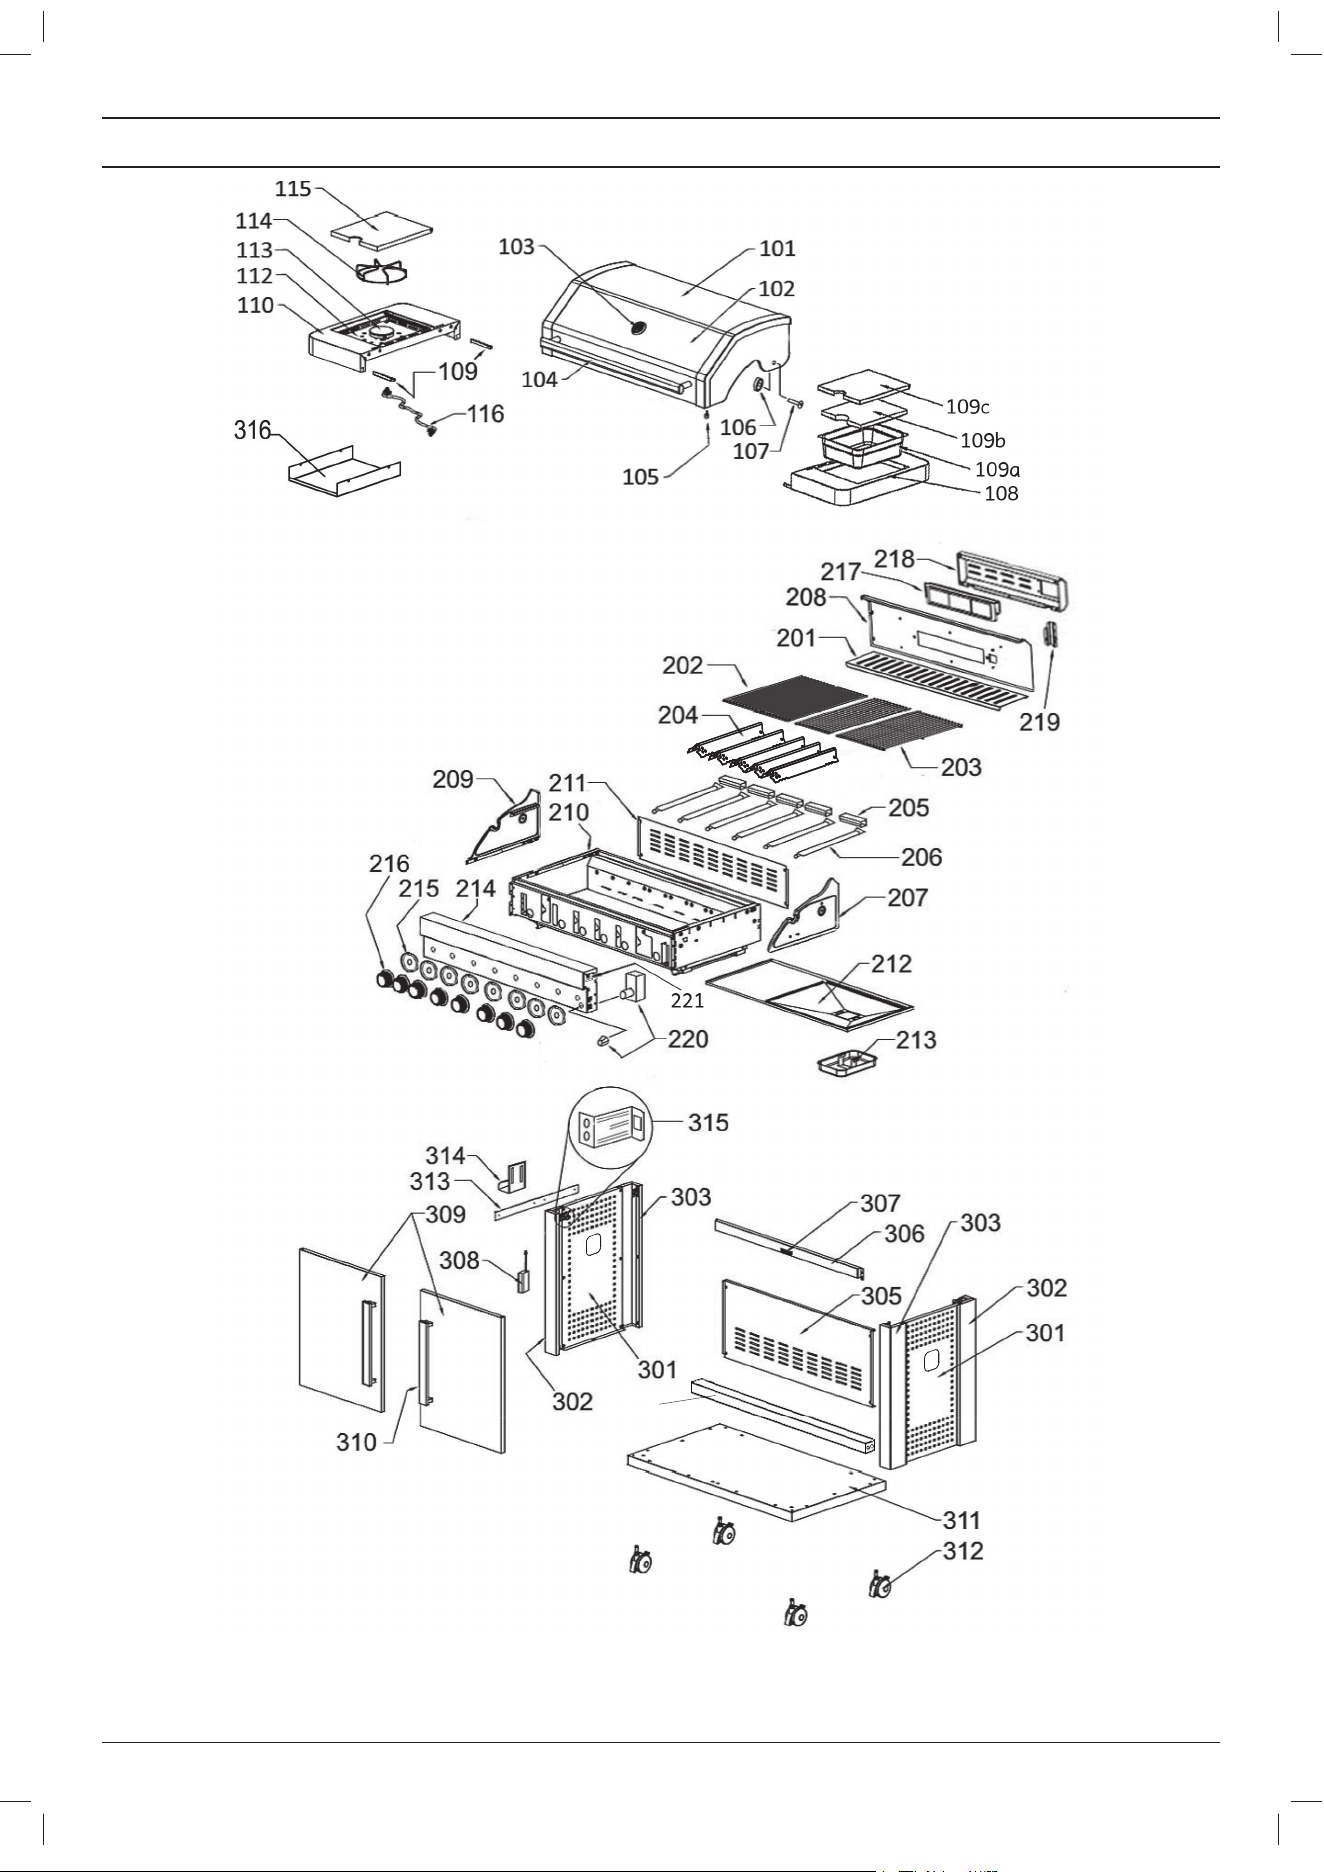
6 BURNER (WITH REAR BURNER) - PARTS DIAGRAM
*IMAGE IS FOR ILLUSTRATION PURPOSE ONLY AND MAY SHOW COMPONENTS THAT ARE NOT INCLUDED ON ALL MODELS OF BBQ.
317
548046.F.2 - Masport 4/6 Burner - April 13, 2021

7
6 BURNER (WITH REAR BURNER) - PARTS LIST
Item No. Description Qty
101 Hood 1
102 *Glass- Window, Hood 1
103 *Gauge- Temperature, Rnd 61mm 1
104 *Handle- Hood, 6 1
105 Rubber Stopper, 12dia x 7.5mm 4
106/107 Fasteners- Hood 2
108 Right side table 1
109a Ice box 1
109b Chopping board 1
109c Side burner 1
110 Table- Side, LH(S/Burner) 1
112 *Bowl- Spillage, Side Burner 1
113 *Burner-Side 1
114 *Trivet- Side Burner 1
115 *Lid- Side Burner 1
116 Pipe- Flexi, Side Burner 1
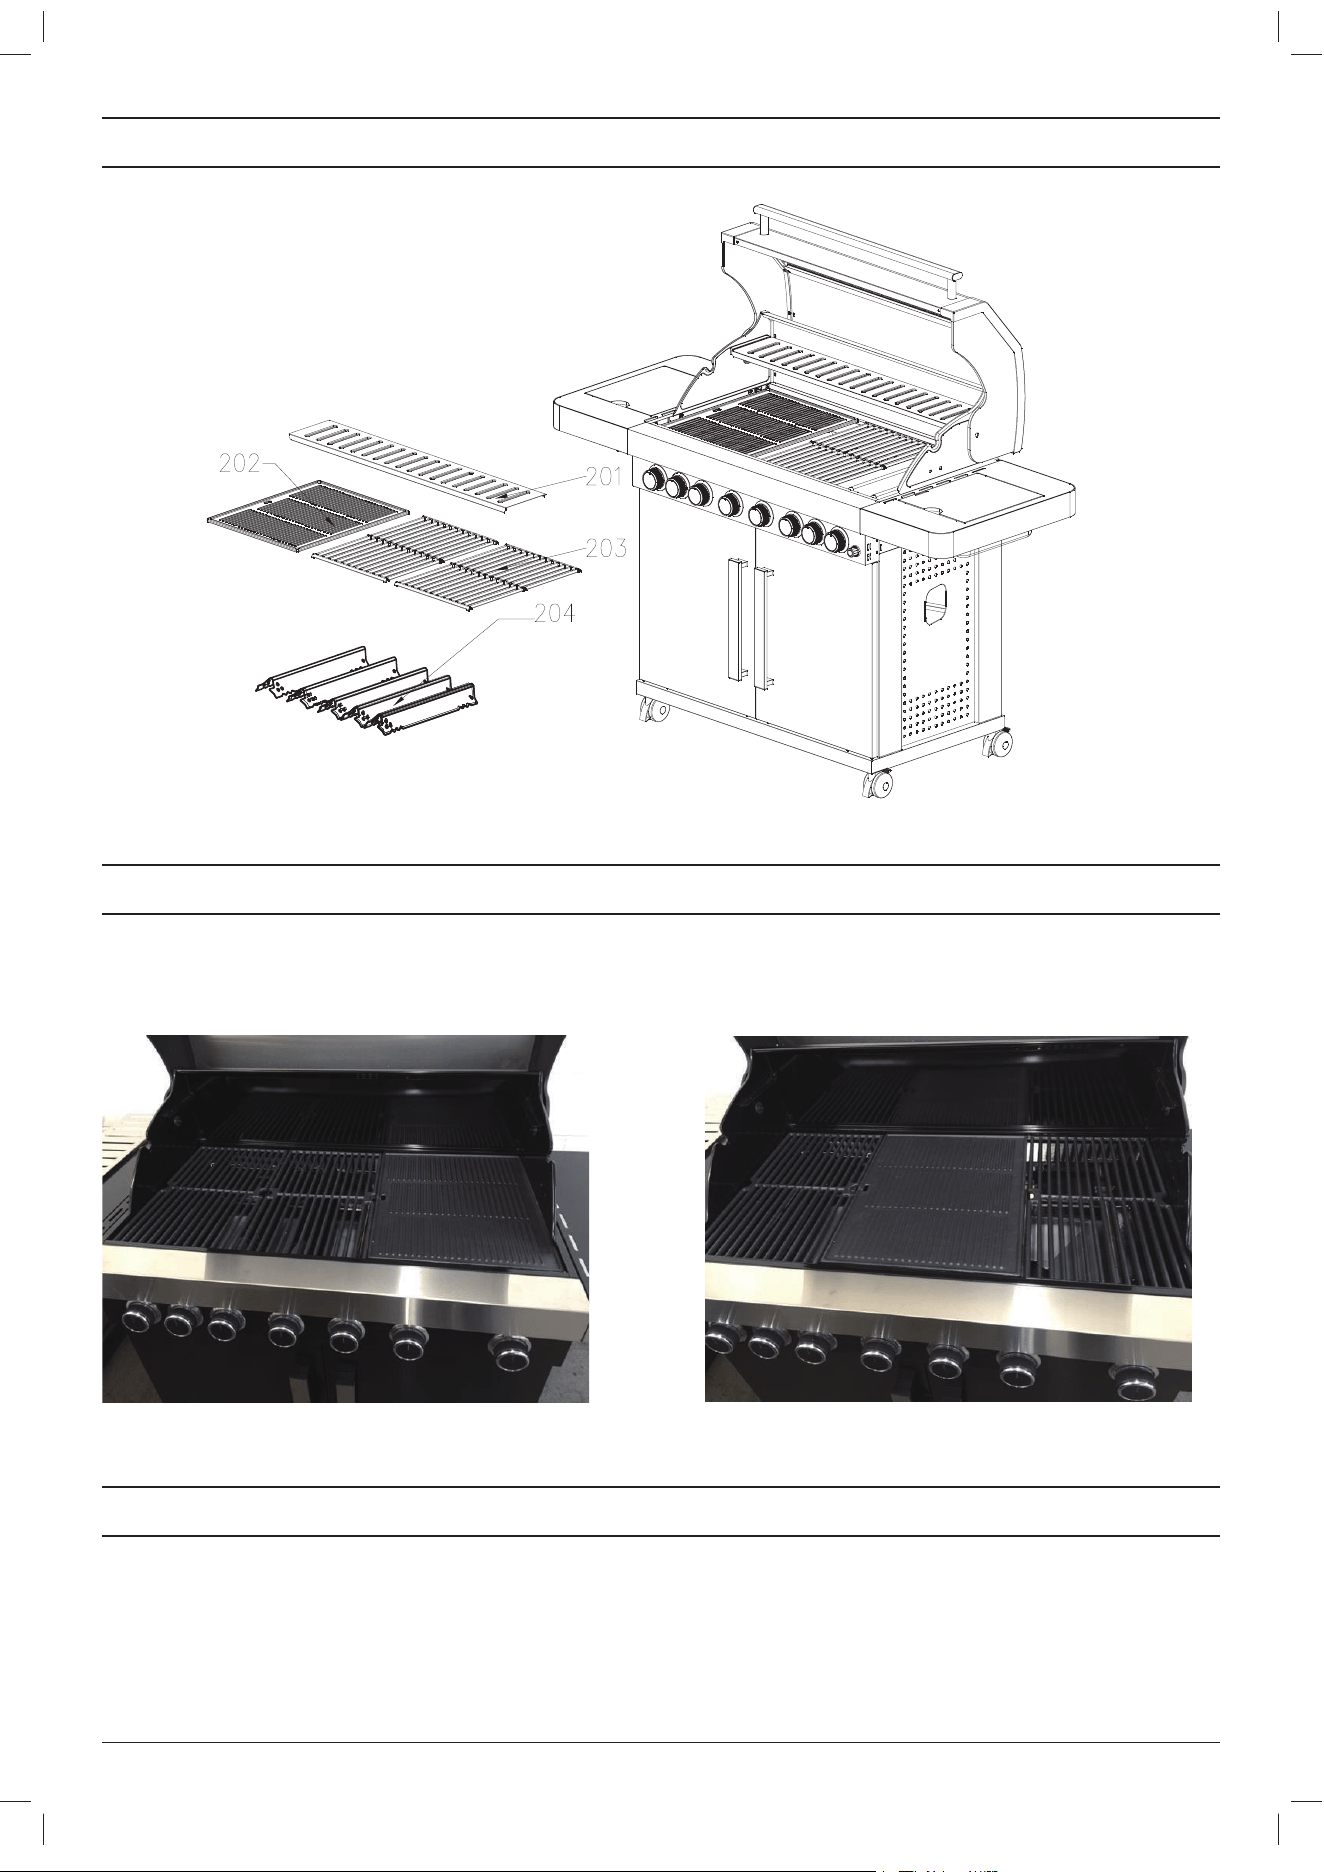
201 Rack- Warming 860mm 1
202 Plate- P/E Matt 360x450 1
203 Grill- P/E Matt 265x450 2
204 Flame- Tamer, 80x390 (Solid) P/E 5
205 Cross Light S/S 5
206 Burner- Tube 432mmx0.8 304S/S 6
207 Panel- Side, RH Hood G/Body 1
208 Panel- Rear, Hood G/Body 1
209 Panel- Side, LH Hood G/Body 1
210 Grill- Body, 6B P/E 1
211 Panel- Rear, Heat Shield 6 1
212 Tray- Drip, 800x380 1
213 *Cup- Grease 1
214 Dashboard 1
215 Bezel- Control Knob 8
216 Knob- BBQ, 8.0 8
217 Burner- Rear 1
218 Cover- Rear Burner 1
219 Panel- Rear, RB6 Ign Cover 1
220 Module- Rear Burner 1
221 USB port 0
301 Panel- Side, LH/RH Trolley 2
302 Leg- L/Frnt-R/Rear 2
303 Leg- R/Frnt-L/Rear 2
305 Panel- Rear, Trolley 1
306 Panel- Support, Front Trolley 1
307 Magnet- Door, 45mm 1
308 Battery Holder, LED 1
309 Door Assy RH/LH 2
310 *Handle- Door (Not required for stainless steel model BBQ) 2
311 Panel- Bottom, Trolley 6 1
312 Castor- Locking 4
313 Strap- Bracket, LPG 1
314 Bracket- Gas Cylinder 1
315 Bracket- Trolley
4
316
*Bottom Cover Panel- Side Burner 1
317 Support bar 1
548046.F.2 - Masport 4/6 Burner - April 13, 2021
8
FASTENERS
ABCDEFGH I J
M4x12 M4x8 M6x12 M6
QTY
x 2 x 6 x 48 x 6 x 44 x 2 x 4 x 2 x 4 x 4
*For stainless steel model BBqs - Fasteners I & J are not required.
CAUTION:
Although we take every effort to ensure that the assembly process is as easy as possible, it is inherent with fabricated steel parts that corners
and edged can cause cuts if improperly handled during assembly procedures. Be careful while handling any parts during assembly. It is strongly
recommended that you protect hands with a pair of work gloves.
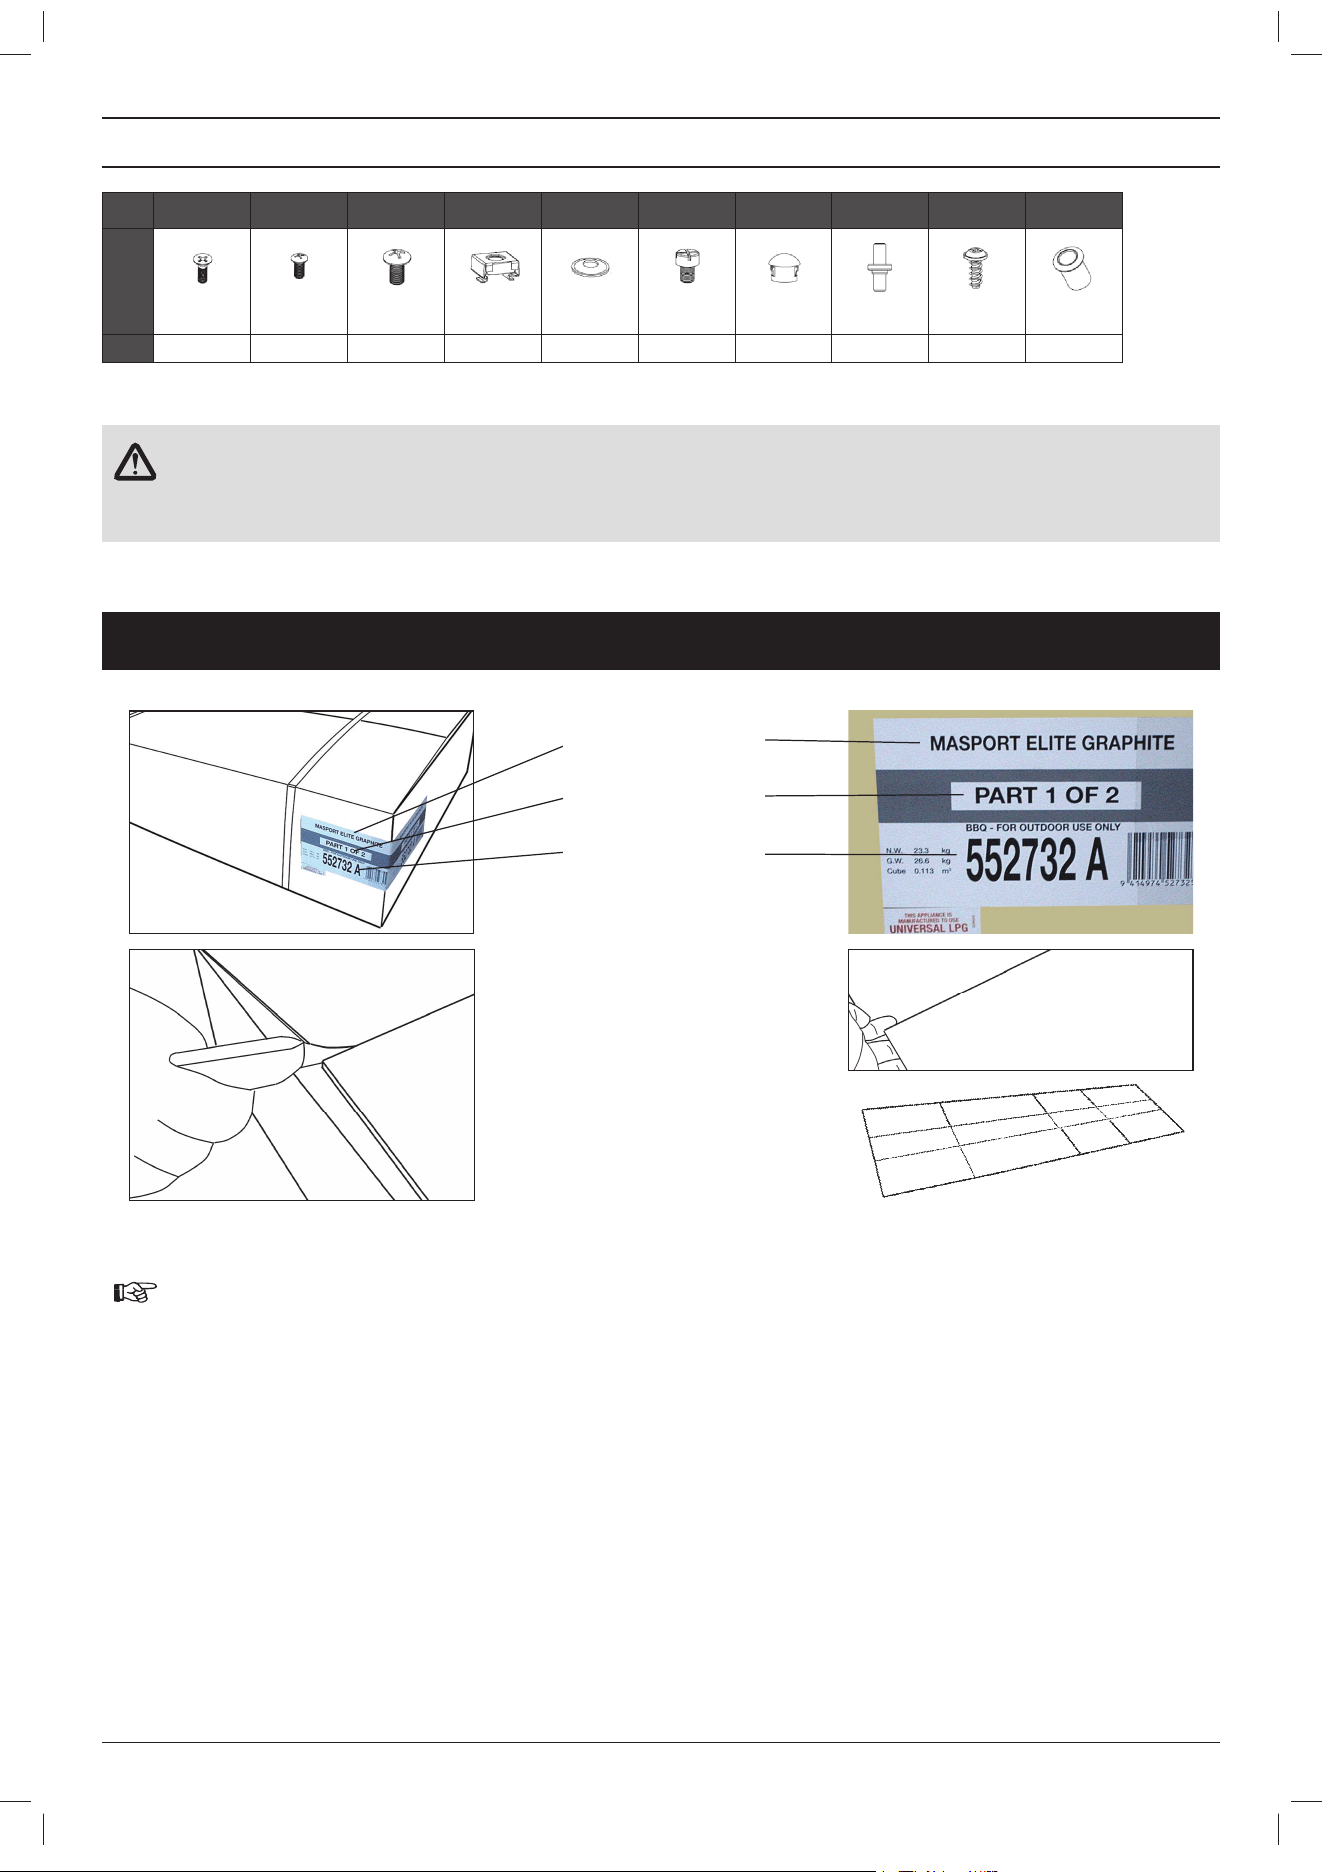
ASSEMBLY INSTRUCTIONS
Open the carton by removing the
shipping straps then slitting along both
ends. Cut the tape only by a small
amount in the middle, finish by lifting the
carton flaps with your hand.
Unpack the entire carton, this carton will
be used as a surface protector as the
cabinet is being built. Open the carton as
shown and place where the BBQ will be
assembled
Product Description
Carton Identification
Product Part Number
Tools needed for assembly: Crosshead screwdriver, 10mm A/F Spanner.
NOTE:
When assembling the barbecue, ensure it is sitting on a flat surface.
For illustration purposes a 6 Burner with Rear Burner is used in assembly steps shown in the next few pages. This cabinet assembly is easier to
assemble with two people.
Before attempting to assemble the BBQ, lay out all of the components and identify each of them, this will make it easier to assemble the BBQ.
548046.F.2 - Masport 4/6 Burner - April 13, 2021
9
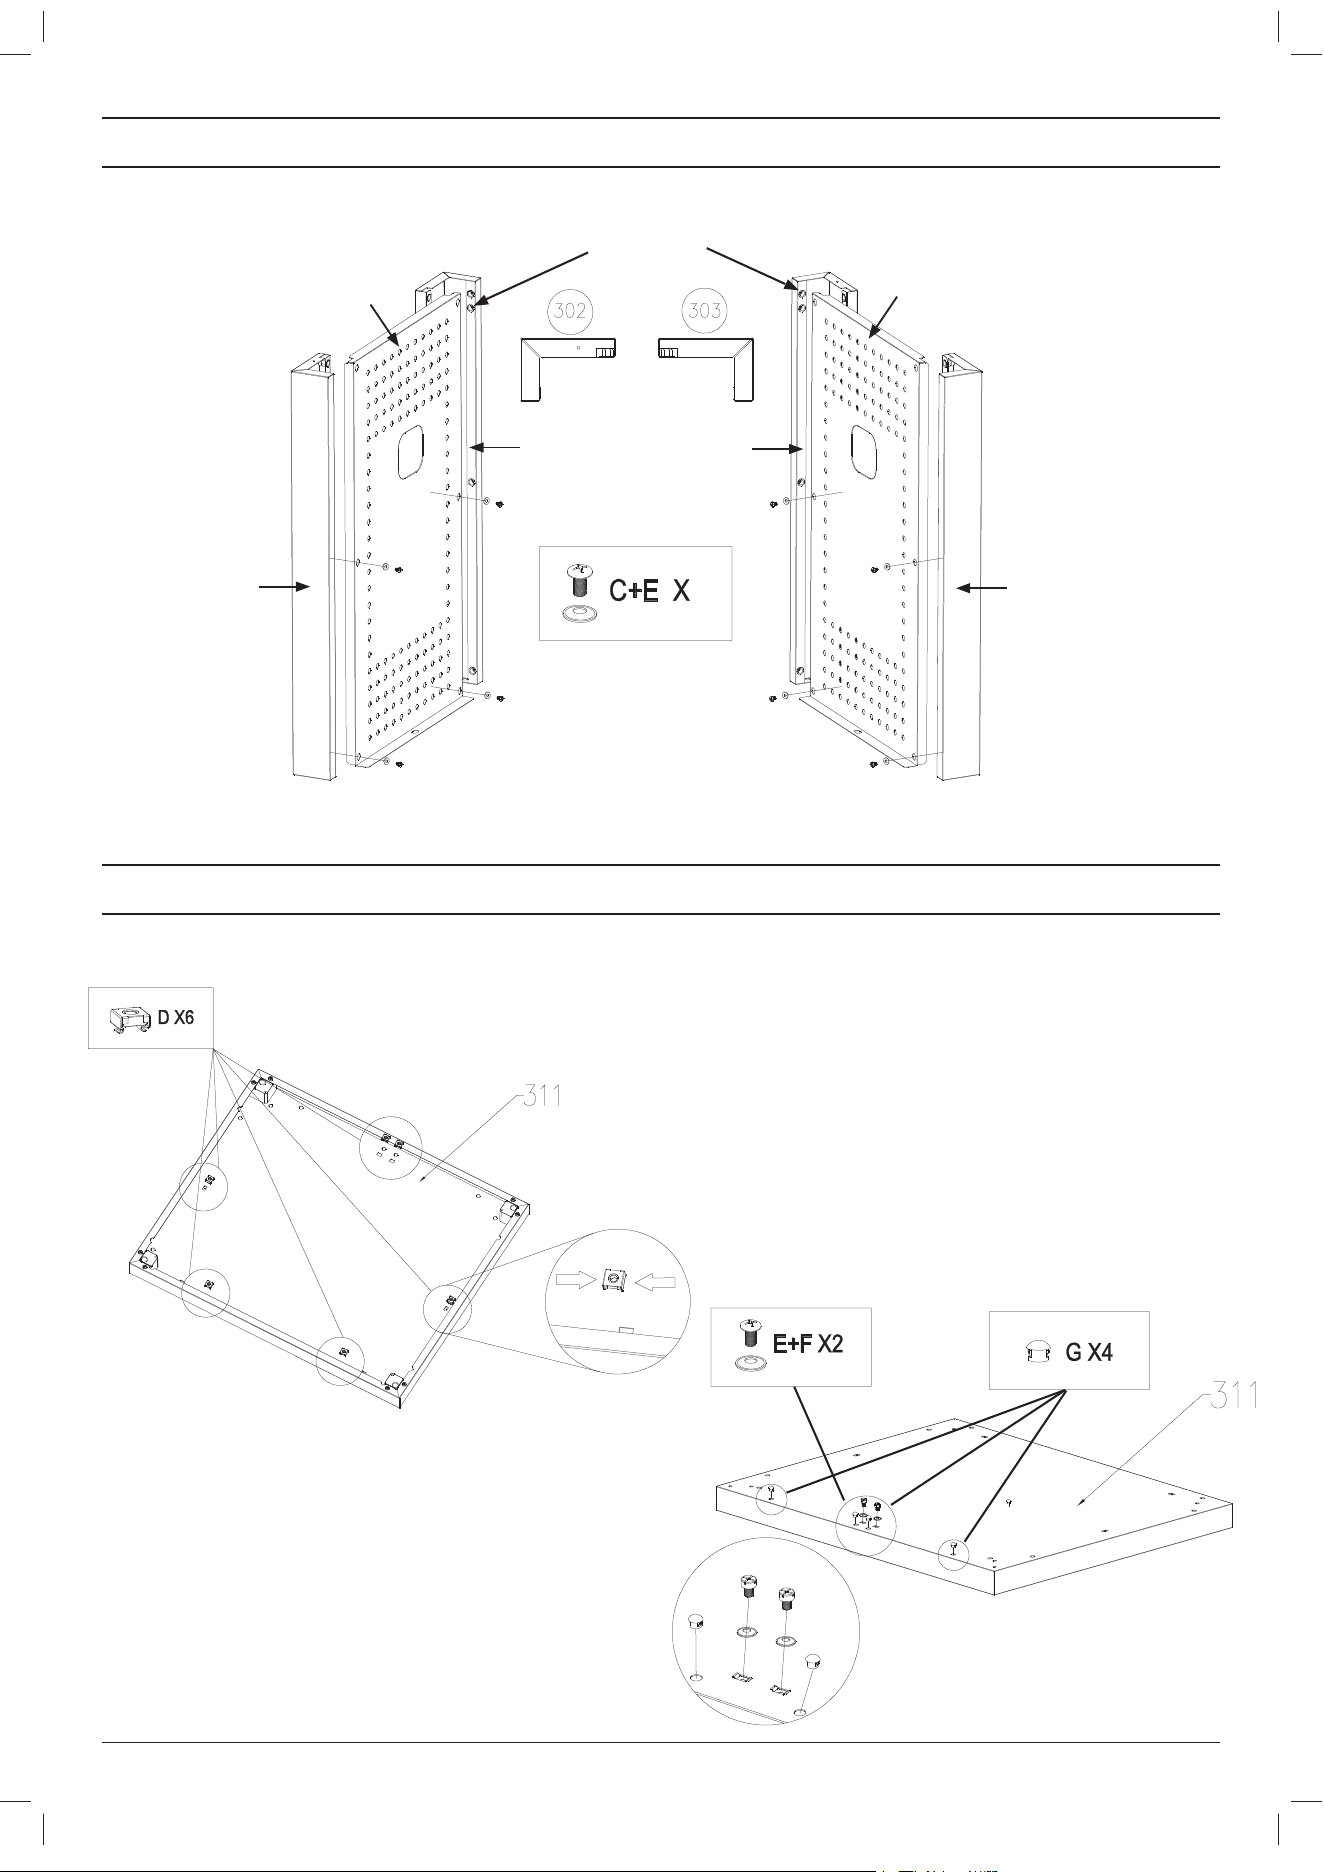
STEP 1
Identify the two different types of legs. The left leg at the left front is the same as the right rear and the leg at the right front is the same as
left rear. Assemble the legs to the side panels.
Alternate way of identifying can be aligning legs such that there are two screw holes on top facing inside the BBQ.
STEP 2
Insert 6 x D (M6) nut on the underside of the bottom panel. Assemble the plastic push pins and the door stopper pins on the top face of
the bottom panel.
8
Right Leg
(Front)
Right Panel
Left Leg
(Front)
Left Panel
Left Leg
(Rear)
Right Leg
(Rear)
Two top screw holes
548046.F.2 - Masport 4/6 Burner - April 13, 2021

10
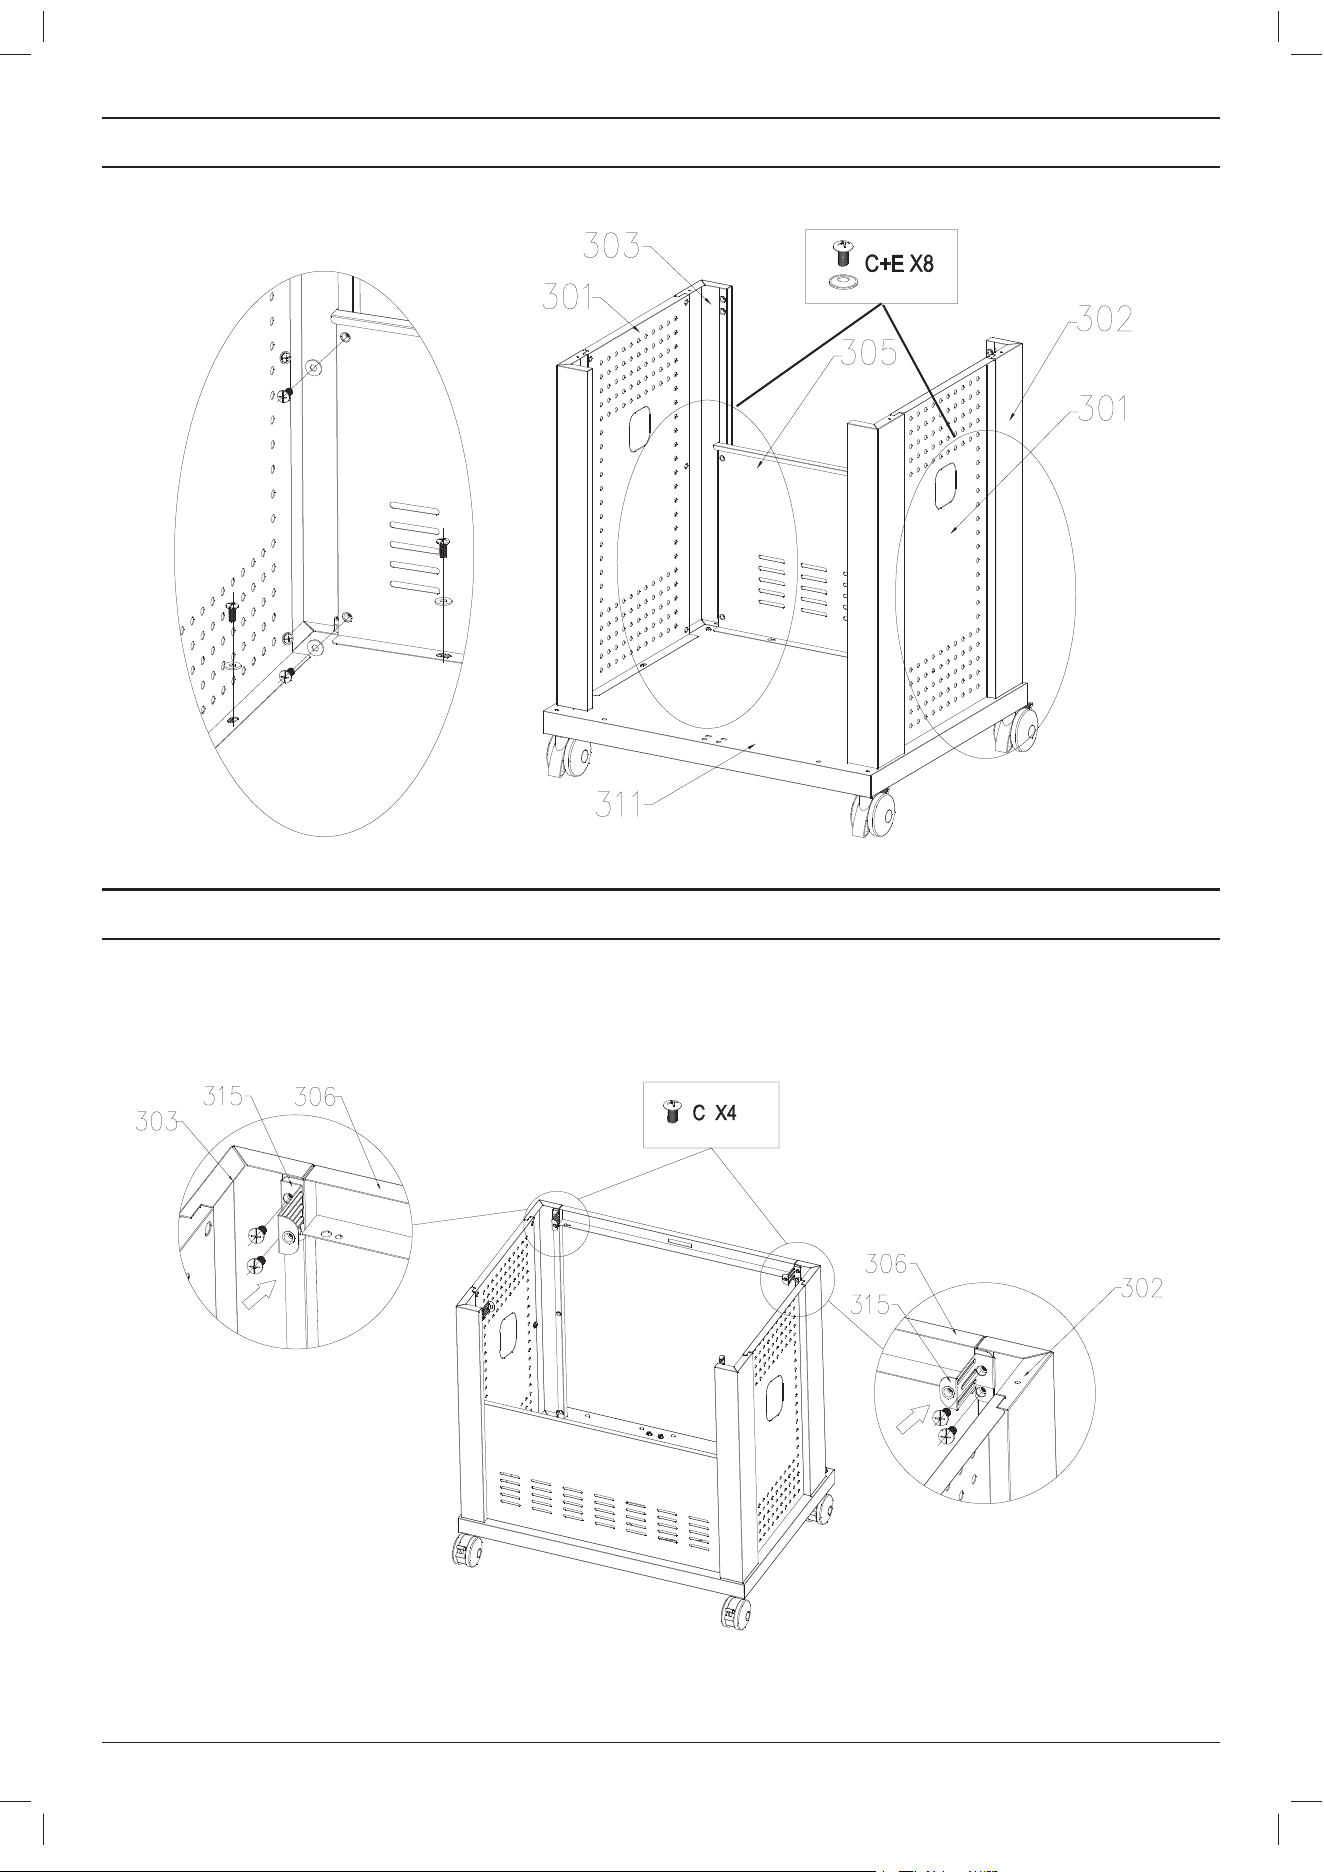
STEP 3
Assemble the side panels to the bottom panel. Then assemble the 4 casters on the bottom panel by pushing them in.
548046.F.2 - Masport 4/6 Burner - April 13, 2021
11
STEP 4
Assemble the rear panel.
STEP 5
Attach the panel support to the front of the trolley and attach the trolley brackets on the top four corners. Trolley brackets need to be
screwed in the top hole of the panel as shown below.
548046.F.2 - Masport 4/6 Burner - April 13, 2021

12
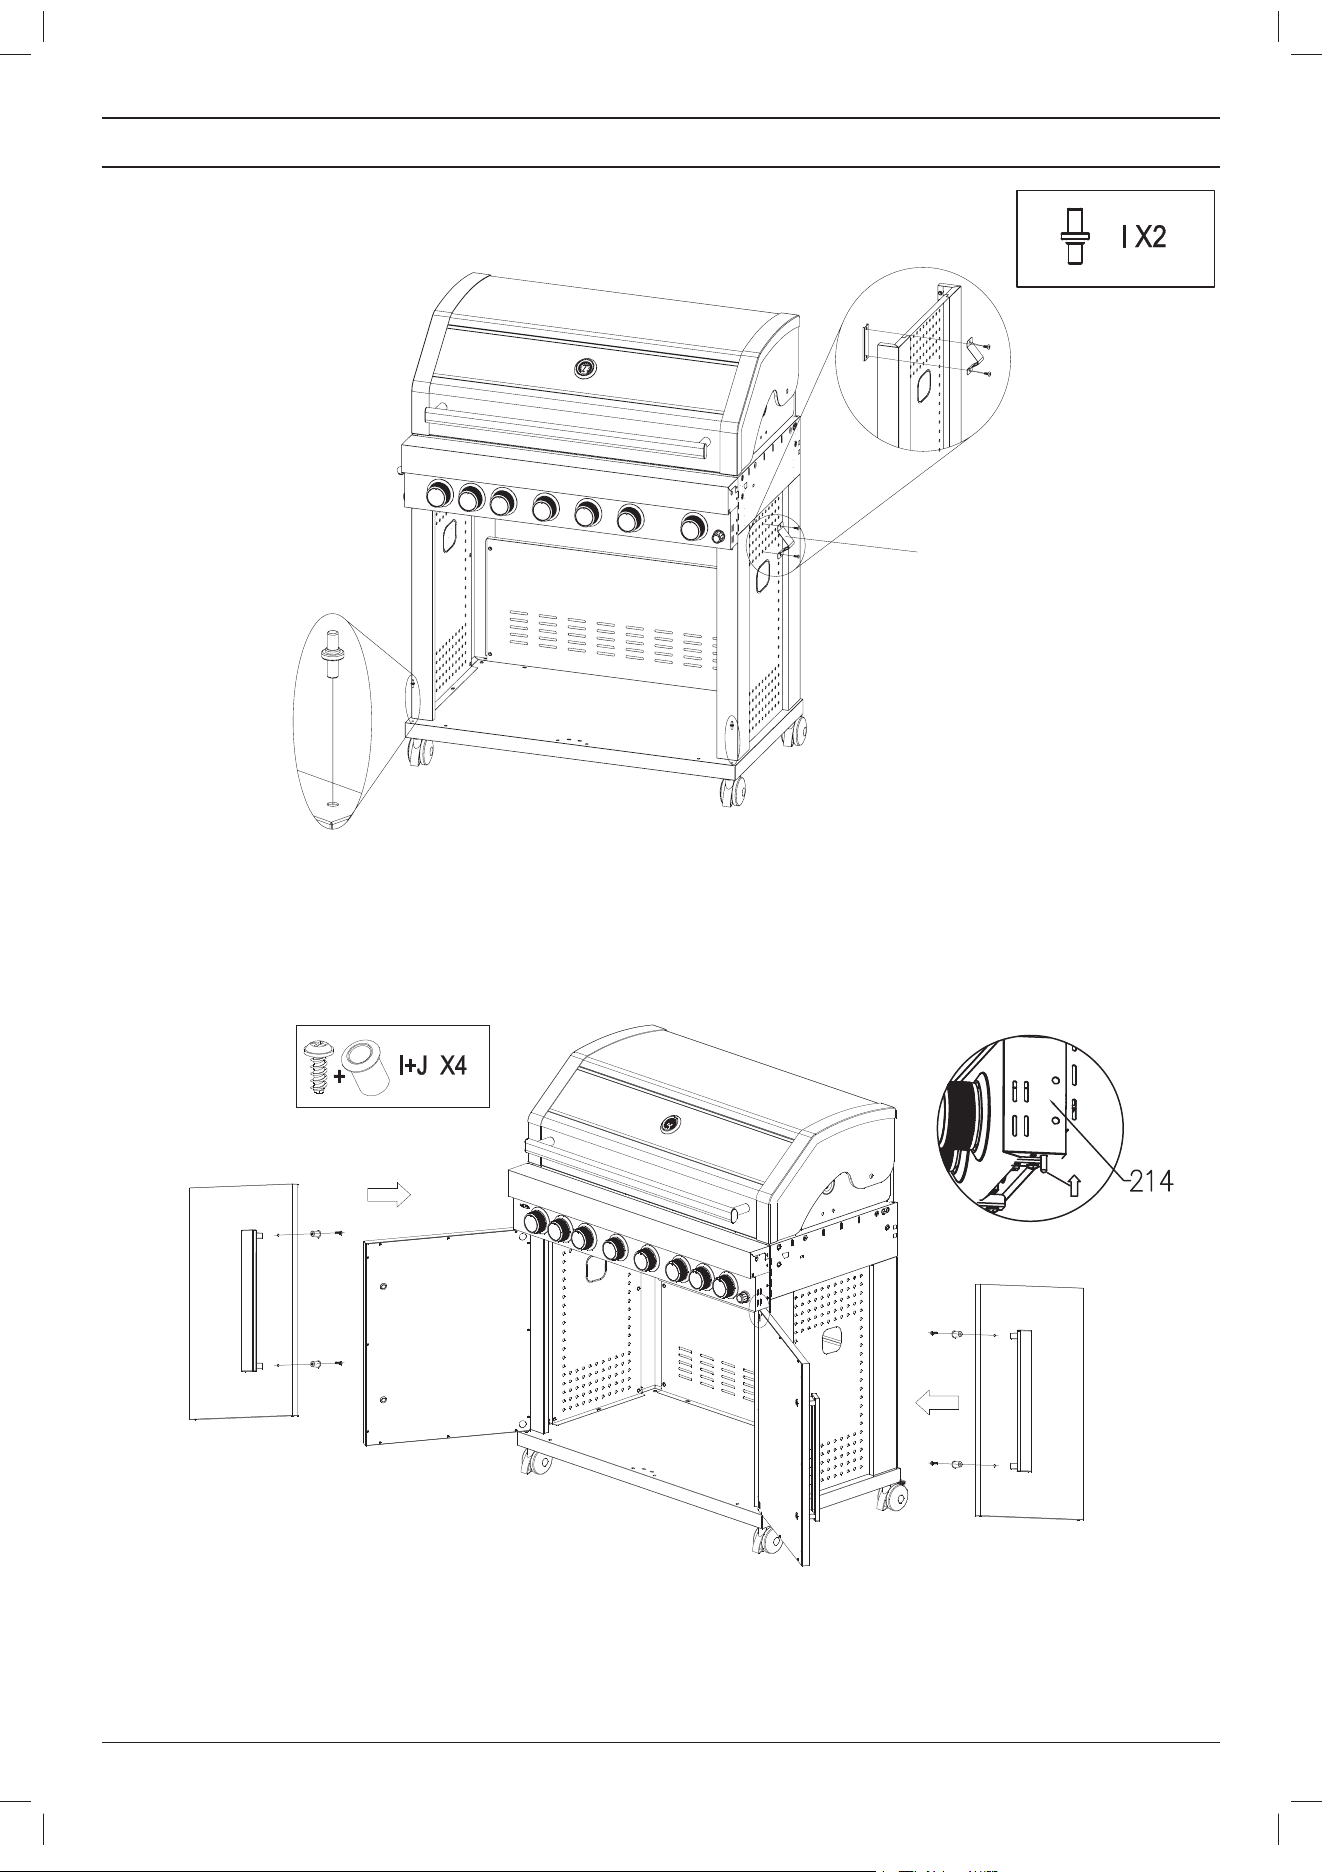
STEP 6
Insert support bar
548046.F.2 - Masport 4/6 Burner - April 13, 2021
13
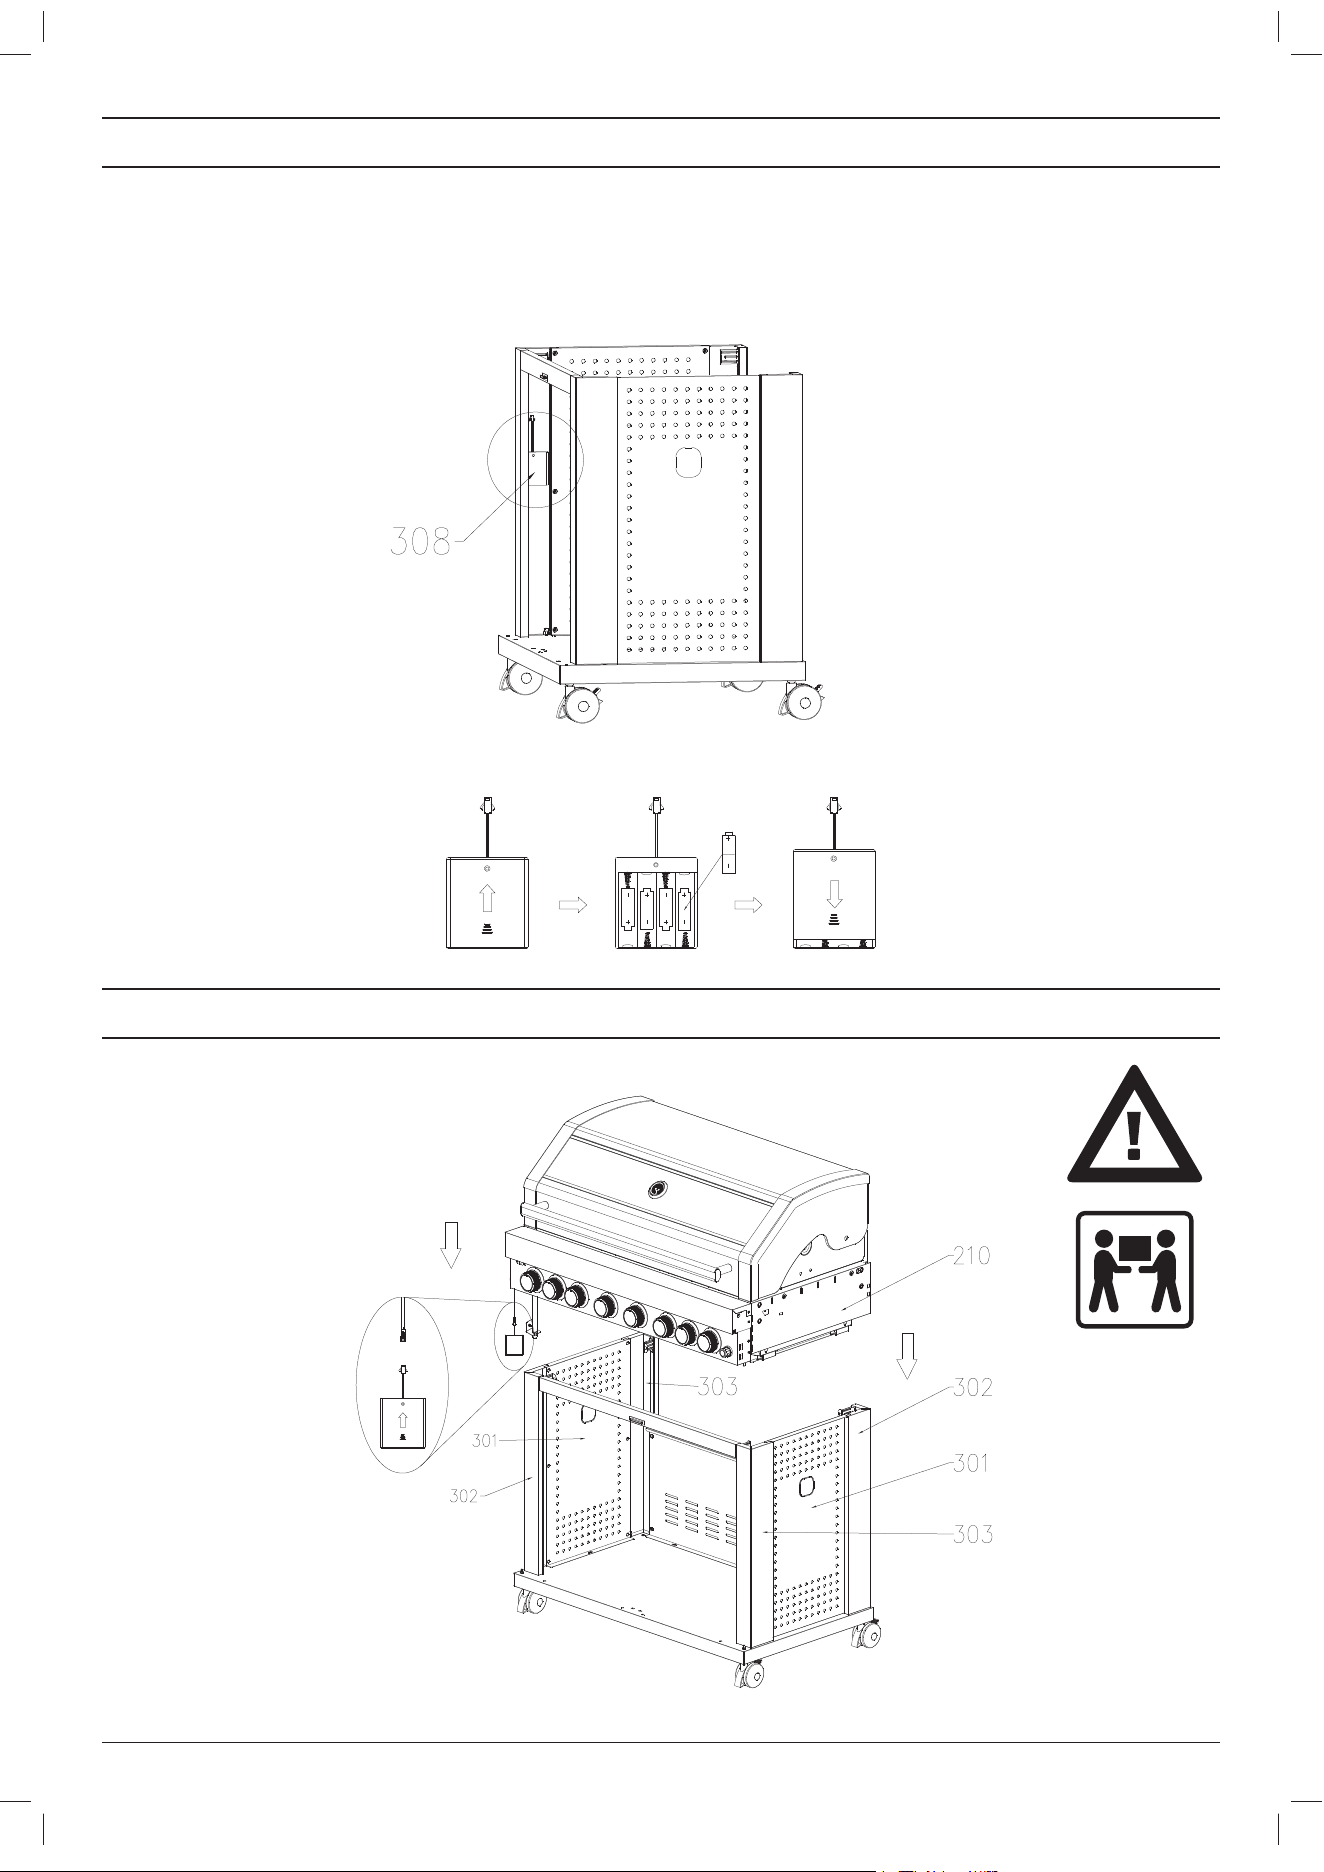
STEP 7
To power the LED Knob lights (not available on all models), the lead coming out from the grill body has to be connected to the battery box.
Make sure that the battery box is positioned as low as the lead allows, to protect the battery box from the heat.
Measure the length of the lead coming out from the grill body assembley and the length of the lead attached to the battery box.
Attach the battery box to the left hand side panel at the farthest possible position (Approximately: 150mm from the bottom panel. Some
BBQ’s may come with fix panel for adapter (Part 42), Assemble the panel as shown below.
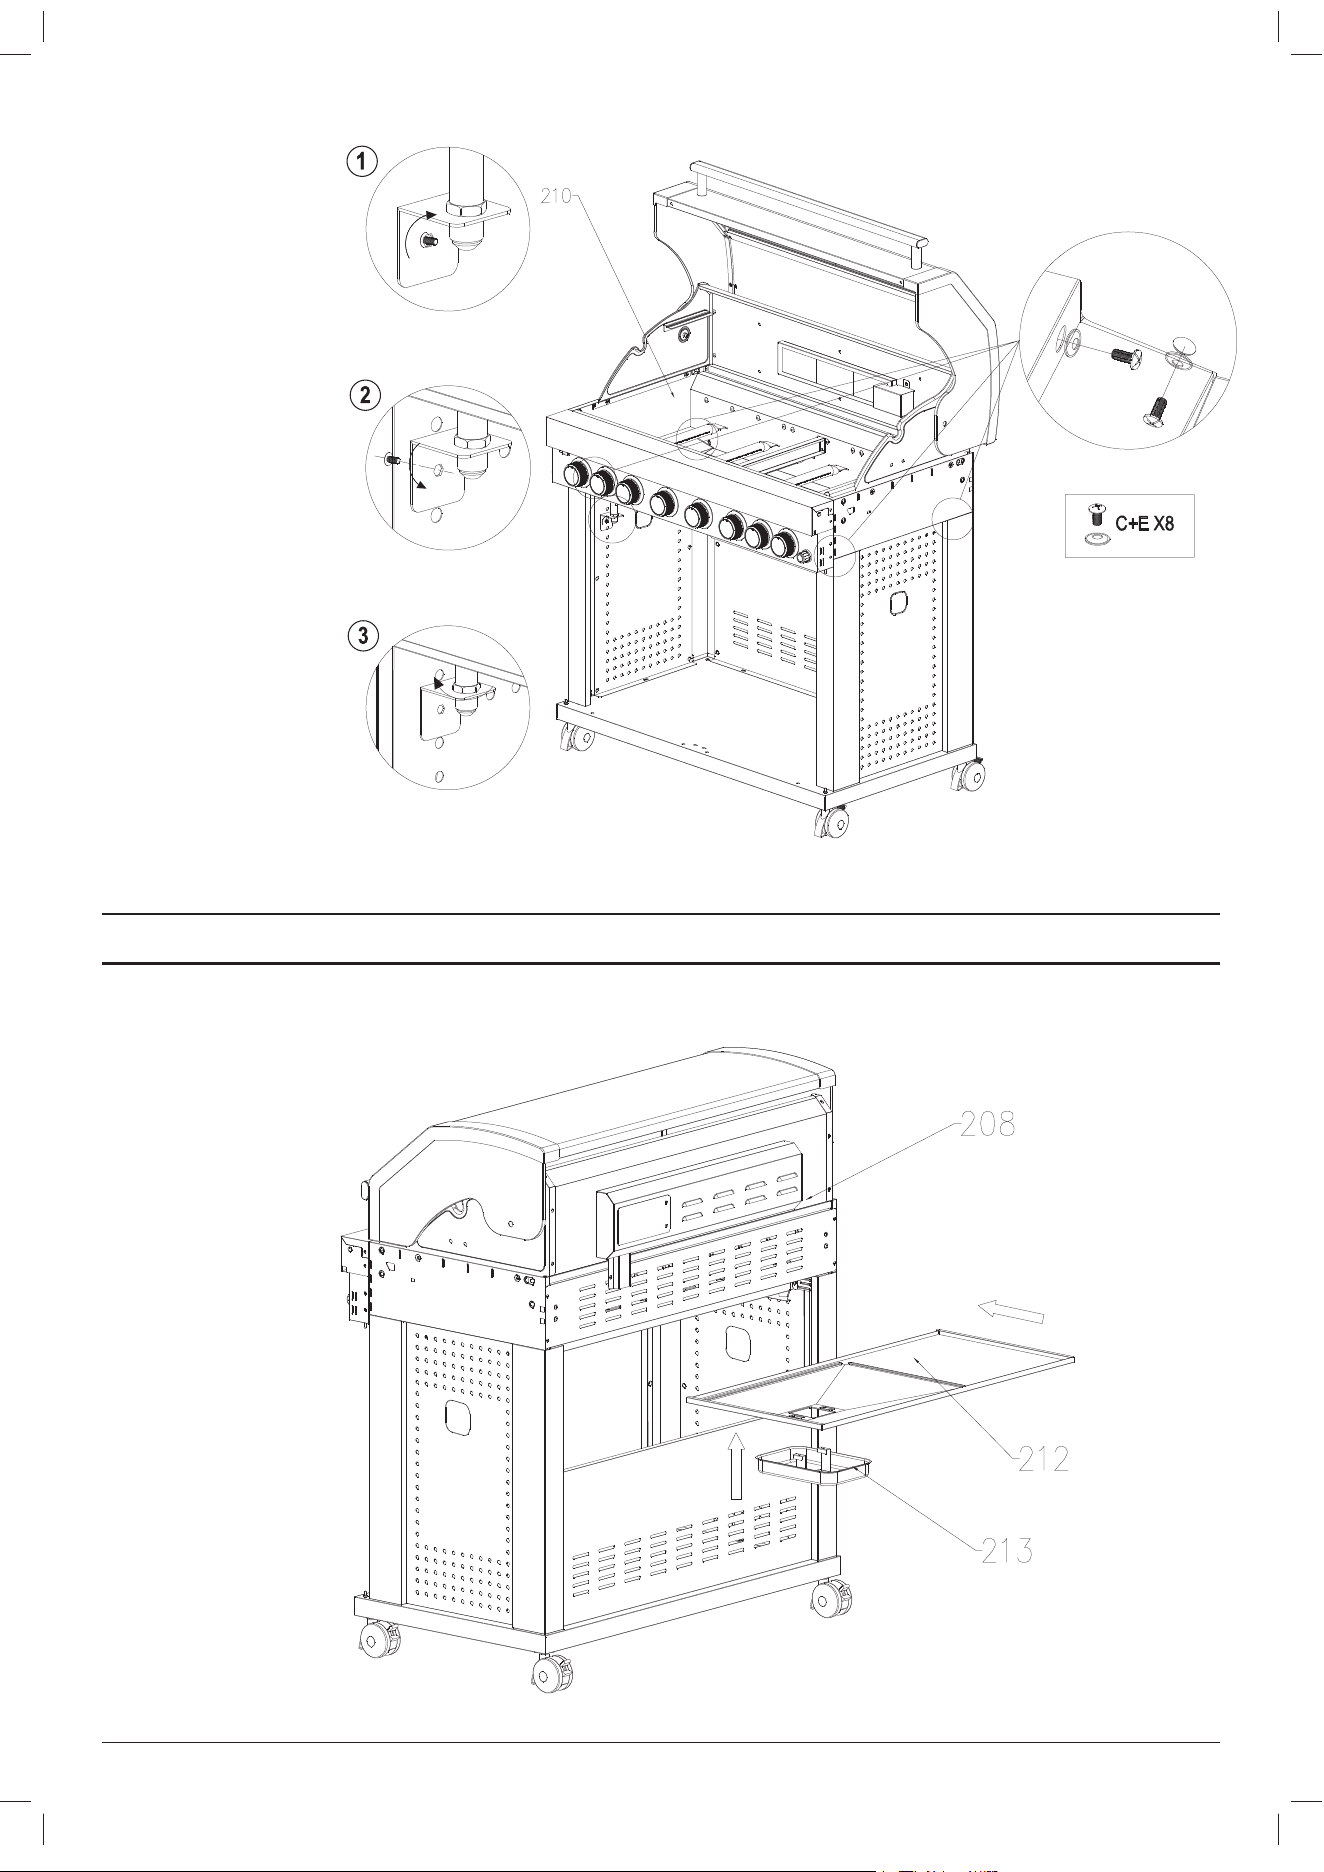
STEP 8
Assemble the hood and grill assembly to the cabinet trolley.
548046.F.2 - Masport 4/6 Burner - April 13, 2021
14
STEP 9
Attach the grease cup and slide & place the drip tray into the grill body.
548046.F.2 - Masport 4/6 Burner - April 13, 2021
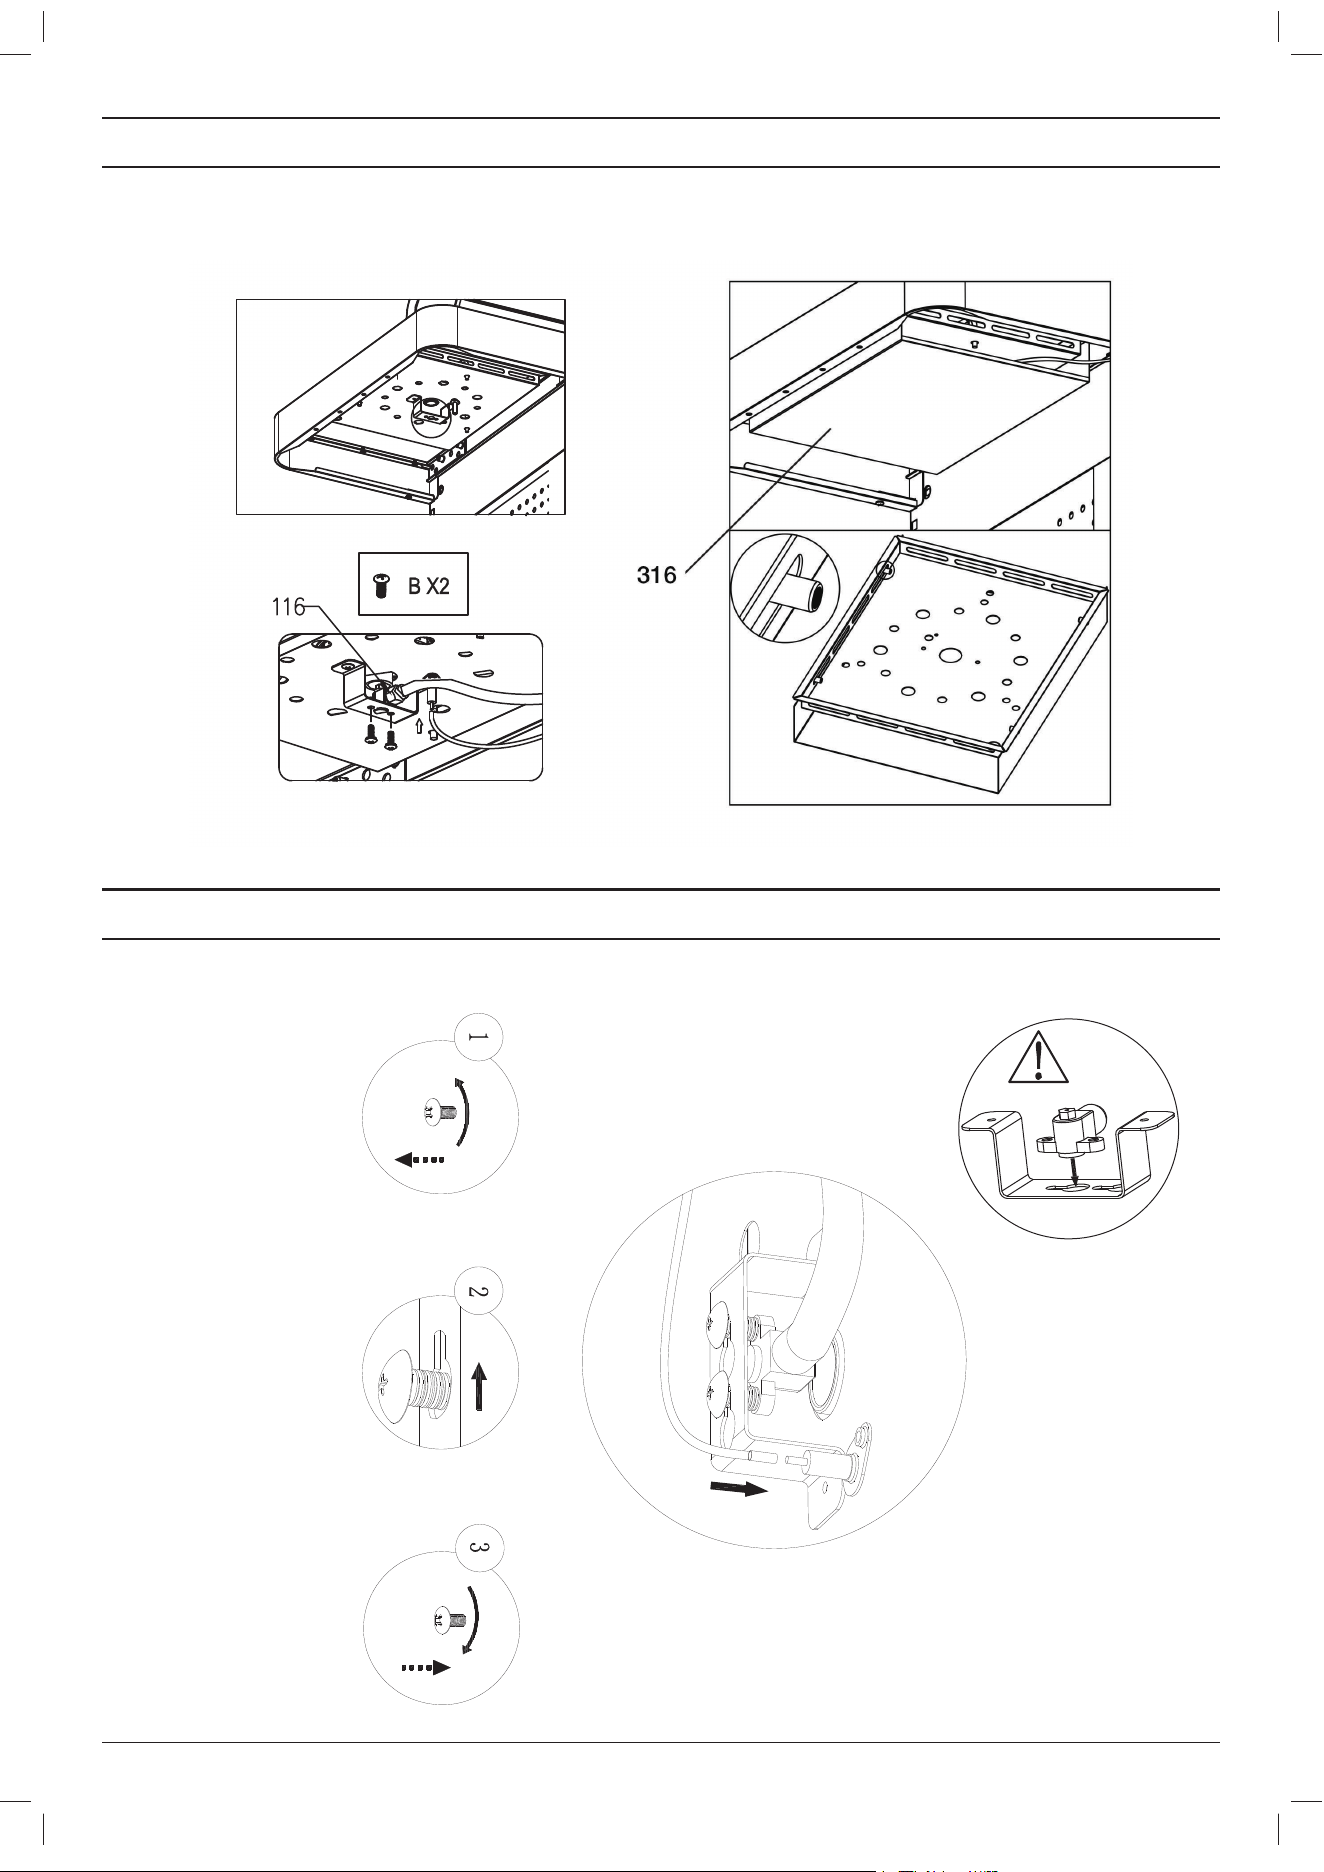
1 a screw preassembled,loosen it off
2 assemble the screw cross side panel,
fixed gas hose end on side panel
3 make hex nut tight
15
STEP 10
Insert the door hinge pins & bottle opener.
*For stainless steel model BBQs: No assembly required for the door handles.
45
548046.F.2 - Masport 4/6 Burner - April 13, 2021
not all models include bottle openner
16
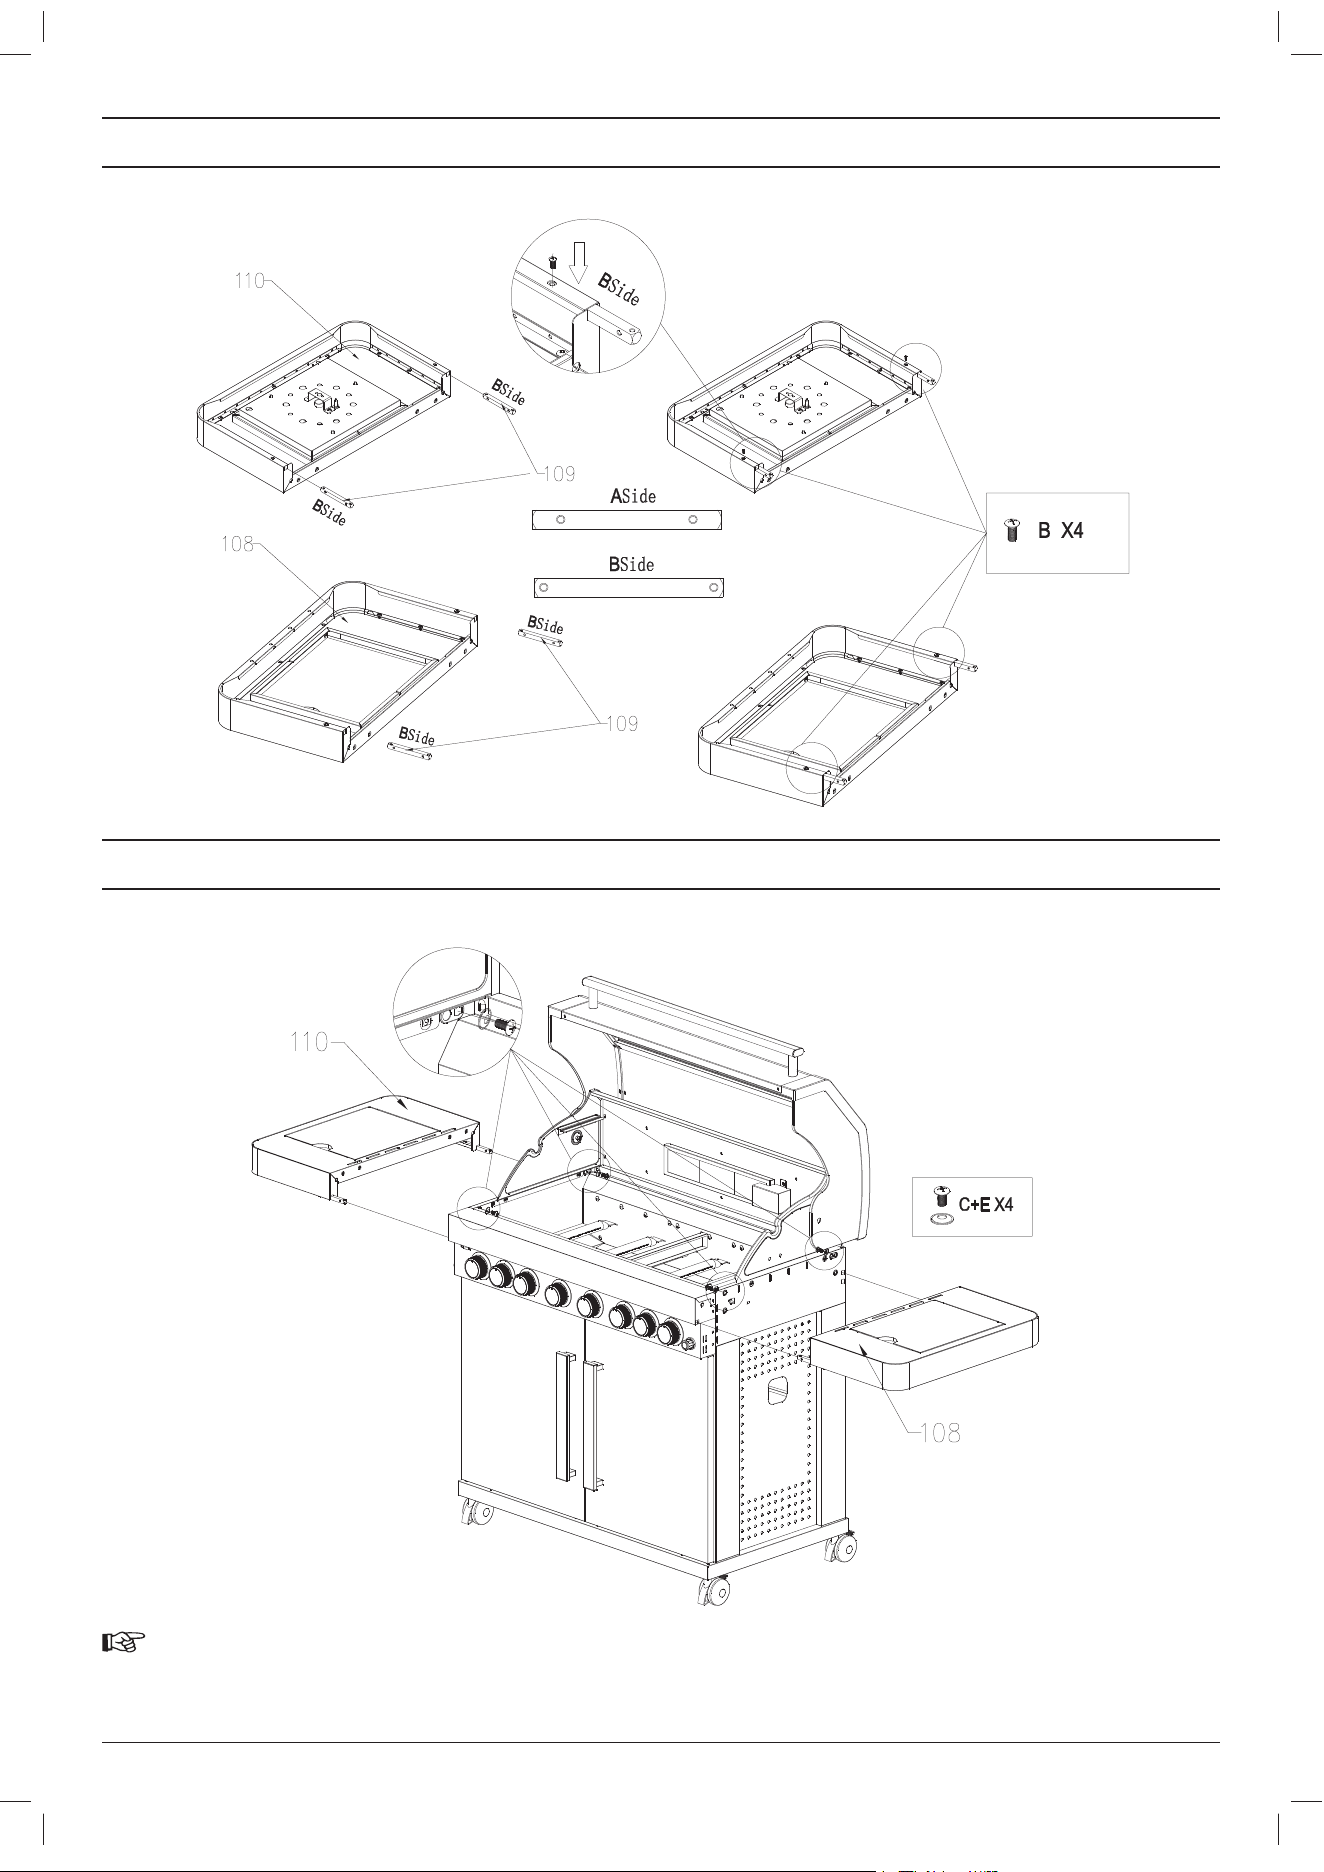
STEP 11
Assemble the side tables. Assemble the support rods on the side tables.
STEP 12
Slide the side tables into the assembled grill body and secure the tables using screws from the grill body to the side tables.
NOTE:
•
Insert front screw first and then insert the rear screw. Tighten the screws once both of the screws are in place.
548046.F.2 - Masport 4/6 Burner - April 13, 2021
only use Bside screw hole to assemble,
A side screw hole not use on this model
17
STEP 13
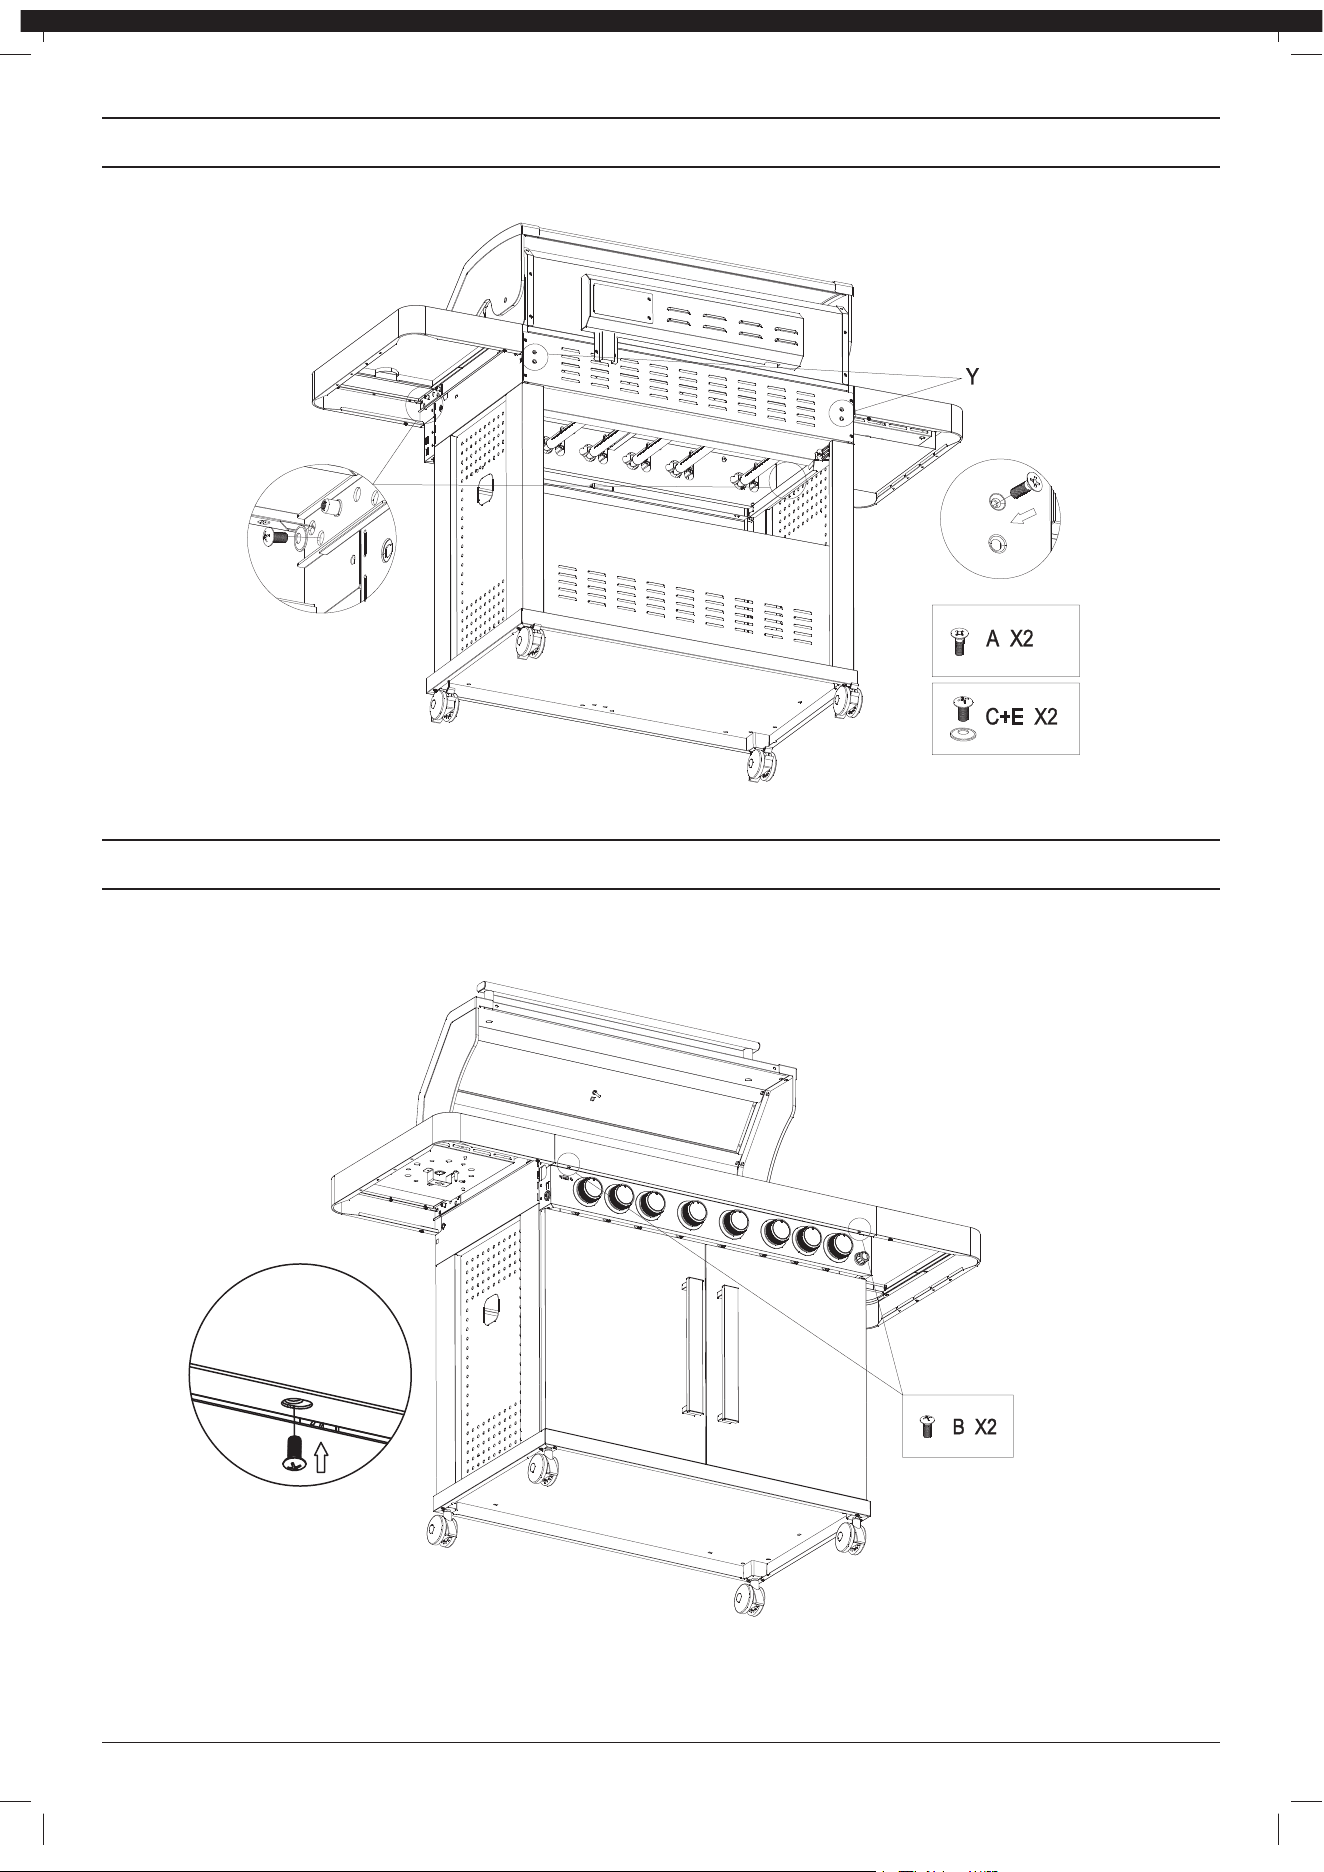
Secure the free end of the support rod from the side table using screws (A x2) at the rear of the grill body. (see location Y)
STEP 14
To secure the Side Tables at the front of the grill body, insert screws (B x2) as shown below.
548046.F.2 - Masport 4/6 Burner - April 13, 2021
18
STEP 15
Attach the Side Burner Jet to the Side Burner using screws (B x2) at location Z. Then attach the bottom cover panel by sliding into place
under the Side Burner.
STEP 16
Side Burner connection.
548046.F.2 - Masport 4/6 Burner - April 13, 2021
19
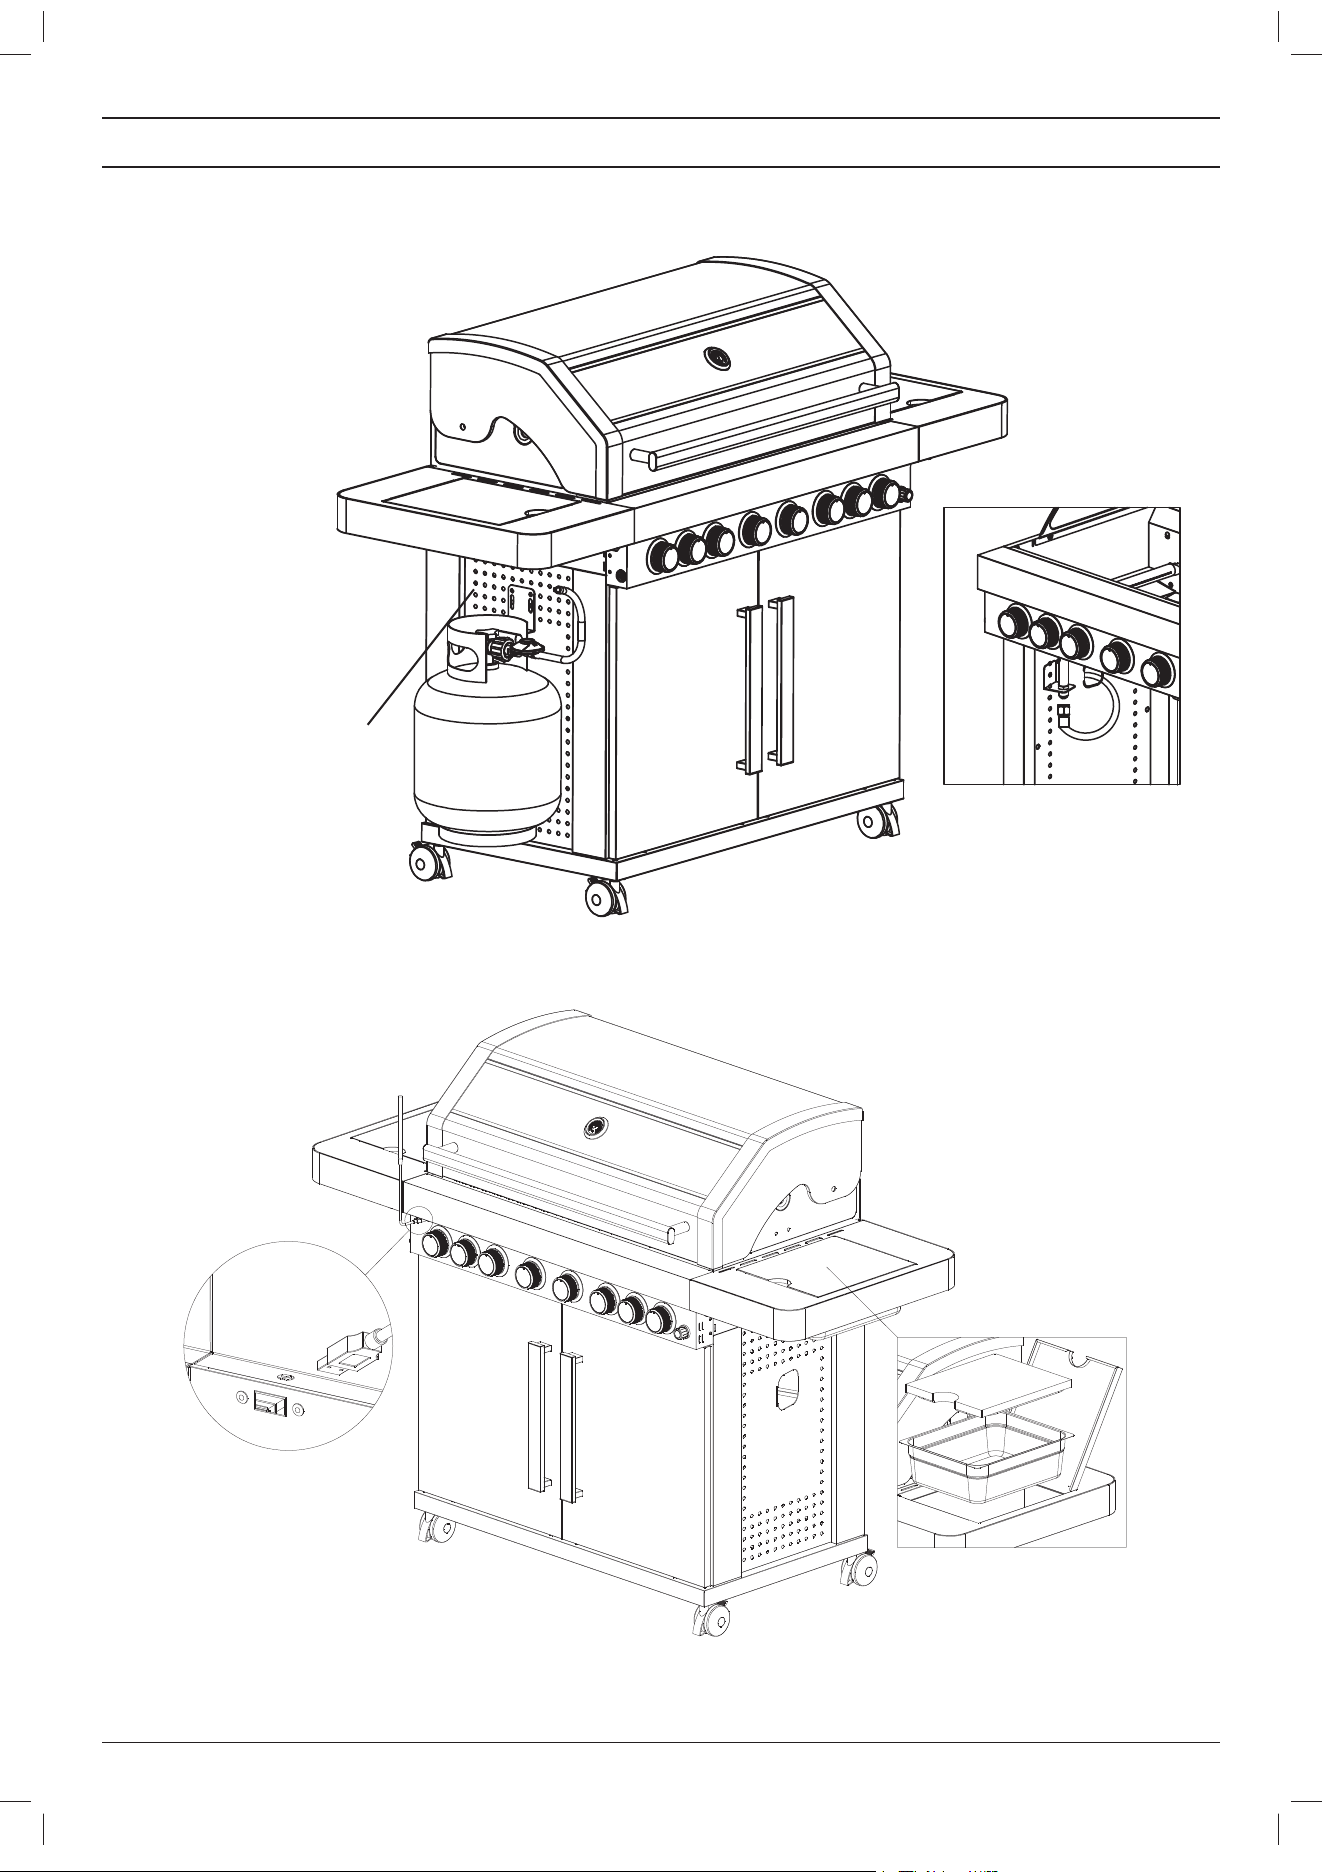
STEP 17
Icebox assembly
When connecting the Hose &
Regulator to the BBQ, route the
Hose away from the BBQ so that it
is not directly touching the
BBQ Firebox.
led light not available
on all models
548046.F.2 - Masport 4/6 Burner - April 13, 2021
20
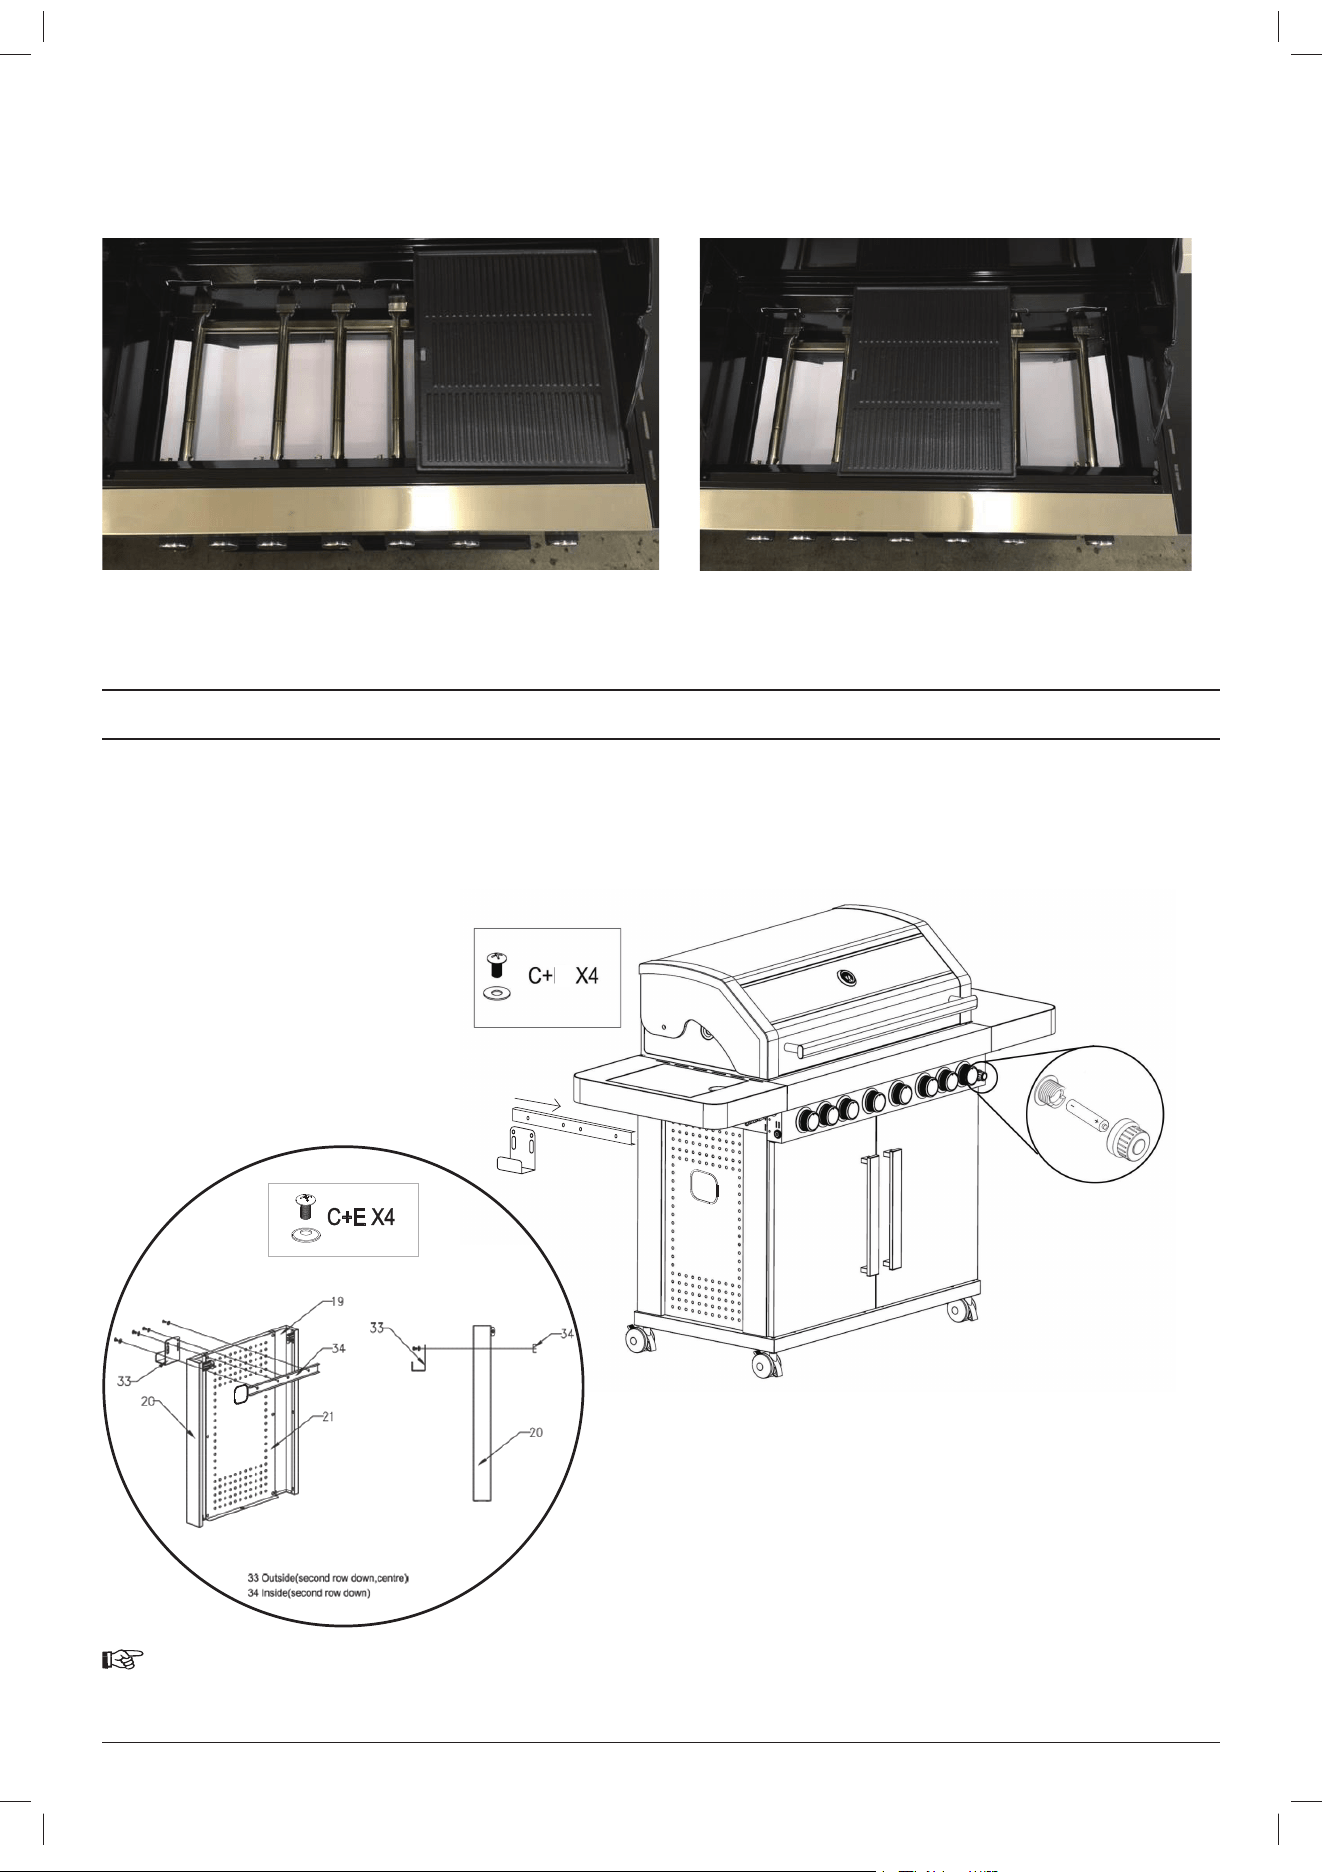
STEP 18
PLATE & GRILL CONFIGURATION.
As the 6 Burner BBQ has one Plate and two Grills, there are two different configurations which can be installed in to the 6 Burner BBQ
(photos 1 & 2).
Photo 1 (can be left or right side) Photo 2 (plate central)
FLAME TAMER CONFIGURATION.
The Flame tamers are required to be inserted in to the BBQ directly above the stainless steel Burner tubes and under the 2 x Grills (Flame
tamers are not required under the Plate), there are location points for these to fit in to.
548046.F.2 - Masport 4/6 Burner - April 13, 2021
21
Shown in photos 3 & 4 are the stainless steel burner tubes of the BBQ and depending on which Grill & Plate configuration used, the Flame
tamers are to be placed so that they sit directly over these Burners. Whilst different Burners are exposed due to the configuration of the
Grills & Plate, the quantity of Flame tamers required remains at four.
Photo 3 (note 4 Flame tamers required) Photo 4 (note 4 Flame tamers required)
**Please note that Flame tamers are not required underneath the Plate.
STEP 19
Assemble the cylinder bracket. Please note that the support bar is mounted on the inside of the cabinet and the cylinder bracket is
mounted on the outside (See Fig. 1). Install the igniter battery (See Fig. 2).
NOTE:
• Befor
e operating this appliance LEAK TEST ALL JOINTS
• Read thor
oughly the information on assembling the hose &
regulator and also the section on Leak Testing
Support bar
mounted on the
inside of the panel
Cylinder bracket
mounted on the
outside
Fig. 2
Unscrew igniter button cap by
turning counterclockwise. Install
AAA battery with negative end
inserted first. Screw back on
the igniter button cap turning
clockwise.
E
548046.F.2 - Masport 4/6 Burner - April 13, 2021
22
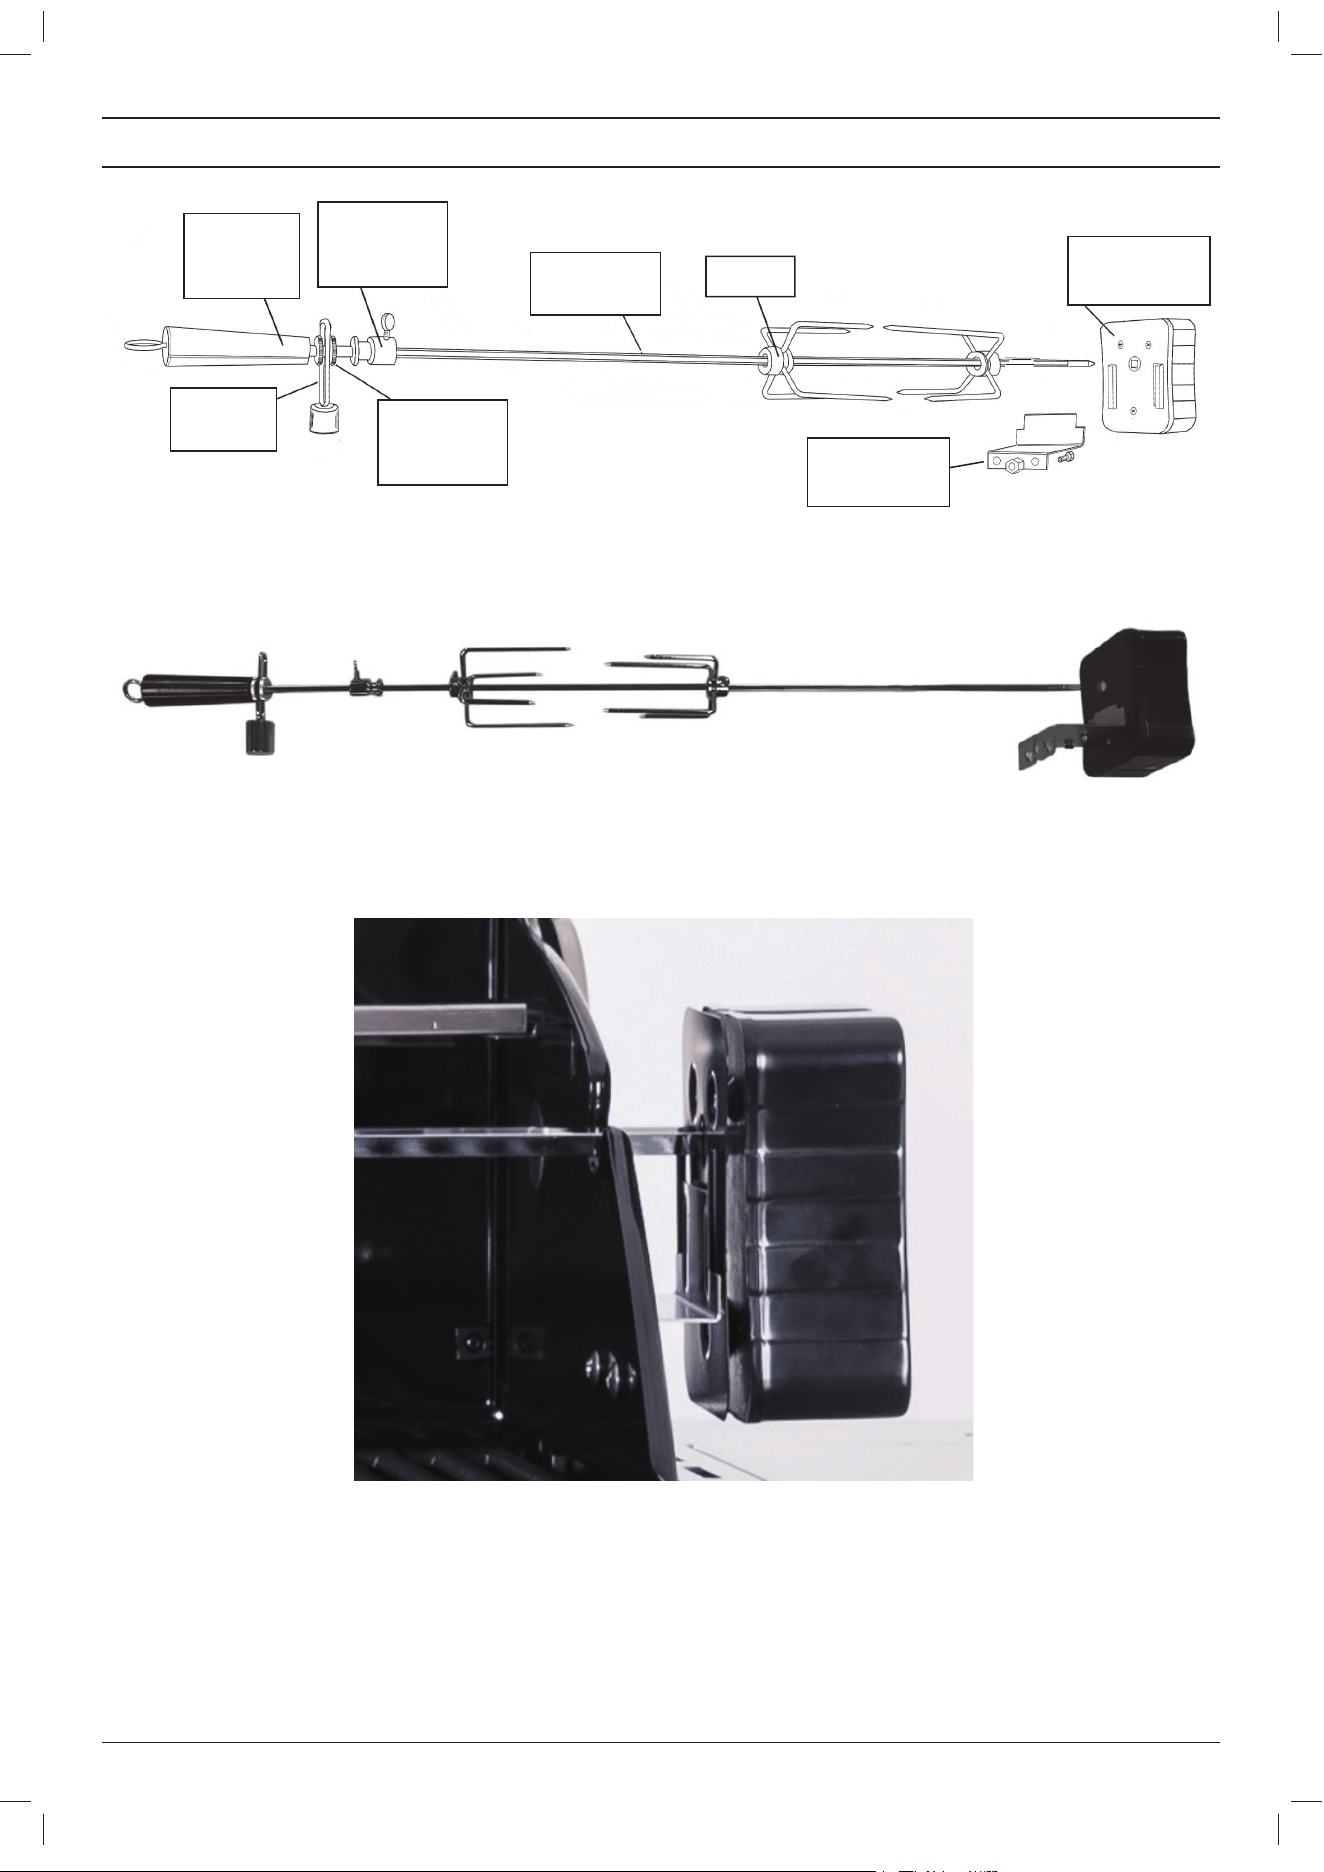
ROTISSERIE (OPTIONAL)
Rotisserie
Motor
Rotisserie
Rod
Counter
weight
washers
Counter
weight
Rotisserie
Rod
Handle
Alignment
Collar with
screw
Prongs
Rotisserie
Bracket
Assembling the Rotisserie Rod with Prongs
Slide the prongs into the rotisserie rod. Slide in the alignment collar with screw on the threaded end, use the round nut, counter weight, nut
and then rotisserie handle in this order.
Attaching the Rotisserie Bracket onto the BBQ grill:
Open the BBQ hood. Use two scr
ews provided with the rotisserie bracket in the mounting holes provided in the side panel of the grill body.
Slide the Rotisserie motor on to the bracket and place the r
otisserie rod assembly locating in the square bush in the motor as above.
548046.F.2 - Masport 4/6 Burner - April 13, 2021
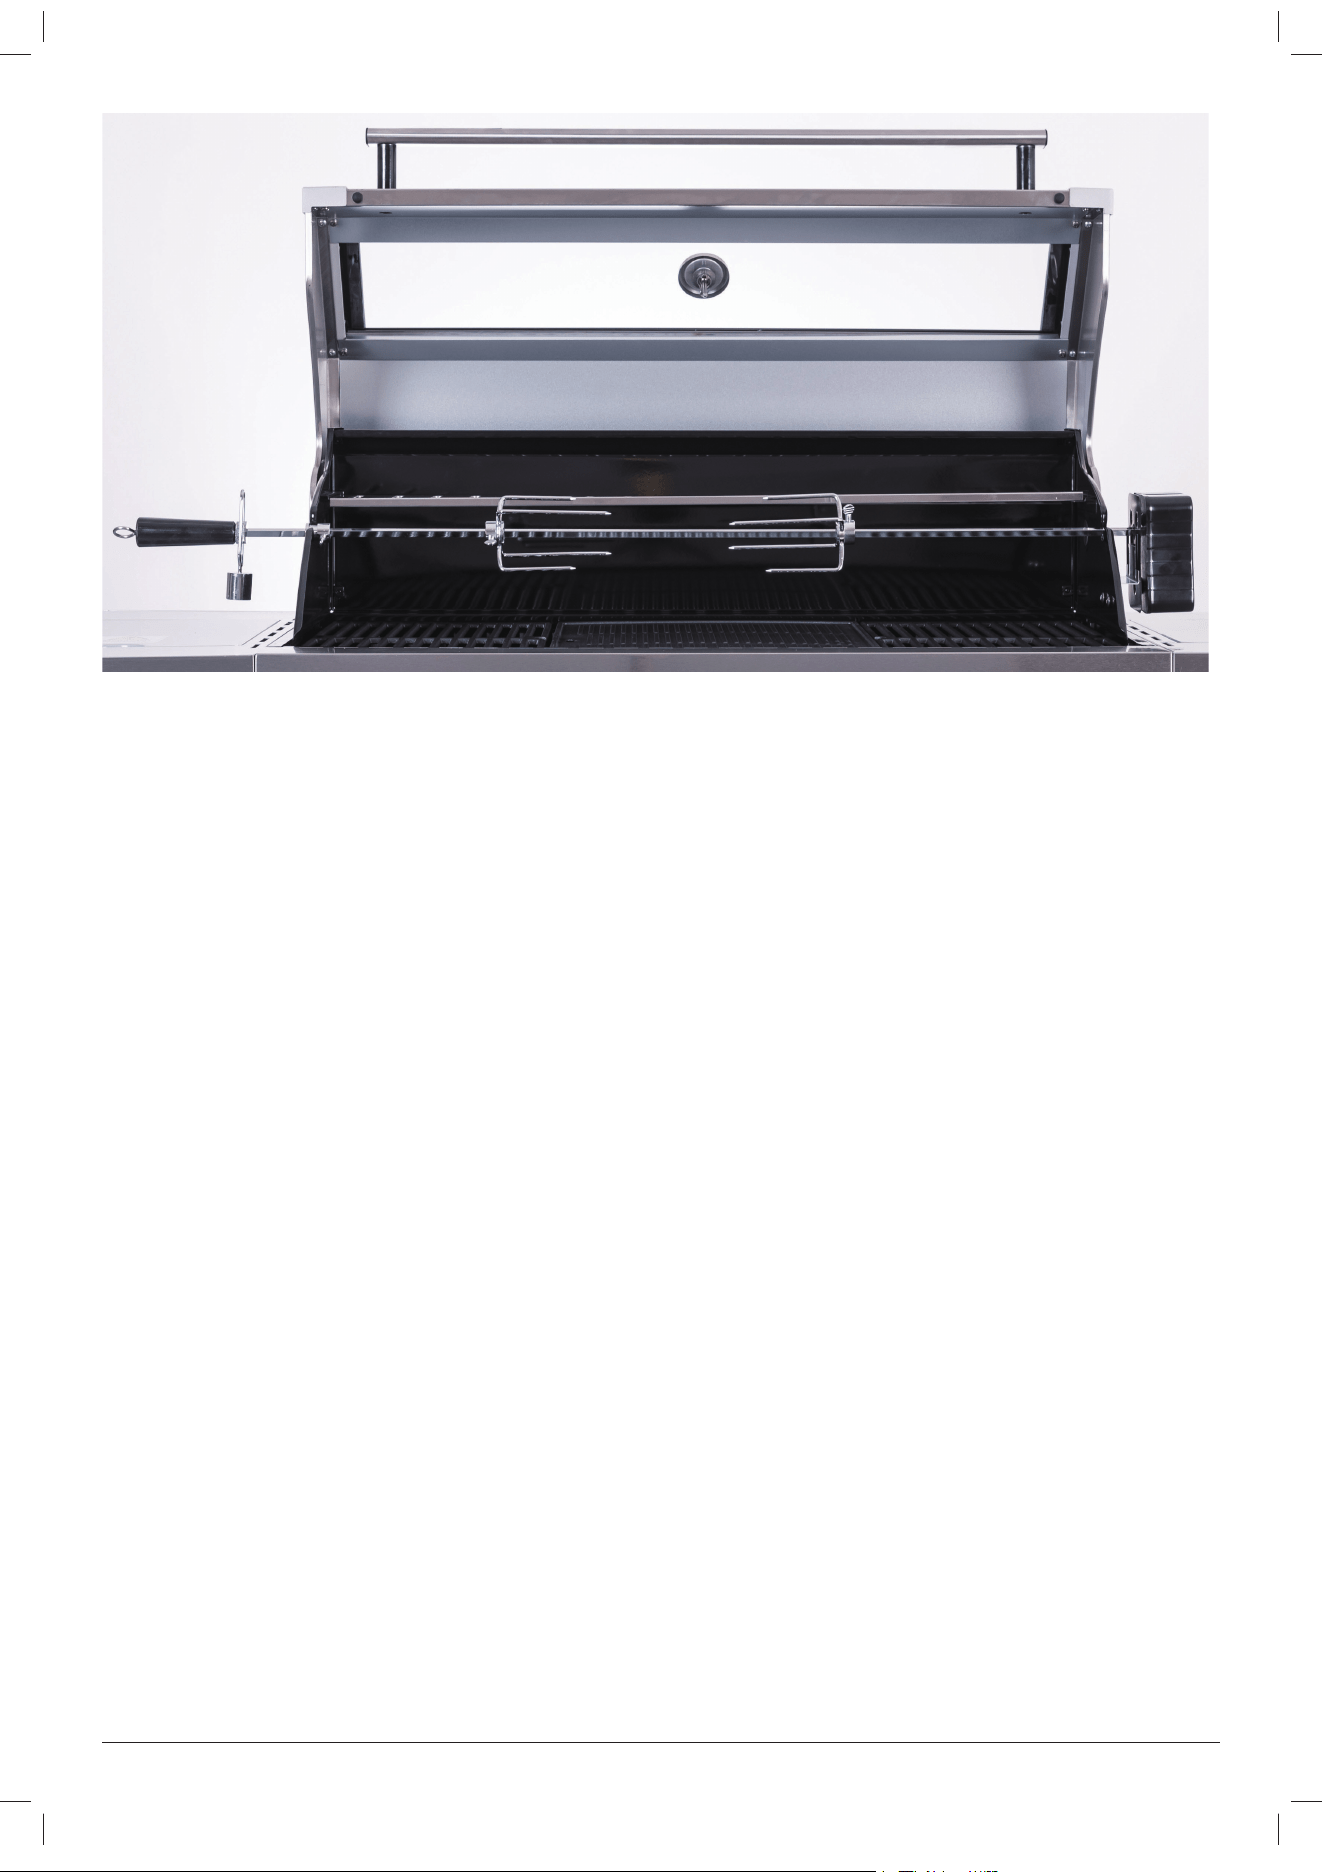
23
While using the rotisserie, adjust the counter weight to your requirement.
548046.F.2 - Masport 4/6 Burner - April 13, 2021
24
LEAK TESTING
When to Test: The BBQ gas bottle, regulator & hose assembly
should be checked for leaks, using the soapy water leak test, every
time you reconnect your regulator to the BBQ gas bottle. You
should also test after any long period of non-use, such as at the
beginning of BBQ season.
What to use: You will need a soapy water solution to check for any
leaks. Mixing liquid hand soap with water will work fine (do not use
any other household cleaning products).
How to Test: Put some soapy water in a spray bottle or a dish.
Turn on the gas bottle but do not turn on the BBQ. Next, spray
the entire valve, regulator and hose assembly with the soapy water
including where the hose connects to the BBQ. Alternatively, you
can apply the soapy water with a paint brush, basting brush.
Bubbles will form if there is a gas leak and you may also smell the
gas. If you find a leak, turn off the gas bottle immediately!
Do not tur
n back on or attempt to use the BBQ if a gas leak has
been detected, contact your local BBQ Dealer for repair.
INSTALLATION
This barbecue is for outdoor use only and should be placed in
a well-ventilated area. Take care to ensure that the minimum
clearances guidelines are followed.
MINIMUM CLEARANCES:
•
From sides: 700mm; From back: 700mm
•
From above (vertical): 1500mm
Keep this barbecue away from any flammable materials! This
appliance shall only be used in an above ground open-air situation
with natural ventilation, without stagnant areas, where gas leakage
and products of combustion are rapidly dispersed by wind and
natural convection. This barbecue is not designed for marine use.
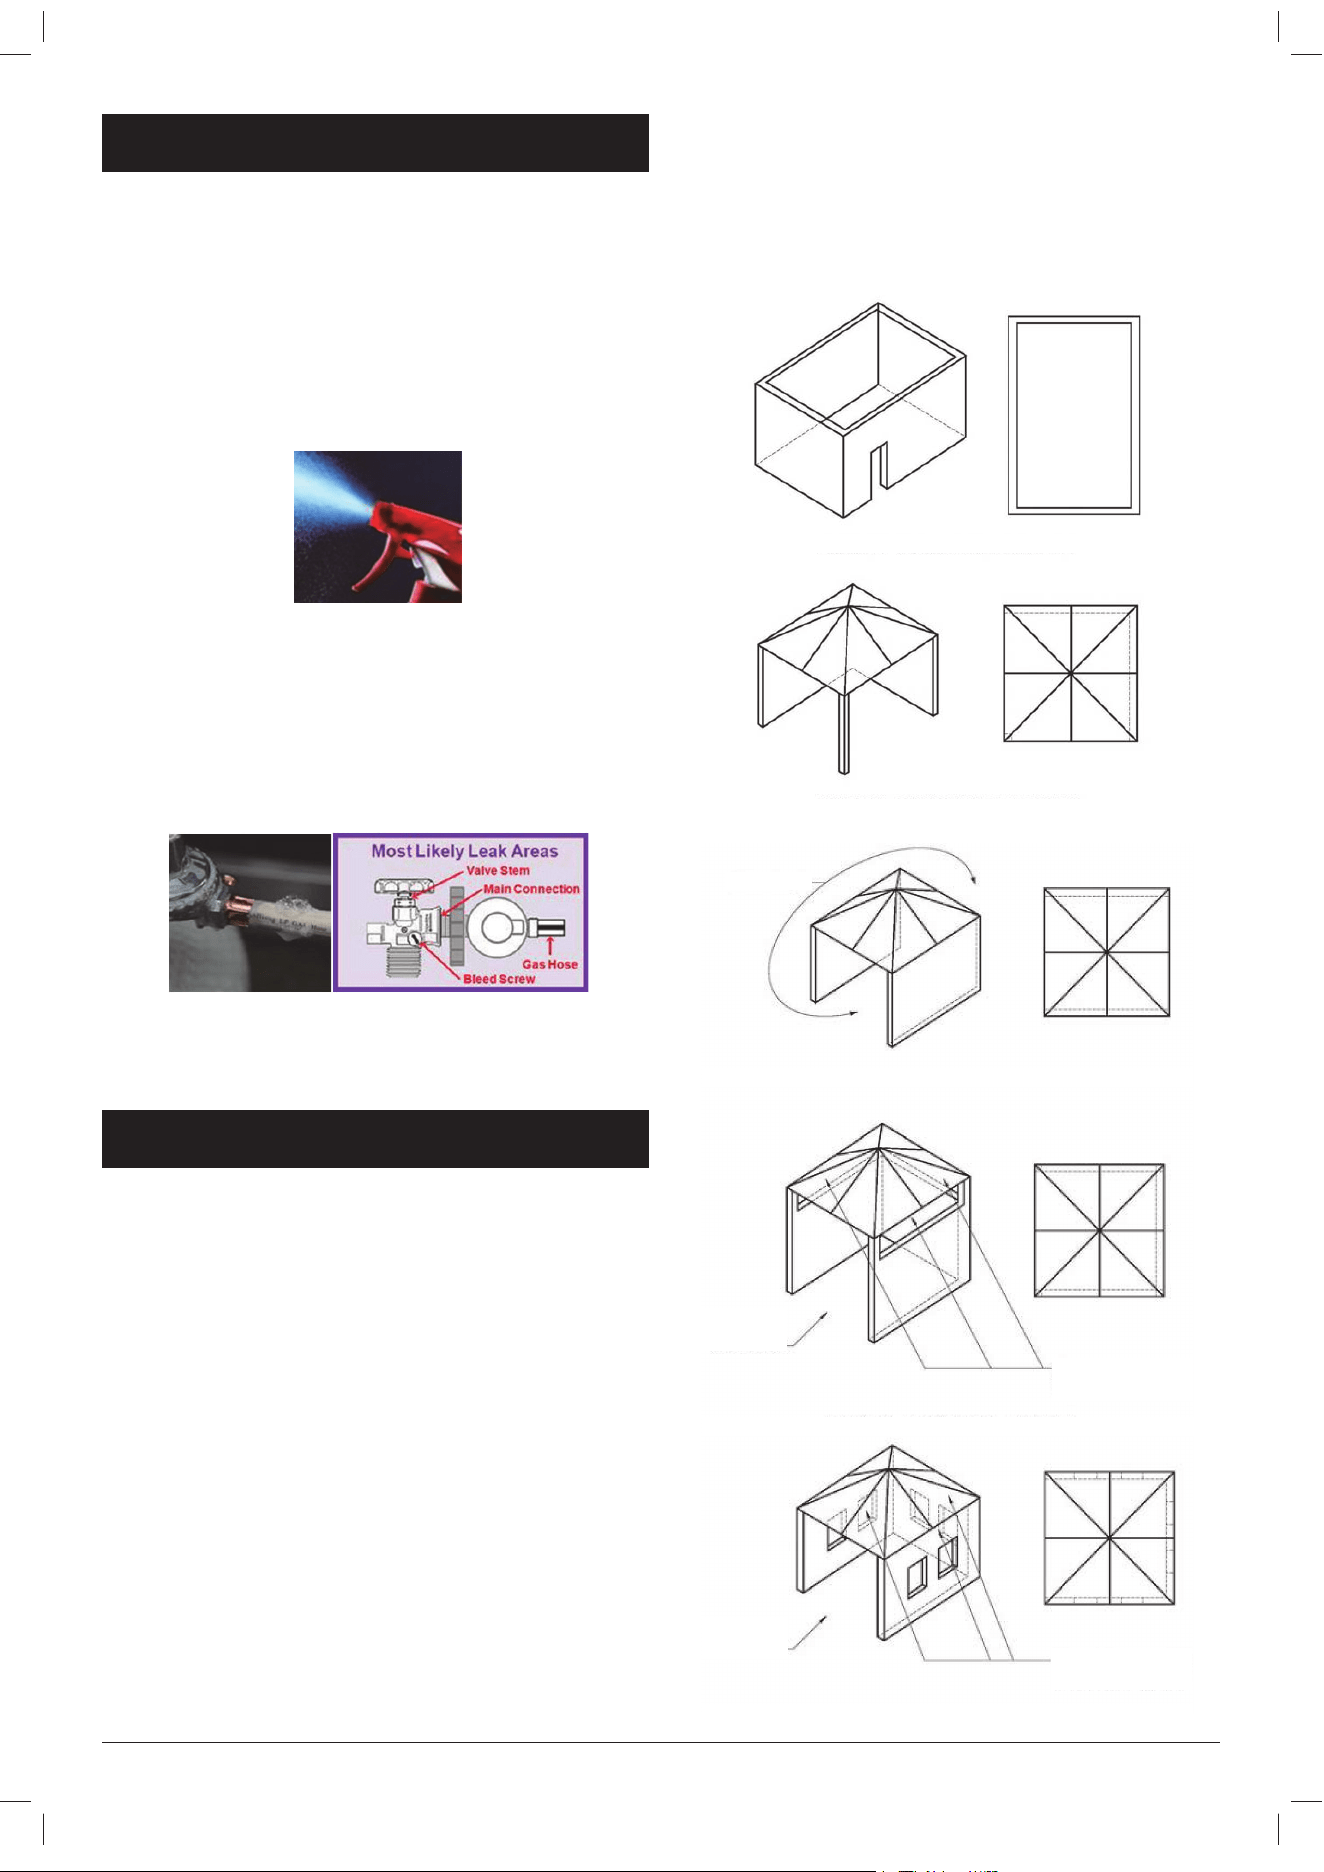
ANY ENCLOSURE IN WHICH THE APPLIANCE IS USED
SHALL COMPLY WITH ONE OF THE FOLLOWING:
1. An enclosur
e with walls on all sides, but at least one permanent
opening at gr
ound level and no overhead cover.
2. Within a partial enclosur
e that includes an overhead cover and no
mor
e than two walls.
3. Within a partial enclosur
e that includes an overhead cover and
mor
e than two walls, the following shall apply:
a) at least 25% of the total wall area is completely open and
unr
estricted
b) at least 30% of the r
emaining wall ar
ea is open and
unrestricted
In the case of balconies, at least 20% of the total of the side, back
and fr
ont wall areas shall be and remain open and unrestricted.
See following diagrams for further illustration:
FIGURE F1-OUTDOOR AREA-EXAMPLE 1
FIGURE F2-OUTDOOR AREA-EXAMPLE 2
Both ends open
FIGURE F5-OUTDOOR AREA-EXAMPLE 5
FIGURE F3-OUTDOOR AREA-EXAMPLE 3
FIGURE F4-OUTDOOR AREA-EXAMPLE 4
Open side at
least 25% of total
wall area
30 percent or more in total
of the remaining wall area is
open and unrestricted
Open side at
least 25% of total
wall area
30 percent or more in total
of the remaining wall area is
open and unrestricted
548046.F.2 - Masport 4/6 Burner - April 13, 2021

25
OTHER PRECAUTIONS
Do not obstruct any of the ventilation openings in the barbecue
body. Also, position the gas supply cylinder inside the cabinet, in
the cylinder base positioning hole. Should you need to change
the gas cylinder, confirm that the cylinder is off, and that there are
no sources of ignition (cigarettes, open flame, sparks, etc.) near
before proceeding. Be sure to inspect the gas hose and ensure it
is free of any twisting or tension. The hose should hang freely with
no bends, folds, or kinks, which could obstruct free flow of gas.
Apart from the connection point, no part of the hose should touch
any hot barbecue parts. Inspect the hose before use. If the hose
is damaged, it must be replaced with a hose suitable for use with
ULPG and meet the national standards for the country of use. The
length shall not exceed 1.5m. Should minimum clearances not
be adhered to severe flare up may be experienced due to lack of
airflow around the barbecue, thus voiding manufacturer’s warranty.
GAS AND REGULATOR INFORMATION
This barbecue is designed for LP gas use only. Bottle sizes of 4.5kg
or greater are recommended for use with this barbecue. Suitable
LPG regulators must have an outlet pressure of 2.75 kPa. You must
have the proper regulator and bottle in order for the barbecue to
operate safely and efficiently. Please consult your local gas dealer
for the most suitable gas cylinders. Please note the regulator
supplied with this barbecue is of an approved type.
The manifold thread type is 5/8” x 18.
For more information on pipe sizing, please refer to AS/NZS 5601 /
AG601.
The gas cylinder must always be stored or used in an upright
position.
Gas Cylinder
Bleeder Valve Screw
Gas Shutoff Valve
Tighten in this direction
Regulator
and hose
Protector Cap
FIXING THE GAS REGULATOR TO THE CYLINDER
Confirm all barbecue control knobs are in the off position.
Hand-tighten the regulator supplied with this barbecue to the gas
cylinder by screwing in an anti-clockwise direction.
DO NOT OVER TIGHTEN!
As the regulator is fitted with a soft nose, it should only be tightened
a further 1/4 turn after resistance is first felt.
OPERATION
WARNING!
Before proceeding, be certain you understand the safety
information contained in this manual.
This barbecue is not designed to be used with more than
66% of the cooking area as a solid plate. Full coverage of
plates will cause excessive build-up of heat and damage
the barbecue.
• Never leave burners on high for more than 10 minutes unless
actually cooking. If the burner makes hissing sounds when lit, it
may be bur
ning inside. Turn burner of
f, allow it to cool and try
again.
• Close the gas cylinder valve after each use.
• Never use plastic or glass utensils on the BBQ
•
Never use the BBQ in strong winds
• Never lay the gas cylinder down (always keep upright)
•
Never allow the flexible gas supply hose or any electrical cord to
come in contact with any heated surface of the BBQ.
• Never lean heavily on the side shelves of your BBQ or attempt to
transport your BBQ by lifting it from the side shelves.
•
Before you start cooking for the first time, clean the BBQ
thor
oughly with hot soapy water. This is necessary to r
emove
r
esiduals and solvents, oil and grease, which may have r
emained
fr
om the manufacturing pr
ocess. The hotplate and grill should be
thor
oughly cleaned in the same manner.
NOTE:
Before using the barbecue for the first time, the barbecue
must be lit and burning for 30 minutes on the “low”
setting.
IMPORTANT
The regulator supplied with this BBQ may incorporate an
Excess Flow Control Safety Device. The Excess Flow Control
will activate to prevent gas flow should a regulator malfunction
occur. It is important that the BBQ operator understands that all
gas valves on the BBQ are closed in the OFF position prior to
opening the gas cylinder valve. If the BBQ valves are open prior
to opening the cylinder valve, the Excess Flow Control will be
activated and prevent the BBQ from being lit. To reset, close the
BBQ valves and gas cylinder valve, wait for 1 minute and use
correct lighting procedure as detailed below.
LIGHTING THE BBQ
Lighting the BBQ is easy, but must be done with due care.
Make sure that the gas is turned on at the cylinder, or that gas is
available to the BBQ. Also, if your BBQ has a roasting hood, ensure
that the hood is up.
SPARK IGNITION
Push the knob control in and turn anticlockwise to the high position.
You should hear clicking as the igniter creates sparks to light the
gas. Once lit, release the igniter button.
DIFFICULTY LIGHTING
If the burner doesn’t light first go, check the gas controls and
try a couple more times. If the burner still does not light, wait a
few minutes to allow the gas to disperse before trying again. If
satisfactory operation cannot be achieved, consult your retailer
before proceeding.
Note: Failure to follow the lighting procedures correctly can lead to
a hazardous condition.
MAIN BURNER AND SIDE BURNER LIGHTING (INTEGRATED
IGNITION)
1. Open the lid before igniting the barbecue
2. Check all the knobs are in the “OFF” position
3. Open the gas contr
ol valve at the gas cylinder
NOTE: The valves fitted to this BBQ include a safety feature.
The valve must be depr
essed before turning. This feature
prevents accidental activation of the knob
4. From the “OFF” position, push in then turn control knob anti-
clockwise to the “HI” position until hear a “click” sound
5. Repeat step 4, 3-4 times until the burner is lit
6. If the burner fails to light, turn of
f and wait for 5 minutes, then
begin fr
om step 4
7. Once a burner is lit, similarly light the remaining burners.
8. Turn the knob anticlockwise to adjust the heat fr
om High –
Medium – Low to your heat r
equir
ement.
548046.F.2 - Masport 4/6 Burner - April 13, 2021

26
FOR MANUAL LIGHTING (MAIN BURNER)
IMPORTANT
Use a match holder and long match stick or BBQ lighter
for lighting the BBQ manually to avoid burning your hand.
1. Open the lid before igniting the barbecue.
2.
Check all the knobs are in the “OFF” position.
3.
Open the gas control valve at the gas cylinder.
4.
From the “OFF” position, push in and then turn the contr
ol
knob anticlockwise to the “HI” position.
5. Hold a lit match (in a match holder) next to one of the main
bur
ners. The burner will light from the match.
Once a burner is lit, the burner next to it can be turned on and will
light off the lit burner. Repeat until all burners are alight.
Each burner can be adjusted. Turn the knob anticlockwise to adjust
the heat from High - medium - Low to your heat requirement.
FOR MANUAL LIGHTING (SIDE BURNER)
1.
T
urn
all knobs to “OFF” then open the LP tank valve. Always
keep your face and body as far from the grill as possible when
lighting.
2. Raise side bur
ner lid.
3. Push in and then tur
n contr
ol knob anticlockwise to high
position.
4. Use a match holder and long match stick or BBQ lighter for
lighting the BBQ manually to avoid burning your hand. Place a
lit match near the bur
ner until the burner ignites.
5. If bur
ner fails to light, turn of
f and wait 5 minutes, then try again.
If bur
ner still does not light after r
epeated attempts, call your
local dealer for assistance.
REAR BURNER LIGHTING (ELECTRONIC IGNITION)
1.
Open the lid before igniting the barbecue.
2.
Check all the knobs are in the “OFF” position.
3.
Open the gas control valve at the gas cylinder.
4.
Operate the rear burner knob in combination with the electr
onic
ignition push button on the side bur
ner table.
5.
From the “OFF” position, push in then turn control knob anti-
clockwise to the “HI” position.
6. Keep the knob pushed in at the “HI” position for 4 seconds
whilst pr
essing the electronic ignition push button.
7.
Repeat the steps from beginning, 3-4 times until the bur
ner is
lit.
8.
Once the rear bur
ner has ignited keep the knob pushed in at
the “HI” position for 20 seconds until stabilized then release the
r
ear burner control knob.
9.
If the burner fails to light, turn of
f and wait for 5 minutes, then
r
epeat the steps from beginning.
10.
Turn the knob anticlockwise to adjust the heat fr
om High –
Medium – Low to your heat requirement.
FOR MANUAL LIGHTING (REAR BURNER)
1.
Open the lid before igniting the barbecue.
2.
Check all the knobs are in the “OFF” position.
3.
Open the gas control valve at the gas cylinder.
4.
From the “OFF” position, push in and then turn the rear bur
ner
contr
ol knob anticlockwise to the “HI” position.
5.
Hold a lit match (in a match holder) next to rear burner
. The
bur
ner will light fr
om the match.
FOR REAR BURNER: LP gas takes longer time to travel from
the valve to the r
ear burner
. Keep the knob pushed in at the
“HI” position for a further 20 seconds until stabilized, then
r
elease the rear burner control knob. Repeat fr
om step 4, 3-4
times until the bur
ner is lit.
6.
If the burner fails to light, turn of
f and wait 5 minutes, then
begin fr
om step 4.
IMPORTANT
Keep a spray bottle of soapy water near the gas supply
valve and check the connections before each use.
WARNING!
•
Do not light the grill if odour of gas is present.
• It is important to ensur
e that all contr
ol valves, including the
gas cylinder
, are turned off after use.
• When using the r
ear burner and r
otisserie use 1 or 2 of the
main burners at the low heat setting if a little extra heat is
required.
• Do not use the r
ear burner in combination with main bur
ners
on high heat setting when the hood is closed.
• Caution / Danger: Extr
eme care is requir
ed when cooking
with hood in closed position. Frequent checks must be
undertaken for the heat and temperatur
e to ensur
e safe
cooking.
•
Too much heat can cause fire.
TURNING OFF A BURNER
Push in then turn each burner control knob clockwise to the “OFF”
position.
TURNING OFF YOUR BARBECUE
When you have finished using your barbecue, turn off the gas at the
bottle. Push in and then turn all the control valves fully clockwise to
the “OFF” position. Wait until the barbecue is sufficiently cool before
replacing the barbecue lid or closing its hood. Once cooled, a
protective cover should always be fitted to the barbecue to protect
your investment from the ailments when not in use.
WARMING RACK
Warming racks are a convenient way to keep cooked food warm or
to warm items such as bread rolls. Always check that your warming
rack is properly fitted before use.
GRILL COOKING
The burners heat up the flame tamers underneath the grill, which
in turn heats the food on the grill. The natural juices produced
during cooking fall onto the flame tamers below and vaporise. The
subsequent rising smoke bastes the food, as it travels upwards,
imparting that unique barbecue flavour.
FLAT PLATE / FLAT-RIBBED PLATE
The burners heat the griddle plate directly, which then cooks the
food on contact. These allow for the cooking of smaller items, such
as seafood, which could fall through the spaces of a grill. They
are also suitable for cooking items that require high-temperature/
short-duration cooking, such as vegetables and smaller cuts of fish.
Similarly, these can be used in exactly the same way as a griddle in
the kitchen, for searing steaks, cooking eggs, etc.
DO NOT use both the plate and deep dish at the same time.
This will cause your BBQ to overheat and could cause a fire.
COOKING AND USE OF HOOD
Barbecues equipped with a roasting hood give the option of
cooking with hood closed to form an ‘oven’ for roasting food, such
as joints of meat, whole chickens, etc.
548046.F.2 - Masport 4/6 Burner - April 13, 2021
27
WARNING!
Cooking with the hood closed and the burners on high creates
a fire risk. When the hood is closed, a large amount of heat is
trapped inside the barbecue. Thus, it is IMPORTANT to make
sure that all the burners are turned to the low position to prevent
burning of the food and damaging the barbecue. Avoid lifting the
hood unnecessarily as heat is lost every time the hood is opened.
Use the temperature gauge to check the heat of the barbecue.
DO NOT ALLOW YOUR BARBECUE TO OVERHEAT. A
BARBECUE SHOULD NEVER BE LEFT UNATTENDED
WHILE COOKING!
For safety reasons, barbecue plates and grills will not cook as hot
towards the front of the barbecue.
FRONT
The slightly lower temperature at the front can easily be overcome
by rotating the food being cooked around the barbecue plate or
grill.
FLARE-UP CONTROL
Flare-ups occur when meat is barbecued, and its fats and juices
fall upon the flame tamers. The smoke from some flare-up helps
give cooked meat its barbecued flavour, but excessive flare-up will
result in meat being burned. To control flare-up, it is advisable to
trim away excess fat from meat and poultry before grilling. Also, the
burners should always be placed on the low setting during cooking.
Finally, extinguish flare-ups by applying baking soda or salt directly
onto the flame tamers. Always protect your hands when handling
anything near the cooking surface of the barbecue.
If a fat fire should occur in the drip tray, turn all knobs to the off
position, turn off the gas at the bottle, and wait for the fire to go out.
Do not pull out the drip tray or douse with water.
COOKING USING OPTIONAL ACCESSORIES
ROTISSERIE COOKING (OPTIONAL)
1.
Carefully remove the cast ir
on cooking surfaces and the
warming rack fr
om the barbecue.
2.
Place the flame tamers to the centre of the barbecue body
. It is
over this ar
ea that the meat will be cooked.
3.
Slide one of the spit forks onto the spit r
od and tighten its
thumb scr
ew to secur
e it into place. Insert the pointed end of
the spit rod into the meat being cooked and slide the meat
towar
ds the centre of the rod. Make sur
e the fork is fully into
the meat. Slide the other fork onto the r
od, into the meat, and
tighten the thumb scr
ew once in place. For optimal r
otisserie
cooking, food must be placed securely onto the middle of the
spit r
od and balanced so that the rotisserie can rotate fr
eely
without interfer
ence fr
om any barbecue surfaces. Any loose
sections of meat should be secured so they do not hang down
and interfer
e with the rotation of the spit rod.
4.
Insert the pointed end of the spit rod into the motor
. Lay the
other end of the spit r
od onto the opposite bracket.
5.
Light the barbecue.
6.
Turn on the rotisserie motor to begin r
otisserie cooking. The
hood has been designed so that it may be closed during
r
otisserie cooking.
7.
Always cook foods on the lowest flame setting to avoid bur
ning
or over
cooking.
8.
DO NOT ALLOW YOUR BARBECUE TO OVERHEAT.
A BARBECUE SHOULD NEVER BE LEFT UNA
TTENDED
WHILE COOKING!
9.
If cooking with rotisserie using indirect heat (not using bur
ners
dir
ectly under meat - oven style cooking), a baking dish (not
supplied on some models) can be placed under the food to
catch fats and drippings.
INFRARED REAR BURNER & ROTISSERIE (OPTIONAL)
Preparing your barbecue:
You will need to remove both grill plate and solid plate, also the
flame tamers and warming rack. Place these in a safe place for later
re-assembly. Place a baking dish (not supplied) onto the burners,
the dish should be large and deep enough to capture the excess
grease as it falls from the food.
Centrally secure the food with the rotisserie prongs, turning the
rotisserie rod by hand to test for balance, adjust the food position
if required. Insert pointed end of rod into the motor, test that
everything is running correctly.
Using the Rear Burner for roasting on a barbecue can be different
depending on our preferences. A suggestion might be to use 1-3
of the main burners to cook the roast and then use the Rear Burner
towards the end of the cooking to “brown up” the roast. Using
the Rear Burner by itself to do the cooking can take a long time
depending on the size of the roast.
Do not use the rear burner in combination with main burners on
high heat setting when the hood is closed.
WARNING!
• Caution / Danger: Extr
eme care is requir
ed when cooking
with hood in closed position. Frequent checks must be
undertaken for the heat and temperatur
e to ensur
e safe
cooking.
•
Too much heat can cause fire.
Coloured BBQ’s are more prone to fading than Black BBQ’s. To
look after your BBQ, do not cook with the Hood down at High
tempreture for long periods of time. Use the BBQ cover when BBQ
is not being used to protect it from direct sunlight.
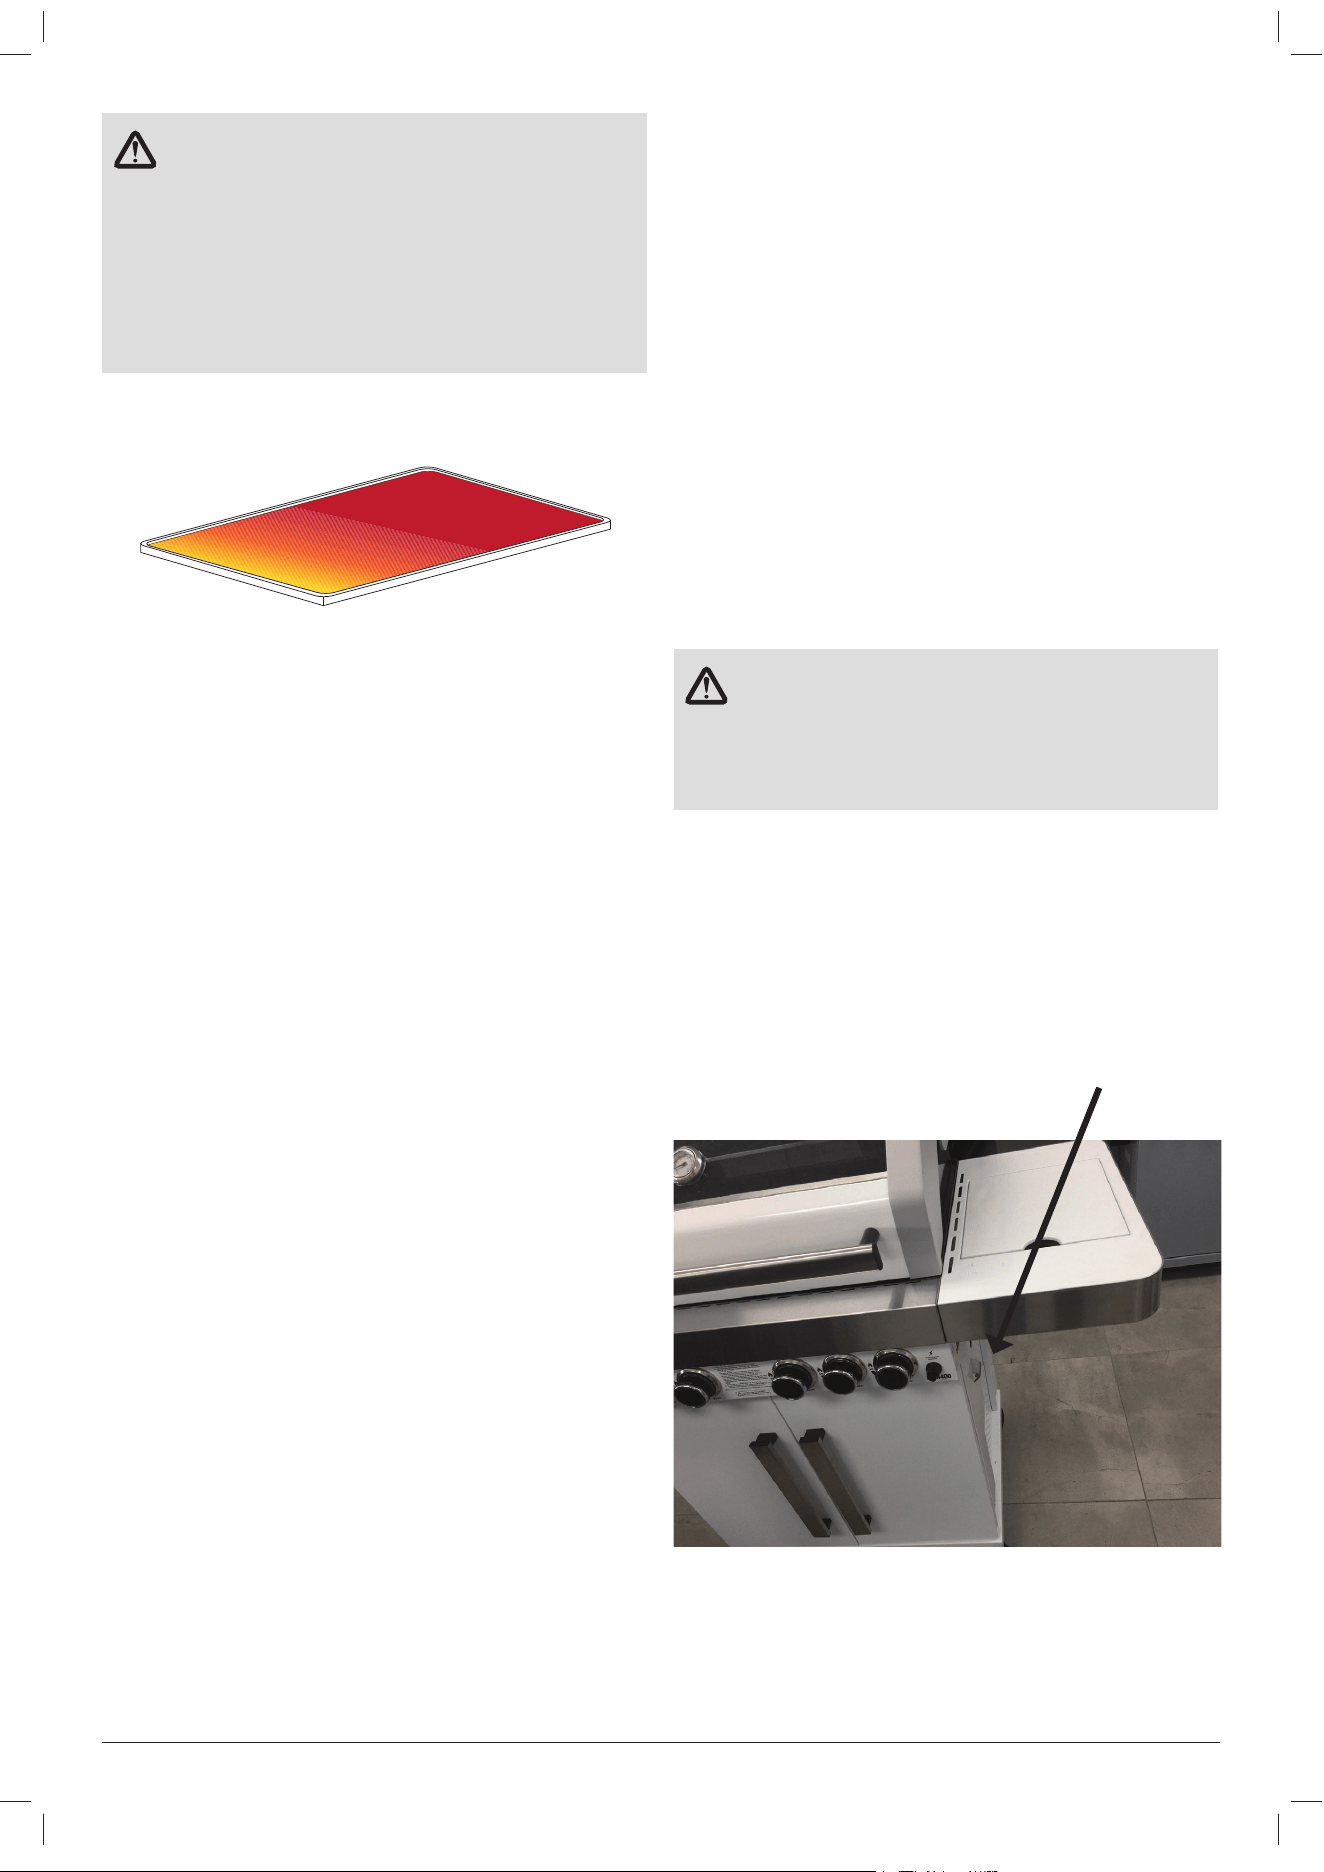
USB PORT
Some models of BBQ come with a USB Port and this can be found
underneath the right hand Side table as shown. The USB Port is
ideally suited for charging cell phones rather than larger devices.
548046.F.2 - Masport 4/6 Burner - April 13, 2021
28
CHECKLIST
Problems Possible Cause Solutions
Integrated Ignition
When push the knob and turn anticlockwise:
- W
on’
t light
Orifice blocked Check the orifice for blockage
- No spark
Dirty contacts of the electrode and or loose
contacts
Remove the connecting wire, clean and reconnect
firmly
- Still no spark
Electrode terminals are damaged Inspect electrode and replace if damage
- W
eak spark Due to moisture / food residue on the electrodes Remove the moisture using paper towel / clean the
electrode
- Spark at places other than the tip of electr
ode Ignition wire damaged Replace the ignition wire
Electronic Ignition (Rear Burner)
When push the knob and turn anticlockwise:
- W
on’
t light
Orifice blocked Check the orifice for blockage
- No spark
Dirty contacts of the electrode and or loose
contacts
Remove the connecting wire, clean and reconnect
firmly
- Still no spark
Dirty / loose contacts at the battery Clean
Dead / discharged Battery Replace battery
Wrong polarity Check and insert the battery correctly
- Still no spark
Circuit incomplete due Loose contacts at the
ignition module
Re-assemble the ignition module make sure the
assembly is tight and makes a complete circuit
- Still no spark
Electrode terminals are damaged Inspect electrode and replace if damage
- W
eak spark Due to moisture / food residue on the electrodes Remove the moisture using paper towel / clean the
electrode
- Spark at places other than the tip of electr
ode Ignition wire damaged Replace the ignition wire
Burner can’t light by match
No gas Open the LP tank valve
Gas flow is not smooth Clear burner tubes
Incorrect assembly between burner and valve Re-assemble
Yellow or orange flames, with gas odour
Incomplete combustion Check the burner inlet for obstruction such as
spiders
Check air shutter for correct adjustment
Check for the source
Low heat with knob in “high” position
Gas hose bent or kinked Straighten
Burner or orifice blocked Clear
Low gas pressure Check Cylinder/ Regulator (refer to pg. 15)
Grill not preheated Preheat the grill for 15 minutes
Flare up
Excessive meat fat Cut off fat before grilling
Over high temperature Adjust
Grease deposit Clean
Flame out
Over high winds Find a less windy place
Flame lifting
Over high gas pressure Call the gas dealer
Flashback
Burner port blocked Clean
Grease fire
Grease accumulated in food Turn off knobs, LP tank valve, leave lid open, let fire
burn out. Clean the grill when cool.
BEFORE CALLING FOR SERVICE
If the grill does not function properly, use the following checklist
before contacting your dealer for service.
APPLIANCE APPROVED OUTDOOR USE ONLY
USE ONLY THE 5/8” x 18 GAS CONNECTION HOSE AND
REGULATOR PROVIDED BY THE MANUFACTURER!
If a replacement is necessary, please contact either our Masport
Customer Service Department or your local dealer.
The use of unauthorised parts can create unsafe conditions and
environment.
Refer to your Masport warranty card for warranty information.
STORAGE OF THE GRILL
1.
Clean the BBQ.
2.
Store the BBQ outdoors in a dry, well ventilated ar
ea and out of
r
each of children when LP tank is connected to the grill.
3.
Store the BBQ indoors ONLY after the LP tank is turned of
f and
r
emoved, the LP tank must be stored outdoors, out of r
each
of childr
en, NEVER stor
e the tank in a building, garage or any
other enclosed ar
ea.
4. If using a cover for your barbecue, check your BBQ every few
weeks.
TROUBLESHOOTING
548046.F.2 - Masport 4/6 Burner - April 13, 2021

29
CARE AND MAINTENANCE
Regularly clean your barbecue between uses and especially
after extended periods of storage. Ensure the barbecue and its
components are sufficiently cool before cleaning. Do not leave the
barbecue exposed to outside weather conditions or stored in damp,
moist areas.
•
Never douse the barbecue with water when its surfaces are hot.
•
Never handle hot parts with unprotected hands.
Whilst our products are made to the highest standards and all care
is taken to make them as weather proof as possible, we cannot
accept responsibility for rust occurring on exposed metal parts
unless this is a result of faulty manufacture of parts.
In order to extend the life and maintain the condition of your
barbecue, we strongly recommend that the unit is covered when
not in use, especially during the winter months.
STAINLESS STEEL CARE AND CLEANING ADVICE
Cleanliness and stainless steel are closely related. Stainless steel
performs best when clean - cleanliness is essential for maximum
resistance to corrosion and to maintain the good looks and life of
your BBQ.
TYPES OF SURFACE CONTAMINANTS
Fingerprints and Stains
Fingerprints and mild stains resulting from normal use are the most
common surface contaminates. They can be removed with a glass
cleaner or with a soft rag. This should be followed by a thorough
warm water rinse.
DIRT
Like any surface that is exposed to the environment especially in
coastal areas, stainless steel can get dirty. Cleaning with warm
water with or without a gentle detergent is sufficient. Next in
order are mild non-scratching abrasive powders such as typical
household cleaners. These can be used with warm water, nylon
bristle brushes, sponges, or clean cloths. Carbon steel brushes or
steel wool should be avoided as they may leave particles embedded
on the surface which can lead to RUSTING. Cleaning should always
be followed by rinsing in clean hot water.
GREASE
Grease may soil stainless steel surfaces in food preparation. These
soils may be mildly corrosive if left or may not allow the surface
to maintain passivity, and so regular removal is a necessity for the
appearance.
TYPES OF CLEANERS AND METHODS
Consider the possibility of scratching and the potential for post-
cleaning corrosion caused by incompletely removed cleaners. Avoid
using abrasive cleaners unless absolutely necessary.
CLEAN WATER AND WIPE
A soft cloth and clean warm water should always be the first choice
for mild stains and loose dirt and soils. A final rinse with clean
water and a dry wipe will complete the process and eliminate the
possibility of water stains.
HOUSEHOLD CLEANERS
Household cleaners fall into two categories: detergent (non-
abrasive) and abrasive cleaners. Abrasive cleaners are more
effective but introduce the possibility of scratching the surface. A
neutral cleaner low in chloride is essential. The cleaning method
generally employed with these cleaners is to apply them to the
stainless surface and follow by cloth wiping in the direction of the
grain or polish lines (not across them). The cleaned surface should
be thoroughly rinsed with clean water and wiped dry with a soft
cloth if water streaking is a consideration.
CARE OF STAINLESS STEEL IN YOUR BBQ
Your BBQ features Stainless Steel components. All Stainless
Steel grades require a level of care and protection to retain their
appearance. Stainless Steels are not immune to corrosion and
neither are they maintenance-free, contrary to popular public
perception. Even the highest marine grades of Stainless Steel
require frequent cleaning to avoid oxidation and other corrosive
issues.
Modern tastes dictate that your BBQ features Stainless Steel with a
brushed finish. This brushed finish is attained by running Stainless
Steel sheets through an abrasive process that removes the mirror
finish and leaves the brushed finish. Brushed-finish Stainless
Steel requires frequent cleaning and care, to maintain its quality of
appearance. Without adequate care it is realistic to expect that it will
show signs of corrosion in time.
Stainless steel is definitely not a maintenance-free material.
Cleanliness and Stainless Steel are closely related.
The cleaner stainless steel can be kept while in storage or during
use, the greater the assurance of optimum corrosion resistance. In
order to maintain the good looks and life of your BBQ, follow these
summary tips on the care of stainless steel:
•
When new or when cleaned and dried, we r
ecommend the
owner apply a thin coat of Olive Oil to stainless steel surfaces
which should then be polished in. The Olive Oil will help greatly
in pr
otecting the stainless steel from corr
osive contaminants and
assisting removal of finger prints and other marks, keeping the
appearance of the stainless steel in new condition. The Olive Oil
coating also makes further polishing easier
.
•
Use clean, soft cloths or sponges to clean your grill.
•
Carbon steel brushes or steel wool should never be used.
•
Do routine cleaning of exposed surfaces.
•
After cleaning, rinse thoroughly with water.
•
Cleaning with chloride-containing detergents must be avoided.
• On polished finishes, rubbing or wiping should be done in the
dir
ection of the polish lines, NOT across them.
• Care must be taken when cleaning the fascia. Printed information
may be erased with heavy cleaning.
CAST IRON COOKING SURF
ACES
Before cooking with the grill, flat plate or deep dish (if supplied with
your BBQ) clean these with hot soapy water to remove any oil or
residue from the packaging or manufacturing process. Wash with
clean water and let the plates dry naturally. Prior to lighting your
BBQ place them back into the BBQ. Then after lighting your BBQ,
let the plates warm up slowly over a period of 30 minutes, during
this time increasing the heat. You will notice slight vapors rise from
the plates, this is natural as residues are burned off. Turn off your
BBQ to allow the plate to cool slightly. The plates can now be
prepared with the addition of cooking oil. Take care that the plates
are not at a temperature where adding the oil will cause a hazard.
Brush the oil over the plate, allowing the oil to be absorbed into the
surface. Allow the plate to fully cool, then remove any excess oil. the
BBQ is now ready. Repeat the above to keep the plate and grill in a
ready condition after each BBQ session.
PORCELAIN ENAMEL COOKING SURFACES
Porcelain Enamel surfaced items should be treated with care and
should not be cleaned with an abrasive cleaner or scratchy cleaning
item. Surfaces will crack or chip if hit or dropped. Porcelain Enamel
surfaces should NOT be regarded as ‘Non-stick’, use of cooking
oil is required as normal. Food will likely stick to an overheated or
un-oiled enamel surface. The surface will be more easily cleaned by
first soaking overnight.
BURNER MAINTENANCE
Provided that they are operating correctly, in normal usage, burning
off the residue after cooking will keep the burners clean. The
burners should be removed and cleaned annually, or whenever
heavy build-up is found, to ensure that there are no signs of
548046.F.2 - Masport 4/6 Burner - April 13, 2021
30
548046.F.2 - Masport 4/6 Burner - April 13, 2021
blockage (debris, insects) in either the burner portholes, the primary
air inlet, or the neck of the stainless steel burners. Use a pipe
cleaner to clear obstructions. When refitting the burners, be careful
to check they are positioned as follows. The neck of the burner fits
over the valve outlet, the top flaps of the gas collector boxes fit over
the top surfaces of the burners.
BURNER MAINTENANCE AND REPLACEMENT
Both the stainless steel burners and flame tamers do have a defined
operating lifespan, these products are often exposed to cooking
marinades and extreme heat in an area of the barbecue which can
be neglected during regular cleaning.
Replacement parts are available from your local barbecue dealer.
SPIDER AND INSECT WARNING!
Spiders and insects can nest in the burners of the grill and cause
the gas to flow from the front of the burner. This is a very dangerous
condition, which can cause a fire to occur, thereby damaging the
grill and making it unsafe to operate.
WHEN TO LOOK FOR SPIDERS
You should inspect the burners at least once a year or immediately
after any of the following conditions occur:
• The smell of gas in conjunction with the burner flames appearing
yellow.
• The BBQ does not reach temperature.
• The BBQ heats unevenly.
• The burners make popping noises.
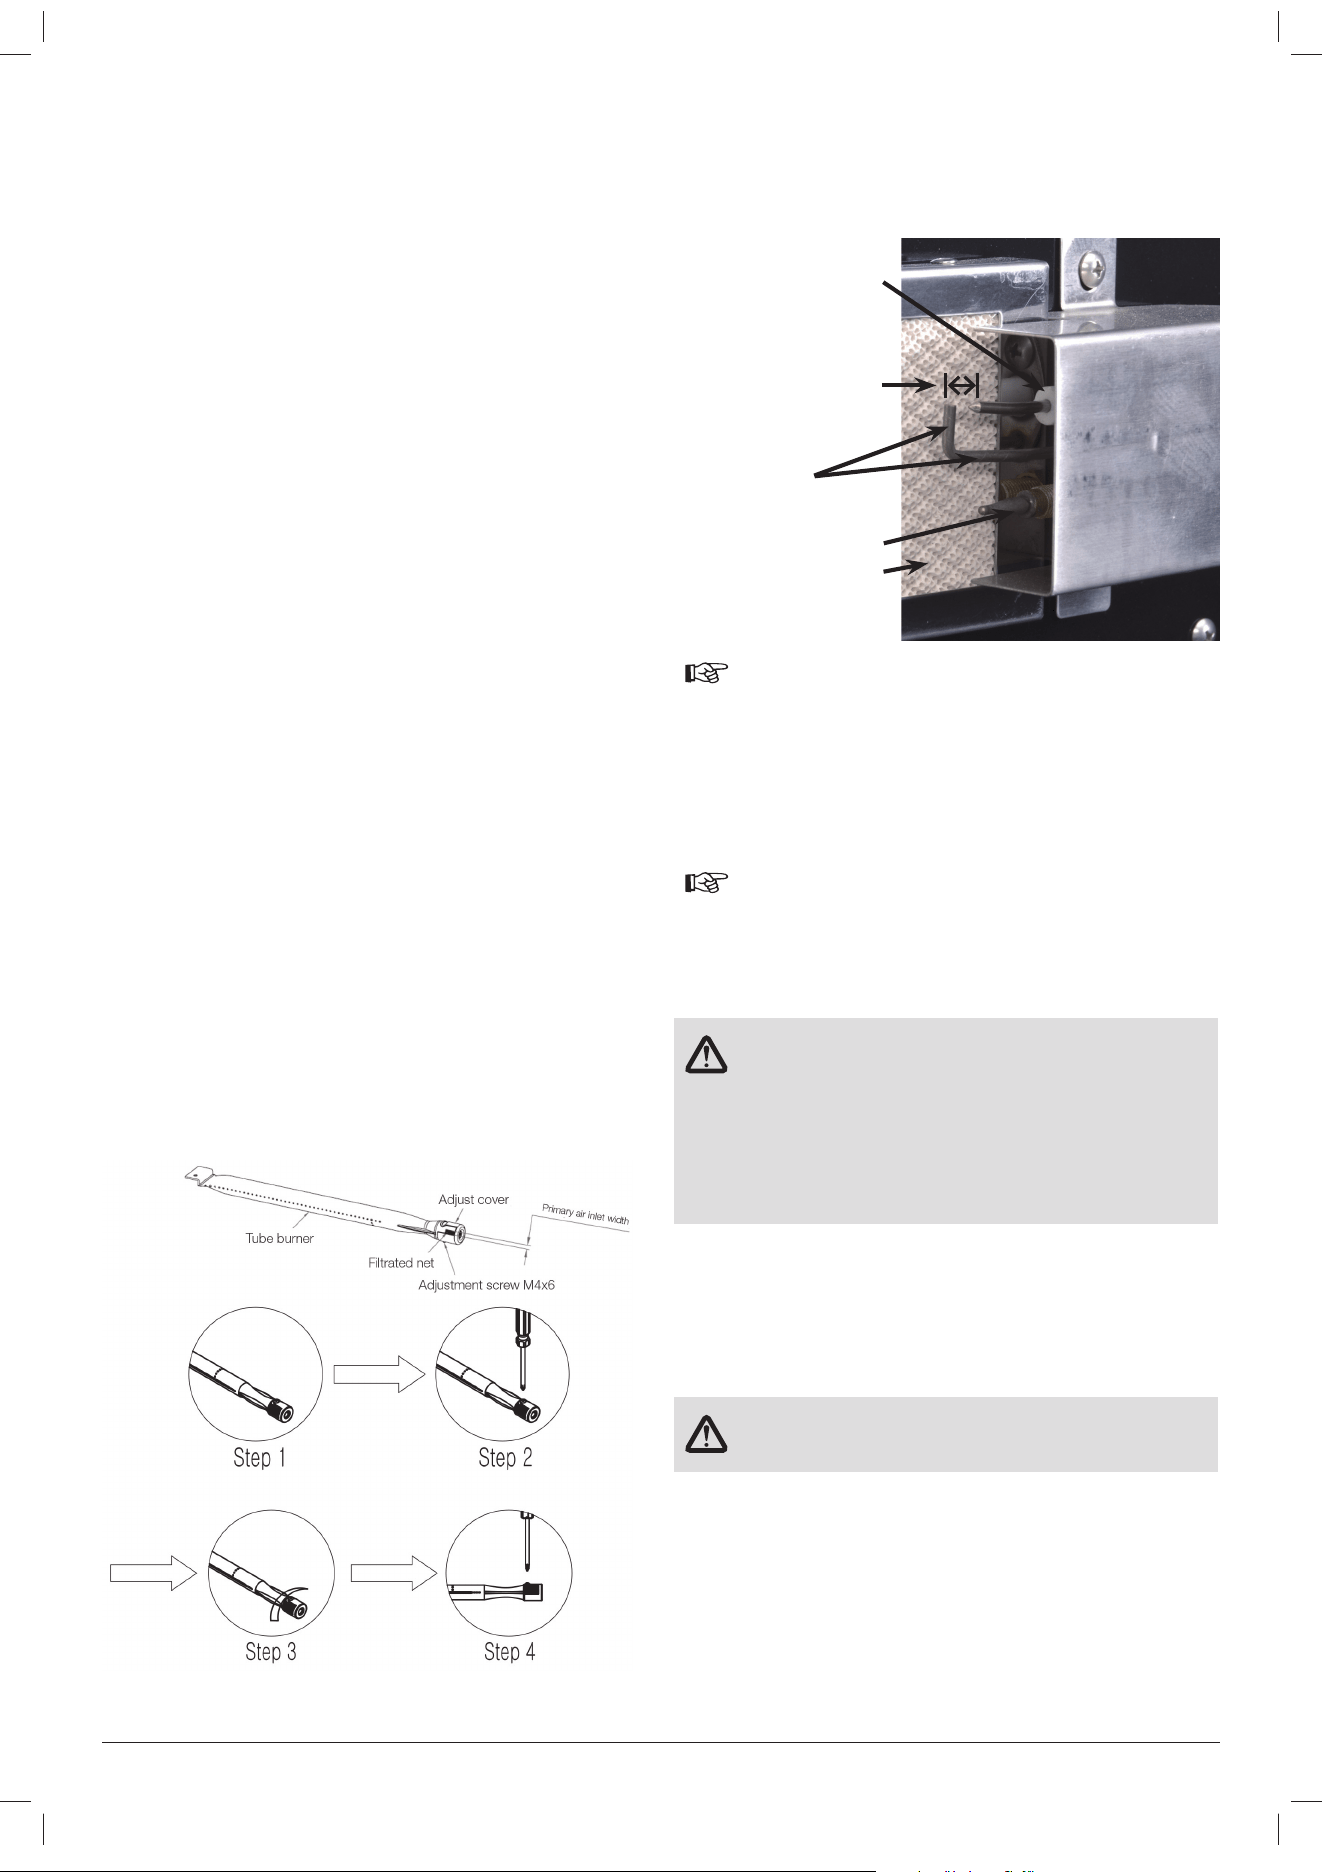
PRIMARY AIR INLET WIDTH REQUIREMENT:
For 4 burner barbecues:
• Width for each side: 5.5~6.5mm
• Total width for two sides: 11~13mm
For 6 burner barbecues:
• Width for each side: 2~2.5mm
• Total width for two sides: 4~5mm
HOW TO ADJUST AIR INLET:
Adjust the primary air inlet width according to the pictures below.
(Burner image shown below is for illustration purpose only)
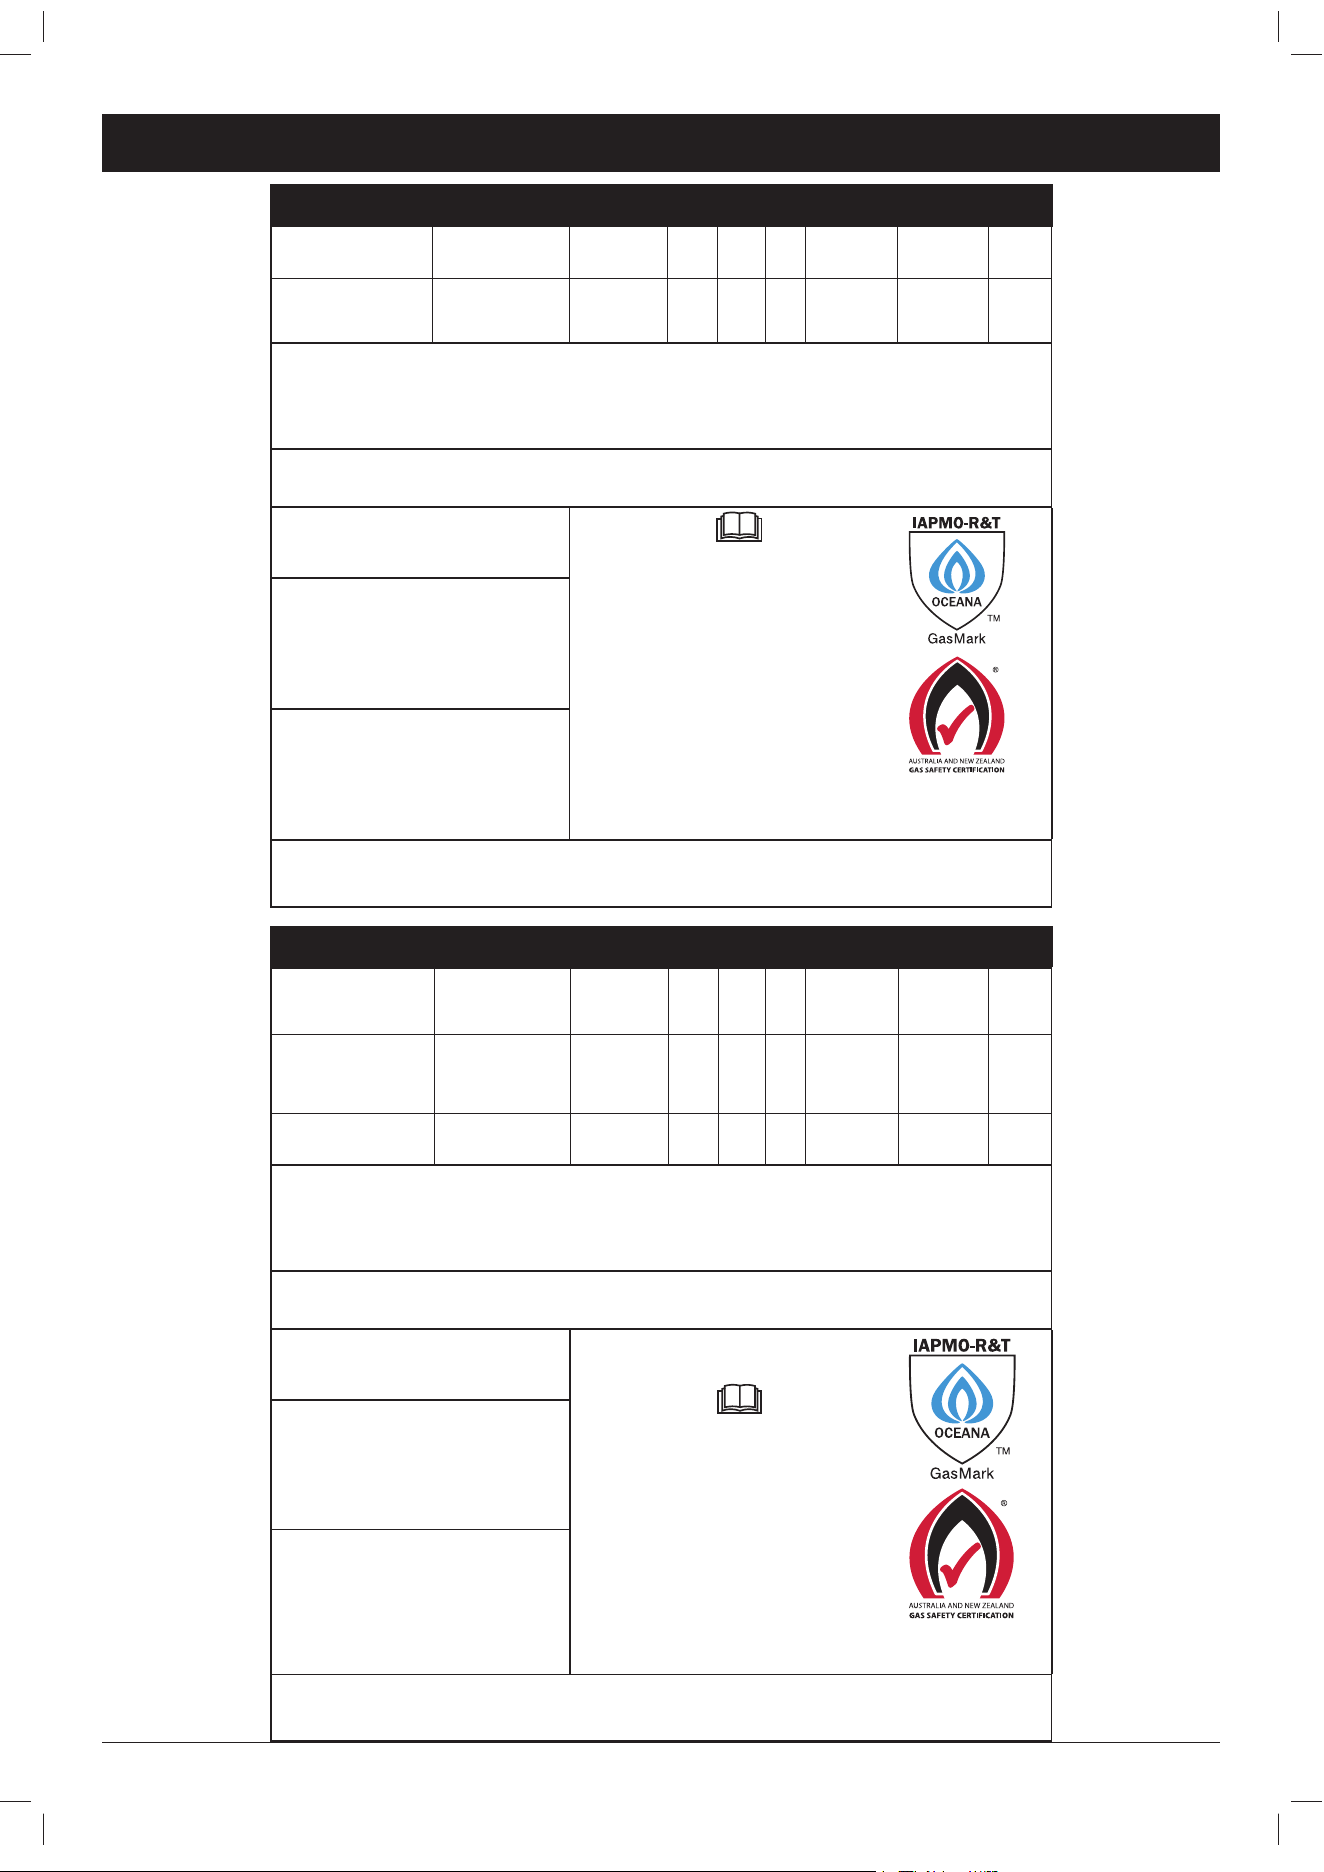
ELECTRODE SETTING
Electrode should have a sparking gap of approximately 4-5mm.
The distance away from the face of the rear burner should less than
9mm.
Take care not to damage the
ceramic insulation around the
positive electrode
4-5mm gap
Adjust electrode with pliers,
holding at these points only
Rear Burner Thermocouple
Rear Burner
NOTE:
Cooking with the rear burner allows the food to “self baste” as it
is turned, any excess juices will fall into the baking dish.
Your BBQ is safe to use with the hood closed however the internal
temperature must be checked. Cooking with the rear burner is
designed to be a slow cooking process, this allows the food to be
succulent. External temperatures and breeze will effect the internal
temperature, as a guide this should be around 165°C to 180°C.
NOTE:
• Vegetables and herbs can be placed into the baking dish,
these items will cook/flavour the food at the same time.
• When using the r
ear burner and r
otisserie use 1 or 2 of the
main burners at the low heat setting if a little extra heat is
r
equired.
WARNING!
• Do not use the r
ear burner in combination with main bur
ners
on high heat setting when the hood is closed.
• Caution / Danger: Extr
eme care is requir
ed when cooking
with hood in closed position. Frequent checks must be
undertaken for the heat and temperatur
e to ensur
e safe
cooking.
•
Too much heat can cause fire.
DRIP TRAY
After every use, check the drip tray, drip pan, and foil pan for fat
build-up. Failure to maintain these areas could result in a fat fire or
excessive flare up. This can severely damage your barbecue and is
not covered by the warranty.
BARBECUE BODY
WARNING!
Not cleaning the barbecue can pose a fire risk!
Regularly remove excess grease or fat from the barbecue body with
a soft plastic or wooden scraper. It is not necessary to remove all
the grease from the body. If you need to clean fully, use hot soapy
water and a cloth, or nylon-bristled brush only. Remove cooking
surfaces and burners before full cleaning. Do not immerse the gas
controls or manifold in water. Check burner operation after carefully
refitting into body.
FIXINGS
All screws and bolts, etc. should be checked and tightened on a
regular basis.

31
548046.F.2 - Masport 4/6 Burner - April 13, 2021
END OF THE COOKING SESSION
After each cooking session, turn the BBQ burners to the “HIGH”
position and burn off for 5 minutes. This procedure will burn off food
residue, thus making cleaning easier.
STORAGE
Store your barbecue in a cool dry place. Cover the burners with
aluminium foil in order to prevent insects or other debris from
collecting in burner holes. A protective cover should always be
fitted to the barbecue to protect your investment from the elements
when not in use. If the barbecue is to be stored indoors, the gas
bottle must be disconnected and left outside. The gas bottle should
always be stored outside, in a dry, well-ventilated area, away from
any sources of heat or ignition. Do not let children tamper with the
bottle.
To protect your investment it is recommended that BBQs are
protected by a suitable BBQ cover. But please note that prior to
using a protective cover, the BBQ should always be cool, cleaned
of any surface contaminant or dirt and be thoroughly dry. Failure to
follow this information can lead to a BBQ cover being a corrosion
breeder rather than a protective tool.
NOTE:
If leaving your BBQ covered for long periods, occasionally
check for corrosion and insect habitation. Oil surfaces for extra
protection.
SERIAL NUMBER
The serial number of your barbecue is located on the inside of the
cabinet either on the right hand door or the side panel. If you do
require any further assistance with your barbecue from your local
dealer or Masport, please have this serial number handy as it will
quickly allow us to identify the barbecue.
32
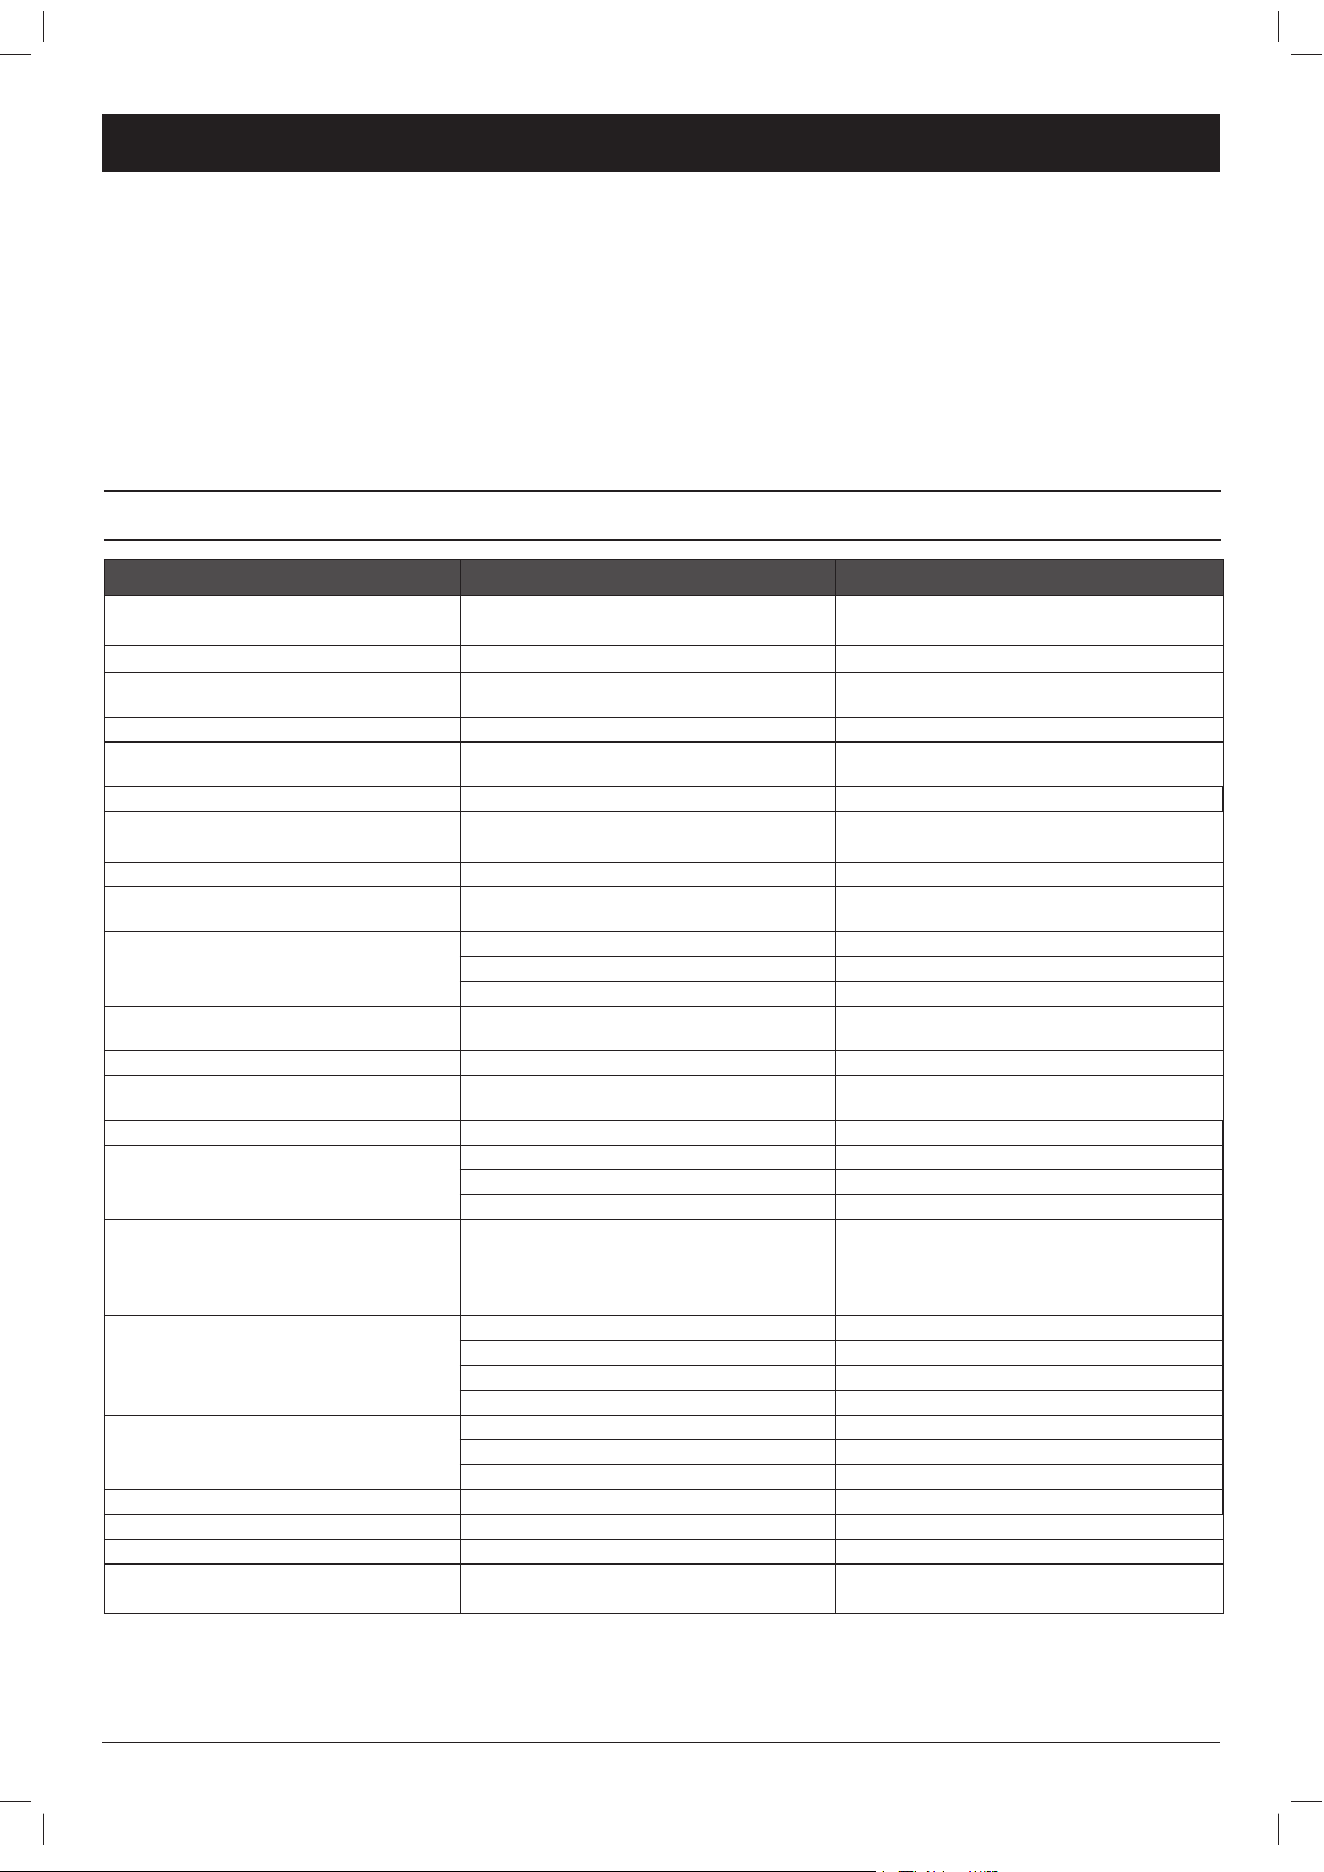
TECHNICAL DATA
Name Model
IAPMO
Approval
Injector
(mm)
Pressure
(kPa)
Inp/Burn
(Mj/h)
Total
(Mj/h)
BBQ MASP MB4400 K104BHEC1
GMK10648
ULPG:
BBQ
S/B
R/B
0.96
0.91
0.94
2.75
4 x 11.50
1 x 10.80
1 x 11.50
68.30
BBQ MASP MB6600 K106BHEC1
GMK10648
ULPG:
BBQ
S/B
R/B
0.96
0.91
0.94
2.75
6 x 11.50
1 x 10.80
1 x 11.50
91.30
Gas Supply Pressure, ULPG
Min: 2.70kPa; Max: 3.45kPA
Gas Type: NZ: Universal LPG
AUS: ULPG
Complies to: EU 2016/426
Standard AS/NZS 52631.7:2016
Minimum Clearance :
From Top of BBQ: 1500mm, From Sides: 700mm, From Rear : 700mm
Distributed by
MASPORT LIMITED
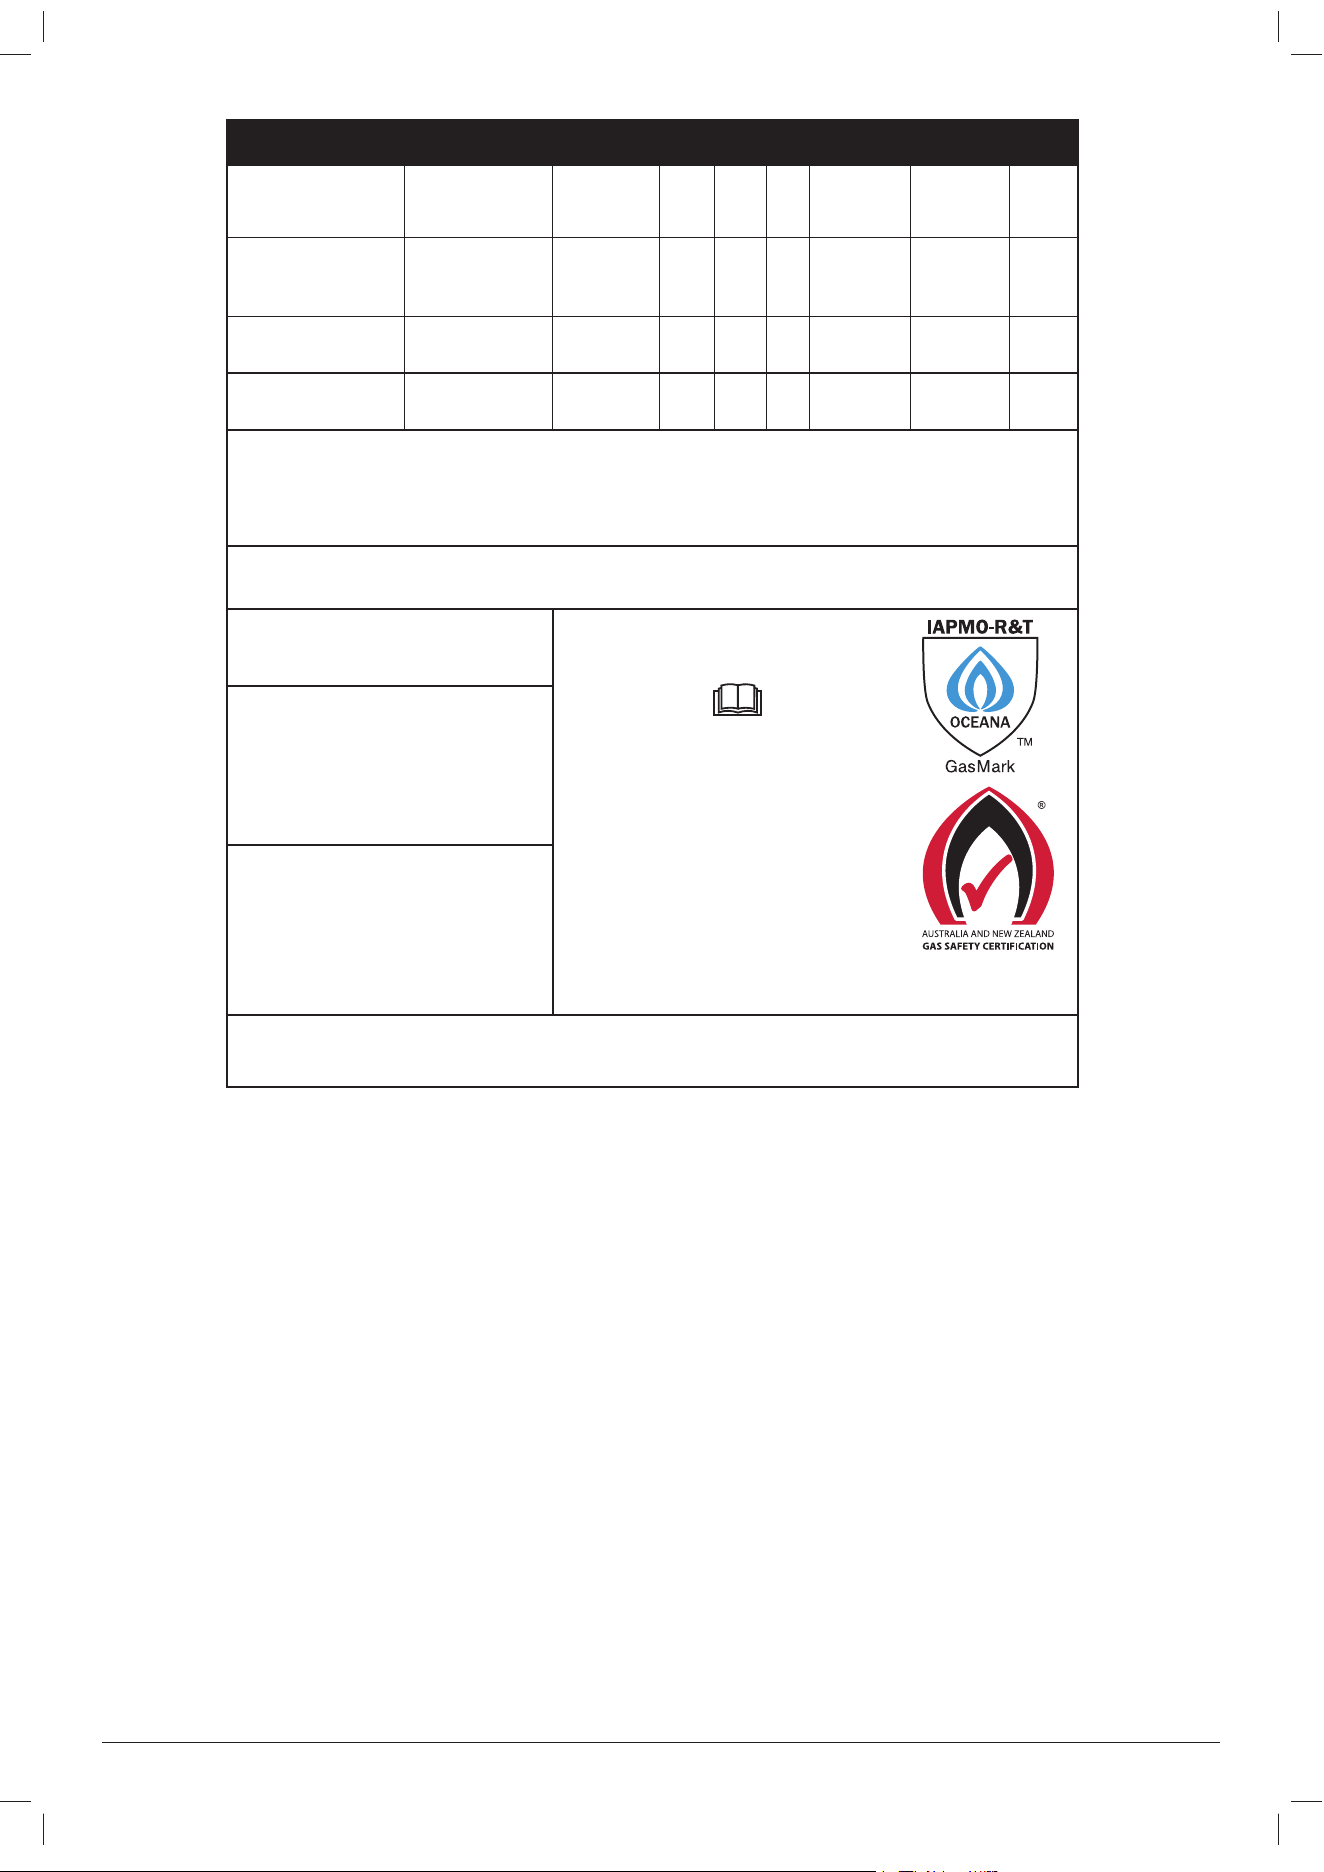
Read the instructions before using
the appliance
USE OUTDOOR ONLY
WARNING:
Parts of this appliance may be very
hot, keep young children away
Do not install in, or connect to the
consumer piping or gas supply
system of a boat or caravan.
Manufactured by:
Ningbo Agsun Products,
Inc. P.R.C
548580.D.0
MASPORT LIMITED
320 Ti Rakau Drive, East Tamaki,
Auckland 2013, New Zealand
PO Box 14349, Panmure Auckland
1471, New Zealand
MASPORT AUSTRALIA PTY LIMITED
27 Commercial Drive
Dandenong South
Melbourne, Victoria 3175, Australia
PO Box 533, Braeside, Victoria 3195,
Australia
For storage and cylinder exchange, disconnect hose at the cylinder only, do not
disconnect hose from the appliance.
Name Model
Approval
Injector
(mm)
Pressure
(kPa)
Inp/Burn
(Mj/h)
Total
(Mj/h)
Classic 6 K106BHEC1
GMK10648
ULPG:
M/B
S/B
R/B
0.96
0.91
0.94
2.75
6 x 11.5
1 x 10.8
1 x 11.5
91.30
Classic 6 SS K106BHEC1-SS
GMK10648
ULPG:
M/B
S/B
R/B
0.96
0.91
0.94
2.75
6 x 11.5
1 x 10.8
1 x 11.5
91.30
Classic 4 K104BEC1
GMK10648
ULPG:
M/B
S/B
0.96
0.91 2.75
4 x 11.50
1 x 10.80 56.80
Gas Supply Pressure, ULPG
Min: 2.70kPa; Max: 3.45kPA
Gas Type: NZ: Universal LPG
AUS: ULPG
Complies to: EU 2016/426
Standard AS/NZS 5263.1.7:2016
Minimum Clearance :
From Top of BBQ: 1500mm, From Sides: 700mm, From Rear : 700mm
Distributed by
MASPORT LIMITED
Read the instructions before using
the appliance
USE OUTDOOR ONL
Y
WARNING: Parts of this appliance
may be very hot, keep young
children away
Manufactured by:
Ningbo Agsun Products,
Inc. P.R.C
546179.B.0
MASPORT LIMITED
320 Ti Rakau Drive, East Tamaki,
Auckland 2013, New Zealand
PO Box 14349, Panmure Auckland
1471, New Zealand
MASPORT AUSTRALIA PTY LIMITED
27 Commerical Drive, Dandenong
South, Melbourne, Victoria 3175,
Australia
PO Box 533, Braeside, Victoria 3195,
Australia
For storage and cylinder exchange, disconnect hose at the cylinder only, do not
disconnect hose from the appliance.
548046.F.2 - Masport 4/6 Burner - April 13, 2021
IAPMO
33
Name Model
Approval
Injector
(mm)
Pressure
(kPa)
Inp/Burn
(Mj/h)
Total
(Mj/h)
Classic Four K104BEC3
GMK10648
ULPG:
M/B
S/B
0.96
0.91 2.75
4 x 11.5
1 x 10.8 56.80
Classic Six K106BHEC3
GMK10648
ULPG:
M/B
S/B
R/B
0.96
0.91
0.94
2.75
6 x 11.5
1 x 10.8
1 x 11.5
91.30
MB6000 K106BHEC3
GMK10648
ULPG:
M/B
S/B
R/B
0.96
0.91
0.94
2.75
6 x 11.5
1 x 10.8
1 x 11.5
91.30
MB4000 K104BEC3
GMK10648
ULPG:
M/B
S/B
0.96
0.91
2.75
4 x 11.5
1 x 10.8 56.80
Gas Supply Pressure, ULPG
Min: 2.70kPa; Max: 3.45kPA
Gas Type: NZ: Universal LPG
AUS: ULPG
Complies to: EU 2016/426
Standar
d AS/NZS 52631.7:2016
Minimum Clearance :
From Top of BBQ: 1500mm, From Sides: 700mm, From Rear : 700mm
Distributed by
MASPORT LIMITED
Read the instructions befor
e using
the appliance
USE OUTDOOR ONLY
WARNING: Parts of this appliance
may be very hot, keep young
children away
Manufactured by:
Ningbo Agsun Products,
Inc. P.R.C
546180.C.0
MASPORT LIMITED
320 Ti Rakau Drive, East Tamaki,
Auckland 2013, New Zealand
PO Box 14349, Panmure Auckland
1471, New Zealand
MASPORT AUSTRALIA PTY LIMITED
27 Commercial Drive
Dandenong South
Melbourne, Victoria 3175, Australia
PO Box 533, Braeside, Victoria 3195,
Australia
For storage and cylinder exchange, disconnect hose at the cylinder only, do not
disconnect hose from the appliance.
548046.F.2 - Masport 4/6 Burner - April 13, 2021
IAPMO

PANTONE 648C
Copyright
©
Masport Limited
Masport Limited
320 Ti Rakau Drive, East Tamaki
Auckland 2013
New Zealand
P: 0800 627 767
Masport Australia Pty Limited
1/40 Abbots Road, Dandenong
South Victoria 3175
Australia
P: 1300 366 225
548046.F.2 - Masport 4/6 Burner - April 13, 2021