
masport.com
Part N
o
: 546638.A.1
MASPORT
Oven-Pizza Table Top
OWNER’S MANUAL
Please read these instructions carefully before assembly, to
reduce risk of re, burn hazard or other injury.
Keep these instructions in a safe place for future use.
32
Keep the instructions in a safe place for future use.
DO NOT OPERATE THIS PIZZA OVEN BEFORE IT HAS
BEEN ASSEMBLED CORRECTLY AND YOU HAVE READ
AND UNDERSTOOD THESE INSTRUCTIONS.
These instructions are intended as a general guide and do
not supersede national or local codes in any way. Contact
local authorities for clarity of laws relating to the operation
of this appliance.
SYMBOLS IN THIS OWNER’S MANUAL
Possible hazard or hazardous situation.
Not observing this instruction can lead to injuries or
cause damage to property.
Important information on proper handling.
Not observing this instruction can lead to faults in
the Pizza Oven.
User information. This information helps you to use all
the functions correctly.
Failure to follow these instructions could result in re or explosion
which could cause property damage, personal injury or death.
Accessible parts may be very hot. Keep young children away
from the hot appliance at all times (even while cooling down).
Some parts of this grill may have sharp edges especially as
mentioned in this manual! Wear suitable protective gloves if
necessary.
Assembled parts sealed by the manufacturer must not be
altered by the user. Any modication of the appliance by
unauthorised persons may be dangerous.
WARNING!
FOR OUTDOOR USE ONLY
WARNING!
To reduce the risk of re, burn hazard or other injury, read the
instructions carefully and be sure your appliance is properly
installed and assembled.
DANGER!
If you smell gas:
1. Shut o gas to the appliance;
2. Extinguish any open ame:
3. Open lid;
4. If odor continues, keep away from the appliance and
immediately call your gas supplier or your re department.
WARNING!
TO INSTALLER:
Test operation of the appliance and instruct the user before
leaving. Ensure the appliance is commissioned correctly before
handing over to the user.
WARNING!
Do not try lighting this appliance without rst reading the
“LIGHTING INSTRUCTION” section of this manual.
IMPORTANT SAFETY INFORMATION
Please read and understand this manual fully before assembly and
use.
• The Manufacturer’s Warranty may be voided by the incorrect use
of this product.
• The Manufacturer or their Agents can accept no liability for the
unsuitability of, or any damage to, food that is cooked on this
appliance.
• Use the correctly specied fuel with this Pizza Oven. Check with
your dealer for the specic fuel for which this Pizza Oven has
been designed.
OWNER’S MANUAL
• The operator must understand all the safety requirements detailed
in this manual before using the Pizza Oven.
• If you have any queries regarding these instructions, contact your
local dealer for clarication before you use your Pizza Oven.
• The unit must be correctly assembled before use. Failure to follow
the manual’s instructions could result in serious damage or injury.
PERSONAL SAFETY
• The use of alcohol, prescription or non-prescription drugs may
impair the consumer’s ability to properly assemble or safely
operate this Pizza Oven.
• The Pizza Oven should be carefully checked for operational use
every time before use.
• Never try to move the Pizza Oven when it is on, or before it has
had time to cool down.
• The person operating this Pizza Oven should pay constant
attention to the food being cooked.
• Do not leave the Pizza Oven unattended when it is alight. The
person should remain at the Pizza Oven at all times when it is
alight/cooking.
THIRD PARTY SAFETY
• The operator is responsible for the safety of all third parties while
the Pizza Oven is in use.
• Onlookers should be kept a safe distance away from the Pizza
Oven when it is in use.
• Keep children and animals well away while the Pizza Oven is in
use and while it is cooling down.
LOCATION
• Do not use indoors. Pizza Oven units are designed for OUTDOOR
USE ONLY.
• Use in a weather-protected area, preferably under shelter.
• Ensure that the Pizza Oven is on an even and secure surface
before operating. Use the castor locks if tted to lock the wheels
in place.
• Do not use within one metre of any ammable surface of
structure.
BURN AWARENESS
• Parts of the Pizza Oven do get extremely hot and could cause
serious burns – touch test the surface before applying a rm grip.
• The hood handle can become hot! Always wear cooking gloves
and long sleeves when handling hot components.
SAFETY AND WARRANTY INFORMATIONCONTENTS
SAFETY AND WARRANTY INFORMATION 3
PARTS DIAGRAM, PARTS LIST & FIXTURES 5
ASSEMBLY INSTRUCTIONS 6
INSTALLATION 9
LEAK TESTING 10
OPERATION 10
TROUBLESHOOTING 13
CARE AND MAINTENANCE 14
TECHNICAL DATA 16
54
• If cooking with the hood closed, be very careful opening the hood,
a sudden rush of hot air could burn an unprotected arm.
GAS AWARENESS
• Ensure all gas couplings and hoses have been correctly tted.
• Always leak test all gas lines and connections before use with
soapy water.
• Use spanner to tighten all gas ttings.
• Check all gas hose and line connection for damage, cuts or
cracks each time for using the appliance.
• Check all burners regularly for insect nests or webs such as
spiders, ants, etc. Nests/webs are dangerous and need to be fully
cleaned.
• Have the gas cylinder lled by an authorized gas supplier.
• USE grill at least 450mm from any wall or surface, combustible
material, gasoline, ame liquids or vapors.
• Do not store ammable materials near this Pizza Oven.
• Do not place the gas bottle underneath the Pizza Oven directly.
• Do not store spare LPG cylinders under or near this Pizza Oven.
• Do not place or use aerosols near this Pizza Oven.
• Do not store or use gasoline or other ammable vapours or liquids
in the vicinity of this Pizza Oven.
• Do not lean over appliance when lighting.
• Do not use appliance with any cover on.
• Do not use plastic or glass utensils on the appliance.
• Do not dismantle control valves.
• Do not test for gas leaks with a naked ame.
• Do not modify the constructions of the appliance or the size of
any burner, injector orice or any other components
• Do not obstruct any ventilation of the appliance.
• Do not allow the exible gas supply hose or any electrical cord to
come in contact with any heated surface of the appliance.
• Do not use charcoal or any other solid fuel in this appliance.
• Do not disconnect any gas ttings while the appliance is in use.
• Do not use a rusty or dented gas cylinder with a damaged gas
valve.
• Do not ll the gas cylinder beyond 80% capacity.
• Ensure that the gas is turned OFF at the cylinder after use and
while the Pizza Oven is unattended.
• When turning o the Pizza Oven, shut o the gas at the supply
source before turning o all the burner controls.
• Do not store gas cylinders below ground level. ULPG is heavier
than air. Should a leak occur, the gas will collect and could ignite
due to presence of a ame or electric spark.
FOR YOUR SAFETY AND OTHERS
If you smell gas:
• Shut o the gas supply to the Pizza Oven.
• Extinguish any open ame (candles, cigarettes, etc.)
• Clear the area to allow the unburned gas to dissipate.
Be aware of the reason for the gas smell, address this before
continuing. Should the gas odour come from the LPG cylinder,
immediately contact the re department from an elevated safe
distance.
Connecting the gas cylinder to the Pizza Oven, refer to that section
in the manual.
Leak testing, refer to that section in the manual.
SAFETY EQUIPMENT
When cooking with oil/grease, re extinguishing materials should be
readily accessible.
In the event of an oil/grease re do not attempt to extinguish with
water or alcohol. Use type BC dry chemical re extinguisher or
smother the re with dirt, sand or baking soda.
RAIN HAZARD
In the event of rain while cooking with oil/grease, turn o the gas
supply and all burners, cover the Pizza Oven as soon as possible.
Move people/animals away from around the Pizza Oven. Do not
attempt to move the Pizza Oven until it has cooled and can safely
be moved.
WARRANTY
Refer to the warranty supplied with this Pizza Oven. Should any
part fail due to defective workmanship or faulty materials within the
specied period from the date of purchase, Masport will replace or
repair the defective part free of charge. Refer to the warranty for
details. Do not use a Pizza Oven that is unsafe.
LPG CYLINDER
The cylinder manufacturer/distributor is responsible for the safety
and performance of the LPG cylinder. This is not included in the
Masport Pizza Oven warranty. Do not use a cylinder that is unsafe.
DISPOSAL OF PACKAGING
Remove all protective packaging including any protective lm from
stainless steel surfaces.
Make sure you properly dispose of, or recycle the packaging
material where possible to comply with applicable waste disposal
laws in your area.
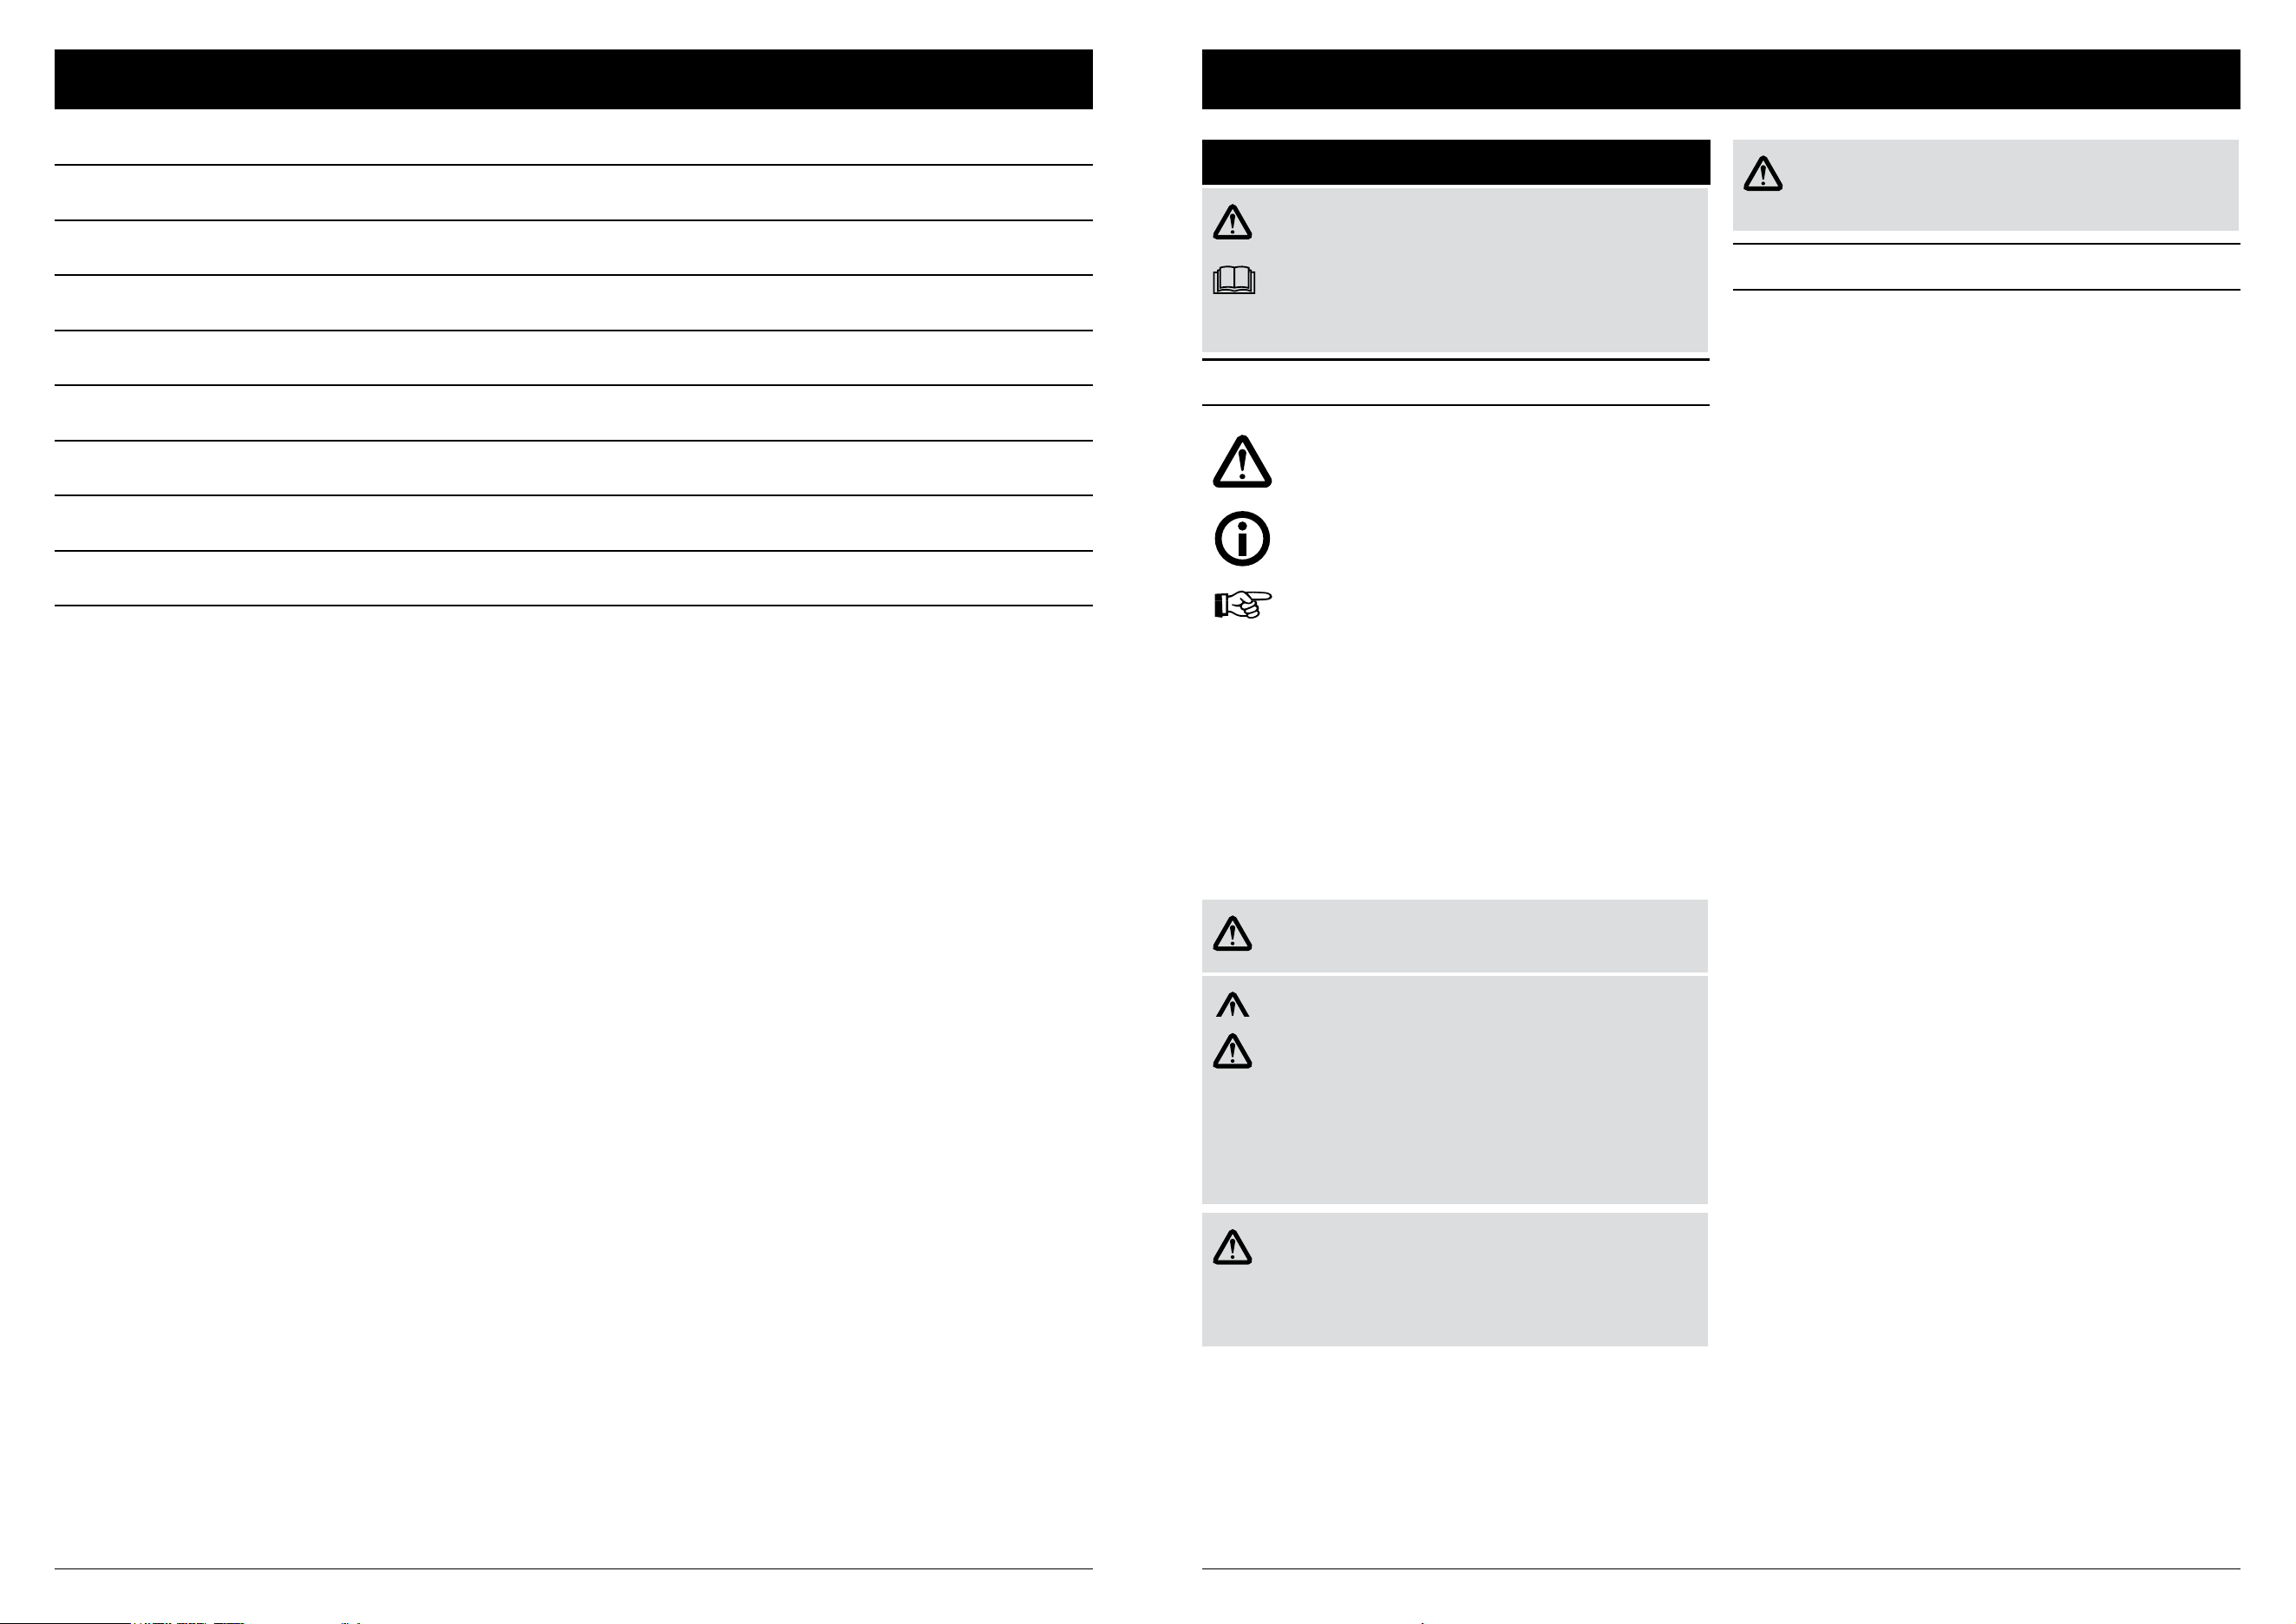
PARTS DIAGRAM, PARTS LIST & FIXTURES
PIZZA OVEN PARTS DIAGRAM
*IMAGE IS FOR ILLUSTRATION PURPOSE ONLY
Item No. Description Qty
1 Pizza Stone 1
2 Pizza Stone Grid 1
3 Front Door 1
4 Chimney Cap 1
5 Chimney 1
6 Main Body 1
7 Grease Tray 1
8 Feet 4
PIZZA OVEN PARTS LIST
FASTENERS
A B C D E
M5x8 M6x10 M6x12 M6 M6
QTY
x 25 x 40 x 16 x 16 x 16
76
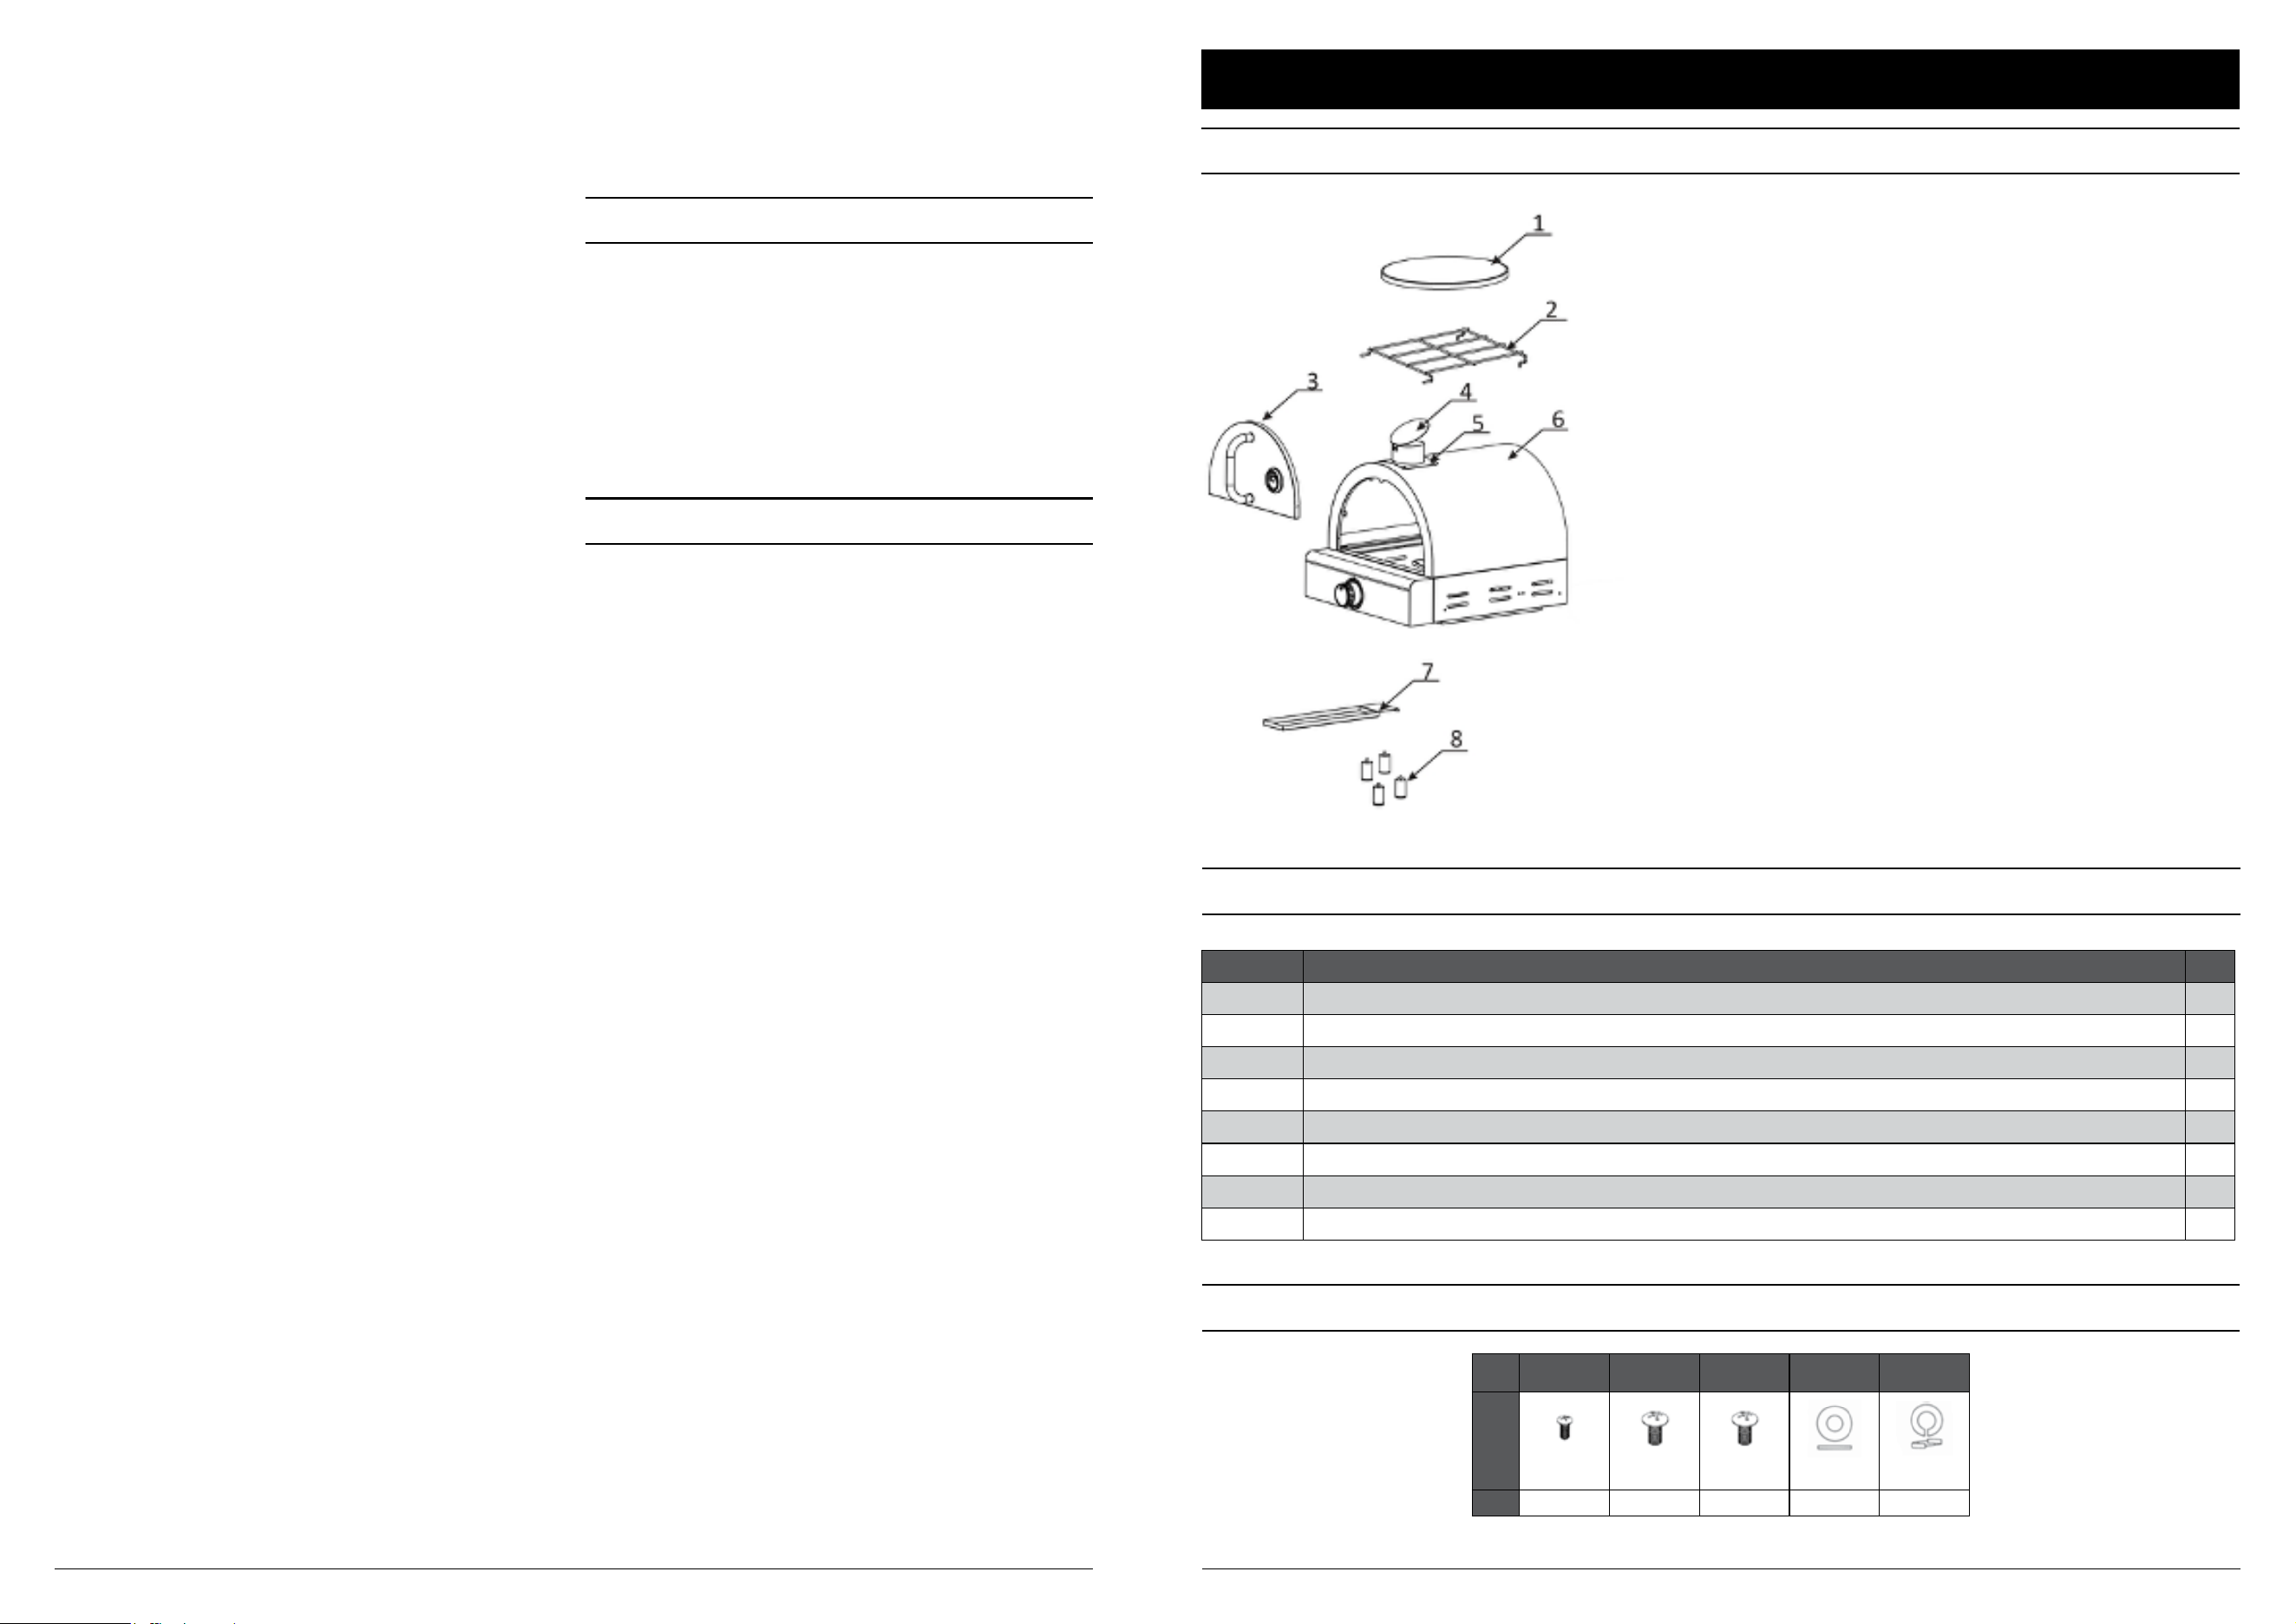
ASSEMBLY INSTRUCTIONS
NOTE:
When assembling the Pizza Oven, ensure it is sitting on a at surface.
Tools Required: Phillips Head Screwdriver and Gloves
STEP 1 - LEG ASSEMBLY
STEP 2 - CHIMNEY ASSEMBLY
STEP 3 - PIZZA GRID ASSEMBLY
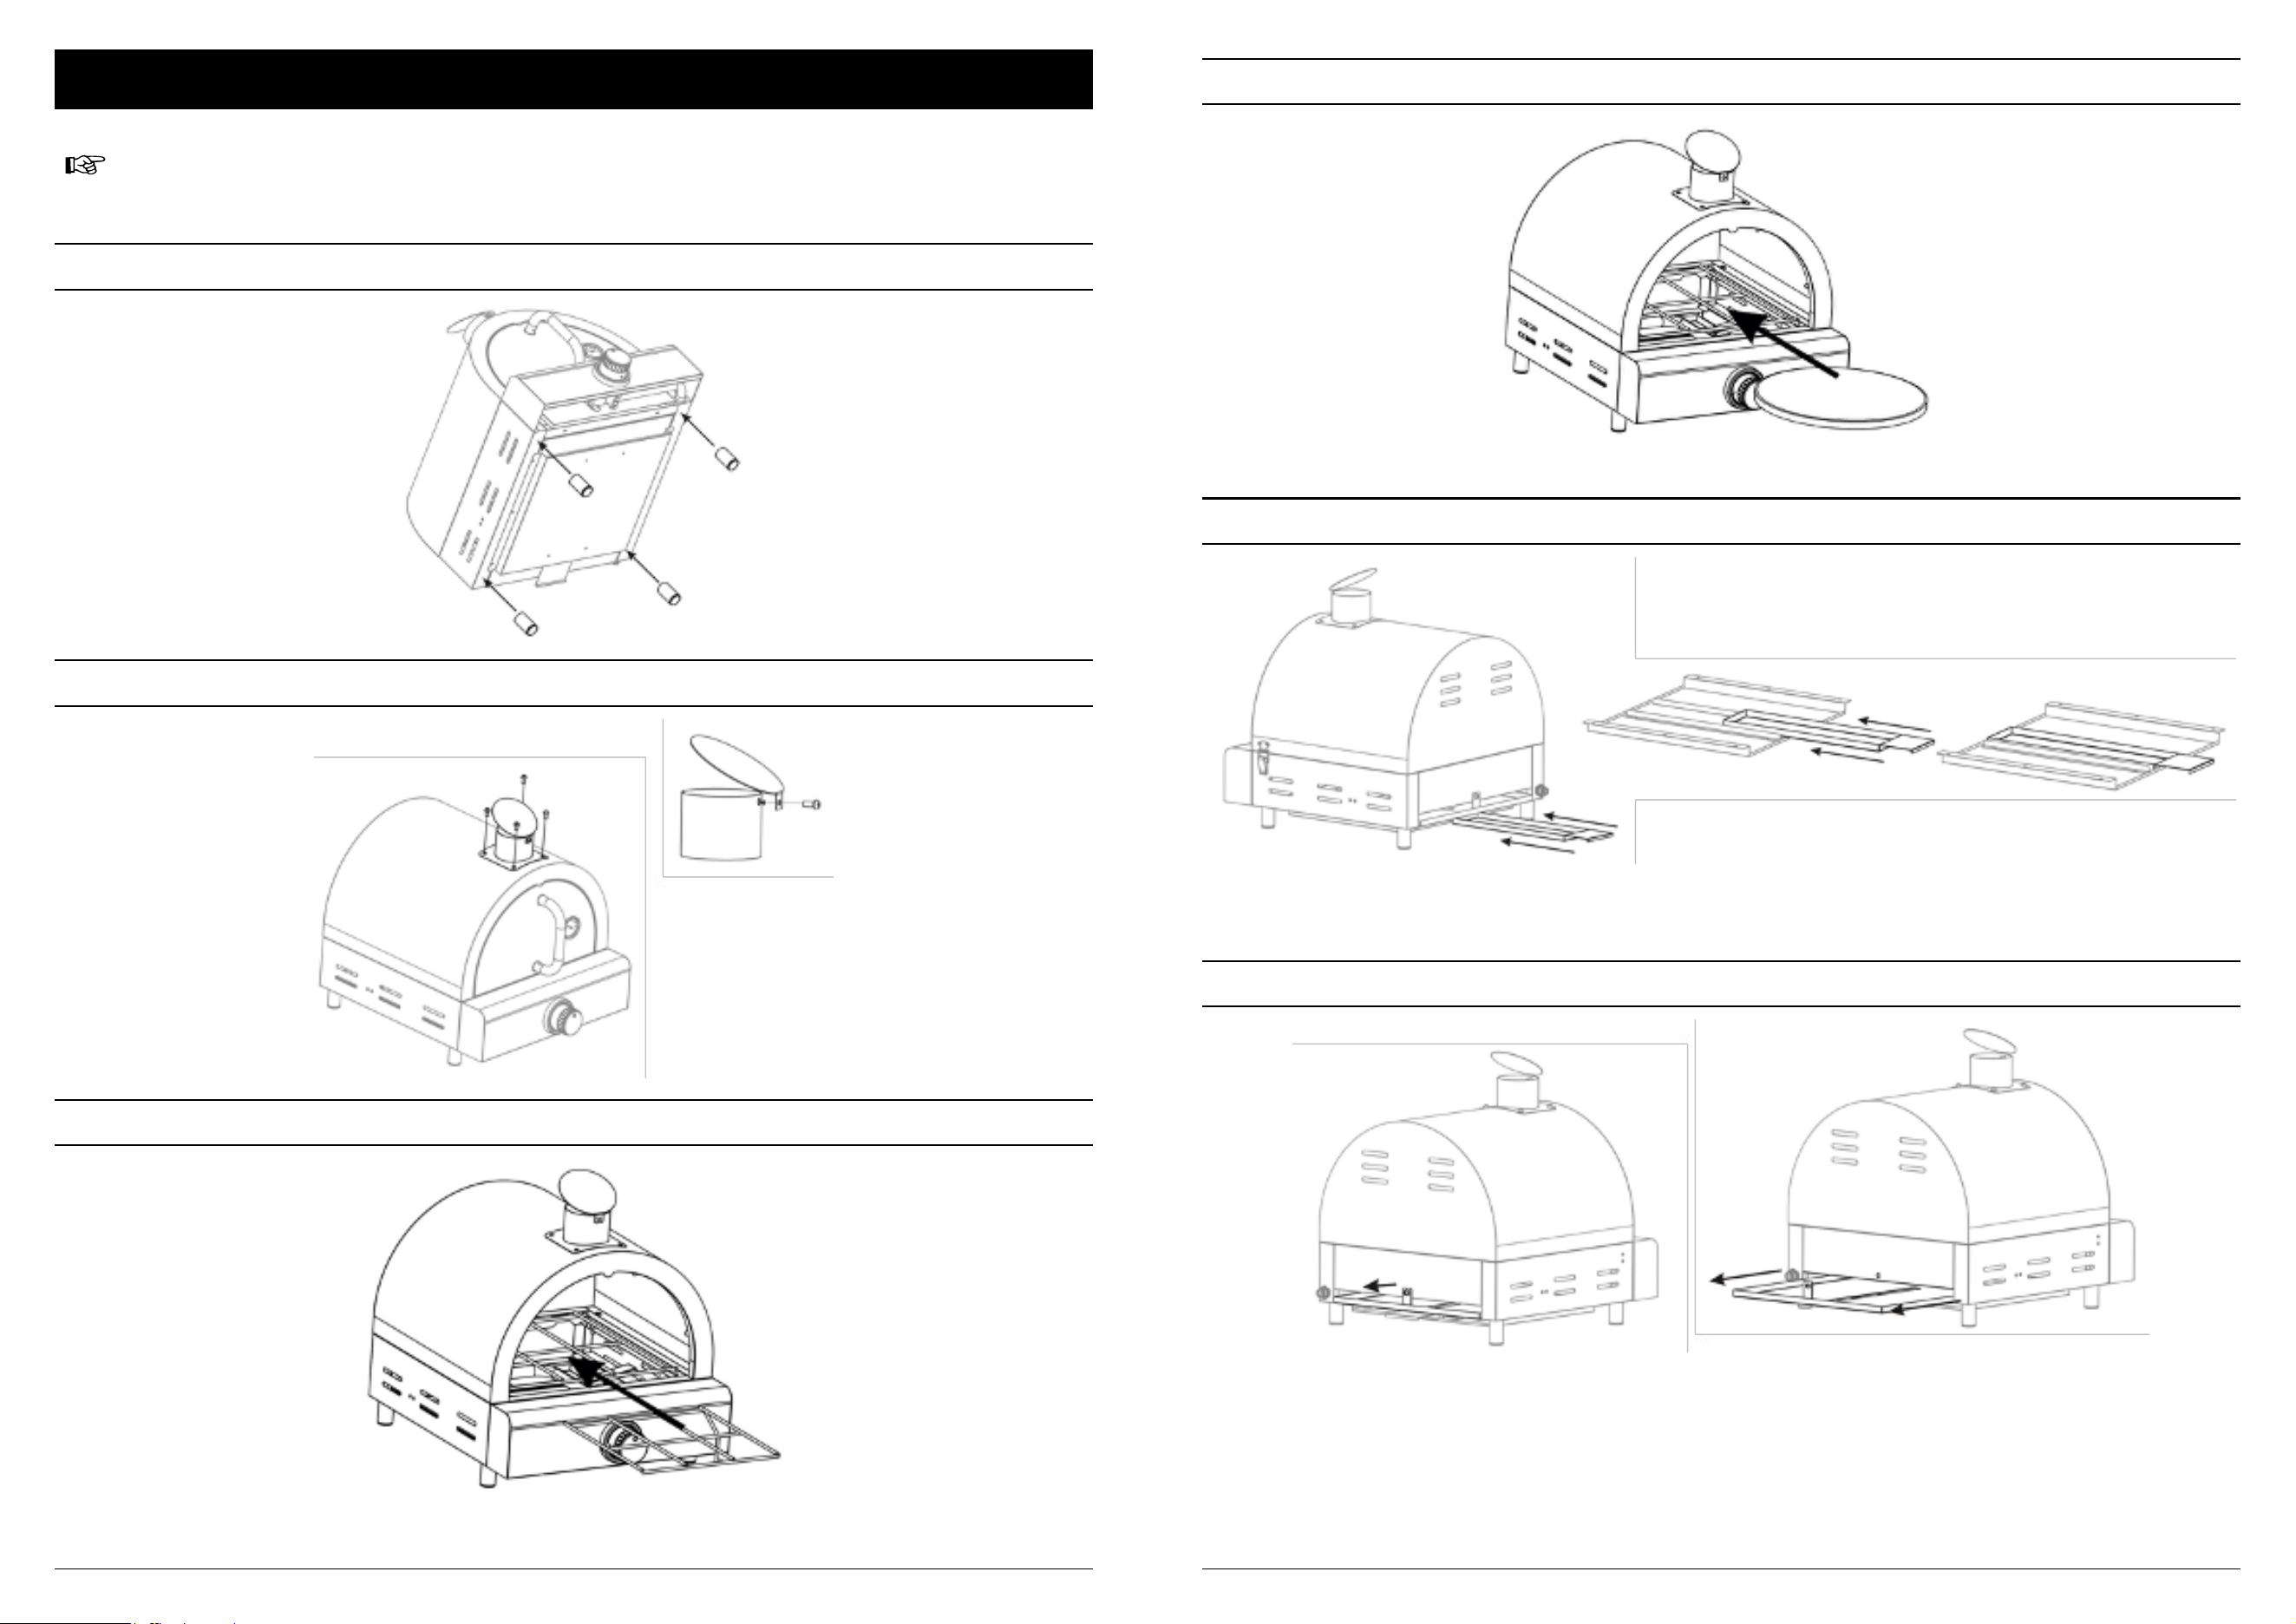
STEP 4 - PIZZA STONE ASSEMBLY
STEP 5 - FOR GREASE PAN
STEP 6 - CLEAN THE FIRE BOX BOTTOM
98
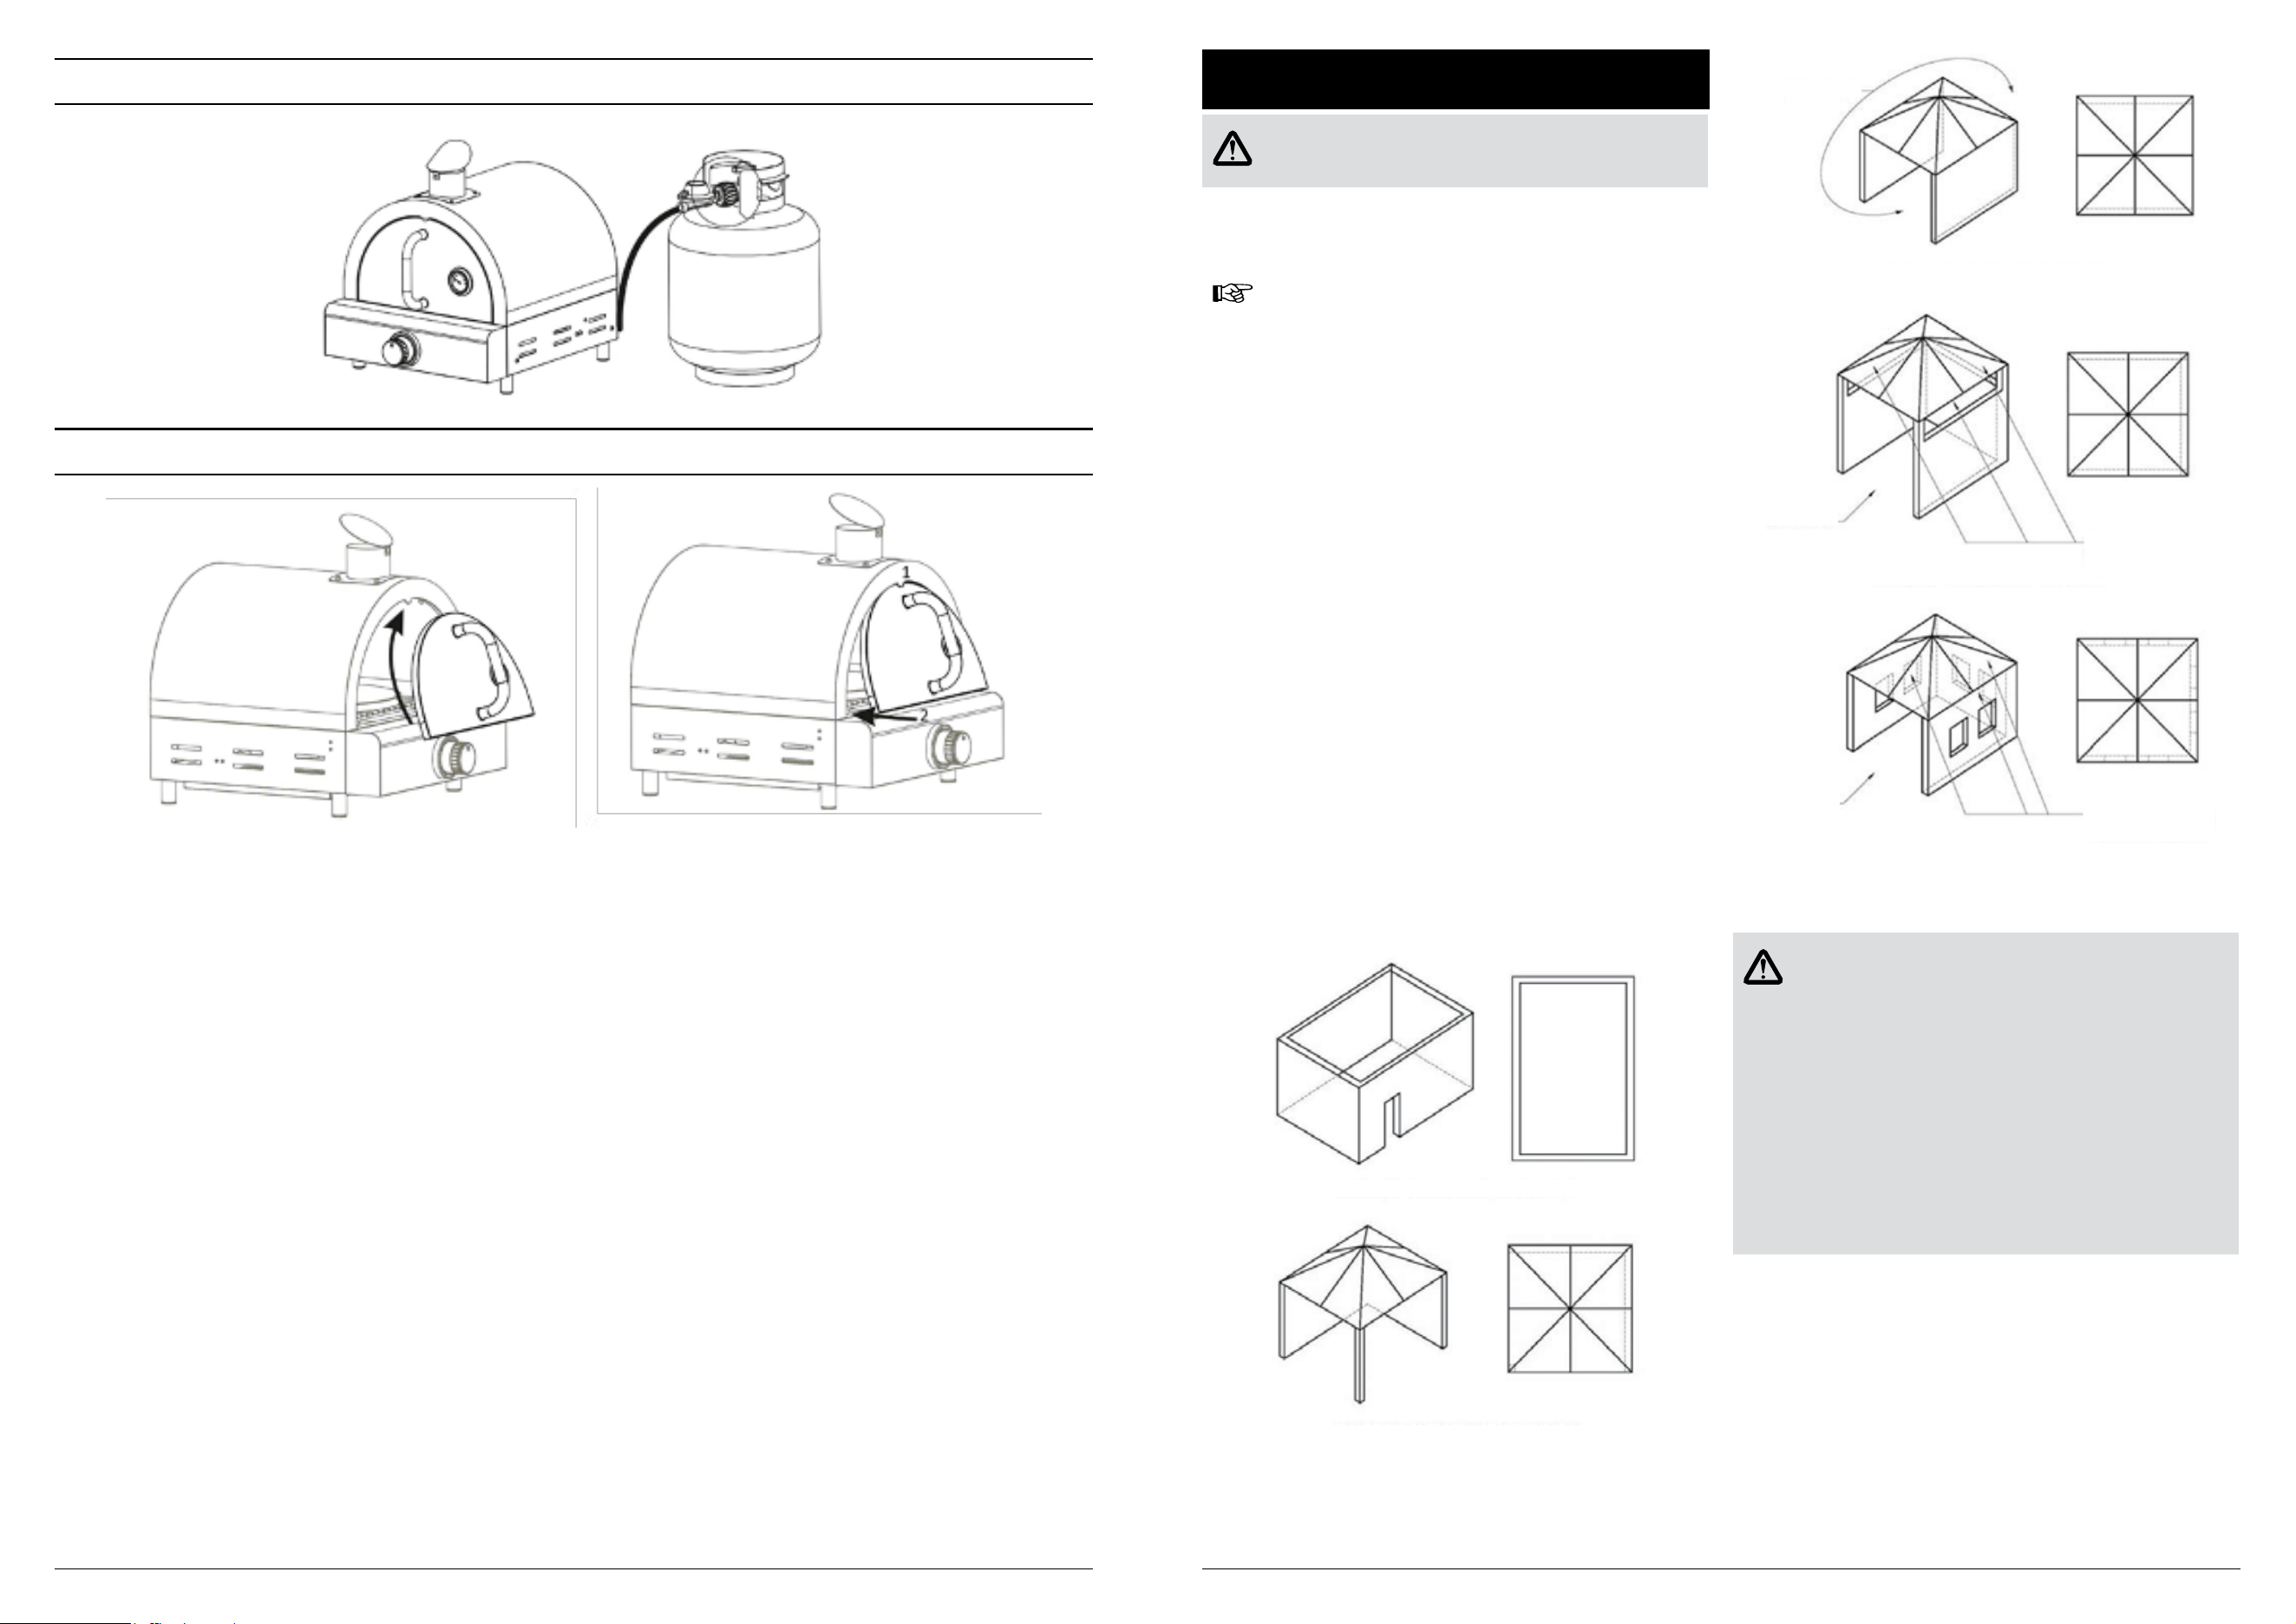
STEP 7 - CONNECTING TO GAS TANK
STEP 8 - WAY TO OPEN THE FRONT DOOR
INSTALLATION
WARNING!
FOR OUTDOOR USE ONLY
This Cooking Appliance should not be used in a building, garage or
any other enclosed area. Also THIS APPLIANCE should be placed
in a well-ventilated area. Take care to ensure that the minimum
clearances guidelines are followed.
NOTE!
Read carefully the pages containing the parts and assembly
before assembling your Pizza Oven.
MINIMUM CLEARANCES:
• From sides: 1,000mm; From back: 1,000mm
• From above (vertical): 1500mm
Keep this Pizza Oven away from any ammable materials! This
appliance shall only be used in an above ground open-air situation
with natural ventilation, without stagnant areas, where gas leakage
and products of combustion are rapidly dispersed by wind and
natural convection. This Pizza Oven is not designed for marine use.
ANY ENCLOSURE IN WHICH THE APPLIANCE IS USED
SHALL COMPLY WITH ONE OF THE FOLLOWING:
1. An enclosure with walls on all sides, but at least one permanent
opening at ground level and no overhead cover.
2. Within a partial enclosure that includes an overhead cover and
no more than two walls.
3. Within a partial enclosure that includes an overhead cover and
more than two walls, the following shall apply:
a) at least 25% of the total wall area is completely open and
unrestricted
b) at least 30% of the remaining wall area is open and
unrestricted
4. In the case of balconies, at least 20% of the total of the side,
back and front wall areas shall be and remain open and
unrestricted.
See following diagrams for further illustration:
FIGURE F1-OUTDOOR AREA-EXAMPLE 1
FIGURE F2-OUTDOOR AREA-EXAMPLE 2
Both ends open
FIGURE F5-OUTDOOR AREA-EXAMPLE 5
FIGURE F3-OUTDOOR AREA-EXAMPLE 3
FIGURE F4-OUTDOOR AREA-EXAMPLE 4
Open side at
least 25% of total
wall area
30 percent or more in total
of the remaining wall area is
open and unrestricted
Open side at
least 25% of total
wall area
30 percent or more in total
of the remaining wall area is
open and unrestricted
GAS AND REGULATOR INFORMATION
WARNING!
This appliance is designed to be used with a gas cylinder
not exceeding 9kg.
• The gas cylinder supply valve must be turned o when the
appliance is not in use.
• Gas cylinders must be stored outdoors, out of reach of
children and must not be stored in a building, garage or any
other enclosed area.
• The gas cylinder used must incorporate a safety collar to
protect the valve assembly.
• Never store a spare cylinder under the barbecue shelves or
inside the trolley housing.
• Any LPG cylinder not attached to the appliance for use should
be stored outdoors and well away from this appliance.
Gas grills are used safely by millions of people when following
simple safety precautions. The items used in the fuel system are
designed for operation with the grill.
(See parts list for replacement items).
This Pizza Oven is designed for ULPG gas use only. Bottle sizes of
4.5kg or greater are recommended for use with this Pizza Oven.
Suitable LPG regulators must have an outlet pressure of 2.75 kPa.
You must have the proper regulator and bottle in order for the Pizza
Oven to operate safely and eciently. Please consult your local gas
dealer for the most suitable gas cylinders. Please note the regulator
supplied with this Pizza Oven is of an approved type.
The manifold thread type is 5/8” x 18.
1110
For more information on pipe sizing, please refer to AS/NZS 5601 /
AG601.
The gas cylinder must always be stored or used in an upright
position.
Gas Cylinder
Bleeder Valve Screw
Gas Shuto Valve
Tighten in this direction
Regulator and
hose
Protector Cap
FIXING THE GAS REGULATOR TO THE CYLINDER
1. Conrm all Pizza Oven control knobs are in the o position.
2. Make sure the cylinder valve is o.
3. Remove the protective cap from the cylinder if present.
4. Leak test the connection with a soapy water solution.
5. Hand-tighten the regulator supplied with this Pizza Oven to the
gas cylinder by screwing in an anti-clockwise direction.
6. DO NOT OVER TIGHTEN!
As the regulator is tted with a soft nose, it should only be tightened
a further 1/4 turn after resistance is rst felt.
LPG CYLINDER
The cylinder manufacturer/distributor is responsible for the safety
and performance of the LPG cylinder. This is not included in the
Masport Pizza Oven warranty. Do not use a cylinder that is unsafe.
When disconnecting and removing the gas cylinder for the purpose
of relling, always observe the following procedure.
• Ensure that all gas control valves on the appliance and the gas
cylinder are turned o before disconnecting the regulator from the
cylinder.
• Do not smoke or use a naked ame near the appliance or gas
cylinder while disconnecting the gas line between the appliance
and gas cylinder.
• Remove the gas cylinder from the enclosure before disconnecting
the regulator from the appliance.
• Tighten all connections before placing the gas cylinder back in its
enclosure.
• The gas leak testing procedure should be conducted every time
the gas cylinder is relled and reconnected to the appliance
before using the appliance.
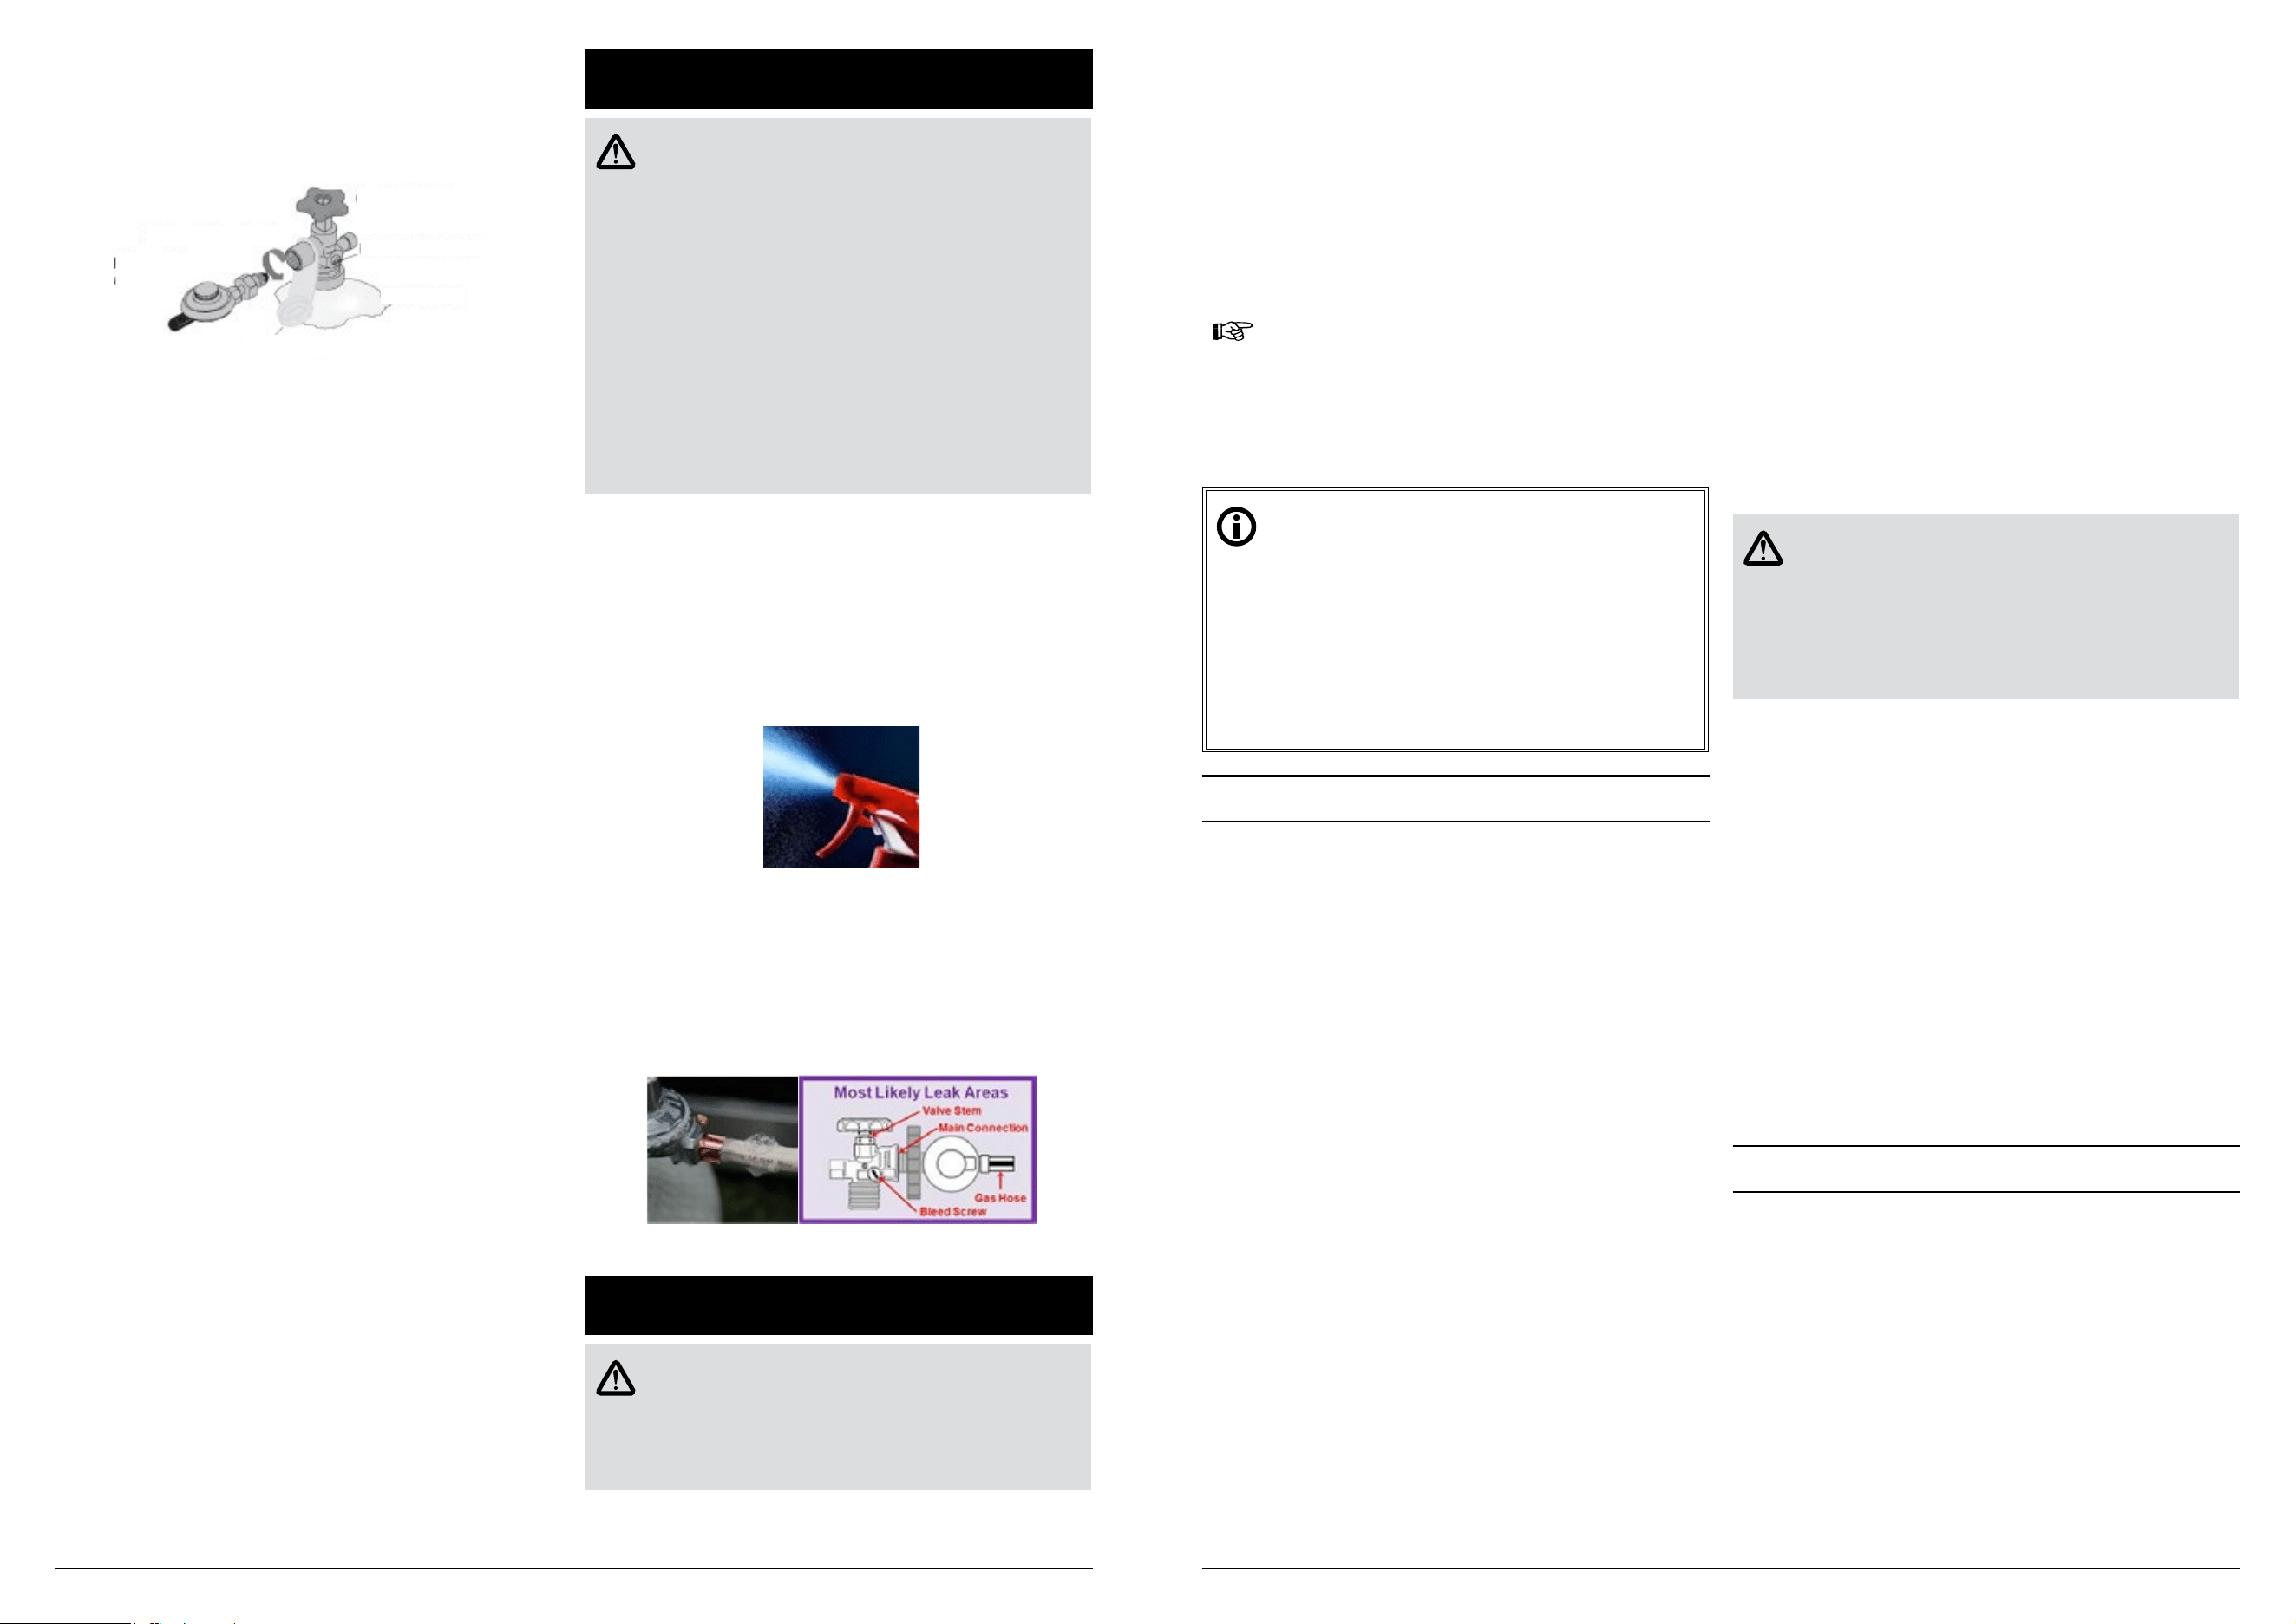
LEAK TESTING
WARNING!
Never use a naked ame to check for gas leaks.
Always use the following procedure to check for gas leaks.
1. In a small container, mix up a solution of water and detergent
or soap.
2. Make sure that the gas supply valve on the gas cylinder is
turned on.
3. Make sure that the gas control valves on the appliance are all
turned o.
4. Using a brush or spray bottle apply the solution to the gas line
and each join in the gas line.
5. Bubbling of the solution will indicate that there is a leak
present.
6. Re-tighten or re-seal any joints that are leaking.
7. If a leak persists then contact your distributor or the
manufacturer for assistance.
When to Test: The Pizza Oven gas bottle, regulator & hose
assembly should be checked for leaks, using the soapy water leak
test, every time you reconnect your regulator to the Pizza Oven gas
bottle. You should also test after any long period of non-use, such
as at the beginning of BBQ season.
What to use: You will need a soapy water solution to check for any
leaks. Mixing liquid hand soap with water will work ne (do not use
any other household cleaning products).
How to Test: Put some soapy water in a spray bottle or a dish.
Turn on the gas bottle but do not turn on the Pizza Oven. Next,
spray the entire valve, regulator and hose assembly with the soapy
water including where the hose connects to the Pizza Oven.
Alternatively, you can apply the soapy water with a paint brush,
basting brush.
Bubbles will form if there is a gas leak and you may also smell the
gas. If you nd a leak, turn o the gas bottle immediately!
Do not turn back on or attempt to use the Pizza Oven if a gas leak
has been detected, contact your local Pizza Oven Dealer for repair.
OPERATION
WARNING!
DO NOT use the pizza stone directly exposed to the burner on
the oven oor. This pizza oven is designed for the pizza stone to
sit on the grill. This will leave a gap for air circulation in the oven.
Full coverage of the burner area will cause excessive buildup of
heat and damage the oven.
• Never leave burners on high for more than 10 minutes unless
actually cooking. If the burner makes hissing sounds when lit, it
may be burning inside. Turn burner o, allow it to cool and try
again.
• Close the gas cylinder valve after each use.
• Before you start cooking for the rst time, clean the Pizza Oven
thoroughly with hot soapy water. This is necessary to remove
residuals and solvents, oil and grease, which may have remained
from the manufacturing process. The hotplate and grill should be
thoroughly cleaned in the same manner.
• Clean and maintain the appliance after each use.
• “Burning o” the Pizza Oven after every use (for approx 15
minutes) will keep excessive food residue to a minimum.
NOTE:
Before using the Pizza Oven for the rst time, the Pizza
Oven must be lit and burning for 30 minutes on the
“low” setting. This will “heat clean” the internal parts and
dissipate odor from the painted nish. The cooking area
may change slightly in colour. It is normal and it is the
nature of the material.
IMPORTANT
The regulator supplied with this Pizza Oven may incorporate an
Excess Flow Control Safety Device. The Excess Flow Control
will activate to prevent gas ow should a regulator malfunction
occur. It is important that the Pizza Oven operator understands
that all gas valves on the Pizza Oven are closed in the OFF
position prior to opening the gas cylinder valve. If the Pizza Oven
valves are open prior to opening the cylinder valve, the Excess
Flow Control will be activated and prevent the Pizza Oven from
being lit. To reset, close the Pizza Oven valves and gas cylinder
valve, wait for 1 minute and use correct lighting procedure as
detailed below.
SAFETY PRACTICE TO AVOID INJURY
• Inspect the gas supply hose prior to turning on the gas. If there is
evidence of cuts, wear, or abrasion, it must be replaced prior to
use.
• Only the pressure regulator and hose assembly supplied with the
appliance should be use. Never substitute regulator for those
supplied with the appliance. Contact customer service for proper
replacement.
• Leak check the hose and regulator connections with a soap and
water solution before operating the appliance.
• DO NOT turn the gas at the LP gas cylinder unless the gas hose
is properly connected to the side burner gas pipe system and all
burner are in the “OFF” position.
• Keep a spray bottle of soapy water near the appliance and check
the connection before each use.
When properly cared for, your appliance will provide safe, reliable
service for many years. However, extreme care must be used as the
appliance intense heat that can increase accident potential.
When using this appliance basic safety practices must be followed,
including following:
• Do not repair or replace any part of the grill unless specically
recommended in this manual. All other service should be referred
to a qualied technician.
• The appliance is for outdoor use only.
• The appliance is not intended to be installed in or on recreational
vehicles and /ore boats.
• Children should not be left alone or unattended in an area where
the appliance is being used.
• DO NOT allow children to sit, stand or play on or around the
appliance at any time.
• Do not store items of interest to children around or below the grill
or cart. Do not allow children to crawl inside the cart.
• Never let clothing, pot holders or other ammable materials come
in contact with or too close to any grate, burner or hot surface
until it has cooled, the fabric could ignite causing serious personal
injury.
• For personal safety, wear proper apparel. Loose tting garments
or sleeves should never been worn while using this appliance.
Some synthetic fabrics are highly ammable and should be not
worn while cooking.
• Only certain types of glass, ceramic earthenware, or other glazed
utensils are suitable for grill use.
• Other types of material may shatter with sudden temperature
changes. Use only low or medium heat settings in accordance
with the manufacturer’s guidelines.
• Do not heat unopened food containers as a built-up of pressure
may cause the containers to burst.
• Use a covered band when opening the grid lid.
When lighting a burner, always pay close attention to what you are
doing. Make certain you are aware of which burner you are lighting
so that your body and clothing remain clear of open ames.
WARNING!
• DO NOT touch the grill, pizza stone or immediate surroundings
as these areas become extremely hot and could cause burns.
• Grease is ammable, let hot grease cool before attempting to
handle it. DO NOT allow grease deposit to collect in the grease
tray. CLEAN THE GREASE TRAY OFTEN.
• DO NOT use aluminum foil to line the grills rack or grill bottom.
For proper lighting and performance of the burner, keep the
burner clean. It is necessary to clean it periodically for optimum
performance. The burner will only operate in one position and must
be mounted correctly for safe operation.
Exercise caution when cleaning the grill. To avoid steam burns,
DO NOT use a wet sponge or cloth to clean the grill while it is hot.
Some cleaners produce noxious fumes or can ignite if applied to a
hot surface.
NEVER USE A DENTED OR RUSTY PROPANE GAS CYLINDER.
DO NOT use the grill to cook excessively fatty meats or other
products which promote are-ups.
DO NOT operate the grill under unprotected combustible
constructions. USE only well ventilated areas. Do not use in
buildings, garages, sheds or other such enclosed areas.
This grill is designed for optimum performance without the use of
briquettes.
Never use the grill in extremely windy conditions. If located in a
consistently windy area, a windbreak will be required.
LIGHTING THE PIZZA OVEN
Lighting the Pizza Oven is easy, but must be done with due care.
Make sure that the gas is turned on at the cylinder, or that gas is
available to the Pizza Oven. Also ensure that the Pizza Oven door is
open.
BURNER LIGHTING INSTRUCTIONS
1. Open the oven door before igniting the pizza oven.
2. Check the control knob is in the “OFF” position.
3. Open the gas control valve at the gas cylinder.
4. From the “OFF” position, push in and then turn control knob
anticlockwise to the “HIGH” position, hold for 4 seconds.
Repeat step 4, 3-4 times until the burner is lit.
5. If the burner fails to light, turn o and wait for 5 minutes, then
begin from step 4.
1312
FOR MANUAL LIGHTING
IMPORTANT
Use a match holder and long match stick or BBQ lighter
for lighting the Pizza Oven manually to avoid burning your
hand.
1. Open the oven door before igniting the grill.
2. Remove the pizza stone.
3. Open the gas control valve at the gas cylinder.
4. Place a match into the match holder and light the match. Then
place the match near the burner inside the re box.
5. From the “OFF” position, push in and then turn control knob
anticlockwise to the “HIGH” position, hold for 4 seconds.
Repeat from step 4, 3-4 times until the burner is lit.
6. If the burner fails to light, turn o and wait for 5 minutes, then
begin from step 4.
IMPORTANT
Keep a spray bottle of soapy water near the gas supply
valve and check the connections before each use.
WARNING!
• Do not light the grill if odour of gas is present.
• It is important to ensure that the control valve, including the
gas cylinder, are turned o after use.
• Caution / Danger: Extreme care is required when cooking
with hood in closed position. Frequent checks must be
undertaken for the heat and temperature to ensure safe
cooking.
• Too much heat can cause re.
SPARK IGNITION
The Pizza Oven valve has integrated ignition system. Pushing the
control knob in and then turning anticlockwise to “HIGH” makes a
click sound and creates a spark to light the gas.
DIFFICULTY LIGHTING
If the burner doesn’t light rst go, check the gas controls and
try a couple more times. If the burner still does not light, wait a
few minutes to allow the gas to disperse before trying again. If
satisfactory operation cannot be achieved, consult your retailer
before proceeding.
Note: Failure to follow the lighting procedures correctly can lead to
a hazardous condition.
TURNING OFF A BURNER
Push in then turn the burner control knob clockwise to the “OFF”
position.
TURNING OFF YOUR PIZZA OVEN
When you have nished using your Pizza Oven, turn o the gas at
the bottle. Push in and then turn the control valve fully clockwise
to the “OFF” position. Wait until the Pizza Oven is suciently cool
before replacing the Pizza Oven door. Once cooled, a protective
cover should always be tted to the Pizza Oven to protect your
investment from the weather when not in use.
FLARE-UP CONTROL
The Pizza Oven can also be used as an outdoor oven. Use
appropriate oven tray (not supplied with your Pizza Oven) to avoid
any fat are ups. Always protect your hands when handling anything
near the cooking surface of the Pizza Oven.
If a fat re should occur in the oven tray, turn the knob to the o
position, turn o the gas at the bottle, and wait for the re to go out.
Do not pull out the oven tray or douse with water. Use baking soda
to extinguish are ups.
WARNING!
• Caution / Danger: The oven surface can be hot.
PIZZA STONE
1. DO NOT use stone over on an open ame
2. Avoid extreme temperature change to the stone. DO NOT
place frozen foods on a hot stone
3. The stone is fragile and can break if bumped or dropped
4. The Pizza Stone gets very hot during use and remains hot for a
longtime after use.
5. DO NOT cool the pizza stone with water when the pizza stone
is still hot
6. Once the Pizza Stone has cooled down, you may clean it with
water, please dry the stone before use
COOKING IN YOUR OVEN
1. Preheat the oven for approx. 20-25 minutes at 180c with the
pizza stone inside the oven,
2. Cooking times may vary depending on pizza base thickness
and the toppings used.
3. Depending on the above, start with 180c and approx 7-8
minutes as a guide.
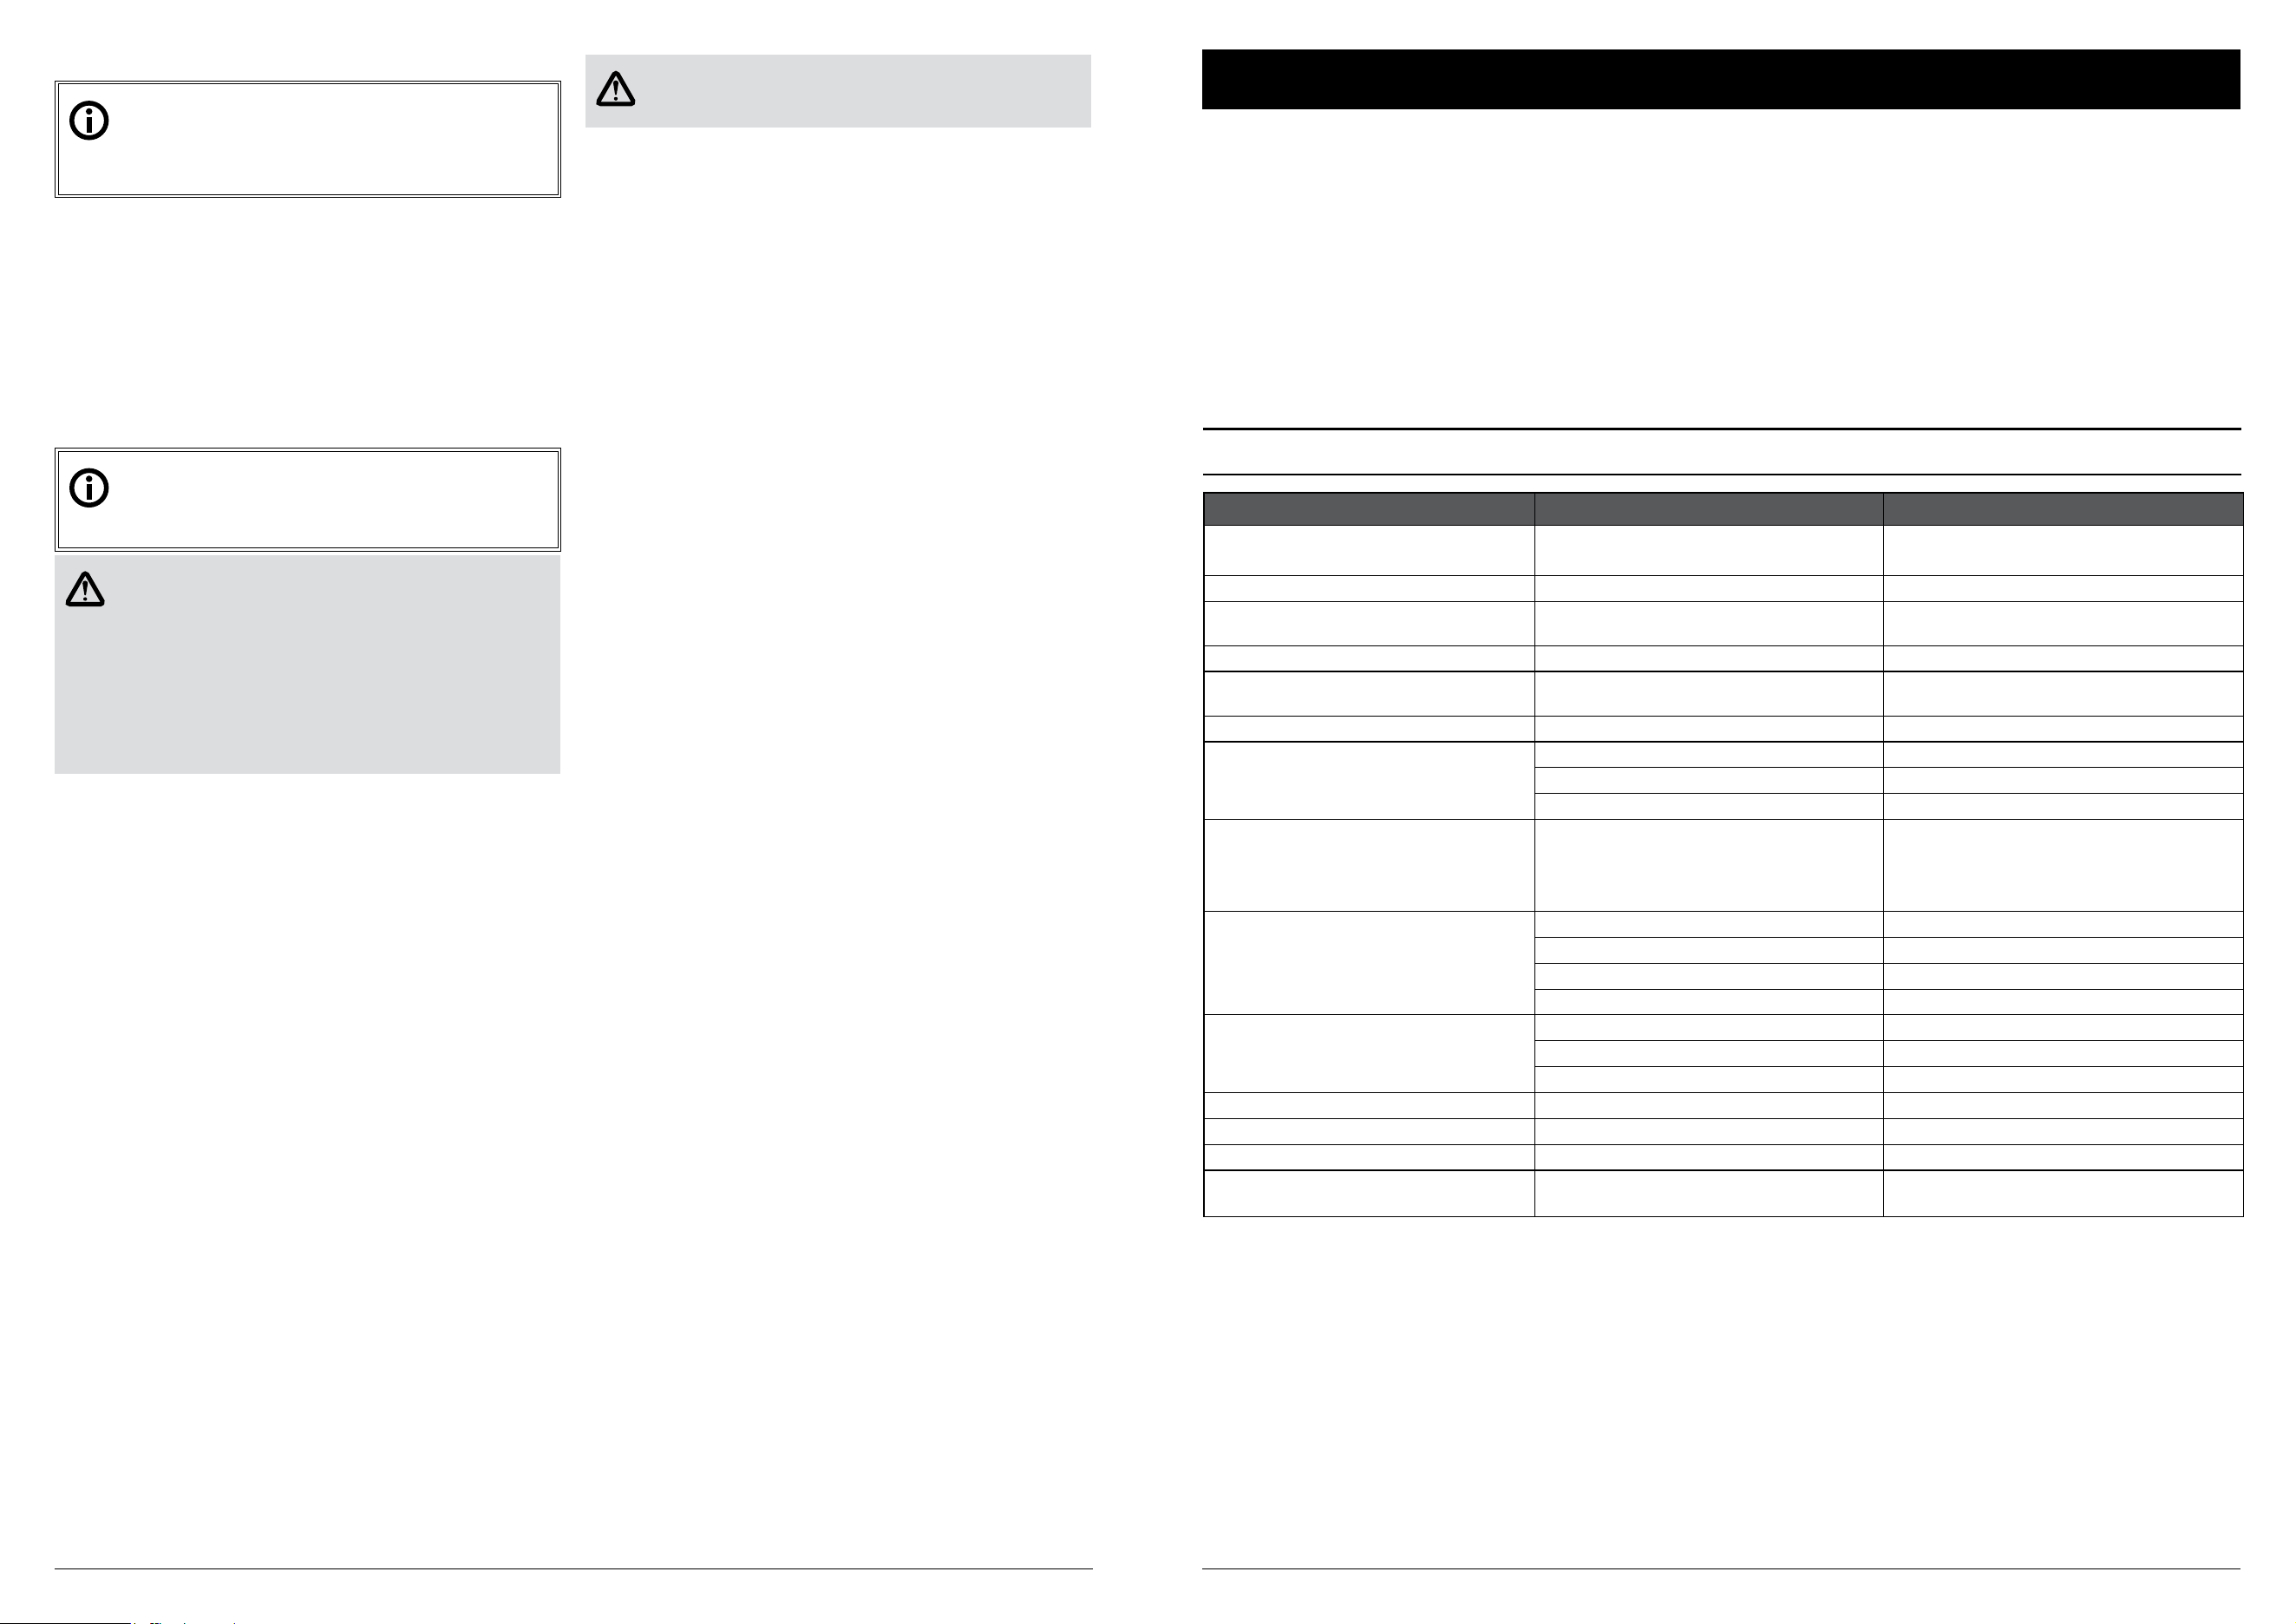
CHECKLIST
Problems Possible Cause Solutions
Ignition
When push the knob and turn anticlockwise:
- Won’t light Orice blocked Check the orice for blockage
- No spark Dirty contacts of the electrode and or loose
contacts
Remove the connecting wire, clean and reconnect
rmly
- Still no spark Electrode terminals are damaged Inspect electrode and replace if damage
- Weak spark Due to moisture / food residue on the electrodes Remove the moisture using paper towel / clean the
electrode
- Spark at places other than the tip of electrode Ignition wire damaged Replace the ignition wire
Burner can’t light by match
No gas Open the LP tank valve
Gas ow is not smooth Clear burner tubes
Incorrect assembly between burner and valve Re-assemble
Yellow or orange ames, with gas odour
Incomplete combustion Check the burner inlet for obstruction such as
spiders
Check air shutter for correct adjustment
Check for the source
Low heat with knob in “high” position
Gas hose bent or kinked Straighten
Burner or orice blocked Clear
Low gas pressure Check Cylinder/ Regulator (refer to pg. 15)
Grill not preheated Preheat the grill for 15 minutes
Flare up
Excessive meat fat Cut o fat before roasting
Over high temperature Adjust
Grease deposit Clean
Flame out
Over high winds Find a less windy place
Flame lifting
Over high gas pressure Call the gas dealer
Flashback
Burner port blocked Clean
Grease re
Grease accumulated in food Turn o knob, LP tank valve, leave lid open, let re
burn out. Clean the grill when cool.
BEFORE CALLING FOR SERVICE
If the grill does not function properly, use the following checklist
before contacting your dealer for service.
APPLIANCE APPROVED OUTDOOR USE ONLY
USE ONLY THE 5/8” x 18 GAS CONNECTION HOSE AND
REGULATOR PROVIDED BY THE MANUFACTURER!
If a replacement is necessary, please contact either our Masport
Customer Service Department or your local dealer.
The use of unauthorised parts can create unsafe conditions and
environment.
Refer to your Masport warranty card for warranty information.
STORAGE OF THE PIZZA OVEN
1. Clean the Pizza Oven.
2. Store the Pizza Oven outdoors in a dry, well ventilated area and
out of reach of children when LP tank is connected to the Pizza
Oven.
3. Store the Pizza Oven indoors ONLY after the LP tank is turned
o and removed, the LP tank must be stored outdoors, out of
reach of children, NEVER store the tank in a building, garage or
any other enclosed area.
4. If using a cover for your Pizza Oven, check your Pizza Oven
every few weeks.
TROUBLESHOOTING
1514
CARE AND MAINTENANCE
Regularly clean your Pizza Oven between uses and especially
after extended periods of storage. Ensure the Pizza Oven and its
components are suciently cool before cleaning. Do not leave the
Pizza Oven exposed to outside weather conditions or stored in
damp, moist areas.
• Never douse the Pizza Oven with water when its surfaces are hot.
• Never handle hot parts with unprotected hands.
Whilst our products are made to the highest standards and all care
is taken to make them as weather proof as possible, we cannot
accept responsibility for rust occurring on exposed metal parts
unless this is a result of faulty manufacture of parts.
In order to extend the life and maintain the condition of your Pizza
Oven, we strongly recommend that the unit is covered when not in
use, especially during the winter months.
STAINLESS STEEL CARE AND CLEANING ADVICE
Your Pizza Oven features Stainless Steel components. All Stainless
Steel grades require a level of care and protection to retain their
appearance. Stainless Steels are not immune to corrosion and
neither are they maintenance-free, contrary to popular public
perception. Even the highest marine grades of Stainless Steel
require frequent cleaning to avoid oxidation and other corrosive
issues.
Modern tastes dictate that your Pizza Oven features Stainless Steel
with a brushed nish. This brushed nish is attained by running
Stainless Steel sheets through an abrasive process that removes
the mirror nish and leaves the brushed nish. Brushed-nish
Stainless Steel requires frequent cleaning and care, to maintain its
quality of appearance. Without adequate care it is realistic to expect
that it will show signs of corrosion in time.
Stainless steel is denitely not a maintenance-free material.
Cleanliness and stainless steel are closely related. Stainless steel
performs best when clean - cleanliness is essential for maximum
resistance to corrosion and to maintain the good looks and life of
your Pizza Oven.
TYPES OF SURFACE CONTAMINANTS
Fingerprints and Stains
Fingerprints and mild stains resulting from normal use are the most
common surface contaminates. They can be removed with a glass
cleaner or with a soft rag. This should be followed by a thorough
warm water rinse.
DIRT
Like any surface that is exposed to the environment especially in
coastal areas, stainless steel can get dirty. Cleaning with warm
water with or without a gentle detergent is sucient. Next in
order are mild non-scratching abrasive powders such as typical
household cleaners. These can be used with warm water, nylon
bristle brushes, sponges, or clean cloths. Carbon steel brushes or
steel wool should be avoided as they may leave particles embedded
on the surface which can lead to RUSTING. Cleaning should always
be followed by rinsing in clean hot water.
GREASE
Grease may soil stainless steel surfaces in food preparation. These
soils may be mildly corrosive if left or may not allow the surface
to maintain passivity, and so regular removal is a necessity for the
appearance.
TYPES OF CLEANERS AND METHODS
Consider the possibility of scratching and the potential for post-
cleaning corrosion caused by incompletely removed cleaners. Avoid
using abrasive cleaners unless absolutely necessary.
CLEAN WATER AND WIPE
A soft cloth and clean warm water should always be the rst choice
for mild stains and loose dirt and soils. A nal rinse with clean
water and a dry wipe will complete the process and eliminate the
possibility of water stains.
HOUSEHOLD CLEANERS
Household cleaners fall into two categories: detergent (non-
abrasive) and abrasive cleaners. Abrasive cleaners are more
eective but introduce the possibility of scratching the surface. A
neutral cleaner low in chloride is essential. The cleaning method
generally employed with these cleaners is to apply them to the
stainless surface and follow by cloth wiping in the direction of the
grain or polish lines (not across them). The cleaned surface should
be thoroughly rinsed with clean water and wiped dry with a soft
cloth if water streaking is a consideration.
COOKING GRILL
The easiest way to clean the grill is immediately after cooking is
completed and the ames have been turned o.
Wear a barbecue mitt to protect your hand from heat and steam.
Scrub the hot cooking grates by dipping a bristled barbecue brush
in tap water. Cleaning will be more dicult if the grill is allowed to
cool.
GRILL BURNER
Abnormal Operations:
Any of the following are considered to be abnormal operation and
may require service.
• Yellow tipping of the yellow ame
• Sooting up of pizza grill
• Burner not igniting properly
• Burner failing to remain alight
• Gas valves which are dicult to turn on
The stainless steel burner does have a dened operating lifespan,
these products are often exposed to cooking marinades and
extreme heat in an area of the Pizza Oven which can be neglected
during regular cleaning.
Replacement parts are available from your local Pizza Oven dealer.
Extreme care should be taken when removing a burner. It must
be correctly centered on the orice before any attempt is made to
relight the grill. Frequency of cleaning with depend on how often
you use the grill.
Failure to properly place the burner over the orice could cause a
re to occur behind and beneath the valve panel, thereby damaging
the grill and making it unsafe to operate.
Before cleaning, make sure the gas supply and control knobs are in
the ‘OFF’ position and the burners have cooled.
Follow these instructions to clean parts of burner assembly or if you
have trouble igniting grill.
1. Turn gas o at control knobs and LPG Tank.
2. Remove pizza stones, cooking grill and smoker box.
3. Remove screw at end of burner using a screwdriver.
4. Carefully lift the burner up and away from valve openings.
5. Wire brush entire outer surface of burner to remove food
residue and dirt.
6. Clean any blocked ports with a sti wire such as an open paper
clip.
7. Check burner for damage, due to normal wear and corrosion
some.
Inspect burner for any damage (crack or holes). If damage is found,
replace with a new burner. Reinstall the burner, check to ensure that
the Gas valve orices are correctly positioned and secured inside
the burner inlet.
We suggest three ways to clean the burner tubes. Use the
one easiest for you.
(A) Bend a sti wire (a light weight coat hanger works well) into a
small hook. Run the hook through each burner tube and burner
several times.
(B) Use a narrow bottle brush with a exible handle (DO NOT use a
brass wire brush), run the brush through each burner tube and
burner several times.
(C) Wear eye protection: use an air hose to force air into the burner
tube and out the air ports. Check each port to make sure air
comes out each hole.
SPIDER AND INSECT WARNING!
Spiders and insects can nest in the burners of the grill and cause
the gas to ow from the front of the burner. This is a very dangerous
condition, which can cause a re to occur, thereby damaging the
grill and making it unsafe to operate.
WHEN TO LOOK FOR SPIDERS
You should inspect the burners at least once a year or immediately
after any of the following conditions occur:
• The smell of gas in conjunction with the burner ames appearing
yellow.
• The Pizza Oven does not reach temperature.
• The Pizza Oven heats unevenly.
• The burner make popping noises.
WARNING!
NATURAL HAZARD SPIDERS
FACT: sometimes spiders and other insects climb into the grill
tubes to the burners. The spiders spin webs build nests and lay
eggs. The webs or nests can be very small, but they are very
strong and can block the ow of gas.
Clean burners prior to use after storing, at the beginning of
grilling season or after a period of one month not being used.
Spider guards are on the air intakes in an eort to reduce this
problem, but it will not eliminate it! An obstruction can result in a
“ashback” (a re in the burner tubes). The grill may still light, but
the obstruction does not allow full gas ow to the burners.
STAINLESS STEEL
There are many stainless steel cleaners available. Always use the
mildest cleaning process rst, scrubbing in the direction of the grain.
DO NOT use steel wool as it will scratch the surface. To touch up
noticeable scratches in the stainless steel, and very lightly with dry
100 grit sand paper in the direction of the grain.
Grease specks can gather and bake onto the surface of the
stainless steel, giving the appearance of rust. For removal, use an
abrasive pad with s stainless steel cleaner.
WE SUGGEST FOLLOWING WAYS TO CLEAN THE BURNER
TUBES
• Bend a sti wire( a light weight coat hanger works well) into a
small hook. Run the hook through each burner tube and burner
several times
• Use a narrow bottle brush with a exible handle (DO NOT use a
brass wire brush), run the brush through each burner tube and
burner several times.
• Wear eye protection: use an air hose to force air into the burner
tube and out the air ports. Check each port to make sure air
comes out each hole
PIZZA STONE
1. DO NOT use stone over on an open ame
2. Avoid extreme temperature change to the stone. DO NOT
place frozen foods on a hot stone
3. The stone is fragile and can break if bumped or dropped
4. The Pizza Stone gets very hot during use and remains hot for a
longtime after use.
5. DO NOT cool the pizza stone with water when the pizza stone
is still hot
6. Once the Pizza Stone has cooled down, you may clean it with
water, please dry the stone before use
OVEN GRILL BODY
WARNING!
Not cleaning the Pizza Oven can pose a re risk!
Regularly remove excess grease spill or fat from the grill body with a
soft plastic or wooden scraper. It is not necessary to remove all the
grease from the body. If you need to clean fully, use hot soapy water
and a cloth, or nylon-bristled brush only. Remove cooking surfaces
and burners before full cleaning. Do not immerse the gas controls
or manifold in water. Check burner operation after carefully retting
into body.
FIXINGS
All screws and bolts, etc. should be checked and tightened on a
regular basis.
END OF THE COOKING SESSION
After each cooking session, turn the Pizza Oven burner to the
“HIGH” position and burn o for 5 minutes. This procedure will burn
o food residue, thus making cleaning easier.
STORAGE
Store your Pizza Oven in a cool dry place. Cover the burner with
aluminium foil in order to prevent insects or other debris from
collecting in burner holes. A protective cover should always be tted
to the Pizza Oven to protect your investment from the elements
when not in use. If the Pizza Oven is to be stored indoors, the gas
bottle must be disconnected and left outside. The gas bottle should
always be stored outside, in a dry, well-ventilated area, away from
any sources of heat or ignition. Do not let children tamper with the
bottle.
To protect your investment it is recommended that Pizza Ovens
are protected by a suitable Pizza Oven cover. But please note that
prior to using a protective cover, the Pizza Oven should always be
cool, cleaned of any surface contaminant or dirt and be thoroughly
dry. Failure to follow this information can lead to a Pizza Oven cover
being a corrosion breeder rather than a protective tool.
NOTE:
If leaving your oven grill covered for long periods, occasionally
check for corrosion and insect habitation. Oil surfaces for extra
protection.
SERIAL NUMBER
The serial number of your Pizza Oven is located on the inside of the
door. If you do require any further assistance with your Pizza Oven
from your local dealer or Masport, please have this serial number
handy as it will quickly allow us to identify the Pizza Oven.
1716
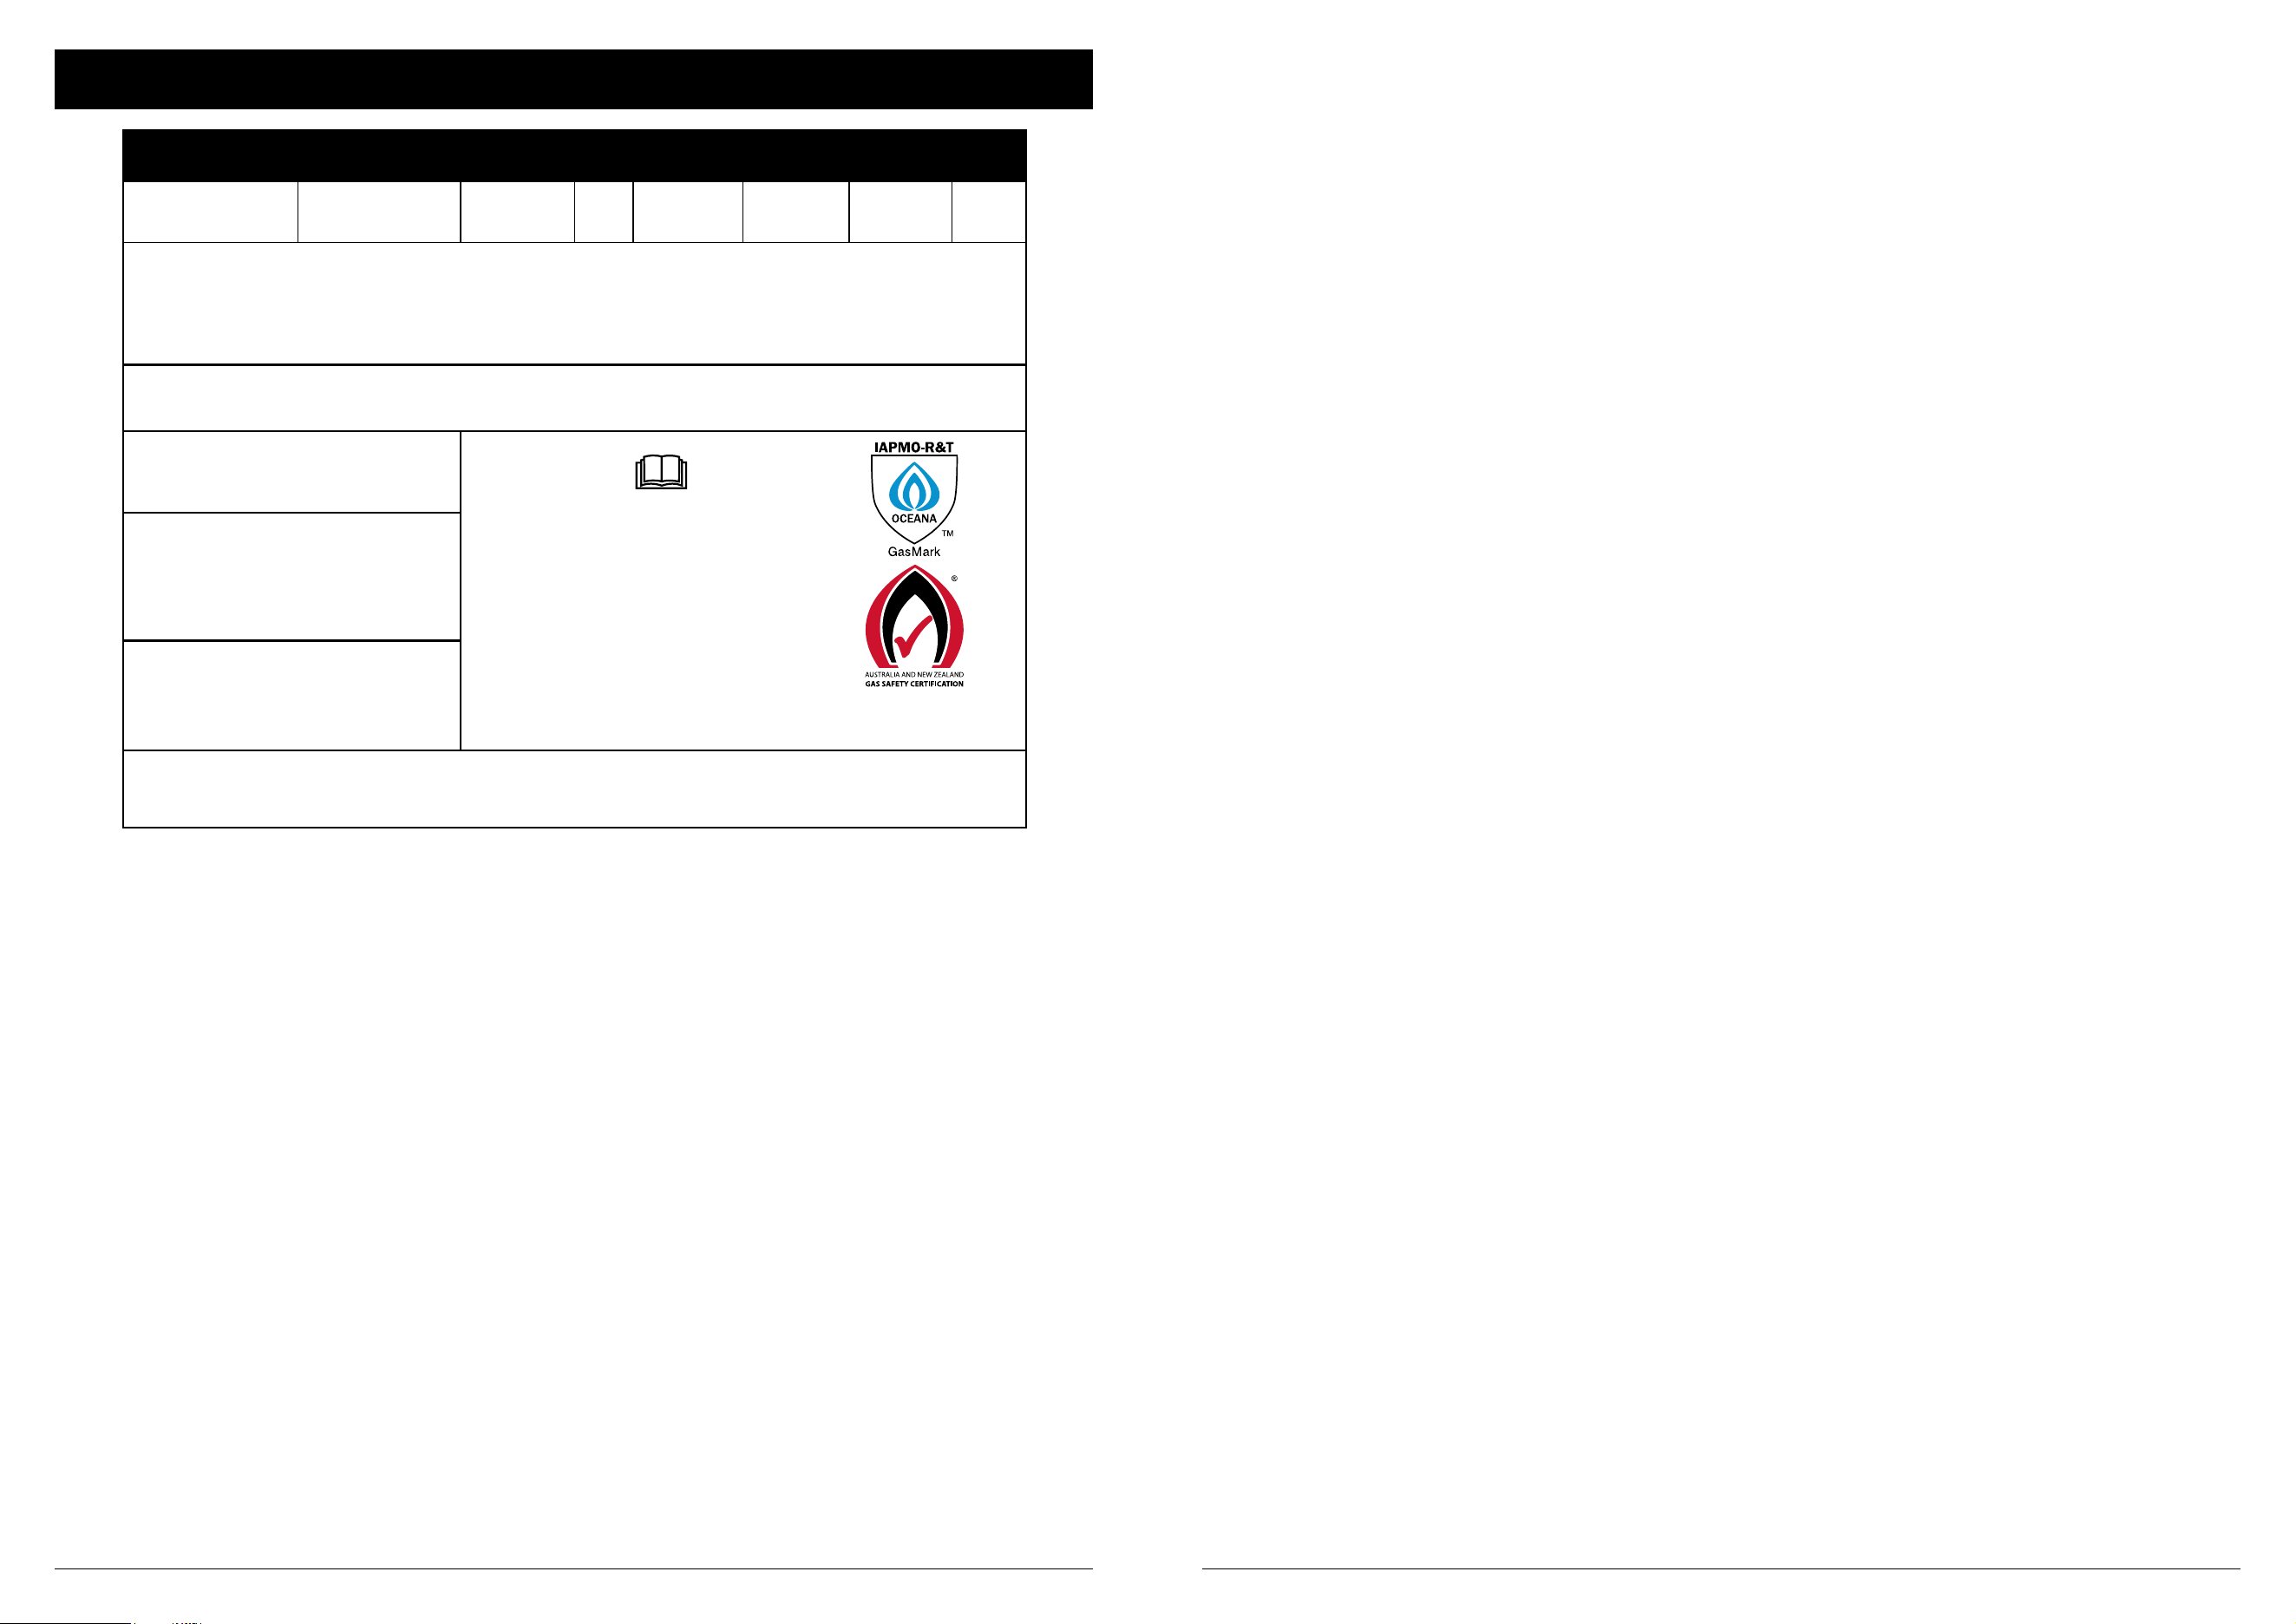
TECHNICAL DATA
Name Model
IAPMO
Approval
Injector
(mm)
Pressure
(kPa)
Inp/Burn
(Mj/h)
Total
(Mj/h)
PIZZA OVEN-
TABLE TOP
PG04
GMK10324
ULPG:
0.93 2.75 1 x 11.6 11.6
Gas Supply Pressure, ULPG
Min: 2.70kPa; Max: 3.45kPA
Gas Type: NZ: Universal LPG
AUS: LPG
Complies to:
Standard AS 4557-2004 (AMDT2)
Minimum Clearance :
From Top of Pizza Oven: 1000mm, From Sides: 1000mm, From Rear : 1000mm
Distributed by
MASPORT LIMITED
Read the instructions before using
the appliance
USE OUTDOOR ONLY
WARNING: Parts of this appliance
may be very hot, keep young
children away
Manufactured by:
Zhongshan Suncook
Hardware App
546657.A.5
MASPORT LIMITED
320 Ti Rakau Drive, East Tamaki,
Auckland 2013, New Zealand
PO Box 14349, Panmure Auckland
1471, New Zealand
MASPORT AUSTRALIA PTY LIMITED
1/40 Abbotts Road, Dandenong South,
Melbourne, Victoria 3175, Australia
PO Box 533, Braeside, Victoria 3195,
Australia
For storage and cylinder exchange, disconnect hose at the cylinder only, do not
disconnect hose from the appliance.

1918

Head Ofce - New Zealand
320 Ti Rakau Drive, East Tamaki, Auckland 2013, New Zealand
P.O. Box 14 349
Auckland 1060, New Zealand

