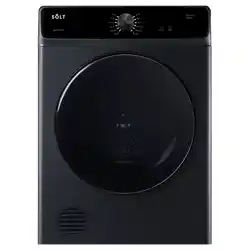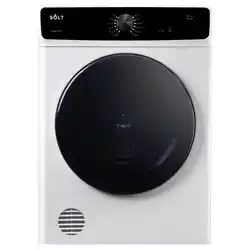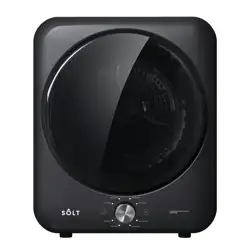

E S S E N T I A L S FOR LIFE
User
Manual
MODEL
GGSVD55W
GGSVD55B
V1.2 0526
5.5kg
Vented
Dryer

2
Welcome
Congratulations on purchasing
your new Vented Dryer!
The Solt brand is proudly
distributed within Australia
by Residentia Group Pty Ltd.
Please refer to the warranty card at the rear of this manual
for information regarding your product’s parts and labour
warranty, or visit us online at www.residentia.group
At Residentia Group, we are customer obsessed and our
Support Team are there to ensure you get the most out of
your appliance. Should you want to learn more about your
rangehood features, and importantly taking care of your
appliance when cleaning, our Support Team are here
to help.
You can use our online Support Centre at anytime by visiting
http://support.residentiagroup.com.au, or you can contact us
via calling us on 1300 11 HELP (4357).
It is important that you read through the following use and
care manual thoroughly to familiarise yourself with the
installation and operation requirements of your appliance to
ensure optimum performance.
Again, thank you for choosing an Sôlt appliance and we look
forward to being of service to you.
Kind Regards,
The Residentia Team
Residentia Group
—
Head Office.
165 Barkly Ave
Burnley
Victoria 3121
Australia
—
ACN.
600 546 656
—
Online.
residentia.group
www.solt.house

Contents
2 Welcome
4 Safety Instructions
9 Your Vented Dryer
10 Installation Instructions
13 Precautions Before Use
15 Operating Your Vented Dryer
20 Cleaning and Maintenance
21 Troubleshooting
23 Technical Specications
24 Purchase Details
26 Warranty Information

4
Safety Instructions
GENERAL SAFETY INSTRUCTIONS
SAFETY WARNING AND PRECAUTIONS
Your safety and the correct operation of the machine are
paramount. Please read these warnings carefully.
• WARNING! or CAUTION! Violation of a marking may
result in serious personal injury and death.
• IMPORTANT! Violation of a marking may cause minor
personal injury or damage to objects.
DRYER SAFETY
WARNING! Failure to follow these safety instructions could
damage the clothes dryer or your clothes.
You may then not be covered by warranty for this damage.
Only plug this appliance directly into an AC power supply
which is properly earthed and had the correct voltage.
Refer to the appliance rating plate (located on the rear of
your clothes dryer) for the voltage information.
CAUTION! If this appliance is supplied from an extension
cord, power-board or other power adapter, the extension
cord/power-board must be positioned so that it is not
subject to moisture or risk of moisture. For safety reasons,
we strongly advise against the use of double adaptors,
power-boards, extension leads or other similar devices.
This appliance is not intended for use by persons (including
children) with reduced physical, sensory or mental
capabilities, or a lack of experience and knowledge, unless
they have been given supervision or instruction concerning
use of the appliance by a person responsible for their
safety. Children should be supervised to ensure that they
do not play with the appliance.
IMPORTANT!
• The lint trap filter must be cleaned after each use.
• If the electrical cord of this appliance is damaged, it must
be replaced by the Manufacturer, Authorised Service
Agent or similarly qualified person in order to avoid a
hazard. Damage to the appliance, including the power
cord, is not covered under the manufacturer’s warranty
and a fee for service may be payable.
• These dryers are for drying clothes, towels and linen
at home. They are not designed or intended for use
in Commercial environments. Do not use them for any
other purpose.
• The dryer is not to be used with any clothing articles
which have had industrial chemicals used for cleaning.
• This appliance is only intended for use indoors only
within a domestic environment.
• Adequate ventilation must be provided.
• Never dry unwashed items with your clothes dryer.
• Never use your clothes dryer to dry items such as latex,
foam rubber, waterproof textiles, rubber backed articles,
or pillows fitted with foam.
• Ensure all objects are removed from pockets.
• Lint must not be allowed to accumulate around the
tumble dryer.
• Always check your clothing items care labels to ensure
they are suitable for use within your dryer.
WARNING! The final cycle of your clothes dryer programs
is a cool down cycle to reduce the temperature of your
clothes. This is incredibly important to ensure that your
clothing items won’t be damaged. Never stop a tumble
dryer before the end of the drying cycle unless all items
are quickly removed and spread out so that the heat is
dissipated.

5
Safety Instructions
WARNING!
Lint lter must be
cleaned after each use.
CAUTION:
Do not operate the
dryer without the lint
lter installed.
6
Safety Instructions (Continued)
FIRE HAZARDS
Some fabrics are not suitable for tumble drying. The
following MUST NOT be placed in your dryer due to the
risk of a fire or an explosion:
• Item(s) that have been spotted or soaked with vegetable
oil, cooking oil, suntan oil, linseed oil, salad oil,
lubrication oil or grease. Oil affected items can ignite
spontaneously, especially when exposed to heat sources
such as in a tumble dryer. The items become warm,
causing as oxidation reaction in the oil. Oxidation creates
heat. If heat cannot escape, the items can become hot
enough to ignite. Pilling, stacking or storing oil-affected
items can prevent heat from escaping and create a
fire hazard. If it is unavoidable that fabrics that contain
vegetable or cooking oil or have been contaminated
by hair care products be placed in a tumble dryer, they
should first be washed is hot water with extra detergent
— this will reduce, but not eliminate the hazard. The
final part of tumble dryer cycle occurs without heat
(Cooling cycle) to ensure that the items are left at the
temperature that ensures that the items will not be
damage.
• Item(s) that have previously been cleaned in, washed
in, or spotted with petrol/gasoline, industrial chemicals
used only for cleaning, dry-cleaning solvents or other
flammable or explosive substances are highly flammable.
Highly flammable or explosive commonly found around
the house include acetone, (nail polish remover)
denatured alcohol, petrol/gasoline, kerosene, some spot
removers, turpentine, waxes and wax removers should
not be put in the dryer. Items containing foam rubber
(also known as latex foam) or similarly textured rubber-
like materials. Foam rubber materials can produce fire by
spontaneous combustion when heated.
• Rubber-backed articles, clothes fitted with foam rubber
pads, pillows, rubber boots and rubber-coated sports
shoes.
WARNING! For your safety, and to reduce the risk of
fire or an explosion, DO NOT store or use petrol or other
inflammable vapours and liquids near your dryer.
CLEANING THE LINT FILTER AFTER EVERY USE
THE LINT FILTER MUST BE INSTALLED FOR EVERY USE
WARNING! LINT BUILD-UP IS A FIRE HAZARD.
A clean lint filter greatly improves your dryers efficiency
and reduces drying times, saves energy and avoids
overheating. Overheating may also damage your clothes.
Tip! If your lint filter isn’t emptied between drying loads,
we estimate the drying time can double after 4–5 cycles
and triple after 8 cycles. Aside from creating a risk of fire,
this results in a significant increase in energy consumption
to dry your clothes.
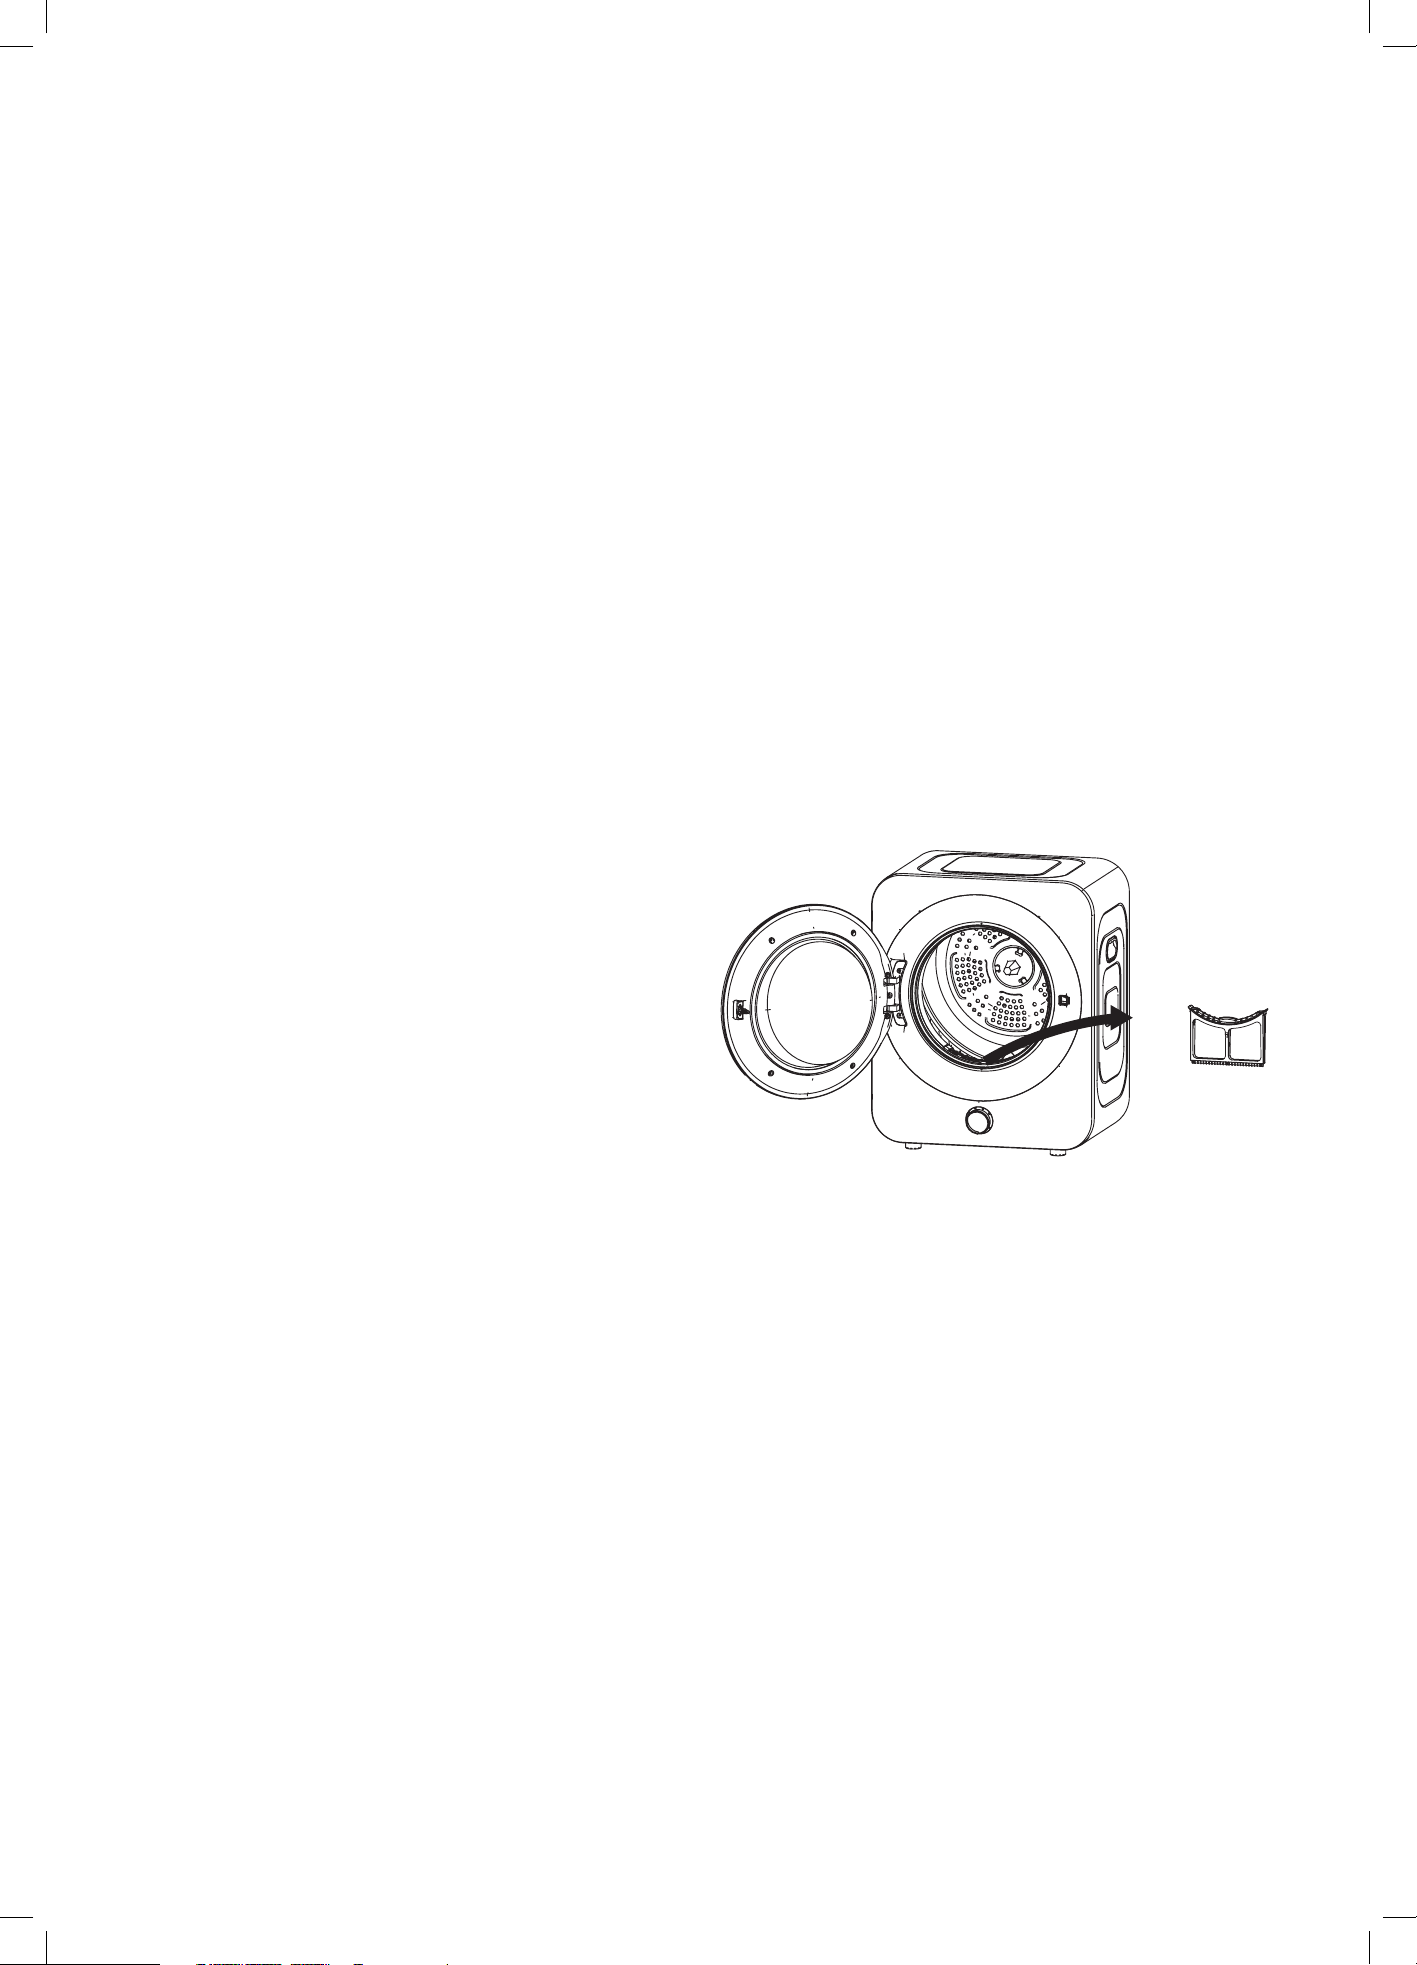
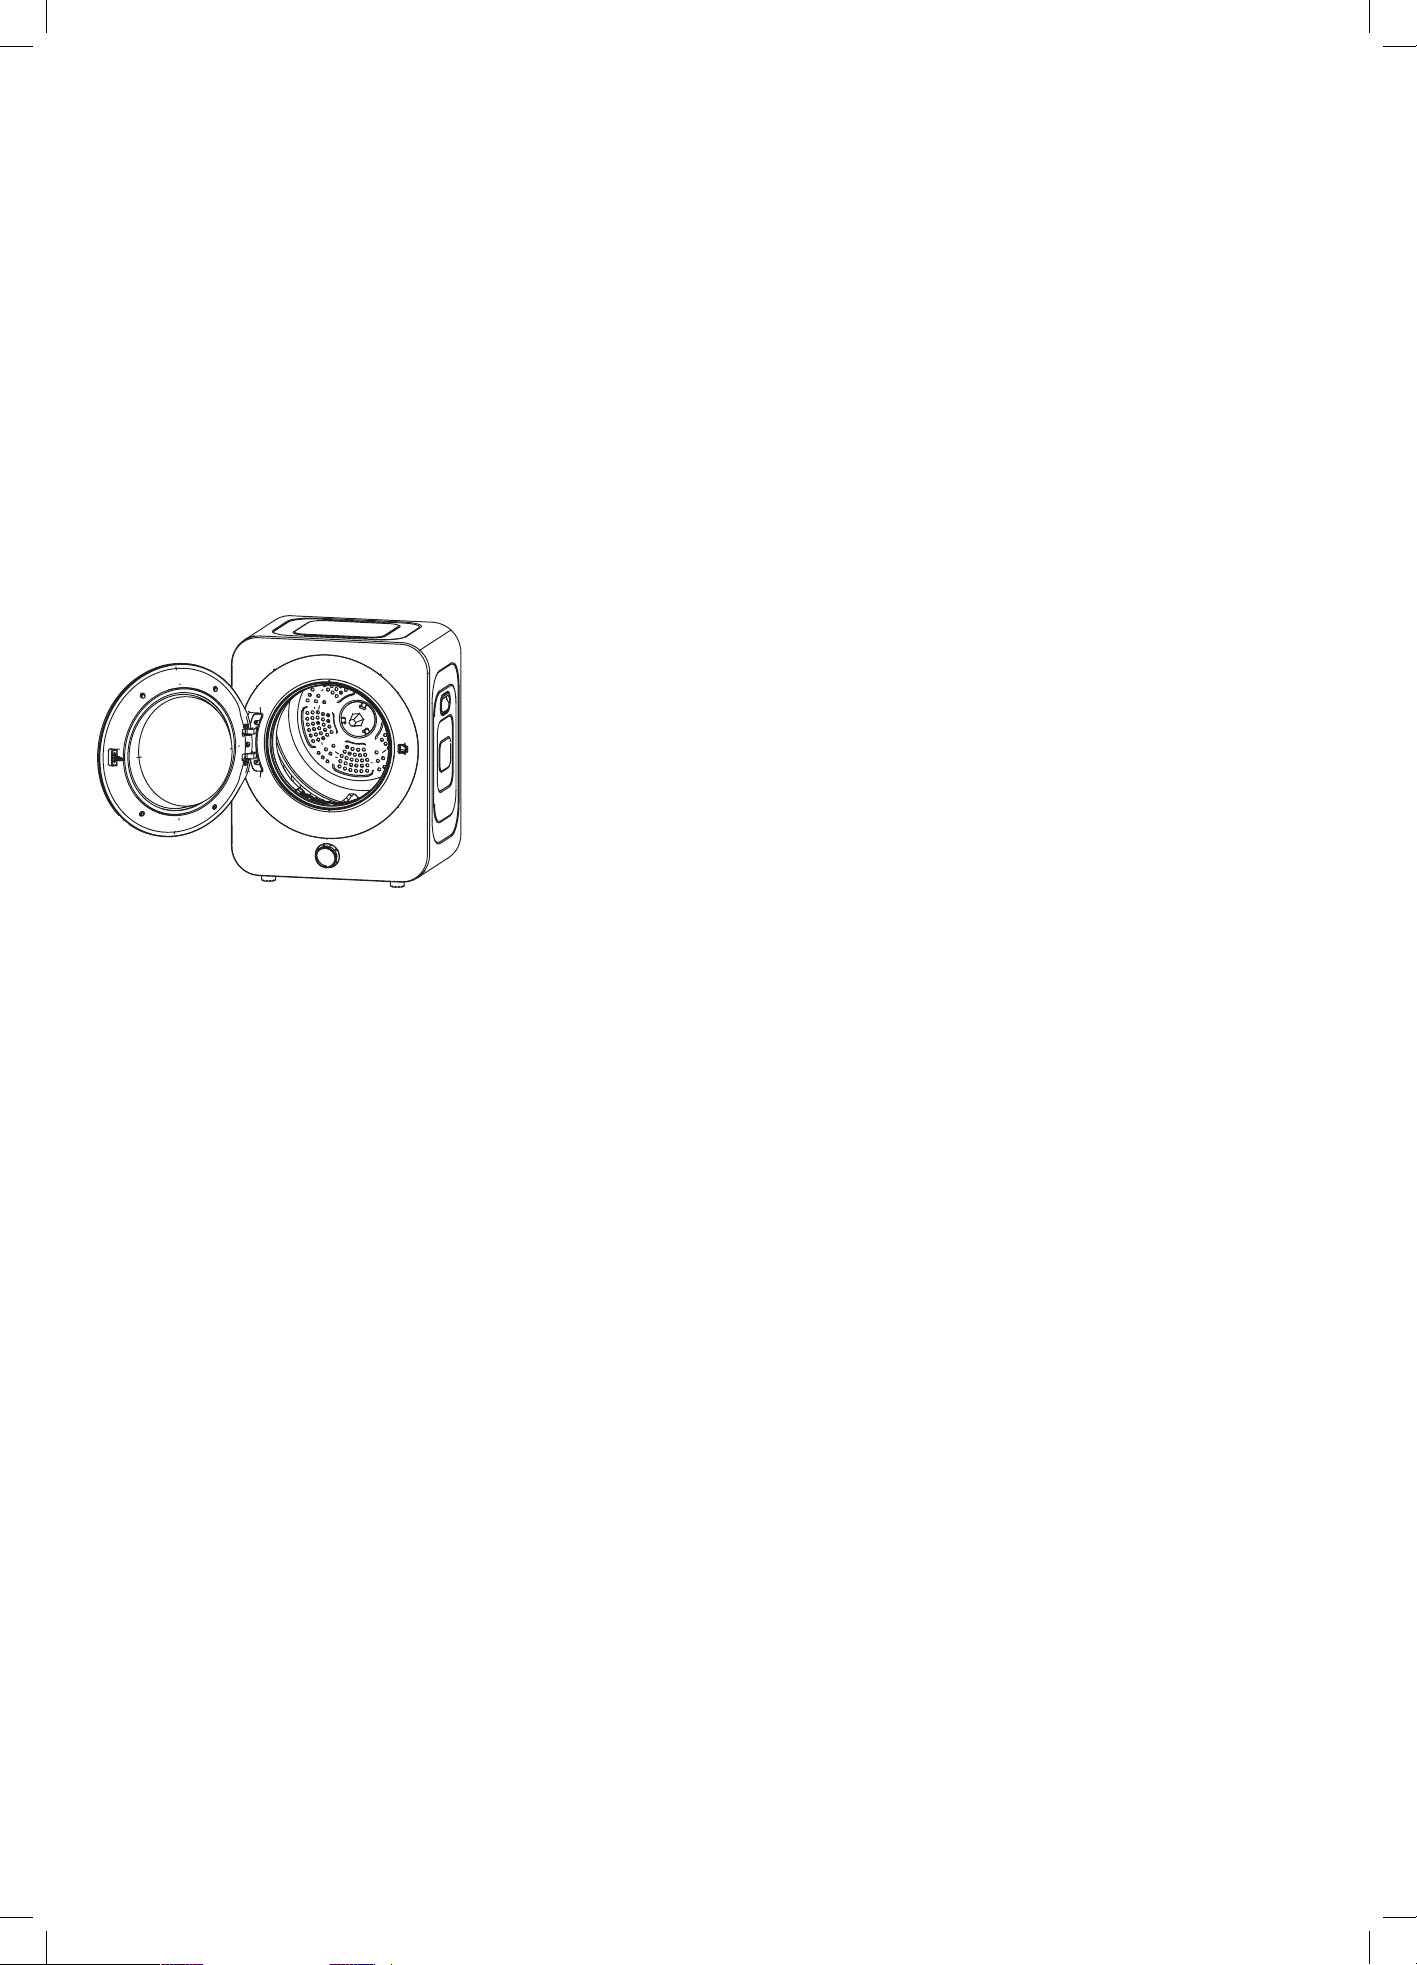
The lint filter is located on the inside of the door, Figure 1
shown below.
Figure 1 — Lint filter location within your vented dryer.
7
WARNING! You must empty your lint lter after every
load and have it installed on every load.
To remove the lint filter, open the dryer door and simply
lift the plastic filter out from its housing. You can click the
lint filter open to allow easy access to remove the lint.
Ensure that the plastic filter is clicked closed again before
replacing into your clothes dryer.
Tip! The lint filter can only be inserted into its housing in
one way and must be used on every load.
IMPORTANT!
• Never operate your dryer without the lint filter in its
correct position.
• Do not allow lint to build up around the dryer
(on the door itself, inside the drum, around the lint filter
itself, etc).
• A torn or damaged lint filter must be replaced
immediately — cease use until this is replaced.
• Do not overload your dryer. Overloading can increase
lint build-up because the airflow is reduced.
Tip! To avoid potential fire hazards, we recommend that
you pay for a qualified appliance technician to inspect and
clean your dryer periodical and if you have been using the
dryer and want to wall mount the unit we recommend to
have the dryer professional clean before doing so.
OPERATING YOUR DRYER
Your dryer is rated to 5.5kg of dry clothing.
Loads must not exceed this rated capacity.
IMPORTANT! Always check your clothing’s care
label information to ensure they are suitable for use within
dryers.
Excessive drying is one of the most damaging things we do
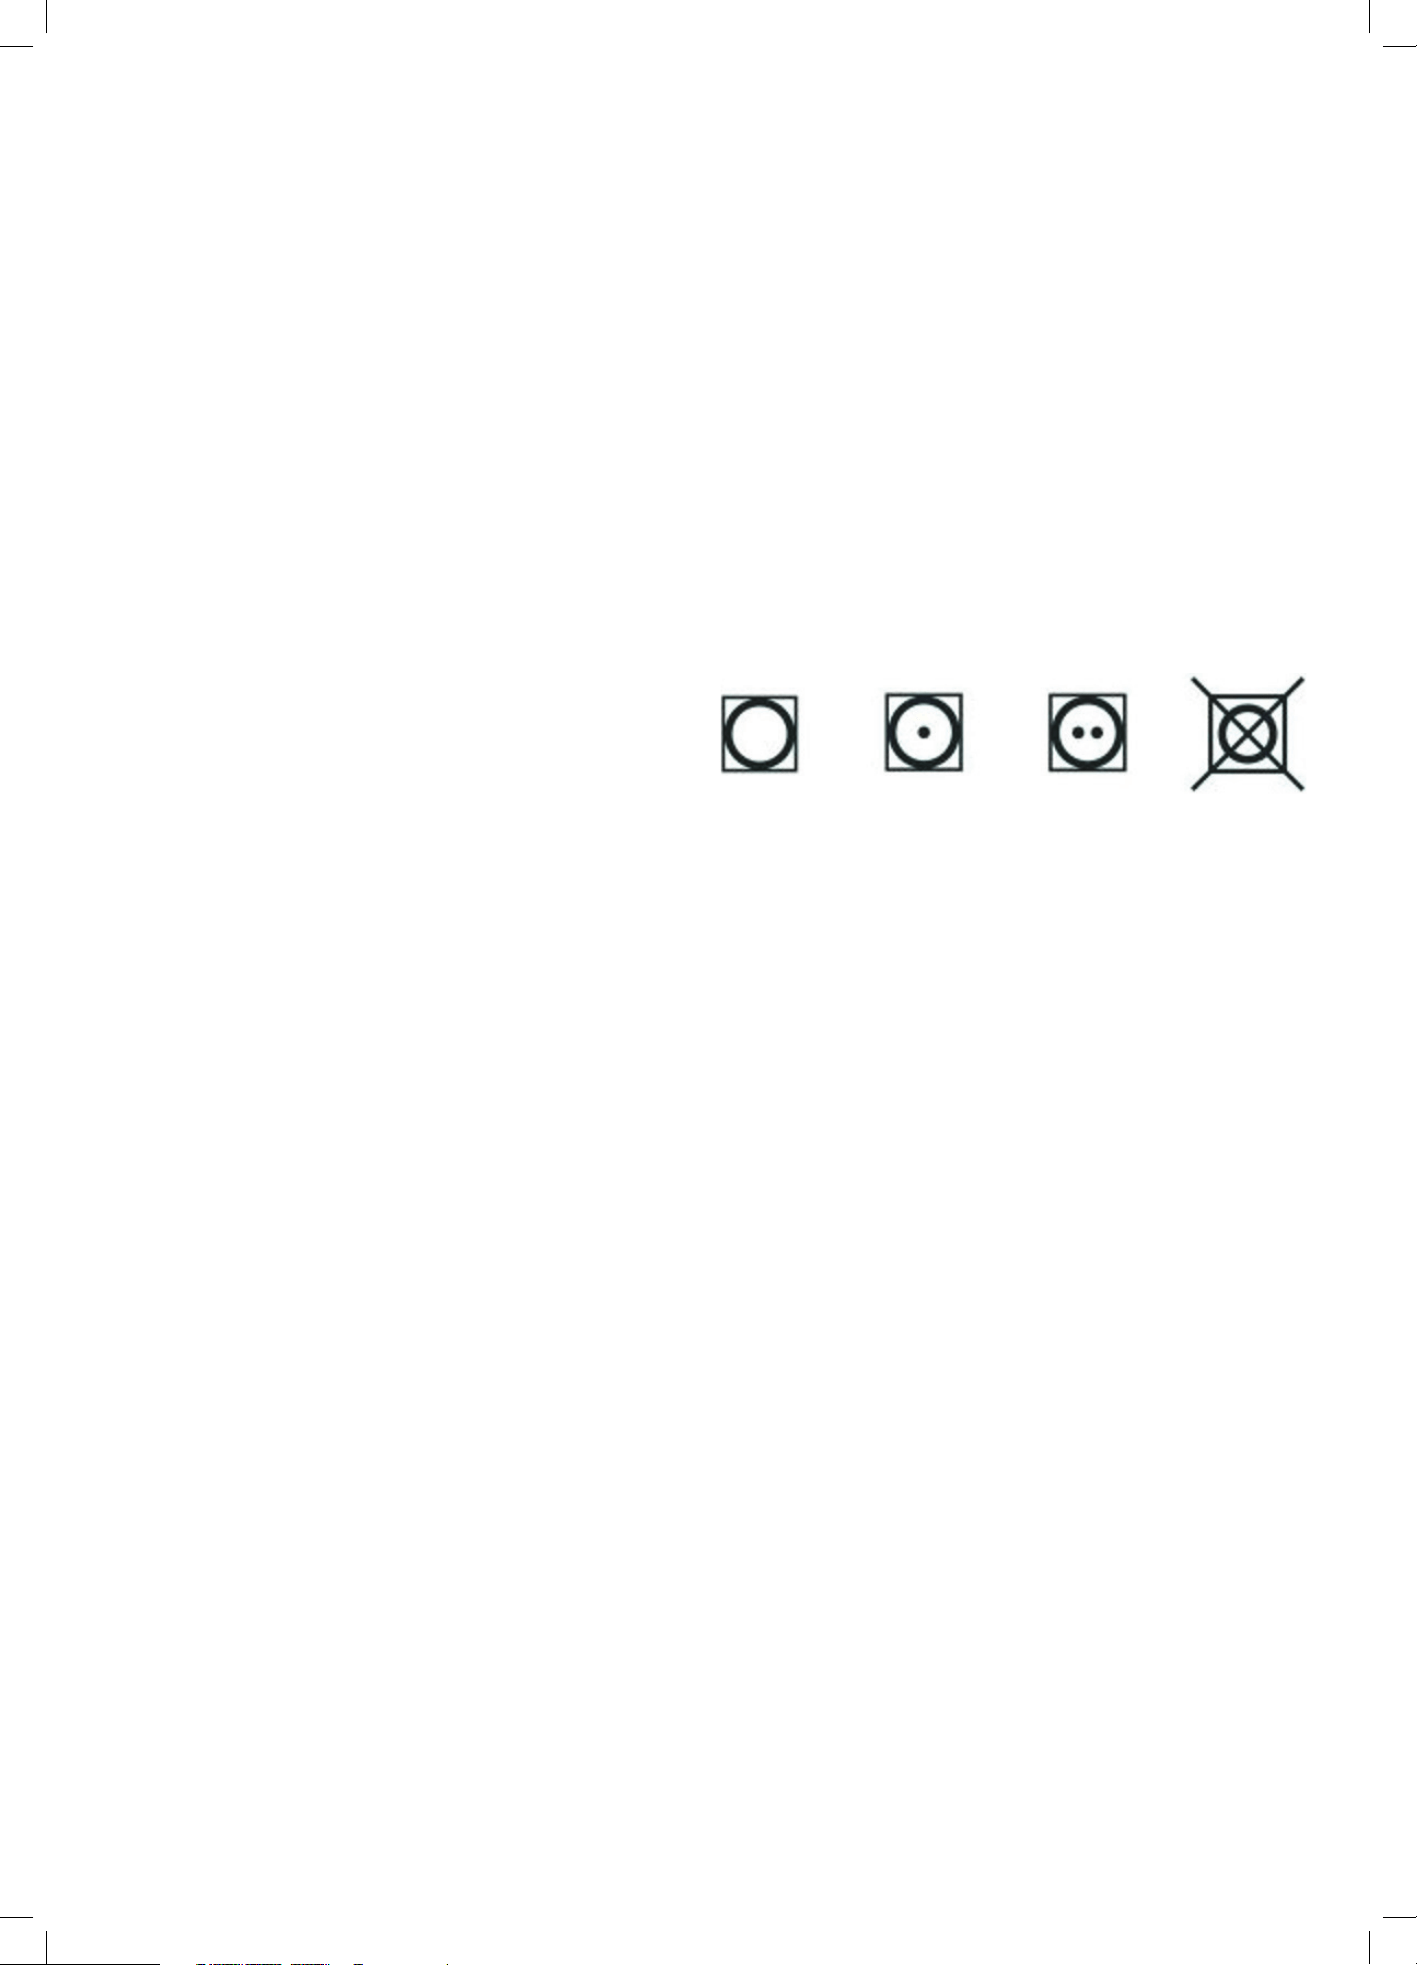
to our laundry. International drying symbols (shown below)
help you select a dryer cycle and a temperature.
Figure 2 — International drying symbols used on your
clothing care labels.
• If the care label has a circle inside a square, your item can
be tumble dried.
• The more dots on the iron symbol suggests the
temperature of heat that can be applied:
• 1 dot = low temperature
• 2 dots = medium temperature
• 3 dots = high temperature
• If there is a cross over the tumble dry symbol, you should
not tumble dry the item.
It’s recommended for air-drying only.
Some guidelines for various fabric types:
• Permanent press and synthetics — Take out as soon as
the dryer stops to reduce wrinkles.
• Woollen articles - not recommended. Pull them to their
original shape, then dry them flat. Vented dryers can
shrink woollen articles.
• Woven and loop knit materials — May shrink, by varying
amount, depending on their quality. Do not use the
“Heavy” Dryness setting for these fabrics, Always stretch
them out immediately after drying.
• Fibre or leather materials — Always check the
manufacturer’s instructions.
• Baby clothes and night gowns — Acrylic clothing or
sleepwear use only on the lighter dryness settings.
• Rubber and plastics — Do not dry any items made
from or containing rubber or plastics, such as aprons,
bibs, babies’ water proof napkins, curtains, tablecloths,
shower caps, clothes fitted with foam rubber pads,
pillows, galoshes, or rubber coated tennis shoes.
• Fibreglass — Not recommended, glass particles left in
the dryer could be picked up by your clothes the next
time you use the dryer and irritate your skin.
Safety Instructions (Continued)

8
CAUTION! Fabric softeners or similar products should not
be used in a tumble dryer to eliminate the effects of static
electricity unless this practice is specifically recommended
by the manufacturer of the fabric softener or product.
Note: We strongly advise against the use of fabric
conditioners of the sheet type that are added to the
clothes in the drum. These products may lead to rapid
blockage of the lint filter and inefficient operation of your
dryer.
UNPACKING
During transportation, protective packaging was used
to protect the appliance against any damage. After
unpacking, please dispose of all elements of packaging
in a way that will not cause damage to the environment.
All materials used for packaging the appliance are
environmentally friendly; they are 100% recyclable and
are marked with the appropriate symbol. Check with your
local council on which packaging elements can be recycled
kerbside and which may need to be disposed of at your
local recycling drop o centre.
Tip! Soft plastics can be recycled at most major grocery
retailers. Polystyrene (EPS) foam may not be accepted by
your local council for recycling- check http://epsa.org.au/
for details of your local EPS recycler.
CAUTION! During unpacking, the packaging materials
(polythene bags, polystyrene pieces, etc.) should be kept
out of reach of children.
DISPOSAL
Old appliances should not simply be disposed of with
normal household waste but should be delivered to a
collection and recycling centre for electric and electronic
equipment. A symbol shown on the product, the instruction
manual or the packaging shows that it is suitable for
recycling.
• Materials used to manufacture the appliance
are recyclable and are labelled with information
concerning this. By recycling materials or other
parts from used devices you are making a signicant
contribution to the protection of our environment.
• Information on appropriate disposal centres for used
devices can be provided by your local council or
authority.
Safety Instructions (Continued)
9
Your Vented Dryer
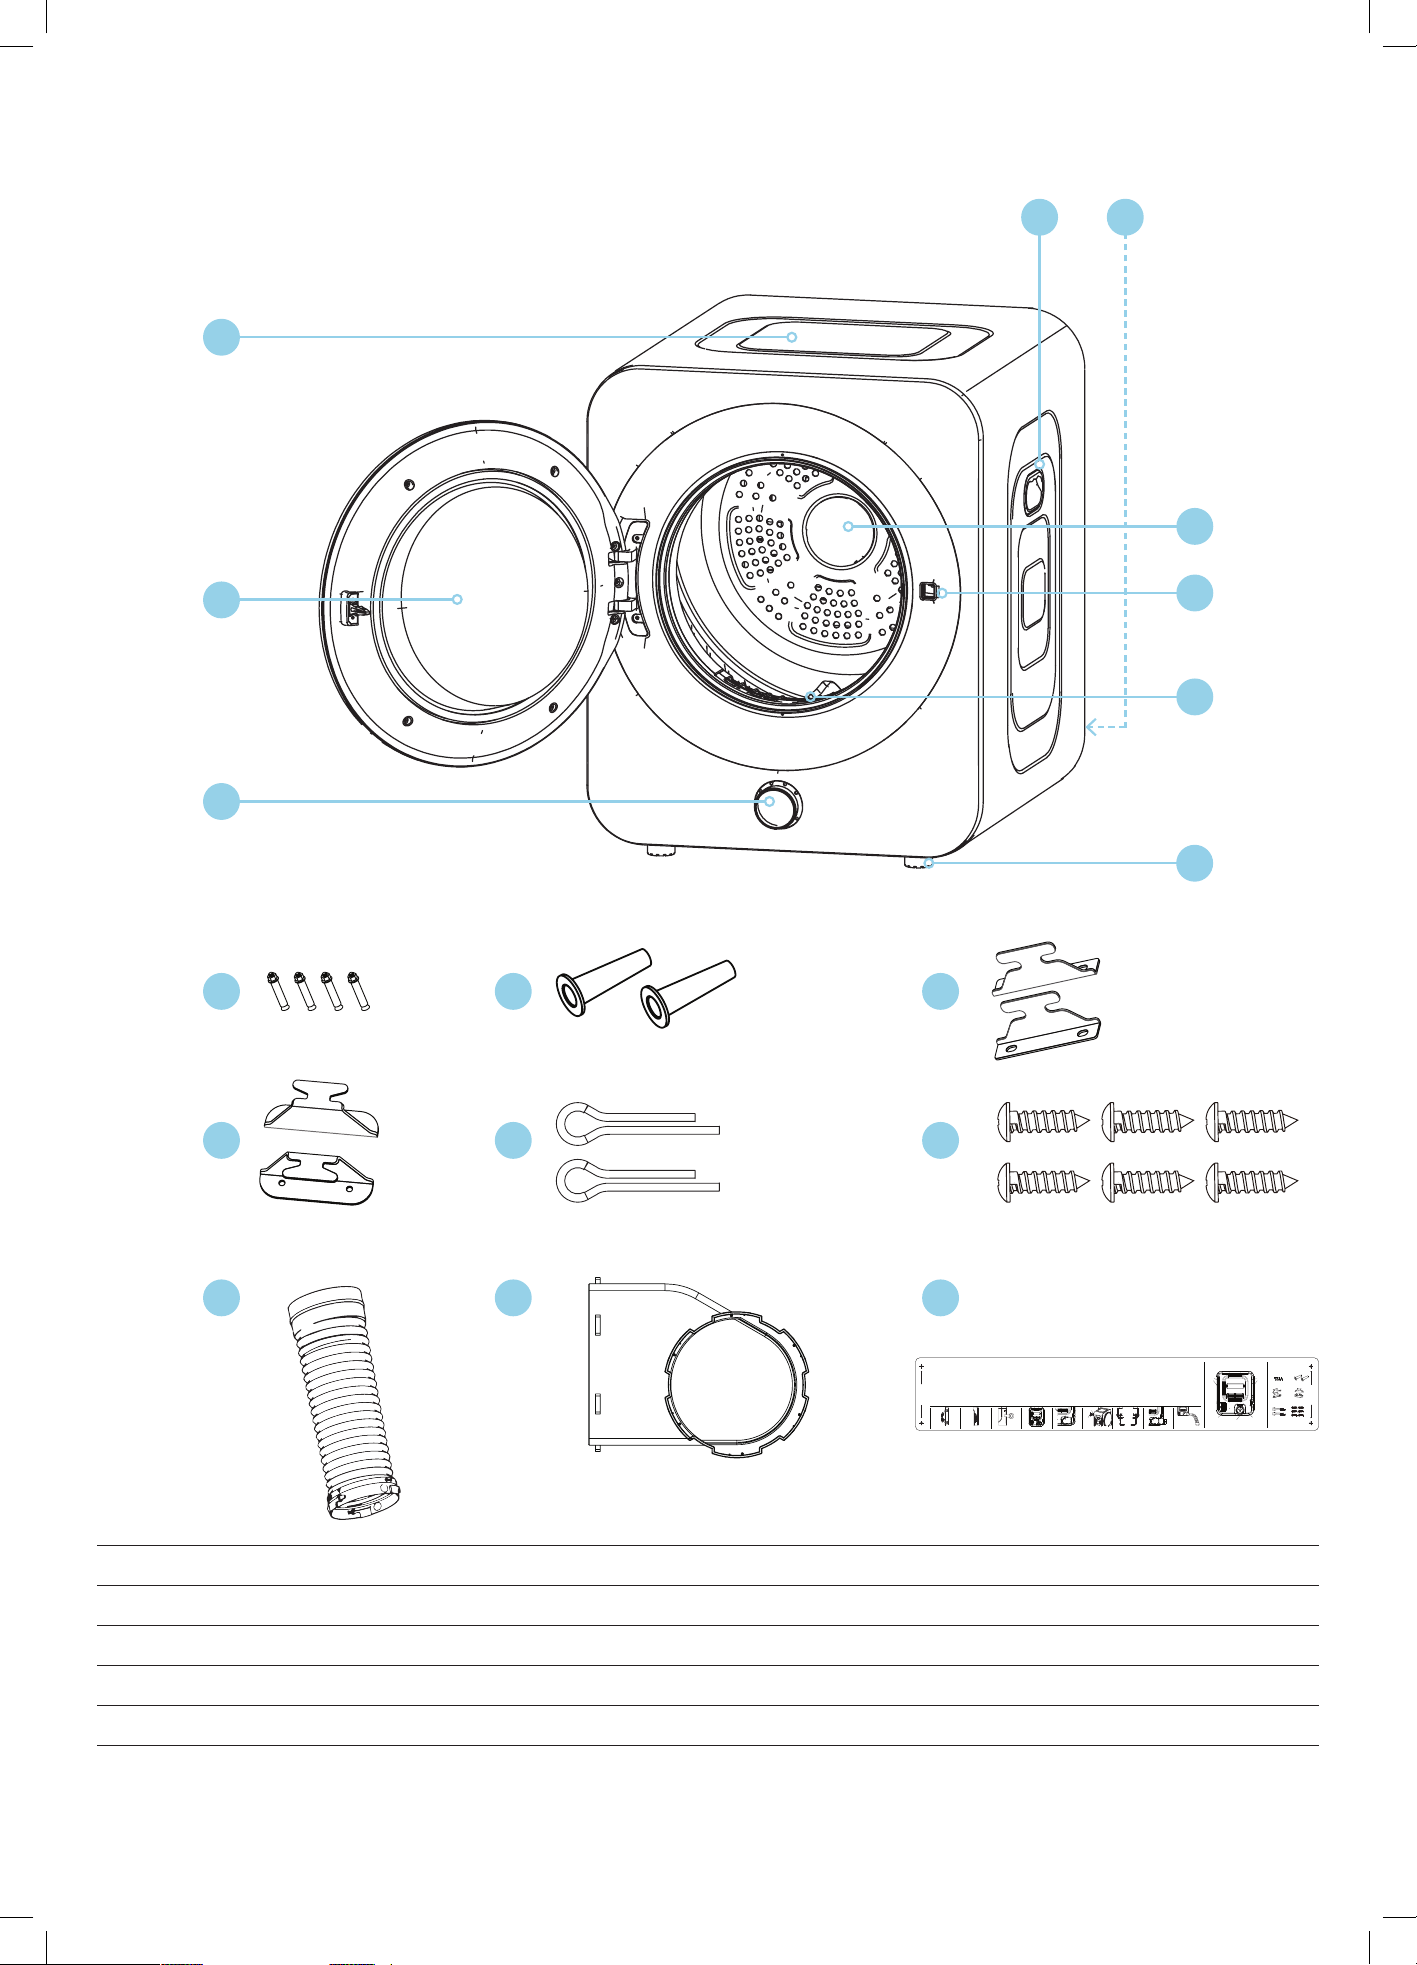
1. Body 2. Door 3. Program Selector 4. Inner Drum
5. Door Lock 6. Lint Filter 7. Feet × 2 8. Grip Handle
9. Rear Vent Outlet 10. M6 Screws × 4 11. Strutting Pieces × 2 12. Metal Plates A × 2
13. Metal Plates B × 2 14. Whistles × 2 15. Screws × 6 16. Flexible Vent Hose
17. Air Outlet Adapter 18. Wall Mounting Guide
Figure 3 — A diagram showing the main components and accessories of your vented dryer.
Note: The diagrams in this user manual are for reference only. Your actual appliance may appear slightly different.
7
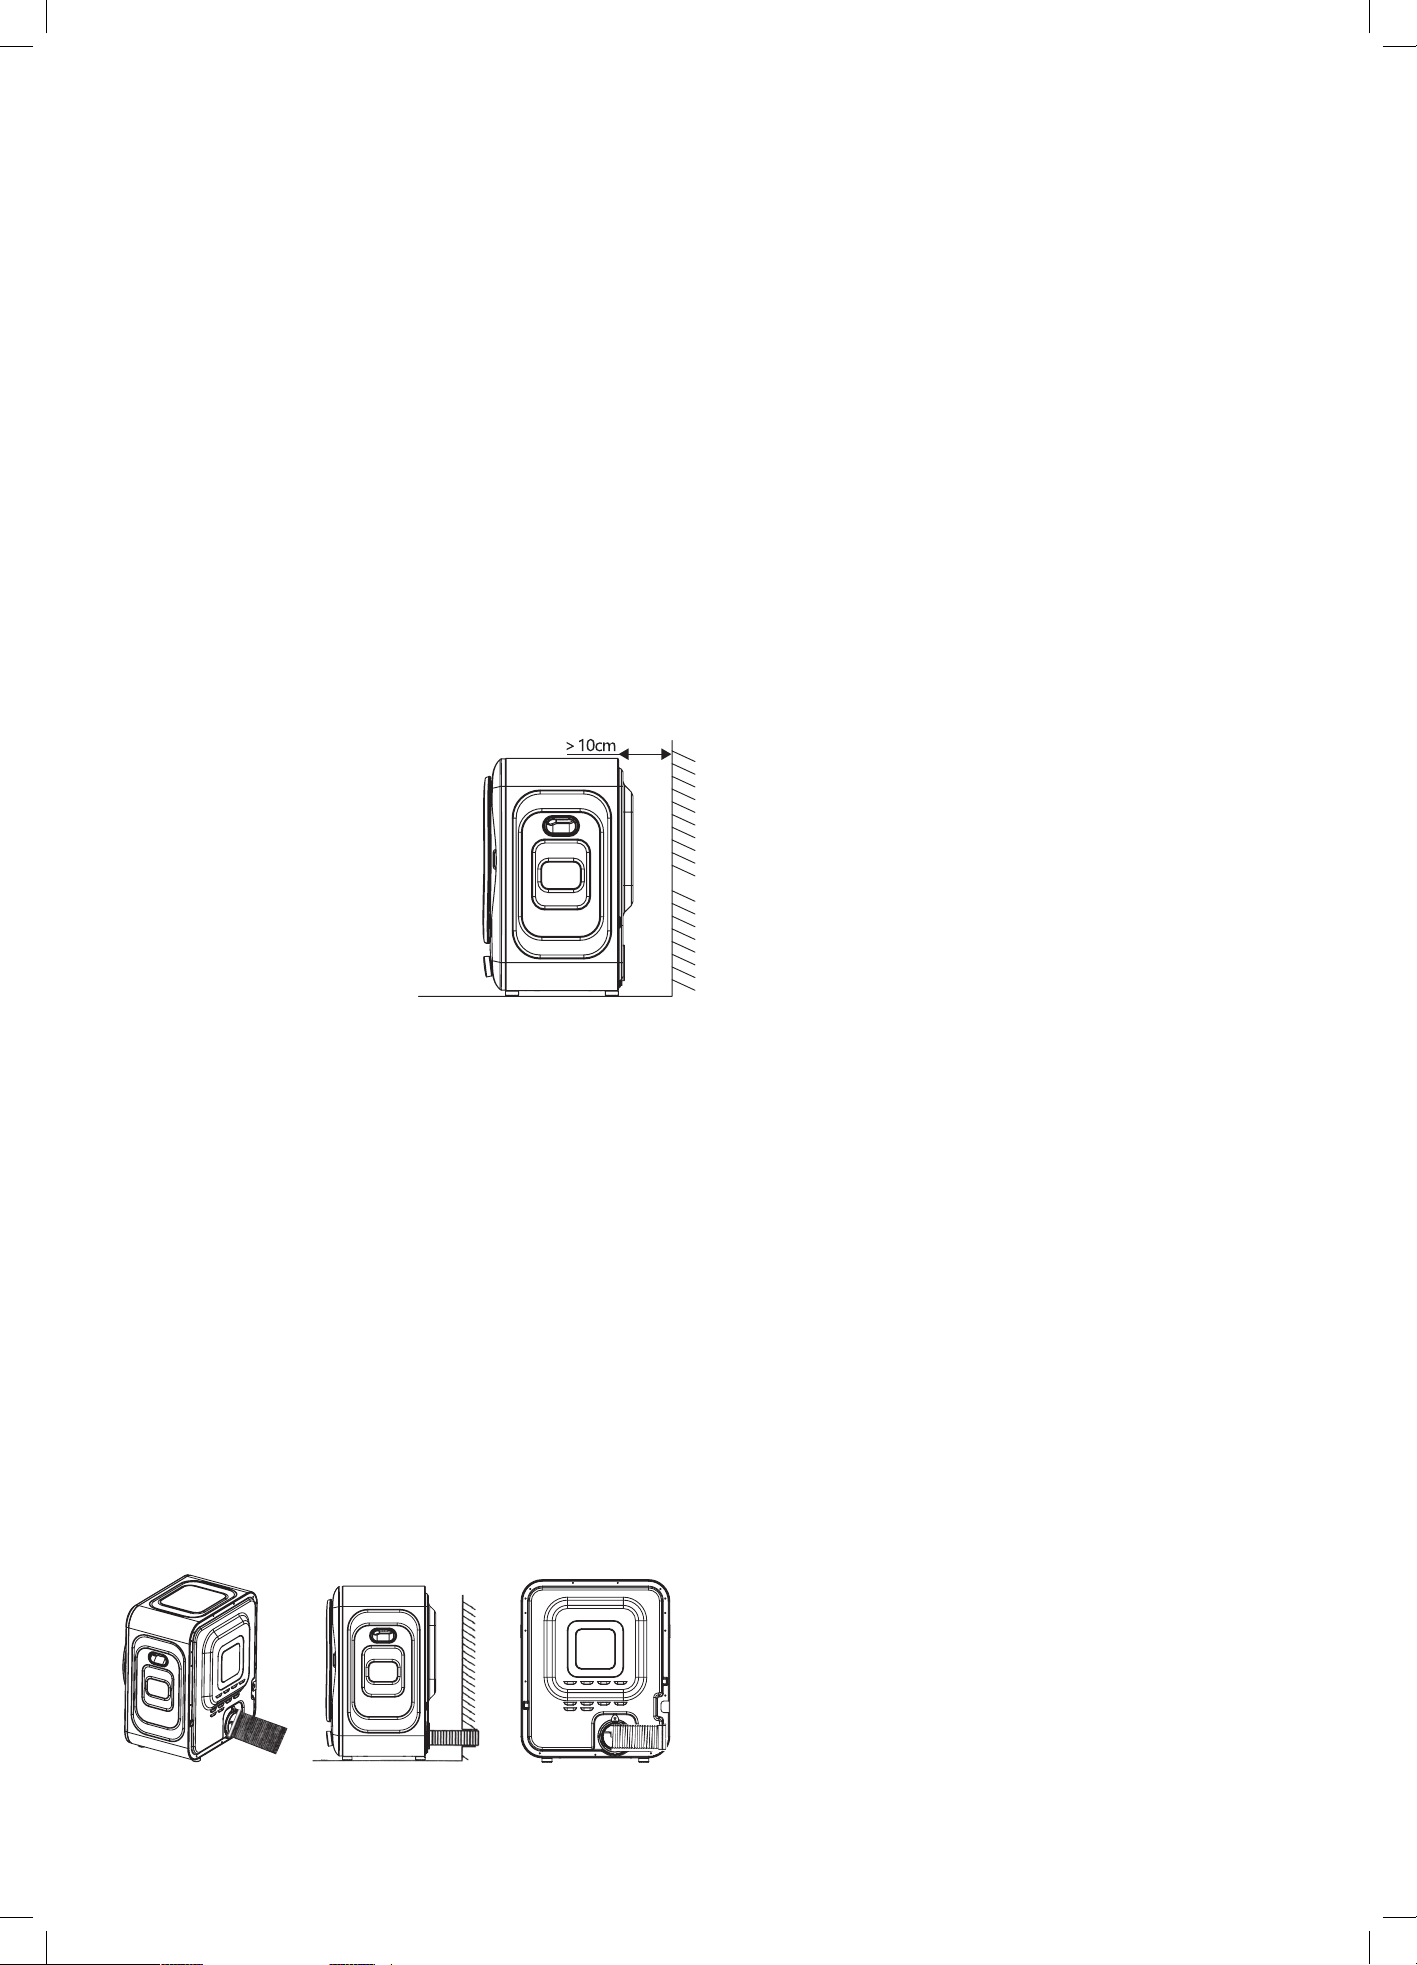
Wall Mounting and Positioning Instructions
Mounting Holes
Required Parts
(Accessories List)
Backplane Illustration
M6 Screws × 4 Strutting pieces × 2
Metal Plates A × 2
Figure A— Metal Plate A
Figure B — Metal Plate B Figure C — Strutting Pieces Figure D — Dryer Rear View Figure F — Metal Plates A & B Figure G — Whistles Figure H — Air Outlet Adapter Figure I — Vent Hose Installed
Metal Plates B × 2
Metal
Plates B
Connection
Point
Plastic Air Outlet Adapter
Connection Point
Metal
Plates B
Connection
Point
Metal
Plates A
Connection
Point
Metal
Plates A
Connection
Point
3×20 Whistles × 2 4×20 Screws × 6
Mounting Holes
IMPORTANT! Wall mounting must be performed by a professional installer.
Failure to do so may result in safety hazards.
For assistance or to organise an authorised service agent contact
our After Sales Support by calling 1300 11 4357, or by emailing [email protected]
• When attaching the Wall Mounting and Positioning Instructions, ensure they are level.
Incorrect alignment may cause the machine to sit unevenly after installation.
• Choose a solid wall for installation; otherwise, there is a risk of safety hazards
• Use a spirit level to ensure the template is perfectly horizontal.
• The product must be installed on a wall in a well-ventilated location, not outdoors
or in an area that is easily exposed to rain.
• If you are not using the extended vent hose, the rear Air Outlet Adapter can be rotated to
• direct airflow as needed.
• If you are using the extended vent hose, the rear adapter must be fixed in position and cannot
be rotated once the hose is attached.
1. Position the Wall Mounting Installation Positioning Manual (template) on the desired wall location. Affix the two self-adhesive strips on the wall according
to the instructions on the template. Note: Ensure the template is level before affixing it to avoid the machine tilting after installation.
2. Drill holes at the four circular points indicated on both ends of the template.
3. Peel off the template and install the M6 expansion bolts into the four holes.
4. Attach the two Metal Plate A parts (as shown in Figure A) to the wall using the installed bolts.
5. Remove the two existing screws on the back of the machine (located on the upper left and upper right sides).
Install the two Metal Plate B parts (as shown in Figure B) using those screw holes.
6. Remove the two screws located on the lower left and lower right sides of the back of the machine.
Install the two Strutting pieces (plastic support pieces, as shown in Figure C) on either side.
7. Figure D shows the rear of the dryer. Install the plastic Air Outlet Adapter onto the rear exhaust vent at the bottom of the machine (as shown in Figure E).
8. Carefully lift the dryer. Hang the Metal Plate B parts (on the back of the machine) onto the corresponding hooks on the Metal Plate A parts (fixed to the wall).
The hooks on Metal Plate B should insert and connect with the hooks on Metal Plate A (as shown in Figure F).
9. Install a whistle to prevent the panels from slipping between the connected Metal Plate A and Metal Plate B parts (as shown in Figure G).
10.If you are using an extended vent hose, attach the hose connector to the air outlet adapter now (as shown in Figure H). Figure I shows the final installed state.
Figure E — Air Outlet Adapter
Metal Plate A
Metal Plate B
1
2
3
8 9
4
5
6
10 11 12
16 17 18
13 14 15
10
Installation Instructions
INSTALLATION REQUIREMENTS
The correct location is critical for the safe and efficient
operation of your vented dryer.
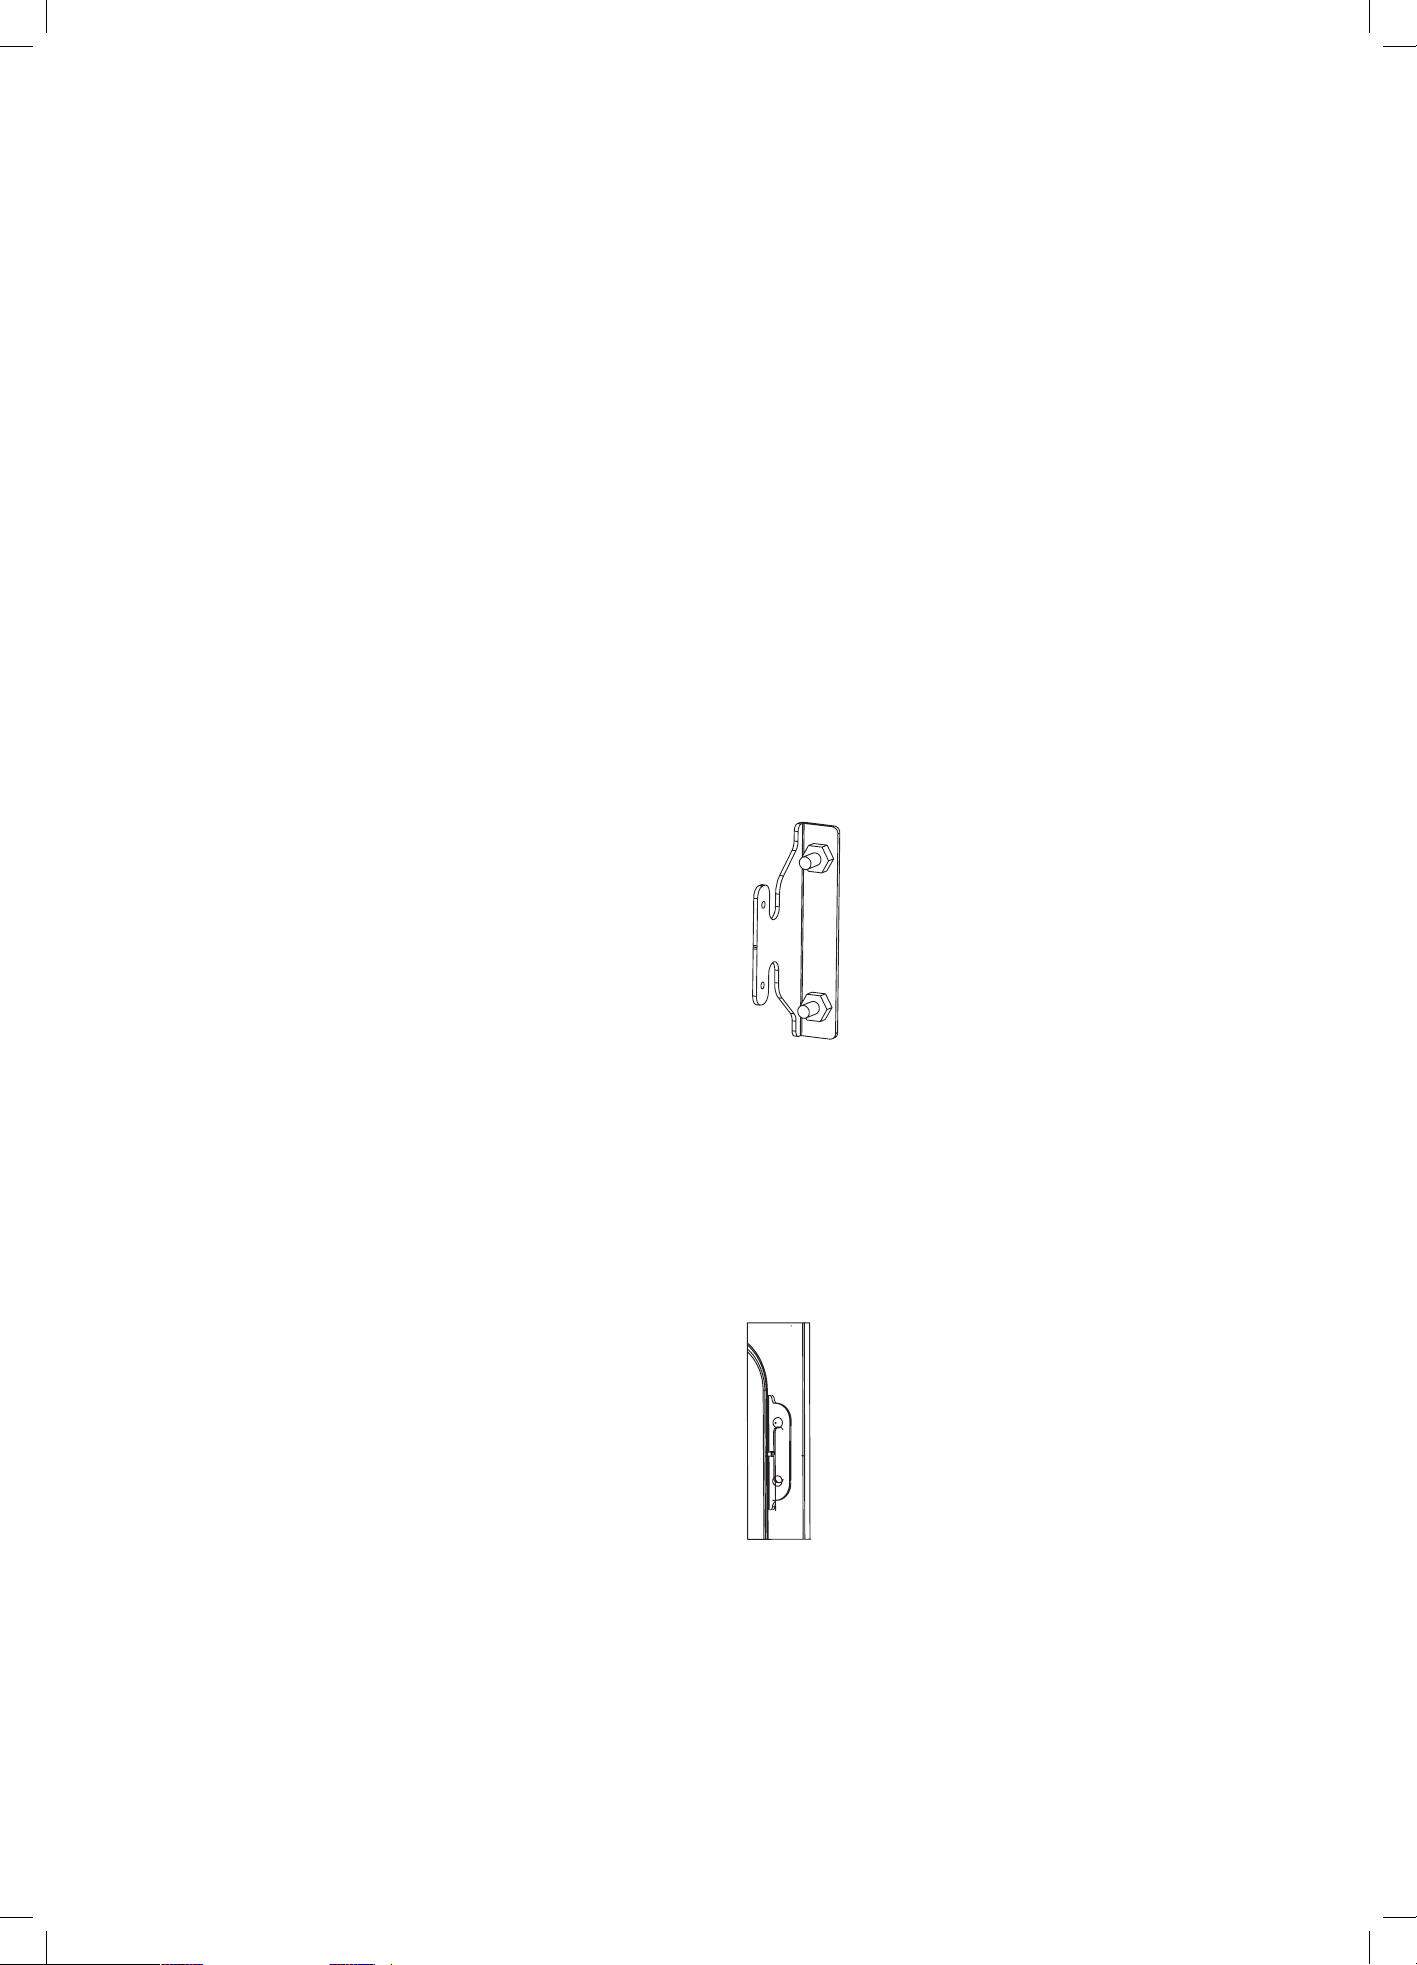
• Ventilation: The dryer must be installed in a well-
ventilated area. Do not install in an open environment or
where it is directly exposed to rain or weather.
• Clearance: Do not place the dryer near curtains or
drapes. Install the dryer with a minimum clearance of
10cm from the wall to allow space for the exhaust vent
installation.
• Conned Spaces: If installing in a small, closed room
(such as a bathroom), ensure there is a distance of at
least 1.5m in front of the dryer to allow for airflow.
• Obstructions: Keep the area around the dryer free of
obstacles to ensure proper
ventilation.
• Flammable Materials:
Do not install the dryer
near where petrol or other
flammable materials are
stored.
• > 10cm Clearance required
from wall
LEVELLING THE DRYER
• Ensure the dryer is placed on a solid, level surface.
• If the floor is uneven, check if the feet are adjustable.
If not, insert a stable metal or plastic shim (not supplied)
under the uneven foot to stabilise the dryer.
• WARNING! If the dryer is tilted more than 2 degrees,
it may operate unevenly, vibrate excessively, or stop
mid-cycle.
INSTALLING THE REAR EXHAUST VENT
• Step 1: Align the threaded end of the Vent Connector
with the air outlet on the back of the dryer.
• Step 2: Insert and rotate clockwise to tighten it firmly
(See Figure 4).
• Step 3: Connect the Flexible Vent Hose to the connector.
Extend the hose to a window or ventilation wall outlet
(See Figure 5 & 6).
Figure 4 Figure 5 Figure 6
EXHAUST AIR DISCHARGE METHODS
This vented dryer must be installed using one of the
exhaust air discharge methods below. The chosen method
will depend on the installation location and available
ventilation. Incorrect exhaust installation may result in poor
drying performance, excessive moisture, overheating, or
condensation.
Method 1 – Direct Exhaust to Room (Not Recommended)
No exhaust accessories are installed. Moist air is discharged
directly into the room near the machine or behind the
wall. This method is only suitable for large, well-ventilated
spaces and is not recommended, as it may cause increased
room humidity, condensation and reduced drying
efficiency.
Method 2 – Flexible Vent Hose Exhaust (Recommended)
Only the air outlet extension pipe (flexible vent hose) is
installed. A hole is made in the wall to discharge moist
air outdoors, or to a location at least 1 metre away from
the dryer. When drilling a hole in the wall, ensure the
approximate corresponding position of the dryer’s rear air
outlet is correctly identified before drilling.
Method 3 – Plastic Air Outlet Adapter Only
Only the plastic air outlet adapter is installed. This may be
placed on the ground or on another suitable platform.
When viewed from the rear of the dryer, the air outlet
direction must be → only.
For wall-mounted installations, the air outlet direction may
be →, ↘ or ↙ only. Incorrect orientation may restrict airflow.
Method 4 – Plastic Air Outlet Adapter + Connector +
Flexible Vent Hose (Most Recommended)
The plastic air outlet adapter and adapter connector must
be installed first. When viewed from the rear of the dryer,
the adapter direction must be → only.
By connecting the flexible vent hose, moist air can then be
discharged to any suitable direction, provided the outlet is
located more than 1 metre away from the dryer.
This is the most recommended installation method for
optimum drying performance and moisture control.
WARNING: EXHAUST AIR INSTALLATION
• Incorrect exhaust air installation may cause poor
drying performance, excessive moisture, condensation,
or overheating.
• Always install the exhaust system using one of the
approved methods described in this manual. Installation
issues caused by restricted or incorrect ventilation are
not covered by warranty.
11
Installation Instructions (Continued)
WALL MOUNTING (IF APPLICABLE)
IMPORTANT! We recommend that wall mounting should
only be performed by a qualified professional.
• The wall used for mounting must be solid and
structurally sound (e.g., brick, or timber-framed and
properly reinforced). Installing on an unsuitable wall
creates a security risk.
• The mounted dryer must still be placed in a location with
good ventilation and sheltered from rain.
• To ensure stability and prevent the machine from tilting
after it’s been attached, the installer must strictly follow
the separate positioning instructions.
• For the complete, detailed wall-mounting procedure,
please refer to the separate Wall Mounting and
Positioning Instructions provided with your machine.
WALL MOUNTING AND POSITIONING INSTRUCTIONS
Tip! The following are included in the Wall Mounting and
Positioning Instructions provided with your Vented Dryer.
IMPORTANT! Wall mounting must be performed
by a professional installer. Failure to do so may result
in safety hazards.
For assistance or to organise an authorised service agent
contact our After Sales Support by calling 1300 11 4357,
or by emailing support@residentiagroup.com.au.
• When attaching the Wall Mounting and Positioning
Instructions (Wall Mounting Guide), ensure they are
level. Incorrect alignment may cause the machine to sit
unevenly after installation.
• Choose a solid wall for installation; otherwise, there
is a risk of safety hazards
• The product must be installed on a wall in a
well-ventilated location, not outdoors or in an area
that is easily exposed to rain.
REQUIRED PARTS (ACCESSORIES LIST)
The following parts are required for wall mounting:
• Metal Plates A (Wall Bracket) × 2
• Metal Plates B (Dryer Bracket) × 2
• Strutting pieces (Plastic Support) × 2
• M6 Screw (Expansion Bolt) × 4
• Whistle (Split Pin/Locking Screw) × 2
• Screw × 2
STEP-BY-STEP INSTALLATION PROCEDURE
Part 1: Preparing the Wall (Wall Brackets)
1. Positioning the Template: Position the Wall Mounting
Installation Positioning Manual (template) on the desired
wall location. Affix the two self-adhesive strips on the
wall according to the instructions on the template.
Note: Use a spirit level to ensure the template is
perfectly horizontal before affixing it to avoid the
machine tilting after installation.
2. Drill Holes: Drill holes at the four circular points
indicated on both ends of the template.
3. Install Bolts: Peel off the template and install the M6
expansion bolts into the four holes.
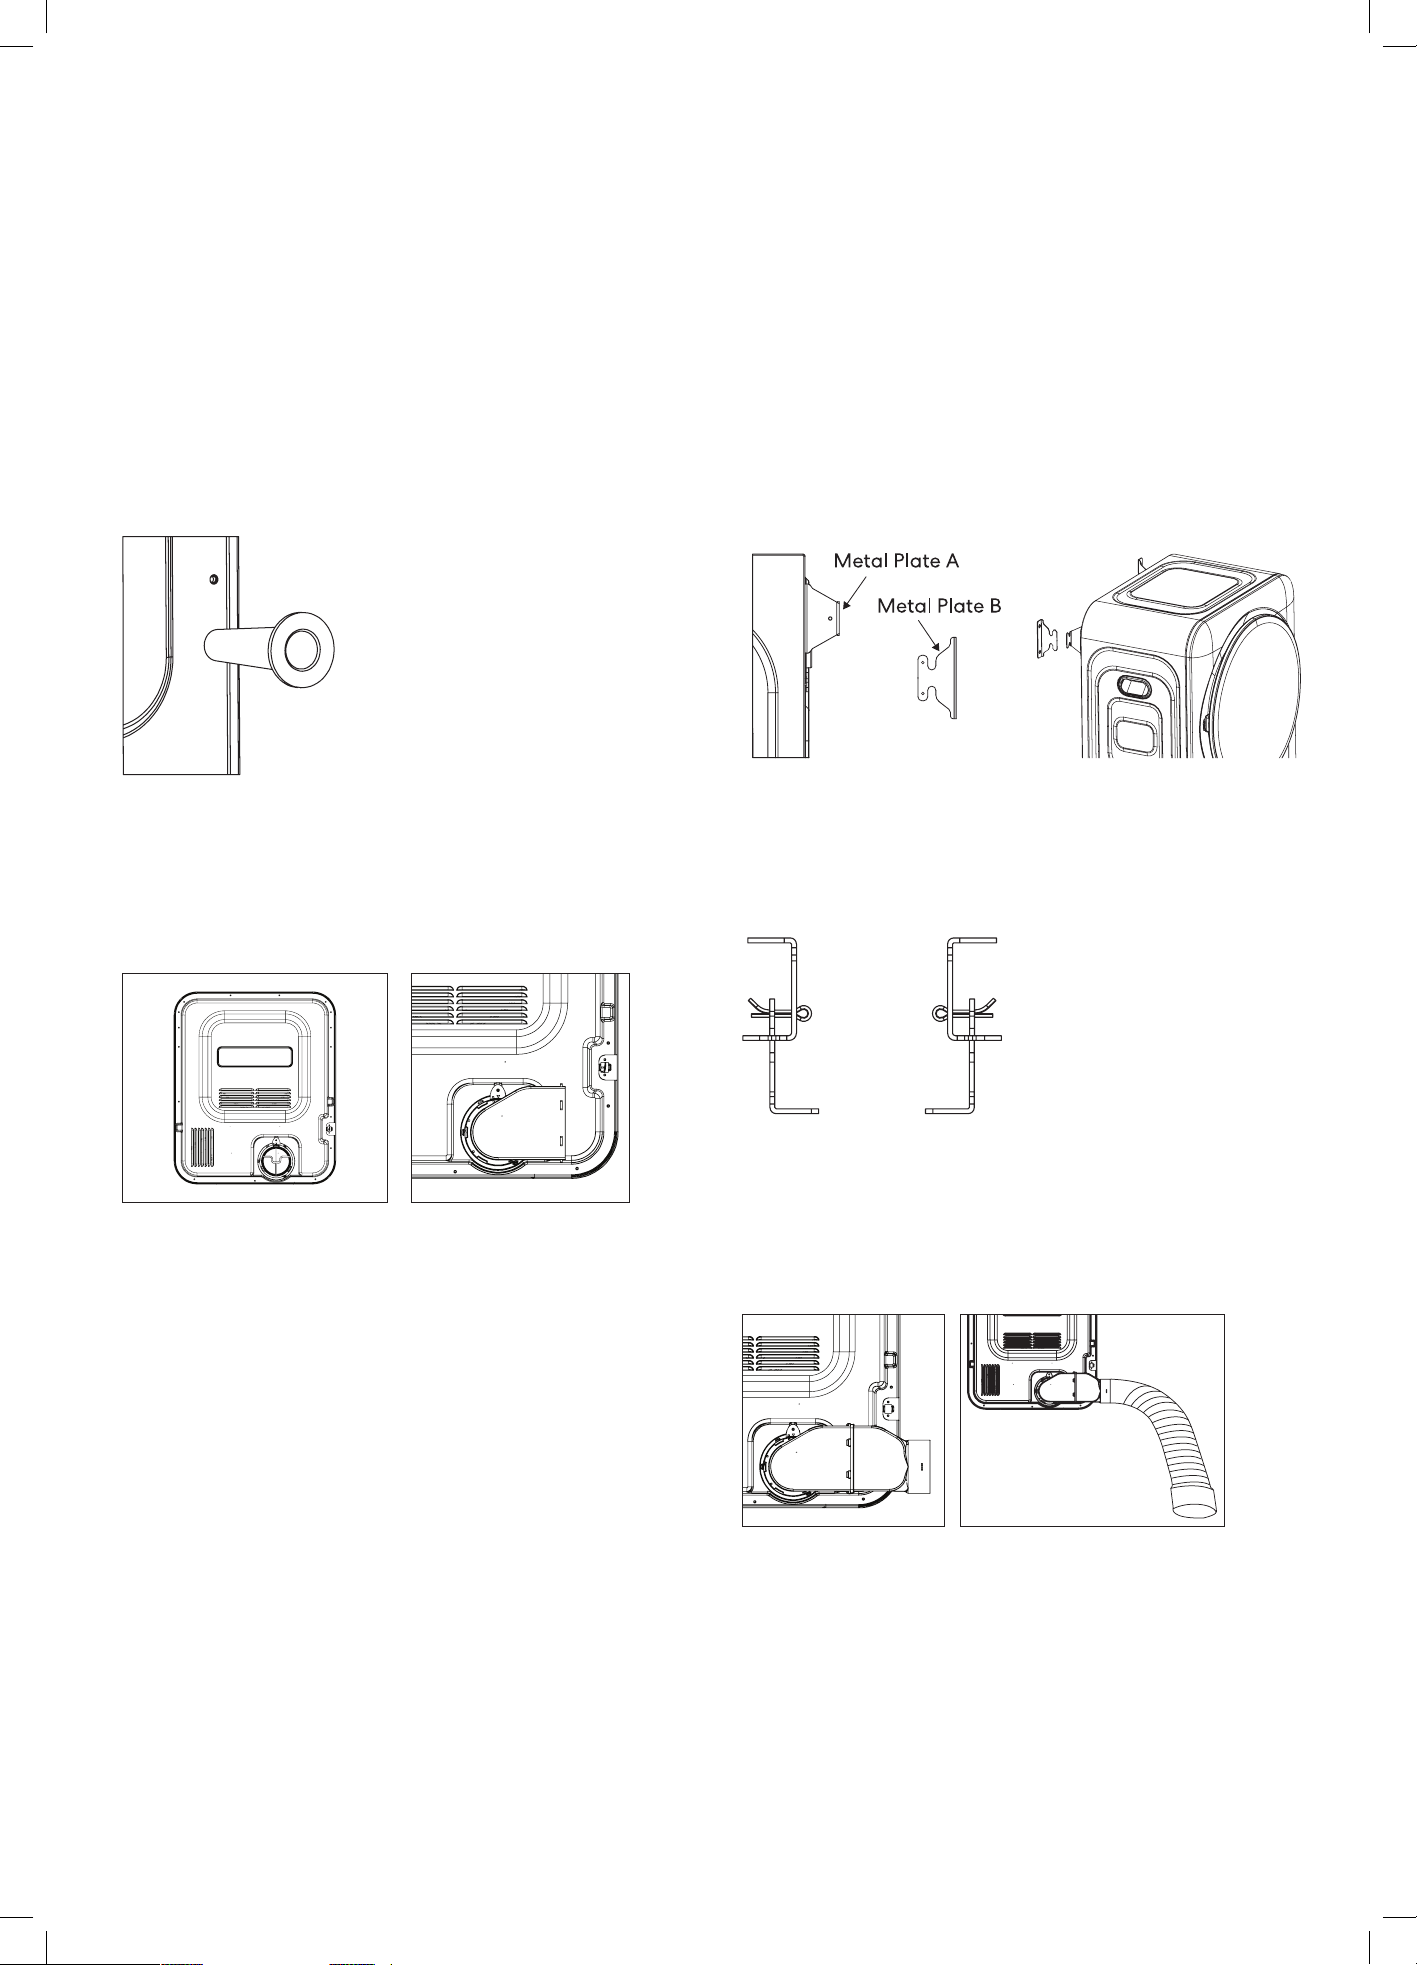
4. Attach Metal Plate A: Attach the two Metal Plate
A parts (as shown in Figure A) to the wall using the
installed bolts.
Figure A — Metal Plate A
Part 2: Preparing the Dryer (Dryer Brackets)
1. Install Metal Plate B (Top): Remove the two existing
screws on the back of the machine (located on the upper
left and upper right sides). Install the two Metal Plate B
parts (as shown in Figure B) using those screw holes.
Figure B — Metal Plate B
12
Installation Instructions (Continued)
2. Install Supports (Bottom): Remove the two screws
located on the lower left and lower right sides of the
back of the machine. Install the two Strutting pieces
(plastic support pieces, as shown in Figure C) on
either side.
Note: These spacers ensure the machine hangs parallel
to the wall.
Figure C — Strutting Pieces
3. Attach the Air Outlet Adapter (Exhaust Adapter):
Install the plastic air outlet adapter onto the rear exhaust
vent at the bottom of the machine as shown in Figure D.
Figure D — Rear of dryer + Air Outlet Adapter installed
IMPORTANT: AIR OUTLET DIRECTION
When installing the plastic air outlet adapter:
• When viewed from the rear of the dryer, the outlet
direction must be → only for non-wall-mounted
installations.
• For wall-mounted installations, the outlet direction may
be →, ↘ or ↙ only. Incorrect orientation may restrict
airflow and reduce drying performance.
Part 3: Final Mounting and Securing
1. Hanging the Dryer: Carefully lift the dryer. Hang the
Metal Plate B parts (on the back of the machine) onto
the corresponding hooks on the Metal Plate A parts
(fixed to the wall). The hooks on Metal Plate B should
insert and connect with the hooks on Metal Plate A (as
shown in Figure E).
Figure E — Metal Plates A & B
2. Securing the Connection: Install a whistle to prevent
the panels from slipping between the connected Metal
Plate A and Metal Plate B parts (as shown in Figure F).
Figure F — Whistles
3. Connect Vent Hose (Optional): If you are using an
extended vent hose, attach the hose connector to the air
outlet adapter now. (See Figure G).
• When using a flexible vent hose, ensure the moist air
is discharged outdoors or to a location at least 1 metre
away from the dryer.
• Do not crush, excessively bend, or restrict the vent hose,
as this will reduce airflow and drying efficiency.

13
POWER SUPPLY AND GROUNDING
• This appliance operates on 220-240V AC, 50Hz.
• WARNING: This appliance must be Earthed.
• The power point must be accessible after installation.
• Do not use an extension cord or double adapter.
Connect directly to a wall power point.
• * In the course of using the dryer, always pay attention
to the safety contents and use common sense to ensure
safe operation. The manufacturer is not responsible for
any loss caused by improper use or disregard of safety
precautions.
ELECTRICAL CONNECTION
• WARNING: Do not modify the plug. If the power cord is
damaged, it must be replaced by the manufacturer, its
service agent, or similarly qualified persons in order to
avoid a hazard.
• This product belongs to Class I electrical appliances. Pay
careful attention to electrical safety when using!
• Reliable grounding is mandatory for the power supply.
The ground wires of electric wires must be buried in the
earth and must not be connected to water pipes, gas
pipelines, or other public facilities.
• The ground wires and zero wires of the electric power
supply must not be separated, and the two live wires
cannot be connected together.
• Special sockets (power outlets) must be used separately.
Sockets must be qualified products that comply with all
compulsory national certifications and must be capable
of carrying more than 10A of current.
• For your safety and the safety of your family, do not use
the machine if the electricity requirements are not met.
This is strictly prohibited.
ADDITIONAL ELECTRICAL ATTENTIONS:
1. To prevent accidents during installation and use, and
to ensure electrical safety, it is necessary for personnel
with electrical knowledge to install sockets and correctly
connect the baseline.
2. It is forbidden to connect the ground wire with the fire
wire (live) or zero wire (neutral). Otherwise, the shell
(casing) of the dryer will become charged (live), which
can easily lead to an electric shock.
3. If the power supply is found to be damaged, it must be
replaced by qualified professionals.
4. When the dryer is no longer working, it is best to remove
the power plug from the socket to ensure absolute
safety.
WORKING ENVIRONMENT AND INSTALLATION
• It is forbidden to store flammable or explosive materials
around the dryer. Do not use flammable sprays near the
dryer when it is running.
• If gas or flammable gas leaks occur, do not plug or
unplug the power supply and do not turn the machine
on or off. Ventilate the area immediately.
• The dryer should not be installed in an open air or humid
environment. If the machine is accidentally drenched or
there is a water leakage incident, it must be ventilated
and fully dried (aired) before ensuring the electrical
components are safe for use.
• Do not place items on top of the dryer, especially hot or
heavy items (e.g., hot pots or water vessels).
• For the rear type air outlet, it is forbidden to connect the
extension tube of the dryer to a flue to prevent smoke
and dust from being refilled (drawn back in).
• Be careful when the dryer is working, as the back cover
board will be hot when steam is exhausted. For safety
reasons, do not allow unattended children or physically
disabled persons to use this machine.
Precautions Before Use

14
MATTERS NEED ATTENTION
(PROHIBITIONS AND USAGE)
• Do not unplug the power cord or switch the power when
the dryer is running. This can damage the components
or lead to electric shock if done with wet hands.
• Do not pull the power cord directly. When not in use
or cleaning, ensure to unplug the power cord first by
holding the plug head.
• WARNING! Risk of fire and explosion: Do not dry clothes
with flammable detergents, dry cleaning solvents, spot
removers, acetone, cooking oil, gasoline, kerosene,
alcohol, turpentine, wax, and wax remover, etc.
• Do not put dripping wet clothes in the dryer. Clothes
must be adequately pre-dehydrated (spun dry) before
placement to prevent rust and damage to the dryer and
other hazards caused by water dropping onto electrical
parts.
• WARNING! Can cause damage or fire: Do not dry items
with rubber or objects similar to elastic material
(e.g., raincoats, bicycle covers, etc.).
• WARNING! Risk of explosion or fire: Do not store
cigarettes, lighters, dry ice, gasoline, and other
flammable or explosive materials in the dryer. |
• Do not use the machine if the items are made of fabrics
that are not allowed to dry in a dryer or if they have
the above warning marks (e.g., Do not dry in rollers,
Drip-dry, Flat dry, Dry in the shade). Follow clothing care
labels strictly.
• CAUTION! Be cautious of steam/hot air escaping upon
opening: It is advised not to open the door before the
end of the dryer program to avoid burns.
• Do not disassemble, repair, or modify the machine
yourself. This can be dangerous and will void your
warranty. Contact qualified professionals only. For
assistance or to organise an authorised service agent
contact our After Sales Support by calling 1300 11 4357,
or by emailing support@residentiagroup.com.au.
• WARNING! Risk of electric shock: Do not touch or use
the dryer when your hands or feet are wet, or when you
are barefoot.
MAINTENANCE AND SETUP CAUTION
1. If a grounding leakage (ground protection) circuit
breaker is required, the symbol must be included on
the display. This symbol ensures that the power plug
matches the socket requirements.
2. For safety, only use the original parts and accessories
supplied by the manufacturer.
3. Do not place the machine on a carpet or foam padding.
This will cause difficulty in heat dissipation and may
damage the machine or other objects.
4. Do not use the dryer on a table above the ground to
prevent the dryer from falling.
5. Clean the filter before and after each use. The dryer and
the surrounding cotton wool (lint) should be regularly
cleaned as well.
Precautions Before Use (Continued)

15
Operating Your Vented Dryer
QUICK START GUIDE
IMPORTANT! Before operating the machine, ensure it has
been installed correctly according to the full installation
instructions.
DRY CLOTHES PREPARATION
Follow these steps to prepare your dryer for a cycle:
• Plug in the power cord.
• Load the clothes.
• Close the door.
STARTING A DRYING CYCLE
1. Press the Power button to turn on the dryer
2. Turn the Program Selector dial to choose a Program
3. Start the machine (Press the Start/Pause button).
PAUSING THE DRYING CYCLE
Press to Start/Pause button to pause the drying cycle.
Auto-O: In Pause mode, if no key is pressed for 10
minutes, the machine will automatically shut down.
END OF DRYING CYCLE
When the drying process is complete, the machine will
provide an audible alert.
Follow these steps after the cycle ends:
• Open the door and take out the clothes.
• *Clean up the filter. (Refer to the Cleaning and
Maintenance section for detailed instructions).
• Turn off the power supply.
Tip: If your power outlet has a separate switch, you may
turn off the power supply by pressing this switch.
IMPORTANT SAFETY & USAGE ATTENTION
For safe and effective operation, please observe the
following points:
• This dryer is designed exclusively for household use.
Always set up and use the procedure strictly according
to the guidelines in this manual.
• Do not overload the dryer. Excessive clothing may
become wedged between the drum and the inspection
window seal, potentially causing damage to the
machine.
• Do not place dripping wet items into the dryer. This
wastes energy and risks damaging the dryer by allowing
water to drip onto electrical components, which could
lead to a fire hazard.
• Do not dry fabrics containing foam rubber or similar
materials (such as sponge-like material).
• Easily damaged fine fabrics (e.g., silk, man-made fabrics,
etc.) should not be tumble dried to prevent wrinkling
and damage.
16
Operating Your Vented Dryer (Continued)
PREPARATIONS BEFORE DRYING
Before starting any drying cycle, follow these preparation
steps to ensure efficient operation and protect your
garments:
GENERAL PREPARATIONS
1. Clean the lter: Always clean the inner barrel (drum)
and the lint filter before each use to maximise drying
efficiency.
2. Power Supply: Ensure the machine is correctly
connected to the AC power supply.
3. Clothing Treatment & Sorting:
• Sort clothes for drying according to their type: cotton
products, chemical fibre fabrics, and wool fabrics.
• Empty all pockets to prevent damage to the dryer and
to avoid unravelling or damage to decorative items
during the cycle.
• Silk Items: When drying delicate or scattered silk
garments, place them inside a mesh laundry bag and
seal the bag before drying.
• Large Items: Big items, such as sheets and
tablecloths, should be placed loosely inside the drum.
Do not fold them.
• Buttons/Zippers: Fasten buttons and hooks, and
close any seams, zippers, and drawstrings to prevent
them from catching on other items or the drum.
• Turning Garments: Turn garments with prints,
embellishments, or heavy seams (like shirts)
inside out.
LOADING THE CLOTHES
1. Open the door.
2. Shake out the clothes to separate them.
3. Place the clothes in the dryer.
4. Finally, close the door firmly.
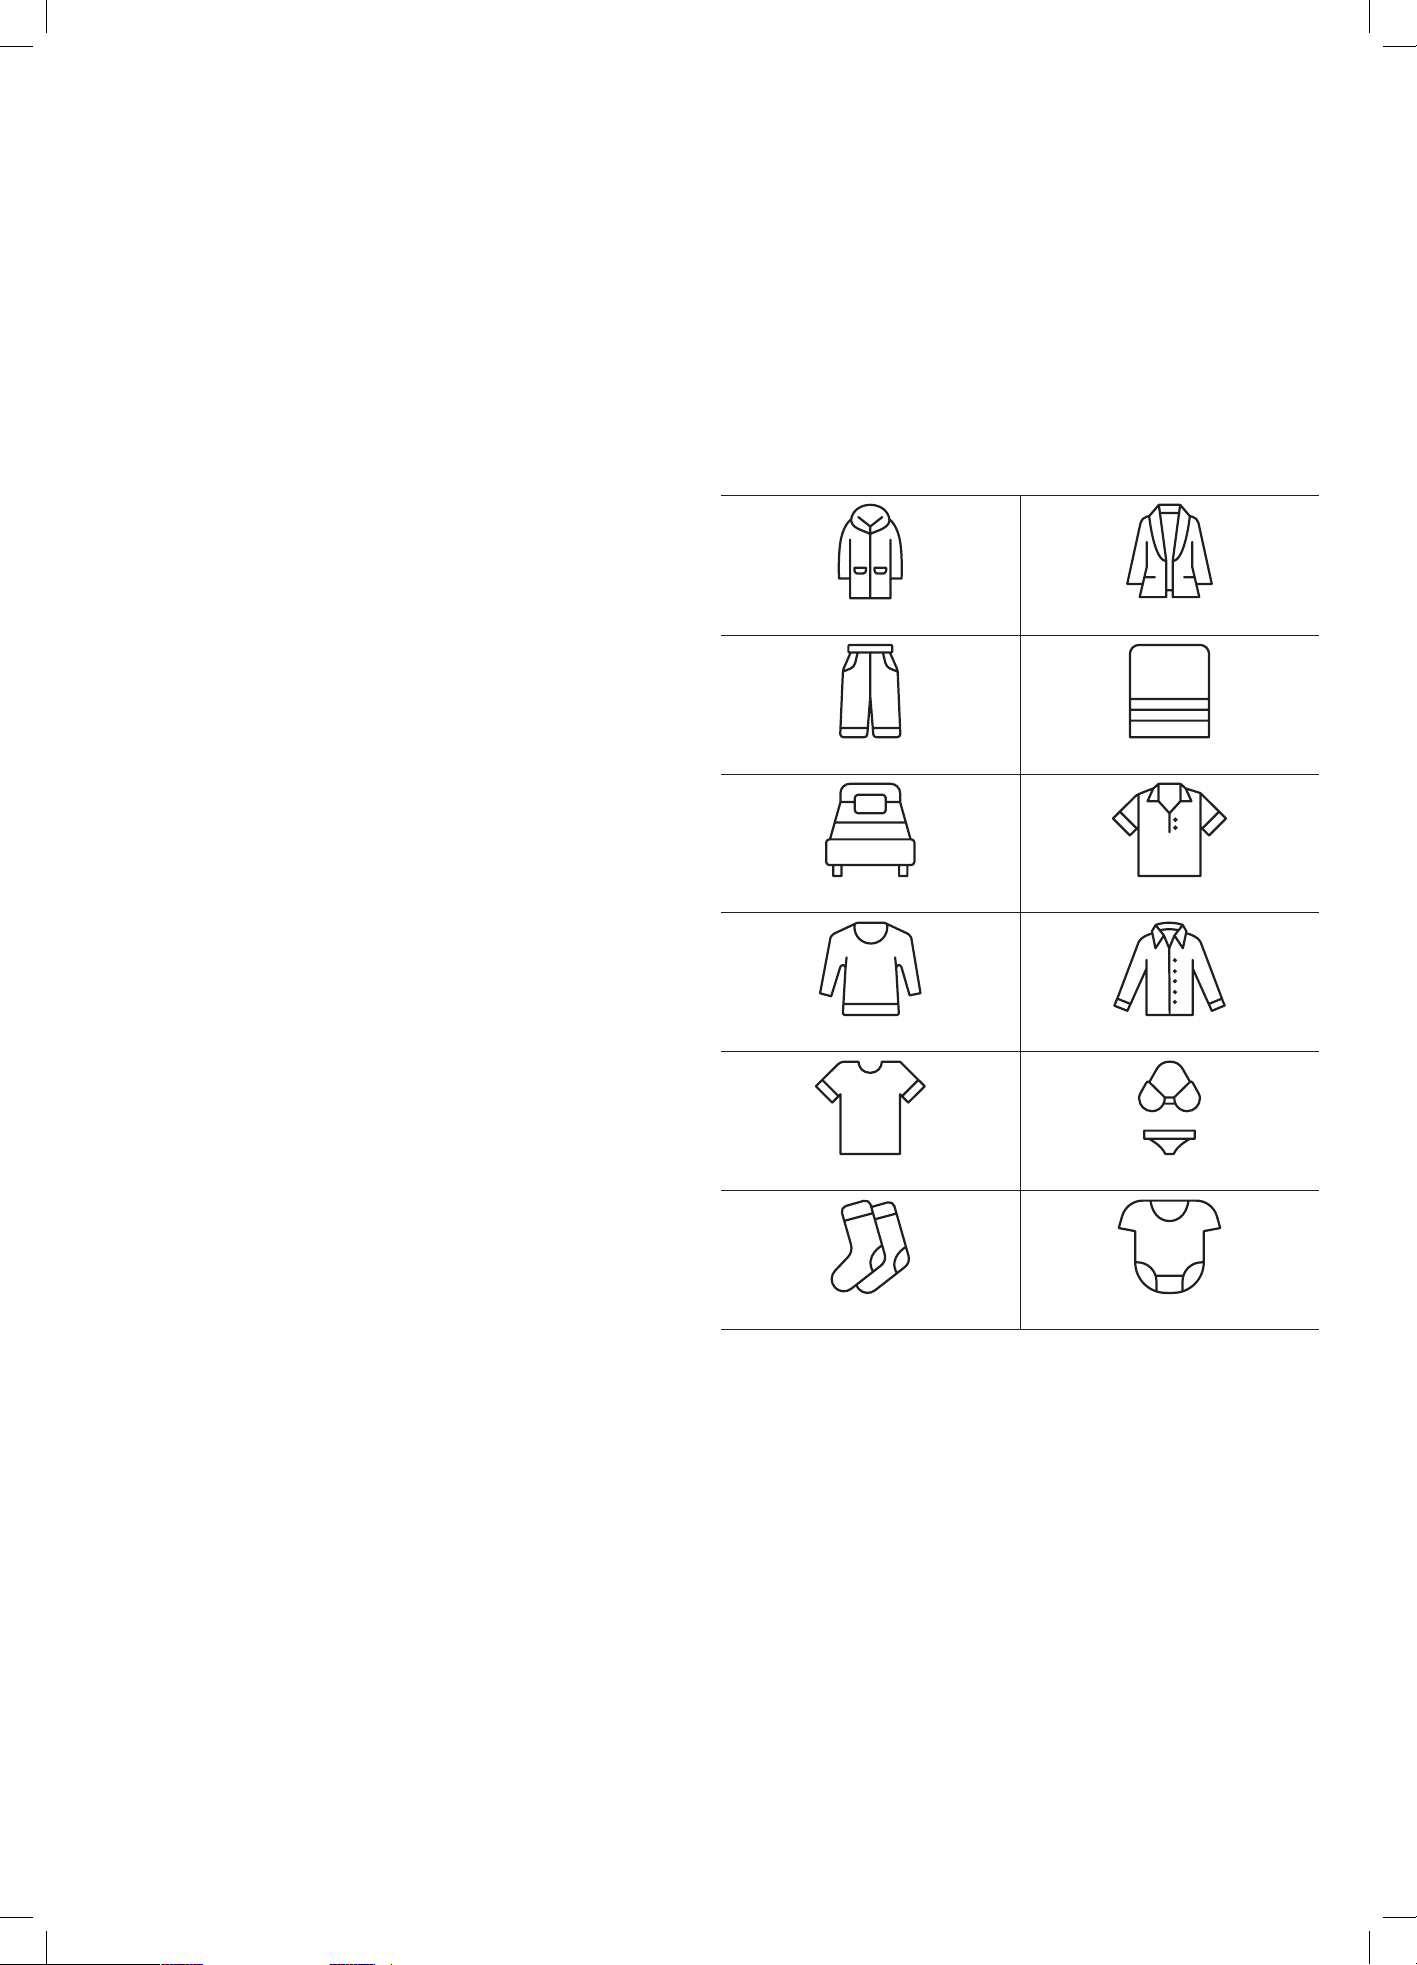
REFERENCE WEIGHTS OF COMMON CLOTHES
The following table provides reference weights for
common dry garments to help prevent overloading the
machine:
Blended Jacket (800g)
Jacket (800g)
Jeans (500g) Towel Quilt (900g)
Single Bed Sheet (600g) Work Clothes (120g)
Sleepwear (200g) Shirt (300g)
T-shirt (180g) Underwear (70g)
Socks (30g) Baby Clothes (100g)
17
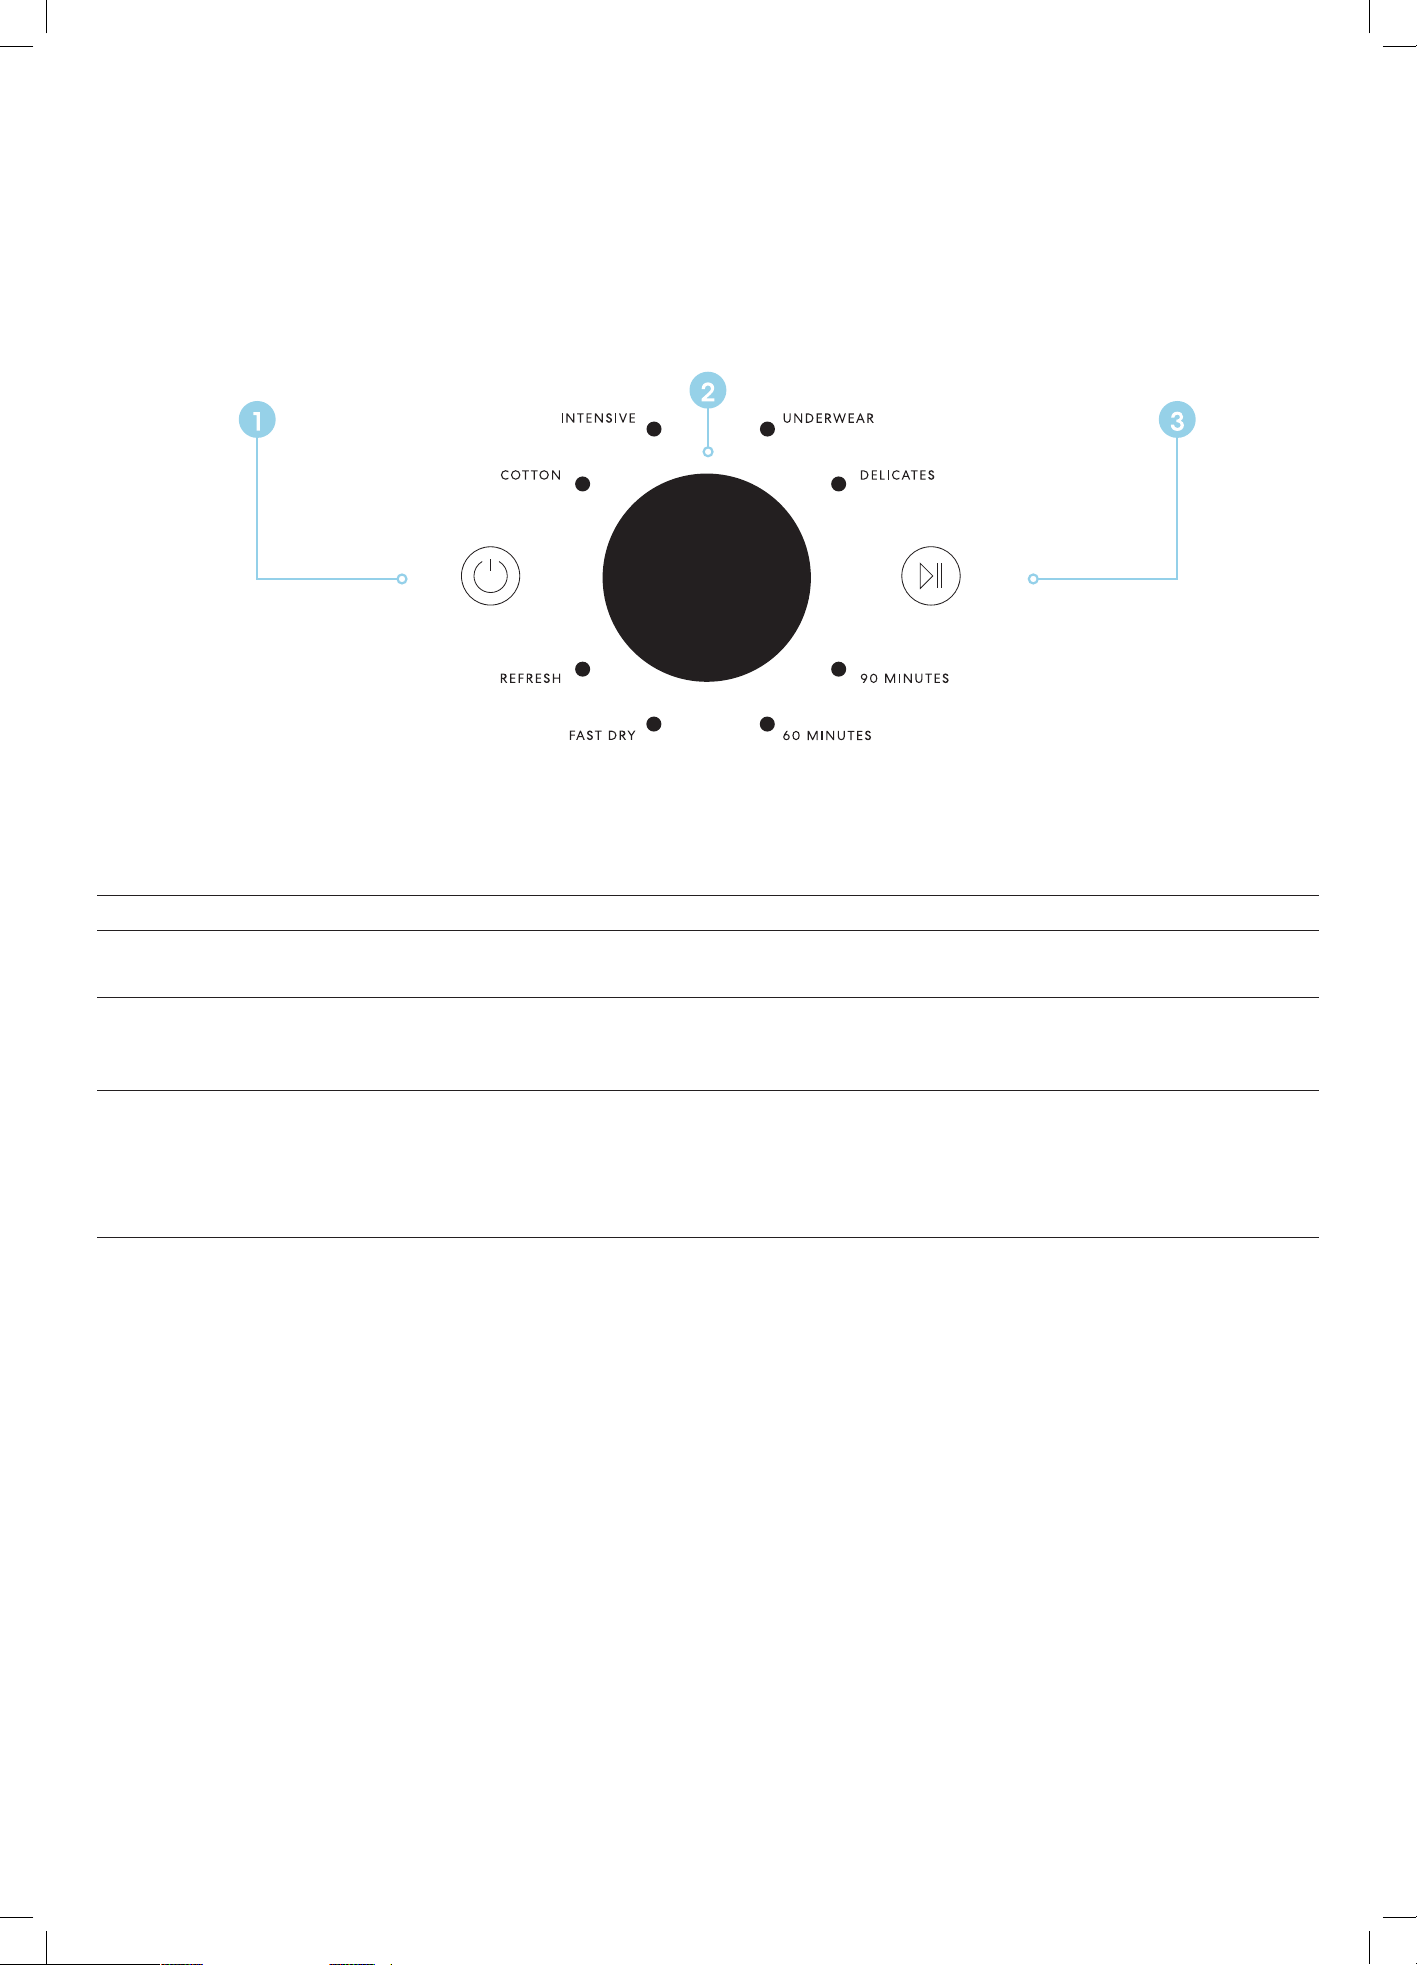
CONTROL PANEL INTRODUCTION
Figure 4 — The control panel for your Vented Dryer
The dryer’s control panel consists of three main elements:
Number Feature Function
1 On / Off Power Button Press and hold this button for 0.5 seconds to turn the machine on or off.
The machine will emit a power-on or power-off tone.
2 Program Selector Dial Select one of the 8 available drying programs.
When the knob is turned, a prompt sound will be emitted and
the corresponding program LED indicator light will illuminate.
3 Start / Pause Button Used to Start or temporarily Pause the drying process.
Each press will sound a tone and alternate between the start and
pause functions.
Note: In pause mode, if no button is pressed for 10 minutes, the machine will
automatically shut down.
ATTENTION (IMPORTANT NOTES):
• The operating times and procedures listed on the ‘Drying Programs and Operating Parameters’ table are specific to this
machine model and may vary from other dryers.
• The actual drying time will be affected by external factors, including the room temperature, humidity, and the type
and weight of the load.
• Always select a program that is appropriate for the clothing’s care label requirements.
• The machine will sound a reminder after the drying process is complete to prompt you to remove the clothes promptly.
• For safety reasons, always clean the lint filter and unplug the dryer after each use.
TIP: If the load of clothes to be dried is less than 0.5kg, it is recommended to use the Fast Dry program.
Operating Your Vented Dryer (Continued)

18
HOW TO PERFORM A DRYING CYCLE
Follow these five simple steps to successfully complete a drying cycle:
STEP 1: PREPARE THE CLOTHES AND MACHINE
• Check Power: Ensure the machine’s power cord is securely plugged into the wall socket.
• Sort and Prepare: Sort your laundry by fabric type (e.g., cotton, synthetics). Empty all pockets, close zippers and
buttons, and turn garments inside out as necessary.
• Clean Filter: Always ensure the lint filter is clean before loading the clothes to maintain drying efficiency.
• Load Clothes: Open the door, shake out the clothes, place them loosely in the drum, and firmly close the door.
STEP 2: TURN ON THE DRYER
• Press and hold the Power button for 0.5 seconds until you hear the power-on tone.
The machine will now be in standby mode.
STEP 3: SELECT THE DRYING PROGRAM
• Turn the Program Selector Dial to choose the desired drying cycle.
• As you turn the dial, the corresponding program’s LED indicator light will illuminate.
• Sensor Drying Programs (Cotton, Intensive, Underwear & Delicates): Select these for sensor-based drying.
• Fixed-Time Programs (Refresh, Fast Dry, 60 Minutes & 90 Minutes): Select these when you need a specific,
non-sensor-controlled drying time.
STEP 4: START THE CYCLE
• Press the Start/Pause button once to begin the drying cycle. You will hear a confirmation tone.
• The machine will now begin tumbling and heating.
STEP 5: END OF CYCLE AND UNLOADING
• Cycle Completion: When the drying process is finished, the machine will provide an audible reminder.
• Unload Clothes: Open the door and immediately remove the dried clothes to minimise wrinkling.
• Clean Filter: Once the clothes are removed, clean the filter again to prepare for the next cycle.
• Power Down: For safety, press the Power button to turn the machine off, and then unplug the power cord from the
wall socket. If the power outlet has a separate switch, turn the power off there.
Operating Your Vented Dryer (Continued)
19
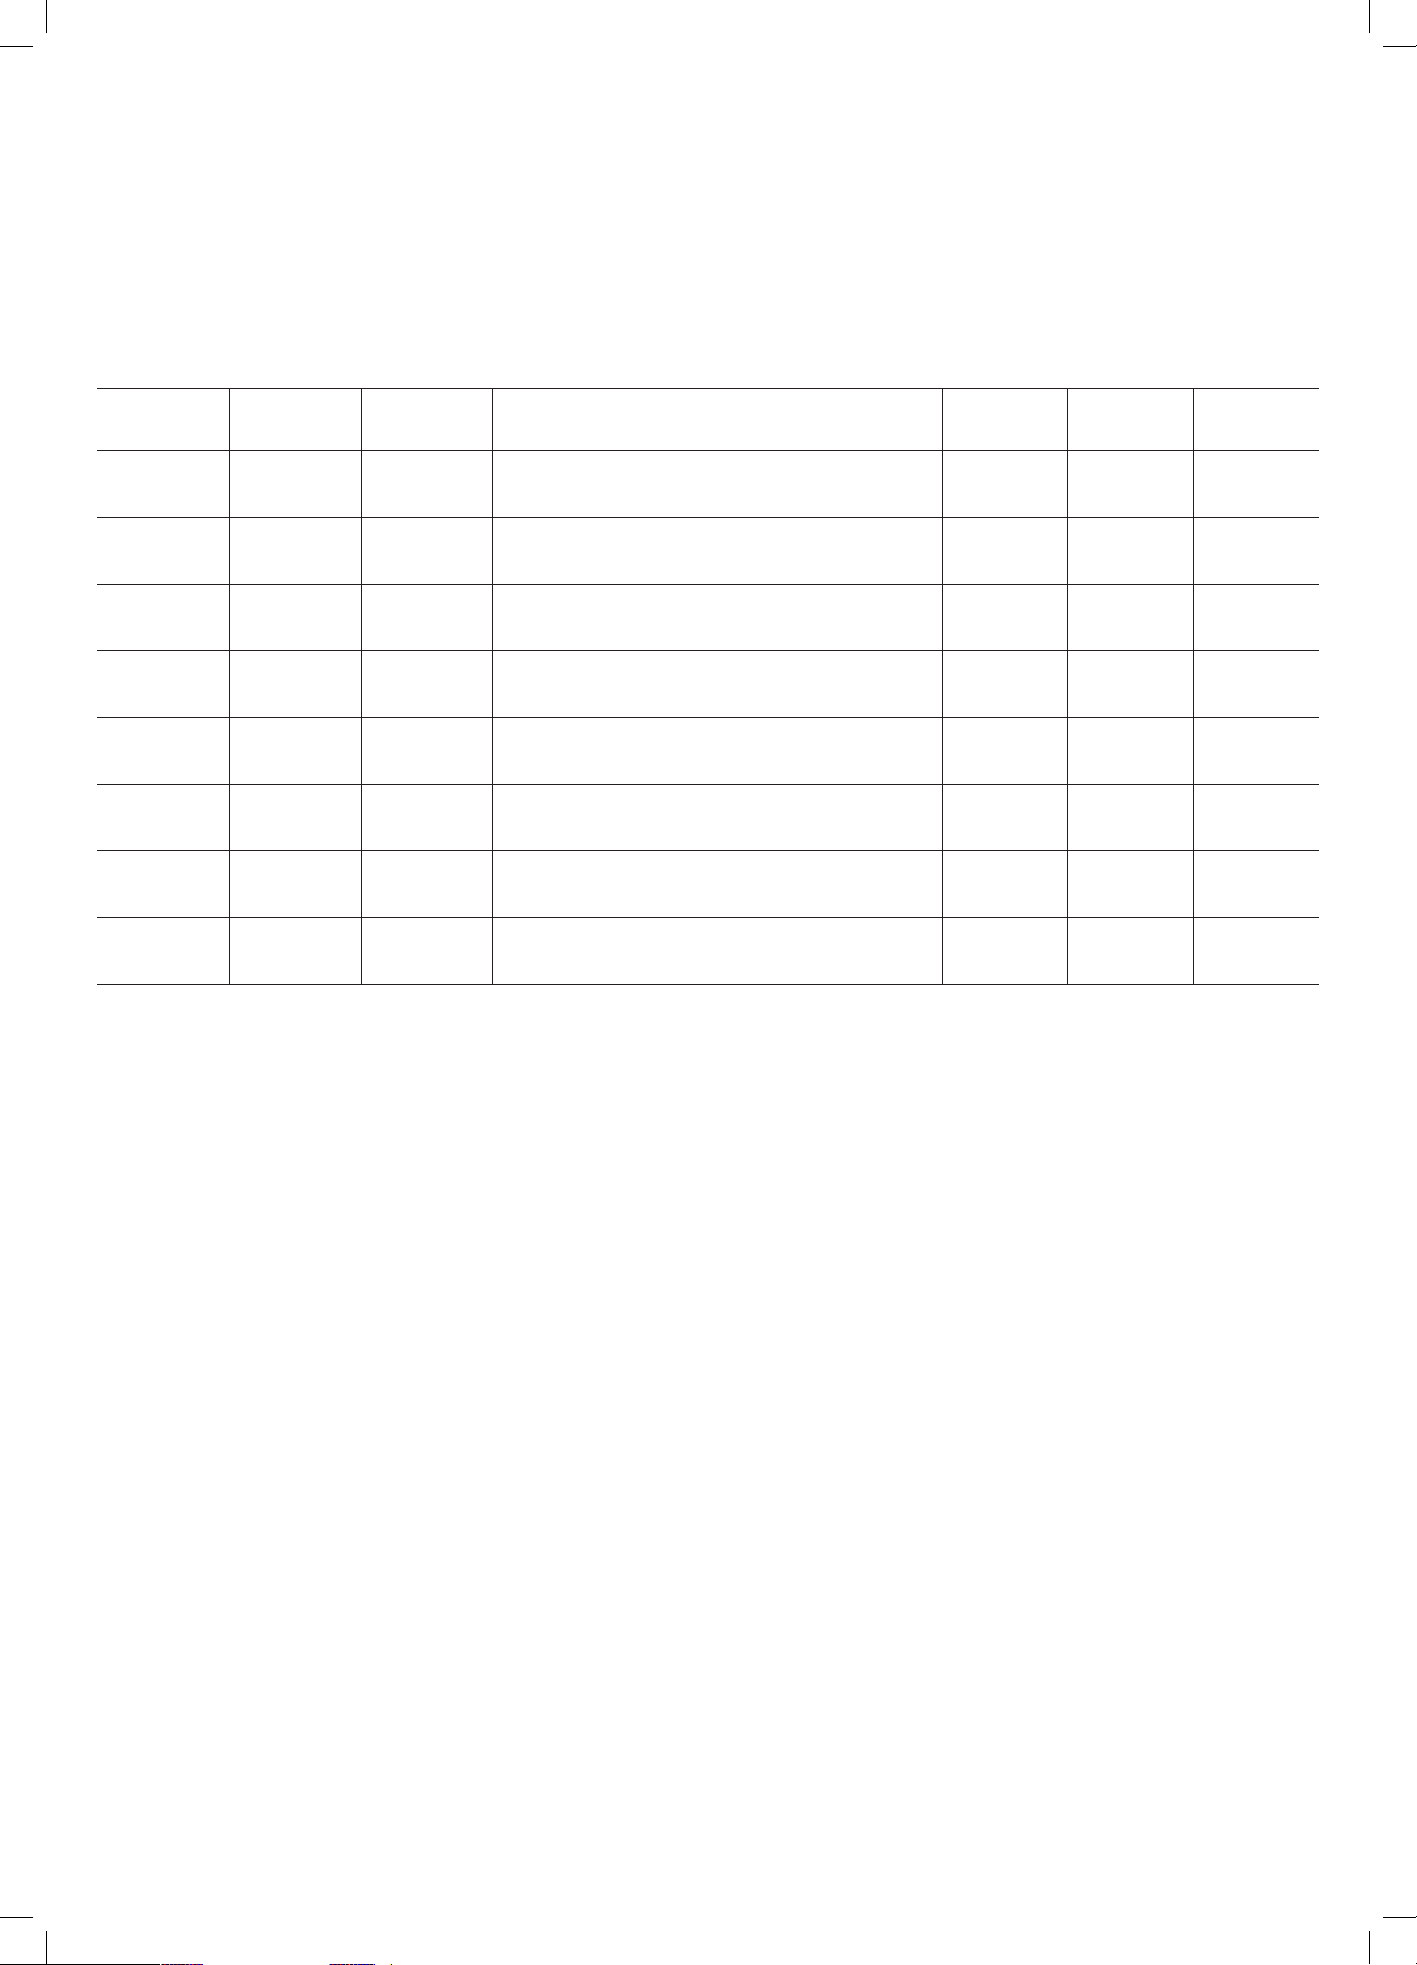
DRYING PROGRAMS AND OPERATING PARAMETERS
Program Max
Capacity
Type Laundry Recommendation Dry Time Cooling
Cycle
Dryness
Level
Cotton 5.5kg Sensor
Drying
Everyday cotton garments, linens,
and durable items.
— 5 Minutes
+
Standard
Intensive 3.5kg Sensor
Drying
Towels, linen and thick sheets requiring
maximum dryness.
— 5 Minutes
+
Extra Dry
Underwear 2.0kg Sensor
Drying
Gentle heat for undergarments. — 5+5
Minutes
Extra Dry
Delicates 2.0kg Sensor
Drying
Low heat for lace, lingerie and heat-
sensitive items needing gentle care.
— 5+5
Minutes
Standard
Refresh 2.5kg Fixed Time Removing minor odours and freshening
worn-but-clean garments.
20
Minutes
5 Minutes —
Fast Dry 0.5kg Fixed Time Quick dry for small loads or slightly damp
items and accessories.
30
Minutes
5 Minutes —
60
Minutes
1.5kg Fixed Time Custom drying for moderately damp
items.
60
Minutes
5 Minutes —
90
Minutes
2.0kg Fixed Time Custom drying for heavier or denser items
that require extended time.
90
Minutes
5 Minutes —
Notes:
• Best Drying Results: For optimal drying performance, load the dryer to approximately 60% of its maximum capacity.
• Smart Cooling (5 Minutes +): The appliance runs an initial 5-minute cooling cycle. A temperature sensor monitors the
internal heat and automatically adjusts the cooling duration, ending the cycle when a safe temperature is reached. This
helps reduce creasing and ensures garments are safe to handle.
• Sensor Drying: Programs marked ‘Sensor Drying’ use moisture sensors to detect the load’s dryness.
Time is an estimate until the sensor level is met.
• Dry Time (min): ‘–’ indicates the time is variable and determined by the sensor.
• Dryness Level: ‘Standard’ is ready for ironing or folding; ‘Extra Dry’ is extra dry.
• Refresh Program: The Refresh program is designed for dry garments only. Do not use this program with wet or damp
clothing, as it is not intended for drying.
OPERATIONAL DETAILS
• Sensor Drying (Auto): If clothes are still damp after the cycle, the machine may automatically extend the time.
• Cooling Procedure: The heating element turns off 5-10 minutes before the end of the cycle, but the drum continues to
tumble. Do not stop the dryer before the cooling cycle is finished unless you quickly remove all laundry and spread it
out to dissipate heat.
• Anti-Crease: If clothes are not removed within 30 minutes after the cycle ends, the drum will rotate for 10 seconds
every 5 minutes to prevent wrinkles.
• Motor Cycles:
Drying: Motor runs in 6-minute reversible cycles.
Cooling: Motor runs in 5-minute reversible cycles.
SAFETY REMINDERS:
• Drying time is affected by ambient temperature, humidity, and load size.
• Always unplug the appliance after use.
Operating Your Vented Dryer (Continued)
20
By ensuring proper cleaning and maintenance of your Vented Dryer, you can ensure that it will have a long and fault free
operation.
WARNING! To avoid an electric shock, always unplug your dryer before cleaning.
CLEAN AFTER EVERY USE:
• Lint build-up on the filter mesh will slow down air circulation and increase the drying time.
• WARNING! FIRE DANGER: Failure to clean the filter after every use allows flammable lint to accumulate,
creating a serious fire hazard.
• The filter must be cleaned after every single use to ensure efficiency and safety.
CLEANING THE FILTER
• CAUTION! Always unplug the appliance or switch it off at the wall socket before you start cleaning.
• Open the dryer door and remove the filter, located within the door opening (refer to Figure 1 within this manual).
• Gently remove the lint (or ‘fluff’) from the filter mesh. You can use a damp, well-wrung cloth or simply use your hands.
• Washing the Filter (If Necessary): If you’ve used a fabric softener, a waxy residue might build up on the filter. If this
happens: Remove the filter and wash it in warm, soapy water and rinse it thoroughly.
INSTALLING THE FILTER:
• If you’ve cleaned the filter with a damp cloth or washed it in water, it must be completely dry before you put it back
into the dryer.
• Once dry, insert the filter back into the dryer door opening.
• IMPORTANT! When cleaning, do not press hard on the mesh or ‘screen’ of the filter, as this can easily damage it.
• Once dry, re-fit the lint filter into the door opening.
IMPORTANT! Clean the filter after each use and must be installed while in use.
CLEANING THE INNER DRUM
Cleaning the Surfaces:
• Use a soft damp cloth to wipe the inner drum and cabinet.
• Ensure that the cloth is only slightly damp and never use excessive amounts of water.
• Do not use scouring pads or other abrasives as these will cause damage to your dryer.
• Do not use alcohol wipes or harsh cleaning chemicals..
• Use a mild, neutral detergent for cleaning.
• Do not rinse the dryer directly with water.
• Do not use volatile materials like thinner, petrol (gasoline), or alcohol for cleaning, as these can damage the surfaces.
IMPORTANT! After cleaning the interior drum, leave the dryer door open to allow the drum to dry completely.
Cleaning and Maintenance
21
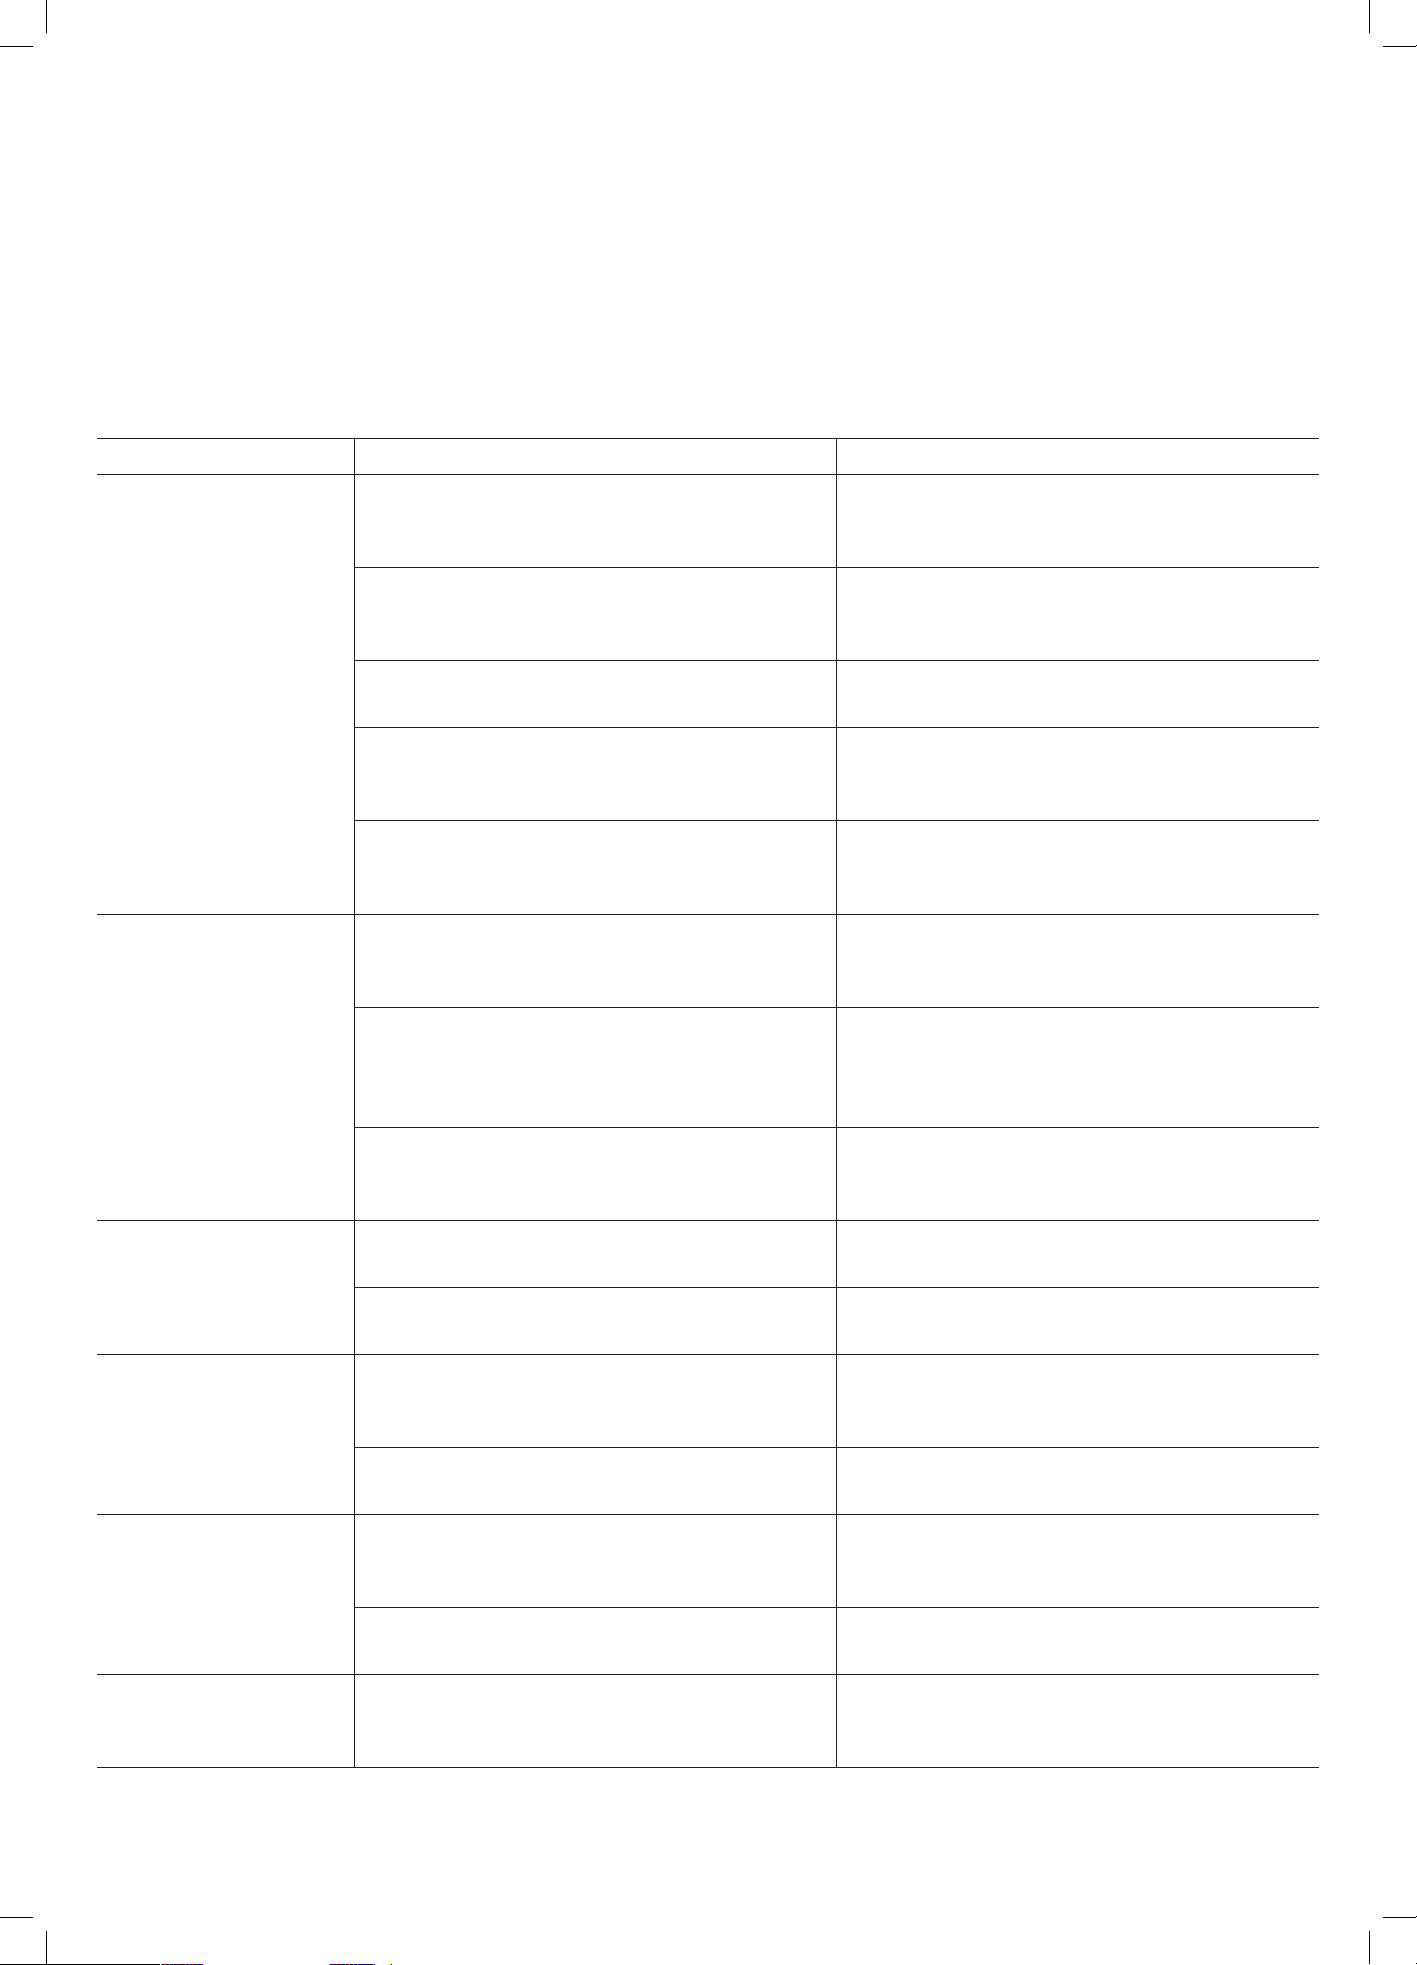
BASIC TROUBLESHOOTING
Check the points listed here before you call for help, and make sure that you have followed the Important safety
Instructions within this manual.
Problem Possible causes & Explanation Action to Take
Fabrics Are Not Drying Power Interruption: The cycle stopped due
to a brief power failure.
Restart the dryer cycle.
Blocked Airow: The air outlet at the back of
the dryer is blocked by lint build-up or foreign
objects.
Check the air outlet at the back of the dryer
for blockages and clean it thoroughly.
Blocked Filter: The lint filter is full. Check the filter for blockage and clean it
immediately.
Item Entanglement: When drying large items
(sheets, quilt covers, tablecloths), clothes may
become excessively tangled during rotation.
The machine may need to be repeatedly
shaken and dried. Unload the items, untangle
them, and restart the cycle.
Heavy Layers: Dense items (denim, thick
coat) retain moisture in partial layers even
after a standard program finishes.
The partial layers that are not thoroughly dry
can be dried again using the appropriate
fixed-time program (e.g., 30 Minutes).
Possible Sounds When
Dryer is Running
Drum Vibrating Sound: Usually caused by
the wet weight of clothing impacting the wall
of the drum as it rotates.
This is generally normal if the load is damp.
Ensure the dryer is on a level surface.
Airow Impingement Sound: This sound
occurs as water vapour is discharged from
the exhaust pipe, and the vapour impacts the
rotating inner drum.
This is a normal phenomenon when the dryer
is working.
Clothing Collision Sound: Items with metal
components (zips, buttons, buckles) impact
the inner drum or viewing window.
This is normal. To reduce noise, ensure these
items are turned inside out before drying.
Significant Increase in
Room Temperature
Poor Ventilation: The room is not adequately
ventilated.
Ensure the area has proper ventilation.
Blocked Rear Airow: The air outlet at the
back of the dryer is blocked.
Remove the obstacle blocking the air outlet.
Dryer Does Not Start Start Button Not Pressed: The program has
been selected but the start button has not
been pressed.
Press the Start button.
Door Open: The dryer door is not
firmly closed.
Ensure the door is securely closed.
Start Indicator
is Not Lit
Power Supply Issue: The power plug is loose
or has not been fully plugged into the wall
socket.
Check and securely insert the power plug.
Dryer Switch O: The main dryer power
switch (or the wall switch) is not turned on.
Ensure the dryer switch button is set to the
ON position.
Over Dry Incorrect Time Selection: The selected
program had an excessively long drying time
for the load size.
Select a program with a shorter drying time
or use an Intelligent program.
Troubleshooting
22
IMPORTANT! To operate all vented clothes dryers efficiently, the clothes dryer must have an unrestricted air supply and
exhaust ventilation. Service calls resulting from installation where ventilation is restricted are not covered by warranty.
The cost of this type of service call will be charged to the customer. Should you require further instructions in the use and
care of your clothes dryer please contact your local Customer Care team.
POSSIBLE FAILURES
Certain problems are due to lack of simple maintenance or oversights, which can be solved easily without calling out a
service technician. Before contacting your local Customer Care team, please check possible cause of malfunction and
solution listed below. Once the problem has been eliminated, press the Start/Pause button to restart the program. If after
all checks, the problem persists, contact your local Customer Care team.
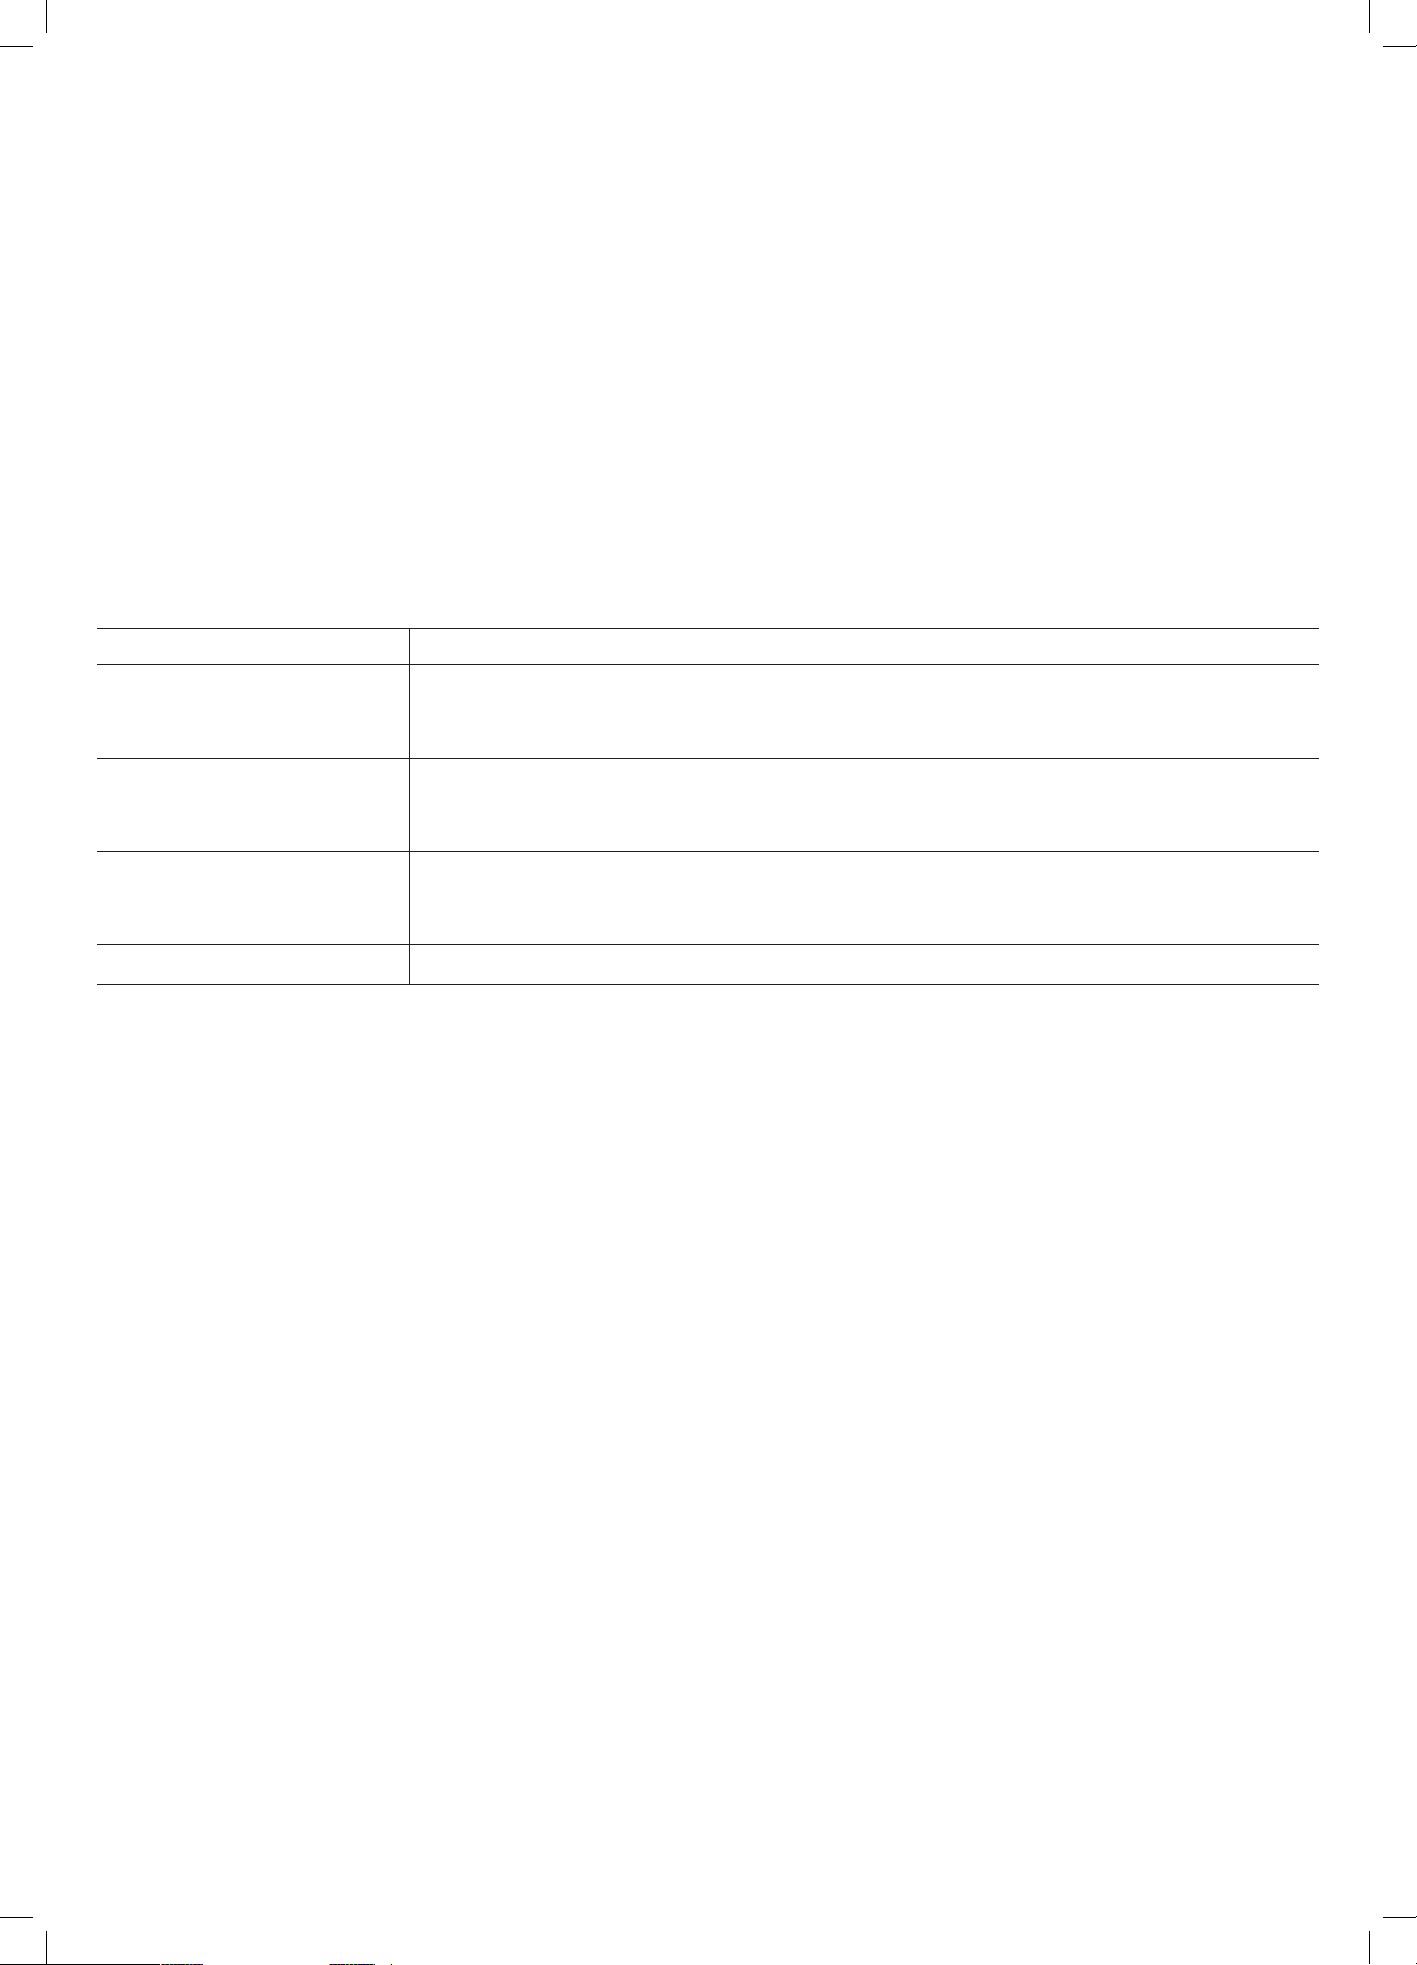
FAILURE INDICATION DESCRIPTION
Cotton, Delicates, Refresh
and 90 Minutes LED lights
are on
Communication failure of the power supply board/display board.
Cotton, Intensive,
Underwear and Delicates
LED lights are on
Temperature sensor abnormal.
Refresh, Fast Dry,
60 Minutes and 90 Minutes
LED lights are on
Over temperature warning.
ALL LED lights are on Door warning (The door is not closed properly).
• Communication error of Display board power supply: Connection signal timeout between Display board and Power
board, failed to link properly or data exception
• Abnormal temperature: Temperature sensor not connected well or damaged
• Over temperature warning: Abnormal heating during working process. If the temperature is too high during operation
and keep 3s, the machine will shut down all loads and warning for over temperature, also machine will power off
automatically without operation for 10 min. Press the Power button to release the error warning.
• Door open warning: If the door is open during operation, the machine will stop working and stay in Pause state, when
the door is closed, press the Start button again to restart running. Machine will power off without any operation for
10 minutes.
ACCESSORIES, PARTS OR FURTHER SUPPORT
Should you need to purchase a replacement lint filter, or any other spare parts, please contact our local
Customer Care team, details of which can be found below.
• Email: support@residentiagroup.com.au
• Phone: 1300 11 4357
Troubleshooting (Continued)
23
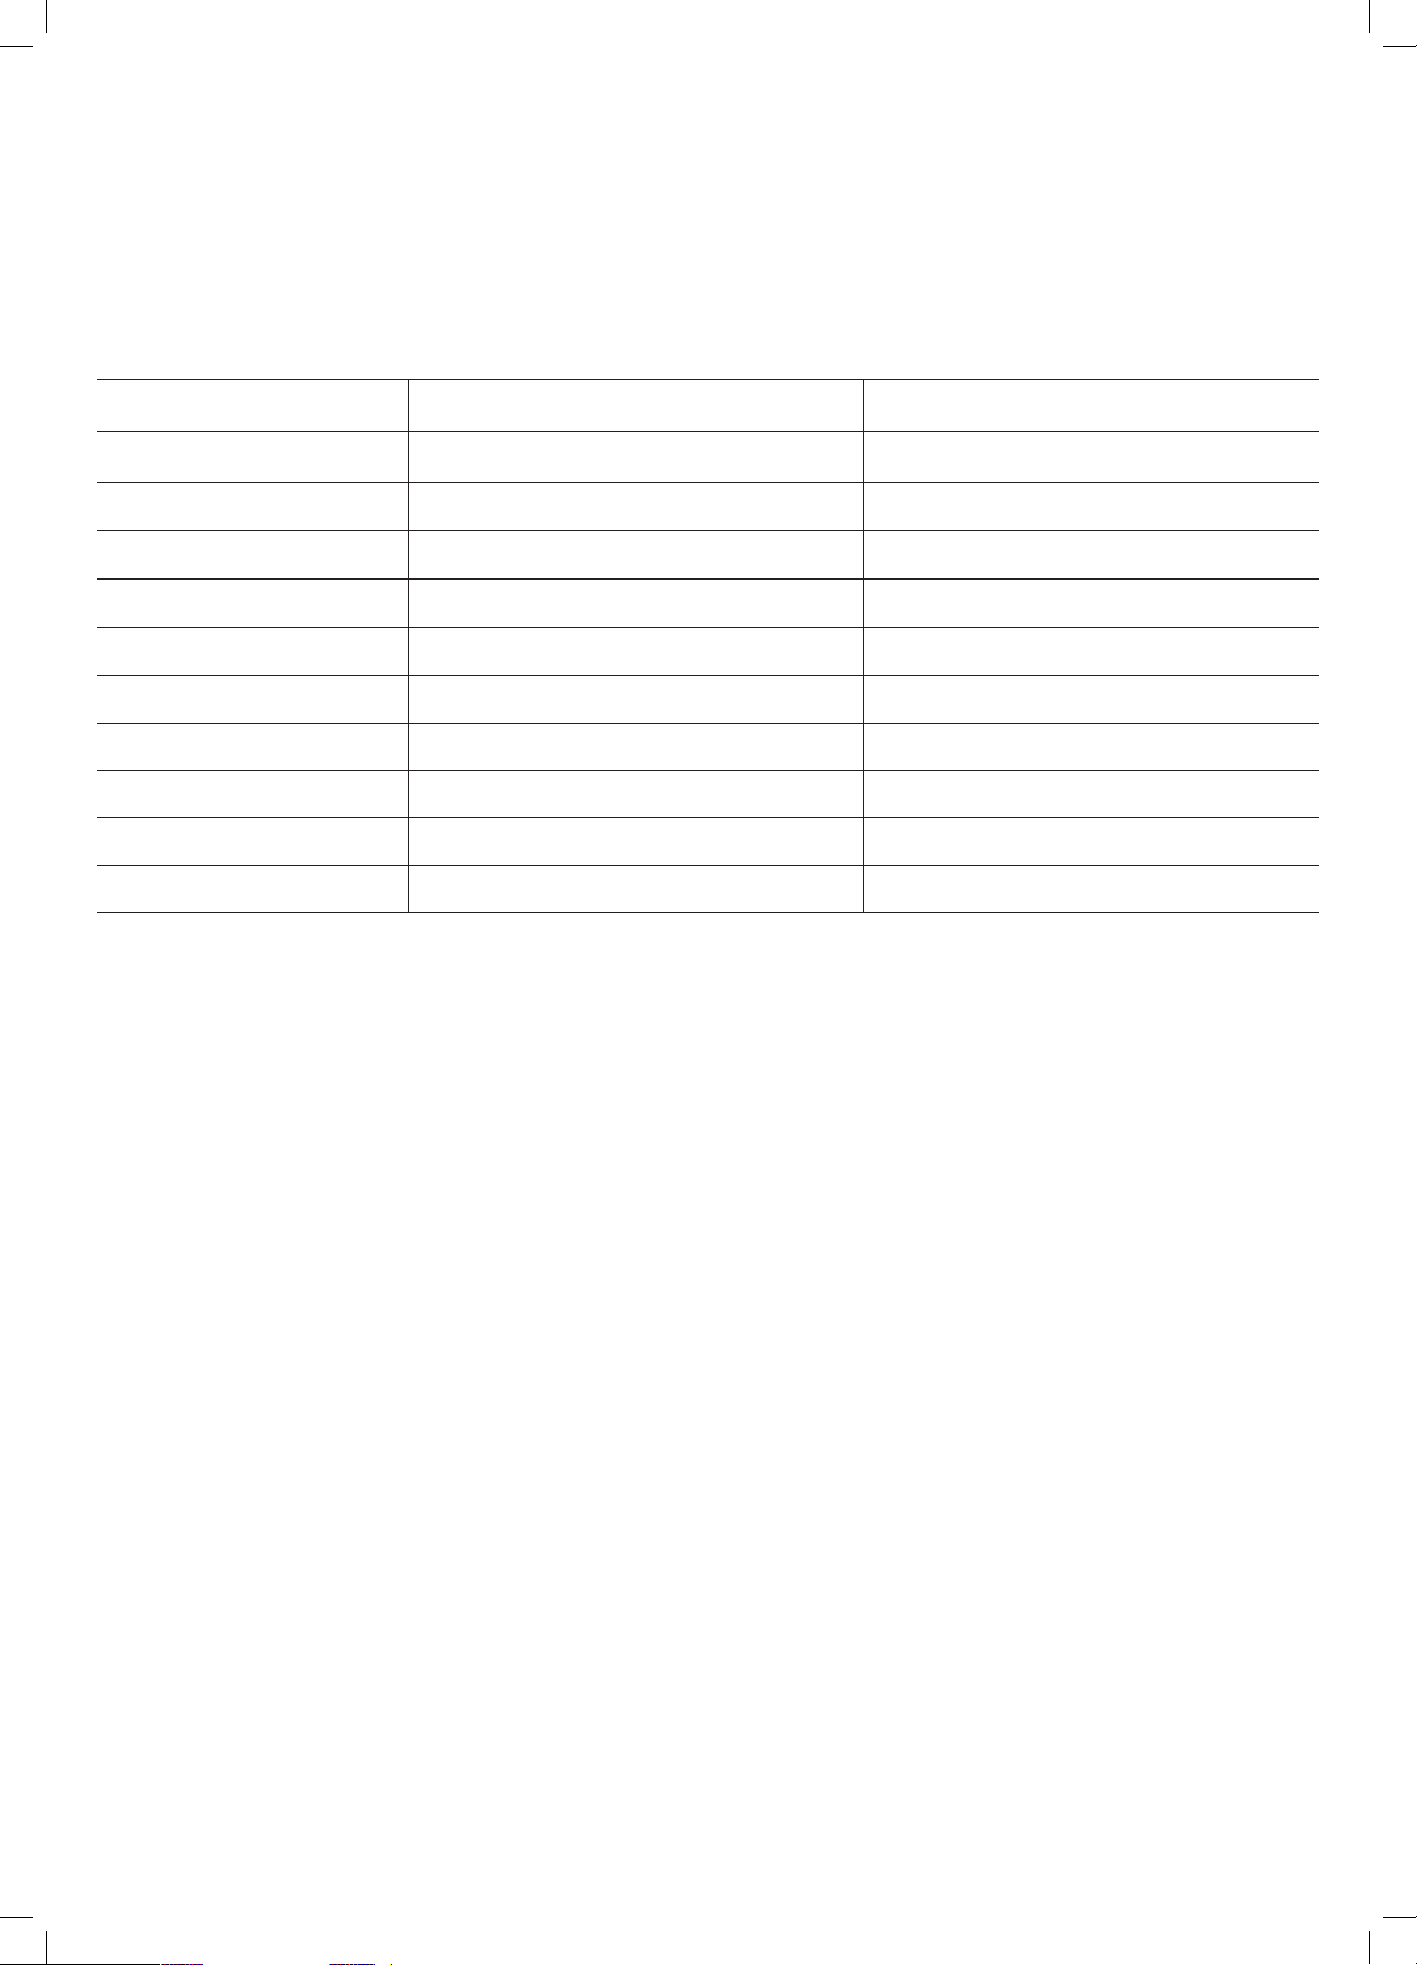
Below outlines the technical specifications for your Vented Dryer.
Model GGSVD55W GGSVD55B
Size 535W × 530D × 645H (mm) 535W × 530D × 645H (mm)
Rated Capacity
5.5kg 5.5kg
Rated Voltage
220–240V~ 220–240V~
Rated Frequency
50Hz 50Hz
Rated Current
6A 6A
Rated Power 1400W 1400W
Energy Rating (MEPS) 2 Stars 2 Stars
Energy Consumption 246 kWh per Year 246 kWh per Year
Net Weight 24kg 24kg
Grade of Waterproof IPX4 IPX4
Note:
• This product is subject to continuous improvement, specification are subject to change without prior notice.
• The rated capacity is the maximum capacity to be dried at one time. Make sure that the dry clothes which are loaded
into the appliance do not exceed the rated capacity.
• Do not install the tumble dryer in a room when there is a risk of frost occurring. At temperatures around freezing point
the tumble dryer may not be able to operate properly.
• There is a risk of damage if the condensate water is allowed to freeze in the pump, hoses and / or condensate
water container
• This product was tested in accordance with AS/NZS 2442.1 and AS/NZS 2442.2 using the program: Cotton,
which is the program recommended for drying a normally soiled cotton load at the rated capacity.
Technical Specifications
24
For future reference, please record the following information which can be found on the rating plate
and the date of purchase which can be found on your sales invoice.
Purchase Details
STORE DETAILS
STORE NAME
|
ADDRESS
|
TELEPHONE
|
PURCHASE DATE
|
PRODUCT DETAILS
MODEL NO.
|
SERIAL NO.*
|
Attach Your Receipt Here
25
Notes

26
Warranty Information
AUSTRALIA & NEW ZEALAND
WARRANTY TERMS & CONDITIONS
LAUNDRY APPLIANCES (CLOTHES DRYERS)
This document sets out the terms and conditions of the
product warranties for Residentia Group Appliances. It is
an important document. Please keep it with your proof of
purchase documents in a safe place for future reference
should you require service for your Appliance.
1. IN THIS WARRANTY
(a) ‘acceptable quality’ as referred to in clause 10
of this warranty has the same meaning referred to in
the ACL;
(b) ‘ACL’ means Trade Practices Amendment (Australian
Consumer Law) Act (No.2) 2010;
(c) ‘Appliance’ means any Residentia Group product
purchased by you accompanied by this document;
(d) ‘ASR’ means Residentia Group authorised service
representative;
(e) ‘Residentia Group’ means Residentia Group Pty Ltd
of 165 Barkly Ave, Burnley VIC 3121, ACN 600 546 656
in respect of Appliances purchased in Australia;
(f ) ‘major failure’ as referred to in clause 10 of this
warranty has the same meaning referred to in the ACL
and includes a situation when an Appliance cannot
be repaired or it is uneconomic for Residentia Group,
at its discretion, to repair an Appliance during the
Warranty Period;
(g) ‘Warranty Period’ means:
(i) where the Appliance is used for personal,
domestic or household use (i.e. normal
single family use) as set out in the instruction
manual, the Appliance is warranted against
manufacturing defects for 24 months, following
the date of original purchase of the Appliance;
(h) ‘you’ means the purchaser of the Appliance not having
purchased the Appliance for re-sale, and ‘your’ has a
corresponding meaning.
2. This warranty only applies to Appliances purchased
and used in Australia and is in addition to (and does
not exclude, restrict, or modify in any way) any
non-excludable statutory warranties in Australia.
3. During the Warranty Period Residentia Group or its
ASR will, at no extra charge if your Appliance is readily
accessible for service, without special equipment
and subject to these terms and conditions, repair or
replace any parts which it considers to be defective.
Residentia Group or its ASR may use remanufactured
parts to repair your Appliance. You agree that any
replaced Appliances or parts become the property
of Residentia Group. This warranty does not apply
to light globes, batteries, lters or similar perishable
parts.
4. Parts and Appliances not supplied by Residentia Group
are not covered by this warranty.

27
Warranty Information (Continued)
Our goods come with guarantees that cannot be excluded under the Australian Consumer Law. You are
entitled to a replacement or refund for a major failure and for compensation for any other reasonably
foreseeable loss or damage. You are also entitled to have the goods repaired or replaced if the goods fail
to be of acceptable quality and the failure does not amount to a major failure.
The Australian Consumer Law requires
the inclusion of the following statement
with this warranty:
5. You will bear the cost of transportation, travel and
delivery of the Appliance to and from Residentia
Group or its ASR. If you reside outside of the service
area, you will bear the cost of:
(a) travel of an authorised representative;
(b) transportation and delivery of the Appliance to and
from Residentia Group or its ASR, in all instances,
unless the Appliance is transported by Residentia
Group or its ASR, the Appliance is transported at
the owner’s cost and risk while in transit to and from
Residentia Group or its ASR.
6. Proof of purchase is required before you can make a
claim under this warranty.
7. You may not make a claim under this warranty unless
the defect claimed is due to faulty or defective parts
or workmanship. Residentia Group is not liable in the
following situations (which are not exhaustive):
(a) the Appliance is damaged by:
(i) accident
(ii) misuse or abuse, including failure to properly
maintain or service
(iii) normal wear and tear
(iv) power surges, electrical storm damage or
incorrect power supply
(v) incomplete or improper installation
(vi) incorrect, improper or inappropriate operation
(vii) insect or vermin infestation
(viii) failure to comply with any additional instructions
supplied with the Appliance;
(b) the Appliance is modied without authority from
Residentia Group in writing;
(c) the Appliance’s serial number or warranty seal has
been removed or defaced;
(d) the Appliance was serviced or repaired by anyone
other than Residentia Group, an authorised repairer
or ASR.
8. This warranty, the contract to which it relates and the
relationship between you and Residentia Group are
governed by the law applicable where the Appliance
was purchased.
9. To the extent permitted by law, Residentia Group
excludes all warranties and liabilities (other than as
contained in this document) including liability for any
loss or damage whether direct or indirect arising from
your purchase, use or non use of the Appliance.
10. For Appliances and services provided by Residentia
Group in Australia, the Appliances come with a
guarantee by Residentia Group that cannot be
excluded under the Australian Consumer Law. You
are entitled to a replacement or refund for a major
failure and for compensation for any other reasonably
foreseeable loss or damage. You are also entitled
to have the Appliance repaired or replaced if the
Appliance fails to be of acceptable quality and
the failure does not amount to a major failure. The
benets to you given by this warranty are in addition
to your other rights and remedies under a law in
relation to the Appliances or services to which the
warranty relates.
11. At all times during the Warranty Period, Residentia
Group shall, at its discretion, determine whether
repair, replacement or refund will apply if an
Appliance has a valid warranty claim applicable
to it.
12. Missing parts are not covered by warranty. Residentia
Group reserves the right to assess each request for
missing parts in a case by case basis. Any parts
that are not reported missing in the rst week after
purchase will not provide free of charge.
13. To enquire about claiming under this warranty, please
follow these steps:
(a) carefully check the operating instructions,
user manual and the terms of this warranty;
(b) have the model and serial number of the
Appliance available;
(c) have the proof of purchase (e.g. an invoice) available;
(d) telephone the numbers shown below.
14. You accept that if you make a warranty claim,
Residentia Group and its ASR may exchange
information in relation to you to enable Residentia
Group to meet its obligations under this warranty.
IMPORTANT
Before calling for service, please ensure that the steps in
point 13 have been followed.
Telephone contacts
► Service: Please call 1300 11 HELP (4357)
► Spare Parts: Please call 1300 11 SPARE (7727)
T. 1300 11 4357
E. support@residentiagroup.com.au
E S S E N T I A L S FOR LIFE
An initiative by
Residentia Group
www.solt.house