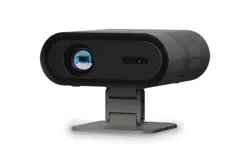

Digital Projector
NeoPix 160 Smart
www.philips.com/support
User Manual
Register your product and get support at
Auto Trapezoid Displace....................................................11
How to Use Projection Settings........................................11
Manual Trapezoid................................................................12
Auto Focus Displace.............................................................12
Screen Zoom...........................................................................13
How to Select the Source....................................................14
How to Play Files in USB Disk.............................................15
Projector installation....................................................................8
Remote Control..............................................................................7
Multimedia Format Supported..................................................6
Speci�cations..................................................................................6
Projector Knowledge....................................................................2
Accessories List...............................................................................1
Important Safeguards..................................................................1
Standard Setting...................................................................8
Installation Method..............................................................9
Turn the Projector Operation On/Off.....................................10
Use of the Projector......................................................................10
Image focusing......................................................................10
Contents

Installation
Important Safeguards
Accessories List
• To get a better watching, please use this projector while drawing the curtain
or in a dark room.
• Please use the projector carefully, dropping or crashing may damage parts or
result in blurred images and abnormal display.
Power
• Be careful while using the power cord, avoid excessive bending; the damage
of power cable may cause electric shock and �re.
• It is better to unplug the power cord after power off.
Cleaning
• Unplug the power cable �rstly.
• Clean the shell regularly with a damp cloth, neutral detergent can be used.
• Please use a glasses cloth or lens paper, not to scratch the lens.
• Please clean projector's vents and speakers regularly by banister brush, or
the ventilation will be blocked.
High Temperature Attention
• While projection or just �nishing, the exhaust port nearby will be very hot,
if touch it, would get scald.
• While projection, please do not look the lens directly, or may hurt eyes.
*Warm Tips
• Do not disassemble the projector, if not, there will be a risk of electric shock,
and the disassembling affect the normal warranty.
• Please do not put any liquid or heavy stuff on the projector.
• To ensure the stability of heat dissipation, please open the height bracket at
the bottom of the projector before you begin.
Remote Control x1
Power Cable x1
User Manual x1
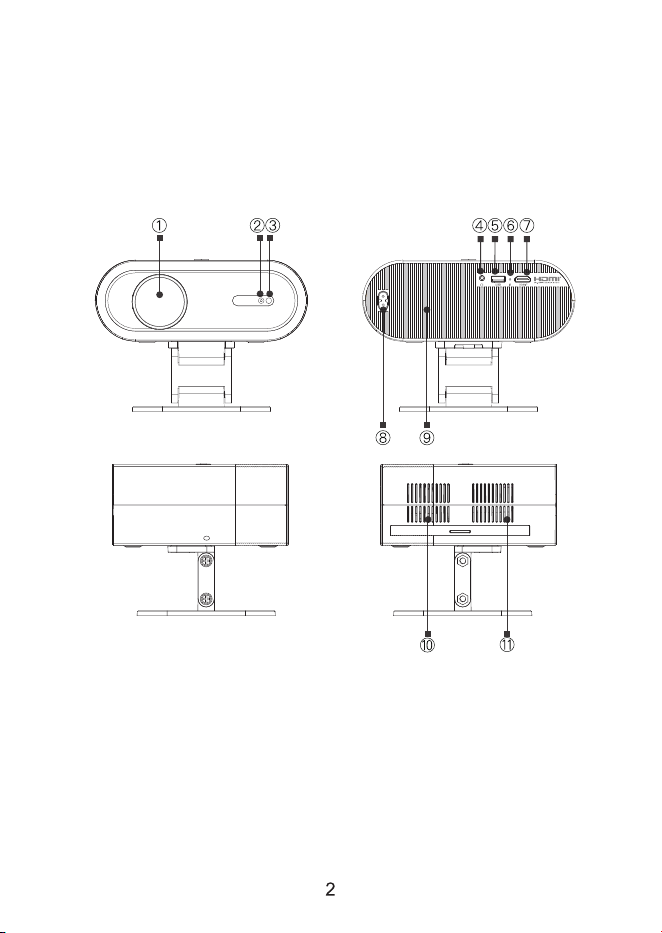
1. Lens
(Only available in auto focus version)
2. Camera
3. IR Receiver
4. 3.5mm Port for the Audio Qutput
5. USB Port
6. IR for the Remote Control
7. HDMI Port
8. Power Socket
9. Heat dissipation outlet
10. Speaker
11. Heat dissipation inlet
With Stand
Projector knowledge
Projector can input high-de�nition video signal and composite video signal, and
support stereo audio signal input and output. Please refer to the following
�gure to connect the projector and other audio equipment according to your own
needs.
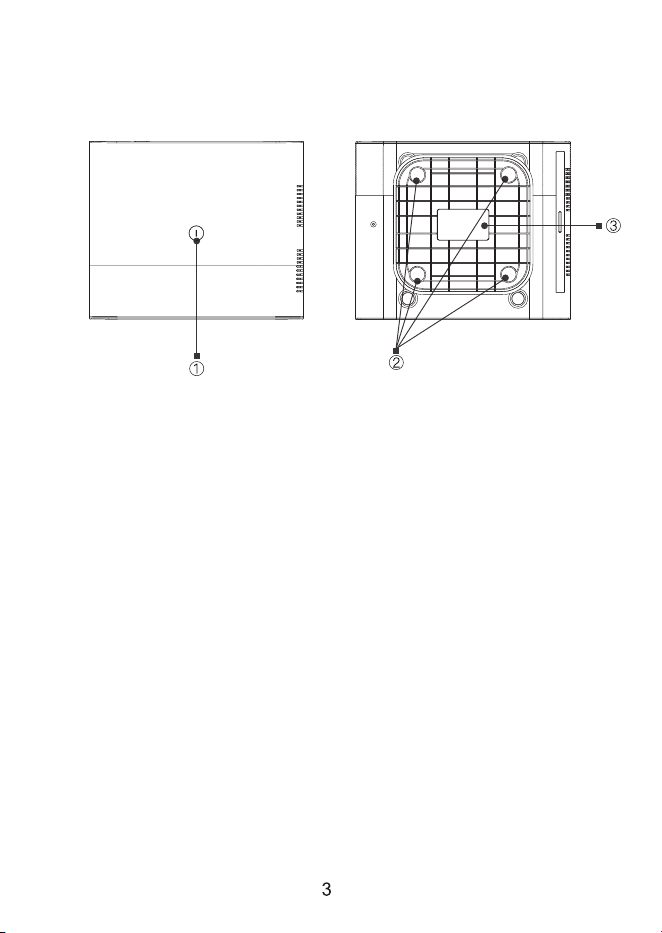
1. Power Key
2. Machine Feet
3. Bottom Label
Projector knowledge
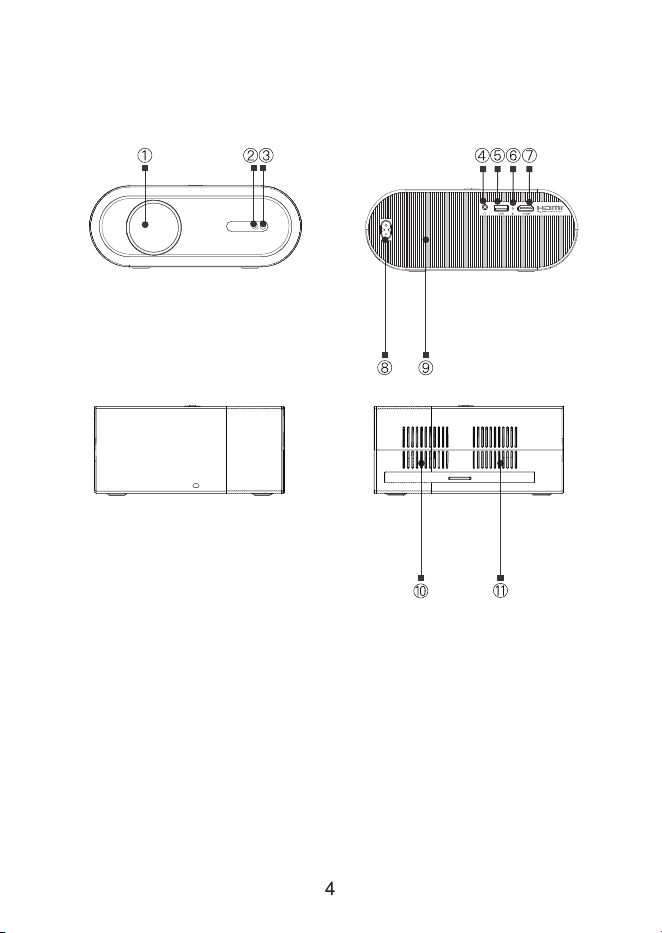
1. Lens
(Only available in auto focus version)
2. Camera
3. IR Receiver
4. 3.5mm Port for the Audio Qutput
5. USB Port
6. IR for the Remote Control
7. HDMI Port
8. Power Socket
9. Heat dissipation outlet
10. Speaker
11. Heat dissipation inlet
Without Stand
Projector knowledge
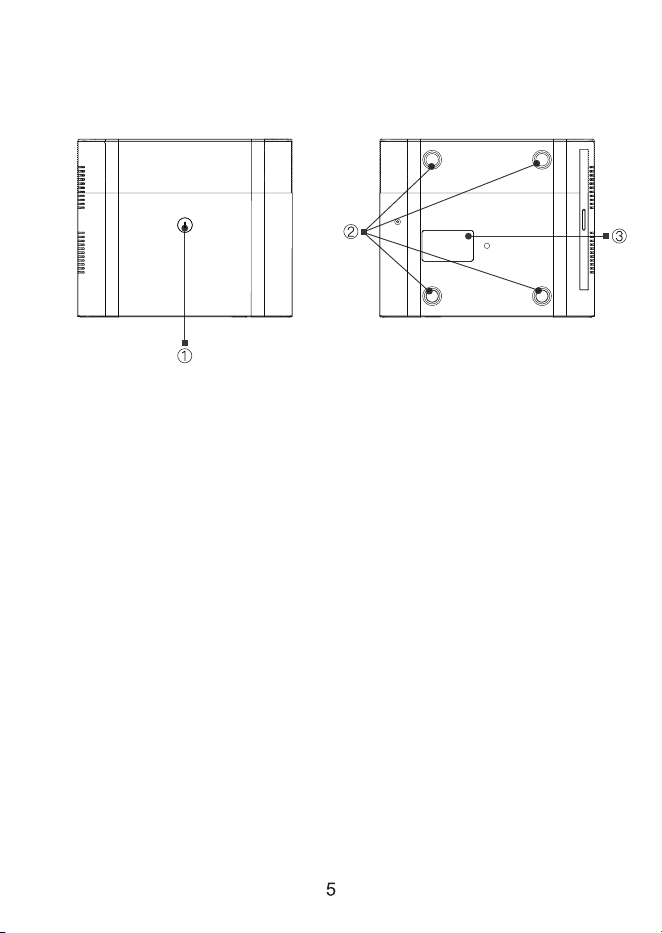
1. Power Key
2. Machine Feet
3. Bottom Label
Projector knowledge
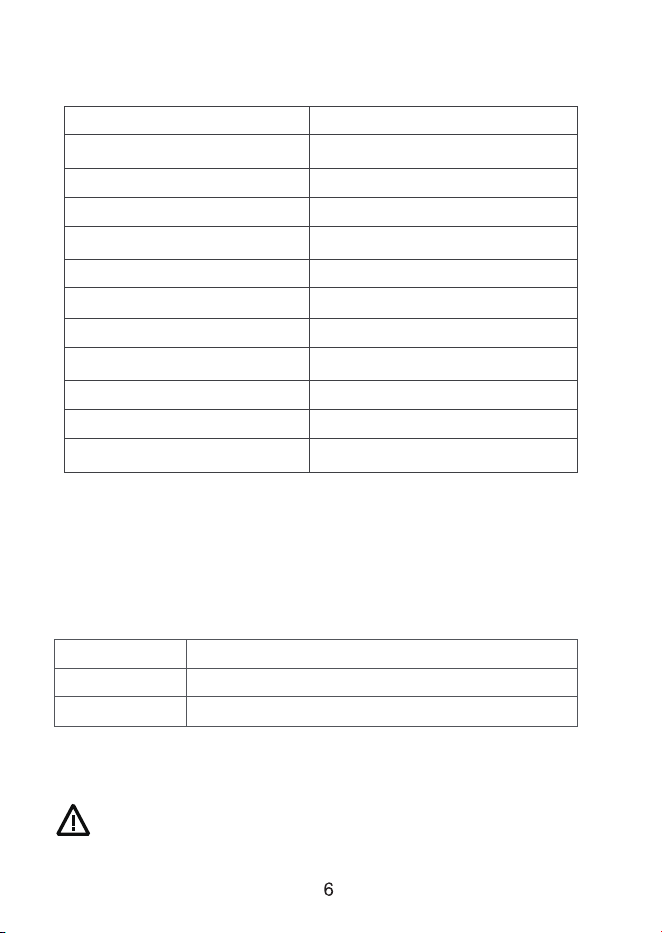
171 x207.1 x147.7mm
Manual/Remote Control
This model does not support any Dolby audio decoding due to
the copyright of Dolby patent.
1.23 KG
0-35°C
HDMIx1 / USBx1
Headphone
16:9 / 4:3
AC100-240V 50/60Hz 1A
1920X1080
LED
NeoPix 160 SmartModel
Lamp
lmage System
Resolution
Input Voltage
Weight
Working Temp
Input Port
Output Port
Aspect Ratio
Size
Operation Mode
lmage Format
Audio Format
Video Format
LCD
MP4/VOB/3GP/TP/TS/F4V/DAT/MOV
MP3/M4A/MP2/WAV/FLAC
JPG/PNG/BMP/JPEG
Speci�cations
Multimedia Format Supported
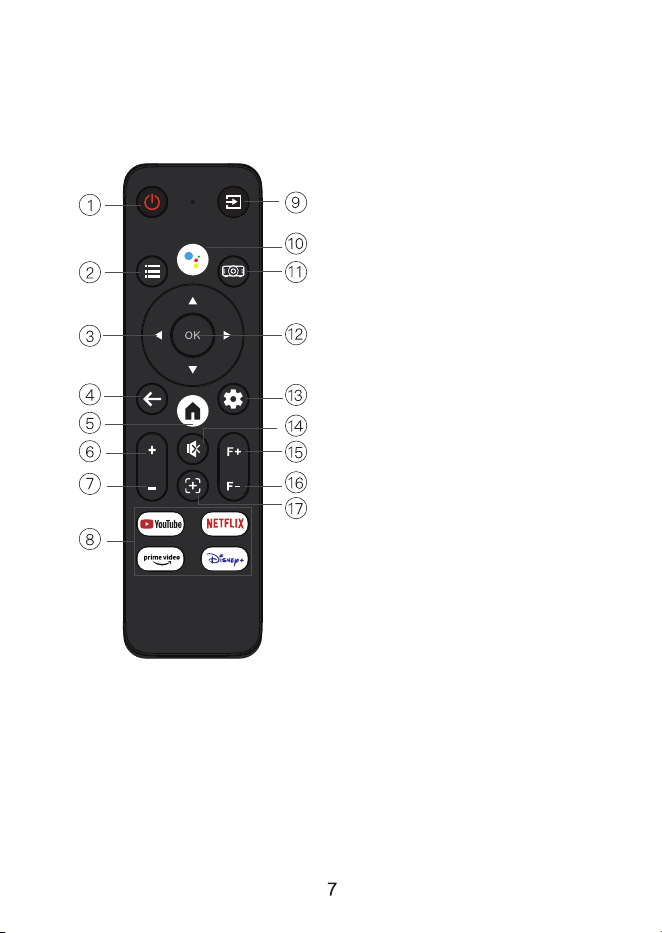
Remote Control
1. Power on/ off
2. Menu
3. Navigation
4. Return
5. Home
6. Volume+
7. Volume-
8. APP
9. Source
10. Google Assistant
11. Projector Setup
12. Enter
13. Google Settings
14. Mute
15. Focus+
16. Focus-
17. Auto focus /Auto keystone
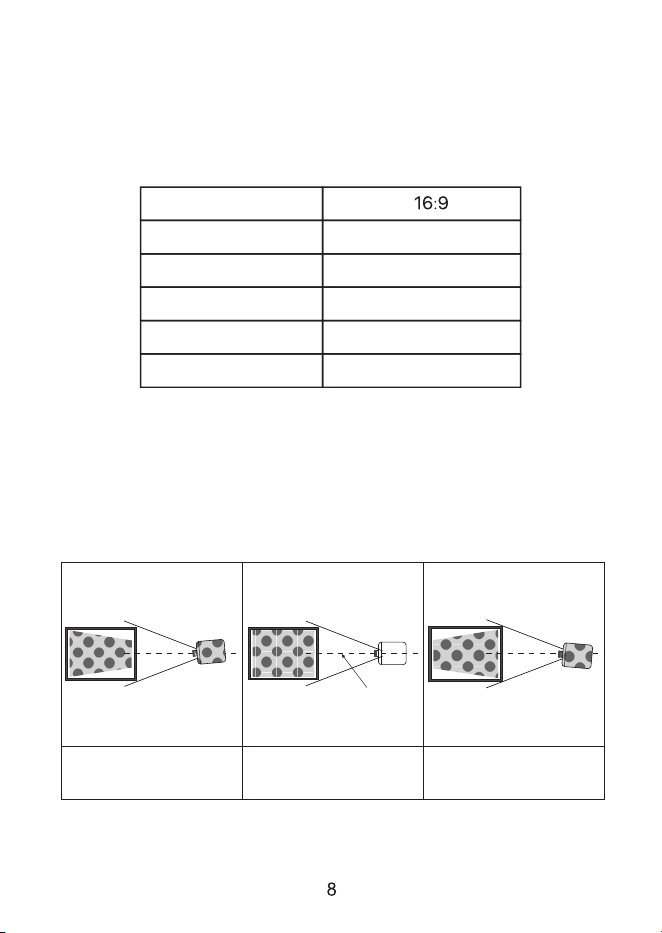
1.3050
70
100
120
1.82
2.61
3.13
Please refer to the following table to adjust your picture size and distance.
(from the lens to the screen).
Please allow + 3% to the image sizes in the table above. lf the distance is less
than min data and more than max data, the image could be blurry.
Please check the diagram below for the trapezoid adjustment.
Incorrect installation Correct installation
Projector
Screen Screen
Symmetry
Axis
Incorrect Installation
Aspect ratio
Picture size (inch) Projection distance (m)
Standard Setting
Warning:
Projector Installation
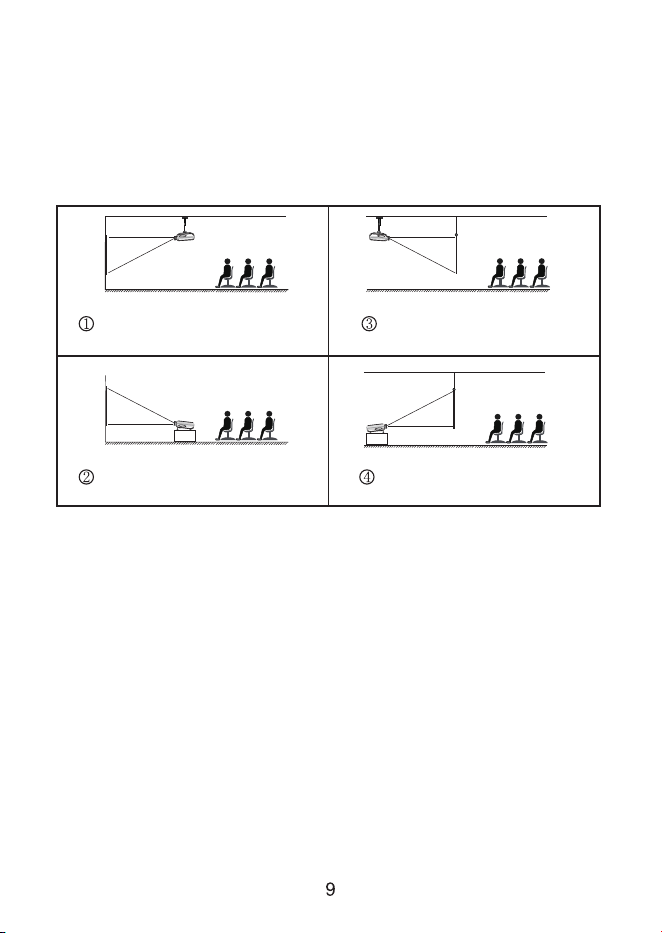
Projector
Projector
Projector
Projector
Screen
Screen
Screen
Screen
Rear projection ceiling mount
Rear projection table mount
Front projection ceiling mount
Front projection table mount
Contact a professional installer to mount this projector to a ceiling.
Follow the instructions below for the correct projector positions.
(The lifting device should be able to withstand 4 times the weight of the product)
1. The projector may be damaged beyond repair if it is incorrectly mounted on
a Ceiling or on a surface.
2. The projector should only be used in an environment where the temperature
does not exceed the range of 5℃-35 ℃. Projector malfunction may occur if this
is not adhered to.
3. Malfunction may occur if the projector is subjected to dusty, wet, moist or
smoky conditions.
4. Poor ventilation could cause overheating which could lead to damage to the
projector as well as a life threatening situation.
(The lifting device should be able to withstand 4 times the weight of the product)
Installation Method
Warning:
Projector Installation
When the projector is connected to a power source, the projector enters
standby and the cover signal indicator is red.
When the newly installed projector is used for the �rst time, the image
will be blurred, and it is necessary to focus the picture;
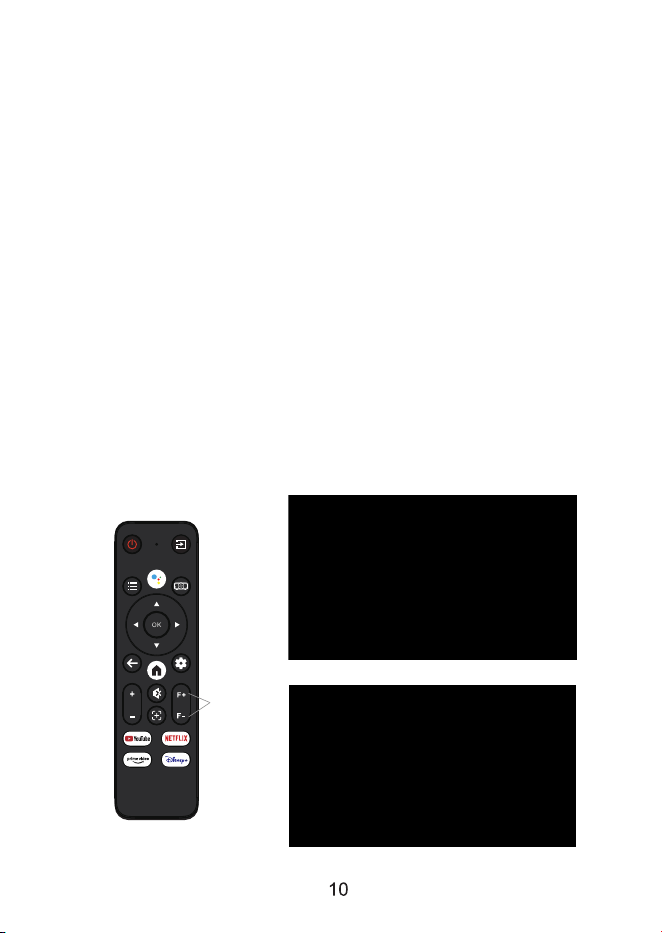
When the picture is blurred, press the focus keys "F+" and" F- "on the
remote control to adjust the focal length of the lens. Tap or long press
the focus button until the picture is clear. (As shown below)
Focus
(Before the focus)
(After the focus)
Operation on: Press the power key on the body or the power key on the
remote control, the indicator will turn blue and enter the working state.
Operation off: In the working state, press the power key of the body or
the power key on the remote control, the indicator changes from blue to
red, and theprojector is turned off.
lmage focusing
Manual Focus
Turn the Projector Operation On/Off
Use of the Projector

Auto Trapezoid Displace
Projection mode: Front / Rear / Front Ceiling / Rear Ceiling
(Enable this furnction,when the device moves up
and down can also keep the picture square.)
( Auto keystone function is only available in autofocus version.Please
do not block the camera while autofocusing.)
After entering the interface, select the mode you want in the projection
settings.
How to Use Projection Settings
Select the settings icon in the main interface, and then press the "OK" key
on the remote control to enter the settings interface and select
“Proiection lmage Setting”.
Note: As the product system is updated from time to time, the specifc operation content is based on the actual situation.
Use of the Projector

Manual Trapezoid
( Auto Focus function is only available in autofocus version. Please do
not block the camera while autofocusing.)
Auto Focus Displace (This function is turned on by default, and the screen
can be kept square even after the device is displaced.)
(Manually adjust the four corners through the arrow keys
until the screen can be corrected )
Note: As the product system is updated from time to time, the specifc operation content is based on the actual situation.
Use of the Projector

Screen Zoom
Note: As the product system is updated from time to time, the specifc operation content is based on the actual situation.
Use of the Projector

How to Select the Source
Click the source key on the remote control and select the desired source on
the popup,such as HDMI/USB/Android TV ,then press the "OK" key on
the remote control to enter the corresponding source interface.
Note: As the product system is updated from time to time, the specifc operation content is based on the actual situation.
Use of the Projector

How to Play Files in USB Disk
Click the source key on the remote control and select the USB on the popup,
then press the "OK" key on the remote control to enter the corresponding
source interface.
Note: As the product system is updated from time to time, the specifc operation content is based on the actual situation.
Use of the Projector

FCC Warning
This device complies with part 15 of the FCC Rules. Operation is subject to the fo llowing two conditions:
(1) This device may not cause harmful interference, and (2) this device must accept any interference
received, including interference that may cause undesired operation.
Any Changes or modifications not expressly approved by the party responsible for compliance could
void the user's authority to operate the equipment.
Note: This equipment has been tes
ted and found to comply with the limits for a Class B digital device,
pur
suant to part 15 of the FCC Rules. These limits are designed to provide reasonable protection
against harmful interference in a residential insta llation. This equipment generates uses and can radiate
radio frequency energy and, if not installed an d used in accordance with the instructions, may cause
harmful interference to radio communications. However, there is no guarantee that interference wil
l not
occur in a par
ticular installation. If this equipment does cause harmful interference to radio or television
reception, which can be determined by turning t he equipment off and on, the user is encouraged to try to
correct the interference by one or more of the f ollowing measures:
-Reorient or relocate the receiving antenna.
-Increase the separation between the equipment and receiver.
-Connect the equipment into an outlet on a circuit different from that to which the
receiver is connected.
-
Consult the dealer or an experienced radio/TV technician for help.
This equipment complies with FCC radiation exposure limits set forth for an uncontrolled environment.
This equipment should be installed and operated with minimum distance 20cm between the radiator &
your body.


Screeneo Innovation SA
8A route de Suisse1163 Etoy -Switzerland
Philips and the Philips Shield Emblem are registered trademarks of Koninklijke Philips N.V. and are
used under license. Screeneo Innovation SA is the warrantor in relation to the product with which
this booklet was packaged.
2025 © Screeneo Innovation SA. All rights reserved.
NeoPix 160
EN
