OWNER'S MANUAL
STYLER
Read this owner's manual thoroughly before operating the appliance and keep
it handy for reference at all times.
ENGLISH
SC5GQR8GA
MFL71825997
Rev.01_032726
www.LGSIGNATURE.com
Copyright © 2026 LG Electronics. All Rights Reserved
Scan to see the online manual.
TABLE OF CONTENTS
2
3 IMPORTANT SAFETY
INSTRUCTIONS
3 READ ALL INSTRUCTIONS BEFORE USE
3 WARNING STATEMENTS
9 PRODUCT OVERVIEW
9 Product Features
12 INSTALLATION
12 Before Installing
13 Installation Location Requirements
15 Unpacking the Appliance
15 Leveling the Appliance
18 OPERATION
18 Operation Overview
19 Preparing Loads
20 Checking Items before Every Load
21 Loading the Appliance
26 Using the High Pressure Handy Steamer
30 Control Panel
32 Cycle Table
39 Settings
41 SMART FUNCTIONS
41 LG ThinQ Application
44 Smart Diagnosis
TM
Function
45 MAINTENANCE
45 Regular Cleaning
48 TROUBLESHOOTING
48 FAQs
48 Before Calling for Service
53 LIMITED WARRANTY
53 USA
56 CANADA
3IMPORTANT SAFETY INSTRUCTIONS
ENGLISH
IMPORTANT SAFETY INSTRUCTIONS
READ ALL INSTRUCTIONS BEFORE USE
Safety Messages
Your safety and the safety of others are very important.
We have provided many important safety messages in this manual and on your appliance. Always read and
follow all safety messages.
Notes for Flammable Refrigerant(R290)
The following symbols are displayed on units.
WARNING STATEMENTS
WARNING
• To reduce the risk of explosion, fire, death, electric shock, scalding or injury to persons when using this
appliance, follow basic precautions, including the following:
• In the appliance enclosure, keep ventilation openings clear of obstruction.
• Do not damage the refrigerant circuit.
Installation
• Contact an authorized service center before installing or relocating the appliance to avoid injury or
product damage when moving the appliance.
• When moving the appliance away from the wall, be careful not to roll over or damage the power cord.
• The appliance is heavy. Two or more people are necessary to move and install the appliance to prevent
damage or injury.
This is the safety alert symbol.
This symbol alerts you to potential hazards that can kill or injure you and others. All safety messages
will follow the safety alert symbol and either the word WARNING or CAUTION.
WARNING
You may be killed or seriously injured if you do not follow instructions.
CAUTION
You may be injured or cause damage to the product if you do not follow instructions.
All safety messages will tell you what the potential hazard is, tell you how to reduce the chance of injury, and
tell you what may happen if the instructions are not followed.
This symbol indicates that this appliance uses a flammable refrigerant. If the refrigerant is
leaked and exposed to an external ignition source, there is a risk of fire.
This symbol indicates that service personnel should be handling this equipment with reference
to the Installation Manual.
This symbol indicates that information is available in the Owner's Manual or Installation Manual.
4 IMPORTANT SAFETY INSTRUCTIONS
• Prior to use, ensure that you are connecting the appliance to a dedicated grounded electrical outlet
rated for use with this appliance. It is the user’s responsibility to replace a standard 2-prong wall outlet
with a standard 3-prong wall outlet.
• Before use, the appliance must be properly installed as described in this manual. Electric shock can
result if the appliance is not properly grounded.
• Do not install the appliance where there may be a danger of the unit falling. The appliance is not
designed for use on ships or airplanes. Check with an authorized LG service center for use under other
special circumstances.
• Do not tamper with controls.
• Install the appliance where the floor is firm and level. The appliance may vibrate excessively and
eventually fall if installed on an unstable surface, causing damage or injury.
• Keep the front side protected when transporting the appliance. Do not truck from the front. The
tempered glass panel on the front of the appliance may break, causing damage or injury.
• Properly ground the appliance to conform to all governing codes and ordinances. Follow the details in
the installation instructions. Electric shock can result if the appliance is not properly grounded.
• Install and store the appliance where it will not be exposed to temperatures below freezing or exposed
to the weather. Allow the appliance to warm to room temperature before use if it was delivered in winter
or at sub-zero temperatures.
• Do not repair or replace any part of the appliance or attempt any servicing unless specifically
recommended in the user-maintenance instructions or in published user-repair instructions that you
understand and have the skills to carry out. Failure to follow this warning can cause serious injury, fire,
electric shock, or death.
• To reduce the risk of electric shock, do not install the appliance in humid spaces such as a bathroom.
Failure to follow this warning can cause death, serious injury, fire, electric shock, or product deformation
or malfunction.
• Remove all packing items and dispose of all shipping materials properly. Failure to do so can result in
burns, fire, explosion, or death.
• Connect to a properly rated, protected, and sized power circuit to avoid electrical overload. Improper
power circuits can melt, creating electric shock and/or fire hazard.
• Keep all packaging from children. Packaging material can be dangerous for children. There is a risk of
suffocation.
• Do not install near another heat source such as a stove, oven or heater. Failure to follow this warning can
cause product deformation, smoke, or fire.
• Do not place candles, smoking materials, or other flammables on top of the appliance. Dripping wax,
smoke, or fire can result.
• Remove all protective vinyl film from the appliance. Failure to do so can cause product damage, smoke,
or fire.
• Certain internal parts are intentionally not grounded and may present a risk of electric shock only during
servicing, Service personnel - Do not contact the following parts while the appliance is energized: pump,
valve, motor, control board.
• Do not tilt the appliance backwards while there is water in the water tank. When moving or reinstalling
the appliance, drain the water tank. If tilting the appliance while there is water in the water tank, water
may overflow inside the appliance and the appliance may not operate normally.
• When installing the appliance, avoid any location where it comes into direct contact with the wind from
the air conditioner. Failure to comply may result in condensation due to a difference in temperature
between the inside of the appliance and the location.
Operation
• Do not allow children to play on or in the appliance. Close supervision of children is necessary when the
appliance is used near children.
5IMPORTANT SAFETY INSTRUCTIONS
ENGLISH
• Do not climb, stand, or hang on the door or on the shelf or anywhere inside the appliance. The appliance
could fall over or be damaged, or other damage or injury could occur.
• Do not step on the doors to the water tanks. The appliance could fall and cause damage and injury.
• Do not place heavy or dangerous objects on top of the appliance.
• Do not put live animals inside the appliance.
• Do not allow children to climb into the appliance.
• In the event of a gas leak (propane/LPG), ensure adequate ventilation and contact an authorized service
center before resuming use. Do not touch or disassemble the electrical outlet of the appliance.
• Do not use or place flammable substances (chemicals, medicine, cosmetics, etc) near the appliance or
store them inside the appliance. Do not place the appliance in the vicinity of flammable gas.
• Disconnect the power cord immediately if you hear a noise, smell a strange odor or detect smoke
coming from the appliance.
• In the event of a flood: Do not go near the appliance when its base is submerged under water. Contact
the service center. There is a risk of electric shock or fire.
• Do not use fabric softeners or products to eliminate static unless recommended by the manufacturer of
the fabric softener or product.
• Do not place hands or body near the steam nozzle during operation. The steam is hot and could cause
an injury.
• Do not insert objects into the steam nozzle. Excessive noise and fire could result.
• Do not drink the water from the water supply or drain tanks.
• If there are small accessories (such as straps from blouses, dresses, etc.), please remove them if possible
before use. If they cannot be removed, please secure them to prevent them from falling off. Accessories
may fall inside the product and cause malfunctions.
• Do not disassemble or modify the appliance.
• Do not put hands, feet, or metal objects below the appliance.
• Do not operate the appliance or touch the power cord with wet hands.
• Keep fingers out of pinch point areas; clearances between the door and cabinet are necessarily small. Be
careful closing the door when children are nearby.
• This appliance is not intended for use by persons (including children) with reduced physical, sensory or
mental capabilities, or lack of experience and knowledge, unless they have been given supervision or
instruction concerning the use of the appliance by a person responsible for their safety.
• Do not place items exposed to cooking oils in the appliance. Items contaminated with cooking oils may
contribute to a chemical reaction that could cause a load to catch fire.
• Do not dry articles that have been previously cleaned in, washed in, soaked in, or spotted with gasoline,
dry-cleaning solvents, or other flammable or explosive substances, as they give off vapors that could
ignite or explode.
• Do not use heat to dry articles containing foam rubber or similarly textured rubber-like materials.
• Do not open door during operation. The performance of the product may be adversely affected. If the
product is installed on or near carpet, condensation from escaping hot air or steam may stain or damage
the carpet.
• Do not use the product for other than the intended purposes. Damage incurred by using the product for
purposes other than those specified in this user manual are not covered by the warranty.
• Do not use replacement parts that have not been recommended by the manufacturer (e.g. parts made at
home using a 3D printer).
• After use, cool down the high pressure handy steamer sufficiently for 5 minutes or more before storing
it. Touching the steamer head or the steam hose before it has cooled down sufficiently may result in
burns.
• Pull out the power plug and fill the water tank with water or clean the product.
• If the product is damaged and the inside of the product is exposed, do not touch the high pressure
handy steamer and contact an authorized service center.
6 IMPORTANT SAFETY INSTRUCTIONS
•The high pressure handy steamer is designed for home use. Do not use it for other purposes.
• The Steamer is only for LG Styler, so do not install it on other home appliances or use it for other
purposes.
• When the product is on or operating, do not spray steam towards a person or an animal. Doing so may
cause burns by steam.
• Do not use the Steamer on clothes that are being worn.
• When the product is on or operating, do not allow children or pet animals to come near the product.
• After operation, do not put your hands or feet on the steamer head or steam hose of the Steamer. Doing
so may cause burns due to residual heat.
• Do not use the Steamer on glass. Doing so may damage glass and result in injury.
• Do not use the Steamer on electronics. Doing so may result in malfunction or damage to the electronics.
• Be careful not to allow children or pet animals to play with the Steamer.
• Do not apply impact on the Steamer or drop the Steamer. If The Steamer is damaged, do not touch it and
contact an authorized service center.
• Do not use Steamer for clothing (Functional sports wear (Gore-Tex), fur, leather, artificial leather, coated
materials, etc.) that can be damaged by steam.
• Do not pull the Steamer forcibly as the parts in the high pressure handy steamer case may be
damaged.
• While using the Steamer, do not close the Styler door and the storage box. Doing so may scratch the
edge of the steamer storage box cover, leave scratch marks on the inside of the door, and damage the
storage box cover or the steam hose.
• When using Steamer to clothing made of rayon may shrink, so use the Low mode.
• When you turn on the Steamer and spray steam for the first time, condensed water may be sprayed and
leave water marks on clothing depending on the surrounding environment, so spray steam into the air
2-3 times for 2-3 seconds before use.
• Depending on the usage environment, moisture may form near the Steamer head and inside the Styler,
so wipe off moisture with a dry towel before storing the Steamer.
• If the steam nozzle is clogged, unclog it with a pin or toothpick. Be sure to clean the nozzle after turning
off the Styler and letting it cool down sufficiently for 30 minutes or longer.
CAUTION
• After use, wipe any moisture remaining around the steam nozzle and the door with a dry cloth before
storing the nozzle.
• To reduce the risk of contact with hot water emitting from steam vents, check the appliance before each
use by holding it away from your body and operating the steam button.
• To reduce the risk of electric shock, do not immerse the appliance in water or other liquids.
• Do not allow the cord to touch hot surfaces.
• Let the appliance cool completely before putting it away.
• Loop the cord loosely around the appliance when storing.
• Do not operate the appliance with a damaged cord, or if the appliance has been dropped or damaged.
• To reduce the risk of electric shock, do not disassemble or attempt to repair the appliance. Take it to a
qualified service person for examination and repair. Incorrect reassembly or repair could cause a risk of
fire, electric shock, or injury to persons when the appliance is used.
• Burns could occur from touching hot metal parts, hot water, or steam.
7IMPORTANT SAFETY INSTRUCTIONS
ENGLISH
Connecting Electricity
• Do not, under any circumstances, cut or remove the ground prong from the power cord. To prevent
personal injury or damage to the appliance, the electrical power cord must be plugged into a properly
grounded outlet.
• This appliance must be plugged into a 120-VAC, 60-Hz grounded outlet protected by a 15-ampere fuse or
circuit breaker. Failure to follow these instructions can result in fire, explosion, or death.
• This appliance must be plugged into a properly grounded outlet. Electrical shock can result if the
appliance is not properly grounded. Have the wall outlet and circuit checked by a qualified electrician to
make sure the outlet is properly grounded. Failure to follow these instructions can create an electric
shock hazard and/or a fire hazard.
• Install the appliance where the plug is easily accessible. Unplug the appliance when not in use to avoid
risk of fire or electric shock.
• Unplug the appliance before disassembly or repair to avoid risk of electric shock.
• The appliance should always be plugged into its own individual electrical outlet which has a voltage
rating that matches the rating plate. This provides the best performance and also prevents overloading
house wiring circuits which could cause a fire hazard from overheated wires.
• Do not use an extension cord to connect to an outlet. Doing so could result in a fire or electric shock.
• Never unplug your appliance by pulling on the power cord. Always grip the plug firmly and pull straight
out from the outlet. The power cord can be damaged, resulting in a risk of fire and electric shock.
• Contact LG or a qualified repair person immediately to repair or replace all power cords that have
become frayed or otherwise damaged. Do not use a cord that shows cracks or abrasion damage along
its length or at either end. The power cord can melt, creating electric shock and/or fire hazard.
• When installing or moving the appliance, be careful not to pinch, crush, or damage the power cord. This
will prevent injury and damage to the appliance from fire and electric shock.
• Do not use a portable multi-socket outlet which is not properly grounded. If needed, use only a multi-
socket outlet which is properly grounded and has a rating of 15 A or higher. Failure to do so may result in
electric shock or fire caused by the device overheating. If the circuit breaker on the device trips, it could
turn off power to the appliance.
Maintenance and Disposal
• Wipe foreign objects (such as dust and water) off the prongs of the power plug and contact areas
regularly. Do not use a wet or damp cloth when cleaning the plug.
• Do not use an appliance to dry the interior. Do not light a candle to remove interior odors.
• Do not spray water onto the appliance directly when cleaning. A fire or electric shock may occur.
• Wipe the interior with a dry cloth after use.
• Clean the lint filter before or after each load.
• To avoid physical injury and burns, use care when cleaning the condenser and do not touch or clean the
condenser with bare hands.
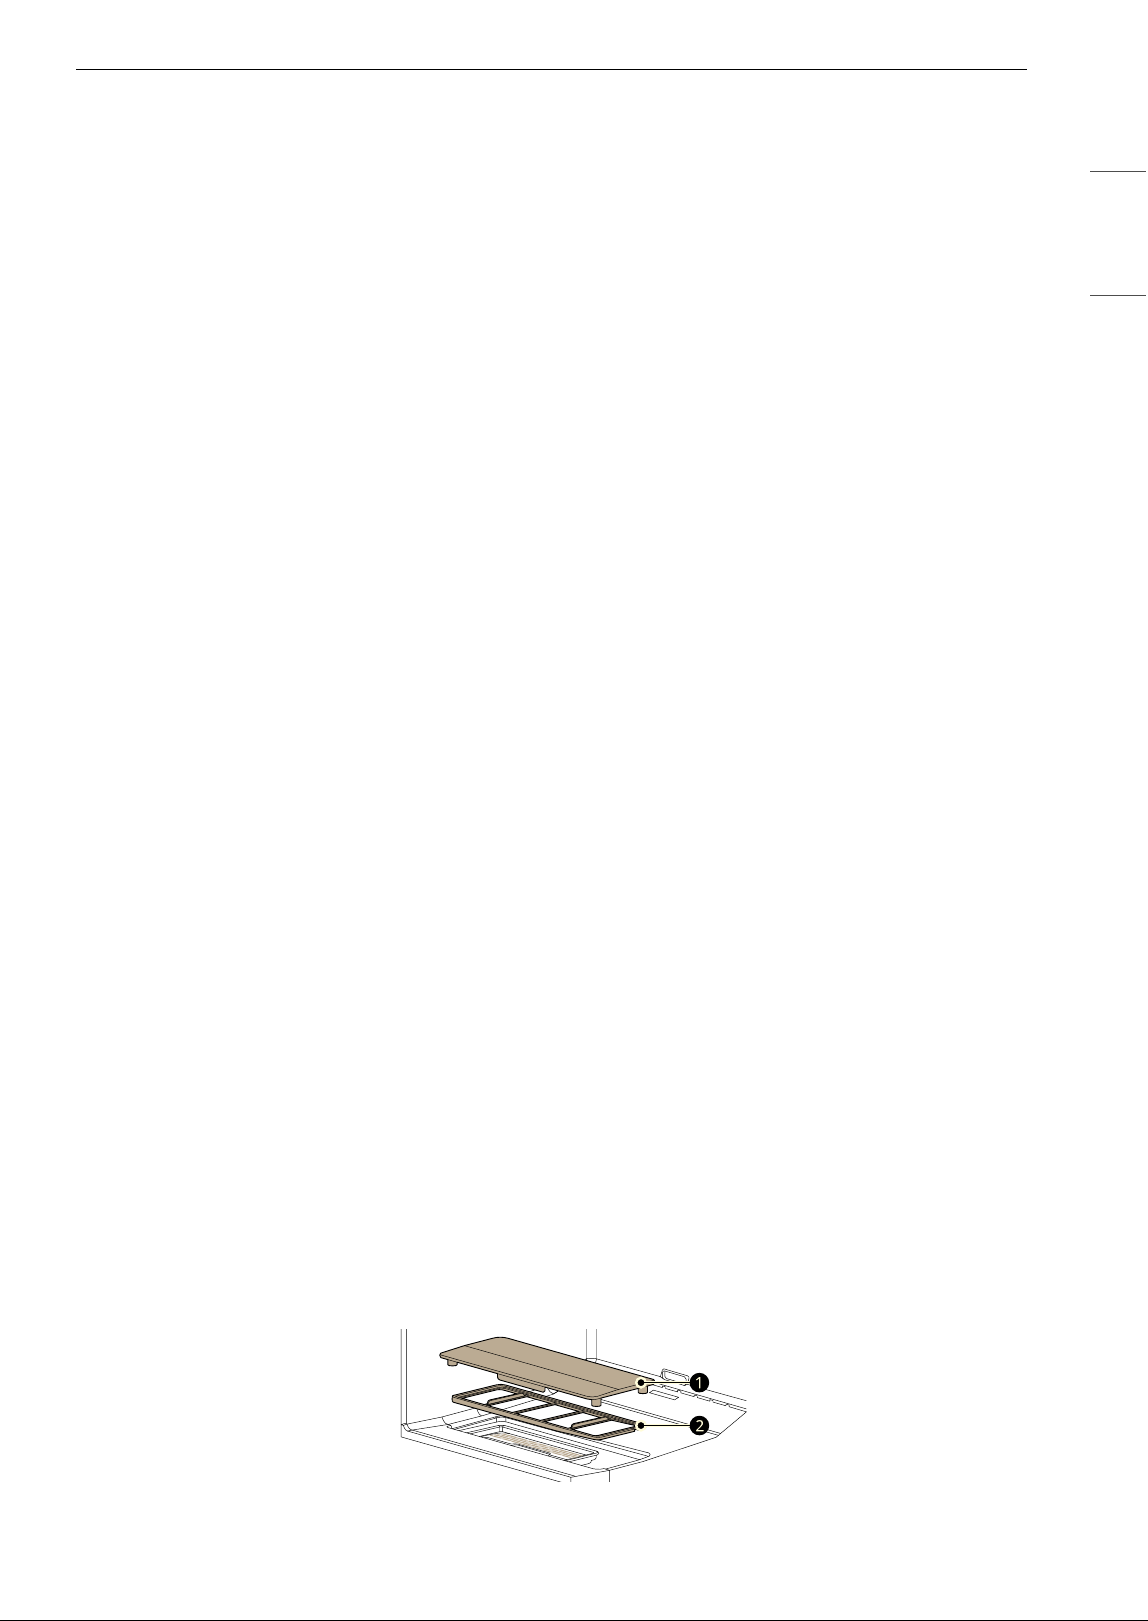
• Install the lint filter cover
a and the lint filter b correctly to ensure that the smart lighting sensor
operates correctly and dust is collected properly. The mirror surface at the bottom of the lint filter cover
is a part for the sensor, so keep it clean with a dry cloth.
8 IMPORTANT SAFETY INSTRUCTIONS
SAVE THESE INSTRUCTIONS
Grounding Instructions
• This appliance must be grounded. In the event of malfunction or breakdown, grounding will reduce the
risk of electric shock by providing a path of least resistance for electric current.
• This appliance must be equipped with a cord having an equipment-grounding conductor and a
grounding plug. The plug must be plugged into an appropriate outlet that is properly installed and
grounded in accordance with all local codes and ordinances.
• Do not modify the plug. If it will not fit the outlet, have a proper outlet installed by a qualified electrician.
• Do not use a bleaching agent such as oxygen- or chlorine-based bleaches on the exterior of the
appliance. They may cause discoloration when applied to the surface of the product.
• Do not use sharp objects when cleaning or operating the controls. An electric shock may occur.
• Avoid hitting the front glass panel with heavy objects. Although it is made of tempered glass, the panel
may break in the event of a strong impact and cause injury.
• Keep the appliance free from rodents, insects, and other foreign objects. They may damage wires,
causing fire or electric shock.
• Before the appliance is removed from service or discarded, remove the door to the drying compartment.
Cut off the power plug and destroy the button section to prevent reuse.
• This appliance must be connected to a grounded metal, permanent wiring system or an equipment-
grounding conductor must be run with the circuit conductors and connected to the equipment-
grounding terminal or lead on the appliance. Electric shock can result if the appliance is not properly
grounded.
• Improper connection of the equipment grounding conductor can result in a risk of electric shock. Check
with a qualified electrician or service person if you are in doubt that the appliance is properly grounded.
9PRODUCT OVERVIEW
ENGLISH
PRODUCT OVERVIEW
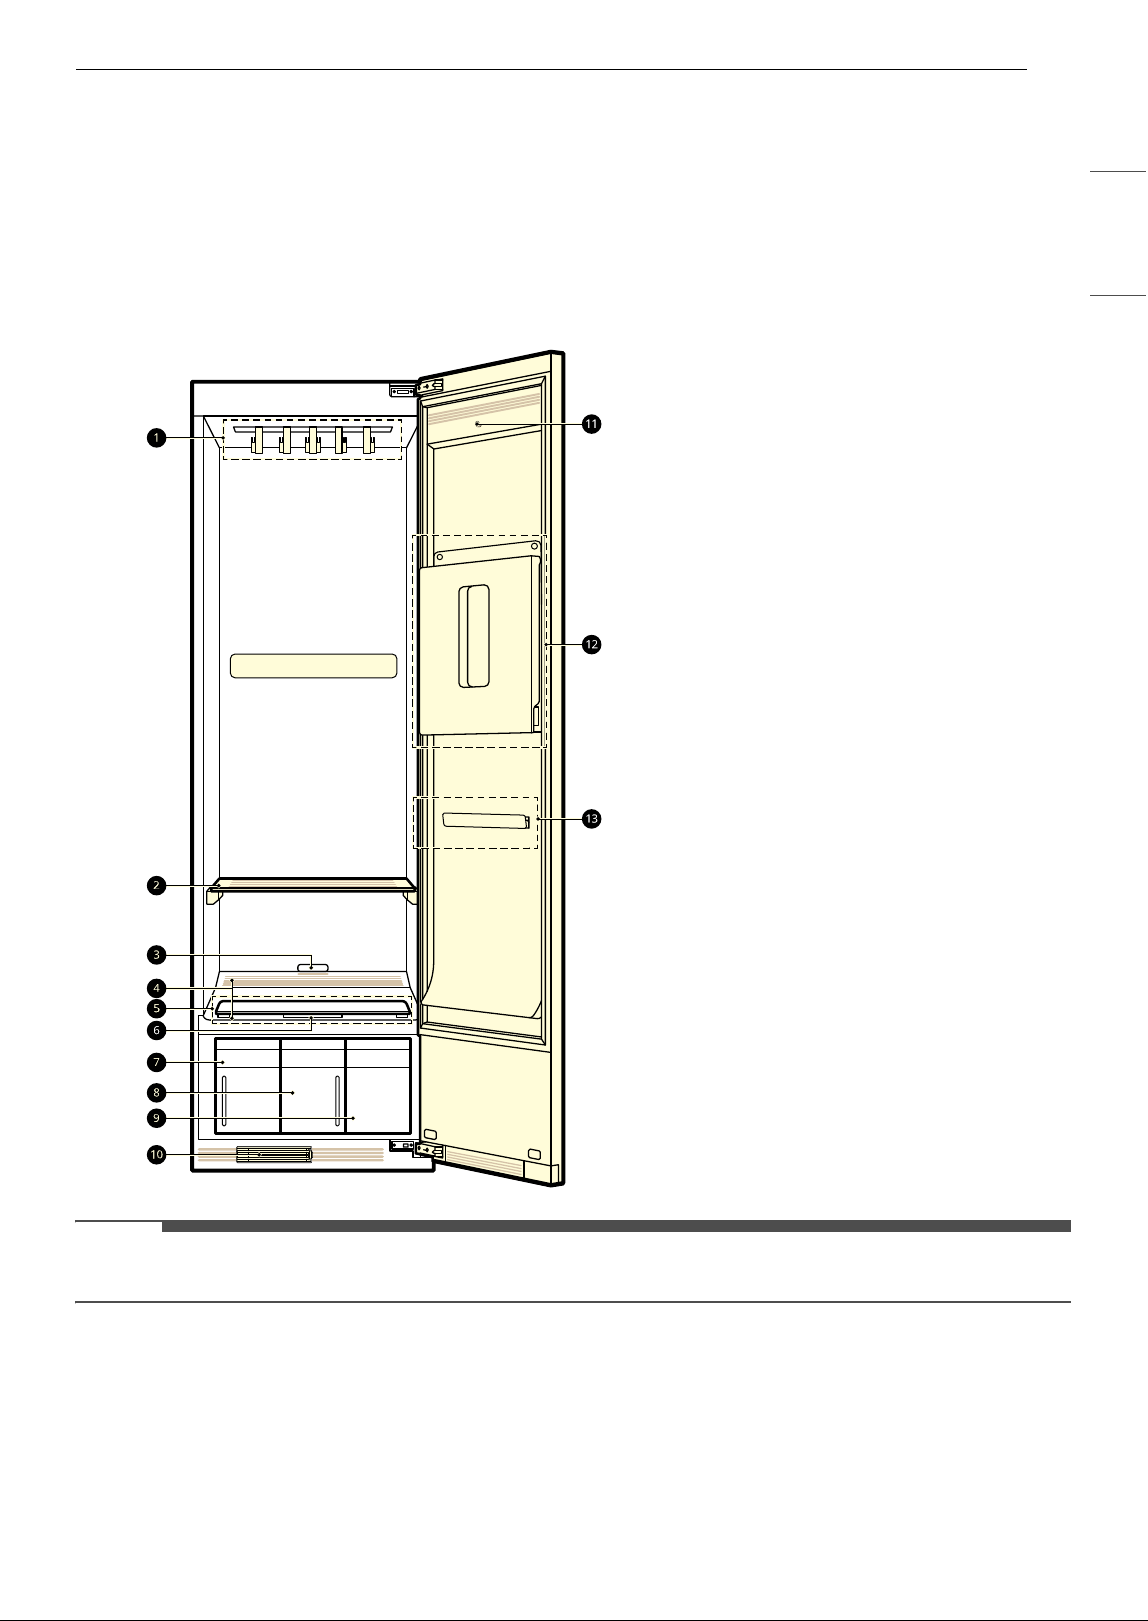
Product Features
The images in this guide may be different from the actual components and accessories, which are subject
to change by the manufacturer without prior notice for product improvement purpose.
Interior
NOTE
• The door swing can be reversed by the installer to fit the installation location.
a Moving hanger
b Shelf
c Light sensor
d Hot air circulation vent
e Lint filter cover
f Aroma sheet case
g Water drain tank
h Water supply tank
i High-pressure handy steamer case
j Dehumidification filter
k Hanger holder
l Pants crease care
m Sliding bracket
10 PRODUCT OVERVIEW
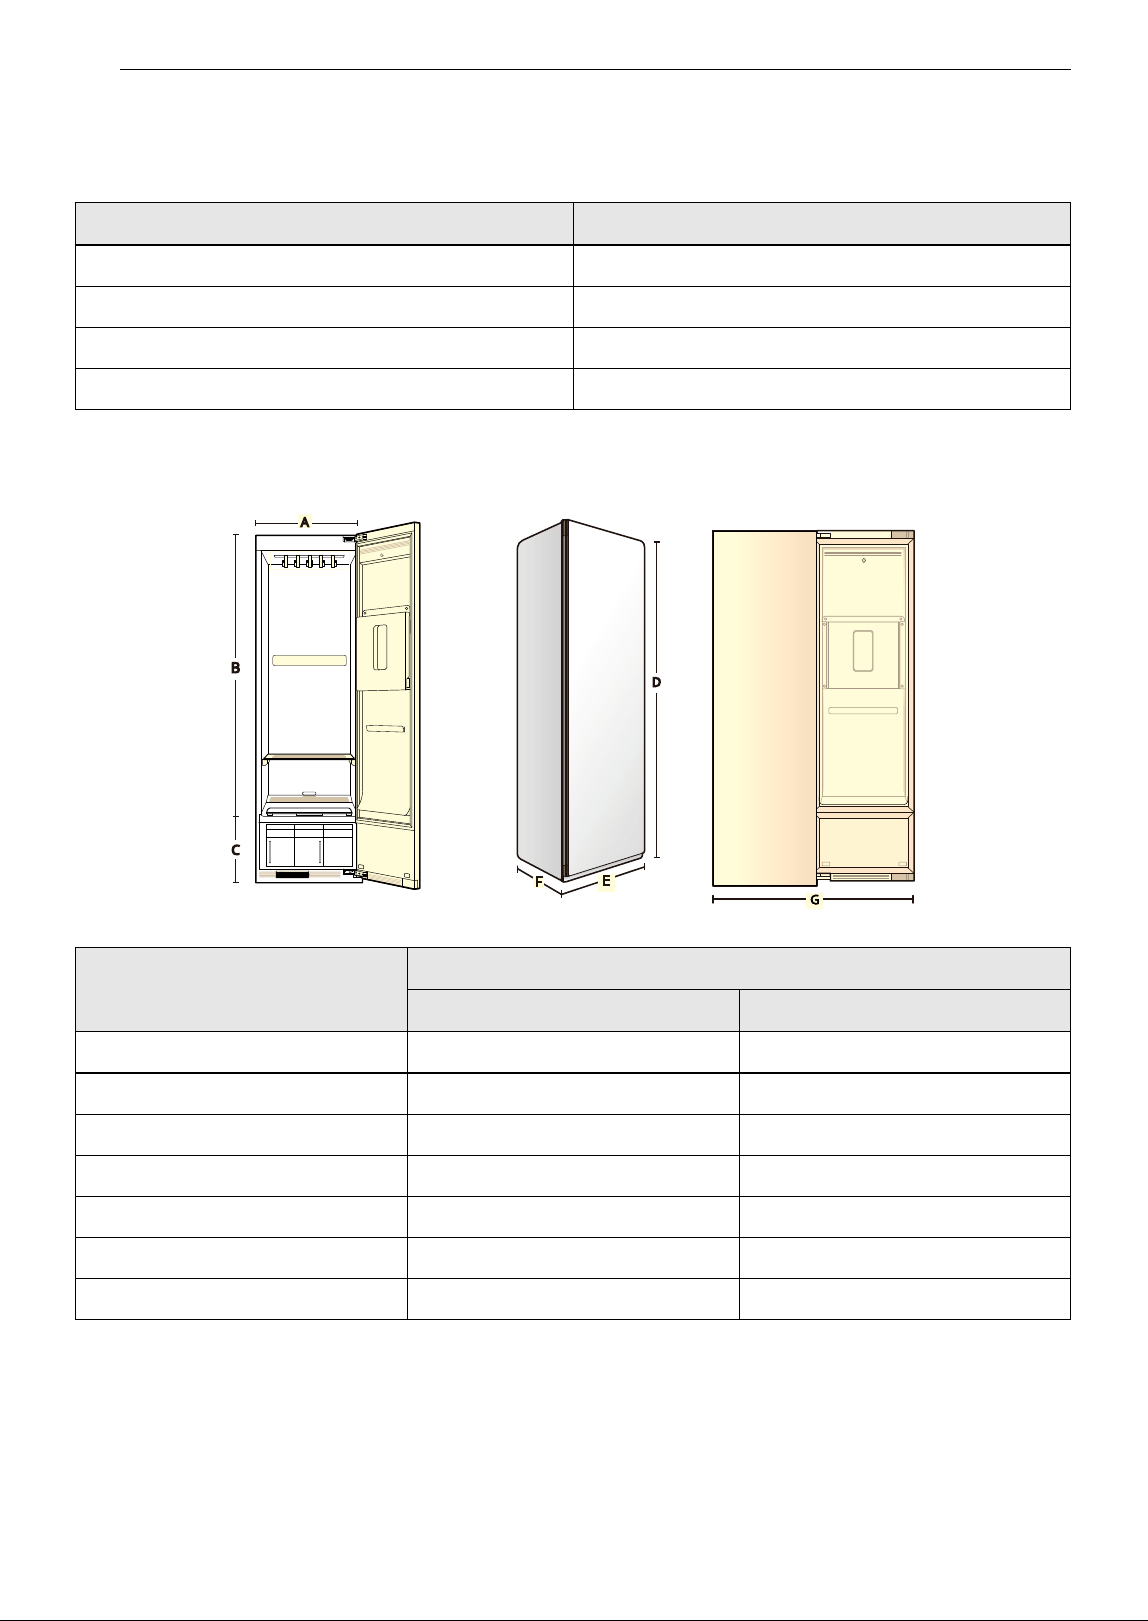
Specifications
Asterisks indicate model variants and can vary (0-9)
or (A-Z).
Dimensions
Model SC5GQR8GA
Electrical Requirements 120 V~, 60 Hz
Net Weight 203 lb (92 kg)
Rated Power 1500 W
Maximum Capacity 6 items
Dimensions (inch / mm)
inch mm
A 21 535
B 61 3/4 1570
C 15 1/2 395
D 77 3/8 1965
E 23 5/8 600
F 24 3/8 620
G 46 7/8 1190
11PRODUCT OVERVIEW
ENGLISH
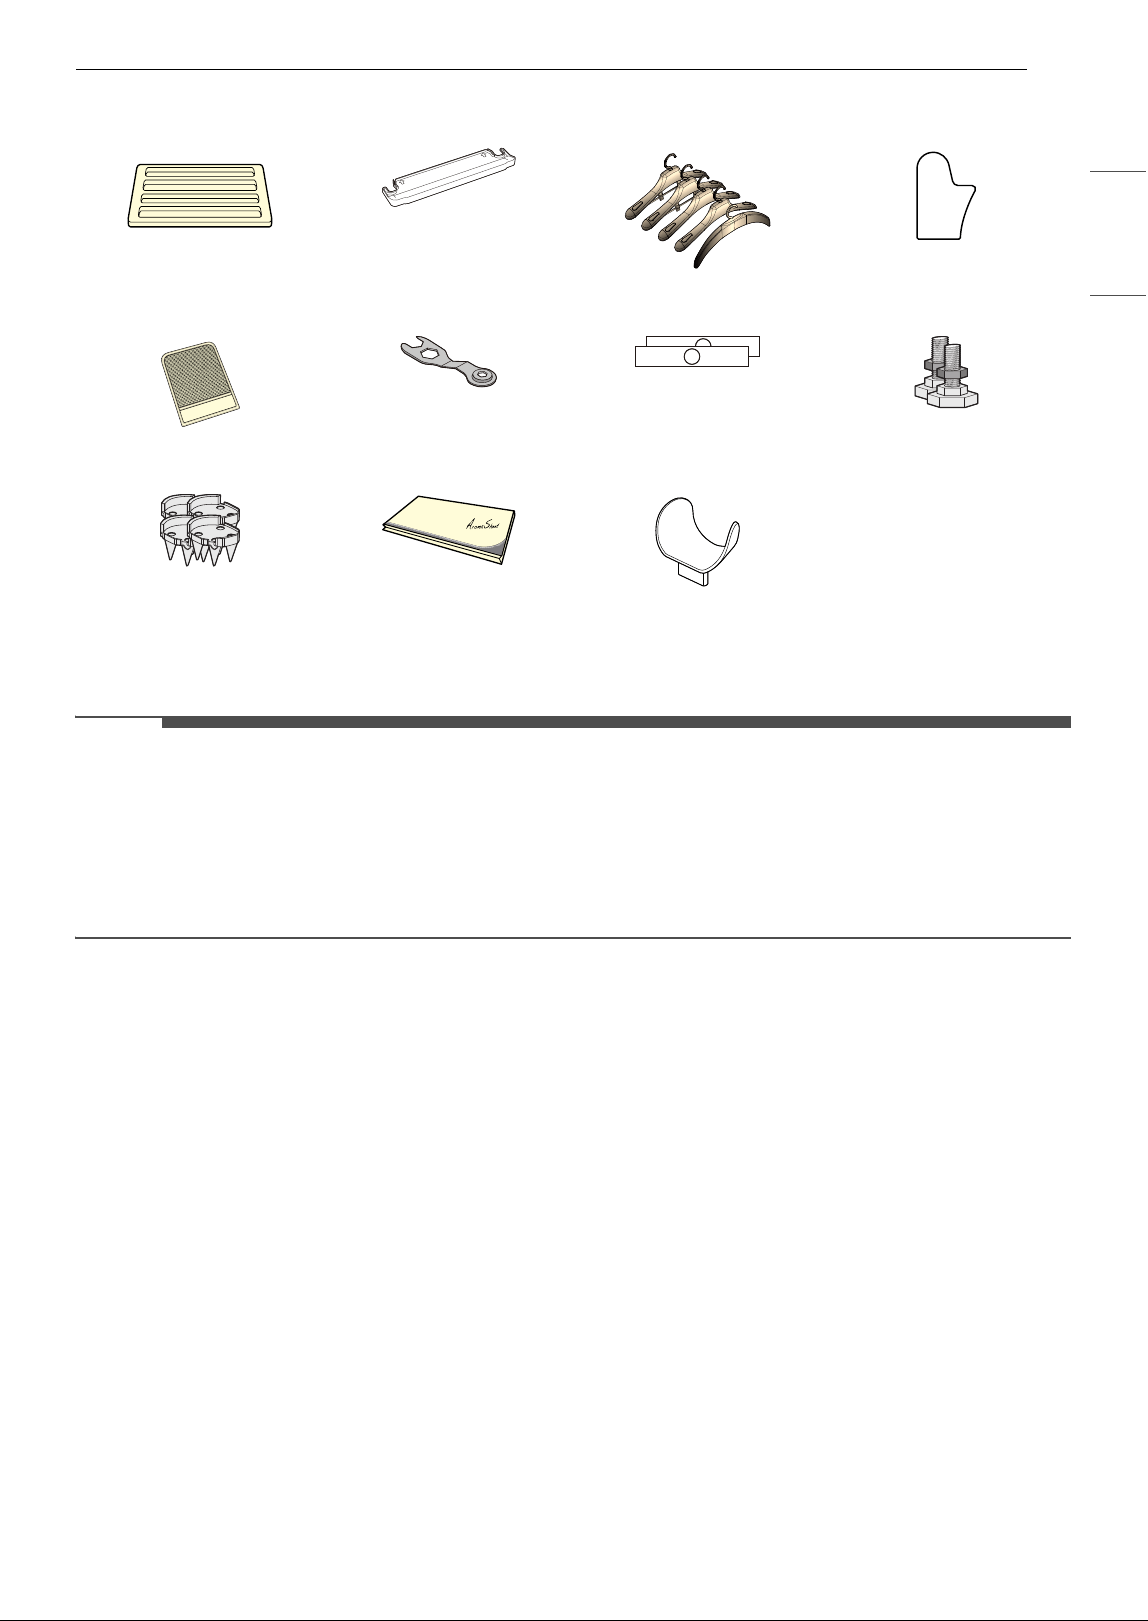
Accessories
† This accessory is only available on some models.
NOTE
• The included accessories vary depending on the model you purchased.
• Contact the store where the appliance was purchased or LG customer service if any accessories are
damaged or missing.
• For your safety and for extended product life, use only authorized components. The manufacturer is not
responsible for product malfunction or accidents caused by the use of separately purchased
unauthorized components or parts.
Shelf Drip tray 5 Regular Hangers Protective glove
cleaning glove Wrench 2 Hinge Covers 2 Rear Leveling Feet
4 Carpet Install Spikes
Aroma Sheets
†
Handy Steamer Holder
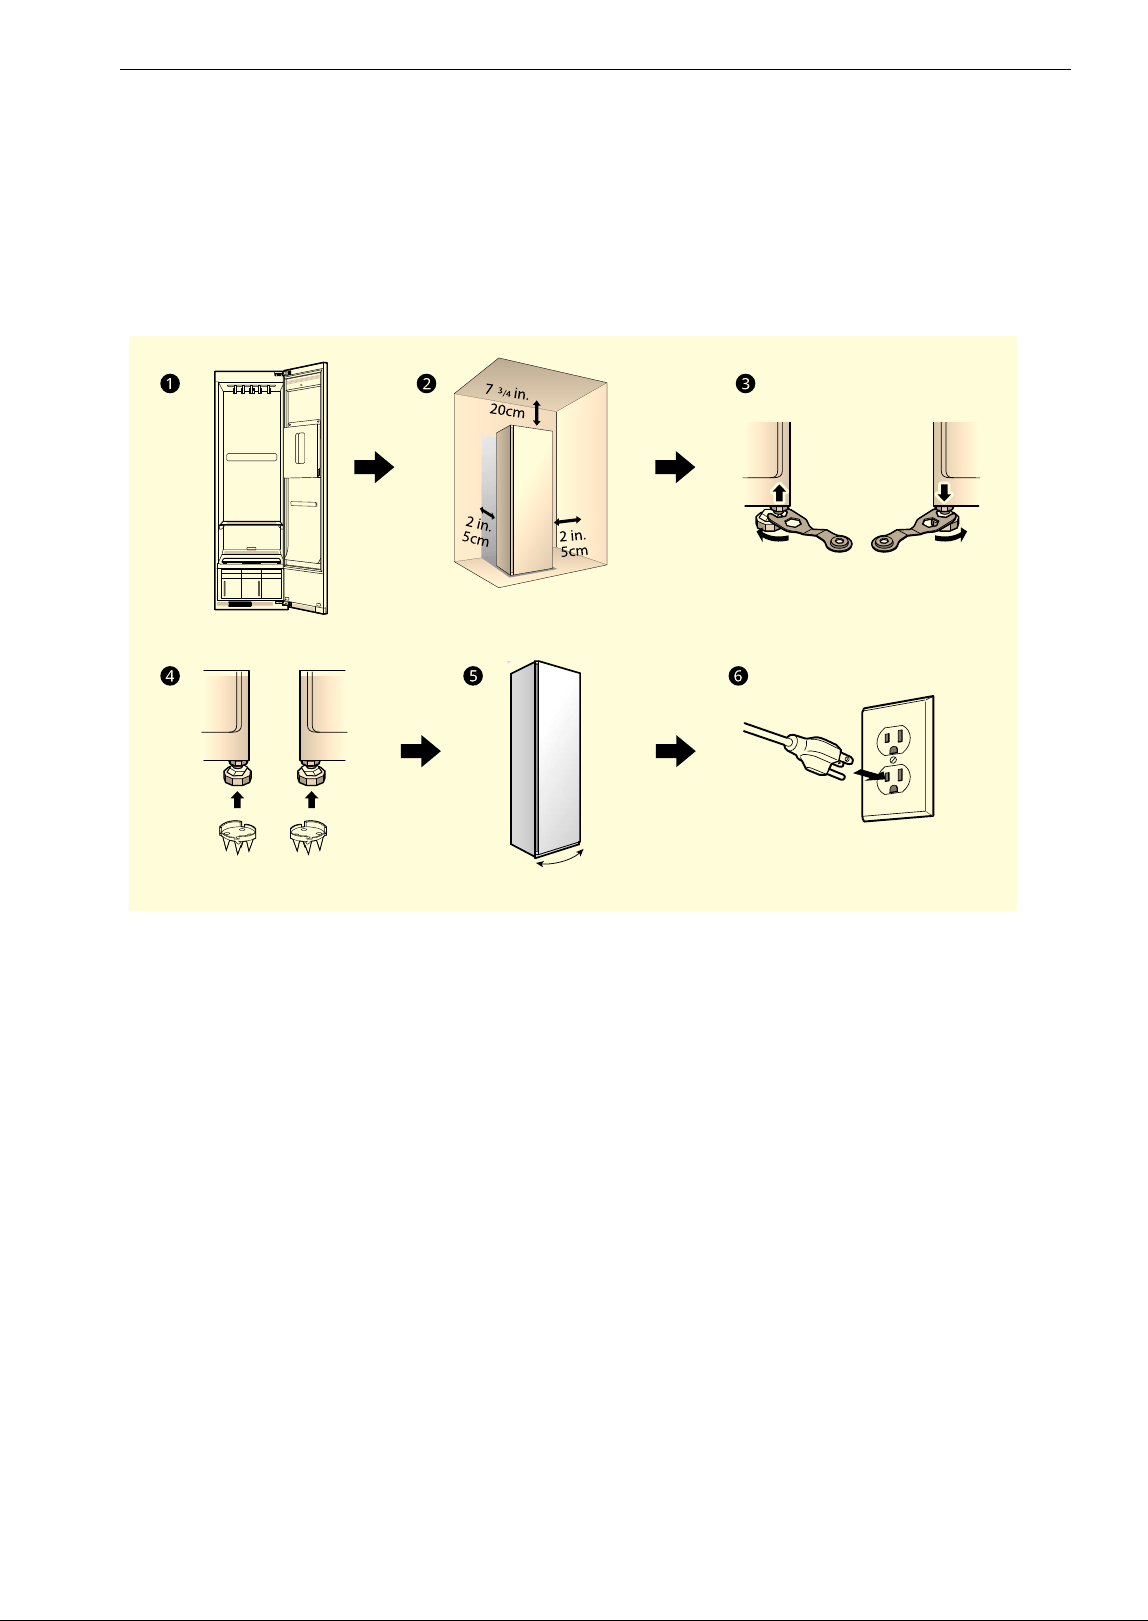
12 INSTALLATION
INSTALLATION
Before Installing
Installation Overview
Please read the following installation instructions first after purchasing this appliance or transporting it to
another location.
a Unpack and remove shipping material
b Check and choose the proper location
c Level the appliance
d Install carpet spikes
†
e Reverse the door swing
†
f Connect to grounded outlet
† If needed.
13INSTALLATION
ENGLISH
Installation Location
Requirements
Before installing the appliance, check the following
requirements for the installation location.
Installation Location
• A grounded electrical outlet should be located
within 2 ft. (61 cm) of either side of the
appliance.
• Install the appliance on a level floor. (Allowable
slope under the appliance: 1°)
• The floor must be level, with a maximum slope
of 1 inch (2.5 cm) under the appliance. If the
slope is greater than 1 inch (2.5 cm), the
appliance cannot be levelled properly.
• The appliance should be easily accessible if it
needs to be serviced.
• Do not install the appliance in an area where it
will be exposed to water and/or weather. Failure
to follow this warning could result in risk of
electric shock, injury, or product damage or
malfunction.
• Do not install the appliance on a hollow or
flexible platform. Doing so may cause excessive
noise and vibration and result in damage or
injury if the appliance tips over.
• Avoid any location where it comes into direct
contact with the wind from the air conditioner.
- Condensation may occur due to a difference in
temperature between the inside of the
product and the wind from the air conditioner.
NOTE
• A sturdy floor should support the total appliance
weight of 203 lb (92 kg). The combined weight of
any other laundry appliances should also be
considered.
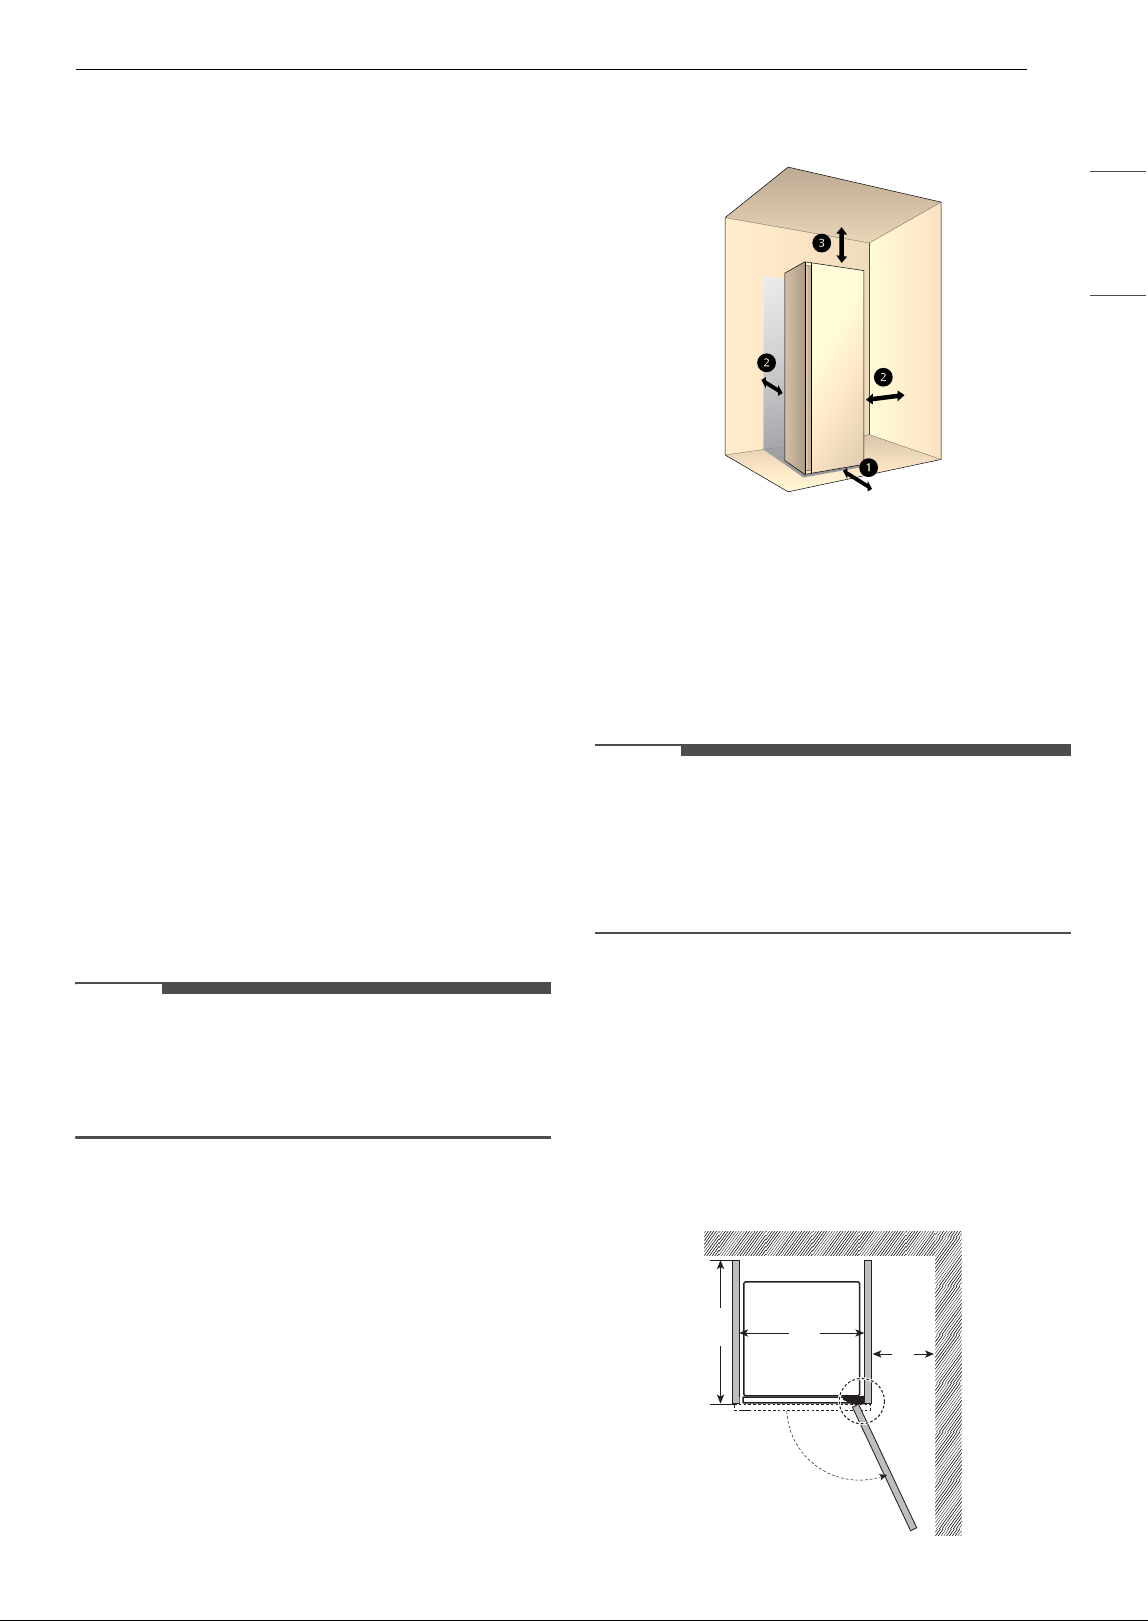
Recommended Installation Spacing
The following clearances are recommended for
the appliance. Although the appliance has been
tested for clearances of 1 3/16 in. (3 cm) on the
sides and rear, recommended clearances should
be considered for the following reasons:
a Allow at least 24 in. (61 cm) in front to open the
door.
b Allow at least 2 in. (5 cm) on both sides and
between the back of the appliance and the wall.
c Allow at least 7 3/4 in. (20 cm) between the top
of the appliance and any overhanging shelves
or cabinets.
NOTE
• If the appliance is too close to adjacent items,
performance may decrease and electricity
consumption may increase.
• Additional space should be considered on all
sides of the appliance to reduce noise transfer.
Installation Spacing for Recessed
Area or Closet Installation
There should be at least a little space around the
appliance (or any other appliance) to avoid contact
with walls, furniture, or other appliances during
operation. Allow a minimum of 1 3/16 in. (3 cm) on
all sides of the appliance to avoid increased noise
or damage.
115˚
B
A
C
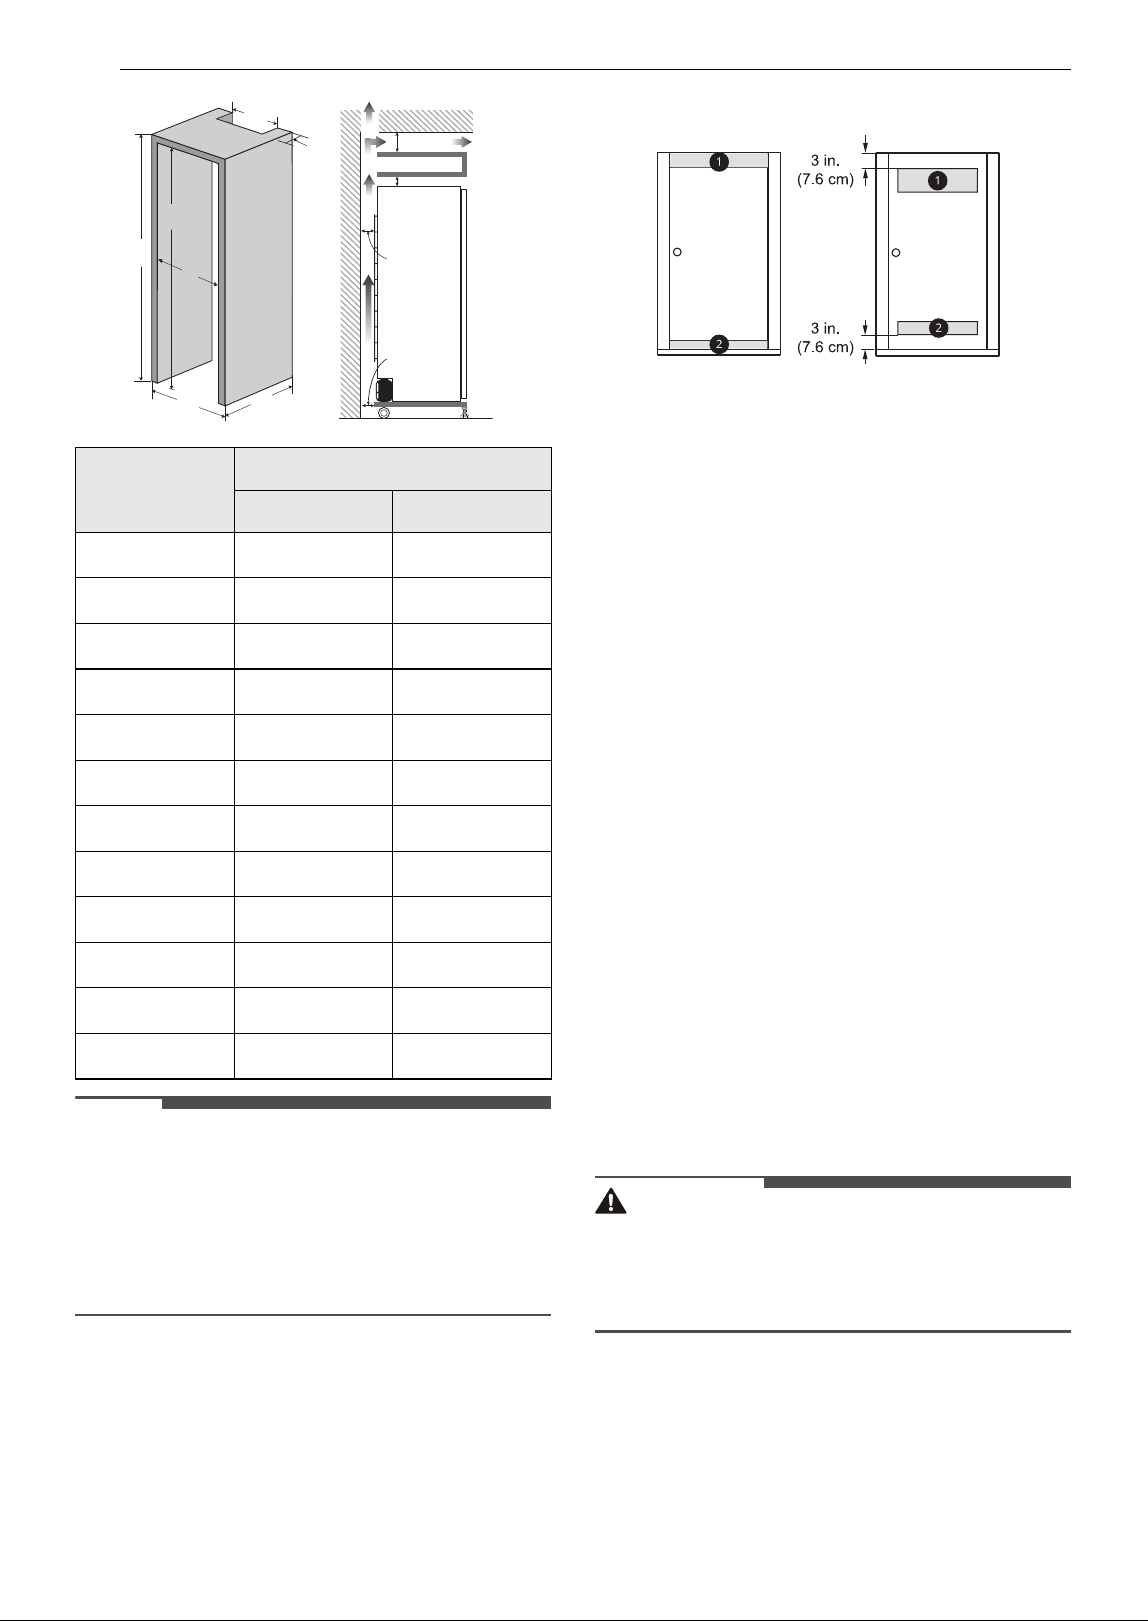
14 INSTALLATION
NOTE
• For closet installation, with a door, minimum
ventilation openings in the top and bottom of
the door are required. Louvered doors with
equivalent ventilation openings are acceptable.
• Minimum vent opening for built-in installation is
31.5 sq. in. (200 cm
2
.)
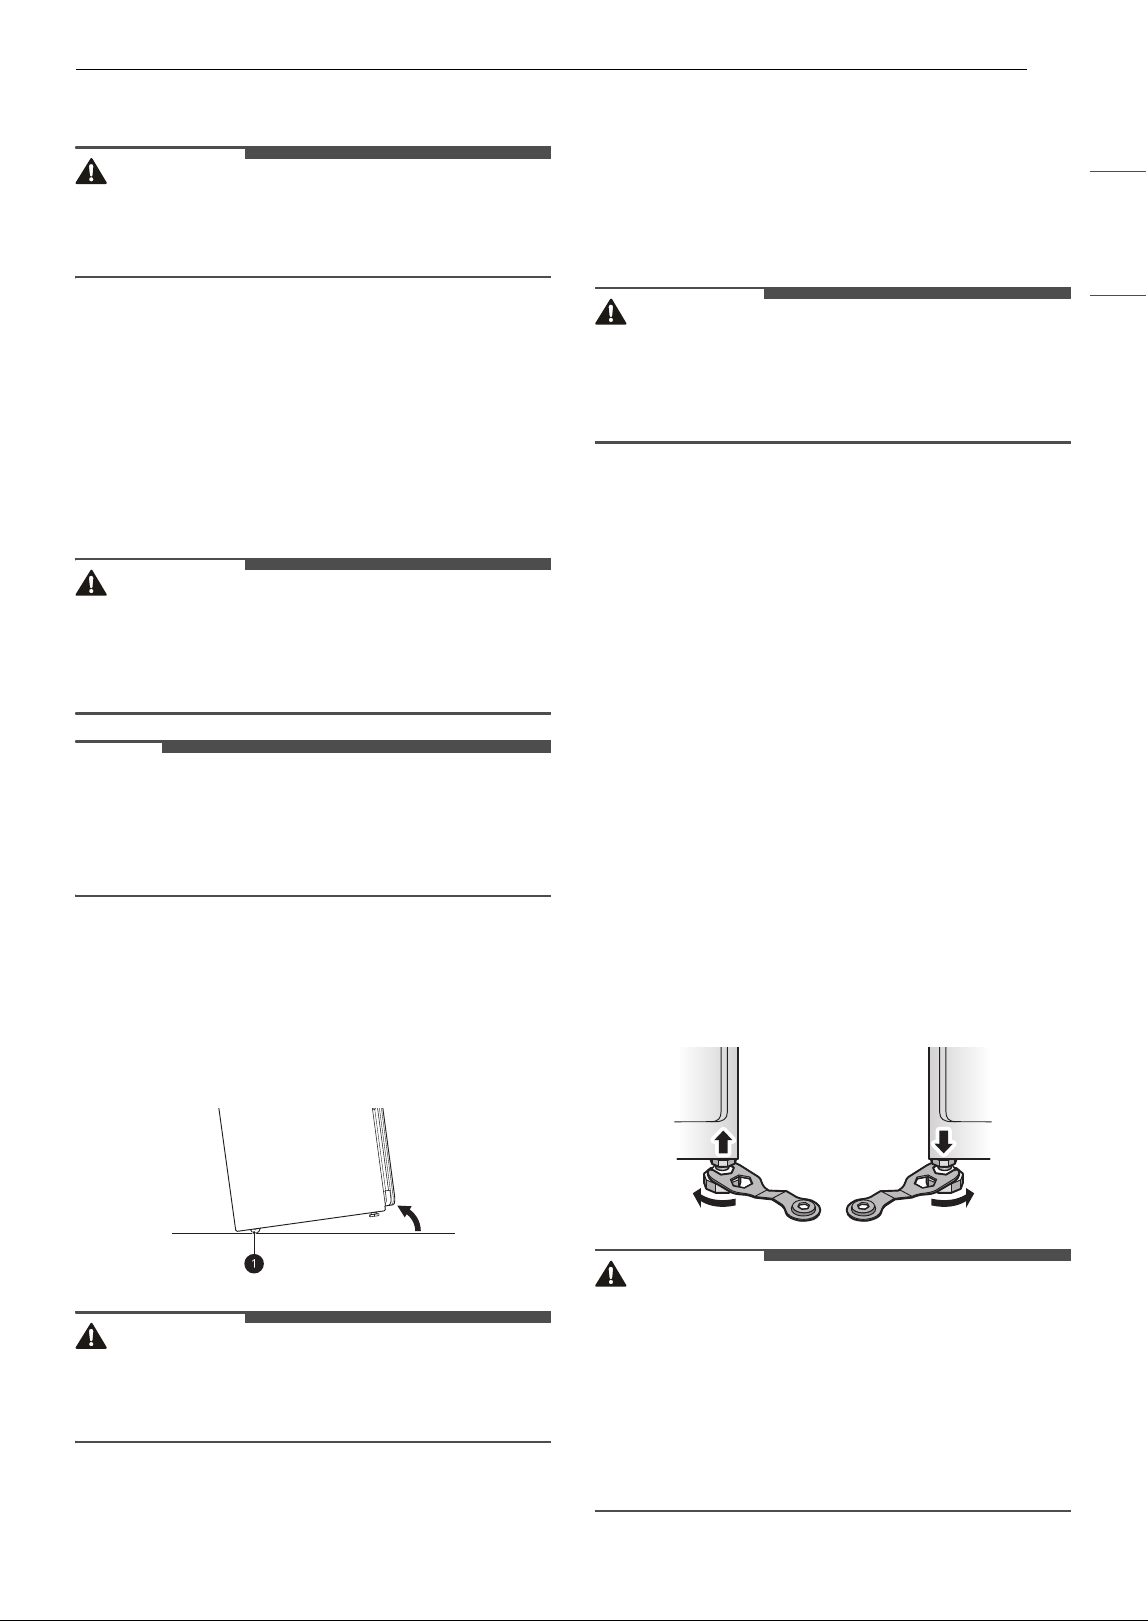
Closet Ventilation Requirements
Closets with doors must have both an upper and
lower vent to prevent heat and moisture build-up
in the closet.
One example shown uses vent grilles in the door.
a Upper vent opening with a minimum opening
of 48 sq. in. (310 cm
2
) must be installed no
lower than 6 ft. (185 cm) above the floor.
b Lower vent opening with a minimum opening
of 24 sq. in. (155 cm
2
) must be installed no
more than one foot above the floor.
Ambient Temperature
• Temperature must be between 50 ℉ (10 °C) and
95 ℉ (35 °C).
• If the ambient temperature is too low or high,
performance may be affected.
• Do not install in direct sunlight or where the
temperature may fall below 32 ℉ (0 °C).
Electrical Connection
• Do not use an extension cord or 2-outlet
adapter.
• Do not overload the outlet with more than one
appliance.
• Connect the appliance to an earthed socket in
accordance with current wiring regulations.
• The appliance must be positioned close to
outlets and the plug should be easily accessible.
WARNING
• The power cord must be plugged into an
appropriate outlet that is installed and
grounded/earthed in accordance with all local
codes and ordinances.
Dimensions
inch mm
A
2 27 1/8 2 690
B
2 26 3/8 2 670
C
2 10 2 250
D
2 78 7/8 2 2004
E
2 78 3/8 2 1990
F
2 21 13/16 2 555
G
2 2 2 50
H
2 27 1/8 2 690
I
2 27 5/8 2 700
J
2 2 2 50
K
2 1 2 25
L
2 2 2 50
B
I H
E
D
F
G
J
K
L
L
7.6 cm7.6 cm
7.6 cm7.6 cm
15INSTALLATION
ENGLISH
Unpacking the Appliance
WARNING
• Use two or more people to unpack and move the
appliance. Failure to do so can result in serious
injury if the appliance tips or falls.
Removing Carton and Shipping
Materials
Unpack the appliance from carton and remove any
tape and temporary labels from the appliance.
• Do not remove any warning labels, the model
and serial number label, or the technical sheet
label that is located under the front of the
appliance.
CAUTION
• Do not use sharp instruments, rubbing alcohol,
flammable fluids, or abrasive cleaners to remove
tape or glue. These products can damage the
surface of the appliance.
NOTE
• Tape or glue residue can also be easily removed
by rubbing a small amount of liquid dish soap
over the adhesive with your fingers. Wipe with
warm water and dry.
Moving the Appliance
Use the wheels a at the bottom of the appliance
to move the appliance. Push the appliance slowly
from about halfway down the front side.
CAUTION
• Keep the appliance upright when moving it. If
you lay the appliance on its side, refrigerant may
leak and cause the appliance to malfunction.
Leveling the Appliance
Checking the Level
Leveling the appliance prevents unnecessary
noise, vibration and movement. Check whether
the appliance is perfectly level after installation.
WARNING
• The appliance is heavy. Two or more people are
required when leveling the appliance. Failure to
follow this warning can cause serious injury or
death.
1 Position the appliance in the final location and
check to make sure it is level.
• All leveling feet must rest solidly on the
floor. Gently push on the corners of the
appliance to make sure that it does not rock
from corner to corner. Make sure there are
no gaps between the front leveling feet and
the floor.
2 Use the wrench (packaged with the appliance)
to turn the leveling feet.
• Extend the front feet to raise the appliance
or retract the feet to lower it. If unable to
level the appliance using only the front feet,
tip the appliance forward and install the two
rear leveling feet. Do not lay the appliance
down to install the leveling feet.
• Raise or lower the appliance using the
leveling feet until the appliance is level from
side to side and front to back.
CAUTION
• Make sure that all leveling feet are in firm
contact with the floor. If the appliance is used
without leveling, it may fall, causing injury,
damage, or product malfunction.
• Adjust the leveling feet only as far as necessary
to level the appliance. Extending the leveling feet
more than necessary can cause the appliance to
vibrate.
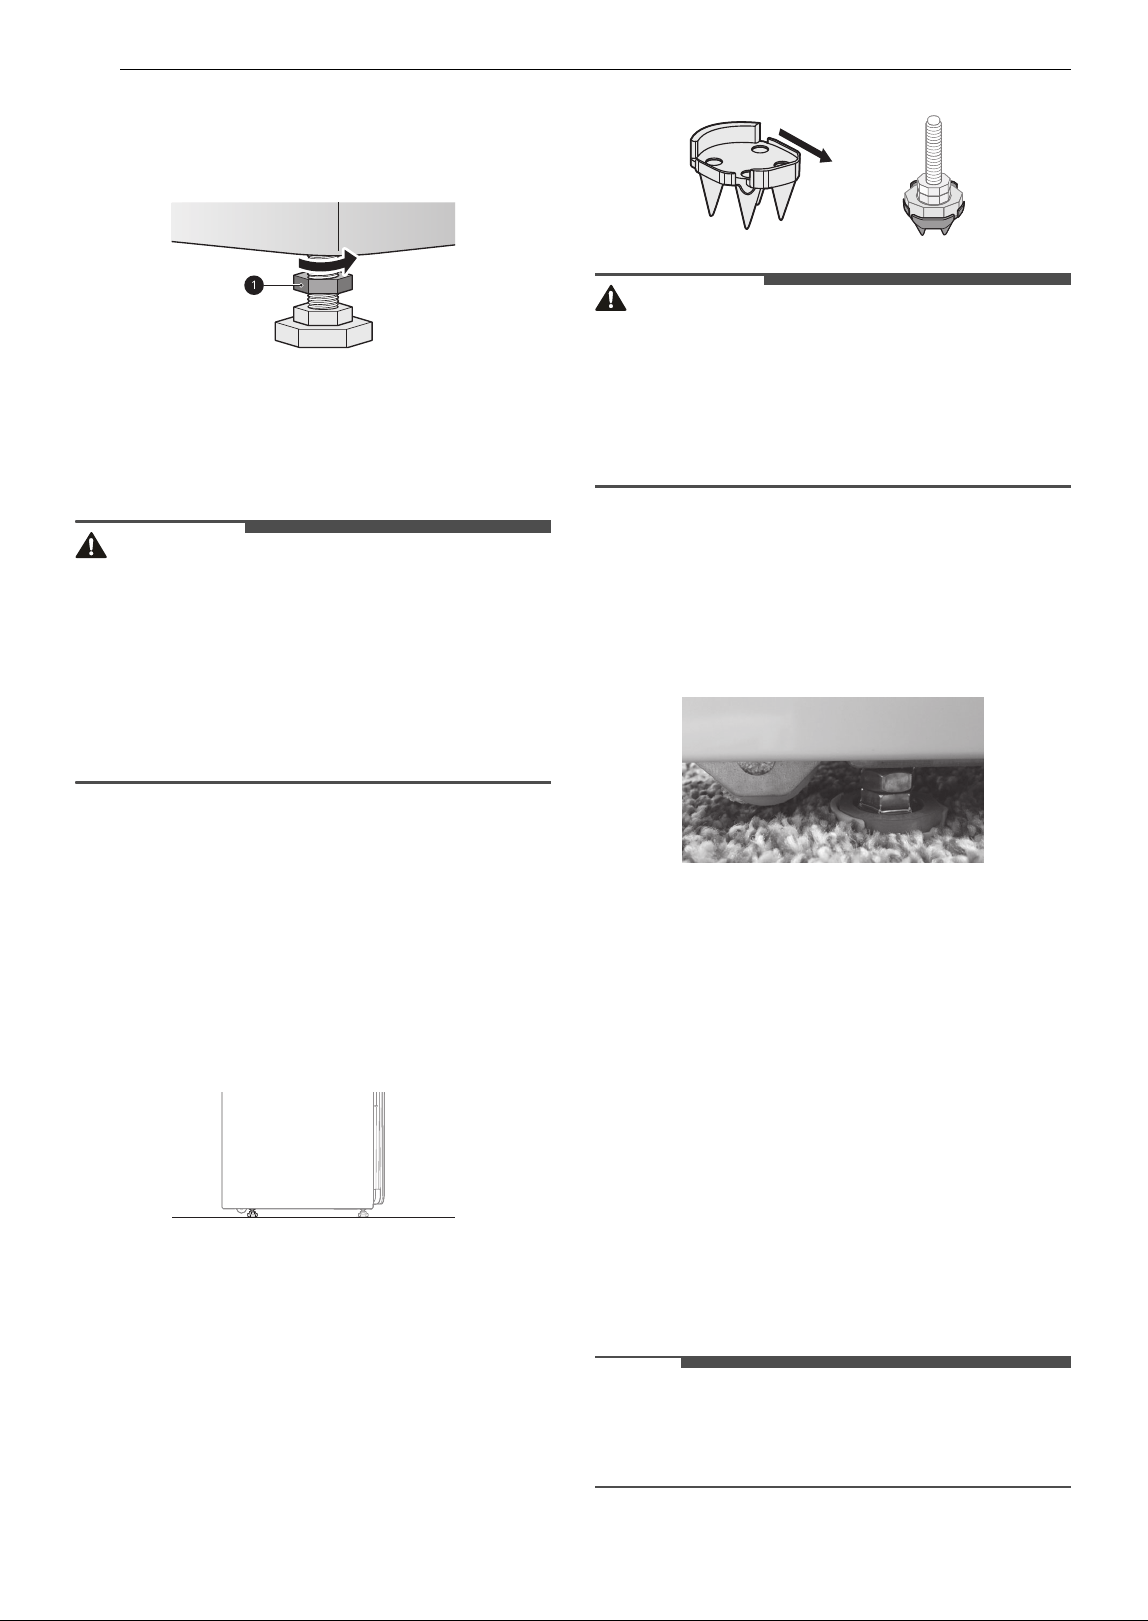
16 INSTALLATION
3 When the appliance is completely stable and
all leveling feet are resting solidly on the floor,
tighten the locking nuts
a.
Installing on Carpeting
Follow these instructions when installing the
appliance on carpeting.
WARNING
• The appliance is heavy. Two or more people are
necessary to install the rear leveling feet and
carpet spikes. Failure to do so can result in back
injury or other injury.
• Keep the appliance upright when moving and
installing it. If you lay the appliance on its side,
refrigerant may leak and cause the appliance to
malfunction.
1 Move the appliance into its final location
using the wheels at the bottom of the
appliance.
2 Install the two rear leveling feet at the rear
bottom of the appliance.
• Tip the appliance, do not lay it down, to
install the leveling feet.
3 Level the unit following the instructions in
Leveling the Appliance.
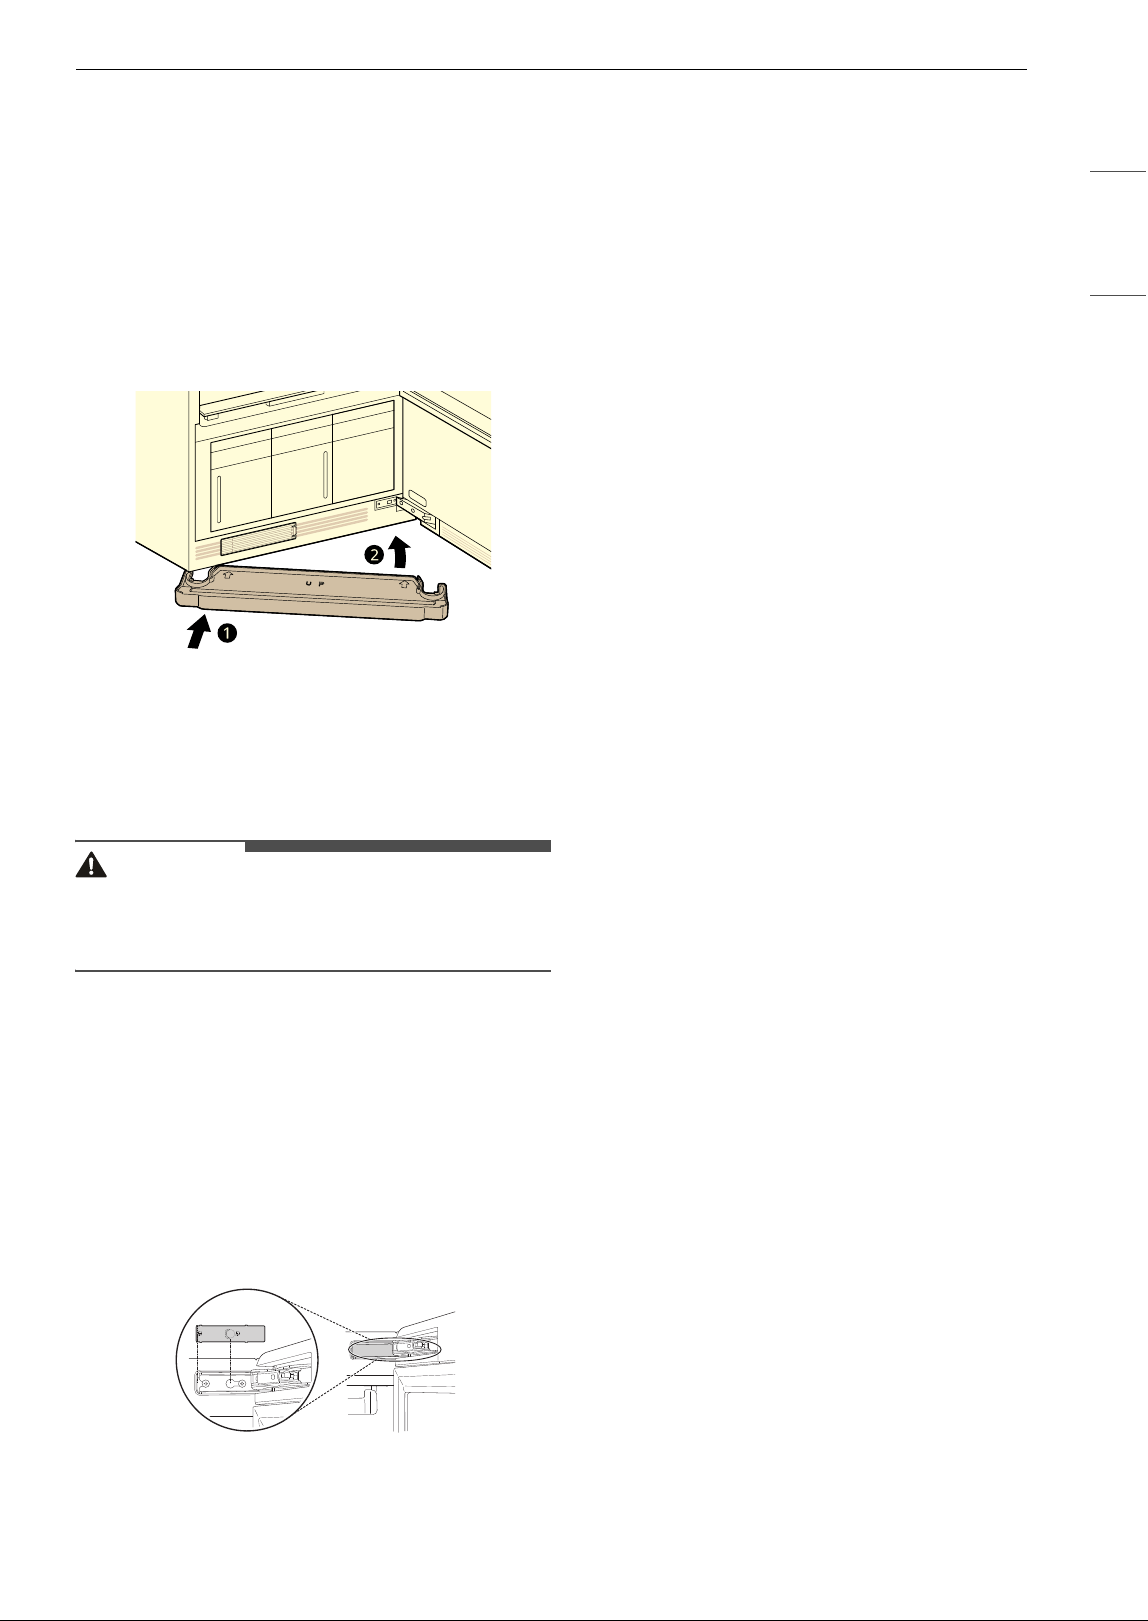
4 Install the four carpet spikes on the ends of
the leveling feet, with the shorter, octagonal
faces toward the front.
WARNING
• Take care when handling the carpet spikes. They
are designed to pierce through the carpet
backing and pad and are very sharp.
• Keep fingers and hands out from under the
spikes when setting the unit in place to avoid
personal injury or product damage.
5 Level the appliance once more after installing
the spikes.
• If the carpet has very deep pile or padding,
the front feet may need to be extended
slightly to install the drip tray.
If installing the appliance on carpeting:
• Be sure to check and empty the drip tray
often.
• Do not open the unit during operation to
avoid condensation forming on carpet
surface, which may result in surface mold or
mildew.
• Keep the bottom of the cabinet dry when
filling or emptying water tanks. Keep the
outside of the water tanks clean and dry to
discourage growth of mold or mildew.
Reversing the Door
It is possible to reverse the direction of the door
swing. This should be done by the installer at the
time of installation, if desired.
NOTE
• If the direction of the door swing needs to be
changed after installation, contact the LG
Customer Information Center.
17INSTALLATION
ENGLISH
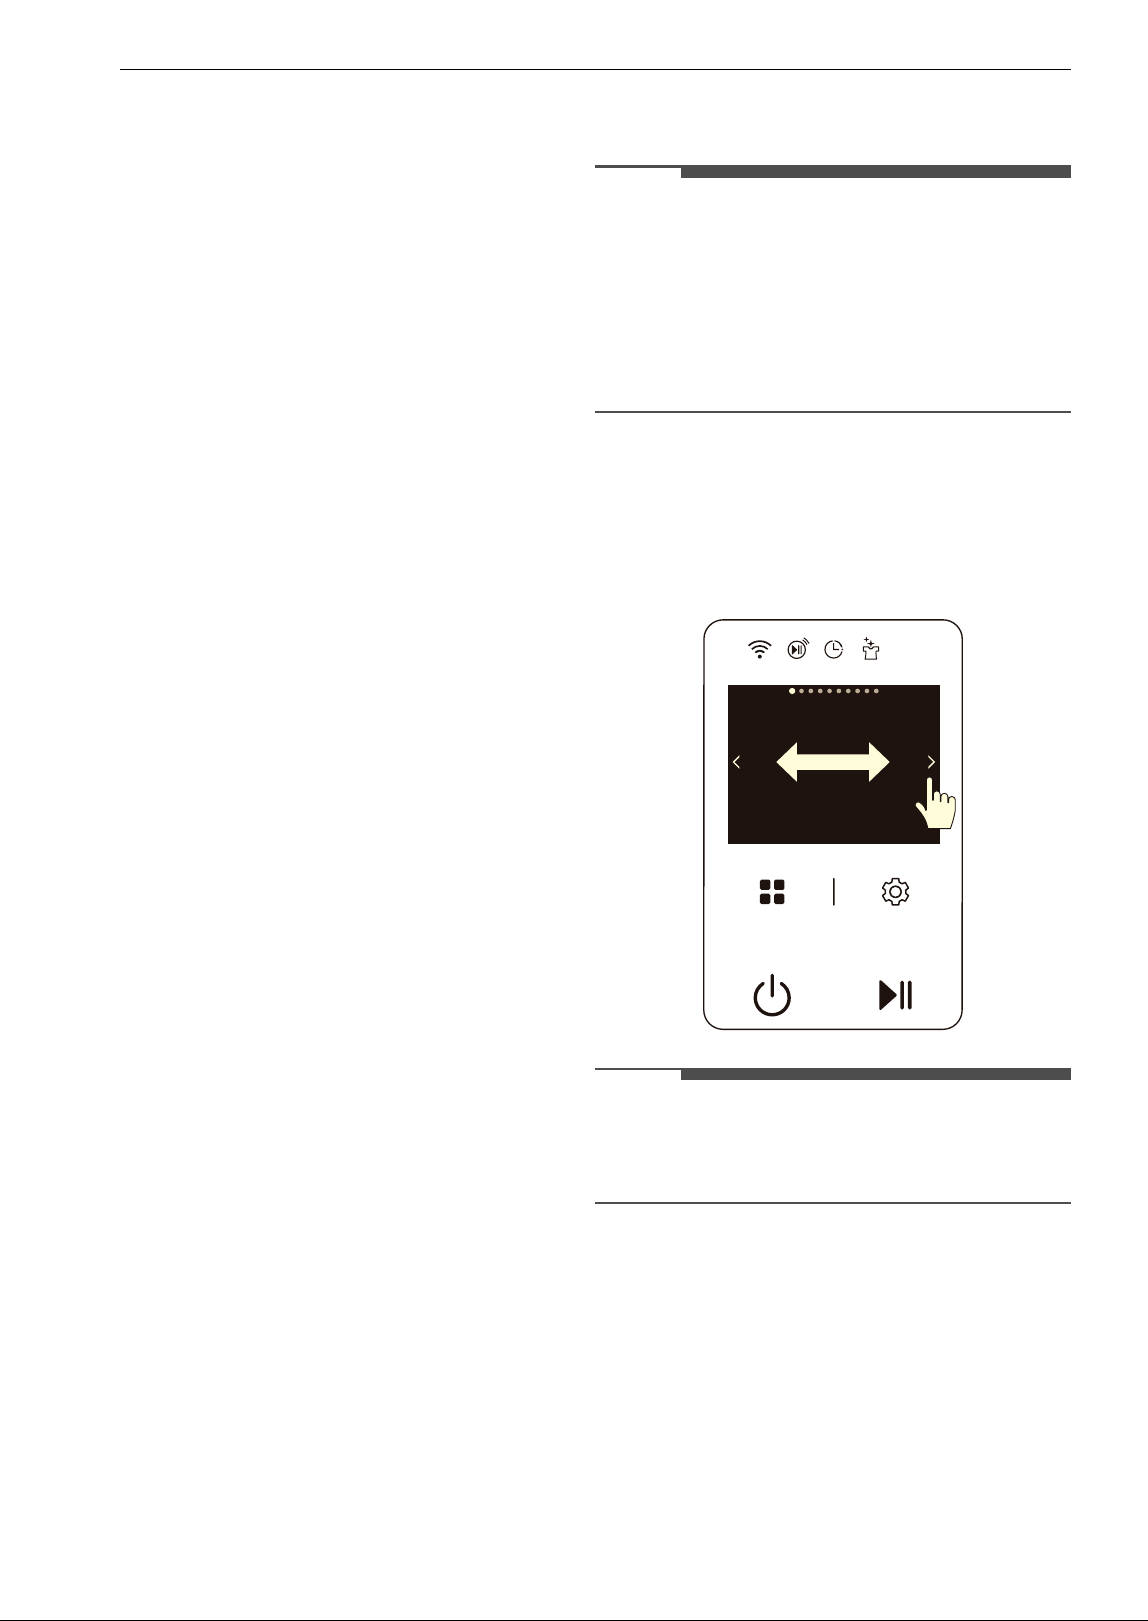
Assembling the Drip Tray
Before using the appliance, insert the drip tray
onto the bottom of the cabinet.
1 Hold the tray so the arrow and letter on the
front of the tray face up.
2 Insert one side of the tray first, then the other.
Push the tray until it slides completely in.
3 To detach, pull one side out then the other.
• If the tray collects water, detach it and
empty the water. After emptying it,
reassemble the tray.
CAUTION
• Do not operate the appliance without installing
the drip tray. Doing so could lead to water
damage caused by leaking.
Installing Hinge Covers
1 Open the appliance door.
2 Snap a hinge cover onto the upper hinge
assembly with the bent edge on the far side
from the hinge.
3 Repeat with the remaining hinge cover on the
lower hinge assembly.
18 OPERATION
OPERATION
WARNING – To reduce the risk of fire, electric
shock, or injury to persons, read the IMPORTANT
SAFETY INSTRUCTIONS before operating this
appliance.
Operation Overview
Using the Appliance
1 Prepare items.
• Exclude heat-sensitive items or items that
can be damaged by exposure to water.
• Place items on hangers or the shelf.
• Fasten buttons and close zippers to keep
items on moving hangers and prevent
damage.
2 Clean the lint filter and change the sheet in
the aroma filter.
• Lift out filter and remove lint from last load
for faster and more efficient performance.
Reinstall filter, checking alignment when
closing grille. Do not operate the appliance
without the lint filter in place. If using a
fabric softener sheet in the aroma filter,
change it after every use.
3 Check the water tanks.
• Fill water supply tank if needed. Empty
water drain tank if needed. Use clean tap
water in the supply tank for better product
performance and lifespan. Do not use
distilled water or reuse water from the drain
tank.
4 Load the appliance.
• Pay attention to fabric care labels and cycle
choice. If clothing is not appropriate for the
cycle selected, it may shrink or be seriously
damaged.
• Remove all empty hangers to avoid noise,
friction, and damage to clothing.
5 Turn on the appliance.
• Touch Power button to turn on the
appliance.
NOTE
• The control panel operates in touch method.
Read the following information and operate it.
- If there is any foreign object on the control
panel, it will not operate. Wipe the control
panel clean before use.
- If you press the control panel with a gloved
hand or other material, it will not operate.
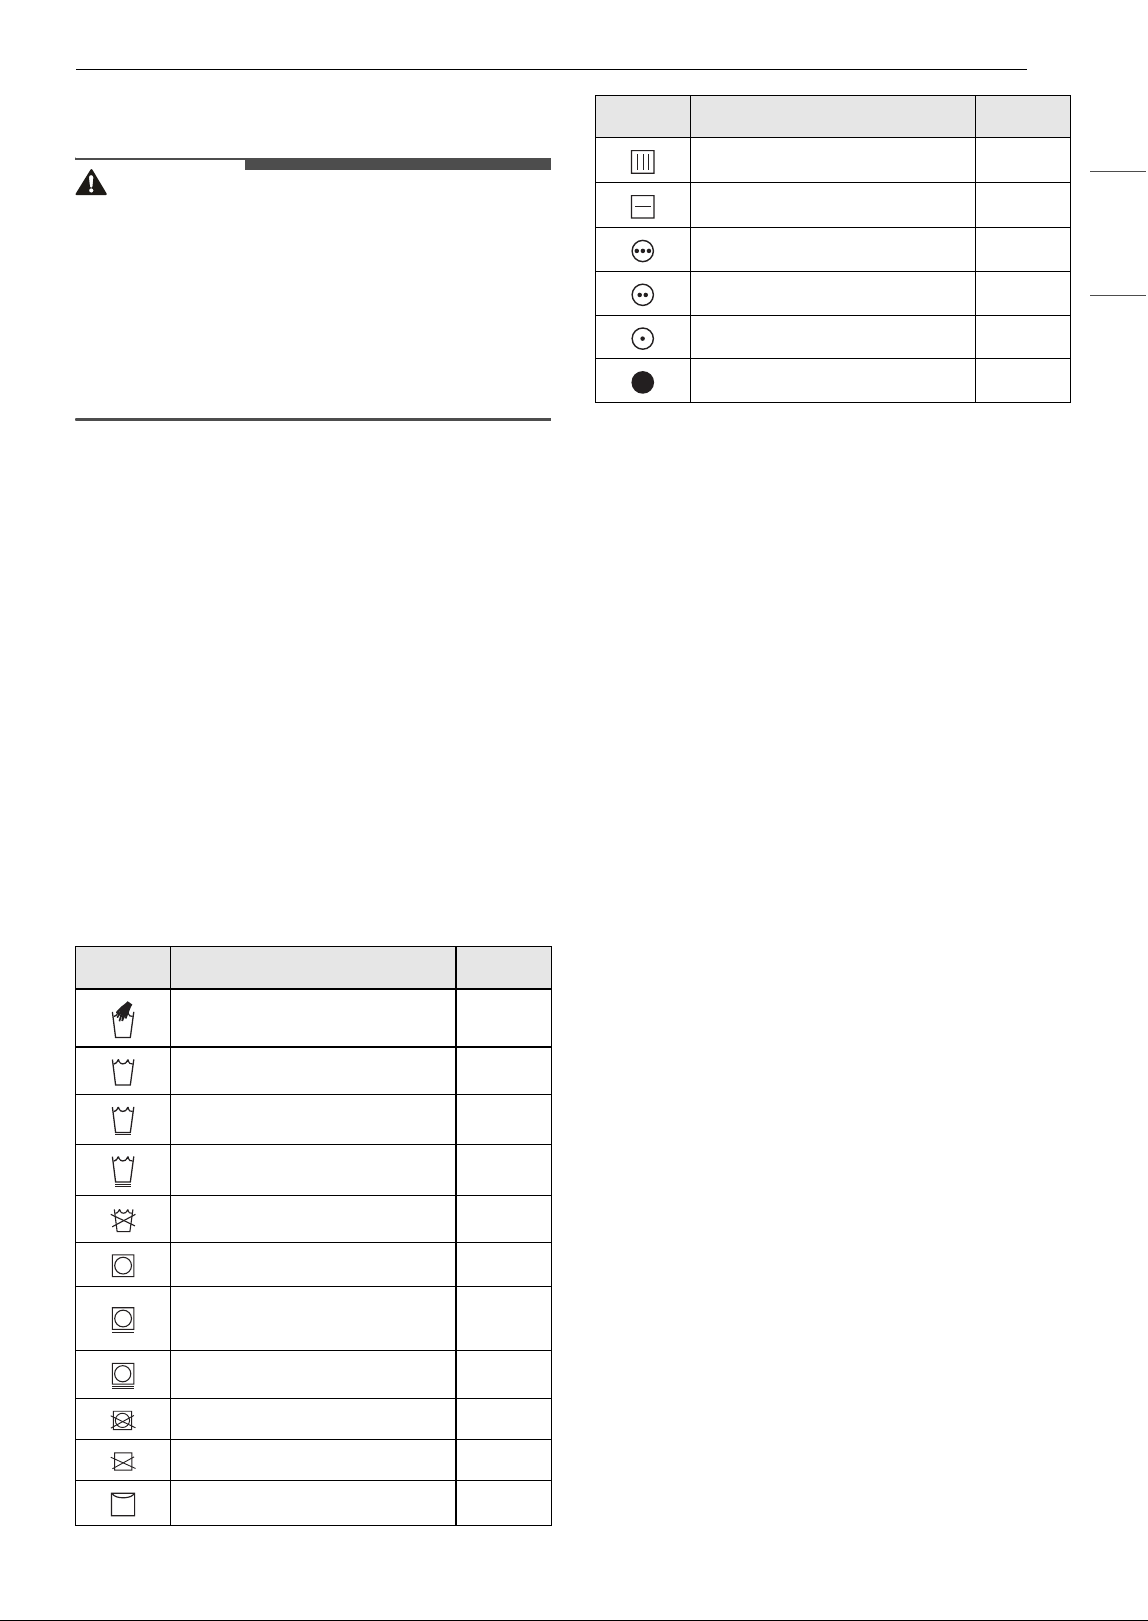
6 Choose a desired cycle.
• Change the cycle by swiping the screen left
and right or pressing the buttons (3, 4) as
follows.
NOTE
• By pressing the Arrangement (g) button at the
bottom of the touch display, you can see 4 cycles
on the split screens.
7 Begin a cycle.
• Touch and hold the Start/Pause button to
begin a cycle. Pause a cycle at any time by
touching Start/Pause again. If you do not
press the Start/Pause button to resume a
cycle within a certain time, the appliance
turns off automatically and all cycle settings
are lost.
• Do not open the door during a cycle. If
steam or hot air escapes, condensation may
19OPERATION
ENGLISH
collect on the floor or walls, resulting in
damage or mold.
CAUTION
• Do not open the door during operation. There is
a risk of burns or injury from escaping hot air or
steam.
• Do not allow steam or hot air to escape the
cabinet during operation. Opening the door
during operation affects performance,
lengthens styling time, and results in water
condensing and collecting on the floor.
8 End of cycle.
• Remove items when the cycle finishes.
Leave the door open to let hot air escape.
The interior light shuts off after 1.5 minutes
if the door is left open.
Preparing Loads
Checking Fabric Care Labels
Most articles of clothing feature fabric care labels
that include instructions for proper care. Below are
some of the symbols that are relevant to choosing
appropriate items for the appliance.
Symbols on Care Labels
† Some fabrics marked with a "do not wash" label,
such as fur and leather, can be used with the
appliance.
Sorting Items
• For best fabric care results, always treat fabrics
with similar care requirements together.
• Different fabrics have different care
requirements, and some fabrics cannot be
treated using certain cycles or should be treated
separately.
Checking Items before Loading
Some items are not appropriate for use with the
appliance. Using the wrong cycle for items can
result in damage to fabrics.
• Check all pockets to make sure that they are
empty. Items such as clips, pens, coins, and keys
can damage both the appliance and your
clothes.
• Do not put items that are sensitive to heat or are
not suitable for washing with water in Styler
cycles that use steam. Use the Gentle Dry cycle
only.
• Fur and leather (only 100% real leather) should
only be treated with the Fur/Leather Care cycle.
This cycle is a downloadable cycle.
• Wash heavily soiled or stained clothes before
putting them in the appliance. The appliance
does not have a washing function. Loose soil or
stains can be transferred between garments
during cycles.
• Treat items with an unpleasant odor in a
separate load. Odors can be transferred
between items during cycles.
• Clothing should be securely fastened, with
zippers and buttons closed, so that it does not
fall off the moving hanger during the cycle.
Label Meaning Check
Hand Wash OK
Machine Wash, Normal cycle OK
Perm press/wrinkle resistant OK
Gentle/delicate OK
Do not wash
OK
†
Normal OK
Permanent press/wrinkle
resistant
OK
Gentle/delicate OK
Do not tumble dry OK
Do not dry NO
Line/hang dry OK
Drip dry OK
Dry flat OK
High OK
Medium OK
Low OK
No heat/air dry NO
Label Meaning Check
20 OPERATION
• Do not put very wet items in the appliance to
dry. Shake off or wring out excess water before
putting items in the cabinet to dry. If a large
amount of water pools in the cabinet, styling
performance may suffer or the appliance may be
damaged.
• If there are small accessories (such as straps
from blouses, dresses, etc.), please remove them
if possible before use. If they cannot be
removed, please secure them to prevent them
from falling off. Accessories may fall inside the
product and cause malfunctions.
Checking Items before Every
Load
Checking the Lint Filter
Always make sure the lint filter is clean before
starting a new load; a clogged lint filter will
increase styling times.
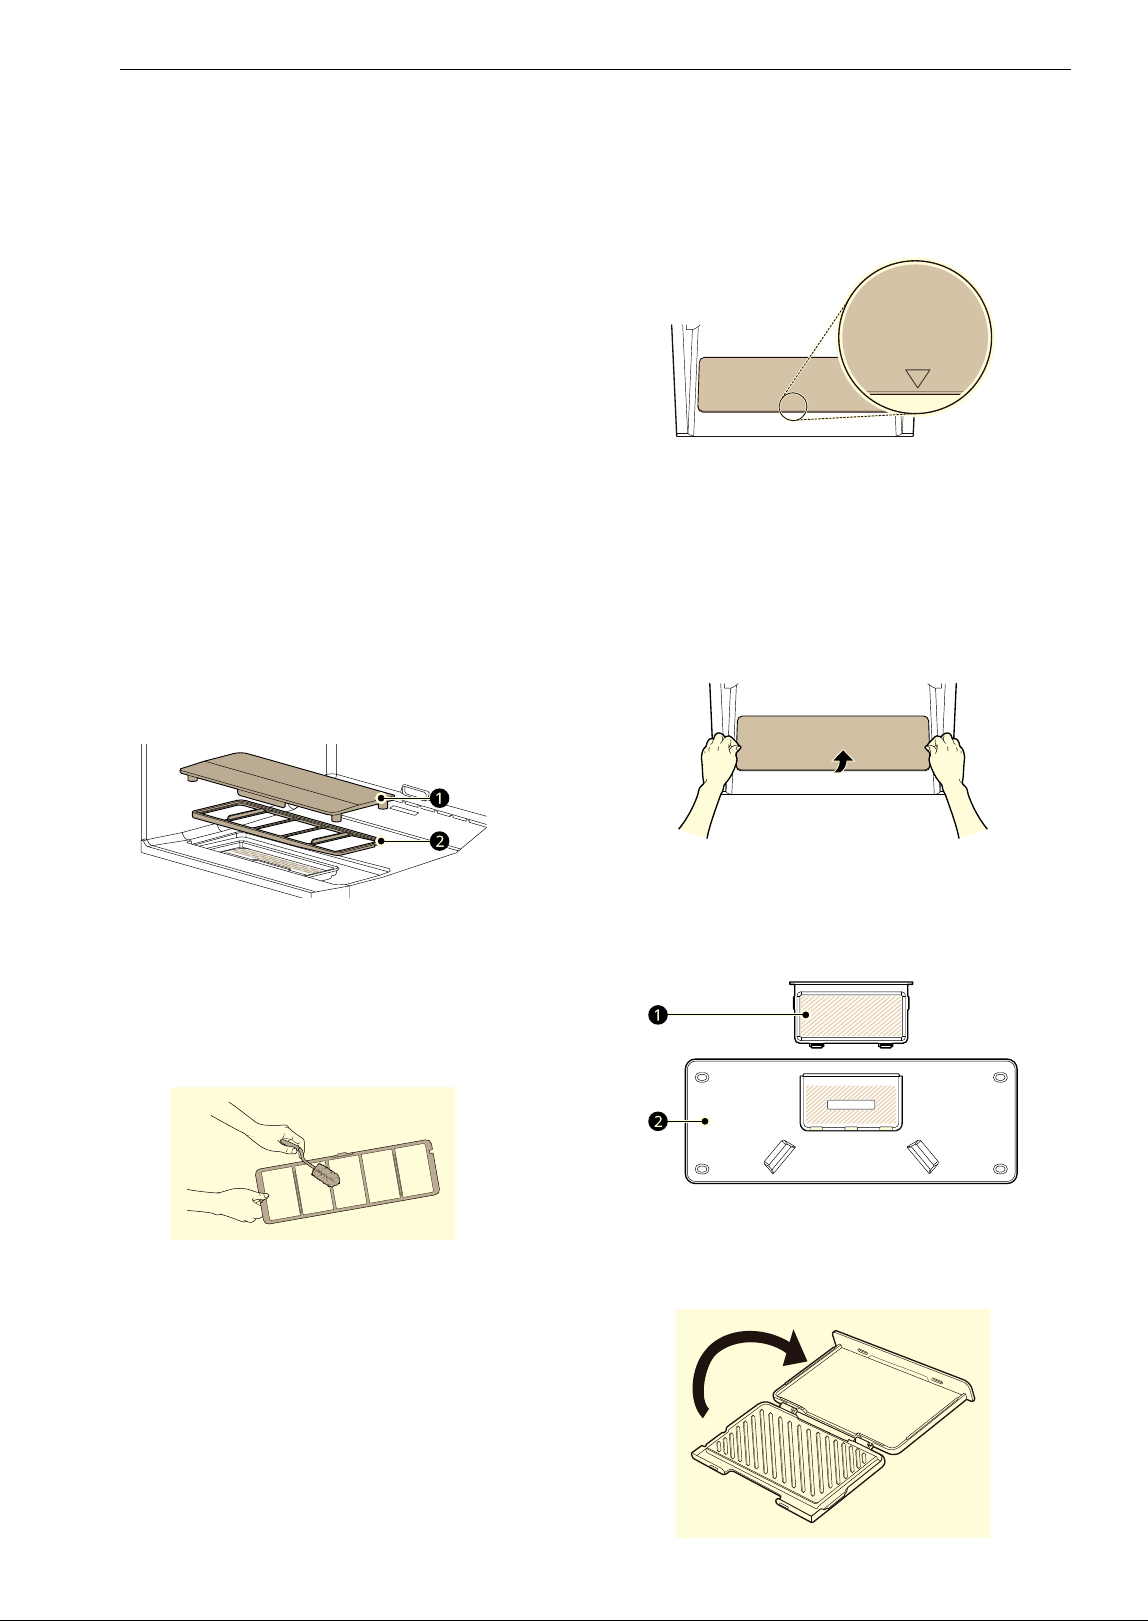
1 Remove the filter cover a and the lint filter b.
2 Brush the lint filter with a soft brush or clean it
with a vacuum cleaner.
• If the lint filter is torn or damaged, replace it
with a new one.
3 Reinstall the lint filter b and the lint filter
cover a properly.
• Install the lint filter cover so that the arrow
(
@) points toward the front of the
appliance.
Checking the Aroma Sheet
Insert one aroma sheet, use it 2 or 3 times, and
then replace it with a new sheet. If you want rich
aroma, replace it after using it 1 or 2 times.
1 Remove the lint filter cover.
2 Remove the aroma filter a from the back of
the lint filter cover b.
3 Open the aroma filter, insert an aroma sheet,
and then close the aroma filter.
21OPERATION
ENGLISH
4 Insert the aroma filter into the back of the lint
filter cover.
5 Reinstall the lint filter cover on top of the lint
filter correctly.
• Install the lint filter cover so that the arrow
(
@) points toward the front of the
appliance.
NOTE
• To use a favorite scent, spray perfume 4 to 5
times on a cotton pad and place the pad in the
aroma filter. The strength of the scent may vary
depending on the fragrance used.
Checking the Water Tanks
Check the water in the water tanks before use. The
water supply tank must be filled with water before
using the appliance. The appliance does not work
without water. The water drain tank should be
emptied before each use.
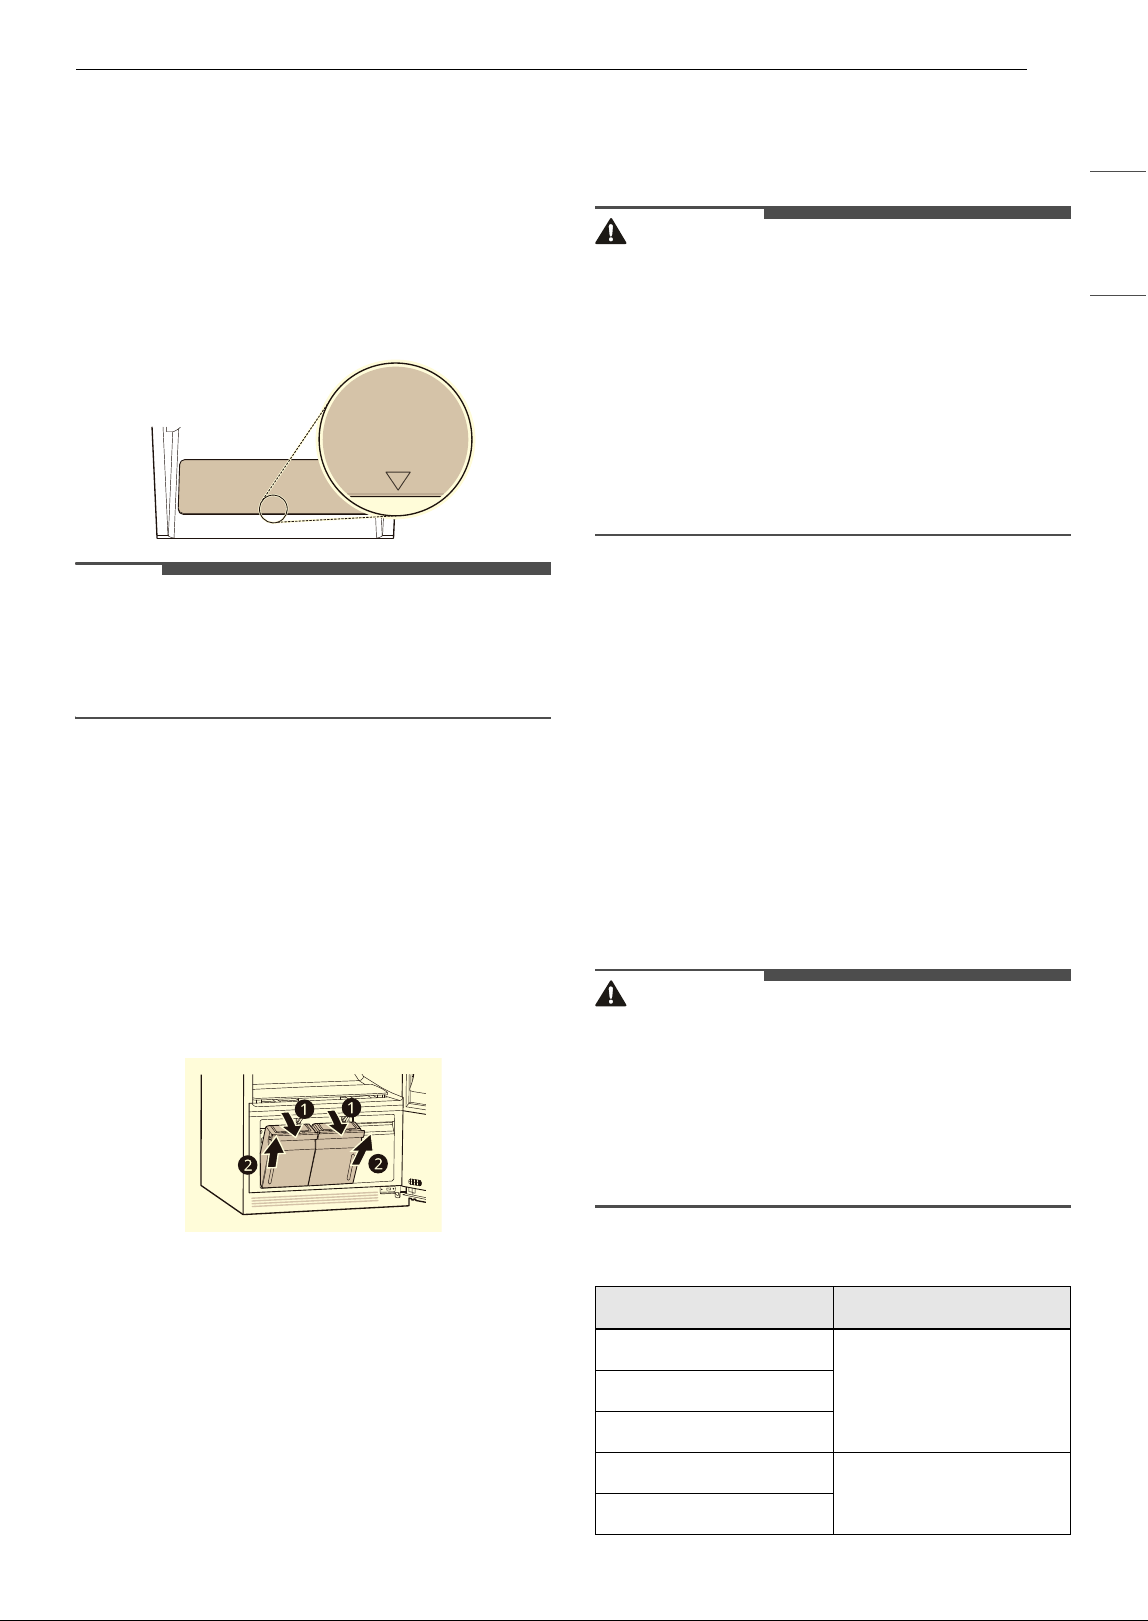
1 Pull the handle of the tank forward and
remove the tanks from the appliance. Check
the water level of the tanks.
2 Make sure the water supply tank is filled with
water.
• The full water supply tank can be used
approximately four times, depending on the
cycles used.
• Use clean tap water or bottled water for
best performance and longer product life.
Do not use distilled water or reuse the
water from the drain tank.
• The first time the appliance is used, 2/3 of
the water in the fully filled water supply tank
is used. Less water is used in following
cycles.
CAUTION
• Only use water when filling the water supply
tank. Any other substance, such as detergent or
fabric softener, may damage the appliance.
• Use only clean tap water or bottled water.
Foreign materials in the water may shorten the
lifespan of the appliance.
• Do not use distilled water. The water sensor may
not work.
• Do not reuse the water in the drain tank to fill
the water supply tank.
3 Make sure the water drain tank is empty.
4 The drain tank will be filled after about three
uses. The tank fills more quickly during styling
cycles. The appliance does not work if the
drain tank is full.
• Some discoloration of the water drain tank
may occur over time. This is normal and will
not affect product performance.
Loading the Appliance
WARNING
• Flammable objects such as lighters or matches
could ignite, causing a fire. Remove them from
pockets to avoid fire, explosion, or death.
• Never style clothes that have been exposed to
oil, gasoline, or other flammable substances.
Failure to obey this warning can result in fire,
explosion, or death.
Choosing a Styling Method
Item How to style it
Suit coat, blazer
Moving hangerCoat, jacket (short)
Coat (long)
Dress (short)
Moving hanger after
removing shelf
Dress (long)
22 OPERATION
The Moving Hanger
Hang clothes on the moving hanger using the
hangers provided with the appliance, or use any
plastic or metal hanger that hooks snugly into the
indentations in the moving hanger.
• Use the moving hanger for suits, coats, jackets,
blouses, dresses, skirts, and pants that don’t
require a crease. Use the Pants Crease Care to
crease pants.
• Anything that can be securely placed on a
hanger and steamed or dried without retaining
hanger marks or other damage can be placed on
the moving hanger.
• Style sweaters or knits on the shelf to avoid
hanger marks.
• Arrange clothing so it does not touch the sides
or rear of the cabinet, if possible. Condensation
may form on the interior surface of the cabinet,
and items in contact with the surface may
remain damp at the end of the cycle.
• The moving hanger will move even when only
the shelf is being used.
• When using an ordinary metal/plastic hanger,
the hook should be less than 5/32 in. (4 mm)
thick and the hook must fit in the indentation in
the moving hanger snugly. If the fit is too loose,
it may result in vibration, noise and damage to
clothing.
CAUTION
• Remove empty hangers from the moving hanger
and place them on the shelf before starting a
cycle. Empty hangers may cause unnecessary
noise, friction, and damage to fabrics.
• Do not lean or pull on the moving hanger.
• Hang hangers in the same direction on the
moving hanger to prevent collisions.
• Do not allow children to play with or hang onto
the moving hanger. The appliance could tip,
resulting in damage or injury.
Using the Moving Hanger
1 Insert hangers into slots and pull down to
secure the hook snugly.
• Hooks should fit down in the slots snugly to
prevent noise, vibration, or damage to
items during operation.
NOTE
• Do not overcrowd items. The fewer items, the
better the styling performance. Items that touch
the sides of the cabinet may pick up
condensation from the cabinet and fail to style
completely.
Using Hangers
The hangers that come with the appliance are for
use with the appliance only. Any plastic or metal
hanger that has a hook less than 5/32" (4 mm)
thick and hooks snugly into the indentations in the
moving hanger can be used in the appliance.
Skirt
Moving hanger
Lightweight blanket,
throw
Baby blanket
Pants (not creased)
Shorts
Children’s clothes
Scarf
Moving hanger or shelfTie
Shawl
Lingerie
Moving hanger or shelf
(if delicate)
Shirt, blouse
Pants (creased) Pants Crease Care
Cap, hat
Shelf
Stuffed toys
Pillow
Sweater
Knitwear
Baby clothes
Item How to style it
23OPERATION
ENGLISH
• Do not use hangers with wool, knitwear, or
delicate lingerie. The garments may stretch or
be left with hanger marks.
• Wrinkles may appear at the back of the collar on
some garments.
• Remove empty hangers or store them in the
shelf during operation.
• Fasten buttons and zippers on hanging clothes
to prevent them from falling off hangers during
operation. Fasten the neck area with cotton
string if there is no button or zipper.
• Remove or store the shelf when hanging longer
items so items won’t get wrinkled.
• Hang long clothing on the left so that it does not
come into contact with the steam nozzle (center).
1 Select an appropriate hanger.
• Choose the appliance hanger that fits the
item you are hanging up.
2 Fasten the buttons and zippers on all
garments and hang them on hangers.
• Doing so helps keep the garments from
falling or becoming more wrinkled during
the cycle. If a garment has no buttons or
zipper, fasten it with a cotton string around
the collar area.
CAUTION
• If there are small accessories (such as straps
from blouses, dresses, etc.), please remove them
if possible before use. If they cannot be
removed, please secure them to prevent them
from falling off. Accessories may fall inside the
product and cause malfunctions.
3 Place the hangers into the slots of the moving
hanger.
CAUTION
• The hanger holder inside the door is for the use
of the high pressure handy steamer, so do not
hang any clothing on the hanger holder when
using a Styler cycle.
The Pants Crease Care
Using the Pants Crease Care helps you remove
daily wrinkles while maintaining the crease lines
on the front and back of your pants.
CAUTION
• When using the pants crease care, open the
product door completely. If not, you may bump
into and damage the product when opening and
closing the pants crease care.
• Do not pull the pants clips forcibly. Doing so
may damage the product.
• Do not lean on or hang heavy items on the door
of the pants crease care. The appliance may tip,
resulting in damage or injury.
• Do not allow children to play with or hang onto
the door of the pants crease care. The appliance
may tip, resulting in damage or injury.
• Keep fingers out of pinch point areas when
closing the door of the pants crease care.
Supervise nearby children to prevent injuries.
24 OPERATION
NOTE
• Pants can be pressed while refreshing other
items in the same cycle.
• For optimum results, use the Pants Crease Care
cycle, which is designed for use with the pants
crease care feature. This cycle can be added
using Edit Cycle List in Settings.
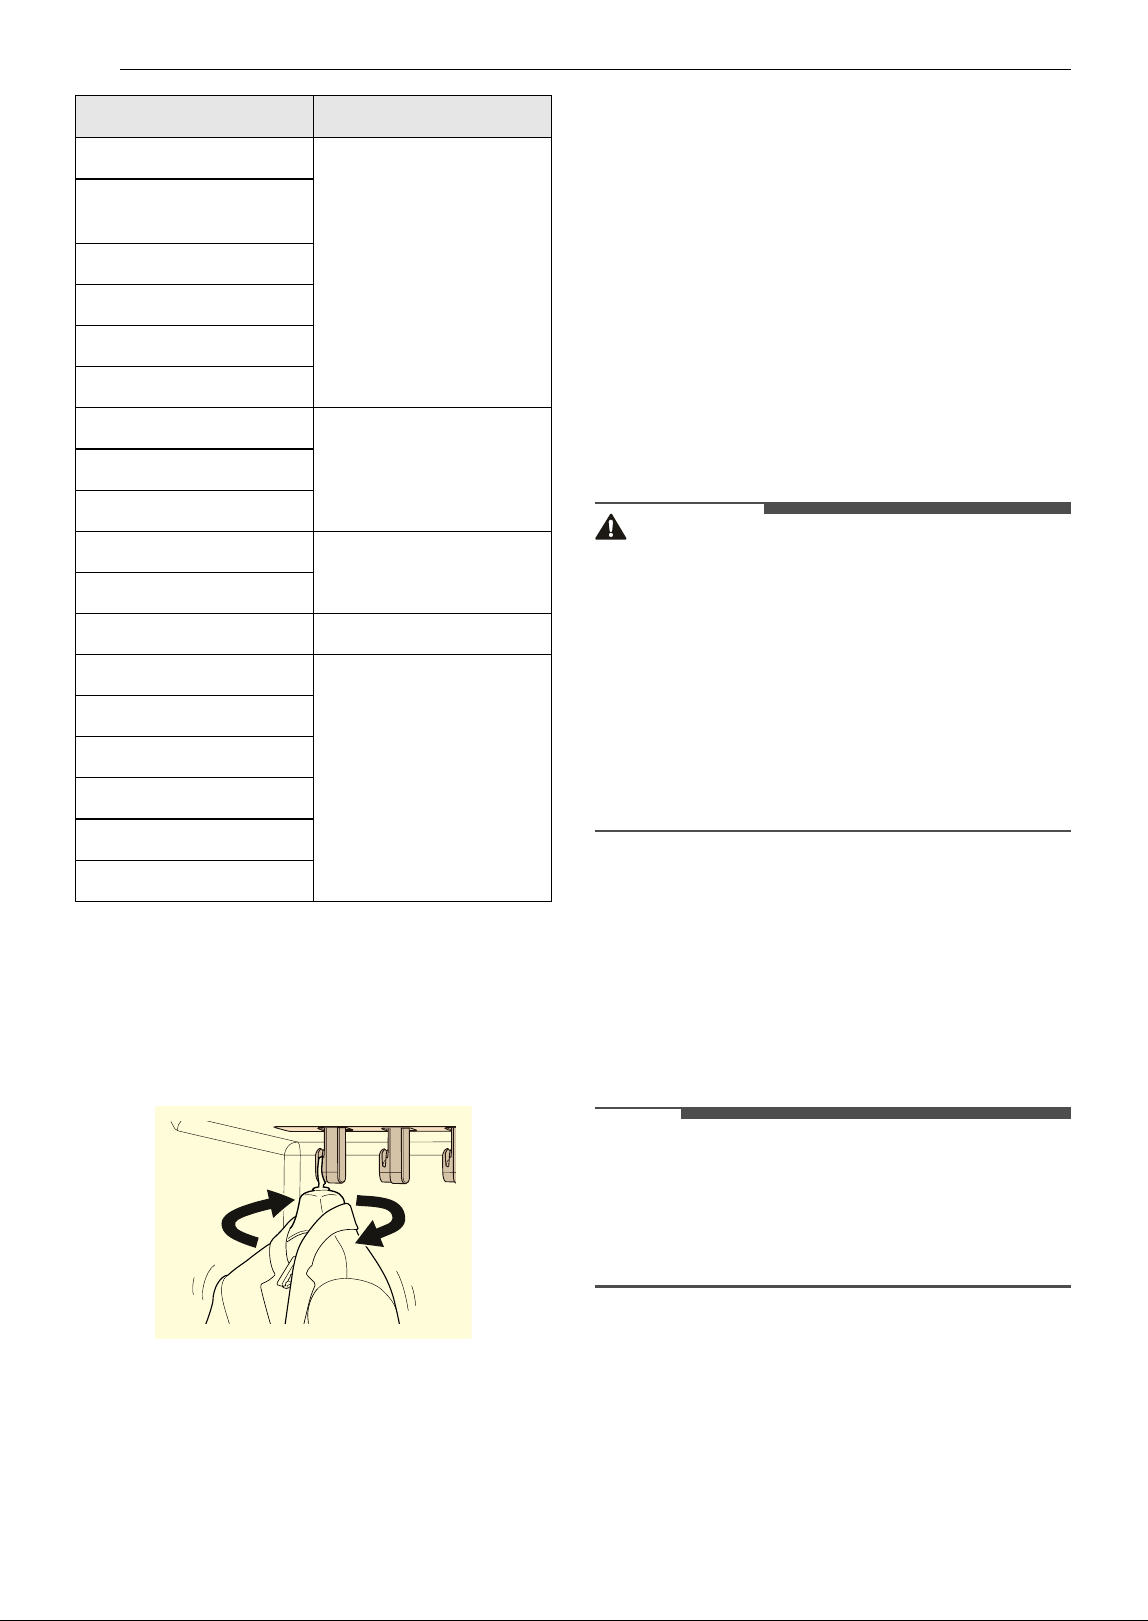
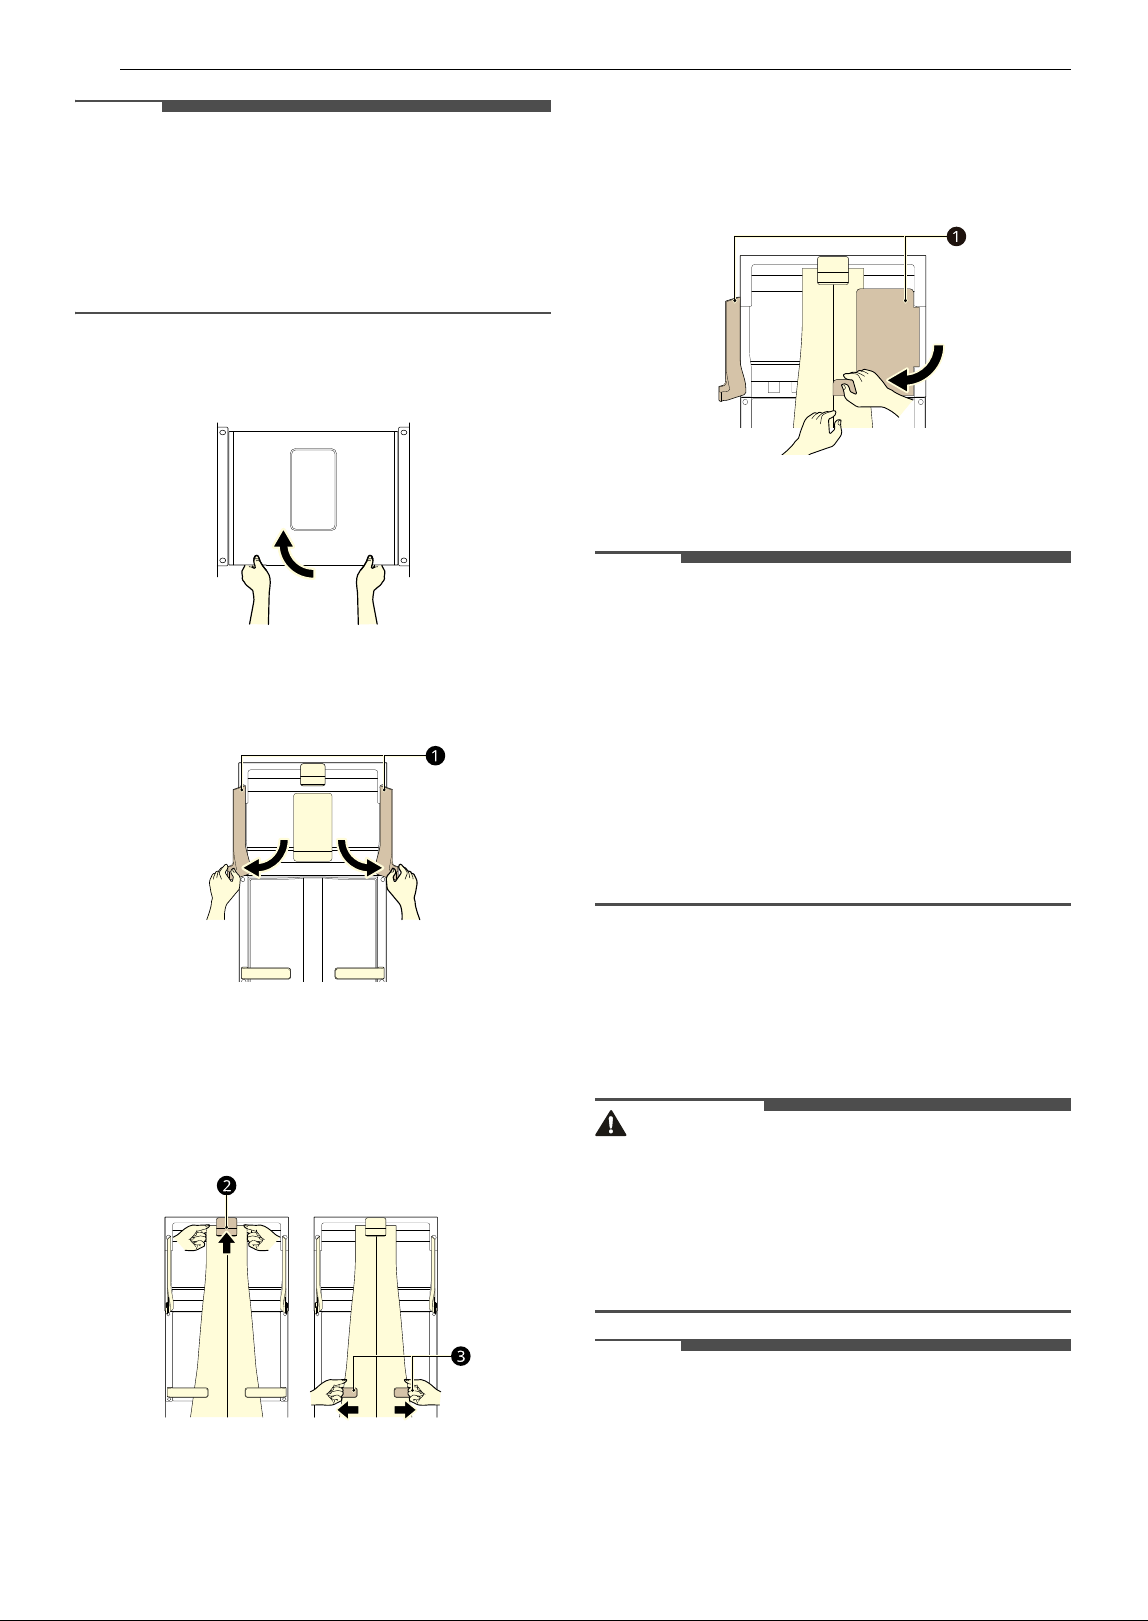
1 Pull the bottom of the pants crease care to
open it.
2 Open the pants fasteners a on the left and
right.
3 Push the pants into the pants fastener
holder b. Insert the pants into the pant
crease care clips
c on the left and right, and
pull on both sides of the pants to press out
the wrinkles.
4 Close the pants fasteners a on the left and
right one at a time.
• Closing the pants fasteners at the same
time may create wrinkles on the pants.
5 Close the pants crease care door.
NOTE
• The degree of wrinkle removal may vary
depending on the type of fabric.
• If you wish to dry pants, hang the pants on the
moving hanger.
•The pants crease care cannot be used for short
clothing such as short pants, so hang such
clothing on the moving hanger.
• If the pants pass beyond the gray rubber
packing, the pants may become wrinkled or the
product may not operate properly. Please check
before operating the product.
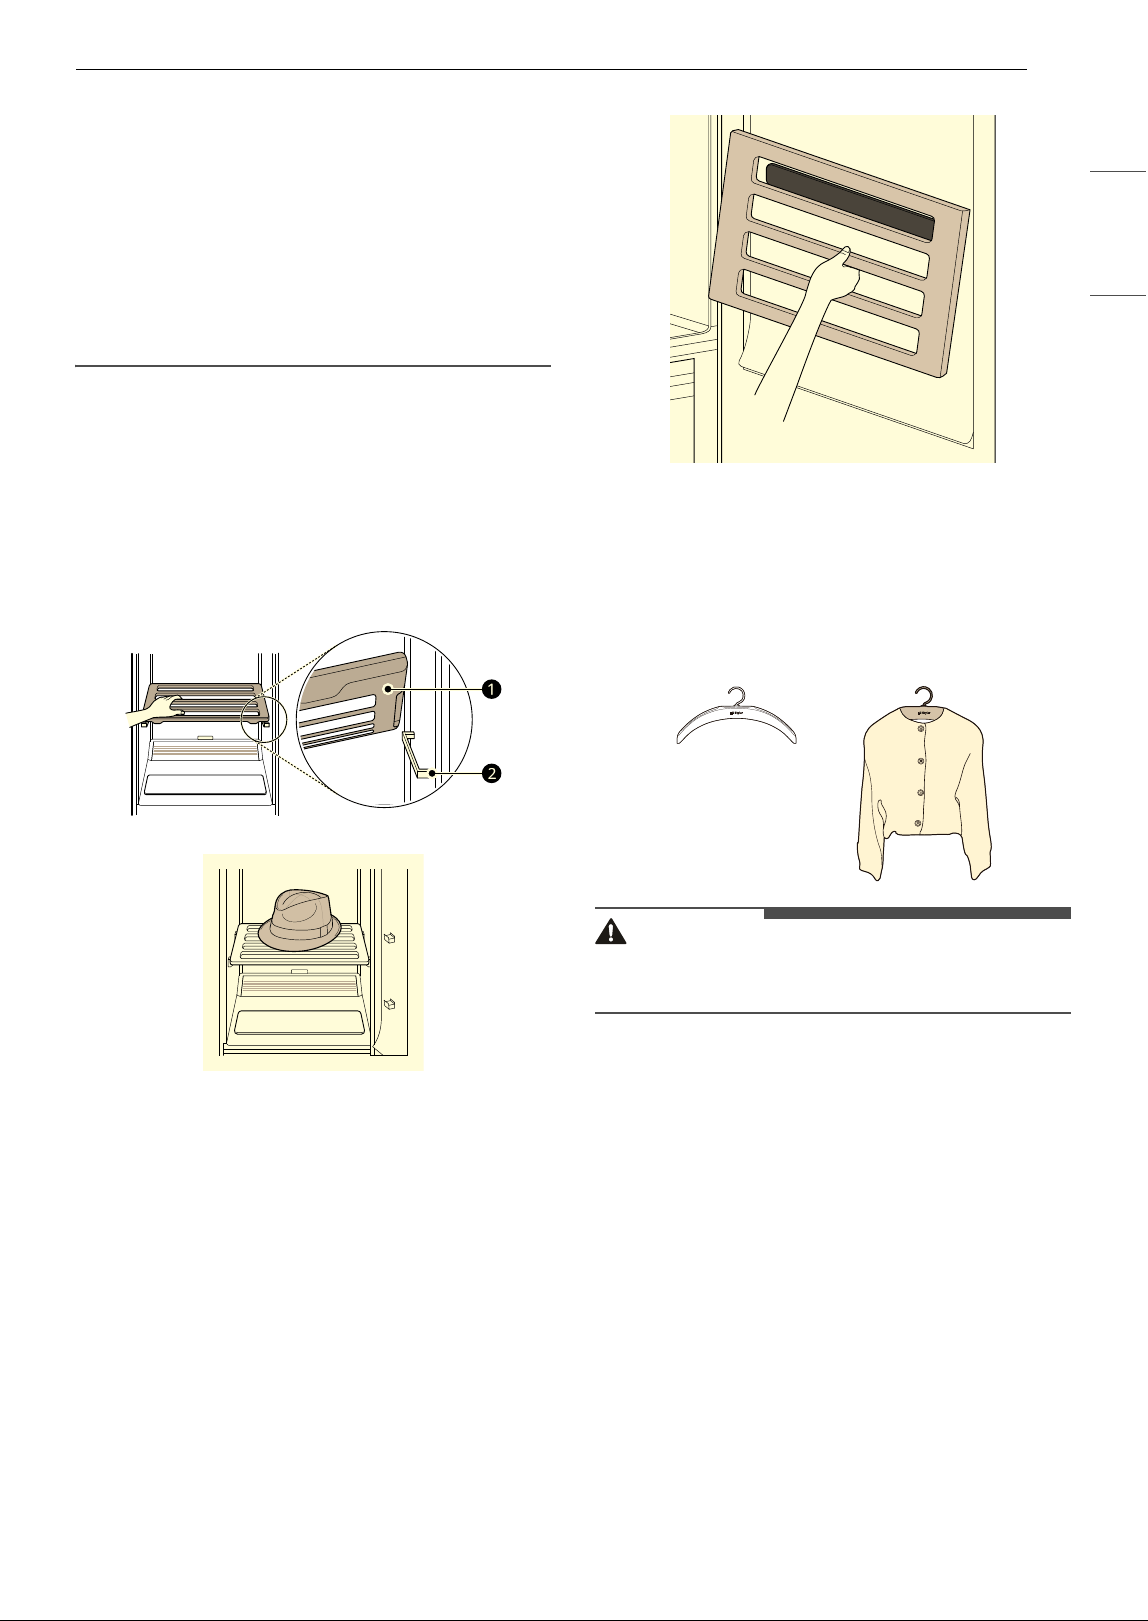
The Shelf
Use the shelf when styling clothes or other items
that are difficult to hang or that may be damaged
if styled while hanging up.
CAUTION
• Do not allow children to climb on or hang on the
shelf. The shelf may fall or the appliance may tip,
resulting in damage or injury.
• Do not place heavy objects on the shelf or use it
to store objects. The shelf may fall, resulting in
damage or injury.
NOTE
• Use the shelf for sweaters, knits, lingerie, or
delicate blouses that can show hanger marks,
stretching, or other damage if dried on a hanger.
• For best styling performance, do not stack items
on the shelf. Style single items or place items
side by side with space between.
25OPERATION
ENGLISH
• Marks also may remain on the shelf depending
on the type of clothing.
• When not in use, store the shelf on the sliding
bracket knobs in the door.
• Arrange items on the shelf so they do not touch
the sides or rear of the cabinet, if possible.
Condensation may form on the interior surface
of the cabinet, and items in contact with the
surface may remain damp at the end of the
cycle.
Assembling the Shelf
1 Place the grooves on the left and right sides of
the shelf
a on the shelf support b.
• If the shelf is not placed properly, it may fall
down during product operation and
accessories may be damaged.
2 When styling is completed, hang the shelf on
the sliding bracket inside the door to store it
for next use.
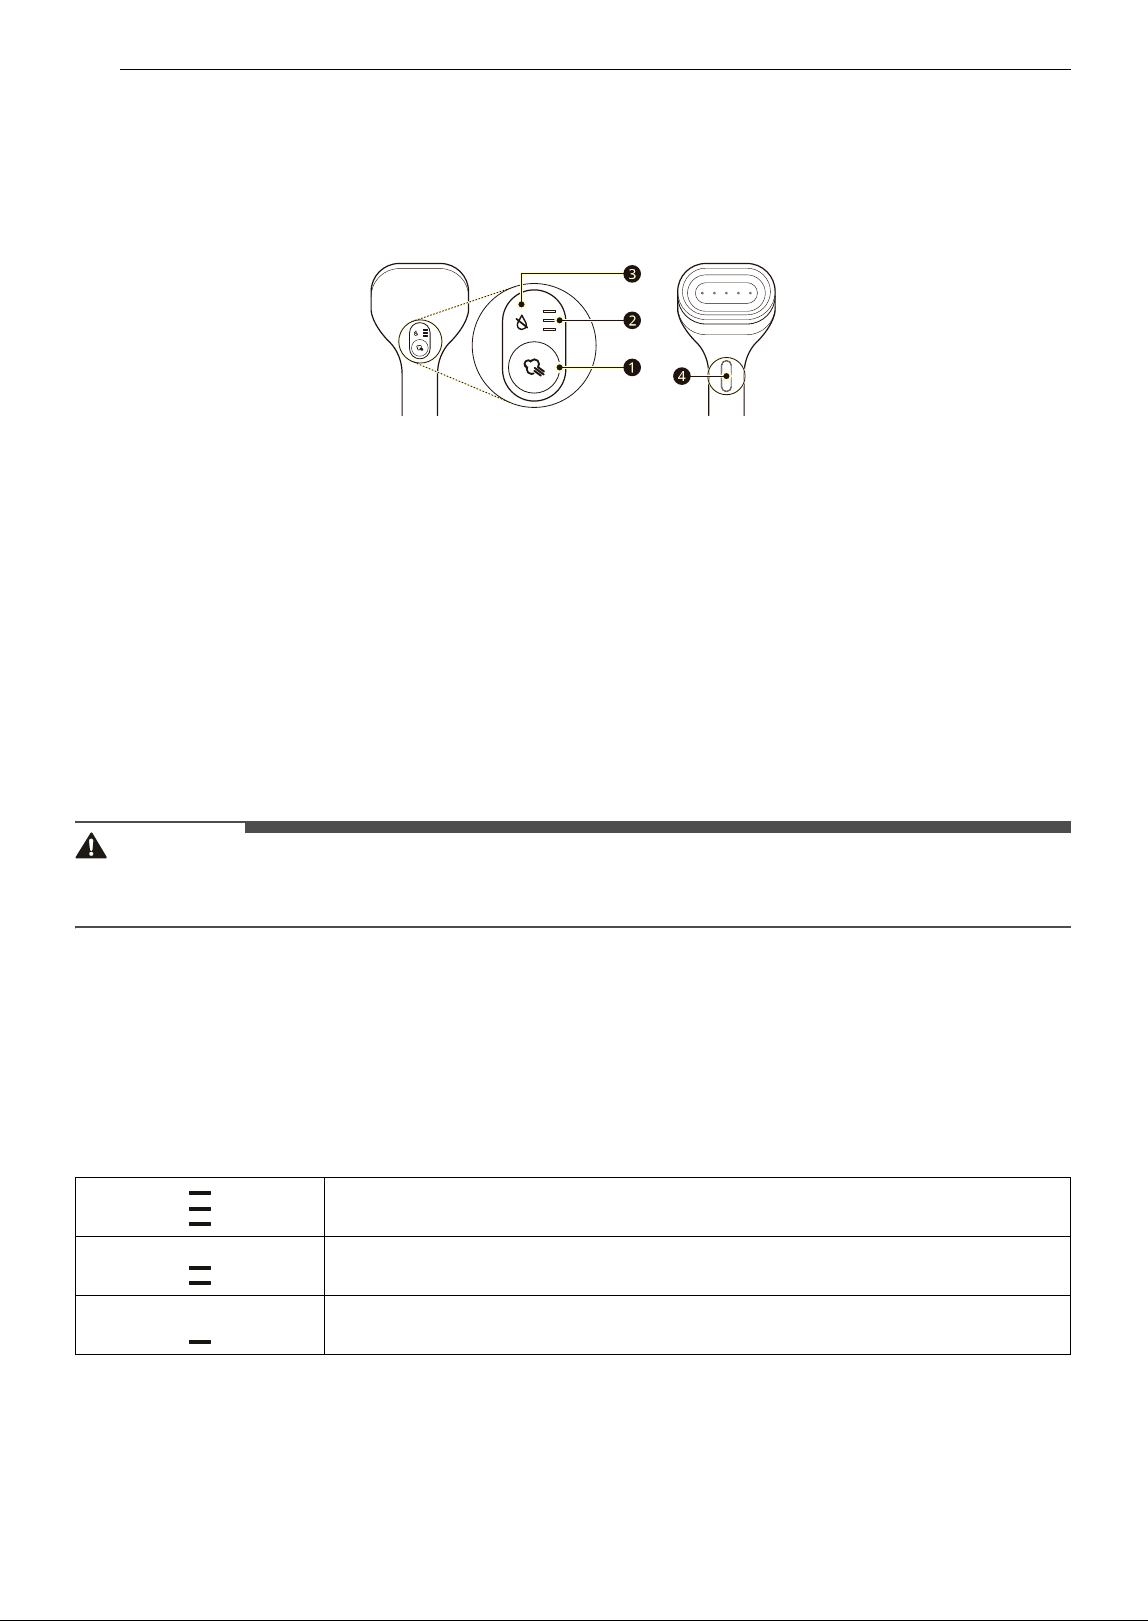
Using the Round Hanger
The round hanger has non-slip pads and a wide
shoulder area to help maintain the shape of your
clothes. Use it on lightweight and thin clothing,
such as knitwear.
CAUTION
• Clothing with a collar can wrinkle at the collar, so
use the styler's basic hanger.
26 OPERATION
Using the High Pressure Handy Steamer
Control Panel
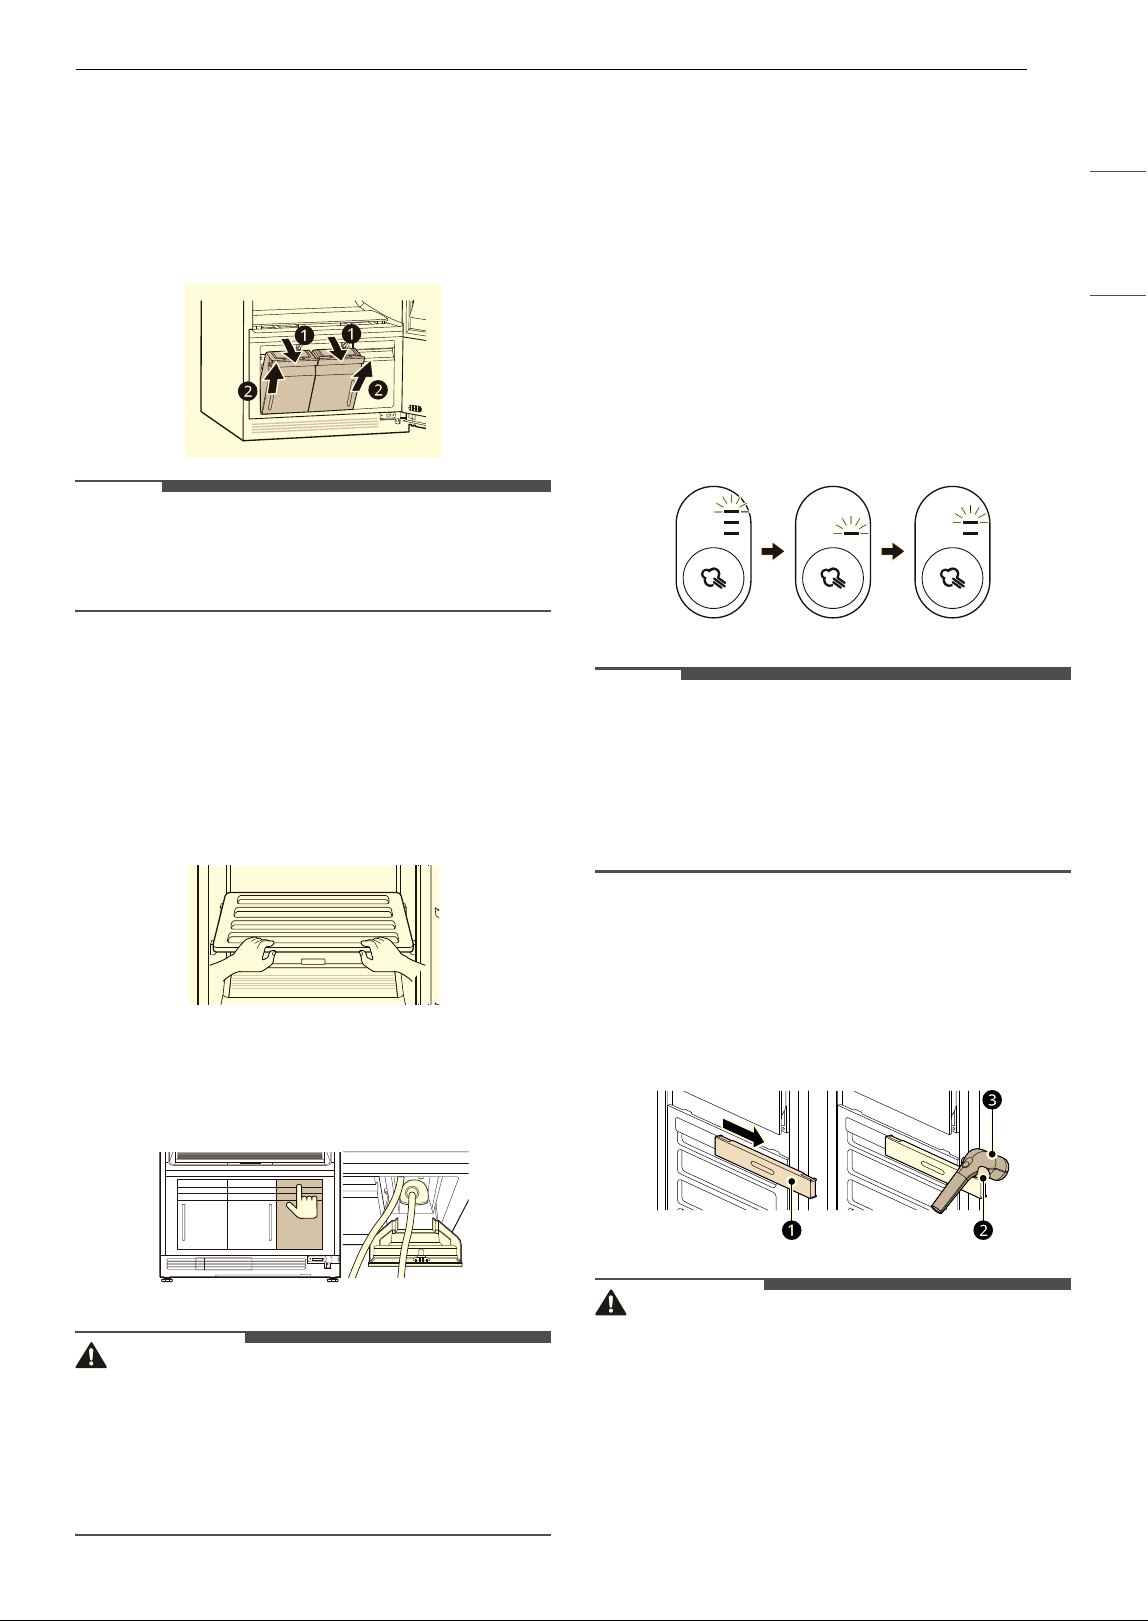
a Steam Mode button
Press and hold down the button for 2 seconds or more to turn on or off the high pressure handy
steamer. Pressing the button briefly while the steamer is on changes the steam spraying mode. Adjust
the steam mode in the order of High - Low - Medium.
b Steam Mode indicator
Indicates the steam mode (High > Low > Medium) and the status (Preparing Steam or Steam
preparation complete).
c Water tank indicator
Indicates if the water supply tank is missing, empty, or full. Check the water supply tank and drain tank
before operating.
CAUTION
• Even if there is water remaining in the water supply tank, a water tank notification may be displayed to
ensure the safety of the steam generator.
d Steam Spraying button
Press the Steam Spraying button to spray steam.
Setting the Steam mode
Adjust the steam level in the order of High - Low - Medium by pressing the Steam Mode button.
• When preparing for steam, the top of the steam mode display window corresponding to each mode
blinks. When the steam is ready, a chime sounds and the display window remains on.
The High mode is suitable for cotton, linen or thick clothing.
The Medium mode is suitable for general clothing.
The Low mode is suitable for clothing that is vulnerable to moisture.
27OPERATION
ENGLISH
How to Use the High Pressure
Handy Steamer
1 Check the water tanks.
• Fill water supply tank if needed. Empty
water drain tank if needed.
NOTE
• Do not put detergent or fabric softener, or any
liquid other than water, into the water supply
tank.
2 Close the door and touch the Power button.
• If the product door is open, press and hold
down the button for 3 seconds or longer.
3 Open the door and secure the shelf.
4 Press the steamer case under the appliance
and remove the steamer.
WARNING
• While using the steamer, do not close the
appliance door and the steamer case. Doing so
may scratch the edge of the steamer storage
box cover, leave scratch marks on the inside of
the door, and damage the storage box cover or
the steam hose.
5 Press and hold down the Steam Mode button
for approximately 2 seconds.
• The initial steam mode is set to High.
6 Press the Steam Mode button briefly to select
the desired steam mode.
• When you press the button, the steam
spraying mode will change in the order of
High - Low - Medium.
• The spray mode display window blinks as
follows and prepares for steam for
approximately 4 minutes.
NOTE
• Water is supplied frequently during steam
preparation and while using the steamer, and at
this time, a noise may occur from the water
supply pump. This pump is for high-pressure
steam generation, so the water supply noise
may be louder.
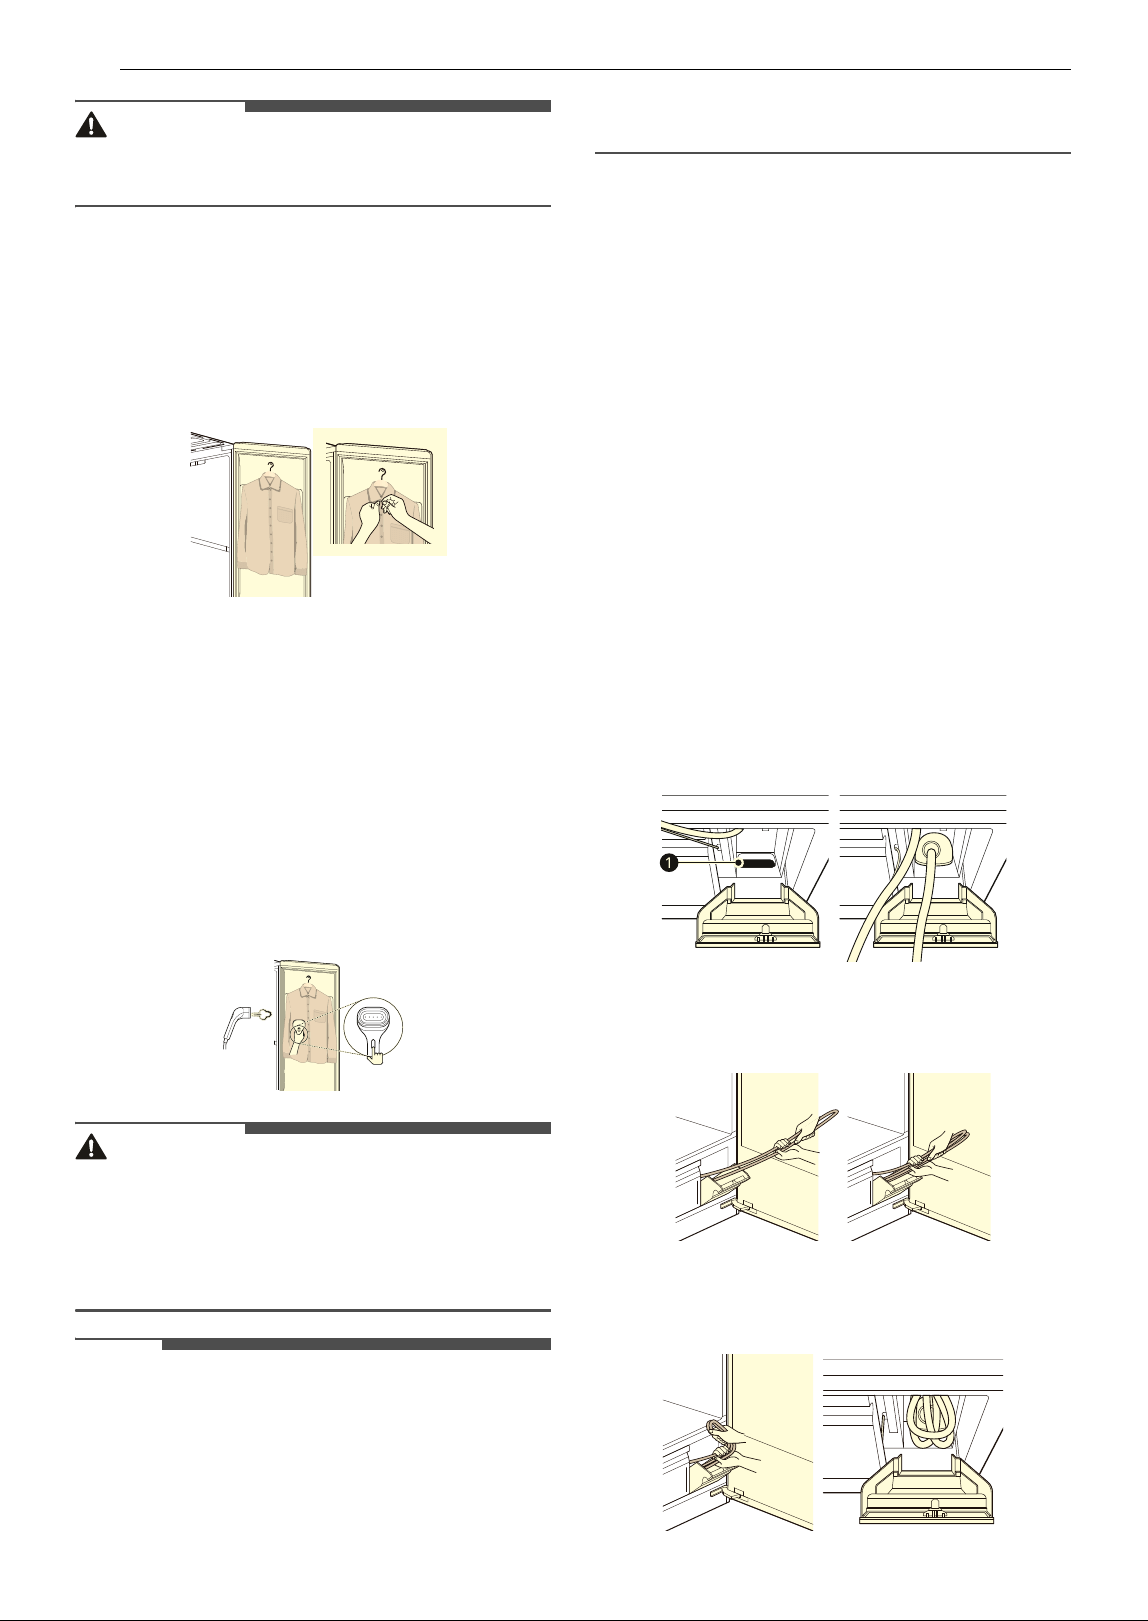
7 When preparing steam, using the steamer, or
organizing clothes after use, pull out the
Sliding Bracketa to the side and attach the
detachable Handy Steamer Holder
b to rest
the high-pressure Handy Steamer
c on.
CAUTION
• Do not close the door while the steamer is
resting on the steamer holder. The steamer may
fall or be hit, causing injury or damage to the
product.
• Be sure to return the sliding bracket to its
original position before closing the door. Do not
lean or press on the sliding bracket while it is
extended.
28 OPERATION
CAUTION
• If the sliding bracket is not extended, the Handy
Steamer Holder cannot be installed.
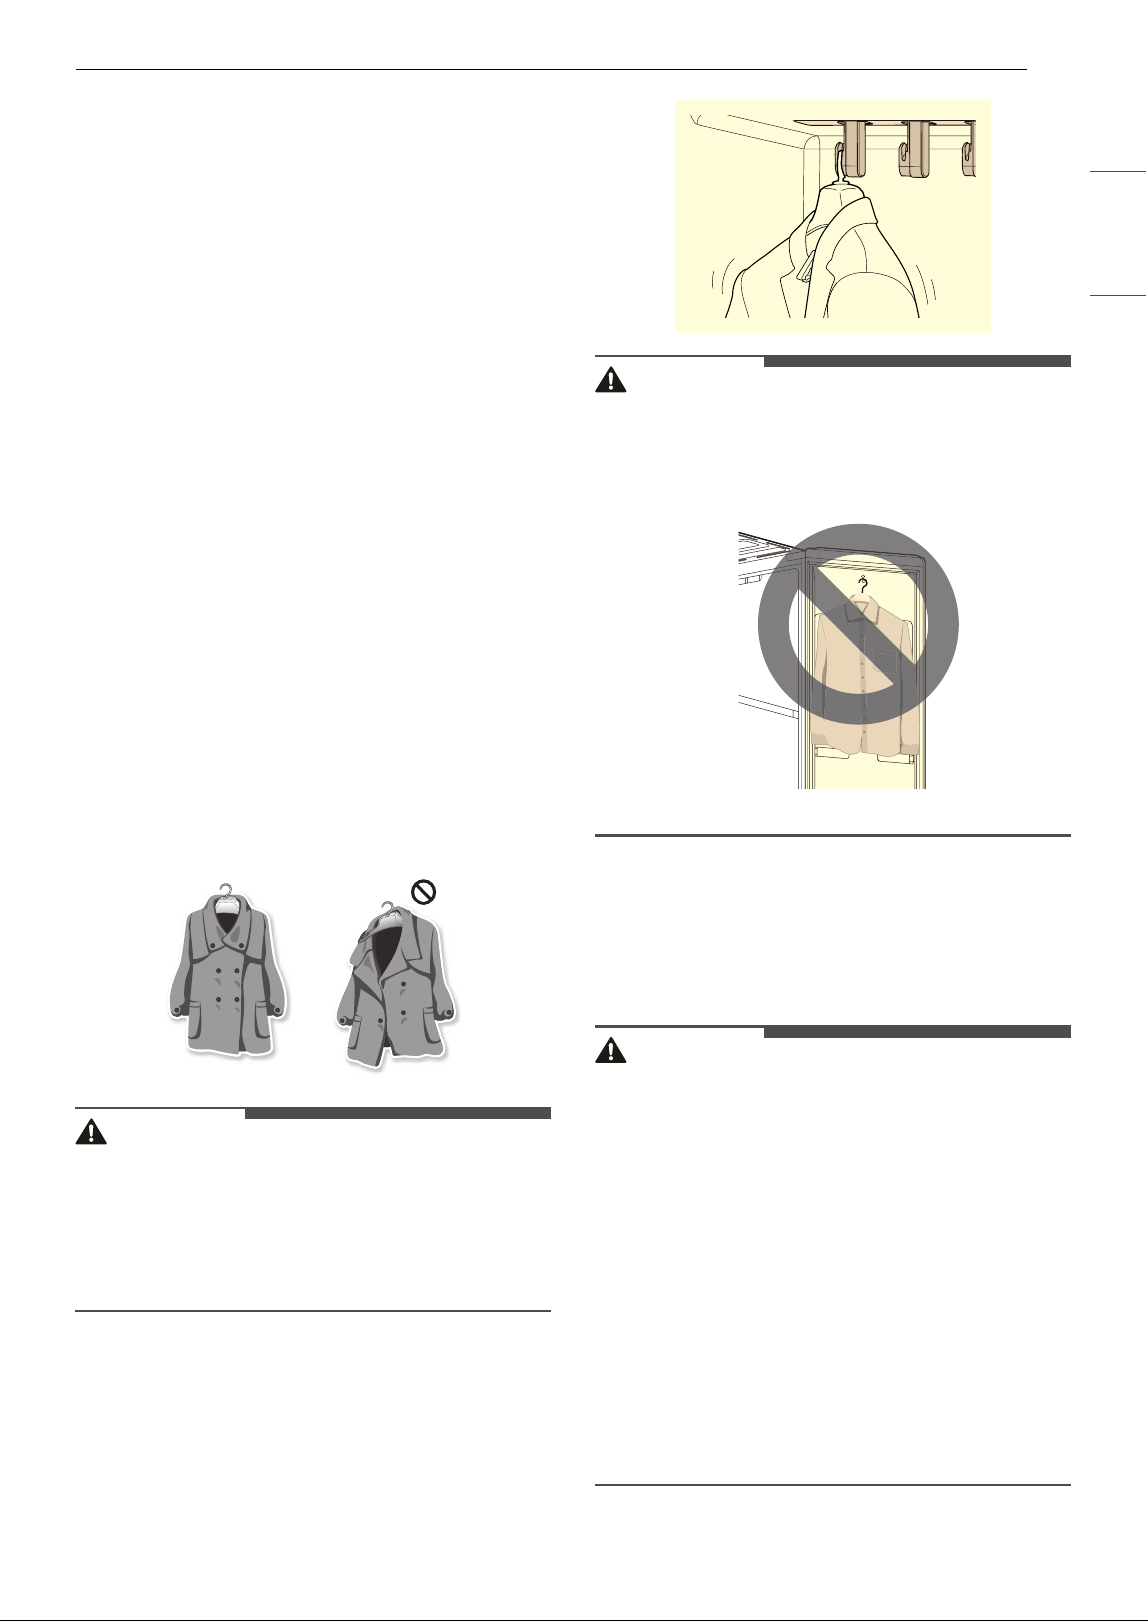
8 Hang clothing on a hanger, and then hang the
hanger on the hanger holder.
• To prevent clothing from falling, use the
hanger provided with the appliance and
close any buttons or zips.
9 When the Steam Mode indicator stops
blinking, it indicates that the steam
preparation is finished.
10 When steam is sprayed for the first time,
condensed water may be sprayed and leave
water marks on clothing depending on the
surrounding environment, so spray steam
into the air 2-3 times for 2-3 seconds before
use.
CAUTION
• There is a risk of burns, so wear the provided
protective glove on the hand used to grab
clothing and use the steamer.
• Spray steam after checking that there is no
person or animal around.
NOTE
• The continuous usage time of the steamer may
vary depending on the fabric material, size,
usage mode, and other usage patterns of the
customer. If you use the steamer continuously, it
may take some time to generate steam, so there
may be a temporary absence of steam. Please
wait a moment, and steam will be generated,
allowing you to use the steamer again.
11 After using the steamer, press and hold down
the Steam Mode button for approximately 2
seconds to end the use.
• Place the steamer on the shelf and allow it
to cool down sufficiently for approximately
5 minutes or more to remove residual heat.
12 Place the steamer in the case.
• Place the steamer head on the insulation
pad inside the case and fold the steam hose
and place it in the case. For more
information, refer to How to Store the
High Pressure Handy Steamer.
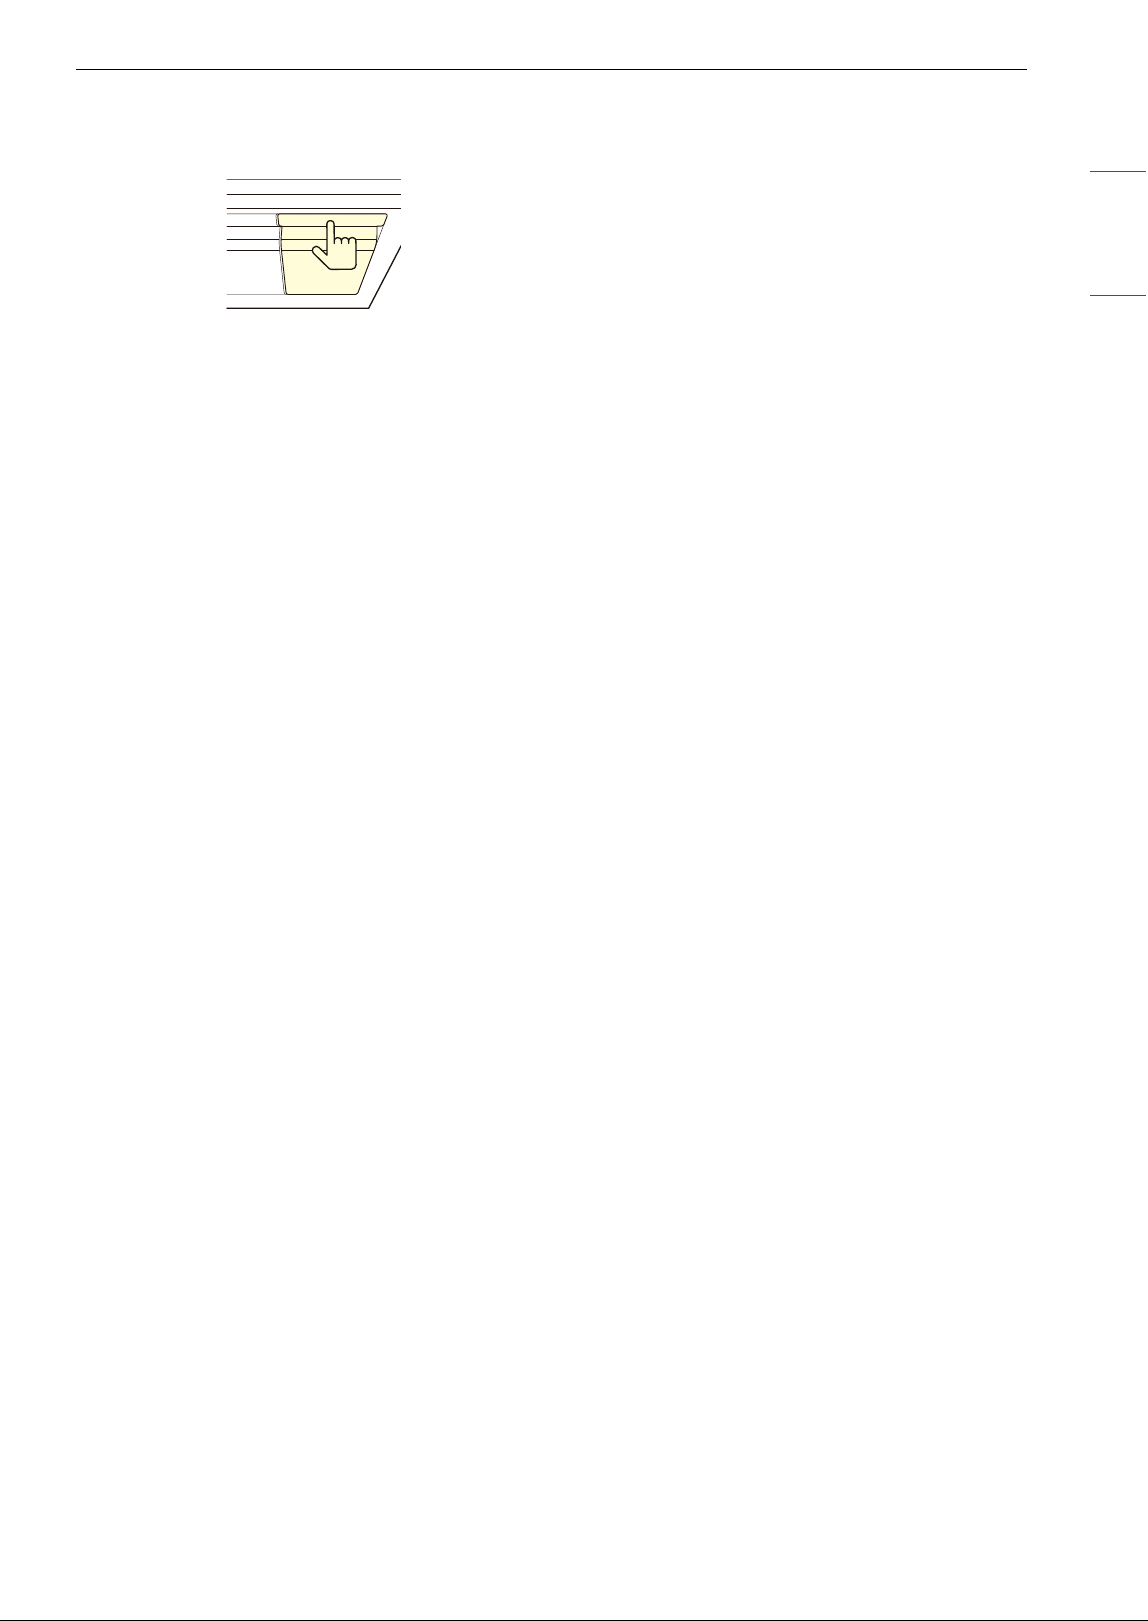
How to Store the High Pressure
Handy Steamer
1 Place the steamer head on the insulation pad
a inside the case.
2 Hold the end and middle of the steam hose
and fold it in half.
3 Fold the steam hose one more time and place
it in the case.
29OPERATION
ENGLISH
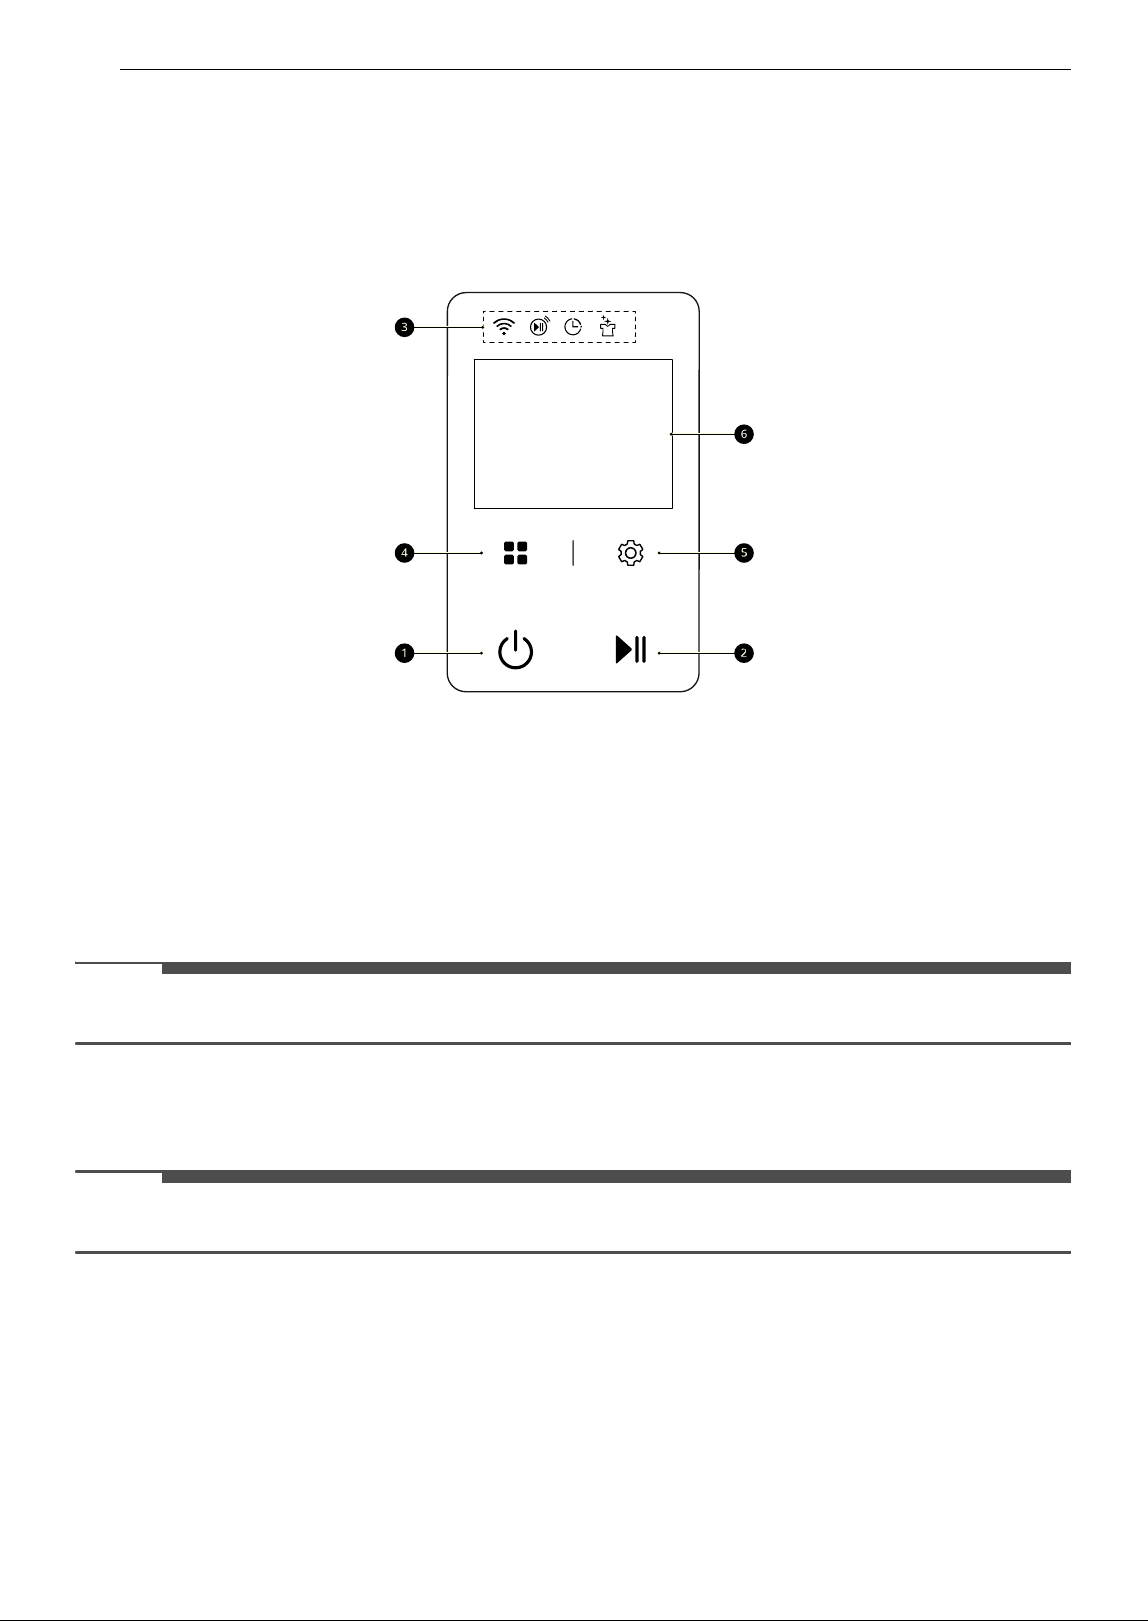
4 Close the high pressure handy steamer case
cover.
30 OPERATION
Control Panel
The control panel responds to touch using static electricity. A light touch is enough to operate it. Use a
cloth when cleaning the controls to avoid contacting and activating the buttons. Foreign substances on the
control, wearing gloves, or touching the buttons through cloth may prevent the buttons from activating.
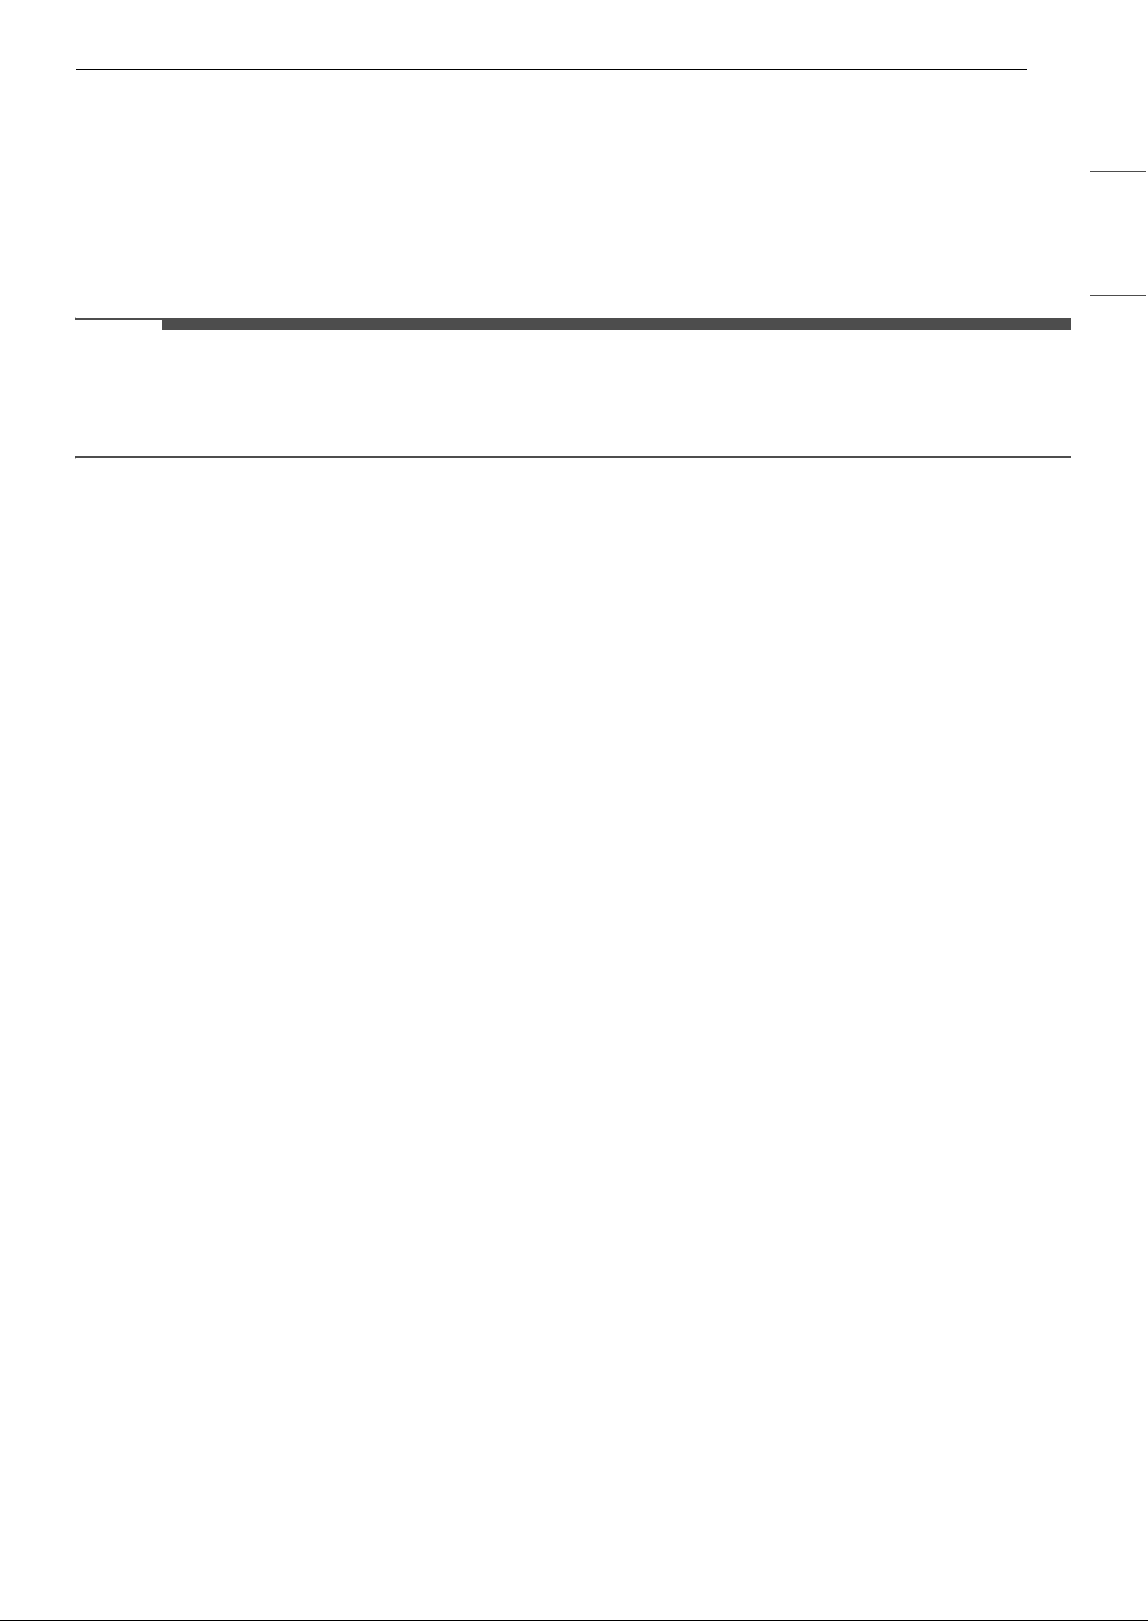
Control Panel Features
a Power Button
•Press the Power button to turn the appliance On/Off. Once the cycle is complete, the appliance
automatically turns off after a few seconds if no buttons are touched.
• Press and hold down the Power button for 1 second or longer to turn off the product during
operation.
- To turn the power on or off while the product door is open, press and hold down the Power button
for 3 seconds or longer. However, if the handy steamer is on, pressing and holding down the
Power button for 1 second or longer with the product door open will turn off the product.
NOTE
• Pressing the Power button during a cycle will cancel that cycle and the cycle settings will be lost.
b Start/Pause Button
Press and hold to start the selected cycle. If the appliance is running, press to pause the cycle without
losing the current settings.
NOTE
• If the product is paused, the power turns off automatically after a certain time for safety reasons.
c Alert Indicators
Indicators light up when the Wi-Fi, Remote Start, Delay Start or Night Care function is set.
•
f : lights up when the appliance is connected to Wi-Fi network at home.
•
w : lights up when the appliance can be controlled remotely.
•
y : lights up when the Delay Start feature is set.
•
' : lights up when the Night Care feature is set.
31OPERATION
ENGLISH
d Arrangement Button
Press to show the list of cycles in split screens.
e Settings Button
Sets additional options and fuctions.
f Touch Display
Select a cycle or change settings.
NOTE
• Touch buttons may operate without any physical manipulation by responding to static electricity from a
human body or a live object near to the buttons.
• Touch buttons may operate by just a light touch with your finger, rather than pressing it forcibly.
32 OPERATION
Cycle Table
The cycles are designed to fit a variety of situations. Select the cycle and setting that best match the load
contents and desired results for maximum performance and fabric care.
Cycle Guide
Default Cycles
These cycles are in the initial cycle list.
Cycle Detail
Normal Refresh Conveniently styles most clothes.
Quick Refresh For styling less wrinkled or odorous clothing within a short period of
time.
Power Refresh For powerful styling.
Suit/Coat Refresh For styling a suit or a coat.
Wool/Knitwear Refresh Keeps wool or knitted fabrics soft.
NOTE
• Thin wool/knitted clothing may stretch or retain marks, so use the
exclusive hanger or place the clothing on the shelf.
• The clothing may deform due to its characteristics.
Silk Refresh For styling silk fabric.
NOTE
• Do not use other cycles for silk clothing as the fabric may be
damaged.
• Hang long clothing such as long dresses on the left side so that it
does not touch the steam outlet (center).
• Be sure to button or zip up the clothing to prevent it from sliding
down.
• Due to the nature of the silk material, wrinkles may occur at the
seams, but this is not considered damage to the clothing.
Cashmere Refresh For styling cashmere knitwear.
AI Refresh Use for styling one item with optimized conditions based on the
clothing.
• The appropriate operating conditions are set automatically by
detecting the weight and length of clothing. Therefore, remove all
empty hangers before using.
• The operating time may increase depending on the detection of
clothing.
Fine Dust Removal Shakes off fine dust from clothing.
Normal Sanitary For hygienic cleaning of clothing.
Heavy Duty Sanitary For hygienic cleaning of clothing for longer times than Normal Sanitary.
33OPERATION
ENGLISH
Single Shirt Dry True Steam is added to this cycle to reduce wrinkles while drying the
clothing.
• Place clothing in the Styler after washing and spinning it dry in a
washer.
NOTE
• This is the Small Load cycle that dries clothing while quickly
removing wrinkles and is designed for one clothing item (a shirt or
a t-shirt).
• Do not use it on clothing made of fabrics that are sensitive to
moisture, such as leather or fur, as they may be damaged by True
Steam.
AI Dry Dries clothing with optimized conditions based on the clothing.
• It detects the weight of clothing and sets the appropriate
operating conditions automatically.
Indoor Dehumidification Dehumidifies the room where the appliance is installed.
• Indoor Dehumidification time can be set to 2 or 4 hours by
pressing the Settings button.
• A notification icon is displayed and a chime sounds if the drain
tank is full. Empty the drain tank and press the Start/Pause button
to continue the Indoor Dehumidification cycle.
NOTE
• Empty the drain tank before using the dehumidify course.
• It is possible for the room temperature to increase due to
outgoing airflow from the appliance.
• If the surrounding humidity is low, indoor dehumidification may
be stopped automatically.
Fur/Leather Refresh Removes moisture and dust from fur or leather, and restores volume to
fur that has been flattened by storage or regular use.
NOTE
• Follow the care methods recommended by the fur/leather
manufacturer.
• This cycle cannot process furs at the level of a professional
company.
• Use with only one piece of fur clothing. Otherwise, the fur may
clump together.
• If clothes are damp from snow or rain, wipe them off with a dry
towel before using the cycle, to keep them from clumping
together.
• To prevent odor from permeating the fabric, run the Normal
Sanitary two to three times before using the Fur/Leather
Refresh, add an aroma sheet, and use the cycle.
• Fasten all buttons or zippers before hanging clothes on moving
hangers. Otherwise, clothes may fall off the hanger and get
damaged.
Cycle Detail
34 OPERATION
Non-Default Cycles
Edit the list of cycles using the Settings - Edit Cycle List option to use these cycles.
Timed Dry Set a dry time for washed and spin-dried clothing.
• Press once for the default time of 30 minutes. Press the time
setting button repeatedly to increase the time up to 3 hours.
Cycle Detail
Bedding Sanitary Keeps bedding and pillow surfaces clean that cannot be washed often.
Padded Coat Dry For drying padded coats and restoring their volume after they are
washed and spin-dried.
NOTE
• Drying clothing that has not been completely rinsed and spin-
dried may leave detergent residue and cause stains or odors on
clothing after drying in the Styler.
• Use with only one padded coat at a time.
• Down jackets may lose volume after the cycle ends, with feathers
clumping inside your clothes. Tap your clothes with palms or
empty plastic bottles to restore the volume.
Padded Coat Refresh Restores volume and softness to padding.
NOTE
• Using with multiple bulky items can decrease drying performance.
Style one bulky item at a time.
Yoga Wear Dry Dries yoga/pilates clothes that have been washed and spin-dried.
Delicate Low-Temperature Dry For gentle, low-temperature drying of clothing that has been washed
and spin-dried.
NOTE
• To avoid stretching or leaving hanger marks on clothing, place it
on the shelf rather than on hangers for drying.
Night Care Refresh Maintains clothing overnight to wear the next day.
School Uniform Refresh Refreshes and reduces wrinkles on school uniforms that are difficult to
wash every day.
Sportswear Refresh Keeps sports clothing such as golf clothing and windbreakers fresh.
Rain/Snow Dry Dries clothes that have become slightly damp in the snow or rain.
Warm Blankets Warm up a blanket in winter to keep you snug.
NOTE
• Place the blanket on the shelf or clip it to a hanger before running
the cycle to keep it from falling.
Scarf Refresh Removes odors from scarves that you use daily.
NOTE
• Place the scarf on the shelf or clip it to a hanger before running the
cycle to keep it from falling.
Cycle Detail
35OPERATION
ENGLISH
Swimwear Dry Gently dries swimsuits.
Baby Clothes Sanitary Takes care of baby clothes hygienically.
NOTE
•Use of Sanitary cycles on fabrics that require delicate care, such as
fur/leather, cashmere/wool, chiffon and linen, can damage the
fabric.
Old Clothes Refresh Refreshes clothes that are stored for a long time and smell damp and
unpleasant.
NOTE
• Use before storing clothes for the season or when moving clothes
from storage back to your closet.
Warm Overcoats Warms up your coat, gloves, and scarf when going out in winter.
Yoga Wear Refresh Keeps yoga or pilates clothing fresh.
Wool/Knitwear Dry Dries clothing that needs special handling, such as wool or knit clothing.
NOTE
• To avoid stretching or leaving hanger marks on clothing, place it
on the shelf rather than on hangers for drying.
• Depending on the content of the fabric, some garments may
shrink.
Doll Sanitary Takes care of dolls hygienically.
NOTE
•Use of Sanitary cycles on fabrics that require delicate care, such as
fur/leather, cashmere/wool, chiffon and linen, can damage the
fabric.
Rainy Days Dry For drying laundry during the rainy season.
Suit/School Uniform Sanitary For keeping suits and uniforms hygienic that cannot be washed or dry
cleaned every day.
Static Removal Use it before wearing clothes that are prone to static electricity in winter,
such as coats and sweaters.
Silent Refresh Use late at night or early in the morning when you want to style clothes
quietly.
NOTE
• The cycle may take longer than standard styling.
Jeans Refresh For refreshing clothes that are likely to cause stains or fade if you wash
them often, like jeans.
NOTE
• Dye from jeans may transfer to the walls or floor of the product, so
clip jeans to a hanger and use the moving hanger.
Cycle Detail
36 OPERATION
CAUTION
• Follow the care instructions recommended by the fur/leather manufacturer. Failure to do so may cause
the fur to be compressed.
• If clothing is snow- or rain-soaked, wipe clothing with a dry towel before using the Styler. Otherwise, the
fur may clump together.
• Jeans may fade, so clip them to a pants hanger and hang them on the moving hanger.
• Use an exclusive cycle for delicate clothing that can be damaged by steam (e.g. fur/leather, cashmere/
wool, chiffon, linen, etc).
NOTE
• Check Fabric Care Guide in this manual and fabric care labels on garment before styling.
• Wrinkles may remain in some items. Wrinkles caused by extended storage may be difficult to reduce.
Wrinkles in cotton or linen may not be reduced completely. Iron after styling, if desired.
• Some odors can be difficult to remove. Odors from oily substances may be difficult for the steam to
penetrate. Odors from extended storage may also be difficult to remove.
• Cycle times may vary depending on the usage environment, including water temperature.
• Very thick clothing may not be dried uniformly at the end of the cycle.
• Styling times for the cycle may be longer for wet clothes that are not spin dried.
Knitted Cardigan Refresh For refreshing knitter cardigans using the round hanger.
NOTE
• When operating the Knitted Cardigan Refresh, using a regular
styler hanger may deform your clothes.
• Place unlined knitwear or thick, heavy sweaters on the shelf to use
the cycle. Using hangers can leave marks or stretch clothes due to
moisture.
• Do not use with washed or spin-dried cardigans.
Pants Crease Care Reduce wrinkles in pants and crease pants again by putting pants in the
Pants Crease Care.
Wet Refresh Refreshes wet and damp clothes.
NOTE
• For clothing that has been wet by rain or has absorbed a lot of
moisture.
• The operating time may vary depending on the humidity of the
laundry.
Cycle Detail
37OPERATION
ENGLISH
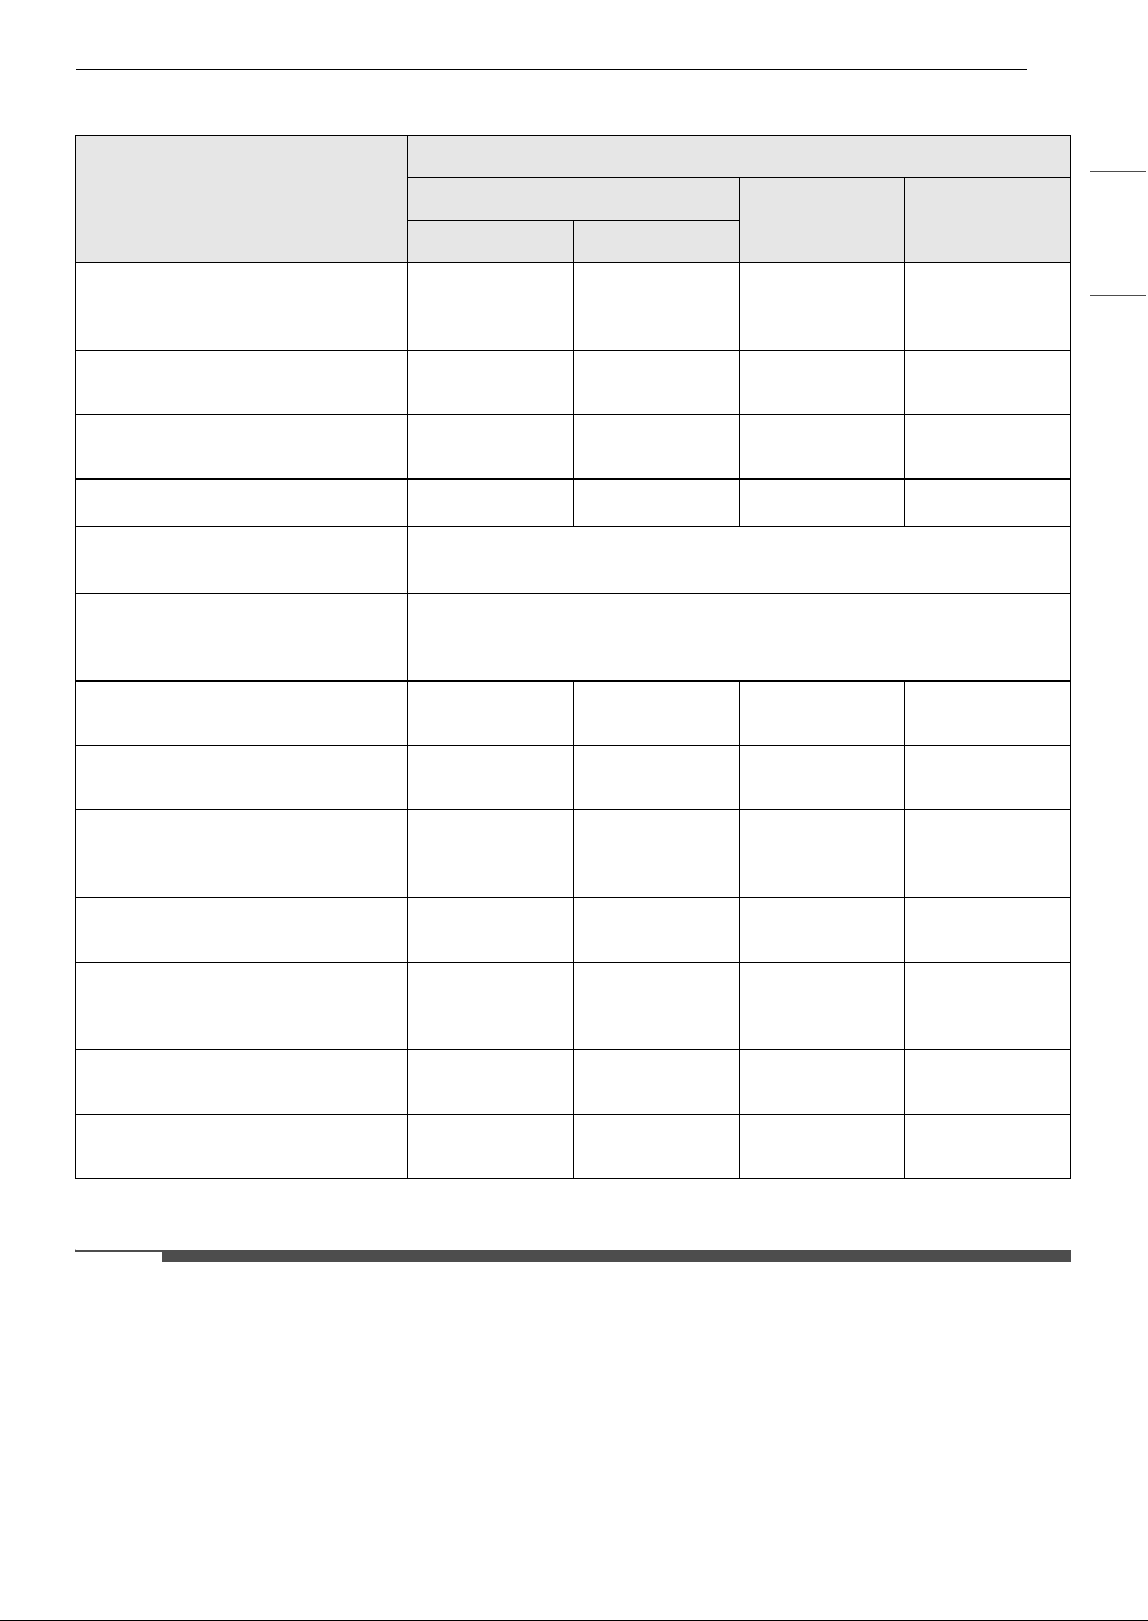
Fabric Care Guide
† Check fabric care labels in garments before use.
NOTE
• Fabrics come in a wide variety of weights and finishes and can have different care requirements for each
variety. It is difficult to cover them adequately in this manual. Before using the appliance with any item,
check the care label before proceeding.
• Do not put items that are not colorfast, are heat-sensitive, or are not suitable for washing with water in
the Refresh or Sanitary cycles. Do a water blot test on a small, inconspicuous spot (an inside seam) to
determine if the fabric is colorfast. For further assistance, consult the clothing manufacturer, a dry
cleaning professional, or a more detailed fabric care guide.
• Using the appliance with items that are very wet or are not colorfast may result in damage to the items
and staining from fabric dyes on the interior of the cabinet. These stains will not affect the operation of
the appliance. Use toothpaste to remove stains from the interior of the cabinet.
Fabric & Clothes
Cycle
Refresh
Sanitary Dry
Wrinkles Odors
Cotton
Towels, socks, underwear, jeans,
sportswear, T-shirts, blankets
###
Linen, hemp, ramie
Summer clothes, tablecloths
###
Alpaca, camel hair, cashmere
Coats, suits
#
†
#
†
#
†
#
†
Scarves, knitwear
#
†
#
Fur, leather
Coats, scarves
• Style the fur or leather clothes using a Fur/Leather Refresh cycle.
Leather must be 100% natural leather (No artificial leather)
Silk
Neckties, ribbons, scarves,
blouses, silk velvet/plush
• Only use downloaded Silk Refresh cycle (low temperature drying).
Wool
Sweaters, knitwear
#
†
#
Winter coats, suits, sportswear,
uniforms
####
Acetate
Suit lining, blouses, neckties,
pajamas
####
Acrylic
Thermal underwear, knitwear
####
Nylon
Stockings, lingerie, sportswear,
curtains
####
Polyurethane (less than 5%)
Stretchable clothing
####
Rayon
Suit Lining
####
38 OPERATION
NOTE
• The appliance does not have a washing function. Wash soiled items before use.
39OPERATION
ENGLISH
Settings
Options and Extra Functions
1 Press the Settings button.
2 Press the desired option or function.
Delay Start
Use this function to delay the start time of the
cycle.
• To cancel the delay, press the Delay Start
button and select Cancel Delay Start.
NOTE
• The delay time can be set from 3 to 19 hours, in
increments of one hour.
• If you change the cycle after setting Delay Start,
it will be canceled.
Night Care
Use this function to store items overnight or
anytime items can’t be removed soon after a cycle
ends. The function periodically produces warm air
to prevent condensation, keeping items warm and
dry until they are removed.
1 Press the Power button.
2 Choose a desired cycle.
3 Press the Settings button.
4 Press the Night Care button.
5 Press and hold the Start/Pause button for 1
second or longer.
• While the Night Care function is running,
pressing the Power button or opening the
door will cancel the Night Care function.
NOTE
• It is normal to hear noise periodically when
warm air is produced.
Control Lock
Use this function to prevent unwanted use of the
appliance or to keep cycle settings from being
changed while the appliance is operating.
• When the controls are locked, "Control Lock is
ON." is displayed on the touch display. If other
buttons are touched before "Control Lock is
ON." is displayed, the function will not be
activated.
Turning Off the Control Lock Function
1 When you touch the screen or the Start/
Pause, Settings or Arrangement button
while locked, the button unlock screen will
appear.
2 Touch the i icon for 3 seconds.
NOTE
• The function does not lock the door.
• The function is retained even if there is a power
outage.
• Once set, the function remains active until it is
manually deactivated. The function must be
deactivated to run another cycle.
Remote Start
With the LG ThinQ app, you can use a smartphone
to control your appliance remotely.
• In order to use the Remote Start function, refer
to SMART FUNCTIONS.
Wi-Fi
Use to set up the Wi-Fi connection. When Wi-Fi is
turned on, the Wi-Fi icon appears in the display.
Auto Cycle Arrangement
When activated, this feature organizes the cycle
list and options automatically based on your usage
patterns.
• On is the default setting.
• Selecting Off retains the current list order.
Edit Cycle List
Edit the list of cycles as desired.
1 Touch Edit Cycle list and add or delete the
desired cycles.
• You can browse the list of cycles by swiping
the screen up and down.
40 OPERATION
• While swiping, keep your finger on the
screen to quickly browse through cycles.
• Cycles with a check mark have been added
to the cycle list.
• Cycles with no check mark have been
deleted from the cycle list.
2 After selecting the cycle, press the
N(Previous) button to save it.
NOTE
• Normal Refresh, AI Refresh, Power Refresh,
Normal Sanitary, Single Shirt Dry and AI Dry
cycles cannot be deleted from the list of cycles.
• You can edit the order of the cycles in the list
from the Auto Cycle Arrangement function on
the product and in the LG ThinQ app.
AI Cycle Recommendation
An appropriate cycle is recommended according to
weather and fine dust status.
Steamer Cleaning
Use this function to remove foreign matter such as
hard water scale inside the steam generator.
1 Check the water tanks.
• Fill water supply tank if needed. Empty
water drain tank if needed.
CAUTION
• Only use water when filling the water supply
tank. Any other substance, such as detergent or
fabric softener, may damage the appliance.
2 Close the door and touch the Power button.
• If the product door is open, press and hold
down the button for 3 seconds or longer.
3 Press the Settings button.
4 Press Steamer Cleaning to begin cleaning
the steam generator.
• Steamer cleaning runs for approximately 3
minutes.
• After cleaning ends, water used for cleaning
will be drained into the water drain tank.
Signal
The volume of the notification sounds and button
sounds can be set from quiet to very loud.
• Default volume is Very Loud and can be
adjusted.
- Volume : No Sound, Quiet, Normal, Loud,
Very Loud
Reset Settings
Select this to delete all the stored data and reset to
factory default settings.
41SMART FUNCTIONS
ENGLISH
SMART FUNCTIONS
LG ThinQ Application
The LG ThinQ application allows you to
communicate with the appliance using a
smartphone.
LG ThinQ Application Features
Communicate with the appliance from a
smartphone using the convenient smart features.
• Energy Monitoring
†
- This feature keeps track of how the appliance’s
power consumption is affected by selected
cycles and options.
• Remote Start
- Control the appliance remotely or check to see
how much time is left in the cycle from the LG
ThinQ application.
NOTE
• Once the Remote Start feature is enabled, you
can start a cycle from the LG ThinQ application.
If the cycle is not started, the appliance will wait
to start the cycle until the appliance is turned off
remotely or the Remote Start feature is
disabled.
• If the door is opened, the Remote Start feature
is disabled.
• Push Messages
- When the cycle is complete or the appliance
has problems, you will receive a push
message.
• Smart Diagnosis
TM
- This function provides useful information for
diagnosing and solving issues with the
appliance based on the pattern of use.
• Settings
- Allows you to set various options on the
appliance and in the application.
† This feature is only available on some models.
NOTE
• In the following cases, you must update the
network information for each appliance in the
LG ThinQ application under Device Cards >
Settings > Change Network.
- wireless router is changed
- wireless router password is changed
- Internet service provider is changed
• This information is current at the time of
publication. The application is subject to change
for product improvement purposes without
notice to users.
Installing LG ThinQ App and
Connecting an LG Appliance
Models with QR Code
Scan the QR code attached to the product using
the camera or a QR code reader app on your
smartphone.
Models without QR Code
1 Search for and install the LG ThinQ app from
the Google Play Store or Apple App Store on a
smartphone.
2 Run the LG ThinQ app and sign in with your
existing account or create an LG account to
sign in.
3 Touch the add (~) button on the LG ThinQ
app to connect your LG appliance. Follow the
instructions in the app to complete the
process.
42 SMART FUNCTIONS
NOTE
• You may be asked to provide a password to
connect to the LG network (not your home
network) during the Wi-Fi setup. The password is
the last 4 characters of the network name,
repeated twice, with no spaces. For example, if
the network name appears as LG_XXXX_8b92,
then you would enter 8b928b92 as your
password. The password is case sensitive and
the last 4 characters are unique to your
appliance.
• To verify the Wi-Fi connection, check that the
f
icon on the control panel is lit.
• The appliance supports 2.4 GHz Wi-Fi networks
only. To check your network frequency, contact
your Internet service provider or refer to your
wireless router manual.
• LG ThinQ is not responsible for any network
connection problems or any faults, malfunctions,
or errors caused by network connection.
• If the appliance is having trouble connecting to
the Wi-Fi network, it may be too far from the
router. Purchase a Wi-Fi repeater (range
extender) to improve the Wi-Fi signal strength.
• The Wi-Fi connection may not connect or may be
interrupted because of the home network
environment.
• The network connection may not work properly
depending on the Internet service provider.
• The surrounding wireless environment can
make the wireless network service run slowly.
• If the appliance cannot be connected due to
problems with the wireless signal transmission,
unplug the appliance and wait about a minute
before trying again.
• If the firewall on your wireless router is enabled,
disable the firewall or add an exception to it.
• The wireless network name (SSID) should be a
combination of English letters and numbers. (Do
not use special characters.)
• Smartphone user interface (UI) may vary
depending on the mobile operating system (OS)
and the manufacturer.
• If the security protocol of the router is set to
WEP, network setup may fail. Change the
security protocol (WPA2 is recommended) and
connect the product again.
Using the Appliance Remotely
Use a smartphone to control the appliance
remotely. You can also monitor the cycle operation
so you know how much time is left in the cycle.
Using Remote Start
1 Put the clothes into the appliance.
2 Press the Power button.
3 Press the Settings button.
4 Press the Remote Start button to use the
appliance remotely.
5 Start a cycle from the LG ThinQ application on
your smartphone.
NOTE
• Once the function is enabled, you can only start
a cycle from the LG ThinQ smartphone
application. If the cycle is not started, the
application will wait to start the cycle until it is
turned off remotely from the application or this
function is disabled.
• If the door has been opened, you cannot start a
cycle remotely.
Disabling Remote Start Manually
When the function is activated, touch the Remote
Start button to disable the function.
Download Cycle
You can download new and specialized cycles that
are not included in the standard cycles on the
appliance.
Appliances that have been successfully connected
to a Wi-Fi network can download a variety of
specialty cycles specific to the appliance.
Various cycles can be used through Settings - Edit
Cycle List.
43SMART FUNCTIONS
ENGLISH
Radio Equipment Specifications
† This feature is only available on some models.
FCC Notice
The following notice covers the transmitter
module contained in this product.
This equipment has been tested and found to
comply with the limits for a Class B digital device,
pursuant to Part 15 of the FCC Rules. These limits
are designed to provide reasonable protection
against harmful interference in a residential
installation. This equipment generates, uses, and
can radiate radio frequency energy and, if not
installed and used in accordance with the
instructions, may cause harmful interference to
radio communications. However, there is no
guarantee that interference will not occur in a
particular installation. If this equipment does
cause harmful interference to radio or television
reception, which can be determined by turning the
equipment off and on, the user is encouraged to
try to correct the interference by one or more of
the following measures:
• Reorient or relocate the receiving antenna.
• Increase the separation between the equipment
and the receiver.
• Connect the equipment into an outlet on a
circuit different from that to which the receiver is
connected.
• Consult the dealer or an experienced radio/TV
technician for help.
This device complies with part 15 of the FCC Rules.
Operation is subject to the following two
conditions:
(1) This device may not cause harmful interference
and
(2) This device must accept any interference
received, including interference that may cause
undesired operation.
Any changes or modifications in construction of
this device which are not expressly approved by
the party responsible for compliance could void
the user’s authority to operate the equipment.
FCC RF Radiation Exposure
Statement
This equipment complies with FCC radiation
exposure limits set forth for an uncontrolled
environment. This transmitter must not be co-
located or operating in conjunction with any other
antenna or transmitter.
This equipment should be installed and operated
with a minimum distance of 20 cm (7.8 inches)
between the antenna and your body. Users must
follow the specific operating instructions for
satisfying RF exposure compliance.
Industry Canada Statement
This device contains licence-exempt transmitter(s)/
receiver(s) that comply with Innovation, Science
and Economic Development Canada’s licence-
exempt RSS(s). Operation is subject to the
following two conditions:
(1) This device may not cause interference.
(2) This device must accept any interference,
including interference that may cause undesired
operation of the device.
IC Radiation Exposure Statement
This equipment complies with IC radiation
exposure limits set forth for an uncontrolled
environment.
This equipment should be installed and operated
with a minimum distance of 20 cm (7.8 inches)
between the antenna and your body.
NOTE
• THE MANUFACTURER IS NOT RESPONSIBLE FOR
ANY RADIO OR TV INTERFERENCE CAUSED BY
UNAUTHORIZED MODIFICATIONS TO THIS
EQUIPMENT. SUCH MODIFICATIONS COULD
VOID THE USER’S AUTHORITY TO OPERATE THE
EQUIPMENT.
Open Source Software Notice
Information
To obtain the source code that is contained in this
product, under GPL, LGPL, MPL, and other open
source licenses that have the obligation to disclose
source code, and to access all referred license
terms, copyright notices and other relevant
documents, please visit https://
opensource.lge.com.
Type
Operating Frequency
Range
Output
Power
(Max.)
Wireless
LAN
2400 MHz - 2472 MHz
< 1 W
Bluetooth
†
2400 MHz - 2483.5 MHz
44 SMART FUNCTIONS
LG Electronics will also provide open source code
to you on CD-ROM for a charge covering the cost
of performing such distribution (such as the cost of
media, shipping, and handling) upon email
request to [email protected].
This offer is valid to anyone in receipt of this
information for a period of three years after our
last shipment of this product.
Smart Diagnosis
TM
Function
Use this feature to help you diagnose and solve
problems with your appliance.
NOTE
• For reasons not attributable to LGE’s negligence,
the service may not operate due to external
factors such as, but not limited to, Wi-Fi
unavailability, Wi-Fi disconnection, local app
store policy, or app unavailability.
• The feature may be subject to change without
prior notice and may have a different form
depending on where you are located.
Using LG ThinQ to Diagnose Issues
If you experience a problem with your Wi-Fi
equipped appliance, it can transmit
troubleshooting data to a smartphone using the
LG ThinQ application.
• Launch the LG ThinQ application and select the
Smart Diagnosis feature in the menu. Follow
the instructions provided in the LG ThinQ
application.
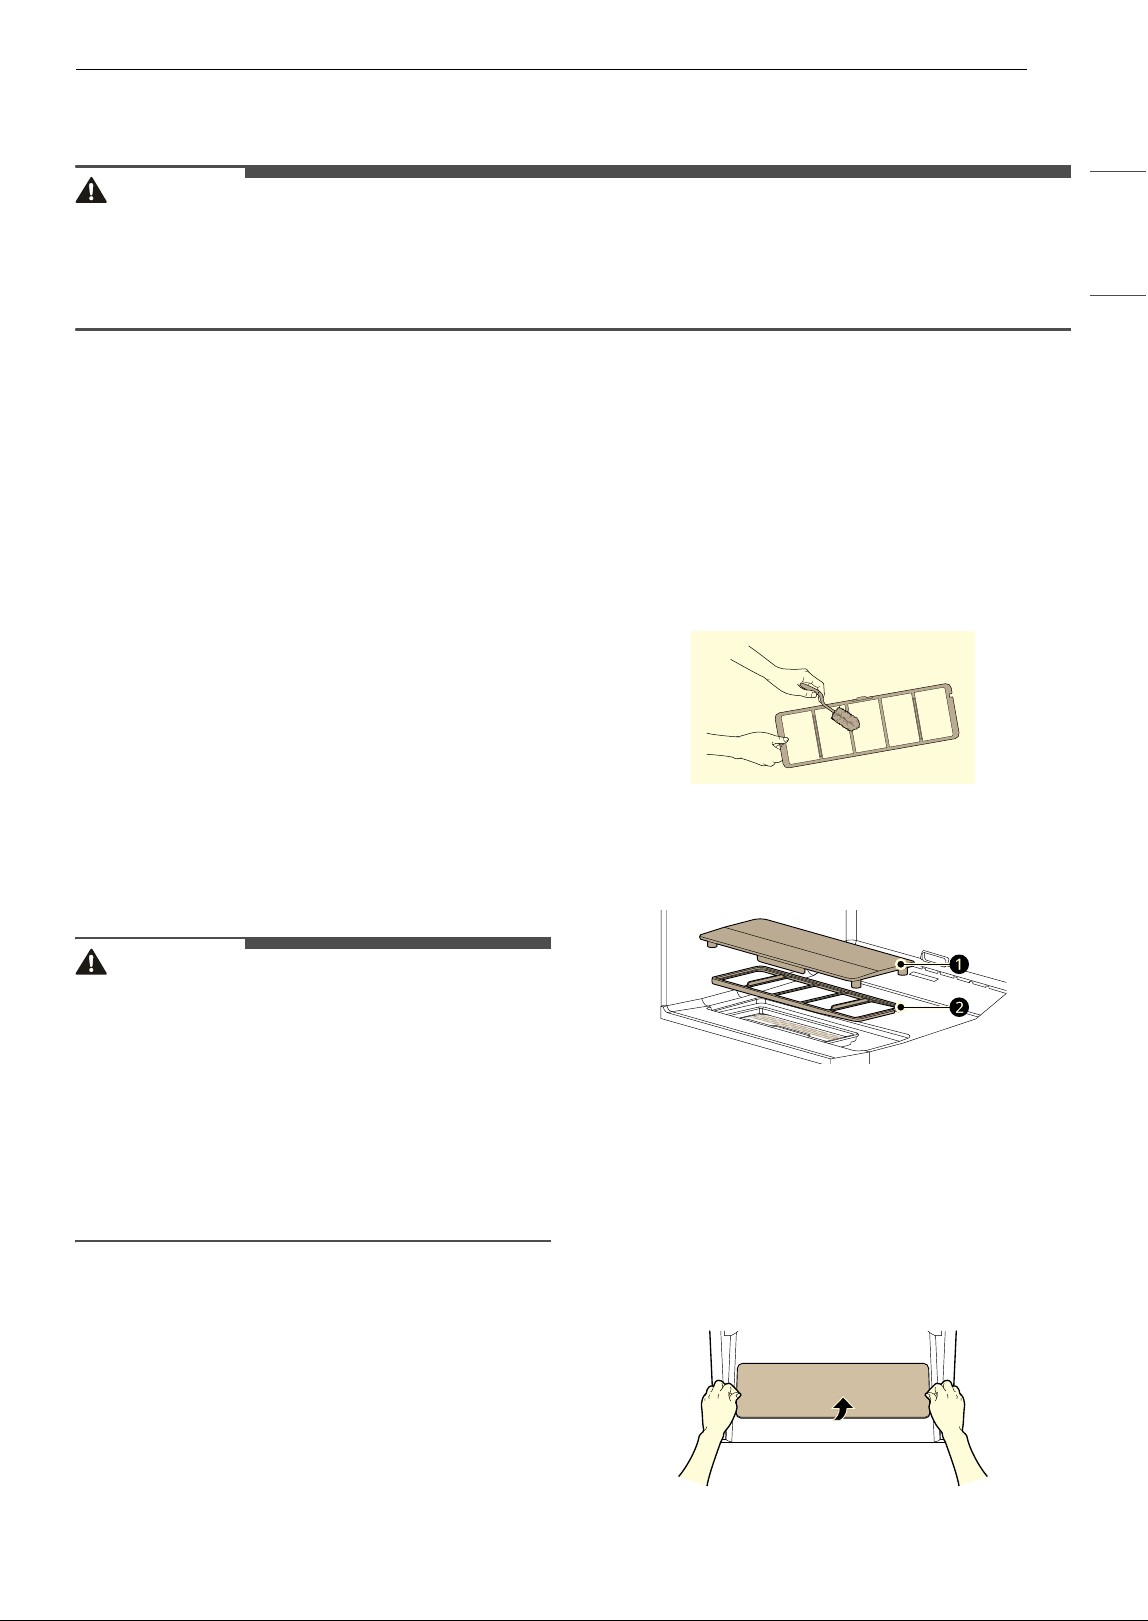
45MAINTENANCE
ENGLISH
MAINTENANCE
WARNING
• Unplug the appliance before cleaning to avoid the risk of electric shock. Failure to follow this warning
can cause serious injury, fire, electrical shock, or death.
• Never use harsh chemicals, abrasive cleaners, or solvents to clean the appliance. They will damage the
finish.
Regular Cleaning
Cleaning the Interior and Exterior
Proper care of your appliance can extend its life.
1 Clean the inside and outside of the appliance
with a damp cloth.
• Glass cleaner can be used to clean the front
glass panel, but spray it on a cloth and wipe
rather than spraying it directly on the panel.
2 Buff the door dry with a clean, dry cloth to
prevent any water stains.
3 Allow the interior and exterior to dry
completely before plugging in and operating
the appliance.
CAUTION
• Do not spray water directly on the appliance.
• Do not use detergent, methylated spirits,
solvents, or any volatile liquids to clean the
exterior of the appliance.
• Never use steel wool or abrasive cleansers; they
can damage the surface.
• Keep sharp objects away from the exterior of the
appliance. The touch panel may not work if
damaged.
Cleaning the Lint Filter
Always remove the lint from the filter after every
cycle. If the lint filter has become very dirty or
clogged, wash the lint filter in warm, soapy water
and allow it to dry thoroughly before reinstalling.
• Never operate the appliance without the lint
filter.
• Never operate the appliance with a wet lint filter.
1 Remove the lint filter cover and lint filter.
2 Clean off large areas of lint first using your
fingers. Then clean off the residual lint using a
vacuum cleaner or soft brush.
• If the lint filter is torn or damaged, replace it
with a new one.
3 After drying the filter completely, insert the
lint filterb and lint filter covera.
Cleaning the Mirror Surface on the
Lint Filter Cover
Clean the appliance regularly to keep it operating
properly.
1 Remove the lint filter cover and lint filter.
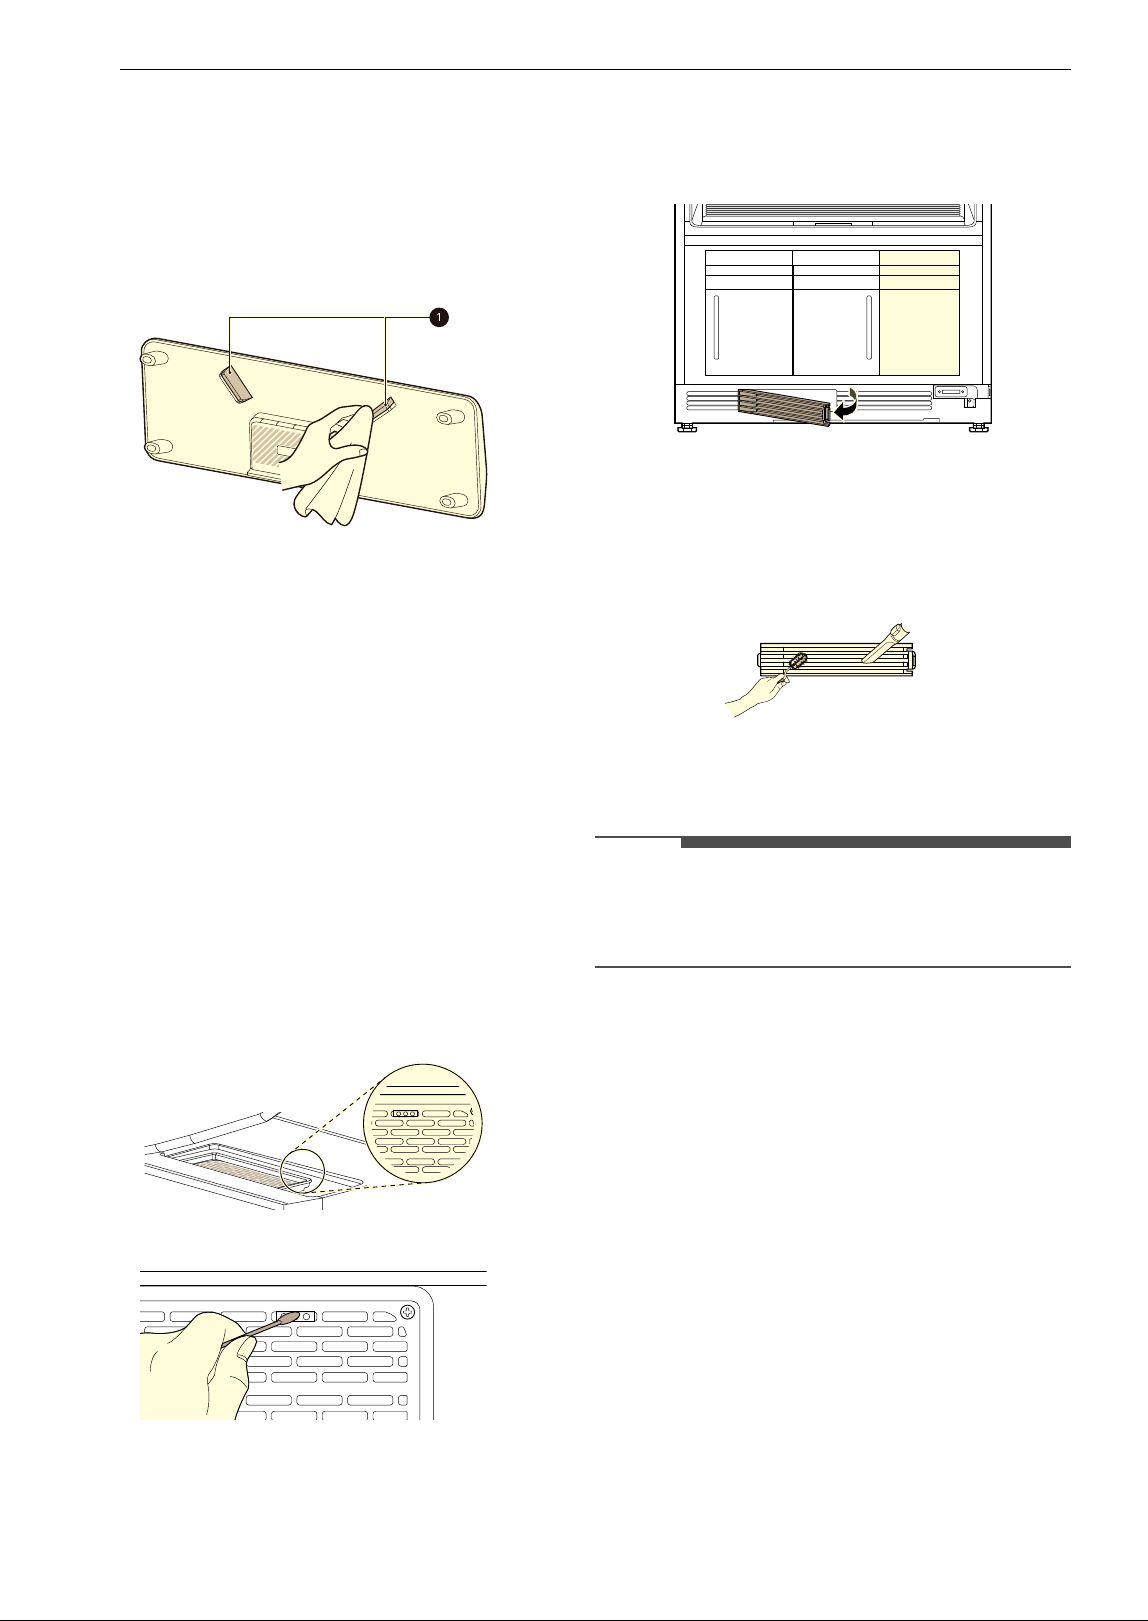
46 MAINTENANCE
2 Wipe the mirror surface on the back of the lint
filter cover with a dry towel.
• If the mirror surface is excessively scratched
or damaged, replace it with a new one.
• If the mirror surface is not kept clean, there
may be a restriction in the functions using
the smart lighting sensor.
3 When cleaning is completed, reinstall the lint
filter cover on top of the lint filter correctly.
• Install the lint filter cover so that the arrow
(
@) points to the front of the appliance.
Cleaning the LED Lighting Case
The lighting case only requires maintenance if
water is poured into the product or wet clothing
such as swimsuits drip water into the air passage
below the lint filter.
1 Remove the lint filter cover and lint filter.
2 Wipe off the top surface of the LED lighting
case using a cotton swab.
Cleaning Dehumidification Filter
1 Take out the dehumidification filter.
2 Wipe off the filter with a soft brush or vacuum
it.
• If the filter is torn or damaged, replace it
with a new one.
3 When cleaning is complete, dry the filter off
completely and install it correctly.
NOTE
• Remember to assemble the filter after cleaning
it. Foreign substances may enter the product if
the product is operated without a filter.
Cleaning the Aroma Filter
For best results, wash the aroma filter using hot
water and dish soap. After cleaning, wipe the filter
with a clean cloth and allow it to dry thoroughly
before reinstalling it.
The aroma filter can also be cleaned in the top rack
of the dishwasher.
• Never operate the appliance without the aroma
filter.
• Never operate the appliance with a wet aroma
filter.
Cleaning the Water Tanks
The water in the water supply tank contacts the
clothing and items treated in the appliance
directly. Clean both tanks periodically and keep
them clean at all times. If the tanks are not
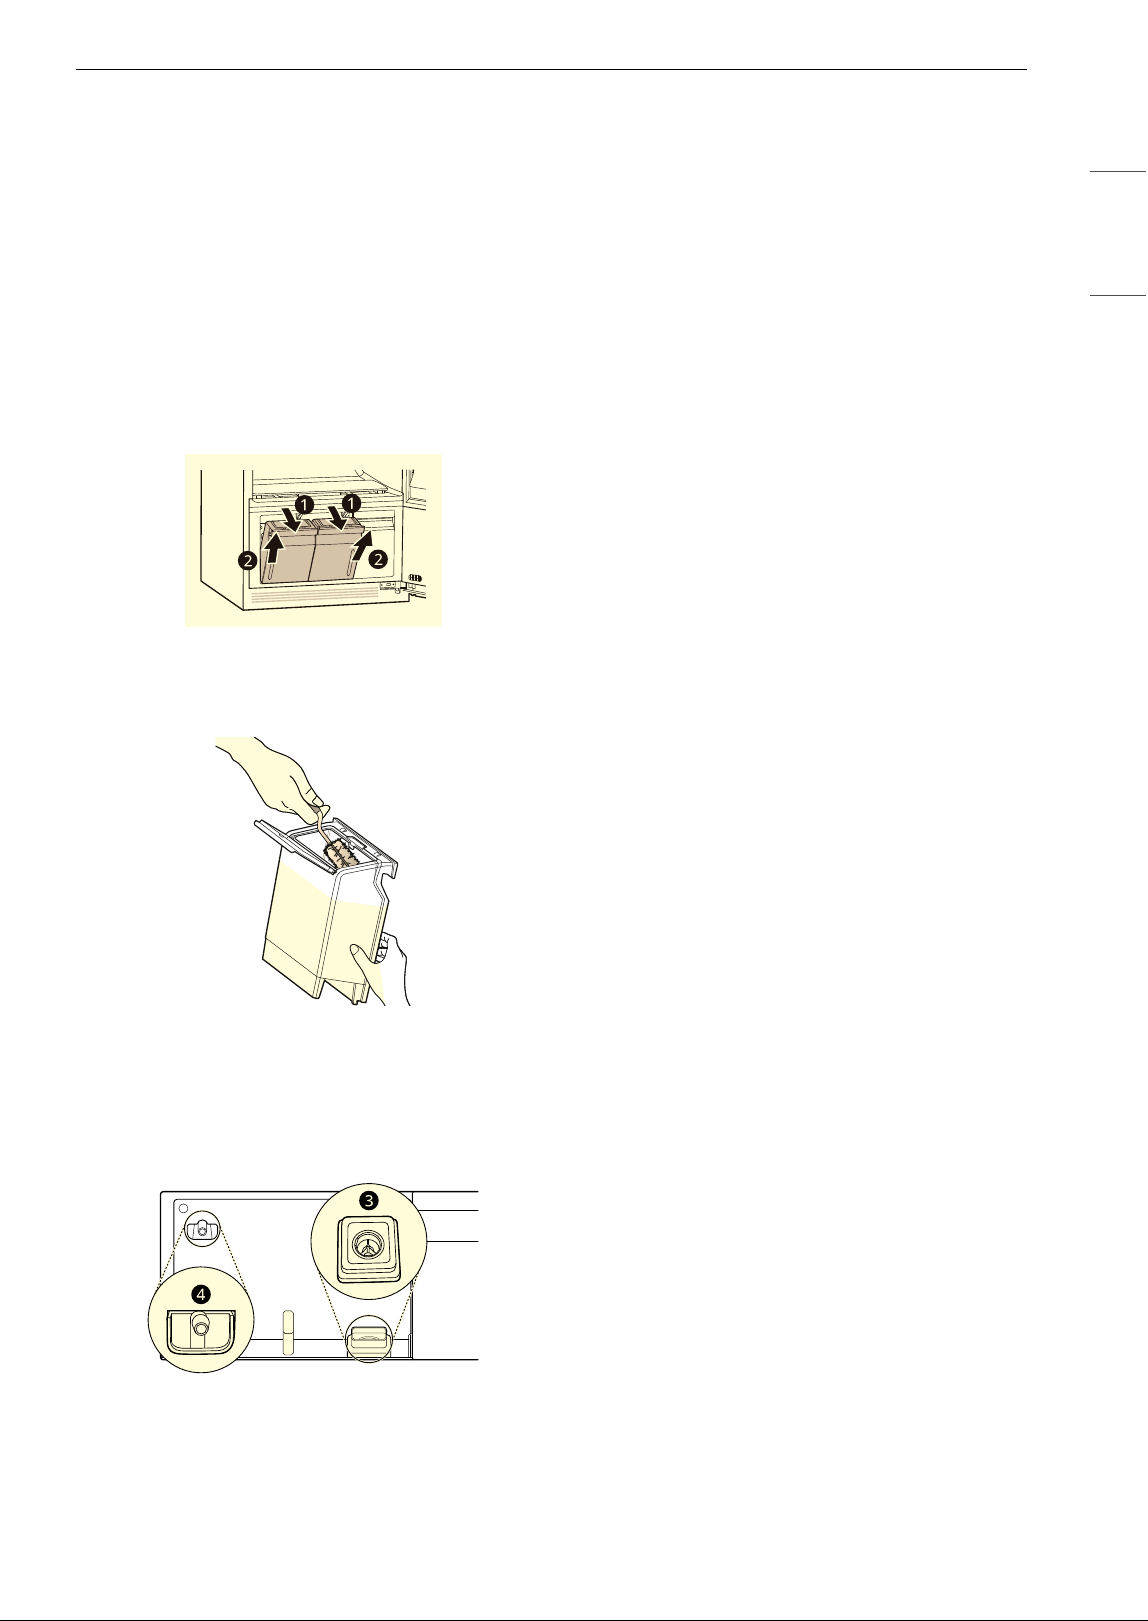
47MAINTENANCE
ENGLISH
properly cleaned, they may start to smell or need
to be replaced.
• Some discoloration of the water drain tank may
occur over time. This is normal and will not affect
product performance.
• Use only clean tap water in the supply tank for
best performance and to prolong the life of the
appliance. Do not use distilled water.
• Do not reuse the water from the water drain
tank in the water supply tank.
1 Pull the handle of the tank forward and then
remove the tanks from the appliance.
2 Clean the inside of the water tanks with a
brush and water.
3 Make sure the drainage nozzle d connected
to the water drain tank and the water supply
hole
c connected to the water supply tank
are not clogged.
4 Allow the outsides of the tanks to dry
completely before reinstalling the tanks.
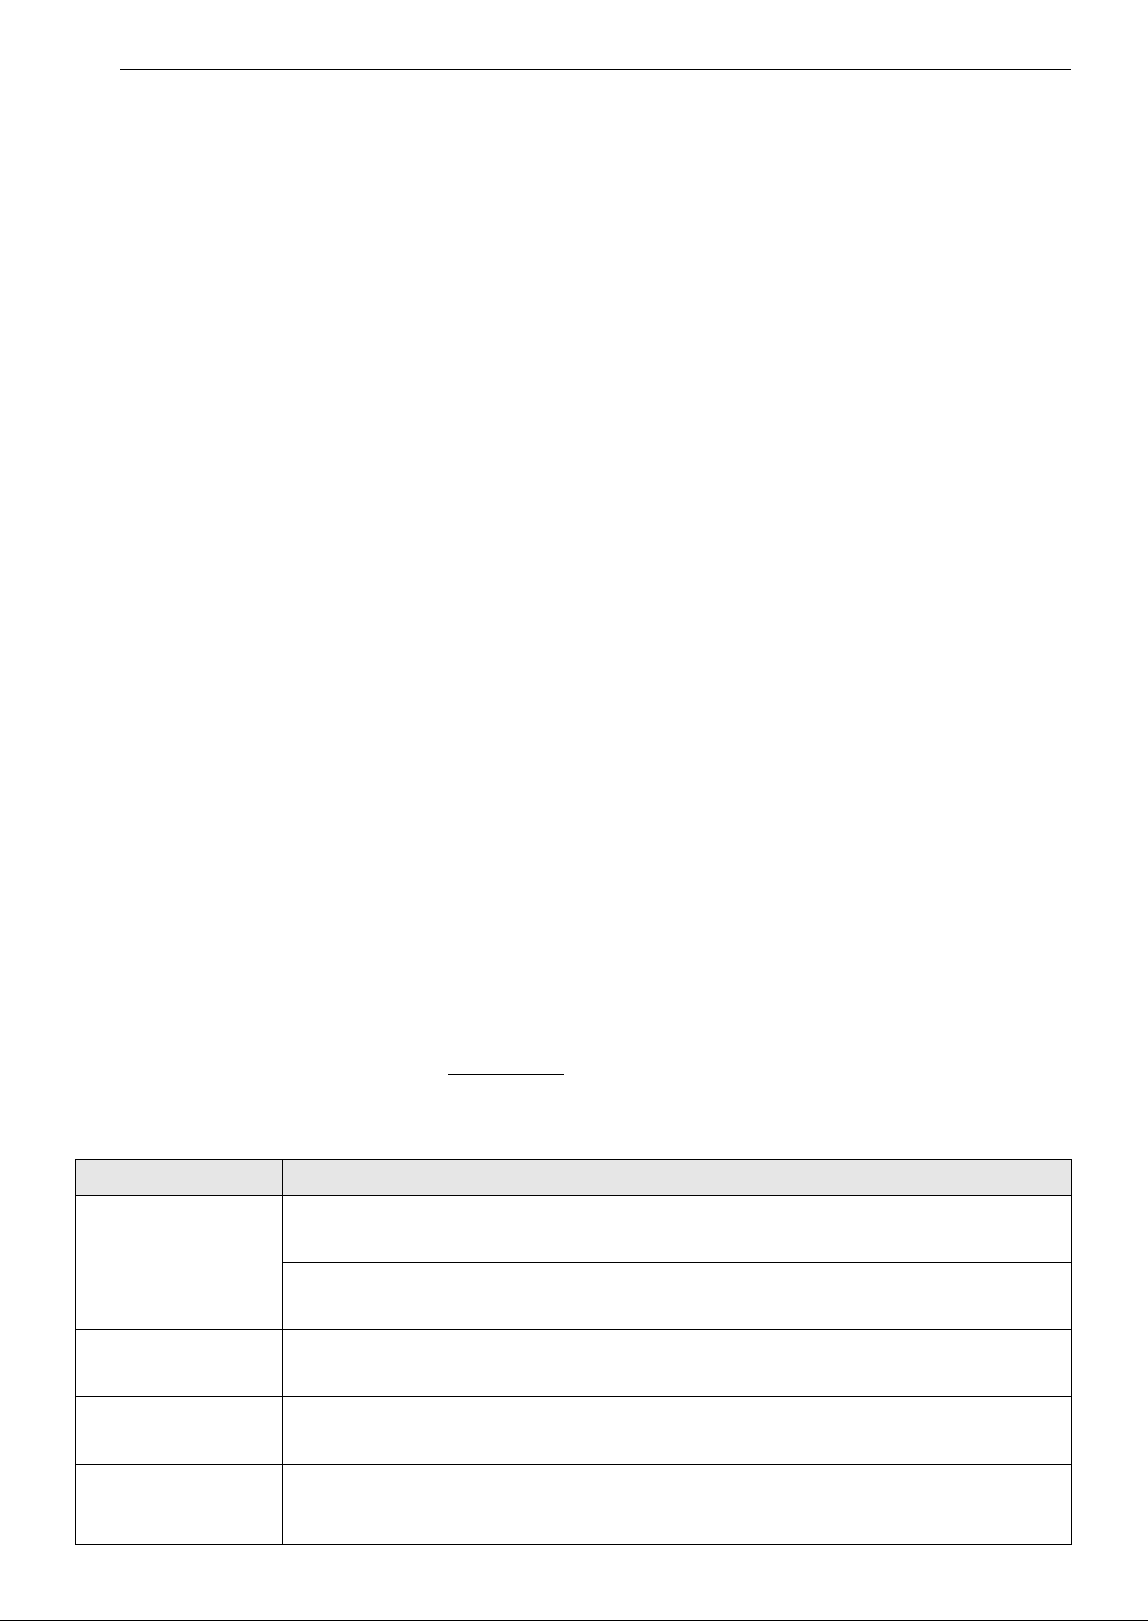
48 TROUBLESHOOTING
TROUBLESHOOTING
FAQs
Frequently Asked Questions
Before Calling for Service
The appliance is equipped with an automatic error-monitoring system to detect and diagnose problems at
an early stage. If the appliance does not function properly or does not function at all, check the following
before you call for service.
For detailed information or videos, visit www.lg.com for the troubleshooting page.
Error Messages
Q: What are aroma sheets and how do I use them?
A: You can use your favorite brand of dryer fabric softener sheets in the aroma filter to infuse items with
a refreshing aroma.The sheets will not soften garments or reduce static. To use the aroma filter, add
a softener sheet before running a cycle. Dispose of the softener sheet at the end of the cycle. For best
performance, clean the aroma filter after every 5-7 uses. See Checking the Aroma Filter, and
Cleaning the Aroma Filter.
Q: Can I put fur, leather, or silk items in the appliance?
A: Download the Fur/Leather Care cycle for use with fur or leather, or the Silk Care cycle for use with
silk items in the appliance. For instructions on downloading new cycles for the appliance, see Smart
Functions and the instructions in the LG ThinQ smartphone application.
Q: Why is the cycle time longer than estimated for the Gentle Dry cycle?
A: The appliance uses a sensor to sense the dryness of fabrics. If clothing or other items are not dried
properly, the cycle time is extended automatically.
Q: Can I install the appliance on carpeting?
A: If installing on carpeting (especially on padded or deep pile carpets), stabilize the unit by installing the
rear leveling legs and the four carpet spikes. For instructions, see Installing on Carpeting.
Extra care must be taken to keep the area around the machine clean and dry. Do not open the cabinet
during operation. There is a risk of burns or injury, and condensation from escaping hot air or steam
could result in damage to carpeting.
Problem Possible Cause & Solution
Check the water
tank
Water supply tank is empty or tank is missing.
• Fill the water supply tank and reinstall it.
Water drain tank is full or tank is missing.
• Empty the water drain tank and reinstall it.
Fill the water supply
tank
Water supply tank is empty or tank is missing.
• Fill the water supply tank and reinstall it. If the error is not released, call for service.
Empty the water
drain tank
Water drain tank is full or tank is missing.
• Empty the water drain tank and reinstall it. If the error is not released, call for service.
The door is open.
Close the door
completely
Door is not completely closed.
• Check that items are completely inside the cabinet and that the door is tightly closed.
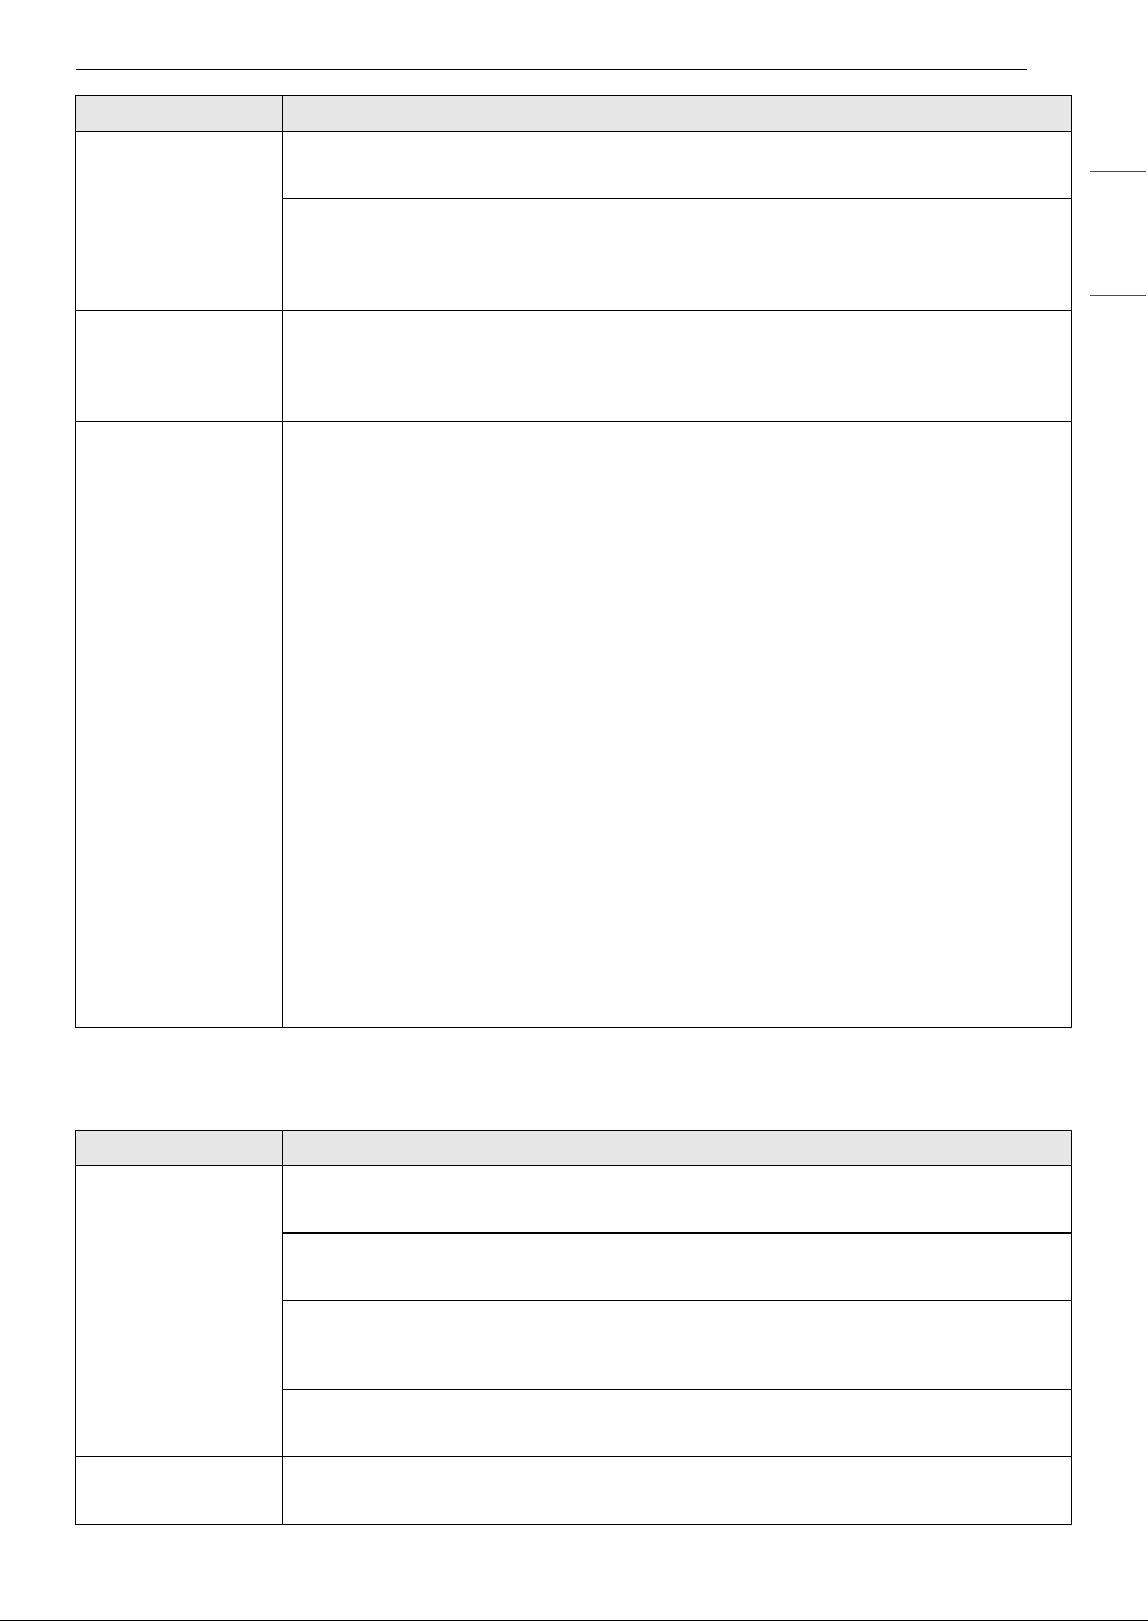
49TROUBLESHOOTING
ENGLISH
Operation
Lint filter mounting
error
Lint filter is missing.
• Install the lint filter in place.
Water has gotten inside the appliance from wet clothing or pouring water inside.
• If water enters the air passage below the lint filter, it may affect product operation.
Remove the lint filter cover and lint filter, drain any visible moisture, allow to dry
completely, and then use the product again.
Clothes falling
detected.
Clothing fell on the bottom of the appliance.
• Hang clothing back on the hanger. Close the buttons and zips on the clothing to prevent it
from falling off during operation. For clothing with no buttons or zips, use a string to
secure it.
Light Sensor Error
Flow Control Unit
Error
Exhaust Fan Error
Temperature Sensor
Error
Steam Heater Error
Compressor Error
Moving Hanger Error
Steamer Steam
Heater Overheating
Error
Steamer Steam
Heater
Disconnection Error
Steamer Handy
Heater
Disconnection Error
Water supply issue
on the Steamer
Steamer drainage
failed
System error.
• Unplug the appliance and call for service.
Problem Possible Cause & Solution
The appliance won’t
operate.
Control panel has powered off due to inactivity.
• This is normal. Touch the Power button to turn the appliance on.
Cord is unplugged.
• Make sure the cord is plugged securely into a working outlet.
Circuit breaker/fuse is tripped/blown.
• Check house circuit breakers/fuses. Replace fuses or reset breaker. The appliance should
be on a dedicated branch circuit.
Appliance is not connected to 120 V socket.
• Make sure the cord is plugged into a grounded socket rated for this appliance.
The cycle won’t start. Start/Pause button was not touched after the cycle was set.
• Touch the Start/Pause button.
Problem Possible Cause & Solution
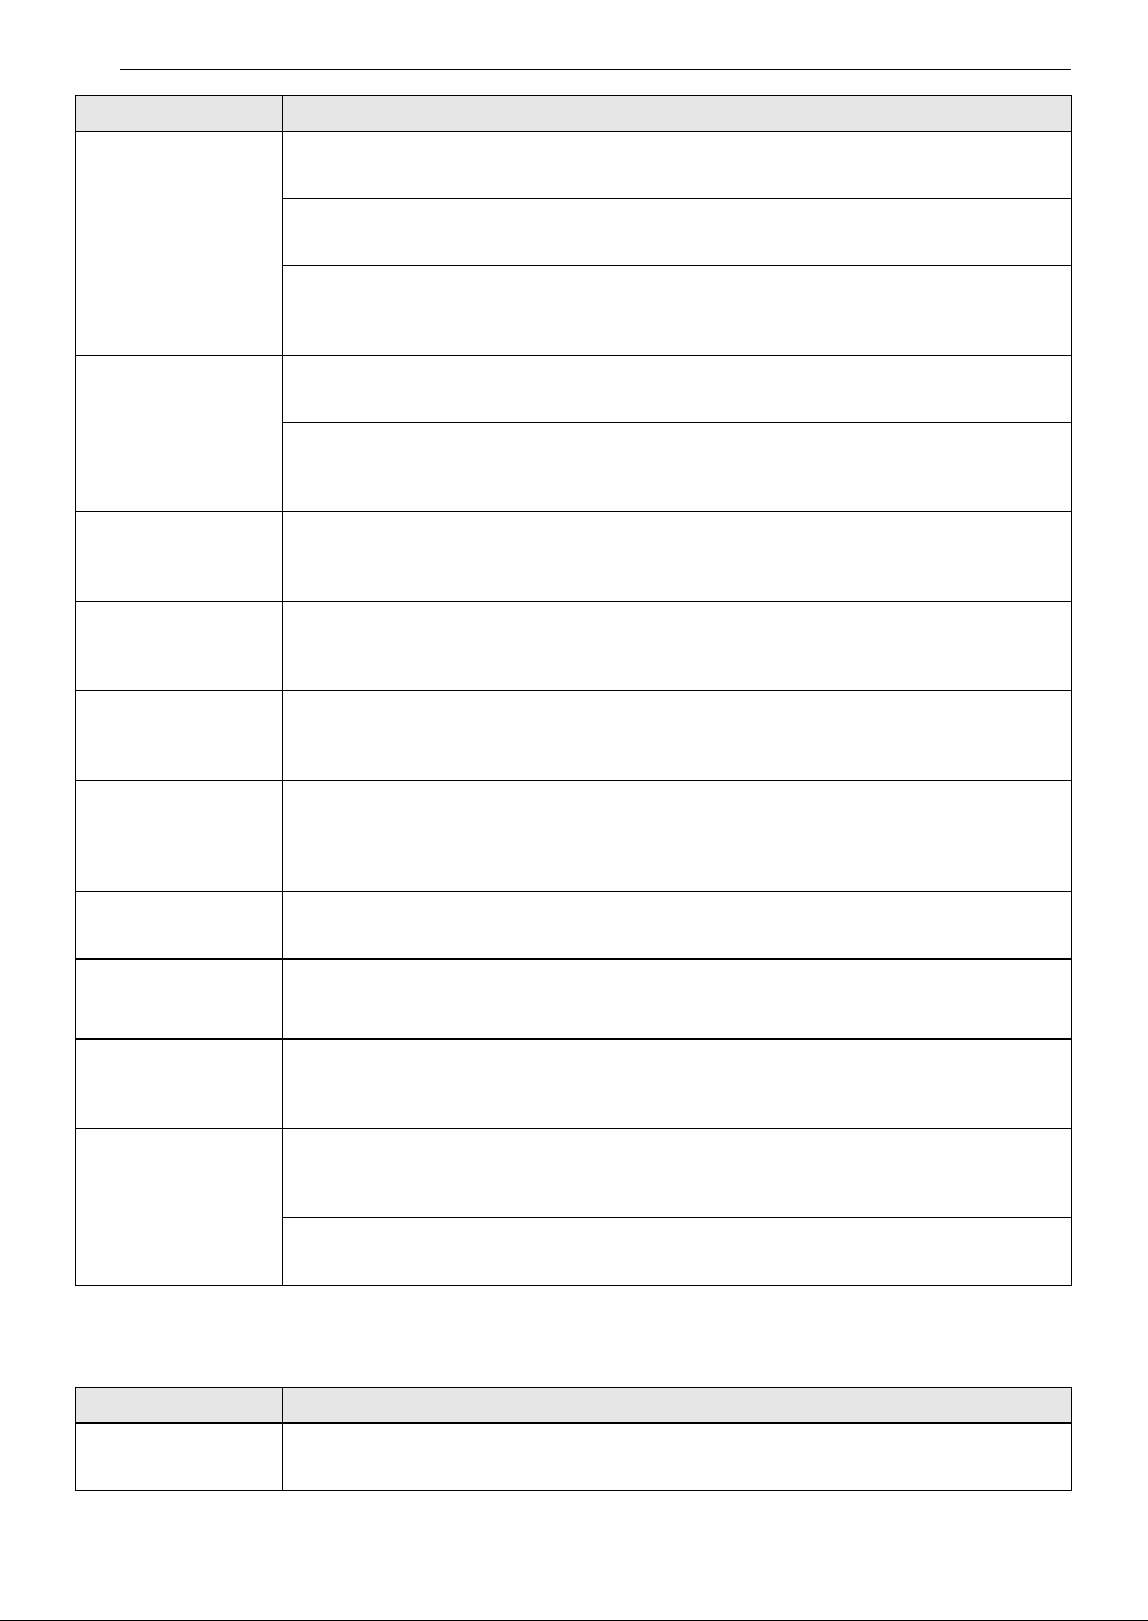
50 TROUBLESHOOTING
Performance
The cycle won’t start. Cycle is producing steam.
• There may be a period of inactivity while steam is produced.
Control panel is locked.
• Disable the locking of the control panel and touch the Start/Pause button.
Detergent or fabric softener put in water supply tank.
• Do not use anything but clean water in the water supply tank. If the appliance don't
operate, call for service.
Steam or hot air
comes out when the
door is opened.
Door is opened during operation.
• It is normal for steam or hot air to escape if the door is opened during operation.
An item is caught in the door, keeping it slightly open.
• Make sure all items are completely inside the cabinet and nothing is caught in the door,
blocking it from closing completely.
Full water supply
tank is empty after
just one use.
Appliance is being used for the first time.
• A larger amount of water is needed the first time the appliance is used to fill the empty
reservoir.
Appliance makes a
loud vibrating noise
on startup.
Moving hanger is balancing load before operation.
• This is normal at the beginning of the cycle. If the noise increases or continues for a long
time, call for service.
Styling times are
taking longer than
estimated.
Clothes were extremely wet when loaded.
• Styling times may be longer for very wet or bulky clothing. Damp dry clothes before
putting them in the appliance. The appliance stops automatically when clothes are dry.
Appliance is moving
from left to right
while operating.
Floor under appliance is not level or is not sturdy enough to support the weight of the
appliance without flexing.
• Install the appliance where the floor is level and sturdy. Compensate for any slight
unevenness in the floor with the leveling legs.
Sound of motor
whirring.
Compressor is running during styling.
• This is normal.
Sound of water
running, boiling, or
hissing.
Steam is being generated and sprayed onto clothes.
• This is normal.
Steam or hot air
leaks out when the
door is closed.
An item is caught in the door, keeping it slightly open.
• Make sure all items are completely inside the cabinet and nothing is caught in the door,
blocking it from closing completely.
Control panel won’t
respond.
Control panel or button has dirt on it.
• Dirt or foreign objects on the control panel will interfere with the operation of the buttons.
Clean the control panel.
Control panel is locked.
• Disable the locking of the control panel. (See Control Lock for instructions.)
Problem Possible Cause & Solution
Clothes are wet at
the end of the cycle
Filter is clogged
• Clean the lint filter.
Problem Possible Cause & Solution
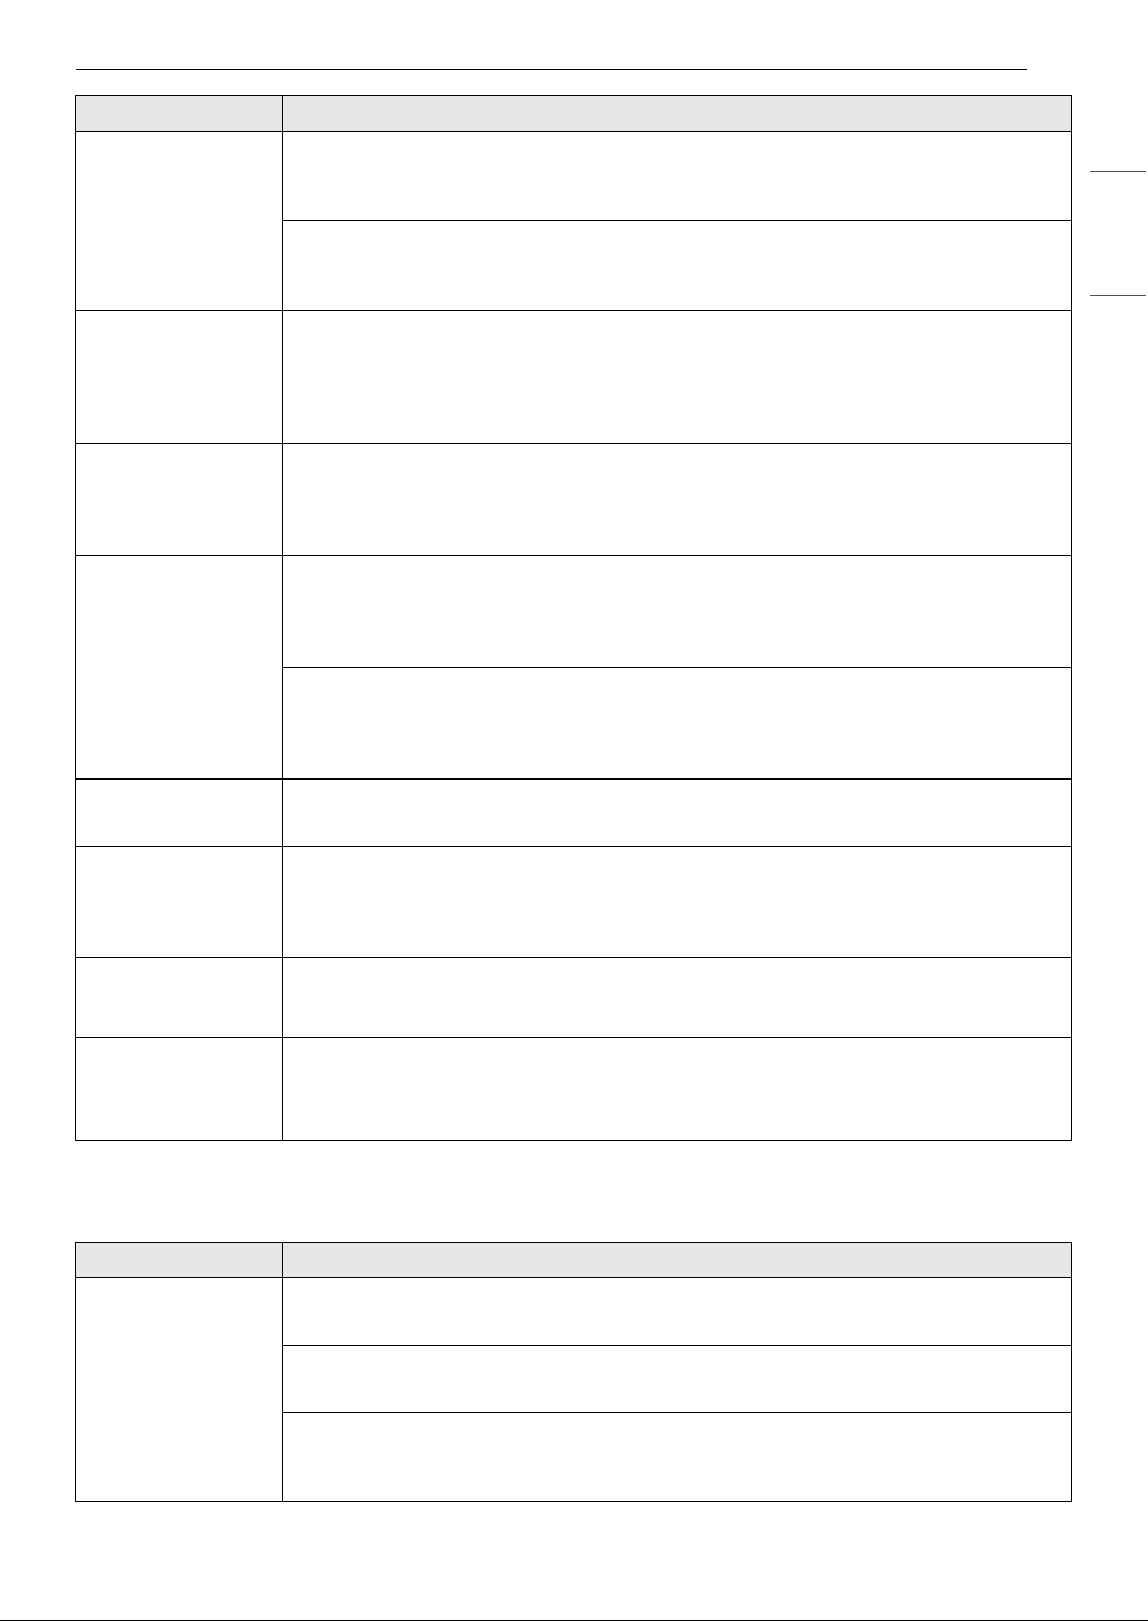
51TROUBLESHOOTING
ENGLISH
Wi-Fi
Clothes are wet at
the end of the cycle
Door gasket is damaged
• If the rubber door gasket is damaged, it leaves a gap in the door seal, affecting
performance of the appliance. Call for service.
Clothes caught in door
• Make sure all items are completely in the cabinet and not stuck in the door, blocking it
from closing completely. Run the cycle again.
Odor is not removed
at end of cycle.
Clothes were stored for a long period of time or are stained with a strong-smelling
substance.
• Odors can be particularly difficult to remove from clothes that have been stored for long
periods or have strong-smelling, oily stains. Wash the clothes first, before using the
appliance.
Wrinkles are not
reduced at end of
cycle.
Clothes were stored for a long period of time.
• Wrinkles may be very difficult to reduce if set for a long time, especially in cotton and linen
fabrics. Iron clothes that have been stored for a long period of time before treating them
with the appliance, to reduce wrinkles more effectively.
Clothes have an
unpleasant odor at
end of cycle.
Appliance has not been used for a long time or water tanks and filters have not been
cleaned.
• Check for dirt or foreign objects in the water supply and water drain tanks. Clean the filters
and water tanks.
Are you using the appliance for the first time?
• The smell is caused by rubber material that is attached to the appliance inside. This kind of
smell is a rubber's own smell and disappears automatically after using the appliance
several times.
Functions are not
operating properly.
Detergent or fabric softener put in water supply tank.
• Do not use anything but clean water in the water supply tank.
Wrinkles at back of
neck after cycle.
Item too large for hanger or fabric too delicate.
• Use the right size hanger for the item so the fabric won’t bunch up and cause wrinkles.
Some fabrics are delicate and will bunch around the hanger no matter what you do. Use
the shelf for lingerie and other delicate items.
Creases are gone
from pants after
cycle.
Pants were hung on the moving hanger, not in the Pants Crease Care.
• Hang pants in the Pants Crease Care to maintain creases at edge of pants legs.
Clothing has water
spots after cycle,
color has faded or
run.
Fabric is not washable, or is not colorfast.
• Check fabric care labels before treating items.
Problem Possible Cause & Solution
Trouble connecting
appliance and
smartphone to Wi-Fi
network.
The password for the Wi-Fi network was entered incorrectly.
• Delete your home Wi-Fi network and begin the connection process again.
Mobile data for your smartphone is turned on.
• Turn off the Mobile data on your smartphone before connecting the appliance.
The wireless network name (SSID) is set incorrectly.
• The wireless network name (SSID) should be a combination of English letters and
numbers. (Do not use special characters.)
Problem Possible Cause & Solution
52 TROUBLESHOOTING
Trouble connecting
appliance and
smartphone to Wi-Fi
network.
The router frequency is not 2.4 GHz.
• Only a 2.4 GHz router frequency is supported. Set the wireless router to 2.4 GHz and
connect the appliance to the wireless router. To check the router frequency, check with
your Internet service provider or the router manufacturer.
The appliance and the router are too far apart.
• If the appliance is too far from the router, the signal may be weak and the connection may
not be configured correctly. Move the router closer to the appliance or purchase and
install a Wi-Fi repeater.
During Wi-Fi setup, the app is requesting a password to connect to the product (on
certain phones).
• Locate the network name which starts with "LG" under Settings > Networks. Note the last
part of the network name.
- If the network name looks like LGE_Appliance_XX-XX-XX, enter lge12345.
- If the network name looks like LGE_Appliance_XXXX, enter XXXX twice as your password.
For example, if the network name appears as LGE_Appliance_8b92, then you would
enter 8b928b92 as your password. In this instance, the password is case sensitive and
the last 4 characters are unique to your appliance.
Problem Possible Cause & Solution
53LIMITED WARRANTY
ENGLISH
LIMITED WARRANTY
USA
TERMS AND CONDITIONS
ARBITRATION NOTICE: THIS LIMITED WARRANTY CONTAINS AN ARBITRATION PROVISION THAT
REQUIRES YOU AND LG ELECTRONICS (“LG”) TO RESOLVE DISPUTES BY BINDING ARBITRATION
INSTEAD OF IN COURT, UNLESS YOU CHOOSE TO OPT OUT. IN ARBITRATION, CLASS ACTIONS AND
JURY TRIALS ARE NOT PERMITTED. PLEASE SEE THE SECTION TITLED “PROCEDURE FOR RESOLVING
DISPUTES” BELOW.
Should your LG Styler (“Product”) fail due to a defect in materials or workmanship under normal and
proper use, during the warranty period set forth below, LG will, at its option, repair or replace the Product.
This limited warranty is valid only to the original retail purchaser of the Product (“You”) and applies only
when purchased lawfully and used within the United States including U.S. Territories.
• Replacement Products and parts are warranted for the remaining portion of the original warranty period
or ninety (90) days, whichever is greater.
• Replacement Products and parts may be new, reconditioned, refurbished, or otherwise factory
remanufactured.
• Replaced Product or part(s) will be the property of LG.
• Proof of original retail purchase specifying the Product model and date of purchase is required to obtain
warranty service under this limited warranty.
EXCEPT TO THE EXTENT PROHIBITED BY APPLICABLE LAW, ANY IMPLIED WARRANTY OF
MERCHANTABILITY OR FITNESS FOR A PARTICULAR PURPOSE ON THE PRODUCT IS LIMITED IN
DURATION TO THE DURATION OF THE ABOVE LIMITED WARRANTY. UNDER NO CIRCUMSTANCES
SHALL LG OR ITS U.S. DISTRIBUTORS/DEALERS BE LIABLE FOR ANY INDIRECT, INCIDENTAL,
CONSEQUENTIAL, SPECIAL, OR PUNITIVE DAMAGES, INCLUDING, WITHOUT LIMITATION, LOST
GOODWILL, LOST REVENUES OR PROFITS, WORK STOPPAGE, IMPAIRMENT OF OTHER GOODS, COST OF
REMOVAL AND REINSTALLATION OF THE PRODUCT, LOSS OF USE, OR ANY OTHER DAMAGES WHETHER
BASED IN CONTRACT, TORT, OR OTHERWISE. LG’S TOTAL LIABILITY, IF ANY, SHALL NOT EXCEED THE
PURCHASE PRICE PAID BY YOU FOR THE PRODUCT.
SOME STATES DO NOT ALLOW THE EXCLUSION OR LIMITATION OF INCIDENTAL OR CONSEQUENTIAL
DAMAGES OR LIMITATIONS ON HOW LONG AN IMPLIED WARRANTY LASTS, SO THE ABOVE
EXCLUSIONS OR LIMITATIONS MAY NOT APPLY TO YOU. THIS LIMITED WARRANTY GIVES YOU
SPECIFIC LEGAL RIGHTS AND YOU MAY ALSO HAVE OTHER RIGHTS THAT VARY FROM STATE TO STATE.
THIS LIMITED WARRANTY DOES NOT COVER:
• Service trips to deliver, pick up, or install, educate how to operate, correct wiring, or correct
unauthorized repairs.
WARRANTY PERIOD
Period Scope of Warranty HOW SERVICE IS HANDLED
Two (2) years from the date of
original retail purchase, or from
the date of delivery as per
applicable law
Parts and Labor (internal/
functional parts only)
LG will provide parts and labor to
repair or replace defective parts.
Ten (10) years from the date of
original retail purchase, or from
the date of delivery as per
applicable law
Inverter Compressor Parts Only (You are responsible for
any applicable labor cost)
54 LIMITED WARRANTY
• Damage or failure of the Product to perform during power failures and interrupted or inadequate
electrical service.
• Damage or failure of the Product caused by leaky or broken water pipes, frozen water pipes, restricted
drain lines, inadequate or interrupted water supply or inadequate supply of air.
• Damage or failure of the Product resulting from operating the Product in a corrosive atmosphere or
contrary to the Product owner’s manual.
• Damage or failure of the Product caused by accidents, pests and vermin, lightning, wind, fire, floods, acts
of nature, or any other causes beyond the control of LG.
• Damage or failure of the Product caused by unauthorized modification or alteration, or if the Product is
used for other than the intended purpose, or any water leakage where the Product was not properly
installed.
• Damage or failure of the Product caused by incorrect electrical current, voltage, or plumbing codes.
• Damage or failure of the Product caused by transportation, storage, and/or handling, including
scratches, dents, chips, and/or other damage to the finish of the Product, unless such damage is
reported within one (1) week of delivery.
• Damage or failure of the Product resulting from misuse, abuse, improper installation, repair, or
maintenance. Improper repair includes the use of parts not authorized by LG. Improper installation or
maintenance includes installation or maintenance contrary to the Product owner’s manual.
• Damage or failure of the Product caused by the use of parts, components, accessories, consumable
cleaning products, or any other products or services that were not authorized by LG.
• Damage or missing items to any display or open box Product.
• Refurbished Product or any Product sold “As Is”, “Where Is”, “With all Faults”, or similar disclaimer.
• Products with original serial numbers that have been removed, altered, or cannot be readily determined.
• Increases in utility costs and additional utility expenses.
• Any noises associated with normal operation.
• Products used for other than normal and proper household use (e.g., commercial, business, or industrial
settings, including any retail or food service establishments, or any commercial lodging/transient rental
setting), or any use contrary to the Product owner's manual.
• Costs associated with removal and reinstallation of the Product for repairs, or the removal and
reinstallation of the Product if it is installed in an inaccessible location or not installed in accordance with
the Product Owner's manual.
• Accessories, removable components, or consumable parts (e.g. Shelves, door bins, drawers, water/air
filters, racks, light bulbs, batteries, etc., as applicable), except for internal/functional parts covered under
this limited warranty.
The cost of repair or replacement under these excluded circumstances shall be borne by You.
TO OBTAIN WARRANTY SERVICE AND ADDITIONAL INFORMATION
Call 1-800-984-6306
and select the appropriate option from the menu.
Or visit our website at http://www.LGSIGNATURE.com
Or by mail: LG Electronics Customer Service P.O. Box 240007 Huntsville, AL 35813 ATTN: CIC
PROCEDURE FOR RESOLVING DISPUTES:
ALL DISPUTES BETWEEN YOU AND LG ARISING OUT OF OR RELATING IN ANY WAY TO THIS LIMITED
WARRANTY OR THE PRODUCT SHALL BE RESOLVED EXCLUSIVELY THROUGH BINDING ARBITRATION, AND
NOT IN A COURT OF GENERAL JURISDICTION. BINDING ARBITRATION MEANS THAT YOU AND LG ARE EACH
WAIVING THE RIGHT TO A JURY TRIAL AND TO BRING OR PARTICIPATE IN A CLASS ACTION.
Definitions. For the purposes of this section, references to “LG” mean LG Electronics U.S.A., Inc., its
parents, subsidiaries and affiliates, and each of their officers, directors, employees, agents, beneficiaries,
predecessors in interest, successors, assigns and suppliers; references to “dispute” or “claim” shall include
any dispute, claim or controversy of any kind whatsoever (whether based in contract, tort, statute,
55LIMITED WARRANTY
ENGLISH
regulation, ordinance, fraud, misrepresentation or any other legal or equitable theory) arising out of or
relating in any way to the sale, condition or performance of the product or this Limited Warranty.
Notice of Dispute. In the event you intend to commence an arbitration proceeding, you must first notify
LG in writing at least 30 days in advance of initiating the arbitration by sending a letter to LG at LG
Electronics, USA, Inc. Attn: Legal Department- Arbitration 111 Sylvan Avenue, Englewood Cliffs, NJ 07632.
You and LG agree to engage in good faith discussions in an attempt to amicably resolve your claim. The
notice must provide your name, address, and telephone number; identify the product that is the subject of
the claim; and describe the nature of the claim and the relief being sought. If you and LG are unable to
resolve the dispute within 30 days, either party may proceed to file a claim for arbitration.
Agreement to Binding Arbitration and Class Action Waiver. Upon failure to resolve the dispute during
the 30 day period after sending written notice to LG, you and LG agree to resolve any claims between us
only by binding arbitration on an individual basis, unless you opt out as provided below. Any dispute
between you and LG shall not be combined or consolidated with a dispute involving any other person’s or
entity’s product or claim. More specifically, without limitation of the foregoing, any dispute between you
and LG shall not under any circumstances proceed as part of a class or representative action. Instead of
arbitration, either party may bring an individual action in small claims court, but that small claims court
action may not be brought on a class or representative basis.
Arbitration Rules and Procedures. To begin arbitration of a claim, either you or LG must make a written
demand for arbitration. The arbitration will be administered by the American Arbitration Association
(“AAA”) and will be conducted before a single arbitrator under the AAA’s Consumer Arbitration Rules that
are in effect at the time the arbitration is initiated (referred to as the “AAA Rules”) and under the
procedures set forth in this section. The AAA Rules are available online at www.adr.org/consumer
. Send a
copy of your written demand for arbitration, as well as a copy of this provision, to the AAA in the manner
described in the AAA Rules. You must also send a copy of your written demand to LG at LG Electronics,
USA, Inc. Attn: Legal Department- Arbitration 111 Sylvan Avenue, Englewood Cliffs, NJ 07632. If there is a
conflict between the AAA Rules and the rules set forth in this section, the rules set forth in this section will
govern. This arbitration provision is governed by the Federal Arbitration Act. Judgment may be entered on
the arbitrator’s award in any court of competent jurisdiction. All issues are for the arbitrator to decide,
except that issues relating to the scope and enforceability of the arbitration provision and to the
arbitrability of the dispute are for the court to decide. The arbitrator is bound by the terms of this
provision.
Governing Law. The law of the state of your residence shall govern this Limited Warranty and any
disputes between us except to the extent that such law is preempted by or inconsistent with applicable
federal law.
Fees/Costs. You do not need to pay any fee to begin an arbitration. Upon receipt of your written demand
for arbitration, LG will promptly pay all arbitration filing fees to the AAA unless you seek more than $25,000
in damages, in which case the payment of these fees will be governed by the AAA Rules. Except as
otherwise provided for herein, LG will pay all AAA filing, administration and arbitrator fees for any
arbitration initiated in accordance with the AAA Rules and this arbitration provision. If you prevail in the
arbitration, LG will pay your attorneys’ fees and expenses as long as they are reasonable, by considering
factors including, but not limited to, the purchase amount and claim amount. Notwithstanding the
foregoing, if applicable law allows for an award of reasonable attorneys’ fees and expenses, an arbitrator
can award them to the same extent that a court would. If the arbitrator finds either the substance of your
claim or the relief sought in the demand is frivolous or brought for an improper purpose (as measured by
the standards set forth in Federal Rule of Civil Procedure 11(b)), then the payment of all arbitration fees will
be governed by the AAA Rules. In such a situation, you agree to reimburse LG for all monies previously
disbursed by it that are otherwise your obligation to pay under the AAA Rules. Except as otherwise
provided for, LG waives any rights it may have to seek attorneys’ fees and expenses from you if LG prevails
in the arbitration.
Hearings and Location. If your claim is for $25,000 or less, you may choose to have the arbitration
conducted solely on the basis of (1) documents submitted to the arbitrator, (2) through a telephonic
hearing, or (3) by an in-person hearing as established by the AAA Rules. If your claim exceeds $25,000, the
right to a hearing will be determined by the AAA Rules. Any in-person arbitration hearings will be held at a
location within the federal judicial district in which you reside unless we both agree to another location or
we agree to a telephonic arbitration.
Opt Out. You may opt out of this dispute resolution procedure. If you opt out, neither you nor LG can
require the other to participate in an arbitration proceeding. To opt out, you must send notice to LG no
56 LIMITED WARRANTY
later than 30 calendar days from the date of the first consumer purchaser’s purchase of the product by
either: (i) sending an e-mail to [email protected], with the subject line: “Arbitration Opt Out” or (ii) calling 1-
800-980-2973. You must include in the opt out e-mail or provide by telephone: (a) your name and address;
(b) the date on which the product was purchased; (c) the product model name or model number; and (d)
the serial number (the serial number can be found (i) on the product; or (ii) online by accessing https://
www.lg.com/us/support and clicking on “How do I find my model number?”).
You may only opt out of the dispute resolution procedure in the manner described above (that is, by e-mail
or telephone); no other form of notice will be effective to opt out of this dispute resolution procedure.
Opting out of this dispute resolution procedure will not affect the coverage of the Limited Warranty in any
way, and you will continue to enjoy the full benefits of the Limited Warranty. If you keep this product and
do not opt out, then you accept all terms and conditions of the arbitration provision described above.
CANADA
TERMS AND CONDITIONS
ARBITRATION NOTICE: THIS LIMITED WARRANTY CONTAINS AN ARBITRATION PROVISION THAT
REQUIRES YOU AND LG TO RESOLVE DISPUTES BY BINDING ARBITRATION INSTEAD OF IN COURT,
UNLESS THE LAWS OF YOUR PROVINCE OR TERRITORY DO NOT PERMIT THAT, OR, IN OTHER
JURISDICTIONS, IF YOU CHOOSE TO OPT OUT. FOR FURTHER CLARITY, THIS ARBITRATION PROVISION
IS NOT APPLICABLE TO CONSUMERS RESIDING IN ONTARIO, BRITISH COLUMBIA OR QUÉBEC. IN
ARBITRATION, CLASS ACTIONS AND JURY TRIALS ARE NOT PERMITTED. PLEASE SEE THE SECTION
TITLED “PROCEDURE FOR RESOLVING DISPUTES” BELOW.
QUEBEC ONLY: LG stands behind its products and makes every reasonable effort to ensure its products
can be maintained and repaired, as required. You may access the catalogue of available parts and services
at https://www.lg.com/ca_en/support/
. HOWEVER, LG IN NO WAY GUARANTEES AND MAKES NO
REPRESENTATIONS REGARDING THE AVAILABILITY OF ANY SPECIFIC SPARE OR REPLACEMENT PART,
REPAIR SERVICE OR INFORMATION OR INSTRUCTIONS FOR SUCH MAINTENANCE AT ANY TIME. LG
EXPRESSLY DISCLAIMS ANY GUARANTEE, WARRANTY OR OBLIGATION IN RESPECT OF THAT AVAILABILITY.
Should your LG Styler ("Product") fail due to a defect in materials or workmanship under normal and
proper use, during the warranty period set forth below, LG Electronics Canada, Inc. ("LGECI") will, at its
option, repair, replace or pro rate the Product upon receipt of proof of the original retail purchase. This
limited warranty is valid only to the original retail purchaser of the Product and applies only to a Product
distributed, purchased from an authorized retailer and used within Canada, as determined at the sole
discretion of LGECI.
• Replacement products and parts are warranted for the remaining portion of the original warranty period
or ninety (90) days, whichever is greater.
• Replacement products and parts may be new, reconditioned, refurbished, or otherwise factory
remanufactured, all at the sole discretion of LGECI.
• Proof of original retail purchase specifying the Product model and date of purchase is required to obtain
warranty service under this Limited Warranty.
WARRANTY PERIOD (Note: If the original date of purchase cannot be verified, the warranty will
begin sixty (60) days from the date of manufacture)
Styler Inverter Compressor
Extended Component
Warranty
Two (2) years from the date of
original retail purchase
Ten (10) years from the date of
original retail purchase
One (1) year from the date of
purchase
Parts and Labor (internal/
functional parts only)
Parts only. (Consumer will be
charged for labor).
Parts only. (Consumer will be
charged for labor).
57LIMITED WARRANTY
ENGLISH
DISCLAIMER:
IF YOU ARE A CONSUMER SUBJECT TO QUÉBEC, BRITISH COLUMBIA OR ONTARIO’S CONSUMER
PROTECTION LEGISLATION, THE EXCLUSION OF WARRANTIES CONTAINED IN THIS SECTION DO NOT
EXCLUDE OR LIMIT THE RIGHTS AND REMEDIES THAT YOU MAY HAVE UNDER SUCH ACT, INCLUDING THE
RIGHT TO MAKE A CLAIM UNDER ANY OF THE STATUTORY WARRANTIES PROVIDED THEREUNDER.
LGECI’S SOLE LIABILITY IS LIMITED TO THE LIMITED WARRANTY SET OUT ABOVE, UNLESS SUCH
LIMITATION IS PROHIBITED BY THE LAWS OF THE PROVINCE IN WHICH YOU RESIDE. EXCEPT AS
EXPRESSLY PROVIDED ABOVE, OR IF OTHERWISE PROHIBITED BY THE LAW OF THE PROVINCE IN
WHICH YOU RESIDE, LGECI DOES NOT MAKE ANY OTHER WARRANTIES OR CONDITIONS RESPECTING
THE PRODUCT, AND HEREBY DISCLAIMS ALL OTHER WARRANTIES AND CONDITIONS RESPECTING THE
PRODUCT, WHETHER EXPRESS OR IMPLIED, INCLUDING BUT NOT LIMITED TO, ANY IMPLIED
WARRANTY OR CONDITION OF MERCHANTABILITY OR FITNESS FOR A PARTICULAR PURPOSE, AND
NO REPRESENTATIONS SHALL BE BINDING ON LGECI. LGECI DOES NOT AUTHORIZE ANY PERSON TO
CREATE OR ASSUME FOR IT ANY OTHER WARRANTY OBLIGATION OR LIABILITY IN CONNECTION
WITH THE PRODUCT. TO THE EXTENT THAT ANY WARRANTY OR CONDITION IS IMPLIED BY LAW, IT IS
LIMITED TO THE WARRANTY PERIOD SET OUT ABOVE. UNDER NO CIRCUMSTANCES SHALL LGECI, THE
MANUFACTURER OR DISTRIBUTOR OF THE PRODUCT, BE LIABLE FOR ANY INCIDENTAL,
CONSEQUENTIAL, SPECIAL, DIRECT, INDIRECT, PUNITIVE OR EXEMPLARY DAMAGES, INCLUDING,
WITHOUT LIMITATION, LOSS OF GOODWILL, LOST PROFITS, LOSS OF ANTICIPATED PROFITS, LOST
REVENUE, LOSS OF USE, OR ANY OTHER DAMAGE, WHETHER ARISING DIRECTLY OR INDIRECTLY FROM
ANY CONTRACTUAL BREACH, FUNDAMENTAL BREACH, TORT OR OTHERWISE, OR FROM ANY ACTS OR
OMISSIONS. LGECI’S TOTAL LIABILITY, IF ANY, SHALL NOT EXCEED THE PURCHASE PRICE PAID BY YOU
FOR THE PRODUCT.
This Limited Warranty gives you specific legal rights. You may also have other rights that vary from
province to province depending on applicable provincial laws. Any term of this Limited Warranty that
negates or varies any implied condition or warranty under provincial law is severable where it conflicts
with such provincial law without affecting the remainder of this warranty’s terms.
THIS LIMITED WARRANTY DOES NOT COVER:
• Service trips to i) deliver, pick up, or install or; educate on how to operate the Product; ii) correct wiring or
plumbing; or iii) correct unauthorized repairs or installations of the Product;
• Damage or failure of the Product to perform during power failures and interrupted or inadequate
electrical service;
• Damage or failure caused by leaky or broken water pipes, frozen water pipes, restricted drain lines,
inadequate or interrupted water supply or inadequate supply of air;
• Damage or failure resulting from operating the Product in a corrosive atmosphere or contrary to the
instructions outlined in the Product’s owner’s manual;
• Damage or failure to the Product caused by accidents, pests and vermin, lightning, wind, fire, floods, acts
of God, or any other causes beyond the control of LGECI or the manufacturer;
• Damage or failure resulting from misuse, abuse, improper installation, repair, or maintenance of the
Product. Improper repair includes use of parts not authorized or specified by LGECI. Improper
installation or maintenance includes installation or maintenance contrary to the Product’s owner’s
manual;
• Damage or failure caused by unauthorized modification or alteration of the Product, or if used for other
than the intended household purpose/use of the Product, or damage or failure resulting from any water
leakage due to improper installation of the Product;
• Damage or failure caused by incorrect electrical current, voltage or plumbing codes;
• Damage or failure caused by use that is other than normal household use, including, without limitation,
commercial or industrial use, including use in commercial offices or recreational facilities, or as
otherwise outlined in the Product’s owner’s manual;
• Damage or failure caused by the use of any accessories, components or cleaning products, including,
without limitation, that are not approved/authorized by LGECI;
58 LIMITED WARRANTY
• Damage or failure caused by transportation and handling, including scratches, dents, chips and/or other
damage to the finish of the Product, unless such damage results from defects in materials or
workmanship and is reported to LGECI within one (1) week of delivery of the Products;
• Damage or missing items to any display, open box, refurbished or discounted Product;
• Refurbished Product or any Product sold “As Is”, “Where Is”, “With all Faults”, or any similar disclaimer;
• Products with original serial numbers that have been removed, altered or cannot be readily determined
at the discretion of LGECI;
• Increases in utility costs and additional utility expenses in any way associated with the Product;
• Replacement of light bulbs, filters, fuses or any other consumable parts;
• Costs associated with removal and/or reinstallation of the Product for repairs;
• Noises associated with normal operation and failure to follow instructions found in the use and care and
installation guides or operating the unit in an unsuitable environment will not be covered under this
warranty.
• Coverage for "in Home" repairs, for products in-warranty, will be provided if the Product is within a 150
km radius from the nearest authorized service center (ASC), as determined by LG Canada. If your Product
is located outside a 150 km radius from a ASC, as determined by LG Canada, it will be your responsibility
to bring the Product, at your sole expense, to the ASC for in-warranty repair.
All costs and expenses associated with the above excluded circumstances, listed under the heading,
This Limited Warranty Does Not Cover, shall be borne by the consumer.
TO OBTAIN WARRANTY SERVICE AND ADDITIONAL INFORMATION, PLEASE CALL OR VISIT OUR WEBSITE:
Call 1-888-542-2623
(8 am - 9 pm EST, 365 days) and select the appropriate option from the menu, or visit
our website at http://www.lg.com
PROCEDURE FOR RESOLVING DISPUTES:
EXCEPT WHERE PROHIBITED AT LAW (INCLUDING WITH RESPECT TO QUÉBEC, BRITISH COLUMBIA AND
ONTARIO CONSUMERS), ALL DISPUTES BETWEEN YOU AND LG ARISING OUT OF OR RELATING IN ANY WAY
TO THIS LIMITED WARRANTY OR THE PRODUCT SHALL BE RESOLVED EXCLUSIVELY THROUGH BINDING
ARBITRATION, AND NOT IN A COURT OF GENERAL JURISDICTION. EXCEPT WHERE PROHIBITED AT LAW
(INCLUDING WITH RESPECT TO QUÉBEC, BRITISH COLUMBIA AND ONTARIO CONSUMERS), YOU AND LG
BOTH IRREVOCABLY AGREE TO WAIVE THE RIGHT TO A JURY TRIAL AND TO BRING OR PARTICIPATE IN A
CLASS ACTION.
Definitions. For the purposes of this section, references to “LG” mean LG Electronics Canada, Inc., its
parents, subsidiaries and affiliates, and each of their officers, directors, employees, agents, beneficiaries,
predecessors in interest, successors, assigns and suppliers; references to “dispute” or “claim” shall include
any dispute, claim or controversy of any kind whatsoever (whether based in contract, tort, statute,
regulation, ordinance, fraud, misrepresentation or any other legal or equitable theory) arising out of or
relating in any way to the sale, condition or performance of the product or this Limited Warranty.
Notice of Dispute. In the event you intend to commence an arbitration proceeding, you must first notify
LG in writing at least 30 days in advance of initiating the arbitration by sending a letter to LGECI Legal
Team at 20 Norelco Drive, North York, Ontario, Canada M9L 2X6 (the “Notice of Dispute”). You and LG
agree to engage in good faith discussions in an attempt to amicably resolve your claim. The notice must
provide your name, address, and telephone number; identify the product that is the subject of the claim;
and describe the nature of the claim and the relief being sought. If you and LG are unable to resolve the
dispute within 30 days of LG’s receipt of the Notice of Dispute, the dispute shall be resolved by binding
arbitration in accordance with the procedure set out herein. You and LG both agree that, during the
arbitration proceeding, the terms (including any amount) of any settlement offer made by either you or LG
will not be disclosed to the arbitrator until the arbitrator determines the dispute.
Agreement to Binding Arbitration and Class Action Waiver. Upon failure to resolve the dispute during
the 30 day period after LG’s receipt of the Notice of Dispute, you and LG agree to resolve any claims
between you and LG only by binding arbitration on an individual basis, unless you opt out as provided
below, or you reside in a jurisdiction that prevents full application of this clause in the circumstances of the
claims at issue (in which case if you are a consumer, this clause will only apply if you expressly agree to the
arbitration). To the extent permitted by applicable law, any dispute between you and LG shall not be
59LIMITED WARRANTY
ENGLISH
combined or consolidated with a dispute involving any other person’s or entity’s product or claim. More
specifically, without limitation of the foregoing, except to the extent such a prohibition is not permitted at
law, any dispute between you and LG shall not under any circumstances proceed as part of a class or
representative action. Instead of arbitration, either party may bring an individual action in small claims
court, but that small claims court action may not be brought on a class or representative basis except to
the extent this prohibition is not permitted at law in your province or territory of jurisdiction as it relates to
the claims at issue between you and LG. This does not apply to consumers in Ontario, British Columbia and
Québec. In accordance with provincial legislation, the consumer and LG may agree to resolve the dispute
using any procedure available, including commencing the action before the competent courts of those
provinces.
Arbitration Rules and Procedures. To begin arbitration of a claim, either you or LG must make a written
demand for arbitration. The arbitration will be private and confidential, and conducted on a simplified and
expedited basis before a single arbitrator chosen by the parties under the provincial or territorial
commercial arbitration law and rules of the province or territory of your residence. You must also send a
copy of your written demand to LG at LG Electronics, Canada, Inc., Attn: Legal Department- Arbitration, 20
Norelco Drive, North York, Ontario M9L 2X6. This arbitration provision is governed by your applicable
provincial or territorial commercial arbitration legislation. For consumers in Ontario, British Columbia and
Québec, the applicable arbitration legislation only applies if consumers agree to submit the dispute to
arbitration. Judgment may be entered on the arbitrator’s award in any court of competent jurisdiction. All
issues are for the arbitrator to decide, except that, issues relating to the scope and enforceability of the
arbitration provision and to the arbitrability of the dispute are for the court to decide. The arbitrator is
bound by the terms of this provision.
Governing Law. The law of the province or territory of your purchase shall govern this Limited Warranty
and any disputes between you and LG except to the extent that such law is preempted by or inconsistent
with applicable federal or provincial/territorial law. Should arbitration not be permitted for any claim,
action, dispute or controversy between you and LG, you and LG attorn to the exclusive jurisdiction of the
courts of the province or territory of your purchase for the resolution of the claim, action, dispute or
controversy between you and LG.
Fees/Costs. You do not need to pay any fee to begin an arbitration. Upon receipt of your written demand
for arbitration, LG will promptly pay all arbitration filing fees unless you seek more than $25,000 in
damages, in which case the payment of these fees will be governed by the applicable arbitration rules.
Except as otherwise provided for herein, LG will pay all filing, administration and arbitrator fees for any
arbitration initiated in accordance with the applicable arbitration rules and this arbitration provision. If you
prevail in the arbitration, LG will pay your attorneys’ fees and expenses as long as they are reasonable, by
considering factors including, but not limited to, the purchase amount and claim amount. Notwithstanding
the foregoing, if applicable law allows for an award of reasonable attorneys’ fees and expenses, an
arbitrator can award them to the same extent that a court would. If the arbitrator finds either the
substance of your claim or the relief sought in the demand is frivolous or brought for an improper purpose
(as measured by the applicable laws), then the payment of all arbitration fees will be governed by the
applicable arbitration rules. In such a situation, you agree to reimburse LG for all monies previously
disbursed by it that are otherwise your obligation to pay under the applicable arbitration rules. Except as
otherwise provided for, LG waives any rights it may have to seek attorneys’ fees and expenses from you if
LG prevails in the arbitration.
Hearings and Location. If your claim is for $25,000 or less, you may choose to have the arbitration
conducted solely (1) on the basis of documents submitted to the arbitrator, (2) through a telephonic
hearing, or (3) by an in-person hearing as established by the applicable arbitration rules. If your claim
exceeds $25,000, the right to a hearing will be determined by the applicable arbitration rules. Any in-
person arbitration hearings will be held at the nearest, most mutually-convenient arbitration location
available within the province or territory in which you reside unless you and LG both agree to another
location or agree to a telephonic arbitration.
Severability and Waiver. If any portion of this Limited Warranty (including these arbitration procedures)
is unenforceable, the remaining provisions will continue in full force and effect to the maximum extent
permitted by applicable law. Should LG fail to enforce strict performance of any provision of this Limited
Warranty (including these arbitration procedures), it does not mean that LG intends to waive or has waived
any provision or part of this Limited Warranty.
Opt Out. The arbitration provision requires you and LG to resolve disputes by binding arbitration instead
of court, unless the laws of your province or territory do not permit that, or, in other jurisdictions, if you
60 LIMITED WARRANTY
choose to opt out. The arbitration provision does not apply to consumers in Ontario, British Columbia and
Québec.
For individuals that fall within the binding arbitration provisions, you may opt out of this dispute resolution
procedure. If you opt out, neither you nor LG can require the other to participate in an arbitration
proceeding. To opt out, you must send notice to LG no later than 30 calendar days from the date of the
first consumer purchaser’s purchase of the product by either (i) sending an e-mail to [email protected], with
the subject line: “Arbitration Opt Out;” or (ii) calling 1-800-980-2973. You must include in the opt out e-mail
or provide by telephone: (a) your name and address; (b) the date on which the product was purchased; (c)
the product model name or model number; and (d) the serial number (the serial number can be found (i)
on the product; or (ii) online by accessing https://www.lg.com/ca_en/findmodel_serial/
).
In the event that you “Opt Out”, the law of the province or territory of your residence shall govern this
Limited Warranty and any disputes between you and LG except to the extent that such law is preempted
by or inconsistent with applicable federal or provincial/territorial law. Should arbitration not be permitted
for any claim, action, dispute or controversy between you and LG, you and LG agree to attorn to the
exclusive jurisdiction of the courts of the province or territory of your residence for the resolution of the
claim, action, dispute or controversy between you and LG.
You may only opt out of the dispute resolution procedure in the manner described above (that is, by e-mail
or telephone); no other form of notice will be effective to opt out of this dispute resolution procedure.
Opting out of this dispute resolution procedure will not affect the coverage of the Limited Warranty in any
way, and you will continue to enjoy the full benefits of the Limited Warranty. If you keep this product and
do not opt out, then you accept all terms and conditions of the arbitration provision described above.
Conflict of Terms. In the event of a conflict or inconsistency between the terms of this Limited Warranty
and the End User License Agreement (“EULA”) in regards to dispute resolution, the terms of this Limited
Warranty shall control and govern the rights and obligations of the parties and shall take precedence over
the EULA.
Memo
Memo
Memo