ENGLISH
iCare IC1000
Instruction Manual

Copyrights
TONOMETER
iCare IC1000
The information in this document is subject to change without prior notice. Should a
conict situation arise concerning a translated document, the English language version
shall prevail.
This device complies with:
Medical Device Regulation (MDR) 2017/745
RoHS Directive 2011/65/EU
Radio Equipment Directive 2014/53/EU
Copyright © 2026 Icare Finland Oy. All rights reserved. iCare is a registered trademark of
Icare Finland Oy, all other trademarks are the property of their respective owners. Made
in Finland.
The Bluetooth® word mark and logos are registered trademarks owned by Bluetooth
SIG, Inc. and any use of such marks by Icare Finland Oy is under license. Other
trademarks and trade names are those of their respective owners.
Icare Finland Oy
Äyritie 22
01510 Vantaa, Finland
Ph. +358 9 8775 1150
info@icare-world.com
www.icare-world.com

Contents
1 Safety information................................................................................................................................................ 5
2 Intended use...........................................................................................................................................................8
3 Possible limitations of use...............................................................................................................................8
4 Introduction............................................................................................................................................................ 9
4.1 Clinical benets.........................................................................................................................................10
4.2 Essential performance..........................................................................................................................10
4.3 Sales package contents....................................................................................................................... 10
4.4 Device parts................................................................................................................................................ 11
4.4.1 Tonometer.......................................................................................................................................... 11
4.4.2 SmartCradle (accessory)........................................................................................................... 13
4.4.3 ChargingCradle (accessory)......................................................................................................14
5 Take the product into use.............................................................................................................................. 14
5.1 Install the wrist strap..............................................................................................................................14
5.2 Prepare the power supply................................................................................................................... 15
5.3 Charge the tonometer battery.......................................................................................................... 15
6 Prepare for measurement..............................................................................................................................18
6.1 Switch on the tonometer..................................................................................................................... 19
6.2 Insert the probe....................................................................................................................................... 19
6.3 Select measurement mode.............................................................................................................. 20
6.3.1 Measurement modes..................................................................................................................20
6.3.2 Automatic probe launch mode..............................................................................................21
7 Take a measurement........................................................................................................................................ 21
7.1 Position the tonometer and measure the eye pressure.........................................................21
7.2 Manual measurement...........................................................................................................................23
7.3 Check the measurement result....................................................................................................... 24
7.4 Errors during measurement...............................................................................................................26
7.5 Eye recognition......................................................................................................................................... 27
7.6 View the measurement history........................................................................................................28
7.7 Switch o the tonometer and remove the probe...................................................................28
8 Tonometer settings...........................................................................................................................................29
8.1 Device serial number and software version............................................................................... 30
9 Pairing via Bluetooth (SmartCradle)..........................................................................................................30
9.1 Pair the SmartCradle..............................................................................................................................30
9.2 Bluetooth notications and errors................................................................................................. 32
9.3 Transfer measurements to cloud software (optional).......................................................... 34
9.4 Turn Bluetooth on or o..................................................................................................................... 34
9.5 Unpair the Bluetooth connection................................................................................................... 34

10 Print the measurement data......................................................................................................................35
10.1 Pair the tonometer and printer....................................................................................................... 35
10.2 Print the measurement results......................................................................................................35
11 Troubleshooting................................................................................................................................................. 36
11.1 SmartCradle troubleshooting............................................................................................................ 36
11.2 Software update with SmartCradle...............................................................................................37
11.3 SmartCradle indicator lights.............................................................................................................38
12 Maintenance.......................................................................................................................................................40
12.1 Replace the probe base......................................................................................................................40
12.2 Replace the battery...............................................................................................................................41
12.3 Cleaning...................................................................................................................................................... 41
12.4 Lifetime......................................................................................................................................................42
12.5 Returning for service or repair........................................................................................................42
12.6 Warranty.................................................................................................................................................... 42
12.7 Recycling....................................................................................................................................................43
13 Accessories, parts and other supplies...................................................................................................43
14 Technical information.................................................................................................................................... 44
14.1 Technical description............................................................................................................................44
14.2 Performance data.................................................................................................................................48
14.3 Symbols and trademarks..................................................................................................................49
14.4 Statement of compliance.................................................................................................................50
14.5 Electromagnetic declaration.............................................................................................................51
15 Annex 1 iCare TP01 Probe technical information...............................................................................56

1 Safety information
WARNING! The iCare IC1000 tonometer should not be used in medical vehicles
or similar environments where there is vibration and/or noise levels are so high
that the user cannot hear error signals.
WARNING! Keep the device out of the reach of children. The probe base,
probe base collar, probe base cover, and probes are small objects and can be
accidentally swallowed, causing suocation.
WARNING! Keep the USB and Ethernet cables out of the reach of children and
pets due to the risk of strangulation.
WARNING! Removing, covering, or defacing any label or sign on the tonometer
or cradle voids all the responsibilities and liabilities of the manufacturer
concerning the safety and eectiveness of the tonometer or cradle.
WARNING! Do not connect to iCare IC1000 tonometer any items that have not
been specied as being part of or compatible with the device.
WARNING! The tonometer (apart from the battery compartment cover) and
cradle should only be opened by qualied iCare service personnel. The there are
no user serviceable parts, except from the probe base and the user replaceable
battery. The tonometer does not require any routine servicing or calibration other
than changing the probe base every six months. If there is a reason to believe
that the servicing of the tonometer is necessary, contact the manufacturer or
local distributor.
WARNING! To avoid a risk of an electric shock, do not touch simultaneously the
patient and the charging pin, or the USB port, or the Ethernet port.
WARNING! Only probes are intended for contacting the eye. Do not move the
tonometer too close to the patient’s eye and avoid touching the eye with other
parts of the tonometer. Do not push the tonometer into the eye.
WARNING! Use of eye drops right before the measurement or topical anesthesia
may aect the measurement result.
WARNING! The tonometer or cradle must not be dropped. To avoid dropping any
of the devices and to ensure safe handling, handle them with care. Always use
the wrist strap with the tonometer to keep the it attached to your wrist when
in use. If the tonometer or cradle is dropped and the casing opens, press the
casing to close the openings.
WARNING! Do not use the tonometer or cradle if any of the devices appear
to be damaged or malfunctioning. The damaged device must be delivered to
service for repair.
WARNING! Do not use probes without a plastic tip. Do not use deformed
probes. Contact the manufacturer or local distributor if you notice faulty probes
or probe packages.
WARNING! Use only original and certied probes made by the manufacturer.
The probes are for single-use (single pair of measurement sequences) only. Each
5

session is dened by one successful measurement in both eyes, but in case
either eye is inamed or infected, measure the healthy eye rst. The probes
must not be cleaned.
WARNING! Only use intact probes taken from an intact, original packaging. Re-
use of a probe could result in incorrect measurement values, damage to the
probe, cross-contamination by bacteria or viruses or infection of the eye. Re-use
of probes voids all responsibilities and liabilities of the manufacturer concerning
the safety and eectiveness of the tonometer.
WARNING! To prevent contamination, keep unused probes in their box. Do not
touch a bare probe. Do not use a probe if it touches a non-sterile surface such
as a table or a oor.
WARNING! The tonometer or cradle must not be repaired or re-assembled by
any other than the manufacturer or its authorized service center. If you notice
changes in the tonometer’s or cradle's performance or it is broken, do not use
them. Ship them to an authorized iCare service center for repair.
WARNING! Servicing or maintenance actions must not be performed while the
device is in use.
WARNING! The tonometer must be switched o when the probe base is
changed.
WARNING! The probe base must be changed, not cleaned.
WARNING! Never immerse the tonometer, cradle or accessories in liquid. Do
not spray, pour, or spill liquid on the tonometer, cradle, accessories, connectors,
switches, or openings in the cover. Immediately remove any liquid from the
surface of the devices.
WARNING! Do not modify the tonometer or cradle in any way. Changes or
modications not expressly approved by the manufacturer could void the user’s
authority to operate the tonometer or cradle.
WARNING! Use of this equipment adjacent to or stacked with other equipment
should be avoided because it could result in improper operation. If such use
is necessary, this equipment and the other equipment should be observed to
verify that they are operating normally.
WARNING! Use of accessories, transducers and cables other than those
specied or provided by the manufacturer of this equipment could result in
increased electromagnetic emissions or decreased electromagnetic immunity of
this equipment and result in improper operation.
WARNING! Interference may occur in the vicinity of equipment marked with the
non-ionizing radiation symbol.
WARNING! Sources of power frequency magnetic eld should be used no closer
than 15 cm (6 inches) to any part of the tonometer, including cables specied by
the manufacturer, to avoid the degradation of performance.
WARNING! Portable RF communications equipment (including peripherals such
as antenna cables and external antennas) should be used no closer than 30
6

cm (12 inches) to any part of the tonometer, including cables specied by the
manufacturer, to avoid the degradation of performance.
WARNING! The measurement method of the tonometer is based on a
magnetically induced motion of a probe and therefore an external magnetic
or radiated RF electromagnetic eld disturbing the probe may prevent the
measurement. In such a case the tonometer continuously displays error
messages during measurement and asks you to repeat the measurement.
Situation can be solved either by removing the source of interference from the
vicinity of the tonometer or by performing the measurement in dierent location
with no such interference.
WARNING! Connection of the iCare tonometer to IT networks including other
equipment could result in previously unidentied risks to patients, operators, or
third parties.
WARNING! The responsible organization should identify, analyze, evaluate, and
control any additional risks resulting from the iCare tonometer connected to IT
networks including other equipment.
WARNING! Read and follow the battery replacing instructions before
replacement of the tonometer battery, as incorrect polarity could result in a
hazardous situation.
PRECAUTION! Report any serious incidents related to the tonometer to
your competent health authority and the manufacturer or the manufacturer’s
representative.
PRECAUTION! When removing the tonometer or cradle from its packaging, and
each time before use, visually inspect the device for any external damage,
particularly for possible damage to the device casing. If you suspect damage
to the device, contact the manufacturer or the distributor of the device.
PRECAUTION! Eye detection is based on the dierence of infrared reections
received from the transmitters: the nose side reects more than the temple
side. If the transmitters become dirty, the recognition may be interfered.
PRECAUTION! Do not cover the eye recognition transmitters or sensor during
the measurement, for example with your ngers. Make sure that the patient’s
face is not covered by hair or a scarf, as they can produce an infrared reection
that causes an error.
PRECAUTION! Take care not to cover the camera with your nger. If the camera
lens becomes dirty, the functionality may be impaired.
PRECAUTION! To ensure the correct functioning of the tonometer, change the
probe base every six months.
PRECAUTION! The probe base may function improperly if dirt or liquid gets
inside it.
PRECAUTION! Use only the battery which is specied in technical description
section of this instruction manual.
PRECAUTION! Changes to the IT network could introduce new risks requiring
additional analysis by the responsible organization. The changes include:
• changes in the IT network conguration
7

• connection of additional items to the IT network
• disconnecting items from the IT network
• update or upgrade of equipment connected to the IT network
PRECAUTION! The measurement data transfer may be interrupted during
electromagnetic disturbance. In such case, reconnect the tonometer to the
computer. If this does not solve the issue, perform the data transfer in other
location with no such interference. The measurement data will not be deleted
from the tonometer before the data is transferred successfully.
2 Intended use
The iCare IC1000 tonometer is a device intended to be used for the measurement of the
intraocular pressure of the human eye.
The iCare IC1000 tonometer is intended to be used by healthcare professionals such as
but not limited to ophthalmologists, optometrists, trained ophthalmic technicians and
nurses.
3 Possible limitations of use
WARNING! The iCare IC1000 tonometer should not be used in medical vehicles
or similar environments where there is vibration and/or noise levels are so high
that the user cannot hear error signals.
NOTE! Characteristics such as age or weight of the patient do not limit the use of the
iCare IC1000 tonometer.
Patients with any of the following conditions should not be measured with the iCare
IC1000 tonometer:
• Active ocular infection including infectious conjunctivitis
• Blepharospasm
The safety and eectiveness of rebound tonometry has not been evaluated for patients
with*:
• Only one functional eye
• Poor or eccentric xation
• Contact lens use
• Dry eyes
• Keratoconus
• High corneal astigmatism > 3 D
• History of prior incisional glaucoma surgery or corneal surgery including corneal laser
surgery
• Corneal scarring
• Microphthalmos
• Buphthalmos
• Nystagmus
• Cataract extraction within last 2 months
• Central corneal thickness greater than 0.60 mm or less than 0.50 mm
8

• Known history of diculty in obtaining Goldmann IOP measurements or any factors
that might contribute to inaccurate Goldmann IOP measurements for example,
tremor.
NOTE! When not in use, it is recommended to keep the tonometer in its carrying case to
protect it from dirt and direct sunlight that might cause damage to the device.
4 Introduction
PRECAUTION! Report any serious incidents related to the tonometer to
your competent health authority and the manufacturer or the manufacturer’s
representative.
The iCare IC1000 tonometer can be used with following accessory devices: IC1000
SmartCradle, IC1000 ChargingCradle, and a compatible printer. The same medical power
supply can be used with tonometer and both cradles.
The iCare IC1000 tonometer is based on a patented, induction-based rebound method,
which allows intraocular pressure (IOP) to be measured by a healthcare professional
accurately, rapidly and without an anesthetic.
The iCare IC1000 tonometer allows a patient’s IOP to be measured for patients in upright
(sitting) or supine positions.
With the iCare rebound measurement method, a miniature, light-weight, single-use
probe is launched in a direction perpendicular to the surface of the center of the cornea
of the eye. The probe is composed of a medical grade plastic tip and a metal shaft.
The metal shaft is magnetized prior to the measurement. During the measurement, the
probe can be considered to act like a moving magnet that induces an electric signal in
the surrounding coil allowing for a highly accurate measurement of the probe’s motion.
After launching, the probe briey makes contact with the cornea and bounces back.
The tonometer records multiple parameters covering the motion of the probe, including
deceleration and rebound time. Using a proprietary algorithm, the device is able to
calculate the eye’s IOP.
The displayed IOP reading is derived from the results from a sequence of six individual
probe rebounds. The displayed IOP measurement is also stored in the tonometer’s
memory for later retrieval.
The iCare IC1000 tonometer has a rechargeable battery. The battery can be charged
directly from a medical power supply using a USB cable and tonometer USB-C port. The
battery can also be charged in the IC1000 SmartCradle and or IC1000 ChargingCradle
powered by a medical power supply.
Device GTIN can be found printed on the device cover accompanied with serial
number and the date of manufacture. For more information about the tonometer or
its accessories or for ordering a paper version of the instruction manual corresponding
the device GTIN or for downloading electronic version, visit www.icare-world.com/ifu. To
download the instruction manual, scan the QR-code accompanied with the "Consult
instructions for use" symbol and the web address on the side of the tonometer.
9

4.1 Clinical benets
With the iCare IC1000 tonometer you can measure the patient’s eye pressure with the
rebound technology. The measurement method does not require special training for the
operator or any topical anesthetics and is quick and painless. The rebound technology
enables measurements to be done also on patients who may be dicult to measure
with other IOP measurement methods, such as children.
This eye pressure measurement tool is an adjunct to the standard of care and does not
replace the conventional methods used to diagnose and manage patients, nor should it
alter the follow-up schedule otherwise indicated for a particular patient.
4.2 Essential performance
The essential performance of the iCare IC1000 tonometer is to measure intraocular
pressure with specied accuracy, to display measurement results or error conditions
and to transfer the measurement data.
If the essential performance of the tonometer is lost or degraded due to
electromagnetic disturbances, the tonometer continuously displays error messages
during the measurement and asks you to repeat the measurement.
4.3 Sales package contents
WARNING! Keep the device out of the reach of children. The probe base,
probe base collar, probe base cover, and probes are small objects and can be
accidentally swallowed, causing suocation.
WARNING! Keep the USB and Ethernet cables out of the reach of children and
pets due to the risk of strangulation.
PRECAUTION! When removing the tonometer or cradle from its packaging, and
each time before use, visually inspect the device for any external damage,
particularly for possible damage to the device casing. If you suspect damage
to the device, contact the manufacturer or the distributor of the device.
NOTE! Use only the parts (such as medical power supply, regional AC plugs and cables)
provided by the manufacturer.
Before using the tonometer, check the sales packaging, including the probe box. If the
packaging is damaged, unintentionally opened before use, or exposed to environmental
conditions outside those specied in this manual, do not use the product and contact
the manufacturer or your distributor for further instructions.
10
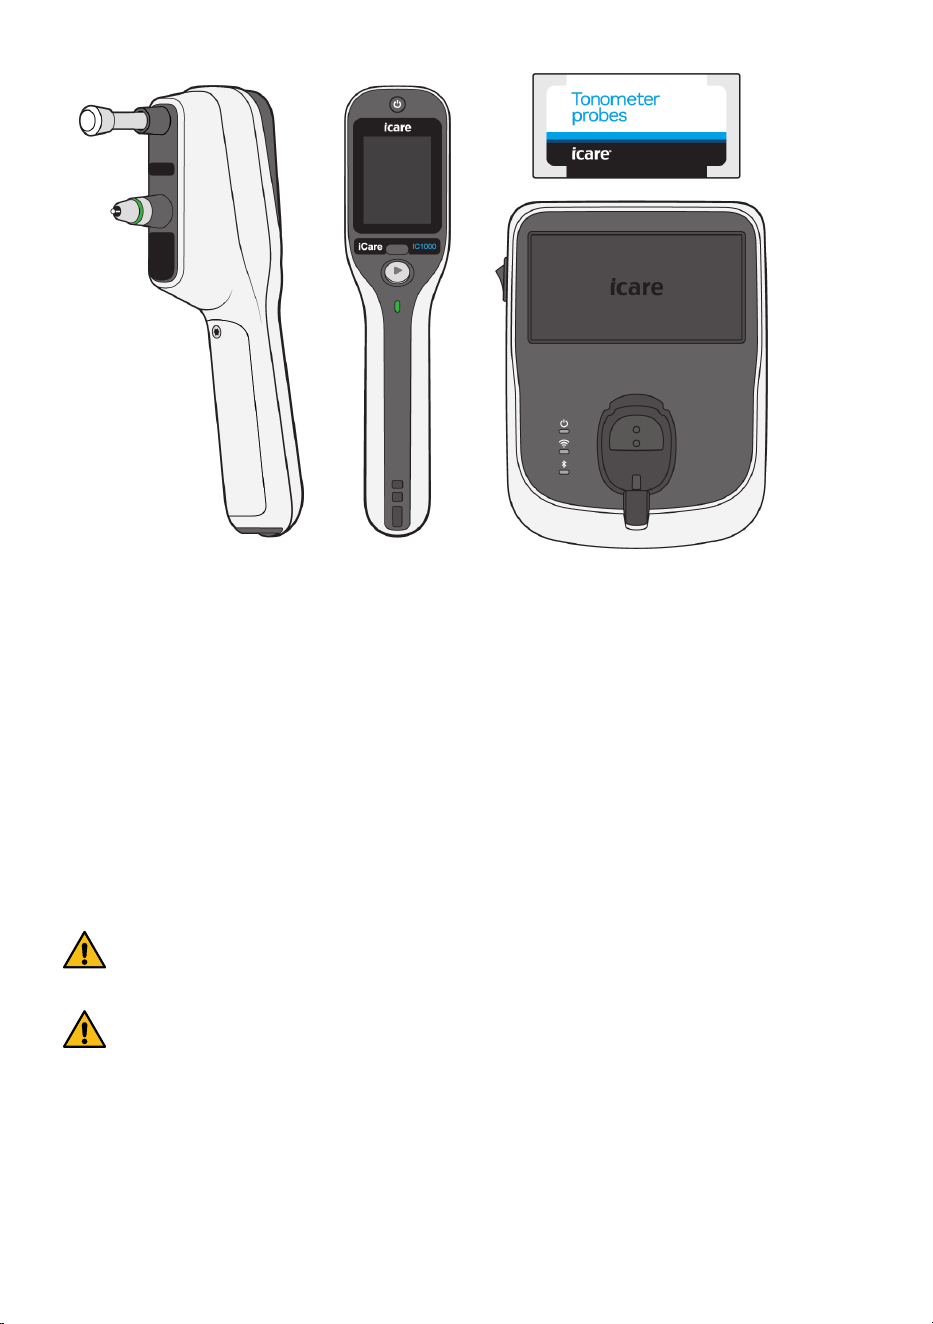
The iCare IC1000 Sales package contains:
• iCare IC1000 tonometer
• Carrying case
• Quick Guide
• Box with 100 single-use
probes
• Spare probe base
• Probe base cover
• Medical power supply
• Regional AC plugs
• USB-cable for power
supply
• Screwdriver Torx TX8
• Wrist strap
IC1000 SmartCradle and ChargingCradle are not included in the tonometer set. They can
be purchased separately.
4.4 Device parts
4.4.1 Tonometer
WARNING! Removing, covering, or defacing any label or sign on the tonometer
or cradle voids all the responsibilities and liabilities of the manufacturer
concerning the safety and eectiveness of the tonometer or cradle.
WARNING! Do not connect to iCare IC1000 tonometer any items that have not
been specied as being part of or compatible with the device.
11
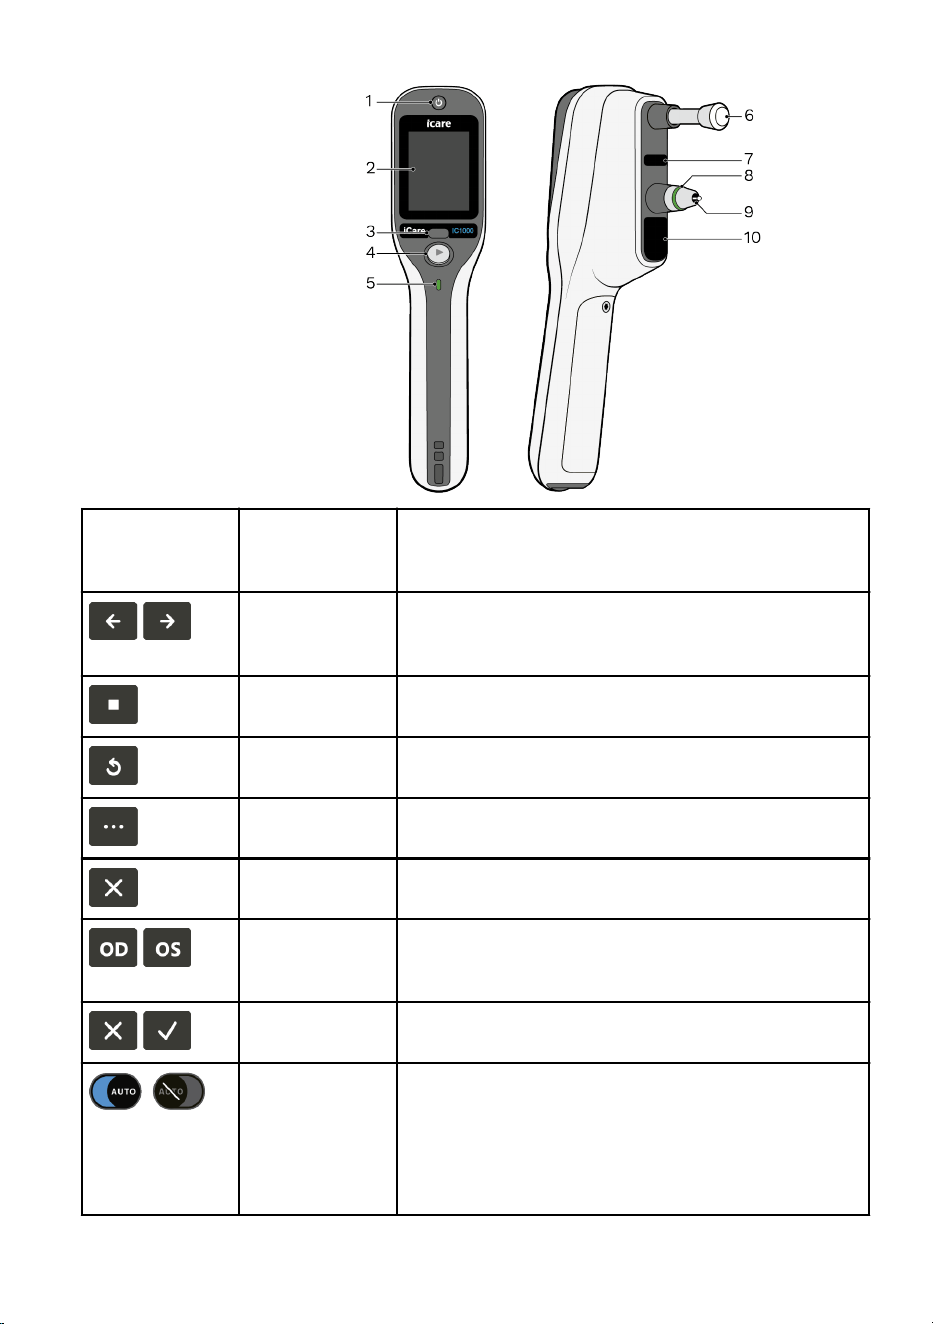
1. Power button
2. Touchscreen display
3. USB port and cover
4. Measure button
5. Status indicator light
6. Forehead support
7. Infrared leds
8. Probe base light
9. Probe base collar
10. Camera and infrared
sensors/leds
Tonometer
touch screen
button
Purpose Functionality
Left and Right
navigation
buttons
Used to navigate the tonometer menu.
Select button Used to activate the desired function such as
entering submenus.
Return button Used to navigate back to the previous menu or
screen.
Option button Used to access additional features or settings
related to the current function.
End button Used to terminate the current operation or session.
OD and OS
selection
buttons
Used to select the eye side of the measured eye if
the eye detection fails.
No and Yes
buttons
No button is used to decline the selection.
Yes button is used to conrm the selection.
Automatic
measure button
– ON/OFF
The toggle button is utilized to switch between
Automatic Probe Launch Mode and Manual Probe
Launch Mode:
Automatic Probe Launch Mode (AUTO): Mode is
activated by default when the toggle button is
positioned to the left.
12
Tonometer
touch screen
button
Purpose Functionality
Manual Probe Launch Mode: Mode is activated
when the toggle button is moved to the right, at
which point the AUTO indicator will be crossed
out.
Normal
Measure/Quick
Measure button
The slider is utilized to switch between Normal
Measure and Quick Measure.
Normal Measure: Activated when the toggle
button is positioned to the left. Normal Measure
is on by default.
Quick Measure: Activated when the toggle button
is moved to the right.
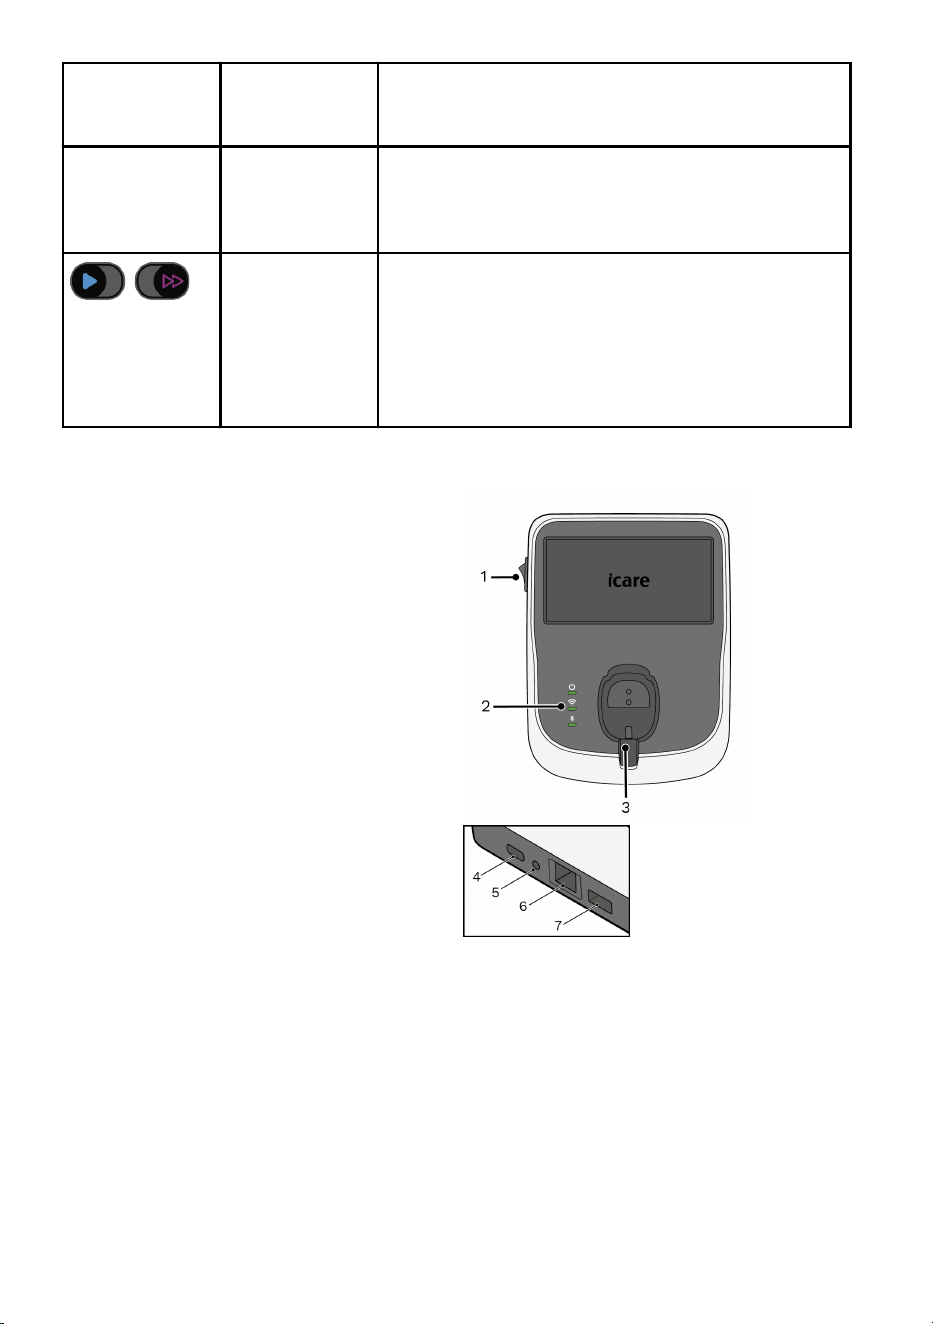
4.4.2 SmartCradle (accessory)
IC1000 SmartCradle is a device for holding
the tonometer and accessories between
use, sending measurement results into
the iCare cloud software and charging the
tonometer battery.
The cradle contains Ethernet, USB type A
and type C connectors.
1. ON/OFF switch
2. Cradle LEDs
3. Charging station
4. USB type C connector (for charging the
device)
5. Pinhole reset
6. Ethernet connector
7. USB type A connector with protective
plug (for USB memory stick only)
13
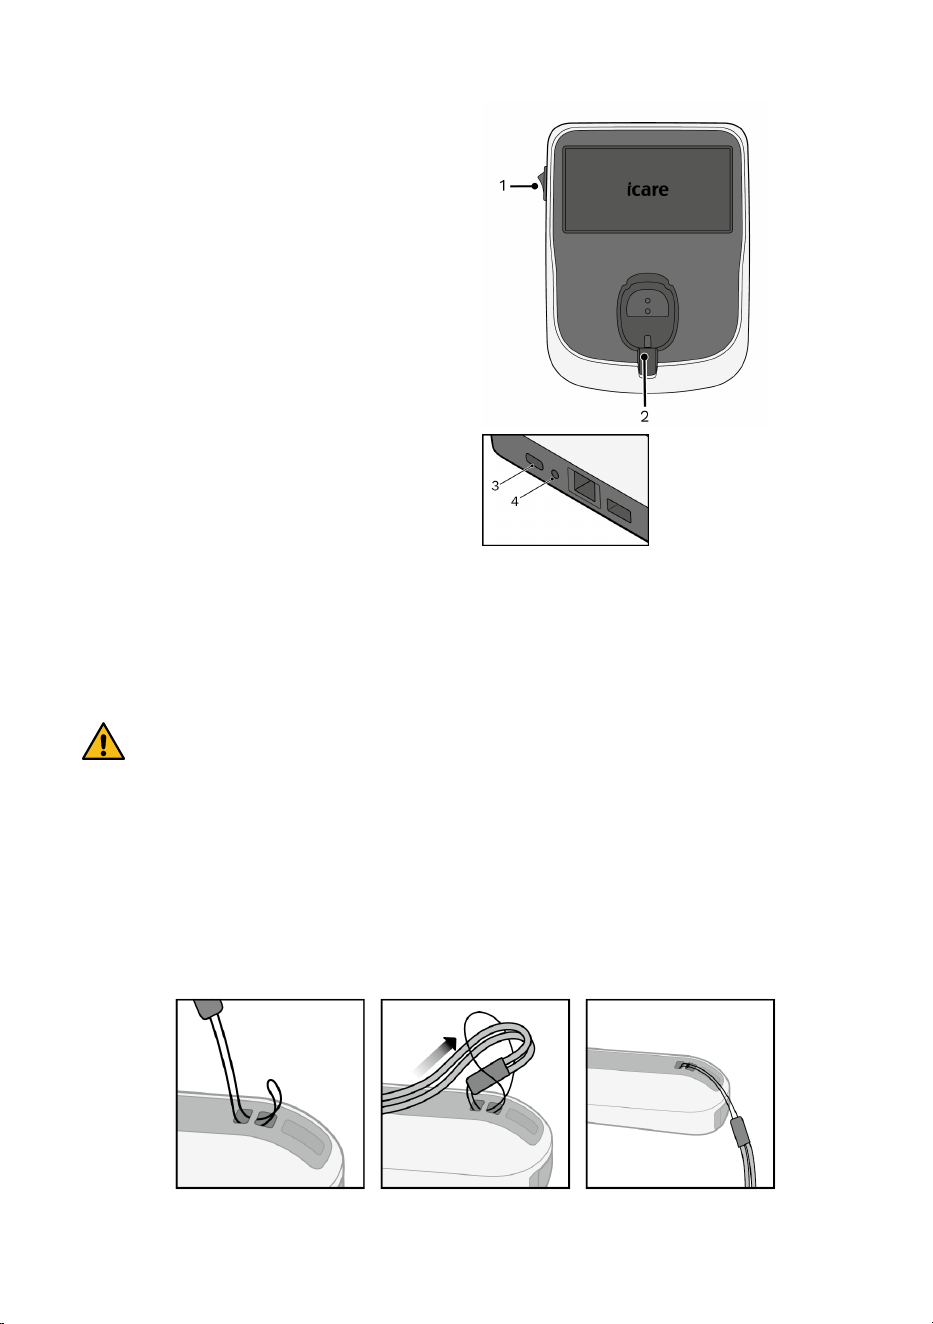
4.4.3 ChargingCradle (accessory)
IC1000 ChargingCradle is a device for
holding the tonometer and accessories
between uses and charging the tonometer
battery.
1. ON/OFF switch
2. Charging station
3. USB type C connector (for charging
battery)
4. Pinhole reset
5 Take the product into use
5.1 Install the wrist strap
WARNING! The tonometer or cradle must not be dropped. To avoid dropping any
of the devices and to ensure safe handling, handle them with care. Always use
the wrist strap with the tonometer to keep the it attached to your wrist when
in use. If the tonometer or cradle is dropped and the casing opens, press the
casing to close the openings.
Before you use the iCare IC1000 tonometer for the rst time, attach the wrist strap.
1. Thread the string loop at the end of the wrist strap through the two holes at the
bottom of the device (see gure below).
2. Take hold of the end of the wrist strap, turn it back and bring it through the loop.
3. Pull the wrist strap to tighten the loop.
14
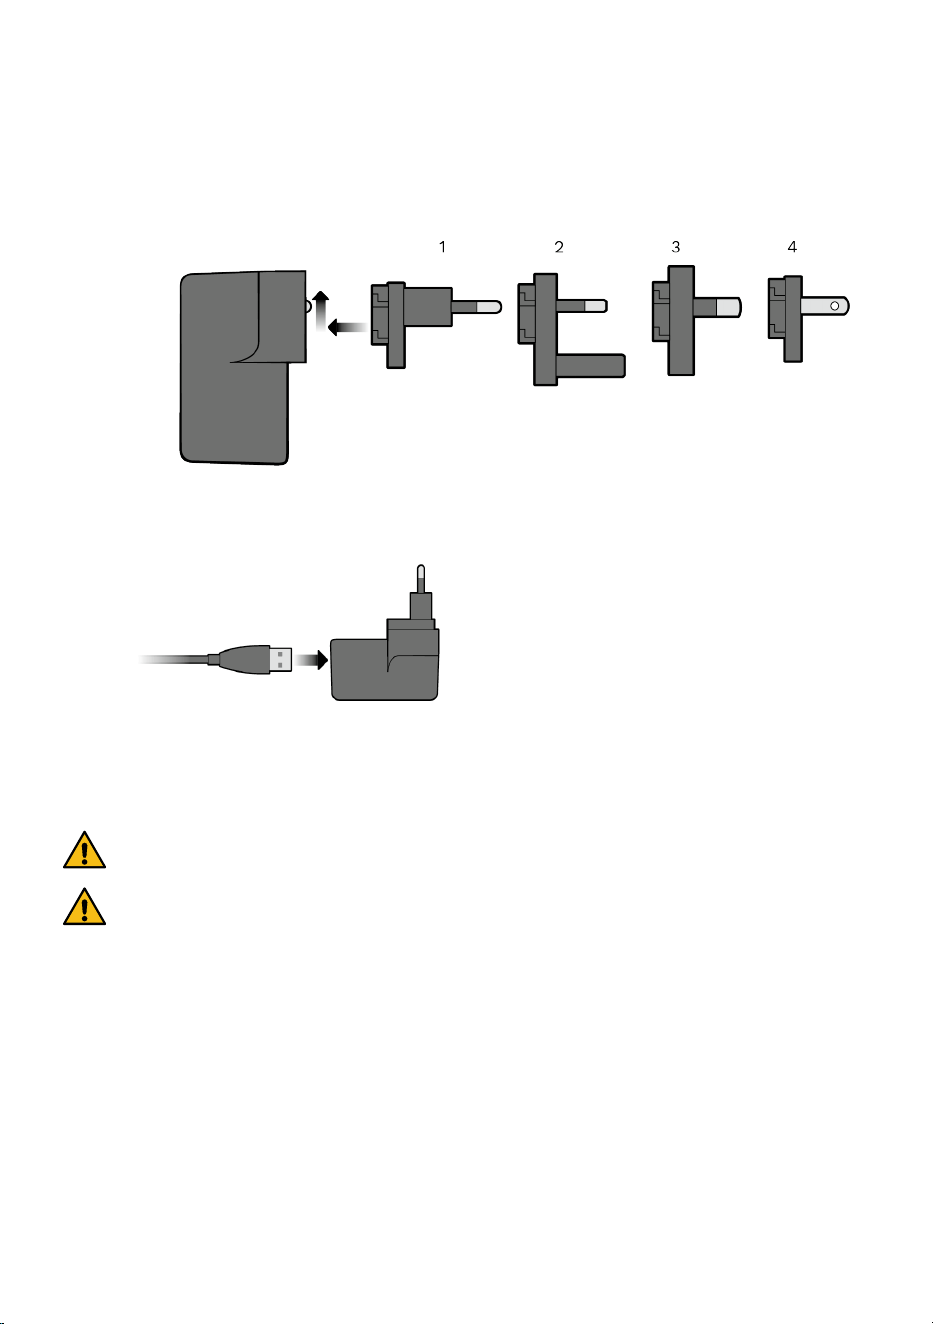
5.2 Prepare the power supply
Prepare the power supply before you charge the tonometer battery:
1. Attach your region’s AC plug to the medical power supply. (1. EU, 2. United Kingdom,
3. Australia, 4. US)
2. Plug in the USB cable to a medical power supply and the power supply to a mains
power.
5.3 Charge the tonometer battery
WARNING! To avoid a risk of an electric shock, do not touch simultaneously the
patient and the charging pin, or the USB port, or the Ethernet port.
WARNING! The tonometer (apart from the battery compartment cover) and
cradle should only be opened by qualied iCare service personnel. The there are
no user serviceable parts, except from the probe base and the user replaceable
battery. The tonometer does not require any routine servicing or calibration other
than changing the probe base every six months. If there is a reason to believe
that the servicing of the tonometer is necessary, contact the manufacturer or
local distributor.
Charge the tonometer battery before taking a measurement. The iCare IC1000 tonometer
is charged with a USB cable or in the cradle. You cannot take measurements while the
tonometer battery is charging.
NOTE! The performance of the rechargeable battery decreases in long term use and
when the device is not used for a long period of time.
To charge the tonometer with a USB cable:
15
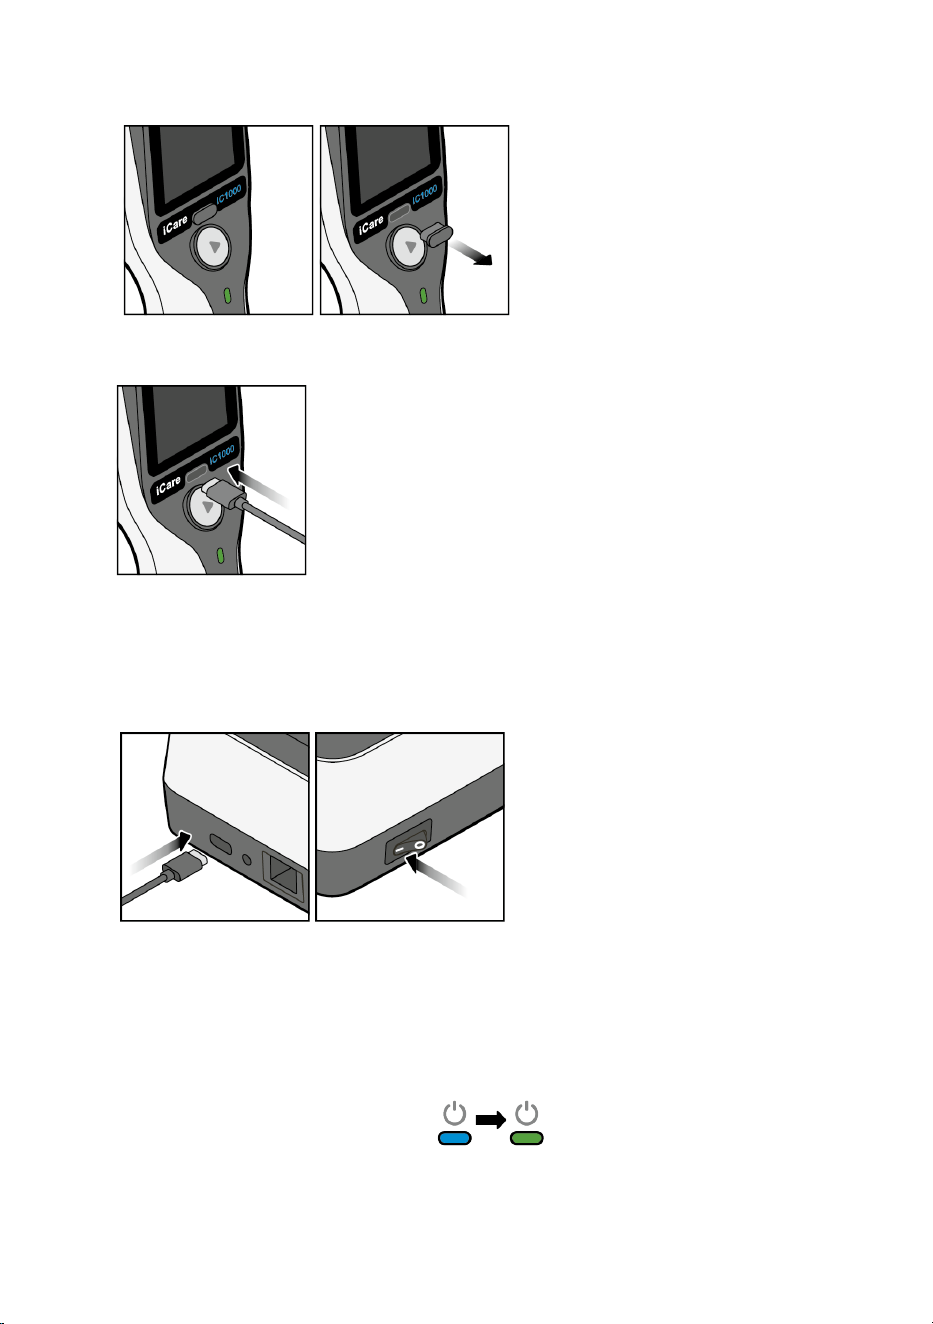
1. Remove the USB port cover and put the tonometer to a place where it cannot fall
while charging.
2. Plug in the USB cable to the tonometer. The tonometer’s status indicator light starts
to ash if the battery is not full.
3. The status indicator light stops ashing when the battery is full. The status indicator
light stays on.
4. The tonometer is ready for measurement and the USB cable can be unplugged.
To charge the tonometer in the cradle:
1. Make sure that the cradle is connected to a power supply and turned on.
NOTE! Put the cradle to a location where it is easy to disconnect the power supply
from the mains electricity if needed.
2. With SmartCradle:
If you are using the SmartCradle for the rst time, the power indicator turns blue
and starts the power on. The power on takes about 25 seconds. When the power
indicator has a solid green light, the cradle is ready to use.
With ChargingCradle:
If you are using the ChargingCradle for the rst time, the power indicator turns green.
16
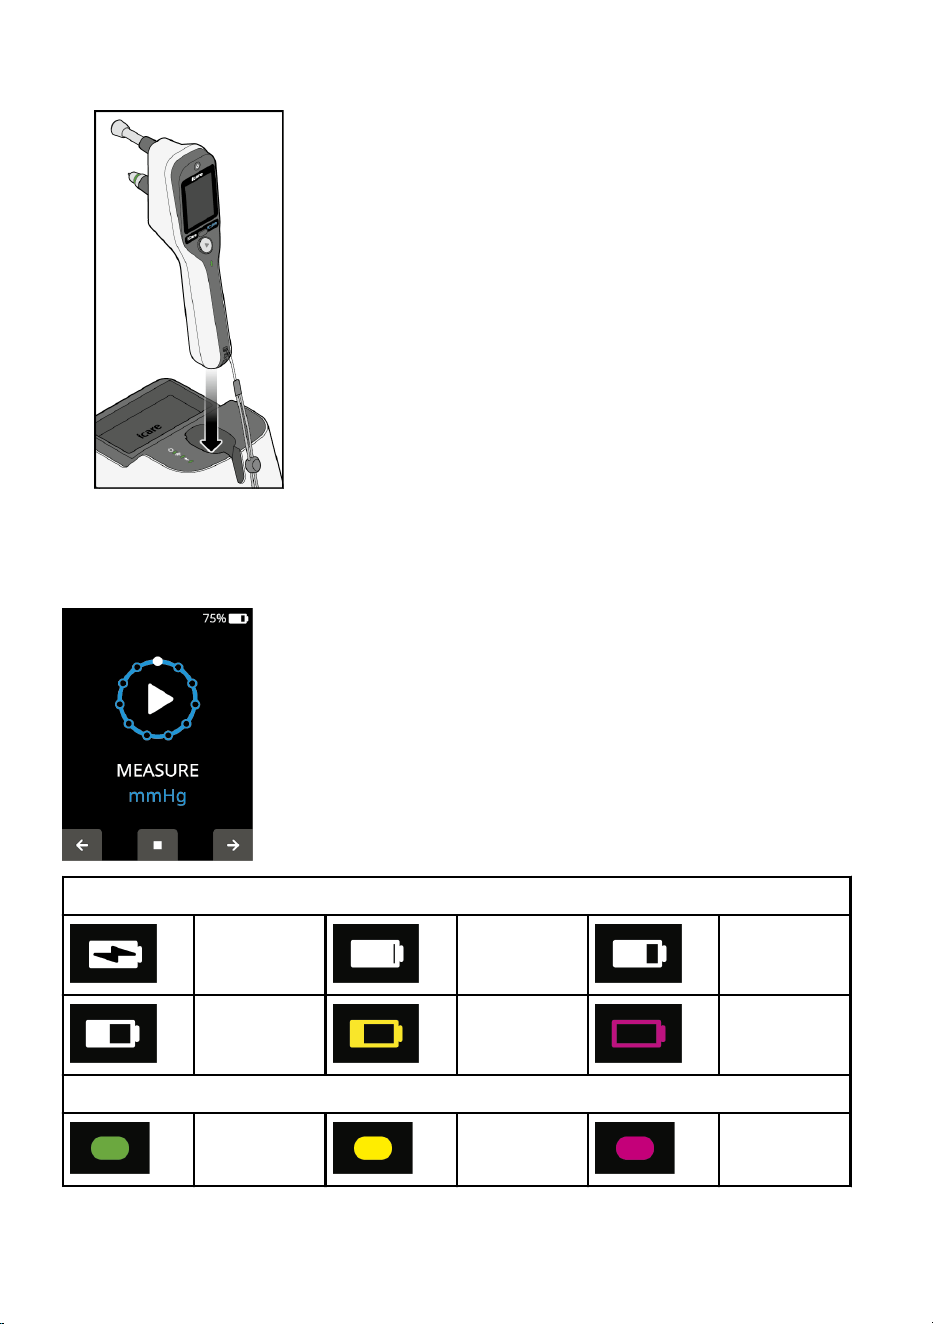
3. Place the tonometer to its designated spot in the cradle. The tonometer’s status
indicator light starts to ash.
4. The status indicator light turns o when the battery is full.
5. The tonometer is ready for measurement and can be removed from the cradle.
The battery charge level is shown on the upper right corner of the display when the
device is on:
Battery status on tonometer display
When
charging
100% - 76% 75% - 51%
50% - 26% 25% - 6% 5% - 1%
Indicator battery light level
100% - 26% 25% - 6% 5% - 1%
17
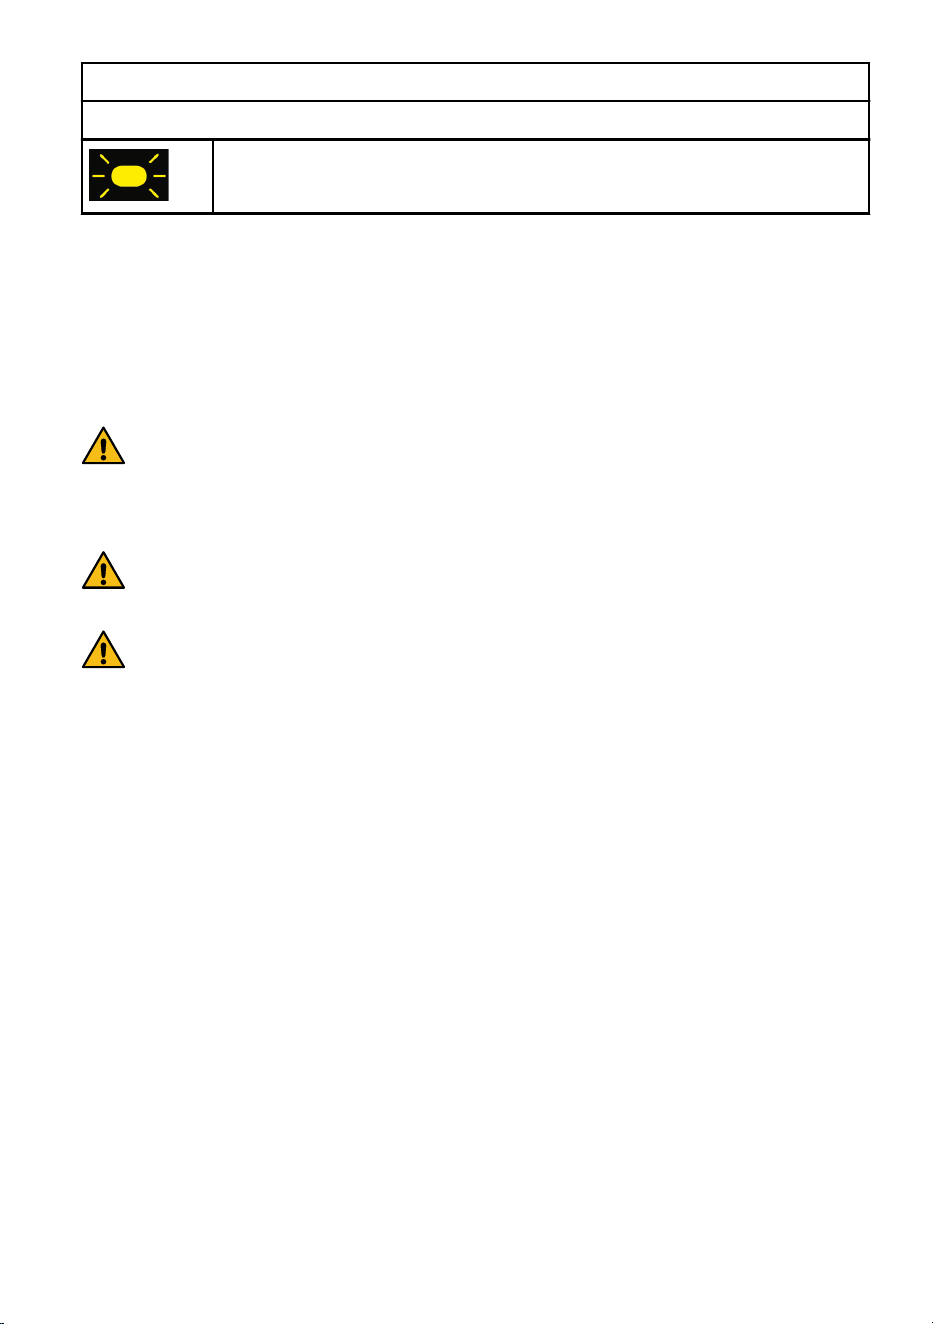
Battery status on tonometer display
Indicator light operation when charging
The pulsating light indicates that the tonometer battery is charging.
Pulsating light color depends on the battery level.
If the tonometer’s battery life decreases and you suspect the device battery should
be changed, contact the manufacturer or your local distributor. Due to battery life
optimization, the cradle will not charge the tonometer if the battery charge is high
enough (approx. 90 %).
6 Prepare for measurement
WARNING! The tonometer or cradle must not be dropped. To avoid dropping any
of the devices and to ensure safe handling, handle them with care. Always use
the wrist strap with the tonometer to keep the it attached to your wrist when
in use. If the tonometer or cradle is dropped and the casing opens, press the
casing to close the openings.
WARNING! Do not use the tonometer or cradle if any of the devices appear
to be damaged or malfunctioning. The damaged device must be delivered to
service for repair.
PRECAUTION! Report any serious incidents related to the tonometer to
your competent health authority and the manufacturer or the manufacturer’s
representative.
18
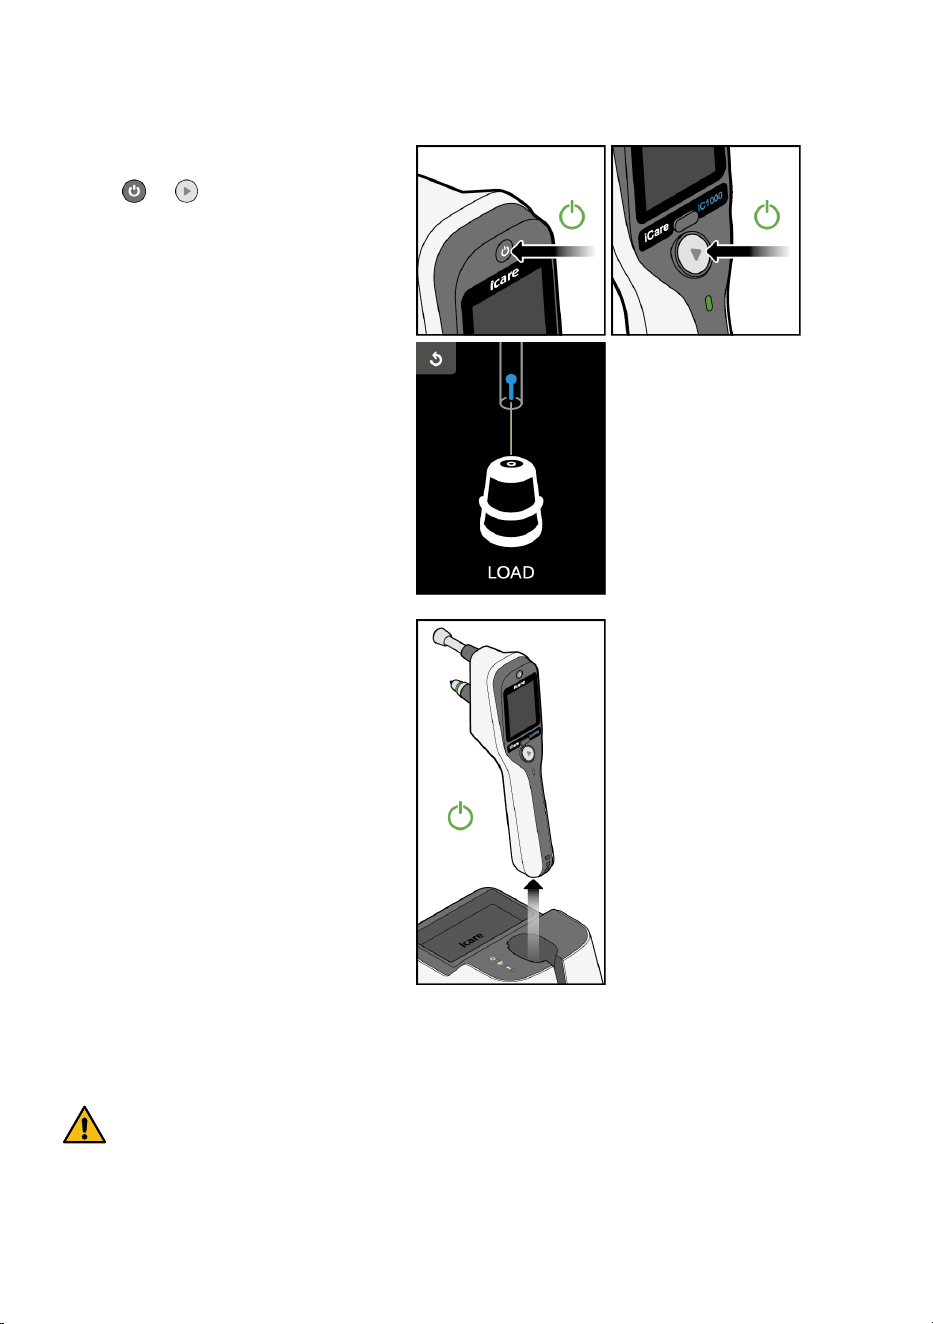
6.1 Switch on the tonometer
To switch on the tonometer:
Press or . The device display
turns on and shows the time and
date during the start-up sequence.
The text LOAD is shown on the
display.
If either the time and/or date are
incorrect, set the correct time and/or
date as instructed in Tonometer
settings on page 29.
Alternatively, the tonometer switches
on when you lift it from the cradle.
6.2 Insert the probe
WARNING! Do not use probes without a plastic tip. Do not use deformed
probes. Contact the manufacturer or local distributor if you notice faulty probes
or probe packages.
19
WARNING! Use only original and certied probes made by the manufacturer.
The probes are for single-use (single pair of measurement sequences) only. Each
session is dened by one successful measurement in both eyes, but in case
either eye is inamed or infected, measure the healthy eye rst. The probes
must not be cleaned.
WARNING! Only use intact probes taken from an intact, original packaging. Re-
use of a probe could result in incorrect measurement values, damage to the
probe, cross-contamination by bacteria or viruses or infection of the eye. Re-use
of probes voids all responsibilities and liabilities of the manufacturer concerning
the safety and eectiveness of the tonometer.
WARNING! To prevent contamination, keep unused probes in their box. Do not
touch a bare probe. Do not use a probe if it touches a non-sterile surface such
as a table or a oor.
The tonometer comes with a box of 100 probes for measuring the IOP. Each probe is
individually stored in a separate container until use. A new probe must be used for each
measurement.
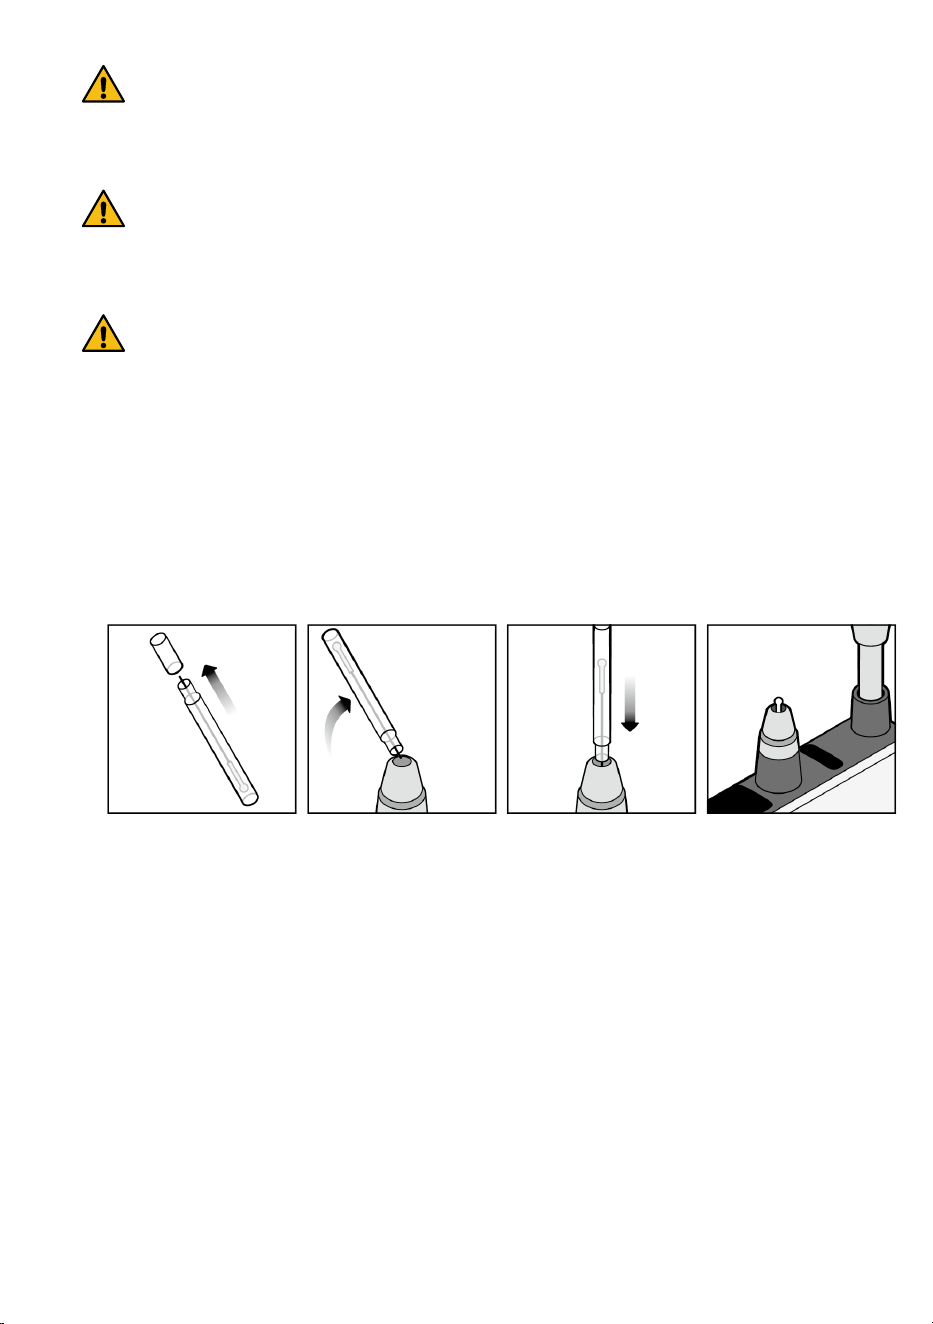
Before you insert the probe, remove the probe base cover by pulling, not turning. Turning
the cover may unscrew the probe base collar.
Make sure that the text LOAD is shown on the display.
To insert the probe:
1. Remove the probe container cap. Keep the container.
2. Keep the tonometer in one hand and the probe container in another.
3. Turn the container sideways to align it with the probe base collar. Turn it upside
down to insert the probe.
4. The tonometer magnetizes the probe and holds it in place.
5. When the probe is loaded, the tonometer screen goes into the measurement mode.
6.3 Select measurement mode
6.3.1 Measurement modes
The iCare IC1000 includes two measurement modes: Normal Measure and Quick
Measure. Tap the toggle button to switch between measurement modes.
20
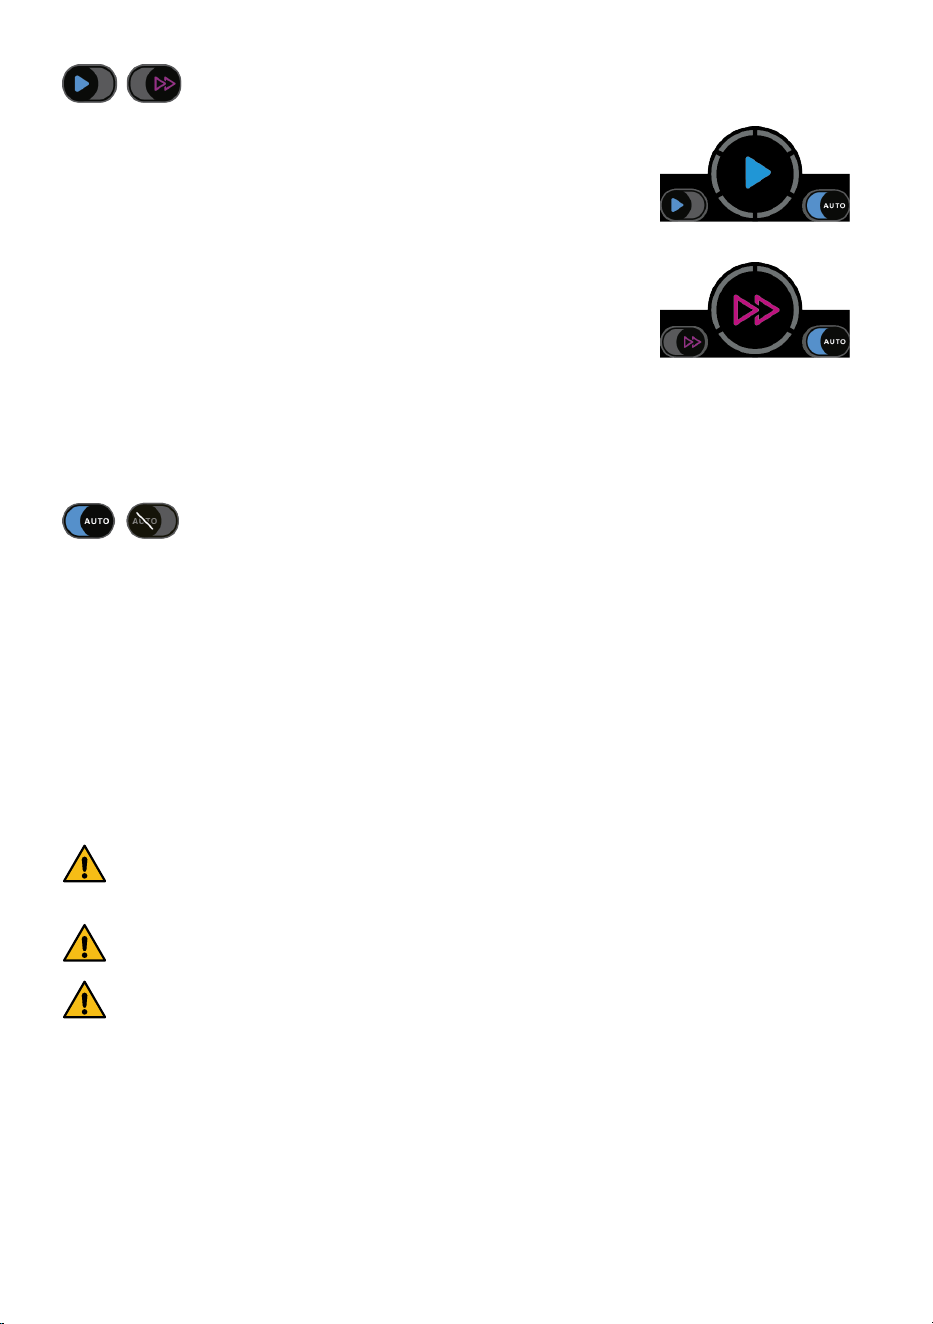
In the Normal Measure, you take six individual rebound
measurements. The nal IOP is calculated from the six
measurements and is shown on the display after the sixth
measurement is taken. Normal Measure is on by default and is
indicated with blue play symbol.
The Quick Measure measures the patient’s IOP with fewer
rebound measurements and a faster measurement cycle. The
purpose of Quick Measure is to enable the IOP measurement
of patients whose IOP cannot be measured with the Normal
Measure for any reason (such as lack of cooperation or the
patient cannot keep the eye open long enough). Quick Measure is
indicated with two magenta colored play symbols.
6.3.2 Automatic probe launch mode
The iCare IC1000 includes an Automatic Probe Launch Mode (AUTO Mode). If the AUTO
Mode feature is on, the tonometer takes measurements automatically when tonometer
is aligned in the correct position. You can turn the AUTO Mode on or o from the toggle
button. Normal Measure and Quick Measure can both be used when the Automatic
Probe Launch Mode is active.
7 Take a measurement
7.1 Position the tonometer and measure the eye pressure
WARNING! Only probes are intended for contacting the eye. Do not move the
tonometer too close to the patient’s eye and avoid touching the eye with other
parts of the tonometer. Do not push the tonometer into the eye.
WARNING! Use of eye drops right before the measurement or topical anesthesia
may aect the measurement result.
PRECAUTION! Take care not to cover the camera with your nger. If the camera
lens becomes dirty, the functionality may be impaired.
NOTE! Before you measure, make sure that the wrist strap is placed around the wrist
and tightened with the lock on the wrist strap.
The iCare IC1000 tonometer includes an alignment guide that directs you put the
tonometer to the correct measurement position.
NOTE! When the AUTO Mode is on, the measurements are taken automatically when
tonometer is in correct position. Measurements can also be taken manually when the
automatic measure is ON by pressing the measure button.
21
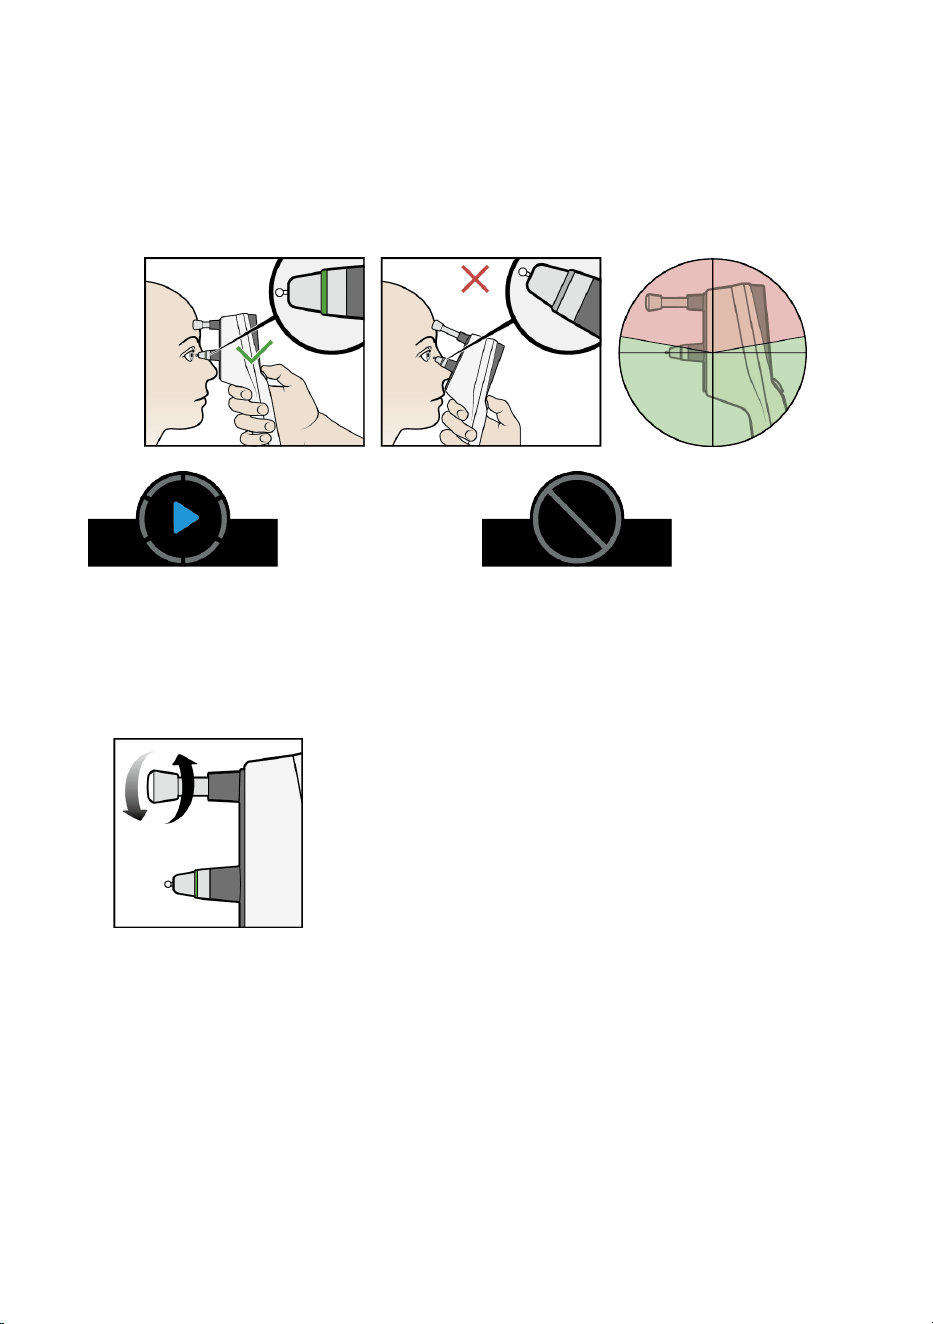
The measurement position is correct when
• the device inclination status is correct: the device points straight in the horizontal
plane (patient sitting) or downwards (patient lying down),
• it is aimed perpendicularly to the center of the cornea and
• the probe is about 5 mm from the eye.
The tonometer screen and green probe base light show the inclination status (device’s
angle).
Correct device inclination: measure-
symbol is displayed, and probe base light
is solid green.
Incorrect device inclination: measure-
symbol is blocked, and probe base light is
OFF.
To adjust the tonometer to correct measuring position:
1. Rotate the forehead support to adjust the length.
2. Ask the patient to relax and look straight ahead.
3. Bring the tonometer in front of the patient’s eye. Set the forehead support to the
patient’s forehead.
4. Adjust the forehead support until the probe is about 5 mm from the eye.
22
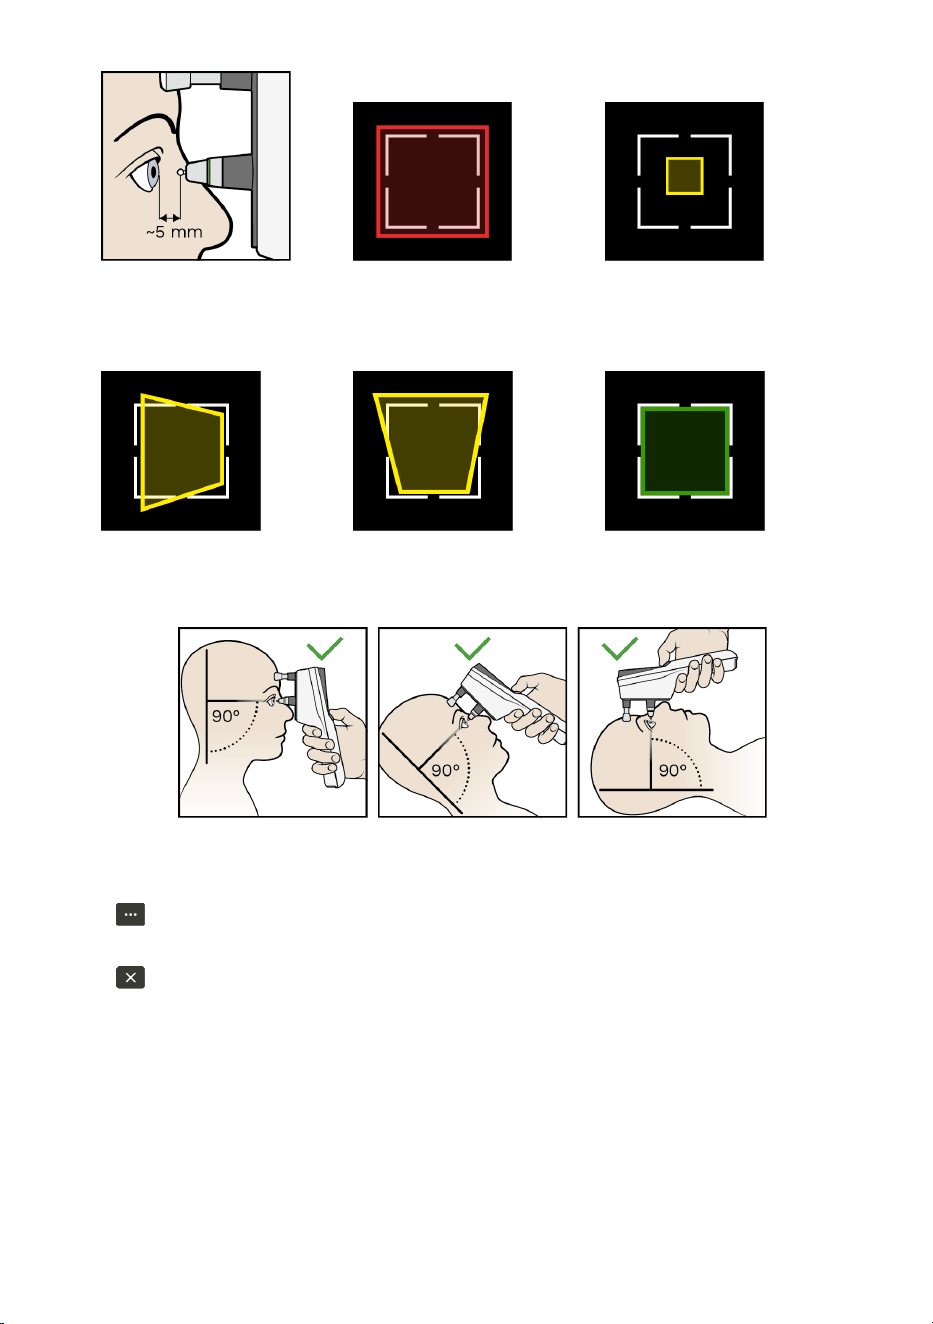
Too near Too far
5. Align the tonometer at a 90-degree angle to the patient’s face. If your position is not
perpendicular the alignment guide shows the incorrect angle.
Rotate Rotate Measure
Measurement can be taken in multiple angles.
6. When the measurements are taken the result is shown on the screen. After 2
seconds, the tonometer switches back to the measurement mode. Measure the
other eye, if needed.
Press to access previous measurements when you are measuring or to reject all
measurements taken during the same measurement round.
Press when you want to stop measuring.
7.2 Manual measurement
When the AUTO Mode is o, position the tonometer in front of the patient’s eye and take
the measurements manually.
1. Position the tonometer in front of the patient’s eye.
23
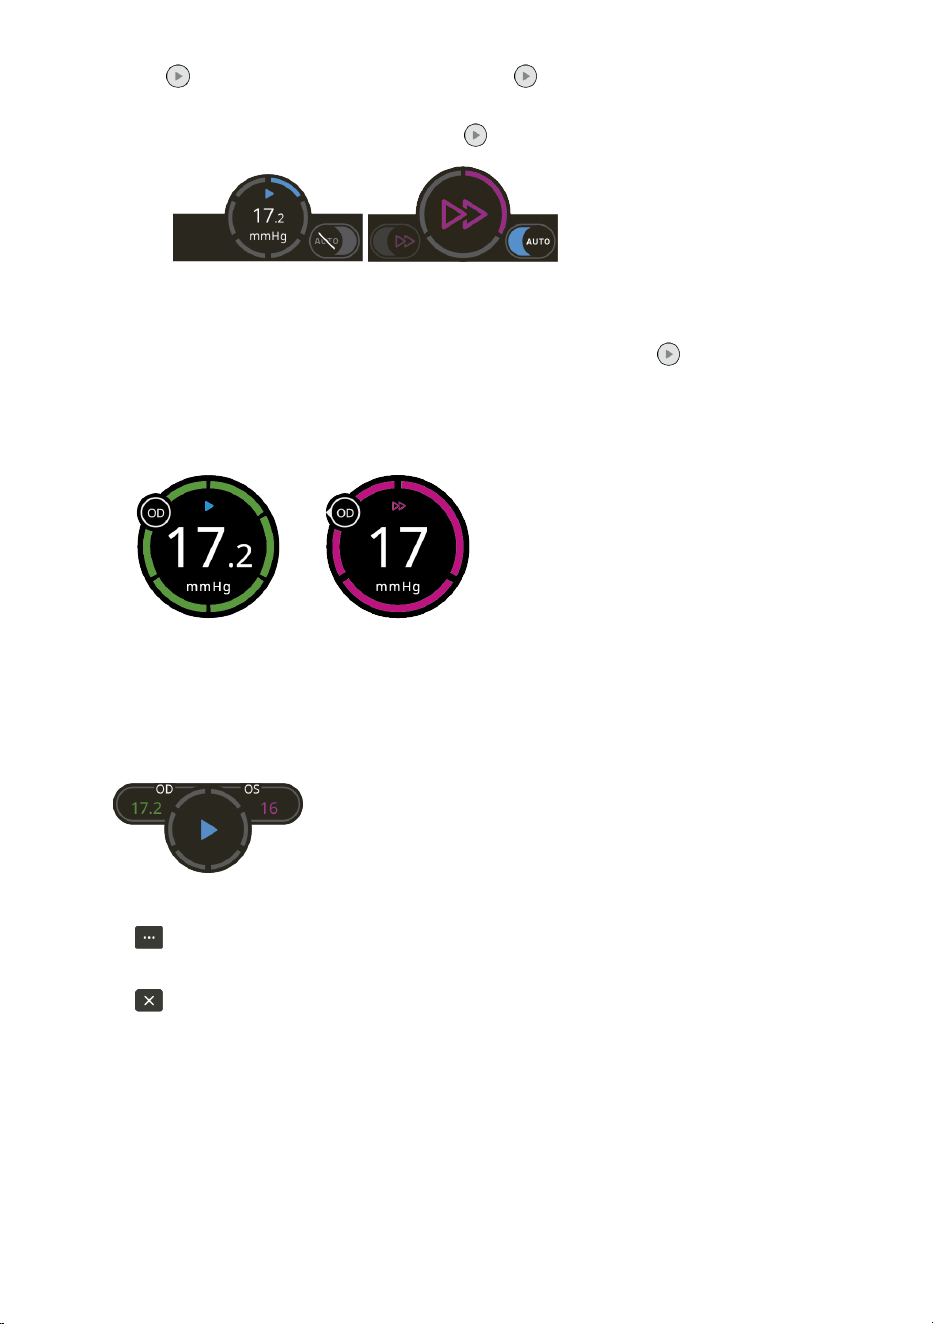
2. Press
6 times (single mode) or hold down (series mode) until the tonometer
has taken 6 measurements.
If the Quick Measure mode is on, press
2 or 3 times.
Measurement progress on the user interface
NOTE! If you receive a measurement error notication, press to acknowledge the
error. Make the necessary corrections and repeat the measurement.
3. When the measurements have been taken, you hear a longer beep. The
measurement sequence is completed.
4. Measurement result is shown for 2 seconds.
5. The device returns to measurement mode. Take another measurement, if needed.
Your previous measurement of OD and OS are shown on the screen. Green color
indicates good measurement quality. Yellow color indicates acceptable measurement
quality. Magenta color indicates Quick Measure measurement.
Measurement mode showing previous measurements
Press to access previous measurements when you are measuring or to reject all
measurements taken during the same measurement round.
Press or when you want to stop measuring.
7.3 Check the measurement result
After a successful measurement, the measurement result is shown on the display. The
quality of the measurement is indicated with a color:
24
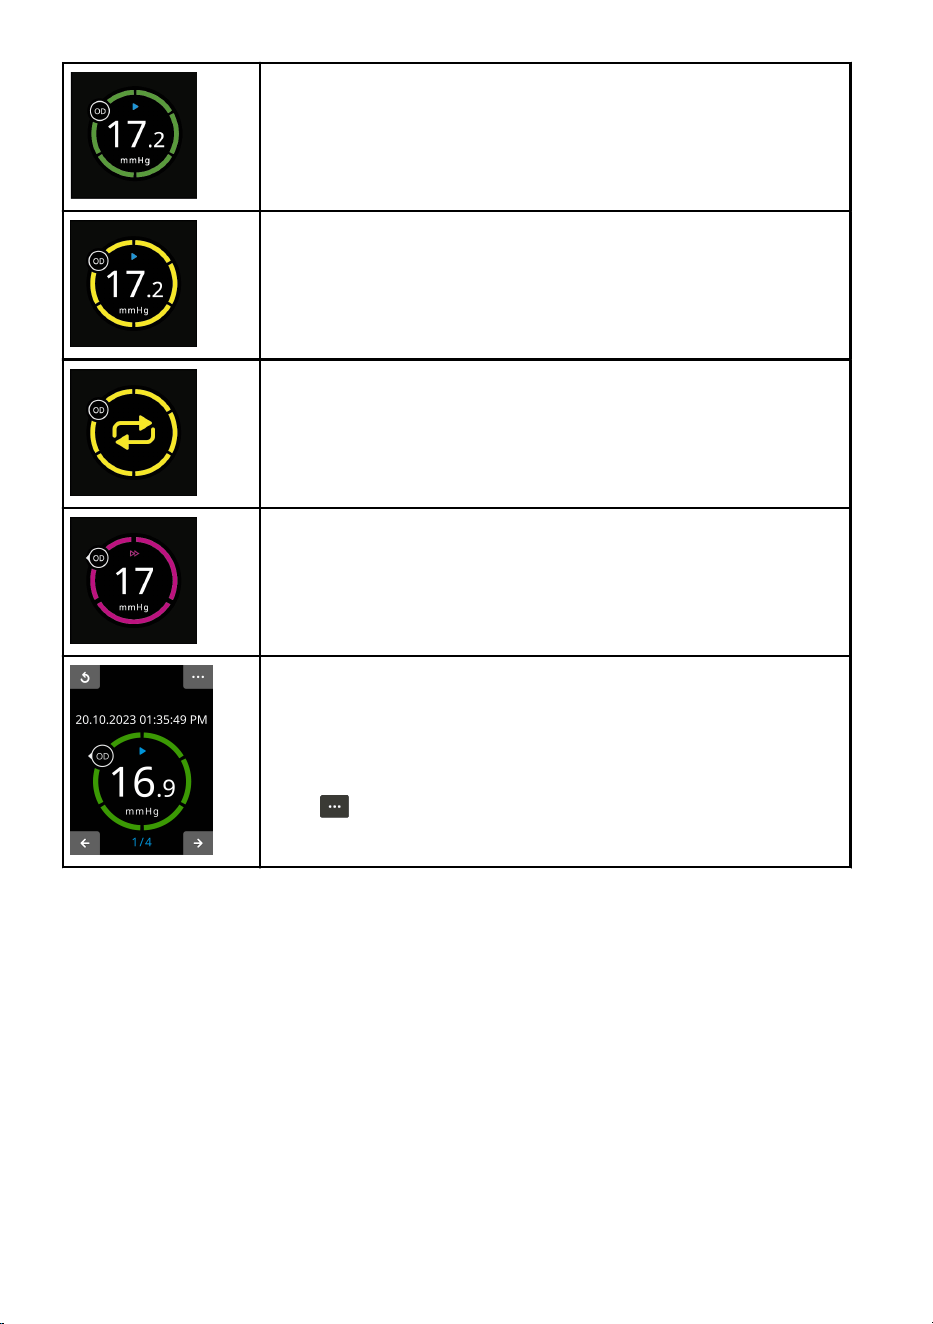
Green: good measurement quality
Yellow: acceptable measurement quality
Yellow, text REPEAT: The variation between the measurements
was too high. Repeat the measurement.
Magenta: Quick measure results are always shown in magenta
color. Quick Measure mode does not have quality indicators.
Viewing results during the measurement round shows the
measurement result, time of the measurement, which eye (right
or left) was measured, and the quality of the measurement
indicated by a color. The measurements can be browsed by
pressing the navigation buttons.
Press to access the measurements during the measurement
round.
The tonometer stores the calculated eye pressure reading in mmHg, the time and date
of the measurement, which eye (right or left) was measured and the quality of the
measurement indicated by a color.
The data collected by tonometer can be transferred to the iCare cloud software.
If you doubt the validity of any of the tonometer’s displayed measurements of IOP (for
example, if you suspect that the probe missed the central cornea or made contact with
the eyelid or lashes), it is recommended that you repeat the measurement. In addition,
if you observe an unusually high or low displayed value of IOP, it is recommended that
you make another measurement, either with the iCare tonometer or using an alternative
method in order to verify the unusual reading.
25
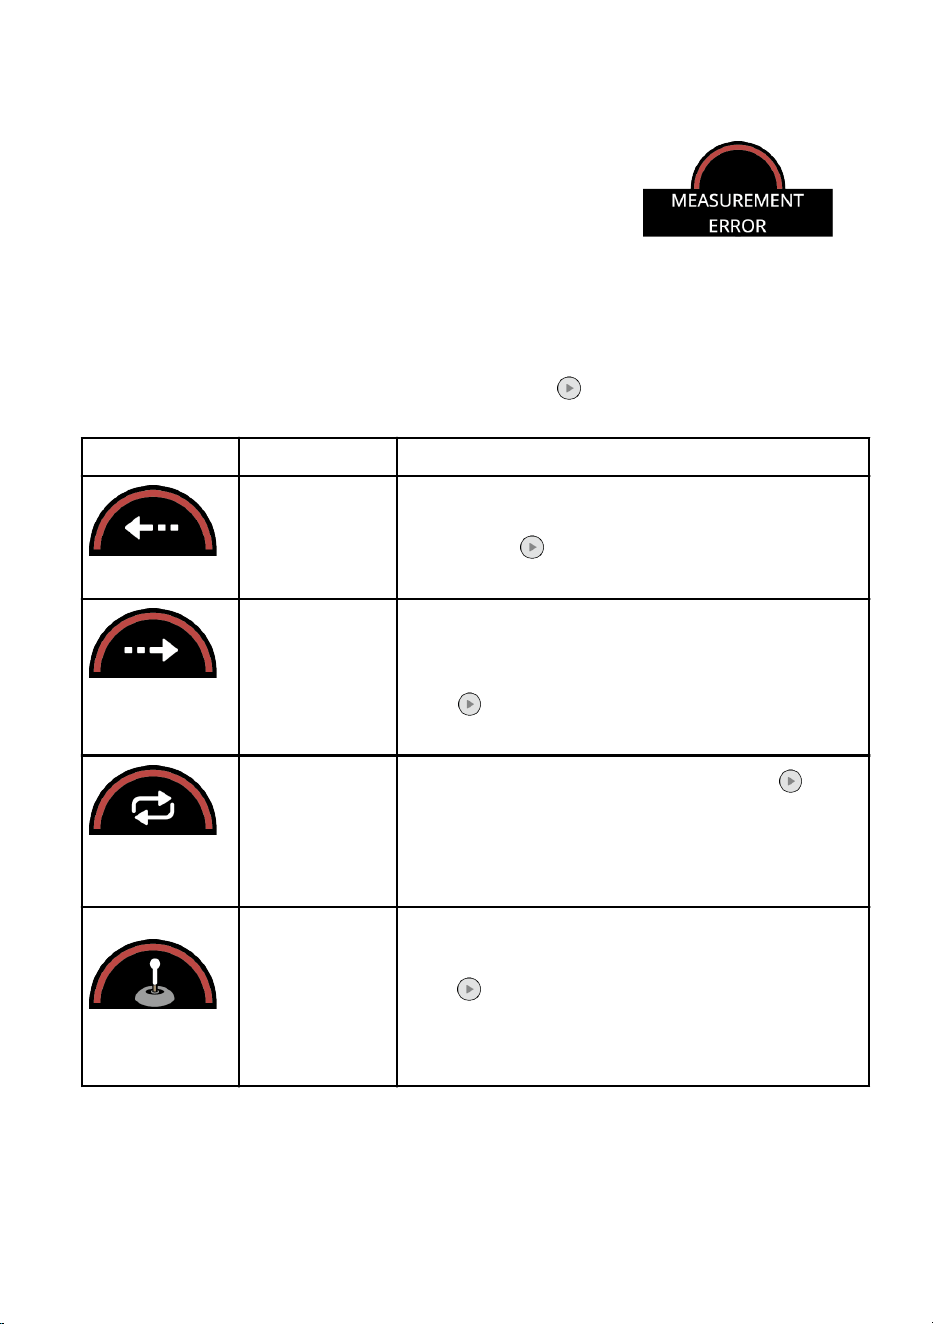
7.4 Errors during measurement
If the probe base light ashes and you hear multiple
beeps, the measurement was not successful. The display
and sounds indicate the source of the error.
Error shown on the user
interface
If the AUTO Mode is on, the error messages other than CHANGE are automatically
acknowledged after 2 seconds.
If the AUTO Mode is o, look at the display and press
to acknowledge the error. Make
the necessary corrections and repeat the measurement.
Error message
Explanation Actions
TOO FAR
The probe did
not touch the
eye.
The measurement was taken from too far away.
Adjust the correct measurement distance to about
5 mm. Press
to clear the error message and
continue measuring.
TOO NEAR
Tonometer was
too close to the
eye.
Adjust the correct measurement distance to about
5 mm.
If the error occurs during measurement sequence,
press
to clear the error message and continue
measuring.
REPEAT
The probe did
not move
properly or did
not make clean
contact with
the cornea.
Measure again or change the probe. Press to
clear the error message and continue measuring.
CHANGE The probe did
not move.
Change the probe. The probe was twisted or
otherwise inserted incorrectly.
Press to clear the error message and continue
measuring. If the error keeps recurring, change also
the probe base as instructed in Replace the probe
base on page 40.
26
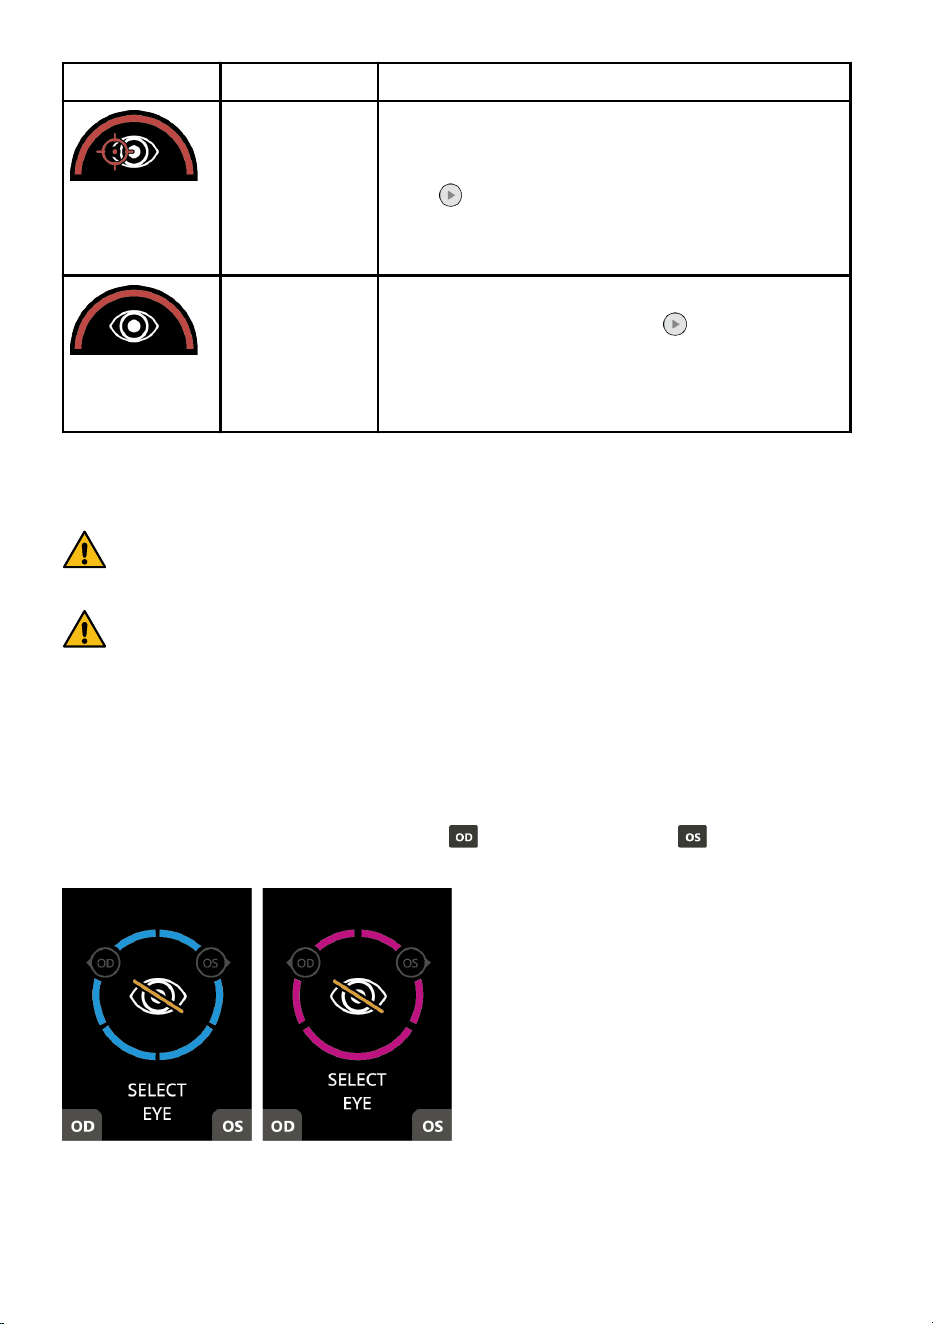
Error message Explanation Actions
INCORRECT
ALIGNMENT
The probe was
not
perpendicular
to the cornea,
or the probe hit
an eyelid or
eyelash.
Make sure that the eye is open, the probe
points towards the center of the cornea and
is perpendicular to the surface of the cornea.
Press
to clear the error message and continue
measuring.
REPEAT OD or
OS
The other eye
was detected in
the same
measurement
sequence.
Measure only the same eye inside same
measurement sequence. Press
to clear the
error message and continue measuring.
Do not cover the eye recognition transmitters or
sensor during the measurement.
7.5 Eye recognition
PRECAUTION! Eye detection is based on the dierence of infrared reections
received from the transmitters: the nose side reects more than the temple
side. If the transmitters become dirty, the recognition may be interfered.
PRECAUTION! Do not cover the eye recognition transmitters or sensor during
the measurement, for example with your ngers. Make sure that the patient’s
face is not covered by hair or a scarf, as they can produce an infrared reection
that causes an error.
The tonometer includes automatic eye recognition to identify which eye, right or left, you
are measuring. The eye recognition is done by the tonometer infrared sensors.
If the automatic eye recognition does not recognize the eye, you can choose the correct
eye after the measurement.
If the automatic eye recognition fails, press (patient’s right eye) or (patient’s left
eye) on the screen to select the measured eye.
27
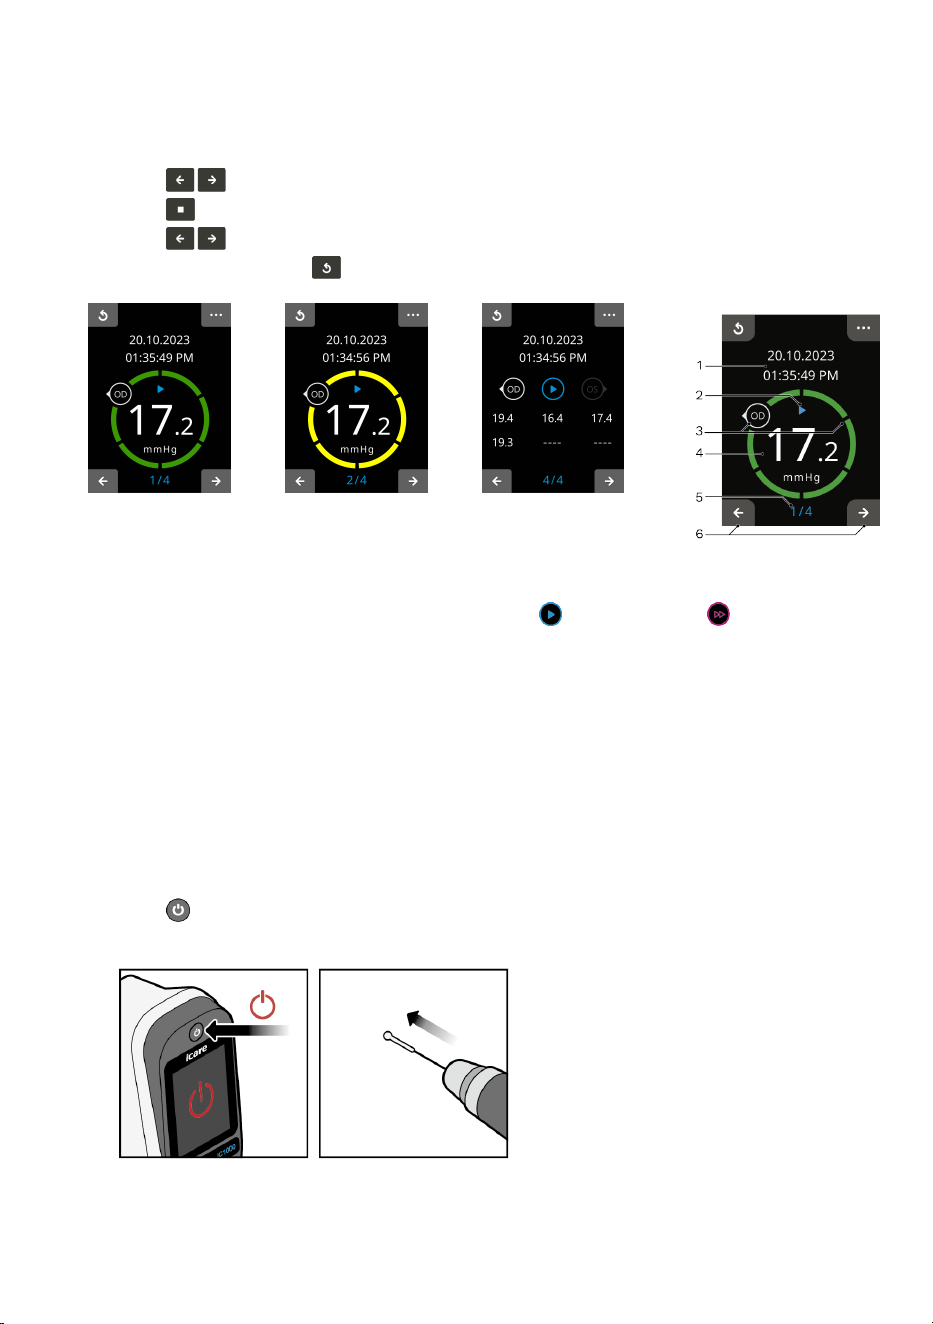
7.6 View the measurement history
1. Navigate to the main menu.
2. Press until you see HISTORY.
3. Press
to access HISTORY.
4. Press to view your previous measurements.
5. To exit the view, press .
1. Date and time
2. Measurement mode indicator (Normal measure , Quick Measure )
3. Measured eye (right or left)
4. IOP result in mmHg (quality indicated by the color of the circle)
5. Number of measurements in the device memory (showing a maximum of 100 latest
measurements)
6. Navigation buttons
7.7 Switch o the tonometer and remove the probe
When you have completed the measurements, turn o the tonometer and dispose of
the probe.
1. Press
for 1 second. The tonometer shows the POWER OFF screen, and the probe
is ejected out of the tonometer.
2. Discard the probe.
28
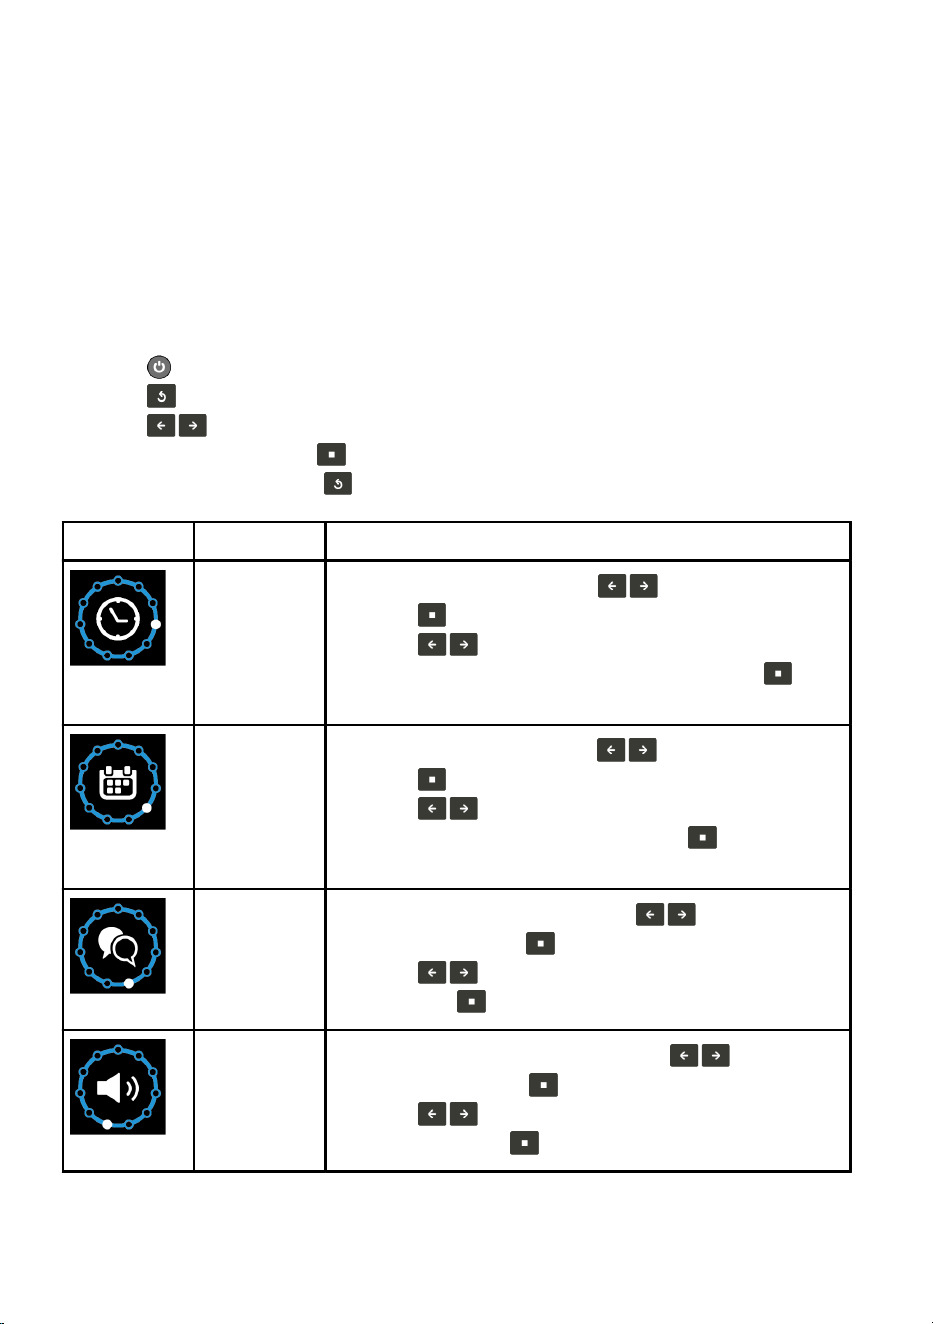
3. Press the probe base cover back over the probe base collar to prevent dirt from
getting in.
Store the tonometer in the carrying case or in the cradle between use.
NOTE! When the tonometer is not used it shuts down automatically after 3 minutes.
The device does not eject the probe when it shuts down automatically. You can
change the automatic shutdown time from tonometer settings.
See Recycling on page 43 for instructions on how to recycle the probe and container.
8 Tonometer settings
1. Press to turn the tonometer on or lift it from the cradle.
2. Press to access the main menu.
3. Press to move between the various settings positioned in the main menu.
4. To select a setting, press .
5. To exit the settings, press .
Screen
Settings Actions
Time
1. To change the time, press until you see TIME.
Press .
2. Press
to navigate to the time format, time
zone, hour and minutes you want, and press
on
each to conrm.
Date
1. To change the date, press until you see DATE.
Press .
2. Press
to navigate to the date format, year,
month and day you want, and press
on each to
conrm.
Language
1. To change the language, press until you see
LANGUAGE. Press .
2. Press
until you see the language you want,
and press
.
Sound
1. To change the volume level, press until you
see SOUND. Press .
2. Press
until you hear the volume level you
want, and press
.
29
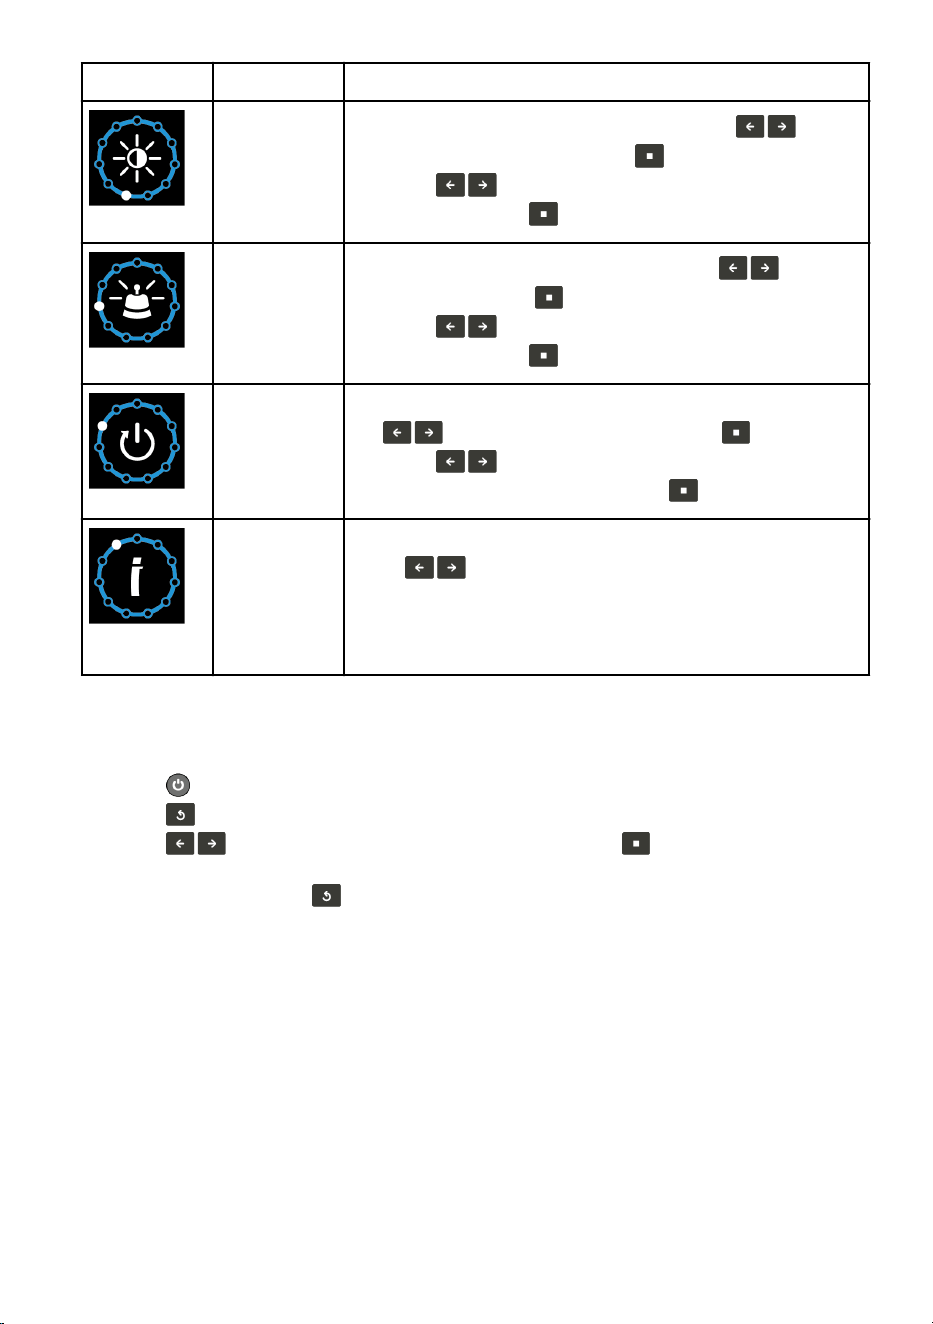
Screen Settings Actions
Display
brightness
1. To change the display brightness, press until
you see BRIGHTNESS. Press .
2. Press
until you see the brightness level you
want, and press
.
Probe base
light
1. To change the probe base light, press until you
see LIGHT. Press .
2. Press
until you see the brightness level you
want, and press
.
Automatic
shutdown
1. To change the automatic shutdown time, press
until you see AUTO-OFF. Press .
2. Press until you see the time you want for the
automatic shutdown, and press .
Info
To browse Device Serial Number and Software Version,
press
.
Scan the QR code on the rst page of the INFO menu to
access the electronic instruction manual at www.icare-
world.com/ifu.
8.1 Device serial number and software version
1. Press
to turn the tonometer on or lift it from the cradle.
2.
Press to access the main menu.
3.
Press until you see INFO on the display and press to enter INFO menu.
4. Press to view device serial numbers and software versions.
5.
To exit the view, press .
NOTE! For the SmartCradle information to be visible in the INFO menu, the
SmartCradle needs to be paired and connected to the tonometer.
9 Pairing via Bluetooth (SmartCradle)
NOTE! Bluetooth functions are only available with the SmartCradle.
9.1 Pair the SmartCradle
1. Make sure that the SmartCradle is on.
30
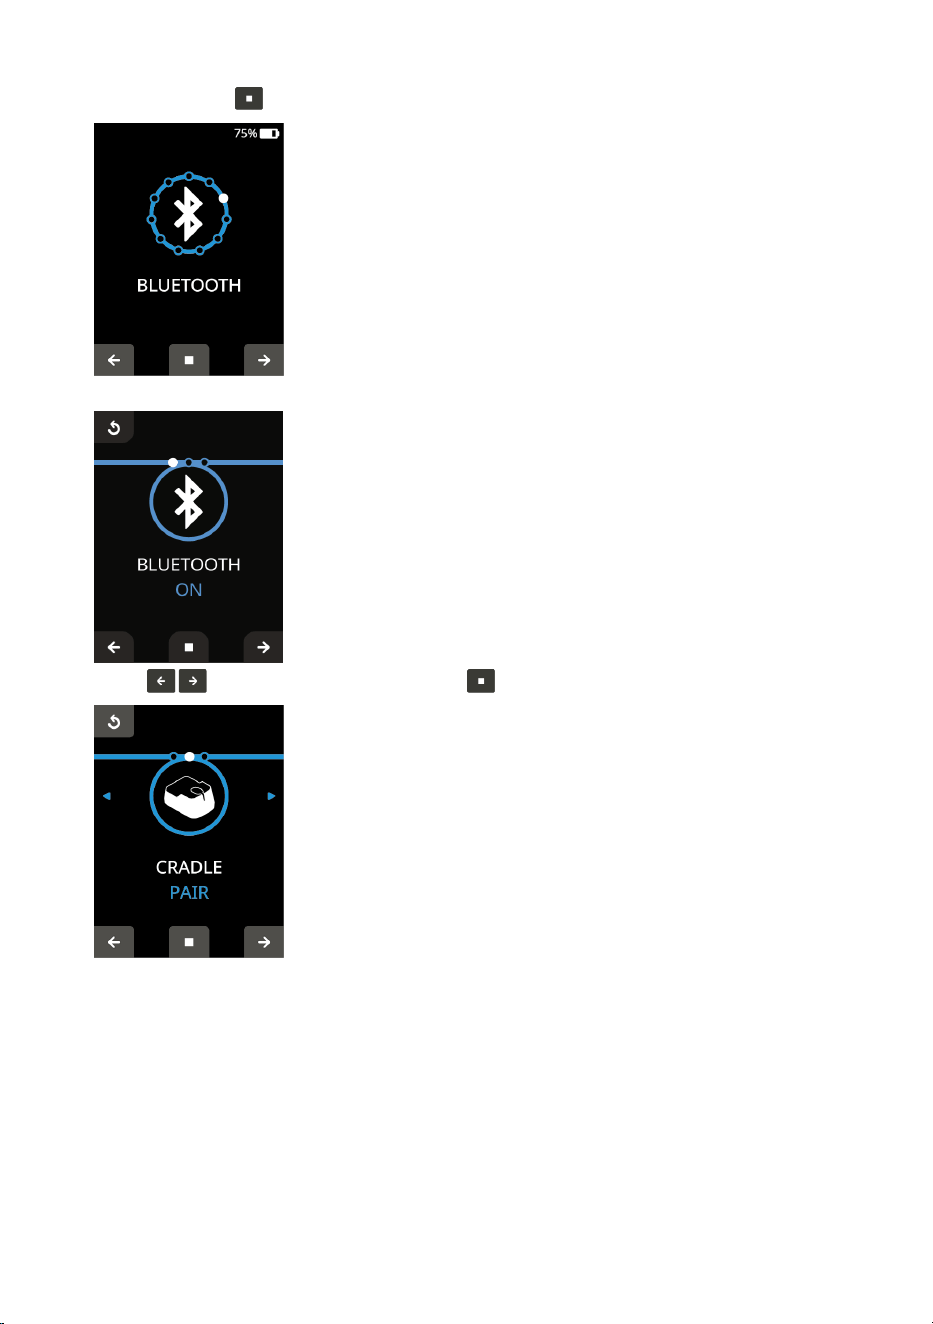
2. Turn on the tonometer. Navigate to the Bluetooth menu in the tonometer user
interface. Press
.
3. Make sure that the Bluetooth state is ON.
4.
Press
until you see CRADLE. Press .
5. Put the IC1000 tonometer into the SmartCradle.
31
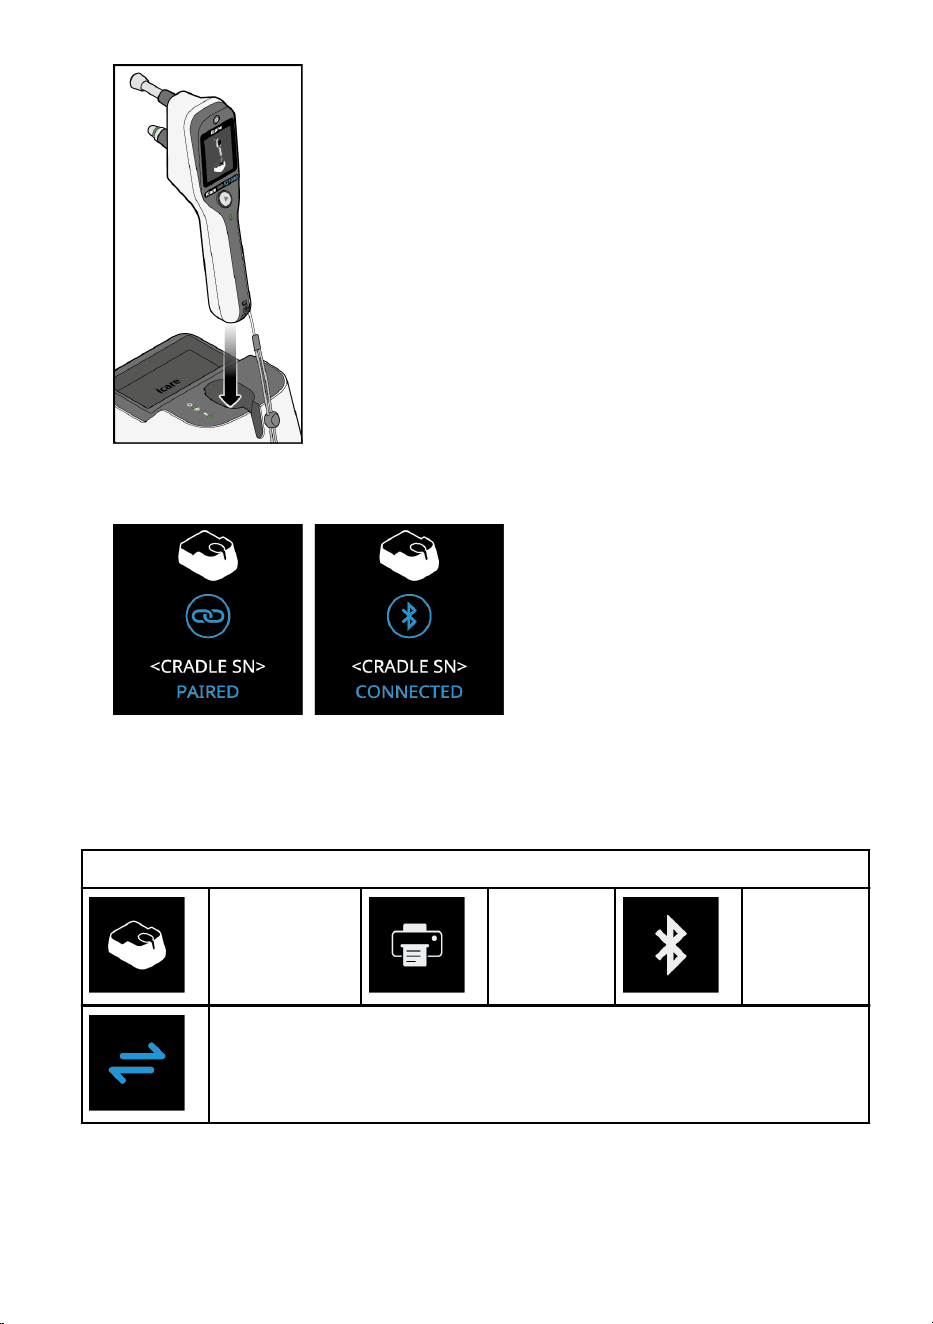
6. The tonometer and SmartCradle connect.
7. When the display shows PAIRED the Bluetooth pairing is established. When the
display shows the text CONNECTED the Bluetooth connection is established.
You can now make software updates to the IC1000 tonometer.
9.2 Bluetooth notications and errors
Bluetooth menu symbols
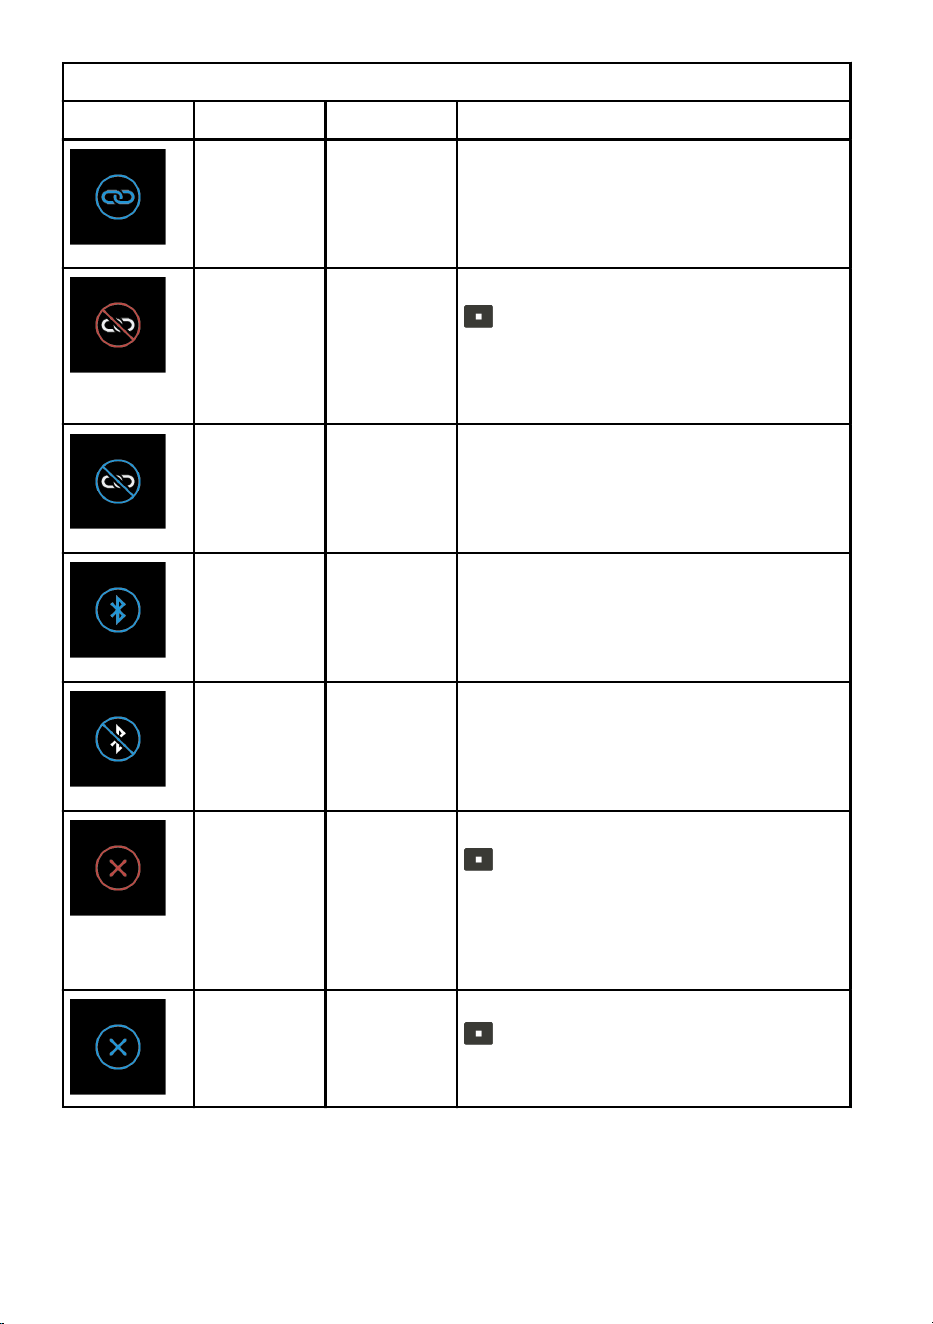
SMARTCRADLE PRINTER BLUETOOTH
The connection symbol appears on the top row when the tonometer is
connected to SmartCradle.
32
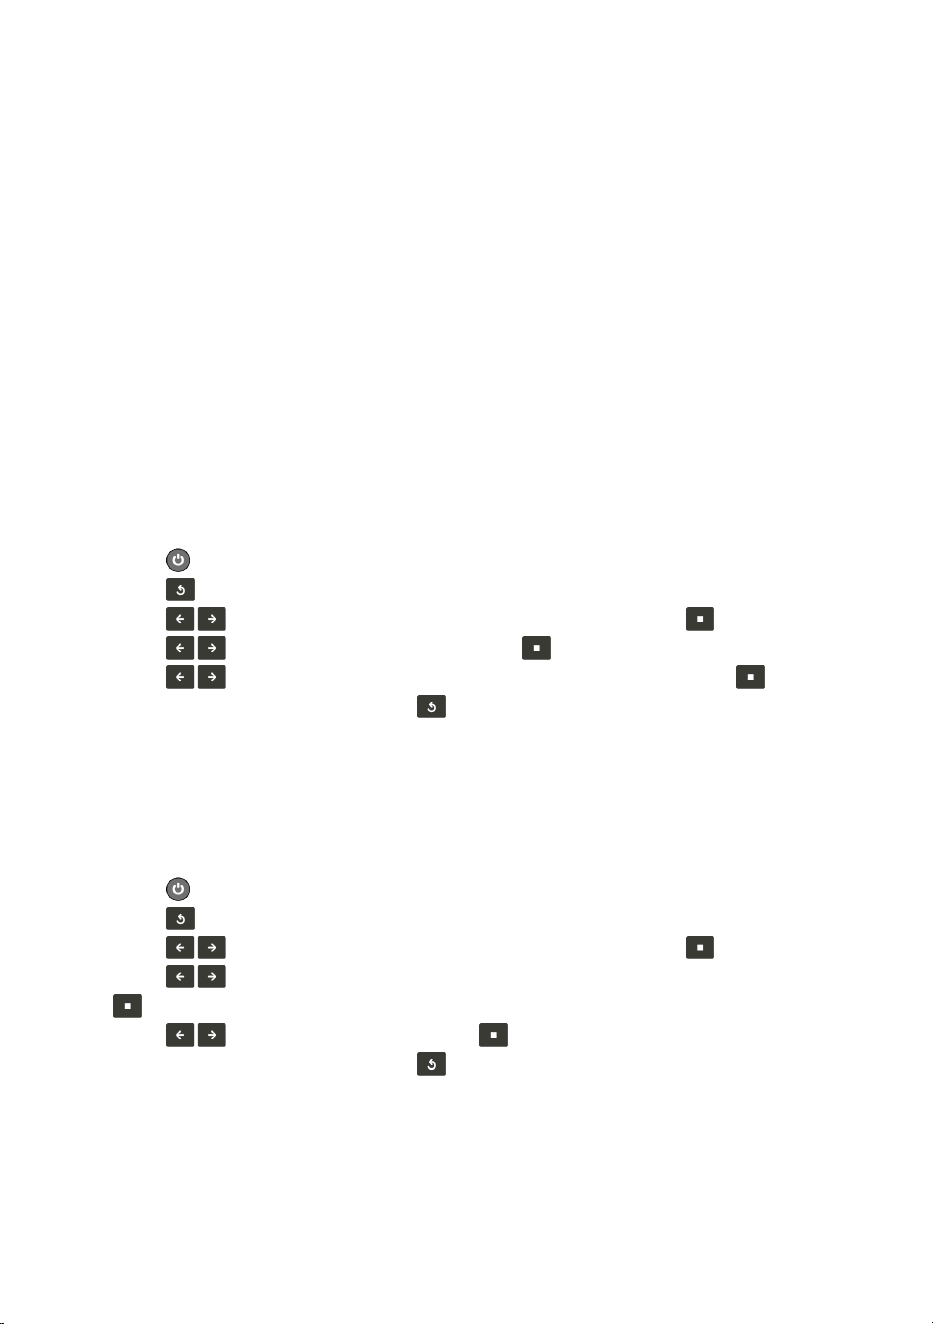
Bluetooth notication
Screen Text Explanation Actions
PAIRED Tonometer
paired with
the
SmartCradle
or printer.
No actions needed.
PAIRING
ERROR
Error during
SmartCradle
pairing.
Acknowledge the notication by pressing
.
Try to pair SmartCradle again. If pairing
again does not work, turn o Bluetooth
and turn it back on to try again.
PAIRING
REMOVED
Pairing
removed
from the
SmartCradle
or printer.
No actions needed.
CONNECTED Tonometer
connected
with the
SmartCradle
or printer.
No actions needed.
DISCONNEC
TED
Connection
disconnecte
d from the
SmartCradle
or printer.
Make sure that the devices are on and
that they are within 10 meters of each
other.
BLUETOOTH
ERROR or
PRINTER
ERROR
Error during
pairing or
connection
Acknowledge the notication by pressing
.
Try to pair again. If pairing again does not
work, turn o Bluetooth and turn it back
on to try again. Make sure that the printer
is on.
NOT FOUND Printer
cannot be
found via
Bluetooth.
Make sure that the printer is on and press
to search for printers.
33
9.3 Transfer measurements to cloud software (optional)
After you have paired the iCare IC1000 tonometer with the SmartCradle, you can
connect your tonometer in the iCare cloud software. After pairing the IC1000 tonometer
with SmartCradle and connecting SmartCradle to your network, measurement data can
be uploaded to the iCare cloud software. Tonometer registration and account setup are
performed in the iCare cloud software.
See the IC1000 SmartCradle quick guide for more information on how to complete the
connection to iCare cloud software and how to register your tonometer.
For further information, read the instructions for iCare cloud software.
9.4 Turn Bluetooth on or o
Bluetooth is on by default on the tonometer. When you are not using Bluetooth to
connect the tonometer or to transfer measurement results, turn o Bluetooth to save
the tonometer battery.
To turn Bluetooth on or o on the tonometer:
1. Press
to turn the tonometer on or lift it from the cradle.
2. Press to access the main menu.
3. Press in the main menu until you see BLUETOOTH. Press .
4.
Press until you see BLUETOOTH. Press .
5.
Press
until you see BLUETOOTH OFF or BLUETOOTH ON. Press .
6.
To exit the Bluetooth menu, press .
9.5 Unpair the Bluetooth connection
You can unpair the tonometer and the SmartCradle or the printer from the Bluetooth
menu.
1. Press to turn the tonometer on or lift it from the cradle.
2.
Press to access the main menu.
3.
Press in the main menu until you see BLUETOOTH. Press .
4.
Press until you see the device you want to unpair (CRADLE or PRINTER). Press
.
5.
Press until you see UNPAIR. Press .
6.
To exit the Bluetooth menu, press .
34
10 Print the measurement data
10.1 Pair the tonometer and printer
1. Press in the main menu until you see BLUETOOTH. Press .
2. Press
until you see PRINTER. Press .
3. If you have not paired a printer before, you see text PAIR. Press . The tonometer
starts searching for printers.
4. After the tonometer has found printers, press to search for the printer you
want. Press to pair the printer.
5. PAIRED appears when the Bluetooth connection is formed.
6. The selected printer prints a test print to verify the connection. If the test page is not
printed out, check that there is paper in the printer, the lid is closed, and the printer
is otherwise ready for printing.
7. If the test print is ok, the device returns to the Bluetooth menu.
The pairing is maintained unless you manually unpair the tonometer and the printer.
See 9.4 Unpair the Bluetooth connection for instructions on how to unpair the
connection.
10.2 Print the measurement results
When the printer and the device are connected and Bluetooth is turned on on the
device, you can print a measurement immediately after a successful measurement from
the session history or later from the measurement history.
To print a result from the session history (printer paired with tonometer):
1.
Press
to choose the measurement result that you want to print.
2.
Press to select the measurement. Sub-menu opens.
3.
Press to navigate to PRINT RESULT.
4.
Press to print selected measurement result.
To print a result from the session history (printer not paired with tonometer):
1.
Press to choose the measurement result that you want to print.
2.
Press to select the measurement. Sub-menu opens.
3.
Press to navigate to PRINT SELECTED.
4.
Press to print selected measurement result. Printer menu opens.
5. Pair the tonometer and printer according to instructions in 10.1 Pair the tonometer
and printer.
To print a result from the measurement history:
1. Navigate to the main menu.
35
2. Press until you see HISTORY. Press .
3. Press
to choose the measurement result that you want to print.
4. Press to open the sub-menu.
5. Press to print out the measurement result.
The printed receipt contains the tonometer model and serial number, measurement
date and time, measured eye and the measurement result and quality of measurement.
You can turn o Bluetooth from the Bluetooth menu to save the tonometer battery.
11 Troubleshooting
Screen Text Explanation Actions
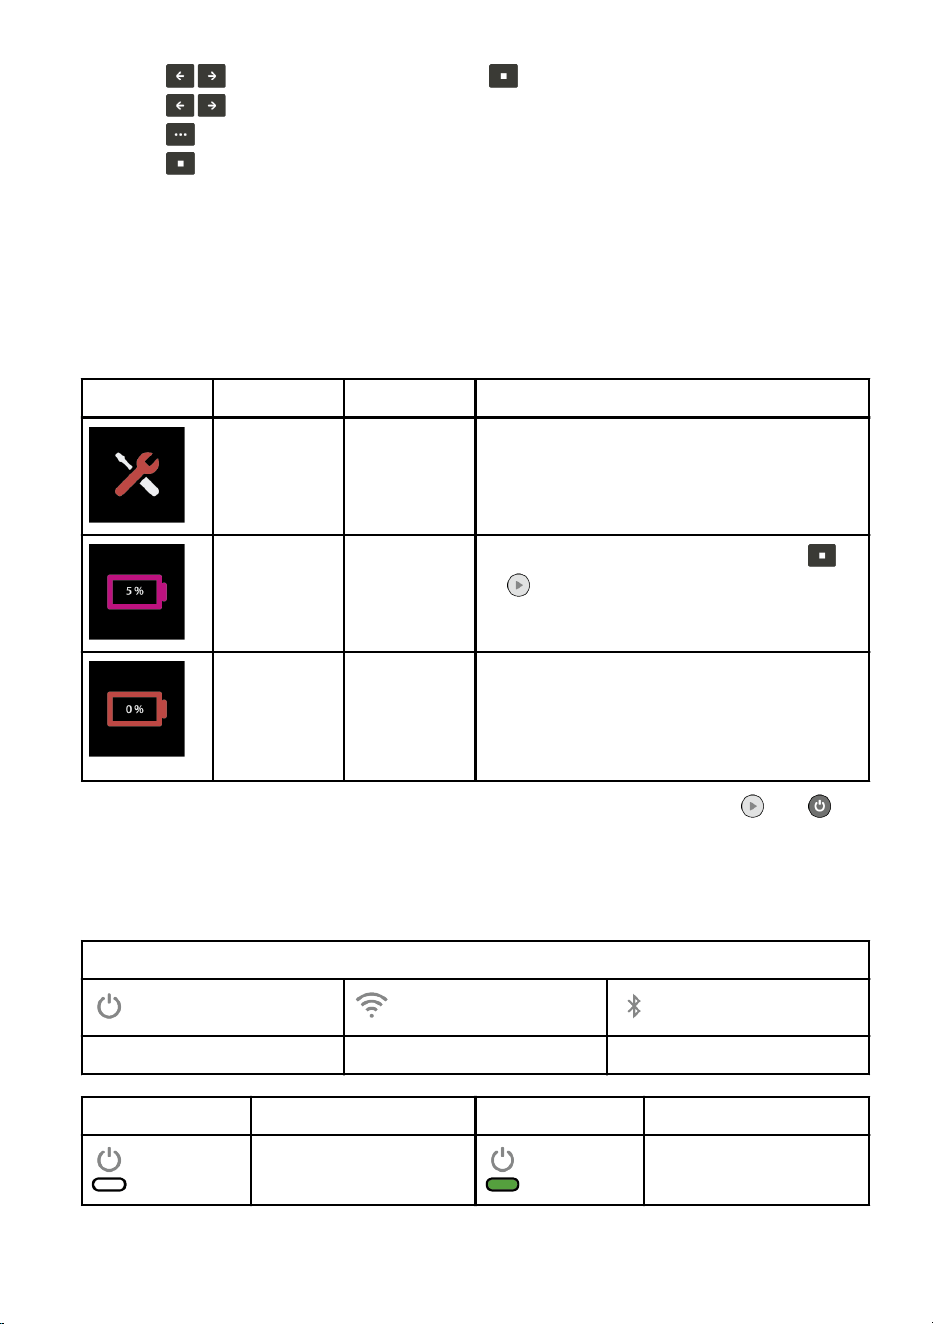
SERVICE Internal
error.
Write down the service ID shown on the
display. Switch o the tonometer. Contact
the distributor or Icare Finland to arrange
service for the tonometer.
LOW Tonometer’s
battery is
low (5%).
Tonometer battery is very low. Press
or to clear the message. Charge the
tonometer battery.
CHARGE Tonometer’s
battery is
empty (0%).
Tonometer
switches o
Charge the tonometer battery. See
chapter 5.3 Charge the tonometer battery.
Tonometer reset: If the tonometer stops working, reboot the device. Press and for
20 seconds. The device reboots.
11.1 SmartCradle troubleshooting
SmartCradle indicator lights
POWER WLAN BLUETOOTH
Indicator light Meaning Indicator light Meaning
No light. The
SmartCradle is o.
POWER LED is solid
green when the cradle
36
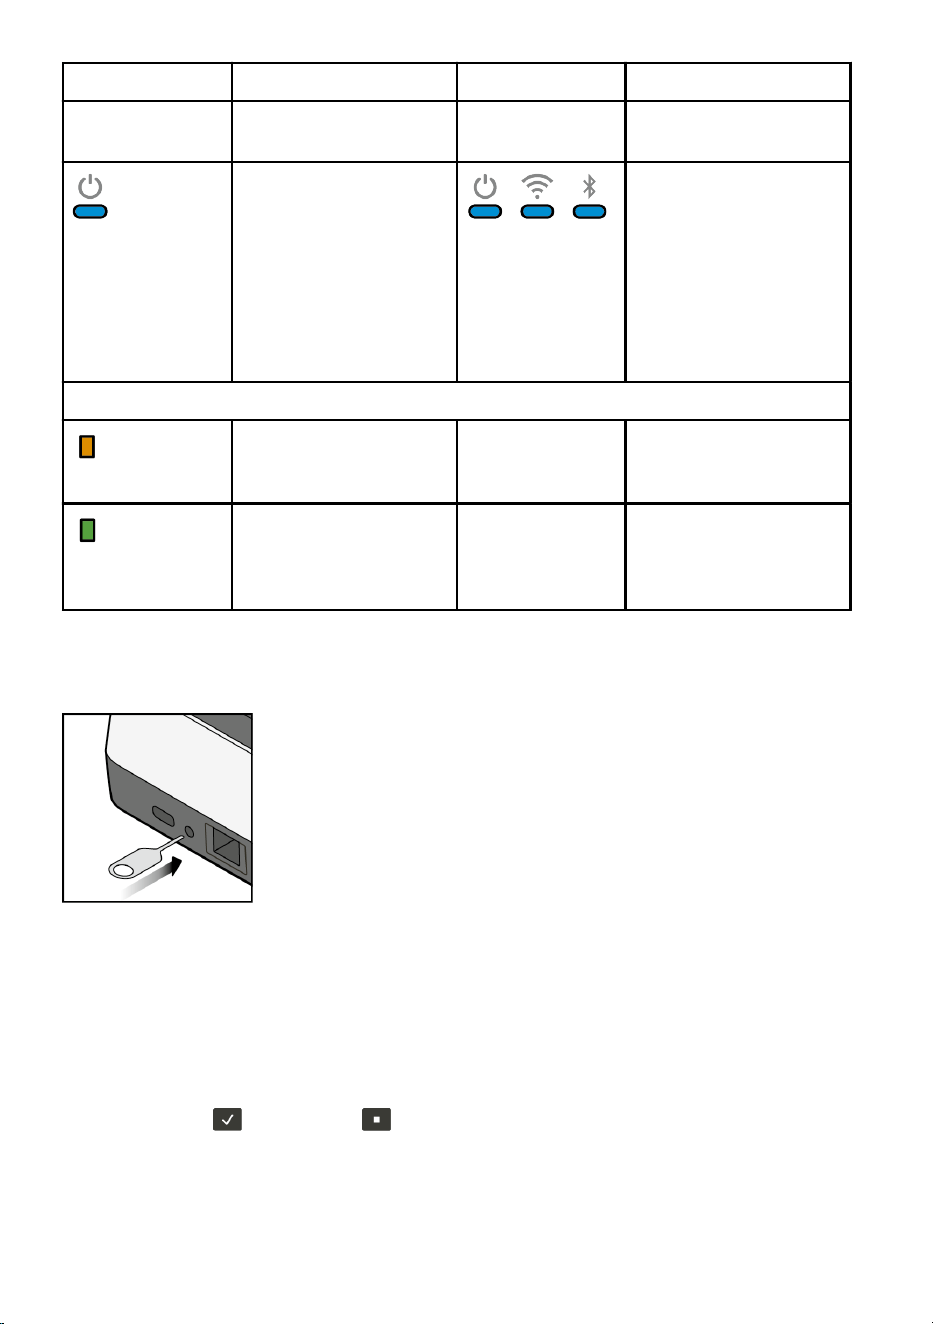
Indicator light Meaning Indicator light Meaning
is ON and cradle SW is
operating normally.
Power indicator light is
blue. The SmartCradle
is turning on. If the
light does not turn
green in 30 seconds,
the start-up has failed.
Turn the SmartCradle
o and on and try
again.
All indicator lights
ash blue. Service
error. Contact your
authorized service
center.
Ethernet connector indicator lights
Pulsating orange light
indicates Ethernet/LAN
activity.
Green light indicates
Ethernet/LAN link/
speed. In this case
10/100.
Reboot: press the reset button shortly to reboot the SmartCradle. Power led ashes.
Factory reset: hold the reset button for 6 seconds until all the light indicators turn o.
The SmartCradle resets and turns on.
11.2 Software update with SmartCradle
Necessary updates including security updates can be applied with the software update
feature. The SmartCradle and tonometer software is updated over the air (OTA update)
or with a USB stick provided by the manufacturer.
If a software update is available, it is oered automatically when the tonometer is
turned on. Press to update or to decline. You can check for updates manually in
the INFO menu.
37
Software update OTA
You see the text SYSTEM UPDATE if the SmartCradle nds an available system update.
1. Press
on the screen to start the update.
2. When the update is processed, the tonometer reboots.
3. If the software update is successful, the tonometer screen shows a blue checkmark.
4. Press
to nish the update.
If the update fails, the tonometer screen shows the text ERROR. Press to return to the
previous screen.
You can check for SmartCradle software updates from the tonometer's INFO menu.
1. In the tonometer main menu, press
until you see INFO. Press .
2. Press until you see CHECK FOR UPDATES.
3. Press CHECK FOR UPDATES on the screen.
4. If a system update is available, you see SYSTEM UPDATE.
5. Press
on the screen to start the update.
6. If the software update is successful, the tonometer screen shows a blue checkmark.
7. Press to nish the update.
Software update with a USB
1. Make sure that the tonometer is placed in the SmartCradle.
2. Remove the connector plug from the USB type A port.
3. Insert the USB stick to the USB type A connector in the SmartCradle.
4. You see the text TONOMETER UPDATE on the tonometer’s screen.
5.
Press on the screen to start the update.
6. When the update is processed, the tonometer reboots.
7. If the software update is successful, the tonometer screen shows a blue checkmark.
8.
Press
to nish the update.
9.
If the update fails, the tonometer screen shows the text ERROR. Press to return
to the previous screen. Remove the USB stick and reinsert to try again.
11.3 SmartCradle indicator lights
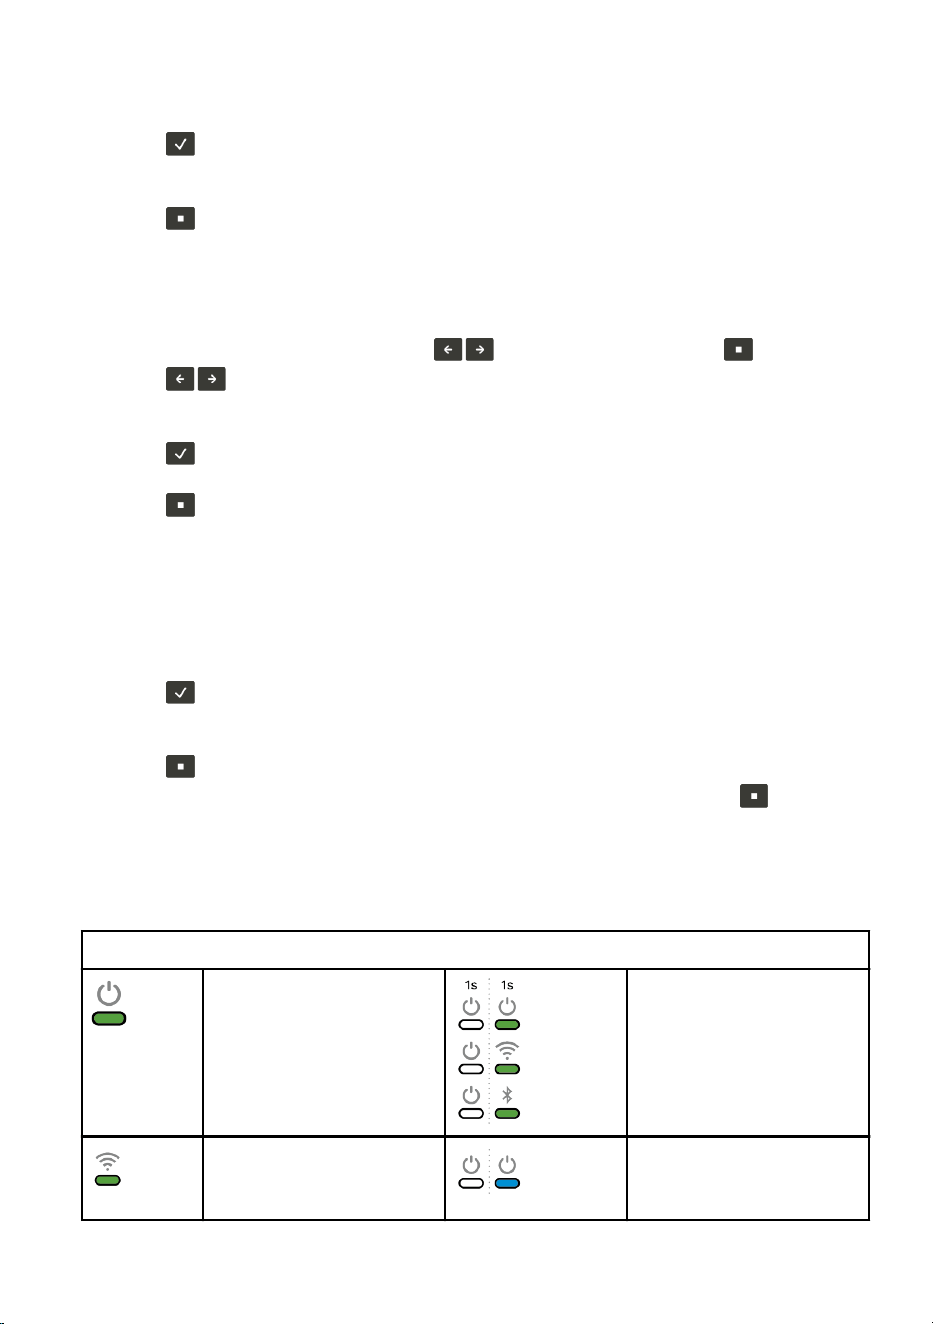
SmartCradle indicator lights
POWER LED is solid
green when the
SmartCradle is ON and
SmartCradle SW is
operating normally.
All three LEDs are ON
for 1 second after factory
reset is successfully
done. Then SmartCradle
reboots.
WLAN/LAN LED is
solid green when the
SmartCradle has active
POWER LED is solid blue
when the SmartCradle
38
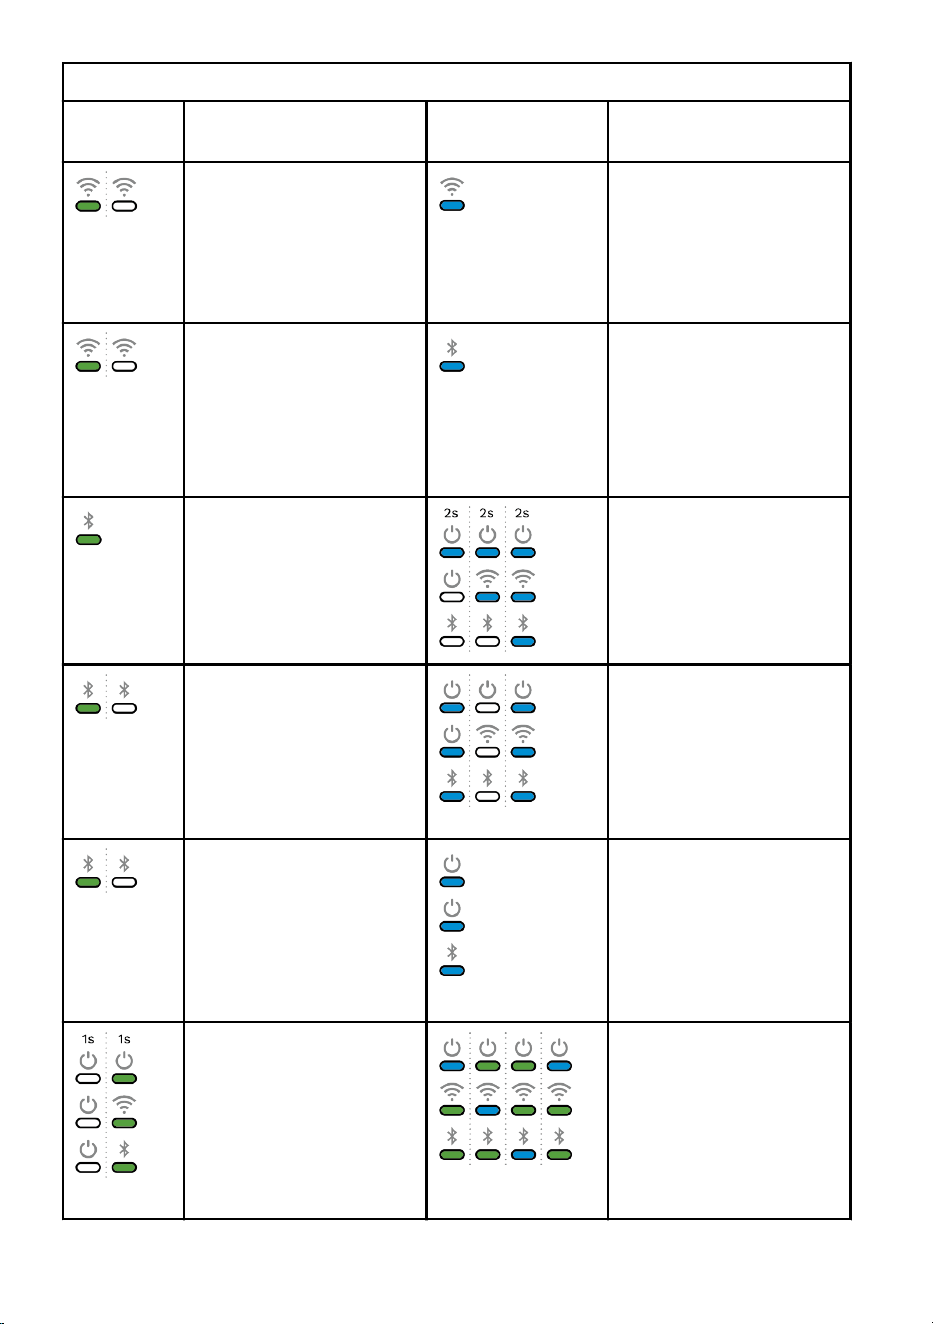
SmartCradle indicator lights
connection to the
internet.
SW is waking up after
switching power ON.
WLAN/LAN LED is
pulsating (green) when
the SmartCradle is trying
to connect to internet.
Sequence ON 1 second/
OFF 1 second.
WLAN/LAN LED is
solid blue when the
SmartCradle’s WLAN/LAN
has an error state.
WLAN/LAN LED is
pulsating (green) when
the SmartCradle is
transferring data to the
cloud. Sequence ON
0,25 second/ OFF 0,25
second.
BLUETOOTH LED is
solid blue when the
SmartCradle’s Bluetooth
has an error state.
BLUETOOTH LED is
solid green when the
SmartCradle has active
Bluetooth connection
with tonometer.
ALL the three LEDs turn
blue alternately every
2 seconds if the reset
button is held down.
After 6 seconds LEDs
turn o.
BLUETOOTH LED is
pulsating (green) when
the SmartCradle is trying
to connect via Bluetooth.
Sequence ON 1 second/
OFF 1 second.
All three LEDs are
pulsating (blue) when
SmartCradle has a
service error state.
Sequence: ON 1 second/
OFF 1 second until reset/
power o.
BLUETOOTH LED is
pulsating (green) when
the tonometer is
transferring data to the
SmartCradle. Sequence
ON 0,25 second/ OFF
0,25 second.
ALL three LEDs are solid
(blue) when conguration
or SW update has failed.
LEDs are on until power
is switched o.
All three LEDs are
pulsating (green) after
conguration or SW
update is OK. Sequence
ON 1 second/ OFF 1
second until USB stick is
removed.
Two of the three LEDs
are solid (green) when
conguration or SW
update is in progress.
One of the LEDs is solid
blue, and it changes
position in order every 1
second.
39
12 Maintenance
WARNING! The tonometer or cradle must not be repaired or re-assembled by
any other than the manufacturer or its authorized service center. If you notice
changes in the tonometer’s or cradle's performance or it is broken, do not use
them. Ship them to an authorized iCare service center for repair.
WARNING! Servicing or maintenance actions must not be performed while the
device is in use.
12.1 Replace the probe base
WARNING! The tonometer must be switched o when the probe base is
changed.
WARNING! The probe base must be changed, not cleaned.
PRECAUTION! To ensure the correct functioning of the tonometer, change the
probe base every six months.
PRECAUTION! The probe base may function improperly if dirt or liquid gets
inside it.
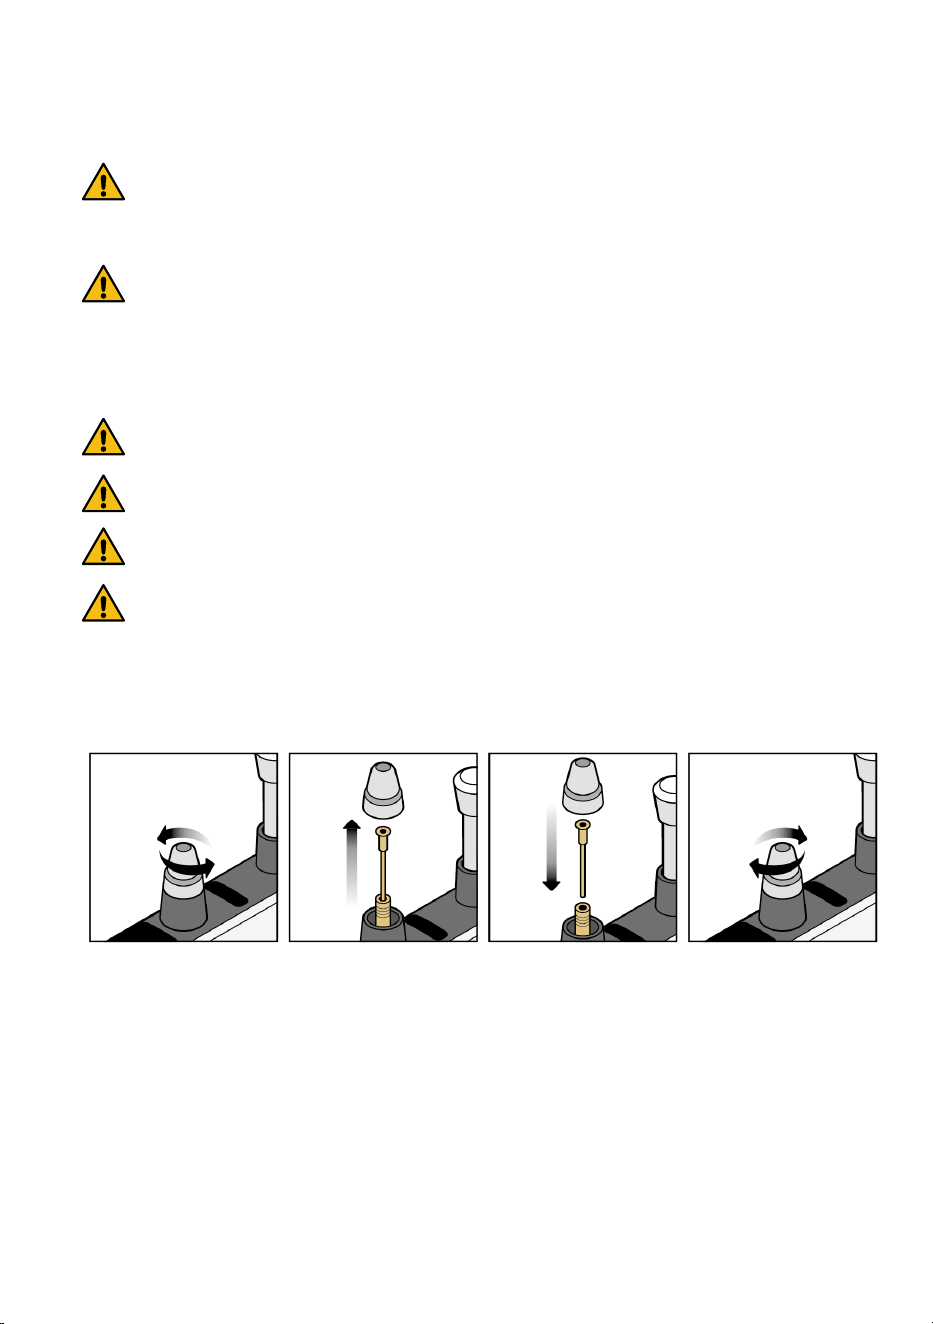
Change the probe base every 6 months. Change the probe base if the tonometer
constantly prompts REPEAT or CHANGE error.
1. Switch o the tonometer.
2. Unscrew the
probe base collar by
hand and put it to a
safe location.
3. Pull the probe
base o using
your thumb and
forenger.
4. Insert a new
probe base into the
tonometer.
5. Screw the
collar back to the
tonometer. Do not
use excesive force
when you tighten
the collar.
6. Dispose of the used probe base.
40
12.2 Replace the battery
WARNING! Read and follow the battery replacing instructions before
replacement of the tonometer battery, as incorrect polarity could result in a
hazardous situation.
PRECAUTION! Use only the battery which is specied in technical description
section of this instruction manual.
Turn o the tonometer before you replace the battery.
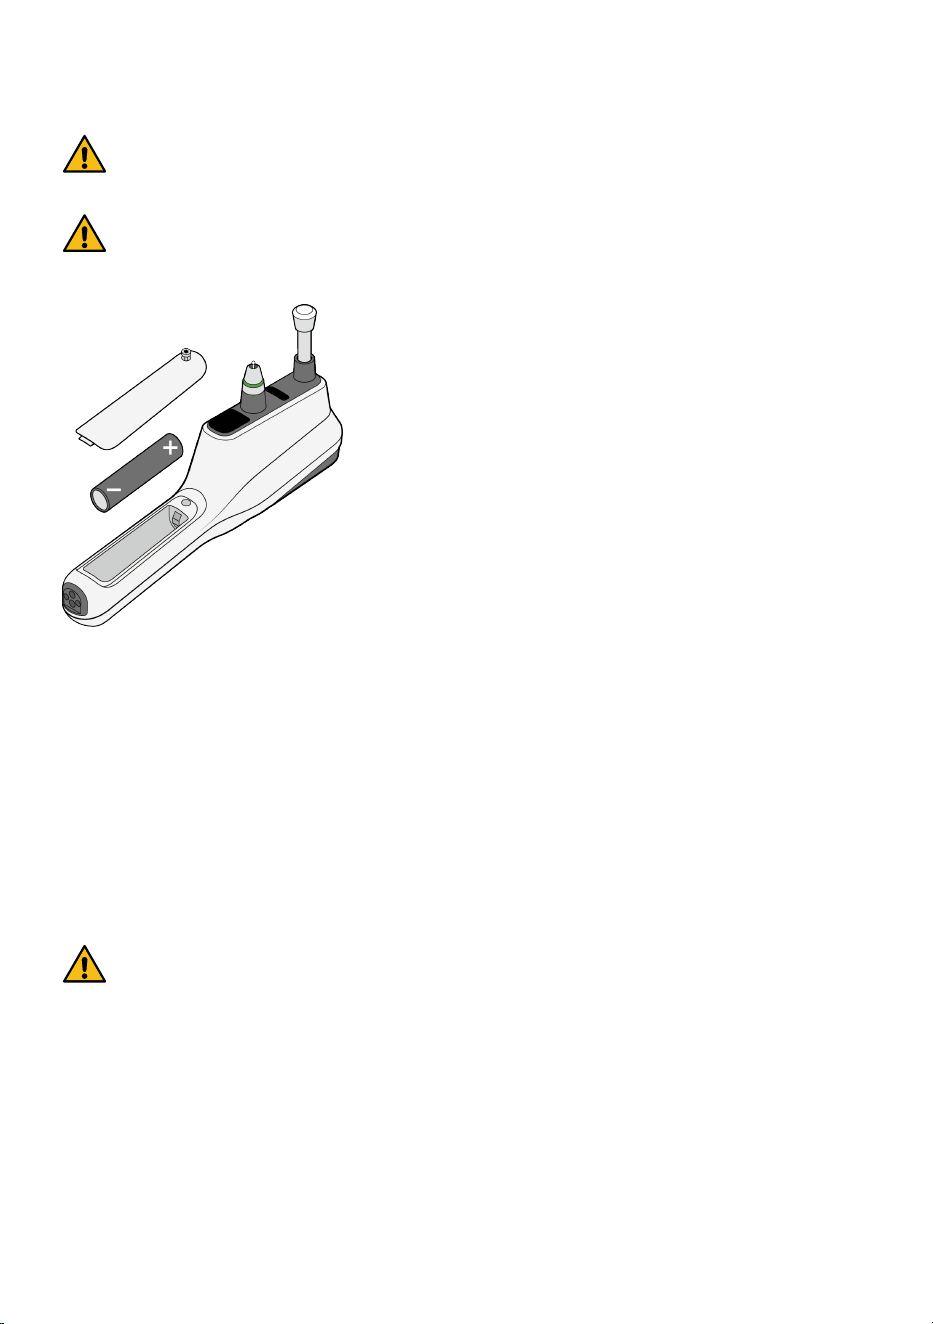
1. Unscrew the battery compartment locking screw with the screwdriver supplied with
the tonometer.
2. Remove the battery compartment cover. Remove the old battery from the
tonometer.
3. Insert the new battery according to the gure. Make sure that the battery is installed
with the correct polarity.
4. Replace the battery compartment cover.
5. Tighten the locking screw to secure the cover. Do not use excessive force when you
tighten the screw.
12.3 Cleaning
WARNING! Never immerse the tonometer, cradle or accessories in liquid. Do
not spray, pour, or spill liquid on the tonometer, cradle, accessories, connectors,
switches, or openings in the cover. Immediately remove any liquid from the
surface of the devices.
To prevent cross-contamination, disinfect the outer surfaces of the tonometer and
cradle using 100% isopropyl alcohol or 70% ethanol once a week.
To clean the tonometer or cradle:
1. Turn the device o.
2. Attach the probe base cover to the tonometer. Cover must be attached to ensure
that the device works as intended after cleaning.
41

3. Dampen a soft cloth with one of the permitted cleaning uids. Ensure that the cloth
is not overly wet, as excessive moisture may damage the device.
4. Lightly wipe the surfaces of the devices. Make sure to wipe the charging contact
surface at the end of the tonometer handle.
5. Remove residual uid using a soft, dry cloth.
12.4 Lifetime
The expected service life of the iCare IC1000 tonometer, SmartCradle and
ChargingCradle is 5 years. The maintenance procedures described in this document are
required during the expected service life.
Inspect the tonometer and cradle for mechanical and functional damage and the safety
labels for legibility and integrity every 12 months. Contact the manufacturer or local
distributor if you detect any damage or deterioration. If any of the devices is damaged,
do not use it.
Applicable in Germany only: Messtechnische Kontrolle nach MPG
(Medizinproduktegesetz) alle 24 Monate.
12.5 Returning for service or repair
WARNING! The tonometer or cradle must not be repaired or re-assembled by
any other than the manufacturer or its authorized service center. If you notice
changes in the tonometer’s or cradle's performance or it is broken, do not use
them. Ship them to an authorized iCare service center for repair.
Contact the seller of the tonometer for shipping instructions. Unless otherwise
instructed, there is no need to ship any accessories with the tonometer. Use a suitable
cardboard or similar box with the appropriate packaging material to protect the device
during shipment. Return the device using any shipping method that includes a proof of
dispatch and delivery.
12.6 Warranty
Warranty information for the iCare tonometers and accessories is available at the iCare
website.
You can access the warranty cards from the QR code:
www.icare-world.com/product-warranty-center.
42

12.7 Recycling
Do not dispose of the tonometer or cradles in household waste. Send them to an
appropriate facility for recovery and recycling. The tonometer and cradle should be
recycled as electronic waste.
The separate collection and recycling of your product or its battery at the time of
disposal help conserve natural resources and ensure that it is recycled in a manner that
protects human health, animal welfare and the environment.
The sales package is carton and can be recycled. Waste carton generally includes paper,
carton, and cardboard packages. Recycle according to local laws and regulations.
When you recycle iCare probes, take into consideration your hospital’s or clinic’s specic
guidelines in addition to local laws and regulations.
Probes are mostly metal. They can be disposed or recycled metal according to local
laws and regulations.
The probe containers and plastic probe boxes are polypropylene. Dispose or recycle
them as plastic according to local laws and regulations.
13 Accessories, parts and other supplies
Order accessories, parts and other supplies by contacting either the manufacturer or
your local distributor.
SKU
Product description Weight Dimensions
Accessories
104 iCare Probe TP01, 100 pcs 89 g 53 x 109 x 36 mm
690 IC1000 SmartCradle 725 g 165 x 124 x 84 mm
691 IC1000 ChargingCradle 715 g 165 x 124 x 84 mm
Parts
540 Probe base 4 g 7 x 32 mm
Other supplies
511 Carrying case, iCare IC1000 703 g 275 x 235 x 76 mm
997 Ethernet cable, CAT 5e, male to
male
48 g 1,5 m
7216 Probe base collar 1 g 17 x 18 mm
553 Power supply 100 g 74 x 39 x 49 mm
557A Regional plug adapters, EU 21 g 32 x 30 x 48 mm
43
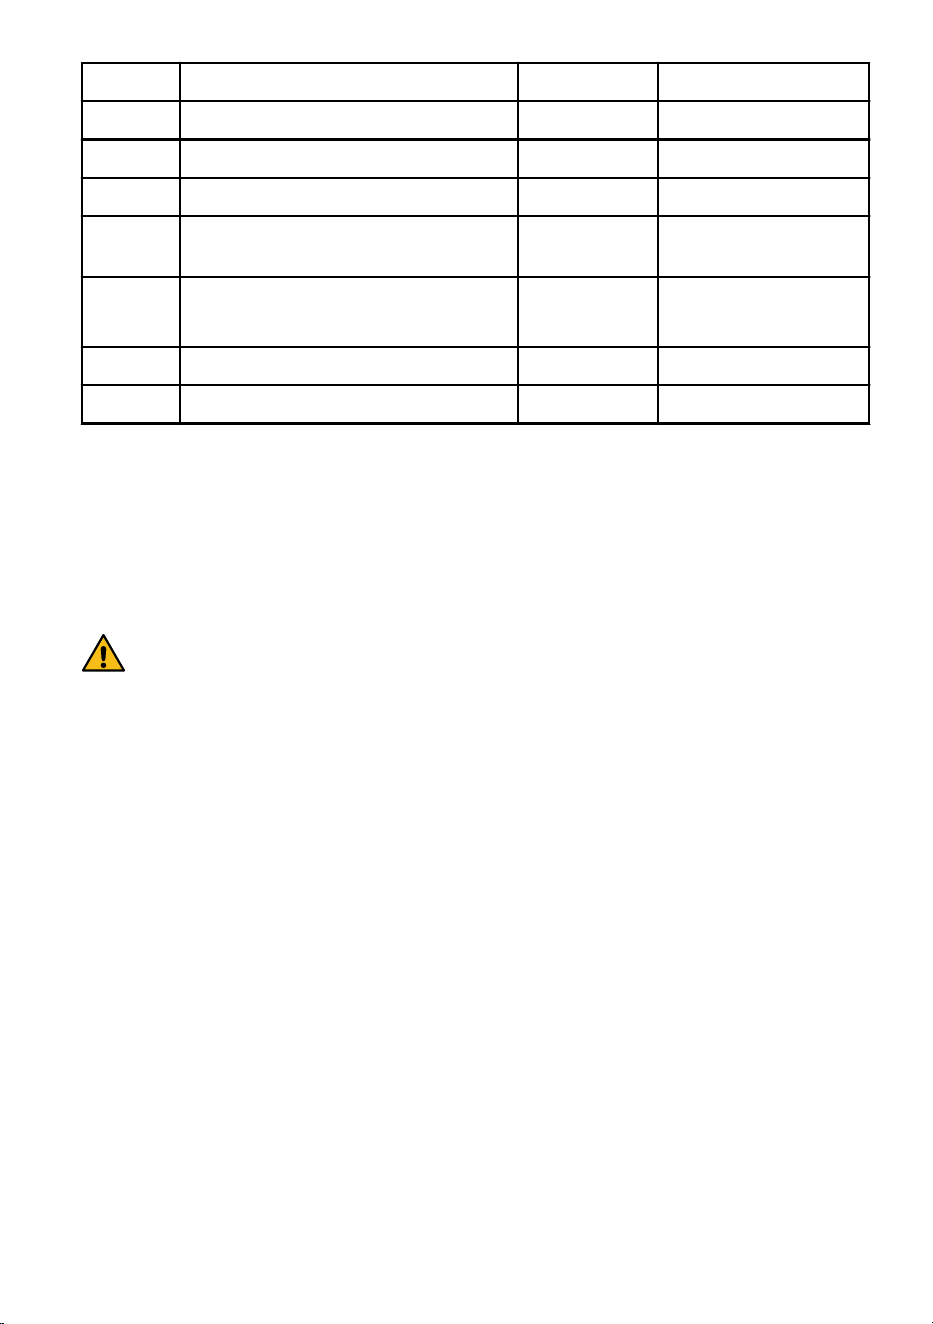
SKU Product description Weight Dimensions
557B Regional plug adapters, USA 10 g 32 x 31 x 28 mm
557C Regional plug adapters, UK 20 g 48 x 41 x 35 mm
557D Regional plug adapters, AUS 15 g 40 x 40 x 30 mm
575C USB cable for power supply, Type C
male to A male
50 g 1,5 m
559 Wrist strap with lock 4 g 10 mm x 10 mm x 270
mm
548B Screwdriver Torx TX8 15 g 16 mm x 90 mm
558 Silicone grip package (2 pcs) 30 g 114 mm x 35 mm
SKU: Stock Keeping Unit
14 Technical information
14.1 Technical description
WARNING! Do not modify the tonometer or cradle in any way. Changes or
modications not expressly approved by the manufacturer could void the user’s
authority to operate the tonometer or cradle.
NOTE! A separate service manual is available for service personnel.
Type:
Tonometer: TA032
SmartCradle: TX03
ChargingCradle: TX04
Dimensions (length x width x height):
Tonometer: 118 x 50 x 213 mm
SmartCradle: 165 x 124 x 84 mm
ChargingCradle: 165 x 124 x 84 mm
Weight:
Tonometer: With battery: 240 g
Without battery: 195 g
SmartCradle: 725 g
ChargingCradle: 715 g
Power supply:
Tonometer: Li-ion battery, rechargeable
3.6-3.7 V/3350-3500 mAh. Replaceable by
the user.
Supported printer model:
Mode of operation: Continuous
Use classication: multiple patient
multiple use
IP classication: IPX0 (device is not
protected against liquids)
Measurement range:
7-50 mmHg
Accuracy:
±1.2 mmHg (≤ 20 mmHg) and ±2.2 mmHg
(> 20 mmHg)
Repeatability (coecient of variation):
<8 %.
Accuracy of display: 0.1
44

Available from the manufacturer:
BAK Battery BAKTH 18650CR-1S-CT
Commercially available:
Keeppower P1835J, Jauch LR1865HB,
Nitecore NL1834, Fenix ARB-L18-3400
Cradle: AC/DC medical power supply,
model no: GEM12I05-USB or GMPU12UI-1-
USB
Input: 100-240VAC, 50/60Hz, 0.4-0.2A
Output: 5V = 2.4A, 12W MAX.
Mains isolation device: medical power
supply with regional plug
Display unit: millimeters of mercury
(mmHg)
Environmental restrictions for the iCare
IC1000 system:
Operation environment (TA032):
• Temperature from +10°C to +35°C
• Relative humidity from 30% to 90%,
non-condensing
• Atmospheric pressure: 800hPa –
1060hPa
Operation environment (TX03, TX04):
• Temperature from +10°C to +35°C
• Relative humidity from 30% to 90%
• Atmospheric pressure: 800hPa –
1060hPa
Storage environment (TA032):
• Temperature from -10°C to +35°C
• Relative humidity from 10% to 75%,
non-condensing
• Atmospheric pressure: 700hPa –
1060hPa
Storage environment (TX03, TX04):
• Temperature from -10°C to +55°C
• Relative humidity from 10% to 95%
• Atmospheric pressure: 700hPa –
1060hPa
Transport environment (TA032):
• Temperature from -20°C to +60°C
• Relative humidity from 10% to 95%
• Atmospheric pressure: 500hPa –
1060hPa
Transport environment (TX03, TX04):
• Temperature from -40°C to +70°C
• Relative humidity from 10% to 95%
• Atmospheric pressure: 500hPa –
1060hPa
The tonometer and its materials are compliant with RoHS Directive 2011/65/EU. The
tonometer and its parts are not made of natural rubber latex.
The fully charged battery for the tonometer is expected to last approximately 400
measurements in normal use. The serial number is located on the bottom or side cover
depending on the device. The lot number of the probes is on the side of the probe box.
The single-use probe and the forehead support of the device are applied parts. There are
no electrical connections from the tonometer to the patient.
The iCare IC1000 tonometer, IC1000 SmartCradle and IC1000 ChargingCradle were
tested according to the recommendations of IEC TS 60601-4-2:2024, Medical electrical
equipment – Part 4-2: Guidance and interpretation – Electromagnetic immunity:
performance of medical electrical equipment and medical electrical systems.
45

The tonometer is suitable for use within the patient environment. Only IEC 60950-1 or
IEC 60601-1 certied devices can be connected into network in the patient environment.
IT network specications
WARNING! Connection of the iCare tonometer to IT networks including other
equipment could result in previously unidentied risks to patients, operators, or
third parties.
WARNING! The responsible organization should identify, analyze, evaluate, and
control any additional risks resulting from the iCare tonometer connected to IT
networks including other equipment.
PRECAUTION! Changes to the IT network could introduce new risks requiring
additional analysis by the responsible organization. The changes include:
• changes in the IT network conguration
• connection of additional items to the IT network
• disconnecting items from the IT network
• update or upgrade of equipment connected to the IT network
iCare IC1000 (TA032) is intended for use in a professional healthcare environment. To
transfer measurement data from the iCare IC1000 tonometer to a host system, the
SmartCradle must be connected to the organization’s IT network. The iCare IC1000
tonometer can be operated independently of the SmartCradle, but data transfer to
the IT network requires a functioning network connection through the SmartCradle. The
iCare IC1000 tonometer is designed so that SmartCradle or network failures do not
prevent the tonometer from performing measurements normally.
To print measurement data from the iCare IC1000 tonometer, the printer must be paired
with the tonometer over a Bluetooth connection. The iCare IC1000 tonometer can be
used normally without a Bluetooth connection, but printing functionality will not be
available.
The system is designed so that any Bluetooth connection failures or interruptions will
not prevent normal operation of the iCare IC1000 tonometer.
Software Bill of Materials (SBOM)
The SBOM is available from the manufacturer’s website www.icare-world.com.
Intended information ow
The iCare IC1000 tonometer collects measurement data. This data is sent via Bluetooth
connection (Bluetooth Low Energy, BLE) to the SmartCradle or a wireless printer.
Tonometer's internal clock is set manually from the tonometer settings. SmartCradle
synchronizes time via NTP.
Potential hazardous situation resulting from the failure of the IT network
If the IT network connection is lost during the data transfer, no data is lost from the
tonometer. The measurement data can still be found from the tonometer memory and
transferred once the connection is re-established.
46

Failure or misconguration of the IT network may result in data not being transferred.
Required characteristics of the IT network
SmartCradle: LAN/WLAN, internet connection
Printer: Bluetooth® 3.0/4.0 BLE
It is recommended that the responsible organization maintain IT network security by
applying established IT security best practices appropriate to its operating environment.
Information regarding the radio communication part of the tonometer
The iCare IC1000 (TA032) tonometer contains a Bluetooth transmitter working at
frequencies between 2.402 GHz and 2.480 GHz. Bluetooth pairing between the
tonometer and the SmartCradle uses NFC (Near-Field Communication) technology. Due
to the limited size available on the device, many of the relevant approval markings are
found in this document.
Bluetooth Module Information (tonometer):
Item
Specication
Bluetooth Module ANNA-B112 module
Communication Bluetooth Low Energy (BLE) 5.0
Radio Frequency (RF) Range 2.402 GHz – 2.480 GHz
Output Power < 2.5 mW (4 dBm)
Antenna Gain 0.5 dBi
Eective Radiated Power < 0.4 mW (-4.85 dBm)
Transmitting distance 10 meters
Market specic information of the
Bluetooth module
FCC ID: XPYANNAB1
IC: 8595A-ANNAB1
MIC: 204-810005
NFC Reader Information:
Item
Specication
NFC Reader IC ST25R95
Communication Near Field Communication (NFC)
Frequency Range 13.553 MHz - 13.567 MHz
Type of Modulation ASK
Output Power < 55 mW
Antenna Type FPC coil antenna with ferrite
47

Item Specication
Eective Radiated Power (ERP) < 0.58nW (-62.4dBm)
Market specic information of the NFC
system
Wi and Bluetooth Module Information (SmartCradle):
Item Specication
Bluetooth Module Azurewave AW-CM276NF Wi-Fi / Bluetooth
module
Communication Bluetooth Low Energy (BLE) 5.0
Wi-Fi version Wi-Fi 802.11ac/a/b/g/n
Bluetooth version Bluetooth 5.0 (BR/EDR), BLE
Wi-Fi RF Range Dual-Band 5 GHz and 2.4GHz
Wi-Fi Bandwidth Up to 866.7 Mbps
Wi-Fi Channel Bandwidth 20/40/80 MHz
Radio Frequency (RF) Range Wi-Fi 2.4G: 2412 - 2484 MHz
Wi-Fi 5G: 5180 - 5825 MHz
Bluetooth: 2402 - 2480 MHz
Output Power Wi-Fi 2.4G: 18.5 dBm Max.
Wi-Fi 5G: 15 dBm Max.
Bluetooth: 4 dBm Max.
Antenna Gain
2.4 GHz: 0.9 dBi
5 GHz: 4.5 dBi
Eective Radiated Power
Wi-Fi 2.4G: 17.25 dB
Wi-Fi 5G: 17.35 dB
Bluetooth: 2.75 dB
Transmitting distance 10 meters
Market specic information of the
Bluetooth module
FCC ID: UAY-W8997-M1216
IC: W8997-M1216
MIC: 020-170034
14.2 Performance data
48
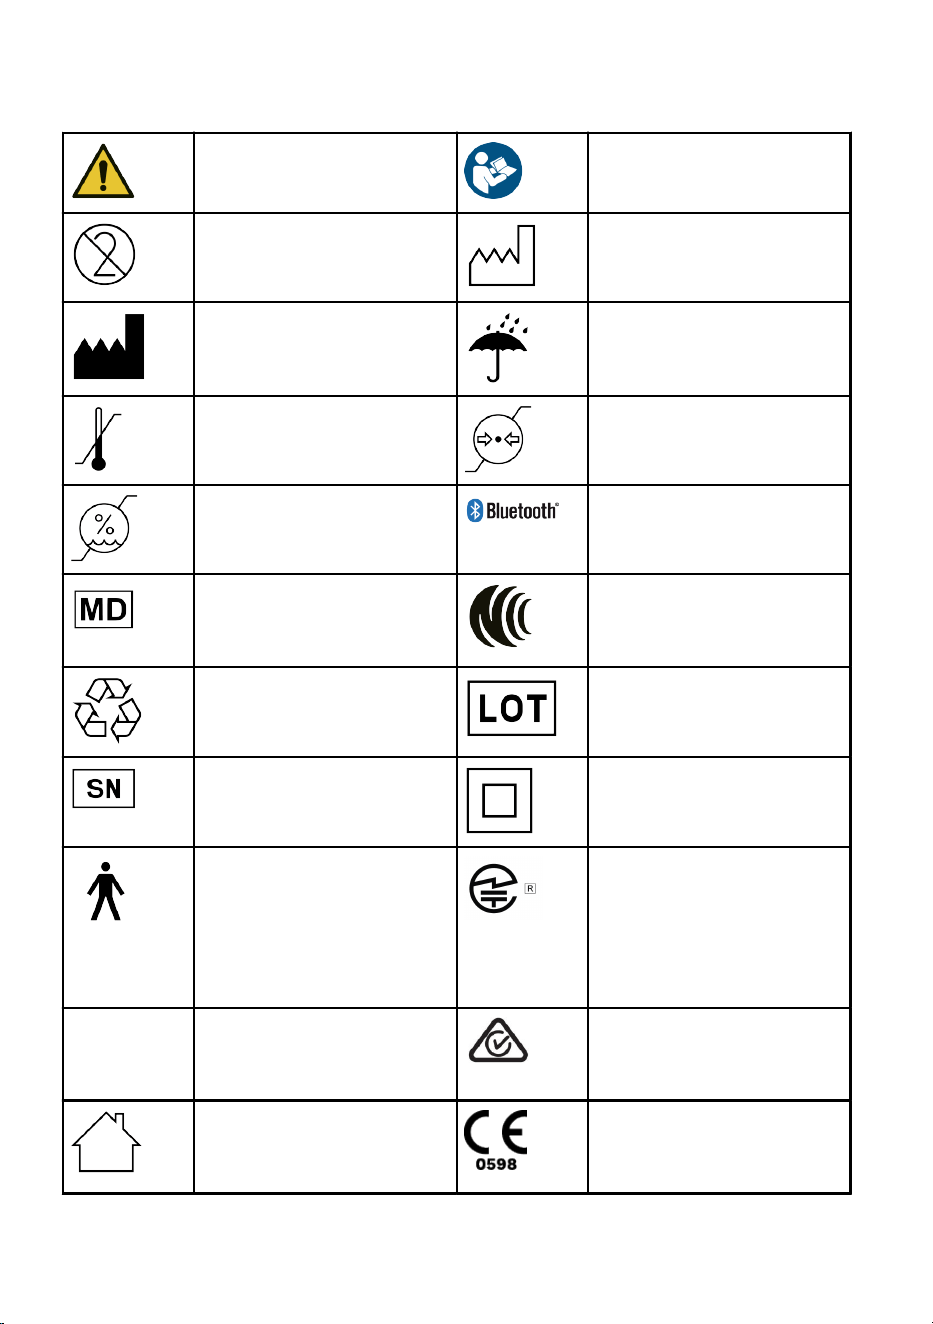
14.3 Symbols and trademarks
General warning sign Refer to the instruction
manual
Single-use only Date of manufacture
Manufacturer Keep dry
Temperature limit Atmospheric pressure
limitation
Humidity limitation Bluetooth communication
Product is a medical device National Communications
Commission (NCC) mark of
Taiwan
Recyclable package
material
Batch code
LOT number
Serial number Class II equipment
Type B applied part Technical conformity mark
and certication number
of the Ministry of
Internal Aairs and
Communications of Japan
(MIC)
RX Only
(U.S.)
Federal law (U.S.) restricts
this device to sale by or on
the order of a physician.
The Regulatory Compliance
Mark (RCM), in Australia and
New Zealand
For indoor use only CE marking accompanied
with the notied body
identication number.
49
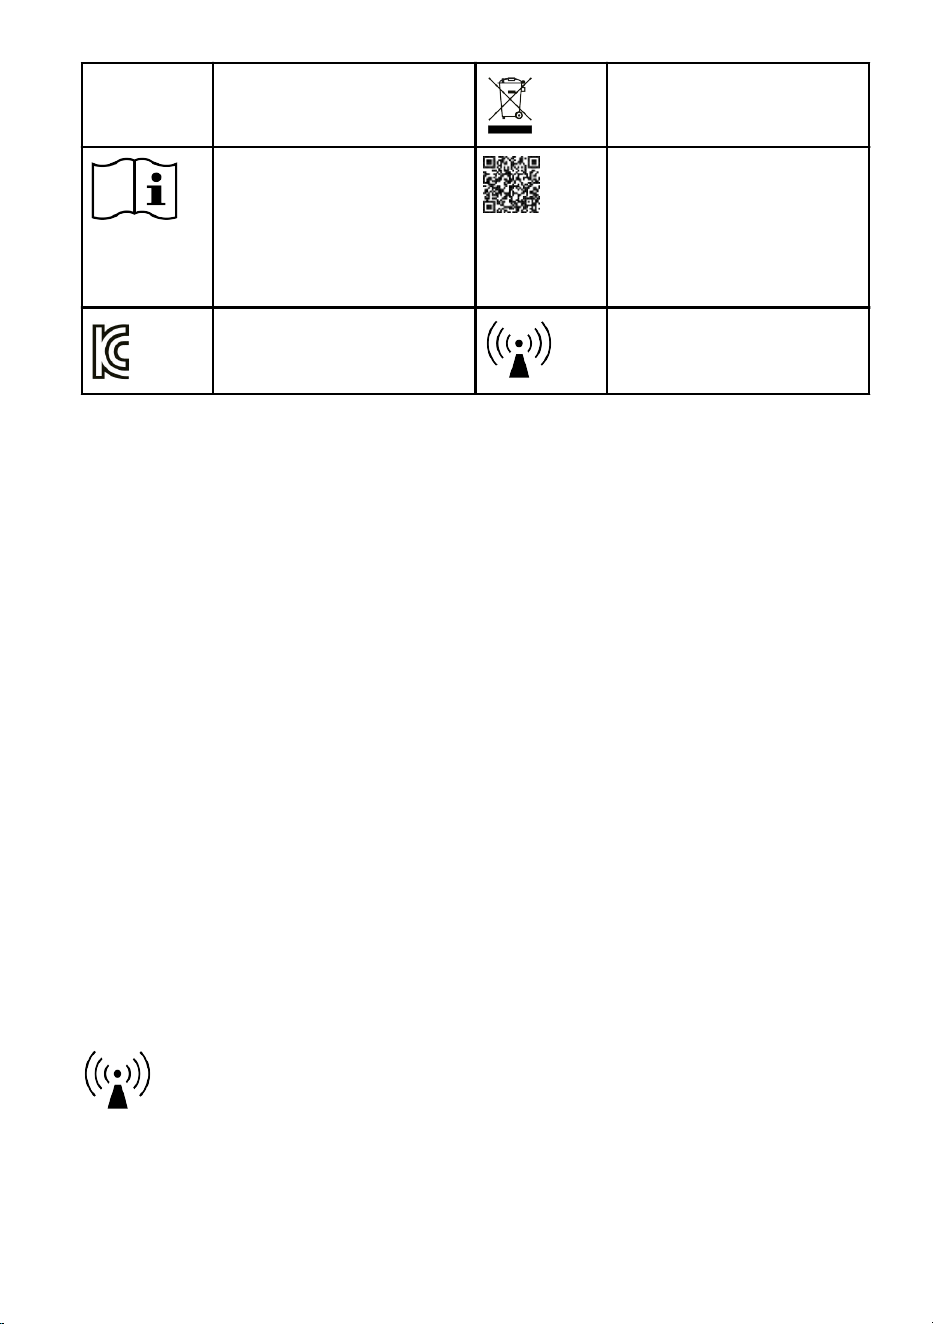
GTIN Global Trade Item Number Waste from Electrical and
Electronic Equipment
Consult instructions for use QR code accompanied with
the Consult instructions for
use -symbol and the web
address on the side of the
tonometer to download the
electronic manual
Korean Certication (KC)
mark
Non-ionizing
electromagnetic radiation
14.4 Statement of compliance
This device complies with Part 15 of the FCC rules and RSS-210 of Industry Canada.
Operation is subject to the following two conditions:
1. This device may not cause harmful interference,
2. This device must accept any interference received, including interference that may
cause undesired operation
Changes or modications not expressly approved by Icare Finland Oy could void the
user’s authority to operate the equipment.
This equipment has been tested and found to comply with the limits for a Class B
digital device, pursuant to part 15 of the FCC Rules. These limits are designed to provide
reasonable protection against harmful interference in a residential installation. This
equipment generates, uses and can radiate radio frequency energy, and if not installed
and used in accordance with the instructions, may cause harmful interference to radio
communications. However, there is no guarantee that interference will not occur in a
particular installation. If this equipment does cause harmful interference to radio or
television reception, which can be determined by turning the equipment o and on, the
user is encouraged to try to correct the interference by one or more of the following
measures:
• Reorient or relocate the receiving antenna.
• Increase the separation between the equipment and receiver.
• Connect the equipment into an outlet on a circuit dierent from that to which the
receiver is connected.
• Consult the dealer or an experienced radio/TV technician for help.
This Product operates in the unlicensed ISM band at 2.4GHz. In case this Product is
used around the other wireless devices including microwave and wireless LAN, which
operate same frequency band of this Product, there is a possibility that interference
occurs between this Product and such other devices. If such interference occurs, please
50
stop the operation of other devices or relocate this Product before using this Product or
do not use this product around the other wireless devices.
14.5 Electromagnetic declaration
WARNING! Use of this equipment adjacent to or stacked with other equipment
should be avoided because it could result in improper operation. If such use
is necessary, this equipment and the other equipment should be observed to
verify that they are operating normally.
WARNING! Use of accessories, transducers and cables other than those
specied or provided by the manufacturer of this equipment could result in
increased electromagnetic emissions or decreased electromagnetic immunity of
this equipment and result in improper operation.
WARNING! Interference may occur in the vicinity of equipment marked with the
non-ionizing radiation symbol.
WARNING! Sources of power frequency magnetic eld should be used no closer
than 15 cm (6 inches) to any part of the tonometer, including cables specied by
the manufacturer, to avoid the degradation of performance.
WARNING! Portable RF communications equipment (including peripherals such
as antenna cables and external antennas) should be used no closer than 30
cm (12 inches) to any part of the tonometer, including cables specied by the
manufacturer, to avoid the degradation of performance.
WARNING! The measurement method of the tonometer is based on a
magnetically induced motion of a probe and therefore an external magnetic
or radiated RF electromagnetic eld disturbing the probe may prevent the
measurement. In such a case the tonometer continuously displays error
messages during measurement and asks you to repeat the measurement.
Situation can be solved either by removing the source of interference from the
vicinity of the tonometer or by performing the measurement in dierent location
with no such interference.
PRECAUTION! The measurement data transfer may be interrupted during
electromagnetic disturbance. In such case, reconnect the tonometer to the
computer. If this does not solve the issue, perform the data transfer in other
location with no such interference. The measurement data will not be deleted
from the tonometer before the data is transferred successfully.
iCare IC1000 (TA032) and accessories (SmartCradle TX03 and ChargingCradle TX04)
are intended for use in a professional healthcare environment with electromagnetic
characteristics specied below. The user of the iCare IC1000 tonometer (TA032) and
accessories should assure that they are used in such an environment.
GUIDANCE AND MANUFACTURER’S DECLARATION IEC 60601-1-2:2014+A1:2020: EDITION
4.1 – ELECTROMAGNETIC EMISSIONS
Conducted and radiated RF
emissions CISPR 11
Group 1 iCare IC1000 (TA032) is
battery operated and uses
RF energy only for its
51

GUIDANCE AND MANUFACTURER’S DECLARATION IEC 60601-1-2:2014+A1:2020: EDITION
4.1 – ELECTROMAGNETIC EMISSIONS
internal function. Therefore,
its RF emissions are low
and are not likely to cause
any interference in nearby
equipment.
Class B iCare IC1000 (TA032) is
suitable for use in all
establishments, including
domestic establishments
and those directly
connected to public low-
voltage power supply
network that supplies
buildings used for domestic
purposes.
Conducted emissions
CISPR 32
Class B Ethernet
Harmonic emissions IEC
61000-3-2
Class A -
Voltage uctuations
ickering emissions IEC
61000-3-3
Complies -
GUIDANCE AND MANUFACTURER’S DECLARATION IEC 60601-1-2:2014+A1:2020: EDITION
4.1 – ELECTROMAGNETIC IMMUNITY
Immunity test IEC 60601 test
level
Compliance level Electromagnetic
environment guidance
Electrostatic
discharge (ESD) IEC
61000-4-2
± 8 kV contact
± 2kV, ± 4kV, ± 8kV,
± 15 kV air
± 8 kV contact
± 15 kV air
Floors should be wood,
concrete or ceramic
tile. If oors are
covered with synthetic
material, the relative
humidity should be at
least 30%.
Electrical fast
Transients / burst
IEC 61000-4-4
± 2 kV 100
kHz repetition
frequency
± 2 kV 100
kHz repetition
frequency
Mains power quality
should be similar to
that of a typical
commercial or hospital
environment.
52

GUIDANCE AND MANUFACTURER’S DECLARATION IEC 60601-1-2:2014+A1:2020: EDITION
4.1 – ELECTROMAGNETIC IMMUNITY
± 1 kV 100
kHz repetition
frequency
± 1 kV 100
kHz repetition
frequency
Ethernet
Surge IEC
61000-4-5
± 1 kV for line(s) to
line(s)
± 1 kV for line(s) to
line(s)
Mains power quality
should be similar to
that of a typical
commercial or hospital
environment.
Voltage dips, short
interruption and
voltage variations
on power supply
lines IEC 610004-11
0 % UT for 0.5
cycle at 0°, 45°,
90°, 135°, 180°,
225°, 270° and 315°
0 % UT for 1 cycle
70 % UT for 25/30
cycles (50/60 Hz)
0 % UT for
250/300 cycles
(50/60 Hz)
0 % UT for 0.5
cycle at 0°, 45°,
90°, 135°, 180°,
225°, 270° and 315°
0 % UT for 1 cycle
70 % UT for 25/30
cycles (50/60 Hz)
0 % UT for
250/300 cycles
(50/60 Hz)
Mains power quality
should be similar to
that of a typical
commercial or hospital
environment.
Power frequency
(50/60 Hz)
magnetic eld IEC
61000-4-8
30 A/m 30 A/m
Power frequency
magnetic elds should
be at levels
characteristic of a
typical location in a
typical commercial or
hospital environment.
WARNING: Sources
of power frequency
magnetic eld should
be used no closer than
15 cm (6 inches) to any
part of iCare IC1000
(TA032), including
cables specied by
the manufacturer, to
avoid the degradation
of performance.
The measurement
method of the iCare
IC1000 tonometer is
based on magnetic
induction and therefore
an external magnetic
eld in line with the
53

GUIDANCE AND MANUFACTURER’S DECLARATION IEC 60601-1-2:2014+A1:2020: EDITION
4.1 – ELECTROMAGNETIC IMMUNITY
probe may prevent the
measurement. In such
case the tonometer
will continuously
ask to repeat
the measurement.
Situation can be
solved either by
removing the source of
interference from the
vicinity of the device
or by performing
the measurement in
dierent location with
no such interference.
Conducted
disturbances
induced by RF
elds IEC 610004-6
3 V
0,15 MHz – 80 MHz
6 V in ISM bands
between 0,15 MHz
and 80 MHz 80 %
AM at 1 kHz
3V
6V
80 MHz 80 % AM
at 1 kHz
WARNING: Portable
RF communications
equipment (including
peripherals such as
antenna cables and
external antennas)
should be used no
closer than 30 cm (12
inches) to any part
of the iCare IC1000
(TA032) including
cables specied by
the manufacturer, to
avoid the degradation
of performance.
Radiated RF IEC
61000-4-3
3 V/m
80 MHz – 2,7 GHz
80 % AM at 1 kHz
3 V/m WARNING: Portable
RF communications
equipment (including
peripherals such as
antenna cables and
external antennas)
should be used no
closer than 30 cm (12
inches) to any part
of the iCare IC1000
(TA032) including
cables specied by
the manufacturer, to
avoid the degradation
of performance.
Interference may occur
54
GUIDANCE AND MANUFACTURER’S DECLARATION IEC 60601-1-2:2014+A1:2020: EDITION
4.1 – ELECTROMAGNETIC IMMUNITY
in the vicinity of
equipment marked
with the following
symbol:
Proximity elds
from RF wireless
communications
equipment IEC
61000-4-3
380 - 390 MHz 27
V/m; PM 50%; 18
Hz
27 V/m
WARNING: Portable
RF communications
equipment (including
peripherals such as
antenna cables and
external antennas)
should be used no
closer than 30 cm (12
inches) to any part
of the iCare IC1000
(TA032) including
cables specied by
the manufacturer, to
avoid the degradation
of performance.
Interference may occur
in the vicinity of
equipment marked
with the following
symbol:
The measurement
method of the iCare
IC1000 tonometer is
based on magnetic
induction and therefore
an external magnetic
eld in line with the
probe may prevent the
measurement. In such
case the tonometer
will continuously
ask to repeat
the measurement.
Situation can be
solved either by
removing the source of
430 - 470 MHz 28
V/m; (FM ±5 kHz, 1
kHz sine) PM; 18 Hz
28 V/m
704 - 787 MHz 9
V/m; PM 50%; 217
Hz
9 V/m
800 - 960 MHz 28
V/m; PM 50%; 18
Hz
28 V/m
1700 - 1990 MHz
28 V/m; PM 50%;
217 Hz
28 V/m
2400 - 2570 MHz
28 V/m; PM 50%;
217 Hz
28 V/m
5100 - 5800 MHz 9
V/m; PM 50%; 217
Hz
9 V/m
55

GUIDANCE AND MANUFACTURER’S DECLARATION IEC 60601-1-2:2014+A1:2020: EDITION
4.1 – ELECTROMAGNETIC IMMUNITY
interference from the
vicinity of the device
or by performing
the measurement in
dierent location with
no such interference.
Proximity magnetic
elds IEC
61000-4-39
134,2 kHz, 65 A/m
13,56 MHz, 7,5 A/m
134,2 kHz, 65 A/m
13,56 MHz, 7,5 A/m
The measurement
method of the iCare
IC1000 tonometer is
based on magnetic
induction and therefore
an external magnetic
eld in line with the
probe may prevent the
measurement. In such
case the tonometer
will continuously
ask to repeat the
measurement.
15 Annex 1 iCare TP01 Probe technical
information
ENGLISH
Intended use
iCare TP01 probe is intended to be used as a single-use accessory when measuring
intraocular pressure of the human eye with an iCare tonometer. It is intended to be used
by healthcare professionals in a professional healthcare environment.
Residual risks
WARNING! Keep the probes out of the reach of children. The probes are small
objects and can be accidentally swallowed, causing suocation.
Technical description
WARNING! Do not touch an iCare TP01 probe with bare hands.
WARNING! iCare TP01 probe is for single-use only. Re-use of a probe
could result in incorrect measurement values, damage to the probe, cross-
contamination by bacteria or viruses or infection of the eye. Re-use of probes
56
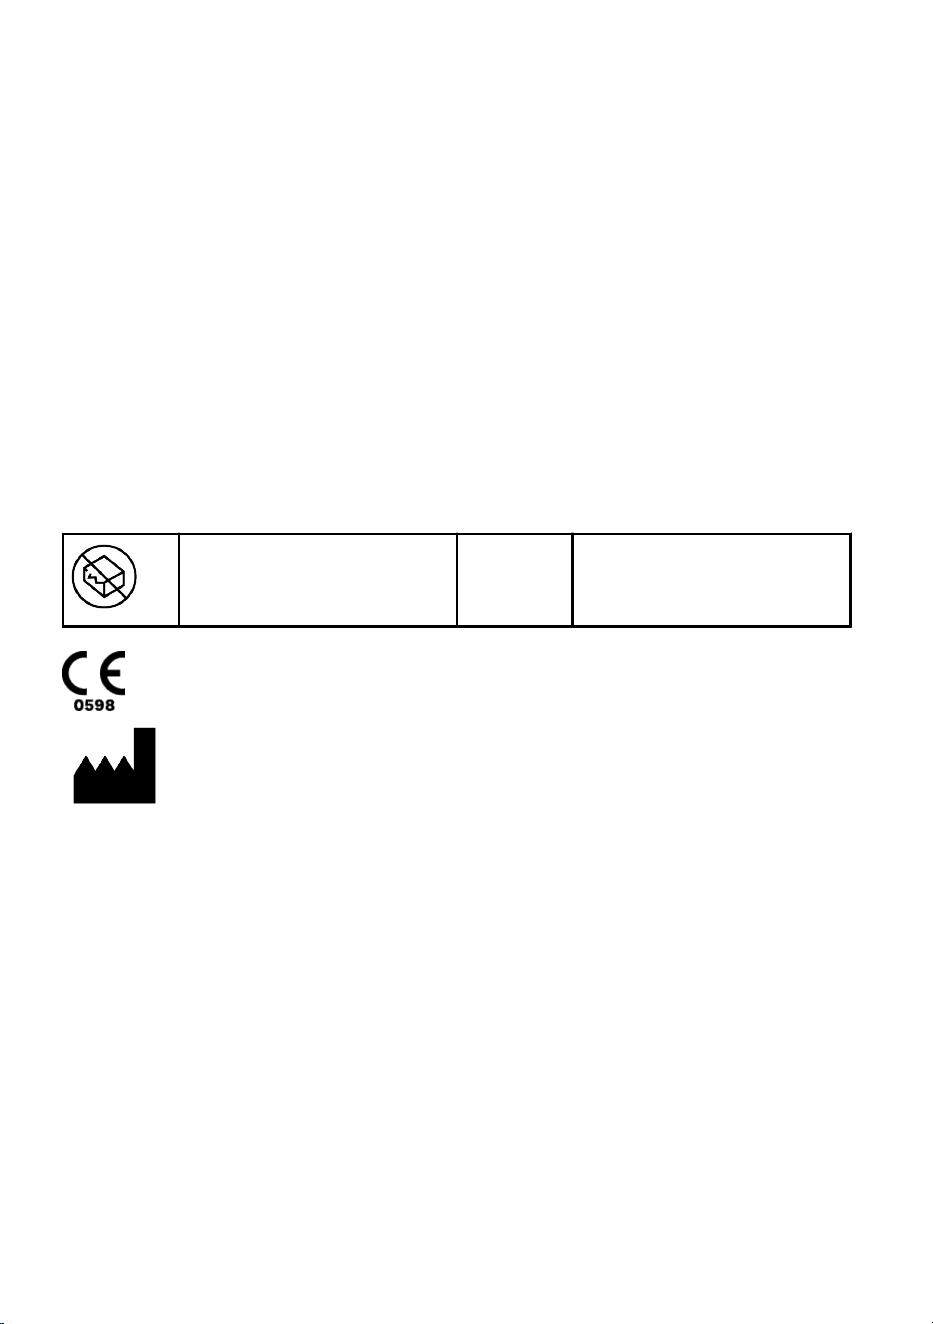
voids all responsibilities and liabilities of the manufacturer concerning the safety
and eectiveness of the tonometer.
iCare TP01 tonometer probe is compatible with iCare tonometers for professional use.
For possible limitations of use, refer to the tonometer manuals.
Type: TP01
Description: Single-use, non-sterile
Lifetime: 3 years from the date of
manufacture
Shelf life: no expiration date
Environmental restrictions for the iCare
TP01 probe:
Operation environment:
• Temperature from +10°C to +35°C
• Air pressure from 800 hPa to 1060 hPa
• Relative humidity from 30% to 90%
Storage environment:
• Temperature from -10°C to +55°C
• Air pressure from 700 hPa to 1060 hPa
• Relative humidity from 10% to 95%
Transport environment:
• Temperature from -40°C to +70°C
• Air pressure from 500 hPa to 1060 hPa
• Relative humidity from 10% to 95%
Symbols specic to TP01 probe
Do not use if the package
is damaged and consult the
instructions for use.
Icare Finland Oy
Äyritie 22
01510 Vantaa, Finland
Ph. +358 9 8775 1150
info@icare-world.com
TP01-052-EN-2.0 2025-05-29
57

Icare Finland Oy
Äyritie 22
01510 Vantaa, Finland
Ph. +358 9 8775 1150
info@icare-world.com
TA032-097-EN-0.19 2026-02-25
www.icare-world.com
iCare is a trademark of Icare Finland Oy. Icare Finland Oy, Icare USA, Inc., iCare World Australia Pty Ltd, China
iCare Medical Technology Co. Ltd, Thirona Retina B.V. and Centervue S.p.A., are parts of Revenio Group and
represent the brand iCare. iCare IC1000 is a trademark or a registered trademark of Icare Finland Oy in the
EU and the USA and/or other countries. Not all products, accessories, services or oers are approved in
every market. Approved labeling and instructions may vary from one country to another. This material is
intended for healthcare professionals only. ©2026 Icare Finland Oy. All rights reserved.