TurboPoly™ Fan
353
USER MANUAL

Your support means the world to us. We
hope you enjoy our product as much as
we did creating it.
Thanks for
Choosing
DREO!

CONTENTS
04
0201
05
03
41-3
CLEANING AND
MAINTENANCE
USING YOUR
APPLIANCE
5-8
9-12
13
TROUBLESHOOTING
ASSEMBLING YOUR
APPLIANCE
KNOWING YOUR
APPLIANCE
ASSEMBLING YOUR
APPLIANCE
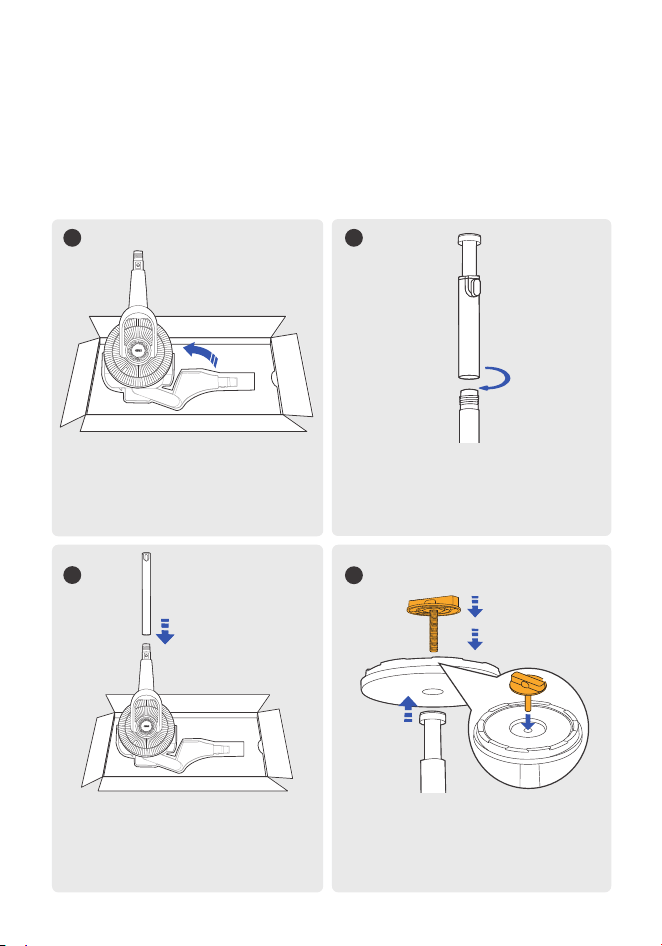
Assembly Instructions
01
When using the appliance for the first time, remove the wraps and aach the parts by following
the steps below.
1
1
Turn the fan body upside down.
3
2
4
Install the short pedestal into the fan
body column by rotating the pedestal
until tightened.
Install the combined column from
step 2 onto the fan head by rotating
the pedestal until tightened.
Push the column into the base, then
screw it into the boom of the
column.
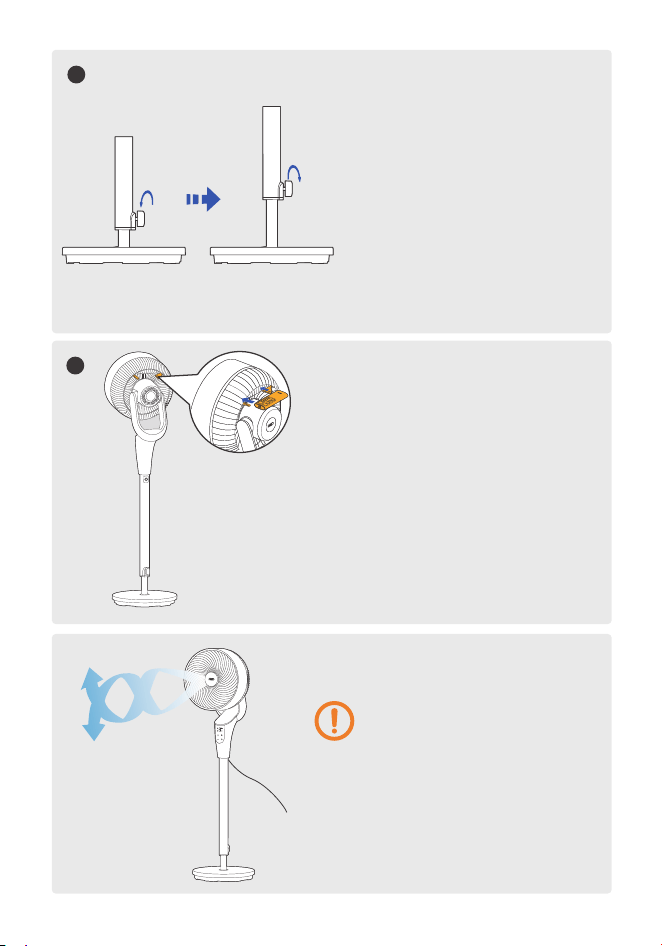
2
CAUTION
Do not operate the air circulator fan if the
base has not been installed.
Please exercise caution and handle the
base with care during installation.
5
6
Raise or lower the appliance to the
desired height.
You can put the remote control in
the holder at the back of the fan
head.
Adjustable:
0-4 inches
Rotate
counterclockwise
Rotate
clockwise
3
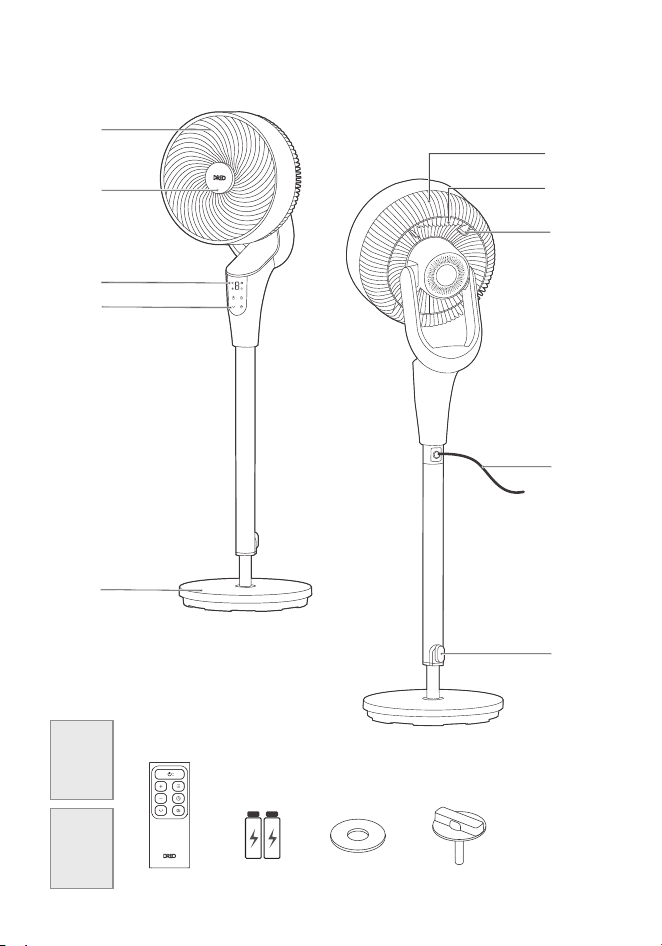
Package Contents
User
Manual
Remote Control
Quick
Start
Guide
Air Outlet
Aroma Pad
Container
LED Display
Base
Control Panel
Air Inlet
Remote
Control Holder
Adjustment Collar
3X Aroma Pads
(1 pre-installed)
2x AAA
Baeries
Carry Handle
Power & Plug
Base Screw
4
02
KNOWING YOUR
APPLIANCE
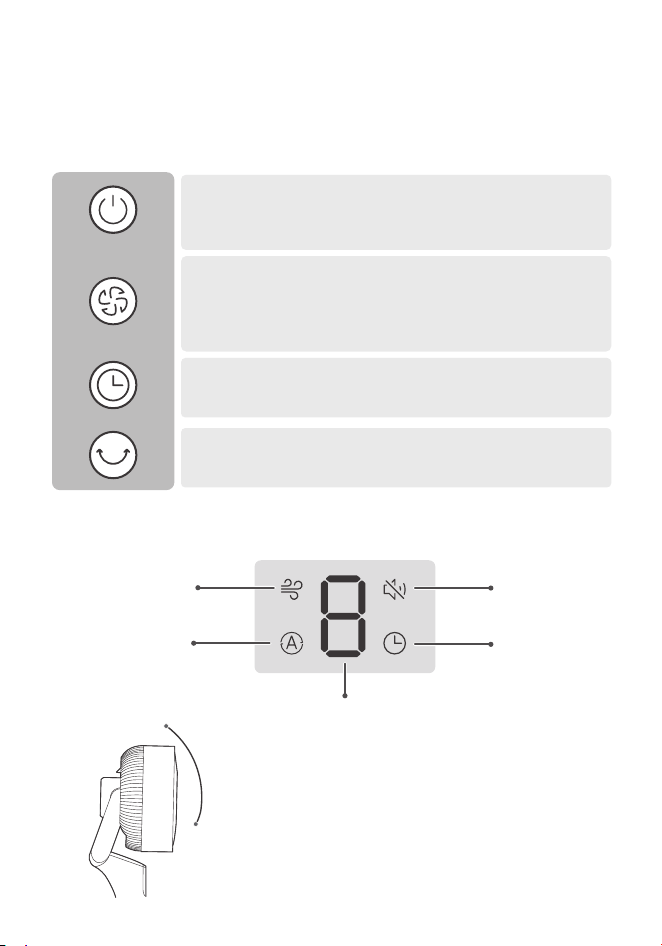
Control Panel
LED Display
Tip: You can adjust the airflow
vertical direction manually (-15°~90°).
Power Buon
• Turn power on/o.
• Long press for 10 seconds to reset factory seings.
Fan Speed Buon
• 1-8 levels & Turbo Mode (display will show "H").
• Long press for 3 seconds to switch between
Normal/Auto modes.
Timer Buon
• Select to set a timer (0-8h).
Horizontal Oscillation Buon
• Sweep airflow horizontally (0°-80°).
90°
-15°
Normal Mode
Mute
Timer
Auto Mode
Fan Speed/Timer Hour
5
03
USING YOUR
APPLIANCE
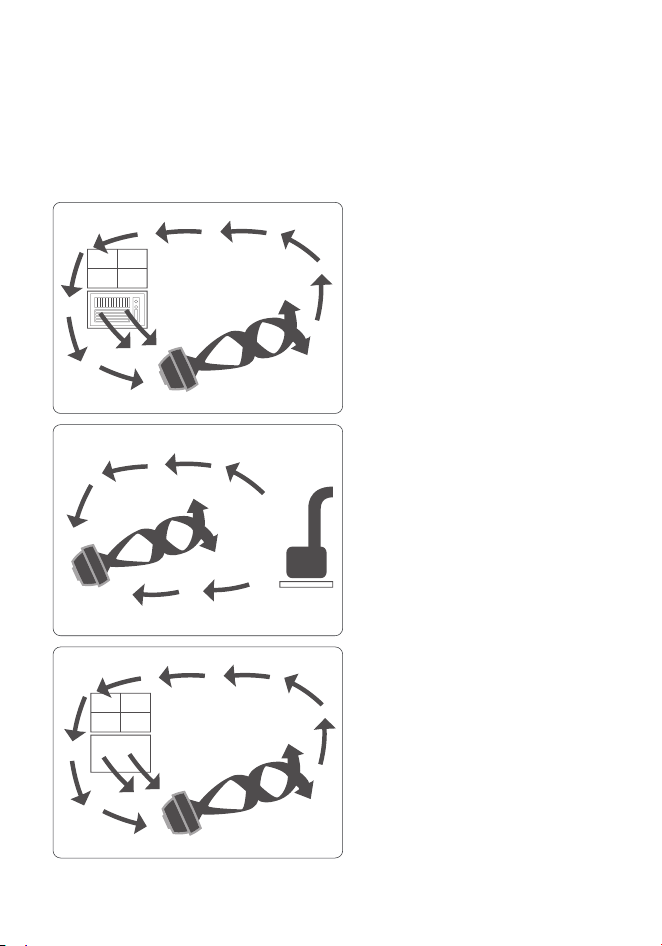
Geing the Most out of Your Air Circulator
Use with Air Conditioner
Summer:
Position the air circulator in front of
your AC to circulate cold air and
provide beer cooling.
Use with Heater
Winter:
Send the heat to the corner of the
room and circulate warm air faster.
Circulation
Spring & Fall:
Make the indoors as fresh and
pleasant as the outdoors.
6
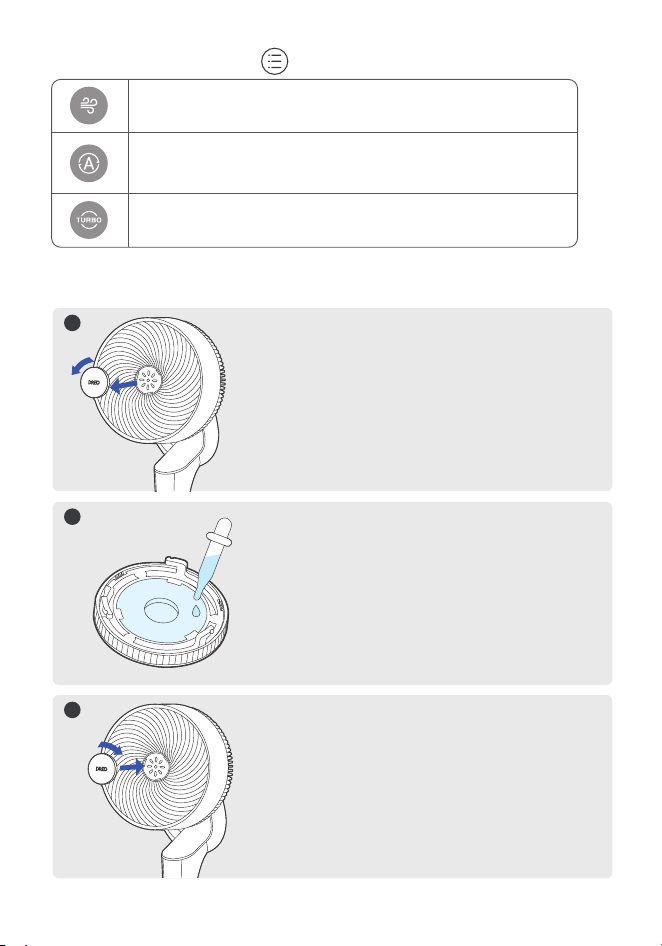
Normal Mode
Fan runs at the fixed speed.
Auto Mode
Fan automatically increases speed when room temp is
higher and decreases speed when temp is lower.
1
2
3
Adding Essential Oil
Rotate the aroma pad container
counterclockwise to take it o.
Add the essential oil to the aroma pad on
the aroma pad container.
Put the aroma pad container back in place
by rotating it clockwise (You will hear a
"click").
Turbo Mode
Fan runs at the maximum speed.
Working Modes
(Press on the remote)
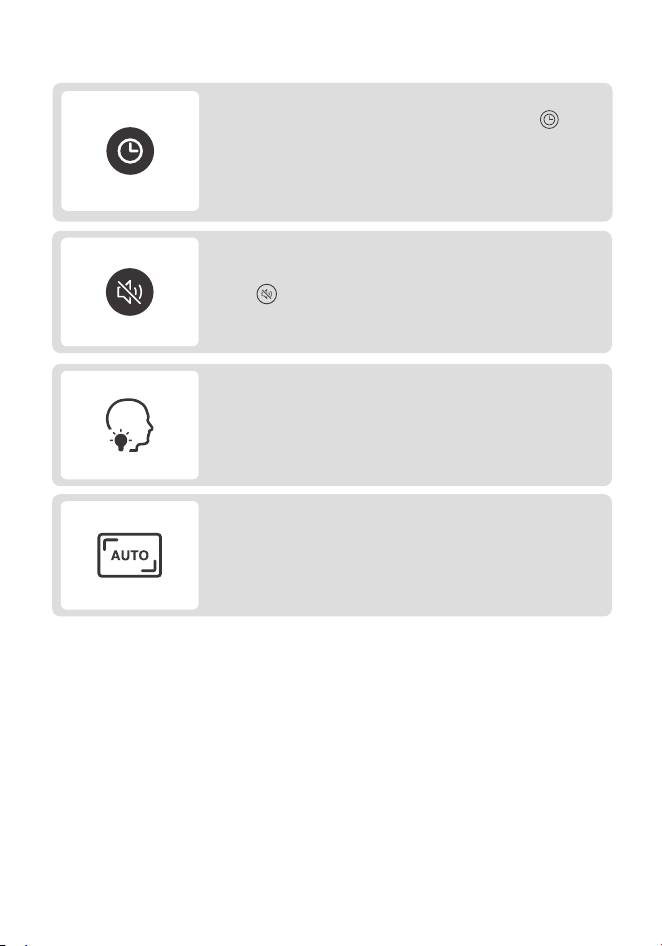
Display turns o after 1 minute.
Wake up the display with any buon.
Press on the remote control to turn on/o the
buon sounds.
Mute
If the fan is turned OFF or disconnected from power,
it will operate under the previous seings (except
the Timer seing) when it is turned ON again.
Memory
Display Auto O
Additional Features
When the fan is ON/OFF, touch the timer buon on
the remote control repeatedly to set a timer from 0 to 8
hours. When the timer ends, the fan will stop/start
running automatically. To cancel, set the time to 0 hour.
Timer
7
Note: When the auto o timer is enabled, display will
return to fan speed after 3 seconds.
8
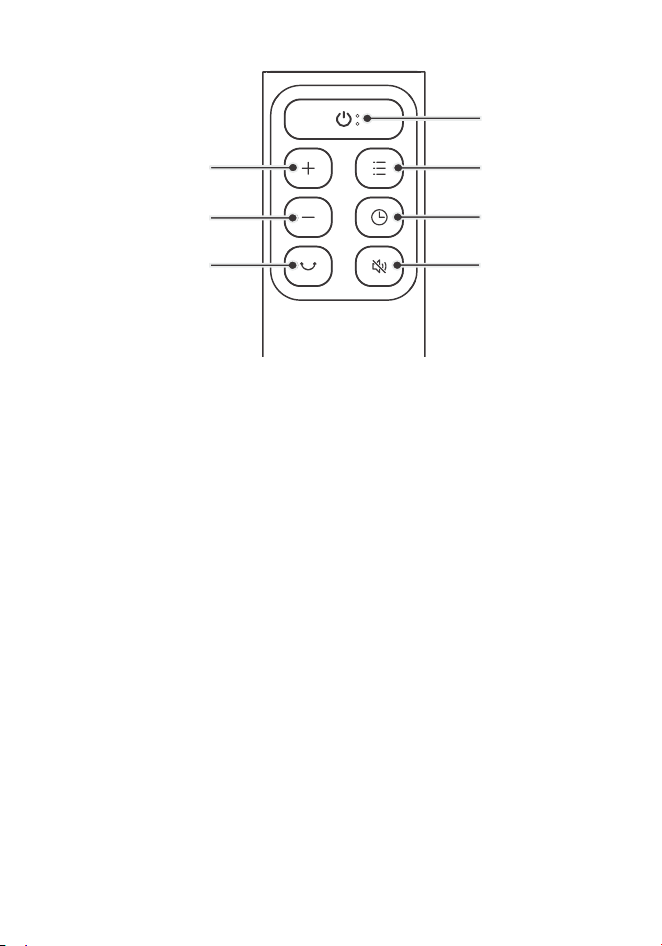
Remote Control
Power
Mode
Timer
Mute
Decrease Level
Increase Level
Horizontal
Oscillation
04
CLEANING AND
MAINTENANCE
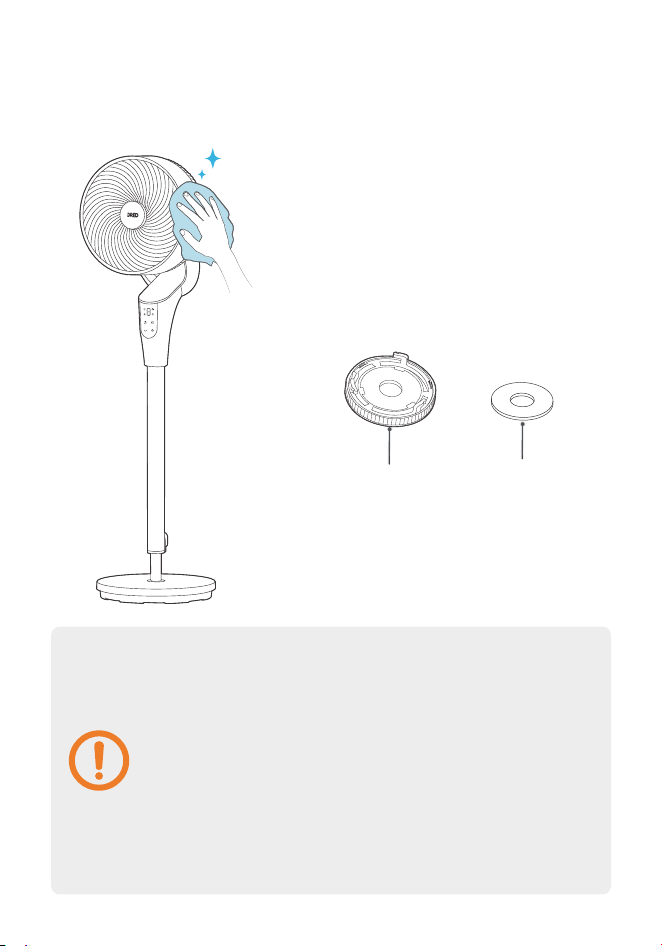
Outer Surface
Gently wipe o the dust with a soft,
dry cloth.
Base
The base can be disassembled in the
reverse order of assembly.
Remove the aroma pad container. Take
out the aroma pad, clean it with water and
dry it up.
Put the dried aroma pad back into the
aroma pad container, and install back in
place.
Aroma Pad Container & Aroma Pad
Aroma Pad Container
Aroma Pad
CAUTION
1. Always unplug the fan before any cleaning or maintenance to
avoid the risk of fire, electric shock, or injury to persons.
2. Do not immerse in water or get water inside the motor housing.
3. Do not use any chemical agents when cleaning the fan.
4. Store in a cool, dry place and cover it to protect from dust.
5. It is recommended to disassemble and clean under professional
guidance.
6. Clean the aroma pad container and aroma pad before adding new
essential oils if it hasn't been used for a long time.
7. Keep the essential oils away from parts other than the aroma pad
container (such as the grille or main unit) to avoid damage. If
contact occurs, clean immediately or wipe with a dry cloth.
9
WARNING
To reduce the risk of electrical shock and injury to persons,
turn o and unplug the appliance before any cleaning and
maintenance.
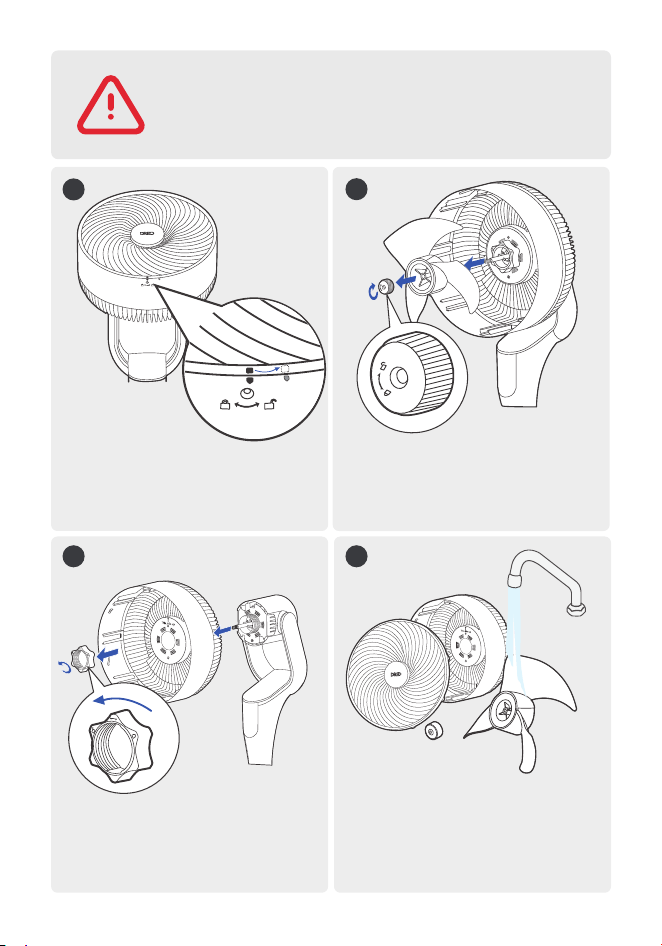
1
2
3
4
Remove the screw on the front grille,
rotate the grille counterclockwise to
take o.
Remove the blade cap by rotating it
as shown and take the blade
assembly out of the shaft.
Remove the hexagram screw to
take o the rear grille.
Rinse cap, blades, and grilles under
running water or with a clean, damp
cloth.
10
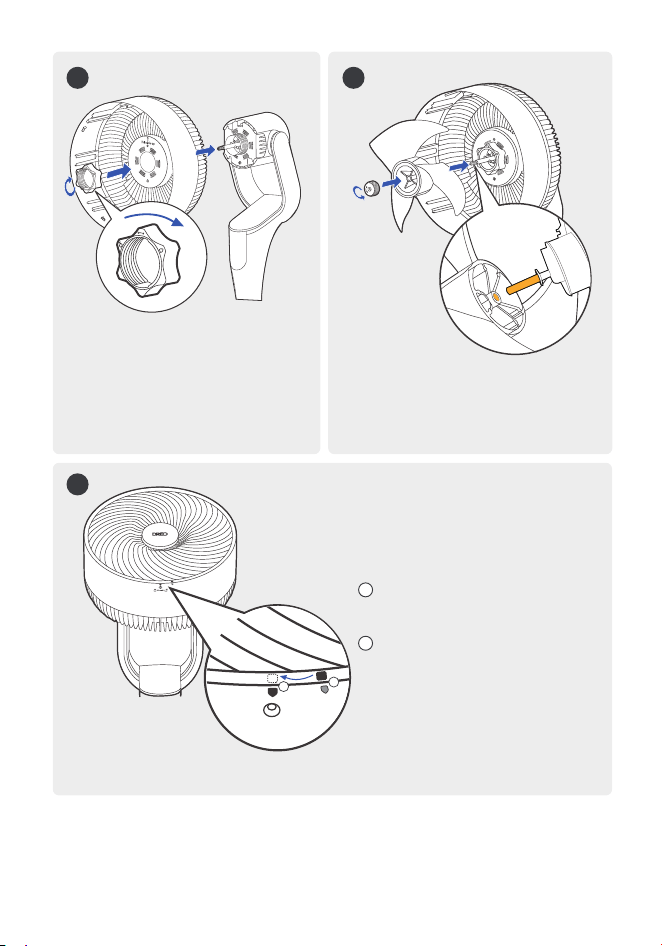
7
Align the point on the front
grille with the right point on the
casing.
Rotate the grille clockwise and
install the screw back in place.
5
Dry up all parts, and screw the rear
grill back into place by aligning the
"This side up" arrow with the top
hole, then put the hexagram screw
back into place
6
Insert the blade assembly back into
the shaft by aligning the centers.
11
1
1
2
2
12
4
3
2
5
1
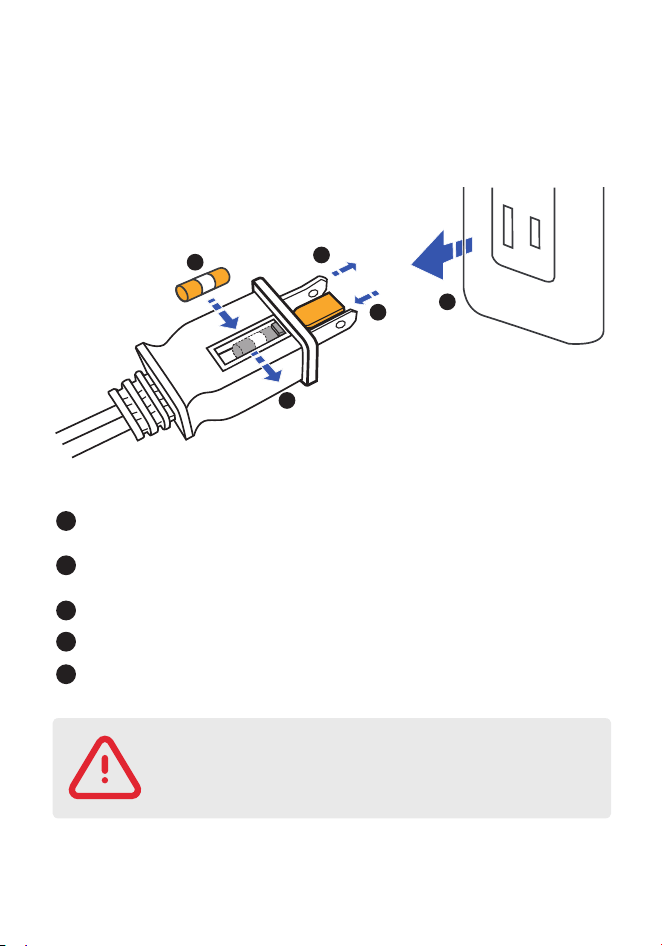
User Servicing Instructions (Fuse)
This appliance features a fused safety plug that protects against overload or
short-circuit situations. If the fuse blows, please cut o power and follow the below
instructions or consult a qualified electrician.
Grasp plug and remove from the receptacle or other outlet device.
Do not unplug by pulling on cord.
Open fuse cover. Slide open fuse access cover on top of aachment
plug towards blades.
Remove fuse carefully. Push the fuse from the other side to remove the fuse.
Risk of fire. Replace fuse only with 5 Amp.125 Volt fuse.
Close fuse cover. Slide closed the fuse access cover on top of aachment plug.
Risk of fire. Do not replace aachment plug.
Contains a safety device(fuse) that should not be removed.
Discard product if the aachment plug is damaged.
WARNING
1
2
3
4
5

Model No.: DR-HPF013
Rev_1.0_EN
Intertek
CM
13
05
TROUBLESHOOTING
My appliance won't turn on!
Make sure that the cord is connected to a powered outlet and the mains
voltage corresponds with the voltage indicated on the appliance.
My appliance is shaky and wobbling!
1. Place the appliance on a flat, level surface.
2. Incorrect installation might also cause shakiness. Please refer to the
assembly instructions in page 4-5.
1. Place the appliance on a flat, level surface.
2. Be sure not to insert anything into the air inlet and outlet.
If your problem is not listed or still persists, please contact our Customer
Support (see page 15)
My appliance is making vibration and noise!
We’re Here to Help!
(Mon - Fri, 9:00 am-5:00 pm PST/PDT)
(888) 290-1688
www.dreo.com
DREO PTE. LTD.
112 ROBINSON ROAD, #03-01, ROBINSON 112, SINGAPORE 068902

Looking for help?
Contact us to get expert support.
www.dreo.com
Mon - Fri, 9:00 am-5:00 pm PST/PDT
support@dreo.com (888) 290-1688 www.dreo.com