Installation Manual
TE001 Model No.
Please watch these videos first and
use this manual as a guide.
Scan the QR code and search TE001
Tutorial Video
If you have any questions, please contact us at
+1 (833) 878-3346
(Monday-Friday 9:00 am-5:00 pm PST)
Need Help? Contact Us!
teeho.com

1. Parts List
.......................................................................................... 1
........................................................................ 3
2. Installation Guide
............................. 3
Step 1: Prepare the Door & Check Dimensions
Step 2: Install the Latch & Strike
...................................................... 4
Step 3: Install Exterior Assembly
....................................................... 7
Step 4: Install Interior Assembly
....................................................... 8
Step 5: Distinguish Left / Right Hand Door
................................... 11
......................................................................... 13
3. Troubleshooting
........................................ 16
4. Information & Safety Warnings
CONTENTS
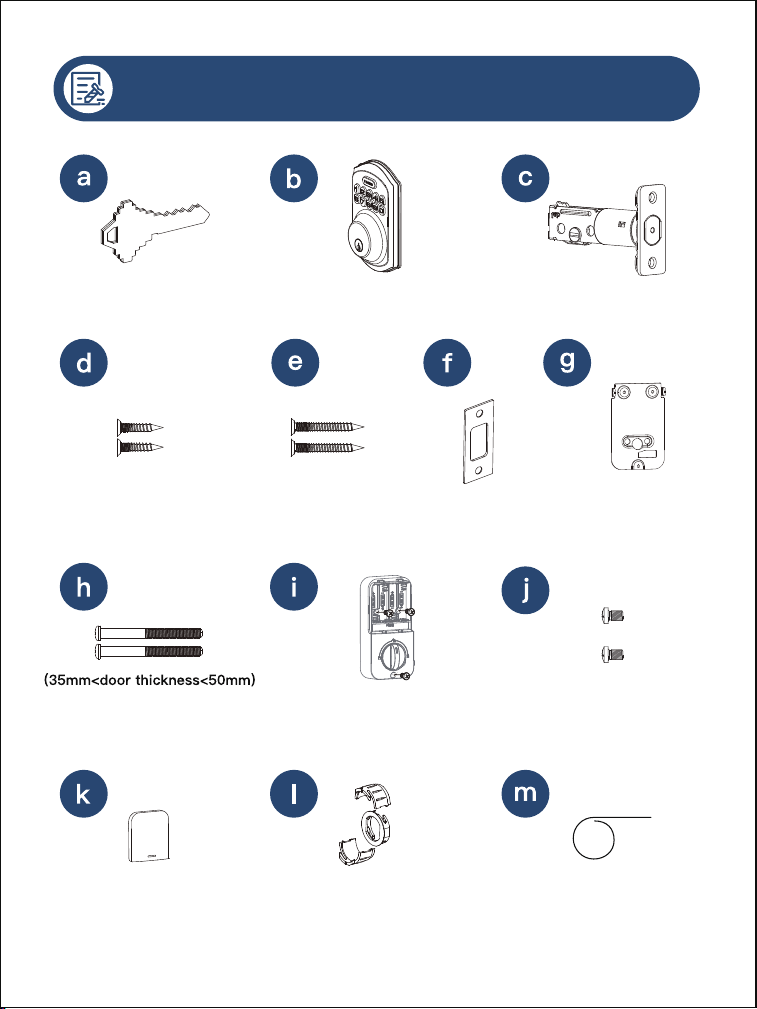
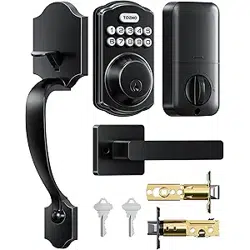
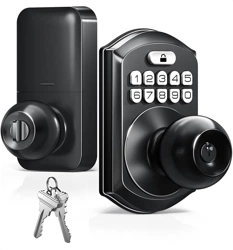
PARTS LIST
Battery Cover Drive-in Collar Reset Tool
Mounting Plate
Screws x2
Interior Assembly
(Screws Pre-installed)
Latch Screws x2 Strike Screws x2 Strike Mounting Plate
Mechanical Keys x2 Exterior Assembly Latch
01
Interior Assembly
Screws (Spare) x2
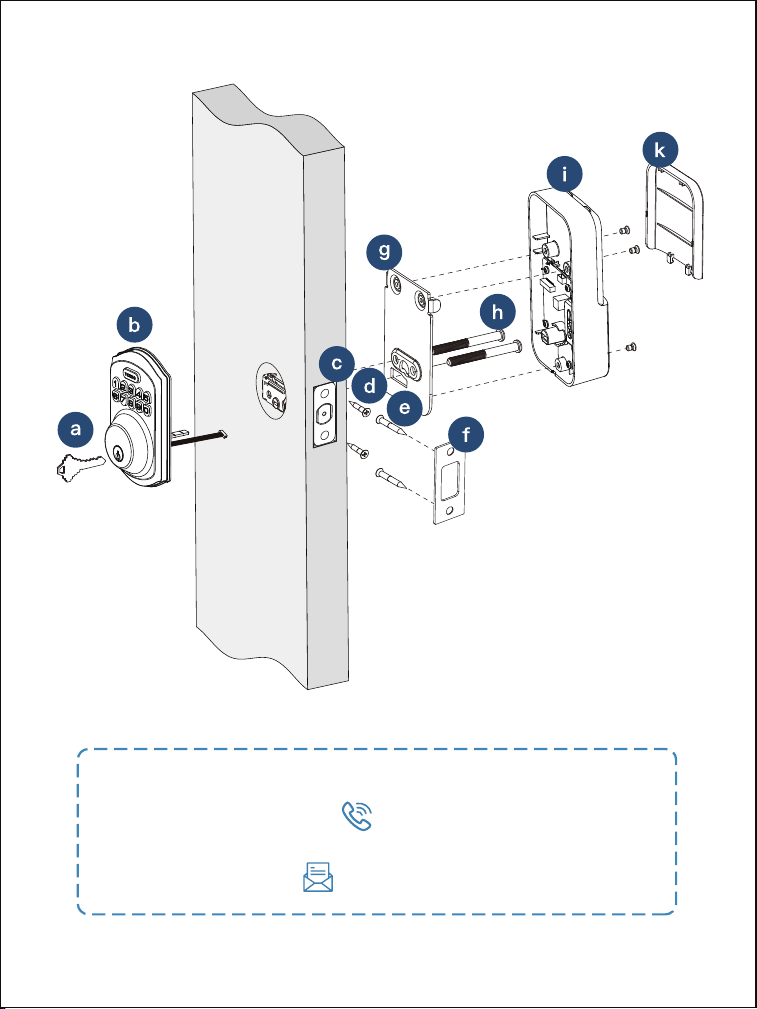
If any parts are missing or damaged, please contact us at
+1 (833) 878-3346
(Monday-Friday 9:00 am-5:00 pm PST)
02
1 2
3 4
INSTALLATION GUIDE
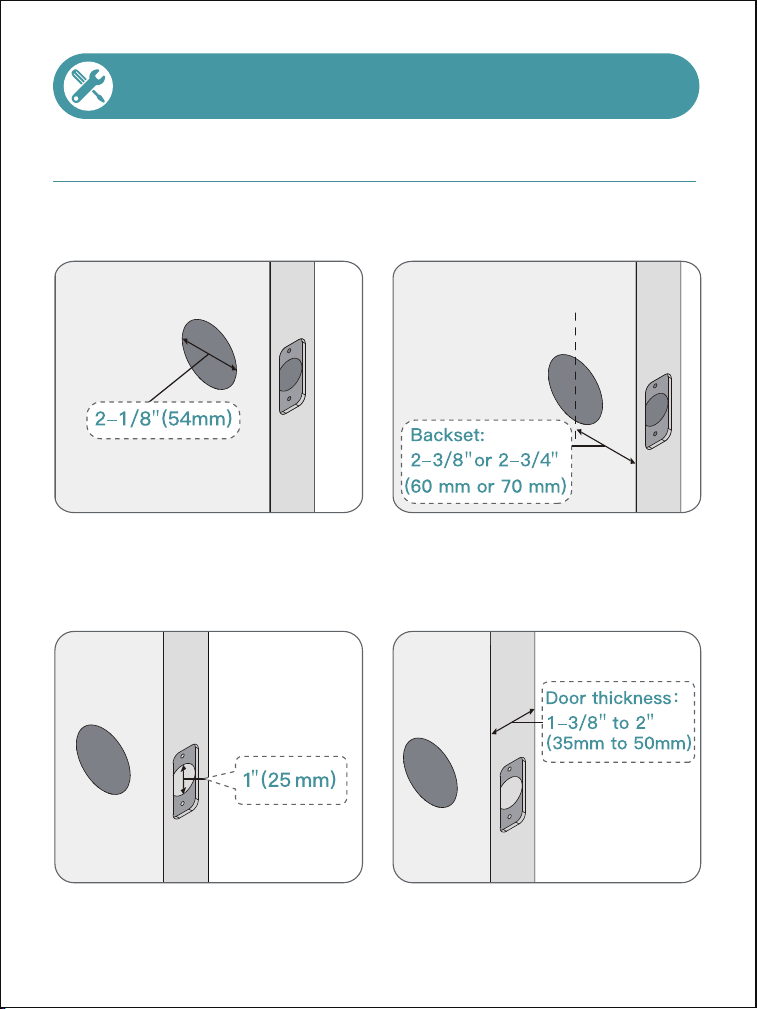
Step 1: Prepare the Door & Check Dimensions
The hole in the door is
2-1/8" (54mm).
The backset is either 2-3/8"
or 2-3/4" (60 or 70mm).
The hole in the door edge is
1" (25mm).
The door thickness is 1-3/8"
to 2" (35mm to 50mm).
03
1
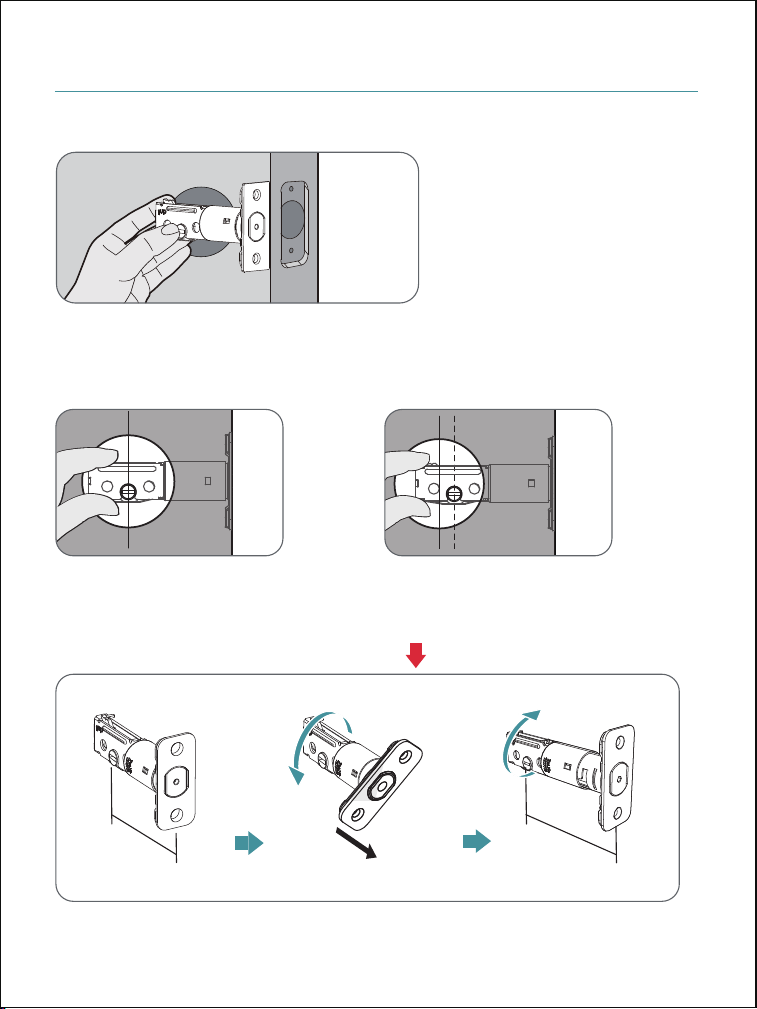
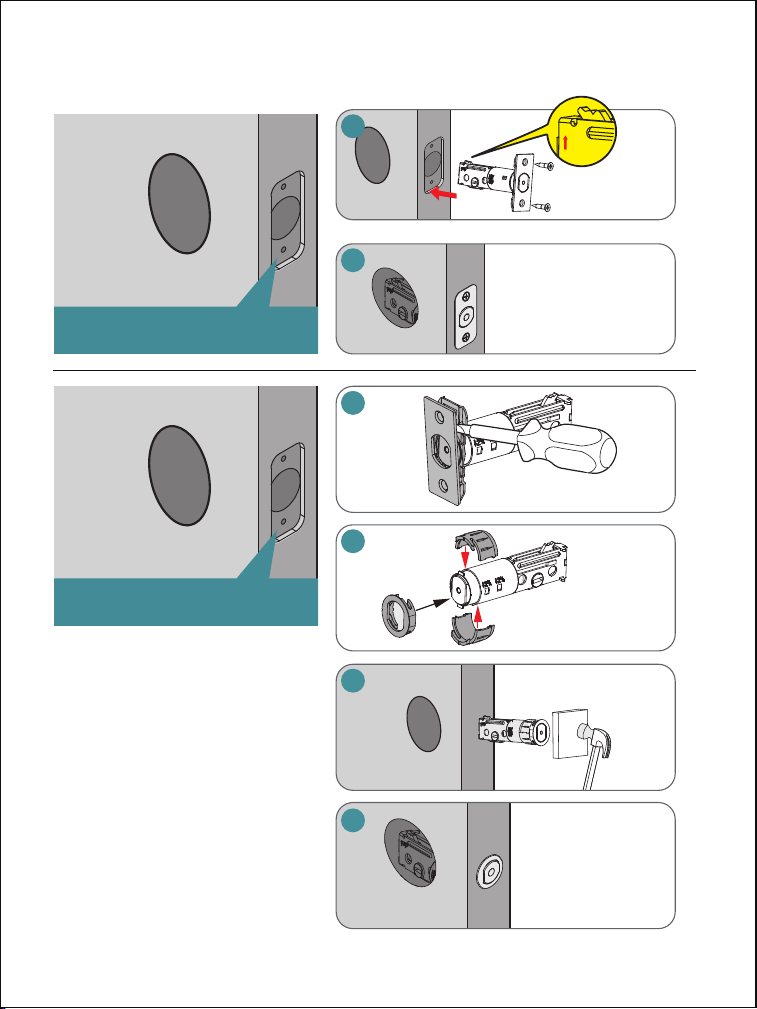
Step 2: Install the Latch & Strike
Hold the Latch in front of the door hole, flush the Latch against
the door edge.
Is the slotted hole centred in the door hole?
No adjustment is required.
Proceed to next step.
YES
Determine backset and adjust the Latch.
Rotate and pull the Latch as shown to extend the Latch.
Slotted hole is NOT centred.
NO
04
2-3/8"
(60mm)
pull
2-3/4"
(70mm)
2
Install the Latch.
Chiseled
Not chiseled
Latch Screws (d)
up
1
2
1
2
Drive-in Collar (l)
3
4
05
4
Strike Screws (e)
Strike (f)
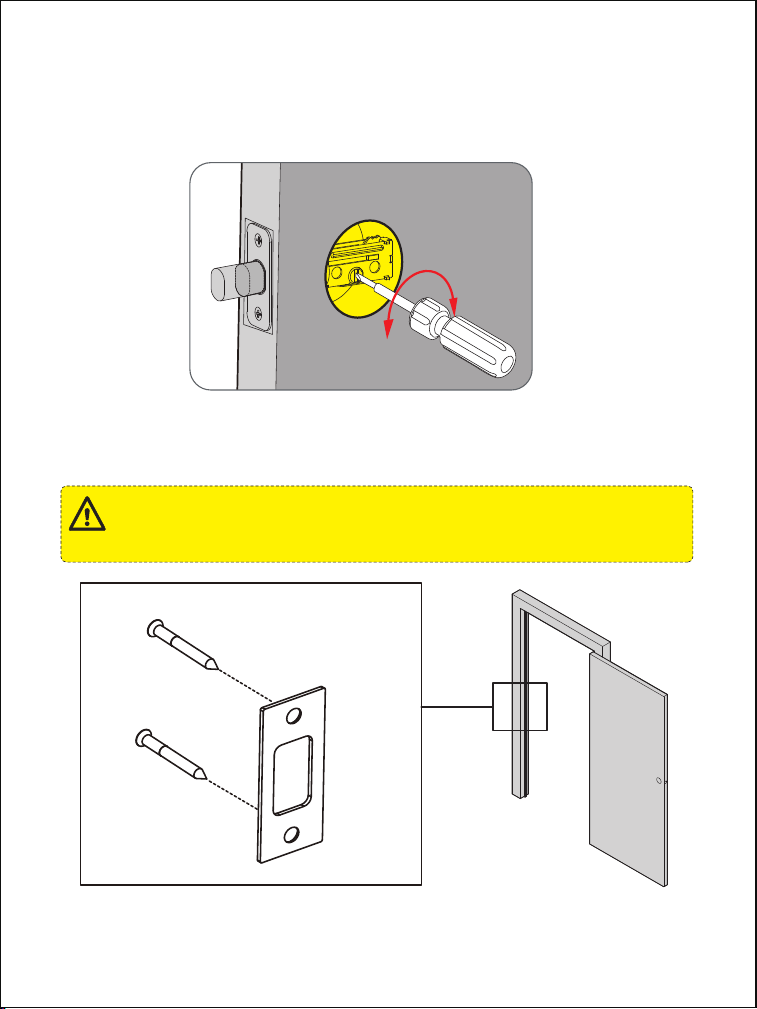
3 Test if the Latch bolt extends and retracts properly by
using a screwdriver.
Install Strike on the door frame.
Make sure the hole in door frame is drilled a minimum of 1" (25mm)
deep.
IMPORTANT:
06
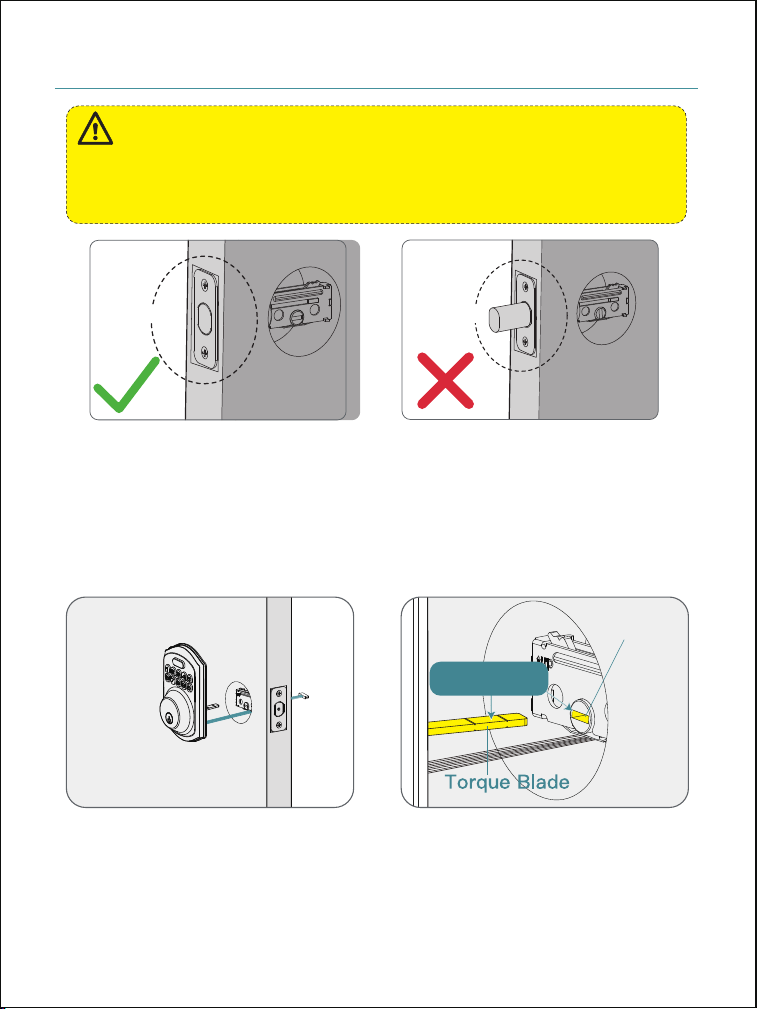
Step 3: Install Exterior Assembly
Unlocked
Locked
1
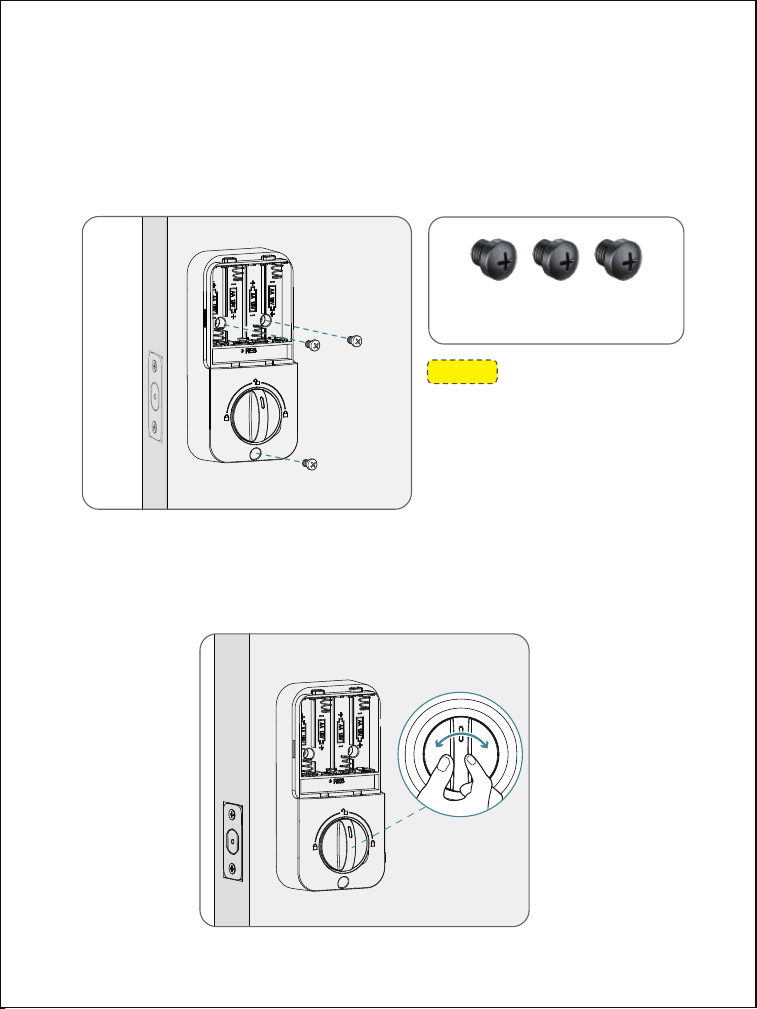
Route the cable below the Latch and insert the
Torque Blade horizontally into the Latch slot, ensuring
both the blade and slot are level.
07
Before installation, the Latch bolt should be retracted completely
(in the unlocked position).
Do not insert the Mechanical Key into the cylinder during the installation.
IMPORTANT:
Latch Slot
Horizontal
08
1
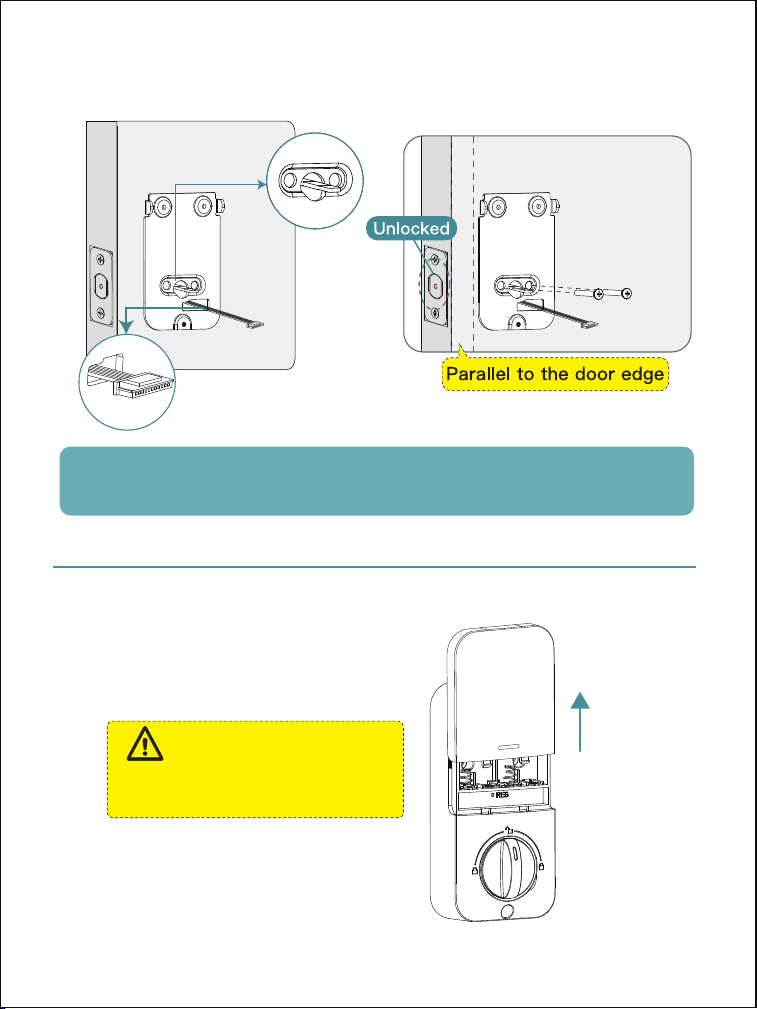
Step 4: Install Interior Assembly
Push the Battery Cover out in the direction as illustrated.
Do not load batteries until the
lock is completely installed.
IMPORTANT:
Note: Both the Exterior and Interior Assembly should be kept parallel
to the door edge.
2
Install the Mounting Plate with the Mounting Plate Screws.
Do not overtighten screws.
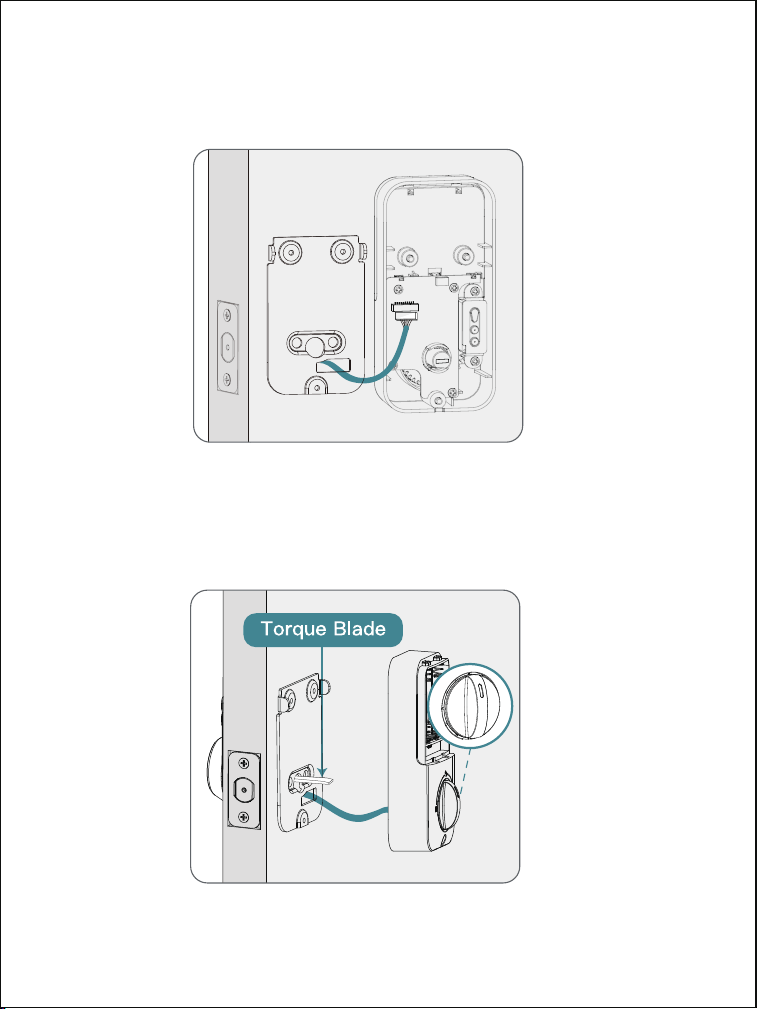
2
Insert the cable connector into the socket. Push the
connector in firmly until it is completely attached.
3
Keep the Thumb Turn in Vertical position and Torque
Blade in Horizontal position, then install the Interior
Assembly.
09
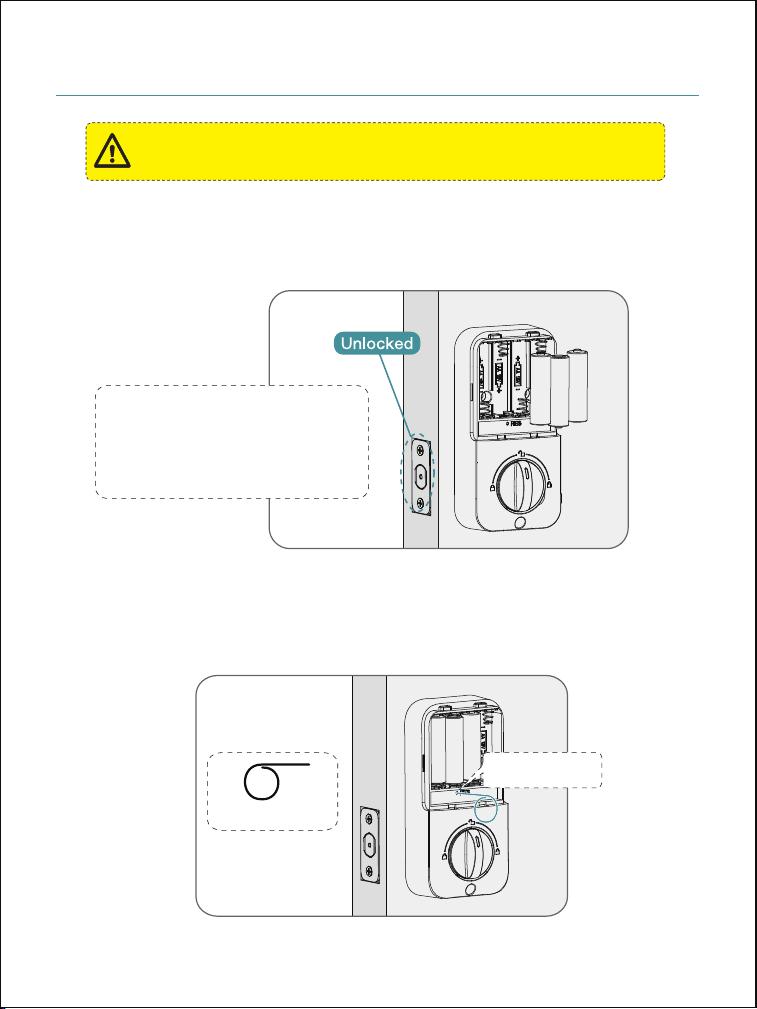
10
Test the lock by rotating the Thumb Turn to see if the
Latch bolt extends and retracts properly.
4
Attach the Interior Assembly to the Mounting Plate.
Please ensure that the Interior Assembly Screws
engage with the screw threads on the Mounting
Plate and tighten all three screws.
NOTE:
Three screws are pre-installed
on the Interior Assembly for
your convenience. The two (j)
in the accessory pack are
spares.
Interior Assembly Screws
(Pre-installed)
2
Press and hold the Reset Button on the Interior Assembly
for 5 seconds using the provided Reset Tool.
Reset Tool (m)
Reset Button
1
Step 5: Distinguish Left / Right Hand Door
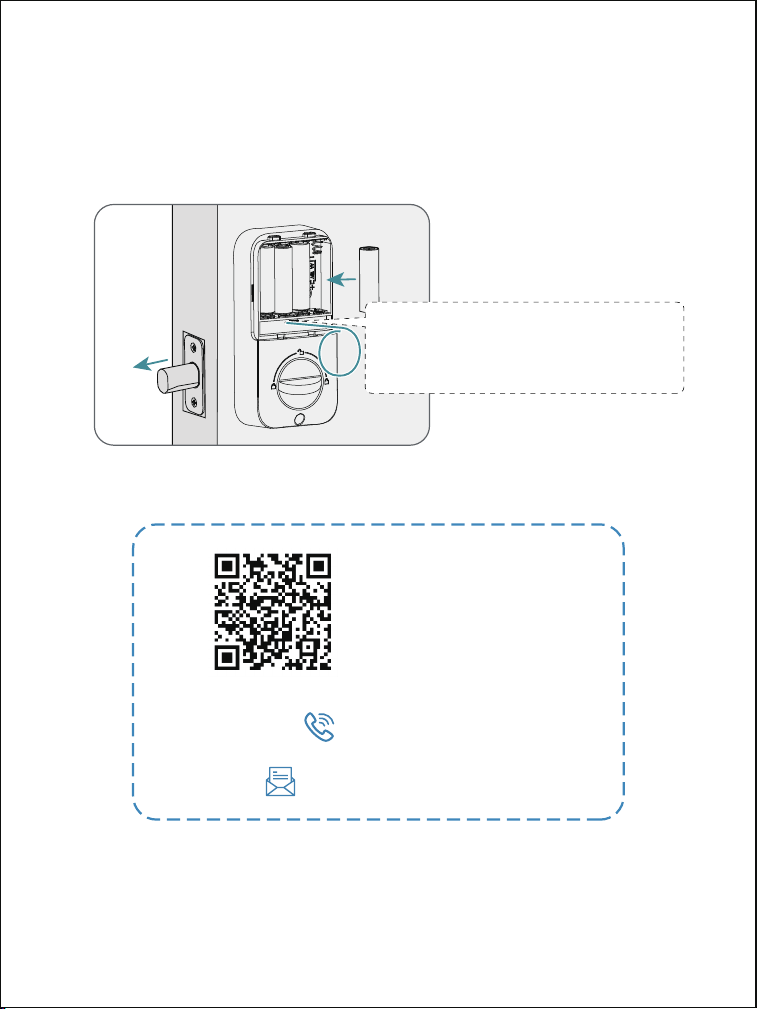
Keep the door open and unlocked, load 3 AA batteries
into the Interior Assembly.
This step is required and crucial for the lock after installation!
IMPORTANT:
Please use all new,
non-rechargeable
Alkaline batteries only.
11
12
3
Continue holding the Reset Button while loading the
last battery until you hear a long beep. The Latch bolt
will extend automatically and memorize the door's
opening direction.
Keep holding the Reset
Button until you hear a long
sound of beep.
Scan the QR code
and search
TE001
If you have any questions, please contact us at
+1 (833) 878-3346
(Monday-Friday 9:00 am-5:00 pm PST)
TROUBLESHOOTING
Uninstall the Interior and Exterior
Assemblies.
Before re-installation, please follow these
guidelines:
(1) Make sure the Latch bolt is in the retracted
position.
(2) Do not insert the Mechanical Key into the
lock cylinder before or during installation.
(3) Make sure the Torque Blade is inserted
horizontally.
Problem Solution
The Latch bolt keeps
going in and out.
I cannot remove my
key unless it is in the
locked position.
13
Disassemble and reinstall the lock by
following the installation tips.
(1)
Please don't insert the Mechanical Key into
the lock cylinder before or during installation;
(2) Keep the Latch fully retracted and the
Torque Blade horizontal;
(3) Please make sure to route the cable
below the Latch;
(4) T
he Exterior and Interior Assembly should
be installed parallel to the door edge.
(5) P
lease reset the lock before programming.
TROUBLESHOOTING
(1) The battery is low if the battery indicator
light keeps flashing. Please replace with 4
new batteries (Alkaline batteries only).
(2) Please refer to “How to Reset”
section and perform a resetting again.
(3) Check the cable for any damage that
may have occurred during installation.
Make sure the cable is firmly connected.
(4) The battery is low if the battery indicator
light keeps flashing. Please replace with 4
new batteries. Make sure the batteries are
properly installed (Alkaline batteries only).
(1) Make sure you have entered the correct
User Code.
(2) Check the Strike to make sure it is
properly aligned and clear so the Latch bolt
can freely move in the hole.
Problem Solution
Fail to reset.
Unable to unlock /
lock by Keypad.
14
TROUBLESHOOTING
(1) Before adding a new User Code, please
change the Default Master Code
12345678 to a new one.
The battery is low if the battery indicator
keeps flashing. Please replace with 4 new
batteries for the best performance (Alkaline
batteries only).
(2) Make sure the New Master Code
has been entered correctly.
(3) The lock can set and store up to 20 user
codes, with each code needing to be at
least 4 to 10 digits long.
Problem Solution
Master Code can not
be changed.
Fail to add a new User
Code.
Battery indicator
keeps flashing.
Performing a resetting will revert the Master
Code back to the default (12345678).
I forgot my Master
Code.
Refer to “How to Reset” section to
perform a resetting.
If it doesn’t solve the issue,
please call us at +1 (833) 878-3346.
15

INFORMATION & SAFETY WARNINGS
Protect your User Codes and Master Code.
Restrict access to your lock’s Interior Assembly and routinely
check your settings to ensure they have not been altered
without your knowledge.
Do not use an electric screwdriver during installation.
This manufacturer advises that no lock can provide complete
security by itself.
This lock may be defeated by forcible or technical means,
or evaded by entry elsewhere on the property.
No lock can substitute for caution, awareness of your
environment, and common sense.
Take care to ensure a long-lasting finish. Please use a soft
and damp cloth to clean the lockset if you need. Using
lacquer thinner, caustic soaps, abrasive cleaners or polishes
could damage the coating and result in tarnishing.
The lock is water-resistant. It can withstand water splashes;
however, do not let water and liquids get into the lock.
Avoid exposure to direct sunlight. Long-term exposure to
direct sunlight may damage the lock.
16

Whatever issues with TEEHO products. Please contact us
before returning it.
+1 (833) 878-3346
(Monday-Friday 9:00 am-5:00 pm PST)
Need Help? Contact Us!
teeho.com
If you have your order ID, videos or images of your
problem (if necessary) ready before contacting Customer
Support, we will solve your problem faster and better.
V4.0
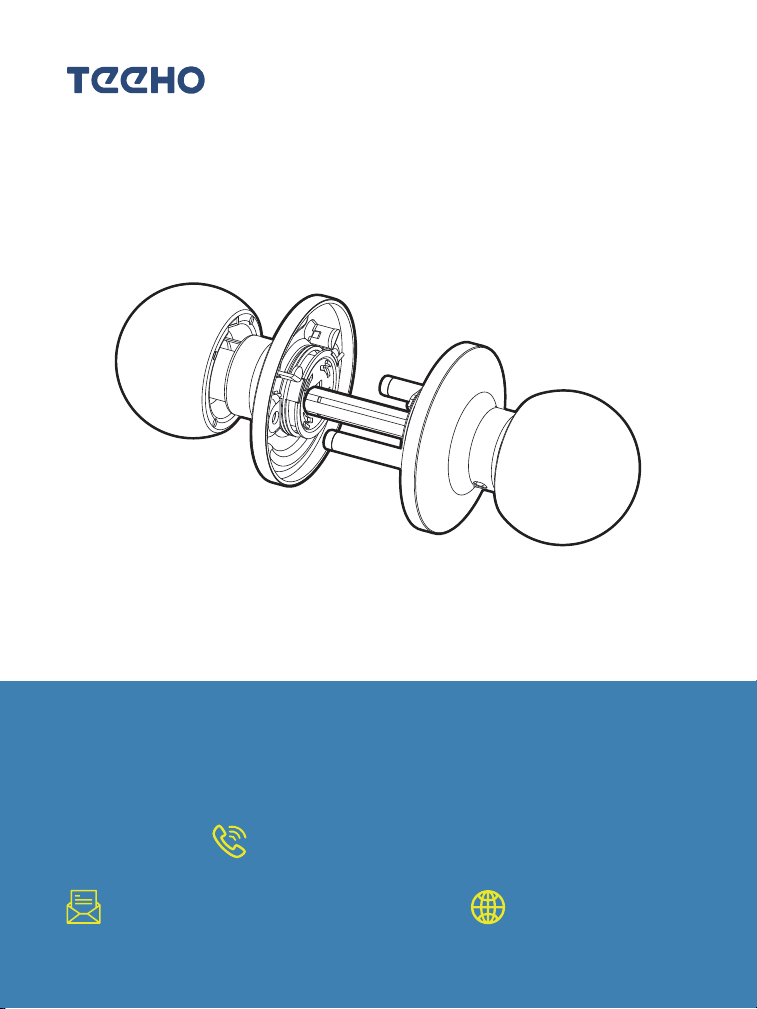
Installation Instructions
of Knob
All pictures in this manual are for illustration purpose only.
Actual product may vary due to product upgrade.
Please contact us if you have any questions at
+1 (833) 878-3346
(Monday-Friday 9:00 am-5:00 pm PST)
Need Help? Contact Us!
teeho.com

CONTENT
01
Parts List
03
Prepare the Door & Check Dimensions
05
Install the Latch & Strike
06
Install Front and Rear Knob
07
Test the Knob
04
Adjust Latch Backset
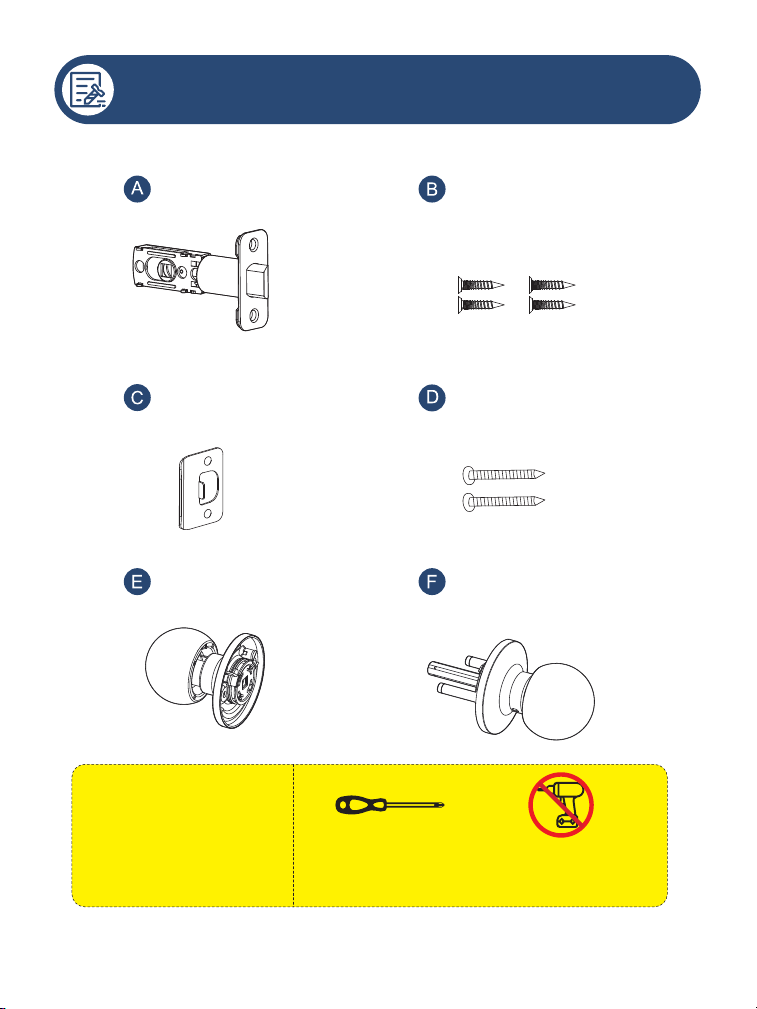
01
Latch
Strike
Mounting
Screws x2
Latch
&
Strike Screws x4
PARTS LIST
TOOL REQUIRED
Do not use an electric screwdriver
during installation.
Rear Knob x1 Front Knob x1
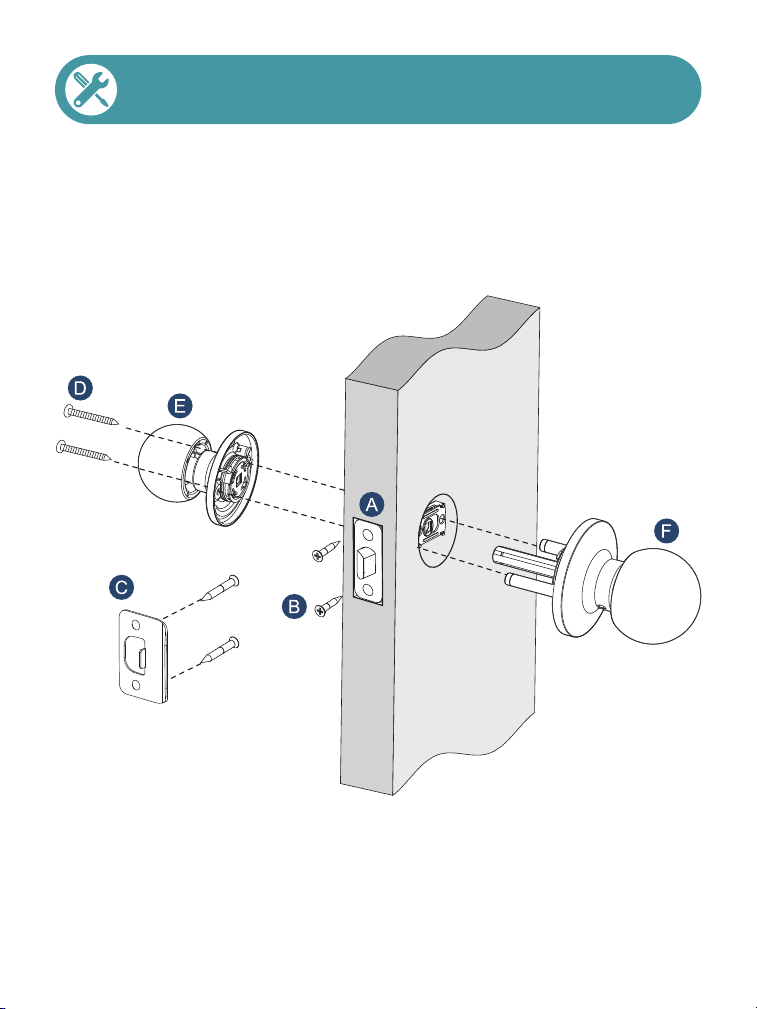
Installation Overview
02
03
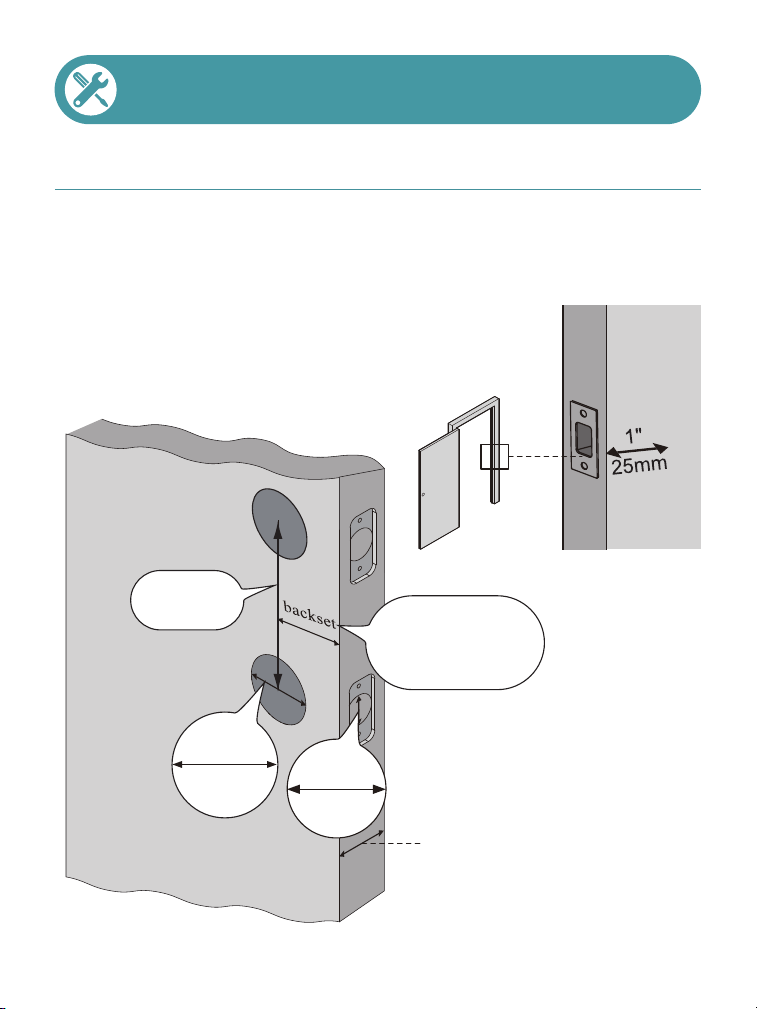
If your door already has the holes shown in the picture
below, proceed to the next step; if your door does not
have holes, use the mounting template to drill a new hole.
INSTALLATION GUIDE
Step 1: Prepare the Door & Check Dimensions
2-3/8" or 2-3/4"
(60 or 70mm)
>3-1/2"
(>90mm)
2-1/8"
(54mm)
1"
(25mm)
Door thickness:
1-3/8" to 2"
(35mm to 50mm)
04
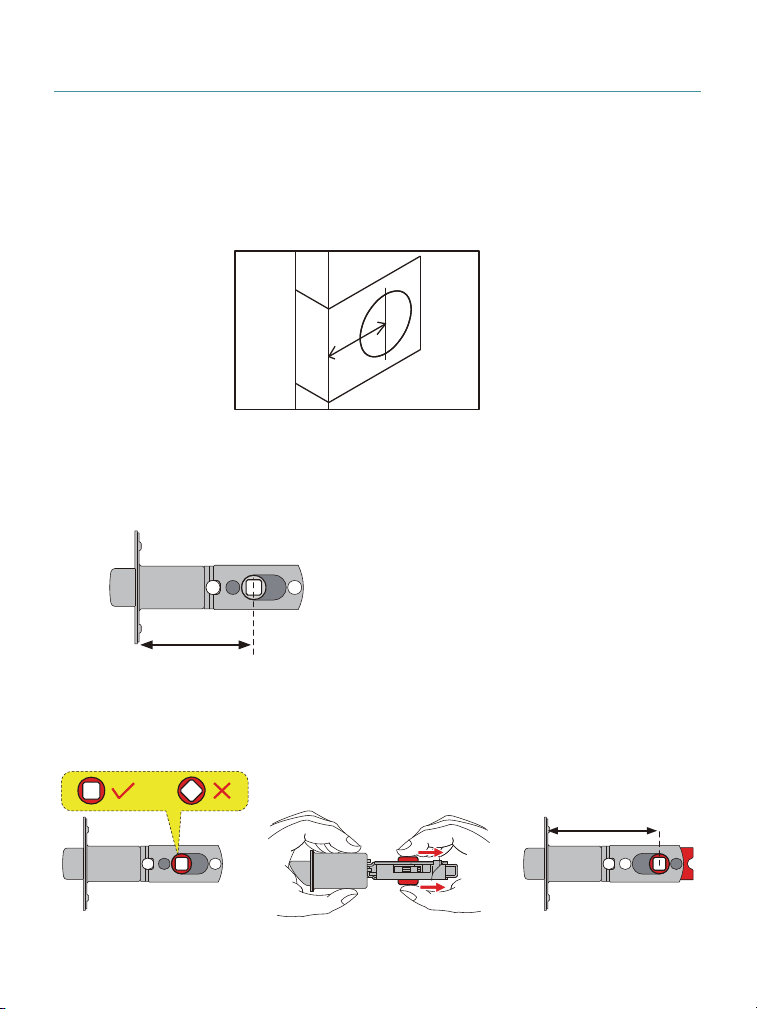
Backset is the distance from the door edge to the center
of the hole in the door.
The Latch is provided with adjustable design which can
fit either 2-3/8"(60mm) or 2-3/4"(70mm) backset.
A.
If the backset of your door is 2-3/8"(60mm),
there is no need to adjust the Latch.
B.
If the backset of your door is 2-3/4"(70mm),
please adjust the Latch.
2-3/8" (60mm)
2-3/4" (70mm)
Step 2: Adjust Latch Backset
05
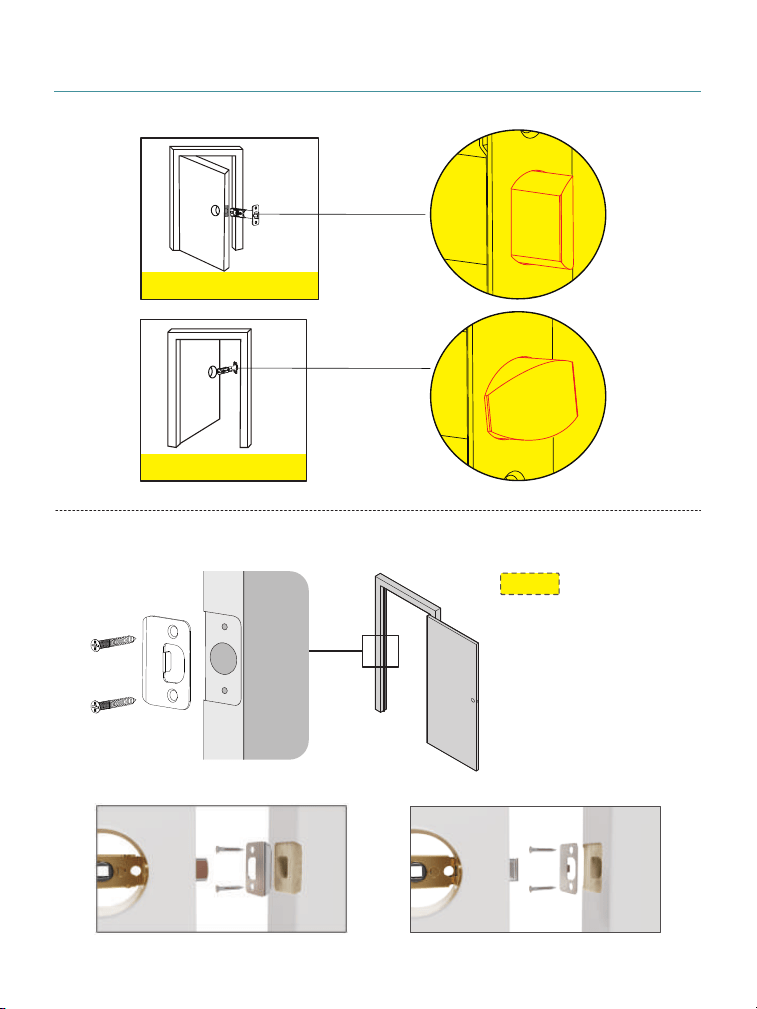
Step 3: Install the Latch & Strike
Opening outwards
Opening inwards
Note:
The bevel of the Latch
should be aligned with
the bevel of the Strike.
Strike
Screws
(B)
Opening outwards
Opening inwards
Install the Latch
Install the Strike
06
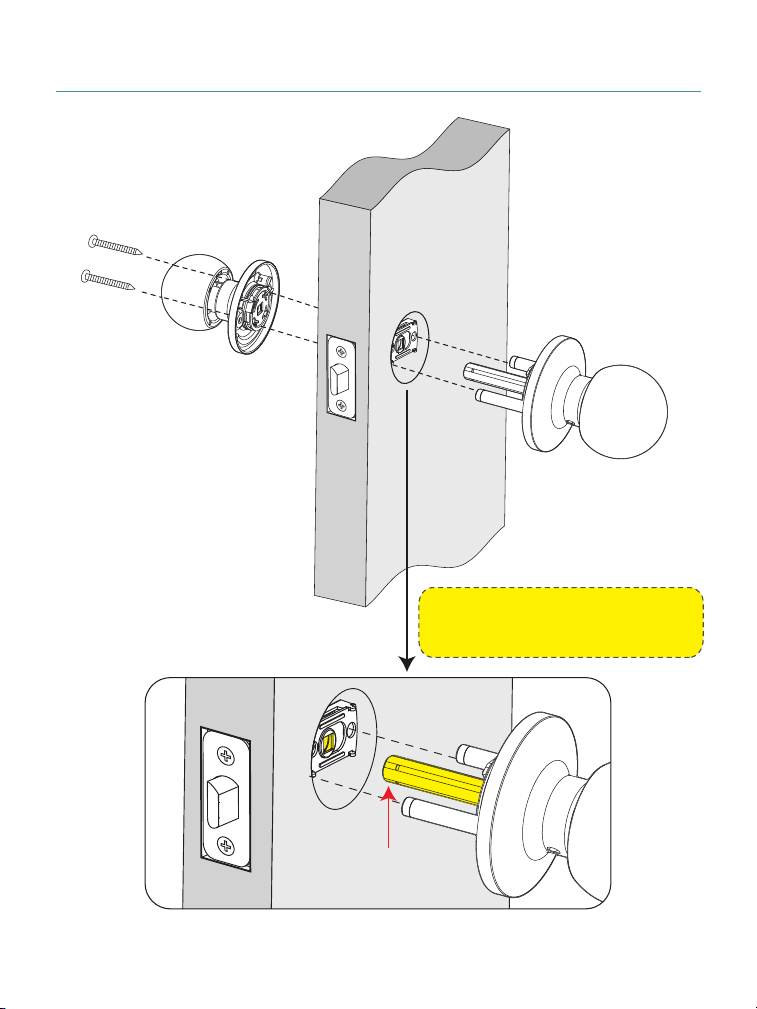
Step 4: Install Front and Rear Knob
The Torque Blade must be
rotated to align with the hole.
Torque Blade
07
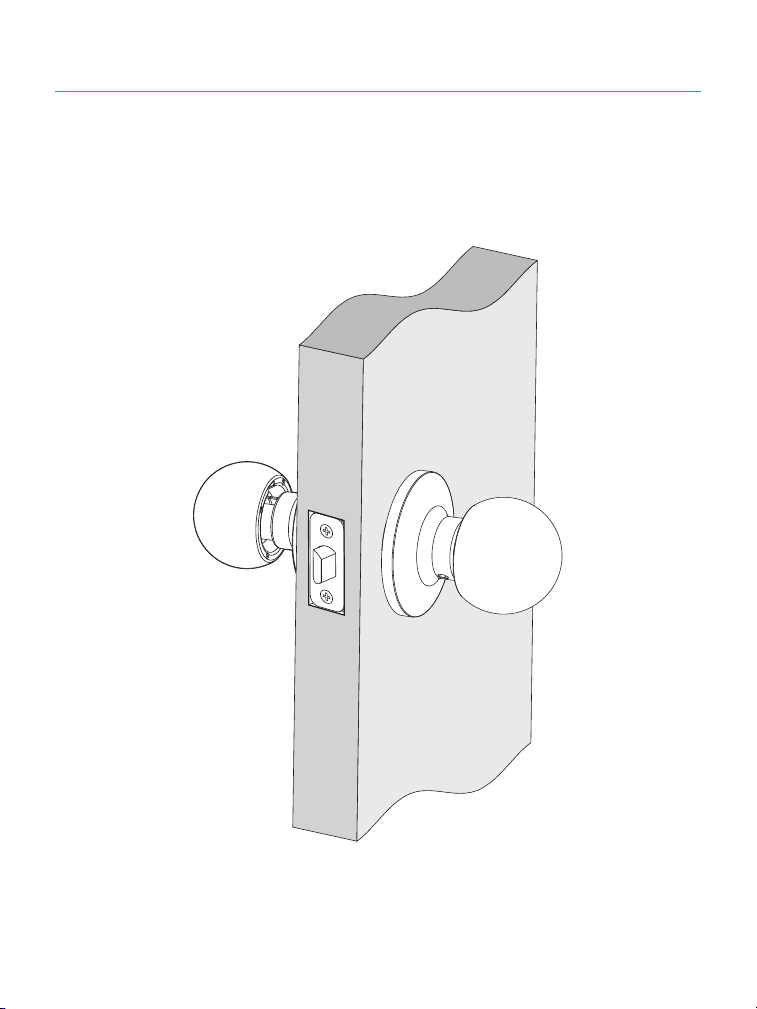
Keep the door open and check the Front and Rear Knob
to ensure it works smoothly.
Step 5: Test the
Knob

Whatever issues with TEEHO products. Please contact us
before returning it.
+1 (833) 878-3346
(Monday-Friday 9:00 am-5:00 pm PST)
Need Help? Contact Us!
teeho.com
If you have your order ID, videos or images of your
problem (if necessary) ready before contacting Customer
Support, we will solve your problem faster and better.