
1
1 Introduction
1.1 Acknowledgement
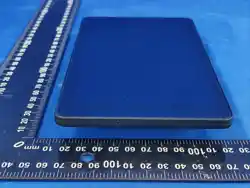
Thank you very much for choosing this product.ZQC-P1, is a 7-inch HD tablet. The main
chip is MT8766 based on Android 9.0 or above operating system, can easily expand third-party
applications.
Built-in 4 G、WIFI、BT、 voice calls and other functions, easy to achieve wireless
communication and wireless network functions, anytime, anywhere surfing; built-in a
variety of sensors to allow you to have a new control and entertainment experience.
This manual system introduces the various functions, usage techniques and precautions of the
MID. Please read this manual carefully before using the MID.
1.2 Notes
Maintenance and maintenance
⚫ Please keep the equipment dry. Do not let the equipment, battery, charger contact with
water and water vapor, or use wet hands to operate the equipment or charger, so as not
to cause equipment short circuit, failure caused by corrosion, personnel electric shock.
⚫ Do not cause equipment, batteries and chargers to be strongly impacted or vibrated
to avoid causing equipment, batteries and chargers to fail.
⚫ Do not place this device, battery and charger in areas where the temperature is too
high or too low, otherwise it may cause equipment, battery and charger failure.
⚫ Please do not impact, throw, prick this MID, and avoid falling, squeezing, bending
MID.
⚫ Do not disassemble equipment and accessories without authorization, otherwise the
equipment and accessories will not be covered by our warranty.
1.3 Safety information
Before using the MID, please read this section information and let your child know the
information. For more detailed information, please refer to the safety instructions and precautions.
⚫ Do not use MID, when driving a car so as not to interfere with safe driving.
2
⚫ In medical places, please abide by the relevant regulations or regulations. Close
the MID. near the medical facility
⚫ Close the MID or turn on the aircraft mode when boarding to avoid wireless
interference with the aircraft control signal.
⚫ Close near the use of high-precision electronic equipment, please close MID,
otherwise it may cause electronic equipment failure.
⚫ Please do not disassemble MID and accessories without authorization. Only
authorized bodies can maintain this MID.
⚫ Please keep the MID away from the magnetic device, MID radiation will erase the
information stored on the magnetic device.
⚫ Do not use MID. at high temperatures, in places with flammable gases, such as
near gas stations
⚫ Please keep MID and accessories out of reach of children. Do not allow children to
use MID. without supervision
⚫ For the use of this MID, please abide by the relevant laws and regulations, and
respect the privacy and legal rights of others.
⚫ Please strictly follow the relevant instructions in this manual when using USB data
lines, otherwise it may damage your MID or personal computer.
⚫ Please do not use this MID, in wet environment such as bathroom and avoid
soaking or washing this MID by liquid.
1.4 Abbreviations/terms
Abbreviations/t
erms
Full name
Note
MID
Mobile Internet Device
Mobile Internet terminals
WIFI
Wireless Fidelity
Wireless LAN based on IEEE 802.11b
standards

3
2MID Introduction
2.1 MID Accessories
Packing list
And your MID box contains the following items:
⚫ MID machine
⚫ Power adapter
⚫ USB connection
⚫ Instructions
2.2 MID use and preparation
Battery charging
Charge the battery before using the MID for the first time.
1. Charge the MID using a power adapter.
2.3 MID Status and Notification
Notification Form
When prompt information appears in your notification panel, click the column box and slide
your hand on the screen to open the notification list. Click on the options you need to view to see
the details. You can then click on the information box to slide up to close the information window.
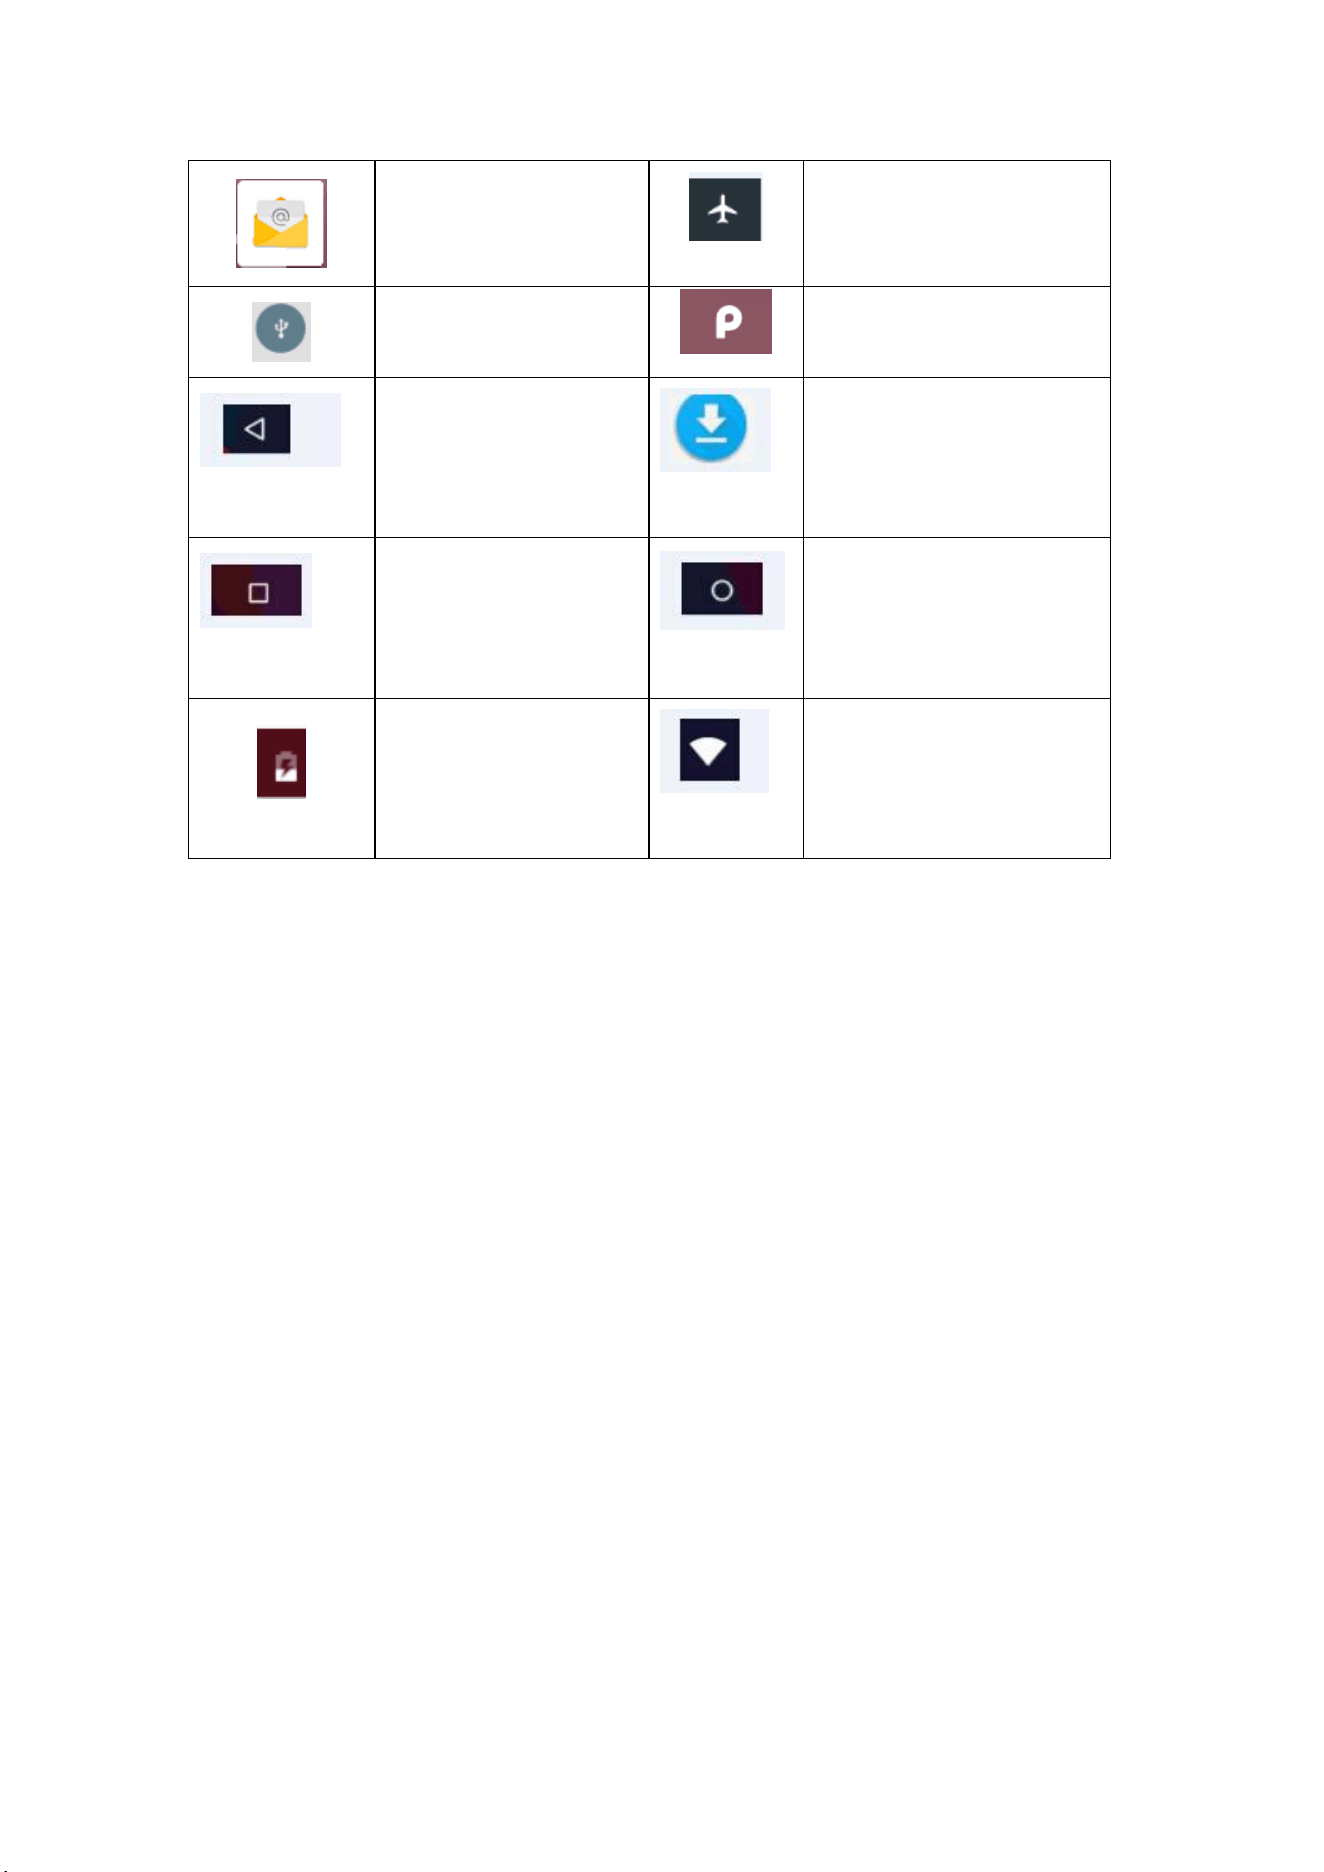
Here is the status bar icon diagram:
4
New mail
Flight pattern
USB connected
Connect USB debug
Return key
Download
Short Click View Use
History
H ome buttons,
Battery power
WIFI service connected,
network available
Notice Panel
A notification will report new mail, open WIFI, and ongoing activities. You can
open the notification panel for specific information.
Open Notification Panel
When a new notification icon appears in the notification bar, click the notification bar to open
the notification panel.
5
3 Quick Start
3.1 Key function
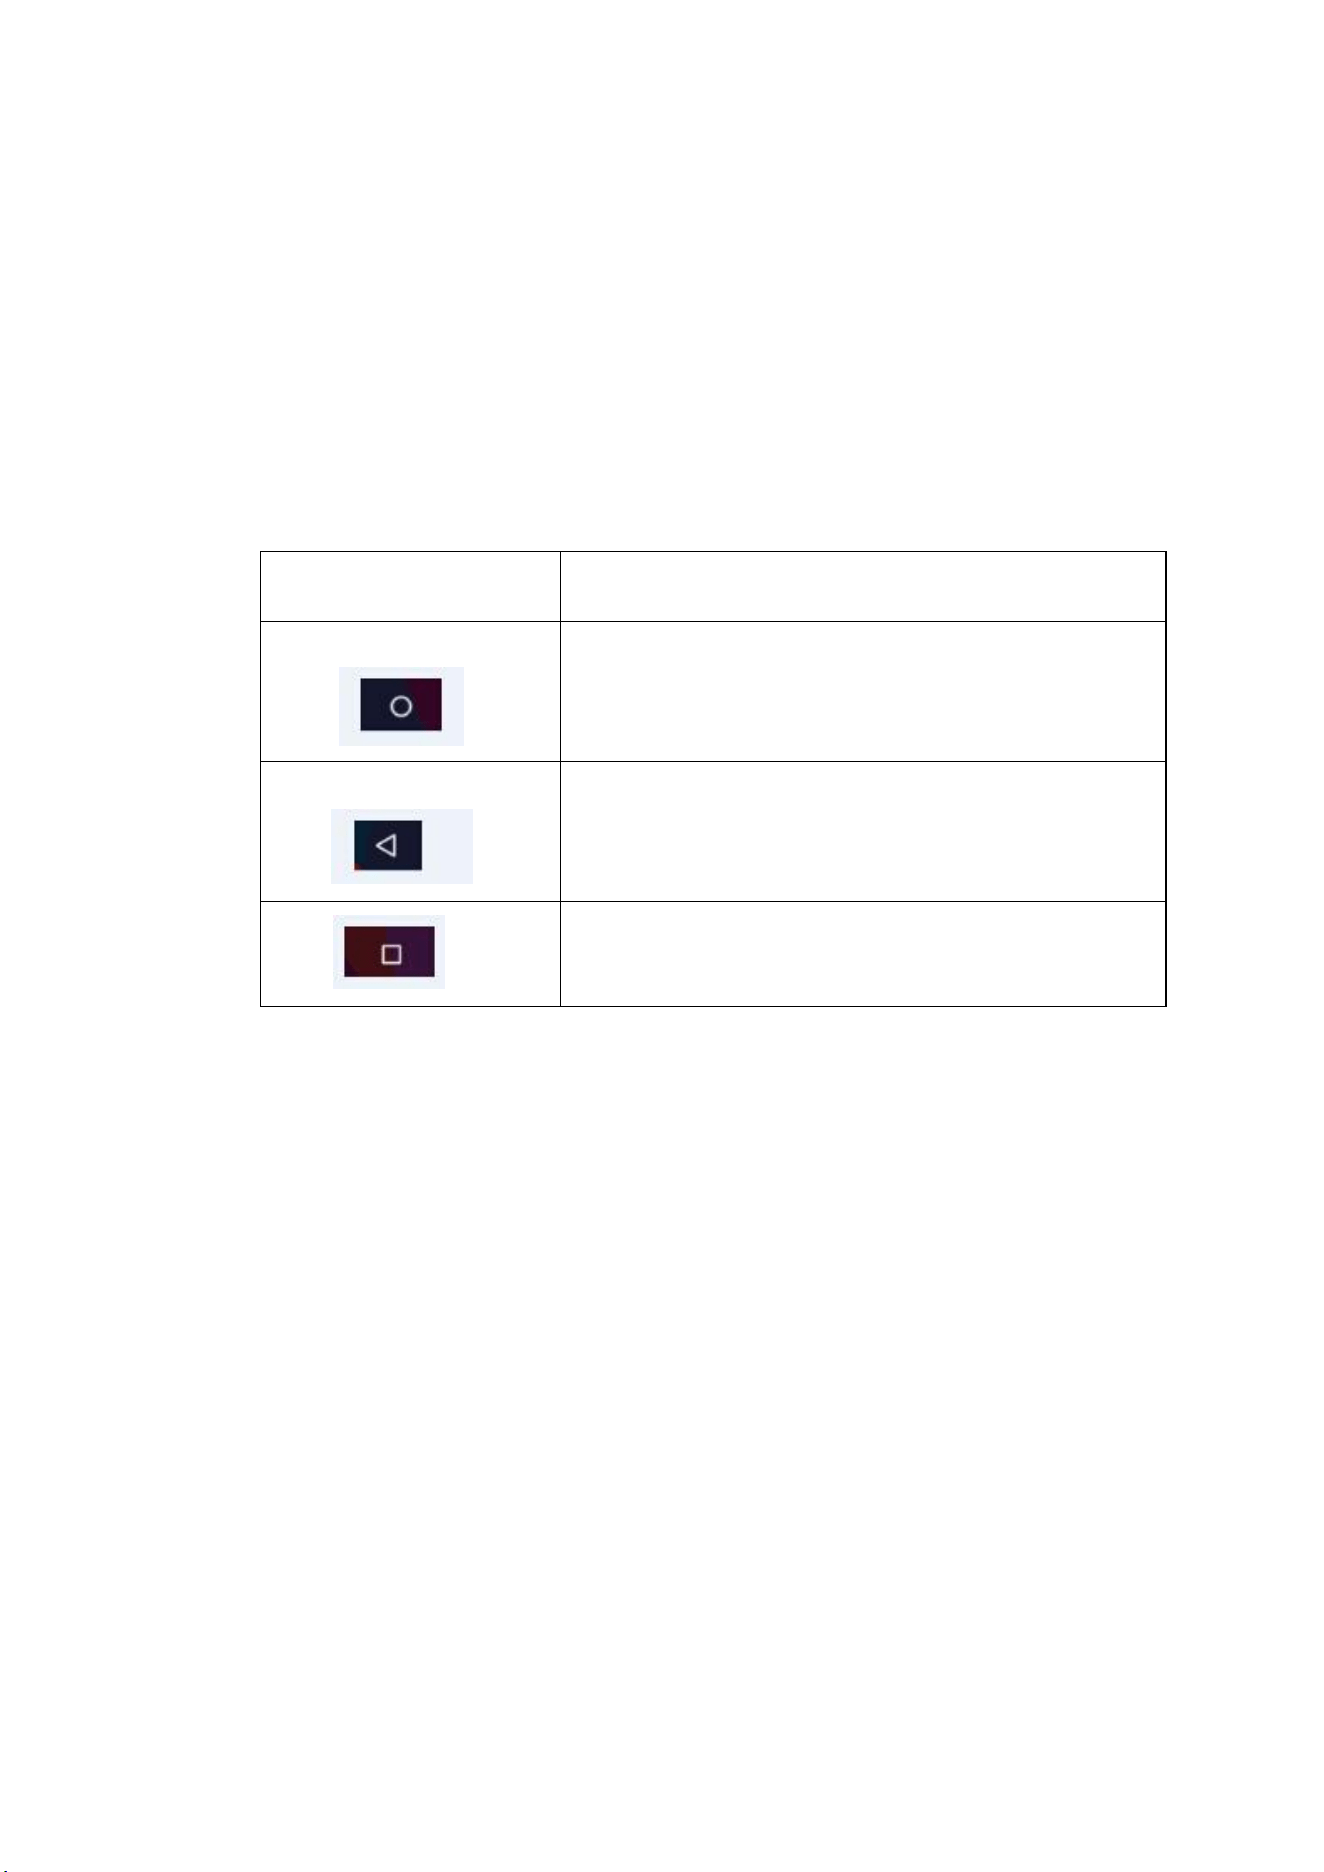
Key function description:
Power Key (power)
Short press hibernation/wake function, long press switch
function
HOME key
(home)
Click on any interface to return to the main interface
Return key
(back)
Any interface click this button to return to the previous
directory
Set key
Click to display user-browsed history
3.2 Boot and shutdown
Boot
After pressing the POWER button for 3 seconds, you can see the boot screen. After the
system is turned on, enter the screen lock state, please unlock.
Shutdown
1. After pressing the POWER button, the shutdown option will pop up.
2. Shutdown options include flight mode, restart and shutdown.
3. Click to turn off the machine.
3.3 Opening and closing of the screen
When the screen is idle, it will turn off automatically
6
1. After the screen is idle for a period of time, the screen is automatically closed to save
battery power.
2. At the screen open state, press the POWER key, the screen can be closed immediately.
When the screen is closed
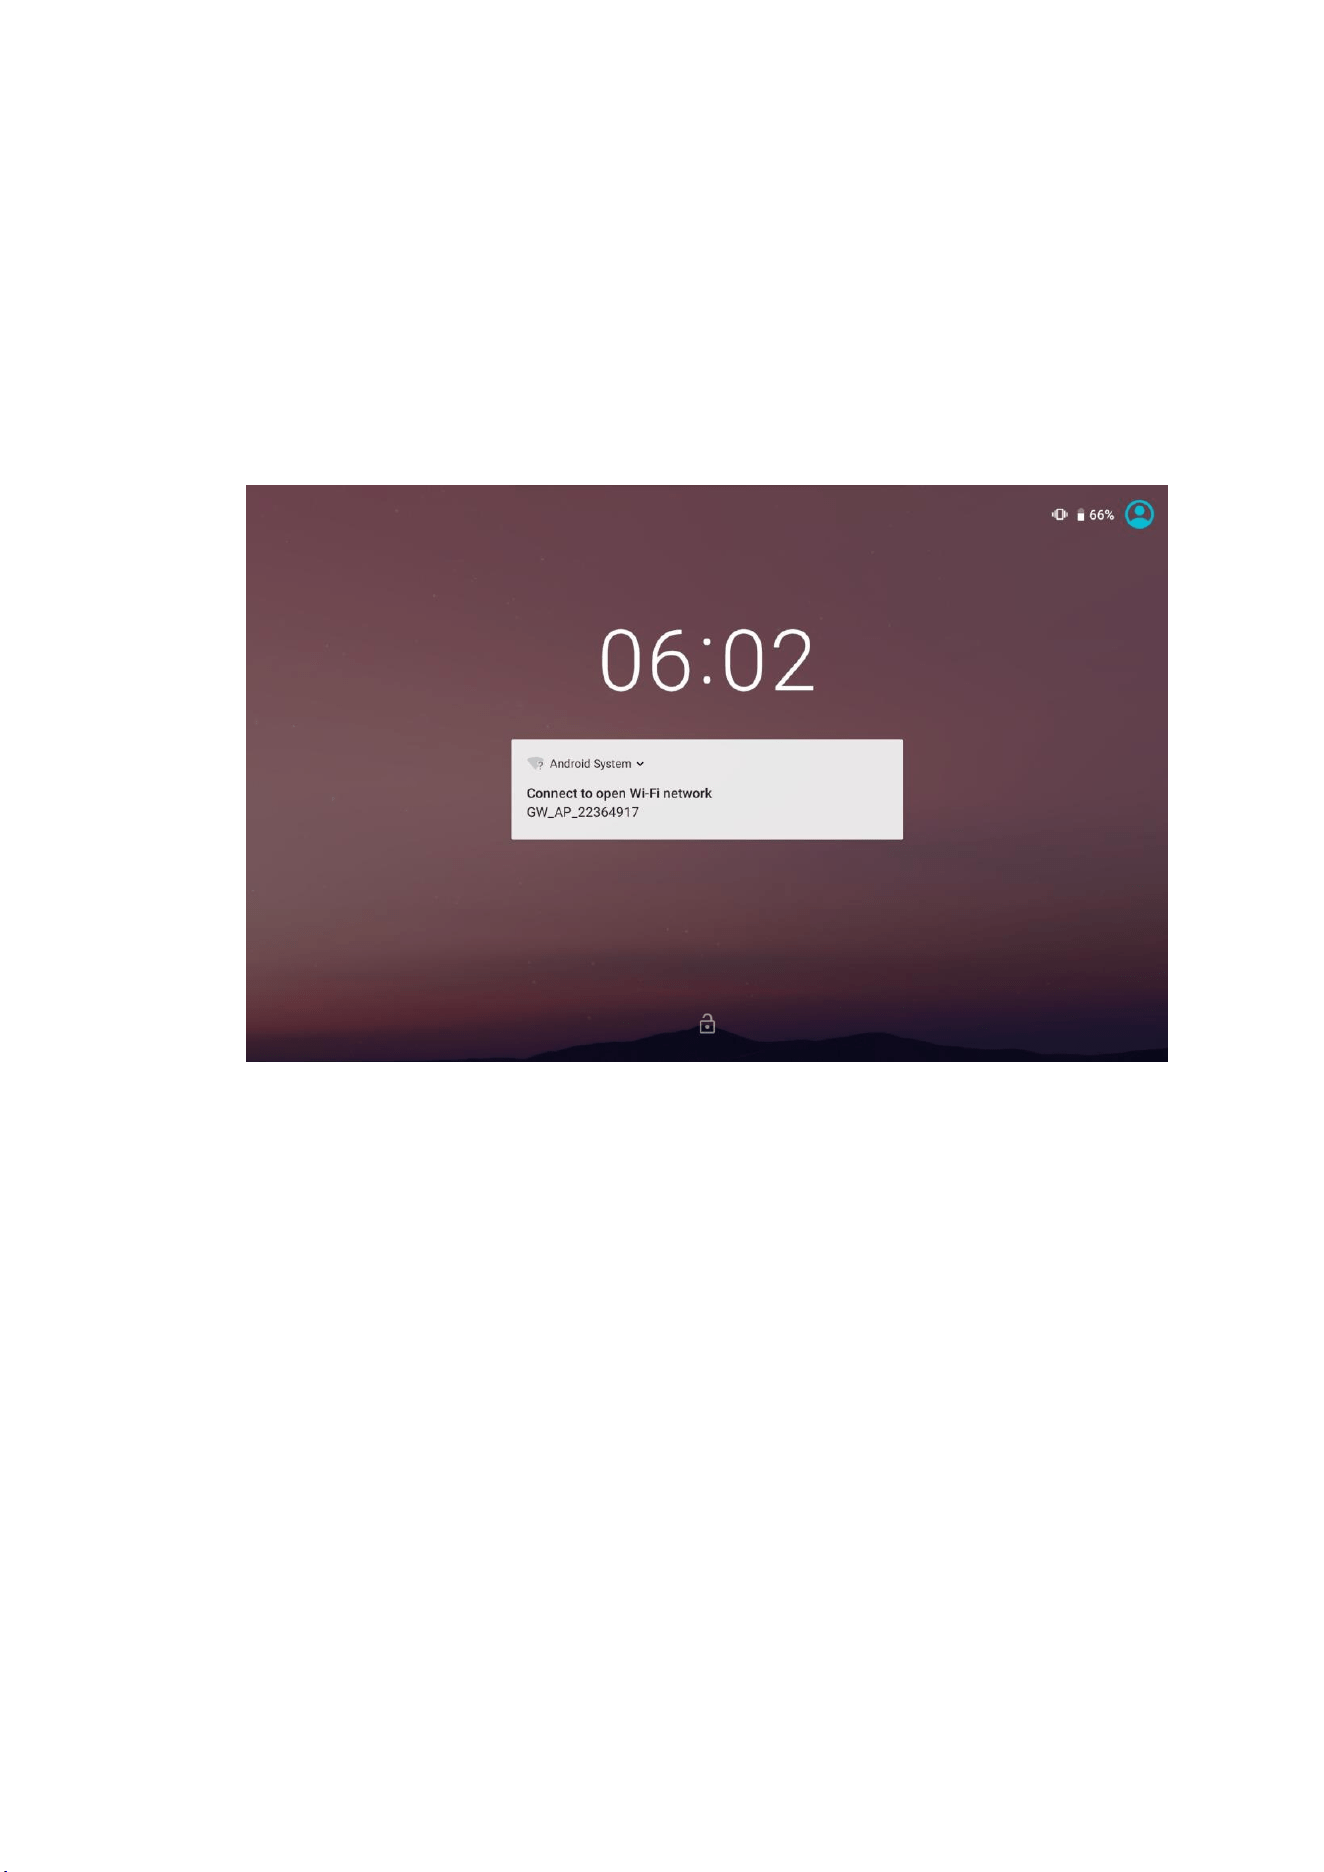
If the screen is closed, you can press the POWER button to open the screen. Open will enter
the lock state, click on the screen on the small lock head, appear as shown in figure 3.1, slide to
the left to unlock into the camera, slide to the right to explain the screen unlock into the dial menu
interface, sliding up is to unlock the screen, enter the standby interface
Figure 3.1
3.4 Use of touch screens
MID operation
A variety of ways to browse the home screen, menus and applications on your MID.
Point selection
When you want to use the screen keyboard input, want to select the application and other
items on the home interface, just touch the click to select.
Hold down

7
To open an option available for an item, such as a text box or link in a web page, or a
shortcut on the home page interface
Mode and main program menu move, just hold down the item.
Fast sliding or sliding
Fast sliding or sliding represents a quick vertical or horizontal drag with a finger on the
screen.
Drag
Before you start dragging, you must hold your fingers and apply some pressure until you
reach the desired position
You can't loosen your fingers before setting them.
Rotation
For most pictures, as long as the MID side rotation can automatically change the screen
direction from horizontal to straight. For example
in input text, music interface, etc.
3.5 Home page interface
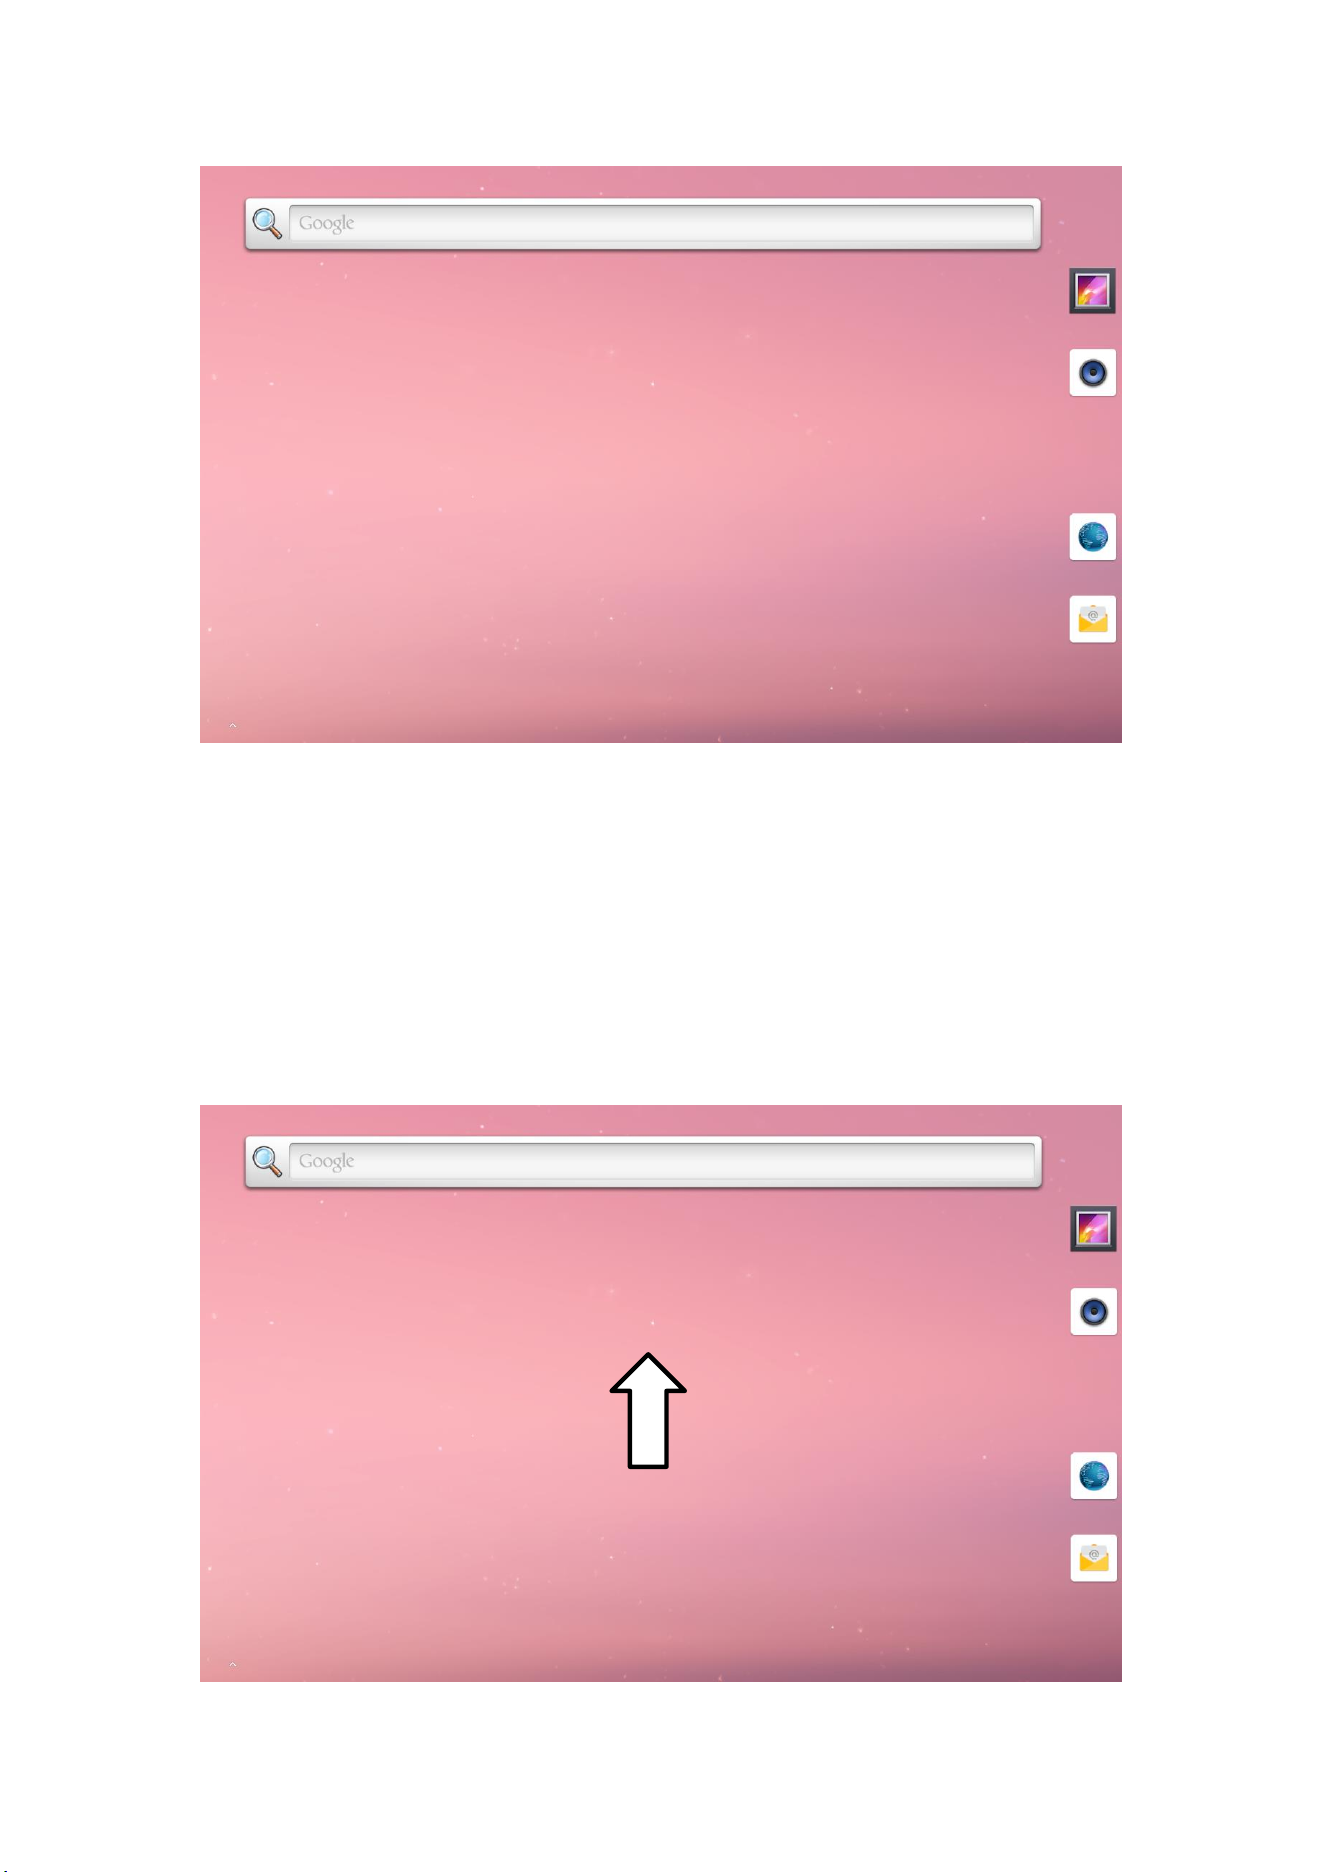
As shown in Figure 3.2, you can use apps, shortcuts, and custom wallpaper for your home
screen.
8
Figure 3.2
Extended home page interface
The home page will extend beyond screen width to provide more space for you to place new
shortcuts, gadgets, etc. Press the blank space of the home page interface, then slide up
quickly with your fingers to enter the home page interface as shown in figure 3-2.1.
9
Figure 3-2.1
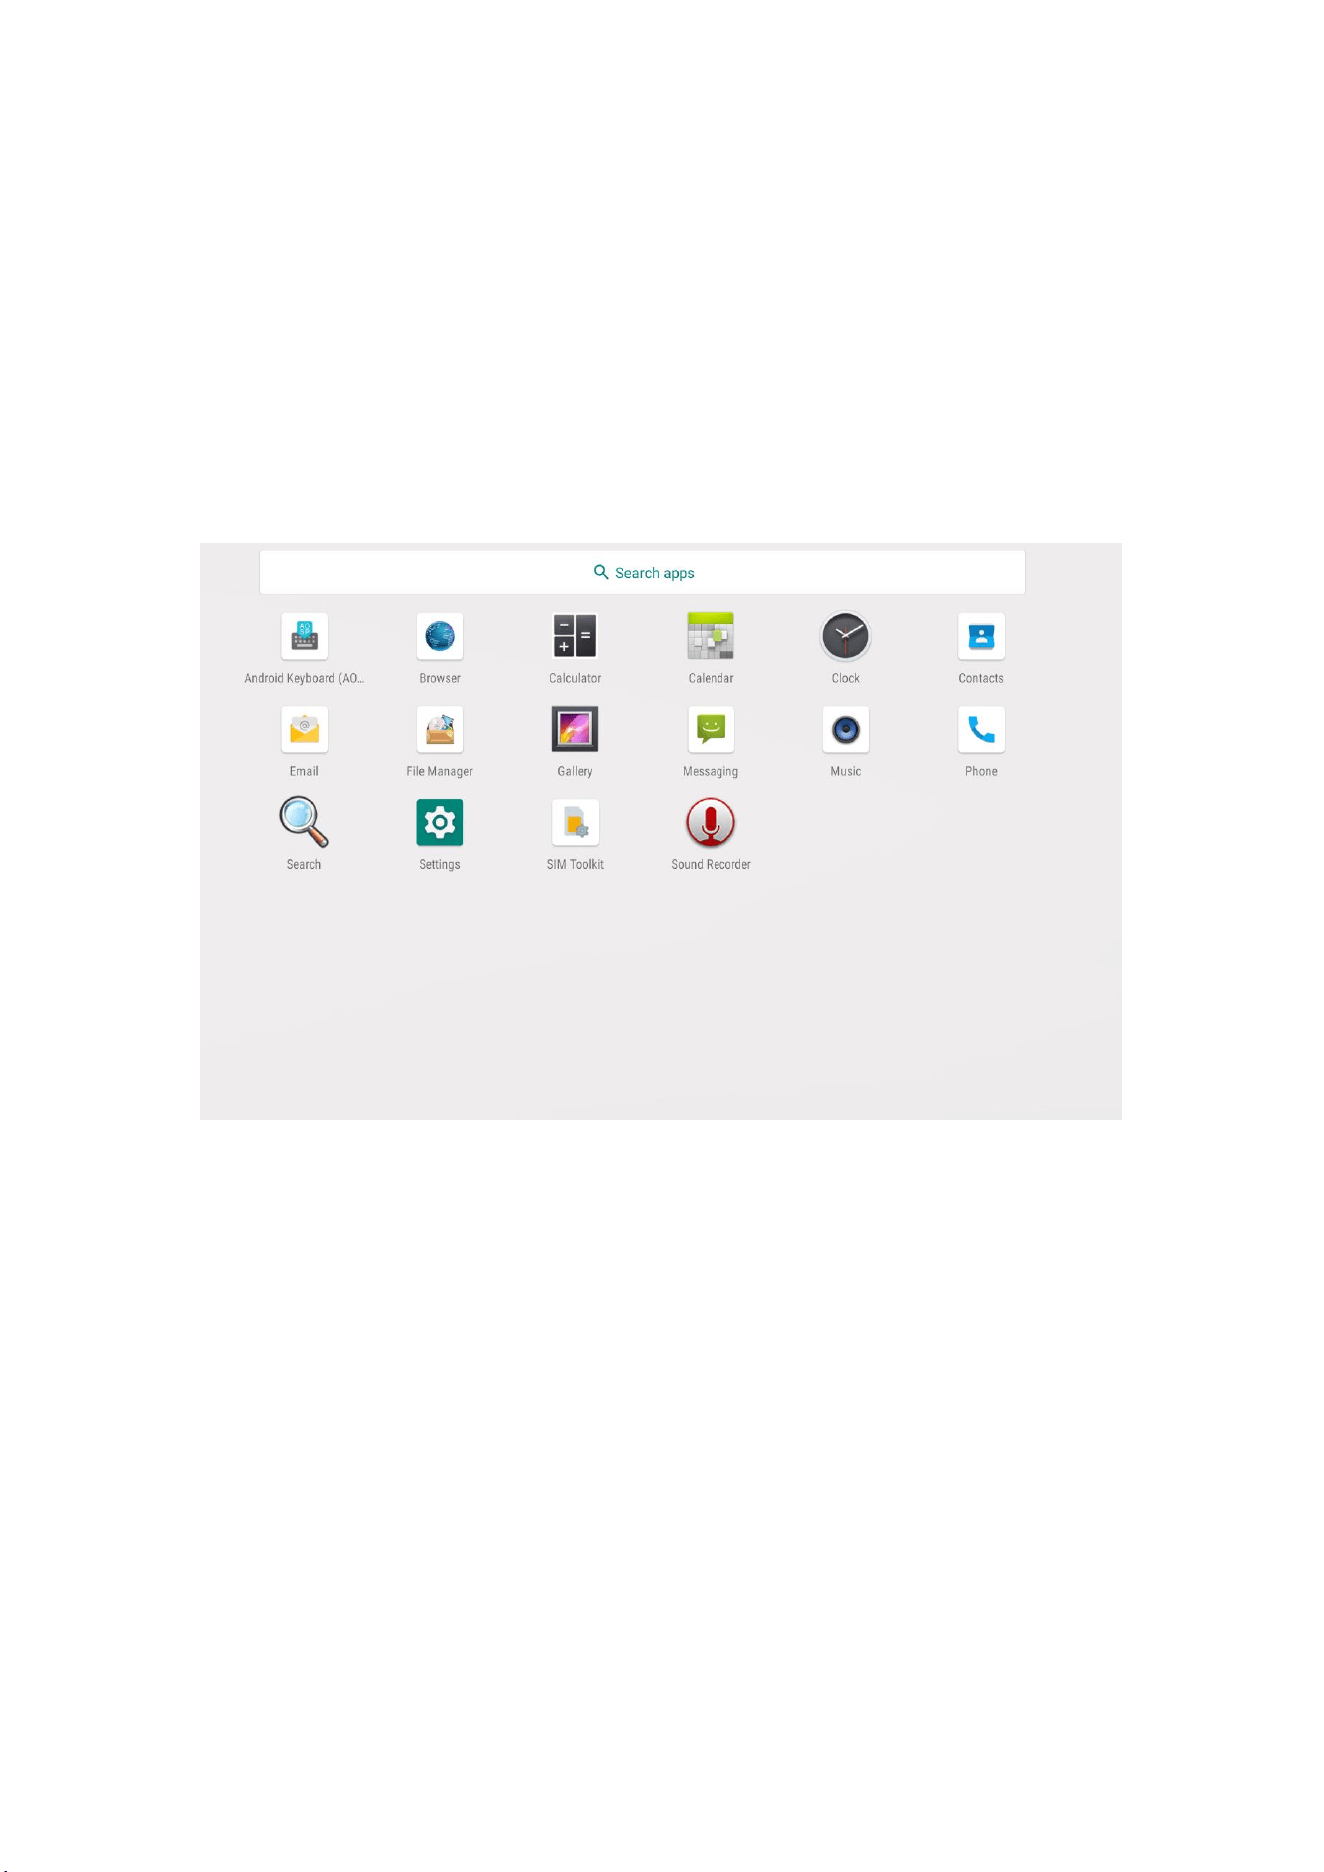
3.6 Access applications
Slide up quickly with your fingers into the main menu interface as shown in figure
3.3; select the application to access.
Figure 3.3
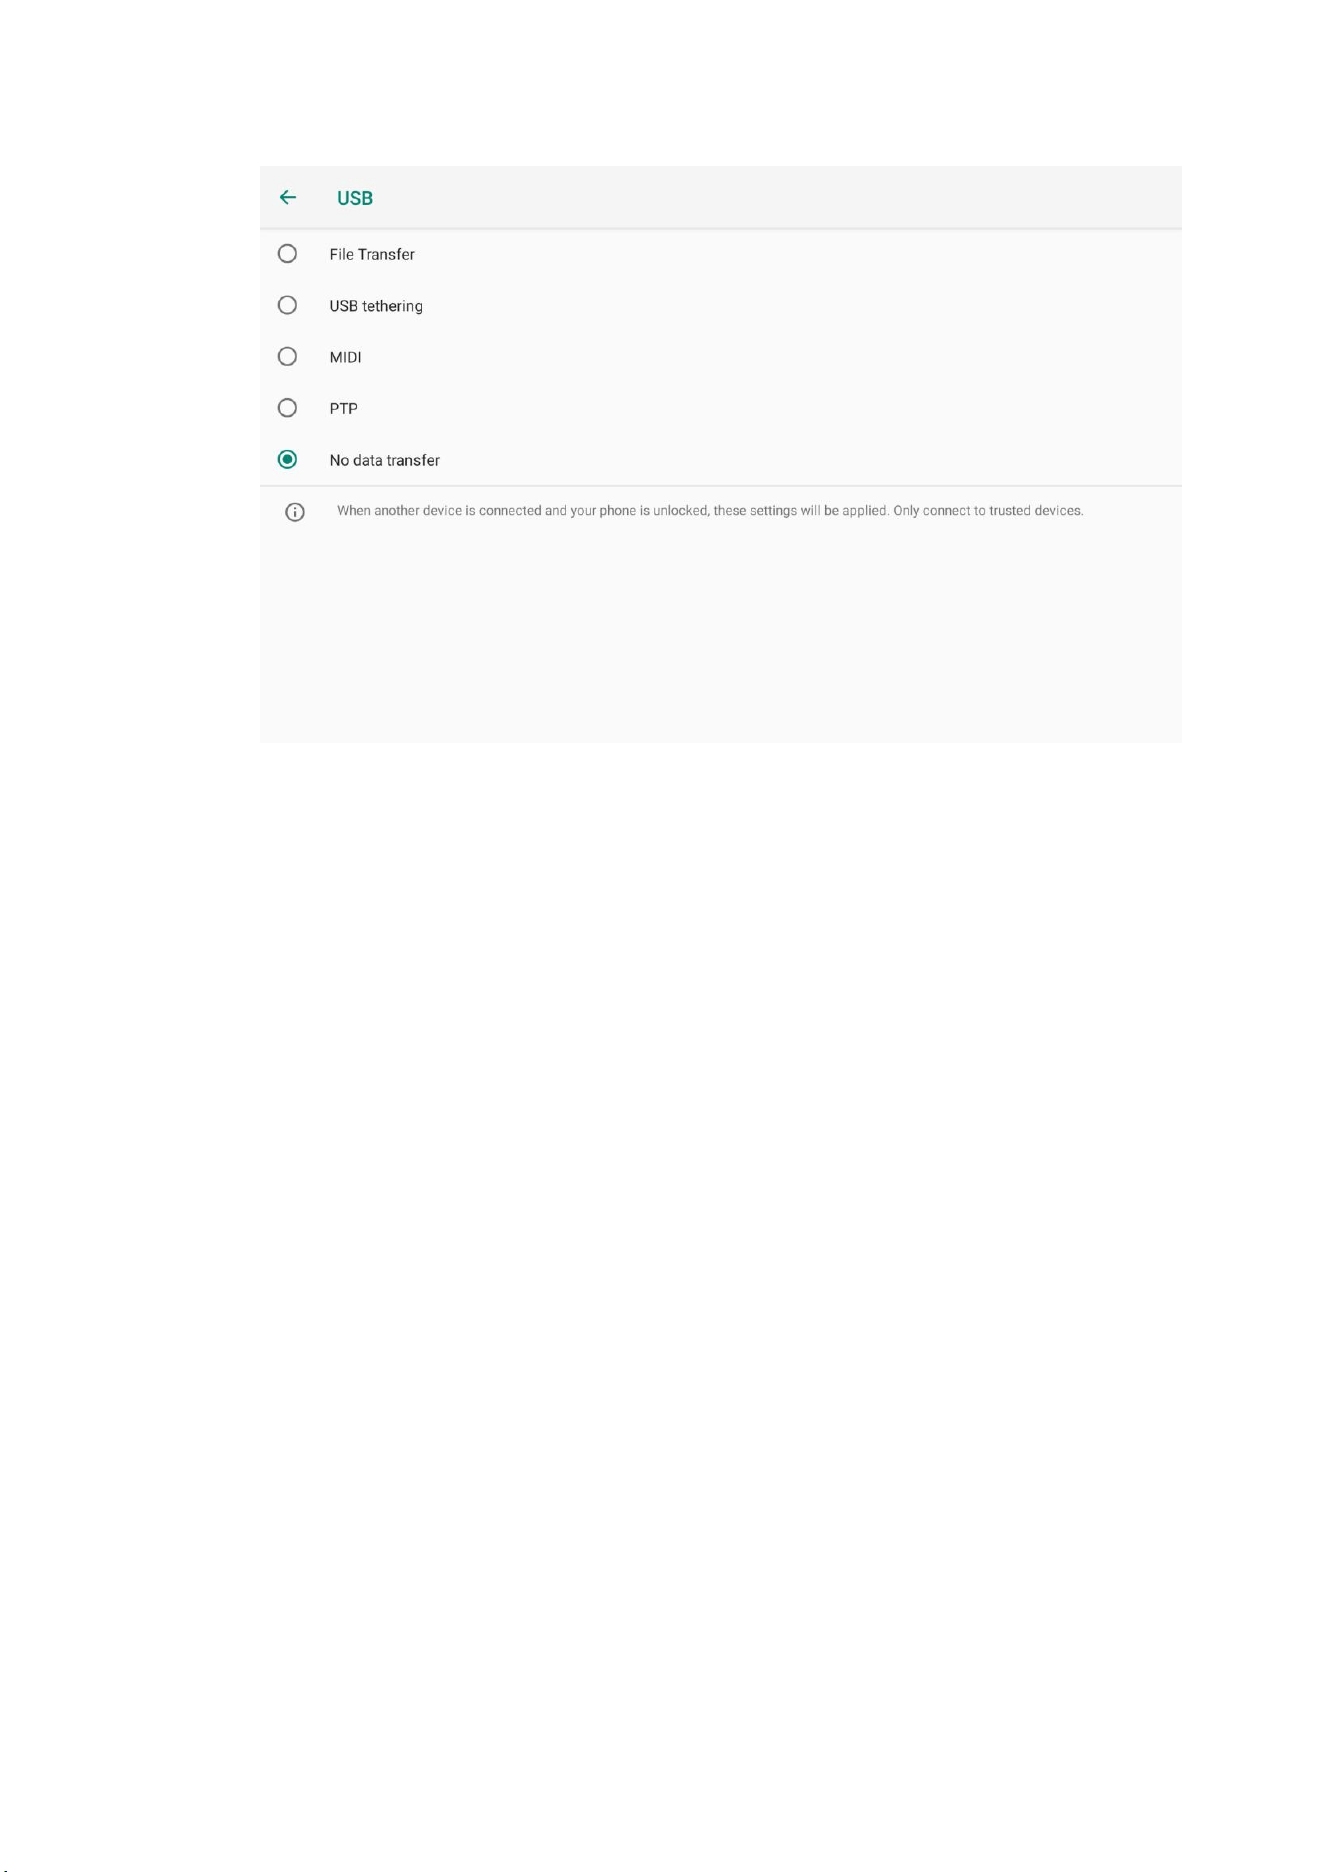
3.7 USB Connections
MID storage settings
Before transferring files, you must first set the storage mode for your MID:
1. Use USB transmission lines to connect the MID to the computer. Notice prompt
will appear in the notice bar.
2. Open the notification panel, how to open the panel please see Chapter 2.3
MID status and notification.
3. On the notification panel, click USB connected, and then click open USB
storage device figure 3.4.
4. At this point USB the connection has been successful.
10
Figure 3.4
Copy the file to the memory card
1. Use USB cable to connect the MID to the computer.
2. According to the MID storage settings, successfully connected to the
computer.
3. open your computer on my computer and view the contents of removable disk
(x) in.
4. Find the file you want to copy and copy to removable disk (x) in.
5. After copying, click close USB Storage device to uninstall.
Note: when your MID is connected to the USB cable, if you open the USB storage device,
you will not be able to access the memory card through the MID, if
you want to access the memory card in the MID, just disconnect the
USB.
3.8 Input text
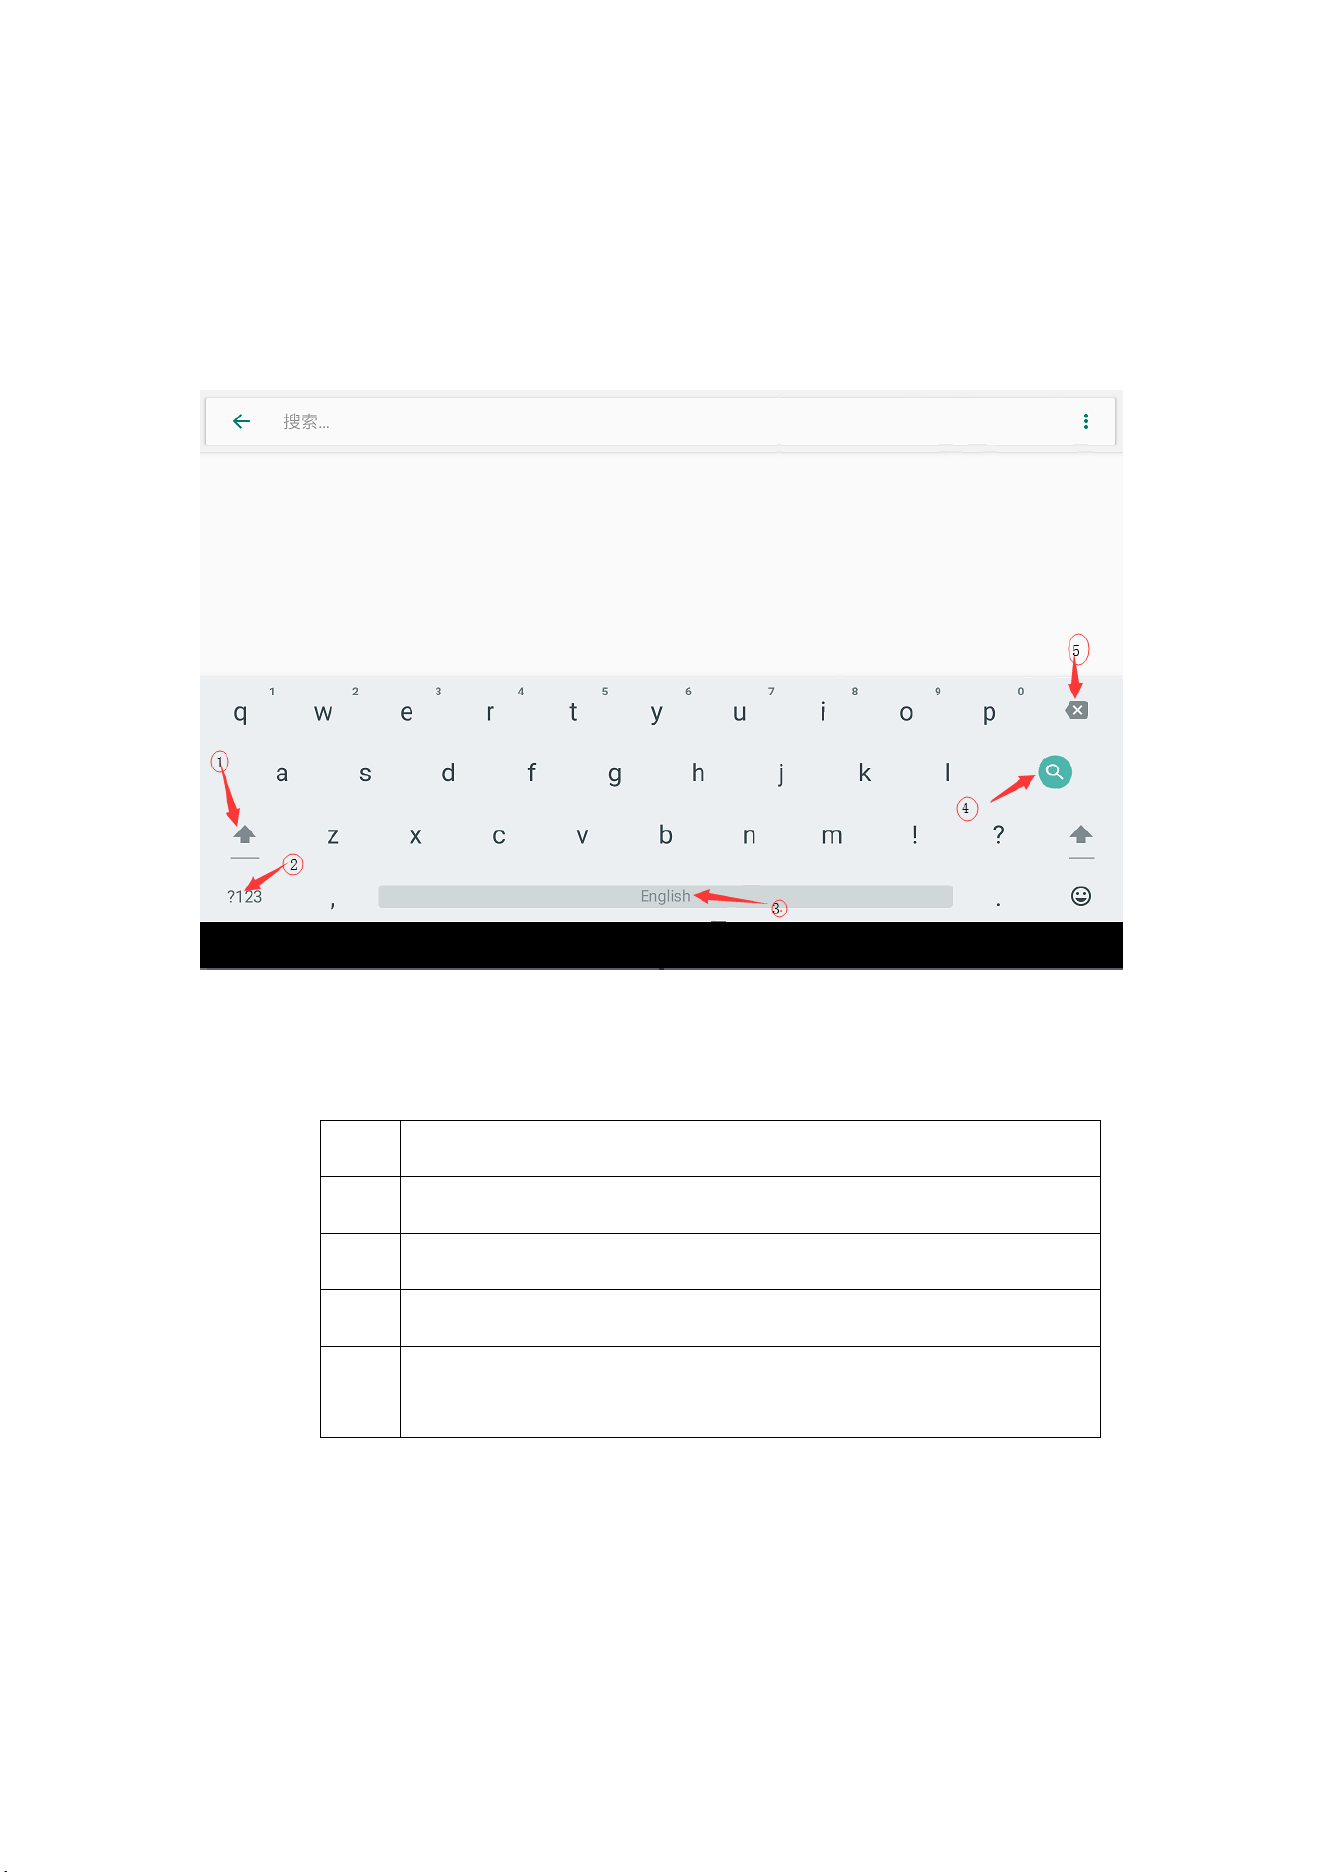
Use of screen keyboards
A screen keyboard appears when you start the program or select a text edit box that needs to
enter text or number. The keyboard has the following input options:
1. Android keyboard
2. Google Pinyin Input
Select the input method you want to use
11
1. Click to set the application.
2. Click language and input method.
3. All installed input methods for your MID are listed in the text settings area.
4. Hook the input method you need.
Using and switching input methods
Figure 3.5
1
Switch input case
2
Input symbols and numbers
3
Click to insert a space
4
Click input to execute
5
Delete the character to the left of the cursor. Click and hold down all
characters to remove the left of the cursor
3.9 Skills
Enter the widget interface
Click on the "widget" above the screen in the application interface or stroke left on the

12
screen to switch to the widget interface.Long press any widget can generate
shortcuts on the desktop, followed by the desktop shortcut icon, can quickly
enter the corresponding application.
Create an application shortcut icon on the desktop
In the application or widget interface, pressing any icon automatically switches to the
desktop, dragging the icon away
Put it anywhere on the desktop.
Tip: The system may require you to make more choices before you can activate the
widget. If there is no space to drag and drop the target position, the widget is
not added to the home screen.
13
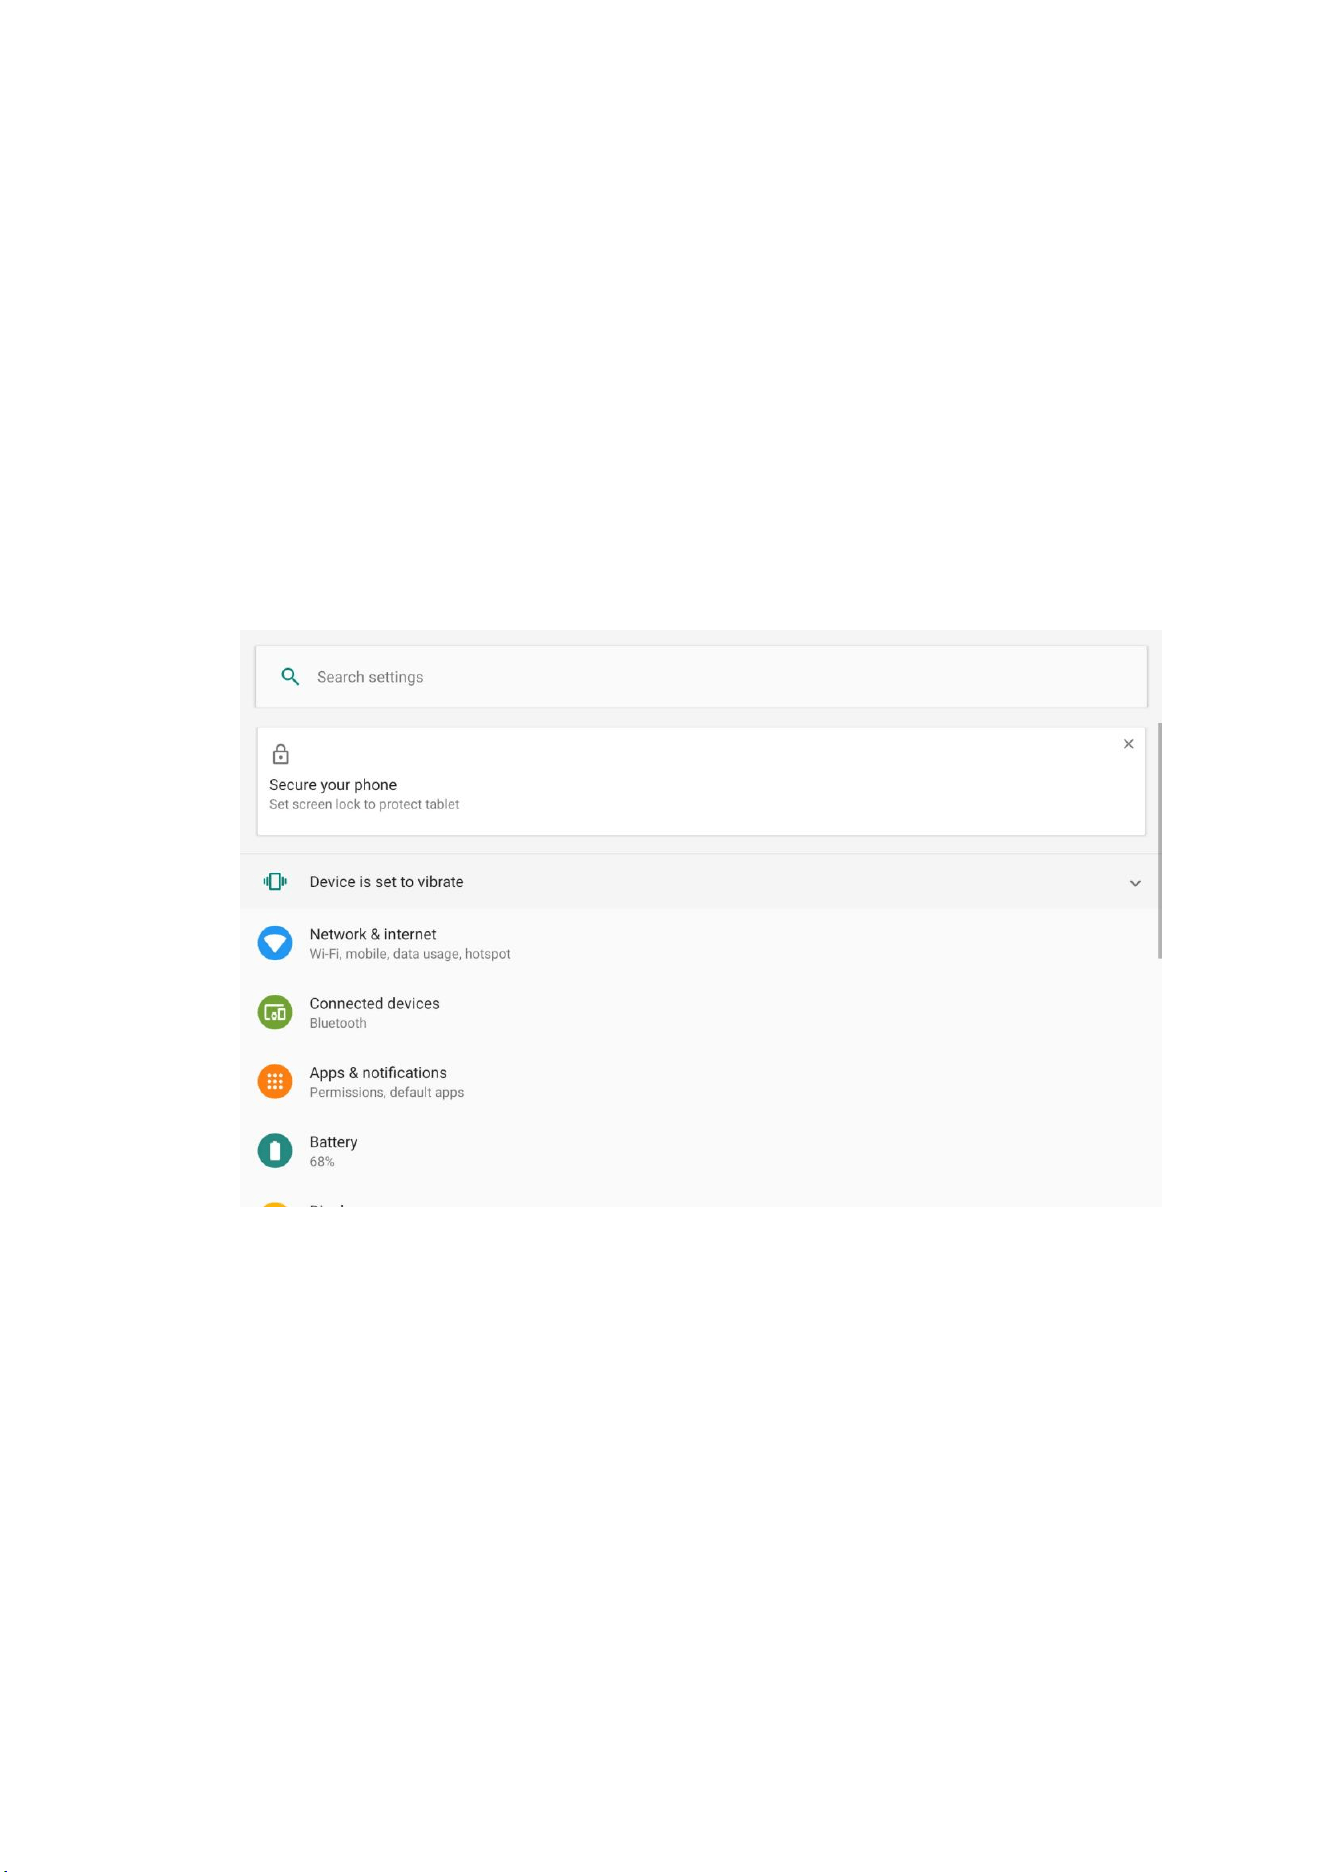
4 Basic
4.1 Wireless and networking
Establish wifi connections
1. Select the setup application at the main menu interface
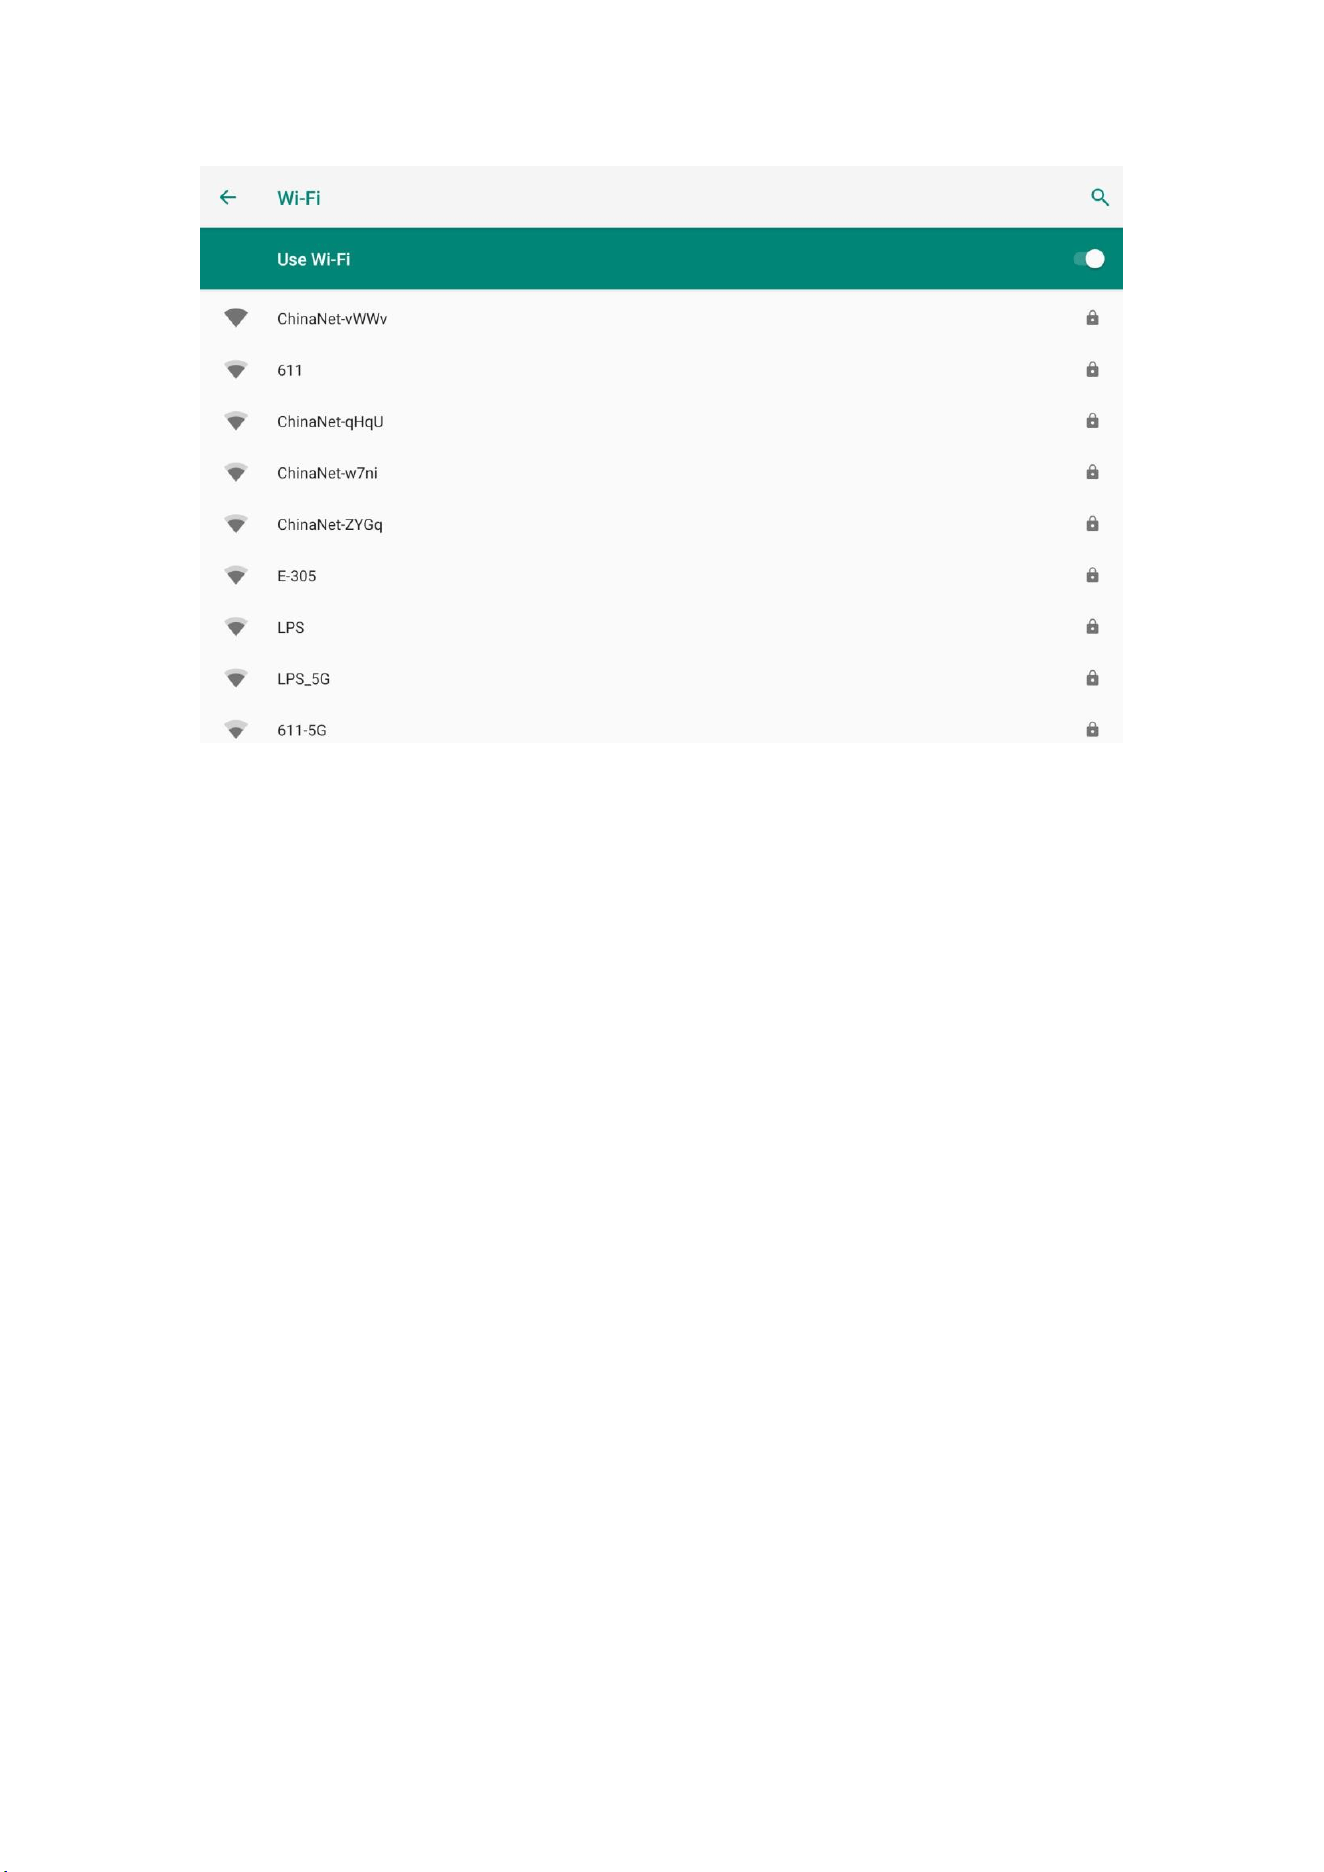
2. The click WLAN, open wifi ,MID automatically scans the available Wi-Fi
wireless network. Figure 4.1
3. Choose the Wi-Fi network you want to connect to, if there is encryption will pop up the
input password window, enter the corresponding password, click on the connection.
Figure 4.1.1
14
Figure 4.1.2
4.2 Bluetooth
Application of Bluetooth Function
1. select the setup application at the main menu interface
2. pick Bluetooth, turn on Bluetooth
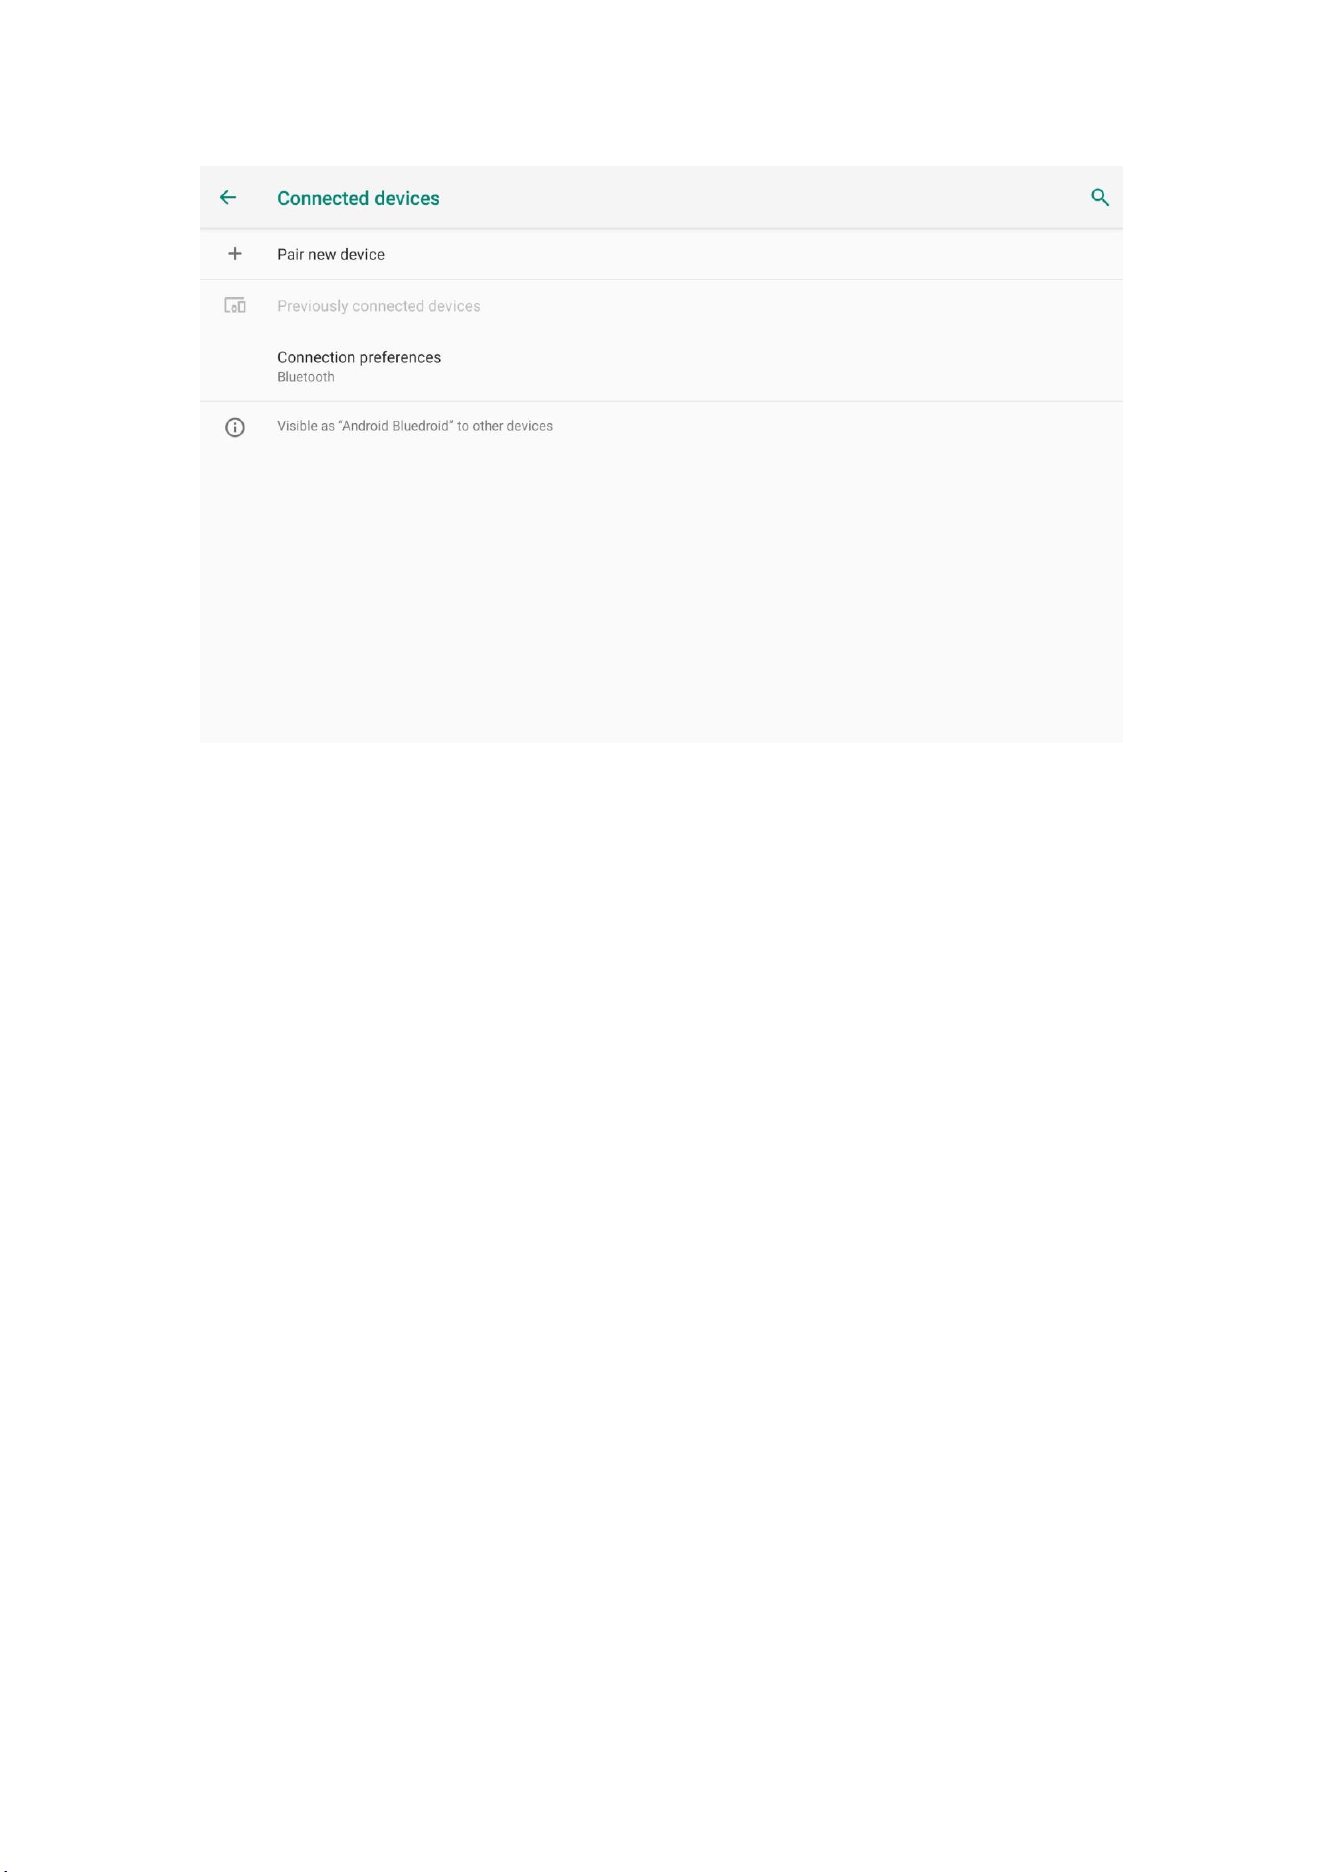
3. someone nearby turns on Bluetooth, click the top right corner search device, MID will
automatically search the nearby Bluetooth device.Figure 4.2
15
Figure 4.2
4. click on the search Bluetooth device, will automatically pop up the matching request
window, enter the corresponding password, and the other side of the corresponding match, you
can match successfully
4.3 Display
Adjust screen brightness
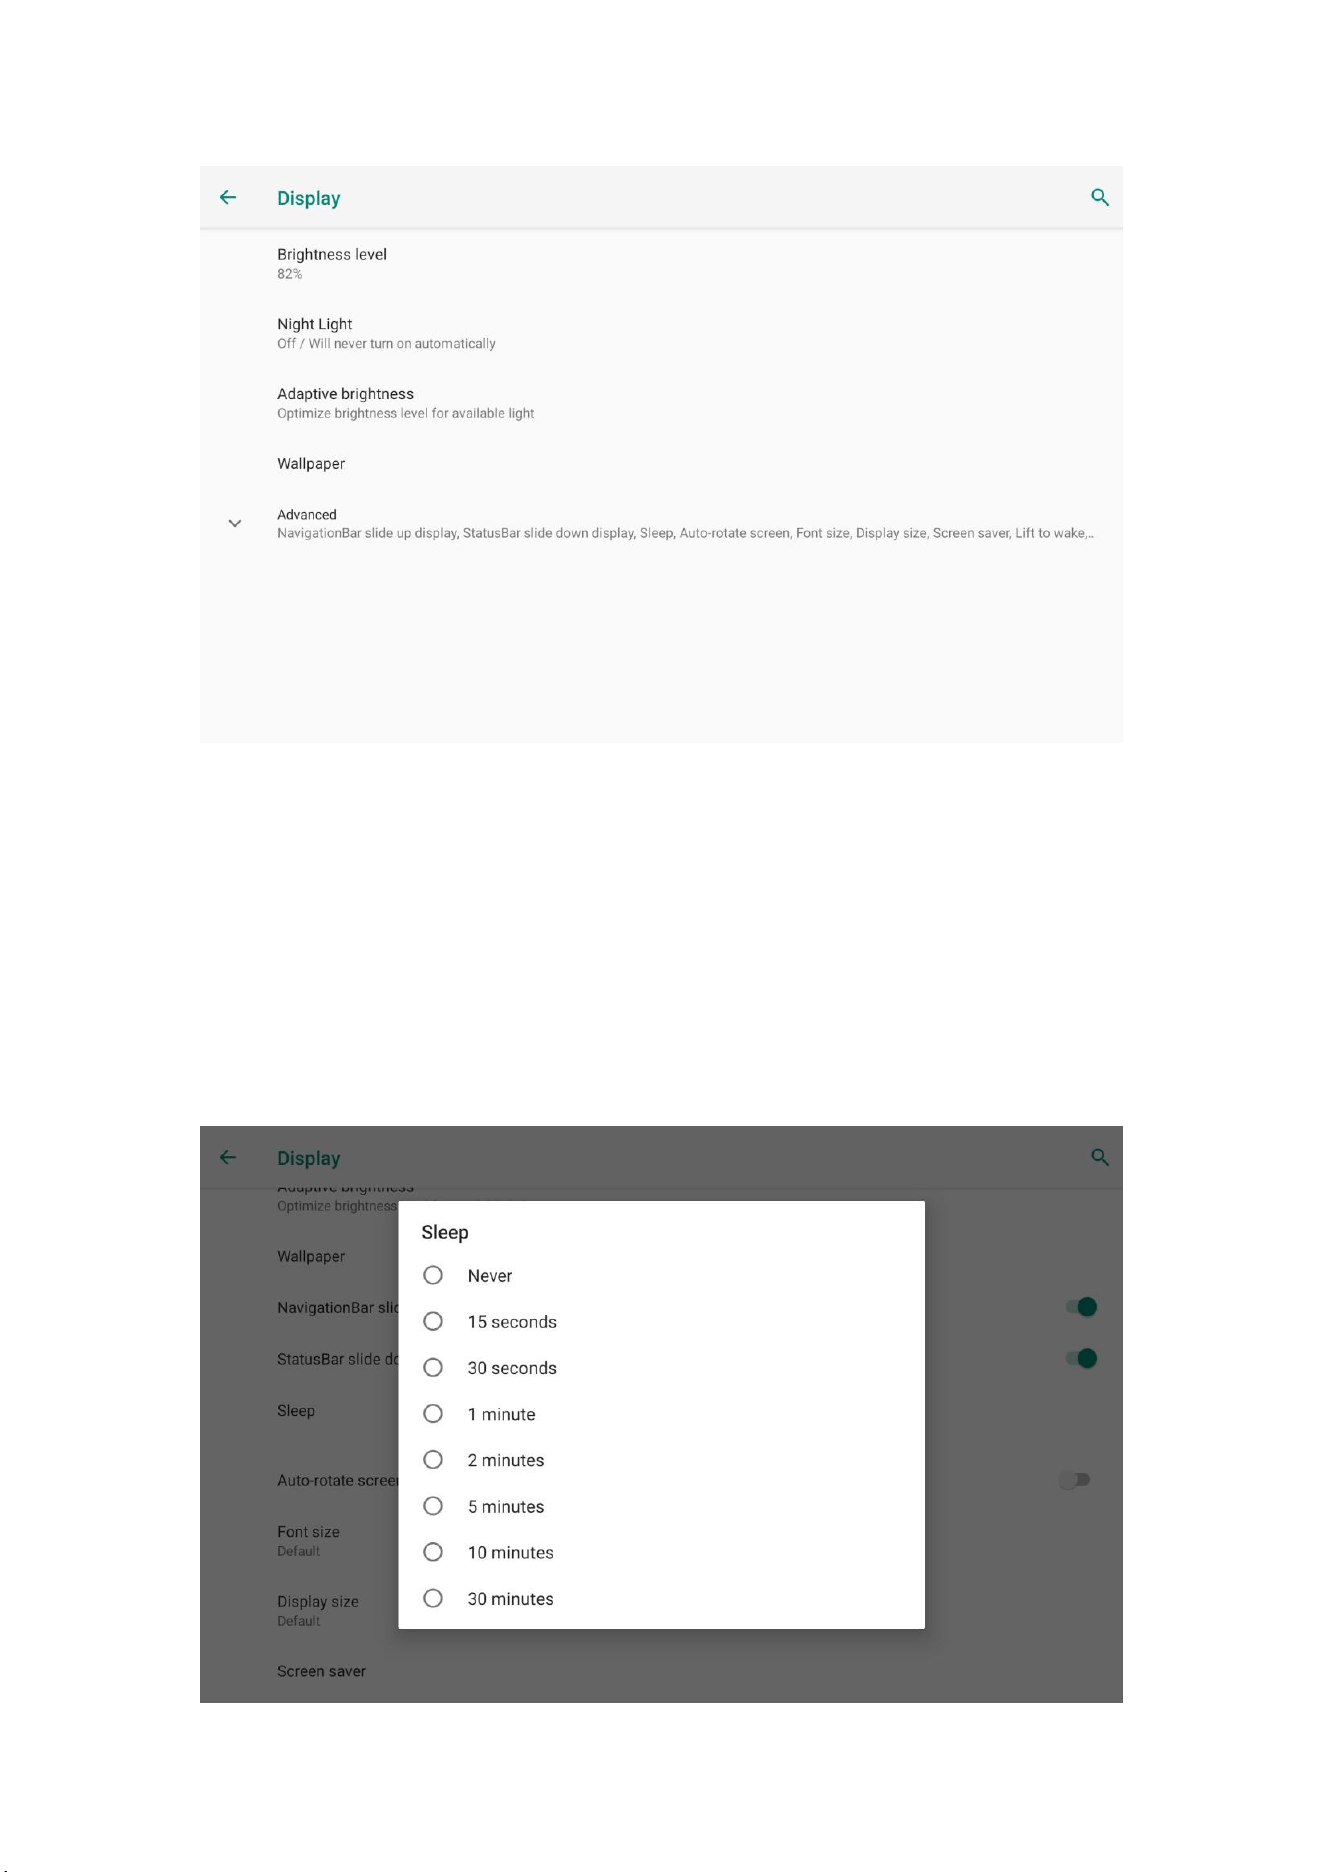
1. Click Setup Application
2. Click display, click brightness.
3. Pop up the brightness setting panel and drag the brightness slider to adjust the dark
brightness.Figure 4.3
16
Figure 4.3
4. adjust brightness, click OK
Adjust screen standby time
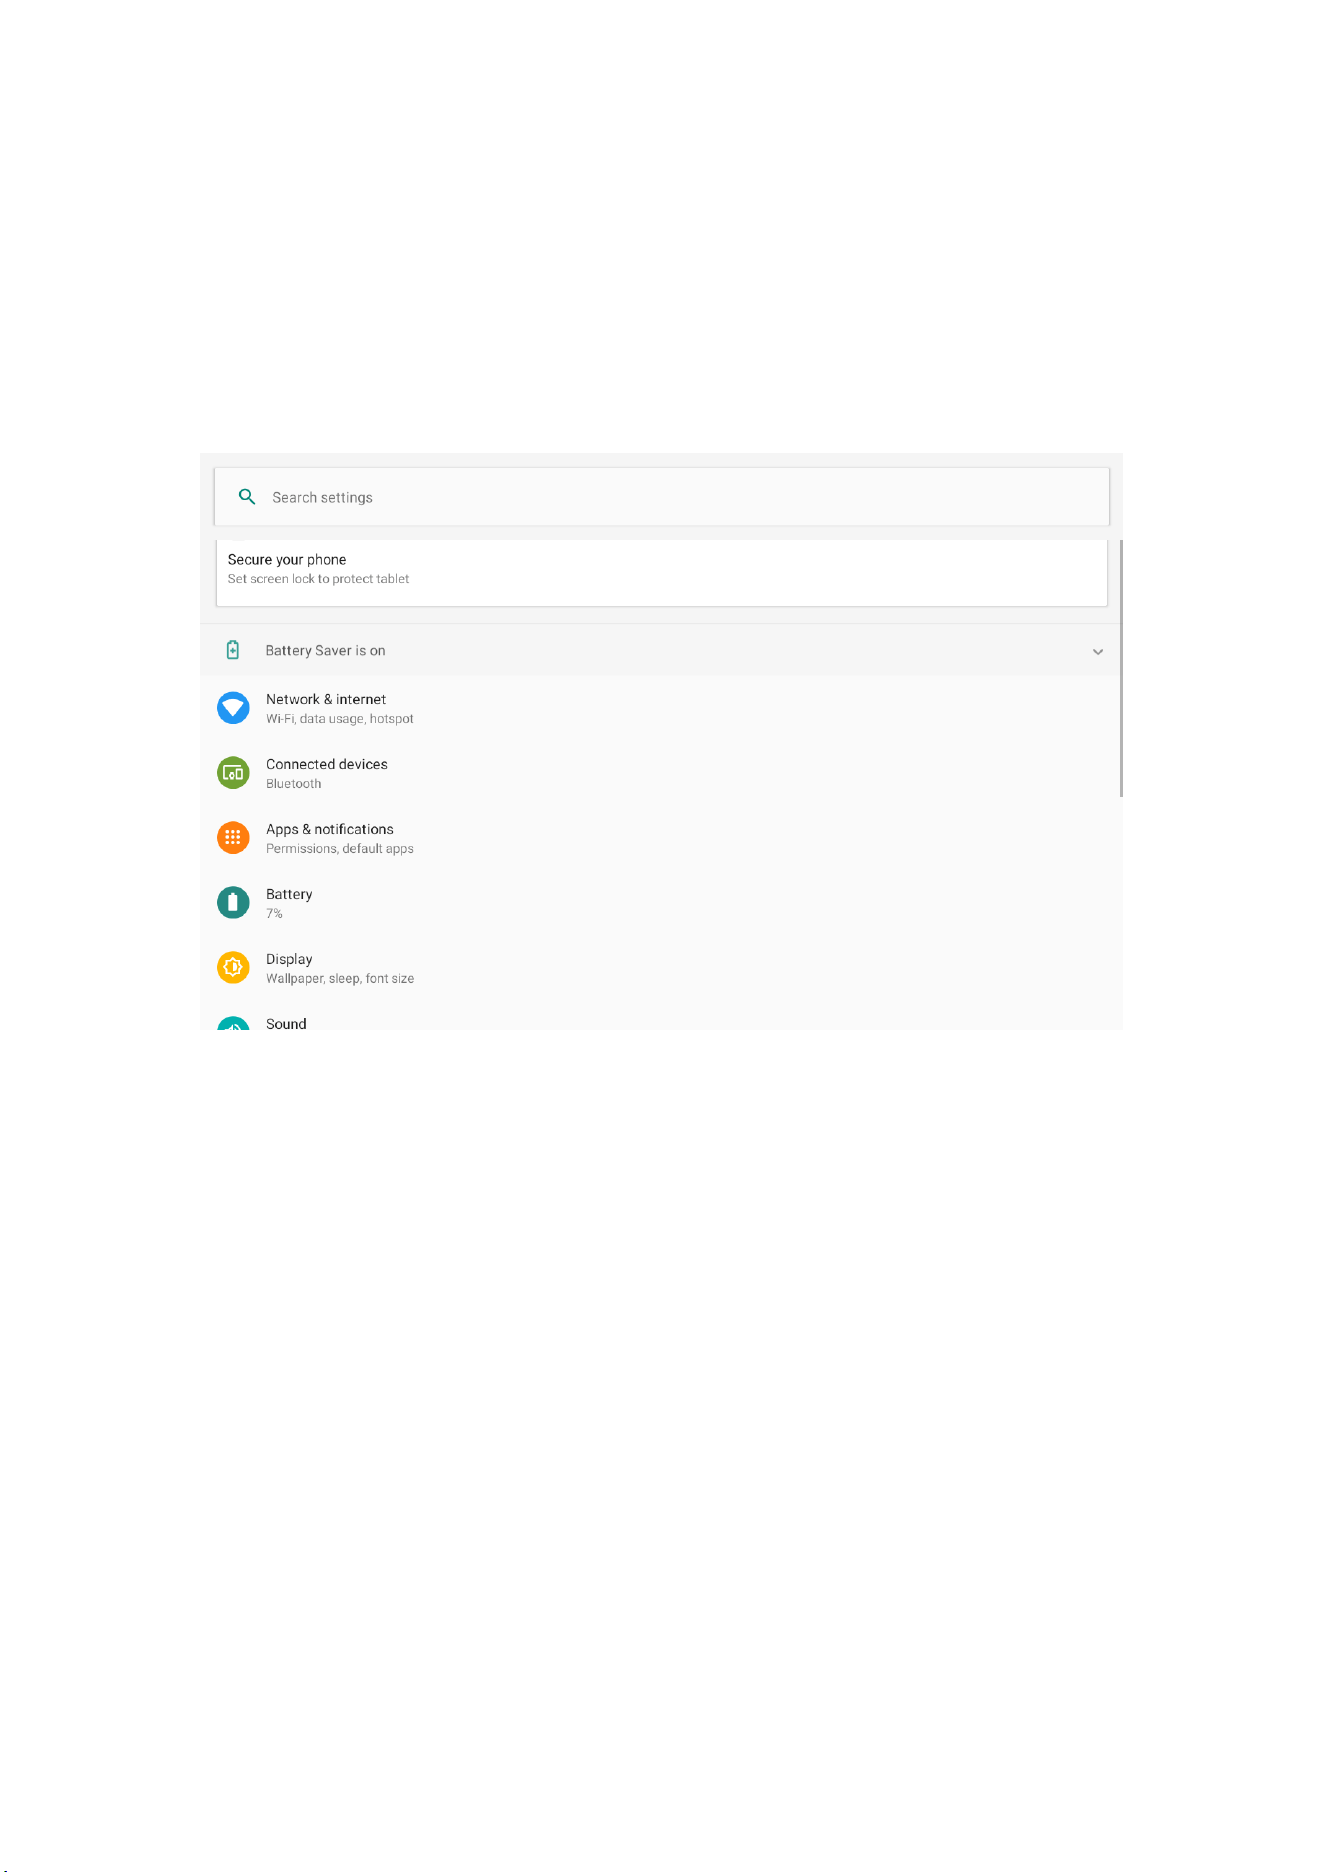
1. Click to set the application.
2. Click display-Advanced —— hibernation.
3. Click "screen delay ".
4. pop-up screen standby time setting, select the standby time you want.Figure 4.5
17
4.5
4.4 Management applications
1. Select Setup in the application list
2. Select the application and notification items that will manage and enter, you can manage and
delete the installed application (Figure 4.6)
Figure 4.6
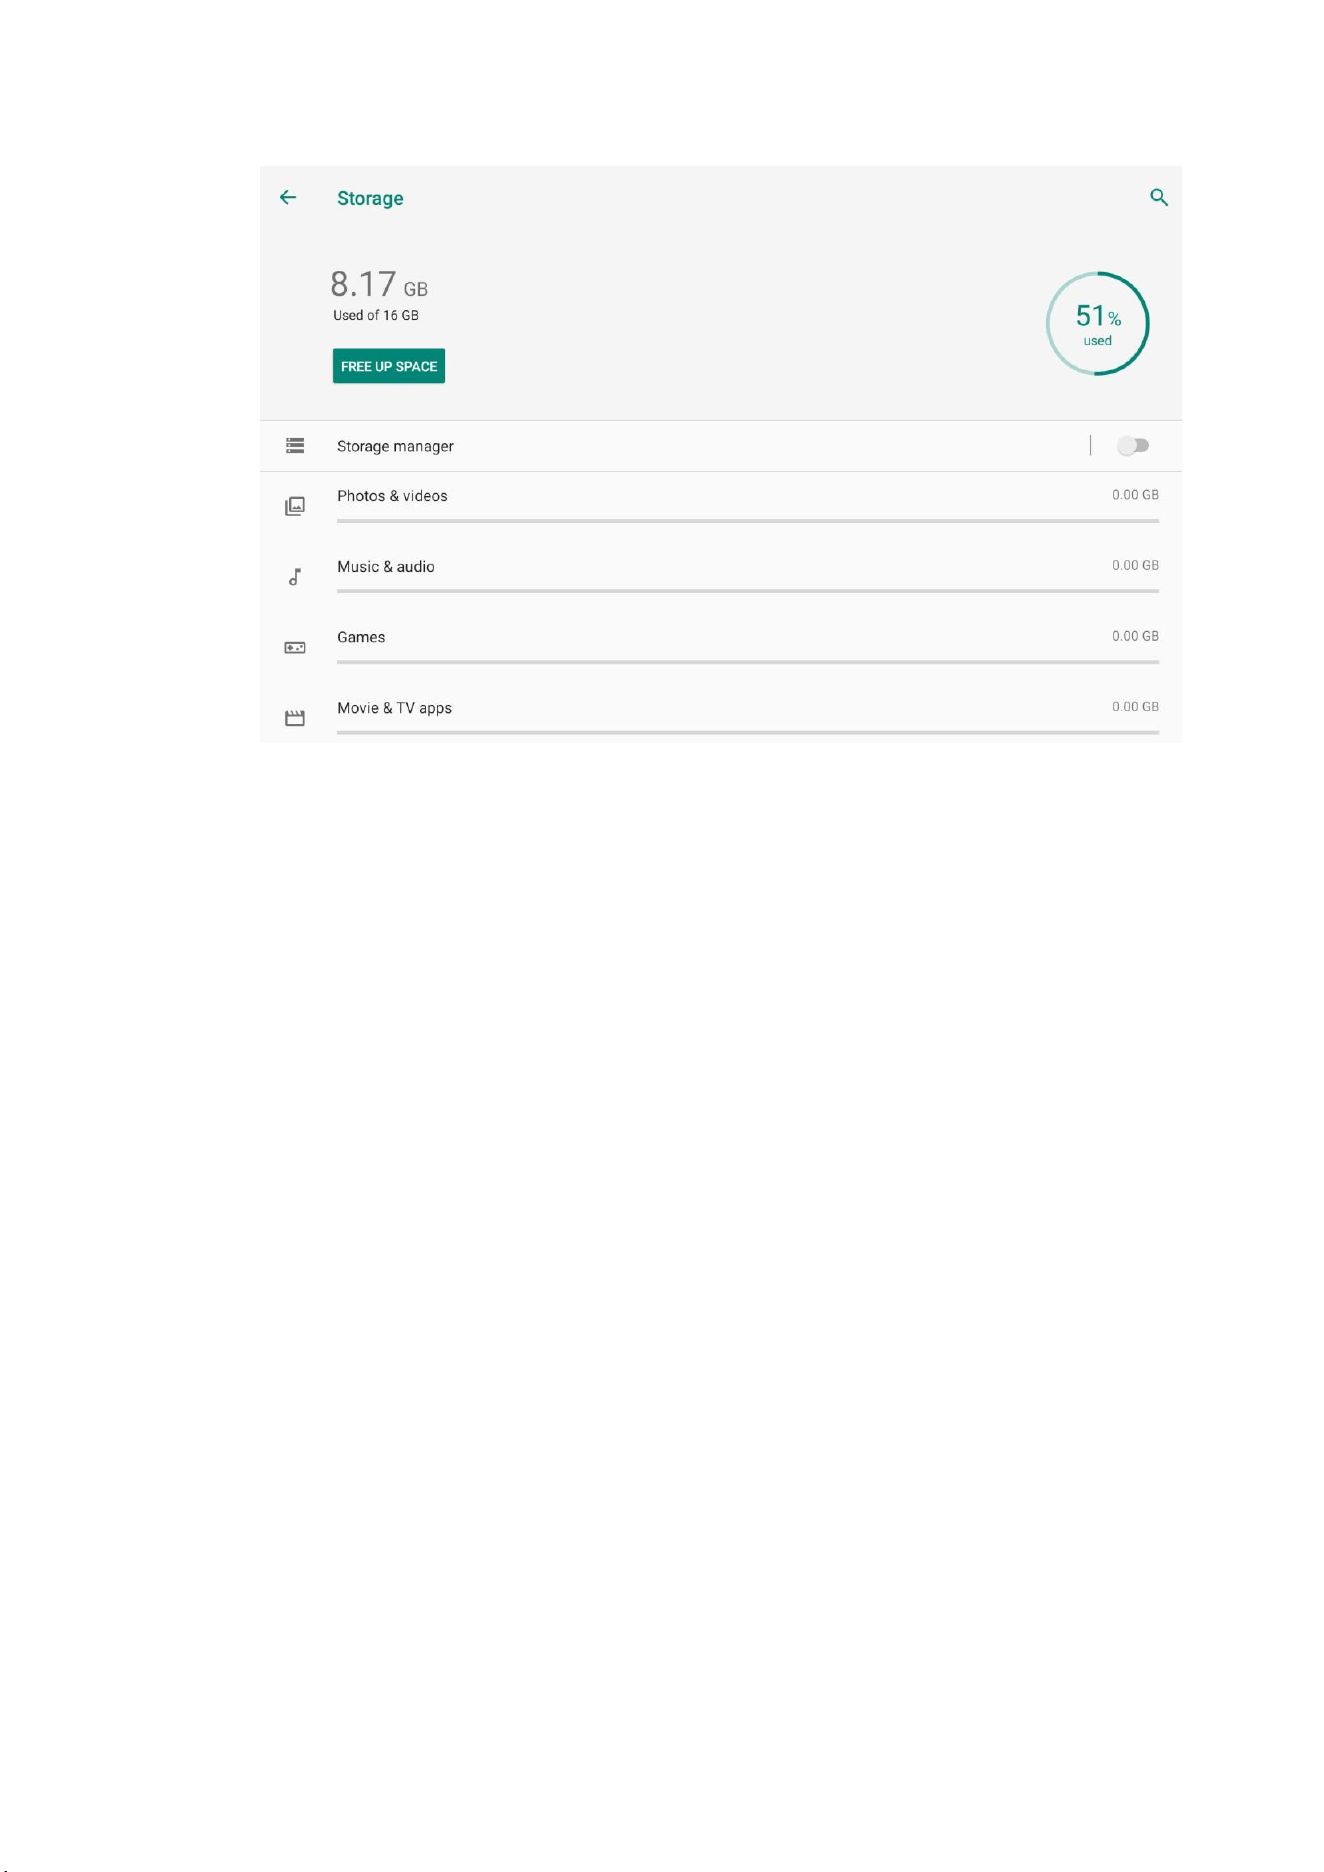
4.5 MID storage
view MID store available space
1. enter the setup application.
2. Click Storage
3. view MID internal storage space.
18
Figure 4.7
4.6 Date and time
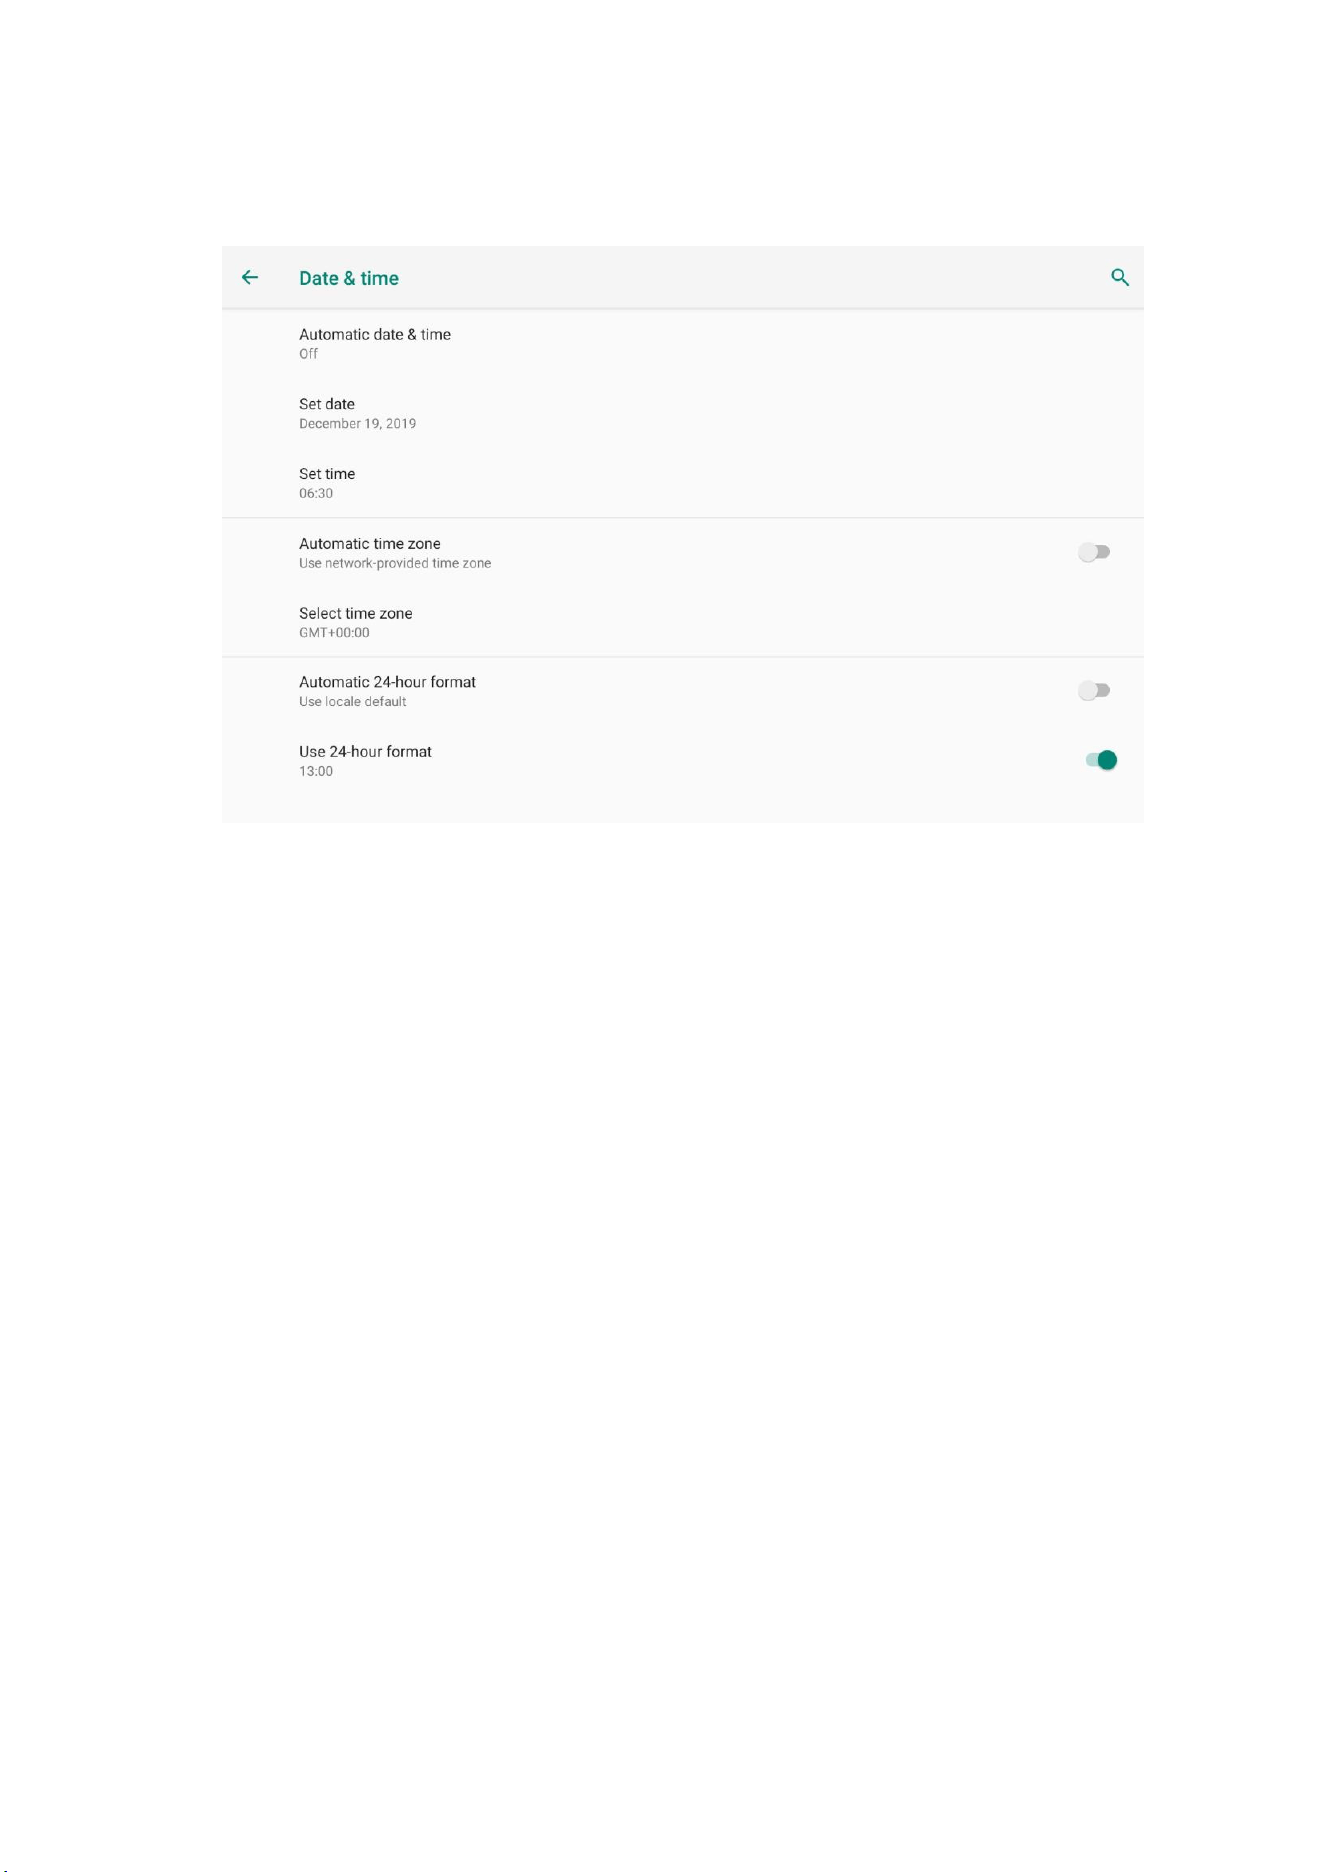
By default, the system automatically uses the date, time zone, and time provided by the network.
Manually adjust dates, times and time zones
1. Click to set the application.
2. scroll down the screen and click on the date and time.
3. Turn off automatic date and time.
4. Turn off automatic time zone
5. Click to select the time zone, and then select the time zone in the list. scroll down the
list to see more time zones.
6. Click the set date, then click the up button or down button to adjust the date, month and
year, and complete the time point selection settings.
7. Click set time. Then click the up button or down button to adjust the hour and minute,
click the AM or PM to change the morning or afternoon (there is no such option when
selecting to use the 24-hour format). Click the settings to complete.
8. Select the 24-hour format check box to switch between 12-hour or 24-hour systems.
The selected time format will also be applied to the alarm clock display time format.
19
9. Click to select the date format, and then select the format to display the date on the
MID.
Figure 4.8
Note: You can not set your own date, time, and time zone by automatically using the time
provided by the network.
4.7 Setting language
1. Click Setup Application
2. Click language and input method.
3. Click the language and then select the language you need. scroll down the list to see
more languages.
4.8 About tablet computers
View MID Status
1. enter the setup application.
2. Click on the tablet computer.You can view status messages, models, version
numbers and other information.
3. enter the setup application.

20
4. Click on the plate.
View System Version
1. enter the setup application.
2. Click on the tablet computer.
3. You can see the model, electricity usage and internal version, etc.
4.9 Security settings
Setup screen lock
Can use unlock pattern or password to lock touch screen to protect your MID privacy
Note: after setting the screen lock, every time you turn on or unlock the touch screen,
you will be required to enter the unlock code.
Set Unlock Patterns
1. In the home page interface, click set the application.
2. Click on security and location information.
3. Click screen lock.
4. In the pop-up text settings area, select the pattern
5. Select the next step according to the prompt.
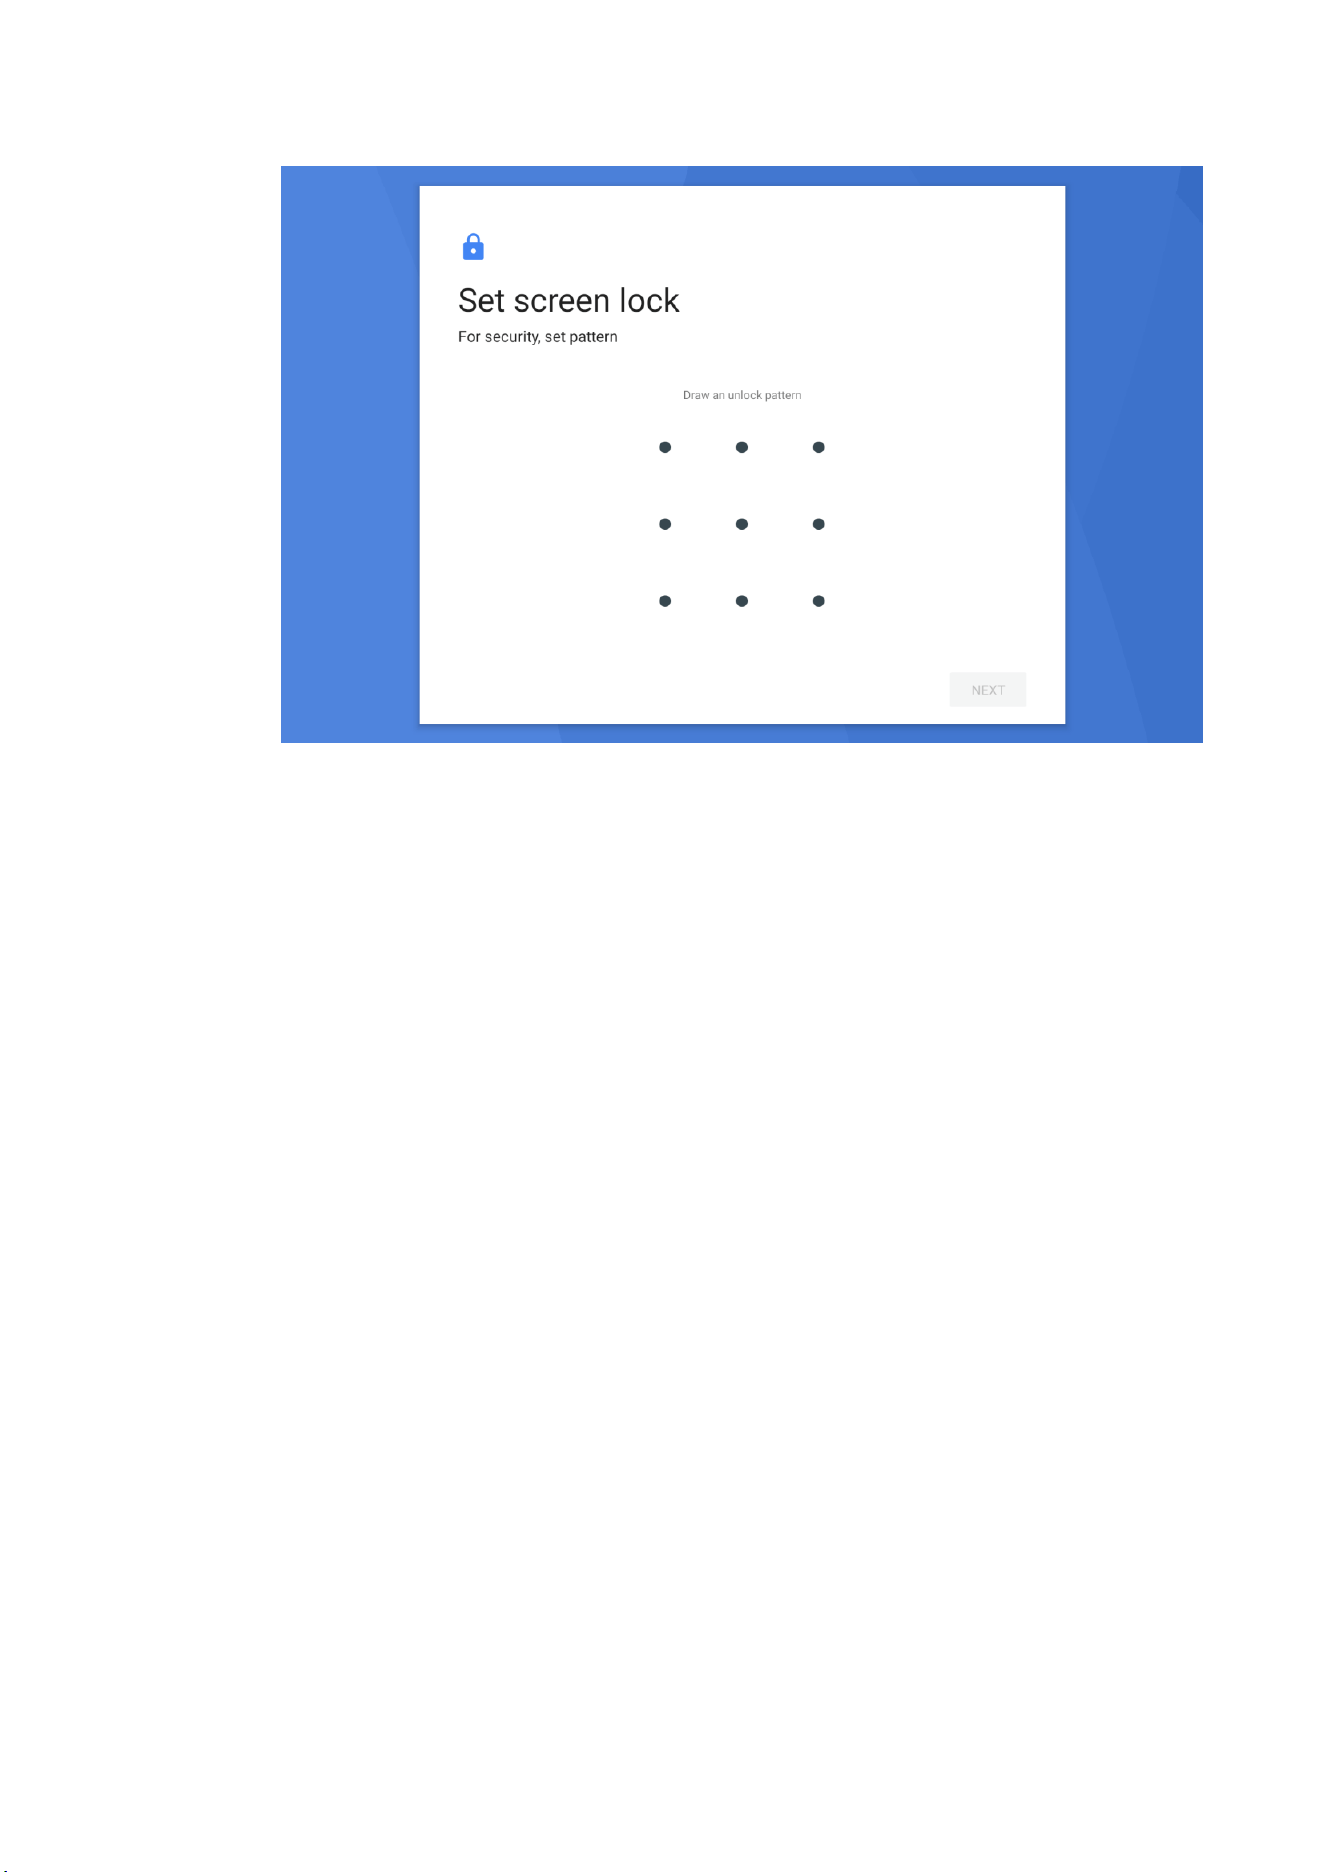
6. pop up unlock pattern panel, the pattern has 9 contacts. Connect at least 4
points in vertical, horizontal or diagonal direction.As shown in figure 4.9, the
finger leaves the screen when finished. The system records the pattern you
set.
7. Click to continue.
8. When you see the prompt, draw a screen unlock pattern again and click
confirm.
21
Figure 4.9
Setting Unlock PIN Code
1. In the main interface, click set the application.
2. Click on security and location information.
3. Click screen lock.
4. At the pop-up text settings area, select PIN.
5. Enter a new PIN code (number) and choose to continue.
6. Enter the new PIN code again and select OK.
Set Unlock Password
1. In the main interface, click set the application.
2. Click safe.
3. Click screen lock.
4. In the pop-up text setting area, select the password.
5. Set the new password (alphanumeric) and select Continue.
6. Enter the password again and select OK.
22
5 Media
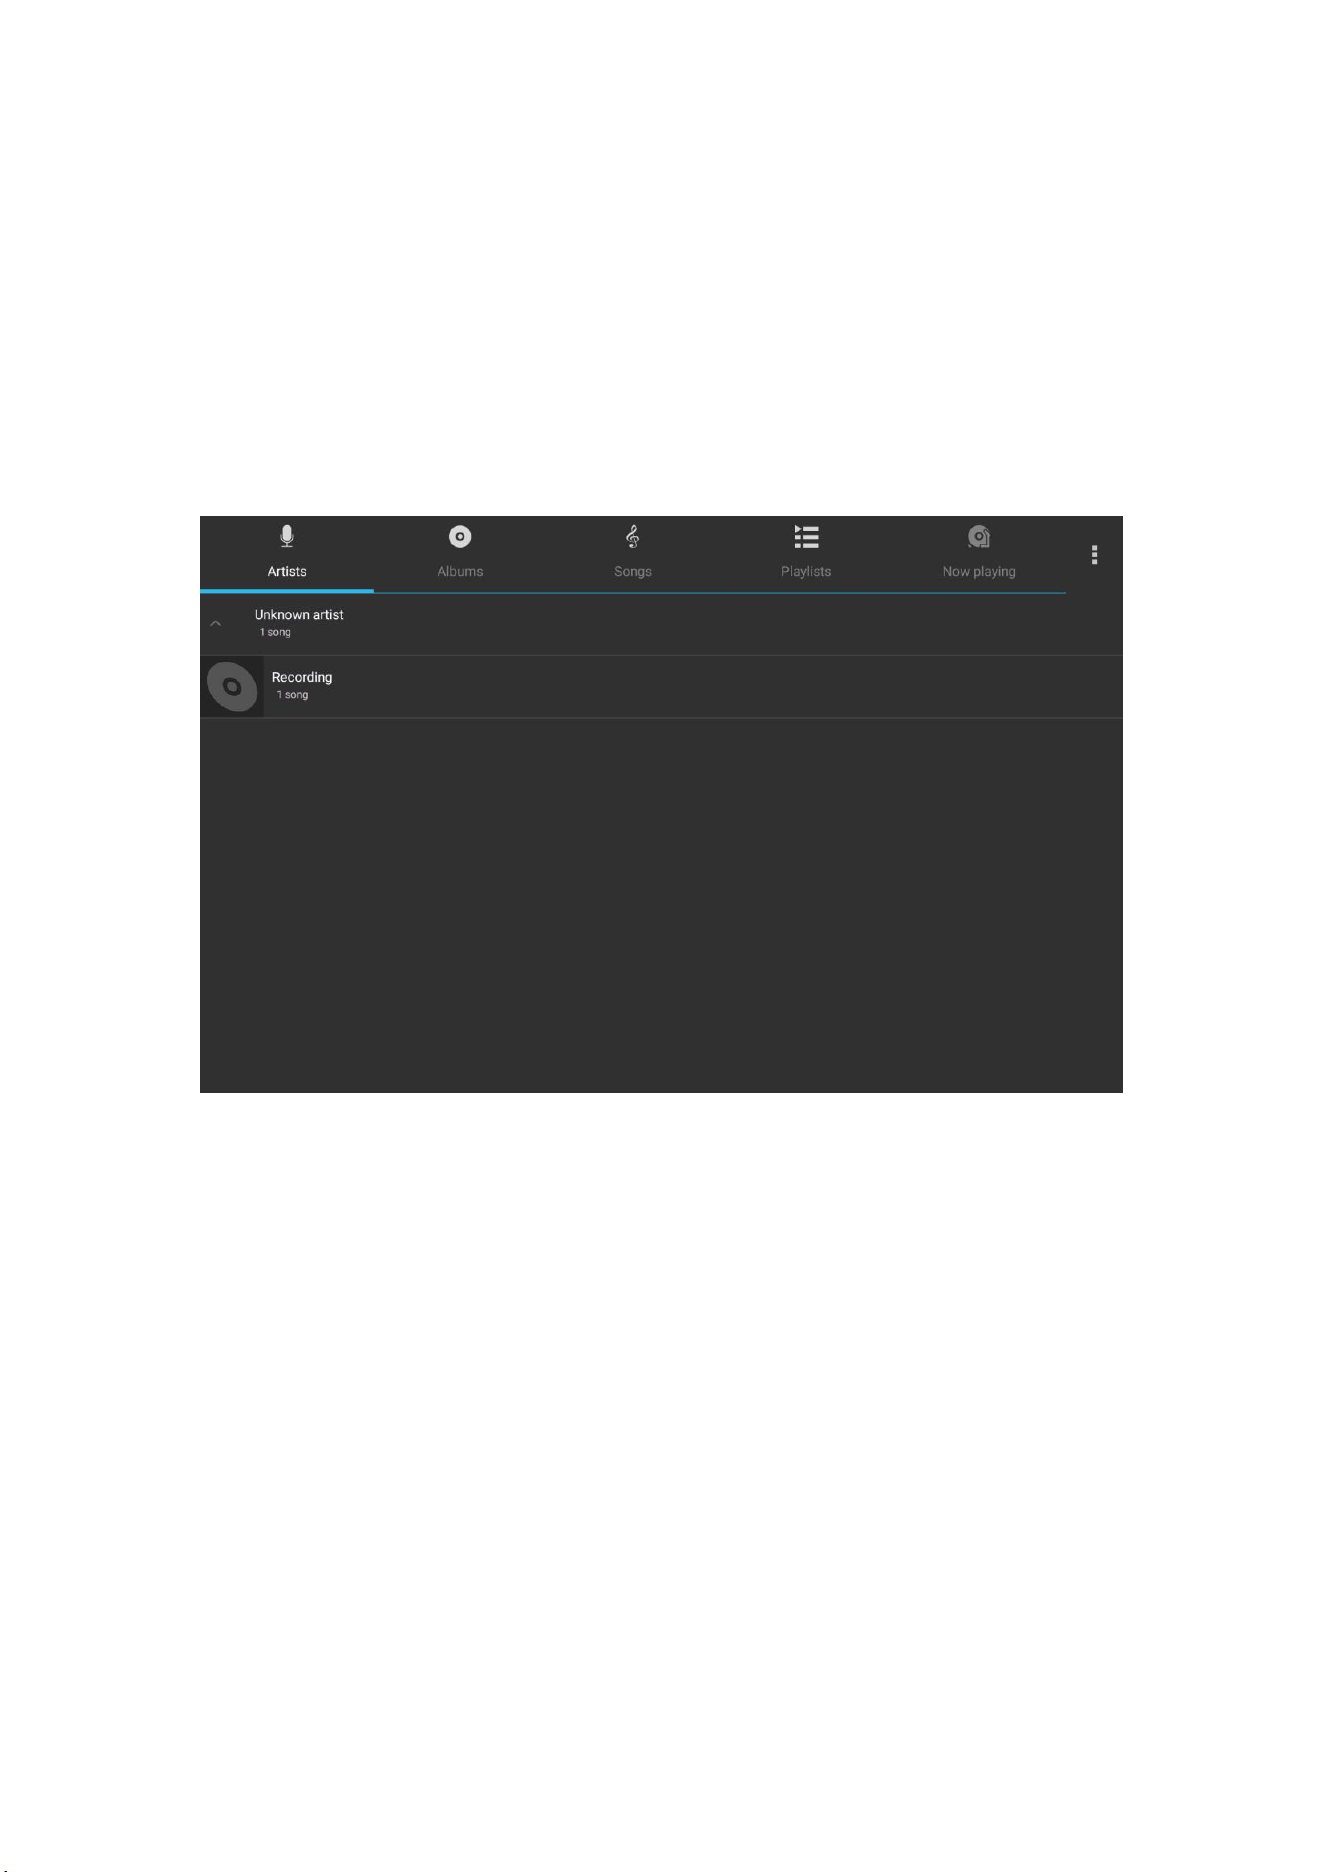
5.1 Music
Go to Music Player: Click on the music icon on the main menu or desktop interface to enter
the music playback, in the list
Click on your favorite music to play, as shown in figure 5.1:
Figure 5.1
5.2 Library
Photo Library applications can automatically search stored photos and video files. And
the gallery classifies these pictures and video files in folders. You can use the gallery
application to view and edit photos, use photos as a desktop and view pictures.
View Pictures
1. On the main interface, click the library application.
2. Go to the gallery and click the folder you want to see to see the pictures
contained therein.
3. click on the picture you want to see, the system will automatically view it in full
screen mode.
3. When viewing a photo, zoom in, place two fingers on the screen, then

23
separate the fingers (closing the fingers will show narrowing) or double-click
the screen
Tip: when browsing pictures, you can slide the picture to the left or right, and switch
the picture to browse
Edit and Set Pictures
When viewing a picture in full screen mode, press the menu key to display menu options, and
you can select the options you need to edit and set the picture.
⚫ Slide presentation
1. Open a picture, use the virtual button to click the menu key, display menu
options.
2. Click to play the slide and it will automatically loop (or select the button
in the picture folder)
⚫ Pruning
1. Click the menu key to display menu options.
2. Then click trim, click drag the relevant area to adjust the cutter.
3. Click the cutter to drag inside and outside the center to adjust the cutting size.
4. After adjusting the size you want, click the cut.
5. If you give up cutting, click cancel to return to the picture browsing.
⚫ Editor
1. Click the menu key to display menu options.
2. Click Edit.
3. Brightness, style, color, effect can be set in the pop-up options.
4. Click Save.
5. If you give up editing, click the return key, in the pop-up dialog box,
click whether to go back to the picture browsing.
24
7 Internet
7.1 Browsers
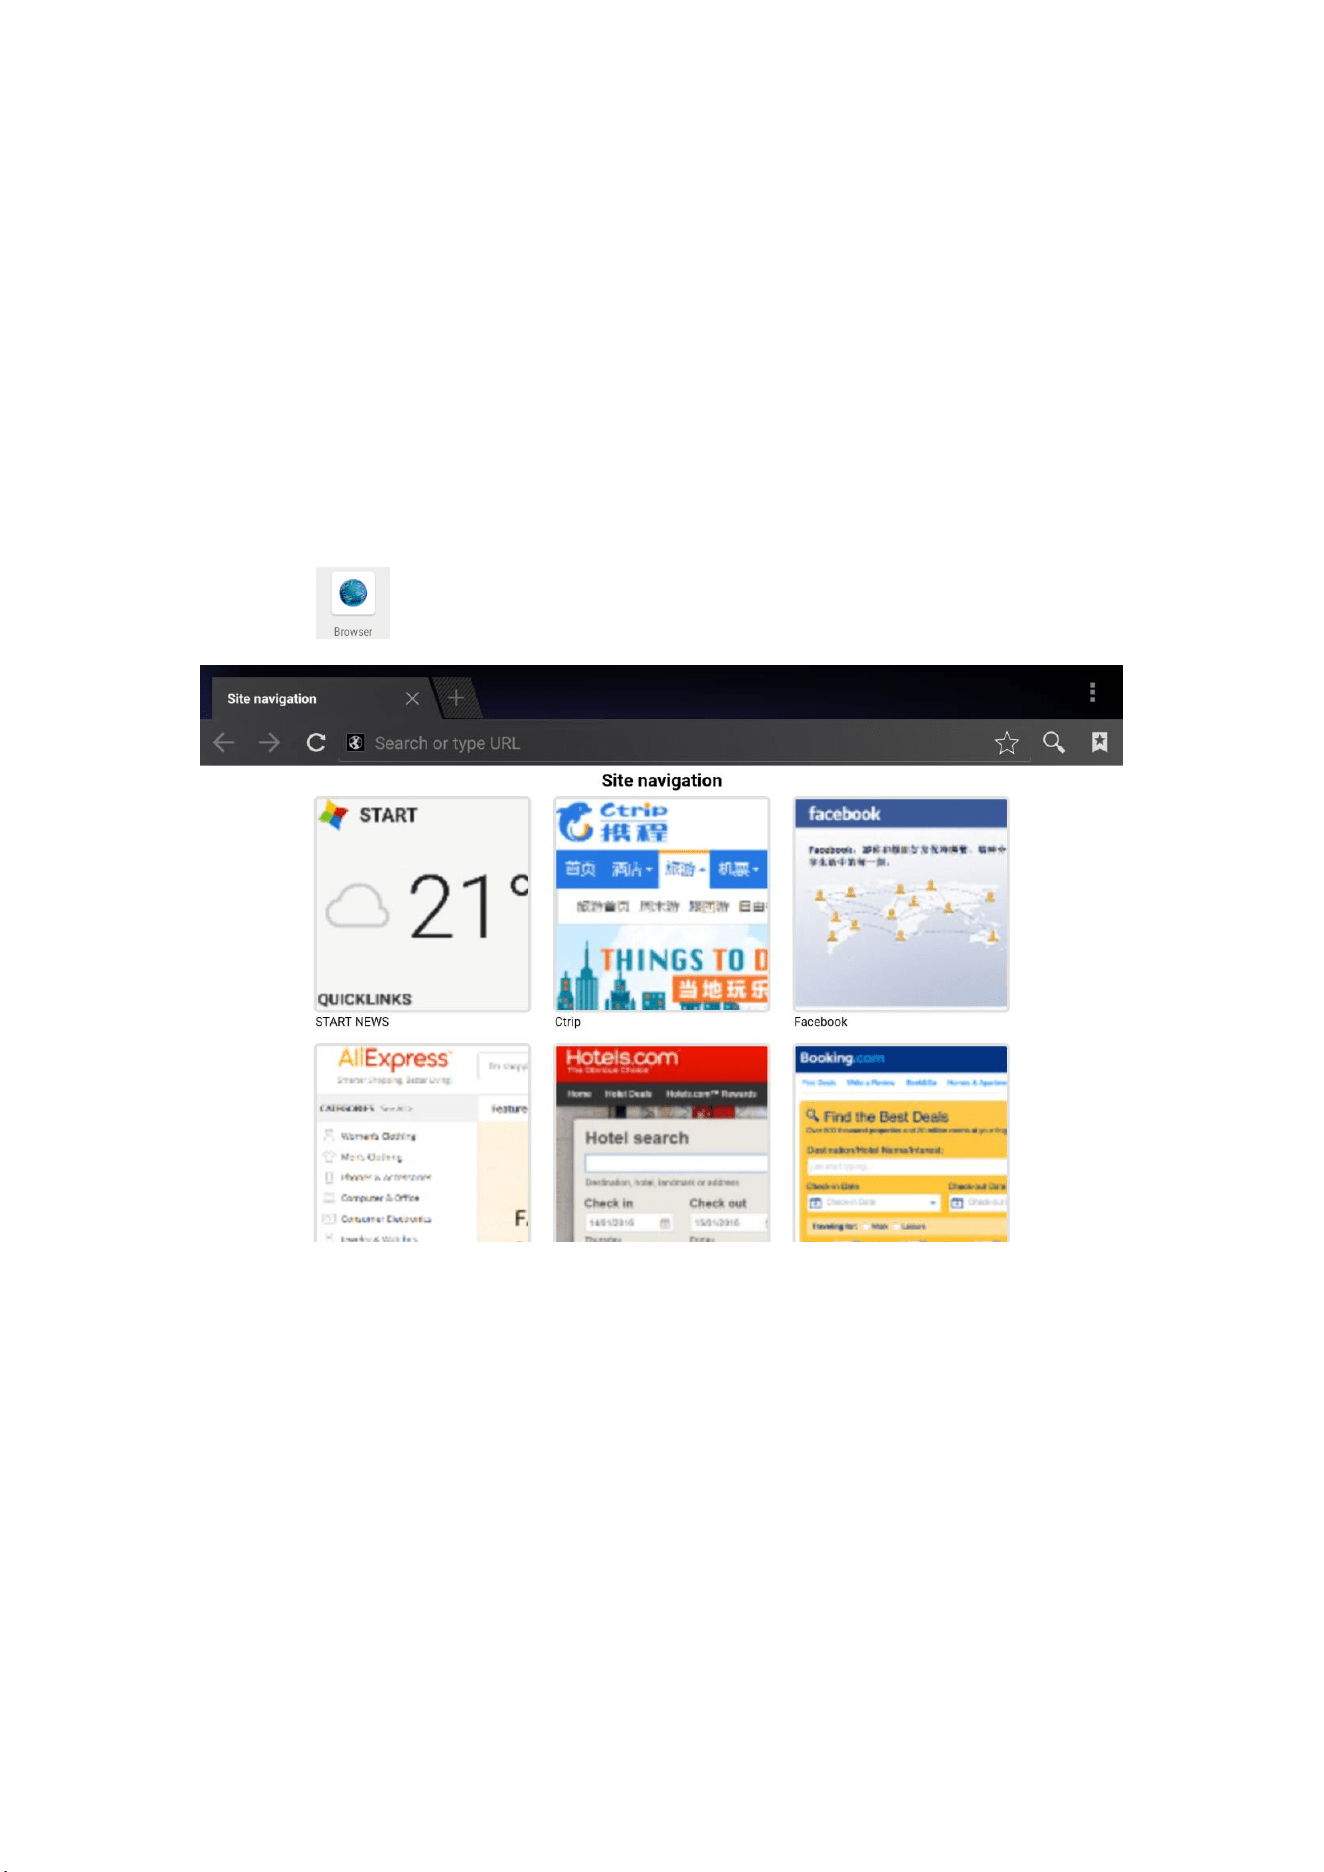
When the wifi or mobile network is properly connected (see Section 4.1 Wireless and
Network Settings), click the main menu or desktop browser to enter the IE interface.
Figure 7.1
Figure 7.1
Click on the address bar to enter the URL click start, enter the corresponding web page, you can
browse the corresponding website information.
7.2 E-mail
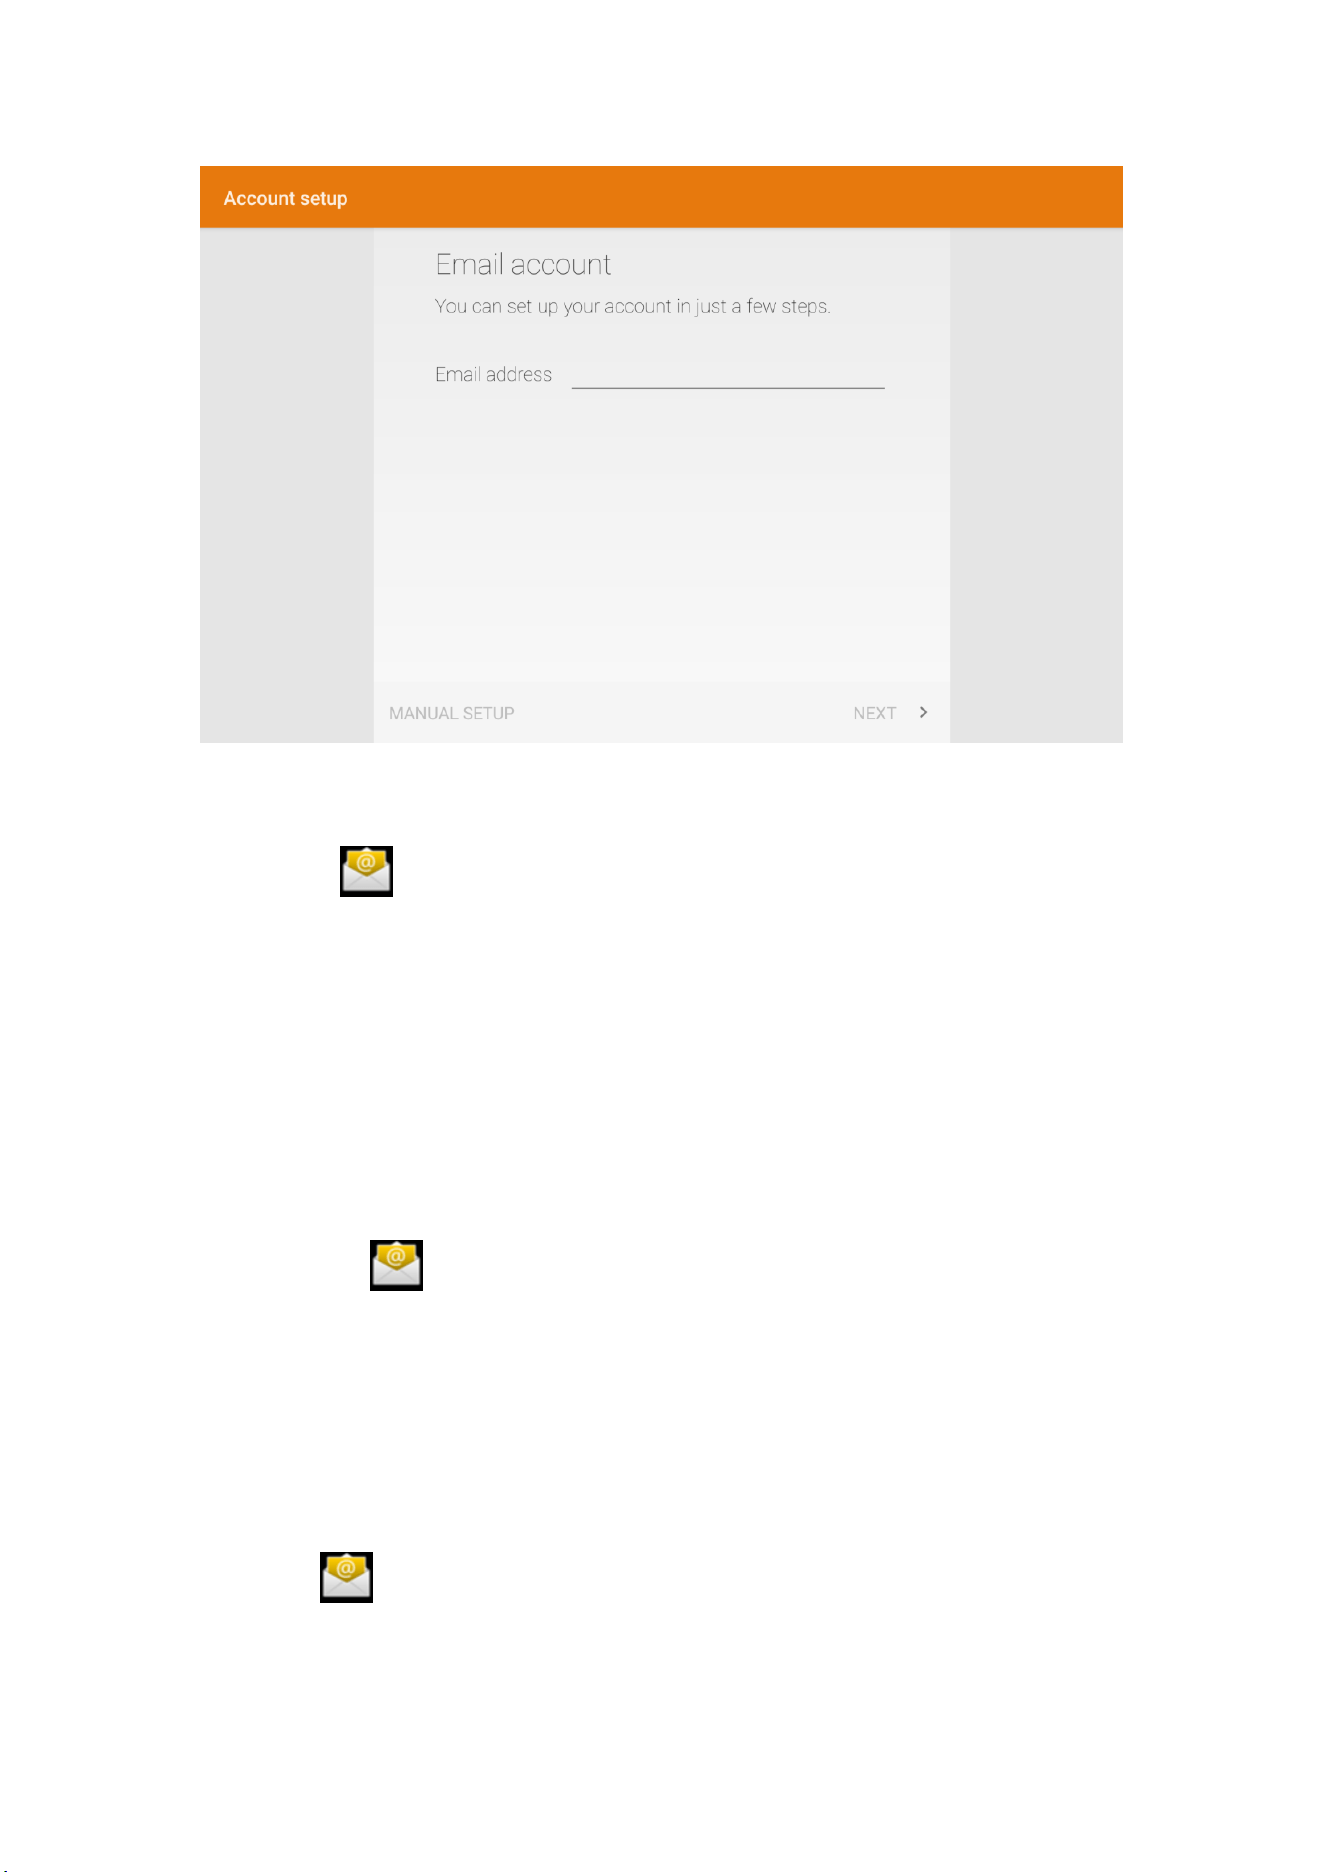
The email application is accompanied by an email setup wizard that can add external POP3 or
IMAP email accounts of common Web email service providers such as vendors such as Yahoo、
Gmail and 163. Figure 7.3
25
Figure 7.3
a. Mailbox Settings
1. After clicking the icon, the mailbox settings wizard will help you set up.
2. Enter the email address and password of your email account.
3. Click the next button to check that the mailbox transceiver server is available.
4. Enter the account name and the name to display and email, and click complete.
5. If the mailbox is available, it will automatically enter your inbox.
b. Delete Email Account
You can delete a set POP3 from your MID or IMAP a mailbox account.
1. Click.
2. Enter your inbox
3. press the menu key (menu).
4. Click the settings.
5. Right drop-down select delete account
6. Click OK to remove.
c. send E-mail information
1. Click to display your inbox.
2. Clicking on the inbox will automatically refresh the message and click
to read.

26
3. Press the menu key and pop up the menu.
4. Click on the upper right corner to enter the write new email
interface.
5. Enter your recipient's email address in the recipient bar.
6. Enter the topic and information content.
7. Click to add attachments.
8. Select the attachments you want to send (such as pictures, videos, etc).
9. Click to send an email.
27
8 Other applications
8.1 Clock
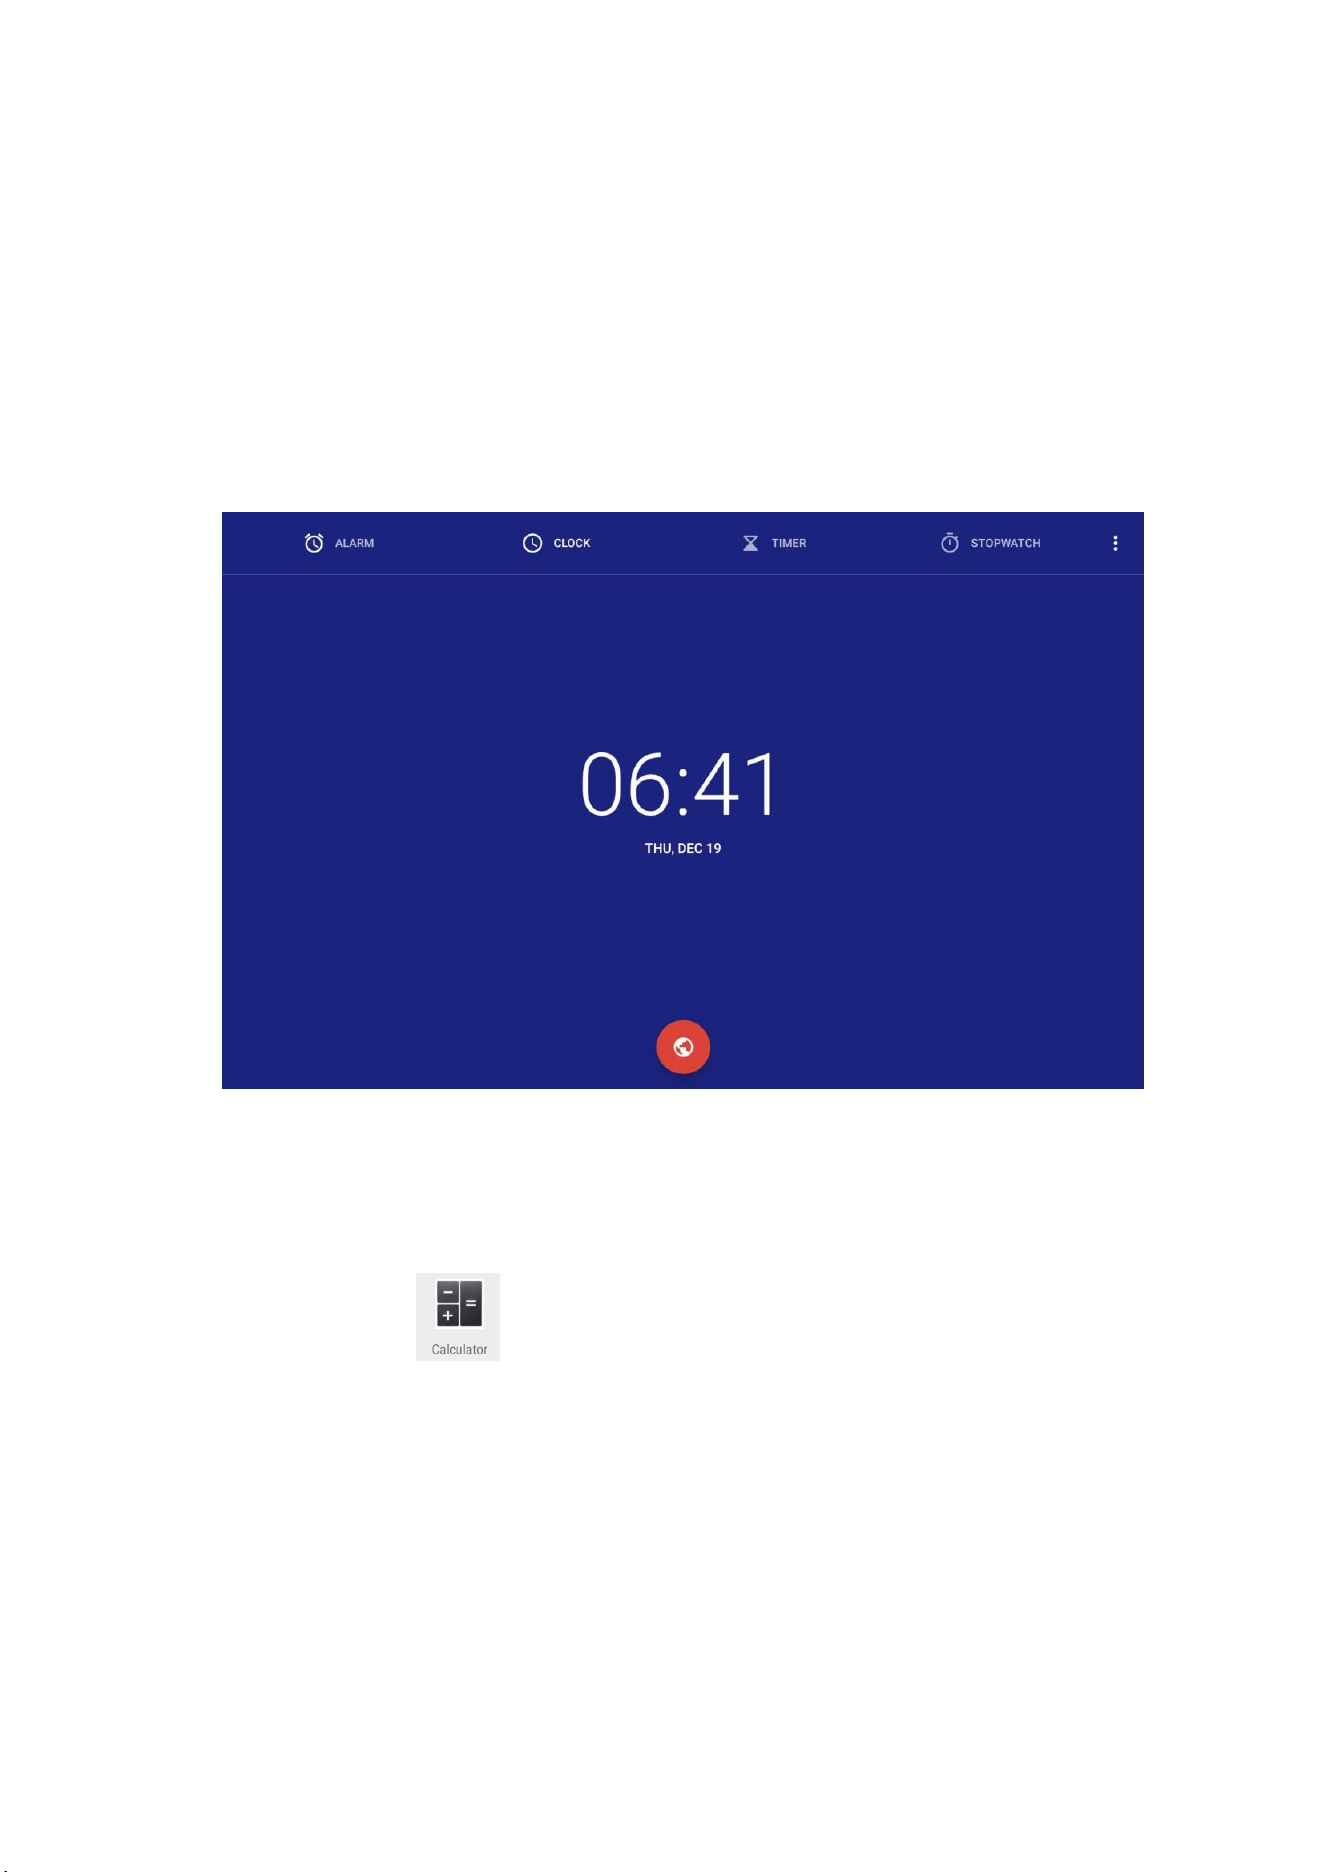
Click the clock program and enter the program interface as shown in figure 8.1.
alarm clock, pictures, music and home button respectively.
Figure 8.1
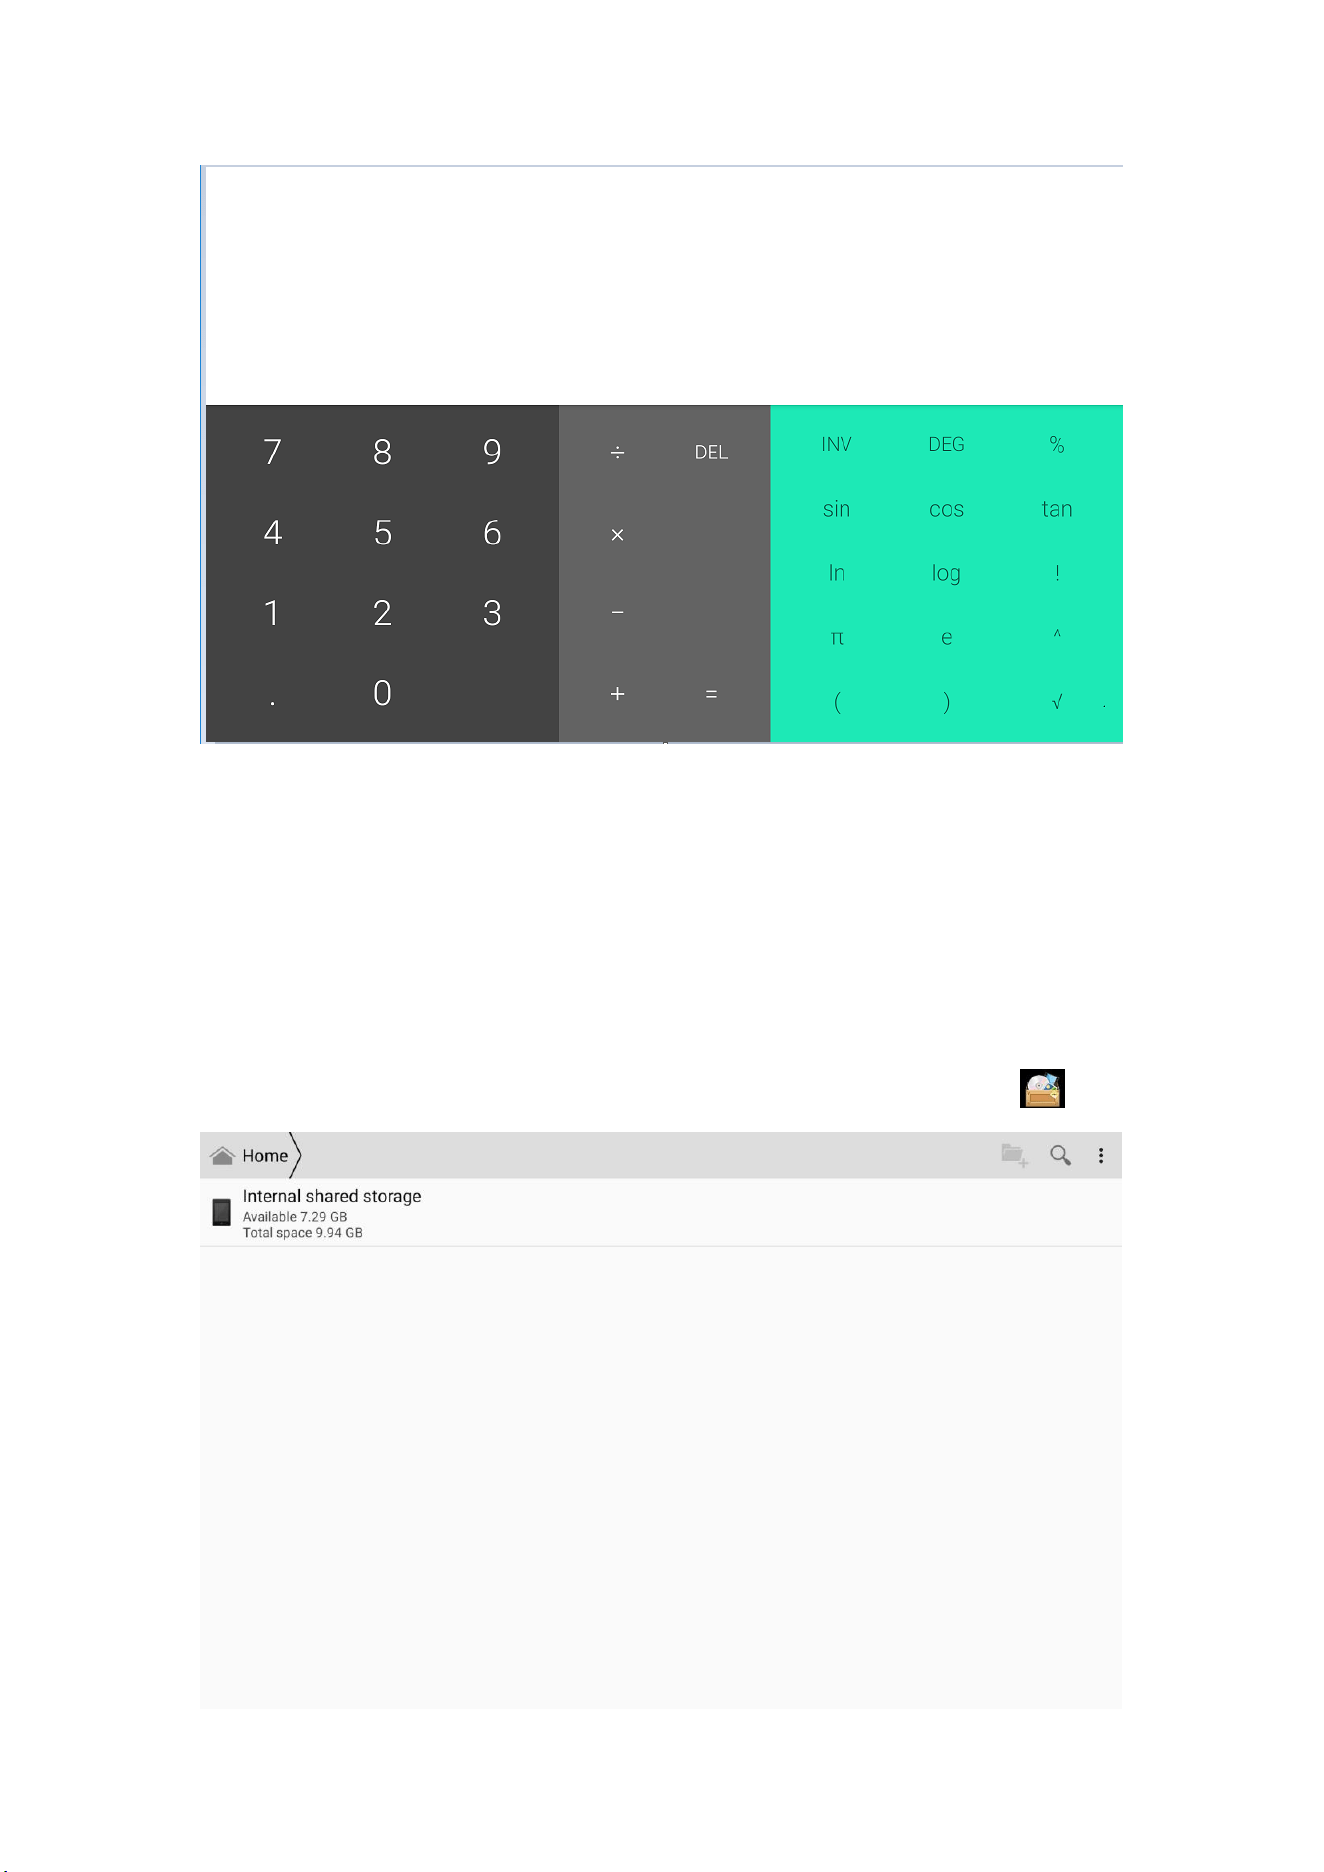
8.2 Calculator
1. Click.
2. Enter the basic panel of the calculator.
3. Touch the panel number or operator on the counter to calculate.
28
Figure 8.2
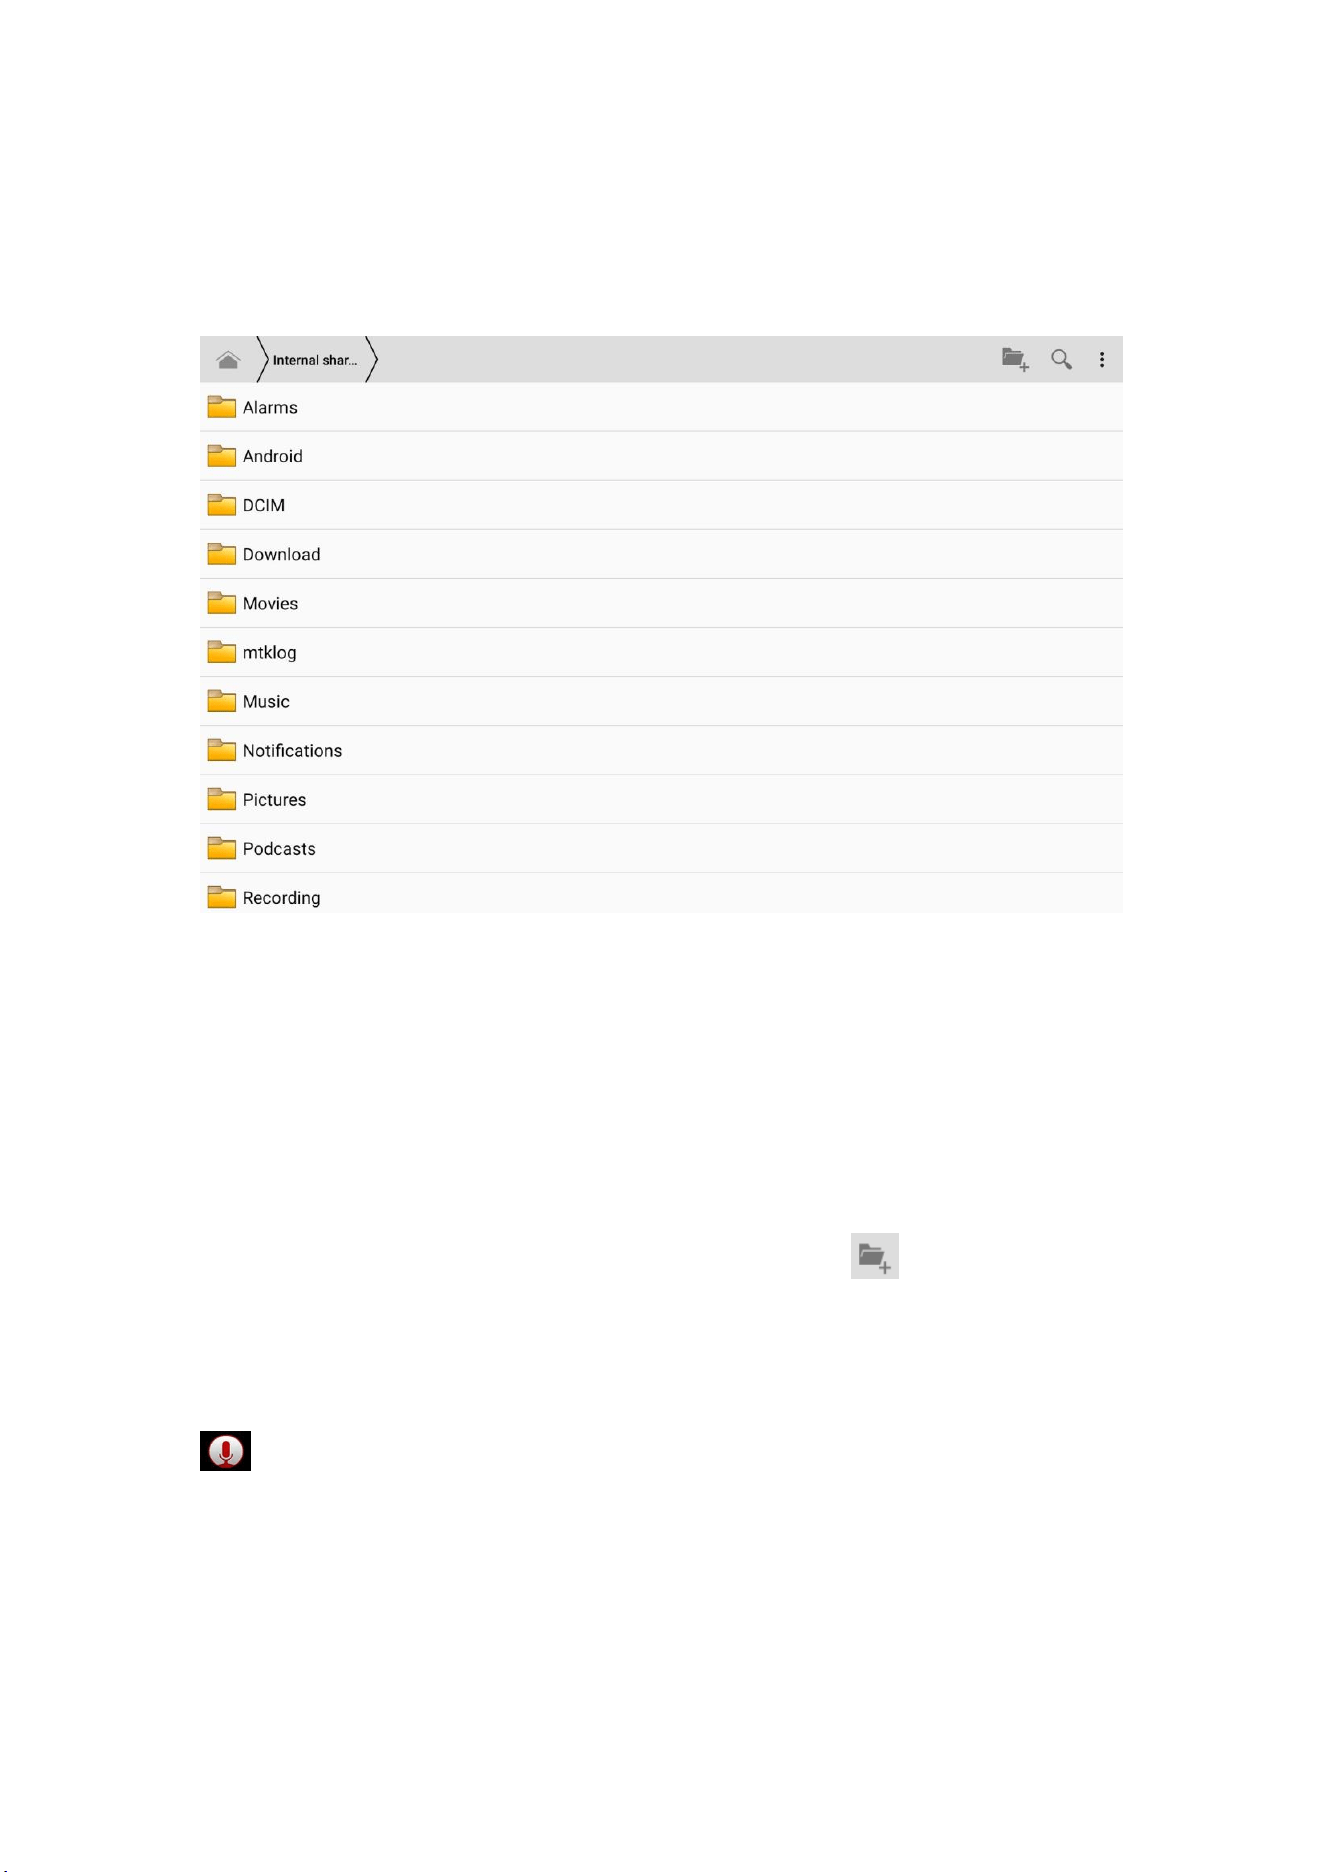
8.3 File Manager
The file manager has operations such as copying, shearing, deleting, renaming folders,
Can also share files, install apk and other functions
Under the main menu or desktop, click the File Management icon to enter File Manager
29
Figure 8.3
a 、 copy, cut, delete, rename folders or files: select a folder or file, click this folder or file to enter
the diagram interface, you can do related operations on files or folders
Figure 8.4
b 、 install apk file: select the suffix in the file manager. apk files, pop-up installer, follow the
prompts to install third-party software
c 、 new folder: select the directory you want to create a new folder, click the top right key, select
the new folder, and follow the instructions to complete the new folder
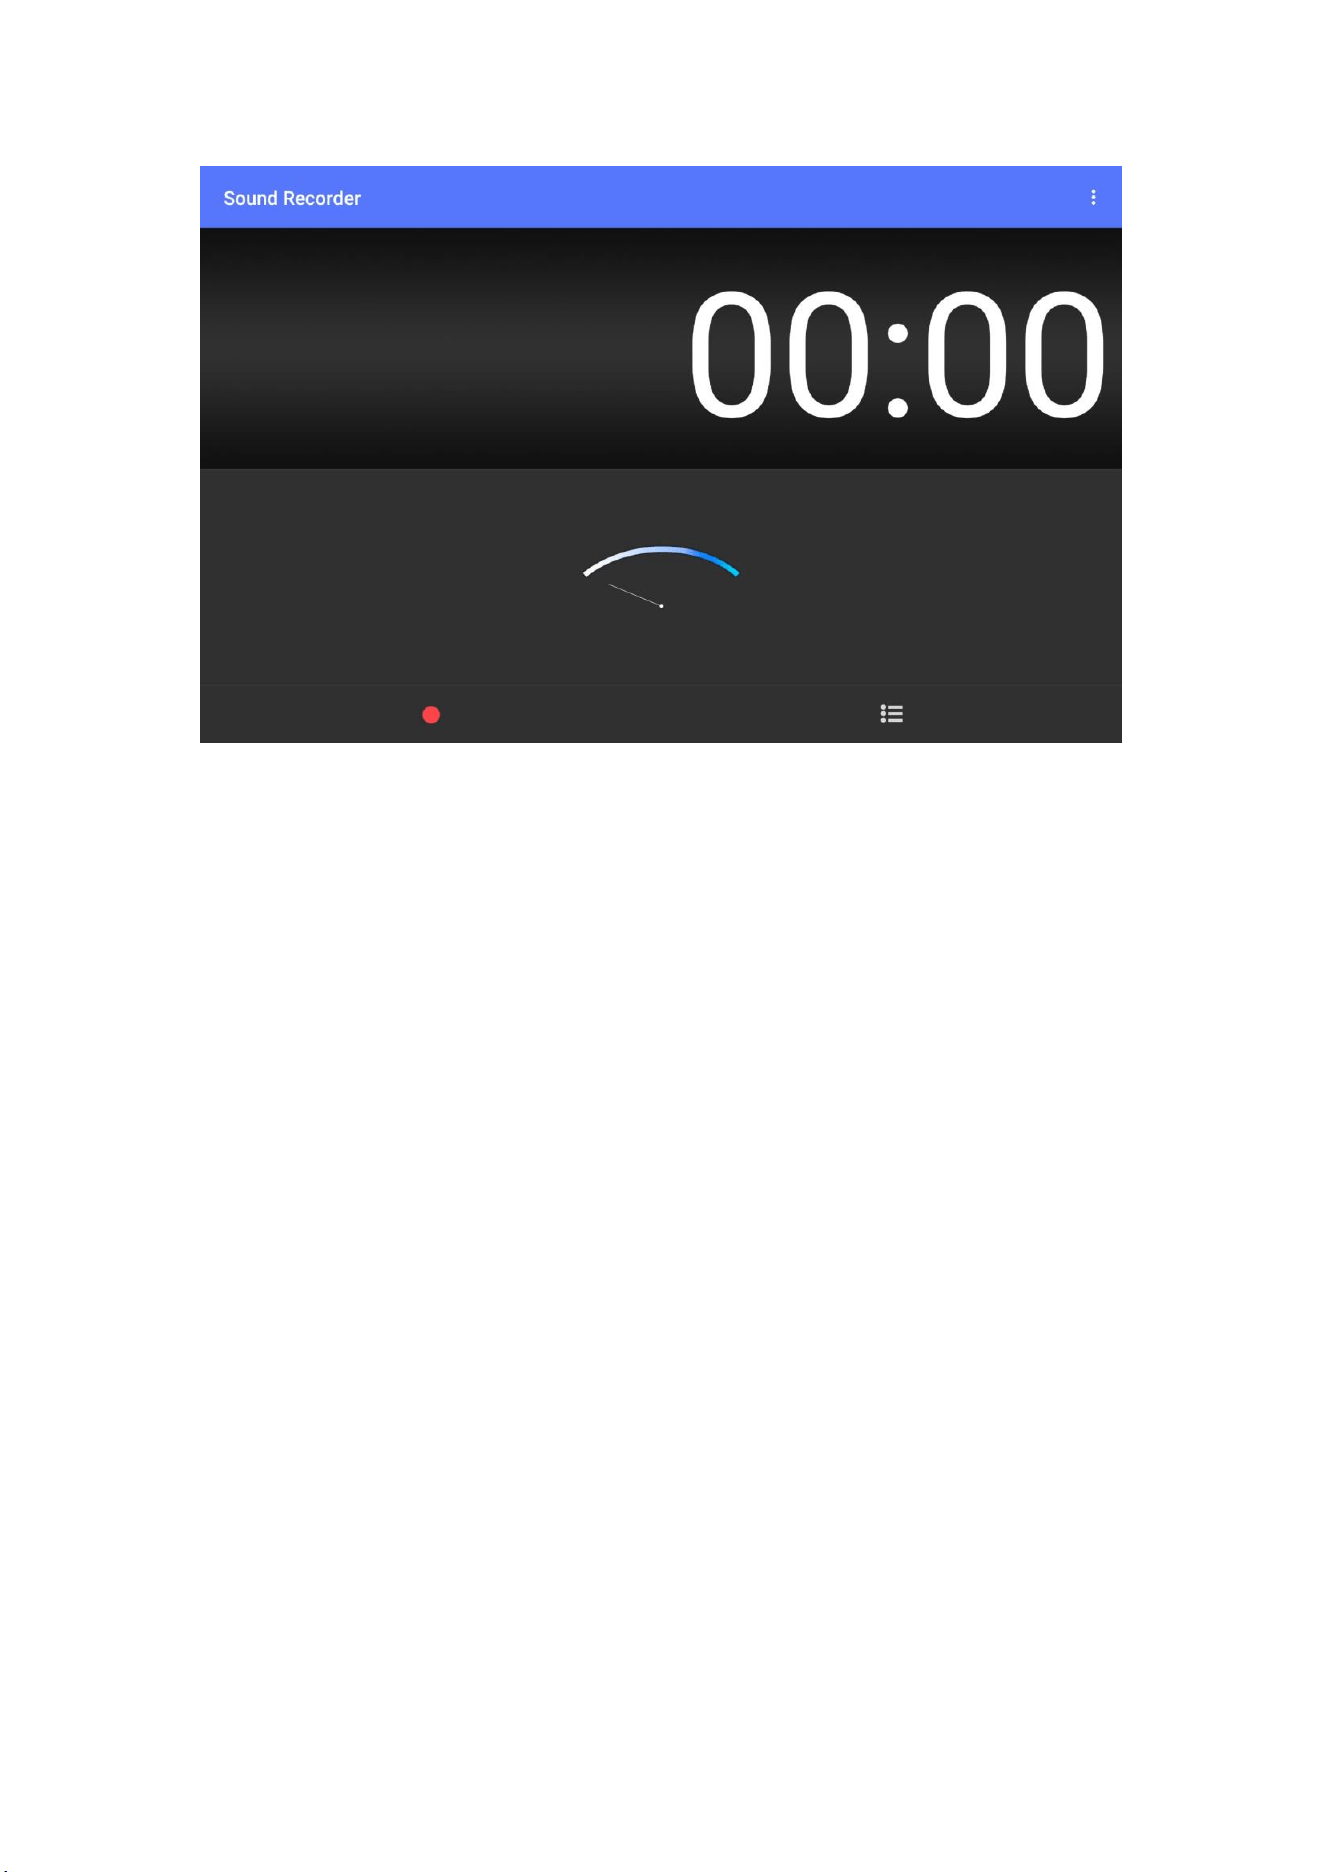
8.4 Recorder
Under the main menu or desktop, click the recording icon to enter the recording
interface, click the recording key to start recording. Click stop to stop recording.
Click the play button to play the recording just now. The system automatically
prompts to use this recording or to give up, please select manually.
Play recording: select audio player to play the recording, first in the Explorer
according to the root directory to select the record file, click to play
30
Figure 8.

31
9. Installation of the programme
9.1 Installation
Installation of third-party applications
You can get third-party applications suitable for Android systems on the
Internet and use them on your own MID.USB connect the computer to copy
the application to the MID storage.
1. Click the File Management application and select the application
that needs to be installed.
2. Hold down the application you need to install.
3. pop-up installation options, click install apk.
4. Follow the installation wizard to run.
Note: search on the Internet for the system for third-party programs are. apk
suffix files.
9.2 Unloading
Uninstall application
1. On the home page interface, click set bitmap.
2. Click on the application and list all applications installed in the system.
3. Click the APK, you want to uninstall.
4. Click to determine the completion of the uninstall.
9.3 Renewal Path
Applications for updating Android systems
◆ Download the latest application through the specified website.
◆ Download through the Internet Android system related software forum.

32
10 Troubleshooting
1. MID first boot slow
After the MID system upgrade, the first boot needs to install pre-installed application
software, the time is about 2-3 minutes, and then the opportunity is faster.
2. MID can not connect WIFI
⚫ Ensure that the wireless routing of network services works properly.
⚫ Ensure that the distance between MID and wireless routing is maintained at
a certain distance and that there are no walls or other obstacles separated
between them.
⚫ Make sure the user name and password are entered correctly.
3. MID felt hot
When multiple applications are used at a time, or the screen is on the brightest
and charging, it may heat up. This is normal.
4. Unable to set up email or register application
⚫ Make sure your network connection is normal and can be connected to the
Internet.
⚫ Make sure the email setting method is correct.
⚫ Make sure your system time is consistent with local time.
5. system abnormal can not operate normally
When you are installing some third-party applications, it may cause the system to fail to work
properly. You can reset the system by pressing the reset key next to the power interface.
6. can't open the page
⚫ Hold the route from the MID within a valid distance
⚫ restart WIFI try again

33
7.MID sometimes runs slowly
⚫ This is a normal phenomenon. Please uninstall some third-party
applications to release more system resources at the end of
advanced task management for applications that are not needed
for the time being
Federal Communication Commission Interference Statement
FCC ID: 2BDTW-P1
This device complies with Part 15 of the FCC Rules. Operation is subject to the following two conditions:
(1) This device may not cause harmful interference, and (2) this device must accept any interference
received, including interference that may cause undesired operation.
This equipment has been tested and found to comply with the limits for a Class B digital device, pursuant
to Part 15 of the FCC Rules. These limits are designed to provide reasonable protection against
harmful interference in a residential installation. This equipment generates, uses and can radiate radio
frequency energy and, if not installed and used in accordance with the instructions, may cause harmful
interference to radio communications. However, there is no guarantee that interference will not occur in
a particular installation. If this equipment does cause harmful interference to radio or television
reception, which can be determined by turning the equipment off and on, the user is encouraged to try to
correct the interference by one of the following measures:
-Reorient or relocate the receiving antenna.
-Increase the separation between the equipment and receiver.
-Connect the equipment into an outlet on a circuit different from that to which the receiver is connected.
-Consult the dealer or an experienced radio/TV technician for help.
FCC Caution: Any changes or modifications not expressly approved by the party responsible for
compliance could void the user's authority to operate this equipment.
Radiation Exposure Statement:
This device meets the government’s requirements for exposure to radio waves.
This device is designed and manufactured not to exceed the emission limits for exposure to radio
frequency (RF) energy set by the Federal Communications Commission of the U.S. Government.
The exposure standard for wireless device employs a unit of measurement known as the Specific
Absorption Rate, or SAR. The SAR limit set by the FCC is 1.6W/kg. Tests for SAR are conducted using
standard operating positions (0mm) accepted by the FCC with the device transmitting at its highest
certified power level in all tested frequency bands.