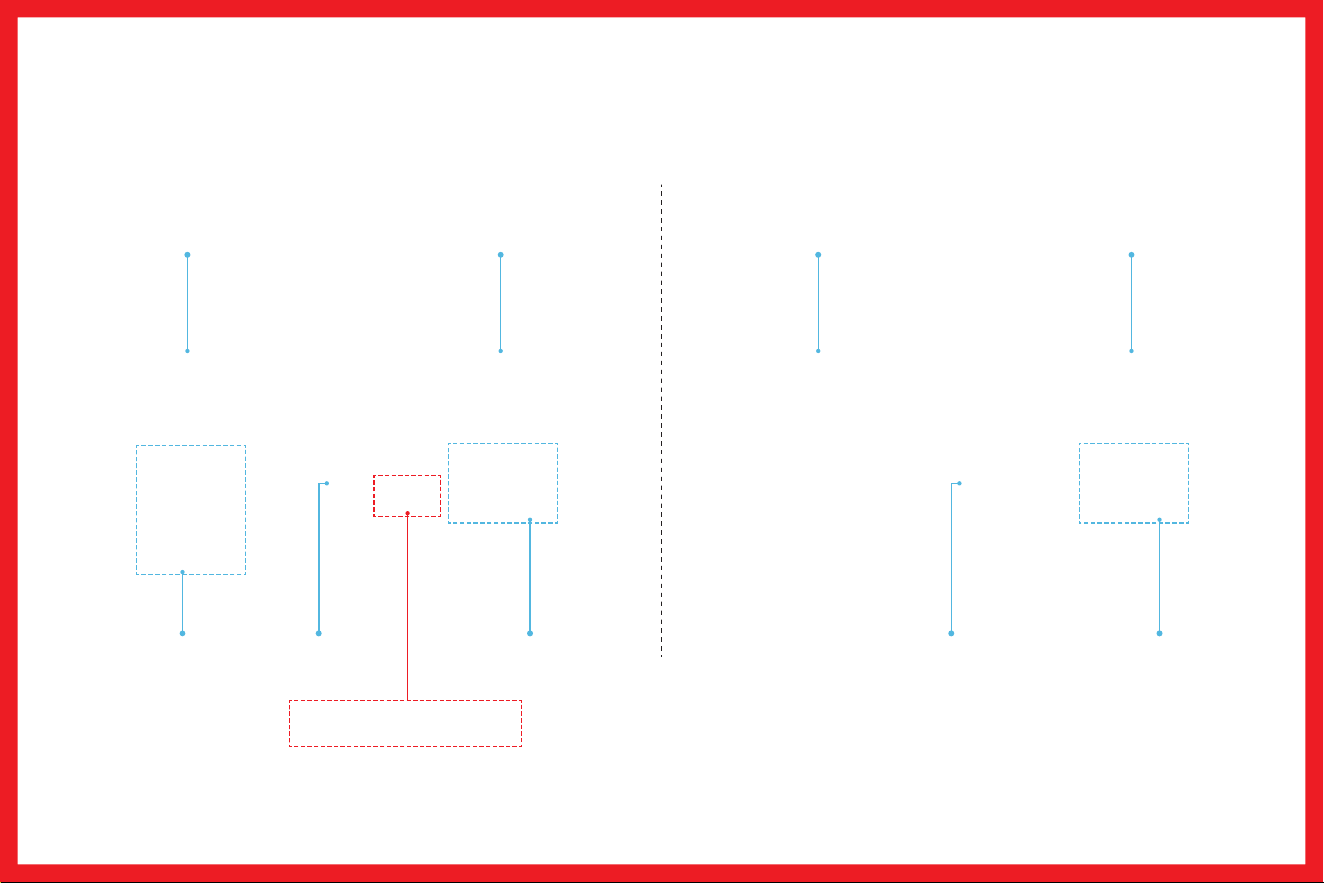
Beginner
Short press "Custom Mode" to quickly switch between 19 built-in personalized singing modes. Adjust "HI, MID, LOW and
Reverb" from any preset mode to get your desired sound. Press Custom Mode Storage to save settings for future use.
Early creators
Recommended Mic
volume: 50%-80%
Recommended Music
volume: 50%-80%
No need
to use
Suggest using the
'Custom Mode'
WARNING: No audio output
below 70% threshold
Suggest using the
'Custom Mode'
Recommended Mic
volume: 50%-80%
Recommended Music
volume: 50%-80%
Interactive
sound effects
Interactive
sound effects
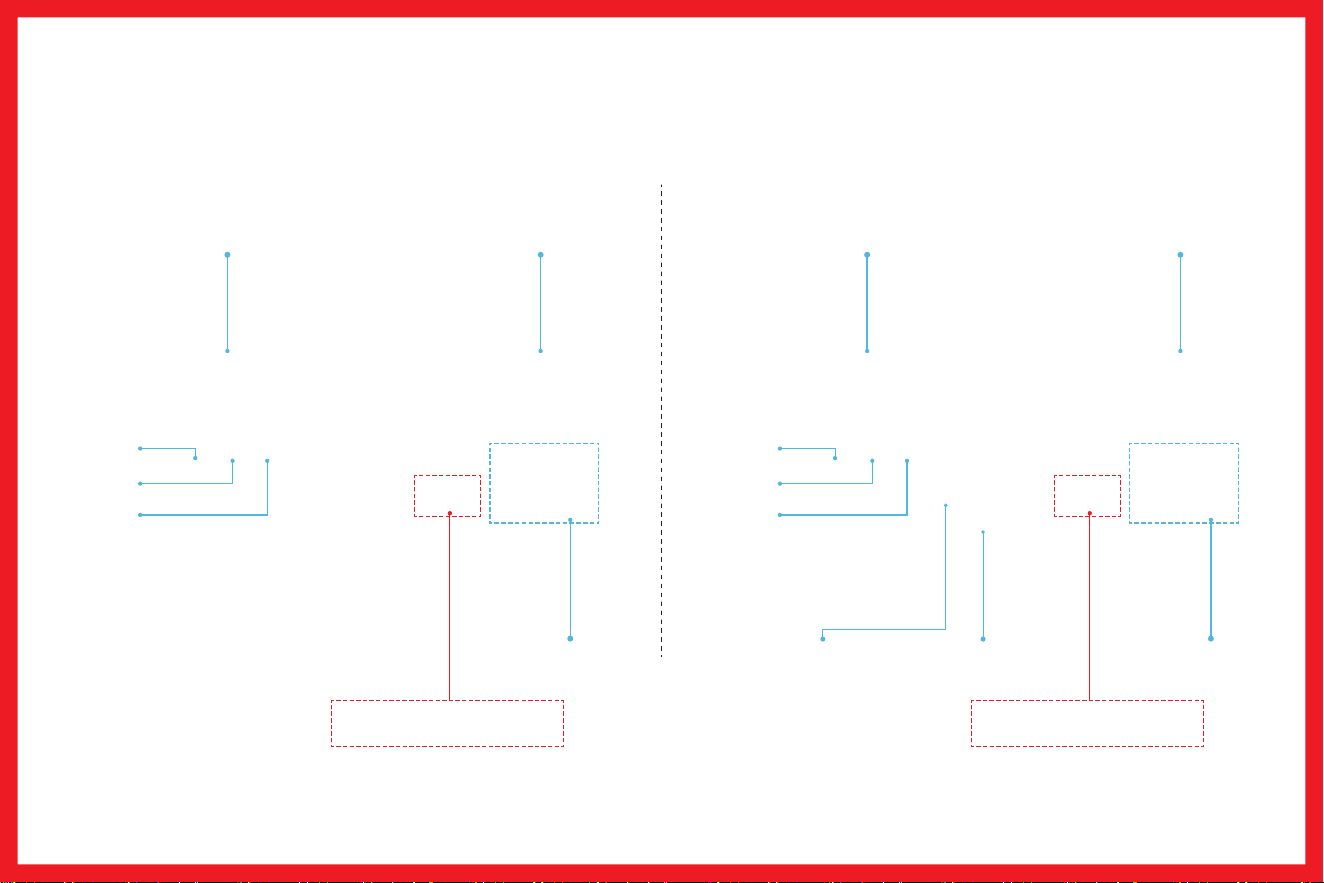
In the intermediate and advanced stages, you can gradually combine additional functions including "Hi", "Mid", "Low"
frequency controls, "Reverb", "Autotune", "Ducking", and "Al Sing Along Mode" to create your own unique vocal tone.
Interactive
sound effects
Interactive
sound effects
Recommended Mic
volume: 50%-80%
Recommended Music
volume: 50%-80%
Mid term proficiency
(Chat creators)
"Hi": 50%
"Low": 50%
"Mid": 50%
Recommended Mic
volume: 50%-80%
Recommended Music
volume: 50%-80%
Advanced stage
(Singing creators)
"Hi": 50%
"Low": 50%
"Mid": 50%
Reverb
Depth: 60%
Reverb
Length: 60%
WARNING: No audio output
below 70% threshold
WARNING: No audio output
below 70% threshold
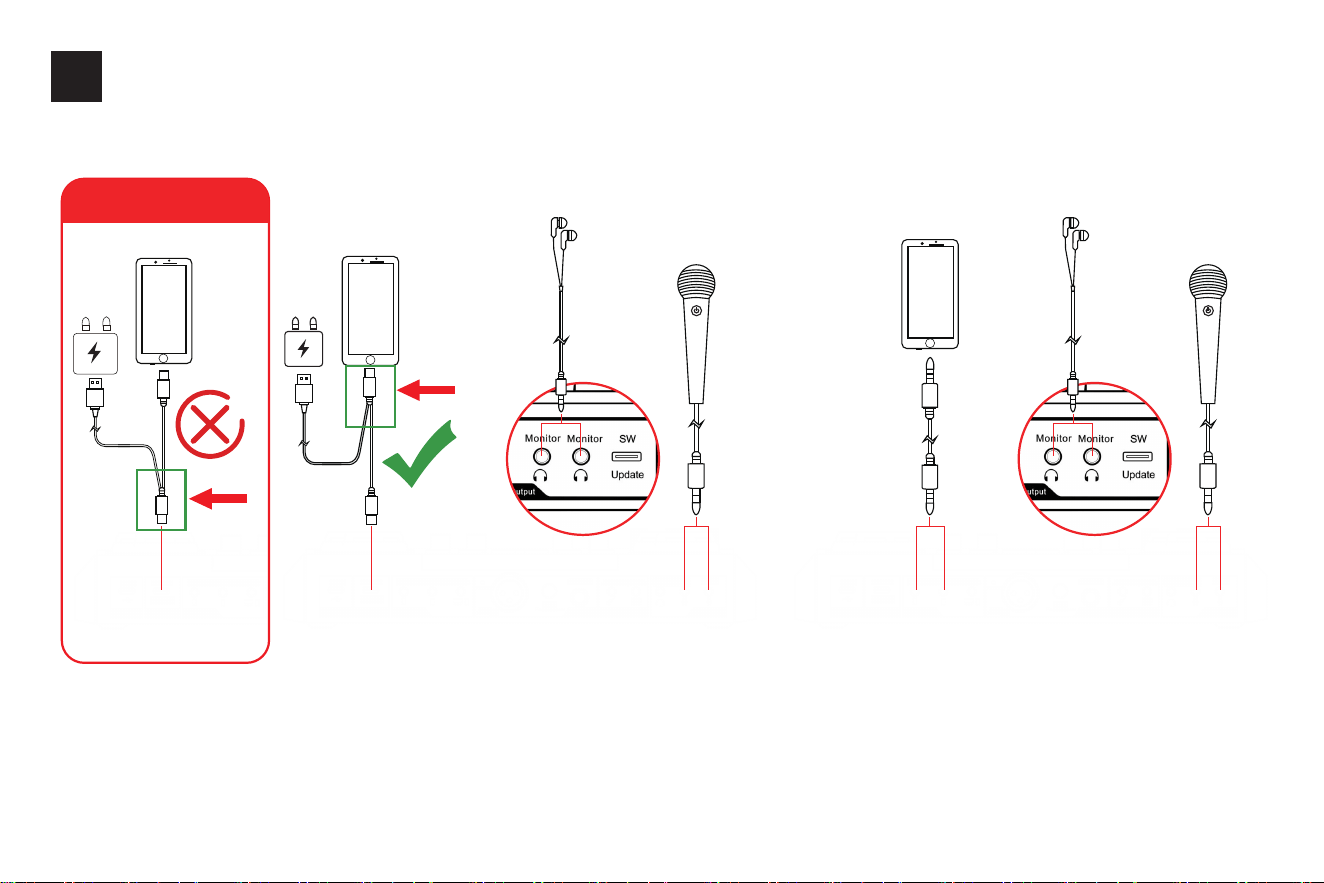
01
Connect to the mobile phone
①
Live streaming using OTG cable
②
Live streaming using 3.5mm
TRRS audio cable
Live
Live
Live
NOTICE
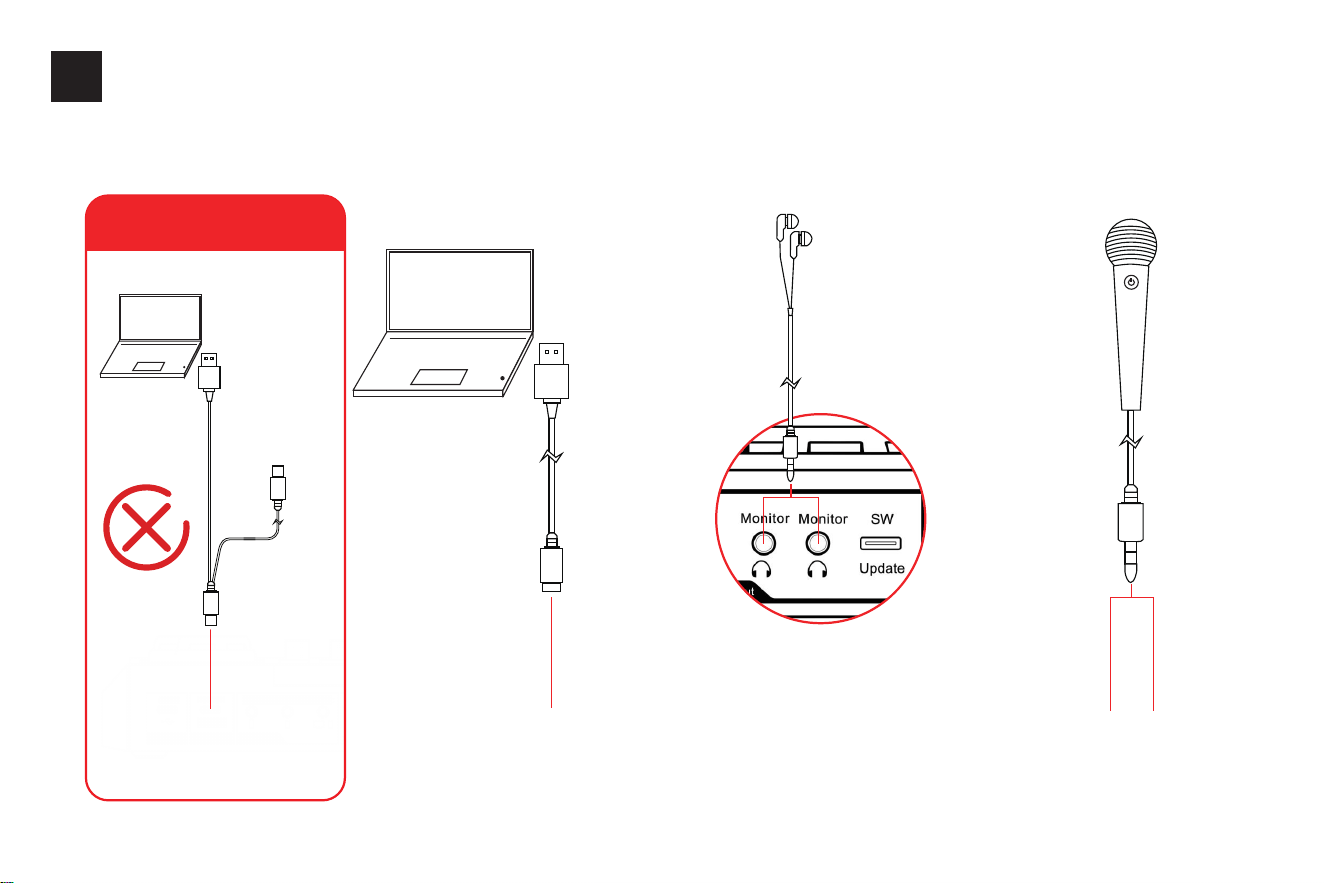
02
Connect to the computer
USB
Live
DO NOT use
an OTG braided
cable for PC
connection.
USB
NOTICE
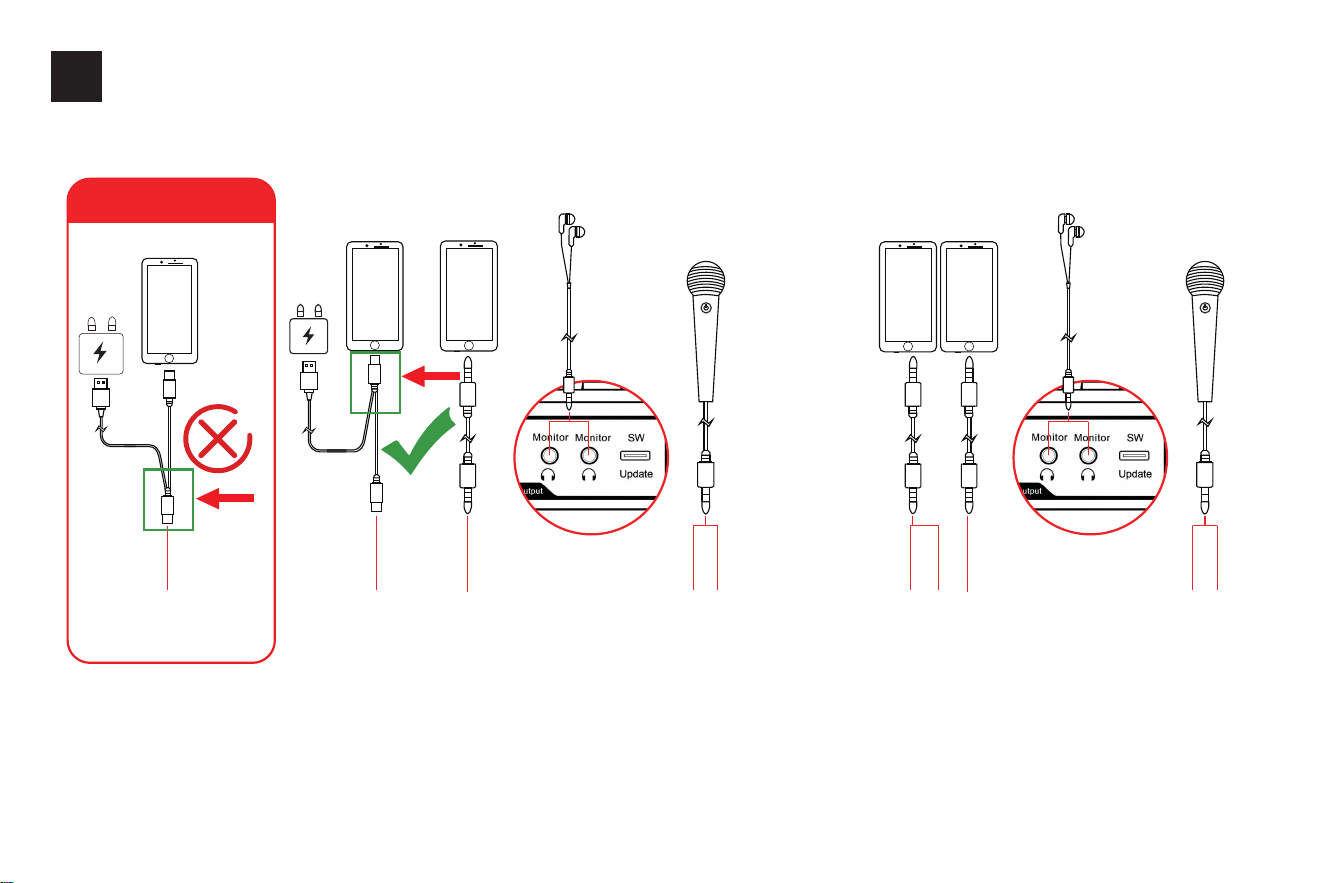
03
Connect two mobile phones
①
Live streaming using OTG cable
②
Live streaming using 3.5mm
TRRS audio cable
or BT
or BT
Music
Music
Live
Live
Live
NOTICE
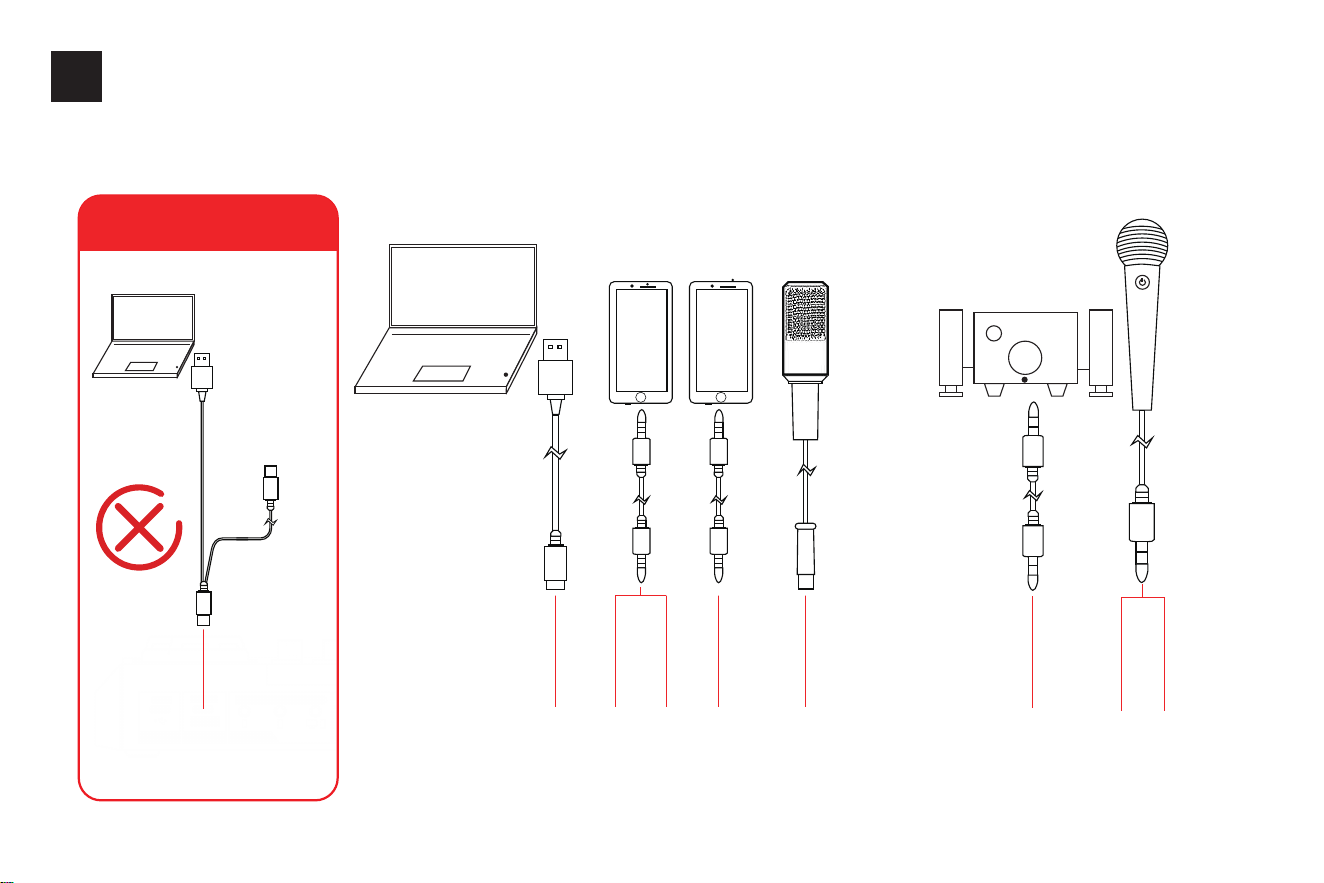
04
Connect with multiple devices
USB
Speaker
Music
Live
Live
USB
DO NOT use
an OTG braided
cable for PC
connection.
NOTICE
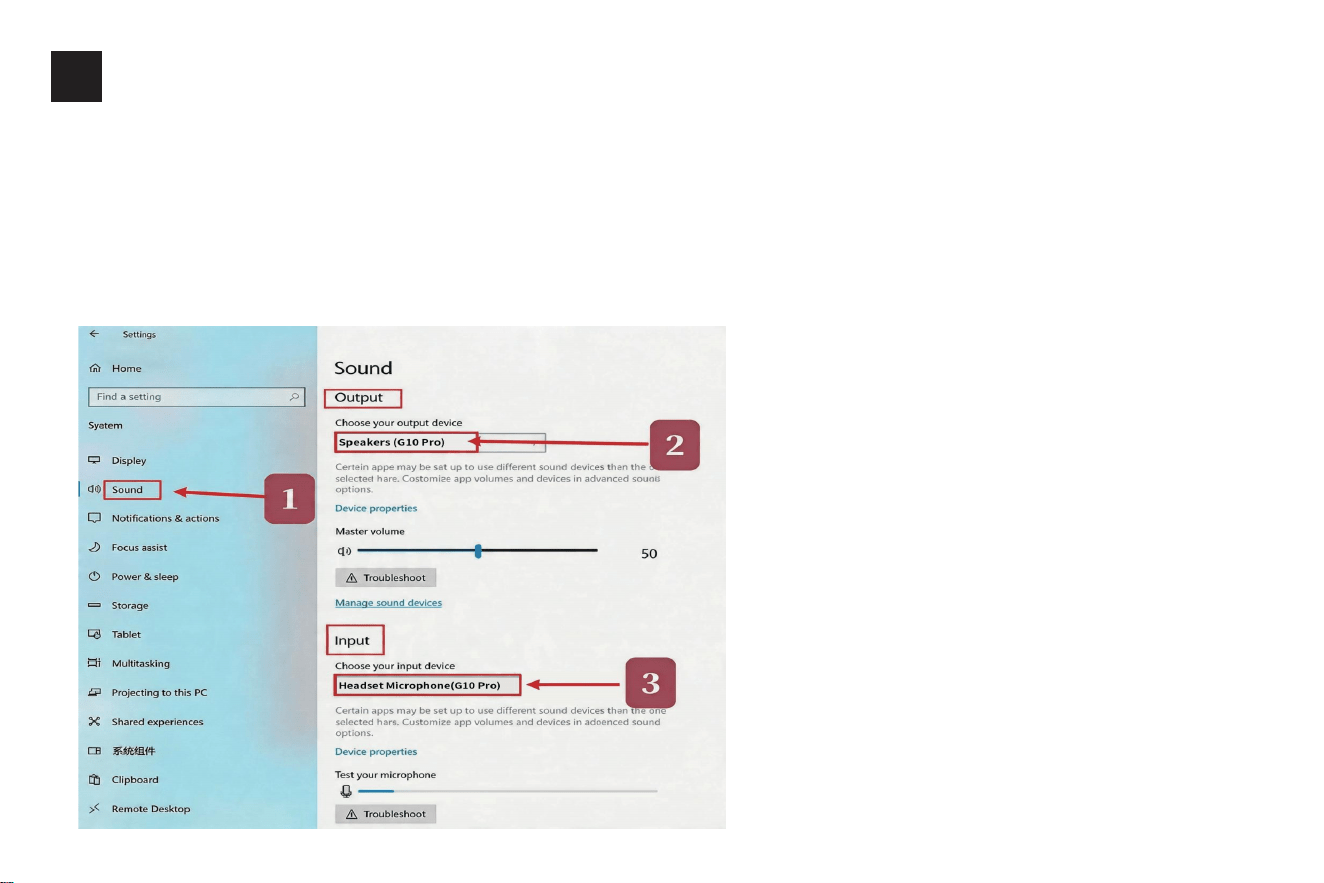
05
Computer connection settings
1. Monitoring headphones, and microphone to the mixer as shown in the diagram.
2. LOOPBACK Function: If using only one PC for live streaming and you want to input the PC system audio, turn on the
"LOOPBACK" function.
3. USB-C Connection: Use a USB-C data cable to connect the computer to the mixer.
The computer will automatically recognize the device. Go to the sound settings and set "MIXER" as the default input and output
device, or in the Playback and Recording sections.
4. Software Setup: Open your streaming, recording, software on your computer, ensuring "G10Pro" is set as the default
audio input/output and recording.

06
Introduction
Thank you for choosing G10Pro MIXER! The G10Pro MIXER is a an easy-to-use, all-in-one, onboard audio solution for live
streaming, podcast recording, broadcasting, gaming and other content creations.
Features 13 audio jacks, provides enough channels to accommodate your home devices. Built-in a XLR(3-pin), ¼″, ⅛″, etc,
microphone jacks, allows you use your different type microphone, and a ⅛″ TRRS headset mic. Moreover, Built-in one USB-C
digital jack for digital connection with PC or mobile devices, and two ⅛″ TRRS analog jacks for analog connection with mobile
devices, works well on your PC, tablets, smartphones and more, it is compatible with iOS, Android, Windows, etc system, run
your content creations on most software, such as live streaming on OBS, online chatting on Twitch, video creation on Youtube/
Tiktok, podcast recording on apple/Google, and more content creations on Facebook, Spotify, Discord, Zoom, Twitter, Instagram,
Streamlabs and more.
Specifications
Streamline your setup and optimize your production with G10Pro MIXER. It features a 4.5″ HD screen, 2 large rotary knobs, 4
sliding faders, 9 knobs, and 26 keys. Intuitive & visualized to control & optimize your audio mixing, no need fiddly software and
complex settings. It is an audio console with hardware-controlled adjustment to all of audio effortlessly for perfect mixing.
Name
Dimension
Environment
Battery
Charging
Working Time
Output Power
Frequency Response
Sampling Rate
BT Version
BT Receive
S/N Ratio
THD
G10Pro
L272mm*W195mm*H60mm, 820g
-20°C ~ 70°C/-4°F-158°F
Lithium ion 4000mAh/3.7V
DC+5V --- 2A max; 5H full charge
4~5H(48V Mic); 7~8H(3. 5mm Mic)
70mW Load 32Ω
50Hz~18KHz
44.1KHz/24Bit
V5.3, compatible with 4.2
<12m(No obstacle)
>102dB
<0.3%@1KHz
Chargr port
OTG port
Live ports
Music port
48V Mic port
LINE IN port
INST port
Speaker port
Headset port
Mic ports
Monitor ports
Operating Frequency Band
Maximum Radio-Frequency Power
Type-c port
Type-c port
3.5mm TRRS ports
3.5mm TRS port
XLR(3-pin)
¼” TRS & TS port
3.5mm TRS port
3.5mm TRS port
3.5mm TRRS port
3.5mm TRS ports
3.5mm TRS ports
2402-2480MHz
9dbm
07
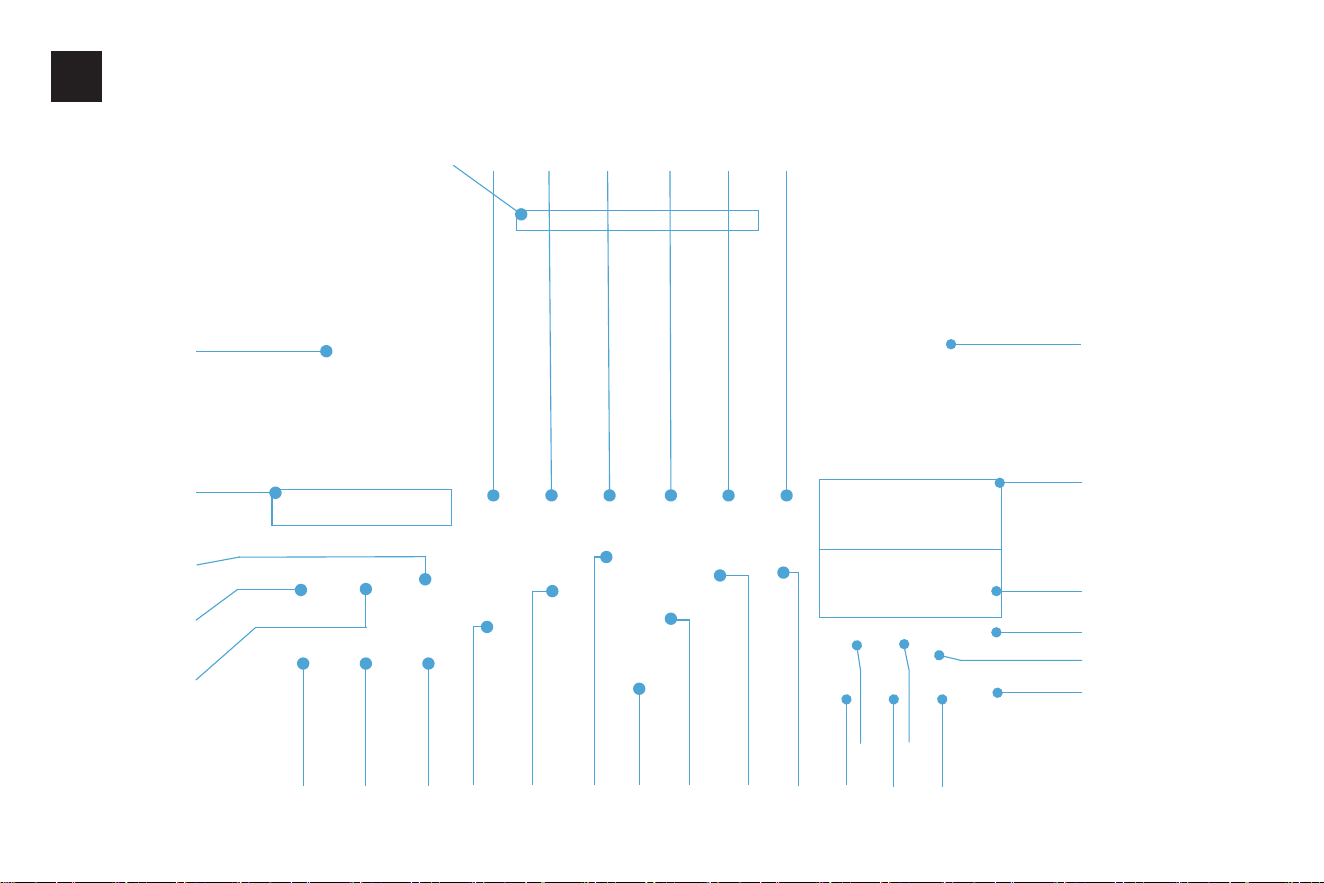
Button Guide(1)
⑱⑰⑯⑮⑭⑬
⑫
⑪
⑩
⑨
⑧
㉔
㉓㉒㉑⑳⑲
⑦ ⑥ ⑤ ④ ③ ② ①
㉕
㉜
㉝
㉛
㉚
㉙
㉘
㉗
㉖

08
Button Guide(2)
Short press to play/pause accompaniment music (from the BT device input).
1. button
2. button
Short press the button to switch to next music song, Long press the button fot 2s to switch to last music song(only for BT music
accompaniment).
Switch cyclically voice changer modes: male, female, baby, deep,off. Short press the "Original Voice" button to exit.
Tips: The voice changer modes has preseted reverb effect, can be adjusted by two reverb fader.
Short press: Bluetooth ON/OFF. Long press: Clear Bluetooth pairing.
BT ID: G10Pro SoundCard
The Bluetooth function is only for inputting background music and is limited by a range of 10 meters.
The input volume of the Bluetooth music is controlled by the "Music" knob.
3. BT button
4. Voice Changer button
7. 12-Step Autotunes indicator
Short press to cyclically switch between the 12-step autotunes, including A, Bb, B, C, Db, D, Eb, E, F, Gb, G, Ab. Adjust the
tune intensity using the Autotune knob.
6. Autotune button
Enable the Ducking function:
When enabled, the mixer will automatically lower the volume of the background music while you are speaking, highlighting your
voice. The background music volume will recover when you stop speaking.
Note: This function works for background music input via Bluetooth and the Music port. If you need to apply Ducking to music
from a PC via USB-C, please turn on the LOOPBACK feature.
5. Ducking button

09
Button Guide(3)
8. Mic Knob
Rotate the knob clockwise to adjust the input volume of microphones(from 48V Mic port, LINE IN port, Mic(1, 2) port and
Headset port).
Rotate the knob clockwise to adjust the 'Hi' 'Mid' Low'' tone of the microphone vocals.
9.'Hi' 'Mid' 'Low' Knob
10. BGM Pitch
Rotate the knob to raise or lower the pitch levels of current accompaniment music (only for the accompaniment music inputted
via BT and Music port). This function is unavailable when the device is connected to a computer solely via the OTG port.
11. INST Knob
Rotate the knob clockwise to adjust the input volume of instruments via the INST jack. It also controls the volume of the 16
soundpad buttons.
12. Speaker Knob
Rotate the knob clockwise to adjust the volume of audio output(via Speaker jack).
13. Timbre Knob
Adjust Timbre level of the current voice.
15. Autotune Knob
Rotate the knob clockwise to adjust the intensity of the current autotune tunes. (only for 12-step autotune tunes).
14. MIC Pitch
Adjust Pitch level of the current voice.
16. Reverb Depth fader
Slide up and down to control the spatial depth of reverb effect.
17. Reverb Length fader

10
Button Guide(4)
Slide up and down to control the duration of reverb effect.
18. Custom Mode/Factory Reset button
Short press Custom Mode: Switch among 19 built-in Custom Modes. The screen will show four identical digits to indicate the
mode number. You can make adjustments via Hi, Mid, Low, Reverb Depth and Reverb Length. Long press the number keys
1-8 on the right to quickly jump to the corresponding Custom Mode. Short press 'Original Voice' button to exit.Long press to
reset the G10Pro mixer to its original settings.
19. POWER/LOOPBACK button
Long press to turn the G10Pro mixer on/off; Short press to turn the LOOPBACK feature on/off.
Function Overview:LOOPBACK routes audio signals received from your computer back to the mixer's output bus, allowing
your streaming audience or recording devices to hear audio played on your computer.
Correct Operation Steps (Avoid Echo Issues):1. Complete basic computer setup first: All audio software (music, video, games,
browsers, streaming/recording apps, etc.) → Set both input and output devices to "G10Pro Mixer"
2. DO NOT enable LOOPBACK at this stage. Test your stream or recording first.
3. If your audience hears both your voice and computer audio, or the recording contains both: No need to enable LOOPBACK
4. If your audience/recording only hears your microphone voice, not music/game sounds: Enable LOOPBACK now
Critical Safety Note:When LOOPBACK is enabled during live co-hosting, voice calls, or video conferences, the other party
will hear their own voice twice. Always disable LOOPBACK before joining any call or co-host session.
20. Ai Denoise
The AI Denoise feature is enabled by default, with two built-in noise reduction modes:
AI Denoise Light Mode: Intelligent filtering of background noise picked up by the mic, designed to reduce lower-level noise
signals.
AI Denoise Strong Mode: Intelligent filtering of background noise picked up by the mic, designed to reduce higher-level noise
signals.
AI Denoise Off: Turn off the AI noise reduction function, and the microphone will output the original captured audio signals.
Wind noise, air conditioner hum, fan sound and other ambient sounds may be picked up. It is recommended to use this mode
only in an extremely quiet environment.
Short press to cyclically switch between all Denoise modes and the Off state.

11
Button Guide(5)
21. Main Output fader
Slide up and down to control the volume of main output to two Live port and OTG port.
22. Monitor Output fader
Slide up and down to control the monitoring volume from 2 "Monitor" ports & "Headset" port.
23. MUTE button
Disabled by default; Enable this feature, the mixer will not input any mic audio.
24. Original Voice
Press this button to instantly switch to the original dry microphone sound and exit vocal effect modes including reverb, electronic
effect and voice changer. No matter which vocal effect mode you are currently in, press this button to instantly switch to pure
original sound when you need to speak temporarily.
25. MON button
Short press the button to turn on/off the direct monitoring function for monitoring all of microphones audio; Enabled by default;
Disable this feature, you will not be able to hear the your microphone's audio from the monitoring headphones.
26. Reverb Preset button
Short press to cycle through preset reverb modes: KTV Mode, MC Mode, Chat Mode, Streamer Mode, Radio Mode and Reverb Off.
Tips: Press the ‘Original Voice’ button for instant exit. You can also fine-tune the reverb effect to your preference using the Reverb
Depth and Reverb Length faders.
27. Custom Mode Storage button
Short press to save current vocal effects. Four identical digits displayed on the screen are the storage numbers. Up to 19 modes
can be saved. Repeatedly short press the 'Custom Mode' button to switch to the Custom Mode with the corresponding number.
28. Custom Mode Delete button
Short press to delete the currently used custom mode. If not in custom mode , it will delete the custom mode with the largest
number by default.

12
Button Guide(6)
29. AI Vocal Cut Button
Press this button to enable the AI Vocal Cut function, which can reduce vocals from audio sources input via the Music jack and
Bluetooth by up to 95%. Vocals are heavily suppressed and accompaniment becomes the dominant sound. This effect applies
simultaneously to monitoring headphones, live stream and recording outputs, ideal for karaoke accompaniment. Actual effect
may vary depending on the song's recording method and mixing style. Press again to disable this function.
30. AI Sing Along Button
Press this button to enable the AI Sing Along function, specially designed for singing live streaming. You can hear the full original
track through monitoring headphones for easy singing along, while live stream and recording outputs can reduce original vocals
by up to 95%. Vocals are heavily suppressed and accompaniment becomes the dominant sound. Actual effect may vary depending
on the song's recording method and mixing style. Press again to disable this function.
Tips: AI Vocal Cut and AI Sing Along. 1.Do not enable built-in effects in your music player software when using these functions.
2.These two functions are mutually exclusive. Only one can be enabled at a time.
3.These functions only apply to accompaniment audio sources input via the Music jack and Bluetooth, and do not affect
microphone input vocals.
4.This function is unavailable when the device is connected to a computer solely via the OTG port.
5.When you are in a live stream co-host session or making a phone call, enabling these two functions will cause the other party's
voice to be eliminated, making it impossible for you to hear them. Please remember to turn off these two functions beforehand.
33. Music knob
Rotate the knob clockwise to control the input volume of the accompaniment music from BT, Music jack and OTG jack.
Press and hold the button for 2 seconds until you hear a prompt tone and the button's light starts flashing, then begin recording.
You can record for a duration of 1 to 10 seconds. (You must continue to hold the button throughout the recording process until
it concludes.) You can record audio and music through multiple microphone jacks. Recording is also available via Bluetooth,
Music jack and OTG jack. Enable LOOPBACK when connecting the device to a computer via OTG to record audio and music.
The INST knob adjusts the volume of soundpads.
31. 8 Custom Scene Effects
Instant trigger sound pads for live streaming/podcast/gaming atmosphere. INST knob adjusts the volume of soundpads.
32. 8 fun soundpads
13
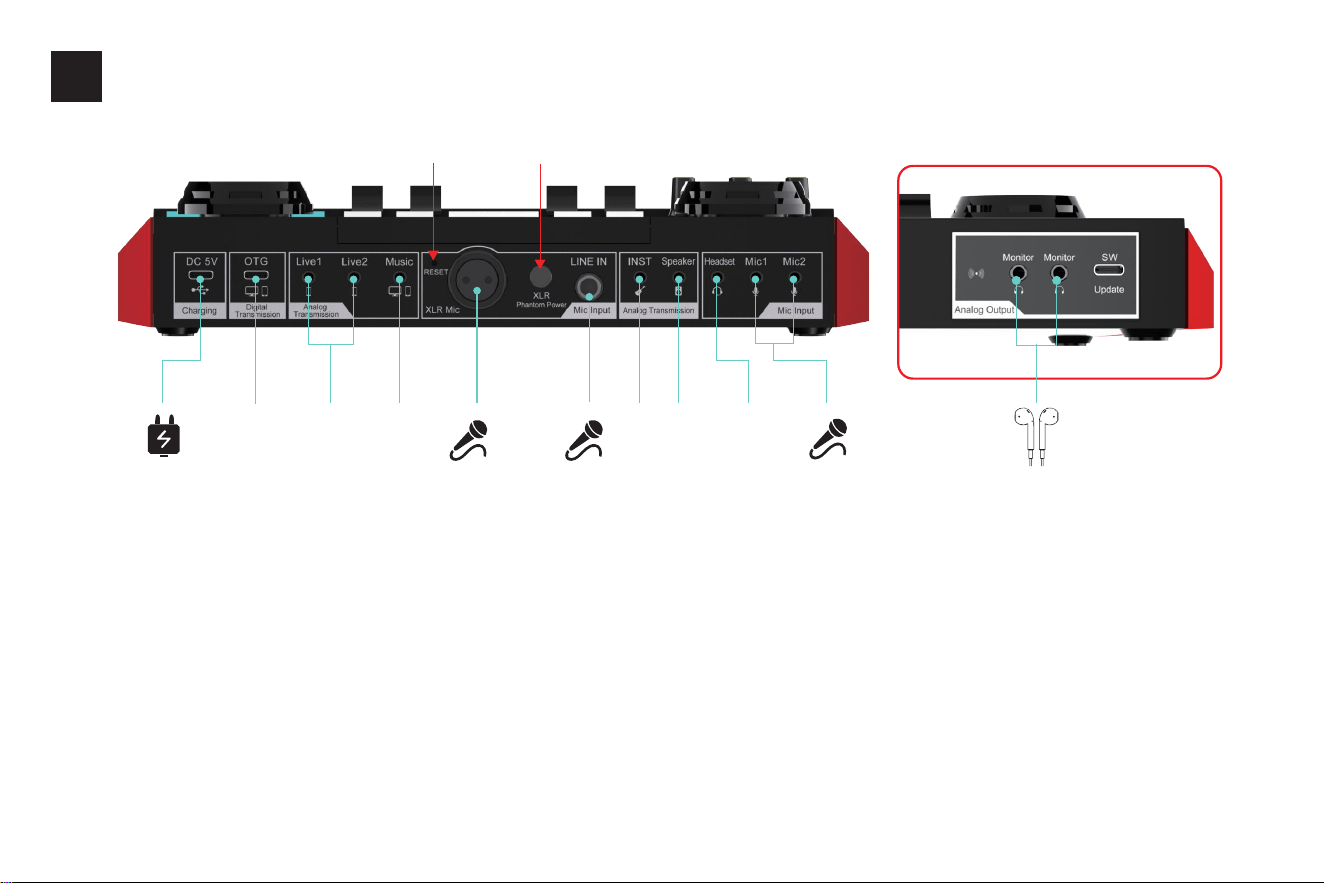
Connector Guide(1)
USB-C port used exclusively for recharging the mixer via a power adapter, power bank, or computer.It is for charging only and
does not support audio signal transmission.
1. DC 5V CHARGING Jack
Input volume is controlled by the "MUSIC" knob. Output volume is adjusted using the "Main Output" fader.It connects mobile
phones, computers and other devices for live streaming, podcasting, recording, gaming etc.
2. OTG Jack
These two 3.5mm TRRS output ports deliver mixed audio to smartphones and tablets via a 3.5mm TRRS cable. They support
multiple simultaneous outputs for mobile recording, live streaming, podcasting and more.
3. LIVE 1, 2 Jack
EarphoneHeadset with
Microphone
1/8"Mic
48V Mic
1/4"Mic
charge only
① ② ③ ④ ⑤ ⑥ ⑦
⑪
⑩⑨⑧
48V Mic on/off48V Indicator

14
Connector Guide(2)
3.5mm input ports for musical instrument devices.
The input volume from the "INST" ports is controlled by the "INST" knob.
7. INST Jack
3.5mm TRS output port for connecting audio playback devices, such as speakers or headphones.
The output volume from this port is controlled by the "Speaker" knob.
8. SPK Jack
A 3.5mm TRRS port for connecting a headset with a microphone.
The input volume is controlled by the "MIC" knob.
9. HEADSET Jack
3.5mm TRS ports for connecting condenser microphones via XLR to 3.5mm cables.The input volume of these ports is controlled
by the MIC knob.
The input volume from these ports is controlled by the "MIC" knob.
10. MIC 1, 2 Jack
Two 3.5mm ports for real-time monitoring of all sound sources from the mixer.
Supports TRS/TRRS headphones.
The monitoring volume is controlled by the "Monitor Output" fader.
11. MONITORING Jack
A 48V input port designed for condenser microphones that require phantom power.
5. 48V Mic Input
A 3.5mm input port for accompaniment music resources. The input volume from this port is controlled by the "MUSIC" knob.
4. MUSIC Jack
A 6.35mm dynamic microphone input port. The input volume is controlled by the "MIC" knob.
6. DYNAMIC Jack

15
Troubleshooting(FAQ)(1)
Q1: The device does not work, or there is no sound
suddenly.
1.The battery is fully discharged. Connect the USB cable to charge
before use;
2.Restart the Audio Mixer. If it cannot be restarted, there is a reset
hole to the right of the "Music" port;
3.Check that all cables are securely plugged in.
Q5:The live streaming sound is too quiet/completely
silent, or the microphone has no sound output.
1. Check that the streaming device is correctly connected to the
OTG port or Live1/Live2 ports;
2. Check that the microphone cable and headphones are
connected to the correct ports. Please turn on the 48V switch
on the rear panel if you use your own 48V condenser microphone;
3. Turn up the "Mic" and "Music" large knobs, and push up the
"Main Output" and "Monitor Output" faders;
4. Check that the "MUTE" and "MON" buttons are steadily lit;
5. When live streaming or podcast recording on a computer,
please set the audio input and output to "G10Pro Mixer".
For mobile phone details, see Q8;
6. Unplug and replug relevant cables to troubleshoot connection
issues.
Q6:Guitar cannot be used with the device.
1.Plug the guitar into the 3.5mm INST jack. The volume is
controlled by the "INST" knob;
2.For a 6.35mm plug, you need to use your own adapter, or
plug it into the "LINE IN" jack. In this case, the guitar input
volume can only be adjusted via the "Mic" knob.
Q2: The sound is not normal.
1.This device has a variety of preset voice changer modes built in.
Please switch to the "original sound" mode;
2.Check that all cables are connected correctly;
3.The side of the microphone with the text is the sound pickup side.
Please speak into this side for optimal sound quality. Do not speak
into the top of the microphone;
4. If everything else is normal but you cannot hear the other person
during a live stream call: Turn up the volume of the "Music" knob,
and turn off the "AI Sing Along" and "AI Voice Cut" (A steady button
light means off) and the "Ducking" function.
Q3: Auto Ducking function not working.
1.This function does not work for voice calls. It only works for
podcasts or live streaming with background music;
2.For live streaming scenarios, two devices (phone, computer, etc.)
are required. One device is used for live streaming via connection
to the OTG port or Live1/Live2 ports, and the other device plays
music via Bluetooth connection to the Audio Mixer or through the
"Music" port for this function to work.
Q4: There is a lot of noise during live streaming.
2.Check that all cables are securely plugged in;
3.Appropriately lower the microphone input volume and turn on
the noise reduction function;
4.When live streaming on a PC, some laptop chargers may
interfere with the mixer. Try unplugging the computer's charging
cable;
5.Unplug the cables connected to the Audio Mixer one by one
to identify which cable or connected device is causing the issue.
1.Check if the battery is nearly depleted and charge it promptly;
16
Troubleshooting(FAQ)(2)
Q7: Voice Changer effect cannot be adjusted.
Press the "Voice Changer" button briefly to switch "voice
changer modes". In "voice changer" mode, you can adjust
the effect using the "Hi Mid", "Low"knob, and "Reverb Depth/
Length" fader.
Q8: I can hear music in my headphones but there is
no sound in the live stream, and none of the mixer
sound effects work.
1.VERIFY THE OTG BRAIDED CABLE CONNECTION
(CRITICAL!)
·Plug the 2-in-1 combined Type-C connector into your
PHONE (DO NOT connect this end to the mixer).
·Plug the other Type-C end of the cable into the OTG port
on the audio mixer (DO NOT use the charging port).
·Ensure the cable is fully inserted. Thick phone cases may
cause poor contact; remove the case and re-plug the cable
if necessary.
2.Confirm successful connection
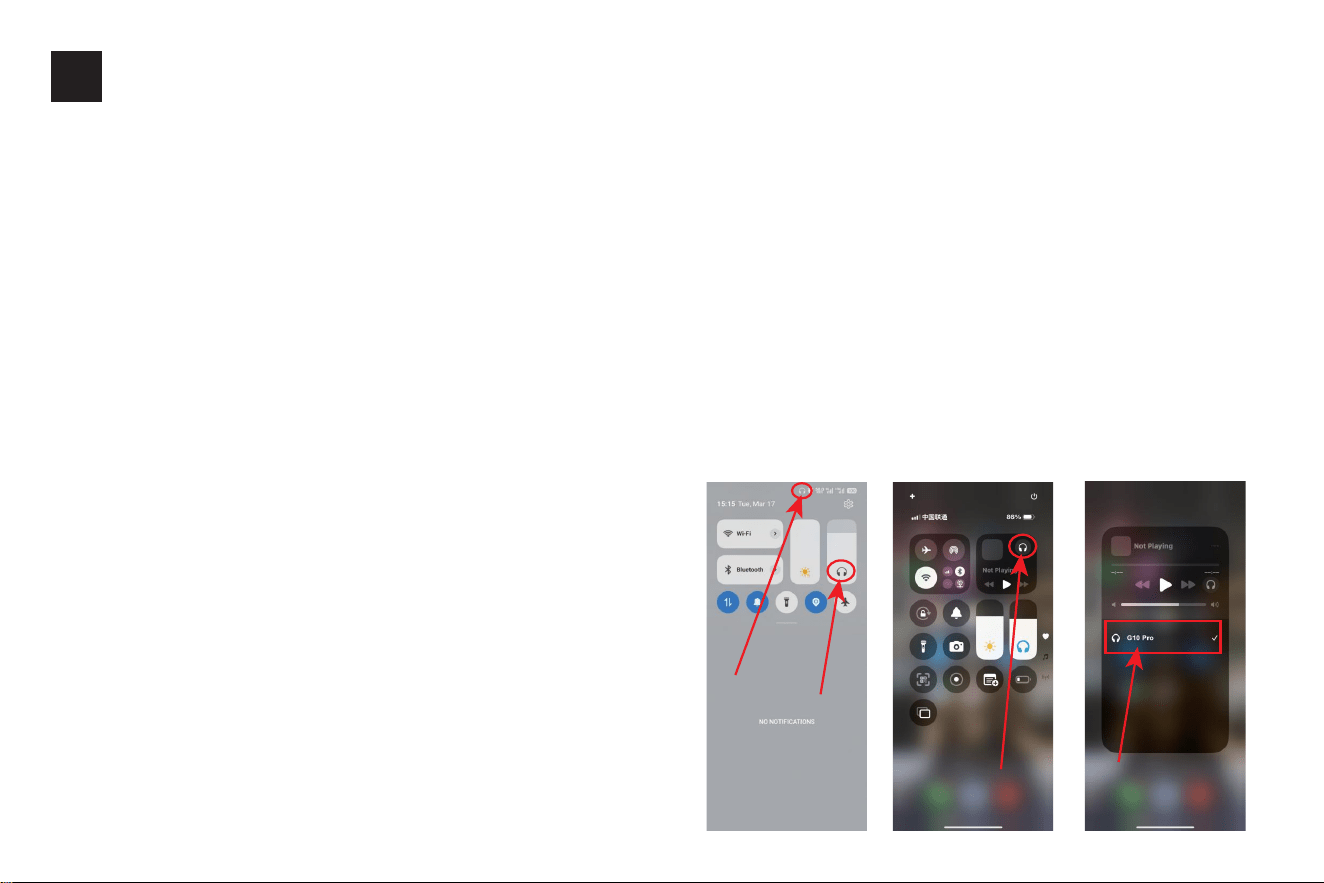
·Android phones: A headphone icon will usually appear
in the status bar. (Figure 1)
·iPhones: The mixer model (e.g., G10Pro) will be
displayed directly. (Figure 2)
3.For phones with a 3.5mm headphone jack Use a TRRS
3.5mm audio cable to connect the mixer's Live1 / Live2 port
to your phone's 3.5mm jack.
4.Adjust phone settings
·Android phones: Disconnect all cables first. Go to Settings >
search for "OTG" and enable the function (some models do
not have this option). Restart your phone, then re-plug the
cable.
·iPhones: Go to Settings > Face ID & Passcode, enable
"Accessories". Restart your phone, then re-plug the cable.
5.Test with a different cable
·Try a replacement OTG braided cable.
·If no spare OTG cable is available, use a dual Type-C
cable that supports data transfer (preferably your phone's
original data cable).
6.If possible, test with a different phone to rule out
device-specific compatibility issues.
Figure 1 Figure 2 Figure 2

17
SAFETY INSTRUCTIONS WARNINGS
To prevent fire, electric shock, or injury:
Power Supply
Use only the 5V/1A power adapter or certified alternatives.(Package includes charging cable only, power adapter not included.)
Do not charge while operating the mixer in high-temperature environments (>40°C/104°F).Disconnect power immediately if the
device emits smoke,unusual odors, or excessive heat
Battery Handling
Lithium-ion battery contained - do not disassemble, crush, or expose to liquids. Charge fully before first use (approx. 5 hours).
For long storage (>3 months), maintain 50% charge level. Dispose of batteries according to local regulations - do not incinerate
Operational Safety
Keep away from water and moisture (IP rating not specified). Maintain at least 10cm clearance from other electronic devices.
Do not block ventilation openings during use. Hearing Protection. Limit headphone volume to <85dB SPL for extended use.
Discontinue use if experiencing hearing discomfort or tinnitus
FCC Caution
This device complies with part 15 of the FCC Rules. Operation is subject to the following two conditions:
(1) This device may not cause harmful interference,
(2) this device must accept any interference received, including interference that may cause undesired operation. Any changes
or modifications not expressly approved by the party responsible for compliance could void the user's authority to operate the
equipment. NOTE: This equipment has been tested and found to comply with the limits for a Class B digital device, pursuant to
Part 15 of the FCC Rules. These limits are designed to provide reasonable protection against harmful interference in a residential
installation. This equipment generates, uses and can radiate radio frequency energy and, if not installed and used in accordance
with the instructions, may cause harmful interference to radio communications. However, there is no guarantee that interference
will not occur in a particular installation. If this equipment does cause harmful interference to radio or television reception, which
can be determined by turning the equipment off and on, the user is encouraged to try to correct the interference by one or more
of the following measures:
-- Reorient or relocate the receiving antenna.
-- Increase the separation between the equipment and receiver.
-- Connect the equipment into an outlet on a circuit different from that to which the receiver is connected.
-- Consult the dealer or an experienced radio/TV technician for help.
The device has been evaluated to meet general RF exposure requirement. The device can be used in portable exposure
condition without restriction.
G10Pro AUDIO MIXER
Product Name: MIXER Model:G10Pro
Support E-mail: [email protected]
Brand Supplier: Shenzhen Tenlamp Trade Co.,Ltd.
Address: 601, Building C, No. 310 Wuhe Avenue, Luhu Community,
Guanhu Street, Longhua District, Shenzhen, Guangdong, 518129, China
Video Tutorials
US Agent:
Company Name:LOBOS IOWA INC
FRN:0036413961
Contact Name:Harley Li
Address:4623 Bittercreek Dr Colorado
Springs CO 80922 US
Phone:+1 8188180538
Email:info@lobos-lowa.com