English
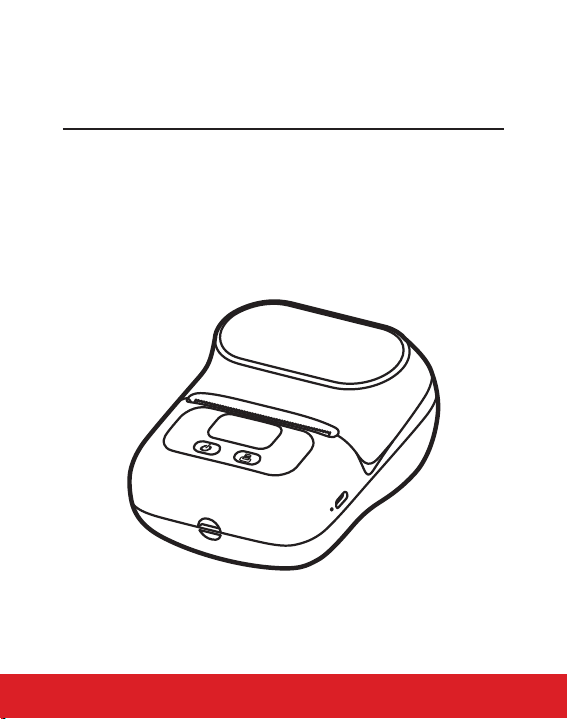
M110
User Guide
1. Product Introduction
1.1 Packing List
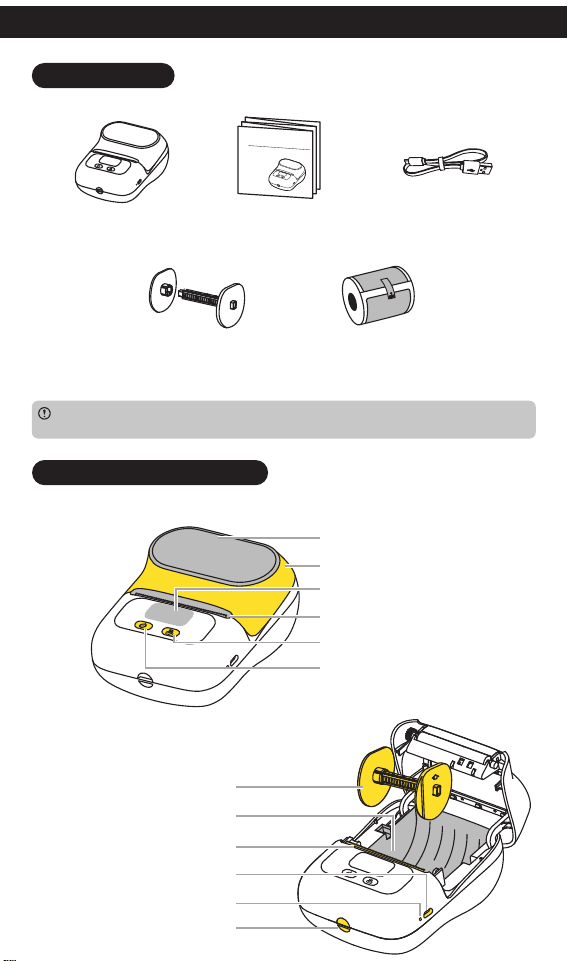
Printer
×1
M110
Quick Start Guide
Quick Start Guide
×1
Type-C Cable
×1
Paper Roll Spindle
×1
100-Pc 40*30㎜ Paper Roll
×1
The Paper Roll and Paper Roll Spindle have been installed in the printer. However, if you
have purchased a bundled printer package, it does not include a 40*30㎜-100pc Paper Roll.
Display
Decorative Panel
Feed/Select Button
Paper Exit
Power/Menu Button
Top Cover
Manual Cutter
Reset Hole
Type-C Charger Port
Paper Compartment
Paper Roll Spindle
Lanyard Hole
1.2 Printer Parts Instruction
2. Getting Started
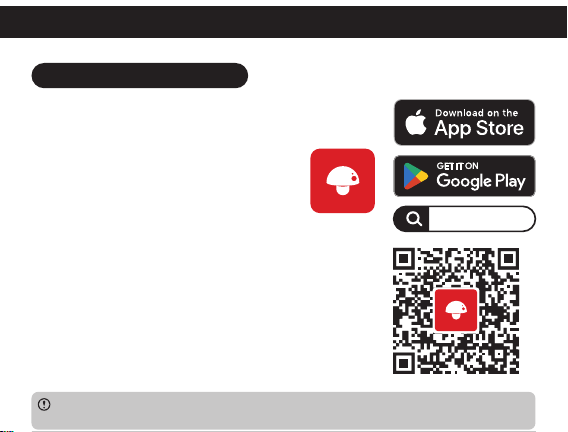
Print Master
2.1 Downloading the App
Method 1: Search for the "Print Master" app on App
Store® or Google Play™ for download and
installation.
Method 2: Scan the QR code to download the app.
You can scan the code using your cell phone's
camera, the built-in QR code scanning feature of your
browser, or a dedicated QR code scanning app.
As the Safari browser on Apple devices does not support direct QR code scanning, please
use your device's built-in QR code scanner instead.
Print Master
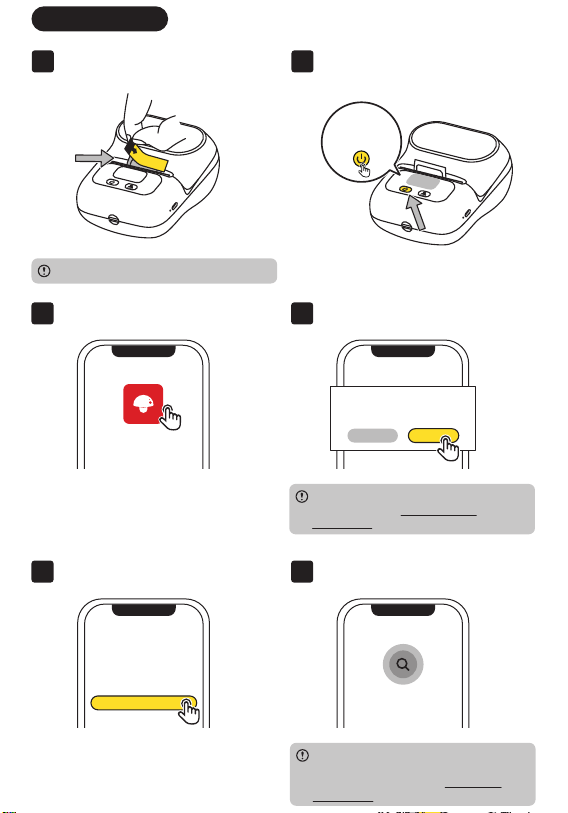
2.2 User Guide
03 Open the "Print Master" app. 04 Grant permissions.
Print Master
"Print Master" would like to use
Bluetooth to connect to the printer
Permission Request
Cancel OK
For more information about app
permissions, see 6.2 Permission
Description in this guide.
05 Tap [Auto Connect]. 06 Searching for printer.
Searching for printer...
Auto Connect
Let's print the first label!
Welcome to Print Master
You can find instructions for manual
connection on the [Home] page. For
detailed instructions, see 6.1 Manual
Connection in this guide.
01 Remove the protective film.
This step is required for first use.
02 Long press the Power Button for 3
seconds until the Display lights up.
Long press
for 3s to turn
on printer
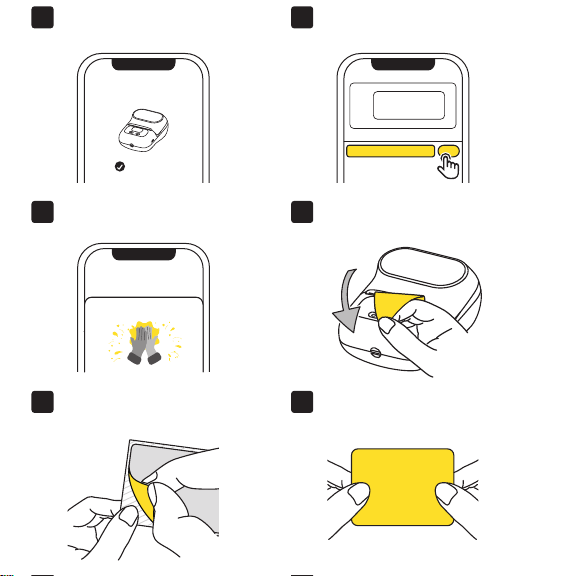
09 Printing is completed. 10 Tear off the label along the Paper
Exit.
PrintPlease enter your nickname
Printing completed
08 Edit your first label, and tap [Print]
after you finish editing.
Hi
your nickname
PrintPlease enter your nickname
07 Connected.
Connected
The following printers are
found
11 Remove the liner. 12 Attach the label to a dry, flat
surface.
Hi
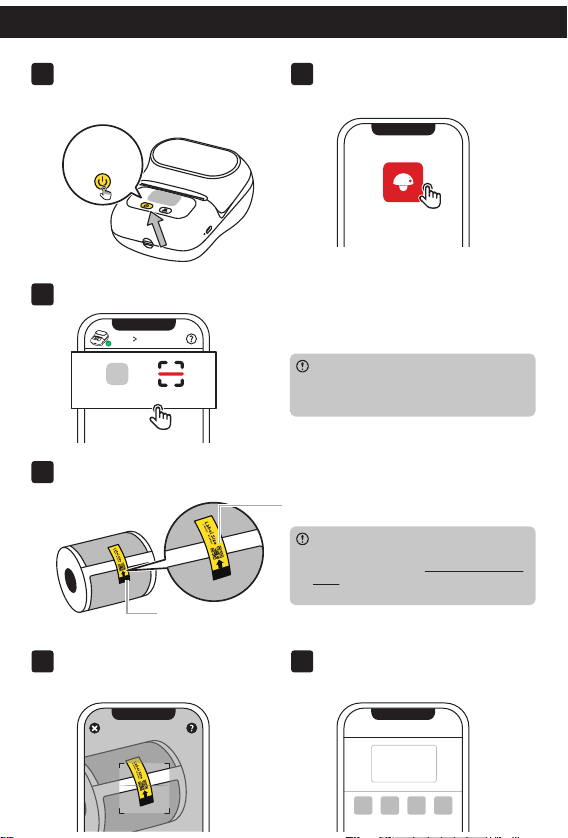
03 Tap [Scan].
M110
Scan
Please use [Scan] after connecting the
printer to the app. Otherwise, scanning
will fail and the editing page will not be
displayed.
3. Replacing the Paper Roll
04 Take out the unused paper roll.
Anti-loosening Sticker
This QR code is for demonstration only. Please
scan the actual QR code on your paper roll.
If you have purchased boxed paper rolls
separately, or if there is no QR code on the
paper roll, please see 4. Identifying Label
Sizes in this guide for instructions on how
to quickly access the editing page.
01
Long press the Power Button for 3
seconds until the Display lights up.
Long press for
3s to turn on
printer
02 Open the "Print Master" app.
Print Master
05 Scan the QR code on the Anti-
loosening Sticker of the paper roll.
06 Paper roll size has been identified.
Enter the editing page.
White-4030
1.57×1.18 in
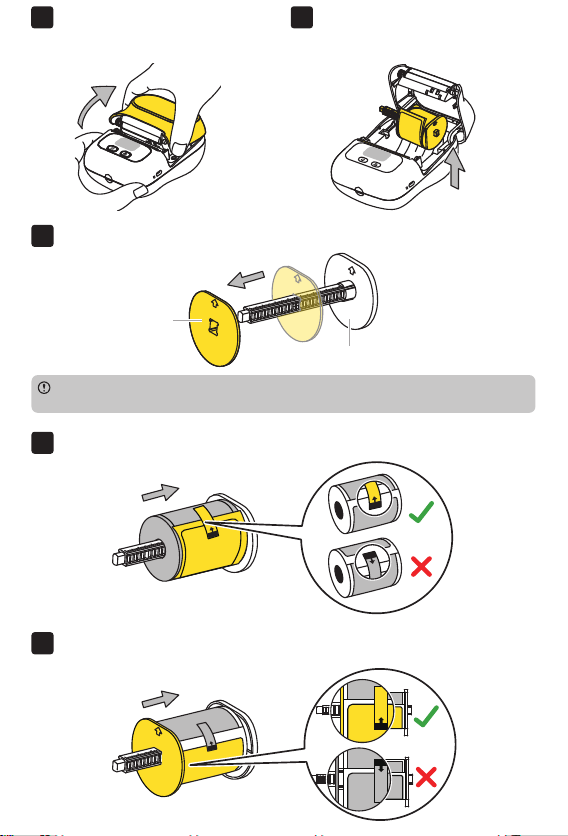
11 Reinstall the Movable Damper and push it to the edge of the paper roll.
10 Place the paper roll.
09 Remove the Movable Damper.
Fixed Damper
Movable Damper
Please remove the existing paper roll from the Paper Roll Spindle before loading a new
paper roll.
07 Hold both sides of the Top Cover
and pull it upwards to open it, as
illustrated.
08 Take out the Paper Roll Spindle.
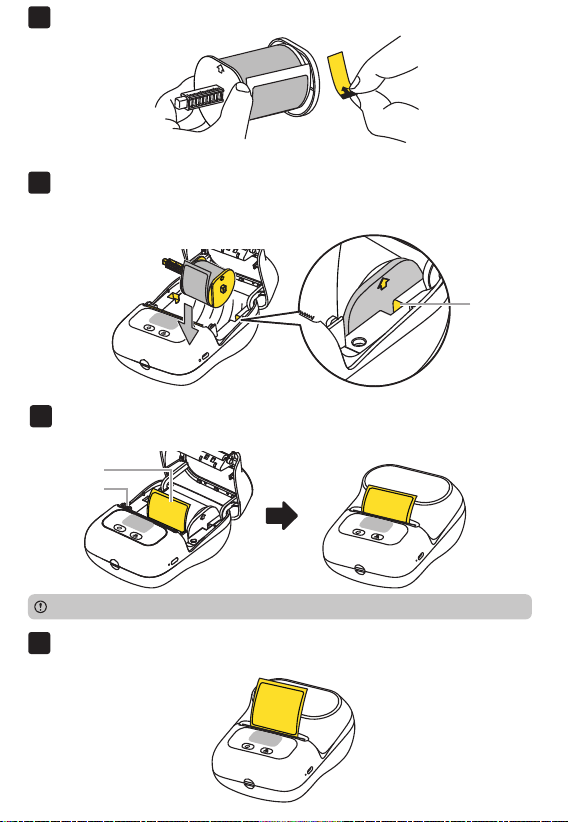
12 Peel off the Anti-loosening Sticker from the side that is marked with an arrow.
13 Insert the ends of the Paper Roll Spindle into the slots on the sides of the
Paper Compartment, making sure that the arrow on the fixed guide is
pointing upwards.
Slots
14 Pull out the label paper until it is higher than the paper exit, and then close
the cover.
Label Paper
Paper Exit
The Label Paper faces the Power Button and is higher than the Paper Exit.
15 The Paper Exit will automatically feed out a blank piece of label paper, which
indicates that calibration is completed.
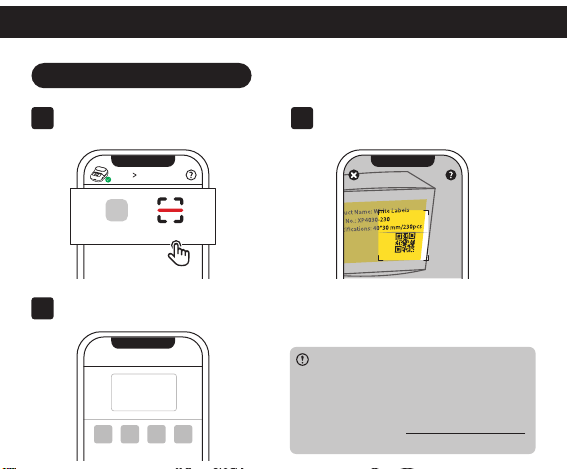
4. Identifying Label Sizes
4.1 Scanning the QR Code
01 Go to "Home" and tap [Scan].
Scan
M110
02 Aim the scanning frame at the QR
code on the paper roll box.
•
Please connect the printer to the app
before you scan the QR code. Otherwise,
the app won't be able to identify the label
size and redirect to the editing page.
•
For instructions on manually connecting
to the printer, see 6.1 Manual Connection
in this guide.
03 Enter the editing page.
White-4030
1.57×1.18 in
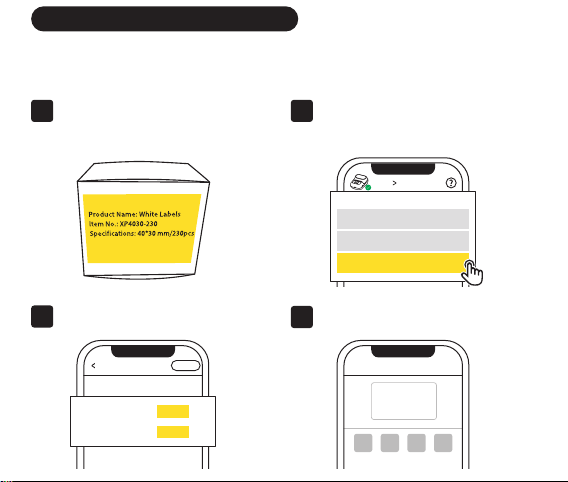
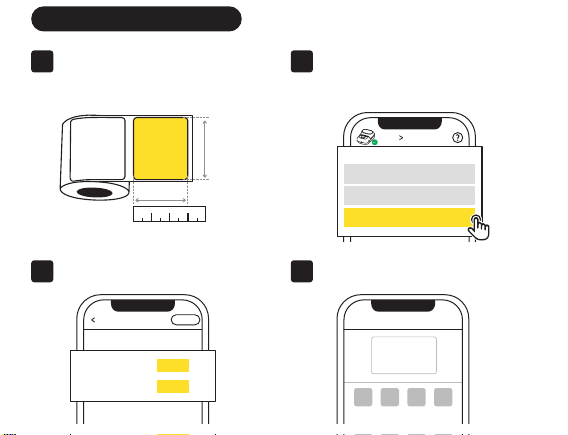
4.2 Finding Label Specifications
If there is no QR code on the paper roll box, please enter the label size manually
in the app. You can identify the label size in the following ways:
01 Find label specifications on the
information side of the paper roll
box.
Newly created by blank label
New Label
M110
Click on [New Label] on the app
homepage and select [Newly
created by blank label].
02
03
Input corresponding specifications.
04 Enter the editing page.
White-4030
1.57×1.18 in
Confirm
Label Setting
Label Width
Label Height
in1.57
1.18 in
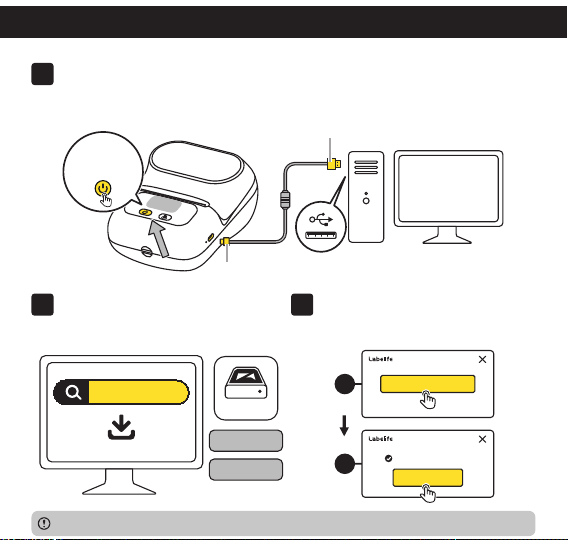
4.3 Measuring the Label
01 Measure the length and width of
a single label with a ruler.
30mm
40mm
0
1 2 3
(cm)
Click on [New Label] on the app
homepage and select [Newly
created by blank label].
02
Newly created by blank label
New Label
M110
Confirm
Label Setting
Label Width
Label Height
in1.57
1.18 in
03
Input corresponding specifications.
04 Enter the editing page.
White-4030
1.57×1.18 in
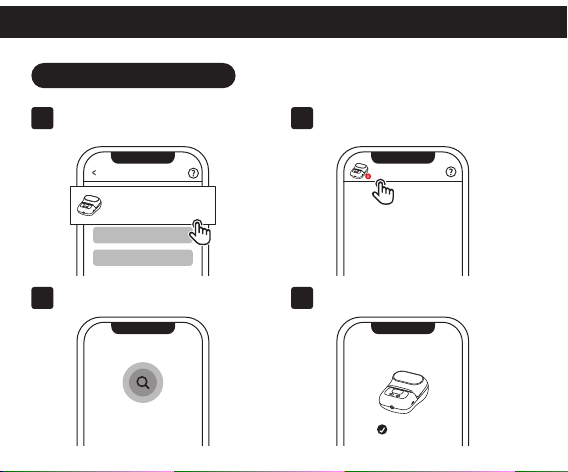
5. Downloading and Installing the PC Application
02 Visit ms.printsupport.cn/?mo=M110
to download the "Labelife"
application.
03 Installing the "Labelife" application.
Windows
Mac
ms.printsupport.cn/?mo=M110
Download
1
2
Custom Install
One-Click Install
Launch Now
Installation Completed
Labelife_Setup
For detailed application guides, please visit the official website: https://labelife.cc
01 Long press the Power Button for 3 seconds until the Display lights up, and
connect the printer to the computer using the original cable supplied with the
printer.
Long press for
3s to turn on
printer
USB Type-A End
USB Type-C Port
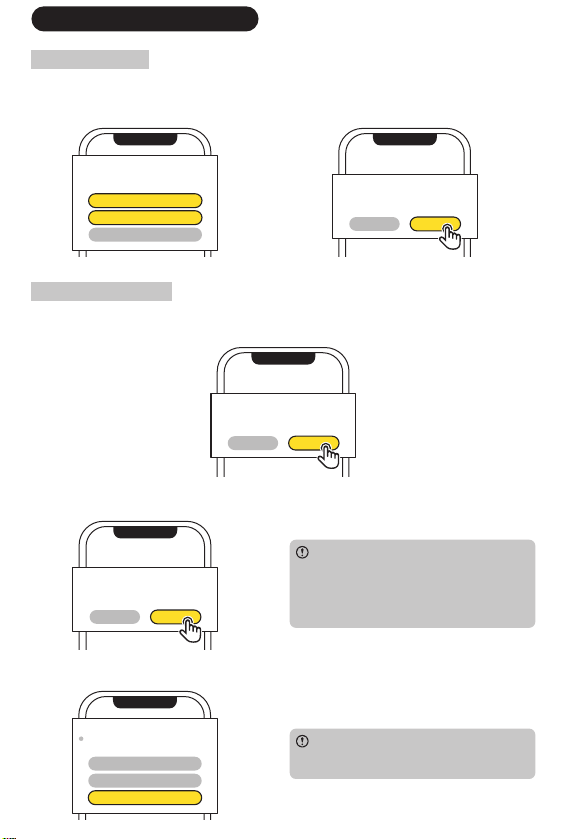
6.1 Manual Connection
6. App User Guide
01 Select your printer. 02 Click on the top left corner to
connect to the printer
Choose your printer
M110 Series
Tap to connect
03 Searching for printer. 04 Connected.
The following printers are
found
Connected
Searching for printer...
6.2 Permission Description
For iOS users
1. The app requires access to the
Internet.
2. The app requires Bluetooth
permission.
Allow "Print Master" to use wireless
data? Some functionality may not
work when wireless data is turned off.
WLAN and Cellular
WLAN Only
Don't Allow
"Print Master" would like to use
Bluetooth to connect to the printer
Permission Request
Cancel OK
For Android users
1. The app requires Bluetooth permission.
"Print Master" would like to use
Bluetooth to connect to the printer
Permission Request
Cancel OK
2. The app requires permission to search for nearby Bluetooth devices.
Allow "Print Master" to find and
connect to nearby devices?
No Yes
For Android 12 and above, the app
requires permission to search for nearby
Bluetooth devices; for systems below
Android 12, the app requires GPS
permission in order to search for nearby
Bluetooth devices.
3. Bluetooth Pairing Request.
Block
Cancel
Pair
Allow access to your contacts and
call history
Pair with M110?
You can simply tap "Pair" without
checking "Allow access to your contacts
and call history."
7. Safety Instructions
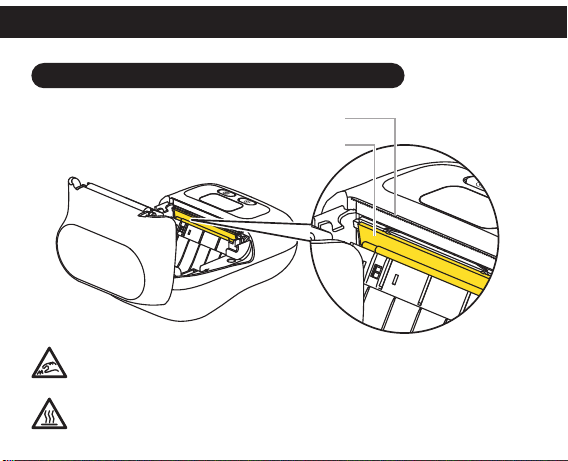
7.1 Manual Cutter and Print Head Instructions
Warning: The component can be HOT! Touching it when it is hot can
cause burns to your fingers. Before you touch the Print Head, please wait
for at least 30 minutes after turning off the printer.
Warning: This cutter has sharp edges. Do not touch the edges of the
cutter.
Print Head
Manual Cutter
7.2 Charging Instructions
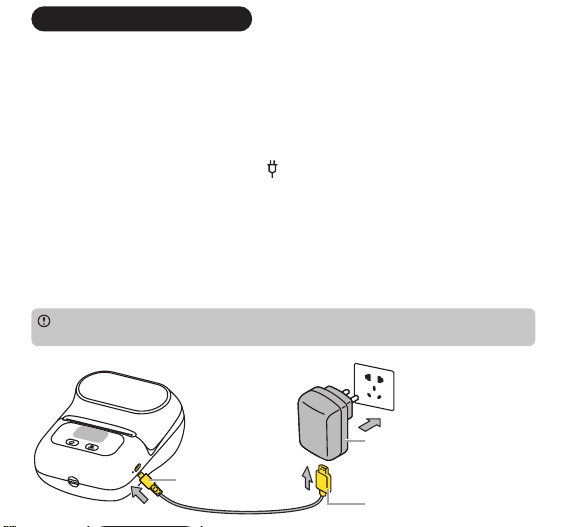
1. Please prepare your own power adapter (DC 5V/2A) with a Type-A port.
2. Insert the Type-C end (flat end) of the USB cable into M110's Type-C Port; insert
the Type-A end (wide end) of the USB cable into the Type-A port of the power
adapter.
3. After connecting the printer to an outlet via the power adapter, check the
Display for the following indications: When the printer is off, "Charging..." will be
displayed. When the printer is on, a " " icon will appear in the top right corner
of the Display.
4. To ensure quick usage, please charge the printer for at least 20 minutes. For a
complete charge, wait for 2-3 hours or until the Display indicates "Charge
Finished".
5. As the printer may heat up during charging, avoid placing it on materials such
as cotton or linen. Once the battery is fully charged, please unplug the charger
promptly.
Avoid using the printer while charging, as this may lead to reduced charging speed,
compromised print quality, and shortened battery life.
Type-A End (Wide End)
Power Adapter with
Type-A Port (not included)
DC5V 2A
Type-C End (Flat
End)
8. Cleaning and Maintenance
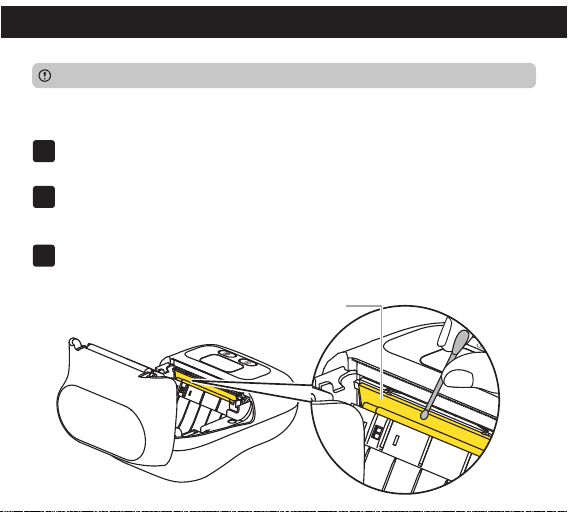
If you encounter issues such as blank lines, blurry print, or missing characters, it
may be caused by dirt on the Print Head. Please follow these steps:
Please make sure the printer is turned off before performing any cleaning or maintenance.
01 If you have just finished printing, wait for at least 30 minutes for the Print
Head to cool down completely.
02 Use a cotton swab dipped in alcohol or a print head cleaning pen (purchased
separately) to gently wipe the surface of the Print Head about 5 times to
remove any dust and stains.
03 Wait 5-10 minutes for the alcohol to evaporate completely. Thus, the cleaning
is done, and you can continue using the printer.
Print Head
9. Operator Panel Instructions
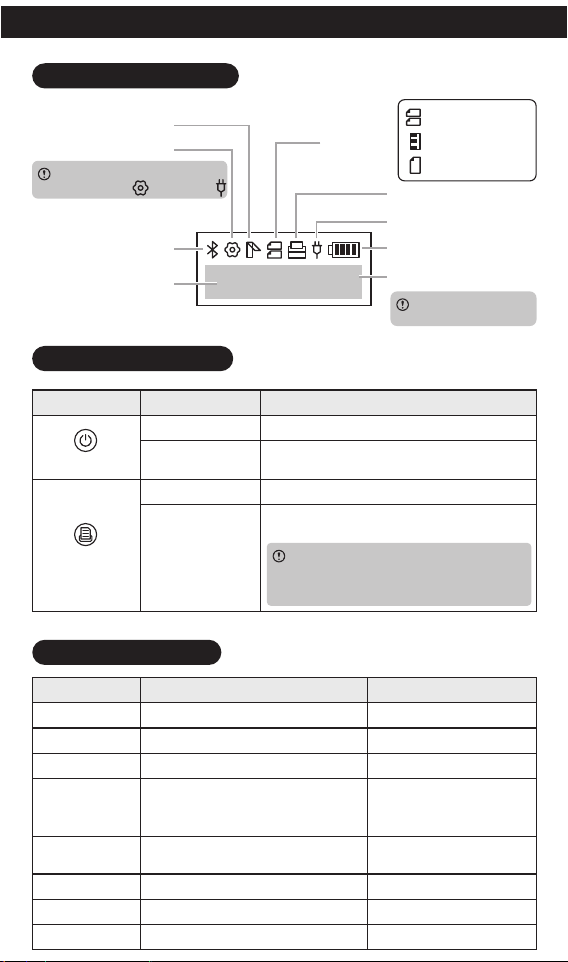
9.1 Display Instructions
Q155C-21X78921
Information Display Area
Charging status
Bluetooth connected
Label Type
Batte Level
Feeding/Printing
Settings
Top Cover opened
Printer Serial Number
(SN Code)
When your printer is connected
to a computer, will turn into
This is the standby
interface
Gap Label
Continuous Label
Black Mark Label
9.2 Button Instructions
Button Type
Power Button
Feed Button
Operation
Long press for 3s
Press once
Press once
Press once
Function
Power on/off
When in standby mode, feed out paper
When in main menu, access sub-menu for
selection
When in standby mode, access main menu
for selection
After selecting an option in a sub-menu, the
system will automatically revert to the
standby interface if there is no further activity
for 10 seconds.
9.3 Menu Instructions
Main Menu
Language
Print Darkness
Paper Gap type
Auto Power
OFF
Restore To
Factory Settings
Firmware Version
Device Address
Test print
Sub-menu
English
Explanation
Choose language
Show firmware version /
Show device address /
Test print Print device information
/
Reset the device to
factory settings
4(Weak),6(Normal),10(Dark) Choose print density
Continuous,Gap,Black Choose label type
5 Minutes, 15 Minutes, 30 Minutes,
1Hour, 2Hour, 4Hour, 8Hour,
24Hour, NO Close (default option)
Schedule automatic shut
down
10. Information to User
1. This device complies with Part 15 of the FCC Rules. Operation is subject to the
following two conditions:
(1) This device may not cause harmful interference,and
(2) This device must accept any interference received, including interference that
may cause undesired operation.
2. Any Changes or modifications not expressly approved by the party responsible
for compliance could void the user's authority to operate the equipment.
NOTE: This equipment has been tested and found to comply with the limits for a
Class B digital device, pursuant to Part 15 of the FCC Rules. These limits are
designed to provide reasonable protection against harmful interference in a
residential installation.
This equipment generates uses and can radiate radio frequency energy and, if
not installed and used in accordance with the instructions, may cause harmful
interference to radio communications.
However, there is no guarantee that interference will not occur in a particular
installation. If this equipment does cause harmful interference to radio or
television reception, which can be determined by turning the equipment off and
on, the user is encouraged to try to correct the interference by one or more of the
following measures:
—Reorient or relocate the receiving antenna.
—Increase the separation between the equipment and receiver.
—Connect the equipment into an outlet on a circuit different from that to which
the receiver is connected.
—Consult the dealer or an experienced radio/TV technician for help.
FCC Radiation Exposure Statement
The device has been evaluated to meet general RF exposure requirement. The
device can be used in portable exposure condition without restriction.
10.1 FCC WARNING

CAN ICES(B)/NMB(B)
- English:
This device contains licence-exempt transmitter(s)/receiver(s) that comply with
Innovation, Science and Economic Development Canada’s licence-exempt
RSS(s). Operation is subject to the following two conditions:
(1) This device may not cause interference.
(2) This device must accept any interference, including interference that may
cause undesired operation of the device.
- French:
L’émetteur/récepteur exempt de licence contenu dans le présent appareil est
conforme aux CNR d’Innovation, Sciences et Développement économique
Canada applicables aux appareils radio exempts de licence. L’exploitation est
autorisée aux deux conditions suivantes:
1) L’appareil ne doit pas produire de brouillage;
2) L’appareil doit accepter tout brouillage radioélectrique subi, même si le
brouillage est susceptible d’en compromettre le fonctionnement IC RF exposure
statement:
The device has been evaluated to meet general IC RF exposure requirement. The
device can be used in portable exposure condition without restriction.
IC Déclaration d'exposition aux RF:
L'appareil a été évalué pour répondre aux exigences générales d'exposition aux
RF d'IC. L'appareil peut être utilisé dans des conditions d'exposition portable
sans restriction.
10.2 ISED NOTICE(Canada)
10.3 European Union
Zhuhai Quin Technology Co., Ltd., as the responsible party for regulatory
compliance, declares under our sole responsibility that as delivered the
described product is in conformity with the Radio Equipment Directive
2014/53/EU, EU Restriction of Hazardous Substances (RoHS) Directive 2011/65/EU
and its amending Directive (EU) 2015/863, and carries the CE-marking.
The described product has been assessed and determined compliant with the
following standards:
SAFETY:EN IEC 62368-1:2020+A11:2020, EN 62479:2010
EMC:EN 55032:2015+A1:2020,
EN 55035:2017+A11:2020,
EN IEC 61000-3-2:2019+A1:2021,
EN 61000-3-3:2013+A1:2019+A2:2021
ETSI EN 301 489-1 V2.2.3(2019-11),
ETSI EN 301 489-17 V3.2.4(2020-09)
Radio:ETST EN 300 328 V2.2.2 (2019-07)
RoHS:EN IEC 63000:2018
SUPPLEMENTARY INFORMATION:This product has been tested and found to
comply with the electromagnetic compatibility (EMC) limits for a Class B digital
device pursuant to the listed directives, regulations and standards. These limits
are designed to provide reasonable protection against harmful interference when
the equipment is operated in a residential or business environment. The
equipment was tested in a typical configuration.
TYPE OF EQUIPMENT: Label Maker
Model Number: M110
Series model(s): N/A
TRADE/BRAND NAME: N/A
2024
Year CE marking was first
affixed to declared product
ZHUHAI CITY, CHINA
Place of Issue
January 25, 2024
Date of Issue
CE20240101
Document Control Tracking Number
Regulatory & Compliance Engineer
Position/Title
Dunxiang Yang
Full Printed Name
Signature
DECLARATION OF CONFORMITY
according to EN ISO/IEC 17050-1:2010
Manufacturer’s Name and Address:
Zhuhai Quin Technology Co., Ltd.
ROOM 103-029(CENTRALIZED OFFICE AREA) , 1F, BUILDING 1, NO. 18 FUTIAN
ROAD, XIANGZHOU DISTRICT, ZHUHAI CITY, CHINA
Phone:86-(0)756-8606111
Email:[email protected]om
EU Authorised Representative:
Prolinx GmbH
Brehmstr.56, 40239 Duesseldorf Germany
10.4 Trademarks
The Bluetooth®/MD word mark and logos are
registered trademarks owned by Bluetooth SIG, Inc.
and any use of such marks by Zhuhai Quin Technology
Co., Ltd. is under license. Other trademarks and trade
names are those of their respective owners.
Apple, the Apple logo, iPhone, iPad, iPod, and iPod touch are trademarks of Apple
Inc., registered in the U.S. and other countries. App Store is a service mark of
Apple Inc.
Android and Google Play are trademarks of Google Inc. Google and Google Logo
are registered trademarks of Google Inc.
Please pay attention to electrical safety. Do not disassemble, crush or puncture
the battery. This product is not a toy.
Bitte achten Sie auf elektrische Sicherheit. Zerlegen, zerquetschen oder
durchstechen Sie die Batterie nicht. Dieses Produkt ist kein Spielzeug.
Veuillez noter la sécurité électrique. Ne pas démonter, écraser ou piquer la
batterie. Ce produit n'est pas un jouet.
Si prega di prestare attenzione alla sicurezza elettrica. Non smontare,
schiacciare o perforare la batteria. Questo prodotto non è un giocattolo.
Preste atención a la seguridad del consumo de electricidad. No retire, triture o
pinche la batería. Este producto no es un juguete.
Lütfen elektrik güvenliğine dikkat edin. Bateriyi dağıtma, yıkma veya
yumruklama. Bu ürün oyuncak değil.
Var uppmärksam på elsäkerheten. Ta inte isär, krossa eller punktera batteriet.
Den här produkten är ingen leksak.
Let op elektrische veiligheid. Demonteer, verpletter of prik de batterij niet. Dit
product is geen speelgoed.
Proszę zwrócić uwagę na bezpieczeństwo elektryczne. Nie demontuj, nie
miażdż ani nie przebijaj akumulatora. Ten produkt nie jest zabawką.
WARNING
The company assumes full responsibility for the revision and explanation of this
manual, exercising utmost diligence to guarantee its accuracy. Nevertheless,
please note that any technical improvements to the product may not be
separately notified, and that the images of the product, accessories, software
interfaces, etc. in this manual serve solely as illustrations and references. Due to
product updates and upgrades, the actual product may vary slightly from the
images. Please refer to the physical product for accurate representations.
Special Notes