1
CORDLESS
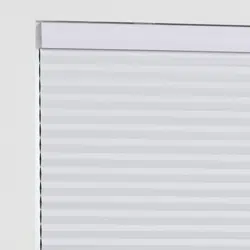
TOP DOWN BOTTOM UP SHADE
Español p. 8
9/16 in. Cellular3/8 in. Cellular
Serial Number
Purchase Date
Thank you for purchasing this ALLEN+ROTH product.
Questions, problems or missing parts?
Before returning, contact us on:
866-439-9800, 8 a.m. - 8 p.m., EST or [email protected].
14
Por un período de un (1) año desde la fecha de compra, el fabricante reemplazará esta decoración de
ventanas con una de valor igual si se descubre que esta decoración de ventanas tiene defectos en el
material o en la mano de obra. Esta garantía no cubre el daño ni los defectos causados o resultantes
por mantenimiento incorrecto, uso negligente o inadecuado, abuso, descuido, accidentes, casos
fortuitos, alteraciones, uso comercial, instalación, remoción o reinstalación. Esta garantía se restringe
a un uso normal por parte del consumidor dentro de Estados Unidos y Canadá. Para obtener el
servicio de garantía, llame al Departamento de Servicio al Cliente al 866-439-9800. de lunes a
domingo de 8 a.m. a 8 p.m., hora estándar del Este. También puede ponerse en contacto con
Impreso en Taiwan
El cortinero se puede limpiar con una esponja húmeda. Para limpiar la persiana de madera, use un
plumero de plumas o el accesorio para cepillar cuando aspire suavemente.
GARANTÍA
PIEZAS DE REPUESTO
CUIDADO Y MANTENIMIENTO
Para obtener piezas de repuesto, llame al Departamento de Servicio al Cliente al 866-439-9800, de 8
a.m. a 8 p.m., hora estándar del Este. También puede ponerse en contacto con nosotros en
ALLEN+ROTH and logo design are
trademarks or registered trademarks of LF,
LLC. All rights reserved.
Caja de aditamentos 79074-6SA1Z000HW2LA NO
DESCRIPTIONPART
Caja de aditamentos
3/8 in. Cellular
9/16 in. Cellular 79074-6SC4Z000HW2LA NO
PART # COVERED UNDER WARRANTY
ITEM #6595563
MODEL #11403
DF25469
2 3
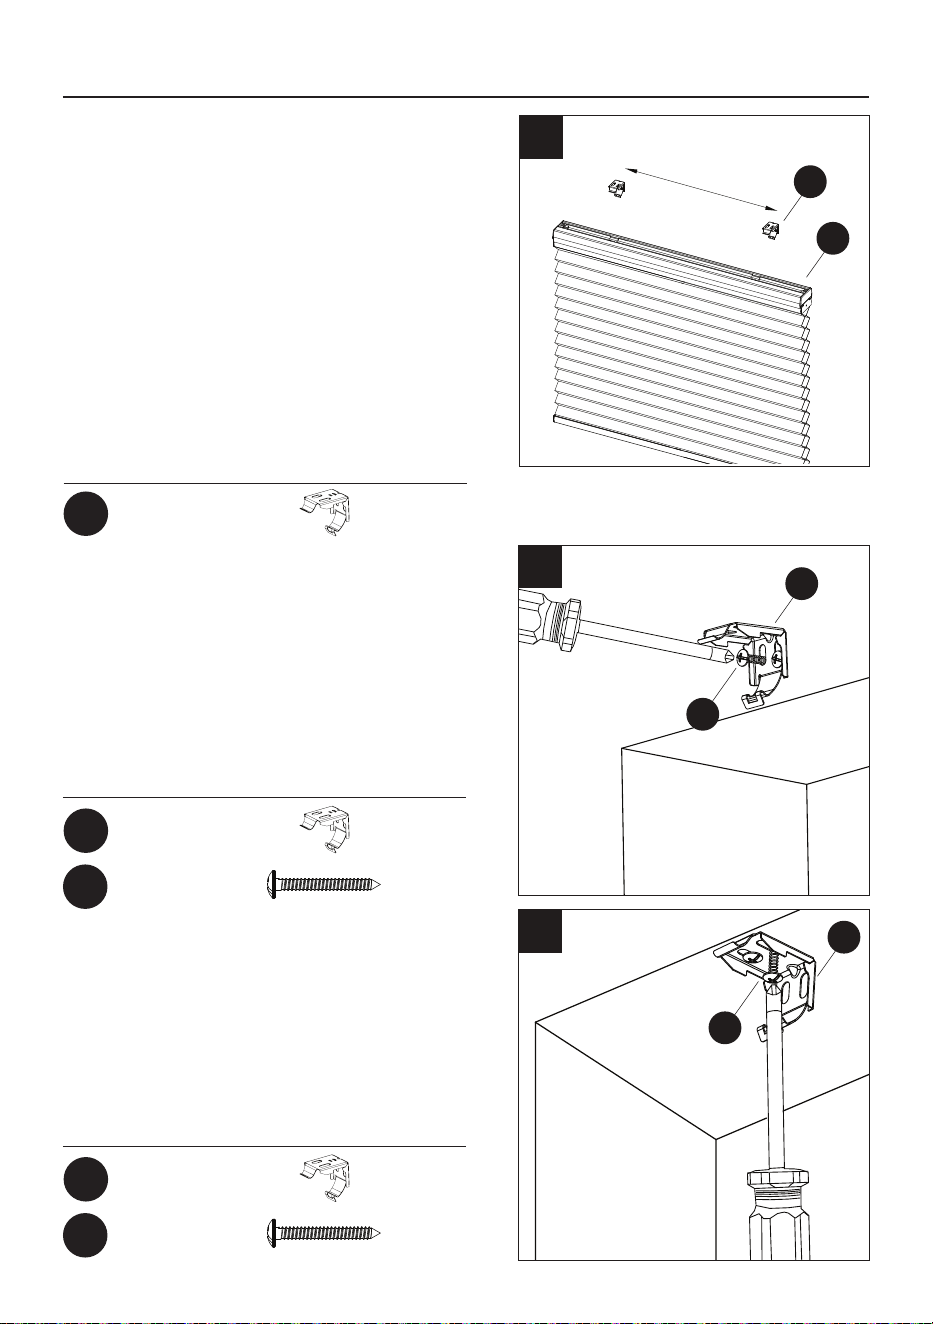
Before beginning assembly of product, make sure all parts are present. Compare parts with package
contents list and hardware contents list. If any part is missing or damaged, do not attempt to
assemble, install or operate the product.
Estimated Assembly Time: 30 minutes
Tools Required for Assembly (not included): Measuring tape, drill with 3/32 in. bit, and pencil.
Helpful Tools (not included): Step stool.
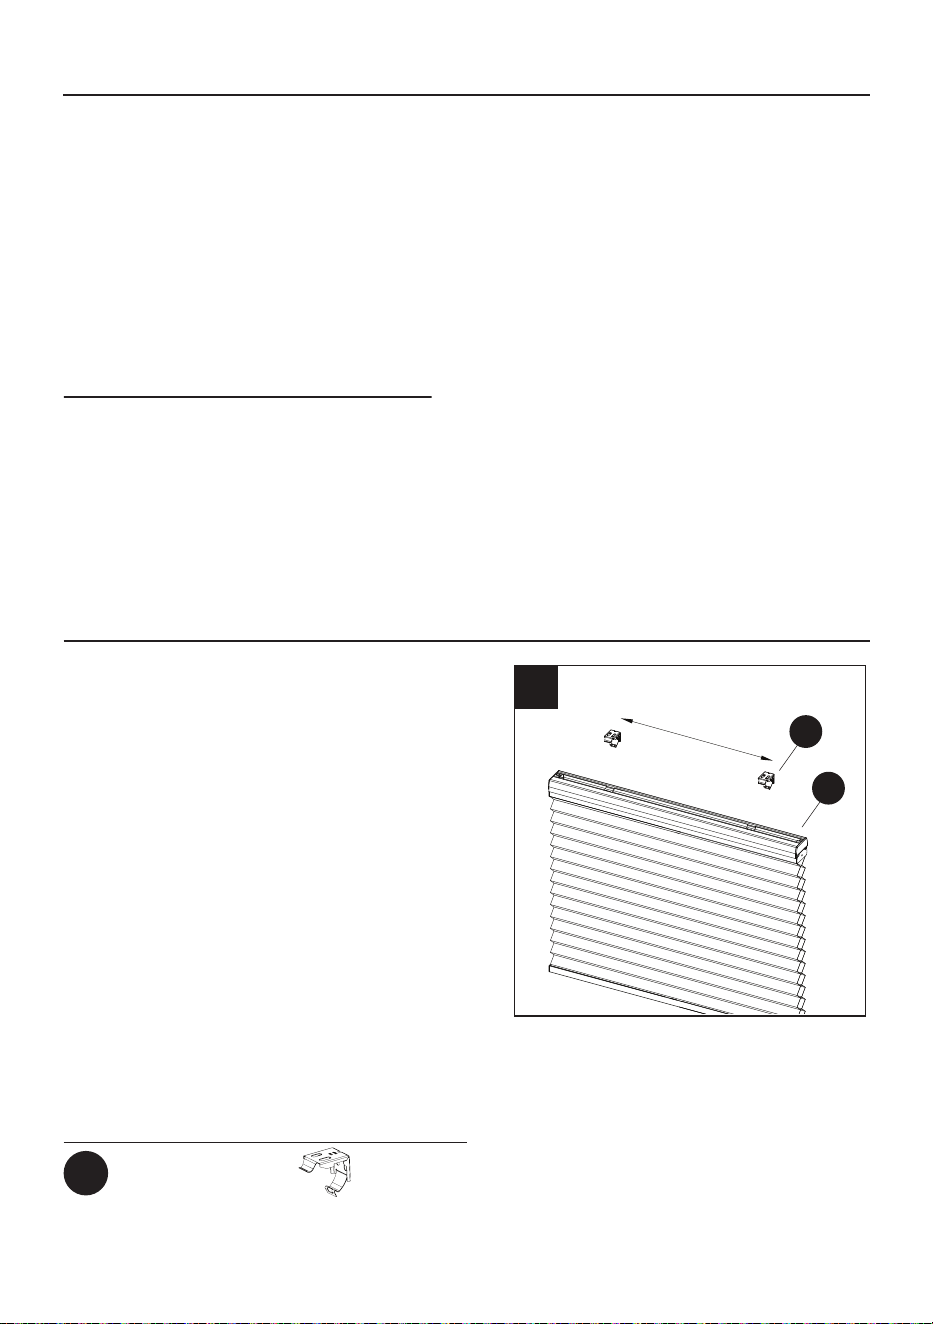
Bracket Location and Installation:
The shade may be installed either inside or outside the window frame. A mounting bracket should be
positioned on each end of the headrail. Wider shades that require 3 or more brackets should be
spaced evenly between the two outermost brackets. Always position the brackets such that there is no
interference with cords and mechanisms inside the headrail. The procedure outlined below will assure
proper bracket placement.
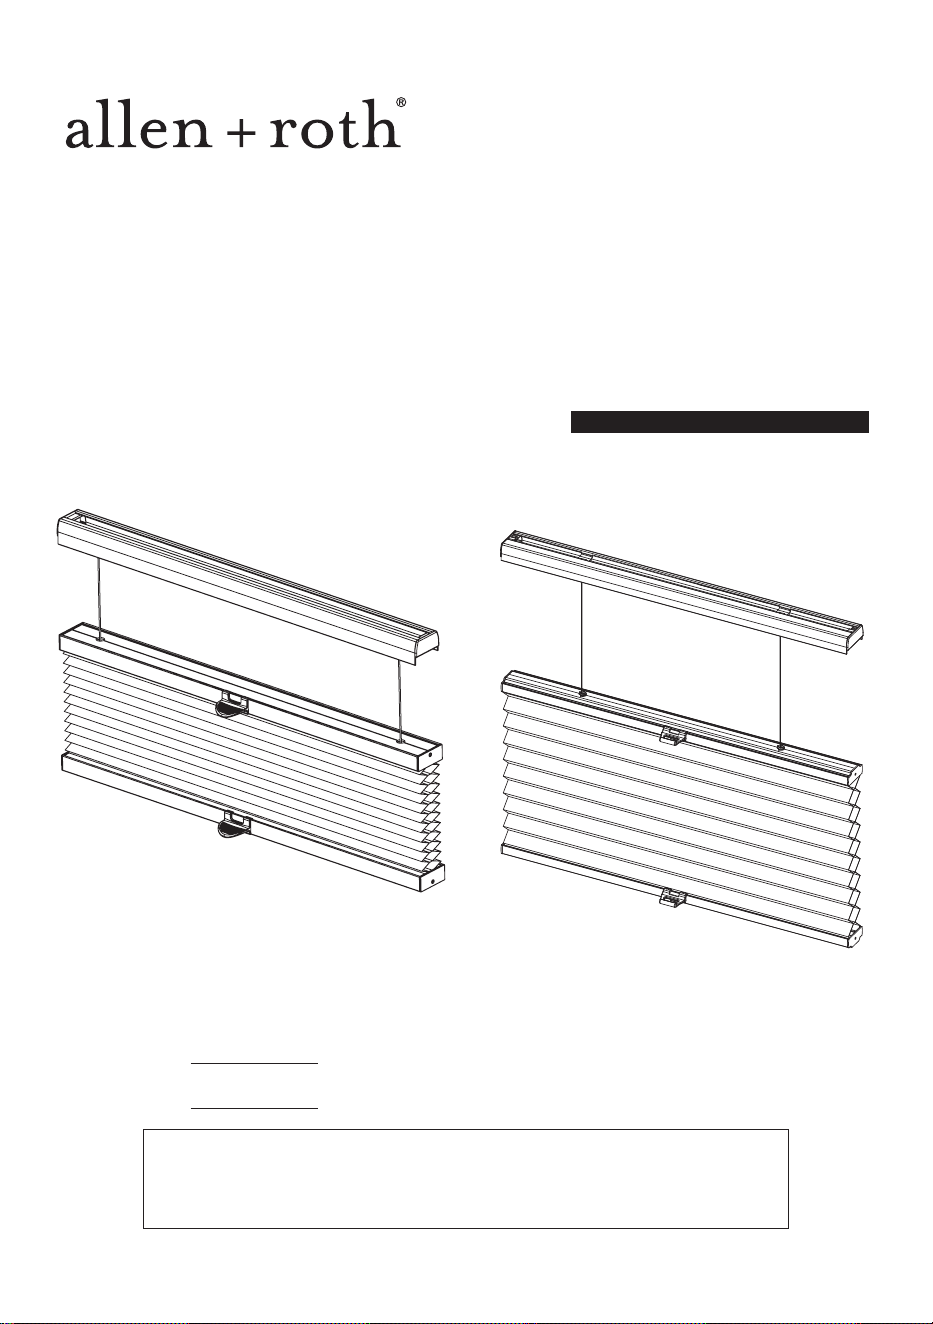
TABLE OF CONTENTS
PREPARATION
PACKAGE CONTENTS
Package Contents..................................................................................................................................
Hardware Contents................................................................................................................................
Preparation.............................................................................................................................................
Assembly Instructions............................................................................................................................
Operating Instructions...........................................................................................................................
Care and Maintenance ..........................................................................................................................
Warranty.................................................................................................................................................
Replacement Parts List..........................................................................................................................
2
3
3
4
6
7
7
7
ShadeA 1
DESCRIPTIONPART QUANTITY
A
A
HARDWARE CONTENTS
Mounting
Bracket
18 in. - 42 in.
Qty. 2
43 in. - 72 in.
Qty. 3
Handle
18 in. - 42 in.
Qty. 2
43 in. - 72 in.
Qty. 4
Wood Screw
18 in. - 42 in.
Qty. 4
43 in. - 72 in.
Qty. 6
AA BB CC
9/16 in. Cellular3/8 in. Cellular
9/16 in. Cellular3/8 in. Cellular

2 3
Before beginning assembly of product, make sure all parts are present. Compare parts with package
contents list and hardware contents list. If any part is missing or damaged, do not attempt to
assemble, install or operate the product.
Estimated Assembly Time: 30 minutes
Tools Required for Assembly (not included): Measuring tape, drill with 3/32 in. bit, and pencil.
Helpful Tools (not included): Step stool.
Bracket Location and Installation:
The shade may be installed either inside or outside the window frame. A mounting bracket should be
positioned on each end of the headrail. Wider shades that require 3 or more brackets should be
spaced evenly between the two outermost brackets. Always position the brackets such that there is no
interference with cords and mechanisms inside the headrail. The procedure outlined below will assure
proper bracket placement.
TABLE OF CONTENTS
PREPARATION
PACKAGE CONTENTS
Package Contents..................................................................................................................................
Hardware Contents................................................................................................................................
Preparation.............................................................................................................................................
Assembly Instructions............................................................................................................................
Operating Instructions...........................................................................................................................
Care and Maintenance ..........................................................................................................................
Warranty.................................................................................................................................................
Replacement Parts List..........................................................................................................................
2
3
3
4
6
7
7
7
ShadeA 1
DESCRIPTIONPART QUANTITY
A
A
HARDWARE CONTENTS
Mounting
Bracket
18 in. - 42 in.
Qty. 2
43 in. - 72 in.
Qty. 3
Handle
18 in. - 42 in.
Qty. 2
43 in. - 72 in.
Qty. 4
Wood Screw
18 in. - 42 in.
Qty. 4
43 in. - 72 in.
Qty. 6
AA BB CC
9/16 in. Cellular3/8 in. Cellular
9/16 in. Cellular3/8 in. Cellular
4 5
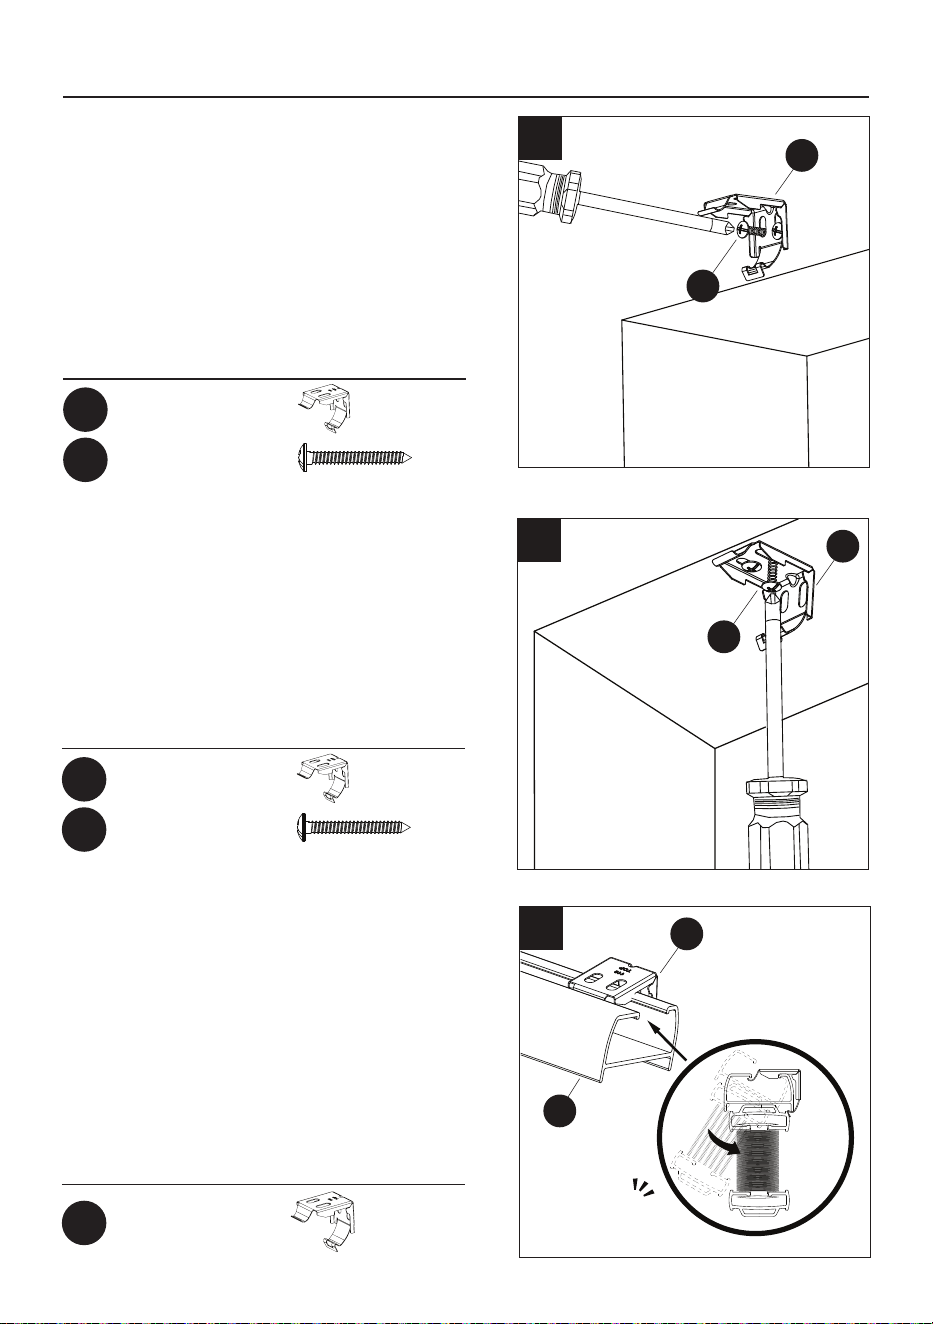
1a. For outside mounting, clip the mounting
bracket (AA) onto the headrail of shade (A). Hold
shade (A) level at the height desired and center it
over the window opening. Mark the exact
location of each mounting bracket (AA) with a
pencil. Remove the mounting brackets (AA)
from the headrail of shade (A). Pre-drill the screw
holes and then mounting bracket (AA) to the wall
or window molding with wood screws (CC).
1b. For inside mounting, clip the mounting brackets
(AA) onto the headrail of shade (A). Hold shade
(A) in place and make pencil mark at the rear of
each mounting bracket (AA). Remove the
mounting brackets (AA) from the headrail.
Predrill the screw holes and then secure the
mounting bracket (AA) to the wall or window
molding with wood screws (CC).
2. Lift the headrail of shade (A) into
position such that the inner front edge
of the headrail slides into the slot at
the front of each mounting bracket
(AA). Push the headrail upward until
the flexible tab at the bottom of each
mounting bracket (AA) snaps onto the
back of the headrail. Check carefully
to assure each mounting bracket (AA)
is properly snapped into place.
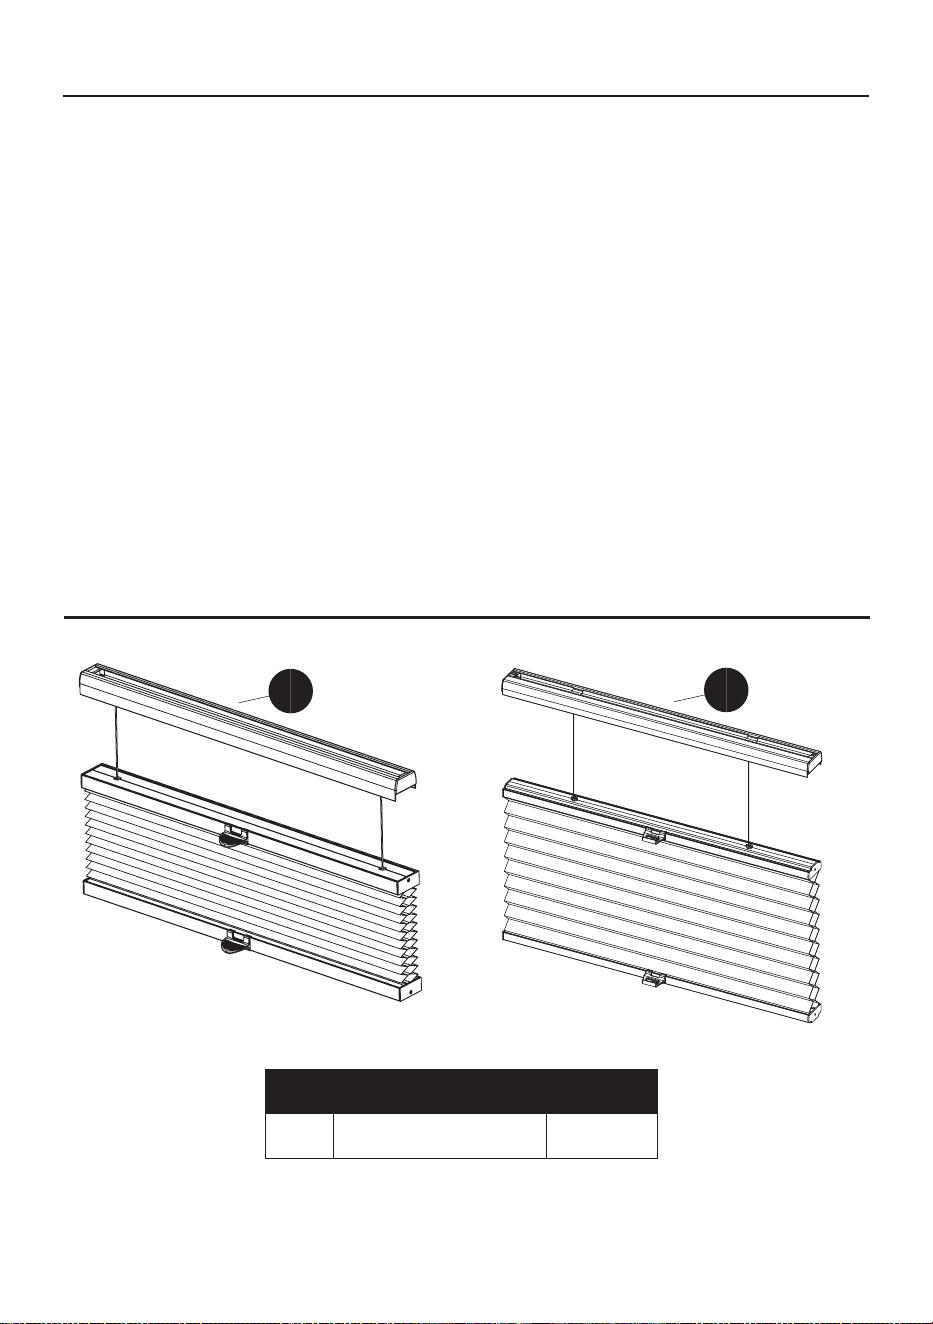
ASSEMBLY INSTRUCTIONS
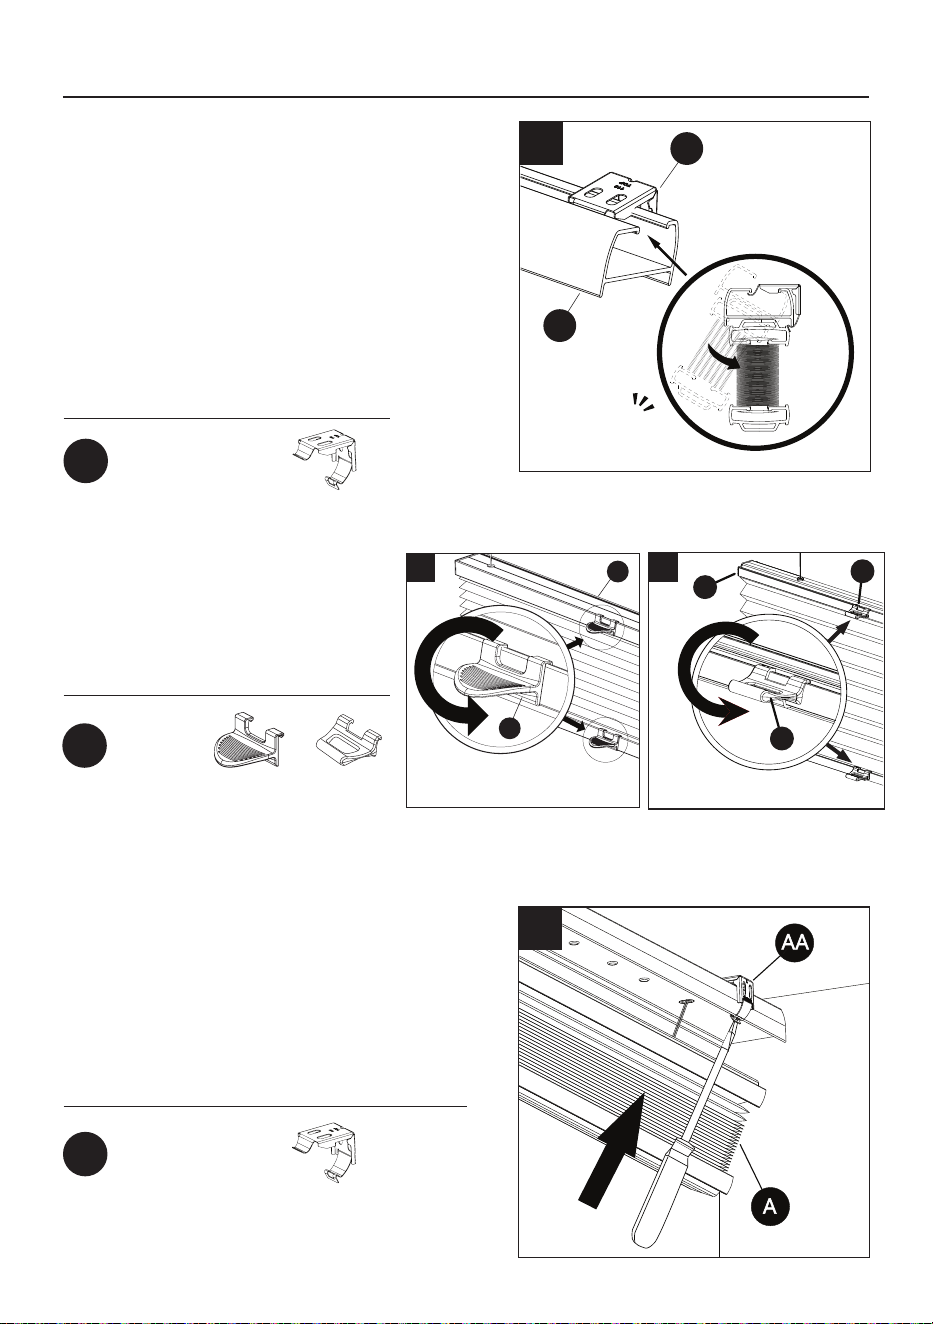
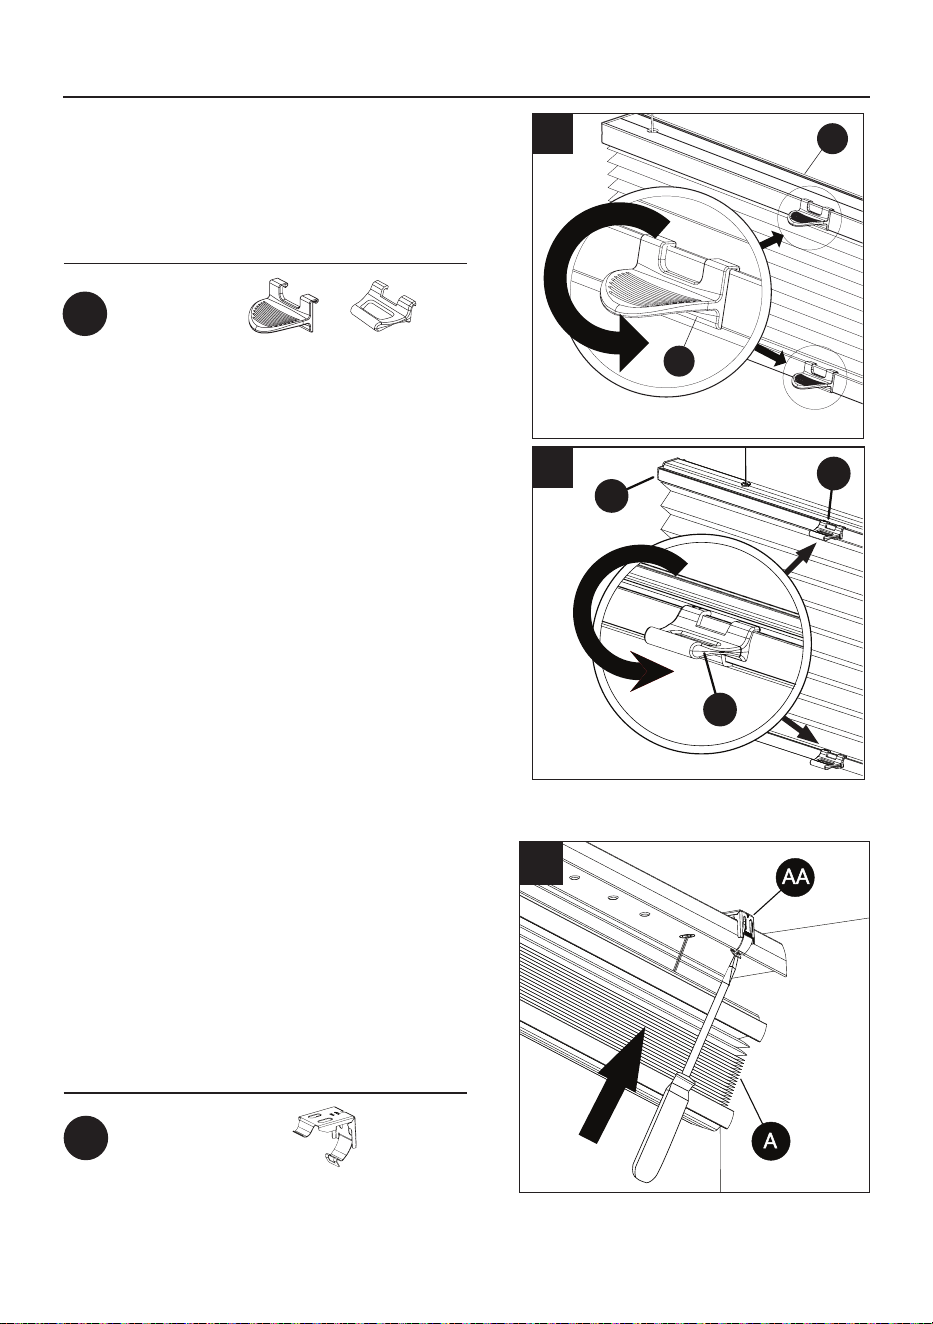
3. Attach the handles (BB) to the center
of the bottom rail and middle rail of
shade (A). Check carefully to assure
that the handles (BB) are properly
snapped into place.
4. OPTIONAL: To remove the shade (A) from the
mounting brackets (AA) after installation lift up
the bottom of the shade (A) to gain access to the
flexible tab on the bottom of the mounting
brackets (AA). Use a screwdriver (Not Included)
to press in the flexible tab until the shade
loosens. Repeat for all mounting brackets (AA).
ASSEMBLY INSTRUCTIONS
3
BB
A
BB
4
Hardware Used
Hardware Used
Hardware Used
BB
Handle
Hardware Used
1a
CC
AA
1b
CC
AA
1. How to measure and mount brackets: Lay
closed shade on a flat surface. Measure the top
of the shade head rail (A) 7 inches from the left
side and mark with a pencil. Also measure the
top of the shade head rail 7 inches from the right
side and mark with a pencil. These marks will be
your mounting bracket (AA) locations. Adjust the
marks as needed, so the mounting brackets (AA)
do not interfere with the working mechanisms
within the head rail (A). Note: Shades over 50-in
will require a center bracket. For over 50-in
shades, measure from left pencil mark to right
pencil mark and place a pencil mark at the center
location. Adjust the position as needed, so the
mounting bracket (AA) does not interfere with the
working mechanisms within the head rail (A).
Hardware Used
1
AA
A
AA
Mounting Bracket
AA
Mounting Bracket
Hardware Used
CC
Wood Screw
AA
Mounting Bracket
CC
Wood Screw
AA
Mounting Bracket
AA
Mounting Bracket
3
A
BB
9/16 in. Cellular3/8 in. Cellular
9/16 in. Cellular3/8 in. Cellular
or
2
AA
A
Click
4 5
1a. For outside mounting, clip the mounting
bracket (AA) onto the headrail of shade (A). Hold
shade (A) level at the height desired and center it
over the window opening. Mark the exact
location of each mounting bracket (AA) with a
pencil. Remove the mounting brackets (AA)
from the headrail of shade (A). Pre-drill the screw
holes and then mounting bracket (AA) to the wall
or window molding with wood screws (CC).
1b. For inside mounting, clip the mounting brackets
(AA) onto the headrail of shade (A). Hold shade
(A) in place and make pencil mark at the rear of
each mounting bracket (AA). Remove the
mounting brackets (AA) from the headrail.
Predrill the screw holes and then secure the
mounting bracket (AA) to the wall or window
molding with wood screws (CC).
2. Lift the headrail of shade (A) into
position such that the inner front edge
of the headrail slides into the slot at
the front of each mounting bracket
(AA). Push the headrail upward until
the flexible tab at the bottom of each
mounting bracket (AA) snaps onto the
back of the headrail. Check carefully
to assure each mounting bracket (AA)
is properly snapped into place.
ASSEMBLY INSTRUCTIONS
3. Attach the handles (BB) to the center
of the bottom rail and middle rail of
shade (A). Check carefully to assure
that the handles (BB) are properly
snapped into place.
4. OPTIONAL: To remove the shade (A) from the
mounting brackets (AA) after installation lift up
the bottom of the shade (A) to gain access to the
flexible tab on the bottom of the mounting
brackets (AA). Use a screwdriver (Not Included)
to press in the flexible tab until the shade
loosens. Repeat for all mounting brackets (AA).
ASSEMBLY INSTRUCTIONS
3
BB
A
BB
4
Hardware Used
Hardware Used
Hardware Used
BB
Handle
Hardware Used
1a
CC
AA
1b
CC
AA
1. How to measure and mount brackets: Lay
closed shade on a flat surface. Measure the top
of the shade head rail (A) 7 inches from the left
side and mark with a pencil. Also measure the
top of the shade head rail 7 inches from the right
side and mark with a pencil. These marks will be
your mounting bracket (AA) locations. Adjust the
marks as needed, so the mounting brackets (AA)
do not interfere with the working mechanisms
within the head rail (A). Note: Shades over 50-in
will require a center bracket. For over 50-in
shades, measure from left pencil mark to right
pencil mark and place a pencil mark at the center
location. Adjust the position as needed, so the
mounting bracket (AA) does not interfere with the
working mechanisms within the head rail (A).
Hardware Used
1
AA
A
AA
Mounting Bracket
AA
Mounting Bracket
Hardware Used
CC
Wood Screw
AA
Mounting Bracket
CC
Wood Screw
AA
Mounting Bracket
AA
Mounting Bracket
3
A
BB
9/16 in. Cellular3/8 in. Cellular
9/16 in. Cellular3/8 in. Cellular
or
2
AA
A
Click
6 7
For a period of one (1) year from the date of purchase, the manufacturer will replace this window
covering with one of equal value if this window covering is found to be defective in material or
workmanship. This warranty does not cover damage or defects caused by or resulting from improper
maintenance, negligent or improper use, abuse, neglect, accidents, act of God, alteration, commercial
use, installation, removal or reinstallation. This warranty is restricted to normal consumer use within
the United States and Canada. To obtain warranty service, contact our customer service department
at 866-439-9800. 8 a.m. - 8 p.m., EST, Monday - Sunday. You could also contact us at
Printed in Taiwan
For replacement parts, call our customer service department at 866-439-9800, 8 a.m. - 8 p.m., EST,
The vinyl headrail and bottom rail can be wiped clean with a damp sponge. To clean the shade fabric,
use a feather duster or vacuum lightly using the soft brush attachment.
WARRANTY
REPLACEMENT PARTS LIST
CARE AND MAINTENANCE
Hardware Box 79074-6SA1Z000HW2LA NO
DESCRIPTIONPART
Hardware Box
3/8 in. Cellular
9/16 in. Cellular 79074-6SC4Z000HW2LA NO
PART # COVERED UNDER WARRANTY
OPERATING INSTRUCTIONS
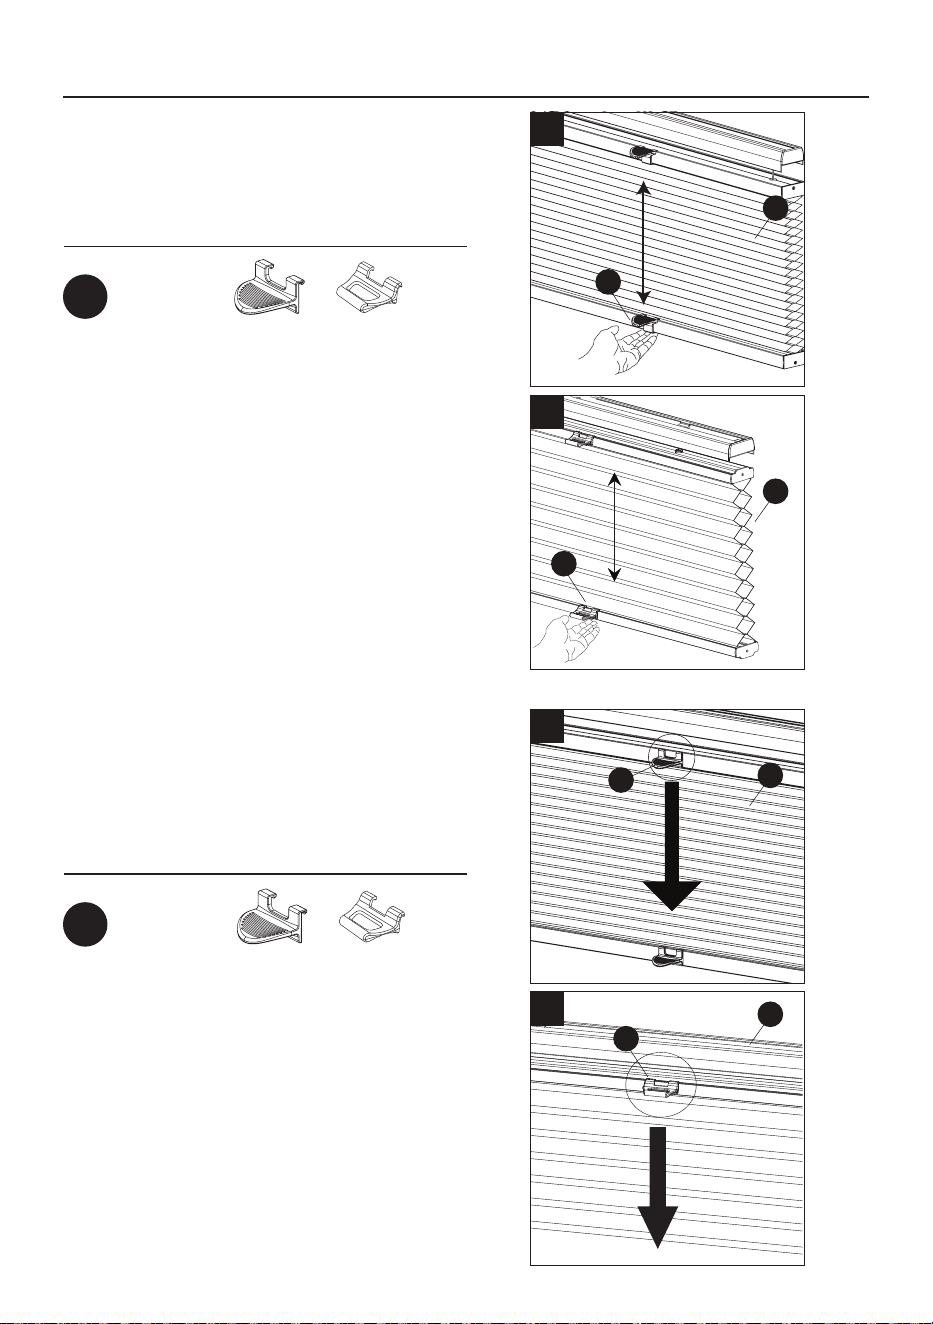
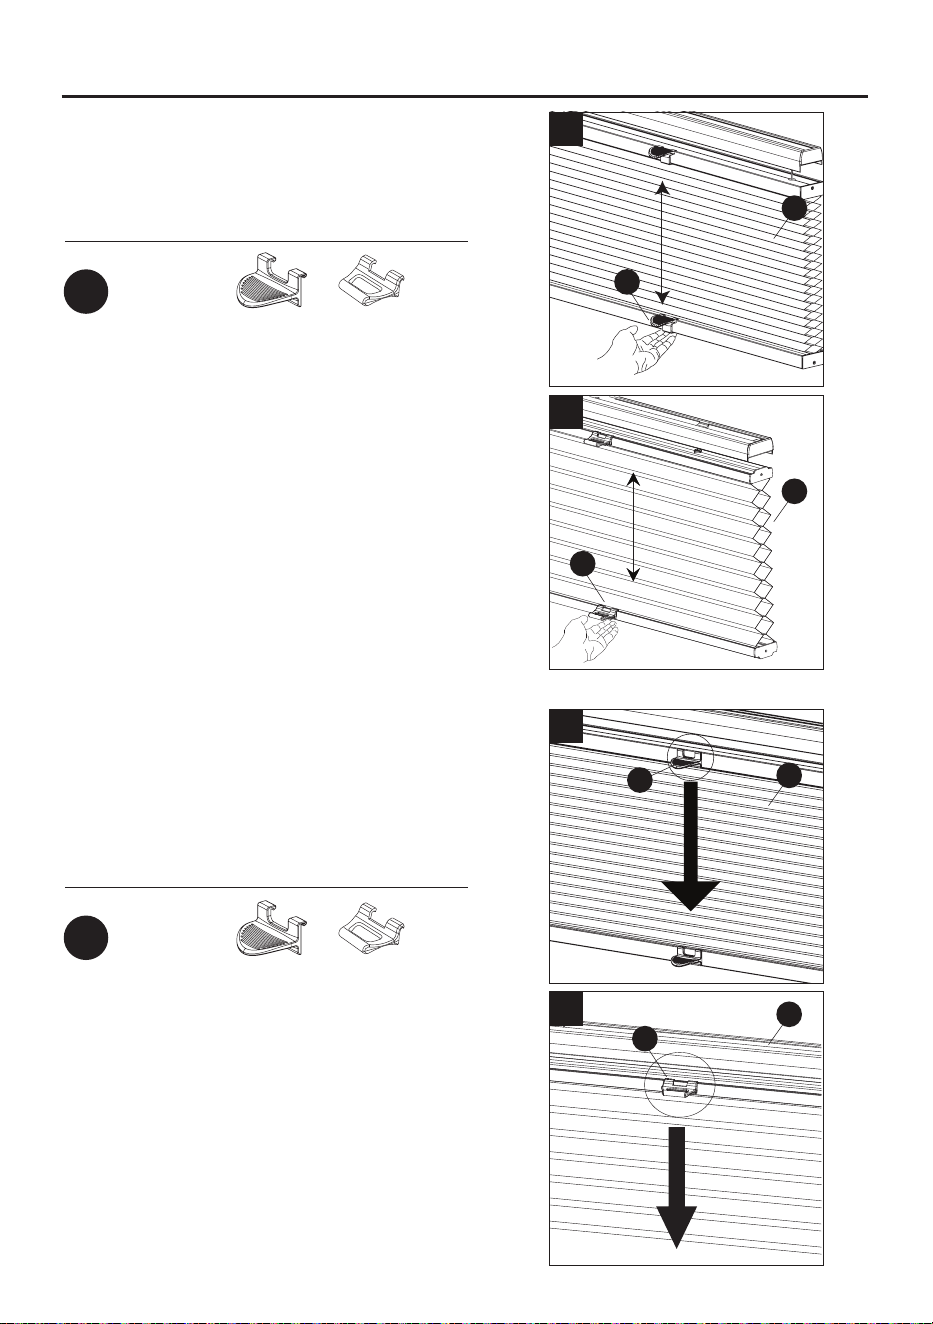
1. Raise or lower the shade (A) by gripping the
bottom rail handle (BB) and lifting or lowering the
bottom rail to the desired height.
1
BB
A
Hardware Used
BB
Handle
2
BB
A
2. Shade (A) can lower down from the top to
let light in, while still retaining privacy. Raise or
lower the middle rail by gripping the middle rail
handle (BB) and lifting or lowering the middle rail
to the desired height.
Hardware Used
BB
Handle
1
BB
A
2
BB
A
9/16 in. Cellular
3/8 in. Cellular
9/16 in. Cellular
3/8 in. Cellular
9/16 in. Cellular3/8 in. Cellular
or
9/16 in. Cellular3/8 in. Cellular
or

6 7
For a period of one (1) year from the date of purchase, the manufacturer will replace this window
covering with one of equal value if this window covering is found to be defective in material or
workmanship. This warranty does not cover damage or defects caused by or resulting from improper
maintenance, negligent or improper use, abuse, neglect, accidents, act of God, alteration, commercial
use, installation, removal or reinstallation. This warranty is restricted to normal consumer use within
the United States and Canada. To obtain warranty service, contact our customer service department
at 866-439-9800. 8 a.m. - 8 p.m., EST, Monday - Sunday. You could also contact us at
Printed in Taiwan
For replacement parts, call our customer service department at 866-439-9800, 8 a.m. - 8 p.m., EST,
Monday - Sunday. You may also contact us at [email protected].
The vinyl headrail and bottom rail can be wiped clean with a damp sponge. To clean the shade fabric,
use a feather duster or vacuum lightly using the soft brush attachment.
WARRANTY
REPLACEMENT PARTS LIST
CARE AND MAINTENANCE
Hardware Box 79074-6SA1Z000HW2LA NO
DESCRIPTIONPART
Hardware Box
3/8 in. Cellular
9/16 in. Cellular 79074-6SC4Z000HW2LA NO
PART # COVERED UNDER WARRANTY
OPERATING INSTRUCTIONS
1. Raise or lower the shade (A) by gripping the
bottom rail handle (BB) and lifting or lowering the
bottom rail to the desired height.
1
BB
A
Hardware Used
BB
Handle
2
BB
A
2. Shade (A) can lower down from the top to
let light in, while still retaining privacy. Raise or
lower the middle rail by gripping the middle rail
handle (BB) and lifting or lowering the middle rail
to the desired height.
Hardware Used
BB
Handle
1
BB
A
2
BB
A
9/16 in. Cellular
3/8 in. Cellular
9/16 in. Cellular
3/8 in. Cellular
9/16 in. Cellular3/8 in. Cellular
or
9/16 in. Cellular3/8 in. Cellular
or
8
Soporte de montaje
45.72 cm - 106.68 cm
Qty. 2
109.22 cm - 182.88 cm
Qty. 3
Manija
45.72 cm - 106.68 cm
Qty. 2
109.22 cm - 182.88 cm
Qty. 4
Tornillo para madera
45.72 cm - 106.68 cm
Qty. 4
109.22 cm - 182.88 cm
Qty. 6
AA BB
ALLEN+ROTH y el diseño del logotipo son
marcas comerciales o marcas registradas
de LF, LLC. Todos los derechos
reservados.
ADJUNTE SU RECIBO AQUÍ
Número de serie
Fecha de compra
Gracias por comprar este producto ALLEN+ROTH.
¿Preguntas, problemas o piezas faltantes?
Antes de volver a la tienda, póngase en contacto con nosotros al:
866-439-9800, de lunes a domingo, de 8 a.m. a 8 p.m., hora estándar del Este,
o en [email protected].
ADITAMENTOS
9
9
9
10
10
13
14
14
14
ÍNDICE
CONTENIDO DEL PAQUETE
Contenido Del Paquete..........................................................................................................................
Aditamentos...........................................................................................................................................
Preparación............................................................................................................................................
Instrucciones De Ensamblaje.................................................................................................................
Instrucciones De Funcionamiento.........................................................................................................
Cuidado Y Mantenimiento.....................................................................................................................
Garantía................................................................................................................................................
Piezas De Repuesto.............................................................................................................................
PERSIANA SIN CORDONES
ASCENDENTE/DESCENDENTE
9/16 in. Cellular3/8 in. Cellular
A
A
PersianaA 1
DESCRIPCIÓNPIEZAS CANTIDAD
9/16 in. Cellular
3/8 in. Cellular
CC
9/16 in. Cellular3/8 in. Cellular
ARTÍCULO #6595563
MODELO #11403
10
Antes de comenzar a instalar el producto, asegúrese de tener todas las piezas. Compare las piezas
con la lista del contenido del paquete y la lista de aditamentos. No intente ensamblar, instalar ni usar
el producto si falta alguna pieza o si estas están dañadas.
Tiempo estimado de ensamblaje: 30 minutos.
Herramientas necesarias para el ensamblaje (no se incluyen): Cinta métrica, taladro con broca de
3/32, y lápiz.
Herramientas útiles (no se incluyen): taburete con escalones.
Ubicación e instalación de las abrazaderas:
La persiana se puede instalar dentro o fuera del marco de la ventana. Se debe colocar una
abrazadera de montaje en cada extremo del cortinero. Las persianas más anchas que necesitan 3 o
más abrazaderas de soporte centrales deben espaciarse de forma uniforme entre las dos
abrazaderas de montaje de los extremos. Siempre coloque las abrazaderas de tal forma que no
interfieran con los cordones o conlos mecanismos internos del cortinero. El procedimiento que se
explica a continuación asegura la instalación correcta de las abrazaderas.
PREPARACIÓN
11
1a. Para montaje exterior, coloque el soporte de
montaje (AA) sobre el cortinero de persiana (A).
Sostenga la persiana (A) a la altura deseada y
céntrela sobre la abertura de la ventana. Use un
lápiz para marcar la ubicación exacta de cada
soporte de montaje (AA).Retire los soportes de
montaje (AA) del cortinero de persiana (A).
Taladre previamente los orificios para los
tornillos. Atornille cada soporte de montaje (AA)
en la pared o en la moldura de la ventana con
los tornillos para madera (CC).
1b. Para montaje interior, coloque la soporte de
montaje (AA) sobre el cortinero de persiana (A).
Sostenga la persiana (A) en su lugar y usando un
lápiz haga una marca en la parte posterior de
cada soporte de montaje (AA).Saque las
soporte de montaje (AA) del cortinero y
alíneelas con las marcas. Taladre previamente los
orificios para los tornillos. Fije cada soporte de
montaje (AA) con los tornillos para madera (CC).
Aditamentos utilizados
1a
CC
AA
1b
CC
AA
CC
Tornillo para madera
AA
Soporte de montaje
Aditamentos utilizados
CC
Tornillo para madera
AA
Soporte de montaje
INSTRUCCIONES DE ENSAMBLAJE
Aditamentos utilizados
AA
Soporte de montaje
INSTRUCCIONES DE ENSAMBLAJE
1. Cómo medir y montar los soportes: coloque
la persiana cerrada sobre una superficie plana.
Mida la parte superior del cortinero de la
persiana (A) a 17.78 cm del lado izquierdo y
marque con un lápiz. Mida además la parte
superior del cortinero de la persiana a 17.78 cm
del lado derecho y marque con un lápiz. Estas
marcas serán las ubicaciones de su soporte de
montaje (AA). Ajuste las marcas según sea
necesario, para que los soportes de montaje
(AA) no interfieran con los mecanismos de
trabajo dentro del cortinero (A). Nota: las
persianas de más de 127 cm requerirán un
soporte central. Para persianas de más de 127
cm, mida desde la marca de lápiz izquierda
hasta la marca de lápiz derecha y coloque una
marca de lápiz en el centro. Ajuste la posición
según sea necesario, para que el soporte de
montaje (AA) no interfiera con los mecanismos
de trabajo dentro del cortinero (A).
2. Levante el continero de persiana (A) hasta
colocarlo de tal forma que el extremo frontal
interior del continero se deslice en la ranura en
la parte frontal de cada soporte de montaje
(AA). Presione el continero de persiana hacia
arriba hasta que la lengüeta flexible en la parte
inferior de cada soporte de montaje (AA)
ingrese en la parte posterior del continero de
persiana. Verifique con cuidado para asegurarse
de que cada soporte de montaje (AA) haya
ingresado en su lugar.
Aditamentos utilizados
AA
Soporte de montaje
1
AA
A
2
AA
A
Click
12
3. Fije las manijas (BB) al centro del riel inferior y
el riel central de la persiana (A). Verifique con
cuidado para asegurarse de que las manijas
(BB) están correctamente ajustadas en su lugar.
Aditamentos utilizados
BB
Manija
Aditamentos utilizados
BB
Manija
Aditamentos utilizados
BB
Manija
4. OPCIONAL: para retirar la persiana (A) de los
soportes de montaje (AA) después de la
instalación levante la parte inferior de la persiana
(A) para obtener acceso a la lengüeta flexible en
la parte inferior de los soportes de montaje (AA).
Utilice un destornillador (no se incluye) para
presionar la lengüeta flexible hasta soltar la
persiana. Repita con todos los soportes de
montaje (AA).
Aditamentos utilizados
AA
Soporte de montaje
INSTRUCCIONES DE ENSAMBLAJE
13
4
INSTRUCCIONES DE FUNCIONAMIENTO
1. Para subir o bajar la persiana (A), tome la
manija (BB) del riel inferior y levante o baje el riel
inferior hasta la altura deseada.
2. La persiana (A) puede bajarse hasta un
desde la parte superior para permitir el ingreso
de la luz, a la vez que mantiene la privacidad.
Para subir o bajar el riel central, tome la manija
del riel central (BB) y levante o baje el riel central
hasta la altura deseada.
3
BB
A
BB
3
A
BB
1
BB
A
2
BB
A
1
BB
A
2
BB
A
9/16 in. Cellular
3/8 in. Cellular
9/16 in. Cellular
3/8 in. Cellular
9/16 in. Cellular
3/8 in. Cellular
9/16 in. Cellular3/8 in. Cellular
or
9/16 in. Cellular3/8 in. Cellular
or
9/16 in. Cellular3/8 in. Cellular
or

1
CORDLESS
TOP DOWN BOTTOM UP SHADE
Español p. 8
9/16 in. Cellular3/8 in. Cellular
Serial Number
Purchase Date
Thank you for purchasing this ALLEN+ROTH product.
Questions, problems or missing parts?
Before returning, contact us on:
14
Por un período de un (1) año desde la fecha de compra, el fabricante reemplazará esta decoración de
ventanas con una de valor igual si se descubre que esta decoración de ventanas tiene defectos en el
material o en la mano de obra. Esta garantía no cubre el daño ni los defectos causados o resultantes
por mantenimiento incorrecto, uso negligente o inadecuado, abuso, descuido, accidentes, casos
fortuitos, alteraciones, uso comercial, instalación, remoción o reinstalación. Esta garantía se restringe
a un uso normal por parte del consumidor dentro de Estados Unidos y Canadá. Para obtener el
servicio de garantía, llame al Departamento de Servicio al Cliente al 866-439-9800. de lunes a
domingo de 8 a.m. a 8 p.m., hora estándar del Este. También puede ponerse en contacto con
nosotros en [email protected].
Impreso en Taiwan
El cortinero se puede limpiar con una esponja húmeda. Para limpiar la persiana de madera, use un
plumero de plumas o el accesorio para cepillar cuando aspire suavemente.
GARANTÍA
PIEZAS DE REPUESTO
CUIDADO Y MANTENIMIENTO
Para obtener piezas de repuesto, llame al Departamento de Servicio al Cliente al 866-439-9800, de 8
a.m. a 8 p.m., hora estándar del Este. También puede ponerse en contacto con nosotros en
ALLEN+ROTH and logo design are
trademarks or registered trademarks of LF,
LLC. All rights reserved.
Caja de aditamentos 79074-6SA1Z000HW2LA NO
DESCRIPTIONPART
Caja de aditamentos
3/8 in. Cellular
9/16 in. Cellular 79074-6SC4Z000HW2LA NO
PART # COVERED UNDER WARRANTY
ITEM #6595563
MODEL #11403
DF25469